Thomson DS401 Operating Instructions Manual
- Categoría
- Altavoces de acoplamiento
- Tipo
- Operating Instructions Manual

SYSTÈME 2.1
iPod / iPhone / Smartphones
USB/SD
FR
DS401
BBI_ DS401_ VER3.0

Table des Matières
Sortie vidéo depuis l'iPhone/iPod 5
Lecture sur l'iPhone/iPod 5
Mode Sommeil 5
Écoute de la radio
6
Utilisation de l'entrée Aux
7
Entrée Line in
7
Entrée Aux
7
Utilisation de l'entrée USB/SD
7
À faire... à éviter
9
Entretien, maintenance
9
Prise en main 1
Contenu de l'emballage 1
Consignes de sécurité 1
Sécurité de la batterie 2
Description des pièces 3
Télécommande 4
Installation de l'iTower 4
Mise sous tension 4
Réglage de l'horloge 5
Charge de l'iPhone/iPod 5
Il est possible que le message « Cet accessoire n'est pas optimisé pour cet iPhone » s'affiche
lorsque vous connectez votre iPhone.
En aucun cas cela n'endommagera votre iPhone ; ce message est simplement destiné à vous
informer ; vous pouvez appuyer sur « dismiss » (ignorer) et écouter votre musique.
Ce message explique que la réception du signal 3G ou WIFI est plus faible lorsque votre iPhone
est connecté.
Prise en main
Sortez l'appareil de l'emballage. Déballez-le. Placez les éléments d'emballage dans la boîte
pour les conserver ou les éliminer en toute sécurité.
Contenu de l'emballage
Haut-parleur tour
Télécommande
Manuel d'utilisation
Câble RCA
Consignes de sécurité
Lors de l'utilisation d'appareils électrique, toujours prendre des précautions de sécurité
essentielles. Cet appareil n'est pas destiné à être utilisé par des personnes (y compris des enfants)
avec des capacités physiques, sensorielles ou mentales réduites ou manquant d'expérience ou de
connaissances. Une personne responsable de leur sécurité doit les surveiller et leur indiquer
comment utiliser l'appareil. Vérifier que l'appareil ne se trouve pas trop près d'appareils émettant
de la chaleur ni placé directement au soleil. Avant de brancher l'appareil sur le courant secteur,
vérifier que la tension électrique indiquée sur la plaque d'informations correspond à celle du
réseau électrique local. Ne pas laisser l'appareil sans surveillance lorsqu'il est branché sur le
courant secteur. Ne pas plonger l'appareil dans l'eau ni aucun autre liquide. Il est impératif de
débrancher le cordon d'alimentation après avoir utilisé l'appareil, avant de le nettoyer ou pendant
les réparations. Une étroite surveillance est nécessaire en cas d'utilisation de l'appareil près des
enfants.
Ne jamais laisser l'appareil à la portée des enfants. Les réparations sur les appareils électriques
- 1 -
Charge et lecture audio depuis votre
Samsung Galaxy
6
Mode Bluetooth
7
Liste de compatibilité :
11

ne doivent être effectuées que par du personnel qualifié. Des réparations inappropriées peuvent
présenter un risque important.
Cet appareil est uniquement destiné à une utilisation domestique et non pas à un but industriel ou
commercial. Ne pas faire fonctionner cet appareil si la prise ou le cordon est endommagé, après
un dysfonctionnement, une chute, ou quelque avarie que ce soit. Ne pas utiliser cet appareil
autrement que pour l'utilisation prévue. Cet appareil doit être placé sur une surface stable
résistante à la chaleur. Ne pas enfoncer d'objets dans les ouvertures car cela pourrait
endommager l'appareil et/ou provoquer un choc électrique. Ne pas utiliser ce produit dans des
conditions humides ou défavorables. Ce produit n'est pas un jouet. Ne pas lire la musique à un
niveau sonore excessif, en particulier à côté des enfants.
Toujours veiller à la sécurité de la batterie...
Vérifier que les compartiments de batterie soient sécurisés. N'utiliser que les batteries
recommandées. Vérifier la bonne adaptation des batteries, faire correspondre les signes plus et
moins de la batterie et du compartiment. Remplacer le jeu complet de batteries simultanément.
Conserver les batteries inutilisées dans leur emballage et les tenir éloignées d'objets métalliques
pouvant provoquer un court-circuit. Sortir les batteries usagées des appareils qui ne seront pas
réutilisés avant longtemps. Toujours surveiller les enfants qui manipulent les batteries. Mettre les
piles boutons et les piles AAA hors de portée des enfant qui pourraient facilement les avaler.
Consulter un médecin en cas d'ingestion des piles.
Ne jamais...
Jeter les batteries dans un feu. Tenter de recharger des piles ordinaires
- 2 -

Description des pièces
1. Station d'accueil micro USB
2. Station d'accueil iPhone/iPod/iPad
3. Entrée de ligne
4. Emplacement de la télécommande
5. Emplacement pour carte SD
6. Port USB
7. Mode veille
8. Fonction
9. Saut vers l'arrière
10. Saut vers l'avant
11. Mém/Heure
12. Play/pause (Lecture/Pause)
13. Volume –
14. Volume +
15. Affichage LCD
Panneau arrière
Sortie vidéo
1. Interrupteur d'alimentation électrique
2. Sortie vidéo
3. Entrée Aux D
4. Entrée Aux G
- 3 -
WARNING:SHOCK HAZARD-DO NOT OPEN
AVIS:RISQUE DE CHOC ELECTRIQUE-NE PAS OUVRIR
AC~ 90-240V 50/60Hz
S/N:
RoHS
Frequences FM87.5-108MHz
Alimentation:~230V/50Hz
Consomation:60watts
Puissance en sortie:2X15W+30W
MODEL:DS401
ON
OFF
POWER
FM ANT
IPOD
VIDEO OUT
AUX IN
R
L
MADE IN CHINA
1.
2.
3.
4.

Télécommande
1. Alimentation électrique
2. Sommeil
3. Muet
4. Menu de l'iPod
5. Menu Haut
6. Source
7. Précédent
8. Entrée
9. Suivant
10. Mémoire et réglage de l'heure
11. Menu Bas
12. Pause/Lecture
13. Aigus+
14. Graves+
15. Volume+
16. Aigus
17. Graves
18. Volume –
Utilisation de la télécommande – La pile
Tirez sur l'onglet transparent qui sort du compartiment de pile à l'extrémité
inférieure (rectiligne) de la télécommande.
Si la télécommande fonctionne par intermittence ou si vous devez vous
approcher de l'appareil pour qu'elle fonctionne, c'est probablement qu'il faut
changer la pile. Pour remplacer la pile, faites glisser le support de pile hors de
la base de la télécommande. Retirez la pile et remplacez-la par une pile
Cr2025 au Lithium de 3 V en plaçant le côté marqué + en bas du support de
pile lorsque vous le remplacez dans le compartiment.
Installation de la tour
Sortez avec précaution le corps et la base
de la tour de leur emballage. Posez la tour
verticalement au sol. L'appareil est maintenant
Alimentation électrique
Placez l'appareil à l'endroit voulu et déroulez le cordon d'alimentation secteur. Insérez le cordon
dans la prise murale et mettez l'appareil sous tension.
- 4 -
-
-
prêt à fonctionner.

Réglage de l'horloge
Après avoir branché l'appareil dans la prise secteur, ou après une
coupure de courant, l'écran LCD affiche « 0:00 » Pour régler l'horloge,
l'appareil doit se trouver en mode veille.
1. Appuyez sur le bouton MEM/TIME; les chiffres affichés clignotent.
2. Appuyez plusieurs fois sur le bouton PREVIOUS/NEXT jusqu'à l'affichage de l'heure exacte.
Appuyez sur la touche MEM/TIME pour confirmer.
L'heure est réglée ; les chiffres des minutes affichés clignotent.
3. Appuyez plusieurs fois sur le bouton PREVIOUS/NEXT jusqu'à l'affichage des minutes
exactes. Appuyez sur la touche MEM/TIME pour confirmer le réglage des minutes.
Réglage de l'alarme
Maintenez enfoncé le bouton MEM/TIME en mode arrêt ; l'écran affiche ON/OFF clignotant pour
sélectionner le réglage ou l'annulation d'une alarme.
Appuyez sur PREVIOUS/NEXT pour sélectionner ON, l'écran se met à clignoter.
Appuyez plusieurs fois sur PREVIOUS/NEXT pour régler l'heure. Appuyez sur MEM/TIME pour
confirmer, puis appuyez sur PREVIOUS/NEXT pour régler les minutes.
Appuyez sur MEM/TIME pour confirmer, puis appuyez sur PREVIOUS/NEXT pour sélectionner
l'état iPod/Aux in. Appuyez sur la touche MEM/TIME pour confirmer.
Lorsqu'aucun iPod n'est connecté, l'appareil passe automatiquement en alarme Aux in.
Le volume sonore augmente progressivement de 0 à 25.
Mode Sommeil
Appuyez sur le bouton SLEEP, l'écran commence à clignoter. Appuyez sur le bouton jusqu'à ce
que l'écran affiche le nombre de minutes à régler. Vous pouvez régler le délai de 10 à 90
minutes.
L'écran clignote trois fois pour confirmer, puis affiche de nouveau l'interface précédente. Si vous
voulez annuler le mode Sommeil, appuyez sur 00, l'écran clignote trois fois et le mode Sommeil
est annulé.
Charge de l'iPhone/iPod
Vous pouvez charger l'iPhone/iPod depuis la base d'ancrage en mode veille ou pendant le
fonctionnement.
L'iPhone/iPod se recharge automatiquement quand il est posé sur
la base. Vérifiez que le commutateur de tension à l'arrière de
l'appareil soit en position ON.
Sortie vidéo depuis l'iPhone/iPod
1. Connectez l'appareil à votre téléviseur en utilisant la sortie vidéo composite.
2. Sur l'iPhone/iPod, naviguez jusqu'à VIDEOS > VIDEO SETTINGS
3. Installez l'iPhone/iPod sur l'appareil pour lancer la lecture d'une vidéo depuis l'iPhone/iPod
posé sur la base.
Lecture sur l'iPhone ou sur l'iPod
1. Appuyez sur le bouton d'alimentation à l'arrière du haut-parleur ou sur la console principale
pour mettre l'appareil sous tension.
2. Pour sélectionner la fonction de lecture de l'iPhone/iPod, maintenez enfoncé le bouton de
fonction jusqu'à ce que le témoin rouge sous l'iPod s'allume.
- 5 -
3. Connectez l'iPhone ou l'iPod au connecteur à l'intérieur de la base d'ancrage.
4. Appuyez sur le bouton Lecture/Pause de l'appareil ou sur la télécommande pour commencer
la lecture depuis l'iPhone/iPod posé sur la base.

Charge et lecture audio depuis votre Samsung Galaxy
1. appuyez sur le bouton d'alimentation pour mettre l'appareil sous tension en en veille
2. appuyez sur la touche fonction jusqu'à ce que l'écran affiche « ADR »
3. placez le téléphone Samsung Galaxy sur la station d'accueil micro USB
4. le téléphone affiche l'icône
et , appuyez sur l’icône ,
la musique est alors émise par la tour.
Remarque : compatible avec Samsung Galaxy SII/ Galaxy SIII/Galaxy SIII mini/Galaxy
note/Galaxy note II/Galaxy nexus
Écoute de la radio
1. Appuyez sur le bouton de l'appareil ou de la télécommande pour sélectionner le mode
RADIO. L'appareil passe alors en mode radio FM.
2. Sélectionnez la station de radio voulue en appuyant sur le
bouton PREVIOUS/NEXT.
3. Maintenez enfoncé le bouton PREVIOUS/NEXT pendant 2
secondes. L'appareil démarre automatiquement et
recherche la fréquence de la station précédente ou suivante clairement audible et
s'arrête sur cette station.
4. Quand vous avez trouvé la station voulue, appuyez sur le bouton MEM sur la
télécommande ; l'écran affiche « P01 ». Appuyez sur M-up ou M-dn jusqu'au numéro
de l'emplacement de mémoire voulu. Appuyez de nouveau sur la touche MEM pour
confirmer et enregistrer la station actuelle.
Utilisation de l'entrée ligne ou entrée AUX
Il est possible d'envoyer les signaux sonores analogiques d'autres sources vers le haut-parleur.
Pour ce faire, appuyez sur le bouton Aux de la tour et appuyez plusieurs fois sur le bouton
source de la télécommande jusqu'à ce que l'écran affiche AUX ou LIN.
Prise jack d'entrée ligne
Nécessite un câble avec mini-jack de 3,5 mm
- 6 -
1. Connectez un câble avec mini-jack de 3,5 mm à la prise Aux. Connectez l'autre extrémité du
câble à un lecteur Mp3 ou à une autre source audio.
2. Appuyez sur le bouton d'alimentation pour mettre l'appareil sous
tension.
3. Appuyez sur le bouton de fonction ou de source de la
télécommande pour passer en mode Line In.
4. Utilisez les commandes de l'autre appareil connecté pour lancer la lecture acheminée par cet
appareil.

Entrée RCA Aux In
Nécessite un câble RCA
1. Connectez un câble RCA à l'entrée auxiliaire. Connectez l'autre extrémité du câble RCA à la
sortie audio du lecteur de DVD, au système stéréo, au système de jeu ou au téléviseur.
2. Appuyez sur le bouton d'alimentation pour mettre l'appareil sous tension.
3. Appuyez sur le bouton de fonction ou de source de la
télécommande pour passer en mode Aux In 2.
4. Utilisez les commandes de l'autre appareil connecté pour lancer la
lecture acheminée par cet appareil.
Utilisation de l'entrée USB/SD
1. Branchez la clé USB/la carte Secure Digital sur le convertisseur USB/SD, puis connectez le
convertisseur sur l'appareil, dans cet ordre. Un autre ordre de branchement pourrait
endommager la base de l'iPhone/iPod.
2. Appuyez sur Function une fois pour passer en mode USB ; la lecture démarre
automatiquement.
3. Appuyez sur Function deux fois pour passer en mode SD ; la lecture démarre
automatiquement.
4. Appuyez sur MENU UP/MENU DOWN pour sélectionner le dossier à ouvrir. L'écran affiche le
nombre de dossiers en premier et le nombre de pistes.
5. Appuyez sur PREVIOUS/NEXT pour sélectionner la piste.
Mode Bluetooth
A. Jumelage avec un téléphone portable
Bluetooth
Vérifiez que votre téléphone portable est compatible Bluetooth. Les étapes de jumelage
spécifiques peuvent varier en fonction du téléphone portable. Consultez le manuel de
l'utilisateur de votre téléphone portable pour les vérifier. Voici quelles sont les étapes courantes
d'un jumelage :
a) N'éloignez pas l'appareil DS401 et le téléphone portable de plus d'un mètre lors du
jumelage.
b) Appuyez sur le bouton Veille, et appuyez une fois sur la touche Fonction pour passer en
- 7 -
mode Bluetooth.
c) Activez la fonction Bluetooth de votre téléphone portable et recherchez des dispositifs
Bluetooth. Une fois la recherche terminée, sélectionnez « DS401 » dans la liste des
dispositifs Bluetooth.
d) À l'invite, saisissez le mot de passe ou No NIP : « 0000 » et appuyez sur « Oui » ou
« Confirmer ».
e) Une fois le jumelage établi, sélectionnez « DS401>>
dans la liste des dispositifs Bluetooth et
appuyez sur « Connect ».
B. Jumelage avec un éméteur stéréo Bluetooth
Les étapes de jumelage varient en fonction de l'émetteur Bluetooth. Consultez le manuel de
l'utilisateur de votre émetteur Bluetooth pour les vérifier. Voici quelles sont les étapes courantes
d'un jumelage :
a) N'éloignez pas l'appareil DS401 et l'émetteur Bluetooth de plus d'un mètre lors du jumelage.
b) Appuyez sur le bouton Veille, et appuyez une fois sur la touche Fonction pour passer en
mode Bluetooth.
c) Sur votre émetteur Bluetooth, passez en mode de jumelage.
d) L'émetteur recherche l'appareil DS401 et s'y connecte automatiquement. L'émission
Bluetooth change une fois la connexion établie.

Remarques :
Le DS401 repasse automatiquement en mode de jumelage après avoir été déconnecté d'un
appareil Bluetooth.
C. Lecture de la musique
Connexion avec un téléphone portable A2DP ou un émetteur Bluetooth
a) Connectez votre téléphone portable A2DP ou émetteur Bluetooth avec le DS401.
b) Vous pouvez maintenant écouter la musique sur le DS401.
c) Appuyez sur Vol+ pour augmenter le volume sonore, ou sur Vol- pour le réduire.
d) Appuyez sur
pour passer à la plage précédente ; un appui long permet un retour
rapide en arrière.
e) Appuyez sur pour passer à la plage suivante ; un appui long permet l'avance rapide.
- 8 -
Remarques :
En cas d'appel entrant pendant que le DS401 est connecté à votre téléphone portable pour la
lecture de la musique, celle-ci est interrompue lorsque vous répondez à l'appel, et reprend à la
fin de l'appel. (Il arrive que la pause se poursuive après la fin de l'appel, tout dépend de votre
téléphone portable.)
Remarques
Débranchez toujours l'appareil lorsqu'il est inutilisé et avant de le nettoyer.
Ne jouez pas de musique à un niveau sonore excessif car cela pourrait endommager votre ouïe
et/ou le matériel. N'utilisez pas cet appareil dans un environnement mouillé ou humide.
Entretien, maintenance
Débranchez toujours l'appareil du courant secteur avant de le nettoyer. Nettoyez l'appareil avec
un chiffon propre, humide, non pelucheux. N'utilisez ni produit abrasif, ni produit de nettoyage
fort.
« Made for iPod », « Made for iPhone » signifie qu'un appareil électronique a été conçu
pour être connecté spécifiquement et respectivement à l'iPod, à l'iPhone, et que le
développeur certifie qu'il satisfait aux normes de performances d'Apple. Apple ne pourra
être tenue pour responsable du fonctionnement de cet appareil ou de sa conformité aux
normes de sécurité ou réglementaires. iPhone et iPod sont des marques déposées de
Apple Inc. aux États-Unis et dans d'autres pays. iPod non inclus. Non compatible avec
iPod shuffle.
Samsung ® et Samsung Galaxy ® sont des marques déposées de Samsung Electronics.
Marque déposée aux États-Unis et dans d'autres pays.
THOMSON est une marque de TECHNICOLOR SA ou de ses filiales utilisée sous licence
par Bigben Interactive.

x Ne pas jeter les appareils électriques et électroniques avec les déchets
habituels.
x Les apporter à un point de collecte.
x Certaines pièces incluses dans ces appareils peuvent être dangereuses
pour la santé et l'environnement.
- 9 -
Par la présente, Bigben Interactive SA, déclare que l'appareil DS401 est conforme aux exigences
essentielles de la directive 1995/5/CE du Parlement européen et du Conseil du 9 Mars 1999
concernant les équipements hertziens et les équipements terminaux de télécommunications et
la reconnaissance mutuelle de leur conformité.
Pour télécharger la déclaration complète, rendez-vous sur notre site Web :
http://www.bigben.eu/support
dans la section « déclaration de conformité ».
Importé par Bigben Interactive SA
www.bigben.eu
Fabriqué en Chine
396, Rue de la Voyette
CRT2 - FRETIN
CS 90414
59814 LESQUIN Cedex
France

- 11 -
Liste de compatibilité :
Liste de compatibilité micro USB (charge et lecture audio)
Micro USB Compatibilities List charging & Audio playback
iPod Docking Compatibilities List
TAB (with Micro USB)
First time using the dock operation:
1. Settings
2.System
3.Accessory
4.Dock
5.Audio out mode
6.Use external speaker when device is docked

SYSTEME 2.1
iPod / iPhone / Smartphones
USB/SD
GB
DS401

Contents
Video Output from iPhone/iPod
5
Playing Your iPhone/iPod
5
Sleep mode
4
Listening to the radio
5
Using the Aux Input
6
Line in
6
Aux In
6
Using USB/SD input
6
Do’s and Don’t
8
Care and Maintenance
8
Getting Started 1
In the Box 1
Safety Instructions 1
Battery Safety 2
Description of Parts 2
Remove control 3
Setting Up your iTower 4
Powering Up 4
Setting Up clock 4
Charging your iPhone/iPod 4
The message “this accessory is not optimized for this iPhone” can be displayed when your iPhone
is connected.
In any case, this will not damage your iPhone, this message is just for your information, you can
press ”dismiss” and listen your music.
It explains that reception of 3G or WIFI signal is weaker when your iPhone is connected.
Getting Started
Remove the appliance from the box. Remove any packaging from the product. Place the
packaging inside the box and either or dispose of safely.
In the Box
Tower speaker unit
Remote control
Instruction manual
RCA cable
Safety Instructions
When using electrical appliances, basic safety precautions should always be followed. This
appliance is not intended for use by persons (including children) with reduced physical, sensory or
mental capabilities or lack of experience or knowledge. They should be given supervision and
instruction in the use of the appliance by a person responsible for their safety. Ensure the
appliance is not too close to heat emitting appliances or placed in direct sunlight. Check that the
voltage indicated on the data plate corresponds with that of the local network before connecting
the appliances to the mains power supply. Do not leave the appliance unattended whilst
connected to the mains power supply. Do not immerse the appliance in water or any other liquids.
It is imperative to unplug the power cord after the appliance has been used, before it is cleaned
and whilst being repaired. Close supervision is required when using this appliance near children.
Never leave the appliance within reach of children. Repairs to electrical appliances should only be
performed by qualified personnel. Improper repairs may place the user at serious risk.
This appliance is intended for household use only and should not be used for industrial or
Charging and audio playback via your
Samsung Galaxy
5
Bluetooth Mode
6
Compatibilites List
9
- 1 -

commercial purposes. Do not operate this appliance with a damaged plug or cord, after a
malfunction or after being dropped or damaged in any way. Do not use this appliance for anything
other than its intended use. This appliance must be placed on a stable, heat resistant surface. Do
not push objects into any openings as damage to the appliance and/or electric shock may occur.
Do not use this product in wet or bad weather conditions. This product is not a toy. Do not play
music at excessive levels especially near children.
Battery Safety Always…
Ensure the battery compartments are secure. Only use the batteries recommended. Ensure
correct fit of batteries, observing the plus and minus marks on both the battery and compartment.
Replace a full set of batteries at one time. Store unused batteries in their packaging and keep
away from metal objects that may cause a short circuit. Remove dead batteries from appliances
that will not be used again for a long time. Supervise children with batteries at all times.
Remember to keep button cell and AAA batteries away from small children as they can easily be
swallowed. Seek medical attention if batteries are swallowed.
Never…
Dispose of batteries in a fire. Attempt to recharge ordinary batteries.
Description of Parts
1. Micro USB dock
2. iPhone/iPod/iPad dock
3. Line in
4. Remote slot
5. SD slot
6. USB slot
7. Standby
8. Function
9. Skip backward
10. Skip forward
11. Men/Time
12. Play/pause
13. Volume –
14. Volume +
15. LCD display
- 2 -

Back Panel
Video Out
1. Power switch
2. Video out
3. Aux in R
4. Aux in L
Remote Control
1. Power
2. Sleep
3. Mute
4. iPod menu
5. Menu up
6. Source
7. Previous
8. Enter
9. Next
10. Memory and set time
11. Menu down
12. Pause/Play
13. Treble+
14. Bass+
15. Volume+
16. Treble
17. Bass
18. Volume-
Using the Remote Control the Battery
Pull the clear tab from the battery compartment at the base (straight) end of the remote.
If your remote becomes intermittent or you find you have to move nearer the unit to
operate, the battery probably needs to be replaced. To replace the battery, slide the
battery holder from the base of the remote control. Remove the battery and replace
with a 3Volt Lithium Cr2025 battery ensuring the +side is on the underside of the
holder as you slide it back into the compartment.
- 3 -
-
-
WARNING:SHOCK HAZARD-DO NOT OPEN
AVIS:RISQUE DE CHOC ELECTRIQUE-NE PAS OUVRIR
AC~ 90-240V 50/60Hz
S/N:
RoHS
Frequences FM87.5-108MHz
Alimentation:~230V/50Hz
Consomation:60watts
Puissance en sortie:2X15W+30W
MODEL:DS4
0
1
ON
OFF
POWER
FM ANT
IPOD
VIDEO OUT
AUX IN
R
L
MADE IN CHINA
1.
2.
3.
4.

Setting up Your Tower
Carefully take the tower body and base out of the packaging. Stand the tower upright on the
floor. The appliance is now ready for use.
Power
Place the unit in the desired position and unravel the mains cable. Insert the cable into the
supply socket and switch on if applicable.
Setting Clock
After the unit is plugged into a mains supply or mains power failure, the
display will show the “0:00” on the LCD display. The unit should be in
standby mode to set the current clock.
1. Press MEM/TIME button, the digits for the display will blink.
2 .Press the PREVIOUS/NEXT button repeatedly until correct hour is set. Press the MEM/TIME
to confirm.
The hour setting; the minute digits on the display will blink.
3. Press the PREVIOUS/NEXT button repeatedly until correct minute is set. Press the
MEM/TIME to confirm the minute setting.
Setting Alarm
Press and hold MEM/TIME button in shutdown state, the display will flash ON/OFF to select
setting alarm or canceling alarm.
Press PREVIOUS/NEXT to select ON, and the display will blink.
Press PREVIOUS/NEXT button repeatedly to set hour. Press MEM/TIME to confirm, then press
PREVIOUS/NEXT to set minute.
Press MEM/TIME to confirm, and then press PREVIOUS/NEXT to select iPod/Aux in status.
Press MEM/TIME to confirm.
When no iPod is connected, the unit will change to Aux in alarm automatically.
The volume would turn up from 0 to 25 gradually.
Sleep Mode
Press the SLEEP button, the display will blink. Press the button until the display shows the
minute you want to set. You can set 10 to 90 minutes.
It blinks three times to confirm, and then return to the interface before. If you want to cancel the
sleep mode, press to 00, after blanking three times, the sleep mode will cancel.
Charging your iPhone/iPod
You can charge your iPhone/iPod via the dock in either stand by or
operation mode.
Your iPhone/iPod will automatically charging when it is docked.
Please ensure that the main power switch at the rear of the unit is in the on position.
- 4 -

Video Output from iPhone/iPod
1. Connect the unit to your television using the composite video output.
2. On your iPhone/iPod, navigate to VIDEOS˚ VIDEO SETTINGS 3. Dock the iPhone/iPod on
the unit to begin playing a video from the docked iPhone/iPod.
Playing your iPhone or iPod
1. Press the power button on the rear of the speaker or on the main console to turn the unit on.
2. To select the iPhone/iPod playback function, press and hold the function button on until the
red light below iPod illuminates.
3. Connect your iPhone or iPod to the connector inside the dock.
4. Press the play/pause button on the unit or on the remote control to begin playing music from
the docked iPhone/iPod.
Charging and audio playback via your Samsung Galaxy
1. press the power button to turn on or standby
2. press the Function or function strut till that the displayed pattern "ADR"
3.
put the Samsung galaxy phone on the Micro USB station.
4. The phone will displayed
and ,please press the
,then can playback the music via the tower.
Remark: compatible Samsung galaxy SII/ Galaxy SIII/Galaxy SIII mini/Galaxy note/Galaxy note
II/Galaxy nexus
Listening to the radio
1. Press the button on the unit or the remote control to select RADIO mode. The unit will
be in FM radio mode.
2. Select the desired radio station by pressing the
PREVIOUS/NEXT button.
3. Press and hold PREVIOUS/NEXT button for 2 seconds,
The unit will automatically start and search the frequencies
for the previous or next strong station and stop on that station.
- 5 -

4. Once you find a station you want to save, press the MEM button on the remote
control, ”P01” will be shown on the display, press M-up or M-dn until the desired
memory position number appears on the display. Press the MEM again to confirm and
save the current station.
Using the Line in or AUX Input
Analogue sound signals from other sources can input to the speaker. To select the Aux function
button on the tower or repeatedly press the source button on the remote control until the
displace shows AUX or LIN.
Line in Jack
Requires a 3.5mm cable
1. Connect a 3.5mm cable to the Aux in 1 jack. Connect the other end of the 3.5mm cable to an
Mp3 player or other audio source.
2. Press the power button to turn the unit on.
3. Press the function button or source button on the remote to switch
to Line In mode.
4. Use the controls on the connected device to begin playing audio routed through the unit.
AUX In Auxiliary Input RCA
Requires an RCA cable
1. Connect an RCA cable to the Auxiliary Input. Connect the other end of the RCA cable to the
audio output on your DVD player, stereo system, gaming system or television.
2. Press the power button to turn the unit on.
3. Press the function button or the SOURCE button on the remote
control to switch to Aux In 2 mode.
4. Use the controls on the connected device to begin playing audio
routed through the unit.
Using the USB/SD input
1. Plug your USB flash drive/Secure Digital Memory Card to the USB/SD converter, then
connect the converter to the unit. Change the sequence may cause damage to the iPhone/iPod
dock.
2. Press function once into the USB mode, the unit can play automatically.
3. Press function twice into the SD mode, the unit can play automatically.
4. Press MENU UP /MENU DOWN to select which folder you want to open. The display will
shows the number of folder first, Otherwise the number of track.
5. Press PREVIOUS/NEXT to select track.
Bluetooth Mode
A. Pairing with a Bluetooth cell phone
Please make sure your cell phone is Bluetooth-enabled. Specific pairing steps may vary with
different cell phones. Please refer to the user manual of your cell phone for further information.
The general pairing steps are as follows:
a) Keep DS401 and Bluetooth cell phone within 1 meter when pairing.
- 6 -

b) Press Standby button, and press the function once into the Bluetooth mode
c) Switch on your cell phone’s Bluetooth function and search for Bluetooth devices. After the
search is completed, select “DS401''” from the Bluetooth device list.
d) According to indication, enter password or PIN No: “0000” and press “Yes” or “confirm”.
e) After successful pairing, select “DS401” from the Bluetooth device list and press “connect”.
B. Pairing with a Bluetooth stereo transmitter
Different Bluetooth transmitters have different pairing ways. Please refer to the user manual of
your Bluetooth transmitter for further information. The general pairing steps are as follows:
a) Keep DS401 and Bluetooth transmitter within 1 meter when pairing.
b) Press Standby button, and press the function once into the Bluetooth mode
c) Switch on your Bluetooth transmitter and let it enter pairing mode.
d) The transmitter will search and connect with DS401 automatically. After successful
connecting, the Bluetooth voice will change when connected successfully.
Remarks:
DS401 will return to pairing mode automatically after disconnecting from a Bluetooth device.
C. Music Playback
Connecting with a A2DP cell phone or Bluetooth transmitter
a) Connect your cell phone or Bluetooth transmitter with DS401.
b) You can listen to your music from DS401 now when playing it back.
c) Press Vol+ to turn up the volume, press Vol- to turn down the volume.
d) Press to skip to the previous song and long press to Rewind.
e) Press to skip to the next song and long press to Fast Forward.
Remarks:
If there is an incoming call while DS401 is connected to your cell phone for music playback, it will
pause at once when you answer the call and resume after the call ended. (Sometimes it will
pause after end the call, it depend on your cell phone.)
Notes
Always unplug the appliance when not in use and before cleaning.
Do not play music at excessive volume levels as damage to hearing and/or the equipment may
occur. Do not use this unit in wet or damp conditions.
- 7 -
Care and Maintenance
Always disconnect the unit from the mains power supply before cleaning. Clean the appliance
with a soft, damp, lint free cloth. Do not use abrasives or harsh cleaners.
“Made for iPhone” and “Made for iPod” means that an electronic accessory has been
designed to connect specifically to iPhone or iPod respectively, and has been certified by
the developer to meet Apple performance standards. Apple is not responsible for the
operation of this device or its compliance with safety and regulatory standards. IPhone
and iPod are trademarks of Apple In., Registered in the U.S. And other countries. IPod not
included. Not iPod shuffle compatible.

Samsung ® and Samsung Galaxy ® are trademarks of Samsung electronics. Registered in
the U.S. And other countries
x Don’t throw the electrical and electronic appliances into the usual dustbin.
x Bring them to a collecting point.
x Some parts contained in these appliances may be dangerous for health and
environment.
Hereby, Bigben Interactive S.A., declares that the DS401 device complies with the essential
requirements of the directive 1995/5/EC of the European Parliament and of the Council of 9
March 1999 on radio equipment and telecommunications terminal equipment and the mutual
recognition of their conformity.
To download the full statement, please visit our website:
http://www.bigben.eu/support
and the
section `declaration of conformity’.
- 8 -
THOMSON is a trademark of TECHNICOLOR SA or its affiliates used under license to
Bigben Interactive.
Imported by Bigben Interactive SA
Made in China
www.bigben.eu
396, Rue de la Voyette
CRT2 - FRETIN
CS 90414
59814 LESQUIN Cedex
France

- 9 -
Compatibilities List:
Micro USB Compatibilities List charging & Audio playback
iPod Docking Compatibilities List
TAB (with Micro USB)
First time using the dock operation:
1. Settings
2.System
3.Accessory
4.Dock
5.Audio out mode
6.Use external speaker when device is docked

SYSTEME 2.1
iPod / iPhone / Smartphones
USB/SD
SP
DS401

Índice
Salida de vídeo del iPhone/iPod 5
Reproducción de su iPhone/iPod 5
Modo de apagado automático
(Sleep)
5
Escuchar la radio 5
Uso de la entrada AUX in 6
Line in 6
AUX in 6
Reproducción de USB/SD 6
Qué hacer y evitar 8
Cuidado y mantenimiento 8
Procedimientos iniciales 1
Contenido de la caja 1
Instrucciones de seguridad 1
Seguridad de la pilas 2
Elementos del equipo 2
Mando a distancia 3
Preparación de su iTower 4
Conexión al suministro eléctrico 4
Ajuste del reloj 4
Carga de su iPhone/iPod 4
Al conectar su iPhone, puede aparecer el mensaje «este accesorio no está optimizado para este
iPhone». De cualquier modo, esto no provocará ningún daño a su iPhone y usted puede pulsar
«dismiss» (ignorar) y escuchar la música. El mensaje es sólo para su información y significa que
la recepción de la señal WiFi o 3G es más débil cuando su iPhone está conectado.
Procedimientos iniciales
Saque el aparato de la caja. Retire cualquier embalaje que pueda tener el producto. Coloque
los embalajes dentro de la caja y elimine los residuos convenientemente.
Contenido de la caja
Torre de altavoces multimedia
Mando a distancia
Manual de instrucciones
Cable con conector RCA
Instrucciones de seguridad
Cuando se usan aparatos eléctricos, siempre hay que seguir una serie de precauciones básicas.
Este equipo no ha sido concebido para ser utilizado por personas (niños incluidos) con minusvalía
física, mental o sensorial o con falta de experiencia o de conocimientos, a menos que sean
supervisados o instruidos acerca del uso del aparato por una persona responsable de su
seguridad. Asegúrese de que el aparato no se encuentre próximo a ninguna fuente de calor ni se
vea expuesto directamente a la luz del sol. Antes de conectar el aparato a la toma eléctrica,
compruebe que el voltaje indicado en la placa de datos sea el mismo que el de la red eléctrica
local. No deje el aparato desatendido mientras esté conectado a la toma de corriente. No sumerja
el aparato en agua o en otros líquidos. Es imprescindible desconectar el cable de alimentación
después de haber utilizado el aparato, antes de limpiarlo o de realizar cualquier reparación. Será
necesaria una supervisión estrecha cuando se utilice este aparato cerca de los niños.
No deje nunca el aparato al alcance de los niños. Los aparatos eléctricos sólo deben ser
reparados por personas cualificadas al efecto. La reparación incorrecta puede implicar un riesgo
grave para el usuario.
4
Carga y reproducción de audio
a través de su Samsung Galaxy
Modo Bluetooth
6
Lista de dispositivos compatibles:
9
- 1 -

Este equipo sólo está destinado al uso doméstico y no se debe utilizar para fines industriales o
comerciales. No utilice este aparato en caso de que el enchufe o el cable se encuentren dañados,
tras un mal funcionamiento o después de que éste se haya caído o sufrido algún daño. No utilice
el aparato para ningún fin distinto al uso previsto. Este aparato se tiene que colocar sobre una
superficie estable y resistente al calor. No coloque objetos en ninguna abertura, ya que esto
podría provocar daños al aparato y/o electrocución. No utilice este producto en condiciones de
humedad o de mal tiempo. Este producto no es un juguete. No ponga un volumen de música
excesivamente elevado, especialmente cerca de los niños.
Seguridad de las pilas... Siempre
Asegúrese de que el compartimento de las pilas sea seguro. Utilice únicamente las pilas
recomendadas. Asegúrese de introducir bien las pilas, respetando la polaridad de éstas y las
marcas de más y menos indicadas en el compartimento. Cuando cambie las pilas, sustitúyalas
todas a la vez. Conserve las pilas nuevas en su envase y manténgalas alejadas de objetos
metálicos que puedan provocar cortocircuitos. Retire las pilas cuando se gasten y también si no
se va a utilizar el aparato durante mucho tiempo. Vigile a los niños en todo momento cuando
tengan pilas. Acuérdese de mantener a los niños pequeños alejados de las pilas de botón y tipo
AAA, ya que se las pueden tragar con facilidad. En caso de tragarse las pilas, busque atención
médica.
Nunca…
Eche las pilas al fuego ni intente cargar las pilas normales.
Elementos del equipo
1. Conexión micro-USB
2. Estación de acoplamiento para iPhone/iPod/iPad
3. Línea de entrada (Line in)
4. Ranura para el mando a distancia
5. Ranura tarjeta SD
6. Ranura USB
7. Standby
8. Function
9. Skip backward (anterior)
10. Skip forward (siguiente)
11. MEM/TIME
12. Play/Pause
13. Volume -
14. Volume +
15. Pantalla LCD
- 2 -

Panel posterior
Salida de vídeo (Video Out)
1. Interruptor de alimentación
2. Salida de vídeo (Video Out)
3. Entrada AUX in (R - dcha.)
4. Entrada AUX in (L - izq.)
Mando a distancia
1. POWER
2. Sleep
3. Mute
4. iPod menu
5. MENU arriba
6. Source
7. Previous
8. Enter
9. Next
10. MEM/TIME
11. MENU abajo
12. Pause/Play
13. Treble+
14. Bass+
15. Volumen+
16. Treble
17. Bass
18. Volumen-
Uso del mando a distancia - Pila
Tire de la pestaña clara del compartimento de la pila de la base del mando.
Si el mando funciona de forma intermitente o ve que tiene que acercarse más al
equipo para que funcione, probablemente haya que cambiar la pila.
Para cambiar la pila, deslice el compartimiento de ésta sacándolo del mando a
distancia. Retire la pila y ponga otra de litio Cr2025 de 3 voltios, asegurándose de
que el lado + se encuentre en la parte inferior del compartimento al cerrarlo.
- 3 -
-
-
WARNING:SHOCK HAZARD-DO NOT OPEN
AVIS:RISQUE DE CHOC ELECTRIQUE-NE PAS OUVRIR
AC~ 90-240V 50/60Hz
S/N:
RoHS
Frequences FM87.5-108MHz
Alimentation:~230V/50Hz
Consomation:60watts
Puissance en sortie:2X15W+30W
MODEL:DS401
ON
OFF
POWER
FM ANT
IPOD
VIDEO OUT
AUX IN
R
L
MADE IN CHINA
1.
2.
3.
4.

Preparación de su torre
Saque con cuidado el cuerpo de la torre y la base del embalaje. Ponga de pie la torre recta
sobre el suelo. El aparato ya estará ahora listo para el uso.
Conexión al suministro eléctrico
Coloque la unidad en el lugar que desee y desenrolle el cable. Conecte el cable a una toma de
corriente y encienda el aparato si procede.
Ajuste del reloj
Después de conectar el equipo a la corriente o después de un fallo de
suministro eléctrico, en la pantalla LCD aparecerá «0:00». El equipo
debería estar en el modo Standby para ajustar la hora del reloj.
1. Pulse el botón MEM/TIME
.
Los dígitos de la pantalla parpadearán.
2. Pulse el botón PREVIOUS/NEXT varias veces hasta que aparezca la hora correcta. Pulse
MEM/TIME para confirmar.
Una vez introducida la hora, los dígitos de los minutos parpadearán en la pantalla.
3. Pulse varias veces el botón PREVIOUS/NEXT hasta llegar a los minutos
correspondientes. Pulse MEM/TIME para confirmar los minutos.
Ajuste de la alarma
Pulse el botón MEM/TIME en el estado de apagado. La pantalla mostrará ON/OFF
parpadeando para seleccionar el ajuste de la alarma o la cancelación de la alarma.
Pulse PREVIOUS/NEXT para seleccionar ON, y la pantalla parpadeará.
Pulse el botón PREVIOUS/NEXT varias veces para introducir la hora. Pulse MEM/TIME para
confirmar y, a continuación, pulse de nuevo PREVIOUS/NEXT para introducir los minutos.
Pulse MEM/TIME para confirmar y, a continuación, pulse de nuevo PREVIOUS/NEXT para
seleccionar la fuente iPod/AUX in. Pulse MEM/TIME para confirmar.
Cuando no haya ningún iPod conectado, el equipo utilizará automáticamente AUX in para la
alarma.El volumen irá pasando gradualmente de 0 a 25.
Modo de apagado automático (Sleep)
Pulse el botón SLEEP. La pantalla parpadeará. Pulse el botón hasta que la pantalla muestre los
minutos que desea establecer. Se puede elegir un tiempo de entre 10 y 90 minutos.
La pantalla parpadeará tres veces para confirmar y después volverá a la interfaz anterior. Si
quiere cancelar el modo Sleep de apagado automático, pulse hasta 00. Una vez haya
parpadeado tres veces, el modo de apagado automático quedará cancelado.
Carga de su iPhone/iPod
Puede cargar su iPhone/iPod a través de la estación de acoplamiento tanto en el modo de
Standby como de funcionamiento del equipo.
Su iPhone/iPod comenzará a cargarse automáticamente una vez
colocado en la estación. Asegúrese de que el interruptor principal
de alimentación que hay en la parte trasera del equipo se
encuentre en la posición ON.
- 4 -

Salida de vídeo del iPhone/iPod
1. Conecte el equipo a su televisor mediante una salida de vídeo compuesto.
2. En su iPhone/iPod, navegue hasta el menú Vídeo/Ajustes (VIDEOS˚VIDEO SETTINGS.
3. Acople el iPhone/iPod en el equipo para comenzar a reproducir un vídeo del iPhone/iPod
conectado.
Reproducción de su iPhone o iPod
1. Pulse el botón de encendido POWER que hay en la parte trasera de los altavoces o en la
consola principal para encender el equipo.
2. Para seleccionar la función de reproducción del iPhone/iPod, mantenga pulsado el botón
Function hasta que se encienda una luz roja bajo el iPod.
3. Introduzca su iPhone o iPod en el conector de la estación de acoplamiento.
4. Pulse el botón Play/Pause del equipo o del mando a distancia para comenzar a reproducir
música del iPhone/iPod acoplado en la estación.
Carga y reproducción de audio a través de su Samsung Galaxy
1. Pulse el botón de encendido POWER para encender el equipo o ponerlo en modo de
espera (Standby)
2. Pulse el botón Function hasta que en la pantalla aparezca «ADR»
3. Ponga el teléfono Samsung Galaxy en la conexión micro-USB..
4. En la pantalla del móvil aparecerá
y Pulse y, a
continuación, ya podrá reproducir la música a través de la torre.
Observaciones: compatible con Samsung Galaxy SII/ Galaxy SIII/Galaxy SIII mini/Galaxy
note/Galaxy note II/Galaxy nexus
Cómo escuchar la radio
1. Pulse el botón del equipo o del mando a distancia para seleccionar el modo RADIO.
El equipo se encontrará en el modo de radio FM.
2. Seleccione la emisora deseada pulsando los botones
PREVIOUS/NEXT.
3. Mantenga pulsado el botón PREVIOUS/NEXT durante 2
segundos. El equipo comenzará a buscar
automáticamente las frecuencias anteriores o siguientes con señal más fuerte,
parándose en cada emisora.
- 5 -

4. Cuando encuentre una emisora que desee guardar, pulse el botón MEM del mando a
distancia. En la pantalla aparecerá «P01». Pulse Menu arriba o Menu abajo hasta que
en la pantalla se vea el número de memoria deseado. Pulse MEM de nuevo para
confirmar y guardar la emisora actual.
Uso de la Línea de entrada o AUX in
Es posible escuchar por los altavoces las señales analógicas de otras fuentes. Puede pulsar el
botón Function de la torre para seleccionar Aux o pulsar varias veces el botón Source del
mando a distancia hasta que en la pantalla aparezca AUX o L IN.
Conector Line in (línea de entrada)
Requiere un cable de 3,5 mm
1. Conecte un cable de 3,5 mm al conector de entrada AUX in 1. Conecte el otro extremo del
cable de 3,5 mm a un reproductor de MP3 u otra fuente de audio.
2. Pulse el botón de encendido POWER para encender el equipo.
3. Pulse el botón Function o el botón de encendido del mando a
distancia para pasar al modo Line in (línea de entrada).
4. Use los controles del dispositivo conectado para comenzar a
reproducir el audio a través del equipo.
Conector RCA de entrada auxiliar (AUX in)
Es necesario un cable con conector RCA
1. Conecte un cable con conector RCA a la entrada auxiliar. Conecte el otro extremo del cable
con conector RCA a la salida de audio de su reproductor de DVD, sistema estéreo, sistema de
juego o televisor.
2. Pulse el botón de encendido POWER para encender el equipo.
3. Pulse el botón Function o el botón SOURCE del mando a distancia
para pasar al modo AUX in 2.
4. Use los controles del dispositivo conectado para comenzar a
reproducir el audio a través del equipo.
Reproducción de USB/SD
1. Conecte su memoria USB/tarjeta de memoria SD al convertidor USB/SD y, a continuación,
conecte el convertidor al equipo. No respetar este orden podría provocar daños a la estación de
acoplamiento para iPhone/iPod.
2. Pulse una vez Function para pasar al modo USB y el equipo podrá reproducir el contenido
automáticamente.
3. Pulse dos veces Function para pasar al modo SD y el equipo podrá reproducir el contenido
automáticamente.
4. Pulse MENU arriba o abajo para seleccionar la carpeta que desee abrir. La pantalla mostrará
el número de carpeta primero, o bien el número de pista.
5. Pulse PREVIOUS/NEXT para seleccionar la pista.
Modo Bluetooth
A. Emparejamiento con un móvil Bluetooth
Asegúrese de que su móvil tenga Bluetooth. Los pasos específicos para el emparejamiento
pueden variar de un teléfono móvil a otro. Consulte el manual del usuario de su móvil para
obtener más información al respecto. Los pasos generales para el emparejamiento son los
siguientes:
- 6 -

a) Sitúe la torre DS401 móvil Bluetooth a una distancia máxima de 1 metro durante el
emparejamiento.
b) Pulse el botón Standby y, a continuación, pulse una vez el botón Function para pasar al
modo Bluetooth.
c) Entre en la función Bluetooth de su móvil y busque los dispositivos Bluetooth. Una vez
finalizada la búsqueda, seleccione «DS401» en la lista de dispositivos Bluetooth.
d) Si hiciera falta, introduzca la contraseña o el nº de PIN: «0000» y pulse «Yes» (sí) o
«confirm» (confirmar).
e) Una vez logrado el emparejamiento, seleccione «DS4010» en la lista de dispositivos
Bluetooth y, a continuación, pulse «connect» (conectar).
B. Emparejamiento con un transmisor estéreo Bluetooth
Los transmisores Bluetooth pueden tener distintas formas de emparejamiento. Consulte el
manual del usuario de su transmisor Bluetooth para obtener más información al respecto. Los
pasos generales para el emparejamiento son los siguientes:
a) Sitúe la torre DS401 y el transmisor Bluetooth a una distancia máxima de 1 metro durante el
emparejamiento.
b) Pulse el botón Standby y, a continuación, pulse una vez el botón Function para pasar al
modo Bluetooth.
c) Encienda su transmisor Bluetooth y entre con él en el modo de emparejamiento.
d) El transmisor realizará la búsqueda y se conectará automáticamente con la torre DS401.
Una vez logrado el emparejamiento, el sonido del transmisor Bluetooth se escuchará por
la torre cuando ambos se encuentren conectados.
Observaciones:
La torre DS401 volverá automáticamente al modo de emparejamiento después de
desconectarse de un dispositivo Bluetooth.
C. Reproducción de música
Conexión con un móvil con A2DP o transmisor Bluetooth
a) Conecte su móvil o transmisor Bluetooth con la torre DS401.
b) Ahora, cuando reproduzca su música, podrá escucharla a través de la torre DS401.
c) Pulse Vol+ para subir el volumen, o bien Vol- para bajarlo.
d) Pulse para pasar a la canción anterior o púlselo durante más tiempo para retroceder
dentro de una canción.
e) Pulse para pasar a la siguiente canción o púlselo durante más tiempo para avanzar
dentro de una canción.
Observaciones:
Si hubiera una llamada entrante mientras la torre DS401 se encuentra conectada al móvil para
reproducir música, la canción quedará automáticamente en pausa cuando responda la llamada,
reanudándose una vez concluida ésta (algunas veces se queda en pausa al finalizar la llamada,
dependiendo del teléfono móvil).
- 7 -
Notas
Desconecte el aparato siempre que no se vaya a usar o antes de limpiarlo.
No ponga el volumen excesivamente alto, ya que esto puede provocar daños auditivos y/o al
equipo. No utilice este equipo en condiciones de humedad o de mal tiempo.
Cuidado y mantenimiento
Desconecte siempre el equipo de la toma de corriente antes de limpiarlo. Limpie el aparato con
un paño suave, húmedo y que no deje pelusa. No utilice limpiadores fuertes o abrasivos.
«Made for iPhone» y «Made for iPod» significa que un accesorio electrónico se ha
diseñado específicamente para conectarse con un iPhone o iPod respectivamente, y que
su desarrollador certifica que cumple con los estándares de funcionamiento de Apple.
Apple no se responsabiliza del funcionamiento de este dispositivo ni de que éste cumpla
con las normas legales o de seguridad. IPhone y iPod son marcas registrada de Apple
Inc. en EE.UU. y otros países. IPod no incluido. No compatible con iPod Shuffle.

Samsung® y Samsung Galaxy® son marcas registradas de Samsung Electronics.
Registradas en EE.UU. y otros países.
x No tire los aparatos eléctricos o electrónicos a la basura normal.
x Llévelos a un punto de recogida para este material, ya que algunas piezas
de estos aparatos pueden ser dañinos para la salud o el medio ambiente.
- 8 -
THOMSON es una marca comercial de TECHNICOLOR SA o sus afiliadas utilizada bajo licencia
por Bigben Interactive.
Fabricado en China
Bigben Interactive S.A. declara que el equipo DS401 cumple con los requisitos esenciales de la
directiva 1995/5/CE del Parlamento Europeo y del Consejo de 9 de marzo de 1999 sobre
equipos radioeléctricos y equipos terminales de telecomunica
conformidad.
Para descargar la declaración completa, puede visitar nuestro sitio Web:
http://www.bigben.eu/support
y la sección «declaration of conformity» (declaración de
conformidad).
Imported by Bigben Interactive SA
www.bigben.eu
396, Rue de la Voyette
CRT2 - FRETIN
CS 90414
59814 LESQUIN Cedex
France

- 9 -
Lista de dispositivos compatibles:
Micro USB Compatibilities List charging & Audio playback
iPod Docking Compatibilities List
TAB (with Micro USB)
First time using the dock operation:
1. Settings
2.System
3.Accessory
4.Dock
5.Audio out mode
6.Use external speaker when device is docked

IMPIANTO 2.1
iPod / iPhone / Smartphone
USB / SD
IT
DS401

Sommario
Uscita video dal dispositivo
iPhone / iPod
5
Riproduzione dal dispositivo
iPhone / iPod
5
Modalità sleep 5
Ascolto della radio 6
Uso dell’ingresso Aux 6
Line in 6
Aux In
7
Uso dell’ingresso USB / SD
7
Indicazioni importanti 8
Cura e manutenzione 9
Operazioni preliminari 1
Contenuto della confezione 1
Norme di sicurezza 1
Sicurezza della batteria 2
Descrizione dei componenti 2
Funzioni e tasti del telecomando 3
Configurazione del dispositivo iTower 4
Accensione 4
Impostazione dell’orologio 4
Caricamento del dispositivo iPhone/iPod 5
Il messaggio “This accessory is not optimized for this iPhone” (“Questo accessorio non è
ottimizzato per l’uso con questo iPhone”) può essere visualizzato sul display quando l’iPhone è
collegato al dispositivo.
Ciò non arrecherà in alcun caso danni all’iPhone in uso. Il messaggio è inteso soltanto a fini
informativi: è sufficiente premere il tasto “Dismiss” (Elimina) e iniziare l’ascolto.
Il messaggio significa che la ricezione del segnale 3G o Wi-Fi è più debole quando l’iPhone è
connesso.
Operazioni preliminari
Rimuovere l’apparecchio dalla confezione. Rimuovere eventuali materiali di imballaggio dal
prodotto. Inserire l’imballo all’interno della confezione o smaltirlo in modo sicuro.
Contenuto della confezione
Altoparlante tower
Telecomando
Manuale di istruzioni
Cavo RCA
Norme di sicurezza
Quando si utilizzano apparecchi elettrici, è necessario attenersi sempre alle precauzioni di
sicurezza principali. L’apparecchio non è destinato all’uso da parte di persone (compresi i bambini)
con ridotte capacità fisiche, sensoriali o mentali oppure che non abbiano acquisito la necessaria
esperienza o competenza. È necessario che questi utenti siano assistiti da un supervisore e che
siano addestrati all’uso da parte di una persona responsabile per la loro sicurezza. Accertarsi che
l’apparecchio non si trovi troppo vicino a fonti di calore o venga esposto alla luce solare diretta.
Prima di collegare gli apparecchi alla corrente elettrica, controllare che la tensione indicata sulla
targhetta corrisponda con quella della rete domestica. Non lasciare l’apparecchio incustodito
quando è collegato alla corrente elettrica. Non immergere l’apparecchio in acqua o in altri liquidi.
Si raccomanda di scollegare il cavo di alimentazione dopo aver utilizzato l’apparecchio, prima di
pulirlo e durante le riparazioni. Quando l’apparecchio viene utilizzato in prossimità di bambini,
sorvegliarli attentamente.
Non lasciare mai l’apparecchio alla portata dei bambini. Le riparazioni ad apparecchi elettrici
Ricarica e riproduzione audio mediante
dispositivi Samsung Galaxy
5
Modalità Bluetooth
7
Elenco dei dispositivi compatibili
10
- 1 -

devono essere effettuate unicamente da personale qualificato. Le riparazioni inadeguate possono
creare gravi situazioni di rischio per l’utente.
Questo apparecchio è destinato esclusivamente all’uso domestico e non deve essere impiegato
per scopi commerciali o industriali. Non utilizzare questo apparecchio se il cavo o la spina sono
danneggiati, dopo un malfunzionamento, dopo che è stato sottoposto ad urti o se presenta
qualsiasi danno. Non utilizzare questo apparecchio per scopi diversi da quello previsto. Questo
apparecchio deve essere collocato su una superficie stabile e resistente al calore. Non inserire
oggetti nelle aperture per evitare di danneggiare l’apparecchio e/o di provocare scosse elettriche.
Non utilizzare questo prodotto in presenza di umidità o in cattive condizioni meteorologiche.
Questo prodotto non è un giocattolo. Non riprodurre la musica a livelli di volume eccessivamente
elevati specialmente se ci si trova in prossimità di bambini.
Indicazioni per un utilizzo sicuro della batteria
Accertarsi che i vani batteria siano chiusi. Utilizzare esclusivamente batterie del tipo
raccomandato. Accertarsi che le batterie siano inserite correttamente osservando i contrassegni +
e - riportati sulla batteria e sul vano. Sostituire tutte le batterie contemporaneamente. Conservare
le batterie non utilizzate nella confezione originale e lontano da oggetti metallici che possono
creare un cortocircuito. Rimuovere le batterie scariche dagli apparecchi che si prevede di non
utilizzare per un lungo periodo di tempo. Sorvegliare sempre i bambini che giocano con le batterie.
Conservare le batterie a bottone e le batterie di tipo AAA lontano dai bambini piccoli perché
possono essere facilmente ingerite. In caso di ingestione delle batterie, rivolgersi immediatamente
a un medico.
Ulteriori indicazioni importanti sulle batterie
Non gettare in alcun caso le batterie nel fuoco. Non tentare mai di ricaricare le batterie normali.
Descrizione dei componenti
1. Base docking micro USB
2. Base docking iPhone / iPod / iPad
3. Ingresso audio (Line-In)
4. Fessura portatelecomando
5. Slot scheda SD
6. Porta USB
7. Stand-by
8. Funzione
9. Traccia precedente
10. Traccia successiva
11. Tasto Men / Time
12. Tasto Play / Pause
- 2 -
13. Tasto Volume -
14. Tasto Volume +
15. Display LCD

Pannello posteriore
Video out (Uscita video)
1. Interruttore di alimentazione
2. Uscita video
3. Ingresso Aux In destro
4. Ingresso Aux In sinistro
Funzioni e tasti del telecomando
1. Alimentazione
2. Sospensione
3. Disattivazione audio
4. Menu iPod
5. Menu su
6. Sorgente
7. Precedente
8. Invio (Enter)
9. Avanti
10. Memoria e impostazione ora
11. Menu giù
12. Pausa/Riproduzione
13. Alti +
14. Bassi +
15. Tasto Volume +
16. Alti
17. Bassi
18. Tasto Volume -
- 3 -
WARNING:SHOCK HAZARD-DO NOT OPEN
AVIS:RISQUE DE CHOC ELECTRIQUE-NE PAS OUVRIR
AC~ 90-240V 50/60Hz
S/N:
RoHS
Frequences FM87.5-108MHz
Alimentation:~230V/50Hz
Consomation:60watts
Puissance en sortie:2X15W+30W
MODEL:DS401
ON
OFF
POWER
FM ANT
IPOD
VIDEO OUT
AUX IN
R
L
MADE IN CHINA
1.
2.
3.
4.

Uso del telecomando a batteria
Tirare la linguetta trasparente dal vano batteri
Se il funzionamento dal telecomando è intermittente o se è necessario avvicinarsi
all’unità per farla funzionare, è probabile che la batteria debba essere sostituita.
Per sostituire la batteria, estrarre il portabatteria dalla base del telecomando facendolo
scorrere. Rimuovere la batteria e sostituirla con una batteria al litio Cr2025
da 3 volt accertandosi che il lato con il segno + si trovi rivolto verso il basso rispetto al
portabatteria quando viene reinserito nel vano.
Configurazione del tower
Estrarre con cautela il corpo del tower e la base dall’imballaggio. Sistemare il tower sul
pavimento in posizione diritta. L’apparecchio è adesso pronto
all’uso.
Alimentazione
Collocare l’unità nella posizione desiderata e svolgere il cavo di alimentazione. Inserire il cavo
nella presa e accendere l’apparecchio.
Impostazione dell’orologio
Dopo avere collegato l’unità alla corrente elettrica o dopo un’interruzione
di corrente, sul display LCD viene visualizzato “0:00”. Per impostare l’ora
corrente, l’unità deve trovarsi in modalità stand-by.
1. Premere il tasto MEM / TIME, le cifre lampeggiano.
2. Premere ripetutamente il tasto PRECEDENTE / AVANTI fino a impostare l’ora corretta.
Premere MEM / TIME per confermare.
L’ora è impostata; le cifre dei minuti lampeggiano sul display.
3. Premere ripetutamente il tasto PRECEDENTE / AVANTI fino a impostare i minuti
corretti. Premere MEM / TIME per confermare l’impostazione dei minuti.
Impostazione dell’allarme
Tenere premuto il tasto MEM / TIME con l’apparecchio spento; sul display lampeggia ON / OFF
per impostare o annullare l’allarme.
Premere PRECEDENTE / AVANTI per selezionare ON; il display lampeggia.
Premere ripetutamente il tasto PRECEDENTE / AVANTI per impostare l’ora. Premere MEM /
TIME per confermare, quindi premere PRECEDENTE / AVANTI per impostare i minuti.
Premere MEM / TIME per confermare, quindi premere PRECEDENTE / AVANTI per selezionare
lo stato iPod / Aux in. Premere MEM / TIME per confermare.
- 4 -

Quando non è collegato nessun iPod, l’unità si imposta automaticamente in Aux in.
Il volume aumenta gradualmente da 0 a 25.
Modalità sleep
Premere il tasto SLEEP, il display lampeggia. Premere il tasto finché sul display non vengono
visualizzati i minuti da impostare. È possibile impostare da 10 a 90 minuti.
Il display lampeggia tre volte prima della conferma, quindi torna all’interfaccia precedente. Se si
desidera annullare la modalità sleep, premere fino a visualizzare 00; dopo tre lampeggi, la
modalità sleep si annulla.
Ricarica del dispositivo iPhone / iPod
È possibile caricare il dispositivo iPhone / iPod tramite il connettore dock sia in modalità di
funzionamento che in modalità stand-by.
Il dispositivo iPhone / iPod, quando è collegato al connettore dock,
si carica automaticamente. Accertarsi che l’interruttore di
alimentazione principale situato sul retro dell’unità si trovi nella posizione ON.
Uscita video dal dispositivo iPhone / iPod
1. Collegare l’unità al televisore utilizzando l’uscita video composita.
2. Sul dispositivo iPhone / iPod, accedere a VIDEO˚ IMPOSTAZIONI VIDEO 3. Collegare il
dispositivo iPhone / iPod all’unità per iniziare la riproduzione di un video dal iPhone / iPod
collegato.
Riproduzione dal dispositivo iPhone / iPod
1. Premere il tasto di accensione sul retro dell’altoparlante o sulla consolle principale per
accendere l’unità.
2. Per selezionare la funzione di riproduzione del dispositivo iPhone / iPod, tenere premuto il
tasto di funzione finché non si accende la spia rossa sotto iPod.
3. Collegare il dispositivo iPhone o il dispositivo iPod al connettore nel dock.
4. Premere il tasto di riproduzione / pausa dell’unità o del telecomando per avviare la
riproduzione della musica dal dispositivo iPhone / iPod collegato.
Ricarica e riproduzione audio mediante dispositivi Samsung Galaxy
1. Premere il pulsante di accensione per accendere il dispositivo o attivare la modalità
standby.
2. Premere il tasto Function fino a quando sul display non appare la dicitura “ADR”.
3. Inserire il telefono Samsung Galaxy sulla base micro USB.
4. Il telefono visualizzerà l’icona
e : premere il tasto
per avviare la riproduzione musicale mediante il tower.
- 5 -

Nota: è necessario utilizzare un telefono compatibile Samsung Galaxy SII / Galaxy SIII / Galaxy
SIII mini / Galaxy note / Galaxy note II / Galaxy nexus
Ascolto della radio
1. Premere il tasto sull’unità o sul telecomando per selezionare la modalità RADIO.
Viene impostata la modalità radio FM.
2. Selezionare la stazione radio desiderata premendo il tasto
PRECEDENTE / AVANTI.
3. Tenere premuto il tasto PRECEDENTE / AVANTI per 2
secondi; l’unità si avvia automaticamente e cerca le
frequenze più potenti della stazione precedente o successiva e si arresta una volta
trovata la stazione.
4. Se si desidera salvare la stazione trovata, premere il tasto MEM sul telecomando; sul
display viene visualizzato ”P01”. Premere M-su o M-giù finché sul display non
compare il numero di posizione in memoria. Premere nuovamente MEM per
confermare e salvare la stazione corrente.
Uso dell’ingresso audio o dell’ingresso AUX
È possibile ascoltare dall’altoparlante segnali audio analogici provenienti da altre sorgenti. Per
selezionare la funzione Aux, premere il tasto sul tower o premere ripetutamente il tasto della
sorgente sul telecomando finché sul display non viene visualizzato AUX o LIN.
Jack ingresso audio
Richiede l’utilizzo di un cavo da 3,5 mm.
1. Collegare un cavo da 3,5 mm all’ingresso Aux in 1. Collegare l’altra estremità del cavo da 3,5
mm a un lettore Mp3 o a un’altra sorgente audio.
2. Premere il tasto di accensione per accendere l’unità.
3. Premere il tasto funzione o il tasto della sorgente sul telecomando
per accedere alla modalità Line In.
4. Utilizzare i comandi sul dispositivo collegato per avviare la riproduzione audio trasmessa
attraverso l’unità.
Ingresso ausiliario AUX In tramite cavo RCA
Richiede l’utilizzo di un cavo RCA.
1. Collegare un cavo RCA all’ingresso ausiliario. Collegare l’altra estremità del cavo RCA
all’uscita audio sul lettore DVD, sull’impianto stereo, sulla stazione di gioco o sul televisore.
2. Premere il tasto di accensione per accendere l’unità.
- 6 -

3. Pr orgente sul telecomando
4. Ut l dispositivo collegato per avviare la
riproduzione audio trasmessa attraverso l’unità.
si cambia la sequenza si rischia di danneggiare il connettore dock del
olta il tasto Function nella modalità USB: l’unità avvierà la riproduzione
olte il tasto Function nella modalità SD: l’unità avvierà la riproduzione
ul display
l numero di tracce.
. Premere PRECEDENTE / AVANTI per selezionare la traccia.
A. Abbinamento a un telefono cellulare Bluetooth
elefono cellulare per ulteriori informazioni. Attenersi alle
seguenti istruzioni generali.
a) si tenere il prodotto DS401 e il telefono cellulare Bluetooth
b) tandby e quindi una volta il tasto Function dopo avere attivato la
c)
mento della ricerca selezionare l’opzione “DS401” dall’elenco dei dispositivi
d) assword o il PIN (“0000”) e premere quindi “Yes” (“Sì”) o
e)
emere il tasto funzione o il tasto della s
per accedere alla modalità Aux In 2.
ilizzare i comandi su
Uso dell’ingresso USB / SD
1. Collegare l’unità flash USB / scheda di memoria SD al convertitore USB / SD, quindi collegare
il convertitore all’unità. Se
dispositivo iPhone / iPod.
2. Premere una v
automaticamente.
3. Premere due v
automaticamente.
4. Premere MENU SU /MENU GIÙ per selezionare la cartella che si desidera aprire. S
viene visualizzato prima il numero della cartella o, in alternativa, i
5
Modalità Bluetooth
Assicurarsi che il telefono cellulare sia dotato di funzione Bluetooth. Le operazioni da compiere
per l’abbinamento possono variare a seconda del telefono cellulare in uso. Si consiglia di fare
riferimento al manuale utente del t
Durante l’abbinamento, assicurar
nel raggio di 1 metro.
Premere il tasto S
modalità Bluetooth
Attivare la funzione Bluetooth del telefono cellulare e cercare i dispositivi Bluetooth. Dopo
il completa
Bluetooth.
Se necessario, inserire la p
“Confirm” (“Conferma”).
Una volta eseguito con successo l’abbinamento, selezionare “DS401” dall’elenco dei
dispositivi Bluetooth e selezionare l’opzione che indica la connessione.
- 7 -
Le operazioni da compiere per l’abbinamento possono variare a seconda del tipo di trasmettitore
Bluetooth in uso. Si consiglia di fare riferimento al manuale utente del trasmettitore Bluetooth
per ulteriori informazioni. Attenersi alle seguenti istruzioni generali.
Abbinamento a un trasmettitore stereo Bluetooth
B.

a) Durante l’abbinamento, assicurarsi tenere il prodotto DS401 e il trasmettitore Bluetooth nel
raggio di 1 metro.
b) Premere il tasto Standby e quindi una volta il tasto Function dopo avere attivato la
modalità Bluetooth
c) Accendere il trasmettitore Bluetooth e assicurarsi che la modalità di abbinamento sia
attivata.
d) Il trasmettitore inizierà la ricerca es eseguirà automaticamente il collegamento con il
prodotto DS401. Una volta eseguito con successo il collegamento, il trasmettitore e il tower
saranno collegati.
Note
Il prodotto DS401 riattiverà la modalità di abbinamento una volta eseguita la disconnessione
da un dispositivo Bluetooth.
C. Riproduzione musicale
Connessione a un telefono cellulare o a un trasmettitore Bluetooth con tecnologia A2DP
a) Collegare il telefono cellulare o il trasmettitore Bluetooth in uso al prodotto DS401.
b) Attivando la riproduzione, darà ascoltare i brani musicali dal prodotto DS401.
c) Premere il tasto Vol+ per aumentare il volume di riproduzione; premere il tasto Vol- per
diminuire il volume di riproduzione.
d) Premere il tasto per passare al brano precedente; con una pressione prolungata del
tasto viene attivata la funzione di riavvolgimento rapido.
e) Premere il tasto per passare al brano successivo; con una pressione prolungata del
tasto viene attivata la funzione di avanzamento rapido.
Note
Qualora arrivi una chiamata in entrata durante la connessione del prodotto DS401 al telefono
cellulare per la riproduzione musicale, la riproduzione verrà arrestata alla risposta e ripristinata
una volta terminata la chiamata. A seconda del telefono cellulare in uso, a chiamata terminata
può essere attivata la modalità di pausa.
- 8 -
Note
Scollegare sempre l’apparecchio quando non viene utilizzato e prima della pulizia.
Non riprodurre la musica a un volume eccessivo poiché si possono provocare danni all’udito o
all’apparecchio stesso. Non utilizzare questo prodotto in presenza di umidità.
Cura e manutenzione
Scollegare sempre l’unità dalla corrente elettrica prima della pulizia. Pulire l’apparecchio con un
panno morbido, inumidito e non lanuginoso. Non utilizzare abrasivi o detergenti aggressivi.
“Made for iPhone” e “Made for iPod” indicano che un accessorio elettrico è stato
progettato per essere collegato appositamente e rispettivamente ai dispositivi iPhone e
iPod, e ha ottenuto la certificazione da parte dello sviluppatore per soddisfare gli
standard di rendimento Apple. Apple non è responsabile per il funzionamento di questo
dispositivo o la sua conformità con gli standard di sicurezza e normativi. iPhone e iPod
sono marchi commerciali di Apple In., registrati negli Stati Uniti e in altri paesi. Il
dispositivo iPod non è incluso nella dotazione. Non compatibile con la funzione di
riproduzione casuale del dispositivo iPod.

x Non gettare gli apparecchi elettrici ed elettronici tra i rifiuti indifferenziati.
x Depositare gli apparecchi presso un apposito punto di raccolta.
x Alcuni componenti contenuti in questi apparecchi possono essere pericolosi
per la salute e per l’ambiente.
- 9 -
THOMSON è un marchio di TECHNICOLOR SA o delle sue società afilliate utilizzato con una
licenza data a la società Bigben Interactive.
Prodotto in Cina
Bigben Interactive S.A. certifica che il dispositivo DS401 è conforme ai requisiti essenziali della
Direttiva 1999/5/CE del Parlamento europeo e del Consiglio del 9 marzo 1999 riguardante le
apparecchiature radio e le apparecchiature terminali di telecomunicazione e il reciproco
riconoscimento della loro conformità (R&TTE).
La dichiarazione di conformità completa è disponibile per lo scaricamento all’indirizzo:
http://www.bigbeninteractive.it/support all’interno della sezione “Dichiarazione di conformità”.
Imported by Bigben Interactive SA
www.bigben.eu
396, Rue de la Voyette
CRT2 - FRETIN
CS 90414
59814 LESQUIN Cedex
France
Samsung ® e Samsung Galaxy ® sono marchi commerciali di Samsung electronics registrati
negli Stati Uniti e in altri paesi.

- 10 -
Elenco dei dispositivi compatibili
Micro USB Compatibilities List charging & Audio playback
iPod Docking Compatibilities List
TAB (with Micro USB)
First time using the dock operation:
1. Settings
2.System
3.Accessory
4.Dock
5.Audio out mode
6.Use external speaker when device is docked

SYSTEME 2.1
iPod / iPhone / Smartphones
USB/SD
PT
DS401

Ao conectar o iPhone pode visualizar a mensagem: “este acessório não está otimizado para este
iPhone”.
De qualquer das formas, tal não irá danificar o seu iPhone. Esta mensagem é apenas informativa
e pode premir em ”dismiss” e ouvir música.
Explica que a receção do sinal 3G ou WIFI é mais fraca quando o iPhone está conectado.
Como começar
Retire o aparelho da caixa. Remova todas as embalagens do produto. Coloque as embalagens
dentro da caixa e deite fora adequadamente.
Na Caixa
Unidade do altifalante
Comando à distância
Manual de instruções
Cabo RCA
Instruções de segurança
Ao utilizar aparelhos elétricos, deve seguir as precauções de segurança essenciais. Este aparelho
não se destina a ser utilizado por pessoas (incluindo crianças) com capacidades físicas,
sensoriais ou mentais reduzidas ou falta de experiência ou conhecimento. Devem ser
supervisionadas e instruídas na utilização do aparelho por uma pessoa responsável pela sua
segurança. Certifique-se de que o aparelho não está demasiado próximo dos aparelhos de
emissão de calor nem é colocado à luz direta do sol. Verifique que a tensão presente na chapa
informativa corresponde à tensão da rede local antes de conectar os aparelhos à fonte de
alimentação de rede. Não deixe o aparelho sem supervisão enquanto estiver conectado à fonte
de alimentação de rede. Não submerja o aparelho em água ou em quaisquer outros líquidos. É
imperativo que remova o cabo de alimentação do aparelho após a utilização, antes de ser limpo e
durante a reparação. Ao utilizar o aparelho perto de crianças é necessário uma supervisão
estreita.
- 1 -
Índice
Saída de vídeo do iPhone/iPod
5
Reproduzir com o iPhone/iPod
5
Modo Sleep
4
Ouvir rádio
5
Utilizar a entrada Aux
5
Line in
6
Aux In 6
Utilizar a entrada USB/SD 6
O que fazer e o que não fazer 7
Cuidados e manutenção 8
Como começar 1
Na caixa 1
Instruções de segurança 1
Medidas de segurança para a pilha 2
Descrição das peças 3
Comando à distancia 4
Configurar o iTower 4
Configurar o relógio 4
Carregar o iPhone/iPod 4
Ligar
4
Carregar e reprodução áudio através
do Samsung Galaxy
5
Modo Bluetooth
7
Lista de compatibilidades:
9

- 2 -
Nunca deixe o aparelho ao alcance das crianças. As reparações aos aparelhos elétricos devem
ser apenas realizadas por pessoal qualificado. As reparações indevidas podem colocar o utilizar
em risco grave.
Este aparelho destina-se apenas à utilização doméstica e não deve ser utilizado para fins
industriais ou comerciais. Não opere este aparelho com um cabo ou o fio danificado, após uma
avaria ou após ter sido deixado cair ou ter sido danificado de qualquer forma. Não utilize este
aparelho para qualquer outro fim, à exceção do fim destino. Este aparelho deve ser colocado
numa superfície estável e resistente ao calor. Não enfie objetos em nenhuma das aberturas do
aparelho, pois pode danificar o mesmo e/ou provocar choque elétrico. Não utilize este produto em
condições climatéricas húmidas ou más. Este produto não é um brinquedo. Não reproduza
música a níveis excessivamente altos, em particular perto de crianças.
Segurança da pilha em primeiro
lugar…
Certifique-se de que os compartimentos da pilha estão fechados. Utilize apenas as pilhas
recomendadas. Certifique-se que coloca corretamente as pilhas de acordo com os polos positivo
e negativo indicados nas pilhas e no compartimento. Substitua o conjunto todo das pilhas de uma
só vez. Guarde as pilhas não utilizadas nas suas embalagens e mantenha-as longe dos objetos
metálicos que possam causar curto-circuito. Remova as pilhas descarregadas dos aparelhos que
não vai utilizar durante um longo período de tempo. Supervisione as crianças que estejam perto
de pilhas. Lembre-se de deve manter as pilhas-botão e as pilhas AAA longe das crianças mais
pequenas, porque podem ser facilmente engolidas. Caso tal aconteça, procure ajuda médica.
Nunca…
Deite as pilhas no fogo. Tente recarregar as pilhas não recarregáveis.
Descrição das peças
1. Dock Micro USB
2. Dock do iPhone/iPod/iPad
3. Line in
4. Ranhura remota
5. Ranhura SD
6. Ranhura USB
7. Standby
8. Função
9. Retroceder
10. Avançar
11. Mem/Hora
12. Reprod./pausa
13. Volume –
14. Volume +
15. Ecrã LCD

- 3 -
Painel traseiro
Saída de vídeo
1. Interruptor de alimentação
2. Saída de vídeo
3. Aux in R
4. Aux in L
WARNING:SHOCK HAZARD-DO NOT OPEN
AVIS:RISQUE DE CHOC ELECTRIQUE-NE PAS OUVRIR
AC~ 90-240V 50/60Hz
S/N:
RoHS
Frequences FM87.5-108MHz
Alimentation:~230V/50Hz
Consomation:60watts
Puissance en sortie:2X15W+30W
MODEL:DS401
ON
OFF
POWER
FM ANT
IPOD
VIDEO OUT
AUX IN
R
L
MADE IN CHINA
1.
2.
3.
4.
Comando à distância
1. Alimentação
2. Sleep
3. Silêncio
4. Menu do iPod
5. Menu anterior
6. Fonte
7. Anterior
8. Enter
9. Seguinte
10. Memória e hora definida
11. Menu seguinte
12. Pausa/Reprod.
13. Treble+
14. Bass+
15. Volume+
16. Treble
17. Bass
18. Volume-
-
-
Colocar a pilha no comando à distância
Puxe a presilha do compartimento das pilhas na ponta da base do comando.
Se o comando ficar intermitente ou achar que tem de se aproximar da unidade para
operar, é porque a pilha provavelmente precisa de ser substituída. Para substituir a
pilha, faça deslizar
o suporte da pilha da base do comando à distância. Retire a pilha e substitua por
uma pilha de lítio de 3 volts Cr2025, certificando-se de que o polo positivo é
colocado na parte inferior do
suporte e fazendo deslizar a pilha no compartimento.
Configurar a torre
Com cuidado, levante a torre e remova a embalagem.
aparelho está pronto a ser utilizado.
Alimentação
Coloque a unidade na posição pretendida e desemaranhe o cabo principal. Introduza o cabo na
entrada e ligue, se aplicável.
Coloque a torre direita no chão. O

Acertar o relógio
Depois da unidade estar ligada à fonte de alimentação de rede, o ecrã
mostra “0:00” no ecrã LCD. A unidade deve estar no modo standby para
acertar o relógio.
1. Prima o botão MEM/HORA e os dígitos do ecrã ficam intermitentes.
2. Prima repetidamente o botão ANTERIOR/SEGUINTE até definir corretamente a hora. Prima
MEM/HORA para confirmar.
Ao acertar a hora, os dígitos no ecrã ficam intermitentes.
3. Prima repetidamente o botão ANTERIOR/SEGUINTE até configurar corretamente os
minutos. Prima MEM/HORA para confirmar a definição dos minutos.
Configurar o alarme
Prima e mantenha o botão MEM/HORA premido no estado de encerramento, o ecrã apresenta
a mensagem intermitente ON/OFF para selecionar a configuração ou cancelamento do alarme.
Prima ANTERIOR/SEGUINTE para selecionar ON e o ecrã fica intermitente.
Prima repetidamente ANTERIOR/SEGUINTE para definir a hora. Prima MEM/HORA para
confirmar, prima ANTERIOR/SEGUINTE para definir os minutos.
Prima MEM/HORA para confirmar, prima ANTERIOR/SEGUINTE para selecionar iPod/Aux no
estado. Prima MEM/HORA para confirmar.
Quando nenhum iPod está conectado, a unidade é automaticamente mudada para Aux no
alarme.
O volume aumente gradualmente de 0 a 25.
Modo Sleep
Prima o botão SLEEP, o ecrã fica intermitente. Prima o botão até o ecrã mostrar o minuto que
quer definir. Pode definir 10 a 90 minutos.
Pisca três vezes para confirmar e, em seguida, volta à interface anterior. Se quiser cancelar o
modo sleep, prima 00, após limpar três vezes, o modo sleep é cancelado.
Carregar o iPhone/iPod
Pode carregar o iPhone/iPod através da dock no modo standby ou
de operação.
O seu iPhone/iPod carrega automaticamente sempre que está na
dock. Certifique-se de que o interruptor da fonte de alimentação na traseira da unidade está na
posição ON.
Saída de vídeo do iPhone/iPod
1. Conecte a unidade à televisão com a saída de vídeo composto.
2. No seu iPhone/iPod, navegue para VIDEOS˚ VIDEO SETTINGS 3. Coloque o iPhone/iPod
na dock na unidade para iniciar a reprodução do vídeo do iPhone/iPod na dock.
Reprodução com o iPhone ou iPod
1. Prima o botão de alimentação na traseira do altifalante ou na consola principal para ligar a
unidade.
2. Para selecionar a função de reprodução do iPhone/iPod, prima e mantenha premido o botão
de função até a luz vermelha do iPod ficar acesa.
3. Conecte o iPhone ou iPod ao conector da dock.
- 5 -

4. Prima o botão reprod./pausa na unidade ou no comando à distância para iniciar a reprodução
da música do iPhone/iPod na dock.
Carregar e reprodução áudio através do Samsung Galaxy
1. prima o botão de alimentação para ligar ou ativar o modo standby
2. prima em função ou no botão função até a mensagem «ADR» ser apresentada
3. coloque o telefone Samsung galaxy em Micro USB.
4. O telefone apresenta
e , prima , de seguida, pode
reproduzir a música através da torre.
Nota: compatível com Samsung galaxy SII/ Galaxy SIII/Galaxy SIII mini/Galaxy note/Galaxy
note II/Galaxy nexus
Ouvir rádio
1. Prima o botão da unidade ou o comando à distância para selecionar o modo RADIO.
A unidade entra no modo de rádio FM.
2. Selecione a estação de rádio pretendida, premindo o
botão ANTERIOR/SEGUINTE.
3. Prima e mantenha o botão ANTERIOR/SEGUINTE
premido durante 2 segundos. A unidade irá
automaticamente iniciar e pesquisar as frequências com sinal forte de estações e irá
parar na estação.
4. Assim que encontrar a estação pretendida, prima o botão MEM do comando à
distância. ”P01” é apresentado no ecrã, prima M-up ou M-dn até o número da posição
da memória pretendido aparecer no ecrã. Prima de novo MEM de novo para
confirmar e guardar a estação atual.
Utilizar a entrada Line in ou AUX
Os sinais de som analógicos de outras fontes podem ser transmitidos pelo altifalante. Para
selecionar o botão função Aux da torre, prima repetidamente o botão de fonte no comando à
distância até o ecrã indicar AUX ou LIN.
- 6 -

Entrada Line in
Necessita um cabo de 3,5 mm
1. Conecte um cabo de 3,5 mm ao Aux in 1. Conecte a outra extremidade do cabo de 3,5 mm a
um leitor de Mp3 ou a outra fonte áudio.
2. Prima o botão de alimentação para ligar a unidade.
3. Prima o botão de função ou de fonte no comando para alternar para
o modo Line In.
4. Utilize os controlos do dispositivo conectado para iniciar a reprodução de áudio através da
unidade.
Entrada AUX In RCA
É necessário um cabo RCA
1. Conecte um cabo RCA à entrada aux. Conecte a outra extremidade do cabo RCA à entrada
de áudio do leitor de DVD, sistema estéreo, de jogos ou televisão.
2. Prima o botão de alimentação para ligar a unidade.
3. Prima o botão de função ou de FONTE no comando à distância
para alternar para o modo Aux In 2.
4. Utilize os controlos do dispositivo conectado para iniciar a
reprodução de áudio através da unidade.
Utilizar a entrada USB/SD
1. Conecte a pen USB/cartão de memória SD no conversor USB/SD e conecte o conversor à
unidade. A alteração da sequência pode causar danos à dock de iPhone/iPod.
2. Prima função uma vez no modo USB, a unidade pode reproduzir automaticamente.
3. Prima função duas vezes no modo SD, a unidade pode reproduzir automaticamente.
4. Prima MENU ANTERIOR /MENU SEGUINTE para selecionar a pasta que pretende abrir. O
ecrã mostra primeira o número da pasta , ou o número da faixa.
5. Prima ANTERIOR/SEGUINTE para selecionar a faixa.
Modo Bluetooth
A. Emparelhar com um telemóvel Bluetooth
Certifique-se de que ativa o Bluetooth. Os passos de emparelhamento específicos podem
variam de telemóvel para telemóvel. Consulte o manual de utilização do telemóvel para mais
informações. Os passos gerais de emparelhamento são os seguintes:
a) Mantenha o DS401 e o telemóvel Bluetooth a um 1 metro durante o emparelhamento.
b) Prima o botão Standby e prima a função uma vez no modo Bluetooth
c) Ative a função Bluetooth do telemóvel e pesquise os dispositivos Bluetooth. Após a
conclusão da pesquisa, selecione “DS401” da lista do dispositivo Bluetooth.
d) De acordo com a indicação, introduza a palavra-passe ou o n.º do PIN: “0000” e prima
“Yes” ou “confirm”.
- 7 -

e) Após a emparelhagem com sucesso, selecione “DS401” da lista de dispositivos Bluetooth e
prima “connect”.
B. Emparelhar com um transmissor estéreo Bluetooth
Diferentes transmissores Bluetooth têm diferentes formas de emparelhamento. Consulte o
manual de utilização do transmissor Bluetooth para mais informações. Os passos gerais de
emparelhamento são os seguintes:
a) Mantenha o DS401 e o transmissor Bluetooth a um 1 metro durante o emparelhamento.
b) Prima o botão Standby e prima a função uma vez no modo Bluetooth
c) Ligue o transmissor Bluetooth e deixe entrar no modo de emparelhamento.
d) O transmissor irá pesquisar e conectar automaticamente com DS401. Depois de conectar
com sucesso, a voz Bluetooth muda quando conectado com sucesso.
Atenção:
DS401 retorna ao modo de emparelhamento automaticamente após a desconexão do
dispositivo Bluetooth.
C. Reprodução da música
Conectar com um telemóvel A2DP ou transmissor Bluetooth
a) Conecte o telemóvel ou transmissor Bluetooth com DS401.
b) Pode ouvir a sua música do DS401.
c) Prima Vol+ para aumentar o volume, prima Vol- para baixar o volume.
d) Prima
para saltar para a música anterior e prima Retroceder.
e) Prima
para saltar para a música seguinte e prima Avançar.
Atenção:
Se receber uma chamada com o DS401 ligado ao te lemóvel para reproduzir música, a música
pausa imediatamente assim que atender a chamada e continua quando a chamada terminar.
(Dependendo do telemóvel, a reprodução pode não ser retomada no final da chamada.)
- 8 -
Notas:
Desligue o aparelho da ficha sempre que não o esteja a utilizar e antes de o limpar.
Não reproduza música a níveis de volume excessivos já que pode prejudicar a audição e/ou
danificar o equipamento. Não utilizar esta unidade em condições húmidas ou molhadas.
Cuidados e manutenção
Desconecte sempre a unidade da fonte de alimentação da rede antes de limpar. Limpe o
aparelho com um pano suave e húmido. Não utilizar agentes de limpeza abrasivos ou fortes.
“Made for iPhone” e “Made for iPod” significa que um acessório eletrónico foi
concebido especificamente para conectar ao iPhone ou iPod respetivamente, e que foi
certificado pelo programador para cumprir as normas de desempenho da Apple. A Apple
não é responsável pela operação deste dispositivo ou pela sua conformidade com as
normas de segurança e regulamentares. IPhone e iPod são marcas registadas de Apple
In., Registada nos EUA e noutros países. IPod não incluído. Não é compatível com o iPod
shuffle.

Samsung ® e Samsung Galaxy ® são marcas registadas de Samsung electronics. Registado
nos EUA e noutros países.
x Não deite fora os aparelhos elétricos e eletrónicos no caixote de lixo normal.
x Entregue-os no ponto de recolha.
x Algumas partes deste aparelho podem ser perigosas para a saúde e para o
ambiente.
- 9 -
THOMSON é uma marca registrada da TECHNICOLOR SA ou das suas subsidiárias utilizada sob
licen?a pela Bigben Interactive.
Fabricado na China
Bigben Interactive S.A. declara, pelo presente, que o dispositivo DS401cumpre os requisitos
essenciais da diretiva 1995/5/CE do Parlamento Europeu e do Conselho de 9 de Março de 1999
sobre equipamento de rádio e equipamento terminal de telecomunicações e o reconhecimento
mútuo da sua conformidade.
Para descarregar a declaração completa, visite o nosso website:
http://www.bigben.eu/support
e
a secção `declaration of conformity’.
Imported by Bigben Interactive SA
www.bigben.eu
396, Rue de la Voyette
CRT2 - FRETIN
CS 90414
59814 LESQUIN Cedex
France

- 10 -
Lista de compatibilidades:
Micro USB Compatibilities List charging & Audio playback
iPod Docking Compatibilities List
TAB (with Micro USB)
First time using the dock operation:
1. Settings
2.System
3.Accessory
4.Dock
5.Audio out mode
6.Use external speaker when device is docked

SYSTEM 2.1
iPod / iPhone / Smartphones
USB/SD
DE
DS401

Inhalt
Video-Inhalte vom iPhone/iPod 6
Inhalte vom iPhone/iPod
6
Sleep-Modus
5
Radioempfang 6
Benutzung des AUX-Eingangs 7
Line in 7
Aux In 7
Benutzung des USB-Ports/des
SD-Kartenslots
7
Tipps und Hinweise 9
Wartung und Pflege 9
Erste Schritte 1
Verpackungsinhalt 1
Sicherheitsanweisungen 1
Batteriesicherheit 2
Beschreibung der Elemente 3
Fernbedienung 4
Einrichtung Ihres iTowers 4
Einschalten 5
Einstellung der Uhr 5
iPhone/iPod aufladen 5
Bei Anschuss Ihres iPhones kann die Meldung “Dieses Zubehör wurde nicht für die Verwendung
mit einem iPhone entwickelt” erscheinen.
Sie können jedoch sicher sein, dass Ihr iPhone durch dieses Gerät nicht beschädigt wird. Diese
Mitteilung dient nur zu Ihrer Information. Sie können diese Meldung bestätigen und trotzdem
sorglos Musik hören.
Allerdings kann der Empfang des UMTS/HSDPA- bzw. WLAN-Signals schwächer sein, wenn Ihr
iPhone angeschlossen ist.
Erste Schritte
Entnehmen Sie das Gerät aus dem Karton. Entfernen Sie sämtliches Verpackungsmaterial vom
Gerät. Bewahren Sie das Verpackungsmaterial im Karton auf oder entsorgen Sie die gesamte
Verpackung auf entsprechende Weise.
Verpackungsinhalt
iTower-Lautsprecher
Fernbedienung
Bedienungsanleitung
Stromkabel
Sicherheitsanweisungen
Bei der Benutzung von Elektrogeräten sind in jedem Fall einige Vorsichtsmaßnahmen zu
beachten. Dieses Gerät eignet sich nicht für den Gebrauch durch Personen (einschl. Kinder) mit
verminderter körperlicher, tastsinnlicher oder geistiger Leistungsfähigkeit oder durch Personen,
die nicht über entsprechendes Wissen bzw. genügend Erfahrung im Umgang mit solchen Geräten
verfügen. Solche Personen sollten von einer Person, die für deren Sicherheit verantwortlich ist,
entsprechend beaufsichtigt und eingewiesen werden. Achten Sie darauf, dass sich das Gerät nicht
zu nahe Hitze entwickelnden Geräten oder in direktem Sonnenlicht befindet. Überprüfen Sie, ob
die Spannung auf dem Typenschild mit der Spannung des Stromnetzes vor Ort übereinstimmt,
bevor Sie das Gerät bzw. die Geräte an die Stromversorgung anschließen. Lassen Sie das Gerät
nach Anschluss an die Stromversorgung nicht unbeaufsichtigt. Tauchen Sie das Gerät nicht in
Wasser oder andere Flüssigkeiten ein. Nach Benutzung des Gerätes bzw. vor einer Reinigung
- 1 -
Aufladen und Audio-Wiedergabe mit Ihrem
Samsung Galaxy
6
Bluetooth-Modus
8
Kompatibel mit:
11

muss das Stromkabel unbedingt von der Stromversorgung getrennt werden. Bei Benutzung des
Gerätes in der Nähe von Kindern ist besondere Vorsicht geboten.
Halten Sie das Gerät unbedingt außerhalb der Reichweite von Kindern. Reparaturen an
elektrischen Geräten sollten ausschließlich von qualifiziertem Personal vorgenommen werden.
Unfachmännische Reparaturen können für den Benutzer ein ernsthaftes Risiko darstellen.
Das Gerät ist für den Hausgebrauch bestimmt und eignet sich nicht für industrielle oder
gewerbliche Zwecke. Betreiben Sie das Gerät nicht mit einem beschädigten Stecker oder
Stromkabel, nach einer Fehlfunktion oder nachdem das Gerät hingefallen ist oder in sonstiger
Weise beschädigt wurde. Benutzen Sie das Gerät ausschließlich zum vorgesehenen Zweck.
Dieses Gerät muss auf eine stabile, hitzeresistente Fläche gestellt werden. Stecken Sie keine
Gegenstände in die Öffnungen, da diese das Gerät beschädigen könnten oder zu einer
Stromstoßgefahr führen. Verwenden Sie dieses Gerät nicht bei Nässe oder bei sonstiger
schlechter Witterung. Dieses Gerät ist kein Spielzeug. Benutzen Sie es bitte nicht zur Wiedergabe
von Musik in übertrieben hoher Lautstärke, insbesondere nicht in der Nähe von Kindern.
Jederzeit Batteriesicherheit
Achten Sie darauf, dass das Batteriefach ordnungsgemäß verschlossen ist. Benutzen Sie nur die
empfohlenen Batterien. Achten Sie auf die richtige Polung der Batterien (siehe Plus- und
Minuszeichen auf den Batterien selbst und im Batteriefach). Ersetzen Sie immer sämtliche
Batterien auf einmal. Lagern Sie unbenutzte Batterien in ihrer Verpackung und halten Sie sie von
Metallobjekten fern, da diese einen Kurzschluss verursachen könnten. Entfernen Sie leere
Batterien aus dem Gerät, wenn das Gerät voraussichtlich längere Zeit nicht benutzt wird. Kinder
sollten im Umgang mit Batterien sorgfältig beaufsichtigt werden. Halten Sie Knopfzellen und
AAA-Batterien außer Reichweite von kleinen Kindern, da solche Batterien leicht
heruntergeschluckt werden können. Verständigen Sie einen Arzt, wenn eine Batterie verschluckt
wurde.
Bitte keinesfalls...
Batterien in offenes Feuer werfen. versuchen, nicht wiederaufladbare Batterien aufzuladen.
- 2 -

Beschreibung der Elemente
1. Micro-USB-Port
2. Docking Station für iPhone/iPod
3. LINE-Anschluss
4. Ablagefach für Fernbedienung
5. SD-Kartenslot
6. USB-Port
7. Standby
8. Funktion
9. Rückwärts überspringen
10. Vorwärts überspringen
11. Speicher/Zeit
12. Play/Pause
13. Lautstärke -
14. Lautstärke +
15. LCD-Display
Rückseite
Video-Ausgang
1. EIN-/AUS-Schalter
2. Video-Ausgang
3. Aux-Eingang rechts
4. Aux-Eingang links
- 3 -
WARNING:SHOCK HAZARD-DO NOT OPEN
AVIS:RISQUE DE CHOC ELECTRIQUE-NE PAS OUVRIR
AC~ 90-240V 50/60Hz
S/N:
RoHS
Frequences FM87.5-108MHz
Alimentation:~230V/50Hz
Consomation:60watts
Puissance en sortie:2X15W+30W
MODEL:DS401
ON
OFF
POWER
FM ANT
IPOD
VIDEO OUT
AUX IN
R
L
MADE IN CHINA
1.
2.
3.
4.

Fernbedienung
1. Power (Ein/Aus)
2. Sleep (Einschlaffunktion)
3. Mute (Stummschaltung)
4. iPod-Menu
5. Menu up (Menu nach oben)
6. Source (Tonquelle)
7. Previous (Zurück)
8. Enter (Eingabe)
9. Next (Weiter)
10. MEM/TIME Speicher und Uhrzeiteinstellung
11. Menu down (Menü nach unten)
12. Pause/Play (Pause/Wiedergabe)
13. Treble+ (Höhen+)
14. Bass+ (Bass+)
15. Volume+ (Lautstärke+)
16. Treble (Höhen-)
17. Bass (Bass-)
18. Volume- (Lautstärke-)
Benutzung der Fernbedienung - Die Batterie
Ziehen Sie den Schutzdeckel des Batteriefaches auf der Unterseite der
Fernbedienung ab.
Wenn Ihre Fernbedienung unzuverlässiger wird oder wenn Sie näher an das Gerät
herangehen müssen,
damit sie funktioniert, muss wahrscheinlich die Batterie gewechselt werden. Zum
Wechsel der Batterie schieben Sie
den Batteriehalter an der Unterseite der Fernbedienung aus dem Batteriefach heraus.
Entfernen Sie die Batterie und legen
Sie eine neue 3-Volt-Batterie vom Typ Lithium Cr
2025 ein. Achten Sie dabei darauf, dass sich
der Pluspol an der unteren Seite des
Halters befindet, bevor Sie den Halter zurück in das Batteriefach schieben.
Einrichtung Ihres iTowers
Nehmen Sie den Hauptteil und den Ständer vorsichtig aus der Verpackung heraus. Stellen Sie
das Gerät aufrecht auf den Boden. Das Gerät ist jetzt
betriebsbereit.
- 4 -

Stromversorgung
Stellen Sie das Gerät an den gewünschten Ort und nehmen Sie das Netzkabel zur Hand.
Stecken Sie das Kabel in eine Wandsteckdose (in manchen Ländern müssen Wandsteckdosen
zunächst eingeschaltet werden).
Einstellung der Uhrzeit
Nachdem das Gerät an die Stromversorgung angeschlossen ist bzw.
nach einem Stromausfall zeigt das LCD-Display "0:00". Im
Standby-Modus kann die aktuelle Uhrzeit eingestellt werden.
1. Betätigen Sie hierzu die MEM/TIME-Taste. Die Ziffern auf dem Display werden daraufhin
aufblinken.
2 .Betätigen Sie mehrfach die PREVIOUS/NEXT-Taste, bis die korrekte Stunde eingestellt ist.
Betätigen Sie zur Bestätigung die MEM/TIME-Taste.
Die Ziffern für die Stunde und die Minuten werden aufblinken.
3. Betätigen Sie mehrfach die PREVIOUS/NEXT-Taste, bis die korrekte Minute
eingestellt ist. Betätigen Sie zur Bestätigung der Minuteneinstellung die
MEM/TIME-Taste.
Einstellung der Weckzeit
Betätigen Sie die MEM/TIME-Taste im Standby-Modus. Das Display wird ON/OFF anzeigen.
Hiermit kann die Weckfunktion aktiviert bzw. deaktiviert werden.
Betätigen Sie PREVIOUS/NEXT und wählen Sie die Option ON. Das Display wird daraufhin
blinken.
Betätigen Sie mehrfach die PREVIOUS/NEXT-Taste, um die Stunde einzustellen. Betätigen Sie
die MEM/TIME-Taste zur Bestätigung und betätigen Sie anschließend die
PREVIOUS/NEXT-Taste, um die Minute einzustellen.
Betätigen Sie die MEM/TIME-Taste zur Bestätigung und betätigen Sie anschließend die
PREVIOUS/NEXT-Taste, um den iPod/Aux in-Status zu wählen. Betätigen Sie die
MEM/TIME-Taste zur Bestätigung.
Wenn kein iPod angeschlossen ist, wird das gerät automatisch auf den AUX-Eingang als
Tonquelle für die Weckfunktion umschalten.
Die Lautstärke wird von 0 bis 25 allmählich erhöht.
Einschlaffunktion
Nach Betätigung der SLEEP-Taste wird das Display aufblinken. Betätigen Sie die Taste, bis das
Display die Anzahl Minuten zeigt, die Sie einstellen möchten. Sie können eine Zeitspanne mit
einer Länge von 10 bis 90 Minuten einstellen.
Das Display blinkt drei Mal zur Bestätigung und kehrt daraufhin zur vorherigen Anzeige zurück.
Wenn Sie die Einschlaffunktion deaktivieren möchten, drücken Sie so lange weiter, bis 00 im
Display erscheint. Nach dreimaligem Blinken wird die Einschlaffunktion deaktiviert.
iPhone/iPod aufladen
Sie können Ihr iPhone bzw. Ihren iPod über die Dockingstation aufladen. Die kann sowohl im
Standby-Modus als auch während des Betriebs erfolgen.
Ihr iPhone/iPod wird automatisch aufgeladen, wenn es an die
Dockingstation angeschlossen ist. Bitte achten Sie darauf, dass der
Hauptschalter auf der Rückseite des Gerätes eingeschaltet ist.
- 5 -

Video-Inhalte vom iPhone/iPod
1. Schließen Sie das Gerät über den Video-Ausgang an Ihr TV-Gerät an.
2. Navigieren Sie auf Ihrem iPhone/iPod zu VIDEOS ˚ VIDEO-EINSTELLUNGEN 3. Docken
Sie Ihr iPhone/Ihren iPod an und starten Sie auf dem angedockten iPhone/iPod ein Video.
iPhone- oder iPod-Wiedergabe
1. Betätigen Sie die Power-Taste auf der Rückseite des Lautsprechers oder auf dem Hauptteil,
um das Gerät einzuschalten.
2. Zur Auswahl der iPhone-/iPod-Option betätigen Sie die FUNCTION-Taste und halten Sie
diese gedrückt, bis die Anzeige iPod rot unterlegt ist.
3. Schließen Sie Ihr iPhone bzw. Ihren iPod an den Stecker in der Dockingstation an.
4. Betätigen Sie die PLAY/PAUSE-Taste auf dem Gerät oder auf der Fernbedienung, um Musik
vom angedockten iPhone/iPod abzuspielen.
Aufladen und Audio-Wiedergabe mit Ihrem Samsung Galaxy
1. Betätigen Sie die POWER-Taste, um das Gerät einzuschalten.
2. Betätigen Sie die Funktionstaste, bis das Display "ADR" anzeigt.
3. Schließen Sie das Samsung Galaxy-Telefon an den Micro-USB-Port an.
4. Das Telefon zeigt
und Betätigen Sie die , um die
Wiedergabe über das DS401 zu starten.
Anmerkung: Kompatibel zu Samsung Galaxy SII/ Galaxy SIII/Galaxy SIII mini/Galaxy
Note/Galaxy Note II/Galaxy Nexus
Radioempfang
1. Betätigen Sie die Taste auf dem Gerät oder auf der Fernbedienung, um den
RADIO-Modus zu wählen. Das Gerät schaltet daraufhin auf FM-Empfang um.
2. Wählen Sie den gewünschten Sender mit Hilfe der
PREVIOUS/NEXT-Taste.
3. Betätigen Sie die PREVIOUS/NEXT-Taste 2 Sekunden
lang. Das Gerät beginnt automatisch mit dem
Frequenzsuchlauf bis zum nächsten empfangsstarken Sender.
4. Wenn Sie einen Sender speichern möchten, betätigen Sie die MEM-Taste auf de
- 6 -

Fernbedienung. Daraufhin erscheint "P01" im Display. Betätigen Sie daraufhin die
Taste M-up bzw. M-dn, bis die gewünschte Speicherposition im Display erscheint.
Betätigen Sie die MEM-Taste erneut, um den betreffenden Sender abzuspeichern.
Benutzung des Line- bzw. AUX-Eingangs
Analoge Audio-Signale von anderen Tonquellen können über den Lautsprecher abgespielt
werden. Zur Auswahl der AUX-Funktion betätigen Sie die SOURCE-Taste auf dem Gerät bzw.
Sie betätigen mehrmals die SOURCE-Taste auf der Fernbedienung, bis das Display AUX oder
LIN anzeigt.
LINE-Anschluss
3,5-mm-Klinkenstecker erforderlich.
1. Schließen Sie den 3,5 mm-Klinkenstecker an den AUX-Eingang 1 an. Schließen Sie das
andere Ende des Kabels an einen MP3-Player oder eine andere Audioquelle an.
2. Betätigen Sie die POWER-Taste, um das Gerät einzuschalten.
3. Betätigen Sie die FUNCTION-Taste bzw. die SOURCE-Taste auf
der Fernbedienung, um auf Line In-Modus umzuschalten.
4. Benutzen Sie die Bedienungselemente auf dem angeschlossenen Gerät, um die Wiedergabe
zu starten.
AUX-Eingang (RCA)
RCA-Kabel erforderlich.
1. Schließen Sie ein RCA-Kabel an den AUX-Eingang an. Schließen Sie das andere Ende des
RCA-Kabels an den Audio-Ausgang Ihres DVD-Players, Ihrer Stereoanlage, Ihrer Spielkonsole
oder Ihres TV-Gerätes an.
2. Betätigen Sie die POWER-Taste, um das Gerät einzuschalten.
3. Betätigen Sie die SOURCE-Taste bzw. die SOURCE-Taste auf der
Fernbedienung, um auf Aux In 2-Modus umzuschalten.
4. Benutzen Sie die Bedienungselemente auf dem angeschlossenen
Gerät, um die Wiedergabe zu starten.
Benutzung des USB-Eingangs
1. Schließen Sie Ihr USB-Flash-Speichermodul bzw. Ihre SD-Speicherkarte an den
USB/SD-Adapter an und schließen Sie den Adapter an das Gerät an. Bitte beachten Sie diese
Reihenfolge, da die iPhone/iPod-Dockingstation ansonsten beschädigt werden könnte.
2. Betätigen Sie die FUNCTION-Taste einmal, um in den USB-Modus zu wechseln. Die
Wiedergabe kann jetzt automatisch starten.
3. Betätigen Sie die FUNCTION-Taste zweimal, um in den SD-Modus zu wechseln. Die
Wiedergabe kann jetzt automatisch starten.
4. Betätigen Sie die Tasten MENU UP bzw. MENU DOWN, um den Ordner zu wählen, den Sie
öffnen möchten. Das Display zeigt die Anzahl der Ordner, gefolgt von Anzahl der Titel.
5. Betätigen Sie die PREVIOUS/NEXT-Taste, um einen Titel zu wählen.
- 7 -

Achten Sie darauf, dass Bluetooth auf Ihrem Mobiltelefon aktiviert ist. Die einzelnen Schritte
zum Koppeln der Geräte sind von Modell zu Modell unterschiedlich. Weitere Informationen
finden Sie in der Betriebsanleitung Ihres Mobiltelefons. Allgemein verläuft das Koppeln von
Geräten wie folgt:
a) Sorgen Sie dafür, dass sich Ihr Mobiltelefon im Abstand von maximal 1 m vom DS401
befindet.
b) Betätigen Sie die Standby-Taste und anschließend die Funktionstaste, wenn Sie sich im
Bluetooth-Modus befinden.
c) Aktivieren Sie die Bluetooth-Funktion an Ihrem Mobiltelefon und suchen Sie nach
Bluetooth-Geräten. Nach der Suche wählen Sie "DS401" aus der Liste der Bluetooth-Geräte.
d) Wenn Sie zur Eingabe eines Kennwortes oder eines PIN-Codes aufgefordert werden,
geben Sie “0000” ein und bestätigen Sie mit “Ja” oder “Bestätigen”.
e) Nachdem das Koppeln erfolgreich verlaufen ist, wählen Sie "DS401" aus der Liste der
Bluetooth-Geräte und wählen anschließend die Option "Verbinden".
B.
Koppeln mit einem Bluetooth-Stereosender
Die Schritte zum Koppeln von Bluetooth-Sendern sind von Modell zu Modell unterschiedlich.
Weitere Informationen finden Sie in der Betriebsanleitung Ihres Bluetooth-Senders. Allgemein
verläuft das Koppeln von Geräten wie folgt:
a) Sorgen Sie dafür, dass sich Ihr Sender im Abstand von maximal 1 m vom DS401 befindet.
b) Betätigen Sie die Standby-Taste und anschließend die Funktionstaste, wenn Sie sich im
Bluetooth-Modus befinden.
c) Schalten Sie Ihren Bluetooth-Sender ein und versetzen Sie ihn in den Koppelmodus.
d) Der Sender wird automatisch suchen und automatische eine Verbindung zum DS401
herstellen. Nach erfolgreicher Koppelung wird ein anderer Bluetooth-Signalton ertönen.
Bluetooth-Modus
A. Koppeln des Gerätes mit einem
Bluetooth-Mobiltelefon
- 8 -

C. Wiedergabe
Anschluss eines A2DP-Mobiltelefons oder eines Bluetooth-Senders
a) Verbinden Sie Ihr Mobiltelefon bzw. Ihren Bluetooth-Sender mit dem DS401.
b) Die Wiedergabe kann dann über das DS401 erfolgen.
c) Regeln Sie die Lautstärke mit Hilfe der Lautstärkenregler (Vol+/Vol-).
d) Betätigen Sie die
-Taste, um zum vorherigen Titel zurückzukehren oder halten Sie die
Taste gedrückt, um innerhalb des Titels zu suchen.
d) Betätigen Sie die -Taste, um zum nächsten Titel zu wechseln oder halten Sie die
Taste gedrückt, um innerhalb des Titels zu suchen.
Anmerkungen:
Bei einem eingehenden Anruf während der Wiedergabe von Musik aus Ihrem Mobiltelefon über
das DS401 wird die Wiedergabe unterbrochen, wenn Sie den Anruf annehmen. Die Wiedergabe
wird nach Beendigung des Gesprächs automatisch fortgesetzt. (Je nach Mobiltelefon muss die
Wiedergabe nach dem Anruf eventuell von Hand neu gestartet werden.)
Hinweise
Trennen Sie das Gerät nach Benutzung und vor einer Reinigung immer vom Stromnetz.
Nutzen Sie das Gerät nicht zur Wiedergabe von Musik in extrem hohen Lautstärken, da dies das
Gehör und das Gerät beschädigen könnte. Benutzen Sie das Gerät nicht unter feuchten
Bedingungen.
Wartung und Pflege
Trennen Sie das Gerät vor Reinigungsarbeiten von der Stromversorgung. Reinigen Sie das
Gerät mit einem weichen, feuchten und fusselfreiem Tuch. Benutzen Sie keine Scheuermittel
oder aggressive Reinigungsmittel.
“Made for iPod" und "Made for iPhone" bedeutet, dass ein Elektrogerät speziell für den
Anschluss eines iPods bzw. iPhones konzipiert ist bzw. dass es vom Hersteller nach
Apple-Leistungsstandards gefertigt wurde. Apple übernimmt keine Haftung für die
Funktion dieses Gerätes oder für die Nichterfüllung von gesetzlichen oder sonstigen
Sicherheitsstandards. IPhone und iPod sind Marken von Apple In. und sind in den USA
und in anderen Ländern registriert. IPod nicht mitgeliefert. Nicht kompatibel mit iPod
Shuffle.
Anmerkungen:
Das DS401 kehrt nach Trennung der Verbindung mit einem Bluetooth-Gerät automatisch in
den Koppelmodus zurück.
- 9 -
Samsung ® und Samsung Galaxy ® sind Marken von Samsung Electronics. Die Marken
sind in den USA und in anderen Ländern registriert.

x Bitte entsorgen Sie elektrische und elektronische Geräte nicht als
Hausmüll.
x Bringen Sie sie zu einer entsprechenden Sammelstelle.
x Einige Komponenten in diesen Geräten können gesundheits- und
umweltschädlich sein.
- 10 -
THOMSON is een handelsmerk van TECHNICOLOR SA en haar dochtermaatschappijen, gebruikt
onder licentie door Bigben Interactive.
Made in China
Hiermit erklärt Bigben Interactive S.A., dass das Gerät DS401 die grundlegenden Anforderungen
des Direktive 1995/5/EA des Europäischen Parlaments und des Rates vom 9. März 1999 über
Funkanlagen und Telekommunikationsendeinrichtungen und die gegenseitige Anerkennung
ihrer Konformität erfüllt.
Die vollständige Erklärung kann über unsere Website:
http://www.bigben.eu/support
unter der
Rubrik `Konformitätserklärung’ heruntergeladen werden.
Imported by Bigben Interactive SA
www.bigben.eu
396, Rue de la Voyette
CRT2 - FRETIN
CS 90414
59814 LESQUIN Cedex
France

- 11 -
Kompatibel mit:
Micro USB Compatibilities List charging & Audio playback
iPod Docking Compatibilities List
TAB (with Micro USB)
First time using the dock operation:
1. Settings
2.System
3.Accessory
4.Dock
5.Audio out mode
6.Use external speaker when device is docked

2.1-SYSTEEM
iPod/iPhone/smartphones
USB/SD
NL
DS401

Inhoud
Video-uitgang van iPhone/iPod 5
Afspelen vanaf iPhone/iPod 5
Slaapmodus
5
De radio beluisteren 6
Gebruik van de Aux-ingang 6
Line in 7
Aux In 7
Gebruik van de USB/SD-ingang 7
Do’s and Don’ts 10
Onderhoud 10
Aan de slag 1
In de doos 1
Veiligheidsinstructies 1
Veiligheid batterijen 2
Beschrijving van onderdelen 3
Afstandsbediening 4
De iTower configureren 4
Inschakelen 4
Klok configureren 5
De iPhone/iPod opladen 5
Als u de iPhone aansluit, wordt mogelijk het bericht “deze accessoire is niet geoptimaliseerd voor
deze iPhone” weergegeven.
Uw iPhone zal niet worden beschadigd. Dit bericht dient puur ter informatie. U kunt op ”negeren”
en naar uw muziek luisteren.
Het bericht geeft aan dat de ontvangst van het 3G- of WiFi-signaal slechter wordt als u de iPhone
aansluit.
Aan de slag
Haal het apparaat uit de doos. Verwijder alle verpakking van het product. Stop de verpakking in
de doos en gooi deze weg.
In de doos
iTower-luidsprekereenheid
Afstandsbediening
Handleiding
RCA-kabel
Veiligheidsinstructies
Bij het gebruik van elektrische apparatuur dient u altijd veiligheidsmaatregelen in acht te nemen.
Deze apparatuur is niet geschikt voor personen (met inbegrip van kinderen) met beperkte fysieke,
zintuiglijke of mentale vaardigheden of een gebrek aan ervaring of kennis. Gebruik van de
apparatuur dient in dat geval onder toezicht plaats te vinden door iemand die verantwoordelijk is
voor de veiligheid. Plaats de apparatuur niet te dicht bij warmtebronnen of in direct zonlicht.
Controleer of de spanning op de typeplaat overeenkomt met die van het lokale netwerk alvorens
de apparatuur aan te sluiten op het net. Laat de apparatuur niet onbeheerd achter terwijl deze is
aangesloten op het net. Laat de apparatuur niet in aanraking komen met water of andere
vloeistoffen. U dient het netsnoer na gebruik, vóór reiniging en tijdens reparatie van de apparatuur
los te koppelen. Streng toezicht is vereist indien deze apparatuur wordt gebruikt in de buurt van
kinderen.
Opladen en audio afspelen via
de Samsung Galaxy
6
Bluetooth-Modus
8
Lijst met compatible apparaten:
11
- 1 -

Plaats de apparatuur nooit binnen handbereik van kinderen. Reparaties aan elektrische
apparatuur mogen alleen worden uitgevoerd door gekwalificeerd personeel. Onjuiste reparaties
kunnen de gebruiker in groot gevaar brengen.
Deze apparatuur is uitsluitend bedoeld voor huishoudelijk gebruik en mag niet worden gebruikt
voor industriële of commerciële doeleinden. Bedien deze apparatuur niet indien de stekker of het
snoer is beschadigd, na een storing of nadat de apparatuur is gevallen of beschadigd. Gebruik
deze apparatuur uitsluitend voor het beoogde doeleinde. Deze apparatuur dient te worden
geplaatst op een stabiel, warmtebestendig oppervlak. Duw geen voorwerpen in de openingen. Dit
kan leiden tot schade aan de apparatuur en/of een elektrische schok. Gebruik dit product niet in
natte of slechte weersomstandigheden. Dit product is geen speelgoed. Speel muziek niet te hard
af, vooral niet als er kinderen in de buurt zijn.
Altijd voorzichtig met batterijen...
Controleer of de batterijcompartimenten goed dicht zitten. Gebruik alleen de aanbevolen batterijen.
Plaats de batterijen op de juiste wijze: de plus- en mintekens op de batterij en in het compartiment
moeten met elkaar overeenkomen. Vervang alle batterijen tegelijkertijd. Bewaar ongebruikte
batterijen in de verpakking en houd deze uit de buurt van voorwerpen die kortsluiting kunnen
veroorzaken. Verwijder gebruikte batterijen uit apparatuur indien deze lange tijd niet wordt gebruikt.
Batterijen mogen door kinderen uitsluitend onder toezicht worden gebruikt. Vergeet niet om
knoopcel- en AAA-batterijen uit de buurt van kinderen te houden, omdat deze makkelijk kunnen
worden ingeslikt. Roep medische hulp in als batterijen zijn doorgeslikt.
Nooit doen...
Batterijen weggooien in vuur. Normale batterijen proberen op te laden.
- 2 -

Beschrijving van onderdelen
1. Micro-USB-dock
2. iPhone/iPod/iPad-dock
3. Lijningang
4. Sleuf voor afstandsbediening
5. SD-sleuf
6. USB-sleuf
7. Standby
8. Functie
9. Achteruit
10. Vooruit
11. Mem/time
12. Play/pause
13. Volume –
14. Volume +
15. LCD-scherm
Achterpaneel
Video-uitgang
1. Aan/uit-schakelaar
2. Video-uitgang
3. Aux in R
4. Aux in L
- 3 -
WARNING:SHOCK HAZARD-DO NOT OPEN
AVIS:RISQUE DE CHOC ELECTRIQUE-NE PAS OUVRIR
AC~ 90-240V 50/60Hz
S/N:
RoHS
Frequences FM87.5-108MHz
Alimentation:~230V/50Hz
Consomation:60watts
Puissance en sortie:2X15W+30W
MODEL:DS401
ON
OFF
POWER
FM ANT
IPOD
VIDEO OUT
AUX IN
R
L
MADE IN CHINA
1.
2.
3.
4.

Afstandsbediening
1. Aan/uit
2. Slapen
3. Dempen
4. iPod-menu
5. Menu omhoog
6. Bron
7. Vorige
8. Enter
9. Volgende
10. Geheugen en tijd instellen
11. Menu omlaag
12. Pauze/start
13. Treble+
14. Bass+
15. Volume+
16. Treble-
17. Bass-
18. Volume-
Gebruik van de batterij van de afstandsbediening
Trek aan het doorzichtige lipje in het batterijcompartiment bij de basis (het uiteinde)
van de afstandsbediening.
Als de afstandsbediening gaat haperen of als u dichter naar de eenheid moet om
deze te bedienen, moet u de batterij waarschijnlijk vervangen.
Om de batterij te vervangen, schuift u de batterijhouder uit de basis van de
afstandsbediening.
Verwijder de batterij en vervang deze door een 3 volt lithium Cr2025-batterij. Zorg
ervoor dat de pluspool aan de onderkant van de houder zit als u de batterij
terugschuift in het compartiment.
De toren configureren
Haal de toren en de basis voorzichtig uit de verpakking. Zet de toren rechtop. De apparatuur is
nu klaar voor gebruik.
Voeding
Plaats de eenheid in de gewenste positie en haal het netsnoer
los. Steek de stekker in het stopcontact en schakel de
apparatuur in.
- 4 -

Klok instellen
Nadat de eenheid op het net is aangesloten (en nadat zich een
elektriciteitsstoring heeft voorgedaan), geeft het scherm de tekst '0:00'
weer op het LCD-scherm. De eenheid moet in stand-bymodus staan om
de huidige klok in te stellen.
1. Druk op de knop MEM/TIME. De cijfers op het scherm gaan knipperen.
2. Druk herhaaldelijk op de knop PREVIOUS/NEXT totdat het juiste uur is ingesteld. Druk op
MEM/TIME om te bevestigen.
Het ingestelde uur en de minuten knipperen op het scherm.
3. Druk herhaaldelijk op de knop PREVIOUS/NEXT totdat de juiste minuten zijn ingesteld.
Druk op MEM/TIME om de minuutinstelling te bevestigen.
Alarm instellen
Houd de knop MEM/TIME vast. Het scherm geeft de melding ON/OFF weer en knippert. Kies of
u het alarm wilt instellen of annuleren.
Als u op PREVIOUS/NEXT drukt om ON te selecteren, knippert het scherm.
Druk herhaaldelijk op PREVIOUS/NEXT om het uur in te stellen. Druk op MEM/TIME om te
bevestigen. Druk daarna op PREVIOUS/NEXT om de minuten in te stellen.
Druk op MEM/TIME om te bevestigen. Druk daarna op PREVIOUS/NEXT om de
iPod/Aux-ingang te selecteren. Druk op MEM/TIME om te bevestigen.
Als er geen iPod is aangesloten, schakelt de eenheid automatisch naar Aux in-alarm.
Het volume gaat geleidelijk van 0 naar 25.
Slaapmodus
Druk op de knop SLEEP. Het scherm gaat knipperen. Druk op de knop totdat het scherm het
aantal minuten weergeeft dat u wilt instellen. De waarde moet tussen de 10 en 90 minuten
liggen.
Het scherm knippert drie keer ter bevestiging en keert daarna terug naar de interface. Als u de
slaapmodus wilt annuleren, drukt u tot de tekst 00 drie keer knippert. De slaapmodus wordt nu
geannuleerd.
De iPhone/iPod opladen
U kunt de iPhone/iPod via het dock opladen in standby- of bedieningsmodus.
De iPhone/iPod wordt automatisch opgeladen als deze is gedockt.
Controleer of de aan/uit-schakelaar aan de achterzijde van de
eenheid is ingeschakeld.
Video-uitgang van iPhone/iPod
1. Sluit de eenheid op de televisie aan met de composietvideo-uitgang.
2. Op de iPhone/iPod navigeert u naar VIDEOS˚ VIDEO SETTINGS.
3. Dock de iPhone/iPod aan de eenheid om een video af te spelen vanaf de gedockte
iPhone/iPod.
Muziek afspelen op de iPhone of iPod
1. Druk op de aan/uit-knop op de achterkant van de luidspreker of op de hoofdconsole om de
eenheid in te schakelen.
2. Om de afspeelfunctie van de iPhone/iPod te selecteren, houdt u de functieknop ingedrukt
totdat de rode lamp onder de iPod oplicht.
- 5 -

3. Sluit de iPhone of iPod aan op de aansluiting in het dock.
4. Druk op de start/pauzeknop van de eenheid of de afstandsbediening om muziek af te spelen
op de gedockte iPhone/iPod.
Opladen en audio afspelen via de Samsung Galaxy
1. Druk op de aan/uit-knop om de eenheid in te schakelen of op stand-by te zetten
2. Druk op de functieknop totdat het scherm de melding "ADR" weergeeft.
3. Plaats de Samsung Galaxy-telefoon in het Micro-USB-station.
4. De telefoon geeft de symbolen
en weer. Druk op .
Nu kunt u de muziek via de toren afspelen.
Opmerking: Compatible met Samsung galaxy SII/Galaxy SIII/Galaxy SIII Mini/Galaxy
Note/Galaxy Note II/Galaxy Nexus.
De radio beluisteren
1. Druk op de knop van de eenheid of de afstandsbediening om RADIOMODUS te
selecteren. De eenheid schakelt naar FM-radiomodus.
2. Selecteer het gewenste radiostation door op de knop
PREVIOUS/NEXT te drukken.
3. Houd de knop PREVIOUS/NEXT 2 seconden vast. De
eenheid start automatisch, zoekt de frequenties voor het
vorige of volgende station met een sterk signaal en stopt vervolgens.
4. Zodra u een station vindt dat u wilt opslaan, drukt u op de knop MEM van de
afstandsbediening. De melding 'P01' wordt weergegeven op het scherm. Druk op
M-up of M-dn totdat de gewenste geheugenpositie op het scherm verschijnt. Druk
nogmaals op MEM om te bevestigen en het huidige station op te slaan.
Gebruik van de Line in- of AUX-ingang
Analoge geluidssignalen van andere bronnen kunnen naar de luidspreker worden gestuurd. Om
de Aux-functie te selecteren, drukt u op de knop van de toren of drukt u herhaaldelijk op de
bronknop van de afstandsbediening totdat het scherm AUX of LIN weergeeft.
- 6 -

Line in-aansluiting
Vereist een 3,5 mm-kabel
1. Sluit een 3,5 mm-kabel aan op de Aux in 1-aansluiting. Sluit het andere uiteinde van de 3,5
mm-kabel aan op een mp3-speler of andere audiobron.
2. Druk op de aan/uit-knop om de eenheid in te schakelen.
3. Druk op de functie- of bronknop van de afstandsbediening om naar
Line In-modus te schakelen.
4. Stuur de audio door de eenheid met de bedieningselementen op de aangesloten apparatuur.
AUX IN RCA
Vereist een RCA-kabel
1. Sluit een RCA-kabel aan op de Aux-ingang. Sluit het andere uiteinde van de RCA-kabel aan
op de audio-uitgang van de dvd-speler, het stereosysteem, het gamesysteem of de televisie.
2. Druk op de aan/uit-knop om de eenheid in te schakelen.
3. Druk op de functie- of SOURCE-knop van de afstandsbediening om
naar Aux In 2-modus te schakelen.
4. Stuur de audio door de eenheid met de bedieningselementen op de
aangesloten apparatuur.
Gebruik van de USB/SD-ingang
1. Steek de USB-flashdrive/beveiligde digitale geheugenkaart in de USB/SD-adapter en sluit de
adapter vervolgens aan op de eenheid. Als u dit niet in de juiste volgorde doet, kan de
iPhone/iPod-dock worden beschadigd.
2. Eenmaal in USB-modus drukt u op Function. De eenheid kan nu automatisch afspelen.
3. Eenmaal in SD-modus drukt u twee keer op Function. De eenheid kan nu automatisch
afspelen.
4. Druk op MENU UP/MENU DOWN om te kiezen welke map u wilt openen. Het scherm geeft
achtereenvolgens het aantal mappen en tracks weer.
5. Druk op PREVIOUS/NEXT om de track te selecteren.
Bluetooth-modus
A. Paren met een Bluetooth-telefoon
Controleer of uw mobiele telefoon ondersteuning biedt voor Bluetooth. De specifieke
paarstappen kunnen per mobiele telefoon verschillen. Zie de gebruiksaanwijzing van uw
mobiele telefoon voor meer informatie. De algemene paarstappen zijn als volgt:
a) Houd de DS401 en de Bluetooth-telefoon tijdens het paren niet meer dan 1 meter uit elkaar.
b) Druk op de Standby-knop en druk eenmaal op de functieknop als u in Bluetooth-modus zit.
c) Schakel de Bluetooth-functie van de mobiele telefoon in en zoek naar Bluetooth-apparaten.
Nadat het zoeken is voltooid, selecteert u “DS401” in de lijst met Bluetooth-apparaten.
d) Voer afhankelijk van de melding op het scherm het wachtwoord of PIN-nummer “0000” in
en druk op “Ja” of “Bevestigen”.
- 7 -

e) Nadat de apparaten zijn gepaard, selecteert u “DS401” in de lijst met Bluetooth-apparaten
en drukt u op “verbinden”.
B. Paren met een Bluetooth-stereozender
Elke Bluetooth-zender heeft een andere paarmethode. Zie de gebruiksaanwijzing van uw
Bluetooth-zender voor meer informatie. De algemene paarstappen zijn als volgt:
a) Houd de DS401 en de Bluetooth-telefoon tijdens het paren niet meer dan 1 meter uit elkaar.
b) Druk op de Standby-knop en druk eenmaal op de functieknop als u in Bluetooth-modus zit.
c) Schakel de Bluetooth-zender in en laat deze naar paarmodus gaan.
d) De zender zoekt de DS401 automatisch om verbinding te maken. Nadat de connectie tot
stand is gebracht, staan de smartphone en de toren met elkaar in verbinding.
Opmerkingen:
DS401 keert automatisch terug naar paarmodus nadat u de verbinding met een
Bluetooth-apparaat heeft verbroken.
C. Muziek afspelen
Verbinding maken met een A2DP-telefoon of Bluetooth-zender
a) Verbind uw mobiele telefoon of Bluetooth-zender met de DS401.
b) U kunt uw muziek nu tijdens het afspelen via de DS401 beluisteren.
c) Druk op Vol+ om het volume te verhogen. Druk op Vol- om het volume te verlagen.
d) Druk op
om naar het vorige nummer te gaan. Druk lang om terug te spoelen.
d) Druk op
om naar het volgende nummer te gaan. Druk lang om vooruit te spoelen.
Opmerkingen:
Als er een gesprek binnenkomt terwijl de DS401 met uw mobiele telefoon is verbonden voor
muziekweergave, wordt de muziek gepauzeerd zodra u het gesprek beantwoordt. De muziek
gaat weer verder nadat het gesprek is beëindigd. (Afhankelijk van uw mobiele telefoon kan de
muziek na beëindiging van het gesprek ook worden gepauzeerd.)
Opmerkingen
Haal altijd de stekker uit het stopcontact als u de apparatuur niet gebruikt en voordat u de
apparatuur gaat reinigen.
- 8 -
Speel muziek niet op een buitensporig hoog volume af. Dit kan leiden tot schade aan het gehoor
en/of de apparatuur. Gebruik deze eenheid niet in natte of slechte omstandigheden.
Onderhoud
Haal de stekker altijd uit het stopcontact alvorens de eenheid te reinigen. Reinig de apparatuur
met een zachte, vochtige en pluisvrije doek. Gebruik geen schuurmiddelen of agressieve
reinigingsmiddelen.

'Made for iPhone' en 'Made for iPod' geven aan dat een elektronische accessoire
speciaal voor respectievelijk de iPhone en iPod is ontwikkeld en volgens de ontwikkelaar
voldoet aan de prestatienormen van Apple. Apple is niet verantwoordelijk voor de
bediening van dit apparaat of de naleving van veiligheidsnormen en regelgeving. iPhone
en iPod zijn handelsmerken van Apple Inc., gedeponeerd in de Verenigde Staten en
andere landen. iPod niet inbegrepen. Niet compatible met iPod-shuffle.
Samsung® en Samsung Galaxy® zijn handelsmerken van Samsung Electronics.
Gedeponeerd in de Verenigde Staten en andere landen.
x Gooi elektrische en elektronische apparaten niet in een normale
vuilnisbak.
x Breng ze naar een verzamelpunt.
x Sommige onderdelen in deze apparatuur kunnen gevaarlijk zijn voor de
gezondheid en het milieu.
- 9 -
THOMSON ist eine unter Lizenz an Bigben Interactive verwendete Marke der Firma TECHNICOLOR
SA oder einer ihrer Tochtergesellschaften.
Made in China
Imported by Bigben Interactive SA
www.bigben.eu
396, Rue de la Voyette
CRT2 - FRETIN
CS 90414
59814 LESQUIN Cedex
France
Hierbij verklaart Bigben Interactive S.A. dat het DS401-apparaat voldoet aan de essentiële
vereisten van richtlijn 1995/5/EG van het Europese Parlement en de Raad van 9 maart 1999
betreffende radioapparatuur en telecommunicatie-eindapparatuur en de wederzijdse erkenning
van hun conformiteit.
Om de volledige verklaring te downloaden, bezoekt u de sectie "conformiteitsverklaring" op onze
website: http://www.bigben.eu/support
.

- 10 -
Lijst met compatible apparaten:
Micro USB Compatibilities List charging & Audio playback
iPod Docking Compatibilities List
TAB (with Micro USB)
First time using the dock operation:
1. Settings
2.System
3.Accessory
4.Dock
5.Audio out mode
6.Use external speaker when device is docked

BBI_ DS401 _ VER3.0
-
 1
1
-
 2
2
-
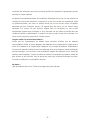 3
3
-
 4
4
-
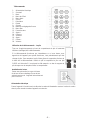 5
5
-
 6
6
-
 7
7
-
 8
8
-
 9
9
-
 10
10
-
 11
11
-
 12
12
-
 13
13
-
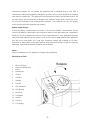 14
14
-
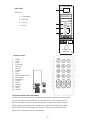 15
15
-
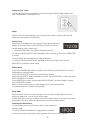 16
16
-
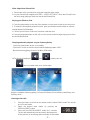 17
17
-
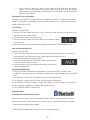 18
18
-
 19
19
-
 20
20
-
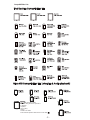 21
21
-
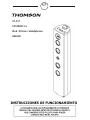 22
22
-
 23
23
-
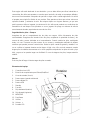 24
24
-
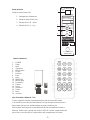 25
25
-
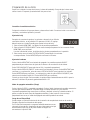 26
26
-
 27
27
-
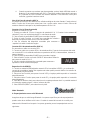 28
28
-
 29
29
-
 30
30
-
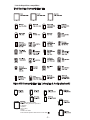 31
31
-
 32
32
-
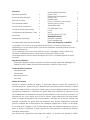 33
33
-
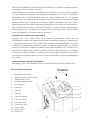 34
34
-
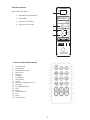 35
35
-
 36
36
-
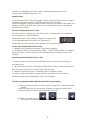 37
37
-
 38
38
-
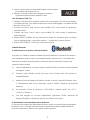 39
39
-
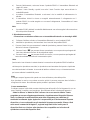 40
40
-
 41
41
-
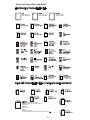 42
42
-
 43
43
-
 44
44
-
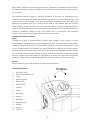 45
45
-
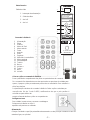 46
46
-
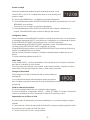 47
47
-
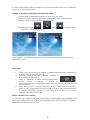 48
48
-
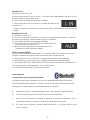 49
49
-
 50
50
-
 51
51
-
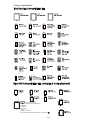 52
52
-
 53
53
-
 54
54
-
 55
55
-
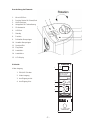 56
56
-
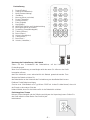 57
57
-
 58
58
-
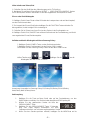 59
59
-
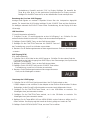 60
60
-
 61
61
-
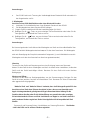 62
62
-
 63
63
-
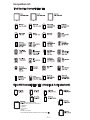 64
64
-
 65
65
-
 66
66
-
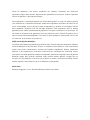 67
67
-
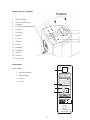 68
68
-
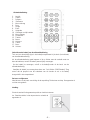 69
69
-
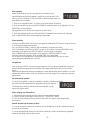 70
70
-
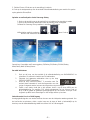 71
71
-
 72
72
-
 73
73
-
 74
74
-
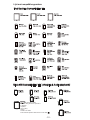 75
75
-
 76
76


Thomson DS401 Operating Instructions Manual
- Categoría
- Altavoces de acoplamiento
- Tipo
- Operating Instructions Manual
en otros idiomas
- français: Thomson DS401
- italiano: Thomson DS401
- Deutsch: Thomson DS401
- Nederlands: Thomson DS401
- português: Thomson DS401
Artículos relacionados
Otros documentos
-
Bigben SB600BTS Manual de usuario
-
-
Memorex mi2290 Manual de usuario
-
-
-
Lenco ID-2 El manual del propietario
-
-
-
Daewoo DCI-27 Manual de usuario
-
TEAC SR-80i Manual de usuario