Bella 2 Slice Toaster, Stainless Steel El manual del propietario
- Categoría
- Tostadoras
- Tipo
- El manual del propietario

WWW.BELLAHOUSEWARES.COM
Register your product and get support • Registrar y obtener asistencia de su producto
2 SLICE TOASTER Instruction Manual
TOSTADOR DE 2 REBANADAS Manual de instrucciones

THANK YOU
for your purchase
BellaLifestyle
BellaLife
#myBELLAlife
for special announcements trendy recipes!
REGISTER
AND SIGN UP
Rate, review or ask us a question.
TELL US WHAT
YOU THINK!
GO TO
:
bellahousewares.com

Table of Contents
Important Safeguards ........................................................................................................................................ 2
Additional Important Safeguards .....................................................................................................................3
Notes on the Plug ............................................................................................................................................... 3
Notes on the Cord...............................................................................................................................................4
Plasticizer Warning ............................................................................................................................................. 4
Electric Power......................................................................................................................................................4
Getting to Know Your 2 Slice Toaster .............................................................................................................. 5
Before Using for the First Time ........................................................................................................................ 5
Automatic Centering Guides .............................................................................................................................5
Toasting Instructions..........................................................................................................................................6
Defrost Cycle ....................................................................................................................................................... 6
Bagel Cycle ..........................................................................................................................................................6
Gluten-Free Cycle ............................................................................................................................................... 7
Cancel Button ...................................................................................................................................................... 7
Convenience Food Toasting ..............................................................................................................................7
Toaster Pastry .....................................................................................................................................................7
Non-Frozen Shelf Pastry ...................................................................................................................................8
Removing Lodged Foods ...................................................................................................................................8
Important Points ................................................................................................................................................ 8
User Maintenance Instructions .........................................................................................................................8
Care & Cleaning Instructions ........................................................................................................................... 8
Storing Instructions ............................................................................................................................................8
Warranty ..............................................................................................................................................................9
Índice
Medidas de seguridad importantes ............................................................................................................... 10
Otras medidas de seguridad importantes .................................................................................................... 11
Notas sobre el enchufe .................................................................................................................................... 12
Notas sobre el cable ......................................................................................................................................... 12
Advertencia sobre los plasticantes .............................................................................................................. 12
Corriente eléctrica ............................................................................................................................................ 12
Descripción del tostador para 2 rebanadas .................................................................................................. 13
Antes de utilizar por primera vez ................................................................................................................... 13
Guías de centrado automático........................................................................................................................13
Instrucciones para tostar ................................................................................................................................. 14
Ciclo de descongelación ..................................................................................................................................14
Ciclo para roscas .........................................................................................................................................14-15
Ciclo sin gluten ................................................................................................................................................. 15
Botón Cancel (Cancelar) ..................................................................................................................................15
Tostado de comida rápida ............................................................................................................................... 15
Productos de pastelería para tostadoras ......................................................................................................15
Productos de pastelería precocidos no congelados ..................................................................................16
Aspectos importantes ...................................................................................................................................... 16
Instrucciones de mantenimiento para el usuario ....................................................................................... 16
Instrucciones de cuidado y limpieza .............................................................................................................. 16
Instrucciones de almacenamiento ................................................................................................................ 16
Garantía.............................................................................................................................................................. 17

2
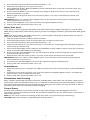
IMPORTANT SAFEGUARDS
1. READ ALL INSTRUCTIONS.
2. Do not touch hot surfaces. Use handles or knobs.
3. To protect against electrical shock do not immerse cord, plugs, or appliance
in water or other liquid.
4. This appliance is not intended for use by persons (including children) with
reduced physical, sensory or mental capabilities, or lack of experience
and knowledge, unless they have been given supervision or instruction
concerning use of the appliance by a person responsible for their safety.
5. Close supervision is necessary when any appliance is used by or near
children.
6. Unplug from outlet when not in use and before cleaning. Allow to cool before
putting on or taking off parts.
7. Do not operate any appliance with a damaged cord or plug or after the
appliance malfunctions, or has been damaged in any manner. Return
appliance to the nearest authorized service facility for examination, repair or
adjustment.
8. The use of accessory attachments not recommended by the appliance
manufacturer may cause injuries.
9. Do not use outdoors.
10. Do not let cord hang over edge of table or counter, or touch hot surfaces.
11. Do not place on or near a hot gas or electric burner, or in a heated oven.
12. To disconnect, press the white halo lighted CANCEL button, then remove
plug from wall outlet.
13. Do not use appliance for other than intended use.
14. Oversize foods, metal foil packages, or utensils must not be inserted in a
Toaster as they may involve a risk of re or electric shock.
15. A re may occur if Toasters are covered or touching ammable material,
including curtains, draperies, walls, and the like, when in operation.
16. Extreme caution must be used when moving an appliance containing hot oil
or other hot liquids.
17. Do not attempt to dislodge food when the Toaster is plugged in.
18. Do not operate unattended
CAUTION!
• DO NOT toast pastries with runny llings or frosting.
• DO NOT toast torn slices of bread.
• DO NOT place buttered bread or wrapped food into the 2-Slice Toaster.
• DO NOT toast small-size breads, mini-baguettes, breadsticks, etc. in this Toaster.
FOR HOUSEHOLD USE ONLY
SAVE THESE INSTRUCTIONS

3
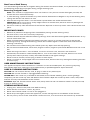
ADDITIONAL IMPORTANT
SAFEGUARDS
CAUTION HOT SURFACES: This appliance generates heat and escaping steam
during use. Proper precautions must be taken to prevent the risk of burns, res,
or other injury to persons or damage to property.
WARNING: ELECTRICAL SHOCK HAZARD. Never attempt to dislodge food inside the
2-Slice Toaster while the Toaster is plugged in. Doing so could cause an electrical
shock hazard or a risk of re.
CAUTION: This appliance is hot during operation and retains heat for some time
after turning OFF. Always use oven mitts when handling hot materials and allow
metal parts to cool before cleaning. Do not place anything on top of the 2-Slice
Toaster while it is operating or while it is hot.
1. A person who has not read and understood all operating, toasting, and
safety instructions is not qualied to operate this appliance. All users of this
appliance must read and understand this Instruction Manual before operating
or cleaning this appliance.
2. If this appliance falls or accidentally becomes immersed in water, unplug it
from the wall outlet immediately. Do not reach into the water!
3. When using this appliance, provide adequate air space above and on all sides
for air circulation. Do not operate this appliance while it is touching or near
curtains, wall coverings, clothing, dishtowels or other ammable materials.
4. To reduce the risk of re, do not leave this appliance unattended during use.
5. If this appliance begins to malfunction during use, immediately press the
white halo lighted CANCEL button and unplug the cord. Do not use or
attempt to repair a malfunctioning appliance!
6. The cord to this appliance should only be plugged directly into a 120V AC
electrical wall outlet.
7. Do not use this appliance in an unstable position.
8. Use the Toaster on a hard, at surface. Do not place Toaster near a ame or
heat or on a soft surface (such as carpet). Avoid placing it where it may tip
over during use. Dropping the Toaster could cause it to malfunction.
9. This Toaster is equipped with Anti-Jam feature. If any toast or toaster food
gets jammed, the Toaster will shut OFF automatically.
NOTES ON THE PLUG
This appliance has a polarized plug (one blade is wider than the other). To reduce
the risk of electric shock, this plug will t in a polarized outlet only one way. If
the plug does not t fully into the outlet, reverse the plug. If it still does not t,
contact a qualied electrician. Do not modify the plug in any way.

4
NOTES ON THE CORD
A short power-supply cord (or detachable power-supply cord) is to be provided to
reduce risks resulting from becoming entangled in or tripping over a longer
cord.
B. Longer detachable power-supply cords or extension cords are available and
may be used if care is exercised in their use.
C. If a long detachable power-supply cord or extension cord is used:
1. The marked electrical rating of the detachable power-supply cord or
extension cord should be at least as great as the electrical rating of the
appliance;
2. If the appliance is of the grounded type, the extension cord should be a
grounding- type 3-wire cord; and
3. The longer cord should be arranged so that it will not drape over the
counter top or table top where it can be pulled on by children or
tripped over.
PLASTICIZER WARNING
CAUTION: To prevent Plasticizers from migrating from the nish of the counter
top or table top or other furniture, place NON-PLASTIC coasters or place mats
between the appliance and the nish of the counter top or table top. Failure to do
so may cause the nish to darken; permanent blemishes may occur or stains can
appear.
ELECTRIC POWER
If the electrical circuit is overloaded with other appliances, your appliance may
not operate properly. It should be operated on a separate electrical circuit from
other appliances.

5
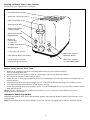
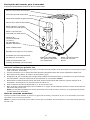
Getting to Know Your 2 slice toaster
Product may vary slightly from illustration
Before Using for the First Time
1. Remove all packaging materials including those that may be inside the toasting
slots or toasting lever slot.
2. Wipe the exterior with a damp cloth. Dry thoroughly. Do not use abrasive cleaners.
3. Do not put the Toaster, cord or plug in water.
4. Make sure the crumb tray is locked in position on the bottom of the Toaster and the toasting lever is in
the UP position.
5. Unwrap power cord from cord storage area on underside of Toaster and plug into a 120V AC outlet.
6. Turn the browning control dial to (1), the lightest setting.
7. Lower the toasting lever until it locks in place. It is recommended to run 2 cycles of toast without bread
before the rst use.
NOTE: Toaster may emit a thin smoke on the initial use. This is normal and not detrimental to the
performance of the Toaster..
Automatic Centering Guides
Lowering the toasting lever closes the centering guides, and holds the bread or toaster food centrally in the
toasting slots.
NOTE: The toasting lever will not lock down unless the Toaster is plugged into a 120V AC electrical outlet.
CANCEL
BAGEL
DEFROST
GLUTEN FREE
Extra Wide Toasting Slots
Automatic Centering Guides
High Lift Toasting Lever
Toasting Lever Slot
White Halo Lighted
CANCEL Button
White Halo Lighted
BAGEL Button
Browning
Control Dial:
(1) LIGHT to
(6) DARK with REHEAT
Non-Skid Feet
Crumb Tray (not shown)
Cord Storage Wrap (not shown)
Power-Supply Cord with
Polarized Plug (not shown)
White Halo Lighted
DEFROST Button
White Halo Lighted
GLUTEN-FREE Button

6
Toasting Instructions
1. Before toasting, make sure the crumb tray is locked in position on the bottom of the Toaster and the
toasting lever is in the UP position.
2. Make sure no bread or other objects are inside the toasting slots. Place Toaster on a at, level, heat
resistant surface.
3. Plug the power cord into a 120V AC electrical outlet.
4. Remove all protective wrappings from food before placing into the toasting slot(s).
IMPORTANT: Avoid toasting torn bread slices or small pieces of toaster food that may get lodged in
toasting slot(s).
5. Insert bread or toaster food into the toasting slot(s).
6. Turn the browning control dial to the desired shade (1 – 6). To test toasting times for browning, it is best
to use both toasting slots; position the browning control dial between (3) and (4) medium; then adjust
each subsequent toasting to your preference.
7. Lower the toasting lever until locked into place. The automatic centering guides hold food upright for
uniform side-to-side toasting.
8. When the bread is lowered into position, the CANCEL button’s halo will illuminate white, and toasting
will begin.
NOTE: The toasting lever will not lock into position unless the Toaster is plugged into a 120V AC electrical
outlet.
NOTE: When toasting a single slice, the bread may be placed in any toasting slot.
NOTE: To prevent a re hazard, never place bread over the opening of the Toaster; always place bread into
the slots.
NOTE: DO NOT change the browning selection during the toasting cycle. Press the white halo lighted
CANCEL button; then turn the browning control dial to adjust. Lower the toasting lever and toast until
the desired toast color is achieved.
9. At the end of the toasting cycle, bread or toaster food will rise automatically. Use the high lift lever to
remove smaller toaster foods or breads such as English mufns.
10. Remove bread from toasting slot(s). Use care when removing toasted bread as both the toastace and
the top of the Toaster will still be hot.
IMPORTANT: Never use a fork or sharp-edged utensil to remove toast, because that may damage the
heating element or cause injury.
11. To interrupt toasting, press the white halo lighted CANCEL button.
12. Unplug cord from wall outlet when not in use and before cleaning. Do not attempt to dislodge food
when the Toaster is plugged in.
Defrost Cycle
Your Toaster both DEFROSTS and TOASTS bread in a single cycle.
IMPORTANT: The DEFROST cycle may be used in addition to the BAGEL and GLUTEN-FREE buttons.
1. Plug the power cord into a 120V AC electrical outlet.
2. Insert the frozen bread, bagel, or gluten-free bread in the Toaster.
3. Turn the browning control dial to the desired shade (1 – 6).
NOTE: When multiple browning buttons have been pressed, (up to 3) it may be necessary to shorten the
browning time by setting the browning control dial 2 shades lighter. Check and continue toasting if
necessary.
4. Lower the toasting lever.
5. Press the DEFROST button. The defrost button’s halo will illuminate white.
6. The toasting lever will rise automatically when the toasting cycle is complete.
Bagel Cycle
NOTE: Use the BAGEL cycle for English mufns, too!
1. Plug the power cord into a 120V AC electrical outlet.
2. Slice bagels or English mufns in half; insert one half in each toasting slot with the cut sides facing the
center of the toasting slots.
NOTE: Use either toasting slot when toasting only half a bagel or English mufn. Use slices that t freely
into toasting slots.

7
3. Turn the browning control dial to the desired shade (1 – 6).
4. Lower the toasting lever until it locks into place.
5. Press the BAGEL button. Both the BAGEL and the CANCEL button’s halo will illuminate white, and
the BAGEL cycle will begin.
6. At the end of the BAGEL cycle, the toasting lever, bagel or English mufn will rise automatically,
and the Toaster will turn OFF.
7. Remove bagel or English mufn from the toasting slot(s). Use care as the top of the Toaster will
still be hot.
IMPORTANT: Never use a fork or sharp-edged utensil to remove toast, because that may damage the
heating element or cause injury.
8. To interrupt the BAGEL cycle, press the white halo lighted CANCEL button.
9. Unplug cord from wall outlet when not in use.
Gluten Free Cycle
Often denser in structure, gluten-free breads and toaster foods require longer cooking times. The GLUTEN
FREE setting automatically alters toasting time to give the same degree of browning achieved with other gluten
breads.
NOTE: Use either toasting slot when toasting only 1 piece of gluten-free bread or toaster food. Use slices or
foods that t freely into toasting slots.
1. Plug the power cord into a 120V AC electrical outlet.
2. Insert the bagel, English mufn or toaster food into 1 or both toasting slots.
3. Turn the browning control dial to the desired shade (1 – 6).
4. Lower the toasting lever until it locks into place. The automatic centering guides hold food upright for
uniform side-to-side toasting.
5. Press the GLUTEN-FREE button. Both the GLUTEN-FREE and the CANCEL button’s halo will illuminate
white, and the GLUTEN-FREE cycle will begin.
6. At the end of the GLUTEN-FREE cycle, the toasting lever, bread or toaster food will rise automatically,
and the Toaster will turn OFF.
7. Remove toast from the toasting slot(s). Use care as the top of the Toaster will still be hot.
IMPORTANT: Never use a fork or sharp-edged utensil to remove toast, because that may damage the
heating element or cause injury.
8. To interrupt the GLUTEN-FREE cycle, press the white halo lighted CANCEL button.
9. Unplug cord from wall outlet when not in use.
Cancel Button
1. When the toasting lever is lowered, the CANCEL button’s halo will illuminate white, and TOASTING will
begin.
2. To STOP or interrupt any toasting cycle, press the white halo lighted CANCEL button. The bread will
automatically rise; the Toaster will turn OFF.
3. Unplug cord from wall outlet when not in use.
Convenience Food Toasting
Many varieties of packaged convenience food are available today, both frozen and non-frozen (shelf pastry).
Since toaster foods and individual tastes vary, it is difcult to recommend exact browning settings. However,
after a little experimentation you will discover the best setting for your needs. You may also wish to refer to
the heating instructions on convenience food packaging.
Toaster Pastry
For best results, follow the instructions printed on the pastry package. If the package does not have
instructions, position the browning control dial to medium, between (3) and (4). Some pastries may require a
second toasting cycle.
NOTE: Do not use this Toaster for toasting pastry items with runny-type frosting or open llings.
CAUTION: Never leave Toaster unattended when toasting pastries.

8
Non-Frozen Shelf Pastry
Turn the browning control dial to a lighter setting. For thicker convenience foods, it may be necessary to adjust
the browning control dial to a higher setting / longer toasting cycle.
Removing Lodged Foods
NOTE: This Toaster is equipped with Anti-Jam feature. If any toast or toaster food gets jammed, the
Toaster will shut OFF automatically.
1. If, after toasting, a piece of bread or any other toaster food becomes lodged in any of the toasting slots,
unplug the Toaster and allow it to cool.
2. Hold the toasting lever down. Turn the Toaster upside down and shake the food loose.
IMPORTANT: Never use a fork or sharp-edged utensil to remove toast, because that may damage the
heating element or cause injury.
3. Pull the crumb tray from the bottom of the Toaster. Wipe the crumb tray with a clean cloth and lock into
place.
IMPORTANT POINTS
• Remove all protective wrappings from food before placing into the toasting slot(s).
• For best results, clean the crumb tray frequently.
• Different breads require different browning settings. Press the white halo lighted CANCEL button at any
time to check toast color.
• When multiple browning buttons have been pressed, (up to 3) it may be necessary to shorten the
browning time by setting the browning control dial 2 shades lighter. Check toast color and continue
toasting if necessary.
• Do not block extra wide toasting slots. Never place any object over the top opening.
• Do not toast buttered bread, Texas toast, English mufns, bagels or pita bread. Melted butter will cause
re.
• When toasting more than 1 slice of bread, use slices of similar size, thickness and freshness.
• Stale bread, thin bread or sweet bread products, such as tea cakes and fruit loaf, brown much more
quickly than ordinary bread, so they should be toasted on the lighter settings.
• Never immerse Toaster, cord or plug in water or other liquid.
• Never use a fork or sharp-edged utensil to remove toast, because that may damage the heating element
or cause injury.
USER MAINTENANCE INSTRUCTIONS
This appliance requires little maintenance. It contains no user-serviceable parts. Any servicing requiring
disassembly other than cleaning must be performed by a qualied appliance repair technician.
CARE & CLEANING INSTRUCTIONS
CAUTION: Do not immerse Toaster, cord, or plug in water or any other liquid.
CAUTION: Be sure the Toaster is unplugged before cleaning.
CRUMB TRAY: The crumb tray is located on the bottom of the Toaster. Working over a sink or garbage
receptacle, pull the crumb tray from the bottom of the Toaster. Wipe the crumb tray with a clean, damp cloth
and lock securely into the bottom of the Toaster.
EXTERIOR: Wipe the Toaster exterior with a clean, damp cloth. Do not use abrasive cleaners. Do not put cord,
or plug in water or liquid.
STORING INSTRUCTIONS
1. Unplug unit, allow to cool, and clean before storing.
2. Store Toaster in its box in a clean, dry place.
3. Never store Toaster while it is hot or still plugged in.
4. Never wrap cord tightly around the appliance; use the storage area on the bottom of the Toaster.
5. Do not put any stress on the cord where it enters the unit, as it could cause the cord to fray and break.

9
Limited TWO-YEAR Warranty
SENSIO Inc. hereby warrants that for a period of TWO YEARS from the date
of purchase, this product will be free from mechanical defects in material and
workmanship, and for 90 days in respect to non-mechanical parts. At its sole
discretion, SENSIO Inc. will either repair or replace the product found to be defective,
or issue a refund on the product during the warranty period.
The warranty is only valid for the original retail purchaser from the date of initial
retail purchase and is not transferable. Keep the original sales receipt, as proof of
purchase is required to obtain warranty validation. Retail stores selling this product
do not have the right to alter, modify, or in any way revise the terms and conditions of
the warranty.
EXCLUSIONS:
The warranty does not cover normal wear of parts or damage resulting from
any of the following: negligent use of the product, use of improper voltage or
current, improper routine maintenance, use contrary to the operating instructions,
disassembly, repair, or alteration by anyone other than qualied SENSIO Inc.
personnel. Also, the warranty does not cover Acts of God such as re, oods,
hurricanes, or tornadoes.
SENSIO Inc. shall not be liable for any incidental or consequential damages caused
by the breach of any express or implied warranty. Apart from the extent prohibited
by applicable law, any implied warranty of merchantability or tness for a particular
purpose is limited in time to the duration of the warranty. Some states, provinces or
jurisdictions do not allow the exclusion or limitation of incidental or consequential
damages, or limitations on how long an implied warranty lasts, and therefore, the
above exclusions or limitations may not apply to you. The warranty covers specic
legal rights which may vary by state, province and/or jurisdiction.
HOW TO OBTAIN WARRANTY SERVICE:
You must contact Customer Service at our toll-free number: 1-866-832-4843.
A Customer Service Representative will attempt to resolve warranty issues over
the phone. If the Customer Service Representative is unable to resolve the problem,
you will be provided with a case number and asked to return the product to SENSIO
Inc. Attach a tag to the product that includes: your name, address, daytime contact
telephone number, case number, and description of the problem. Also, include a
copy of the original sales receipt. Carefully package the tagged product with the sales
receipt, and send it (with shipping and insurance prepaid) to SENSIO Inc.’s address.
SENSIO Inc. shall bear no responsibility or liability for the returned product while in
transit to SENSIO Inc.’s Customer Service Center.

10
MEDIDAS DE SEGURIDAD
IMPORTANTES
PRECAUCIÓN: Cuando se utilizan aparatos eléctricos, se deben seguir precauciones
de seguridad básicas, entre ellas:
1.
LEA TODAS LAS INSTRUCCIONES.
2. No toque las supercies calientes. Utilice las asas o manijas.
3. A n de evitar descargas eléctricas, no sumerja cables, enchufes ni en agua u otros
líquidos.
4. Es necesario supervisar atentamente a los niños si usan aparatos o están
cerca de ellos.
5. Desenchufe el aparato del tomacorriente cuando no lo utilice y antes de limpiarlo.
Espere a que se enfríe antes de colocarle o extraerle piezas.
6. No utilice ningún aparato si el cable o el enchufe están dañados, o si el aparato no
funciona bien o se ha dañado de alguna forma. Lleve el aparato al servicio técnico
autorizado más cercano para que lo examinen, reparen o ajusten.
7. El uso de accesorios que no estén recomendados por el fabricante del aparato puede
provocar lesiones.
8. No lo utilice en exteriores.
9. No permita que el cable cuelgue por el borde de la mesa o mesada, ni toque las
supercies calientes.
10. No lo coloque encima ni cerca de un quemador eléctrico o de gas calientes, ni de un
horno caliente.
11. Se debe tener sumo cuidado cuando se traslada un aparato con aceite u otros
líquidos calientes.
12. Siempre coloque el enchufe en el aparato en primer lugar; luego, enchufe el cable al
tomacorriente de pared. Para desconectarlo, cambie los controles a la posición de
apagado (OFF); luego, quite el enchufe del tomacorriente de pared.
13. No se deben introducir alimentos sobredimensionados, paquetes con papel metálico
ni utensilios metálicos en el tostador, ya que pueden originar un riesgo de incendio o
descarga eléctrica.
14. Se puede ocasionar un incendio si el tostador está cubierto o en contacto con
materiales inamables, incluidas cortinas, paños, paredes y objetos similares, cuando
está en funcionamiento.
15. No intente quitar el alimento cuando el tostador esté enchufado. (Esta oración puede
omitirse si el tostador utiliza elementos calefactores recubiertos).
16. No le dé al aparato otro uso que no sea el indicado.
17. Guarde estas instrucciones.
PRECAUCIÓN:
NO tueste elementos de repostería con baños o rellenos líquidos.
NO tueste rebanadas de pan rasgadas.
NO coloque pan con manteca ni alimentos envueltos en el tostador.
NO tueste pan pequeño, minibaguetes, colines, etc.
GUARDE ESTAS INSTRUCCIONES

11
PARA USO DOMÉSTICO
ÚNICAMENTEGUARDE ESTAS
INSTRUCCIONES
OTRAS MEDIDAS DE SEGURIDAD
IMPORTANTES
PRECAUCIÓN. SUPERFICIES CALIENTES: Este electrodoméstico genera calor y
libera vapor mientras está en funcionamiento. Se deben tomar las medidas de
precaución adecuadas para evitar el riesgo de quemaduras, incendios u otros
tipos de lesiones o daños materiales.
ADVERTENCIA: PELIGRO DE DESCARGA ELÉCTRICA. Nunca intente sacar los
alimentos del interior de la tostadora para 2 rebanadas mientras esté enchufada.
De lo contrario, podría producirse una descarga eléctrica o riesgo de incendio.
PRECAUCIÓN: Este electrodoméstico se calienta durante su funcionamiento
y retiene calor durante un tiempo luego de apagarse. Siempre use manoplas
cuando manipula materiales calientes y deje enfriar las piezas de metal antes
de lavarlas. No coloque ningún elemento sobre la tostadora para 2 rebanadas
mientras está en funcionamiento o caliente.
1. Las personas que no hayan leído y comprendido todas las instrucciones de
funcionamiento, tostado y seguridad no deben utilizar este electrodoméstico.
Todos los usuarios de este electrodoméstico deben leer y comprender este
manual de instrucciones antes de poner en funcionamiento o limpiar la
unidad.
2. Si el electrodoméstico se cae o accidentalmente se sumerge en agua,
desenchúfelo del tomacorriente de pared de inmediato. ¡No introduzca la
mano en el agua!
3. Cuando utilice este electrodoméstico, proporcione una buena ventilación
por encima y a los lados de la unidad para que circule el aire. No utilice
este electrodoméstico mientras esté en contacto con cortinas o cerca de
cortinas, recubrimientos de pared, ropa, paños de cocina u otros materiales
inamables.
4. Para reducir el riesgo de incendio, no deje este electrodoméstico sin
supervisión mientras está en funcionamiento.
5. Si este electrodoméstico comienza a funcionar mal durante el uso, presione
el botón CANCEL (Cancelar) iluminado con halo blanco y desenchufe el cable.
¡No utilice ni intente reparar un electrodoméstico que funcione mal!
6. El cable de este electrodoméstico solo debe enchufarse directamente en un
tomacorriente eléctrico de pared de 120 V CA.
7. No utilice este electrodoméstico en una posición inestable.
8. Utilice la tostadora sobre una supercie rme y plana. No coloque la
tostadora cerca de una llama o calor o sobre una supercie blanda (como
alfombras). Evite colocarla en un lugar donde pueda volcarse durante su uso.
Dejar caer la tostadora podría causar un mal funcionamiento.
9. Esta tostadora tiene la función Anti-Jam (Antiatascamiento). En caso de
atascamiento de tostadas o alimentos para tostar, la tostadora se apagará
automáticamente.

12
Notas sobre el enchufe
Este aparato tiene un enchufe polarizado (una clavija es más ancha que la
otra). Para reducir el riesgo de descarga eléctrica, este enchufe se debe colocar
en un tomacorriente polarizado en una sola dirección. Si el enchufe no entra
completamente en el tomacorriente, dé vuelta el enchufe. Si aun así no encaja, llame
a un electricista calicado. No modique el enchufe de ninguna manera.
Notas sobre el cable
Se debe usar el cable de alimentación corto provisto (o cable de alimentación
separable) para reducir el riesgo de enredarse o tropezarse si el cable fuera más
largo.
A. El corto cable es suministrado para reducir el riesgo de que se enreden o se
tropiecen con un cable más largo.
B. Cables de alimentación más largos y removibles o las alargadoras son disponibles
y se pueden utilizarlos si se ejerce cuidado.
C. Si un cable largo y removible o una alargadora sea usado:
1. La potencia eléctrica marcada del cordón o de la alargadora debe ser,
por lo menos, tan fuerte como la potencia eléctrica del aparato;
2. El cordón debe estar dispuesto de manera que no cuelga del borde
de la encimera o la mesa donde pueda ser tirado por niños o donde
alguien se tropiece involuntariamente con el cable; y
3. Si el aparato es del tipo con conexión a tierra, el cable o la alargadora
debe ser un enchufe de 3 hojas con conexión a tierra.
Advertencia sobre los plasticantes
PRECAUCIÓN: A n de evitar que los plasticantes se adhieran al acabado de la mesada,
la mesa u otro mueble, coloque un posafuentes o salvamanteles que NO SEA DE
PLÁSTICO entre el aparato y la supercie de la mesada o mesa. Si no se hace esto,
es posible que el acabado se oscurezca, se formen marcas permanentes o aparezcan
manchas.
Corriente eléctrica
Si se recarga el circuito eléctrico con otros aparatos, es posible que este aparato
no funcione correctamente. Se debe utilizar en un circuito eléctrico separado de los
otros aparatos.

13
Descripción del tostador para 2 rebanadas
El producto puede diferir levemente de las ilustraciones.
Antes de utilizar por primera vez
1. Quite todos los materiales de empaque, incluidos los que puedan estar dentro de las ranuras para tostar
o de la palanca de tostado.
2. Limpie el exterior con un paño húmedo. Séquelo completamente. No utilice limpiadores abrasivos.
3. No coloque la tostadora, el cable ni el enchufe en agua.
4. Asegúrese de que la bandeja para migas esté trabada correctamente en su posición en la parte inferior
de la tostadora y de que la palanca de tostado esté en la posición ARRIBA.
5. Desenrolle el cable de alimentación del área de almacenamiento del cable en la parte inferior de la
tostadora y enchúfelo en un tomacorriente de 120 V CA.
6. Gire el selector de control de dorado a (1), el ajuste más leve.
7. Baje la palanca de tostado hasta que se trabe en su lugar. Se recomienda realizar 2 ciclos de tostado sin
pan antes del primer uso.
NOTA: La tostadora puede emitir humo durante el uso inicial. Esto es normal y no es perjudicial para el
rendimiento de la tostadora.
Guías de centrado automático
Al bajar la palanca de tostado, se cierran las guías de centrado y mantienen el pan o los alimentos para tostar
centrados en las ranuras para tostar.
NOTA: La palanca de tostado no se trabará salvo que la tostadora esté enchufada a un tomacorriente eléctrico
de 120 V CA.
CANCEL
BAGEL
DEFROST
GLUTEN FREE
Ranuras para tostar extraanchas
Guías de centrado automático
Palanca de tostado de gran elevación
Ranura de la palanca de tostado
Botón CANCEL (Cancelar)
iluminado con halo blanco
Botón “rosca de pan”
iluminado con halo blanco
Selector de
control de dorado:
(1) LEVE a
(6) OSCURO con
REHEAT (Recalentar)
Patas antideslizantes
Bandeja para migas (no se muestra)
Enrollador para almacenamiento
de cable (no se muestra)
Cable de alimentación con
enchufe polarizado (no se muestra)
Botón GLUTEN-FREE
(Sin gluten) iluminado
con halo blanco
Botón “recalentamiento“
iluminado con halo
blanco

14
Instrucciones para tostar
1. Antes de tostar, asegúrese de que la bandeja para migas esté trabada correctamente en su posición en
la parte inferior de la tostadora y de que la palanca de tostado esté en la posición ARRIBA.
2. Asegúrese de que no haya pan ni otros objetos dentro de las ranuras para tostar. Coloque la tostadora
sobre una supercie plana, nivelada y resistente al calor.
3. Enchufe el cable de alimentación a un tomacorriente eléctrico de 120 V CA.
4. Retire todos los envoltorios de protección de los alimentos antes de colocarlos en la(s) ranura(s)
para tostar.
IMPORTANTE: Evite tostar rebanadas de pan partidas o pequeños trozos de alimentos para tostar que
puedan atorarse en la(s) ranura(s) para tostar.
5. Coloque el pan o el alimento para tostar en la(s) ranura(s) para tostar.
6. Gire el selector de control de dorado a la intensidad deseada (1 a 6). Para probar los tiempos de dorado,
lo mejor es usar ambas ranuras para tostar; coloque el selector de control de dorado en la posición
media entre (3) y (4); luego, ajuste cada dorado subsiguiente según sus preferencias.
7. Baje la palanca de tostado hasta que quede trabada en su lugar. Las guías de centrado automático
mantienen el alimento en posición vertical para un tostado uniforme de ambos lados.
8. Cuando el pan se baja a su posición, el halo del botón CANCEL (Cancelar) se iluminará de color blanco
y comenzará el tostado.
NOTA: La palanca de tostado no se trabará en su posición, salvo que la tostadora esté enchufada a un
tomacorriente eléctrico de 120 V CA.
NOTA: Al tostar una sola rebanada, el pan puede colocarse en cualquier ranura para tostar.
NOTA: Para evitar el riesgo de incendio, nunca coloque pan sobre la abertura de la tostadora; siempre
coloque el pan en las ranuras.
NOTA: NO cambie la selección de dorado durante el ciclo de tostado. Presione el botón CANCEL (Cancelar)
iluminado con halo blanco; luego, gire el selector de control de dorado. Baje la palanca de tostado
y tueste hasta alcanzar el color de dorado deseado.
9. Al nal del ciclo de tostado, el pan o los alimentos para tostar suben automáticamente. Use la palanca
de gran elevación para quitar alimentos o panes más pequeños para tostar, como panecillos.
10. Retire el pan de la(s) ranura(s) para tostar. Tenga cuidado al retirar el pan tostado, ya que tanto
la tostada como la parte superior de la tostadora estarán calientes.
IMPORTANTE: Nunca utilice un tenedor o un utensilio con bordes alados para retirar las tostadas,
ya que esto podría dañar el elemento de calentamiento o causar lesiones.
11. Para interrumpir el tostado, presione el botón CANCEL (Cancelar) iluminado con halo blanco.
12. Desenchufe el cable del tomacorriente de pared cuando no la utilice y antes de limpiarla. No intente
sacar los alimentos cuando la tostadora esté enchufada.
Ciclo de descongelación
Su tostadora DESCONGELA y TUESTA el pan en un solo ciclo.
IMPORTANTE: El ciclo DEFROST (Descongelación) puede utilizarse en combinación con los botones BAGEL
(Rosca) y GLUTEN-FREE (Sin gluten).
1. Enchufe el cable de alimentación a un tomacorriente eléctrico de 120 V CA.
2. Inserte el pan congelado, la rosca o el pan sin gluten en la tostadora.
3. Gire el selector de control de dorado a la intensidad deseada (1 a 6).
NOTA: Cuando se pulsan varios botones de dorado (hasta 3), puede ser necesario acortar el tiempo
de dorado ajustando el selector de control de dorado 2 niveles menos. Revise y continúe tostando
si fuera necesario.
4. Baje la palanca de tostado.
5. Presione el botón DEFROST (Descongelar). El halo del botón DEFROST (Descongelar) se iluminará
de color blanco.
6. La palanca de tostado se elevará automáticamente cuando se haya completado el ciclo de tostado.
Ciclo para roscas
NOTA: ¡También puede utilizar el ciclo BAGEL (Rosca) para los panecillos!
1. Enchufe el cable de alimentación a un tomacorriente eléctrico de 120 V CA.
2. Corte las roscas o los panecillos por la mitad; inserte una mitad en cada ranura de tostado con los lados
cortados hacia el centro de las ranuras para tostar.
NOTA: Utilice cualquier ranura para tostar cuando tueste solo la mitad de una rosca o de un panecillo.
Utilice rebanadas que quepan libremente en las ranuras para tostar.
3. Gire el selector de control de dorado a la intensidad deseada (1 a 6).
4. Baje la palanca de tostado hasta que quede trabada en su lugar.

15
5. Presione el botón BAGEL (Rosca). Tanto el halo del botón BAGEL (Rosca) como el del botón CANCEL
(Cancelar) se iluminarán de color blanco y comenzará el ciclo BAGEL (Rosca).
6. Al nal del ciclo BAGEL (Rosca), la palanca de tostado, la rosca o el panecillo se elevarán
automáticamente y la tostadora se apagará.
7. Retire la rosca o el panecillo de la(s) ranura(s) para tostar. Tenga cuidado con la parte superior de la
tostadora, ya que seguirá caliente.
IMPORTANTE: Nunca utilice un tenedor o un utensilio con bordes alados para retirar las tostadas,
ya que esto podría dañar el elemento de calentamiento o causar lesiones.
8. Para interrumpir el ciclo BAGEL (Rosca), presione el botón CANCEL (Cancelar) iluminado con
halo blanco.
9. Desenchufe el cable del tomacorriente de pared cuando no la utilice.
Ciclo sin gluten
A menudo, los panes y alimentos para tostar sin gluten, al tener una estructura más densa, requieren tiempos
de cocción más largos. El ajuste GLUTEN FREE (Sin gluten) cambia automáticamente el tiempo de tostado
para lograr el mismo nivel de dorado que con otros panes con gluten.
NOTA: Utilice cualquier ranura para tostar cuando tueste solo una pieza de pan o alimento para tostar sin
gluten. Utilice rebanadas de alimentos que quepan libremente en las ranuras para tostar.
1. Enchufe el cable de alimentación a un tomacorriente eléctrico de 120 V CA.
2. Coloque la rosca, el panecillo o el alimento para tostar en una o ambas ranuras para tostar.
3. Gire el selector de control de dorado a la intensidad deseada (1 a 6).
4. Baje la palanca de tostado hasta que quede trabada en su lugar. Las guías de centrado automático
mantienen el alimento en posición vertical para un tostado uniforme de ambos lados.
5. Presione el botón GLUTEN-FREE (Sin gluten). Tanto el halo del botón GLUTEN-FREE (Sin gluten) como
el del botón CANCEL (Cancelar) se iluminarán en blanco y comenzará el ciclo GLUTEN-FREE
(Sin gluten).
6. Al nal del ciclo GLUTEN-FREE (Sin gluten), la palanca de tostado, el pan o el alimento para tostar se
elevarán automáticamente y la tostadora se apagará.
7. Retire la tostada de la(s) ranura(s) para tostar. Tenga cuidado con la parte superior de la tostadora,
ya que seguirá caliente.
IMPORTANTE: Nunca utilice un tenedor o un utensilio con bordes alados para retirar las tostadas,
ya que esto podría dañar el elemento de calentamiento o causar lesiones.
8. Para interrumpir el ciclo GLUTEN-FREE (Sin gluten), presione el botón CANCEL (Cancelar) iluminado
con halo blanco.
9. Desenchufe el cable del tomacorriente de pared cuando no la utilice.
Botón Cancel (Cancelar)
1. Cuando se baja la palanca de tostado, el halo del botón CANCEL (Cancelar) se iluminará de color blanco
y comenzará el tostado.
2. Para PARAR o interrumpir cualquier ciclo de tostado, presione el botón CANCEL (Cancelar) iluminado
con halo blanco. El pan se elevará automáticamente; la tostadora se apagará.
3. Desenchufe el cable del tomacorriente de pared cuando no la utilice.
Tostado de comida rápida
Hoy en día, hay muchas variedades de comidas rápidas envasadas, tanto congeladas como no congeladas
(pastelería precocida). Debido a que los alimentos para tostar y los gustos individuales varían, es difícil
recomendar ajustes de dorado exactos. Sin embargo, después de experimentar un poco, descubrirá el mejor
ajuste para sus necesidades. También puede consultar las instrucciones de calentamiento en el envase de la
comida rápida.
Productos de pastelería para tostadoras
Para obtener los mejores resultados, siga las instrucciones impresas en el paquete del producto de pastelería.
Si el paquete no tiene instrucciones, coloque el selector de control de dorado en una posición intermedia,
entre (3) y (4). Algunos productos de pastelería pueden requerir un segundo ciclo de tostado.
NOTA: No utilice esta tostadora para tostar pasteles con glaseado líquido o rellenos abiertos.
PRECAUCIÓN: No deje nunca la tostadora sin supervisión cuando tueste productos de pastelería.

16
Productos de pastelería precocidos no congelados
Gire el selector de control de dorado a un ajuste más leve. Para comidas rápidas más gruesas, podría ser
necesario ajustar el selector de control de dorado a un ajuste más alto o un ciclo de tostado más largo.
Cómo quitar alimentos atascados
NOTA: Esta tostadora tiene la función Anti-Jam (Antiatascamiento). En caso de atascamiento de tostadas
o alimentos para tostar, la tostadora se apagará automáticamente.
1. Si, después del tostado, una pieza de pan o cualquier otro alimento para tostar se quedara atascado
en alguna de las ranuras para tostar, desenchufe la tostadora y deje que se enfríe.
2. Mantenga la palanca de tostado hacia abajo. De vuelta la tostadora y sacúdala para quitar
el alimento ojo.
IMPORTANTE: Nunca utilice un tenedor o un utensilio con bordes alados para retirar las tostadas,
ya que esto podría dañar el elemento de calentamiento o causar lesiones.
3. Saque la bandeja para migas de la parte inferior de la tostadora. Limpie la bandeja para migas con un
paño limpio y colóquela en su lugar.
ASPECTOS IMPORTANTES
• Retire todos los envoltorios de protección de los alimentos antes de colocarlos en la(s) ranura(s) para
tostar.
• Para obtener resultados óptimos, limpie la bandeja para migas frecuentemente.
• Panes distintos requieren ajustes de dorado diferentes. Presione el botón CANCEL (Cancelar) iluminado
con halo blanco en cualquier momento para vericar el tono de dorado.
• Cuando se pulsan varios botones de dorado (hasta 3), puede ser necesario acortar el tiempo de dorado
ajustando el selector de control de dorado 2 niveles menos. Controle el color de dorado y continúe
tostando si fuera necesario.
• No bloquee las ranuras para tostar extraanchas. Nunca coloque ningún objeto sobre la
abertura superior.
• No tueste pan, tostadas texanas, panecillos, roscas o pan pita con mantequilla. La mantequilla derretida
provocará un incendio.
• Cuando tueste más de una rebanada de pan, use rebanadas de tamaño, grosor y frescura similares.
El pan duro, el pan no o los productos panicados dulces, tales como los pasteles para la hora del té
y los panes de fruta, se doran mucho más rápido que el pan común, de modo que deben tostarse con
ajustes más leves.
• Nunca sumerja la tostadora, el cable o el enchufe en agua u otro líquido.
• Nunca utilice un tenedor o un utensilio con bordes alados para retirar las tostadas, ya que esto podría
dañar el elemento de calentamiento o causar lesiones.
INSTRUCCIONES DE MANTENIMIENTO PARA EL USUARIO
Este electrodoméstico requiere poco mantenimiento. No contiene piezas que puedan ser reparadas por
el usuario. Cualquier tipo de mantenimiento, aparte de la limpieza, para el que sea necesario desarmar el
aparato, debe ser realizado por un técnico calicado para reparar electrodomésticos.
INSTRUCCIONES DE CUIDADO Y LIMPIEZA
PRECAUCIÓN: No sumerja la tostadora, el cable ni el enchufe en agua ni en ningún otro líquido.
PRECAUCIÓN: Asegúrese de que la tostadora esté desenchufada antes de limpiarla.
BANDEJA PARA MIGAS: La bandeja para migas está en la parte inferior de la tostadora. Encima de un
fregadero o receptáculo de basura, saque la bandeja para migas de la parte inferior de la tostadora. Limpie la
bandeja para migas con un paño limpio y húmedo y colóquela en su posición hasta que se trabe en la parte
inferior de la tostadora.
EXTERIOR: Limpie el exterior de la tostadora con un paño limpio y húmedo. No utilice limpiadores abrasivos.
No coloque el cable ni el enchufe en agua o líquido.
INSTRUCCIONES DE ALMACENAMIENTO
1. Desenchufe la unidad, déjela enfriar y límpiela antes de guardarla.
2. Guarde la tostadora en su caja, en un lugar limpio y seco.
3. Nunca guarde la tostadora enchufada ni mientras esté caliente.
4. Nunca ate el cable de forma ceñida alrededor del electrodoméstico; utilice el área de almacenamiento
en la parte inferior de la tostadora.
5. No aplique tensión en el cable en la parte que ingresa a la unidad, ya que el cable podría pelarse
y romperse.

17
Garantía limitada de DOS AÑOS
Mediante la presente, SENSIO Inc. garantiza que, durante el plazo de DOS AÑOS a
partir de la fecha de compra, este producto no presentará defectos mecánicos en el
material ni en la mano de obra, y durante 90 días, no los presentará en las piezas no
mecánicas. A su entera discreción, SENSIO Inc. reparará o reemplazará el producto
que resulte defectuoso, o emitirá un reembolso por el producto durante el plazo de
garantía.
Esta garantía es válida únicamente para el comprador minorista original a partir de la
fecha de compra minorista inicial y no es transferible. Conserve el recibo de compra
original, ya que se exige una prueba de compra para obtener la validación de la
garantía. Las tiendas minoristas no tienen derecho a alterar, modicar ni corregir de
ninguna manera los términos y condiciones de la garantía.
EXCLUSIONES:
La garantía no cubre el desgaste normal de las piezas ni el daño ocasionado por
cualquiera de las siguientes causas: uso negligente del producto, uso de un voltaje
o corriente incorrectos, mantenimiento de rutina inadecuado, uso contrario al de
las instrucciones de funcionamiento, desarmado, reparación o alteración a cargo de
personas que no sean miembros del personal calicado de SENSIO Inc. Asimismo, la
garantía no cubre actos de la naturaleza, como incendios, inundaciones, huracanes o
tornados.
SENSIO Inc. no asumirá responsabilidad por daños incidentales o resultantes
ocasionados por la violación de cualquier garantía expresa o implícita. Salvo en
la medida en que lo prohíban las leyes aplicables, cualquier garantía implícita de
comerciabilidad o aptitud para un propósito particular se limita temporalmente a la
duración de la garantía. Algunos estados, provincias o jurisdicciones no permiten la
exclusión ni la limitación de daños incidentales o resultantes, o limitaciones sobre
la duración de una garantía implícita y, por lo tanto, es posible que las exclusiones o
limitaciones mencionadas no le correspondan. La garantía cubre derechos legales
especícos que pueden variar de un estado, una provincia o una jurisdicción a otros.
CÓMO OBTENER EL SERVICIO DE GARANTÍA:
Debe comunicarse con el Servicio de atención al cliente a nuestro número telefónico
gratuito: 1-866-832-4843. Un representante del Servicio de atención al cliente
intentará resolver los problemas referidos a la garantía por teléfono. Si este no puede
resolver el problema, le proporcionarán un número de caso y le solicitarán que
devuelva el producto a SENSIO Inc. Adhiera una etiqueta al producto que incluya: su
nombre, dirección, número telefónico de contacto durante el día, número de caso y
descripción del problema. Además, incluya una copia del recibo de compra original.
Envuelva cuidadosamente el producto etiquetado con el recibo de compra, y envíelo
(con el envío y el seguro prepagados) a la dirección de SENSIO Inc. SENSIO Inc. no
asumirá obligación ni responsabilidad alguna por el producto devuelto que esté en el
trayecto hacia el Centro de servicio al cliente de SENSIO Inc.

GRACIAS
para su compra
BellaLifestyle
BellaLife
#myBELLAlife
para arriba para anuncios especiales y los
ingresos de la moda!
REGISTRARSE
Y FIRMAR
VISITE
:
bellahousewares.com
Evaluar, revisar o hacernos una pregunta.
CUÉNTANOS LO
QUE PIENSAS!
!

19

BELLA is a registered trademark of Sensio Inc., Montréal, Canada H3B 3X9.
All rights reserved.
BELLA es una marca registrada de Sensio Inc., Montréal, Canada H3B 3X9.
Todos los derechos reservados.
For customer service questions or comments
Dudas o comentarios contactar el departamento de servicio al cliente
1-866-832-4843 / [email protected]
SO-316130 r4
-
 1
1
-
 2
2
-
 3
3
-
 4
4
-
 5
5
-
 6
6
-
 7
7
-
 8
8
-
 9
9
-
 10
10
-
 11
11
-
 12
12
-
 13
13
-
 14
14
-
 15
15
-
 16
16
-
 17
17
-
 18
18
-
 19
19
-
 20
20
-
 21
21
-
 22
22


Bella 2 Slice Toaster, Stainless Steel El manual del propietario
- Categoría
- Tostadoras
- Tipo
- El manual del propietario
en otros idiomas
Artículos relacionados
-
Bella 14866 El manual del propietario
-
-
-
-
-
-
-
-
-
Otros documentos
-
 Continental Electric CE23431 Manual de usuario
-
 Continental Electric PS77451 Manual de usuario
-
Black & Decker T4707S Manual de usuario
-
Professional Series PS77401 Manual de usuario
-
 Continental Electric CE23432 Manual de usuario
-
Black & Decker T4808 Manual de usuario
-
 Courant CTP-4152K Guía del usuario
-
 Continental Electric CE23431 Manual de usuario
-
Rival 16041 El manual del propietario
-
 Continental Electric CE23451 Manual de usuario


