Sylvania LC420SS8 El manual del propietario
- Categoría
- Equipo de música suplementario
- Tipo
- El manual del propietario

42"Digital LCD
NEED HELP?
PLEASE CALL TOLL FREE[
1-800-968-3429
OR VISIT OUR WEB SITE AT
www.SylvaniaConsumerElectronics.com
Owner's Manu
....LC420SS
•YlY_

The model and serial numbers of this unit may be found on the cabinet.
You should record and retain those numbers for future reference.
Model No.:
Serial No.:
[] Precautions
WARNING: TO REDUCETHE RISKOF FIREOR ELECTRICSHOCK, DO NOT EXPOSETHIS APPARATUS
TO RAIN ORMOISTURE.
APPARATUS SHALL NOT BEEXPOSEDTO DRIPPINGOR SPLASHING AND NO OBJECTS
FILLED WITH LIQUIDS, SUCH AS VASES,SHALL BEPLACED ON THE APPARATUS.
CAUTION
CAUTION: TO REDUCE THE RISK OF ELECTRIC
SHOCK, DO NOT REMOVE COVER (OR BACK). NO USER
SERVICEABLE PARTS INSIDE. REFERSERVICING TO
QUALIFIED SERVICE PERSONNEL.
The lightning flash with arrowhead symbol, within an
equilateral triangle, is intended to alert the user to the
presence of uninsulated "dangerous voltage"within the
apparatus's enclosure that may be of sufficient magnitude
to constitute a risk of electric shock to persons.
The exclamation point within an equilateral triangle is
intended to alert the user to the presence of important
operating and maintenance (servicing) instructions in
the literature accompanying the apparatus.
The caution marking is located on the rear or bottom of the cabinet.
Important Safety Instructions
1. Read these instructions. 10. Protect the power cord from being walked on or
2. Keep these instructions.
3. Heed all warnings.
4, Followall instructions.
5. Do not use this apparatus near water.
6, Clean onlywith drycloth.
7, Do not block any ventilation openings. Install in
accordance with the manufacture's instructions.
8, Do not install near any heat sources such as radiators,
heat registers, stoves, or other apparatus (including
amplifiers) that produce heat.
9, Do not defeat the safety purpose of the polarized or
grounding-type plug. A polarized plug has two blades
with one wider than the other. A grounding type plug
has two blades and a third grounding prong. The wide
blade or the third prong are provided for your safety. If
the provided plug does not fit into your outlet, consult
an electrician for replacement of the obsolete outlet.
pinched particularly at plugs, convenience receptacles,
and the point where they exit from the apparatus.
11. Only use attachments/accessories specified by the
manufacturer.
12, Useonly with the cart, stand, tripod, bracket,
or table specified by the manufacturer, or _'_
sold with the apparatus. When a cart is used, _ _ m
use caution when moving the cart/apparatus _ _
combination to avoid injury from tip-over.
1:3. Unplug this apparatus during lightning storms or when
unused for long periods of time.
14. Refer all servicing to qualified service personnel.
Servicing is required when the apparatus has been
damaged in any way, such as power-supply cord or
plug is damaged, liquid has been spilled or objects
have fallen into the apparatus, the apparatus has
been exposed to rain or moisture, does not operate
normally, or has been dropped.
FCC WARNING
This apparatus may generate or use radio frequency energy. Changes or modifications to this apparatus may cause
harmful interference unless the modifications are expressly approved in the manual. The user could lose the authority to
operate this apparatus if an unauthorized change or modification is made.
RADIO-TV INTERFERENCE
This apparatus has been tested and found to comply with the limits for a Class Bdigital device, pursuant to Part 15 of
the FCC Rules. These limits are designed to provide reasonable protection against harmful interference in a residential
installation. This apparatus generates, uses, and can radiate radio frequency energy and, if not installed and used in
accordance with the instructions, may cause harmful interference to radio communications. However, there is no
guarantee that interference will not occur in a particular installation. If this apparatus does cause harmful interference to
radio or television reception, which can be determined by turning the apparatus off and on, the user is encouraged to
try to correct the interference by one or more of the following measures:
1) Reorient or relocate the receiving antenna.
2) Increase the separation between the apparatus and receiver.
3) Connect the apparatus into an outlet on a circuit different from that to which the receiver is connected.
4) Consult the dealer or an experienced radio/TV technician for help.
This Class B digital apparatus complies with Canadian ICES-O03.
Cet appareil num_rique de la classe B est conforme _ la norme NMB-O03 du Canada.
EN

Thisapparatusshouldnotbeplacedinabuilt-ininstallationsuchasabookcaseorrack unless proper ventilation is provided.
Make sure to eave a space of 3.2 inches (8cm) or more around this apparatus.
Disconnect the mains plug to shut off when find trouble or not in use. The mains plug shall remain readily operable.
CAUTION: Danger of explosion if battery is incorrectly replaced. Replace only with the same or equivalent type. 1
WARN NG: Batteries (battery pack or battery installed) shall not be exposed to excessive heat such as sunshine, fire or the like.
(_) LAMP IN LCD CONTAINS MERCURY, DISPOSE ACCORDING TO LOCAL, STATE OR FEDERAL LAW.
WARNING: To prevent injury, this apparatus must be securely attached to the floor/wall in accordance with the instructions. ]
TO AVOID THE HAZARDS OF ELECTRICAL SHOCK AND FIRE
• Do not handle the power cord with wet hands.
• Do not remove this unit cabinet. Touching parts inside the cabinet could result in electric shock and/or damage to this
unit. For service and adjustment inside the cabinet, call a qualified dealer or an authorized service center.
• Do not pull on the power cord when disconnecting it from an AC outlet. Grasp it by the plug.
• Do not put your fingers or objects into the unit.
LOCATION AND HANDLING
• The openings should not be blocked by placing the unit on a bed, sofa, carpet, rug, or other similar surface.
• Do not install the unit near or over a radiator or heat register.
• Do not install the unit in direct sunlight, near strong magnetic fields, or in a place subject to dust or strong vibration.
• Avoid a place with drastic temperature changes.
• Install the unit in a horizontal and stable position. Do not place anything directly on top or bottom of the unit.
Depending on your external devices, noise or disturbance of the picture and/or sound may be generated if the unit is
placed too close to them. In this case, please ensure enough space between the external devices and the unit.
• Depending on the environment, the temperature of this unit may increase slightly. This is not a malfunction.
NOTE ABOUT RECYCLING
• This unit's packaging materials are recyclable and can be reused. Please dispose of any materials in accordance
with your local recycling regulations.
• Batteries should never be thrown away or incinerated but disposed of in accordance with your local
regulations concerning chemical wastes.
WHEN CARRYING THIS UNIT
• At least two people are required when carrying this unit.
• Make sure to hold the upper and bottom frames of the unit firmly as illustrated.
©
ii!ii_!!_
iiiii:_il
ii !!ii_iii
i i ¸
iiiii!i_
iTJ
ii:!!ili
EN

[] Supplied Accessories
owner's manual quick start guide
(1EMN22312) (1EMN22313)
remote control batteries
(NFO2OUD) (AA x 2)
Phillips pan screw for
attaching the stand x 4
(FPH34100)
• If you need to replace these accessories, please refer to the part No. with the illustrations and call our toll free
customer support line found on the cover of this manual,
• Depending on your antenna system, you may need different types of combiners (mixers) or separators (splitters),
Contact your local electronics store for these items.
[]Attaching the Stand
You must attach the stand to the unit to display upright. Be sure the front and rear of the stand match the proper direction,
Spread a thick and soft cloth over
a table,
Place the main unit face down
onto it,
Make sure not to damage the
screen, At least two people are
required at this step.
2 Insert the stand all the way to the 3
main unit slowly,
Make sure not to put the AC cord
between the stand and the unit.
Drive Phillips pan screws in the
4 threaded holes at the bottom
of the stand with a screwdriver
tightly,
No re:
• When attaching the stand, ensure that oil screwsare tightly fastened. If the stand isnot properly attached, it could causethe unit to fall,
resulting in injuries as well as damage to theunit.
•Make sure to usea table which can support the weight of this unit and is larger than this unit.
•Make sure the table is in astable location.
•Ifyou removed thestand shafts from this unit for wall mounting, make surethatyou attach them before attaching thestand.
[] Symbols Used in this Manual
The following is the description for the symbols used in this manual,
Description refers to:
: Digital TV operation : Analog TV operation
• If neither symbol appears under the function heading, operation is applicable to both,
[] Trademark Information
• HDMI, the HDMI logo and High-Definition Muhimedia interface are trademarks or registered trademarks of HDMI
Licensing LLC,
• Manufactured under license from Dolby Laboratories/'Dolby"and the double-D symbol are trademarks of Dolby
Laboratories.
• Product that have earned ENERGY STAR®are designed to protect the environment through superior energy efficiency.
EN

_Features [] Contents
• DTV/TV/CATV
- You can use your remote control to select
channels which are broadcast in digital format and
conventional analog format. Also, cable subscribers
can access their cable TV channels.
• Information Display (DTV only)
- You can display the title, contents and other
information of the current DTV program on the TV
screen.
• Auto Channel Scan
- This unit automatically scans and memorizes
channels available in your area, eliminating difficult
setup procedures.
• V-chip
- This feature allows you to block children's access to
inappropriate programs.
• Closed Caption Decoder
- Built-in closed caption decoder displays text for
closed caption supported programming.
• MTS/SAP Tuner
- Audio can be selected from the remote control.
• Auto Shut Off Function
- If there is no signal input from the antenna terminal
and no operation for 15 minutes, the unit will turn
off automatically.
• Sleep Timer
- This feature will automatically turned off the power
of the unit at a specific time.
• Choices for On-screen Language
- Select your on-screen language:
English, Spanish or French.
• Stereo Sound Function
• PLL Frequency Synthesized Tuning
- Provides free and easy channel selection and lets
you tune directly to any channel using the channel
number buttons on the remote control.
• Resume
- This unit automatically rnemorizes settings ifa
power failure occurs.
HDMI Input
PC Input
Component Video Input
S-video Input
AV Input
Digital Audio Coaxial Output
/N FRODUC FON
Precautions...................................................... 2
SuppliedAccessories.............................................. 4
AttachingtheStand............................................... 4
SymbolsUsedinthisManual....................................... 4
TrademarkInformation........................................... 4
Features......................................................... 5
Buttonsonthe RemoteControl..................................... 6
Installingthe Batteries............................................ 6
ControlPanel..................................................... 7
RearPanel....................................................... 7
i
_iiii_!ill
iill!ill
PREPARAT ON
BasicConnection.................................................. 8
ExternalDeviceConnection........................................ 9
AttachingaWallMount Bracket(s01dseparately)................... 12
/NTAL SETTING
Initial Setup..................................................... 13
MainMenu...................................................... 14
AutoChannelScan............................................... 14
LanguageSelection.............................................. 15
WATCH NG TV
ChannelSelection................................................ 16
VolumeAdjustment.............................................. 16
SleepTimer..................................................... 16
StillMode....................................................... 17
SwitchingEachMode............................................. 17
SwitchingAudioMode ........................................... 17
ScreenInformation.............................................. 18
1]/ScreenDisplayMode........................................... 19
OPTIONAL SETT NG
ChannelList..................................................... 20
ManualRegister................................................. 20
AntennaConfirmation............................................ 21
PictureAdjustment.............................................. 22
SoundAdjustment............................................... 23
ClosedCaption................................................... 24
DTVClosedCaption............................................... 25
CCStyle......................................................... 26
V-chip.......................................................... 28
PCSettings...................................................... 31
HDMIAudio..................................................... 32
TROUBLESHOOT NG
TroubleshootingGuide........................................... 33
/NFORMAT ON
Glossary........................................................ 35
Maintenance.................................................... 35
CableChannelDesignations....................................... 36
GeneralSpecifications............................................ 36
ElectricalSpecifkation............................................ 36
OtherSpecifications......................................... 36
ii iiii:il
_ii'iii!ii
ilili!i;
iiii_i:i
Limited Warranty ..................................... Backcover
© 2007 Funai Electric Co., Ltd.
All rights reserved. No part of this manual may be reproduced, copied, transmitted, disseminated, transcribed, downloaded or stored in
any storage medium, in any form or for any purpose without the express prior written consent of Funai.
Furthermore, any unauthorized commercial distribution of this manual or any revision hereto is strictly prohibited.
Information in this document is subject to change without notice. Funai reserves tile right to change tile content herein without the
obligation to notify any person or organization of such changes.
I_UNAI with the _'_ design is a registered trademark of Funai Electric Co., Ltd and may not be used in any way without the express written
consent of Funai. All other trademarks used herein remain the exclusive property of their respective owners. Nothing contained in this
manual should be construed as granting, by implication or otherwise, any license or right to use any of the trademarks displayed herein.
Misuse of any trademarks or any other content in this manual is strictly prohibited. Funai shall aggressively enforce its intellectual property
rights to tile fullest extent of the law.
EN

[] Buttons on the Remote Control
3
4
5
6
7--
8
1. POWER (p13)
Press to turn the unit on and off
2. Number buttons (p16)
• Press to select channels.
-- (hyphen)
• Press to shift the minor channel
from the major channel.
3. SETUP (p14)
Press to display the main menu.
4. <II_IAIV(p13)
Press to move left/right/up/
down through the items.
5. ENTER (p13)
Press to decide the command of
setting when the main menu is
displayed.
6. BACK (p18)
Press to return to previous menu
operation.
7. CN. RECALL (p16)
Press to return to previous
channel.
8. VOk. /_(p16)
Press to adjust the volume.
9. MUTE D_:(p16)
Press to turn the sound on and off.
10, INPUT SELECT (pl 7)
Press to access connected
external devices like a DVD player
orVCR.
11. SLEEP (p16)
Press to activate the sleep timer.
12. AUDIO (p17)
Digital Mode (DTV)
• Press to select the audio
language.
Analog Mode (TV)
• Press to select the audio mode.
13. STILL (p17)
Press to pause screen image.
14. SCREEN MODE _ (pl 9)
Press to select aspect ratio
available for the TV screen.
15. INFO (p18)
Digital Mode (DTV)
• Press to display the channel
information, signal type and TV
setting.
Analog Mode (TV)
• Press to display the channel
number, signal type and TV
setting,
External Input Mode
• Press to display the external
input modes, signal type and TV
setting.
16. CN A/V (p16)
Press to select channels and the
external input modes.
[] Installing the Batteries
Install the batteries (AA x 2) matching tile polarity indicated inside battery compartment of the remote control,
Battery Precautions:
• Be sure to follow the correct polarity as indicated in the battery coropartment. Reversed batteries may cause damage to tbe device.
• Do not mix different types of batteries together (e.g., Alkaline and Carbon-Zinc) or old batteries with fresh ones.
• If the device is not to be used for a long period of time, remove the batteries to prevent damage or injury from possible battery leakage.
• Do not try to recharge batteries; they can overheat and rupture.
EN

[] Control Panel
[] Rear Panel
rear of this unit
11
12
side of this unit
rear of this unit
1. POWER (p13)
Press to turn the unit on and off.
2. INPUT SELECT (p17)
• Press to access connected external devices like a
1 DVD player or VCR.
• Press to decide the command of setting when the
'2 menu is displayed.
3. CHANNELA/V (p16)
'3 Press to select channels or move up/down through the
main menu items.
•4 4, VOLUME /_(p16)
Press to adjust the volume or move right (_)/left (_)
5 through the main menu items.
5. SETUP (p14)
6 Press to display the main menu,
6. infrared sensor window
•_7 Receives infrared rays transmitted from the remote
control.
7. standby indicator
Lights up in standby mode.
=4
side of this unit
ii!ii_!!_
ii:i:il
1. PCinputjack(p12)
VGA cable connection for PC,
2. audio input jack for PC connection (pl 2)
Mini-plug audio cable connection for PC.
i
3. antenna input jack (p8)
RF coaxial cable connection for your antenna or
cable/satellite box.
4. HDMlinputjack (p9)
HDMI connection for HDMI devices.
5. audio inputjack(p9)
RCA audio connection for DVI devices.
(For HDMI1 input jack only)
6. AC power cord
Connect to a standard AC outlet to supply power to
this unit.
1. coaxial digital audio output jack (pl 1)
Coa× ald g talaod oconnectionforddecoderoran
audio receiver.
8. audio input jack (plO)
RCA audio connection for external devices,
9. video input jack (pl 1)
RCA video connection for external devices,
10. S-video input jack (p 1O)
S-video connection for external devices.
11. audio output jack (pl 1)
RCA audio connection for external devices.
12. component video and audio input jack (plO)
Component video and RCA audio connection for
external devices.
EN

[] Basic Connection
Thissectiondescribeshowto connectthe unittoanantenna,cable/satellitebox,etc.
I Note:
• Besurey_urantenr_a_r_therdeviceisc_nr_ectedpr_per_ybef_rep_ugging_nthep_werc_rd.
[Antenna Connection]
Connect the RFcoaxial cable on your home outlet to the antenna input jack of this unit.
e.g.)
antenna _
@
@
rear of this unit
RFcoaxial cable
cableTV
company
Once connections are completed, turn on the unit and begin initial setup.
Channel scanning is necessary for the unit to memorize all available channels in your area.
(Refer to "Initial Setup" on page 13.)
Note:
• Foryour safety and to avoid damage to this unit, pleaseunplug the RFcoaxial cable from the antenna input jack before moving the
unit.
• Ifyou usean antenna to receiveanalog TV,it should also work for DTVreception. Outdoor or attic antennas will be more effective than
settop versions.
• Toeasilyswitch your reception source between antenna and cable,instafl an antenne selector.
• Ifyou connect to thecable system directly, contact the CATVinstaller.
[Connection to Cable Box or Satellite Box]
Use an RF coaxial cable to connect the antenna input jack of the unit to the antenna output jack of the cable/satellite box.
e.g.)
satellite dish
rear of this unit
ANTIN ANTOUT RF coaxial cable
cableTV
company
cable/satellite box
* Required cables and connecting methods differ depending on the cable/satellite box.
For more information, please contact your cable/satellite provider.
EN

[] External Device Connection
[HDMI Connection]
HDMI (High-Definition Multimedia Interface) transports high definition video and multi-channel digital audio through
a single cable. It ensures that the content sent from the source to the unit is of the highest possible resolution.
e.g.) rear of this unit
HDMI cable
DVD player with the HDMI output jack
Note:
• This unit accepts 480i/480p/720p/1080i/1080p video signals, end 32kHz/44. lkHz/48kHz audio signals.
• This unit accepts only 2 channel audio signal (LPCM).
• You need to select "PCM" for the digital audio output of the device connected or the HDMI audio setting.
There may be no audio output ifyou select "Bitstream', etc.
• This unit only accepts signals compliant with EIA861.
[HDMI-DVI Connection]
If your video device has a DVI output jack, use an HDMI-DVI conversion cable for this connection,
e.g.)
HDMI-DVI To HDMI1 input jack only
conversion cable
rear of this unit
cable box or satellite box
with the DVl output jack
i ill!ill
ii!ii_!,!_
}i!iiiiii
IO
iTJ
ii:_!!ili
Note:
• This unitoccepts 480i/480p/720p/I080i/1080p video signals.
• HDMI-DVI connection requires separate RCA audio connection as well.
• Audio signals ore converted from digital to analog for this connection.
• DVI does not display 480i image that is not compliant with EIA/CEA-861/861B.
iiiziii:ii
EN

[Component Video Connection]
Component video connection offers better picture quality for video devices connected to the unit.
Use a component video cable to connect the unit to external video devices equipped with component video output
jacks.
If you connect to the unit's COMPONENTI or COMPONENT2 video input jacks, connect an RCA audio cable to the audio
L/R jacks of COMPONENTI or COMPONENT2 accordingly.
e.g.)
DVD player with _
the component video output jacks _:_,
F AUDIO OUTq
_ L R
RCA audio cable
rear of this unit
Note:
• Thisunit accepts 480i/480p/720p/1080i/1080p video signals.
• When the noiseappears on the TVscreen, disconnecting the VGAcablemay reduce it.
[S-video Connection]
S-video connection offers good picture quality for video devices connected to the unit.
Use an S-video cable to connect the unit to external video devices equipped with S-video output jack.
If you connect to the unit's VIDEOI S-video or VIDEO2 S-video input jack, connect an RCA audio cable to the audio L/R
jacks ofVIDEOI orVIDEO2 accordingly.
e.g.)
J
DVD player with
the S-video output jack
AUDIO OUT S-VIDEO
L R _ OUT rear of this unit
Note:• Ifyou connect to the S-videoinput jack and the video inputjack at thesame time, the S-videoconnection will have priority. ]
EN

[Video Connection]
RCA video connection offers standard picture quality for video devices connected to the unit.
If you connect to the unit's VIDEO1 or VIDEO2 video input jack, connect an RCA audio cable to the audio L/R jacks of
VIDEO 1 orVlDEO 2 accordingly.
When the audio jack of the video device is monaural, connect an RCA audio cable to the audio L input jack.
e.g.) rear of this unit
camcorder video c
VCR
AUDIO OUT VIDEO
/ L R OUT
Note:
• Ifyou connect to the S-videoinput jack and the video input jack at thesame time, the S-video connection will have priority.
[Audio Output Connection]
Digital (for digital broadcasting only)
If you connect this unit to an external digital audio device, you can enjoy multi-channel audio like 5.1ch digital
broadcasting sound.
Analog
Ifyou connect this unit to an external analog audio device, you can enjoy stereo (2channel) audio.
e.g.)
Dolby Digital
decoder
stereo system
DIGITAL AUDIO
COAXIAL IN
digital audio coaxial cable
rear of this unit
RCA audio cable
_iiii!i!_i
i¸i¸i¸¸¸11
ii!ii_!.!_
!;b
ii iiii:i
ii !!ii_ill
i i ¸
iiiii!i_
IO
ii:_!!ii_i
EN

[PCConnection]
This unit is equipped with a PCinput jack, If you connect this unit to your PC,you can use this unit as a computer
monitor.
e.g.) VGA cable should be rear of this unit
with ferrite core.
VGA cable
mini-plug audio cable
personal computer
Note:
• Pleasepurchase the VGAcable that has aferrite core.
[]Attaching a Wall Mount Bracket (sold separately)
Thefollowingisadescriptionofthemethodforattachingawallmountto thisunit,
Whenperformingthisoperation,refertothe instructionmanualincludedwith thewall mountkit.
You need the following wall mount kit for this unit
Flat panel TV wall mount
Modelnumber:VMPL
For more information,
please visit SANUSSYSTEMSwebsite at www.sanUSoCOm
* ,_l_,and,(2_indicate the position of the screw holes on this unit.
rear of this unit
-'_ stand shafts
1 Spread a thick and soft cloth over a table. Place the
main unit face clown onto it. Make sure not to damage
the screen. At least two people are required at this step.
Note:
• Make sure to usea table which can support the weight of
this unit and islarger than this unit.
• Make sure thetable is in a stable location.
EN
2 Remove the stand shafts from this
unit.
Unscrew the M5 screws indicated by 0_and remove the
stand shafts. Please be careful with the unit after you
remove the stand shafts.
Note:
• TheM5screws and stand shafts you have removed are
necessaryfor reattachment at a later date. Make sure to
keep them in asafe place.
Attach the monitor brackets to this unit using the
M6 screws included with the wall mount kit.
Note:
• Only use the screwholes indicated by _ for mounting this
unit.
• For instructions on how toattach the monitor plate, refer
to the instruction manual included with the wall mount kit.
Attach this unit to the wall. At least two people are
required at this step.
Note:
• Referto the instruction manual included with the wall
mount kit when securing this unit to the wall.

[] Initial Setup
Thissectionwill guideyouthroughtheunit'sinitialsettingwhichincludes
selectingalanguageforyouron-screenmenuandautochannelscan,
whichautomaticallyscansandmemorizesviewablechannels,
Before you begin:
Makesureifthe unitisconnectedto antenna orcable.
After making all the necessary connections, press
[POWER] to turn on the unit.
_'OWER
• This operation maytake a few moments.
2 Use [Cursor l/Y] to select the on-screen language
from the choices on the right side of the TV screen.
(English / Espa_ol / Fran_ais)
or
V ¸
• "Initial Setup" menu on step 3 will be displayed in the
selected language after you press [ENTER].
3 Use [Cursor l/V] to select "Air" for TV channels or
"Cable" for CATV channels, then press [ENTER].
!
oP
• Scanning and memorizing of channels start
automatically.
Note:
• Ifyou connect the cablesystem directly, contact the CATV
installer.
• Ifyou press[POWER] or [SETUP]during auto channel
scan,this setting will be canceled.
• Theinitial auto channel scanfunction can be executed
for either "Air"or "Cable"only once. Whenyou change the
connection (Air/Cable), set auto channel scan again. (Refer
to page 14.)
• Youcan cancelor exit the initial auto channel scanmenu
bypressing [SETUP].
• If thereis no signal input from theantenna terminal and
no operation for severalsecondsafter you turn on the unit,
"Helpful Hints" appears. Follow the instructions listed on
the TVscreen.
!,,7_
ii !!i,i_]i
i 7 ¸
ii111!7
IO
! i71::
ii:_!!ii_i
• When the scanning and memorizing are completed,
the lowest memorized channel in the broadcasting
will be displayed.
iiTiii:ii
EN

[] Main Menu
Thissectiondescribestheoverviewofthe mainmenudisplayedwhenyou
press[SETUP].Formoredetails,seethereferencepageforeachitem.
Themainmenuconsistsofthe functionsetting itemsbelow.
Press [SETUP].
• EXIT
To exit settings.
• PICTURE
You can adjust the picture quality.
(Refer to "Picture Adjustment" on page 22.)
• SOUND
You can adjust the sound quality.
(Refer to "Sound Adjustment" on page 23.)
• CHANNEL
You can automatically scan the viewable channels
and remove those that are undesired.
(Refer to "Auto Channel Scan" on page 14.)
• DETAIL
You can change the display format for closed
caption, which displays the dialogue ofa TV program
or other information across the TV screen.
(Refer to "Closed Caption" on page 24.)
Set the viewing limitations.
(Refer to "V-chip" on page 28.)
Adjust the position, stability and clarity of the PC
screen.
(Refer to "PC Settings" on page 31.)
And select the sound input for the HDMI1 input jack
if your unit is connected to an HDMI device.
(Refer to "HDMI Audio" on page 32.)
• LANGUAGE
You can change the language (English, Spanish,
French) displayed on the main menu.
(Refer to "Language Selection" on page 15.)
[]Auto Channel Scan
If youswitchwires(e.g.,betweenantennaandCATV)or ifyou movethe
unit to adifferent areaafter the initial setting, or if you restorethe DTV
channelyoudeleted,youwill needto performauto channelscan.
Beforeyou begin:
Makesureifthe unitisconnectedto antennaorcable.
Press [SETUP] to display the main menu.
iJ
2 Use [Cursor AIr] to select "CHANNEL", then press
[ENTER].
or
3 Use [Cursor A/r] to select "Autoscan", then press
[ENTER].
or
Use [Cursor A/r] to select an appropriate option, then
press [ENTER].
or
• When aerial antenna is connected, select "Air".
• When connected to CATV, select "Cable".
• Scanning and memorizing of channels start
automatically.
• When the scanning and memorizing are completed,
the lowest memorized channel will be displayed.
EN

Note:
• lfyou connect the cable system directly, contact the CATV
installer.
• Ifyou press [POWER] or [SETUP] during auto channel
scan, the setting will be canceled.
• Channel settings will be saved even if the power fails.
• Ifyou need the English menus instead of the Spanish or
French men us you are having, press [SETUP]. Use
[Cursor A/V] to select "IDIOMA" or "LANGUE" then press
[ENTER]. Use [Cursor A/V] to select "English", then press
[ENTER]. Press [SETUP] to exit the main menu.
• With regard only to the digital channel, even after the
scanning is complete if you unplug the AC power cord
before turning off the unit by pressing [POWER], the
channel setting may be lost.
[] Language Selection
Youcan choose English, Spanish, or French as your on-screen language.
Press [SETUP] to display the main menu.
2 Use [Cursor A/V] to select "LANGUAGE", then press
[ENTER].
or
3 Use [Cursor A/V] to select "English", "Espa_ol" or
"Fran_ais", then press [ENTER].
or
i,?i_
ii!ii_!.!_
iiiii:_il
V
Press [SETUP] to exit.
i i ¸
iiiii!i_
jC ¸
iTJ
ii:_!!ii_i
EN

[] Channel Selection
Selectchannelsbypressing[CH•/V] or[theNumberbuttons].
[] Volume Adjustment
Thissectiondescribeshowto adjustthevolume.Themutefunction,which
turnsthesoundoffandon,isalsodescribed.
• To select the memorized channels, use [CH •Iv] or
[the Number buttons].
• To select the non-memorized channels, use
[the Number buttons].
To Use [the Number buttons]
When selecting analog channel 12
- When selecting digital channel 12-1
Be sure to press [-] before entering the minor
channel number.
• Press [CH. RECALL] to return to the previously
viewed channel.
About digital TV broadcasting:
With its high definition broadcast, digital broadcasting
far surpasses analog broadcasting in both its picture
and sound quality.
What is the minor channel?
By using high compression technology, digital
broadcasting offers a service that enables multiple
signals to send simultaneously,
Therefore, you can select more than one program per
major channel since digital broadcasting technology
distinguishes between multiple channels broadcast by
a single network,
NTSC(analog mode) [Air Time] ATSC(digital mode)
18:00
18:30
19:00
19:30
20:00
20:30
major cha_nel
,,_ :change automatically
_:> :change manually by using [CH •Iv]
• I
minor channel
Note:
• "No Signal" will appear on the TVscreenafter the minor
channel broadcast is over.
Use [VOL. I ] to adjust the audio volume,
• The volume bar will be displayed at the bottom of
the TV screen when adjusting the volume,
• The volume bar display will automatically disappear
in a few seconds,
Press [MUTE D_] to turn off and on the sound,
MU;_
\
• "Mute" is displayed on the TV screen for a few
seconds,
Press [MUTE D_:]again or [VOL. _I ] to recover the
original volume,
[] Sleep Timer
Thesleeptimer canbeset toautomatically turn offthe unit after an
incrementalperiodoftime.
1 Press [SLEEP] to set the sleep timer.
• Sleep timer display appears on the %/screen,
2 Press [SLEEP] repeatedly to change the amount of time
until shut off,
i,i :
• You can set your unit to turn off after a set period of
time (from 30 to 120 minutes),
• Each press of [SLEEP] will increase the time by 30
minutes.
• After set up, the sleep timer display can be called up
for checking by pressing [SLEEP],
To Cancel the Sleep Timer
Press [SLEEP] repeatedly until "Sleep Off" is displayed
on the TV screen,
Note:
• Thesleeptimer setting display will automatically
disappear in a few seconds.
• Whenyou disconnect the unit from theACoutlet or when
apower failure occurs,the sleeptimer setting will be
canceled.
EN

[] Still Mode
Youcanfreezethe imageshownontheTVscreen,
Press [STILL] to pause the image shown on the screen.
S_iLi
• The sound output will not be paused.
• If no signal isdetected or protected signal is received
during still mode, the image remains paused and the
sound output will be muted.
• The still function will be released after 5 minutes.
To cancel still mode, press any button except [POWER].
[] Switching Each Mode
Youcaneasilyswitchwiththe remotecontrolto the DTV(ATSC)andTV
(NTSC)ortoaccessexternaldeviceswhentheyareconnectedto theunit,
Press [INPUT SELECT] or [CH A] repeatedly to cycle
through the input modes.
',:U
o_
TV/DTVchannel
i
• Pressing [CH Y] reverses the direction of the mode.
To use the video or S-video input jack of VIDEO1 on
the unit, select "Video1 ".
To use the video or S-video input jack of VIDEO2 on
the unit, select "Video2".
To use the component video input jacks of
COMPONENT1 on the unit, select "Component1".
To use the component video input jacks of
COMPONENT2 on the unit, select "Component2".
To use the HDMI1 input jack on the unit, select
"HDMI1 ".
To use the HDMI2 input jack on the unit, select
"HDMI2".
To use the PC input jack on the unit, select "PC".
[] Switching Audio Mode
Thissectiondescribeshowto switchthe audiolanguage,
i,71_
Press [AUDIO] to display the currently selected
audio mode. While receiving an MTS broadcast,
press repeatedly to cycle through the available audio
channel.
AUBiO
When all audio are available
i
When stereo and monaural audio are available
When SAP and monaural audio are available
When only monaural audio is available
STEREO
SAP
MONO
(Cannot be switched)
: Outputs stereo-audio
: Outputs second audio program
: Outputs mono-audio
• The information display will automatically disappear
in a few seconds.
Press [AUDIO] to display the currently selected
language and the number of available languages.
2 Press [AUDIO] repeatedly to cycle through the
available audio languages.
Ai Z_iiO
ii:iii!
i i ¸
iiiii!i_
[O
iTJ
ii:!!ii_i
• Available languages differ depending on the
broadcast. "Other" is displayed when the audio
language cannot be acquired, or the acquired
languages are other than English, Spanish or French.
• The information display will automatically disappear
in a few seconds.
Note:
• Pressing[AUDIO] does not control external audio devices.
EN

[] Screen Information
Youcandisplaythecurrentlyselectedchannelorotherinformationsuchas
the audiomodeonthe TVscreen.
Intheanalogmode,the currentchannelnumberandtheaudiomodeare
displayed.
Inthe digital mode,thedetailedbroadcastinginformation for the current
channelsuchas programtitle, programguidesare displayed.
Press [INFO].
Press [INFO] to display the details of the currently
selected program.
• The current channel number, audio mode, type of
resolutions for video signal, TV aspect ratio, CC and
TV rating are displayed at the top-right corner of the
TV screen.
To clear the display, press [INFO] again.
You can also press [BACK].
[Broadcasting Information]
• The following information is displayed.
1 program title
2 broadcast station
3 program guide
(The program guide added to broadcasting
information is displayed. Maximum display of 4
lines.)
4 channel number
5 audio language
(Refer to"Switching Audio Mode" on page 17.)
6 effective scanning lines and scan mode
7 program format
8 program aspect ratio
9 program rating
10 CC (not available if CC is set to "Off")
9 lO
Note:
• When the program guide consists of more than 4 lines, use
[CursorA/V] to scroll
• "No description provided" isdisplayed when the program
guide is not provided.
• While theprogram guide isdisplayed, the dosed caption
function isinterrupted.
• Inexternalinput mode, thefollowing screenis displayed;
e.g.)When an external device isconnected to VIDEO1input
jack.
• Theinformation display will automatically disappear in
1minute.
EN

[]TV Screen Display Mode
4typesofdisplaymodescanbeselectedwhen the broadcastingstation
issending4:3or16:9videosignal.And3typesofdisplaymodescanbe
selectedfor PCinputsignal.
Press [SCREEN MODE _] repeatedly to switch the TV
aspect ratio.
For 4:3 video signal
Sidebar
(normal)
Wide
Full
$
Cinema
[Sidebar]
Display a 4:3 picture at its original size. Sidebars appear
on both edges of the screen.
[Full]
Display a 4:3 picture at a 16:9 size; the picture is
stretched horizontally to fill the screen.
[Cinema]
Display a 4:3 picture at a 16:9 size; the picture is
stretched horizontally and vertically to fill the screen,
This crops out the top and bottom of the picture.
[Wide]
Display the picture with its center at the original size
and the edges stretched horizontally.
For 16:9 video signal
Full Zoom
(normal)
Expand Cinema
[Full]
Display a 16:9 picture at its original size,
[Zoom]
Display a 16:9 picture at its maximum size without
changing its horizontal and vertical ratio.
[Cinema]
Display a vertically stretched picture.
[Expand]
Display a horizontally stretched picture.
For PC input signal
Sidebar Full
Dot By Dot
(normal)
i
[Sidebar]
Display a proportionately stretched picture. Sidebars
appear on both edges of the screen,
[Full]
Display a picture that isstretched out of proportion to
fill the screen.
[Dot By Dot]
Display a picture in its original size,
Note:
• Youmay not switch the display mode depending on the
program.
• For PCinput signal "Sidebor" may not be setectable
depending on the aspectratio of the input signal.
i,i'i_
i111;
ii:iii!
i 'ii'i'
iiiii!}_
i0
iTJ
ii:_!!ii_i
EN

[] Channel List
Thechannellistfunctionletsyouremoveundesiredchannelsfromthe
channelregistrationlist,
Press [SETUP] to display the main menu.
[] Manual Register
Themanualregisterfunctionletsyouaddthechannelsthatwerenotadded
bytheautochannelscanduetothereceptionconditionatthe initialsetting,
Press [SETUP] to display the main menu.
2 Use [Cursor A/Y] to select "CHANNEL", then press
[ENTER].
or
Use [Cursor A/V] to select "CHANNEL", then press
[ENTER].
or
3 Use [CursorA/V] to select "Channel List", then press
[ENTER].
or
Use [Cursor A/V] to select "Manual Register", then
press [ENTER].
or
Use [Cursor A/V] to select the channel you want to
remove, then press [ENTER].
or
Use [the Number buttons] to enter the number of the
channel you want to add, then press [ENTER].
@@@
@@@
@@@
• The channel display for the removed channel
darkens. You will not be able to select the channel
again using [CH A/V].
• To reactivate a removed channel, highlight it using
[Cursor A/V] and press [ENTER]. The channel
display lightens.
• When you remove a major channel, its minor
channels are removed as well.
Note:
• Thechannel with the "DTV"indicated on the display is
ATSC.Otherwise the channel isNTSC.
Press [SETUP] to exit.
Press [SETUP] to exit.
!!;i! i iii _
Note:
• Ifset up completes successfully,
"Registered to the Channel List" is displayed.
• Ifexternalinputis used,itis notpossible to register the
channel and "Unavailable" will be displayed on theTV
screen.
EN

[] Antenna Confirmation
Thisfunctionletsyoucheckthe signalstrengthofeachchannel,
Press [SETUP] to display the main menu.
2 Use [Cursor A/V] to select "CHANNEL", then press
[ENTER].
or
3 Use [Cursor A/Y] to select "Antenna", then press
[ENTER].
or
i,?i_
ii!ii_!,!_
ii:i:_il
Use [the Number buttons] or [CH A/V] to select the
channel for which you want to check the signal strength.
0@@
0@@
@00
or
ii !!i,i_iii
i i ¸
iiiii!i_
ii:_!!ii_i
• If the channel is set to external input, you cannot
confirm the antenna condition.
Press [SETUP] to exit,
EN

[] Picture Adjustment
Youcanadjust brightness,contrast,color,tint andsharpness.
1 Press [SETUP] to display the main menu.
2 Use [Cursor A/V] to select "PICTURE", then press
[ENTER].
or
Brightness
Contrast
Color
Tint
Cursor_
to decrease
brightness
to decrease
contrast
to decrease
color
Cursorl_
to increase
brightness
to increase
contrast
to brighten
color
to add red to add green
Sharpness
to make soft to make clear
Use [Cursor A/Y] to select the item you want to adjust,
then press [ENTER].
or
Reset Settings
Use [Cursor A/V] to select "Reset", then press [ENTER]
to restore the "Picture Mode" setting to default.
or
Adjust the picture quality.
Picture Mode
Use [Cursor A/V] to select the desired setting, then
press [ENTER]. (Standard, Dynamic, Movie and News)
or
Brightness, Contrast, Color, Tint, Sharpness
Use [Cursor _/1_] to adjust.
41o
Color Temp•
Use [Cursor A/V] to select the desired setting, then
press [ENTER]. (Cool, Neutral and Warm)
or
Energy Saving
Use [Cursor _/1_] to adjust the brightness of the backlight.
:To brighten
Or
:To darken
Note:
• Tocancel picture adjustment, press[SETUP].
Press [SETUP] to exit.
EN

[] Sound Adjustment
Youcanadjusttreble,bassandsurround,
1 Press [SETUP] to display the main menu.
2 Use [Cursor A/r] to select "SOUND", then press
[ENTER].
or
3 Use [Cursor A/r] to select the sound type you want to
adjust, then press [ENTER].
or
Surround
Use [Cursor A/r] to turn on or off the surround
function, then press [ENTER].
or
Reset Settings Z
Use [Cursor A/r] to select "Reset", then press [ENTER]
to restore the sound settings to default.
or
Note:
• Tocancel sound adjustment, press[SETUP].
Press [SETUP] to exit.
!;b
Adjust the sound setting.
Treble, Bass
Use [Cursor </1!_] to adjust.
Cursor< Cursorl_
Treble to decrease to increase
_ higher-pitched higher-pitched
, sounds sounds
Bass to decrease to increase
lower=pitched lower=pitched
sounds sounds
ii !!i,i_iii
i i ¸
iiiii!i_
[0
iTJ
ii:_!!ii_i
.........
EN

[] Closed Caption
Youcanviewclosedcaptioning(co)forTVprograms,moviesandnews.
Closedcaptionreferto text ofdialogueordescriptionsdisplayedon-screen
f0rthe hearingimpaired.
1 Press [SETUP] to display the main menu.
3
2 Use (Cursor A/V] to select "DETAIL", then press
[ENTER].
or
w
3 Use (Cursor A/V] to select "Closed Caption", then
press [ENTER].
or
W
Use (Cursor A/Y] to select "Conventional CC", then
press [ENTER].
or
Y
Use [Cursor A/V] to select the desired closed caption,
then press [ENTER].
or
[Caption Mode]
CC1 and Text1;
are the primary caption and text services.
The captioning or text is displayed in the same
language as the program's dialogue
(up to 4 lines of script on the TV screen, where it
does not obstruct relevant parts of the picture).
CC3 and Text3;
serve as the preferred data channels.
The captioning or text is often a secondary language.
CC2, CC4, Text2 and Text4;
are rarely available and broadcasters use them only
in special conditions, such as when "CC1" and "CC3"
or "Text1" and "Text3" are not available.
• There are 3 display modes according to programs:
Paint-on mode:
Displays input characters on the TV screen
immediately.
Pop-on mode:
Once characters are stored in memory, they are
displayed all at once.
Roll-up mode:
Displays the characters continuously by scrolling
(max. 4 lines).
Press [SETUP] to exit.
j,
Note:
• Toshow theclosed caption on your TVscreen,broadcast
signal must contain the dosed caption data.
• Not all TVprograms and commercials have the closed
caption or all typesof the dosed caption.
• Captions and texts may not match the TVvoice exactly.
• Changing channels may delay the dosed caption for afew
seconds.
• Adjusting or muting the volume may delay thedosed
caption for a few seconds.
• Abbreviations, symbols and other grammatical shortcuts
may be usedin order to keeppace with theon-screen
action. Thisisnot aproblem with the unit.
• Thecaption or text characters will not bedisplayed while
the main menu or functions display is shown.
• Ifa black boxappears on the TVscreen, this means that
the closed caption is set to the text mode. Todear the box,
select "CC1'_"CC2""CC3","CC4"or ,,Off,,.
• If the unit receivespoor quality television signals, the
captions may contain errors,or theremight be no captions
at alL Somepossible causesof poor quality signals are:
- Automobile ignition noise
- Electricmotor noise
- Weaksignal reception
- Multiplex signal reception (ghosts or screenflutter)
• Theunitretains thedosedcaptionsettingifthepower
fails.
• Closedcaption will not bedisplayed whenyou are using
an HDMI connection.
• When the unit receivesa special effects playback signal
(i.e.,Search,Slow and Still) from a VCR'svideo output
channel (CH3or CH4),the unit may not display the correct
caption or text.
EN

[] DTV Closed Caption
Inaddition tothe basicclosedcaptiondescribedonpage24,DTVhasits
own closedcaptioncalledDW CCUsethis menuto changethesettings for
DTVCC.
Press [SETUP] to display the main menu.
Sii iiii_
2 Use [Cursor A/V] to select "DETAIL", then press
[ENTER].
or
3 Use [Cursor A/V] to select "Closed Caption", then
press [ENTER].
or
i,?i_
Use [Cursor A/r] to select the desired DTV closed
caption, then press [ENTER].
or
DTV CC
off
ServicelN6
Select if you do not want
DTV CC.This is the default.
Select one of these before
changing any other item
in "Closed Caption" menu.
Choose"Service1" under
normal circumstances.
Press [SETUP] to exit.
Note:
• "DTVCC" thatyou con switch differs depending on the
broadcast description.
ii!iiii!i
Use [CursorA/V] to select "DTV CC", then press
[ENTER].
or

[] CC Style
Youcanchangethe style ofCCsuchasfont,colororsize,etc.
Press [SETUP] to display the main menu.
2 Use [Cursor A/V] to select "DETAIL", then press
[ENTER].
or
Use [Cursor A/Y] to select "On", then press [ENTER].
or
7 Use [Cursor A/V] to select an item, then press
[ENTER]. Then use [Cursor A/V] to select the desired
setting and press [ENTER].
Picture display
Use [Cursor A/V] to select "Closed Caption", then
press [ENTER].
or
Use [Cursor A/V] to select "CC Style", then press
[ENTER].
or
v
Use [Cursor A/V] to select "User Setting", then press
[ENTER].
or
Edge
(Edge Color and EdgeType)
Font
(Font Style, Font Size, Font Color and Font Opacity)
Back
(Back Color and Back Opacity)
• The setting description for each item is shown below.
[Font Style]
Closed Captioning font style can be changed as below.
[Font Size]
Font size of the displayed caption can be switched as
below.
EN

[Font Color]
Font color of the displayed caption can be switched as
below.
[Edge Type]
Edge type of the displayed caption can be switched as
below.
[Font Opacity]
Font opacity of the displayed caption can be switched
as below.
[Back Color]
Background color of the displayed caption can be
switched as below.
8 Press [SETUP] to exit.
ii ,,
i iiiiiill
ii!;i_!,!_
iiiii:_il
[Back Opacity]
Background opacity of the displayed caption can be
switched as below.
[Edge Color]
Edge color of the displayed caption can be switched as
below.
ii !!i{ii
i i ¸
iiiii!i_
JO
ii:_!!ii_i
EN

[] V-chij
V-chip reads the ratings for programs, then denies accessto the programs
which exceed the rating level you set. With this function, you can block
certain programming inappropriate for children.
1 Press [SETUP] to display the main menu.
3
2 Use [Cursor A/Y] to select "DETAIL", then press
[ENTER].
or
3 Use [Cursor A/V] to select "V-chip", then press
[ENTER].
or
Use [the Number buttons] to enter the 4-digit
numbers for your password.
@@@
@@@
@@@
See the following description for setting each item.
,A
El
C
A-."A. MPAA Rating" _ page 29
B-."B. TV Rating" _ page 29
C-."C. New Password" =I>page 30
Note:
• When you select a rating and set it to "Block", the higher
ratings will be blocked autornatically. The lower ratings
will be available for viewing.
• When you set the highest rating to "View", all ratings turn
to "View" automatically.
• To block any inappropriate programming, setyour limits in
"MPAA Rating", "TV Rating" and "Downloodable Rating"
• The V-chip setting will be retained after a power failure
(except the access code reverts to 0000).
• If the rating is blocked, will appear.
• "Downloadable Rating" will be available when the unit
receives a digital broadcast using the new rating system.
• If the broadcasting signal does not have the downloadable
rating information, "Downloadable Rating is currently not
available." will appear.
This message will also appear when you try to access
"Downloadable Rating" after you have cleared the
downloadable rating information, and the new
information has not been downloaded since.
• To clear the downloadable rating information andits
setting, select "Clear Downloadable Rating"
• When you have not set up your password, enter
0000.
• When the password is correct, the "V-chip" menu is
displayed.
EN

MPAARatingistheratingsystemcreatedbyMPAA(Motion Picture
AssociationofAmerica).
Use [Cursor AIr] to select "MPAA Rating", then press
[ENTER].
or
Use [Cursor A/r] to select the desired rating, then
press [ENTER] repeatedly to switch between "View"
and "Block".
or
Y
'_ _ _j_._,_ ...................
Use [Cursor AIr] to select "TV Rating", then press
[ENTER].
or
,,<_y
Use [Cursor A/V/</I_] to select the desired rating,
then press [ENTER] repeatedly to switch between
"View" and "Block".
i,?i_
Rating Category
X Mature audience only
NC-17 No one under 17 admitted
R Restricted; under 17requires accompanying
parent or adult guardian
PG-13 Unsuitable for children under 13
PG Parental guidance suggested
G General audience
NR No rating
7 Press [SETUP] to exit.
Note:
• Changing the category to "Block" or "View" automatically
changes all itssub ratings to the same ("Block" or "View").
Press [SETUP] to exit.
[To Set the Sub Ratings]
As for TV-MA, TV-14, TV-PG, or TV-Y7, you can further
set the sub ratings to block specific elements of
i i!i
programming. To set the sub ratings, follow the step
below.
Use [Cursor A/V/'</I_] to select the desired rating,
then press [ENTER] repeatedly to switch between
"View" and "Block".
ii !!i,i_iii
io
iTJ
EN

Rating Category
TV-MA Mature audience only higher
TV-14 Unsuitable for children under 14 _
TV-PG Parental guidance suggested
TV-G General audience
TV-Y7 Appropriate for all children 7 and I
older _
TV-Y Appropriate for all children lower
Sub Rating
FV
V
S
L
D
Category
FantasyViolence
Violence
Sexual Situation
Coarse Language
Suggestive Dialogue
Rating
TV-Y7
TV-PG
TV-14
TV-MA
TV-PG,TV-14
Note:
• Blockedsub rating will appear beside the main rating
category in "TVRating" menu.
• You cannot block asub radng (D,L,Sor V)if the main
rating isset to ,View,
• Changing the category to "Block" or "View" automatically
changes all itssub ratings to the same ("Block" or "View").
Althoughthe default code"0000"issuppliedwith the unit,youcanset
yourownpassword.
Use [Cursor A/V] to select "New Password", then press
[ENTER].
or
Press [the Number buttons] to enter the new 4-digit
password.
• Enter password again in "Confirm password." entry
field.
@@@
0OO
@@@
7 Press [SETUP] to exit.
Note:
• Make sure newpassword and confirm password must be
exactly the same. If tbey are different, the space is cleared
for reentering.
• Yourpasswordwillbeerasedandreturn to thedefault
(0000) when apower failure occurs.Ifyou forget the
password, unplug the power cord for 10seconds to restore
the password to 0000.
EN

[] PC Settings
Thisfunctionletsyouadjustthe PCscreenposition,clockand phaseduring
PCinput,
Press [SETUP] to display the main menu.
2 Use [Cursor A/V] to select "DETAIL", then press
[ENTER].
or
3 Use [Cursor A/r] to select "PC settings", then press
[ENTER].
or
Use [Cursor A/r] to select the setting you want to
adjust, then press [ENTER].
or
Adjust the setting.
Auto Adjustment
Use [Cursor A/r] to select "Adjust", then press
[ENTER].
Or
T
• The Horizontal/Vertical position, clock and phase of
the PC screen are automatically adjusted.
Horizontal Position, Vertical Position
Use [Cursor<l•] to adjust.
Cursor 'd Cursor•
Horizontal Position
to move PC to move PC
screen left screen right
Vertical Position
to move PC to move PC
screen down screen up
Clock, Phase
Use [Cursor _/•] to adjust the "Clock" setting to
stabilize the PC screen and the "Phase" setting to
improve the clarity of the PCscreen.
Cursor _ Cursor•
Clock
Phase
to decrease
setting value
to increase
setting value
i,71_
i L¸
ii!iiii_!i
ii !!i,i_iii
i i ¸
iiiii!i_
IZ!
6 Press [SETUP] to exit.
Note:
• Adjust the "Phase"setting after the "Clock"setting has
beenproperly adjusted.
• Youmay not obtain an appropriate screenwith auto
adjustment for some signals. In this case,adjust the
settings manually.
EN

[]HDMI Audio
Youcansetthemethodofsoundinputfor the HDMI1inputjack,
Press [SETUP] to display the main menu.
2 Use [Cursor A/V] to select "DETAIL", then press
[ENTER].
or
w
3 Use [Cursor A/V] to select "HDMI1 Audio", then press
[ENTER].
or
Use [Cursor A/V] to select the desired sound input,
then press [ENTER].
or
Select if you have connected both
digital device to the HDMI1 input
Auto jack and analog device to the
audio sources. Digital audio input
signal will have priority.
HDMI1
Audio Select if you have connected a
Digital digital device to the HDMI1 input
jack for digital audio input signal.
Select if you have connected an
Analog analog device to the analog audio
jacks for analog audio input signal.
5 Press [SETUP] to exit,
EN

[]Troubleshooting Guide
If the unit does not perform properly when operated as instructed in this owner's manual, check the following chart once
before calling for service.
No power
No picture or sound
No color
Sound OK, picture poor
Picture distorted
Weak picture
Lines or streaks in picture
Picture blurred
Ghosts in picture
Bars on TV screen
Picture rolls vertically
Different color marks on
TV screen
Poor reception on some
channels
Picture OK, sound poor
No reception of digital signals
Be sure the power cord is plugged in.
If a power failure occurs, unplug the power cord for 30 minutes to allow the unit to
reset itself.
• Check if the power is on.
• Check the outlet connection.
• Check the antenna or cable connection to the main unit.
• When the outside antenna is used, check the wire condition and connection.
• View other TV channels. The problem might be limited to the broadcasting station.
• Turn off the power and wait for about 1 minute, then turn it on again.
• Check the antenna or cable connection to the main unit.
• When the outside antenna is used, check the wire condition and connection.
• View other TV channels. The problem might be limited to the broadcasting station.
• Adjust the"Color" in the main menu.
• Check the antenna or cable connection to the main unit.
• When the outside antenna is used, check the wire condition and connection.
Electrical interference from nearby appliances may affect picture quality.
• Adjust"Contrast"and "Brightness" in the main menu.
• View other TV channels. The problem might be limited to the broadcasting station.
• When the outside antenna is used, check the wire condition and connection.
• View other TV channels. The problem might be limited to the broadcasting station.
• Check the antenna or cable connection to the main unit.
• When the outside antenna is used, check the wire condition and connection.
• Adjust"Contrast"and "Brightness" in the main menu.
• View other TV channels. The problem might be limited to the broadcasting station.
• When the outside antenna is used, check the wire condition and connection.
Electrical interference from nearby appliances may affect picture quality.
• View other TV channels. The problem might be limited to the broadcasting station.
• When the outside antenna is used, check the wire condition and connection.
• View other TV channels. The problem might be limited to the broadcasting station.
• Check the antenna or cable connection to the main unit.
• When the outside antenna is used, check the wire condition and connection.
Electrical interference from nearby appliances may affect picture quality.
• View other TV channels. The problem might be limited to the broadcasting station.
• When the outside antenna is used, check the wire condition and connection.
Electrical interference from nearby appliances may affect picture quality.
• When the outside antenna is used, check the wire condition and connection.
Electrical interference from nearby appliances may affect picture quality.
• View other TV channels. The problem might be limited to the broadcasting station.
Move the unit away from nearby electric appliances. Turn off the power and wait
30 minutes before turning it back on.
• View other TV channels. The problem might be limited to the broadcasting station.
• Check the antenna or cable connection to the main unit.
• When the outside antenna is used, check the wire condition and connection.
Electrical interference from nearby appliances may affect picture quality.
• View other TV channels. The problem might be limited to the broadcasting station.
• View other TV channels. The problem might be limited to the broadcasting station.
Make sure auto channel scan has been completed. (Refer to "Auto Channel Scan"
on page 14.)
Auto channel scan must be completed when you set up the unit for the first time
or move it to a location where previously unavailable channels are broadcast.
• The selected channel may not be broadcasting.
• When auto channel scan is interrupted and not completed, some channels will not
be received. Make sure to complete. (Refer to "Auto Channel Scan" on page 14.)
i•i
if ••
EN

Theenteredchannelnumber
changesautomatically
Remotecontroldoesnotwork
Manydigitalchannelshavealternatechannelnumbers.Theunitchangesthe
numbersautomaticallytotheonessignifyingthebroadcastingstations.Theseare
thenumbersusedforanalogbroadcasts.
•Checktheantennaorcableconnectiontothemainunit.
•Checkthebatteriesoftheremotecontrol.
•Checkifthereisanobstaclebetweentheinfraredsensorwindowandtheremote
control.
•Testthesignaloutput.IfOK,thenpossibleinfraredsensortrouble.
(Referto"IRSignalCheck"onpage35.)
•Aimtheremotecontroldirectlyattheinfraredsensorwindowonthefrontofthe
unit.
Reducethedistancetotheunit.
Re-insertthebatterieswiththeirpolarities(+/-signs)asindicated.
•Whenthereisaninfrared-equippeddevicesuchasPCnearthisunit,itmay
interrupttheremotecontrolsignalofthisunit.
Movetheinfrared-equippeddeviceawayfromthisunit,changetheangleofthe
infraredsensororturnofftheinfraredcommunicationfunction.
Problems with Closed Caption Feature
Misspelled captions are • Closed captioning production companies may broadcast programs without
displayed, correcting the misspelling in a live broadcast.
Captions are not entirely • Captions that are delayed a few seconds behind the actual dialogue are common
displayed, or captions are for live broadcasts. Most captioning production companies can display a dialogue
delayed behind the dialogue, to a maximum of 220 words per minute. If a dialogue exceeds that rate, selective
editing is used to insure that the captions remain up-to-date with the current TV
screen dialogue.
Captions are displayed as a Interference from buildings or weather conditions may cause captioning to be
white box. incomplete.
No caption is displayed in the Broadcasting station may shorten the program to insert advertisement. The closed
closed caption-supported caption decoder cannot read the information of the shortened program.
program.
No caption is displayed • The videotape may be illegally copied, or the caption signal might not have been
when playing the videotape read during copying.
containing captions.
Black box is displayed in the • The text mode is selected for caption. Select "CC1 ", "CC2", "CC3", "CC4"or "Off".
TV screen.
Note:
• TheLCDpanel ismanufactured to provide many years of useful life. Occasionally a few non active pixelsmay appear asa fixed point of
blue, green or red. Thisis not to beconsidered adefect in the LCDscreen.
• Some functions are not available in spedfic modes,but this is not a malfunction. Readthedescription in this owner's manual for more
details on correct operations.
EN

[] Glossary
ATSC
Acronym that stands for Advanced
Television Systems Committee and
the name of the digital broadcasting
standards.
Aspect Ratio
The width of a TV screen relative to its
height. Conventional TVs are 4:3 (in
other words, the TV screen is almost
squa re); widescreen models are 16:9
(the TV screen is almost twice as wide
as its height),
Component Video
This is a video signal format that
conveys each of 3 principal colors of
light (red, blue and green) through
different signal lines.This allows the
viewers to experience picture colors
as original as it is.There are several
signal formats, including Y / Pb / Pr
andY/Cb/Cr,
Dolby Digital
The system developed by Dolby
Laboratories to compress digital
sound. It offers stereo sound (2ch) or
multi-channel audio.
HDMI (high-definition multimedia
interface)
Interface that supports all
uncompressed, digital audio/video
formats including set-top box, DVD
player or digital television, over a
single cable,
HDTV (high definition TV)
Ultimate digital format that produces
high resolution and high picture
quality.
NTSC
Acronym that stands for National
Television Systems Committee and
the name of the current analog
broadcasting standards,
Password
A stored 4-digit number that allows
access to parental control features,
SAP (secondary audio program)
Second-audio channel delivered
separately from main-audio channel.
This audio channel is used as an
alternate in bilingual broadcasting,
SDTV (standard definition TV)
Standard digital format that is similar
to the NTSC picture quality.
S-video
Offers higher quality images by
delivering each signal, color (c) and
luminance (y) independently of each
other through separate cables.
i,i'i_
ii!ii_!!_
iiiii:_il
[] Maintenance
• Wipe the front panel and other exterior surfaces of the unit with a
soft clothimmersed inlukewarm water andwrung dry.
• Neverusea solvent or alcohol.Do notspray insecticide liquid near
the unit. Suchchemicalsmay causedamage and discolorationto
the exposedsurfaces.
Wipethe panelofthe unitwithasoftcloth.Beforecleaningthe
panel,disconnectthe powercord.
Should your unit become inoperative, do nottry to correctthe
problemyourself.Thereare nouser serviceable parts inside. Turn
off the unit, unplug the power cordand callourtoll free customer
support line found onthe coverof this manual to locate an
authorized service center.
If the remote control isnot working properly, you canusean AM
radioor digital camera (including acellular phonewith built-in
camera)to see if it issending outan infraredsignal.
• With an AM radio:
Tunethe AM radio station to an0n-br0adcasting
frequency.Pointthe remote controltowards it,
pushany button andlisten. If the soundfrom the
radioflutters, it isreceivingthe remotec0ntr01's
infrared signal.
•Witha digitalcamera
(includingbuilt-incellphonecameras):
Pointadigitalcameratowardstheremotecontrol.
Pushanybuttononthe remotecontroland100k
throughthedigitalcamera.Iftheinfraredlight
appearsthroughthecamera,the remotecontrolis
working.
ii!!i,i_iii
_ii!!iill
EN

[] Cable Channel Designations
Ifyousubscribeto cableIV, the channelsaredisplayedas1-135.Cablecompaniesoftendesignatechannelswithlettersorletter-numbercombinations.
Pleasecheckwithyourlocalcablecompany.Thefollowingisachartof commoncablechannel designations.
TVDisplay 1 2 3 4 5 6 7 8 9 10 11 12 13 14 15 16 17 18 19 20 21
:A_v,,,, w+2:
TVDispMy 22 23 24 25 26 27 28 29 30 31 32 33 34 35 36 37 38 39 40 41 42
TVDisplay 43 44 45 46 47 48 49 50 51 52 53 54 55 56 57 58 59 60 61 62 63
TVDisplay 64 65 66 67 68 69 70 71 72 73 74 75 76 77 78 79 80 81 82 83 84
TVDisplay 8_ 86 87 88 89 90 91 92 93 94 95 96 97 98 99 100 101 102 103 104 105
TVDisplay 106 107 108 109 110 111 112 113 114 115 116 117 118 119 120 121 122 123 124 125 126
TVDisplay 127 128 129 130 131 132 133 135
[] General Specifications
TV format: ATSC/ NTSC-MTVstandard
Closed caption system:
§15.122/FCC(digitalCC) §15.119/FCC(analogCC)
Channel coverage (ATSC/NTSC):
Terrestrial VHE: 2~13 UHE:14~69
CATV 2~13,A~W,W+1~W+94 (analogW+1~W+84),
A-S~A-I, SA
Tuning system: Channelfreguencysynthesizedtuning system
Channel access: Directaccesskeyboard,
Programmablescan,and upldown
[] Electrical Specification
Sound output: 10W,8Ox2
[] Other Specifications
Terminals:
Antennainput: VHF/UHF/CATV 7SOunbalanced(F-type)
S-videoinput: MiniDIN4-pinjackx2 Y:lVp-p (750)
C:286mVp-p(75_)
Videoinput: RCAjackx2 lVp-p(7SO)
Audioinput: RCAjack(L/R)x10 2Vrms
Componentvideoinput:
RCAjackx6
HDMIinput: HDM119pinx2
PCinput: D-Sub1Spinx 1(RGB)
Y: lVp-p (75_)
Pb:700mVp-p(7S_)
Pr: 700mVp-p(7S_1)
Minijacko3.Smm x 1(audio)
Coaxialdigital audiooutput:
RCAjackxl 500mVp-p(75_)
Analogaudio output:
RCAjackx2
Remote control: Digital encodedinfraredlight system
Operating temperature:
41°F(S°C)to I04°F(40°0
Power requirements:
120V~AC+/- 10% 60Hz+/- 0.S%
Power consumption (maximum):
240W
LCD: 42inchesfull HDpanel
Dimensions: <Without stand>
H: 27.5 inches (698mm)
W:41.2inches (1046mm)
D: 4.8inches (120ram)
<With stand>
H: 29.6 inches (7S0mm)
W:41.2inches (1046mm)
D: 13.6inches (34Smm)
Weight: 50.7Ibs. (23.0kg)
• Designsandspecificationsaresubjectto changewithout noticeand
without ourlegalobligation.
• Ifthere isa discrepancybetween languages,the default languagewill
heEnglish.
EN

SYLVANIA
LIMITED WARRANTY
FUNAI CORR will repair this product, free of charge in the USA in the event of defect in materials or
workmanship as follows:
DURATION:
PARTS: FUNAI CORP.will provide parts to replace defective parts without charge for one (1) year
from the date of original retail purchase. Certain parts and LCD image burn-in are excluded
from this warranty.
LABOR: FUNAI CORP.will provide the labor without charge for a period of ninety (90) days from the
date of original retail purchase.
LIMITS AND EXCLUSIONS:
THIS WARRANTY IS EXTENDED ONLYTOTHE ORIGINAL RETAIL PURCHASER. A PURCHASE RECEIPT OR
OTHER PROOF OF ORIGINAL RETAIL PURCHASE WILL BE REQUIRED TOGETHER WITH THE PRODUCTTO
OBTAIN SERVICE UNDER THIS WARRANTY.
This warranty shall not be extended to any other person or transferee.
This warranty is void and of no effect if any serial numbers on the product are altered, replaced, defaced,
missing or if service was attempted by an unauthorized service center.This limited warranty does not
apply to any product not purchased and used in the United States.
This warranty only covers failures due to defects in material or workmanship which occur during
normal use. It does not cover damage which occurs in shipment, or failures which are caused by repairs,
alterations or products not supplied by FUNAI CORP.,or damage, which results from accident, misuse,
abuse, mishandling, misapplication, alteration, faulty installation, improper maintenance, commercial use
such as hotel, rental or office use of this product, or damage which results from fire, flood, lightning or
other acts of God.
THIS WARRANTY DOES NOT COVER PACKING MATERIALS, ANY ACCESSORIES (EXCEPTREMOTE CONTROL),
ANY COSMETIC PARTS,COMPLETE ASSEMBLY PARTS, DEMO OR FLOOR MODELS.
FUNAI CORP.AND ITS REPRESENTATIVESOR AGENTS SHALL IN NO EVENT BELIABLE FOR ANY GENERAL,
INDIRECT OR CONSEQUENTIAL DAMAGES ARISING OUT OF OR OCCASIONED BYTHE USE OF OR THE
INABILITY TO USE THIS PRODUCT. THIS WARRANTY IS MADE IN LIEU OF ALL OTHER WARRANTIES, EXPRESS
OR IMPLIED, AND OF ALL OTHER LIABILITIES ON THE PART OF FUNAI, ALL OTHER WARRANTIES INCLUDING
THE WARRANTY OF MERCHANTABILITY AND FITNESS FOR A PARTICULAR PURPOSE, ARE HEREBY
DISCLAIMED BY FUNAI AND ITS REPRESENTATIVESIN THE UNITED STATES.
ALL WARRANTY INSPECTIONS AND REPAIRSMUST BE PERFORMED BYAN AUTHORIZED SERVICECENTER.
THIS WARRANTY ISONLY VALID WHEN THE UNIT ISCARRIED-IN TO AN AUTHORIZED SERVICECENTER.
THE PRODUCT MUST BEACCOMPANIED BYA COPY OF THE ORIGINAL RETAIL PURCHASE RECEIPT.IF NO
PROOF OF PURCHASE ISATTACHED, THE WARRANTY WILL NOT BE HONORED AND REPAIRCOSTSWILL BE
CHARGED.
IMPORTANT:
THIS LIMITED WARRANTY GIVESYOU SPECIFIC LEGAL RIGHTS. YOU MAY HAVE OTHER RIGHTS THAT VARY
FROM STATETO STATE.IF,AT ANYTIME DURING THE WARRANTY PERIOD, YOU ARE UNABLE TO OBTAIN
SATISFACTION WITH THE REPAIROF THIS PRODUCT, PLEASECONTACT FUNAI CORP.
ATTENTION:
FUNAI CORR RESERVESTHE RIGHT TO MODIFY ANY DESIGN OF THIS PRODUCT
WITHOUT PRIOR NOTICE.
WARRANTY STATEMENT REGARDING NON AUTHORIZED REPAIRS:
To obtain warranty service, you must take the product, or deliver the product freight prepaid, in either its
original packaging or packaging affording an equal degree of protection, to any AUTHORIZED SERVICE
CENTER. FUNAI CORP.will not reimburse you for any service done by unauthorized service providers
without prior written approval.
To locate your nearest AUTHORIZED SERVICE CENTER or for general service inquiries,
please contact us at:
FUNAI CORPORATION
Customer Service
Tel : 1-800-968-3429
www.SylvaniaConsu merElectronics.com
19900 Van Ness Avenue, Torrance, CA 90501
Printed in China A81H1UH
1EMN22312 "_'_*'_*

ConPantalla irT_evisi6n Dinl
---,-,,_en2pulga_
Manua/de/USUar
LC420SS
AYUDA?
LLAME AL TELEFONO GRATUTITO!
1-800-968-3429
VISITE NUESTRO SlTIO WEB EN
www.SylvaniaConsumerElectronics.com
• L ¸

El modelo y el nOmero de serie de esta unidacl se pueden encontrar
en la caja. Debera anotar y guardar el modelo y el nOmero de serie
para consultarlos, si los necesita, en el futuro.
[] Precauciones
Numerode modelo:
N0merode serie:
ADVERTENCIA: PARAREDUClRELRIESGODEQUESEPRODUZCAUN INCENDIO0 SEREClBAUNADESCARGA
ELI_CTRICA,NOEXPONGAESTEAPARATOA LALLUVlANIA LAHUMEDAD.
ELAPARATONODEBERAEXPONERSEA LOSGOTEOSNIALASSALPICADURAS,Y ENClMADEleLNO
DEBERANPONERSEOBJETOSCONLIQUlDOSENSUINTERIORCOMO,POREJEMPLO,FLOREROS.
CAUTION
AVISO'PARAREDUCIRELRIESGODESUFRIRUNADESCARGAELI_CTRICA
NOQUITELACUBIERTA(0 ELPANELPOSTERIOR).ENELINTERIORDEL
APARATONOHAYPIEZASQUEDEBAMANIPULARELUSUARIO.SOLICITEEL
SERVICIODEREPARACIONESALPERSONALDESERVlCIOCUALIFICADO.
La marca de aviso est_ situada en la parte inferior o posterior de la caja.
El simbolo del rayo con punta de flecha, en el interior de un
tri_ngulo equil_tero, tiene la finalidad de avisar al usuario
de la presencia de"tensi6n peligrosa"dentro de la caja del
aparato que podria set de suficiente intensidad como para
constituir un riesgo para las personas en caso de que _stas
recibiesen una descarga el_ctrica.
El signo de exdamacidn dentro de un tri_ngulo equil_tero
tiene la finalidad de avisar al usuario de la presencia de
instrucciones de utilizacidn y mantenimiento (servicio) en el
material impreso que acompa_a al aparato.
Instrucciones de Seguridad Importantes
1. Lea estas instrucciones. 10. Proteja el cable para que nadie Io pise ni sea pellizcado,
2. Guarde estas instrucciones.
3. Haga caso de todas las advertencias.
4. Siga todas las instrucciones.
5. No utilice este aparato cerca del agua.
6. Limpie el aparato con un pa6o seco.
7. No tape ninguna abertura de ventilaci6n. Haga la
instalaci6n siguienclo las instrucciones clel fabricante.
8. No instale el aparato cerca cle fuentes cle calor como, pot
ejemplo, racliadores, saliclas de aire caliente, estufas u otros
aparatos (incluyenclo amplificaclores) que procluzcan calor.
9. No anule la funci6n de seguriclacl de la clavija polarizacla
o con conexi6n a tierra. Una clavija polarizacla tiene
dos patillas, una de la cuales es m_s ancha que la otra.
Una clavija clel tipo de conexi6n a tierra tiene dos
patillas y una espiga de conexi6n a tierra. La patilla
m_s ancha y la espiga se incluyen para su seguriclacl.
Si la clavija suministracla no se puecle conectar en su
toma de corriente, consulte a un electricista para que le
reemplace la toma de corriente obsoleta.
particularmente en la clavija, recept,iculo de
conveniencia o punto por doncle sale del aparato.
11. Utilice solamente los accesorios especificaclos pot el
fabricante.
12. Utilice el aparato s61ocon el carrito, soporte,
tripocle, m_nsula o mesa especificaclo por el
fabricante, o vendiclo con el aparato. Cuanclo
utilice un carrito, tenga cuidaclo para mover
la combinaci6n clel carrito/aparato, para
evitar causar hericlas o que el aparato se caiga.
13. Desenchufe este aparato clurante las tormentas el_ctricas
o cuanclo no se vaya a utilizar clurante mucho tiempo.
14. Solicite toclas las reparaciones al personal de servicio
cualificaclo. Las reparaciones set,in necesarias cuanclo el
aparato se haya estropeaclo de cualquier forma como,
por ejemplo, cuanclo el cable o la clavija de alimentaci6n
se hayan daffado, cuando se hayan derramado liquidos o
hayan caiclo objetos en el interior clel aparato, cuanclo el
aparato haya estado expuesto a la Iluvia o a la humedad,
cuanclo no funcione normalmente o cuanclo se haya caido.
ADVERTENCIA DE LA FCC
Este aparato puede generar o utilizar energia raclioel_ctrica. Los cambios o las modificaciones que se hagan en este aparato
poclr_n causar interferencias a menos que _stos sean aprobaclos expresamente en este manual. El usuario poclr_ percler la
autorizaci6n que tiene para utilizar este aparato si hace alg0n cambio o moclificaci6n que no haya siclo autorizaclo.
INTERFERENCIA DE RADIO Y TV
Este aparato ha siclo probaclo y ha clemostrado cumplir con los limites existentes para los clispositivos digitales de la
Clase B, de conformiclacl con el Apartaclo 15 de las Normas de la FCC. Este aparato genera, utiliza y puecle racliar energia
raclioel_ctrica, y, si no se instala y utiliza de acuerclo con las instrucciones, puecle causar interferencias perjucliciales
en las comunicaciones pot radio. Sin embargo, no existen garantias de que no se procluzcan interferencias en una
instalaci6n particular. Si este aparato causa interferencias perjucliciales en la recepci6n de la radio o la televisi6n, Io
que se puecle cleterminar apaganclo y luego encenclienclo el aparato, al usuario se le recomiencla intentar eliminar la
interferencia tomanclo una, o m,is, de las mecliclas siguientes:
1) Cambie la orientaci6n y la ubicaci6n de la antena de recepci6n.
2) Aumente la separaci6n entre el aparato y el receptor.
3) Conecte el aparato en una toma de corriente o circuito que sean cliferentes de aquellos a los que est_ conectaclo el receptor.
4) Consulte a su concesionario o t_cnico en raclio/TV con experiencia para solicitar su ayucla.
Este aparato digital de la clase B cumple con la norma canadiense ICES-003.
Cet appareil num_rique de la classe B est conforme _ la norme NMB-O03 du Canada.
ES

Esteaparatonodeber_colocarseenunainstalaci6nempotradacomo,porejemplo,unalibreriaoestanteria,amenos
quedispongadeunaventilaci6napropiada.
Aseg0resededejarunespacioibredeunos3,2pugadas(Scm)arededordeesteaparato.
Desconectelaclavijadealimentaci6ndelatomadecorrientecuandobusqueunproblemaonoutiliceelaparato.La
cavijadeaaimentaci6ndeber_estarsiempreistaparaserconectada.
AVlSO: Si la pila se sustituye incorrectamente existe el riesgo de que se produzca una explosi6n. Sustit0yala siempre por
otra de tipo equivalente.
ADVERTENClA: Las baterias y las pilas (la bateria o la pila que est_ instalada) no deber_n exponerse a un calor excesivo como, por
ejemplo, el del sol, el de un incendio u otro similar.
LA LUZ (_) DE LA LCD CONTIENE MERCURIO, DESHAGASE DE ELLA CUMPLIENDO LA LEY LOCAL, ESTATAL O FEDERAL.
ADVERTENCIA: Para impedir lesiones, este aparato deber_ fijarse firmemente al suelo/pared siguiendo las instrucciones.
PARA EVITAR PEI.IGROS DE DESCARGA EI.F:CTRICA O INCENDIO
• No maneje el cable de alimentaci6n con las manos mojadas.
• No retire la caja de este aparato. Tocar las piezas del interior de la caja puede causar una descarga el_ctrica y/o daffos
en este aparato. Para realizar reparaciones y ajustes en el interior de este aparato, Ilame a un concesionario cualificado
o a un centro de reparaciones autorizado.
• No tire del propio cable cuando Io desconecte de una toma de CA. Sujete la clavija y tire de ella.
• No meta sus dedos ni otros objetos en la unidad.
COI.OCACION Y MANEJO
• Las aberturas no deber_n taparse colocando la unidad en una cama, sof_, alfombra u otra superficie similar.
• No instale la unidad cerca de un radiador o salida de aire caliente.
• No instale la unidad expuesta a la luz solar directa, cerca de campos magn&ticos o en lugares expuestos al polvo o a
vibraciones fuertes.
• Evite colocar la unidad donde se produzcan cambios extremos de temperatura.
• Instale la unidad en una posici6n horizontal y estable. No ponga nada directamente encima o debajo de la unidad.
Dependiendo de los dispositivos externos, es posible que se produzcan ruidos y alteraciones en la imagen y/o sonido si la
unidad se coloca demasiado cerca de ellos. En este caso, deje un buen espacio entre los dispositivos extemos y la unidad.
• Dependiendo del medio ambiente, la temperatura de esta unidad puede aumentar un poco, pero esto no indica
ning0n fallo de funcionamiento.
NOTA ACERCA DEL RECICLADO
• Los materiales de embalaje de esta unidad son reciclables y pueden volver a utilizarse. Disponga de ellos
segun los reglamentos de reciclado locales.
Las baterias y las pilas nunca deber_n tirarse a la basura ni incinerarse, sino que se deber_ disponer de ellas
seg0n los reglamentos locales relacionados con la basura quimica.
TRANSPORTE DE ESTA UNIDAD
• Esta unidad deber_ set llevada pot un minimo de dos personas.
• Aseg0rese de sujetar firmemente los bastidores superior e inferior de la unidad como se muestra en la ilustraci6n.
i!iii_
il!iiiil_
ES

[] Accesorios Suministrados
manual del usuario guia de inicio rapido
(1EMN22312) (1EMN22313)
mando a distancia pilas tornillo Phillips para
(NFO2OUD) (AA x 2) enganchar el soporte x 4
(FPH34100)
• Si necesita cambiar estos accesorios, consulte el numero de pieza que aparecejunto alas ilustraciones y Ilame a
nuestro tel&fono de atenci6n al cliente, que encontrar_ en la portada de este manual.
• SegOn su sistema de antena, puede necesitar diferentes tipos de combinadores (mezcladores) o separadores
(divisores). Para obtener estos elementos, acuda a su establecimiento de electr6nica local.
[] Conectar el Soporte
Tiene que poner el soporte a la unidad para que se muestre recta. Cornpruebe que la parte trasera y la delantera del
soporte coinciden en la direcci6n apropiada.
Extienda un paffo grueso y suave
sobre una mesa.
Coloque la unidad principal con la
pantalla hacia abajo sobre la mesa.
Compruebe que no daffa la
pantalla. Se necesitan al menos
dos personas para Ilevar a cabo
este paso.
2 Introduzca el soporte deltodoen 3
la unidad principal lentamente.
Compruebe que el cable de
alimentaci6n de CA no est_ entre
el soporte y la unidad.
Atornille firmemente los tornillos
phillips para enganchar el
soporte en los 4 orificios roscados
en la parte inferior de la base.
Nota:
•AIponer etsoporte, compruebe quetodos los tornillos est_n bien apretados. Si elsoporte no estd bien puesto, podria hater que secaiga
la unidad con elresultado dehefidas asf como da5os a la unidad.
•Aseg(lrese deutilizar una mesa quepueda soportar elpeso dela unidad y quesea rods grande quela unidad.
•Aseg(lrese dequela mesa seencuentra enposid6n estable.
•Si retira los ejesdela basede esta unidad para fijar elaparato en la pared, aseg(Iresedeincorporaflos antes defijar la base.
[] Simbolos Utilizados en este Manual
festaes [a descripci6n de los simbolos utilizados en este manual.
La descripci6n se refiere a:
: Funcionamiento de TV digital _ : Funcionamiento de TV anal6gica
• Si no aparece ninguno de los simbolos bajo el encabezamiento de funci6n, el funcionamiento es aplicable a ambos.
[] Informaci6n sobre Marcas Registradas
• HDMI, el Iogotipo de HDMI y High-Definition Multimedia Interface son marcas comerciales o marcas registradas de
HDMI Licensing LLC.
• Fabricado bajo licencia de Dolby Laboratories/'Dolby"y el simbolo de la doble D son marcas comerciales de Dolby
Laboratories.
• Los Productos que han conseguido el ENERGYSTAR_'est_n diseffados para proteger el medio ambiente a trav6s de una
mejor eficiencia en el consumo de energia.
ES

[] Caracteristicas [] Contenido
• DTV/TV/CATV
- Puede utilizar su mando a distancia para seleccionar
canales emitidos en formato digital y en formato
anal6gico convencional. Adem_s, los suscriptores
de cable pueden acceder a sus canales de televisi6n
por cable.
• Pantalla de Informaci6n de Programas
(solamente DTV)
- Puede visualizar el titulo, el contenido y otra
informaci6n del actual programa DTV en la pantalla
del televisor.
• Exploraci6n Autom_itica de Canales
- Esta unidad explora y memoriza autom_ticamente
los canales disponibles en su zona, eliminando
complicados procedimientos de configuraci6n.
• V-chip
- Esta funci6n le permite bloquear el acceso de los
ni_os a programas inapropiados.
• Decodificador de Subtitulos
- El decodificador de subtitulos incorporado
muestra el texto de la programaci6n que contiene
subtitulos.
• Sintonizador MTS/SAP
- Puede seleccionarse el audio desde el mando a
distancia.
• Funci6n de Apagado Autom_tico
- Si no hay entrada de seffal desde el terminal de
antena y no se realiza ninguna operaci6n durante
15 minutos, la unidad se apagar_ autom_ticamente.
• Temporizador de Apagado
- Esta funci6n apagara autom_ticamente la unidad a
una hora especificada.
• Opciones para Idioma de Pantalla
- Seleccione el idioma que aparecer_ en la pantalla:
Ingl6s, espa_ol o franc_s.
• Funci6n de Sonido Est_reo
• Sintonizaci6n de Frecuencia PLL Sintonizada
- Proporciona una selecci6n de canales gratuita y
sencilla y le permite sintonizar directamente con
cualquier canal mediante los botones de n0mero
de canal del mando a distancia.
• Resumen
- Esta unidad memoriza autom_ticamente la
configuraci6n en caso de ocurrir alg0n torte de
alimentaci6n.
Entrada HDMI
Entrada PC
Entrada de Video en Componentes
Entrada de S-video
Entrada AV
Salida de Audio Digital Coaxial
Precauciones..................................................... 2
AccesoriosSuministrados.......................................... 4
Conectarel Soporte............................................... 4
SimbolosUtilizadosenesteManual................................. 4
Informaci6nsobreMarcasRegistradas.............................. 4
Caracteristicas.................................................... 5
BotnesenelMandoaDistancia..................................... 6
Instalaci6ndelasPilas............................................. 6
PaneldeControl.................................................. 7
PanelTrasero..................................................... 7
Conexi6nB_sica.................................................. 8
C0nexi6ndeDisp0sitiv0Extern0.................................... 9
Instalaci6ndeunS0p0rteparael M0ntajeenPared
(sevendeporseparado).......................................... 12
AJUSTE NCAL
Configuraci6nInicial............................................. 13
Meni Principal.................................................. 14
Exploraci6nAutorn_iticadeCanales................................ 14
Selecci6ndeIdioma.............................................. 15
PARA '\/ER LA TELEV/S(>N
Selecci6ndeCanal............................................... 16
AjustedeVolumen............................................... 16
TemporizadordeApagado........................................ 16
ModoFijo....................................................... 17
ParaCarnbiarentreCadaModo.................................... 17
ParaCambiarel MododeAudio ................................... 17
Inforrnaci6ndePantalla.......................................... 18
MododeVisualizaci6ndePantalladelTelevisor..................... 19
i
i •
i
ii m
iiii_L
AJUS[E OPC ONAL
ListadeCanales................................................. 20
RegistroManual................................................. 20
ConfirmacibndelaAntena........................................ 21
AjustedeImagen................................................ 22
AjustedeS0nid0................................................. 23
Subtitulos....................................................... 24
Subtitul0senDTV................................................ 25
Estil0CC........................................................ 26
V-chip.......................................................... 28
AjustesdePC.................................................... 31
AudioHDMI..................................................... 32
5_OL_;C;:GDI D OBL MAt:_
Iuia deSolutiondeProblemas.................................... 33
Glosario......................................................... 35
Mantenimiento.................................................. 35
DenominacionesdeCanalesdeCable.............................. 36
EspecificacionesGenerales........................................ 36
Especificaci6nEl_ctrica........................................... 36
OtrasEspecificaciones....................................... 36
il!_iiiil_
i
© 2007 Funai Electric Co., Ltd. Garantia Limitada .................................. 1"apatrasera
Todos los derechos reservados. No se permite la reproducci6n total o partial de este manual, ni su copia, transmisi6n, difusi6n,
transcripci6n, descarga o almacenamiento en ningOn soporte de almacenamiento, en forma alguna o con fin alguno sin la autorizaci6n
expresa y previa por escrito de Funai.
Adem_s, toda distribuci6n comercial no autorizada de este manual o toda revisi6n del mismo queda estrictamente prohibida.
La informaci6n contenida en este documento puede ser objeto de cambios sin previo aviso. Funai se reserva el derecho de cambiar el
contenido de este documento sin la obligaci6n de notificar dichos cambios a ninguna persona u organizaci6n.
I_UNAI con el diseho _ es una marca comercial registrada de Funai Electric Co., Ltd y no se puede utilizar en modo alguno sin la
autorizaci6n expresa por escrito de Funai. Todas las restantes marcas comerciales utilizadas en este documento siguen siendo propiedad
exclusiva de sus respectivos propietarios. Nada de Io contenido en este manual debe set entendido como concesi6n, implicita o de otro
tipo, de cualquier licencia o derecho de uso de cualquiera de las marcas comerciales en el visualizadas. El uso indebido de cualquier marca
comercial o de cualquier otro contenido de este manual queda estrictamente prohibido. Funai ham cumplir en_rgicamente sus derechos
de propiedad intelectual dentro de los limites m_ximos establecidos por la ley.
ES

[] Botnes en el Mando a Distancia
3
4
5
6
7--
8
1. POWER (p. 13)
Presione para activar y desactivar
la unidad,
2. Botones num_ricos (p. 16)
• Presione para seleccionar los
canales,
-- (gui6n)
• Presione para separar el canal
menor del canal mayor,
3. SETUP (p. 14)
Presione para visualizar el men0
principal,
4. _II_ IA IV (p. 13)
Presione para desplazarse por los
elementos, izquierda/derecha/
arriba/abajo,
5. ENTER (p, 13)
Presione para decidir el comando
de ajuste cuando aparezca el
menu principal,
6. BACK (p. 18)
Presione para volver a la
operaci6n de men0 anterior.
7. CH. RECALL (p, 16)
Presione para volver al canal
anterior,
8. VOL.'I (p, 16)
Presione para ajustar el volumen,
9. MUTE _ (p, 16)
Presione para activar y desactivar
el sonido,
10. INPUT SELECT (p, 17)
Presione para acceder a los
dispositivos extemo conectado,
como un reproductor de DVD o
aparato de video (VCR),
11. SLEEP (p, 16)
Presione para activar el
temporizador de apagado.
12. AUDIO (p, 17)
Modo Digital (DTV)
• Presione para seleccionarel
idioma de audio,
Modo Anal6gico (TV)
• Presione para seleccionarel
modo de audio,
13, STILL (p, 17)
Presione para detener
moment_neamente la imagen.
14. SCREEN MODE 1_3(p. 19)
Presione para seleccionar las
relaciones de aspecto disponibles
para la pantalla del televisor.
15. INFO (p, 18)
Modo Digital (DTV)
• Presione para mostrar la
informaci6n de canal, el tipo de
seffal y el ajuste de TV,
Modo Anal6gico (TV)
• Presione para mostrar el
n0mero de canal, el tipo de
seffal y el ajuste de TV,
Modo de Entrada Extema
• Presione para mostrar los
modos de entrada externa, el
tipo de seffal y el ajuste deTV.
16. CH AIr (p, 16)
Presione para seleccionar los
canales y los modos de entrada
externo.
[] Instalacibn de las Pilas
Instale las pilas (AA x 2) de manera que coincida la polaridad indicada en el interior del compartimiento de las pilas del
mando a distancia,
Precauciones sobre las Pilas: 1
I
• Aseg(_resede seguir la polaridad correcta seg_n Io indicado en el cornpartimiento de las pilas. Unas pilas en posici6n invertida pueden I
causar dafos en el dispositivo. I
• No mezcle diferentes tipos depilas (por ejemplo, Alcalinas yde Carbono-Zinc), ni pilas viejas conpilas nuevas. I
• Siel dispositivo no seva a usar durante un per[odo prolongado de tiempo, quite tas pilas para evitar da_os o lesionespor posibles fugas deI
laspilas.
• No intente recargar laspilas;ya quepodrian sobrecalentarse y rornperse.
ES

[] Panel de Control
[] Panel Trasero
parte trasera de la unidad
parte lateral de la unidad
parte trasera de la unidad
1. POWER (p. 13)
Presione para activar y desactivar la unidad.
2. INPUT SELECT (p. 17)
• Presione para acceder a los dispositivos externo
conectado, como un reproductor de DVD o aparato
de video (VCR).
m 1
• Presione para decidir el commando de ajuste
cuando aparezca el menO.
CHANNEL A/V (p. 16)
Presione para se}eccionar cana}es o despiazarse arriba/
abajo pot los elementos del menu principal.
VOLUME_/ (p. 16)
Presione para ajustar el volumen o para moverse a
'5 derecha (_)/izquierda (V) pot los elementos del menu
principal.
5, SETUP (p. 14)
6 Presione para visualizar el menO principal.
6. ventana del sensor de infrarrojos
7 Recibe los rayos infrarrojos transmitidos desde el
mando a distancia.
7. indicador de espera
Se ilumina en el rnodo de espera.
11
2
3.
3
4,
'4
i_,iil!
,ii_!il
12
parte lateral de la unidad
1. toma de entrada de PC (p. 12)
Conexi6n del cable VGA para PC.
2. toma de entrada de audio para conexi6n de PC (p. 12)
Conexi6n de cable de audio con mini-enchufe para PC.
3. toma de entrada de antena (p. 8)
Conexi6n de cable coaxial RF para su antena o caja de
cable/sat_lite.
4. toma de entrada HDMI (p. 9)
Conexi6n HDMI para dispositivos HDML
5. toma de entrada de audio (p. 9)
Conexi6n de audio RCA para dispositivos DVl.
(Solamente para la toma de entrada HDMI1)
6. cable de alimentaci6n de CA
Con6ctelo a una toma est_ndar de CA para suministrar
alimentaci6n el_ctrica a esta unidad.
7. toma de salida de audio digital y coaxial (p. 11)
Conexi6n de audio digital y coaxial para decodificador
o receptor de audio.
8. toma de entrada de audio (p. 10)
Conexi6n de audio RCA para dispositivos externo.
9. toma de entrada de video (p. 11)
Conexi6n de video RCA para dispositivos externo.
10. toma de entrada de S-video (p. 10)
Conexi6n de S-video para dispositivos externo.
11. toma de salida de audio (p. 11)
Conexi6n de audio RCA para dispositivos externo.
12. toma de entrada de video en componentes y audio (p. 1O)
Conexi6n de video en componentes y de audio RCA
para dispositivos externo.
ES

[] Conexi6n B6sica
Enestasecci6nsedescribec6moc0nectarlaunidadaunaantena,cajadecable/sat_lite,etc.
I Nota:
• Aseg_resedequesu antena u otra dispositivo estdconectada correctamente antes deenchufar el cable dealimentacidn.
[Conexi6n de Antena]
Conecte el cable coaxial RF de su toma de corriente a la toma de entrada de antena de esta unidad,
p.ej.)
parte trasera de la unidad
cable coaxial RF
empresa de
TV por cable
Una vez completadas las conexiones, encienda la unidad e inicie la configuraci6n inicial,
La exploraci6n de canales es necesaria para que la unidad memorice todos los canales disponibles en su zona,
(Consulte la secci6n "Configuraci6n Inicial"en la p_gina 13).
Nora:
• Parasu seguridady para evitar dafios en esta unidad, desenchufe el cablecoaxial RFdela torna deentrada de antena antes de mover
la unidad.
• Siutiliza una antena para recibir televisidn analdgica, _sta deber[a funcionar tambi_n para recepci6n deDTV Las antenas deexterior
tejado serdn rndseficacesquelas de versionesdesobremesa.
• Paracambiar fdcilmente su fuentede recepcidn entre antena y cable,instale unselector deantena.
• Siseconecta directamente al sistema de cable,p6ngase en contacto con el instalador de CATV
[Conexi6n a Caja de Cable o Caja de Sat_lite]
Utilice un cable coaxial RF para conectar la toma de entrada de antena de la unidad a la toma de salida de antena de la
caja de cable/sat&lite,
p.ej.)
plato de
sat_lite
parte trasera de la unidad
ANTIN ANT OUT cable coaxial RF
empresa de
caja de cable/sat_lite
Los cables necesarios y los m6todos de conexi6n varian segOn la caja de cable/sat&lite,
Para m_s informaci6n, p6ngase en contacto con su proveedor de cable/sat&lite,
ES

[] ConexiOn de Dispositivo Externo
[Conexibn HDMI]
HDMI (High-Definition Multimedia Interface/Interfaz multimedia de alta definiciOn) es una interfaz que transmite video
y audio digital por canales m01tiples de alta definiciOn mediante un solo cable. Esto asegura que las se_ales que se
envian desde la fuente hacia la unidad son de la m_s aha definici6n posible,
p.ej.)
parte trasera de la unidad
reproductor de DVD con toma de
salida HDMI
cable HDMI
Nora:
• Esta unidad acepta sehales de vfdeo de 480i/480p/720p / 1080i/1080p, y sef}ales de audio de 32 kHz/44,1 kHz/48 kHz.
• Esta unidad solamente acepta sehat de audio de 2 canales (LPCM).
• Esnecesafio seleccionar "PCM'para la salida de audio digital del dispositivo conectado o la configuration de audio HDMI.
Puede qua no haya sehal de audio si selecciona "Bitstream" (Secuencia de bits), etc.
• Esta unidad solamente acepta sehales compatibles con la norma EIA861.
) '_'i
ii%!_
i!ii_!
[ConexiOn HDMI-DVI]
Si su dispositivo de video tiene una toma de salida DVI, utilice un cable conversor HDMI-DVI para esta conexiOn,
p.ej.)
i
SOlo para la toma de
cable de conversion entrada HDMI1 parte trasera de la unidad
HDMI-DVl
caja de cable o caja de
sat_litecontomade ii!)i
saiida DVI i !iiiiil
Nota:
• Esta unidad acepta sehales de vfdeo de 480i/480p/720p / 1080i/1080p.
• La conexiOn HDMI-DVI tambi)n requiere una conexidn de cable de audio RCA separada.
• Las sehales de audio se convierten de digitales a analOgicas para esta conexiOn.
• DVI no muestra la irr}agen de resolution 480i qua no es compatible con la norma EIA/CEA-861/861B.
ES

[Conexi6n de Video en Componentes]
La conexi6n de video en componentes ofrece una mejor calidad de imagen para dispositivos de video conectados a la
unidad.
Utilice un cable de video en componentes para conectar la unidad a dispositivos de video externos equipados con
tomas de salida de video en componentes.
Si Io conecta a las tomas de entrada de video COMPONENT1 6 COMPONENT2 de la unidad, conecte el cable de audio
RCA alas tomas de audio L/R de COMPONENT1 6 COMPONENT2 respectivamente.
p._.j.)
(verde)
,_ ] Y Pb/Cb Pr/Cr[ parte trasera de la unidad
...................... [] 'COMPON_NT_DEOOUT ''l
L R q
reproductor de DVD con lastomas
de salida de vfdeo en corr
Nota:
• Esta unidad acPptasehalesde Wdeode480i/480p/720p / 1080i/1080p.
• Cuando sienta el ruido enla pantalla del televisor, desconectar elcable VGApuede reducirlo.
[Conexi6n de S-video]
La conexi6n S-video ofrece una buena calidad de imagen para dispositivos de video conectados a la unidad.
Utilice un cable S-video para conectar la unidad a dispositivos de video externos equipados con toma de salida de
S-video.
Si Io conecta alas tomas de entrada de video S-video1 VIDEO1 6 S-video2 VIDEO2 de la unidad, conecte el cable de
audio RCA alas tomas de audio L/R de S-videol VIDEO1 6 S-video2 VIDEO2 respectivamente.
p.ej.)
AUDIO OUT S-VIDEO
L R OUT parte trasera de la unidad
reproductor de DVD con toma de
salida de S-video
Nota:• Siseconecta ala toma de entrada de S-videoy a la toma deentrada de Wdeoalmismo tiempo, tendrd prioridad laconexi6n S-video. ]
ES

[Conexibn de Video]
La conexi6n de video RCA ofrece una calidad normal de imagen para dispositivos de video conectados a la unidad,
Si Io conecta a las tomas de entrada de video VIDEO1 6VIDEO2 de la unidad, conecte el cable de audio RCA a las tomas
de audio L/R de VIDEO1 6 VIDEO2 respectivamente.
Cuando la toma de audio del dispositivo de video sea monoaural, conecte el cable de audio RCA a la toma de entrada
de audio L (izquierda).
p.ej.)
parte trasera de la unidad
camara
de video
aparato de video
AUDIO OUT
,L _ %T°
I
/DE
Nota:• Siseconecta ala toma de entrada de S-videoy a la toma deentrada de vfdeo al mismo tiempo, tendrd prioridad la conexi6n S-video. ]
[Conexibn de Salida de Audio]
Digital (solamente para la emisi6n digital)
Si conecta esta unidad a un dispositivo de audio digital externo, podr_ disfrutar de audio muhicanal, como el sonido de
emisiones digitales de 5+I canales (5.1ch).
_kAnalbgica
Siconecta esta unidad a un dispositivo de audio anal6gico externo, podr,_disfrutar de sonido est6reo (2 canales),
p.ej.)
decodificador
Dolby Digital
sistema est_.reo
parte trasera de la unidad
ii!ii_!_
ii_ii?
_ii;_IIII!!
iIi:_i:il
i!iii_
il!_iiiil_
ES

[Conexi6n de PC]
Esta unidad est_ equipado con una toma de entrada de PC. Si conecta la unidad a su ordenador, puede utilizarlo como
monitor.
p.ej.)
El cable VGA debe
tener el nticleo de
ferrita.
cable VGA
parte trasera de la unidad
cable de audio de mini-enchufe
computad _personal
Noto:
• Por favor, cornpre el cable VGAque tenga el nOcleodeferrita.
]
[] Instalaci6n de un Soporte pare el Montaje en Pared (se vende pot separado}
Acontinuaci6nseofreceunadescripci6ndelm_todoparainstalarunsoporteparaelmontaje enparedenesteaparato.
AIrealizarestaoperaci6u,cousulteel manualdeinstruccionesinduidoconeljuego demontajeeupared,
i Necesitar_ el siguiente soporte de montaje en pared i
para este aparato. !i
Televisor de pantalla plane pare fijar ala pared i
Numerodemodelo:VMPL i
Paremds informacidn, [
visite etsitio web deSANUSSYSTEMSen www.sanus.com i
* '0) Y_2)indican la posici6n de los agujeros de tornillo de este aparato.
)arte trasera de la unidad
Extienda un paffo grueso y suave sobre una mesa. Coloque
la unidad principal con la pantalla hacia abajo sobre la
mesa. Compruebe que no daffa la pantalla. Se necesitan al
menos dos personas pare Ilevar a cabo este paso.
No ta:
• Aseg_resedeutitizar una mesa qua pueda soportar el peso
detaparato y quasea mds grande quael aparato.
I • AsegOresedeque ta mesase encuentra enposici6n estable.
ES
2 Retire los ejes de la base de esta unidad.
Desatomille los tornillos M5 indicados en rd) y quite los
ejes de la base. Sea cuidadoso con la unidad luego de
retirar los ejes de la base.
Note:
• Lostornillos M5y la base desoporte que ha retirado
serdn necesafios pare volvera instalarlos postefiormente.
Asegdrese deguardarlos en un tugar seguro.
File los soportes del monitor a esta unidad con los
tornillos M6 que se incluyen en el equipo pare fijar en
la pared.
Note:
• Utilice solamente los agujeros de tornillo indieados en_2_
pare montar esteaparato.
• Pareconocer instrucciones sobre c6mo colocar la place del
monitor, consulte elmanual deinstrucciones induido con
eljuego demontaje enpared.
4 Instale el aparato en la pared. Se necesitan al menos dos
personas pare Ilevar a cabo este paso.
Note:
• Consulte el manual deinstrucciones inctuido con eljuego
demon taje enpared pare sujetar el aparato a la pared.

[] Configuraci6n Inicial
Estasecci6nleguiar_atray,sdelajusteinitialdelaunidad,queincluye
laselecci6ndeunidiomaparasusmenusdepantallaylaexploration
autom_iticadecanales,queexploraymemorizaautom_iticamentelos
canalesvisibles.
Antesdeempezar:
Asegtiresedequelaunidadest_iconectadaalaantenaoalcable.
Despu_s de hacer todas las conexiones necesarias,
presione [POWER] para encender la unidad.
POWER
• Esta operaci6n tardar_ unos momentos.
2 Utilice [Cursor AIr] para seleccionar el idioma de
pantalla entre las opciones de la cterecha de la pantalla
del televisor. (English / Espa_ol / Fran(;ais)
• Aparecer_ en pantalla el men0 "Ajuste Inicial" en
el paso 3, en el idioma seleccionado despu_s de
presionar [ENTER].
Utilice [Cursor A/V] para seleccionar "Aire" para
canales de televisi6n o "Cable" para canales CATV y
luego presione [ENTER].
!
!
• Comienza autom_ticamente la exploraci6n y la
memorizaci6n de los canales.
Nota:
• Sise conecta directamen teal sistema de cable, p6ngase en
contacto con elinstalador de CATV.
• Sipresiona [POWER] o[SETUP] duran tela exploraci6n
automdtica decanates,esteajuste secancelard.
• Lafund6n deexploraddn automdtica inicial decanales
puede ejecutarse,para "Aire"o "Cable"solamente una vez.
AIcambiar la conexi6n (aire/cable), establezcadenuevola
exploraci6n automdtica de canales.(Consultela pdgina 14).
• Puedecancelar osalir del mend deexploraddn
automdtica decanales presionando [SETUP].
• Sino hay entrada de serialdesde el terminal deantena y
no seproduce ninguna operaddn durante ratios segundos
despu#sde encender la unidad, aparecerd "Sugerencias
Otiles'_Siga lasinstrucciones delapantalla dettelevisor.
_ii_IIII!!
iIii_i_:il
IO
i!iii_
}!_iiiil_
• Cuando la exploraci6n y la memorizaci6n han
finalizado, se muestra el canal memorizado m_s bajo
de la emisi6n.
ES

[] Mend Principal
Enestasecci6nsedescribenlosaspectosgeneralesdelmenu principalque
aparecealpresionar[SETUP].Param_sdetalles,consultelap_ginade
referenciadecadaelemento.
Elmenuprincipalsecomponedelossiguienteselementosdeajustede
funci6n.
[] Exploraci6n Autom_tica de
Canales
Sicambialoscables(porejemplo, entreantenayCAW)osimuevela
unidadaotrolugardespu_sdelajusteinitial,osirecuperauncanalDTV
eliminado,tendr_querealizarlaexploraci6nautom_ticadecanales.
Presione [SETUP].
• SALIR
Permite abandonar la configuraci6n.
• IMAGEN
Puede ajustar la calidad de la imagen.
(Consulte la secci6n "Ajuste de Imagen" en la
p_gina 22).
• SONIDO
Puede ajustar la calidad de sonido.
(Consulte la secci6n "Ajuste de Sonido" en la
p,_gina 23).
• CANAL
Puede explorar autom_ticamente los canales visibles
y eliminar los no deseados.
(Consulte la secci6n "Exploraci6n Autom_tica de
Canales" en la p,_gina 14).
• DETALLE
Puede cambiar el formato de pantalla para
subtitulos para sordos, que muestran el di_logo de
un programa de televisi6n u otra informaci6n en la
pantalla del televisor.
(Consuhe la secci6n "Subtitulos" en la p_gina 24).
Ajuste las limitaciones de visualizaci6n.
(Consuhe la secci6n "V-chip" en la p_gina 28).
Ajuste la posici6n, la estabilidad y la claridad de la
pantalla del PC.
(Consulte la secci6n "Ajustes de PC" en la p,]gina 31).
Y, si su unidad est_ conectado al dispositivo HDMI,
seleccione la entrada de sonido para la toma de
entrada HDMI1.
(Consulte la secci6n "Audio HDMI" en la p,]gina 32).
• IDIOMA
Puede cambiar el idioma (Ingl6s, Espaffol, Franc6s)
visualizado en el menu principal.
(Consulte la secci6n "Selecci6n de Idioma" en la
p_gina 15).
Antesdeempezar:
Asegtiresedequelaunidadest_conectadaalaantenaoalcable.
Presione [SETUP] para visualizar el men0 principal.
#:
2 Utilice [Cursor A/V] para seleccionar "CANAU', y luego
presione [ENTER].
o
3 Utilice [Cursor A/V] para seleccionar "Autoscan", y
luego presione [ENTER].
o
Utilice [Cursor A/V] para seleccionar la opci6n
apropiada y presione [ENTER].
o
• Cuando la antena a6rea est6 conectada, seleccione
"Aire".
• Cuando se conecte a un CATV, seleccione "Cable".
• Comienza autom_ticamente la exploraci6n y la
memorizaci6n de los canales.
• Cuando la exploraci6n y la memorizaci6n han
finalizado, se muestra el canal memorizado m_s bajo.
ES

Nota:
• Si se conecta directarnente al sistema de cable, pdngase en
contacto con el instalador de CATV.
• Sipresiona [POWER] o [SETUP] durante la exploraci6n
automdtica de canales, este ajuste se cancetard.
• El ajuste del canal se guardard induso si se produzca un
carte de energfa.
• Si tiene men(is el ingles o en franc_s y necestia en espaSol,
presione [SETUP]. Utilice [Cursor A/V] para seleccionar
"LANGUAGE" o "LANGUE", y luego presiane [ENTER].
Utilice [Cursor A/V] para seleccionar "EspaSol", y luego
presione [ENTER[. Presione [SETUP] para elirninar el men
principal
• Solamente con respecto al canal digital incluso despu#s
de finalizar la exploraci6n, si desenchufa el cable de
alimentaci6n de CA antes de apagar la unidad presionando
[POWER], et ajuste del canal puede perderse.
[] Selecci6n de Idioma
Puede elegir Ingles, Espahol,Franc_scomo idioma de pantalla.
1 Presione [SETUP] para visualizarel menO principal.
2 Utilice [Cursor A/Y] para seleccionar "IDIOMA", y
luego presione [ENTER].
o
3 Utilice [CursorA/V] para seleccionar"English",
"EspaF_ol" o "Fran_ais" y presione [ENTER].
o
ii!ii_!_
ii_iiiiii
Presione [SETUP] para salir.
iii:_i_:il
i!iii_
il!_iiiil_
ES

[] Selecci6n de Canal [] Ajuste de Volumen
Seleccioneloscanalespresionando[CHA /Y] o[Iosbotonesnum_ricos]. Enestasecci6nsedescribec6moajustarelvolumen.Tambi_nsedescribela
funci6ndesilenciamient0,queactivaydesactivaels0nid0.
• Para seleccionar los canales memorizados, utilice
[CH A/V] o [los botones num_ricos].
• Para seleccionar los canales no mernorizados, utilice
[los botones num_ricos].
Para utilizar [los botones num_ricos]
- Cuando seleccione el canal anal6gico 12
- Cuando seleccione el canal digital 12-1
Asegurese de presionar [-] antes de introducir el
n0mero de canal menor.
• Presione [CH. RECALL] para volver al canal
anteriormente visualizado.
Acerca de la emisi6n de televisi6n digitah
Con su emisi6n de alto definici6n, la emisi6n digital es
muy superior a la emisi6n anal6gica en su calidad tanto
de imogen como de sonido.
i.Qu_ es el canal menor?
Mediante una tecnologia de alto compresi6n, la
emisi6n digital ofrece un servicio que permite el env[o
simult_neo de m0ltiples seffales.
Pot tanto, puede seleccionar m_s de un programa por
canal mayor, dado que la tecnologia de emisi6n digital
distingue entre multiples canales emitidos pot una
determinada red.
[Hora de
NTSC(modoanal6gico) emisi6n] ATSC(modo digital)
18:00
18:30
19:00
19:30
20:00
20:30
canal mayor canal menor
_. :cambie autom_ticamente
_> :cambie manualmente utilizando [CH A/V]
Nota:
• Aparecerd "SinSePal"en la pantalla del televisor una vez
terminada la emisi6n del canal menor.
Utilice [VOL. _/ ] para ajustar el volumen de audio.
• La barra de volumen se mostrar_ en la porte inferior
de la pantalla del televisor cuando ajuste el volumen.
• La barra de volumen desaparecer& autom_ticamente
dentro de unos segundos.
Presione [MUTE _X] para activar y desactivar el sonido.
i}
• "Mudo" (silencio) aparece en la pantalla del televisor
durante unos segundos.
Presione nuevamente [MUTE DX] o utilice [VOL. _/ ]
para recuperar el volumen original.
[] Temporizador de Apagado
Eltemp0rizad0rdeapagad0puedec0nfigurarseparaapagar
aut0m_iticamentelaunidaddespu_sdeunperi0d0incrementaldetiemp0.
1 Presione [SLEEP] para ajustar el temporizador de
apagado.
• La visualizaci6n del temporizador de apagado
aparece en la pantalla del televisor.
2 Presione [SLEEP] repetidamente para cambiar el
tiempo que debe transcurrir hasta el apagado.
• Puede preparar su unidad para que se apague
despu@s de transcurrir un periodo de tiempo (de 30 a
120 minutos).
• Coda presi6n de [SLEEP] aumentar_ el tiempo en 30
minutos.
• Despu@s del ajuste, puede visualizarse el
temporizador de apagado, para su comprobaci6n,
presionando [SLEEP].
Para cancelar el temporizador de apagado
Presione [SLEEP] repetidamente hasta que aparezca
"Reposar Off" en la pantalla del televisor.
Nora:
• Lapantalla deajuste det temporizador deapagado
desaparecerdautomdticamente deunos segundos.
• Cuando desconectela unidad de la toma de CAo cuondo
seproduzca un folio de suministro el_ctrico, el ajuste de/
temporizador de apagado quedard anulado.
ES

[] Modo Fijo
Puedecongelarlaimagenmostradaenlapantalladeltelevisor,
Presione [STILL] para detener moment_neamente la
imagen mostrada en pantalla.
• La salida de sonido no se detiene.
• Si no se detecta ninguna seffal y no se recibe
ninguna seffal protegida en el modo fijo, la imagen
permanece detenida y se desactiva la salida de
sonido.
• La funci6n fijo debe reactivarse despu6s de 5
minutos.
Para anular el modo fijo, presione cualquier bot6n
excepto el bot6n [POWER].
[] Para Cambiar entre Cada Modo
PuedecambiarfacilmenteentreDTV(ATSC)yTV(NTSC)oaccederadispositivos
externoconelmandoadistanciacuandoest_nconectadosalaunidad,
Presione [INPUT SELECT] o [CH i] varias veces para
pasar a trav6s de todos los modos de entrada.
iii¸LiiC_ i
CanalTV/DTV
!
• AI presionar [CH V] cambia el modo en sentido
contrario.
• Para utilizar la toma de entrada de video o de S-video
VIDEO1 de la unidad, seleccione "Video1 ".
• Para utilizar la toma de entrada de video o de S-video
VIDEO2 de la unidad, seleccione "Video2".
• Para utilizar la tomas de entrada de video en
componentes COMPONENT1 de la unidad,
seleccione "Component1".
• Para utilizar la tomas de entrada de video en
componentes COMPONENT2 de la unidad,
seleccione "Component2".
• Para utilizar la toma de entrada HDMI1 en la unidad,
seleccione "HDMI 1".
• Para utilizar la toma de entrada HDMI2 en la unidad,
seleccione "HDMI2".
• Para utilizar la toma de entrada de PCen la unidad,
seleccione "PC".
[] Para Cambiar el Modo de Audio
Enestasecci6nsedescribec6mocambiarel idiomadeaudio,
Presione [AUDIO] para mostrar por pantalla el modo de
audio actualmente seleccionado. Durante la recepci6n
de una emisi6n MTS, presione repetidamente para
recorrer los canales de audio disponibles.
Cuando todo el audio est5 disponible
iii:i!i;
_>
Cuando los modos de audio est6reo y mono est_n
disponibles
Cuando los modos de audio SAP y mono est_n
disponibles
Cuando unicamente el modo de audio mono est,]
disponible
ii71
i%1
(no puede cambiarse)
i
ESTEREO : Emite audio en est6reo
SAP : Emite un segundo programa de audio
MONO : Emite audio en mono
• La visualizaci6n de informaci6n desaparecer_
autom_ticamente dentro de unos segundos.
Presione [AUDIO] para visualizar el idioma actualmente
seleccionado y el n0mero de idiomas disponibles.
AUDIO
2 Presione [AUDIO] repetidamente para recorrer los
idiomas de audio disponibles.
i
i!iii_
• Los idiomas disponibles difieren segOn la emisi6n.
Se muestra "Otro" cuando no puede obtenerse el
idioma de audio o si los idiomas que se obtienidos no
son Ingl6s, Espaffol o Franc6s.
• La visualizaci6n de informaci6n desaparecer_
autom_ticamente dentro de unos segundos.
Nota:
• Presionando [AUDIO] no secontrola el dispositivo de
audio extemo.
ES

[] Informacibn de Pantalla
Puedevisualizarel canalactualmenteseleccionadouotrainformaci6n,por
ejemplo el mododeaudio,enlapantalladeltelevisor,
Enel modoanal6gicosevisualizanel numerodel canalactualyelmodo de
audio.
Enel mododigital sevisualizala informaci6ndeemisiondetalladapara
el canalactualcomo,porejemplo,el titulo del programaylasguiasde
programas.
Presione [INFO]. Presione [INFO] para mostrar por pantalla los detalles
del programa seleccionado actualmente.
NFO
• El numero de canal actual, el modo de audio, el tipo
de resoluciones para sefiales de video, la relaci6n
de aspecto del televisor, los subtitulos y la clase de
TV aparecen en la esquina superior derecha de la
pantalla del televisor.
Para borrar la pantalla, presione [INFO] nuevamente.
Tambi6n puede presionar [BACK].
[Informacidn de emisi6n]
• Se muestra la siguiente informaci6n.
1 titulo de programa
2 emisora
3 guia de programas
(Se muestra la guia de programas afiadida a la
informaci6n de emisi6n. Se muestra un m_ximo
de 4 lineas).
4 nOmero de canal
5 idioma de audio
(Consulte la secci6n "Para Cambiar el Modo de
Audio"en la p_gina 17).
6 lineas de exploraci6n efectivas y modo de
exploraci6n
7 formato de programa
8 relaci6n de aspecto del programa
9 clasificaci6n del programa
IOCC (opci6n no disponible cuando el CC est_
ajustado en "Off")
Nora:
• Cuando la gu[a deprogramas tenga mds de 4t[neas,
utilice [Cursor A/V] para desplazarse.
• Sevisualiza "No seproporciona descfipci6n." cuando no se
facilita la gu(a deprograrnas.
• Mientras se visualiza la gu[a deprogramas seinterrumpe
la funcidn de subdtulos.
• Enel modo deentrada externa, semuestra lasiguiente
pantalla;
p. ej.) Cuando se ha conectado un disposidvo externo a ta
toma de entrada VIDEO1.
• La visualizaddn deinformaddn desaparecerd
automddcamente en I minuto.
ES

[] Modo de Visualizacibn de
Pantalla del Televisor
Puedenseleccionarse4tiposdemodosdevisualizaci6ncuandolaemisora
enviaunaseEaldevideode4:3o16:9.Ypuedenseleccionarsetrestiposde
modosdevisualizationparaseEalesdeentradaPC,
Presione [SCREEN MODE I_:3]repetidamente para
cambiar la relaci6n del aspecto del televisor.
SC Riiii!!l_i
Para se6al de video 4:3
Sidebar
(normal)
Ancha
Total
Cine
[Sidebar]
Visualizaci6n de una imagen 4:3 en su tama_o original.
Los barras laterales aparecen en ambos extremos de la
pantalla.
[Total]
Visualizaci6n de una imagen 4:3 en un tomato a escala
16:9, la imogen se extiende horizontalmente para Ilenar
la pantalla.
[Cine]
Visualizaci6n de una imogen 4:3 en un tama_o a escala
16:9; la imagen se extiende horizontal y verticalmente
para Ilenar la pantalla. Esto recorta los partes superior e
inferior de la imogen.
[Ancha]
La imagen se muestra con su centro en tama6o original
y los extremos se extienden horizontalmente.
Para se6al de video 16:9
Total
(normal)
Amplia
[Total]
Zoom
Cine
Visualizaci6n de una imagen 16:9 en su tamaF_o original.
[Zoom]
Visualizaci6n de una imagen 16:9 en su mayor tamaF_o
sin modificar el aspecto horizontal o vertical.
[Cine]
Visualizaci6n de una imagen que se extiende
verticalmente.
[Amplia]
Visualizaci6n de una imogen que se extiende
horizontalmente.
Para se6al de entrada PC
Sidebar Total
Punto Por Punto
(normal)
[Sidebar]
Visualizaci6n de una imagen que se extiende
proporcionalmente. Los barras laterales aparecen en
ambos extremos de la pantalla.
[Total]
Visualizaci6n de una imogen que se estira para ocupar
la pantalla proporcionalmente.
[Punto Por Punto]
Visualizaci6n de una imogen en su tarna_o original.
Note:
• Segdn elprograma, esposible que etmodo de
visualizacidn no cambie.
• Paralo se/_aldeentrada dePC,"Sidebar'puede queno
estd disponible paro seteccionarse seg_n la retaci6n de
aspecto de la sehal de entrada.
i
iii!!!_il
i ,i]:
ii!ii!_!iil_
i!iii_
}!_iiiil_
ES

[] Lista de Canales
LafuucionListadecanalesle permiteeliminar loscanalesnodeseadosde
lalistadeinscriptiondecanales.
Presione [SETUP] para visualizar el menu principal.
[] Registro Manual
Lafuncionderegistromanualpermiteagregarloscanalesquenose
agregaronmediante laexploration autom_ticadecanalesdebidoalestado
delareceptionenelajusteinitial.
Presione [SETUP] para visualizar el menu principal.
2 Utilice [Cursor AIr] para seleccionar "CANAL", y luego
presione [ENTER],
o
Utilice [Cursor AIr] para seleccionar "CANAL", y luego
presione [ENTER].
o
3 Utilice [CursorA/V] para seleccionar"Lista Canales", y
luego presione [ENTER].
o
Utilice [Cursor A/V] para seleccionar'Registro
Manual", y luego presione [ENTER].
o
Utilice [Cursor A/V] para seleccionar el canal que
desee eliminar, luego presione [ENTER].
o
• Los canales eliminados se oscurecen en la pantalla.
No le ser_ posible seleccionar el canal otra vez
utilizando [CH AIv].
• Para reactivar un canal que ha sido eliminado,
m,]rquelo utilizando [Cursor AIv], luego presione
[ENTER]. La visualizaci6n del canal se ilumina.
• Cuando elimina un canal principal, se eliminan
tambi6n sus canales menores conexos.
Nota:
• Elcanal con laindicaci6n "DTV"enla pantalla esATSC.En
casocontrario, el canal esNTSC.
Presione [SETUP] para salir.
4 Utilice [los botones num_ricos] para introducir el
numero de canal que desea agregar, luego presione
[ENTER],
0OO
@@@
@@@
Presione [SETUP] para salir.
Nota:
• Silo configuracidn se corr_pletacorrectamente, se muestra
el mensaje "Registroen lista canales'_
• Sise utiliza unaserialextemo, noesposible registrar el canal
y etmensoje "Nodisponible"se mostrard enIopantalto det
televisor.
ES

[] Confirmacibn de la Antena
Estafunci0nlepermitec0mpr0barlaintensidaddelase6aldecadacanal,
1 Presione [SETUP] para visualizar el menO principal.
2 Utilice [Cursor A/V] para seleccionar "CANAL" y luego
presione [ENTER].
o
3 Utilice [Cursor A/Y] para seleccionar "Antena", y luego
presione [ENTER].
o
W'
_>
ii!ii_!_
ii_ii?
Utilice [los botones num_ricos] o [CH A/V] para
seleccionar el canal respecto del cual desea comprobar
la intensidad de la sepal.
@@@
@@@
@@@
• Si el canal est_ ajustado a una entrada externa, no
puede confirmar el estado de la antena.
iIii_i_:il
i!iii_
il!_iiiil_
Presione [SETUP] para salir.
ES

[]Ajuste de Imagen
Puedeajustarel brill0,el c0ntraste,el color,el matizylanitidez.
Presione [SETUP] para visualizar el menO principal.
i!_iiii ii_
2 Utilice [Cursor A/V] para seleccionar "IMAGEN", y
luego presione [ENTER].
o
3 Utilice [Cursor Air] para seleccionar el elemento que
desea ajustar, luego presione [ENTER].
o
Claridad
Contraste
Color
Matiz
Nitidez
Cursor
_arareducir el
brillo
_arareducir el
contraste
_arareducir el
color
para agregar
rojo
_arasuavizar
Cursor DI_
para aunnentar
el brillo
para aumentar
el contraste
para dar m_s
brillo al color
para agregar
verde
para aclarar
Restablecer Ajustes
Utilice [Cursor A/V] para seleccionar "Restablecer", y
luego presione [ENTER] para cambiar el ajuste "Modo
de Imagen" al ajuste inicial.
Ajuste la calidad de imagen.
Modo de Imagen
Utilice [Cursor AIr] para seleccionar el ajuste deseado,
y presione [ENTER], (Normal, Din_mico, Cine y Noticia)
V
Claridad, Contraste, Color, Matiz, Nitidez
Utilice [Cursor _/1_] para ajustar.
o,
Tempe• de Color
Utilice [Cursor Air] para seleccionar el ajuste
deseado, y presione [ENTER]. (Frio, Neutral y Caliente)
Ahorro El_ctrico
Utilice [Cursor </1_] para ajustar el brillo de la l,impara
trasera.
I :Para iluminar
0
: Para oscurecer
Nora:
• Paracancetar etajuste dela imagen, presione [SETUP].
Presione [SETUP] para salir.
!i_i!i i iii *
ES

[]Ajuste de Sonido
Puedeajustarel treble,elbaj0yels0nid0surround.
I Presione [SETUP] para visualizar el menO principal,
2 Utilice [Cursor Air] para seleccionar "SONIDO", y
luego presione [ENTER].
o
Utilice [Cursor Air] para seleccionar el tipo de sonido
que desea ajustar, luego presione [ENTER].
o
Envolvente
Utilice [Cursor A/r] para activar o desactivar la
funci6n surround, luego presione [ENTER],
o
Restablecer Ajustes
Utilice [Cursor Air] para seleccionar "Restablecer", y
luego presione [ENTER] para cambiar el ajustes sonido
al ajuste inicial,
Nota:
• Paracancetar etajuste del sonido,presione [SETUP].
Presione [SETUP] para salir,
!!_iiii i)i _
iii!¸
Haga el ajuste del sonido,
Agudo, Grave
Utilice [Cursor <II_] para ajustar,
Cursor< Cursorl_
Agudo para reducir para aumentar
los sonidos los sonidos
con m_s altura con m_s altura
' tonal tonal
Grave para reducir para aumentar
los sonidos los sonidos
con menos con menos
altura tonal altura tonal
iIii_i_:il
i!iii_
il!_iiiil_
ES

[] Subtitulos
Puedever los subUtulos (co)para programas detelevision, pelkulas e
informativos, Subtitulo se refiere al texto de di_ilogo o descripciones
visualizadas en pantalla para personas conproblemas auditivos,
I Presione [SETUP] para visualizar el men0 principal.
2 Utilice [Cursor.Iv] para seleccionar "DETALLE", y
luego presione [ENTER].
o
3 Utilice [Cursor,lV] para seleccionar"Subtitulo
Cerrado", y luego presione [ENTER],
o
Utilice [Cursor./V] para seleccionar "S.C.
Convencional", luego presione [ENTER].
o
Utilice [Cursor.Iv] para seleccionar el subtitulo
deseado, luego presione [ENTER],
o
ES
[Modo de subtitulos]
S.C.1 y Textol;
son los servicios primarios de subtitulos y texto,
Los subtitulos o el texto se muestran en el mismo
idioma que el di_logo del programa
(hasta 4 lineas de escritura sobre la pantalla del
televisor, sin tapar zonas relevantes de la imagen),
S.C.3 y Texto3;
sirven como canales de datos preferidos,
Los subtitulos o el texto se muestran con frecuencia
en un idioma secundario,
S.C.2, S.C.4, Texto2 y Texto4;
est_n raramente disponibles y las emisoras los
utilizan solamente en circunstancias especiales,
por ejemplo cuando "S.C,I" y "S.C,3" o "Texto I" y
"Texto3" no est_n disponibles.
• Hay 3 rnodos devisualizaci6n seg0n los programas:
Modo "Paint-on":
Visualiza inmediatamente en la pantalla del televisor
los caracteres introducidos,
Modo "Pop-on":
Una vez que los caracteres son almacenados en
memoria, se muestran todos a la vez.
Modo "Roll-up":
Muestra los caracteres continuadamente mediante
desplazamiento de lineas (m_ximo 4 lineas),
Presione [SETUP] para salir,
Nota:
° Para mostrar los subt/tulos en la pantalla de su televisor, la
serial de emisi6n debe contener los datos de los subt[tulos.
• No todos los programas y anuncios de TV con tienen
subt[tulos o todo tipo de subt[tulos.
• Los subtftulos y textos pueden no coinddir exactamen te
con la voz det televisor.
• El carnbio de canales puede retrasar los subtitulos unos
segundos.
• Ajustar o silendar et volumen puede retrasar los subt[tulos
unos segundos.
• Pueden utilizarse abreviaciones, s[mbolos y otras
abreviaturas gramaticales para sincronizar el texto con
la action en pantalla. Esto no supone un problema de la
unidad.
• Los subt[tulos o caracteres de texto no se visuatizardn
mientras se muestren et meng principal o la pantalla de
fundones.
° Si aparece un recuadro negro en la pantatla det televisor,
esto significa que los subt[tulos estdn configurados en
modo texto. Para borrar ese recuadro, selecdone "S.C.1",
"S.C2", "S.C.3", "S.C.4"o ,,Off,,.
° Si la unidad redbe serrates de televisi6n de calidad
deficiente, los subdtulos podrdn contener errores, o es
posible que no aparezcan los subdtulos. Algunas posibles
causas de sefiales de calidad deficiente son:
- Ruido de ignici6n de automdviles
- Ruido de motor et_ctfico
- Recepci6n de serial d_bil
- Recepci6n de sehal multiplex (irndgenes fantasrnas o
fluctuadones en pantalla)
° La unidad conserva la configuraci6n de subt[tulos si se
produce un corte de suministro el_ctfico.
° Los subtftulos no se mostrardn cuando se utilice una
conexi6n HDMI.
• Cuando la unidad recibe una sehal de reproducci6n con
efectos especiales (esdecir, b(_squeda, cdmara lenta e
imagen congelada) del canal de salida de video del VCR (CA3
o CA4), la unidad podria dejar de mostrar el titulo o texto
correcto.

[] Subtitulos en DTV
Adem_sdelossubtitulosb_sicosdescritosenlap_gina24,DTVtienesus
propiossubtitulosdenominadosDTVCO.Utiliceestemenuparacambiarla
configuraci6ndeDTVCO.
Presione [SETUP] para visualizar el men0 principal.
2 Utilice [Cursor Air] para seleccionar "DETALLE", y
luego presione [ENTER].
o
Utilice [Cursor AIr] para seleccionar "Subtitulo
Cerrado", y luego presione [ENTER].
o
Utilice [Cursor AIr] para seleccionar los subtitulos
DTV deseados, y luego presione [ENTER].
o
S.C. DTV
off
Servicio I-6
Selecci6nelo si no desea
DTV CC. Este es el ajuste
predeterminado.
Seleccione uno de ellos antes
de cambiar cualquier otro
elemento del men_ "Subtftulo
Cerrado"Seleccione
"Serviciol "en circunstancias
normales.
Presione [SETUP] para salir.
Nota:
• "S.C.DTV" sepuede cambiar dependiendo dela
descfipcidn dela emisidn.
Utilice [Cursor AIr] para seleccionar "S.C. DTV", y
luego presione [ENTER].
O
%F
ES

[] Estilo CC
Puedecambiarelestilo deCC,p0rejemplofuente,color0tama_o,etc.
Presione [SETUP] para visualizar el menO principal.
i!_iiii if_
2 Utilice [Cursor Air] para seleccionar "DETALLE", y
luego presione [ENTER].
o
Utilice [Cursor Air] para seleccionar "On", y luego
presione [ENTER].
o
7 Utilice [Cursor AIr] para seleccionar un elemento,
luego presione [ENTER]. Utilice [Cursor AIr] para
seleccionar el ajuste deseado, y presione [ENTER].
Visualizaci6n de la imagen
3 Utilice[CursorA/V] para seleccionar"Subtitulo
Cerrado", y luego presione [ENTER].
o
Utilice [Cursor Air] para seleccionar "Estilo S.C.", y
luego presione [ENTER].
o
Borde
(Color yTipo de Borde)
Fuente
(Estilo,Tama_3o,Color y Opacidad de la Fuente)
Lado posterior
(Color Posterior y Opacidad Posterior)
• A continuaci6n se muestra la descripci6n del ajuste
para cada uno de los elementos.
[Estilo Fuente]
El estilo de fuente de los subtitulos puede modificarse
como sigue.
Utilice [Cursor AIr] para seleccionar "Config. Usuarid",
y luego presione [ENTER].
o
[TamaEo Fuente]
El tamafio de fuente del subtitulo mostrado puede
cambiarse como sigue.
ES

[Color Fuente]
El color de fuente del subtitulo mostrado puede
cambiarse como sigue,
[Tipo Borde]
El tipo de horde de[ subUtulo mostrado puede
cambiarse como sigue,
15 ¸
[Opaco Fuente]
La opacidad de la fuente del subtitulo mostrado puede
cambiarse como sigue,
8 Presione [SETUP] para salir,
[Color Fondo]
El color de rondo del subtitulo mostrado puede
cambiarse como sigue,
!i!iii_i
ii!t!_
!iii_i!'
[Opaco Atr6s]
La opacidad de fondo del subtitulo mostrado puede
cambiarse como sigue.
!iiit
iIi;_i:;il
[Color Borde]
El color del borde de[ subtitulo mostrado puede
cambiarse como sigue,
ES

[] V-chij
V-chip lee lasdases de los programas, y niega el accesoa los programas
que exceden el nivel de clasificaci6n establecido. Conesta funci6n, puede
bloquear determinados programas inapropiados para ni_os.
Presione [SETUP] para visualizar el men0 principal.
2 Utilice [Cursor AIr] para seleccionar "DETALLE", y
luego presione [ENTER].
o
3 Utilice [Cursor A/V] para seleccionar "V-chip", luego
presione [ENTER],
0
Utilice [los botones num_ricos] para introducir los
n0meros de 4 digitos de su contrase_a,
@@@
@@@
@@@
Consulte la siguiente descripci6n para ajustar cada
elemento,
A
-B
uC
A'""A. Clase de MPAA" => p_gina 29
B'""B. Clase de "IV" => p_gina 29
C'""C. Nueva C6digo de Acceso" _ p_gina 30
Nora:
• Cuando seleccione una dasificacidn y la ajuste en "Bloque',
las clasificaciones mds altas quedardn bloqueadas
automdticamente. Las dasificaciones mds bajas estardn
disponibles para su visidn.
• Cuando seleccione la ctasificacidn mds alta en "Mirar"
todas las clases cambian automdticamente a "Mirar'_
• Para bloquear cualquier programa inadecuado, ajuste
los l#_ites en "Clase de MPAA', "Clase de TV" y "Clase
descargada'_
• El ajuste V-chip se mantendrd despu_s de producirse un
torte en el suministro et_ctrico (pero el c6digo de acceso
vuelve a 0000).
• Si la clasificacidn se bloquea, aparecerd @.
• "Clase descargada" estard disponible cuando la unidad
reciba una emisiOn digital utilizando el nuevo sistema de
dasificaddn.
• Si la seF_alemitida no cuenta con la information
descargable de calificacidn, aparecerd "La dase
descargada no se encuentra disponible actualmente."
Este mensaje aparecerd tambi@n cuando usted trate de
acceder a "Clase descargada" despu#s de haber borrado
la informacidn descargable de calificaci6n, y no haya
descargado nueva informaci6n desde entonces.
• Para borrar la informaddn de calificaci6n descargable y
sus ajustes, seleccionar "Eliminar dase descargada'_
• Cuando no haya configurado su contrase_a,
introduzca 0000.
• Cuando la contrase_a es la correcta, se muestra el
men0 de "V-chip".
ES

ClasedeMPAAesel sistemadeclasificaci6ncreadoporlaMPAA(Motion
PictureAssociationofAmerica).
Utilice [Cursor AIr] para seleccionar "Clase de MPAA",
y luego presione [ENTER].
o
6 Utilice [Cursor A/V] para seleccionar la clasificaci6n
deseada y luego presione [ENTER] repetidamente para
cambiar entre "Mirar" y "Bloque",
T
iii ,
Utilice [Cursor Air] para seleccionar "Clase de TV", y
luego presione [ENTER].
o
Utilice [CursorAlvl_ll_] para seleccionar la
clasificaci6n deseada y luego presione [ENTER]
repetidamente para cambiar entre "Mirar" y "Bloque',
Clasificaci6n Categoria
X Exclusivamente para p0blico adulto
NC-17 No apto para menores de 17ahos
Restringido; menores de 17 ahos tienen que
R estar acompahados por un progenitor o un
tutor adulto
PG-13 No apto ninos menores de 13 anos
PG Sesugiere orientaci6n de los padres
G Todos los p0blicos
NR Sin clasificaci6n
Presione [SETUP] para salir.
Nota:
• AI cambiar ta categorfa a "Bloque" o "Mirar" cambia
automdticamente todas sussubcategorias a Io mismo
('Bloque" o "Mirar').
Presione [SETUP] para salir,
[Para Ajustar las Subcategorias]
En Io referente a TV-MA, TV-14, TV-PG, 6 TV-Y7, puede
seguir ajustando las subcategorias para bloquear
elementos especificos de la programaci6n, Para ajustar
las subcategorias, siga el paso indicado,
Utilice [Cursor A/V/'d/l_] para seleccionar la
clasificaci6n deseada y luego presione [ENTER]
repetidamente para cambiar entre "Mirar" y "Bloque",
ES

Clasificacibn Categoria
TV-MA Exclusivamente para
a0blico adulto superior
TV-14 No apto niffos menores de
14 afros _%
TV-PG Se sugiere orientaci6n de
los padres
TV-G Todos los p0blicos
TV-Y7 Apto para todos los niffos _ p
desde los 7 aF/os
TV-Y Apto para todos los niffos inferior
Clasificacibn
TV-Y7
Subclasificaci6n
FV
V
S
L
D
Categoria
Fantasia Violencia
Violencia
Situaci6n Sexual
Lenguaje Grosero
Di_logo Sugerente
TV=PG
TV-14
TV-MA
TV-PG,TV-14
Nota:
• Las subcategorfas bloqueadas aparecerdnjunto a la
categorfa de clasificaci6n principal en el men(l "Clase de TV"
• No padrd bloquear una subcategor[a (D, L, S o V)si la dase
principal estd ajustada en "Mirar'[
• AI cambiar la categar[a a "Blaque" o "Mirar", carnbia
automdticamente todas sus subcategor[as a to mismo
("Btoque" o "Mirar').
%_5 ¸ _ !_ _i_ !i_
Aunque el c6digo predeterminado"OOOO"viene incorporado con la unidad,
usted puede ajustar su propia contraseffa.
Utilice [Cursor A/V] para seleccionar "Nuevo C6digo
de Acceso" y luego presione [ENTER].
o
Presione [los botones num_ricos] para introducir la
nueva contraseffa de 4 digitos,
• Vuelva a introducir la contraseffa en el espacio
"Confirme c6d. de acceso.".
@@0
@00
@00
Presione [SETUP] para salir.
Nora:
• AsegOrese de que la nueva contrase_ay la contrase_a de
confirrnaci6n son exactamente iguales. Si son diferentes, el
espacia queda en blanco para volver a introdudrla.
• Su con trase_a se borrard y volverd a la predeterminada
(0000) cuanda se praduzca un fallo en la alimentaci6n. Si
olvida la cantrasef_a, desenchufe el cable de atimentaddn
durante 10 segundas para restaurar ta cantrase_a en
0000.
ES

[]Ajustes de PC
Estafunci6n lepermiteajustar lap0sici0ndelapantalladel 0rdenad0r,el
reloj ylafasedurantelaentrada PC.
Presione [SETUP] para visualizar el men0 principal.
2 Utilice [Cursor Air] para seleccionar "DETALLE", y
luego presione [ENTER].
o
_W
Utilice [Cursor A/V] para seleccionar "Ajustes de PC", y
luego presione [ENTER].
o
_W
Utilice [Cursor A/V] para seleccionar la opci6n que
desea ajustar, luego presione [ENTER].
o
_W
Haga el ajuste.
Ajuste Autom_itico
Utilice [Cursor Air] para seleccionar "Ajuste", luego
presione [ENTER].
• Seajustan autom,iticamente la posici6n Horizontal/
Vertical, el reloj y la fase de la pantalla del ordenador.
Posici6n Horizontal, Posici6n Vertical
Utilice [Cursor _/•] para ajustar,
Posici6n Horizontal
Cursor
9ara mover la
_anta]la del
ordenador
hacia la
tzquierda
3aramover la
3antalla del
ordenador
hacia abajo
Cursor•
para mover la
pantalla del
ordenador
hacia la
derecha
Posici6n Vertical para mover la
pantalla del
ordenador
hacia arriba
Reloj, Fase
Utilice [Cursor _/•] para hacer ajustar el "Reloj" y
estabilizar la pantalla del ordenador y el ajuste "Fase"
mejorando asi la claridad de la pantalla del ordenador.
Cursor _ Cursor•
Reloj
Fase
3ara disminuir
el valor del
ajuste
para aumentar
el valor de
ajuste
iiiii:ili ! i
i <
i?!
Presione [SETUP] para salir.
Nota:
• Ajuste I0 opcidn"Fase"despu_sdehaber ajustado
correctamenteIo opcidn "Reloj'_
• Conelojuste outomddco puede queno obtenga une
pantalle opropiada paro olgunas sef_ales.En este caso,
ajuste losopciones monuolmente.
ES

Audio HDMI
Puedeajustar el mecanismo deentrada de sonidopara latoma de entrada
HDMI1.
Presione [SETUP] para visualizar el men0 principal.
2 Utilice [Cursor,lv] para seleccionar "DETALLE", y
luego presione [ENTER].
o
Utilice [Cursor,/V] para seleccionar "Audio HDMII", y
luego presione [ENTER].
o
_Y7
Utilice [Cursor.IV] para seleccionar la entrada de
sonido deseada, y luego presione [ENTER].
0
Seleccione si se ha conectado el
dispositivo digital a la toma de
entrada HDMII y el dispositivo
Autom_tico
anal6gico alas fuentes de audio. La
seffal de entrada de audio digital
tendr_ la prioridad.
Audio Seleccione si se ha conectado el
HDMI1 Digital dispositivo digital a la toma de
entrada HDMII para seffales de
entrada de audio digitales.
Seleccione si se ha conectado el
dispositivo anal6gico alas tomas
Anal6gico de audio anal6gicas para seffales de
entrada de audio anal6gicas.
Presione [SETUP] para salir.
i!Zil Ui _
ES

Guia de Solucibn de Problemas
Si la unidad no funciona correctamente cuando se siguen las instrucciones de este manual del usuario, compruebe la
siguiente tabla antes de Ilamar al servicio tecnico.
i¸¸3¸
No hay corriente
No hay imagen ni sonido
• AsegOrese de que el cable de alimentaci6n est_ enchufado.
Si se produce un corte de alimentaci6n, desenchufe el cable de alimentaci6n
durante 30 minutos para permitir que la unidad se reinicie.
• Compruebe si la unidad est_ encendido.
• Compruebe la conexi6n el6ctrica.
• Compruebe la conexi6n de antena o de cable con la unidad principal.
• Cuando se utilice la antena exterior, compruebe el estado del cable y de la conexi6n.
• Vea otros canales de televisi6n. El problema podria limitarse a una emisora.
• Apague la unidad y espere aproximadamente 1 minuto para volver a encenderlo.
No hay color • Compruebe la conexi6n de antena o de cable con la unidad principal.
• Cuando se utilice la antena exterior, compruebe el estado del cable y de la conexi6n.
• Vea otros canales de televisi6n. El problema podria limitarse a una emisora.
• Ajuste"Color"en el menO principal.
Sonido correcto, imagen • Compruebe la conexi6n de antena o de cable con la unidad principal.
deficiente • Cuando se utilice la antena exterior, compruebe el estado del cable y de la conexi6n.
• La interferencia electrica de aparatos cercanos puede afectar a la calidad de la imagen.
• Ajuste"Contraste"y"Claridad"en el menO principal.
• Yea otros canales de televisi6n. El problema podria limitarse a una emisora.
Imagen distorsionada • Cuando se utilice la antena exterior, compruebe el estado del cable y de la conexi6n.
• Yea otros canales de televisi6n. El problema podria limitarse a una emisora.
Imagen debil • Compruebe la conexi6n de antena o de cable con la unidad principal.
• Cuando se utilice la antena exterior, compruebe el estado del cable y de la conexi6n.
• Ajuste"Contraste"y"Claridad"en el menO principal.
• Yea otros canales de televisi6n. El problema podria limitarse a una emisora.
Lineas o rayas en la imagen •Cuando se utilice la antena exterior, compruebe el estado del cable y de la conexi6n.
• La interferencia el6ctrica de aparatos cercanos puede afectar a la calidad de la imagen.
• Yea otros canales de televisi6n. El problema podria limitarse a una emisora.
Imagen borrosa • Cuando se utilice la antena exterior, compruebe el estado del cable y de la conexi6n.
• Yea otros canales de televisi6n. El problema podria limitarse a una emisora.
Imagenes fantasmas en la • Compruebe la conexi6n de antena o de cable con la unidad principal.
imagen • Cuando se utilice la antena exterior, compruebe el estado del cable y de la conexi6n.
• La interferencia electrica de aparatos cercanos puede afectar a la calidad de la imagen.
• Yea otros canales de televisi6n. El problema podria limitarse a una emisora.
Barras en la pantalla del • Cuando se utilice la antena exterior, compruebe el estado del cable y de la conexi6n.
televisor • La interferencia electrica de aparatos cercanos puede afectar a la calidad de la imagen.
La imagen se desplaza • Cuando se utilice la antena exterior, compruebe el estado del cable y de la conexi6n.
verticalmente • La interferencia electrica de aparatos cercanos puede afectar a la calidad de la imagen.
• Yea otros canales de televisi6n. El problema podria limitarse a una emisora.
Marcas de diferente color en la Separe la unidad de los aparatos el6ctricos cercanos. Apague la unidad y espere
pantalla del televisor aproximadamente 30 minutos para volver a encenderla.
• Yea otros canales de televisi6n. El problema podria limitarse a una emisora.
Recepcion deficiente en • Compruebe la conexi6n de antena o de cable con la unidad principal.
determinados canales • Cuando se utilice la antena exterior, compruebe el estado del cable y de la conexi6n.
• La interferencia electrica de aparatos cercanos puede afectar a la calidad de la imagen.
• Yea otros canales de televisi6n. El problema podria limitarse a una emisora.
Imagen correcto, sonido • Yea otros canales de televisi6n. El problema podria limitarse a una emisora.
deficiente
No se reciben se_ales digitales • AsegOrese de que la exploraci6n autom,itica de canales ha finalizado. (Consulte
"Exploraci6n Autom_tica de Canales"en la p_gina 14.)
La exploraci6n autom_tica de canales debe haberse finalizado cuando configure
la unidad por primera vez o cuando la traslade a un lugar donde se emitan canales
anteriormente no disponibles.
Es posible que el canal seleccionado no se este emitiendo.
• Cuando la exploraci6n autom_tica de canales se interrumpe y no se finaliza,
algunos canales no se recibir_n. AsegOrese de finalizar. (Consulte"Exploraci6n
Autom,itica de Canales"en la p_gina 14.)
iiiZ_ii:ii:
ES
i2
ii!ii_!_
}_ii?
!
i!iii_
}!_iiiil_

Eln_merodecanal
introducidocambia
autom_ticamente
Elmandoadistanciano
funciona
Muchoscanalesdigitalestienennumerosdecanalalternativos.Launidadcambia
dichosnumerosautom_ticamentealoscorrespondientesalasemisorasactivas,
Estossonlosnumerosutilizadosparaemisionesanal6gicas.
•Compruebelaconexi6ndeantenaodecableconlaunidadprincipal.
•Compruebelaspilasdelmandoadistancia.
•Compruebesihayalgunobst_culoentrelaventanadelsensordeinfrarrojosyel
mandoadistancia,
Pruebelasalidadelasepal.Siescorrecta,esposiblequehayaalgOnproblema
conelsensordeinfrarrojos.
(Consulte"Comprobaci6ndelaSePaldeInfrarrojos(IR)"enlap_gina35,)
•Conelmandoadistancia,apuntedirectamentehacialaventanadelsensorde
infrarrojosenlapartedelanteradelaunidad.
Reduzcaladistanciaconrespectoalaunidad,
Reinsertelaspilasconsuspolaridades(signos+/-)comoindicadas.
•Cuandohayundispositivoprovistodeinfrarrojoscomounordenadorcercade
estaunidad,puedeinterferirconlasepaldelmandoadistanciadeestaunidad,
Retiredichodispositivoconinfrarrojosalej_ndolodelaunidad,cambieel_ngulo
delsensordeinfrarrojosydesactivelafunci6nquehabilitalacomunicaci6npot
infrarrojos,
Problemas con la Funci6n de Subtitulos
Aparecen subtitulos con faltas Las empresas de producci6n de subtitulos pueden emitir programas sin corregir
de ortografia, la ortografia en una emisi6n en directo,
Los subtitulos no se muestran Los subtitulos que se retrasan unos segundos con respecto al di,_logo real son
enteros, o aparecen retrasados habituales en las emisiones en directo. La mayoria de las empresas de producci6n
con respecto al di_logo, de subtitulos pueden mostrar un di_logo hasta un m_ximo de 220 palabras
por minuto. Si un di_logo supera ese limite, se utiliza una edici6n selectiva para
garantizar que los subtitulos se mantienen actualizados con el di_logo de la
pantalla del televisor en cada momento,
Los subtitulos aparecen en un Las interferencias procedentes de edificios o condiciones climatol6gicas pueden
recuadro blanco, hacer que los subtitulos aparezcan incompletos.
No aparece ningOn subtitulo La emisora puede acortar el programa para insertar publicidad. El decodificador
en el programa de soporte de de subtitulos no puede leer la informaci6n del programa acortado.
subtitulos.
No aparece ningun subtitulo Es posible que la cinta de video se haya copiado ilegalmente o que la sepal de
cuando se reproduce una subtitulos no se haya leido durante la copia.
cinta de video con subtitulos,
Aparece un recuadro negro en Se ha seleccionado el modo texto para subtitulos, Seleccione "S,C,I", "S,C,2",
la pantalla del televisor. "S,C.3", "S,C,4" 6 "Off".
Nota:
• Elpanel LCDha sido fabricado de manera que puede tenermuchos a_os devida dtil. Ocasionalmente, pueden aparecerp[xetes
inactivos, como unpunto fijo de color azul, verde o rojo. £sto no debe considerarse un defecto de la pantalla LCD.
• Algunas funciones no estdn disponibles enmodos espec[ficos,pero esto no esun fallo defundonamiento. Pararrldsdetalles sobrelas
operaciones correctas, lea la descripcidn deestemanual del usuario.
ES

[]Glosario
ATSC
Acronimo de"Advanced Television
Systems Committee"(Comite de
sistemas avanzados de television) y el
nombre de unas normas de emision
digital.
Contrasefia
Un nOmero almacenado de 4 digitos
que permite el acceso alas funciones
de control parental.
Dolby Digital
El sistema desarrollado por Dolby
Laboratories para comprimir el sonido
digital. Ofrece un sonido estereo (2
canales) o audio multicanal.
HDMI (interfaz multimedia de alta
defincibn)
Interfaz compatible con todos los
formatos de audio/video digitales no
comprimidos incluyendo un receptor
de cable, un grabador DVD ou un
televisor digital, en un solo cable.
[] Mantenimiento
HDTV (televisi6n de alta definici6n)
Reciente formato digital que produce
una alta resolucion y una elevada
calidad de imagen.
NTSC
Acr6nimo de"National Television
Systems Committee" (Comite de
sistemas nacionales de television) y el
nombre de unas normas de emision
analogica.
Relaci6n de Aspecto
La anchura de una pantalla de
television con respecto a su altura.
Los televisores convencionales son
de 4:3 (en otras palabras, la pantalla
del televisor es casi cuadrada), los
modelos de pantalla ancha son de
16:9 (la pantalla del televisor es casi
dos veces mas ancha que alta).
SAP (programa de audio secundario)
Segundo canal de audio transmitido
por separado del canal de audio
principal. Este canal de audio se
utiliza como altemativo en la emision
bilingOe.
SDTV (televisi6n de definici6n
est_indar)
Formato digital estandar similar a la
calidad de imagen de NTSC.
S-video
Ofrece imagenes de mayor calidad
al transmitir cada serial, color
(c) y luminancia (y) de manera
independiente entre si a traves de
cables separados.
Video en Componentes
Setrata de un formato de serial de
video que transmite cada uno de los 3
colores principales de luz (rojo, azul y
verde) a traves de diferentes lineas de
serial. Esto permite a los espectadores
experimentar colores de imagen
muy similares a los originales. Existen
diversos formatos de serial, incluidos el
denominado Y/Pb/Pr y el denominado
Y/Cb/Cr.
iii!_!,¸
}_ii?
J_
__II_
• Limpie el panel delantero yotras superficies exteriores de la
unidad conun trapo suave inmerso en aguatemplada ybien
escurrido.
• Noutilice nunca disolvente nialcohol.Nosuelte liquido insecticida
en aerosolcercade la unidad. Estosproductosquimicospueden
causardaEosy decoloracionen lassuperficies expuestas.
Limpieel panelconunpasoblando.Antesdelimpiarelpanel
desconecteelcabledelaalimentacion.
L_,. _ 1_T_] i 1
Si suaparato dejade funcionar,no intente corregirel problema
ustedmismo. Ensu interior no contiene piezasque puedan ser
reparadas porel usuario.Apaguela unidad, desenchufeel cable
de alimentacion yIlame a nuestrotelefono gratuito deatencional
cliente, que encontrar_ien laportada de estemanual para Iocalizar
un centro de servicio autorizado.
Sielmandoadistancianofuncionacorrectamente,puedeutilizar
unaradioAMounac_imaradigital(inclusountelefonomovilcon
c_imaraincorporada)paracomprobarsiest_ienviandounaseEalde
infrarrojos.
•ConunaradioAM:
Sint0nicelaemis0raderadioAMenuna "_
frecuenciadenoemisiOn.Apunteconelmand0 _
adistanciahaciaella,presi0necualquierb0tOny
escuche.Siels0nid0delaradiofluct_a,significa
queest_recibiend0laseffaldeinfrarr0j0sdel --
mand0a distancia.
•Conunac_imaradigital
(incluidaslasc_imarasincorporadasentelefonosmoviles):
Apunteconlac_maradigitalhaciaelmand0a
distancia.Presi0necualquierb0tOndelmand0a
distanciay mireenelvisordelac_maradigital.Si
laluzinfrarr0jaapareceenlac_mara,elmand0a
distanciafunci0na.
ES

[] Denominaciones de Canales de Cable
Sisesuscribealatelevisi6nporcable,loscanalesse muestrancomo1-135.
Lasempresasdecableamenudodenominanloscanalescon letraso combinacionesdeletra-nlimero.Compruebeestedetalleconsuempresalocaldecable.
Latabla siguienteincluyelasdenominacionesdecanaldecablehabituales.
)antalladeT/ 1 2 3 4 5 6 7 8 9 10 11 12 13 14 15 16 17 18 19 20 21
N w÷s W÷6
)antalladeT/ 22 23 24 25 26 27 28 29 30 31 32 33 34 35 36 37 38 39 40 41 42
)antalladeT/ 43 44 45 46 47 48 49 50 51 52 53 54 55 56 57 58 59 60 61 62 63
W+33 W+41
_antalladeT/ 64 65 66 67 68 69 70 71 72 73 74 75 76 77 78 79 80 81 82 83 84
w÷_
_antalladeTl 85 86 87 88 89 90 91 92 93 94 95 96 97 98 99 I00 I01 102 103 104 105
_antalladeT/ 106 107 108 109 110 111 112 113 114 115 116 117 118 119 120 121 122 123 124 125 126
)antalladeT/ 127 128 129 130 131 132 133 134 135
[] Especificaciones Generales
Formato de TV: ATSC/ NTSC-MTVest_indar
Subtitulos (CC) sistema:
§15.122/FCC(Subtitulosdigitales)
§15.119/FCC(Subtitulosanal6gic0s)
Cobertura de canales (ATSC/NTSC):
Terrestre VHF: 2~13 UHF:14~69
CATV 2~13,A~W,W+l~W+g4 (ana16gicoW+l~W+84),
A-S~A-1,5A
Sistema de sintonizaci6n:
Sistemadesintonizaci0nsintetizadadefrecuencia
decanales
Acceso a los canales:
Tecladodeacces0direct0,exploraci6npr0gramabley
arriba/abajo
[] Especificaci6n El ctrica
Salida de sonido: lOW,8(1x2
• Losdiseffosylasespecificacionespuedenserobjetodemodificaciones
sin previoavisoysin obligacioneslegalespornuestraparte.
• Siseproduceunadiscrepanciaentre idiomas,el idiomapredeterminado
ser_elIngles.
[] Otras Especificaciones
Terminales:
Entradadeantena:
VHF/UHF/CATV 75(1desequilibrad0s(tip0F)
Entradade S-video:
Minit0maDINde4patillasx2 Y:1Vp-p(75(1)
C:286mVp-p(75(1)
Entradadevideo:
TomaRCAx2 1Vp-p(75(1)
Entradadeaudio:
T0maRCA(L/R)x10 2Vrms
Entradadevideoencemponentes:
TomaRCAx6 Y: 1Vp-p(75(1)
Pb:700mVp-p(75(1)
Pr: 700mVp-p(75(1)
EntradaHDMh HDMIde19patillasx2
EntradaPC: D-Subde1Spatillasx1(RGB)
Minit0mao3,5mm x1(audio)
Salida deaudiodigitalcoaxial:
TomaRCAx1 S00mVp-p(75(1)
Salidade audioanal6gica:
TomaRCAx2
Mando a distancia:
Sistemadeluzinfrarr0jac0dificadadigitalmente
Temperatura de funcionamiento:
41°F(5%)a104°F(40°C)
Potencia:
120V~AC+/- 10%,60Hz+/- 0.5%
Consumo de potencia (m_ximo):
240W
LCD: PanelHDc0mplet0de42pulgadas
Dimensiones: <Sin soporte>
Altura:27,5pulg. (698mm)
Ancho:41,2 pulg. (1046mm)
Profundidad:4,8pulg. (120ram)
<Consoporte>
Altura: 29,6pulg.
Ancho:41,2 pulg.
Peso:
(750mm)
(1046mm)
Profundidad:13,6pulg. (345mm)
50,7Ibs. (23,0kg)
ES

SYLVANIA
GARANT|A LIMITADA
FUNAI CORR reparar_ este producto, de forma gratuita en Estados Unidos, en caso de defecto de
materiales o fabricaci6n, del modo siguiente:
DURACION:
PIEZAS: FUNAI CORP.suministrar_ piezas de repuesto de las piezas defectuosas de forma gratuita
durante un (1) aSo desde la fecha de compra minorista original. Determinadas piezas y el
efecto de persistencia de la imagen en la pantalla LCD est_n excluidas de esta garantia.
MANO DE OBRA: FUNAI CORP. suministrar_ la mano de obra de forma gratuita durante un
periodo de noventa (90) dias desde la fecha de compra minorista original.
LIMITES Y EXCLUSIONES:
ESTA GARANTfA SE EXTIENDE SOLAMENTE AL COMPRADOR MINORISTA ORIGINAL. UN RECIBO
DE COMPRA U OTRA PRUEBA DE COMPRA MINORISTA ORIGINAL SERA EXIGIDA JUNTO CON EL
PRODUCTO PARA OBTENER SERVICIO BAJO ESTA GARANTfA.
Esta garantia no se extender_ a ninguna otra persona o beneficiario.
Esta garantia quedar_ invalidada y sin efecto en caso de alteraci6n, sustituci6n, borrado o p_rdida de
los nOmeros de serie del producto o si se intent6 una reparaci6n pot parte de un centro de servicio no
autorizado. Esta garantia limitada no se aplica a ningOn producto no comprado y utilizado en Estados Unidos.
Esta garantia solamente cubre los fallos debidos a defectos de material o fabricaci6n que se produzcan
durante su uso normal. No cubre da6os producidos durante el transporte, ni dahos ocasionados pot
reparaciones, alteraciones o productos no suministrados por FUNAI CORP.,o da6os resultantes de accidente,
uso indebido, abuso, trato indebido, aplicaci6n indebida, alteraci6n, instalaci6n defectuosa, mantenimiento
inadecuado, uso comercial (por ejemplo, el uso de este producto en hoteles, establecimientos de alquiler u
oficinas) o da_os resultantes de incendio, inundaci6n, tormenta el&ctrica o cat_strofes naturales.
ESTAGARANTfANOCUBRELOSMATERIALESDEEMBALAJE,NINGUNTIPODEACCESORIOS(EXCEPTOELMANDO A
DISTANCIA),NINGUNAPIEZADEADORNO,PIEZASDEMONTAJECOMPLETAS,MODELOSDEDEMOSTRACION0 DETALLER.
FUNAI CORP.Y SUS REPRESENTANTES0 AGENTESNO SERANEN NINGON CASOCONSIDERADOS RESPONSABLES
DEDANOS GENERALES,INDIRECTOS0 CONSECUENClALES,RESULTANTESDE0 PROVOCADOSPOR ELUSO0
LA IMPOSIBILIDAD DE USO DE ESTEPRODUCTO.ESTAGARANT[A SUSTITUYEA CUALQUIEROTRA GARANT[A,
EXPRESA0 IMPL[ClTA, YCUALQUIEROTRA RESPONSABILIDADCIVIL POR PARTEDE FUNAI, CUALQUIEROTRA
GARANT[A QUE INCLUYALA GARANT[A DE COMERClABILIDAD E IDONEIDAD PARAUN FINCONCRETO,QUEDAN
PORLA PRESENTEEXCLUIDASPORDE FUNAI YSUS REPRESENTANTESEN ESTADOSUNIDOS.
TODAS LAS INSPECCIONES Y REPARACIONES BAJO GARANTfA DEBEN SER EFECTUADAS POR UN CENTRO
DE SERVICIO AUTORIZADO. ESTAGARANTfA ESVALIDA EXCLUSIVAMENTE CUANDO EL APARATO SEA
ENTREGADO A UN CENTRO DE SERVICIO AUTORIZADO.
ELPRODUCTODEBEIRACOMPANADO PORUNA COPIA DELRECIBODECOMPRA MINORISTAORIGINAL.SINO SE
ADJUNTA PRUEBADE COMPRA,LA GARANTiA NO SEAPLICARAY SECOBRARAN LOSCOSTESDE LA REPARACION.
IMPORTANTE:
ESTAGARANTfA LIMITADA LEOTORGA DERECHOS LEGALES ESPECfFICOS.ESPOSIBLE QUE SEA USTED
BENEFICIARIO DE OTROS DERECHOS QUE VARfEN DE UN ESTADO A OTRO. SI, EN CUALQUIER MOMENTO
DURANTE EL PERIODO DE GARANTfA, NO PUEDE USTED OBTENER SATISFACCION CON RESPECTOA LA
REPARACION DE ESTEPRODUCTO, LE ROGAMOS QUE SEPONGA EN CONTACTO CON FUNAI CORP.
ATENCION:
FUNAICORP.SERESERVAELDERECHODEMODIFICARCUALQUIERDISENODEESTEPRODUCTOSINPREVlOAVlSO.
DECLARACION DE GARANTIA CON RESPECTO A REPARACIONES NO AUTORIZADAS:
Para obtener servicio de garantia, debe usted aceptar el producto, o hacer entrega del producto con
portes pagados, ya sea en su embalaje original o en un embalaje que proporcione el mismo grado de
protecci6n, a cualquier CENTRO DE SERVICIO AUTORIZADO. FUNAI CORP. no efectuar_ reembolso por
ningOn servicio realizado por proveedores de servicio no autorizados sin autorizaci6n previa por escrito.
Para Iocalizar su CENTRO DE SERVlCIO AUTORIZADO m_s pr6ximo o para solicitudes
generales de servicio, puede ponerse en contacto con nosotros en:
FUNAI CORPORATION
Servicio de Atenci6n al Cliente
Tel. : 1-800-968-3429
www.SylvaniaConsu merElectronics.com
19900 Van Ness Avenue, Torrance, CA 90501
A81H1UH
-
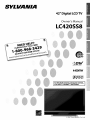 1
1
-
 2
2
-
 3
3
-
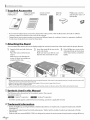 4
4
-
 5
5
-
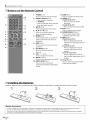 6
6
-
 7
7
-
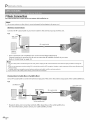 8
8
-
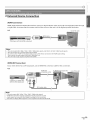 9
9
-
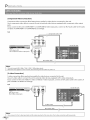 10
10
-
 11
11
-
 12
12
-
 13
13
-
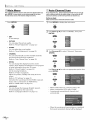 14
14
-
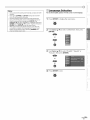 15
15
-
 16
16
-
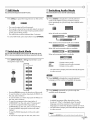 17
17
-
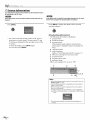 18
18
-
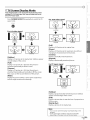 19
19
-
 20
20
-
 21
21
-
 22
22
-
 23
23
-
 24
24
-
 25
25
-
 26
26
-
 27
27
-
 28
28
-
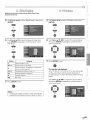 29
29
-
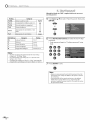 30
30
-
 31
31
-
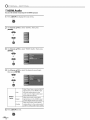 32
32
-
 33
33
-
 34
34
-
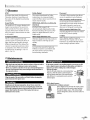 35
35
-
 36
36
-
 37
37
-
 38
38
-
 39
39
-
 40
40
-
 41
41
-
 42
42
-
 43
43
-
 44
44
-
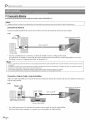 45
45
-
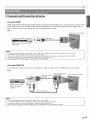 46
46
-
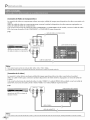 47
47
-
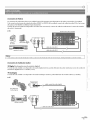 48
48
-
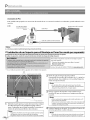 49
49
-
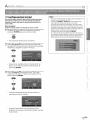 50
50
-
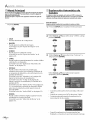 51
51
-
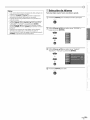 52
52
-
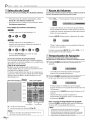 53
53
-
 54
54
-
 55
55
-
 56
56
-
 57
57
-
 58
58
-
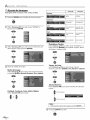 59
59
-
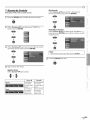 60
60
-
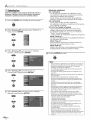 61
61
-
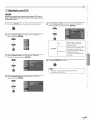 62
62
-
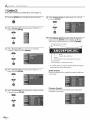 63
63
-
 64
64
-
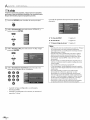 65
65
-
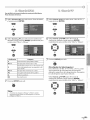 66
66
-
 67
67
-
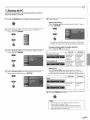 68
68
-
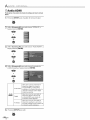 69
69
-
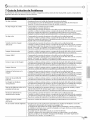 70
70
-
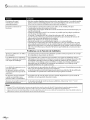 71
71
-
 72
72
-
 73
73
-
 74
74


Sylvania LC420SS8 El manual del propietario
- Categoría
- Equipo de música suplementario
- Tipo
- El manual del propietario
En otros idiomas
- English: Sylvania LC420SS8 Owner's manual
Documentos relacionados
-
Sylvania LC225SL9 El manual del propietario
-
-
Emerson LC320SLX El manual del propietario
-
-
Sylvania LC195SL8 El manual del propietario
-
-