

2
User’s Manual
This refrigetaror is not intended for use by persons
(including children) with physical, sensory or mental
impairments, or people with lack of experience and
knowledge, unless they have received regarding
the use of the refrigerator or under the supervision
of person responsible for their safety.
Its recommended that children be supervisioned
to ensure they are not playing with the refrigerator.
For Children
Prevent accidents. After unpa-
cking the refrigerator, keep the
packing material out of the reach
of children.
Do not allow your refrigerator
to be handled by children, even
when disconnected.
In case your refrigerator has any silica gel or Desi
Pak® pack inside, throw it away and do not let the
children play with it.
For the User / Installer
1. Safety
Safety .............................................................02
Installation .....................................................03
Description of the Refrigerator ...................04
How to Use ....................................................13
Cleaning and Maintenance ..........................16
Solving Problems .........................................20
Hints and Suggestions .................................22
Technical Information ..................................26
Table of contents
Disconnect the Refrigerator from the socket
whenever cleaning or doing maintenance.
Never disconnect the Refrigerator from the so-
cket by pulling the power cable. Use the plug.
If the power cord is damaged, do not try to x
it. It must be replaced by the tecnical service
or qualied professional in order to avoid a
hazard.
Do not store drugs, toxic or chemical products
in your Refrigerator, as they may contaminate
food items.
Products in high-pressure aerosol, identied
as ammable or with a small ame symbol
cannot be stored in the refrigerator or freezer
under risk of explosion.
Do not lean on the doors. The hinges may be-
come deregulated, affecting the refrigerator’s
sealing and compromising its performance.
Transport your refrigerator in vertical position
(standing). It is not recommended transporta-
tion in horizontal position.
IMPORTANT
Thank you for choosing Electrolux. In this manual
you will nd all the information for your safety and
proper use of your Fridge. Read all the instructions
before using the device and save it for further
references.
The identication label where all the information
about code, model, manufacturer and others, will
be used by the Technical Service in case your frid-
ge needs repairs. Do not remove it from its place.
Environmental Hints
The symbol on the product or on its packaging
indicates that this product may not
be treated as household waste.
Instead it shall be handed over to
the applicable collection point for
the recycling of electrical and elec-
tronic equipment. By ensuring this
product is disposed of correctly,
you will help prevent potential negative conse-
quences for the environment and human health,
which could otherwise be caused by inappropriate
waste handling of this product. For more detailed
information about recycling of this product, please
contact your local city ofce, your household waste
disposal service or the shop where you purchased
the product.
silica gel or
Desi Pak®
WARNING
Never place candles or incense
lighted over the Fridge, given the
risk of res or product damage.

3
2. Installation
Remove the base from the packing
With the help of other adults,
carefully recline the fridge to one
of the sides. With someone’s
help, break the base with your
hands. Tilt the refrigerator to the
other side and remove the rest
of the base.
In the back part remove the adhe-
sive tapes and unlock both back
spacers. Leave it in horizontal
position.
Choose the Location
Install your refrigerator in a ventilated location
away from direct sunlight and heat sources (stove,
ovens, etc.) and ammable products.
Do not install your refrigerator unsheltered (open
to weather).
For the denite position of the refrigerator, respect
the minimum distances recommended:
- On top: 10 cm
- Side: 10 cm
- Behind: 10 cm
Check if the spaces left in
the front of the fridge and
in the right side (looking
at the front of the fridge)
are enough to allow com-
plete opening of the door
and crisper drawer.
Leveling
Set the leveling feet to
ensure perfect refrigerator
stability, preventing rocking
movement. Leave frontal
casters rolling freely.
In order to perform the leveling feet must be com-
pletely on the oor.
To better close the door, the product must be
slightly reclined to the back.
The proper functioning of the refrigerator shall
depend on its perfect leveling.
WARNING
Leveling must be performed with closed
doors.
Your refrigerator was developed to use the
leveling feet, which come with it.
Therefore, do not use other feet other than
the original. There are wheels on the upper
back part of your refrigerator to facilitate
movement.
During packaging removal, the feeding cable
will be loose. To avoid damages, attach it
with adhesive tape in the back of the fridge.
After unpacking and leveling, wait at least
two hours before connecting your refrigera-
tor to prevent malfunctioning.
On top
Side
Behind
Electrical Installation
Before turning your fridge on re-
move the transparent protective
wrapping plastic applied on the
control panel in the freezer door.
Before connecting your refrige-
rator, check if the voltage on the
socket where it will be plugged
is equal to the one indicated on
the label next to the plug (on the
power cable) or on the refrigera-
tor ID label.
Be careful not to leave the refrige-
rator over the power cable.
Connect the refrigerator to an
exclusive socket. Do not use
extensions or T-connectors.
For your safety, request an elec-
trician of your trust to check the
condition of the electrical power
system at the location it will be
plugged and for further infor-
mation, contact the Technical
Service.
The socket wires where your
refrigerator will be connected
should be of copper and have
a minimum section of 2.5 mm².

4
3.Description of the Refrigerator
Parts
1. “Ice Twister” (DF80/DF80X) / Automatic Ice Maker
(DFI80/DI80X)
2. Ice storage recipient
3. “Drink Express” (DF80/DF80X)
4. Turbo freezing compartment (Turbo Freezer)
5. Retractile and small shelf of the freezer
6. Retractile and big shelf of the freezer
7. Freezer compartment light - 1 unit - (luminary)
8. Freezer door shelves (2 units)
9. Removable “Ice Stock”.
10. Cup support - “Frosty Cups” (2 units)
11. Space convenient compartment
12. Lights in the fridge compartment - 3 units - (luminary)
13. Temperature control selector in the fridge (DF80/
DF80X)
14. Removable glass shelve (2 per refrigerator)
15. Crisper drawer lid
16. Humidity Control
17. Crisper Drawer
18. Crisper Drawer sliding control
19. Leveling feet/ casters
20. Removable bin “Space+” (picnic)(DFI80/DI80X)
21. “Space Express”/“Gourmet Express”/“Drink Ex-
press” (DFI80/DI80X) Retractile Shelf (DF80/DF80X)
22. “Flex Box” shelf (2 per fridge)
23. Small multi-use shelf
24. Removable shelf for delicate fruits
25. Bottle holder shelve
26. Refrigerator door shelf (3 in models DF80/ DF80X)
and (2 in models DFI80/DI80X)
27. Bottles lock
28. “Space Light” removable shelf.
29. Water supply (DFI80/DI80X)
30. Removable can dispenser
31. Control Panel
32. Handles
33. Rotating water dispenser (DFI80/DI80X)
34. Water dispenser action button (DFI80/DI80X)
35. Deodorizer
36. Water lter element (DFI80/DI80X)
37. Retractile shelf of the fridge
38. Freezer door (not reversible)
39. Fridge door (not reversible)
40. Multi-Flow
41. Egg tray
42. Extra Crisper Drawer (DFI80/DI80X)
43. Extra Crisper Drawer cover (DFI80/DI80X)
44. Breakfast tray
WARNING
Do not use the refrigerator without connecting
the grounding wire.
Do not use the product without grounding it. If the
installation doesn’t have grounding, for your safety,
ask to a trusted electrician to provide it.
The grounding cable (green or yellow and green)
located at the back of your refrigerator must be
connected to an efcient grounding and should
not be connected directly to the electric power
network or to water and/or gas pipes, electricity,
telephone conduits, lightning rods, etc.
If your product is equipped with a 3-prong plug po-
wer cord, it will not have a grounding cable (green
or yellow and green). It must be plugged into a
properly grounded and polarized 3-prong outlet.
Do not use adaptor to bypass the grounding. Do
not replace it for a two prong plug. If necessary, for
your safety, ask to a trusted electrician to ground
your appliance.
Grounding is the best safety for the user against
electric discharges.
Ground Wire (Grounding)
Admissible voltage variation
Voltage (V) Minimum (V) Maximum (V)
127
220
116
201
133
231
Fio Terra (aterramento)
IMPORTANT
In case the voltage at installation site is out of
the indicated limits on Admissible Voltage Varia-
tion table, ask the dealer energy the adequacy
of voltage levels and adapt a voltage stabilizer
of not less than 2000 VA. If there is any, voltage
variation on site, outside the specied limits
(see table above) or a not constant energy su-
pply, the appliance may change in its operation.
If so, remove the plug for 5 minutes and then
reconnect it to the energy supply (check item
6 - Solving Problems - Pages 20 and 21).

5
Control Panel DF80 / DF80X
Control Panel DFI80 / DI80X
This panel has approximation mode. To set it,
place your hand rapidly over the control panel.
All Buttons will light up with 50% luminous intensity.

6
Button “GOURMET EXPRESS” (fast cooling
after desserts - models DFI80/DI80X)
By setting this button, it is selected the kind of dessert
expected to cool faster, during a predetermined time
for each dessert:
trie, cheesecake, mousse and pudding. In case you
wish to deactivate this function, you must touch the
screen “GOURMET EXPRESS” again until the indica-
tor shows room temperature.
Button “FRIDGE TEMPERATURE (models
DFI80/DI80X)
This button allows the adjustment of temperature in the
fridge compartment: Minimum, Medium and Maximum.
Intermediary adjustments to these positions can also
be performed.
Button “FREEZER TEMPERATURE”
This button allows the adjustment of temperature in
the freezer compartment: Minimum, Medium and
Maximum. Intermediary adjustments to these
positions can also be performed, in models (DFI80/
DI80X).
WARNING
The function “Drink Express” (Beverage Fast
Cooling) can experience changes to the beverage
nal temperature given the electric tension, room
temperature and beverage initial temperature.
Avoid opening the fridge door frequently when this
function is being used.
Button “DRINK EXPRESS” (Beverage fast
cooling)
By setting this button, it is selected the kind of drink
expected to cool faster, during a predetermined time for
each drink: In case you wish to deactivate this function,
you must press the button “DRINK EXPRESS” again
until the indicator shows two bars (- -) in models DF80/
DF80X and room temperature in models DFI80/DI80X.
For models DF80 and DF80X the beverages must be
in the Drink Express drawer at the freezer.
Indicator of Electronic Panel Locked
Indicates when the control panel is locked to avoid
changes to the settings.
To lock the control panel of models DFI80/DI80X
it must be pressed at the same time the buttons
FRIDGE TEMPERATURE and FREEZER TEM-
PERATURE for approximately 3 seconds.
To unlock, repeat the process.
To lock the control panel of models DF80/DF80X
it must be pressed at the same time the buttons
FREEZER TEMPERATURE and AUTO CONTROL
for approximately 3 seconds. To unlock, repeat the
process.
For these models, once the panel is locked “LOC” will
appear on the display.
Button “INTELLIGENT SENSOR” (DFI80/DI80X)
This button when set, will make the device stop oper-
ating in manual mode to operate in automatic mode.
Variations in room temperature will be considered
automatically, assuring the conservation properties in
food stored in the fridge.
With this function activated, it is not possible to set the
freezer temperature and the fridge temperature (the
buttons are blocked).
Indicator of FREEZING TURBO or BEVERAGES
FAST COOLING or DESSERT FAST COOLING time
(DFI80/DI80X)
In case one of the functions above has been chosen, the
indicator shows the operation remaining time.
For example: 30, 29, 28 minutes and so on until zero
(0:00). Should you wish to use the functions simultane-
ously (cool drinks and freeze food or party manner), the
counter will show the remaining time to conclude each
Dessert Indicator (DFI80/DI80X)
It shows which dessert was selected for fast cooling:
trie, cheesecake, mousse or pudding. The selection is
made by pressing the button “GOURMET EXPRESS”.
Indicators of Temperature Selection of Fridge
Compartment (DFI80/DI80X)
They indicate the temperature selected in the fridge
compartment.
The adjustment is made by pressing the button
FRIDGE TEMPERATURE.
When the fridge is turned on for the rst time, turned on
after cleaning or after blackout, the control will always
indicate medium position.
Temperature Selection Indicators of the
Freezer Compartment
They indicate the selected temperature in the freezer
compartment.
The adjustment is made by pressing the screen
FREEZER TEMPERATURE.
When the fridge is turned on for the rst time, turned
on after cleaning or after blackout, the control always
indicates medium position.
Beverage Indicator
Shows the drink selected for Rapid Cooling: cham-
pagne, beer or canned drinks (DF80/DF80X) or sodas,
champagne, beer and canned drinks (DFI80/DI80X).
The selection is made by pressing the screen “DRINK
EXPRESS”.

7
function with a respective display light for 30 seconds
and then remain alternating in-between functions until
one of them is concluded.
(DFI80/DI80X)
When no function is selected, the indicator in models
DFI80 and DI80X shows room temperature and in
models DF80 and DF80X the indicator will show two
bars (- -) moving up and down.
Button TURBO FREEZING:
Allows for faster food cooling or freezing. This function’s
operation time can be set to 30 minutes (minimum) and
up to 2 hours and 30 minutes (maximum).
Other periods that may be selected: 45 minutes, 1 hour,
1 hour and 30 minutes and 2 hours.
In case you wish to deactivate this function, you must
press the button TURBO FREEZING again until the
indicator shows (- -) in models DF80/DF80X or room
temperature in models DFI80/DI80X.
WARNING
The function TURBO FREEZING will not work in
case the function BEVERAGE FAST COOLING
is working or selected before (this information
is valid only for models DF80 and DF80X).
Indicator of High Temperature in the Freezer
and/or Fridge Compartment (DFI80/DI80X)
This indicator will turn on every time the Freezer and/or
Fridge compartment temperature is higher (hot) than
the proper temperature for storage.
We recommend not to perform freezer and/or fridge
load when the indicator of high temperature is on.
Keep temperature setting of freezer compartment at
maximum and wait a few minutes until the indicator is
off. In case this indicator remains on for a long period,
contact Technical Service.
Indicator of Water Filter Replacement (DFI80/
DI80X)
Indicates when the water lter expired and must be
replaced.
The lter must be purchased in the Technical Service.
After the lter replacement, by pressing at the same
time buttons PARTY and FRIDGE TEMPERATURE,
for approximately 3 seconds. This operation will turn
off the luminous indicator and will restart the 500 liters
count (lter useful life) of the new lter.
Indicator of Door Opened (DFI80/DI80X)
This indicator stays on as an alert while any of the doors
(refrigerator or freezer) remains open.
BUTTON/Function PARTY
The function, when selected, maintains the freezing
capacity at maximum, and cooling capacity for 6 hours,
even with several door openings. To activate this func-
tion by pressing the button “PARTY” once (DFI80/
DI80X) or press the button “AUTO CONTROL” twice
(DF80/DF80X). The function Party can be deactivated
at any time, by pressing the button “PARTY” (DFI80/
DI80X) or button “AUTO CONTROL” (DF80/DF80X).
Button/Function Shopping
The function, when selected, keeps the freezing capac-
ity at maximum, allowing a fast freezing and cooling
of new food.
The function Shopping has a duration of 3 hours,
although it can be deactivated at any time, by press-
ing the button “SHOPPING” (DFI80/DI80X) or button
“AUTO CONTROL” (DF80/DF80X). This function
activates open door alarm to start tinging only after
10 minutes.
WARNING
The water outlet in the dispenser will be interrupted
at the moment the Ice Maker is being relled.
Fill up only with potable water.
Button “ICE MAKER” (Automatic Ice Maker
– only in models DFI80 and DI80X)
By pressing this button, the ice maker is turned on and
the ice starts to be made automatically.
Make sure there is water in the water supply at all
times, so the ice can be made. The lack of water in
the water supply is indicated on
the display according to the pic-
ture. To deactivate the automatic
ice maker at any time, press the
button “ICE MAKER”.
To remove the “ rA “ from the display you must rell
the water supply, wait a few minutes so the water can
go through the lter and press the Button Ice Maker
again. The fact “ rA “ does not appear on the display
does exempt the lack of water from the water supply,
because the water use by the Water Dispenser is not
monitored by this alert.

8
Button/Function Vacation
The function Vacation, when selected keeps the free-
zer temperature at minimum for models DF80/DF80X
and the freezer temperature and fridge at minimum for
models DFI80/DI80X. This function is indicated when
the product remains closed for long periods of time.
During the rst 30 minutes, after the function is selec-
ted, the product can be opened without deactivating
this function. To deactivated this function at any time,
press the button “VACATION” in models DFI80/DI80X
and the button “AUTO CONTROL” in models DF80/
DF80X or open one of the doors for 30min, after the
function is selected.
Button “AUTO CONTROL” (Automatic Control)
DF80/DF80X
By pressing the button “AUTO CONTROL” it is pos-
sible to select one of the automatic control functions:
Vacation, Party and Shopping (DF80/DF80X).
Attention: If the function “AUTO CONTROL” is
selected, the functions TURBO FREEZING, “DRINK
EXPRESS”, “ICE EXPRESS” and FREEZER TEM-
PERATURE will not be selected, until the function
“AUTO CONTROL” is interrupted.
“AUTO CONTROL” indicators (Automatic Con-
trol - DF80/DF80X)
Shows the automatic control function selected.
21.1. Vacation
The function Vacation, when selected (pressing the but-
ton “AUTO CONTROL”, keeps the freezer temperature
at minimum. This function is indicated when the product
remains closed for long periods of time. During the rst
30 minutes, after the function is selected, the product
can be opened without deactivating this function. The
function Vacation can be deactivated at any time, by
pressing the button “AUTO CONTROL” or open any one
of the doors 30 minutes after the function is selected.
21.2. Party
The function, when selected (pressing the button “AUTO
CONTROL” twice), keeps the freezing capacity at most
for 6 hours, even with several door openings. The func-
tion Party can be deactivated at any time, by pressing
the button “AUTO CONTROL”.
21.3. Shopping
The function, when selected (pressing the button “AUTO
CONTROL” three times), keeps the freezing capacity at
most, allowing a fast freezing of new food. The function
Shopping has a duration of 3 hours, although it can be
deactivated at any time, by pressing the button “AUTO
CONTROL”.
With this function activated, the alarm of the door opened
starts to work after 10 minutes.
Button “ICE EXPRESS” (DF80/DF80X)
This Button allows the ice to be formed faster in the
freezer compartment. Make sure the ice trays in the
“Ice Twister” are lled with water. To deactivate this
function, press the button “Ice Express” at any time.
Indicator of Room Temperature (DFI80/
DI80X)
Indicates the room temperature where the fridge is
installed when no other function is being used.
Time Indicator (DFI80/DI80X)
Indicates in minutes the remaining time of a pre-
selected function.
Temperature Indicator (DFI80/DI80X)
Indicates the temperature in Celsius grade of a pre-
selected function.
The fridge has ve types of alarm:
26.1 Open door Alarm
After, approximately 4 minutes (normal operation) and 10
minutes (operating on shopping mode) with the door(s)
opened, the alarm goes on.
The alarm is automatically turned off when closing the
door. Note: In case of the doors remains opened, after
silence time is passed, the alarm goes on again.
26.2 TURBO FREEZING LONG Alarm
(Periods of 1:00h, 1:30h, 2:00h and 2:30h)
At the end of the time chosen for the TURBO FREEZ-
ING, the respective Button and the panel numbers will
be ashing for about 10 seconds.
To turn off, open and close the freezer door or activate
the respective button.
26.3 TURBO FREEZING SHORT Alarm
(Periods of 30 and 45 minutes)
At the end of the selected TURBO-FREEZE period, the
alarm will be triggered, sounding for about 1 minute. In
this case, if the door is not opened, an alert “bip” will
sound every minute. After the end of the operation, in
addition to the sound signal the respective Button will
be ashing in the control panel. To turn off the sound
and visual alarms, open and close the freezer door or
activate the respective button.
26.4 Beverage Fast Cooling Alarm (DRINK EX-
PRESS)
At the end of the pre-set period for the chosen drink
express cooling, the alarm will sound for one minute.
Remove all the beverages and close the door. If this
procedure is not followed, after 1 minute, 1 alert “bip”
will sound every minute. After the end of the operation,
in addition to the sound signal the respective Button will

9
be ashing in the control panel. To turn off the sound and
visual alarms, activate the respective Button or remove
the beverage and close the door.
26.5 Dessert Fast Cooling Alarm (GOURMET EX-
PRESS - mod. (DFI80/DI80X)
At the end of the pre-set period for the chosen dessert
express cooling, the alarm will sound for one minute.
After the end of the operation, in addition to the sound
signal the respective Button will be ashing in the control
panel. To turn off the sound and visual alarms, activate
the respective button. Remove the dessert and close
the fridge door. If this procedure is not followed, after 1
minute, 1 alert “bip” will sound every minute.
26.6 ICE EXPRESS Alarm (DF80/DF80X)
At the end of the chosen time for the ICE EXPRESS, the
respective Button and the panel numbers will be ash-
ing, for approximately 10 seconds. To turn off, open and
close the freezer door or activate the respective button.
Button “Water Dispenser Activator”
Pressing the Button and keeping it pressed, you can
serve water in a glass.
For this it is necessary to: a) The water dispenser
is opened; b) The electric panel is unlocked; c) The
reservoir is lled with potable water.
Turbo-freezing Compartment
This compartment allows a
faster foodstuff cooling. This
compartment is located in the
superior right area of your
freezer.
“Ice Twister” / Ice Trays (DF80/DF80X)
After removing it from its place, ll the “Ice Twister”
with water carefully so the ice
trays will not overow. Place
the “Ice Twister” correctly into
position. The water freezes
after a few hours. Gently, turn
the handle clockwise until the
cubes come loose and fall from
the ice recipient.
“Ice Maker” / Automatic Ice Maker (DFI
80
/
DI
80
X)
Fill the potable water supply on
the fridge door with and activate
the button “Ice Maker” located
in the control panel. The water
freezes after a few hours. the ice
will automatically fall into the ice recipient. This compart-
ment is located in the superior left area of your freezer.
Beverage Fast Cooling Drawer (DF
80
/
DF
80
X)
Place the bottle or can in this
drawer to cool your drink faster in
the freezer compartment (A) and
activate the function drink express
in the control panel (refer to sec-
tion “Tips and Advices” beverage
fast cooling table).
If you wish, you can use this dra-
wer to keep food in the fridge (B),
in this position, even activating
the function DRINK EXPRESS beverage fast cooling
will not occur.
A
B
Frosty Cups
Developed to store cups and
glasses, so they can be cooled at
the moment of use.
Space Convenience Compartment
This compartment is used to store
some food that require lower
storing temperature (near 0°C)
without freezing. Example: food
to be consumed or cooked in a
short period of time such as meat, sh, dessert and
similar. This compartment is located in the superior
right area of your fridge.
WARNING
Fill up only with potable water.

10
Fruits and Vegetables Drawer (DFI80/DI80X)
Compartment that does not allow
the cooled air to be directly in
contact with fruits and vegetables.
It provides the right humidity level to
an improved preservation.
For better preservation, always
keep fruits and vegetables stored
inside this compartment.
Retractile Shelf (DF
80
/DF
80
X)
This shelf can be de-
tracted, allowing sto-
rage of larger objects
in your fridge, such as
jars and bottles.
To unlock them, push
the locks down (A) in
the lower part of the
shelf and then, push
it back (B).
A
B
Crisper Drawer with Sliding Control
Keep the humidity and freshness
of fruits and vegetables due to the
circulation of cool air not in direct
contact with the food.
For best conservation, keep the ve-
getables and fruits in this location.
You are provided with a fruit and
vegetable sliding control, to faci-
litate the food organization place
it on the right or left. In it, can also
be stored small packages of food.
Humidity Control
To Best store the food, there is a
humidity control in the crisper dra-
wers which regulates the airow.
When storing Leafy vegetables
it is recommended to reduce the
incoming air, displacing the Button
to the left, avoiding food dehydra-
tion. For fruits, we recommend increasing the airow.
When storing fruits and vegetables together, set the
Humidity Control to intermediary.
Delicate Fruits
The compartment has an incli-
nation system (A) and a handle
that facilitate its removal from the
product. Use this space to store
small fruits, such as grapes,
strawberry, etc.
This compartment is located in the central right area
of you fridge door.
Multi-Flow System
This system distributes cool
air for the cooling of food
items inside the refrigerator
compartment.
Attention: Always leave the
air outlets free to facilitate
cool air circulation and thus
improve food conservation.
Ice Stock
This compartment is able to store
ice made in the “Ice Twister”
(DF80/DF80X), automatic ice
maker (DFI80/DI80X), or store be-
verage bottles that do not freeze.
The compartment has a handle
that facilitate its removal from the product. This
compartment is located in the inferior right area of
your freezer door.
Removable Multi-use Shelves
These 3 shelves (2 in models,
DFI80 and DI80X) are used to
store several types of food,
adequate to the fridge tem-
perature.
A
Light Space
The compartment has a cover and
a handle that facilitate its removal
from the product. Ideal to store
light products. This compartment
is located in the superior right area
of your fridge.

11
Deodorizer
The deodorizer reduces inconve-
nient food or liquid odors.
It is installed on the upper part of
the refrigerator compartment.
To solve any doubts concerning
the cleaning of the deodorizer,
consult the section “Cleaning and
Maintenance”.
Egg Tray
The egg tray is removable and
has a handle for better movement
between the fridge, sink and table.
Its maximum capacity is of 18 eggs.
The egg tray is sent into the Crisper drawer.
Removable Can Dispenser
The can support is sent into the
Crisper drawer.
Especially developed for storing
350ml containers of your favorite
drinks.
You can remove it from the door
and take to the table for your
greater convenience.
The container-holder can be
mounted in two different posi-
tions: In the door (1) or in the
fridge “Space Express” compart-
ment (2) (DFI80/DI80X). It can
cool the cans faster at the same time, by only activating
the DRINK EXPRESS function in the Control Panel.
Position
Position
Retractile Glass Shelves
This shelves can be detracted and folded, allowing
the storage of bigger objects in your fridge, such
as jars and cakes. To unlock them, push the locks
down (A) in the lower part of the shelves and then,
push it back.
If you wish, you still can fold it up.
Position 1
Position 2
A
Bottle Shelves and Locks
1. Bottle-holder Shelves:
The bottle-holder shelf accommo-
dates bottles of 3.3 liters.
2. Bottles lock:
The bottle lock has a function that
prevents bottles from shaking
loose on the shelf.
To use it, just t it onto the shelf and slide to the right or
left, as shown on the gure.
It can also be used to store small condiments or Milk
cartons in its interior.
Gourmet Express / Drink Express Compart-
ment (models DFI
80
and DI
80
X)
This compartment was develo-
ped for fast cooling of desserts
and beverages within the fridge
compartment. It can be used with
trays, cans, bottles and, if you wish
even with the whole can support.
To use this compartment, open its
door, store the dessert or bevera-
ge you wish to cool fast, close the
door and select the type of dessert
to be cooled off through the Button
“Gourmet Express” or select the
type of beverage through the
button “Drink Express”. It is not
recommended to put desserts
and beverages at the same time.
In case you do not wish to use
this compartment for the functions
mentioned above, it can be used
as a regular shelf in the fridge,
you only need to place the cover
according to the pictures shown.
It is not recommended to use the
buttons Gourmet Express and
Drink Express in this position.
This compartment is located in the superior left area of
your fridge.
In case you wish to use this place as an extra cold
compartment to store some food that require lower tem-
perature (near 0ºC) close the lip, but do not activate the
buttons “Gourmet Express” and “Drink Express”.
WARNING
Do not put weight or recipients over the cover
“A” when it is opened.
A
A

12
Water Container (only for models, DFI
80
e DI
80
X)
Developed to provide pure and healthy water,
given its exclusive ltering system.
Pure Filter
Fill it with potable water only
and wait the ltering to start.
Important: In the rst rell use
(lter element) the water can
present a ark aspect, due to the
activated coal black. It is requi-
red to conduct this rst ltering
with the container outside the
fridge, preferably in the sink, so the water with
dark aspect is disposed. Repeat this procedure
for 3 times (approximately 9 liters of water). This
procedure must be repeated at every rell
replacement (lter element). recommended to
replace the rell every 6 months or 500 liters. The
indicator of lter replacement will turn on after the
consumption of 500l of water.
How to Use the Water Container (only for
models, DFI
80
and DI
80
X)
1. Detach the water tube of the container.
2. Remove the reservoir from the refrigerator’s
door, lifting and pulling it as
shown on the side drawing.
3. Fill the water container and
wait the ltration.
It is required the rst ltering
is made in a place the ltered
water can be described (for
instance, in the sink).
Repeat this procedure for 3
times (approximately 9 liters
of water).
This procedure must be repeated at every rell
replacement (lter element).
4. Place the water container in the position and
attach the water tube, pressing rmly down.
5. Open the cover of the superior area of the water
container, ll it up and wait the potable water
ltering process.
“Flex Box” Shelves
These two shelves are used to
store several types of food units
or small packages. To make the
access easy, they are remo-
vable. To facilitate the Access
use them in position 2 and after
using return them to position 1.
6. After this procedure, the ltering system can be
used normally.
7. To serve, open the dispenser rotating it, place a
glass in the water outlet located in the external
door of the fridge and activate the button (A)
located right above.
8. In order to avoid undesirable activations, turn
the dispenser and keep it closed (position 1).
A
WARNING
- Before using it for the rst time, wash the
reservoir with water and neutral soap to eli-
minate any residues. Refer to section “Water
Container Cleaning”, on page 16.
Use drinking water only. The use of any other
beverage can leave residues, taste or odor
in the container.
- The potable water reservoir should only be
lled when placed into its position on the
door. Water supply temperature shall not be
higher than 43ºC.
- Let the water cool for about 12 hours.
- It is possible to hear some noise from the
air entry when the water leaves the reservoir.
- For models DFI80 and DI80X it is possible
also to hear some noises made by the water
supply automatic system in the ice maker
and water dispenser.
- In case the water is not owing, press once
again the activating button. Keep the glass
under the water outow for a few moments
to ensure the water is completely collected
by the glass.
- Do not use gasied beverage such as soft
drinks. The drink may leak due to the gas
pressure.

13
Back Spacer
Avoid the fridge to touch the wall.
Keep the back spacers always in
position 1 (horizontal).
When transporting the fridge,
keep the spacer in position 2
(vertical). This will facilitate the
fridge passage through the door, for instance. Use an
adhesive tape to keep in position 2.
Bin “Space +” (Picnic) (DFI
80
/DI
80
X)
The “Space +” bin is removable
and has two handles to improve
the movement between fridge,
sink, table, etc.
Breakfast tray
In this space it is possible to store
items such as cheese, yogurts,
butter, etc. which are regularly
taken to the table.
4. How to Use
How to turn your refrigerator on and off
To turn your refrigerator on or off, just connect or
disconnect the plug from the socket after checking
the product’s correct voltage.
Before turning the fridge on by the rst time, read
the instruction brochure placed in the door and
this entire manual carefully.
When turning the fridge off, wait 10 minutes
before turning it on again.
IMPORTANT
Loading/Replenishing
In the rst lling or after cleaning:
1. For better accommodation of recipients in the
freezer and refrigerator compartments, all shelves
can be removed and repositioned, and the freezer
and fresh food compartments removed.
2. Connect the refrigerator’s plug into the socket.
3. Leave it working for at least two hours before
storing any foodstuff inside.
4. Begin lling of the food items from the refrigerator
shelves, leaving the door shelves for last. It is im-
portant to respect the maximum load limit indicated
in the gure below.
5. After lling, set the temperature control to the most
suitable position, following the information of the
items “Freezer Electronic Temperature Control”
and Refrigerator Temperature Control”.
6. Do not put food on the air outlets, so the fridge
performance is not compromised.
Maximum Load Limits

14
The adjustment positions for freezer and fridge
temperature are pre-established at the manufac-
turer plant.
However, the temperature shall depend on the
conditions of the room temperature, foodstuff and
the rate at which the door is opened.
Therefore, be careful not to place foodstuff in such
manner that it blocks the air outlets and avoid
opening the door unnecessarily.
The fridge compartment of models DF80/DF80X
has independent temperature control located
inside and on top of the fridge. For adjustments,
refer to section “Manual Temperature Control of
the Fridge”.
Fine Adjustment of Temperature
Your fridge has been manufactured within in-
ternational Standards and has three levels of
temperature with pre-established values at the
manufacturer plant for models DF80/DF80X and
ve levels for models DFI80/DI80X, being able to
be adjustable (increase or decrease) according
to your need.
Should you wish to change them, you have the
Temperature Fine-Tuning option for the three/ve
levels as explained next.
Electronic Control of Freezer (DF
80
/
DF
80
X/DFI
80
/DI
80
X) and Fridge
(DFI
80
/DI
80
X) Temperature
By pressing it successively,
the freezer temperature
will be selected as shown
below:
Electronic Control of Freezer and
Fridge Temperature
(Default Temperatures)
Freezer
Temperature
Fridge
Temperature
(DFI80/DI80X)
Adjust
-24ºC (cold max)
---
-20ºC (cold med)
---
-16ºC (cold min)
-1ºC (cold max)
1ºC
3ºC (cold med)
5ºC
8ºC (cold min)
Maximum
Medium
Minimum
1. To program this function (DF80/DF80X)
1.1. Press the button “AUTO CONTROL” and
select function VACATION and then, press
5 times the button “TEMP. FREEZER”. The
function indicator will turn on showing the latest
adjustment made. Temperature ne adjustment
set is valid for the 3 temperature levels of the
freezer compartment.
1.2. Setting Options:
To increase 0.5 ºC to the pre-established tem-
perature, press the button TEMP. FREEZER
until the function indicator shows 05.
To increase 1 ºC to the pre-established tempe-
rature, press the button TEMP. FREEZER until
the function indicator shows 10.
To decrease 0.5 ºC to the pre-established tem-
perature, press the button TEMP. FREEZER
until the function indicator shows 05 with a
dash on its left side.
To decrease 1 ºC to the pre-established tempe-
rature, press the button TEMP. FREEZER until
the function indicator shows 10 with a dash on
its left side.
To decrease 2.0 ºC to the pre-established tem-
perature, press the button TEMP. FREEZER
until the function indicator shows 20 with a
dash on its left side.
After three seconds without pressing any buttons,
the ne adjustment is nished.

15
2. To program this function (DFI80/DI80X)
2.1. Press at the same time the buttons “DRINK
EXPRESS” and “TEMP. FREEZER” until you
hears a sound alarm. The function indicator will
turn on showing the latest adjustment made.
The ne adjustment is valid for all ve levels
of freezer and fridge temperature.
2.2. Setting Options:
The rst number appearing on the display
(tens) corresponds to fridge temperature and
the second number (units) corresponds to
freezer temperature.
To increase 0.5ºC to the pre-established fridge
temperature press TEMP. FRIDGE until the
number 1 appears on the left side of the display.
To increase 0.5ºC to the pre-established freezer
temperature, press TEMP. FREEZER until
the number 1 appears on the right side of the
display.
To increase 1ºC to the pre-established freezer
temperature press TEMP. FREEZER until
the number 2 appears on the right side of the
display.
To increase 1ºC to the pre-established fridge
temperature press TEMP. FRIDGE until the
number 2 appears on the left side of the display.
To decrease -0.5ºC to the pre-established
freezer temperature press TEMP. FREEZER
until the number 3 appears on the right side of
the display.
To decrease 1.0ºC to the pre-established free-
zer temperature press TEMP. FREEZER until
the number 4 appears on the right side of the
display.
To decrease -0.5ºC to the pre-established
fridge temperature press TEMP. FRIDGE until
the number 3 appears on the left side of the
display.
To decrease 1.0ºC to the pre-established fridge
temperature press TEMP. FRIDGE until the
number 4 appears on the left side of the display.
To decrease 2.0ºC to the pre-established free-
zer temperature press TEMP. FREEZER until
the number 5 appears on the right side of the
display.
To decrease 2.0ºC to the pre-established fridge
temperature press TEMP. FRIDGE until the
number 5 appears on the left side of the display.
After three seconds without pressing any buttons,
the ne adjustment is nished.
Several freezer and fridge combinations can be
freely used, ex: 55, 32, 52, 33, 43, etc.

16
Fridge Manual Temperature Control
(DF
80
/DF
80
X)
To properly control your
refrigerator’s temperatu-
re, consider the following
factors:
1. The quantity of food
stored.
2. The environment tem-
perature where the re-
frigerator is installed.
3. To get maximum, medium and minimum cold,
turn the “B” Button to the right or left until the
respective grading is align with the Gray round
part “A”.
A
B
Cleaning the Deodorizer
In case of a bad odor in the
freezer compartment and in the
refrigerator, act as follows:
1. Set the temperature control of
the refrigerator to MAXIMUM
for about an hour and return
to the former setting.
2. Then, remove the deodorizer
fron the upper part of the com-
partment of the refrigerator and carefully loosen
the deodorizer from inside the cover.
5. Cleaning and Maintenance
Before any maintenance opera-
tion, including those described
in this manual, disconnect the
refrigerator from the main power by
removing the plug from the socket.
Never clean your fridge with in-
ammable uids, such as alcohol, kerosene, thinner,
varsol, solvents or any other abrasive chemical pro-
ducts such as detergents, acids or vinegars in order
to not damage the polished protection and other parts.
After cleaning, replace the accessories supplied with
the refrigerator (drawers, shelves, etc) in their proper
places inside the refrigerator. In case any food item
is spilled inside the refrigerator, clean it immediately.
Many of these food items can damage or leave an
inconvenient odor on the internal refrigerator surfaces
if they stay un-cleaned for long.
Never use metallic spatulas, brushes, abrasives or
alkaline products to clean the plastic surfaces inside
your refrigerator.
Before cleaning the refrigerator, remember that wet
objects can easily stick to extremely cold surfaces.
Therefore, do not touch cold surfaces with cloths,
sponges or even your wet hands.
WARNING
WARNING
The plastic parts cannot be washed with
hot water.
In case of not wanting to use the specic
functions of your refrigerator’s in the daily
basis, for example: Party, Shopping, Vaca-
tion, Auto Control, etc; you can regulate
your refrigerator according to the table
below.
Internal Part
Clean the inside of the refrigerator and the ac-
cessories with a warm water solution and sodium
bicarbonate (a soup spoon of bicarbonate for each
liter of water). Carefully dry it.

17
Automatic Ice Maker “Ice- Maker”
(DFI
80
/DI
80
X)
The ice maker has a
stick (A) that checks if
there is ice formed in
the ice storage contai-
ner. When cleaning the
ice maker, this stick,
must not be forced at nay direction.
The ice maker is placed in the superior left area
of the freezer compartment.
3. Leave it in a clean water container for three hours.
4. Remove and leave the deodorizer at rest to dry for
2 hours and assemble it again.
5. The deodorizer should be changed after its third
cleaning.
6. It is recommended the use of a small screwdriver to
remove the part supporting the deodorizer.
Water Tubes Replacement (DFI
80
/DI
80
X)
Your fridge allows the replace-
ment of the water tubes from
time to time, in order to maintain
the water purity at all times. It is
recommended the annual repla-
cement of the tubes.
Before using the automatic ice maker, it
is recommended to clean the water con-
tainer, according to item “Water Container
Cleaning”.
It is also recommended the disposal of the
rst ice cubes. This will assure the ice trays
and other parts in contact with the water
before turning to ice, are clean. Dispose at
least 30 ice cubes before using it.
IMPORTANT
Lights Replacement
To replace a light bulb in your
fridge, proceed as follows:
1. Turn the fridge off, by unplug-
ging the electrical power cord
from the wall outlet.
2. Remove the shelves in front
of the light lid (luminary).
3. Pull the luminary simulta-
neously with both hands until
it is completely loose (A).
4. Replace the used light bulb
with an equivalent one (same
dimensions, tension and
maximum Power of 25 W).
5. Reattach the luminary, rst
attaching the pins of one of
plastic cover ends (B) and
then, push the other end (C)
against the fridge wall, until it
is locked in the original position.
6. Attach the electrical power cord to the wall outlet.
A
A
A
B
B
1. Release the water tube
of the water container (1)
2. Remove the fridge door
container, lifting and
pulling according to the
picture (2).
3. Release the lateral locks
carefully (3).
4. Remove the main contai-
ner cover (4).
5. Remove the inside contai-
ner and remove the rell
carefully – lter element
(5).
6. Clean up all the parts (ex-
cept the rell) with warm
water and mild soap,
wash with running water.
7. Do not forget to reattach
the rubber seal cover from
the main container.
Water Container Cleaning (only for models
DFI80 and DI80X)
WARNING
Before removing the reservoir from the door,
completely empty it.
C

18
8. Install the rell (lter
element) in the in-
side container, and
make sure it is pla-
ced in a way to keep
the sealing between
the parts and close
the inside container.
9. Assemble the inside container in the main
container.
10. Attach the main container cover using lateral
locks.
11. Read the procedures on how to use the water
container (page.12).
WARNING
Do not wash the rell, given the risk of its
own contamination.
WARNING
Given the special polish applied in your
product to make cleaning easy, do not use
abrasive sponges, steel brushes, not even
special products to clean stainless steel,
pastes, sapolio and inflammable fluids,
such as, alcohol, kerosene, gas, varsol,
solvents car wax, polishers and other abra-
sive chemical products such as chlorine,
detergents, acids or vinegars.
The use of such products can damage
the polish protection and, subsequently,
stain and/or risk permanently the surface
of your fridge.
It is recommended to activate the function
LOCKED ELECTRONIC PANEL when per-
forming Control Panel cleaning to avoid
activating some functions accidentally.
External part
To easily clean the external
part of your refrigerator, use a
wet cloth in warm water and
neutral soap solution, and then
carefully dry.
The doors of models DF80X
and DI80X have special pro-
tector polish which avoids nger marks and
stains, use a dry annel or moist in warm water
with mild soap and then, dry it carefully.
WARNING
The door rubbers are attached and remo-
vable.
Door Rubber Seal
The sealing rubbers of the doors should be ca-
refully cleaned with a wet cloth, with care not to
damage them.
Water Collector and Condenser
Cleaning
Your fridge has a water
collector and a condenser
located in the back near
the compressor (motor).
The collector function is
to store water from the
automatic defrost, which evaporates through the
heat generated in this area.
The condenser function is to assist the refrige-
ration.
Cleaning the collector and condenser is recom-
mended every 6 months.
WARNING
Do not remove the fridge back cover
Do not throw water directly inside or outsi-
de the refrigerator.
Water Drop Collector Cleaning (models
DFI
80
and DI
80
X)
1. Remove the drip pan from the
refrigerator door.
2. Dry the water whenever ne-
cessary.
3. Clean the drip pan and the
cover with warm water and
neutral soap.
4. Fit the drip pan cover on the
refrigerator door.

19
Automatic Ice Maker Cover and Ice Storage
Container (models DFI80 and DI80X)
To remove the cover, rst
pull the left side of the part
(A), displace it to the left
(B) until unlocking the right
side pin.
To remove the drawer, pull it
forward (C) and lift it at the
end of its course.
“Drink Express” (models DF80 and DF80X)
To remove “Drink Express”
press the safety locks down
(A) and pull it forward.
Hold “Drink Express” steady
in case it is loaded. This
lock exists in freezer and
fridge use.
How to remove accessories
Freezer Shelves:
The freezer glass shelves are removable, and
can be used according to your need. To remove
them, push the safety locks down (A), leave them
retracted (B), lift the shelves a little at the same
time and pull the set forward (C).
Door shelves:
Slightly lift it to remove it.
Water Container Cover (only for models, DFI80
and DI80X)
In order to remove it is required the prior removal
of the water container from the fridge door.
Removable Glass Shelves:
Remove by pulling the shelf
until it locks and lift it.
Glass shelves can be placed
in any position in the fridge,
except the glass shelf right
above the crisper drawer in
models DFI80/DI80X which
can only be placed in this
position.
Water Container (only for models DFI80 and
DI80X)
1.Detach the water tube of the
container.
2. Slightly lift and pull the
reservoir to remove it, ac-
cording to the side drawing.
A
A
B
C
A
B
C

20
6. Solving Problems
Customer Support
In case the refrigerator presents any malfunction, check for the possible causes and corrections.
• Connect the plug to the socket.
• Connect the product to the right tension.
• Correct the defect in the socket.
• Wait the Power to return, change the fuse or
turn on the switch.
• Remove the plug from the electric outlet for
5 minutes reconnecting it on sequence.
• Plug is off the socket.
• Product connected to different tension outlet.
• Bad contact socket
• Lack of electrical Power, off switch or burned
fuse.
• Power outage or voltage oscillation.
If the refrigerator
fails to work )
• Adjust the temperature correctly
• See “Installation – Choose Location”.
• Unblock the air outlet of Multi-Flow.
• See Electric Installation (page.3).
• Open only for the necessary time.
• Inadequate setting of the temperature control
of the refrigerator compartment.
• Direct sunlight or other heat sources close to
the refrigerator.
• Hindered air ventilation.
• Power supply with different tension than the
product’s.
• Excessive open door time.
If the Fridge is not
Cooling
(Insufcient
Refrigeration)
• Set temperature control properly.
• Reposition food items.
• Dry them before keeping.
• Inadequate setting of the temperature control
of the refrigerator compartment.
• Food items to close to air outlets.
• Food items to wet.
Food frozen in
the refrigerator
compartment
• Close both doors. In case you wish more
time with open door(s), select function SHO-
PPING.
• See Electric Installation (page.3).
• End of programmed function. Open the doors
or press the button ashing
• Door open
• Power supply with different tension than the
product’s.
• Turbo Freezing / Drink Express / Gourmet
Express / Ice Express.
Alarm sounding
• Adjust seals and water connections properly.• Water leaking from the reservoir.
Leak in the water con-
tainer (only DFI80 and
DI80X).
• Call the Technical Service.• Failure of a refrigerator function
Function indicator
messages
• Rell the container with potable water.
• Activate button “Ice maker”.
• Place the container in its original position.
• There is no water in the water compartment.
• Button “Ice Maker” deactivated.
• Ice container is not in position.
The ice is not automa-
tically made (models
DFI80/DI80X)
• Unlock the control panel according to instruc-
tions on page 6. With the control panel locked
the dispenser will not release water.
• Control panel locked.
Control panel but-
tons are not accep-
ting commands.
Probable Causes/Corrections
• Remove the plug from the electric outlet for
5 minutes reconnecting it on sequence.
• Power outage or voltage oscillation.
Touching the buttons
sound signal is not
emitted. The alarm
does not go off. TUR-
BO FREEZING/“DRINK
EXPRESS”/ “GOUR-
MET EXPRESS”

21
• Wait for the defreezing period to end (about 30
minutes) and the selected function will be run
as requested.
• The compressor, after disconnection, will
always wait some minutes before connec-
ting again for the internal pressures of the
refrigeration system to stabilize. This prevents
overloading and premature discharge of the
compressor, which is normal.
• After pressing a function selection key, there
is a time span of few seconds (Intentional) for
the function to be actuated. This allows you to
visually conrm your choice before the function
becomes active.
• Refrigerator is in automatic freezer defrost
process.
• Compressor (motor) newly turned off.
• Time selection for Turbo Freezing “Gourmet
Express”, Party, Shopping or “Drink Express
When the Turbo
Freezing, “Gourmet
Express”, Party,
Shopping or “Drink
Express” button is
pressed, the com-
pressor (motor) is not
immediately turned
on
• Keep the freezer door closed.
• Choose to make the amount of ice to be con-
sumed.
• Avoid leaving the ice storage container away
from its place for a long time. Use the “Ice
Stock”.
• Remove the melted ice and repeat the ice
making process.
• Freezer door opened for a long period.
• The ice is not used.
• Ice storage container was removed from its
place for a long period.
• There has been a blackout for a long period.
The ice melts and
binds (DFI80 and
DI80X)
• Fill the container with potable water, wait a few
seconds and activate the button Ice Maker.
• Lack of water in the container.
The control panel
shows “rA”.
• Correctly set the humidity control.
• Properly pack the food.
• Closed humidity control.
• Food stored without packing.
Excessive humidity
in the fruits and
vegetables drawer
• Remove the plug from the outlet, wait 10
seconds and plug it back.
• The fridge is operating on “Show Room” mode,
i.e., store display mode.
Panel and lights are
working, but the fridge
is not cooling
Sweat on the External Surface
According to international norm ISO8561, refrigerators,
freezers and their combinations of domestic use should
not present external surface water drainage but when
installed in locations with relative humidity above 75%
and temperatures above 32ºC, it is normal for the refri-
gerator to present external condensing (sweat).
Normal Operational Noises
Your refrigerator may make a squeaking noise, espe-
cially when the door is open. This noise is as result of
the expansion of uid within the evaporator, which does
not represent a defect.
The compressor can also make some noise. This is
a characteristic of modern compressors that work at
higher speeds than the former models, presenting better
performance and reduced power consumption.
Water feeding to the ice maker and water dispenser
can generate noises. This is a normal characteristic
of the water pump operation located behind the water
container (in models DFI80/DI80X).
The ice maker can also generate noises while making
the ice. This is a normal characteristic of the haste ope-
ration which checks if there is ice or not formed in the
storage container, or by the rotating movement of the
automatic ice maker extractor (ice falling on the storage
container in models DFI80/DI80X).
The contraction and dilation of internal components
due to temperature uctuation can generate small
snaps in your refrigerator, which do not represent
any kind of defect.
Door Seal
Upon closing the refrigerator’s door there will be an inter-
nal vacuum, hindering its opening, which is normal due
to a perfect sealing. However, do not force its opening.
Wait for some instants before opening again.
Ice on Freezer Compartment
Your operating fridge can present ne layers of ice in
the freezer compartment, specially below glass shelves
and “Multi Flow” air outlets. It will not bring problems to
your fridge operation.

22
Avoid the contact of any kind of oil or fat with the plastic parts of the refrigerator as they may be damaging.
Do not, in any circumstance, lubricate the door hinge as the plastic parts may be damaged.
Attention: Avoid magnets in the doors; they may damage its surface.
7. Hints and Suggestions
FOOD
APPROXIMATED
QTY
TURBO COMPARTMENT FREEZING (TIME
IN MINUTES)
30
-
30
-
-
60
60
-
30
-
30
45
30
60
60
-
-
-
-
45
120
45
150
-
not recommended
90
not recommended
150
90
not recommended
not recommended
150
not recommended
150
not recommended
not recommended
not recommended
not recommended
not recommended
150
60
30
150
not recommended
150
not recommended
150
60
7.05 oz
10.58 oz
14.11 oz
42.33 oz
10.58 oz
22.93 oz
29.63 oz
42.33 oz
16.91 oz
10.58 oz
42.33 oz
28.92 oz
11.29 oz
17.64 oz
34.57 oz
52.91 oz
2.29 oz
12.70 oz
3.53 oz
42.33 oz
2 liters
21.16 oz
68.08 oz
8.45 oz
Chocolate bar
Codsh/cassava cake
Bonbon box
Beef
Chicken thigh
Pudding
Flan
Chicken
Jelly
Fine sausage
Mayonnaise
Coconut custard
Mousse
Cheese bread
Trufes (Trie)
Fish
Popsicle
Pizza
Fruit pulp
Milk pudding
Ice-cream (2 liters)
Biscuit pie
Ice-cream pie
Water (ice)
FREEZER COOLING/FREEZING TABLE
* In environment temperatures other than 23ºC and with the Freezer compartment lled above 50% of its capacity,
the reference values of the table above will suffer some alterations.
COOLING FREEZING
DRINK
Time (minutes)
DF80/DF80X
(on Freezer)
Time (minutes)
DFI80/DI80X
(on Express Space)
30
35
40
-
40
45
45
60
Champagne (750 ml bottle)
Soft drink (350 ml container)
Beer (600 ml bottle)
Soda (2 l bottle)
BEVERAGE FAST COOLING TABLE*

23
* These are the pre-set times considering the environment temperature of 25ºC. The cooling times will
vary according to environment temperature and size, quantities and type of recipient (containers, plastic
bottles, etc.).
If you are not satised with the dessert or drink’s temperature, repeat the drink express process.
* To prevent leakage and bottle rupture (plastic/glass) as well as can rupture, do not leave drinks in the
freezer in the following conditions:
- Long duration;
- Drink Express function deactivated; (models DF80 / DF80X);
- Turbo-freezing function activated.
DESSERT FAST COOLING TABLE*
Time (minutes)
DFI80 and DI80X
90
60
120
150
DESSERT
(on Express Space)
Pudding
Mousse
Cheesecake
Trie
GOURMET EXPRESS RECIPES
Cheesecake
Ingredients:
200g icebox cookies
5 tablespoons melted unsalted butter at room temperature;
Filling:
150g regular cream cheese
1 sachet 12g unavored gelatin
1 can of heavy cream
1 can condensed milk.
Freezing:
230g blackberry jam;
Steps
Batter:
Grind the cookies in a food processor into ne pieces. Add the melted butter until the ne pieces are moist.
Cover the inside of a 20 cm diameter spring form pan with baking paper.
Transfer the cookie batter to the form and straighten the surface with a tablespoon.
Bake it for 10 minutes at 180°C, do not over bake, otherwise the batter may crush.
Reserve.
Filling:
In the mixer add the condensed Milk, cream cheese and mix for 10 minutes. Add the cream and dissolved gelatin
in 5 teaspoons of warm water (micro waved for 30 seconds), mix for another minute.
Set up:
Put the lling over the cold batter and distribute the Jam with a spatula.
Cover with a plastic layer and take it to cool in the Gourmet Express compartment, activate function “cheesecake”
the display will show 120min. At the end of the time the beep (sound alarm) will be activated and the display will
show “00” warning about the end of programming.
To serve, remove the spring and paper wrapped around the cheesecake.

24
Chocolate Mousse
Ingredients:
3 eggs;
2 tablespoons of sugar;
200g bittersweet chocolate, nely chopped;
1 can of heavy cream at fridge temperature;
Steps
Mix the egg whites until they are foamy and reserve;
Melt the chocolate and reserve;
Mix the yolks until they start to Double-size, add the sugar and keep mixing; stir in the melted chocolate and
heavy cream; turn off the mixer and add the foamy egg whites, gently mix it together.
Transfer to a 20 cm diameter deep recipient.
Cover the recipient with a plastic layer and let it cool in the Gourmet Express compartment, activate the function
“mousse” and the display will show 60min. At the end of the time the beep (sound alarm) will be activated and
the display will show “00” warning about the end of programming.
Peach trie
Ingredients:
2 tablespoons cornstarch dissolved in 200ml cold milk;
1 can of condensed milk;
3 strained yolks;
1 can of whipped cream;
200g champagne cookies;
1/2 can of preserved peaches in sugar syrup cut in half;
3 foamy egg whites;
3 tablespoons sugar;
Powder chocolate for decorating icing;
Steps
In a pan add the cornstarch dissolved in Milk, the condensed Milk, the yolks and stew, until it gains consistence
always stirring; let it cool; After cooled add the whipped cream, mix well and reserve;
In a 20cm X 30cm recipient, distribute the cookies and moist them with the peach syrup, cover the cookies with
peach cut in small cubes;
Distribute on top of the fruit half the cooled cream, and make another peach layer;
Mix the foamy egg whites and add 1 tablespoon sugar each time until it gets very rm, mix half the egg whites to
the remaining cream. Distribute the mixture over the peaches and decorate using powder chocolate.
Let it cool in the Gourmet Express compartment, activate function “trie” and the display will show 150min.
At the end of the time the beep (sound alarm) will be activated and the display will show “00” warning about the
end of programming.
Coconut Pudding:
Ingredients:
1 can of condensed milk;
1 can of whipped cream;
100g fresh grated coconut;
200 ml milk;
24g (2 sachets) unavored gelatin dissolved in ½ glass of water.
Steps
To the blender, add the Milk, the condensed Milk, the grated coconut and the dissolved gelatin, mix for 2 minutes,
add the whipped cream and mix for another minute.
Transfer to a glass recipient special for pudding with a 20 cm diameter hole.
Cover the recipient with a plastic layer and let it cool in the Gourmet Express compartment, activate the function
“pudding” and the display will show 90min. At the end of the time the beep (sound alarm) will be activated and
the display will show “00” warning about the end of programming.
After cooled place the pudding in a plate and decorate as you like.
Suggestion: cover with plum syrup.

25
How to Save Energy
Keep your refrigerator door open for the necessary
time only.
If the door is not properly closed, power con-
sumption will increase and irregular ice formation
occurs.
Try to set the temperature according to the infor-
mation in the manual.
It is important not to block air circulation by pla-
cing towels, plastics or disorganized distribution
of food items on the shelves so as to keep the
temperature uniform.
Never place hot food inside the refrigerator.
In case of short absence (ex.: holidays), your
fridge can be on using function vacation. However,
remember that there may be a long power failure
during your absence.
In case of long absence (ex.: traveling), if you wish
to turn the fridge off, remove all the food and clean
them leaving the doors semi-opened to avoid mold
and unpleasant odors.
The fact the fridge remains off will not compromise
its operation when turned back on.
In the case of power failure for a long period,
avoid opening the doors while the electric power
is not reestablished so as not to compromise the
conservation of the food items.
Freezing Foodstuff
The products to be frozen should be fresh and
clean.
Wrap food in proper portions for your family’s size
for a single consumption. De-frozen food should
not be frozen again.
Small packs allow for faster and uniform freezing.
Fatty foods freeze in a shorter time. Salt also
reduces the storage time of foodstuff.
Wrap food items well, ensuring that they are well
closed.
Never place food for freezing in contact with alre-
ady frozen food as the temperature of the frozen
food tends to rise.
De-freezing Foodstuff
To de-freeze meat, sh and fruits, keep them in
the refrigerator compartment.
Small meat portions should be cooked while still
frozen.
Vegetable can be de-frozen with hot water.
Pre-cooked dishes can be directly heated in the
oven as long as with the proper packing.
Microwave ovens are suitable for de-freezing all
types of food items, depending on the type of pa-
cking. Follow the oven manufacturer’s instructions.
Storing Foodstuff
To preserve the characteristics of food items or
liquids, keep the recipients closed.
For leafy vegetables, fruits and vegetables, put
them in a plastic bag and store them in the crisper
drawer.
Dry the recipients before placing them in the
refrigerator.
In case you have to store food or liquids that ab-
sorb or transmit strong odors easily, keep them
with a seal or carefully wrapped.

26
8. Technical Information
TECHNICAL INFORMATION ACCORDING TO ISO 8561 (1995)/Amd. (1996)
421 l
132 l
553 l
134 l
423 l
557 l
Automatic
Automatic
1900 mm
800 mm
809 mm
750 mm
1423 mm
104 kg
25 W
7,5 kg/24h
14 h
R134a
413 l
129 l
542 l
131 l
415 l
546 l
Automatic
Automatic
1900 mm
800 mm
809 mm
750 mm
1423 mm
112 kg
25 W
7,5 kg/24h
14 h
R134a
TECHNICAL INFORMATION ACCORDING TO IRAM 2404-3:1998
Capacity
Refrigerator Capacity
Freezer Capacity
Total Storage Capacity
Gross Refrigerator capacity
Gross Freezer capacity
Total gross capacity
Refrigerator compartment defrosting
Freezer compartment defrosting
Height
Cabinet width
Door width
Depth with closed door
Depth with open door (including minimum distance to the wall)
Net weight
Lamp power
Freezing capacity
Retention time
Cooling gas
Manufacturer name
Manufacturer model
Product type
Energy consumption classication
(scale from A (more efcient) to G (less efcient)
Ecological label
Energy consumption
Refrigerator net volume
Freezer net volume
Freezer star classication
Frost free mark when applicable
Retention time
Freezing capacity
Climate Class
Noise
ELECTROLUX
DF80/DF80X
Refrigerator/
Freezer - 7
B
ELECTROLUX
DFI80/DI80X
Refrigerator/
Freezer - 7
B
---
650 kWh/year
421 l
132 l
frost free
17 h
7,5 kg/24h
Sub-Tropical - ST
51 dB(A)
---
650 kWh/year
413 l
129 l
frost free
17 h
7,5 kg/24h
Sub-Tropical - ST
50 dB(A)
( ) ( )

27
ENERGY CONSUMPTION - DF80 y DF80X
ENERGY CONSUMPTION - DFI80 y DI80X
Voltage Frequency
According to ISO 8561 (1995)/Amd.(1996)
According to COVENIN 3193:1999
According to INEN
220V/50Hz
53,4 kWh/month
-
-
127V/60Hz
71 kWh/month
668 kWh/year
864 kWh/year
220V/60Hz
71 kWh/month
-
-
Voltage Frequency
According to ISO 8561 (1995)/Amd.(1996)
According to COVENIN 3193:1999
According to INEN
According ISO 15502 Y NCH 3000
220V/50Hz
53,4 kWh/month
-
-
39,69 kWh/month
127V/60Hz
70 kWh/month
685 kWh/year
852 kWh/year
-
220V/60Hz
70 kWh/month
-
-
-
Temperature of Use: minimum 5ºC / maximum 50ºC
Filtering System
(Only for models DFI80 and DI80X)

28
Manual del Usuario
Este refrigerador no está diseñado para ser utilizado
por personas (incluidos niños) con discapacidad física,
sensorial o mental, o personas con falta de experiencia
y conocimiento, a menos que hayan recibido en relación
con el uso del refrigerador o bajo la supervisión de un
persona responsable de su seguridad.
Se recomienda que los niños sean supervisados para
asegurarse de que no están jugando con el refrigerador.
Para Niños
Evite accidentes. Después de desembalar el re-
frigerador, mantenga el material
del embalaje, lejos del alcance de
los niños.
No permita que su refrigerador sea
manoseado por niños, aun estando
desconectado.
Cuando su refrigerador contenga algún paquete
de gel de sílice o arcilla Desi Pak® en su interior,
deséchelo y no permita que niños jueguen con él.
Para el Usuario / Instalador
1. Seguridad
Seguridad ......................................................28
Instalación .....................................................29
Descripción del Refrigerador ......................30
Como Usar ....................................................39
Limpieza y Mantenimiento ...........................42
Solución de Problemas ................................46
Pistas y Consejos .........................................48
Informaciones Técnicas...............................52
Índice
Desconecte el Refrigerador del tomacorriente
siempre que realice la limpieza o mantenimiento.
Nunca desconecte el Refrigerador del tomacor-
riente tirando del cable eléctrico. Use la clavija.
No prenda, tuerza o amarre el cable eléctrico.
Habiendo daños en el cable de alimentación
eléctrica, no intente repararlo. El debe ser cam-
biado por el servicio de pos venta, o persona
calicada a nes de evitar riesgos.
No almacene en el Refrigerador medicamentos,
productos tóxicos o químicos, porque pueden
contaminar los alimentos.
Productos en aerosol bajo alta presión, iden-
ticados por la palabra inamable o con el
símbolo de una pequeña llama, no pueden ser
almacenados en ningún refrigerador o freezer
provocando riesgo de explosión.
No se apoye sobre las puertas. Las bisagras se
podrán desreglar, perjudicando el sellado del
Refrigerador y comprometiendo su desempeño.
Transporte su refrigerador en posición vertical
(de pie). No se recomienda el transporte en
posición horizontal.
IMPORTANTE
Gracias por elegir Electrolux. En este manual usted
encuentra todas las informaciones para su seguridad
y el uso adecuado de su Refrigerador. Lea todas las
instrucciones antes de utilizar el aparato y guárdelas
para futuras referencias.
Guarde la nota scal de compra. La garantía
sólo es válida mediante su presentación en el
Servicio Técnico.
La etiqueta de identicación, en donde están las
informaciones del código, modelo, fabricante y
otras, será utilizada por el Servicio Técnico caso su
Refrigerador necesite reparo. No la retire del lugar en
donde está adherida.
Pistas Ambientales
El símbolo en el producto o en su
embalaje indica que este producto no
se puede tratar como desperdicios
normales del hogar. Este producto
se debe entregar al punto de reco-
lección de equipos eléctricos y elec-
trónicos para reciclaje. Al asegurarse
de que este producto se deseche correctamente,
usted ayudará a evitar posibles consecuencias
negativas para el ambiente y la salud pública, lo
cual podría ocurrir si este. No utilice patas distintas
de las originales. Aguardar por lo menos 2 horas
para conectar el Refrigerador. Eso evita problemas
en su funcionamiento. Caso necesite cambiar su
refrigerador de lugar, usted debe repetir el proceso
de nivelado. Para facilitar el cierre de la puerta, ajuste
las patas niveladoras delanteras e incline levemente
el refrigerador para atrás. producto no se manipula
de forma adecuada. Para obtener información más
detallada sobre el reciclaje de este producto, póngase
en contacto con la administración de su ciudad, con
su servicio de desechos del hogar o con la tienda
donde compró el producto.
silica gel o
Desi Pak®
ATENCIÓN
Jamás deje velas o inciensos en-
cendidos sobre el Refrigerador,
provocando riesgo de incendios o
daños al producto.

29
2. Instalación
Retire la Base del Embalaje
Con ayuda de otras personas
adultas, incline cuidadosamente
el refrigerador hacia uno de los
lados. Con la ayuda de otra
persona quiebre la base con las
manos. Incline el refrigerador
hacia el otro lado y retire el resto
de la base.
En la parte trasera del refrigera-
dor retire las cintas adhesivas y
destrabe los dos distanciadores
traseros. Déjelos en la posición
horizontal.
Elegir el Local
Instale su refrigerador en un local ventilado que
no permita la incidencia directa de rayos solares
y que esté distante de fuentes de calor (cocina,
hornos, etc.) y productos inamables.
No instale su refrigerador al aire libre.
Para el posicionamiento denitivo del refrigerador,
respete las distancias mínimas recomendadas:
- Arriba: 10 cm
- Al lado: 10 cm
- Atrás: 10 cm
Verique si el espacio
dejado al frente del re-
frigerador y en el lado
derecho (observando el
refrigerador de frente)
son sucientes para permitir la abertura completa
de la puerta y de las gavetas frutas/verduras.
Nivelar
Ajuste los pies niveladores
para garantizar la perfecta
estabilidad del refrigerador,
evitando movimientos de
balanceo. Deje las rueditas
frontales girando libremente.
Para eso los pies niveladores deberán quedar
totalmente apoyados en el piso.
Para un mejor cierre de las puertas, el producto
debe quedar levemente inclinado hacia atrás.
El buen funcionamiento del refrigerador depende
de su perfecto nivelado.
ATENCIÓN
El nivelado debe ser realizado con las puer-
tas cerradas.
Su refrigerador fue desarrollado para usar
los pies niveladores que lo acompañan.
Por lo tanto, no utilice otros tipos de pies que
no sean los originales. Existen rueditas en
la parte frontal y trasera de su refrigerador
para facilitar el movimiento.
Durante la retirada del embalaje el cable de
alimentación quedará suelto. Para evitar
daños al mismo, sujételo con una cinta en
la parte trasera del refrigerador.
Después desembalar y nivelar, espere un
mínimo de dos horas antes de conectar su
refrigerador para evitar mal funcionamiento.
Arriba
Al lado
Atrás
Instalación Eléctrica
Antes de conectar su refrigerador
retire las películas de plástico protec-
toras transparentes que se encuen-
tran aplicadas encima del panel de
control en la puerta del freezer y en
la puerta del refrigerador.
Antes de conectar su refrigerador,
verique si la tensión eléctrica del
tomacorriente donde será conectado
es igual al indicado en la etiqueta
localizada próxima al enchufe (en
el cable de alimentación eléctrica)
o en la etiqueta de identicación del
refrigerador. Tenga cuidado para que
el refrigerador no quede apoyado
sobre el cable eléctrico.
Conecte su refrigerador a un to-
macorriente exclusivo. No utilice
extensiones o conectores tipo T
(múltiple).
Para su seguridad, solicite a un elec-
tricista de su conanza que verique
la condición de la red eléctrica del
local de instalación del refrigerador
y, para mayores informaciones, consulte la norma ó
entre en contacto con el Servicio Técnico.
Los cables del tomacorriente donde será conectado
su refrigerador deben ser de cobre y tener sección
mínima de 2,5 mm².

30
3.Descripción del Refrigerador
Piezas
1. “Ice Twister” (DF80/DF80X) / “Ice Maker” Fabricador de
Hielo Automático (DFI80/DI80X)
2. Recipiente para almacenar hielo
3. “Drink Express”
(DF80/DF80X)
4. Compartimiento turbo congelamiento (Turbo Freezer)
5. Bandeja retráctil y removible pequeña del freezer
6. Bandeja retráctil y removible grande del freezer
7. Lámpara del compartimiento freezer - 1 unidad (luminaria)
8. Bandejas de la puerta del freezer (2 unidades)
9. “Ice Stock” removible
10. Porta copas - “Frosty Cups”
(2 unidades)
11. Compartimiento espacio conveniencia
12. Lámparas del compartimiento refrigerador
- 3 unidades
(luminaria)
13. Selector de control de temperatura del refrigerador
(DF80/DF80X)
14. Estante de vidrio removible (2 por refrigerador)
15. Tapa de la gaveta Frutas/verduras (DFI80/DI80X)
16. Control de humedad
17. Gaveta Frutas/verduras
18. Divisor móvil de la gaveta frutas/verduras
19. Pies niveladores / rueditas
20. Cesta “Espacio+”
(Picnic) removible (DFI80/DI80X)
21. “Espacio Express”/“Gourmet Express”/“Drink Express”
(DFI80/DI80X) Bandeja Retráctil (DF80/DF80X)
22. Bandeja basculante “Flex Box” (2 por refrigerador)
23. Bandeja multiuso pequeña
24. Bandeja basculante y removible para frutas delicadas
25. Estante porta-botellas
26. Bandeja de la puerta del refrigerador
(3 en los modelos
DF80/ DF80X)
y (2 en los modelos DFI80/DI80X)
27. Traba botellas:
28. Bandeja “Espacio Light” removible
29. Depósito de agua
(DFI80/DI80X)
30. Porta latas removible
31. Panel de control
32. Jaladores
33. Dispensador de agua giratorio
(DFI80/DI80X)
34. Tecla para accionar el dispensador de agua (DFI80/DI80X)
35. Desodorizador
36. Elemento ltrante de agua
(DFI80/DI80X)
37. Bandeja retráctil y removible del refrigerador
38. Puerta del freezer
(no reversible)
39. Puerta del refrigerador (no reversible)
40. Multi-Flow
41. Cesta de Huevos
42. Cajón extra Frutas/verduras
(DFI80/DI80X)
43. Tapa de la gaveta extra Frutas/verduras (DFI80/DI80X)
44. Bandeja Desayuno
ATENCIÓN
No use el refrigerador sin encender el conduc-
tor de tierra.
No utilice el producto sin antes conectarlo al tierra.
Si la instalación no posee cable tierra, para su
seguridad, solicite a un electricista instalarlo.
El cable tierra (verde o amarillo y verde), ubicado
en la parte posterior del refrigerador, deberá ser
conectado a un cable tierra eciente y no deberá
ser conectado directamente a la red eléctrica ni
a tubos de instalación de agua, gas, electricidad,
teléfono, para-rayos, etc.
Si su producto está equipado con un enchufe de
3 pinos el no poseerá un cable tierra (verde o
amarillo y verde). El enchufe deberá ser conectado
a una toma de corriente equivalente. El pino tierra
no deberá ser removido.
El cable tierra es la mejor forma de protección del
usuario contra choques eléctricos.
Conductor de Tierra (aterramiento)
Variación Admisible de Tensión
Tensión (V) Mínima (V) Máxima (V)
127
220
116
201
133
231
Fio Terra (aterramento)
IMPORTANTE
En caso de que la tensión en el local de insta-
lación esté fuera de los límites indicados en la
tabla Variación Admisible de Tensión, solicite
para la compañía de suministro de energía
lá adecuación de los niveles de tensión y
adapte un regulador de tensión (estabilizador)
no inferior a 2000 VA. Si hay, en el lugar de
instalación, variación de tensión fuera de los
límites especicados (ve tabla antes citada) o
caídas frecuentes en el suministro de energía,
el aparato puede cambiar en su funcionamien-
to. Caso ocurra, quite el tapón durante 5 min y
vuelva a conectarlo (mirar el punto 6 - Solución
de Problemas - Páginas 46 e 47).

31
Panel de Control DF80 / DF80X
Panel de Control DFI80 / DI80X
Este panel posee modo de aproximación. Para
accionarlo pase la mano rápidamente sobre el
panel de control.
Todas las teclas encienden con 50% de intensidad
luminosa.

32
Tecla “GOURMET EXPRESS” (enfriamiento
rápido de postres - modelos DFI80/DI80X)
Accionando esta tecla, se selecciona el tipo de postre
que se desea enfriar más rápidamente, durante
un tiempo preestablecido para cada postre: pavê,
cheesecake, mousse y pudín. Cuando desee inter-
rumpir esta función, basta presionar nuevamente la
tecla “GOURMET EXPRESS” hasta que el indicador
muestre la temperatura ambiente.
Tecla “TEMPERATURA REFRIGERADOR
(modelos DFI80/DI80X)
Esta tecla permite el ajuste de la temperatura en el
compartimiento refrigerador: Mínimo, Medio y Máximo.
Ajustes intermedios a estas posiciones también podrán
ser realizados.
Tecla “TEMPERATURA FREEZER”
Esta tecla permite el ajuste de la temperatura en el
compartimiento freezer: Mínimo, Medio y Máximo.
Ajustes intermedios a estas posiciones también podrán
ser realizados, en los modelos (DFI80/DI80X).
ATENCIÓN
La función “Drink Express” (Enfriamiento Rápido
de Bebidas) puede tener alteración en la tempera-
tura nal de la bebida debido a la variación de la
tensión eléctrica, de la temperatura ambiente y de
la temperatura inicial de la bebida. Evite abrir la
puerta del refrigerador con frecuencia cuando esta
función esté siendo usada.
Tecla “DRINK EXPRESS” (Enfriamiento Rá-
pido de Bebidas)
Accionando esta tecla, se selecciona el tipo de bebida
que se desea enfriar más rápidamente durante un tiem-
po preestablecido para cada bebida. Cuando desee
interrumpir esta función, basta presionar nuevamente
la tecla “DRINK EXPRESS” hasta que el indicador
muestre dos barras (- -) en los modelos DF80/DF80X
y temperatura ambiente en los modelos DFI80/DI80X.
Para los modelos DF80 y DF80X las bebidas deberán
estar en la gaveta Drink Express en el freezer.
Indicador del Panel Electrónico Trabado
Indica cuándo el panel de control está trabado para
evitar que las conguraciones sean alteradas.
Para trabar el panel de control de los modelos DFI80/
DI80X se debe presionar al mismo tiempo las teclas
TEMPERATURA REFRIGERADOR y TEMPERA-
TURA FREEZER por aproximadamente 3 segundos.
Para destrabar, repetir el proceso.
Para trabar el panel de control de los modelos DF80/
DF80X se debe presionar al mismo tiempo las teclas
TEMPERATURA DEL FREEZER y AUTOCONTROL
por aproximadamente 3 segundos. Para destrabar,
repetir el proceso. Al trabar el panel de estos modelos
aparecerá “LOC” en el display.
Tecla “INTELLIGENT SENSOR” (DFI80/DI80X)
Esta tecla cuando es accionada, hará que el aparato
deje de operar en modo manual para operar en modo
automático. Las variaciones de temperatura ambiente
serán consideradas automáticamente, garantizando
las propiedades de conservación de los alimentos
dispuestos en el refrigerador.
Con esta función activada, no es posible regular la tem-
peratura del Freezer y la temperatura del refrigerador
(las teclas quedan bloqueadas).
Indicador de Tiempo del TURBO CONGELA-
MIENTO o ENFRIAMIENTO RÁPIDO DE BEBIDAS o
ENFRIAMIENTO RÁPIDO DE POSTRES (DFI80/DI80X)
Cuando sea elegida una de las funciones arriba, el indica-
dor muestra el tiempo que falta para el n de la operación.
Por ejemplo: 30, 29, 28 minutos y así sucesivamente
hasta alcanzar cero (0:00). Cuando desee utilizar las
funciones al mismo tiempo (enfriar bebidas, congelar ali-
mentos o modo esta), el indicador de tiempo mostrará
el tiempo restante para la nalidad de cada función
Indicador de Postres (DFI80/DI80X)
Muestra cuál fue el postre seleccionado para el
enfriamiento rápido: pavê, cheesecake, mousse o
pudín. La selección es realizada presionando la tecla
“GOURMET EXPRESS”.
Indicadores de Selección de Temperatura del
Compartimiento Refrigerador (DFI80/DI80X)
Indican la temperatura seleccionada en el compar-
timiento refrigerador.
El ajuste es realizado presionando la tecla TEMPERA-
TURA REFRIGERADOR.
Cuando el refrigerador es desconectado por primera
vez, reconectado después de la limpieza o después
de la caída de energía eléctrica, el control siempre
indicará posición media.
Indicadores de Selección de Temperatura del
Compartimiento Freezer
Indican la temperatura seleccionada en el compar-
timiento freezer.
El ajuste es realizado presionando la tecla TEMPERA-
TURA FREEZER.
Cuando el refrigerador es desconectado por primera
vez, reconectado después de la limpieza o después
de la caída de energía eléctrica, el control siempre
indicará posición media.
Indicador de Bebidas
Muestra cual fue la bebida seleccionada para el En-
friamiento Rápido: champagne, cerveza o bebida en
lata (DF80/DF80X) o gaseosa, champagne, cerveza
y bebida en lata (DFI80/DI80X). La selección es real-
izada presionando la tecla “DRINK EXPRESS”.

33
con su respectiva luz indicadora por 30 segundos y
entonces, permanecerá alternando entre las funciones
hasta que una de ellas termine.
(DFI80/DI80X)
Cuando ninguna función esté seleccionada, el indicador
en los modelos DFI80 y DI80X mostrará la temperatura
ambiente y en los modelos DF80 y DF80X el indicador
mostrará dos barras (- -) moviéndose de abajo para
arriba.
Tecla TURBO CONGELAMIENTO:
Permite el enfriamiento o congelamiento más rápido de
los alimentos. El tiempo de operación de esta función
puede ser ajustado de 30 minutos (mínimo) hasta 2
horas y 30 minutos (máximo).
Otros períodos que podrán ser seleccionados: 45
minutos, 1 hora, 1 hora y 30 minutos y 2 horas.
Cuando desee interrumpir esta función, basta presio-
nar nuevamente la tecla TURBO CONGELAMIENTO
hasta que el indicador muestre (- -) en los modelos
DF80/DF80X o la temperatura ambiente en los mo-
delos DFI80/DI80X.
ATENCIÓN
La función TURBO CONGELAMIENTO no
funcionará cuando la función ENFRIAMIENTO
RÁPIDO DE BEBIDAS se encuentre en operaci-
ón o sea seleccionada antes (esta información
es válida sólo para los modelos DF80 y DF80X).
Indicador de Temperatura Alta en el Compar-
timiento Freezer y/o Refrigerador (DFI80/DI80X)
Este indicador se encenderá siempre que la tempera-
tura en el compartimiento Freezer y/o Refrigerador se
encuentre más elevada (caliente) que la temperatura
adecuada para almacenamiento.
Recomendamos no efectuar la carga del freezer y/o
refrigerador cuando el indicador de temperatura alta
se encuentre acceso.
Mantenga el regulado de temperatura del compar-
timiento freezer al máximo y aguarde algunos minutos
hasta que el indicador se apague. Cuando este indica-
dor permanezca encendido por un largo período, entre
en contacto con el Servício Técnico.
Indicador de Cambio de Filtro de Agua (DFI80/DI80X)
Indica cuándo el ltro de agua expiró su validez y debe
ser sustituido.
El ltro debe ser adquirido en un proveedor de piezas.
Después del cambio del ltro, se debe presionar al
mismo tiempo las teclas FIESTA y TEMPERATURA
REFRIGERADOR, por aproximadamente 3 segundos.
Esta operación desconectará el indicador luminoso y
reiniciará el conteo de 500 litros (vida útil del ltro) del
nuevo ltro.
Indicador de Puerta Abierta (DFI80/DI80X)
Este indicador se mantiene encendido como una
alerta, mientras que cualquiera de las puertas (freezer
o refrigerador) permanece abierta.
Tecla/Función FIESTA
La función, cuando es seleccionada, mantiene capa-
cidad de congelamiento al máximo y la capacidad de
enfriamiento por 6 horas, aun con varias aberturas de
las puertas. Para activar esta función basta presionar
una vez la tecla “FIESTA” (DFI80/DI80X) o tocar la
tecla “AUTO CONTROL” dos veces (DF80/DF80X).
La función Fiesta puede ser desactivada en cualquier
momento, basta tocar la tecla “FIESTA” (DFI80/DI80X)
o tecla “AUTO CONTROL” (DF80/DF80X).
Tecla/Función Compras
La función, cuando es seleccionada, mantiene la ca-
pacidad de congelamiento en el máximo, permitiendo
así un rápido congelamiento y enfriamiento de los
nuevos alimentos.
La función Compras tiene duración de 3 horas, sin em-
bargo puede ser desactivada en cualquier momento,
basta tocar la tecla “COMPRAS” (DFI80/DI80X) o tecla
“AUTO CONTROL” (DF80/DF80X). Con esta función
accionada la alarma de puerta abierta comienza a
operar sólo después de 10 minutos.
ATENCIÓN
La salida de agua por el dispensador será interrum-
pida en el momento que el Ice Maker esté siendo
reabastecido.
Complete solamente con agua potable.
Tecla “ICE MAKER” (Fabricador de Hielo
Automático - sólo modelos DFI80 y DI80X)
Tocando esta tecla, el fabricador de hielo es accio-
nado y el hielo comienza a ser producido automáti-
camente.
Verique que siempre haya agua en el depósito de
agua, para que el hielo pueda
ser fabricado. La falta de agua
en el depósito es indicada en el
display conforme la gura. Para
desactivar la fabricación de hielo
automático en cualquier momento, basta tocar la
tecla “ICE MAKER”.
Para retirar el “ rA ” del display basta reabastecer
el depósito de agua, espere algunos minutos para
que el agua pase por el ltro, y accione la tecla Ice
Maker nuevamente. El hecho de no aparecer “ rA ”
en el display no exenta que haya falta de agua en el
depósito, porque el uso de agua por el Dispensador
de Agua no es monitoreado por esta alerta.

34
Tecla/Función Vacaciones
La función Vacaciones, cuando es seleccionada, mantie-
ne la temperatura del freezer en el regulado mínimo para
los modelos DF80/DF80X y la temperatura del freezer
y refrigerador en el regulado mínimo para los modelos
DFI80/DI80X. Esta función es indicada cuando el pro-
ducto permanece cerrado por largos períodos de tiempo.
Durante los primeros 30 minutos, después de seleccio-
nada la función, el producto puede ser abierto sin que
desactive la función. Para desactivar esta función en
cualquier momento toque la tecla “VACACIONES” en
los modelos DFI80/DI80X y la tecla “AUTO CONTROL”
en los modelos DF80/DF80X o abra una de las puertas
30min después de seleccionar la función.
Tecla “AUTO CONTROL” (Automatic Control)
DF80/DF80X
Tocando la tecla “AUTO CONTROL” es posible se-
leccionar una de las funciones de control automático:
Vacaciones, Fiesta y Compras (DF80/DF80X).
Atención: Si la función “AUTO CONTROL” es
seleccionada las funciones TURBO CONGELA-
MIENTO, “DRINK EXPRESS”, “ICE EXPRESS” y
TEMPERATURA FREEZER no podrán ser selec-
cionadas, hasta que la función “AUTO CONTROL”
sea interrumpida.
Indicadores “AUTO CONTROL” (Control Auto-
mático - DF80/DF80X)
Muestra la función de control automático seleccionado.
21.1. Vacaciones
La función Vacaciones, cuando es seleccionada (un
toque en la tecla “AUTO CONTROL”, mantiene la tem-
peratura del freezer en el regulado mínimo. Esta función
es indicada cuando el producto permanece cerrado por
largos períodos de tiempo. Durante los primeros 30
minutos, después de seleccionada la función, el pro-
ducto puede ser abierto sin que desactive la función. La
función Vacaciones puede ser desactivada en cualquier
momento, basta tocar la tecla “AUTO CONTROL” o
abrir cualquiera de las puertas 30 minutos después de
seleccionada la función.
21.2. Fiesta
La función, cuando es seleccionada (dos toques en
la tecla “AUTO CONTROL”), mantiene capacidad de
congelamiento en el máximo por 6 horas, aun con varias
aberturas de las puertas. La función Fiesta puede ser
desactivada en cualquier momento, basta tocar la tecla
“AUTO CONTROL”.
21.3. Compras
La función, cuando es seleccionada (tres toques de la
tecla “AUTO CONTROL”), mantiene la capacidad de
congelamiento en el máximo, permitiendo así un rápido
congelamiento de los nuevos alimentos. La función
Compras tiene duración de 3 horas, sin embargo puede
ser desactivada en cualquier momento, basta tocar la
tecla “AUTO CONTROL”. Con esta función accionada
la alarma de puerta abierta comienza a operar después
de 10 minutos.
Tecla “ICE EXPRESS” (DF80/DF80X)
Esta tecla permite que el hielo pueda ser formado
más rápidamente en el compartimiento freezer. Ve-
rique que los moldes de hielo del “Ice Twister” se
encuentren abastecidos con agua. Para desactivar
esta función, basta tocar la tecla “Ice Express” en
cualquier momento.
Indicador de Temperatura Ambiente
(DFI80/DI80X)
Indica la temperatura ambiente donde el refrigerador
está instalado cuando ninguna otra función está
siendo utilizada.
Indicador de Tiempo (DFI80/DI80X)
Indica en minutos el tiempo restante para el nal de
una función preseleccionada.
Indicador de Temperatura (DFI80/DI80X)
Indica la temperatura en grados Celsius de una función
preseleccionada.
El refrigerador posee cinco tipos de alarma:
26.1 Alarma Puerta Abierta
Después de aproximadamente 4 minutos (en funcio-
namiento normal) y 10 minutos (en funcionamiento de
modo compras) con la(s) puerta(s) abierta(s), la alarma
se activa.
Al cerrar la(s) puerta(s), la alarma se desconectará
automáticamente. Obs.: Cuando permanezca con una
de las puertas abierta, después de transcurrido el tiempo
de silencio, la alarma volverá a sonar.
26.2 Alarma TURBO CONGELAMIENTO LARGO
(Períodos de 1:00h, 1:30h, 2:00h y 2:30h)
Terminado el tiempo elegido para el TURBO CON-
GELAMIENTO, la tecla respectiva y los números del
panel quedarán parpadeando por aproximadamente
10 segundos.
Para desconectar sólo abra y cierre la puerta del freezer
o accione la respectiva tecla.
26.3 Alarma TURBO CONGELAMIENTO CORTO
(Períodos de 30 y 45 minutos)
Terminado el tiempo elegido para el TURBO CONGELA-
MIENTO, la alarma se activará por aproximadamente 1
minuto. En este caso, si la puerta no es abierta, un “bip”
de alerta sonará de minuto en minuto. Después de la
nalización de la operación, además de la señal sonora
la tecla respectiva quedará parpadeando en el panel de
control. Para desconectar la alarma sonora y la alarma
visual, sólo abra y cierre la puerta del freezer o accione
la respectiva tecla.
26.4 Alarma Enfriamiento Rápido de Bebidas (DRINK
EXPRESS)
Terminado el tempo preestablecido para el enfriamiento
rápido de la bebida elegida, la alarma se activará por

35
un minuto. Retire la bebida y cierre la puerta. Si ese
procedimiento no es seguido, después de 1 minuto,
sonará 1 “bip” de alerta a cada minuto. Después de la
nalización de la operación, además de la señal sonora
la tecla respectiva quedará parpadeando en el panel de
control. Para desconectar la alarma sonora y la alarma
visual accione la respectiva tecla o retire la bebida y
cierre la puerta.
26.5 Alarma Enfriamiento Rápido de Postres (GOUR-
MET EXPRESS - mod. DFI80/DI80X)
Terminado el tiempo preestablecido para el enfriamiento
rápido del postre elegido, la alarma se activará por un
minuto. Después de la nalización de la operación,
además de la señal sonora la tecla respectiva quedará
parpadeando en el panel de control. Para desconectar
la alarma sonora y la alarma visual, accione la respectiva
tecla. Retire el postre y cierre la puerta del refrigerador. Si
este procedimiento no es seguido, después de 1 minuto
sonará 1 “bip” de alerta a cada minuto.
26.6Alarma ICE EXPRESS (DF80/DF80X)
Terminado el tiempo elegido para el ICE EXPRESS,
la tecla respectiva y los números del panel quedarán
parpadeando por aproximadamente 10 segundos. Para
desconectar sólo abra y cierre la puerta del freezer o
accione la respectiva tecla.
Tecla “Accionador del Dispensador de Agua
Tocando la tecla y manteniendo la misma presionada,
usted podrá servirse agua en un vaso.
Para eso es necesario que: a) La moldura giratoria del
dispenser de agua esté en la posición abierta; b) El
panel electrónico esté destrabado; c) El depósito esté
abastecido con agua potable.
Compartimiento Turbo Congelamiento
Este compartimiento posibilita
un enfriamiento más rápido de
los alimentos. Este compar-
timiento está localizado en la
parte superior derecha de su
freezer.
“Ice Twister” / Moldes de Hielo (DF
80
/
DF
80
X)
Después de retirarlo del local,
llene con agua potable el “Ice
Twister” tomando cuidado para
no transbordar los moldes de
hielo. Encaje el “Ice Twister”
correctamente en la posición. Después de algunas
horas el agua congelará. Gire suavemente la perilla
en sentido horario, hasta que los cubos se suelten y
caigan en el recipiente para hielo.
Gaveta para Enfriamiento Rápido de Bebi-
das (DF
80
/DF
80
X)
Coloque botella o latas en esta
gaveta para enfriar su bebida
más rápidamente en el compar-
timiento freezer (A) y accione la
función drink express en el panel
de control (consulte en la secci-
ón “Sugerencias y Consejos” la
tabla para enfriamiento rápido de
bebidas).
Cuando quiera, usted puede
usar esta gaveta para conservar alimentos en el
refrigerador (B), en esta posición, aun accionando la
función DRINK EXPRESS no ocurrirá el enfriamiento
rápido de bebidas.
A
B
Frosty Cups
Desarrollado para almacenar va-
sos y copas, para que estén hela-
dos al momento de su utilización.
Compartimiento Espacio Conveniencia
Este compartimiento sirve para
conservar algunos alimentos que
necesitan de menor temperatura
de conservación (próxima a 0°C)
sin necesidad de congelamiento.
Ejemplo: alimentos para ser consumidos o cocidos en
corto espacio de tiempo como carnes, peces, postres
y similares. Este compartimiento está localizado en la
parte superior derecha de su refrigerador.
“Ice Maker” / Fabricador de Hielo
Automático (DFI
80
/DI
80
X)
Llene con agua potable el de-
pósito que se encuentra en la
puerta del refrigerador y accione
la tecla “Ice Maker” localizada en
el panel de control. Después de
algunas horas el agua conge-
lará. El hielo caerá automáticamente en el recipiente
para hielo. Este compartimiento está localizado en la
parte superior izquierda de su freezer.
ATENCIÓN
Complete solamente con agua potable.

36
Cajón Extra Fruits and Vegetables (DFI80/
DI80X)
Mantiene la humedad y el frescor
de las frutas y vegetales debido a
la circulación del aire frío
que no se queda en contacto con
los alimentos en este comparti-
mento.
Para una mejor conservación, mantenga siempre los
vegetales y frutas en este local.
Bandeja Retráctil (DF
80
/DF
80
X)
Esta bandeja puede
ser disminuida, per-
mitiendo el almace-
namiento de objetos
mayores en su refri-
gerador, como jarras
y botellas.
Para destrabarlas,
presione hacia aba-
jo las trabas (A) en
la parte baja de la
bandeja y después
empújela hacia atrás (B).
A
B
Cajón Frutas/verduras con Divisor Móvil
Mantiene la humedad y el frescor
de las frutas y de los vegetales
debido a la circulación del aire frío
que no queda en contacto directo
con los alimentos.
Para mejor conservación, manten-
ga siempre los vegetales y frutas
en este local.
Usted dispone de un divisor de
frutas y verduras, para facilitar la
organización de sus alimentos,
desplácelos hacia la derecha o
hacia la izquierda. En él también se puede almacenar
pequeños embalajes o alimentos sueltos.
Control de humedad
Para mejor conservación de los
alimentos, existe un control de
humedad en las gavetas frutas/
verduras que regula el pase
de aire.
Cuando almacene verduras se
recomienda la reducción de la
abertura de pase de aire, desplazándose el botón
hacia la izquierda, evitando la deshidratación de los
alimentos. Al almacenar frutas se recomienda aumentar
el pase de aire.
En el almacenamiento de frutas y verduras juntas, regu-
le el Control de Humedad en una posición intermedia.
Sistema Multi-Flow
Este sistema tiene la función
de distribuir el aire frío para el
enfriamiento de los alimentos
en el compartimiento freezer
y refrigerador.
Atención: Siempre deje las
salidas de aire libres para fa-
cilitar la circulación de aire frío
y así, mejorar la conservación
de los alimentos.
“Ice Stock”
En este compartimiento es posible
almacenar hielo hecho en el “Ice
Twister” (DF80/DF80X), fabrica-
dor automático de hielo (DFI80/
DI80X), o acondicionar botellas de
bebidas que no congelan.
El compartimiento posee un asa que facilita la retirada
del producto. Este compartimiento está localizado en
la parte inferior derecha de la puerta de su freezer.
Estantes Multiuso Removibles
Estas 3 bandejas (2 en los
modelos DFI80 y DI80X)
sirven para almacenar di-
versos tipos de alimentos,
adecuados a temperatura
del refrigerador.
Frutas delicadas
El compartimiento posee un
sistema de inclinación (A) y un
asa que facilitan la retirada del
producto. Use este espacio para
almacenar frutas pequeñas,
como uva, fresa, etc.
Este compartimiento está localizado en la parte central
derecha de la puerta de su refrigerador.
A
Espacio light
El compartimiento posee una tapa
y un asa que facilitan la retirada
del producto. Ideal para almacenar
productos light. Este comparti-
miento está localizado en la parte
superior derecha de la puerta de su
refrigerador.

37
Desodorizador
El desodorizador tiene la función
de reducir olores desagradables
de alimentos o líquidos.
Está instalado en la parte superior
del compartimiento refrigerador.
Para aclarar dudas respecto a
la limpieza del desodorizador,
consulte la sección “Limpieza y
Mantenimiento”.
Cesta de Huevos
La canastilla de huevos es remo-
vible y posee un asa para mejor
movimiento entre el refrigerador,
fregadero y mesa. Su capacidad máxima es de 18
huevos.
La cesta de huevos es enviada dentro de la gaveta
Frutas/verduras.
Porta Latas Removible
El porta latas es enviado dentro
de la gaveta Frutas/verduras.
Esta pieza fue desarrollada
especialmente para el almace-
namiento de latas de 350 ml de
su bebida preferida.
Usted puede retirarlo de la
puerta y llevarlo a la mesa para
su mayor comodidad.
El porta-latas puede ser utilizado
en 2 posiciones diferentes: en
la puerta (1) o en el comparti-
miento refrigerador “Espacio
Express” (2) (DFI80/DI80X). En él se puede enfriar
más rápidamente todas las latas al mismo tiempo,
bastando sólo accionar la función DRINK EXPRESS
en el Panel de Control.
Posición
Posición
Bandejas de Vidrio Retráctiles y Remo-
vibles
Estas bandejas pueden ser disminuidas y dobladas,
permitiendo el almacenamiento de objetos mayo-
res en su refrigerador, como jarras y tortas. Para
destrabarlas, presione hacia abajo las trabas (A)
en la parte de debajo de las bandejas y después
empújelas hacia atrás. Si lo preere, aun puede
doblarlas hacia arriba.
Posición 1
Posición 2
A
Estantes y Traba Botellas
1. Estantes Porta-botellas
La bandeja porta botellas, acon-
diciona botellas de bebidas con
hasta 3,3 litros.
2. Traba botellas:
La traba botellas posee la función
de evitar que las botellas queden
balanceando sueltas en la bandeja.
Para utilizarla, basta encajarla en la bandeja y deslizarla
hacia la derecha o izquierda, conforme indica la gura.
También puede ser utilizada para almacenar pequeños
condimentos o cajas de leche en su interior.
Compartimiento Gourmet Express / Drink
Express (modelos DFI
80
y DI
80
X)
Este compartimiento fue desar-
rollado para enfriamiento rápido
de postres y bebidas dentro del
compartimiento refrigerador. Pue-
de ser usado con platos, latas,
botellas y si desea hasta con el
porta latas entero.
Para utilizar este compartimiento
basta abrir su puerta, acondicionar
el postre o bebida que desee en-
friar rápidamente, cerrar la puerta
y seleccionar el tipo de postre a ser
enfriado rápidamente a través de
la tecla “Gourmet Express” o se-
leccionar el tipo de bebida a través
de la tecla “Drink Express”. No es
recomendable colocar postres y
bebidas al mismo tiempo.
Si no quiere utilizar este com-
partimiento para las funciones
anteriores, el mismo puede ser uti-
lizado como una bandeja común
del refrigerador, para esto basta
colocar la tapa del compartimiento
conforme guras al lado. En esta
posición es desaconsejable el uso de las teclas Gourmet
Express y Drink Express.
Este compartimiento está localizado en la parte superior
izquierda de su refrigerador.
Si quiere utilizar este local como un compartimiento extra-
frío para conservar algunos alimentos que necesiten de
menor temperatura (próx. de 0°C) basta cerrar la tapa,
pero no accione las teclas “Gourmet Express” y “Drink
Express”.
ATENCIÓN
No coloque pesos o recipientes sobre la tapa
“A” cuando ella se encuentre abierta.
A
A

38
Depósito para Agua (sólo para los mode-
los DFI
80
y DI
80
X)
Desarrollado para proporcionar agua pura y saluda-
ble, debido al exclusivo sistema de ltraje
Pure Filter
Abastezca apenas con agua
potable y aguarde el ltraje.
Importante: En la primera utili-
zación del repuesto (elemento
ltrante) el agua puede presentar
un aspecto oscuro, debido a la
carbonilla de carbón activado.
Es necesario proceder este
primer ltraje con el depósito fuera del refrigerador,
de preferencia en el fregadero, para que el agua con
aspecto oscuro sea descartada. Repita este proce-
dimiento por 3 veces (aproximadamente 9 litros de
agua). Este procedimiento deberá ser repetido
en cada cambio de repuesto (elemento ltrante).
Se recomienda el cambio de repuesto cada 6 meses
ó 500 litros.
El indicador de cambio de ltro se encenderá después
del consumo de 500l de agua.
Cómo Utilizar el Depósito para Agua
(sólo para los modelos DFI
80
y DI
80
X)
1. Desconecte el tubo de
alimentación de agua del
depósito.
2. Retire el depósito de la
puerta del refrigerador, le-
vantándolo y tirándolo con-
forme diseño al lado.
3. Abastezca el depósito con
agua potable y espere el
ltraje.
Es necesario que el primer ltraje sea realizado
en un local donde el agua ltrada pueda ser des-
cartada (por ejemplo, en el fregadero).
Repita este procedimiento por 3 veces (aproxima-
damente 9 litros de agua).
Este procedimiento debe ser repetido en cada
cambio del repuesto (elemento ltrante).
Bandejas Basculantes “Flex Box”
Estas dos bandejas sirven para
almacenar diversos tipos de ali-
mentos sueltos o con pequeños
embalajes. Para facilitar el acce-
so éstas son basculantes. Para
facilitar el acceso use las mis-
mas en la posición 2 y después
del uso colóquelas nuevamente
a la posición 1.
4. Monte el depósito en la posición y recoloque el
tubo de alimentación de agua, presionando el
mismo rmemente hacia abajo.
5. Abra la tapa de la parte superior del depósito,
abastezca con agua potable y aguarde el pro-
ceso de ltraje de agua.
6. Después de este procedimiento, se puede utili-
zar normalmente el sistema de ltraje.
7. Para servir, abra el dispensador girándolo, colo-
que un vaso junto a la salida de agua localizada
en la parte externa de la puerta del refrigerador
y accione el botón (A) localizado encima.
8. Para prevenirse de accionamientos indesea-
dos, gire el dispensador y manténgalo cerrado
(posición 1).
A
ATENCIÓN
- Antes de iniciar la utilización, lave el de-
pósito con agua y detergente neutro, con la
nalidad de eliminar eventuales residuos.
Consulte el tópico “Limpieza del Depósito
para agua”, en la página 16.
- Utilice sólo agua propia para consumo.
(potable) El uso de cualquier otro tipo de
bebida podrá dejar residuos, gusto u olor
en el depósito.
- El depósito para agua sólo debe ser abas-
tecido cuando se encuentre encajado en su
posición en la puerta. El agua de abaste-
cimento no deberá tener una temperatura
mayor que 43ºC.
- Espere que el agua enfríe por aproximada-
mente, 12 horas.
- Es posible oír algunos ruidos causados
por la entrada de aire cuando el agua sale
del depósito.
- Para los modelos DFI80 y DI80X también
es posible oír algunos ruidos causados por
el sistema automático de alimentación de
agua, en el fabricador de hielo y dispensador
de agua.
- Cuando el agua no uya bien, apriete más
una vez el botón de accionamiento. Perma-
nezca con el vaso debajo de la salida de
agua por algunos instantes para asegurar
que toda el agua sea colectada por el vaso.
- No utilice bebidas gasicadas, tales como
refrescos. La bebida puede derramar debido
a la presión del gas.

39
Distanciadores Traseros
Evita que el refrigerador quede
apoyado en la pared. Deje siem-
pre os distanciadores traseros en
la posición 1 (horizontal).
Al transportar el refrigerador deje
el distanciador en la posición 2
(vertical). Esto facilitará el pase del refrigerador por
la puerta por ejemplo. Use una cinta adhesiva para
dejarlas en la posición 2.
Canastilla “Espacio +” (Picnic) (DFI
80
/
DI
80
X)
La canastilla “Espacio +” es re-
movible y posee dos asas para
mejorar el movimiento entre el re-
frigerador, fregadero, mesa, etc.
Bandeja Desayuno
En este espacio es posible alma-
cenar ítems como quesos, yo-
gures, mantequilla, etc. que son
llevados a la mesa regularmente.
4. Como Usar
Como Encender y Desconectar su Re-
frigerador
Para conectar o desconectar su refrigerador, basta
conectar o desconectar el enchufe del tomacor-
riente vericando la tensión correcta del producto.
Antes de conectar el refrigerador por primera
vez, lea atentamente el folleto de instrucciones
colocado en la puerta y todo este manual.
Siempre que desconecte el Refrigerador,
espere 10 minutos antes de reconectarlo.
IMPORTANTE
Cargar / Abastecer
En el primer abastecimiento o después de la limpieza.
1. Para un mejor acondicionamiento de los recipientes
en los compartimientos freezer y refrigerador, todas
las bandejas pueden ser removidas o reposiciona-
das y las tapas de los compartimientos del freezer
y de alimentos frescos pueden ser retiradas.
2. Conecte la clavija de su refrigerador en el enchufe.
3. Déjelo funcionando un mínimo de dos horas antes
de almacenar cualquier alimento en su interior.
4. Inicie el abastecimiento de los alimentos por las ban-
dejas del refrigerador, dejando las bandejas de la
puerta por último. Es importante respetar los límites
máximos de carga indicados en la siguiente gura.
5. Después del abastecimiento, ajuste los controles
de temperatura para la posición más adecuada,
siguiendo las informaciones de los ítems “Control
Electrónico de Temperatura en el Freezer” y “Con-
trol de Temperatura en el Refrigerador”.
6. No coloque alimentos apoyados en las salidas
de aire para no comprometer el desempeño del
refrigerador.
Limites Máximos de Carga

40
Las posiciones de ajuste de temperatura del
freezer y del refrigerador son preestablecidas
de fábrica.
Sin embargo, esta temperatura depende de las
condiciones de la temperatura ambiente, acondi-
cionamiento de los alimentos y de la frecuencia
de abertura de la puerta.
Por lo tanto, cuidado para no posicionar los ali-
mentos de modo que obstruyan las salidas de aire
y evite abrir la puerta innecesariamente.
El compartimiento refrigerador de los modelos
DF80/DF80X, posee control de temperatura inde-
pendiente, localizado internamente y en la parte
de arriba (techo) del refrigerador. Para regulado
consulte la sección “Control de Temperatura Ma-
nual en el Refrigerador”.
Ajuste Fino de Temperaturas
Su refrigerador fue producido dentro de los
estándares internacionales y posee tres niveles
de temperatura, con valores preestablecidos de
fábrica para los modelos DF80/DF80X y cinco
niveles para los modelos DFI80/DI80X, pudiendo
ser ajustados (disminuir o aumentar) de acuerdo
con su necesidad.
Cuando desee alterarlos, existe la posibilidad
de Ajuste Fino de Temperatura de los tres/cinco
niveles, de acuerdo a lo explicado a continuación.
Control Electrónico de Temperatura en
el Freezer (DF
80
/DF
80
X/DFI
80
/DI
80
X)
y Refrigerador (DFI
80
/DI
80
X)
Presionándose sucesiva-
mente se puede seleccionar
la temperatura en el freezer,
conforme abajo:
Control Electrónico de Temperatura
del Freezer y Refrigerador
(Temperaturas preestablecidas de fábrica)
Temperatura en
el Freezer
Temperatura en
el Refrigerador
(DFI80/DI80X)
Ajuste
-24ºC (frio max)
---
-20ºC (frio med)
---
-16ºC (frio min)
-1ºC (frio max)
1ºC
3ºC (frio med)
5ºC
8ºC (frio min)
Maximo
Medio
Minimo
1. Para programar esta función (DF80/DF80X)
1.1. Presione la tecla “AUTO CONTROL” y seleccio-
ne la función VACACIONES y enseguida toque
5 veces la tecla “TEMP. CONGELADOR”. El
indicador de funciones se encenderá indicando el
último ajuste.
El ajuste no de temperatura programado, es válido
para los 3 niveles de temperatura del compartimiento
del freezer.
1.2. Opciones de Ajuste:
Para aumentar 0,5 ºC en la temperatura
preestablecida, toque la tecla TEMP. CONGE-
LADOR hasta aparecer 05 en el indicador de
Funciones.
Para aumentar 1 ºC en la temperatura preesta-
blecida, toque la tecla TEMP. FREEZER hasta
aparecer 10 en el indicador de Funciones.
Para disminuir 0,5 ºC en la temperatura pre-
establecida, toque la tecla TEMP. FREEZER
hasta aparecer 05 con un guión al lado izquier-
do en el indicador de Funciones.
Para disminuir 1 ºC en la temperatura preesta-
blecida, toque la tecla TEMP. FREEZER hasta
aparecer 10 con un guión al lado izquierdo en
el indicador de Funciones.
Para disminuir 2,0 ºC en la temperatura pre-
establecida, toque la tecla TEMP. FREEZER
hasta aparecer 20 con un guión al lado izquier-
do en el indicador de Funciones.
Después de tres segundos sin que sea tocada
ninguna tecla, el ajuste no es nalizado.

41
2. Para programar esta función (DFI80/DI80X)
2.1. Presione al mismo tiempo las teclas “DRINK
EXPRESS” y “TEMP. FREEZER” hasta oír
una señal sonora. El indicador de funciones
se encenderá indicando el último ajuste. El
ajuste no es válido para los cinco niveles de
temperatura del freezer y refrigerador.
2.2. Opciones de Ajuste:
El primer número que aparece en el display
(decena) corresponde a la temperatura del
refrigerador y el segundo número (unidad)
corresponde a la temperatura del freezer.
Para aumentar 0,5ºC en la temperatura
del freezer preestablecida, toque TEMP.
FREEZER hasta aparecer el número 1 al lado
derecho del display.
Para aumentar 0,5ºC en la temperatura del
refrigerador preestablecida, toque TEMP. RE-
FRIGERADOR hasta aparecer el número 1 al
lado izquierdo del display.
Para aumentar 1ºC en la temperatura del fre-
ezer preestablecida toque TEMP. FREEZER
hasta aparecer el número 2 al lado derecho
del display.
Para aumentar 1ºC en la temperatura del
refrigerador preestablecida toque TEMP. RE-
FRIGERADOR hasta aparecer el número 2 al
lado izquierdo del display.
Para disminuir -0,5ºC en la temperatura del
freezer preestablecida toque TEMP. FREEZER
hasta aparecer el número 3 al lado derecho del
display.
Para disminuir -0,5ºC en la temperatura del
refrigerador preestablecida toque TEMP. RE-
FRIGERADOR hasta aparecer el número 3 al
lado izquierdo del display.
Para disminuir 1,0ºC en la temperatura del
freezer preestablecida toque TEMP. FREEZER
hasta aparecer el número 4 al lado derecho del
display.
Para disminuir 1,0ºC en la temperatura del
refrigerador preestablecida toque TEMP. RE-
FRIGERADOR hasta aparecer el número 4 al
lado izquierdo del display.
Para disminuir 2,0ºC en la temperatura del
freezer preestablecida toque TEMP. FREEZER
hasta aparecer el número 5 al lado derecho del
display.
Para disminuir 2,0ºC en la temperatura del
refrigerador preestablecida toque TEMP. RE-
FRIGERADOR hasta aparecer el número 5 al
lado izquierdo del display.
Después de tres segundos sin que sea tocada
ninguna tecla, el ajuste no es nalizado.
Las diversas combinaciones de temperatura
del freezer y refrigerador pueden ser usados
libremente, ej: 55, 32, 52, 33, 43, etc.

42
Control Temperatura Manual en el
Refrigerador (DF
80
/DF
80
X)
Para proceder a correcto
regulado de tempera-
tura de su refrigerador,
considere los siguientes
factores:
1. La cantidad de ali-
mentos que se alma-
cenarán.
2. La temperatura del am-
biente en donde el refrigerador está instalado.
3. Para obtener el regulado Frío Máximo, Frío
Medio o Frío Mínimo, gire el botón “B” hacia la
derecha o izquierda, hasta que la respectiva
graduación se alinee con la pieza redonda de
color gris “A”.
A
B
Limpieza del Desodorizador
En caso de mal olor en el com-
partimiento del freezer y en el
compartimiento del refrigerador,
proceda de la siguiente forma:
1. Ajuste el control de temperatura
del compartimiento refrigerador
en la posición MAX durante
aproximadamente una hora y
retorne al ajuste anterior.
2. Enseguida, retire la tapa del desodorizador lo-
calizado en la parte superior del compartimiento
del refrigerador y desencaje cuidadosamente el
desodorizador del interior de la tapa.
5. Limpieza y Mantenimiento
Antes de efectuar cualquier opera-
ción de mantenimiento, incluyendo
las descritas en este manual, des-
conecte el refrigerador de la energía
eléctrica, retirando el enchufe del
tomacorriente. Jamás limpie su
refrigerador con uidos inamables como alcohol,
kerosén, gasolina, thinner, varsol, solventes u otros
productos químicos abrasivos como detergentes, áci-
dos o vinagres, para no dañar la protección del barniz
y demás piezas. Después de la limpieza, recoloque los
accesorios suministrados con el refrigerador (gavetas,
anaqueles, etc.) en sus lugares correspondientes,
en el interior del refrigerador. Cuando algún alimento
sea derramado en el interior del refrigerador, limpie
inmediatamente. Muchos de esos alimentos pueden
dañar, manchar o dejar con olor desagradable las su-
percies internas del refrigerador, cuando permanecen
por mucho tiempo en contacto. Nunca use espátulas
metálicas, cepillos, productos abrasivos o alcalinos
para limpieza de las supercies de plástico en el inte-
rior de su refrigerador. Antes de comenzar a limpiar el
refrigerador, recuerde que objetos húmedos pueden
adherirse fácilmente a supercies extremamente frías.
De esa forma, no toque las supercies frías con paños,
esponjas o hasta con las manos húmedas.
ATENCIÓN
Caso no quiera utilizar funciones especí-
cas de su refrigerado en el día a día, como
por ejemplo: Party, Shopping, Vacation,
Auto Control, etc; usted podrá regular su
refrigerador conforme tabla abajo:
ATENCIÓN
Las piezas de plástico no pueden ser la-
vadas con agua caliente.
Parte Interna
Limpie el interior del refrigerador y los accesorios,
con una solución de agua tibia y bicarbonato de
sodio (una cuchara de sopa de bicarbonato para
cada 1 litro de agua). Séquelo cuidadosamente.

43
Fabricador de Hielo Automático “Ice-
Maker” (DFI
80
/DI
80
X)
El fabricador de hielo
posee una varilla (A)
que verifica si hay o
no hielo formado en el
recipiente de almace-
namiento de hielo. Al
limpiar el fabricador de hielo, esta varilla no deberá
ser forzada en ninguna dirección. El fabricador de
hielo se encuentra en la parte superior izquierda
del compartimiento freezer.
3. Sumerja en un envase de agua limpia durante
tres horas.
4. Retire y deje el desodorizador en reposo para secar
por 2 horas y móntelo nuevamente.
5. Es recomendable el cambio del desodorizador
después de su tercera limpieza.
6. Se recomienda el uso de un destornillador
pequeño, para retirar la pieza que sustenta el
desodorizador.
Sustitución de las Mangueras de Agua
(DFI
80
/DI
80
X)
Su refrigerador permite que las
mangueras de agua puedan ser
cambiadas cada cierto tiempo
para siempre mantener la pureza
de su agua. Es recomendable el
cambio anual de las mangueras.
Antes de utilizar el fabricador de hielo
automático “Ice Maker”, es recomendado
realizar la limpieza del depósito de agua,
conforme ítem “Limpieza del Depósito
para agua”.
También es recomendado el descarte de las
primeras piedras de hielo. Eso garantizará
que los moldes de hielo y las demás piezas
que tengan contacto con el agua antes de
volverse hielo queden limpios. Descarte
por lo menos 30 piedras de hielo antes de
su utilización.
IMPORTANTE
Sustitución de la Lámpara
Para sustituir la lámpara de su
Refrigerador, proceda de la si-
guiente manera:
1. Desconecte el refrigerador reti-
rando el cable de alimentación
del tomacorriente.
2. Retire los anaqueles que se
encuentran al frente de la tapa
de la lámpara (luminaria).
3. Tire la luminaria simultáne-
amente con las dos manos
hasta soltarla totalmente (A).
4. Cambie la lámpara quemada
por otra con las mismas di-
mensiones, tensión y potencia
máxima de 25 W.
5. Recoloque la luminaria, prime-
ramente encajando los pernos de una de las extre-
midades de la capa plástica (B) y después empuje la
otra extremidad (C) contra el fondo del refrigerador,
hasta trabar en la posición original.
6. Recoloque el cable de alimentación en el toma-
corriente.
1. Suelte el tubo de alimen-
tación de agua del depó-
sito de agua (1).
2. Retire el depósito de la
puerta del refrigerador,
levantándolo y tirando
conforme el diseño (2).
3. Suelte las trabas laterales
con cuidado (3).
4. Retire la tapa del depósito
principal (4).
5. Retire el depósito interno
y retire cuidadosamente
el repuesto –elemento
ltrante (5).
6. Limpie todas las piezas
(excepto el repuesto) con
agua tibia y jabón neu-
tro, enjuáguelas en agua
corriente.
7. No olvide recolocar la
goma de sellado de la
Limpieza del Depósito para agua (sólo para
los modelos DFI80 y DI80X)
ATENCIÓN
Antes de retirar el depósito de la puerta,
déjelo totalmente vacío.
A
A
A
B
C

44
tapa del depósito
principal.
8. Instale el repuesto
(elemento ltrante)
en el depósito in-
terno, verificando
que se encuentre
bien encajado, para
mantener el sellado entre las piezas.
9. Monte el depósito interno en el depósito prin-
cipal.
10. Encaje la tapa en el depósito principal utilizan-
do las trabas laterales.
11. Lea los procedimientos de cómo utilizar el
depósito para agua (pág. 38).
ATENCIÓN
No lave el repuesto, provocando el riesgo
de contaminación del mismo.
ATENCIÓN
En razón del empleo de barniz especial
aplicado en su producto para facilitar la
limpieza, no use esponjas abrasivas, cepil-
los de acero, ni productos especiales para
limpieza de acero inoxidable, pastas, sa-
polios y productos con uidos inamables
como alcohol, kerosén, gasolina, varsol,
solventes, ceras automotrices, pulidores y
otros productos químicos abrasivos como
cloro, detergentes, ácidos o vinagres.
El uso de estos productos puede dañar la
protección de barniz y por consecuencia,
causar rayados y/o manchas irreversibles
en las supercies do su refrigerador.
Es recomendado activar la función PANEL
ELECTRÓNICO TRABADO al ejecutar la
limpieza del Panel de Control, para evitar
el accionamiento accidental de alguna
función.
Parte Externa
Para limpiar fácilmente la parte
externa de su refrigerador,
utilice un paño humedecido en
solución de agua tibia con deter-
gente neutro y después séquelo
cuidadosamente.
Las puertas de los modelos
DF80X y DI80X poseen un barniz especial pro-
tector que evita marcas de dedos y manchas,
utilice franela seca o humedecida en agua
tibia con detergente neutro y después seque
cuidadosamente.
ATENCIÓN
Las gomas de las puertas son encajadas y
removibles.
Goma de Cierre de la Puerta
Las gomas de sellado de las puertas deben ser
limpiadas cuidadosamente con un paño húmedo
teniendo cuidado para no dañarlas.
Limpieza de Colector de Agua y
Condensador
Su refrigerador posee un
colector de agua y un con-
densador localizado en la
parte trasera próximo al
compresor (motor). La fun-
ción del colector es almacenar agua del deshielo
automático, que después evapora a través del
calor generado en esta región.
La función del condensador es auxiliar en la
refrigeración.
La limpieza del colector y del condensador es
recomendada cada 6 meses.
ATENCIÓN
No remueva la tapa trasera del refrigerador
No eche agua directamente dentro o fuera
del refrigerador.
Limpieza del Colector de Gotas de Agua
(modelos DFI
80
e DI
80
X)
1. Retire la tapa del colector de
gotas de la puerta del refrige-
rador.
2. Seque el agua colectada
siempre que sea necesario.
3. Limpie el goteo y la tapa del
goteo con agua tibia y jabón
neutro.
4. Encaje la tapa de la grasera
en la puerta del refrigerador.

45
Tapa del Fabricador de Hielo Automático “Ice
Maker” y Recipiente para Almacenar Hielo
(modelos DFI80 y DI80X)
Para retirar la tapa, primera-
mente tire el lado izquierdo
de la pieza (A), desplácela
hacia la izquierda (B) hasta
soltar el perno en el lado
derecho.
Para retirar la gaveta basta
jalarla hacia el frente (C)
y levantarla al nal de su
curso.
“Drink Express” (modelos DF80 y DF80X)
Para retirar el “Drink Ex-
press” presione la traba de
seguridad hacia abajo (A) y
tírelo hacia el frente.
Sujete rmemente el “Drink
Express” cuando el mismo
se encuentre cargado. Esta
traba existe tanto en la po-
sición de uso en el freezer
como en el refrigerador.
Como Remover los Accesorios
Anaqueles del Freezer:
Los anaqueles de vidrio del freezer son removi-
bles, pudiendo ser utilizadas de acuerdo con su
necesidad. Para retirarlas, presione las trabas de
seguridad hacia abajo (A), deje las mismas retraí-
das (B), levante conjuntamente los anaqueles un
poco y tire el conjunto para frente (C).
Anaqueles de las Puertas:
Levante un poco para reti-
rarlos.
Tapa del Depósito para agua (sólo para los
modelos, DFI80 y DI80X)
Para retirarla es necesario antes retirar el depósito
para agua de la puerta del refrigerador.
Estantes de Vidrio Plegable:
Retire jalando el anaquel
hasta trabar y levántelo.
Los anaqueles de vidrio
pueden ser colocados en
cualquier posición en el
refrigerador, excepto el ana-
quel de vidrio encima de la
gaveta frutas/verduras de
los modelos DFI80/DI80X
que sólo puede ser encajada en esta posición.
Depósito para agua (sólo para los modelos
DFI80 y DI80X)
1.Desconecte el tubo de
alimentación de agua del
depósito.
2. Levante un poco y tire el
depósito para retirarlo, con-
forme diseño al lado.
A
A
B
C
A
B
C

46
6. Solución de Problemas
Asistencia al Consumidor
En caso de que su Refrigerador presente algún problema de funcionamiento, verique las probables causas y
correcciones.
• Conecte el enchufe en el tomacorriente.
• Conecte el producto en la tensión correcta.
• Corrija el defecto en el tomacorriente eléc-
trico.
• Espere el retorno de la energía, cambie el
fusible o conecte el disyuntor de la residencia.
•
Quite el tapón de la toma por 5 min.
volviendo a conectarlo en la secuencia
.
• Enchufe desconectado del tomacorriente.
• Producto conectado en tomacorriente con
tensión diferente del producto.
• Tomacorriente con mal contacto.
• Falta de energía eléctrica o disyuntor desco-
nectado o fusible quemado
• Caída de energía eléctrica o oscilación de
tensión.
Si el Refrigerador
no Funciona (no
Conecta)
• Ajuste correctamente el regulado de tempe-
ratura.
• Ver “Instalación - Elegir el Local”.
• Desobstruya las salidas de aire del Multi-Flow.
• Vea Instalación Eléctrica (pág. 29).
• Ábrala sólo el tiempo necesario.
• Ajuste inadecuado del control de temperatura
del compartimiento refrigerador.
• Incidencia de luz solar directa u otras fuentes
de calor próximo al refrigerador.
• Circulación de aire perjudicada.
• Tensión de la red eléctrica diferente de la
indicada en el producto.
• Tiempo excesivo de puerta abierta.
Si el Refrigerador
no Hiela
(Refrigeración
insatisfactoria)
• Posicione correctamente el control de tem-
peratura.
• Reposicione los alimentos.
• Séquelos antes de almacenarlos.
• Ajuste inadecuado del control de temperatura
del compartimiento refrigerador.
• Alimentos posicionados próximos a las salidas
de aire.
• Alimentos muy húmedos.
Alimentos
congelando en el
compartimiento
refrigerador
• Cierre ambas puertas, Cuando desee un
tiempo mayor de puerta(s) abierta(s) selec-
cione la función COMPRAS.
• Vea Instalación Eléctrica (pág. 29).
• Fin de la función programada. Abra las puer-
tas o pulse en la tecla que esté guiñando.
• Puerta abierta.
• Tensión de la red eléctrica diferente de la
indicada en el producto.
• Turbo Congelamiento / Drink Express / Gour-
met Express / Ice Express.
Alarma sonando
• Ajuste correctamente los sellos y las cone-
xiones de agua.
• Derramando agua del depósito para agua
Fuga en el depósito
para agua (sólo DFI80
y DI80X).
• Llame al Servicio Técnico.• Falla de alguna de las funciones de su refri-
gerador.
Mensajes en el indica-
dor de funciones
• Abastezca de agua potable el depósito.
• Accione la tecla “Ice maker”.
• Coloque el recipiente en su posición original.
• No hay agua en el depósito de agua.
• Tecla “Ice Maker” desactivada.
• Recipiente para almacenar hielo no está en
posición.
No fue fabricado hielo
automáticamente (mo-
delos DFI80/DI80X)
• Destrabe el panel de acuerdo a las instruc-
ciones de la página 32. 5) Con el panel de
control trabado no saldrá agua del dispenser.
• Panel de control trabado.
Teclado del panel de
control no acepta co-
mando.
Probables Causas/Correcciones
• Abastezca el depósito con agua potable, espere
algunos minutos y accione la tecla Ice Maker.
• Falta agua en el depósito.
Aparece “rA” en el
panel de control
• Ajuste adecuadamente el control de humedad.
• Embálelos adecuadamente.
• Control de humedad cerrado.
• Alimentos almacenados desembalados.
Humedad excesiva en
la gaveta de frutas y
legumbres

47
• Aguarde la nalización de deshielo (aproxima-
damente 30 minutos) y la función seleccionada
será ejecutada de acuerdo a lo solicitado.
• El compresor (motor), después de conectado,
siempre aguardará algunos minutos antes de
retornar a conectar para que las presiones inter-
nas del sistema de refrigeración se estabilicen.
Esto evita sobrecarga y desgaste prematuro del
compresor, lo cual es normal.
• Después de tocada una tecla de selección
de funciones, existe un tiempo de algunos
segundos (intencional) para que la función
sea accionada. Esto es para que usted pueda
conrmar visualmente su elección antes de la
realización de la función.
• Refrigerador está en proceso de deshielo
automático del freezer.
• Compresor (motor) recién-desconectado.
• Selección de tiempo de Turbo Congelamiento
“Gourmet Express”, Fiesta, Compras o “Drink
Express”
Tocada la tecla Tur-
bo Congelamiento,
“Gourmet Express”,
Fiesta, Compras o
“Drink Express”, el
compresor (motor)
no funciona inmedia-
tamente
• Mantenga la puerta del freezer cerrada.
• Procure fabricar sólo lo que será consumido
de hielo.
• Evite dejar el recipiente para almacenamiento
de hielo fuera de su local por mucho tiempo,
Utilícelo “Ice Stock”.
• Retire el hielo derretido y repita el proceso de
fabricación de hielo.
• Puerta del freezer abierta por un largo período
de tiempo.
• El hielo no es usado.
• Recipiente para almacenar hielo fue removido
de su local por un largo período de tiempo.
• Hubo caída de energía eléctrica por tiempo
prolongado.
El hielo derrite y se
aglutina (DFI80 y
DI80X)
•
Quite el tapón de la toma por 5 min.
volviendo a conectarlo en la secuencia
.
• Caída de energía eléctrica o oscilación de
tensión.
Tocando en las teclas
la señal sonora no es
emitida. La alarma no
toca TURBO CONGE-
LAMIENTO / “DRINK
EXPRESS” / “GOUR-
MET EXPRESS”
• Retire el enchufe del tomacorriente, espere
10 segundos y recoloque el enchufe en el
tomacorriente nuevamente.
• Refrigerador está operando en modo “Show
Room”. es decir, modo demostración en Tienda.
Panel y lámparas están
funcionando pero el
refrigerador no hiela
Sudor en la Superficie Externa
Según la norma internacional ISO8561, los refrigeradores,
freezers y combinados de uso doméstico no deben pre-
sentar escurrimiento de agua en la supercie externa, pero
cuando son instalados en locales con humedad relativa
de aire mayor de 75% y con temperaturas superiores a
32ºC es normal que el refrigerador presente condensación
externa (sudor).
Ruidos Normales de Operación
Su refrigerador en funcionamiento puede presentar un
ruido, principalmente cuando se encuentre con la puerta
abierta. Este ruido se debe a la expansión del uido refrige-
rante dentro del evaporador, lo que no representa defecto.
El compresor (motor) puede generar un ruido. Esto es una
característica de los compresores modernos que funcio-
nan en velocidades mayores que los modelos antiguos,
presentando mejor desempeño y menor consumo de
energía. La alimentación de agua para el fabricador de hielo
automático y para el dispensador de agua puede generar
ruido. Ésta es una característica normal de funcionamiento
de la bomba de agua localizada atrás del depósito de agua
(en los modelos DFI80/DI80X). El fabricador de hielo “Ice
Maker” también puede generar ruido cuando el mismo
está produciendo hielo. Ésta es una característica normal
de funcionamiento de la varilla que verica si hay o no
hielo formado en el recipiente de almacenamiento, o por
el movimiento giratorio de extracción de hielo del fabricador
automático “Ice Maker” (caída de hielo en el recipiente de
almacenamiento en los modelos DFI80/DI80X).
La contracción y dilatación de los componentes
internos, debido a la variación de temperatura, puede
generar pequeños chasquidos en su refrigerador, lo
cual no representa cualquier tipo de defecto.
Cierre de la Puerta
Al cerrar la(s) puerta(s) del refrigerador, habrá formación
de vacío interno, dicultando la abertura, lo cual es normal
debido al perfecto sellado. Por lo tanto, no fuerce la apertu-
ra. Aguarde algunos instantes antes de abrir nuevamente.
Hielo en el Compartimiento Freezer
Su refrigerador en funcionamiento puede presentar
pequeñas capas de hielo en el compartimiento freezer,
principalmente debajo de los anaqueles de vidrio y en las
salidas de aire “Multi Flow”. Esto no traerá problemas al
funcionamiento para su refrigerador.

48
Evite el contacto de cualquier tipo de aceite o grasa con las partes plásticas del refrigerador, pues pueden
causar daños.
No lubrique la bisagra de la puerta en hipótesis alguna, pues puede causar daños a las partes plásticas.
Atención: Evite utilizar imanes en las puertas, pues esto puede danicar su supercie.
7. Pistas y Consejos
ALIMENTO
CANTIDAD
APROXIMADA
COMPARTIMIENTO TURBO
CONGELAMIENTO (TIEMPO EN MINUTOS)
30
-
30
-
-
60
60
-
30
-
30
45
30
60
60
-
-
-
-
45
120
45
150
-
no recomendable
90
no recomendable
150
90
no recomendable
no recomendable
150
no recomendable
150
no recomendable
no recomendable
no recomendable
no recomendable
no recomendable
150
60
30
150
no recomendable
150
no recomendable
150
60
200 g
300 g
400 g
1.200 g
300 g
650 g
840 g
1.200 g
500 ml
300 g
1.200 g
820 g
320 g
500 g
980 g
1.500 g
65 g
360 g
100 g
1.200 g
2 litros
600 g
1.930 g
250 ml
Barra de chocolate
Croqueta de bacalao/mandioca
Caja de bombón
Carne de ganado
Croqueta de pollo
Creminuto (Pudín)
Flan
Pollo
Gelatina
Longaniza na
Mayonesa
Manjar de coco
Mousse
Pan de queso
Parfait (Trie)
Pescado
Polo
Pizza
Pulpa de fruta
Pudín de leche
Helado (2 litros)
Tarta de galleta
Tarta de helado
Agua (hielo)
TABLA PARA ENFRIAMIENTO/CONGELAMIENTO EN EL CONGELADOR *
* En temperaturas ambientes diferentes de 23ºC y compartimiento Freezer abastecido mayor de 50% de su
capacidad, los valores de referencia de la tabla arriba sufrirán variaciones.
ENFRIAMIENTO CONGELAMIENTO
BEBIDA
Tiempo (minutos)
DF80/DF80X
(en el Congelador)
Tiempo (minutos)
DFI80/DI80X
(en Espacio Express)
30
35
40
-
40
45
45
60
Champagne (botella de 750 ml)
Refresco (lata de 350 ml)
Cerveza (botella de 600 ml)
Gaseosa (botella de 2 l)
TABLA PARA ENFRIAMIENTO RÁPIDO DE BEBIDAS*

49
* Estos son los tiempos programados considerando temperatura ambiente de 25ºC los tiempos de enfriamiento
sufrirán variaciones de acuerdo con la temperatura ambiente y tamaño, cantidades y tipo de recipientes (latas,
botellas de plástico, etc.).
Si no quedarse satisfecho con la temperatura de su bebida o postre, repita el proceso de enfriamiento rápido.
* Para evitar fuga de líquidos y rompimiento de botellas (plástico/vidrio) y latas, no deje bebidas en el interior
del freezer en las siguientes condiciones:
- Por tiempo prolongado;
- Función “Drink Express” (enfriamiento rápido de bebidas) desactivada; (modelos DF80 / DF80X);
- Función Turbo Congelamiento activada.
TABLA PARA ENFRIAMIENTO RÁPIDO DE POSTRES*
Tiempo (minutos)
DFI80 y DI80X
90
60
120
150
POSTRE
(en Espacio Express)
Pudín (Pudding)
Mousse
Cheesecake
Parfait (Trie)
RECETAS GOURMET EXPRESS
Cheesecake
Ingredientes:
200g de galleta maicena
5 cucharas de sopa de mantequilla sin sal derretida a temperatura ambiente.
Relleno:
150g de cream cheese original
1 sachet 12g de gelatina sin sabor
1 lata de crema de leche sin suero
1 Lata de leche condenado.
Cobertura:
230g de mermelada de mora.
Modo de Preparar
Masa:
Pase las galletas en el procesador hasta formar una harina, retorne la harina de galleta al procesador y adicione
de a pocos la mantequilla derretida, hasta que la harina quede húmeda.
Forre el fondo y los laterales de un molde de aro removible de 20cm de diámetro con papel mantequilla.
Transera la masa de galleta para el molde y compacte con una cuchara de sopa, dejando toda la supercie lisa
y con el mismo espesor.
Lleve al horno para asar por 10 minutos a temperatura de 180°C, no ase demasiado para no quedar quebradizo.
Reserve para enfriar.
Relleno:
En la batidora junte la leche condensada, cream cheese y bata por 10 minutos. Adicione la crema de leche y la
gelatina disuelta en 5 cucharas de sopa de agua calentada en el microondas por 30 segundos, bata más un minuto
en la batidora para mezclar bien.
Montaje:
Coloque el relleno sobre la masa fría y esparza la mermelada con una espátula.
Cubra con película de plástico el recipiente y lleve para congelar en el compartimiento Gourmet Express, accione
la función “cheesecake” en el display aparecerá 120min. Al nal del tiempo el “beep” (señal sonora) accionará y
en el display “00” aparecerá, avisando el n de la programación.
Para servir retire el aro y el papel que envuelve el lateral del cheesecake.
Mousse de chocolate
Ingredientes:
3 huevos.

50
2 cucharas de sopa de azúcar.
200g de chocolate medio amargo raspado.
1 lata de crema de leche a temperatura de refrigeración.
Modo de Preparar
Bata bien las claras a punto de nieve y reserve.
Derrita el chocolate y reserve.
Bata las yemas en la batidora hasta duplicar de volumen, junte el azúcar y continúe batiendo; incorpore el cho-
colate derretido y la crema de leche sin suero; Desconecte la batidora y junte las claras a punto de nieve, mezcle
delicadamente.
Transera para un recipiente hondo de 20 cm. de diámetro.
Cubra con película de plástico el recipiente y llévelo para congelar en el compartimiento Gourmet Express, accione
la función “mousse” en el display aparecerá 60min. Al nal del tiempo el “beep” (señal sonora) accionará y en el
display “00” aparecerá, avisando el n de la programación.
Pavê de durazno
Ingredientes:
2 cucharas de sopa de harina de maíz disuelto en 200 ml de leche fría.
1 lata de leche condensada.
3 yemas tamizadas.
1 lata de crema de leche sin suero.
200g de galleta champagne.
1/2 lata de conserva de durazno en mitades.
3 claras a punto de nieve.
3 cucharas de azúcar.
Achocolatado o chocolate en polvo para decorar.
Modo de Preparar
En una olla junte la harina disuelta con la leche, la leche condensada, las yemas tamizadas y cocine en fuego
bajo hasta dar consistencia siempre moviendo; deje enfriar; Después de frío junte la crema de leche sin suero,
mezcle bien y reserve.
En un recipiente de 20cm X 30cm distribuya las galletas y humedézcalos con el almíbar del durazno, cubra las
galletas con el durazno cortados en pequeños cubos.
Esparza sobre la fruta mitad de la crema fría; y haga más una capa de durazno;
Bata las claras a punto de nieve y junte 1 cuchara de azúcar de cada vez hasta quedar bien rme, mezcle mitad de
la clara batida al restante de la crema. Esparza esa mezcla sobre los melocotones, decórela cerniendo chocolate
en polvo.
Lleve para congelar en el compartimiento Gourmet Express, accione la función “pavê” en el display aparecerá 150min.
Al nal del tiempo el “beep” (señal sonora) accionará y en el display “00” aparecerá, avisando el n de la programación.
Pudín de coco
Ingredientes:
1 lata de leche condensada.
1 crema de leche sin suero.
100g de coco fresco rallado.
200 ml de leche.
24g (2 sachets) de gelatina sin sabor, disuelta en ½ vaso de agua.
Modo de Preparar
En la licuadora coloque la leche, la leche condensada, el coco rallado y la gelatina disuelta y bata por 2 minutos,
adicione la crema de leche y bata por más 1 minuto.
Transera para un recipiente de vidrio para pudín con oricio en el medio de 20 cm de diámetro.
Cubra con película de plástico el recipiente y lleve para congelar en el compartimiento Gourmet Express, accione
la función
“pudín” en el display aparecerá 90min. Al nal del tiempo el “beep” (señal sonora) accionará y en el display “00”
aparecerá, avisando el n de la programación.
Después de helado vierta el pudín sobre un plato raso y decore al gusto.
Sugerencia: cubra con almíbar de ciruela negra.

51
Como Economizar Energía
Mantenga la puerta de su refrigerador abierta sólo
el tiempo necesario.
Si la puerta no se encuentra debidamente cerrada,
aumentará el consumo de energía y podrá ocurrir
formación irregular de hielo.
Busque regular la temperatura conforme informa-
ciones contenidas en este manual.
Es importante no obstruir la circulación del aire
con la colocación de toallas, plásticos o con la
mala distribución de los alimentos en los anaque-
les, con el objetivo de mantener la temperatura
homogénea.
Nunca coloque alimentos calientes en el refri-
gerador.
En caso de que haya corta ausencia (ej.: feriados),
su refrigerador podrá quedar conectado utilizando
la función vacaciones. Sin embargo, recuerde que
podrá haber caída de energía prolongada durante
su ausencia.
En caso de que haya prolongada ausencia (ej.:
viajes), pretendiendo desconectar el refrigerador,
remueva todos los alimentos y límpielos dejando
las puertas entreabiertas para evitar moho y olores
desagradables.
El hecho de que el refrigerador permanezca des-
conectado no comprometerá su funcionamiento
al ser reconectado.
Cuando falte energía eléctrica por un período pro-
longado, evite abrir las puertas mientras la energía
eléctrica no es restablecida para no comprometer
la conservación de los alimentos.
Congelamiento de Alimentos
Los productos a ser congelados deben ser frescos
y limpios.
Embale los alimentos en porciones adecuadas al
tamaño de su familia y que puedan ser consumi-
dos de una sola vez. Alimentos descongelados no
deben ser congelados nuevamente.
Paquetes pequeños permiten un congelamiento
rápido y uniforme.
Alimentos grasosos tienen un menor plazo de
congelamiento. La sal también reduce el tiempo
de almacenamiento de los alimentos.
Embale bien los alimentos asegurándose de que
se encuentren bien cerrados.
Nunca coloque alimento a ser congelado en
contacto con el alimento ya congelado, porque
la temperatura del alimento congelado tiende a
aumentar.
Descongelación de Alimentos
Para descongelar carnes, pecados y frutas, man-
téngalos en el compartimiento refrigerador.
Pedazos pequeños de carne pueden ser cocidos
aun congelados.
Se pueden congelar vegetales en agua ferviente.
Platos precocidos pueden ser calentados directa-
mente en el horno siempre y cuando su embalaje
sea adecuado.
Hornos de microondas son adecuados para
descongelar todos los tipos de alimentos, depen-
diendo del tipo de embalaje. Siga las instrucciones
del fabricante de su horno.
Almacenamiento de Alimentos
Para preservar las características de los alimentos
o líquidos, manténgalos en recipientes cerrados.
Para verduras, legumbres y frutas colóquelos en
sacos de plástico y almacénelos en las gavetas
frutas/verduras.
Seque los recipientes antes de ponerlos en el
refrigerador.
Cuando usted almacene productos alimenticios
o líquidos que absorban o transmitan olores muy
fuertes con facilidad, guárdelos en recipientes con
tapa o embalados cuidadosamente.

52
8. Informaciones Técnicas
INFORMACIONES TÉCNICAS CONFORME ISO 8561 (1995)/Amd. (1996)
421 l
132 l
553 l
134 l
423 l
557 l
Automatic
Automatic
1900 mm
800 mm
809 mm
750 mm
1423 mm
104 kg
25 W
7,5 kg/24h
14 h
R134a
413 l
129 l
542 l
131 l
415 l
546 l
Automatic
Automatic
1900 mm
800 mm
809 mm
750 mm
1423 mm
112 kg
25 W
7,5 kg/24h
14 h
R134a
FICHA DE INFORMACIONES TÉCNICAS CONFORME IRAM 2404-3:1998
Capacidad
Almacenamiento Refrigerador
Almacenamiento Freezer
Almacenamiento Total
Bruta Refrigerador
Bruta Freezer
Bruta Total
Deshielo del compartimiento refrigerador
Deshielo del compartimiento freezer
Altura
Ancho del gabinete
Ancho de las puertas
Profundidad con puerta cerrada
Profundidad con puerta abierta (incluye distancia mínima hasta la pared)
Peso neto
Potencia de la lámpara
Capacidad de congelación
Tiempo de retención
Gas refrigerante
Nombre o marca comercial del proveedor
Identicación del modelo del proveedor
Tipo de aparato
Clasicación del modelo por su eciencia energética
(escala que abarca de A (mayor eciencia) a G (menor eciencia)
Etiqueta ecológica
Consumo de energía
Volumen útil del compartimiento de alimentos frescos (5°C)
Volumen útil del compartimiento de alimentos congelados
Clasicación por estrellas del compartimiento de alimentos congelados
Mención “Sin escarcha” cuando sea procedente
Período de elevación de la temperatura (máx.)
Capacidad de congelación
Clase climática
Ruído
ELECTROLUX
DF80/DF80X
Refrigerador/
Congelador - 7
B
ELECTROLUX
DFI80/DI80X
Refrigerador/
Congelador - 7
B
---
650 kWh/año
421 l
132 l
Sin escarcha
17 h
7,5 kg/24h
Sub-Tropical - ST
51 dB(A)
---
650 kWh/año
413 l
129 l
Sin escarcha
17 h
7,5 kg/24h
Sub-Tropical - ST
50 dB(A)
( ) ( )

53
Temperatura de Utilización: mínimo 5ºC / máximo 50ºC
Sistema de Filtrado
(Sólo para los modelos DFI80 y DI80X)
CONSUMO DE ENERGÍA - DF80 y DF80X
CONSUMO DE ENERGÍA - DFI80 y DI80X
Tensión / Frecuencia
Conforme ISO 8561(1995)/Amd.(1996)
Conforme COVENIN 3193:1999
Conforme INEN
220V/50Hz
53,4 kWh/mes
-
-
127V/60Hz
71 kWh/mes
668 kWh/año
864 kWh/año
220V/60Hz
71 kWh/mes
-
-
Tensión / Frecuencia
Conforme ISO 8561(1995)/Amd.(1996)
Conforme COVENIN 3193:1999
Conforme INEN
Conforme ISO 15502 Y NCH 3000
220V/50Hz
53,4 kWh/mes
-
-
39,69 kWh/mes
127V/60Hz
70 kWh/mes
685 kWh/año
852 kWh/año
-
220V/60Hz
70 kWh/mes
-
-
-

54
Anotações

55

69492215 Jan/12 Rev.04
-
 1
1
-
 2
2
-
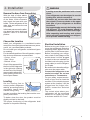 3
3
-
 4
4
-
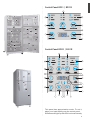 5
5
-
 6
6
-
 7
7
-
 8
8
-
 9
9
-
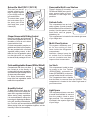 10
10
-
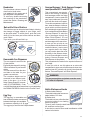 11
11
-
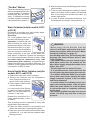 12
12
-
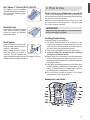 13
13
-
 14
14
-
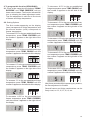 15
15
-
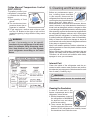 16
16
-
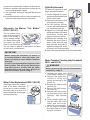 17
17
-
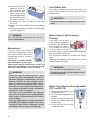 18
18
-
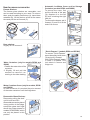 19
19
-
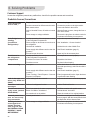 20
20
-
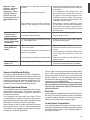 21
21
-
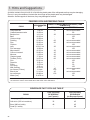 22
22
-
 23
23
-
 24
24
-
 25
25
-
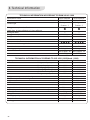 26
26
-
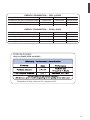 27
27
-
 28
28
-
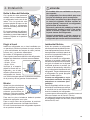 29
29
-
 30
30
-
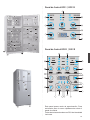 31
31
-
 32
32
-
 33
33
-
 34
34
-
 35
35
-
 36
36
-
 37
37
-
 38
38
-
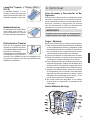 39
39
-
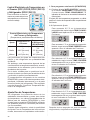 40
40
-
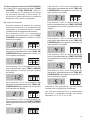 41
41
-
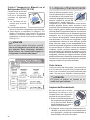 42
42
-
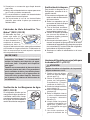 43
43
-
 44
44
-
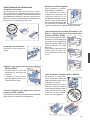 45
45
-
 46
46
-
 47
47
-
 48
48
-
 49
49
-
 50
50
-
 51
51
-
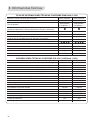 52
52
-
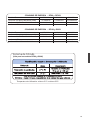 53
53
-
 54
54
-
 55
55
-
 56
56


en otros idiomas
- English: Electrolux DI80X User manual
Artículos relacionados
-
Electrolux DF80X Manual de usuario
-
-
-
Electrolux DW51X Manual de usuario
-
-
-
-
-
-
Otros documentos
-
Whirlpool WVG301/1 Guía del usuario
-
HOTPOINT/ARISTON SH8 2D XROFD 2 Guía del usuario
-
Fulgor Milano F7PBM36S1R Guía de instalación
-
Samsung RF23M8070SG/AA-00 El manual del propietario
-
-
LG GT46HGPP Manual de usuario
-
-
Dometic NRX 35-130 Instrucciones de operación
-
Frigidaire FRTL26G3BPW Información importante
-