Snapper 2690980 El manual del propietario
- Categoría
- Cortadoras de césped
- Tipo
- El manual del propietario
Este manual también es adecuado para

Operator's
ual
Riding Mower
Model No. Description
2690980 LT2452 Riding Mower, 24 Gross HP, 52" (132,1 cm)
2690980A LT2452 Riding Mower, 24 Gross HP, 52" (132,1 cm)
130.280120
130.280121
1752030
Revision B

Thankyouforpurchasingthisquality-buikSNAPPERmower.We'repleasedthatyou'veplacedyourconfidenceinthe
SNAPPERbrand.Whenoperatedandmaintainedaccordingtotheinstructionsinthismanual,yourSNAPPERproductwill
providemanyyearsofdependableservice.
Thismanuamcontainssafetyinformationto make you aware of the hazards and risks associated with mowers and how
to avoid them. This product and its approved attachments/accessories are designed and intended only for lawn work or
snow removal and are not intended for any other purpose. It is important that you read and understand these instructions
thoroughly before attempting to start or operate this equipment. Save these originam instructions for future reference.
Mower
Model Number
Serial Number
Engine
Model Type Trim
Date Code
Date Purchased
Copyright @ 2010 All rights reserved. No part of this materia_ may
be reproduced or transmitted in any form without the express written
permission of Bdggs & Stratton Power Products Group, LLC.
SNAPPER is a trademark of Bdggs & Stratton Power Products Group, LLC
2 www.snapper.com

Table of Contents
Operator Safety ............................................ 4
Important Safety Instructions ........................................ 4
Safety Symbols and Meanings ...................................... 4
Safe Operation Practices ........................................... 5
Safety Decals .................................................... 10
Features and Controls ...................................... 12
Tractor Controls .................................................. 13
Electronic Dashboard .............................................. 14
Operation ................................................. 15
General Operating Safety .......................................... 15
Safety Interlock System Tests ....................................... 15
Check Tire Pressure .............................................. 15
Oil Recommendations ............................................. 15
Check and Add Engine Oil ......................................... 16
Oil Pressure ..................................................... 16
Fuel Recommendations ............................................ 16
Adding Fuel...................................................... 17
Staffing the Engine ................................................ 17
Driving the Tractor ................................................ 18
Mowing ......................................................... 18
Reverse Mowing Option (RMO TM) ................................... 18
Pushing the Tractor by Hand ........................................ 18
Adjusting the Mower Cutting Height ................................. 19
Parking Brake .................................................... 19
Cruise Control ................................................... 19
Stopping the Tractor and Engine .................................... 19
Maintenance ............................................... 20
Maintenance Chart ................................................ 20
Check Tire Pressure .............................................. 20
Check Mower Blade Stopping Time ................................. 20
Battery Maintenance .............................................. 21
Disconnect the Battery ............................................. 21
Remove and Install the Battery ...................................... 21
Connect the Battery ............................................... 21
Cleaning the Battery and Cables .................................... 21
Charging the Battery .............................................. 21
Changing the Engine Oil ........................................... 22
Servicing the Air Filter ............................................. 23
Servicing the Muffler .............................................. 23
Servicing the Spark Plugs .......................................... 23
Washing the Mower Deck .......................................... 24
Adjusting the Gauge Wheels ........................................ 25
Lubrication ...................................................... 26
Storage ......................................................... 27
Troubleshooting ............................................ 28
Specifications .............................................. 30
Warranties ................................................. 31

Operator Safety
important Safety instructions
SAVE THESE mNSTRUCTmONS- This manual contains
important instructions that shouWdbe followed during the
initial set-up, the operation, and the maintenance of the
equipment. Save these originam instructions for future
reference.
Safety Symbols and Meanings
DANGER indicates a hazard which, if not avoided, will
result in death or serious injury.
WARNmNG indicates a hazard which, if not avoided,
could result in death or serious injury.
CAUTmON indicates a hazard which, if not avoided,
could result in minor or moderate injury.
FiRE MOVINGPARTS SHOCK STOP
NOTICE indicates a situation that coumd result in damage
to the product.
TOXICFUMES KICKBACK EXPLOSION
HOTSURFACE
ilO
ONOFF
WEAR EYE HAZARDOUS CHOKE
PROTECTION CHEMICAL
WARNING
The engine exhaust from this product contains
chemicals known to the State of California to cause cancer,
birth defects, or other reproductive harm.
WARNING
Certain components inthis product and its related
accessories contain chemicals known to the State
of California to cause cancer, birth defects, or other
reproductive harm. Wash hands after handling.
READMANUAL FAST SLOW OiL FUEL
FUEL
SHUT-OFF
18eMax°
18"Max°
ROLL-OVER
HAZARD
0
AMPUTATION
HAZARD
The safety alert symbol is used to identify safety
information about hazards that can result in personal injury.
A signal word (DANGER, WARNING, or CAUTION) is used
with the alert symbol to indicate the likelihood and the
potential severity of injury. In addition, a hazard symbol may
be used to represent the type of hazard.
WARNING
Battery posts, terminals, and related accessories
contain lead and lead compounds - chemicals known to the
State of California to cause cancer, birth defects, or other
reproductive harm. Wash hands after handling.
WARNING
Running engine gives off carbon monoxide, an
odorless, colorless, poison gas.
Breathing carbon monoxide can cause headache,
fatigue, dizziness, vomiting, confusion, seizures,
nausea, fainting or death.
• Operate equipment ONLY outdoors.
• Keep exhaust gas from entering a confined area through
windows, doors, ventilation intakes, or other openings.
4 www.snapper.com

Safe Operation Practices
OperatingSafety
Power equipment is only as safe as the operator. If it is
misused, or not properly maintained, itcan be dangerous!
Remember, you are responsible for your safety and that of those
around you. Use common sense, and think through what you are
doing. If you are not sure that the task you are about to perform
can be safely done with the equipment you have chosen, ask a
professional: contact your local authorized dealer.
Readthe Manual
The operator's manual contains important safety information you
need to be aware of BEFORE you operate your unit as well as
DURING operation.
Safe operating techniques, an explanation of the product's features
and controls, and maintenance information is included to help you
get the most out of your equipment investment.
Be sure to completely read the Safety Rules and Information found
on the following pages. Also completely read the Operation section.
Tragic accidents can occur with children. Do not allow them
anywhere near the area of operation. Children are often
attracted to the unit and mowing activity. Never assume that
children will remain where you last saw them. If there is a
risk that children may enter the area where you are mowing,
have another responsible adult watch them.
DO NOT GIVE CHILDREN RIDES ON THiS UNIT! This
encourages them to come near the unit in the future while it
is running, and they could be seriously hurt. They may then
approach the unit for a ride when you are not expecting it,
and you may run over them.
Reverse
Do not mow in reverse unless
absolutely necessary.
Always look down
and behind before
and while traveling
in reverse even with
the mower blades
disengaged.
5

_ 3.5 ft
20.0 ft (6,0 m}
SlopeOperation
You could be seriously injured or even killed if you use this unit on too
steep an incline. Using the unit on a slope that is too steep or where you
don't have adequate traction can cause you to lose control or roll over.
A good rule of thumb is to not operate on any slope you cannot back up
(in 2-wheel drive mode), You should not ope_te on inclines with a sbpe
greater than a 3.5 foot rise over a 20 foot length. A_ways drive up and
down slopes: never cross the face.
Also note that the surface you are driving on can greatly impact stability
and control. Wet grass or icy pavement can seriously affect your ability
to control the unit.
ff you feel unsure about operating the unit on an incline, don't do it. k's
not worth the risk.
MovingParts
This equipment has many moving parts that can injure you or someone else.
However, if you are seated in the seat properly and follow all the rules in this book,
the unit is safe to operate.
The mower deck has spinning mower blades that can amputate hands and feet.
Do not allow anyone near the equipment while it is running!
To help you, the operator, use this equipment safely, it is equipped with an
operator-present safety system. Do NOT attempt to alter or bypass the system.
See your dealer immediately if the system does not pass all the safety interlock
system tests found in this manual.
ThrownObjects
This unit has sp_nn_ngmower blades. These blades can pick up and throw
debris that could seriously injure a bystander. Be sure to dean up the area to
be mowed BEFORE you start mowing.
Do not operate this unit without the entire grass catcher or discharge guard
(deflector) in place.
Do not aWowanyone in the mowing area while the unit is running! If someone
does enter the area, shut the unit off immediately unti_they leave.
FuelandMaintenance
Gasoline is extremely flammable. Its vapors are also extremely flammable
and can travel to distant ignition sources. Gasoline must only be used as
a fuel, not as a solvent or cleaner. Fuel should never be stored any place
where its vapors can build up or travel to an ignition source like a pilot light.
Fuel bebngs in an approved, plastic, sealed gas can, or in the tractor fuel
tank with the cap securely closed. Spilled fuel needs to be cleaned up
immediately.
Proper maintenance is criticat to the safety and performance of your unit.
Be sure to perform the maintenance procedures listed in this manual and be
sure to periodically test the safety system.
6 www.snapper°com

Readthesesafetyrulesandfollowthemclosely.Failuretoobeytheserulescouldresultinlossofcontrolofunit,
severepersonalinjuryordeathtoyou,orbystanders,ordamagetopropertyorequipment.This mowing deck
_able of amputating hands and feet and throwing ob!ects° The triangle _ in text signifies important
cautions or warnings which must be followed.
GENERAL OPERATmON
1. Read, understand, and follow all instructions in the
manual and on the unit before starting.
2. Do not put hands or feet near rotating parts or under
the machine. Keep clear of the discharge opening at all
times.
3. Only allow responsible adults, who are familiar with the
instructions, to operate the unit (local regulations can
restrict operator age).
4. Clear the area of objects such as rocks, toys, wire, etc.,
which could be picked up and thrown by the blade(s).
5. Be sure the area is clear of other people before mowing.
Stop the unit if anyone enters the area.
6. Never carry passengers.
7. Do not mow in reverse unless absolutely necessary.
Always look down and behind before and while travelling
in reverse.
8. Never direct discharge material toward anyone. Avoid
discharging material against a wall or obstruction.
Material may ricochet back toward the operator. Stop the
blade(s) when crossing gravel surfaces.
9. Do not operate the machine without the entire grass
catcher, discharge guard (deflector), or other safety
devices in place.
10. Slow down before turning.
11. Never leave a running unit unattended. Always
disengage the PTO, set parking brake, stop engine, and
remove starter insert before dismounting.
12. Disengage blades (PTO) when not mowing. Shut off
engine and wait for all parts to come to a complete
stop before cleaning the machine, removing the grass
catcher, or unclogging the discharge guard.
13. Operate the machine only in daylight or good artificial
light.
14. Do not operate the unit while under the influence of
alcohol or drugs.
15 Watch for traffic when operating near or crossing
roadways.
16. Use extra care when loading or unloading the unit into a
trailer or truck.
17. Always wear eye protection when operating this unit.
18. Data indicates that operators, age 60 years and above,
are involved in a large percentage of power equipment-
related injuries. These operators should evaluate their
ability to operate the equipment safely enough to protect
themselves and others from injury.
19. Follow the manufacturer's recommendations for wheel
weights or counterweights.
20. Keep in mind the operator is responsible for accidents
occurring to other people or property.
21. All drivers should seek and obtain professional and
practical instruction.
22. Always wear substantial footwear and trousers. Never
operate when barefoot or wearing sandals.
23. Before using, always visually check that the blades and
blade hardware are present, intact, and secure. Replace
worn or damaged parts.
24. Disengage attachments before: refueling, removing an
attachment, making adjustments (unless the adjustment
can be made from the operator's position).
25. When the machine isparked, stored, or left unattended,
lower the cutting means unless a positive mechanical
lock is used.
26. Before leaving the operator's position for any reason,
engage the parking brake (if equipped), disengage the
PTO, stop the engine, and remove the starter insert.
27. To reduce fire hazard, keep the unit free of grass,
leaves. & excess oil. Do not stop or park over dry leaves,
grass or combustible materials.
TRANSPORTING AND STORAGE
1. When transporting the unit on an open trailer make sure
it is facing forward, in the direction of travel. If the unit is
facing backwards, wind lift could damage the unit.
2. Always observe safe refuefing and fuel handling
practices when refueling the unit after transportation or
storage.
3. Never store the unit (with fuel) in an enclosed poorly
ventilated structure. Fuel vapors can travel to an ignition
source (such as a furnace, water heater, etc.) and cause
an explosion. Fuel vapor is also toxic to humans and
animals.
4. Always follow the engine manual instructions for storage
preparations before storing the unit for both short and
long term periods.
5. Always follow the engine manual instructions for proper
start-up procedures when returning the unit to service.
6. Never store the unit or fuel container inside where there
is an open flame or pilot light, such as in a water heater.
AHow unit to cool before storing.
7

SLOPE OPERATION
Slopes are a major factor re_atedto loss-of-control and tip-
over accidents, which can result insevere injury or death.
Operation on all slopes requires extra caution. If you cannot
back up the slope or if you feel uneasy on it, do not operate
on it.
Control of a walk-behind or ride-on machine sliding on a
slope will not be regained by the application of the brake.
The main reasons for loss of control are: insufficient tire grip
on the ground, speed too fast, inadequate braking, the type
of machine is unsuitable for its task, lack of awareness of the
ground conditions, incorrect hitching and load distribution.
1. Mow up and down slopes, not across.
2. Watch for holes, ruts, or bumps. Uneven terrain could
overturn the unit. Tall grass can hide obstacles.
3. Choose a slow speed so that you will not have to stop
or change speeds while on the slope.
4. Do not mow on wet grass. Tires may loose traction.
5. A_ways keep unit in gear especially when traveling
down slopes. Do not shift to neutral and coast
downhill.
6. Avoid starting, stopping, or turning on a slope. If tires
lose traction, disengage the blade(s) and proceed
slowly straight down the slope.
7. Keep all movement on slopes slow and gradual. Do
not make sudden changes in speed or direction, which
could cause the machine to rollover.
8. Use extra care while operating machines with grass
catchers or other attachments; they can affect the
stability of the unit. Do not use on steep slopes.
9. Do not try to stabilize the machine by putting your foot
on the ground (ride-on units).
10. Do not mow near drop-offs, ditches, or embankments.
The mower could suddenly turn over if a wheel is over
the edge of a cliff or ditch, or if an edge caves ran.
11. Do not use grass catchers on steep slopes.
12. Do not mow slopes if you cannot back up them.
13. See your authorized dealer/retailer for
recommendations of wheel weights or countePcceights
to improve stability.
14. Remove obstacles such as rocks, tree limbs, etc.
15. Use slow speed. Tires may lose traction on slopes
even through the brakes are functioning properly.
16. Do not turn on sJopes unless necessary, and then, turn
slowly and gradually downhill, if possible.
TOWED EQUIPMENT (RJDEoON UNITS)
1. Tow only with a machine that has a hitch designed for
towing. Do not attach towed equipment except at the
hitch point.
2. Follow the manufacturer's recommendations for
weight limit for towed equipment and towing on slopes.
3. Never allow children or others in or on towed
equipment.
4. On slopes, the weight of the towed equipment may
cause loss of traction and loss of control.
5. Travel slowly and allow extra distance to stop.
6. Do not shift to neutral and coast down hill.
Never operate on slopes greater than 17.6 percent
(10°) which is a rise of 3-1/2 feet (106 cm) vertically in
20 feet (607 cm) horizontally.
When operating on slopes use additional wheel
weights or counterweights. See your dealer/retailer to
determine which weights are available and appropriate
for your unit.
Select slow ground speed before driving onto slope.
Inaddition to front weights, use extra caution when
operating on slopes with rear-mounted grass catchers.
Mow UP and DOWN the slope, never across the face,
use caution when changing directions and DO NOT
START OR STOP ON SLOPE.
Tragic accidents can occur ifthe operator is not alert to the
presence of children. Children are often attracted to the unit
and the mowing activity. Never assume that children will
remain where you last saw them.
1. Keep children out of the mowing area and under the
watchful care of another responsible adult.
2. Be alert and turn unit off if children enter the area.
3. Before and during reverse operation, look behind and
down for small children.
4. Never carry children, even with the blade(s) off. They
may fall off and be seriously injured or interfere with
safe unit operation. Children who have been given rides
in the past may suddenly appear in the mowing area
for another ride and be run over or backed over by the
machine
5. Never allow children to operate the unit.
6. Use extra care when approaching blind corners, shrubs,
trees, or other objects that may obscure vision.
EM_SSIONS
1. Engine exhaust from this product contains chemicals
known, in certain quantities, to cause cancer, birth
defects, or other reproductive harm.
2. Look for the relevant Emissions Durability Period and Air
Index information on the engine emissions label.
mGNITmONSYSTEM
1. This spark ignition system complies with Canadian
ICES-002.
8 www.snapper°com

SERVICE AND MAINTENANCE
Safe Handling of Gasomine
1. Extinguish all cigarettes, cigars, pipes, and other
sources of ignkion.
2. Use only approved gasoline containers.
3. Never remove the gas cap or add fuel with the engine
running. AHow the engine to cool before refueling.
4. Never fuel the machine indoors.
5. Never store the machine or fuel container where there is
an open flame, spark, or pilot light such as near a water
heater or other appliance.
6. Never fill containers inside a vehicle or on a truck bed
with a plastic bed liner. Always place containers on the
ground away from your vehicle before filling.
7. Remove gas-powered equipment from the truck or
trailer and refuel it on the ground. If this is not possible,
then refuel such equipment on a trailer with a portable
container, rather than from a gasoline dispenser nozzle.
8. Keep nozzle in contact with the rim of the fuel tank or
container opening at all times until fueling is complete.
Do not use a nozzle lock-open device.
9. If fuel is spilled on clothing, change clothing immediately.
10. Never over-fill the fuel tank. Replace gas cap and tighten
securely.
11. Use extra care in handling gasoline and other fuels.
They are flammable and vapors are explosive.
12. If fuel is spilled, do not attempt to start the engine but
move the machine away from the area of spillage and
avoid creating any source of ignition until fuel vapors
have dissipated.
13. Replace all fuel tank caps and fuel container caps
securely.
Service & Maintenance
1. Never run the unit in an enclosed area where carbon
monoxide fumes may collect.
2. Keep nuts and bolts, especially blade attachment bolts
tight and keep equipment in good condition
3. Never tamper with safety devices. Check their proper
operation regularly and make necessary repairs if they
are not functioning properly.
4. Keep unit free of grass, leaves, or other debris build-up.
Clean up oil or fuel spillage, and remove any fuel-soaked
debris. Allow machine to cool before storage.
5. If you strike an object, stop and inspect the machine.
Repair, if necessary, before restarting.
6. Never make adjustments or repairs with the engine
running.
7. Check grass catcher components and the discharge
guard frequently and replace with manufacturer's
recommended parts, when necessary.
8. Mower blades are sharp. Wrap the blade or wear gloves,
and use extra caution when servicing them.
9. Check brake operation frequently. Adjust and service as
required.
10. Maintain or replace safety and instructions labels, as
necessary.
11. Do not remove the fuel filter when the engine is hot
as spilled gasoline may ignite. Do not spread fuel line
clamps further than necessary. Ensure clamps grip
hoses firmly over the filter after installation.
12. Do not use gasoline containing METHANOL, gasohol
containing more than 10% ETHANOL, gasoline
additives, or white gas because engine!fuel system
damage could result.
13. If the fuel tank must be drained, it should be drained
outdoors.
14. Replace faulty silencers/mufflers.
15. Use only factory authorized replacement parts when
making repairs.
16. Always comply with factory specifications on all settings
and adjustments.
17. Only authorized service locations should be utilized for
major service and repair requirements.
18. Never attempt to make major repairs on this unit
unless you have been properly trained. Improper
service procedures can result in hazardous operation,
equipment damage and voiding of manufacturer's
warranty.
19. On multiple blade mowers, take care as rotating one
blade can cause other blades to rotate.
20. Do not change engine governor settings or over-speed
the engine. Operating the engine at excessive speed
can increase the hazard of personal injury.
21. Disengage drive attachments, stop the engine, remove
the starter insert, and disconnect the spark plug wire(s)
before: clearing attachment blockages and chutes,
performing service work, striking an object, or if the unit
vibrates abnormally. After striking an object, inspect the
machine for damage and make repairs before restarting
and operating the equipment.
22. Never place hands near the moving parts, such as a
hydro pump cooling fan, when the tractor is running.
(Hydro pump cooling fans are typically located on top of
the transaxle).
23 Units with hydraulic pumps, hoses, or motors:
WARNING: Hydraulic fluid escaping under pressure
may have sufficient force to penetrate skin and cause
serious injury. Ifforeign fluid is injected into the skin
it must be surgically removed within a few hours by a
doctor familiar with this form of injury or gangrene may
result Keep body and hands away from pin holes or
nozzles that eject hydraulic fluid under high pressure.
Use paper or cardboard, and not hands, to search for
leaks. Make sure all hydraulic fluid connections are tight
and all hydraulic hoses and lines are ingood condition
before applying pressure to the system. If leaks occur,
have the unit serviced immediately by your authorized
dealer.
24. WARNING: Stored energy device. Improper release of
springs can result in serious personal injury. Springs
should be removed by an authorized technician.
25. Models equipped with an engine radiator: WARNING:
Stored energy device. To prevent serious bodily injury
from hot coolant or steam blow-out, never attempt to
remove the radiator cap while the engine is running.
Stop the engine and wait until it is cool. Even then, use
extreme care when removing the cap.
9

Safety Decals
TransmissionRelease
Part No. 1730202
Amputation and thrown objects_
Keep hands and feet
_ away from deck. _'$_ I
2
•Donotoperatemower/,--_ k
,_d unless discharge chute /.*°° ,_L I
or entire grass catcher _,,-_#I_""_ I
is in its proper place. _,,_
DANGERAmputation Hazard
PartNo. 7101665
10
Figure
www°snapper°com

Thispageintentionallyleftblank.
11

Features and Controls
J
Figure 2
12 www.snapper.com

Tractor Controls
Drake Peda_
Depressing the brake peda_ applies the tractor
brake.
Cruise Control
This locks the ground speed control in forward.
The cruise control has five lock positions.
Electronic Dashboard
See Electronic Dashboard section.
Fue_Tank
To remove the cap, turn counterclockwise.
Ground Speed Pedams
The forward ground speed peda_ controls the
tractor's forward ground speed. The reverse
ground speed peda_ controls the tractor's reverse
ground speed.
Headlight Switch
This turns the tractor headlights on and off.
Height-of-Cut Switch
This adjusts the mower cutting height. Press the
switch UP to raise the mowing cutting height
and DOWN to lower the mower cutting height.
The height-of-cut is displayed on the electronic
dashboard.
Parking Drake
This locks the parking brake when the tractor is
stopped. See Parking Brake section.
Power Outlet (12V-DO)
The power outlet is 12V-DC. Accessories must be
rated at 9 amps or less.
Power Take-Off (PTO) Switch
This engages and disengages attachments that
use the PTO. To engage the PTO, pull UP on the
switch. Push DOWN to disengage.
NOTE: The operator must be seated firmly in the
tractor seat for the PTO to function.
Reverse Mowing Option (RMO)
This allows the operator to mow (or use other
PTO driven attachments) whi_etraveling in
reverse. To activate, turn the RMO key after the
PTO is engaged. The L.E.D. light will illuminate,
and the operator can then mow in reverse. Each
time the PTO is engaged, the RMO needs to be
reactivated if desired.
mgnition Switch
The ignition switch starts and stops the engine, it
has three positions: OFF, RUN,and START.
STOP Stops the engine and shuts off the
electrica_ system.
RUN AHows the engine to run and powers the
electrical system.
START Cranks the engine for starting.
NOTE: Never leave the ignition switch in the RUN
position with the engine stopped. This will drain
the battery.
Throttle Contro!
This controls the engine speed. Move the throttle
control FORWARD to increase engine speed and
BACK to decrease engine speed. Always operate
at FULL throttle.
Transmission Remease Lever
This releases the transmission so that the tractor
can be pushed by hand.
13

Electronic Dashboard
The electronic dashboard displays the total hours, trip hours,
digital clock, and cutting height (see Figure 3).
To*al Trip / Hours
%
\
\
\
J
A. Total Hours, Trip Hours, and Clock
B. Height-of-Cut
C. MODE and RESET Buttons
Figure 3
Display Total Hours, Trip Hours, and Clock
NOTE: Whenever you start up the unit. the Total Hours
are displayed. The Total Hours will automatically reset to 0
after 999.9.
1. Press MODE for less than 1 second to display the Trip
Hours.
2. Press RESET for greater than 3 seconds to reset the
Trip Hours to 0.
3. Press MODE for less than 1 second to display the
C_ock (see Set the Clock section).
4. Press MODE for less than 1 second to return to Total
Hours.
Set the Clock
1. Press MODE for greater than 3 seconds. The hours
will flash on the display.
2. Press RESET to adjust the hours.
3. Press MODE for less than 1 second to save the
setting. The minutes will flash on the display.
4. Press RESET to adjust the minutes.
5. Press MODE for less than 1 second to save the
setting.
14 www,snapper°com

Operation
General Operating Safety
Be sure to read aHinformation in the Operator Safety
section before attempting to operate this unit. Become
familiar with aHof the controls and how to stop the unit.
WARNmNG
Ifthe unit does not pass a safety test, do not operate
it. See an authorized dealer.
Safety Interlock System Tests
This unit is equipped with a Safety Interlock System. Do not
attempt to bypass or tamper with the switches and devices.
Test 1 -- Engine shoumd NOT crank if:
o PTO switch is ON, OR
o Brake pedal is NOT fully depressed (parking brake
OFF), OR
The cruise control lever is NOT in NEUTRAL.
Test 2 -- Engine SHOULD crank if:
o PTO switch is OFF, AND
o Brake pedal is fully depressed (parking brake ON), AND
o The cruise control meveris in NEUTRAL.
Test 3 _ Engine shoumd SHUT OFF if:
o Operator rises off seat with PTO engaged. OR
o Operator rises off seat with brake pedal NOT fully
depressed (parking brake OFF).
Test 4 _ Check Mower Blade Stopping Time
Mower blades and mower drive belt should come to a como
plete stop within five seconds after electric PTO switch is
turned OFF. If mower drive belt does not stop within five
seconds, readjust the PTO clutch as described in the MAIN-
TENANCE section or see your dealer.
Test 5 _ Reverse Mow Option (RMO) Check
Engine should shut off if reverse travel is attempted if
the PTO has been switched on and RMO has not been
activated.
o RMO light should illuminate when RMO has been
activated.
NOTE: Once the engine has stopped, the PTO switch must
be turned off after the operator returns to the seat in order to
start the engine.
WARNmNG
Mowing in reverse can be hazardous to bystanders.
Tragic accidents can occur ifthe operator is not alert to the
presence of children. Never activate the RMO if children
are present. Children are often attracted to the unit and the
mowing activity.
Check Tire Pressure
Tires should be checked periodically to provide the optimum
traction and to guarantee the best cut (see Figure 4).
NOTE: These pressures may differ slightly from the
"Maximum inflation"stamped on the side walls of the tires.
12-14 psi
(0,82-0,96 bar)
10 psi
(0,68 bar)
Figure 4
Oil Recommendations
We recommend the use of Briggs & Stratton Warranty
Certified oils for best performance. Other high-quality
detergent oils are acceptable if classified for service SF, SG,
SH, SJ or higher. Do not use special additives.
Outdoor temperatures determine the proper oil viscosity for
the engine. Use the chart to select the best viscosity for the
outdoor temperature range expected.
Oil Recommendations
oF
120 _ ._
0
-20
°C
49
o:i
_:_ 38
_-_ 27
o _ 15
R m 4
_: -18
-29
* Below 400F(40C)the use of SAE 30 willresult
inhard starting.
**Above 800F(270C)the useof 10W30maycause
increasedoil consumption.Checkoil levelmore
frequently.
15

Check and Add Engine OH
1. Place the tractor on a level surface (see Figure 5).
Figure 5
2. Stop the engine (see Stopping the Tractor and Engine).
3. Clean the oil fill area of any debris and remove.
4. Remove the dipstick and wipe with a dean cloth (see
Figure 6).
5. Fully insert the dipstick.
6. Remove the dipstick and check the oil level. +tshould be
at the FULL mark on the dipstick.
7. If FULL, insert the dipstick and tighten securely.
If LOW, add oil slowly into the engine oil fill tube (see Oil
Recommendations). Do not overfill. After adding oil.
wait one minute, then check the oHlevel
Oil Pressure
if the oil pressure istoo bw, a pressure switch (ifequipped)
will either stop the engine or activate a warning device on
the equipment. If this occurs, stop the engine and check the
oil level with the dipstick.
if the oil lever is below the ADD mark, add oil until it reaches
the FULL mark. Start the engine and check for proper
pressure before continuing to operate.
if the oil level isbetween the ADD and FULL marks, do not
start the engine. Contact an authorized dealer to have the
oil pressure problem corrected.
Figure 6
Fue_ Recommendations
Q
O
O
Fue_ must meet these requirements:
Clean, fresh, unleaded gasoline.
A minimum of 87 octane/87 AKI (91 RON).
Gasoline with up to 10% ethanol (gasoho{) or up to
15% MTBE (methyl tertiary butyl ether) is acceptable.
CAUTION: Do not use unapproved gasolines, such as E85.
Do not mix oil in gasoline or modify the engine to run on
alternate fuels. This will damage the engine components
and void the engine warranty.
To protect the fuel system from gum formation, mix a fuel
stabilizer into the fuel. See the Storage section. All fuel is
not the same. If starting or performance problems occur,
change fuel providers or change brands. This engine is
certified to operate on gasoline. The emissions control
system for this engine is EM (Engine Modifications).
16 www.snapper.com

Adding Fuel Starting the Engine
WARNmNG
Fuel and its vapors are extremely flammable and
explosive.
Fire or explosion can cause severe burns or
death.
When Adding Fuel
o Turn engine off and let engine cool at least 3 minutes
before removing the fuel cap.
o Fill fuel tank outdoors or in weIFventilated area.
o Do not overfill fuel tank. To allow for expansion of the
fuel do not fill above the bottom of the fuel tank neck.
o Keep fuel away from sparks, open flames, pi_otlights,
heat, and other ignition sources.
o Check fuel lines, tank, cap, and fittings frequently for
cracks or leaks. Replace if necessary.
If fuel spills, wait until it evaporates before starting
engine.
.
Clean the fuel cap area of dirt and debris. Remove the
fuel cap (A, Figure 7). A_sosee Features and Controls
section.
2. Fill the fuel tank (B) with fuel. To allow for expansion of
the fuel, do not fill above the bottom of the fuel tank neck
(c).
3. Reinstall the fuel cap.
Figure 7
WARNmNG
Fuel and its vapors are extremely flammable and
explosive.
Fire or explosion can cause severe burns or
death.
When Starting Engine
o Ensure that spark plug, muffler, fuel cap, and air
cleaner (if equipped) are in place and secured.
o Do not crank engine with spark plug removed.
o If engine floods, set choke (if equipped) to OPEN/RUN
position, move throttle (if equipped) to FAST position
and crank until engine starts.
WARNmNG
Engines give off carbon monoxide, an odorless,
colorless, poison gas.
Breathing carbon monoxide can cause nausea,
fainting, or death.
Fire or explosion can cause severe burns or death.
Start and run eng!ne outdoors.
Do not start or run engine in enclosed area, even if
doors or windows are open.
1. Check the oil level (see Check and Add Engine Oil).
2. Sit in the seat and lift UP the seat adjustment lever,
position as desired, and release the lever to lock the seat
in position.
3. Engage the parking brake. Fully depress the brake
pedal pull UP on the parking brake control, and release
the brake pedal.
4. Push in the PTO switch to disengage.
5. Move the throttle control to the FAST position.
6. Turn the ignition switch to the START position. After the
engine starts running, release the switch to the RUN
position.
17

Driving the Tractor
.
.
.
4.
5.
.
Sit in the seat and adjust the seat so that you can
comfortably reach all the controls and see the dashboard
display (see Features and Controls).
Engage the parking brake. Fully depress the brake
pedal pull UP on the parking brake control, and release
the brake pedal.
Make sure the PTO switch is disengaged.
Start the engine (see Starting the Engine).
Disengage the parking brake. Fully depress the brake
pedal, press DOWN on the parking brake control, and
release the brake pedal.
Depress the forward ground speed control pedal to
travel forward. Release the pedal to stop. Note that the
further down the pedal is depressed the faster the tractor
will travel.
7. Stop the tractor by releasing the ground speed control
pedals, setting the parking brake, and stopping the
engine (see Stopping the Tractor and Engine).
Mowing
1. Set the mower cutting height to the desired level using
the height-of-cut switch (see Features and Controls).
2. Engage the parking brake. Make sure the PTO switch is
disengaged.
3. Start the engine (see Starting the Engine).
4. Move the throttle control to the FAST position.
5. Engage the PTO to activate the mower blades.
6. Disengage the parking brake then begin mowing
7. When finished mowing, shut off the PTO.
8. Stopthe engine (seeStopping the Tractor and Engine).
WARNING
The engine will shut off if the reverse ground speed
pedal is depressed while the PTO ison and the RMO has
not been activated. The operator should always turn the
PTO off prior to driving across on roads, paths, or any area
that may be used by other vehicles. Sudden loss of drive
could create a hazard.
Reverse Mowing Option (RIVIOTM)
WARNING
Mowing in reverse can be hazardous to bystanders.
Tragic accidents can occur if the operator isnot alert to the
presence of children. Never activate the RMO if children
are present. Children are often attracted to the unit and the
mowing activity.
The Reverse Mowing Option (RMO) allows the operator to
mow in reverse (see Features and Controls). To activate,
turn the RMO key after the PTO is engaged. The L.E.D. light
will illuminate, and the operator can then mow in reverse.
Each time the PTO is engaged the RMO needs to be
reactivated ifdesired. The key should be removed to restdct
access to the RMO.
Pushing the Tractor by Hand
1. Disengage the PTO and turn the engine off (see
Features and Controls).
2. Pull out the lever approximately 2-3/8" (6 cm) to release
the transmission (see Figure 8).
3. The tractor can now be pushed by hand.
WARNING
Towing the unit will cause transmission damage.
Do not use another vehicle to push or pull this unit. Do not
actuate the transmission release lever while the engine is
running.
Figure 8
18 www.snapper.com

Adjusting the Mower Cutting Height
Use the height-of-cut switch to raise or lower the mower
cutting height (see Features and Controls).
Press the switch UP to raise the mowing cutting height and
DOWN to lower the mower cutting height. The height-of-cut
is disp_ayed on the electronic dashboard.
Parking Brake
Use the parking brake control to engage or disengage the
parking brake when the tractor is stopped (Features and
Controls).
Engage the Parking Brake - To engage the parking brake,
fully depress the brake pedal, pull UP on the parking brake
control, and release the brake pedal
Disengage the Parking Brake - To disengage the parking
brake, fully depress the brake pedal, press DOWN on the
parking brake control, and release the brake pedal
Cruise Control
TO ENGAGE:
1. Depress the forward ground speed pedal (see Features
and Controls),
2. Pull up the cruise control when the desired speed ms
reached. The cruise will lock inone ol itsfive locking
positions.
TO DISENGAGE:
1. Depress the brake pedal.
OF{
2. Depress the forward ground speed pedal.
Stopping the Tractor and Engine
WARNING
Fuel and itsvapors are extremely flammable and
explosive.
Fire or explosion can cause severe burns or
death.
Do not choke the carburetor to stop the engine.
1. Release the ground speed pedals to return to the
NEUTRAL position (see Features and Controls).
2. While still on the lawn, disengage the PTO switch, then
wait for aHmoving parts to stop.
3. Turn the ignition switch to the STOP position.
4. Remove the key and keep in a safe place out of the
reach of children.
5_
Engage the parking brake. Fully depress the brake
pedal, pull UP on the parking brake control, and release
the brake pedal
19

Maintenance Chart
Every 8 Hours or Daily
Check safety interlock system
Clean debris off tractor and mower deck
Clean debris from engine compartment
Every 25 Hours or Annually *
Check tire pressure
Check mower blade stopping time
Check tractor and mower for loose hardware
Every 50 Hours or Annually *
Clean battery and cables
Check tractor brakes
See Dealer Annually to
Lubricate tractor and mower
Check mower blades H
* Whichever comes first
** Check blades more often in regions with sandy soils or
high dust conditions.
!! !! ii!ii : !i i!!i!!i!i!i! ! i ! !!i!i !i ii!ii i!i!iiii! i! !i! !i!i iiiiiiii!i!! i! i!! i !! ii i!i!i ii ii i ii iii i !!iiiiiiiiiiiiiiiiiiiiiiiiiiiiiiiiiiiiiiiiiiiiiiiiiiiiiiiiiiiiiiiiiiiiiiiiiiiiiiiiiiiiiiiiiiiiiiiiiiiiiiiiiiiiiiiiiiiiiiiiiiiiiiiiiiiiiiiiiiiiiiiiiiiiiiiiiiiiiiiiiiiiiiiiiiiiiiiiiiiiiiiiiiiiiiiiiiiiiiiiiiiiiiiiiiiiiiiiiiiiiiiiiiiiiiiiiiiiiiiiiiiiiiiiiiiiiiiiiiiiiiiiiiiiiiiiiiiiiiiiiiiiiiiiiiiiiiiiiiiiiiiiiiiiiiiiiiiiiiiiiiiiiiiiiiiiiiiiiiiiiiiiiiiiiiiiiiiiiiiiiiiiiiiiiiiiiiiiiiiiiiiiiiiiiiiiiiiiiiiiiiiiiiiiiiiiiiiiiiiiiiiiiiiiiiiiiiiiiiiiiiiiiiiiiiiiiiiiiiiiiiiiiiiiiiiiiiiiiiiiiiiiiiiiiiiiiiiiiiiiiiiiiiiiiiiiiiiiiiiiiiiiiiiiiiiiiiiiiiiiiiiiiiiiiiiiiiiiiiiiiiiiiiiiiiiiiiii!i
Change engine oil
Check engine oil level
Every 25 HoUrs oF Annually * .................
Clean engine air filter and pre-cleaner **
Change engine oil
Replace oil filter
Replace air filter
Replace pre-cleaner
Dealer Annually
hspect muffler and spark attester
Replace spark plug
Replace fuel rifler
Clean engine air cooling system
" Whichever comes first
_ Clean more often in dusty conditions or when airborne
debris mspresent.
WABNmNG
Unintentional sparking can result in fire or electric
shock.
Unintentional start-up can result in entanglement.
traumatic amputation or laceration.
Before performing adjustments or repairs:
o Disconnect the spark plug wire and keep it away from
the spark plug.
o Disconnect battery at negative terminal (only engines
with electric start).
o Use only correct tools.
o Do not tamper with governor spring, links, or other
parts to increase engine speed.
o Replacement parts must be of the same design and
installed in the same position as the original parts.
Other parts may not perform as well, may damage the
unit, and may result in injury.
o Do not strike the flywheel with a hammer or hard object
because the flywheel may shatter during operation.
Check Tire Pressure
Tires should be checked periodically to provide the optimum
traction and to guarantee the best cut (see Figure 4).
NOTE: These pressures may differ slightly from the
"Maximum Inflation" stamped on the side walls of the tires.
Check Mower Blade Stopping Time
WARNING
If the mower blade does not come to a complete
stop within 5 seconds, the blade must be adjusted. Do not
operate the machine until the proper adjustment has been
9erformed by an authorized dealer.
Check the mower blade for proper function (see Safety
Interlock System Tests). The blade should stop rotating in
5 seconds or less after moving the blade control to the OFF
position.
20 www°snapper°eom

Battery Maintenance
WARNmNG
When removing or installing battery cables,
disconnect the negative cable FIRST and
reconnect it LAST. if not done in this order, the
positive termina_ can be shorted to the frame by a
tool.
WARNING
Battery posts, terminals, and related accessories
contain lead and lead compounds - chemicals known to
the State of California to cause cancer, birth defects, or
other reproductive harm. Wash hands after handling.
Disconnect the Battery
1. Stopthe engine (see Stopping the Tractor and Engine).
2. %sconnect the NEGATIVE (black) cables first.
3. %sconnect the POSITIVE (red) cables last.
(÷)
B
(2x)
Remove and Install the Battery
Remove and Install the battery as shown in Figure 9.
Connect the Battery
1. Stopthe engine (see Stepping the Tractor and Engine).
2. Connect the POSiTiVE (red) cables first.
3. Connect the NEGATIVE (black) cables last.
Cleaning the Battery and Cables
1.
2.
3.
Clean the battery platform with a solution of baking soda
and water.
Clean the battery terminals and cable ends with a wire
brush and battery terminal cleaner until shiny.
Coat the assembled terminals with petroleum jelly or
non-conducting grease.
Charging the Battery
Figure 9
WARNING
Keep open flames and sparks away from the
battery; the gasses coming from it are highly
explosive. Ventilate the battery well during
charging.
A dead battery or one too weak to start the engine may
be the result of a defect in the charging system or other
electrica_ component. If there is any doubt about the cause
of the problem, see your dealer. If you need to replace the
battery, see the Cleaning the Battery and Cables section.
To charge the battery, follow the instructions provided by
the battery charger manufacturer as well as all warnings
included in the Operator Safety section of this manual.
Charge the battery until fully charged. Do not charge at a
rate higher than 10 amps.
21

Changing the Engine Oil
WARNING
Fuel and its vapors are extremely flammable and
explosive.
Fire or explosion can cause severe burns or death.
When Changing Oil
o If you drain the oil from the top oil fill tube, the fuel tank
must be empty or fuel can leak out and result in a fire
or explosion.
1. Run engine until warm.
2. Place the tractor on a level surface (see Figure 5).
3. Stopthe engine (see Stepping the Traeter and Engine).
4. Clean oil fill and filter areas of any debris. Remove
dipstick and lay on clean cloth (see Figure 6).
5. Disconnect the oil drain hose (see Figure 10). Carefully
remove cap and lower hose into an approved container.
After the oil has drained, install cap tightly, then attach
the hose to the side of the engine.
6. Remove the oil filter and dispose of properly.
/
/ \
\
Figure 1
7. Lightly lubricate the oil fiker gasket with fresh, clean oil
(see Figure 11).
8. Install the oil filter by hand until the gasket contacts the
oil filter adapter, then tighten the oil filter 1/2 to 3/4 turns.
9. Add oil (see Check and Add Engine Oil).
Figure 10
22 www.snapper.com

Servicing the Air Filter Servicing the Muffler
WARNING
Fuel and itsvapors are extremely flammable and
explosive.
Fire or explosion can cause severe burns or
death.
o Never start or run the engine wkh the air cleaner
assembly or air filter removed..
NOTICE: Do not use pressurized air or solvents to clean the
filter. Pressurized air can damage the filter and solvents will
dissolve the filter.
1. Unscrew and remove cover (A, Figure 12).
2. Remove air cleaner assembly (B) and disassemble.
3. Clean up any possible debris that might get into the
carburetor throat (C).
NOTE: Replace pre-cleanericartridge when dirty or
damaged.
Figure 12
Pre-Cmeaner C_eaning
1. Wash in soapy water with liquid detergent.
2. Squeeze dry in clean cloth.
Cartridge Cleaning
Tap gently on flat surface to remove light debris. Do not
attempt to clean cartridge.
WARNmNG
Running engine produces heat. Engine parts,
especially muffler, become extremely hot.
Severe thermal burns can occur on contact.
Combustible debris, such as leaves, grass, brush,
etc. can catch fire.
o Allow muffler, engine cylinder and fins to cool before
touching.
o Remove visible debris from engine compartment.
WARNING
Replacement parts must be the same position as
the original parts or fire could result.
To service the muffler, see an authorized dealer.
Servicing the Spark Plugs
WARNmNG
Unintentional sparking can result in fire or electric
shock.
Unintentional start=up can result in entanglement,
traumatic amputation, or laceration.
When testing for spark:
o Use approved spark plug tester.
Do not check for spark with spark plug removed.
CAUTION: Spark plugs have different heat ranges, it is
important that the correct spark plug is used, otherwise,
engine damage can occur.
CmeanSpark Plug
Clean with wire brush and sturdy knife. Do NOT use
abrasives (see Figure 13).
23

CheckSparkPmugGap
Useasparkplugfeelergaugetocheckthegapbetweenthe
twoelectrodes.Whenthegapiscorrect,thegaugewifldrag
s_ighflyasyoupuWlitthroughthegap.
Ifnecessary,usethesparkpluggaugetoadjustthegapby
gentlybendingthecurvedelectrodewithouttouchingthe
centerelectrodeortheporcelain.
.030-
(0.76 ram)
mnstaHSpark Plug
Finger tighten, then tighten with wrench.
, 180 inqbs (20 Nm), OR
o 1/2 turn when reinstalling the original spark plug.
1/4 turn when instaflJng a new spark plug.
Figure 13
24 www.snapper.com

Washing the Mower Deck
NOTE: The washout port allows you to connect a typical
garden hose to the trim side (L.H.) of the mower deck to
remove grass and debris from the underside. This ensures
proper and safe operation of the mower.
WARNING
Before running the mower, make sure the hose
_1_ is properly connected and does not come into
contact with the blades. When the mower is
running and the blades are engaged, the person
cleaning the mower deck must be in the operator position,
and there are no bystanders. Failure to follow these
precautions may result in serious injury or death.
2.
Place the tractor on a level surface (see Figure 5).
Attach the quick disconnect (A, Figure 14) to garden
hose (B) and connect to washout port (C) on mower
deck.
Figure 14
Run water to remove grass and debris from underside of
mower deck.
3_
4. Turn the mower on and place in the highest cutting
position.
5. Stopthe engine (see Stopping the Tractor and Engine).
6. Remove the garden hose and quick disconnect from the
washout port when completed.
Adjusting the Gauge Wheels
Use the gauge wheels to prevent the mower from scalping.
1. Select the cutting height (see Features and Controls).
2. Set parking brake.
3. Stopthe engine (see Stopping the Tractor and Engine).
4. Adjust front and rear gauge wheels as needed (see
Figure 15).
o Front gauge wheels use the bottom two holes.
o Rear gauge wheels use the top two holes.
NOTE: If the gauge wheels touch the ground, the mower
deck is not level. See an authorized dealer.
Figure 15
25

Werecommendthatallmovingpartsshouldbelubricated
wherecontactismadewithotherparts(seeFigure16).
Keepoilandgreaseoffbeltsandpulleys.Wipesurfaces
cleanbeforeandafterlubrication.
V
(8x)
I
L
(ix)
Figure 16
26 www.snapper°com

Storage
WARNmNG
Never store the unit (with fuel) in an enclosed,
unventilated structure. Fuel vapors can travel
to an ignition source (such as a furnace, water
heater, etc.) and cause an explosion. Fuel vapor
is also toxic to humans and animals.
When Storing Fuel Or Equipment With Fuel in Tank
o Store away from furnaces, stoves, water heaters, or
other appliances that have pilot lights or other ignition
sources because they can ignite fuel vapors.
Engine Oil
While the engine is still warm, change the engine oil. See
Changing the Engine Oil section.
Before starting the unit after it has been stored:
o Check all fluid levels. Check all maintenance items.
o Perform all recommended checks and procedures found
in this manual.
o Allow the engine to warm up for several minutes before
use.
Equipment
Disengage the PTO, set the parking brake, and stop the
engine (seeStopping the Tractor and Engine).
Store battery in a cool, dry place and fully charge about
once a month. If the battery is left inthe unit, disconnect the
negative cable.
FueJSystem
Fuel can become stale when stored over 30 days. Stale fuel
causes acid and gum deposits to form in the fuel system or
on essential carburetor parts. To keep fuel fresh, use Bri ggs
& Stratton FRESH START® fuel stabilizer, available as a
liquid additive or a drip concentrate cartridge
There is no need to drain gasoline from the eng ne if a fuel
stabilizer is added according to instructions Run the engine
for 2 minutes to circulate the stabilizer throughout the fuel
system. The engine and fuel can then be stored up to 24
months.
If gasoline in the tank has not been treated with a fuel
stabilizer, it must be drained into an approved container.
Run the engine until it stops from lack of fuel. The use of a
fuel stabilizer in the storage container is recommended to
maintain freshness.
27

Troubleshooting
Troubleshooting the Tractor
PROBLEM
Enginewiii net turnover
or start.
Enginestartshardor runs
poorly.
Engineknocks.
Excessiveoil consumption.
LOOKFOil
Brake pedal not
depressed.
PTO (electric clutch)
switch is in ON position.
Cruise control engaged.
Out of fuel.
Fuse is blown.
Battery terminals require
cleaning.
Battery discharged or
dead.
Wiring loose or broken.
Solenoid or starter motor
fau Ity.
Safety interlock switch
fau Ity.
Water infuel.
Gas is old or stale.
ii!i,i!i_i
Fuel mixture too riS:h ..........
Engine has other .........
probmem. ..............................................
Low oil level.
Using wrong grade oil.
Engine running too hot. ......
Using wrong grade
Toomucho,
crankcase. ....
Dirty air filter.
Ground speed control
pedals not depressed.
flEiVIEDY
Fully depress brake pedal.
Place in OFF position.
Move knob to NEUTRAL/OFF position.
Ifengine is hot, allow it to cool, then refill the fuel tank.
See authorized dealer.
See Cleaning the Battery and Cables section.
Recharge or replace battery.
Visually check wiring. If wires are frayed or broken, see authorized
dealer.
See authorized dealer.
See a_:thorized deaJ:e_ :
_,, _i_i_i_i__..... _;_,_,_,_,?,
_eeauthorized de_ler.
@lean airflke# ......
See authe_i:_ed 8_ler.
Ched:_aS:d as required.
S_e Chart.
S_e _uthorized dealer.
86e aimRecommendations Chart.
D_ainexcess oil.
IEngineexhaust is black. See Servicing the Air FHter section.
Depress pedals.
Transmission release Move into DRIVE position.
Engineruns, but tractor will lever in PUSH position.
nat drive.
Parking brake is engaged. Disengage parking brake.
Traction drive belt is See authorized dealer.
broken or slipping.
Brakewill net held. internal brake worn. See authorized dealer.
Steering linkage is loose. See authorized dealer.
Tractor steers hard or improper tire inflation. See Check Tire Pressure section.
handles poorly. Front wheel spindle See authorized dealer.
bearings dry.
28 www.snapper°com

Troubleshooting the Mower
Mower cut is Uneven.
Mower cut is rough
Engine stalls easily with
mower engaged.
Excessive mower vibration.
Engine runs and tractor
drives, but mower wiii not
drive.
LOOKFOR
Lift _inkage not properly
attached or damaged.
Mower not Weveled
properly.
Tractor tires not properly
inflated.
Engine speed too slow.
Ground speed too fast.
Mower has other problem.
Engine speed too slow.
Ground speed to fast.
Dirty or clogged air filter.
Cutting height set too low.
Discharge chute jamming.
Engine not up to
operating temperature.
Starting mower in tall
grass.
Mower has other problem.
PTO not engaged.
See authorized dealer.
REIVIEDY
See authorized dealer.
See Check Tire Pressure section.
Set to full throttle.
Slow down.
See authorized dealer.
Set to full throttle.
Slow down.
See Servicing Air Fimtersection.
Cut tall grass at maximum cutting height during first pass.
Cut grass with discharge pointing toward previously cut area.
Run engine for several minutes to warm-up.
Start the mower in a cleared area.
Seeauthorized dealer. =..........
gaPe TO.
En g the
Mower has other problem. 'See authorized
29

Specifications
24 Gross HP Briggs & Stratton
Model
Horsepower
Displacement
Electrical System
Oil Capacity
Engine Oil
Spark Plug Gap
Spark Plug Torque
Fuel Tank Capacity
Professional Series TM, V-Twin wiEFM
24 Gross HP @ 3600 rpm
44.2 cu in. (724 cc)
Alternator: 9 amp Regulated,
Battery: 12V-230 CCA
64 oz (1,9 L)
Synthetic 5W30
0.030 in. (0,76 mm)
180 inqbs (20 Nm)
Capacity: 4.0 gal (15,1 L)
CHASSIS
Seat
Seat Adjustment
Turning Radius
Front Wheels
Hear Wheels
Mesh, Suspension
9-Position
14 in. (35,6 cm)
Tire Size: 15 x 6.0/
inflation Pressure: 12-14 psi (0,82 -0,96 bar)
Tire Size: 22 x 9.5-12
inflation Pressure: 10 psi (0,68 bar)
TRANSMISSION
I_lake Tuff Torq® K46
Type Foot Pedal Hydrostatic
Ground Speed Forward: 0-5.6 MPH _0-9.0 kmih_
Reverse: 0-3.5 MPH t0-5.6kmih/
Drive Belt
Brakes Manual
MOWER DECK
Cutting Width
Base Deck Platform
Number of Blades/Type
Frame Suspension
Deck Support Wheels/Number
Height-of-Cut
Mower Lift
Cutting Positions
DIMENSSONS
Overall Length
Overall Width (with deflector)
Overall Height
52" (132,1 cm)
Side Discharge
3, Standard Lift
Frame Hung
Standard, 4 Anti=Scalp Wheels
1.5" to 4.0" (3,8 to 10,2 cm)
Electric Height-of-Cut
Infinite
71" (180 cm)
65" (165 cm)
45" (114 cm)
Engine Power Rating information
The gross power rating for individual gas engine models is labeled in accordance with SAE (Society of Automotive
Engineers) code J1940 (Smafl Engine Power & Torque Rating Procedure), and rating performance has been obtained
and corrected in accordance with SAE J1995 (Revision 2002-05). Torque values are derived at 3060 RPM; horsepower
values are derived at 3600 RPM. Actual gross engine power will be lower and is affected by, among other things, ambient
operating conditions and engine-to-engine variability. Given both the wide array of products on which engines are placed
and the variety of environmental issues appficable to operating the equipment, the gas engine will not develop the rated
gross power when used in a given piece of power equipment (actual "on-site" or net horsepower). This difference is due to
a variety of factors including, but not limited to, accessories (air cleaner, exhaust, charging, cooling, carburetor, fuel pump,
etc.), appfication limitations, ambient operating conditions (temperature, humidty, altitude), and engine-to-engine variability.
Due to manufacturing and capacity limitations, Briggs & Stratton may substitute an engine of higher rated power for this
Series engine.
Parts and Accessories
See an authorized dealer.
30 www.snapper°com

UMtTED WARRANTY
Briggs & Stratton Power Products Group, LLC will repair and/or replace, free of charge, any part(s) of the equipment that is defective
in material or workmanship or both. Briggs & Stratton Corporation will repair and/or replace, free of charge, any part(s) of the Briggs
and Stratton engine* (if equipped) that is defective in material or workmanship or both. Transportation charges on product submitted
for repair or replacement underthis warranty must be borne by purchaser. This warranty is effective for the time periods and subject
to the conditions stated below. For warranty sewice, find the nearest Authorized Service Dealer using our dealer Iocator at www.
BriggsandStratton.com or www.Snapper.com.
There is no other express warranty. Implied warranties, including those of merchantability and fitness for a particular purpose, are limited
to one year from purchase or to the extent permitted by law. Liability for incidental or consequential damages are excluded to the extent
exclusion is permitted by law.
Some states or countries do not allow limitations on how long an implied warranty lasts, and some states or countries do not allow the
exclusion or limitation of incidental or consequentiaJdamages, so the above limitation and exclusion may not apply to you. This warranty
gives you specific legal rights and you may also have other rights which vary from state to state or country to country.
The warranty period begins on the date of purchase by the first retail consumer or commercial end user, and continues for the period
of time stated above. "Consumer use" means personal residential household use by a retail consumer. "Commercial use" means aH
other uses, incJuding use for commercial, income producing or rental purposes. Once product has experienced commercial use, it
shah thereafter be considered as commercial use for purposes of this warranty.
No warranty registration is necessary to obtain warranty on Briggs & Stratton products. Save your proof of purchase receipt, if you
do not provide proof of the initial purchase date at the time warranty service is requested, the manufacturing date of the product will
be used to determine warranty eligibility.
We welcome warranty repair and apologize to you for being inconvenienced. Warranty service is available only through servicing dealers
authorized by Briggs & Stratton or BSPPG, LLC.
Most warranty repairs are handled routinely, but sometimes requests for warranty service may not be appropriate. This warranty only covers
defects in materials or workmanship. It does not cover damage caused by improper use or abuse, improper maintenance or repair, normal wear
and tear, or stale or unapproved fueL
Improper Use and Abuse - The proper, intended use of this product is described in the Operator's Manual Using the product in away not
described in the Operator's Manual or using the product after it has been damaged will void your warranty. Warranty is not allowed if the serial
number on the product has been removed or the product has been altered or modified inany way, or ifthe product has evidence of abuse such as
impact damage, or water/chemical corrosion damage.
Improper Maintenance or Repair -This product must be maintained according to the procedures and schedules provided in the Operator's
Manual, and serviced or repaired using genuine Briggs & Stratton parts. Damage caused by lack of maintenance or use of non-original parts is not
covered by warranty.
Normal Wear - Like all mechanical devices, your unit is subject to wear even when properly maintained. This warranty does not cover repairs
when normal use has exhausted the life of a part or the equipment. Maintenance and wear items such as filters, belts, cutting blades, and brake
pads (engine brake pads are covered) are not covered by warranty dueto wear characteristics alone, unless the cause is due to defects in
material or workmanship.
Stale Fuel - In order to function correctly, this product requires fresh fuel that conforms to the criteria specified in the Operator's Manual Damage
caused by stab fuel (carburetor leaks, clogged fuel tubes, sticking valves, etc) is not covered bywarranty.
* Applies to Briggs & Stratton engines only. Warranty coverage of non-Briggs & Stratton engines is provided by the engine manufacturer.
31

The California Air Resources Board, U.S. EPA, and Briggs & Stratton (B&S) are pleased
to explain the emissions control system warranty on your Model Year 2011-2012
engine/equipment. In California, new small off-road engines and large spark ignited
engines less than or equal to 1.0 liter must be designed, built, and equipped to meet the
State's stringent antiosmog standards. B&S must warrant the emissions control system
on your engine/equipment for the periods of time listed below provided there has been
no abuse, neglect, or improper maintenance of your engine or equipment.
Your emissions control system may include parts such as the carburetor or fuel injection
system, fuel tank, ignition system, and catalytic converter. Also included may be hoses,
belts, connectors, sensors, and other emissionsorelated assemblies.
Where a warrantable condition exists, B&S will repair your engine/equipment at no cost
to you including diagnosis, parts, and labor.
Manufacturer's Warranty Coverage:
Small off-road engines and large spark ignited engines less than or equal to 1.0 literare
warranted for two years, if any emissions=related part on your engine/equipment is
defective, the part will be repaired or replaced by B&S.
Owner's Warranty Responsibilities:
As the engine/equipment owner, you are responsible for the performance of the
required maintenance listed in your owner's manual, B&S recommends that you
retain all receipts covering maintenance on your engine/equipment, but B&S cannot
deny warranty solely for the lack of receipts or your failure to ensure the performance
d all scheduled maintenance.
As the engine/equipment owner, you should however be aware that B&S may deny
you warranty coverage if your engine/equipment or a part has failed due to abuse,
neglect, improper maintenance, or unapproved modifications.
You are responsible for presenting your engine/equipment to a B&S distribution
center, servicing dealer, or other equivalent entity, as applicable, as soon as a
problem exists, The warranty repairs should be completed in a reasonable amount of
time, not to exceed 30 days. If you have any questions regarding your warranty
rights and responsibilities, you should contact B&S at (414) 259-5262.
The following are specific provisions relative to your Emissions Centre! Warranty Coverage. It is in addition to the B&S engine warranty for nomregulated engines found in the
Operator's Manual.
1. Warranted Emissions Parts
Coverage under this warranty extends only to the parts listed below (the emissions
control systems parts) to the extent these parts were present on the engine
purchased.
a. Fuel Metering System
Cold start enrichment system (soft choke)
Carburetor and interna_ parts
Fuelpump
Fuel line, fuel line fittings, clamps
Fuel tank, cap and tether
Carbon canister
b. Air Induction System
Air cleaner
Intake manifold
Purge and vent line
c. Ignition System
Spark plug(s}
Magneto ignition system
d. Catalyst System
Catalytic converter
Exhaust manifold
Air injection system or pulse valve
e. Miscellaneous Items Used in Above Systems
Vacuum, temperature, position, time sensitive valves ann switches
Connectors and assemblies
2. Length of Coverage
For a period of two years from date of original purchase, B&S warrants to the odginal
purchaser and each subsequent purchaser that the engine is designed, built, and
equipped so as to conform with alt applicable regulations adopted by the Air
Resources Board; that it is free from defects in material and workmanship that could
cause the failure of a warranted part; and that it is identical in all material respects to
the engine described in the manufacturer's application for certification. The warranty
period begins on the date the engine is originally purchased.
The warranty on emissions-.related parts is as follows:
Any warranted part that is not scheduled for replacement as required
maintenance in the owner's manual supplied, is warranted for the warranty
period stated above. If any such part fails during the period of warranty
coverage, the part will be repaired or replaced by B&S at no charge to the
owner. Any such part repaired or replaced under the warranty will be warranted
for the remaining warranty period.
Any warranted pert that is scheduled only for regular inspection in the owner's
manua_ supplied, is warranted for the warranty period stated above. Any such
part repaired or replaced under warranty will be warranted for the remaining
warranty period.
Any warranted part that is scheduled for replacement as required maintenance
in the owner's manual supplied, iswarranted for the period of time prior to the
first scheduled replacement point for that part. If the part fails prior to the first
scheduled replacement, the part wilt be repaired or replaced by B&S at no
charge to the owner. Any such part repaired or replaced under warranty will be
warranted for the remainder of the period prior to the first scheduled
replacement point for the part.
Add on or modified parts that are not exempted by the Air Resources Board
may not be used. The use of any non exempted add on or modified parts by the
owner will be grounds for disallowing a warranty claim. The manufacturer will
not be liable to warrant failures of warranted parts caused by the use of a non
exempted add on or modified part.
Consequential Coverage
Coverage shall extend to the failure of any engine components caused by the
failure of any warranted emissions parts.
Claims and Coverage Exclusions
Warranty claims shall be filed according to the provisions of the B&S engine
warranty policy. Warranty coverage does not apply to failures of emissions parts
that are not odginal equipment B&S parts or to parts that fail due to abuse, neglect,
or improper maintenance as set forth in the B&S engine warranty policy. B&S is not
liable for warranty coverage of failures of emissions parts caused by the use of
add-on or modified parts.
Engines that are certified to meet the California Air Resources Board (CARB) small
off-road Emissions Standard must display information regarding the Emissions Durability
Period and the Air hdex. Briggs & Stratton makes this information available to the
consumer on our emissions labels. The engine emissions label wil_ indicate certification
information.
The Emissions Durability Period describes the number of hours of actual running time
for which the engine is certified to be emissions compliant, assuming proper
maintenance in accordance with the Operating & Maintenance Instructions. The
following categories are used:
Moderate:
Engine is certified to be emissions compliant for 125 hours of actual engine running time.
mntermediate:
Engine is certified to be emissions compliant for 250 hours of actual engine running time.
Extended:
Engine is certified to be emissions compliant for 500 hours of actual engine running time.
For example, a typicat walk-behind _awnmower is used 20 to 25 hours per year.
Therefore, the Bmiesione DurabiBity Period of an engine with an intermediate rating
would equate to 10 to 12 years.
Bnggs & Stratton engines are certified to meet the United States Environmental
Protection Agency (USEPA) Phase 2 emissions standards. For Phase 2 certified
engines, the Emissions Compliance Period referred to on the Emissions Compliance
label indicates the number of operating hours for which the engine has been shown to
meet Federal emissions requirements.
For engines less than 225 cc displacement.
Category C = 125 hours, Category B = 250 hours, Category A = 500 hours
For engines of 225 cc or more displacement.
Category C = 250 hours, Category B = 500 hours, Category A = 1000 hours
32 www°snapper°com

33

Snapper, Inc.
P.O. Box 702
Milwaukee, WI U.S.A.
www.Snapper.com
1-800-317-7833

Cortac6sped
Node modelo Oescripci6n
2690980 Cortacesped LT2452, 24 caballos de fuerza brutos, 52 pulg. (132,1 cm)
2690980A Cortacesped LT2452, 24 caballos de fuerza brutos, 52 pulg. (132,1 cm)
130.280120
130.280121

Gracias por haber adquiddo este cortacesped SNAPPER de a_tacalidad. Le agradecemos la confianza que ha
depositado en la marca SNAPPER. Si usa y realiza el mantenimiento del equipo de conformidad con las instrucciones de
este manual, su producto SNAPPER le ofrecera muchos a_os de funcionamiento fiable.
Este manuaJ contiene informaci6n de seguridad para advertirle sobre los peligros y riesgos asociados con el
cortacesped y c6mo evitarlos. Este producto y sus accesodos aprobados estan dise_ados solamente para cortar cesped
o retirar nieve, y no tienen otra finalidad. Es importante que lea y comprenda estas instrucciones con detenimiento antes
de proceder a arrancar o hacer funcionar este equipo. Conserve estas instrucciones originames para consultarlas en
el futuro°
Cortac6sped
NOmero de modelo
NOmero de serie
Motor
Corte del tipo de modelo
Fecha de c6digo
Fecha de compra
Copyright © 2010Todos los derechos reservados. Ningunaparte de este material
podrb,ser reproducida o transmitida en modo alguno y por ningOnmedio sin el
consentimiento explicito por escrito de Briggs & Stratton PowerProductsGroup, LLC.
SNAPPER es una marca comercial de Briggs & Stratton PowerProductsGroup, LLC
2 www.snapper.com

Tabla de contenido
Seguridad del usuario ....................................... 4
Instrucciones de seguridad importante ............................... 4
Simbolos de seguridad y significados ................................ 4
Practicas de utitizaci6n segura ...................................... 5
Catcomanias de seguridad ......................................... 10
Caracteristicas y controles .................................. 12
Controles del tractor ............................................... 13
Tablero electr6nico ................................................ 14
Operaci6n ................................................. 15
Consideraciones generales de segundad de funcionamiento ............. 15
Pruebas del sistema de interbloqueo de seguridad ..................... 15
Compruebe ta presion de los neumaticos ............................. 15
Recomendaciones para el aceite .................................... 15
Verifique y agregue et aceite det motor ............................... 16
Presi6n de aceite ................................................. 16
Recomendaciones para combustible ................................. 16
ASadir combustible ................................................ 17
Arranque del motor ................................................ 17
Conducci6n del tractor ............................................. 18
Cortar el cesped .................................................. 18
Opcion de corte en marcha atras _'RMOTM) ............................ 18
Empujar el tractor cortacesped manuatmente .......................... 18
Ajustar ta attura de corte del cortacesoed ............................. 19
Freno de estacionamiento ......................................... 19
Control de velocidad de crucero ..................................... 19
Como detener el tractor y el motor ................................... 19
Mantenimiento ............................................. 20
Tabla de mantenimiento ............................................ 20
Compruebe ta presi6n de los neumaticos ............................. 20
Revisar el tiempo de detenci6n de ta cuchilla det cortacesped ............ 20
Mantenimiento de ta bateria ........................................ 21
Desconectar la bateda ............................................. 21
Retirar e instalar la bateda ......................................... 21
Conectar ta bateda ................................................ 21
Limpiar ta bateria y el cabteado ..................................... 21
Carga ta bateda .................................................. 21
Cambiar et aceite del motor ......................................... 22
Mantenimiento del fittro de a_re...................................... 23
Mantenimiento del silenciador ...................................... 23
Mantenimiento de tas bujias ........................................ 23
Limpieza de la plataforma del cortacesped ............................ 24
Ajustar tas ruedas regutadoras ...................................... 25
Lubricacion ...................................................... 26
Atmaceaje ....................................................... 27
Soluci6n de problemas ...................................... 28
Especificaciones ........................................... 30
Garantia ................................................... 31
_) 3

Seguridad del usuario
mnstrucciones de seguridad importante
CONSERVE ESTAS INSTRUCCIONES - Este manual
contiene instrucciones importantes que debedan seguirse
durante e_arranque inicial, el uso y el mantenimiento del
equipo. Conserve estas instrucciones originames para
consu_tadas en emfuturo.
Simbolos de seguridad y significados
PEUGRO indica un pe_igro que, si no se Woevita,
resu_tara en muerte o _esE6ngrave.
ADVERTENCmA indica un peligro que, si no se Wo
evka, podria resu_tar en muerte o _esE6ngrave.
PRECAUCm6N indica un pe_igro que, si no se evka,
podria resu_tar en _esi6n menor o moderada.
FUEGO PIEZASM()VILES DESCARGA DETENGA
VAPORES RETROCES0 EXPLOSION ENCENDER
TOXtCOS APAGAR
UTJLIOE AGENTES SUPERRCIE
PROTECCIONES QUiMICOS CAUENTE
OCULARES PELIGROSOS
STARTER
LEAEL ACBTE COMBUSTIBLE
MANUAL
1_PMax.
PEUGRODE
VUELCO
0
PELIGRODE
AMPUTACION
El dmbo_o de alerta de seguridad se usa para
identificar informaci6n de seguridad sobre peligros que
pueden ocasionar lesiones personales. Se usa una palabra
de sehal (PEUGRO, ADVERTENCIA o PRECAUCJON)
con el simbolo de alerta para identificar la probabi_idad y
potencial gravedad de lesiones. Ademas, se puede usar un
dmbolo de peligro para representar el tipo de peligro.
AVmSOindica una situaci6n que puede provocar dahos
en emproducto.
ADVERTENCmA
El escape del motor de este producto contiene
sustancias quimicas que el estado de California sabe que
causan cancer, defectos de nacimiento u otros daSos
reproductivos.
ADVERTENCIA
Algunos componentes de este producto y sus
accesorios relacionados contienen sustancias qdmicas que
el estado de California sabe que causan cancer, defectos
de nacimiento u otros dahos reproductivos. Lavese las
manos despues de manejar la bateria o sus accesodos.
ADVERTENC_A
Los bornes, las terminales de la bateria y los
accesorios de lamisma contienen plomo y compuestos
de plomo, productos qdmicos que el estado de California
reconoce causar cancer, defectos de nacimiento y otras
lesiones geneticas. Lavese las manos despues de manejar
la batefia osus accesorios.
ADVERTENC_A
El motor expulsa mon6xido de carbono, y un gas
venenoso, sin color y sin olor.
Respirar mon6xido de carbono puede causar dolores
de cabeza, fatiga, mareos, v6mitos, confusion,
convulsiones, nauseas, desmayos o incluso la muerte.
• Opere el equipo 0NICAMENTE al aire Iibre.
• Evite que los gases del tubo de escape entren en un area
cerrada a traves de ventanas, puertas, tomas de aire, u
otras aberturas.
4 www.snapper.com

Pr_cticas de utilizaci6n segura
Mane]atel equipoconseguridad
El equipo electr6nico somamente es seguro en Ja medida en
_o que RoutHiza eUoperador. Si se utiliza de un modo incorrecto,
o no se realiza un mantenimiento correcto, ipuede set peligroso!
Recuerde, usted es responsable de su seguridad y de aquellos que
le rodean. Utilice el sentido comOn, y piense Io que est,5 haciendo.
Si no esta seguro de si la tarea que va a Ilevar a cabo se puede
realizar con el equipo escogido con seguridad, p[dale consejo a un
profesional: o pdngase en contacto con el distribuidor local.
Leael Manual
El manual del usuado contiene informaci6n de seguridad importante
que necesita conocer ANTES de manejar su unidad y MIENTRAS
la maneja.
Tecnicas de funcionamiento de seguridad, una explicaci6n de
las caractedsticas y mandos del producto, e informaci6n sobre
el mantenimiento se inc_uyenpara ayudade a sacar el mejor
rendimiento a su equipo.
AsegOrese de leer totaimente la Informacion y Normas de seguridad
que aparecen en las siguientes paginas. Tambien lea por completo
la seccidn de Operaci6n.
NiSos
Pueden suceder accidentes tragicos con niSos. No les
permita estar cerca del area de operacidn. Pot Io general
los niSos se sientes atraidos pot la unidad y pot la actividad
de cortar cesped. Nunca de pot hecho que los niSos vayan
a permanecer en el Oltimo lugar en el que los vio. Si hay
riesgo de que los niSos puedan entrar en la zona en la que
esta cortando el cesped, haga que otto adulto los vigile.
iNO PASEE A LOS NJNOS EN ESTA UNIDAD! Esto
les anima a acercarse cerca de la unidad en un futuro
mientras esta en funcionamiento, pot Io que poddan resultar
gravemente heridos. Se pueden acercar a la unidad para
dar un paseo cuando usted no Io espera, y los puede
atropellar.
Marchaatra's
No siegue en sentido contrario al
normal a menos que
no sea absoJutamente
necesario. Mire
siempre hacia abajo
y hacia atras antes
y durante la marcha
atras, incluso cuando
se hayan desacopJado
las cuchiHas del
cortacesped.
_) 5

(3,5 ft)
Funcionamientoen pendientes
Podda lesionarse gravemente o incluso matarse si utiliza esta unidad
en cuestas demasiado pronunciadas. El uso de la unidad en una
pendiente que es demasiado pronunciada o donde no posea la
tracci6n adecuada puede hacer que pierda el control o que vuelque.
Un buen consejo es no utilizar el cortacesped en ninguna pendiente
sobre la que no pueda ir marcha atras (en modo tracci6n a dos ruedas).
No debe usar el tractor en terrenos con una inclinaci6n superior a
los 1,5 m (3,5 pies) sobre una Iongitud de 6,0 m (20 pies). Siempre
conduzca subiendo y bajando pendientes: no de un lado a otto.
Tambien tenga en cuenta que la superficie sobre la que esta
conduciendo puede afectar en gran medida a la estabilidad y al
control. La hierba hQmeda y el pavimento helado pueden afectar
gravemente su capacidad de controlar la unidad.
Si no esta seguro sobre c6mo operar la unidad en una pendiente, no
Io haga. No vale la pena ardesgarse.
Piezasm6viles
Este equipo tiene piezas m6viles que le pueden causar da5os a usted o a otras
personas. Sin embargo, si usted se mantiene en la posici6n del operario, y sigue
las instrucciones proporcionadas en esta manual, esta unidad es segura.
La cubierta del cortacesped posee cuchiHas en movimiento que pueden amputar
manos y pies. No permita que nadie este cerca del equipo mientras esta en
funcionamiento.
Para ayudade a usted, el operario, a que utilice este equipo con seguridad, esta
unidad esta equipada con un sistema de seguridad que detecta la presencia
del usuario. NO intente alterar ni modificar el sistema. Consulte a su distribuidor
inmediatamente si el sistema no pasa todas las pruebas del sistema de
interbloqueo de seguridad que aparecen en este manual.
0bjetos tirados
Esta unidad posee cuchillas en movimiento. Estas cuchillas pueden recoger
y arrojar desechos que podrian lesionar gravemente a personas que se
encuentren en la zona. Asegurese de limpiar la zona a sesgar ANTES de
comenzar.
No opere esta unidad sin haber instalado el recogedor de hierba o la
protecci6n posterior (deflector).
iNo permita que nadie permanezca en la zona en la que esta manejando la
unidad! Si alguien entrase en la zona, apague inmediatamente la unidad y
espere a que se vaya.
Combustibley mantenimient0
La gasolina es extremadamente inflamable. Sus vapores tambien son
extremadamente infiamables y pueden alcanzar fuentes de ignici6n
lejanas. La gasolina solamente se puede utHizar como combustible, no
como disolvente o limpiador. Nunca debe guardarse en un lugar en el que
sus vapores pueden alcanzar una fuente de ignici6n como una luz piloto.
El combustible debe permanecer en una lata de combustible sellada o en
un recipiente de plastico aprobado, o en el dep6sito de combustible del
tractor con la tapa bien cerrada. El combustible derramado ha de limpiarse
inmediatamente.
Un mantenimiento adecuado es importantisimo para la seguridad y
rendimiento de su unidad. AsegOrese de realizar los procedimientos
de mantenimiento que aparecen en este manual, y de comprobar
peri6dicamente el sistema de seguridad.
6 www,snapper.eom

Leaestasnormasdeseguridadyrespetelasestrictamente.Elnorespetarestasnormaspoddaresultaren
perdidadelcontroldelaunidad,lesionespersonalesgravesomuerteparaelusuariooparaterceros,odahos
enpropiedadesoenelequipo.La plataforma de segado puede Ilegar a amputar manos _ lanzar
En el texto, el triangulo_ significa precauciones o advertencias importantes que deben seguirse.
FUNCIONAMIENTO GENERAL
1. Debera leer, comprender y seguir todas las instrucciones que
se contienen en el manual o en ta propia unidad antes de
empezar a utilizarta.
2. No coloque las manos o pies cerca de componentes giratodos
ni debajo de la maquina. Mantengase tejos en todo momento
de la apertura de descarga.
3. 0nicamente adultos responsabtes que esten familiarizados
con tas instrucciones deberan hacer funcionar ta unidad (la
normativa local puede imponer restdcciones relativas a ta edad
del operador).
4. Despeje ta zona de objetos como son piedras, juguetes,
cables, etc. Esos objetos podrian set cogidos y tanzados pot
ta(s) cuchitta(s).
5. Cerci6rese de que no hay personas en la zona de operaci6n
antes de empezar a utilizar ta unidad. Detenga ta unidad si
atguna persona entra en ta zona de operaci6n.
6. Nunca lteve en la unidad a nadie como pasajero.
7. No siegue en sentido contrario at normal a menos que no sea
absolutamente necesario. Mire siempre detras y debajo antes
de desplazarse hacia atras y durante esa operaci6n.
8. No realice la descarga en ningOn caso apuntando hacia
una persona en la operaci6n. No realice la descarga del
material contra una pared u otros elementos obstructivos,
Los materiales pueden rebotar hacia el usuario. Detenga ta(s)
cuchittas cuando cruce sobre superficies con grava.
9. No haga funcionar ta maquina sin que et recogedor de hierba.
ta protecci6n posterior (deflector) y los demas dispositivos de
seguridad esten en su tugar.
10. Reduzca tavelocidad antes de realizar giros.
11. Nunca deje una unidad en funcionamiento sin vigilancia.
Siempre se debera desacoplar tas cuchittas IPTO}, ooner et
freno de estacionamiento, apagar et motor y retirar ta ttave de
acceso antes de proceder a desmontar ta unidad
12. Desacople las cuchittas (PTO) cuando no vaya a utitizar ta
unidad. Apague el motor y espere hasta ta comoleta detencton
de todos los componentes antes de proceder a timpiar la
maquina, retirar et recogedor de hierba o desbloquear ta
protecci6n posterior.
13. Utilice ta maquina solo con ta tuz del dia o con buena
ituminaci6n artificial.
14. No utitice ta unidad mientras este bajo los efectos del alcohol o
de drogas.
15 Mantengase aterta ante el trafico cuando se halle cerca de
vias de comunicaci6n o cruce pot etlas.
16. Tenga especial cuidado cuando cargue o descargue ta unidad
de remolques o camiones.
17. Utitice siempre protecciones ocutares cuando utitice la unidad.
18. Datos indican que operadores de 60 aSos y mas estan
involucrados en un gran porcentaje de lesiones asociadas
a equipos electricos. Estos operadores deberan evatuar su
capacidad de operar el equipo de manera to suficientemente
segura como para evitar tesiones, en eltos mismos o en
terceros.
19. Siga las recomendaciones det fabdcante sobre los pesos y
contrapesos de tas ruedas.
20. Tenga presente que el operador sera et responsable de los
accidentes que puedan sufnr otras personas o propiedades.
21. Quienes conduzcan ta unidad deberan procurarse instrucci6n
practica profesionat.
22. Deberan vestirse siempre catzado y pantalones robustos.
Nunca utilice ta unidad con los pies desnudos o calzando
sandatias.
23. Antes de utitizar la unidad, siempre debera comprobar
visua_mente que las cuchiltas y los correspondientes
mecanismos estb_nen su sitio, intactos y bien firmes. Sustituya
los componentes gastados o da_ados.
24. Desacopte los elementos anexos antes de reatizar tas
siguientes acciones: tlenar el dep6sito de combustible, retirar
elementos anexos o realizar ajustes (a menos que el ajuste o
ajustes puedan set realizados desde la posici6n del operador).
25. AI estacionar, almacenar o dejar sin vigitancia la maquina,
baie los elementos de corte, a menos que se utitice un cierre
mecanico efectivo.
26. Antes de abandonar por cualquier causa ta posici6n del
operador, ponga el freno de estacionamiento (si se tiene),
desacople tas cuchillas (PTO), detenga el motor y retire ta ttave
de acceso.
27. Para reducir el riesgo de incendio, mantenga la unidad libre de
hierba, hojas o exceso de tubdcantes. No detenga ni estacione
la unidad sobre hojas o hierba secas, ni sobre matedates
combustibles.
TRANSPORTE Y ALMACENAMIENTO
1. Cuando transporte ta unidad sobre un remolque abierto,
cerci6rese de esta orientado hacia adelante, en la direcci6n
del viaje. Si ta unidad esta odentada en el sentido contrario at
de marcha, el empuje det viento podria daSarta.
2. Siga siempre practicas seguras de repostaje y manipulaci6n
de combustible al cargar combustible en ta unidad despues del
transporte o almacenaje.
3. Nunca guarde ta unidad (con combustible) en un tugar cerrado,
o con ventitaci6n pobre. Los vapores det combustible pueden
ttegar hasta una fuente de ignici6n (hornos, catentadores de
agua, etc.) y producir una explosi6n. El vapor det combustible
tambien es t6xico para los humanos y los animates.
4. Siempre siga tas instrucciones de manual del motor para
preparaciones para almacenaje, antes de almacenar ta unidad,
tanto para periodos cortos como largos.
5. Siempre siga las instrucciones del manual de motor para
procedimientos adecuados de arranque at colocar ta unidad
nuevamente en servicio.
6. No almacene nunca la unidad o et dep6sito de combustible
en el interior de tugares en que haya llamas expuestas o luces
pitoto, como es el caso de las proximidades de un catentador
de agua. Deje que ta unidad se enfrie antes de proceder a su
atmacenamiento.

FUNCIONAMtENTO EN PENDIENTES
Las pendientes son un factor de gran perdida en los casos
de perdida de control yen los accidentes en los que vuelca el
cortacesped, que pueden resuttar en tesiones graves o incluso
ta muerte. La operacion en todo tipo de pendientes requiere
una precauci6n aSadida. Si no puede ir hacia atras sobre una
pendiente con el cortacesped o no se siente seguro sobre ta
pendiente, no ta utitice la unidad sobre ella.
El control de un tractor cortacesped que se deslice sobre una
pendiente no se recuperara mediante la aplicaci6n del freno. Las
principates causas de perdida det control son: insuficiente agarre
de los neumaticos sobre et firme, el exceso de vetocidad, ta
apticaci6n incorrecta del freno, tainadecuaci6n de ta maquina para
et uso concreto, ta incorrecta percepci6n de tas condiciones del
piso, o el enganche o ta distribuci6n de cargas incorrectos.
1. Accione et cortacesped en pendientes, en subida y bajada y
no a to ancho.
2. Preste atencion ante posibles hoyos, surcos o golpes. Et
terreno irregular podda hacer que ta unidad vuelque. La
hierba alta puede ocuttar obstaculos.
3. Escoja una velocidad de segado que te permita no tenet que
detenerse o cambiar ta velocidad mientras este recordendo
ta pendiente.
4. No utilice el cortacesped sobre hierba hOmeda. Los
neumaticos poddan perder tracci6n.
5. Siempre mantenga ta unidad con una marcha al bajar
tas pendientes. No ponga el punto muerto para bajar pot
pendientes.
6. Evite arrancar, detenerse, o girar sobre tas pendientes. Si
los neumaticos pierden traccion, desacople tas cuchittas y
continOe tentamente en tinea recta hacia abalo.
7. Todo desplazamiento en pendientes debera set lento y
gradual. No reatice cambios repentinos en ta velocidad o en
tadirecci6n; ta maquina podria volcar.
8. Ponga ta mayor atenci6n cuando haga funcionar la mAqulna
con recogedores de hierba u otros elementos acoplados:
pueden afectar a ta estabilidad de ta unidad. No util ice ta
maquina en pendientes pronunciadas.
9. No intente estabitizar ta maquina colocando su pie sobre el
piso (en unidades en tas que el conductor va montado sobre
elias).
10. No utilice el cortacesped cerca de bajadas, zanjas o
terraplenes. El cortacesped podria volcar si una rueda se
sit0a sobre el borde de una zanja o dsco, o sJel borde cede,
11. No utilice recogedores de hierba en pendientes
pronunciadas.
12. No reatice ta operaci6n de segado en pendientes si no
puede ir marcha atras sobre eltas.
13. Consutte a su concesionadoivendedor autorizado para
obtener recomendaciones sobre pesos y contrapesos para
tas ruedas para mejorar ta estabitidad.
14. Retire obstacutos como son piedras, ramas de arboles, etc.
15. Opere a bajas vetocidades. Los neumaticos pueden perder
tracci6n en pendientes inctuso si los frenos funcionan
adecuadamente.
16. No realice giros en pendientes a menos que ello sea
necesado, y, en ese caso, haga giros tentos y graduales,
siempre pendiente hacia abajo si elto es posible.
EQUIPO REMOLCADO (UNIDADES
1. Remolque solamente con una maquina que tenga un
enganche diseSado para remolque. No sujete et equipo
remolcado a elementos que no sean el punto de enganche.
2. Siga tas recomendaciones del fabricante en cuanto a los
timites de peso para equipos remolcados y remolque en
pendientes.
ADVERTENCIA
Nunca opere en pendientes de mas det 17,6% (10°); esos
vatores equivalen a un incremento vertical de 106 cm
(3-1/2 pies) en un espacio horizontal de 607 cm (20 pies).
Cuando opere en pendientes utitice pesos y contrapesos
adicionates para tas ruedas. Consutte a su concesionario/
vendedor para determinar que pesos apropiados se
encuentran disponibles para su unidad.
Seleccione una vetocidad de avarice lenta antes de empezar
a subir una pendiente. Ademas de los pesos delanteros, debe
emplearse una precauci6n especial al operar en pendientes
con recogedores de hierba de enganche posterior.
Corte el cesped SUBIENDO y BAJANDO pendientes, nunca
de un costado a otto, ponga ta mayor atenci6n cuando
cambie tadirecci6n y NO ARRANQUE NI SE DETENGA EN
PENDIENTES.
3. No permita que que ni_os uotras personas se suban at equipo
remolcado.
4. Sobre las pendientes, el peso det equipo remolcado puede
causar perdida de tracci6n y perdida de control.
5. Vaya despacio y deje una distancia extra para poder parar.
6. No ponga et punto muerto para bajar por pendientes.
NINOS
Pueden ocurdr accidentes tragicos si el operador no esta atento a la
presencia de niSos. Los ni_os sueten sentirse atraidos pot la unidad
y pot ta actividad del cortacesped. Nunca de por hecho que los niSos
vayan a permanecer en el Ottimotugar en el que los vio.
1. Mantenga a los ni_os fuera del Area de corte y bajo ta
vigitancia atenta de un adulto responsable.
2. Este atento y apague el equipo si entran ni_os en ta zona.
3. Antes y durante el avarice marcha atras, mire atras y hacia
abajo para detectar ta presencia de ni_os.
4. Nunca tteve ni5os en ta unidad, ni siquiera sin ta(s) cuchilla(s).
Los nifios poddan caerse y tesionarse gravemente, o interferir
en el seguro funcionamiento de ta unidad. Los nifios que
hayan montado en un cortacesped en otros momentos pueden
aparecer repenfinamente en tazona en ta que este cortando el
cesped para que los tteve y pueden caerse o set atropeltados
por la maquina.
5. Nunca permita que ni_os hagan funcionar la unidad.
6. Tenga un especial cuidado al acercarse a esquinas ciegas,
arbustos, arboles u otros objetos que puedan dificultar ta
visi6n.
1. El escape del motor de este producto contiene sustancias
quimicas que, en ciertas cantidades, se sabe que causan
cancer, defectos de nacimientos u otros da_os reproductivos.
2. Busque informaci6n relevante de Periodo de Permanencia
de tas Emisiones e Indice en el Aire en ta etiqueta sobre
emisiones dei motor.
SISTEMA DE IGNICION
1. Este sistema de encendido pot chispa cumple con ta norma
ICEA-002 canadiense.
8 www,snapper°com

REPARACION Y MANTENIMIENTO
Manipulaci6n segura de la gasolina
1. Apague todos los cigarrittos, puros, pipas y cuaiquier otra
fuente de ignici6n.
2. Utiiice Onicamente contenedores de gasolina homotogados.
3. No retire tatapa de la gasolina ni reponga combustible con et
motor en funcionamiento. Deje que el motor se enfde antes de
reponer el combustible.
4. No tiene el dep6sito de ta maquina en espacios cerrados.
5. No guarde ta maquina ni el contenedor de carburante en
tugares en los en que haya llamas expuestas, se produzcan
chispas o haya tuces pitotos, como es el caso catentadores de
agua u otros dispositivos.
6. Nunca ttene recipientes dentro de un vehicuto o sobre el piso
de un camion o remolque con cobertores de plastico. Siempre
coloque los contenedores sobre el suelo, tejos dei vehicuto,
antes de proceder a tlenartos.
7. Retire det cami6n o remolque el equipamiento que se atimente
de gasolina y reponga el carburante sobre el suelo. Si ello no
es posibte, entonces abastezca el vehicuto sobre un remolque
con un contenedor portatit, no con una boquitta de surtidor de
gasolina.
8. Mantenga ta boquitla en contacto con el borde de ta boca
del tanque o recipiente de combustible en todo momento y
hasta haber completado el ttenado. No utitice dispositivos para
btoquear y mantener abiertas boquittas.
9. Si se derrama carburante sobre ta ropa, cambiese de
inmediato.
10. En ningOn caso debera superar el t[mite de ttenado del
deposito de combustible. Vuetva a colocar ta tapa dei dep6sito
y ajOstela firmemente.
11. Empiee la mayor precauci6n cuando manipute gasolina u otros
elementos combustibles. Los carburantes son inftamables y
sus vapores, explosivos.
12. Si se derrama combustible, no intente porter el motor en
marcha; aleje la maquina dei area del derrame y evJte cuatquJer
fuente de ignici6n hasta que se hayan disipado los vapores dei
combustible.
13. Vuelva ajustar firmemente las tapas de los tanques y de los
contenedores de combustible.
Servicio t_cnico y mantenimiento
1. Nunca haga funcionar ta unidad en espacios cerrados en los
que puedan acumutarse el monoxido de carbono.
2. Mantenga tas tuercas y pernos, especiatmente los pemos de
acople de tas cuchillas, apretados y mantenga el equipo en
buenas condiciones.
3. Nunca fuerce los dispositivos de seguridad. Verifique
periOdicamente su correcto funcionamiento, y reatice todas tas
reparaciones necesarias si no funcionan correctamente.
4. Mantenga ta unidad tibre de hierba, hojas u otras
acumutaciones de desechos. Limpie posibles derrames de
tubdcantes o combustible y retire los desechos que puedan
resuttar impregnados de combustible. Deje que ta maquina se
enfrie antes de proceder a su almacenamiento.
5. Si gotpea cualquier objeto con ta unidad, detengase e
inspeccione ta maquina. Antes de voiver a hacer funcionar ta
maquina, realice tas reparaciones necesadas.
6. No realice ningOn tipo de ajustes o reparaciones con el motor
en marcha.
7. Supervise con frecuencia los componentes de los recogedores
de hierba y ta proteccion posterior y, cuando sea necesado,
sustitOyalos por componentes recomendados por et fabdcante.
8. Las cuchitlas det cortacesped son elementos cortantes.
Retraiga ta cuchitta o utitice guantes y emplee ta mayor
precauci6n cuando reatice operaciones de mantenimiento en
elias.
9. Verifique con frecuencia el funcionamiento de los frenos. Haga
los ajustes y reparaciones necesados.
10. Mantenga o recambie tas etiquetas de instrucciones y de
segufidad cuando sea necesado.
11. No retire et fittro de gasolina mientras et motor este catiente; ta
gasolina que se derrame podria incendiarse. No disperse tas
abrazaderas del tubo de combustible mas atta de lo necesado.
Asegure firmemente tas tuercas de agarre de tas abrazaderas
sobre el fiitro tras su instataci6n.
12. No utilice gasolina que METANOL, gasohoi que contenga mas
det 10% de ETANOL, adifivos para tagasolina, o white gas; et
motor o el sistema de atimentaci6n podrian resuttar daSados.
13. Si et deposito de combustible ha de set drenado, esa
operaci6n debe realizarse at aire tibre.
14. Reemplace los sitenciadores/tapabocas defectuosos.
15. Solo use piezas de reposici6n autorizadas pot ta fabrica al
hacer reparaciones.
16. Cumpla siempre con las especificaciones de fabrica en todas
tas configuraciones y ajustes.
17. Unicamente se deberan utitizar establecimientos autodzados
para el mantenimiento y tas reparaciones de mayor catado.
18. Nunca intente reatizar reparaciones mayores en esta unidad
a no set que tenga ta capacitaci6n necesada. Procedimientos
de servicio incorrectos pueden resuttar en funcionamiento
peligroso, da_os al equipo y anutaci6n de ta garantia del
fabdcante.
19. En maquinas de cortacespedes de mOltiples cuchiltas, debera
emplear ta mayor precauci6n, ya que una cuchitla puede hacer
girar a las demas.
20. No cambie los ajustes del timitador del motor ni revolucione
en exceso el motor. La operacion de un motor a una velocidad
excesiva puede incrementar el riesgo de que se produzcan
lesiones personales.
21. Desenganche ta transmisi6n de los accesorios, detenga et
motor, retire ta ltave de acceso y desconecte el o los cables de
ta bujia antes de reatizar tas siguientes operaciones: despejar
obstrucciones y conductos, realizar reparaciones, tras golpear
con un objeto o si ta unidad vibra anormalmente. Tras golpear
un objeto, inspeccione ta maquina en busca de posibles da_os
y haga las reparaciones necesarias antes de volver a porter en
marcha y hacer funcionar el equipo.
22. No coloque nunca las manos cerca de componentes m6vites,
como son el ventitador de refdgeracion de ta bomba de
carburante cuando la unidad este en funcionamiento (los
ventitadores de refdgeraci6n de ta bomba de carburante estan
situadas tipicamente en ta parte superior del conjunto motdz).
23. Unidades de con bombas hidraulicas, mangueras o motores:
ADVERTENCIA: Los fiuidos hidrauticos que escapen a presi6n
puede tenet fuerza suficientes para penetrar la piel y causar
lesiones graves. Se se inyectan fiuidos extra_os en la piel,
deberan set eliminados quirOrgicamente en el plazo maximo
de unas horas por un facuttativo que este familiadzado con
esta forma de lesiones; en caso contrado podria producirse
un cuadro de gangrena. Mantenga el cuerpo y las manos tejos
de odficios o boquiltas de los que salgan eyectados fiuidos
hidraulicos a alta presi6n. Utitice papel o cart6n, no las manos,
para detectar fugas. Cerciorese de que todas las conexiones
de los fluidos hidraulicos estan ajustadas y que todas tas
mangueras y cables se hayan en buenas condiciones antes de
aplicar presi6n sobre el sistema. Si se producen fugas, haga
que ta unidad sea reparada de forma inmediata pot su centro
de distdbuci6n autorizado.
24. ADVERTENCIA: Dispositivo acumutador de energia. La
inadecuada tiberaci6n de resortes puede resuttar en graves
tesiones corporales. Los resortes deben set retirados pot un
tecnico autorizado.
25. Modetos que inctuyen un radiador de motor: ADVERTENClA:
Dispositivo acumutador de energia. Para evitar tesiones
corporales graves a ra[z de la explosi6n del anticongelante
o vapor catiente, nunca intente retirar tatapa del radiador
mientras que el motor este en marcha. Detenga el motor
y espere a que se enfde. Inctuso despues, tenga extremo
cuidado ai retirar tatapa.
_) 9

Calcomanias de seguridad
Liberacidnde iatransmisi6n
N° Pieza1730202
Panel principal de peiigre
N° Pieza1734879
Amputation and thrown objects
Keep hands and feet /
._ away from deck. _._ I
Do not operate mower ,**_ [
_4 untess discharge chute {,÷,_" J&,l
or entire grass catcher *,_.,Z#_ [
is in its proper place, ,,o,_o_jl
Riesge, Peligro de amputaeidn
N° Pieza7181885
10
Figura 1
www,snapper°com

Estapaginasedej6enblancointencionalmente.
_) 11

Caracteristicas y conttoies
J
Figura 2
12 www.snapper.com

Controles del tractor
Pedal del freno
Si presiona el peda_ de_freno, se activan los
frenos del tractor.
Control de veJocidad de crucero
Esto bloquea el control de velocidad de avances
hacia adelante. E_controlador de velocidad de
crucero posee cinco posiciones de bloqueo.
Tabmero emectr6nico
Consuke la secci6n Tab/ero e/ectrdnico.
Tanque de combustibJe
Para retirar la tapa, gire hacia la izquierda.
Pedales para controlar Javelocidad
El pedal del aceJerador controla la velocidad de
avance del tractor. El pedaJdel ace_erador de
reversa controla la velocidad reversa del tractor.
Jnterruptor deUfoco
Esto enciende o apaga los focos delanteros del
tractor.
Jnterruptor de altura de torte
Esto ajusta la akura de corte del cortacesped.
Presione el interruptor hacia ARRIBA para elevar
la altura de corte de cesped y hacia ABAJO para
bajar laaltura. La altura de corte de cesped se
muestra en el tablero electr6nico.
Freno de estacionamiento
Esto bloquea o desbloquea el freno de
estacionamiento cuando el tractor se encuentra
detenido. Consulte lasecci6n Freno de
estacionamiento.
Toma de corriente (12V-CC)
La toma de corriente es 12V-CC. Los accesorios
deben estar clasificado en 9 amperios o menos.
Jnterruptor PTO
Esto acopla y desacopla los accesorios que
utiJizael PTO. Para acoplar el PTO, LEVANTE el
interruptor. BAJELO para desacopJar.
NOTA: El operador debe estar firmemente
sentado en el asiento del tractor para que
funcione el PTO.
Opci6n de torte marcha atria
(RMO, pot sus sigRas en ingles)
Esto permite a_operador cortar el cesped (o
utilizar otros accesorios conducidos pot PTO)
mientras avanza marcha atras. Para activar, gire
la Ilave de opci6n de corte marcha atras despues
de acopJar PTO. Se encendera Jaluz del LED y,
a continuaci6n, el usuario podra cortar marcha
atras. Cada vez que se acople PTO, puede
reactivar la opci6n de corte marcha atras, si Io
desea.
Jnterruptor de encendido
El interruptor de encendido arranca y detiene el
motor y cuenta con tres posiciones: APAGADO,
ENCENDIDO, y ARRANQUE.
APAGADO
Detiene el motor y apaga el
sistema electrico.
ENCENDIDO Permite que el motor funcione y
aiimenta el sistema electrico.
ARRANQUE
Enciende el motor para el
arranque.
NOTA: Nunca de]e e_interruptor de ignici6n en la
pos_ci6n de MARCHA con el motor apagado. Esto
descargar_5 la bateda.
Control Aceierador
Esto controla Jave_ocidad del motor. Mueva
la mariposa hacia ADELANTE para aumentar
la velocidad de_motor y hacia ATRAS para
disminuida. Siempre opere a TODA MARCHA.
Palanca de liberaci6n de Jatransmisi6n
Esto libera Jatransmisi6n a fin de que el tractor
pueda ser empujado manualmente.
_) 13

Tablero electr6nico
El tablero electr6nico exhibe el total de horas, horas de
viaje, reloj digital y altura de corte (vet Figura 3).
A. Totat de horas, horas de viaje y reloj
B. AItura de torte
C° Botones MODO (MODE) y REESTABLECER (RESET}
Figura 3
Tiempo total de funcionamiento y tiempo de
viaje
NOTA: Siempre que se arranque la unidad, se exhibe
el Total de Horas. El Total de Horas se reestablecera
automaticamente a 0 despues de 999.9.
1. Optima MODO (MODE) pot menos de 1 segundo
para exhibit las Horas de Viaje.
2. Optima REESTABLECER (RESET) por mas de 3
segundos para reestablecer las Horas de Viaje a 0.
3. Oprima MODO (MODE) pot menos de 1 segundo
para exhibir el Reloj (vet la secci6n Ajuste de la hora
en el reloj).
4. Optima MODO (MODE) pot menos de 1 segundo
para exhibit elTotal de Horas.
Ajuste de ia hora en el reloj
1. Optima MODO (MODE) por mas de 3 segundos. Las
horas se encenderan intermitente en el visor.
2. Optima REESTABLECER (RESET) para ajustar las
horas.
3. Optima MODO (MODE) por menos de 1 segundo
para guardar el ajuste. Los minutos se encenderan
intermitente en el visor.
4. Opdma REESTABLECER (RESET) para ajustar los
minutos.
5. Optima MODO (MODE) pot menos de un segundo
para guardar el ajuste.
14 www.snapper.com

Operaci6n
Consideraciones generales de seguridad de
funcionamiento
AsegOrese de leer toda la informaci6n en ta secci6n Seguridad
del usuario antes de intentar utilizar esta unidad. Famitiaricese
con todos los controles y con el modo de detener ta unidad.
ADVERTENCIA
Si la unidad no pasa con exito atgOntest de seguridad,
no taponga en funcionamiento. Consulte a un distribuidor
autorizado.
Pruebas del sistema de bloqueo de seguridad
Esta unidad esta equipada con un sistema de interbloqueo de
seguridad. No intente evitar ni modificar los interruptores y los dis-
positivos.
Prueba 1: El motor NO debe arranear si:
el interruptor de toma de fuerza esta en ACTIVADO, O
el pedal del freno NO se presiona por completo (freno de
estacionamiento SUELTO), O
ta patanca de control de crucero NO esta en NEUTRO.
Prueba 2: El motor DEBE arrancar sJ:
el interruptor de toma de fuerza esta APAGADO Y
el pedal del freno se encuentra presionado por completo {freno
de estacionamiento ACTIVADO) Y
ta patanca de control de crucero esta en NEUTRO.
Prueba 3: El motor se debe APAGAR s[:
el operador se tevanta del asiento con ta toma de fuerza
activada; O
el operador eleva et asiento con el pedal del freno SIN
presionarto por completo (freno de estacionamiento SUELTO).
Prueba 4: Revise el tiempo de detenc[6n de las cuchillas del
cortac_sped
Las cuchillas y la correa de transmision del cortacesoed deben
detenerse completamente dentro de cinco segundos tuego de
apagar el interruptor de toma de fuerza electrico. Si ta correa de
transmision del cortacesped no se detiene dentro de clnco segun-
dos, vuelva a ajustar et embrague de ta toma de fuerza, segQn se
describe en ta secci6n MANTENIMIENTO, o consulte a su distri-
buidor.
Prueba 5: Revise la opc[6n de corte de c_sped marcha atras
(RMO)
El motor debe apagarse cuando se intente dar marcha atras si
se ha activado ta toma de fuerza y no se ha activado ta marcha
atras.
La tuz de corte de cesped marcha atras debe encenderse
cuando se haya activado esta funci6n.
NOTA: Una vez detenido el motor, se debe apagar el interruptor de
toma de fuerza tuego de que el operador vuelva a sentarse para
arrancar el motor.
ADVERTENCIA
El corte marcha atras puede ser petigro para los
transeuntes. Pueden ocurrir accidentes graves si et usuario no
esta atento ante ta presencia de niSos. Nunca active la RMO
en presencia de nifios. Los niSos suelen sentirse atraidos por ta
unidad y por ta actividad del cortacesped.
Compruebe la presi6n de los neum_ticos
Los neumaticos se deben comprobar regularmente para obtener
6ptima tracci6n y garantizar el mejor corte (vease Figura 4).
NOTA: Estas presiones pueden diferir tigeramente del inflado
maximo ("Maximum Inflation"' que consta impreso en ta superficie
lateral de los neumaticos.
0,82 a 0,96 bar
(12 a 14 psi)
0,68 bar
(10 psi)
Figura 4
Recomendaciones para el aceite
Recomendamos usar aceites certificados con garantia de Briggs
& Stratton para lograr el mejor rendimiento. Tambien se pueden
usar aceites detergente de atta catidad si estan ctasificados para el
servicio SE SG, SH, SJ o superior. No utilice aditivos especiales.
Las temperaturas extedores determinan taviscosidad correcta
del aceite para el motor. Use ta tabla para seleccionar ta mejor
viscosidad para el rango de temperaturas exteriores esperadas.
oF
120
100
80
--=60
40
20
0
-20
Recomendaciones
para el aceite
°C
--__i 49
38
27
oi! _ 15
_ 4
-- -- -7
-18
-29
* Pot debajo de 4°C(40°F),el uso de SAE30 se
traduciraen unarranquedificil.
** Potencima de 27°C(80°F),el usode 10W30podra
ocasionarunaumentodel consumedeaceite.
Reviseel nivelde aceiteconmasfrecuencia.
15

Verifique y agregue el aceite del motor
1. Coloque el tractor sobre una superficie lisa (vease Figura 5).
2.
3.
4.
5,
6.
7.
Figura 5
Detenga el motor (consutte Cdmo detener el tractor y el
motor).
Limpie y retire cuatquier suciedad que exista en el Area de
ttenado del aceite.
Retire ta vadtla para medir el nivet de aceite y timpiela con un
paso timpio (vease Figura 6).
Inserte pot completo ta vadlta para medir el nivet de aceite.
Saque ta vadtta y compruebe el nivet del aceite. Debe estar en
ta marca de FULL (Lteno) de la varitta.
Si esta FULL (Lleno), inserte ta varitla de medir y ajOstela
firmemente.
Siesta LLENO, inserte ta varitla y aprietela bien. Siesta BAJO
el nivet de aceite, agregue aceite lentamente dentro det tubo
de ttenado de aceite de motor (vet Recomendaciones para
el aceite). No lo ltene en exceso. Despues de haber agregado
aceite, espere un minuto y tuego vedfique el nivel det aceite.
Presi6n de aceite
Si la presi6n de aceite es demasiado baja, un interruptor de
presi6n (si se tiene) detendra et motor o activara un dispositivo
de catentamiento en el equipo. Si esto ocurre, detenga el motor y
revise el nivel de aceite con ta varitta.
Si el nivet de aceite esta por debajo de la marca ADD (ASadir),
aSada aceite hasta que et nivel alcance ta marca de FULL (Lleno).
Arranque el motor y reviselo para asegurarse de que tenga ta
presi6n correcta antes de continuar con el funcionamiento.
Si et nivel de aceite oscila entre tas marcas ADD (ASadir) y FULL
(Lteno), no arranque el motor. P6ngase en contacto con un
distdbuidor autorizado para corregir el problema de presi6n del
aceite.
Figura 6
Recomendaciones para combustible
El combustible debe cumplir estos requisitos:
Gasolina fresca y sin plomo.
Un minimo de 87 octanos/87 AKI (91 RON).
- La gasolina con un maximo de110% de etanol (gasohol)
o un maximo de115% de MTBE (acetato de metiteter de
propilenglicol).
PRECAUCION: No utilice gasolinas no homologadas, como
es el caso de E85. No haga mezclas con tas gasolina ni reatice
modificaciones en et motor para hacerto funcionar con otros
combustibles. Hacer tat cosa dafiaria los componentes del motor y
anular_a la gatant_a del motor,
Para proteger el sistema de combustible de la formaci6n de
resinas, mezcle un estabitizador de combustible en el combustible.
Consutte ta secci6n AImacenaje. No todos los combustibles
son iguales. Si tiene problemas durante et arranque o el
funcionamiento, cambie de proveedor o marca de combustible.
Et funcionamiento de este motor con gasolina esta certificado.
Et sistema de control de emisiones para este motor es EM
(Modificaciones de motores).
16 www.snapper.com

ASadir combustible Arranque del motor
ADVERTENCIA
Et combustible y sus vapores son extremamente
infiamables y explosivos.
El fuego o tas explosiones pueden causar quemaduras
graves o inctuso ta muerte.
AI aSadir combustible
- Apague el motor y deje que el motor se enfrie durante at
menos 3 minutos antes de retirar ta tapa de ttenado del
combustible.
- Ltene el tanque de combustible en exteriores en un Area bien
ventilada.
- No llene demasiado el tanque de combustible. Para permitir
que el combustible se expanda, no ttene et deposito
por encima de ta parte inferior del cuelto del tanque de
combustible.
- Mantenga el combustible atejado de chispas, llamas
abiertas, pilotos, calory otras fuentes de igniciOn.
- Revise las tineas de combustible, tanque, tapa y conectores
a menudo, para constatar si presentan rajaduras o perdidas.
Cambielas, si fuera necesado.
- Si se derrama combustible, espere hasta que se evapore
para arrancar el motor.
1.
2.
Limpie el area de ta tapa del tanque de combustible. Retire
ta tapa del deposito de combustible [A. Figura 7) Consutte
tambien ta secci6n CaracteHsdcas y controles.
Ltene el dep6sito de combustible (B) con combustible. Para
permitir que et combustible se expanda, no tleve el deposito
por encima de la parte inferior del cuelto del tanque de
combustible (C).
3, Vuelva a instalar tatapa del combustible.
ADVERTENCIA
Et combustible y sus vapores son extremamente
inftamables y explosivos.
El fuego o tas explosiones pueden causar quemaduras
graves o inctuso ta muerte.
Cuando arranque el motor
- AsegOrese que ta bujia, el silenciador, ta tapa de ttenado de
combustible (si se tiene) y el fittro de aire esten colocados y
fijos en su tugar.
- No encienda ei motor con ta bujia desenchufad&
- Si ei motor se desborda, coloque el estrangutador (si se
tiene) en ta posici6n OPEN/RUN (Abdr/Marcha), coloque
ei acelerador en FAST (Rapido) y gire ei motor hasta que
arranque.
ADVERTENCIA
El motor exputsa monoxido de carbono, y un gas
venenoso, sin color y sin olor.
Respirar monoxido de carbono puede causar nauseas,
mareos o inctuso ta muerte.
El fuego o tas explosiones pueden causar quemaduras
graves o inctuso ta muerte.
Arranaue et motor y dejeto en marcha en exteriores.
No arranque el motor ni lo deje en marcha en areas
cerradas, aunque haya puertas o ventanas abiertas.
1.
2.
3.
4.
5.
6.
Compruebe el nivel de aceite (consutte Verifique y agregue
el aceite del motor).
Sientese en et asiento y LEVANTE la patanca de ajuste de
asiento, posicione et asiento a su gusto y suelte ta patanca
para trabar el asiento en esa posici6n.
Accione el freno de mano. Presione et pedal del freno a fondo,
tire el control det freno de estacionamiento HACIA ARRIBA y
suette el pedal del freno.
Desconecte el interruptor de ta toma de fuerza empujandolo
hacia ADENTRO.
Mueva et control de aceleraci6n a ta posici6n FAST (Rapido).
Gire ta ltave de encendido a ta posici6n de ARRANQUE.
Despues de que el motor arranque, coloque el interruptor a ta
posici6n MARCHA.
Figura 7
_) 17

Conducci6n del tractor
1. SitOese en et asiento y ajOstelo a fin de que pueda alcanzar
todos los controles y vet ta pantalla del tablero c6modamente
(vease Caracterisdcas y controles),
2. Accione el freno de mano. Presione et pedal del freno a fondo,
tire el control del freno de estacionamiento HACIA ARRIBA y
suette et pedal det freno.
3. Compruebe que el interruptor PTO este desengranado.
4. Ponga en marcha el motor (vease Arranque del motor).
5. Desacople el freno de estacionamiento. Presione et pedal del
freno a fondo, presione et control del freno de estacionamiento
HACIA ABAJO y suette el pedat del freno.
6. Presione el acelerador para permitir el avance. Libere el pedal
para detenerse. Note que cuanto mas se presione el pedal, el
tractor avanzara con mas rapidez.
7. Detenga et tractor sokando los pedates que controtan ta
vetocidad de avarice dei tractor, colocando el freno de
estacionamiento, y deteniendo el motor (vease Cdmo detener
el tractor y el motor),
Cortar el c6sped
1. Ajuste la attura de corte del cortacesped en et nivel deseado
utilizando el interruptor de attura de corte (vet Caracteristicas
y controles),
2. Accione el freno de mano, AsegQrese que el interruptor de la
toma de fuerza este desengranada.
3. Arranque el motor (vea Cdmo arrancar el motor).
4. Coloque el aceJerador en ta posici6n FULL (Lteno).
5. Accione ta toma de fuerza para activar tas taminas del
cortacesped.
6. Desactive el freno de estacionamiento y comience a cortar el
cesped.
7. Cuando termine de cortar el cesped, apague el PTO.
8. Detenga el motor (consutte Cdmo detener el tractor y el
motor).
Opci6n de torte en marcha atr_s (RMO TM)
ADVERTENCIA
El corte marcha atras puede ser petigro para los
transeQntes. Pueden ocurrir accidentes graves si et usuario no
esta atento ante ta presencia de niSos. Nunca active la RMO
en presencia de niSos. Los niSos suelen sentirse atraidos por ta
unidad y por ta actividad del cortacesped.
La opci6n de cortar et cesped en marcha atras (RMO) permite at
operador sesgar el cesped marcha atras (vease Caracterfsticas
y mandos). Para activar, gire la ttave de opci6n de corte marcha
atras despues de acoptar PTO. Se encendera la tuz del LED y, a
continuaci6n, el usuario podra cortar marcha atras. Cada vez que
se acople PTO, puede reactivar ta opci6n de corte marcha atras,
silo desea. Se deberia retirar ta ltave para restringir el acceso a ta
opci6n de cortar el cesped en marcha atras.
Empujar el tractor cortac6sped manualmente
1,
2.
3.
Desacople el PTO y apague el motor (vease Caracterfsdcas
y controles),
Levante la palanca 6 cm (2-3/8 putg.) aproximadamente para
tiberar ta transmisi6n (vease Figura 8).
Es ahora que puede empujarse el tractor manualmente.
ADVERTENCIA
Et motor se apagara si se encuentra presionado el
pedal de acelerador de reversa mientras que PTO se encuentra
activado y aQn no se ha activado taopci6n de cortar etcesped
marcha atras. Etoperador siempre deberia apagar et PTO antes
de conducir en caItes, rutas, o cualquier Area que sea utitizada
por otros vehiculos. La perdida de conducci6n repentina podria
convertirse en un riesgo.
Figura 8
18 www°snapper°com

Ajuste de la altura de corte del cortac_sped
UtHice el interruptor de akura de corte para aumentar o reducir
ta attura de corte det cortacesped (vease Caracterisdcas y
controles).
Presione el interruptor hacia ARRIBA para elevar ta attura de corte
de cesped y hacia ABAJO para bajar ta altura. La attura de corte
de cesped se muestra en el tablero electr6nico.
Freno de estacionamiento
Utilice el control det freno de estacionamiento para accionar o
desactivar el freno de estacionamiento cuando el tractor este
detenido (vet Caracterisdcas y controles),
Accionamiento del freno de estacionamiento - Para accionar
el freno de estacionamiento, presione el pedal det freno a fondo,
tire del control del freno de estacionamiento HACIA ARRIBA y
suelte el pedal det freno.
Desactivaci6n del freno de estacionamiento - Para desactivar
el freno de estacionamiento, presione et pedal del freno a fondo,
presione el control del freno de estacionamiento HACIA ABAJO y
suelte el pedal del freno.
Control de velocidad de crucero
PARA DESACOPLAR:
1. Presione el pedal del acelerador de avance {vease
Caracteristicas y controles).
2. Levante et controlador de velocidad de crucero cuando se
atcance la velocidad deseada. Et controlador de vetocidad
de crucero se bloqueara en una de sus cinco posiciones de
bloqueo.
PARA DESACOPLAR:
1, Presione el pedal de freno.
6
2. Presione el pedal dei acelerador.
C6mo detener el tractor y el motor
ADVERTENCIA
Et combustible y sus vapores son extremamente
infiamables y explosivos,
El fuego o tas explosiones pueden causar quemaduras
graves o inctuso ta muerte,
No cebe el carburador para detener el motor.
1. Suelte los pedates de vetocidad de desptazamiento para
regresar a la posici6n NEUTRAL (vet Caracterisdcas y
controles),
2. Aun sobre el cesped, desengrane el interruptor de tatoma de
fuerza y espere que todas tas piezas m6vites se detengan.
3. Gire ta ttave de encendido a ta posici6n PARAR.
4. Retire ta llave y mantengala en un tugar seguro fuera dei
atcance de los niSos.
5.
Accione el freno de mano. Presione el pedal del freno a fondo,
tire el control det freno de estacionamiento HACIA ARRIBA y
suelte el pedal dei freno.
[_ 19

Mantenimiento
Tabla de mantenimiento
Carla 8 horas o diariamente
Revisar el sistema de bloqueo de seguridad
Limpiar el tractor y el cortacesped
Limpiar los desechos del compartimento del motor
Carla 25 horas o anuaimente *
Verificar la presidn de los neumaticos
Comprobar ef tiempo de detenci6n de las cuchillas de
la segadora
Revisar tractoricortacesped pot si tuviesen piezas
sueftas
Carla 50 horas o anuaimente *
Limpiar la bateria y el cableado
Revisar el funcionamiento de los frenos
Consuite ai distribuidor carla a_o para
Lubricar el tractor y el cortacesped
Revisar las cuchiHas del cortacesped ""
* Lo que ocurra en primer lugar
** Revise las cuchiHas mas a menudo en regiones que
tengan suelos arenosos y en condiciones en las que
exista mucho polvo.
Ptimeraa 5 hotaa
Cambiar el aceite del motor
Carla 8 horaa o diariamente
Comprobar el nivel de aceite del motor
Carla 25 hotaa o anuaimente *
Limpiar el filtro y el depurador de aire del motor **
Cambiar el aceite del motor
Sustituir el filtro de aceite
Anualmente
Sustituir el fHtro de aire
Sustituir el depurador
hspeccionar el silenciador y la pantalla antichispas
Sustituir _abujia
Sustituir e_fi_trode combustible
Limpiar el sistema de refrigeraciOn de aire del motor
Lo que ocurra en primer lugar
_ En condiciones en las que exista polvo o suciedad
en forma de particulas en suspensidn, limpiar mas a
menudo.
ADVERTENCiA
Las chispas no deseadas pueden causar un incendio o
una descarga electrica.
Et arranque no intencionat pueden resuitar en
enmaraSamiento, amputaci6n traumatica o taceraci6n.
Antes de rea_izar ajustes o reparaciones:
- Desconecte el cable de ta bujia y mantengalo alejado de ta
bujia.
- Desconecte ta bateria en taterminal negativa (s61ose aplica
a motores con arranque electrdnico).
- Utiiice sotamente tas herramientas apropiadas.
- No apiique fuerza mediante resortes de regutador, entaces,
u otras piezas para aumentar ta velocidad dei motor.
- Las piezas de reemplazo deben set tas mismas e instatarse
en la misma posicidn que tas piezas originales. Otras piezas
pueden no funcionar de ta misma manera, pueden daSar ta
unidad, y pueden causar tesiones.
- No golpee el volante con un martilto o un objeto sdlido ya
que este puede romperse durante el funcionamiento.
Compruebe la presi6n de los neumaticos
Los neuma.ticos se deben comprobar regularmente para obtener
6ptima tracci6n y garantizar el mejor corte _vease Figura 4).
NOTA: Estas presiones pueden difedr tigeramente del infiado
maximo ("Maximum Inflation") que consta impreso en ta superficie
lateral de los neumaticos.
Revisar el tiempo de detenci6n de ia cuchilla
del cortac_sped
ADVERTENCIA
Si la cuchiIIa dei cortacesped no se detiene por completo
dentro de los 5segundos, se debera ajustar tacuchiita. No opere
ta unidad hasta que un distribuidor autorizado haya reatizado el
ajuste apropiado.
Compruebe que tas cuchittas det cortacesped funcionen
correctamente (vease Pruebas de_s_stema de interb_oqueo
de seguridad). La cuchilla deberia dejar de girar dentro de los
5 segundos o menos despues de colocar el control de cuchiltas en
ta posici6n OFF (Apagado).
20 www°anapper°com

Mantenimiento de ia bater{a
ADVERTENCIA
Cuando retire o instale los cables de ta bateria,
desconecte el cable negative EN PRIMER LUGAR y
reconectelo EN 0LTIMO LUGAR. Si no se sigue este
orden, etterminal positive puede set acortado hasta el
marco per una herramienta.
ADVERTENCIA
Los bornes, las terminales de la bateria y los accesodos de
tamisma contienen plomo y compuestos de plomo, productos
quimicos que el estado de California reconoce causar cancer,
defectos de nacimiento y otras tesiones geneticas. Lavese tas
manes despues de manejar ta bateda o sus accesorios.
Desconectar la bater{a
1. Detenga el motor (consuke Cdmo detener el tractor y el
motor).
2, Desconecte los cables NEGATWOS (negros) pdmero,
3, Desconecte los cables POSFWOS (rojos) a to Qltimo,
B
(2x)
Retirar e instalar la bater{a
Retire e instale ta bateda tal come se muestra en ta Figura 9.
Conectar la bater_a
1. Detenga el motor (consutte Cdmo detener el tractor y el
meter).
2. Conecte los cables POSITWOS (rojos) en primer lugar,
3. Conecte los cables NEGATWOS (negros) en Qltimo lugar.
Figura 9
Carga de la bater_a
ADVERTENCIA
Mantenga tas llamas abiertas y las chipas tejos de
ta bateria: tos gases procedentes de esta son muy
explosives. Ventite bien ta bateria mientras se carga.
Limpiar la bater_a y el cableado
1. Limpie la plataforma de ta bateda con una soluci6n de agua de
soda y agua.
2. Limpie los terminales de ta bateria y los extremes de los cables
con un cepilto y timpiador para terminal de bateda hasta que
reluzcan.
3. Cubra tas terminales ensambladas con vaselina o grasa
aislante.
Una bateria agotada o una demasiado descargada come para
porter en marcha el motor puede set el resuitado de un defecto en
el sistema de carga o en otros componentes el6ctdcos. Si tiene
dudas sobre tacausa del probiema, consulte a su distdbuidor.
Si necesita sustituir la bateda, consulte ta secci6n Mmpiar la
bateria y del caMeado,
Para cargar ta bateria, siga tas instrucciones que facitita el
fabricante del cargador de la bateria y tambien todas tas
advertencias que se incluyen en ta secci6n Seguddad del
usuaHe en este manual. Cargue la bateria hasta que este
totatmente cargada. No cargue ta bateria a mas de 10 ampedos.
_) 21

Cambiar el aceite del motor
ADVERTENCIA
Et combustible y sus vapores son extremamente
infiamables y explosivos.
El fuego o tas explosiones pueden causar quemaduras
graves o inctuso ta muerte.
AI cambiar el aceite
Si extrae et aceite del tubo de aceite superior, el tanque
de combustible debe estar vado o es posible que se filtre
combustible y que esto cause un incendio o una explosi6n.
1. Haga funcionar el motor hasta que se catiente.
2. Coloque et tractor sobre una superficie lisa (vease Figura 5).
3. Detenga el motor (consulte Cdmo detener el tractor y el
motor).
4. Limpie cualquier suciedad que exista en las areas de ttenado
y filtro de aceite. Retire ta vadtta para medir el nivel de aceite y
col6queta sobre un paso timpio (vease Figure 6).
5. Desconecte ta manguera de desagOe del aceite (vease Figura
10). Retire con cuidado tatapa y coloque ta manguera en un
contenedor homologado. Una vez drenado el aceite, vuelva
a colocar tatapa firmemente y, a continuaci6n, conecte ta
manguera at costado del motor.
6. Quite el filtro de aceite y deshagase de el de ta manera
correcta.
Figura 11
7. Lubrique tJgeramente la junta del filtro de aceite con aceite
limpio y fresco (vease Figura 11).
8. Instate el filtro de aceite a mano hasta que ta junta entre en
contacto con el adaptador det filtro de aceite y luego apriete el
filtro de aceite con media o tres cuartos de vuelta.
9. ASada aceite i vease Comprobar y agregar ace#e al motor).
Figura 10
22 www,snapper°com

Mantenimiento del filtro de aire Mantenimiento del silenciador
ADVERTENCIA
Et combustible y sus vapores son extremamente
infiamables y explosivos.
El fuego o tas explosiones pueden causar quemaduras
graves o inctuso ta muerte.
Nunca arranque o haga funcionar et motor con el conjunto de
fittro de aire o el fittro de aire quitados.
AVlSO: No utilice aire presudzado o disolventes para limpiar et
filtro. Etaire presurizado puede daSar el filtro y los disolventes to
disolveran.
1. Destorniite y quite ta cubierta (A, Figura 12).
2. Quite el conjunto det filtro de aire (B) y desm6nteto.
3. Limpie cuatquier tipo de desechos posibles dentro dei cuelto
del carburador (C).
NORA: Sustituya el depurador/cartucho cuando este sucio o
daSado.
F[gura 12
Lirnpieza del depurador
1. Limpielo en agua jabonosa con detergente liquid&
2. EstrOjelo en un paso timpio.
Limpieza det cartucho
Golpeeto suavemente sobre una superficie plana para eliminar los
desechos tivianos. No intente timpiar el cartucho.
N
ADVERTENCIA
Et motor en marcha produce calor. Las piezas del motor,
especialmente el sitenciador, se vuelven sumamente
calientes.
Se pueden producir quemaduras termicas graves al
contacto.
Detritos del combustible, tales como hojas, cesped,
maleza, etc., pueden incendiarse.
Permita que et silenciador, el citindro y tas atetas del motor
se enfrien antes de tocados.
Limpie los desechos visibles del compartimiento del motor.
ADVERTENCIA
Las piezas de reemplazo deben estar en ta misma
posicion que tas piezas originates o puede originarse un
incendio.
Para el mantenimiento del sitenciador, consutte a un distdbuidor
autorizado.
Mantenimiento de las bu]ias
ADVERTENCIA
Las chispas no deseadas pueden causar un incendio o
una descarga electdca.
AI realizar pruebas de chispas:
o Use un probador de bujias aprobado.
o No reatice ta prueba de chispas sin ta bujia colocada.
PRECAUCIONES: Las bujias poseen distintos tangos de cator.
Es Jmportante utitizar ta bujia apropiada, de otto modo, podda
daBarse el motor.
Limpieza de la buj_a
Limpie con un cepitlo de alambre y un cuchitlo resistente. NO
utilice abrasivos (vease Figura 13).
_) 23

Comprobaci6n de la abertura de la buj_a
Utitice un calibre de espesor de bujias para comprobar el espacio
entre los dos etectrodos. Cuando el espacio es correcto, el calibre
se arrastrara tigeramente hasta que pase pot el espacio.
Si es necesafio, utilice et calibre de bujia para ajustar et espacio
dobtando suavemente el electrodo curvado sin tocar el electrodo
central o ta porcelana.
0,76 rnrn
(0,030 pulg.)
instalaci6n de la buj_a
Primero apdetela con los dedos y, a continuaci6n, con una ttave
mecanica.
- 20 Nm (180 putg.-tbs), 0
• media vuelta al reinstalar ta bujia original.o cuarto de vuelta at
instalar una bujia nueva.
Figura 13
24 www.snapper.corn

Limpieza de la plataforma del cortac6sped
NOTA: El puerto de desiave te permite conectar una manguera
de jardin fipica al tado de corte (izquierdo) de ta plataforma det
cortacesped para retirar el pasto y desechos de su parte inferior.
Esto asegura el funcionamiento seguro y correcto del cortacesped.
ADVERTENCIA
Antes de operar el cortacesped, asegOrese que
ta manguera este conectada correctamente y no
toque las cuchiltas. Cuando et cortacesped este en
funcionamiento y tas cuchillas esten engranadas, ta
persona que este timpiando la plataforma del cortacesped debe
estar en ta posici6n de operador y no debe haber personas
cerca. El no seguir estas precauciones puede resultar en
tesiones graves o muerte.
1,
2.
Coloque el tractor sobre una superficie lisa (vease Figura 5).
Ensamble el desconector rapido (A, Figura 14) a una
manguera del jardin (B) y conectelo at puerto de destave (C) en
ta ptataforma del cortacesped.
\,
\
\
\
Figura 14
3. Deje correr agua para retirar el pasto y los desechos de ta parte
inferior de ta plataforma del cortacesped.
4. Encienda el cortacesped y col6quelo en ta posici6n de corte
mas atta.
5. Apague el cortacesped.
6. Retire ta manguera de jardin y el desconector rapido del puerto
de destave at finalizar.
A]ustar las ruedas reguladoras
Utilice tas ruedas de medici6n para evitar que el cortacesped
realice cortes rasantes.
1. Seleccione ta altura de corte (vease Caracterisdcas y
controles).
2. Coloque el freno de estacionamiento.
3. Detenga el motor (consulte Cdmo detener el tractor y el
motor).
4. Ajuste tas ruedas regutadoras delanteras y traseras seg_n sea
necesado (vease Figura 15).
- Las ruedas regutadoras delanteras utitizan los dos agujeros
inferiores.
- Las ruedas regutadoras traseras utilizan los dos agujeros
superiores.
NOTA: Si las ruedas reguladoras tocan el suelo, la plataforma
del cortacesped no esta nivelada. Consulte a un distribuidor
autorizado.
Figura 15

Lubricaci6n
Recomendamos que todas tas piezas m6vites deberian lubricarse
en caso de que entren en contacto con otras piezas (vease Figura
16). Mantenga tibre de lubricante y grasa tas correas y poleas.
Limpie tas superficies antes y despues de ta tubdcaci6n.
V
(8x)
m
L
(ix)
Figura 16
26 www.snapper°com

Almacena]e
ADVERTENCIA
No almacene ta unidad (con combustible) en tugares
cerrados sin ventilaci6n. Los vapores del combustible
pueden ttegar hasta una fuente de ignici6n (hornos,
calentadores de agua, etc.) y producir una explosi6n.
Et vapor del combustible tambien es t6xico para los
humanos y los animales.
AI almacenar combustible o equipo con combustible en el
tanque
- Almacene lejos de hornos, cocinas, calentadores de agua
u otros aparatos con pitoto u otra fuente de ignici6n, ya que
pueden prender fuego a vapores del combustible.
Aceite de motor
Mientras el motor sigue estando catiente, cambie el aceite del
motor. Vease ta secci6n Cambiar el aceite del motor.
Antes de porter en marcha la unidad despu_s de que 6sta
haya estado almacenada:
- Compruebe los niveles de todos los fluidos. Compruebe todos
los etementos de mantenimiento.
Lteve a cabo todas tas comprobaciones recomendadas en
este manual.
Deje que el motor se catiente unos minutos antes de utitizarto.
Equipo
Desacople el PTO, ponga et freno de mano y detenga el motor
(consutte Cdmo detener el tractor y el motor).
Atoje la bateria en un tugar fresco y seco y carguela por completo
una vez at mes. Si se deja ta bateria en ta unidad, desconecte el
cable negativo.
Sistema de combustible
Etcombustible puede deteriorarse si se atmacena durante ma.sde
30 dias. El combustible detenorado hace que se creen depositos
de acidos y resina en el sistema de combustible o en componentes
esenciates det carburador. Para mantener en combustible en
buenas condiciones, use el estabitizador de combustible FRESH
START@ de Bdggs & Stratton, disponibte como aditivo tiQuido o en
forma de cartucho concentrado por goteo.
No es necesario drenar ta gasolina del motor si se a5ade un
estabilizador de combustible de acuerdo con tas instrucciones.
Haga funcionar el motor durante 2 minutos _)araaue el
estabitizador circute por el sistema de combustible. De este modo,
el motor y el combustible pueden atmacenarse hasta 24 meses.
Si tagasolina det tanque no se ha tratado con un estabitizador
de combustible, debe drenarse en un contenedor aprobado para
tat fin. Haga funcionar el motor hasta que se detenga debido a la
falta de combustible. Es recomendable usar un estabilizador de
combustible en et contenedor de almacenamiento para mantener
el combustible en buen estado.
_) 27

Soiuci6n de prob emas
Resoluci6n de probiemas en el tractor
PROBLEMA
Ei motor no gira o
arranca.
EI motor no
arranca bien ono
funciona bien.
BUSQUE
El pedal del freno esta oprimido.
El interruptor del PTO (embrague
electdco) esta en la posici6n
ENCENDIDO.
Controlador de velocidad en
acci6n.
No hay combustible.
SOLUCION
Levante el pie completamente del pedal de freno.
SitOelo en la posici6n APAGADO.
Motor ahogado.
El fusible esta quemado.
Los terminales de la bateda
requieren limpieza.
La bateda esta descargada o
agotada.
El cableado esta desaflojado o
roto.
Solenoide o starter defectuosos.
Interruptor de interbloqueo de
seguridad defectuoso.
Presencia de agua en el
combustible.
El combustible es viejo :_:h_
echado a perder.
La mezcla de combustible es
demasiado rica.
El motor tiene otro problema.
Bajo nivel de lubricante: .............
lUtilizaci6n de lubricant_ 8_ .....
incorrecto. ......
El motor se calienta demasiado al
funcionar.
Utilizaci6n de lubricante de grado
i incorrecto.
Exceso de lubricante en el carter.
El filtro del aire esta sucio.
Estrangulador cerrado.
Los pedales de contro_ de
velocidad no se han pisado.
Palanca de liberaci6n de la
transmisi6n en la posici6n
EMPUJAR.
Freno de estacionamiento puesto.
La correa de transmisi6n de
tracci6n esta rote o resbala.
Mueva el cebador a posici6n NEUTRALiAPAGADO.
Si el motor esta caliente, espere a que se enfde y luego reponga
el combustible del tanque.
Desacople el estrangulador.
Consulte a un distdbuidor autorizado.
Consulte la secci6n Limpieza de la bateria y del cableado.
Recargue o sustituya la bateda.
Inspeccion@Visualmente el cab! iaao Si los cables estan
deshilac:ha_S o rotos consa:ffe _:un distnbuidor autodzado.
CS_sui_e a n distribui_e_ _utori ado.
ConsG!_ea un distribUiSer _utorizado.
Co_suke a un di_d_UidSr autorizado.
Consulte _ U di_{ribuidor autorizado.
Li_pie el _iltro del aire.
C_nsulte a un distribuidor autorizado.
:_mpruebe yen su caso reponga
el lubricante.
Consulte Table de recomendaciones de aceite.
Consulte a un distnbuidor autodzado.
Excesivoconsume Consulte Table de recomendaciones de aceite.
de mabfieante.
Drene el exceso de lubricante.
Eltube de escape Consulte la secci6n Mantenimiento del filtro de aire.
est_ ennegrecid0. Abra el estrangulador.
Pise los pedales.
Cambiela a la posici6n IMPULSAR.
El meter arranca,
peroel traet0r no
avanza. Quite el freno de estacionamiento.
Consulte a un distnbuidor autorizado.
28 www°snapper°com

Resoluci6n de problemas en el tractor (continuaci6n}
PROBLEMA
Eifreno nose
sostiene.
Eitractor gira
o maniobra
de manera
insuficiente.
BUSQUE
El freno interno esta desgastado.
La conexi6n de la direcci6n esta
desaflojada.
Infiado incorrecto de los
neumAticos.
Los cojinetes de las ruedas
delanteras estan secos.
SOLUCJON
Consulte a un distdbuidor autodzado.
Consulte a un distdbuidor autodzado.
Consulte la secci6n Comprobar _apresi6n de _os neumaticos.
Consulte a un distdbuidor autodzado.
Resoluci6n de
PROBLEMA
El cortac6sped no
se eJeva.
jEi aortaqua haee
iel ¢0rtaeespedes
desiguai.
jEi ¢0rtequa haee
jel ¢0rtaeesped
tiene un aspeete
ibaste.
jEi motor se atasea
f_eiimente conei
¢0rtaeespeden
mareha.
probiemas en el cortac6sped
gUSQUE
El acople de elevaci6n no esta
conectado correctamente o esta
daSado.
El cortacesped no
adecuadamente equilibrado.
Los neumaticos del tractor no
estan infiados correctamente.
La ve_ocidad del motor es
demasiado lenta.
La ve_ocidad de tierra es
demasiado rapida.
El cortacesped tiene otro ......
problema.
La ve_ocidad del motor
demasiado lenta.
La velocidad de tierra es
demasiado rapida.
El fHtrodel aire esta sucio u
obstro o.
AItura de carte dem_iad: hajal
Conducto de descarga at_scado.
Motor no preparado para la
temperatura operativa.
Arranque del cortacesped en
hierba alta.
El cortacesped tiene otto
problema.
SOLUCJON
Consulte a un distdbuidor autodzado.
Consulte a un distribuidor autodzado.
Consuke la 8ecci6n Comproba,_ i_:ptesi6n de los neumaticos.
C_ _ig re I velocidad_!_xim del estrangulador.
b!sminGya la velooid_d,:
_onsulte _uSdist_ibuidor autodzado.
Confgu_:Sy_Jocidad al maxima del estrangulador.
Di_mi_a la velocidad.
_nsulte la secci6n Mantenimiento de_ filtro de aire.
Carte la hierba alta con la maxima altura en la primera pasada.
Hierba cortada con Jadescarga apuntando hacia una una zona
cortada previamente.
Permita que el motor funcione varios minutos para que se caliente.
Arranque el motor en una zona despejada.
J[}emasiada Consulte a un distdbuidor autodzado.
vibraei_nen el
eortae_sped.
El meter arranea El PTO no esta embragado. Embrague el PTO.
y el tractor se
despiaza, per0 el E_cortacesped tiene otto Consulte a un distdbuidor autodzado.
tractor noavanza, problema.

Especificaciones
MOTOR
Briggs & Stratton de 24 caballos
de fuerza brutos
Modeto
CabaiWos de fuerza
Desptazamiento
Sistema el6ctrico
Capacidad de aceite
Aceite dei motor
Abertura de la buj_a
Torsi6n de bujia
Capacidad del depSsito
de combustible
Serie profesional TM, V-Twin ciEFM
24 caballos de fuerza brutos a 3600 rpm
724 cc (44,2 pulgadas cQbicas)
Alternador: 9 amperios regulado,
Bateria: 12V-230 CCA
1,9 L (64 oz)
Sintetico 5W30
0,76 mm (0,030 pulg=)
20 Nm (180 pulg=-Ibs)
Capacidad: 15,1 L (4,0 gal)
Asiento
Ajuste dei asiento
Radio de giro
Ruedas delanteras
Ruedas ttasetas
Malla, suspensi6n
9 posiciones
35,6 cm (14 puJg=)
Dimensiones de los neumaticos: 15 x 6,0/
Presi6n Inflado: 0,82-0,96 bar (12-14 psi)
Tama_o del neumatico: 22 x 9=5-12
Presi6n Inflado: 0,68 bar (10 psi)
PLATAFORMA DEL CORTACESPED
Ancho de torte
Plataforma de cubierta base
N_mero de cuchillas/Tipo
Suspensi6n dei marco
Rueda de soporte de
plataforma/NSmero
AJtura de corte
Elevaci6n del cortacesped
Posiciones de torte
132=1 cm (52 pulg=)
Descarga lateral
3, elevaci6n estb.ndar
Colgante de marco
Estandar, 4 ruedas contra corte rasante
de 3,8 a 10,2 cm
(de 1,5 pulg=a 4,0 pulg=)
Altura de corte electrica
Infinitas
Largo general
Ancho general (con deflector)
AJto general
180 cm (71 pulg=)
165 cm (65 pulg=)
114 cm (45 pulg=)
Marea Tuff Torq@ K46
Tipo Pedal hidrost&tico
Palancas de velocidad Avance: 0_9,0 kmih (0-5,6 MPHt
Marcha atras: 0-5,6kmih (0-3.5 MPH}
Conducci6n Correa
Frenos Manual
mnformaci6n de ciasificaci6n de potencia de1 motor
La dasificacidn de potencia bruta para el moddo de motor de gasotina individual esta etiquetada de acuerdo con e/ cddigo J1940
(Smafl Engine Power & Torque Rating Procedure,} de la SAE (Society of Automotive Engineers}, y la dasificacidn de rendimiento ha
sido obtenida y corregida de conformidad con SAE J1995 (Revision 2002-05) Los valores de fuerzas de torsidn han sido obtenidos a
3060 rpm; los vatores de cabaflos de fuerza han sido obtenidos a 3600 rpm. La potencia bruta efectiva de/motor resultara disminuida
y se verb afectada pot, entre otros e/ementos,/as condciones ambientales de funcionamiento y variabilidad entre motores. Dado el
ampfio conjunto de productos en que se cdocan los motores y la variedad de cuestiones ambientales rdevantes para el funcionamiento
de/equipo, el motor de gasofina no desarroflara la potencia bruta dasificada cuando se utifice en un componente de equipamiento
motorizado determinado (potencia dd motor efectiva in situ o neta). Estas diferencias son debidas a una ampfia variedad de factores,
induidos, sin exclusidn de otros, accesorios (fimpiadores de aire, tubos de escape, carga, refrigeracidn, carburador, bomba de
combustible), fimitaciones de apficacidn, condiciones ambientales de funcionamiento (temperatura, humedad, altitud), y/a variabifidad
entre motores. A causa de/as fimitaciones de fabricacidn y de capacidad, Briggs & Stratton podra sustituir una mayor potencia
dasificada para este motor de serie.
Piezas y accesorios
Consuke a un distribuidor autorizado.
30 www°snapper°com

_!_!!!_ii_i¸__ ..............................................
GARANTJA LJMITADA
Bnggs & Stratton Power Products Group, LLCreparara yio reemplazara, sin cargo, cualquier pieza del equipo queeste defectuosa en
material o fabricaci6n o ambos. Briggs &Stratton Corporation reparara_yio reemplazara,sin cargo, cualquier pieza del motor*de Briggs
& Stratton (siesta equipado con 6ste) que este defectuosa en material o fabricaci6n oambos. El comprador debe cubrir los gastos de
transporte del producto que se ende para reparaci6n o reemplazo seg0n esta garantia. Esta garantia esta en vigencia por los periodos y
sujeta alas condiciones que seestablecen ma_sadelante. Parael servicio de garantia, busque el distribuidor de servicio autorizado mas
cercano usando el mapa Iocalizadorde distribuidores en www.BriggsandStratton.com o www.Snapper.com.
No existe otra garantia expresa. Las garantias implicitas, inclusive aquellas de comerciabilidad y de idoneidad para un prop6sito en
particular se limitan a unaSo a partir de la fecha de compra o hasta los limites permitidos por la ley.La responsabilidad por daSosdirectos o
emergentes esta excluida seg0n Io permita le ley.
Algunos estados o paises no permiten limitaciones sobre la duraci6n de una garantia implicita y algunos estados o paises no permiten la
exclusi6n o limitaci6n de da5os directos o indirectos, pot Io que puede que la limitaci6n y exclusi6n anterior no se aplique a usted. Esta
garantia le otorga derechos legales especificos y tambien podria ejercer otros derechos que varian segOnel estado o el pais.
El periodo de garantia comienza en la fecha de compra por el primer usuario final de consumo minorista o comercial,y continOadurante el
periodo de tiempo que se indica anteriormente. "Uso de consumo" significa uso dom6stico residencialpersonal por unconsumidor minorista.
"Uso comercial" significa todos los otros usos, Ioque incluye el uso para pr0p6sitos comerciales, generar ingresos o alquiler. Unavez que el
producto sehaya usado para fines comerciales, de ahi en adelante se considerara como para uso comerciala efectos de esta garantia.
No es necesario registrar la garantia para obtenerel servicio de garantia para productos Br!ggs& Stratton. Guarde el recibo del comprobante de
la compra. Si no proporciona uncomprobante de lafecha de compra inicial en el momento en que sesolicite el sewicio de garantia, se usara la
fecha de fabricaci6n del producto se usara_para determinar si tiene derecho a la garantia.
Aceptamos las reparaciones por el servicio de garantia y nos disculpamos por las molestias.El servicio de garantia se encuentra disponible
solamente a traves de concesionarios de servicio autorizados por Briggs & Stratton o BSPPG, LLC.
La mayoriade las reparaciones por el servicio de garantia se gestionan de manera rutinaria, aunque en ocasiones puede que las solicitudes
de servicio de garantia no seanadecuadas. Esta garantia solamente cubre defectosde materialo fabricaci6n. No cubre los daSosocasionados
pot un uso incorrecto o un realuso, un mantenimiento o unas repa[aciones inadecuadas, el desgaste y la roturapropios del uso, o el usode un
combustible en realestado o no aprobado.
Uso no adecuado y real uso - El uso correcto y para el quese ha concebido este equipo se describe en el manual del usuario.Si el producto no
se usade la manera que se describe en el manual del usuario o si el producto seusa despues de que hayaresultado daSado,quedara anulada
la garantia. Lagarantia queda anulada si se ha borrado el nOmerode serie del producto o el producto ha sido modificado de alguna manera, o
si el producto presenta indicios de haber sido usado incorrectamente, por ejemplo, daSosproducidos por un impacto, o daSos producidos por
corrosi6n quimicaiagua.
Reparaci6n o mantenimiento incorrectos - Este producto debe mantenerse de acuerdo con los procedimientos y elcalendario que se
proporcionan en el manual del usuario, y debe ser reparado usando para ello piezas originales de Briggs & Stratton. La garantia no cubre los
da_os ocasionados por la falta de mantenimiento oel uso de piezas no originales.
Desgaste normal - Como otros dispositivos mecanicos, su unidad esta_sujeta a un desgaste incluso si se realiza en ella un mantenimiento
correcto. Esta garantia no cubre las reparaciones cuando el uso normal ha agotado la vida 0til de una pieza odel equipo. Las piezas que sufren
desgaste y que deben sometersea programas de mantenimiento tales como los filtros, la correas, lascuchillas de corte y las zapatas del freno
(las zapatas del freno del motor estancubiertas por la garantia) no estan cubiertas por la garantia debido a que 0nicamente pueden desgastarse,
a menos que el origen del desgaste sean defectos en el material o en la fabricaci6n.
Combustible en real estado - Paraque este producto funciona correctamente, se necesita combustible fresco (reciente) que cumpla los criterios
especificados en el manual del usuario. Losda5os ocasionados porel combustible viejo (en mai estado), comofugas en el carburador, tubos de
combustible obstruidos, valvulas obstruidas, etc. no estan cubiertos por la garantia.
* Estos61ose aplica a los motores de Briggs& Stratton. La cobertura de la garantia de los motores nofabricados por Briggs & Stratton ia ofrece el
fabricante del motor.
_:) 31

32 www.snapper.com

_] 33

Snapper, inc.
RO. Box 702
Milwaukee, W_U.S.A.
www.Snapper.com
1-800-317-7833
-
 1
1
-
 2
2
-
 3
3
-
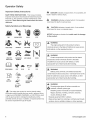 4
4
-
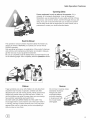 5
5
-
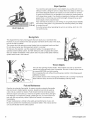 6
6
-
 7
7
-
 8
8
-
 9
9
-
 10
10
-
 11
11
-
 12
12
-
 13
13
-
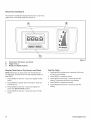 14
14
-
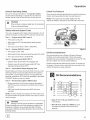 15
15
-
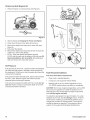 16
16
-
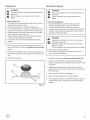 17
17
-
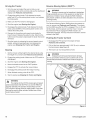 18
18
-
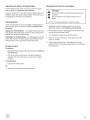 19
19
-
 20
20
-
 21
21
-
 22
22
-
 23
23
-
 24
24
-
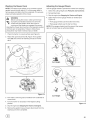 25
25
-
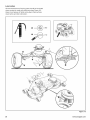 26
26
-
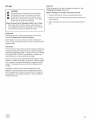 27
27
-
 28
28
-
 29
29
-
 30
30
-
 31
31
-
 32
32
-
 33
33
-
 34
34
-
 35
35
-
 36
36
-
 37
37
-
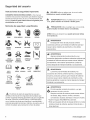 38
38
-
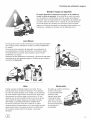 39
39
-
 40
40
-
 41
41
-
 42
42
-
 43
43
-
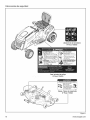 44
44
-
 45
45
-
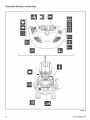 46
46
-
 47
47
-
 48
48
-
 49
49
-
 50
50
-
 51
51
-
 52
52
-
 53
53
-
 54
54
-
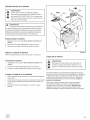 55
55
-
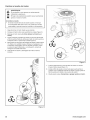 56
56
-
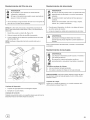 57
57
-
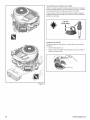 58
58
-
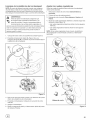 59
59
-
 60
60
-
 61
61
-
 62
62
-
 63
63
-
 64
64
-
 65
65
-
 66
66
-
 67
67
-
 68
68


Snapper 2690980 El manual del propietario
- Categoría
- Cortadoras de césped
- Tipo
- El manual del propietario
- Este manual también es adecuado para
en otros idiomas
- English: Snapper 2690980 Owner's manual
Artículos relacionados
Otros documentos
-
Simplicity SNAPPER (SEARS) LT2452 RIDING MOWERS Manual de usuario
-
-
Simplicity MANUAL, OPS, ECLP21602KWV Manual de usuario
-
-
-
-
-
-
-