NURSAL PL-029U Instrucciones de operación
- Tipo
- Instrucciones de operación


Table of Contents
Introduction....................................................................................................................................................1
Indications for Use.........................................................................................................................................1
Safety Warning.............................................................................................................................................. 2
Contraindications...........................................................................................................................................2
Warnings........................................................................................................................................................2
Precautions.....................................................................................................................................................2
Adverse Reactions......................................................................................................................................... 4
Environmental Condition for Transport and Storage.....................................................................................4
Symbols interpretation...................................................................................................................................5
Safety Test Standards.....................................................................................................................................5
Electromagnetic Compatibility and FCC Compliance statement................................................................ 6
Product Specifications................................................................................................................................. 12
Setup............................................................................................................................................................ 15
Operating Instruction................................................................................................................................... 16
Recommended practice................................................................................................................................17
Cleaning and Maintenance...........................................................................................................................18
Trouble Shooting......................................................................................................................................... 19
Recommended Use Positions.......................................................................................................................20
Contact Information.....................................................................................................................................21
Électrostimulateur (Appareil TENS)........................................................................................................... 22
Elektronischer Pulsstimulator (TENS Gerät)...............................................................................................27
Stimolatore Elettronico a Impulsi (Unità TENS).........................................................................................31
Estimulador eléctrico transcutáneo (Unidad de TENS)...............................................................................36

Contents of Different Language Versions
English......................................................................................................................................................1-21
French.....................................................................................................................................................22-36
German................................................................................................................................................... 27-30
Italian......................................................................................................................................................31-35
Spanish....................................................................................................................................................36-40

1
Introduction
Electronic Pulse Stimulator(TENS)delivers electric impulses to tired and sore muscles. These
different frequencies of impulses covering Transcutaneous Electrical Nerve Stimulation mimic the
action potential coming from the central nervous system to trigger contraction of the muscle. It may be
helpful in relieving aches and pains in various parts of the body such as the waist, shoulders, joints,
hands and feet.
Indications for Use
To be used for temporary relief of pain associated with sore and aching muscles in the shoulder, waist,
back, arm, and leg, due to strain from exercise or normal household and work activities.

2
Safety Warning
Contraindications
Do not use this device on patients who have a cardiac pacemaker, implanted defibrillator, or other
implanted metallic or electronic device, because this may cause electric shock, burns, electrical
interference, or death.
Do not use this device on patients whose pain syndromes are undiagnosed.
Warnings
Do not apply stimulation over the patient’s neck because this could cause severe muscle spasms
resulting in closure of the airway, difficulty in breathing, or adverse effects on heart rhythm or blood
pressure.
Do not apply stimulation across the patient’s chest, because the introduction of electrical current into
the chest may cause rhythm disturbances to the patient’s heart, which could be lethal.
Do not apply stimulation over, or in proximity to, cancerous lesions.
Do not apply stimulation when the patient is in the bath or shower.
If you have one of the following conditions, please consult with your physician before purchasing or
using this device.
Acute disease, malignant tumor, infective disease, pregnant, heart disease, high fever, abnormal blood
pressure, lack of skin sensation or an abnormal skin condition, any condition requiring the active
supervision of a physician.
Precautions
Do not use this device while driving.
Do not use this device while sleeping.
Do not use this device in high humidity areas such as a bathroom.
Keep the device away from wet, high temperature and direct-sunlight place.
Keep this device out of reach of children.
Stop using this device at once if you feel pain, discomfort, dizziness or nausea and consult your
physician.
Do not attempt to move the electrode pads while the device is operating.
Do not use the device around the heart, on the head, mouth, pudendum or blemished skin areas.
Do not apply stimulation of this device in the following conditions:
(1) across the chest because the introduction of electrical current into the chest may cause rhythm
disturbances to the heart, which could be lethal;
(2) over painful areas. Please consult with your physician before using this device if you have painful
areas;
(3) over open wounds or rashes, or over swollen, red, infected, or inflamed areas or skin eruptions (e.g.,

3
phlebitis, thrombophlebitis, varicose veins). Apply stimulation only to normal, intact, clean, healthy
skin;
(4) in the presence of electronic monitoring equipment (e.g., cardiac monitors, ECG alarms). The
electronic stimulator may not operate properly when the electrical stimulation device is in use;
(5) while operating machinery, or during any activity in which electrical stimulation can put you at risk
of injury;
(6) on children.
Be aware of the following.
(1) to consult with your physician before using this device. The simulation with the device may:
i. cause lethal rhythm disturbances to the heart in susceptible individuals;
ii. disrupt the healing process after a recent surgical procedure;
(2) that the device is not effective for pain of central origin, including headache;
(3) that the device is not a substitute for pain medications and other pain management therapies;
(4) that the device has no curative value;
(5) that the device is a symptomatic treatment and, as such, suppresses the sensation of pain that would
otherwise serve as a protective mechanism;
(6) that the long-term effects of electrical stimulation are unknown;
(7) that the user may experience skin irritation, burns or hypersensitivity due to the electrical
stimulation or electrical conductive medium (gel);
(8) if the user has suspected or diagnosed epilepsy, the user should follow precautions recommended by
his or her physician;
(9) to use caution if the user has a tendency to bleed internally, such as following an injury or fracture;
(10) use caution if stimulation is applied over the menstruating uterus;
(11) use caution if stimulation is applied over areas of skin that lack normal sensation;
(12) stop using the device if the device does not provide pain relief;
(13) use this device only with the leads, electrodes, and accessories that the manufacturer recommends.
(14) Do not share the use of the electrode pads with others.
(15) Do not use the device while it’s charging.
(16) The device contains the lithium battery. If overheating of the device occurred during the charging,
stop the charging or operation immediately and report to the seller.
(17) Dispose of the battery-containing device according to the local, state, or federal laws.
The long-term effects of electrical stimulation are unknown.
Since the effects of stimulation of the brain are unknown, stimulation should not be applied across the
head, and electrodes should not be placed on opposite sides of the head.
The safety of electrical stimulation during pregnancy has not been established.
Some patients may experience skin irritation or hypersensitivity due to the electrical stimulation or

4
electrical conductive medium (gel).
Patients with suspected or diagnosed heart disease should follow precautions recommended by their
physicians.
Patients with suspected or diagnosed epilepsy should follow precautions recommended by their
physicians.
Use caution if stimulation is applied over the menstruating or pregnant uterus.
Adverse Reactions
Patients may experience skin irritation and burns beneath the stimulation electrodes applied to the skin;
Patients may experience headache and other painful sensations during or following the application of
electrical stimulation near the eyes and to the head and face.
Patients should stop using the device and should consult with their physicians if they experience
adverse reactions from the device.
Environmental condition for normal working, transport and storage
- Normal working ambient temperature: 5~40°C
- Normal working ambient humidity: 15%~90% RH
- Store and transport ambient temperature: -25 ~70°C
- Store and transport ambient humidity: 0%~90% RH
- Atmospheric pressure: 70~106kPa

5
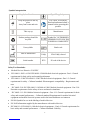
Symbols interpretation
Safety Test Standards:
Medical Devices Directive 93/42/EEC
IEC 60601-1:2005+A1:2012/EN 60601-1:2006 Medical electrical equipment - Part 1: General
requirements for basic safety and essential performance
IEC 60601-1-2:2007/EN 60601-1-2:2007 Medical electrical equipment - Part 1-2: General
requirements for safety - Collateral standard: Electromagnetic compatibility - Requirements and
tests
IEC 60601-2-10:2012/EN 60601-2-10:2000+A1:2001 Medical electrical equipment - Part 2-10:
Particular requirements for the safety of nerve and muscle stimulators
IEC 60601-1-11:2010 Medical electrical equipment -- Part 1-11: General requirements for basic
safety and essential performance -- Collateral standard: Requirements for medical electrical
equipment and medical electrical systems used in the home healthcare environment.
EN 980 Symbols for use in the labeling of medical devices
EN 1041 Information supplied by the manufacturer with medical devices
IEC/60601-1-6/ EN 60601-1-6 Medical electrical equipment – Part1-6: General requirements for
basic safety and essential performance – Collateral standard: Usability
Fragile, handle with care
Type BF applied part
Keep the product in the dry
place
Away from water and rain.
CAUTION, Avoid injury.
Read and understand owner’s
manual before operating this
product.
This way up
Manufacturer
Product package should be
recycled.
Symbol for "AUTHORISED
REPRESENTATIVE IN THE
EUROPEAN COMMUNITY"
Unrecyclable
Batch code
Date of manufacture
FDA
510(k)
FDA 510(k) cleared
Serial number
IP22
IP code of the device

6
IEC 60601-1-11/ EN 60601-1-11 Medical electrical equipment – Part 1-11: General requirements
for basic safety and essential performance – Collateral standard: Requirements for medical
electrical equipment and medical electrical systems used in home healthcare environment
IEC 62304/ EN 62304 Medical device software - Software life-cycle processes
IEC 62366/ EN 62366 Medical devices – Application of usability engineering to medical devices
ISO 10993-1 Biological evaluation of medical devices - Part 1: Evaluation and testing within a risk
management process
Electromagnetic Compatibility and FCC Compliance Statement
1) This product needs special precautions regarding electromagnetic compatibility (EMC) and needs to
be installed and put into service according to the EMC information provided, and this unit can be
affected by portable and mobile radio frequency (RF) communications equipment.
2) Do not use a mobile phone or other devices that emit electromagnetic fields, near the unit. This may
result in incorrect operation of the unit.
3) Caution: This unit has been thoroughly tested and inspected to assure proper performance and
operation!
4) Caution: This machine should not be used adjacent to or stacked with other equipment and that if
adjacent or stacked use is necessary, this machine should be observed to verify normal operation in the
configuration in which it will be used
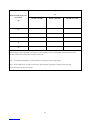
Guidance and manufacture’s declaration – electromagnetic emission
The device is intended for use in the electromagnetic environment specified below. The customer of the user of the device should
assure that it is used in such an environment.
Emission test
Compliance
Electromagnetic environment – guidance
RF emissions
CISPR 11
Group 1
The device use RF energy only for its internal function.
Therefore, its RF emissions are very low and are not likely to
cause any interference in nearby electronic equipment.
RF emission
CISPR 11
Class B
The device is suitable for use in all establishments, including
domestic establishments and those directly connected to the
public low-voltage power supply network that supplies
buildings used for domestic purposes.
Harmonic emissions
IEC 61000-3-2
Not applicable
(internal battery powered)

7
Guidance and manufacture’s declaration – electromagnetic immunity
The device is intended for use in the electromagnetic environment specified below. The customer or the user of device should assure
that it is used in such an environment.
Immunity test
IEC 60601 test level
Compliance level
Electromagnetic environment -
guidance
Electrostatic discharge
(ESD)
IEC 61000-4-2
±6 kV contact
±8 kV air
±6 kV contact
±8 kV air
Floors should be wood, concrete or
ceramic tile. If floor are covered with
synthetic material, the relative
humidity should be at least 30%.
Electrical fast
transient/burst
IEC 61000-4-4
±2 kV for power supply
lines
±1 kV for input/output
lines
Not applicable
(internal battery
powered)
Mains power quality should be that
of a typical commercial or hospital
environment.
Surge
IEC 61000-4-5
± 1 kV line(s) to line(s)
± 2 kV line(s) to earth
Not applicable
(internal battery
powered)
Mains power quality should be that
of a typical commercial or hospital
environment.
Voltage dips, short
interruptions and
voltage variations on
power supply input
lines
IEC 61000-4-11
<5% UT
(>95% dip in UT)
for 0.5 cycle
40% UT
(60% dip in UT)
for 5 cycles
70% UT
Not applicable
(internal battery
powered)
Mains power quality should be that
of a typical commercial or hospital
environment. If the user of the device
requires continued operation during
power mains interruptions, it is
recommended that the device be
powered from an uninterruptible
power supply or a battery.
Voltage fluctuations/
flicker emissions
IEC 61000-3-3
Not applicable
(internal battery powered)

8
(30% dip in UT)
for 25 cycles
<5% UT
(>95% dip in UT)
for 5 sec
Power frequency
(50Hz/60Hz) magnetic
field IEC 61000-4-8
3 A/m
3 A/m
Power frequency magnetic fields
should be at levels characteristic of a
typical location in a typical
commercial or hospital environment.
NOTE UTis the a.c. mains voltage prior to application of the test level.
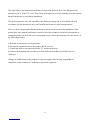
Guidance and manufacture’s declaration – electromagnetic immunity
The device is intended for use in the electromagnetic environment specified below. The customer or the user of the
device should assure that it is used in such an environment.
Immunity test
IEC 60601 test level
Compliance
level
Electromagnetic environment - guidance
Conducted RF
IEC 61000-4-6
3 Vrms
150 kHz to 80 MHz
3 Vrms
Portable and mobile RF communications equipment should be
used no closer to any part of the device, including cables, than
the recommended separation distance calculated from the
equation applicable to the frequency of the transmitter.
Recommended separation distance

9
Where Pis the maximum output power rating of the transmitter
in watts (W) according to the transmitter manufacturer and dis
the recommended separation distance in metres (m).
Field strengths from fixed RF transmitters, as determined by an
electromagnetic site survey,ashould be less than the compliance
level in each frequency range.b
Interference may occur in the vicinity of equipment marked with
the following symbol:
Radiated RF
IEC 61000-4-3
3 V/m
80 MHz to 2.5 GHz
3 V/m
NOTE 1 At 80 MHz and 800 MHz, the higher frequency range applies.
NOTE 2 These guidelines may not apply in all situations. Electromagnetic propagation is affected by absorption and reflection
from structures, objects and people.
a Field strengths from fixed transmitters, such as base stations for radio (cellular/cordless) telephones and land
mobile radios, amateur radio, AM and FM radio broadcast and TV broadcast cannot be predicted theoretically
with accuracy. To assess the electromagnetic environment due to fixed RF transmitters, an electromagnetic site
survey should be considered. If the measured field strength in the location in which the device is used exceeds the applicable
RF compliance level above, the device should be observed to verify normal operation. If abnormal performance is observed,
additional measures may be necessary, such as re-orienting or relocating the device.
b Over the frequency range 150 kHz to 80 MHz, field strengths should be less than 3 V/m.
Recommended separation distances between
portable and mobile RF communications equipment and the device .
The device is intended for use in an electromagnetic environment in which radiated RF disturbances are controlled. The customer or the
user of the device can help prevent electromagnetic interference by maintaining a minimum distance between portable and mobile RF
communications equipment (transmitters) and the device as recommended below, according to the maximum output power of the
communications equipment.

10
Rated maximum output power
of transmitter
(W)
Separation distance according to frequency of transmitter
(m)
150 KHz to 80 MHz
80 MHz to 800 MHz
800 MHz to 2.5 GHz
0.01
0.12
0.12
0.23
0.1
0.38
0.38
0.73
1
1.2
1.2
2.3
10
3.8
3.8
7.3
100
12
12
23
For transmitters rated at a maximum output power not listed above, the recommended separation distance din metres (m) can be
estimated using the equation applicable to the frequency of the transmitter, where P is the maximum output power rating of the
transmitter in watts (W) according to the transmitter manufacturer.
NOTE 1 At 80 MHz and 800 MHz, the separation distance for the higher frequency range applies.
NOTE 2 These guidelines may not apply in all situations. Electromagnetic propagation is affected by absorption and
reflection from structures, objects and people.

11
The subject device has been tested and found to comply with the limits for a Class B digital device,
pursuant to part 15 of the FCC rules. These limits are designed to provide reasonable protection against
harmful interference in a residential installation.
The product generates, uses, and can radiate radio frequency energy and, if not installed and used
accordance with the instructions, may cause harmful interference to radio communications.
However, there is no guarantee that the interference will not occur in a particular installation. If the
product does cause harmful interference to radio or television reception, which can be determined by
turning the product on or off, the user is encouraged to try to correct the interference by one or more of
the following measures:
a) Reorient or relocate the receiving antenna;
b) Increase the separation between the product and the receiver;
c) Consult the dealer or an experienced radio / TV technician for help.
d) Connect the equipment into an outlet on a circuit different from that to which the receiver is
connected.
Changes or modifications to this product not expressly approved by the party responsible for
compliance could void the user’s authority to operate the equipment.

12
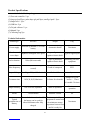
Product Specifications
Accessories included in the package.
(1).Tens unit controller * 1pc
(2).Large gel pad*2pcs; palm shape gel pad*4pcs; small gel pads * 2pcs
(3).Output wire * 3pcs
(4).USB line *1pc
(5).Gel pad collector * 1pc
(6).Manual *1pc
(7).Collecting bag*1pc
Technical Information
Model/type
PL-029U
Weight
110g
Power supply
Powered by internal 3.7V li-ion
battery
Automatic shutoff
20 minutes
Waveform and
wave shape
Biphasic rectangular wave pulse
Degree of protection
against electric shock
Type BF applied part
Pulse duration
100us (Microseconds)
Type of protection
against electric shock
Internally powered
equipment
Pulse frequency
1-100Hz (Hz=vibration per
second)
Grade of waterproof
IP22
Output Voltage
Max. 50pp ±20%(at 500ohm load)
Product life
1 year
Treatment time
10.20,30,40,50,60minutes
Lifetime for electrode
Storage for 2 year
(no use), Times
of reusable: 30 times
Output intensity
0 to 20 levels, adjustable
Mode of operation
Continuous
operation
Modes
18 auto modes
Software version
A0
Typical
operation time of
Battery
If to use both channels at level 20,
the battery can be used for
about180 minutes after fully
charged.
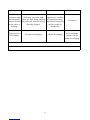
The time required for me
equipment to warm from
the minimum storage
temperature between uses
until it is ready for
30 minutes

13
intended use
Behaviour of me
equipment while
the rechargeable
internal electrical
power source is
charging:
The battery icon on the right
corner will flash during charging
and will be still with full capacity
after fully charged.
The time required for me
equipment to cool from
the maximum storage
temperature between uses
until it is ready for
intended use
15 minutes
Typical service
life of Battery
300 times of recharging
Adapter for charging
Please use output
DC5V and output
current 0.3-2.0A
adapter for charging
Note: Not intended to be sterilized.
Not for use in an OXYGEN RICH ENVIRONMENT

14
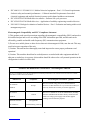
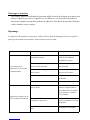
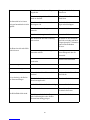
Programs
Program name
Time min.
Frequency (Hz)
Pulse Width (μs)
Mode 1
10,20,30,40,50,60
10-35
100
Mode 2
10,20,30,40,50,60
8.75-60
100
Mode 3
10,20,30,40,50,60
4-100
100
Mode 4
10,20,30,40,50,60
18-100
100
Mode 5
10,20,30,40,50,60
18-52.5
100
Mode 6
10,20,30,40,50,60
1-100
100
Mode 7
10,20,30,40,50,60
1-35
100
Mode 8
10,20,30,40,50,60
6.6-10
100
Mode 9
10,20,30,40,50,60
4-8
100
Mode 10
10,20,30,40,50,60
62.5
100
Mode 11
10,20,30,40,50,60
2
100
Mode 12
10,20,30,40,50,60
12.5-55.5
100
Mode 13
10,20,30,40,50,60
100
100
Mode 14
10,20,30,40,50,60
80
100
Mode 15
10,20,30,40,50,60
50
100
Mode 16
10,20,30,40,50,60
6
100
Mode 17
10,20,30,40,50,60
30
100
Mode 18
10,20,30,40,50,60
Combination of the above
100

15
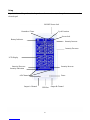
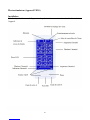
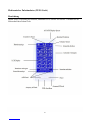
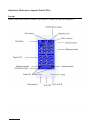
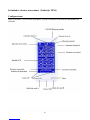
Setup
Unpack the box of the product, take the product and accessories out, and snap the connect unit onto the
electrode pad.
ON/OFF/Screen lock
Intensity Increase
Countdown Timer
Battery Indicator
LCD Display
Intensity Decrease
Intensity Indication
A/B Channel
Output A Channel
USB Port
Output B Channel
Pause
Intensity Increase
Intensity Decrease
Cycle Function
Screen lock

16
Operating instruction
The following steps are used to guide the device operation.
Electronic Pulse Stimulator (TENS) needs to be charged for up to 8 hours before the first use.
Connect a pair of electrode pads to one connecting wire by snapping them on; the other end of the
connecting wire is connected to the left output of the device. Similarly, the other pair of electrode
pads is connected to the remaining connecting wire and the right output of the device.
Attach one pair or two pair of the electrode pads to the treatment area, such as shoulder and legs.
Press the ON/OFF button for 2 seconds to turn the unit on, the unit will automatically start at Mode
1 and Channel A.
Lightly touching the screen to change mode as your like, make sure not change the mode too fast.
Before changing intensity of mode, firstly you should know which channel you are at. Since the
intensity changing of channel A and channel B is separate. If icon A is flashing, you are can
change the intensity of channel A only. If icon B is flashing, you can change the intensity of
channel B only.
If you want to change from channel A from channel B, you can press the button A/B once or you
can just simply press A or B icon on the two sides of intensity bars at bottom of the screen to
change the channel.
When certain mode has been chosen, you can change the intensity of this mode. The icon A will be
flashing, you can change the intensity of channel A now. If you want to change the intensity of
channel B, press the button A/B once or you can just simply press A or B icon, then the icon B is
flashing, now you can change the intensity of channel B only.
There are two ways to change the intensity, you can touch the icon +on the screen OR pressing the
+button on the right side of uni to increase the intensity. By touching the icon- on the screen or
press the - button on the right side of the unit, you can decrease the intensity.
When pressing the SUSPEND button, the unit will pause and there is not output till you press the
button SUSPEND again. In SUSPEND status, the intensity, mode, timer etc are not adjustable. But
the screen lock function is available.
If you like certain mode and you want to keep using it, you can simply press the cycle
icon on top of the screen, then the current mode and intensity will keep on till you stop
the cycle function by pressing the cycle icon again. The default cycle countdown time is 20
minutes, the cycle function will make the countdown time repeat again and again. You can also
reset the countdown time by yourself.
If you enjoy certain mode and don’t want to make any change further, you can press the ON/OFF
button once slightly, the screen will be locked and the backlight is off in order to save more energy,
Or press the lock icon on the screen, the screen will be locked but the backlight is still on. In
locking status, the unit is till on with intensity output but all function icons are locked, you are not

17
able to change the mode, intensity etc. It will avoid screen touching by mistake. To unlock the
screen, you can press the ON/OFF once slightly or press the lock icon on the screen.
Pressing the countdown time on the screen, you can set the timer from 10 minutes to 60 minutes.
When power bar in the battery icon disappear, the unit is going to run out power, it should be
charged as soon.
When you turn on the unit, if the unit test no load, for example you didn’t connect the unit well
with body, you are not able to adjust the intensity.
Recommended practice:
Duration suggested for each skin area is 20 min and 2 times per day. Consult with your physician
for longer and more frequent uses.
Start from the lowest intensity and gradually adjust the intensity to a comfortable level at a scale
from 1 to 20.
Good skin care is important for a comfortable use of device. Be sure the treatment site is clean of
dirt and body lotion.
Keeping the electrode in the storage bag after use will extend its lifespan. The electrode is
disposable and should be replaced when it loses the adhesiveness. To purchase additional electrodes,
please contact the seller.


19
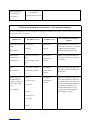
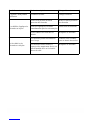
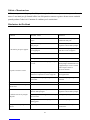
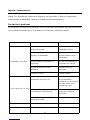
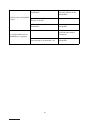
Trouble Shooting
If your device is not operating properly, please check below for common problems and suggested
solutions. If the recommended action does not solve the problem, please contact the seller.
Problem
Possible Cause
Solution
The intensity is not felt with a
very weak intensity level
Pads are not attached to the body firmly
Attach both pads firmly to
the skin
The transparent films are still stuck to
the pads
Peel off film on the adhesive
surface of pads
The pads stack together or overlap
Do not stack pads together or
overlap pads
The intensity setting is getting weak
Increase the intensity level
The battery capacity is low
Change the battery
The skin turns red or the skin
feels irritated
The adhesive surface of the pads is dirty
or dry
Wash adhesive surface of
pads gently with your
fingertips for about 3 seconds
under slow running water
The therapy time is too long or the
intensity is set too high
Reduce the application time
or reduce the intensity
The electrode pad surface if worm out
Replace electrode pad
No power source
The battery capacity is depleted
Change the battery
Power cuts off during use
The battery is weak
Change the battery
It is difficult to attach the pad
to the skin
Have you remove the transparent film
from the pad?
Peel off film on the adhesive
surface of pads
Was the pad applied immediately after
washing?
Dry the pad
Is the adhesive surface of the pad
damaged?
Replace the pad
Adhesive surface of pad is not
sticky
Pads get deteriorative
Contact the vendor for
replacements.
Were the pads stored under high
temperature, high humidity,or sunshine
Replace the pad.


23
Instructions d’utilisation
Les points suivants vous guideront dans l’utilisation de l’appareil.
Avant la première utilisation, rechargez l’électrostimulateur (TENS) pendant 8 heures.
Branchez une paire d’électrodes à un des fils électriques de connexion, puis branchez le fil
électrique au port de sortie situé à gauche de l’appareil. De même, branchez une autre paire
d’électrodes à l’autre fil électrique de connexion, puis branchez le fil électrique au port de sortie
situé à droite de l’appareil.
Appliquez une paire (ou les deux paires) d’électrodes sur les zones que vous souhaitez traiter,
par exemple les épaules et les jambes.
Appuyez sur le bouton ON/OFF pendant 2 secondes pour allumer l’appareil. Ce dernier
démarre automatiquement en mode 1 sur le canal A.
Appuyez légèrement sur l’écran pour changer le mode de votre choix, assurez-vous de ne pas
changer le mode trop rapidement.
Avant de changer l’intensité du mode, vous devez savoir quel canal est utilisé, car le
changement d’intensité du canal A et du canal B est séparé. Si l’icône A clignote, vous pouvez
uniquement modifier l’intensité du canal A. Si l’icône B clignote, vous pouvez uniquement
modifier l’intensité du canal B.
Si vous souhaitez passer du canal A au canal B, vous pouvez appuyer sur le bouton A/B une
fois ou simplement appuyer sur l’icône A ou B des deux côtés des barres d’intensité au bas de
l’écran pour changer le canal.
Lorsqu’un mode est sélectionné, vous pouvez modifier l’intensité de ce mode. Lorsque l’icône
A clignote, vous pouvez changer l’intensité du canal A. Si vous souhaitez modifier l’intensité
du canal B, appuyez une fois sur la touche A/B, ou appuyez simplement sur l’icône A ou B,
puis l’icône B clignote, vous pouvez maintenant modifier l’intensité du canal B.
Il existe deux façons de modifier l’intensité, vous pouvez toucher l’icône + sur l’écran OU
appuyer sur le bouton + au côté droit de l’appareil pour augmenter l’intensité. En touchant
l’icône - sur l’écran ou en appuyant sur la touche - du côté droit de l’appareil, vous pourrez
également diminuer l’intensité.
Lorsque vous appuyez sur le bouton PAUSE, l’électro-stimulation s’arrête jusqu’à ce que vous
appuyiez à nouveau sur le bouton PAUSE. Lorsque l’appareil est en PAUSE, l’intensité, le
mode, la minuterie, etc. ne sont pas réglables, mais la fonction de verrouillage de l’écran reste
disponible.

24
Si vous aimez un certain mode et que vous souhaitez continuer à l’utiliser, vous pouvez
simplement appuyer sur l’icône de fonctionnement en boucle en haut de l’écran,
puis le mode et l’intensité sélectionnés continueront jusqu’à ce que vous arrêtiez le
fonctionnement en boucle en appuyant à nouveau sur l’icône. Par défaut, le fonctionnement en
boucle est paramétré sur une minuterie de 20 minutes et à la fin du compte à rebours le mode se
répète encore et encore. Vous pouvez également réinitialiser manuellement la minuterie.
Si vous appréciez un certain mode et que vous ne souhaitez pas effectuer d’autres modifications,
vous pouvez appuyer une fois légèrement sur le bouton ON/OFF, l’écran sera verrouillé et le
rétroéclairage s’éteindra afin d’économiser plus d’énergie. SINON, appuyez sur l’icône de
verrouillage sur l’écran, l’écran sera verrouillé, mais le rétroéclairage restera allumé. Lorsque
l’appareil est verrouillé, il est allumé et produit de l’intensité, mais toutes les icônes de fonction
sont verrouillées, vous ne pouvez pas modifier le mode, l’intensité, etc., ceci afin d’éviter
d’appuyer sur l’écran par erreur. Pour déverrouiller l’écran, vous pouvez appuyer une fois
légèrement sur le bouton ON/OFF ou appuyer sur l’icône de verrouillage à l’écran.
En appuyant sur la minuterie à l’écran, vous pouvez régler la minuterie de 10 minutes à 60
minutes.
Lorsque la barre de l’icône de la batterie disparaît, l’appareil va manquer de batterie, il doit être
rechargé dès que possible.
Lorsque vous allumez l’appareil et qu’il ne produit aucun courant électrique c’est peut-être que
les électrodes sont mal branchées, si tel est le cas vous ne pouvez pas ajuster l’intensité.
Utilisation recommandée :
La durée et fréquence d’utilisation recommandée du traitement pour chaque zone est de 20
minutes 2 fois par jour.
Commencez une séance au niveau d’intensité le plus faible, puis augmentez progressivement le
niveau d’intensité (par paliers allant du niveau 1 au niveau 20) afin d’atteindre un niveau
d’intensité confortable.
Une bonne hygiène de peau est essentielle pour pouvoir utiliser l’appareil confortablement.
Assurez-vous que la zone traitée est parfaitement propre et ne présente aucun résidu de lotion
pour le corps.
Pour augmenter la durée de vie des électrodes, conservez-les dans leur sac de rangement après
chaque utilisation. Les électrodes sont jetables et doivent être remplacées lorsqu’elles perdent
leur adhésivité. Pour obtenir de nouvelles électrodes, veuillez contacter votre revendeur.

25
Nettoyage et entretien
Tout d’abord, utilisez un chiffon doux légèrement imbibé d’eau ou de détergent au ph neutre pour
nettoyer l’appareil, puis essuyez l’appareil avec un chiffon sec. Les électrodes sont jetables et
doivent être remplacées lorsqu’elles perdent leur adhésivité. Pour obtenir de nouvelles électrodes,
veuillez contacter votre revendeur.
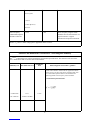
Dépannage
Si l’appareil ne fonctionne pas correctement, veuillez vérifier le guide de dépannage suivant. Si ce guide ne
permet pas de résoudre votre problème, veuillez contacter votre revendeur.
Problème
Cause possible
Solution
Je ne ressens pas les
pulsations avec les niveaux
d’intensité faibles
Les électrodes n’adhèrent pas
fermement à la peau
Appliquez les électrodes de
sorte qu’elles adhèrent
fermement à la peau
Vous n’avez pas retiré le film de
protection des électrodes
Retirez le film de protection
des électrodes
Les électrodes sont appliquées les unes
sur les autres
Ne placez pas les électrodes
les unes sur les autres
Le niveau d’intensité est trop faible
Augmentez le niveau
d’intensité
Le niveau de batterie est faible
Rechargez la batterie
Apparition de rougeurs sur la
peau et sensation d’irritation
La surface adhésive des électrodes est
sale ou sèche
Avec le bout du doigt,
nettoyez soigneusement la
face adhésive des électrodes
en les passant 3 secondes à
l’eau courante
Le temps d’utilisation est trop long ou
l’intensité est trop élevée
Réduisez la durée de la
séance ou diminuez le niveau
d’intensité
La surface adhésive des électrodes est
usée
Remplacez les électrodes

26
Pas d’alimentation.
La batterie est épuisée
Changez la batterie
L’appareil s’éteint pendant
l’utilisation
La batterie est faible
Changez la batterie
Il est difficile d’appliquer les
électrodes sur la peau
Vous n’avez pas retiré le film de
protection des électrodes
Retirez le film de protection
des électrodes
Vous avez appliqué les électrodes
immédiatement après les avoir nettoyées
Faites sécher les électrodes
La face adhésive des électrodes est
abîmée
Remplacez les électrodes
La face adhésive des
électrodes ne colle plus
Les électrodes perdent leur adhésivité
avec l’usage
Contactez votre revendeur
pour en obtenir de nouvelles
Les électrodes ont été stockées et
exposées à des températures élevées, un
taux d’humidité élevé ou à la lumière
directe du soleil
Remplacez les électrodes


28
Bedienungshinweise
Die folgenden Schritte erklären Ihnen die Verwendung des Geräts.
Der elektronische Pulsstimulator (TENS) muss sich bis zu 8 Stunden aufladen, bevor er zum ersten
Mal verwendet werden kann.
Bringen Sie ein Paar der Elektroden-Pads mit den Kabeln an und schließen Sie diese an den linken
Ausgang des Geräts. Wiederholen Sie das mit den restlichen Pads und Kabel und dem rechten
Ausgang des Geräts.
Bringen Sie die zwei Paare der Elektroden-Pads im Behandlungsbereich an (z.B. Schulter oder
Beine).
Betätigen Sie die AN/AUS Taste für 2 Sekunden, um das Gerät einzuschalten. Das Gerät beginnt
automatisch im Modus 1 und Kanal A.
Beühren Sie sanft das Display, um den Modus nach Belieben zu ändern. Gehen Sie sicher, den
Modus nicht zu schnell zu wechseln.
Vor dem Ändern der Intensität des Modus sollten Sie zuerst wissen, in welchem Kanal Sie sich
befinden. Denn die Intensität des Kanals A und B ändert sich separate. Falls Symbol A blinkt,
können Sie nur die Intensität von Kanal A ändern. Falls Symbol B blinkt, können Sie nur die
Intensität des Kanals B ändern.
Wenn Sie von Kanal A zu Kanal B wechseln möchten, drücken Sie einmalig die Taste A/B oder
tippen auf das A/B Symbol an den zwei Intensitätsleisten am unteren Bildschirmrand.
Wenn ein bestimmter Modus ausgewählt wurde, können Sie die Intensität dieses Modus anpassen.
Wenn das Symbol A blinkt, können Sie die Intensität des Kanals A ändern. Wenn Sie die Intensität
des Kanals B anpassen wollen, drücken Sie einmalig die A/B Taste oder tippen Sie auf das A oder
B Symbol und wenn das B Symbol blinkt, können Sie die Intensität des Kanals B anpassen.
Es gibt zwei Wege zur Anpassung der Identität. Sie können das Symbol + auf dem Display
antippen ODER die + Taste auf der rechten Seite des Geräts betätigen. Gleiches gilt für die –
Tasten auf der Fernbedienung oder dem Display, um die Intensität zu verringern.
Wenn Sie die SUSPEND Taste drücken, wird das Gerät stoppen, bis Sie die Taste erneut drücken.
In diesem Status kann der Modus, die Intensität oder der Timer nicht angepasst werden. Die
Display-Sperre ist jedoch weiterhin verfügbar.
Wenn Sie einen bestimmten Modus mögen und diesen verwenden möchen, können Sie einfach auf
das Kreissymol oben am Display klicken und der aktuelle Modus und die Intensität
werden beibehalten, bis Sie diesen Modus per Klick auf die Kreistaste wieder beenden. Der
standardmäßige Schleifen-Countdown beträgt 20 Minuten. Die Schleifen-Funktion sorgt dafür, dass
die Countdown-Zeit immer wieder wiederholt wird. Sie können die Countdown-Zeit eigenständig
zurückstellen.

29
Wenn Ihnen ein bestimmter Modus gefällt und keine weiteren Änderungen vornehmen möchten,
können Sie die AN/AUS Taste betätigen und das Display wird gesperrt. Das Hintergrundlicht geht
nun aus, um Energie zu sparen. Oder drücken Sie Sperrtaste und das Display wird blockiert. Nun ist
das Hintergrundlicht jedoch noch an. Während der Sperre nutzt das Gerät die vorherige Intensität,
aber alle anderen Funktionen sind gesperrt. Sie können den Modus, die Intensität usw. nicht ändern.
So vermeiden Sie unbeabsichtigte Änderungen per Berührung des Displays. Um das Display zu
entsperren, können Sie die AN/AUS Taste drücken oder die Sperrtaste auf dem Display drücken.
Drücken Sie die Countdown-Zeit auf dem Display, um den Timer von 10 bis zu 60 Minuten
einzustellen.
Wenn die Energieanzeige verschwindet, wird das Gerät keine Leistung mehr haben. Es sollte
schnellstmöglich aufgeladen werden.
Wenn Sie das Gerät einschalten und die Kabel nicht gut mit dem Gerät verbunden sind, können Sie
die Intensität nicht anpassen.
Empfohlene Anwendung:
Die empfohlene Anwendungsdauer pro Hautbereich beträgt 20 Minuten zweimal pro Tag.
Besprechen Sie dies auch mit Ihrem Arzt für längere Verwendungen.
Beginnen Sie bei der geringsten Intensität und passen Sie die Intensität langsam von 1 bis 20 an.
Eine gute Hautpflege ist wichtig, um das Gerät bequem nutzen zu können. Stellen Sie sicher, dass
die Haut sauber ist und dass keine Cremes oder Lotions aufgetragen sind.
Durch das Lagern der Elektroden-Pads in den Taschen verlängern Sie deren Lebensdauer. Die
Elektroden können entsorgt werden und sollten ersetzt werden, wenn sie nicht mehr kleben.
Kontaktieren Sie den Verkäufer, um weitere Elektroden-Pads zu kaufen.
Reinigung und Pflege
Bitte nutzen Sie ein Tuch, um das Gerät zu reinigen und nutzen Sie dann ein trockenes Tuch, um es
trocken zu wischen. Die Elektroden sind wegwerfbar und sollten ersetzt werden, wenn sie nicht mehr
kleben. Kontaktieren Sie den Verkäufer für Ersatz.
Problembehandlung
Wenn Ihr Gerät nicht normal funktioniert, finden Sie hier die Lösungen zu häufigen Problemen. Falls
dies nicht hilft, kontaktieren Sie bitte den Verkäufer.
Problem
Mögliche Ursache
Lösung

30
Die Intensität ist bei einem
geringen Intensitätslevel nicht
spürbar.
Die Pads sind nicht fest am Körper
angebracht.
Bringen Sie beide Pads
korrekt an
Die durchsichtigen Schutzfilme sind
noch an den Pads.
Film auf Klebefläche oder
Pads lösen
Die Pads stecken zusammen oder
überlappen sich.
Pads nicht übereinander
legen oder überlappen
Die Intensitätseinstellung ist zu
schwach.
Intensität erhöhen
Die Batterieleistung ist zu schwach
Batterie aufladen
Die Haut rötet sich oder fühlt
sich irritiert an
Die Klebefläche der Pads ist dreckig
oder trocken
Waschen Sie die Oberfläche
der Pads vorsichtig mit Ihren
Fingerspitzen für 3 Sekunden
unter leicht fließendem
Wasser.
Die Behandlungszeit ist zu lang oder die
Intensität zu hoch
Verringern Sie die
Anwendungszeit oder die
Intensität
Die Elektro-Pad Oberfläche ist
verbraucht
Elektro-Pad austauschen
Keine Stromquelle
Die Batterie ist leer
Ersetzen Sie die Batterie
Stromunterbrechung
Die Batterie ist schwach
Ersetzen Sie die Batterie
Es ist schwierig, das Pad an
der Haut anzubringen
Haben Sie den Schutzfilm vom Pad
entfernt?
Nehmen Sie den Schutzfilm
der Pads ab
Wurde das Pad direkt nach dem
Waschen angebracht?
Trocknen Sie die Pads
Ist die Klebefläche der Pads beschädigt?
Ersetzen Sie die Pads
Die Klebefläche klebt nicht
Die Pads sind alt
Kontaktieren Sie den
Verkäufer für Ersatz
Die Pads wurden bei hoher Temperatur
oder Luftfeuchtigkeit oder direkter
Sonneneinstrahlung gelagert.
Ersetzen Sie die Pads


32
Istruzioni operative
Per il funzionamento del dispositivo svolgere i seguenti passi:
Lo Stimolatore Elettronico a Impulsi (TENS) deve essere messo in carica fino a 8 ore prima del
primo utilizzo.
Collegare un paio di elettrodi su un cavetto di collegamento fissandoli a scatto; l'altra estremità del
cavetto è collegata all'uscita sinistra del dispositivo. Allo stesso modo, collegare l'altra coppia di
elettrodi sull’altro cavetto e all'uscita destra del dispositivo.
Attaccare una coppia o due coppie di pastiglie per elettrodi sull'area di trattamento, come spalle e
gambe.
Premere il tasto ON/OFF per 2 secondi per accendere l'unità, l'unità inizia automaticamente nel
Modo 1 e utilizza il Canale A.
Toccare leggermente lo schermo per modificare il Modo come si desidera, assicurarsi di non
modificare il Modo troppo rapidamente.
Per modificare l'intensità del Modo, bisogna prima stabilire quale canale è attivo. Infatti, la
modifica d'intensità del canale A e quella del canale B sono separate. Se l'icona A lampeggia, si può
modificare solo l'intensità del canale A. Se l'icona B lampeggia, si può modificare solo l'intensità
del canale B.
Se si desidera passare dal canale A al canale B e viceversa, si può premere il tasto A/B una volta o
semplicemente premere l'icona A o quella B sui due lati delle barre di intensità nella parte inferiore
dello schermo.
Una volta scelto un determinato Modo, è possibile modificarne l'intensità. Se l'icona A lampeggia,
si può modificare l'intensità di questo canale subito. Se si desidera modificare l'intensità del canale
B, premere il pulsante A/B una volta o semplicemente premere l'icona A o quella B, l'icona B
lampeggia, ed è ora possibile modificare solo l'intensità del canale B.
Si può cambiare l'intensità in due modi: si può toccare l'icona + sullo schermo OPPURE premere il
tasto + sul lato destro dell’unità per aumentare l'intensità. Toccando l'icona - sullo schermo, o
premendo il tasto - sul lato destro dell'unità, si può ridurre l'intensità.
Quando si preme il tasto SUSPEND, l'apparecchio va in pausa e non è visualizzata alcuna uscita
finché non si preme di nuovo SUSPEND. Nello stato SUSPEND, l'intensità, il modo, il timer, ecc.
non si possono variare. Tuttavia, la funzione blocco dello schermo è disponibile.
Se piace un determinato Modo e si vuole continuare a usarlo, si può semplicemente premere l’icona
ripetizione ciclo in alto nello schermo; così il modo e l’intensità correnti saranno
mantenuti fino all’interruzione della ripetizione del ciclo, premendo di nuovo sull’icona. Il timer
inverso per il ciclo è di 20 minuti per default; attivando la funzione ciclo il timer inverso sarà
ripristinato ripetutamente. Si può anche resettare il timer inverso manualmente.

33
Se piace un determinato Modo e non si desidera modificarlo, si può premere leggermente il tasto
ON/OFF, lo schermo si blocca e la retroilluminazione si spegne per risparmiare energia, oppure,
premendo l'icona di blocco, lo schermo si blocca ma la retroilluminazione resta attiva. Nello stato
di blocco, l'unità mantiene l’intensità di uscita, ma le icone delle funzioni si bloccano e non è
possibile modificare il modo, l'intensità, ecc. Con il blocco si evitano modifiche indesiderate
dovute al tocco accidentale dello schermo. Per sbloccare lo schermo, si può premere leggermente il
tasto ON/OFF o l'icona di blocco sullo schermo.
Premendo il timer inverso sullo schermo si può impostare la durata da 10 minuti a 60 minuti.
Quando la barra di alimentazione nell'icona della batteria scompare, l'unità sta per restare priva di
alimentazione e la batteria deve essere ricaricata non appena possibile.
Quando si accende l'unità e non viene rilevato alcun carico, ad esempio l'unità non è stata collegata
correttamente al corpo, non è possibile modificare l'intensità.
Raccomandazioni per l’Uso:
La durata suggerita per ogni zona della pelle è di 20 min. per 2 volte al giorno. Consultare il medico
per usi più lunghi e più frequenti.
Iniziare con l'intensità minima e regolare gradualmente a un livello confortevole in una scala da 1 a
20.
Una buona cura della pelle è importante per un utilizzo confortevole del dispositivo. Assicurarsi
che il punto di applicazione sia pulito e privo di lozioni per il corpo.
Tenere gli elettrodi nella custodia dopo l'uso garantirà una maggiore durata. Gli elettrodi sono usa e
getta e devono essere sostituiti quando perdono l'adesività. Per acquistare nuovi elettrodi, si prega
di contattare il venditore.

34
Pulizia e Manutenzione
Utilizzare un panno umido per pulire il dispositivo, quindi utilizzare un panno asciutto per strofinare di
nuovo. I cuscinetti per gli elettrodi offerti con il dispositivo sono usa e getta e devono essere sostituiti
quando perdono l’adesività. Contattare il venditore per le sostituzioni.
Risoluzione dei Problemi
Problema
Possibile Causa
Soluzione
L’intensità si percepisce appena
I cuscinetti non sono attaccati saldamente al
corpo
Fissare entrambe le pastiglie
saldamente alla pelle
Le pellicole trasparenti sono ancora attaccate
alle pastiglie
Staccare la pellicola dalla
superficie adesiva delle pastiglie
Le pastiglie sono una sull’altra o si
sovrappongono
Non mettere le pastiglie una
sull’altra o non sovrapporle
L'impostazione di intensità è debole
Aumentare il livello d’intensità
La capacità della batteria è bassa
Sostituire la batteria
La pelle si arrossa o si irrita
La superficie adesiva delle pastiglie è sporca
o secca
Lavare la superficie adesiva
delle pastiglie delicatamente con
i polpastrelli per circa 3 secondi
sotto l'acqua corrente a
pressione minima
Il tempo di terapia è troppo lungo o
l'intensità è impostata su valori troppo alti
Ridurre la durata o l’intensità
dell’applicazione
La superficie delle pastiglie degli elettrodi è
consumata
Sostituire le pastiglie degli
elettrodi
Non c’è alimentazione
La batteria è esaurita
Sostituire la batteria
L’alimentazione si interrompe
durante l'uso
La batteria è debole
Sostituire la batteria
È difficile attaccare le pastiglie
alla pelle
La pellicola trasparente di protezione è stata
rimossa dalle pastiglie?
Staccare la pellicola dalla
superficie adesiva delle pastiglie
Le pastiglie sono state applicate subito dopo
essersi lavati?
Asciugare le pastiglie
La superficie adesiva delle pastiglie è
danneggiata?
Sostituire le pastiglie
La superfice delle pastiglie non è
adesiva
Le pastiglie sono deteriorate
Contattare il venditore per la
sostituzione

35
Se il dispositivo non funziona correttamente, controllare nella tabella seguente i problemi usuali e le
soluzioni suggerite. Se l'azione consigliata non risolve il problema, si prega di contattare il venditore.
Le pastiglie sono state conservate a
temperatura elevata, esposte a forte umidità
o alla luce diretta del sole?
Sostituire le pastiglie


37
Instrucciones de operación
Los siguientes pasos lo guiarán en el funcionamiento del dispositivo.
El estimulador eléctrico transcutáneo (TENS) debe cargarse hasta 8 horas antes del primer uso.
Conecte un par de almohadillas de electrodos a un cable de conexión. El otro extremo del hilo de
conexión debe estar conectado a la salida izquierda del dispositivo. Así como el otro par de
almohadillas de electrodo debe estar conectado al cable de conexión restante y a la salida derecha
del dispositivo.
Conecte un par o dos pares de electrodos a la zona de tratamiento, como en el hombro y las piernas.
Pulse el botón de ON / OFF durante 2 segundos para encender la unidad. La unidad comenzará
automáticamente en el modo 1 y en el canal A.
Toque ligeramente la pantalla para cambiar el modo a su gusto, asegúrese de no cambiar el modo
demasiado rápido.
Antes de cambiar la intensidad del modo, primero debe saber en qué canal se encuentra, ya que el
cambio de intensidad del canal A y del canal B está separado. Si el icono A está parpadeando, sólo
puede cambiar la intensidad dentro del canal A. Si el icono B está parpadeando, sólo puede cambiar
la intensidad dentro del canal B.
Si desea cambiar del canal A al canal B, presione el botón de A / B una vez o simplemente puede
presionar el icono A o B en los dos lados de las barras de intensidad en la parte inferior de la
pantalla para cambiar el canal.
Cuando haya seleccionado cierto modo, cambie la intensidad del modo. El icono A parpadeará, y
podrá cambiar la intensidad del canal A. Si desea cambiar la intensidad del canal B, presione el
botón de A / B una vez o simplemente presione el icono A o B, y el icono B parpadeará para que
pueda cambiar la intensidad dentro del canal B.
Hay dos maneras de cambiar la intensidad, tocando el icono + en la pantalla o, presionando el botón
+ en el lado derecho de unidad para aumentar la intensidad. Al tocar el icono en la pantalla o
presionar el botón - en el lado derecho de la unidad, podrá disminuir la intensidad.
Al presionar el botón de SUSPEND, la unidad se detendrá y podrá volver a activarla presionando el
botón de SUSPEND de nuevo. En el estado de SUSPEND, la intensidad, el modo, el temporizador,
etc., no son ajustables pero la función de bloqueo de pantalla sí.
• Si está cómodo con algún modo y desea seguir usándolo, simplemente puede presionar el icono de
ciclo en la parte superior de la pantalla, el modo actual y la intensidad se mantendrán
hasta que detenga la función del ciclo pulsando de nuevo el icono de ciclo. El tiempo regresivo del
ciclo está predeterminado por 20 minutos, la función de ciclo hará que el tiempo regresivo se
repita una y otra vez. También puede restablecer el tiempo regresivo usted mismo.
• Si le gusta algún modo y no desea hacer ningún cambio adicional, puede presionar ligeramente el
botón de ON / OFF, la pantalla se bloqueará y la luz de fondo se apagará para ahorrar energía. O

38
también presione el icono de bloqueo en la pantalla, esto hará que la pantalla se bloquee pero la luz de
fondo se mantendrá encendida. En el estado del bloqueo, la unidad está encendida con la salida de la
intensidad pero todos los iconos de la función están bloqueados, no podrá cambiar el modo, la
intensidad ni más. Esto evitará que toque la pantalla por error. Para desbloquear la pantalla, presione
ligeramente una vez la tecla ON / OFF o pulse el icono de bloqueo en la pantalla.
• Si pulsa el tiempo regresivo de la pantalla, puede ajustar el temporizador de 10 minutos a 60 minutos.
• Cuando la barra de energía en el icono de la batería desaparezca, la unidad se descargará y deberá
cargarla pronto.
• Cuando encienda la unidad, si ésta no carga, por ejemplo, que no haya conectado bien la unidad con
el cuerpo, no podrá ajustar la intensidad.
Uso recomendado:
• La duración sugerida para cada área de la piel es de 20 min y 2 veces al día. Consulte a su médico
para usos más largos y frecuentes.
• Comience desde la intensidad más baja y gradualmente ajústela a un nivel cómodo en una escala de 1
a 20.
• Un buen cuidado de la piel es importante para un uso cómodo del dispositivo. Asegúrese de que el
sitio de tratamiento no esté sucio ni tenga loción para el cuerpo.
• Mantenga el electrodo en la bolsa de almacenamiento después de cada uso para prolongar su vida útil.
El electrodo es desechable y debe ser reemplazado cuando pierde la adhesividad. Para comprar
electrodos adicionales, contacte al vendedor.

39
impieza y mantenimiento
Utilice el paño para limpiar el dispositivo primero y, después utilice un paño seco para volverlo a
limpiar. Los electrodos que vienen con el dispositivo son desechables, y deben ser reemplazados
cuando pierdan su adhesividad. Contacte al vendedor para obtener reemplazos.
Resolución de problemas
Si el dispositivo no funciona correctamente, revise las soluciones más comunes que puede utilizar para
resolver algunos problemas que se le presenten. Si no funcionan, consulte al vendedor.
Problema
Posible causa
Solución
La intensidad es muy débil
Las almohadillas no están sujetas
firmemente al cuerpo
Conecte firmemente ambas
almohadillas a la piel
Las películas transparentes todavía están
pegadas a las almohadillas
Quite la película sobre la
superficie adhesiva de las
almohadillas
Las almohadillas están pegadas o se
superponen
No junte las almohadillas o
sobreponga una con otra
El ajuste de intensidad se está
debilitando
Aumente el nivel de
intensidad
La batería está baja
Cambie la batería
La piel se pone roja o se irrita
La superficie adhesiva de las
almohadillas está sucia o seca
Lave la superficie adhesiva
de las almohadillas
suavemente con las yemas de
los dedos durante unos 3
segundos bajo agua
El tiempo de terapia es demasiado largo
o la intensidad es demasiado alta
Reduzca el tiempo de
aplicación o reduzca la
intensidad
La superficie de la almohadilla del
electrodo está salida
Reemplace el electrodo
No hay fuente de energía
La batería está baja
Cambie la batería
La energía se corta durante el
uso
La batería está baja
Cambie la batería

40
Es difícil poner la almohadilla
a la piel
¿Ya quitó la película transparente de la
almohadilla?
Quite la película sobre la
superficie adhesiva de las
almohadillas
¿Aplicó la almohadilla inmediatamente
después del lavado?
Seque la almohadilla
¿Está dañada la superficie adhesiva de la
almohadilla?
Vuelva a colocar la
almohadilla
La superficie adhesiva de la
almohadilla no es pegajosa
Las almohadillas están deterioradas
Póngase en contacto con el
proveedor para comprar
reemplazos.
Se almacenaron las almohadillas a una
alta temperatura, alta humedad, o sol
Vuelva a colocar la
almohadilla

-
 1
1
-
 2
2
-
 3
3
-
 4
4
-
 5
5
-
 6
6
-
 7
7
-
 8
8
-
 9
9
-
 10
10
-
 11
11
-
 12
12
-
 13
13
-
 14
14
-
 15
15
-
 16
16
-
 17
17
-
 18
18
-
 19
19
-
 20
20
-
 21
21
-
 22
22
-
 23
23
-
 24
24
-
 25
25
-
 26
26
-
 27
27
-
 28
28
-
 29
29
-
 30
30
-
 31
31
-
 32
32
-
 33
33
-
 34
34
-
 35
35
-
 36
36
-
 37
37
-
 38
38
-
 39
39
-
 40
40
-
 41
41
-
 42
42
-
 43
43
-
 44
44


NURSAL PL-029U Instrucciones de operación
- Tipo
- Instrucciones de operación
en otros idiomas
- français: NURSAL PL-029U Mode d'emploi
- italiano: NURSAL PL-029U Istruzioni per l'uso
- English: NURSAL PL-029U Operating instructions
- Deutsch: NURSAL PL-029U Bedienungsanleitung
Otros documentos
-
Terraillon Trio Care El manual del propietario
-
-
Sharper Image Cordless T.E.N.S. Massager El manual del propietario
-
-
Beurer EM44 El manual del propietario
-
Drive Medical Padded Swivel Seat Cushion Manual de usuario
-
 PAINGONE 15229690 Instrucciones de operación
-
 TensCare Sonic Stim + Manual de usuario
-
 Compex FIT Manual de usuario


