Energizer 44577 Color-Changing Wireless Remote 12 Inch Light Bar Manual de usuario
- Tipo
- Manual de usuario

BATTERY INSTALLATION:
Open the baery compartment on the back of the light by sliding
the back cover in the direction of the arrow. Insert 6 AA baeries,
noting polarity. Replace cover by sliding in opposite direction.
REMOTE:
NOTE: Remove battery isolation tab for first time use.
To replace exhausted baery, unscrew the baery door on the
back of the remote. Insert 1 CR2032 baery, noting polarity.
Replace the cover and screw back in.
REMOTE OPERATION:
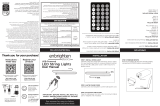
NOTE: Switch to "RF" for remote control functions (See Fig. 1).
1. On the remote, press the “ON” buon to turn the lights on. The
default seing is white.
2. Pressing the “FADE” buon will slowly cycle through the
spectrum of colors.
3. Press the “WHITE” buon to switch the lights back
to white.
4. Use the “+” and “-” buons to brighten or dim the lights.
5. The “R,” “G” and “B” buons stand for red, green and blue.
These buons allow you to either select one of these colors or
blend them to select the desired color.
a. Hold the “R,” “G” or “B” buon for three seconds to go
directly to that color
b. Press and release the buons repeatedly to move through
the RGB spectrum one color at a time.
c. Press and release the R, G and B buons in any combination
to create custom colors.
6. The “SAVE” buon allows you to quickly return to your favorite
color. Once the desired color is found, hold the “SAVE” buon
until it flashes. The color will now be easily selectable by
pressing the “SAVE” buon.
7. The “15,” “30,” “45” and “60” buons automatically turn
the lights o aer the number of minutes indicated
on the buon.
MANUAL OPERATION:
1. Move switch to ON position to turn the light on. The only color
option in manual operation is white.
2. Move switch to OFF position to turn the light o.
MOUNTING INSTRUCTIONS:
NOTE: Mounting template is provided under the product.
To mount light: Remove baery cover and mount in desired
location using screws and the included mounting template or
double-sided tape. Reaach light to mounted baery cover.
Anchors are included for installing screws in the sheetrock.
NOTE: Battery door may remain mounted when changing
batteries.
Functional range may be adversely aected by one or more of the
following factors: weather, radio frequency interference, low battery or
obstructions between the transmitter and receiver.
FCC NOTE: The manufacturer is not responsible for any radio or TV interference caused
by unauthorized modifications to this equipment. Such modifications could void the user’s
authority to operate the equipment.
FCC STATEMENT: This device complies with Part 15 of the FCC rules. Operation is subject
to the following two conditions: (1) this device may not cause harmful interference, and (2)
this device must accept any interference received, including interference that may cause
undesired operation. This device must not be co-located or operating in conjunction with
any other antenna or transmier. This equipment has been tested and found to comply
with the limits for a Class B digital device, pursuant to Part 15 of the FCC Rules. These limits
are designed to provide reasonable protection against harmful interference in a residential
installation. This equipment generates, uses and can radiate radio frequency energy and, if
not installed and used in accordance with the instructions, may cause harmful interference
to radio communications. However, there is no guarantee that interference will not occur
in a particular installation. If this equipment does cause harmful interference to radio or
television reception, which can be determined by turning the equipment o and on, the user
is encouraged to try to correct the interference by one or more of the following measures:
•Reorient or relocate the receiving antenna.
•Increase the separation between the equipment and receiver.
• Connect the equipment into an outlet on a circuit dierent from that to which the receiver
is connected.
•Consult the dealer or an experienced radio/TV technician for help.
WARNING: Changes or modifications to this unit not expressly approved by the party
responsible for compliance could void the user's authority to operate the equipment.
Color-Changing Wireless Remote
12" Light Bar
44577, 44578 EnSp Manual
11/20/20 MS v1
Fig. 1
RF
ON OFF
WHITE
15 30
45
60
++
--
RG
B
3
1
2
4
6
5
7
FAD E
SAVE
©2020 Energizer. Energizer and certain graphic designs are trademarks
of Energizer Brands, LLC and related subsidiaries and are used under
license by Jasco Products Company, LLC.
Contact our U.S.-based Consumer Care at 1-800-654-8483 between
7AM-8PM CST.
90-day warranty. Visit www.byjasco.com for warranty details.
MADE IN CHINA/HECHO EN CHINA
READ IT
OR WATCH IT
Read instructions or watch
easy-to-follow video.
Scan QR code or visit
https://byjasco.com/44577i
Battery Operated Light Bar, Color Changing remote control

INSTALACIÓN DE PILAS:
Abra el compartimento de las pilas ubicado en la parte posterior de la
luz deslizando la tapa en el sentido de la flecha. Coloque 6 pilas “AA”,
según la polaridad. Vuelva a colocar la tapa deslizándola en sentido
opuesto.
REMOTO:
NOTA: Para el primer uso, quite la cinta aislante de la pila.
Para cambiar las pilas, desatornille el compartimento ubicado en la
parte trasera del control remoto. Coloque 1 pila CR2032, teniendo en
cuenta el sentido de la polaridad. Vuelva a colocar la tapa y el tornillo.
FUNCIONAMIENTO REMOTO:
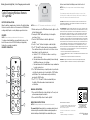
NOTA: cambie a "RF" para las funciones de control remoto (Ver Fig. 1).
1. En el remoto, presione “ON” para encender las luces. El modo
predeterminado es blanco.
2. Al presionar “FADE” se recorre el espectro de colores lentamente.
3. Presione “WHITE” para volver al blanco.
4. Use “+” y “-” para subir o bajar las luces.
5. Los botones “R”, “G” y “B” representan los colores rojo (R), verde (G)
y azul (B). Estos botones le permiten seleccionar uno de los colores
o combinarlos para elegir el color deseado.
a. Mantenga presionado el botón “R”, “G” o “B” durante tres
segundos para ir directamente a ese color o
b. Pulse y suelte cualquier botón varias veces para desplazarse por
el espectro RGB de a un color a la vez.
c. Pulse y suelte los botones R (rojo), G (verde) y B (azul) en
cualquier combinación para crear colores personalizados.
6. “SAVE” le permite volver a su color favorito rápidamente. Una
vez encontrado el color favorito, mantenga presionado “SAVE”
hasta que parpadee. Ahora el color se podrá elegir fácilmente al
presionar “SAVE”.
7. “15,” “30,” “45” y “60” apagarán las luces de forma automática al
pasar los minutos indicados en el botón.
FUNCIONAMIENTO MANUAL:
1. Coloque el interruptor en ON para encender la luz. La única opción
de color en el funcionamiento manual es el blanco.
2. Coloque el interruptor en OFF para apagar la luz.
INSTRUCCIONES DE INSTALACIÓN:
NOTA: la plantilla de instalación se encuentra debajo del producto.
Para instalar la luz: retire la tapa del compartimento de las pilas
e instálela en la ubicación seleccionada con tornillos y la plantilla de
instalación incluida o con la cinta adhesiva de doble cara. Vuelva a
colocar la luz en la tapa instalada del compartimento de las pilas. Se
incluyen anclajes para instalar tornillos en panel de yeso.
Nota: la tapa de las pilas puede permanecer instalada al cambiarlas.
El rango de funcionamiento podría verse afectado por uno
o más de los siguientes factores: clima, interferencia de
frecuencia radial, pila baja del transmisor o bloqueos entre el
transmisor y el receptor.
NOTA DE LA FCC: El fabricante no es responsable de las interferencias de radio o televisión
causadas por modificaciones no autorizadas al equipo. Dichas modificaciones podrían anular la
autoridad del usuario para usar el equipo.
DECLARACIÓN DE LA COMISIÓN FEDERAL DE COMUNICACIONES (FCC):
Este dispositivo cumple con el apartado 15 de la normativa de la FCC. El funcionamiento está
sujeto a las dos condiciones siguientes: (1) este dispositivo no causa interferencia negativa
y (2) este dispositivo debe aceptar las interferencias recibidas, incluidas las interferencias
que puedan causar un funcionamiento no deseado. Este dispositivo no debe estar colocado
ni funcionando junto a otra antena o transmisor. Este equipo ha sido probado y cumple con
los límites para dispositivos digitales de Clase B, de conformidad con el apartado 15 de la
normativa de la FCC. Estos límites están diseñados para proveer protección razonable contra
interferencias perjudiciales en instalaciones residenciales. Este dispositivo genera, usa y puede
irradiar energía de radiofrecuencias y, si no se instala y usa según las instrucciones, puede
provocar interferencia perjudicial a las radiocomunicaciones. No obstante, no hay garantías
de que no ocurrirá interferencia en una instalación en particular. Si este dispositivo provoca
interferencia perjudicial a la recepción de radio o televisión, lo que puede determinarse
encendiendo y apagando el dispositivo, se recomienda que el usuario intente corregir la
interferencia por medio de la implementación de una o más de las siguientes medidas:
•Cambiar la orientación o el lugar de la antena receptora.
• Incrementar la separación entre el dispositivo y el receptor.
• Conectar el dispositivo a un tomacorriente de un circuito diferente del circuito al que el receptor
está conectado.
• Consultar al distribuidor o a un técnico con experiencia en radio/televisión para solicitar ayuda.
ADVERTENCIA: Todo cambio o modificación que se realice a esta unidad sin aprobación de la
parte responsable del cumplimiento de esta norma podría anular la autoridad del usuario de
operar el equipo.
Fig. 1
Barra de iluminación inalámbrica de
12’’ con cambio de colores
©2020 Energizer. Energizer y algunos diseños gráficos son marcas comerciales de
Energizer Brands, LLC y subsidiarias relacionadas, que se utilizan bajo la licencia de
Jasco Products Company, LLC.
¿Preguntas? Comuníquese al 1-800-654-8483 entre las 7:00 a.m. y las 8:00 p.m.
CST (hora central estándar)
Garantía de 90 días. Visite www.byjasco.com para conocer los detalles de la garantía.
RF
ON OFF
WHITE
15 30
45
60
++
--
RG
B
3
1
2
4
6
5
7
FAD E
SAVE
-
 1
1
-
 2
2