Energizer 47485-T2 Battery Operated LED Ceiling Fixture Manual de usuario
- Tipo
- Manual de usuario

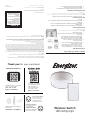
Wireless Switch
LED Ceiling Light
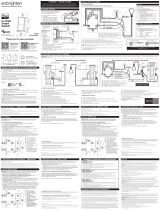
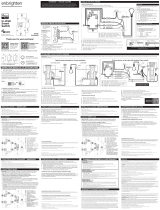
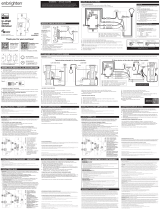
MOUNT THE CEILING LIGHT
1. Remove the base of the ceiling light by rotating
it counterclockwise. Use the provided screws and
anchors to mount the base to the desired surface.
Ensure it is firmly installed.
2. Insert 4 C baeries (not included) into the ceiling
light, noting polarity.
3. Use the switch next to the baeries to set the
brightness level to 100 or 200 lumens. 200 lumens
will be a brighter option with less baery life. 100
lumens will be a less bright option but with longer
baery life.
4. Aach the light to the mounted base by turning it clockwise
until it clicks into place.
NOTE: Ensure the mounting surface is capable of supporting the light
with batteries installed.
MOUNT THE WALL SWITCH
1. Remove the back mounting plate from the wall switch by sliding the wall switch
remote upwards.
2. Using the included screws, install them through the mounting plate holes. Do not
overtighten.
3. Mount the wall switch onto the mounting plate by gently sliding it downward to secure
it in place.
WALL SWITCH OPERATION
1. Press up on the switch to turn the light ON, press down to turn the light OFF.
NOTE: There is a 60min. timeout feature that will turn the light OFF to conserve battery life. The wall-
switch remote will control all Energizer Wireless Switch LED Ceiling Light (47485) within
a 50-foot range.
WALL SWITCH BATTERY REPLACEMENT
1. To replace the switch’s baery, slide and remove the baery door.
2. Replace with one A23 baery, noting polarity.
3. Replace the baery door and ensure it is firmly closed.
MADE IN CHINA/HECHO EN CHINA
Wireless Switch LED Ceiling Light
FCC NOTE: The manufacturer is not responsible for any radio or TV interference caused by unauthorized modifications to this
equipment. Such modifications could void the user’s authority to operate the equipment.
Suppliers Declaration of Conformity | Model #: 47485 | Jasco Products Co., 10 E. Memorial Rd., Oklahoma City, OK 73114,
www.byjasco.com
FCC STATEMENT: This device complies with Part 15 of the FCC rules. Operation is subject to the following two conditions: (1) this
device may not cause harmful interference, and (2) this device must accept any interference received, including interference
that may cause undesired operation. This device must not be co-located or operating in conjunction with any other antenna or
transmier. This equipment has been tested and found to comply with the limits for a Class B digital device, pursuant to Part
15 of the FCC Rules. These limits are designed to provide reasonable protection against harmful interference in a residential
installation. This equipment generates, uses and can radiate radio frequency energy and, if not installed and used in accordance
with the instructions, may cause harmful interference to radio communications. However, there is no guarantee that interference
will not occur in a particular installation. If this equipment does cause harmful interference to radio or television reception, which
can be determined by turning the equipment o and on, the user is encouraged to try to correct the interference by one or more
of the following measures:
• Reorient or relocate the receiving antenna.
• Increase the separation between the equipment and receiver.
• Connect the equipment into an outlet on a circuit dierent from that to which the receiver is connected.
Consult the dealer or an experienced radio/TV technician for help.To comply with FCC's RF radiation exposure limits for general
population/uncontrolled exposure, this device must be installed to provide a seperation distance of at least 20cm from all
persons.
WARNING: changes or modifictions to this unit not expressly approved by the party resposible for compliance could void the
user's authority to operate the equipment.
• BATTERIES MAY LEAK HARMFUL
LIQUIDS OR IGNITABLE MATERIALS
OR EXPLODE CAUSING INJURY AND
PRODUCT DAMAGE
• DO NOT MIX OLD AND NEW OR OTHER
BATTERY TYPES
• REPLACE ALL BATTERIES AT THE
SAME TIME
• REMOVE BATTERIES IF PRODUCT
IS TO BE UNUSED FOR EXTENDED
PERIODS OF TIME
WARNING
©2021 Energizer. Energizer and certain graphic designs are trademarks of Energizer
Brands, LLC and related subsidiaries and are used under license by Jasco Products
Company, LLC.
Questions? Contact our U.S.-based Consumer Care at 1-800-654-8483 between
7AM-8PM, M-F, Central Time.
90-day warranty. Visit www.byjasco.com for warranty details.
474 85 E nSp Manual v1
12/15/20 MS
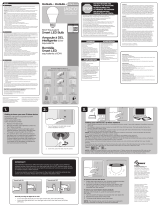
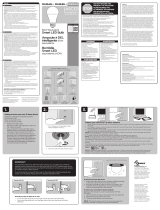
For deals, to register
your purchase and to
tell us how we’re
doing, simply scan
the code or visit
byjasco.com/deals
Instructions made easy
Read instructions or watch
easy-to-follow video.
Scan code or visit
byjasco.com/47485i
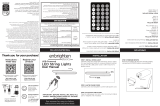
Thank you for your purchase!
Like our product?
Leave a review
on your favorite
retailer website
or amazon.com
Having problems?
Let us know how
we can help.
1-800-654-8483
between 7AM-8PM,
M-F, Central Time.
Discover innovative lighting
solutions at
www.byjasco.com/lighting

• LAS PILAS PUEDEN PERDER LÍQUIDOS
PERJUDICIALES O MATERIALES
INFLAMABLES, O EXPLOTAR Y
CAUSAR LESIONES Y DAÑOS EN LOS
PRODUCTOS
• NO COMBINE PILAS VIEJAS Y NUEVAS,
NI TIPOS DE PILAS DISTINTAS
• REEMPLACE TODAS LAS PILAS AL
MISMO TIEMPO.
• QUITE LAS PILAS SI NO USARÁ EL
PRODUCTO DURANTE PERIODOS
PROLONGADOS
ADVERTENCIA
INSTALE LA LÁMPARA DE TECHO
1. Retire la base de la lámpara de techo girándola
hacia la izquierda. Use los tornillos y los tacos
provistos para montar la base en la superficie
elegida.
2. Coloque 4 pilas C (no incluidas) en la lámpara de
techo; tenga en cuenta los polos.
3. Use el interruptor junto a las pilas para ajustar el
nivel de brillo a 100 o 200 lúmenes.
4. Fije la lámpara a la base montada girándola hacia la
derecha hasta que se escuche un clic.
NOTA: Asegúrese de que la superficie de montaje pueda soportar la
lámpara con las pilas puestas.
MONTE EL INTERRUPTOR DE PARED
1. Retire la placa de montaje posterior del interruptor de pared
deslizando el control remoto del interruptor de pared
hacia arriba.
2. Utilizando los tornillos incluidos, instálelos a través de los orificios de la placa de montaje. No
apriete demasiado.
3. Monte el interruptor de pared en la placa de montaje deslizándolo suavemente hacia abajo
para asegurarlo en su lugar.
FUNCIONAMIENTO DEL INTERRUPTOR DE PARED
1. Presione hacia arriba en el interruptor para encender la luz, presione hacia abajo para
apagar la luz.
NOTA: Hay una función de temporizador de 60 min. que apagará la luz para preservar la vida útil
de la pila. El transmisor remoto del interruptor controlará la lámpara LED de techo con interruptor
inalámbrico Energizer (47485) dentro de una distancia de 15 metros (50 ft).
REEMPLAZO DE LA PILA DEL INTERRUPTOR DE PARED
1. Para cambiar la pila del interruptor, deslice y retire la tapa del compartimiento de la pila.
2. Reemplace con una pila A23, teniendo en cuenta los polos.
3. Vuelva a colocar la tapa del compartimiento para la pila y asegúrese de que quede bien
cerrada.
Lámpara LED de techo con interruptor inalámbrico Energizer
NOTA DE LA FCC: El fabricante no es responsable de las interferencias de radio o televisión causadas por modificaciones no autorizadas
al equipo. Dichas modificaciones podrían anular la autoridad del usuario para usar el equipo.
DECLARACIÓN DE LA COMISIÓN FEDERAL DE COMUNICACIONES (FCC):
Declaración de conformidad del proveedor | Modelo #: 47485 | Jasco Products Co., 10 E. Memorial Rd., Oklahoma City, OK 73114,
www.byjasco.com
Este dispositivo cumple con el apartado 15 de la normativa de la FCC. El funcionamiento está sujeto a las dos condiciones siguientes:
(1) este dispositivo no causa interferencia negativa y (2) este dispositivo debe aceptar las interferencias recibidas, incluidas
las interferencias que puedan causar un funcionamiento no deseado. Este dispositivo no debe estar colocado ni funcionando
junto a otra antena o transmisor. Este equipo ha sido probado y cumple con los límites para dispositivos digitales de Clase B, de
conformidad con el apartado 15 de la normativa de la FCC. Estos límites están diseñados para proveer protección razonable contra
interferencias perjudiciales en instalaciones residenciales. Este dispositivo genera, usa y puede irradiar energía de radiofrecuencias
y, si no se instala y usa según las instrucciones, puede provocar interferencia perjudicial a las radiocomunicaciones. No obstante, no
hay garantías de que no ocurrirá interferencia en una instalación en particular. Si este dispositivo provoca interferencia perjudicial a
la recepción de radio o televisión, lo que puede determinarse encendiendo y apagando el dispositivo, se recomienda que el usuario
intente corregir la interferencia por medio de la implementación de una o más de las siguientes medidas:
• Cambiar la orientación o el lugar de la antena receptora.
• Incrementar la separación entre el dispositivo y el receptor.
• Conectar el dispositivo a un tomacorriente de un circuito diferente del circuito al que el receptor está conectado.
Consultar al distribuidor o a un técnico con experiencia en radio/televisión para solicitar ayuda.
Para cumplir con los límites de exposición de radiofrecuencias de la FCC correspondientes a la exposición no controlada/de la
población en general, este aparato se debe instalar con una distancia de separación de al menos 20 cm de toda persona.
ADVERTENCIA: Todo cambio o modificación que se realice a esta unidad sin aprobación de la parte responsable del cumplimiento
de esta norma podría anular la autoridad del usuario de operar el equipo.
©2021 Energizer. Energizer y algunos diseños gráficos son marcas
comerciales de Energizer Brands, LLC y subsidiarias relacionadas,
que se utilizan bajo la licencia de Jasco Products Company, LLC.
¿Preguntas? Comuníquese al 1-800-654-8483 entre las 7:00 a.m. y
las 8:00 p.m. CST (hora central estándar)
Garantía de 90 días. Visite www.byjasco.com para conocer los
detalles de la garantía.
-
 1
1
-
 2
2


Energizer 47485-T2 Battery Operated LED Ceiling Fixture Manual de usuario
- Tipo
- Manual de usuario
en otros idiomas
Artículos relacionados
Otros documentos
-
Philips SPC1234AT-27 Outdoor Lighting Control Socket Guía del usuario
-
 Enbrighten Basics LED Color Changing Fairy String Lights, 60 Lights, 20ft., White Manual de usuario
-
 Enbrighten Z-Wave Plus Commercial Grade In-Wall Smart Paddle Switch, 700 Series, White Guía de inicio rápido
-
 Enbrighten Z-Wave Plus In-Wall Smart Toggle Switch, 700 Series, White Guía de inicio rápido
-
 Enbrighten Z-Wave Plus In-Wall Smart Toggle Dimmer, 700 Series, White Guía de inicio rápido
-
JascoPro Series 64637/ZW7105 Manual de usuario
-
Defiant NOA0039T Manual de usuario
-
 Enbrighten 52190/ ZW7105 Manual de usuario
-
 Enbrighten 52190/ZW7105 Manual de usuario
-
 Enbrighten 70333 Galaxy Wave Mini Projector Manual de usuario


