HECHO EN VIETNAM
Philips y el emblema de escudo Philips son marcas registradas
de Koninklijke Philips N.V. y se usan bajo licencia. Este producto
ha sido fabricado y se comercializa bajo responsabilidad de Jasco
Products Company y Jasco Products Company LLC,
10 E. Memorial Rd., Oklahoma City, OK 73114 es el garante en
relación a este producto.
Este prducto tiene una garantía limitada de 1 año. Visite www.
philips.com/support para conocer los detalles de la garantía.
¿Tiene preguntas? Comuníquese con nuestro servicio de atención
al consumidor de EE. UU. al 1-844-816-0320, de lunes a viernes,
de 7AM a 8PM (hora central).
Visite www.byjasco.com/patents para información sobre la
patente del producto.
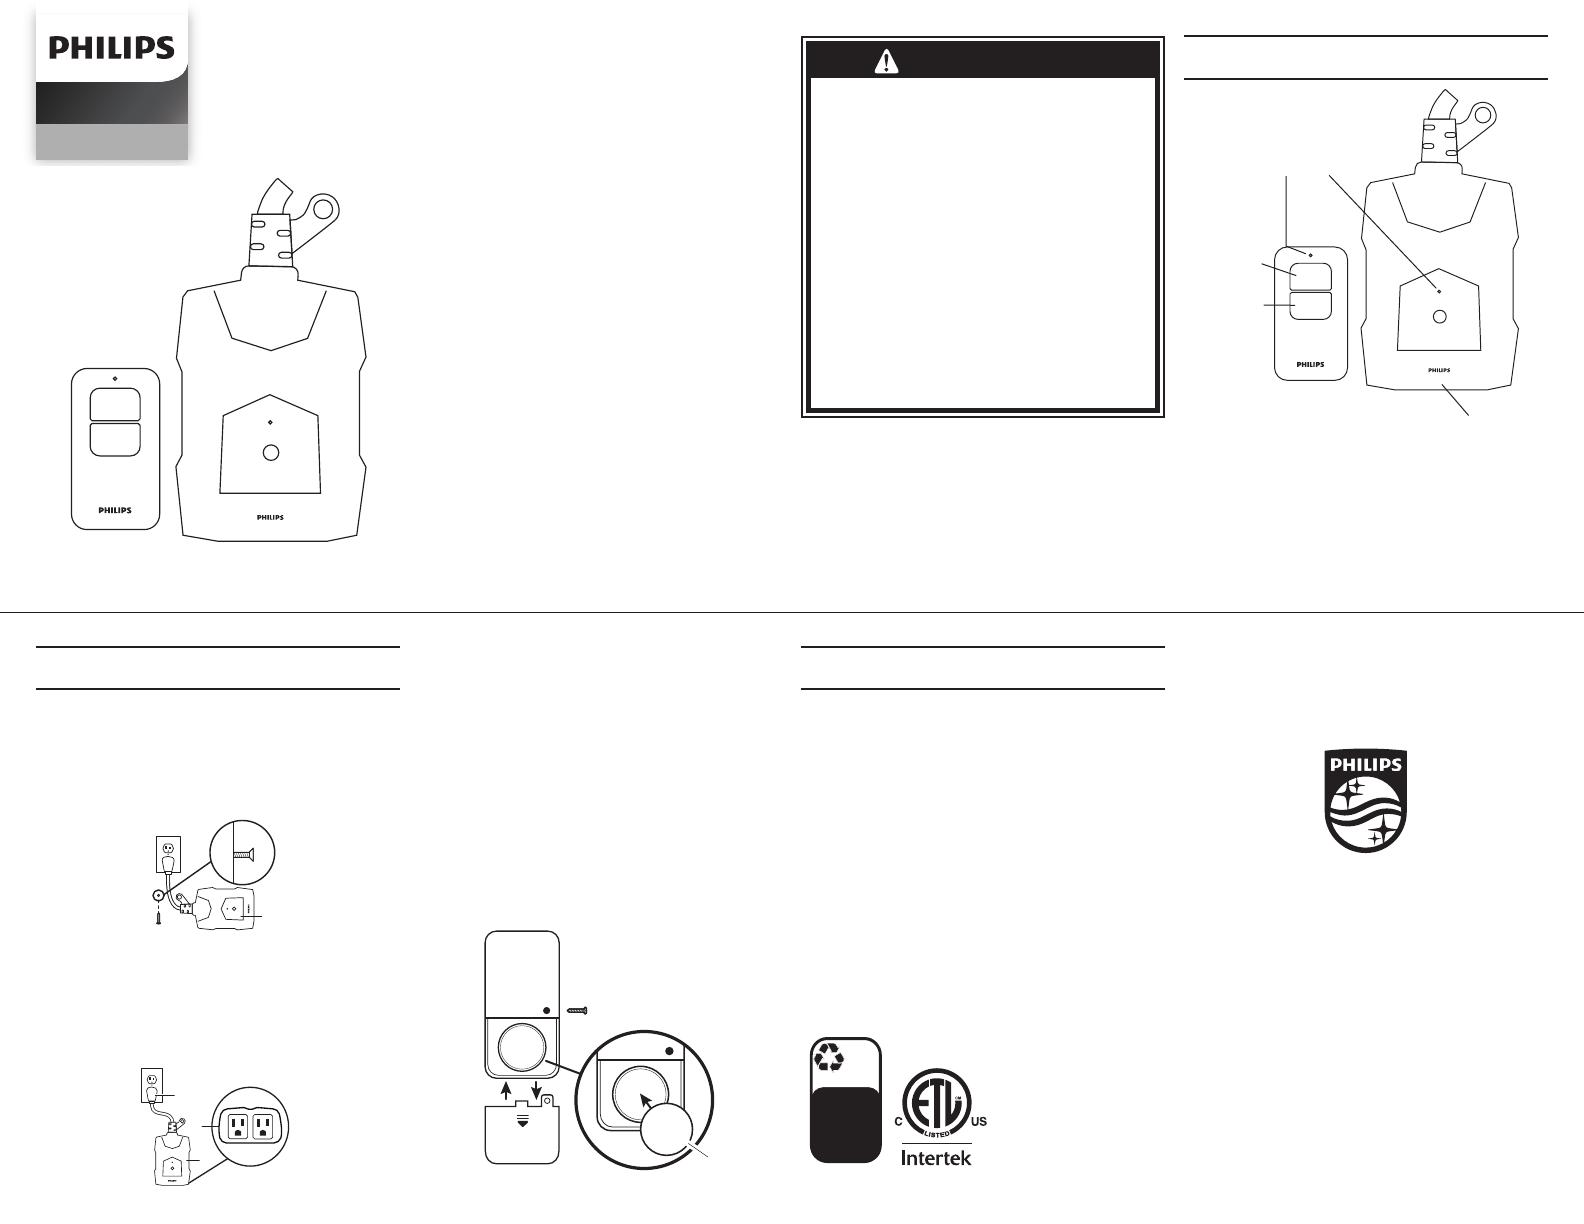
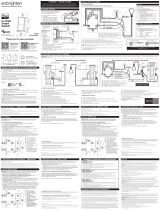
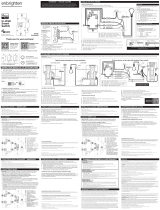
1. Instalación del temporizador
• Instale el temporizador (A) en una pared con un
tomacorriente protegido por un interruptor de circuito
con conexión a tierra (GFCI).
• Clave un tornillo o clavo (no incluido) en la pared. El clavo o
tornillo debe sobresalir al menos 7/8 pulg. de la pared y permitir
que el programador quede por encima del nivel del suelo en la
medida de lo posible.
• Cuelgue el temporizador (A) por el aro del lado
superior izquierdo de la unidad con los tomacorrientes
(D) mirando hacia abajo para que no acumulen humedad.
• Enchufe el cable de conexión a tierra (C) a un
tomacorriente GFCI.
• Enchufe el aparato que desea conectar al control de
iluminación en uno de los dos tomacorrientes (D).
A. Temporizador de exteriores:
Enchufe el o los aparatos que desea controlar en los tomacorrientes
con conexión a tierra ubicados en la parte inferior del temporizador
de exteriores.
B. Transmisor remoto inalámbrico:
Presione el botón de encendido en el control remoto para activar las
lámparas o aparatos enchufados al temporizador. Presione el botón
de apagado para apagar el aparato. Consulte las instrucciones de
instalación.
Instrucciones de instalación
Home power
NOA0025
SPC1234AT/27
ON
OFF
DECLARACIÓN DE LA COMISIÓN FEDERAL DE COMUNICACIONES (FCC):
Este dispositivo cumple con las Especificaciones del apartado 15
Declaración de conformidad del proveedor | Modelo #:N O A 0 0 2 5 , SPC1234AT/27 | Jasco
Products Co., 10 E. Memorial Rd., Oklahoma City, OK 73114, www.byjasco.com
de las normas
de la FCC y con las especificaciones de las normas radioeléctricas (RSS) del
Ministerio de Industria de Canadá aplicables a aparatos exentos de licencia. El
funcionamiento está sujeto a las siguientes dos condiciones: (1) este dispositivo
no debe provocar interferencia perjudicial, y (2) este dispositivo debe aceptar
toda interferencia que reciba, incluso la que pudiera causar un funcionamiento
no deseado.
NOTA DE LA FCC: El fabricante no se hace responsable de ninguna interferencia
de radio o TV ocasionada por modificaciones no autorizadas efectuadas a este
equipo. Dichas modificaciones podrían anular la autoridad del usuario para
utilizar el equipo.
NOTA: Este equipo ha sido probado y cumple con los límites para aparatos
digitales de Clase B, de conformidad con el apartado 15 de las normas de
la FCC. Estos límites están diseñados para proveer protección razonable
contra interferencias perjudiciales en una instalación residencial. Este equipo
genera, usa y puede irradiar energía de radiofrecuencias y, si no se instala y
usa según las instrucciones, puede provocar interferencia perjudicial a las
radiocomunicaciones. No obstante, no hay garantías de que no ocurrirá
interferencia en una instalación en particular. Si este equipo provoca
interferencia perjudicial a la recepción de radio o televisión, lo que puede
determinarse encendiendo y apagando el equipo, se recomienda que el
usuario intente corregir la interferencia por medio de la implementación de
una o más de las siguientes medidas:
— Reorientar o reubicar la antena receptora.
— Incrementar la separación entre el equipo y el receptor.
— Conectar el equipo a un tomacorriente de un circuito
diferente del circuito al que está conectado el receptor.
— Consultar al distribuidor o a un técnico con experiencia
en radio/televisión para solicitar asistencia.
—CAN ICES-3(B)/NMB-3(B)
A
C
A
D
B
RIESGO DE DESCARGA ELÉCTRICA:
• INTRODUZCA COMPLETAMENTE EL ENCHUFE EN UN RECEPTÁCULO
CONTROLADO POR GFCI
• MANTENGA FUERA DEL ALCANCE DE LOS NIÑOS
• NO USAR CON CABLES DE EXTENSIÓN
• INSTALE EL TEMPORIZADOR LO MÁS ARRIBA POSIBLE DEL NIVEL
DEL SUELO CON EL RECEPTÁCULO ORIENTADO HACIA ABAJO
• NO DEBE SUMERGIRSE EN AGUA NI UTILIZARSE EN LUGARES
EXPUESTOS DIRECTAMENTE A GOTEOS O SALPICADURAS DE AGUA
• DESCONECTE ANTES DE LIMPIARLO
RIESGO DE INCENDIO:
• NO SUPERE LAS ESPECIFICACIONES ELÉCTRICAS NOMINALES
• NO UTILICE PARA CONTROLAR APARATOS QUE INCLUYAN
ELEMENTOS CALORÍFICOS (COCINAS, CALEFACTORES, PLANCHAS, ETC)
ADVERTENCIAS SOBRE LAS PILAS:
• LAS PILAS PUEDEN PERDER LÍQUIDOS PERJUDICIALES O MATERIALES
INFLAMABLES, O BIEN EXPLOTAR Y CAUSAR LESIONES CORPORALES
O DAÑOS EN LOS PRODUCTOS
• NO COMBINE PILAS VIEJAS Y NUEVAS, NI TIPOS DE PILAS DISTINTAS
• REEMPLACE TODAS LAS PILAS AL MISMO TIEMPO
• CAMBIE DE INMEDIATO LAS PILAS TOTALMENTE DESCARGADAS
• QUITE LAS PILAS SI NO USA EL PRODUCTO DURANTE
PERIODOS PROLONGADOS
ADVERTENCIA
RECEPTOR
Rango funcional .......................................................................... Hasta 80 ft.
Carga tungsteno máxima .........................................................1000 W, 8A
Carga resistiva máxima.......................................................... 1875 W, 15 A
Valor nominal ........................................................................125 VAC/60 Hz
TRANSMISOR
Rango funcional .......................................................................... Hasta 80 ft.
Tipo de pilas Use solo pilas CR2032El rango de funcionamiento podría verse
afectado por uno o más de los siguientes factores: clima, interferencia de frecuencia
radial, pila baja del transmisor y bloqueos entre el transmisor y el receptor.
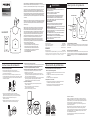
2. Preparación del mando a distancia:
• Tire de la lengüeta de plástico del mando para activar la batería.
3. Enchufe el temporizador y pulse el botón ON del mando a
distancia. El temporizador debería encenderse.
4. Emparejamiento del mando a distancia y el temporizador:
El temporizador debe estar emparejado con el mando a
distancia, pero si no funciona:
• Enchufe el temporizador y, antes de que transcurran cinco
segundos, desenchúfelo. Repita este proceso tres veces hasta
que la luz indicadora roja parpadee.
• Pulse cualquier botón del mando a distancia. La luz indicadora
roja del programador dejará de parpadear cuando el
emparejamiento se haya realizado correctamente.
5. Cambiar la batería (B):
• Retire el tornillo Philips y deslice la tapa de las pilas del
mando a distancia.
• Retire la pila e inserte una nueva pila CR2032 —
tenga en cuenta la polaridad.
• Vuelva a colocar la tapa y el tornillo.
1. Si la luz del indicador no se activa al presionar el
botón, compruebe lo siguiente:
• Asegúrese de mantener pulsado el botón durante al menos
un segundo.
• Verique la orientación de la pila, teniendo en cuenta l
a polaridad.
• Cambie la pila Use solo pilas CR2032.
2. El aparato no se enciende.
• Asegúrese de que la lámpara o el dispositivo electrónico
enchufado al temporizador está encendido.
• Asegúrese de que el cable de alimentación de CA esté
bien enchufado en un tomacorriente de CA.
Resolución de problemas
ON
OFF
Encendido
(on)
Apagado
(o)
2 tomacorrientes
Luces indicadoras
Descripción del producto
100%
recyclable
Separate
paper
from plastic
before
recycling
byjasco.com/recycle
paper made from 25%
5023165
NOA0025T


 1
1
 2
2
 3
3


Defiant NOA0039T Manual de usuario
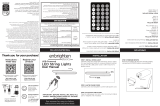 Enbrighten Basics LED Color Changing Fairy String Lights, 60 Lights, 20ft., White Manual de usuario
Energizer 47485-T2 Battery Operated LED Ceiling Fixture Manual de usuario
Honeywell 39363/ZW4203 Manual de usuario
Enbrighten WFD4203 Manual de usuario
 Enbrighten WiFi LED Color Changing Curtain Gem Lights, 88 Lights, 3ft. by 7ft., White Guía de inicio rápido
 Enbrighten Z-Wave Plus Commercial Grade In-Wall Smart Paddle Switch, 700 Series, White Guía de inicio rápido
 Enbrighten Z-Wave Plus In-Wall Smart Toggle Switch, 700 Series, White Guía de inicio rápido


