
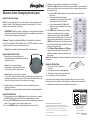
BATTERY INSTALLATION
Puck: To open, twist back cover of puck light counterclockwise and
remove. Insert 3 AAA baeries per puck (noting polarity). To close,
replace cover and twist clockwise.
IMPORTANT: Dierent types of baeries or new and used baeries
should not be mixed. Exhausted baeries should be removed from
the xture and disposed of properly.
Remote: To replace exhausted baery, remove the screw and
cover, on the back of the remote. Insert 1 CR2032 baeries, noting
polarity. Replace the cover and screw back in.
Note: Remove baery isolation tab before rst time use.
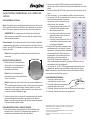
MOUNTING INSTRUCTIONS:
1. Remove back cover and use pre-
installed double-sided tape to mount in
desired location.
Note: For a more permanent
installation, screw through the two
holes using counter sunk screws.
Note: Ensure one of the two wireless
icons ( ) remains unobstructed and facing desired direction for
remote to reach interior sensor. The remote will work beer with
direct line of sight access to the wireless icons ( ).
2. Reaach light to mounted back cover by aligning tabs and
twisting clockwise.
Note: Back cover may remain mounted when changing baeries.
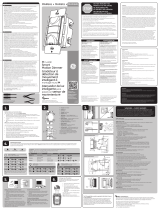
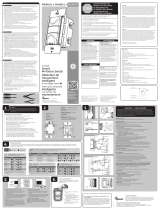
REMOTE OPERATION:
1. On the remote, press the ON buon to turn the lights on, or press
the OFF buon to turn them o. The default seing is white.
2. Pressing the FADE buon will slowly cycle through the spectrum of
colors. Press again to stop on the current color.
3. Press the WHITE buon to switch the lights back to white.
Screw holes
4. Use the + and - buons to brighten or dim the lights.
5. The R, G and B buons stand for red, green and blue. These buons
allow you to either select one of these colors or blend them to select
the desired color.
a. Hold the R, G or B buon for three seconds to go directly to
that color.
b. Press and release the buons
repeatedly to move through the RGB
spectrum one color at a time.
c. Press and release the R, G and B
buons in any combination to create
custom colors.
6. The SAVE buon allows you to quickly
return to your favorite color. Once the
desired color is found, hold the SAVE
buon until the light ashes. The color will
now be easily selectable by pressing the
SAVE buon. Once the color is set, you can
turn o the product and hit SAVE to turn it
back on to the set color.
7. The 10min, 30min, 60min and 120min
buons automatically turn the lights o
aer the number of minutes indicated on
the buon.
Note: When using the remote, point directly at the puck for proper
operation.
MANUAL OPERATION:
1. First press: turns the light on
in white
2. Second press: color-changing mode
3. Third press: stops on the current color
4. Fourth press: turns the light o
Functional range may be adversely aected by one or more of the
following factors: weather, radio frequency interference, low baery
or obstructions between the transmier and receiver.
Wireless Color-Changing Puck Lights
59332 EnSp Manual v2
9/27/2021
©2021 Energizer. Energizer and certain graphic designs are
trademarks of Energizer Brands, LLC and related subsidiaries and
are used under license by Jasco Products Company, LLC.
Contact our U.S.-based Consumer Care at 1-800-654-8483
between 7AM-8PM CST.
90-day warranty. Visit www.byjasco.com for warranty details.
MADE IN CHINA/HECHO EN CHINA
READ IT
OR WATCH IT
Read instRuctions oR watch
easy-to-follow video.
scan QR code oR visit
byjasco.com/59332i

COLOCACIÓN DE LAS PILAS
Disco: Para abrirlo, gire hacia la izquierda la tapa trasera de la luz de
disco y retírela. Inserte 3 pilas AAA por disco (teniendo en cuenta los
polos). Para cerrar, vuelva a colocar la tapa y gire hacia la derecha.
IMPORTANTE: No se deben mezclar distintos tipos de pilas ni
pilas nuevas con usadas. Debe sacar las pilas sin carga de la luz y
eliminarlas debidamente.
Control remoto: Para cambiar una pila, retire el tornillo, la tapa del
compartimiento de las pilas, en la parte posterior del control remoto.
Inserte 1 pilas CR2032, teniendo en cuenta los polos. Vuelva a colocar
la tapa y atornille.
Nota: Retire la lengüeta de aislamiento de las pilas antes del
primer uso.
INSTRUCCIONES DE MONTAJE:
1. Retire la tapa del compartimiento
de las pilas y use la cinta adhesiva
de doble cara preinstalada para
montarla donde desee.
Nota: Para una instalación más
permanente, use tornillos avellanados
en los dos oricios.
Nota: Asegúrese de que los dos íconos de conexión inalámbrica (
) se mantengan sin obstrucciones y hacia la dirección deseada
para que el control remoto llegue al sensor interior. El control
remoto funcionará mejor con línea visual de acceso directa a los
íconos de conexión inalámbrica ( ).
2. Vuelva a colocar la luz en la tapa del compartimiento de las pilas
montada alineando las pestañas y girando hacia la derecha.
Nota: La tapa del compartimiento de las pilas puede permanecer
montada cuando cambie la pilas.
FUNCIONAMIENTO CON EL CONTROL REMOTO:
1. En el control remoto, presione el botón ON (encendido) para
encender la luz o el botón OFF (apagado) para apagarla. La
conguración predeterminada es de color blanco.
Screw holes
2. Al presionar el botón FADE (atenuación) se desplazará por el
espectro de colores. Vuelva a presionarlo para detenerse en el color
actual.
3. Presione el botón WHITE (blanco) para volver al color blanco de las
luces.
4. Use los botones + y - para aumentar el brillo o atenuar las luces.
5. Los botones R, G y B corresponden a los colores rojo, verde y azul.
Estos botones le permiten seleccionar
uno de esos colores o mezclarlos para
seleccionar el color deseado.
a. Mantenga presionado el botón R, G
o B durante tres segundos para ir
directamente a ese color.
b. Presione y suelte los botones varias
veces para avanzar por el espectro
RGB un color a la vez.
c. Presione y suelte los botones R, G y B
en cualquier combinación para crear
colores personalizados.
6. El botón SAVE (guardar) le permite volver
rápidamente a su color favorito. Cuando
encuentre el color que preere, mantenga
presionado el botón SAVE hasta que la
luz parpadee. Ahora podrá seleccionar
fácilmente el color presionando el
botón SAVE. Después de congurar el
color, puede apagar el producto y presionar SAVE para volver a
encenderla en el color establecido.
7. Los botones 10, 30, 60 y 120 apagan automáticamente las luces
después de que transcurren los minutos indicados en el botón.
Nota: Cuando use el control remoto, apunte directamente al disco
para asegurar una conexión correcta.
FUNCIONAMIENTO MANUAL:
1. Presionar el botón una vez:
enciende la luz en color blanco
2. Presionar el botón una segunda vez:
modo de cambio de colores
3. Presionar el botón una tercera vez: se detiene en el color actual
4. Presionar el botón una cuarta vez: apaga la luz
©2021 Energizer. Energizer y algunos diseños grácos son marcas comerciales
de Energizer Brands, LLC y subsidiarias relacionadas, que se utilizan bajo la
licencia de Jasco Products Company, LLC.
¿Preguntas? Comuníquese al 1-800-654-8483 entre las 7:00 a.m. y las 8:00
p.m. CST (hora central estándar)
Garantía de 90 días. Visite www.byjasco.com para conocer los detalles de
la garantía.
Luces táctiles inalámbricas con cambio de
colores
-
 1
1
-
 2
2


en otros idiomas
Artículos relacionados
Otros documentos
-
Enbrighten 60423 Manual de usuario
-
 GE Enbrighten 26933 Manual de usuario
-
GE 24922 - Universal Remote Control Manual de usuario
-
GE Z-Wave Plus In-Wall Dimmer Smart Motion Switch El manual del propietario
-
-
-
 Enbrighten Z-Wave Plus In-Wall On/Off Smart Motion Switch El manual del propietario
-
-
GE 24911 Manual de usuario

