
Instruction Manual and
Warranty Information
WF-LAMI
®
Distributed by
El manual en español
empieza en la página 9
©2010 HoMedics, Inc. y sus compañías afiliadas, reservados todos los derechos. HoMedics
®
es una marca
registrada de HoMedics, Inc. y sus compañías afiliadas. Envirascape™ es una marca comercial de HoMedics
Inc. y sus compañías afiliadas. Reservados todos los derechos.
IB-WFLAMI
HoMedics vende sus productos con la intención de que no tengan defectos de
fabricación ni de mano de obra por un plazo de un año a partir de la fecha de
compra original, con las siguientes excepciones. HoMedics garantiza que sus
productos no tendrán defectos de material ni de mano de obra bajo condiciones de
uso y servicio normales. Esta garantía se extiende únicame nte a consumidores y no
a distribuidores.
Para obtener servicio para su producto HoMedics, envíe por correo el producto y su
recibo de compra fechado (como comprobante de compra), con franqueo pago, a la
siguiente dirección:
HoMedics Consumer Relations
Service Center Dept. 168 Suite 3
43155 West Nine Mile Rd
Novi, MI 48375
No se aceptarán pagos contra entrega.
HoMedics no autoriza a nadie, incluyendo, pero sin limitarse a, distribuidores,
posteriores consumidores compradores del producto a un distribuidor, o
compradores remotos, a obligar a HoMedics de forma alguna más allá de las
condiciones aquí establecidas. La garantía de este producto no cubre daños
causados por uso inadecuado o abuso, accidente, conexión de accesorios
no autorizados, alteración del producto, instalación inadecuada, reparaciones
o modificaciones no autorizadas, uso inadecuado de la fuente de energía/
electricidad, cortes de energía, caída del producto, funcionamiento incorrecto o
daño de una pieza de funcionamiento debido al no cumplimiento del mantenimiento
recomendado por el fabricante, daños durante el transporte, robo, descuido,
vandalismo, condiciones climáticas, pérdida de uso en el período durante el cual el
producto está en una instalación de reparación o a la espera de piezas o reparación,
o cualquier otra condición, sin importar cual sea, que se encuentre fuera del control
de HoMedics.
Esta garantía es válida únicamente si el producto es comprado y operado en el
país en el cual se compró el producto. Un producto que requiera modificaciones
o adaptación para habilitar su funcionamiento en cualquier país que no sea aquél
para el que fue diseñado, fabricado, aprobado y/o autorizado, o la reparación de
productos dañados por estas modificaciones no están cubiertos bajo esta garantía.
LA GARANTÍA AQUÍ ESTABLECIDA SERÁ LA ÚNICA Y EXCLUSIVA GARANTÍA.
NO HABRÁ NINGUNA OTRA GARANTÍA EXPRESA NI IMPLÍCITA, INCLUYENDO
NINGUNA GARANTÍA DE COMERCIALIZACIÓN O APTITUD NI NINGUNA OTRA
OBLIGACIÓN POR PARTE DE LA COMPAÑÍA CON RESPECTO A PRODUCTOS
CUBIERTOS POR ESTA GARANTÍA. HOMEDICS NO TENDRÁ RESPONSABILIDAD
ALGUNA POR NINGÚN DAÑO INCIDENTAL, CONSECUENTE NI ESPECIAL. BAJO
NINGÚN CONCEPTO ESTA GARANTÍA REQUERIRÁ MÁS QUE LA REPARACIÓN
O CAMBIO DE ALGUNA PIEZA O PIEZAS QUE SE HALLEN DEFECTUOSAS
DENTRO DEL PERÍODO DE VIGENCIA DE ESTA GARANTÍA. NO SE EFECTUARÁN
REEMBOLSOS. SI NO HAY PIEZAS DE REPUESTO DISPONIBLES PARA LOS
MATERIALES DEFECTUOSOS, HOMEDICS SE RESERVA EL DERECHO DE
REALIZAR SUSTITUCIONES EN VEZ DE REPARAR O CAMBIAR.
Esta garantía no se extiende a la compra de productos abiertos, usados, reparados,
embalados otra vez y/o abiertos y vueltos a cerrar, incluyendo entre otras cosas la
venta de dichos productos en sitios de remate por Internet y/o la venta de dichos
productos por revendedores o mayoristas. Todas y cada una de las garantías
cesarán y terminarán inmediatamente con respecto a cualquier producto o pieza
del mismo que estén reparados, cambiados, alterados o modificados sin el
consentimiento previo explícito y por escrito de HoMedics.
Esta garantía le proporciona derechos legales específicos. Es posible que usted
tenga derechos adicionales que pueden variar de un país a otro. Debido a las
regulaciones de ciertos países, es posible que algunas de las limitaciones y
exclusiones no se apliquen en su caso.
Por más información con respecto a nuestra línea de productos en los EE.UU.,
visítenos en: www.homedics.com
Dirección postal:
HoMedics Service Center
Dept. 168
Suite 3
43155 West Nine Mile Rd
Novi, MI 48375
Correo electrónico:
cservice@homedics.com
Teléfono:
800-466-3342
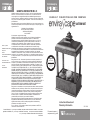
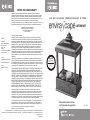
LANTERN MIST
TM
C A N D L E L I T T A B L E T O P R E L A X A T I O N F O U N T A I N
GARANTÍA LIMITADA POR UN AÑO
P
l
e
a
s
e
T
a
k
e
A
M
o
m
e
n
t
N
o
w
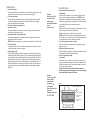
Register
Your Product At:
www.homedics.com/register
Your valuable input regarding this
product will help us create
the products you will
want in the future.

The sounds of nature
Thank you for purchasing EnviraScape, HoMedics’ tabletop
relaxation fountain. This, like the entire HoMedics product line,
is built with high-quality craftsmanship to provide you with
years of dependable service. We hope that you will find it to
be the finest product of its kind.
EnviraScape enables you to create an all-encompassing
environment with sound. The sound of flowing water enhances
your environment by releasing negative ions, and promoting
relaxation. Only EnviraScape offers you the luxury of these
vital benefits with its creative design which adds beauty to any
indoor environment.
EnviraScape Features
Innovative, Artistic Design
Enhances the environment at home or at work.
Durable Electrical Water Pump
Can be operated from any indoor electrical outlet.
Easy to Assemble
Assembles in minutes with simple, illustrated instructions.
IMPORTANT SAFETY INSTRUCTIONS:
When using an electrical appliance, basic precautions should
always be followed, including the following:
READ ALL INSTRUCTIONS BEFORE USING
DANGER
- To reduce the risk of electric shock:
• Alwaysunplugtheappliancefromtheelectricaloutlet
immediately after using and before cleaning.
• Donotreachforanappliancethathasfallenintowater.
Unplug it immediately.
• Donotplaceorstoreappliancewhereitcanfallorbepulled
into a tub or sink. Do not place in or drop into water or other
liquid.
• Donotconnecttoanyvoltageotherthanthatshown
on the pump.
• Donotpumpflammableliquids.
• Donotusewaterabove90
o
F.
WARNING
- To reduce the risk of burns, fire, electric shock
or injury to persons:
• Anapplianceshouldneverbeleftunattendedwhenplugged
in. Unplug from outlet when not in use and before putting
on or taking off parts or attachments.
2
• Closesupervisionisnecessarywhenthisapplianceisused
by or near children, invalids or disabled persons.
• Usethisapplianceonlyforitsintendeduseasdescribedin
this manual. Do not use attachments not recommended by
HoMedics; specifically any attachments not provided with
the unit.
• Neveroperatethisapplianceifithasadamagedcord,plug,
pump, cable or housing. If it is not working properly, if it has
been dropped or damaged, return it to Homedics Service
Center for examination and repair.
• Keepcordawayfromheatedsurfaces.
• Neverdroporinsertanyobjectintoanyopening.
• Donotoperatewhereaerosol(spray)productsarebeing
used or where oxygen is being administered.
• Donotcarrythisappliancebysupplycordorusecordas
handle.
• Todisconnect,removeplugfromoutlet.
• Thisapplianceisdesignedforindooruseonly.
SAVE THESE INSTRUCTIONS:
Caution – Please read all instructions
carefully before operating.
• Neverleavetheapplianceunattended,especiallyifchildren
are present.
• Nevercovertheappliancewhenitisinoperation.
• Thisunitshouldnotbeusedbychildrenwithout
adult supervision.
• Connectthepumpwiththepropervoltageasindicated
on the pump label.
• Alwayskeepthecordawayfromhightemperatureandfire.
• Unplugthepumpfrompowersourcebeforecleaning,
maintenance or disassembling.
• Togetthebestflowingeffect,productmustbeplacedona
flat surface and should never be placed on an electrical
appliance.
• Neverletpumprundry,asthiswillshortenlifeofthepump.
• Donotlift,carry,hang,orpullthepumpbythepowercord.
• Operatewithfreshwateronly.
• Operatepumpcompletelysubmergedforpropercooling.
3
CAUTION:
The pump must
be completely
submerged in
water. If the
pump is
making noises,
most likely it is
not completely
submerged in
water.
CAUTION:
Only set the
fountain and
fountain parts
on waterproof
surfaces

CAUTION CONTINUED
• Theelectricalcordofthisproductcannotbereplaced.Ifitsustains
damage, you must stop using this product immediately and return it to
the HoMedics Service Center for repair. (See the warranty section for
HoMedics address.)
• Disconnecttheappliancefromoutletbeforeputtinghandsintowater.
4 5
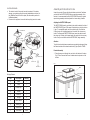
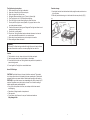
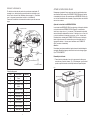
Assembly and Instructions for Use
Unpack the product. Be sure that all parts listed are included. Familiarize
yourself with the WATER PUMP (B) before completing assembly of the
fountain. It is recommended that the WATER PUMP be set at its highest
speed during assembly and later adjusted to a lower setting if desired.
Adjusting the WATER PUMP speed:
The WATER PUMP speed is controlled by the switch located at the front of
the WATER PUMP (Figure 8).The speed is indicated by a plus(+) and minus
(-) sign. To increase the speed, move the switch slowly in the direction
of the plus sign. At its highest speed level, the switch will not move any
further. To decrease the WATER PUMP speed, move the switch toward
the minus sign. Similarly, at its lowest speed, the switch will not move any
further .Once you are familiar with the WATER PUMP, begin assembly.
Attention:
Togetthebestresults,pleaseoperatepumpcompletelysubmerged.Keep
the water level above the minimum water level (Figure 8) at ALL TIMES.
Fountain Assembly:
1. Place the pump cord through the cord slot on the bottom of the base
(Fig 1).This will ensure that the unit is balanced when placed on a flat
surface.
Part Description Quantity
A Base 1
B Pump 1
C Fountain Top 1
D Oil dish 1
E Aroma Oil 1
F Tea Light 2
G Power Adaptor 1
H Cleaning Pin 1
I Fountain Lid 1
J River Rocks Varies
Package Contents
Fig 1
I. Fountain lid
D. Oil dish
C. Fountain
top
Clean water
F. Tea light
B. Pump
A. Fountain base
Switch
Power cord
Cleaning pin
mark
Fountain lid
G. Adaptor
H. Cleaning
pin
Rainfall
hole
Flat surface
Base
Pump power cord
Cord slot
J. River rocks
E. Aroma oil

5
7
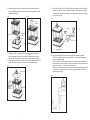
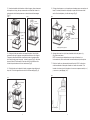
2. Insert the pump outlet into the water tube and align the holder notch
with the tab at the edge of the base. The fountain top will stand on the
base securely (Fig 2).
3. Place the oil dish on a flat surface. Fill oil dish
way with water and
add a few drops of Aroma Oil to the water. Place the oil dish in dish
holder in the fountain top and make sure it is level and secure (Fig 3).
4. Cover the fountain with the fountain lid and add the clean water into the
basin. The water level should be even with the watermark (Fig 4).
Fig 2 Fig 3
Fig 4
5. Place the Tea Light into the Tea Light holder at the base. Light the tea light if
desired to diffuse the oil scent. Attach the adaptor to the power cord (Fig 5).
if replacement tea lights are needed, we recommend using only long burning
(5+ hours) tea lights.
6. Add river rocks (to the base, around tea light) and arrange as desired.
NOTE: If any splashing occurs once fountain is running, please rearrange
rocks till splashing stops
7. Plug the cord into 120V household outlet .The fountain is controlled by the
switch located on the power cord. If the pump doesn’t operate, rotate in-line
switch once to turn “on” and once more to turn “off “.
Note: Ensure that the electrical cord loops below the electrical outlet to form
a “Drip Loop”.This will prevent water from running down the cord into the
electrical outlet (Fig 6).
Water tube
Outlet
Pump
Tab
Notch hole
Oil dish
Dish holder
Fountain lid
Watermark
Clear water
Fig 5
Tea light
Adaptor
Switch
Power cord
Tea light holder
Fig 6
Drip loop

8
9
WARNING:
ToPreventFire.Keepburningcandlewithinsight.Keepoutofreachchildren
and pets. Never burn a candle on or near anything that can catch fire.
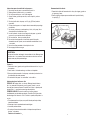
Fountain storage:
1. Unplug the fountain from the electrical outlet, empty the water, and store in a
dry, cool place.
2. Store the provided cleaning pin in the fountain lid and snap into clip (Fig 7).
Fig 7
Tea light burning instructions:
1. Never leave burning Tea Light unattended.
2. Keepoutofthereachofchildrenandpets.
3. Burn not longer than 5hr at a time.
4. Extinguishameandallowtocool;Trimwick,thenrelight.
5. Trim Tea Light wick to 1/4”(6.35mm) before lighting.
6. Place Tea Light in holder before lighting to protect furniture.
7. Do not place Tea Light on wood, plastic, vinyl, paper, fabric or other
non-heat-resistant surfaces.
8. Candle will become hot during use. Extinguish Tea Light and allow to cool
completely before handling.
9. Do not burn in drafty areas.
10. Do not burn Tea Light without ample overhead clearance, too close to
wall, near combustible materials. or in a enclosed area.
11. Never drop burned matches or any other objects into candle.
12.Neverextinguishamewithwater.
Caution:
1. This fountain is not a toy; keep out of reach of children and pets.
2. Use the proper power source as indicated on the adaptor
3. Do not touch the oil dish and Tea Light while the product is in operation to
prevent being burned.
4. Do not ignite the Tea Light in an unventilated room.
Aroma Oil Warnings:
CAUTION:EyeIrritant.Keepoutofreachofchildrenandpets.Thisproduct
is not a toy and solution is not intended for human consumption. Contact with
enclosed solution may cause irritation. Wash hands thoroughly after handing.
FIRST AID: If eye contact occurs, rinse immediately with plenty of water for 10
minutes. If ingestion occurs, drink plenty of water. Do not induce vomiting. If
irritation persists, seek medical attention.
• Ifanyoftheoilisspilledonthefloor,useadampclothtocleanareato
avoid slipping.
• Discontinueifallergicreactionisexperienced.
• Oilsmaystain.
• DonotplacevialofAromaoilorcaponfinishedwoodsurfaces.
May damage finish.
Cleaning pin mark
Cleaning
pin
Rainfall hole
Fountain lid

Maintenance
• To clean the pump:
Unplug from electrical outlet. Remove it from the base of the fountain. Use
a small brush or stream of water to remove any debris (Fig 4).
• To keep water clean:
Periodically change water and clean the product according to the water
condition.Keepingthewatercleanpreventsthewaterfrombecoming
sticky and forming micro-organisms.
• To clean off hard water deposits on
the base or rocks:
Soak the container and rocks in a mixture of vinegar and water to clean
and remove any mineral build-up .
• Keeping the water at an optimum level:
Add water periodically to keep water level at an optimum level to avoid
shortening the life of the pump.
NOTE: Never let the pump run dry, as this will shorten the life of the pump.
• Fountain storage
Unplug the fountain from the electrical outlet, empty the water, and store
rocks and fountain in a dry, cool place.
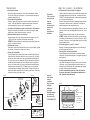
• Changing light bulb
First, unplug fountain and let bulb cool down. Remove the bulb from the
rubber plug of the plastic light tube. Pull the rubber plug together with the
bulb cover out from the plastic light tube and slowly pull apart (Fig. 6). Be
gentle with bulb cover since it is glass. Insert the rubber plug back into
the plastic light tube. Now pull bulb straight out from rubber neck (Fig. 7).
Replace with new bulb, inserting prongs into the holes. Place bulb cover
securely onto rubber neck and slide together into rubber plug of plastic
light tube.
Troubleshooting
• If the pump fails to operate, check
the following:
Check the circuit breaker, or try a different outlet to make
sure the pump is getting electrical power. NOTE: Always
disconnect from electrical outlet before handling the pump.
Check the pump discharge and tubing for kinks and obstruc-
tions. Algae build up can be flushed out with a
garden hose.
Remove the pump inlet to access the impeller area. Turn the
rotor to ensure it is not broken or jammed.
Monthly maintenance will add to your pump’s life.
NOTE: Ensure that the electrical cord loops below the elec-
trical outlet to form a ‘Drip Loop’. This will prevent water from
running down the cord into the electrical outlet.
• If the pump gurgles, spews, or “burps”:
Check the water level to make sure the pump has enough
water to function.
• Obtaining a desired water level:
Check the water level daily the first week to measure the rate
of evaporation; refill with water as needed.
• If water is splashing outside
the fountain:
Rocks that are hit by water and also touch the edge of the
base will cause water to splash outside of the base and con-
tribute to the splash factor. Expect some splash to occur as
you get the rocks organized.
If splash continues, adjust the flow control valve to a
lower setting, and/or rearrange the river rocks by moving
them away from the edge of the base.
Minimum Water Level
Flow Control Valve
(+) faster water
output
(-) slower water
output
Figure 8
11
10
Caution:
All servicing of this
fountain must be
performed by
authorized HoMedics
service
personnel only.
Attention:
In order to get best
results, please
operate pump
completely
submerged.
Keep the water level
above the
minimum water level
ALL THE TIME.

Manual de instrucciones
e Información de garantía
WF-LAMI
© 2010 HoMedics, Inc. and its affiliated companies, all rights reserved. HoMedics
®
is a registered trademark of
HoMedics, Inc. and its affiliated companies. Envirascape™ is a trademark of HoMedics, Inc. and its affiliated companies.
All rights reserved.
IB-WFLAMI
HoMedics sells its products with the intent that they are free of defects in
manufacture and workmanship for a period of one year from the date of original
purchase, except as noted below. HoMedics warrants that its products will be
free of defects in material and workmanship under normal use and service. This
warranty extends only to consumers and does not extend to Retailers.
To obtain warranty service on your HoMedics product, mail the product and your
dated sales receipt (as proof of purchase), postpaid, to the following address:
HoMedics Consumer Relations
Service Center Dept. 168 Suite 3
43155 West Nine Mile Rd
Novi, MI 48375
No COD’s will be accepted.
HoMedics does not authorize anyone, including, but not limited to, Retailers,
the subsequent consumer purchaser of the product from a Retailer or remote
purchasers, to obligate HoMedics in any way beyond the terms set forth herein.
This warranty does not cover damage caused by misuse or abuse; accident; the
attachment of any unauthorized accessory; alteration to the product; improper
installation; unauthorized repairs or modifications; improper use of electrical/
power supply; loss of power; dropped product; malfunction or damage of an
operating part from failure to provide manufacturer’s recommended maintenance;
transportation damage; theft; neglect; vandalism; or environmental conditions; loss
of use during the period the product is at a repair facility or otherwise awaiting
parts or repair; or any other conditions whatsoever that are beyond the control of
HoMedics.
This warranty is effective only if the product is purchased and operated in the
country in which the product is purchased. A product that requires modifications
or adoption to enable it to operate in any other country than the country for which
it was designed, manufactured, approved and/or authorized, or repair of products
damaged by these modifications is not covered under this warranty.
THE WARRANTY PROVIDED HEREIN SHALL BE THE SOLE AND EXCLUSIVE
WARRANTY. THERE SHALL BE NO OTHER WARRANTIES EXPRESS OR
IMPLIED INCLUDING ANY IMPLIED WARRANTY OF MERCHANTABILITY OR
FITNESS OR ANY OTHER OBLIGATION ON THE PART OF THE COMPANY WITH
RESPECT TO PRODUCTS COVERED BY THIS WARRANTY. HOMEDICS SHALL
HAVE NO LIABILITY FOR ANY INCIDENTAL, CONSEQUENTIAL OR SPECIAL
DAMAGES. IN NO EVENT SHALL THIS WARRANTY REQUIRE MORE THAN THE
REPAIR OR REPLACEMENT OF ANY PART OR PARTS WHICH ARE FOUND
TO BE DEFECTIVE WITHIN THE EFFECTIVE PERIOD OF THE WARRANTY.
NO REFUNDS WILL BE GIVEN. IF REPLACEMENT PARTS FOR DEFECTIVE
MATERIALS ARE NOT AVAILABLE, HOMEDICS RESERVES THE RIGHT TO
MAKEPRODUCTSUBSTITUTIONSINLIEUOFREPAIRORREPLACEMENT.
This warranty does not extend to the purchase of opened, used, repaired,
repackaged and/or resealed products, including but not limited to sale of such
products on Internet auction sites and/or sales of such products by surplus or
bulk resellers. Any and all warranties or guarantees shall immediately cease and
terminate as to any products or parts thereof which are repaired, replaced, altered,
or modified, without the prior express and written consent of HoMedics.
This warranty provides you with specific legal rights. You may have additional
rights which may vary from country to country. Because of individual country
regulations, some of the above limitations and exclusions may not apply to you.
For more information regarding our product line in the USA,
please visit: www.homedics.com
Mail To:
HoMedics
Consumer Relations
Service Center
Dept. 168
Suite 3
43155 West Nine Mile Rd
Novi, MI 48375
e-mail:
cservice@homedics.com
phone: 800-466-3342
Hours:
8:30am-7pm EST
LANTERN MIST
TM
L U z D E L A S v E L A S F U E N T E R E L A j A C I ó N P A R A
LIMITED ONE YEAR WARRANTY
Register
Your Product At:
www.homedics.com/register
Your valuable input regarding this
product will help us create
the products you will
want in the future.

Los sonidos de la naturaleza
Gracias por comprar la fuente de relajación para mesa EnviraScape
de HoMedics. Éste, al igual que toda la línea de productos
HoMedics, está fabricado con mano de obra de alta calidad para
brindarle años de servicio confiable. Esperamos que lo encuentre
como el mejor producto de su clase.
EnviraScape le permite crear un ambiente completo con sonido.
El sonido del agua fluyendo realza su ambiente liberando iones
negativos e incentivando la relajación. Sólo EnviraScape le ofrece
el lujo de estos beneficios vitales con su creativo diseño que agrega
belleza a cualquier ambiente interior.
Características de EnviraScape
Diseño artístico e innovador
Realza el ambiente en su hogar o en el trabajo.
Bomba de agua eléctrica de gran duración
Se puede hacer funcionar desde cualquier tomacorriente eléctrico
de interiores.
Fácil de armar
Se arma en minutos con instrucciones simples e ilustradas.
IMPORTANTES INSTRUCCIONES DE SEGURIDAD:
Cuando utiliza un artefacto eléctrico, siempre se deben seguir ciertas
precauciones básicas, incluyendo lo siguiente:
LEA TODAS LAS INSTRUCCIONES ANTES DE USAR
PELIGRO
- Para reducir el riesgo de choque eléctrico:
• Siempre desenchufe el artefacto del tomacorriente
inmediatamente después de usarlo y antes de limpiarlo.
• Nointentetomarunartefactoquehayacaídoalagua.
Desenchúfelo de inmediato.
• Nocoloqueniguardeunartefactodondepuedacaerseoser
tirado hacia una tina o lavamanos. No lo coloque ni lo deje caer
en agua ni en ningún otro líquido.
• Nolaconecteaningúnotrovoltajequenoseaqueelsemuestra
en la bomba.
• Nobombeelíquidosinflamables.
• Nolauseconaguaaunatemperaturasuperioralos90ºF.
ADVERTENCIA
-
Para reducir el riesgo de quemaduras,
incendio, choque eléctrico o lesiones a las personas:
• Unartefactonuncadebeserdejadosinatencióncuandoestá
enchufado. Desenchúfelo del tomacorriente cuando no lo esté
usando y antes de colocar o quitar piezas o accesorios.
• Esnecesariaunasupervisiónestrictacuandolousanniños
o personas inválidas o incapacitadas o cuando está próximo a ellos.
• Utiliceesteartefactosóloparaelusoparaelcualestádiseñadoycomo
se describe en este manual. No use accesorios no recomendados por
HoMedics, específicamente ningún accesorio no proporcionado con la
unidad.
• Nuncahagafuncionaresteaparatositieneelcordón,elenchufe,labomba
el cable o el armazón dañado. Si no está funcionando adecuadamente, si
se ha caído o dañado, envíelo al Centro de servicio de HoMedics para que
sea examinado y reparado.
• Mantengaelcablealejadodesuperficiescalientes.
• Nuncalodejecaerniinserteobjetosenningunaabertura.
• Nolohagafuncionardondeseutilizanproductosderociadoporaerosolo
donde se está administrando oxígeno.
• Nolleveesteartefactotomadodelcable,niuseelcablecomomanija.
• Paradesconectarlo,quiteelenchufedeltomacorriente.
• Esteartefactoestádiseñadoúnicamenteparausarloeninteriores.Nolo
use en exteriores.
• ¡LabombillaesCALIENTE!
• Desenchufelafuenteydejeenfriarlabombillaantesdetocarla.
• Mantengalabombillaalejadadematerialesquepuedenincendiarse.
• Jamastoquelabombillaconsusmanos.Usesiempreunatelasuave.
Aceite de la piel puede dañar la bombilla.
• Nooperelabombillasinlacubiertadebombilla,niconunacubierta
dañada.
GUARDE ESTAS INSTRUCCIONES
Precaución: Sírvase leer todas las instrucciones con
atención antes de poner en funcionamiento.
• Nuncadejeelartefactosinvigilancia,especialmentesihayniños
presentes.
• Nuncacubraelartefactomientrasestáenfuncionamiento.
• Estaunidadnodebeserusadaporniñossinlasupervisióndeunadulto.
• Conectelabombaconelvoltajeadecuadosegúnseindicaenlaetiqueta
de la bomba.
• Siempremantengaelcordónalejadodelastemperaturasaltas.
• Desenchufelabombadelafuentedeenergíaantesdelimpiar,realizarel
mantenimiento o desarmar.
• Paraobtenerelmejorefectodeflujo,sedebecolocarelproductosobre
una superficie plana y nunca se lo debe colocar sobre un artefacto
eléctrico.
• Nuncadejequelabombafuncionesinagua,yaqueestoacortarálavida
de la bomba.
• Nolevante,lleve,cuelguenitiredelabombatomándoladelcablede
corriente.
• Hagafuncionarconaguadulcesolamente.
• Hagafuncionarlabombacompletamentesumergidaparalograrun
enfriamiento adecuado.
11
PRECAUCIÓN:
La bomba debe
estar total-
mente sumer-
gida en agua. Si
la bomba hace
ruido, lo más
probable es
que no esté
totalmente
sumergida en
el agua.
PRECAUCIÓN:
Coloque la
fuente y las pie-
zas de la fuente
únicamente
sobre superficies
impermeables.
10

PRECAUCIÓN CONTINUACIÓN
El cable de corriente de este producto no puede ser reemplazado. Si
presenta daños, debe dejar de usar este producto de inmediato y envi-
arlo al Centro de servicio de HoMedics para su reparación. (Consulte la
sección de garantía para obtener la dirección de HoMedics).
Desconecte el artefacto del tomacorriente antes de poner las manos en
agua.
12 13
Armado e instrucciones de uso:
Desempaque el producto. Asegúrese de que se incluyan todas las piezas
mencionadas. Familiarícese con la BOMBA DE AGUA (B) antes de realizar
el ensamblaje de la fuente. Se recomienda que la BOMBA DE AGUA se fije
a su máxima velocidad durante el armado y luego se ajuste a una velocidad
menor si así se desea.
Ajuste de la velocidad de la BOMBA DE AGUA:
La velocidad de la BOMBA DE AGUA se controla con el interruptor ubicado
en la parte frontal de la BOMBA DE AGUA (Figura 8). La velocidad se
indica con un signo de más (+) y de menos (-). Para aumentar la velocidad,
mueva el interruptor lentamente en la dirección del signo de más. A su nivel
máximo de velocidad, el interruptor no se moverá más allá de ese punto.
Para disminuir la velocidad de la BOMBA DE AGUA, mueva el interruptor
hacia el signo de menos. De la misma forma, en su velocidad menor, el
interruptor se detendrá. Una vez que se familiarice con la BOMBA DE
AGUA, comience el ensamblaje.
Atención:
Para obtener los mejores resultados, haga funcionar la bomba totalmente
sumergida. Mantenga el agua por encima del nivel mínimo de agua (figura
8) en TODO MOMENTO.
Ensamblaje de la fuente:
1. Pase el cable de la bomba a través de la ranura para el cable que se
encuentra en el fondo de la base. (Fig. 1). Esto asegurará que la unidad
quede en equilibrio cuando se la coloque sobre una superficie plana.
Fig 1
Superficeie plana
Base
Cable de alimentación
de la bomba
Ranura para el cable
Part Description Quantity
A Base 1
B Boma 1
C Parte superior de la
fuente
1
D Plato para aceite 1
E Aceites aromáticos 1
F Vela pequeña 2
G Adaptador 1
H Alfiler de limpieza 1
I Tapa de la fuente 1
J Rocas de río Varies
Contenido del paquete
I. Tapa de la fuente
D.
Plato para
aceite
C.
Parte
superior
e la fuente
Limpieza del agua
F. Vela pequeña
A. Bomba
Fuente de base
Interruptor
Cable de alimentación
Limpieza pin
marca
I. Tapa de
la fuente
G.Adaptador
Limpieza pin
marca
Lluvia
agujero
J.
Rocas de río
E. Aceites aromáticos

14
15
2. Introduzca la salida de la bomba en el tubo de agua y alinee la muesca
del soporte con la lengüeta que se encuentra en el borde de la base. La
parte superior de la fuente permanecerá sobre la base de forma segura
(Fig. 2).
3. Coloque el plato para aceite en una superficie plana. Llene el plato
para aceite con agua y agregue unas gotas de aceite aromático al agua.
Coloque el plato para aceite en el soporte del plato en la parte superior
de la fuente y asegúrese de que esté nivelado y seguro (Fig. 3). add a few
drops of Aroma Oil to the water. Place the oil dish in dish holder in the
fountain top and make sure it is level and secure (Fig 3).
4. Cubra la fuente con la tapa de la fuente y agregue el agua limpia en el
depósito. El nivel del agua debe coincidir con la marca de agua (Fig. 4).
Fig 2 Fig 3
5. Coloque la vela pequeña en el soporte para la misma que se encuentra en la
base. Si lo desea, encienda la vela pequeña para difundir la esencia del
aceite. Una el adaptador y el cable de energía (Fig. 5).
6. Agregue las rocas de río (a la base, alrededor de la vela pequeña) y
arréglelas como desee.
NOTA: si ocurre alguna salpicadura una vez que la fuente esté en
funcionamiento, vuelva a acomodar las rocas hasta que deje de salpicar.
7. Enchufe el cable a un tomacorriente domiciliario de 120 V. La fuente se
controla mediante el interruptor ubicado en el cable de corriente. Si la
bomba no funciona, gire el interruptor en línea una vez para encender (“on”)
y una vez más para apagar (“off”).
Tubo de agua
Salida
Bomba
Tab
Orificio de la muesca
Oil dish
Dish holder
Fig 4
Tapa de la fuente
Filigrana
Agua clara
Fig 5
Vela pequeña
Adaptador
Interruptor
Cable de corriente
Soporte para vela pequeña
Fig 6
Bucle de goteo

17
18
ADVERTENCIA:
Para prevenir incendios: mantenga la vela encendida a la vista. Mantenga fuera
del alcance de niños y mascotas. Nunca encienda una vela sobre o cerca de
cualquier cosa que pueda prenderse fuego.
Almacenamiento de la fuente:
1. Desenchufe la fuente del tomacorriente eléctrico, quite el agua y guarde en
un lugar seco y fresco.
2. Guarde el alfiler de limpieza que se suministra en la tapa de la fuente y
tránquela (Fig. 7).
Instrucciones para el encendido de la vela pequeña:
1. Nunca deje una vela pequeña encendida sin supervisión.
2. Mantenga fuera del alcance de niños y mascotas.
3. No la deje encendida por más de 5 horas seguidas.
4. Apague la llama y permita que se enfríe, recorte el pabilo y vuelva a
encender.
5. Recorte el pabilo de la vela pequeña a 1/4 pulg. (6,35 mm) antes de
encenderla.
6. Coloque la vela pequeña en el soporte antes de encenderla para proteger
sus muebles.
7. No coloque la vela pequeña sobre madera, plástico, vinilo, papel, tela u
otrassuperciesnoresistentesalcalor.
8. La vela se calentará durante el uso. Apague la vela pequeña y permita
que se enfríe por completo antes de manipularla.
9. No la encienda en áreas con corrientes de aire.
10.Noenciendalavelapequeñasinelsucienteespaciolibrearriba,
demasiado cerca de la pared, cerca de materiales combustibles ni en un
área cerrada.
11. Nunca tire cerillas quemadas ni otros objetos a la vela.
12. Nunca apague la llama con agua.
Precaución:
1. Esta fuente no es un juguete; manténgala fuera del alcance de los niños y de
las mascotas.
2. Use la fuente eléctrica adecuada según se indica en el adaptador.
3. No toque el plato para aceite ni la vela pequeña mientras el producto esté en
funcionamiento para evitar quemarse.
4. No encienda la vela pequeña en una habitación sin ventilación.
Advertencias sobre el aceite aromático:
PRECAUCIÓN: Produce irritación en los ojos. Mantenga fuera del alcance
de niños y mascotas. Este producto no es un juguete y la solución no está
diseñada para el consumo humano. El contacto con la solución adjunta puede
causar irritación. Lávese bien las manos luego de manipularla.
PRIMEROS AUXILIOS: Si ocurre el contacto con los ojos, enjuague
inmediatamente con abundante agua durante 10 minutos. Si se ingiere, beba
abundante agua. No induzca el vómito. Si la irritación persiste, busque atención
médica.
• Sisederramaaceiteenelpiso,useunpañohúmedoparalimpiarelárea,
para evitar resbalarse.
• Interrumpaelusosiexperimentareaccionesalérgicas.
• Losaceitespuedenmanchar.
• Nocoloqueelfrascodeaceitearomáticonilatapasobresuperficiescon
terminación de madera.
Puede dañar la terminación.
Fig 7
Marca del alfiler de limpieza
Alfiler de limpieza
Orificio de lluvia
Tapa de la fuente

Plastic Plug
Bulb Cover
Plastic Plug
Bulb
Plastic Plug
Bulb Cover
Plastic Plug
Bulb
Plastic Plug
Bulb Cover
Plastic Plug
Bulb
19
18
Diagnóstico y resolución de problemas
• Si la bomba no funciona, verifique lo siguiente:
Revise el disyuntor o enchufe la unidad en otro tomacorriente
para asegurarse de que la bomba está recibiendo corriente.
ATENCIÓN: Siempre desconecte la bomba del tomacorriente
eléctrico antes de manipularla.
Revise la descarga de la bomba y las mangueras para detec-
tar pliegues u obstrucciones. La acumulación de algas se
puede enjuagar con una manguera de jardín.
Quite la entrada de la bomba para obtener acceso al área del
propulsor. Gire el rotor para asegurarse de que no esté roto o
trabado.
El mantenimiento mensual alargará la vida de su bomba.
ATENCIÓN: Asegúrese de que el cable de corriente cuelgue
por debajo del tomacorriente eléctrico para formar un “bucle
de goteo”. Esto evitará que el agua pueda correr por el cable
hacia el tomacorriente.
• Si la bomba gorgotea, “vomita” o “eructa”:
Revise el nivel del agua para asegurar que la bomba tenga
suficiente agua para funcionar.
• Cómo lograr el nivel de agua deseado:
Revise diariamente el nivel de agua en la primera semana
para medir la velocidad de evaporación; agregue agua según
sea necesario.
• Si el agua salpica fuera de la fuente:
Las piedras que golpea el agua y además tocan el borde de
la base harán que el agua salpique fuera de la base y con-
tribuya al factor de salpicado. Es de esperarse que salpique
un poco mientras organiza las piedras.
Si continúa salpicando, ajuste la válvula de control de
flujo en un valor menor, y/o reubique las piedras de río
alejándolas del borde de la base.
Mantenimiento
• Para limpiar la bomba:
Desenchufe del tomacorriente eléctrico. Quite la bomba de la base
de la fuente. Utilice un cepillo pequeño o chorro de agua para quitar
cualquier desecho (Fig. 4).
• Para mantener el agua limpia:
Cambie el agua periódicamente y limpie el producto de acuerdo a la
condición del agua. Mantener el agua limpia evita que la misma se
vuelva pegajosa y la formación de microorganismos.
• Para limpiar los depósitos de agua dura de la base o de las piedras:
Remoje el recipiente y las piedras en una mezcla de vinagre y agua
para limpiar y quitar cualquier acumulación mineral.
• Mantenimiento del agua a un nivel óptimo:
Agregue agua en forma periódica para mantener el agua en un nivel
óptimo y evitar que la vida de la bomba se vea reducida.
ATENCIÓN: Nunca deje que la bomba funcione sin agua, ya que esto
acortará la vida de la bomba.
• Guardado de la fuente
Desenchufe la fuente del tomacorriente eléctrico, quite el agua y guarde
las piedras y la fuente en un lugar seco y fresco.
• Cambio de las bombillas
Primero desenchufe la fuente y deje enfriar la bombilla. Retire la bom-
billa del enchufe de caucho del tubo de luz de plástico (Fig. 5). Hale el
enchufe de caucho junto con la tapa de la bombilla fuera del tubo de
luz de plástico y sepárelo lentamente (Fig. 6). Manipule la cubierta con
cuidado ya que la misma es de vidrio. Vuelva a inserir el enchufe de
caucho en el tubo de luz de plástico. Ahora, hale la bombilla derecho
afuera del cuello de caucho (Fig. 7). Reemplácela con una bombilla
nueva, insertando los espigos en los orificios. Coloque firmemente la
tapa de la bombilla sobre el cuello de caucho y deslícela en el enchufe
de caucho del tubo de luz de plástico.
Precaución:
Todo el servicio
de esta fuente
debe ser
realizado
únicamente por
personal de
servicio
autorizado de
HoMedics.
Atención:
Para obtener
mejores
resultados
haga funcionar
la bomba
totalmente
sumergida.
Mantenga el agua
por encima del
nivel mínimo EN
TODO MOMENTO
.
Nivel mínimo de agua
Válvula de control
de flujo
(+) salida de agua
más rápida
(-) salida de agua
más lenta
Figura 8
Figura 4
+
-
Placa delantera
El tubo de PVC
se conecta acá
Placa trasera
Patas de succión
Propulsor
Entrada de
la bomba
Palanca de
control de flujo
Armazón
Figura 5
Figura 6
Tubo de luz
de plástico
Figura 7
Tapa de la
bombilla
Enchufe de
caucho
Cuello de
caucho
Tapa de la
bombilla
La
bombilla
La
bombilla
-
 1
1
-
 2
2
-
 3
3
-
 4
4
-
 5
5
-
 6
6
-
 7
7
-
 8
8
-
 9
9
-
 10
10
-
 11
11
-
 12
12


en otros idiomas
- English: HoMedics WFL-LAMI
Artículos relacionados
-
HoMedics WFL-SLMP Instruction Manual And Warranty
-
-
-
-
-
-
-
-
HoMedics WF-SBWL Instruction book
-