
Worldwide Leader in
Steaming Equipment Since 1940
Esteam
®
and J-Series
OWNER’S MANUAL
PRINTED IN THE USA
FORM #5500B - REVISION 17
Printed on Post-Consumer Recycled Paper
© Copyright 2014

Congratulations and Thank You!
Table of Contents
2
Thank you for purchasing your Jiffy
®
Steamer
from the world’s leading manufacturer of
steaming equipment since 1940. We strive to
engineer and manufacture the very best
steamer available backed by
superior customer service.
With proper maintenance and cleaning, your Jiffy
®
Steamer will last through years of demanding use.
Thank you again and we sincerely appreciate your
business.
Warmest regards,
Jiffy
®
Steamer Company, LLC
Made in the USA Since 1940
Safety Instructions .....................................................................3
How to Steam..............................................................................4
Esteam
®
Hand Held Steamer.................................................5-8
Jiffy Steamer Accessories ..........................................................9
Model J-1 & J-2 Jiffy
®
Steamers .......................................10-15
Model J-2000 Jiffy
®
Steamer .............................................16-21
Model J-4000 Pro-Line Jiffy
®
Steamer .............................22-27
Model J-1, J-2 & J-2000 Jiffy
®
Steamers
Cleaning Instructions...............................................................28
Model J-4000 Jiffy
®
Steamer Cleaning Instructions.............29
Jiffy
®
Steamer Maintenance....................................................30
More Jiffy
®
Steamer Accessories.............................................31
Jiffy
®
Steamer Steam Head Configurations .....................32-33
Jiffy
®
Steamer Cord Plug Configurations..............................33
Troubleshooting ..................................................................34-35
Jiffy
®
Matrix Charts ...........................................................36-39
Product Specifications .............................................................40
Jiffy
®
Steamer Warranty & Return Policy ............................41
Jiffy
®
Steamer Contact Information.......................................42

LISTED
COMMERCIAL
GARMENT STEAMER
579M
3
Important Jiffy
®
Steamer Safety Instructions
When using your Jiffy
®
Steamer, basic precautions should always
be followed, including the following:
1. WARNING! Read all instructions prior to usage.
2. To reduce the risk of contact with hot water emitting from steam vents,
check appliance before each use by holding it away from body and operating.
3. Use appliance only for its intended use. Steam only in an up and down
vertical motion. Never use steamer in a horizontal position
or tilt into a backward position, this may result in water discharge.
4. To avoid the risk of electric shock, do not immerse the appliance in
water or other liquids.
5. Never tug cord to disconnect from outlet; instead grasp plug and pull to
disconnect.
6. Do not allow cord to touch hot surfaces. Let appliance cool completely
before storing.
7. Always disconnect appliance from electrical outlet when filling with water,
emptying, and when not in use.
8. Do not operate appliance with a damaged cord, or if the appliance has been
dropped or damaged. To reduce the risk of electric shock, do not disassemble
or attempt to repair the appliance, take it to a qualified service person or return
to the Jiffy
®
Steamer factory for examination and repair. Incorrect reassembly or
repair could cause a risk of fire, electric shock or injury to persons when the
appliance is used.
9. Close supervision is necessary for any appliance being used near children. Do
not leave appliance unattended while connected to power source.
10. Burns could occur from touching hot parts, hot water or steam. Use care
when you empty a steam appliance as there may be hot water in the reservoir.
11. Indoor use only.
12. Never attempt to steam clothing while on body.
13. Never use an extension cord.
14. This marking on the product denotes that the unit is grounded.
SAVE THESE INSTRUCTIONS
RISK OF
ELECTRIC
SHOCK
RISK OF
BURNS

How to Steam
As your dry cleaner knows, steam is the gentlest, safest, most efficient method to
remove wrinkles. Not only is steaming five times faster than ironing, it is guaranteed
not to scorch even the most delicate materials and fabrics. Our steamers will remove
wrinkles from clothing, drapery, tablecloths...virtually any fabric. Use the following
information to help guide you to more proficient steaming.
Some articles
can be steamed
better from the
underside. This
allows the
steam to relax
the fibers of the
material, thus
removing the wrinkles.
Jiffy
®
Steamers are
great for removing
“closet crunch,” and
they eliminate most
trips to the drycleaner.
Convenient
hanger/hook
mechanism holds both
clothes and steam head securely.
Always steam with
the hose in an
upright position so
any condensation is
free to flow back
into the steamer. If
steaming in a low
position near floor,
frequently extend
hose up and out to keep hose clear
of condenstation
Pants may be easily steamed by
hanging them by the cuff. You may
also use your Jiffy Steamboard to
serve as a vertical pressing board to
steam your garments.
4
When steaming,
touch material
lightly with steam
head and wrinkles
will vanish instantly.
The combination of
the warm, moist
steam and the steam
head is important for
a smooth finish.

Esteam
®
Features and Directions.
ESTEAM
®
Directions for Use
1. Make sure your Esteam
®
is unplugged before filling.
2. Check to make sure the factory-installed red o-ring is
secure inside the water tank before operating steamer
(figure #1).
3. Fill with tap or distilled water to the full mark on the outside of the steamer.
Never overfill. Never use water left overnight in steamer. Stale water causes
foaming action and can create water droplets. If you start to see scale
buildup in the water cup of your ESTEAM, it is time to clean it with
our Jiffy Steamer Liquid Cleaner. Not doing so, could alter
the performance of the unit.
4. After filling, place steam cap on steamer and twist
firmly until cap arrows align with arrows on the tank
(figure #2). Make sure it is secure before operating unit.
5. Plug your Esteam
®
into proper voltage outlet. Steamer will start
heating within 15 seconds, providing live steam from cold
water within 2 minutes.
6. Always steam with a vertical up and down motion (figure #3). Do not tilt unit
forward or backward.
7. Avoid allowing steamer to run dry of water.
8. Refer to page 8 for complete cleaning instructions.
WARNING: Never operate without water. Unplug after each use.
Figure 1
Figure 2
5
Features
• 3 times more powerful than any other
hand-held steamer on the market
• Largest water reservoir available
• Wide mouth, easy-to-fill water tank
• 600-watt heating element; automatic safety
shut-off temporarily cuts unit off when
it runs dry
• Uses plain tap or distilled water (no
additives required)
• Comfortable, easy-to-grip handle
• Special outer housing for cool-to-the-
touch operation
• No internal water lines or pumps to
become clogged by hard water
• 9-foot power cord for more manageable
handling
• Fits neatly inside attaché or suitcase
• Available with a multiple plug converter for world travel
Ownerʼs
Manual
Steam Cap
Figure 3
Includes:
ESTEAM
®
Main Body

Esteam
®
Parts Diagram
6

7
Esteam
®
Parts Diagram Key
ESTEAM
®
Should you ever need replacement parts for your Jiffy
®
Steamer, you may purchase
them separately. Use this handy diagram and parts list to identify any part you may
need. Please include model and serial number when ordering.
Jiffy Steamer
Key# Part # Part Description
1 0653 Esteam 120 Volt 600 Watt Heater
with Gaskets and Nut
0655 Esteam 230 Volt 625 Watt Heater
with Gaskets and Nut
1a. Esteam Heater
(Sold with Item #0653 or #0655 as a Kit)
1b. Gasket for Esteam Heater
(Sold with Item #0653 or #0655 as a Kit)
1c. Nut for Esteam Heater
(Sold with Item #0653 or #0655 as a Kit)
2 0661 Red Inside O-Ring
3 0662 Black Outside O-Ring
4 0669 Esteam Water Tank
5 0640 Esteam 36 T-L263 Thermostat
6 0643 Fusible Link Clamp
7 0644 Fusible Link Clamp Screw
8 0641 Fusible Link Wire with Insulated Lug (Orange)
9 0681 Red Wire with Insulated Lugs
10 0645 Pilot Light with Wiring Harness
for 120 Volt Electrical Systems
0646 Pilot Light with Wiring Harness
for 230 Volt Electrical Systems
11 0647 Cord set (18/2 gauge)
12 0665 Right Case Half
13 0666 Left Case Half
14 0667 Four (4) Screws for Esteam Outer Case Halves
15 0663 Complete Steam Cap with Face Plate
ACCESSORIES
0619 Voltage Converter for Travel
0899 Liquid Cleaner - 3 Ten (10) Ounce
Bottles per Package*
*Not Available for Export.
ESTEAM Steam Caps with Face Plates and Case Halves are Available in Black or Pink.
Please specify color when ordering.
If you donʼt see the part you need, please contact us.

8
Esteam
®
Cleaning Instructions
Once you begin to see calcium scale
collect in the bottom of your
ESTEAM
®
hand steamer, it is time
to use the Jiffy
®
Steamer Liquid
Cleaner. It is important that you
use our cleaner as it was specially
formulated for our products.
Using another cleaner could void
the warranty. Please follow these
instructions:
1. Pour 4 ounces of water in your
ESTEAM
®
hand steamer.
2. Plug in the unit and bring to full steam.
3. Unplug the unit and allow to cool for 2 minutes.
4. Pour out all water.
5. Pour in 5 ounces (1/2 bottle) of the Jiffy
®
Steamer Liquid Cleaner.
6. DO NOT STEAM THE UNIT WITH THE LIQUID CLEANER.
7. Leave the liquid cleaner in the unit for 3 hours.
8. Pour out the liquid cleaner solution.
9. Scrub with a stiff bristled brush to remove excess sediment as necessary.
10. Flush the unit 3 times with fresh water.
11. Resume steaming as normal.

Jiffy
®
Steamer Accessories
9
Accessories
Jiffy Travel Case
ITEM # 0890
Now you can take your Jiffy
Steamer everywhere you go
with our innovative Jiffy
Steamer Travel Case. This
case can be used with any
model Jiffy Steamer and is
ideal for transporting your
steamer to trade shows,
work sites, trunk shows,
conferences and
conventions. Never be without your Jiffy
Steamer again! The Jiffy Steamer Travel Case
is constructed with the finest materials to
insure the protection of your steamer. External
Dimensions: 25" x 17" x 11"
• Push-button retractable handle with
comfort-grip
• Molded protective corners
• Heavy-duty, dual zippers with 1" pull tabs
• Premium twin in-line skate wheels.
• Large interior pocket for storing steam
head and hose attachment
• Reinforced, interior adjustable straps to
secure your Jiffy Steamer
Jiffy Steamer
Professional
Garment Hanger
ITEM # 0897
This unique Professional Garment Hanger
design works in concert with your Jiffy®
Steamer to prevent unsightly hanger marks
and to facilitate the steaming process. They
are ideal for retail showrooms, trade shows,
traveling sales people,and residences. These
high quality hangers will last you a lifetime.
Jiffy® Steamer Professional Garment
Hangers are loaded with features including:
• Solid metal chrome
construction
• Formed shoulders to
prevent hanger marks
• Non Slip, adjustable,
coated clips for pants
and skirts
• 360 degree swivel
hook
• Removable pants bar
Jiffy Steamer
Magik Brush
ITEM # 1042
Jiffy Steamer Magik
Brush quickly and
effectively removes
lint, fuzz, dust, dandruff and pet hair from
clothing, bedding and upholstery. A
comfort-grip handle and double-sided surface
ensures longer brush life, twice the pick-up
capacity of one-sided brushes, plus
convenient left or right hand use. Keep your
clothing and upholstery looking their best
with this handy brush.
Jiffy Steamer Professional
Lint Roller
ITEM # 1045
Our Professional Grade Lint
Roller features a reusable
comfort-grip handle and Super
Tac2 Professional Strength
Adhesive lint strips. The Zip
Strip technology enables quick
and easy sheet removal with no
waste. The roll is 4 inches wide
and 30 feet long. 1 handle and 1
roll per order. 3 part roll refills
are available. Great for home,
office or travel!
Jiffy Steamer
Steam Spray
Gently fragrant and
natural, Jiffy
®
Steamer’s new,
scented Jiffy
®
Steam
Spray leaves your clothes and fabrics
smelling fresh and clean. The Jiffy
®
Steam
Spray is offered to you in three delightful
fragrances, each made with high quality
essential oils for a long lasting refreshing
scent. The Jiffy
®
Ocean Breeze scent (item
#1054) captures the essence of a perfect day
by the sea in a bottle. Jiffy
®
Lavender Steam
Spray (item #1052) brings the freshness of
Provence into your home, or try the Jiffy®
Tickled Pink Steam Spray (item #1036) for
the fresh scent of springtime. 32 ounce refill
bottles are available for all scents.

J-2 Base Unit
Rod Set
(not included with
J-1 series)
Jiffy
®
J-1 and J-2 Model Steamer
10
FEATURES
• Cast aluminum housing for durability (Models J-1 and J-2)
• Lightweight, flexible hose - Models J-2 (J-1 series
utilizes a brass hat nozzle)
• Shatterproof water bottle
• Safety wiring feature temporarily turns the unit off if it
accidentally runs dry
• Comfortable, easy-to-grip handle
• Removes wrinkles up to five times faster than
conventional ironing
• Easy-roll casters for mobility (casters not included with
J-1 series)
• Numerous steam head attachments available
• 120 volt or 230 volt units available
• Backed by Jiffy
®
’s renowned customer service--should your
steamer need repair, send it to us and we will repair and ship
the unit within 24 hours from its arrival to our plant
Assembly
Wrench
Water
Bottle
INCLUDES:
Steam Head
and Hose
Attachment
(not included
with J-1
series)
Ownerʼs
Manual
Hat Nozzle
(J-1 Models)

J-2
1
. For J-2 models, attach hose firmly with included
assembly wrench, which is magnetized and located on
the bottom of the unit (figure #1). Assemble and attach
hose hanger rod set. For J-1 models, the brass hat nozzle
should already be attached. There is no rod set or hose
attachment for J-1 models.
Every Jiffy
®
Steamer has
been factory tested and it is not uncommon for small
amounts of water to be in the unit.
2. Invert bottle of fresh tap or distilled water, plug into proper voltage
outlet, turn switch to lighted ON position and you will have steam
within minutes. Never use your foot to turn steamer on/off. Never substitute
the Jiffy
®
Steamer water bottle.
3. For easy operation, mount optional Jiffy
®
Steamboard to
door or wall to hold clothing while steaming (figure #2).
For hanging garments without optional Jiffy
®
Steamboard, simply install an eye screw or nail to inside
of a doorway or directly onto a wall or you may use
steamer’s rod set as shown in figure 3. Touch material
lightly with steaming head and wrinkles will vanish
instantly. The combined touch of the steaming head and
the direct steam is very important. Some articles can be
steamed better from the underneath side. Speed and
efficiency is accomplished with a little practice. Always
steam with hose in an upright position, so any
condensation is free to flow back into
steamer. If steaming in a low position
near floor, extend hose up and out
frequently to keep clear of
condensation.
DO NOT ALLOW STEAMER TO RUN
DRY.
4. Hang steam head in an upright position
in the hose hanger section when not in
use and turn switch to OFF (figure #3).
5. Periodically, pour old water out of
steamer to avoid sediment buildup and maintain proper
water level (figure #4). Remove hard water deposits with
Jiffy
®
Liquid Cleaner. See page 28 for complete cleaning
instructions.
NOTE: No two water supplies have the same mineral content. If your steamer begins to
cut on and off during normal use, the thermostat is indicating the heating unit needs the
sediment cleaned out.
Figure 1
Jiffy
®
J-1 and J-2 Model Steamer Directions
Figure 2
Figure 4
11
Figure 3
WARNING: Never operate without water. Unplug after each use.

Jiffy Steamer
Key# Part # Part Description
1 1030 Rod Set and Nut Complete with Metal Studs
0031 Hose Hanger Rod Set with Adapter Complete
0031A Hose Hanger Rod Set without Adapter Complete
0041 Base Adapter with Thumb Screw (for Old Style Rods Sets)
2 0035 Hook Section of Rod Set
Should you ever need replacement parts for your Jiffy
®
Steamer, you may
purchase them separately. Use this handy diagram and parts list to identify any
part you may need. Please include model and serial number when ordering.
Jiffy
®
J-1 and J-2 Parts Diagram
12
24
17
20
18
25
27
26
28
22
23
21
19
15
14
13
7
12
16
11
10
9
8
2
1
3
4
5
6

13
Jiffy
®
J-1 and J-2 Parts Diagram Key
J-1/J-2/J-200
Jiffy Steamer
Key# Part # Part Description
3 0036 Middle Section of Rod Set
4 1033 Bottom Section of Rod Set (with Nut Attached)
0037 Bottom Section of Rod Set (without Nut)
0043 Metal Threaded Cap Screw for Rod Set
0039 Metal Threaded Stud for Rod Sections
5 0253 Plastic Steam Head/Handle Replacement Kit
6 0251 Plastic Head/Handle Hose Attachment Complete
0280 Hose Per Foot (Black in Color)
7 0003B Painted Die Cast Aluminum Housing Kit 120 Volt
0003C Painted Die Cast Aluminum Housing Kit 230 Volt
0023 Plastic Water Bottle “A” with Cap
0027 Replacement Cap for Water Bottle “A”
8 0026A Plastic Water Bottle “B” without Check Valve Cap
9 0025 Plastic Water Bottle “B” with Check Valve Cap
10 0027A Replacement Check Valve Cap for Water Bottle “B”
11 0027B Replacement Check Valve Cap Baffle Only
12 0004 Round Beauty Ring
0122 Toggle Switch (3 Pieces)
0127 Red Neon Pilot Light with Lock Ring 120 Volt
0128 Red Neon Pilot Light with Lock Ring 230 Volt
13 1125 Green Lighted Contura Rocker Switch 120 Volt
1126 Green Lighted Contura Rocker Switch 230 Volt
14 0132 Cord Set (16/3 gauge) with Strain Relief
15 0146B Cord Strain Relief
16 0028 Water Cup with 90 Degree Brass Fitting
0147 Internal Wire Set for Models with Front Red Light
17 0148 Internal Wire Set for Models with Green Contura Rocker Switch
0596 Heating Unit Kit (wiring included) for Models with Front Red Light
– 120 Volt Cord Set and 4” Water Line
0177A Heating Unit Kit (wiring included) for Models with Front Red Light
– 230 Volt Cord Set and 4” Water Line
0597 Heating Unit Kit (wiring included) for Models with Green Lighted
Rocker Switch - 120 Volt Cord Set and 4” Water Line
0597A Heating Unit Kit (wiring included) for Models with Green Lighted
Rocker Switch - 230 Volt Cord Set and 4” Water Line
18 0161A Heating Unit Assembly (no wiring included)
– 120 Volt and 4” Water Line
0162A Heating Unit Assembly (no wiring included)
– 230 Volt and 4” Water Line
19 0030 Brass 90 Degree Elbow Joint
20 1130 3/8” x 1/4” Straight Brass Fitting for Heating Element Housing. *Beginning in
November 2012, this fitting is now cast into the heating element.
21 0591 Copper Tube (4” length) with Nuts and Compression Rings
1191 Copper Tube (4 1/2” length) with Nuts and Compression Rings
0187 Copper Tube (5” length) with Nuts and Compression Rings
22 0160 L-290 Thermostat
23 0195 Fusible Link Clamp
24 0151 Fusible Link Wire with Insulated Lug and Clamp
25 0009 Bottom Plate with Casters
26 0011 Bottom Plate Casters (Set of 4)
27 0010 Screws for Bottom Plate (4 Screws Total)
ACCESSORIES
28 1026 “I” Kit - 5.5ʼ Hose with Four Attachments
1050 Jiffy Steamer Assembly Wrench
0274 Brass Hat Nozzle Attachment
0254 Metal Head/Wood Handle Hose Attachment Complete
0256 Metal Head / Wood Handle Only
0269 Replacement Wooden Handle (for Metal Steam Heads)
0262 Wig Hose Attachment
1062 Steam Cleaning “B” Brush Hose Attachment
1063 Brush Only for the B” Hose Attachment
0899 Liquid Cleaner - 3 Ten (10) Ounce Bottles per Package*
*Not Available for Export.
If you donʼt see the part you need, please contact us.

2
Black
from
Cordset
11
White from Cordset
7
7
Brass Nuts
3
Ground Location
1
Cordset
13
Strain Relief
Green
White
Black from Cordset
White
Orange
Yellow
5
6
2
3
8
Element
Mounting
Screws
9
White Wire
4
Blue Wire
Orange
Fusible Link
Brass
Heating Unit
12
5
10
Yellow Wire
6
L-290
Thermostat
Jiffy
®
J-1 and J-2 Wiring Diagram
14
Caution:
Insure that the power cord is
unplugged from the electrical
outlet before attempting to
repair your Jiffy
®
Steamer.

15
Jiffy
®
J-1 and J-2 Wiring Instructions
1. Insert cord set (1) into housing and connect black positive wire (2) from
cord set to terminal number 5 on the switch.
2. Secure with grounding screw ground wire from cord set to the ground
location on the housing (3).
3. Connect blue wire (4) from the right side of brass heating element (5) to
right side of the L-290 thermostat (6).
4. Insert brass heating element unit into housing. Hand tighten the brass nuts
(7) on the water line to the element and to the 90 degree fitting from the
cup. Tighten 2 mounting screws (8) at the base of heating element. Now,
use a 5/8” wrench to securely tighten the brass nuts on the water line to the
element and to the 90 degree fitting from the water cup. Heating unit may
be loosened and adjusted for a better fit if necessary.
5. Connect white wire (9) from the left side of the heater unit to terminal
number 6 on switch.
6. Connect yellow wire (10) from the left side of the thermostat to terminal
number 3 on the switch.
7. Connect white neutral wire (11) from cord set bundle to orange fusible link
with plastic connector (12).
8. Connect other end of orange fusible link to terminal number 2 on the
switch.
9. Set steamer upright and place black plastic strain relief (13) approximately
4 1/2” from end of cord set and insert into housing using pliers.
10. Secure bottom plate with four screws.
11. To avoid leakage, be sure to tighten hose (or hat nozzle) with wrench before
using steamer.
Before attempting any repair on a Jiffy Steamer product, make sure that it is
unplugged from the outlet. If you have any questions, please contact our repair
department at 1-800-525-4339 between 7:30 AM - 4:00 PM Central Standard
Time.
Please note switch terminal 2, 3, 5 and 6 indicated on the enlarged switch
diagram are marked on the actual switch. Jiffy® Steamers manufactured before
May 2000 are not marked with the terminal switch numbers. Numbers in
parenthesis refer to the drawing on on the right.

Jiffy
®
J-2000 Model Steamer
16
FEATURES
• Polymer outer housing unit for durability
• Lightweight, flexible hose
• Shatterproof water caddy
• Safety wiring feature temporarily turns the unit off should it
accidentally run dry
• Comfortable, easy-to-grip handle
• Removes wrinkles up to five times faster than conventional
ironing
• Easy-roll casters for mobility
• Numerous steam head attachments available
• 120 volt or 230 volt units available
• Backed by Jiffy
®
’s renowned Customer Service--should your
steamer need repair, send it to us and we will repair and ship
the unit within 24 hours from its arrival to our plant
INCLUDES:
J-2000 Base Unit
Rod Set
(Not included
with J-2000H series)
)
Owner's
Manual
Assembly
Wrench
Water
Caddy
Check
Valve Cap
Steam Head
and Hose
Attachment
(Not included
with J-2000H
series)

Jiffy
®
J-2000 Directions
1. Attach hose firmly with included assembly wrench,
which is magnetized and located on the bottom of the
unit. Assemble and attach hose hanger rod set.
Every
Jiffy® Steamer has been factory tested and it is not
uncommon for small amounts of water to be in the unit.
2. Invert water caddy filled with distilled or tap water,
plug into proper voltage outlet, turn switch to lighted
ON position and you will have steam within minutes.
Never substitute the Jiffy
®
Steamer water caddy.
3. For easy operation, mount optional Jiffy
®
Steamboard to door or wall to
hold clothing while steaming (figure #2). For hanging garments without
optional Jiffy
®
Steamboard, simply install an eye screw or nail to inside of a
doorway or directly onto a wall or you may use your steamer’s rod set as
shown in figure 3. Touch material lightly with steaming head and wrinkles
will vanish instantly. The combined touch of the
steaming head and the direct steam is very important.
Some articles can be steamed better from the
underneath side. Speed and efficiency is accomplished
with a little practice. Always steam with hose in an
upright position, so any condensation is free to flow
back into steamer. If steaming in a low position near
floor, straighten hose up and out frequently to keep
clear of condensation. DO NOT
ALLOW STEAMER
TO RUN DRY.
4.
Hang steam head in an upright position in the hose hanger
section when not in use and turn switch to OFF (figure #3).
5. Periodically, pour old water out of steamer to avoid
sediment buildup and maintain proper water level (figure
#4). Remove hard water deposits with Jiffy
®
Liquid
Cleaner. Wipe water cup out with a hand towel. See page
28 for complete cleaning instructions.
NOTE: No two water supplies have the same mineral content.
If your steamer begins to cut on and off during normal use, the
thermostat is indicating the heating unit needs the sediment
cleaned out.
F
igure 1
J-2000
Figure 2
Figure 3
Figure 4
17
WARNING: Never operate without water. Unplug after each use.

Should you ever need replacement parts for your Jiffy
®
Steamer, you may
purchase them separately. Use this handy diagram and parts list to identify any
part you may need. Please include model and serial number when ordering.
Jiffy
®
J-2000 Parts Diagram
18
16
23
5
17
19
21
22
20
18
15
13
14
27
25
26
24
8
7
6
1
11
8.2
10
4
3
2
8.1

Jiffy Steamer
Key# Part # Part Description
1
1030 Rod Set and Nut Complete with Metal Studs
2 0035 Hook Section of Rod Set
3
0036 Middle Section of Rod Set
4 1033 Bottom Section of Rod Set (with Nut Attached)
0
043 Metal Threaded Cap Screw for Rod Set
0039 Metal Threaded Stud for Rod Sections
5 1102 Grounding Strap for Heating Element
6
0253 Plastic Steam Head/Handle Replacement Kit
7 0251 Plastic Head/Handle Hose Attachment Complete
0
280 Hose Per Foot (Black in Color)
8 1107B J-2000 Beige Housing Kit with Water Cup - 120 Volt
1
107C J-2000 Beige Housing Kit with Water Cup - 230 Volt
1107PB J-2000 Pink Housing Kit with Water Cup - 120 Volt
1107PC J-2000 Pink Housing Kit with Water Cup - 230 Volt
8.1 1110 O-Ring for J-2000 Water Cup
8.2 1111 J-2000 Water Cup with 90 degree Bass Fitting and o-ring
9 1140 J-2000 Water Caddy Complete
with Check Valve Cap
10 1141 J-2000 Water Caddy Complete
without Check Valve Cap
11 0027A Replacement Check Valve Cap
0564 Ryton Insulator Set (2 feet and 1 ring)
12 0027B Replacement Check Valve Cap Baffle Only
13 1125 Green Lighted Contura Rocker Switch - 120 Volt
1126 Green Lighted Contura Rocker Switch - 230 Volt
14 0132 Cord Set (16/3 gauge) with Strain Relief
15 0146B Cord Strain Relief
16 0148 Internal Wire Set
0597 Heating Unit Kit (wiring included) for Models with Green
Lighted Contura Rocker Switch - 120 Volt Cord Set and
4” Water Line
0597A Heating Unit Kit (wiring included) for Models with Green
Lighted Contura Rocker Switch - 230 Volt Cord Set and
4” Water Line
17 0161A Heating Unit Assembly (no wiring included) for
Models with Green Lighted Rocker Switch - 120 Volt
Cord Set and 4” Water Line
0162A Heating Unit Assembly (no wiring included) for
Models with Green Lighted Contura Rocker Switch -
230 Volt Cord Set and 4” Water Line
18 1131 Brass 90 Degree Elbow Joint - Extended Version
19 1130 3/8” x 1/4” Straight Brass Fitting for Heating Element Housing. *Beginning in
November 2012, this fitting is now cast into the heating element.
20 0591 Copper Tube(4” length) with Nuts and
Compression Rings
21 0160 L-290 Thermostat
22 0195 Fusible Link Clamp
23 0151 Fusible Link Wire with Insulated Lug and Clamp
24 1120 Bottom Plate with Casters
25 0011 Bottom Plate Casters (Set of 4)
26 1114 Screws for Bottom Plate (4 Screws Total)
ACCESSORIES
1026 “I” Kit - 5.5ʼ Hose with Four Attachments
27 1050 Jiffy Steamer Assembly Wrench
0254 Metal Head/Wood Handle Hose Attachment Complete
0256 Metal Head / Wood Handle Only
0269 Replacement Wooden Handle (for Metal Steam Heads)
0262 Wig Hose Attachment
1062 Steam Cleaning “B” Brush Hose Attachment
1063 Brush Only for the “B” Hose Attachment
0899 Liquid Cleaner - 3 Ten (10) Ounce Bottles per Package*
*Not Available for Export.
19
Jiffy
®
J-2000 Parts Diagram Key
J-2000
If you donʼt see the part you need, please contact us.

2
Black
from
Cordset
11
White from Cordset
7
7
Brass Nuts
3
Ground Location
1
Cordset
13
Strain Relief
Green
White
Black from Cordset
White
Orange
Yellow
5
6
2
3
8
Element
Mounting
Screws
9
White Wire
4
Blue Wire
Orange
Fusible Link
Brass
Heating Unit
12
5
10
Yellow Wire
6
L-290
Thermostat
Grounding
Strap
Green
Ground Wire
20
Caution:
Insure that the power cord is
unplugged from the electrical
outlet before attempting to
repair your Jiffy
®
Steamer.
Jiffy
®
J-2000 Wiring Diagram

21
Jiffy
®
J-2000 Wiring Instructions
1. Insert cord set (1) into housing and connect black positive wire (2) from
cord set to terminal number 5 on the switch.
2. Connect blue wire (4) from the right side of brass heating element (5) to
right side of the L-290 thermostat (6).
3. Insert brass heating element unit into housing. Hand tighten the brass nuts
(7) on the water line to the element and to the 90 degree fitting from the
cup. Tighten 2 mounting screws (8) at the base of heating element. Now,
use a 5/8” wrench to securely tighten the brass nuts on the water line to the
element and to the 90 degree fitting from the cup. Heating unit may be
loosened and adjusted for a better fit if necessary.
4. Place the copper 4 inch grounding strap as shown in drawing. Secure
grounding strap and the green ground wire with the grounding screw by
attaching to the heating element ground location (3).
5. Connect white wire (9) from the left side of the heater unit to terminal
number 6 on switch.
6. Connect yellow wire (10) from the left side of the thermostat to terminal
number 3 on the switch.
7. Connect white neutral wire (11) from cord set bundle to orange fusible link
with plastic connector (12).
8. Connect other end of orange fusible link to terminal number 2 on the
switch.
9. Set steamer upright and place black plastic strain relief (13) approximately
4 1/2” from end of cord set and insert into housing using pliers.
10. Secure bottom plate with four screws.
11. To avoid leakage, be sure to tighten hose (or hat nozzle) with wrench before
using steamer.
Before attempting any repair on a Jiffy Steamer product, make sure that it is
unplugged from the outlet. If you have any questions, please contact our repair
department at 1-800-525-4339 between 7:30 AM - 4:00 PM Central Standard Time.
Please note switch terminal 2, 3, 5 and 6 indicated on the enlarged switch diagram
are marked on the actual switch. Jiffy® Steamers manufactured before May 2000
are not marked with the terminal switch numbers. Numbers in parenthesis refer to
the drawing on on the right.

Jiffy
®
J-4000 Pro-Line Model Steamer
22
FEATURES
• Built-in, easy-to-read sight gauge which indicates water level
and sediment build-up.
• Cast aluminum housing unit for durability
• Corrosion-proof stainless steel boiler tank--no water lines to
become clogged with hard water deposits
• Dual thermostats for preheat and steam settings.
• Safety wiring feature temporarily turns the unit off should it
accidentally run dry
• Pressure release water fill cap
• Numerous steam head attachments available
• Backed by Jiffy
®
’s renowned customer service--should your
steamer need repair, send it to us and we will repair and ship
the unit within 24 hours from its arrival to our plant
INCLUDES:
Rod Set
(Not included on
J-4000H Series)
Owner's
Manual
Assembly
Wrench
Funnel
Steam Head
and Hose
Attachment
J-4000
Base Unit
(Not included
on J-4000H
Series)

1. Attach hose firmly with included assembly wrench,
which is magnetized and located on the bottom of the
unit (figure #1). Assemble and attach hose hanger rod
set (figure #2). For “H” series models, there will be no
hose attachment or rod set to attach.
2. Using supplied funnel, add a maximum of four quarts
of warm (fresh tap or distilled) water (cold water takes
longer to preheat). Do not overfill. The black water fill
cap has a pressure release feature that is designed to
activate should there be an increase of pressure in the
boiler tank. If you start to see or hear steam escaping
from the cap, check to see if the hose has a kink or
loop in it. If so, straighten out the hose. If the escaping
steam does not cease, please contact Jiffy Steamer at
731-885-6690. Plug into proper voltage outlet, turn
switch to “PREHEAT”. Steamer will hold at this
temperature, and the light will go off and on
occasionally. NOTE: The J-4000 Steamer contains a
large water reservoir for 2 hours of continuous
steaming. Leave the switch in the “PREHEAT” position (figure #3) if you
plan to use your steamer throughout the day. This will maintain water
temperature in the reservoir.
3. Immediately after water is preheated, (red pilot light turns off) turn switch to
“STEAM” position for steam in approximately 2 minutes. The combined
touch of the steaming head and the direct steam is very important. Some
articles can be steamed better from the underneath side.
Always steam with hose in upright position so any
condensation is free to flow back into steamer. If steaming
in a low position near floor, straighten hose up and out
frequently to keep it clear of condensation. If steamer runs
dry it will temporarily shut off. Once finished using the
unit, turn the switch to the “OFF” position.
If more water needs to be added to the
steamer, allow steamer to cool before
removing fill cap and adding more water. Never pour cold
water on a hot element. Resume steaming by resetting the
switch to the “STEAM” position.
4. Hang steam head and hose in upright position in the hose
hanger section (figure #4), turn switch to the “OFF” position
(figure #3) and unplug the cord set when not in use.
5. Periodically, pour old water out of steamer to avoid
sediment build up and maintain proper water level. Never
have more than 4 quarts of water in steamer. If overfilled, water will boil up
into hose. The Jiffy
®
Liquid Cleaner is recommended every 6 months to flush
mineral deposits. See page 29 for complete cleaning instructions.
Every Jiffy
®
Steamer has been factory tested and it is not uncommon for small amounts
of water to be in the unit.
WARNING: Never operate without water. Unplug after each use.
23
Jiffy
®
J-4000 Directions
J-4000
Figure 1
Figure 2
Figure 3
Figure 4

Should you ever need replacement parts for your Jiffy
®
Steamer, you may
purchase them separately. Use this handy diagram and parts list to identify any
part you may need. Please include model and serial number when ordering.
24
Jiffy Steamer
Key# Part # Part Description
1 1030 Rod Set and Nut Complete with Metal Studs
1034 Rod Set and Nut Complete for Drapery Steamers
2 0035 Hook Section of Rod Set
Jiffy
®
J-4000 Parts Diagram
* For models manufactured after March 2005.
24
26
25
29
28
27
16
22
23
17
21
12
20
14
18
5
6
19
13
15
7
89
10
4
3
1
11
2

Jiffy Steamer
Key# Part # Part Description
3 0036 Middle Section of Rod Set (with Barrel Stud and Cap Screw)
4 1033 Bottom Section of Rod Set (with Nut Attached)
0037 Bottom Section of Rod Set (without nut)
0038 Additional Middle Section of Rod Set for Drapery Steamers
0043 Metal Threaded Cap Screw for Rod Set
0039 Metal Threaded Stud for Rod Sections
5 0253 Plastic Steam Head/Handle Replacement Kit
6 0251 Plastic Head/Handle Hose Attachment Complete
0280 Hose Per Foot (Black in Color)
7 1302 J-4000 Die Cast Aluminum Housing Kit (120 Volt)
1303 J-4000 Die Cast Aluminum Housing Kit (230 Volt)
0006 Hex Beauty Ring
8 0004 Round Beauty Ring
9 0049P Pressure Release Water Fill Cap
0053 Funnel
10 0054 Housing Handle with Two Screws
11 0199 Rotary Power Switch and Knob
12 0201 Replacement Knob Only for Rotary Power Switch
13 1310 Red Neon Pilot Light (120 VOLT)
1311 Red Neon Pilot Light (230 VOLT)
14 0133 Cord Set (14/3 gauge) with Strain Relief
15 0146C Cord Strain Relief
16 0050 Water Level Sight Gauge with Nuts and Washers
1353 Stainless Steel Boiler Tank Kit Complete (120 Volt/1500 Watts)
1354 Stainless Steel Boiler Tank Kit Complete (230 Volt/1500 Watts)
0074A Stainless Steel Boiler Tank with Sight Gauge (J-4)
17 0074C Stainless Steel Boiler Tank Only
18 1370
Stainless Steel Boiler Tank Lid with 2 Brass Fittings and 2 Beauty Rings
19 0071 Boiler Tank Screw Set (Set of 30)
0061 Boiler Tank Silicone Sealer (2.8 Fluid Ounces)
0062 Boiler Tank Silicone Sealer (10.1 Fluid Ounces)
20 0075 Boiler Tank Gasket
21 0063 “W” Bend Heating Element (120 Volt, 1500 Watt) with Hardware
0064 “W” Bend Heating Element (230 Volt, 1500 Watt) with Hardware
22 0203 Preheat Thermostat (L-170)
23 0204 Steam Thermostat (L-220)
24 0155 Internal Wire Set (Set of 5 Wires) for “W” Bend Element
25 0158 Fusible Link Wire with Insulated Cap and Clamp
26 1320 Bottom Plate with Four Casters
27 0017 Bottom Plate Screws (Set of 4)
28 0018 Bottom Plate Casters (Set of 4)
ACCESSORIES
1026 “I” Kit - 5.5ʼ Hose with
Four Interchangeable Steam HeadAttachment
s
1027 “I” Kit - 7.5ʼ Hose with
Four Interchangeable Steam HeadAttachment
s
29 1050 Jiffy Steamer Assembly Wrench
0259 Auto Hose Attachment with Dual Metal Heads
0257 Carpet Hose Attachment with 12” wide Metal Head
0252 7.5ʼ Drapery Hose Attachment with Plastic Steam Head
0255 7.5ʼ Drapery Hose Attachment with Metal Steam Head
0254 Metal Head / Wood Handle Hose Attachment Complete
0256 Metal Head / Wood Handle Only
0269 Replacement Wooden Handle (for Metal Steam Heads)
0262 Wig Hose Attachment
0274 Brass Hat Nozzle Attachment
1062 Steam Cleaning “B” Brush Hose Attachment
1063 Brush Only for the “B” Hose Attachment
0899 Liquid Cleaner - 3 Ten (10) Ounce Bottles per Package*
*Not Available for Export.
25
Jiffy
®
J-4000 Parts Diagram Key
J-4000
If you donʼt see the part you need, please contact us.

Jiffy
®
J-4000 Wiring Diagram
26
Caution:
Insure that the power cord is unplugged from the electrical
outlet before attempting to repair your Jiffy
®
Steamer.

27
Jiffy
®
J-4000 Wiring Instructions
1. Positive black (1) (brown for 230 volt units) to A on switch.
2.
Neutral white to (2) brown fuse wire (4) (blue for 230 volt units).
3. Green ground wire (3) to grounding mount on housing.
4. Brown fuse (4) wire to B on switch.
5. Blue wire (5) from top of preheat thermostat (L170) to #1 on
switch.
6. White wire (6) from left side of element to #4 on switch.
7. Red wire (7) from top of steam thermostat (L-220) to #2
on switch.
8. Long yellow wire (8) from bottom of preheat thermostat to right
side of element.
9. Short yellow wire (9) from right side of element to bottom of
steam (L-220) thermostat.
10. White wire (10) from light to left side of element.
11. Medium length yellow wire (11) from light to right side of
element.
Please note, the switch terminal numbers and the switch
terminal letters are marked on the actual switch.
J-4000
Questions?
When calling our technical support line
@ 1-800-525-4339
or e-mail us at
jsinfo@jiffysteamer.com
Please have your
model and serial number available.

Jiffy
®
J-1, J-2 and J-2000 Cleaning Instructions.
28
The cleaning procedure below is recommended as a regular maintenance
measure to help your steamer maintain its maximum steaming performance.
This maintenance should be performed on a basis of every 3-6 months
depending on your water supply. In most cases, a steamer that is severely
clogged will require disassembly to properly clean and prolong the life span of
the unit. An authorized repair center or a Jiffy® Steamer service technician best
performs this disassembly.
1. Unplug your steamer from the wall outlet. Remove hose attachment at the
brass coupling using a wrench and remove water bottle from unit. Pour out
any remaining water from your unit.
2. If the hose attachment is blocked by sediment build-up, flush your hose
attachment by using a garden water hose. This should loosen and remove
any build-up that may have occurred within the hose itself.
3. To clean the internal parts of your steamer, use of the Jiffy® Liquid Cleaner
(10 ounce bottle) is recommended. This acid-based cleaner will remove
hard water deposits and sediment build-up. This
cleaner is not available for export.
4. Pour the cleaning solution into the water cup of
your steamer. This is the location on the steamer
base where you normally place the water
bottle or caddy. Allow the cleaning solution
to remain in the unit for 3 hours. DO
NOT STEAM THE SOLUTION IN
THE UNIT AS DAMAGE MAY
OCCUR.
5. Pour the cleaning solution out of the
steamer. Do this by tilting the steamer
back and forth and pouring the solution
out of the water cup area.
6. Rinse the unit thoroughly by flushing
with fresh water 3 times.
7. If discolored water or residue continues
to come from the unit, the above
procedure may need to be repeated.
8. Please call 1-800-525-4339 or 731-885-
6690 for further instructions or questions.

29
Jiffy
®
J-4000 Cleaning Instructions
The cleaning procedure below is recommended as a regular maintenance
measure to help your steamer maintain its maximum steaming performance.
This maintenance should be performed on a basis of every 3-6 months
depending on your water supply. In most cases, a steamer that is severely
clogged will require disassembly to properly clean and prolong the life span of
the unit. An authorized repair center or a Jiffy® Steamer service technician best
performs this disassembly.
1. Remove hose attachment from unit at the brass coupling using a wrench.
Pour out any remaining water from your unit.
2. If the hose attachment is blocked by sediment build-up, use a water hose to
clean inside the hose. This should loosen and remove any build-up that may
have occurred within the hose itself.
3. To clean the internal parts of your steamer, use of the Jiffy® Liquid Cleaner
(10 ounce bottle) is recommended. This acid-based cleaner will remove hard
water deposits and sediment build-up. This cleaner is not available for
export.
4. Fill your steamer with 1 gallon of water and add the entire ten (10) ounce
bottle of Jiffy® Steamer Liquid Cleaner. Turn the steamer to PREHEAT and
allow water and solution to warm.
5. When the red pilot light goes off, indicating the end of the PREHEAT
cycle, turn the switch to OFF and unplug the steamer from the wall outlet.
Allow the water and cleaning solution to remain in the steamer for 3 hours.
DO NOT STEAM THE SOLUTION IN THE UNIT AS DAMAGE MAY
OCCUR.
6. Pour the cleaning solution out of the steamer. Do this by tipping the steamer
over and pouring the solution out of the brass fitting where your hose
attachment normally connects.
7. Rinse the unit thoroughly by flushing with fresh water 3 times.
8. If discolored water or residue continues to come from the unit, the above
procedure may need to be repeated.
9. Please call 1-800-525-4339 or 731-885-6690 for further instructions or
questions.

Clean and rinse your steamer regularly:
All steamers need to be cleaned and rinsed on occasion to remove mineral deposits.
We recommend our Jiffy
®
Steamer Liquid Cleaner for cleaning internal parts.
Never use additives:
Additives such as salt, vinegar, bleach, perfumes and dyes should never be added to
your steamer water. These substances will corrode or clog internal parts.
Never allow your steamer to run dry:
Running a steamer dry will cause internal damage to the heating element and wiring.
Never pour cold water into a hot steamer:
If by mistake your steamer has run dry of water, allow the unit to cool before adding
water. Cold water poured on top of a hot heating element may cause damage to the
element.
Steam in a vertical, upright position:
Do not use your steamer in a horizontal position like an iron. Steam in a vertical up
and down motion. This will allow the condensation in the hose to flow back into the
steamer.
Secure your hose nut tightly:
If your steamer has a hose attachment, use the onboard assembly wrench to insure the
brass nut is fastened tightly to the base of the steamer. Wrench is magnetized to the
bottom plate.
Never use an extension cord:
Extension cords should not be used on this product. Adding an extension cord may
create damage to the steamer’s power cord and internal wiring.
Do not pull steamer by the power cord:
Pulling the steamer by the power cord may cause the internal wiring to become loose.
Never use your foot to turn steamer ON/OFF:
Damage may occur to the power switch should you turn the unit off using excess
pressure with your foot.
Storing the steamer:
Before storing the steamer for an extended period (30 days or more), empty all water
from the unit. Water becomes stale with time and may clog internal parts.
Jiffy
®
Steamer Maintenance
30

PATENTS
Jiffy
®
Steamer products and their components mentioned within this manual are covered
by some or all of the following U.S. patents:
D421,165 / D423,156 / D426,924. The
design and configuration of the Model J-2 is a registered U.S. Trademark. Other
patents are pending.
31
Other Jiffy
®
Steamer Accessories
Esteam
®
Converter & Adapter Plugs
Take your Esteam
®
worldwide and use it at 100% power.
Our converter contains a 25 amp triac semiconductor for
stable power output, large aluminum heat-sink to dissipate
heat and a UL listed, flame retarding, non-conductive
material used in the outer housing. Available for 120 volt
units only.
The Jiffy
®
Steamboard
The Jiffy
®
Steamboard provides
a convenient work
space for quickly
setting pleats and
creases. Ideal for
clothing retailers,
tailors and home use.
Attachments
enclosed with the
board allow you to
mount the unit to your baseboard (optional
for an additional charge), hang it over a door
or mount it directly
to the wall. Not for export.
Jiffy
®
Liquid Cleaner
Our unique liquid cleaner removes hard water deposits from your
Jiffy
®
Steamer. Easy to use, and it works on all Jiffy
®
models.
Use only Jiffy
®
Cleaner as other cleaners may damage internal
parts. Not available for export.

Jiffy
®
Steamer Head Configurations
32
Optional Steam Head Configurations
Configuration #1
Standard Plastic
Steam Head
A
vailable on the J-2
®
,
J-2000
®
,
J-4000
®
and J-4000D
®
Model
steamers.
Metal Steam Head
with Wooden Handle
Available on the J-2M
®
,J-2000M
®
, J-
4000A
®
, J-4000DM
®
and
J-4000M
®
Model steamers.
Configuration #2
Carpet Installation
and Wallpaper
Removal Steam Head
Available on the J-4000C
®
Model
steamer.
Configuration #3
Wig Steam Head
Available on the J-2W
®
,J-2000W
®
and J-4000W
®
Model steamers.
Configuration #5
Auto/Upholstery
Pipe Steam Head &
the Interchangeable
Metal Steam Head
Available on the J-4000A
®
Model
steamer.
Configuration #4

33
Jiffy
®
Steamer Head and Plug Configurations
Configuration #6
Hat Steam Nozzle
Available on the J-1
®
,J-2000H
®
,
and J-4000H
®
Model steamers.
Configuration #7
Steam Cleaning
Brush Head
Available on the J-2B
®
, J-2000B
®
,
and J-4000B
®
Model steamers.
NEMA 1-15 120V
PLUG #1
Not available on the J-4000
®
Series.
NEMA 5-15 120V
or 230V
PLUG #2
Not available on the ESTEAM
®
Series.
CEE-7 230V
PLUG #3
BS 546 230V
PLUG #4
BS 1363 230V
PLUG #5
ETSA S/86 230V
PLUG #6
SI 32 230V
PLUG #7
620-P 230V
PLUG #8
Jiffy
®
Steamer World Power Supply Configurations
Configuration #8
Jiffy
®
Steamer
“I” Kit with
Four Interchangable
Steam Head
Attachments
5.5ʼ - “I” Hose Available on all J-Series Units.
7.5ʼ - “I” Hose Only Available on J-4000 Series.

Jiffy
®
Steamer Troubleshooting
PROBLEM POSSIBLE CAUSE SOLUTION
Steamer works poorly or
cycles ON and OFF while
steaming.
On units purchased in
1986 and before, the red
indicator light illuminates
but the unit never heats
or steams.
The green indicator light
does not illuminate when
turned to ON position.
The steamer spits water
from the steam head.
Unit does not produce
steam when green
indicator light is on.
The unit has sediment build-up and needs a thorough
cleaning.
Possible thermostat trouble.
The fuse wire is bad.
The cordset is bad.
Wires may be disconnected.
The switch is bad.
The unit is not plugged in.
The outlet may be defective or inoperable.
The heating element may be bad.
The steam head may be cracked or damaged.
The unit has been overfilled (4 quarts maximum).
The rod set is not fully assembled (three sections for
most models and four sections for drapery steamers).
The unit has sediment build-up and needs to be
cleaned.
Check water level to make sure unit is not out of
water.
Heating element may be bad.
Wire may be disconnected.
Jiffy
®
Liquid Cleaner may solve the problem, but
manual cleaning is the best solution at this point.
The heating element must be disassembled and
cleaned out manually.
Check the unitʼs current flow and replace defective
part.
Try to plug the unit into another outlet.
Replace the heating element. This may be done
by you, an authorized repair center, or by a Jiffy
®
Steamer Company technician.
Replace head once signs of excess wear are
apparent.
Make sure the hose is straight and that it has no
kinks which may trap condensation in the hose.
Use Jiffy Liquid Cleaner.
Turn unit off, allow cool down period and refill water
container.
Check unit with a voltage meter (if qualified).
34
J-1 / J-2 / J-2000 Models
PROBLEM POSSIBLE CAUSE SOLUTION
Steamer works poorly or
c
ycles ON and OFF while
s
teaming.
The unit spits water from
steam cap.
The red indicator light
i
lluminates but the unit
n
ever heats or steams.
T
he unit has sediment build-up and needs a thorough
cleaning.
P
ossible thermostat trouble.
The fuse wire, heating element or thermostat
may be bad.
The unit is being over-filled.
The unit needs to be cleaned out inside tank and cap.
User is tilting unit too far forward or backward during
usage.
U
se Jiffy
®
L
iquid Cleaner to clean off element. A
s
mall brush may be needed to help scrub unit.
Replace thermostat on unit.
Replace fusible link wire, heating element or
t
hermostat in unit. This may be done by you, an
authorized repair center, or by a Jiffy
®
Steamer
Company technician.
For best results from your steamer, use Jiffy Liquid
Cleaner periodically to remove sediment deposits
f
rom your water (every 3 to 4 months) depending
on how much the unit is used.
Do not over-fill unit above max water mark
indicated on side of unit.
Esteam
®

PLEASE NOTE: Each of these items serve as a simple suggestion when
repairing your Jiffy
®
Steamer. To insure professional service, please send
your unit to the plant for authorized personnel to repair the steamer.
A user may experience decreased performance at higher altitudes.
PROBLEM POSSIBLE CAUSE SOLUTION
T
he red indicator light
remains ON for over 20
minutes, but no steam is
produced from the unit
a
t the STEAM setting.
The red indicator light
works on the PREHEAT
or STEAM setting, but
not on both.
The red indicator light
does not illuminate when
the switch is turned to
t
he PREHEAT or STEAM
setting
.
The steamer spits
water from the steam
head.
The steamer leaks
water at the base of the
unit.
The heating element may be bad.
Thermostat may be bad.
C
heck water level.
T
he fuse wire is bad.
The cordset is bad.
Wires may be disconnected.
T
he switch is bad.
The unit is not plugged in.
Wires may be disconnected.
The switch is bad.
The L170 or L220 thermostat is bad.
The steam head has a crack or blemish.
Hard water sediment has built up in the head.
The unit has been overfilled (4 quarts maximum).
The rod set is not fully assembled (three sections for
most models and four sections for drapery steamers).
The unit has sediment build-up and needs to be cleaned.
There may be a hole in the tank (most common with
older model units using aluminum tanks).
The brass coupling between the hose and unit may be
loose.
The silicone sealant or rubber gasket around the tank
assembly is leaking.
Replace the heating element and reseal the tank
assembly with high temperature silicone.
Replace thermostat.
C
heck the unitʼs current flow and replace defective
part.
Wiring needs to be checked by an authorized
repair center, or by a Jiffy
®
Steamer Company
technician.
Replace switch.
Replace thermostat.
Replace head once signs of excess wear are
apparent.
Never fill the steamer with more than 4 quarts.
Make sure the hose is straight and that it has no
kinks which may trap condensation in the hose.
Use Jiffy Liquid Cleaner.
The faulty tank must be replaced with a new
stainless steel tank. This involves replacing the
tank, lid, and housing. This task is best serviced by
a Jiffy
®
Steamer Company technician.
Tighten hose coupling with a wrench.
Reseal the tank and lid with a high heat silicone.
35
J-4000 Model
Jiffy
®
Steamer Troubleshooting
Questions?
Call our technical support line
@ 1-800-525-4339 or 1-731-885-6690
or e-mail us at
jsinfo@jiffysteamer.com

M
J-1 J-2 J-2B J-2I
•
• •
•
• •
• •
• •
• •
• •
• •
• •
••
•
• • • •
• • • •
• •
• •
• •
•
•
•
Automotive
Furniture
Hat Manufacturers
Industrial Supply
Floral Applications
Hospitality Industry
Retail
• Clothing
• Mass Channel
Steam Cleaning
Photography
Movie Production
Interior Designers
• Drapes
• Carpets
•Wallpaper
Cosmetics
• Beauty Salons
• Hair Replacement
Rental Stores
Supply Houses
Clothing
Steam Cleaning
Wallpaper
Drapes
Fur
niture
W
igs
T
ravel
Consumer
Commercial
Matrix Chart
INDEX
A = upholstery
B
= steam brush
C = carpet
D = drapery
DM = metal steam
head for drapery
H = hat
I = interchangeable
steam head
M = metal steam
head with
wooden
handle
W = wig
9
" Aluminum
B
ent Pipe
A
ttachment Head
6
" Metal
Attachment Head
Brush
A
ttachment
(
fits onto the 9"
Aluminum Bent
P
ipe Attachment Head)
12" Carpet
Attachment Head
Hose with
W
ooden Handle
a
nd Brass
C
onnection Fitting
1
2
3
4
5
I
Jiffy
®
Steamer Company, LLC
Shipping Address: 4462 Ken-Tenn Highway • Union City, Tennessee 38261 or Mailing Address:
36
Jiffy
®
Steamer Matrix Chart

P.O. Box 869 • Union City, TN 38281-0869 • Phone: 1-731-885-6690 • Fax: 1-731-885-6692 • Made in the USA Since 1940
37
Use this helpful matrix chart to help you find
the right Jiffy
®
Steamer for your needs!
J-2M J-2W J-2000 J-2000B J-2000I J-2000M Esteam
®
Steamboard
•
• • • •
• • • • •
• • • • • • •
• • • • • •
• • • • •
• • • • •
• •
• • • • • •
••• • • •
•
• •
• • • • • • • •
• • • • • • • •
BEST
• •
BEST
• •
• •
• • • •
• • •
BEST
•
BEST
d
M
w
B
9
" Aluminum
Bent Pipe
Attachment Head
6" Metal
Attachment Head
B
rush
A
ttachment
(
fits onto the 9"
Aluminum Bent
Pipe Attachment Head)
1
2" Carpet
Attachment Head
Hose with
W
ooden Handle
a
nd Brass
C
onnection Fitting
1
2
3
4
5
I
Use this helpful matrix chart to help you find
the right Jiffy
®
Steamer for your needs!
P

Jiffy
®
Steamer Matrix Chart
Jiffy
®
Steamer Company, LLC
Shipping Address: 4462 Ken-Tenn Highway • Union City, Tennessee 38261 or Mailing Address:
38
J-4000 J-4000A J-4000B
Pro-Line Pro-Line Pro-Line
BEST
•
BEST
•
BEST
•
•
• •
• •
BEST BEST BEST
BEST BEST BEST
BEST
BEST
Automotive
Furniture
Hat Manufacturers
Industrial Supply
Floral Applications
Hospitality Industry
Retail
• Clothing
• Mass Channel
Steam Cleaning
Photography
Movie Production
Interior Designers
• Drapes
• Carpets
• Wallpaper
Cosmetics
• Beauty Salons
• Hair Replacement
Rental Stores
Supply Houses
Clothing
Steam Cleaning
Wallpaper
Drapes
Furniture
Wigs
Travel
Consumer
Commercial
Matrix Chart
INDEX
A = upholstery
B = steam brush
C = carpet
D = drapery
DM = metal steam
head for drapery
H = hat
I = interchangeable
steam head
M = metal steam
head with
wooden
handle
W = wig

Use this helpful matrix chart to help you find
the right Jiffy
®
Steamer for your needs!
P.O. Box 869 • Union City, TN 38281-0869 • Phone: 1-731-885-6690 • Fax: 1-731-885-6692 • Made in the USA Since 1940
J-4000C J-4000D J-4000H J-4000I J-4000M J-4000W
Pro-Line Pro-Line Pro-Line Pro-Line Pro-Line Pro-Line
BEST
BEST
BEST
BEST BEST BEST BEST
BEST BEST
BEST BEST BEST BEST
•
BEST
•
BEST
BEST
•
BEST BEST
BEST BEST
BEST
•
BEST
•
BEST
•
BEST
•
BEST
BEST BEST BEST BEST BEST BEST
BEST BEST BEST BEST BEST BEST
•
BEST
BEST BEST
•
•
•
BEST
9
" Aluminum
B
ent Pipe
A
ttachment Head
6
" Metal
A
ttachment Head
B
rush
Attachment
(
f
its onto the 9"
Aluminum Bent
P
ipe Attachment Head)
12" Carpet
Attachment Head
Hose with
W
ooden Handle
a
nd Brass
C
onnection Fitting
1
2
3
4
5
I
39

W
orldwide Leader in
S
teaming Equipment Since 1940
Jiffy
®
Steamer
PRODUCT
SPECIFICATIONS
40
UL CSA, CE, TUV,
NOM, ANCE
UL CSA, CE, TUV,
NOM, ANCE
UL CSA, CE, TUV,
NOM, ANCE
UL CSA, CE, TUV,
NOM, ANCE
UL CSA, CE, TUV,
NOM, ANCE
UL CSA, CE, TUV,
NOM, ANCE

41
Jiffy
®
Steamer Warranty
3 YEAR LIMITED PRODUCT WARRANTY
As the global leader of steaming equipment since 1940, we feel that our
warranty should properly stand behind every product we craft. The Jiffy
®
Steamer is precision built, tested and inspected before leaving our factory
located in Union City, Tennessee. It is guaranteed against defects in material or
workmanship for three (3) years from date of purchase. Cords are excluded. If
any part proves to be defective, this product will be repaired free of charge. A
nominal handling fee does apply. This warranty shall not apply to any unit
which has been subject to misuse, neglect, negligence, accidents or has not
had routine cleaning maintenance. Such damage will be reconditioned at our
normal repair services rate. JIFFY
®
STEAMER COMPANY, LLC shall not be in
any manner responsible for any incidental, special or consequential damages.
All implied warranties including but not limited to implied warranties of fitness
and merchantability, are limited in duration to three (3) years from date of
original purchase. This warranty gives you specific legal rights, and you may
have other rights which vary from state to state. Some states do not allow the
exclusion limitations on how long an implied warranty lasts, so the above
limitations and exclusions may not apply to you. If your Jiffy® Steamer requires
service, ship it, with proof of purchase (include $19.90 for shipments in the
USA) to the address on page 42.
Return Policy
Jiffy
®
Steamer Company, LLC strives to manufacture the very best quality steamers available in the
world today. In the event you find that our products do not meet your needs, you may return the unit in
the original packaging materials, along with a copy of the purchase receipt to the following address:
Jiffy
®
Steamer Company, LLC • Attn: Returns Department
4462 Ken-Tenn Highway • Union City, Tennessee 38261 • USA
Phone: 1-731-885-6690 • Fax: 1-731-885-6692
Toll-Free: 1-800-525-4339 (In North America)
This return policy only applies to goods purchased directly from Jiffy
®
Steamer Company, LLC and
is independent of other dealer return policies. Please note that we shall issue 100% merchandise
credit if the unit is returned in new condition within 30 days of purchase. If the unit is returned in
new condition outside this 30 day window, but before the end of 12 months since the purchase
date, there shall be a 10% restocking fee assessed based on the invoice cost. Shipping charges
are non-refundable under either of the above circumstances. Jiffy
®
Steamer Company, LLC
reserves the right to refuse credit for discontinued products or steamers more than one (1) year
past the date of purchase. If you have further questions regarding this, or any other issue, please
do not hesitate to contact our customer service department at the above number. Thank you for
your interest in Jiffy
®
Steamer products.

ThankYou
forpurchasingtheoriginal Jiffy
®
Steamer!
42
Jiffy
®
Steamer Contact Information
Contact Us
Jiffy
®
Steamer Company, LLC looks forward to serving your needs.
If you have questions regarding our products, please do not hesitate
to contact us.
Jiffy
®
Steamer Corporate Headquarters Information:
Shipping Address: Mailing Address:
4462 Ken-Tenn Highway P.O. Box 869
Union City, Tennessee 38261 Union City, Tennessee 38281
United States of America United States of America
Toll-Free: 1-800-525-4339 (In North America)
Voice: 1-731-885-6690
Fax: 1-731-885-6692
Email: jsinfo@jiffysteamer.com
Web: www.jiffysteamer.com
If Service is Required
PLEASE DO NOT RETURN THIS APPLIANCE TO THE
STORE WHERE IT WAS PURCHASED.
For information regarding product service, please call our Toll-Free
number noted above. Our customer service hours are from 7:30 AM –
4:00 PM, Central Time Zone, Monday through Friday. Please have your
model number, serial number, place of purchase, date of purchase and
description of the problem available. All products serviced by our factory
technicians carry a six (6) month warranty. Thank you and we look forward
to serving your needs.

42
Información para contactar a los Vaporizadores
Jiffy
®
Contáctenos
Jiffy
®
Steamer Company, LLC espera poder servir a sus
necesidades. Si tiene preguntas acerca de nuestros productos, por
favor no dude en llamarnos.
Información acerca de las Oficinas Centrales de Jiffy
®
Steamer:
Dirección de envíos: Correo:
4462 Ken-Tenn Highway P.O. Box 869
Union City, Tennessee 38261 Union City, Tennessee 38281
EE.UU. EE.UU.
Línea gratuita: 1-800-525-4339 (en Norteamérica.)
Correo de Voz: 1-731-885-6690
Fax: 1-731-885-6692
Correo electrónico: jsinfo@jiffysteamer.com
Pagina Web: www.jiffysteamer.com
Si requiere de Servicio
POR FAVOR NO DEVUELVA ELAPARATO A
LA TIENDA DONDE LA COMPRÓ.
Para información acerca de nuestro servicio de producto, por favor
llame a la línea gratuita indicada arriba. Nuestras horas de servicio
son de 7:30 AM a 4:00 PM, horario de la zona central. Por favor
tenga a la mano su número de modelo, número de serie, lugar de
compra, fecha de compra y descripción del problema. Todos los
productos revisados por nuestros técnicos de fábrica cuentan con
una garantía de seis (6) meses. Gracias y esperamos poder servirle.
¡Gracias
por adquirir el vaporizador Jiffy
®
original!

41
Garantía de Jiffy
®
Steamer
GARANTÍA LIMITADA DE PRODUCTO POR 3 AÑOS
Como líder mundial en equipos de vaporizado desde 1940, sentimos que nuestra
garantía debería respaldar apropiadamente cada producto que manufacturamos. La
vaporizadora Jiffy
®
es fabricada a precisión, probada e inspeccionada antes de dejar
nuestra fábrica en Union City, Tennessee. Está garantizada contra defectos en
material o mano de obra por tres (3) años, desde la fecha de compra. No incluye
cables. Si alguna parte prueba estar defectuosa, el producto será reparado sin cargo.
Aplica una tarifa nominal por manejo. Esta garantía no aplica a ninguna unidad que
haya sido empleada mal, negligentemente, que haya sufrido accidentes, o que no
haya tenido mantenimiento de limpieza rutinario. Este daño será reparado a nuestra
tarifa normal de servicio. JIFFY
®
STEAMER COMPANY, LLC no será de ninguna
manera responsable por daños incidentales, especiales o colaterales. Todas las
garantías incluidas, más no limitadas a las garantías implícitas de estado físico y
comercialización, están limitadas a tres (3) años desde la fecha original de compra.
Esta garantía le otorga derechos específicos, y puede tener otros derechos que
varían de estado a estado. Algunos estados no permiten las limitaciones de exclusión
respecto de cuánto debe durar una garantía implícita, así que las limitaciones arriba
mencionadas y las exclusiones pueden no aplicarle a usted. Si su vaporizadora Jiffy®
requiere servicio, envíela, con una prueba de compra (incluya $19.90 para cargos de
envío en los Estados Unidos de América) a la dirección que aparece en la página 42.
Política de devolución
Jiffy
®
Steamer Company, LLC se esfuerza por fabricar los vaporizadores de mejor calidad en el mundo. En el caso
de que nuestros productos no cumplan con sus necesidades, usted puede devolver la unidad en su empaque
original junto con una copia del recibo de compra a la siguiente dirección:
Jiffy® Steamer Company, LLC • Attn: Returns Department (Departamento de Devoluciones)
4462 Ken-Tenn Highway • Union City, Tennessee 38261 • USA
Teléfono: 1-731-885-6690 • Fax: 1-731-885-6692
Llamada gratuita al: 1-800-525-4339 (En Norte América)
Esta política de garantía solo se aplica a la mercancía adquirida directamente de Jiffy
®
Steamer Company, LLC y es
independiente de otras políticas de devolución de distribuidores. Por favor tenga en cuenta que si devuelve la
unidad en condiciones nuevas dentro de los 30 días siguientes a su compra, le otorgaremos un crédito por el
100% de la unidad. Si la unidad se devuelve en condiciones nuevas pero fuera del periodo de 30 días pero
antes de cumplirse los 12 meses de la fecha de compra, se cargará una cuota del 10% del valor de la factura por
realmacenamiento. Los cargos de envió no son reembolsables bajo ninguna de las circunstancias mencionadas
anteriormente. Jiffy
®
Steamer Company, LLC se reserva el derecho de negar créditos por productos descontinuados
o por vaporizadores con fechas de compra mayores a un año. Si tiene alguna duda al respecto, o cualquier otro
problema, por favor no dude en llamar a nuestro departamento de servicio al cliente al número indicado arriba.
G
racias por su interés en los productos Jiffy
®
S
teamer.

Líder mundial en
equipos de vapor desde
ESPECIFICACIONES
DE PRODUCTO
Vaporizadores Jiffy
®
40
¿
Comentarios? ¿Preguntas?
Llame a la línea de asistencia de Jiffy
®
Steamer Company
a
l 1-800-525-4339

¡Utilice esta tabla de aplicaciones para ayudarle a encontrar el vaporizador
Jiffy
®
adecuado para sus necesidades!
P.O. Box 869 - Union City, TN 38281-0869 - Tel_fono: 1-731-885-6690 - Fax: 1-731-885-6692 - Hecho en los EE.UU. desde 1940
J-4000C J-4000D J-4000H J-4000I J-4000M J-4000W
Línea Profesíonal Línea Profesíonal Línea Profesíonal Línea Profesíonal Línea Profesíonal Línea Profesíonal
MEJOR
MEJOR
MEJOR
MEJOR MEJOR MEJOR MEJOR
MEJOR
MEJOR
MEJOR MEJOR MEJOR MEJOR
•
MEJOR
•
MEJOR
MEJOR
•
MEJOR MEJOR
MEJOR MEJOR
MEJOR
•
MEJOR
•
MEJOR
•
MEJOR
•
MEJOR
MEJOR MEJOR MEJOR MEJOR MEJOR MEJOR
MEJOR MEJOR MEJOR MEJOR MEJOR MEJOR
•
MEJOR
MEJOR MEJOR
•
•
•
MEJOR
I
Disponible con boquilla de
vapor metálica (J-4000DM)
Con manguera de 7.5 pies (2,29
metros) y juego de tubos más largo
39

Tabla de aplicaciones de los vaporizadores Jiffy
®
J
iffy® Steamer Company, LLC Dirección de envíos: 4462 Ken-Tenn Highway - Union City, Tennessee 38261 o escríbanos a
38
J-4000 J-4000A J-4000B
Línea Profesíonal Línea Profesíonal Línea Profesíonal
MEJOR
•
MEJOR
•
MEJOR
•
•
• •
• •
MEJOR MEJOR MEJOR
MEJOR MEJOR MEJOR
MEJOR
MEJOR
Automotriz
Muebles
Fabricantes de sombreros
Insumos industriales
Aplicaciones de floristería
Industria de hospitalidad
Comercio al por menor
- Ropa
- Canales en masa
Limpieza a vapor
Fotografía
Producción de películas
Diseñadores de interiores
- Cortinas
- Alfombras
- Papel tapiz
Cosméticos
- Salones de belleza
- Reemplazo de cabello
Tiendas de alquileres
Casas de abastecimiento
Ropa
Limpieza a vapor
Papel tapiz
Cortinas
Muebles
Pelucas
Viajes
Consumidor
Comercial
ÍNDICE
A=tapicería
B=cepillo de vapor
C=alfombra
D=cortinas
DM = boquilla de vapor
metálica para cortinas
H=sombrero
I=boquilla de vapor
intercambiable
M=boquilla de vapor
metálica con mango
de madera
W= peluca
Con manguera de 7.5 pies (2,29
metros) y juego de tubos más largo
Tabla de
aplicaciones

J-2M J-2W J-2000 J-2000B J-2000I J-2000M Esteam
®
Steamboard
•
• • • •
• • • • •
• • • • • • •
• • • • • •
• • • • •
• • • • •
• •
• • • • • •
••• • • •
•
• •
• • • • • • • •
• • • • • • • •
MEJOR
• •
MEJOR
• •
• •
• • • •
• • •
MEJOR
•
MEJOR
M
w
B
I
Use this helpful matrix chart to help you find
the right Jiffy
®
Steamer for your needs!
P
y p
P.O. Box 869 - Union City, TN 38281-0869 - Tel_fono: 1-731-885-6690 - Fax: 1-731-885-6692 - Hecho en los EE.UU. desde 1940
37
¡Utilice esta tabla de aplicaciones para ayudarle a encontrar el vaporizador
Jiffy
®
adecuado para sus necesidades!

M
J-1 J-2 J-2B J-2I
•
• •
•
••
• •
• •
• •
• •
• •
• •
•
•
•
• • • •
• • • •
• •
• •
• •
••
•
Automotriz
Muebles
Fabricantes de sombreros
Insumos industriales
Aplicaciones de floristería
Industria de hospitalidad
Comercio al por menor
- Ropa
- Canales en masa
Limpieza a vapor
Fotografía
Producción de películas
Diseñadores de interiores
- Cortinas
- Alfombras
- Papel tapiz
Cosméticos
- Salones de belleza
- Reemplazo de cabello
Tiendas de alquileres
Casas de abastecimiento
Ropa
Limpieza a vapor
Papel tapiz
cortinas
Muebles
Pelucas
Viajes
Consumidor
Comercial
Tabla de
aplicaciones
I
ÍNDICE
A=tapicería
B=cepillo de vapor
C=alfombra
D=cortinas
DM = boquilla de vapor
metálica para cortinas
H=sombrero
I=boquilla de vapor
intercambiable
M=boquilla de vapor
metálica con mango
de madera
W= peluca
Jiffy® Steamer Company, LLC Dirección de envíos: 4462 Ken-Tenn Highway - Union City, Tennessee 38261 o escríbanos a
36
Tabla de aplicaciones de los vaporizadores Jiffy
®

NOTE POR FAVOR: Cada uno de estos puntos sirve como una simple sugerencia cuando
repare su Vaporizador Jiffy
®
. Para asegurar un servicio profesional, por favor envíe la unidad
a la planta para que el personal autorizado pueda reparar el vaporizador. A grandes alturas, el
usuario puede experimentar una disminución en el rendimiento.
PROBLEMA POSIBLE CAUSA SOLUCIÓN
La luz indicadora roja funciona
ya sea en la posición de
precalentamiento (PREHEAT)
o de vapor (STEAM) pero no
en
ambas.
La luz indicadora roja no
se ilumina cuando el
interruptor se coloca en
la posición de
precalentamiento
(PREHEAT) o de vapor
(STEAM).
El vaporizador salpica
agua desde la boquilla
de vapor.
El vaporizador está
goteando agua por la
base de la unidad.
El elemento de calentamiento puede estar dañado.
El termostato puede estar dañado.
Revise el nivel del agua
El hilo de fusible está dañado.
El cable y conector está dañado.
Puede haber cables desconectados.
El interruptor está dañado.
La unidad no está conectada.
Puede haber cables desconectados.
El interruptor está dañado.
El termostato L170 o L220 está dañado.
La boquilla tiene un defecto o está rajada.
Se han acumulado sedimentos de agua en la boquilla.
La unidad se llenó de mas (4 cuartos de galón (3,79
litros) máximo).
El juego de tubos no está totalmente ensamblado (tres
secciones en la mayoría de modelos y cuatro en
vaporizadores para cortinas).
Puede haber un agujero en el tanque (mas
comúnmente en modelos antiguos que usan tanques
de aluminio).
El acoplador de bronce que va entre la manguera y la
unidad puede estar flojo.
El sellador de silicona o el empaque de caucho que
va alrededor del tanque tiene una fuga.
Cambie el elemento de calentamiento y vuelva a
sellar el ensamble del tanque con silicona
resistente a altas temperaturas.
Cambie el termostato.
Revise el flujo de corriente de la unidad y cambie
la parte defectuosa.
El cableado debe ser revisado por un centro de reparación
autorizado o por un técnico de la compañía Jiffy® Steamer.
Cambie el interruptor.
Cambie el termostato.
Cambie la boquilla una vez que empiece a notar
signos de desgaste.
Nunca llene el vaporizador con más de 4 cuartos
de galón (3,79 litros).
Asegurase que la manguera está derecha y no
tenga secciones torcidas que puedan atrapar
condensación en la manguera.
El tanque defectuoso debe cambiarse por un
tanque de acero inoxidable nuevo. Esto implica
cambiar el tanque, la tapa y la cubierta. Esta labor
es mejor que la realice un técnico de la Compañía
Jiffy
®
Steamer.
Apriete la conexión de la manguera con una llave.
Vuelva a sellar el tanque y la tapa con silicona
resistente a altas temperaturas.
35
Modelo J-4000
Solución de problemas de los vaporizadores Jiffy
®
¿Preguntas?
Llame a Nuestra Línea de Soporte Técnico
Al 1-800-525-4339 o al 1-731-885-6690
O bien envíenos un correo electrónico a
jsinfo@jiffysteamer.com
La luz indicadora roja del
vaporizador permanece iluminada
por más de 20 minutos, pero la
unidad no produce vapor cuando el
interruptor se coloca en la posición
de vapor (STEAM).

Solución de problemas de los vaporizadores Jiffy
®
PROBLEMA POSIBLE CAUSA SOLUCIÓN
El vaporizador no
funciona bien o se
ENCIENDE y se APAGA
cuando está trabajando
En unidades adquiridas
en 1986 o antes, la luz
indicadora roja se ilumina
p
ero la unidad nunca se
calienta ni saca vapor.
La luz indicadora verde
no se ilumina cuando se
coloca en la posición de
encendido (ON)
El vaporizador salpica
a
gua desde la boquilla
de vapor.
La unidad no saca vapor
cuando la luz indicadora
v
erde está encendida
La unidad presenta acumulación de sedimentos y
necesita una limpieza completa
Puede tener algún problema el termostato
El hilo de fusible está dañado.
El cable y conector está dañado.
Los cables pueden estar desconectados.
El interruptor está dañado.
La unidad no está conectada a una toma de corriente.
La toma de corriente puede estar defectuosa o inoperable.
E
l elemento de calentamiento puede estar dañado.
L
a boquilla puede estar rajada o dañada.
La unidad se lleno de mas (4 cuartos de galón (3,79
l
itros) máximo)
El juego de tubos no está totalmente ensamblado
(
tres secciones en la mayoría de modelos y cuatro en
vaporizadores para cortinas)
Revise el nivel de agua para asegurarse que la
unidad no se haya quedado sin agua.
El elemento de calentamiento puede estar dañado.
A
lgún cable puede estar desconectado
El Limpiador líquido Jiffy
®
podría solucionar el problema,
pero una limpieza manual es la mejor solución a estas
alturas. Se debe desarmar el elemento de calentamiento
para limpiarlo manualmente.
Revise el flujo de corriente de la unidad y cambie
la parte defectuosa.
Trate de conectar la unidad a otra toma de
corriente.
Cambie el elemento de calentamiento. Esto lo
puede hacer usted mismo, un centro de
reparación autorizado o bien un técnico de la
c
ompañía Jiffy
®
S
teamer.
Cambie la boquilla una vez que empiece a notar
signos de desgaste.
Asegúrese que la manguera este derecha y no
tenga secciones torcidas que puedan atrapar
condensación en la manguera.
Apague la unidad, deje que se enfrié por un rato y
vuelva a llenar el recipiente de agua.
R
evise la unidad con un medidor de voltaje (si
está calificado).
34
Modelos J-1 / J-2 / J-2000
PROBLEMA POSIBLE CAUSA SOLUCIÓN
El vaporizador no
funciona bien o se
ENCIENDE y se APAGA
cuando está trabajando
La unidad salpica agua
desde la tapa de vapor
La luz indicadora roja se
ilumina pero la unidad
nunca se calienta ni saca
vapor
La unidad tiene acumulación de sedimentos y
necesita una limpieza completa.
Puede tener algún problema el termostato.
Es posible que esté dañado el hilo fusible, el
elemento de calentamiento o el termostato.
La unidad está demasiado llena.
La unidad debe limpiarse por dentro el tanque y la tapa.
El operar la unidad la está ladeando demasiado hacia
adelante o hacia atrás
Use el Limpiador líquido Jiffy
®
para limpiar el
elemento. Puede ser que necesite usar un cepillo
pequeño para restregar la unidad.
Cambie el termostato de la unidad
Cambie el hilo del fusible de enlace ó cambie el
elemento de la unidad. Esto lo puede hacer usted
mismo, un centro de reparación autorizado o un
técnico de la compañía Jiffy
®
Steamer.
Para que su vaporizador dé los mejores
resultados, utilice periódicamente el Limpiador
líquido Jiffy
®
para retirar los depósitos de
sedimentos de agua (cada 3 o 4 meses)
dependiendo del uso de su vaporizador.
No llene la unidad por encima de la marca de
máximo indicada en el lado de la unidad.
Esteam
®

33
Configuraciones de cables eléctricos y boquilla de vapor para los vaporizadores Jiffy
®
Configuración #6
Boquilla de vapor
para sombreros
Disponible en los vaporizadores
modelos J-1
®
, J-2000H
®
y J-4000H
®
.
Configuración #7
Boquilla de cepillo
para limpiar a vapor
Disponible en los vaporizadores
modelos J-2B
®
, J-2000B
®
y J-4000B
®
.
NEMA 1-15 120V
ENCHUFE #1
No está disponible para la
s
erie J-4000®
NEMA 5-15 120V
o 230V ENCHUFE #2
No está disponible para la serie
ESTEAM®
CEE-7 230V
ENCHUFE #3
BS 546 230V
ENCHUFE #4
BS 1363 230V
ENCHUFE #5
ETSA S/86 230V
ENCHUFE #6
SI 32 230V
ENCHUFE #7
620-P 230V
ENCHUFE #8
Configuraciones de suministros eléctricos del mundo para los vaporizadores Jiffy
®
Configuración #8
Juego “I” para
vaporizadores
Jiffy
®
con cuatro
aditamentos para
la boquilla
de vapor
Manguera “I” de 5.5ʼ (13,97 centímetros)
disponible en todas las unidades de la serie J.
Manguera “I” de 7.5ʼ (19,05 centímetros)
disponible únicamente en la serie J-4000
Aditamento de cepillo
(se adapta al aditamento
de tubo doblado de 9”
(22,86 centímetros)
Aditamento de metal
de 6”
(15,24 centímetros)
Aditamento para
alfombra de 12” (30,48
centímetros)
Aditamento de tubo de
aluminio doblado para la
boquilla de vapor de 9
pulgadas (22,86
centímetros)
Manguera con mango de
madera y accesorio de
conexión de bronce
2 1/2” (6,35
centímetros)

Configuraciones de las boquillas de vapor para los vaporizadores Jiffy
®
32
Configuraciones opcionales de las boquillas para aplicar vapor
Configuración #1
Boquilla de vapor
estándar de plástico
Disponible en los
vaporizadores
modelos J-2
®
, J-2000
®
,
J-4000
®
y J-4000D
®
.
Boquilla de vapor de
metal con mango de madera
Disponible en los vaporizadores
modelos J-2M®,J-2000M®,
J-4000A®, J-4000DM®,
y J-4000M®.
Configuración #2
Boquilla de vapor
para instalar alfombras y
retirar papel tapiz
Disponible en el vaporizador
modelo J-4000C
®
.
Configuración #3
Boquilla de vapor
para pelucas
Disponible en los vaporizadores
m
odelos J-2W
®
,
J-2000W
®
y J-4000W
®
.
Configuración #5
Boquilla de tubo y
boquilla de metal
Intercambiable para
automóviles/tapicería
Disponible en los vaporizadores
modelo J-4000A
®
.
Configuración #4
9
” (12,70
c
entímetros)
9” (22,86
centímetros)
6
” (15,24
centímetros)
12” (30,48
centímetros)
6” (15,24
centímetros)
6” (15,24
centímetros)

Patentes
Los productos y componentes de los vaporizadores Jiffy
®
mencionados en este manual están
cubiertos por algunas o todas las siguientes patentes de los EE.UU.: D421,165 / D423,156 /
D426,924. El diseño y la configuración del Modelo J-2 es una marca registrada en los EE.UU.
Las demás patentes están en trámite.
31
Otros accesorios para los vaporizadores Jiffy
®
Convertidores y adaptadores de enchufes
para ESTEAM
®
Lleve su ESTEAM
®
por todo el mundo y úselo al 100%. Nuestro
convertidor tiene un semiconductor triac de 25 amperios para una
potencia de salida estable, un disipador de calor grande de
aluminio con código UL, una cubierta exterior de material no
conductor e ignífugo. Disponible para 120 voltios.
Tabla Jiffy
®
para
aplicar vapor
La tabla de aplicación
Jiffy
®
proporciona un
espacio de trabajo
conveniente para
acomodar rápidamente
los pliegues y dobleces.
Es ideal para tiendas de
ropa, sastrerías y para
uso en el hogar. Los
aditamentos incluidos
con la tabla le permiten
montarla en el rodapié (opcional con cargo
adicional), colgarla en la puerta o montarla
directamente en la pared. No está disponible para
exportación.
Limpiador líquido Jiffy
®
Nuestro exclusivo líquido elimina los depósitos de agua dura en el
vaporizador Jiffy
®
. Es fácil de usar y funciona en todos los modelos de
vaporizadores Jiffy
®
. Utilice únicamente el Limpiador Jiffy
®
ya que otros
limpiadores podrían dañar las partes internas. No está disponible para
exportación.

Limpie y enjuague el vaporizador con frecuencia
Todos los vaporizadores deben limpiarse y enjuagarse de vez en cuando
para retirar los depósitos de minerales. Para limpiar las partes internas
recomendamos nuestro Limpiador líquido Jiffy
®
.
Nunca utilice aditivos:
Nunca agregue aditivos al agua del vaporizador tales como sal, vinagre, lejía,
perfumes y tintes. Estas sustancias corroen o tapan las partes internas.
Nunca permita que se quede sin agua el vaporizador:
Usar el aparto sin agua provoca daños en el elemento de calentamiento y en
el cableado.
Nunca vierta agua fría en un vaporizador caliente
Si por error su vaporizador se ha quedado sin agua, deje enfriar la unidad
antes de agregarle agua. Cuando se vierte agua fría sobre un elemento de
calentamiento ya caliente, podría causar daños al elemento.
Aplique el vapor en posición vertical:
No use el vaporizador en posición horizontal como si fuera una plancha.
Aplique vapor con movimientos verticales de arriba hacia abajo. Esto
permitirá que la condensación dentro de la manguera fluya de regreso al
vaporizador.
Sujete la tuerca de la manguera firmemente:
Si el vaporizador tiene un aditamento de manguera, utilice la llave de tuercas
que viene con el aparato para asegurar que la tuerca de bronce en la base
del vaporizador está bien apretada. La llave está magnetizada y se encuentra
en la tapa inferior.
Nunca utilice un alargador:
No se deben utilizar alargadores con este producto. El uso de un alargador
puede provocar daños al cable de energía del vaporizador y a los cables
internos.
No hale el vaporizador con el cable:
Halar el vaporizador con el cable de corriente puede aflojar los cables
internos.
Nunca use su pie para ENCENDER/APAGAR el vaporizador:
El interruptor de corriente podría dañarse por el exceso de presión al apagar
la unidad con el pie.
Almacenamiento del Vaporizador:
Antes de guardar el vaporizador durante periodos prolongados (30 días o
más), saque toda el agua de la unidad. El agua se hace rancia con el tiempo
y puede tapar las partes internas.
Mantenimiento del vaporizador Jiffy
®
30

29
Se recomienda realizar el siguiente procedimiento de limpieza como medida de
mantenimiento para ayudar a que su vaporizador mantenga su máximo rendimiento. El
mantenimiento se debe realizar cada 3 a 6 meses, dependiendo del tipo de agua que
utilice. En la mayoría de los casos, una unidad seriamente obstruida se debe desarmar
para limpiarse adecuadamente y prolongar así su vida útil. Esta labor es mejor que la
realicen los centros de reparación autorizados y los técnicos de servicio para los
vaporizadores Jiffy
®
.
1. Retire la manguera en el acople de bronce con una llave y retire la botella de agua de
la unidad. Vierta el agua que haya quedado dentro de ella.
2. Si el aditamento de la manguera se encuentra bloqueada por la acumulación de
sedimentos, use una manguera para limpiarla. Esto deberá de retirar la mayoría de
los depósitos dentro de la manguera.
3. Para limpiar las partes internas del vaporizador, se recomienda usar el limpiador
líquido Jiffy
®
(botella de 10 onzas (2,96 decilitros)). Este limpiador a base de ácido
retirará la acumulación de sedimento y los depósitos de agua dura. Este limpiador
no está disponible para exportación.
4. Llene el vaporizador con un galón (3,79 litros) de agua y agregue toda la botella del
Limpiador líquido de Jiffy
®
de diez (10) onzas (2,96 decilitros). Coloque el
interruptor en la posición de precalentar (PREHEAT) y deje que se caliente el agua y
la solución.
5. Cuando se apague la luz de piloto roja se apague, indicando el final del ciclo de
precalentamiento, coloque el interruptor en la posición de apagado (OFF) y
desconecte el vaporizador de la toma de corriente. Deje el agua y la solución de
limpieza dentro del vaporizador durante 3 horas. NO PRODUZCA VAPOR CON
LA SOLUCIÓN DENTRO DE LA UNIDAD YA QUE ESTO PUEDE
OCASIONAR DAÑOS.
6. Retire la solución de limpieza del vaporizador inclinándolo y sacando la solución
por el accesorio de bronce donde normalmente se conecta el aditamento de la
manguera.
7. Enjuague la unidad llenándola con agua limpia tres veces dejando que salga el agua.
8. Si sigue saliendo agua descolorida o residuos de la unidad, es posible que se tenga
que repetir el procedimiento # 7.
9. Por favor llame al 1-800-525-4339 o al 731-885-6690 si tiene alguna pregunta o para
más instrucciones.
Instrucciones de limpieza para los vaporizadores Jiffy
®
modelo J-4000

Instrucciones de limpieza para los vaporizadores Jiffy® modelos J-1, J-2 y J-2000
28
Se recomienda realizar el siguiente procedimiento de limpieza como medida de
mantenimiento para ayudar a que su vaporizador mantenga su máximo rendimiento. El
mantenimiento se debe realizar cada 3 a 6 meses, dependiendo del tipo de agua que
utilice. En la mayoría de los casos, una unidad seriamente obstruida se debe desarmar
para limpiarse adecuadamente y prolongar así su vida útil. Esta labor es mejor que la
realicen los centros de reparación autorizados y los técnicos de servicio para los
vaporizadores Jiffy
®
.
1. Desconecte el vaporizador de la toma de corriente. Retire la manguera en el acople
de bronce con una llave y retire la botella de agua de la unidad. Vierta el agua que
haya quedado dentro de ella.
2. Si el aditamento de la manguera se encuentra bloqueada por la acumulación de
sedimentos, use una manguera para limpiarla. Esto deberá de retirar la mayoría de
los depósitos dentro de la manguera.
3. Para limpiar las partes internas del vaporizador, se recomienda usar el limpiador
líquido Jiffy
®
(botella de 10 onzas (2,96 decilitros). Este limpiador a base de ácido
retirará la acumulación de sedimento y los depósitos de agua
dura. Este limpiador no está disponible para exportación.
4. Vierta la solución de limpieza en la vasija de agua del
vaporizador. Este es el lugar en la base del
vaporizador donde normalmente se coloca la
botella o el tanque de agua. Deje la solución de
limpieza dentro de la unidad durante 3 horas.
NO PRODUZCA VAPOR CON LA
SOLUCIÓN DENTRO DE LA UNIDAD YA
QUE ESTO PUEDE OCASIONAR DAÑOS.
5. Retire la solución de limpieza del vaporizador
inclinándolo de un lado a otro sacando la
solución del área de la vasija de agua.
6. Enjuague la vasija llenándola con agua limpia
tres veces dejando que salga el agua del área de
la vasija.
7. Si sigue saliendo agua descolorida o residuos
de la unidad, es posible que se tenga que repetir
el procedimiento # 6.
8. Por favor llame al 1-800-525-4339 o al 731-
885-6690 si tiene alguna pregunta o para más
instrucciones.

27
Instrucciones de cableado para los vaporizadores Jiffy® modelo J-4000
1. El cable negro positivo (1) (café para las unidades de 230 voltios) se
conecta en la letra “A” del interruptor.
2. El cable blanco neutro (2) se conecta al hilo fusible café (4) (azul para
las unidades de 230 voltios).
3. El cable de tierra (3) se conecta en el soporte de tierra en la cubierta del
vaporizador.
4. El hilo fusible café (4) se conecta en la letra “B” del interruptor.
5. El cable azul (5) en la parte superior del termostato de precalentamiento
(L170) se conecta al #1 del interruptor.
6. El cable blanco (6) del lado izquierdo de la unidad se conecta al #4 del
interruptor.
7. El cable rojo (7) de la parte superior del termostato de vapor (L-220) se
conecta al #2 del interruptor.
8. El cable amarillo largo (8) de la parte inferior del termostato de
precalentamiento se conecta al lado derecho de la unidad.
9. El cable amarillo corto (9) del lado derecho de la unidad se conecta a la
parte inferior del termostato de vapor (L-220)
10. El cable blanco (10) se conecta de la luz al lado izquierdo de la unidad.
11. El cable amarillo mediano (11) se conecta de la luz al lado derecho de la
unidad.
Por favor fíjese que los números y letras de los bornes del
interruptor están marcados en el interruptor en si.
J-4000
¿Preguntas?
Cuando llame a nuestra línea de soporte técnico
al 1-800-525-4339
o nos envíe un correo electrónico a
jsinfo@jiffysteamer.com,
por favor tenga a mano
el modelo y el número de serie

Diagrama de conexiones eléctricas para los
vaporizadores Jiffy
®
modelo J-4000
26
Precaución:
Asegúrese que el cable de corriente esté desconectado de la
toma de corriente antes de intentar reparar su vaporizador
Jiffy
®
.

# de repuesto del
Código # vaporizador Jiffy Descripción del repuesto
3 0036 Sección media del juego de tubos (con perno y tornillo de cabeza)
4 1033 Sección inferior del juego de tubos (con tuerca)
0037 Sección inferior del juego de tubos (sin tuerca)
0038
Sección media adicional del juego de tubos para vaporizadores de cortinas
0043 Tornillo de cabeza de metal para el juego de tubos
0039 Perno de metal roscado para las secciones del tubo
5 0253 Juego de repuesto del mango/boquilla de vapor de plástico
6 0251
Mango/boquilla de vapor de plástico con aditamento de manguera completo
0280 Manguera por pies (Color negro)
7 1302 Cubierta J-4000 de Aluminio Fundido Equipo (120 Voltios)
1303 Cubierta J-4000 de Aluminio Fundido Equipo (230 Voltios)
0006 Arandela hexagonal
8 0004 Arandela de protección
9 0049P Tapa liberadora de presión de agua
0053 Embudo
10 0054 Mango de la cubierta con dos tornillos
11 0199 Interruptor giratorio y perilla
12 0201 Perilla de repuesto únicamente para interruptor giratorio
13 1310 Luz piloto de neón color rojo (120 Voltios)
1311 Luz piloto de neón color rojo (230 Voltios)
14 0133 Cable y conector (calibre 14/3) con protector
15 0146C Protector contra tirones para el cable
16 0050
Medidor visual de agua con tuercas y arandelas
1353
Juego completo de tanque de calentamiento en acero inoxidable (120 Voltios/1500 vatios)
1354
Juego completo de tanque de calentamiento en acero Inoxidable (230 Voltios/1500 vatios)
0074A
Tanque de calentamiento en acero inoxidable con medidor visual (J-4)
17
0074C Únicamente el tanque de calentamiento en acero inoxidable.
18 1370
T
apa del tanque de calentamiento con 2 acopladores de bronce y 2 arandelas
19 0071 Juego de tornillos para el tanque de calentamiento (juego de 30)
0061
Sellador de silicona para tanque de Calentamiento (2,8 onzas (0,83 decilitros) líquidas)
0062
Sellador de silicona para tanque de Calentamiento (10,1 onzas (2,99 decilitros) líquidas)
20 0075 Empaque del tanque de calentamiento
21 0063 Elemento de calentamiento con doblado “W”
(120 voltios, 1500 vatios) con componentes
0064 Elemento de calentamiento con doblado “W”
(230 voltios, 1500 vatios) con componentes
22 0203 Termostato de precalentamiento (L-170)
23 0204 Termostato de vapor (L-220)
24 0155 Juego de cables internos (juego de 5 cables) para el elemento
de calentamiento con doblado “W”
25 0158 Hilo del fusible de enlace con tapa aislada y sujetador
26 1320 Tapa inferior con ruedas
27 0017 Tornillos para la tapa inferior (4 tornillos en total)
28 0018 Ruedas para la tapa inferior (juego de 4)
ACCESORIOS
1026 Juego “I” - Manguera de 5,5' (1,68 metros) con cuatro aditamentos
intercambiables para la boquilla de vapor
1027 Juego “I” - Manguera de 7,5' (2,29 metros) con cuatro aditamentos
intercambiables para la boquilla de vapor
29 1050 Llave de ensamble para vaporizadores Jiffy
0259 Aditamento de manguera para automóviles con boquillas metálicas
0257 Aditamento de manguera para alfombras con boquilla metálica
d
e 12” (30,48 centímetros)
0252
Aditamento de manguera para cortinas de 7,5' (2,29 metros) con boquilla plástica
0255
Aditamento de manguera para cortinas de 7,5' (2,29 metros) con boquilla metálica
0
254
B
oquilla metálica/Mango de madera con aditamento de manguera completo
0
256 Boquilla metálica/Mango de madera únicamente
0269 Mango de madera de repuesto (para boquillas metálicas)
0262 Aditamento de manguera para pelucas
0274 Aditamento de la boquilla de bronce para sombreros
1
062 Aditamento de manguera del cepillo “B” para limpiar a vapor
1
063 Únicamente el cepillo para el aditamento de manguera "B"
0
899
L
impiador líquido - 3 Botellas de diez 10 onzas (2,96 decilitros) por paquete*
*
No está disponible para exportación
25
Listado de repuestos de los vaporízadores Jiffy
®
J-4000
J-4000
Si no encuentra el repuesto que necesita, por favor comuníquese con nosotros.

En caso que usted llegara a necesitar repuestos para su vaporizador Jiffy
®
, los puede
pedir por separado. Guíese por este práctico diagrama y listado de repuestos para
identificar cualquier parte que pudiera necesitar. Por favor indique el modelo y el número
de serie cuando haga su pedido.
24
#
de repuesto del
Código # vaporizador Jiffy Descripción del repuesto
1 1030 Juego de tubos y tuerca completo incluyendo clavos de metal
1034
Juego de tubos y tuerca completo para los vaporizadores de cortinas
2 0035 Sección de gancho del juego de tubos
Diagrama de partes de los vaporizadores Jiffy
®
J-4000
*Para modelos fabricados después de marzo de 2005.
24
26
25
29
28
27
16
22
23
17
21
12
20
14
18
5
6
19
13
15
7
89
10
4
3
1
11
2

1. Conecte la manguera firmemente usando la llave de montaje
magnética localizada en la tapa inferior del aparato (figura
#1).Ensamble y monte el tubo para colgar la manguera (figura #2).
Para los modelos de serie “H”, no habrá ningún accesorio de
manguera ni tubo para conectar.
2. Usando el embudo que viene con el aparato, añada como máximo,
cuatro cuartos de galón (3,79 litros) de agua tibia (de la llave o
destilada; el agua fría tarda más en precalentar). No llene de más.
La tapa negra tiene un dispositivo que libera la presión del vapor, y
está diseñado para utilizarse en caso de que se incremente la presión
en el tanque de agua. Si usted empieza a ver o escuchar vapor
escapar de la tapa, cheque si la manguera tiene alguna curva o rizo
en ella. Estire la manguera. Si el escape de vapor no cesa, por favor
contacte con Jiffy Steamer al 731-885-6690. Conecte a una toma de
corriente de voltaje adecuado, y coloque el interruptor en la
posición de precalentar (PREHEAT). El vaporizador se mantendrá a
esta temperatura y la luz se apagara y se encenderá de vez en
cuando. NOTA: El vaporizador J-4000 cuenta con una reserva de
agua para 2 horas de vapor continuo. Si piensa usar el vaporizador a
lo largo del día, deje el interruptor en la posición de precalentar
(figura #3) para que se mantenga la temperatura del agua en el tanque.
3. Inmediatamente después de precalentar el agua (se apaga la luz piloto color rojo), coloque el
interruptor en la posición de vapor
(STEAM) para tener vapor en aproximadamente 2 minutos.
La combinación de la boquilla y la aplicación directa de vapor son muy importantes. Algunas
prendas se pueden vaporizar mejor por dentro. Siempre aplique el vapor con la manguera en
posición vertical de modo que cualquier condensación pueda volver libremente hacia el
vaporizador. Si está aplicando vapor en una posición cerca del piso, mueva frecuentemente la
manguera hacia arriba y hacia afuera para evitar condensación. Si el
vaporizador se queda sin agua, se apagará temporalmente. Una vez que
haya terminado de usar la unidad, coloque el interruptor en la posición de
apagado (OFF). Si necesita añadir agua al vaporizador, espere que se enfríe
antes de quitar la tapa para agregar el agua. Nunca vierta agua fría en un
elemento caliente. Continué la aplicación de vapor colocando el interruptor
en la posición de vapor (STEAM).
4.Cuando no use la boquilla, cuélguela en el gancho
del tubo apuntando hacia arriba (figura #4) y
coloque el interruptor en la posición de apagado
(OFF) (figura #3) y desconecte el cable y conector.
5.
Vacié periódicamente el agua que haya estado ya tiempo estancada para evitar
la acumulación de sedimentos, mantenga un nivel de agua adecuado. Nunca
ponga más de 4 cuartos de galón (3,79 litros) de agua en el vaporizador. Si se
pasa, el agua puede hervir en la manguera. Se recomienda usar el Limpiador
líquido Jiffy
®
cada 6 meses para sacar los depósitos de minerales. Vea la página
29 para instrucciones de limpieza completas.
Todos los vaporizadores Jiffy
®
se han probado en fábrica y por esto puede haber
pequeñas cantidades de agua en la unidad.
ADVERTENCIA: Nunca trate de usar el aparato sin agua. Para mayor
seguridad desconecte el aparato después de cada uso.
23
Instrucciones de uso para los vaporizadores Jiffy
®
modelo J-4000
Figura 1
Figura 2
Figura 3
J-4000
Figura 4

Vaporizadores Jiffy
®
Pro-Line modelo J-4000
22
CARACTERÍSTICAS
• Medidor integrado de fácil lectura que indica el nivel de agua y la
acumulación de sedimentos
• Cubierta exterior de aluminio fundido para mayor durabilidad
• Tanque de calentamiento de acero inoxidable a prueba de corrosión-sin
conductos de agua que se tapen por depósitos de agua dura.
• Termostatos duales para posiciones de precalentamiento (preheat) y vapor
(steam)
• Circuito de seguridad que apaga automóticamente el aparato en caso de
que accidentalmente quede sin agua
• Tapa liberadora de presión de agua
• Viene con diversos tipos de boquillas de vapor
• Respaldado por el reconocido servicio al cliente de Jiffy
®
– si su vaporizador
necesita reparación, envíenoslo y se lo repararemos y se lo mandaremos de
regreso dentro de 24 horas después de recibirlo en nuestra planta.
INCLUYE:
J
uego de tubos
(
no se incluye en la
serie J-4000H)
Manual del
propietario
Llave de
montaje
Embudo
Accesorio de
manguera y
boquilla de
vapor (no se
incluye en
la serie
J-4000H
)
Unidad base
J-4000

21
Instrucciones de cableado para los vaporizadores Jiffy
®
modelo J-2000
1. Inserte el cable y conector (1) en la cubierta y conecte el cable negro
positivo (2) del cable y conector al borne número 5 del interruptor.
2. Coloque la cinta de cobre de conexión a tierra de 4 pulgadas (10,16
centímetros) como se muestra en el diagrama. Fije la cinta de conexión a
tierra y el cable verde de conexión a tierra, sujetándolos a la conexión a
tierra de la unidad de calentamiento (3).
3. Conecte el alambre azul (4) del lado derecho del elemento de calentamiento
de bronce (5) en el lado derecho del termóstato L-290 (6).
4. Inserte la unidad de calentamiento de bronce en la cubierta y apriete las
tuercas de bronce (7) en el conducto de agua a la unidad y al accesorio de
90 grados de la vasija. Apriete los 2 tornillos de montaje (8) en la base de
la unidad de calentamiento. Luego, use una llave de 5/8 pulgadas para
apretar las tuercas en el conducto de agua a la unidad y al accesorio de 90
grados de la vasija. La unidad de calentamiento se puede soltar y acomodar
para un mejor ajuste si es necesario.
5. Conecte el cable blanco (9) del lado izquierdo de la unidad de
calentamiento al borne número 6 del interruptor.
6. Conecte el cable amarillo (10) del lado izquierdo del termostato al borne
número 3 del interruptor.
7. Conecte el cable blanco neutro (11) del cable y conector al fusible de enlace
naranja con conector plástico (12).
8. Conecte el otro extremo del fusible de enlace naranja al borne número 2 del
interruptor.
9. Acomode el vaporizador hacia arriba, coloque el protector contra tirones de
plástico negro (13) aproximadamente a 4 1/2 pulgadas (11,43 centímetros)
del extremo del cable y conector e insértelo en la cubierta con pinzas.
11. Asegure la tapa inferior con cuatro tornillos.
12. Para evitar fugas, antes de usar el vaporizador, asegúrese de apretar la
manguera (o la boquilla para sombreros) con la llave de tuercas.
Por favor fíjese que los números en el borne de interruptores 2, 3, 5
y 6 indicadas en la ampliación del diagrama de interruptores están
marcados en el interruptor en sí. Los vaporizadores Jiffy
®
fabricados antes de Mayo del año 2000 no tienen marcados los
números en el borne de interruptores. Los números entre paréntesis
se refieren al diagrama en la página 14.

2
Negro del
cable y
conector
11
Blanco del cable y conector
7
7
Tuercas
de bronce
3
C
onexión a tierra
1
Cable de
Electricidad
13
Alivio de
T
ensión
Verde
Blanco
Negro del cable y conector
Blanco
Naranja
Amarillo
5
6
2
3
8
Tornillos de
m
ontaje del
e
lemento
9
Cable blanco
4
C
able azul
Fusible de enlace
naranja
Unidad de calentamiento
d
e bronce
12
5
10
C
able amarillo
6
Termostato
L-290
Cinta de
c
onexión
a
tierra
Cable verde de
c
onexión a tierra
20
Precaución:
Asegúrese que el cable de
corriente esté desconectado
de la toma de corriente antes
intentar reparar su vaporizador
Jiffy
®
.
Diagrama de conexiones eléctrícas para los
vaporizadores Jiffy
®
modelo J-2000

# de repuesto del
Código # vaporizador Jiffy Descripción del repuesto
1 1030 Juego de tubos y tuerca incluyendo clavos de metal
2 0035 Sección de gancho del juego de tubos
3 0036 Sección media del juego de tubos
4 1033 Sección inferior del juego de tubos ( con tuerca)
0043 Tornillo de cabeza de metal para el juego de tubos
0039 Perno de metal roscado para las secciones del tubo
5 1102 Cinta de conexión a tierra para el elemento de calentamiento
6 0253 Juego de repuesto del mango/boquilla de vapor de plástico
7 0251
Mango/boquilla de vapor de plástico con aditamento de manguera completo
0280 Manguera por pies (Color negro)
8 1107B Juego de cubierta beige para el J-2000 con vasija de agua - 120 Voltios
1107C Juego de cubierta beige para el J-2000 con vasija de agua - 230 Voltios
1107PB Juego de cubierta rosada para el J-2000 con vasija de agua - 120 Voltios
1107PC Juego de cubierta rosada para el J-2000 con vasija de agua - 230 Voltios
8.1 1110 Anillo “O” para la vasija de agua del J-2000
8.2 1111
Vasija de agua del J-2000 con acoplador de bronce de 90 grados y anillo “O”
9 1140 Tanque de agua J-2000 completo con tapa de válvula antirretorno
10 1141 Tanque de agua J-2000 completo sin tapa de válvula antirretorno
11 0027A Tapa de repuesto de válvula antirretorno
0564 Kit de Ryton aislante (2 pastas y una arandela)
12 0027B Tapa de repuesto de la sola mampara de la válvula de retorno
13 1125 Interruptor oscilante "Contura" de luz verde 120 voltios
1126 Interruptor oscilante "Contura" de luz verde 230 voltios
14 0132 Cable y conector (calibre 16/3) con protector
15 0146B Protector contra tirones para el cable
16 0148 Juego de cables internos
0597 Juego de la unidad de calentamiento (incluyendo cableado) para
modelos con interruptor oscilante verde -Cable y conector de
120 Voltios y conducto de agua de 4” (11,43 centímetros)
0597A Juego de la unidad de calentamiento (incluyendo cableado) para
modelos con interruptor oscilante verde -Cable y conector de
230 Voltios y conducto de agua de 4” (11,43 centímetros)
17 0161A Conjunto de la unidad de calentamiento (sin cableado) para
modelos con interruptor oscilante verde -Cable y conector de
120 Voltios y conducto de agua de 4” (11,43 centímetros)
0162A Conjunto de la unidad de calentamiento (sin cableado) para
modelos con interruptor oscilante verde -Cable y conector de
230 Voltios y conducto de agua de 4” (11,43 centímetros)
18 1131 Junta articulada de bronce de 90 grados - versión alargada
19 1130
Acoplador recto de bronce de 3/8” x 1/4” para la cubierta del elemento de calentamiento. *A partir de
Noviembre del 2012, este accesorio viene fundido a la unidad de calentamiento.
20 0591
Tubo de Cobre (4” (11,43 centímetros) de largo) con tuercas y anillos de compresión
21 0160 Termostato L-290
22 0195 Sujetador del fusible de enlace
23 0151 Hilo del fusible de enlace con lengüeta aislada y sujetador
24 1120 Tapa inferior con ruedas
25 0011 Ruedas para la tapa inferior (juego de 4)
26 0010 Tornillos para la tapa inferior (4 tornillos en total)
ACCESORIOS
2
7 1026 Juego “I” - Manguera de 5.5' (1,68 metros) con cuatro aditamentos
1
050 Llave de ensamble para vaporizadores Jiffy®
0254
Boquilla metálica/Mango de madera con aditamento de manguera completo
0256 Boquilla metálica/Mango de madera únicamente
0269 Mango de madera de requesto (para boquillas de vapor metálicas)
0
262 Aditamento de manguera para pelucas
1062 Aditamento de manguera del cepillo “B” para limpiar a vapor
1
063 únicamente el cepillo para el aditamento de manguera "B"
0899 Limpiador líquido - 3 Botellas de diez (10) onzas (2,96 decilitros)
qpor paquete*
*
No está disponible para exportación
19
Listado de repuestos de los vaporizadores Jiffy
®
J-2000
J-2000
Si no encuentra el repuesto que necesita, por favor comuníquese con nosotros.

En caso que usted llegara a necesitar repuestos para su vaporizador Jiffy
®
, los puede
pedir por separado. Guíese por este práctico diagrama y listado de repuestos para
identificar cualquier parte que pudiera necesitar. Por favor indique el modelo y el número
de serie cuando haga su pedido.
Diagrama de partes de los vaporizadores Jiffy
®
J-2000
18
16
23
5
17
19
21
22
20
18
15
13
14
27
25
26
24
8
7
6
1
11
8.2
10
4
3
2
8.1

Instrucciones de uso para los vaporizadores Jiffy
®
modelo J-2000
1. Conecte la manguera firmemente utilizando la llave de montaje
magnética localizada en la parte inferior del aparato. Ensamble y
sujete el juego de tubos para colgar la manguera. Todos los
vaporizadores Jiffy
®
se han probado en fábrica y por esto puede
haber pequeñas cantidades de agua en la unidad.
2. Voltee el tanque lleno de agua de la llave o destilada, conecte el
aparato a una toma de corriente de voltaje adecuado, coloque el
interruptor a la posición de encendido (ON) y en cuestión de minutos tendrá
vapor. Nunca remplace el tanque de agua de Jiffy
®
Steamer con otro.
3. Para una fácil operación, monte la tabla opcional para aplicar vapor Jiffy
®
en la puerta o en la
pared para sostener la ropa mientras aplica vapor (figura #2). Si no cuenta con la tabla
opcional Jiffy
®
, coloque un clavo o tornillo con ojal en el marco de la puerta o en la pared
para poder colgar sus prendas ó bien utilice el juego de tubos del vaporizador como se
muestra en la figura 3. Toque la tela ligeramente con la boquilla y las arrugas desaparecerán
instantáneamente. La combinación de la boquilla y la aplicación directa de vapor son muy
importantes. Algunas prendas se pueden vaporizar mejor por dentro.
Con un poco de práctica, logrará velocidad y eficiencia. Siempre
aplique el vapor con la manguera en posición vertical de modo que
cualquier condensación pueda volver libremente hacia el
vaporizador. Si está aplicando vapor en una posición cerca del piso,
mueva la manguera frecuentemente hacia arriba y hacia afuera para
mantenerla libre de condensación. NO PERMITA EL
VAPORIZADOR SE QUEDE SIN AGUA.
4. Cuelgue la boquilla de vapor apuntando hacia arriba en el gancho
para colocar la manguera cuando no la esté
usando y coloque el interruptor en la
posición de apagado (OFF) (figura #3).
5. Periódicamente vacié el agua que haya quedado dentro del vaporizador
para evitar la acumulación de sedimentos y mantenga un nivel de agua
adecuado (figura #4). Retire los depósitos de agua dura con el
Limpiador líquido Jiffy
®
. Refiérase a la página 28 para ver las
instrucciones de limpieza completas.
NOTA: Cada fuente de agua contiene diferentes contenidos de
minerales. Si el vaporizador comienza a apagarse durante su
uso normal, el termostato le está indicando que la unidad de
calentamiento necesita que se le limpie la acumulación de
sedimentos.
Figura 1
J-2000
Figura 2
Figura 3
F
igura 4
17
ADVERTENCIA: Nunca use el vaporizador sin agua.
Desconéctelo después de cada uso.

Vaporizadores Jiffy
®
modelo J-2000
16
CARACTERÍSTICAS
• Cubierta de polímero para mayor durabilidad
• Manguera Ligera y flexible
• Tanque de agua resistente al impacto
• Cableado de seguridad que apaga automáticamente el aparato en caso de
que accidentalmente se quede sin agua
• Mango cómodo y fácil de sostener
• Elimina las arrugas hasta cinco veces más rápido que el planchado
convencional
• Cuenta con ruedas para movilidad
• Viene con varios accesorios para las boquillas de vapor
• Respaldado por el reconocido servicio al cliente de Jiffy
®
– si su
vaporizador necesita reparación, envíenoslo y lo repararemos y se lo
mandaremos de regreso dentro de 24 horas después de recibirlo en
nuestra planta.
INCLUYE:
Unidad base J-2000
Juego de tubos
(no se incluye en
la serie J-2000H)
Manual del
Propietario
Llave de
Montaje
Tanque
de Agua
Tapa de la
válvula
antirretorno
Accesorio de
manguera y
boquilla de
vapor
(no se incluye en
la serie J-2000H)

15
Instrucciones de cableado para los vaporizadores Jiffy
®
modelos J-1 y J-2
1. Inserte el cable y conector (1) en la cubierta y conecte el cable negro
positivo (2) del cable y conector al Borne número 5 del interruptor.
2. Sujete el cable verde de tierra con el tornillo de tierra del cable y conector a
la conexión a tierra en la cubierta (3).
3. Conecte el alambre azul (4) del lado derecho del elemento de calentamiento
de bronce (5) en el lado derecho del termóstato L-290 (6).
4. Inserte la unidad de calentamiento de bronce en la cubierta y apriete las
tuercas de bronce (7) en la conducto de agua a la unidad y al accesorio de
90 grados de la vasija. Apriete los 2 tornillos de montaje (8) en la base de
la unidad de calentamiento. Luego, use una llave de 5/8 pulgadas para
apretar las tuercas en el conducto de agua a la unidad y al accesorio de 90
grados de la vasija de agua. La unidad de calentamiento se puede soltar y
acomodar para un mejor ajuste si es necesario.
5. Conecte el cable blanco (9) del lado izquierdo de la unidad de
calentamiento al borne número 6 del interruptor.
6. Conecte el cable amarillo (10) del lado izquierdo del termostato al borne
número 3 del interruptor.
7. Conecte el cable blanco neutro (11) del cable y conector al fusible de enlace
naranja con conector plástico (12).
8. Conecte el otro extremo del fusible de enlace naranja al borne número 2 del
interruptor.
9. Acomode el vaporizador hacia arriba, coloque el protector contra tirones de
plástico negro (13) aproximadamente a 4 1/2 pulgadas (11,43 centímetros)
del extremo del cable y conector e insértelo en la cubierta con pinzas.
10. Asegure la tapa inferior con cuatro tornillos.
11. Para evitar fugas, antes de usar el vaporizador, asegúrese de apretar la
manguera (o la boquilla para sombreros) con la llave de tuercas.
Por favor fíjese que los números en el borne de interruptores 2, 3, 5 y 6
indicadas en la ampliación del diagrama de interruptores están marcados en
cada interruptor. Los vaporizadores Jiffy
®
fabricados antes de Mayo del año
2000 no tienen marcados los números en el borne de interruptores. Los números
entre paréntesis se refieren al diagrama en la página 14.

2
Negro del
cable y
c
onector
11
B
lanco del cable y conector
7
7
Tuercas
de bronce
3
C
onexión a tierra
1
C
able de
Electricidad
13
Alivio de
T
ensión
Verde
Blanco
Negro del cable y conector
Blanco
Naranja
Amarillo
5
6
2
3
8
T
ornillos de
montaje del
elemento
9
Cable blanco
4
C
able azul
Fusible de enlace
naranja
Unidad de calentamiento
de bronce
12
5
10
Cable amarillo
6
Termostato
L-290
Diagrama de conexiones eléctricas para los
vaporizadores Jiffy
®
modelos J-1 y J-2
14
Precaución:
Asegúrese que el cable de
corriente esté desconectado
de la toma de corriente antes
intentar reparar su vaporizador
Jiffy
®
.

13
Listado de repuestos de los vaporizadores Jiffy® J-1 y J-2
J-1/J-2/J-200
# de repuesto del
Código # vaporizador Jiffy Descripción del repuesto
3 0036 Sección media del juego de tubos
4 1033 Sección inferior del juego de tubos (con tuerca)
0037 Sección inferior del juego de tubos (sin tuerca)
0043 Tornillo de cabeza de metal para el juego de tubos
0039 Perno de metal roscado para las secciones del tubo
5 0253 Juego de repuesto del mango/boquilla de vapor de plástico
6 0251
Mango/boquilla de vapor de plástico con aditamento de manguera completo
0280 Manguera por pies (Color negro)
7 0003B Cubierta de aluminio fundido pintada 120 Volt
0003C Carcaza de Aluminio Reforzado Pintado 230 Volt
0023 Botella de agua “A” plástica con tapa
0027 Tapa de repuesto para botella de agua “A”
8 0026A Botella de agua “B” plástica sin tapa de válvula antirretorno
9 0025 Botella de agua “B” plástica con tapa de válvula antirretorno
10 0027A Tapa de repuesto de válvula antirretorno para botella de agua “B”
11 0027B Tapa de repuesto de la sola mampara de la válvula de retorno
12 0004 Arandela de protección
0122 Interruptor de palanca (3 piezas)
0127 Luz piloto de neón color rojo con aro de cierre 120 voltios
0128 Luz piloto de neón color rojo con aro de cierre 230 voltios
13 1125 Interruptor oscilante "Contura" de luz verde 120 voltios
1126 Interruptor oscilante "Contura" de luz verde 230 voltios
14 0132 Cable y conector (calibre 16/3) con protector
15 0146B Protector contra tirones para el cable
16 0028 Vasija de agua con acoplador de bronce de 90 grados
0147 Juego de cables internos para modelos con luz roja frontal
17 0148
Juego de cables internos para modelos con interruptor oscilante "Contura" Verde
0596 Juego de la unidad de calentamiento (incluyendo cableado) para
modelos con luz roja frontal -Cable y conector de 120 Voltios y
conducto de agua de 4” (10,16 centímetros)
0177A Juego de la unidad de calentamiento (incluyendo cableado) para
modelos con luz roja frontal -Cable y conector de 230 Voltios y
conducto de agua de 4” (10,16 centímetros)
0597 Juego de la unidad de calentamiento (incluyendo cableado) para
modelos con interruptor oscilante verde -Cable y conector de
120 Voltios y conducto de agua de 4” (10,16 centímetros)
0597A Juego de la unidad de calentamiento (incluyendo cableado) para
modelos con interruptor oscilante verde -Cable y conector de
230 Voltios y conducto de agua de 4” (10,16 centímetros)
18 0161A Conjunto de la unidad de calentamiento (sin cableado)
-120 voltios y conducto de agua de 4” (10,16 centímetros)
0162A Conjunto de la unidad de calentamiento (no incluye alambrado)
-230 voltios y conducto de agua de 4” (10,16 centímetros)
19 0030 Junta articulada de bronce de 90 grados
20 1130
Acoplador recto de bronce de 3/8” x 1/4” para la cubierta del elemento de calentamiento. *A partir de
Noviembre del 2012, este accesorio viene fundido a la unidad de calentamiento.
21 0591
Tubo de Cobre (4” (10,16 centímetros) de largo) con tuercas y anillos de compresión
1191
Tubo de Cobre (4 1/2” (11,43 centímetros) de largo) con tuercas y anillos de compresión
0187
Tubo de Cobre (5” (12,70 centímetros de largo) con tuercas y anillos de compresión
22 0160 Termostato L-290
23 0195 Sujetador del fusible de enlace
24 0151 Hilo del fusible de enlace con lengüeta aislada y sujetador
25 0009 Tapa inferior con ruedas
26 0011 Ruedas para la tapa inferior (juego de 4)
2
7 0010 Tornillos para la tapa inferior (4 tornillos en total)
ACCESORIOS
28 1026 Juego “I” - Manguera de 5,5' (1,68 metros) con cuatro aditamentos
1050 Llave de ensamble para vaporizadores Jiffy
®
0274 Aditamento de la boquilla de bronce para sombreros
0254
Boquilla metálica/Mango de madera con aditamento de manguera completo
0256 Boquilla metálica/Mango de madera únicamente
0269 Mango de madera de repuesto (para boquillas de vapor metálicas)
0
262 Aditamento de manguera para pelucas
1
062 Aditamento de manguera del cepillo “B” para limpiar a vapor
1
063 únicamente el cepillo para el aditamento de manguera "B"
0
899
L
impiador líquido - 3 Botellas de diez (10) onzas 2,96 decilitros por paquete*
*No está disponible para exportación
Si no encuentra el repuesto que necesita, por favor comuníquese con nosotros.

# de repuesto del
C
ódigo # vaporizador Jiffy Descripción del repuesto
1 1030 Juego de tubos y tuerca incluyendo clavos de metal
0031 Juego completo de tubos, gancho para manguera y adaptador
0031A Juego completo de tubos, gancho para manguera sin adaptador
0041 Adaptador de base y tornillo mariposa
(para juegos de tubo antiguos)
2 0035 Sección de gancho del juego de tubos
En caso que usted llegara a necesitar repuestos para su vaporizador Jiffy
®
, los puede
pedir por separado. Guíese por este práctico diagrama y listado de repuestos para
identificar cualquier parte que pudiera necesitar. Por favor indique el modelo y el número
de serie cuando haga su pedido.
Diagrama de partes de los vaporizadores Jiffy
®
J-1 y J-2
12
24
17
20
18
25
27
26
28
22
23
21
19
15
14
13
7
12
16
11
10
9
8
2
1
3
4
5
6

J-2
1. Para los modelos J-2, conecte la manguera firmemente utilizando la llave
de montaje magnética localizada en la parte inferior del aparato (figura
#1). Ensamble y sujete el juego de tubos para colgar la manguera. En los
modelos J-1, la boquilla de bronce para sombreros deberá de estar ya
instalada. Los modelos J-1 no vienen con el juego de tubos ni el accesorio
para la manguera. Todos los vaporizadores Jiffy
®
se han probado en
fábrica y por esto puede haber pequeñas cantidades de agua en la unidad.
2. Voltee la botella llena de agua de la llave o destilada, conecte el aparato a
una toma de corriente de voltaje adecuado, coloque el interruptor a la
posición de encendido (ON) y en cuestión de minutos tendrá vapor. No use el pie para
encender/apagar el vaporizador. Nunca remplace la botella de agua de Jiffy
®
Steamer con otra.
Figura 1
Instrucciones de uso para los vaporizadores Jiffy
®
modelos J-1 y J-2
Figura 2
Figura 4
11
Figura 3
ADVERTENCIA: Nunca use el vaporizador sin agua. Desconéctelo después de cada uso.
3. Para una fácil operación, monte la tabla opcional para aplicar vapor Jiffy
®
en la puerta o en la pared para sostener la ropa mientras aplica vapor
(figura #2). Si no cuenta con la tabla opcional Jiffy
®
, coloque un clavo o
tornillo con ojal en el marco de la puerta o en la pared para poder colgar
sus prendas ó bien utilice el juego de tubos del vaporizador como se
muestra en la figura 3. Toque la tela ligeramente con la boquilla y las
arrugas desaparecerán instantáneamente. La combinación de la boquilla y
la aplicación directa de vapor son muy importantes. Algunas prendas se
pueden vaporizar mejor por dentro. Con un poco de práctica, logrará
velocidad y eficiencia. Siempre aplique el vapor con la manguera en
posición vertical de modo que cualquier condensación pueda volver
libremente hacia el vaporizador. Si está aplicando vapor en una posición
cerca del piso, mueva la manguera frecuentemente hacia arriba y hacia
afuera para mantenerla libre de condensación. NO PERMITA EL
VAPORIZADOR SE QUEDE SIN AGUA.
4. Cuelgue la boquilla de vapor apuntando hacia arriba
en el gancho para la manguera cuando no la esté
usando y coloque el interruptor en la posición de
apagado (OFF) (figura #3).
5. Periódicamente vacié el agua que haya quedado dentro
del vaporizador para evitar la acumulación de
sedimentos y mantenga un nivel de agua adecuado
(figura #4). Retire los depósitos de agua dura con el
Limpiador líquido Jiffy
®
. Refiérase a la página 28 para
ver las instrucciones de limpieza completas.
NOTA: Cada fuente de agua contiene diferentes contenidos de
minerales. Si el vaporizador comienza a apagarse durante su uso
normal, el termostato le está indicando que la unidad de
calentamiento necesita que se le limpie la acumulación de
sedimentos.

Unidad base J-2
Juego de tubos
(no se incluye en
la serie J-1)
Vaporizadores Jiffy
®
modelos J-1 y J-2
10
CARACTERÍSTICAS
• Cubierta de aluminio fundido para mayor durabilidad (Modelos J-1 y
J-2)
• Manguera ligera y flexible - Modelos J-2 (la serie J-1 utiliza una
boquilla de bronce para sombreros)
• Botella de agua inastillable
• Cableado de seguridad que apaga automóticamente el aparato en caso
de que accidentalmente se quede sin agua
• Mango cómodo y fácil de sostener
• Elimina las arrugas hasta cinco veces más rápido que el planchado
convencional
• Cuenta con ruedas para movilidad (las ruedas no se incluyen en la serie
J-1)
• Viene con varios accesorios para las boquillas de vapor
• Vienen unidades de 120 o 230 voltios
• Respaldado por el reconocido servicio al cliente de Jiffy
®
-- si su
vaporizador necesita reparación, envíenoslo y se lo repararemos y se lo
mandaremos de regreso dentro de 24 horas después de recibirlo en
nuestra planta.
Llave de
Montaje
Botella
de Agua
INCLUYE:
Accesorio de
manguera y
boquilla de
vapor
(no se incluye en
la serie J-1)
Manual del
Propietario
Boquilla para
sombreros
(modelos J-1)

Accesorios del vaporizador Jiffy
®
9
Accesorios
Estuche de viajes Jiffy
ARTÍCULO # 0890
Ahora puede llevar su vaporizador
Jiffy a donde vaya con nuestro
innovador Estuche de viajes Jiffy
Steamer. El estuche se puede usar
con cualquier modelo de los
vaporizadores Jiffy y es ideal para
transportar su vaporizador a ferias
de muestras, sitios de trabajo,
desfiles de modas, conferencias y
congresos. ¡No se quede sin su
vaporizador Jiffy nunca! El Estuche
de viajes Jiffy Steamer está construido con los materiales
más finos para asegurar la protección de su vaporizador.
Dimensiones externas: 25" x 17" x 11" (63,50 centímetros x
43,18 centímetros x 27,94 centímetros)
• Jaladera retráctil con asidero cómodo
• Esquinas protectoras moldeadas
• Cierres dobles resistentes con anillas de 1”
• Ruedas de primera calidad de patines en línea
• Bolsillo interior grande para almacenar la boquilla de
vapor y el aditamento de la manguera
• Correas reforzadas internas ajustables para sujetar el
vaporizador Jiffy
Gancho de ropa
profesional Jiffy
Steamer
ARTÍCULO # 0897
Este singular diseño de gancho de ropa profesional
funciona en conjunto con su vaporizador Jiffy
®
para
evitar marcas feas y para facilitar el procesote aplicar
vapor. Sin ideales para salas de muestras, ferias de
muestras, vendedores viajantes, y residencias. Estos
ganchos de alta calidad le durarán toda la vida.
Los ganchos de ropa profesionales Jiffy
®
Steamer
tienen varias características incluyendo:
• Construcción en metal al cromo
• Hombros formados para evitar las marcas que dejan
los ganchos convencionales
• Sujetadores forrados
antideslizantes, ajustables
para pantalones y faldas
• Gancho giratorio
• Barra para pantalones
removible
Cepillo mágico
Jiffy Steamer
ARTÍCULO # 1042
El cepillo mágico Jiffy
Steamer retira las hilas, la
pelusa, el polvo, la caspa y el pelo de las mascotas rápida
y eficazmente de la ropa, la ropa de cama y la tapicería.
Su mango cómodo y su superficie de dos caras asegura
una vida más larga, el doble de capacidad de los cepillos
de una sola cara, y lo puede usar una persona zurda o
derecha. Mantenga su ropa y tapicería con un aspecto
inmejorable con este práctico cepillo.
Recogedor de hilas profesional de
Jiffy Steamer
ARTÍCULO # 1045
Nuestro recogedor de hilas
profesional le ofrece un mango
cómodo reutilizable y cintas
adhesivas Super Tac2 profesionales.
La tecnología Zip Strip le permite
retirar las cintas rápida y fácilmente
sin desperdicio. El rollo mide 4
pulgadas (10,16 centímetros) de
ancho y 30 pies (9,14 metros) de
largo. 1 mango y 1 rollo por cada
pedido. Hay repuestos de 3 rollos.
¡Ideal para la casa, la oficina, o para
viajes!
Atomizador de vapor
Jiffy Steamer
Con su fragancia suave y
natural, el nuevo spray
perfumado de Jiffy
®
Steamer le deja la ropa y
las telas oliendo a fresco y limpio. Le ofrecemos el
spray Jiffy
®
en tres fragancias belicosas, cada una hecha
con aceites esenciales de alta calidad para una aroma de
larga duración. La fragancia Brisa del mar de Jiffy
®
(artículo #1054) capta la esencia de un día perfecto a la
orilla del mar en una botella. El spray Lavanda de Jiffy
®
(artículo #1052) le trae la frescura de Provenza a su
hogar, o pruebe el spray Caricias Rosadas de Jiffy
®
(artículo #1036) para el fresco aroma de la primavera.
Hay frascos de repuesto de 32 onzas (9,46 decilitros)
para todas las fragancias.

8
I
nstrucciones de limpieza del Esteam
®
Cuando empiece a notar acumulaciones
de calcio en la parte inferior del
vaporizador portátil ESTEAM
®
, será
hora de utilizar el Limpiador líquido
de Jiffy
®
Steamer. Es importante
que usted utilice nuestro limpiador,
ya que fue formulado
especialmente para nuestros
productos. Utilizar otor limpiador
puede invalidar la garantia. Por
favor siga estas instrucciones:
1. Agregue 4 onzas (1,18 decilitros) de
agua al vaporizador portátil ESTEAM
®
.
2. Conecte el aparato y coloque el vapor al
máximo.
3. Desconecte el aparato y déjelo enfriar
durante 2 minutos.
4. Vacié el agua.
5. Agregue 5 onzas (1,48 decilitros) (1/2 botella) del Limpiador líquido de
Jiffy
®
Steamer.
6. NO INTENTE PRODUCIR VAPOR CON EL LIMPIADOR LÍQUIDO
DENTRO DE LA UNIDAD
7. Deje el limpiador dentro del aparato durante 3 horas.
8. Vacíe el Limpiador Líquido.
9. Utilice un cepillo de cerdas duras para quitar el exceso de sedimentos.
10. Enjuague el aparato 3 veces con agua limpia.
11. Vuelva a utilizar el vaporizador normalmente.

7
Listado de repuestos del Esteam
®
ESTEAM
®
En caso que usted llegara a necesitar repuestos para su vaporizador Jiffy
®
, las
puede pedir por separado. Guíese por este práctico diagrama y listado de repuestos
para identificar cualquier parte que pudiera necesitar. Por favor indique el modelo y
el número de serie cuando haga su pedido.
# de repuesto del
Código # vaporizador Jiffy Descripción del repuesto
1 0653 Calentador Esteam de 120 voltios,
600 vatios con empaques y tuerca
0655 Calentador Esteam de 230 voltios,
625 vatios con empaques y tuerca
1a. Calentador Esteam
(Se vende como juego con los artículos #0653 o #0655)
1b. Empaque para calentador Esteam
(Se vende como juego con los artículos #0653 o #0655)
1c. Tuerca para calentador Esteam
(Se vende como juego con los artículos #0653 o #0655)
2 0661 Anillo “O” interior rojo
3 0662 Anillo “O” exterior negro
4 0669 Tanque de agua del Esteam
5 0640 Termostato 36 T-L263 del Esteam
6 0643 Sujetador del fusible de enlace
7 0644 Tornillo para el sujetador del fusible de enlace
8 0641 Hilo del fusible de enlace con lengüeta aislada (naranja)
9 0681 Cable rojo con lengüeta aislada
10 0645 Luz piloto con mazo de cables para sistemas
eléctricos de 120 voltios
0646 Luz piloto con mazo de cables para
sistemas eléctricos de 230 voltios
11 0647 Cable y conector (calibre 18/2)
12 0665 Mitad derecha de la cubierta
13 0666 Mitad izquierda de la cubierta
14 0667 Cuatro (4) tornillos para las mitades de la cubierta exterior
15 0663 Tapa de vapor completa con placa frontal
Accesorios
0619 Convertidor de voltaje para viajes
0899 Limpiador líquido - 3 Botellas de
diez (10) onzas (2,96 decilitros) por paquete*
*No está disponible para exportación
Las tapas de vapor ESTEAM con placas frontales y las mitades de cubierta vienen en negro o rosado.
Por favor indique el color cuando haga su pedido.
Si no encuentra el repuesto que necesita, por favor comuníquese con nosotros.

Diagrama de partes del Esteam
®
6

Características e instrucciones de Esteam
®
ESTEAM
®
Instrucciones de uso
1. Antes de llenarlo, asegúrese que el Esteam
®
esté desconectado.
2. Antes de operar el vaporizador, asegúrese que el anillo rojo que viene
instalado de fábrica esté firme dentro del tanque (figura #1).
3. Llene el tanque con agua destilada o de la llave hasta donde está la
marca de lleno en la parte exterior del vaporizador. Nunca se pase de
esta marca. Nunca utilice agua que haya pasado toda la noche dentro del vaporizador ya que el agua
estancada causa espuma y esto puede crear gotas. Si empieza a notar acumulación de escamas en el
contenedor de agua de su ESTEAM, es tiempo de limpiarol con nuestro limpiador liquido
Jiffy Steamer. No hacerio, podria afectar el de sempeño de la unidad.
4. Cuando termine de llenar, coloque la tapa de vapor en el vaporizador y
enrosque firmemente hasta que las flechas de la tapa queden alineadas con
las del tanque (figura #2). Asegúrese de que la tapa esté bien cerrada antes
de operar la unidad.
5. Conecte el Esteam
®
a un toma corriente de voltaje adecuado. El
vaporizador empezará a calentarse en 15 segundos, y en 2 minutos calentará el
agua fría hasta convertirla en vapor.
6. Siempre aplique el vapor con movimientos verticales de arriba hacia abajo (figura
#3).
No incline la unidad hacia atrás ni hacia adelante.
7. Evite que el vaporizador se quede sin agua.
8. Para ver las instrucciones de limpieza completas, vea la pagina 8.
ADVERTENCIA: Nunca use el aparato sin agua. Desconéctelo después de usarlo.
Figura 1
Figura 2
5
Características
• 3 veces más poderoso que cualquier otro vaporizador
portátil en el mercado.
• El recipiente de agua más grande del mercado.
• Tanque de agua de boca ancha, fácil de llenar.
• Elemento de calentamiento de 600 vatios; apagado
automático de seguridad que desactiva la unidad
temporalmente cuando empieza a secarse.
• Usa agua de la llave o destilada (no requiere
aditivos)
• Mango cómodo y fácil de sostener
• La parte exterior del aparato está especialmente
diseñada para sentirse fresca al tacto cuando está
trabajando.
• No tiene bombas o conductos de agua internas que
puedan taparse con agua dura
• Cable eléctrico de 9 pies (2.74 metros) para mayor
maniobrabilidad.
• Cabe fácilmente en un maletín o una maleta.
• Ofrece diversos tipos de enchufes convertidores para poder
llevarlo de viaje
Manual del
propietario
Tapa de vapor
Figura 3
Incluye:
Cubierta del
Esteam
®

Cómo aplicar vapor
Como lo saben en las tintorerías, el vapor es el método más suave, seguro y eficiente para
eliminar las arrugas. No solo es cinco veces más rápido que el planchado, sino que le
garantiza no quemar hasta las telas más delicadas. Nuestros vaporizadores eliminan las
arrugas en la ropa, las cortinas, los manteles… prácticamente cualquier tela. Use la
siguiente información como guía para aplicar el vapor con mayor destreza.
Algunas prendas
se vaporizan
mejor por
dentro. Esto
permite que el
vapor relaje las
fibras de la tela,
y así elimina las
arrugas.
Los vaporizadores Jiffy
®
son excelentes para
quitar las “arrugas por
amontonamiento en el
closet” evitándole así
viajes a la tintorería. Su
conveniente mecanismo
de gancho/soporte
sostiene tanto la prenda como la boquilla
de manera segura.
Siempre aplique vapor
con la manguera en
posición vertical para
que cualquier tipo de
condensación pueda
regresar libremente
hacia el interior del
vaporizador. Si está
aplicando vapor en una
posición cerca al piso,
extienda la manguera
hacia arriba y hacia fuera con
frecuencia para mantenerla libre de
condensación.
Es más fácil aplicar el vapor a los
pantalones colgándolos del dobladillo.
También puede usar la tabla de
aplicación Jiffy como mesa de
planchar vertical para aplicarle vapor
a sus prendas.
4
Cuando aplique
vapor, toque la tela
ligeramente con la
boquilla y las arrugas
desaparecerán
instantáneamente. La
combinación del
vapor caliente y
húmedo y la boquilla
es importante para un
terminado suave.

3
Instrucciones importantes de seguridad de los vaporizadores Jiffy
®
Cuando utilice su vaporizador Jiffy
®
, siempre siga estas
precauciones básicas:
1. ¡ADVIRTIENCO! Lea todas las instrucciones antes de usarlo.
2. Para reducir el riesgo de contacto con el agua caliente despedida por los
agujeros de vapor, revise el aparato antes de cada uso sosteniéndolo alejado de
su cuerpo y accionándolo.
3. Use el aparato únicamente para lo que está diseñado. Aplique el vapor
únicamente con movimientos verticales de arriba hacia abajo. Nunca utilice el
vaporizador en posición horizontal ni lo incline hacia atrás, lo cual podría
resultar en la salida del agua.
4. Para evitar el riesgo de un choque eléctrico, no sumerja el aparato en agua u
otros líquidos.
5. Nunca hale el cable para desconectarlo de la toma; más bien agarre el enchufe y
hálelo para desconectarlo.
6. No permita que el cable entre en contacto con superficies calientes. Deje que se
enfríe completamente antes de guardarlo.
7. Siempre desconecte el aparato de la toma eléctrica cuando lo llene de agua,
cuando lo vacíe y cuando no lo esté utilizando.
8. No use el aparato si el cable está dañado, o si el aparato se ha caído o presenta
algún daño. Para reducir el riesgo de choque eléctrico, no desarme ni intente
reparar el aparato. Llévelo a una persona calificada de mantenimiento o
devuélvalo a la fábrica de Jiffy
®
Steamer para su revisión y reparación. Un
ensamble o reparación incorrecta puede causar un incendio, choque eléctrico o
lesión a personas al usarlo.
9. Se requiere una supervisión estricta cuando se usa cualquier aparato cerca de
niños. No deje el aparato desatendido mientras esté conectado a la fuente de
energía.
10. Se puede quemar si toca las partes calientes, agua caliente o el vapor. Tenga
cuidado cuando vacíe los aparatos de vapor ya que puede haber agua caliente en
el tanque.
11. Solamente para uso en interiores.
12. Nunca intente aplicar vapor a prendas en el cuerpo de una persona.
13. Nunca use un alargador
14. Esta marca en el producto, indica que tiene conexión a tierra.
GUARDE ESTAS INSTRUCCIONES
RIESGO DE
CHOQUE
ELÉCTRICO
RIESGO DE
QUEMADURA
LISTED
C
OMMERCIAL
G
ARMENT STEAMER
5
79M

¡Felicitaciones y gracias!
Tabla de contenido
2
Gracias por su compra del Vaporizador Jiffy
®
con el fabricante número uno de equipos de
vapor desde 1940. Nos esforzamos por
diseñar y fabricar el mejor vaporizador
disponible en el mercado,
respaldado por
nuestro servicio al cliente de
primera calidad. Con una limpieza y mantenimiento adecuado,
su vaporizador Jiffy
®
durará a través de años de uso intensivo
y exigente. De nuevo, gracias, realmente agradecemos la
oportunidad para servirle.
Cordial saludo,
Jiffy
®
Steamer Company, LLC
Hecho en los EE.UU. desde 1940
Instrucciones de seguridad ..................................................................................................3
Cómo aplicar vapor ..............................................................................................................4
Vaporizador portátil Esteam
®
...........................................................................................5-8
Accesorios del Vaporizador Jiffy
®
.......................................................................................9
Vaporizadores Jiffy
®
modelos J-1 y J-2 .......................................................................10-15
Vaporizadores Jiffy
®
modelo J-2000 ............................................................................16-21
Vaporizadores Jiffy
®
Pro-Line modelo J-4000 ...........................................................22-27
Instrucciones de limpieza para los Vaporizadores Jiffy
®
modelos J-1, J-2 y J-2000 ...................................................................................................28
Instrucciones de limpieza para los Vaporizadores Jiffy
®
modelo J-4000.......................29
Mantenimiento del Vaporizador Jiffy
®
..............................................................................30
Otros accesorios del Vaporizador Jiffy
®
............................................................................31
Configuraciones de las boquilla de vapor para los Vaporizadores Jiffy
®
................32-33
Configuraciones de cables eléctricos para los Vaporizadores Jiffy
®
..............................33
Solución de problemas ..................................................................................................34-35
Tabla de aplicaciones de Jiffy
®
.....................................................................................36-39
Especificaciones de producto ............................................................................................40
Garantía y Política de devolución del Jiffy
®
Steamer......................................................41
Información para contactar a los Vaporizadores Jiffy
®
..................................................42

Líder mundial en
equipos de vapor desde 1940
Esteam
®
y Serie J
MANUAL DEL PROPIETARIO
IMPRESO EN LOS EE.UU.
FORMA #5500B - REVISI
óN 17
Impreso en papel reciclado de correspondencia con clients.
© Copyright 2014
-
 1
1
-
 2
2
-
 3
3
-
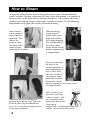 4
4
-
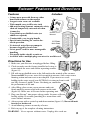 5
5
-
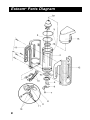 6
6
-
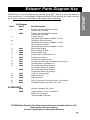 7
7
-
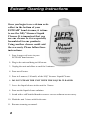 8
8
-
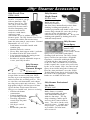 9
9
-
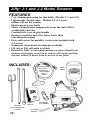 10
10
-
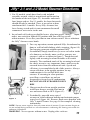 11
11
-
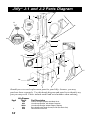 12
12
-
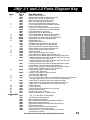 13
13
-
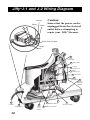 14
14
-
 15
15
-
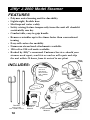 16
16
-
 17
17
-
 18
18
-
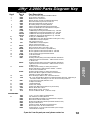 19
19
-
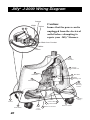 20
20
-
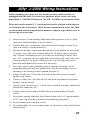 21
21
-
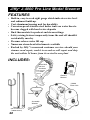 22
22
-
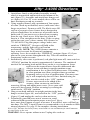 23
23
-
 24
24
-
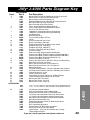 25
25
-
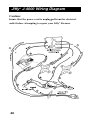 26
26
-
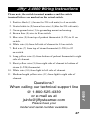 27
27
-
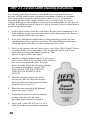 28
28
-
 29
29
-
 30
30
-
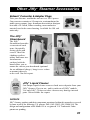 31
31
-
 32
32
-
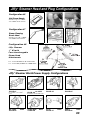 33
33
-
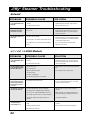 34
34
-
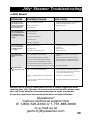 35
35
-
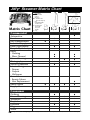 36
36
-
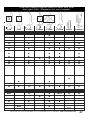 37
37
-
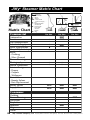 38
38
-
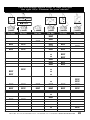 39
39
-
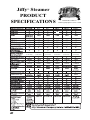 40
40
-
 41
41
-
 42
42
-
 43
43
-
 44
44
-
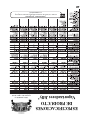 45
45
-
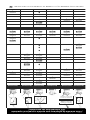 46
46
-
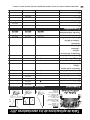 47
47
-
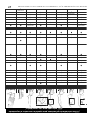 48
48
-
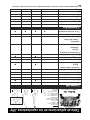 49
49
-
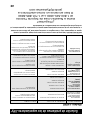 50
50
-
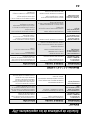 51
51
-
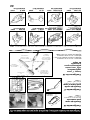 52
52
-
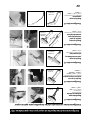 53
53
-
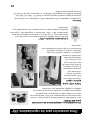 54
54
-
 55
55
-
 56
56
-
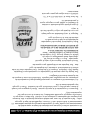 57
57
-
 58
58
-
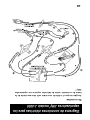 59
59
-
 60
60
-
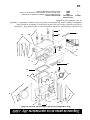 61
61
-
 62
62
-
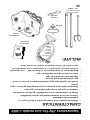 63
63
-
 64
64
-
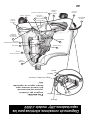 65
65
-
 66
66
-
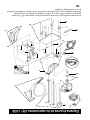 67
67
-
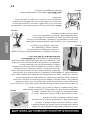 68
68
-
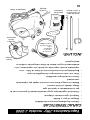 69
69
-
 70
70
-
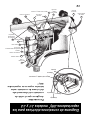 71
71
-
 72
72
-
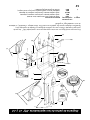 73
73
-
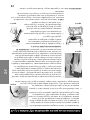 74
74
-
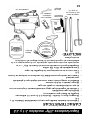 75
75
-
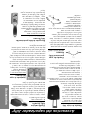 76
76
-
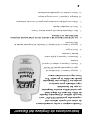 77
77
-
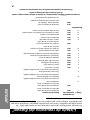 78
78
-
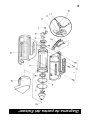 79
79
-
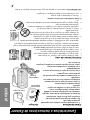 80
80
-
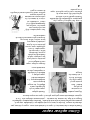 81
81
-
 82
82
-
 83
83
-
 84
84


Jiffy Steamer Esteam Manual de usuario
- Tipo
- Manual de usuario
en otros idiomas
- English: Jiffy Steamer Esteam User manual
Artículos relacionados


Otros documentos
-
Moen 22823 Manual de usuario
-
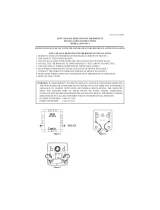 HouseWarmer HWTMV El manual del propietario
-
Premier ED-3256 Manual de usuario
-
Reliable 500GC Instrucciones de operación
-
-
-
Milwaukee 2719-21-2810-20 Manual de usuario
-
SINGER Garment Steamer El manual del propietario
-
Conair GS88 Manual de usuario
-
KPS KPS-TEMPO7MEC El manual del propietario
