
98647-003-32
98647-003-32
98647-003-32
Installation Instructions | Installationsanleitung |
Notice d’installation | Instrucciones de instalación |
Manuale d’installazione
Sartorius YDH01CIP, YDH01CWS
Sartorius YDH02CIP, YDH02CWS
Sartorius YDH03CIP, YDH03CWS
Columns for Attaching the Indicator to the Weighing Platform
Stative zur Befestigung des Auswertegerätes an Wägeplattform
Colonnes pour fixer l’indicateur à la plate-forme de pesée
Columnas de soporte para la fijación del visor a la plataforma de pesaje
Colonnine per fissare l’indicatore alla piattaforma di pesata

2 YDH01_2_3CIP, YDH01_2_3CWS YDH01_2_3CIP, YDH01_2_3CWS 3
2
English – page 3
In cases involving questions of interpretation,
the German-language version shall prevail.
Deutsch – Seite 6
Im Auslegungsfall ist die deutsche Sprache
maßgeblich.
Français – page 9
En cas de questions concernant l’interprétation,
la version en langue allemande fera autorité.
Italiano – pagina 12
In caso di interpretazione, fa testo la
versione in lingua tedesca.
Español – página 15
En caso de interpretación, la versión en
lengua alemana será determinante.

2 YDH01_2_3CIP, YDH01_2_3CWS YDH01_2_3CIP, YDH01_2_3CWS 3
3
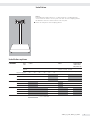
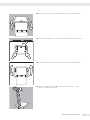
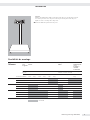
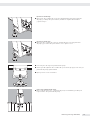
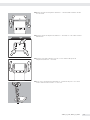
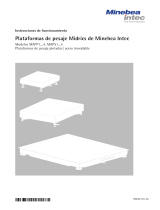
Installation
Purpose
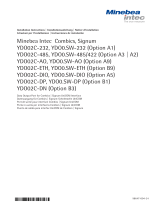
For installing the Combics indicator on a column attached to a weighing platform.
You can attach the column to the long side or the short side of the weighing platform
(the illustration shows the column mounted on the long side).
Remove the load plate from the weighing platform.
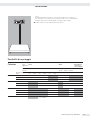
Installation options
Columns Device Combics Midrics®Signum Supreme
series: «stainless steel»:
Only CWS models
Weighing DC (320 +240 mm) ED (400 +300 mm) FE (500 +400 mm) DC (320+ED (400+FE (500+Stainless steel
platform: 240 mm) 300 mm) 400 mm)
Short Long Short Long Short Long Long side only Long side only
Equipment Supplied side side side side side side
YDH01CWP/CWS
Female connector – +–+–++++ –
Screw M6+20 M6+20 M6+20 M6+20 M6+20 M6+20 M6+25 M6+30 M6+40 M4+16
Washer +++++–+++ +
YDH02CWP/CWS
Female connector – +–+–++++ –
Screw M6+20 M6+20 M6+20 M6+20 M6+20 M6+20 M6+25 M6+30 M6+40 M4+16
Washer +++++–+++ +
YDH03CWP/CWS
Female connector – +–+–++++ –
Screw M6+20 M6+25 M6+20 M6+25 M6+20 M6+25 M6+30 M6+30 M6+40 M4+16
Washer +++++–+–– +
Nut +++++–+++ –
= not recommended

4 YDH01_2_3CIP, YDH01_2_3CWS YDH01_2_3CIP, YDH01_2_3CWS 5
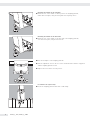
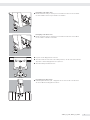
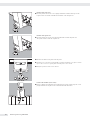
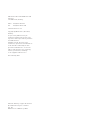
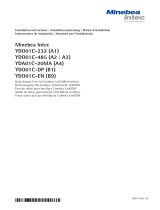
Mounting the Column on the Long Side
Attach the foot of the column to the long side of the weighing platform,
under the bottom plate, using the 4 long bolts and 4 spacing sleeves.
Mounting the Column on the Short Side
Attach the foot of the column to the short side of the weighing platform,
over the bottom plate, using the 4 short bolts.
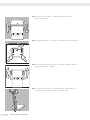
Place the load plate on the weighing platform.
Turn the adjustment screw on the foot of the column until the column is supported
and the weighing platform is level.
Tighten the nut to fix the screw in position.
For Combics series (short side):
Secure the weighing platform cable with a cable clamp.
4

4 YDH01_2_3CIP, YDH01_2_3CWS YDH01_2_3CIP, YDH01_2_3CWS 5
5
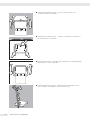
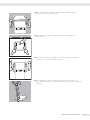
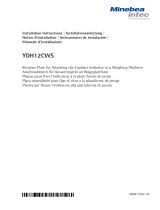
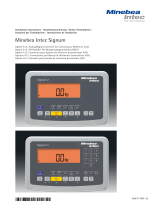
Remove the 2 side bolts and remove the indicator retainer from the column.
Attach the retainer plate to the bottom of the indicator with the 3 Allen screws.
Attach the indicator to the column using the 2 side bolts and spring washers.
Secure the weighing platform cable and the power cord with the 3 (or 4)
clamps to the back of the column.

6 YDH01_2_3CIP, YDH01_2_3CWS YDH01_2_3CIP, YDH01_2_3CWS 7
6
Installation
Zweck
Befestigung des Auswertegerätes Combics mit einem Stativ an einer Wägeplattform.
Das Stativ kann an der kurzen Seite oder der langen Seite der Wägeplattform
angeschraubt werden (im Bild: Montage an der langen Seite).
Lastplatte von Wägeplattform abnehmen.
Montagemöglichkeiten
Stative
Geräte Combics Midrics
®
Signum Supreme
serie: »Edelstahl«:
nur CWS-Modelle
Wäge- DC (320 +240 mm) ED (400 +300 mm) FE (500 +400 mm) DC (320+ED (400+FE (500+Edelstahl
plattform: 240 mm) 300 mm) 400 mm)
kurze lange kurze lange kurze lange nur lange Seite nur lange Seite
Lieferumfang Seite Seite Seite Seite Seite Seite
YDH01CWP/CWS
Buchse – +–+–++++ –
Schraube M6+20 M6+20 M6+20 M6+20 M6+20 M6+20 M6+25 M6+30 M6+40 M4+16
Scheibe +++++–+++ +
YDH02CWP/CWS
Buchse – +–+–++++ –
Schraube M6+20 M6+20 M6+20 M6+20 M6+20 M6+20 M6+25 M6+30 M6+40 M4+16
Scheibe +++++–+++ +
YDH03CWP/CWS
Buchse – +–+–++++ –
Schraube M6+20 M6+25 M6+20 M6+25 M6+20 M6+25 M6+30 M6+30 M6+40 M4+16
Scheibe +++++–+–– +
Mutter +++++–+++ –
= ni cht empfohlen

6 YDH01_2_3CIP, YDH01_2_3CWS YDH01_2_3CIP, YDH01_2_3CWS 7
7
Befestigung an der langen Seite
Fuß der Stativsäule mittig an der langen Seite der Plattform unter dem unteren Blech
mit 4 Distanzhülsen und 4 langen Schrauben anschrauben.
Befestigung an der kurzen Seite
Fuß der Stativsäule mittig an der kurzen Seite der Plattform über dem unteren Blech
mit den 4 kurzen Schrauben anschrauben.
Lastplatte auf die Wägeplattform aufsetzen.
Schraube am Fuß der Stativsäule in die Stellung drehen, in der die Stativsäule am Boden
abgestützt ist und die Wägeplattform eben justiert ist.
Schraubenstellung mit Mutter kontern.
Bei Combics-Serie (kurze Seite):
Verbindungskabel Auswertegerät – Wägeplattform mit einer Schelle an der Unterseite
des unteren Blechs der Wägeplattform fixieren.

8 Bedienungsanleitung YVB01FSM Bedienungsanleitung YVB01FSM) 9
8
Verbindungsblech (Auswertegerät – Stativ) von der Stativsäule lösen:
2 seitliche Schrauben herausdrehen.
Verbindungsblech (Auswertegerät – Stativ) mit 3 Schrauben an der Unterseite
des Auswertegerätes anschrauben.
Kopf der Stativsäule mit 2 Schrauben und Federscheiben am Verbindungsblech
(Auswertegerät – Stativ) anschrauben.
Verbindungskabel Auswertegerät – Wägeplattform und Netzkabel mit den
3 bzw. 4 Schellen an der Rückseite der Stativsäule fixieren.

8 Bedienungsanleitung YVB01FSM Bedienungsanleitung YVB01FSM) 9
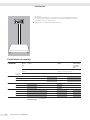
Possibilités de montage
Colonnes Série Combics Midrics®Signum Supreme
d’appareils : « acier
inoxydable » :
seulement
modèles CWS
Plate-forme DC (320 +240 mm) ED (400 +300 mm) FE (500 +400 mm) DC (320+ED (400+FE (500+Acier inoxydable
de pesée : 240 mm) 300 mm) 400 mm)
Côté Côté Côté Côté Côté Côté Seulement côté long Seulement côté
Contenu de la livraison court long court long court long long
YDH01CWP/CWS
Connecteur femelle – +–+–++++ –
Vis M6+20 M6+20 M6+20 M6+20 M6+20 M6+20 M6+25 M6+30 M6+40 M4+16
Rondelle +++++–+++ +
YDH02CWP/CWS
Connecteur femelle – +–+–++++ –
Vis M6+20 M6+20 M6+20 M6+20 M6+20 M6+20 M6+25 M6+30 M6+40 M4+16
Rondelle +++++–+++ +
YDH03CWP/CWS
Connecteur femelle – +–+–++++ –
Vis M6+20 M6+25 M6+20 M6+25 M6+20 M6+25 M6+30 M6+30 M6+40 M4+16
Rondelle +++++–+–– +
Ecrou +++++–+++ –
= déconseillé
9
Installation
Fonction
Fixation de l’indicateur Combics à une plate-forme de pesée à l’aide d’une colonne.
La colonne peut être vissée au petit ou au long côté de la plate-forme de pesée
(figure ci-contre : montage sur le long côté).
Retirer le tablier de la plate-forme de pesée.

10 Bedienungsanleitung YVB01FSM Bedienungsanleitung YVB01FSM) 11
10
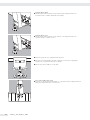
Fixation sur le long côté
Visser le pied de la colonne sous la plaque inférieure au milieu du long côté de
la plate-forme à l’aide de 4 douilles d’écartement et de 4 longues vis.
Fixation sur le petit côté
Visser le pied de la colonne sur la plaque inférieure au milieu du petit côté
de la plate-forme à l’aide des 4 petites vis.
Remettre le tablier sur la plate-forme de pesée.
Tourner la vis se trouvant sur le pied de la colonne de manière à ce que la colonne
repose sur le sol et à ce que la plate-forme de pesée soit à niveau.
Bloquer la position de la vis avec l’écrou.
Pour la série Combics (côté court) :
Fixer le câble de raccordement entre l’indicateur et la plate-forme de pesée sous la
plaque inférieure de la plate-forme à l’aide d’une bride de fixation.

10 Bedienungsanleitung YVB01FSM Bedienungsanleitung YVB01FSM) 11
11
Enlever la plaque de raccord (entre la colonne et l’indicateur) de la colonne en
dévissant les 2 vis se trouvant sur les côtés.
Visser la plaque de raccord entre l’indicateur et la colonne sous l’indicateur
à l’aide de 3 vis.
Visser le haut de la colonne à la plaque de raccord entre l’indicateur et la colonne
à l’aide de 2 vis et de rondelles élastiques ondulées.
Fixer le câble de raccordement entre l’indicateur et la plate-forme de pesée ainsi
que le câble d’alimentation en courant à l’arrière de la colonne à l’aide de 3 ou 4 brides
de fixation.

12 Bedienungsanleitung YVB01FSM Bedienungsanleitung YVB01FSM) 13
Posibilidades de montaje
Columnas
Aparatos Combics Midrics® Signum Supreme
serie: »acero fino«:
sólo modelos
CWS
Plataforma DC (320 +240 mm) ED (400 +300 mm) FE (500 +400 mm) DC (320+ED (400+FE (500+Acero fino
de pesaje 240 mm) 300 mm) 400 mm)
Contenido lado corto lado largo lado corto lado largo lado corto lado largo sólo lado largo sólo lado largo
suministrado
YDH01CWP/CWS
Casquillo – +–+–++++ –
Tornillo M6+20 M6+20 M6+20 M6+20 M6+20 M6+20 M6+25 M6+30 M6+40 M4+16
Arandela +++++–+++ +
YDH02CWP/CWS
Casquillo – +–+–++++ –
Tornillo M6+20 M6+20 M6+20 M6+20 M6+20 M6+20 M6+25 M6+30 M6+40 M4+16
Arandela +++++–+++ +
YDH03CWP/CWS
Casquillo – +–+–++++ –
Tornillo M6+20 M6+25 M6+20 M6+25 M6+20 M6+25 M6+30 M6+30 M6+40 M4+16
Arandela +++++–+–– +
Tuerca +++++–+++ –
= no recomendado
12
Instalación
Uso previsto
Fijación del visor Combics con una columna de soporte a una plataforma de pesaje.
La columna puede atornillarse en el lado corto o largo de la plataforma de pesaje
(en la figura: montaje en el lado largo).
Quitar el plato de carga de la plataforma de pesaje.

12 Bedienungsanleitung YVB01FSM Bedienungsanleitung YVB01FSM) 13
13
Fijación en el lado largo
Fijar la pata de la columna de soporte en la mitad del lado largo de la plataforma
de pesaje, por debajo de la placa inferior, mediante 4 casquillos distanciadores
y 4 pernos largos.
Fijación en el lado corto
Fijar el pie de la columna de soporte en la mital del lado corto de la plataforma
de pesaje y por encima de la placa inferior con los 4pernos cortos.
Colocar el plato de carga en la plataforma de pesaje.
Girar la pata de regulación de la columna de soporte hasta que apoye en el suelo y la
plataforma de pesaje quede nivelada.
Fijar la posición con la contratuerca.
Para la serie Combics (lado corto):
Fijar el cable de unión visor – plataforma de pesaje con abrazadera, por debajo de
la placa inferior de la plataforma de pesaje.

14 Bedienungsanleitung YVB01FSM Bedienungsanleitung YVB01FSM) 15
14
Aflojar la placa de unión (visor – columna) de la columna de soporte:
sacar 2 tornillos laterales.
Fijar la placa de unión (visor – columna) con 3 tornillos Allen en la base del visor.
Fijar el cabezal de la columna de soporte con 2 tornillos y arandelas de resorte
a la placa de unión (visor – columna).
Fijar el cable de conexión visor – plataforma de pesaje y cable de red con las
3 o 4 abrazaderas, en la parte trasera de la columna de soporte.

14 Bedienungsanleitung YVB01FSM Bedienungsanleitung YVB01FSM) 15
15
Installazione
Scopo
Fissaggio dell’indicatore Combics a una piattaforma di pesata per mezzo di
una colonnina. La colonnina può essere avvitata sul lato corto o su quello lungo
della piattaforma di pesata (nella figura: montaggio sul lato lungo).
Togliere il piatto di carico dalla piattaforma di pesata.
Possibilità di montaggio
Colonnine Serie Combics Midrics
®
Signum Supreme
apparecchi: «acciaio inox»:
solo modelli CWS
Piattaforma DC (320 +240 mm) ED (400 +300 mm) FE (500 +400 mm) DC (320+ED (400+FE (500+acciaio inox
di pesata: 240 mm) 300 mm) 400 mm)
Equipaggiamento Lato Lato Lato Lato Lato Lato Solo lato lungo Solo lato lungo
fornito corto lungo corto lungo corto lungo
YDH01CWP/CWS
Connettore femmina – +–+–+++ + –
Vite M6+20 M6+20 M6+20 M6+20 M6+20 M6+20 M6+25 M6+30 M6+40 M4+16
Rondella +++++–+++ +
YDH02CWP/CWS
Connettore femmina – +–+–+++ + –
Vite M6+20 M6+20 M6+20 M6+20 M6+20 M6+20 M6+25 M6+30 M6+40 M4+16
Rondella +++++–+++ +
YDH03CWP/CWS
Connettore femmina – +–+–+++ + –
Vite M6+20 M6+25 M6+20 M6+25 M6+20 M6+25 M6+30 M6+30 M6+40 M4+16
Rondella +++++–+–– +
Dado +++++–+++ –
= non consigliato

16 YDH01_2_3CIP, YDH01_2_3CWS YDH01_2_3CIP, YDH01_2_3CWS 17
16
Fissaggio sul lato lungo
Avvitare il piede della colonnina al centro del lato lungo della piattaforma sotto
la piastra inferiore, usando 4 distanziali e 4 viti lunghe.
Fissaggio sul lato corto
Avvitare il piede della colonnina al centro dell lato corto della piattaforma sotto
la piastra inferiore, usando 4 viti corte.
Rimettere il piatto di carico sulla piattaforma di pesata.
Ruotare la vite sul piede della colonnina in modo che la colonnina sia appoggiata
al pavimento e la piattaforma di pesata sia livellata.
Bloccare la posizione della vite con un dado.
Per la serie Combics (lato corto):
Fissare il cavo di collegamento dell’indicatore – piattaforma di pesata alla parte inferiore
della piastra della piattaforma con una fascetta.

16 YDH01_2_3CIP, YDH01_2_3CWS YDH01_2_3CIP, YDH01_2_3CWS 17
17
Allentare la piastra di collegamento (indicatore – colonnina) dalla colonnina svitando
le 2 viti laterali.
Avvitare la piastra di collegamento (indicatore – colonnina) con 3 viti sul lato inferiore
dell’indicatore.
Avvitare la testa della colonnina con 2 viti e rosette elastiche sulla piastra di
collegamento (indicatore – colonnina).
Fissare il cavo di collegamento dell’indicatore – piattaforma di pesata e cavo di rete
sul retro della colonnina usando le 3 o 4 fascette.

18 YDH01_2_3CIP, YDH01_2_3CWS YDH01_2_3CIP, YDH01_2_3CWS 19

18 YDH01_2_3CIP, YDH01_2_3CWS YDH01_2_3CIP, YDH01_2_3CWS 19

Minebea Intec Bovenden GmbH & Co. KG
Leinetal 2
37120 Bovenden, Germany
Phone +49 (0) 551.309.83.0
Fax +49 (0) 551.309.83.190
www.minebea-intec.com
Copyright by Minebea Intec ,Bovenden,
Germany.
No part of this publication may be
reprinted or translated in any form or by
any means without prior written permission
from Minebea Intec .
All rights reserved. The status of the
information, specifications and illustrations
in this manual is indicated by the date
given below. Minebea Intec reserves the
right to make changes to the technology,
features, specifications, and design
of the equipment without notice.
Date: February 2017
Printed in Germany on paper that has been
bleached without any use of chlorine.
RS · KT
Publication No.: WYD6111-p17025
-
 1
1
-
 2
2
-
 3
3
-
 4
4
-
 5
5
-
 6
6
-
 7
7
-
 8
8
-
 9
9
-
 10
10
-
 11
11
-
 12
12
-
 13
13
-
 14
14
-
 15
15
-
 16
16
-
 17
17
-
 18
18
-
 19
19
-
 20
20


Minebea Intec Columns for Attaching the Indicator to the Weighing Platform El manual del propietario
- Tipo
- El manual del propietario
- Este manual también es adecuado para
en otros idiomas
Artículos relacionados
-
 Minebea Intec YDH12CWS Retainer Plate for Attaching the Combics Indicator to a Weighing Platform Guía de instalación
-
 Minebea Intec Pallet Scale/Flat-bed Scale: Option Y2 for Use in Zone 2 and 22 Hazardous Areas El manual del propietario
-
 Minebea Intec CAPXS.. Models Stainless Steel Weighing Platforms for Use in Hazardous Areas/Locations El manual del propietario
-
 Minebea Intec Combics, Signum Datenausgang für Combics | Signum-Schnittstelle UniCOM El manual del propietario
-
 Minebea Intec Data Output Port for Combics UniCOM Interface YDO01, YDA01 El manual del propietario
-
 Minebea Intec Option A15. Analog/Digital Converter for Connecting a Reference Scale El manual del propietario
-
 Minebea Intec YFP02CWS Fastening Kit for Combics Weighing Platforms El manual del propietario
-
 Minebea Intec Pit Frame Edges YEG01...08 El manual del propietario
-
 Minebea Intec Midrics MAPP1...4, MAPS1...4 Plataformas de pesaje El manual del propietario


