
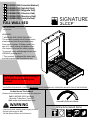
FULLWALLBED
1108222COM(ColumbiaWalnut)
1108335COM(NightfallOak)
1108341COM(MagnoliaOak)
1108344COM(SilvertonOak)
1108356COM(MontereyOak)
1108900COM (Centralia Oak)
B341108000COM3
THISINSTRUCTIONBOOKLETCONTAINS
IMPORTANT
SAFETYINFORMATION.PLEASEREADANDKEEPFORFUTUREREFERENCE.
FollowAmeriwoodHome
Tube
You
DateofPurchase___/___/___
LotNumber:
DoNotReturnThisProduct!
Contactourcustomerserviceteamforhelpfirst.
Call:1‐800‐489‐3351(tollfree)
Monday‐Friday9am‐5pmCST
Visit:www.ameriwoodhome.com AssemblyDifficultyMeter
Easy Tough
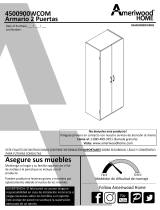
‐Unitcantipovercausingsevereinjuryordeath.
‐Anchorunittostudinwall
‐DoNotallowchildrentoclimbonunit
WARNING
We highly recommend having a
professional assemble your
product
WARNING:
*WARNINGFORYOUNGCHILDREN‐
Thisproductcontainssmallcomponents,
pleaseensurethattheyarekeptaway
fromsmallchildren.Childrenunderthe
ageof6,smallinfantsandbabiesmust
notsleeponthisbedforsafetyreasons.
Topreventinjuryanddamagetothisunit,
PROHIBITjumpingonit.
*Thisproductisdesignedforhomeuse
andnotintendedforcommercialuse.

ContactUs!
HelpfulHints
2
ameriwoodhome.com
DoNOTreturnthisproduct!
Contactourfriendlycustomerserviceteamfirstforhelp.
Callus!
1‐800‐489‐3351
Monday‐Friday
9am‐5pmCST
Visitameriwoodhome.comtoviewthe
limitedwarrantyvalidintheU.S.andCanada.
AssemblyTips
‐Openyouritemintheareayouplantokeepittoavoidexcessiveheavylifting.
‐Identify,sortandcountthepartsbeforeattemptingassembly.
‐MakesuretoalwaysfacethepointonthetopoftheCamLocktowardsthe
outeredge.
‐DoNOTuseharshchemicalsorabrasivecleanersonthisitem.
‐Neverpush,pull,ordragyourfurniture.
Tube
You
PEOPLENEEDEDFORASSEMBLY:2

3
ameriwoodhome.com
BeforeYouStart
Quick
Tip
Assembly
CamLockFasteningSystem
ThisCamLockFasteningSystemwillbeusedthroughouttheassemblyprocess.
Readthrougheachstepcarefullyandfollowtheproperorder
Separateandcountallyourpartsandhardware
Partsarelabeledonthesurfaceoredgeofthepart
Giveyourselfenoughroomfortheassemblyprocess
Havethefollowingtools:FlatHeadScrewdriver,#2PhillipsHead
ScrewdriverandHammer
Caution:Ifusingapowerdrillorpowerscrewdriverforscrewing,
pleasebeawaretoslowdownandstopwhenscrewistight.
Failuretodosomayresultinstrippingthescrew.
12
34

4
ameriwoodhome.com
BoardIdentification
Notactualsize
GC
E
I
A
B
H
L
DF
J
M
K

5
ameriwoodhome.com
BoardIdentification
Parts List
ITEM QTY PART
NUMBER DESCRIPTION
A131108335010 LEFT PANEL ASM
B1
31108335020 RIGHT PANEL ASM
C1
31108335031 TOP
D1
31108335041 BOTTOM
E1
31108335051 VALANCE
F131108335061 KICK
G1
31108335071 UPPER BACK PANEL
H1
31108335081 LOWER BACK PANEL
I1
31108335091 STOP RAIL
J131108335100 LEFT DOOR PANEL
K131108335110 RIGHT DOOR PANEL
L1
31108335121 BOTTOM STRINGER
M2
31108335130 HANDLE MOLDING
partsfor1108335COM(NightfallOak)
Parts List
ITEM QTY PART
NUMBER DESCRIPTION
A1
31108222010 LEFT PANEL ASM
B131108222020 RIGHT PANEL ASM
C1
31108222031 TOP
D1
31108222041 BOTTOM
E1
31108222051 VALANCE
F1
31108222061 KICK
G131108222071 UPPER BACK PANEL
H1
31108222081 LOWER BACK PANEL
I1
31108222091 STOP RAIL
J131108222100 LEFT DOOR PANEL
K1
31108222110 RIGHT DOOR PANEL
L1
31108222121 BOTTOM STRINGER
M2
31108222130 HANDLE MOLDING
partsfor1108222COM(ColumbiaWalnut)
Parts List
ITEM QTY PART
NUMBER DESCRIPTION
A131108341010 LEFT PANEL ASM
B1
31108341020 RIGHT PANEL ASM
C1
31108341031 TOP
D131108341041 BOTTOM
E1
31108341051 VALANCE
F1
31108341061 KICK
G1
31108341071 UPPER BACK PANEL
H1
31108341081 LOWER BACK PANEL
I131108341091 STOP RAIL
J131108341100 LEFT DOOR PANEL
K1
31108341110 RIGHT DOOR PANEL
L1
31108341121 BOTTOM STRINGER
M2
31108341130 HANDLE MOLDING
partsfor1108341COM(MagnoliaOak)

6
ameriwoodhome.com
BoardIdentification
Parts List
ITEM QTY PART
NUMBER DESCRIPTION
A1
31108344010 LEFT PANEL ASM
B131108344020 RIGHT PANEL ASM
C1
31108344031 TOP
D1
31108344041 BOTTOM
E1
31108344051 VALANCE
F1
31108344061 KICK
G131108344071 UPPER BACK PANEL
H1
31108344081 LOWER BACK PANEL
I1
31108344091 STOP RAIL
J131108344100 LEFT DOOR PANEL
K1
31108344110 RIGHT DOOR PANEL
L1
31108344121 BOTTOM STRINGER
M2
31108344130 HANDLE MOLDING
partsfor1108344COM(SilvertonOak)
Parts List
ITEM QTY PART
NUMBER DESCRIPTION
A1
31108356010 LEFT PANEL ASM
B1
31108356020 RIGHT PANEL ASM
C1
31108356031 TOP
D131108356041 BOTTOM
E1
31108356051 VALANCE
F1
31108356061 KICK
G1
31108356071 UPPER BACK PANEL
H1
31108356081 LOWER BACK PANEL
I1
31108356091 STOP RAIL
J131108356100 LEFT DOOR PANEL
K1
31108356110 RIGHT DOOR PANEL
L131108356121 BOTTOM STRINGER
M2
31108356130 HANDLE MOLDING
partsfor1108356COM(MontereyOak)
Parts List
ITEM QTY PART
NUMBER DESCRIPTION
A131108900010 LEFT PANEL ASM
B1
31108900020 RIGHT PANEL ASM
1C 31108900031 TOP
1D 31108900041 BOTTOM
1E 31108900051 VALANCE
F131108900061 KICK
G1
31108900071 UPPER BACK PANEL
H1
31108900081 LOWER BACK PANEL
I1
31108900091 STOP RAIL
J131108900100 LEFT DOOR PANEL
K131108900110 RIGHT DOOR PANEL
L1
31108900121 BOTTOM STRINGER
M2
31108900130 HANDLE MOLDING
partsfor1108900COM(CentraliaOak)

7
ameriwoodhome.com
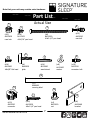
PartList
ActualSize
Note that your unit may contain extra hardware
1
24
5
6789
11
10
13
12
(x22)
#A22620
cam lock
(x16)
#A12105
#8x7/16" pan head
(x8)
#A13950
#8x3-1/2" pan head
(x22)
#A22610
cam bolt
(x16)
#A12400
#8x5/8" flat head
(x4)
#A43020
glide
(x14)
#A21660
wood dowel
(x8)
#A25400
washer
(x10)
#A22910
connector bolt
(x10)
#A22920
connector
(x50)
#A13020
#8x1-1/4" pan head
(x4)
#A20330
nut
(x8)
#A53460
bracket
3
ATTENTION / ATENCION / ATTENTION
(x1)
#B64481
warning label
14

8
ameriwoodhome.com
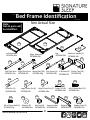
BedFrameIdentification
NotActualSize
20d
20f
20e
20h
20g
20j
20i
20k 20l 20m 20n 20o
20p 20q 20r 20t 20u
LeftAssembly
3678096-20a
RightAssembly
3678096-20b
Leg
3678096-20c MattressHolder(2)
3678096-20d
LeftPivotArm
3678096-20e
RightPivotArm
3678096-20f
WoodSlat(28)
3678096-20g
GasPiston(4)
3678096-20h
UBracket(4)
3678096-20i
PlasticCap(56)
3678096-20j
PivotPin(2)
3678096-20k
LargeClevisPin(4)
3678096-20l
SmallClevisPin(2)
3678096-20m
CotterPin(6)
3678096-20n
M6x16mmBolt(12)
3678096-20o
M6x10mmBolt(6)
3678096-20p
Washer(8)
3678096-20q
HexNut(4)
3678096-20r
4mmHexKey
3678096-20s
Wrench
3678096-20t
Rubber Foot (2)
3678096-20u
20a 20b
20c
Note:
Not all parts will
be identified.
20s

9
ameriwoodhome.com
VERY IMPORTANT INFORMATION
INFORMACION MUY IMPORTANTE
INFORMATION TRÊS IMPORTANTES

10
ameriwoodhome.com
STEP1
FLIP
179
7
7
(x6) (x4) (x2)
Proper orientation of Cam Lock
Proper orientation of Cam Lock
1
1
9
G
G

11
ameriwoodhome.com
STEP2
1
7
(x4)
(x4)
7
7
1
1
Proper orientation of Cam Lock
Proper orientation of Cam Lock
H

12
ameriwoodhome.com
STEP3
1
7
7
7
1
1
(x4)
(x2)
Proper orientation of Cam Lock
Proper orientation of Cam Lock
L

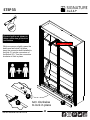
13
ameriwoodhome.com
STEP4
1
7
10
(x4)
(x2)
(x4)
7
7
1
1
10
D
D
Proper orientation of Cam Lock
Proper orientation of Cam Lock
Proper orientation of Connector
FLIP

14
ameriwoodhome.com
STEP5
9
(x8)
9
E
F

15
ameriwoodhome.com
STEP6
1
710
7
7
(x4)
(x2)
(x6)
1
1
10
10
Proper orientation of Connector
Proper orientation of Connector
Proper orientation of Cam Lock
Proper orientation of Cam Lock
C

16
ameriwoodhome.com
STEP7
4
(x11)
4
4
A

17
ameriwoodhome.com
STEP8
5
(x8)
TheLeftPivotArm(20e)islocatedinthe
3678096COMWallBedMechanismbox
555
5
5
5
55
20e
A
A

18
ameriwoodhome.com
STEP9
4
(x11)
4
4
B

19
ameriwoodhome.com
STEP10
5
(x8)
TheRightPivotArm(20f)islocatedinthe
3678096COMWallBedMechanismbox
B
555
55
5
5
5
B
20f

20
ameriwoodhome.com
STEP11
turnclockwise
tolockinplace x4
C
E
rawedge

21
ameriwoodhome.com
STEP12
G
C
raw edge
turnclockwise
tolockinplace
x2

22
ameriwoodhome.com
STEP13
LOCK
x5
C
G
A

23
ameriwoodhome.com
STEP14
raw edge
D
L
H
A
LOCK
x6

24
ameriwoodhome.com
STEP15
LOCK
x11
B

25
ameriwoodhome.com
STEP16
12 6
(x4)
(x4)
Laytheunitontoitsfront
12
6
TapinBushings(12)withahammer
ScrewinGlides(6)alltheway

26
ameriwoodhome.com
The next steps are to assemble your unit to the wall
Assembled unit MUST be square on the height, width,
and depth to function properly
Assembled unit MUST be placed flat against the wall
Assembled unit MUST be screwed into wall studs at the
top and bottom for safety
You need to locate at least 3 studs, but 4 is better
DO NOT use wall anchors to fasten your unit to the wall
For Masonry, Concrete, or other
wall materials:
Consult your local hardware store
for appropriate anchors to securely
attach your unit to the wall.

27
ameriwoodhome.com
STEP17
Place your unit FLUSH against the wall
There are notches provided at the
back of your unit. These notches
are to fit around the baseboard on
your wall. If your baseboard is
higher or thicker than the notches
provided on the unit, you will need
to remove the baseboard, cut it
down to fit on both sides of your
unit, then refasten to the wall.

28
ameriwoodhome.com
STEP18
Assembled unit MUST be flush on the height,
width, and depth to function properly
If required, unscrew the
Glides counter-clockwise
as necessary in all 4
corners until your unit is
level in all directions
A ladder will be required
Do not lean against the
top of the unit, it may
cause sagging

29
ameriwoodhome.com
STEP19
Locate the studs in the wall, using a stud finder.
Using a pencil, mark the stud locations on the
upper surface of the Upper Back Panel (G).
Using a level, carry the stud locations down to
the Bottom Stringer (L), and with a pencil, mark
the stud locations.
You need to locate at least
3 studs, but 4 is better
G
L
A ladder will be required
Do not lean against the
top of the unit, it may
cause sagging

30
ameriwoodhome.com
STEP20
3
(x8)
First, make sure that your unit is still level in all directions.
Drill 1/8" (3mm) pilot holes through the Upper Back Panel (G) and Bottom
Stringer (L) at the stud locator marks.
Fasten the unit to the studs in the wall with the Screws (3).
A ladder will be required
Do not lean against the
top of the unit, it may
cause sagging
G
L

31
ameriwoodhome.com
The next steps are to assemble the metal bed
frame and mechanism
These parts are located in the #3678096COM
Wall Bed Mechanism Carton

32
ameriwoodhome.com
STEP21
20s 20o 20u
(x1) (x4) (x2)
20u
20c
press in each hole
20a
20o
20b
20a
20b
20o
20b
20a

33
ameriwoodhome.com
STEP22
20s
20i
20q
20o
(x1)
(x4)
(x8)
(x8)
20i
20q
20q
20o
20o
20a
20b

34
ameriwoodhome.com
STEP23
20a20a
20b
20s 20p
20p
20p
20d
(x1) (x4)

35
ameriwoodhome.com
STEP24
20l 20n
20h
(x4) (x4)
(x4)
20l
20h
20n
The "long" end of both pistons
is to be fastened here
20h
20l20l
20n
20a
20b
The "long" end
of both pistons
is to be fastened
here
The ends of both pistons need
to be inserted into the groove
of the bed frame when assembled.

36
ameriwoodhome.com
STEP25
20s 20k 20p
(x1) (x2) (x2)
With a person on each side, lift the bed
mechanism, line up the holes of the Bed
Assembly with the large bushing hole of
the Left and Right Pivot arm (20e & 20f)
already installed to your unit, and insert
the Pivot Pins (20k) as shown. Secure
the pivot pins with a 10mm Bolt (20p).
The cabinet is not shown to allow a
clear view of the bed frame assembly
Do not fasten the Pistons to
the Left and Right Pivot arms
at this point, this will be done
on step 26
Already fastened
to your unit
20k
20p
20e
20k 20p
20f
Already fastened
to your unit
20a
20b

37
ameriwoodhome.com
STEP26
With a person on each side, carefully
lift the bed frame in the closed
position. While one person pushes the
bed frame into the cabinet, passed the
90 degrees, the other person is to
engage the "front" Gas Piston (20h)
on each side of the unit, to the front
pin of the Left and Right Pivot Arm
(20e & 20f). Then tightly secure with
two Nuts (20r).
To engage the "rear" Gas Piston (20h)
on each side of the unit, slowly and
carefully wiggle the bed frame back
and forth until you can insert the Gas
Pistons (20h) onto the rear pin of the
Left and Right Pivot Arm (20e & 20f).
Then tightly secure with two Nuts
(20r).
20t 20r
(x1) (x4)
20r
20h
push here
into cabinet

38
ameriwoodhome.com
STEP27
20m 20n
(x2) (x2)
The cabinet is not shown to allow a
clear view of the bed frame assembly
Pull the bed frame down,
then attach Leg (20c) as
shown
20m
20n
20m
20n The bed frame is equipped with
a locking mechanism to lock the
Leg (20c) in place.
To lock or unlock the leg, pull
on the locking mechanism.
Apply Warning
Label here
ATTENTION / ATENCION / ATTENTION
14
(x1)
14 20c

39
ameriwoodhome.com
STEP28
13
11 2
8
(x4)
(x4)
(x4)
(x8)
11
8
J
M
Handle Molding (M) is to be centered on the Left Door Panel (J)
raw edge
2
13
Proper orientation
of bracket

40
ameriwoodhome.com
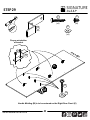
STEP29
13
11
8
2
(x4)
(x4)
(x8)
(x4)
raw edge
Proper orientation
of bracket
2
13
11
8
K
M
Handle Molding (M) is to be centered on the Right Door Panel (K)

41
ameriwoodhome.com
STEP30
With the help of another person,
lift the Left Door Panel (J),
position the Brackets (13) over
the three Support Rails of the
Bed Frame, and drop into
position.
Repeat the procedure for the
Right Door Panel (K).
IMPORTANT:
First, unlock and flip the leg
into the cabinet.
Then, lower the bed frame
down a bit to allow
clearance to hook Door
Panels (J&K).
The cabinet is not shown
to allow a clear view of
the bed frame assembly Holes in Door Panels (J&K) will
be closer to each other at the
center
J
K
13 Support Rail

42
ameriwoodhome.com
STEP31
11
(x38)
With the help of another person, carefully pull the bed frame open
Line up the holes of the bed frame with the holes in Panels (J&K), and fasten with Screws (11).
The cabinet is not shown
to allow a clear view of
the bed frame assembly
11
K
J

43
ameriwoodhome.com
STEP32
20g
20j 11
(x28)
(x56) (x4)
Slip the wood slats underneath the
straps at each corner
A ladder will be required
Do not lean against the
top of the unit, it may
cause sagging
Fasten Stop Rail (I) to the
underside of Top (C) with
Screws (11)
Press a Plastic Cap (20j) at each
end of a Wood Slat (20g).
Press both Plastic Caps (20j),
attached to the Wood Slat, into the
holes of the Metal Bed Frame.
Repeat the procedure for all 28
wood slats and 56 plastic caps.
11
20j
20g
20j
I
C
finished
edge

44
ameriwoodhome.com
STEP33
Front of unit is not shown to
allow a clear view of the kick
and bottom
While one person slightly opens the
bed frame and holds it in place,
insert the connector bolts installed in
the Kick (F) into the connectors of
the Bottom (D). Turn the connectors
clockwise to lock in place.
turn clockwise
to lock in place
x4
D
FF
open frame slightly

45
ameriwoodhome.com
MaximumLoads
CertificateofConformity
1. ThiscertificateappliestotheDorelHomeFurnishings,Inc.productidentifiedbythisinstructionmanual.
2. ThiscertificateappliestocomplianceofthisproductwiththeCPSCBanonLead‐ContainingPaint(16CFR1303).
3. Thisproductisdistributedby:DorelHomeFurnishings,Inc.
410EastFirstStreetSouth
WrightCity,MO63390
636‐745‐3351
4. SiteofManufacture:Tiffin, OH
5. Seefrontpageofinstructionmanualfordateofmanufacture.
Thisunithasbeendesignedtosupportthemaximumloadsshown.Exceedingtheseloadlimits
couldcausesagging,instability,productcollapse,and/orseriousinjury.
This bed is designed to accommodate a Full Size Mattress, up
to 10" inches thick.
* with a maximum weight of 60 lbs (27.2 kgs)
* with a minimum weight of 30 lbs (13.6 kgs)
After you have finished assembling your
wall bed, please keep the assembly
manual by placing it under the mattress,
in the frame of the mobile part of the bed.
Once you've placed your fitted sheet onto
your mattress, secure your mattress with
the straps provided in all 4 corners of the
bed frame.
Keep the bed closed when not in use.
It is recommended not to leave pillows
and/or ornamental pillows in place when
the bed is closed to preserve the
mechanism.
Caution
Two people may be required to
open and close the bed
600 lbs
(272 kgs)
Plus mattress weight

46
ameriwoodhome.com
Registeryourproducttoreceivethefollowing:
*Newtrenddetails‐sneakpeekonwhat'snew
*Surveys‐haveavoicewithinourcommunity
*Exclusivedealsanddiscountcodes
*Quickandeasyreplacementpartservice
Toregisteryourproduct,visitameriwoodhome.com
Visityourlocalretailer'swebsite,rateyourpurchased
productandleaveussomefeedback!
Wewouldliketoextendabig"ThankYou"toallof
ourcustomersfortakingthetimetoassemblethis
AmeriwoodHomeproduct,andtogiveusyour
valuablefeedback.

47
ameriwoodhome.com
Español
Cubie
rtaDelantera
Estelibrodeinstruccionescontieneinformación
IMPORTANTE
deseguridad.Porfavorleaymanténgalopara
referenciaenelfuturo.
NoRegreseesteproducto!
Comuniqueseconnuestroamistosoequipodeservicioalclienteparaobtener
ayuda.
Llamenosal:1‐800‐489‐3351(Gratis)Lunes‐Viernes9am‐5pmCST
Visitar:
www.ameriwoodhome.com
PRECAUCION
Estemueblepuedevolcarseycausargravesheridasy/omuerte.
Anclarelmuebleaunpostedemaderaenlapared(siestoserequiere).
NoPermitaquelosniñosmontenelmueble.
ADVERTENCIA:
* ADVERTENCIA para los niños pequeños - Este producto contiene piezas pequeñas, por favor asegúrese de que
se mantengan alejados de los niños pequeños. Los niños menores de 6 años, los niños pequeños y los bebés no
deben dormir en esta cama por razones de seguridad. Para evitar lesiones y daños en la unidad, PROHIBIR saltar
sobre ella.
* Este producto está diseñado para uso doméstico y no para uso comercial.
Recomendamosencarecidamentequeunprofesionalmontesuproducto.
ConsejosÚtiles(página2)
‐Abrasuartículoeneláreadondeustedplaneautilizarloparaevitarlevantarymoverlomenos
‐Identificar,ordenarycontarlaspiezasantesdeintentarensamblar
‐Asegúresedequesiempreesteelpuntolocaizadoenlapartesuperiordebloqueadordeleva
estevolteadohaciabordeexterior
‐Nousequimicasfuertesnilimpiadoresabrasivosenestearticulo
‐Nuncaempuje,tireniarrastrelosmuebles
AntesdeQueEmpieces(página3)
‐Leacuidadosamentecadapasoysigaelordencorrecto
‐Separarycontartodassuspiezasyhardware
‐Désesuficienteespacioparaelprocesodeensamble
‐Tengalassiguientesherramientas:destornilladordecabezaPhillips#2,unmartillo,unbuscadordevigas,
lápiz,taladroconbrocasde1/8"y1/4".
‐Precaución:Siusauntaladroelectrónicooundestornilladoreléctricoparaatornillar,porfavorasegúreseque
dejedeatornillarcuandoeltonillosesteapretado.Fallarhacerestopuedecausarbarrereltornillo.

48
ameriwoodhome.com
Español
Sistemadefijarelbloqueodeleva(página3)
Estasistemadefijarelbloqueodelevaserausadoentodoelprocesoensamble.
Página7
Tengaencuentaquesuunidadpuedecontenerhardwareadicional
Página8
Nota:Noseidentificarántodaslaspiezas.
Página10,11,12,13,15
orientaciónadecuadadelbloqueodelaleva
dalelavuelta
orientaciónadecuadadelconnector
Página17
elbrazodepivoteizquierdo(20e)seencuentraenlacajadelmecanismodecamadepared
3678096COM
Página19
elbrazodepivotederecho(20f)seencuentraenlacajadelmecanismodecamadepared3678096COM
Página20,21
gireenelsentidodelasagujasdelrelojparabloquearensulugar
bordecrudo
Página25
coloquelaunidadsobresufrente
Golpeelosbujes(12)conunmartillo
Atornillelosdeslizadores(6)completamente
Página26
Lossiguientespasossonmontarsuunidadenlapared.
LaunidadensambladaDEBEestaraescuadraenaltura,anchoyprofundidadparafuncionar
correctamente
LaunidadensambladaDEBEcolocarseplanacontralapared
LaunidadensambladaDEBEestaratornilladaalosmontantesdelaparedenlapartesuperioreinferior
paramayorseguridad.
Debeubicaralmenos3montantesdepared,peroespreferible4
NOuseanclajesdeparedparasujetarsuunidadalapared
Paramampostería,hormigónuotrosmaterialesdepared:consulteconsuferreteríalocalparaobtener
losanclajesadecuadosparasujetarfirmementesuunidadalapared.

49
ameriwoodhome.com
Español
Página27
Coloquesuunidadalrascontralapared
Haymuescasenlaparteposteriordesuunidad.
Estasmuescasdebenencajaralrededordelzócalodelapared.
Sisuzócaloesmásaltoomásgruesoquelasmuescasprovistasenlaunidad,deberáquitarelzócalo,
cortarloparaquequepaenambosladosdesuunidadyluegovolverafijarloalapared.
Página28
LaunidadensambladaDEBEestarniveladaenaltura,anchoyprofundidadparafuncionar
correctamente.
Siesnecesario,desatornillelosdeslizadoresensentidoantihorariosegúnseanecesarioenlascuatro
esquinashastaquesuunidadesténiveladaentodaslasdirecciones.
Serequeriráunaescalera
Noseapoyecontralapartesuperiordelaunidad,puedecausarflacidez
Página29
Ubiquelosmontantesenlapared,usandounbuscadordemontantes.
Conunlápiz,marquelasubicacionesdelosmontantesenlasuperficiesuperiordelpanelposterior
superior(G).
Conunnivel,llevelasubicacionesdelosmontanteshastaellargueroinferior(L)y,conunlápiz,marque
lasubicacionesdelosmontantes.
Necesitaubicaralmenos3postes,pero4esmejor
Serequeriráunaescalera
Noseapoyecontralapartesuperiordelaunidad,puedecausarflacidez
Página30
Primero,asegúresedequesuunidadaúnesténiveladaentodaslasdirecciones.
Taladreorificiosguíade1/8"(3mm)atravésdelpanelposteriorsuperior(G)yellargueroinferior(L)en
lasmarcasdeubicacióndelospostes.Fijelaunidadalosmontantesdelaparedconlostornillos(3).
Serequeriráunaescalera
Noseapoyecontralapartesuperiordelaunidad,puedecausarflacidez
Página31
Lossiguientespasossonensamblarelmarcoyelmecanismodelacamademetal
Estaspiezasseencuentranenlacajadecartóndelmecanismodecamamural#3678096COM
Página32
presioneencadaagujero

50
ameriwoodhome.com
Página35
Elextremo"largo"deambospistonesdebefijarseaquí.
Losextremosdeambospistonesdebeninsertarseenlaranuradelmarcodelacamacuandose
ensamblan.
Página36
Yafijadoasuunidad
Conunapersonaacadalado,levanteelmecanismodelacama,alineelosorificiosdelconjuntodela
camaconelorificiodelbujegrandedelbrazodepivoteizquierdoyderecho(20ey20f)yainstaladoen
suunidadeinsertelospasadoresdepivote(20k)comosemuestra.
AsegurelospasadoresdepivoteconunPernode10mm(20p).
ElgabinetenosemuestraparapermitirunavistaclaradelensamblajedelmarcodelacamaNosujete
lospistonesalosbrazosdepivoteizquierdoyderechoenestepunto,estoseharáenelpaso26
Página37
Conunapersonaacadalado,levanteconcuidadoelmarcodelacamaenlaposicióncerrada.Mientras
unapersonaempujaelarmazóndelacamadentrodelgabinete,pasandolos90grados,laotrapersona
debeengancharelpistóndegasdelantero(20h)acadaladodelaunidad,alpasadordelanterodel
brazodepivoteizquierdoyderecho(20ey20f).Luegoasegúrelofirmementecondostuercas(20r).Para
acoplarelpistóndegastrasero(20h)acadaladodelaunidad,muevalentaycuidadosamenteelmarco
delacamahaciaadelanteyhaciaatráshastaquepuedainsertarlospistonesdegas(20h)enelpasador
traserodelbrazodepivoteizquierdoyderecho(20ey20f).Luegoasegúrelofirmementecondos
tuercas(20r).
Empujeaquíenelgabinete
Página38
Elgabinetenosemuestraparapermitirunavistaclaradelensamblajedelmarcodelacama
Jaleelmarcodelacamahaciaabajo,luegoconectelaPata(20c)comosemuestra
ElarmazóndelacamaestáequipadoconunmecanismodebloqueoparabloquearlaPata(20c)ensu
lugar.Parabloquearodesbloquearlapierna,tiredelmecanismodebloqueo.
Aplicarlaetiquetadeadvertenciaaquí
Página39
Orientaciónadecuadadelsoporte
bordecrudo
Lamolduradelamanija(M)debeestarcentradaenelpaneldelapuertaizquierda(J)
Página40
Orientaciónadecuadadelsoporte
bordecrudo
Lamolduradelamanija(M)debeestarcentradaenelpaneldelapuertaderecha(K)
Español

51
ameriwoodhome.com
Español
Página41
Carrildesoporte
Conlaayudadeotrapersona,levanteelpaneldelapuertaizquierda(J),coloquelossoportes(13)sobre
lostresrielesdesoportedelmarcodelacamaycolóquelosensuposición.
Repitaelprocedimientoparaelpaneldelapuertaderecha(K).
IMPORTANTE:Primero,desbloqueeycoloquelapataenelgabinete.Luego,bajeunpocoelmarcodela
camaparadejarespacioparaengancharlospanelesdelapuerta(JyK).
Elgabinetenosemuestraparapermitirunavistaclaradelensamblajedelmarcodelacama
Losagujerosenlospanelesdelaspuertas(JyK)estaránmáscercaentresíenelcentro
Página42
Conlaayudadeotrapersona,abraconcuidadoelmarcodelacama.
Alineelosorificiosdelarmazóndelacamaconlosorificiosdelospaneles(JyK)yfíjeloscontornillos
(11).
Elgabinetenosemuestraparapermitirunavistaclaradelensamblajedelmarcodelacama
Página43
Serequeriráunaescalera
Noseapoyecontralapartesuperiordelaunidad,puedecausarflacidez
Sujeteelrieldetope(I)alaparteinferiordelapartesuperior(C)contornillos(11)
Presioneunatapadeplástico(20j)encadaextremodeunlistóndemadera(20g).
Presioneambastapasdeplástico(20j),unidasallistóndemadera,enlosorificiosdelmarcodelacama
demetal.
Repitaelprocedimientoparalas28tablillasdemaderaylas56tapasdeplástico.
Desliceloslistonesdemaderadebajodelascorreasencadaesquina.
Página44
marcoabiertoligeramente
Lapartedelanteradelaunidadnosemuestraparapermitirunavistaclaradelapatadayelfondo.
Mientrasunapersonaabreligeramenteelarmazóndelacamaylomantieneensulugar,insertelos
pernosdelconectorinstaladosenlapatada(F)enlosconectoresdelaparteinferior(D).Girelos
conectoresenelsentidodelasagujasdelrelojparabloquearlosensulugar.
Gireensentidohorarioparabloquearensulugar

52
ameriwoodhome.com
Español
Página45
CARGAMAXIMA
Estaunidadhasidodiseñadaparasoportarlacargamáximaanotada.Elexcederestoslímitespuede
causarinestabilidad,colapsarsey/ocausarseriaslesiones.
EstacamaestádiseñadaparaacomodaruncolchóntamañoFull,dehasta10"pulgadasdegrosor.
*conunpesomáximode60libras(27.2kgs)
*conunpesomínimode30libras(13.6kgs)
Unavezquehayaterminadodemontarsucamaabatible,conserveelmanualdemontajecolocándolo
debajodelcolchón,enelmarcodelapartemóvildelacama.
Precaucion:Esposiblequeserequierandospersonasparaabrirycerrarlacama
Unavezquehayacolocadosusábanaajustableensucolchón,aseguresucolchónconlascorreas
provistasenlas4esquinasdelmarcodelacama.
Mantengalacamacerradacuandonoestéenuso.
Serecomiendanodejaralmohadasy/oalmohadasornamentalesensulugarcuandolacamaestá
cerradaparapreservarelmecanismo.
Máspesodelcolchón
Página46
Registresuproductopararecibirlosiguiente:
*Detallesdenuevastendencias‐Vistazoalonuevo
*Encuestas‐alecsuvozentresucomunidad
*Códigosdeofertasydescuentosexclusivos
*Fácilyrápidoserviciodepartesderemplace
Pararegistrarsuproducto,visiteameriwoodhome.com
Clasificasiónde5estrellas
Visiteelsitiowebdesutiendalocal,califiquesucomprado
ydenossuscomentarios!
Nosgustaríaenviarungran"Agradecimiento"atodosnuestrosclientesportomarseeltiempode
ensamblaresteproductodeAmeriwoodHome,ypordarnossusvaliososcomentarios.
Gracias

53
ameriwoodhome.com
Français
CouvertureAvant
CELIVRETD'INSTRUCTIONCONTIENTDESINFORMATIONS
IMPORTANTES
SURLASÉCURITÉ.VEUILLEZLIREET
GARDERPOURUNERÉFÉRENCEFUTURE
Neretournezpasceproduit!
Contacteznotreéquipedeserviceàlaclientèleamicaled'abordpourobtenirde
l'aide.
Appelez‐nous:
1‐800‐489‐3351(sansfrais)duLundiauVendredide9hà17hHeureCentrale
Visitez:
www.ameriwoodhome.com
ATTENTION
Lemeublepeutbasculeretcauserdesblessuresgravesoulamort.
Ancrerlemeubleàuneplanchemuraledanslemur(siindiqué).
Nelaissezpaslesenfantsgrimpersurlemeuble.
ATTENTION:
*AVERTISSEMENTPOURLESJEUNESENFANTS‐Ceproduitcontientdepetitscomposants,s'ilvousplaîtveiller
àcequ'ilssonttenusàl'écartdespetitsenfants.Lesenfantsdemoinsde6ans,lespetitsnourrissonsetles
bébésnedoiventpasdormirsurcelitpourdesraisonsdesécurité.Pouréviterlesblessuresetlesdommages
àcetappareil,INTERDIREsautantsurelle.
*Ceproduitestconçupourunusagedomestiqueetnondestinéàunusagecommercial.
Nousvousrecommandonsvivementdefaireassemblervotreproduitparunprofessionnel
AstucesUtiles(page2)
‐Ouvrezvotrearticledanslazonequevousprévoyezdelegarderpourmoinsdelevagelourd
‐Identifier,trieretcompterlespiècesavantd'essayerd'assembler
‐Assurez‐voustoujoursdefairefacelapointesituésurlehautdelaSerruredeCameverslebordextérieur
‐N'utilisezpasdeproduitschimiquesagressifsoudenettoyantsabrasifssurcetappareil
‐Nejamaispousser,tirer,oufaireglisservotremeuble
AvantdeCommencer(page3)
‐Lisezattentivementchaqueétapeetsuivezlebonordre
‐Séparezetcompteztoutesvospiècesetmatériaux
‐Donnez‐voussuffisammentdeplacepourl'assemblage
‐Avoirlesoutilssuivants:tournevisàtêtePhillips#2,Marteau,Niveau,LocalisateurdePanneau,Crayon,
perceuseavecdesmèchesde1/8"et1/4"
‐
Attention:Sivousutilisezuneperceuseélectriqueouuntournevisélectriquepourvisser,veillezàralentiret
arrêterlorsquelavisestbienserrée.Lenon‐respectdecetteconsignepeutendommagerlavis.

54
ameriwoodhome.com
Français
SystèmedeFixationdeCame(page3)
CeSystèmedeFixationdeCameserautilisétoutaulongdel'assemblage
Page7
Notezquevotreappareilpeutcontenirdumatérielsupplémentaire
page8
Remarque:lespiècesneserontpastoutesidentifiées.
Page10,11,12,13,15
bonneorientationduverrouàcame
retourner
bonneorientationduconnecteur
Page17
LeBrasPivotantGauche(20e)estsituédansle
3678096COMBoîtedemécanismedelitescamotable
Page19
LeBrasPivotantDroit(20f)estsituédansle
3678096COMBoîtedemécanismedelitescamotable
Page20,21
tournerdanslesensdesaiguillesd'unemontrepourverrouillerenplace
bordbrut
Page25
Posezl'appareilsursondevant
Taperlesdouilles(12)avecunmarteau
Vissercomplètementlessous‐pattes(6)
Page26
Lesprochainesétapesconsistentàassemblervotreappareilaumur
L'unitéassembléeDOITêtred'équerresurlahauteur,lalargeuretlaprofondeurpourfonctionner
correctement
L'unitéassembléeDOITêtreplacéeàplatcontrelemur
L'unitéassembléeDOITêtrevisséedanslespoteauxmurauxenhautetenbaspourplusdesécurité
Vousdevezlocaliseraumoins3poteauxmuraux,mais4estpréférable
N'UTILISEZPASd'ancragesmurauxpourfixervotreappareilaumur
Pourlamaçonnerie,lebétonoud'autresmatériauxdemur:Consultezvotrequincaillerielocalepourles
ancragesappropriéspourfixersolidementvotreunitéaumur.

55
ameriwoodhome.com
Français
Page27
Placezvotreappareilcontrelemur
Ilyadesencochesàl'arrièredevotreappareil.
Cesencochesdoivents'adapterautourdelaplinthesurvotremur.
Sivotreplintheestplushauteouplusépaissequelesencochesfourniessurl'unité,vousdevrezretirer
laplinthe,lacouperpourqu'elles'adaptedesdeuxcôtésdevotreunité,puislaremettreaumur.
Page28
L'unitéassembléeDOITaffleurerlahauteur,lalargeuretlaprofondeurpourfonctionner
correctement
Uneéchelleseranécessaire
Mettezl'appareildeniveauàl'aidedessous‐pattesjusqu'àcequelelits'ouvreetseferme
correctement.
Sinécessaire,dévissezlessous‐pattesdanslesensantihorairesinécessairedansles4coinsjusqu'àce
quevotreappareilsoitdeniveaudanstouteslesdirections
Page29
Localisezlesmontantsdanslemuràl'aided'undétecteurdemontants.Àl'aided'uncrayon,marquez
lesemplacementsdesgoujonssurlasurfacesupérieuredupanneauarrièresupérieur(G).Àl'aide
d'unniveau,ramenezlesemplacementsdesmontantsverslelimoninférieur(L)etavecuncrayon,
marquezlesemplacementsdesmontants.
Vousdevezlocaliseraumoins3tenons,mais4c'estmieux
Uneéchelleseranécessaire
Nevousappuyezpascontreledessusdel'appareil,celapourraitprovoquerunaffaissement
Page30
Toutd'abord,assurez‐vousquevotreappareilesttoujoursdeniveaudanstouteslesdirections.
Percezdesavant‐trousde3mm(1/8po)àtraverslepanneauarrièresupérieur(G)etlesupport
inférieur(L)auniveaudesrepèresdelocalisationdesmontants.
Fixezl'unitéauxmontantsdumuraveclesvis(3).
Uneéchelleseranécessaire
Nevousappuyezpascontreledessusdel'appareil,celapourraitprovoquerunaffaissement
Page31
Lesprochainesétapesconsistentàassemblerlecadreetlemécanismedulitenmétal
Cespiècessetrouventdanslecartondumécanismedelitescamotable#3678096COM
Page32
pressedanschaquetrou

56
ameriwoodhome.com
Français
Page35
L'extrémité"longue"desdeuxpistonsdoitêtrefixéeici
Lesextrémitésdesdeuxpistonsdoiventêtreinséréesdanslarainureducadredelitunefois
assemblées.
Page36
Déjàattachéàvotreappareil
Avecunepersonnedechaquecôté,soulevezlemécanismedulit,alignezlestrousdel'assemblagedu
litaveclegrandtroudedouilledesbrasdepivotgaucheetdroit(20eet20f)déjàinstalléssurvotre
unité,etinsérezlesbrochesdepivot(20k)commemontré.Fixezlesaxesdepivotavecunboulonde
10mm(20p).
L'armoiren'estpasillustréepourpermettreunevuedégagéedel'ensembleducadredelit
Nefixezpaslespistonsauxbrasdepivotgaucheetdroitàcestade,celaserafaitàl'étape26
Page37
Avecunepersonnedechaquecôté,soulevezdélicatementlecadredelitenpositionfermée.
Pendantqu'unepersonnepousselecadredulitdansl'armoire,passéles90degrés,l'autrepersonne
doitengagerlepistonàgazavant(20h)dechaquecôtédel'unité,àlabrocheavantdesbrasdepivot
gaucheetdroit(20eet20f).Ensuite,fixezfermementavecdeuxécrous(20r).
Pourengagerlepistonàgazarrière(20h)dechaquecôtédel'unité,agitezlentementet
soigneusementlecadredelitd'avantenarrièrejusqu'àcequevouspuissiezinsérerlespistonsàgaz
(20h)surlagoupillearrièredesbrasdepivotgaucheetdroit(20e&20f).Ensuite,fixezfermement
avecdeuxécrous(20r).
Poussezicidansl'armoire
Page38
L'armoiren'estpasillustréepourpermettreunevuedégagéedel'ensembleducadredelit
Tirezlecadredelitverslebas,puisfixezlajambe(20c)commeillustré
Lecadredelitestéquipéd'unmécanismedeverrouillagepourverrouillerlajambe(20c)enplace.
Pourverrouilleroudéverrouillerlepied,tirezsurlemécanismedeverrouillage.
Appliquezl'étiquetted'avertissementici
Page39
Bonneorientationdusupport
bordbrut
Lamouluredepoignée(M)doitêtrecentréesurlepanneaudeportegauche(J)
Page40
Bonneorientationdusupport
bordbrut
Lamouluredepoignée(M)doitêtrecentréesurlepanneaudeportedroit(K)

57
ameriwoodhome.com
Français
Page41
Raildesupport
Avecl'aided'uneautrepersonne,soulevezlepanneaudeportegauche(J),positionnezlessupports
(13)surlestroisrailsdesupportducadredelitetmettez‐leenplace.
Répétezlaprocédurepourlepanneaudeportedroit(K).
IMPORTANT:
Toutd'abord,déverrouillezetretournezlepieddansl'armoire.
Ensuite,abaissezunpeulecadredulitpourpermettreledégagementd'accrocherlespanneauxde
porte(JetK).
L'armoiren'estpasillustréepourpermettreunevuedégagéedel'ensembleducadredelit
Lestrousdanslespanneauxdeporte(JetK)serontplusprocheslesunsdesautresaucentre
Page42
Avecl'aided'uneautrepersonne,ouvrezdélicatementlecadredelit
Alignezlestrousducadredelitaveclestrousdespanneaux(JetK)etfixezaveclesvis(11).
L'armoiren'estpasillustréepourpermettreunevuedégagéedel'ensembleducadredelit
Page43
Uneéchelleseranécessaire
Nevousappuyezpascontreledessusdel'appareil,celapourraitprovoquerunaffaissement
Fixezleraild'arrêt(I)surlafaceinférieuredudessus(C)aveclesvis(11)
Appuyezsuruncapuchonenplastique(20j)àchaqueextrémitéd'unelatteenbois(20g).
Enfoncezlesdeuxcapuchonsenplastique(20j),attachésàlalamelleenbois,danslestrousducadre
delitenmétal.
Répétezlaprocédurepourles28lattesdeboiset56capuchonsenplastique.
bordfini
Glissezleslattesdeboissouslessanglesàchaquecoin
Page44
cadrelégèrementouvert
L'avantdel'appareiln'estpasillustrépourpermettreunevuedégagéesurlesupportetlebas
Pendantqu'unepersonneouvrelégèrementlecadredulitetlemaintientenplace,insérezles
boulonsdeconnexioninstallésdanslesupport(F)danslesconnecteursdubas(D).
Tournezlesconnecteursdanslesensdesaiguillesd'unemontrepourlesverrouillerenplace.
Tournezdanslesensdesaiguillesd'unemontrepourverrouillerenplace

58
ameriwoodhome.com
Français
Page45
CHARGESMAXIMALES
Cemeubleaétéconçupoursupporterleschargesmaximalesindiquées.Enexcédantceslimitesde
charge,lemeublepourraitdevenirinstable,s'effondrer,et/oucauserdesblessuresgraves.
Celitestconçupouraccueillirunmatelasfull,jusqu'à10poucesd'épaisseur.
*avecunpoidsmaximumde60livres(27.2kg)
*avecunpoidsminimumde30livres(13.6kg)
Aprèsavoirfinid'assemblervotrelitescamotable,veuillezconserverlemanueldemontageenle
plaçantsouslematelas,danslecadredelapartiemobiledulit.
Avertissement:Deuxpersonnespeuventêtrenécessairespourouvriretfermerlelit
Unefoisquevousavezplacévotredraphoussesurvotrematelas,fixezvotrematelasaveclessangles
fourniesdansles4coinsducadredelit.
Gardezlelitfermélorsqu'iln'estpasutilisé.
Ilestrecommandédenepaslaisserlesoreillerset/ouoreillersdécoratifsenplacelorsquelelitest
fermépourpréserverlemécanisme.
Pluslepoidsdumatelas
Page46
Enregistrezvotreproduitpourrecevoirlesélémentssuivantes:
*Détailssurlesnouvellestendances‐unaperçusurlesnouveautés
*Sondages‐avoirunevoixauseindenotrecommunauté
*Offresexclusivesetcodespromo
*Servicedepiècesderechangerapideetfacile
Pourenregistrervotreproduit,visitezameriwoodhome.com
5Étoiles
VisitezlesiteWebdevotredétaillantlocal,évaluezvotreproduit
achetéetlaissez‐nousquelquescommentaires!
Noustenonsàoffrirungrand"Merci"àtousnosclientspouravoirprisletempsd'assemblerce
produit"AmeriwoodHome",etdenousdonnervoscommentairesprécieux.
Merci
-
 1
1
-
 2
2
-
 3
3
-
 4
4
-
 5
5
-
 6
6
-
 7
7
-
 8
8
-
 9
9
-
 10
10
-
 11
11
-
 12
12
-
 13
13
-
 14
14
-
 15
15
-
 16
16
-
 17
17
-
 18
18
-
 19
19
-
 20
20
-
 21
21
-
 22
22
-
 23
23
-
 24
24
-
 25
25
-
 26
26
-
 27
27
-
 28
28
-
 29
29
-
 30
30
-
 31
31
-
 32
32
-
 33
33
-
 34
34
-
 35
35
-
 36
36
-
 37
37
-
 38
38
-
 39
39
-
 40
40
-
 41
41
-
 42
42
-
 43
43
-
 44
44
-
 45
45
-
 46
46
-
 47
47
-
 48
48
-
 49
49
-
 50
50
-
 51
51
-
 52
52
-
 53
53
-
 54
54
-
 55
55
-
 56
56
-
 57
57
-
 58
58


en otros idiomas
- français: Dorel Home 1108900COM Manuel utilisateur
- English: Dorel Home 1108900COM User manual
Artículos relacionados
-
 Dorel Home 5811341COM Assembly Manual
-
 Dorel Home 4500900WCOM Assembly Manual
-
 Dorel Home 4500056WCOM Assembly Manual
-
Dorel Home 8169344COM Manual de usuario
-
 Dorel Home 8368900COM Assembly Manual
-
Ameriwood Home 5756337COM Instruction Booklet
-
Ameriwood Home 5955222COM1 Instruction Booklet
-
 Dorel Home HD80037 Guía de instalación
-
 Dorel Home 1674096WCOM Assembly Manual
-
 Dorel Home 5795341EBL Assembly Manual


