
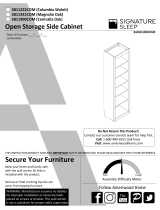
SideCabinet
8169222COM(ColumbiaWalnut)
8169335COM(NightfallOak)
8169341COM(MagnoliaOak)
8169344COM(SilvertonOak)
8169356COM(MonterayOak)
8169900COM (Centralia Oak)
B348169000COM3
THISINSTRUCTIONBOOKLETCONTAINS
IMPORTANT
SAFETYINFORMATION.PLEASEREADANDKEEPFORFUTUREREFERENCE.
FollowAmeriwoodHome
Tube
You
DateofPurchase___/___/___
LotNumber:
DoNotReturnThisProduct!
Contactourcustomerserviceteamforhelpfirst.
Call:1‐800‐489‐3351(tollfree)
Visit:
www.ameriwoodhome.com AssemblyDifficultyMeter
Easy Tough
‐Unitcantipovercausingsevereinjuryordeath.
‐Anchorunittostudinwall
‐DoNotallowchildrentoclimbonunit
WARNING

ContactUs!
HelpfulHints
2
ameriwoodhome.com
DoNOTreturnthisproduct!
Contactourfriendlycustomerserviceteamfirstforhelp.
Callus!
1‐800‐489‐3351
Visitameriwoodhome.comtoviewthe
limitedwarrantyvalidintheU.S.andCanada.
AssemblyTips
‐Openyouritemintheareayouplantokeepittoavoidexcessiveheavylifting.
‐Identify,sortandcountthepartsbeforeattemptingassembly.
‐Compressiondowelsarelightlytappedinwithahammer.
‐Slidesarelabeledwitha
R
(right)and
L
(left)forproperplacement.
‐MakesuretoalwaysfacethepointonthetopoftheCamLocktowardsthe
outeredge.
‐Useallthenailsprovidedforthebackpanelandspreadthemoutequally.
‐Backpanelmustbeusedtomakesureyourunitissturdy.
‐DoNOTuseharshchemicalsorabrasivecleanersonthisitem.
‐Neverpush,pull,ordragyourfurniture.
Tube
You
PEOPLENEEDEDFORASSEMBLY:1‐2

3
ameriwoodhome.com
BeforeYouStart
Quick
Tip
Assembly
CamLockFasteningSystem
ThisCamLockFasteningSystemwillbeusedthroughouttheassemblyprocess.
Readthrougheachstepcarefullyandfollowtheproperorder
Separateandcountallyourpartsandhardware
Partsarelabeledonthesurfaceoredgeofthepart
Giveyourselfenoughroomfortheassemblyprocess
Havethefollowingtools:FlatHeadScrewdriver,#2PhillipsHead
ScrewdriverandHammer
Caution:Ifusingapowerdrillorpowerscrewdriverforscrewing,
pleasebeawaretoslowdownandstopwhenscrewistight.
Failuretodosomayresultinstrippingthescrew.
12
34
PresspartstogethersoCAMBOLTinserts
intoedgehole.
PressCAMBOLTintohole. PressCAMLOCKintohole.
Endhole
Usingascrewdriver,turntheCAMLOCKclockwiseto
locktheCAMLOCKandCAMBOLTintotheirholes
andfasteningpartstogether.
Arrowtopointtowardsend
holeinedgeofpart.

4
ameriwoodhome.com
BeforeYouStart
VERY IMPORTANT INFORMATION
INFORMACION MUY IMPORTANTE
INFORMATION TRÊS IMPORTANTES

5
ameriwoodhome.com
BoardIdentification
Notactualsize
Thispieceispaperboardconstruction.
Itisnotmadefromwoodbutis
requiredfortheassemblyofyourunit.
LEFT
DWR
SIDE
DWR
BACK
DWR
BOTTOM
AB
C
C
D
E
E
F
G
H
I
I
J
K
L
N
M
O
P
RIGHT
DWR
SIDE
FALSE
DWR
FRONT
Q
BACK
PANEL
N
M

6
ameriwoodhome.com
BoardIdentification
Parts List
ITEM QTY PART NUMBER DESCRIPTION
A138169222010 LEFT PANEL ASM
B1 38169222020 RIGHT PANEL ASM
C2 38169222030 SHELF
D1 38169222040 FIXED SHELF
E2 38169222050 ADJUSTABLE SHELF
F138169222060 VALANCE
G1 38169222070 KICK
H1 38169222080 BACK RAIL
I238169000090 STRINGER
J138169000100 UPPER BACK PANEL
K1 38169222110 DOOR
L1 38169222120 HORIZONTAL MOLDING
M1 38169222130 PULL OUT FRONT
N138169222140 PULL OUT SHELF
O1 38169222150 PULL OUT LEFT RAIL
P1 38169222160 PULL OUT RIGHT RAIL
Q138169222170 DRAWER FRONT
-1K816922200 BACK PANEL
-139991167340400L LEFT DRAWER SIDE
-139991167340400R RIGHT DRAWER SIDE
-139991167063450F FALSE DRAWER FRONT
-139991167063450B DRAWER BACK
-139991324064420D DRAWER BOTTOM
partsfor8169222COM(ColumbiaWalnut)

7
ameriwoodhome.com
BoardIdentification
Parts List
ITEM QTY PART NUMBER DESCRIPTION
A138169335010 LEFT PANEL ASM
B1 38169335020 RIGHT PANEL ASM
C2 38169335030 SHELF
D1 38169335040 FIXED SHELF
E2 38169335050 ADJUSTABLE SHELF
F138169335060 VALANCE
G1 38169335070 KICK
H1 38169335080 BACK RAIL
I238169000090 STRINGER
J138169000100 UPPER BACK PANEL
K1 38169335110 DOOR
L1 38169335120 HORIZONTAL MOLDING
M1 38169335130 PULL OUT FRONT
N138169335140 PULL OUT SHELF
O1 38169335150 PULL OUT LEFT RAIL
P1 38169335160 PULL OUT RIGHT RAIL
Q1381693350170 DRAWER FRONT
-1K816933500 BACK PANEL
-139991167340400L LEFT DRAWER SIDE
-139991167340400R RIGHT DRAWER SIDE
-139991167063450F FALSE DRAWER FRONT
-139991167063450B DRAWER BACK
-139991324064420D DRAWER BOTTOM
partsfor8169335COM(NightfallOak)

8
ameriwoodhome.com
BoardIdentification
partsfor8169341COM(MagnoliaOak)
Parts List
ITEM QTY PART NUMBER DESCRIPTION
A1 38169341010 LEFT PANEL ASM
1B 38169341020 RIGHT PANEL ASM
2C 38169341030 SHELF
D1 38169341040 FIXED SHELF
E2 38169341050 ADJUSTABLE SHELF
F1 38169341060 VALANCE
G1 38169341070 KICK
H138169341080 BACK RAIL
2I 38169000090 STRINGER
J138169000100 UPPER BACK PANEL
K1 38169341110 DOOR
L1 38169341120 HORIZONTAL MOLDING
M138169341130 PULL OUT FRONT
N1 38169341140 PULL OUT SHELF
O1 38169341150 PULL OUT LEFT RAIL
P138169341160 PULL OUT RIGHT RAIL
Q138169341170 DRAWER FRONT
-1K816934100 BACK PANEL
-139991167340400L LEFT DRAWER SIDE
-139991167340400R RIGHT DRAWER SIDE
-139991167063450F FALSE DRAWER FRONT
-139991167063450B DRAWER BACK
-139991324064420D DRAWER BOTTOM

9
ameriwoodhome.com
BoardIdentification
partsfor8169344COM(SilvertonOak)
Parts List
ITEM QTY PART NUMBER DESCRIPTION
A1 38169344010 LEFT PANEL ASM
1B 38169344020 RIGHT PANEL ASM
2C 38169344030 SHELF
D1 38169344040 FIXED SHELF
E2 38169344050 ADJUSTABLE SHELF
F1 38169344060 VALANCE
G1 38169344070 KICK
H138169344080 BACK RAIL
2I 38169000090 STRINGER
J138169000100 UPPER BACK PANEL
K1 38169344110 DOOR
L1 38169344120 HORIZONTAL MOLDING
M138169344130 PULL OUT FRONT
N1 38169344140 PULL OUT SHELF
O1 38169344150 PULL OUT LEFT RAIL
P138169344160 PULL OUT RIGHT RAIL
Q138169344170 DRAWER FRONT
-1K816934400 BACK PANEL
-139991167340400L LEFT DRAWER SIDE
-139991167340400R RIGHT DRAWER SIDE
-139991167063450F FALSE DRAWER FRONT
-139991167063450B DRAWER BACK
-139991324064420D DRAWER BOTTOM

10
ameriwoodhome.com
BoardIdentification
partsfor8169356COM(MontereyOak)
Parts List
ITEM QTY PART NUMBER DESCRIPTION
A1 38169356010 LEFT PANEL ASM
B1 38169356020 RIGHT PANEL ASM
C2 38169356030 SHELF
D1 38169356040 FIXED SHELF
E2 38169356050 ADJUSTABLE SHELF
F1 38169356060 VALANCE
G1 38169356070 KICK
H138169356080 BACK RAIL
I2 38169000090 STRINGER
J138169000100 UPPER BACK PANEL
K1 38169356110 DOOR
L1 38169356120 HORIZONTAL MOLDING
M138169356130 PULL OUT FRONT
N1 38169356140 PULL OUT SHELF
O1 38169356150 PULL OUT LEFT RAIL
P138169356160 PULL OUT RIGHT RAIL
Q138169356170 DRAWER FRONT
-1K816935600 BACK PANEL
-139991167340400L LEFT DRAWER SIDE
-139991167340400R RIGHT DRAWER SIDE
-139991167063450F FALSE DRAWER FRONT
-139991167063450B DRAWER BACK
-139991324064420D DRAWER BOTTOM

11
ameriwoodhome.com
BoardIdentification
Parts List
ITEM QTY PART NUMBER DESCRIPTION
A138169900010 LEFT PANEL ASM
B1 38169900020 RIGHT PANEL ASM
C2 38169900030 SHELF
D1 38169900040 FIXED SHELF
E2 38169900050 ADJUSTABLE SHELF
F138169900060 VALANCE
G1 38169900070 KICK
H1 38169900080 BACK RAIL
I238169000090 STRINGER
J138169000100 UPPER BACK PANEL
K1 38169900110 DOOR
L1 38169900120 HORIZONTAL MOLDING
M1 38169900130 PULL OUT FRONT
N138169900140 PULL OUT SHELF
O1 38169900150 PULL OUT LEFT RAIL
P1 38169900160 PULL OUT RIGHT RAIL
Q138169900170 DRAWER FRONT
-1K816990000 BACK PANEL
-139991167340400L LEFT DRAWER SIDE
-139991167340400R RIGHT DRAWER SIDE
-139991167063450F FALSE DRAWER FRONT
-139991167063450B DRAWER BACK
-139991324064420D DRAWER BOTTOM
partsfor8169900COM(CentraliaOak)

12
ameriwoodhome.com
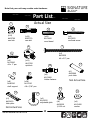
PartList
ActualSize
NotActualSize
(x24)
#A22700
cam lock
(x24)
#A22710
cam bolt
1
2
3
(x16)
#A21660
wood dowel
(x8)
#A23025
confirmat screw
5
(x4)
#A12810
#8 x 1" pan
6
(x12)
#A22760
quicklock
7
(x4)
#A13950
#8 x 3.5" pan
(x8)
#A80250
shelf support
89
(x28)
#A12120
#8 x 7/16" pan
10
(x4)
#A21960
hidden fastener
(x1)
#A33060
push latch
12
(x1)
#A35420
latch plate
13
(x4)
#A43020
adjustable glide
14
(x4)
#A20330
1/4-20 nut
15
(x4)
#A25400
washer
Note that your unit may contain extra hardware
11
4
NotActualSize

13
ameriwoodhome.com
PartList
ActualSize
(x2)
#A65685
hinge plate
(x1)
#A65690
glissando
(x6)
#A11070
#6 x 10.5" euro screw
Note that your unit may contain extra hardware
17 18
19
(x1)
#A56100
drawer slide
20
(x1)
#A56540
pullout slide
21
(x2)
#A65680
euro hinge
16
NotActualSize

14
ameriwoodhome.com
PartList
Disassembleslides(A56100)
19 (x1)
#A56100
drawer slide
Extendtheslideasshown.Pressthereleaseleverand
removetheinnerslide.Keepaclothhandyasslideparts
willhavegreaseoninnerparts.
UsetheseholestofastentotheLeft&RightAssemblies(A&B)
UsetheseholestofastentotheLeft&RightDrawerSides
Tobeassembledtodrawer

15
ameriwoodhome.com
PartList
Disassembleslides(A56540)
Extendeachslideasshown.Presstheblacklever
upwardandseparatethetwopartsoftheslide.
BlackLever
ThisoutersidewillattachtotheLeft&RightAssemblies(A&B)
Usethesethreeholeswhenattachingslide.
ThisinnerslidewillbeattachedtotheLeft&RightPullOutRail.
Usethesethreeholeswhenattachinginnerslide.
20 (x1)
#A56540
drawer slide
To be assembled to pull out shelf

16
ameriwoodhome.com
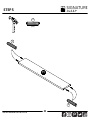
STEP1
(x8)
C
16
3
(x4)
(x6)
1
1
6
3
3
x2
ProperorientationofCamLock
ProperorientationofQuicklock
rawsurface

17
ameriwoodhome.com
STEP2
16
3
(x4) (x2)
(x3)
D
31
1
3
6
ProperorientationofCamLock
ProperorientationofQuicklock

18
ameriwoodhome.com
STEP3
1
3
(x4) (x2)
31
1
3
J
ProperorientationofCamLock

19
ameriwoodhome.com
STEP4
1
3
(x8) (x4)
3
1
1
3
I
x2
ProperorientationofCamLock

20
ameriwoodhome.com
STEP5
3
(x4)
3
3
H

21
ameriwoodhome.com
STEP6
C
G
rawsurface
sideviewdetail
ofkicklocation
Turnclockwisetolock
bothpartstogether
C
G

22
ameriwoodhome.com
STEP7
C
rawsurface
F
C
F
Turnclockwisetolock
bothpartstogether
sideviewdetail
ofvalancelocation

23
ameriwoodhome.com
STEP8
D
L
D
sideviewdetail
ofmoldinglocation
Turnclockwisetolock
bothpartstogether
L

24
ameriwoodhome.com
STEP9
2
(x12)
2
2
A

25
ameriwoodhome.com
STEP10
919 20
(x1)
(x1)
(x6)
9
9
9
9
9
9
19
20
A
A

26
ameriwoodhome.com
STEP11
2
(x12)
2
2
B

27
ameriwoodhome.com
STEP12
19 20
9
(x1) (x1)
(x6)
19
20
9
9
9
9
9
9
B
B

28
ameriwoodhome.com
STEP13
A
C
G
A
H
I
I
UNLOCKLOCK
smallholes
locatedhere

29
ameriwoodhome.com
STEP14
UNLOCKLOCK
A
D
LC
F

30
ameriwoodhome.com
STEP15
A
J
C
F
UNLOCKLOCK

31
ameriwoodhome.com
STEP16
UNLOCKLOCK
B

32
ameriwoodhome.com
STEP17
BACK
PANEL
SlideBackPanelintothegrooves
intheLeft&RightAssemblies(A&B).
PleaseassuretheBackPanelis
alignedwiththeholesintheBackRail(H)
151.00 mm
H
I
H
I
Placeyourunitontoitsfront...

33
ameriwoodhome.com
STEP18
9
(x4)
9
H
BACK
PANEL
15
(x4)
15
9
15
x4

34
ameriwoodhome.com
STEP19
13 14
(x4) (x4)
13
14
x4
A
TapinBushings(14)withahammer
ScrewinGlides(13)alltheway

35
ameriwoodhome.com
The next steps are to assemble your unit to the wall
Assembled unit MUST be square on the height, width,
and depth to function properly
Assembled unit MUST be placed flat against the wall
Assembled unit MUST be screwed into wall studs for
safety
DO NOT use wall anchors to fasten your unit to the wall
For Masonry, Concrete, or other
wall materials:
Consult your local hardware store
for appropriate anchors to securely
attach your unit to the wall.

36
ameriwoodhome.com
STEP20
Place your unit FLUSH against the wall
There are notches provided at the
back of your unit. These notches
are to fit around the baseboard on
your wall. If your baseboard is
higher or thicker than the notches
provided on the unit, you will need
to remove the baseboard, cut it
down to fit on both sides of your
unit, then refasten to the wall.

37
ameriwoodhome.com
STEP21
AssembledunitMUSTbesquareon
theheight,width,anddepthto
functionproperly
A ladder will be required
Do not lean against the
top of the unit, it may
cause sagging
If required, unscrew the
Glides counter-clockwise
as necessary in all 4
corners until your unit is
level in all directions

38
ameriwoodhome.com
STEP22
Locatethestudsinthewall,usingastudfinder.
Usingapencil,markthestudlocationsonthe
uppersurfaceoftheUpperBackPanel(J)above
theShelf(C)andonthelowerStringer(I).Locate
theLowerStringer(I)behindtheBackPanel.
BACK
PANEL
J
Youneedtolocate2studs
(2marksatthetop&2marks
atthebottom).
A ladder will be required
Do not lean against the
top of the unit, it may
cause sagging
I
C

39
ameriwoodhome.com
STEP23
7
(x4)
First,makesurethatyourunit
isstilllevelinalldirections.
Drill1/8"(3mm)pilotholesthrough
theUpperBackPanel(J)andthrough
theBackPanelandStringer(I)atthe
studlocatormarks.
Fastentheunittothestudsinthewall
withtheScrews(7).
A ladder will be required
Do not lean against the
top of the unit, it may
cause sagging
J
BACK
PANEL
I

40
ameriwoodhome.com
STEP24
LEFT
DWR
SIDE
RIGHT
DWR
SIDE
19
9
(x6) (x1)
99
19
19

41
ameriwoodhome.com
STEP25
(x4)
4
4
4
LEFT
DWR
SIDE
RIGHT
DWR
SIDE
FALSE
DWR
FRONT

42
ameriwoodhome.com
STEP26
FALSE
DWR
FRONT
DWR
BOTTOM
4
(x4)
4
4
1st
2nd
FALSE
DWR
FRONT
DWR
BACK
DWR
BOTTOM
finished
surface

43
ameriwoodhome.com
STEP27
5
(x4)
5
FALSE
DWR
FRONT
Q
DWR
BACK

44
ameriwoodhome.com
STEP28
6
(x3)
6
N
ProperorientationofQuicklock
N
M
Turnclockwisetolock
bothpartstogether
sideviewdetail
ofpulloutfrontlocation
N
M

45
ameriwoodhome.com
STEP29
(x4)
10
10
10
10
10
N
N
M
M
O
P
1st
2nd

46
ameriwoodhome.com
STEP30
20
(x1)
9
(x6)
20
20
9
9
9
9
9
9
N
M

47
ameriwoodhome.com
STEP31
Assembledtodrawersides(make
suretofullyengageintocarrier)
Carrier
AssembledtoLeft&Rightassemblies(A&B)
Youwillneedtopushforcefully
ontotheassemblytofullyengage
theslides
A
B
Q

48
ameriwoodhome.com
STEP32
Besurethecarrieroftheslideis
positionedallthewaytothefrontofthe
slidebeforeyouinstallthepulloutshelf.
Youwillneedtopushforcefully
ontotheassemblytofullyengage
theslides
B
A
N
Assembled to Left & Right Assemblies (A & B)

49
ameriwoodhome.com
DoorOptions...
Youmaychoosewhichwayyouwantthedoortoopen.
Opentotheleft Opentotheright

50
ameriwoodhome.com
STEP33
K
21
(x2)
21
18
(x4)
18 18

51
ameriwoodhome.com
STEP34
Instructionsfordooropeningtotheleft...
16
(x2)
A
16
16
16
A

52
ameriwoodhome.com
STEP35
11 12
(x1) (x1)
11
12
18
(x2)
18
18
Continuedfordooropeningtotheleft...
B
B

53
ameriwoodhome.com
STEP36
16
(x2)
Instructionsfordooropeningtotheright...
16
16
B
16
B

54
ameriwoodhome.com
STEP37
11 12 18
(x1) (x1) (x2)
11
12
18
18
Continuedfordooropeningtotheright...
A
A

55
ameriwoodhome.com
DoorAdjustments...
16
Eccentricadjustmentscrew‐shiftsthewholehingeupanddown.
(upanddown)
21
Adjuststhegapbetweenthefaceofthedoorand
thefaceoftheverticalmoldingontheleft&right
assemblieswhenintheclosedposition.
(fronttoback)
Adjuststhegapsbetweenthe
door&left&rightassemblies(A&B)
(sidetoside)

56
ameriwoodhome.com
STEP38
17
(x1) 17
21
21
17
HOOKS
K
Thisstepisoptional...
Placeglissandosoftclose(17)on
thelowerhingeoftheDoor(K).
Insert hooks of glissando into these
holes on the cup of the hinge on both sides,
then press firmly to lock in place.

57
ameriwoodhome.com
STEP39
8
(x8)
Thereare3desiredlocationsforthe
adjustableshelves(E).Twoareshownhere.
Youmayalsoplaceoneadjustableshelf(E)
behindthedoor(K).
K
E
E
8
8

58
ameriwoodhome.com
MaximumLoads
Warning:Riskofinjurytopersons‐donotplaceatelevisiononthisfurniture.Thisfurnitureis
notapprovedforusewithatelevision.
25lbs
11.3kg
(drawer)
20lbs
9.0kg
(pulloutshelf)
CertificateofConformity
1.ThiscertificateappliestotheDorelHomeFurnishings,Inc.productidentifiedbythisinstructionmanual.
2.ThiscertificateappliestocomplianceofthisproductwiththeCPSCBanonLead‐ContainingPaint(16CFR1303).
3.Thisproductisdistributedby:DorelHomeFurnishings,Inc.
410EastFirstStreetSouth
WrightCity,MO63390
636‐745‐3351
4.SiteofManufacture:Cornwall,ON
5.Seefrontpageofinstructionmanualfordateofmanufacture.
40lbs
18.1kg
(fixedshelf
behinddoor)
Thisunithasbeendesignedtosupportthemaximumloadsshown.Exceedingtheseloadlimits
couldcausesagging,instability,productcollapse,and/orseriousinjury.
0lbs
0kg
(shelf)
40lbs
18.1kg
(shelf)
30lbs
13.6kg
(adjustable
shelves)

59
ameriwoodhome.com
Registeryourproducttoreceivethefollowing:
*Newtrenddetails‐sneakpeekonwhat'snew
*Surveys‐haveavoicewithinourcommunity
*Exclusivedealsanddiscountcodes
*Quickandeasyreplacementpartservice
Toregisteryourproduct,visitameriwoodhome.com
Visityourlocalretailer'swebsite,rateyourpurchased
productandleaveussomefeedback!
Wewouldliketoextendabig"ThankYou"toallof
ourcustomersfortakingthetimetoassemblethis
AmeriwoodHomeproduct,andtogiveusyour
valuablefeedback.

60
ameriwoodhome.com
CubiertaDelantera
Estelibrodeinstruccionescontieneinformación
IMPORTANTE
deseguridad.Porfavorleaymanténgalo
parareferenciaenelfuturo.
NoRegreseesteproducto!
Comuniqueseconnuestroamistosoequipodeservicioalclienteparaobtener
ayuda.
Llamenosal:1‐800‐489‐3351(Gratis)
Visitar:
www.ameriwoodhome.com
PRECAUCION
Estemueblepuedevolcarseycausargravesheridasy/omuerte.
Anclarelmuebleaunpostedemaderaenlapared(siestoserequiere).
NoPermitaquelosniñosmontenelmueble.
ConsejosÚtiles(página2)
‐Abrasuartículoeneláreadondeustedplaneautilizarloparaevitarlevantarymoverlomenos
‐Identificar,ordenarycontarlaspiezasantesdeintentarensamblar
‐Lasclavijasdecompresiónsegolpeanconunmartillo
‐LasdiapositivasestánmarcadasconunaR(derecha)yL(izquierda)paralacolocacióncorrecta
‐Asegúresedequesiempreesteelpuntolocaizadoenlapartesuperiordebloqueadordeleva
estevolteadohaciabordeexterior
‐Utilizartodoslosclavosparaelpaneldeatrasydistribuirlosporigual
‐Elpaneldeatrasdebeutilizarseparaasegurarsedequelaunidadquedefijayfirme
‐Nousequimicasfuertesnilimpiadoresabrasivosenestearticulo
‐Nuncaempuje,tireniarrastrelosmuebles
AntesdeQueEmpieces(página3)
‐Leacuidadosamentecadapasoysigaelordencorrecto
‐Separarycontartodassuspiezasyhardware
‐Désesuficienteespacioparaelprocesodeensamble
‐Tengalassiguientesherramientas:destornilladordecabezaplana,#2cabezaPhillips
Destornilladorymartillo
‐Precaución:Siusauntaladroelectrónicooundestornilladoreléctricoparaatornillar,porfavorasegúrese
quedejedeatornillarcuandoeltonillosesteapretado.Fallarhacerestopuedecausarbarrereltornillo.
Sistemadefijarelbloqueodeleva(página3)
Estasistemadefijarelbloqueodelevaserausadoentodoelprocesoensamble.
Página5
Estapiezaesdecartón.Noestáhechadem adera,peroesnecesariaparaelmontajedelaunidad.
Español

61
ameriwoodhome.com
Español
Página14
Desmontajedecorrederas(A56100)
Paramontajedelcajón
Extiendalacorrederacomosemuestra.Presionelapalancadeaperturayretirelacorrederainterior.Tengaun
trapoamano,yaquepuedehabergrasaenlaspiezasinternas.
Utiliceestosorificiosparafijarlosmontajesizquierdoyderecho(AyB)
Utiliceestosorificiosparafijarloslateralesizquierdoyderechodelcajón
Página15
Desmontajedecorrederas(A56540)
Paramontajedelaplacaextraíble
Extiendacadacorrederacomosemuestra.Presionelapalancanegrahaciaarribayseparelasdospiezasdela
corredera.
Esteladoexteriorseuniráalosmontajesizquierdoyderecho(AyB)
Utiliceestostresorificiosparaacoplarlacorredera.
Estacorrederainteriorseacoplaráalrielextraíbleizquierdoyderecho.
Utiliceestostresorificiosparaacoplarlacorrederainterior.
Página16,17,18&19
Orientaciónadecuadadelacerraduradeleva
Orientaciónadecuadadelacerradurarápida
Superficieintacta
Página21
Gireenelsentidodelasagujasdelrelojparajuntarambaspiezas
Vistalateraldelaubicacióndelsujetador
Superficieintacta
Página22
Gireenelsentidodelasagujasdelrelojparajuntarambaspiezas
Vistalateraldelaubicacióndelacenefa
Superficieintacta
Página23
Gireenelsentidodelasagujasdelrelojparajuntarambaspiezas
Vistalateraldelaubicacióndelamoldura
Página28
Pequeñosorificiosubicadosaquí
Página32
Coloquelaunidaddefrente...
Desliceelpanelposteriorporlasranurasdelosmontajesizquierdoyderecho(AyB).
Asegúresedequeelpanelposteriorestéalineadoconlosorificiosdelrielposterior(H).

62
ameriwoodhome.com
Español
Página34
Golpeelosbujes(14)conunmartillo.
Atornillelosdeslizadores(13)totalmente.
Página35
Lossiguientespasossonmontarsuunidadenlapared.
LaunidadensambladaDEBEestaraescuadraenaltura,anchoyprofundidadparafuncionar
correctamente
LaunidadensambladaDEBEcolocarseplanacontralapared
Launidaddebeatornillarsealosmontantesporseguridad
NOuseanclajesdeparedparasujetarsuunidadalapared
Paramampostería,hormigónuotrosmaterialesdepared:consulteconsuferreteríalocalparaobtener
losanclajesadecuadosparasujetarfirmementesuunidadalapared.
Página36
Coloquesuunidadalrascontralapared
Haymuescasenlaparteposteriordesuunidad.
Estasmuescasdebenencajaralrededordelzócalodelapared.
Sisuzócaloesmásaltoomásgruesoquelasmuescasprovistasenlaunidad,deberáquitarelzócalo,
cortarloparaquequepaenambosladosdesuunidadyluegovolverafijarloalapared.
Página37
LaunidadDEBEquedarprecisaenaltura,anchoyprofundidadparaquefuncionecorrectamente.
Serequeriráunaescalera
Noseapoyecontralapartesuperiordelaunidad,puedecausarflacidez
Siesnecesario,desatornillelosdeslizadoresensentidoantihorariosegúnseanecesarioenlascuatro
esquinashastaquesuunidadesténiveladaentodaslasdirecciones.
Página38
Ubiquelosmontantesenlaparedconundetectordevigas.Conunlápiz,marquelasubicacionesdelos
montantesenlasuperficiesuperiordelpanelposteriorsuperior(J),porencimadelaplaca(C)yeneltravesaño
inferior(I).Ubiqueeltravesañoinferior(I)detrásdelpanelposterior.
Debeubicar2montantes(2marcasenlapartesuperiory2enlaparteinferior).
Serequeriráunaescalera
Noseapoyecontralapartesuperiordelaunidad,puedecausarflacidez
Página39
Primero,asegúresedequesuunidadaúnesténiveladaentodaslasdirecciones.
Taladreorificiosguíade1/8"(3mm)enelpanelposteriorsuperior(J),yenelpanelposterioryeltravesaño(I)
sobrelasmarcasdeldetectordevigas.
Fijelaunidadalosmontantesconlostornillos(7).
Serequeriráunaescalera
Noseapoyecontralapartesuperiordelaunidad,puedecausarflacidez

63
ameriwoodhome.com
Español
Página44
Orientaciónadecuadadelacerradurarápida
detalledevistalateraldelaubicaciónfrontalextraíble
Gireenelsentidodelasagujasdelrelojparajuntarambaspiezas
Página47
Montadoenlosmontajesizquierdoyderecho(AyB)
Soporte
Montadoenloslateralesdelcajón(asegúresedequeencajentotalmenteenelsoporte)
Deberápresionarconfuerzasobreelmontajeparaqueencajenbientodaslacorrederas
Página48
Montadoenlosmontajesizquierdoyderecho(AyB)
Asegúresedequeelsoportedelacorrederaestébienubicadoalfrentedelacorrederaantesdeinstalarlos
cajones.
Deberápresionarconfuerzasobreelmontajeparaqueencajenbientodaslacorrederas
Página49
Opcionesdelapuerta...
Puedeelegirdequémaneraquierequeseabralapuerta.
Abiertaalaizquierda
Abiertaaladerecha
Página51
Instruccionesparaquelapuertaseabraalaizquierda...
Página52
Continuación:paraquelapuertaseabraalaizquierda...
Página53
Instruccionesparaquelapuertaseabraaladerecha...
Página54
Continuación:paraquelapuertaseabraaladerecha...
Página55
Ajustesdelapuerta...
Tornillodeajusteexcéntrico:desplazatodalabisagrahaciaarribayhaciaabajo.(Arribayabajo)
Ajustalosespaciosentrelapuertaylosmontajesizquierdoyderecho(AyB)(Deladoalado)
Ajustaelespacioentrelacaradelapuertaylacaradelamolduraverticalenlosmontajesizquierdoyderecho
cuandoestáenposicióncerrada.(Delfrentehaciaatrás)

64
ameriwoodhome.com
Español
Página56
Estepasoesopcional…
ColoqueelcierreamortiguadorGlissando(17)enlabisagrainferiordelapuerta(K).
InsertelosganchosdelGlissandoenestosorificiosdelacazoletadelabisagraenamboslados,luego
presionefirmementeparaajustarlosensulugar.
Ganchos
Página57
Hay3ubicacionesrecomendadasparalasplacasajustables(E).Aquísemuestrandos.Tambiénpuede
colocarunaplacaajustable(E)detrásdelapuerta(K).
Página58
CARGAMAXIMA
Estaunidadhasidodiseñadaparasoportarlacargamáximaanotada.Elexcederestoslímitespuede
causarinestabilidad,colapsarsey/ocausarseriaslesiones.
ADVERTENCIA:Riesgodelesionesalaspersonas‐nocoloqueuntelevisorsobremuebles.Estemueble
noestáaprobadoparasuusoconuntelevisor.
Página59
Registresuproductopararecibirlosiguiente:
*Detallesdenuevastendencias‐Vistazoalonuevo
*Encuestas‐alecsuvozentresucomunidad
*Códigosdeofertasydescuentosexclusivos
*Fácilyrápidoserviciodepartesderemplace
Pararegistrarsuproducto,visiteameriwoodhome.com
Clasificasiónde5estrellas
Visiteelsitiowebdesutiendalocal,califiquesucomprado
ydenossuscomentarios!
Nosgustaríaenviarungran"Agradecimiento"atodosnuestrosclientesportomarseeltiempode
ensamblaresteproductodeAmeriwoodHome,ypordarnossusvaliososcomentarios.
Gracias

65
ameriwoodhome.com
CouvertureAvant
CELIVRETD'INSTRUCTIONCONTIENTDESINFORMATIONS
IMPORTANTES
SURLASÉCURITÉ.VEUILLEZLIRE
ETGARDERPOURUNERÉFÉRENCEFUTURE
Neretournezpasceproduit!
Contacteznotreéquipedeserviceàlaclientèleamicaled'abordpourobtenir
del'aide.
Appelez‐nous:
1‐800‐489‐3351(sansfrais)
Visitez:
www.ameriwoodhome.com
ATTENTION
Lemeublepeutbasculeretcauserdesblessuresgravesoulamort.
Ancrerlemeubleàuneplanchemuraledanslemur(siindiqué).
Nelaissezpaslesenfantsgrimpersurlemeuble.
AstucesUtiles(page2)
‐Ouvrezvotrearticledanslazonequevousprévoyezdelegarderpourmoinsdelevagelourd
‐Identifier,trieretcompterlespiècesavantd'essayerd'assembler
‐LesgoujonsdecompressionsonttaraudésavecunMarteau
‐Lesglissièressontmarquéesd'unR(droit)etd'unL(gauche)pourunbonplacement
‐Assurez‐voustoujoursdefairefacelapointesituésurlehautdelaSerruredeCameverslebordextérieur
‐Utilisertouslesclousfournispourlepanneauarrièreetlesrépartirégalement
‐Lepanneauarrièredoitêtreutilisépourvousassurerquevotreappareilestrobuste
‐N'utilisezpasdeproduitschimiquesagressifsoudenettoyantsabrasifssurcetappareil
‐Nejamaispousser,tirer,oufaireglisservotremeuble
AvantdeCommencer(page3)
‐Lisezattentivementchaqueétapeetsuivezlebonordre
‐Séparezetcompteztoutesvospiècesetmatériaux
‐Donnez‐voussuffisammentdeplacepourl'assemblage
‐Avoirlesoutilssuivants:tournevisàtêteplate,#2tournevisPhillips,etMarteau
‐
Attention:Sivousutilisezuneperceuseélectriqueouuntournevisélectriquepourvisser,veillezàralentir
etarrêterlorsquelavisestbienserrée.Lenon‐respectdecetteconsignepeutendommagerlavis.
SystèmedeFixationdeCame(page3)
CeSystèmedeFixationdeCameserautilisétoutaulongdel'assemblage
Page5
Cettepièceestuneconstructionencarton.Iln'estpasenbois,maisestnécessaireàl'assemblagedevotremeuble.
Français

66
ameriwoodhome.com
Français
Page14
Démonterlesglissières(A56100)
Àassemblerautiroir
Déployezlaglissièrecommeindiqué.Appuyezsurlelevierdelibérationetretirezlaglissièreintérieure.Gardez
unchiffonàportéedemaincarlespartiesintérieuresdelaglissièreserontrecouvertesdegraisse.
Utilisezcestrouspourfixerlesassemblagesgaucheetdroit(AetB).
Utilisezcestrouspourfixerlescôtésgaucheetdroitdutiroir.
Page15
Démonterlesglissières(A56540)
Àassemblerpourfairesortirl'étagère
Déployezchaqueglissièrecommeindiqué.Appuyezsurleleviernoirverslehautetséparezlesdeuxpartiesde
laglissière.
Cecôtéextérieurserafixéauxensemblesgaucheetdroit(AetB).
Utilisezcestroistrouspourfixerlaglissière.
Cetteglissièreintérieureserafixéeaurailcoulissantgaucheetdroit.
Utilisezcestroistrouspourfixerlaglissièreintérieure.
Page16,17,18&19
Orientationcorrecteduverrouàcame
Orientationcorrecteduverrouillagerapide
Surfacebrute
Page21
Tournezdanslesensdesaiguillesd'unemontrepourverrouillerlesdeuxpartiesensemble
Détaildelavuelatéraledel'emplacementdusupport
Surfacebrute
Page22
Tournezdanslesensdesaiguillesd'unemontrepourverrouillerlesdeuxpartiesensemble
Détaildelavuelatéraledel'emplacementdelacantonnière
Surfacebrute
Page23
Tournezdanslesensdesaiguillesd'unemontrepourverrouillerlesdeuxpartiesensemble
Détaildelavuelatéraledel’emplacementdumoulage
Page28
Petitstroussituésici
Page32
Placezvotreunitésursafaceavant…
Faitesglisserlepanneauarrièredanslesrainuresdesassemblagesgaucheetdroit(AetB).
Veillezàcequelepanneauarrièresoitalignéaveclestrousdurailarrière(H).

67
ameriwoodhome.com
Français
Page34
Tapersurlesdouilles(14)avecunmarteau.
Visserlespatins(13)àfond.
Page35
Lesprochainesétapesconsistentàassemblervotreappareilaumur
L'unitéassembléeDOITêtred'équerresurlahauteur,lalargeuretlaprofondeurpourfonctionner
correctement
L'unitéassembléeDOITêtreplacéeàplatcontrelemur
L'unitéassembléedoitêtrevisséedanslesmontantsdumurpourplusdesécurité.
N'UTILISEZPASd'ancragesmurauxpourfixervotreappareilaumur
Pourlamaçonnerie,lebétonoud'autresmatériauxdemur:Consultezvotrequincaillerielocalepour
lesancragesappropriéspourfixersolidementvotreunitéaumur.
Page36
Placezvotreappareilcontrelemur
Ilyadesencochesàl'arrièredevotreappareil.
Cesencochesdoivents'adapterautourdelaplinthesurvotremur.
Sivotreplintheestplushauteouplusépaissequelesencochesfourniessurl'unité,vousdevrezretirer
laplinthe,lacouperpourqu'elles'adaptedesdeuxcôtésdevotreunité,puislaremettreaumur.
Page37
L'unitéassembléeDOITêtred'équerreenhauteur,enlargeuretenprofondeurpourfonctionner
correctement.
UneéchelleseranécessaireNevousappuyezpascontreledessusdel'appareil,celapourrait
provoquerunaffaissement
Sinécessaire,dévissezlessous‐pattesdanslesensantihorairesinécessairedansles4coinsjusqu'àce
quevotreappareilsoitdeniveaudanstouteslesdirections
Page38
Repérerlesmontantsdumuràl'aided'undétecteurdemontants.Àl'aided'uncrayon,marquez
l'emplacementdesmontantssurlasurfacesupérieuredupanneauarrièresupérieur(J)au‐dessusdela
tablette(C)etsurlelongeroninférieur(I).Placezlatraverseinférieure(I)derrièrelepanneauarrière.
Vousdevezlocaliser2goujons(2marquesenhautet2marquesenbas).
UneéchelleseranécessaireNevousappuyezpascontreledessusdel'appareil,celapourraitprovoquerun
affaissement
Page39
Toutd'abord,assurez‐vousquevotreappareilesttoujoursdeniveaudanstouteslesdirections.
Percezdesavant‐trousde3mm(1/8pouce)àtraverslepanneauarrièresupérieur(J)etàtraverslepanneau
arrièreetlelimon(I)auxpointsderepèredesmontants.Fixezl'unitéauxmontantsdumuràl'aidedesvis(7).
UneéchelleseranécessaireNevousappuyezpascontreledessusdel'appareil,celapourraitprovoquerun
affaissement

68
ameriwoodhome.com
Français
Page44
Orientationcorrecteduverrouillagerapide
détaildelavuelatéraledel'emplacementavantcoulissant
Tournezdanslesensdesaiguillesd'unemontrepourverrouillerlesdeuxpartiesensemble
Page47
Assembléauxassemblagesgaucheetdroit(AetB)
Transporteur
Assemblésurlescôtésdutiroir(assurez‐vousd'engagercomplètementdanslesupport)
Vousdevrezpousseravecforcesurl'assemblagepourengagercomplètementlesglissières
Page48
Assembléauxassemblagesgaucheetdroit(AetB)
Assurez‐vousquelesupportdelaglissièreestpositionnécomplètementàl'avantdelaglissièreavant
d'installerlestiroirs.
Vousdevrezpousseravecforcesurl'assemblagepourengagercomplètementlesglissières
Page49
Optionsdeporte…
Vouspouvezchoisirdansquelsensvousvoulezquelaportes'ouvre.
Ouvertàgauche
Ouvertàdroite
Page51
Instructionspourl'ouverturedelaporteàgauche…
Page52
Suitedel'ouverturedelaporteàgauche…
Page53
Instructionspourl'ouverturedelaporteàdroite…
Page54
Suitedel'ouverturedelaporteàdroite…
Page55
Réglagesdelaporte…
Visderéglageexcentrique‐‐déplacel'ensembledelacharnièredehautenbas.(Dehautenbas)
Ajustel'écartentrelaporteetlesassemblagesgaucheetdroit(AetB)(d'uncôtéàl'autre).
Règlel'espaceentrelafacedelaporteetlafacedelamoulureverticalesurlesensemblesgaucheetdroiten
positionfermée.(Del'avantàl'arrière)

69
ameriwoodhome.com
Français
Page56
Cetteétapeestfacultative…
Placezleglissandosoftclose(17)surlacharnièreinférieuredelaporte(K).
Insérezlescrochetsduglissandodanscestroussurlacoupedelacharnièredesdeuxcôtés,puis
appuyezfermementpourverrouillerenplace.
Crochets
Page57
Ilya3emplacementssouhaitéspourlesétagèresréglables(E).Deuxsontillustrésici.Vouspouvez
égalementplaceruneétagèreréglable(E)derrièrelaporte(K).
Page58
CHARGESMAXIMALES
Cemeubleaétéconçupoursupporterleschargesmaximalesindiquées.Enexcédantceslimitesde
charge,lemeublepourraitdevenirinstable,s'effondrer,et/oucauserdesblessuresgraves.
AVERTISSEMENT:Risquedeblessurecorporelle‐nepasplacerunetélévisionsurcemeuble.Ce
meublen'estpasapprouvépouruneutilisationavecunetélévision.
Page59
Enregistrezvotreproduitpourrecevoirlesélémentssuivantes:
*Détailssurlesnouvellestendances‐unaperçusurlesnouveautés
*Sondages‐avoirunevoixauseindenotrecommunauté
*Offresexclusivesetcodespromo
*Servicedepiècesderechangerapideetfacile
Pourenregistrervotreproduit,visitezameriwoodhome.com
5Étoiles
VisitezlesiteWebdevotredétaillantlocal,évaluezvotreproduit
achetéetlaissez‐nousquelquescommentaires!
Noustenonsàoffrirungrand"Merci"àtousnosclientspouravoirprisletempsd'assemblerceproduit
"AmeriwoodHome",etdenousdonnervoscommentairesprécieux.
Merci
-
 1
1
-
 2
2
-
 3
3
-
 4
4
-
 5
5
-
 6
6
-
 7
7
-
 8
8
-
 9
9
-
 10
10
-
 11
11
-
 12
12
-
 13
13
-
 14
14
-
 15
15
-
 16
16
-
 17
17
-
 18
18
-
 19
19
-
 20
20
-
 21
21
-
 22
22
-
 23
23
-
 24
24
-
 25
25
-
 26
26
-
 27
27
-
 28
28
-
 29
29
-
 30
30
-
 31
31
-
 32
32
-
 33
33
-
 34
34
-
 35
35
-
 36
36
-
 37
37
-
 38
38
-
 39
39
-
 40
40
-
 41
41
-
 42
42
-
 43
43
-
 44
44
-
 45
45
-
 46
46
-
 47
47
-
 48
48
-
 49
49
-
 50
50
-
 51
51
-
 52
52
-
 53
53
-
 54
54
-
 55
55
-
 56
56
-
 57
57
-
 58
58
-
 59
59
-
 60
60
-
 61
61
-
 62
62
-
 63
63
-
 64
64
-
 65
65
-
 66
66
-
 67
67
-
 68
68
-
 69
69


en otros idiomas
- français: Dorel Home 8169344COM Manuel utilisateur
Artículos relacionados
-
 Dorel Home 5811341COM Assembly Manual
-
 Dorel Home HD80037 Guía de instalación
-
Ameriwood Home 5770330COM Manual de usuario
-
Dorel Home 1108900COM Manual de usuario
-
 Dorel Home 5581500COM2 Instrucciones de operación
-
 Dorel Home 8393341COM Assembly Manual
-
 Dorel Home 8393900COM Assembly Manual
-
-
 Dorel Home 8368900COM Assembly Manual


