BabySense HD S2 Manual de usuario
- Categoría
- Monitores de video para bebés
- Tipo
- Manual de usuario

HD S2
Video Baby Monitor
User Manual
For any product related question please contact us at
www.babysensemonitors.com | www.hisense.co.il
Hisense Ltd. 27 Shaked St.
Hevel Modi’in Industrial Park,
7319900 ISRAEL | 972-3-9566604
Wireless Digital Video Baby Monitor
Watch, Listen and Talk to Your Baby
Models: HD S2 - 1 Camera
HD S2 - 2 Cameras

3
EN
HDS2 Video
Baby Monitor
ENG
FRA
ITA
02-24
27-49
71-92
By
European Authorised Representative
OBELIS s.a | [email protected]
Boulevard Général Wahis 53, 1030 Brussels, Belgium
Tel +(32) 2.732.59.54 | Fax +(32) 2.732.60.03
1. Warnings and Safety Instructions
Follow these safety precautions to prevent fire, injury or damage to the product.
Read and keep instructions: It is very important that you read all the safety and operating instructions before the Babysense video monitor
is operated.
Please retain your purchase receipt as you will need to produce it if warranty service is required.
1.1 WARNINGS
STRANGULATION HAZARD: Children can become entangled in cords.
Make sure the Baby unit, Parent unit and mains adaptor cables are
kept out of reach of your baby and other young children at all times, at
least 6 feet away.
• CHOKING HAZARD: This product contains small parts which may
cause chocking. Exercise care when unpacking and assembling the
product and keep the small parts away from children.
• RISK OF SUFFOCATION: Keep all packaging materials and protective
foils out of reach of children.
• DANGER FROM POWER CORDS: To avoid possible danger from power
cords, the cords should be secured and never be hung on or near
the crib. Never place the Baby unit or Parent unit inside your baby's
crib, bed or playpen.
• DO NOT HANDLE ROUGHLY, DROP OR THROW: Babysense video
monitor is a high-quality electronic device which must be handled with care.
• This product is designed for INDOOR USE ONLY.
• WATER AND MOISTURE: The product should not be exposed to rain, moisture, or splashing. Never use or place the product in or near
moisture or water.
• THIS PRODUCT CANNOT REPLACE RESPONSIBLE ADULT SUPERVISION: Your video monitor is designed to be an aid and should not be used
as a substitute for responsible and proper adult supervision of a child.
• POWER SOURCE: This product should only be used with the AC power adapters supplied by the manufacturer, as included in this package.
• VENTILATION: This product should not be used on a bed, sofa, rug or similar surface that may block the ventilation or speaker openings,
or be placed in an enclosed area, such as a bookcase or drawer that may impede air flow. Never cover the product with clothes, towels,
United Kingdom Authorised Representative
Sandford Gate East Point Business Park Oxford OX4 6LB U.K.
Tel +44.1491.378012

54
EN EN
blankets or any other item.
• THIS PRODUCT IS NOT A TOY: It should be kept out of children's reach.
• KEEP AWAY FROM SOURCES OF HEAT: This unit should not be exposed to direct heat sources such as a candle, stove, radiator, heat register
or other appliance that emit heat. The unit should not be left in direct sunlight.
• BATTERY: Before you use the product, we recommend you fully charge the battery of the Parent Unit, so that it continues to work if you
disconnect it from the power supply to carry it to another location.
• INSTALLATION LOCATION: The installation location plays an important role in ensuring proper operation. Therefore, maintain a distance of
at least 5 feet from other electronic equipment, such as microwave ovens or Wi−Fi routers, otherwise they could cause interference. If this
occurs, move the baby and parent units to another location.
• RANGE: Range of all baby monitors is always measured in an open space. The actual range may be shortened due to environmental
obstacles (such as concrete walls).
• DAMAGE REQUIRING SERVICE: This product should be serviced by qualified personnel only.
• DO NOT TRY TO OPEN AND REPAIR THE PRODUCT: If you have any problems with the product, please contact the authorized distributor.
• In case of unusual noises or smells originating from the device, immediately disconnect the product from the power outlet and contact
authorized distributor.
• If the product becomes dirty, use a lightly damp soft cloth to wipe surfaces, taking care to not allow water into any openings.
IMPORTANT: Babysense Video Monitor is designed only for hearing the baby’s voice and seeing the images of the baby. This product
is not a medical device and should not be used as a substitute for responsible adult supervision. It is important that you regularly
check on your baby personally.
1.2 Safety Instructions for AC Power Adapter
• The adapter should not be exposed to direct heat sources such as a candle, stove, radiator, heat register or other appliance that emit heat.
• During continual use, the power adapters may become warm to the touch. This is normal and should not be a cause of concern.
• Examine intactness of the power cord and its plug.
• The adapter must be handled with care: do not handle roughly, drop or throw.
• When removing the power adapter from the wall outlet, hold and pull from the receptacle.
• Do not pull on the cable itself or bend the cable as that will put additional stress on the cable and could lead to damages.
• Do not touch the power adapter with wet hands or allow liquids to spill on it.
• Make sure the mains adaptor cables are kept out of reach of your baby and other young children at all times. To avoid possible danger
from power cords, the cords should be secured and never be hung on or near the crib.
• Do not replace the plugs or cable on your power adapter. This product should only be used with the AC power adapters supplied by the
manufacturer, as included in this package.
• Never cut, damage or bend the power cord.
• Do not put any objects on top of the power cord, which could cause overheating, damage, combustion and electrocution.
• Do not leave the power adapter connected to the wall outlet when it is not plugged into the Baby or Parent Unit.
WARNING:
• Do not replace the power cord with non-original substitutes. Improper connection may cause electrocution.
• Do not place the AC adaptor cable in a high wear and tear location. Never use a frayed or compromised cord.
• Intended for indoor use only.
1.3 Safety Instructions for Li-ion battery (Non removable pre-installed battery)
• Do not attempt to repair or adjust any of the electrical or mechanical functions of the unit.
• Do not dismantle, cut, open, crush, bend, puncture, or shred cells or batteries.
• If a battery leaks, do not let the battery liquid touch skin or eyes. If this happens, immediately flush the affected areas with water, and seek
medical assistance.
• The battery should not be exposed to direct sunlight or heat sources such as a candle, stove, radiator, heat register or other appliance
that emit heat.
• Do not modify, remanufacture, attempt to insert foreign objects into the battery, or immerse or expose it to water or other liquids. Batteries
may explode if damaged.
• Use only the battery pack supplied with the product or the same type, sold by the manufacturer or its authorized distributors. Improper use
or use of unapproved batteries may present a risk of fire, explosion, or other hazards, and may invalidate the warranty.
• If you believe the battery is damaged, remove product from the charger and stop using the product.
• Never use a damaged battery.
1.4 Information on disposal of product
Always dispose of your product (with the non removable pre-installed battery) at the end of their life in an environmentally responsible way
and in accordance with your local waste disposal requirements.
All cardboard and paper packaging materials should be recycled in accordance with your local council waste regulations.
Thank you for choosing Babysense Video Monitor from Hisense Ltd.

76
EN EN
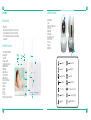
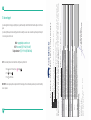
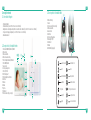
2.3 Baby Unit Overview
18. Infrared LEDs
19. Lens
20. Light Sensor (Night Vision)
21. Power LED
22. Night Light
23. Microphone
24. Temperature Sensor
25. ON/OFF Switch
26. DC Jack
27. Speaker
28. PAIR Button
2. Overview
2.1 Pack Contents
• Parent Unit x 1
• Baby Unit (Camera) x 1 (x2 in HD-S2 2 camera model)
• AC Power Adapter x 2 (x3 in HD-S2 2 camera model)
• Set for wall mounting x 1 (x2 in HD-S2 2 camera model)
• User Manual x 1
2.2 Parent Unit Overview
1. Power ON/OFF/SLEEP Button
2. Charging LED
3. Power LED
4. Volume Level LEDs
5. Volume Up/Down Buttons
6. MENU/EXIT Button
7. Night Light
8. Navigation Keys
9. OK/ZOOM Button
10. Talk Back Button
11. Camera Switch Button
12. Microphone
13. Antenna
14. Speaker
15. Stand
16. DC Jack
17. Reset Button (Under the Stand)
Lullaby
VOX
Split Screen
Camera
Setting
Temp C/F
Temp
Time Format
Brightness
Timer
Alert Volume
Frequency Setting
Customers Support
Night Light Icon

98
EN EN
3. Getting Started
3.1 Powering the Baby Unit (Camera)
• Connect the Camera Power Adapter to the DC-Jack (26) on the back bottom of the Baby Unit.
• Plug the AC power adapter into the wall outlet.
• Ensure the ON/OFF switch (25) is in the ON position.
• The unit will power on automatically and the green power LED (3) will light up.
• Use the ON/OFF switch (25) to turn the Baby Unit off.
NOTE: Only use the AC power adapter included in this package.
3.2 Powering the Parent Unit
• The adapter should not be exposed to direct heat sources such as a candle, stove, radiator, heat register or other appliance that emit heat.
• Connect the Parent Unit Power Adapter to the DC-Jack (16) on the right side of the Parent Unit.
• Plug the AC power adapter into the wall outlet.
• Press and hold the Power button (1) on the top left side of the Parent Unit for 2 seconds to turn the unit on.
• Once the Parent Unit is turned on, the green power LED (3) will light up and “Babysense Video” logo will display on the LCD.
• Press and hold the Power button (1) on the top left side of the Parent Unit for 5 seconds to turn the unit off.
NOTE: Only use the AC power adapter included in this package.
NOTE: The Parent Unit is supplied with a built-in rechargeable Li-ion battery (3.7V 4000mAh).
We recommend whenever possible, keep the Parent Unit plugged in to keep the battery charged.
3.3 Charging the Parent Unit
• Connect the power adapter to the DC-Jack (16) on the right side of the Parent Unit.
• Plug the AC power adapter into the wall outlet.
• Charging LED (2) on the Parent Unit will light up in RED to indicate charging.
• When the unit is turned on, the battery charging icon (changing bars) will appear at the top right corner of the LCD screen.
• Full battery indicator (4 fixed bars) will appear at the top right corner of the LCD screen, indicating the battery is fully charged. The charging
LED (2) will turn green once the battery is fully charged.
NOTE: Before the first use or after a long product storage, it is recommended to fully charge the Parent Unit prior to operating the monitor. It
takes approximately 8 hours to fully charge the battery.
NOTE: The monitor can be operated normally during the charging process.
NOTE: Low Battery Warning - The battery icon turns red on the LCD screen to indicate that the battery is low. The warning is accompanied
with an acoustic beep sound, indicating that the battery needs to be recharged. *
* Alert Volume can be adjusted in the Parent Unit menu, see details in Section Warning Alert” Volume Setting”.
3.4 Set Up
• Once both the Baby and Parent Units are switched on, the display on the Parent Unit will show the video captured by the Baby Unit(s).
• Baby Unit(s) are paired to the Parent Unit when supplied. There is no need to pair the units again unless the Baby Unit loses its link with the
Parent Unit. To renew the pairing of your units or pair a new/additional Baby Unit, follow the procedure described in “Section 4.4 Pairing the
Baby Unit (Camera) with the Parent Unit”.
• The Baby Unit should be placed at least 6 feet away from the baby’s crib on a flat surface. Alternatively, it can be wall mounted.
• Never place the Baby Unit inside the crib, bed or playpen.
• Make sure the unit and cords are out of reach of the baby and other young children.
• To avoid a strangulation hazard, the power cords should be secured and never hung on the crib or near the baby.
• Place the baby monitor in a place where the air can circulate freely and avoid blocking the ventilation and speaker openings.
• Aim the camera (s) to best optimize the viewing area: Select a location for the camera that provides a clear view of the area you want
to monitor, which is free from dust, and is not in line-of-sight to a strong light source or direct sunlight. Avoid installing the camera where
there are thick walls or obstructions between the camera and the monitor.
• To use your Parent Unit and Baby Unit together, you must be able to establish a radio link between them; the range may be affected by
environmental conditions/obstacles (See more details in Troubleshooting Section 6 - “Interference or poor reception”)
4. Operating the Monitor
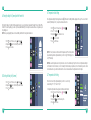
4.1 Lullaby & White Noise Setting
You can soothe your baby to sleep by playing 5 pre-programmed lullabies from the Baby Unit.
The monitor also features White Noise, which is an effective way to soothe a crying infant and lull your newborn to sleep. The Lullaby and White
Noise features are is controlled remotely from the Parent Unit.

1110
EN EN
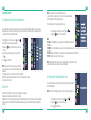
To change the VOX Level please follow the instructions below:
1. Press to access the menu, choose and press
2. Navigate with to select the desire vox level.
VOX - LOW - Low sensitivity level - higher sound level is required to reactivate the
transmission
VOX – MEDIUM - Medium sensitivity level - medium sound level is required to reactivate
the transmission
VOX - HIGH - High sensitivity level - low sound level is required to reactivate the
transmission
VOX - OFF - Constant transmission – no standby mode.
NOTE: To resume the video and audio signal manually on your parent unit when VOX
function is on, briefly press any key on your Parent Unit.
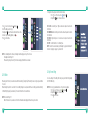
4.3 Split Screen Setting
You can see images from two Baby Units side by side on your Parent Unit by enabling
the SPLIT SCREEN setting.
NOTE: This function is only available when two or more cameras are paired.
1. Press to access the menu, choose and press
2. Navigate with to select the desire option
3. Press to exit the menu
1. Press to access the menu, choose and press
2. Press the lullaby you want to play.
3. Navigate with to select the desire duration and music volume
4. In order to stop the lullaby playback, select
5. Press to exit the menu
NOTE: Once the lullaby function is turned on, the lullaby icon will be displayed on top of the LCD screen.
The lullaby default setting is OFF.
When selecting the loop mode only the 5 melodies are played; the White Noise is excluded.
4.2 VOX Mode
When using the VOX function, the sound and video transmission will stop (standby mode) if the Baby Unit does not register any sound within
30 seconds.
While in standby mode, the LCD screen turns off. Once the Baby Unit registers a sound, louder than the set sensitivity level, it will automatically
start transmitting the signal (sound and video) to the Parent Unit and the LCD screen will turn on.
NOTE: VOX default setting is OFF.
When VOX Mode is active, sound detected from either camera will wake the display and show the respective camera.

1312
EN EN
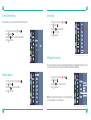
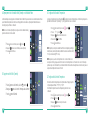
4.6 Temperature Scale Setting
The temperature reading from the temperature sensor (24) at the back of the Baby Unit will be displayed on the top of the screen. To switch
between °F (Fahrenheit) and °C (Celsius) follow the below instructions:
1. Press to access the menu, choose and press
2. Press °F / °C and press
3. Navigate with to select the desire scale
4. Press button to confirm
5. Press to exit the menu
NOTE: The monitor features a built-in automatic temperature alert. The monitor will alert
(visual indication) when the temperature in baby’s room is too high (90°F and higher) or too
low (55°F and lower).
NOTE: Make sure the temperature sensor is not positioned too close to the camera body as it may affect the correct temperature reading. It is
recommended to stretch out the sensor, so it is as far away from the camera body as possible. Also, it is recommended to place the camera
in an area where there is good air circulation and not in a closed cornered area where the temperature tends to be higher.
4.7 Temperature Alert Setting
This function is to alert if the temperature in baby’s room is too low or too high.
Default setting is: <15 °C/59 °F and >31 °C/89 °F.
To change the temperature alert levels, please follow the below instructions:
1. Press to access the menu, choose and press
2. Press and press
3. Navigate with to select the desire option
4. Press to exit the menu
4.4 Pairing the Baby Unit (Camera) with the Parent Unit
The Baby Unit is paired to the Parent Unit when supplied. There is no need to pair the units again unless the Baby Unit loses its link with the
Parent Unit. To renew the pairing of your units or pair a new/additional Baby Unit, follow the procedure below If unsuccessful, please repeat
the pairing process:
NOTE: Before you begin pairing, make sure to have the Baby and Parent Units side by side and turned on.
1. Press to access the menu, choose and press
2 Navigate with to select the camera you want to pair
3. Press to exit the menu
.
4.5 Deleting the Baby Unit (Camera)
1. Press to access the menu, choose and press
2. Navigate with to select the camera you want to delete
3. Press to exit the menu

1514
EN EN
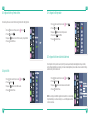
4.10 Timer Setting
1. Press to access the menu, choose and press
2. Press and press
3. Navigate with to select the desire time
4. Press button to confirm
5. Press to exit the menu
4.11 Warning Alert Volume Setting
This setting controls the volume of an audio “beep” sound alerting when the Parent Unit is low on battery, High/Low Temp alert or out of range
(no connection to Baby Unit). You can set a lower volume level during the night and higher level during the day.
1. Press to access the menu, choose and press
2. Press and press
3. Navigate with to select the desire alert volume
4. Press to exit the menu
NOTE: Selecting the OFF option will mute all alerts. In case of low battery, high/low temp or
out of range, there will be no acoustic notification heard.
4.8 Time and Time Format Setting
This function allows you to choose the desired time format: 12H or 24H and set your time.
1. Press to access the menu, choose and press
2. Press and press
3. Navigate with to select the desire format, and set the time
4. Press to exit the menu
4.9 Brightness Adjustment
1. Press to access the menu, choose and press
2. Press and press
3. Navigate with to select the desire brightness
4. Press to exit the menu

1716
EN EN
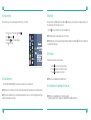
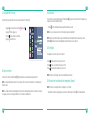
4.14 Night Light
This monitor features a night light integrated into the Baby Unit (22), allowing you to remotely activate a comforting glow to baby’s room.
There are 3 light levels (from low to high) to choose from.
• Press the button on your Parent Unit to choose the desired light intensity.
NOTE: The Night Light status icon will be displayed on top of the LCD screen.
NOTE: Night Light feature can also be activated manually on the Baby Unit. Briefly press the PAIR button (28) on the bottom of the Baby Unit
to cycle between the intensity levels.
4.15 Zoom Mode
This baby monitor features two-zoom levels: x2 and x4.
1. Press the button once to activate “x2” zoom option
2. Press the button twice to activate “x4” zoom option
3. Press the button again to exit zoom option
NOTE: This function is not available when SPLIT SCREEN mode is ON.
4.16 Switching between the paired Baby Units (Cameras)
NOTE: This function is only available when two or more cameras are paired.
• To switch between paired cameras – briefly press the CAMERA SWITCH button (11) on your Parent Unit.
4.12 Frequency Setting
This function allows you to choose desired frequency format 50Hz (for US) or 60Hz (for EU)
1. Press to access the menu, choose and press
2. Press and press
3. Navigate with to select the desire frequency
4. Press to exit the menu
4.13 Volume Adjustments
• Press the VOLUME UP/DOWN buttons (5) to increase/decrease the sound coming out of the parent unit.
NOTE: In normal use, it is recommended to set the volume at level 3 and below. Higher volume levels are intended for loud/noisy environments.
NOTE: If the volume on the Parent Unit is set too high and the Baby and Parent Units are close to each other, a high-pitched noise may be
heard (also known as feedback or static noise).

1918
EN EN
6. Troubleshooting
4.17 SCAN Mode - Automatic switching between the paired Baby Units (Cameras)
You can set the SCAN (loop) mode and each paired Baby Unit will be displayed on the screen for 15 seconds and then the screen will
automatically change to the next paired Baby Unit.
• Press and hold the CAMERA SWITCH button (11) to activate the automatic SCAN mode. A SCAN MODE ON message will appear on the screen
and a loop sign will appear next to the camera number on the top of LCD screen.
• Press the CAMERA SWITCH button (11) to deactivate the Scan mode
4.18 Talk to Baby
• Press and hold the on your Parent Unit to talk to your baby or partner in the baby’s room via Baby Unit.
• Release the button when you are finished talking.
NOTE: While the “Talk to Baby” function is in use, there is no possibility to hear the sounds from the Baby Unit. Releasing the talk button allows
one to hear the sounds from the baby’s room again.
4.19 Parent Unit Screen ON/OFF (Audio only mode)
• Press the POWER button (1) to turn the LCD screen ON/OFF
5. Maintenance
All of the following maintenance procedures should only be performed when Baby and Parent Units are unplugged and off.
• Clean the surfaces of the Baby and Parent Units with a soft, fluff-free cloth.
• Never use cleaning agents or solvents.
• If the units become dirty, use a lightly damp cloth to wipe surfaces, taking care not to allow water into any openings.
Possible cause/solutionProblem
• The power adapters may not be properly connected.
• Ensure that the Baby and Parent Units are ON.
• Adjust the monitor antenna to vertical position.
• Make sure the Baby and Parent Units are not far away from each other.
• Baby and Parent Units may not be properly paired. Follow PAIRING instructions.
No reception on the Parent Unit
• Move the Baby Unit closer to Parent unit.
• Use of other 2.4GHz products, such as wireless networks (Wi-Fi routers), Bluetooth
systems, or microwave ovens, may cause interference with this product, so keep the
baby monitor at least 5ft (1.5m) away from these types of products or turn them off if
they appear to be causing interference.
• The Baby or Parent Units may be too close to metal objects.
• The battery power may be too low.
Interference or poor reception
• Restart the Baby Unit (unplug the power adapter from the wall outlet, wait for approx. 5 seconds
and plug it back into the wall outlet).
• Reset the Parent Unit by pressing the RESET button
(17)
, located at the back of the Parent Unit,
under the stand.
Image frozen on the Parent Unit
• The Baby Unit and Parent Unit may be too close to each other. Move them further apart.
• The volume on the Parent Unit may be set too high. Lower the volume.
A high-pitched sound is heard from the
units (feedback, static)
• Volume setting on the Parent Unit may be too low. Increase the volume.
• Battery power may be too low. Recharge the battery.
Cannot hear the baby sounds on the
Parent Unit

2120
EN EN
IMPORTANT: If the above troubleshooting guide did not help you solve your problem, please contact our customer service via:
Email - [email protected]
Toll Free Number – (833) 568-2229 (USA ONLY)
Telephone Number - (972) 3-9566604 (INTERNATIONAL)
Possible cause/solution
Problem
• In a quiet environment, surrounding the Parent Unit, decrease the volume on your Parent
Unit to level 3 and below.
• In a loud environment, surrounding the Parent Unit, increase the volume to the maximum
level.
Background noises
• Automatic Night vision mode may be on. Increase lighting around the camera to force
monitor out of night vision mode.
Picture is black and white
• Camera Lens is dirty. Follow the Maintenance procedure.
• Confirm that power adapters are properly connected.
• Reset the Parent unit by pressing the RESET button (17), located at the back of the Parent Unit,
under the stand.
Lines/marks across the screen
• The power adapter may not be properly connected.
• Switch to another wall outlet.
• Switch between the Baby Unit and Parent Unit power adapters.
The rechargeable battery will not charge,
or no charge light shows
7. Specifications
• HD S2Product Model
• 2.4GHz FHSSFrequency
• GFSKType of Modulation
• 4 MbpsData Rate
• 3.5 MHzChannel Bandwidth
• Up to 960 feet / 350 meters (open space – no obstructions)Transmission Range
• 5V, 1.0 AInput Voltage
• Input: 100-240VAC 50 / 60Hz, 200mA Max;
• Output: 5V, 1.0A;
Power Adapter
• 5.0” TFT LCD (1280*720 pixels)LCD Screen
• Model: YB905560
• 3.7V, 4000 mAh
Rechargeable battery
(pre-installed in Parent Unit)
• Approx. up to 20 hours (VOX on)
• Approx. up to 12 hours (Monitor on)
Operating time with battery fully charged (Parent Unit)
* It takes about 8 hours to fully charge the battery.
• 18dBm MTransmitting Power
• 1/4" Color CMOSImage sensor type
• 940nmIR LED Type
• Indoor use only; Temperature: 32-104°F / 0-40°C
• Humidity: 5% to 90% rh. (relative humidity)
Operation Environment

2322
EN EN
9. IC Statements
This device complies with Industry Canada license-exempt RSS standard(s):
Operation is subject to the following Two conditions:
(1) this device may not cause interference, and
(2) this device must accept any interference, including interference that may cause undesired operation of the device.
Le présent appareil est conforme aux CNR d’Industrie Canada applicables aux appareils radio exempts de licence.
L’exploitation est autorisée aux deux conditions suivantes:
(1) l’appareiI ne doit pas produire de brouillage, et
(2) l’utilisateur de l’appareil doit accepter tout brouillage radioélectrique subi, même si le brouillage est susceptible d’en compromettre le fonctionnement.
10. Warranty Terms
We take quality very seriously. This is why all of our products come with a one-year warranty from the original purchase date against defects
in workmanship and materials. If you have warranty or support issues, please contact our customer service:
8. FCC Statements
This device complies with part 15 of the FCC Rules. Operation is subject to the following two conditions:
(1) This device may not cause harmful interference.
(2) This device must accept any interference received, including interference that may cause undesired operation.
NOTE 1: This equipment has been tested and found to comply with the limits for a Class B digital device, pursuant to part 15 of the FCC Rules.
These limits are designed to provide reasonable protection against harmful interference in a residential installation.
This equipment generates, uses and can radiate radio frequency energy and, if not installed and used in accordance with the instructions,
may cause harmful interference to radio communications. However, there is no guarantee that interference will not occur in a particular
installation. If this equipment does cause harmful interference to radio or television reception, which can be determined by turning the
equipment off and on, the user is encouraged to try to correct the interference by one or more of the following measures:
• Reorient or relocate the receiving antenna.
• Increase the separation between the equipment and receiver.
• Connect the equipment into an outlet on a circuit different from that to which the receiver is connected.
• Consult the dealer or an experienced radio/TV technician for help.
NOTE 2: Any changes or modifications to this unit not expressly approved by the party responsible for compliance could void the user’s
authority to operate the equipment.

24
EN
11. Customer Support
If you have any problems setting up or using this product, you will find useful tips and information in the Troubleshooting section of this user
guide.
If you have any further questions about using the product after reviewing the resources above or would like to purchase replacement parts
or accessories, please contact us via:
Email - [email protected]
US Toll-Free number (833) 568-2229 (USA ONLY)
Telephone Number - (972) 3-9566604 (INTERNATIONAL)
NOTE: You can always find our contact details in the setting menu in your Parent Unit.
1. Press to access the menu, choose and press
2. Press and press
3. Press to exit the menu
IMPORTANT: Please retain your purchase receipt and attach to the back page of this user manual as you will need to produce this if warranty
service is required.
HD-S2,
I
,

HD S2
Video Baby Monitor
Manual de usuario
Ante cualquier duda o consulta relacionada con el
producto, por favor contáctenos a
www.babysensemonitors.com | www.hisense.co.il
Video Baby Monitor Inalámbrico Digital
Mire, escuche y hable con su bebé
Modelo: HD S2 - 1 cámara
HD S2 - 2 cámaras

2928
SPA SPA
• ESTE PRODUCTO NO REEMPLAZA LA SUPERVISIÓN ADULTA RESPONSABLE: El monitor De video está diseñado para ser una ayuda y no
para sustituir la supervisión, responsable y adecuada de un adulto.
• FUENTE DE ALIMENTACIÓN: Este producto solo se debe utilizar con los adaptadores de alimentación de CA, suministrados por el
fabricante, como se incluye en este paquete.
• VENTILACIÓN: Este producto no debe usarse en una cama, sofá, alfombra o superficies similares que puedan bloquear la ventilación o
las aberturas de los altavoces, ni colocarse en áreas cerradas, estanterías o cajones que puedan impedir el flujo de aire. Nunca cubra el
producto con ropa, toallas, frazadas o cualquier otro articulo.
• ESTE PRODUCTO NO ES UN JUGUETE: Debe mantenerse fuera del alcance de los niños.
• MANTENGA ALEJADO DE FUENTES DE CALOR: Esta unidad no debe exponerse a fuentes de calor directas, como velas, estufas,
radiadores, calefactores u otros aparatos queemitan calor. La unidad no debe dejarse en la luz solar directa.
• BATERÍA: Antes de usar el producto, recomendamos que cargue completamente la batería de la Unidad de Padres, de forma que
continúe funcionando siempre que se desconecte la fuente de alimentación durante el transporte a otra ubicación.
• UBICACIÓN DE LA INSTALACIÓN: La ubicación de la instalación juega un papel importante para garantizar el funcionamiento correcto
del producto. Mantenga una distancia de al menos 5 pies de otros equipos electrónicos tales como hornos de microondas o
enrutadores Wi-Fi, a fin de evitar interferencias ondulatorias. Si esto ocurriese mueva las unidades de bebé y padres a otra ubicación.
• RANGO: El rango de todos los monitores del bebé siempre se mide en espacio abierto. El rango real podría ser más corto debido a
obstáculos ambientales (tales como muros de hormigón).
• DAÑOS QUE REQUIEREN REPARACIÓN: Este producto debe ser reparado únicamente por personal calificado.
• NO INTENTE ABRIR O REPARAR EL PRODUCTO: Si confronta algún problema, contacte su distribuidor autorizado.
• En caso de ruidos u olores inusuales, originados en el dispositivo, desconecte inmediatamente el producto de la toma de corriente y
contacte su distribuidor autorizado.
• Si el producto se ensucia, use un paño suave ligeramente humedecido para limpiar las superficies, cuidando de no dejar que entre
agua por ninguna abertura.
IMPORTANTE: El monitor de video de Babysense está diseñado sólo para escuchar la voz y ver las imágenes del bebé. Este producto no
es un dispositivo médico y no debe utilizarse como sustituto de supervisión adulta responsable. Es importante que vigile regularmente a
su bebé personalmente.
1. Advertencias e Instrucciones de Seguridad
Siga estas instrucciones de seguridad para evitar incendios, lesiones o daños en el producto.
• Lea y guarde las instrucciones: Es muy importante que lea todas las instrucciones de seguridad y operación antes de operar el monitor
de video de Babysense.
• Conserve el recibo de compra, ya que deberá presentarlo para servicio en garantia.
1.1 ADVERTENCIAS:
• PELIGRO DE ESTRANGULACIÓN: Los niños pueden enredarse en
cuerdas. Asegúrese de que la Unidad del Bebé, la Unidad de Padres
y los cables del adaptador de red estén, en todo momento, fuera
del alcance de su bebé u otros niños pequeños. Mantenga una
distancia mínima de 6 pies.
• PELIGRO DE AHOGO: Este producto contiene piezas pequeñas que
pueden causar asfixia. Tenga cuidado al desempacar y ensamblar
el producto y mantenga las partes pequeñas alejadas de los niños.
• RIESGO DE ASFIXIA: Mantenga todos los materiales de embalaje y
las láminas de plástico fuera del alcance de los niños.
• PELIGRO CON LOS CABLES DE ALIMENTACIÓN: Para evitar posibles
riesgos con los cables de alimentación, estos deben asegurarse y
nunca colgarse sobre la cuna ni cerca de ella. Nunca coloque la
Unidad del Bebé o la Unidad de Padres dentro de la cuna, la cama o el corralito de su bebé.
• NO MANIPULE BRUSCAMENTE, LO DEJE CAER NI ARROJE: La pantalla de video Babysense es un dispositivo electrónico de alta calidad
que debe manejarse con cuidado.
• Este producto está diseñado SÓLO PARA USO EN INTERIORES.
• AGUA Y HUMEDAD: El producto no debe exponerse a la lluvia, la humedad o salpicaduras de líquidos. Nunca use o coloque el producto
en o cerca de agua ni en ambientes húmedos.

3130
SPA SPA
1.2 Instrucciones de Seguridad para el Adaptador de Corriente de CA
• El adaptador no debe exponerse a fuentes de calor directas, tales como velas, estufas, radiadores, calefactores u otros aparatos que
emitan calor.
• Durante el uso continuo, los adaptadores de alimentación pueden calentarse al tacto. Esto es normal y no debe ser motivo de
preocupación.
• Examine la integridad del cable de alimentación y su enchufe.
• El adaptador debe manipularse con cuidado: no lo manipule bruscamente, lo deje caer ni arroje.
• Cuando retire el adaptador de corriente de la toma de corriente de la pared, sostenga y tire del receptáculo.
• No tire ni doble el cable, ya que eso ejercería una presión adicional sobre el cable y podría provocar daño.
• No toque el adaptador de corriente con las manos mojadas ni permita que se derramen líquidos sobre él.
• Asegúrese de que los cables estén fuera del alcance de su bebé u otros niños pequeños en todo momento. Para evitar posibles
riesgos con los cables de alimentación estos se deben asegurar y nunca colgarse sobre la cuna ni cerca de ella.
• No reemplace los enchufes o el cable de su adaptador de corriente. Este producto sólo se debe utilizer con los adaptadores de
alimentación de CA suministrados por el fabricante, como se incluye en este paquete.
• Nunca corte, dañe ni doble el cable de alimentación.
• No coloque ningún objeto encima del cable de alimentación, ya que podría causar sobrecalentamiento, daños, combustión y
electrocución.
• No deje el adaptador de corriente conectado a la toma de corriente cuando no esté enchufado a la Unidad del Bebé o de padres.
ADVERTENCIA:
• No reemplace el cable de alimentación con reemplazos no originales. La conexión incorrecta puede causar electrocución.
• No coloque el cable del adaptador de CA en ubicaciones de alto desgaste. Nunca use un cable deshilachado o defectuoso.
• Destinado sólo para uso en interiores.
1.3 Instrucciones de Seguridad para la batería de ión de Litio (Baterías no removible instalada)
• No intente reparar o ajustar ninguna de las funciones eléctricas o mecánicas de la unidad.
• No desmonte, corte, abra, aplaste, doble, perfore o triture celdas o baterías.
• Si la batería tiene fugas, no permita que el goteo líquido de una batería esté en contacto con la piel o los ojos. Si esto sucede, lave de
inmediato las áreas afectadas con agua y solicite asistencia médica.
• La batería no debe exponerse a la luz solar directa ni a fuentes de calor tales como velas, estufas, radiadores, rejillas de calefacción u
otros aparatos que emitan calor.
• No modifique, re manufacture o intente insertar objetos extraños en la batería. Tampoco la sumerja ni exponga al agua u otros líquidos.
Las baterías pueden explotar si están dañadas.
• Use únicamente el paquete de baterías suministrado con el producto o el mismo tipo, provisto por el fabricante o sus distribuidores
autorizados. El uso inadecuado o el uso de baterías no aprobadas pueden presentar un riesgo de incendio, explosión y otros peligros
que pueden invalidar la garantia.
• Si considera que la batería está dañada, retire el producto del cargador y deje de usarlo.
• Nunca use una batería dañada.
1.4 Información sobre la eliminación de y el producto
Siempre deseche el producto (con las baterías no removible instalada) al final de su vida útil
de una forma ambientalmente responsable y de acuerdo con los requisitos locales de
liquidación de desechos. Todos los materiales de embalaje de cartón y papel se deben reciclar según las regulaciones locales sobre
desechos.
Gracias por elegir el monitor de video Babysense de Hisense Ltd.

3332
SPA SPA
2.3 Descripción de la Unidad del Bebé
18. LEDes infrarrojos
19. Lentes
20. Sensor de luz (Visión nocturna)
21. LED de encendido
22. Luz nocturna
23. Micrófono
24. Sensor de temperature
25. Interruptor ON/OFF
26. Enchufe DC
27. Altavoz
28. Botón PAIR (emparejar)
2 Descripción General
2.1 Contenido del Paquete
• Unidad de Padres x 1
• Unidad del Bebé x 1 (x 2 en HD-S2 2 modelo con dos cámaras)
• Adaptador de corriente para el Reino Unido con enchufe UE de salida x 2 (x 3 en HD-S2 2 modelo con dos cámaras)
• Conjunto de montaje para pared x 1 (x 2 en HD-S2 2 modelo con dos cámaras)
• Manual del usuario x 1
2.2 Descripción de la Unidad de Padres
1. Botón de ENCENDIDO/APAGADO/DORMIR
2. LED de carga
3. LED de encendido
4. LEDes de nivel de volume
5. Botón Volumen Aumentar/Disminuir
6. Botón MENU/SALIDA
7. Luz de noche
8. Teclas de navegación
9. Botón OK/ZOOM
10. Botón “Responder”
11. Botón interruptor de cámara
12. Micrófono
13. Antena
14. Altavoz
15. Soporte
16. Enchufe DC
17. Botón de reinicio (Bajo el soporte)
Canción de cuna
VOX
Pantalla dividida
Cámara
Ajuste
Temp C/F
Temp
Formato de hora
Brillo
Temporizador
Alerta de volumen
Ajuste de frecuencia
Soporte a Clientes
Icono de luz nocturna

3534
SPA SPA
3. Primeros pasos
3.1 Alimentación de la Unidad del Bebé (Cámara)
• Conecte el adaptador de corriente de la cámara a la Enchufe DC (26) en la parte posterior de la Unidad
para Bebés. Conecte el adaptador de corriente de CA a la toma de corriente.
• Asegúrese de que el interruptor ON / OFF (25) esté en la posición ON
• La unidad se encenderá automáticamente y se encenderá el LED (3) verde de encendido .
• Use el Interruptor de ON / OFF (25) para apagar la Unidad del Bebé.
NOTA: Sólo utilice el adaptador de corriente de CA incluido en este paquete.
3.2 Alimentación de la Unidad de Padres
• Conecte el adaptador de corriente de la cámara a la Enchufe DC (16) en la parte derecha de la Unidad de Padres.
• Conecte el adaptador de corriente de CA a la toma de corriente.
• Presione y mantenga presionado el botón de Encendido (1) en el lado superior izquierdo de la Unidad de Padres durante 2 segundos
para encender la unidad.
• Una vez se encienda la Unidad de Padres, se encenderá el LED verde de encendido (3) y se mostrará el logotipo de “Babysense Video”
en la pantalla LCD.
• Presione y mantenga presionado el botón de Encendido (1) en el lado superior izquierdo de la Unidad de Padres durante 5 segundos
para apagar la unidad.
NOTA: Sólo utilice el adaptador de corriente de CA incluido en este paquete.
NOTA: La Unidad de Padres se entrega con una batería recargable de iones de litio incorporada
(3.7V 4000 mAh).
Nosotros recomendamos siempre que sea posible, mantenga la Unidad de Padres conectada a la red eléctrica a fin de mantener la
batería cargada.
3.3 Carga de la Unidad de Padres
• Conecte el adaptador de corriente de la cámara a la Enchufe DC (16) en la parte derecha de la Unidad de Padres.
• Conecte el adaptador de corriente de CA a la toma de corriente.
• El LED de carga (2), en la Unidad de Padres, se iluminará en ROJO para indicar que está cargando.
• Cuando se enciende la unidad, el icono de carga de la batería (barras de cambio) aparecerá en la esquina superior derecha de la
pantalla LCD.
• El indicador de batería llena (4 barras fijas = cargado) aparecerá en la esquina superior derecha de la pantalla, confirmando que
la batería está completamente cargada. El LED de carga (2) en la Unidad de Padres pasará a verde siempre que la batería esté
completamente cargada.
NOTA: Antes de usar el aparato por primera vez, o luego de un largo almacenamiento del producto, se recomienda cargar
completamente la Unidad de Padres. La carga completa de la batería tarda aproximadamente 8 horas.
NOTA: La pantalla puede funcionar normalmente durante el proceso de carga.
NOTA: Advertencia de batería baja - El ícono de la batería se vuelve rojo en la pantalla LCD para indicar que la batería está baja. La
advertencia se acompaña con un pitido de aviso que indica que la batería debe recargarse. *
* El volumen de alerta se puede ajustar en el menú de la unidad para padres, consulte los detalles en la sección Alerta de advertencia
“Configuración de volumen”
3.4 Instalación
• Una vez que las unidades del bebé y padres estén encendidas, la pantalla de la Unidad de Padresmostrará el video captado en la
Unidad/es del Bebé.
• La Unidad/ed del Bebé está emparejada con la Unidad de Padres por defecto. No hay necesidad de volver a vincular las unidades, a
menos que la Unidad del Bebé pierda enlace. Para renovar el emparejamiento de las unidades o emparejar una Unidad del Bebé nueva
o adicional, siga el procedimiento descrito en la Sección 4.1.
• La Unidad del Bebé debe colocarse a una distancia mínima de 6 pies de la cuna, sobre unasuperficie plana. También puede ser
montada en la pared.
• Nunca coloque la Unidad del Bebé dentro de la cuna, cama o corralito.
• Asegúrese de que la unidad, los cables y el adaptador de red estén fuera del alcance del bebé u otros niños pequeños.
• Para evitar un peligro de estrangulamiento, los cables de alimentación deben asegurarse y nunca deben colgarse sobre el bebé ni
cerca del mismo.
• Coloque el monitor de bebé en un lugar donde el aire pueda circular libremente y evite bloquear la ventilación y las aberturas del
altavoz.
• Apunte la(s) cámara(s) para optimizar mejor el área de visualización: seleccione la ubicación de la cámara para que proporcione una
vista clara del área que desea monitorear. La cámara debe estar libre de polvo, y nunca en la línea de visión de otra cámara o fuente
de luz directa. Evite instalar la cámara donde haya paredes gruesas u obstrucciones entre la cámara y la pantalla.
• Para usar la unidad de los padres y la del bebé juntos, debe poder establecer un enlace de radio Entre ambas; el rango puede ser
afectado por condiciones ambientales u obstáculos (Vea más detalles en la Sección de Sección 6 de resolución de problemas-
“Interferencia o mala recepción”).

3736
SPA SPA
NOTA: La configuración VOX está desactivada (OFF) por defecto.
Cuando el modo VOX se encuentre activo, el sonido detectado por cualquier cámara
accionará el display y mostrará la cámara respectiva.
Para cambiar el nivel de VOX, siga las siguientes instrucciones:
1. Presione para acceder al menú, seleccione y presione
2. Navegue con para seleccionar el nivel deseado
NOTA:
VOX -BAJO - De sensibilidad bajo - se requiere un nivel de sonoridad más alto para reactivar
la transmission.
VOX – MEDIO - Nivel de sensibilidad medio - se requiere un nivel de sonoridad medio para reactivar
la transmission.
VOX – ALTO -
Nivel de sensibilidad alto - se requiere un nivel de sonoridad bajo para reactivar la transmisión
VOX -OFF -
Transmisión constante - sin modo de espera.
NOTA: Para reanudar la señal de video y audio en su unidad para padres, cuando la función VOX está
activado, presiones brevemente cualquier tecla en la Unidad de padres.
4.3 Configuración de Pantalla Dividida (Split Screen)
Usted podrá ver imágenes de las dos dispositivos del bebé, una al lado de otra, al activar la
función Pantalla Dividida .
NOTA: Esta función solo está disponible cuando dos o más cámaras están emparejadas.
1. Presione para acceder al menú, seleccione y presione
2. Navegue con para seleccionar opción deseada
3. Presione para salir del menú
4. Operando el monitor
4.1 Configuración de la Canción de Cuna y Ruido Blanco
Puede calmar al bebé para que duerma tocando 5 canciones de cuna pre programadas. El aparato también cuenta con un sonido
de Ruido Blanco, que es una forma efectiva de calmar y adormecer a su recién nacido. La función Canción de Cuna y Ruido Blanco se
controla de forma remota desde la Unidad de Padres.
1. Presione para acceder al menú, seleccione y presione
2. Presione la canción de cuna que desea reproducir
3. Navegue con el para seleccionar la duración y volumen de
la música
4. Selecciones para detener la reproducción de la canción de
cuna
5. Presione para salir del menú
NOTA: Una vez que la función Canción de Cuna esté activada, el
icono de Canción de Cuna se mostrará en la parte superior de la
pantalla LCD.
La configuración por defecto de Canción de Cuna es OFF (desactivada).
Únicamente se reproducirán 5 melodías cuando seleccione el modo de reproducción continua.
No se incluye el sonido de fondo.
4.2 Modo VOX
En la función VOX, la transmisión de sonido y video se detendrá (modo de espera) si la
Unidad del Bebé no registra ningún sonido durante 30 segundos.
La pantalla LCD en modo de espera se apaga. Una vez que La Unidad del Bebé registre un sonido más alto que el nivel de sensibilidad
establecido, el sistema comenzará a transmitir automáticamente la señal (sonido y video) a la Unidad de Padres y la pantalla LCD se
encenderá.

3938
SPA SPA
4.6 Configuración de Escala de Temperatura
La lectura de temperatura del sensor de temperatura (24), en la parte posterior de la Unidad del Bebé, se mostrará en la parte superior de
la pantalla. Para cambiar entre °F (Fahrenheit) y °C (Celsius), siga las instrucciones a continuación:
1. Presione para acceder al menú, seleccione y presione
2. Presione - °F / °C y presione
3. Navegue con para seleccionar escala deseada
4. Presione el botón para confirmar
5. Presione para salir del menú
NOTA: El aparato tiene incorporado una alarma automática de temperatura y alertará (por
indicación visual) cuando la temperatura en la habitación del bebé sea demasiado alta (90
°F o más) o demasiado baja (55°F o menos).
NOTA: Asegúrese de que el sensor de temperatura no esté colocado demasiado cerca
del cuerpo de la cámara, ya que puede afectar la lectura correcta de la temperatura. Se recomienda colocar el sensor lo más alejado
posible del cuerpo de la cámara. Además, se recomienda instalar la cámara en un área donde haya buena circulación de aire y nunca en
esquinas donde la temperatura tiende a ser más alta.
4.7 Configuración de Alerta de Temperatura
Esta función le alertará si la temperatura de la recámara del bebé es muy baja o muy alta.
Configuración predeterminada: <15 °C/59 °F y 31 °C/89 °F>.
Para cambiar la configuración de alerta de temperatura, siga las instrucciones a
continuación:
1. Presione para acceder al menú, seleccione y presione
2. Presione y presione
3. Navegue con para seleccionar opción deseada
4. Presione para salir del menú
4.4 Emparejamiento de la Unidad del Bebé (Cámara) con la Unidad de Padres
La Unidad del Bebé ya viene emparejada con la Unidad de Padres de fábrica. No hay necesidad de volver a vincular las unidades a menos
que la Unidad del Bebés pierda enlace. Para renovar el emparejamiento de las unidades o emparejar una Unidad del Bebé nueva o
adicional, siga el procedimiento a continuación:
NOTA: Antes de comenzar el emparejamiento, asegúrese de tener las unidades del bebé y
padres una al lado de la otra al encenderlas.
1. Presione para acceder al menú, seleccione y presione
2. Navegue con para seleccione la cámara que desea emparejar
3. Presione para salir del menú
4.5 Supprimer une Unité Bébé (Caméra)
1. Presione para acceder al menú, seleccione y presione
2. Navegue con para seleccionar la cámara que desea eliminar
3. Presione para salir del menú

4140
SPA SPA
4.10 Configuración de Temporizador
1. Presione para acceder al menú, seleccione y presione
2. Presione y presione
3. Navegue con para seleccionar el tiempo deseado
4. Presione el botón para confirmar
5. Presione para salir del menú
4.11 Configuración de Volumen de Alerta de Advertencia
Esta configuración controla el volumen de un sonido de “bip” de audio que alerta cuando la unidad para padres tiene poca batería,
alerta de temperatura alta/baja o fuera de rango (sin conexión a la unidad para bebés). Puede establecer un nivel de volumen más bajo
durante la noche y más alto durante el día.
1. Presione para acceder al menú, seleccione y presione
2. Presione y presione
3. Navegue con para seleccionar el deseado volume de alerta
4. Presione para salir del menú
NOTA: Seleccionar la opción APAGADO apagará todas las alertas. En caso de batería baja,
temperatura alta/baja o conexión fuera de rango, no se escuchará ninguna advertencia
acústica.sera entendue.
4.8 Configuración de Hora y Formato de Hora.
Esta función le permite seleccionar el formato de hora y fijar la hora: 12H or 24H y fijar la hora.
1. Presione para acceder al menú, seleccione y presione
2. Presione y presione
3. Navegue con para seleccionar el formato deseado y configurar la hora
4. Presione para salir del menú
4.9 Ajuste de Brillo
1. Presione para acceder al menú, seleccione y presione
2. Presione y presione
3. Navegue con para seleccionar el brillo deseado
4. Presione para salir del menú

4342
SPA SPA
4.14 Luz Nocturna
El sistema cuenta con una luz nocturna integrada en la Unidad del Bebé
(22)
que puede ser activada de forma remota para proveer un
resplandor reconfortante en la habitación del bebé
• Presione Botón de la Unidad para Padres para elegir la intensidad de luz deseada.
NOTA:
El icono
de estado de la luz nocturna se mostrará en la parte superior de la pantalla LCD.
NOTE: La función de luz nocturna también se puede activar manualmente en la Unidad para Bebés. Presione brevemente el botón
EMPAREJAR
(28)
en la parte inferior de la Unidad para Bebés para alternar entre los niveles de intensidad.
4.15 Zoom Digital
Este vigilabebés cuenta con dos niveles de zoom: x2 and x4.
Presione botón una vez para activar la opción de zoom “x2”
Presione botón dos veces para activar la opción de zoom “x4”
Presione botón nuevamente para salir de la opción de zoom
NOTA: Esta función no está disponible cuando el modo Pantalla Dividida está activado.
4.16 Alternación entre las unidades del bebé emparejadas (Cámaras)
NOTA: Esta función solo está disponible cuando se emparejan dos o más cámaras.
• Para cambiar entre cámaras emparejadas, presione brevemente el Botón interruptor de cámara
(11)
en su Unidad para Padres.
4.12 Configuración de Frecuencia
Esta función le permite elegir el formato de frecuencia deseado 60Hz (para US) O 50Hz (para UE)
1. Appuyez pour accéder au menu, sélectionnez puis appuyez
2. Appuyez 50Hz/60Hz et appuyez sur
3. Naviguez pour sélectionner choix de l’échelle
4. Appuyez pour quitter le menu
4.13 Ajustes de Volumen
Presione los Botóns Volume Aumentar/Disminuir (5) para aumentar/reducir el sonido proveniente del dispositivo parental.
NOTA: Se recomienda utilizar un nivel de volumen 3 o inferior para uso normal. Los niveles de volumen más altos están diseñados para
ambientes ruidosos.
NOTA: Si se configura el volumen de la unidad parental a un nivel alto y las unidades parental y del bebé se encuentran cerca la una de
la otra, puede escucharse un sonido agudo (también conocido como ruido de retroalimentación

4544
SPA SPA
6.Résolution des Problems
4.17 Modo de escaneo - Alternación automática entre las unidades del bebé
emparejadas (Cámaras)
Puede establecer el modo ESCANEAR loop (circuito) para mostrar cada Unidad del Bebé emparejada en la pantalla durante 15 segundos.
La pantalla cambiará automáticamente a la siguiente Unidad del Bebé emparejada.
• Presione y mantenga el botón interruptor de cámara
(11)
para activar el modo de ESCANEADO automático. El mensaje SCAN MODE ON
aparecerá en la pantalla y un símbolo circular se mostrará junto al número de la cámara, en la parte superior de la pantalla LED.
• Presione el botón del interruptor de la cámara
(11)
para desactivar el modo SCAN automático.
4.18 Hablar con el Bebé
• Presione y mantenga en la Unidad de Padres para hablar con su bebé o con su pareja en la habitación del bebé.
• Suelte el botón cuando haya terminado de hablar.
NOTA: Mientras se utiliza la función “Hablar con el bebé”, no es posible escuchar los sonidos de la unidad para bebés. Al soltar el botón de
hablar, uno puede volver a escuchar los sonidos de la habitación del bebé.
4.19 Pantalla de la unidad principal ON/OFF (modo de solo audio)
• Pulse el botón POWER (1) para encender/apagar la pantalla LCD
5. Mantenimiento
Todos los procedimientos de mantenimiento siguientes deben realizarse sólo cuando las unidades del bebé y de padres están
desenchufadas de la toma de corriente.
• Limpie las superficies de las unidades del bebé y de padres con un paño suave y sin pelusa.
• Nunca use detergentes o disolventes.
• Si las unidades se ensucian, use un paño ligeramente humedecido para limpiar las superficies, teniendo cuidado de no dejar pasar
agua por ninguna abertura.
Posible causa y soluciónProblema
• Los adaptadores de potencia pueden no estar conectados correctamente.
• Asegúrese de que las unidades del bebé y de padres estén ON (ENCENDIDAS).
• Ajuste la antena del aparato en posición vertical.
• Asegúrese de que las unidades del bebé y de padres no estén demasiado lejos la una de la otra.
• Las unidades del bebé y de padres pueden no estar emparejadas adecuadamente.
Siga las instrucciones de EMPAREJAMIENTO.
Sin recepción en la Unidad
• Coloque la Unidad del Bebé más cerca de la Unidad de Padres.
• Algunos dispositivos de 2,4 GHz, como redes inalámbricas (enrutadores de Wi-Fi), sistemas
Bluetooth u hornos de microondas pueden causar interferencia. Mantenga el sistema alejado al
menos a 5 pies (1,5 m) de tales articulos o apáguelos si parece que están causando interferencia.
• Las unidades del bebé o de padres pueden estar demasiado cerca de objetos metálicos.
• La carga de la batería puede estar demasiado baja.
Interferencia o mala recepción
• Reinicie la Unidad del Bebé (desenchufe el adaptador de alimentación de la toma de corriente, espere
aproximadamente 5 segundos y vuelva a enchufar a la toma de corriente).
• Reinicie la Unidad de Padres al presionar el botón de reinicio (17), localizado en la parte posterior de la
unidad parental, bajo el soporte.
Imagen congelada en la
Unidad de Padres
• Las unidades del bebé y de padres pueden estar demasiado cerca una de
Se escucha un sonido
estridente (ruido de
• Las unidades del bebé y de padres pueden estar demasiado cerca una de la otra. Sepárelas más.
• El volumen en la Unidad de Padres puede estar demasiado alto. Baja el volumen
retroalimentación, ruido
estático)

4746
SPA SPA
7.Especificaciones
IMPORTANTE: Si la guía de solución de problemas anterior no le ayuda a resolver su problema, contacte nuestro servicio al cliente a través
de:
Email - [email protected]
Hisense telephone number - 972-3-9566604
Posible causa y soluciónProblema
• La configuración del volumen en la Unidad de Padres puede estar demasiado baja. Aumente el
volumen.
• La carga de la batería puede estar demasiado baja. Recargue la batería.
No se pueden escuchar
los sonidos del bebé en la
Unidad de Padres
• Si el entorno alrededor de la Unidad de Padres es tranquilo, reduzca el volumen de la Unidad de
Padres al nivel 3 o menos.
• Si el entorno alrededor de la Unidad de Padres es ruidoso, aumente el volumen al nivel máximo.
Ruidos de fondo
• El modo automático de visión nocturna puede estar activado. Encienda las luces de la habitación
para forzar el monitor a salir del modo de visión nocturna.
La imagen es en blanco
y negro
• La lente está sucia. Siga el procedimiento de mantenimiento
• Confirme que los adaptadores de alimentación estén conectados correctamente.
• Reinicie la Unidad de Padres al presionar el botón de reinicio (17), localizado en la parte posterior de la
Unidad parental, bajo el soporte.
Líneas o marcas en la
pantalla
• Es posible que el adaptador de alimentación esté conectado incorrectamente.
• Cambie a otra toma de corriente.
• Alternar entre los adaptadores de la Unidad del bebé y la Unidad Parental.
La batería no se carga o
no se enciende la luz de
carga
• HD S2Product Model
• 2.4GHz FHSSFrecuencia
• GFSKTipo de modulación
• 4 MbpsVelocidad de datos
• 3.5 MHzAncho de banda
• Up to 960 feet / 350 meters (espacio abierto – sin obstáculos)Rango de transmisión
• 5V, 1.0A;Voltaje de alimentación
• Input: 100-240VAC 50 / 60Hz, 200mA Max;
• Output: 5V, 1.0A;
Adaptador de alimentación
• 5.0” TFT LCD (1280*720 pixel)Pantalla LCD
• Model: YB905560
• 3.7V, 4000 mAh
Batería recargable (incorporada en la Unidad de Padres)
• Aprox. hasta 20 horas (VOX activado)
• hasta 12 horas (monitor encendido)
Tiempo de funcionamiento con la batería cargada
completamente (Unidad de Padres)
* Toma aproximadamente 8 horas cargar la batería
completamente.
• 18dBm MPotencia de transmisión
• 1/4” Color CMOSTipo de sensor de imagen
• 940nmTipo de LED IR
• Solamente para uso en interiores; Temperatura:
32-104 ° F / 0-40 ° C
• Humedad: 5% a 90% hr. (humedad relativa)
Ambiente de operación

48
SPA
8. Condiciones de Garantia
Tomamos la calidad muy en serio Esta es la razón por la cual todos nuestros productos tienen garantia de un año contra defectos de mano
de obra y materiales a partir de la fecha de compra original. Para consultas sobre la garantia o apoyo técnico, consulte nuestro Servicio de
Atención al Cliente:
9. Asistencia al Cliente
Si tiene algún problema para configurar o usar este producto, encontrará información y consejos útiles en la sección Solución de Problemas
de esta guía de usuario.
Si tiene más preguntas sobre el uso del producto, después de revisar los recursos mencionados anteriormente, o si desea comprar piezas
de repuesto y accesorios, comuníquese con nosotros a través de:
Email - [email protected]
Hisense telephone number - 972-3-9566604
NOTA:
Usted siempre podrá encontrar nuestros detalles de contacto en el menú de configuración de su Unidad Parental.
1. Presione para acceder al menú, seleccione y presione
2. Presione y presione
3. Presi
one para salir del menú
IMPORTANTE:
Conserve el recibo de compra y adjúntelo a la última página de esta guía de usuario, ya que deberá
presentarlo si se requiere servicio de garantia.
V.INT.UG.01.HD-S2(US-UK).06.23

HD S2
For any product related question please contact us at
www.babysensemonitors.com | www.hisense.co.il
Hisense Ltd. 27 Shaked St.
Hevel Modi’in Industrial Park,
7319900 ISRAEL | 972-3-9566604
-
 1
1
-
 2
2
-
 3
3
-
 4
4
-
 5
5
-
 6
6
-
 7
7
-
 8
8
-
 9
9
-
 10
10
-
 11
11
-
 12
12
-
 13
13
-
 14
14
-
 15
15
-
 16
16
-
 17
17
-
 18
18
-
 19
19
-
 20
20
-
 21
21
-
 22
22
-
 23
23
-
 24
24
-
 25
25
-
 26
26


BabySense HD S2 Manual de usuario
- Categoría
- Monitores de video para bebés
- Tipo
- Manual de usuario
en otros idiomas
- English: BabySense HD S2 User manual
Artículos relacionados
Otros documentos
-
Angelcare AC315 El manual del propietario
-
Sytech BABYLINK510 Manual de usuario
-
-
Angelcare AC517 El manual del propietario
-
Alecto DVM-64 El manual del propietario
-
 Philips AVENT SCD630 Manual de usuario
-
 Avent SCD630/37 Manual de usuario
-
 Avent SCD843/37 Manual de usuario


