Pioneer PLX-500-K Manual de usuario
- Categoría
- Tocadiscos de audio
- Tipo
- Manual de usuario

PLX-500-K
PLX-500-W
TURNTABLE
PLATINE VINYLE
PLATTENSPIELER
GIRADISCHI
DRAAITAFEL
GIRADISCOS
GIRADISCOS
ПРОИГРЫВАТЕЛЬ
ВИНИЛОВЫХ ДИСКОВ
Operating Instructions
Mode d’emploi
Bedienungsanleitung
Istruzioni per l’uso
Handleiding
Manual de instrucciones
Manual de instruções
Инструкции по эксплуатации
http://pioneerdj.com/support/
The Pioneer DJ site shown above offers FAQs, information on software, and various other types of information
and services to allow you to use your product in greater comfort.
Le site Pioneer DJ indiqué ci-dessus propose une FAQ, des informations sur le logiciel et divers types
d’informations et de services qui permettent une utilisation plus confortable de ce produit.
Die oben angegebene Pioneer DJ-Website enthält häufig gestellte Fragen, Informationen über Software und
andere wichtige Informationen und Dienste, die Ihnen helfen, Ihr Produkt optimal zu verwenden.
Il sito Pioneer DJ indicato qui sopra offre una sezione FAQ, informazioni sul software ed informazioni e servizi
di vario tipo, per permettere un uso più confortevole dei nostri prodotti.
Op bovengenoemde Pioneer DJ website vindt u FAQ’s, informatie over software, en andere informatie en
diensten voor nog meer gebruiksgemak van uw product.
El sitio de Pioneer DJ indicado más arriba tiene una sección con las preguntas más frecuentes, y además
ofrece información del software y varios tipos de información y servicios para que usted pueda usar su
producto con la mayor comodidad.
O site da Pioneer DJ mostrado acima oferece FAQs, informações sobre o software e outros tipos de
informações e serviços para permitir utilizar o produto com um maior conforto.
Указанный выше сайт Pioneer DJ содержит ответы на часто задаваемые вопросы, информацию о
программном обеспечении и различную другую информацию, а также предлагает услуги, чтобы вы
могли с большим комфортом пользоваться приобретенным изделием.
РусскийPortuguêsEspañol
FrançaisDeutsch ItalianoEnglish Nederlands

En
2
Voltage selector
You can find the voltage selector switch on the top
panel of multi-voltage models.
The factory setting for the voltage selector is
220-240 V. Please set it to the correct voltage for
your country or region.
Before changing the voltage, disconnect the AC power
cord. Use a medium size screwdriver to change the
voltage selector switch.
D3-4-2-1-5*_A2_En
CAUTION
TO PREVENT THE RISK OF ELECTRIC SHOCK, DO NOT
REMOVE COVER (OR BACK). NO USER-SERVICEABLE
PARTS INSIDE. REFER SERVICING TO QUALIFIED
SERVICE PERSONNEL.
D3-4-2-1-1_B1_En
WARNING
This equipment is not waterproof. To prevent a fire or
shock hazard, do not place any container filled with
liquid near this equipment (such as a vase or flower
pot) or expose it to dripping, splashing, rain or
moisture.
D3-4-2-1-3_A1_En
WARNING
To prevent a fire hazard, do not place any naked flame
sources (such as a lighted candle) on the equipment.
D3-4-2-1-7a_A1_En
Operating Environment
Operating environment temperature and humidity:
+5 °C to +35 °C (+41 °F to +95 °F); less than 85 %RH
(cooling vents not blocked)
Do not install this unit in a poorly ventilated area, or in
locations exposed to high humidity or direct sunlight (or
strong artificial light).
D3-4-2-1-7c*_A2_En
CAUTION
The POWER switch on this unit will not completely
shut off all power from the AC outlet. Since the power
cord serves as the main disconnect device for the
unit, you will need to unplug it from the AC outlet to
shut down all power. Therefore, make sure the unit
has been installed so that the power cord can be
easily unplugged from the AC outlet in case of an
accident. To avoid fire hazard, the power cord should
also be unplugged from the AC outlet when left
unused for a long period of time (for example, when
on vacation).
D3-4-2-2-2a*_A1_En
This product is for general household purposes. Any
failure due to use for other than household purposes
(such as long-term use for business purposes in a
restaurant or use in a car or ship) and which requires
repair will be charged for even during the warranty period.
K041_A1_En
POWER-CORD CAUTION
Handle the power cord by the plug. Do not pull out the
plug by tugging the cord and never touch the power
cord when your hands are wet as this could cause a
short circuit or electric shock. Do not place the unit, a
piece of furniture, etc., on the power cord, or pinch the
cord. Never make a knot in the cord or tie it with other
cords. The power cords should be routed such that they
are not likely to be stepped on. A damaged power cord
can cause a fire or give you an electrical shock. Check
the power cord once in a while. When you find it
damaged, ask your nearest service center or your
dealer for a replacement. S002*_A1_En
If you want to dispose this product, do not mix it with general household waste. There is a separate collection system for used
electronic products in accordance with legislation that requires proper treatment, recovery and recycling.
Private households in the member states of the EU, in Switzerland and Norway may return their used electronic products free of charge to
designated collection facilities or to a retailer (if you purchase a similar new one).
For countries not mentioned above, please contact your local authorities for the correct method of disposal.
By doing so you will ensure that your disposed product undergoes the necessary treatment, recovery and recycling and thus prevent potential
negative effects on the environment and human health.
K058b_A1_En
VENTILATION CAUTION
When installing this unit, make sure to leave space around
the unit for ventilation to improve heat radiation (at least
15 cm at top, 5 cm at rear, and 5 cm at each side).
WARNING
Slots and openings in the cabinet are provided for
ventilation to ensure reliable operation of the product,
and to protect it from overheating. To
prevent fire hazard,
the openings should never be blocked or covered with
items (such as newspapers, table-cloths, curtains) or by
operating the equipment on thick carpet or a bed.
D3-4-2-1-7b*_A1_En

En
3
NOTE:
This equipment has been tested and found to comply with the limits for a Class B digital device, pursuant to Part 15
of the FCC Rules. These limits are designed to provide reasonable protection against harmful interference in a
residential installation. This equipment generates, uses, and can radiate radio frequency energy and, if not installed
and used in accordance with the instructions, may cause harmful interference to radio communications. However,
there is no guarantee that interference will not occur in a particular installation. If this equipment does cause
harmful interference to radio or television reception, which can be determined by turning the equipment off and on,
the user is encouraged to try to correct the interference by one or more of the following measures:
— Reorient or relocate the receiving antenna.
— Increase the separation between the equipment and receiver.
— Connect the equipment into an outlet on a circuit different from that to which the receiver is connected.
— Consult the dealer or an experienced radio/TV technician for help.
D8-10-1-2_A1_En
Information to User
Alterations or modifications carried out without appropriate authorization may invalidate the user’s right to operate
the equipment.
D8-10-2_A1_En
For other areas
FEDERAL COMMUNICATIONS COMMISSION DECLARATION OF CONFORMITY
This device complies with part 15 of the FCC Rules. Operation is subject to the following two conditions: (1) This
device may not cause harmful interference, and (2) this device must accept any interference received, including
interference that may cause undesired operation.
Product Name: TURNTABLE
Model Number: PLX-500-K, PLX-500-W
Responsible Party Name: PIONEER ELECTRONICS (USA) INC.
SERVICE SUPPORT DIVISION
Address: 1925 E. DOMINGUEZ ST. LONG BEACH, CA 90810-1003, U.S.A.
Phone: 1-800-421-1404
URL: http://www.pioneerelectronics.com
D8-10-4*_C1_En
English

En
4
Contents
How to read this manual
! Thank you for buying this Pioneer DJ product.
Be sure to read this booklet, which includes important information
that you must understand before using this product.
After you have finished reading the instructions, put them away in a
safe place for future reference.
! In this booklet, the names of the buttons and terminals of the main
unit appear in square brackets ([ ]).
Examples:
Press the [START/STOP] button.
Before start
Features ....................................................................................................... 5
What’s in the box ........................................................................................ 5
Before you start
Installing rekordbox (Mac/Windows) ........................................................ 6
Assembly ..................................................................................................... 6
Part names and functions
Top panel ..................................................................................................... 8
Rear panel ................................................................................................... 9
Adjustment
Adjusting the tone arm balance .............................................................. 10
Adjusting the stylus pressure .................................................................. 10
Adjusting anti-skating .............................................................................. 11
Adjusting the arm lifter height ................................................................ 11
Adjusting the arm height ......................................................................... 11
Connections
Connecting to powered speakers............................................................ 12
Connecting to a pre-main amplifier and component ............................ 12
Connecting to a DJ mixer ......................................................................... 13
Connecting with a computer ................................................................... 13
Place of installation .................................................................................. 13
Adjusting the height of the main unit ..................................................... 13
Operation
Turning the power on ............................................................................... 14
Turning the power off ............................................................................... 14
Playback .................................................................................................... 14
Pausing playback...................................................................................... 14
Finishing playback .................................................................................... 14
Adjusting the pitch ................................................................................... 14
Displaying a record jacket ....................................................................... 14
To play a standard EP record ................................................................... 15
Illuminating the stylus tip ........................................................................ 15
Recording .................................................................................................. 15
Replacing the stylus ................................................................................. 15
Changing the cartridge ............................................................................ 15
Additional information
Troubleshooting ........................................................................................ 16
Cautions on use ........................................................................................ 16
Maintenance of each part ........................................................................ 16
About trademarks and registered trademarks ...................................... 17
Specifications............................................................................................ 17

En
5
English
Before start
Features
This unit is a high-torque direct drive turntable that can be enjoyed in a
variety of applications ranging from home listening to DJing.
High-quality analog record sound
The path from the stylus tip to the PHONO/LINE output has been
designed as the shortest to faithfully reproduce the original sound qual-
ity of analog records.
Furthermore, since not only PHONO output but also LINE output is sup-
ported, you can easily enjoy high quality analog record sound by simply
directly connecting with powered speakers.
Easy digital recording
A USB-B terminal is provided so you can directly connect this unit and
a PC or Mac and then record analog record sound sources to the PC or
Mac by converting them to data. Digital recording with simple operation
can be performed by using the recording function of the free music man-
agement application “rekordbox” (Ver.4.2.1 or later) when recording.
DJ performance capable direct-drive
turntable
The adoption of a high-torque direct-drive system means you can per-
form track mixing, scratching, and other DJ performances by combining
two of these units with a DJ mixer.
Dust cover that can serve as a stand for a
record jacket
A record jacket can be displayed on the dust cover while the dust cover
is in an open state. This allows you to enjoy analog record sound while
looking at the record jacket.
What’s in the box
! Turntable
! Slip mat
! Dust cover
! Adapter for EP record
! Balance weight
! Headshell (cartridge included)
! Shell weight
! Power cord
! USB cable
! Audio adapter cable (Stereo pin plug (female) to stereo mini plug
(male))
! Warranty (for some regions)
1
! Operating instructions (this document)
1 The included warranty is for the European region.
WARNING
Store small parts out of the reach of children and
infants. If accidentally swallowed, contact a doctor
immediatel
y.
D41-6-4_A1_En

En
6
Before you start
Installing rekordbox (Mac/Windows)
1 Access rekordbox.com.
https://rekordbox.com/en/store/
! The page content is subject to change without notice.
2 Check the Get Started guide and then click [Free to
Download].
3 Carefully read the Software End User License
Agreement and select the [Agree] check box if you
agree.
When you select the check box, [Download] becomes clickable.
4 Click [Download].
Downloading of rekordbox (Mac/Windows) starts.
5 Double-click the downloaded file to unzip it.
6 Double-click the unzipped file to launch the installer.
7 Carefully read the Software End User License
Agreement, and continue with the installation according
to the instructions on the screen if you agree.
! If you do not agree to the contents of the Software End User License
Agreement, cancel the installation.
8 When the installation completion screen appears,
follow the instructions on the screen to close the
installer.
The installation is now complete.
! To use rekordbox dj, rekordbox dvs, and rekordbox video, activation
(license authentication) is required. For details, see the rekordbox
Operating Instructions.
https://rekordbox.com/en/support/manual.php
Assembly
1 Attach the turntable and slip mat.
Set the turntable on the center spindle and place the slip mat on top of
the turntable.
! Be careful not to hit the turntable on the main unit or drop it.
Turntable
Center spindle
Slip mat
2 Attach the headshell.
Insert the headshell with attached cartridge into the tone arm. Next,
while keeping the headshell horizontal, tighten the lock nut.
Lock nut

En
7
English
! Before use, remove the stylus cover without touching the stylus tip.
Stylus cover
3 Attach the balance weight.
Attach the balance weight to the rear shaft of the tone arm.
Balance weight
Attach the dust cover.
Insert the hinges of the dust cover into the holders at
the rear panel of this unit.
When removing the dust cover, pull the hinges up outward while the
dust cover is in an open state.
Hinge
Holder

En
8
Part names and functions
Top panel
1
2 3 45 6
c
d
e
f
ghij
a9
7
b
8
1 POWER switch
When turning the switch to the [ON] side, the power is turned on and
the strobe illuminator on the side lights.
= Turning the power on (p. 14 )
Turning the power off (p. 14 )
2 START/STOP button
Pressing the button starts or stops rotation of the turntable.
= Playback (p. 14 )
3 Speed change button
Changes the speed according to the record to be played.
! For a 33 1/3 rpm record, press the [33] button.
! For a 45 rpm record, press the [45] button.
! For a 78 rpm record, press the [33] button and [45] button at the
same time.
= Playback (p. 14 )
4 Stylus illuminator
Lights to illuminate the stylus tip.
= Illuminating the stylus tip (p. 15 )
5 Stylus illuminator switch
The stylus illuminator lights in white and ascends to the position at
which the stylus tip is illuminated.
= Illuminating the stylus tip (p. 15 )
6 Headshell
7 TEMPO slider
You can slide back and forth to perform fine adjustment of the rota-
tion speed.
= Adjusting the pitch (p. 14 )
8 Tone arm
= Adjustment (p. 10 )
9 Arm clamper
Clamps the tone arm.
a Arm rest
Serves as the support base for the tone arm.
b Lifter lever
The tone arm goes up when the lever is pulled up. The tone arm goes
down when the lever is pushed down.
c Arm lifter
This device is used to move the tone arm up and down. It is operated
by the lifter lever.
d ANTI SKATING dial
When a record is played, there is power to pull the stylus tip toward
the inner perimeter. By matching this dial to the stylus pressure
value, that power is eliminated.
= Adjusting anti-skating (p. 11 )
e HEIGHT ADJUST lock
Locks the adjusted height of the arm.
= Adjusting the arm height (p. 11 )
f HEIGHT ADJUST dial
Used to adjust the height of the tone arm.
= Adjusting the arm height (p. 11 )
g Balance weight
Used to balance the tone arm and adjust the stylus pressure.
= Adjustment (p. 10 )
h Stylus pressure adjustment ring
Used to match to the appropriate stylus pressure of the cartridge.
= Adjusting the stylus pressure (p. 10 )
i Headshell stand
Used to stand the headshell up.
j Adapter for EP record
Used to play standard EP records.
= To play a standard EP record (p. 15 )

En
9
English
Rear panel
3
12
4 5
1 PHONO/LINE switch
Switches the level of the sound output from the unit.
— [PHONO]: Select this when the unit is connected with a device
that supports phono level input, such as a pre-main amplifier or
component.
— [LINE]: Select this when the unit is connected with a device that
supports line level input, such as a powered speakers.
CAUTION
Do not connect the unit with a device that supports phono level input
while the PHONO/LINE switch is in the [LINE] state.
2 USB terminal
Connect the USB cable (included) here.
= Connecting with a computer (p. 13 )
3 Audio cable
= Connections (p. 12 )
4 AC IN
Connects to a power outlet using the included power cord. Wait until
all connections between the equipment are completed before con-
necting the power cord.
! Be sure to use the included power cord.
5 Insulator
Suppresses the effect of outside vibration. Turning the insulator
adjusts the turntable height.
= Adjusting the height of the main unit (p. 13 )

En
10
Adjustment
Adjusting the tone arm balance
Because the cartridge and headshell weights differ depending on the
product, the balance of the tone arm is adjusted.
Prepare as follows.
! Remove the stylus cover and arm clamper while paying attention not
to touch the stylus tip.
! Push down the lifter lever.
! Set the [ANTI SKATING] dial to “0”.
Keep the tone arm from the arm rest and adjust the
balance so it is horizontal.
Turn the balance weight until the tone arm becomes almost horizontal.
! When moving the tone arm, make sure that the stylus tip does not
directly touch the turntable and the like.
Adjusting the stylus pressure
To prevent stylus jumping or sound distortion, the stylus pressure is
adjusted to the appropriate stylus pressure value determined for each
cartridge.
The appropriate stylus pressure value for the included cartridge is from
3.0 g to 4.0 g.
Prepare as follows.
! Return the tone arm to the arm rest and secure with the arm clamp.
1 Match the “0” on the stylus pressure adjustment ring
to the center line of the arm rear shaft.
While using your finger to hold the balance weight to keep it from mov-
ing, turn only the stylus pressure adjustment ring so that the number “0”
comes to the black center line of the tone arm rear shaft.
Center line
2 Adjust the stylus pressure.
Turn the balance weight to adjust to the appropriate stylus pressure
value for your cartridge.
! When turning the balance weight, the stylus pressure adjustment
ring turns together. While observing the adjustment ring, adjust the
stylus pressure to the appropriate value.
Center line

En
11
English
Adjusting anti-skating
This adjustment is made to prevent stylus jumping.
Match to the same scale position as the stylus pressure
value.
Turn the [ANTI SKATING] dial to match the reference line to the same
value as the cartridge stylus pressure value.
When scratch play is performed
To prevent stylus jumping, adjust the scale position to match the play
action.
Adjusting the arm lifter height
When using other than the included cartridge, adjust this to match the
cartridge to be used.
Prepare as follows.
! A record is placed on a slip mat.
! Remove the stylus cover and arm clamper while paying attention not
to touch the stylus tip.
! Pull up the lifter lever and move the tone arm onto the record.
Adjust the height by turning the screw while the arm
lifter is pushed down.
— Turing clockwise narrows the distance between the record and
stylus.
— Turing counterclockwise widens the distance between the record
and stylus.
! The arm lifter height (the distance between the record and stylus
when the lifter lever is pulled up) is factory-adjusted in a range
between approximately 8 mm and 13 mm.
Screw
Arm lifter
Adjusting the arm height
When using the included cartridge, the “0” position is appropriate.
When using other than the included cartridge, adjust this to match the
cartridge to be used.
1 Turn the [HEIGHT ADJUST] lock to unlock the lock.
Unlock
2 Push down the lifter lever and place the stylus on the
record, then adjust the [HEIGHT ADJUST] dial to make
the tone arm and record parallel.
Adjust so that the tone arm becomes horizontal.
[
HEIGHT ADJUST
] dial
3 Turn the [HEIGHT ADJUST] lock to fix the height of
the arm.
After adjusting height of the arm, always turn the [HEIGHT ADJUST]
lock to fix the arm.

En
12
Connections
! Be sure to turn off the power and unplug the power cord from the power outlet whenever making or changing connections.
! Refer to the operating instructions for the component to be connected.
! Connect the power cord after all the connections between devices have been completed.
Connecting to powered speakers
Powered speakers
Audio cable
Rear panel
Power cord
To power outlet
1 Set the [PHONO/LINE] switch to [LINE].
2 Connect the audio cable to the [LINE] input terminal of the powered speakers, etc.
! If necessary, use the included audio adapter cable.
3 Connect the power cord.
Connects to a power outlet using the included power cord. Wait until all connections between the equipment are completed before connecting the
power cord.
Connecting to a pre-main amplifier and component
Pre-main amplifier, component, etc.
Audio cable
Rear panel
Power cord
To power outlet
1 Set the [PHONO/LINE] switch to [PHONO].
2 Connect the audio cable to the [PHONO] input terminal of the pre-main amplifier or other component.
! If this product is connected to a pre-main amplifier or component that does not have a [PHONO] terminal, sufficient volume and sound quality
cannot be obtained. In that case, set the [PHONO/LINE] switch of this unit to [LINE] and then connect this unit to the [LINE] input terminal of the
pre-main amplifier or component or use a phono equalizer.
3 Connect the power cord.
Connects to a power outlet using the included power cord. Wait until all connections between the equipment are completed before connecting the
power cord.

En
13
English
Connecting to a DJ mixer
Turntable
DJ Mixer
Audio cable
Audio cable
Rear panel
Power cord
To power outlet
1 Set the [PHONO/LINE] switch to [PHONO].
2 Connect the audio cable to the [PHONO] input terminal of the DJ mixer.
! If this product is connected to a DJ mixer that does not have a [PHONO] input terminal, sufficient volume and sound quality cannot be obtained. In
that case, set the [PHONO/LINE] switch of this unit to [LINE] and then connect the unit to the [LINE] input terminal of the DJ mixer.
3 Connect the power cord.
Connects to a power outlet using the included power cord. Wait until all connections between the equipment are completed before connecting the
power cord.
Connecting with a computer
USB driver software is not required for this unit.
= Recording (p. 15 )
Rear panel
USB cable
Computer
To power outlet
Power cord
1 Connect the USB cable to a USB port on the computer.
2 Connect the power cord.
Connects to a power outlet using the included power cord. Wait until all connections between the equipment are completed before connecting the
power cord.
Place of installation
Place the unit on a level surface that is free of external vibration.
! To the extent possible, keep the unit away from the speaker system.
! When the unit is very close to a radio (AM/FM broadcasting), the
radio could generate noise. Keep the distance as far away from the
unit as possible.
Adjusting the height of the main
unit
Adjust the height by turning the insulator in a way that the main unit is
horizontal.

En
14
Operation
Turning the power on
1 Make all the connections, then plug the power cord
into a power outlet.
= Connections (p. 12 )
2 Change the [POWER] switch to the [ON] side to turn
on the power of the unit.
This unit’s indicators light and the power turns on.
Turning the power off
Change the [POWER] switch to the [OFF] side to turn off
the power of the unit.
This unit’s power turns off.
Playback
Prepare as follows.
! Place a record on the turntable.
! Remove the stylus cover and arm clamper.
1 Change the [POWER] switch to the [ON] side to turn
on the power of the unit.
2 Select the rotation speed to match the record to be
played by pressing a speed change button.
3 Press the [START/STOP] button.
The turntable rotates.
4 Pull up the lifter lever and move the tone arm onto
the record.
5 Push down the lifter lever.
The tone arm slowly descends and playback begins.
Pausing playback
Pull up the lifter lever.
The stylus of the cartridge lifts away from the record.
! To resume playback, push down the lifter lever.
Finishing playback
1 Pull up the lifter lever to return the tone arm to the
arm rest and then push down the lifter lever.
2 Press the [START/STOP] button.
The turntable stops smoothly.
3 Change the [POWER] switch to the [OFF] side to turn
off the power of the unit.
Use the arm clamper to secure the tone arm.
To protect the stylus tip, attach the stylus cover.
Close the dust cover.
Adjusting the pitch
Move the [TEMPO] slider forward or backward.
Moving the slider forward increases the rotation speed and moving it
backward decreases the rotation speed.
! When the [TEMPO] slider is at the center, the indicator lights in
yellow-green and the rotation speed becomes the specified rpm
(33 1/3 rpm, 45 rpm, or 78 rpm).
! The scale of the [TEMPO] slider is a rough value. Please use it as a
guide.
! You can confirm that the rotation speed has become the specified
rpm by looking at the four rows of strobe patterns inscribed around
the turntable.
Strobe pattern
1 When the strobe pattern appears stopped, 33 1/3 rpm (50 Hz power
supply)
2 When the strobe pattern appears stopped, 45 rpm (50 Hz power
supply)
3 When the strobe pattern appears stopped, 33 1/3 rpm (60 Hz power
supply)
4 When the strobe pattern appears stopped, 45 rpm (60 Hz power
supply)
! A strobe illuminator (red LED light) is used to illuminate the strobe
pattern of this unit. When checking the pitch, always use the strobe
illuminator light.
Displaying a record jacket
Place the record jacket behind the stoppers attached to the dust cover
as shown in the figure.
StoppersRecord jacket
! Do not place anything other than a record jacket.
! Place the record jacket secured behind the stoppers properly.
! When using this feature during playback, be careful that the record
jacket does not fall. The record or stylus may be damaged.
! Be careful not to close the dust cover while a record jacket is placed
on it.

En
15
English
To play a standard EP record
Attach the EP record adapter to the center spindle and press the [45]
button.
Illuminating the stylus tip
When the stylus illuminator switch is pressed, the stylus illuminator
lights in white and ascends to the position at which the stylus tip is
illuminated.
! If it is not needed, press the stylus illuminator switch to lower it. The
stylus illuminator switch goes off.
! Do not look directly at the light while the stylus illuminator is lit.
Recording
Analog records can be digitally recorded by connecting with a computer
that has the music management software “rekordbox” installed.
For details, access the rekordbox product site below and see the rekord-
box Operating Instructions in [Support].
https://rekordbox.com/en/store/
Replacing the stylus
Check that the power is not on before performing the following
procedure.
1 Hold the cartridge with one hand.
2 Remove the cartridge in the direction of the arrow
while holding the stylus holder part with your other
hand.
Changing the cartridge
This unit is not compatible with MC cartridges. Use a VM cartridge or an
MM cartridge.
Removing the cartridge
1 Remove the screws, nuts, and washers attached to
the headshell.
2 Disconnect the lead wires connected to the cartridge.
Attaching the cartridge
1 Connect the cartridge while matching the colors of
the lead wires of the headshell and the symbols on the
cartridge terminals.
Match the colors of the lead wires of the headshell and the symbols on
the cartridge terminals as follows.
When looking from the front, the top left is L+: white, the bottom left is
L-: blue, the top right is R+: red, and the bottom right is R-: green.
! Connect the lead wires securely using tweezers or the like.
2 Attach the cartridge to the headshell using the
screws, nuts, and washers included with the cartridge.
Cartridge
Lead wire
Headshell
Shell weight
! When attaching the cartridge to the headshell, attach it properly.
! When using a cartridge between 5 g or less, use the supplied shell
weight.
Adjusting the overhang
Use the following overhang adjustment scale to adjust the position
using the cartridge attaching screw so that the stylus tip comes to a
position 53 mm from the tone arm attachment part.
53 mm
Overhang adjustment scale
53 mm

Additional information
Troubleshooting
! Incorrect operation is often mistaken for trouble or malfunction. If you think that there is something wrong with this component, check the points
below and the [FAQ] for the [PLX-500] on the Pioneer DJ support site.
http://pioneerdj.com/support/
Sometimes the problem may lie in another component. Inspect the other components and electrical appliances being used. If the problem cannot
be rectified, ask your nearest service center or your dealer to carry out repair work.
! This unit may not operate properly due to static electricity or other external influences. In this case, proper operation may be restored by turning the
power off, waiting 1 minute, then turning the power back on.
Problem Check Remedy
The power is not turned on. Is the power cord properly connected? Properly connect the included power cord to a power outlet.
Is the [POWER] switch for power supply set to
[ON]?
Set the [POWER] switch for power supply to [ON].
No sound or small sound. Are the audio cables properly connected? Connect the audio cables properly.
Are the terminals and plugs dirty? Clean the terminals and plugs before making connections.
Is the headshell attached properly? Attach the headshell property.
The left and right sound are reversed. Are the left and right connections for each piece of
equipment reversed?
Correctly connect the audio cable and the lead wires of headshell part.
There is a low hum sound (humming
or buzzing sound) during playback.
Is there an electric device such as a fluorescent
lamp or its power cord near the connection cord?
Place the power cord of the fluorescent lamp or other device as far away as
possible.
The stylus tip does not come down on
the record.
Is the stylus pressure adjusted property? Match the balance weight to the appropriate stylus pressure value for your
cartridge.
Is the arm horizontally balanced? Turn the balance weight until the tone arm becomes horizontal state.
Stylus jumping occurs. Is the stylus pressure adjusted property? Match the balance weight to the appropriate stylus pressure value for your
cartridge.
Is the record warped or does it have scratches? Check the condition of the record.
Does the stylus tip have a lot of dust on it? Remove the shell with cartridge and use a soft tip brush or writing brush to care-
fully remove dust, etc. from the stylus tip.
Is anti-skating adjusted correctly? Adjust anti-skating correctly.
Is the arm height adjusted correctly? Adjust the arm height correctly.
The arm stops along the way and does
not go ahead.
Does the record have scratches? Check the condition of the record.
Is the arm coming into contact with something? Check around the arm. If there is an obstacle, remove it.
Sound volume is low or loud
(distorted).
Is the connection to the amplifier appropriate for
the cartridge type (output)?
Connect the connection cables properly.
Is the setting of the [PHONO/LINE] switch correct? Set the [PHONO/LINE] switch correctly according to the input terminal of the
connected device.
The rotating turntable shakes a lot. Dirt, etc. is adhered to the attachment parts of the
turntable and center spindle.
Remove the dirt.
Cautions on use
About condensation
Water droplets (condensation) may form inside the unit (on operating
parts and lenses) in the winter, for example, if the unit is moved from a
cold place into a warm room or if the temperature in the room in which
the unit is installed rises suddenly (through heating, etc.). The unit will
not operate properly and will not be playable with condensation inside.
Let the unit stand for 1 to 2 hours at room temperature (though this
time depends on the conditions of the condensation) without turning on
the power. The water droplets will evaporate and the unit will become
playable. Condensation can occur in the summer as well if the unit is
exposed to the direct wind from an air-conditioner, etc. If this happens,
move the unit to a different location.
When transporting the unit to another
location
Use the original packing materials to pack the unit.
If the original packing materials are not available, be sure to perform the
following.
! Detach the slip mat and turntable before packing.
! Detach the headshell and balance weight from the arm and pack
carefully.
! Use the arm clamper to secure the tone arm and use tape to secure
it so that it does not move.
! Wrap the main unit in a blanket or soft paper so that it will not be
damaged.
! Pack so that a force will not be applied to the tone arm.
Maintenance of each part
When attaching and detaching the headshell, turn off the power of the
amplifier.
If you attempt to do so while the volume is loud, the speaker could be
damaged.
! Remove the shell with cartridge and use a soft tip brush or writing
brush to carefully remove dust, etc. from the stylus tip.
! Use a good quality record cleaner to clean records.
! Use a soft cloth or something similar to clean the headshell terminal
and then reattach it to the tone arm.
En
16

En
17
English
Cleaning the dust cover, etc.
Use a soft cloth to clean the dust cover and cabinet
! Do not clean the dust cover while playing. Static electricity could
cause the tone arm to be pulled by the dust cover.
About trademarks and registered
trademarks
! "Pioneer DJ" is a trademark of PIONEER CORPORATION, and is used
under license.
! rekordbox is a trademark or registered trademark of the Pioneer DJ
Corporation.
The names of companies and products mentioned herein are trade-
marks or registered trademarks of their respective owners.
Specifications
Power requirements ........AC 110 V to 120 V or 220 V to 240 V, 50 Hz/60 Hz
Power consumption ............................................................................... 11 W
Main unit weight .................................................................................10.7 kg
Max. external dimensions ...
450 mm (W) × 158.5 mm (H) × 367.5 mm (D)
Tolerable operating temperature ........................................+5 °C to +35 °C
Tolerable operating humidity ...................... 5 % to 85 % (no condensation)
Turntable part
Drive method .............................................................. Servo type direct drive
Motor ...............................................................3-phase brushless DC motor
Braking system ................................................................... Electronic brake
Rotation speed ...................................................33 1/3 rpm, 45 rpm, 78 rpm
Rotation speed adjustment range ........................................................±8 %
Wow and flutter ........................................................... 0.15 % or less WRMS
S/N ratio .................................................................................50 dB or higher
Turntable.................................... Aluminum die-casting Diameter: 332 mm
Starting torque ................................................................ 1.6 kg·cm or more
Starting time ............................................... 1 second or less (at 33 1/3 rpm)
Tone arm part
Arm type .................................................. Universal type S-shape tone arm,
gimbal-supported type bearing structure, static balance type
Effective length............................................................................... 230.5 mm
Overhang ............................................................................................. 16 mm
Tracking error .................................................................................. Within 3°
Arm height adjustment range .............................................................. 6 mm
Stylus pressure variable range ............................. 0 g to 4.0 g (1 scale 0.1 g)
Proper cartridge weight ................................ 9.5 g or less (single cartridge)
Cartridge type ............................................................................................ VM
Output voltage
PHONO ......................................................................................2.5 mV/1 kHz
LINE ...........................................................................................150 mV/1 kHz
— The specifications and design of this product are subject to
change without notice.
! © 2016 Pioneer DJ Corporation. All rights reserved.

Fr
2
ATTENTION
POUR ÉVITER TOUT RISQUE D’ÉLECTROCUTION, NE
PA
S ENLEVER LE COUVERCLE (NI LE PANNEAU
ARRIÈRE). A
UCUNE PIÈCE RÉPARABLE PAR
L
’UTILISATEUR NE SE TROUVE À L’INTÉRIEUR.
CONFIER TOUT ENTRETIEN À UN PERSONNEL
QU
ALIFIÉ UNIQUEMENT.
D3-4-2-1-1_B1_Fr
AVER
TISSEMENT
Cet appareil
n’est pas étanche. Pour éviter les risques
d’incendie et de décharge électrique, ne placez près de
lui un récipient rempli d’eau, tel qu’un vase ou un pot
de fleurs, et ne l’exposez pas à des gouttes d’eau, des
éclaboussures, de la pluie ou de l’humidité.
D3-4-2-1-3_A1_Fr
Milieu de fonctionnement
Te
mpérature et humidité du milieu de fonctionnement :
De +5 °C à +35 °C (de +41 °F à +95 °F) ; Humidité
relative inférieure à 85 % (orifices de ventilation non
obstrués
)
N’installez pas l’appareil dans un endroit mal ventilé ou
un lieu soumis à une forte humidité ou en plein soleil
(ou à une forte lumière artificielle).
D3-4-2-1-7c*_A1_Fr
Ce produit est destiné à une utilisation domestique
générale. Toute panne due à une utilisation autre qu'à
des fins privées (comme une utilisation à des fins
commerciales dans un restaurant, dans un autocar
ou sur un bateau) et qui nécessite une réparation
sera aux frais du client, même pendant la période de
garantie.
K041_A1_Fr
NOTE IMPORTANTE SUR LE CABLE
D’ALIMENTATION
Tenir le câble d’alimentation par la fiche. Ne pas
débrancher la prise en tirant sur le câble et ne pas
toucher le câble avec les mains mouillées. Cela risque
de provoquer un court-circuit ou un choc électrique. Ne
pas poser l’appareil ou un meuble sur le câble. Ne pas
pincer le câble. Ne pas faire de noeud avec le câble ou
l’attacher à d’autres câbles. Les câbles d’alimentation
doivent être posés de façon à ne pas être écrasés. Un
câble abîmé peut provoquer un risque d’incendie ou un
choc électrique. Vérifier le câble d’alimentation de
temps en temps. Contacter le service après-vente le
plus proche ou le revendeur pour un remplacement.
S002*_A1_Fr
AVER
TISSEMENT
P
our éviter les risques d’incendie, ne placez aucune
flamme nue (telle qu’une bougie allumée) sur
l’appareil.
D3-4-2-1-7a_A1_Fr
Si vous souhaitez vous débarrasser de cet appareil, ne le mettez pas à la poubelle avec vos ordures ménagères. Il existe un système de
collecte séparé pour les appareils électroniques usagés, qui doivent être récupérés, traités et recyclés conformément à la législation.
Les habitants des états membres de l’UE, de Suisse et de Nor
vège peuvent retourner gratuitement leurs appareils électroniques usagés aux
centres de collecte agréés ou à un détaillant (si vous rachetez un appareil similaire neuf).
Dans les pays qui ne sont pas mentionnés ci-dessus, veuillez contacter les autorités locales pour savoir comment vous pouvez vo
us débarrasser
de vos appareils.
V
ous garantirez ainsi que les appareils dont vous vous débarrassez sont correctement récupérés, traités et recyclés et préviendrez de cette façon
les impacts néfastes possibles sur l’environnement et la santé humaine.
K058b_A1_Fr
Sélecteur de tension
Le sélecteur de tension se trouve sur le panneau
supérieur des modèles multi-tension.
Le réglage d’usine du sélecteur de tension est
220-240 V. Réglez-le sur la tension adaptée à votre
pays ou région.
Avant de changer la tension, débranchez le cordon
d’alimentation secteur. Utilisez un tournevis de taille
moyenne pour changer le sélecteur de tension.
D3-4-2-1-5*_A2_Fr
PRÉCAUTION DE VENTILATION
Lors de l’installation de l’appareil, veillez à laisser un
espace suffisant autour de ses parois de manière à
améliorer la dissipation de chaleur (au moins 15 cm sur
le dessus, 5 cm à l’arrière et 5 cm de chaque côté).
AVER
TISSEMENT
Les fentes et ouvertures du coffret sont prévues pour la
ventilation
, pour assurer un fonctionnement stable de
l’appareil et pour éviter sa surchauffe. P
our éviter les
risques d’incendie, ne bouchez jamais les ouvertures et
ne les recouvrez pas d’objets, tels que journaux, nappes
ou rideaux, et
n’utilisez pas l’appareil posé sur un tapis
épais ou un lit
.
D3-4-2-1-7b*_A1_Fr

Fr
3
ATTENTION
L’interrupteur POWER de cet appareil ne coupe pas
complètement celui-ci de sa prise secteur. Comme le
cordon d’alimentation fait office de dispositif de
déconnexion du secteur, il devra être débranché au
niveau de la prise secteur pour que l’appareil soit
complètement hors tension. Par conséquent, veillez à
installer l’appareil de telle manière que son cordon
d’alimentation puisse être facilement débranché de
la prise secteur en cas d’accident. Pour éviter tout
risque d’incendie, le cordon d’alimentation sera
débranché au niveau de la prise secteur si vous
prévoyez une période prolongée de non utilisation
(par exemple avant un départ en vacances).
D3-4-2-2-2a*_A1_Fr
Français

Fr
4
Sommaire
Comment lire ce manuel
! Merci d’avoir acheté ce produit Pioneer DJ.
Veillez à lire ce manuel car il contient des informations importantes
qui doivent être comprises avant d’utiliser ce produit.
Cela fait, conservez le mode d’emploi de façon à pouvoir vous y
référer en cas de nécessité.
! Dans ce manuel, les noms des touches et des prises de l’appareil
principal apparaissent entre crochets ([ ]).
Exemples :
Appuyez sur la touche [START/STOP].
Informations préliminaires
Caractéristiques .......................................................................................... 5
Contenu du carton d’emballage ............................................................... 5
Avant de commencer
Installation de rekordbox (Mac/Windows) ............................................... 6
Montage ....................................................................................................... 6
Noms et fonctions des éléments
Panneau supérieur ..................................................................................... 8
Panneau arrière .......................................................................................... 9
Réglage
Réglage de l’équilibre du bras de lecture ............................................... 10
Réglage de la pression de la pointe de lecture ...................................... 10
Réglage de l’antipatinage ........................................................................ 11
Réglage de la hauteur du système de levage du bras ........................... 11
Réglage de la hauteur du bras ................................................................ 11
Raccordements
Raccordement à des enceintes amplifiées ............................................ 12
Raccordement à un préamplificateur principal et à un composant ... 12
Raccordement à une table de mixage DJ .............................................. 13
Raccordement à un ordinateur ............................................................... 13
Emplacement du lecteur ......................................................................... 13
Réglage de la hauteur de l’appareil principal ........................................ 13
Fonctionnement
Mise sous tension ..................................................................................... 14
Mise hors tension ..................................................................................... 14
Lecture ....................................................................................................... 14
Pause de la lecture ................................................................................... 14
Fin de la lecture ......................................................................................... 14
Réglage du pitch ....................................................................................... 14
Affichage d’une pochette de disque ....................................................... 14
Pour la lecture de disques 45 tours standard ........................................ 15
Éclairage de l’extrémité de la pointe de lecture ..................................... 15
Enregistrement ......................................................................................... 15
Remplacement de la pointe de lecture................................................... 15
Changement de cellule ............................................................................ 15
Informations supplémentaires
En cas de panne ....................................................................................... 16
Précautions d’emploi ............................................................................... 16
Entretien de chaque élément .................................................................. 17
À propos des marques commerciales et des marques déposées ....... 17
Spécifications............................................................................................ 17

Fr
5
Français
Informations préliminaires
Caractéristiques
Cet appareil est une platine à entraînement direct et couple élevé que
vous pouvez utiliser dans de nombreuses applications allant de l’écoute
à la maison au DJing.
Son des disques vinyles de qualité
supérieure
La trajectoire entre la pointe de lecture et la sortie PHONO/LINE a été
conçue pour être la plus courte afin de pouvoir reproduire fidèlement la
qualité sonore d’origine des disques vinyles.
En outre, étant donné que les deux sorties PHONO et LINE sont prises
en charge, vous pouvez facilement bénéficier d’une grande qualité
de son des disques vinyles par un simple branchement direct sur les
enceintes amplifiées.
Simplicité d’enregistrement numérique
Une prise USB-B est prévue pour brancher directement cet appareil
sur un PC ou un Mac, puis pour enregistrer les sources audio des
disques vinyles sur le PC ou le Mac en les convertissant en don-
nées. L’enregistrement numérique par une simple opération peut être
réalisé à l’aide de la fonction d’enregistrement de l’application gra-
tuite de gestion musicale « rekordbox » (Ver.4.2.1 ou ultérieure) pen-
dant l’enregistrement.
Platine à entraînement direct pour une
prestation DJ
L’adoption d’un système à entraînement direct et couple élevé signi-
fie que vous pouvez effectuer un mixage de morceau, un scratching
et d’autres prestations DJ en combinant deux de ces appareils à une
table de mixage DJ.
Le capot anti-poussière peut servir de
support pour une pochette de disque
Une pochette de disque peut être affichée sur le capot anti-poussière
lorsque celui-ci est ouvert. Vous profitez ainsi du son du disque vinyle
tout en regardant sa pochette.
Contenu du carton d’emballage
! Plateau
! Feutrine
! Capot anti-poussière
! Adaptateur pour disque 45 tours
! Contrepoids d’équilibrage
! Porte-cellule (cellule incluse)
! Contrepoids de porte-cellule
! Cordon d’alimentation
! Câble USB
! Câble d’adaptateur audio (jack à broches stéréo (femelle) vers mini-
jack stéréo (mâle))
! Garantie (pour certaines régions)
1
! Mode d’emploi (ce document)
1 La garantie incluse est destinée à la région européenne.
AVERTISSEMENT
Gardez les pièces de petite taille hors de la portée des
bébés et des enfants. En cas d’ingestion accidentelle,
veuillez contacter immédiatement un médecin
.
D41-6-4_A1_Fr

Fr
6
Avant de commencer
Installation de rekordbox (Mac/
Windows)
1 Accédez à rekordbox.com.
https://rekordbox.com/fr/store/
! La page de contenu est soumise à modification sans notification
préalable.
2 Consultez le guide de démarrage, puis cliquez sur
[Téléchargement].
3 Lisez attentivement l’Accord de licence du logiciel et
cochez la case [Accepter] si vous acceptez.
Lorsque vous cochez la case, [Téléchargement] peut être sélectionné.
4 Cliquez sur [Téléchargement].
Le téléchargement de rekordbox (Mac/Windows) commence.
5 Double-cliquez sur le fichier téléchargé pour le
décompresser.
6 Double-cliquez sur le fichier décompressé pour lancer
le programme d’installation.
7 Lisez attentivement l’Accord de licence du logiciel, et
passez à l’installation en fonction des instructions qui
apparaissent à l’écran si vous l’acceptez.
! Si vous n’acceptez pas le contenu de l’Accord de licence du logiciel,
annulez l’installation.
8 Lorsque l’écran de fin de l’installation apparaît, suivez
les instructions qui apparaissent à l’écran pour fermer le
programme d’installation.
L’installation est terminée.
! Pour pouvoir utiliser rekordbox dj, rekordbox dvs et rekordbox video,
une activation (authentification de licence) est nécessaire. Pour
plus d’informations, reportez-vous au mode d’emploi de rekordbox.
https://rekordbox.com/fr/support/manual.php
Montage
1 Installez le plateau et la feutrine.
Positionnez le plateau sur l’axe central et placez la feutrine sur le dessus
du plateau.
! Veillez à ne pas heurter le plateau sur l’appareil principal ou à ne pas
le laisser tomber.
Plateau
Axe central
Feutrine
2 Fixez le porte-cellule.
Insérez le porte-cellule avec la cellule installée dans le bras de lecture.
Ensuite, serrez l’écrou de blocage tout en maintenant le porte-cellule
à l’horizontale.
Écrou de blocage

Fr
7
Français
! Avant l’utilisation, retirez le capot de la pointe de lecture sans tou-
cher la pointe.
Capot de la pointe de lecture
3 Fixez le contrepoids d’équilibrage.
Fixez le contrepoids d’équilibrage sur l’arbre arrière du bras de lecture.
Contrepoids d’ équilibrage
Installez le capot anti-poussière.
Insérez les charnières du capot anti-poussière dans les
supports situés à l’arrière de cet appareil.
Lors du retrait du capot anti-poussière, tirez les charnières vers le haut
alors que le capot anti-poussière est ouvert.
Charnière
Support

Fr
8
Noms et fonctions des éléments
Panneau supérieur
1
2 3 45 6
c
d
e
f
ghij
a9
7
b
8
1 Commutateur POWER
En tournant l’interrupteur sur [ON], l’appareil est mis sous tension
et l’éclairage stroboscopique sur le côté s’allume.
= Mise sous tension (p. 14 )
Mise hors tension (p. 14 )
2 Touche START/STOP
L’appui sur cette touche démarre ou arrête la rotation du plateau.
= Lecture (p. 14 )
3 Touche de changement de vitesse
Change la vitesse en fonction du disque à lire.
! Pour un disque 33 1/3 tours, appuyez sur la touche [33].
! Pour un disque 45 tours, appuyez sur la touche [45].
! Pour un disque 78 tours, appuyez sur la touche [33] et sur la
touche [45] simultanément.
= Lecture (p. 14 )
4 Dispositif d’éclairage de la pointe de lecture
S’allume pour éclairer l’extrémité de la pointe de lecture.
= Éclairage de l’extrémité de la pointe de lecture (p. 15 )
5 Interrupteur du dispositif d’éclairage de la pointe de
lecture
Le dispositif d’éclairage de la pointe de lecture s’allume en blanc
et monte jusqu’à la position permettant d’éclairer l’extrémité de la
pointe de lecture.
= Éclairage de l’extrémité de la pointe de lecture (p. 15 )
6 Porte-cellule
7 Curseur TEMPO
Vous pouvez faire glisser le curseur d’avant en arrière pour effectuer
un réglage précis de la vitesse de rotation.
= Réglage du pitch (p. 14 )
8 Bras de lecture
= Réglage (p. 10 )
9 Serre-bras
Maintient le bras de lecture en place.
a Repose-bras
Sert de support pour le bras de lecture.
b Levier de levage
Le bras de lecture monte lorsque le levier est tiré vers le haut. Le bras
de lecture descend lorsque le levier est poussé vers le bas.
c Système de levage du bras
Ce dispositif est utilisé pour déplacer le bras de lecture de haut en
bas. Il est commandé par le levier de levage.
d Molette ANTI SKATING
Quand un disque est lu, une force attire l’extrémité de la pointe de
lecture vers l’intérieur du disque. En faisant correspondre cette
molette à la valeur de la pression de la pointe de lecture, cette force
est supprimée.
= Réglage de l’antipatinage (p. 11 )
e Verrouillage HEIGHT ADJUST
Verrouille la hauteur réglée du bras.
= Réglage de la hauteur du bras (p. 11 )
f Molette HEIGHT ADJUST
Permet de régler la hauteur du bras de lecture.
= Réglage de la hauteur du bras (p. 11 )
g Contrepoids d’équilibrage
Permet d’équilibrer le bras de lecture et de régler la pression de la
pointe de lecture.
= Réglage (p. 10 )
h Bague de réglage de la pression de la pointe de
lecture
Permet de faire correspondre la pression de la pointe de lecture
appropriée de la cellule.
= Réglage de la pression de la pointe de lecture (p. 10 )
i Emplacement pour porte-cellule
Permet de poser un porte-cellule.
j Adaptateur pour disque 45 tours
Permet de lire des disques 45 tours standard.
= Pour la lecture de disques 45 tours standard (p. 15 )

Fr
9
Français
Panneau arrière
3
12
4 5
1 Commutateur PHONO/LINE
Permet de changer le niveau du son provenant de l’appareil.
— [PHONO] : Sélectionnez cette option lorsque l’appareil est rac-
cordé à un dispositif prenant en charge l’entrée de niveau phono,
un préamplificateur principal ou un composant par exemple.
— [LINE] : Sélectionnez cette option lorsque l’appareil est raccordé
à un dispositif prenant en charge l’entrée de niveau de ligne, des
enceintes amplifiées par exemple.
ATTENTION
Ne raccordez pas l’appareil à un dispositif prenant en charge le
niveau d’entrée phono lorsque le commutateur PHONO/LINE est
à l’état [LINE].
2 Prise USB
Raccordez le câble USB (fourni) ici.
= Raccordement à un ordinateur (p. 13 )
3 Câble audio
= Raccordements (p. 12 )
4 AC IN
À relier à une prise d’alimentation avec le cordon d’alimentation
fourni. Avant de brancher le cordon d’alimentation, assurez-vous que
tous les autres appareils sont raccordés.
! Veillez à utiliser le cordon d’alimentation fourni.
5 Isolant
Supprime l’effet des vibrations extérieures. Vous pouvez régler la
hauteur de la platine en tournant les pieds isolants.
= Réglage de la hauteur de l’appareil principal (p. 13 )

Réglage
Réglage de l’équilibre du bras de
lecture
Étant donné que les poids de la cellule et du porte-cellule diffèrent selon
le produit, l’équilibre du bras de lecture doit être réglé.
Préparez comme suit.
! Retirez le couvercle de la pointe de lecture et le serre-bras tout en
veillant à ne pas toucher l’extrémité de la pointe de lecture.
! Poussez le levier de levage vers le bas.
! Réglez la molette [ANTI SKATING] sur “0”.
Éloignez le bras de lecture du repose-bras et
réglez l’équilibre pour qu’il soit horizontal.
Tournez le contrepoids d’équilibrage jusqu’à ce que le bras de lecture
devienne presque horizontal.
! Lors du déplacement du bras de lecture, assurez-vous que l’extré-
mité de la pointe de lecture ne touche pas directement le plateau,
etc.
Réglage de la pression de la pointe
de lecture
Afin d’éviter les sauts de la pointe de lecture ou la distorsion du son, la
pression de la pointe de lecture est réglée sur la valeur de la pression de
la pointe de lecture appropriée qui est déterminée pour chaque cellule.
La valeur de pression appropriée de la pointe de lecture de la cellule
fournie est comprise entre 3,0 et 4,0 g.
Préparez comme suit.
! Ramenez le bras de lecture sur le repose-bras et fixez-le avec le
serre-bras.
1 Faites correspondre le “0” sur la bague de réglage de
la pression de la pointe de lecture avec la ligne médiane
de l’arbre arrière du bras de lecture.
Tournez uniquement la bague de réglage de la pression de la pointe
de lecture de sorte que le chiffre “0” soit sur la ligne médiane noire
de l’arbre arrière du bras de lecture tout en maintenant le contre-
poids d’équilibrage avec votre doigt pour l’empêcher de bouger.
Ligne médiane
2 Réglez la pression de la pointe de lecture.
Tournez le contrepoids d’équilibrage pour faire le réglage sur la valeur
de la pression de la pointe de lecture appropriée pour votre cellule.
! Lorsque vous tournez le contrepoids d’équilibrage, la bague de
réglage de la pression de la pointe de lecture tourne en même
temps. Tout en observant la bague de réglage, réglez la pression de
la pointe de lecture à la valeur appropriée.
Ligne médiane
Fr
10

Fr
11
Français
Réglage de l’antipatinage
Ce réglage permet d’empêcher la pointe de lecture de sauter.
Faites correspondre à la même position de la graduation
que la valeur de la pression de la pointe de lecture.
Tournez la molette [ANTI SKATING] pour faire correspondre la ligne de
référence avec la même valeur de la pression de la pointe de lecture de
la cellule.
Lors du scratching
Afin d’éviter les sauts de la pointe de lecture, réglez la position de la
graduation en fonction de l’utilisation.
Réglage de la hauteur du système
de levage du bras
Lorsque vous utilisez une cellule autre que celle fournie, réglez cette
pression en fonction de la cellule utilisée.
Préparez comme suit.
! Posez un disque sur la feutrine.
! Retirez le couvercle de la pointe de lecture et le serre-bras tout en
veillant à ne pas toucher l’extrémité de la pointe de lecture.
! Tirez le levier de levage vers le haut et déplacez le bras de lecture sur
le disque.
Réglez la hauteur en tournant la vis lorsque le système
de levage du bras est abaissé.
— Tourner dans le sens horaire réduit la distance entre le disque et
la pointe de lecture.
— Tourner dans le sens antihoraire agrandit la distance entre le
disque et la pointe de lecture.
! La hauteur du système de levage du bras (la distance entre le disque
et la pointe de lecture lorsque le levier de levage est tiré vers le haut)
est réglé en usine dans une plage entre environ 8 mm et 13 mm.
Vi
s
Système de levage du bras
Réglage de la hauteur du bras
Lorsque vous utilisez la cellule fournie, la position « 0 » est appropriée.
Lorsque vous utilisez une cellule autre que celle fournie, réglez cette
pression en fonction de la cellule utilisée.
1 Tournez le verrouillage [HEIGHT ADJUST] pour le
déverrouiller.
Déverrouiller
2 Poussez le levier de levage vers le bas et posez la
pointe de lecture sur le disque, puis réglez la molette
[HEIGHT ADJUST] de sorte que le bras de lecture et le
disque soient parallèles.
Ajustez de sorte que le bras de lecture soit à l’ horizontale.
Molette [
HEIGHT ADJUST
]
3 Tournez le verrouillage [HEIGHT ADJUST] pour fixer la
hauteur du bras.
Une fois la hauteur du bras réglée, il faut toujours tourner le verrouillage
[HEIGHT ADJUST] pour fixer le bras.

Raccordements
! Veillez à toujours éteindre les appareils et à débrancher le cordon d’alimentation de la prise secteur avant de raccorder un appareil ou de changer
les liaisons.
! Reportez-vous au mode d’emploi de l’appareil devant être raccordé.
! Lorsque tous les appareils ont été raccordés, vous pouvez brancher le cordon d’alimentation.
Raccordement à des enceintes amplifiées
Enceintes amplifiées
Câble audio
Panneau arrière
Cordon
d’alimentation
À une prise
d’alimentation
1 Réglez la commande [PHONO/LINE] sur [LINE].
2 Raccordez le câble audio à la prise d’entrée [LINE] des enceintes amplifiées, etc.
! Si nécessaire, utilisez le câble d’adaptateur audio fourni.
3 Branchez le cordon d’alimentation.
À relier à une prise d’alimentation avec le cordon d’alimentation fourni. Avant de brancher le cordon d’alimentation, assurez-vous que tous les autres
appareils sont raccordés.
Raccordement à un préamplificateur principal et à un composant
Câble audio
Panneau arrière
Cordon
d’alimentation
À une prise
d’alimentation
Préamplificateur principal,
composant, etc.
1 Réglez la commande [PHONO/LINE] sur [PHONO].
2 Raccordez le câble audio à la prise d’entrée [PHONO] du préamplificateur principal ou d’un autre composant.
! Si ce produit est raccordé à un préamplificateur principal ou à un composant qui ne possède pas de prise [PHONO], il n’est pas possible d’obtenir
un volume et une qualité sonore suffisants. Dans ce cas, réglez le commutateur [PHONO/LINE] de cet appareil sur [LINE], puis raccordez l’appareil
à la prise d’entrée [LINE] du préamplificateur principal ou du composant, ou utilisez un égaliseur phono.
3 Branchez le cordon d’alimentation.
À relier à une prise d’alimentation avec le cordon d’alimentation fourni. Avant de brancher le cordon d’alimentation, assurez-vous que tous les autres
appareils sont raccordés.
Fr
12

Fr
13
Français
Raccordement à une table de mixage DJ
Plateau
Table de mixage DJ
Câble audio
Câble audio
Panneau arrière
Cordon
d’alimentation
À une prise
d’alimentation
1 Réglez la commande [PHONO/LINE] sur [PHONO].
2 Raccordez le câble audio à la prise d’entrée [PHONO] de la table de mixage DJ.
! Si ce produit est raccordé à une table de mixage DJ qui ne possède pas de prise d’entrée [PHONO], il n’est pas possible d’obtenir un volume et une
qualité sonore suffisants. Dans ce cas, réglez le commutateur [PHONO/LINE] de cet appareil sur [LINE], puis raccordez l’appareil à la prise d’en-
trée [LINE] de la table de mixage DJ.
3 Branchez le cordon d’alimentation.
À relier à une prise d’alimentation avec le cordon d’alimentation fourni. Avant de brancher le cordon d’alimentation, assurez-vous que tous les autres
appareils sont raccordés.
Raccordement à un ordinateur
Aucun logiciel de pilote USB n’est nécessaire pour cet appareil.
= Enregistrement (p. 15 )
Panneau arrière
Câble USB
Ordinateur
Cordon
d’alimentation
À une prise
d’alimentation
1 Raccordez le câble USB à un port USB de l’ordinateur.
2 Branchez le cordon d’alimentation.
À relier à une prise d’alimentation avec le cordon d’alimentation fourni. Avant de brancher le cordon d’alimentation, assurez-vous que tous les autres
appareils sont raccordés.
Emplacement du lecteur
Placez l’appareil sur une surface plane qui n’est pas soumise aux vibra-
tions externes.
! Dans la mesure du possible, gardez l’appareil éloigné du système de
haut-parleurs.
! Lorsque l’appareil est très proche d’une radio (radiodiffusion AM/
FM), la radio pourrait générer du bruit. Gardez l’appareil le plus
éloigné possible.
Réglage de la hauteur de l’appareil
principal
Réglez la hauteur en tournant les pieds isolants de sorte que l’appareil
principal soit horizontal.

Fr
14
Fonctionnement
Mise sous tension
1 Après avoir effectué tous les raccordements, branchez
le cordon d’alimentation sur une prise murale.
= Raccordements (p. 12 )
2 Basculez l’interrupteur [POWER] sur [ON] pour
mettre l’appareil sous tension.
Les indicateurs de cet appareil s’allument et l’appareil se met sous
tension.
Mise hors tension
Basculez l’interrupteur [POWER] sur [OFF] pour
mettre l’appareil hors tension.
Cet appareil se met hors tension.
Lecture
Préparez comme suit.
! Placez un disque sur le plateau.
! Retirez le couvercle de la pointe de lecture et le serre-bras.
1 Basculez l’interrupteur [POWER] sur [ON] pour
mettre l’appareil sous tension.
2 Sélectionnez la vitesse de rotation correspondant au
disque à lire en appuyant sur une touche de changement
de vitesse.
3 Appuyez sur la touche [START/STOP].
Le plateau tourne.
4 Tirez le levier de levage vers le haut et déplacez le
bras de lecture sur le disque.
5 Poussez le levier de levage vers le bas.
Le bras de lecture descend lentement et la lecture commence.
Pause de la lecture
Tirez le levier de levage vers le haut.
La pointe de lecture de la cellule se soulève du disque.
! Pour reprendre la lecture, poussez le levier de levage vers le bas.
Fin de la lecture
1 Tirez le levier de levage vers le haut pour ramener le
bras de lecture sur le repose-bras, puis poussez le levier
de levage vers le bas.
2 Appuyez sur la touche [START/STOP].
Le plateau s’arrête en douceur.
3 Basculez l’interrupteur [POWER] sur [OFF] pour
mettre l’appareil hors tension.
Utilisez le serre-bras pour fixer le bras de lecture.
Fixez le couvercle de la pointe de lecture pour protéger l’extrémité de la
pointe de lecture.
Fermez le capot anti-poussière.
Réglage du pitch
Déplacez le curseur [TEMPO] vers l’avant ou l’arrière.
Déplacer le curseur vers l’avant augmente la vitesse de rotation et le
déplacer vers l’arrière diminue la vitesse de rotation.
! Lorsque le curseur [TEMPO] est au centre, l’indicateur s’allume
en jaune-vert et la vitesse de rotation correspond aux tours/minute
spécifiés (33 1/3 tr/min, 45 tr/min ou 78 tr/min).
! La graduation du curseur [TEMPO] est une valeur approximative.
Veuillez l’utiliser à titre de référence.
! Vous pouvez vérifier que la vitesse de rotation correspond bien aux
tours/minute spécifiés en observant les quatre rangées de points
stroboscopiques gravés autour du plateau.
Points stroboscopiques
1 Lorsque les points stroboscopiques semblent arrêté, 33 1/3 tr/min
(alimentation 50 Hz)
2 Lorsque les points stroboscopiques semblent arrêtés, 45 tr/min
(alimentation 50 Hz)
3 Lorsque les points stroboscopiques semblent arrêtés, 33 1/3 tr/min
(alimentation 60 Hz)
4 Lorsque les points stroboscopiques semblent arrêtés, 45 tr/min
(alimentation 60 Hz)
! Un éclairage stroboscopique (lumière LED rouge) est utilisé pour
éclairer les points stroboscopiques de cet appareil. Lors de la vérifi-
cation du pitch, utilisez toujours l’éclairage stroboscopique.
Affichage d’une pochette de disque
Placez la pochette de disque derrière les butées fixées au capot
anti-poussière comme indiqué sur la figure.
BouchonsPochette de disque
! Ne placez rien d’autre qu’une pochette de disque.
! Fixez fermement la pochette de disque derrière les butées.
! Si vous utilisez cette fonctionnalité pendant la lecture, veillez à ce
que la pochette de disque ne tombe pas. Le disque ou la pointe de
lecture pourrait être endommagé.
! Veillez à ne pas fermer le capot anti-poussière lorsqu’une pochette
de disque est installée dessus.

Fr
15
Français
Pour la lecture de disques 45 tours
standard
Placez l’adaptateur pour disque 45 tours sur l’axe central et appuyez sur
la touche [45].
Éclairage de l’extrémité de la pointe
de lecture
Lorsque vous appuyez sur l’interrupteur d’éclairage de la pointe de
lecture, le dispositif d’éclairage de la pointe de lecture s’allume en blanc
et monte jusqu’à la position permettant d’éclairer l’extrémité de la pointe
de lecture.
! Appuyez sur l’interrupteur du dispositif d’éclairage de la pointe de
lecture pour le rabaisser s’il n’est pas nécessaire. L’interrupteur du
dispositif d’éclairage de la pointe de lecture s’éteint.
! Ne regardez pas directement la lumière lorsque l’éclairage de la
pointe de lecture est allumé.
Enregistrement
Des disques vinyles peuvent être enregistrés numériquement en rac-
cordant à un ordinateur sur lequel le logiciel de gestion de musique
“rekordbox” est installé.
Pour plus d’informations, accédez au site du produit rekordbox ci-des-
sous et consultez le Mode d’emploi de rekordbox dans [Aide].
https://rekordbox.com/fr/store/
Remplacement de la pointe de
lecture
Vérifiez que l’appareil n’est pas allumé avant d’effectuer la procédure
suivante.
1 Tenez la cellule d’une main.
2 Retirez la cellule dans le sens de la flèche tout en
tenant le support de la pointe de lecture à l’écart
de l’autre main.
Changement de cellule
Cet appareil n’est pas compatible avec les cellules MC. Utilisez une
cellule VM ou MM.
Retrait de la cellule
1
Retirez les vis, écrous et rondelles fixés au porte-cellule.
2 Débranchez les fils conducteurs raccordés à la cellule.
Fixation de la cellule
1 Raccordez la cellule en faisant correspondre les
couleurs des fils conducteurs du porte-cellule avec les
symboles sur les prises de la cellule.
Faites correspondre les couleurs des fils conducteurs du porte-cellule
avec les symboles sur les prises de la cellule comme ci-dessous.
Depuis l’avant de l’appareil, L+: blanc se trouve en haut à gauche, L-:
bleu se trouve en bas à gauche, R+: rouge se trouve en haut à droite et
R-: vert se trouve en bas à droite.
!
Raccordez fermement les fils conducteurs à l’aide d’une pince ou similaire.
2 Fixez la cellule au porte-cellule à l’aide des vis, écrous
et rondelles fournis avec la cellule.
Cellule
Fil conducteur
Porte-cellule
Contrepoids de porte-cellule
! Lorsque vous fixez la cellule au porte-cellule, fixez-la fermement.
! Lors de l’utilisation d’une cellule de 5 g ou moins, utilisez le contre-
poids de porte-cellule fourni.
Réglage du surplomb
Utilisez l’échelle de réglage du surplomb suivante pour régler la position
à l’aide de la vis de fixation de la cellule, de sorte que l’extrémité de la pointe
de lecture soit à une position de 53 mm de la fixation du bras de lecture.
53 mm
Échelle de réglage du surplomb
53 mm

Informations supplémentaires
En cas de panne
! Une erreur de commande est souvent prise pour une anomalie de fonctionnement ou une panne. S’il vous semble que quelque chose est anormal
avec cet appareil, vérifiez les points suivants et les [FAQ] du [PLX-500] sur le site de support de Pioneer DJ.
http://pioneerdj.com/support/
Parfois, le problème peut provenir d’un autre composant. Examinez les autres composants et appareils électriques utilisés. Si le problème ne peut
pas être résolu, contactez votre service après-vente le plus proche ou votre revendeur pour une réparation.
! De l’électricité statique ou des influences externes ont peut être déréglé cet appareil. Dans ce cas, il est possible de faire fonctionner à nou-
veau l’appareil en l’éteignant, puis rallumant 1 minute plus tard.
Problème Vérification Solution
L’appareil ne s’allume pas. Est-ce que le cordon d’alimentation est correcte-
ment raccordé ?
Branchez correctement le cordon d’alimentation fourni sur une
prise d’alimentation.
Est-ce que l’interrupteur d’alimentation [POWER]
est réglé sur [ON]?
Réglez l’interrupteur d’alimentation [POWER] sur [ON].
Aucun son ou son faible. Est-ce que les câbles audio sont correctement
raccordés ?
Raccordez correctement les câbles audio.
Est-ce que les prises et fiches sont sales ? Nettoyez les prises et les fiches avant d’effectuer les raccordements.
Est-ce que le porte-cellule est correctement fixé? Fixez correctement le porte-cellule.
Les sons de droite et de gauche sont
inversés.
Les connexions gauche et droite de chaque appa-
reil sont-elles inversées?
Raccordez correctement le câble audio et les fils conducteurs du porte-cellule.
Il y a un faible bruit de fond (bourdon-
nement) pendant la lecture.
Y a-t-il un appareil électrique, tel qu’une lampe
fluorescente, ou son cordon d’alimentation près
du câble de connexion?
Placez le cordon d’alimentation de la lampe fluorescente ou tout autre appareil
aussi loin que possible.
L’extrémité de la pointe de lecture
ne s’abaisse pas sur le disque.
La pression de la pointe de lecture est-elle correc-
tement réglée?
Faites correspondre le contrepoids d’équilibrage avec la valeur de la pression de
la pointe de lecture appropriée pour votre cellule.
Le bras est-il équilibré horizontalement? Tournez le contrepoids d’équilibrage jusqu’à ce que le bras de lecture devienne
horizontal.
La pointe de lecture saute. La pression de la pointe de lecture est-elle correc-
tement réglée?
Faites correspondre le contrepoids d’équilibrage avec la valeur de la pression de
la pointe de lecture appropriée pour votre cellule.
Le disque est-il déformé ou a-t-il des rayures? Vérifiez l’état du disque.
L’extrémité de la pointe de lecture est-elle très
poussiéreuse?
Retirez le porte-cellule avec la cellule installée et utilisez une petite brosse
souple ou un pinceau pour enlever soigneusement la poussière, etc. de l’extré-
mité de la pointe de lecture.
L’antipatinage est-il réglé correctement? Réglez l’antipatinage correctement.
La hauteur du bras est-elle réglée correctement? Réglez la hauteur du bras correctement.
Le bras s’arrête en cours de lecture
et n’avance plus.
Y a-t-il des rayures sur le disque? Vérifiez l’état du disque.
Le bras est-il en contact avec quelque chose? Vérifiez autour du bras. Retirez l’obstacle, le cas échéant.
Le volume sonore est faible ou fort
(déformé).
La connexion à l’amplificateur est-elle appropriée
pour le type de cellule (sortie)?
Raccordez correctement les câbles de liaison.
Le réglage du commutateur [PHONO/LINE] est-il
correct ?
Réglez correctement le commutateur [PHONO/LINE] en fonction de la
prise d’entrée du dispositif raccordé.
Le plateau rotatif bouge beaucoup. De la saleté ou autre est collée sur les éléments de
fixation du plateau et de l’axe central.
Retirez la saleté.
Précautions d’emploi
À propos de la condensation
Des gouttelettes d’eau (condensation) peuvent se former à l’intérieur
de l’appareil (sur les pièces et les lentilles) en hiver, par exemple, si
vous transportez sans transition l’appareil d’un endroit froid dans un
pièce chaude, ou si la température de la pièce où se trouve l’appa-
reil augmente rapidement (un appareil de chauffage, par exemple,
est mis en marche). Cet appareil ne fonctionne pas correctement
et la lecture n’est pas possible si de la condensation s’est formée
dans l’appareil. Laissez l’appareil éteint pendant 1 ou 2 heures à la
température ambiante (selon l’intensité de la condensation). Les gout-
telettes d’eau s’évaporeront et la lecture sera de nouveau possible. De
la condensation peut aussi se former en été si l’appareil est exposé
à l’air d’un climatiseur, etc. Dans ce cas, installez l’appareil à un autre
endroit.
Lors du transport de l’appareil à un autre
endroit
Utilisez les matériaux d’emballage d’origine pour emballer l’appareil.
Si vous ne disposez pas des matériaux d’emballage d’origine, assu-
rez-vous d’effectuer les opérations suivantes.
! Démontez la feutrine et le plateau avant l’emballage.
! Démontez le porte-cellule et le contrepoids d’équilibrage du bras et
emballez-les soigneusement.
! Utilisez le serre-bras pour fixer le bras de lecture et utilisez du ruban
adhésif pour le maintenir fermement en place.
! Enveloppez l’appareil principal dans une couverture ou du papier
souple pour ne pas l’endommager.
! Emballez afin qu’une force ne puisse pas être exercée sur le bras de
lecture.
Fr
16

Fr
17
Français
Entretien de chaque élément
Lors du montage et du démontage du porte-cellule, étei-
gnez l’amplificateur.
Tenter d’effectuer une telle opération alors que le volume est fort pour-
rait provoquer l’endommagement du haut-parleur.
! Retirez le porte-cellule avec la cellule installée et utilisez une petite
brosse souple ou un pinceau pour enlever soigneusement la pous-
sière, etc. de l’extrémité de la pointe de lecture.
! Utilisez un nettoyant pour disque de bonne qualité pour nettoyer les
disques.
! Utilisez un chiffon doux ou quelque chose de similaire pour nettoyer
la borne du porte-cellule, puis fixez-le à nouveau au bras de lecture.
Nettoyage du capot anti-poussière, etc.
Utilisez un chiffon doux pour nettoyer le capot anti-poussière et le boîtier
! Ne nettoyez pas le capot anti-poussière pendant la lecture. Le
bras de lecture pourrait être attiré au capot anti-poussière à cause
de l’électricité statique.
À propos des marques commerciales
et des marques déposées
! « Pioneer DJ » est une marque déposée de PIONEER CORPORATION
qui est utilisée sous licence.
! rekordbox est une marque commerciale ou une marque déposée de
Pioneer DJ Corporation.
Les noms de sociétés et de produits mentionnés ici sont des marques
commerciales ou des marques déposées de leurs détenteurs respectifs.
Spécifications
Alimentation ...................... CA 110 V à 120 V ou 220 V à 240 V, 50 Hz/60 Hz
Consommation ....................................................................................... 11 W
Poids de l’appareil principal ...............................................................10,7 kg
Dimensions maximales ........ 450 mm (L) × 158,5 mm (H) × 367,5 mm (P)
Température de fonctionnement tolérée ............................. +5 °C à +35 °C
Humidité de fonctionnement tolérée .......5 % à 85 % (sans condensation)
Plateau
Méthode d’entraînement ........... Entraînement direct de type servomoteur
Moteur .................................Moteur à courant continu sans balai triphasé
Système de freinage ..................................................Freinage électronique
Vitesse de rotation .................................. 33 1/3 tr/min, 45 tr/min, 78 tr/min
Plage de réglage de la vitesse de rotation ............................................±8 %
Fluctuation de vitesse ............................................ 0,15 % ou moins WRMS
Rapport S/B .............................................................................. 50 dB ou plus
Plateau ............................................. Aluminium moulé, Diamètre : 332mm
Couple de démarrage ..................................................... 1,6 kg·cm ou plus
Temps de démarrage .......................1 secondes ou moins (à 33 1/3 tr/min)
Bras de lecture
Type de bras......................................................Bras de lecture en S de type
universel, support à cardan, équilibrage statique
Longueur effective ......................................................................... 230,5 mm
Surplomb ............................................................................................. 16 mm
Erreur de suivi ............................................................................. Moins de 3°
Plage de réglage de la hauteur du bras ............................................... 6 mm
Plage variable de la pression de la pointe de lecture ..................0 g à 4,0 g
(1 graduation 0,1 g)
Poids de la cellule approprié ........................... 9,5 g ou moins (une cellule)
Type de cellule ........................................................................................... VM
Tension de sortie
PHONO ......................................................................................2,5 mV/1 kHz
LINE ...........................................................................................150 mV/1 kHz
— Les caractéristiques et la présentation peuvent être modifiées,
sans avis préalable, dans un souci d’amélioration.
! © 2016 Pioneer DJ Corporation. Tous droits de reproduction et de
traduction réservés.

De
2
ACHTUNG
UM SICH NICHT DER GEFAHR EINES ELEKTRISCHEN
SCHLAGES AUSZUSETZEN, DÜRFEN SIE NICHT DEN
DECKEL (ODER DIE RÜCKSEITE) ENTFERNEN. IM
GERÄTEINNEREN BEFINDEN SICH KEINE VOM
BENUTZER REPARIERBAREN TEILE. ÜBERLASSEN
SIE REPARATUREN DEM QUALIFIZIERTEN
KUNDENDIENST.
D3-4-2-1-1_B1_De
WARNUNG
Dieses Gerät ist nicht wasserdicht. Zur Vermeidung der
Gefahr von Brand und Stromschlag keine Behälter mit
Flüssigkeiten (z.B. Blumenvasen und -töpfe) in die
Nähe des Gerätes bringen und dieses vor Tropfwasser,
Spritzwasser, Regen und Nässe schützen.
D3-4-2-1-3_A1_De
WARNUNG
Keine Quellen offener Flammen (z.B. eine brennende
Kerze) auf dieses Gerät stellen.
D3-4-2-1-7a_A1_De
Betriebsumgebung
Betriebstemperatur und Betriebsluftfeuchtigkeit:
+5 °C bis +35 °C, 85 % rel. Feuchte max.
(Ventilationsschlitze nicht blockiert)
Eine Aufstellung dieses Gerät an einem unzureichend
belüfteten, sehr feuchten oder heißen Ort ist zu
vermeiden, und das Gerät darf weder direkter
Sonneneinstrahlung noch starken Kunstlichtquellen
ausgesetzt werden.
D3-4-2-1-7c*_A1_De
Dieses Gerät ist für den Heimgebrauch vorgesehen.
Falls bei Einsatz zu einem anderem Zweck (z.B.
Langzeitgebrauch zu gewerblichen Zwecken in einem
Restaurant oder Betrieb in einem Fahrzeug bzw.
Schiff) eine Funktionsstörung auftritt, die eine
Reparatur des Gerätes erforderlich macht, werden
die Reparaturkosten dem Kunden selbst dann in
Rechnung gestellt, wenn die Garantiefrist noch nicht
abgelaufen ist. K041_A1_De
Mischen Sie dieses Produkt, wenn Sie es entsorgen wollen, nicht mit gewöhnlichen Haushaltsabfällen. Es gibt ein getrenntes
Sammelsystem für gebrauchte elektronische Produkte, über das die richtige Behandlung, Rückgewinnung und Wiederverwertung
gemäß der bestehenden Gesetzgebung gewährleistet wird.
Privathaushalte in den Mitgliedsstaaten der EU, in der Schweiz und in Norwegen können ihre gebrauchten elektronischen Produkte an
vorgesehenen Sammeleinrichtungen kostenfrei zurückgeben oder aber an einen Händler zurückgeben (wenn sie ein ähnliches neues Produkt
kaufen).
Bitte wenden Sie sich in den Ländern, die oben nicht aufgeführt sind, hinsichtlich der korrekten Verfahrensweise der Entsorgung an die örtliche
Kommunalverwaltung.
Auf diese Weise stellen Sie sicher, dass das zu entsorgende Produkt der notwendigen Behandlung, Rückgewinnung und Wiederverwertung
unterzogen wird, und so mögliche negative Einflüsse auf die Umwelt und die menschliche Gesundheit vermieden werden.
K058b_A1_De
VORSICHTSHINWEIS ZUR BELÜFTUNG
Bei der Aufstellung dieses Gerätes muss für einen
ausreichenden Freiraum gesorgt werden, um eine
einwandfreie Wärmeabfuhr zu gewährleisten
(mindestens 15 cm oberhalb des Gerätes, 5 cm hinter
dem Gerät und jeweils 5 cm an der Seite des Gerätes).
WARNUNG
Im Gerätegehäuse sind Ventilationsschlitze und andere
Öffnungen vorgesehen, die dazu dienen, eine
Überhitzung des Gerätes zu verhindern und einen
zuverlässigen Betrieb zu gewährleisten. Um
Brandgefahr auszuschließen, dürfen diese Öffnungen
auf keinen Fall blockiert oder mit Gegenständen (z.B.
Zeitungen, Tischdecken und Gardinen) abgedeckt
werden, und das Gerät darf beim Betrieb nicht auf
einem dicken Teppich oder Bett aufgestellt sein.
D3-4-2-1-7b*_A1_De
Spannungswähler
Der Spannungs-Wahlschalter befindet sich bei
Modellen mit mehreren Spannungen an der Oberseite.
Die Werkseinstellung des Spannungswählers
beträgt 220 bis 240 V. Bitte wählen Sie die richtige
Spannung für Ihr Land oder Ihre Region.
Trennen Sie vor dem Spannungswechsel das Netzkabel.
Ändern Sie die Position des Spannungs-Wahlschalters
mit einem Schraubendreher mittlerer Größe.
D3-4-2-1-5*_A2_De

De
3
ACHTUNG
Der POWER-Schalter dieses Gerätes trennt das Gerät
nicht vollständig vom Stromnetz. Um das Gerät
vollständig vom Netz zu trennen, muss der
Netzstecker aus der Netzsteckdose gezogen werden.
Daher sollte das Gerät so aufgestellt werden, dass
stets ein unbehinderter Zugang zur Netzsteckdose
gewährleistet ist, damit der Netzstecker in einer
Notsituation sofort abgezogen werden kann. Um
Brandgefahr auszuschließen, sollte der Netzstecker
vor einem längeren Nichtgebrauch des Gerätes,
beispielsweise während des Urlaubs, grundsätzlich
von der Netzsteckdose getrennt werden.
D3-4-2-2-2a*_A1_De
VORSICHT MIT DEM NETZKABEL
Fa
ssen Sie das Netzkabel immer am Stecker. Ziehen Sie
nicht am Kabel selbst, und fassen Sie das Netzkabel
niemals mit nassen Händen an
, da dies einen
Ku
rzschluss oder elektrischen Schlag verursachen
kan
n. Stellen Sie nicht das Gerät, Möbelstücke o.ä. auf
das Netzkabel; sehen Sie auch zu, dass es nicht
eingeklemmt wird. Machen Sie niemals einen Knoten
in das Netzkabel, und binden Sie es nicht mit anderen
Kabeln
. Das Netzkabel sollte so gelegt werden, dass
niemand darauf tritt. Ein beschädigtes Netzkabel kann
einen Brand oder elektrischen Schlag verursachen
.
Pr
üfen Sie das Netzkabel von Zeit zu Zeit. Sollte es
beschädigt sein
, wenden Sie sich an Ihre nächste
K
undendienststelle oder Ihren Händler, um es zu
ersetzen
. S002*_A1_De
Deutsch

De
4
Inhalt
Zum Lesen dieser Anleitung
! Vielen Dank, dass Sie sich für dieses Pioneer DJ-Produkt entschie-
den haben.
Lesen Sie unbedingt dieses Infoblatt, den es enthält wichtige
Informationen, mit denen Sie sich vor dem Gebrauch dieses
Produktes vertraut machen müssen.
Nachdem Sie die Bedienungsanleitung gelesen haben, legen Sie sie
griffbereit zum Nachschlagen ab.
! In dieser Broschüre werden die Namen der Tasten und Anschlüsse
des Hauptgeräts in eckigen Klammern ([ ]) angegeben.
Beispiele:
Drücken Sie die Taste [START/STOP].
Vor der Inbetriebnahme
Merkmale ..................................................................................................... 5
Lieferumfang ............................................................................................... 5
Bevor Sie beginnen
Installieren von rekordbox (Mac/Windows) ............................................. 6
Montage ....................................................................................................... 6
Bezeichnungen und Funktionen der
Komponenten
Oberseite ..................................................................................................... 8
Rückseite ..................................................................................................... 9
Anpassung
Anpassen des Tonarmgleichgewichts ................................................... 10
Anpassen des Nadeldrucks ..................................................................... 10
Anti-Skating-Anpassung .......................................................................... 11
Anpassen der Höhe des Armhebers ...................................................... 11
Anpassen der Armhöhe ........................................................................... 11
Anschlüsse
Anschließen der Aktivlautsprecher......................................................... 12
Anschluss an einen Vor-/Hauptverstärker und eine Komponente ...... 12
Anschluss an einen DJ-Mixer .................................................................. 13
Verbinden mit einem Computer .............................................................. 13
Installationsort .......................................................................................... 13
Anpassen der Höhe des Hauptgeräts .................................................... 13
Bedienung
Einschalten der Stromversorgung .......................................................... 14
Ausschalten der Stromversorgung ......................................................... 14
Wiedergabe ............................................................................................... 14
Anhalten der Wiedergabe ........................................................................ 14
Beenden der Wiedergabe ........................................................................ 14
Anpassen der Tonhöhe ............................................................................ 14
Aufstellen einer Schallplattenhülle......................................................... 14
Abspielen einer Standard-EP .................................................................. 14
Beleuchtung der Nadelspitze .................................................................. 15
Aufnahme .................................................................................................. 15
Austauschen der Nadel ........................................................................... 15
Wechseln des Tonabnehmers ................................................................. 15
Zusätzliche Informationen
Störungssuche .......................................................................................... 16
Vorsichtshinweise..................................................................................... 16
Wartung der einzelnen Teile .................................................................... 17
Über Markenzeichen und eingetragene Markenzeichen ..................... 17
Technische Daten ..................................................................................... 17

De
5
Deutsch
Vor der Inbetriebnahme
Merkmale
Dieser Plattenspieler mit Direktantrieb für ein hohes Drehmoment kann
für verschiedene Anwendungen – vom Musikhören zu Hause bis hin zu
DJ-Auftritten – eingesetzt werden.
Hochwertiger analoger
Schallplatten-Sound
Der Weg von der Nadelspitze zum PHONO/LINE-Ausgang wurde so kurz
wie möglich konzipiert, um die Klangqualität von analogen Schallplatten
so originalgetreu wie möglich wiederzugeben.
Da zudem sowohl der PHONO-Ausgang als auch der LINE-Ausgang
unterstützt wird, können Sie durch den direkten Anschluss von
Aktivlautsprechern problemlos einen hochwertigen analogen
Schallplatten-Sound genießen.
Einfaches digitales Aufnehmen
Über den USB-B-Anschluss können Sie dieses Gerät und einen PC
oder Mac direkt verbinden und dann analoge Schallplatten-Sound-
Quellen auf dem PC oder Mac aufnehmen, indem Sie diese zu Daten
konvertieren. Die direkte Aufnahme mit einfacher Bedienung kann mit
der Aufnahmefunktion der kostenlosen Musikverwaltungsanwendung
„rekordbox” (Version 4.2.1 oder höher) erfolgen.
Plattenspieler mit Direktantrieb für
DJ-Auftritte
Der Einsatz eines System mit Direktantrieb für ein hohes Drehmoment
ermöglicht das Mixen von Tracks, Scratching und andere DJ-Funktionen
durch die Kombination von zwei dieser Geräte mit einem DJ-Mixer.
Abdeckhaube als Ständer für eine
Schallplattenhülle
Eine Schallplattenhülle kann auf der Abdeckhaube aufgestellt werden,
wenn die Abdeckhaube geöffnet ist. Dadurch können Sie beim Hören
von analogem Schallplattensound auf die Schallplattenhülle schauen.
Lieferumfang
! Plattenteller
! Slipmat
! Abdeckhaube
! Adapter für EPs
! Gegengewicht
! Tonabnehmerkopf (inklusive Tonabnehmer)
! Tonkopfgewicht
! Netzkabel
! USB-Kabel
! Audio-Adapterkabel (Stereo-Klinkenstecker (weiblich) zu Stereo-
Miniklinkenstecker (männlich))
! Garantie (für bestimmte Regionen)
1
! Bedienungsanleitung (dieses Dokument)
1 Die mitgelieferte Garantie gilt für die Region Europa.
WARNUNG
Kleine
Teile außerhalb der Reichweite von Kleinkindern
und Kindern aufbewahre
n. Bei unbeabsichtigtem
Ve
rschlucken ist unverzüglich ein Arzt aufzusuchen.
D41-6-4_A1_D
e

De
6
Bevor Sie beginnen
Installieren von rekordbox (Mac/
Windows)
1 Gehen Sie zu rekordbox.com.
https://rekordbox.com/en/store/
! Der Seiteninhalt kann ohne Ankündigung geändert werden.
2 Lesen Sie die Kurzanleitung und klicken Sie auf [Free
To Download].
3 Lesen Sie die Software-
Endbenutzerlizenzvereinbarung sorgfältig durch und
aktivieren Sie das Kontrollkästchen [Akzeptieren], wenn
Sie einverstanden sind.
Wenn Sie das Kontrollkästchen aktivieren, können Sie [Download]
anklicken.
4 Klicken Sie auf [Download].
Der Download von rekordbox (Mac/Windows) beginnt.
5 Doppelklicken Sie auf die heruntergeladene Datei, um
sie zu entpacken.
6 Doppelklicken Sie auf die entpackte Datei, um den
Installationsassistenten zu starten.
7 Lesen Sie die Software-Lizenzvereinbarung sorgfältig
durch und fahren Sie mit der Installation entsprechend
der Anweisungen auf dem Bildschirm fort, wenn Sie
dieser zustimmen.
! Wenn Sie mit dem Inhalt der Software-Lizenzvereinbarung nicht
einverstanden sind, brechen Sie die Installation ab.
8 Wenn der Bildschirm mit der Fertigstellung der
Installation angezeigt wird, folgen Sie den Anweisungen
auf dem Bildschirm, um den Installationsassistenten zu
schließen.
Die Installation ist damit abgeschlossen.
! Um rekordbox dj, rekordbox dvs und rekordbox video zu benutzen, ist
eine Aktivierung (Lizenz-Authentifizierung) erforderlich. Entnehmen
Sie Einzelheiten der Bedienungsanleitung von rekordbox.
https://rekordbox.com/en/support/manual.php
Montage
1 Setzen Sie den Plattenteller und die Slipmat auf.
Setzen Sie den Plattenteller auf die mittlere Spindel und platzieren Sie
die Slipmat auf den Plattenteller.
! Schlagen Sie dabei nicht mit dem Plattenteller auf das Hauptgerät
und lassen Sie ihn nicht fallen.
Plattenteller
Mittlere Spindel
Slipmat
2 Bringen Sie den Tonabnehmerkopf an.
Setzen Sie den Tonabnehmerkopf mit angebrachtem Tonabnehmer in
den Tonarm ein. Ziehen Sie als Nächstes die Kontermutter an, während
Sie dabei den Tonabnehmerkopf horizontal halten.
Gegenmutter

De
7
Deutsch
! Entfernen Sie vor der Verwendung die Nadelabdeckung, ohne dabei
die Nadelspitze zu berühren.
Nadelabdeckung
3 Bringen Sie das Gegengewicht an.
Befestigen Sie das Gegengewicht am hinteren Schaft des Tonarms.
Gegengewicht
Bringen Sie die Abdeckhaube an.
Schieben Sie die Gelenke der Abdeckhaube in die Halter
an der Rückseite des Geräts.
Wenn Sie die Abdeckhaube entfernen, ziehen Sie die Gelenke bei geöff-
neter Abdeckhaube nach oben heraus.
Gelenk
Halter

De
8
Bezeichnungen und Funktionen der Komponenten
Oberseite
1
2 3 45 6
c
d
e
f
ghij
a9
7
b
8
1 POWER Schalter
Wenn dieser Schalter in die [ON]-Position gestellt wird, wird das
Gerät eingeschaltet und die Stroboskop-Beleuchtung an der Seite
leuchtet.
= Einschalten der Stromversorgung (S. 14 )
Ausschalten der Stromversorgung (S. 14 )
2 START/STOP-Taste
Durch Drücken auf die Taste wird die Drehung des Plattentellers
gestartet oder gestoppt.
= Wiedergabe (S. 14 )
3 Drehzahländerungstaste
Ändert die Drehzahl entsprechend der abzuspielenden Schallplatte.
! Drücken Sie bei einer Platte mit 33 1/3 U/Min auf die [33]-Taste.
! Drücken Sie bei einer Schallplatte mit 45 U/Min auf die
[45]-Taste.
! Bei einer Schallplatte mit 78 U/Min drücken Sie die [33]-Taste
und die [45]-Taste gleichzeitig.
= Wiedergabe (S. 14 )
4 Nadelbeleuchtung
Beleuchtet die Nadelspitze.
= Beleuchtung der Nadelspitze (S. 15 )
5 Nadelbeleuchtungsschalter
Die Nadelbeleuchtung leuchtet in weiß und reicht bis zur
Beleuchtungsposition der Nadelspitze.
= Beleuchtung der Nadelspitze (S. 15 )
6 Tonabnehmerkopf
7 TEMPO-Schieber
Der Schieber lässt sich zur Feineinstellung der Drehzahl vor- und
zurückschieben.
= Anpassen der Tonhöhe (S. 14 )
8 Tonarm
= Anpassung (S. 10 )
9 Armhalterung
Hält den Tonarm.
a Armstütze
Stützt den Tonarm.
b Anhebehebel
Wenn der Hebel nach oben gezogen wird, geht der Tonarm nach
oben. Wenn der Hebel nach unten gedrückt wird, geht der Tonarm
nach unten.
c Armheber
Diese Vorrichtung wird verwendet, um den Tonarm nach oben und
unten zu heben. Er wird über den Anhebehebel bedient.
d ANTI SKATING-Drehrad
Beim Abspielen einer Schallplatte wird die Nadelspitze durch die
Skatingkraft zum inneren Perimeter gezogen. Durch Anpassen die-
ses Drehrads an den Nadeldruckwert wird diese Kraft eliminiert.
= Anti-Skating-Anpassung (S. 11 )
e HEIGHT ADJUST-Verriegelung
Verriegelt die angepasste Armhöhe.
= Anpassen der Armhöhe (S. 11 )
f HEIGHT ADJUST-Drehrad
Passt die Höhe des Tonarms an.
= Anpassen der Armhöhe (S. 11 )
g Gegengewicht
Gleicht das Gewicht des Tonarms aus, und passt den Nadeldruck an.
= Anpassung (S. 10 )
h Nadeldruckanpassungsring
Passt den Nadeldruck an den Tonabnehmer an.
= Anpassen des Nadeldrucks (S. 10 )
i Tonabnehmerkopf-Ständer
Hält den Tonabnehmerkopf.
j Adapter für EPs
Spielt Standard-EPs ab.
= Abspielen einer Standard-EP (S. 14 )

De
9
Deutsch
Rückseite
3
12
4 5
1 PHONO/LINE-Regler
Schaltet den Pegel des Soundausgangs von diesem Gerät um.
— [PHONO]: Wählen Sie dies, wenn dieses Gerät mit einem Gerät
verbunden ist, das den Phono-Pegel-Eingang, wie z. B. einen
Vor-/Hauptverstärker oder eine Komponente, unterstützt.
— [LINE]: Wählen Sie dies, wenn dieses Gerät mit einem
Gerät verbunden ist, das den Line-Pegel-Eingang, wie z. B.
Aktivlautsprecher, unterstützt.
ACHTUNG
Verbinden Sie das Gerät nicht mit einem Gerät, das den Phono-Pegel-
Eingang unterstützt, wenn der PHONO/LINE-Schalter sich im Zustand
[LINE] befindet.
2 USB-Anschluss
Schließen Sie das USB-Kabel (mitgeliefert) hier an.
= Verbinden mit einem Computer (S. 13 )
3 Audiokabel
= Anschlüsse (S. 12 )
4 AC IN
Stellt die Verbindung zum Stromnetz mit dem mitgelieferten
Netzkabel her. Warten Sie, bis alle Verbindungen zwischen den
Geräten hergestellt sind, bevor Sie das Netzkabel anschließen.
! Verwenden Sie immer das mitgelieferte Netzkabel.
5 Dämpfer
Dämpft äußere Vibrationen. Durch Drehen der Dämpfer wird die
Plattenspielerhöhe angepasst.
= Anpassen der Höhe des Hauptgeräts (S. 13 )

Anpassung
Anpassen des
Tonarmgleichgewichts
Da sich das Gewicht des Tonabnehmers und Tonabnehmerkopfes je
nach Produkt unterscheiden, muss das Gleichgewicht des Tonarms
angepasst werden.
Nehmen Sie folgende Vorgänge vor.
! Entfernen Sie die Nadelabdeckung und die Armhalterung und ach-
ten Sie darauf, nicht die Nadelspitze zu berühren.
! Drücken Sie den Anhebehebel nach unten.
! Stellen Sie das [ANTI SKATING]-Drehrad auf “0”.
Nehmen Sie den Tonarm von der Armstütze, und passen
Sie das Gegengewicht so an, dass der Arm horizontal
steht.
Drehen Sie das Gegengewicht so weit, bis der Tonarm beinahe horizon-
tal steht.
! Achten Sie beim Bewegen des Tonarms darauf, dass die Nadelspitze
nicht direkt den Plattenteller o.ä. berührt.
Anpassen des Nadeldrucks
Um Nadelsprünge oder Tonverzerrungen zu verhindern, muss der
Nadeldruck an den geeigneten Nadeldruckwert entsprechend des
Tonabnehmers angepasst werden.
Der geeignete Nadeldruckwert für den mitgelieferten Tonabnehmer
beträgt 3,0 g bis 4,0 g.
Nehmen Sie folgende Vorgänge vor.
! Setzen Sie den Tonarm zurück auf die Armstütze, und sichern Sie
ihn mit der Armhalterung.
1 Richten Sie die “0” am Nadeldruckanpassungsring an
der mittleren Linie des hinteren Armschafts aus.
Verhindern Sie mit Ihrem Finger, dass sich das Gegengewicht bewegt,
und stellen Sie den Nadeldruckanpassungsring so ein, dass die Zahl “0”
an der schwarzen mittleren Linie des hinteren Tonarmschafts ausgerich-
tet ist.
Mittlere Linie
2 Passen Sie den Nadeldruck an.
Drehen Sie das Gegengewicht, um den geeigneten Nadeldruckwert für
Ihren Tonabnehmer einzustellen.
! Gemeinsam mit dem Gegengewicht dreht sich auch der
Nadeldruckanpassungsring. Stellen Sie den Nadeldruck auf den
geeigneten Wert unter Beobachtung des Anpassungsrings ein.
Mittlere Linie
De
10

De
11
Deutsch
Anti-Skating-Anpassung
Diese Anpassung soll Nadelsprünge verhindern.
Stellen Sie die gleiche Position auf der Skala wie für den
Nadeldruckwert ein.
Drehen Sie das [ANTI SKATING]-Drehrad, bis die Referenzlinie auf den
gleichen Wert wie für den Nadeldruckwert des Tonabnehmers einge-
stellt ist.
Bei der Scratch-Wiedergabe
Passen Sie die Skalenposition an den Wiedergabevorgang an, um
Nadelsprünge zu verhindern.
Anpassen der Höhe des Armhebers
Wenn Sie einen anderen als den mitgelieferten Tonabnehmer benutzen,
passen Sie diesen Wert an den benutzten Tonabnehmer an.
Nehmen Sie folgende Vorgänge vor.
! Eine Schallplatte wird auf der Slipmat platziert.
! Entfernen Sie die Nadelabdeckung und die Armhalterung und ach-
ten Sie darauf, nicht die Nadelspitze zu berühren.
! Ziehen Sie den Anhebehebel nach oben, und setzen Sie den Tonarm
auf die Schallplatte.
Passen Sie die Höhe an, indem Sie die Schraube drehen,
während der Armheber nach unten gedrückt wird.
— Wenn die Schraube im Uhrzeigersinn gedreht wird, verringert
sich der Abstand zwischen Schallplatte und Nadel.
— Wenn die Schraube entgegen dem Uhrzeigersinn gedreht wird,
erhöht sich der Abstand zwischen Schallplatte und Nadel.
! Die Höhe des Armhebers (der Abstand zwischen Schallplatte und
Nadel, wenn der Anhebehebel nach oben gezogen wird) ist werksei-
tig auf einen Bereich von 8 bis 13 mm eingestellt.
Schraube
Armheber
Anpassen der Armhöhe
Wenn Sie den mitgelieferten Tonabnehmer benutzen, ist die Position „0”
korrekt. Wenn Sie einen anderen als den mitgelieferten Tonabnehmer
benutzen, passen Sie diesen Wert an den benutzten Tonabnehmer an.
1 Drehen Sie die [HEIGHT ADJUST]-Verriegelung zur
Entriegelung.
Entsperren
2 Drücken Sie den Anhebehebel nach unten, setzen Sie
die Nadel auf die Schallplatte, und drehen Sie dann am
[HEIGHT ADJUST]-Drehrad, um den Tonarm parallel an
der Schallplatte auszurichten.
So anpassen, dass der Tonarm horizontal steht.
[HEIGHT ADJUST]-Drehrad
3 Drehen Sie die [HEIGHT ADJUST]-Verriegelung, um
die Armhöhe zu sichern.
Drehen Sie nach der Anpassung der Armhöhe immer die
[HEIGHT ADJUST]-Verriegelung, um den Arm zu sichern.

Anschlüsse
! Schalten Sie die Stromversorgung aus und ziehen Sie das Netzkabel aus der Netzsteckdose, bevor Sie Geräte anschließen oder die Anschlüsse
ändern.
! Beachten Sie die Bedienungsanleitung der angeschlossenen Komponente.
! Schließen Sie das Netzkabel an, nachdem alle Anschlüsse zwischen den Geräten vorgenommen wurden.
Anschließen der Aktivlautsprecher
Aktivlautsprecher
Audiokabel
Rückseite
Netzkabel
Zur
Netzsteckdose
1 Stellen Sie den [PHONO/LINE]-Schalter auf [LINE].
2 Schließen Sie das Audio-Kabel an die [LINE]-Eingangsbuchse der Aktivlautsprecher usw. an.
! Benutzen Sie, falls nötig, das mitgelieferte Audio-Adapterkabel.
3 Schließen Sie das Netzkabel an.
Stellt die Verbindung zum Stromnetz mit dem mitgelieferten Netzkabel her. Warten Sie, bis alle Verbindungen zwischen den Geräten hergestellt sind,
bevor Sie das Netzkabel anschließen.
Anschluss an einen Vor-/Hauptverstärker und eine Komponente
Audiokabel
Rückseite
Netzkabel
Zur
Netzsteckdose
Vor-/Hauptverstärker, Komponente etc.
1 Stellen Sie den [PHONO/LINE]-Schalter auf [PHONO].
2 Verbinden Sie das Audiokabel mit der [PHONO] -Eingangsbuchse des Vor-/Hauptverstärkers oder einer anderen
Komponente.
! Wenn dieses Produkt an einen Vor-/Hauptverstärker oder eine Komponente ohne [PHONO]-Buchse angeschlossen ist, kann keine ausreichende
Lautstärke- und Tonqualität erzielt werden. Stellen Sie in diesem Fall den [PHONO/LINE]-Schalter dieses Geräts auf [LINE] und schließen Sie dann
dieses Gerät an die [LINE]-Eingangsbuchse des Vor-/Hauptverstärkers oder der Komponente an oder benutzen Sie einen Phono-Equalizer.
3 Schließen Sie das Netzkabel an.
Stellt die Verbindung zum Stromnetz mit dem mitgelieferten Netzkabel her. Warten Sie, bis alle Verbindungen zwischen den Geräten hergestellt sind,
bevor Sie das Netzkabel anschließen.
De
12

De
13
Deutsch
Anschluss an einen DJ-Mixer
Plattenteller
DJ Mixer
Audiokabel
Audiokabel
Rückseite
Netzkabel
Zur
Netzsteckdose
1 Stellen Sie den [PHONO/LINE]-Schalter auf [PHONO].
2 Schließen Sie das Audio-Kabel an die [PHONO]-Eingangsbuchse des DJ-Mixers an.
! Wenn dieses Produkt an einen DJ-Mixer ohne [PHONO]-Eingangsbuchse angeschlossen ist, kann keine ausreichende Lautstärke- und Tonqualität
erzielt werden. Stellen Sie in diesem Fall den [PHONO/LINE]-Schalter dieses Geräts auf [LINE] und schließen Sie dann das Gerät an die [LINE]-
Eingangsbuchse des DJ-Mixers an.
3 Schließen Sie das Netzkabel an.
Stellt die Verbindung zum Stromnetz mit dem mitgelieferten Netzkabel her. Warten Sie, bis alle Verbindungen zwischen den Geräten hergestellt sind,
bevor Sie das Netzkabel anschließen.
Verbinden mit einem Computer
Eine USB-Treibersoftware wird für dieses Gerät nicht benötigt.
= Aufnahme (S. 15 )
Rückseite
USB-Kabel
Computer
Netzkabel
Zur
Netzsteckdose
1 Schließen Sie das USB-Kabel an den USB-Anschluss am Computer an.
2 Schließen Sie das Netzkabel an.
Stellt die Verbindung zum Stromnetz mit dem mitgelieferten Netzkabel her. Warten Sie, bis alle Verbindungen zwischen den Geräten hergestellt sind,
bevor Sie das Netzkabel anschließen.
Installationsort
Stellen Sie das Gerät auf eine ebene Oberfläche, die keinen externen
Vibrationen ausgesetzt ist.
! Halten Sie das Gerät so weit wie möglich vom Lautsprechersystem
entfernt.
! Wenn sich das Gerät in der Nähe eines Radios befindet (AM/UKW-
Empfang), könnte das Radio Rauschen verursachen. Halten Sie
einen so großen Abstand wie möglich.
Anpassen der Höhe des Hauptgeräts
Passen Sie die Höhe an, indem Sie die Dämpfer so drehen, dass das
Hauptgerät horizontal steht.

Bedienung
Einschalten der Stromversorgung
1 Stellen Sie alle Verbindungen her und stecken Sie
dann den Netzstecker in eine Steckdose.
= Anschlüsse (S. 12 )
2 Bringen Sie den [POWER]-Schalter in die [ON]-
Position, um das Gerät einzuschalten.
Die Anzeigen dieses Geräts leuchten auf, und es wird mit Strom
versorgt.
Ausschalten der Stromversorgung
Bringen Sie den [POWER]-Schalter in die [OFF]-Position,
um das Gerät auszuschalten.
Die Stromversorgung dieses Geräts schaltet aus.
Wiedergabe
Nehmen Sie folgende Vorgänge vor.
! Legen Sie eine Schallplatte auf den Plattenteller.
! Entfernen Sie die Nadelabdeckung und die Armhalterung.
1 Bringen Sie den [POWER]-Schalter in die [ON]-
Position, um das Gerät einzuschalten.
2 Wählen Sie die Drehzahl, um die
abzuspielende Schallplatte durch Drücken einer
Drehzahländerungstaste entsprechend einzustellen.
3 Drücken Sie die Taste [START/STOP].
Der Plattenteller dreht sich.
4 Ziehen Sie den Anhebehebel nach oben, und setzen
Sie den Tonarm auf die Schallplatte.
5 Drücken Sie den Anhebehebel nach unten.
Der Tonarm senkt sich langsam ab, und die Wiedergabe beginnt.
Anhalten der Wiedergabe
Ziehen Sie den Anhebehebel nach oben.
Die Nadel des Tonabnehmers hebt sich von der Schallplatte ab.
! Um die Wiedergabe fortzusetzen, drücken Sie den Anhebehebel
nach unten.
Beenden der Wiedergabe
1 Ziehen Sie den Anhebehebel nach oben, damit der
Tonarm zur Armstütze zurückkehrt, und drücken Sie
dann den Anhebehebel nach unten.
2 Drücken Sie die Taste [START/STOP].
Der Plattenspieler hält behutsam an.
3 Bringen Sie den [POWER]-Schalter in die [OFF]-
Position, um das Gerät auszuschalten.
Sichern Sie den Tonarm mit der Armhalterung.
Bringen Sie die Nadelabdeckung an, um die Nadelspitze zu schützen.
Schließen Sie die Abdeckhaube.
Anpassen der Tonhöhe
Bewegen Sie den Schieber [TEMPO] vorwärts oder rückwärts.
Wenn der Schieber nach vorn bewegt wird, erhöht sich die Drehzahl.
Wenn der Schieber nach hinten bewegt wird, verringert sich die Drehzahl.
! Wenn sich der [TEMPO]-Schieber in der Mitte befindet, leuchtet die
Anzeige gelbgrün und die Drehzahl wechselt zur angegebenen U/
Min (33 1/3 U/Min, 45 U/Min oder 78 U/Min).
! Die Skala des [TEMPO]-Schiebers ist nur ein ungefährer Wert.
Nutzen Sie ihn als Referenz.
! Sie können überprüfen, ob die Drehzahl zur angegebenen U/
Min gewechselt ist, indem Sie auf die vier Reihen mit dem
Stroboskopmuster rings am Plattenspieler Bezug nehmen.
Stroboskopmuster
1 Wenn sich das Stroboskop-Muster scheinbar nicht mehr ändert,
33 1/3 U/Min (50 Hz Stromversorgung)
2 Wenn sich das Stroboskop-Muster scheinbar nicht mehr ändert,
45 U/Min (50 Hz Stromversorgung)
3 Wenn sich das Stroboskop-Muster scheinbar nicht mehr ändert,
33 1/3 U/Min (60 Hz Stromversorgung)
4 Wenn sich das Stroboskop-Muster scheinbar nicht mehr ändert,
45 U/Min (60 Hz Stromversorgung)
! Eine Stroboskop-Beleuchtung (rote LED-Leuchte) erzeugt das
Stroboskopmuster dieses Geräts. Benutzen Sie zum Überprüfen der
Tonhöhe immer die Leuchte der Stroboskop-Beleuchtung.
Aufstellen einer Schallplattenhülle
Stellen Sie die Schallplattenhülle hinter die Stopper, die an der
Abdeckhaube angebracht sind, wie in der Abbildung gezeigt.
StopperSchallplattenhülle
! Stellen Sie nur Schallplattenhüllen auf.
! Stellen Sie die Schallplattenhülle korrekt hinter die Stopper.
! Während Sie diese Funktion während der Wiedergabe benutzen,
achten Sie darauf, dass die Schallplattenhülle nicht umfällt. Die
Schallplatte oder die Nadel können möglicherweise beschädigt
werden.
! Achten Sie darauf, nicht die Abdeckhaube zu schließen, während
eine Schallplattenhülle darin steht.
Abspielen einer Standard-EP
Setzen Sie den EP-Adapter auf die mittlere Spindel, und drücken Sie auf
die [45]-Taste.
De
14

De
15
Deutsch
Beleuchtung der Nadelspitze
Wenn der Nadelbeleuchtungsschalter betätigt wurde, leuchtet die
Nadelbeleuchtung in weiß und reicht bis zur Beleuchtungsposition der
Nadelspitze.
! Falls dies nicht erwünscht ist, drücken Sie auf die Nadelbeleuchtung,
um sie abzusenken. Der Nadelbeleuchtungsschalter erlischt.
! Schauen Sie nicht direkt ins Licht, wenn die Nadelbeleuchtung
leuchtet.
Aufnahme
Analoge Schallplatten können durch die Verbindung mit einem
Computer mit der installierten Musikverwaltungssoftware rekordbox
digital aufgenommen werden.
Details finden Sie auf der nachstehenden rekordbox-Produktseite und in
der Bedienungsanleitung von rekordbox unter [Support].
https://rekordbox.com/en/store/
Austauschen der Nadel
Überprüfen Sie, ob das Gerät nicht eingeschaltet ist, bevor Sie das fol-
genden Verfahren ausführen.
1 Halten Sie den Tonabnehmer mit einer Hand.
2 Entfernen Sie den Tonabnehmer in Pfeilrichtung,
während Sie den Nadelhalterteil mit der anderen Hand
halten.
Wechseln des Tonabnehmers
Dieses Gerät ist nicht mit MC-Tonabnehmern kompatibel. Verwenden
Sie einen VM-Tonabnehmer oder einen MM-Tonabnehmer.
Entfernen des Tonabnehmers
1 Entfernen Sie die Schrauben, Muttern und
Unterlegscheiben am Tonabnehmerkopf.
2 Entfernen Sie die Führungsdrähte, die am
Tonabnehmer angebracht sind.
Anbringen des Tonabnehmers
1 Bringen Sie den Tonabnehmer an, während Sie die
Farben der Führungsdrähte des Tonabnehmerkopfs
an den Symbolen der Klemmen des Tonabnehmers
ausrichten.
Richten Sie die Farben der Führungsdrähte des Tonabnehmerkopfs an
den Symbolen an den Klemmen des Tonabnehmers wie folgt aus.
Wenn man von vorne schaut: oben links ist L+: weiß, unten links ist L-:
blau, oben rechts ist R+: rot und unten rechts ist R-: grün.
! Schließen Sie die Führungsdrähte mit einer Zange oder ähnlichen
Werkzeugen sicher an.
2 Bringen Sie den Tonabnehmer am Tonabnehmerkopf
mit den Schrauben, Muttern und Unterlegscheiben an,
die mit dem Tonabnehmer mitgeliefert wurden.
Tonabnehmer
Führungsdrah
t
Tonabnehmerkopf
Tonkopfgewicht
! Bringen Sie den Tonabnehmer ordnungsgemäß am
Tonabnehmerkopf an.
! Verwenden Sie beim Gebrauch eines Tonabnehmers von weniger als
5 g das mitgelieferte Tonkopfgewicht.
Anpassen des Überhangs
Verwenden Sie die folgende Überhanganpassungsskala, um die Position
mithilfe der Tonabnehmer-Einstellschraube so einzurichten, dass die
Nadelspitze einen Abstand von 53 mm zur Tonarmbefestigung erreicht.
53 mm
Überhanganpassungsskala
53 mm

De
16
Zusätzliche Informationen
Störungssuche
! Bedienungsfehler werden oft irrtümlich für Störungen oder Ausfälle gehalten. Wenn Sie den Eindruck haben, dass diese Komponente nicht ord-
nungsgemäß funktioniert, überprüfen Sie bitte die Punkte unten und [FAQ] für [PLX-500] auf der Pioneer DJ-Support-Website.
http://pioneerdj.com/support/
Manchmal liegt das Problem an einer anderen Komponente. Überprüfen Sie die anderen Komponenten und elektrischen Geräte, die verwendet
werden. Wenn das Problem nicht behoben werden kann, bitten Sie Ihre nächste Kundendienstvertretung oder Ihren Fachhändler, die Reparatur
durchzuführen.
! Dieses Gerät kann möglicherweise aufgrund von statischer Elektrizität oder anderen externen Faktoren nicht richtig arbeiten. In diesem Fall kann
richtiger Betrieb durch Ausschalten, mindestens 1 Minute Warten und dann erneutes Einschalten wieder hergestellt werden.
Problem Prüfen Abhilfe
Das Gerät schaltet nicht ein. Ist das Netzkabel richtig angeschlossen? Schließen Sie das mitgelieferte Netzkabel richtig an eine Steckdose an.
Ist der [POWER]-Schalter für die Stromversorgung
auf [ON] gestellt?
Stellen Sie den [POWER]-Schalter für die Stromversorgung auf [ON].
Es wird kein oder nur sehr schwacher
Ton erzeugt.
Sind die Audiokabel richtig angeschlossen? Schließen Sie die Audiokabel richtig an.
Sind Buchsen und Stecker verschmutzt? Reinigen Sie Buchsen und Stecker vor dem Herstellen von Verbindungen.
Ist der Tonabnehmerkopf richtig angeschlossen? Schließen Sie den Tonkopf richtig an.
Der linke und rechte Ton sind
vertauscht.
Sind die linken und rechten Anschlüsse für jedes
Ausrüstungsteil vertauscht?
Verbinden Sie das Audiokabel und die Führungsdrähte des Tonabnehmerkopfs
ordnungsgemäß.
Während der Wiedergabe ist ein tiefes
Brummgeräusch (Summen oder
Surren) zu hören.
Befindet sich ein elektrisches Gerät wie eine
Neonlampe oder sein Netzkabel in der Nähe des
Anschlusskabels?
Verlegen Sie das Netzkabel der Neonlampe oder stellen Sie ein anderes Gerät so
weit entfernt wie möglich auf.
Die Nadelspitze berührt nicht die
Schallplatte.
Ist der Nadeldruck richtig eingestellt? Stellen Sie das Gegengewicht auf den geeigneten Nadeldruckwert für Ihren
Tonabnehmer ein.
Ist der Arm horizontal ausgerichtet? Drehen Sie das Gegengewicht so weit, bis der Tonarm horizontal steht.
Es treten Nadelsprünge auf. Ist der Nadeldruck richtig eingestellt? Stellen Sie das Gegengewicht auf den geeigneten Nadeldruckwert für Ihren
Tonabnehmer ein.
Ist die Schallplatte verzogen oder zerkratzt? Überprüfen Sie den Zustand der Schallplatte.
Hat sich an der Nadelspitze viel Staub
angesammelt?
Nehmen Sie den Kopf mit Tonabnehmer ab, und entfernen Sie mit einer weichen
Bürste oder einem Pinsel vorsichtig jeglichen Staub usw. von der Nadelspitze.
Ist das Anti-Skating richtig eingestellt? Stellen Sie das Anti-Skating richtig ein.
Ist die Armhöhe richtig eingestellt? Stellen Sie die Armhöhe richtig ein.
Der Arm stoppt während der
Wiedergabe und bewegt sich nicht
weiter.
Ist die Schallplatte zerkratzt? Überprüfen Sie den Zustand der Schallplatte.
Berührt der Arm etwas? Überprüfen Sie den Armbereich und entfernen Sie ein etwaiges Hindernis.
Die Lautstärke ist zu niedrig oder zu
hoch (verzerrt).
Wurde der Anschluss an den Verstärker ord-
nungsgemäß für diesen Tonabnehmer (Ausgabe)
vorgenommen?
Schließen Sie die Verbindungskabel richtig an.
Ist die Einstellung des [PHONO/LINE]-Schalters
korrekt?
Stellen Sie den [PHONO/LINE]-Schalter entsprechend der Eingangsbuchse des
angeschlossenen Geräts ein.
Der sich drehende Plattenspieler
schwankt stark.
Schmutz befindet sich an den Montageteilen des
Plattenspielers und der mittleren Spindel.
Entfernen Sie den Schmutz.
Vorsichtshinweise
Über Kondensation
Wassertröpfchen (Kondensation) können sich im Gerät (auf
Funktionsteilen und Linsen) im Winter absetzen, zum Beispiel wenn das
Gerät von einem kalten Ort in einen warmen Raum gebracht wird oder
wenn die Temperatur im Raum, in dem das Gerät installiert ist, plötzlich
ansteigt (durch Heizung usw.). Das Gerät funktioniert nicht richtig und
kann nicht zur Wiedergabe verwendet werden, wenn sich im Inneren
Kondensation gebildet hat. Lassen Sie das Gerät 1 bis 2 Stunden lang
bei Raumtemperatur stehen (die genaue erforderliche Zeit ist je nach
Bedingungen der Kondensation unterschiedlich), ohne es einzuschal-
ten. Die Wassertröpfchen verdampfen, und das Gerät wird betriebsbe-
reit. Kondensation kann auch im Sommer auftreten, z.B. wenn das Gerät
dem direkten Luftstrom von einer Klimaanlage, usw. ausgesetzt ist. In
diesem Fall stellen Sie das Gerät an einem anderen Ort auf.
Transport des Geräts an einen anderen
Ort
Verpacken Sie das Gerät in seine Originalverpackungsmaterialien.
Wenn die Originalverpackungsmaterialien nicht mehr vorhanden ist,
nehmen Sie Folgendes vor.
! Entfernen Sie die Slipmat und den Plattenspieler vor dem Verpacken.
! Entfernen Sie den Tonabnehmerkopf und das Gegengewicht vom
Arm, und verpacken Sie beide sorgfältig.
! Sichern Sie den Tonarm mithilfe der Armhalterung und verwenden
Sie Klebeband, damit er sich nicht bewegt.
! Wickeln Sie die Haupteinheit in eine Decke oder weiches Papier,
damit sie nicht beschädigt wird.
! Packen Sie so, dass keine Kraft auf den Tonarm ausgeübt wird.

De
17
Deutsch
Wartung der einzelnen Teile
Schalten Sie den Verstärker beim Anbringen und Abnehmen des
Tonabnehmerkopfs aus.
Wenn Sie diesen Vorgang bei hoher Lautstärke vornehmen, könnte der
Lautsprecher beschädigt werden.
! Nehmen Sie den Kopf mit Tonabnehmer ab, und entfernen Sie mit
einer weichen Bürste oder einem Pinsel vorsichtig jeglichen Staub
usw. von der Nadelspitze.
! Reinigen Sie Schallplatten mit einem geeigneten und hochwertigen
Schallplattenreiniger.
! Reinigen Sie den Tonabnehmerkopfanschluss mit einem weichen
Tuch o. ä., und befestigen Sie ihn dann erneut am Tonarm.
Reinigen der Abdeckhaube usw.
Reinigen Sie die Abdeckhaube und das Gehäuse mit einem weichen
Tuch
! Reinigen Sie die Abdeckhaube nicht während der Wiedergabe.
Durch statische Elektrizität könnte die Abdeckhaube am Tonarm
ziehen.
Über Markenzeichen und
eingetragene Markenzeichen
! “Pioneer DJ” ist ein Markenzeichen der PIONEER CORPORATION
und wird unter Lizenz verwendet.
! rekordbox ist eine Marke oder eingetragene Marke der Pioneer DJ
Corporation.
Die hier erwähnten Produkt- oder Firmennamen sind Marken oder einge-
tragene Marken der jeweiligen Eigentümer.
Technische Daten
Stromanforderungen
........ 110 V bis 120 V oder 220 V bis 240 V Wechselspannung, 50 Hz/60 Hz
Leistungsaufnahme ............................................................................... 11 W
Gewicht des Hauptgeräts ................................................................... 10,7 kg
Max. Abmessungen .............. 450 mm (B) × 158,5 mm (H) × 367,5 mm (T)
Betriebstemperatur ........................................................... +5 °C bis +35 °C
Betriebsluftfeuchtigkeit ........................5 % bis 85 % (keine Kondensation)
Plattentellereinheit
Antriebsmethode ................................................. Servomotor-Direktantrieb
Motor ....................................... 3-phasiger bürstenloser Gleichstrommotor
Bremssystem ........................................... Elektronische Bremsvorrichtung
Drehzahl ..................................................33 1/3 U/Min, 45 U/Min, 78 U/Min
Drehzahl-Anpassungsbereich ..............................................................±8 %
Gleichlaufschwankungen ................................ 0,15 % oder weniger WRMS
Signalrauschabstand ........................................................50 dB oder höher
Plattenteller ......................... Umfang des Aluminiumdruckgußes: 332 mm
Anlaufdrehmoment .................................................... 1,6 kg·cm oder mehr
Anlaufzeit ............................... 1 Sekunden oder weniger (bei 33 1/3 U/Min)
Tonarmeinheit
Armtyp ........................................................Universaler S-förmiger Tonarm,
kardanisch abgestütztes Drucklager, statischer Ausgleichstyp
Effektive Länge ............................................................................... 230,5 mm
Überhang ............................................................................................. 16 mm
Spurfehler .............................................................................Innerhalb von 3°
Armhöhe-Anpassungsbereich ............................................................. 6 mm
Variabler Nadeldruckbereich .............................0 g bis 4,0 g (1 Skala 0,1 g)
Korrektes Tonabnehmergewicht....9,5 g oder weniger (ein Tonabnehmer)
Tonabnehmer-Typ ..................................................................................... VM
Ausgangsspannung
PHONO ......................................................................................2,5 mV/1 kHz
LINE ...........................................................................................150 mV/1 kHz
— Änderungen der technischen Daten und das Design dieses
Geräts ohne vorherige Ankündigung bleiben vorbehalten.
! © 2016 Pioneer DJ Corporation. Alle Rechte vorbehalten.

It
2
ATTENZIONE
PER EVIT
ARE IL RISCHIO DI SCOSSE ELETTRICHE,
NON RIMUOVERE IL COPERCHIO (O IL RETRO). NON
CI SONO P
ARTI INTERNE LA CUI MANUTENZIONE
POSSA ESSERE EFFET
TUATA DALL’UTENTE. IN CASO
DI NECESSITÀ, RIVOLGERSI ESCL
USIVAMENTE A
PERSONALE DI SERVIZIO QU
ALIFICATO.
D3-4-2-1-1_B2_It
ATTENZIONE
Questo apparecchio non è impermeabile. Per prevenire
pericoli di incendi o folgorazioni, non posizionare nelle
vicinanze di questo apparecchio contenitori pieni di
liquidi (quali vasi da fiori, o simili), e non esporre
l’apparecchio a sgocciolii, schizzi, pioggia o umidità.
D3-4-2-1-3_A1_It
ATTENZIONE
Per evitare il pericolo di incendi, non posizionare
sull’apparecchio dispositivi con fiamme vive (ad
esempio una candela accesa, o simili).
D3-4-2-1-7a_A1_It
Condizioni ambientali di funzionamento
Gamma ideale della temperatura ed umidità
dell’ambiente di funzionamento:
da +5 °C a +35 °C, umidità relativa inferiore all‘85 %
(fessure di ventilazione non bloccate)
Non installare l’apparecchio in luoghi poco ventilati, o
in luoghi esposti ad alte umidità o alla diretta luce del
sole (o a sorgenti di luce artificiale molto forti).
D3-4-2-1-7c*_A1_It
Questo prodotto è destinato esclusivamente all'uso
domestico. Eventuali disfunzioni dovute ad usi diversi
(quali uso prolungato a scopi commerciali, in
ristoranti, o uso in auto o su navi) e che richiedano
particolari riparazioni, saranno a carico dell'utente,
anche se nel corso del periodo di garanzia.
K041_A1_It
Selettore della tensione
L’interruttore del selettore della tensione è posizionato
sul pannello superiore nei modelli multi-tensione.
L’impostazione di fabbrica del selettore della
tensione è 220-240 V. Impostarla sulla tensione
corretta del paese o regione di propria residenza.
Prima di cambiare la tensione, scollegare il cavo di
alimentazione. Utilizzare un cacciavite di medie dimensioni
per configurare l’interruttore del selettore della tensione.
D3-4-2-1-5*_A2_It
AVVERTENZA PER LA VENTILAZIONE
Installare l’apparecchio avendo cura di lasciare un
certo spazio all’intorno dello stesso per consentire una
adeguata circolazione dell’aria e migliorare la
dispersione del calore (almeno 15 cm sulla parte
superiore, 5 cm sul retro, e 5 cm su ciascuno dei lati).
ATTENZIONE
L’apparecchio è dotato di un certo numero di fessure e
di aperture per la ventilazione, allo scopo di garantirne
un funzionamento affidabile, e per proteggerlo dal
surriscaldamento. Per prevenire possibili pericoli di
incendi le aperture non devono mai venire bloccate o
coperte con oggetti vari (quali giornali, tovaglie, tende o
tendaggi, ecc.), e l’apparecchio non deve essere
utilizzato appoggiandolo su tappeti spessi o sul letto.
D3-4-2-1-7b*_A1_It
Se si vuole eliminare questo prodotto, non gettarlo insieme ai rifiuti domestici. Esiste un sistema di raccolta differenziata in conformità
alle leggi che richiedono appositi trattamenti, recupero e riciclo.
I privati cittadini dei paesi membri dell’UE, di Svizzera e Norvegia, possono restituire senza alcun costo i loro prodotti elettronici usati ad appositi
servizi di raccolta o a un rivenditore (se si desidera acquistarne uno simile).
Per i paesi non citati qui sopra, si prega di prendere contatto con le autorità locali per il corretto metodo di smaltimento.
In questo modo, si è sicuri che il proprio prodotto eliminato subirà il trattamento, il recupero e il riciclo necessari per prevenire gli effetti
potenzialmente negativi sull’ambiente e sulla vita dell’uomo.
K058b_A1_It

It
3
AVVERTIMENTO RIGUARDANTE IL FILO DI
ALIMENT
AZIONE
Pr
endete sempre il filo di alimentazione per la spina.
Non tiratelo mai agendo per il filo stesso e non toccate
mai il filo con le mani bagnati, perchè questo potrebbe
causare cortocircuiti o scosse elettriche. Non collocate
l’unità, oppure dei mobili sopra il filo di alimentazione e
controllate che lo stesso non sia premut
o. Non
annodate mai il filo di alimentazione nè collegatelo con
altri fili. I fili di alimentazione devono essere collocati in
tal modo che non saranno calpestati. Un filo di
alimentazione danneggiato potrebbe causare incendi o
scosse elettriche. Controllate il filo di alimentazione
regolarmente. Quando localizzate un eventuale danno
,
rivolgetevi al più vicino centro assistenza oppure al
vostro rivenditore per la sostituzione del filo di
alimentazione
.
S002*_A1_It
AVVERTENZA
L’interruttore principale (POWER) dell’apparecchio
non stacca completamente il flusso di corrente
elettrica dalla presa di corrente alternata di rete. Dal
momento che il cavo di alimentazione costituisce
l’unico dispositivo di distacco dell’apparecchio dalla
sorgente di alimentazione, il cavo stesso deve essere
staccato dalla presa di corrente alternata di rete per
sospendere completamente qualsiasi flusso di
corrente. Verificare quindi che l’apparecchio sia stato
installato in modo da poter procedere con facilità al
distacco del cavo di alimentazione dalla presa di
corrente, in caso di necessità. Per prevenire pericoli
di incendi, inoltre, il cavo di alimentazione deve
essere staccato dalla presa di corrente alternata di
rete se si pensa di non utilizzare l’apparecchio per
periodi di tempo relativamente lunghi (ad esempio,
durante una vacanza).
D3-4-2-2-2a*_A1_It
Italiano

It
4
Indice
Come leggere questo manuale
! Vi ringraziamo per avere acquistato questo prodotto Pioneer DJ.
Leggere attentamente questo volantino, che include informazioni
importanti che devono venire comprese prima di usare questo
prodotto.
Dopo aver letto queste istruzioni, riporle in un luogo sicuro per
poterle consultare di nuovo al momento del bisogno.
! In questo libretto, i nomi dei pulsanti e dei terminali dell’unità princi-
pale sono indicati fra parentesi quadre ([ ]).
Esempi:
Premere il pulsante [START/STOP].
Prima di cominciare
Caratteristiche............................................................................................. 5
Contenuto della confezione ....................................................................... 5
Prima di iniziare
Installazione di rekordbox (Mac/Windows) .............................................. 6
Montaggio ................................................................................................... 6
Nome delle varie parti e funzioni
Pannello superiore ..................................................................................... 8
Pannello posteriore .................................................................................... 9
Regolazione
Regolazione del bilanciamento del braccio ........................................... 10
Regolazione della pressione della puntina ............................................ 10
Regolazione dell’antiskating.................................................................... 11
Regolazione dell’altezza dell’alzabraccio ............................................... 11
Regolazione dell’altezza del braccio ....................................................... 11
Collegamenti
Connessione a diffusori autoalimentati ................................................. 12
Collegamento a un preamplificatore e a un componente .................... 12
Collegamento a un mixer DJ ................................................................... 13
Collegamento ad un computer ............................................................... 13
Posizione di installazione ......................................................................... 13
Regolazione dell’altezza dell’unità principale ........................................ 13
Impiego
Accensione ................................................................................................ 14
Spegnimento ............................................................................................. 14
Riproduzione ............................................................................................. 14
Pausa della riproduzione ......................................................................... 14
Arresto della riproduzione........................................................................ 14
Regolazione del pitch ............................................................................... 14
Alloggio per la copertina del disco .......................................................... 14
Per riprodurre un disco EP standard ...................................................... 15
Illuminazione dell’estremità della puntina ............................................. 15
Registrazione ............................................................................................ 15
Sostituzione della puntina ....................................................................... 15
Sostituzione della testina ......................................................................... 15
Informazioni aggiuntive
Diagnostica ............................................................................................... 16
Precauzioni per l’uso ................................................................................ 16
Manutenzione delle parti ......................................................................... 16
A proposito del marchi di fabbrica o marchi di fabbrica depositati .... 17
Dati tecnici ................................................................................................ 17

It
5
Italiano
Prima di cominciare
Caratteristiche
Questa unità è un giradischi a trazione diretta e coppia elevata, perfetto
per vari impieghi che vanno dall’ascolto amatoriale all’utilizzo da parte
di DJ.
Audio per registrazione analogica di alta
qualità
La distanza tra la testina e l’emissione PHONO/LINE è stata progettata
in modo da risultare la più breve possibile, così da riuscire a riprodurre
fedelmente la qualità audio originale dei dischi analogici.
Inoltre, grazie al supporto contemporaneo dell’emissione PHONO e
dell’emissione LINE, è possibile godere dell’alta qualità dell’audio in
registrazione analogica, mediante il semplice collegamento di diffusori
autoalimentati.
Registrazione digitale semplice
È possibile collegare direttamente l’unità a un PC o un Mac tramite il
terminale USB-B in dotazione, così da poter registrare le tracce audio
del disco analogico nel PC o Mac, convertendole in dati. La registra-
zione digitale richiede poche semplici operazioni, grazie alla funzione di
registrazione inclusa nell’applicazione gratuita per la gestione musicale
“rekordbox” (Ver.4.2.1 o successiva).
Giradischi a trazione diretta ideale per
performance DJ
L’adozione di un sistema a trazione diretta e coppia elevata permette di
utilizzare l’unità per fare scratch, missare e in genere per l’attività da DJ,
dopo aver collegato due unità ad un mixer per DJ.
Il coperchio antipolvere può fungere da
supporto per la copertina dei dischi
In posizione aperta, il coperchio antipolvere può ospitare le copertine dei
dischi. In questo modo è possibile vedere la copertina del disco che si
sta ascoltando.
Contenuto della confezione
! Piatto
! Tappetino
! Copripolvere
! Adattatore per dischi EP
! Contrappeso
! Portatestina (testina inclusa)
! Peso della testina
! Cavo di alimentazione
! Cavo USB
! Cavo adattatore audio (da spinotto a spillo (femmina) stereo a spina
mini stereo (maschio))
! Garanzia (per alcune regioni)
1
! Istruzioni per l’uso (questo documento)
1 La garanzia acclusa vale per l’Europa.
ATTENZIONE
Conser
vare i piccoli ricambi fuori dalla portata dei
bambini e dei bebé. Se inghiottiti accidentalmente,
recarsi immediatemente dal medico
.
D41-6-4_A1_It

It
6
Prima di iniziare
Installazione di rekordbox (Mac/
Windows)
1 Accedere a rekordbox.com.
https://rekordbox.com/it/store/
! Il contenuto della pagina è soggetto a modifiche senza preavviso.
2 Leggere la Guida rapida e quindi fare clic su
[Download Gratis].
3 Leggere attentamente l’accordo di licenza per l’utente
finale del software e selezionare la casella di controllo
[Accetta] se si accettano i termini.
Dopo aver selezionato la casella di controllo, sarà possibile fare clic su
[Download].
4 Fare clic su [Download].
Il download di rekordbox (Mac/Windows) viene avviato.
5 Fare doppio clic sul file scaricato per decomprimerlo.
6 Fare doppio clic sul file decompresso per avviare il
programma di installazione.
7 Leggere attentamente l’accordo di licenza
per l’utente finale del software e, se si è d’accordo,
continuare l’installazione seguendo le istruzioni sullo
schermo.
! Se non si è d’accordo con l’accordo di licenza per l’utente finale del
software, annullare l’installazione.
8 Quando viene visualizzata la schermata di
completamento dell’installazione, seguire le istruzioni
sullo schermo per chiudere il programma di installazione.
L’installazione è completa.
! Per utilizzare rekordbox dj, rekordbox dvs e rekordbox video è richie-
sta l’attivazione (autenticazione della licenza). Per ulteriori dettagli,
vedere le Istruzioni per l’uso di rekordbox.
https://rekordbox.com/it/support/manual.php
Montaggio
1 Montare il piatto e il tappetino.
Collocare il piatto sull’alberino centrale e posizionare il tappetino sopra
il piatto.
! Non urtare il piatto dell’unità principale e non farlo cadere.
Piatto
Alberino centrale
Tappetino
2 Montaggio il portatestina.
Inserire il portatestina con la testina installata nel braccio quindi,
tenendo il portatestina in posizione orizzontale, stringere il controdado.
Controdado

It
7
Italiano
! Prima dell’utilizzo, rimuovere il copritestina senza toccare la testina.
Copri puntina
3 Montaggio il contrappeso.
Fissare il contrappeso sul retro del braccio.
Contrappeso
Montare il coperchio antipolvere.
Inserire i cardini del coperchio antipolvere nei relativi
supporti posti nel pannello posteriore dell’unità.
Per rimuovere il coperchio antipolvere, tirare i cardini verso l’esterno
mentre il coperchio si trova in posizione aperta.
Cardine
Supporto

It
8
Nome delle varie parti e funzioni
Pannello superiore
1
2 3 45 6
c
d
e
f
ghij
a9
7
b
8
1 Interruttore POWER
Quando si porta l’interruttore in posizione [ON], l’unità si accende e
la luce stroboscopica laterale si illumina.
= Accensione (p. 14 )
Spegnimento (p. 14 )
2 Pulsante START/STOP
Premere il pulsante per avviare o arrestare la rotazione del piatto.
= Riproduzione (p. 14 )
3 Pulsante di modifica della velocità
Cambia la velocità in base al disco da riprodurre.
! Per un disco a 33 1/3 giri, premere il pulsante [33].
! Per un disco a 45 giri, premere il pulsante [45].
! Per un disco a 78 giri, premere contemporaneamente i pulsanti
[33] e [45].
= Riproduzione (p. 14 )
4 Luce della puntina
Si accende per illuminare l’estremità della puntina.
= Illuminazione dell’estremità della puntina (p. 15 )
5 Interruttore della luce della puntina
La luce della puntina si accende con un colore bianco e arriva fino
alla posizione in cui l’estremità della puntina è illuminata.
= Illuminazione dell’estremità della puntina (p. 15 )
6 Portatestina
7 Cursore TEMPO
È possibile scorrerlo avanti e indietro per regolare con precisione la
velocità di rotazione.
= Regolazione del pitch (p. 14 )
8 Braccio
= Regolazione (p. 10 )
9 Bloccabraccio
Blocca il braccio.
a Poggiabraccio
Serve da base di supporto per il braccio.
b Leva di sollevamento
Tirare questa leva per alzare il braccio e spingerla per abbassarlo.
c Alzabraccio
Dispositivo utilizzato per alzare e abbassare il braccio. È azionato
dalla leva di sollevamento.
d Manopola ANTI SKATING
Quando viene riprodotto un disco, viene generata una forza rotatoria
che spinge la puntina verso il perimetro interno. Facendo corrispon-
dere questa manopola al valore della pressione della puntina, questo
tipo di forza viene eliminato.
= Regolazione dell’antiskating (p. 11 )
e Blocco HEIGHT ADJUST
Blocca il braccio all’altezza regolata.
= Regolazione dell’altezza del braccio (p. 11 )
f Manopola HEIGHT ADJUST
Consente di regolare l’altezza del braccio.
= Regolazione dell’altezza del braccio (p. 11 )
g Contrappeso
Consente di bilanciare il braccio e di regolare la pressione della
puntina.
= Regolazione (p. 10 )
h Anello di regolazione della pressione della puntina
Consente di impostare la pressione adeguata della puntina della
testina.
= Regolazione della pressione della puntina (p. 10 )
i Sostegno per portatestina
Consente di alloggiare il portatestina.
j Adattatore per dischi EP
Utilizzato per riprodurre dischi EP standard.
= Per riprodurre un disco EP standard (p. 15 )

It
9
Italiano
Pannello posteriore
3
12
4 5
1 Selettore PHONO/LINE
Consente di alternare il livello del suono emesso dall’unità.
— [PHONO]: selezionare questa opzione quando l’unità è connessa
ad un dispositivo che supporta l’ingresso di livello fono, come ad
esempio un preamplificatore o un componente.
— [LINE]: selezionare questa opzione quando l’unità è connessa ad
un dispositivo che supporta l’ingresso di livello linea, come ad
esempio degli diffusori autoalimentati.
ATTENZIONE
Non connettere l’unità ad un dispositivo che supporta l’ingresso di
livello fono se l’interruttore PHONO/LINE è in posizione [LINE].
2 Terminale USB
Collegare qui il cavo USB (in dotazione).
= Collegamento ad un computer (p. 13 )
3 Cavo audio
= Collegamenti (p. 12 )
4 AC IN
Si collega ad una presa di corrente col cavo di alimentazione
accluso. Collegare il cavo di alimentazione solo a collegamenti fra
unità completati.
! Usare solo il cavo di alimentazione accluso.
5 Isolatore
Elimina l’effetto delle vibrazioni esterne. Se si ruota l’isolatore, è
possibile regolare l’altezza del piatto.
= Regolazione dell’altezza dell’unità principale (p. 13 )

It
10
Regolazione
Regolazione del bilanciamento del
braccio
Poiché il peso della testina e del portatestina varia a seconda del pro-
dotto, è necessario regolare il bilanciamento del braccio.
Effettuare i seguenti preparativi.
! Rimuovere il copripuntina e il bloccabraccio, facendo attenzione a
non toccare l’estremità della puntina.
! Spingere la leva di sollevamento verso il basso.
! Impostare la manopola [ANTI SKATING] su “0”.
Sollevare il braccio dal portabraccio e regolarne
il bilanciamento in modo che si trovi in posizione
orizzontale.
Ruotare il contrappeso finché il braccio non rimane in posizione quasi
del tutto orizzontale.
! Quando si sposta il braccio, fare attenzione affinché l’estremità della
puntina non tocchi direttamente il piatto.
Regolazione della pressione della
puntina
Per impedire che la testina salti o che venga generato un suono distorto,
è necessario regolare la pressione della puntina a seconda del tipo di
testina.
Il valore di pressione sonora corretto per la puntina in dotazione varia
da 3,0 g a 4,0 g.
Effettuare i seguenti preparativi.
! Riportare il braccio sul poggiabraccio e fermarlo con il
bloccabraccio.
1 Far corrispondere lo “0” sull’anello di regolazione per
la pressione della puntina con la linea centrale dell’asta
posteriore del braccio.
Utilizzando un dito per tenere fermo il contrappeso in modo che non si
muova, ruotare l’anello di regolazione per la pressione della puntina in
modo che il numero “0” si trovi sulla linea centrale nera dell’asta poste-
riore del braccio.
Linea centrale
2 Regolare la pressione della puntina.
Ruotare il contrappeso per impostare il valore adeguato per la pressione
della puntina a seconda della testina in uso.
! Quando si ruota il contrappeso, ruota anche l’anello di regolazione
per la pressione della puntina. Mentre si osserva l’anello di regola-
zione, impostare la pressione della puntina sul valore appropriato.
Linea centrale

It
11
Italiano
Regolazione dell’antiskating
Questa regolazione consente di impedire i salti della puntina.
Far corrispondere la posizione della scala con il valore
della pressione della puntina.
Ruotare la manopola [ANTI SKATING] in modo da far corrispondere la
linea di riferimento con lo stesso valore della pressione della testina.
Se si usa la tecnica scratch
Per impedire che la puntina salti, far corrispondere la posizione della
scala all’azionamento del piatto durante la riproduzione.
Regolazione dell’altezza
dell’alzabraccio
Se si utilizza una puntina diversa da quella fornita in dotazione, occorre
modificare quest’impostazione in modo che rispetti il valore corretto
della puntina usata.
Effettuare i seguenti preparativi.
! Posizionare un disco sul tappetino.
! Rimuovere il copripuntina e il bloccabraccio, facendo attenzione a
non toccare l’estremità della puntina.
! Alzare la leva di sollevamento e spostare il braccio sul disco.
Regolare l’altezza ruotando la vite mentre la leva di
sollevamento è abbassata.
— Ruotare in senso orario per ridurre la distanza tra disco e
puntina.
— Ruotare in senso antiorario per aumentare la distanza tra disco e
puntina.
! L’altezza dell’alzabraccio, ovvero la distanza tra disco e puntina
quando l’alzabraccio è sollevato, è predefinita entro gli 8 mm e i 13
mm circa.
Vite
Alzabraccio
Regolazione dell’altezza del braccio
Con la puntina fornita in dotazione, utilizzare la posizione “0”. Se si
utilizza una puntina diversa da quella fornita in dotazione, occorre modi-
ficare quest’impostazione in modo che rispetti il valore corretto della
puntina usata.
1 Ruotare il blocco [HEIGHT ADJUST] per sbloccarlo.
Sbloccare
2 Abbassare la leva di sollevamento e collocare
la puntina sul disco, quindi regolare la manopola
[HEIGHT ADJUST] in modo che il braccio e il disco siano
paralleli.
Regolare in modo che il braccio sia in posizione orizzontale.
Manopola [HEIGHT ADJUST]
3 Ruotare il blocco [HEIGHT ADJUST] per
fissare l’altezza del braccio.
Dopo aver regolato l’altezza del braccio, ruotare sempre il blocco
[HEIGHT ADJUST] per fissare il braccio.

It
12
Collegamenti
! Prima di fare o modificare collegamenti, non mancare di spegnere l’apparecchio e di scollegare il cavo di alimentazione.
! Consultare le istruzioni per l’uso del componente da collegare.
! Collegare il cavo di alimentazione dopo che tutti i collegamenti fra dispositivi sono stati fatti.
Connessione a diffusori autoalimentati
Diffusori autoalimentati
Cavo audio
Pannello posteriore
Ad una presa
Cavo di
alimentazione
1 Portare l’interruttore [PHONO/LINE] in posizione [LINE].
2 Collegare il cavo audio al terminale di ingresso [LINE] dei diffusori autoalimentati o dispositivi analoghi.
! Se necessario, utilizzare il cavo adattatore audio in dotazione.
3 Collegare il cavo di alimentazione.
Si collega ad una presa di corrente col cavo di alimentazione accluso. Collegare il cavo di alimentazione solo a collegamenti fra unità completati.
Collegamento a un preamplificatore e a un componente
Cavo audio
Pannello posteriore
Ad una presa
Cavo di
alimentazione
Preamplificatore, componente, ecc.
1 Portare l’interruttore [PHONO/LINE] in posizione [PHONO].
2 Collegare il cavo audio al terminale di ingresso [PHONO] del preamplificatore o di un altro componente.
! Se questo prodotto è collegato a un preamplificatore o a un componente che non dispone di terminale [PHONO], non sarà possibile ottenere un
volume e una qualità sonora adeguati. In questo caso, portare l’interruttore [PHONO/LINE] di questa unità in posizione [LINE] e collegare l’unità al
terminale di ingresso [LINE] del preamplificatore o del componente, oppure utilizzare un equalizzatore fono.
3 Collegare il cavo di alimentazione.
Si collega ad una presa di corrente col cavo di alimentazione accluso. Collegare il cavo di alimentazione solo a collegamenti fra unità completati.

It
13
Italiano
Collegamento a un mixer DJ
Piatto
Mixer DJ
Cavo audio
Cavo audio
Pannello posteriore
Ad una presa
Cavo di
alimentazione
1 Portare l’interruttore [PHONO/LINE] in posizione [PHONO].
2 Collegare il cavo audio al terminale di ingresso [PHONO] del mixer DJ.
! Se questo prodotto è collegato a un mixer DJ che non dispone di terminale [PHONO], non sarà possibile ottenere un volume e una qualità sonora
adeguati. In questo caso, portare l’interruttore [PHONO/LINE] di questa unità in posizione [LINE] e collegare l’unità al terminale di ingresso [LINE]
del mixer DJ.
3 Collegare il cavo di alimentazione.
Si collega ad una presa di corrente col cavo di alimentazione accluso. Collegare il cavo di alimentazione solo a collegamenti fra unità completati.
Collegamento ad un computer
Questa unità non necessita di software driver per USB.
= Registrazione (p. 15 )
Pannello posteriore
Cavo USB
Computer
Ad una presa
Cavo di
alimentazione
1 Collegare il cavo USB ad una porta USB del computer.
2 Collegare il cavo di alimentazione.
Si collega ad una presa di corrente col cavo di alimentazione accluso. Collegare il cavo di alimentazione solo a collegamenti fra unità completati.
Posizione di installazione
Collocare l’unità su una superficie piana, in modo che non sia soggetta
a vibrazioni esterne.
! Per quanto possibile, tenere l’unità lontana dagli altoparlanti.
! Se l’unità è molto vicina a una radio che trasmette nelle frequenze
AM/FM, questa potrebbe generare dei disturbi. Tenere l’unità quanto
più possibile lontana dalla radio.
Regolazione dell’altezza dell’unità
principale
Per regolare l’altezza, ruotare l’isolatore in modo che l’unità principale
sia in posizione orizzontale.

It
14
Impiego
Accensione
1 Stabilire tutti i collegamenti e inserire il cavo di
alimentazione a una presa di corrente.
= Collegamenti (p. 12 )
2 Portare l’interruttore [POWER] in posizione [ON] per
accendere l’unità.
Gli indicatori di questa unità si accendono ed essa si accende.
Spegnimento
Portare l’interruttore [POWER] in posizione [OFF] per
spegnere l’unità.
Questa unità si spegne.
Riproduzione
Effettuare i seguenti preparativi.
! Collocare un disco sul piatto.
! Rimuovere il copritestina e il bloccabraccio.
1 Portare l’interruttore [POWER] in posizione [ON] per
accendere l’unità.
2 Selezionare la velocità di rotazione in base al disco da
riprodurre, mediante la pressione del relativo pulsante di
velocità.
3 Premere il pulsante [START/STOP].
Il piatto inizia a girare.
4 Alzare la leva di sollevamento e spostare il braccio sul
disco.
5 Spingere la leva di sollevamento verso il basso.
Il braccio scende lentamente e il disco viene riprodotto.
Pausa della riproduzione
Spingere la leva di sollevamento verso l’alto.
La puntina della testina si stacca dal disco.
! Per riprendere la riproduzione, spingere la leva di sollevamento verso
il basso.
Arresto della riproduzione
1 Alzare la leva di sollevamento per riportare il
braccio sul poggiabraccio, quindi spingere la leva di
sollevamento verso il basso.
2 Premere il pulsante [START/STOP].
Il giradischi si arresta in modo graduale.
3 Portare l’interruttore [POWER] in posizione [OFF] per
spegnere l’unità.
Utilizzare il bloccabraccio per tenere bloccato il braccio.
Fissare il copritestina per proteggere la testina.
Chiudere il coperchio antipolvere.
Regolazione del pitch
Muovere [TEMPO] in avanti o indietro.
Spostare il cursore in avanti per aumentare la velocità di rotazione
oppure indietro per diminuirla.
! Quando il cursore [TEMPO] si trova in posizione centrale, l’indica-
tore diventa di colore giallo-verde e viene adottata la velocità di rota-
zione impostata (33 1/3 giri, 45 giri o 78 giri).
! La scala del cursore [TEMPO] è indica un valore approssimativo, che
va usato solo come riferimento.
! A conferma di ciò, è possibile fare riferimento alle quattro righe dei
disegni stroboscopici presenti intorno al piatto.
Disegno stroboscopico
1 Quando il disegno stroboscopico appare fermo, 33 1/3 giri (con
alimentazione a 50 Hz)
2 Quando il disegno stroboscopico appare fermo, 45 giri (con alimen-
tazione a 50 Hz)
3 Quando il disegno stroboscopico appare fermo, 33 1/3 giri (con
alimentazione a 60 Hz)
4 Quando il disegno stroboscopico appare fermo, 45 giri (con alimen-
tazione a 60 Hz)
! La luce stroboscopica (LED rosso) illumina il disegno stroboscopico
dell’unità. Utilizzare sempre la luce stroboscopica per verificare il
pitch.
Alloggio per la copertina del disco
Posizionare la copertina dietro i fermi presenti all’interno del coperchio
antipolvere, come mostrato in figura.
FermiCopertina disco
! Questo spazio non è adatto ad ospitare oggetti diversi dalle copertine
dei dischi.
! Le copertine devono essere ben ferme dietro gli appositi fermi.
! Durante la riproduzione, prestare attenzione ad evitare il rischio che
la copertina possa ribaltarsi, finendo per danneggiare il disco o la
puntina.
! Non chiudere il coperchio antipolvere senza aver prima rimosso la
copertina eventualmente presente.

It
15
Italiano
Per riprodurre un disco EP standard
Collocare l’adattatore per dischi EP nell’alberino centrale e premere il
pulsante [45].
Illuminazione dell’estremità della
puntina
Quando si preme l’apposito interruttore, la luce della puntina si accende
con un colore bianco e arriva fino alla posizione in cui l’estremità della
puntina è illuminata.
! Se non è necessario, premere l’interruttore della luce della puntina
per spegnerla.
! Non rivolgere lo sguardo diretto alla luce della puntina quando è
accesa.
Registrazione
È possibile registrare i dischi analogici in digitale, collegando questa
unità a un computer su cui è installato il software di gestione musicale
“rekordbox”.
Per ulteriori dettagli, accedere al sito di rekordbox indicato di seguito e
vedere le Istruzioni per l’uso di rekordbox in [Supporto].
https://rekordbox.com/it/store/
Sostituzione della puntina
Prima di eseguire questa procedura, accertarsi che l’apparecchio non
sia acceso.
1 Mantenere la testina con una mano.
2 Rimuovere la testina in direzione della freccia,
mantenendo ferma l’alloggio della testina con l’altra
mano.
Sostituzione della testina
Questa unità supporta testine di tipo MC. È possibile utilizzare testine
VM o MM.
Rimozione della testina
1 Rimuovere le viti, i dadi e le rondelle del portatestina.
2 Scollegare i cavi elettrici collegati alla testina.
Installazione della testina
1 Collegare la testina avendo cura di rispettare i colori
dei cavi elettrici del portatestina e i simboli dei terminali
della testina.
Fare attenzione a rispettare i colori dei cavi elettrici del portatestina e i
simboli dei terminali della testina, come indicato di seguito.
Da una vista frontale, in alto a sinistra “L+: bianco”, in basso a sinistra
“L-: blu”, in alto a destra “R+: rosso” e in basso a destra “R-: verde”.
! Fissare i cavi elettrici utilizzando delle pinzette o un utensile simile.
2 Installare la testina sul portatestina, mediante le viti, i
dadi e le rondelle in dotazione alla testina.
Puntina
Cavo elettric
o
Portatestina
Peso della testina
! Procedere avendo cura di posizionare correttamente la testina all’in-
terno del portatestina.
! Se si usa una testina con un peso uguale o inferiore a 5 g, utiliz-
zare l’apposito peso in dotazione.
Regolazione della sporgenza
Utilizzare la seguente scala di regolazione della sporgenza per rego-
lare la posizione mediante la vite di fissaggio della testina in modo
che l’estremità della puntina si trovi a 53 mm dal punto di attacco del
braccio.
53 mm
Scala di regolazione della sporgenza
53 mm

Informazioni aggiuntive
Diagnostica
! L’uso scorretto dell’apparecchio viene spesso scambiato per un guasto. Se si ritiene che questa unità abbia qualche guasto, controllare i punti
seguenti e le [FAQ] del [PLX-500] sul sito di supporto di Pioneer DJ.
http://pioneerdj.com/support/
A volte il problema risiede in un altro componente. Controllare gli altri componenti e apparecchi elettronici usati. Se il problema non può essere
eliminato, contattare il più vicino centro assistenza o rivenditore per richiedere una riparazione.
! Questa unità può non funzionare a causa di elettricità statica o altre influenze esterne. In questo caso, il funzionamento corretto dovrebbe tornare
spegnendo questa unità, attendendo un minuto e riaccende.
Problema Controllare Rimedio
L’apparecchio non è acceso. Il cavo di alimentazione è collegato correttamente? Collegare bene il cavo di alimentazione accluso ad una presa di corrente.
L’interruttore [POWER] di alimentazione è impo-
stato su [ON]?
Impostare l’interruttore [POWER] di alimentazione su [ON].
Audio assente o insufficiente. I cavi audio sono collegati correttamente? Collegare correttamente i cavi audio.
I terminali o gli spinotti sono sporchi? Pulire i terminali e gli spinotti prima di procedere con i collegamenti.
Il portatestina è collegato correttamente? Collegare il portatestina in modo adeguato.
L’audio di sinistra e quello di destra
sono invertiti.
I collegamenti per i canali sinistro e destro di ogni
apparecchiatura sono invertiti?
Collegare correttamente i cavi audio e i cavi elettrici del portatestina.
Durante la riproduzione si ascoltano
dei disturbi di sottofondo.
Vicino al cavo di collegamento è presente un
dispositivo elettronico come una lampada fluore-
scente o il rispettivo cavo di alimentazione?
Collocare il più lontano possibile il cavo di alimentazione della lampada fluore-
scente o di qualsiasi altro dispositivo.
La puntina non scende sul disco. La pressione della puntina è stata regolata in
modo adeguato?
Fa corrispondere il contrappeso con il valore adeguato per la pressione della
puntina a seconda della testina in uso.
Il braccio è bilanciato orizzontalmente? Ruotare il contrappeso finché il braccio non rimane in posizione orizzontale.
La puntina salta. La pressione della puntina è stata regolata in
modo adeguato?
Fa corrispondere il contrappeso con il valore adeguato per la pressione della
puntina a seconda della testina in uso.
Il disco è distorto o graffiato? Controllare lo stato del disco.
Sulla puntina è presente molta polvere? Rimuovere il portatestina con la testina e utilizzare un pennellino con punta
morbida per rimuovere polvere e residui simili dalla puntina.
L’antiskating è regolato correttamente? Regolare l’antiskating in modo corretto.
L’altezza del braccio è regolata correttamente? Regolare l’altezza del braccio in modo corretto.
Il braccio si ferma e non avanza. Il disco è graffiato? Controllare lo stato del disco.
Il braccio entra a contatto con qualcosa? Controllare la zona del braccio e, se è presente qualche ostacolo, rimuoverlo.
Il volume è troppo basso o troppo alto
(distorto).
Il collegamento all’amplificatore è adeguato al tipo
di testina (uscita)?
Collegare correttamente i cavi di collegamento.
La posizione dell’interruttore [PHONO/LINE] è
corretta?
Impostare l’interruttore [PHONO/LINE] correttamente in base al terminale di
ingresso del dispositivo collegato.
Il piatto giradischi non è stabile. Deve essersi formata della polvere o altro sporco
tra le parti di collegamento del piatto e l’alberino
centrale.
Rimuovere la polvere e ogni altro tipo di sporco.
Precauzioni per l’uso
La condensa
In inverno, all’interno dell’unità (sulle parti in funzione e sulle lenti) si
potrebbero formare delle goccioline di acqua (condensa), ad esempio,
se l’unità viene spostata da un luogo freddo ad una stanza calda oppure
se la temperatura della stanza in cui l’unità è installata sale improvvisa-
mente (col riscaldamento, ecc.). Con della condensa all’interno, l’unità
non sarà in grado di funzionare in modo appropriato e la riproduzione
risulterà impossibile. Lasciare l’unità a riposo da 1 a 2 ore a tempe-
ratura ambiente (per quanto questo tempo dipenda dalle condizioni
di condensa) senza attivare l’alimentazione. Le goccioline d’acqua
evaporeranno e la riproduzione sull’unità diverrà nuovamente possibile.
La condensa può formarsi anche in estate se l’unità viene esposta
direttamente al flusso d’aria di un condizionatore, ecc. Se ciò dovesse
accadere, spostare l’unità in una posizione diversa.
Spostamento e trasporto dell’unità
Utilizzare il materiale originale per imballare l’unità.
Se il materiale di imballaggio originale non è disponibile, effettuare le
seguenti operazioni.
! Staccare il tappetino e il piatto prima dell’imballaggio.
! Staccare il portatestina e il contrappeso e imballarli con cura.
! Utilizzare il bloccabraccio per tenere fermo il braccio e applicare
anche del nastro adesivo in modo che non si muova.
! Avvolgere l’unità principale con un panno o un foglio di carta mor-
bida in modo che non venga danneggiato.
! Imballare avendo cura di evitare che una qualsiasi forza possa rag-
giungere il braccio.
Manutenzione delle parti
Quando si collega e si scollega il portatestina, spegnere l’amplificatore.
Se si dovessero eseguire queste operazioni mentre il volume è alto, gli
altoparlanti potrebbero danneggiarsi.
! Rimuovere il portatestina con la testina e utilizzare un pennellino con
punta morbida per rimuovere polvere e residui simili dalla puntina.
! Utilizzare un prodotto di buona qualità per pulire i dischi.
! Utilizzare un panno morbido o un altro prodotto simile per pulire il
terminale del portatestina, quindi riattaccarlo al braccio.
It
16

It
17
Italiano
Pulizia del coperchio antipolvere e di
altre parti
Utilizzare un panno morbido per pulire il coperchio antipolvere e il
cabinet
! Non pulire il coperchio antipolvere durante la riproduzione di un
disco. L’elettricità statica potrebbe far sì che il braccio venga attratto
verso il coperchio antipolvere.
A proposito del marchi di fabbrica o
marchi di fabbrica depositati
! “Pioneer DJ” è un marchio di PIONEER CORPORATION e viene
riportato su licenza.
! rekordbox è un marchio o un marchio registrato di Pioneer DJ
Corporation.
I nomi delle aziende e dei prodotti menzionati sono marchi di fabbrica o
marchi di fabbrica depositati dei rispettivi proprietari.
Dati tecnici
Requisiti di alimentazione
.................................... CA da 110 V a 120 V o da 220 V a 240 V, 50 Hz/60 Hz
Consumo di corrente ............................................................................. 11 W
Peso unità principale ..........................................................................10,7 kg
Dimensioni massime ............ 450 mm (L) × 158,5 mm (A) × 367,5 mm (P)
Temperature di funzionamento tollerabili ......................Da +5 °C a +35 °C
Umidità di funzionamento tollerabile ......Da 5 % a 85 % (senza condensa)
Piatto
Metodo di azionamento ...........................Trazione diretta con servomotore
Motore...........................................................Motore CC brushless a tre fasi
Impianto frenante .............................................................. Freno elettronico
Velocità di rotazione ..............................................33 1/3 giri, 45 giri, 78 giri
Gamma di regolazione della velocità di rotazione ...............................±8 %
Wow and flutter ..........................................................0,15 % o meno WRMS
Rapporto S/N ................................................................................50 dB o più
Piatto ........................................ In alluminio pressofuso Diametro: 332 mm
Coppia di avvio ...................................................................... 1,6 kg·cm o più
Tempo di avvio ........................................... 1 secondo o meno (a 33 1/3 giri)
Braccio
Tipo di braccio ............................................... Braccio a S di tipo universale,
struttura con supporto a bilanciere, tipo di bilanciamento statico
Lunghezza effettiva ........................................................................ 230,5 mm
Sporgenza ............................................................................................ 16 mm
Errore di tracciamento .......................................................................Entro 3°
Gamma di regolazione dell’altezza del braccio ................................... 6 mm
Gamma variabile di pressione della puntina .......................... Da 0 g a 4,0 g
(1 scala di 0,1 g)
Peso corretto della testina ............................ 9,5 g o meno (testina singola)
Tipo di testina ............................................................................................ VM
Tensione di uscita
PHONO ......................................................................................2,5 mV/1 kHz
LINE ...........................................................................................150 mV/1 kHz
— I dati tecnici ed il design di questo prodotto sono soggetti a
modifiche senza preavviso.
! © 2016 Pioneer DJ Corporation. Tutti i diritti riservati.

Nl
2
LET OP
OM HET GEV
AAR VOOR EEN ELEKTRISCHE SHOCK TE
VOORK
OMEN, DEKSEL (OF RUG) NIET
VERWIJDEREN. AAN DE BINNENZIJDE BEVINDEN
ZICH GEEN ELEMENTEN DIE DOOR DE GEBRUIKER
KU
NNEN BEDIEND WORDEN. ENKEL DOOR
GEK
WALIFICEERD PERSONEEL TE BEDIENEN.
D3-4-2-1-1_B2_Nl
WAARSCHUWIN
G
Dit apparaat is niet waterdicht. Om brand of een
elektrische schok te voor
komen, mag u geen voorwerp
dat vloeistof bevat in de buurt van het apparaat zetten
(bijvoorbeeld een bloemenvaas) of het apparaat op
andere wijze blootstellen aan waterdruppels,
opspattend water
, regen of vocht.
D3-4-2-1-3_A1_Nl
WAARSCHUWIN
G
Om brand te voor
komen, mag u geen open vuur (zoals
een brandende kaars) op de apparatuur zette
n.
D3-4-2-1-7a_A1_Nl
Gebruiksomgeving
Te
mperatuur en vochtigheidsgraad op de plaats van
gebruik:
+5 °C tot +35 °C, minder dan 85 % RH
(ventilatieopeningen niet afgedekt
)
Zet het apparaat niet op een slecht geventileerde plaats
en stel het apparaat ook niet bloot aan hoge
vochtigheid of direct zonlicht (of sterke kunstmatige
verlichting)
.
D3-4-2-1-7c*_A1_Nl
Dit apparaat is bestemd voor normaal huishoudelijk
gebruik. Indien het apparaat voor andere doeleinden
of op andere plaatsen wordt gebruikt (bijvoorbeeld
langdurig gebruik in een restaurant voor zakelijke
doeleinden, of gebruik in een auto of boot) en als
gevolg hiervan defect zou raken, zullen de reparaties
in rekening gebracht worden, ook als het apparaat
nog in de garantieperiode is.
K041_A1_Nl
Deponeer dit product niet bij het gewone huishoudelijk afval wanneer u het wilt verwijderen. Er bestaat een speciaal wettelijk
voorgeschreven verzamelsysteem voor de juiste behandeling, het opnieuw bruikbaar maken en de recycling van gebruikte
elektronische producten.
In de lidstaten van de EU, Zwitserland en Noorwegen kunnen particulieren hun gebruikte elektronische producten gratis bij de daarvoor
bestemde verzamelplaatsen of een verkooppunt (indien u aldaar een gelijkwaardig nieuw product koopt) inleveren.
Indien u zich in een ander dan bovengenoemd land bevindt kunt u contact opnemen met de plaatselijke overheid voor informatie over de juiste
verwijdering van het product.
Zodoende zorgt u ervoor dat het verwijderde product op de juiste wijze wordt behandeld, opnieuw bruikbaar wordt gemaakt, t gere
cycleerd en het
niet schadelijk is voor de gezondheid en het milieu.
K058b_A1_Nl
Spanningskeuzeschakelaar
De spanningskeuzeschakelaar bevindt zich op het
bovenpaneel van modellen die geschikt zijn voor
verschillende voltages.
De fabrieksinstelling van de
spanningskeuzeschakelaar is 220-240 V. Stel hem in
op de juiste spanning voor uw land of gebied.
Ontkoppel het netsnoer voordat u de spanning wijzigt.
Gebruik een middelgrote schroevendraaier om de stand
van de spanningskeuzeschakelaar te wijzigen.
D3-4-2-1-5*_A2_Nl
BELANGRIJKE INFORMATIE BETREFFENDE
DE VENTILATIE
Let er bij het installeren van het apparaat op dat er
voldoende vrije ruimte rondom het apparaat is om een
goede doorstroming van lucht te waarborgen
(tenminste 15 cm boven, 5 cm achter en 5 cm aan de
zijkanten van het apparaat).
WAARSCHUWING
De gleuven en openingen in de behuizing van het
apparaat zijn aangebracht voor de ventilatie, zodat een
betrouwbare werking van het apparaat wordt verkregen
en oververhitting wordt voorkomen. Om brand te
voorkomen, moet u ervoor zorgen dat deze openingen
nooit geblokkeerd worden of dat ze afgedekt worden
door voorwerpen (kranten, tafelkleed, gordijn e.d.) of
door gebruik van het apparaat op een dik tapijt of een
bed.
D3-4-2-1-7b*_A1_Nl

Nl
3
LET OP
De POWER schakelaar van dit apparaat koppelt het
apparaat niet volledig los van het lichtnet. Aangezien
er na het uitschakelen van het apparaat nog een
kleine hoeveelheid stroom blijft lopen, moet u de
stekker uit het stopcontact halen om het apparaat
volledig van het lichtnet los te koppelen. Plaats het
apparaat zodanig dat de stekker in een noodgeval
gemakkelijk uit het stopcontact kan worden gehaald.
Om brand te voorkomen, moet u de stekker uit het
stopcontact halen wanneer u het apparaat langere
tijd niet denkt te gebruiken (bijv. wanneer u op
vakantie gaat).
D3-4-2-2-2a*_A1_Nl
WAARSCHUWING NETSNOER
P
ak het netsnoer beet bij de stekker. Trek de stekker er
niet uit door aan het snoer te trekken en trek nooit aan
het netsnoer met natte handen aangezien dit
ko
rtsluiting of een elektrische schok tot gevolg kan
hebbe
n. Plaats geen toestel, meubelstuk o.i.d. op het
netsnoe
r, en klem het niet vast. Maak er nooit een
knoop in en en verbind het evenmin met andere
snoere
n. De netsnoeren dienen zo te worden geleid dat
er niet per ongeluk iemand op gaat staan
. Een
beschadigd netsnoer kan brand of een elektrische
schok veroor
zaken. Kontroleer het netsnoer af en toe.
Wa
nneer u de indruk krijgt dat het beschadigd is, dient
u bij uw dichtstbijzijnde onderhoudscentrum of uw
dealer een nieuw snoer te k
open.
S002*_A1_Nl
Nederlands

Nl
4
Inhoud
Opmerkingen over deze handleiding
! Hartelijk dank voor uw aankoop van dit Pioneer DJ product.
Lees dit boekje. Het bevat belangrijke informatie die je moet begrij-
pen voordat je dit product gaat gebruiken.
Na het doorlezen van de gebruiksaanwijzing dient u deze te bewaren
op een veilige plaats, voor latere naslag.
! Ik dit boekje staan de namen van de toetsen en aansluitingen van het
hoofdtoestel tussen vierkante haakjes ([ ]).
Voorbeelden:
Druk op de [START/STOP] knop.
Alvorens te beginnen
Kenmerken .................................................................................................. 5
Inhoud van de doos .................................................................................... 5
Voordat u begint
Installeren van rekordbox (Mac/Windows) .............................................. 6
Montage ....................................................................................................... 6
Overzicht van de bedieningstoetsen
Bovenpaneel................................................................................................ 8
Achterpaneel ............................................................................................... 9
Aanpassingen
De balans van de arm aanpassen ........................................................... 10
De naalddruk aanpassen ......................................................................... 10
Anti-skating aanpassen ........................................................................... 11
De hoogte van de armlift aanpassen ...................................................... 11
De hoogte van de arm aanpassen .......................................................... 11
Aansluitingen
Aansluiting op luidsprekers met voeding ............................................... 12
Aansluiting op een pre-hoofdversterker en component ....................... 12
Verbinding maken met een DJ-mengpaneel ......................................... 13
Aansluiten van een computer ................................................................. 13
Geschikte opstelling ................................................................................. 13
De hoogte van het hoofdtoestel aanpassen ........................................... 13
Bediening
Inschakelen van de stroom ...................................................................... 14
Uitschakelen van de stroom .................................................................... 14
Afspelen ..................................................................................................... 14
Het afspelen pauzeren ............................................................................. 14
Het afspelen beëindigen .......................................................................... 14
De toonhoogte aanpassen ....................................................................... 14
Een platenhoes tonen .............................................................................. 14
Standaard EP-platen afspelen ................................................................. 14
De naaldpunt verlichten ........................................................................... 15
Opnemen ................................................................................................... 15
De naald vervangen .................................................................................. 15
Het element vervangen ............................................................................ 15
Aanvullende informatie
Verhelpen van storingen .......................................................................... 16
Voorzorgen bij het gebruik ....................................................................... 16
Onderhoud van de onderdelen ................................................................ 16
Over handelsmerken en gedeponeerde handelsmerken ..................... 17
Specificaties .............................................................................................. 17

Nl
5
Nederlands
Alvorens te beginnen
Kenmerken
Dit toestel is een direct aangedreven draaitafel met krachtig koppel voor
gebruik in uiteenlopende situaties, van luistergenot in de eigen kamer
tot DJ-optredens.
Analoog opnamegeluid van hoge
kwaliteit
Het pad van de naaldpunt tot de PHONO/LINE-uitgang is zo kort moge-
lijk ontworpen om de oorspronkelijke geluidskwaliteit van analoge platen
getrouw weer te geven.
Bovendien wordt niet alleen een PHONO-uitgang maar ook een LINE-
uitgang ondersteund, en u kunt dus eenvoudig in hoge kwaliteit van
analoge platen genieten door eenvoudig luidsprekers met voeding direct
aan te sluiten.
Eenvoudig digitaal opnemen
Er is een USB-B-aansluiting aanwezig zodat u dit toestel direct met een
PC of een Mac kunt verbinden en geluid van analoge platen op een PC of
Mac kunt opnemen en digitaal opslaan. Eenvoudig digitaal opnemen is
mogelijk met de opnamefunctie van de kosteloze applicatie voor muziek-
beheer “rekordbox” (versie 4.2.1 of later).
Direct aangedreven draaitafel voor
DJ-optredens
Dankzij toepassing van directe aandrijving met een krachtig koppel kunt
u tracks mixen, scratchen en andere DJ-handelingen verrichten door
twee van deze toestellen met een DJ-mengpaneel te verbinden.
Stofkap met standaard voor platenhoes
In de stofkap kan een platenhoes getoond worden terwijl hij geopend is.
Zo houdt u de platenhoes in het oog terwijl de muziek wordt afgespeeld.
Inhoud van de doos
! Draaitafel
! Slipmat
! Stofhoes
! Adapter voor EP-platen
! Contragewicht
! Kopshell (element inbegrepen)
! Shellgewicht
! Stroomsnoer
! USB-kabel
! Audioadapterkabel (stereo-penstekker (vrouwelijk) naar stereo-minis-
tekker (mannelijk))
! Garantie (voor bepaalde regio’s)
1
! Handleiding (dit document)
1 De meegeleverde garantie is geldig voor de Europese regio.
WAARSCHUWING
Berg kleine onderdelen op buiten het bereik van
kinderen en peuters. R
aadpleeg onmiddellijk een arts
indien kleine onderdelen per ongeluk worden ingeslikt.
D41-6-4_A1_N
l

Nl
6
Voordat u begint
Installeren van rekordbox (Mac/
Windows)
1 Ga naar rekordbox.com.
https://rekordbox.com/en/store/
! De pagina kan zonder kennisgeving gewijzigd worden.
2 Selecteer de startgids en klik op [Free To Download].
3 Lees aandachtig de gebruiksovereenkomst voor de
software en selecteer het vakje [Akkoord] als u akkoord
gaat.
Als u het vakje selecteert, kan [Download] aangeklikt worden.
4 Klik op [Download].
Het downloaden van rekordbox (Mac/Windows) begint.
5 Dubbelklik op het gedownloade bestand om het uit
te pakken.
6 Dubbelklik op het uitgepakte bestand om het
installatieprogramma te starten.
7 Lees de gebruiksrechtovereenkomst aandachtig, en
volg de instructies op het scherm om verder te gaan met
de installatie als u akkoord gaat.
! Annuleer de installatie als u niet akkoord gaat met de
gebruiksrechtovereenkomst.
8 Wanneer op het scherm wordt gemeld dat de
installatie voltooid is, volgt u de instructies op het
scherm om het installatieprogramma af te sluiten.
Hiermee is de installatie voltooid.
! Voor gebruik van rekordbox dj, rekordbox dvs en rekordbox video
is activering (verificatie van de licentie) vereist. Zie voor details de
bedieningshandleiding van rekordbox.
https://rekordbox.com/en/support/manual.php
Montage
1 Bevestig de draaitafel en de slipmat.
Plaats de draaitafel op de middenas, en de slipmat op de draaitafel.
! Let op dat je niet met de draaitafel tegen het hoofdtoestel stoot en
het niet laat vallen.
Draaitafel
Middenas
Slipmat
2 Bevestig de kopshell.
Steek de kopshell met het bevestigde element op de arm. Houd vervol-
gens de kopshell horizontaal en draai de vastzetmoer aan.
Vastzetmoer

Nl
7
Nederlands
! Verwijder vóór gebruik de naaldkap zonder de naaldpunt aan te
raken.
Naaldkap
3 Bevestig het contragewicht.
Bevestig het contragewicht aan de achterkant van de arm.
Contragewicht
Bevestig de stofkap.
Steek de scharnieren van de stofkap in de houders op
het achterpaneel van dit toestel.
U verwijdert de stofkap door de scharnieren van de stofkap in geopende
stand omhoog naar buiten te trekken.
Scharnier
Houder

Nl
8
Overzicht van de bedieningstoetsen
Bovenpaneel
1
2 3 45 6
c
d
e
f
ghij
a9
7
b
8
1 POWER-schakelaar
Als je de schakelaar naar de positie [ON] draait, wordt het toestel
ingeschakeld en licht de stroboscoopverlichting aan de zijkant op.
= Inschakelen van de stroom (blz. 14 )
Uitschakelen van de stroom (blz. 14 )
2 START/STOP-toets
Als je op de knop drukt, gaat de draaitafel draaien of stopt hij.
= Afspelen (blz. 14 )
3 Knop voor snelheidswijziging
Hiermee wijzig je de snelheid voor de afgespeelde plaat.
! 33 1/3 toerenplaat: druk op de knop [33].
! 45 toerenplaat: druk op de knop [45].
! Voor een 78-toerenplaat druk je de knoppen [33] en [45] tegelij-
kertijd in.
= Afspelen (blz. 14 )
4 Naaldverlichting
Licht op en verlicht de naaldpunt.
= De naaldpunt verlichten (blz. 15 )
5 Schakelaar voor naaldverlichting
De naaldverlichting licht wit op en gaat omhoog naar de positie
waarop de naaldpunt wordt verlicht.
= De naaldpunt verlichten (blz. 15 )
6 Kopshell
7 TEMPO schuifregelaar
Je kunt de schuifregelaar naar voren en naar achteren schuiven om
de draaisnelheid nauwkeurig aan te passen.
= De toonhoogte aanpassen (blz. 14 )
8 Arm
= Aanpassingen (blz. 10 )
9 Armklem
Houdt de arm vast.
a Armsteun
Ondersteunt de arm.
b Lifthendel
Duw de hendel omhoog om de arm op te tillen, en omlaag om de
arm neer te laten.
c Armlift
Hiermee wordt de arm omhoog en omlaag bewogen. Je bedient hem
met de lifthendel.
d Instelknop ANTI SKATING
Als een plaat wordt afgespeeld, ontstaat op de naald een kracht
die hem naar binnen trekt. Je kunt die kracht opheffen door met
deze instelknop de juiste instelling te maken overeenkomstig de
naalddruk.
= Anti-skating aanpassen (blz. 11 )
e Vergrendelknop HEIGHT ADJUST
Vergrendelt de aangepaste hoogte van de arm.
= De hoogte van de arm aanpassen (blz. 11 )
f Instelknop HEIGHT ADJUST
Wordt gebruikt om de hoogte van de arm aan te passen.
= De hoogte van de arm aanpassen (blz. 11 )
g Contragewicht
Wordt gebruikt om de balans van de arm en de naalddruk aan te
passen.
= Aanpassingen (blz. 10 )
h Afstelring voor de naalddruk
Wordt gebruikt om de juiste naalddruk in te stellen voor het element.
= De naalddruk aanpassen (blz. 10 )
i Standaard voor kopshell
Wordt gebruikt als standaard voor de kopshell.
j Adapter voor EP-platen
Wordt gebruikt om standaard EP-platen af te spelen.
= Standaard EP-platen afspelen (blz. 14 )

Nl
9
Nederlands
Achterpaneel
3
12
4 5
1 PHONO/LINE-schakelaar
Omschakelen van het niveau van de geluidsuitvoer van het toestel.
— [PHONO]: Selecteer deze stand wanneer het toestel verbonden is
met een apparaat met phononiveau-ingang, zoals een pre-hoofd-
versterker of component.
— [LINE]: Selecteer deze stand wanneer het toestel verbonden is
met een apparaat met lijnniveau-ingang, zoals luidsprekers met
voeding.
WAARSCHUWING
Verbind het toestel niet met een apparaat met phononiveau-ingang
wanneer de schakelaar PHONO/LINE in de stand [LINE] staat.
2 USB-aansluiting
Sluit hierop de USB-kabel (meegeleverd) aan.
= Aansluiten van een computer (blz. 13 )
3 Audiokabel
= Aansluitingen (blz. 12 )
4 AC IN
Aansluiten op een stopcontact met het bijgeleverde netsnoer. Wacht
met aansluiten van het netsnoer totdat eerst alle aansluitingen
tussen de apparatuur onderling compleet zijn gemaakt.
! Gebruik alleen het bijgeleverde netsnoer.
5 Schokdemper
Onderdrukt trillingen van buitenaf. Je kunt hem draaien om de
hoogte van de draaitafel af te stellen.
= De hoogte van het hoofdtoestel aanpassen (blz. 13 )

Nl
10
Aanpassingen
De balans van de arm aanpassen
Omdat het gewicht van het element en de kopshell verschilt naargelang
het product, moet de balans van de arm wellicht worden aangepast.
Doe het volgende als voorbereiding.
! Verwijder de naaldkap en de armklem. Let daarbij op dat je de naald-
punt niet aanraakt.
! Duw de lifthendel omlaag.
! Zet de instelknop [ANTI SKATING] op “0”.
Houd de arm van de armsteun en pas de balans zo aan
dat hij horizontaal staat.
Draai aan het contragewicht tot de arm bijna horizontaal staat.
! Let goed op dat de naald niet de draaitafel e.d. raakt wanneer je de
arm verplaatst.
De naalddruk aanpassen
Om springen van de naald en geluidsvervorming te voorkomen, moet de
naalddruk worden aangepast voor elk element.
Het meegeleverde element is geschikt voor een naalddruk tussen 3,0 g
en 4,0 g.
Doe het volgende als voorbereiding.
! Verplaats de arm terug naar de armsteun en zet hem vast met de
armklem.
1 Breng de “0” op de afstelring voor de naalddruk naar
de middenlijn op het achterstuk van de arm.
Houd met je vingers het contragewicht tegen zodat hij niet beweegt.
Draai ondertussen alleen de afstelring voor de naalddruk zodat het cijfer
“0” op de zwarte middenlijn komt te staan op het achterstuk van de arm.
Middenlijn
2 Pas de naalddruk aan.
Draai het contragewicht om de juiste naalddruk in te stellen voor het
gebruikte element.
! Als je contragewicht draait, draait de afstelring voor de naalddruk
mee. Houd de afstelring in het oog en stel de juiste naalddruk in.
Middenlijn

Nl
11
Nederlands
Anti-skating aanpassen
Met deze aanpassing voorkom je dat de naald springt.
Zet de meetschaal op dezelfde waarde als de naalddruk.
Draai de instelknop [ANTI SKATING] zo dat de referentielijn overeen-
komt met dezelfde waarde als de naalddruk van het element.
Afspelen met scratchen
Om springen van de naald te voorkomen moet je de schaalpositie aan-
passen aan je afspeelacties.
De hoogte van de armlift aanpassen
Als u een ander element dan het meegeleverde exemplaar gebruikt,
moet u deze aanpassing uitvoeren voor het gebruikte element.
Doe het volgende als voorbereiding.
! Leg de plaat op de slipmat.
! Verwijder de naaldkap en de armklem. Let daarbij op dat je de naald-
punt niet aanraakt.
! Duw de lifthendel omhoog en beweeg de arm naar de plaat.
Pas de hoogte aan door de schroef te draaien terwijl de
armlift omlaag is geduwd.
— Draai met de wijzers van de klok mee om de afstand tussen de
plaat en de naald te verkleinen.
— Draai tegen de wijzers van de klok in om de afstand tussen de
plaat en de naald te vergroten.
! De hoogte van de armlift (de afstand tussen de plaat en de naald
wanneer je de lifthendel omhoog duwt) kan worden ingesteld tussen
ongeveer 8 mm en 13 mm.
Schroe
f
Armlift
De hoogte van de arm aanpassen
Als u het meegeleverde element gebruikt, is de positie “0” aangewezen.
Als u een ander element dan het meegeleverde exemplaar gebruikt,
moet u deze aanpassing uitvoeren voor het gebruikte element.
1 Draai de vergrendelknop [HEIGHT ADJUST] los om de
vergrendeling op te heffen.
Ontgrendelen
2 Duw de lifthendel omlaag en zet de naald op de
plaat. Stel vervolgens de instelknop [HEIGHT ADJUST] zo
af dat de arm evenwijdig staat met de plaat.
Zodanig aanpassen dat de arm horizontaal komt te staan.
Instelknop [HEIGHT ADJUST]
3 Draai de vergrendelknop [HEIGHT ADJUST] vast om
de arm op de ingestelde hoogte te vergrendelen.
Na het aanpassen van de armhoogte moet je altijd de vergrendelknop
[HEIGHT ADJUST] vastzetten om de arm te vergrendelen.

Nl
12
Aansluitingen
! Schakel altijd eerst de stroom uit en trek de stekker uit het stopcontact alvorens u enige aansluiting maakt of verbreekt.
! Zie tevens de gebruiksaanwijzingen van de aan te sluiten apparatuur.
! Sluit het netnoer pas aan nadat alle aansluitingen tussen de apparatuur volledig zijn gemaakt.
Aansluiting op luidsprekers met voeding
Luidsprekers met voeding
Audiokabel
Achterpaneel
Stroomsnoer
Naar stopcontact
1 Zet de schakelaar [PHONO/LINE] op [LINE].
2 Sluit de audiokabel aan op de ingang [LINE] van de luidsprekers met voeding, enz.
! Gebruik indien nodig de meegeleverde audio-adapterkabel.
3 Sluit het netsnoer aan.
Aansluiten op een stopcontact met het bijgeleverde netsnoer. Wacht met aansluiten van het netsnoer totdat eerst alle aansluitingen tussen de appara-
tuur onderling compleet zijn gemaakt.
Aansluiting op een pre-hoofdversterker en component
Audiokabel
Achterpaneel
Stroomsnoer
Naar stopcontact
Pre-hoofdversterker, component, enz.
1 Zet de schakelaar [PHONO/LINE] op [PHONO].
2 Sluit de audiokabel aan op de ingang [PHONO] van de pre-hoofdversterker of andere component.
! Als dit product wordt aangesloten op een pre-hoofdversterker of component zonder een [PHONO]-aansluiting, kunnen niet voldoende volume en
geluidskwaliteit worden verkregen. Zet in dat geval de schakelaar [PHONO/LINE] van dit toestel op [LINE], en sluit vervolgens dit toestel aan op de
ingang [LINE] van de pre-hoofdversterker of component of gebruik een phono-equalizer.
3 Sluit het netsnoer aan.
Aansluiten op een stopcontact met het bijgeleverde netsnoer. Wacht met aansluiten van het netsnoer totdat eerst alle aansluitingen tussen de appara-
tuur onderling compleet zijn gemaakt.

Nl
13
Nederlands
Verbinding maken met een DJ-mengpaneel
Draaitafel
DJ-mengpaneel
Audiokabel
Audiokabel
Achterpaneel
Stroomsnoer
Naar stopcontact
1 Zet de schakelaar [PHONO/LINE] op [PHONO].
2 Sluit de audiokabel aan op de ingang [PHONO] van het DJ-mengpaneel.
! Als dit product wordt aangesloten op een DJ-mengpaneel zonder een [PHONO]-aansluiting, kunnen niet voldoende volume en geluidskwaliteit
worden verkregen. Zet in dat geval de schakelaar [PHONO/LINE] van dit toestel op [LINE], en sluit vervolgens het toestel aan op de ingang [LINE]
van het DJ-mengpaneel.
3 Sluit het netsnoer aan.
Aansluiten op een stopcontact met het bijgeleverde netsnoer. Wacht met aansluiten van het netsnoer totdat eerst alle aansluitingen tussen de appara-
tuur onderling compleet zijn gemaakt.
Aansluiten van een computer
Dit toestel heeft geen USB-stuurprogramma nodig.
= Opnemen (blz. 15 )
Achterpaneel
USB-kabel
Computer
Naar stopcontact
Stroomsnoer
1 Sluit de USB-kabel aan op een USB-poort op de computer.
2 Sluit het netsnoer aan.
Aansluiten op een stopcontact met het bijgeleverde netsnoer. Wacht met aansluiten van het netsnoer totdat eerst alle aansluitingen tussen de appara-
tuur onderling compleet zijn gemaakt.
Geschikte opstelling
Plaats het toestel op een vlak oppervlak zonder externe trillingen.
! Houd het toestel zo ver mogelijk uit de buurt van het
luidsprekersysteem.
! Als het toestel erg dicht bij een radio (AM/FM) staat, kan de radio
ruis veroorzaken. Maak de afstand tot het toestel zo groot mogelijk.
De hoogte van het hoofdtoestel
aanpassen
Pas de hoogte aan door de schokdemper zo ver te draaien dat het hoofd-
toestel horizontaal staat.

Bediening
Inschakelen van de stroom
1 Maak alle verbindingen en steek vervolgens de
stekker in het stopcontact.
= Aansluitingen (blz. 12 )
2 Zet de schakelaar [POWER] in de positie [ON] om het
toestel in te schakelen.
De indicators van dit toestel lichten op en de stroom wordt ingeschakeld.
Uitschakelen van de stroom
Zet de schakelaar [POWER] in de positie [OFF] om het
toestel uit te schakelen.
De stroomvoorziening van dit toestel wordt uitgeschakeld.
Afspelen
Doe het volgende als voorbereiding.
! Plaats een plaat op de draaitafel.
! Verwijder de naaldkap en de armklem.
1 Zet de schakelaar [POWER] in de positie [ON] om het
toestel in te schakelen.
2 Selecteer met een van de snelheidsknoppen de
geschikte draaisnelheid voor de plaat.
3 Druk op de [START/STOP] knop.
De draaitafel draait.
4 Duw de lifthendel omhoog en beweeg de arm naar
de plaat.
5 Duw de lifthendel omlaag.
De arm beweegt langzaam omlaag en het afspelen begint.
Het afspelen pauzeren
Duw de lifthendel omhoog.
De naald van het element wordt van de plaat getild.
! Duw de lifthendel omlaag om het afspelen te hervatten.
Het afspelen beëindigen
1 Duw de lifthendel omhoog, beweeg de arm naar de
armsteun, en duw de lifthendel omlaag.
2 Druk op de [START/STOP] knop.
De draaitafel komt zonder schokken tot stilstand.
3 Zet de schakelaar [POWER] in de positie [OFF] om het
toestel uit te schakelen.
Zet de arm vast met de armklem.
Bevestig de naaldkap om de naaldpunt te beschermen.
Sluit de stofkap.
De toonhoogte aanpassen
Beweeg de [TEMPO] schuifregelaar naar voren of naar
achteren.
Als je de schuifregelaar naar voren schuift, wordt de draaisnelheid
verhoogt. Als je hem naar achteren schuift, wordt de draaisnelheid
verlaagd.
! Wanneer de schuifregelaar [TEMPO] in het midden staat, licht de
indicator geel-groen op en wordt de gekozen draaisnelheid gebruikt
(33 1/3 tpm, 45 tpm of 78 tpm).
! De schaal van de schuifregelaar [TEMPO] is een ruwe waarde.
Gebruik deze als richtlijn.
! Je kunt controleren of de gespecificeerde draaisnelheid in tpm
bereikt is door naar de vier rijen met stroboscooppatronen te kijken
rond de draaitafel.
Stroboscooppatroon
1 Het stroboscooppatroon lijkt stil te staan: 33 1/3 tpm (50 Hz voeding)
2 Het stroboscooppatroon lijkt stil te staan: 45 tpm (50 Hz voeding)
3 Het stroboscooppatroon lijkt stil te staan: 33 1/3 tpm (60 Hz voeding)
4 Het stroboscooppatroon lijkt stil te staan: 45 tpm (60 Hz voeding)
! Het stroboscooppatroon van dit toestel wordt verlicht met stro-
boscoopverlichting (rode LED). Gebruik altijd de stroboscoopverlich-
ting om de toonhoogte te controleren.
Een platenhoes tonen
Zet de platenhoes achter de stoppers in de stofkap, zoals in de afbeel-
ding wordt getoond.
StoppersPlatenhoes
! Plaats hier geen andere voorwerpen dan een platenhoes.
! Zet de platenhoes stevig achter de stoppers.
! Pas op dat de platenhoes niet omvalt als je deze functie tijdens het
afspelen gebruikt. De plaat of de naald kan beschadigd worden.
! Pas op dat je de stofkap niet sluit terwijl de platenhoes er nog in
staat.
Standaard EP-platen afspelen
Plaats de adapter voor EP-platen op de middenas en druk op de knop
[45].
Nl
14

Nl
15
Nederlands
De naaldpunt verlichten
Als je op de schakelaar voor de naaldverlichting drukt, licht de naaldver-
lichting wit op en gaat hij omhoog naar de positie waarop de naaldpunt
wordt verlicht.
! Als je hem niet nodig hebt, druk je op de schakelaar voor de naald-
verlichting om hem te laten zakken. De schakelaar voor de naaldver-
lichting gaat uit.
! Kijk niet direct in het licht wanneer de naaldverlichting brandt.
Opnemen
Analoge platen kunnen digitaal opgenomen worden door verbinding te
maken met een computer waarop de software “rekordbox” voor muziek-
beheer geïnstalleerd is.
Details vind je op de productwebsite van rekordbox hieronder en in de
bedieningshandleiding voor rekordbox onder [Support].
https://rekordbox.com/en/store/
De naald vervangen
Vergewis je ervan dat het systeem is uitgeschakeld voordat je de vol-
gende procedure uitvoert.
1 Houd het element met één hand vast.
2 Verwijder het element in de richting van de pijl
terwijl je het naaldhoudergedeelte met je andere hand
vasthoudt.
Het element vervangen
Dit toestel is niet compatibel met MC-elementen. Gebruik een
VM-element of een MM-element.
Het element verwijderen
1 Verwijder de schroeven, moeren en sluitringen van
de kopshell.
2 Ontkoppel de draden van het element.
Het element bevestigen
1 Sluit het element aan; let er daarbij op dat de kleuren
van de draden van de kopshell en de symbolen bij de
aansluitingen op het element overeenstemmen.
De kleuren van de draden van de kopshell en de symbolen op de elemen-
taansluitingen dienen als volgt overeen te komen.
Vanaf de voorkant gezien: linksboven is L+: wit, linksonder is L-: blauw,
rechtsboven is R+: rood, en rechtsonder is R-: groen.
! Sluit de draden stevig aan met een tang of dergelijke.
2 Bevestig het element op de kopshell met de
schroeven, moeren en sluitringen die bij het element
geleverd werden.
Element
Draad
Kopshell
Shellgewicht
! Bevestig het element deugdelijk op de kopshell.
! Als het element 5 g of minder weegt, moet je het meegeleverde
shellgewicht gebruiken.
De overhang aanpassen
Pas de overhangpositie aan met de bevestigingsschroef voor het ele-
ment. Gebruik daarbij de volgende meetschaal. De naaldpunt moet
uitkomen op een positie 53 mm van het bevestigingsdeel van de arm.
53 mm
Meetschaal voor aanpassing van de overhang
53 mm

Nl
16
Aanvullende informatie
Verhelpen van storingen
! Verkeerde bediening kan vaak de oorzaak zijn van een schijnbare storing of foutieve werking. Als u denkt dat er iets mis is met deze apparatuur,
moet u de punten hieronder controleren en de [FAQ] voor de [PLX-500] op de Pioneer DJ-ondersteuningssite.
http://pioneerdj.com/support/
Soms wordt het probleem door een andere component veroorzaakt. Inspecteer de andere componenten en elektrische apparaten die gebruikt wor-
den. Als u het probleem niet kunt verhelpen, vraag dan uw dichtstbijzijnde servicecentrum of uw vakhandelaar om het apparaat te laten repareren.
! Dit apparaat kan soms niet goed werken vanwege statische elektriciteit of andere externe invloeden. In dat geval kunt u de juiste werking herstellen
door de stroom uit te schakelen, 1 minuut te wachten en dan de stroom weer in te schakelen.
Probleem Controle Oplossing
De stroom wordt niet ingeschakeld. Is het netsnoer naar behoren aangesloten? Sluit het meegeleverde stroomsnoer op de juiste manier aan op een stopcontact.
Staat de schakelaar [POWER] voor de stroomvoor-
ziening op [ON]?
Zet de schakelaar [POWER] voor de stroomvoorziening op [ON].
Er klinkt niet of nauwelijks geluid. Zijn de audiosnoeren goed aangesloten? Zorg dat de audiokabels juist zijn aangesloten.
Zijn de aansluitbussen en de stekkers vuil? Maak de aansluitbussen en de stekkers schoon voordat u aasluitingen gaat
maken.
Is de kopshell correct bevestigd? Bevestig de kopshell correct.
Het geluid links en rechts wordt
omgekeerd.
Zijn de aansluitingen voor links en rechts op elk
onderdeel van de apparatuur correct?
Sluit de audiokabel en de draden van de kopshell correct aan.
Er klinkt een laag zoemend (of brom-
mend) geluid tijdens het afspelen.
Staat of ligt er in de buurt van de voedingskabel
een ander elektrisch apparaat zoals een tl-buis of
een draad ervan?
Plaats de voedingskabel van de tl-buis of het andere apparaat zo ver mogelijk uit
de buurt.
De naaldpunt komt niet omlaag op
de plaat.
Is de naalddruk correct ingesteld? Stel het contragewicht af voor de juiste naalddruk voor het gebruikte element.
Is de arm horizontaal in evenwicht? Draai aan het contragewicht tot de arm horizontaal staat.
De naald springt. Is de naalddruk correct ingesteld? Stel het contragewicht af voor de juiste naalddruk voor het gebruikte element.
Is de plaat krom of heeft hij krassen? Controleer de staat van de plaat.
Zit er veel stof aan de naaldpunt? Verwijder de shell met het element, en verwijder stof e.d. van de naaldpunt met
een penseeltje met een zachte punt.
Is anti-skating correct ingesteld? Stel anti-skating correct in.
Is de armhoogte correct ingesteld? Stel de armhoogte correct in.
De arm stopt halverwege en gaat niet
verder.
Heeft de plaat krassen? Controleer de staat van de plaat.
Raakt de arm iets? Controleer de ruimte rond de arm. Verwijder eventuele obstakels.
Het geluid is zacht of hard (vervormd). Is de aansluiting met de versterker correct voor het
type element (uitgang)?
Zorg dat de aansluitsnoeren juist zijn aangesloten.
Is de schakelaar [PHONO/LINE] correct ingesteld? Zet de schakelaar [PHONO/LINE] in de juiste stand naargelang de ingangsaan-
sluiting van het aangesloten apparaat.
De draaitafel trilt erg wanneer hij
draait.
Er zit vuil enz. bij de bevestigingen van de draaita-
fel en de middenas.
Verwijder het vuil.
Voorzorgen bij het gebruik
Over condensvocht
Er kunnen waterdruppeltjes uit de lucht in het apparaat (vooral op
mechanische onderdelen en lenzen) condenseren; bijvoorbeeld ’s win-
ters, als het apparaat vanuit een koude omgeving wordt meegenomen
naar een warme ruimte, of als de ruimte waarin het apparaat staat plot-
seling wordt verwarmd. Als er condensatie in het apparaat is opgetre-
den, zal het niet goed werken en kunt u het even niet gebruiken. Laat het
apparaat gewoon uitgeschakeld ongeveer 1 tot 2 uur lang op kamertem-
peratuur staan (hoe lang het duurt hangt af van de hoeveelheid con-
densatie). Het condensvocht zal verdampen en dan kunt u het apparaat
weer normaal gebruiken. Condensatie kan zich ook ’s zomers voordoen
als het apparaat in de directe luchtstroom van een airconditioner e.d.
staat. In dat geval kunt u het apparaat beter op een andere plaats zetten.
Transport van het toestel naar een
andere locatie
Gebruik het oorspronkelijke verpakkingsmateriaal om het toestel in te
pakken.
Als het oorspronkelijke verpakkingsmateriaal niet meer aanwezig is, let
dan zeker op de volgende punten.
! Verwijder de slipmat en de draaitafel voor het inpakken.
! Verwijder de kopshell en het contragewicht van de arm en pak ze
voorzichtig in.
! Zet de arm vast met de armklem, en zet hem met tape vast zodat hij
niet kan bewegen.
! Wikkel het hoofdtoestel in een deken of zacht papier zodat hij niet
kan worden beschadigd.
! Neem het toestel zo vast dat er geen kracht wordt uitgeoefend op de
arm.
Onderhoud van de onderdelen
Zet de stroom van de versterker uit wanneer je de kopshell bevestigt en
verwijdert.
Als je dit doet terwijl het volume hoog staat, kan de luidspreker bescha-
digd worden.
! Verwijder de shell met het element, en verwijder stof e.d. van de
naaldpunt met een penseeltje met een zachte punt.
! Reinig platen met platenreiniger van een goede kwaliteit.
! Reinig de aansluiting van de kopshell met een zachte doek of gelijk-
aardig materiaal en bevestig hem terug aan de arm.

Nl
17
Nederlands
De stofhoes e.d. reinigen
Reinig de stofhoes en de kast met een zachte doek
! Reinig de stofhoes niet tijdens het afspelen. De arm kan door de
stofhoes worden aangetrokken door statische elektriciteit.
Over handelsmerken en
gedeponeerde handelsmerken
! “Pioneer DJ” is een handelsmerk van PIONEER CORPORATION en
wordt in licentie gebruikt.
! rekordbox is een handelsmerk of geregistreerd handelsmerk van de
Pioneer DJ Corporation.
De hierin vermelde namen van bedrijven en hun producten zijn de
handelsmerken of geregistreerde handelsmerken van hun respectieve
eigenaars.
Specificaties
Voeding ......... 110 V tot 120 V of 220 V tot 240 V wisselstroom, 50 Hz/60 Hz
Stroomverbruik ...................................................................................... 11 W
Gewicht hoofdapparaat .....................................................................10,7 kg
Buitenafmetingen ................ 450 mm (B) × 158,5 mm (H) × 367,5 mm (D)
Toegestane bedrijfstemperatuur........................................+5 °C tot +35 °C
Toegestane luchtvochtigheid ................ 5 % tot 85 % (zonder condensatie)
Draaitafel
Aandrijving .............................................................Directe servoaandrijving
Motor ...................................................... Borstelloze DC-motor met 3 fasen
Remsysteem ..................................................................... Elektronische rem
Draaisnelheid ..................................................... 33 1/3 tpm, 45 tpm, 78 tpm
Instelbereik draaisnelheid .....................................................................±8 %
Wow en flutter ........................................................ 0,15 % of minder WRMS
S/R-verhouding ....................................................................... 50 dB of meer
Draaitafel ....................................... Aluminium gegoten Diameter: 332 mm
Startkoppel ...................................................................... 1,6 kg·cm of meer
Starttijd ............................................. 1 seconden of minder (bij 33 1/3 tpm)
Arm
Type arm ............................................................. Universele S-vormige arm,
cardanische lagering, statische balans
Effectieve lengte ............................................................................. 230,5 mm
Overhang ............................................................................................. 16 mm
Volgfout.................................................................................... Minder dan 3°
Instelbereik armhoogte......................................................................... 6 mm
Variabel bereik naalddruk ................................. 0 g tot 4,0 g (1 schaal 0,1 g)
Aangewezen elementgewicht ....................9,5 g of minder (enkel element)
Type element ............................................................................................. VM
Uitgangsspanning
PHONO ......................................................................................2,5 mV/1 kHz
LINE ...........................................................................................150 mV/1 kHz
— De technische gegevens en het ontwerp van dit product kunnen
vanwege voortgaande verbetering zonder voorafgaande kennis-
geving worden gewijzigd.
! © 2016 Pioneer DJ Corporation. Alle rechten voorbehouden.

Es
2
Selector de tensión
El selector de tensión está situado en panel superior de
los modelos de tensiones múltiples.
El ajuste predeterminado del selector de tensión es
de 220-240 V. Ajústelo a la tensión correcta de su
país o región.
Para México, ajuste el voltaje en 110-120 V antes de
utilizar este producto.
Antes de cambiar la tensión, desenchufe el cable de
alimentación de CA. P
ara cambiar el ajuste del selector
de tensión, emplee un destornillador de tamaño medio.
D3-4-2-1-5*_A2_Es
PRECAUCIÓN
PA
RA PREVENIR EL PELIGRO DE CHOQUE ELÉCTRICO
NO REMOVER
LA TAPA NI LAS PARTES DENTRO NO
UTILIZADAS, LL
AMAR UNA PERSONA CUALIFICADA.
D3-4-2-1-1_B2_Es
ADVER
TENCIA
Este aparato no es impermeable.
Para evitar el riesgo
de incendio y de descargas eléctricas, no ponga ningún
recipiente lleno de líquido (como pueda ser un vaso o
un florero) cerca del aparato ni lo exponga a gote
o,
salpicaduras, lluvia o humedad
.
D3-4-2-1-3_A1_Es
ADVER
TENCIA
Pa
ra evitar el peligro de incendio, no ponga nada con
fuego encendido (como pueda ser una vela) encima del
aparat
o.
D3-4-2-1-7a_A1_Es
Entor
no de funcionamiento
Te
mperatura y humedad del entorno de funcionamiento
+5 °C a +35 °C; menos del 85 % de humedad relativa
(rejillas de refrigeración no obstruidas
)
No instale este aparato en un lugar mal ventilado
, ni en
lugares expuestos a alta humedad o a la luz directa del
sol (o de otra luz artificial potente).
D3-4-2-1-7c*_A1_Es
Este producto es para tareas domésticas generales.
Cualquiera avería debida a otra utilización que tareas
domésticas (tales como el uso a largo plazo para
motivos de negocios en un restaurante o el uso en un
coche o un barco) y que necesita una reparación
hará que cobrarla incluso durante el período de
garantía.
K041_A1_Es
Si desea deshacerse de este producto, no lo mezcle con los residuos generales de su hogar. De conformidad con la legislación
vigente, existe un sistema de recogida distinto para los productos electrónicos que requieren un procedimiento adecuado de
tratamiento, recuperación y reciclado.
Las viviendas privadas en los estados miembros de la UE, en Suiza y Noruega pueden devolver gratuitamente sus productos electr
ónicos usados
en las instalaciones de recolección previstas o bien en las instalaciones de minoristas (si adquieren un producto similar nuevo
).
En el caso de los países que no se han mencionado en el párrafo anterio
r, póngase en contacto con sus autoridades locales a fin de conocer el
método de eliminación correcto
.
Al actuar siguiendo estas instrucciones, se asegurará de que el producto de desecho se somete a los procesos de tratamient
o, recuperación y
reciclaje necesarios, con lo que se previenen los efectos negativos potenciales para el entorno y la salud humana.
K058b_A1_Es
PRECAUCIÓN P
ARA LA VENTILACIÓN
Cuando instale este aparat
o, asegúrese de dejar
espacio en torno al mismo para la ventilación con el fin
de mejorar la disipación de calor (por lo menos 15 cm
encima, 5 cm detrás, y 5 cm en cada lado)
.
ADVER
TENCIA
Las ranuras y aberturas de la caja del aparato sir
ven
para su ventilación para poder asegurar un
funcionamiento fiable del aparato y para protegerlo
contra sobrecalentamiento
. Para evitar el peligro de
incendio
, las aberturas nunca deberán taparse ni
cubrirse con nada (como por ejempl
o, periódicos,
manteles, cortinas) ni ponerse en funcionamiento el
aparato sobre una alfombra gruesas o una cama
.
D3-4-2-1-7b*_A1_Es

Es
3
PRECAUCIÓN
El interruptor de la alimentación POWER de este
aparato no corta por completo toda la alimentación
de la toma de corriente de CA. Puesto que el cable de
alimentación hace las funciones de dispositivo de
desconexión de la corriente para el aparato, para
desconectar toda la alimentación del aparato deberá
desenchufar el cable de la toma de corriente de CA.
Por lo tanto, asegúrese de instalar el aparato de
modo que el cable de alimentación pueda
desenchufarse con facilidad de la toma de corriente
de CA en caso de un accidente. Para evitar correr el
peligro de incendio, el cable de alimentación también
deberá desenchufarse de la toma de corriente de CA
cuando no se tenga la intención de utilizarlo durante
mucho tiempo seguido (por ejemplo, antes de irse de
vacaciones).
D3-4-2-2-2a*_A1_Es
PRECAUCIONES CONCERNIENTES A LA
MANIPULACIÓN DEL CABLE DE
ALIMENT
ACIÓN
To
me el cable de alimentación por la clavija. No
extraiga la clavija tirando del cable. Nunca toque el
cable de alimentación cuando sus manos estén
mojadas, ya que esto podría causar cortocircuitos o
descargas eléctricas. No coloque la unidad, algún
mueble, etc., sobre el cable de alimentación
.
Asegúrese de no hacer nudos en el cable ni de unirlo a
otros cables. Los cables de alimentación deberán ser
dispuestos de tal forma que la probabilidad de que
sean pisados sea mínima. Una cable de alimentación
dañado podrá causar incendios o descargas eléctricas.
Re
vise el cable de alimentación está dañado, solicite el
reemplazo del mismo al centro de se
rvicio más
cercan
o, o a su distribuidor.
S002*_A1_Es
Español

Es
4
Contenido
Cómo leer este manual
! Gracias por adquirir este producto Pioneer DJ.
Asegúrese de leer este folleto, el cual incluye información impor-
tante que usted deberá entender antes de usar este producto.
Después de haber terminado de leer estas instrucciones, guárdelas
en un lugar seguro para, en caso de ser necesario, consultarlas en el
futuro.
! En este folleto, los nombres de los botones y los terminales de la
unidad principal aparecen entre corchetes ([ ]).
Ejemplos:
Pulse el botón [START/STOP].
Antes de empezar a usar la unidad
Características ............................................................................................ 5
Contenido de la caja ................................................................................... 5
Antes de comenzar
Instalación rekordbox (Mac/Windows) ..................................................... 6
Montaje ........................................................................................................ 6
Nombres y funciones de los controles
Panel superior ............................................................................................. 8
Panel trasero ............................................................................................... 9
Ajuste
Ajuste del equilibrio del brazo fonocaptor.............................................. 10
Ajuste de la presión de la aguja .............................................................. 10
Ajuste de anti-skating ............................................................................... 11
Ajuste de la altura del elevador del brazo ............................................... 11
Ajuste de la altura del brazo .................................................................... 11
Conexiones
Conexión con altavoces amplificados .................................................... 12
Conexión a un preamplificador y a un componente ............................. 12
Conexión a un mezclador DJ ................................................................... 13
Conexión con un ordenador .................................................................... 13
Lugar de instalación ................................................................................. 13
Ajuste de la altura de la unidad principal ............................................... 13
Operación
Conexión de la alimentación ................................................................... 14
Desconexión de la alimentación ............................................................. 14
Reproducción ............................................................................................ 14
Pausa de la reproducción ........................................................................ 14
Final de la reproducción .......................................................................... 14
Ajuste del tono .......................................................................................... 14
Visualización de una portada de disco ................................................... 14
Para reproducir un disco EP estándar ................................................... 15
Iluminación de la punta de la aguja ........................................................ 15
Grabación .................................................................................................. 15
Sustitución de la aguja............................................................................. 15
Cambio del cartucho ................................................................................ 15
Información adicional
Solución de problemas ............................................................................ 16
Cuidados para el uso ................................................................................ 16
Mantenimiento de cada parte ................................................................. 16
Acerca de las marcas de fábrica y marcas registradas ........................ 17
Especificaciones ....................................................................................... 17

Es
5
Español
Antes de empezar a usar la unidad
Características
Esta unidad es un giradiscos con accionamiento directo y un par de giro
elevado que se puede usar en una gran variedad de aplicaciones que
van desde escuchar música en casa hasta actuaciones de DJ.
Sonido de grabación analógica de alta
calidad
La ruta desde la punta de la aguja hasta la salida PHONO/LINE se ha
acortado lo máximo posible para reproducir de forma fiel la calidad de
sonido original de los discos analógicos.
Asimismo, como no solo se admite la salida PHONO sino también la
salida LINE, puede disfrutar fácilmente del sonido de grabación analó-
gica de alta calidad simplemente conectando directamente con altavo-
ces amplificados.
Fácil grabación digital
Se proporciona un terminal USB-B para que pueda conectar direc-
tamente esta unidad y un PC o un Mac y después grabar fuentes de
sonido de grabación analógica en el PC o Mac convirtiéndolas a datos.
Se puede realizar la grabación digital con una sencilla operación utili-
zando la función de grabación de la aplicación gratuita de gestión de
música “rekordbox” (Ver.4.2.1 o posterior) durante la grabación.
Giradiscos con accionamiento directo que
permite actuaciones de DJ
La adopción de un sistema de accionamiento directo con un alto par
permite realizar la mezcla de pistas, scratching y otras actuaciones de
DJ combinando dos de estas unidades con un mezclador de DJ.
Cubierta guardapolvo que puede servir
como soporte para una portada de disco
Se puede mostrar una portada de disco en la cubierta guardapolvo
mientras está abierta. Esto permite disfrutar del sonido de grabación
analógica mientras se mira la portada del disco.
Contenido de la caja
! Giradiscos
! Slip mat
! Cubierta guardapolvo
! Adaptador para discos EP
! Contrapeso
! Portacápsula (cartucho incluido)
! Peso para la cápsula
! Cable de alimentación
! Cable USB
! Cable adaptador de audio (clavija estéreo (hembra) a mini-clavija
estéreo (macho))
! Garantía (para algunas regiones)
1
! Manual de Instrucciones (este manual)
1 La garantía incluida es para la región europea.
ADVERTENCIA
Guarde las piezas pequeñas fuera del alcance de los
niños. Si las ingirieran accidentalmente, póngase de
inmediato en contacto con un médico
.
D41-6-4_A1_Es

Es
6
Antes de comenzar
Instalación rekordbox (Mac/
Windows)
1 Acceda a rekordbox.com.
https://rekordbox.com/es/store/
! El contenido de la página está sujeto a cambios sin previo aviso.
2 Consulte la Guía de inicio y haga clic en [Descarga
Gratis].
3 Lea detenidamente el Acuerdo de licencia de usuario
final del software y active la casilla de verificación
[Acepto] si está de acuerdo.
Cuando active la casilla de verificación, se podrá hacer clic en
[Descarga].
4 Haga clic en [Descarga].
Se iniciará la descarga de rekordbox (Mac/Windows).
5 Haga doble clic en el archivo descargado para
descomprimirlo.
6 Haga doble clic en el archivo descomprimido para
ejecutar el instalador.
7 Lea atentamente el Acuerdo de licencia de usuario
final del software y continúe con la instalación según las
instrucciones de la pantalla si está de acuerdo.
! Si no acepta el contenido del Acuerdo de licencia de usuario final del
software, cancele la instalación.
8 Cuando aparece la pantalla de finalización de la
instalación, siga las instrucciones de la pantalla para
cerrar el instalador.
La instalación se ha completado ahora.
! Para utilizar rekordbox dj, rekordbox dvs y rekordbox video, es nece-
saria la activación (autenticación de licencia). Para obtener detalles,
consulte el Manual de instrucciones de rekordbox.
https://rekordbox.com/es/support/manual.php
Montaje
1 Monte el giradiscos y la slip mat.
Coloque el giradiscos en el husillo central y coloque la slip mat encima
del giradiscos.
! Tenga cuidado de no golpear el giradiscos contra la unidad principal
ni dejarlo caer.
Giradiscos
Eje central
Slip mat
2 Monte el portacápsula.
Inserte el portacápsula con el cartucho montado en el brazo fonocaptor.
A continuación, apriete la contratuerca mientras mantiene el portacáp-
sula horizontal.
Contratuerca

Es
7
Español
! Antes del uso, retire la cubierta de la aguja sin tocar la punta de la
aguja.
Cubierta de la aguja
3 Monte el contrapeso.
Fije el contrapeso al eje trasero del brazo fonocaptor.
Contrapeso
Coloque la cubierta guardapolvo.
Inserte las bisagras de la cubierta guardapolvo en los
soportes del panel trasero de esta unidad.
Cuando retire la cubierta guardapolvo, tire de las bisagras hacia arriba
con la cubierta guardapolvo abierta.
Bisagra
Soporte

Es
8
Nombres y funciones de los controles
Panel superior
1
2 3 45 6
c
d
e
f
ghij
a9
7
b
8
1 Conmutador POWER
Si se gira el conmutador hacia el lado [ON], se conecta la alimenta-
ción y se ilumina la iluminación estroboscópica de al lado.
= Conexión de la alimentación (pág. 14 )
Desconexión de la alimentación (pág. 14 )
2 Botón START/STOP
Al pulsar el botón se inicia o se detiene la rotación del giradiscos.
= Reproducción (pág. 14 )
3 Botón de cambio de velocidad
Cambia la velocidad de acuerdo con el disco que se vaya a
reproducir.
! Para un disco de 33 1/3 rpm, pulse el botón [33].
! Para un disco de 45 rpm, pulse el botón [45].
! Para un disco de 78 rpm, pulse el botón [33] y el botón [45]
simultáneamente.
= Reproducción (pág. 14 )
4 Iluminación de la aguja
Se enciende para iluminar la punta de la aguja.
= Iluminación de la punta de la aguja (pág. 15 )
5 Conmutador para la iluminación de la aguja
La iluminación de la aguja se enciende en luz blanca y asciende
hasta la posición en la que la punta de la aguja se ilumina.
= Iluminación de la punta de la aguja (pág. 15 )
6 Portacápsula
7 Barra deslizante TEMPO
Puede deslizar la barra hacia adelante o atrás para realizar un ajuste
fino de la velocidad de rotación.
= Ajuste del tono (pág. 14 )
8 Brazo fonocaptor
= Ajuste (pág. 10 )
9 Agarre del brazo
Sirve para agarrar el brazo fonocaptor.
a Apoyo del brazo
Sirve como base de soporte para el brazo fonocaptor.
b Palanca elevadora
El brazo fonocaptor asciende cuando se tira hacia arriba de la
palanca. El brazo fonocaptor desciende cuando se aprieta la palanca
hacia abajo.
c Elevador del brazo
Este dispositivo se utiliza para mover el brazo fonocaptor hacia arriba
y abajo. Se maneja mediante la palanca elevadora.
d Dial ANTI SKATING
Cuando se reproduce un disco, hay una fuerza que tira de la punta
de la aguja hacia el perímetro interior. Al hacer coincidir este dial
con el valor de presión de la aguja, se elimina esta fuerza.
= Ajuste de anti-skating (pág. 11 )
e Bloqueo HEIGHT ADJUST
Bloquea la altura ajustada del brazo.
= Ajuste de la altura del brazo (pág. 11 )
f Dial HEIGHT ADJUST
Se utiliza para ajustar la altura del brazo fonocaptor.
= Ajuste de la altura del brazo (pág. 11 )
g Contrapeso
Se utiliza para equilibrar el brazo fonocaptor y ajustar la presión de
la aguja.
= Ajuste (pág. 10 )
h Anillo de ajuste de presión de la aguja
Se utiliza para hacer coincidir con la presión adecuada de aguja del
cartucho.
= Ajuste de la presión de la aguja (pág. 10 )
i Soporte del portacápsula
Se utiliza para levantar el portacápsula.
j Adaptador para discos EP
Se utiliza para reproducir discos EP estándar.
= Para reproducir un disco EP estándar (pág. 15 )

Es
9
Español
Panel trasero
3
12
4 5
1 Conmutador PHONO/LINE
Cambia el nivel de la salida de sonido de la unidad.
— [PHONO]: Seleccione esta opción cuando esta unidad se
conecte con un dispositivo compatible con la entrada de
nivel fonográfico, como un preamplificador principal o un
componente.
— [LINE]: Seleccione esta opción cuando esta unidad se conecte
con un dispositivo compatible con la entrada de nivel de línea,
como altavoces amplificados.
AVISO
No conecte la unidad con un dispositivo que admite la entrada de
nivel fonográfico mientras el interruptor PHONO/LINE está en el
estado [LINE].
2 Terminal USB
Conecte el cable USB (incluido) aquí.
= Conexión con un ordenador (pág. 13 )
3 Cable de audio
= Conexiones (pág. 12 )
4 AC IN
Conecta a una toma de corriente con el cable de alimentación
incluido. Espere hasta que todas las conexiones entre el equipo
estén terminadas antes de conectar el cable de alimentación.
! Asegúrese de usar el cable de alimentación incluido.
5 Aislador
Suprime los efectos de la vibración externa. Al girar el aislador se
ajusta la altura del giradiscos.
= Ajuste de la altura de la unidad principal (pág. 13 )

Ajuste
Ajuste del equilibrio del brazo
fonocaptor
Debido a que los pesos del portacápsula y del cartucho son diferen-
tes en función del producto, se puede ajustar el equilibrio del brazo
fonocaptor.
Realice la preparación del siguiente modo.
! Retire la cubierta de la aguja y el agarre del brazo teniendo cuidado
de no tocar la punta de la aguja.
! Apriete hacia abajo la palanca elevadora.
! Ajuste el dial [ANTI SKATING] a “0”.
Mantenga el brazo fonocaptor lejos del apoyo del brazo
y ajuste el equilibrio de modo que esté horizontal.
Gire el contrapeso hasta que el brazo esté casi en horizontal.
! Al mover el brazo fonocaptor, asegúrese de que la punta de la aguja
no toca directamente el giradiscos y similares.
Ajuste de la presión de la aguja
Para evitar que la aguja salte o se distorsione el sonido, se ajusta la pre-
sión de la aguja al valor apropiado de la presión de aguja determinado
para cada cartucho.
El valor de presión adecuado de la aguja para el cartucho incluido es de
entre 3,0 g y 4,0 g.
Realice la preparación del siguiente modo.
! Devuelva el brazo fonocaptor al apoyo del brazo y asegúrelo
mediante el agarre del brazo.
1 Haga coincidir el “0” en el anillo de ajuste de presión
de la aguja con la línea central del eje trasero del brazo.
Mientras utiliza su dedo para mantener el contrapeso de modo que no
se mueva, ajuste sólo el anillo de ajuste de presión de la aguja de modo
que el número “0” coincida con la línea central negra del eje trasero del
brazo fonocaptor.
Línea central
2 Ajuste de la presión de la aguja.
Gire el contrapeso para ajustarlo al valor apropiado de la presión de la
aguja para su cartucho.
! Al girar el contrapeso, se gira conjuntamente el anillo de ajuste de
presión de la aguja. Mientras observa el anillo de ajuste, ajuste la
presión de la aguja al valor adecuado.
Línea central
Es
10

Es
11
Español
Ajuste de anti-skating
Este ajuste se realiza para evitar los saltos de la aguja.
Ha de coincidir con la misma posición de la escala que el
valor de presión de la aguja.
Gire el dial [ANTI SKATING] para que coincida con la línea de referencia
del mismo valor que el valor de presión de la aguja del cartucho.
Cuando se realiza una reproducción
scratch
Para evitar los saltos de aguja, ajuste la posición de la escala para que
coincida con la acción de reproducción.
Ajuste de la altura del elevador del
brazo
Cuando utilice un cartucho diferente al que se incluye, ajuste este valor
para que sea el adecuado para el cartucho que utilice.
Realice la preparación del siguiente modo.
! Se coloca un disco en una slip mat.
! Retire la cubierta de la aguja y el agarre del brazo teniendo cuidado
de no tocar la punta de la aguja.
! Tire hacia arriba de la palanca elevadora y desplace el brazo fono-
captor hasta el disco.
Ajuste la altura girando el tornillo mientras el alzador
del brazo baja.
— Al girar en sentido horario se reduce la distancia entre el disco y
la aguja.
— Al girar en sentido antihorario se amplía la distancia entre el
disco y la aguja.
! La altura del elevador del brazo (la distancia entre el disco y la aguja
cuando se sube la palanca elevadora) está ajustada de fábrica en un
rango entre aproximadamente 8 mm y 13 mm.
T
ornillo
Elevador del brazo
Ajuste de la altura del brazo
Cuando utilice el cartucho incluido, la posición “0” será la adecuada.
Cuando utilice un cartucho diferente al que se incluye, ajuste este valor
para que sea el adecuado para el cartucho que utilice.
1 Gire el bloqueo [HEIGHT ADJUST] para desbloquearlo.
Desbloquear
2 Apriete hacia abajo la palanca elevadora y coloque
la aguja en el disco; a continuación, ajuste el dial
[HEIGHT ADJUST] para poner en paralelo el brazo
fonocaptor y el disco.
Ajústelo de forma que el brazo fonocaptor quede en posición horizontal.
Dial [HEIGHT ADJUST]
3 Gire el bloqueo [HEIGHT ADJUST] para fijar la altura
del brazo.
Después de haber ajustado la altura del brazo, gire siempre el bloqueo
[HEIGHT ADJUST] para fijar el brazo.

Conexiones
! Asegúrese de desconectar la alimentación y desenchufar el cable de alimentación de la toma de corriente siempre que haga o cambie conexiones.
! Consulte el manual de instrucciones del componente que va a ser conectado.
! Conecte el cable de alimentación después de terminar las conexiones entre los aparatos.
Conexión con altavoces amplificados
Altavoces amplificados
Cable de audio
Panel trasero
Cable de
alimentación
A la toma
de corriente
1 Ajuste el conmutador [PHONO/LINE] en [LINE].
2 Conecte el cable de audio al terminal de entrada [LINE] de los altavoces amplificados, etc.
! Si es necesario, utilice el cable adaptador de audio que se incluye.
3 Conecte el cable de alimentación.
Conecta a una toma de corriente con el cable de alimentación incluido. Espere hasta que todas las conexiones entre el equipo estén terminadas antes
de conectar el cable de alimentación.
Conexión a un preamplificador y a un componente
Cable de audio
Panel trasero
Cable de
alimentación
A la toma
de corriente
Preamplificador principal,
componente, etc.
1 Ajuste el conmutador [PHONO/LINE] en [PHONO].
2 Conecte el cable de audio al terminal de entrada [PHONO] del preamplificador principal o a otro componente.
! Si este producto se conecta a un preamplificador o a un componente que no tenga un terminal [PHONO], no se puede alcanzar el volumen sufi-
ciente ni la calidad de sonido necesaria. En ese caso, ajuste el conmutador [PHONO/LINE] de esta unidad en [LINE] y, a continuación, conecte
esta unidad al terminal de entrada [LINE] del preamplificador principal o utilice un ecualizador fonográfico.
3 Conecte el cable de alimentación.
Conecta a una toma de corriente con el cable de alimentación incluido. Espere hasta que todas las conexiones entre el equipo estén terminadas antes
de conectar el cable de alimentación.
Es
12

Es
13
Español
Conexión a un mezclador DJ
Giradiscos
Mezclador DJ
Cable de audio
Cable de audio
Panel trasero
Cable de
alimentación
A la toma
de corriente
1 Ajuste el conmutador [PHONO/LINE] en [PHONO].
2 Conecte el cable de audio al terminal de entrada [PHONO] del mezclador DJ.
! Si este producto se conecta a un mezclador DJ que no tenga un terminal de entrada [PHONO], no se puede alcanzar el volumen suficiente ni la
calidad de sonido debida. En ese caso, ajuste el conmutador [PHONO/LINE] de esta unidad en [LINE] y, a continuación, conecte esta unidad al
terminal de entrada [LINE] del mezclador DJ.
3 Conecte el cable de alimentación.
Conecta a una toma de corriente con el cable de alimentación incluido. Espere hasta que todas las conexiones entre el equipo estén terminadas antes
de conectar el cable de alimentación.
Conexión con un ordenador
No se necesita software de controlador USB para esta unidad.
= Grabación (pág. 15 )
Panel trasero
Cable USB
Ordenador
Cable de
alimentación
A la toma
de corriente
1 Conecte el cable USB a un puerto USB del ordenador.
2 Conecte el cable de alimentación.
Conecta a una toma de corriente con el cable de alimentación incluido. Espere hasta que todas las conexiones entre el equipo estén terminadas antes
de conectar el cable de alimentación.
Lugar de instalación
Coloque la unidad sobre una superficie plana que esté libre de vibracio-
nes externas.
! Dentro de lo posible, mantenga la unidad alejada del sistema de
altavoces.
! Si la unidad está muy cerca de una radio (emisiones AM/FM), la
radio puede generar ruidos. Mantenga la distancia máxima posible
con la unidad.
Ajuste de la altura de la unidad
principal
Ajuste la altura girando el aislador de modo que la unidad principal esté
horizontal.

Es
14
Operación
Conexión de la alimentación
1 Haga todas las conexiones y luego conecte el cable de
alimentación en una toma de corriente.
= Conexiones (pág. 12 )
2 Cambie el conmutador [POWER] hacia el lado [ON]
para encender la unidad.
Los indicadores de esta unidad se encienden y se conecta la
alimentación.
Desconexión de la alimentación
Cambie el conmutador [POWER] hacia el lado [OFF] para
apagar la unidad.
La alimentación de esta unidad se desconecta.
Reproducción
Realice la preparación del siguiente modo.
! Coloque un disco en el giradiscos.
! Retire la cubierta de la aguja y el agarre del brazo.
1 Cambie el conmutador [POWER] hacia el lado [ON]
para encender la unidad.
2 Seleccione la velocidad de rotación para que
concuerde con el registro que se reproducirá al pulsar un
botón de cambio de velocidad.
3 Pulse el botón [START/STOP].
El giradiscos comienza a girar.
4 Tire hacia arriba de la palanca elevadora y desplace el
brazo fonocaptor hasta el disco.
5 Apriete hacia abajo la palanca elevadora.
El brazo fonocaptor desciende lentamente y comienza la reproducción.
Pausa de la reproducción
Tire de la palanca elevadora hacia arriba.
La aguja del cartucho se eleva alejándose del disco.
! Para volver a la reproducción, apriete hacia abajo la palanca
elevadora.
Final de la reproducción
1 Tire hacia arriba de la palanca para devolver el brazo
fonocaptor al apoyo del brazo y después apriete hacia
abajo la palanca elevadora.
2 Pulse el botón [START/STOP].
El giradiscos se detiene suavemente.
3 Cambie el conmutador [POWER] hacia el lado [OFF]
para apagar la unidad.
Utilice el agarre del brazo para asegurar el brazo fonocaptor.
Para proteger la punta de la aguja, ponga la cubierta de la aguja.
Cierre la cubierta guardapolvo.
Ajuste del tono
Mueva la barra deslizante [TEMPO] hacia delante o hacia
atrás.
Si mueve la barra deslizante hacia adelante, se incrementa la veloci-
dad de rotación y, si la mueve hacia atrás, disminuye la velocidad de
rotación.
! Cuando la barra deslizante [TEMPO] esté en el centro, el indicador
se iluminará de color amarillo-verde y la velocidad de rotación alcan-
zará las rpm que se especifiquen (33 1/3 rpm, 45 rpm o 78 rpm).
! La escala de la barra deslizante [TEMPO] es un valor aproximado.
Utilícela como guía.
! Puede confirmar que la velocidad de rotación haya alcanzado las
rpm especificadas observando las cuatro filas de patrones estrobos-
cópicos inscritos alrededor del giradiscos.
Patrón estroboscópico
1 Cuando el patrón estroboscópico aparezca detenido, 33 1/3 rpm
(alimentación de 50 Hz)
2 Cuando el patrón estroboscópico aparezca detenido, 45 rpm (alimen-
tación de 50 Hz)
3 Cuando el patrón estroboscópico aparezca detenido, 33 1/3 rpm
(alimentación de 60 Hz)
4 Cuando el patrón estroboscópico aparezca detenido, 45 rpm (alimen-
tación de 60 Hz)
! Se utiliza una iluminación estroboscópica (luz LED roja) para ilumi-
nar el patrón estroboscópico de esta unidad. Cuando compruebe el
tono, utilice siempre la lámpara de iluminación estroboscópica.
Visualización de una portada de
disco
Coloque la portada de disco detrás de los topes fijados a la cubierta
guardapolvo tal y como se muestra en la figura.
TopesPortada de disco
! No coloque nada más que una portada de disco.
! Coloque la portada de disco de forma correcta fijándola detrás de los
topes.
! Cuando utilice esta característica durante la reproducción, tenga
cuidado de que la portada de disco no caiga. Se puede dañar el
disco o la aguja.
! Tenga cuidado de no cerrar la cubierta guardapolvo mientras haya
una portada de disco colocada en ella.

Es
15
Español
Para reproducir un disco EP estándar
Instale el adaptador de discos EP en el husillo central y pulse el botón [45].
Iluminación de la punta de la aguja
Cuando se pulsa el conmutador para la iluminación de la aguja, se
enciende la iluminación de la aguja en luz blanca y asciende hasta la
posición en la que la punta de la aguja se ilumina.
! Si no se necesita, pulse el interruptor del iluminador de la aguja; este
se apagará.
! No mire directamente a la luz mientras la iluminación de la aguja
está encendida.
Grabación
Los discos analógicos se pueden grabar conectando el equipo con un orde-
nador que tenga instalado el software de gestión de música “rekordbox”.
Para obtener detalles, acceda al sitio web del producto rekordbox que se
indica a continuación y consulte el Manual de instrucciones de rekord-
box en [Soporte].
https://rekordbox.com/es/store/
Sustitución de la aguja
Compruebe que la alimentación no esté conectada antes de realizar el
siguiente procedimiento.
1 Sujete el cartucho con una mano.
2 Retire el cartucho en la dirección de la flecha mientras
sujeta la parte de soporte de la aguja con la otra mano.
Cambio del cartucho
Esta unidad no es compatible con cartuchos MC. Utilice un cartucho
VM o un cartucho MM.
Extracción del cartucho
1 Retire los tornillos, las tuercas y las arandelas fijadas
al portacápsula.
2 Desconecte los cables conectados al cartucho.
Montaje del cartucho
1 Conecte el cartucho haciendo coincidir los colores
de los cables del portacápsula y los símbolos de los
terminales del cartucho.
Haga coincidir los colores de los cables del portacápsula y los símbolos
de los terminales del cartucho de la siguiente manera.
Mirando desde la parte frontal, la parte superior izquierda es L+: blanco,
la parte inferior izquierda es L-: azul, la parte superior derecha es
R+: rojo y la parte inferior derecha es R-: verde.
!
Conecte los cables de forma segura usando pinzas o elementos similares.
2
Monte el cartucho en el portacápsula usando los tornillos,
las tuercas y las arandelas que se incluyen con el cartucho.
Cápsula
Cable conductor
Portacápsula
Peso para la cápsula
! Cuando monte el cartucho en el portacápsula, móntelo
correctamente.
! Si se emplea un cartucho de 5 g o menos, utilice el peso suminis-
trado para la cápsula.
Ajuste del saliente
Utilice la siguiente escala de ajuste del saliente para ajustar la posición utili-
zando el tornillo de sujeción de cartucho de modo que la punta de la aguja se
encuentre
en una posición a 53 mm de la pieza de sujeción del brazo fonocaptor.
53 mm
Escala de ajuste del saliente
53 mm

Información adicional
Solución de problemas
! La operación incorrecta se confunde a menudo con un problema o un fallo de funcionamiento. Si piensa que algo no funciona bien con este com-
ponente, verifique los puntos de abajo y las [FAQ] para el [PLX-500] en el sitio de asistencia Pioneer DJ.
http://pioneerdj.com/support/
Algunas veces, el problema puede estar en otro componente. Inspeccione los otros componentes y los aparatos eléctricos que esté utilizando. Si
no se puede rectificar el problema, pida al centro de servicio más cercano o a su concesionario que realice el trabajo de reparación.
! Esta unidad puede no funcionar bien debido a la electricidad estática o a otras influencias externas. En este caso, el funcionamiento apropiado se
puede restaurar desconectando la alimentación, esperando 1 minuto y volviendo a conectar la alimentación.
Problema Verificación Remedio
La alimentación no se conecta. ¿Está bien conectado el cable de alimentación? Conecte bien el cable de alimentación incluido a una toma de corriente.
¿Está el interruptor [POWER] para la alimentación
de corriente puesto en [ON]?
Coloque el interruptor [POWER] para la alimentación de corriente en [ON].
No hay sonido o éste está muy bajo. ¿Están bien conectados los cables de audio? Conecte correctamente los cables de audio.
¿Están sucios los terminales y las clavijas? Limpie los terminales y las clavijas antes de hacer conexiones.
¿Está montado correctamente el portacápsula? Monte correctamente el portacápsula.
Los sonidos izquierdo y derecho están
invertidos.
¿Están invertidas las conexiones izquierda y
derecha para cada parte del equipo?
Conecte correctamente el cable de audio y los conductores de la pieza
portacápsula.
Se produce un zumbido grave (sonido
tipo ronquido o zumbido) durante la
reproducción.
¿Hay un dispositivo eléctrico como una lámpara
fluorescente o su cable de alimentación cerca del
cable de alimentación de la unidad?
Coloque el cable de alimentación de la lámpara fluorescente o del otro disposi-
tivo lo más lejos posible.
La punta de la aguja no desciende
hasta alcanzar el disco.
¿Está ajustada la presión de la aguja
correctamente?
Haga coincidir el contrapeso al valor apropiado de la presión de la aguja para
su cartucho.
¿Está equilibrado el brazo horizontalmente? Gire el contrapeso hasta que el brazo fonocaptor se encuentre en estado
horizontal.
Se producen saltos de la aguja. ¿Está ajustada la presión de la aguja
correctamente?
Haga coincidir el contrapeso al valor apropiado de la presión de la aguja para
su cartucho.
¿Está alabeado el disco o está rayado? Compruebe el estado del disco.
¿Se ha acumulado en la punta de la aguja una
gran cantidad de polvo?
Retire el portacápsula con el cartucho y utilice un pincel de punta suave o un
pincel de escritura para eliminar con cuidado el polvo, etc. de la punta de la
aguja.
¿Está ajustado correctamente el anti-skating? Ajuste el anti-skating correctamente.
¿Está ajustada correctamente la altura del brazo? Ajuste correctamente la altura del brazo.
El brazo se detiene a lo largo del
camino y no sigue adelante.
¿Está rayado el disco? Compruebe el estado del disco.
¿Tiene contacto el brazo con algún obstáculo? Compruebe alrededor del brazo. Si hay algún obstáculo, retírelo.
El volumen de sonido es bajo o alto
(distorsionado).
¿Es adecuada la conexión con el amplificador para
el tipo de cartucho (salida)?
Conecte correctamente los cables de conexión.
¿El ajuste del conmutador [PHONO/LINE] es
correcto?
Ajuste el conmutador [PHONO/LINE] correctamente al terminal de entrada del
dispositivo conectado.
El giradiscos vibra mucho. Se ha adherido suciedad, etc. a las piezas de
sujeción del giradiscos y al eje central.
Retire la suciedad.
Cuidados para el uso
Acerca de la condensación
En invierno pueden formarse gotas de agua (condensación) dentro de
la unidad (en las partes de funcionamiento o en la lente), por ejemplo,
si ésta se pasa de un lugar frío a otro caliente o si la temperatura de la
habitación donde esta instalada la unidad aumenta repentinamente
(empleando una calefacción, etc.). La unidad no funcionará correcta-
mente o no funcionará en absoluto con condensación en su interior.
Deje la unidad a la temperatura ambiental de la habitación durante 1 ó
2 horas (aunque este tiempo depende de las condiciones de la conden-
sación) sin conectar su alimentación. Las gotas de agua se evaporarán y
la unidad podrá reproducir. La condensación también se puede producir
en verano si la unidad se expone a la salida directa de aire procedente
de un acondicionador de aire, etc. Si pasa esto, ponga la unidad en una
posición diferente.
Al transportar la unidad a otra ubicación
Utilice los materiales de embalaje originales para empaquetar la unidad.
Si los materiales de embalaje originales no están disponibles, asegúrese
de realizar lo siguiente.
! Desmonte el giradiscos y la slip mat antes del embalaje.
! Desmonte el portacápsula y el contrapeso del brazo y empaquételos
con cuidado.
! Utilice el agarre del brazo para asegurar el brazo fonocaptor y utilice
cinta adhesiva para fijarlo sin que pueda moverse.
! Envuelva la unidad central en una manta o un papel suave de modo
que no se dañe.
! Empaquételo de forma que no se ejerza fuerza sobre el brazo
fonocaptor.
Mantenimiento de cada parte
Al montar y desmontar el portacápsula, apague la alimentación del
amplificador.
Si lo hace mientras el volumen es alto, se pueden dañar los altavoces.
Es
16

Es
17
Español
! Retire el portacápsula con el cartucho y utilice un pincel de punta
suave o un pincel de escritura para eliminar con cuidado el polvo,
etc. de la punta de la aguja.
! Utilice un limpiador de buena calidad para limpiar los discos.
! Utilice un paño suave o similar para limpiar el terminal del portacáp-
sula y vuelva a montarlo en el brazo fotocaptor.
Limpieza de la cubierta guardapolvo, etc.
Utilice un paño suave para limpiar la cubierta guardapolvo y el gabinete
! No limpie la cubierta guardapolvo durante la reproducción. La ener-
gía estática puede provocar que el brazo fonocaptor sea empujado
por la cubierta guardapolvo.
Acerca de las marcas de fábrica y
marcas registradas
! “Pioneer DJ” es una marca comercial de PIONEER CORPORATION y
se usa bajo licencia.
! rekordbox es una marca comercial o marca registrada de Pioneer DJ
Corporation.
Los nombres de compañías y productos mencionados aquí son mar-
cas comerciales o marcas comerciales registradas de sus respectivos
propietarios.
Especificaciones
Requisitos de potencia ...... CA 110 V a 120 V, o 220 V a 240 V, 50 Hz/60 Hz
Consumo de energía.............................................................................. 11 W
Peso de la unidad principal ...............................................................10,7 kg
Dimensiones máximas .... 450 mm (An) × 158,5 mm (Al) × 367,5 mm (Pr)
Temperatura de funcionamiento tolerable .......................... +5 °C a +35 °C
Humedad de funcionamiento tolerable .....5 % a 85 % (sin condensación)
Parte del giradiscos
Método de accionamiento ...................... Accionamiento directo tipo servo
Motor ................................................. Motor sin escobillas de 3 fases de cc
Sistema de freno ............................................................... Freno electrónico
Velocidad de rotación ........................................33 1/3 rpm, 45 rpm, 78 rpm
Rango de ajuste de la velocidad de rotación .......................................±8 %
Lloro y fluctuación................................................0,15 % o inferior a WRMS
Relación señal/ruido ........................................................... 50 dB o superior
Giradiscos .... Caja de fundición a presión de aluminio; diámetro: 332 mm
Presión de arranque .......................................................... 1,6 kg·cm o más
Tiempo de arranque ............................... 1 segundo o menos (a 33 1/3 rpm)
Parte del brazo fonocaptor
Tipo de brazo ...Brazo fonocaptor universal de tipo forma en S, estructura
de alojamiento de tipo gimbal admitido, tipo de equilibrado estático
Longitud efectiva ............................................................................ 230,5 mm
Saliente ................................................................................................ 16 mm
Error de pista .............................................................................. Dentro de 3°
Rango de ajuste de la altura del brazo ................................................ 6 mm
Rango variable de presión de la aguja ...............0 g a 4,0 g (1 escala 0,1 g)
Peso propio del cartucho .........................9,5 g o menos (cartucho simple)
Tipo de cartucho ....................................................................................... VM
Tensión de salida
PHONO ......................................................................................2,5 mV/1 kHz
LINE ...........................................................................................150 mV/1 kHz
Consumo de energía para México
Modo normal
1
.........................................................................11 Wh/día
1 Considerando 1 hora de uso al día
— Las especificaciones y diseño de este producto están sujetos a
cambios sin previo aviso.
! © 2016 Pioneer DJ Corporation. Todos los derechos reservados.

Pt
2
CUIDADO
P
ARA PREVENIR O PERIGO DE CHOQUE ELÉTRICO,
NÃO REMOV
A A COBERTURA (NEM A PARTE POSTE-
RIOR). NÃO EXISTEM NO INTERIOR PEÇAS REP
ARÁ-
VEIS PE
LO UTILIZADOR. A MANUTENÇÃO DEVE SER
EFETUADA POR PESSOAL ESPECIALIZAD
O.
D3-4-2-1-1_B1_Pt
AVISO
Este aparelho não é à prova de água. Para prevenir o
perigo de incêndio ou choque elétrico, não coloque
perto dele recipientes contendo líquidos (tais como
uma jarra ou um vaso de flores) nem o exponha a
pingos, salpicos, chuva ou humidade.
D3-4-2-1-3_A1_Pt
AVISO
Para prevenir o perigo de incêndio, não coloque fontes
de chamas nuas (tais como uma vela acesa) sobre o
aparelho.
D3-4-2-1-7a_A1_Pt
Ambiente de funcionamento
Temperatura e humidade do ambiente de
funcionamento:
+5 °C a +35 °C; humidade relativa inferior a 85 %
(respiradouros de refrigeração não bloqueados)
Não instale o aparelho num espaço insuficientemente
arejado ou em locais expostos a uma humidade
elevada ou a luz solar direta (ou a iluminação artificial
intensa).
D3-4-2-1-7c*_A1_Pt
Este produto destina-se a utilização doméstica geral.
A reparação de qualquer avaria devida a utilizações
fora desse âmbito (como, por exemplo, utilização
prolongada num restaurante, para efeitos comerciais,
ou utilização num automóvel ou num barco) será
cobrada, ainda que dentro da garantia.
K041_A1_Pt
CUIDADOS COM A VENTILAÇÃO
Quando instalar esta unidade, certifique-se de que
deixa espaço em torno da unidade para ventilação de
modo a melhorar a radiação térmica (pelo menos 15
cm na parte superior, 5 cm na parte posterior e 5 cm
em cada um dos lados).
AVISO
As ranhuras e as aberturas da caixa destinam-se a
ventilação, para garantir o funcionamento fiável do
produto e para evitar o seu sobreaquecimento.
Para evitar riscos de incêndio, as aberturas nunca
devem ser bloqueadas ou cobertas com coisas (como
jornais, toalhas de mesa, cortinas) ou através do
funcionamento do equipamento em cima de um tapete
grosso ou uma cama.
D3-4-2-1-7b*_A1_Pt
Os consumidores dos Estados-membros da UE, da Suíça e da Noruega podem entregar equipamentos eletrónicos fora de uso em determinadas
instalações de recolha ou a um retalhista (se adquirirem um equipamento novo similar).
Nos países não mencionados acima, informe-se sobre o método de eliminação correto junto das autoridades locais.
Ao fazê-lo estará a garantir que o produto que já não tem utilidade para si é submetido a processos de tratamento, recuperação e reciclagem
adequados, evitando-se assim potenciais efeitos negativos para o ambiente e a saúde humana.
K058b_A2_Pt
Se quiser eliminar este produto, não o misture com resíduos domésticos gerais. Existe um sistema de recolha separado para produtos
eletrónicos usados de acordo com a legislação que requer tratamento, recuperação e reciclagem adequados.
Selector de voltagem
Nos modelos com multivoltagem, o interruptor selector
de voltagem encontra-se no painel superior.
A definição de fábrica do selector de voltagem é
220-240 V. Defina o selector para a voltagem
adequada ao seu país ou região.
Antes de alterar a voltagem, desligue o cabo de
alimentação de CA. Utilize uma chave de parafusos de
tamanho médio para alterar a posição do interruptor
selector de voltagem.
D3-4-2-1-5*_A2_Pt

Pt
3
CUIDADO
O botão POWER do aparelho não o desliga
completamente da energia fornecida pela tomada
CA. Uma vez que o cabo de alimentação serve como
o principal dispositivo de desconexão, será
necessário desligá-lo da tomada para desligar toda a
alimentação. Por isso, verifique se a unidade foi
instalada de forma que o cabo de alimentação possa
ser facilmente desligado da tomada AC, em caso de
acidente. Para prevenir o risco de incêndio, deverá
desligar igualmente o cabo de alimentação de
energia da tomada CA quando o aparelho não for
utilizado durante um período prolongado (por
exemplo, durante um período de férias).
D3-4-2-2-2a*_A1_Pt
AVISO SOBRE O CABO DE ALIMENTAÇÃO
Manuseie o cabo de alimentação através da ficha. Não
retire a ficha puxando o cabo e nunca toque no cabo
de alimentação com as mãos húmidas, pois pode
provocar um curto
-circuito ou choque elétrico. Não
coloque a unidade, um móvel, etc., sobre o cabo de
alimentação nem trilhe o cabo
. Nunca faça um nó no
cabo nem o amarre a outros cabos. Os cabos de
alimentação devem ser encaminhados de modo a não
serem pisados. Um cabo de alimentação danificado
pode provocar um incêndio ou um choque elétrico
.
Ve
rifique periodicamente o cabo de alimentação.
Quando estiver danificado
, solicite um cabo de
alimentação de substituição junto do seu revendedor
ou centro de assistência.
S002*_A1_Pt
Português

Pt
4
Índice
Como ler este manual
! Obrigado por adquirir este produto da Pioneer DJ.
Certifique-se de que lê este folheto que inclui informações importan-
tes que deve compreender antes de utilizar este produto.
Após terminar de ler as instruções, coloque-as num local seguro
para futura referência.
! Neste folheto, os nomes dos botões e dos terminais da unidade
principal são indicados entre parêntesis retos ([ ]).
Exemplos:
Prima o botão [START/STOP].
Antes de começar
Características ............................................................................................ 5
Conteúdo da embalagem .......................................................................... 5
Antes de começar
Instalar o rekordbox (Mac/Windows) ........................................................ 6
Montagem ................................................................................................... 6
Nomes de peças e funções
Painel superior ............................................................................................ 8
Painel posterior ........................................................................................... 9
Regulação
Regular o balanço do braço de leitura.................................................... 10
Regular a pressão da agulha ................................................................... 10
Regular o anti-skating .............................................................................. 11
Regular a altura do elevador do braço .................................................... 11
Regular a altura do braço ........................................................................ 11
Ligações
Ligar a altifalantes alimentados .............................................................. 12
Ligar a um componente e a um amplificador integrado ...................... 12
Ligar a uma mesa de mistura de DJ ....................................................... 13
Ligar a um computador............................................................................ 13
Local de instalação ................................................................................... 13
Regular a altura da unidade principal .................................................... 13
Funcionamento
Ligar a alimentação .................................................................................. 14
Desligar a alimentação ............................................................................ 14
Reprodução ............................................................................................... 14
Interromper a reprodução........................................................................ 14
Terminar a reprodução ............................................................................. 14
Regular o pitch .......................................................................................... 14
Exibir uma capa de disco ......................................................................... 14
Para ouvir um disco EP standard ............................................................ 15
Iluminar a ponta da agulha...................................................................... 15
Gravação .................................................................................................... 15
Substituir a agulha ................................................................................... 15
Mudar a célula .......................................................................................... 15
Informações adicionais
Resolução de problemas ......................................................................... 16
Cuidados no uso ....................................................................................... 16
Manutenção de cada peça ...................................................................... 16
Acerca de marcas comerciais e marcas comerciais registadas ......... 17
Especificações .......................................................................................... 17

Pt
5
Português
Antes de começar
Características
Esta unidade é um gira-discos de acionamento direto e elevado binário
que pode ser desfrutada com várias aplicações, quer esteja a ouvir
música em casa ou em atuações de DJ.
Som de discos analógicos de alta
qualidade
O caminho desde a ponta da agulha até à saída PHONO/LINE foi con-
cebido com a distância mais curta possível para reproduzir fielmente a
qualidade de som original dos discos analógicos.
Além disso, uma vez que além da saída PHONO é também suportada a
saída LINE, pode desfrutar facilmente do som de discos analógicos de
alta qualidade, tendo para isso apenas de ligar diretamente altifalantes
alimentados.
Gravação digital simples
É fornecido um terminal USB-B para que possa ligar esta unidade direta-
mente a um PC ou a um Mac e, em seguida, gravar fontes de som ana-
lógicas para o PC ou Mac convertendo-as em dados. Quando pretender
efetuar gravações, pode realizar uma gravação digital com operações
simples se utilizar a função de gravação da aplicação de gestão de
música gratuita “rekordbox” (Ver.4.2.1 ou posterior).
Disco de acionamento direto com
capacidade para atuações de DJ
A adoção de um sistema de acionamento direto e binário elevado signi-
fica que pode realizar mistura de faixas, scratching e outras atuações de
DJ combinando duas destas unidades com um misturador de DJ.
Tampa antipó que pode ser utilizada
como base para a capa de um disco
É possível exibir a capa de um disco na tampa antipó enquanto esta
está aberta. Desta forma, pode desfrutar do som de discos analógicos
enquanto visualiza a capa do disco.
Conteúdo da embalagem
! Prato
! Tapete anti estático
! Tampa antipó
! Adaptador para disco EP
! Contrapeso
! Cabeça (célula incluída)
! Peso
! Cabo de alimentação
! Cabo USB
! Cabo adaptador de áudio (ficha de pinos estéreo (fêmea) para minifi-
cha estéreo (macho))
! Garantia (apenas para algumas regiões)
1
! Instruções de operação (este documento)
1 A garantia incluída é para a região europeia.
AVISO
Guarde as peças pequenas fora do alcance das
crianças. Se forem engolidas acidentalmente, contacte
imediatamente um médico
.
D41-6-4_A3_Pt

Pt
6
Antes de começar
Instalar o rekordbox (Mac/Windows)
1 Aceda ao rekordbox.com.
https://rekordbox.com/en/store/
! Os conteúdos da página estão sujeitos a alterações sem aviso
prévio.
2 Selecione o guia Como Começar e, em seguida, clique
em [Free To Download].
3 Leia atentamente o Acordo de Licença do Software
pelo Utilizador Final e selecione a caixa de verificação
[Concordo], se concordar.
Quando seleciona a caixa de verificação, [Download] torna-se
selecionável.
4 Clique em [Download].
A transferência do rekordbox (Mac/Windows) inicia-se.
5 Clique duas vezes no ficheiro transferido para o
descomprimir.
6 Clique duas vezes no ficheiro descomprimido para
executar o programa de instalação.
7 Leia com atenção o Acordo de Licença do Utilizador
Final do Software e, se concordar, prossiga com a
instalação de acordo com as instruções apresentadas no
ecrã.
! Se não concordar com o conteúdo do Acordo de Licença do
Utilizador Final do Software, cancele a instalação.
8 Quando o ecrã de conclusão da instalação aparecer,
siga as instruções apresentadas no ecrã para fechar o
programa de instalação.
A instalação está agora concluída.
! Para utilizar o rekordbox dj, o rekordbox dvs e o rekordbox video, é
necessário efetuar a ativação (autenticação da licença). Para obter
mais informações, consulte as instruções de funcionamento do
rekordbox.
https://rekordbox.com/en/support/manual.php
Montagem
1 Monte o prato e o tapete anti estático.
Coloque o prato no eixo central e posicione o tapete anti estático em
cima do prato.
! Tenha cuidado para não bater com o prato na unidade principal nem
o deixar cair.
Tapete anti estático
Prato
Eixo central
2 Monte a cabeça.
Introduza a cabeça com a célula montada no braço de leitura. Em
seguida, mantendo a cabeça no horizontal, aperte a porca de fixação.
Porca de bloqueio

Pt
7
Português
! Antes de utilizar, retire a tampa da agulha sem tocar na ponta da
agulha.
Tampa da agulha
3 Monte o contrapeso.
Monte o contrapeso no eixo traseiro do braço de leitura.
Contrapeso
Monte a tampa antipó.
Introduza as dobradiças da tampa antipó nos encaixes
existentes no painel posterior desta unidade.
Quando pretender retirar a tampa antipó, puxe as dobradiças para cima
mantendo a tampa antipó aberta.
Dobradiça
Encaixe

Pt
8
Nomes de peças e funções
Painel superior
1
2 3 45 6
c
d
e
f
ghij
a9
7
b
8
1 Interruptor POWER
Quando roda o interruptor para o lado [ON], liga o gira-discos e o
iluminador estroboscópico lateral acende-se.
= Ligar a alimentação (pág. 14 )
Desligar a alimentação (pág. 14 )
2 Botão START/STOP
Se premir o botão inicia ou para a rotação do prato.
= Reprodução (pág. 14 )
3 Botão de mudança de velocidade
Muda a velocidade de acordo com o disco que vai reproduzir.
! No caso de um disco de 33 1/3 rpm, prima o botão [33].
! Para um disco de 45 rpm, prima o botão [45].
! Para um disco de 78 rpm, prima o botão [33] e o botão [45] em
simultâneo.
= Reprodução (pág. 14 )
4 Iluminador da agulha
Acende-se para iluminar a ponta da agulha.
= Iluminar a ponta da agulha (pág. 15 )
5 Interruptor do iluminador da agulha
O iluminador da agulha acende-se com uma luz branca e sobe para
a posição em que a ponta da agulha fica iluminada.
= Iluminar a ponta da agulha (pág. 15 )
6 Cabeça
7 Deslizador TEMPO
Pode empurrar o cursor para a frente ou para trás para fazer o ajuste
fino da velocidade de rotação.
= Regular o pitch (pág. 14 )
8 Braço de leitura
= Regulação (pág. 10 )
9 Gancho do braço
Prende o braço de leitura.
a Apoio do braço
Serve como base de suporte do braço de leitura.
b Alavanca do elevador
O braço de leitura sobe quando puxa a alavanca para cima. Quando
empurra a alavanca para baixo o braço desce.
c Elevador do braço
Este dispositivo move o braço de leitura para cima ou para baixo. É
acionado com a alavanca.
d Botão rotativo ANTI SKATING
Quando ouve um disco, há uma força que puxa a ponta da agulha
na direção do perímetro interior. Se acertar este botão rotativo com o
valor da pressão da agulha, essa força é eliminada.
= Regular o anti-skating (pág. 11 )
e Lingueta de bloqueio de HEIGHT ADJUST
Bloqueia a altura para que o braço foi regulado.
= Regular a altura do braço (pág. 11 )
f Botão rotativo HEIGHT ADJUST
Utilizado para regular a altura do braço de leitura.
= Regular a altura do braço (pág. 11 )
g Contrapeso
Utiliza-se para balancear o braço de leitura e regular a pressão da
agulha.
= Regulação (pág. 10 )
h Anel de regulação da pressão da agulha
Utiliza-se para acertar a pressão adequada da agulha da célula.
= Regular a pressão da agulha (pág. 10 )
i Suporte para a cabeça
Utiliza-se para manter a cabeça na vertical.
j Adaptador para disco EP
Utiliza-se para reproduzir discos EP standard.
= Para ouvir um disco EP standard (p. 15 )

Pt
9
Português
Painel posterior
3
12
4 5
1 Interruptor PHONO/LINE
Alterna o nível da saída do som da unidade.
— [PHONO]: Selecione esta opção quando a unidade estiver ligada
a um dispositivo que suporte entrada de nível fono como, por
exemplo, um amplificador integrado ou componente.
— [LINE]: Selecione esta opção quando a unidade estiver ligada a
um dispositivo que suporte entrada de nível de linha como, por
exemplo, altifalantes alimentados.
ADVERTÊNCIA
Não ligue a unidade a um dispositivo que suporte entrada de nível
fono quando o interruptor PHONO/LINE se encontrar no estado
[LINE].
2 Terminal USB
Ligue o cabo USB (incluído) aqui.
= Ligar a um computador (pág. 13 )
3 Cabo de áudio
= Ligações (pág. 12 )
4 AC IN
Liga a uma saída de alimentação utilizando o cabo de alimentação
incluído. Aguarde até todas as ligações entre o equipamento esta-
rem completas antes de ligar o cabo de alimentação.
! Certifique-se de que utiliza o cabo de alimentação incluído.
5 Isolador
Elimina o efeito da vibração exterior. Se rodar o isolador regula a
altura do prato.
= Regular a altura da unidade principal (p. 13 )

Pt
10
Regulação
Regular o balanço do braço de
leitura
Como os pesos da célula e da cabeça diferem com o produto, o balanço
do braço de leitura tem de ser regulado.
Faça o seguinte.
! Retire a tampa da agulha e o gancho do braço com cuidado para
não tocar na ponta da agulha.
! Empurre para baixo a alavanca do elevador.
! Regule o botão rotativo [ANTI SKATING] para “0”.
Mantenha o braço de leitura no descanso e ajuste o
balanço até o braço ficar horizontal.
Rode o contrapeso até o braço de leitura ficar na horizontal.
! Ao mover o braço de leitura, certifique-se de que a ponta da agulha
não toca diretamente no prato nem em nada.
Regular a pressão da agulha
Para evitar que a agulha salte ou haja distorções no som, a pressão da
agulha é regulada para o valor de pressão adequado a cada célula.
O valor da pressão da agulha adequado à célula incluída varia entre 3,0
g a 4,0 g.
Faça o seguinte.
! Volte a colocar o braço de leitura no descanso e prenda-o com o
gancho.
1 Acerte o “0” do anel de regulação da pressão da
agulha com a linha central do eixo traseiro do braço.
Segure o contrapeso com o dedo para impedir que se mova e rode ape-
nas o anel de regulação da pressão da agulha de forma a que o número
“0” fique posicionado na linha central preta do eixo traseiro do braço de
leitura.
Linha central
2 Regule a pressão da agulha.
Rode o contrapeso para regular o valor da pressão da agulha adequada
à célula.
! Quando roda o contrapeso, o anel de regulação da pressão também
roda. Olhando para o anel de regulação, regule a pressão da agulha
para o valor adequado.
Linha central

Pt
11
Português
Regular o anti-skating
Esta regulação é feita para evitar que a agulha salte.
Acerte-a para a posição da régua correspondente ao
valor da pressão da agulha.
Rode o botão rotativo [ANTI SKATING] de maneira a que a linha de
referência coincida com o valor da pressão da agulha da célula.
Se estiver a fazer scratch
Para evitar que a agulha salte, regule a posição da régua em
conformidade.
Regular a altura do elevador do
braço
Quando utilizar outra célula que não a incluída, ajuste a altura de acordo
com a célula que vai ser utilizada.
Faça o seguinte.
! Está posicionado um disco num tapete anti estático.
! Retire a tampa da agulha e o gancho do braço com cuidado para
não tocar na ponta da agulha.
! Levante a alavanca do elevador e coloque o braço de leitura sobre o
disco.
Regule a altura rodando o parafuso ao mesmo tempo
que empurra o elevador do braço para baixo.
— Se rodar no sentido dos ponteiros do relógio diminui a distância
entre o disco e a agulha.
— Se rodar no sentido contrário ao dos ponteiros do relógio,
aumenta a distância entre o disco e a agulha.
! A altura do elevador do braço (a distância entre o disco e a agulha
quando a alavanca do elevador é puxada para cima) é regulada na
fábrica para um valor entre cerca de 8 mm e 13 mm.
Elevador do braço
Parafuso
Regular a altura do braço
Quando utilizar a célula incluída, a posição “0” é adequada. Quando
utilizar outra célula que não a incluída, ajuste a altura de acordo com a
célula que vai ser utilizada.
1 Rode a lingueta de bloqueio [HEIGHT ADJUST] para
desbloquear.
Desbloqueie
2 Empurre a alavanca do elevador para baixo e coloque
a agulha no disco; depois regule o botão rotativo
[HEIGHT ADJUST] de maneira a que o braço de leitura e o
disco fiquem paralelos.
Ajuste de forma a que o braço de leitura fique na horizontal.
Botão rotativo [HEIGHT ADJUST]
3 Rode a lingueta de bloqueio [HEIGHT ADJUST] para
fixar a altura do braço.
Depois de regular a altura do braço, rode sempre a lingueta de bloqueio
[HEIGHT ADJUST] para fixar o braço.

Pt
12
Ligações
! Certifique-se de desligar a energia e desligar o fio da tomada sempre que fizer ou mudar as ligações.
! Consulte as instruções de funcionamento do componente a ligar.
! Ligue o fio elétrico depois de terminar de fazer todas as ligações entre os dispositivos.
Ligar a altifalantes alimentados
Painel posterior
Altifalantes alimentados
Cabo de áudio
Cabo de alimentação
Para a saída de alimentação
1 Coloque o interruptor [PHONO/LINE] na posição [LINE].
2 Ligue o cabo de áudio ao terminal de entrada [LINE] dos altifalantes alimentados, etc.
! Se necessário, utilize o cabo adaptador de áudio incluído.
3 Ligue o cabo de alimentação.
Liga a uma saída de alimentação utilizando o cabo de alimentação incluído. Aguarde até todas as ligações entre o equipamento estarem completas
antes de ligar o cabo de alimentação.
Ligar a um componente e a um amplificador integrado
Amplificador integrado, componente, etc.
Painel posterior
Cabo de áudio
Cabo de alimentação
Para a saída de alimentação
1 Coloque o interruptor [PHONO/LINE] na posição [PHONO].
2 Ligue o cabo de áudio ao terminal de entrada [PHONO] do amplificador integrado ou outro componente.
! Se ligar este produto a um amplificador integrado ou componente que não tenha um terminal [PHONO], não conseguirá obter o volume e a qua-
lidade de som necessários. Neste caso, coloque o interruptor [PHONO/LINE] desta unidade na posição [LINE] e, em seguida, ligue a unidade ao
terminal de entrada [LINE] do amplificador integrado ou componente, ou utilize um equalizador fono.
3 Ligue o cabo de alimentação.
Liga a uma saída de alimentação utilizando o cabo de alimentação incluído. Aguarde até todas as ligações entre o equipamento estarem completas
antes de ligar o cabo de alimentação.

Pt
13
Português
Ligar a uma mesa de mistura de DJ
Painel posterior
Cabo de áudio
Cabo de áudio
Prato
Misturador de DJ
Cabo de alimentação
Para a saída de alimentação
1 Coloque o interruptor [PHONO/LINE] na posição [PHONO].
2 Ligue o cabo de áudio ao terminal de entrada [PHONO] da mesa de mistura de DJ.
! Se ligar este produto a uma mesa de mistura de DJ que não tenha um terminal de entrada [PHONO], não conseguirá obter o volume e a qualidade
de som necessários. Neste caso, coloque o interruptor [PHONO/LINE] desta unidade na posição [LINE] e, em seguida, ligue a unidade ao terminal
de entrada [LINE] da mesa de mistura de DJ.
3 Ligue o cabo de alimentação.
Liga a uma saída de alimentação utilizando o cabo de alimentação incluído. Aguarde até todas as ligações entre o equipamento estarem completas
antes de ligar o cabo de alimentação.
Ligar a um computador
Esta unidade não requer software de controlo para USB.
= Gravação (pág. 15 )
Painel posterior
Cabo USB
Computador
Cabo de alimentação
Para a saída de alimentação
1 Ligue o cabo USB a uma porta USB existente no computador.
2 Ligue o cabo de alimentação.
Liga a uma saída de alimentação utilizando o cabo de alimentação incluído. Aguarde até todas as ligações entre o equipamento estarem completas
antes de ligar o cabo de alimentação.
Local de instalação
Coloque a unidade numa superfície nivelada que não esteja exposta a
vibrações externas.
! Na medida do possível, afaste a unidade do sistema de colunas.
! Se a unidade estiver muito perto de um rádio (transmissão em AM/
FM), o rádio pode gerar interferências. Afaste o rádio o mais possível
da unidade.
Regular a altura da unidade principal
Regule a altura rodando o isolador de maneira a que a unidade fique na
horizontal.

Funcionamento
Ligar a alimentação
1 Efetue todas as ligações e, em seguida, ligue o cabo
de alimentação a uma tomada.
= Ligações (pág. 12 )
2 Coloque o interruptor [POWER] no lado [ON] para
ligar a unidade.
Os indicadores da unidade acendem-se e a alimentação é ligada.
Desligar a alimentação
Coloque o interruptor [POWER] no lado [OFF] para
desligar a unidade.
Desliga a alimentação da unidade.
Reprodução
Faça o seguinte.
! Coloque um disco no prato.
! Retire a tampa da agulha e o gancho do braço.
1 Coloque o interruptor [POWER] no lado [ON] para
ligar a unidade.
2 Selecione a velocidade de rotação de acordo com o
disco a ser reproduzido premindo o botão de mudança
de velocidade.
3 Prima o botão [START/STOP].
O prato roda.
4 Levante a alavanca do elevador e coloque o braço de
leitura sobre o disco.
5 Empurre para baixo a alavanca do elevador.
O braço de leitura desce e a reprodução começa.
Interromper a reprodução
Puxe a alavanca do elevador para cima.
A agulha da célula levanta e sai de cima do disco.
! Para retomar a reprodução, empurre a alavanca do elevador para
baixo.
Terminar a reprodução
1 Puxe a alavanca do elevador para cima para voltar a
colocar o braço de leitura no descanso e depois empurre
a alavanca para baixo.
2 Prima o botão [START/STOP].
O prato para suavemente.
3 Coloque o interruptor [POWER] no lado [OFF] para
desligar a unidade.
Utilize o gancho do braço para prender o braço de leitura.
Para proteger a ponta da agulha, coloque a tampa respetiva.
Feche a tampa antipó.
Regular o pitch
Mova o deslizador [TEMPO] para a frente ou para trás.
Se mover o cursor para a frente aumenta a velocidade de rotação e se o
mover para trás diminui a velocidade de rotação.
! Quando o deslizador [TEMPO] se encontra no centro, o indicador
acende com uma luz verde-amarelada e a velocidade de rotação
muda para as rpm especificadas (33 1/3 rpm, 45 rpm ou 78 rpm).
! A escala do cursor de [TEMPO] é um valor aproximado. Utilize-a
como guia.
! Pode confirmar se a velocidade de rotação mudou para as rpm
especificadas olhando para as quatro linhas dos padrões estrobos-
cópicos inscritos à volta do prato.
Padrão estroboscópico
1 Quando o padrão estroboscópico parece parado, 33 1/3 rpm (alimen-
tação a 50 Hz)
2 Quando o padrão estroboscópico parece parado, 45 rpm (alimenta-
ção a 50 Hz)
3 Quando o padrão estroboscópico parece parado, 33 1/3 rpm (alimen-
tação a 60 Hz)
4 Quando o padrão estroboscópico parece parado, 45 rpm (alimenta-
ção a 60 Hz)
! É utilizado um iluminador estroboscópico (luz de LED vermelha) para
iluminar o padrão estroboscópico desta unidade. Quando pretender
verificar o pitch, utilize sempre o iluminador estroboscópico.
Exibir uma capa de disco
Coloque a capa de disco atrás dos fixadores existentes na tampa antipó
conforme apresentado na figura.
FixadoresCapa de disco
! Não coloque mais nada além de uma capa de disco.
! Coloque a capa de disco atrás dos fixadores de forma segura e
correta.
! Quando utilizar esta funcionalidade durante a reprodução, tenha cui-
dado para que a capa de disco não caia. O disco ou a agulha podem
ficar danificados.
! Tenha cuidado para não fechar a tampa antipó enquanto estiver
colocada uma capa de disco.
Pt
14

Pt
15
Português
Para ouvir um disco EP standard
Instale o adaptador de disco EP no eixo central e prima o botão [45].
Iluminar a ponta da agulha
Se premir o interruptor do iluminador da agulha, este acende-se com
uma luz branca e sobe para a posição em que a ponta da agulha fica
iluminada.
! Se não for necessário, prima o interruptor do iluminador da agulha
para o baixar. O interruptor do iluminador desliga-se.
! Não olhe diretamente para a luz enquanto o iluminador da agulha
estiver aceso.
Gravação
É possível gravar digitalmente discos analógicos efetuando uma ligação
com um computador que tenha o software de gestão de música “rekor-
dbox” instalado.
Para obter mais informações, aceda ao site de produtos do rekordbox
indicado em seguida e consulte as instruções de funcionamento do
rekordbox em [Support].
https://rekordbox.com/en/store/
Substituir a agulha
Certifique-se de que a alimentação não está ligada antes de efetuar o
procedimento seguinte.
1 Segure na célula com uma mão.
2 Retire a célula na direção da seta enquanto segura na
parte do suporte da agulha com a outra mão.
Mudar a célula
Esta unidade não é compatível com cartuchos MC. Utilize um cartucho
VM ou um cartucho MM.
Retirar a célula
1 Retire os parafusos, as porcas e as anilhas da cabeça.
2 Desligue os fios condutores da célula.
Montar a célula
1 Ligue a célula tendo em atenção as cores dos fios
condutores da cabeça e os símbolos dos terminais da
célula.
Faça coincidir as cores dos fios condutores da cabeça e os símbolos dos
terminais da célula da forma indicada em seguida.
Quando estiver a olhar de frente, o lado superior esquerdo é L+: branco,
o lado inferior esquerdo é L-: azul, o lado superior direito é R+: vermelho,
e o lado inferior direito é R-: verde.
! Ligue os fios condutores de forma segura utilizando um alicate ou
uma ferramenta semelhante.
2 Monte a célula na cabeça utilizando os parafusos, as
porcas e as anilhas fornecidos com a célula.
Peso
Cabeça
Cabeça
Fio condutor
! Quando estiver a montar a célula na cabeça, faça-o corretamente.
! Se utilizar uma célula com 5 g ou menos, utilize o peso indicado.
Ajustar a parte saliente
Utilize a escala de ajustamento da parte saliente mostrada abaixo para
regular a posição utilizando o parafuso de fixação da célula de maneira
a que a ponta da agulha fique posicionada a 53 mm de distância da
parte de fixação do braço de leitura.
53 mm
Escala de ajustamento da parte saliente
53 mm

Pt
16
Informações adicionais
Resolução de problemas
! Geralmente confunde-se uma operação incorreta com um problema ou mau funcionamento. Caso ache que existe algo de errado com este compo-
nente, consulte os pontos abaixo e as [FAQ] para o [PLX-500] no site de suporte da Pioneer DJ.
http://pioneerdj.com/support/
Às vezes o problema pode dever-se a outro componente. Inspecione os outros componentes e os aparelhos elétricos que estão a ser utilizados. Se
não for possível resolver o problema, contacte o centro de assistência ou o fornecedor mais próximo para a realização do serviço de reparação.
! Esta unidade pode não funcionar corretamente devido a eletricidade estática ou outras influências externas. Neste caso, o funcionamento normal
é reposto desligando a alimentação, aguardando 1 minuto e, em seguida, ligando novamente a alimentação.
Problema Verificar Solução
A alimentação não está ligada. O cabo de alimentação está ligado corretamente? Ligue corretamente o cabo de alimentação incluído a uma saída de
alimentação.
O interruptor [POWER] de alimentação de cor-
rente está na posição [ON]?
Coloque o interruptor [POWER] de alimentação de corrente na posição [ON].
Sem som ou som reduzido. Os cabos de áudio estão ligados corretamente? Ligue os cabos de áudio corretamente.
Os terminais e fichas estão sujos? Limpe os terminais e fichas antes de efetuar ligações.
A cabeça está bem montada? Monte a cabeça corretamente.
O som esquerdo e direito estão
trocados.
As ligações esquerda e direita de cada equipa-
mento estão trocadas?
Ligue corretamente o cabo de áudio e os fios condutores da parte da cabeça.
Ouve-se um som sibilante baixo (um
zumbido ou som vibrante) durante a
reprodução.
Existe algum aparelho elétrico, como um can-
deeiro com luz fluorescente ou o cabo de alimen-
tação respetivo perto do cabo de ligação?
Coloque o cabo de alimentação do candeeiro com luz fluorescente ou do outro
dispositivo o mais afastado possível.
A ponta da agulha não desce sobre
o disco.
A pressão da agulha está regulada corretamente? Acerte o contrapeso com o valor da pressão da agulha adequado à célula.
O braço está equilibrado horizontalmente? Rode o contrapeso até o braço de leitura ficar na horizontal.
O agulha salta. A pressão da agulha está regulada corretamente? Acerte o contrapeso com o valor da pressão da agulha adequado à célula.
O disco está empenado ou tem riscos? Verifique as condições do disco.
A ponta da agulha tem muito pó? Retire a cabeça com a célula e utilize uma escova de ponta macia ou um pincel
de escrita para limpar, com cuidado, o pó, etc. da ponta da agulha.
O anti-skating está corretamente regulado? Regule o anti-skating corretamente.
A altura do braço está regulada corretamente? Regule a altura do braço corretamente.
O braço para a meio e não continua. O disco tem riscos? Verifique as condições do disco.
O braço está em contacto com alguma coisa? Inspecione a zona à volta do braço. Se houver um obstáculo retire-o.
O volume do som está muito baixo ou
muito alto (distorcido).
A ligação ao amplificador é adequada ao tipo de
célula (saída)?
Ligue corretamente os cabos de ligação.
O interruptor [PHONO/LINE] está na posição
correta?
Coloque o interruptor [PHONO/LINE] na posição correta de acordo com o
terminal de entrada do dispositivo ligado.
O prato que está em rotação treme
muito.
Aderiu lixo ou algo semelhante às partes de
fixação do prato e do eixo central.
Retire o lixo.
Cuidados no uso
Condensação
Poderá haver formação de gotículas de água (condensação) interna-
mente (nas peças operacionais e lente) durante o inverno, por exemplo,
se a unidade for levada rapidamente de uma lugar frio para uma sala
aquecida ou se a temperatura ambiente da sala onde o aparelho se
encontra subir rapidamente (através de aquecimento, etc.). A unidade
não irá funcionar corretamente e não poderá ser reproduzida com
condensação no interior. Deixe a unidade repousar durante 1 a 2 horas
à temperatura ambiente (este tempo depende das condições da conden-
sação) sem ligar a alimentação. As gotículas de água irão evaporar-se e
será possível usar a função de reprodução da unidade. A condensação
pode ocorrer no verão, assim como se a unidade for exposta a vento
direto proveniente de um aparelho de ar condicionado, etc. Se isso
acontecer, desloque a unidade para uma localização diferente.
Se transportar a unidade para outro local
Embale a unidade nos materiais de embalagem originais.
Se os materiais de embalagem originais não estiverem disponíveis, faça
o indicado a seguir.
! Retire o tapete anti estático e o prato antes de embalar.
! Desmonte a cabeça e o contrapeso do braço e embale-os
cuidadosamente.
! Prenda o braço de leitura com o gancho respetivo e use fita autoco-
lante para o prender de maneira a que não se mova.
! Embrulhe a unidade principal num cobertor ou papel macio para
impedir que fique danificada.
! Embale de forma a que o braço de leitura não fique sujeito a forças.
Manutenção de cada peça
Quando montar e desmontar a cabeça, desligue o amplificador.
Se tentar fazê-lo com o volume alto, pode danificar as colunas.
! Retire a cabeça com a célula e utilize uma escova de ponta macia ou
um pincel de escrita para limpar, com cuidado, o pó, etc. da ponta
da agulha.
! Limpe os discos com um produto de limpeza de discos de boa
qualidade.
! Utilize um pano macio ou uma coisa semelhante para limpar o
terminal da cabeça e depois volte a montá-la no braço de leitura.

Pt
17
Português
Limpar a tampa antipó, etc.
Utilize um pano macio para limpar a tampa antipó e a caixa
! Não limpe a tampa antipó durante a reprodução. A eletricidade
estática pode fazer com que o braço de leitura seja empurrado pela
tampa antipó.
Acerca de marcas comerciais e
marcas comerciais registadas
! “Pioneer DJ” é uma marca comercial da PIONEER CORPORATION e
é utilizada sob licença.
! rekordbox é uma marca comercial ou uma marca comercial regis-
tada da Pioneer DJ Corporation.
Os nomes de empresas e produtos aqui mencionados são marcas
comerciais ou marcas comerciais registadas dos seus respetivos
proprietários.
Especificações
Requisitos de energia ....... AC 110 V a 120 V ou 220 V a 240 V, 50 Hz/60 Hz
Consumo de energia.............................................................................. 11 W
Peso da unidade principal ..................................................................10,7 kg
Dimensões máximas externas
................................................ 450 mm (L) × 158,5 mm (A) × 367,5 mm (P)
Temperatura operacional tolerada ...................................... +5 °C a +35 °C
Humidade operacional tolerada ................5 % a 85 % (sem condensação)
Parte do prato
Método de transmissão ................................ Transmissão direta tipo servo
Motor ....................................... Motor DC 3 fases de comutação eletrónica
Sistema de travagem ......................................................... Travão eletrónico
Velocidade de rotação .......................................33 1/3 rpm, 45 rpm, 78 rpm
Intervalo de regulação da velocidade de rotação ................................±8 %
Distorção e vibração .............................................0,15 % WRMS ou inferior
Relação sinal/ruído ...........................................................50 dB ou superior
Prato .................................................. Alumínio fundido Diâmetro: 332 mm
Binário inicial ................................................................. 1,6 kg·cm ou mais
Tempo de arranque ..............................1 segundo ou menos (a 33 1/3 rpm)
Parte do braço de leitura
Tipo de braço ...
Braço de leitura em forma de S de tipo universal, estrutura
de apoio de tipo suportada por cardã, tipo balanço estático
Comprimento efetivo ..................................................................... 230,5 mm
Parte saliente ...................................................................................... 16 mm
Erro de tracking ............................................................................ Cerca de 3°
Intervalo de regulação da altura do braço........................................... 6 mm
Intervalo variável de pressão da agulha ........0 g a 4,0 g (1 escala de 0,1 g)
Peso adequado da célula ............................... 9,5 g ou menos (uma célula)
Tipo de cartucho ....................................................................................... VM
Tensão de saída
PHONO ......................................................................................2,5 mV/1 kHz
LINE ...........................................................................................150 mV/1 kHz
— As especificações e design deste produto estão sujeitos a altera-
ções sem aviso prévio.
! © 2016 Pioneer DJ Corporation. Todos os direitos reservados.

Ru
2
ВНИМАНИЕ
В
О ИЗБЕЖАНИЕ ПОРАЖЕНИЯ ЭЛЕКТРИЧЕСКИМ
ТО
КОМ НЕ СНИМАЙТЕ КРЫШКУ (ИЛИ ЗАДНЮЮ
СТ
ЕНКУ). ВНУТРИ НЕ СОДЕРЖАТСЯ ДЕАТЛИ,
ПРЕДНА
ЗНАЧЕННЫЕ ДЛЯ РЕМОНТА
ПО
ЛЬЗОВАТЕЛЕМ. ДЛЯ ОБСЛУЖИВАНИЯ
ОБР
АТИТЕСЬ К КВАЛИФИЦИРОВАННОМУ
С
ОТРУДНИКУ СЕРВИСНОЙ СЛУЖБЫ.
D3-4-2-1-1_B1_Ru
ПРЕД
УПРЕЖДЕНИЕ
Данное обор
удование не является
во
донепроницаемым. Во избежание пожара или
поражения э
лектрическим током не помещайте
ря
дом с оборудованием емкости с жидкостями
(например,
вазы, цветочные горшки) и не
допу
скайте попадания на него капель, брызг, дождя
или
влаги.
D3-4-2-1-3_A1_Ru
ПРЕД
УПРЕЖДЕНИЕ
Во и
збежание пожара не приближайте к
обор
удованию источники открытого огня
(например, зажженные св
ечи).
D3-4-2-1-7a_A1_Ru
Условия эксплуатации
Изделие эксплуатируется при следующих
температуре и влажности:
+5 °C до +35 °C; влажность менее 85 % (не
заслоняйте охлаждающие вентиляторы)
Не устанавливайте изделие в плохо
проветриваемом помещении или в месте с высоко
й
влажностью, открытом для прямого солнечного
света (или сильного искусственного света).
D3-4-2-1-7c*_A1_Ru
K041_A1_Ru
Если вы желаете утилизировать данное изделие, не выбрасывайте его вместе с обычным бытовым мусором. Существует
отдельная система сбора использованных электронных изделий в соответствии с законодательством, которая предполагает
соответствующее обращение, возврат и переработку.
Чacтные клиенты-в странах-членах ЕС, в Швейцарии и Норв
егии могут бесплатно возвращать использованные электронные изделия
в с
оответствующие пункты сбора или дилеру (при покупке сходного нового изделия).
В странах, не пере
численных выше, для получения информации о правильных способах утилизации обращайтесь в cooтветcтвующие
учре
ждения.
Пост
упая таким образом, вы можете быть уверены в том, что утилизируемый продукт будет соответствующим образом обработан,
пере
дан в соответствующий пункт и переработан без возможных негативных последствий для окружающей среды и здоровья людей.
K058b_A1_Ru
ОБЯЗАТЕЛЬНАЯ ВЕНТИЛЯЦИЯ
При установке устройства обеспечьте достаточное
пространство для вентиляции во избежание
повышения температуры внутри устройства (не
менее 15 см сверху, 5 см сзади и по 5 см слева и
справа).
ПРЕДУПРЕЖДЕНИЕ
В корпусе устройства имеются щели и отверстия
для вентиляции, обеспечивающие надежную
работу изделия и защищающие его от перегрева.
Во избежание пожара эти отверстия ни в коем
случае не следует закрывать или заслонять
другими предметами (газетами, скатертями и
шторами) или устанавливать оборудование на
толстом ковре или постели.
D3-4-2-1-7b*_A1_Ru
Перек
лючатель напряжения
П
ереключатель напряжения находится на верхней
пане
ли у моделей с возможностью переключения
нап
ряжения.
На
заводе-изготовителе переключатель
напр
яжения установлен в положение 220-240 В.
Выберите правильное нап
ряжение для вашей
страны или региона.
Пере
д тем, как выбрать другое напряжение,
от
соедините силовой кабель. С помощью
от
вертки среднего размера переведите
перек
лючатель напряжения в нужное положение.
D3-4-2-1-5*_A2_Ru

Ru
3
ВНИМАНИЕ
Выключатель POWER данного устройства не
полностью отключает его от электросети. Чтобы
полностью отключить питание устройства,
вытащите вилку кабеля питания из
электророзетки. Поэтому устройство следует
устанавливать так, чтобы вилку кабеля питания
можно было легко вытащить из розетки в
чрезвычайных обстоятельствах. Во избежание
пожара следует извлекать вилку кабеля питания
из розетки, если устройство не будет
использоваться в течение долгого времени
(например, если вы уезжаете в отпуск).
D3-4-2-2-2a*_A1_Ru
МЕРЫ ПРЕДОСТОРОЖНОСТИ ПРИ
ОБР
АЩЕНИИ С СЕТЕВЫМ ШНУРОМ
Держит
е сетевой шнур за вилку. Не вытаскивайте
вил
ку, взявшись за шнур, и никогда не касайтесь
се
тевого шнура, если Ваши руки влажные, так как
эт
о может привести к короткому замыканию или
поражению э
лектрическим током. Не ставьте
аппара
т, предметы мебели и т.д. на сетевой шнур,
не зажимай
те его. Не завязывайте узлов на шнуре
и не с
вязывайте его с другими шнурами. Сетевые
шну
ры должны лежать так, чтобы на них нельзя
был
о наступить. Поврежденный сетевой шнур
мож
ет стать причиной возникновения пожара или
пора
зить Вас электрическим током. Время от
времени пров
еряйте сетевой шнур. В случае
обна
ружения повреждения обратитесь за заменой
в
ближайший сервисный центр или к Вашему
диле
ру.
S002*_A1_R
u
Русский

Ru
4
Содержание
Как следует читать данное руководство
! БлагодаримВасзапокупкуэтогоизделиякомпанииPioneerDJ.
Обязательнопрочтитеданнуюброшюру.Внейсодержится
важнаяинформация,которуюнеобходимоизучитьдоисполь-
зованияданногоизделия.
Позавершениюизученияинструкций,хранитеихвнадежном
местедлясправоквбудущем.
! Вданнойброшюреназваниякнопокиразъемовосновного
блокауказываютсявквадратныхскобках([]).
Примеры:
Нажмитекнопку[START/STOP].
До начала
Свойства............................................................................................5
Комплектпоставки............................................................................5
Перед началом работы
Установкаrekordbox(Mac/Windows)................................................6
Сборка................................................................................................6
Названия деталей и функции
Верхняяпанель.................................................................................8
Задняяпанель...................................................................................9
Регулировка
Регулировкабалансатонарма.......................................................10
Регулировкаприжимнойсилыиглы..............................................10
Регулировкакомпенсациискатывающейсилы............................11
Регулировкавысотымикролифта.................................................11
Регулировкавысотытонарма........................................................11
Подключения
Подключениекактивнымколонкам...............................................12
Подключениекинтегральномуусилителюидругому
компоненту.......................................................................................12
ПодключениекDJмикшеру...........................................................13
Подключениескомпьютером.........................................................13
Местоустановки..............................................................................13
Регулировкавысотыосновногоблока...........................................13
Управление
Включениепитания.........................................................................14
Отключениепитания.......................................................................14
Воспроизведение............................................................................14
Приостановкавоспроизведения....................................................14
Завершениевоспроизведения.......................................................14
Регулировкавысотытона...............................................................14
Какпоказатьобложкупластинки....................................................14
Воспроизведениестандартныхдолгоиграющихпластинок........15
Подсветкакончикаиглы..................................................................15
Запись...............................................................................................15
Заменастилуса...............................................................................15
Заменакартриджа...........................................................................15
Дополнительная информация
Возможныенеисправностииспособыихустранения.................16
Предостереженияпоиспользованию...........................................16
Техническоеобслуживаниекаждогоузла.....................................17
Оторговыхмаркахизарегистрированныхторговыхмарках......17
Техническиехарактеристики..........................................................17

Ru
5
Русский
До начала
Свойства
Данноеустройствопредставляетсобойвиниловыйпроигрыватель
спрямымприводомибольшимкрутящиммоментом,который
можноиспользоватькакдома,такинаDJ-выступлениях.
Высококачественный звук аналоговых
записей
Мыдобилисьминимальногопутипрохождениясигналаотострия
иглызвукоснимателядовыходаPHONO/LINEдлявоспроизведе-
ниязвукаворигинальномкачествеаналоговойзаписи.
Болеетого,посколькуподдерживаетсянетольковыходPHONO,
ноивыходLINE,вылегкоможетенаслаждатьсявысококачествен-
нымзвукоманалоговыхзаписей,простонапрямуюподключив
активныеколонки.
Простота цифровой записи
РазъемUSB-Bпозволяетнапрямуюподключитьэтоустройство
кПКилиMacизаписыватьзвукизаналоговыхисточниковнаПК
илиMac,преобразуяеговданные.Дляпростойцифровойзаписи
можноиспользоватьфункциюзаписибесплатногопрограммного
обеспечениядляуправлениямузыкой“rekordbox”(версии4.2.1и
выше).
Поворотный столик с прямым приводом
для DJ-выступлений
Благодарясистемепрямогоприводасвысокимкрутящиммомен-
томвылегкоможетемикшироватьдорожки,использоватьфункции
скрэтчаидругиеDJ-эффекты,объединивдватакихустройствас
DJ-микшером.
Пылезащитная крышка при этом может
служить подставкой под конверт
пластинки
Конвертпластинкиможноустановитьнаоткрытойпылезащитной
крышке.Таквысможетенаслаждатьсязвукоманалоговыхзаписей
иодновременновидетьконверт.
Комплект поставки
! Опорныйдиск
! Слип-мат
! Пылезащитнаякрышка
! Адаптердлядолгоиграющихпластинок
! Противовес
! Головказвукоснимателя(скартриджем)
! Груздержателя
! Силовойкабель
! USBкабель
! Звуковойкабель-адаптер(состереорозеткина
мини-стереовилку)
! Гарантия(длянекоторыхрегионов)
1
! Инструкциипоэксплуатации(данныйдокумент)
1 ПрилагающаясягарантияпредназначенадляЕвропейского
региона.
ПРЕДУПРЕЖДЕНИЕ
Хранит
е небольшие детали вне доступа детей. При
случайном заг
латывании, немедленно
обращай
тесь к врачу.
D41-6-4_A1_Ru

Ru
6
Перед началом работы
Установка rekordbox (Mac/
Windows)
1 Откройте сайт rekordbox.com.
https://rekordbox.com/en/store/
! Содержаниестраницыможетизменятьсябезпредваритель-
ногоуведомления.
2 Выберите Краткое руководство и щелкните [Free
To Download].
3 Внимательно прочитайте Лицензионное
соглашение и установите флажок [принимаю], если
вы согласны с его условиями.
Еслиустановленэтотфлажок,значок[Download]становится
активным.
4 Нажмите [Download].
Начнетсязагрузкаrekordbox(Mac/Windows).
5 Дважды щелкните по скачанному файлу, чтобы
разархивировать его.
6 Дважды щелкните по разархивированному
файлу, чтобы запустить программу установки.
7 Внимательно прочтите Лицензионное
соглашение и, если вы согласны с ним, продолжите
установку, следуя инструкциям на экране.
! ЕсливынесогласнысусловиямиЛицензионногосоглашения,
отменитеустановку.
8 Когда откроется окно с сообщением о завершении
установки, закройте программу установки, следуя
инструкциям на экране.
Установказавершена.
! Дляиспользованияrekordboxdj,rekordboxdvsиrekordbox
videoтребуетсяактивация(проверкаподлинностилицензии).
Подробнеесм.вИнструкцияхпоэксплуатацииrekordbox.
https://rekordbox.com/en/support/manual.php
Сборка
1 Установите поворотный столик и подложку.
Установитеповоротныйстоликнацентральныйшпиндельиполо-
житенанегоподложку.
! Будьтеосторожны,неподвергайтеопорныйдискнаосновном
блокеудараминероняйтеего.
Опорный диск
Центральный шпиндель
Слип-мат
2 Установите держатель картриджа.
Вставьтедержателькартриджасустановленнымкартриджемв
тонарм.Затемзатянитестопорнуюгайку,поддерживаядержатель
вгоризонтальномположении.
Контргайка

Ru
7
Русский
! Передиспользованиемснимитекрышкустилуса,некасаясь
кончикастилуса.
Крышка стилуса
3 Установите противовес.
Установитепротивовесназаднюючастьтрубкитонарма.
Противовес
Прикрепите пылезащитную крышку.
Вставьте шарниры пылезащитной крышки в
держатели на задней панели этого устройства.
Приснятиипылезащитнойкрышкипотянитешарнирывверх
наружу,чтобыкрышкаоказаласьоткрытой.
Шарнир
Держатель
Сборка
1 Установите поворотный столик и подложку.
Установитеповоротныйстоликнацентральныйшпиндельиполо-
житенанегоподложку.
! Будьтеосторожны,неподвергайтеопорныйдискнаосновном
блокеудараминероняйтеего.
Опорный диск
Центральный шпиндель
Слип-мат
2 Установите держатель картриджа.
Вставьтедержателькартриджасустановленнымкартриджемв
тонарм.Затемзатянитестопорнуюгайку,поддерживаядержатель
вгоризонтальномположении.
Контргайка

Ru
8
Названия деталей и функции
Верхняя панель
1
2 3 45 6
c
d
e
f
ghij
a9
7
b
8
1 Переключатель POWER
Приповоротепереключателявсторону[ON]питаниевключа-
етсяизагораетсястробирующаяподсветканабоковойпанели.
=
Включениепитания
(стр.14)
Отключениепитания
(стр.14)
2 Кнопка START/STOP
Нажатиекнопкизапускаетилиостанавливаетвращениеопор-
ногодиска.
=
Воспроизведение
(стр.14)
3 Кнопка изменения скорости
Позволяетустанавливатьскоростьвсоответствиисвоспроиз-
водимойпластинкой.
! Дляпластиноксоскоростьювращения331/3об/мин
нажмитекнопку[33].
! Дляпластиноксоскоростьювращения45об/миннажмите
кнопку[45].
! Для78об/миннажмитеодновременнокнопки[33]и[45].
=
Воспроизведение
(стр.14)
4 Устройство подсветки иглы
Предназначенодляподсветкикончикаиглы.
=
Подсветкакончикаиглы
(стр.15)
5 Переключатель подсветки иглы
Включаетбелуюподсветкуиглыиподнимаетустройствопод-
светкивположениеподсветкикончикаиглы.
=
Подсветкакончикаиглы
(стр.15)
6 Держатель картриджа
7 Ползунок TEMPO
Можноперемещатьводнуилидругуюсторонудляточной
регулировкискоростивращения.
=
Регулировкавысотытона
(стр.14)
8 Тонарм
=
Регулировка
(стр.10)
9 Зажим тонарма
Служитдляфиксациитонарма.
a Упор тонарма
Служитопоройтонарма.
b Рычаг микролифта
Приподъемерычагатонармподнимается.Приопускании
рычагатонармопускается.
c Микролифт тонарма
Этоустройствопредназначенодляперемещениятонармавверх
ивниз.Управлениеимосуществляетсярычагоммикролифта.
d Ручка ANTI SKATING
Привоспроизведениипластинкинакончикиглыдействует
сила,направленнаякцентрувращения.Засчетустановкис
помощьюэтойручкидавленияравногосиле,воздействующей
наиглу,влияниеэтойсилыустранятся.
=
Регулировкакомпенсациискатывающейсилы
(стр.11)
e Фиксатор HEIGHT ADJUST
Фиксируетустановленнуювысотутонарма.
=
Регулировкавысотытонарма
(стр.11)
f Ручка HEIGHT ADJUST
Используетсядлярегулировкивысотытонарма.
=
Регулировкавысотытонарма
(стр.11)
g Противовес
Используетсядлябалансировкитонармаирегулировкипри-
жимнойсилыиглы.
=
Регулировка
(стр.10)
h Кольцо регулировки прижимной силы иглы
Используетсядляустановкинеобходимойприжимнойсилыкартриджа.
=
Регулировкаприжимнойсилыиглы
(стр.10)
i Стойка держателя картриджа
Используетсядляустановкиголовкиввертикальномположении.
j Адаптер для долгоиграющих пластинок
Используетсядлявоспроизведениястандартныхдолгоиграю-
щихпластинок.
=
Воспроизведениестандартныхдолгоиграющихпластинок
(стр.15)

Ru
9
Русский
Задняя панель
3
12
4 5
1 Переключатель PHONO/LINE
Переключениеуровнязвучания,выводимогосустройства.
—[PHONO]:выберитеприподключениикустройству,которое
поддерживаетвходсголовкизвукоснимателяпроигрыва-
телягрампластинок,такомукакинтегральныйусилитель
илидругойкомпонент.
—[LINE]:выберитеприподключениикустройству,которое
поддерживаетлинейныйвход,такомукакактивныеколонки.
ПРЕДОСТЕРЕЖЕНИЕ
Неподключайтекустройству,котороеподдерживаетвходс
головкизвукоснимателяпроигрывателягрампластинок,если
переключательPHONO/LINEнаходитсявположении[LINE].
2 Разъем USB
ПодключитесюдакабельUSB(входитвкомплектпоставки).
=
Подключениескомпьютером
(стр.13)
3 Аудиокабель
=
Подключения
(стр.12)
4 AC IN
Подключаетсякрозеткечерезпоставляемыйсиловойкабель.
Подключайтесиловойкабельтолькопослезавершениявсех
подключениймеждуоборудованием.
! Используйтетолькопоставляемыйсиловойкабель.
5 Демпфер
Подавляетвлияниевнешнихвибраций.Засчетповоротадемп-
фераможнорегулироватьвысотупроигрывателя.
=
Регулировкавысотыосновногоблока
(стр.13)

Регулировка
Регулировка баланса тонарма
Посколькувзависимостиотизделиямассыкартриджаидержа-
телякартриджаотличаются,предусмотренарегулировкабаланса
тонарма.
Выполнитеследующиеподготовительныеоперации:
! Снимитезащитныйколпачокиглыизажимтонарма,неприка-
саяськкончикуиглы.
! Опуститерычагмикролифта.
! Установитерегулятор[ANTI SKATING]на“0”.
Снимите тонарм с упора и отрегулируйте баланс
таким образом, чтобы тонарм располагался
горизонтально.
Вращайтепротивовес,покатонармнеприметпочтигоризонталь-
ноеположение.
! Приперемещениитонармаобращайтевниманиенато,чтобы
кончикиглынекасалсянепосредственноопорногодискаи
другихузлов.
Регулировка прижимной силы
иглы
Дляпредотвращенияперескоковиглыиискажениязвуканеобхо-
димосоответствующимобразомотрегулироватьприжимнуюсилу
иглыдлякаждогокартриджа.
Соответствующаясиланажатиястилусадлякартриджаизком-
плекта:от3,0до4,0g.
Выполнитеследующиеподготовительныеоперации:
! Вернитетонармнаупоризакрепитезажимомтонарма.
1 Совместите метку “0” на кольце регулировки
прижимной силы иглы с осевой линией на задней
части трубки тонарма.
Удерживаяпротивовеспальцемдляпредотвращенияегопере-
мещения,повернитетолькокольцорегулировкиприжимнойсилы
иглытак,чтобыметкачисла“0”совпаласчернойосевойлинией
назаднейчаститрубкитонарма.
Центральная шкала
2 Отрегулируйте прижимную силу иглы.
Повернитепротивовес,чтобыустановитьприжимнуюсилуиглы,
соответствующуюиспользуемомукартриджу.
! Привращениипротивовесавращаетсяикольцорегулировки
прижимнойсилы.Следязакольцомрегулировки,установите
необходимуюприжимнуюсилуиглы.
Центральная шкала
Ru
10

Ru
11
Русский
Регулировка компенсации
скатывающей силы
Этарегулировкавыполняетсядляпредотвращенияперескока
иглы.
Установите то же значение на шкале, что и для
прижимной силы иглы.
Повернитеручку[ANTI SKATING]такимобразом,чтобыметка
значения,установленногодляприжимнойсилыиглыкартриджа,
совпадаласбазовойлинией.
При воспроизведении со скрэтчем
Дляпредотвращенияперескоковиглыотрегулируйтеположение
шкалывсоответствиистипомвоспроизведения.
Регулировка высоты микролифта
Прииспользованиикартриджанеизкомплектапоставкиотрегули-
руйтееевсоответствиисиспользуемымкартриджем.
Выполнитеследующиеподготовительныеоперации:
! Пластинкаустанавливаетсянаподложку.
! Снимитезащитныйколпачокиглыизажимтонарма,неприка-
саяськкончикуиглы.
! Поднимитерычагмикролифтаиустановитетонармна
пластинку.
Отрегулируйте высоту, поворачивая винт при
опущенном микролифте.
— Привращениипочасовойстрелкерасстояниемеждупла-
стинкойииглойуменьшается.
— Привращениипротивчасовойстрелкирасстояниемежду
пластинкойииглойувеличивается.
! Высотамикролифтатонарма(расстояниемеждупластинкойи
иглой,когдарычагмикролифтаподнятвверх)устанавливается
назаводе-изготовителевдиапазонепримерноот8ммдо13
мм.
Вин
т
Микролифт тонарма
Регулировка высоты тонарма
Прииспользованиикартриджаизкомплектапоставкииспользуйте
положение«0».Прииспользованиикартриджанеизкомплекта
поставкиотрегулируйтееевсоответствиисиспользуемым
картриджем.
1 Поверните фиксатор [HEIGHT ADJUST], чтобы его
разблокировать.
Разблокировать
2 Опустите рычаг микролифта и установите
иглу на пластинку, а затем с помощью ручки
[HEIGHT ADJUST] добейтесь параллельности тонарма
и пластинки.
Отрегулируйте так, чтобы рычаг тона принял
горизонтальное положение
Положение ручки [HEIGHT ADJUST]
3 Поверните фиксатор [HEIGHT ADJUST], чтобы
зафиксировать высоту тонарма.
Послерегулировкивысотытонармаобязательноповернитефик-
сатор[HEIGHT ADJUST],чтобызафиксироватьтонарм.

Подключения
! Привыполненииилиизмененииподключений,обязательноотключитепитаниеиотсоединитесиловойкабельотрозетки.
! Смотритеинструкциипоэксплуатациикподключаемомукомпоненту.
! Послезавершениявсехподключениймеждуустройствамиподключитесиловойкабель.
Подключение к активным колонкам
Аудиокабель
Задняя панель
Силовой кабель
К розетке
Активные колонки
1 Установите переключатель [PHONO/LINE] в положение [LINE].
2 Подключите аудиокабель к входному разъему [LINE] активных колонок.
! Принеобходимостииспользуйтеприлагаемыйкабель-адаптер.
3 Подключите силовой кабель.
Подключаетсякрозеткечерезпоставляемыйсиловойкабель.Подключайтесиловойкабельтолькопослезавершениявсехподключений
междуоборудованием.
Подключение к интегральному усилителю и другому компоненту
Аудиокабель
Интегральный усилитель,
компонент и т. д.
Задняя панель
Силовой кабель
К розетке
1 Установите переключатель [PHONO/LINE] в положение [PHONO].
2 Подключите аудиокабель к входному разъему [PHONO] интегрального усилителя или другого компонента.
! Еслиданноеизделиеподключенокинтегральномуусилителюилидругомукомпонентубезразъема[PHONO],получениезвучания
достаточногоуровняикачествабудетневозможно.Вэтомслучаепереведитепереключатель[PHONO/LINE]наэтомустройствев
положение[LINE],азатемподключитеустройствоквходномуразъему[LINE]интегральногоусилителяилидругогокомпоненталибо
воспользуйтесьфонографическимэквалайзером.
3 Подключите силовой кабель.
Подключаетсякрозеткечерезпоставляемыйсиловойкабель.Подключайтесиловойкабельтолькопослезавершениявсехподключений
междуоборудованием.
Ru
12

Ru
13
Русский
Подключение к DJ микшеру
Опорный диск
DJ Микшер
Аудиокабель
Аудиокабель
Задняя панель
Силовой кабель
К розетке
1 Установите переключатель [PHONO/LINE] в положение [PHONO].
2 Подключите аудиокабель к входному разъему [PHONO] на DJ-микшере.
! ЕслиданноеизделиеподключенокDJ-микшерубезразъема[PHONO],получениезвучаниядостаточногоуровняикачествабудет
невозможно.Вэтомслучаепереведитепереключатель[PHONO/LINE]наэтомустройствевположение[LINE],азатемподключите
устройствоквходномуразъему[LINE]DJ-микшера.
3 Подключите силовой кабель.
Подключаетсякрозеткечерезпоставляемыйсиловойкабель.Подключайтесиловойкабельтолькопослезавершениявсехподключений
междуоборудованием.
Подключение с компьютером
ДляданногоустройстванетребуетсяпрограммныйдрайверUSB.
=
Запись
(стр.15)
Задняя панель
USB кабель
Компьютер
К розетке
Силовой кабель
1 Подключите USB-кабель к порту USB на компьютере.
2 Подключите силовой кабель.
Подключаетсякрозеткечерезпоставляемыйсиловойкабель.Подключайтесиловойкабельтолькопослезавершениявсехподключений
междуоборудованием.
Место установки
Установитеустройствонагоризонтальнуюповерхность,которая
неподвергаетсявоздействиювнешнихвибраций.
! Устанавливайтеустройствонамаксимальномвозможномрас-
стоянииотакустическойсистемы.
! Еслиустройствонаходитсянанебольшомрасстоянииотради-
оприемника(диапазонаAM/FM),израдиоприемникаможет
бытьслышеншум.Устанавливайтерадиоприемникнамакси-
мальномвозможномрасстоянииотданногоустройства.
Регулировка высоты основного
блока
Путемповоротадемпфераотрегулируйтевысотутакимобразом,
чтобыосновнойблокнаходилсягоризонтально.

Ru
14
Управление
Включение питания
1 Выполните все подключения, затем подключите
силовой кабель к розетке.
=
Подключения
(стр.12)
2 Переведите переключатель [POWER] в положение
[ON], чтобы включить питание устройства.
Высвечиваютсяиндикаторыданногоаппаратаивключается
питание.
Отключение питания
Переведите переключатель [POWER] в положение
[OFF], чтобы выключить питание устройства.
Питаниеданногоаппаратаотключается.
Воспроизведение
Выполнитеследующиеподготовительныеоперации:
! Положитепластинкунаопорныйдиск.
! Снимитезащитныйколпачокиглыизажимтонарма.
1 Переведите переключатель [POWER] в положение
[ON], чтобы включить питание устройства.
2 Выберите скорость вращения в соответствии с
записью, нажимая кнопку изменения скорости.
3 Нажмите кнопку [START/STOP].
Опорныйдисквращается.
4 Поднимите рычаг микролифта и установите
тонарм на пластинку.
5 Опустите рычаг микролифта.
Тонарммедленноопускаетсяиначинаетсявоспроизведение.
Приостановка воспроизведения
Поднимите рычаг микролифта.
Иглакартриджаподнимаетсяотпластинки.
! Длявозобновлениявоспроизведенияопуститерычаг
микролифта.
Завершение воспроизведения
1 Поднимите рычаг микролифта, чтобы вернуть
тонарм на упор, а затем опустите рычаг микролифта.
2 Нажмите кнопку [START/STOP].
Проигрывательплавнопрекращаетвоспроизведение.
3 Переведите переключатель [POWER] в положение
[OFF], чтобы выключить питание устройства.
Закрепитетонармзажимомтонарма.
Чтобызащититькончикиглы,наденьтезащитныйколпачокиглы.
Закройтепылезащитнуюкрышку.
Регулировка высоты тона
Передвигайте ползунок [TEMPO] вперед или назад.
Приперемещенииползункавпередчастотавращенияувеличива-
ется,априперемещенииназад—уменьшается.
! Когдаползунок[TEMPO]окажетсяпоцентру,загоритсяжел-
то-зеленыйсигналиндикатораибудетустановленавыбранная
скоростьвращения(331/3,45или78оборотоввминуту).
! Шкалаползунка[TEMPO]показываетприблизительноезначе-
ние.Используйтееговкачествеориентира.
! Чтобыпроверить,чтоскоростьвращенияизмениласьсоответ-
ствующимобразом,посмотритестробоскопическийсигнална
поворотномстолике.
Метки стробоскопии
1 Еслисигналнедвижется,скоростьвращениясоставляет
331/3об/мин(питание50Гц)
2 Еслисигналнедвижется,скоростьвращениясоставляет45об/
мин(питание50Гц)
3 Еслисигналнедвижется,скоростьвращениясоставляет
331/3об/мин(питание60Гц)
4 Еслисигналнедвижется,скоростьвращениясоставляет45об/
мин(питание60Гц)
! Дляподсвечиванияметокстробоскопиивданномустройстве
используетсястробоскоп(красныйсветодиод).Припроверке
высотывсегдаиспользуйтестробоскоп.
Как показать обложку пластинки
Установитеобложкузадержателями,прикрепленнымикпылеза-
щитнойкрышке,какпоказанонарисунке.
Конверт пластинки Ограничители
! Неустанавливайтетудадругиепредметы.
! Правильнозакрепитеобложкузадержателями.
! Прииспользованииэтойфункциивовремявоспроизведения
следите,чтобыобложканеупала.Этоможетповредитьпла-
стинкуилистилус.
! Неоткрывайтепылезащитнуюкрышку,еслинанейустанов-
ленаобложкапластинки.

Ru
15
Русский
Воспроизведение стандартных
долгоиграющих пластинок
Установитеадаптердолгоиграющихпластинокнацентральный
шпиндельинажмитекнопку[45].
Подсветка кончика иглы
Нажатиепереключателяподсветкивключаетбелуюподсветку
иглыиподнимаетустройствоподсветкивположениеподсветки
кончикаиглы.
! Есливэтомнетнеобходимости,нажмитенавыключатель
подсветкистилуса,чтобыопуститьего.Подсветкастилуса
выключится.
! Несмотритепрямонагорящийсигналстилуса.
Запись
Приподключенииккомпьютеру,накоторомустановленоприло-
жениедляуправлениямузыкой“rekordbox”,возможнацифровая
записьаналоговыхпластинок.
Подробнуюинформациюсм.насайтепродуктаrekordboxв
Инструкцияхпоэксплуатацииrekordboxвразделе[Support].
https://rekordbox.com/en/store/
Замена стилуса
Передвыполнениемследующейпроцедурыубедитесьвтом,что
питаниеотключено.
1 Возьмите картридж одной рукой.
2 Снимите картридж в направлении, указанном
стрелкой, удерживая держатель стилуса другой
рукой.
Замена картриджа
ЭтоустройствонеподдерживаеткартриджиMC.Пользуйтесь
картриджамиVMилиMM.
Снятие картриджа
1
Снимите винты, гайки и шайбы с головки звукоснимателя.
2 Отключите электрические провода от картриджа.
Установка картриджа
1 Подключите картридж с учетом цветовой
маркировки проводов на головке звукоснимателя и
символов на контактах картриджа.
Учитывайтецветовуюмаркировкупроводовнаголовкезвукосни-
мателяисимволынаконтактахкартриджа.
Еслисмотретьспереди,верхнийлевый—L+:белый,нижний
левый—L-:синий,верхнийправый—R+:красный,нижнийпра-
вый—R-:зеленый.
! Надежноподключитепроводаспомощьюклещейит.п.
2 Прикрепите картридж к головке звукоснимателя с
помощью винтов, гаек и шайб из комплекта поставки
картриджа.
Головка звукоснимателя
Входной проводник
Держатель картриджа
Груз держателя
! Надежноприкрепитекартриджкголовкезвукоснимателя.
! Прииспользованиикартриджамассой5гилименееустано-
витевходящийвкомплектпоставкиприжимнойвес.
Регулировка навеса
Длярегулировкиположенияприпомощивинтакреплениякар-
триджавоспользуйтесьпоказаннойнижешкалойрегулировки
навеса.Выполнитерегулировкитакимобразом,чтобыкончикиглы
находилсянарасстоянии53ммотдеталикреплениятонарма.
53 mm
Шкала регулировки навеса
53 mm

Дополнительная информация
Возможные неисправности и способы их устранения
! Зачастуюнеправильноесрабатываниеошибочновоспринимаетсязанеполадкуилинеисправность.Есливыдумаете,чтосданным
компонентомчто-тонетак,проверьтепунктыниже,атакже[FAQ]для[PLX-500]насайтеподдержкиPioneerDJ.
http://pioneerdj.com/support/
Иногдапроблемаможетзаключатьсявдругомкомпоненте.Проверьтедругиеиспользуемыекомпонентыиэлектроприборы.Если
решитьпроблемунеудается,обратитесьзаремонтомвближайшийавторизованныйсервисныйцентриликсвоемудилеру.
! Данныйаппаратможетнесрабатьыватьсоответствующимобразомпопричинестатическогоэлектричестваилиподругимвнешним
причинам.Втакомслучае,обычнуюработуможновозобновить,отключивпитание,обождав1минутуизатемсновавключивпитание.
Неисправность Проверьте Способ устранения
Невключаетсяпитание. Подключен-лисиловойкабельсоответствую-
щимобразом?
Подключитепоставляемыйсиловойкабелькрозеткесоответствующим
образом.
Установленлипереключатель[POWER]пита-
ниявположение[ON]?
Установитепереключатель[POWER]питаниявположение[ON].
Звучаниеотсутствуетилислишком
низкийуровеньзвучания.
Подключены-лиаудиокабелисоответствую-
щимобразом?
Правильноподключитеаудиокабели.
Незагрязнены-литерминалыиштекеры? Передвыполнениемподключенийочиститетерминалыиштекеры.
Правильнолиустановлендержатель
картриджа?
Правильноустановитедержателькартриджа.
Звуклевогоиправогоканала
поменяныместами.
Поменянылиместамисоединениялевогои
правогоканаловкаждогооборудования?
Правильноподсоединитеаудиокабельипроволочныевыводыдержателя
картриджа.
Вовремявоспроизведенияслы-
шентихийгудящийзвук(гудение
илижужжание).
Находитсяливозлесоединительногошнура
такоеэлектрическоеустройство,какфлуорес-
центнаялампаилиеешнурпитания?
Проложитешнурпитанияфлуоресцентнойлампыилиустановитедругое
устройствонамаксимальномвозможномрасстоянии.
Кончикиглынеопускаетсяна
пластинку.
Правильнолиотрегулированаприжимная
силаиглы?
Отрегулируйтепротивовес,чтобыустановитьприжимнуюсилуиглы,
соответствующуюиспользуемомукартриджу.
Выполненалигоризонтальнаябалансировка
тонарма?
Повернитепротивовесдодостижениягоризонтальногоположения
тонарма.
Происходятперескокииглы. Правильнолиотрегулированаприжимная
силаиглы?
Отрегулируйтепротивовес,чтобыустановитьприжимнуюсилуиглы,
соответствующуюиспользуемомукартриджу.
Деформированлипластинкаиестьлинаней
царапины?
Проверьтесостояниепластинки.
Скопиласьлинакончикеиглыпыль? Снимитедержательскартриджемиосторожноудалитепыльилидругие
загрязненияскончикаиглымягкойщеткойиликисточкой.
Правильноливыполненарегулировкакомпен-
сациискатывающейсилы?
Правильноотрегулируйтекомпенсациюскатывающейсилы.
Правильноливыполненарегулировкавысоты
тонарма?
Правильноотрегулируйтевысотутонарма.
Тонармостанавливаетсяине
перемещаетсядальше.
Естьлинапластинкецарапины? Проверьтесостояниепластинки.
Упираетсялитонармвпостороннийобъект? Проверьтеобластьвокругтонарма.Вслучаеобнаруженияпрепятствия,
удалитеего.
Громкостьзвукаслишком
низкаяилислишкомвысокая
(искаженная).
Соответствуетлиподключениекусилителю
используемомутипукартриджа(выходу)?
Подключитесоединительныекабелисоответствующимобразом.
Настройкапереключателя[PHONO/LINE]
правильная?
Правильновыполнитенастройкупереключателя[PHONO/LINE]всоответ-
ствиисвходнымразъемомподключенногоустройства.
Поворотныйстоликпривращении
слегкавибрирует.
Вместахкрепленияповоротногостоликаина
центральномшпинделеналиплагрязьит.п.
Удалитегрязь.
Предостережения по
использованию
О конденсации
Внутриаппарата(нарабочихдеталяхилилинзе)могутобазо-
ватьсяводяныекапли(конденсация)взимнеевремя,например,
еслиаппаратбылперенесенсхолодногоместовтеплуюкомнату,
илипривнезапномповышениитемпературывкомнате,гдеуста-
новленаппарат(обогревание,др.).Аппаратнебудетсрабатывать
соответствующимобразоминебудетвоспроизводиться,пока
внутринегоимеетсяконденсация.Оставьтеаппаратна1или2
часаприкомнатнойтемпературе(хотявданноевремязависит
отсостоянияконденсации)отключенным.Водяныекаплииспа-
рятсяиможнобудетуправлятьаппаратом.Конденсацияможет
происходитьтакжеивлетнеевремя,еслиаппаратподвергался,
например,прямомуобдуваниюоткондиционеравоздух.Втаком
случаепередвиньтеаппаратвдругоеместо.
При транспортировке устройства в
другое место
Дляупаковкиустройстваиспользуйтеоригинальныеупаковочные
материалы.
Еслиоригинальныеупаковочныематериалыотсутствуют,выпол-
нитеследующиеоперации:
! Передначаломупаковкиснимитеподложкуиопорныйдиск
проигрывателя.
! снимитедержателькартриджаипротивовесстонармаитща-
тельноихупакуйте.
Ru
16

Ru
17
Русский
! спомощьюзажиматонармазафиксируйтетонармизакрепите
еголипкойлентой,чтобыисключитьегоперемещение.
! завернитеосновнойблокводеялоилимягкуюбумагу,чтобыне
допуститьегоповреждения.
! Упаковывайтебезприменениясилыкрычагутона.
Техническое обслуживание
каждого узла
Приустановкеиснятиидержателякартриджаотключайтепитание
усилителя.
Выполнениеэтихоперацииприустановленнойвысокойгромкости
можетвызватьповреждениегромкоговорителя.
! Снимитедержательскартриджемиосторожноудалитепыль
илидругиезагрязненияскончикаиглымягкойщеткойили
кисточкой.
! Дляочисткипластинокиспользуйтевысококачественноесред-
стводлячисткипластинок.
! Припомощимягкойтканиилианалогичногоматериалаочи-
ститевыводыдержателякартриджа,азатемустановитедер-
жательнатонарм.
Очистка пылезащитной крышки и
других деталей
Дляочисткипылезащитнойкрышкиикорпусаиспользуйтемягкую
ткань
! Неочищайтепылезащитнуюкрышкувовремявоспроизведе-
ния.Статическоеэлектричествоможетпривестикпритягива-
ниютонармакпылезащитнойкрышке.
О торговых марках и
зарегистрированных торговых
марках
! «PioneerDJ»являетсязарегистрированнымтоварнымзна-
комкорпорацииPIONEERCORPORATIONииспользуетсяпо
лицензии.
! rekordbox–торговаямаркаилизарегистрированнаяторговая
маркакомпанииPioneerDJCorporation.
Указанныездесьназваниякомпанийиизделийявляютсятор-
говымимаркамиилизарегистрированнымиторговымимарками
соответствующихвладельцев.
Технические характеристики
Требованиякпитанию
....
от110Вдо120Вилиот220Вдо240Впеременноготока,50Гц/60Гц
Потребляемаямощность.............................................................11Вт
Весосновногоаппарата............................................................ 10,7кг
Макс.габариты................... 450мм(Ш)×158,5мм(В)×367,5мм(Г)
Допускаемаярабочаятемпература...................... от+5°Cдо+35°C
Допускаемаярабочаявлажность...
от5%до85%(безконденсации)
Узел опорного диска
Привод...................................................Прямойссервоуправлением
Двигатель.................. 3-фазныйбесколлекторныйпостоянноготока
Систематорможения.........................................Электронныйтормоз
Скоростьвращения.................... 331/3об/мин,45об/мин,78об/мин
Диапазонрегулировкискоростивращения.................................±8%
Коэффициентдетонации.............................. Неболее0,15%WRMS
Соотношениесигнал/шум...........................................Неменее50дБ
Опорныйдиск.............................. Литойалюминий,диаметр:332мм
Пусковоймомент.....................................................неменее1,6кг·см
Времястарта.......................... Неболее1секунд(при331/3об/мин)
Узел тонарма
Типтонарма
.........................УниверсальныйS-образныйскарданнойподвеской,
статическисбалансированный
Эффективнаядлина..............................................................230,5мм
Навес........................................................................................... 16мм
Погрешностьслежения.....................................................Неболее3°
Диапазонрегулировкивысотытонарма...................................... 6мм
Диапазонрегулировкиприжимнойсилыиглы
.............................................От0гдо4,0г(1делениешкалы—0,1г)
Собственныйвескартриджа...........9,5гилименее(одинкартридж)
Типкартриджа................................................................................. VM
Напряжение на выходе
PHONO...............................................................................2,5мВ/1кГц
LINE...................................................................................150мВ/1кГц
— Техническиехарактеристикииконструкцияданногоизделия
могутизменятьсябезуведомления.
! ©PioneerDJCorporation2016.Всеправазащищены.

Ru
18

Ru
19
Русский
Серийный номер
P1 - Год изготовления
P1 P2
Дату изготовления оборудования можно определить по серийному номеру, который содержит информацию о
месяце и годе производства.
Дата изготовления оборудования
Год 2001
A
2002
B
2003
C
2004
D
2005
E
2006
F
2007
G
2008
H
2009
I
2010
J
Символ
12 цифр
10 цифр
2 цифры
Год 2011
K
2012
L
2013
M
2014
N
2015
O
2016
P
2017
Q
2018
R
2019
S
2020
T
Символ
P2 - Месяц изготовления
Месяц 1
A
2
B
3
C
4
D
5
E
6
F
7
G
8
H
9
I
10
J
11
K
12
L
Символ
D3-7-10-7_A1_Ru
Примечание:
Корпорация Пайонир Диджей устанавливает следующую продолжительность срока службы официально
поставляемых на Российский рынок товаров.
Аудио и видеооборудование: 7 лет
Переносное аудиооборудование: 6 лет
Другое оборудование (наушники, микрофон и т.д.): 5 лет
D3-7-10-6b_B1_Ru
Информация для покупателей в ЕАЭС:
Уполномоченной организацией в соответствии с требованиями ТР ТС 004/2011, 020/2011, 017/2011
является ООО "ПИОНЕР РУС", Россия, 105064, г. Москва, Нижний Сусальный переулок, дом 5, строение
19, т. (495) 9568901
D3-7-10-8b_A1_Ru

PIONEER ELECTRONICS (THAILAND) CO., LTD.
17th Fl., KPN To wer, 719 Rama 9 Road, Bangkapi, Huaykwang, Bangkok 10310
TEL: +66-2-717-0777
PIONEER TECHNOLOGY (MALAYSIA) SDN. BHD
16th Floor, Menara Uni. Asia 1008 Jalan Sultan Ismail 50250 Kuala Lumpur
TEL: +60-3-2697-2920
ӒᎣӌԥ४ϵѨ
ѯᢋѯіҀϲୣ࿆ӏၰ ĵıĸ ဵĹዃ
TEL: +886-(0)2-2657-3588
ӒᎣႬφȞॸ෬ȟԥ४ϵѨ
ॸ෬Οᓹߞؔᢋၿ ĺıĺġဵ Ķġዃ
TEL: +852-2848-6488
PIONEER ELECTRONICS DE MEXICO S.A. DE C.V.
Blvd.Manuel Avila Camacho 138 10 piso Col.Lomas de Chapultepec,
Mexico, D.F. 11000 TEL: +52-55-9178-4270
PIONEER INDIA ELECTRONICS PRIVATE LTD.
216, Second Floor, Time To wer, M.G. Road, Sector 28, Gurgaon 122001,
Haryana, India TEL: +91-124-463-6100
PDJ_001_all
6F, Yo kohama i-Mark Place, 4-4-5 Minatomirai, Nishi-ku, Yo kohama, Kanagawa 220-0012 JAPA N
Корпорация Пайонир Диджей
6F, Йокогама i-Mark Place, 4-4-5 Минатомирай, Ниси-ку, Йокогама, Канагава 220-0012 ЯПОНИЯ
Anteros Building, Odyssey Business Park, West End Road,South Ruislip, Middlesex, HA4
6QQ, U.K.TEL: +44-203-7617-220
2050 W. 190th Street, Suite 109, Torrance, CA 90504, U.S.A. TEL: +1 (424) 488-0480
PIONEER ELECTRONICS ASIACENTRE PTE. LTD.
2 Jalan Kilang Barat, #07-01, Singapore 159346 TEL: +65-6378-7888
PIONEER ELECTRONICS AUSTRALIA PTY. LTD.
5 Arco Lane, Heatherton, Victoria, 3202, Australia, TEL: +61-3-9586-6300
Printed in China/ Imprimé en Chine
Сделано в Китае
© 2016 Pioneer DJ Corporation.All rights reserved.
© 2016 Pioneer DJ Corporation.Tous droits de reproduction et de traduction réser vés.
<DRH1378-C>
<502-PLX500B-3626B>
-
 1
1
-
 2
2
-
 3
3
-
 4
4
-
 5
5
-
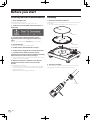 6
6
-
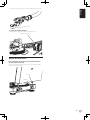 7
7
-
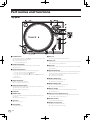 8
8
-
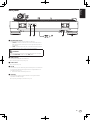 9
9
-
 10
10
-
 11
11
-
 12
12
-
 13
13
-
 14
14
-
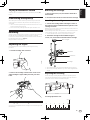 15
15
-
 16
16
-
 17
17
-
 18
18
-
 19
19
-
 20
20
-
 21
21
-
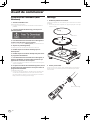 22
22
-
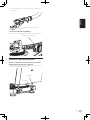 23
23
-
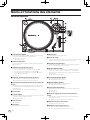 24
24
-
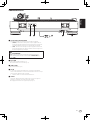 25
25
-
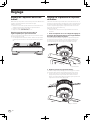 26
26
-
 27
27
-
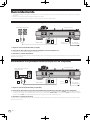 28
28
-
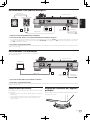 29
29
-
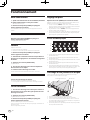 30
30
-
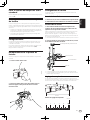 31
31
-
 32
32
-
 33
33
-
 34
34
-
 35
35
-
 36
36
-
 37
37
-
 38
38
-
 39
39
-
 40
40
-
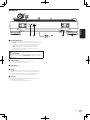 41
41
-
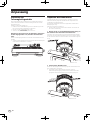 42
42
-
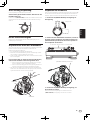 43
43
-
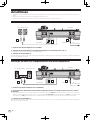 44
44
-
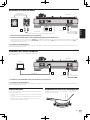 45
45
-
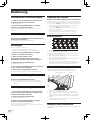 46
46
-
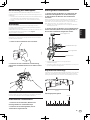 47
47
-
 48
48
-
 49
49
-
 50
50
-
 51
51
-
 52
52
-
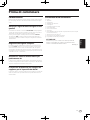 53
53
-
 54
54
-
 55
55
-
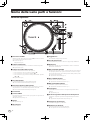 56
56
-
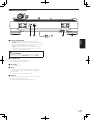 57
57
-
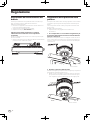 58
58
-
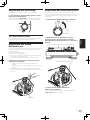 59
59
-
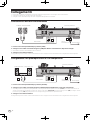 60
60
-
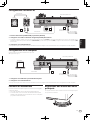 61
61
-
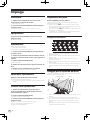 62
62
-
 63
63
-
 64
64
-
 65
65
-
 66
66
-
 67
67
-
 68
68
-
 69
69
-
 70
70
-
 71
71
-
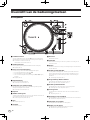 72
72
-
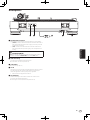 73
73
-
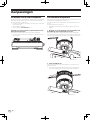 74
74
-
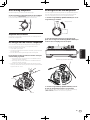 75
75
-
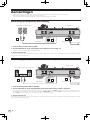 76
76
-
 77
77
-
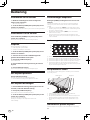 78
78
-
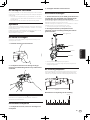 79
79
-
 80
80
-
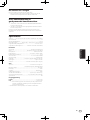 81
81
-
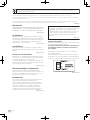 82
82
-
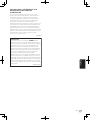 83
83
-
 84
84
-
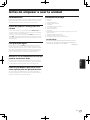 85
85
-
 86
86
-
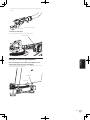 87
87
-
 88
88
-
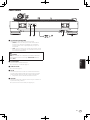 89
89
-
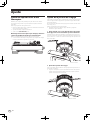 90
90
-
 91
91
-
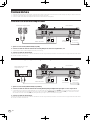 92
92
-
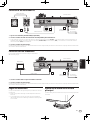 93
93
-
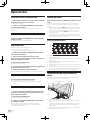 94
94
-
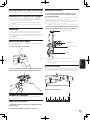 95
95
-
 96
96
-
 97
97
-
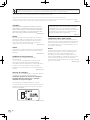 98
98
-
 99
99
-
 100
100
-
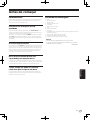 101
101
-
 102
102
-
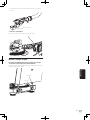 103
103
-
 104
104
-
 105
105
-
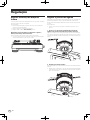 106
106
-
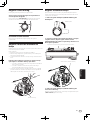 107
107
-
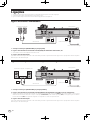 108
108
-
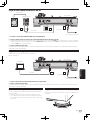 109
109
-
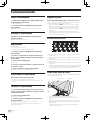 110
110
-
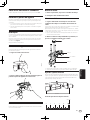 111
111
-
 112
112
-
 113
113
-
 114
114
-
 115
115
-
 116
116
-
 117
117
-
 118
118
-
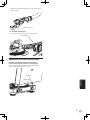 119
119
-
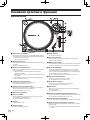 120
120
-
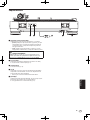 121
121
-
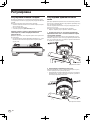 122
122
-
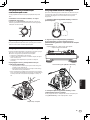 123
123
-
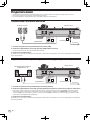 124
124
-
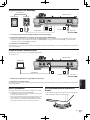 125
125
-
 126
126
-
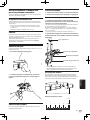 127
127
-
 128
128
-
 129
129
-
 130
130
-
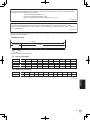 131
131
-
 132
132


Pioneer PLX-500-K Manual de usuario
- Categoría
- Tocadiscos de audio
- Tipo
- Manual de usuario
en otros idiomas
- français: Pioneer PLX-500-K Manuel utilisateur
- italiano: Pioneer PLX-500-K Manuale utente
- Deutsch: Pioneer PLX-500-K Benutzerhandbuch
- Nederlands: Pioneer PLX-500-K Handleiding
- português: Pioneer PLX-500-K Manual do usuário