
Operator's Manuam
GRIIFTSMIIN°
6.5 Horse Power
Yard Vacuum
Model No. 247.770120
CAUTION: Before using
this product, read this
manual and foN_ow aim
safety fumes and operating
instructions.
o SAFETY
ASSEMBLY
OPERATION
MAINTENANCE
PARTS LIST
ESPANOL
Sears, Roebuck and Co., Hoffman Estates, IL 60179, U.S.A.
Visit our web site: www.craftsman.com
FORMNO,769-03167
04/16/2007

OneYearFuimWarrantyon Craftsman YardVacuum
Thisequipmentiscoveredbyaone=yearwarranty,providedthatitismaintained,lubricated,andtunedupaccordingtotheinstructionsinthe
operator'smanualDuringthewarrantyyear,ifthisequipmentexperiencesanyfailureduetodefectsinmaterialorworkmanship,RETURNiTTO
YOURNEARESTSEARSPARTS&REPAIRCENTER,andSearswillrepairit,freeofcharge,In=homewarrantyserviceisavailable,butyouwill
havetopayatripcharge,
Thiswarrantydoesnotcover:
, Expendabbitemswhichbecomewornduringnormaluse,suchassparkplugs,aircleaners,belts,andoilfilters,
, Tirereplacementorrepaircausedbypuncturesfromoutsideobiects,suchasnails,thorns,stumps,orglass,
Repairsnecessarybecauseofoperatorabuse,includingbutnotlimitedto,damagecausedbyobiects,suchasstones,metaldebrisor
oversizedpiecesofwood,orimpactingobjectsthatbendtheframeorcrankshaft,orover=speedingtheengine,
Repairsnecessarybecauseofoperatorne@gence,includingbutnotlimitedto,ebctrbalandmechanbaldamagecausedbyimproper
storage,failuretousethepropergradeandamountofengineoil,orfailuretomaintaintheequipmentaccordingtotheinstructionscontained
intheoperator'smanual,
• Engine(fuelsystem)cleaningorrepairscausedbyfueldeterminedtobecontaminatedoroxidized(stale),Ingeneral,fuelshouldbeused
within30daysofitspurchasedate,
Equipmentifusedforcommercialorrentalpurposes,
Thiswarrantyappliesforonly90daysifthisproductiseverusedforcommercialorrentalpurposes,
ThiswarrantyappliesonlywhilethisproductisusedintheUnitedStates,
Thiswarrantygivesyouspecificlegalrights,andyoumayalsohaveotherrightswhichvaryfromstatetostate,
Scars,RoebuckandCo.,HoffmanEstates,IL60179
HorsePower:
EngineOilType:
EngineOilCapacity:
FuelCapacity:
SparkPlug:
SparkPlugGap:
6,5
SAE3O
18ounces
11/2Quarts
Champion@RJ19LM
,020"
Recordthemodelnumber,serialnumber
anddateofpurchaseabove
@SearsBrands,LLC 2

Congratulationson makingasmartpurchase,YournewCraftsman®
productisdesignedandmanufacturedforyearsofdependableopera-
tion,Butlikeall products,it mayrequirerepairfromtimetotime,That's
whenhavinga RepairProtectionAgreementcansaveyoumoneyand
aggravation,
Here'swhat'sincludedintheAgreement:
• Expertservicebyour 12,000professionalrepairspecialists
• Unlimitedserviceand nochargefor partsandlaboronall covered
repairs
• Productreplacementifyourcoveredproductcan'tbefixed
• Discountof 10%fromregularpriceofserviceandservice-related
partsnotcoveredbytheagreement;also,10%off regularpriceof
preventivemaintenancecheck
• Fasthelpbyphone- phonesupportfromaSearstechnicianon
productsrequiringimhomerepair,plusconvenientrepair
scheduling
Purchasea RepairProtectionAgreementnowandprotectyourself
fromunexpectedhassleandexpense,
OnceyoupurchasetheAgreement,a simplephonecallisall thatit
takesforyoutoscheduleservice,Youcancallanytimedayornight,or
schedulea serviceappointmentonline,
Searshasover12,000professionalrepairspecialists,whohave
accesstoover4,5millionqualitypartsandaccessories,That'sthe
kindofprofessionalismyoucancounton tohelpprolongthelifeof
yournewpurchaseforyearstocome,PurchaseyourRepairProtection
Agreementtoday!
Somelimitations andexclusions apply. For prices and additional
information call 1-800-827o6655.
Sears Installation Service
ForSearsprofessionalinstallationof homeappliances,garagedoor
openers,waterheaters,andothermaiorhomeitems,in theU,S,A,call
1-800-4-MY-HOME®

Thissymbolpointsoutimportantsafetyinstructions
which,ifnotfollowed,couldendangerthepersona)
safetyand/orpropertyofyourselfandothers,Read
andfollowallinstructionsinthismanualbefore
attemptingtooperatethismachine,Failuretocomplywiththese
instructionsmayresultinpersona)iniury,Whenyouseethissymbol,
HEEDITSWARNING!
Thismachinewasbuilttobeoperatedaccordingtotherulesfor
safeoperationinthismanualAswithanytypeofpowerequipment,
carelessnessorerroronthepartoftheoperatorcanresultinserious
iniury,Thismachineiscapableofamputatinghandsandfeetand
throwingobiects,Failuretoobservethefollowingsafetyinstructions
couldresultinseriousiniuryordeath,
YourResponsibility:Restricttheuseofthispowermachineto
personswhoread,understand,andfollowthewarningsandinstruc-
tionsinthismanualandonthemachine,
EngineExhaust,someofitsconstituents,andcertainvehicle
componentscontainoremitchemicalsknowntoStateofCaliforniato
causecancerandbirthdefectsorotherreproductiveharm,
TRA(N(NG
o Read,understand,andfollowall instructionsonthe machineandin
the manual(s)beforeattemptingtoassembleand operate.Keepthis
manualina safeplacefor futureandregularreferenceandfor ordering
replacementparts.
o Befamiliarwith allcontrolsandtheirproperoperation.Knowhowto stop
the machineanddisengagethemquickly.
o Neverallowchildrenunder16yearsoldto operatethismachine.Chil-
dren16yearsoldand overshouldreadandunderstandthe operation
instructionsand safetyrulesin this manualandshouldbetrained and
supervisedbya parent.
o Neverallowadultsto operatethismachinewithoutproperinstruction.
o Keepbystanders,helpers,pets,andchildrenat least75feetfromthe
machinewhileit isinoperation.Stopmachineif anyoneentersthearea.
o Neverrunan engineindoorsor in apoorlyventilatedarea.Engine
exhaustcontainscarbonmonoxide,anodorlessanddeadlygas.
o Donotput handsandfeet nearrotatingpartsorin thefeedingchambers
anddischargeopening.Contactwiththe rotatingimpellercan amputate
fingers,hands,andfeet.
o Neverattemptto unclogeitherthefeedintakeor dischargeopening,
removeoremptyvacuumbag,or inspectand repairthe machinewhile
theengineis running.Shutthe engineoff andwaituntilall movingparts
havecometo acompletestop.Disconnectthe sparkplugwireand
groundit againstthe engine.
PREPARAT(ON
Thoroughlyinspectthe areawherethe equipmentisto beused.Remove
all rocks,bottles,cans, orotherforeignobjectswhichcould bepickedup
or thrownandcausepersonalinjuryordamagetothe machine.
o Alwayswearsafetyglassesorsafetygogglesduringoperationor while
performinganadjustmentor repair,to protecteyes.Thrownobjects
whichricochetcancauseseriousinjurytothe eyes.
o Wearsturdy,rough-soledworkshoesandclose-fittingslacksandshirts.
Loosefitting clothesorjewelrycanbe caughtin movableparts. Never
operatethismachineinbarefeetor sandals.Wearleatherworkgloves
whenfeedingmaterialinthe chipperchute.
o Beforestarting,checkall boltsandscrewsforpropertightnessto be
surethe machineisin safeworkingcondition.Also,visuallyinspect
machinefor any damageatfrequentintervals.
o Maintainor replacesafetyand instructionslabels,asnecessary.
o Toavoidpersonalinjuryor propertydamageuseextremecarein
handlinggasoline.Gasolineisextremelyflammableandthevaporsare
explosive.Seriouspersonalinjurycanoccurwhengasolineisspilledon
yourselforyourclotheswhichcanignite.Washyourskinandchange
clothesimmediately.
o Useonlyan approvedgasolinecontainer.
o Extinguishall cigarettes,cigars,pipes,andothersourcesof ignition.
o Neverfuel machineindoors.
o Neverremovegascapor addfuelwhilethe engineishot or running.
o Allowenginetocoolatleasttwominutesbeforerefueling.
o Neveroverfillfuel tank.Fill tankto nomorethan 1/2inchbelowbottom
offiller neckto providespacefor fuelexpansion.
o Replacegasolinecapandtightensecurely.
o If gasolineisspilled,wipeit offthe engineandequipment.Move
machineto anotherarea.Wait5 minutesbeforestartingtheengine.
o Neverstorethe machineorfuelcontainerinsidewherethereisan open
flame,spark,or pilotlight(e.g.furnace,waterheater,spaceheater,
clothesdryer,etc.).
o Toreduceafire hazard,keep machinefreeofgrass,leaves,or other
debrisbuild-up.Cleanupoil orfuelspillageandremoveanyfuelsoaked
debris.
o Allowmachineto coolatleast5 minutesbeforestoring.
4

OPERATmON
Do notputhandsandfeetnearrotatingpartsor inthe feedingchambers
anddischargeopening.Contactwiththe rotatingimpellercanamputate
fingers,hands,andfeet.
o Beforestartingthe machine,makesurethe chipperchute,feedintake,
andcuttingchamberareemptyandfreeofall debris.
o Thoroughlyinspectallmaterialtobeshreddedandremoveanymetal,
rocks,bottles,cans,or otherforeignobjectswhichcouldcausepersonal
injuryor damageto the machine.
o Ifthe impellerstrikesaforeignobjector ifyourmachineshouldstart
makinganunusualnoiseorvibration,immediatelyshutthe engineoff.
Allowthe impellerto cometoa completestop.Disconnectthesparkplug
wire,groundit againsttheengineand performthefollowingsteps:
1.Inspectfor damage.
2.Repairor replaceanydamagedparts.
3.Checkforanyloosepartsandtightentoassurecontinuedsafe
operation.
o Do notallowanaccumulationofprocessedmaterialto buildupinthe
dischargearea.This canpreventproperdischargeand resultin kickback
ofmaterialthroughthefeedopening.
o Do notattempttoshredor chipmateriallargerthanspecifiedonthe
machineorin thismanual.Personalinjuryor machinedamagecould
result.
o Neverattempttounclogeitherthefeedintakeor dischargeopening
whiletheengineis running.Shutthe engineoff,waituntilall moving
partshavestopped,disconnectthe sparkplugwireandgrounditagainst
theenginebeforeclearingdebris.
o Neveroperatewithoutvacuumbag anddischargechuteproperly
attachedtothe machine.Neveremptyor changevacuumbagwhilethe
engineisrunning.Zipperedendofvacuumbagmustbekeptclosedat
alltimes duringoperation.
o Neveroperatewithouteitherthe inletnozzleor optionalhoseattachment
properlyattachedtothe machine.Neverattempttoattachorchange
eitherattachmentwhilethe engineisrunning.
o Keepall guards,deflectorsandsafetydevicesin placeandoperating
properly.
o Keepyourface andbodybackandtothe sideofthechipperchutewhile
feedingmaterialintothe machinetoavoidaccidentalkickbackinjuries.
o Neveroperatethismachinewithoutgoodvisibilityor light.Alwaysbe
sureofyourfootingandkeepafirm holdonthe handles.
o Do notoperatethismachineon agravelsurface.
o Do notoperatethismachinewhileundertheinfluenceof alcoholor
drugs.
o Mufflerand enginebecomehotandcancausea burn. Donottouch.
o Neverpickupor carrymachinewhilethe engineisrunning.
MAINTENANCE & STORAGE
, Nevertamperwith safetydevices.Checktheirproperoperation
regularly.
o Checkboltsandscrewsforpropertightnessatfrequentintervalsto keep
the machinein safeworkingcondition.Also,visuallyinspectmachinefor
anydamageand repair,if needed.
o Beforecleaning,repairing,or inspecting,stoptheengineand make
certainthe impellerand allmovingpartshavestopped.Disconnectthe
sparkplugwireandgrounditagainstthe engineto preventunintended
starting.
o Donotchangethe enginegovernorsettingsor overspeedthe engine.
Thegovernorcontrolsthe maximumsafeoperatingspeedofthe engine.
o Maintainor replacesafetyand instructionlabels,asnecessary.
o Followthismanualforsafeloading,unloading,transporting,andstorage
ofthis machine.
o Neverstorethe machineorfuelcontainerinsidewherethere isanopen
flame,sparkor pilotlightsuch asa waterheater,furnace,clothes dryer,
etc.
o Alwaysrefertothe operator'smanualfor properinstructionson
off-seasonstorage.
o Ifthefueltank hasto bedrained,dothis outdoors.
o Observeproperdisposallawsandregulationsfor gas, oil,etc.to protect
the environment.
Do not modify engine
Toavoidseriousinjuryor death,do notmodify'enginein anyway.Tampering
withthegovernorsettingcanleadto arunawayengineandcauseitto operate
at unsafespeeds.Nevertamperwithfactorysettingofenginegovernor.

Thispage left intentionallyblank.
6

TOAVOID SERIOUSiNJURY
READ O PERATOR_S MANUAL
KEEP HANDS OUT OF UNLET AND DUBCHARGE OPENUNGS WHILE MACNUNE
USRUNNUNG_ ROTATUNO BLADES ARE UNSIDE
TURN ENGUNEOFF AND ALLOW UMPELLERTOCOME TO COMPLETE STOP /; J;
BEFORE REMOVING BAG,
DO NOTATTEMPTTO CLEAR A CLOGOR JAMWUTB THE ENGINE RUNNING
DO NOT OPERATE DN,T WITHOUT BAG OR OPT,ONAL RLOWER CHUTE ,N _ :_PLACE,
DO NOr B_ND OF_'A LKUNFRONTOF _WER CNLrrEOR AiM _ BYSTANDER& --
KEEP HANDS OUT OF DISCHARGE OPENING.
.DO NOT STAND OR WALK IR FRONT OF
DISCRARGE OPEninG OR AiM IT AT
BYSTARDER& OBJECTS TRROWR ORT OF
CHUTE CAR CAUSE PER_RAL IRJRRY
,, KEEP CHimER ARI) OTHERS AWAY s 3o 27
7

IMPORTANT:Thisunitisshippedwithoutgasolineoroil in theengine,
Becertaintoserviceenginewithgasolineandoil asinstructedinthe
Operationsectionofthis manualbeforeoperatingyourmachine,
NOTE:Referencetorightand lefthandsideoftheYardVacuumis
observedfromtheoperatingposition,
OPENmNG CARTON
1, Cuteachcornerofthecartonverticallyfromtopto bottom,
2, Removeall looseparts,
3, Removeloosepackingmaterial,
REMOVmNG UNmT FROM CARTON
1, Liftunitfromthereartodetachitfromunderlyingcartonmaterial
androll unitoutofcarton,
2, Checkcartonthoroughlyforanyotherlooseparts,
NOTE:Makesurenottocrimpcanes whileremovingloosepartsor
theentireunitfromthecarton,
LOOSE PARTS mNCARTON
(See Figure 1)
, UpperandLowerHandle
Bag
• BlowerChute
• SafetyGlasses
, EngineOil(Maybe locatedin bag)
• Operator'sManual
ff
_UpperHandle
Wing Nut
Star Knobs
Carriage
Bolts
Carriage
Wing Nuts Screws
Bag BlowerChute
SafetyGlasses Bottleof EngineOil
Operator'sManual
Figure1
J
8

ATTACHING THE HANDLE
1, Removethe hairpinclipsfromthehandlebracketsandremove
thecarriagescrewsandwingnutsfromthelowerhandle,
a, Placethebottomholesin lowerhandleoverthepinson the
handlebracketsandsecurewith hairpinclips,SeeFigure2,
b, insertcarriagescrewsthroughupperholein lowerhandle
fromthe insideandsecurewithwingnuts,SeeFigure2,
2, a, Unfoldtheupperhandleuntilitalignswith lowerhandle,
Makesuretheropeguideisonthe rightsideof upperhandle,
SeeFigure3,
I_,IPORTANT:Makesurethecablesareroutedoutsidethe lower
handle,Also,donotcrimpthecableswhileliftingupthehandles,
b, Securethetwo handlesbytighteningthestar knobs
(carriageboltsmustbeseatedproperlyintothehandle),See
Figure3,
3, Loosenthewingnutthat securestheropeguidetotherightside
of upperhandle,
a, Pullthestarterropeoutoftheengineslowly,SeeFigure4,
b, S@thestarterropeintotheropeguide,
c, Tightenthewingnut,SeeFigure4,
f
f
f
Figure2
Figure3
J
J
9
Figure4
J

f
\
\
\
Figure5
ATTACHING THE BAG
1, Graspbaghandb withone handandslidelockingrodon
mountingbracketwithotherhandtowardengine,Usetheendof
mountingbracketasbveragewhenslidingthelockingrod,
2, Slipbagovertherimofthedischargeopeningandrelease
lockingrodtosecurebagin place,SeeFigure5,
3, Snapbagcliptothetopofthe lowerhandb,
4, Placethelowerstrapsonthebagoverthetopof lowerhandb,
hookingthemon thestuds,SeeFigure6,
NOTE:Thebag/chuteswitchbuttonattachedtothemountingbracket
mustbefullydepressedbythetip offronttabon baghandb when
securingthebagorenginewillnotstart,
J
Figure6
J
10

ATTACHING THE BLOWER CHUTE f- -4\
NOTE:Thebagmustberemovedbeforeinstallingtheblowerchute,
1, Graspblowerchutewithonehandandslidelockingrodon
mountingbracketwithotherhandtowardengine,Usetheendof
mountingbracketasleveragewhenslidingthelockingrod,See
Figure7,
2, Slipblowerchuteoverrimofdischargeopeningandrelease
lockingrodtosecurechutein place,asin Figure7,
3, Raisethenozzleheighttothehighestsettingwhenusingthe
blowerchute,Referto nozzleheightadjustmentinthe next
section,
NOTE:Thebag/chuteswitchbuttonattachedtothe mountingbracket
mustbefullydepressedbythetipoffronttabontheblowerchuteor
enginewillnotstart,
NOZZLE HEmGHT ADJUSTMENT
The nozzlecanbeadiustedtoanyfivepositions,rangingfrom5/8"
to4 1/8"groundclearance,Thenozzleheighthastobe adiusted
accordingtoyardconditions,
1, Depressnozzleheightadiustmentlevertowardswheel See
Figure8,
2, Movetheheightadiustmentleverforwardor backwardtoadiust
thenozzleupwardsor downwards,Makesurebothleversarein
thesameposition,
3, Releaselevertowardsdeck,
NOTE:Ingeneral,raisethenozzleheighttovacuumathick layerof
leavesortooperatewiththeblowerchute,Lowerthenozzleheightfor
smoothersurfaces,
f
Figure7
Figure8
Y
11

Bag ThrottleControl ChokeControl
Starter
Handle
Bag Handle
Fiii
Fiii
Blower
Chute
Chippew
Chute
NozzleHeight
Adjustment Lever
Nozzle
Figure9
Nowthatyouhavesetup youryardvacuumforoperation,get
acquaintedwith itscontrolsand features,Thesearedescribedbelow
andillustratedon thispage,Thisknowledgewillallowyoutouseyour
newequipmenttoits fullestpotential
Theoperationofanyyardvacuumcanresultinforeignobiectsbeing
thrownintotheeyes,whichcandamageyoureyesseverely,Always
wearthesafetyglassesprovidedwiththis unitor eyeshblds while
operatingor performinganyadiustmentsor repairsonit,
CHIPPER CHUTE
Allowstwigsandsmallbranchesupto1=1/2"indiameterto befedinto
theimpellerforchipping,SeeFigure9,
NOZZLE
Yardwastesuchas leavesor pineneedbscanbevacuumedup
throughthenozzb forshredding,
BAG
Colbcts shreddedmaterialfedthroughthechipperchuteorvacuumed
throughthenozzle,
BLOWER CHUTE
Whenattachedto unit,theblowerchuteis usedtodischargeyard
wastesuchashaves,pineneedle,or smalltwigsacrossyard,
BAG HANDLE
Usedtograspbagin ordertoassistinattaching,removing,and
emptyingbag,SeeFigure9,
NOZZLE HEmGHT ADJUSTMENT LEVER
Usedtoadiustthenozzb groundcbarance rangingapproximately
from5/8" to4 1/8",
Meets ANSi Safety Standards
CraftsmanYardVacuumsconformtothesafetystandardoftheAmericanNationalStandardsinstitute(ANSI).
12

THROTTLE CONTROL
This levercontrolstheenginespeedandstopfunction,Throughthree
separatepositionson thebverfromleft toright,theoperationisas
follows:
Start/Run Slow/Idle EngineOff
CHOKE CONTROL
Thechokecontrolisusedtochokethecarburetorandassistinstarting
theengine,
STARTER HANDLE
Usedto starttheengine,
GAS AND OIL FILL-UP
OH (one bottle shipped with unit)
First Time Use
1, Removeoil filldipstick,
2, WiththeYardVacuumonbvel ground,usea funneltoempty
entirecontentsofoil bottb providedintotheengine,
3, Replaceoil filldipstickandtighten,
Subsequent Uses
Onlyusehighqualitydetergentoil ratedwithAPIserviceclassification
SF,SG,or SH,Selecttheoil'sSAEviscositygradeaccordingtothe
expectedoperatingtemperature,Followthechartbelow,
r6'_6older_,_ 32°F
Oil Viscosity Chart
Althoughmulti-viscosityoils(5W30,10W30,etc,)improvestarting
incoldweather,theywillresultinincreasedoil consumptionwhen
usedabove32°RCheckyourengineoil bvel morefrequentlytoavoid
possibleenginedamagefromrunninglowonoil
1, Checktheoil levelmakingcertainnottorubthedipstickalongthe
insidewallsoftheoil filltube,Thiswouldresultin afalsedipstick
reading,RefilltoFULLmarkondipstick,ifnecessary,Capacity
isapproximately18oz,Overfillingwillcausetheenginetosmoke
profuselyandwillresultin poorengineperformance,
2, Replaceoil filldipstickandtighten,
3, Keepoil levelatFULL,Runningtheenginewithtoolittleoilcan
resultinpermanentenginedamage,
Useextremecarewhenhandlinggasoline,Gasolineisextremely
flammabbandthevaporsareexplosive,Neverfuelmachineindoors
or whib theengineishotor running,Extinguishcigarettes,cigars,
pipes,andothersourcesof ignition,
Gasoline
1, Removefuelcapfromthefueltank,
2, Makesurethecontainerfromwhichyouwillpourthegasolineis
cleanandfreefromrustorforeignparticles,Neverusegasoline
that maybestab fromlongperiodsof storageinits container,
Gasolinethat hasbeensittingforanyperiodlongerthanfour
weeksshouldbeconsideredstab,
3, Fillfueltankwithcban, fresh,unleadedregulargasolineonly,Do
notusegasolinecontainingMETHANOL,Replacefuelcap,
UseAlcoholbbndedfuels (calbdgasoholor usingethanolor metha-
nol)canattractmoisturewhichleadstoseparationandformationof
acidsduringstorage,Acidicgascandamagethefuelsystemofan
enginewhib instorage,
Toavoidengineproblems,thefuelsystemshouldbeemptiedbefore
storagefor30daysorlonger,Drainthegastank,starttheengine
andletit rununtilthefuelfinesandcarburetorareempty,Use
freshfuelnextseason,SeeSTORAGEInstructionsforadditional
information,
Neveruseengineorcarburetorcbaner productsinthefueltankor
permanentdamagemayoccur,
NOTE:Checkthefuellevelperiodicallyto avoidrunningoutofgaso-
linewhileoperatingtheYardVacuum,Ifthe unitrunsoutofgasasit
ischipping,it maybenecessarytounclogthedischargeareabeforeit
canbe restarted,RefertoSERVICEANDADJUSTMENTsection,
13

f
ThrottleControl
ChokeControl
J
Figure 10
Figure11
Whenmovingthrottbcontrolbver, becarefulof heatedsurfacesand
sharpedgeson mufflerguard,
TO START ENGINE
1, Attachsparkplugwireandrubberboottosparkplug,
2, Thebag/chuteswitchbuttonmustbefullydepressedbythetipof
fronttabon baghandbor blowerchuteforenginetostart,
3, Makesurebag/chuteswitchwireisconnectedtoengineand
groundedtomountingbracket,
4, Gastankshouldbefilled3/4 tofullbeforestarting,
5, Movethrottlecontrolto START/RUN(Rabbit)_ position,See
Figure10,
6, MovethechokecontrolI'_1 towardthethrottlecontroltochoke
theengine'scarburetor,(Awarmenginemaynotrequirechoking,)
SeeFigure10,
7, Standingbehindthe unit,graspstarterhandleand pullropeout
untilyoufeela drag,SeeFigure11,
8, Pulltheropewitha rapid,continuous,fullarmstroke,Keepa firm
gripon thestarterhandb,Lettheroperewindslowly,
9, Repeat,ifnecessary,untilenginestarts,Whenenginestarts,
movechokecontrolgraduallyawayfromthethrottlecontrol
10, ifenginefalters,movechokecontrolbacktowardthethrottb
controlandrepeatsteps7 through9, ,,_,,,,_
11, ALWAYSkeepthethrottlecontrolin theSTART/RUN_ posi_
tionwhenoperatingtheYardVacuum,
TO STOP ENGmNE
1, Movethrottb controlbvertoslow (turtb) _ position,
Wheneverpossible,graduallyreduceenginespeedbefore
stoppingengine,
2, Movethrottlecontrolbverto STOP orOFFposition,
3, Disconnectsparkplugwireandgroundittotheretainingpostto
preventaccidentalstartingwhib theequipmentis unattended,
14

TO EMPTY BAG
1, Unhookbagstrapsfromthelowerhandle,
2, Unsnapbagclipfromthetopoflowerhandle,SeeFigure12,
3, Graspbaghandlewithonehandand pulllockrodon mounting
bracketwithotherhandtowardenginetorelease,
4, Lift bagoff backofunit,
5, Twistthetwo buttonson thebackofthebagtounlockandempty
contents,SeeFigure13,Holdbaghandleandbagclipwhile
emptyingthecontents,
6, Compressbagopeningand foldinnerflapoveropening,
7, Foldouterflapoverinnerflapandinsertbuttonson thebag
throughmetaloutlets,SeeFigure13,
8, Twistthebuttonstolock bag,Placebagbackontounitas
instructedin theAssemblySection,
TO REMOVE BLOWER CHUTE
1, Graspblowerchutewithonehandand pulllockrodon mounting
bracketwithotherhandtowardenginetorelease,RefertoFigure
7 intheASSEMBLYsection,
2, Removeblowerchutefromovertherimofthedischargeopening,
Placebothhandsontopof upperhandletopushunitoveryardwaste,
Yardwastesuchasleavesandpineneedlescanbe vacuumedup
throughthenozzleforshredding,Aftermaterialhasbeenshredded
bytheflailbladesontheimpellerassembly,itwillbedischarged
intocatcherbagorthroughblowerchute,Donotattempttoshredor
chipanymaterialotherthanvegetationfoundin a normalyard(Le,
branches,leaves,twigs,etc,)Avoidfibrousplantssuchastomato
vinesuntiltheyarethoroughlydriedout, Materialssuchasstalksor
heavybranchesupto 1-1/2"indiametermaybefedintothechipper
chute,
Donotattempttoshred,chip,or vacuumanymateriallargerthan
specifiedonthemachineorin thismanual Personaliniuryordamag_
tothemachinecouldresult,
IMPORTANT:Theflailscreenislocatedinsidethehousinginthe
dischargearea,If theflailscreenbecomesclogged,removeandclean
asinstructedin theMaintenancesection,Forbestperformance,it is
alsoimportantto keepthechipperbladesharp,
Donotatanytimemakeanyadiustmentswithoutfirststopping
engineanddisconnectingsparkplug wire,
f
/
/
f
Figure12
Buttons
OuterFIaF
Figure13
Inner
Flap
J
J
15

Alwaysstopengineanddisconnectsparkplugwirebeforeperformin{
anymaintenanceoradiustments.Alwayswearsafetyglassesduring
operationor whileperforminganyadiustmentsor repairs.
GENERAL RECOMMENDATmONS
Alwaysobservesafetyrubs whenperforming
anymaintenance,
. Thewarrantyon thisyardvacuumdoesnotcoveritemsthat have
beensubiectedtooperatorabuseor negligence,Toreceivefull
valuefromwarranty,operatormustmaintaintheequipmentas
instructedhere,
. Someadiustmentswill havetobe madeperiodicallytomaintain
yourunitproperly.
Periodicallycheckall fastenersand makesurethesearetight.
ENGmNE MAINTENANCE
Checking the Spark Pmug
Cban sparkplugandresettheelectrodegapto0,020"atbast oncea
season;replaceevery100hoursofoperation,
• Cban areaaroundthesparkplugbase,Donotsandblastspark
plug,Sparkplugshouldbecbaned byscrapingorwirebrushing
andwashingwitha commercialsolvent,
• Removeand inspectthesparkplug,Checkgap tomakesureit is
setat,020",SeeFigure14,
. Replacethesparkplugifelectrodesarepitted,burned,or the
porcelainiscracked,
Servicing the Air Cleaner
Donotusepressurizedairor solventstocleantheair cleaner
cartridge.
Theair cleanerpreventsdamagingdirt, dust,etc,,fromenteringthe
carburetorandbeingforcedintotheengineandisimportanttoengine
lifeand performance,Theair cleanerconsistsof apbated filter,Never
runtheenginewithoutanaircbaner compbtelyassembled,
Cleanorreplacetheair cleanerevery25hoursofoperation.
1. Loosenscrewandtilt plastb housingcoveronsideofengine
down.SeeFigure15.
2. Removeair filterfromplastb housingcoverandreplacewith
cleanor newfilter.
3. Insertcover'stabsintoslotsin bottomofbase.
4. Tiltcoverupintoplaceandtightenscrew.
NOTE:If thefilter istornor damagedin anyway,replaceit.
f_ Electrode Porcelain
<------.020 inch(.51ram)gap
\
Figure14
Figure15
16

Check Engine OH
1, Stopengineandwaitseveralminutesbeforecheckingoillevel,
Withengineonlevelground,theoil mustbe toFULLmarkon
dipstick,
2, Removeoil filldipstickand wipecleanwithcloth,
3, Replaceand tightendipstick,Removeandcheckoil level,Level
shouldbeatFULLmark,
4, If needed,addoil slowly-recheck,Donotover%
5, Wipedipstickclean,replaceandtighten,Removeandcheckoil
level,Oil levelshouldbeatFULLlineon dipstick,
Donotoverfil,Overfillingwithoil maycausetheenginetonotstart,
or hardstarting,IfovertheFULLmarkon thedipstick,drainoilto
reduceoil levelto FULLmarkon dipstick,
Change Engine OH
, Onlyusehighqualitydetergentoil ratedwithAR service
classificationSF,SG,or SH,Selecttheoil'sSAEviscositygrade
accordingtotheexpectedoperatingtemperature,Refertoopera-
tionsectionforviscositychart,
, Changeengineoil afterthefirstfivetoeighthoursofoperation,
andeveryfifty hoursoreveryseasonthereafter,Changeoil every
twentyfivehourswhenoperatingengineunderheavyloador in
hightemperatures,
To Drain Oil
1, Drainthefuelfromthetankbyrunningtheengineuntilthefuel
tankisempty,
2, Disconnectsparkplugwireandkeepitawayfromsparkplug,
3, WithengineOFFbutstill warmremoveoil filldipstick,
4, Tipuniton itsside(sparkplugsideup)todrainthroughtheoil fill
tubeintoappropriatereceptacle,
Usedoilisa hazardouswasteproduct,Disposeofusedoilproperly,
Donotdiscardwithhouseholdwaste,Checkwithyourlocalauthori-
tiesor SearsServiceCenterforsafedisposal/recyclingfacilities,
5, Whenengineisdrainedofalloil, placeenginelevel,Refillwith
approximately18oz,of freshoil FilltoFULLlineon dipstick,Do
notoverfill,RefertoGasAnd Oil Fill-Up inOPERATIONsection,
6, Replaceoil filldipstickandtighten,
7, Replacesparkplugwirebeforestarting,
Clean Engine
, Dailyorbeforeeveryuse,cleangrass,chaffor accumulated
debrisfromengine,Keeplinkage,spring,andcontrolsclean,
Keepareaaroundand behindmufflerfreeofanycombustible
debris,
, Keepingenginecleanallowsair movementaroundengine,
• Enginepartsshouldbekeptcleantoreducetheriskofover-
heatingandignitionofaccumulateddebris,This isespecially
importantifcuttingtallgrass,
Donotusewatertocleanengineparts,Watercouldcontaminatefuel
system,Useabrushor drycloth,
Carburetor Adjustment
Thecarburetoronthisengineisnotadiustable,
Donotattemptto altertheenginespeedbytamperingwiththe
engine'sgovernorlinkage,Doingsocouldresultinseriouspersonal
iniuryanddamagetotheengine,TheengineRPMhasbeensetat
thefactory,
LUBRICATmON
• Wheels- Placea fewdropsof SAE30 oiloneachshoulderscrew
once a season,
• Nozzleheight adjustment levers- Lubricatenozzleheight
adjustmentleverswith lightoil
• Locking Rod-Lubricatethelockrodandcompressionsprings
whichattachtothemountingbracket,
CLEAN EQUmPMENT
CleantheYardVacuumthoroughlyaftereachuse,
, Washbagperiodicallywithwater,Allowto drythoroughlyin
shade,
, Iftheflailscreenbecomesclogged,removeandcleanas
instructedbelow,
NOTE:Cleaningwitha forcefulsprayofwateris notrecommendedas
itcouldcontaminatethefuelsystem,
Temperatureof mufflerand nearbyareasmayexceed150°F (65°C),
Avoidtheseareas,
Service Muffler
, Inspectmufflerperiodically,and replaceif necessary,Replace-
mentpartsforthemufflermustbethesameandinstalledinthe
samepositionastheoriginalparts,otherwisefirecanoccur,
17

F 't -"
REMOVING THE FLAIL SCREEN
If thedischargeareabecomesclogged,removetheflailscreenand
cleanareaasfollows:
1, Stoptheengine,Makecertainthechipper/shreddervacuumhas
cometoa completestop,
2, Beforeuncloggingthedischargechute,disconnect and ground
the spark plug wireto retaining pest,
3, Removethevacuumbagor blowerchutefromtheunitas
instructedin theOPERATIONsectionto obtainaccesstoflail
screen,
4, Removeself tappingscrewon rightsideofunitthatattachesto
theflailscreen,SeeFigure14,
5, Removehexscrewontopofrearhousingnearmountingbracket
andtheflangelocknutthatsecuresflailscreen,SeeFigure14,
6, Removeand cleanthescreenbyscrapingor washingwithwater,
SeeFigure15,
7, Reinstallthescreen,
f
Figure14
Figure15
18

SHARPENmNGOF{REPLACmNGCHIPPER
NOTE:Whentippingtheunit,emptytheoilandfueltankandkeep
enginesparkplugsideup,
1. Disconnect and ground the spark plug wireto retaining post.
2, Removebag assemblyor Newerchute,
3, Removethethreehexcapscrewsholdingthechipperchuteto
theupperhousing,SeeFigure16,
4, Removethefronthubcaps,flangelocknuts,frontwheels,and
wavewashersthatattachtothepivotarmassemblies,SeeFigure
17,
5, Removetheshoulderscrews,thrustwashers,andbellwashers
thatgothroughthepivotarmstothefrontsupportbrace,The
frontsupportbraceandlocknutcanberemovedatthistimeas
well,
6, Removethethreescrewson theupperhousingthatsecurethe
nozzlecover,SeeFigure18,
f
k.
f
jj
\
Figure16
.......front Support Brace andLock Nui
Pivot
BellWasher
Thrust Washer (\
Shoulder Screw
J
19
Wave
Washer
Lock Nut VV'heel
HubCap
Figure17
Figure18
J

7, Carefullyflit andsupporttheunitupto provideaccessunderneath
tothenozzlemountinghardwareand impeller,Removethethree
shoulderboltssecuringtheblackplasticlowerflailhousingtothe
lowerhousing,Referto Figure19,
8, Tilttopofblackplasticlowerflailhousingtowardtheengineto
remove,
9, Usinga 8/16"allenwrench,removetheflatheadcapscrewsthat
holdthechipperbladetotheimpeller,Thesescrewsareacces-
sibb throughtheopeningcreatedwhenthechipperchutewas
removedearlier,SeeFigure20,
10, Thenutson theflatheadcapscrewscanbereachedfrom
underneathusinga 1/2-inchsocket,universal,andextension,
SeeFigure21,
11, Replaceor sharpenchipperblade,Thebladecanbe sharpened
witha fib oron agrindingwheel
12, Whensharpeningblade,protecthandsbyusingglovesandfollow
theoriginalangleofgrind,
18, Reassembbbyperformingthepreviousstepsin theopposite
orderand mannerofremoval,
NOTE:Tightenbladescrewsto2SO-250 in-lbs,Makecertainchipper
bladeisreassembledwiththesharpedgefacingupward,
f
Black
Nozzle
f
............::
• / /
'i'i
,:: : .......... ...........
........... \
ShoulderScrews
Figure19
/i
Fiat HeadCa Screws
Chipper Blade
Figure20
J
f
Nuts
Impeller _\
\
2O
Figure21
J

MAINTENANCE SCHEDULE
Beforeperforminganytypeofmaintenance/service,disengageall 1
controlsandstoptheengine,Waituntilallmovingpartshavecometo
a completestop,Disconnectsparkplugwireandgrounditagainstthe
enginetopreventunintendedstarting,Alwayswearsafetyglassesduring1
operationorwhileperforminganyadiustmentsorrepairs, J
Followthemaintenanceschedulegivenbelow,Thischartdescribes
serviceguidelinesonly,UsetheServiceLogcolumnto keeptrackof
completedmaintenancetasks,Tolocate the nearestSearsService
Centeror to schedule service, simply contact Searsat
loS00o4oMYoHOME®.
EachUse
1st5=8 hours
25 hours
50 hours
Annuallyor 100hours
BeforeStorage
uUnderheavyloador inhightemperatures
....! _:_
1, Engineoil level
2, Looseor missinghardware
3, Unitandengine,
1, Engineoil
1, Engineoilt
2, Aircleaner
3, Controllinkagesand pivots
1, Engineoil
1, Sparkplug
1, Fuelsystem
1, Check
2, Tightenorreplace
3, Clean
1, Change
1, Change
2, Cleanor replace
3, Lubewithlightoil
1, Change
1, Clean,replace,re=gap
1, Runengineuntilitstopsfromlackof
fuelor addagasolineadditivetothe
gasin thetank,
21

Neverstoreyardvacuumwithfuelin tankindoorsor in poorly
ventilatedareaswherefuelfumesmayreachan openflame,spark,
or pilotlightasona furnace,waterheater,clothesdryer,or gas
appliance,
PREPARING THE ENGmNE
Forenginesstoredover30 days:
1, Topreventgumfromformingin fuelsystemor oncarburetor
parts,runengineuntilitstopsfromlackoffuelor adda gasoline
additivetothegasinthetank,ifyouusea gasadditive,runthe
engineforseveralminutestocirculatetheadditivethroughthe
carburetor--afterwhichtheengineandfuelcanbestoredupto
six months,
2, Whib engineisstillwarm,changetheoil
3, Removesparkplugand pourapproximately1 oz,(30 ml)ofclean
engineoil intothecylinder,Pulltherecoilstarterseveraltimesto
distributetheoil,andreinstallthesparkplug,
4, Cban engineofsurfacedebris,
PREPARING THE YARD VACUUM
Whenstoringtheyardvacuuminan unventilatedor metalstorage
shed,careshouldbetakentorustproofthenon-paintedsurfaces,
Usinga lightoil orsilicone,coattheequipment,especiallyany
springs,bearings,andcabbs,
Removealldirt fromexteriorofengineand equipment,
Followlubricationrecommendations,
Storeequipmentin a clean,dryarea,Donotstoreinanarea
whereequipmentispresentthatmayusea pilotlightor hasa
componentthatcancreatea spark,
22

Beforeperforminganytypeofmaintenance/service,disengageall
controlsandstoptheengine,Waituntilallmovingpartshavecometo
acompletestop,Disconnectsparkplugwireandgrounditagainstthe
Ienginetopreventunintendedstarting,Alwayswearsafetyglassesduring
_operationorwhileperforminganyadiustmentsor repairs,
Thissection addresses minor service issues.To locatethe nearest SearsService Center or to schedule service, simply contact Sears
at 1-800-4-MYoHOME®.
Enginefailstostart
Enginerunserratically
1, Throttlelevernotin correctstartingposition
2, Chokenotin ONposition
3, Sparkplugwiredisconnected
4, Faultysparkplug
5, Fueltankemptyorstalefuel
6, Cannotpullrecoilcord
7, Safetyswitchnotdepressed
8, Safetyswitchwireisnotconnectedto
engineor notproperlygrounded
1, UnitrunningonCHOKE
2, Sparkplugwireloose
3, Stalefuel
4, Waterordirt infuelsystem
5, Dirtyair cleaner
6, LowengineRPM
7, Carburetoroutofadiustment
1, Engineoillevellow
2, Airflowrestricted
Engineoverheats
Enginehesitatesat highRPMs 1, Sparkpluggap settooclose 1,
Engineidlespoorly 1, Fouledsparkplug 1,
2, Dirtyair cleaner 2,
Excessivevibration 1, Loosepartsor damagedimpeller 1,
Unitdoesnotdischarge 1, Dischargeareaclogged 1,
Rateofdischargeslows
considerablyorcompositionof
dischargedmaterialchanges
2, Foreignobiectlodgedin impeller
3, LowengineRPM
4, Vacuumbagisfull
1, LowengineRPM
2, Chipperbladedull
,,,,_{:,W_1__
1, Movethrottleleverto START/RUNposition,
2, MoveCHOKEtoONposition,
3, Connectwiretosparkplug,
4, Clean,adiustgap,or replace,
5, Filltankwithclean,freshgasoline,
6, Obstructionlodgedin impeller,Disconnectspark
plugwireandremovelodgedobiect,
7, Safetyswitchmustbedepressedbythefronttabon
the baghandlewhensecuringthebag,
8, Connectsafetyswitchwiretoengineconnectorand
groundtomountingbracket,
1, MovechokelevertoOFFposition,
2, Connectandtightensparkplugwire,
3, Filltankwithfreshgasoline,
4, Drainfuel Refillwithfreshfuel
5, Cleanor replaceaircleanerfilter,
6, Alwaysrunengineatfullthrottle,
7, ContactyourSearsParts&RepairCenter,
1, Fillenginewithproperamountand typeofoil
2, Cleangrassclippingsanddebrisfromaroundthe
engine'scoolingfinsandblowerhousing,
Removesparkplugandadiustgap,
Replacesparkplugandadiustgap,
Replaceair cleanercartridge,
Stopengineimmediatelyanddisconnectsparkplug
wire,ContactyourSearsParts& RepairCenter,
Stopengineimmediatelyanddisconnectsparkplug
wire,Cleanflailscreenandinsideofdischargeopera
ing,
2, Stopengineanddisconnectsparkplugwire,Remove
lodgedobiect,
3, Alwaysrunengineatfullthrottle,
4, Emptybag,
1, Alwaysrunengineatfullthrottle,
2, Replacechipperbladeor contactyourSearsParts&
RepairCenter,
23

Yard Vacuum -- Model No. 247.770120
\
\
\
\
\
\
\.
* Impeller (719-0530A) cannot be
ordered separately•To order the
impeller, entire assembly (681-0152)
must bepurchased,
[]
@.
24

Yard Vacuum -- Model No. 247.770120
1 725q700 SwitchCover
2 725-3166 SafetySwitch
3 710-0224 HexWasherScrew,#10q6 x,50
4 629-0920A WireHarness
5 731q613 SafetySwitchCover
6 714-0104 CotterPin
7 731q905A NozzleCover
8 732-0962 CompressionSpring
9 781-0778A MountingBracket
10 7474153 LockRod
11 712-04063 IFlangeLockNut,5/16q8
12 736-0607 ExternalLockWasher5/16
13 710-0502A HexWasherScrew3/8q6 x 1,25
14 710q220 IScrew,#12q6x ,750
15 710-3195 HexCapScrew5/16q8x 4,5
16 710-3025 HexCapScrew5/16q8x,625
17 710-0607 IScrew,5/16q8x,500
18 710-0726 Screw,5/16q2x,75
19 710q054 HexScrew5/16-24x 1,0
20 781-0490 ChipperBlade
21 736-0119 LockWasher5/16
22 712-0411 HexLockNut5/16-24
23 681-0152 ImpellerAssembly
24 719-0329 FlailBlade
25 781-0735 PinClip
26 711q401 ClevisPin
27 715_0166 SpiralPin
28 736-0247 FlatWasher,375IDx 1,25OD
29 736-0217 LockWasher3/8
30 710-0818 HexCapScrew3/8-24x2,0
31 681-0154 ScreenAssembly
32 710q650 ShoulderScrew,,30x ,46
33 781-0721B LowerHousing
34 664-0094 BagAssembly
35 631-0083 ChuteAssembly
-- 723-0400 SafetyGlasses(NotShown)
25

Yard Vacuum -- Model No. 247.770120
A
/
\
26

Yard Vacuum -- Model No. 247.770120
1
2
3
4
5
6
7
8
9
10
11
12
13
14
15
16
681-0122
749-04172
720-0279
710-1205
720-04072
710-1174
749-04165
781-04068
711-1293
712-0397
710-0703
710-0726
781-04081
712-04065
714-0104
681-0155A
ChipperChuteAssembly
UpperHandle
Knob
EyeBolt
StarKnob,5/16-18
CarriageBolt
LowerHandle
UpperHousing
Studs
WingNut1/4-20
CarriageScrew1/4-20x,75
Screw,5/16-12x,750
RearWheelSupportBrace
FlangeLockNut,3/8-16
CotterPin
HandleBracketAssy,LH
681-0156A HndleBrktAssy,RH (NotShown)
17 631-0090 BlowerChuteAssembly
18 736-0105 BellWasher,401[Dx,870OD
19 734-2004A Wheel,8x2,125
20 738-1015 ShoulderScrew3/8-16
21 731-0981A Hubcap
22 781-04082 FrontWheelSupportBrace
23 736-0314 ThrustWasher,375IDx,70OD
24 738-1172 ShoulderScrew,,750IDx ,500
25 741-0751 HeightAdiustmentBearing
26 687-02094 PivotArmAssembly
27 736-0232 WaveWasher,531IDx,781OD
28 720-0426 HeightAdiustmentKnob
29 732-1026 SpringLever
30 736-0741 BellWasher,760IDx,250D
27

Craftsman 6.5 H.P. Engine IVlodel No. 124T02
For Yard Vacuum Model 247.770120
684
5O
383_
635
28
J
741 i
20@
306

Craftsman &5 H.P. Engine Model No. 124T02
ForYard Vacuum Model 247.770120
425
968
668
188
445
443_
843
%
365
977 CARBURETOR
GASKET SET
163_137_
633A S
633 @
276@
121 CARBURETOR OVERHAUL KiT
633A ®
633 @
276 @ 127 (_
29_ 970%
692 I
1o4
276 @
29

Craftsman &5 H.P. Engine Model No. 124T02
For Yard Vacuum tVlodel 247.770120
358 ENGINE GASKET SET
3© 20@ 842_
163
304
334_
305
23
670@ 190_
1 1036 EMiSSiONS LABEL ]
65
58
592_
689 _C_
456 _
597 _
6O
3O

Craftsman 6.5 H.P. Engine Model No. 124T02
ForYard Vacuum Model 247.770120
1 697322 CylinderAssembly
2 399269 Kit-Bushing/Seal
3 299819St SeaFOil(MagnetoSide)
4 493279 Sump-Engine
5 691160 Head-Cylinder
7 692249t Gasket-CylinderHead
8 695250 BreatherAssembly
9 696125 Gasket-Breather
10 691125 Screw(BreatherAssembly)
11 691781 Tube-Breather
12 692232t Gasket-Crankcase
13 690912 Screw(CylinderHead)
15 691680 Plug-OilDrain
16 694478 Crankshaft
20 399781St SeaFOil(PTOSide)
22 691092 Screw(EngineSump)
23 691987 Flywheel
24 222698S Key-Flywheel
25 791097 PistonAssembly(Standard)
791326 PistonAssembly(,020"Oversize)
26 791098 RingSet(Standard)
791324 RingSet(,020"Oversize)
27 691866 Lock-PistonPin
28 499423 Pin-Piston
29 499424 Rod-Connecting
32 691664 Screw(ConnectingRod)
32A 695759 Screw(ConnectingRod)
33 262651S Valve-Exhaust
34 262652S Valve-intake
35 691270 Spring-Valve(intake)
36 691270 Spring-Valve(Exhaust)
37
4O
43
45
46
48
5O
51
54
55
58
6O
65
78
81
95
97
104
108
109
117
118
121
125
127
130
133
134
137
159
163
694086
692194
691997
690548
691449
790450
497465
272199St
691650
691421
697316
281434S
690837
691108
691740
691636
696565
6912425
691182
498593
498981
494870
498260
792253
6944685
696564
398187
3981885
6939815*
691753
272653St5"
Guard-Flywheel
RetaineFValve
SlingeFGovernor/Oil
Tappet-Valve
Camshaft
ShortBlock
Manifold-Intake
Gasket-Intake
Screw(intakeManifold)
Housing-RewindStarter
Rope-Starter(CuttoRequiredLength)
Grip-StarterRope
Screw(RewindStarter)
Screw(FlywheelGuard)
Lock-MufflerScrew
Screw(ThrottleValve)
Shaft-Throttle
Pin-FloatHinge
Valve-Choke
Shaft-Choke
Jet-Main(Standard)
Jet-Main(HighAltitude)
Kit-CarburetorOverhaul
Carburetor
Plug-Welch
Valve-Throttle
Float-Carburetor
Valve-Needle/Seat
Gasket-FloatBowl
Bracket-AirCleanerPrimer
Gasket-AirCleaner
31

Craftsman 6.5 H.P. Engine IVlodel No. 124T02
For Yard Vacuum Model 247.770120
187 691050 Line-Fuel(CuttoRequiredLength)
188 693399 Screw(ControlBracket)
190 690940 Screw(FuelTank)
202 691829 Link-MechanicalGovernor
209 691291 Spring-Governor
222 692150 Bracket-Control
227 690783 ControlLever-Governor
276 2717165" SealingWasher
287 690940 Screw(DipstickTube)
300 692038 Muffler
304 493294 Housing-Blower
305 691108 Screw(BlowerHousing)
306 690450 Shield-Cylinder
307 690345 Screw(CylinderShield)
332 690662 Nut(Flywheel)
333 802574 Armature-Magneto
334 691061 Screw(ArmatureMagneto)
337 802592S Plug-Spark
356 496381 Wire-Stop
358 497316 EngineGasketSet
363 19069 FlywheelPuller
365 692524 Screw(Carburetor)
383 89838s Wrench-SparkPlug
404 690272 Washer(GovernorCrank)
425 690670 Screw(AirCleanerCover)
443 692523 Screw(AirCleanerPrimerBase)
445 491588S Filter-AirCleanerCartridge
455 791960 Cup-Flywheel
456 692299 Plate-PawlFriction
459 281505 PawI-Ratchet
505
523
524
525
529
562
584
585
592
597
601
6O8
613
615
616
617
621
633
633A
635
668
670
684
689
692
718
741
832
838
842
691251
495264
692296f
495265
691923
691119
697734
691879f
690800
691696
791850
497680
691340
690340
698801
270344St_*
692310
6913215"
6938675"
66538S
493823
692294
690345
691855
690572
690959
790345
499034
690664
691031f
Nut(GovernorControlLever)
Dipstick
Seal-DipstickTube
Tube-Dipstick
Grommet
Bolt(GovernorControlLever)
Cover-BreatherPassage
Gasket-BreatherPassage
Nut(RewindStarter)
Screw(PawlFrictionPlate)
Clamp-Hose
Starter-Rewind
Screw(Muffler)
Retainer-GovernorShaft
Crank-Governor
Seal-ORing(intakeManifold)
Switch-Stop
Seal-Choke/ThrottleShaft
Seal-Choke/ThrottleShaft
Boot-SparkPlug
Spacer
Spacer-FuelTank
Screw(BreatherPassageCover)
Spring-Friction
Spring-Detent
Pin-Locating
Gear-Timing
Guard-Muffler
Screw(MufflerGuard)
Seal-ORing(DipstickTube)
32

Craftsman 6.5 H.P. Engine Model No. 124T02
ForYard Vacuum Model 247.770120
843 691884 Sleeve-Lever
843A 691895 Sleeve-Lever
847 692017 Assembly-Dipstick/Tube
851 493880s Terminal-SparkPlug
868 697338 Seal-Valve
869 691155 Seat-Valve(intake)
870 690380 Seat-Valve(Exhaust)
871 262001 Bushing-Guide(Exhaust)
63709 Bushing-Guide(intake)
930 691919 Guard-Rewind
957 699985 Cap-FuelTank
966 496118 Base-AirCleanerPrimer
968 692298 Cover-AirCleaner
970 691669 Screw(AirCleanerPrimerBracket)
972 699374 Tank-Fuel
975 493640 Bowl-Float
976 694395
977 498261
1036
1058 MS3260
1059 692311
1210 498144
1211 498144
1329 126T02-
0005
Primer-Carburetor
Set-CarburetorGasket
Label-Emissions(Availablefroma Briggs&
Strattonauthorizedservicedealer)
Operator'sManual
Kit-Screw/Washer
Assembly-Pulley/Spring(Pulley)
Assembly-Pulley/Spring(Spring)
ReplacementEngine(Replacement
Enginelistedis notavailableintheState
of California,Repairwithindividualparts,
TransferRewindAssemblyfromoriginal
engineto replacementengine, Transfer
FlywheelAssemblyto replacementengine,
TransferGroundWireTerminaland/orstop
switchtoreplacementengine, Remove
694849andadd 694478,)
1330 272147 RepairManual
tlncluded in EngineGasketSet,Key,No,358
$ Includedin CarburetorOverhaulKit,Key,No, 121
*IncludedinCarburetorGasketSet,Key,No,977
33

(This page applicable inthe U.S.A. and Canada only.)
Sears, Roebuck and Co., U.S.A. (Sears}, the California Air Resources Board (CARB)
and the United States Environmenta! Protection Agency (U.S. EPA)
Emission Control System Warranty Statement (Owner's Defect Warranty Rights and Obligations)
EMISSIONCONTROLWARRANTYCOVERAGEISAPPLICABLETOCERT!- YEAR1997ANDLATERENGINESWHICHAREPURCHASEDANDUSED
FlEDENGINESPURCHASEDINCALIFORNIAIN1995ANDTHEREAF- ELSEWHEREINTHE UNITEDSTATES(ANDAFTERJANUARY1,2001 IN
TER,WHICHAREUSEDINCALIFORNIA,ANDTOCERTIFIEDMODEL CANADA).
California and United States Emission Control Defects Warranty Statement
TheCaliforniaAirResourcesBoard(CARB),U.S.EPAandSearsarepleased engineforthe periodsoftimelistedbelow,providedtherehasbeenno abuse,
toexplainthe EmissionControlSystemWarrantyonyourmodelyear2000and neglector impropermaintenanceofyoursmalloff-roadengine.Youremis-
latersmalloff-roadengine(SORE).InCalifornia,newsmalloff-roadengines sioncontrolsystemincludespartssuchas thecarburetor,aircleaner,ignition
mustbedesigned,builtand equippedto meettheState'sstringentanti-smog system,mufflerandcatalyticconverter.Alsoincludedmaybeconnectorsand
standards.Elsewhereinthe UnitedStates,newnon-road,spark-ignition otheremissionrelatedassemblies.Whereawarrantableconditionexists,Sears
enginescertifiedformodelyear1997and latermustmeetsimilarstandardsset will repairyoursmalloff-roadengineatnocosttoyouincludingdiagnosis,parts
forthbythe U.S.EPA.Searsmustwarranttheemissioncontrolsystemonyour and labor.
Sears Emission Control Defects Warranty Coverage
Smalloff-roadenginesarewarrantedrelativeto emissioncontrolpartsdefects partonyourengineisdefective,the partwillbe repairedor replacedbySears.
fora periodofoneyear,subjecttoprovisionssetforthbelow.Ifanycovered
Owner's Warranty Responsibilities
Asthe smalloff-roadengineowner,youareresponsiblefor theperformanceof provedmodifications.Youareresponsiblefor presentingyoursmalloff-road
therequiredmaintenancelistedinyourOperatingandMaintenanceInstruc- engineto anAuthorizedSearsServiceDealeras soonas aproblemexists.The
tions.Searsrecommendsthatyouretainallyourreceiptscoveringmaintenance undisputedwarrantyrepairsshouldbecompletedina reasonableamountof
onyoursmalloff-roadengine,butSearscannotdenywarrantysolelyforthe time,notto exceed30 days.Ifyouhaveanyquestionsregardingyourwarranty'
lackofreceiptsorforyourfailuretoensuretheperformanceofallscheduled rightsand responsibilities,youshouldcontactaSearsServiceRepresentative
maintenance.Asthe smalloff-roadengineowner,youshouldhoweverbe at 1--800--469--4663.Theemissionwarrantyisadefectswarranty.Defectsare
awarethat Searsmaydenyyouwarrantycoverageifyoursmalloff-roadengine judgedon normalengineperformance.Thewarrantyis notrelatedto anin-use
ora parthasfaileddueto abuse,neglect,impropermaintenanceor unap- emissiontest.
Sears Emission Control Defects Warranty Provisions
ThefollowingarespecificprovisionsrelativetoyourEmissionControlDefectsWarrantyCoverage.It isin additionto theSearsenginewarrantyfor non-regulated
enginesfoundin theOperatingandMaintenanceInstructions.
1. WarrantedParts 3. NoCharge
Coverageunderthiswarrantyextendsonlytothe partslistedbelow(the Repairor replacementof anyWarrantedPartwill beperformedatno
emissioncontrolsystemsparts)tothe extentthesepartswerepresenton chargetothe owner,includingdiagnosticlaborwhichleadstothe
theenginepurchased, determinationthataWarrantedPartis defective,ifthe diagnosticworkis
a. FuelMeteringSystem performedatanAuthorizedSearsServiceDealer.Foremissionswarranty
oColdstartenrichmentsystem servicecontactyournearestAuthorizedSearsServiceDealeraslistedin
oCarburetorand internalparts the "YellowPages"under"Engines,Gasoline,""GasolineEngines,""Lawn
oFuelPump Mowers,"or similarcategory.
b. Air InductionSystem 4. Claimsand CoverageExclusions
oAircleaner Warrantyclaimsshallbefiledin accordancewiththe provisionsofthe
oIntakemanifold SearsEngineWarrantyPolicy.Warrantycoverageshallbeexcludedfor
c. IgnitionSystem failuresofWarrantedPartswhicharenot originalSearspartsor because
ofabuse,neglector impropermaintenanceassetforth in theSears
oSparkplug(s) EngineWarrantyPolicy.Searsis notliabletocoverfailuresofWarranted
oMagnetoignitionsystem Partscausedbythe useof add-on,non-original,or modifiedparts.
d. CatalystSystem 5. Maintenance
oCatalyticconverter AnyWarrantedPartwhich is notscheduledfor replacementas required
oExhaustmanifold maintenanceor whichisscheduledonlyfor regularinspectiontothe effect
oAir injectionsystemor pulsevalve ofrepair or replaceas necessary"shallbewarrantedastodefectsfor the
e. MiscellaneousItemsUsedinAboveSystems warrantyperiod.AnyWarrantedPartwhichisscheduledfor replacement
oVacuum,temperature,position,timesensitivevalves
asrequiredmaintenanceshallbewarrantedasto defectsonlyfor the
andswitches periodoftime uptothe firstscheduledreplacementforthat part.Any
* Connectorsandassemblies replacementpartthat isequivalentin performanceand durabilitymay
2. LengthofCoverage be usedin theperformanceofanymaintenanceor repairs.Theowneris
Searswarrantstothe initialownerand eachsubsequentpurchaserthat responsiblefortheperformanceofall requiredmaintenance,as definedin
theWarrantedPartsshall befreefrom defectsin materialsandworkman- theSearsOperatingandMaintenanceInstructions.
shipwhichcausedthe failureofthe WarrantedPartsforaperiodofone 6. ConsequentialCoverage
yearfromthe datethe engineis deliveredto a retailpurchaser. Coveragehereundershallextendtothefailureofanyenginecomponents
causedbythefailureof anyWarrantedPartstillunderwarranty.
Inthe USAandCanada,a24hourhotline,1-800-469-4663,hasa menuofpre-recordedmessagesofferingyouenginemaintenanceinformation.
34

Look For Relevant Emissions E)urabHity Period and
Air hde× mnformation On Your Engine Emissions Labe_
Engines that are certified to meet the California Air Resources Board (CARB) Tier 2 Emission Standards must
display information regarding the Emissions Durability Period and the Air index. Sears, Roebuck and Co., U.S.A.
makes this information available to the consumer on our emission labels.
The Emissions Durability Period describes the number of hours of actual running time for which the engine is
certified to be emissions compliant, assuming proper maintenance in accordance with the Operating & Mainte-
nance Instructions. The following categories are used:
Moderate: Engine is certified to be emission compliant for 125 hours of actual engine running time.
Intermediate: Engine is certified to be emission compliant for 250 hours of actual engine running time.
Extended: Engine is certified to be emission compliant for 500 hours of actual engine running time.
For example, a typical walk-behind lawn mower is used 20 to 25 hours per year. Therefore, the Emissions
Durability Period of an engine with an intermediate rating would equate to 10 to 12 years.
The Air Index is a calculated number describing the relative level of emissions for a specific engine family. The
lower the Air Index, the cleaner the engine. This information is displayed in graphical form on the emissions label.
After Ju_y 1,2000, Look For Emissions Compliance Period
On Engine Emissions Compliance Labe_
After July 1, 2000 certain Sears, Roebuck and Co., U.SoA. engines will be certified to meet the United States
Environmental Protection Agency (USEPA) Phase 2 emission standards. For Phase 2 certified engines, the Emis-
sions Compliance Period referred to on the Emissions Compliance label indicates the number of operating hours
for which the engine has been shown to meet Federal emission requirements.
For engines less than 225 cc displacement, Category C = 125 hours, B = 250 hours and A = 500 hours.
For engines of 225 cc or more, Category C = 250 hours, B = 500 hours and A = 1000 hours.
This isa generic representation of the emission labeltypically found on a certified engine.
35

Deciaraci6n de garantia ...................... PSgina 36
Acuerdo de Protecci6n Para
Reparaciones ....................................... PSgina 37
Practicas operaci6n seguras ............... Paginas 38-39
Montaje ................................................ Paginas 40-43
Operaci6n ............................................ PSginas 44-47
Servicio y Mantenimiento .................... Paginas 48-53
Aimacenamiento fuera de temporada__ P_gina 54
Soluci6n de problemas ...................... Pagina 55-56
Etiquetas de seguridad ....................... Pagina 7
Lista de piezas .......................................... Pagina 24
Nqmero de servicio ..................... Cubierta posterior
Garant_a completa de un afio para la aspiradora para patios Craftsman
Esteequipoestb,cubiertoporunagarantiade unaho,sbmpre quesemantenga,lubriquey aiustedeacuerdoconlasinstruccionesdel presente
manualdeloperador.Durantcel ahode garanfia,siesteequiposufrccualqubrfallaproducidapordefectosen materiabso manodeobra,
DEVUCLVALOA SUCENTRODEPARTES& REPARAClONSEARSMASCERCANO,y ScarsIoreparar_sin ningOncargo.Elserviciode
garanfiaa domicilioestAdisponibleperoseaplicar_,uncargode traslado.
Esta garantia no cubre:
. Artfculosde duraci6nlimitadaqucsufrcndcsgastebaiocondicioncsnormabsde uso,tabs comobuiiasde cnccndido,purificadorcsde
aire,correasyfiltrosde aceite.
. Rcemplazoo reparacionesde Ilantascausadasporpinchadurasconobietosexteriorescomo,poreiemplo,clavos,espinas,palosovidrios,etc.
• Reparacionesnecesariasdebidoa abusodel operador,incluyendo,perosinlimitarsea ellos,losdahoscausadosporobietos,tabs como
pbdras, desechosde metalo trozosde maderade untamahodemasiadogrande,obietosque hacenimpactoque puedendoblarla
estructurao el cSrter,o sobreaccbrarel motor.
Reparacionesnecesariasdebidoa negligenciadeloperador,incluyendoentreotros,dahosmecb,nicoy electricoocasionadoporun
almacenamientonoapropiado,fallaporel usode aceitede gradoy/o cantidadnoapropiadao fallapot nodar mantenimientoal equipode
acuerdoconlasinstruccionescontenidasenel manualdel operador.
. Limpbzaoreparacionesal motor(sistemadecombustible)provocadasporuncombustibbcontaminadouoxidado(vieio).Engeneral,el
combustibbdebeutilizarseen unperiodono mayorde30 diasa partirdesuadquisici6n.
. Equiposutilizadosparafinescomcrcialcso dealquiler.
Estagarantfas61otendr&validezdurante90 diassiesteproductose utilizaencualquiermomentoparafinescomerciabso dealquiler.
Estagaranfias61otendrAvalidezmbntrasel productose utiliceen losEstadosUnidos.
Estagaranfialeotorgaderechoslegalesespecificos,peroustedpodriagozardeotrosderechosen raz6nde sulugarderesidencia.
Sears, Roebuckand Co.,Hoffman Estates,IL 60179
Caballosdefuerza:
Tipodeaceitedelmotor:
Capacidadde aceitedel motor:
Capacidadde combustible:
Buiias:
Separaci6nde lasbuiias:
6.5
SAE30
18onzas
1 1/22 cuartos
Champion@RJ19LM
.020"
Np3merode modelo ..........................................................
Np3merode serie ..............................................................
Fechade compra.............................................................
Registrearribael nOmerodel modelo,el nOmerode serb yla fecha
de compra
@SearsBrands,LLC 3(}

Felicitacionesper haberrealizadounaadquisici6ninteligente.El
productoCraftsman@que haadquiridoestAdisehadoyfabficado
parabfindarmuchosahosdefuncionamientoconfiable.Perocome
todoslosproductosa vecespuederequefirde reparaciones.Esen
esemementocuandoeldisponerde unAcuerdode protecci6npara
reparacionesle puedeahorrardineroy problemas.
Acontinuaci6nsedetallanlospuntosincluidosen elAcuerdo:
• Sertdcio experto prestadopernuestros12,000especialistasen
reparacionesprofesionales
• Servicio ilimitadosin cargo paralaspiezasyla manedeobraen
todaslasreparacionescubiertas
. Reemplazodel producto sinoes posiblerepararel producto
cubierto
. Descuentode 10%del precionormaldelservicioy delaspiezas
relacionadasconel mismoquenoest6ncubiertasperel acuerdo;
adem_,s,10%delprecionormalde lavefificaci6nde manten-
imientopreventive
• Ayudar_pida por tel_fono- asistenciatelef6nicaa cargode un
t6cnicode Searsparalosproductosquerequierenreparaci6n
a domicilio,adem_sdeunaprogramaci6nconvenienteparala
reparaci6n
Unavez adquiridoel Acuerdo,puedeprogramarelserviciocon
tans61orealizarunaIlamadatelef6nica,PuedeIlamaren cualquier
mementodeldia o dela nocheo programarunservicioen linea,
Searsdisponedem_,sde 12,000especialistasenreparaciones
profesionalesquetienenaccesoa m_sde4,5millonesdepiezasy
accesoriosde buenacalidad,Esteesel ripede profesionalismoen
el quepuedeconfiarparaque leayudeaprolongarlavidaOtildel
productorecientementeadquiridoen losahospervenir,iAdquierahey
suacuerdodeprotecci6nparareparaciones!
Se aplican determinadaslimitacionee y e×clusiones.Paraobtener
informaciSnadicional y precios Ilameal 1-800-827o6655.
Se_icio de instalaci6n de Sears
Sideseasolicitarla instalaci6nprofesionalde Searsdeaparatos
dom6sficos,dispositivosparaabfirportones,calentadoresde aguay
otrosarticulosdom6sticosimportantes,en losEstadosUnidosIlame
al 1-800-4-MY-HOME®.
37

Lapresenciadeestesfmboloindicaquesetratade
instruccionesimportantesde seguridadquesedeben
respetarparaevitarponerenpeligrosuseguridad
personaly/o materialy lade otraspersonas.Leay siga
todaslas instruccionesde estemanualantesde porter
enfuncionamientoesta maquina.Si no respetaestasinstruccionespodr[a
provocarlesionespersonales.Cuandoyea estesimbolo,ipresteatenci6na
la advertencia!
Su responsabilidad: Restrinia el uso de esta m_quina motorizada
a las personas que lean, comprendan y respeten las advertencias e
instrucciones que aparecen en este manual yen la m_,quina.
Estam;Jquinafueconstruidaparaser operadade acuerdoconlas reglas
deseguridadcontenidaseneste manual.AIigualquecon cualquiertipo
deequipomotorizado,un descuidooerrorporpartedeloperadorpuede
producirlesionesgraves.Estamaquinaescapazde amputarmanosy pies
y dearrojarobjetoscongranfuerza.Deno respetarlasinstruccionesde
seguridadsiguientessepuedenproducirlesionesgraveso lamuerte.
El escapedelmotorde esteproducto,algunosde suscomponentesy
algunoscomponentesdelvehfculocontieneno liberansustanciasqdmicas
queel estadodeCaliforniaconsideraque puedenproducircancer,defectos
de nacimientou otrosproblemasreproductivos.
CAPACITACION
o Lea,entienday cumplatodaslas instruccionesincluidasen lam;Jquina
yen los manualesantesde montarlay utilizarla.Guardeestemanual
enun lugarseguroparaconsultasfuturasy regulares,asi comopara
solicitarrepuestos.
o Familiar[cesecontodosloscontrolesy suoperaci6nadecuada.Sepa
c6modetenerla maquinay c6modesengranarloscontrolesrapidam-
ente.
o No permitanuncaque losniRosmenoresde 16afrosutilicenesta
m_.quina.Losnif_osde 16afrosy mas mayoresdebenleery comprender
las instruccionesdeoperaciony lasreglasdeseguridadcontenidasen
estemanual,y tambi6ndebensercapacitadosy estarsupervisadospor
unode los padres.
o Nuncapermitaquelosadultosoperenestamaquinasinrecibirantesla
instruccionapropiada.
o Mantengaalos transeOntes,ayudantes,mascotasy niRosal menosa
75piesde lamaquinamientrasestaoperando.Detengalamaquinasi
alguienentraen lazona.
Nuncaenciendaun motorenespacioscerradosoen unazonacon poca
ventilaci6n.Elescapedel motorcontienemonoxidodecarbono,un gas
inodoroy letal.
o No pongalasmanoso lospiescercadelas piezasrotatoriasoenlas
camarasdealimentaci6nni en laaberturadedescarga.Elcontactocon
el motorrotatoriopuedeproducirla amputacionde dedos,manosopies.
o Nuncatrate dedestaparlatomadealimentaci6nola aberturade
descarga,nitratedesacarovaciarla bolsadela aspiradora,nide
revisary repararla maquinamientrasel motorestaenmarcha.Apague
el motory esperehastaquetodaslas piezasmovilessehayandetenido
porcompleto.Desconecteelcablede labujfay pongalodemaneraque
hagamasacontrael motor.
PREPARATIVOS
o Inspeccioneminuciosamenteelareaderideutilizar;Jelequipo.Retire
todaslaspiedras,botellas,latasu otrosobjetosextrafiosquepuedanser
levantadosoarrojadoscausandolesionespersonalesodaRosalamaquina.
o Paraprotegerselosojosutilicesiempreanteojosoantiparrasde
seguridadmientrasopera la m;Jquinaomientrasla ajustao repara.Los
objetosarrojadosquerebotanpuedenlesionargravementelavista.
o Utilicezapatosdetrabajoresistentes,desuelafuerte,as[como
pantalonesy camisasajustados.Lasprendassueltaso lasalhajas
puedenquedaratrapadasen laspiezasm6viles.Nuncautilicela
mb.quinadescalzooconsandalias.Utiliceguantesde trabajodecuero
cuandoalimentematerialperel canaldela cortadora.
o Antesdeencenderla maquinacontrolequetodoslospernosy tornillos
est6nbienajustadosparacomprobarquelamaquinaseencuentraen
condicionessegurasdeoperaci6n.Ademas,realiceunainspecci6nvisual
dela maquinaaintervalosfrecuentesparacontrolarsilamismaesta
daFlada.
o Mantengaoreemplacelasetiquetasde seguridadeinstruccionessegOn
sea necesario.
o Paraevitarlesionespersonalesodares materialesseasumamente
cuidadosoal manipularlagasolina.Lagasolinaesaltamenteinflamable
y susvaporespuedencausarexplosiones.Sepuedelesionargrave-
mentesiderramagasolinasobreustedosobrela ropayaquesepuede
encender.Lavesela piely cambiesede ropadeinmediato.
o Utilices61orecipientesparagasolinaautorizados.
o Apaguetodosloscigarrillos,cigarros,pipasy otrasfuentesdecombusti6n.
o Nuncacarguecombustibleenla maquinaen unespaciocerrado.
o Nuncasaquelatapadelgas niagreguecombustiblemientrasel motor
estacalienteoenmarcha.
o Dejequeel motorseenfrieporIomenosdos minutosantesdevolvera
cargarcombustible.
o Nuncarecargueeltanquedecombustible.Lleneel tanquenom;Jsde
1/2pulgadapordebajode labasedelcuellodelfiltroparadejarespacio
paraladilataci6ndelcombustible.
o Vuelvaacolocarlatapade lagasolinay ajListelabien.
o Limpielagasolinaderramadasobreel motory elequipo.Trasladela
maquinaaotrazona.Espere5minutosantesdeencenderelmotor.
o Nuncaalmacenela m;Jquinao el recipientedecombustibleenun
espaciocerradodondehayafuego,chispasoluz piloto(porejemplo,
hornos,calentadoresdeagua,calefactores,secadoresde ropa,etc.)
o Parareducirel riesgodeincendiomantengalamaquinalimpiade
pasto,hojasy de acumulaci6ndeotrosdesechos.Limpielosderrames
de aceiteocombustibley saquetodoslosdesechosembebidoscon
combustible.
o Dejequela maquinaseenfr[eperIomenos5minutesantesde
guardarla.
38

OPERACION
, No pongalas manoso los piescercadelas piezasrotatoriasoenlas
camarasdealimentacionni en laaberturadedescarga.El contactocon
el motorrotatoriopuedepro@@ laamputacionde de@s,manosopies.
o Antesdeencenderlamaquinacompruebequeelcanal delacortadora,
latomade alimentaciony lacamaradecorteestanvaciasy sin
desechos.
o Inspeccioneminuciosamentetodoel materialque @seatriturary saque
losobjetosmetalicos,piedras,botellas,latasu otrosobjetosextra_os
quepuedenocasionarlesioneso da_arla maquina.
o Sielmotorgolpeaunobjetoextra_oosila maquinaempiezaaproducir
unsonidopococomOnounavibraci6n,@agueel motordeinmediato.
Dejequeel motorsedetengaporcompleto.Desconecteel cablede la
bujfa,pongalodemaneraquehagamasacontraelmotory sigaestos
pasos:
1.Inspeccionela ma.quinaparaversiesta da_ada.
2.Repareoreemplacelas piezasdaF_adas.
3.Controlesihaypiezasflojasy ajListelasparaasegurarquela maquina
funcionedemaneraseguray continua.
o No permitaque seacumulematerialprocesadoen lazona dedescarga.
El mismopuedeobstaculizarla descargaadecuaday provocarel
retornodel materialatravesdela aberturade alimentaci6n.
o No intentetriturarni picarmaterialde mayortama_oal especificadoen
la maquinaoen estemanual.Sepodr[anproducirlesionesoda_os.
o Nuncatrate dedestaparlatomadealimentaci6no la aberturade
descargamientrasel motorestaenmarcha.Apagueel motory espere
hastaquetodaslas piezasquesemuevense hayandetenidopor
completo,desconecteel cabledela buj[ay pongalodemaneraque
hagamasacontrael motorantesdesacarlosescombros.
o Nuncaoperela maquinasin que la bolsadela aspiradoray el canalde
descargaest@conectadosala maquinacomocorresponde.Nunca
vac[enicambiela bolsadela aspiradoramientrasel motorestb,en
marcha.El extremoconcierredela bolsadela aspiradoradebequedar
cerradotodoel tiempomientraslaopera.
o Nuncaoperela maquinasi el picodeingresoola uni6nopcionalparala
mangueranoestanconectadosala maquinaadecuadamente.Nunca
intenteconectarocambiarningunadeestas unionesmientrasel motor
estb,en marcha.
o Mantengatodoslosprotectores,desviadoresy dispositivosdeseguridad
ensuhgary en buenascondiciones.
o Mientrasalimentamaterialdentrode lamaquinamantengasu rostro
y sucuerpodetrasy haciaun costadodelcanalde lacortadorapara
evitarlesionesporretrocesosaccidentales.
o Nuncaopereestamaquinasin buenavisibilidadoihminaci6n.Siempre
debeestarsegurode queestabienafirmadoy sostengabienlas
manijas.
o Noopereestam_Jquinaensuperficiescongrava.
o Noopereestamaquinaestandobajolosefectosdelalcoholode
drogas.
o El silenciadory elmotorsecalientany puedenproducirquemaduras.No
lostoque.
o Nuncalevanteotransportela maquinacuandoel motorestaencendido.
MANTENJMJENTO Y ALMACENAMmENTO
, Nuncamanipulelosdispositivosde seguridaddemaneraimprudente.
Controleperiodicamenteque funcionende formaadecuada.
o Controlefrecuentementequetodoslospernosy tornillosestenbien
ajustadosparacomprobarque la maquinaseencuentraencondiciones
segurasdefuncionamiento.Ademas,realiceuna inspeccionvisualde
la maquinaparacontrolarsi la mismaestadaRaday reparelade ser
necesario.
o Antesde limpiar,repararoinspeccionarla maquina,detengael motor
y compruebequeel mismoy quetodaslas piezasm6vilessehallan
detenido.Desconecteel cabledela bujfay pongalodemaneraque
hagamasacontrael motorparaevitarqueseenciendademanera
accidental.
o Nocambiela configuraciondelreguladordelmotorni acelerede-
masiadoelmismo.El reguladorcontrolala velocidadmaximasegurade
operaci6ndelmotor.
o MantengaoreemplacelasetiquetasdeseguridadeinstruccionessegOn
sea necesario.
o Siga lasinstruccionesde estemanualparacargar,descargar,transpor-
tary almacenardemaneraseguraestamaquina.
o Nuncaalmacenelamb,quinao el recipientedecombustibleenun
espaciocerradodondehayafuego,chispaso hz pilotocomopor
ejemplo,calentadoresdeagua,hornos,secadoresderopa,etc.
o Consultesiempreel manualdeloperadorparaconocerlas instrucciones
adecuadasparaelalmacenamientofueradetemporada.
o Si debevaciareltanquedecombustible,hagaloal airelibre.
o Respetelas normasreferentesa la disposici6ncorrectay las reglamen-
tacionessobregas,combustible,etc.paraprotegerel medioambiente.
No modifique el motor
Paraevitarlesionesgraveso la muerte,no modifiqueelmotorbajoninguna
circunstancia.Si cambialaconfiguraci6ndelreguladorel motorpuededescon-
trolarsey operaravelocidadesinseguras.Nuncacambielaconfiguraci6nde
fabricadel reguladordel motor.
39

I[_IPORTANTE:Estaunidadseenvfasingasolinaniaceiteen el mo_
tor,AntesdeoperarlamAquinacargueel motorcongasolinayaceite
comoseindicaen el manualseparadodelmismo,
NOTA:Lasreferenciasa losladosderechoe izqubrdode laaspira-
doraparapatiossehacenobservandolam_quinadesdela posici6n
deoperaci6n,
APERTURA DE LA CAJA DE CART6N
1, Cortecadaunadelasesquinasdela caiavertbalmente,de la
partesuperiora la base,
2, Saquetodaslaspbzassueltas,
3, Quiteel materialde empaquesuelto,
C6MO SACAR LA UNIDAD DE LA CAJA
1, Elevelaunidaddesdela parteposteriorparasepararladel
materialde lacajaquequededebajo,yhagarodarlaunidad
fuerade lacaja,
2, Verifiquecuidadosamentesi enla cajaquedaalgunapartesuelta,
NOTA:AsegOresede nodoblarloscanes mientrasextraede lacaja
laspartessueltaso todala unidad,
PIEZAS SUELTAS DENTRO DE LA CAJA
(Vea la figura 1)
,, Maniiasuperiore inferior
• Bolsa
, Canaldesoplado
, Anteoiosde seguridad
• Aceiteparamotor(puedeestaren elinteriordela boBa)
, Manualdel operador
ff
S
GuJade Ia
cuerda
mariposa
j Manijasuperior
Cerroios
deCarro
Manija
\
X
Tuercade
mariposa
Tornillo deI
oarro
BotelIade aceite para motor
Anteojos deseguridad
Manualdel operador
Figura1
J
40

MONTAJE DE LA MANIJA
1. Saquelosbrochesdehorquillade lossoportesde lamaniia,y
saquelostornillosdelcarroylastuercasde ma@osadela maniia
inferior.
a. Sit@losaguierosinferioresde lamaniiainferiorsobre
lospernosde lossoportesde lamaniia,yasegOreloscon
brochesdehorquilla.Vealafigura2.
b. Insertelostornillosdel carrodesdeel ladode afueraa traves
delaguierosuperiorde la maniiainferiory asegOreloscon
tuercasde mariposa.Veala figura2.
2. a. Desplieguelamaniiasuperiorhastaquequedealineadacon
la maniiainferior.AsegOresequela gu[ade lacuerdaest6
situadaa laderechadela maniiasuperior.Veala figura3.
IMPORTANTE:AsegOresedeenrutarloscanes fuerade la maniia
inferior.Asimismo,noprenseloscanes mientraslevantalasmaniias.
3,
b. Parasuietarlasdosmaniiasaiustelasperillasde la manija
(lospernosdelcarrodebenestarcolocadosde forma
adecuadaen la maniia).Veala figura3.
Aflojela tuercademariposaquesostienelaguiade lacuerd
contrael ladoderechodela maniiasuperior,
a, Tirelentamentede lacuerdade arranqueparasacarladel
motor.Vealafigura4.
b. Deslicelacuerdadearranqueenlagu[a.
c. Aiustela tuercaa ma@osa.Veala figura4.
41
f-
f
L ••X
Figura 2
Figura 3
Figura 4
J
m
J

f
\
/ \ ",, ,,,, ,,# i ",,\\\\ ,,,y
Figura5
MONTAJE DE LA BOLSA
1, Sostengala maniiade labolsaconunamanoydeslicelavarilla
de seguridaddel soportede montaiehaciael motorconlaotra
mano,Useel extremodelsoportedemontaiecomopalanca
cuandodeslicela varillade seguridad,
2, Deslbela bolsaporencimadelbordede laaberturade descarga
y sueltela varilladeseguridadparaaiustarlabolsaen sulugar,
Veala figura5,
3, Unaelbrochede labolsaa presi6nconlapartesuperiorde la
maniiainferior,
4, Coloquelastirasinferioresde la bolsaporeneimade laparte
superiorde la maniiainferior,enganch_ndolasen lospernos,Yea
lafigura6,
NOTA:El bot6ninterruptorde bolsa/ canal,unidoa la mensulade
montaie,debequedarpresionadototalmenteporla puntadela aleta
delanterasituadaen lamaniiadela bolsaeuandoaiustedichabolsa,
o el motornoarranear_,
Figura6
J
42

INSTALAR EL CANAL DE SOPLADO f_ -_\
NOTA:hayqueretirarlabolsaantesde instalarel canalde soplado,
1, Tomeel canalde sopladoconunamanoydeslicelavarillade
seguridaddel soportede montajehaciael motorconlaotra
mano,Useel extremodelsoportede montaiecomopalanca
cuandodeslicelavarillade seguridad,Vealafigura7,
2, Desliceel canalde sopladoporencimadel bordede laabertura
dedescarga,ysueltelavarillade seguridadparaaiustarel canal
ensu lugar,
3, Aumentela alturadelpicoal m_ximocuandoutiliceelcanalde
soplado,Consultelasinstruccionesparaajustarlaalturadel pico
enla siguientesecci6n,
NOTA:Elbot6ninterruptordebolsa/ canalunidoa lamensulade
montajedebequedarpresionadototalmentepor lapuntade laaleta
delanterasituadaen el canaldesoplado,o elmotornoarrancar_,
AJUSTE DE LA ALTUFIA DEL PICO
Puedeaiustarel picoen seisposicionesquevarfandesde5/8"a 4
1/8"de distanciadelsuelo,DebeaiustarlaalturadelpicosegOnlas
condicionesdelpatio,
1, Oprimalapalancade aiustede laalturadel picohaciala rueda,
Vealafigura8,
2, Muevalapalancadeajustede alturahaciadelanteo haciaatrAs,
paramoverel picoarribao abajo,AsegOresede queambas
palancasestb<nen lamismaposici6n,
3, Liberela palancahaciala cubierta,
NOTA:en general,levantelaalturadel picoparaaspirarunacapa
gruesade hojaso parausarelcanaldesoplado,Baielaalturadel
picoparasuperficiesm_slisas,
f
Figura7
Y
Figura8
43

Control del
estrangulador
Control de
obturaciOn
Manija dei
arrancador
Boisa
Manijade la bolsa
Llenadode aceite
Llenadode
Canalde
sopladoe
Canalde la
cortadora
Palancade ajuste
de la altura del
pico
Palanca
Figura9
Ahoraqueyaha aiustadosuaspiradoraparapatiosparalaoperaci6n, DO LDA
familiarieeseconsuscontrolesyearaeterisficas,Estossedeserben Juntael materialtrituradoqueingres6a travesdelcanalde picadoo
yseilustranen estap_gina,Esteconocimientole permitir_ufilizarsu quefueaspiradoa trav6sdel pieoode la manguera,
nuevoequipoa sum_ximaeapaeidad,
AIoperarunacortadoratrituradorapuedeserqueobietosextrahos
seanarroiadosa losojosIoeualpuededaharlosgravemente,Utiliee
siemprelosanteoiosde seguridadprovistosconestaunidado
Iproteetoresparaoiosmientrasoperaymientrasrealizaaiusteso
[reparaciones,
CANAL DE LA CORTADORA
Permiteque lasramaspequeSasde hastalq/2" dedi_metroingresen
al motorparapicarlas,Vealafigura9,
PALANCA
Losdesechosqueseacumulanen lospatioscomoporeiemplohs hoias
olasaguiasdelospinossepuedenaspirarconelpbo parapicarlos,
CANAL BE SOPLADO
CuandoseIounea launidadelcanaldesopladoseutilizaparasoplaro
esparcirporlospatioslosdesechosqueseacumulanenlosmismoscomo
poreiemplolashoias,lasaguiasdelospinosolasramaspequehas,
MANmJA DE LA BOLSA
Seutilizaparatomarh bolsaparacolocarh,sacarlayvaciarla,Yealafigura9,
PALANCA DE AJUSTE DE LA ALTURA DEL
PmCO
Seutilizaparaajustarla distanciaentreel sueloy el picoquevarb
aproximadamentede 5/8"a 4 1/8",Vealafigura9,
Cumpie con tos est_ndares de seguddad de ANSi
LasaspiradorasparapatiosdeCraftsmancumpbnconlosestbadaresdeseguridaddelinstitutoestadounidensedeest_.ndaresnacionales(ANSt),
44

CONTROL DEL ESTRANGULADOR
Estapalancacontrolalavelocidaddelmotory lafunci6ndedetenci6n.
Mediantetresposiciones[ndependientesde lapalanca,de [zquierdaa
derecha a operaci6nserealizade lasiguienteforma:
2,
3.
Vuelvaacolocarlavarillade Ilenadode aceiteyaiOstela.
Mantengael n[velde ace[teen lamarcaFULL.S[poneel motor
en marchaconmuypocoaceitelepuedecausardahospermam
entes.
Arranque/ nento/ Motor apagado
marcha nenta
CONTROL DE OBTURACI6N
Elcontroldeobturaci6nseufil[zaparacebarel carburadoryayudara
queel motorarranque.
MANIJA DEL ARRANCADOR
Seutilizaparaencenderel motor.
LLENADO DE GASOUNA Y ACEITE
Aceite (se envia una boteHa junto con maunidad)
Primer uso
1. Saquela varilladel niveldeaceite.
2. Conla aspiradoraparapatiosal niveldel suelo,utiliceunembudo
paravadardentrodel motortodoel conten[dode la botellade
aceitesuministradaconla unidad.
3. Vuelvaa colocarla varillade Ilenadodeaceiteya]Ostela.
Usesposteriores
Usesolamenteun aceitedetergentedealtacalidadcuyaclasificaci6n
deservicioAPIseaSF,SGo SH.Seleccioneel gradode viscosidad
SAEdel ace[tesegOnla temperaturade operaci6nesperada.Cumpla
latablaqueaparecea cont[nuaci6n.
fr[o _ 32° _ M_s calient_
Tablade viscosidad delaceite .ji
Aunquelosace[tesdeviscosidadmOlt[pie(5W30,10W30,etc.)
meioranel encendidocuandoel dimaest,.fr[o,losmismos[ncremem
tanelconsumode aceitecuandoseusana m_sde 32°RCompruebe
el n[veldeace[teconmayorfrecuenc[aparaevitardares deb[doa que
el motortraba]econun n[veldeace[teba]o.
1. Compruebeel nivelde aceiteasegur_ndosequelavarilladel
n[veldeace[tenoroceconlasparedesinter[oresdeltubode
Ilenadodeace[te.Dehacerlosepuedeprodudrunalectura
falsade la var[lladeln[velde ace[te.Rellenehastala marcade
FULL(lleno)dela varilh delnivelde aceite,s[ esnecesario.La
capac[dadesdeaproximadamente18oz.ElIlenadoen exceso
hacequeel motoremanemuchohumoyqueel rendim[entodel
mismonoseabueno.
Tengaextremocu[dadocuandomanipulegasol[na.Lagasol[naes
altamente[nflamableysusvaporespuedencausarexplosiones.
Nuncacarguecombustibleenlamb,qu[naenun espaciocerrado
o cuandoel motorestb,cal[enteo en march&Apaguecigarrillos,
lcgarros,p pasy otrasfuentesde combust6n.
GASOUNA
1. Saquelatapadel combustibledeldep6sitodelmismo.
2. Verifiquequeel recipientedelquevaa verterlagasolinaeste
limpioy librede6xidoodeobietosextraRos.Nousenunca
gasolinaquepuedaestarvieiaperhaberestadoalmacenadaensu
recipienteporlargosperiodos.Lagasolinaquehaestadoestacio-
nadaperun per[odosuperiora cuatrosemanasdebeconsiderarse
v[eia.
3. Lleneel tanquede combustibles61ocongasol[nanormalsin
plomo,I[mp[ay fresca.Nousegasol[naquecontengaMETANOL.
Vuelvaacolocarlatapadecombustibleensulugar.
Loscombustiblesconmezclade alcohol(queseIlamangasohol,
o queufil[zanetanolo metanol)puedenatraerhumedad,Ioque
conducea laseparaci6ny formaci6nde b,cidosduranteel almace-
namiento.ElgasaddicopuededaRarel s[stemade combustibledel
motormientraslam_quinaest_almacenada.
Paraevitarproblemasconelmotor,sedebevaciarel sistemade
combustibleantesdealmacenarlam_quinadurante30 dhs om_s.
Vacieeltanquede nafta,enciendael motorydeielofuncionarhasta
quelaslineasde combustibley elcarburadorest6nvac[os.La
siguientetemporadausecombustiblefresco.ConsultelasInstruc-
c[onesde ALMACENAMIENTOs[desea[nformaci6nadicionaL
Nousenuncaproductosde limpiezaparamotoreso carburadores
enel dep6sitodecombustible,sepuedenocasionardares perma-
nentes.
NOTA:Verifiqueperi6dicamenteelnivelde combustibleparaevitar
quedarsesingasolinamientrasest,,operandolaaspiradorapara
patios.S[la unidadsequedasincombustiblemientrasest_triturando,
puederesultarnecesar[odestaparel _readedescargaantesdepoder
volvera encenderla.Consultela secci6nSERVlCIOY MANTEN-
IMIENTO.
45

f
.... Controldelestrangulador ---_----
6ontrol de obturaci6n
@
Figura !0
Figura11
Cuandomuevala palancadelcontroldel reguladortengacuidado
conlassuperficiescalientesylosbordesafiladosde la protecci6ndel
silenciador,
PARA ENCENDER EL MOTOR
1, Conecteel cabb de la bqia y la mangade gomaa la misma,
2, Elbot6ndelinterruptordebolsa/ canaldebequedarpresionado
totalmenteporlapuntadelaabtadelanterasituadaenlamanijadela
bolsaoenelcanaldesoplado,yaqueencasocontrarioelmotorno
arrancarb,,
8, Compruebequeelcabledelinterruptorde labolsa/ canalest6
coneetadoal motoryqueest6conectadoa tierramediantela
mensulademontaie,
4, EltanquedecombustibbdebeIbnarsea3/4deltotalantesde
arrancar,
5, Muevala palancade controldelestranguladora la posiei6n_
START/RUN(eneendido/ funcionamiento,representado
porunaliebre),Yeala figura10,
6, Muevael controldelobturadorhaciael controldelreguladorI1&l
paraobturarel carburadordel motor,(Siel motorestb.tibiola
obturaci6npuedenoset necesaria),Yeala figura10,
7, 8ituadodetMsde launidad,tomela maniiadelarrancadorytire
de lacuerdahastaquesientaun tir6n,Yealafigura11,
8, Tirede lacuerdademanerar@idaycontinua,Aprietebienla
maniiadelarraneador,Deiequelacuerdaseenrosquebntamente,
9, Repitaestepaso,deserneeesario,basraqueseenciendael mo-
tor,Cuandoseenciendeel motormuevael controldeobturaci6n
gradualmenteleiosdel controldelestrangulador,
10, 8i el motorfalla,muevael controldel obturadorhaeiaatMs,en
direcci6nal controldelestrangulador,y repitalospasos1a 9,
11, Mantenga8tEMPREel controldel estrangu_dorenposiei6n
START/RUN(encendido/ funeionamiento)_ mientrasopere
laaspiradoraparapatios,
PARA DETENER EL MOTOR
1, Elreguladorde movimientocontrolalapalancaparareducir_
lamareha(tortuga)de laposici6n,8iemprequeposible,graduaP
mentereduzcalaveloeidadde motorantesde pararel motor,
2, Muevalaspalaneasde controldel reguladora laposiei6n
STOP(detenci6n)u OFF(apagado),
8, Deseonecteel cablede la buiiade la buiiay col6queloa masa
contraelpostederetenci6nparaevitarqueseenebndaae-
cidentalmentemientrasno seestb.prestandoatenci6nal equipo,
46

DESCARGA DE LA BOLSA
1. Desenganchelastirasde labolsade la maniiainferior.
2. Suelteel brochede labolsaa presi6nde la partesuperiorde la
manijainferior.Veala figura12.
3. Tomela manijade labolsaconunamanoytiredela varillade
seguridaddel soportede montajehaciael motorconlaotramano
parasoltarla.
4. Elevelabolsafuerade laparteposteriorde la unidad.
5. Girelosdos botonesdela parteposteriordela bolsaparaabrirla
yvaciarel contenido.Veala figura13.Sostengala maniiayel
brochedela bolsamientrasvach el contenido.
6. Comprimalaaberturadelabolsaydonelaaletainteriorsobrela
abertura.
7. DoNelaaletaexteriorsobrelaaletainteriore [nsertelosbotones
de labolsaa trav6sdelassalidasmetb,licas.Veala figura13.
8. Girelosbotonesparacerrarlabolsa.Ubiquelabolsade nuevo
enla unidadcomose[ndicaen laSecci6ndeAsamblea.
EXTRACCKSN DEL CANAL DE SOPLADO
1. Tomeel canalde sopladoconunamanoytiredela varillade
seguridaddel soportede montaiehaciael motorconlaotramano
parasoltarlo.Consultelafigura7en la Secci6nde Asamblea.
2. Saqueelcanaldesophdoporencimadelbordedelaaberturade
descarga.
Coloqueambasmanosencimadelmangosuperiorparaempuiarlaunidad
sobreh basuradeyard&Eldesechoqueseacumulaenlospatioscomo
porejemplolashoiasylasagujasdelospinospuedenaspirarseatraves
delpicoparatriturarlos.Despuesquehatrituradoel materialconlashoias
dedesgranardelmontaiedelmotor,elmismoserb,descargadoa labolsa
colectoraoa travesdelcanaldesoplado.S61outilicelam_quinapara
trituraro picarelmaterial[ntegrantedelavegetaci6nqueseencuentra
enunpationormal(esdecir,ramas,hoias,ramaspequeRas,etc.)Evite
lasplantasfibrosascomopore]emplolasdetomateshastaqueest6n
totalmentesecas.Sepueden[ntroducirmaterialescomoporeiemplo
troncoso ramaspesadasdehasta1-1/2"dedi_metroenelcanalde la
cortadora.
No[ntentetriturar,picarn[aspirarmaterialde mayortamahoal
especificadoen lam_quinao en estemanualSepodrianproducir
lesioneso dahosa lam_quina.
f
/
/
\
\
Figura12
J
Buttons
IMPORTANTE:Lapantalladedesgranadoest_ubicadadentrode la
cajaen lazonadedescarga.S[setapala pantalladedesgranado,
s_quelay limpielacomose[ndicaenla secci6nde mantenimiento.
Paraobtenerelmejorresultadoes[mportantetambi6nmantener
afiladalahojade lacortadora.
Siempredetengael motorydesconecteel camede labuiiaantesde
real[zarcualqu[eraiuste.
47

2_
uridaddurantelaoperaci6no mientrasaiustao
reparaesteequipo,
RECOMENDACIONES GENERALES
Respetesiemprelasreglasde seguridadcuandorealicetareas
demantenimiento,
Lagaranfiadeestaaspiradoraparapatiosnocubreelementos
quehanestadosuietosal realusoo negligeneiadel operador,
Parareeibirel reemboBototaldela garanfia,eloperadordeber_
darmantenimientoal equipotalycomoseindicaen estemanual
AIgunosaiustes@ben serrealizadosperi6dicamenteparael
mantenimientoadecuadodela unidad,
Reviseperi6dieamentetodoslossuietadoresycompruebeque
est6nbienaiustados,
MANTENIMIENTO DE MOTOR
Servicio A La Bu)_a
Limpielabuiiayaiusteel espacioa 0,020"al menosunavezpor
estaci6n;sustituyacada100horasde la operaci6n,
• Arealimpiaalrededordela basede buiia, Noliie labuiia,Se
debenlimpiarlasbuiiasmedianteraspadoo talladoconcepillo
dealambrey lavadoconunsolventecomerciaL
. Quitee inspeccionelabuiia,Compruebeel huecoparaasegu-
rarsequeespuestoen ,020",Verla Figura14,
. Sustituyala buiiasiloselectrodessonpicados,quemados,o la
porcelanaesrajada,
Servicio Del Fiitro De Aire
Nouseairepresurizadoo solventesparalimpiarel cartuchode filtro
de aire,
Elfiltrode aireevitael ingresoal carburadorde sucbdad,polvo,etc,
periudieialesy evitaque losmismosseanintroducidosdentrodel mo-
tor,Adem_s,dichofiltroes importanteparala vidaOtilyel rendimiento
delmotor,Elfiltrodeaireconstade unfiltroplisado,Noponganunca
enfuncionamientoel motorsinhabermontadototalmenteel filtrode
aire,
Limpioosustituyenel filtrode airecada25 horasdela operaci6n,
1, Afloieeltornilloe inclinehaciaabaiolacubiertadelaloiamiento
depl_sticoenel lateraldelmotor,Yealafigura15,
2, Retireel filtroplisadode laeubiertadelaloiamientode plgsticoy
sustituyaporunfiltro limpioo nuevo,
3, Insertelasetiquetasde latapaen ranurasenel fondodela base,
4, Inclinehaciaarribalacubiertahastasuubieaci6ny aprieteel
tornillo,
NOTA:Siel filtroest_rotoo dahado,c_mbblo,
II
II
1. Espaciode0,020pulg(0,51ram)
2. Electrodo
3. Porcelana
Figura 14
f
\ \
\ \
\\ \
\\
Figura15
J
48

Compruebe El AceJte Del Motor
1. Detengael motory esperevariosminutosantesdeverificarel
niveldeaceite.Conel motorubbadoensuelopareio,elaceite
debeestaren lamarcaFULL(lleno)dela varilladel nivelde
aceite.
2. Saquela varilladel niveldeaceiteylimpielimpioconlatela.
3. Susfituyayaprbte lavarillade aceite.Quitey compruebeel nivel
delaceite.Elnb'eldeberiaestaren lasehalLLENA.
4. Desernecesario,ahadael petr61eodespacio- nuevocontrol.No
sobrellenar.
5. Limpielavarilladeaceitelimpia,sustituyayapretar.Quitey
compruebeel nkteldelaceite.Elniveldelaceitedeberiaestaren
la lineaLLENAenla varilladeaceite.
Nohagaoverfil.Elsobrellenoconel petr61eopuedehacerqueel
motornocombnce,o confuerzacombnzo.Sisobrela sehalLLENA
en la varilladeaceite,dreneel petr61eoparareducirel niveldel
aceitea lasehalLLENAenla varillade aceite.
Cambio Del Aceite Del Motor
Usesolamenteunaceitedetergentede altacalidadcuya
clasificaci6nde servbioAPIseaSE SGo SH. Sebccioneel
gradode viscosidadSAEdel aceitesegOnlatemperaturade
operacbnesperada.Consultelasecci6ndeoperaci6nparaverla
tablade viscosidad.
. Cambbel petr61eode motordespu6sde lascincoa ocho
primerashorasde laoperaci6n,y cadacincuentahoraso
cadatemporadaa partirde entonces.Cambbel petr6bocada
veintbincohorascuandomotordeoperacionesbajolacarga
pesadao entemperaturasaltas.
Como Vaciar El Aceite
1. Vacb elcombustibbdeltanquehacbndofuncionarel motor
hastaqueel tanquedecombustbb est6vacio.
2. Desconectela buiiaIoalambranyguardanbios de la buiia.
3. Conel motorLEJOSperotodaviasecalbntan quitanel petr61eo
Ilenanla varilladeaceite.
4. La unidadde puntaensulado (hdo de buiia)paradrenarporel
petr61eoIlenaeltuboenel recept_culoapropiado.
El petr6bousadoesundesechoarrbsgado.Elimineelpetr6bo
usadocorrectamente.Nodesecheconlabasurade lacasa.
CompruebeconsusautoridadesIocabso Chamuscael Centrode
Servbio parainstalacionesde disposici6n/reciclaieseguras.
5. Cuandoel motoresdrenadode todoel petr6bo, niveldemotor
de lugar.Recambioconaproximadamente18onz.de petr6bo
fresco.Llenesea la lineaLLENAenla varilladeaceite.No
sobrellenar.Refi6raseaGasyPetr6boLbnar en lasecci6nde
OPERACION.
6. Vuelvaa colocarla varillade IlenadodeaceiteyajOstela.
7. Sustituyael alambredebuiiaantesdelcomienzo.
La temperaturadel silendadorylasAreascercanaspuedesuperar
los1500F(650F). Eviteesaszonas.
Servicio AI Silenciador
Inspeccioneperi6dicamenteel silenciadoryreempl_celodeser
necesario.Losrepuestosparael silenciadordebenserel mismoe
instaladoen lamismaposici6nque laspartesoriginales,porotraparte
encenderpuedeocurrL
Limpieza Del Motor
Diariamenteo antesde cadauso,limpiehierba,bardao
escombrosacumuladosdel motor.Guardeencadenambnto,
primavera,y mandoslimpios.GuardeelAreaalrededory detrAs
del silenciadorsincuabsqubra escombroscombustibbs.
• El cuidadodel motorlimpiopermiteel movimbntoa6reoaired=
edordel motor.
= Laspartesde motordeberfanserguardadaslimpiasparareducir
el rbsgo de recalentarsey la ignbi6ndeescombrosacumulados.
Esteessobretodoimportantecortandola altahierba.
Nouseel aguaparalimpiarpartesde motor,El aguapodrfa
contaminarel sistemadecombustible,Useuncepilloo la telaseca,
Ajuste de Carburador
Elcarburadoren estemotornoesaiustable.
VelocJdad de Motor
Nointentecambiarlavelocidadde motormanipulandoelencade-
nambntodegobernadordel motor.Hacbndotanpodriacausarla
heridapersonalseriay daharal motor.LasREVOLUCIONESPOR
MINUTOde motorhansidopuestasen laf_brica.
LUBRICACKSN
• Ruedas - Sit_eunaspocasgotasde aceiteSAE30 encada
tornilloconrebordeunavezpor temporada.
• Palancasde ajuste de altura del pico- Lubriquelaspalancas
de aiustedealturadel pboconaceiteligero.
• Varilla de seguridad- Lubriquelavarillade seguridady los
resortesdecompresi6nque launena lam6nsulademontaie.
UMPIEZA DEL EQUIPO
Limpiecuidadosamentela aspiradoraparapatiosdespuesde
cadauso.
Lavelabolsaconaguaperi6dicamente.Permitaqueseseque
bienen unsitioa la sombra.
Si setapalapantallade desgranado,sAquelay limpblacomose
indicaabaio.
NOTA:La limpiezaconunchorrode aguaa presi6nnoserecomiem
da,yaqueel sistemade combusfibbpodriaresultarcontaminado.
49

propiedad,
EXTRACCI6N DE LA PANTALLA DE DES-
GRANADO
Si lazonade descargasetapa,saquelapantalladedesgranadoy
limpielazonacomoseindicaa continuaci6n,
1, Detengael motor,Compruebequeelvac[ode lacortadora/tritu_
radorasehayadetenidopotcompleto,
2, Antesdedestaparel canaldedescarga,deecooecteel cablede
la bujia y p6ngalode maneraque haga masacontra el poete
de retenci6n.
3, Saquelabolsadela aspiradorao el canalde sopladodela
unidad,comoseindicaenla secci6nOPERACION,paraacceder
a lapantalladedesgranado,
4, Saqueeltornilloautosellantedel ladoderechodela unidadque
seunea lapantalladedesgranado,Vealafigura16,
5, Saqueeltornillode cabezahexagonalde lapartesuperiorde
la cajaposteriorcercadelsoportede montaje,yh tuercade
seguridaddela bridaque unelapantallade desgranado,Veala
figura16,
6, Saquelapantallay limpielaconuncepilloo I_velaconagua,Vea
la figura17,
7, Vuelvaa colocarla pantalla,
F 't ................./
Figura16
i •
\
\\
Figura17
5O

AFILADO O REEMPLAZO DE LAS HOJAS DE
LA CORTADORA
NOTA:cuandoinclinela unidad,vacieeldep6sitodecombus%b y
aceite,y mantengael ladede labuiia haciaarriba.
1. Deseonecteel cable de la bujia y p6ngalo de maneraque
haga masacontra el poste de retenci6n.
2. Retireel montaiede la bolsao elcanalde soplado.
3. Aiustelostrestornillosdecabezahexagonalque sostbnenel
canalde lacortadoraalacaiasuperior.Veala figura18.
4. Saquelastapasde buiedelanteras,lastuercasde seguridadde
brida,lasruedasdelanterasy lasarandelasondulatoriasquevan
unidasa losmontaiesdelbrazegiratorio.Veala figura19.
5. Saquelostornillosconreborde,lasarandelasdearrastrey las
arandelasde campanaquepasanper losbrazesgiratorioshasta
la trabadesostendelantera.Latrabadesostendelanteray la
tuercadeseguridadpuedenquitarseeneste mementotambi6n.
6. Saquelostrestornillosdela cajasuperiorque aiustanlacubbrta
delpico.Vealafigura20.
51
Figura18
f Traba de_ost@ delanteray
tuerca desegL idad
Montaie del brazo giratorio
Arandela de campana
Arandela dearrastre
Tornillo con reborde
Arandela
ondulatoria
Tueroade _'_
Rueda
,_ seguridad j
Figura19
J
Figura20

7, Inclinelaun[dadconcu[dadoyap6yelahac[aarribaparaobtener
accesoporlaparteinferioralmaterialdemontajedelpicoyal
motor,Retirelostrestorn[llosconrebordequeaseguranelp[co
depl_sticonegroalaca]ainferior,Consultelafigura21,
8, Inclinelapartesuperiordelpicodeplgsticonegrohac[aelmotor
pararet[rarlo,
9, MedianteunaIlaveAIbnde3/16",retirelostornillosdecabeza
planaquesuietanlahoiadelacortadoraalmotor,DichostorniP
lossonaccesibbsatravesdelaaberturaquesecre6cuando
ret[r6elcanaldelacortadoraanter[ormente,Vealafigura22,
10,Espos[blealcanzarlastuercasdelostorn[llosdecabezaplana
desdelaparteinferior,medianteunaIlaveuniversalde1/2pulg,
conextens[6n,Vealaf[gura23,
11,Cambboafiblasho]asdelacortadora,Sepuedeafilarla
cuch[llaconunaf[ladoroconunaruedadeesmalte,
12,Cuandoafiblashojas,prote]aselasmanosmedianteelusode
guantesysigael_ngulooriginaldemolido,
13,Pararealizarelreensambladosigalospasosanterioresenorden
ymanera[nversosalaextracci6n,
NOTA:Aiustelostornillosdelaho]aconunpardetorsi6nde210-250
in-lbs,Compruebequesereensamblenlashoiasdelacortadoracon
elf[Iohac[aarr[ba,
f
Pico de
plJstico
negro
Tornillos con reborde
F[gura21
f
Tornillos de
cabeza plana
( -..
/,
qoja de la
cortadora
F[gura22
f_ Motor
/
de
Figura23
52

LmSTADE MANTENmMIENTO
Antesde realizarcualquiertipodel mantenimiento/servicio,suelte
todoslosmandosypareel motor,Esperehastaque todaslaspartes
demovimientohayanvenidoa unaparadacompleta,Desconecteel
alambredebuiiay bAselocontrael motorparaprevenirel comienzo
involuntario,SiempreIlevepuestoscristalesinastillablesdurantela
operaci6no realizandocualquieraiusteo reparaciones,
Sigala listade mantenimientodadaabajo,Estacartadescribepautas
deservicios61o,Usela columnadeTroncode Servicioparaguardar
lapistade tareasdemantenimientocompletadas,Localizarel mAs
cercanoChamuscael Centrode Serviciooprogramarel servicio,sire=
plementeponerseencontactoChamuscaen 1-800-4-MY-HOME®.
los 5- 8 horas
25 horas
1, Niveldelaceite de motor
2, Hardwaresueltooausente
3, Unidady motor
1, Elaceite de motor
1, Elaceite de motort
2, Filtrodeaire
3, Encadenamientosdecontrol
y pivotes
Elaceitede motor
Bujh
S+stemadecombusfib+e
1, Comprobar
2, Aprieteo sustituir
3, Limpio
1, Cambio
1, Cambio
2, Limpioosustituyen
3, Lubricaci6nconpetr61eoligero
50 horas 1, 1, Cambio
Anualmenteo100 horas 1, 1, Limpio,sustituya,nuevohueco
AntesdeAImacenaie 1, 1, Elmotordidgidohastaqueestose
parea faltadelcombustibleo aMada
unaditivode gasolinaalgasenel
tanque,
t Baiocargapesadao entemperaturasaltas
53

Nuncaalmaceneel \,'adodeyardaconel combustibleenel tanque
dentrooen Areasma)ventiIadasdondelosvaporesde combustible
puedenaIcanzaruna)lamaabierta,)achispa,o e)piIotocomoen un
homo,caIentadorde agua,secadorderopa,o apIicaci6nde gas.
PREPARAC(ON DEL MOTOR
YaquelosmotoresaImacenaronmAsde 30dias:
1. Paraimpedira lagomaformarseen elsistemade combustible
o enpartesde carburador,dirijase)motorhastaqueestose
parea faItade)combustibleo ahadirunaditivodegasoIinaa)
gasen e)tanque.Siustedusaunaditivodegas,dirigee)motor
durantevariosminutosparaponerencircuIaci6ne)aditivopore)
carburador-- despuesquee)motorye)combustiblepuedenser
aImacenadoshastaseismeses.
2. Mientrase)motorestodav(acaIiente,cambioe)petr6Ieo.
3. Quite)abuiia yviertaaproximadamente1onz.(30m))de)
petr6Ieode motor)impioene)ciIindro.Tiree)iuezdesa)idade
retrocesovariasvecesparadistribuire)petr6Ieo,e instaIarde
nuevo)abuiia.
4. Limpiee)motorde escombrossuperficiaIes.
LA PREPARAC(ON DEL VAC(O DE YARDA
AImacenandoelvado deyardaen uncobertizode aImacenaieno
ventiIadoo metAlico,el cuidadodeber(asertornadoa inoxidable
)assuperficiesno pintadas.Usandoun petr6Ieoligeroo siIicona,
cubrae)equipo,sobretodocuaIquierprimavera,portes,ycanes.
• Quitetoda)asuciedadde)exteriorde motory equipo.
, Sigarecomendacionesdelubricaci6n.
, Equipodefiendaen unArea)impia,seca.NoaImaceneen un
Areadondee)equipoestApresentequepuedeusarun piIotoo
tieneun componenteque puedecreeunachispa.
54

srio,SiempreIlevepuestoscristabs inastillablesdurantela operaci6no realizandocualquieraiusteo reparaciones,
Esta secci6n sedirige a cuestiones de servbio menores.Localizar el m_seercano Chamuscael Centre de Se_vbio o programarel
servicio, simplemente penerseencontacts Chamuseaen 1-800-a-MY-HOME®.
El motornoarranca
El motorfuncionade manera
err_tica
Mill
1, Lapalancadel reguladorno est_en la
posbi6ndearranquecorrecta
2, Lapalaneade obturaei6nnoest_en la
posiei6nON(eneendido)
8, Sehadesconeetadoelcane de la buiia
4, La buiiano funcionaeorreetamente
5, Eltanquedecombustibleest_vaeb oel
combustibleesvieio
6, Nose puedetirarde lacuerdade retroeeso
7,
Elinterrupterde seguridadno est_
presionado
8, Elcane del interrupterde seguridadnoest_
coneetadoal motoro noest_eoneetadoa
tierracomeeorresponde
1, La unidadest_funcionandoen laposiei6n
CHOKE(obturaci6n)
2, Elcane de la buiiaest_fioio
8, Eleombusfibleesvieio
4, Aguao suciedaden el sistemadel combus=
tible
5, Elfiltrode aireest,.sucio
6, RPMdelmotor baias
7, Esneeesarioaiustarelcarburador
1. Muevalapalancadel reguladora la posici6nSTART
(inbio)/RUN(dirigido).
2. Pongael interrupteren laposici6nCHOKE(obtura-
ci6n).
3. Conecteelcane a labujia.
4. Limpb,ajusteladistanciadisruptivao cambb.
5. Lleneel tanquecongasolinalimpiay fresca.
6. Hayunaobstrucci6nen el motor.Desconecteel
cane de labuiiay retireel objetoatascado.
7. Elinterrupterdeseguridaddebeserpresionadoper
laaletadelanterade la maniiade labolsacuandose
aseguralaboB&
8. Conecteelcabledel interrupterdeseguridadal
conectordelmotor,de maneraquehagamasa
contrala m6nsulade montaie.
1. Cambb lapalancade obturaci6na laposici6nOFF
(apagado).
2. Conecteyajusteel cane de labujia.
3. Lleneel tanquecongasolinalimpiay fresca.
4. Vacieel tanquedelcombustible.Vuelvaa Ilenarlo
concombustiblelimpio.
5. Limpieo cambb el filtrodeaire.
6. Sbmpreaccioneel motorconel estranguladoral
m_ximo.
7. Contacteconsucentrede partesyreparaciones
Sears.
55

luier fipodel mantenimiento/servicio,sueltetodoslosmandosy pareelmotor,Esperehastaquetodaslaspartesde
Ilevepuestoscristalesinasfillablesdurantela operaci6no realizandocualquieraiusteo reparaciones,
Esta secci6n sedirige a cuestiones de servicio menores.Localizar el m_scercano Chamusca el Centro de Servicio o programar el
servicio, simplemente ponerse en contacto Chamuseaen 1-800-4-MYoHOME®.
El motorrecalienta
1, El nivelde aceitedel motoresbale
2, Flu]odeaire restringido
1,
i2,
Saltosocasionales(pausas)a 1, Ladistanciadisruptivade labuiiaesmuy 1,
altavelocidad poca
El motorfuncionaenvac[omal 1, Buiiaensuciada 1,
2, Elfiltrode aireestAsucio 2,
Demasiadavibraci6n 1, HaypartesqueestAnfioiaso el motorestA 1,
dahado
La unidadnodescarga 1, ElAreadedescargaestAtapada 1,
2, Hayunob]etoextrahoenel motor
3, RPMdelmotorba]as
4, La bolsade la aspiradoraestAIlena,
1, RPMdelmotorbaias
2, La hoiade lacortadoraestAdesafilada
La tasade descargasereduce
de maneraconsiderableo
cambiala composici6ndel
materialdescargado
2,
3,
4,
1,
2,
Lleneel carterconla adecuadaselecci6nde aceite,
Recortesde peri6dicode hierbalimpiosyescom-
brosdealrededordelasaletasde refrigeraci6ndel
motoryalojamientodesoplador,
Quitelabuiiay aiusteel hueco,
Sustituyalabuiia yaiusteel hueco,
Limpieo cambieel filtrodeaire,
Detengael motorde inmediatoydesconecteel
cabledela bujia,Contacteconsucentredepartesy
reparacionesSears,
Detengael motorde inmediatoydesconecteel
cabledela buiia,Limpiela pantalladedesgranadoy
el interiorde laaberturade descarga,
Detengael motorydesconecteel cablede labuiia,
Saqueelobjetoextrahodel motor,
Siempreaccioneel motorconel estranguladoral
mAximo,
Vacielabolsa,
Siempreaccioneel motorconel estranguladoral
mAximo,
Reemplacela hojade lacortadorao contacteasu
centrede reparacionesy partesSears,
56

(Esta p_gina se aplica s61oen EE,UU, y Canada),
Sears, Roebuck and Co°, U,S°A° (Sears}, emConsejo de F{ecursos Ambientales de California (OAF{B}
y la Agencia de Protecci6n Ambiental de los Estados Unidos (ERA}
Dectaraci6n de garantia demsistema de controm de emisiones (derechos y obmigaciones de la garantia de defectos del propi=
etario}
LACOBERTURADE LAGARANTfADE CONTROLDEEMISIONESES
APLICABLEA LOSMOTORESCERTIFICADOSCOMPRADOSENCALIFOR-
NIAEN 1995Y POSTERIORMENTE,QUE SEUTILIZANENCALIFORNIA,
Declaracion de garantia sobre defectos en el control
ElConsejodeRecursosAmbientalesdeCalifornia(CARB),laEPA(Agencia
deProtecci6nAmbientaldelos EE.UU.)y Searstienenel gustode explicarla
garantiadelsistemadecontroldeemisionesparamotoresdelargo2000y para
elfuturoconrelaciona motorespequeSostodoterreno(SORE).EnCalifornia,
los nuevosmotorespequer_ostodoterrenodebenestardisefiados,construidos
yequipadosparacumplirconlas rigurosasnormasanti-smogdelestado.En
el restode losEstadosUnidos,losmotoresnuevostodoterrenodeencendido
perchispacertificadosparael afio 1997debencumplirestb,ndaressimilares
establecidosporla EPA.Searsdebegarantizarel sistemadecontroldeemis-
Y PARALOSMODELOSCERTIFICADOSDELANO 1997YPOSTERIORES,
QUESECOMPRENYUTILICENENCUALQUIERPARTEDE LOSESTADOS
UNIDOS(Y APARTIRDEL1DEENERODE2001ENCANAD,_).
de ernisiones para California y los Estados Unidos
Jonesdesumotorparalosperiodosdetiempoenumeradosa continuacidn,
siemprequenohayaabuso,negligenciaomantenimientoindebidodesu
motortodoterrenopequer_o.Susistemadecontroldeemisionespuedeincluir
piezastalescomoel carburador,el filtrodeaire,elsistemadeencendido,el
silenciadory elconversorcatalitico.Tambi6npuedeincluirconectoresy otras
unidadesrelacionadasconlas emisiones.Dondeexistaunacondici6ncubierta
potlagarantia,Searsrepararasupequefiomotortodoterrenosincostoalguno
incluyendodiagn6stico,piezasy manede obra
Cobertura de Bagarantla Sears para defectos en et control de emisiones
Losmotorestodotenenopequer_osestangarantizadosen Iorelativoalcontrol a lasdisposicionesqueseindiquenacontinuaci6n.Siunapartedesumotor
deemisionesparadefectosenpiezasduranteunper[ododedosa[ios,sujeto cubiertapot lagarantiaesdefectuosa,Searsrepararaosustituiradichaparte.
F{esponsabHidades del propietario en remaci6n con Bagarantma
Comepropietariodelmotortodoterrenopequer_o,Ud.esresponsabledela
realizaci6ndelmantenimientorequeridoqueseincluyeenlas instrucciones
deoperaciony mantenimiento.Searsrecomiendaqueseconserventodoslos
recibosrelativosal mantenimientode sumotortodoterrenopequefio,pero
nopudedenegarlagarantiasimplementeporla faltadelosmismos,o porsu
incumplimientodelmantenimientoprogramado.Comopropietariodelmotor
peque5otodoterrenodebesaberque,sinembargo,Searslepuedenegar
lacoberturade lagaranfiasi su motortodoterrenopequefioo una piezadel
mismohanfalladodebidoaabuso,negligencia,mantenimientoindebidoo
a modificacionesnoaprobadas.Ud.es responsabledepresentarsu motor
todoterrenopeque5oaundistribuidorde serviciosSearsautorizadotan pronto
comeaparezcaunproblema.Lasreparacionesdela garantiasinconflicto
debencompletarseenun plazodetiemporazonable,nosuperiora30dias.Si
tienealgunapreguntarespectoa susderechosy responsabilidadesreferen-
tesala garantia,debecontactarconun representantedeserviciosSearsal
1--800--469--4663.Lagarantiadeemisioneses unagarantiaperdefectos.Los
defectossejuzgandeacuerdoconelfuncionamientonormalde unmotor.La
garanfianoestarelacionadaconunapruebade emisionesenuso.
Disposiciones de _agarantia Sears para defectos en el control de ernisiones
Lassiguientessondisposicionesespecificasrelacionadasconla coberturade lagarantiaparadefectosenel controldeemisiones.Esunafiadidoa lagarantiade
motorSearsparamotoresnoreguladosqueseencuentraen lasinstruccionesdefuncionamientoy mantenimiento.
1. Piezascongarantia
Lacoberturade estagarantiaseextiende0nicamentealas piezas
queaparecenacontinuaci6n(las partesde lossistemasdecontrolde
emisiones),siemprequedichaspiezasestuvieranya enel motoren el
momentodesucompra.
a. Sistemademedici6ndecombustible
oSistemadeenriquecimientoparaarranqueenfr[o
oCarburadory partesintemas
oBombade combustible
b. Sistemadeinducci6nde aire
oFiltrode aire
oColectordeadmisi6n
c. Sistemadeencendido
oBuj[a(s)deencendido
oSistemadeencendidomagneto
d. Sistemadelcatalizador
oConvertidorcatalitico
oColectordeescape
oSistemadeinyecci6nde aireo valvuladeimpulses
e. Elementosvariadosusadosenlos sistemasanteriores
oValvulasdevado, sensiblesatemperatura,posici6ny tiempo
eintenuptores
• Conectoresy montajes
2. Alcancedela cobertura
Searsgarantizaalposeedorinicialy a loscompradoressubsiguientes
quelaspiezascongarantianotendrandefectosenmaterialesnimano
deobraque provoquenla falladelas mismasduranteunper[odede
dosaSosa partirdela fechaenqueelmotorseentregaauncomprador
particular.
3. Sincargo
Lareparaci6noreemplazodecualquierpartecongarantiaserealizara
sin cargoalgunoparael poseedor,incluyendotareasde diagnosticoque
permitandeterminarsiuna partecongarantiaes defectuosa,siempreque
dicho diagn6sticoserealiceen undistribuidorde serviciosSearsautoriza-
do. Parael serviciode lagarantiadeemisiones,contacteal distribuidorde
serviciosSearsautorizadomascercanoincluidoen las'P_.ginasamarillas"
en lascategorias"Motores,gasolina","Motoresdegasolina","Podadoras
dec6sped",o similares.
4. Reclamacionesy exclusionesa la cobertura
Lasreclamacionesde lagaranfiadebenenviarsedeacuerdocon las
disposicionesdela politicadegarantiaparamotoresSears.Lacobertura
de lagarantiaexcluiradefectosen piezascongarant[aquenoseanpartes
originalesSears,o abuso,negligenciaomantenimientoincorrecto,tal y
comoseestableceen lapoliticade garantiaparamotoresSears.Searsno
esresponsablede lasfallasen piezascongarant[aprovocadasperel use
de partesar_adidas,que noseanoriginalesoquesehayanmodificado.
5. Mantenimiento
Cualquierpartecongarantiaquenoeste programadaparaset reem-
plazadacomomantenimientorequerido,oquesolodebainspeccionarse
regularmenteal efectode"inspeccioneoreemplaceseg0nseanecesario",
estaragarantizadacontra defectosduranteel per[odedela garantia.Todas
las piezasgarantizadasqueest6nprogramadasparasu reemplazopara
cumplirconlos requisitesdemantenimientoestarangarantizadass61o
porel periodoanterioral primerreemplazoprogramadoparadichapieza.
Cualquierpiezaderecambioquesea equivalenteenfuncionamientoy
durabilidadpuedeusarsepararealizarmantenimientooreparaciones.El
propietarioes responsablede realizartodoel mantenimientorequerido,tal
y comosedefineen lasinstruccionesdefuncionamientoy mantenimiento
Sears
6. Coberturaindirecta
Perla presente,lacoberturase extiendea lafalladecualquiercomponente
de motorprovocadaperlafallade unapiezacongarantiaqueestetodav[a
en per[ododegarant[a.
Enlos EstadosUnidosy Canadahayunalineadeatenci6nde24 horas,1-800=469=-4663,quecuentacon unmen0conmensajespre-grabadosquecontienen
informaci6nparael mantenimientode motores.

Busque el periodo de duraci6n de emisiones importantes y[a informacion de c[asificacion de aire en
la etiqueta de emisiones de su motor
Los motores cuyo cumplimiento con los est&ndares de emisi6n Tier 2 de la Comisi6n de Recursos Ambientales de Catifornia (CARB)
est6 certificado deben exhibir la informaci6n relacionada con el periodo de duraci6n de las emisiones y la clasificaci6n de aire. Sears,
Roebuck and Co., de los Estados Unidos ponen esta informac[6n a dispos[ci6n del consumidor en nuestras etiquetas de emisiones.
El Periodo de Duraci6n de [as Emisiones describe el n[imero de horas de tiempo real de funcionamiento para el cual se certifica que
el motor cumple con las reglas de emisi6n, descontando el mantenimbnto adecuado del mismo segQn las instrucciones de oper-
aci6n y mantenimiento. Se utilizan [as siguientes categorias:
Moderado:Se certifica que el motor cumple con [as reglas de emisi6n durante 125 horas de tiempo real de funcionamiento del motor.
[nmediato:Se certifica que el motor cumpJe con las reglas de emisi6n durante 250 horas de tiempo real de funcionamiento del motor.
Extendido:Se certifica que el motor cump{e con las reglas de emisi6n durante 500 horas de tiempo real de funcionamiento del motor.
Por ejemplo, una cortadora de c_sped tipica que se empuja desde atr&s se usa entre 20 y 25 horas pot afo. Por [o tanto, el Pedodo
de Duraci_Sn de Emisiones de un motor con una c[asificac{6n intermedia seria equivalente a entre 10y 12 afros.
Lac[asificaci6n de aire es un nQmero calculado para describir el nivel relativo de emisiones para un grupo de motores en particular.
Cuanto menor sea la c{asfficaci6n de aire, mayor es la limpieza del motor. La informaci6n se presenta de forma gr&fica en la etiqueta
de emisiones.
Despues de[ 1 de ju[[o de 2000, busque e[ per[odo de cump[[m[ento de [as reg[as de
emisiones en la etiqueta de cumpiimiento de las reg[as de emisiones de[ motor
Despu6s del 1 de juiio de 2000 se certificar& que determinados motores Sears, Roebuck and Co., de los Estados Unidos
cumplen con los estb.ndares de emisiones de la fase 2 de la Agencia de Proteccidn Ambiental de los Estados Unidos (USED
PA). Para los motores certificados para la etapa 2, el periodo de cumplimiento con las reglas de emisiones al cual se hace
referencia en la etiqueta de cumplimiento con las reglas de emisiones indica el nQmero de horas de funcionamiento para el
cual se ha demostrado que el motor cumpJe con los requerimientos federales de emisi6n.
Para los motores con desplazamiento inferior a 225 cc, Categoria C = 125 horas, B = 250 horas y A = 500 horas.
Para los motores con desp[azamiento de 225 cc o m&s, Categoria C = 250 horas, B = 500 horas y A = 1000 horas.
El desplazamiento de los motores de la serie modelo 150112 es 249 cc.
Lapresente es una representaciSn gen_rica de [a etiqueta de emisiSn que se encuentra genera[mente en un
motor certificado.
58

59

Your Home
For repair - in your home - of all major brand appliances,
lawn and garden equipment, or heating and cooling systems,
no matter who made it, no matter who sold it!
For the replacement parts, accessories and
owner's manuals that you need to do-it-yourself.
For Sears professional installation of home appliances
and items like garage door openers and water heaters.
1-800-4-MY-HOME ® (1-800-469-4663)
Call anytime, day or night (U.S.A. and Canada)
www.sears.com www.sears.ca
For expert home solutions advice: www.managemyhome.com
Our Home
For repair of carry-in items like vacuums, lawn equipment,
and electronics, call or go on-line for the location of your nearest
Sears Parts & Repair Service Center
1-800-488-1222 (U.S.A./ 1-800-469-4663 (Canada/
Call anytime, day or night
www.sears.com www.sears.ca
To purchase a protection agreement on a product serviced by Sears:
1-800-827-6655 (U.S.A.) 1-800-361-6665 (Canada)
Para pedir servicio de reparaci6n Au Canada pour service en fran_ais:
a domicilio, y para ordenar piezas: 1-800-LE-FOYER Mc
1-888-SU-HOGAR ® (1-800-533-6937)
(1-888-784-6427) www.sears.ca
,Se- //rs
® Registered Trademark / Trademark / sM Service Mark of Sears Brands, LLC
T_,T
® Marca Registrada / ' Marca de F_brica / sM Marca de Servicio de Sears Brands, LLC
MC _,ID
Marque de commerce / _ Marque d_pos_e de Sears Brands, LLC © Sears Brands, LLC
-
 1
1
-
 2
2
-
 3
3
-
 4
4
-
 5
5
-
 6
6
-
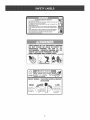 7
7
-
 8
8
-
 9
9
-
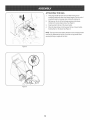 10
10
-
 11
11
-
 12
12
-
 13
13
-
 14
14
-
 15
15
-
 16
16
-
 17
17
-
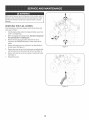 18
18
-
 19
19
-
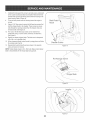 20
20
-
 21
21
-
 22
22
-
 23
23
-
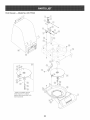 24
24
-
 25
25
-
 26
26
-
 27
27
-
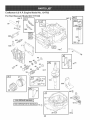 28
28
-
 29
29
-
 30
30
-
 31
31
-
 32
32
-
 33
33
-
 34
34
-
 35
35
-
 36
36
-
 37
37
-
 38
38
-
 39
39
-
 40
40
-
 41
41
-
 42
42
-
 43
43
-
 44
44
-
 45
45
-
 46
46
-
 47
47
-
 48
48
-
 49
49
-
 50
50
-
 51
51
-
 52
52
-
 53
53
-
 54
54
-
 55
55
-
 56
56
-
 57
57
-
 58
58
-
 59
59
-
 60
60


Craftsman 247770120 El manual del propietario
- Tipo
- El manual del propietario
- Este manual también es adecuado para
En otros idiomas
- English: Craftsman 247770120 Owner's manual
Documentos relacionados
-
MTD 24777366 El manual del propietario
-
Craftsman 247770130 El manual del propietario
-
-
-
-
-
-
-
MTD 247.38821 El manual del propietario
-