Baby Jogger city bistro Assembly Instructions Manual
- Tipo
- Assembly Instructions Manual

©2019 Baby Jogger NWL0001005846D 11/19
babyjogger.com
ASSEMBLY INSTRUCTIONS
INSTRUCCIONES DEL ENSAMBLAJE
city bistro
®

2
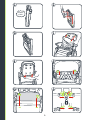
1 Shoulder Strap
2 Harness Covers
3 Seat Pad
4 Tray Insert
5 Tray Release Button
6 Calf Support
7 Seat Fold Button
8 Tray
9 Height Adjust Button
10 Frame Fold Button
11 Tray Storage Tab
12 Rear Leg
13 Harness Adjuster
14 Harness Buckle
1
2
3
4
9
7
12
6
5
9
10
10
8
7
13
14
11

3
3
7
4
1
2
CLICK!
CLIC!
CLICK!
CLIC!
8
1
2
5
6

4
11 12
13
14
16
15
10
9

5
17
18
19 20
22
21
1
2
24
23

6
26
27 28
29
31
30
32
25
CLICK!
CLIC!

7
34
35
36
37
33

8
EN
Failure to follow these warnings and the assembly instructions
could result in serious injury or death. Read all instructions before use.
• PLEASE SAVE OWNER’S
MANUAL FOR FUTURE USE.
• ONLY USE PRODUCT AS
INSTRUCTED.
• FOLLOW ASSEMBLY
INSTRUCTIONS CAREFULLY.
If you experience any
difficulties, please contact
the Customer Service
Department.
• ADULT ASSEMBLY REQUIRED.
• This Product is not intended to
be used with any other used
with any other accessories,
unless specified by Baby
Jogger.
• DO NOT ADJUST the height of
high chair with your child in it.
• DO NOT FORCE TRAY against
child. Use only the three
adjustment positions. Be sure
both adjustment fingers are
engaged in armrest slots.
• NEVER allow a child to push
away from table.
• FALL HAZARD: Children have
suffered severe head injuries
including skull fractures when
falling from high chairs. Falls
can happen suddenly if child is
not restrained properly.
• Always use restraints, and
adjust to fit snugly.
• Tray is not designed to hold
child in chair.
• STAY NEAR AND WATCH
CHILD DURING USE. Always
keep your child in view.
• It is recommended that the
highchair be used only by
children capable of sitting
upright unassisted.
• STRANGULATION HAZARD:
Do not place highchair in
any location where there are
cords, such as window blind
cords, drapes, phone cords,
etc.
• This highchair is designed to
be used by child capable of
sitting upright unassisted
(approximately 6 months
of age) up to 3 years of age.
Maximum weight 40 lb (18kg).
• DISCONTINUE USING YOUR
HIGHCHAIR should it become
damaged or broken.
• Keep child away from
highchair when folding/
unfolding highchair.
• STORE HIGHCHAIR away from
child when not in use.
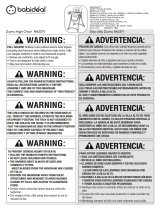
WARNING

9
ADJUSTING HEIGHT
WARNING
DO NOT adjust the height of the
product with the child in it.
19 To adjust height, squeeze buttons on
the outside of both legs and lower
or raise seat. There are 4 height
positions.
HARNESS COVERS
20 Slide harness covers onto harness
straps.
TO FOLD HIGHCHAIR
21 Press in and squeeze handle on
bottom of the tray and remove from
highchair.
22 Rotate calf support up into storage
position.
23 Squeeze button on back of seat back
and rotate highchair seat closed.
NOTE: To ensure smooth folding,
buttons must be fully squeezed
before rotating.
24 Squeeze handle and rotate up.
25 Be sure highchair is locked closed.
TO STORE TRAY
26 Slide tray onto mounts on back legs
of highchair.
27 Tray stored.
TO REMOVE SEAT PAD
28 Unfasten snaps on seat pad from
mounts on seat back.
29 Disconnect plastic hooks from
bottom of seat back.
30 Insert seat pad webbing through
slots in calf support.
31 Pull webbing out of calf support.
32 Press button on buckle to release
straps if connected.
33 Insert shoulder harness straps
through slots in seat back.
34 Pull softgoods shoulder harness
straps out of seat pad.
35 Insert waist harness through seat
pad.
36 Insert crotch strap through seat pad.
37 Re-attach shoulder harness straps
through slots in seat back.
TO OPEN HIGHCHAIR
1 Squeeze leg release handle.
2 Rotate handle down until highchair
locks open.
3 Grasp highchair seat back.
4 Pull seat back up until it locks into
open. CHECK that seat is locked by
pushing on the seat back.
5 Lower calf support down to use
position.
6 Fasten snaps on seat pad to mounts
on seat back.
7 Ensure plastic hooks is attached
around bottom of seat back.
ATTACHING TRAY
8 Press in and squeeze handle on
bottom and attach tray to highchair
arms. CHECK the tray is properly
installed by pulling on the tray.
9 Tray can also be attached as shown.
TRAY INSERT
Dishwasher safe.
10 Attach tray insert by pushing it down
on the tray.
11 To remove pull up on the back of the
tray.
USING SAFETY HARNESS
WARNING
Falling hazard: Always use the
restraint system.
12 To open, press button on buckle to
release the waist straps and slide
shoulder strap off of waist straps.
13 To close, slide shoulder strap
connectors to waist straps and insert
into buckle.
14 Use slide adjuster on shoulder,
waist and crotch straps for tighter
adjustment.
ADJUSTING SAFETY HARNESS
15 Line up ends of shoulder straps from
seat back.
16 Pull out front of seat pad.
17 Insert shoulder straps through
matching seat pad slot.
18 Insert into matching slots in seat
back and secure in seat back.
EN

10
EN
CARE AND MAINTENANCE
To preserve the longevity of your
highchair, it is important to perform
simple, regular maintenance. From
time to time, make sure that the joints
and folding areas are still in good
condition. All repairs should only be
carried out by an authorized dealer.
WASHING
Seat Fabric
• You can machine wash your
highchair’s seat in cold water with a
mild detergent.
• Be sure to remove the harness straps
the seat pad before washing.
• Do not use solvents, caustic or
abrasive cleaning materials.
• Do not press, iron, dry clean, tumble
dry or wring the fabric.
• If the seat pads need to be replaced,
only use parts from a Baby Jogger
Authorized Dealer. They are the only
ones that are guaranteed to have
been safety tested and designed to fit
this seat.
Tray Insert
• Tray Insert is dishwasher safe on top
rack.
Plastic/Metal Parts
• Wipe clean using a mild soap and
warm water.
• You must not remove, dismantle
or alter any part of the seat folding
mechanism or brakes.
STORING
• DO NOT store outside.
• Always store the highchair in a dry
environment.
• Store the highchair in a safe place
when not in use (i.e. where children
cannot play with it).
• DO NOT place heavy objects on top of
the highchair.
• DO NOT store the highchair near a
direct heat source such as a radiator
or fire.

11
Baby Jogger’s Limited Lifetime Warranty:
Baby Jogger warrants that the frame is free of manufacturer defects for the lifetime
of the product. Manufacturer’s defects include but are not limited to the breaking
of welds and frame tube damage. Textile or soft side materials and all other
components shall be warranted for one year from the date of purchase (except for
tubes). Proof of purchase is required to make a warranty claim and the warranty is
only extended to the original purchaser.
THIS WARRANTY DOES NOT COVER:
• Normal wear and tear
• Corrosion or rust
• Incorrect assembly, or the installation of third party parts or accessories not
compatible with the original design
• Accidental or intentional damage, abuse or neglect.
• Commercial use
• Improper storage/care of the unit
This warranty specifically excludes claims for indirect, incidental, or consequential
damages. The implied warranties of merchantability and fitness for a particular
purpose is according to the specific warranty period for this model unit at time
of purchase. Some states do not allow the exclusion or limitation of incidental or
consequential damages, so the above limitations or exclusions may not apply to
you. This warranty gives you specific legal rights, and you may also have other rights
which vary from state to state. To know what your legal rights are in your state,
consult your local or state consumer affairs office or your State’s Attorney General.
If your product was purchased outside of the United States, please contact the
distributor in the country nearest you. Their contact information can be found on
our website at http://www.babyjogger.com. Claims for warranty outside of the
country in which the product was purchased may incur shipping charges.
NOTE: When contacting Baby Jogger distributor regarding your product, please have
your product’s serial number ready.
Customer Care Contact Information:
E-Mail: Customerservice@babyjogger.com
Call: 1-800-241-1848 8:30am - 5:30pm EST, Mon - Fri.
Fax: 1-804-262-6277
Mail: Baby Jogger, LLC
4110 Premier Drive
High Point, NC 27265
www.babyjogger.com
PLEASE DO NOT CONTACT THE PLACE OF PURCHASE FOR PARTS OR WARRANTY ISSUES
Baby Jogger’s Limited Lifetime Warranty:
www.babyjogger.com/register
EN

12
1
2
3
4
9
7
12
6
5
9
10
10
8
7
13
14
11
1 Correa para los hombros
2 Almohadillas del arnés
3 Almohadilla del asiento
4 Inserto de la bandeja
5 Botón de liberación de la
bandeja
6 Soporte de las pantorrillas
7 Botón de plegado del
asiento
8 Bandeja
9 Botón de ajuste de la altura
10 Canasta de almacenamiento
11 Pestaña de almacenamiento
para bandeja
12 Pata posterior
13 Ajustador del arnés
14 Hebilla del arnés

13
SP
No cumplir con estas advertencias y las instrucciones
de ensamblaje, podría resultar en lesiones serias o la muerte.
Lea todas las instrucciones antes de usar.
• POR FAVOR, CONSERVE EL
MANUAL DEL PROPIETARIO
PARA UTILIZARLO EN EL
FUTURO.
• USE ESTE PRODUCTO
SOLAMENTE COMO SE
INDICA.
• SIGA LAS INSTRUCCIONES
DE ENSAMBLAJE
CUIDADOSAMENTE.
Si experimenta alguna
dificultad, por favor, contacte
al Departamento de Servicio
al Cliente.
• SE REQUIERE MONTAJE POR
UN ADULTO.
• Este producto no está
diseñado para usarse con
ningún otro accesorio, a
menos que lo especifique
Baby Jogger.
• NO AJUSTE la altura de la silla
alta mientras su niño esté
dentro.
• NO FUERCE LA BANDEJA
CONTRA EL NIÑO. Use
solamente las tres posiciones
de ajuste. Asegúrese de que
ambos dedos de ajuste están
trabados en las ranuras de los
apoyabrazos.
• NUNCA deje que el niño se
empuje para apartarse de la
mesa.
• PELIGRO DE CAÍDAS: Los
niños han sufrido lesiones
severas de la cabeza, incluso
fracturas del cráneo, al
caerse desde una silla alta.
Las caídas pueden ocurrir
repentinamente si no se ha
asegurado correctamente al
niño.
• Use siempre los sistemas de
seguridad y ajústelos para
que queden bien ajustados.
• La bandeja no se diseñó
para asegurar al niño en la
silla.
• QUÉDESE CERCA Y VIGILE
AL NIÑO DURANTE EL USO.
Siempre tenga su niño a la
vista.
• Se recomienda que
solamente los niños que
puedan sentarse por sí solos
utilicen la silla alta.
• PELIGRO ESTRANGULACIÓN:
No coloque la silla alta
en cualquier lugar donde
haya cordones, tales como
cordones de persianas,
cortinas, teléfonos, etc.
• Esta silla alta está diseñada
para ser utilizada por niños
capaces de sentarse por sí
solos (aproximadamente a
los 6 meses de edad) hasta
los 3 años. El peso máximo es
de 40 lb (18 kg).
• DEJE DE USAR SU SILLA ALTA
si ésta se daña o rompe.
• Mantenga al niño alejado de
la silla alta cuando la pliegue/
despliegue.
• ALMACENE LA SILLA ALTA
alejada del niño cuando no la
esté usando.
ADVERTENCIA

14
13 Para cerrarlo, deslice los conectores
de las correas del hombro a las
correas de la cintura y póngalos en la
hebilla.
14 Use el ajustador deslizable en las
correas del hombro, la cintura y
la entrepierna para ajustarlas más
apretadamente.
CÓMO AJUSTAR EL ARNÉS DE
SEGURIDAD
15 Alinee los extremos de las correas
del hombro en el respaldo del
asiento.
16 Sáquelas por la parte frontal de la
almohadilla del asiento.
17 Inserte las correas del hombro a
través de la ranura correspondiente
de la almohadilla del asiento.
18 Insértelas en las ranuras
correspondientes del respaldo del
asiento y asegúrelas a este.
AJUSTE DE LA ALTURA
ADVERTENCIA
NO ajuste la altura del producto
cuando el niño está sentado.
19 Para ajustar la altura, apriete los
botones en la parte exterior de
ambas patas y baje o suba el asiento.
Hay 4 posiciones para la altura.
FUNDAS DEL ARNÉS
20 Deslice las fundas del arnés sobre
las correas de los hombros.
CÓMO PLEGAR LA SILLA ALTA
21 Oprima y mantenga apretada la
manija en la parte inferior de la
bandeja y sáquela de la silla alta.
22 Gire el soporte de las pantorrillas
hacia arriba a la posición de
almacenamiento.
23 Apriete el botón en la parte trasera
del respaldo y gire el asiento de la
silla alta para cerrarlo. NOTA: Para
lograr un plegado fácil, los botones
deben presionarse completamente
antes de rotarse.
PARA ABRIR LA SILLA ALTA
1 Apriete la manija liberadora de la
pata.
2 Gire la manija hacia abajo hasta que
la silla alta se bloquee en posición
abierta.
3 Sujete el respaldo del asiento de la
silla alta.
4 Tire del respaldo hacia atrás hasta
que se bloquee en posición abierta.
Empuje el respaldo del asiento para
VERIFICAR que el asiento esté bien
trabado.
5 Baje el soporte de las pantorrillas
hasta la posición adecuada para
usarlo.
6 Abroche las trabas de la almohadilla
del asiento a los montantes en el
respaldo del asiento.
7 Asegúrese de que los ganchos de
plástico estén enganchados en
la parte inferior del respaldo del
asiento.
INSTALACIÓN DE LA BANDEJA
8 Oprima y mantenga oprimida
la manija en la parte inferior y
conecte la bandeja a los brazos de
la silla alta. Tire de la bandeja para
VERIFICAR que esté debidamente
instalada.
9 También puede conectar la bandeja
como se muestra.
INSERTO DE LA BANDEJA
Puede lavarse en el lavaplatos.
10 Coloque el inserto de la bandeja
empujándolo hacia abajo sobre la
bandeja.
11 Para sacarlo, tire hacia arriba desde
la parte trasera de la bandeja.
CÓMO USAR EL ARNÉS DE SEGURIDAD
ADVERTENCIA
PELIGRO DE CAÍDAS: Use siempre el
sistema de seguridad.
12 Para abrirlo, oprima el botón de la
hebilla para liberar las correas de
la cintura y deslice la correa del
hombro para sacarla de las correas
de la cintura.
SP

15
SP
24 Apriete la manija y gírela hacia arriba.
25 Asegúrese de que la silla alta esté
bloqueada en la posición cerrada.
CÓMO ALMACENAR LA BANDEJA
26 Deslice la bandeja en los montantes
de las patas traseras de la silla alta.
27 Bandeja almacenada.
CÓMO SACAR LA ALMOHADILLA DEL
ASIENTO
28 Destrabe los broches de la
almohadilla del asiento de los
montantes del respaldo.
29 Desabroche los ganchos de plástico
de la parte inferior del respaldo del
asiento.
30 Inserte la malla de la almohadilla del
asiento a través de las ranuras del
soporte de las pantorrillas.
31 Tire para sacar la malla del soporte
de las pantorrillas.
32 Presione el botón de la hebilla
para liberar las correas si están
enganchadas.
33 Inserte las correas del arnés para el
hombro a través de las ranuras del
respaldo del asiento.
34 Tire de las correas blandas del arnés
para el hombro para sacarlas de la
almohadilla del asiento.
35 Inserte el arnés de la cintura a través
de la almohadilla del asiento.
36 Inserte la correa de la entrepierna a
través de la almohadilla del asiento.
37 Vuelva a insertar las correas del
arnés para hombro a través de las
ranuras del respaldo del asiento.

16
SP
CUIDADO Y MANTENIMIENTO
Para preservar la durabilidad de la
silla alta, es importante realizar tareas
simples y periódicas de mantenimiento.
De vez en cuando, asegúrese de que
las uniones y lugares con pliegues
todavía estén en buenas condiciones.
Todas las reparaciones deben ser
completadas por un concesionario
autorizado solamente.
LAVADO
Tela del asiento
• Puede lavar a máquina el asiento
de la silla alta con agua fría y un
detergente suave.
• Asegúrese de sacar las correas del
arnés de la almohadilla del asiento
antes de lavarla.
• No use disolventes, productos
cáusticos o materiales abrasivos para
la limpieza.
• No prense, planche, lave en seco, ni
seque en secadora o escurra la tela.
• Si las almohadillas del asiento deben
reemplazarse, use solamente piezas
de un concesionario autorizado
de Baby Jogger. Son las únicas con
garantía de que se ha probado su
seguridad y que están diseñadas para
ajustarse a este asiento.
Inserto de la bandeja
• El inserto de la bandeja se puede
lavar en la parte superior del
lavavajillas.
Piezas de plástico/metal
• Limpie con un paño usando un jabón
suave y agua tibia.
• No debe sacar, desarmar ni alterar
ninguna parte del mecanismo de
pliegue del asiento o los frenos.
ALMACENAMIENTO
• NO guarde al aire libre.
• Guarde siempre la silla alta en un
ambiente seco.
• Guarde la silla alta en un lugar seguro
cuando no la usa (p. ej., donde los
niños no puedan jugar con ella).
• NO ponga objetos pesados encima de
la silla alta.
• NO guarde la silla alta cerca de
fuentes de calor directas como un
radiador o fuego.

17
Garantía limitada de por vida de Baby Jogger:
Baby Jogger garantiza que el armazón no tiene defectos de fabricación durante
toda la vida del producto. Los defectos de fabricación incluyen pero no se limitan
a la rotura de soldaduras y daños a los tubos del armazón. Los materiales textiles
o blandos del costado y todos los otros componentes están garantizados por un
año desde la fecha de compra (excepto los tubos). Se requiere prueba de la compra
para presentar una reclamación bajo la garantía y la garantía solamente se extiende
al comprador original.
ESTA GARANTÍA NO CUBRE:
• Desgaste normal
• Corrosión o herrumbre
• Ensamblaje incorrecto o la instalación de piezas o accesorios de terceros que no
sean compatibles con el diseño original
• Daño accidental o intencional, abuso o negligencia.
• Uso comercial
• Almacenamiento/cuidado inadecuado de la unidad
Esta garantía excluye específicamente reclamaciones por daños indirectos,
incidentales o consecuentes. Las garantías implícitas de comerciabilidad y aptitud
para un propósito particular se incluyen según el período de garantía específica de
este modelo en el momento de la compra. Algunos estados no permiten la exclusión
o limitación de daños incidentales o consecuentes, de manera que las limitaciones o
exclusiones anteriores podrían no aplicarse a su caso. Esta garantía le brinda derechos
legales específicos y podría tener otros derechos que varían de un estado a otro. Para
conocer cuáles son sus derechos legales en su estado, consulte a la oficina local o del
estado de asuntos al consumidor o al Fiscal General de su estado.
Si su cochecito fue comprado fuera de los Estados Unidos, por favor comuníquese
con el distribuidor en el país más cercano. Se puede encontrar la información de
contacto en nuestro sitio web en http://www.babyjogger.com. Las reclamaciones
por garantía fuera del país en el que se compró el producto podrían incurrir cargos
por envío.
NOTA: Cuando se comunique con el distribuidor de Baby Jogger sobre su producto,
por favor tenga a mano el número de serie del producto.
Garantía limitada de por vida de Baby
Jogger: www.babyjogger.com/register
Información de contacto de atención al cliente:
Correo electrónico: Customerservice@babyjogger.com
Llame al: 1-800-241-1848 8:30am - 5:30pm
EST, Mon - Fri.
Fax: 1-804-262-6277
Correo : Baby Jogger, LLC
4110 Premier Drive
High Point, NC 27265
www.babyjogger.com
NO CONTACTE EL LUGAR DE COMPRA PARA PIEZAS NI CUESTIONES DE GARANTÍA
SP

Notes • Notas

Notes • Notas

6655 Peachtree Dunwoody Rd. NE • Atlanta, GA 30328
1.800.241.1848 • www.babyjogger.com
Baby Jogger, LLC
-
 1
1
-
 2
2
-
 3
3
-
 4
4
-
 5
5
-
 6
6
-
 7
7
-
 8
8
-
 9
9
-
 10
10
-
 11
11
-
 12
12
-
 13
13
-
 14
14
-
 15
15
-
 16
16
-
 17
17
-
 18
18
-
 19
19
-
 20
20


Baby Jogger city bistro Assembly Instructions Manual
- Tipo
- Assembly Instructions Manual
en otros idiomas
- English: Baby Jogger city bistro
Artículos relacionados

Otros documentos
-
Graco PD162118B Manual de usuario
-
-
-
-
-
-
-
-
 babideal Zuma RA2371 Guía de inicio rápido
