
SWA-9000S
USER MANUAL

ENG - 2
Safety Information
Thank you for purchasing this product (SWA-9000S).
CAUTION
RISK OF ELECTRIC SHOCK.
DO NOT OPEN
This symbol indicates that
high voltage is present
inside. It is dangerous to
make any kind of contact
with any internal part of
this product.
CAUTION: TO REDUCE THE RISK OF ELECTRIC
SHOCK, DO NOT REMOVE THE COVER (OR BACK).
NO USER-SERVICEABLE PARTS ARE INSIDE. REFER
SERVICING TO QUALIFIED SERVICE PERSONNEL.
Refer to the table below for an explanation of
symbols which may be on your Samsung product.
This symbol indicates that
this product has included
important literature
concerning operation and
maintenance.
Class II product : This symbol indicates that it does not require a safety connection to
electrical earth (ground). If this symbol is not present on a product with a power cord,
the product MUST have a reliable connection to protective earth (ground).
AC voltage : This symbol indicates that the rated voltage marked with the symbol is AC
voltage.
DC voltage : This symbol indicates that the rated voltage marked with the symbol is DC
voltage.
Caution, Consult instructions for use : This symbol instructs the user to consult the user
manual for further safety related information.
• The slots and openings in the cabinet and
in the back or bottom are provided for
necessary ventilation. To ensure reliable
operation of this apparatus, and to protect it
from overheating, these slots and openings
must never be blocked or covered.
– Do not place this apparatus in a conned
space, such as a bookcase, or built-in
cabinet, unless proper ventilation is
provided.
– Do not place this apparatus near or over
a radiator or heat register, or where it is
exposed to direct sunlight.
– Do not place vessels (vases etc.)
containing water on this apparatus.
A water spill can cause a re or electric
shock.
• Do not expose this apparatus to rain
or place it near water (near a bathtub,
washbowl, kitchen sink, or laundry tub, in
a wet basement, or near a swimming pool,
etc.). If this apparatus accidentally gets wet,
unplug it and contact an authorized dealer
immediately.
• Do not overload wall outlets, extension cords
or adaptors beyond their capacity, since this
can result in re or electric shock.

ENG - 2 ENG - 3
Safety Information
Thank you for purchasing this product (SWA-9000S).
CAUTION
RISK OF ELECTRIC SHOCK.
DO NOT OPEN
This symbol indicates that
high voltage is present inside.
It is dangerous to make any
kind of contact with any
internal part of this product.
CAUTION: TO REDUCE THE RISK OF
ELECTRIC SHOCK, DO NOT REMOVE THE
COVER (OR BACK). THERE ARE NO USER
SERVICEABLE PARTS INSIDE. REFER ALL
SERVICING TO QUALIFIED PERSONNEL.
This symbol indicates that
this product has included
important literature
concerning operation and
maintenance.
Class II product : This symbol indicates that it does not require a safety connection to
electrical earth (ground).
AC voltage : This symbol indicates that the rated voltage marked with the symbol is AC
voltage.
DC voltage : This symbol indicates that the rated voltage marked with the symbol is DC
voltage.
Caution, Consult instructions for use : This symbol instructs the user to consult the user
manual for further safety related information.
• Route power-supply cords so that they are
not likely to be walked on or pinched by items
placed on or against them. Pay particular
attention to cords at the plug end, at wall
outlets, and the point where they exit from
the apparatus.
• To protect this apparatus from a lightning
storm, or when it is left unattended and
unused for long periods of time, unplug it from
the wall outlet and disconnect the antenna or
cable system. This will prevent damage to the
set due to lightning and power line surges.
• Before connecting the AC power cord to the
DC adaptor outlet, make sure the voltage
designation of the DC adaptor corresponds to
the local electrical supply.
• Never insert anything metallic into the open
parts of this apparatus. Doing so may create a
danger of electric shock.
• To avoid electric shock, never touch the inside
of this apparatus. Only a qualied technician
should open this apparatus.
• Make sure to plug the power cord in until it is
rmly seated. When unplugging the power
cord from a wall outlet, always pull on the
power cord’s plug. Never unplug by pulling on
the power cord. Do not touch the power cord
with wet hands.
• If this apparatus does not operate normally
- in particular, if there are any unusual
sounds or smells coming from it - unplug it
immediately and contact an authorized dealer
or service centre.
• Maintenance of Cabinet.
– Before connecting other components to
this product, be sure to turn them off.
• Be sure to pull the power plug out of the
outlet if the product is to remain unused or
if you are leaving the house for an extended
period of time (especially when children,
elderly, or disabled people will be left alone in
the house).
– Accumulated dust can cause an electric
shock, an electric leakage, or a re by
causing the power cord to generate sparks
and heat or the insulation to deteriorate.
• Contact an authorized service centre for
information if you intend to install your
product in a location with heavy dust, high or
low temperatures, high humidity, chemical
substances, or where it will operate 24 hours
a day such as in an airport, a train station, etc.
Failing to do so may cause serious damage to
your product.
• Use only a properly grounded plug and wall
outlet.
– An improper ground may cause electric
shock or equipment damage. (Class 1
Equipment only.)
• To turn this apparatus off completely, you
must disconnect it from the wall outlet.
Consequently, the wall outlet and power plug
must be readily accessible at all times.
• Do not allow children to hang on the product.
• Store the accessories (battery, etc.) in a
location safely out of the reach of children.
– Do not place vessels (vases etc.)
containing water on this apparatus.
A water spill can cause a re or electric
shock.
• Do not expose this apparatus to rain
or place it near water (near a bathtub,
washbowl, kitchen sink, or laundry tub, in
a wet basement, or near a swimming pool,
etc.). If this apparatus accidentally gets wet,
unplug it and contact an authorized dealer
immediately.
• Do not overload wall outlets, extension cords
or adaptors beyond their capacity, since this
can result in re or electric shock.

ENG - 4 ENG - 5
• Do not install the product in an unstable
location such as a shaky self, a slanted oor,
or a location exposed to vibration.
• Do not drop or strike the product. If the
product is damaged, disconnect the power
cord and contact a service centre.
• To clean this apparatus, unplug the power
cord from the wall outlet, and then wipe
the product using a soft, dry cloth. Do not
use any chemicals such as wax, benzene,
alcohol, thinners, insecticide, air fresheners,
lubricants, or detergent. These chemicals can
damage the appearance of the product or
erase the printing on the product.
• Do not expose this apparatus to dripping
or splashing. Do not put objects lled with
liquids, such as vases, on the apparatus.
• Do not plug multiple electric devices into the
same wall socket. Overloading a socket can
cause it to overheat, resulting in a re.
WARNING :
• TO PREVENT THE SPREAD OF
FIRE, KEEP CANDLES AND
OTHER ITEMS WITH OPEN
FLAMES AWAY FROM THIS
PRODUCT AT ALL TIMES.
• To reduce the risk of re or electric shock, do
not expose this appliance to rain or moisture.
Precautions
1. Ensure that the AC or DC power supply
in your house complies with the power
requirements listed on the identication
sticker located on the back of your product.
Install your product horizontally, on a
suitable base (furniture), with enough space
around it for ventilation (7~10 cm).
Make sure the ventilation slots are not
covered. Do not place the unit on ampliers
or other equipment which may become hot.
This unit is designed for continuous use.
To fully turn off the unit, disconnect the AC
plug from the wall outlet.
2. Do not expose the unit to direct sunlight
or other heat sources. This could lead
to overheating and cause the unit to
malfunction.
3. Unplug the Power cord from the AC wall
socket if the unit malfunctions. Your product
is not intended for industrial use. It is for
personal use only. Condensation may occur
if your product has been stored in cold
temperatures. If transporting the unit during
the winter, wait approximately 2 hours until
the unit has reached room temperature
before using it.
4. If the electricity supplied to your home is
rated at 240V AC, use a suitable plug adapter
to connect this unit to your electrical outlets.
Important Safety Instructions
Read these operating instructions carefully
before using the unit. Follow all the safety
instructions listed below. Keep these operating
instructions handy for future reference.
1. Read these instructions.
2. Keep these instructions.
3. Heed all warnings.
4. Follow all instructions.
5. Do not use this apparatus near water.
6. Clean only with a dry cloth.
7. Do not block any ventilation openings. Install
in accordance with the manufacturer’s
instructions.
8. Do not install near any heat sources such
as radiators, heat registers, stoves, or other
apparatus (including AV receivers) that
produce heat.
9. Do not defeat the safety purpose of the
polarized or grounding-type plug.
A polarized plug has two blades with one
wider than the other. A grounding type
plug has two blades and a third grounding
prong. The wide blade or the third prong
are provided for your safety. If the provided
plug does not t into your outlet, consult an
electrician for replacement of the obsolete
outlet.

ENG - 4 ENG - 5
Precautions
1. Ensure that the AC or DC power supply
in your house complies with the power
requirements listed on the identication
sticker located on the back of your product.
Install your product horizontally, on a
suitable base (furniture), with enough space
around it for ventilation (7~10 cm).
Make sure the ventilation slots are not
covered. Do not place the unit on ampliers
or other equipment which may become hot.
This unit is designed for continuous use.
To fully turn off the unit, disconnect the AC
plug from the wall outlet.
2. Do not expose the unit to direct sunlight
or other heat sources. This could lead
to overheating and cause the unit to
malfunction.
3. Unplug the Power cord from the AC wall
socket if the unit malfunctions. Your product
is not intended for industrial use. It is for
personal use only. Condensation may occur
if your product has been stored in cold
temperatures. If transporting the unit during
the winter, wait approximately 2 hours until
the unit has reached room temperature
before using it.
4. If the electricity supplied to your home is
rated at 240V AC, use a suitable plug adapter
to connect this unit to your electrical outlets.
Important Safety Instructions
Read these operating instructions carefully
before using the unit. Follow all the safety
instructions listed below. Keep these operating
instructions handy for future reference.
1. Read these instructions.
2. Keep these instructions.
3. Heed all warnings.
4. Follow all instructions.
5. Do not use this apparatus near water.
6. Clean only with a dry cloth.
7. Do not block any ventilation openings. Install
in accordance with the manufacturer’s
instructions.
8. Do not install near any heat sources such
as radiators, heat registers, stoves, or other
apparatus (including AV receivers) that
produce heat.
9. Do not defeat the safety purpose of the
polarized or grounding-type plug.
A polarized plug has two blades with one
wider than the other. A grounding type
plug has two blades and a third grounding
prong. The wide blade or the third prong
are provided for your safety. If the provided
plug does not t into your outlet, consult an
electrician for replacement of the obsolete
outlet.
10. Protect the power cord from being walked
on or pinched particularly at plugs,
convenience receptacles, and the point
where it exits the apparatus.
11. Only use attachments/accessories specied
by the manufacturer.
12. Use only with the cart,
stand, tripod, bracket,
or table specied by the
manufacturer, or sold with
the apparatus. When a cart
is used, use caution when moving the cart/
apparatus combination to avoid injury from
tip-over.
13. Unplug this apparatus during lightning
storms or when you intend to leave it unused
for long periods of time.
14. Refer all servicing to qualied service
personnel. Servicing is required when the
apparatus has been damaged in any way,
such as when the power-supply cord or plug
is damaged, liquid has been spilled or objects
have fallen into the apparatus, the apparatus
has been exposed to rain or moisture, does
not operate normally, or has been dropped.

ENG - 6 ENG - 7
Accessories
STANDBY
LINK
WIRELESS
Surround
Speaker (2EA)
Speaker Cable
(2EA)
Power Cord Wireless Dongle
(WHM520V)
Wireless
Receiver
Module
Screw (2EA) Holder-Dongle
(Stand Type)
Holder-Dongle
(Wall mount Type
/ One Mount Type)
Toroidal Ferrite Core
• The Wireless Dongle is only compatible with Samsung Soundbars. For a list of compatible Samsung
Soundbars, see page 12. Do not connect the dongle to any other devices, such as smartphones,
desk-top PCs, or notebook PCs.
Specications
Weight
Wireless Receiver Module 0.7 kg
Surround Speaker 0.6 kg
Dimensions (W x H x D)
Wireless Receiver Module 50.0 X 201.3 X 132.0 mm
Surround Speaker 87.5 X 147.0 X 87.5 mm
Operating Temperature Range +5°C to +35°C
Operating Humidity Range 10% ~ 75%
Frequency range 20Hz~20KHz
NOTES
– Samsung Electronics Co., Ltd reserves the right to change the specications without notice.
– Weight and dimensions are approximate.
– For more information about the power supply and power consumption, refer to the label attached
to the product.
– Design and specications are subject to change without prior notice.
Open Source Licence Notice
• To send inquiries and requests regarding open sources, contact Samsung via Email
(oss.request@samsung.com).
Connecting the SWA-9000S to a Soundbar
1. Connect the Wireless Receiver Module to 2 Surround Speakers
Use the speaker cables to connect the two surround sound speakers to the Wireless Receiver
Module.
• The speaker cables are colour coded.
SURROUND-LEFT
ID SET
L
R
SURROUND SPEAKERS OUT
SPEAKER IMPEDANCE : 3Ω
POWER
ID SET
L
R
SURROUND SPEAKERS OUT
SPEAKER IMPEDANCE : 3Ω
SURROUND-RIGHT
SURROUND-LEFT SURROUND-RIGHT
• When connecting the speaker cables to the Wireless Receiver Module, follow these steps:
1. Insert the grey plug into the grey jack on the Wireless Receiver.
2. Insert the blue plug into the blue jack on the Wireless Receiver.
• When connecting the speaker cables to the surround speakers, follow these steps:
1. Match the speaker cable connected to the grey jack to the speaker with the grey label.
2. Match the speaker cable connected to the blue jack to the speaker with the blue label.
3. Insert the red and black coloured ends of each speaker cable into the red and black jacks of
the appropriate speaker.
• The labels are on the backs of the speakers.

ENG - 8 ENG - 9
2. Check the standby status after plugging into an electrical outlet
Plug the Wireless Receiver Module power cord into an electrical outlet and into the Wireless
Receiver Module to turn on the Wireless Receiver Module. The LINK LED indicator (blue LED) on the
Wireless Receiver Module blinks. If the LED does not blink, refer to step 8 on page 11.
ID SET
L
R
SURROUND SPEAKERS OUT
SPEAKER IMPEDANCE : 3Ω
POWER
POWER
STANDBY
LINK
STANDBY
LINK
Blue blinking
Attach the Toroidal Ferrite Core to the Power Cord of the Soundbar
(Applicable only when connecting the SWA-9000S and MS series Soundbars/home
cinemas.)
HDMI IN
HDMI OUT
(TV-ARC)
WIRELESS
AUX IN
DIGITAL AUDIO IN
(OPTICAL)
POWER
IN
POWER
OUT
(For TV)
AC 100V~240V
4A~1.66A
POWER
IN
POWER
OUT
(For TV)
AC 100V~240V
4A~1.66A
Bottom of the Soundbar
Attach the Toroidal ferrite core to the power cord
of the Soundbar to help prevent RF interference
from radio signals.
1. Pull the xing tab of the Toroidal ferrite core to
open it.
2. Make two loops in the Soundbar’s power cord.
3. Attach the Toroidal ferrite core to the Soundbar’s
power cord as shown in the gure on the left, and
then close it by pressing it until it clicks.
• Ensure that the ferrite core is attached as
close as possible to the power plug of the
Soundbar.
3. Connect the main unit of the Soundbar to the Wirless Dongle
Connect the wireless dongle to the “WIRELESS” port on the Soundbar main unit.
• When inserting the Wireless Dongle into the holder, make sure that the “WIRELESS” logo is
facing up, as shown in the pictures below.
• For Soundbar “HW-N8xx” model, skip this step and proceed to the next.
WIRELESS
WIRELESS
WIRELESS
1
2
Stand Type
WIRELESS
WIRELESS
WIRELESS
1
2
Wall Mount Type
WIRELESS
WIRELESS
WIRELESS
WIRELESS
WIRELESS
WIRELESS
WIRELESS
HW-MS5XX/HW-MS6XX/HW-MS65XX
WIRELESS
WIRELESS
WIRELESS
WIRELESS
HW-MS7XX
One Mount Type (WMN300SB, not supplied)
Precautions for purchasing an additional SWA-W700 (optional Subwoofer)
Do not remove the wireless dongle from the main Soundbar unit.
The wireless dongle that comes with the product can be used with the SWA-W700 (optional
Subwoofer).

ENG - 8 ENG - 9
2. Check the standby status after plugging into an electrical outlet
Plug the Wireless Receiver Module power cord into an electrical outlet and into the Wireless
Receiver Module to turn on the Wireless Receiver Module. The LINK LED indicator (blue LED) on the
Wireless Receiver Module blinks. If the LED does not blink, refer to step 8 on page 11.
ID SET
L
R
SURROUND SPEAKERS OUT
SPEAKER IMPEDANCE : 3Ω
POWER
POWER
STANDBY
LINK
STANDBY
LINK
Blue blinking
Attach the Toroidal Ferrite Core to the Power Cord of the Soundbar
(Applicable only when connecting the SWA-9000S and MS series Soundbars/home
cinemas.)
HDMI IN
HDMI OUT
(TV-ARC)
WIRELESS
AUX IN
DIGITAL AUDIO IN
(OPTICAL)
POWER
IN
POWER
OUT
(For TV)
AC 100V~240V
4A~1.66A
POWER
IN
POWER
OUT
(For TV)
AC 100V~240V
4A~1.66A
Bottom of the Soundbar
Attach the Toroidal ferrite core to the power cord
of the Soundbar to help prevent RF interference
from radio signals.
1. Pull the xing tab of the Toroidal ferrite core to
open it.
2. Make two loops in the Soundbar’s power cord.
3. Attach the Toroidal ferrite core to the Soundbar’s
power cord as shown in the gure on the left, and
then close it by pressing it until it clicks.
• Ensure that the ferrite core is attached as
close as possible to the power plug of the
Soundbar.
3. Connect the main unit of the Soundbar to the Wirless Dongle
Connect the wireless dongle to the “WIRELESS” port on the Soundbar main unit.
• When inserting the Wireless Dongle into the holder, make sure that the “WIRELESS” logo is
facing up, as shown in the pictures below.
• For Soundbar “HW-N8xx” model, skip this step and proceed to the next.
WIRELESS
WIRELESS
WIRELESS
1
2
Stand Type
WIRELESS
WIRELESS
WIRELESS
1
2
Wall Mount Type
WIRELESS
WIRELESS
WIRELESS
WIRELESS
WIRELESS
WIRELESS
WIRELESS
HW-MS5xx/HW-MS6xx/HW-MS65xx
WIRELESS
WIRELESS
WIRELESS
WIRELESS
HW-MS7xx
One Mount Type (WMN300SB, not supplied)
Precautions for purchasing an additional SWA-W700 (optional Subwoofer)
Do not remove the wireless dongle from the main Soundbar unit.
The wireless dongle that comes with the product can be used with the SWA-W700 (optional
Subwoofer).

ENG - 10 ENG - 11
7. Check if the LINK LED is solid blue (connection complete)
STANDBY
LINK
STANDBY
LINK
Blue is On
The LINK LED indicator stops blinking
and glows a solid blue when a
connection is established between the
Soundbar and the Wireless Receiver
Module.
8. If the SWA-9000S does not connect, take the necessary steps
according to the LED Indicator’s status
LED status Action
LINK (Blue)
On
Connected with
the Soundbar
-
Blinking
Connection
standby status
Check if the Soundbar is turned on
Repeat steps 4 through 7.
STANDBY (Red) On Connection failure
Check if the Soundbar is turned on
1. Press the ID SET button on the back
of the Wireless Receiver Module with
a pen tip for 5~6 seconds until the
LINK LED indicator blinks (in Blue).
ID SET
L
R
SURROUND SPEAKERS OUT
SPEAKER IMPEDANCE : 3Ω
POWER
ID SET
5 Sec
2. Repeat steps 4 through 7.
Others - Errors Contact a Samsung Service Centre.
4. Turn off the Soundbar
Turn off the Soundbar using the Soundbar’s remote control or by pressing the (Power) button
on the main Soundbar unit.
BYE
• The image of the Soundbar may differ from your Soundbar, depending on the model.
5. Congure “ID SET” using the Soundbar’s remote control
Press the VOL button on your remote control for 5~6 seconds until the “ID SET” message appears
on your Soundbar’s display.
• Steps for “ID SET” may vary by the Soundbar model. Please read manual for your Soundbar.
If the manual does not provide “ID SET” instructions, follow steps described in the image below.
VOL
SOUNDBAR
ID SET
5 Sec
• The image of the Soundbar may differ from your Soundbar, depending on the model.
6. Turn on the Soundbar
Turn on the Soundbar using the Soundbar’s remote control or by pressing the (Power) button on
the main Soundbar unit.
• Some Soundbar models will be automatically powered on after completing “5. ID SET” step.
ON
• The image of the Soundbar may differ from your Soundbar, depending on the model.

ENG - 12
CAUTIONS
• If you have connected your Soundbar and one or more Samsung Wireless Speakers via a wireless
router:
Disable the surround sound for the Soundbar and Samsung Wireless Speaker, and then install and
use the SWA-9000S.
• If you connect the SWA-9000S and do not disable surround sound as described above:
Sound will be played via both the Samsung Wireless Speakers and the SWA-9000S’s surround
speakers.
Compatible Models
• Compatible with select Samsung Soundbar. Please visit the Soundbar product page at
www.samsung.com/support for more information.
• Compatible model list is subject to change without further notice.

FRA - 2
Consignes de Sécurité
Merci d’avoir acheté ce produit (SWA-9000S).
ATTENTION
RISQUE DE CHOC ÉLECTRIQUE.
NE PAS OUVRIR
Ce symbole indique que
ce produit est alimenté
par haute tension. Il est
dangereux de toucher
la moindre pièce située
à l’intérieur de ce
produit.
ATTENTION: POUR ÉVITER LES RISQUES DE CHOC
ÉLECTRIQUE, NE DÉMONTEZ PAS LE CAPOT.
L’APPAREIL NE CONTIENT PAS DE PIÈCES RÉPARABLES
PAR L’UTILISATEUR ; S’ADRESSER À UN SERVICE APRÈS-
VENTE QUALIFIÉ.
Reportez-vous au tableau ci-dessous pour une explication
des symboles pouvant gurer sur votre produit Samsung..
Ce symbole indique
qu’une documentation
importante relative au
fonctionnement et à
l’entretien est fournie
avec le produit.
Produit de classeII: ce symbole indique qu'aucun branchement de sécurité à la terre
(prise de terre) n'est requis. Si ce symbole n'est pas présent sur un produit avec un cordon
d'alimentation, le produit DOIT avoir une connexion de protection able à la terre.
Tension CA: ce symbole indique que la tension nominale indiquée par le symbole est
une tension CA.
Tension CC: ce symbole indique que la tension nominale indiquée par le symbole est
une tension CC.
Mise en garde, Consulter le mode d'emploi: ce symbole avertit l'utilisateur qu'il doit
consulter le manuel d'utilisation pour en savoir plus sur les informations relatives à la
sécurité.
• Les fentes et les ouvertures situées à l’arrière
et en dessous de l’appareil permettent
d’assurer une ventilation correcte. An
d’assurer le bon fonctionnement de l’appareil
et d’empêcher toute surchauffe, veillez à ne
jamais obstruer ces ouvertures de quelque
façon que ce soit.
– Ne placez pas l’appareil dans un endroit
conné comme une bibliothèque ou un
meuble intégré sauf si une ventilation
sufsante y est assurée.
– Ne placez pas l’appareil à proximité
ou sur un radiateur ou une bouche
de chaleur et ne l’exposez jamais à la
lumière directe du soleil.
– Ne posez pas de récipients contenant
du liquide (ex.: vase, etc.) sur l’appareil
an d’éviter tout risque d’incendie ou
d’électrocution en cas de projections.
• N’exposez pas l’appareil à la pluie et ne
le placez pas à côté d’une source d’eau
(baignoire, lavabo, évier, cuve, sous-sol
humide, piscine, etc.). Si l’appareil est exposé
à de l’eau ou à de l’humidité par accident,
débranchez-le et contactez immédiatement
un représentant agréé.
• Ne surchargez pas les prises murales, les
rallonges et les adaptateurs an d’éviter tout
risque d’incendie ou d’électrocution.

FRA - 2 FRA - 3
Consignes de Sécurité
Merci d’avoir acheté ce produit (SWA-9000S).
ATTENTION
RISQUE DE CHOC ÉLECTRIQUE.
NE PAS OUVRIR
Ce symbole indique que
ce produit est alimenté
par haute tension. Il est
dangereux de toucher la
moindre pièce située à
l’intérieur de ce produit.
ATTENTION: POUR LIMITER LES RISQUES DE
DÉCHARGE ÉLECTRIQUE, NE RETIREZ JAMAIS LE
CACHE (NI L’ARRIÈRE DE L’APPAREIL). CERTAINES
PIÈCES QU’IL CONTIENT NE SONT PAS RÉPARABLES
PAR L’UTILISATEUR. VEUILLEZ CONTACTER UN
TECHNICIEN QUALIFIÈ POUR TOUTE RÉPARATION.
Ce symbole indique
qu’une documentation
importante relative au
fonctionnement et à
l’entretien est fournie
avec le produit.
Produit de classeII: ce symbole indique qu'aucun branchement de sécurité à la terre
(prise de terre) n'est requis.
Tension CA: ce symbole indique que la tension nominale indiquée par le symbole est
une tension CA.
Tension CC: ce symbole indique que la tension nominale indiquée par le symbole est
une tension CC.
Mise en garde, Consulter le mode d'emploi: ce symbole avertit l'utilisateur qu'il doit
consulter le manuel d'utilisation pour en savoir plus sur les informations relatives à la
sécurité.
• Organisez les câbles de sorte qu’ils ne gênent
pas la circulation dans la pièce ou qu’ils ne
soient pas écrasés par le mobilier attenant.
Assurez-vous toujours que les parties côté
che, prise murale et sortie de l’appareil sont
en bon état.
• An de protéger l’appareil de la foudre, ou
si vous prévoyez de ne pas l’utiliser pendant
une période prolongée, débranchez-le. Faites
de même avec l’antenne ou le système de
câblage. Vous éviterez ainsi qu’ils ne soient
endommagés par la foudre ou une surtension.
• Avant de brancher le cordon d’alimentationCA
sur la prise de l’adaptateurCC, assurez-vous
que les caractéristiques électriques de
l’adaptateurCC correspondent à l’alimentation
électrique locale.
• N’insérez jamais d’objets métalliques dans les
ouvertures de l’appareil. Vous risqueriez de
vous électrocuter.
• Pour éviter tout risque d’électrocution, ne
touchez jamais les composants internes de
l’appareil. Seul un technicien qualié est
autorisé à ouvrir l’appareil.
• Enfoncez correctement la prise dans le
mur. Pour débrancher l’appareil du mur,
tirez toujours sur la che du câble. Ne
tentez jamais de le débrancher en tirant
directement sur le câble. Ne touchez jamais le
cordon d’alimentation si vous avez les mains
mouillées.
• Si vous constatez que l’appareil ne fonctionne
pas normalement (bruits ou odeurs
inhabituels), débranchez-le immédiatement
et contactez un revendeur ou un centre de
services agréé.
• Entretien du meuble.
– Avant de brancher un composant sur cet
appareil, assurez-vous que celui-ci est
hors tension.
• Débranchez toujours l’appareil si vous
prévoyez de ne pas l’utiliser pendant une
période prolongée (en particulier si des
enfants ou des personnes aux capacités
réduites sont laissées sans surveillance).
– L’accumulation de poussière sur l’appareil
risque de provoquer des étincelles, une
surchauffe ou un problème d’isolation
et de provoquer un choc électrique, une
fuite électrique ou un incendie.
• Contactez un centre de services agréé pour
obtenir plus d’informations si vous souhaitez
installer votre produit dans une pièce exposée
à la poussière, à des températures extrêmes,
à l’humidité ou à des substances chimiques
ou dans un endroit où il fonctionnera en
permanence, comme dans un hall d’aéroport
ou de gare. Le non-respect de ces consignes
risque d’endommager gravement l’appareil.
• Utilisez uniquement une che et une prise
murale correctement mises à la terre.
– Une mise à la terre incorrecte peut
provoquer un choc électrique ou
endommager l’équipement. (équipement
de classe1 uniquement.)
• Pour éteindre complètement l’appareil, vous
devez débrancher le cordon d’alimentation
de la prise murale. C’est pourquoi le cordon
d’alimentation doit être facilement accessible
à tout moment.
• Ne laissez jamais les enfants jouer avec
l’appareil.
• Conservez les accessoires (piles, etc.) dans un
endroit sûr, hors de leur portée.
– Ne posez pas de récipients contenant
du liquide (ex.: vase, etc.) sur l’appareil
an d’éviter tout risque d’incendie ou
d’électrocution en cas de projections.
• N’exposez pas l’appareil à la pluie et ne
le placez pas à côté d’une source d’eau
(baignoire, lavabo, évier, cuve, sous-sol
humide, piscine, etc.). Si l’appareil est exposé
à de l’eau ou à de l’humidité par accident,
débranchez-le et contactez immédiatement
un représentant agréé.
• Ne surchargez pas les prises murales, les
rallonges et les adaptateurs an d’éviter tout
risque d’incendie ou d’électrocution.

FRA - 4 FRA - 5
• N’installez pas le produit dans un endroit
instable, comme sur une étagère branlante,
un sol incliné ou dans un local exposé à des
vibrations.
• Ne faites pas tomber l’appareil et ne l’exposez
pas à des chocs. S’il est endommagé
débranchez le câble d’alimentation et
contactez le centre de services.
• Pour nettoyer l’appareil, débranchez d’abord
le câble d’alimentation de la prise murale,
puis essuyez-le avec un chiffon doux et sec.
N’utilisez pas de produits chimiques, tels que
de la cire, du benzène, de l’alcool, des diluants,
des insecticides, des puricateurs d’air, des
lubriants ou des détergents. Ils risquent
d’endommager le revêtement du produit ou
d’en effacer les inscriptions.
• Évitez toute projection d’eau sur l’appareil. Ne
posez jamais d’objets contenant un liquide
(ex: un vase) sur l’appareil.
• Ne branchez pas plusieurs appareils
électriques sur une même prise murale.
Surcharger une prise murale peut provoquer
une surchauffe et donc un incendie.
AVERTISSEMENT :
• AFIN D’ÉVITER TOUT RISQUE
DE PROPAGATION D’INCENDIE,
ÉLOIGNEZ LES BOUGIES OU LES
AUTRES DISPOSITIFS À FEU NU
DE L’APPAREIL.
• Pour réduire les risques d’incendie ou de
décharge électrique, veuillez ne pas exposer
cet appareil à la pluie ou à l’humidité.
Précautions
1. Vériez que l’alimentation électrique
CA ou CC de votre logement respecte
les conditions en matière d’alimentation
répertoriées sur l’étiquette d’identication
située au dos de votre produit. Installez
le produit horizontalement, sur une base
adaptée (meuble), en laissant sufsamment
d’espace autour du produit pour une bonne
ventilation (entre 7 et 10 cm). Vériez que les
fentes de ventilation ne sont pas couvertes.
Ne placez pas l’unité sur des haut-parleurs
ou sur tout autre équipement susceptible
de devenir chaud. Cette unité a été conçue
pour une utilisation continue. Pour l’éteindre
complètement, débranchez la prise CA de la
prise murale.
2. N’exposez pas l’unité à la lumière directe du
soleil ou à d’autres sources de chaleur.
Cela pourrait entraîner une surchauffe et des
dysfonctionnements.
3. Débranchez le câble d’alimentation de
la prise murale CA si l’unité présente un
dysfonctionnement. Le produit n’a pas été
conçu pour une utilisation industrielle, mais
pour une utilisation personnelle uniquement.
De la condensation peut se former si le
produit a été stocké à basse température.
Si vous transportez l’unité en hiver, attendez
environ 2 heures, le temps qu’elle atteigne la
température ambiante, avant de l’utiliser.
4. Si l’alimentation électrique est utilisée à
240 V CA, un adaptateur de prise adapté doit
être utilisé.
Consignes de sécurité
importantes
Lisez attentivement ces consignes avant
d’utiliser l’appareil. Veillez à respecter toutes les
consignes répertoriées ci-après. Conservez ces
instructions à portée de main pour vous y référer
ultérieurement.
1. Lisez attentivement ces consignes.
2. Conservez-les précieusement.
3. Tenez compte de tous les avertissements
mentionnés.
4. Respectez toutes les instructions sans
exception.
5. N’utilisez pas cet appareil à proximité de
l’eau.
6. Nettoyez-le à l’aide d’un tissu sec.
7. Ne bloquez pas les ouvertures de ventilation.
Installez l’appareil conformément aux
instructions du fabricant.
8. N’installez pas l’appareil à proximité d’une
source de chaleur de type radiateur, registre
de chaleur, cuisinière ou tout autre appareil
(y compris les récepteurs AV) générateur de
chaleur.
9. Ne désactivez pas le dispositif de sécurité
de la che de mise à la terre ou de la che
polarisée. Une che polarisée comporte
deux lames dont l’une est plus large que
l’autre. Une che de mise à la terre comporte
deux lames et une troisième broche de
mise à la terre. La lame la plus large et la
troisième broche sont destinées à assurer
votre sécurité. Si la che fournie ne s’insère
pas dans la prise utilisée, faites appel à un
électricien pour faire remplacer celle-ci.

FRA - 4 FRA - 5
Précautions
1. Vériez que l’alimentation électrique
CA ou CC de votre logement respecte
les conditions en matière d’alimentation
répertoriées sur l’étiquette d’identication
située au dos de votre produit. Installez
le produit horizontalement, sur une base
adaptée (meuble), en laissant sufsamment
d’espace autour du produit pour une bonne
ventilation (entre 7 et 10 cm). Vériez que les
fentes de ventilation ne sont pas couvertes.
Ne placez pas l’unité sur des haut-parleurs
ou sur tout autre équipement susceptible
de devenir chaud. Cette unité a été conçue
pour une utilisation continue. Pour l’éteindre
complètement, débranchez la prise CA de la
prise murale.
2. N’exposez pas l’unité à la lumière directe du
soleil ou à d’autres sources de chaleur.
Cela pourrait entraîner une surchauffe et des
dysfonctionnements.
3. Débranchez le câble d’alimentation de
la prise murale CA si l’unité présente un
dysfonctionnement. Le produit n’a pas été
conçu pour une utilisation industrielle, mais
pour une utilisation personnelle uniquement.
De la condensation peut se former si le
produit a été stocké à basse température.
Si vous transportez l’unité en hiver, attendez
environ 2 heures, le temps qu’elle atteigne la
température ambiante, avant de l’utiliser.
4. Si l’alimentation électrique est utilisée à
240 V CA, un adaptateur de prise adapté doit
être utilisé.
Consignes de sécurité
importantes
Lisez attentivement ces consignes avant
d’utiliser l’appareil. Veillez à respecter toutes les
consignes répertoriées ci-après. Conservez ces
instructions à portée de main pour vous y référer
ultérieurement.
1. Lisez attentivement ces consignes.
2. Conservez-les précieusement.
3. Tenez compte de tous les avertissements
mentionnés.
4. Respectez toutes les instructions sans
exception.
5. N’utilisez pas cet appareil à proximité de
l’eau.
6. Nettoyez-le à l’aide d’un tissu sec.
7. Ne bloquez pas les ouvertures de ventilation.
Installez l’appareil conformément aux
instructions du fabricant.
8. N’installez pas l’appareil à proximité d’une
source de chaleur de type radiateur, registre
de chaleur, cuisinière ou tout autre appareil
(y compris les récepteurs AV) générateur de
chaleur.
9. Ne désactivez pas le dispositif de sécurité
de la che de mise à la terre ou de la che
polarisée. Une che polarisée comporte
deux lames dont l’une est plus large que
l’autre. Une che de mise à la terre comporte
deux lames et une troisième broche de
mise à la terre. La lame la plus large et la
troisième broche sont destinées à assurer
votre sécurité. Si la che fournie ne s’insère
pas dans la prise utilisée, faites appel à un
électricien pour faire remplacer celle-ci.
10. Placez le cordon d’alimentation de sorte
qu’il ne puisse être ni piétiné ni pincé,
particulièrement au niveau de la che, de
la prise de courant et du point de sortie du
cordon de l’appareil.
11. Utilisez exclusivement les xations/
accessoires spéciés par le fabricant.
12. Utilisez exclusivement
le meuble à roulettes, le
socle, le trépied, le support
ou la table recommandés
par le fabricant ou vendus
avec l’appareil. Si l’appareil est posé sur un
meuble à roulettes, déplacez l’ensemble
avec précaution pour éviter de faire tomber
l’appareil et de vous blesser.
13. Débranchez l’appareil en cas d’orage ou
lorsqu’il est inutilisé pendant une période
prolongée.
14. Conez toutes les réparations à un
technicien qualié. Votre appareil doit
impérativement être réparé lorsqu’il a
été endommagé de quelque manière que
ce soit: détérioration du cordon ou de la
che d’alimentation, projection de liquide
sur l’appareil, chute d’objets à l’intérieur
de l’appareil, exposition à la pluie ou à
l’humidité, dysfonctionnement, chute.

FRA - 6 FRA - 7
Accessoires
STANDBY
LINK
WIRELESS
Enceinte
surround (2EA)
Câble d’enceinte
(2EA)
Cordon
d’alimentation
Clé électronique
sans l (WHM520V)
Module de
réception
sans l
Vis (2EA) Support de clé
électronique
(Fixation
verticale)
Support de clé
électronique
(Fixation murale /
Fixation unique)
Noyau de tore ferrite
• La clé électronique sans l est uniquement compatible avec les Soundbars Samsung.
Pour une liste des Soundbars Samsung compatibles, reportez-vous à la page 12.
Ne connectez pas la clé électronique à un autre appareil, comme un smartphone, un ordinateur de
bureau ou un ordinateur portable.
Spécications
Poids
Module de réception sans l 0,7 kg
Enceinte surround 0,6 kg
Dimensions (L x H x P)
Module de réception sans l 50,0 X 201,3 X 132,0 mm
Enceinte surround 87,5 X 147,0 X 87,5 mm
Plage de températures de fonctionnement +5°C à +35°C
Plage de taux d’humidité de fonctionnement 10% ~ 75%
Plage de fréquences 20Hz~20KHz
REMARQUES
– Samsung Electronics Co., Ltd se réserve le droit de modier les caractéristiques sans préavis.
– Le poids et les dimensions sont approximatifs.
– Pour plus d’informations sur l’alimentation et la consommation électriques, reportez-vous à
l’étiquette collée sur le produit.
– La présentation et les spécications peuvent faire l’objet de modications sans préavis.
Avis de licence libre
• Pour toute requête et demande concernant les sources ouvertes, contactez Samsung via e-mail à
l’adresse (oss.request@samsung.com).
Connexion du SWA-9000S à une Soundbar
1. Connecter le module de réception sans l à 2 enceintes surround
Utilisez les câbles d’enceinte pour connecter deux enceintes surround au module de réception sans
l.
• Les câbles d’enceinte répondent à un code couleur.
SURROUND-LEFT
ID SET
L
R
SURROUND SPEAKERS OUT
SPEAKER IMPEDANCE : 3Ω
POWER
ID SET
L
R
SURROUND SPEAKERS OUT
SPEAKER IMPEDANCE : 3Ω
SURROUND-RIGHT
SURROUND-LEFT SURROUND-RIGHT
• Lors de la connexion des câbles d’enceinte au module de réception sans l, suivez ces étapes :
1. Insérez la che grise dans la prise jack grise du module de réception sans l.
2. Insérez la che bleue dans la prise jack bleue du module de réception sans l.
• Lors de la connexion des câbles d’enceinte aux enceintes surround, suivez ces étapes :
1. Faites correspondre le câble d’enceinte connecté à la prise jack grise à l’enceinte avec
l’étiquette grise.
2. Faites correspondre le câble d’enceinte connecté à la prise jack bleue à l’enceinte avec
l’étiquette bleue.
3. Insérez les extrémités rouge et noire de chaque câble d’enceinte dans les prises jack rouge
et noire des enceintes appropriées.
• Les étiquettes sont situées au dos des enceintes.

FRA - 8 FRA - 9
2. Vériez l’état de veille après le branchement à une prise électrique
Branchez le cordon d’alimentation du module de réception sans l à une prise électrique et
raccordez-le au module de réception sans l pour allumer le module de réception sans l.
Le voyant LED LINK (LED bleue) situé sur le module de réception sans l clignote. Si le voyant LED
ne clignote pas, reportez-vous à l’étape 8 à la page 11.
ID SET
L
R
SURROUND SPEAKERS OUT
SPEAKER IMPEDANCE : 3Ω
POWER
POWER
STANDBY
LINK
STANDBY
LINK
Clignotement bleu
Fixer le noyau de tore ferrite au cordon d’alimentation de la Soundbar
(Applicable uniquement lors de la connexion de Soundbars/Home cinéma SWA-9000S
et de la série MS.)
HDMI IN
HDMI OUT
(TV-ARC)
WIRELESS
AUX IN
DIGITAL AUDIO IN
(OPTICAL)
POWER
IN
POWER
OUT
(For TV)
AC 100V~240V
4A~1.66A
POWER
IN
POWER
OUT
(For TV)
AC 100V~240V
4A~1.66A
Partie inférieure de la Soundbar
Fixez le noyau de tore ferrite au cordon d’alimentation
de la Soundbar pour aider à éviter toute interférence RF
avec des signaux radio.
1. Tirez sur la languette de xation du noyau de tore
ferrite pour l’ouvrir.
2. Faites deux boucles avec le cordon d’alimentation de
la Soundbar.
3. Fixez le noyau de tore ferrite sur le cordon
d’alimentation de la Soundbar comme indiqué sur la
gure sur la gauche, puis fermez-le en appliquant une
pression dessus jusqu’à entendre un clic.
• Assurez-vous que le tore ferrite est xé aussi près de
la che d’alimentation de la Soundbar que possible.
3. Connexion de l’unité principale de la Soundbar à la clé
électronique sans l
Connectez la clé électronique sans l au port « WIRELESS » situé sur l’unité principale de la Soundbar.
• Lors de l’insertion de la clé électronique dans le support, assurez-vous que le logo « WIRELESS »
est tourné vers le haut, comme indiqué sur l’image ci-dessous.
• Pour le modèle de Soundbar « HW-N8xx », ignorez cette étape et passez à la suivante.
WIRELESS
WIRELESS
WIRELESS
1
2
Fixation verticale
WIRELESS
WIRELESS
WIRELESS
1
2
Fixation murale
WIRELESS
WIRELESS
WIRELESS
WIRELESS
WIRELESS
WIRELESS
WIRELESS
HW-MS5XX/HW-MS6XX/HW-MS65XX
WIRELESS
WIRELESS
WIRELESS
WIRELESS
HW-MS7XX
Fixation unique (WMN300SB, non fourni)
Précautions pour l’achat d’un SWA-W700 supplémentaire (subwoofer en option)
Ne retirez pas la clé électronique sans l de l’unité principale de la Soundbar.
La clé électronique sans l fournie avec le produit peut être utilisée avec le SWA-W700 (subwoofer
en option).

FRA - 8 FRA - 9
2. Vériez l’état de veille après le branchement à une prise électrique
Branchez le cordon d’alimentation du module de réception sans l à une prise électrique et
raccordez-le au module de réception sans l pour allumer le module de réception sans l.
Le voyant LED LINK (LED bleue) situé sur le module de réception sans l clignote. Si le voyant LED
ne clignote pas, reportez-vous à l’étape 8 à la page 11.
ID SET
L
R
SURROUND SPEAKERS OUT
SPEAKER IMPEDANCE : 3Ω
POWER
POWER
STANDBY
LINK
STANDBY
LINK
Clignotement bleu
Fixer le noyau de tore ferrite au cordon d’alimentation de la Soundbar
(Applicable uniquement lors de la connexion de Soundbars/Home cinéma SWA-9000S
et de la série MS.)
HDMI IN
HDMI OUT
(TV-ARC)
WIRELESS
AUX IN
DIGITAL AUDIO IN
(OPTICAL)
POWER
IN
POWER
OUT
(For TV)
AC 100V~240V
4A~1.66A
POWER
IN
POWER
OUT
(For TV)
AC 100V~240V
4A~1.66A
Partie inférieure de la Soundbar
Fixez le noyau de tore ferrite au cordon d’alimentation
de la Soundbar pour aider à éviter toute interférence RF
avec des signaux radio.
1. Tirez sur la languette de xation du noyau de tore
ferrite pour l’ouvrir.
2. Faites deux boucles avec le cordon d’alimentation de
la Soundbar.
3. Fixez le noyau de tore ferrite sur le cordon
d’alimentation de la Soundbar comme indiqué sur la
gure sur la gauche, puis fermez-le en appliquant une
pression dessus jusqu’à entendre un clic.
• Assurez-vous que le tore ferrite est xé aussi près de
la che d’alimentation de la Soundbar que possible.
3. Connexion de l’unité principale de la Soundbar à la clé
électronique sans l
Connectez la clé électronique sans l au port « WIRELESS » situé sur l’unité principale de la Soundbar.
• Lors de l’insertion de la clé électronique dans le support, assurez-vous que le logo « WIRELESS »
est tourné vers le haut, comme indiqué sur l’image ci-dessous.
• Pour le modèle de Soundbar « HW-N8xx », ignorez cette étape et passez à la suivante.
WIRELESS
WIRELESS
WIRELESS
1
2
Fixation verticale
WIRELESS
WIRELESS
WIRELESS
1
2
Fixation murale
WIRELESS
WIRELESS
WIRELESS
WIRELESS
WIRELESS
WIRELESS
WIRELESS
HW-MS5xx/HW-MS6xx/HW-MS65xx
WIRELESS
WIRELESS
WIRELESS
WIRELESS
HW-MS7xx
Fixation unique (WMN300SB, non fourni)
Précautions pour l’achat d’un SWA-W700 supplémentaire (subwoofer en option)
Ne retirez pas la clé électronique sans l de l’unité principale de la Soundbar.
La clé électronique sans l fournie avec le produit peut être utilisée avec le SWA-W700 (subwoofer
en option).

FRA - 10 FRA - 11
4. Éteindre la Soundbar
Éteignez la Soundbar à l’aide de la télécommande de la Soundbar ou en appuyant sur le bouton
(Alimentation) situé sur l’unité principale de la Soundbar.
BYE
• L’image de la Soundbar peut être différente de votre Soundbar, selon le modèle.
5. Congurer « ID SET » à l’aide de la télécommande de la Soundbar
Appuyez sur le bouton VOL de votre télécommande pendant 5 à 6 secondes jusqu’à ce que le
message « ID SET » s’afche sur l’écran de votre Soundbar.
• Les étapes pour « ID SET » peuvent varier selon le modèle de Soundbar. Veuillez lire le manuel
de votre Soundbar. Si le manuel ne fournit pas les instructions du « ID SET », suivez les étapes
décrites sur l’image ci-dessous.
VOL
SOUNDBAR
ID SET
5 Sec
• L’image de la Soundbar peut être différente de votre Soundbar, selon le modèle.
6. Allumer la Soundbar
Allumez la Soundbar à l’aide de la télécommande de la Soundbar ou en appuyant sur le bouton
(Alimentation) situé sur l’unité principale de la Soundbar.
• Certains modèles de Soundbar seront automatiquement mis sous tension après avoir terminé
l’étape « 5. ID SET ».
ON
• L’image de la Soundbar peut être différente de votre Soundbar, selon le modèle.
7. Vériez que le voyant LED LINK s’éclaire en bleu en continu
(connexion établie)
STANDBY
LINK
STANDBY
LINK
Allumé en bleu
Le voyant LED LINK arrête de clignoter
et s’éclaire en bleu en continu
lorsqu’une connexion est établie entre
la Soundbar et le module de réception
sans l.
8. Si le SWA-9000S ne se connecte pas, suivez les étapes
nécessaires selon l’état du voyant LED
État LED Action
LINK (Bleu)
Allumé
Connecté avec la
Soundbar
-
Clignotement
État de veille de la
connexion
Vériez que la Soundbar est allumée.
Répétez les étapes 4 à 7.
STANDBY (Rouge) Allumé
Échec de la
connexion
Vériez que la Soundbar est allumée.
1. Appuyez sur le bouton ID SET au
dos du module de réception sans l
avec la pointe d'un stylo pendant 5 à
6 secondes jusqu'à ce que le voyant
LED LINK clignote (en bleu).
ID SET
L
R
SURROUND SPEAKERS OUT
SPEAKER IMPEDANCE : 3Ω
POWER
ID SET
5 Sec
2. Répétez les étapes 4 à 7.
Autres - Erreurs
Contactez un service après-vente
Samsung.

FRA - 12
PRÉCAUTIONS
• Si vous avez connecté votre Soundbar et une ou plusieurs enceintes sans l Samsung via un
routeur sans l :
Désactivez le son surround pour la Soundbar et l’enceinte sans l Samsung, puis installez et utilisez
le SWA-9000S.
• Si vous connectez le SWA-9000S et que vous ne désactivez pas le son surround comme indiqué
ci-dessus :
Le son sera émis des enceintes Samsung sans l et des enceintes surround du SWA-9000S.
Modèles compatibles
• Compatible avec la Soundbar Samsung sélectionnée. Veuillez vous rendre sur la page produit de la
Soundbar sur www.samsung.com/support pour plus d’informations.
• La liste des modèles compatibles est sujette à modications sans avis préalable.

POR - 2
Informações de Segurança
Obrigado por ter adquirido este produto (SWA-9000S).
CUIDADO
RISCO DE CHOQUE ELÉCTRICO.
NÃO ABRIR.
Este símbolo indica a
presença de alta tensão
no interior do produto.
É perigoso estabelecer
qualquer tipo de
contacto com as peças
existentes no interior do
produto.
CUIDADO: PARA REDUZIR O RISCO DE CHOQUES
ELÉCTRICOS, NÃO RETIRE A TAMPA POSTERIOR.
O INTERIOR NÃO CONTÉM PEÇAS PASSÍVEIS DE
REPARAÇÃO PELO UTILIZADOR.
A MANUTENÇÃO DEVE SER EFECTUADA POR
PESSOAL TÉCNICO QUALIFICADO.
Consulte a tabela abaixo para uma explicação dos
símbolos que poderão estar no seu produto Samsung.
Este símbolo indica
a existência de
documentação
importante relativa
ao funcionamento e
manutenção deste
produto (fornecida com o
mesmo).
Produto de classe II: Este símbolo indica que não é necessária uma ligação eléctrica de
segurança à terra. Se este símbolo não se encontrar num produto com o de ligação à
rede, o produto DEVERÁ possuir uma ligação de proteção segura à terra.
Tensão CA: Este símbolo indica que a tensão nominal é CA.
Tensão CC: Este símbolo indica que a tensão nominal é CC.
Cuidado, consulte as instruções de utilização: Este símbolo aconselha o utilizador a
consultar o manual do utilizador quanto a informações de segurança.
• As ranhuras e aberturas na unidade e na
parte superior e inferior destinam-se à
ventilação do produto. Para garantir um
funcionamento seguro do aparelho e para
prevenir uma situação de sobreaquecimento,
estas ranhuras e aberturas nunca podem ser
bloqueadas ou cobertas.
– Não coloque este aparelho em locais
fechados, tais como uma estante ou
armário, excepto se existir ventilação
adequada.
– Não coloque este aparelho junto ou sobre
um radiador ou aquecedor, nem nunca o
exponha à luz solar directa.
– Não coloque recipientes com água (vasos,
etc.) sobre este aparelho. O contacto com
a água pode causar incêndio ou choque
eléctrico.
• Não exponha este aparelho a chuva nem o
coloque próximo de água (perto de banheiras,
lava-loiças, piscinas, etc.). Em caso se
contacto acidental com a água, desligue
o aparelho e contacte imediatamente um
revendedor autorizado.
• Não sobrecarregue tomadas de parede,
extensões ou adaptadores além da sua
capacidade, uma vez que tal poderá resultar
em incêndio ou choque eléctrico.

POR - 2 POR - 3
Informações de Segurança
Obrigado por ter adquirido este produto (SWA-9000S).
CUIDADO
RISCO DE CHOQUE ELÉCTRICO.
NÃO ABRIR.
Este símbolo indica a
presença de alta tensão
no interior do produto.
É perigoso estabelecer
qualquer tipo de contacto
com as peças existentes
no interior do produto.
CUIDADO: PARA REDUZIR O RISCO DE CHOQUE
ELÉCTRICO, NÃO RETIRE A TAMPA (OU PARTE
POSTERIOR). NÃO EXISTEM PEÇAS PASSÍVEIS
DE REPARAÇÃO PELO UTILIZADOR NO INTERIOR
DO PRODUTO. QUALQUER REPARAÇÃO DEVE
SER EFECTUADA POR PESSOAL TÉCNICO
QUALIFICADO.
Este símbolo indica
a existência de
documentação importante
relativa ao funcionamento
e manutenção deste
produto (fornecida com o
mesmo).
Produto de classe II: Este símbolo indica que não é necessária uma ligação eléctrica de
segurança à terra.
Tensão CA: Este símbolo indica que a tensão nominal é CA.
Tensão CC: Este símbolo indica que a tensão nominal é CC.
Cuidado, consulte as instruções de utilização: Este símbolo aconselha o utilizador a
consultar o manual do utilizador quanto a informações de segurança.
• Encaminhe os cabos de alimentação para
que não obstruam a passagem nem sejam
pressionados por outros itens. Tenha
particular atenção aos cabos nas extremidade
das chas, nas tomadas e no ponto de saída
do aparelho.
• Para proteger este aparelho durante uma
trovoada, ou se não for utilizado durante
períodos prolongados, desligue-o da tomada
e desligue a antena ou o sistema de cabo. Isto
irá proteger o produto de danos em caso de
sobrecarga de corrente.
• Antes de ligar o cabo de alimentação CA
ao transformador, certique-se de que
a indicação de tensão de alimentação do
transformador é compatível com a rede
eléctrica utilizada.
• Nunca insira objectos metálicos nas aberturas
deste aparelho. Se o zer poderá existir o
perigo de choque eléctrico.
• Para evitar choques eléctricos, nunca toque
no interior deste aparelho. Este aparelho deve
ser aberto apenas por um técnico qualicado.
• Certique-se de que liga correctamente o
cabo de alimentação. Ao desligar o cabo de
alimentação de uma tomada, puxe sempre a
cha do cabo de alimentação. Nunca desligue
puxando o cabo. Não toque no cabo de
alimentação com as mãos molhadas.
• Em caso de funcionamento incorrecto deste
aparelho, em particular, em caso de emissão
de sons ou odores anormais, desligue o
produto imediatamente e contacte um centro
de assistência ou revendedor autorizado.
• Manutenção da caixa.
– Antes de ligar outros componentes a este
produto, certique-se de que os desliga.
• Certique-se de que desliga o cabo de
alimentação da tomada se o produto não for
utilizado ou mesmo se se ausentar durante
um período prolongado (em particular, se
deixar crianças, idosos ou pessoas com
deciência em casa).
– A acumulação de pó pode causar
choque eléctrico, descargas eléctrica
ou incêndio, podendo causar faíscas no
cabo de alimentação e a deterioração do
isolamento.
• Contacte um centro de serviço autorizado
para obter informações se pretender instalar
o seu produto num local sujeito a poeiras,
temperaturas muito elevadas ou muito
baixas, com muita humidade, perto de
substâncias químicas, ou onde irá funcionar
24 horas por dia, como por exemplo, num
terminal de aeroporto ou estação ferroviária,
etc.
• Utilize apenas um cha e tomada com ligação
à terra.
– Uma ligação incorrecta pode causar
choque eléctrico ou danicar o
equipamento. (Apenas Equipamento de
Classe l.)
• Para desligar completamente este aparelho,
é necessário desligá-lo da tomada. Por este
motivo, a tomada e o cabo de alimentação
têm de estar facilmente acessíveis a qualquer
momento.
• Não permita que crianças exerçam pressão
sobre o produto.
• Guarde os acessórios (bateria, etc.) num local
seguro, afastado do alcance das crianças.
– Não coloque recipientes com água (vasos,
etc.) sobre este aparelho. O contacto com
a água pode causar incêndio ou choque
eléctrico.
• Não exponha este aparelho a chuva nem o
coloque próximo de água (perto de banheiras,
lava-loiças, piscinas, etc.). Em caso se
contacto acidental com a água, desligue
o aparelho e contacte imediatamente um
revendedor autorizado.
• Não sobrecarregue tomadas de parede,
extensões ou adaptadores além da sua
capacidade, uma vez que tal poderá resultar
em incêndio ou choque eléctrico.

POR - 4 POR - 5
• Não instale o produto num local instável,
como por exemplo, uma prateleira instável,
piso inclinado ou num local sujeito a
vibrações.
• Não deixe cair o produto nem o sujeite a
impactos. Em caso de danos no produto,
desligue o cabo de alimentação e contacte
um centro de assistência.
• Para limpar este aparelho, desligue o cabo
de alimentação da tomada e limpe o produto
utilizando um pano seco e macio. Não
utilize químicos como cera, benzina, álcool,
diluentes, insecticidas, sprays ambientadores,
lubricantes ou detergente. Estes químicos
podem danicar o aspecto do produto ou
apagar as impressões no produto.
• Não exponha o aparelho a gotejamento nem
a salpicos. Não devem ser colocados objectos
com líquidos como, por exemplo, vasos, em
cima do aparelho.
• Não utilize a mesma tomada para ligar vários
aparelhos eléctricos. Sobrecarregar uma
tomada poderá causar o sobreaquecimento
da mesma, provocando um incêndio.
AVISO :
• PARA IMPEDIR A PROPAGAÇÃO
DE CHAMAS, MANTENHA
SEMPRE VELAS E OUTROS
ITENS COM CHAMA AFASTADOS
DESTE PRODUTO.
• Para reduzir o risco de fogo ou choque
eléctrico, não exponha este equipamento à
chuva ou humidade.
Precauções
1. Certique-se de que a fonte de alimentação
CA ou CC da sua residência está em
conformidade com os requisitos elétricos
indicados no autocolante de características
na parte traseira do produto. Instale o
produto na horizontal, numa base adequada
(mobília), com espaço suciente à volta
para ventilação (7 a 10 cm). Certique-se
de que as ranhuras de ventilação não estão
cobertas. Não coloque a unidade sobre
amplicadores ou outro equipamento que
possa car quente. A unidade foi concebida
para utilização contínua. Para desligar a
unidade completamente, desligue a cha CA
da tomada de parede.
2. Não exponha a unidade a luz solar direta
ou outras fontes de calor. Isto pode originar
sobreaquecimento e provocar avaria na
unidade.
3. Desligue o cabo de alimentação da tomada
de parede CA, se a unidade se avariar.
O produto não foi concebido para utilização
industrial.
É apenas para utilização pessoal.
Se o produto for armazenado a baixas
temperaturas, poderá ocorrer condensação.
Se transportar a unidade durante o inverno,
espere aproximadamente 2 horas, até
a unidade ter alcançado a temperatura
ambiente, antes de a utilizar.
4. Deve ser utilizado um adaptador de cha
adequado, se a fonte de alimentação
utilizada for de 240 V CA.
Instruções de segurança
importantes
Antes de utilizar a unidade, leia estas instruções
de utilização com atenção. Siga todas as
instruções de segurança apresentadas abaixo.
Guarde estas instruções de utilização num local
acessível, para consulta futura.
1. Leia estas instruções.
2. Guarde estas instruções.
3. Tenha atenção a todos os avisos.
4. Siga todas as instruções.
5. Não utilize este aparelho perto de água.
6. Limpe-o apenas com um pano seco.
7. Não tape quaisquer aberturas de ventilação.
Instale-o de acordo com as instruções do
fabricante.
8. Não o instale próximo de fontes de calor,
tais como aquecedores, bocas de ar quente,
fogões ou outros aparelhos (incluindo
receptores AV) que produzam calor.
9. Não contorne a segurança da cha do tipo
polarizado ou com ligação à terra. As chas
polarizadas têm duas lâminas, uma mais
larga que a outra. Uma cha com ligação à
terra inclui duas lâminas e um terceiro pino.
A lâmina larga ou o terceiro pino visam
garantir a sua segurança. Se a cha fornecida
não for adequada para a tomada utilizada,
consulte um electricista para substituir a
tomada obsoleta.

POR - 4 POR - 5
Precauções
1. Certique-se de que a fonte de alimentação
CA ou CC da sua residência está em
conformidade com os requisitos elétricos
indicados no autocolante de características
na parte traseira do produto. Instale o
produto na horizontal, numa base adequada
(mobília), com espaço suciente à volta
para ventilação (7 a 10 cm). Certique-se
de que as ranhuras de ventilação não estão
cobertas. Não coloque a unidade sobre
amplicadores ou outro equipamento que
possa car quente. A unidade foi concebida
para utilização contínua. Para desligar a
unidade completamente, desligue a cha CA
da tomada de parede.
2. Não exponha a unidade a luz solar direta
ou outras fontes de calor. Isto pode originar
sobreaquecimento e provocar avaria na
unidade.
3. Desligue o cabo de alimentação da tomada
de parede CA, se a unidade se avariar.
O produto não foi concebido para utilização
industrial.
É apenas para utilização pessoal.
Se o produto for armazenado a baixas
temperaturas, poderá ocorrer condensação.
Se transportar a unidade durante o inverno,
espere aproximadamente 2 horas, até
a unidade ter alcançado a temperatura
ambiente, antes de a utilizar.
4. Deve ser utilizado um adaptador de cha
adequado, se a fonte de alimentação
utilizada for de 240 V CA.
Instruções de segurança
importantes
Antes de utilizar a unidade, leia estas instruções
de utilização com atenção. Siga todas as
instruções de segurança apresentadas abaixo.
Guarde estas instruções de utilização num local
acessível, para consulta futura.
1. Leia estas instruções.
2. Guarde estas instruções.
3. Tenha atenção a todos os avisos.
4. Siga todas as instruções.
5. Não utilize este aparelho perto de água.
6. Limpe-o apenas com um pano seco.
7. Não tape quaisquer aberturas de ventilação.
Instale-o de acordo com as instruções do
fabricante.
8. Não o instale próximo de fontes de calor,
tais como aquecedores, bocas de ar quente,
fogões ou outros aparelhos (incluindo
receptores AV) que produzam calor.
9. Não contorne a segurança da cha do tipo
polarizado ou com ligação à terra. As chas
polarizadas têm duas lâminas, uma mais
larga que a outra. Uma cha com ligação à
terra inclui duas lâminas e um terceiro pino.
A lâmina larga ou o terceiro pino visam
garantir a sua segurança. Se a cha fornecida
não for adequada para a tomada utilizada,
consulte um electricista para substituir a
tomada obsoleta.
10. Proteja o cabo de alimentação, para que não
seja pisado nem entalado, especialmente nas
zonas da cha, das tomadas e do ponto em
que sai do aparelho.
11. Utilize apenas ligações/acessórios
especicados pelo fabricante.
12. Utilize apenas o carrinho,
suporte, tripé, apoio ou
mesa especicado pelo
fabricante ou vendido com
o aparelho. Se utilizar um
carrinho, tenha cuidado ao mover o carrinho
com o aparelho, de modo a evitar lesões no
caso de o conjunto tombar.
13. Desligue o aparelho durante trovoadas ou
quando não o utilizar durante muito tempo.
14. Para qualquer reparação, contacte sempre
um técnico qualicado. Pode ser necessária
uma reparação no caso de o aparelho sofrer
qualquer tipo de dano como, por exemplo,
cabo ou cha de alimentação danicados,
líquido derramado ou entrada de objectos
no aparelho, exposição do aparelho à chuva
ou à humidade, funcionamento incorrecto ou
queda do aparelho.

POR - 6 POR - 7
Acessórios
STANDBY
LINK
WIRELESS
Coluna
surround
(2 unid.)
Cabo de coluna
(2 unid.)
Cabo de
alimentação
Dongle sem os
(WHM520V)
Módulo de
recetor sem
os
Parafuso
(2 unid.)
Suporte do
dongle
(Tipo base)
Suporte do dongle
(Tipo suporte de
parede/
Tipo simples)
Núcleo de ferrite
toroidal
• O dongle sem os só é compatível com os Soundbar da Samsung. Para obter uma lista dos modelos
de Soundbar da Samsung compatíveis, consulte a página 12. Não ligue o dongle a qualquer outro
dispositivo, como smartphones, PC de secretária ou portáteis.
Especicações
Peso
Módulo de recetor sem os 0,7 kg
Coluna surround 0,6 kg
Dimensões (L x A x P)
Módulo de recetor sem os 50,0 X 201,3 X 132,0 mm
Coluna surround 87,5 X 147,0 X 87,5 mm
Limites da temperatura de funcionamento +5°C ~ +35°C
Limites da humidade de funcionamento 10% ~ 75%
Intervalo da frequência 20Hz~20KHz
NOTAS
– A Samsung Electronics Co., Ltd reserva-se ao direito de alterar as especicações sem aviso prévio.
– O peso e as dimensões indicados são aproximados.
– Para obter mais informação sobre a fonte de alimentação e o consumo de energia, consulte a
etiqueta no produto.
– A conceção e as especicações estão sujeitas a alteração sem aviso prévio.
Aviso de Licença de Open Source
• Para enviar pedidos e perguntas sobre software open source, contacte a Samsung por e-mail
(oss.request@samsung.com).
Ligar o SWA-9000S a um Soundbar
1. Ligue o módulo de recetor sem os às 2 colunas surround
Utilize os cabos das colunas para ligar as duas colunas surround ao módulo de recetor sem os.
• Os cabos das colunas estão codicados por cor.
SURROUND-LEFT
ID SET
L
R
SURROUND SPEAKERS OUT
SPEAKER IMPEDANCE : 3Ω
POWER
ID SET
L
R
SURROUND SPEAKERS OUT
SPEAKER IMPEDANCE : 3Ω
SURROUND-RIGHT
SURROUND-LEFT SURROUND-RIGHT
• Siga os passos a seguir para ligar os cabos das colunas ao módulo de recetor sem os:
1. Ligue a cha cinzenta à entrada cinzenta no recetor sem os.
2. Ligue a cha azul à entrada azul no recetor sem os.
• Siga os passos a seguir para ligar os cabos das colunas às colunas surround:
1. Ligue o cabo da coluna ligado à entrada cinzenta à coluna com a etiqueta cinzenta.
2. Ligue o cabo da coluna ligado à entrada azul à coluna com a etiqueta azul.
3. Coloque as extremidades vermelha e preta de cada cabo da coluna nas entradas vermelhas
e preta da coluna correspondente.
• As etiquetas estão na parte traseira das colunas.

POR - 8 POR - 9
2. Verique se o módulo está no modo de espera depois de o ligar a
uma tomada elétrica
Ligue o cabo de alimentação do módulo de recetor sem os a uma tomada elétrica e ao próprio
módulo para o ligar. O indicador LED LINK (LED azul) do módulo de recetor sem os pisca.
Se o LED não piscar, consulte o passo 8 na página 11.
ID SET
L
R
SURROUND SPEAKERS OUT
SPEAKER IMPEDANCE : 3Ω
POWER
POWER
STANDBY
LINK
STANDBY
LINK
A piscar a azul
Fixar o núcleo de ferrite toroidal ao cabo de alimentação do Soundbar
(Só se aplica ao ligar o SWA-9000S e a série MS de Soundbars/sistemas de cinema em casa.)
HDMI IN
HDMI OUT
(TV-ARC)
WIRELESS
AUX IN
DIGITAL AUDIO IN
(OPTICAL)
POWER
IN
POWER
OUT
(For TV)
AC 100V~240V
4A~1.66A
POWER
IN
POWER
OUT
(For TV)
AC 100V~240V
4A~1.66A
Parte inferior do Soundbar
Fixe o núcleo de ferrite toroidal no cabo de alimentação
do Soundbar para ajudar a prevenir interferências de RF
provocadas por sinais de rádio.
1. Aperte a patilha do núcleo de ferrite toroidal para a
abrir.
2. Faça o cabo de alimentação do Soundbar dar duas
voltas ao núcleo.
3. Fixe o núcleo de ferrite toroidal ao cabo de alimentação
do Soundbar, como se mostra na gura à esquerda, e
feche-o fazendo pressão até ouvir um clique.
• Certique-se de que o núcleo de ferrite é
colocado o mais próximo possível da cha elétrica
do Soundbar.
3. Ligue a unidade principal do Soundbar ao dongle sem os
Ligue o dongle sem os à entrada “WIRELESS” da unidade principal do Soundbar.
• Quando colocar o dongle sem os no suporte, certique-se de que o logótipo “WIRELESS” ca
virado para cima, conforme se mostra na gura em baixo.
• No caso do modelo “HW-N8xx” do Soundbar, ignore este passo e avance para o passo seguinte.
WIRELESS
WIRELESS
WIRELESS
1
2
Tipo base
WIRELESS
WIRELESS
WIRELESS
1
2
Tipo suporte de parede
WIRELESS
WIRELESS
WIRELESS
WIRELESS
WIRELESS
WIRELESS
WIRELESS
HW-MS5XX/HW-MS6XX/HW-MS65XX
WIRELESS
WIRELESS
WIRELESS
WIRELESS
HW-MS7XX
Tipo simples (WMN300SB, não fornecido)
Precauções ao comprar uma SWA-W700 adicional (subwoofer opcional)
Não retire o dongle sem os da unidade principal do Soundbar.
O dongle sem os fornecido com o produto pode ser utilizado com o SWA-W700 (subwoofer
opcional).

POR - 8 POR - 9
2. Verique se o módulo está no modo de espera depois de o ligar a
uma tomada elétrica
Ligue o cabo de alimentação do módulo de recetor sem os a uma tomada elétrica e ao próprio
módulo para o ligar. O indicador LED LINK (LED azul) do módulo de recetor sem os pisca.
Se o LED não piscar, consulte o passo 8 na página 11.
ID SET
L
R
SURROUND SPEAKERS OUT
SPEAKER IMPEDANCE : 3Ω
POWER
POWER
STANDBY
LINK
STANDBY
LINK
A piscar a azul
Fixar o núcleo de ferrite toroidal ao cabo de alimentação do Soundbar
(Só se aplica ao ligar o SWA-9000S e a série MS de Soundbars/sistemas de cinema em casa.)
HDMI IN
HDMI OUT
(TV-ARC)
WIRELESS
AUX IN
DIGITAL AUDIO IN
(OPTICAL)
POWER
IN
POWER
OUT
(For TV)
AC 100V~240V
4A~1.66A
POWER
IN
POWER
OUT
(For TV)
AC 100V~240V
4A~1.66A
Parte inferior do Soundbar
Fixe o núcleo de ferrite toroidal no cabo de alimentação
do Soundbar para ajudar a prevenir interferências de RF
provocadas por sinais de rádio.
1. Aperte a patilha do núcleo de ferrite toroidal para a
abrir.
2. Faça o cabo de alimentação do Soundbar dar duas
voltas ao núcleo.
3. Fixe o núcleo de ferrite toroidal ao cabo de alimentação
do Soundbar, como se mostra na gura à esquerda, e
feche-o fazendo pressão até ouvir um clique.
• Certique-se de que o núcleo de ferrite é
colocado o mais próximo possível da cha elétrica
do Soundbar.
3. Ligue a unidade principal do Soundbar ao dongle sem os
Ligue o dongle sem os à entrada “WIRELESS” da unidade principal do Soundbar.
• Quando colocar o dongle sem os no suporte, certique-se de que o logótipo “WIRELESS” ca
virado para cima, conforme se mostra na gura em baixo.
• No caso do modelo “HW-N8xx” do Soundbar, ignore este passo e avance para o passo seguinte.
WIRELESS
WIRELESS
WIRELESS
1
2
Tipo base
WIRELESS
WIRELESS
WIRELESS
1
2
Tipo suporte de parede
WIRELESS
WIRELESS
WIRELESS
WIRELESS
WIRELESS
WIRELESS
WIRELESS
HW-MS5xx/HW-MS6xx/HW-MS65xx
WIRELESS
WIRELESS
WIRELESS
WIRELESS
HW-MS7xx
Tipo simples (WMN300SB, não fornecido)
Precauções ao comprar uma SWA-W700 adicional (subwoofer opcional)
Não retire o dongle sem os da unidade principal do Soundbar.
O dongle sem os fornecido com o produto pode ser utilizado com o SWA-W700 (subwoofer
opcional).

POR - 10 POR - 11
4. Desligue o Soundbar
Desligue o Soundbar utilizando o respetivo controlo remoto ou premindo o botão (Alimentação)
na unidade principal do Soundbar.
BYE
• A imagem do Soundbar pode ser diferente do seu Soundbar, consoante o modelo.
5. Congure “ID SET” utilizando o controlo remoto do Soundbar
Prima o botão VOL no controlo remoto, durante 5 a 6 segundos, até a mensagem “ID SET” ser
apresentada no ecrã do Soundbar.
• Os passos para “ID SET” podem variar consoante o modelo do Soundbar. Consulte o manual
do seu Soundbar. Se o manual não incluir instruções para “ID SET”, siga os passos descritos na
imagem em baixo.
VOL
SOUNDBAR
ID SET
5 Sec
• A imagem do Soundbar pode ser diferente do seu Soundbar, consoante o modelo.
6. Ligue o Soundbar
Ligue o Soundbar utilizando o respetivo controlo remoto ou premindo o botão (Alimentação) na
unidade principal do Soundbar.
• Alguns modelos do Soundbar ligam-se automaticamente depois de concluir o passo “5. ID SET”.
ON
• A imagem do Soundbar pode ser diferente do seu Soundbar, consoante o modelo.
7. Verique se o LED LINK está aceso continuamente a azul (ligação
concluída)
STANDBY
LINK
STANDBY
LINK
Aceso a azul
O indicador LED LINK para de piscar
e ca aceso continuamente quando a
ligação entre o Soundbar e o módulo de
recetor sem os é estabelecida.
8. Se o SWA-9000S não car ligado, efetue os passos necessários,
seguindo o estado do indicador LED
Estado do LED Ação
LINK (Azul)
Aceso
Ligado ao
Soundbar
-
A piscar
Ligação em modo
de espera
Verique se o Soundbar está ligado
Repita os passos 4 a 7.
STANDBY
(Vermelho)
Aceso Falha ao ligar
Verique se o Soundbar está ligado
1. Prima o botão ID SET na parte
traseira do módulo de recetor sem
os com a ponta de uma caneta,
durante 5 a 6 segundos, até o
indicador LED LINK piscar (a azul).
ID SET
L
R
SURROUND SPEAKERS OUT
SPEAKER IMPEDANCE : 3Ω
POWER
ID SET
5 Sec
2. Repita os passos 4 a 7.
Outros - Erros
Contacte um Centro de Assistência
Técnica Samsung.

POR - 12
PRECAUÇÕES
• Se ligou o Soundbar a uma ou mais colunas sem os Samsung através de um router sem os:
Desligue o sistema surround do Soundbar e as colunas sem os Samsung e instale depois o
SWA-9000S.
• Se ligar o SWA-9000S e não desligar o sistema surround como descrito acima:
O som será reproduzido através das colunas sem os Samsung e das colunas surround do
SWA-9000S.
Modelos compatíveis
• Compatível com alguns Soundbars da Samsung. Consulte a página do produto Soundbar para mais
informações www.samsung.com/support.
• A lista de modelos compatíveis está sujeita a alterações sem aviso prévio.

2 - ARA
.)SWA-9000S
Samsung
II
•
•
•
•
•
•
•
•
–
–
–
•
•

2 - ARA3 - ARA
.)SWA-9000S
II
•
•
•
•
•
•
•
•
–
•
–
•
•
–
I
•
•
•
–
•
•

4 - ARA5 - ARA
•
•
•
•
•
•
•
1
10~7
2
3
4
240
1
2
3
4
5
6
7
8
9

4 - ARA5 - ARA
1
10~7
2
3
4
240
1
2
3
4
5
6
7
8
9
10
11
12
13
14

6 - ARA7 - ARA
STANDBY
LINK
WIRELESS
)2
)2(
)WHM520V
)2
• Samsung SoundbarsSamsung Soundbars
12
X X
X X
+35+5
%75%10
20 20
–
–
–
–
• Samsung
SOUNDBARSWA-9000S
1
•
SURROUND-LEFT
ID SET
L
R
SURROUND SPEAKERS OUT
SPEAKER IMPEDANCE : 3Ω
POWER
ID SET
L
R
SURROUND SPEAKERS OUT
SPEAKER IMPEDANCE : 3Ω
SURROUND-RIGHT
SURROUND-LEFT SURROUND-RIGHT
•
1
2
•
1
2
3
•

8 - ARA9 - ARA
2
LINKLED
118LED
ID SET
L
R
SURROUND SPEAKERS OUT
SPEAKER IMPEDANCE : 3Ω
POWER
POWER
STANDBY
LINK
STANDBY
LINK
ID SET
L
R
SURROUND SPEAKERS OUT
SPEAKER IMPEDANCE : 3Ω
POWER
POWER
STANDBY
LINK
STANDBY
LINK
So undbar
SoundbarMSSWA-9000S
HDMI IN
HDMI OUT
(TV-ARC)
WIRELESS
AUX IN
DIGITAL AUDIO IN
(OPTICAL)
POWER
IN
POWER
OUT
(For TV)
AC 100V~240V
4A~1.66A
POWER
IN
POWER
OUT
(For TV)
AC 100V~240V
4A~1.66A
Soundbar
Soundbar
1
2
Soundbar
3
Soundbar
•
.Soundbar
3Soundbar
SoundbarWIRELESS
•
WIRELESS
•
SoundbarHW-N8xx
WIRELESS
WIRELESS
WIRELESS
1
2
WIRELESS
WIRELESS
WIRELESS
1
2
WIRELESS
WIRELESS
WIRELESS
WIRELESS
WIRELESS
WIRELESS
WIRELESS
WIRELESS
WIRELESS
WIRELESS
WIRELESS
HW-MS7XX
WMN300SB
SWA-W700
Soundbar
SWA-W700

8 - ARA9 - ARA
2 .
LINKLED
118LED
ID SET
L
R
SURROUND SPEAKERS OUT
SPEAKER IMPEDANCE : 3Ω
POWER
POWER
STANDBY
LINK
STANDBY
LINK
ID SET
L
R
SURROUND SPEAKERS OUT
SPEAKER IMPEDANCE : 3Ω
POWER
POWER
STANDBY
LINK
STANDBY
LINK
Soundbar
SoundbarMSSWA-9000S
HDMI IN
HDMI OUT
(TV-ARC)
WIRELESS
AUX IN
DIGITAL AUDIO IN
(OPTICAL)
POWER
IN
POWER
OUT
(For TV)
AC 100V~240V
4A~1.66A
POWER
IN
POWER
OUT
(For TV)
AC 100V~240V
4A~1.66A
Soundbar
Soundbar
1
.
2
.
Soundbar
3
.
Soundbar
•
.Soundbar
3 .Soundbar
SoundbarWIRELESS
•
WIRELESS
•
SoundbarHW-N8xx
WIRELESS
WIRELESS
WIRELESS
1
2
WIRELESS
WIRELESS
WIRELESS
1
2
WIRELESS
WIRELESS
WIRELESS
WIRELESS
WIRELESS
WIRELESS
WIRELESS
HW-MS65xxHW-MS6xxHW-MS5xx
WIRELESS
WIRELESS
WIRELESS
WIRELESS
HW-MS7xx
WMN300SB
SWA-W700
Soundbar
SWA-W700

10 - ARA11 - ARA
4Soundbar
Soundbar
Soundbar
BYE
• Soundbar
5
Soundbar
65
VOL
Soundbar
•
Soundbar
Soundbar
VOL
SOUNDBAR
5 Sec
• Soundbar
6Soundbar
Soundbar
Soundbar
•
5Soundbar
ON
• Soundbar
7LIN KLED
STANDBY
LINK
STANDBY
LINK
LINKLED
Soundbar
8
SWA-9000S
LED
LED
LINK
Soundbar
-
Soundbar
74
STANDBY
Soundbar
1
65
LINKLED
ID SET
L
R
SURROUND SPEAKERS OUT
SPEAKER IMPEDANCE : 3Ω
POWER
ID SET
5 Sec
274
-Samsung

12 - ARA
•
SamsungSoundbar
SamsungSoundbar
SWA-9000S
•SWA-9000S
Samsung
SWA-9000S
• SoundbarSamsung Soundbar
•

© 2017 Samsung Electronics Co., Ltd. All rights reserved.
Contact SAMSUNG WORLD WIDE
If you have any questions or comments relating to Samsung products, please contact the SAMSUNG customer
care Centre.
Area Contact Centre Web Site
`
Middle East
EGYPT
08000-7267864
16580
www.samsung.com/eg/
support
IRAN
021-8255
www.samsung.com/iran/
support
ISRAEL
*6963
www.samsung.com/il/
support/
SAUDI
ARABIA
(+966) 8002474357
(800 24/7 HELP)
www.samsung.com/sa_en/
support (English)
www.samsung.com/sa/
support (Arabic)
PAKISTAN
0800-Samsung (72678)
www.samsung.com/pk/
support
U.A.E
800-SAMSUNG
(800 - 726 7864)
www.samsung.com/ae/
support (English)
www.samsung.com/ae_ar/
support (Arabic)
OMAN 800-SAM CS (800-72627)
KUWAIT 183-CALL (183-2255)
BAHRAIN 8000-GSAM (8000-4726)
QATAR 800-CALL (800-2255)
TURKEY 444 77 11
www.samsung.com/tr/
support
JORDAN
0800-22273
06 5777444
www.samsung.com/levant/
supportLEBANON 1299
IRAQ 80010080
ALGERIA
3004
www.samsung.com/n_africa/
support
TUNISIA
80 100 012
MOROCCO 080 100 22 55
Area Contact Centre Web Site
`
Africa
SOUTH AFRICA 0860 SAMSUNG (726 7864)
www.samsung.com/za/
support
NAMIBIA 08197267864
www.samsung.com/africa_en/
support
ZAMBIA 3434
MAURITIUS +230 460 3830
REUNION 0262 50 88 80
www.samsung.com/africa_fr/
support
MOZAMBIQUE 847267864
www.samsung.com/africa_pt/
support
NIGERIA 0800-726-7864
www.samsung.com/
africa_en/support
GHANA 0800-100-077
COTE D’IVOIRE 8000-00-77
www.samsung.com/africa_fr/
support
SENEGAL 800-00-0077
CAMEROON 67095-0077
KENYA 0800 545 545
www.samsung.com/africa_en/
support
UGANDA 0800 300 300
TANZANIA 0800 780 089
RWANDA 9999
www.samsung.com/africa_fr/
support
DRC 499999
SUDAN 1969
www.samsung.com/eg/
support
AH68-02976R-04
AH68-02976R-04
-
 1
1
-
 2
2
-
 3
3
-
 4
4
-
 5
5
-
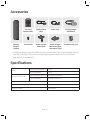 6
6
-
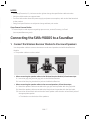 7
7
-
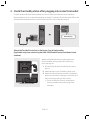 8
8
-
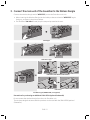 9
9
-
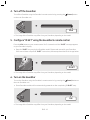 10
10
-
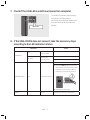 11
11
-
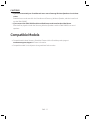 12
12
-
 13
13
-
 14
14
-
 15
15
-
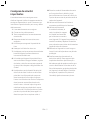 16
16
-
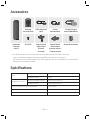 17
17
-
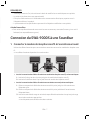 18
18
-
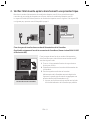 19
19
-
 20
20
-
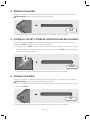 21
21
-
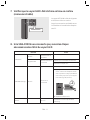 22
22
-
 23
23
-
 24
24
-
 25
25
-
 26
26
-
 27
27
-
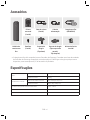 28
28
-
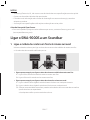 29
29
-
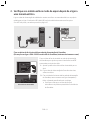 30
30
-
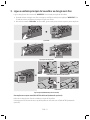 31
31
-
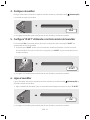 32
32
-
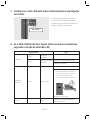 33
33
-
 34
34
-
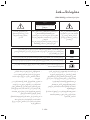 35
35
-
 36
36
-
 37
37
-
 38
38
-
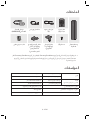 39
39
-
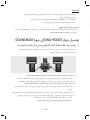 40
40
-
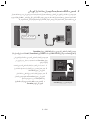 41
41
-
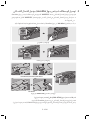 42
42
-
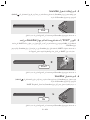 43
43
-
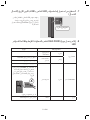 44
44
-
 45
45
-
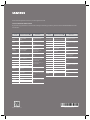 46
46


En otros idiomas
- français: Samsung SWA-9000S Manuel utilisateur
- English: Samsung SWA-9000S User manual
- português: Samsung SWA-9000S Manual do usuário
Documentos relacionados
-
Samsung SWA-9000S Manual de usuario
-
-
Samsung SWA-8500S Manual de usuario
-
-
-
Samsung SWA-W700 Manual de usuario
-
Samsung HW-NW700 Manual de usuario
-
-
-
Samsung HW-Q80R Guía de inicio rápido
Otros documentos
-
Peavey FX 2 32 Channel Non-Powered Mixer El manual del propietario
-
Crest Audio Pro-LITE 5.0 Manual de usuario
-
Peavey Escort 5000 Portable PA System El manual del propietario
-
-
-
Peavy IPR2 2000 Manual de usuario
-