Parkside PBSD 600 A1 Original Instructions Manual
- Categoría
- Lijadoras eléctricas
- Tipo
- Original Instructions Manual

IAN 315561
LIJADORA DE BANDA
LEVIGATRICE A NASTRO PBSD 600 A1
LIJADORA DE BANDA
Traducción del manual de instrucciones original
BELT SANDER
Translation of the original instructions
LEVIGATRICE A NASTRO
Traduzione delle istruzioni d’uso originali
BANDSCHLEIFER
Originalbetriebsanleitung

ES Traducción del manual de instrucciones original Página 1
IT / MT Traduzione delle istruzioni d’uso originali Pagina 13
GB / MT Translation of the original instructions Page 25
DE / AT / CH Originalbetriebsanleitung Seite 37
Antes de empezar a leer abra la página que contiene las imágenes y, en seguida, familiarícese con todas
las funciones del dispositivo.
Prima di leggere aprire la pagina con le immagini e prendere confidenza con le diverse funzioni
dell'apparecchio.
Before reading, unfold the page containing the illustrations and familiarise yourself with all functions of
the device.
Klappen Sie vor dem Lesen die Seite mit den Abbildungen aus und machen Sie sich anschließend mit allen
Funktionen des Gerätes vertraut.

A

ES │ 1 ■
PBSD 600 A1
Índice
Introducción .....................................................2
Uso previsto ................................................................ 2
Componentes ilustrados ....................................................... 2
Volumen de suministro ........................................................ 2
Características técnicas ....................................................... 2
Indicaciones generales de seguridad para las herramientas eléctricas .....3
1. Seguridad en el lugar de trabajo ............................................. 3
2. Seguridad eléctrica ........................................................ 3
3. Seguridad de las personas .................................................. 4
4. Uso y manejo de la herramienta eléctrica ....................................... 4
Indicaciones de seguridad específicas para las lijadoras ............................. 5
Puesta en funcionamiento ..........................................5
Tensado/cambio de la banda lijadora ........................................... 5
Ajuste del mango adicional .................................................... 6
Colocación de la cubierta frontal en una posición abatida ............................ 6
Montaje/desmontaje de la aspiración de polvo .................................... 6
Indicaciones de trabajo ....................................................... 7
Manejo .........................................................7
Encendido y apagado ........................................................ 7
Vaciado del depósito de polvo ................................................. 7
Selección de la velocidad y de la banda lijadora ................................... 8
Trabajo estacionario .......................................................... 9
Consejos y trucos ............................................................ 9
Mantenimiento y limpieza ..........................................9
Desecho .........................................................9
Garantía de Kompernass Handels GmbH ............................10
Asistencia técnica ................................................11
Importador .....................................................11
Traducción de la Declaración de conformidad original ..................12

■ 2 │ ES
PBSD 600 A1
LIJADORA DE BANDA
PBSD600A1
Introducción
Felicidades por la compra de su aparato nuevo.
Ha adquirido un producto de alta calidad. Las
instrucciones de uso forman parte del producto y
contienen indicaciones importantes acerca de la
seguridad, del uso y del desecho de este aparato.
Antes de usar el producto, familiarícese con todas
las indicaciones de manejo y de seguridad. Utilice
el producto únicamente como se describe y para
los ámbitos de aplicación indicados. Entregue todos
los documentos cuando transfiera el producto a
terceros.
Uso previsto
Según el papel de lija, la lijadora está prevista
para el lijado en seco de superficies de madera,
plástico, metal y plaste, así como de superficies
pintadas y barnizadas. Este aparato solo debe
utilizarse para el lijado en seco. Tenga en cuenta
que, para el procesamiento de distintos materiales,
deben utilizarse papeles de lija diferentes con el
granulado que corresponda y debe adaptarse la
velocidad al material. El aparato no está indicado
para su uso industrial. La utilización de la máquina
para otros fines o su transformación se considera-
rán contrarias al uso previsto y elevarán considera-
blemente el riesgo de accidentes. El fabricante no
se responsabiliza por los daños derivados de una
utilización contraria al uso previsto.
Componentes ilustrados
Interruptor de encendido/apagado
Mango adicional (superficie de agarre de goma)
Cubierta frontal
Palanca tensora para la banda lijadora
Rueda de ajuste de la velocidad de la banda
Mango (superficie de agarre de goma)
Tornillo de ajuste del mango
Alojamientos para los sargentos
Conexión para el depósito de polvo
Botón de bloqueo para el interruptor de
encendido/apagado
Depósito de polvo
Tornillo de ajuste de la banda
Banda lijadora
Sargento
Manguito reductor
Adaptador para la aspiración
Volumen de suministro
1lijadora de banda PBSD600A1
1banda lijadora para madera (granulado:80)
1depósito de polvo
1 adaptador para la aspiración y manguito
reductor (para la aspiración de polvo externa)
2sargentos
1manual de instrucciones de uso
Características técnicas
Tensión nominal: 230V ∼50Hz
(corriente alterna)
Consumo nominal
de potencia: 600W
Velocidad de la
banda al ralentí: 170-250m/min
Velocidad nominal
de ralentí:
n
0
360-560r.p.m.
Banda lijadora: 75x457mm
Clase de protección: II/
(aislamiento doble)
Valor de emisión sonora:
Medición de ruidos según la norma EN62841.
Valores típicos del nivel sonoro con ponderación A
de la herramienta eléctrica:
Nivel de presión sonora: L
pA
= 91 dB(A)
Incertidumbre: K
pA
= 3 dB
Nivel de potencia acústica: L
WA
= 102 dB(A)
Incertidumbre: K
WA
= 3 dB
¡Use protección auditiva!
Valor total de vibraciones:
Valores totales de vibración (suma vectorial de tres
líneas) calculados según la norma EN62841:
Lijado con plato de lijado: a
h
=4,2m/s
2
Incertidumbre K=1,5m/s
2

ES │ 3 ■
PBSD 600 A1
INDICACIÓN
► El nivel de vibraciones especificado en estas
instrucciones de uso se ha calculado según
un proceso de medición estandarizado en
la norma EN62841 y puede utilizarse para
la comparación de aparatos. El valor de
emisión de vibraciones especificado también
puede utilizarse para realizar una valora-
ción preliminar de la exposición. El valor de
emisión de vibraciones varía en función del
uso de la herramienta eléctrica y, en algunos
casos, puede superar los valores especifica-
dos en estas instrucciones. Por este motivo, la
carga de las vibraciones puede estar infra-
valorada si se utiliza la herramienta eléctrica
regularmente de esta manera.
¡ADVERTENCIA!
► Intente que la carga de las vibraciones sea lo
más reducida posible. Algunas medidas para
reducir el nivel de vibraciones son el uso de
guantes al manejar la herramienta y la limita-
ción del tiempo de trabajo. Para ello, deben
tenerse en cuenta todas las partes del ciclo
de funcionamiento (por ejemplo, los momen-
tos en los que la herramienta eléctrica está
desconectada y los momentos en los que
está conectada, pero funciona sin carga).
Indicaciones generales
de seguridad para las
herramientas eléctricas
¡ADVERTENCIA!
► Lea todas las indicaciones de seguridad,
las instrucciones, las ilustraciones y los
datos técnicos suministrados con esta
herramienta eléctrica. El incumplimiento de
las siguientes instrucciones puede provocar
descargas eléctricas, incendios o lesiones
graves.
Conserve todas las indicaciones de seguridad
y las instrucciones para el futuro.
El término “herramienta eléctrica” utilizado en las
indicaciones de seguridad se refiere a las herra-
mientas eléctricas de accionamiento eléctrico (con
cable de red) y a las de accionamiento por batería
(sin cable de red).
1. Seguridad en el lugar de trabajo
a) Mantenga limpia y bien iluminada la zona de
trabajo. El desorden y la falta de iluminación en
el lugar de trabajo pueden provocar accidentes.
b) No trabaje con la herramienta eléctrica en un
entorno potencialmente explosivo en el que
haya líquidos, gases o polvos inflamables.
Las herramientas eléctricas generan chispas
que pueden incendiar el polvo o los vapores.
c) Mantenga a los niños y a otras personas ale-
jados durante el manejo de la herramienta
eléctrica. Si se distrae, podría perder el control
de la herramienta eléctrica.
2. Seguridad eléctrica
a) El enchufe de la herramienta eléctrica debe
encajar correctamente en la toma eléctrica.
No debe modificarse el enchufe de ninguna
forma.
No utilice ningún enchufe adaptador junto
con herramientas eléctricas con conexión a
tierra. El uso de enchufes sin manipular conec-
tados a una toma eléctrica adecuada reduce
el riesgo de descarga eléctrica.

■ 4 │ ES
PBSD 600 A1
b) Evite el contacto físico con cualquier superficie
que esté conectada a tierra, como tuberías,
sistemas de calefacción, cocinas y neveras. Si
su cuerpo hace contacto con la toma de tierra,
existe mayor riesgo de descarga eléctrica.
c) Mantenga el aparato alejado de la lluvia o
de humedades. La penetración de agua en
una herramienta eléctrica aumenta el riesgo
de descarga eléctrica.
d) No utilice el cable de conexión para otros
usos, p.ej., para transportar y colgar la he-
rramienta eléctrica o para tirar del enchufe y
desconectarlo de la red eléctrica. Mantenga
el cable de conexión alejado del calor, del
aceite, de los bordes cortantes o de las piezas
móviles. Un cable de conexión dañado o enre-
dado aumenta el riesgo de descarga eléctrica.
e) Si desea utilizar la herramienta eléctrica al
aire libre, utilice exclusivamente los alarga-
dores de cable homologados para su uso en
exteriores. El uso de un alargador adecuado
para exteriores reduce el riesgo de descarga
eléctrica.
f) Si no puede evitarse el uso de la herramienta
eléctrica en un entorno húmedo, utilice un
interruptor diferencial residual. Su uso reduce
el riesgo de descarga eléctrica.
3. Seguridad de las personas
a) Esté alerta, preste atención a lo que hace y
proceda con sensatez a la hora de trabajar
con una herramienta eléctrica. No utilice
ninguna herramienta eléctrica si se siente
cansado o se encuentra bajo la influencia
de drogas, alcohol o medicamentos. Un solo
momento de distracción mientras utiliza la
herramienta eléctrica puede causar lesiones
graves.
b) U
tilice siempre un equipo de protección indivi-
dual y gafas de protección. El uso de un equipo
de protección individual, como mascarilla anti-
polvo, calzado de seguridad antideslizante,
casco o protecciones auditivas según el tipo de
herramienta eléctrica en cuestión, reduce el
riesgo de lesiones.
c) Evite que el aparato pueda ponerse en mar-
cha accidentalmente. Asegúrese de que la
herramienta eléctrica esté apagada antes de
conectarla a la red eléctrica o a la batería,
asirla o transportarla. Si transporta la herra-
mienta eléctrica con los dedos en el interruptor
o conecta la herramienta eléctrica ya encendida
a la red eléctrica, puede provocar accidentes.
d) Antes de encender la herramienta eléctrica,
retire las herramientas de ajuste o las llaves.
Las herramientas o llaves que se encuentren
dentro del alcance de la pieza giratoria de la
herramienta eléctrica pueden producir lesiones.
e) Evite mantener una postura corporal forzada.
Busque una postura segura y mantenga el
equilibrio en todo momento. Así podrá contro-
lar mejor la herramienta eléctrica, especialmente
en situaciones inesperadas.
f) Utilice ropa adecuada. No lleve ropa ancha
ni joyas. Mantenga el pelo y la ropa lejos de
las piezas móviles. La ropa holgada, las joyas
o el pelo suelto pueden quedar atrapados en
las piezas móviles.
g) Si se admite el montaje de dispositivos de
aspiración y de acumulación de polvo, deben
conectarse y utilizarse correctamente. El uso
de un dispositivo de aspiración de polvo puede
reducir los riesgos causados por el polvo.
h) Evite cultivar un sentimiento de falsa seguridad
y no se desvíe de lo dispuesto por las normas
de seguridad aplicables a las herramientas
eléctricas aun cuando esté muy familiarizado
con la herramienta eléctrica por haberla
utilizado repetidas veces. Un descuido en la
manipulación puede causar lesiones graves en
una fracción de segundo.
4. Uso y manejo de la herramienta
eléctrica
a) No sobrecargue la herramienta eléctrica.
Utilice la herramienta eléctrica adecuada
para el trabajo en cuestión. De esta manera,
trabajará mejor y de forma más segura dentro
del rango de potencia indicado.

ES │ 5 ■
PBSD 600 A1
b) No utilice ninguna herramienta eléctrica con el
interruptor defectuoso. Una herramienta que no
pueda encenderse o apagarse es peligrosa y
debe repararse.
c) Desconecte el enchufe de la red eléctrica o
retire la batería extraíble antes de realizar
cualquier ajuste en el aparato, cambiar los
accesorios o abandonar la herramienta eléc-
trica. Estas medidas de seguridad evitan que
la herramienta eléctrica se encienda de forma
accidental.
d) Guarde las herramientas eléctricas que no
vaya a utilizar fuera del alcance de los niños.
No permita el uso de la herramienta eléctrica
a personas que no estén familiarizadas con su
manejo o que no hayan leído estas indicacio-
nes. Las herramientas eléctricas son peligrosas
cuando están en manos de personas inexpertas.
e) Mantenga las herramientas eléctricas y los
accesorios en perfecto estado. Compruebe
que las piezas móviles funcionen correcta-
mente y no se atasquen, y asegúrese de que
ninguna pieza se haya roto ni esté dañada
de forma que el funcionamiento del aparato
pueda verse afectado. Encargue la repara-
ción de las piezas dañadas antes de utilizar
la herramienta eléctrica. Muchos accidentes
se deben al mal estado de las herramientas
eléctricas.
f) Mantenga las herramientas de corte limpias
y afiladas, ya que así se atascan menos y son
más fáciles de guiar.
g) Utilice la herramienta eléctrica, los accesorios,
las herramientas intercambiables, etc. según
lo dispuesto en estas instrucciones. Tenga en
cuenta las condiciones de trabajo y los pro-
cedimientos que deban seguirse. El uso de las
herramientas eléctricas para aplicaciones dis-
tintas a las previstas puede causar situaciones
peligrosas.
h) Mantenga los mangos y las superficies de
agarre secos, limpios y sin restos de aceite
o grasa. Si los mangos o las superficies de
agarre están resbaladizos, no podrá manejarse
ni controlarse la herramienta eléctrica de forma
segura en caso de imprevistos.
5. Asistencia técnica
a) Encargue la reparación de su herramienta
eléctrica exclusivamente al personal cuali-
ficado especializado y solo con recambios
originales. De esta forma, se garantiza que la
seguridad del aparato no se vea afectada.
Indicaciones de seguridad específicas
para las lijadoras
■ Sujete el aparato por los mangos aislados,
ya que la banda lijadora podría entrar
en contacto con el propio cable de red. Si el
cable eléctrico se daña, las piezas metálicas
del aparato podrían quedar bajo tensión y
provocar una descarga eléctrica.
¡ADVERTENCIA!
■ Los polvos desprendidos de algunos materia-
les, como la pintura con contenido de plomo
y algunos tipos de madera y metales, pueden
ser perjudiciales para la salud.
■ El contacto con estos polvos o su inhalación
entraña un riesgo contra la salud del usuario
o de las personas que se encuentren próximas
a él.
■ ¡Utilice gafas protectoras y mascarilla de
protección contra el polvo!
Puesta en funcionamiento
Tensado/cambio de la banda lijadora
¡ADVERTENCIA! PELIGRO DE LESIONES
■ Desconecte siempre el enchufe de la red
eléctrica antes de realizar cualquier tarea en
la lijadora de banda.
1. Suelte el mecanismo tensor de la banda lija-
dora; para ello, accione la palanca tensora
hacia fuera. Con esto, puede extraerse la
banda lijadora .
2. Coloque una nueva banda lijadora o cám-
biela para procesar otro material o cambiar el
grosor del granulado.
IMPORTANTE: la dirección de las flechas de
la parte interior de la banda lijadora y de
la carcasa del aparato deben coincidir.

■ 6 │ ES
PBSD 600 A1
3. Vuelva a colocar la palanca tensora en la
posición inicial.
Ajuste de la banda lijadora
de forma
manual:
Si la banda lijadora no se centra tras el encendido,
es posible que tenga que ajustarla manualmente.
♦ Para ello, gire el tornillo de ajuste
en el ro-
dillo delantero hasta que la banda lijadora
marche de forma centrada.
IMPORTANTE: asegúrese de que la banda
lijadora no roce la carcasa. Revise regular-
mente la banda lijadora y, en caso necesario,
ajústela con el tornillo de ajuste .
Ajuste del mango adicional
El mango adicional puede ajustarse en varias
posiciones.
♦ Para ajustar el mango adicional
, afloje el
tornillo .
♦ Ajuste el mango adicional
hasta alcanzar
la posición deseada.
♦ Vuelva a apretar el tornillo
.
Colocación de la cubierta frontal en
una posición abatida
La cubierta frontal puede abatirse hacia arriba
para lijar puntos de difícil acceso (consulte la
figura).
¡ADVERTENCIA!
► Solo puede abatirse la cubierta frontal
si también se abate hacia arriba el mango
adicional
(consulte el capítulo "Ajuste
del mango adicional").
♦ Abata la cubierta frontal
hacia arriba.
Montaje/desmontaje de la aspira-
ción de polvo
¡ADVERTENCIA! ¡RIESGO DE
EXPLOSIÓN!
■ En caso de presencia de polvo/mezclas de
aire explosivas, debe utilizarse un aspirador
especial adecuado. ¡EXISTE PELIGRO DE
INCENDIO POR LA GENERACIÓN DE
CHISPAS! No utilice ningún dispositivo de
aspiración de polvo para el lijado de metales
(depósito de polvo
o aspirador de polvo).
■ No deben procesarse los materiales que con-
tengan asbesto. El asbesto es cancerígeno.
¡ADVERTENCIA! ¡PELIGRO DE
INCENDIO!
■ Existe peligro de incendio al trabajar con
aparatos eléctricos que dispongan de un
depósito de polvo o que puedan conectarse
a un aspirador por medio de un dispositivo
de aspiración de polvo. En condiciones poco
favorables, como, p. ej., si se generan chispas
o al lijar piezas metálicas o restos de metal en
superficies de madera, el serrín del depósito de
polvo (o de la bolsa de la aspiradora) puede
llegar a incendiarse. Esta situación puede pro-
ducirse especialmente si el serrín se mezcla con
restos de pintura/barniz o con otros productos
químicos y el material que deba lijarse se ca-
lienta tras un largo tiempo de trabajo. Por este
motivo, debe evitarse el sobrecalentamiento del
material y del aparato y vaciarse siempre el
depósito de polvo o la bolsa de la aspiradora
antes de realizar pausas en el trabajo.
■ Procure que la zona de trabajo esté bien
ventilada.
■ Observe las disposiciones nacionales pertinen-
tes para los materiales que desee procesar.

ES │ 7 ■
PBSD 600 A1
■ Utilice una mascarilla de protección
antipolvo.
Montaje del depósito de polvo
:
♦ Coloque el depósito de polvo
desde arriba
sobre la conexión para el depósito de polvo.
Desmontaje/extracción del depósito de polvo:
♦ Tire del depósito de polvo
hacia arriba para
extraerlo del aparato.
Conexión del adaptador para la aspiración
y del manguito reductor para la aspiración
externa:
♦ Coloque el adaptador para la aspiración
sobre la conexión .
♦ Inserte el manguito reductor
para la aspira-
ción externa en el adaptador para la aspira-
ción .
♦ Conecte el tubo de un aspirador de polvo auto-
rizado (p. ej., un aspirador para talleres) en el
manguito reductor para la aspiración externa.
Desmontaje del adaptador para la aspira-
ción y del manguito reductor para la aspira-
ción externa:
♦ Tire del tubo del aspirador de polvo.
♦ Extraiga el manguito reductor
para la aspi-
ración externa.
♦ Tire del adaptador para la aspiración
hacia
arriba para extraerlo de la conexión .
Indicaciones de trabajo
Basta con ejercer una ligera presión:
■ No apriete demasiado. El propio peso de la
lijadora de banda es suficiente para obtener un
buen resultado. Además, así evitará el desgaste
prematuro de la banda lijadora
y la superficie
de la pieza de trabajo quedará más lisa.
Abrasión y superficie:
■ La potencia de abrasión y la calidad de la su-
perficie dependen de la velocidad de la banda
y del grosor del granulado de la banda lijado-
ra
(consulte también el apartado "Selección
de la velocidad y de la banda lijadora").
Procedimiento de lijado:
■ Coloque el aparato ya encendido sobre la pieza
de trabajo y trabaje con un avance modera-
do. Realice el proceso de lijado describiendo
bandas paralelas y ligeramente superpuestas.
Para evitar dejar molestos rastros transversales
durante el lijado, lije exclusivamente en la
dirección de las fibras. Tras procesar la pieza,
levante primero el aparato y apáguelo.
INDICACIÓN
► Durante el trabajo, sujete siempre el aparato
con las dos manos de forma firme.
Manejo
Encendido y apagado
Puede seleccionarse entre el modo de funciona-
miento temporal y el modo de funcionamiento
continuo.
Activación del modo de funcionamiento
temporal:
♦ Pulse el interruptor de encendido/apagado
.
Desactivación del modo de funcionamiento
temporal:
♦ Suelte el interruptor de encendido/apagado
.
Activación del modo de funcionamiento
continuo:
♦ Pulse el interruptor de encendido/apagado
,
manténgalo pulsado y presione el botón de
bloqueo
.
Desactivación del modo de funcionamiento
continuo:
♦ Pulse el interruptor de encendido/apagado
y vuelva a soltarlo.
Vaciado del depósito de polvo
El depósito de polvo debe vaciarse cada
10minutos durante el funcionamiento.
♦ Tire del depósito de polvo
para extraerlo
del aparato (consulte el capítulo "Montaje/
desmontaje de la aspiración de polvo").

■ 8 │ ES
PBSD 600 A1
♦ Agite el depósito de polvo sobre un conte-
nedor de basura para vaciarlo.
♦ Vuelva a colocar el depósito de polvo
en
el aparato.
Selección de la velocidad y de la
banda lijadora
Con la rueda de ajuste de la velocidad de la ban-
da , puede seleccionarse la velocidad incluso
con el aparato en marcha. La velocidad óptima de
la banda depende de la pieza de trabajo o del
material que deba procesarse. Calcule siempre
por sí mismo la velocidad más adecuada realizan-
do una prueba. En la siguiente lista, encontrará
valores orientativos que le facilitarán la selección
de la velocidad.
Material/tarea Madera blanda
Lijado grueso
(granulado)
60
Lijado fino (granulado) 240
Preselección de la
velocidad
Alta (5-6)
Material/tarea Madera dura
Lijado grueso
(granulado)
60
Lijado fino (granulado) 180
Preselección de la
velocidad
Alta (5-6)
Material/tarea Tableros de
aglomerado
Lijado grueso
(granulado)
60
Lijado fino (granulado) 150
Preselección de la
velocidad
Alta (5-6)
Material/tarea Decapado de
pintura/barniz
Lijado grueso
(granulado)
60
Lijado fino (granulado) ––
Preselección de la
velocidad
Alta (5-6)
Material/tarea Lijado de barniz
Lijado grueso
(granulado)
150
Lijado fino (granulado) 320
Preselección de la
velocidad
Baja (1-2)
Material/tarea Eliminación de he-
rrumbre en el acero
Lijado grueso
(granulado)
40
Lijado fino (granulado) 120
Preselección de la
velocidad
Media/alta (3-4)
Material/tarea Plásticos
Lijado grueso
(granulado)
120
Lijado fino (granulado) 240
Preselección de la
velocidad
Baja/media (2-3)
Material/tarea Metales no ferrosos
(p. ej., aluminio)
Lijado grueso
(granulado)
80
Lijado fino (granulado) 150
Preselección de la
velocidad
Media/alta (3-4)

ES │ 9 ■
PBSD 600 A1
Trabajo estacionario
♦ Coloque el mango adicional en posición
horizontal.
♦ Dé la vuelta a la herramienta eléctrica de la
manera mostrada en la figura A y colóquela
sobre una superficie de trabajo estable.
♦ Inserte los dos sargentos
en los alojamien-
tos previstos para ello y fije la herramienta
eléctrica.
Consejos y trucos
■ Nunca procese madera y metal con la misma
banda lijadora .
■ Si la banda lijadora está desgastada o mellada,
puede dañar la pieza de trabajo. Por este moti-
vo, debe cambiarse la banda lijadora siempre
que corresponda.
■ Cuelgue siempre las bandas lijadoras para
guardarlas, ya que pueden quedar inutilizables
si se doblan.
Mantenimiento y limpieza
¡ADVERTENCIA! ¡PELIGRO DE LESIO-
NES! Antes de realizar cualquier
tarea en el aparato, apáguelo y des-
conecte el enchufe de la red eléctrica.
La lijadora de banda no necesita mantenimiento.
■ Limpie el aparato directamente después de su
uso.
■ Utilice un paño seco para la limpieza del
aparato. No use nunca bencina, disolventes ni
limpiadores que deterioren el plástico.
Vaciado/limpieza del depósito de polvo
:
♦ Tire del depósito de polvo
para extraerlo
del aparato.
♦ Vacíe completamente el depósito de polvo
dando ligeros golpecitos y vuelva a colocar el
depósito de polvo en el aparato.
♦ Mantenga siempre despejadas las ranuras de
ventilación.
♦ Retire el polvo que quede adherido con un pincel.
Desecho
El embalaje consta de materiales ecológi-
cos que pueden desecharse a través de
los centros de reciclaje locales.
No deseche las herramientas eléctri-
cas con la basura doméstica.
Según la Directiva 2012/19/EU, las herramientas
eléctricas usadas deben recogerse por separado
para someterse a un reciclaje ecológico.
Puede informarse acerca de las posibilidades de
desecho de los aparatos usados en su administra-
ción municipal o ayuntamiento.
Deseche el embalaje de forma
respetuosa con el medio ambiente.
Observe las indicaciones de los
distintos materiales de embalaje y, si
procede,
recíclelos de la manera correspondi-
ente. Los materiales de embalaje
cuentan
con abreviaciones (a) y cifras (b) que
significan lo siguiente:
1–7: plásticos,
20–22: papel y cartón,
80–98: materiales compuestos
Puede informarse acerca de las
posibilidades de desecho de los
aparatos usados en su administración
municipal o ayuntamiento.

■ 10 │ ES
PBSD 600 A1
Garantía de
Kompernass Handels GmbH
Estimado cliente:
Este aparato cuenta con una garantía de 3 años a
partir de la fecha de compra. Si se detectan defectos
en el producto, puede ejercer sus derechos legales
frente al vendedor. Estos derechos legales no se ven
limitados por la garantía descrita a continuación.
Condiciones de la garantía
El plazo de la garantía comienza con la fecha de
compra. Guarde bien el comprobante de caja
original, ya que lo necesitará como justificante de
compra.
Si dentro de un periodo de tres años a partir de la
fecha de compra de este producto se detecta un
defecto en su material o un error de fabricación,
asumiremos la reparación o sustitución gratuita del
producto a nuestra elección. La prestación de la
garantía requiere la presentación del aparato de-
fectuoso y del comprobante de caja, así como una
breve descripción por escrito del defecto detectado
y de las circunstancias en las que se haya produci-
do dicho defecto, dentro del plazo de tres años.
Si el defecto está cubierto por nuestra garantía, le
devolveremos el producto reparado o le suministra-
remos uno nuevo. La reparación o sustitución del
producto no supone el inicio de un nuevo periodo
de garantía.
Duración de la garantía y reclamaciones
legales por vicios
La duración de la garantía no se prolonga por
hacer uso de ella. Este principio también se aplica
a las piezas sustituidas y reparadas. Si después
de la compra del aparato, se detecta la existencia
de daños o de defectos al desembalarlo, deben
notificarse de inmediato. Cualquier reparación que
se realice una vez finalizado el plazo de garantía
estará sujeta a costes.
Alcance de la garantía
El aparato se ha fabricado cuidadosamente según
estándares elevados de calidad y se ha examinado
en profundidad antes de su entrega.
La prestación de la garantía solo rige para defectos
en los materiales o errores de fabricación. Esta
garantía no cubre las piezas del producto normal-
mente sometidas al desgaste y que, en consecuencia,
puedan considerarse piezas de desgaste ni los
daños producidos en los componentes frágiles,
p. ej., interruptores, baterías, moldes de horno o
piezas de vidrio.
Se anulará la garantía si el producto se daña o no
se utiliza o mantiene correctamente. Para utilizar
correctamente el producto, deben observarse todas
las indicaciones especificadas en las instrucciones
de uso. Debe evitarse cualquier uso y manejo que
esté desaconsejado o frente al que se advierta en
las instrucciones de uso.
El producto está previsto exclusivamente para su
uso privado y no para su uso comercial. En caso
de manipulación indebida e incorrecta, uso de la
fuerza y apertura del aparato por personas ajenas
a nuestros centros de asistencia técnica autorizados,
la garantía perderá su validez.
Proceso de reclamación conforme a la
garantía
Para garantizar una tramitación rápida de su re-
clamación, le rogamos que observe las siguientes
indicaciones:
■ Mantenga siempre a mano el comprobante
de caja y el número de artículo (p. ej., IAN
12345) como justificante de compra.
■ Podrá ver el número de artículo en la placa
de características, grabado en el aparato, en
la portada de las instrucciones (parte inferior
izquierda) o en un adhesivo en la parte trasera
o inferior del aparato.
■ Si se producen errores de funcionamiento u
otros defectos, póngase primero en contacto
con el departamento de asistencia técnica
especificado a continuación por teléfono o
por correo electrónico.

ES │ 11 ■
PBSD 600 A1
■ Podrá enviar el producto calificado como
defectuoso junto con el justificante de compra
(comprobante de caja) y la descripción del de-
fecto y de las circunstancias en las que se haya
producido de forma gratuita a la dirección de
correo proporcionada.
En www.lidl-service.com, podrá
descargar este manual de usuario y
muchos otros más, así como vídeos
sobre los productos y software.
Asistencia técnica
¡ADVERTENCIA!
■ Encomiende exclusivamente la repara-
ción del aparato al servicio de asistencia
técnica o a un electricista especializado y
solo con los recambios originales. De esta
forma, se garantizará que la seguridad del
aparato no se vea afectada.
¡ADVERTENCIA!
■ Encomiende siempre la sustitución del
enchufe o del cable de red al fabricante
del aparato o a su servicio de atención al
cliente. De esta forma, se garantizará que la
seguridad del aparato no se vea afectada.
INDICACIÓN
► Los recambios no especificados (p.ej., esco-
billas de carbón, interruptores o depósito de
polvo) pueden solicitarse a través de nuestro
servicio de asistencia técnica.
Servicio España
Tel.: 902 59 99 22
(0,08 EUR/Min. + 0,11 EUR/
llamada (tarifa normal))
(0,05 EUR/Min. + 0,11 EUR/
llamada (tarifa reducida))
E-Mail: [email protected]
IAN 315561
Importador
Tenga en cuenta que la dirección siguiente no
es una dirección de asistencia técnica. Póngase
primero en contacto con el centro de asistencia
técnica especificado.
KOMPERNASS HANDELS GMBH
BURGSTRASSE 21
DE - 44867 BOCHUM
ALEMANIA
www.kompernass.com

■ 12 │ ES
PBSD 600 A1
Traducción de la Declaración de conformidad original
En virtud del presente documento, nosotros, KOMPERNASS HANDELS GMBH, responsable
de los documentos: Semi Uguzlu, BURGSTR. 21, DE-44867 BOCHUM Alemania, declaramos
que este producto cumple con lo dispuesto por las siguientes normas, documentos normativos
y directivas CE:
Directiva relativa a las máquinas
(2006/42/EC)
Compatibilidad electromagnética
(2014/30/EU)
Directiva sobre las restricciones a la utilización de determinadas sustancias peligrosas en
aparatos eléctricos y electrónicos
(2011/65/EU)*
* La responsabilidad exclusiva de la expedición de esta declaración de conformidad recaerá
sobre el fabricante. El objeto descrito de la declaración cumple con las disposiciones de la Directiva
2011/65/EU del Parlamento Europeo y del Consejo del 8 de junio de 2011 sobre las restricciones
a la utilización de determinadas sustancias peligrosas en aparatos eléctricos y electrónicos.
Normas armonizadas aplicadas:
EN 62841-1:2015
EN 62841-2-4:2014
EN 55014-1:2017
EN 55014-2:2015
EN 61000-3-2:2014
EN 61000-3-3:2013
EN 50581:2012
Denominación de la máquina: Lijadora de banda PBSD600A1
Año de fabricación: 02-2019
Número de serie: IAN315561
Bochum, 31/01/2019
Semi Uguzlu
- Responsable de calidad -
Reservado el derecho de realizar modificaciones técnicas en relación con el desarrollo tecnológico.

IT
│
MT
│
13 ■
PBSD 600 A1
Indice
Introduzione ....................................................14
Uso conforme .............................................................. 14
Componenti illustrati .........................................................14
Volume della fornitura .......................................................14
Dati tecnici ................................................................ 14
Indicazioni generali di sicurezza per elettro utensili ....................15
1. Sicurezza sul posto di lavoro ................................................ 15
2. Sicurezza elettrica ........................................................15
3. Sicurezza delle persone ....................................................16
4. Uso e trattamento dell’elettro utensile ..........................................16
Indicazioni relative alla sicurezza specifiche per levigatrici ...........................17
Messa in funzione ................................................17
Bloccaggio/sostituzione del nastro abrasivo ...................................... 17
Regolazione impugnatura supplementare ........................................ 18
Sollevamento della copertura anteriore ..........................................18
Applicazione/rimozione dell'aspirazione della polvere ............................. 18
Istruzioni operative .......................................................... 19
Uso ............................................................19
Accensione e spegnimento .................................................... 19
Svuotamento del sacco della polvere ...........................................19
Selezione del numero di giri e del nastro abrasivo .................................20
Lavoro stazionario ..........................................................21
Consigli e suggerimenti ...................................................... 21
Manutenzione e pulizia ...........................................21
Smaltimento ....................................................21
Garanzia della Kompernass Handels GmbH ..........................22
Assistenza ......................................................23
Importatore. . . . . . . . . . . . . . . . . . . . . . . . . . . . . . . . . . . . . . . . . . . . . . . . . . . . . 23
Traduzione della dichiarazione di conformità originale .................24

■ 14
│
IT
│
MT
PBSD 600 A1
LEVIGATRICE A NASTRO
PBSD 600 A1
Introduzione
Congratulazioni per l'acquisto del nuovo appa-
recchio. È stato scelto un prodotto di alta qualità.
Il manuale di istruzioni è parte integrante del
presente prodotto. Esso contiene importanti indica-
zioni per la sicurezza, l'uso e lo smaltimento. Prima
di utilizzare il prodotto, acquisire dimestichezza
con tutte le indicazioni relative ai comandi e alla
sicurezza. Utilizzare il prodotto solo come descritto
e per i campi d'impiego indicati. In caso di cessione
del prodotto a terzi, consegnare anche tutta la
relativa documentazione.
Uso conforme
La levigatrice a nastro - a seconda della carta
abrasiva - è predisposta per la levigatura di superfici
asciutte in legno, plastica, metallo e mastice non-
ché di superfici laccate. L'apparecchio può essere
utilizzato solo per levigatura a secco. Assicurarsi che
per la lavorazione dei diversi materiali si utilizzino
fogli abrasivi di grana adeguata e che anche il
numero di giri sia adatto al materiale. L'apparecchio
non è destinato all'uso commerciale. Qualunque
altro impiego o modifica della macchina è da
considerarsi non conforme alla destinazione d'uso
prevista e può comportare gravi rischi di infortunio.
Il produttore non si assume alcuna responsabilità
per i danni derivanti da un uso non conforme.
Componenti illustrati
Interruttore ON/OFF
Impugnatura supplementare (superficie
d'impugnatura gommata)
Copertura anteriore
Leva di serraggio per nastro abrasivo
Rotella di regolazione velocità nastro
Impugnatura (superficie di presa gommata)
Vite per regolazione impugnatura
Scomparti per morsa a vite
Attacco per sacco della polvere
Tasto di blocco per interruttore ON/OFF
Sacco della polvere
Vite di regolazione per andamento nastro
Nastro abrasivo
Morsa a vite
Riduttore
Adattatore di aspirazione
Volume della fornitura
1 levigatrice a nastro PBSD 600 A1
1 nastro abrasivo per legno (grana 80)
1 sacco della polvere
1 adattatore per aspirazione e giunto di riduzione
(per l'aspirazione della polvere esterna)
2 morse a vite
1 manuale di istruzioni per l'uso
Dati tecnici
Tensione nominale: 230 V ∼ 50 Hz
(corrente alternata)
Potenza assorbita
nominale: 600 W
Velocità nastro
in folle: 170–250 m / min
Numero di giri
nominale in folle:
n
0
360–560 min
-1
Nastro abrasivo: 75 x 457 mm
Classe di protezione: II / (isolamento
doppio)
Valore di emissione acustica:
Valore misurato relativo al rumore rilevato ai sensi
della norma EN 62841. Valori tipici del livello di
rumore dell'elettroutensile classificato A:
Livello di pressione acustica: L
pA
= 91 dB (A)
Fattore di incertezza: K
pA
= 3 dB
Livello di potenza acustica: L
WA
= 102 dB (A)
Fattore di incertezza: K
WA
= 3 dB
Indossare protezioni acustiche!
Valore complessivo delle vibrazioni:
Valori totali di vibrazione (somma dei vettori di tre
direzioni) rilevati ai sensi della norma EN62841:
Levigatura con platorello: a
h
= 4,2 m/s
2
Fattore di incertezza K = 1,5 m/s
2

IT
│
MT
│
15 ■
PBSD 600 A1
NOTA
► Il livello di vibrazioni indicato nelle presen-
ti istruzioni è stato misurato secondo un
procedimento di misurazione conforme alla
norma EN62841 e può essere usato per un
confronto tra vari apparecchi. Il coefficiente
di emissione delle vibrazioni può anche
essere usato per una stima introduttiva dell'e-
sposizione. Il coefficiente di emissione delle
vibrazioni cambia in base all'uso dell'elettro-
utensile e in alcuni casi può essere superiore
al valore indicato nelle presenti istruzioni. La
sollecitazione da vibrazioni potrebbe risultare
sottostimata se l'elettroutensile viene utilizzato
regolarmente in tal modo.
AVVERTENZA!
► Cercare di ridurre il più possibile la sollecita-
zione da vibrazioni. Provvedimenti adeguati
per la riduzione della sollecitazione da
vibrazioni prevedono l'uso di guanti durante
l'impiego dell'elettroutensile e la limitazio-
ne dei tempi di lavoro. Occorre tenere in
considerazione tutte le componenti del ciclo
di esercizio (per esempio i tempi nei quali
l'elettroutensile è spento e i tempi in cui è
acceso ma funziona senza carico).
Indicazioni generali
di sicurezza per elettro-
utensili
AVVERTENZA!
► Osservare tutte le indicazioni relative alla
sicurezza, le istruzioni, le illustrazioni e i
dati tecnici di cui è dotato questo elettro-
utensile. Il mancato rispetto delle seguenti
istruzioni può causare scosse elettriche,
incendi e/o gravi lesioni.
Conservare le indicazioni relative alla sicu-
rezza e le istruzioni per uso futuro.
Il termine “elettroutensile” utilizzato nelle indicazioni
relative alla sicurezza si riferisce a elettroutensili
collegabili alla rete elettrica (con cavo di rete) o
a elettroutensili a batteria (senza cavo di rete).
1. Sicurezza sul posto di lavoro
a) Mantenere l’area di lavoro pulita e ben illu-
minata. Il disordine e la scarsa illuminazione
dell’area di lavoro potrebbero dare luogo a
infortuni.
b) Non lavorare con elettroutensili in ambienti
a rischio di esplosione, in presenza di liquidi,
gas o polveri infiammabili. Gli elettroutensili
generano scintille che possono incendiare la
polvere o i vapori.
c) Tenere lontani i bambini e altre persone
durante l’uso dell’elettroutensile. In caso di
distrazione, si potrebbe perdere il controllo
dell’elettroutensile.
2. Sicurezza elettrica
a) La spina dell’elettroutensile deve essere ido-
nea all’inserimento nella presa. La spina non
deve essere assolutamente modificata.
Non utilizzare connettori adattatori con
elettroutensili collegati a terra. Le spine non
modificate e le prese idonee riducono il rischio
di scosse elettriche.
b) Evitare il contatto corporeo con superfici col-
legate a terra, come tubi, termosifoni, fornelli
e frigoriferi. Quando il corpo è a diretto contatto
col suolo, sussiste un maggiore pericolo di scosse
elettriche.
c) Tenere gli elettroutensili lontano dalla pioggia
o dall’umidità. La penetrazione di acqua in un
apparecchio elettrico aumenta il rischio di scosse
elettriche.
d) Non utilizzare il cavo di allacciamento per
scopi non conformi, come ad es. per tra-
sportare l’elettroutensile, per appenderlo o
per scollegare la spina dalla presa. Tenere
il cavo di allacciamento lontano dal calore,
dall’olio, da angoli acuminati o da parti in
movimento. Cavi di allacciamento danneggiati
o aggrovigliati aumentano il rischio di scosse
elettriche.

■ 16
│
IT
│
MT
PBSD 600 A1
e) Se si lavora all’aperto con un elettroutensile,
utilizzare solo prolunghe ammesse anche per
uso esterno. L’utilizzo di un cavo di prolunga
idoneo all’uso esterno riduce il rischio di scosse
elettriche.
f) Se è inevitabile l’uso dell’elettroutensile in
un ambiente umido, utilizzare un interruttore
differenziale. L’uso di un interruttore differenziale
evita il rischio di scosse elettriche.
3. Sicurezza delle persone
a) Prestare attenzione controllando le operazioni
in corso e procedendo con cura quando si
lavora con un elettroutensile. Non utilizzare
l’elettroutensile se non si è concentrati o ripo-
sati a sufficienza, o se si è sotto l’influsso di
droghe, alcol o farmaci. Un solo momento di
disattenzione nell’uso dell’elettroutensile può
dare luogo a gravi lesioni.
b) I
ndossare dispositivi di protezione individuali
e sempre occhiali di protezione. L’uso di un
dispositivo di protezione individuale come ma-
scherina antipolvere, scarpe antiscivolo, casco
protettivo o paraorecchi acustici, a seconda
dell’uso e dell’impiego dell’elettroutensile, riduce
il rischio di lesioni.
c) Evitare l’accensione involontaria. Accertarsi
che l’elettroutensile sia spento prima di col-
legarlo all’alimentazione e/o alla batteria,
sollevarlo o trasportarlo. Se si tiene il dito
sull’interruttore mentre si sposta l’elettroutensile
o si collega l’elettroutensile alla rete elettrica
con l’interruttore su ON, si possono verificare
infortuni.
d) Rimuovere gli utensili di regolazione o le
chiavi per dadi prima di accendere l’elettro-
utensile. Un utensile o una chiave lasciati in
una parte rotante dell’elettroutensile possono
provocare lesioni.
e) Evitare posture innaturali. Provvedere a una
posizione sicura e mantenere sempre l’equi-
librio. In tal modo si può controllare meglio
l’elettroutensile, soprattutto in situazioni imprevi-
ste.
f) Indossare un abbigliamento idoneo. Non in-
dossare abiti larghi o gioielli. Tenere lontani i
capelli e gli indumenti dalle parti in movimen-
to. Gli abiti larghi e sciolti, i gioielli o i capelli
lunghi possono impigliarsi nelle parti mobili.
g) Se è possibile montare dispositivi aspirapol-
vere e aspiratrucioli, occorre collegarli e
utilizzarli correttamente. L’uso di un aspiratore
per polvere può ridurre i pericoli associati alla
polvere.
h) Anche se si è acquisita dimestichezza con
l’apparecchio usandolo spesso, non sentirsi
troppo sicuri e non mancare di rispettare le
regole sulla sicurezza nell’uso di elettroutensi-
li. Una piccola disattenzione può dare luogo a
gravi lesioni in una frazione di secondo.
4. Uso e trattamento dell’elettro-
utensile
a) Non sovraccaricare l’elettroutensile. Utilizzare
l’elettroutensile idoneo al proprio lavoro. Con
l’elettroutensile adatto si lavora meglio e con
maggiore sicurezza nell’intervallo di potenza
indicato.
b) Non utilizzare elettroutensili con interruttore
guasto. Un elettroutensile che non si riesce
più a spegnere o ad accendere è pericoloso e
deve essere riparato.
c) Staccare la spina dalla presa di corrente
e/o rimuovere la batteria, se sfilabile, prima
di eseguire impostazioni sull’apparecchio,
sostituire gli utensili o riporre l’elettroutensile.
Questa misura precauzionale consente di impe-
dire l’avvio involontario dell’elettroutensile.
d) Conservare gli elettroutensili non utilizzati
fuori della portata dei bambini. Non consenti-
re l’uso dell’elettroutensile a persone inesperte
o che non abbiano letto le presenti istruzioni.
Gli elettroutensili sono pericolosi se utilizzati da
persone inesperte.

IT
│
MT
│
17 ■
PBSD 600 A1
e) Trattare gli elettroutensili e gli utensili con
cura. Controllare che le parti mobili dell’appa-
recchio funzionino perfettamente e non si
inceppino e che non vi siano elementi rotti o
danneggiati al punto da compromettere la
funzione dell’elettroutensile. Fare riparare le
parti danneggiate prima di utilizzare l’elettro-
utensile. Molti infortuni derivano da una cattiva
manutenzione degli elettroutensili.
f) Mantenere gli utensili da taglio ben affilati e
puliti. Gli utensili da taglio trattati con cura e
con bordi di taglio affilati si inceppano meno
spesso e sono più facili da controllare.
g) Utilizzare elettroutensili, utensili, ecc. conformi
a queste istruzioni. Tenere conto delle con-
dizioni di lavoro e dell’attività da eseguire.
L’uso di elettroutensili per applicazioni diverse
da quelle previste può dare luogo a situazioni
di pericolo.
h) Mantenere le impugnature e le superfici di
presa asciutte, pulite e prive di olio e grasso.
Impugnature e superfici di presa scivolose non
consentono un controllo e un utilizzo sicuro
dell’elettroutensile in situazioni impreviste.
5. Assistenza
a) Fare riparare l’elettroutensile solo da per-
sonale qualificato specializzato e solo con
l’utilizzo di ricambi originali. In tal modo si
garantisce la sicurezza dell’elettroutensile.
Indicazioni relative alla sicurezza
specifiche per levigatrici
■ Afferrare sempre l'apparecchio dal manico
isolato, in quanto il nastro abrasivo po-
trebbe toccare il proprio cavo di rete. Il dan-
neggiamento di una linea che conduce tensione
potrebbe mettere sotto tensione anche le parti
dell'apparecchio di metallo e causare così una
scossa elettrica.
AVVERTENZA!
■ Polveri di materiali come pittura contenente
piombo, alcuni tipi di legno e metallo potreb-
bero essere nocive alla salute.
■ Il contatto con queste polveri o la loro
inalazione può rappresentare un pericolo
per la salute dell'utente o delle altre persone
presenti nell'ambiente di lavoro.
■ Indossare occhiali protettivi e mascherina
antipolvere!
Messa in funzione
Bloccaggio/sostituzione del nastro
abrasivo
AVVERTENZA! PERICOLO DI LESIONI
■ Staccare sempre la spina dalla presa prima
di eseguire lavori sulla levigatrice a nastro.
1. Svitare il dispositivo di serraggio per il nastro
abrasivo ribaltando completamente la leva di
serraggio
. Il nastro abrasivo può venire
rimosso.
2. Adesso inserire un nuovo nastro abrasivo
o
sostituire il nastro abrasivo inserito per lavorare
altro materiale o per cambiare la dimensione
della grana.
IMPORTANTE: La direzione delle frecce pre-
senti all'interno del nastro abrasivo e sull'in-
volucro dell'apparecchio deve coincidere.
3. Portare nuovamente la leva di serraggio
alla posizione di partenza.
Regolare manualmente il nastro abrasivo
:
Se l'andamento del nastro dopo l'accensione
non è centrato, lo si deve regolare manualmente
all'occorrenza.
♦ A tale scopo ruotare la vite di regolazione
presente sul rullo anteriore fino a quando il
nastro abrasivo non scorre centrato.
IMPORTANTE: Badare assolutamente che il
nastro abrasivo non si incastri nell'involucro.
Controllare periodicamente l'andamento del
nastro e regolarlo, se necessario, con la vite di
regolazione .

■ 18
│
IT
│
MT
PBSD 600 A1
Regolazione impugnatura supple-
mentare
È possibile regolare l'impugnatura supplementare
in diverse posizioni.
♦ Per regolare l'impugnatura supplementare
svitare la vite
.
♦ Portare l'impugnatura supplementare
nella
posizione desiderata.
♦ Serrare nuovamente la vite
.
Sollevamento della copertura
anteriore
È possibile sollevare la copertura anteriore per
effettuare interventi di levigatura in punti difficilmente
raggiungibili (vedi figura).
AVVERTENZA!
► La copertura anteriore
può venire solleva-
ta solo se anche l'impugnatura supplementa-
re è stata alzata (vedi capitolo "Regola-
zione impugnatura supplementare").
♦ Sollevare la copertura anteriore
.
Applicazione/rimozione dell'aspira-
zione della polvere
AVVERTENZA! PERICOLO DI
ESPLOSIONE!
■ In caso di polvere / miscela d'aria esplosiva
si deve utilizzare un apposito aspiratore.
PERICOLO D'INCENDIO DOVUTO ALLO
SVILUPPO DI SCINTILLE! Quando si levigano
metalli non utilizzare un dispositivo per l'aspi-
razione della polvere (sacco della polvere
o aspirapolvere).
■ Non lavorare materiali contenenti amianto.
L'amianto è considerato cancerogeno.
AVVERTENZA! PERICOLO
D'INCENDIO!
■ Quando si lavora con apparecchi elettrici
dotati di contenitore di raccolta polvere o
collegati all'apparecchio tramite un dispositivo
di aspirazione della polvere, sussiste il rischio
di incendio! In condizioni sfavorevoli, come ad
es. la formazione di scintille, la molatura del
metallo o in presenza di resti di metallo nel
legno, la polvere di legno presente nel conte-
nitore di raccolta polvere (o nel sacchetto filtro
dell'aspirapolvere) può incendiarsi. Ciò può
succedere in particolare se la polvere di legno
è mescolata a resti di vernice o altre sostanze
chimiche e il materiale si è surriscaldato
dopo un lungo tempo di lavorazione. Evitare
pertanto assolutamente il surriscaldamento
del materiale e dell'appa recchio e prima delle
pause di lavoro svuotare sempre il sacco della
polvere o il sacchetto filtro dell'aspirapolvere.
■ Provvedere a una buona ventilazione del
luogo di lavoro.
■ Rispettare le norme vigenti nel paese d'impiego
inerenti ai materiali da lavorare.
■
Indossare una mascherina anti-
polvere.
Applicazione del sacco della polvere
:
♦ Infilare il sacco della polvere
dall'alto sull'at-
tacco per il sacco della polvere.

IT
│
MT
│
19 ■
PBSD 600 A1
Smontaggio/rimozione del contenitore di
raccolta polvere:
♦ Sfilare il sacco della polvere
verso l'alto.
Applicazione dell'adattatore di aspirazione
e del giunto di riduzione per aspirazione
esterna:
♦ Infilare l'adattatore di aspirazione
sull'attacco
.
♦ Inserire il giunto di riduzione
per aspirazione
esterna nell'adattatore di aspirazione .
♦ Infilare il tubo flessibile di un impianto di aspi-
razione polveri omologato (es. di un aspirapol-
vere da officina) sul giunto di riduzione
per
aspirazione esterna.
Rimozione dell'adattatore di aspirazione
e del giunto di riduzione per aspirazione
esterna:
♦ Rimuovere il tubo flessibile del dispositivo aspi-
rapolvere.
♦ Sfilare il giunto di riduzione
per aspirazione
esterna.
♦ Sfilare l'adattatore di aspirazione
dall'attacco
tirandolo verso l'alto.
Istruzioni operative
È sufficiente esercitare una leggera pressione
di levigatura:
■ Lavorare con una pressione di levigatura ridotta.
Il peso proprio della levigatrice a nastro è suffi-
ciente per ottenere buoni risultati di levigatura.
Inoltre lavorando così si limita il logorio del
nastro abrasivo
e la superficie del pezzo
da lavorare risulta più liscia.
Asportazione e superficie:
■ La velocità del nastro e lo spessore della gra-
na del nastro abrasivo
definiscono la resa
dell'asportazione e la finitura della superficie
(vedi anche capitolo "Selezione del numero di
giri e del nastro abrasivo").
Processo di levigatura:
■ Collocare l'apparecchio acceso sul pezzo da
lavorare e lavorare avanzando moderatamente.
Eseguire il processo di levigatura in parallelo e
in sovrapposizione alle piste abrasive. Al fine di
evitare fastidiose tracce di levigatura trasversali,
levigare procedendo solo nella direzione delle
fibre. Sollevare l'apparecchio dopo la lavora-
zione del pezzo e spegnerlo solo in seguito.
NOTA
► Durante la lavorazione, afferrare sempre
l'apparecchio saldamente con entrambe le
mani.
Uso
Accensione e spegnimento
Nell'utilizzo della levigatrice a nastro si può
scegliere tra modalità a impulsi e funzionamento
in continuo.
Attivazione della modalità a impulsi:
♦ Premere l'interruttore ON/OFF
.
Disattivazione della modalità a impulsi:
♦ Rilasciare l'interruttore ON/OFF
.
Attivazione del funzionamento in continuo:
♦ Premere l'interruttore ON/OFF
, tenerlo
premuto e premere il tasto di blocco .
Disattivazione del funzionamento in continuo:
♦ Premere l'interruttore ON / OFF
e rilasciarlo
nuovamente.
Svuotamento del sacco della polvere
Durante il funzionamento si consiglia di scaricare
il sacco della polvere ogni 10 minuti.
♦ Sfilare il sacco della polvere
(vedi capitolo
"Applicazione/rimozione dell'aspirazione
della polvere")
♦ Per scaricare il sacco della polvere
scuoterlo
tenendolo sopra un cestino per rifiuti.
♦ Applicare nuovamente il sacco della polvere
sull'apparecchio.

■ 20
│
IT
│
MT
PBSD 600 A1
Selezione del numero di giri e del
nastro abrasivo
Con la rotella di regolazione velocità nastro è
possibile selezionare il numero di giri anche con
l'apparecchio in funzione. La velocità ottimale del
nastro dipende dal pezzo ossia dal materiale da
lavorare. Calcolare il relativo numero di giri più
adatto con una prova pratica. Nella seguente
tabella sono indicati valori non vincolanti che
facilitano il calcolo.
Materiale / zona
di lavoro
Legno morbido
Molatura grossolana
(grana)
60
Molatura di precisione
(grana)
240
Preselezione del
numero di giri
alto (5–6)
Materiale / zona
di lavoro
Legno duro
Molatura grossolana
(grana)
60
Molatura di precisione
(grana)
180
Preselezione del
numero di giri
alto (5–6)
Materiale / zona
di lavoro
Pannelli di truciolato
Molatura grossolana
(grana)
60
Molatura di precisione
(grana)
150
Preselezione del
numero di giri
alto (5–6)
Materiale / zona
di lavoro
Rimozione di vernici
e smalti
Molatura grossolana
(grana)
60
Molatura di precisione
(grana)
––
Preselezione del
numero di giri
alto (5–6)
Materiale / zona
di lavoro
Levigatura di smalti
Molatura grossolana
(grana)
150
Molatura di precisione
(grana)
320
Preselezione del
numero di giri
basso (1–2)
Materiale / zona
di lavoro
Trattamento antirug-
gine per acciaio
Molatura grossolana
(grana)
40
Molatura di precisione
(grana)
120
Preselezione del
numero di giri
medio / alto (3–4)
Materiale / zona
di lavoro
Materie plastiche
Molatura grossolana
(grana)
120
Molatura di precisione
(grana)
240
Preselezione del
numero di giri
bassa / media (2–3)

IT
│
MT
│
21 ■
PBSD 600 A1
Materiale / zona
di lavoro
Metalli non ferrosi
(per es. alluminio)
Molatura grossolana
(grana)
80
Molatura di precisione
(grana)
150
Preselezione del
numero di giri
medio / alto (3–4)
Lavoro stazionario
♦ Portare l'impugnatura supplementare in
posizione orizzontale.
♦ Voltare l'elettroutensile come mostrato nella figura
A e collocarlo su un piano di lavoro stabile.
♦ Inserire due morse a vite
negli appositi scom-
parti e bloccare saldamente l'elettroutensile.
Consigli e suggerimenti
■ Non lavorare mai legno o metallo con lo stesso
nastro abrasivo .
■ Nastri abrasivi logorati o rovinati potrebbero
danneggiare il pezzo da lavorare. Sostituire
pertanto tempestivamente i nastri abrasivi.
■ Conservare sempre i nastri abrasivi tenendoli
appesi, in quanto pieghe ecc. li renderebbero
inutilizzabili.
Manutenzione e pulizia
ATTENZIONE! PERICOLO DI LESIONI!
Prima di qualsiasi lavoro sull'appa-
recchio, spegnere l'apparecchio e
staccare la spina.
La levigatrice a nastro non necessita di manuten-
zione.
■ Pulire l'apparecchio subito dopo il termine del
lavoro.
■ Per la pulizia dell'apparecchio utilizzare un
panno asciutto; non impiegare in alcun caso
benzina, solventi o detergenti in grado di attac-
care la plastica.
Svuotamento/pulizia del sacco della
polvere
:
♦ Sfilare il sacco della polvere
dall'apparecchio.
♦ Svuotare completamente il sacco della polvere
battendovi sopra e poi infilare nuovamente
il sacco della polvere sull'apparecchio.
♦ Tenere sempre libere le aperture di aerazione.
♦ Eliminare la polvere più attaccata con un
pennello.
Smaltimento
L'imballaggio è composto da materiali
ecocompatibili che possono essere smaltiti
tramite gli appositi centri di raccolta e
riciclaggio.
Non smaltire gli elettrodomestici
assieme ai normali rifiuti domestici!
In base alla Direttiva europea 2012/19/EU, gli
elettrodomestici usati devono essere raccolti sepa-
ratamente e conferiti a un centro per il riciclaggio
ecologico.
Per lo smaltimento dell'apparecchio usato, informarsi
presso l'amministrazione comunale o municipale.
Smaltire l‘imballaggio conformemente
alle norme di tutela ambientale.
Tenere conto dei codici presenti sui
vari materiali di imballaggio ed
eventualmente separare i materiali
effettuando una raccolta differenziata.
I materiali di imballaggio presentano
codici costituiti da abbreviazioni (a) e
numeri (b) con il seguente significato:
1–7: materie plastiche,
20–22: carta e cartone,
80–98: materiali compositi
Per lo smaltimento del prodotto una
volta che ha terminato la sua funzione,
informarsi presso l’amministrazione
comunale.

■ 22
│
IT
│
MT
PBSD 600 A1
Garanzia della
Kompernass Handels GmbH
Egregio Cliente,
Questo apparecchio ha una garanzia di 3 anni
dalla data di acquisto. Qualora questo prodotto
presentasse vizi, Le spettano diritti legali nei confronti
del venditore del prodotto. La garanzia qui di seguito
descritta non costituisce alcun limite a tali diritti
legali.
Condizioni di garanzia
Il periodo di garanzia decorre dalla data dell’ac-
quisto. Si prega di conservare lo scontrino di cassa
originale. Tale documento è necessario come
prova di acquisto.
Qualora entro tre anni a partire dalla data
dell’acquisto di questo prodotto si presentasse un
vizio del materiale o di fabbricazione, provvedere-
mo, a nostra discrezione, a riparare o a sostituire
gratuitamente il prodotto. Questa prestazione di
garanzia ha come presupposto che l’apparecchio
difettoso e la prova di acquisto (scontrino di cassa)
vengano presentati entro il termine di tre anni e
che si descriva per iscritto in cosa consiste il vizio e
quando si è presentato.
Se il vizio rientra nell’ambito della nostra garanzia,
il Suo prodotto verrà riparato o sostituito da uno
nuovo. Con la riparazione o la sostituzione del pro-
dotto non decorre un nuovo periodo di garanzia.
Periodo di garanzia e diritti legali di
rivendicazione di vizi
Il periodo di garanzia non viene prolungato da
interventi in garanzia. Ciò vale anche per le parti
sostituite e riparate. Danni e vizi eventualmente già
presenti al momento dell’acquisto devono venire
segnalati immediatamente dopo che l’apparecchio
è stato disimballato. Le riparazioni eseguite dopo
la scadenza del periodo di garanzia sono a
pagamento.
Ambito della garanzia
L’apparecchio è stato prodotto con cura secondo
severe direttive qualitative e debitamente collaudato
prima della consegna.
La garanzia viene prestata in caso di vizi del
materiale o di fabbricazione. Questa garanzia non
si estende a componenti del prodotto che sono
esposti al normale logorio e possono pertanto essere
considerati come componenti soggetti a usura o a
danni che si verificano su componenti delicati, per
es. interruttori, batterie, stampi da forno o parti
realizzate in vetro.
Questa garanzia decade se il prodotto è stato
danneggiato oppure utilizzato o sottoposto a
interventi di manutenzione in modo non conforme.
Per un utilizzo adeguato del prodotto si devono
rigorosamente rispettare tutte le istruzioni esposte
nel manuale di istruzioni per l’uso. Si devono asso-
lutamente evitare modalità di utilizzo e azioni che
il manuale di istruzioni per l’uso sconsiglia o da cui
esso mette in guardia.
Il prodotto è destinato esclusivamente all’uso do-
mestico e non a quello commerciale. La garanzia
decade in caso di impiego improprio o mano-
missione, uso della forza e interventi non eseguiti
dalla nostra filiale di assistenza autorizzata.
Trattamento dei casi di garanzia
Per garantire una rapida evasione della Sua richiesta,
La preghiamo di seguire le seguenti istruzioni:
■ Tenga a portata di mano per qualsiasi richiesta
lo scontrino di cassa e il codice dell’articolo
(per es. IAN 12345) come prova di acquisto.
■ Il codice dell’articolo è indicato sulla targhetta
di modello, su un’incisione, sul frontespizio del
manuale di istruzioni per l’uso (in basso a sinistro)
o come adesivo sul lato posteriore o inferiore.
■ Qualora si presentassero malfunzionamenti o
altri tipi di vizi, contatti innanzitutto il reparto
assistenza clienti qui di seguito indicato telefo-
nicamente o via e-mail.
■ Una volta che il prodotto è stato registrato come
difettoso, lo può poi spedire a nostro carico,
provvedendo ad allegare la prova di acquisto
(scontrino di cassa), una descrizione del vizio
e l’indicazione della data in cui si è presentato,
all’indirizzo del servizio di assistenza clienti che
Le è stato comunicato.

IT
│
MT
│
23 ■
PBSD 600 A1
Al sito www.lidl-service.com si possono
scaricare questo e molti altri manuali di
istruzioni per l’uso, filmati sui prodotti e
software.
Assistenza
AVVERTENZA!
■ Fare riparare gli apparecchi dal centro di
assistenza o da un elettricista specializzato
e solo con pezzi di ricambio originali.
In tal modo si garantisce la sicurezza del-
l'apparecchio.
AVVERTENZA!
■ Fare eseguire sempre la sostituzione della
spina o del cavo dal produttore dell'appa-
recchio o dal relativo centro di assistenza.
In tal modo si garantisce la sicurezza del-
l'apparecchio.
NOTA
► I pezzi di ricambio non indicati (come ad es.
spazzole di carbone, interruttori, sacco della
polvere) possono essere ordinati tramite il
nostro call center.
Assistenza Italia
Tel.: 02 36003201
E-Mail: [email protected]
Assistenza Malta
Tel.: 80062230
E-Mail: [email protected]
IAN 315561
Importatore
Badi che il seguente indirizzo non è quello del
servizio di assistenza clienti. Contatti innanzitutto
il servizio di assistenza clienti indicato.
KOMPERNASS HANDELS GMBH
BURGSTRASSE 21
DE - 44867 BOCHUM
GERMANIA
www.kompernass.com

■ 24
│
IT
│
MT
PBSD 600 A1
Traduzione della dichiarazione di conformità originale
La KOMPERNASS HANDELS GMBH, responsabile della documentazione: nella persona del
Sig. Semi Uguzlu, BURGSTR. 21, DE - 44867 BOCHUM, Germania, dichiara con la presente
che questo prodotto è conforme alle seguenti norme, documenti normativi e Direttive CE:
Direttiva macchine
(2006 / 42 / EC)
Compatibilità elettromagnetica
(2014 / 30 / EU)
Direttiva RoHS
(2011 / 65 / EU)*
* Il produttore è il responsabile esclusivo del rilascio di questa dichiarazione di conformità. L'oggetto
della dichiarazione sopra descritto soddisfa le prescrizioni della Direttiva 2011/65/EU del
Parlamento Europeo e del Consiglio Europeo dell'8giugno 2011 sulla restrizione dell'uso di
determinate sostanze pericolose nelle appa recchiature elettriche ed elettroniche.
Norme armonizzate utilizzate:
EN 62841-1:2015
EN 62841-2-4:2014
EN 55014-1:2017
EN 55014-2:2015
EN 61000-3-2:2014
EN 61000-3-3:2013
EN 50581:2012
Denominazione della macchina: Levigatrice a nastro PBSD 600 A1
Anno di produzione: 02 - 2019
Numero di serie: IAN 315561
Bochum, 31/01/2019
Semi Uguzlu
- Direttore qualità -
Con riserva di modifiche tecniche volte al miglioramento del prodotto.

GB
│
MT
│
25 ■
PBSD 600 A1
Contents
Introduction .....................................................26
Intended use ...............................................................26
Depicted components ........................................................ 26
Package contents ...........................................................26
Technical data ............................................................. 26
General Power Tool Safety Warnings ...............................27
1. Work area safety ......................................................... 27
2. Electrical safety .......................................................... 27
3. Personal safety ...........................................................28
4. Power tool use and care ................................................... 28
5. Service ................................................................. 29
Appliance-specific safety instructions for grinders ..................................29
Operation ......................................................29
Tensioning/replacing the abrasive belt ..........................................29
Adjusting the additional handle ................................................29
Flipping up the front cover .................................................... 30
Attaching/removing a dust extraction unit ........................................30
Working procedures ......................................................... 31
Use ............................................................31
Switching on and off ........................................................ 31
Emptying the dust collector. . . . . . . . . . . . . . . . . . . . . . . . . . . . . . . . . . . . . . . . . . . . . . . . . . . . 31
Selecting speed and abrasive belt .............................................. 32
Stationary work ............................................................ 32
Tips and tricks ..............................................................33
Maintenance and cleaning .........................................33
Disposal ........................................................33
Kompernass Handels GmbH warranty ..............................34
Service .........................................................35
Importer .......................................................35
Translation of the original Conformity Declaration .....................36

■ 26
│
GB
│
MT
PBSD 600 A1
BELT SANDER PBSD 600 A1
Introduction
Congratulations on the purchase of your new appli-
ance. You have chosen a high-quality product. The
operating instructions are part of this product. They
contain important information about safety, usage
and disposal. Before using the product, please
familiarise yourself with all operating and safety
instructions. Use the product only as described and
for the range of applications specified. Please also
pass these operating instructions on to any future
owner.
Intended use
The belt grinder is designed for the dry surface
sanding of wood, plastic, metal and plaster and
painted surfaces (depending on the type of sand-
paper used). The appliance may only be used
for dry sanding. Please note that you need to use
appropriate abrasive belts with different grains for
working different materials, and that you may need
to adapt the speed to suit the material. The appli-
ance is not intended for commercial use. Any other
use of or modification to the appliance is deemed
to be improper and carries the risk of serious per-
sonal injury. The manufacturer accepts no responsi-
bility for damage(s) attributable to misuse.
Depicted components
ON/OFF switch
Additional handle (rubberised grip)
Front cover
Clamping lever for abrasive belt
Belt speed adjusting wheel
Handle (rubberised grip)
Screw for adjusting the handle
Recesses for screw clamps
Connection for dust collector
Locking button for ON/OFF switch
Dust collector
Adjustment screw for belt tracking
Abrasive belt
Screw clamp
Reducer
Dust extraction adapter
Package contents
1 belt sander PBSD 600 A1
1 abrasive belt for wood (grain 80)
1 dust collector
1 dust extraction adapter and reducer (for external
dust extraction)
2 screw clamps
1 set of operating instructions
Technical data
Rated voltage: 230 V ∼50 Hz
(AC)
Rated power
consumption: 600 W
Idling belt speed: 170–250 m/min
Rated idling speed:
n
0
360–560 rpm
Abrasive belt: 75 x 457 mm
Protection class: II /
(double insulation)
Noise emission value:
Noise measurement value determined in accord-
ance with EN 62841. The A-rated noise level of
the power tool is typically as follows:
Sound pressure level: L
pA
= 91 dB (A)
Uncertainty: K
pA
= 3 dB
Sound power level: L
WA
= 102 dB (A)
Uncertainty: K
WA
= 3 dB
Wear hearing protection!
Total vibration value:
Total vibration value (vector total of three direc-
tions) determined in accordance with EN 62841:
Grinding with the grinding disc: a
h
= 4.2 m/s
2
Uncertainty K = 1.5 m/s
2

GB
│
MT
│
27 ■
PBSD 600 A1
NOTE
► The vibration level specified in these instruc-
tions has been measured in accordance
with the standardised measuring procedure
specified in EN 62841 and can be used to
make equipment comparisons. The specified
vibration emission value can also be used to
make an initial exposure estimate. The vibra-
tion emission value varies in accordance with
the use of the power tool and may be higher
than the value specified in these instructions
in some cases. Regular use of the power tool
in this way may cause the user to underesti-
mate the vibration.
WARNING!
► Try to keep the vibration loads as low as
possible. Measures to reduce the vibration
load are, e.g. wearing gloves and limiting
the working time. This applies to all states of
operation (e.g. times when the power tool is
switched off and times where the power tool
is switched on but running without load).
General Power Tool
Safety Warnings
WARNING!
► Read all safety warnings, instructions, il-
lustrations and specifications provided with
this power tool. Failure to follow all instruc-
tions listed below may result in electric shock,
fire and/or serious injury.
Save all warnings and instructions for future
reference.
The term „power tool“ in the warnings refers
to your mains-operated (corded) power tool or
battery-operated (cordless) power tool.
1. Work area safety
a) Keep work area clean and well lit. Cluttered
or dark areas invite accidents.
b) Do not operate power tools in explosive
atmospheres, such as in the presence of flam-
mable liquids, gases or dust. Power tools cre-
ate sparks which may ignite the dust or fumes.
c) Keep children and bystanders away while
operating a power tool. Distractions can cause
you to lose control.
2. Electrical safety
a) Power tool plugs must match the outlet. Never
modify the plug in any way. Do not use any
adapter plugs with earthed (grounded)
power tools. Unmodified plugs and matching
outlets will reduce risk of electric shock.
b) Avoid body contact with earthed or ground-
ed surfaces, such as pipes, radiators, ranges
and refrigerators. There is an increased risk of
electric shock if your body is earthed or grounded.
c) Do not expose power tools to rain or wet
conditions. Water entering a power tool will
increase the risk of electric shock.

■ 28
│
GB
│
MT
PBSD 600 A1
d) Do not abuse the cord. Never use the cord
for carrying, pulling or unplugging the power
tool. Keep cord away from heat, oil, sharp
edges or moving parts. Damaged or entangled
cords increase the risk of electric shock.
e) When operating a power tool outdoors, use
an extension cord suitable for outdoor use.
Use of a cord suitable for outdoor use reduces
the risk of electric shock.
f) If operating a power tool in a damp location
is unavoidable, use a residual current device
(RCD) protected supply. Use of an RCD
reduces the risk of electric shock.
3. Personal safety
a) Stay alert, watch what you are doing and
use common sense when operating a power
tool. Do not use a power tool while you are
tired or under the influence of drugs, alcohol
or medication. A moment of inattention while
operating power tools may result in serious
personal injury.
b) Use personal protective equipment. Always
wear eye protection.
Protective equipment such
as a dust mask, non-skid safety shoes, hard hat or
hearing protection used for appropriate
conditions will reduce personal injuries.
c) Prevent unintentional starting. Ensure the
switch is in the off-position before connecting
to power source and/or battery pack, picking
up or carrying the tool. Carrying power tools
with your finger on the switch or energising
power tools that have the switch on invites ac-
cidents.
d) Remove any adjusting key or wrench before
turning the power tool on. A wrench or a key
left attached to a rotating part of the power tool
may result in personal injury.
e) Do not overreach. Keep proper footing and
balance at all times. This enables better control
of the power tool in unexpected situations.
f) Dress properly. Do not wear loose clothing or
jewellery. Keep your hair and clothing away
from moving parts. Loose clothes, jewellery or
long hair can be caught in moving parts.
g) If devices are provided for the connection of
dust extraction and collection facilities, ensure
these are connected and properly used.
Use of dust collection can reduce dust-related
hazards.
h) Do not let familiarity gained from frequent
use of tools allow you to become complacent
and ignore tool safety principles. A careless
action can cause severe injury within a fraction
of a second.
4. Power tool use and care
a) Do not force the power tool. Use the correct
power tool for your application. The correct
power tool will do the job better and safer at
the rate for which it was designed.
b) Do not use the power tool if the switch does
not turn it on and off. Any power tool that can-
not be controlled with the switch is dangerous
and must be repaired.
c) Disconnect the plug from the power source
and/or remove the battery pack, if detach-
able, from the power tool before making any
adjustments, changing accessories, or storing
power tools. Such preventive safety measures
reduce the risk of starting the power tool ac-
cidentally.
d) Store idle power tools out of the reach of
children and do not allow persons unfamiliar
with the power tool or these instructions to
operate the power tool. Power tools are
dangerous in the hands of untrained users.
e) Maintain power tools and accessories. Check
for misalignment or binding of moving parts,
breakage of parts and any other condition
that may affect the power tool’s operation. If
damaged, have the power tool repaired be-
fore use. Many accidents are caused by poorly
maintained power tools.
f) Keep cutting tools sharp and clean. Properly
maintained cutting tools with sharp cutting
edges are less likely to bind and are easier to
control.

GB
│
MT
│
29 ■
PBSD 600 A1
g) Use the power tool, accessories and tool bits
etc. in accordance with these instructions, tak-
ing into account the working conditions and
the work to be performed. Use of the power
tool for operations different from those intended
could result in a hazardous situation.
h) Keep handles and grasping surfaces dry,
clean and free from oil and grease. Slippery
handles and grasping surfaces do not allow
for safe handling and control of the tool in unex-
pected situations.
5. Service
a) Have your power tool serviced by a qualified
repair person using only identical replace-
ment parts. This will ensure that the safety of
the power tool is maintained.
Appliance-specific safety instructions
for grinders
■ Hold the appliance by the insulated handles
as the abrasive belt can come into contact
with its own power cable. Damage to a live
wire may make exposed metal parts of the
power tool live and could give the operator an
electric shock.
WARNING!
■ Dusts from materials such as leaded paint,
some types of wood and metal can be harm-
ful to your health.
■ Contact with or inhalation of these dusts can
represent a health hazard for the person
operating the appliance and other people in
the vicinity.
■ Wear safety goggles and a protective dust
mask!
Operation
Tensioning/replacing the abrasive
belt
WARNING! RISK OF INJURY
■ Always remove the power plug from the wall
socket before carrying out any work on the
belt grinder.
1. Loosen the clamping device for the abrasive
belt by swivelling the clamping lever
all
the way out. The abrasive belt can now be
removed.
2. Now fit a new abrasive belt
or swap the
belt to work on a different material or to use a
different grain size.
IMPORTANT: The direction of the arrows on
the inside of the abrasive belt and on the
appliance housing must match.
3. Push the clamping lever back into its initial
position.
Manually adjusting the abrasive belt
:
If the belt tracking is not centred when you switch
on the appliance, you may need to manually ad-
just it.
♦ To do this, turn the adjusting screw
on the
front roller until the abrasive belt is running
centred.
IMPORTANT: It is important to ensure that
the abrasive belt
does not rub against the
housing. Check the belt tracking regularly and
adjust it with the adjusting screw if required .
Adjusting the additional handle
You can position the additional handle in several
different positions.
♦ To reposition the additional handle
undo the
screw .
♦ Move the additional handle
to the required
position.
♦ Retighten the screw
.

■ 30
│
GB
│
MT
PBSD 600 A1
Flipping up the front cover
You can flip up the front cover to grind in hard-to-
reach areas (see illustration).
WARNING!
► The front cover
can only be flipped
upwards if the additional handle is also
positioned upwards (see section "Adjusting
the additional handle").
♦ Flip up the front cover
.
Attaching/removing a dust extrac-
tion unit
WARNING! RISK OF EXPLOSION!
■ If there is an explosive dust/air mixture, you
must use a specially designed extraction
appliance. RISK OF FIRE DUE TO FLYING
SPARKS! Do not use dust extraction systems
(dust collector
or vacuum cleaner) when
grinding metals.
■ Materials containing asbestos must not be pro-
cessed. Asbestos is a known carcinogen.
WARNING! RISK OF FIRE!
■ When working with power tools which
have a dust collector or can be connected
to a vacuum cleaner via a vacuum cleaner
adapter, there is a risk of fire! In unfavourable
conditions, e.g. when sparks are flying while
sanding metal or metal residues in wood,
wood dust in the dust collector (or the bag
of the vacuum cleaner) can spontaneously
ignite. This is a particular risk if the wood
dust is mixed with paint residues or other
chemicals and the workpiece has become hot
after being worked for a long time. Therefore,
do not allow the workpiece to overheat and
always empty the dust box or the dust bag
of the vacuum cleaner before taking a break
from work.
■ Ensure that your workplace is adequately
ventilated.
■ Observe the regulations applicable in
your country regarding the materials to be
worked.
■
Wear a dust mask.
Fitting the dust collector
:
♦ Push the dust collector
onto the dust collector
connection from above.
Dismantling/removing the dust collector:
♦ Pull the dust collector
off upwards.
Connecting a dust extraction adapter and
reducer for an external extraction appliance:
♦ Push the dust extraction adapter
onto the
connection .
♦ Push the reducer
for the dust extraction
adapter into the adapter fitting .
♦ Push the hose from a suitable dust extraction ap-
pliance (e.g. a workshop vacuum cleaner) onto
the reducer
for external vacuum extraction.

GB
│
MT
│
31 ■
PBSD 600 A1
Removing the dust extraction adapter and
reducer for an external extraction appliance:
♦ Pull off the hose of the dust extraction appli-
ance.
♦ Remove the reducer
for external dust extrac-
tion.
♦ Pull the dust extraction adapter
upwards off
the connection .
Working procedures
A light grinding pressure is sufficient:
■ Apply minimal pressure when grinding. The belt
grinder's own weight is sufficient for a good
grinding result. In addition, working this way
helps to reduce the wear on the abrasive belt
and the surface of the workpiece will become
more smooth.
Removal and surface:
■ The material removal rate and surface quality
are determined by the belt speed and grain
strength of the abrasive belt
(see also the
section "Selecting speed and abrasive belt").
Grinding:
■ Place the appliance on the workpiece when
switched on and work at a moderate feed rate.
Guide the grinder in parallel and overlapping
sanding motions over the workpiece. To avoid
unpleasant transverse grinding marks, always
sand in the direction of the grain. After complet-
ing the task, lift the appliance from the work-
piece and then switch it off.
NOTE
► Always hold the appliance firmly with two
hands while working.
Use
Switching on and off
While operating the belt grinder, you can choose
between instantaneous and continuous operation.
Switching to instantaneous operation:
♦ Press the ON/OFF switch
.
Switching off instantaneous operation:
♦ Release the ON/OFF switch
.
Switching to continuous operation:
♦ Press the ON/OFF switch
, keep it pressed in
and then press the lock button .
Switching off continuous operation:
♦ Press the ON/OFF switch
and then release
it.
Emptying the dust collector
The dust collector should be emptied after every
10 minutes of operation at least.
♦ Pull the dust collector
off (see section
"Attaching/removing a dust extraction unit")
♦ Shake the dust collector
over a rubbish bin
to empty it.
♦ Fit the dust collector
back onto the appli-
ance.

■ 32
│
GB
│
MT
PBSD 600 A1
Selecting speed and abrasive belt
You can use the belt speed adjusting wheel to
adjust the speed, even while the appliance is run-
ning. The optimum belt speed is dependent on the
workpiece or material being processed. We rec-
ommend carrying out a practice run to determine
the correct speed. In the table below, you will find
some recommended values which will help you de-
termine which belt and speed to use for which job.
Material/working
area
Softwood
Rough sanding
(grain size)
60
Finishing (grain size) 240
Speed preselection high (5–6)
Material/working
area
Hardwood
Rough sanding
(grain size)
60
Finishing (grain size) 180
Speed preselection high (5–6)
Material/working
area
Chipboard
Rough sanding
(grain size)
60
Finishing (grain size) 150
Speed preselection high (5–6)
Material/working
area
Removing paint/
varnish
Rough sanding
(grain size)
60
Finishing (grain size) ––
Speed preselection high (5–6)
Material/working
area
Rubbing down
paintwork/varnish
Rough sanding
(grain size)
150
Finishing (grain size) 320
Speed preselection low (1–2)
Material/working
area
Removing rust from
steel
Rough sanding
(grain size)
40
Finishing (grain size) 120
Speed preselection medium/high (3–4)
Material/working
area
Plastics
Rough sanding
(grain size)
120
Finishing (grain size) 240
Speed preselection low/medium (2–3)
Material/working
area
Non-ferrous metals
(e.g. aluminium)
Rough sanding
(grain size)
80
Finishing (grain size) 150
Speed preselection medium/high (3–4)
Stationary work
♦ Turn the additional handle to the horizontal
position.
♦ Turn the power tool as shown in the illustration
and place it on a stable worktop.
♦ Fit the two screw clamps
in the recesses
provided and clamp the power tool tightly.

GB
│
MT
│
33 ■
PBSD 600 A1
Tips and tricks
■ Never use the same abrasive belt to work
wood and metal.
■ Worn or cracked abrasive belts can damage
the workpiece. Therefore, be sure to replace
worn abrasive belts before starting work.
■ Always hang up the abrasive belts to store
them, as kinks etc. can make them unusable.
Maintenance and cleaning
WARNING! RISK OF INJURY! Switch
off the appliance and pull out the
power plug before starting any
work on the appliance.
The belt grinder is maintenance-free.
■ Always clean the appliance directly after finishing
work.
■ Use a dry cloth to clean the housing. Under no
circumstances should you use fuel, detergents,
solvents or abrasive cleaners.
Emptying/cleaning the dust collector
:
♦ Pull the dust collector
off the appliance.
♦ Empty the dust collector
completely by
knocking out the contents and then push the
dust collector back onto the appliance.
♦ Ensure ventilation openings are always free.
♦ Remove any adhering grinding dust with a
brush.
Disposal
The packaging is made from environmen-
tally friendly material and can be dis-
posed of at your local recycling plant.
Do not dispose of power tools in
your normal domestic waste!
European Directive 2012/19/EU requires that
worn-out power tools be collected separately and
recycled in an environmentally compatible manner.
Your local community or municipal authorities
can provide information on how to dispose of the
appliance.
Dispose of the packaging in an
environmentally friendly manner.
Note the labelling on the packaging
and separate the packaging material
components for disposal if necessary.
The packaging material is labelled
with abbreviations (a) and numbers
(b) with the following meanings:
1–7: Plastics,
20–22: Paper and cardboard,
80–98: Composites
Your local community or municipal
authorities can provide information on
how to dispose of the worn-out
product.

■ 34
│
GB
│
MT
PBSD 600 A1
Kompernass Handels GmbH
warranty
Dear Customer,
This appliance has a 3-year warranty valid from
the date of purchase. If this product has any faults,
you, the buyer, have certain statutory rights. Your
statutory rights are not restricted in any way by the
warranty described below.
Warranty conditions
The validity period of the warranty starts from the
date of purchase. Please keep your original receipt
in a safe place. This document will be required as
proof of purchase.
If any material or production fault occurs within
three years of the date of purchase of the product,
we will either repair or replace the product for you
at our discretion. This warranty service is depend-
ent on you presenting the defective appliance and
the proof of purchase (receipt) and a short written
description of the fault and its time of occurrence.
If the defect is covered by the warranty, your product
will either be repaired or replaced by us. The repair
or replacement of a product does not signify the
beginning of a new warranty period.
Warranty period and statutory claims for
defects
The warranty period is not prolonged by repairs
effected under the warranty. This also applies to
replaced and repaired components. Any damage
and defects present at the time of purchase must
be reported immediately after unpacking. Repairs
carried out after expiry of the warranty period shall
be subject to a fee.
Scope of the warranty
This appliance has been manufactured in accordance
with strict quality guidelines and inspected meticu-
lously prior to delivery.
The warranty covers material faults or production
faults. The warranty does not extend to product parts
subject to normal wear and tear or fragile parts such
as switches, batteries, baking moulds or parts made
of glass.
The warranty does not apply if the product has been
damaged, improperly used or improperly maintained.
The directions in the operating instructions for the
product regarding proper use of the product are
to be strictly followed. Uses and actions that are
discouraged in the operating instructions or which
are warned against must be avoided.
This product is intended solely for private use and
not for commercial purposes. The warranty shall be
deemed void in cases of misuse or improper handling,
use of force and modifications/repairs which have
not been carried out by one of our authorised
Service centres.
Warranty claim procedure
To ensure quick processing of your case, please
observe the following instructions:
■ Please have the till receipt and the item number
(e.g. IAN 12345) available as proof of purchase.
■ You will find the item number on the type plate,
an engraving on the front page of the instructions
(bottom left), or as a sticker on the rear or bot-
tom of the appliance.
■ If functional or other defects occur, please
contact the service department listed either by
telephone or by e-mail.
■ You can return a defective product to us free of
charge to the service address that will be provided
to you. Ensure that you enclose the proof of
purchase (till receipt) and information about
what the defect is and when it occurred.
You can download these instructions
along with many other manuals,
product videos and software on
www.lidl-service.com.

GB
│
MT
│
35 ■
PBSD 600 A1
Service
WARNING!
■ Have the power tool repaired by the service
centre or a qualified electrician and only
using genuine replacement parts. This will
ensure that the safety of the appliance is
maintained.
WARNING!
■ Always ensure that the power plug or the
mains cable is replaced only by the manu-
facturer of the appliance or by an approved
customer service provider. This will ensure
that the safety of the appliance is maintained.
NOTE
► Replacement parts not listed (such as carbon
brushes, switches, dust collector) can be
ordered via our service hotline.
Service Great Britain
Tel.: 0800 404 7657
E-Mail: [email protected]
Service Malta
Tel.: 80062230
E-Mail: [email protected]
IAN 315561
Importer
Please note that the following address is not the
service address. Please use the service address
provided in the operating instructions.
KOMPERNASS HANDELS GMBH
BURGSTRASSE 21
DE - 44867 BOCHUM
GERMANY
www.kompernass.com

■ 36
│
GB
│
MT
PBSD 600 A1
Translation of the original Conformity Declaration
We, KOMPERNASS HANDELS GMBH, documents officer: Mr. Semi Uguzlu, BURGSTR. 21,
DE-44867 BOCHUM, GERMANY, hereby declare that this product complies with the following
standards, normative documents and EC directives:
Machinery Directive
(2006/42/EC)
EMC (Electromagnetic Compatibility)
(2014/30/EU)
RoHS Directive
(2011 / 65 / EU)*
* The manufacturer bears the full responsibility for compliance with this conformity declaration. The object
of the declaration described above complies with the requirements of the Directive 2011/65/EU of the
European Parliament and Council of 8 June 2011 on the limitations of use of certain dangerous sub-
stances in electrical and electronic appliances.
Applied harmonised standards:
EN 62841-1:2015
EN 62841-2-4:2014
EN 55014-1:2017
EN 55014-2:2015
EN 61000-3-2:2014
EN 61000-3-3:2013
EN 50581:2012
Type designation of machine: Belt sander PBSD 600 A1
Year of manufacture: 02 - 2019
Serial number: IAN 315561
Bochum, 31/01/2019
Semi Uguzlu
- Quality Manager -
We reserve the right to make technical changes in the context of further product development.

DE
│
AT
│
CH
│
37 ■
PBSD 600 A1
Inhaltsverzeichnis
Einleitung .......................................................38
Bestimmungsgemäßer Gebrauch ...............................................38
Abgebildete Komponenten ................................................... 38
Lieferumfang ............................................................... 38
Technische Daten ...........................................................38
Allgemeine Sicherheitshinweise für Elektrowerkzeuge ..................39
1. Arbeitsplatzsicherheit ......................................................39
2. Elektrische Sicherheit ...................................................... 39
3. Sicherheit von Personen ....................................................40
4. Verwendung und Behandlung des Elektrowerkzeugs ............................. 40
5. Service ................................................................. 41
Gerätespezifische Sicherheitshinweise für Schleifer .................................. 41
Inbetriebnahme .................................................41
Schleifband einspannen /wechseln ............................................. 41
Zusatzhandgriff einstellen ..................................................... 42
Frontabdeckung hochklappen ................................................. 42
Staubabsaugung anbringen/entfernen .......................................... 42
Arbeitshinweise. . . . . . . . . . . . . . . . . . . . . . . . . . . . . . . . . . . . . . . . . . . . . . . . . . . . . . . . . . . . . 43
Bedienung ......................................................43
Ein- und ausschalten .........................................................43
Staubbox entleeren .........................................................43
Drehzahl und Schleifband wählen .............................................. 44
Stationäres Arbeiten .........................................................44
Tipps und Tricks ............................................................ 44
Wartung und Reinigung ...........................................45
Entsorgung .....................................................45
Garantie der Kompernaß Handels GmbH ............................46
Service .........................................................47
Importeur ......................................................47
Original-Konformitätserklärung ....................................48

■ 38
│
DE
│
AT
│
CH
PBSD 600 A1
BANDSCHLEIFER PBSD 600 A1
Einleitung
Wir beglückwünschen Sie zum Kauf Ihres neuen
Gerätes. Sie haben sich damit für ein hochwertiges
Produkt entschieden. Die Bedienungsanleitung ist
Teil dieses Produkts. Sie enthält wichtige Hinweise für
Sicherheit, Gebrauch und Entsorgung. Machen Sie
sich vor der Benutzung des Produkts mit allen Bedien-
und Sicherheitshinweisen vertraut. Benutzen Sie das
Produkt nur wie beschrieben und für die angegebe-
nen Einsatzbereiche. Händigen Sie alle Unterlagen
bei Weitergabe des Produkts an Dritte mit aus.
Bestimmungsgemäßer Gebrauch
Der Bandschleifer ist - je nach Schleifpapier - für tro-
ckenes Flächenschleifen von Holz, Kunststoff, Metall
und Spachtelmasse sowie lackierten Oberflächen
ausgelegt. Das Gerät darf nur für Trockenschliff
verwendet werden. Beachten Sie bitte, dass Sie zur
Bearbeitung der verschiedenen Materialien entspre-
chende Schleifblätter mit unterschiedlicher Körnung
einsetzen und die Drehzahl ebenfalls dem Material
anpassen. Das Gerät ist nicht für den gewerblichen
Einsatz bestimmt. Jede andere Verwendung oder
Veränderung der Maschine gilt als nicht bestimmungs-
gemäß und birgt erhebliche Unfallgefahren. Für
aus bestimmungswidriger Verwendung entstandene
Schäden übernimmt der Hersteller keine Haftung.
Abgebildete Komponenten
EIN- / AUS-Schalter
Zusatzhandgriff (Gummierte Grifffläche)
Frontabdeckung
Spannhebel für Schleifband
Stellrad Bandgeschwindigkeit
Handgriff (Gummierte Grifffläche)
Schraube für Handgriffverstellung
Aussparungen für Schraubzwinge
Anschluss für Staubbox
Feststelltaste für EIN- / AUS-Schalter
Staubbox
Justierschraube für Bandlauf
Schleifband
Schraubzwinge
Reduzierstück
Absaugadapter
Lieferumfang
1 Bandschleifer PBSD 600 A1
1 Schleifband für Holz (Körnung 80)
1 Staubbox
1 Absaugadapter und Reduzierstück
(zur externen Staubabsaugung)
2 Schraubzwingen
1 Bedienungsanleitung
Technische Daten
Bemessungsspannung: 230 V ∼ 50 Hz
(Wechselstrom)
Bemessungsaufnahme: 600 W
Leerlauf-
Bandgeschwindigkeit: 170–250 m / min
Bemessungs-
Leerlaufdrehzahl:
n
0
360–560 min
-1
Schleifband: 75 x 457 mm
Schutzklasse: II /
(Doppelisolierung)
Geräuschemissionswert:
Messwert für Geräusch ermittelt entsprechend
EN 62841. Der A-bewertete Geräuschpegel des
Elektrowerkzeugs beträgt typischerweise:
Schalldruckpegel: L
pA
= 91 dB (A)
Unsicherheit: K
pA
= 3 dB
Schallleistungspegel: L
WA
= 102 dB (A)
Unsicherheit: K
WA
= 3 dB
Gehörschutz tragen!
Schwingungsgesamtwert:
Schwingungsgesamtwerte (Vektorsumme dreier
Richtungen) ermittelt entsprechend EN 62841:
Schleifen mit Schleifteller: a
h
= 4,2 m/s
2
Unsicherheit K = 1,5 m/s
2

DE
│
AT
│
CH
│
39 ■
PBSD 600 A1
HINWEIS
► Der in diesen Anweisungen angegebene
Schwingungspegel ist entsprechend einem
in EN 62841 genormten Messverfahren ge-
messen worden und kann für den Gerätever-
gleich verwendet werden. Der angegebene
Schwingungsemissionswert kann auch zu
einer einleitenden Einschätzung der Ausset-
zung verwendet werden. Der Schwingungs-
emissionswert wird sich entsprechend dem
Einsatz des Elektrowerkzeugs verändern und
kann in manchen Fällen über dem in diesen
Anweisungen angegebenen Wert liegen. Die
Schwingungsbelastung könnte unterschätzt
werden, wenn das Elektrowerkzeug regelmä-
ßig in solcher Weise verwendet wird.
WARNUNG!
► Versuchen Sie, die Belastung durch Vibrationen
so gering wie möglich zu halten. Beispielhafte
Maßnahmen zur Verringerung der Vibrationsbe-
lastung sind das Tragen von Handschuhen beim
Gebrauch des Werkzeugs und die Begrenzung
der Arbeitszeit. Dabei sind alle Anteile des
Betriebszyklus zu berücksichtigen (Beispiels-
weise Zeiten, in denen das Elektrowerkzeug
abgeschaltet ist, und solche, in denen es zwar
eingeschaltet ist, aber ohne Belastung läuft).
Allgemeine
Sicherheitshinweise
für Elektrowerkzeuge
WARNUNG!
► Lesen Sie alle Sicherheitshinweise, Anwei-
sungen, Bebilderungen und technischen
Daten, mit denen dieses Elektrowerkzeug
versehen ist. Versäumnisse bei der Einhaltung
der nachfolgenden Anweisungen können
elektrischen Schlag, Brand und/oder schwere
Verletzungen verursachen.
Bewahren Sie alle Sicherheitshinweise und
Anweisungen für die Zukunft auf.
Der in den Sicherheitshinweisen verwendete Begriff
„Elektrowerkzeug“ bezieht sich auf netzbetriebene
Elektrowerkzeuge (mit Netzleitung) und auf akku-
betriebene Elektrowerkzeuge (ohne Netzleitung).
1. Arbeitsplatzsicherheit
a) Halten Sie Ihren Arbeitsbereich sauber und
gut beleuchtet. Unordnung und unbeleuchtete
Arbeitsbereiche können zu Unfällen führen.
b) Arbeiten Sie mit dem Elektrowerkzeug nicht
in explosionsgefährdeter Umgebung, in der
sich brennbare Flüssigkeiten, Gase oder
Stäube befinden. Elektrowerkzeuge erzeugen
Funken, die den Staub oder die Dämpfe entzün-
den können.
c) Halten Sie Kinder und andere Personen wäh-
rend der Benutzung des Elektrowerkzeugs
fern. Bei Ablenkung können Sie die Kontrolle
über das Elektrowerkzeug verlieren.
2. Elektrische Sicherheit
a) Der Anschlussstecker des Elektrowerkzeugs
muss in die Steckdose passen. Der Stecker
darf in keiner Weise verändert werden.
Verwenden Sie keine Adapterstecker gemein-
sam mit schutzgeerdeten Elektrowerkzeugen.
Unveränderte Stecker und passende Steckdo-
sen verringern das Risiko eines elektrischen
Schlages.

■ 40
│
DE
│
AT
│
CH
PBSD 600 A1
b) Vermeiden Sie Körperkontakt mit geerdeten
Oberflächen wie von Rohren, Heizungen,
Herden und Kühlschränken. Es besteht ein
erhöhtes Risiko durch elektrischen Schlag, wenn
Ihr Körper geerdet ist.
c) Halten Sie Elektrowerkzeuge von Regen
oder Nässe fern. Das Eindringen von Wasser
in ein Elektrowerkzeug erhöht das Risiko eines
elektrischen Schlages.
d) Zweckentfremden Sie die Anschlussleitung
nicht, um das Elektrowerkzeug zu tragen,
aufzuhängen oder um den Stecker aus der
Steckdose zu ziehen. Halten Sie die Anschluss-
leitung fern von Hitze, Öl, scharfen Kanten
oder sich bewegenden Teilen. Beschädigte
oder verwickelte Anschlussleitungen erhöhen das
Risiko eines elektrischen Schlages.
e) Wenn Sie mit einem Elektrowerkzeug im
Freien arbeiten, verwenden Sie nur Ver-
längerungsleitungen, die auch für den
Außenbereich zugelassen sind. Die Anwen-
dung einer für den Außenbereich geeigneten
Verlängerungsleitung verringert das Risiko eines
elektrischen Schlages.
f) Wenn der Betrieb des Elektrowerkzeugs in
feuchter Umgebung nicht vermeidbar ist, ver-
wenden Sie einen Fehlerstromschutzschalter.
Der Einsatz eines Fehlerstromschutzschalters ver-
mindert das Risiko eines elektrischen Schlages.
3. Sicherheit von Personen
a) Seien Sie aufmerksam, achten Sie darauf,
was Sie tun, und gehen Sie mit Vernunft
an die Arbeit mit einem Elektrowerkzeug.
Benutzen Sie kein Elektrowerkzeug, wenn
Sie müde sind oder unter dem Einfluss von
Drogen, Alkohol oder Medikamenten stehen.
Ein Moment der Unachtsamkeit beim Gebrauch
des Elektrowerk zeugs kann zu ernsthaften
Verletzungen führen.
b) T
ragen Sie persönliche Schutzausrüstung und
immer eine Schutzbrille. Das Tragen persönlicher
Schutzausrüstung, wie Staubmaske, rutschfeste
Sicherheitsschuhe, Schutzhelm oder Gehörschutz,
je nach Art und Einsatz des Elektrowerkzeugs,
verringert das Risiko von Verletzungen.
c) Vermeiden Sie eine unbeabsichtigte
Inbetrieb nahme. Vergewissern Sie sich, dass
das Elektrowerkzeug ausgeschaltet ist, bevor
Sie es an die Stromversorgung und / oder
den Akku anschließen, es aufnehmen oder
tragen. Wenn Sie beim Tragen des Elektrowerk-
zeugs den Finger am Schalter haben oder das
Elektrowerkzeug eingeschaltet an die Strom-
versorgung anschließen, kann dies zu Unfällen
führen.
d) Entfernen Sie Einstellwerkzeuge oder Schrau-
benschlüssel, bevor Sie das Elektrowerkzeug
einschalten. Ein Werkzeug oder Schlüssel, der
sich in einem drehenden Teil des Elektrowerk-
zeugs befindet, kann zu Verletzungen führen.
e) Vermeiden Sie eine abnormale Körperhal-
tung. Sorgen Sie für einen sicheren Stand
und halten Sie jederzeit das Gleichgewicht.
Dadurch können Sie das Elektrowerkzeug in
unerwarteten Situationen besser kontrollieren.
f) Tragen Sie geeignete Kleidung. Tragen Sie
keine weite Kleidung oder Schmuck. Halten
Sie Haare und Kleidung fern von sich bewe-
genden Teilen. Lockere Kleidung, Schmuck
oder lange Haare können von sich bewegen-
den Teilen erfasst werden.
g) Wenn Staubabsaug- und -auffangeinrich-
tungen montiert werden können, sind diese
anzuschließen und richtig zu verwenden.
Die Verwendung einer Staubabsaugung kann
Gefährdungen durch Staub verringern.
h) Wiegen Sie sich nicht in falscher Sicherheit
und setzen Sie sich nicht über die Sicherheits-
regeln für Elektrowerkzeuge hinweg, auch
wenn Sie nach vielfachem Gebrauch mit
dem Elektrowerkzeug vertraut sind. Achtloses
Handeln kann binnen Sekundenbruchteilen zu
schweren Verletzungen führen.
4. Verwendung und Behandlung des
Elektrowerkzeugs
a) Überlasten Sie das Elektrowerkzeug nicht.
Verwenden Sie für Ihre Arbeit das dafür
bestimmte Elektrowerkzeug. Mit dem passen-
den Elektrowerkzeug arbeiten Sie besser und
sicherer im angegebenen Leistungsbereich.

DE
│
AT
│
CH
│
41 ■
PBSD 600 A1
b) Benutzen Sie kein Elektrowerkzeug, dessen
Schalter defekt ist. Ein Elektrowerkzeug, das
sich nicht mehr ein- oder ausschalten lässt, ist
gefährlich und muss repariert werden.
c) Ziehen Sie den Stecker aus der Steckdose
und / oder entfernen Sie den abnehmba-
ren Akku, bevor Sie Geräteeinstellungen
vornehmen, Einsatzwerkzeugteile wechseln
oder das Elektrowerkzeug weglegen. Diese
Vorsichtsmaßnahme verhindert den unbeabsich-
tigten Start des Elektrowerkzeugs.
d) Bewahren Sie unbenutzte Elektrowerkzeuge
außerhalb der Reichweite von Kindern auf.
Lassen Sie keine Personen das Elektrowerk-
zeug benutzen, die mit diesem nicht vertraut
sind oder diese Anweisungen nicht gelesen
haben. Elektrowerkzeuge sind gefährlich, wenn
sie von unerfahrenen Personen benutzt werden.
e) Pflegen Sie Elektrowerkzeuge und Einsatz-
werkzeug mit Sorgfalt. Kontrollieren Sie, ob
bewegliche Teile einwandfrei funktionieren
und nicht klemmen, ob Teile gebrochen oder
so beschädigt sind, dass die Funktion des
Elektrowerkzeugs beeinträchtigt ist. Lassen
Sie beschädigte Teile vor dem Einsatz des
Elektrowerkzeuges reparieren. Viele Unfälle
haben ihre Ursache in schlecht gewarteten
Elektrowerkzeugen.
f) Halten Sie Schneidwerkzeuge scharf und
sauber. Sorgfältig gepflegte Schneidwerkzeuge
mit scharfen Schneidkanten verklemmen sich
weniger und sind leichter zu führen.
g) Verwenden Sie Elektrowerkzeug, Einsatz-
werkzeug, Einsatzwerkeuge usw. entspre-
chend diesen Anweisungen. Berücksichtigen
Sie dabei die Arbeitsbedingungen und die
auszuführende Tätigkeit. Der Gebrauch von
Elektrowerkzeugen für andere als die vorge-
sehenen Anwendungen kann zu gefährlichen
Situationen führen.
h) Halten Sie Griffe und Griffflächen trocken,
sauber und frei von Öl und Fett. Rutschige
Griffe und Griffflächen erlauben keine sichere
Bedienung und Kontrolle des Elektrowerkzeugs
in unvorhergesehenen Situationen.
5. Service
a) Lassen Sie Ihr Elektrowerkzeug nur von quali-
fiziertem Fachpersonal und nur mit Original-
Ersatzteilen reparieren. Damit wird sicherge-
stellt, dass die Sicherheit des Elektrowerkzeugs
erhalten bleibt.
Gerätespezifische Sicherheitshinweise
für Schleifer
■ Halten Sie das Elektrowerkzeug an den
isolierten Griffflächen, da die Schleiffläche
die eigene Anschlussleitung treffen kann. Das
Beschädigen einer spannungsführenden Leitung
kann metallene Geräteteile unter Spannung
setzen und zu einem elektrischen Schlag führen.
WARNUNG!
■ Stäube von Materialien wie bleihaltigem An-
strich, einigen Holzarten und Metall können
gesundheitsschädlich sein.
■ Die Berühung oder das Einatmen dieser Stäu-
be kann eine Gefährdung für die Bedienper-
son oder in der Nähe befindliche Personen
darstellen.
■ Tragen Sie Schutzbrille und Staubschutzmaske!
Inbetriebnahme
Schleifband einspannen /wechseln
WARNUNG! VERLETZUNGSGEFAHR
■ Ziehen Sie den Netzstecker immer aus der
Steckdose, bevor Sie Arbeiten am Band-
schleifer durchführen.
1. Lösen Sie die Spannvorrichtung für das Schleif-
band, indem Sie den Spannhebel
ganz
herausschwenken. Das Schleifband lässt
sich entnehmen.
2. Legen Sie nun ein neues Schleifband
auf bzw. wechseln Sie es aus, um anderes
Material zu bearbeiten oder die Kornstärke zu
wechseln.
WICHTIG: Die Pfeilrichtungen auf der Innen-
seite des Schleifbandes und am Gerätege-
häuse müssen übereinstimmen.

■ 42
│
DE
│
AT
│
CH
PBSD 600 A1
3. Drücken Sie den Spannhebel wieder in die
Ausgangsposition.
Schleifband
manuell justieren:
Wird der Bandlauf nach dem Einschalten nicht
zentriert, müssen Sie den Bandlauf ggf. manuell
nachstellen.
♦ Drehen Sie dazu die Justierschraube
an der
vorderen Rolle, bis das Schleifband zentriert
läuft.
WICHTIG: Achten Sie unbedingt darauf, dass
sich das Schleifband nicht am Gehäuse
einschleift. Prüfen Sie regelmäßig den Bandlauf
und regeln Sie ihn, wenn nötig, mit der Justier-
schraube nach.
Zusatzhandgriff einstellen
Sie können den Zusatzhandgriff in mehrere
Positionen einstellen.
♦ Lösen Sie zum Verstellen des Zusatzhandgriffes
die Schraube .
♦ Stellen Sie den Zusatzhandgriff
in die ge-
wünschte Position ein.
♦ Ziehen Sie die Schraube
wieder fest.
Frontabdeckung hochklappen
Sie können die Frontabdeckung zum Schleifen
an schwer erreichbaren Stellen hochklappen
(siehe Abbildung).
WARNUNG!
► Die Frontabdeckung
kann nur hochge-
klappt werden, wenn der Zusatzhandgriff
ebenfalls nach oben geklappt wurde (siehe
Kapitel „Zusatzhandgriff einstellen“).
♦ Klappen Sie die Frontabdeckung
nach oben.
Staubabsaugung anbringen/
entfernen
WARNUNG! EXPLOSIONSGEFAHR!
■ Bei explosivem Staub / Luftgemisch müssen
Sie einen dazu speziell geeigneten Absauger
verwenden. BRANDGEFAHR DURCH
FUNKENFLUG! Verwenden Sie beim Schlei-
fen von Metallen keine Staubabsaugung
(Staubbox
oder Staubsauger).
■ Asbesthaltiges Material darf nicht bearbeitet
werden. Asbest gilt als krebserregend.
WARNUNG! BRANDGEFAHR!
■ Beim Arbeiten mit Elektrogeräten, die über
eine Staubfangbox verfügen oder durch eine
Staubabsaugvorrichtung mit dem Staubsauger
verbunden werden können, besteht Brandge-
fahr! Unter ungünstigen Bedingungen, wie
z. B. bei Funkenflug - beim Schleifen von Metall
oder Metallresten in Holz - kann sich Holzstaub
in der Staubfangbox (oder im Staubbeutel des
Staubsaugers) selbst entzünden. Dies kann
insbesondere dann geschehen, wenn der
Holzstaub mit Lackresten oder anderen chemi-
schen Stoffen vermischt ist und das Schleifgut
nach langem Arbeiten heiß ist. Vermeiden
Sie deshalb unbedingt eine Überhitzung des
Schleifguts und des Gerätes und entleeren Sie
vor Arbeitspausen stets die Staubfangbox bzw.
den Staubbeutel des Staubsaugers.
■ Sorgen Sie für gute Belüftung des Arbeitsplatzes.
■ Beachten Sie in Ihrem Land gültige Vorschrif-
ten für die zu bearbeitenden Materialien.
■
Tragen Sie eine Staubschutzmaske.

DE
│
AT
│
CH
│
43 ■
PBSD 600 A1
Staubbox anbringen:
♦ Schieben Sie die Staubbox
von oben auf
den Anschluss für die Staubbox.
Staubbox demontieren / abnehmen:
♦ Ziehen Sie die Staubbox
nach oben hin ab.
Absaugadapter und Reduzierstück zur
Fremdabsaugung anschließen:
♦ Schieben Sie den Absaugadapter
auf den
Anschluss .
♦ Schieben Sie das Reduzierstück
zur Fremd-
absaugung in den Absaugadapter .
♦ Schieben Sie den Schlauch einer zulässigen
Staubsaugvorrichtung (z. B. eines Werkstatt-
staubsaugers) auf das Reduzierstück
zur
Fremdabsaugung.
Absaugadapter und Reduzierstück zur
Fremdabsaugung abnehmen:
♦ Ziehen Sie den Schlauch der Staubsaugvorrichtung
ab.
♦ Ziehen Sie das Reduzierstück
zur Fremdab-
saugung ab.
♦ Ziehen Sie den Absaugadapter
von dem
Anschluss nach oben hin ab.
Arbeitshinweise
Geringer Schleifdruck genügt:
■ Arbeiten Sie mit geringem Schleifdruck. Das
Eigengewicht des Bandschleifers reicht für
gute Schleifleistungen aus. Zusätzlich schonen
Sie durch diese Arbeitsweise den Verschleiß
des Schleifbandes
und die Oberfläche des
Werkstückes wird glatter.
Abtrag und Oberfläche:
■ Die Abtragsleistung und die Oberflächengüte wer-
den von der Bandgeschwindigkeit und der Korn-
stärke des Schleifbandes
bestimmt (siehe auch
Abschnitt „Drehzahl und Schleifband wählen“).
Schleifvorgang:
■ Platzieren Sie das Gerät eingeschaltet auf dem
Werkstück und arbeiten Sie mit mäßigem Vor-
schub. Führen Sie den Schleifvorgang parallel
und überlappend zu den Schleifbahnen durch.
Zur Vermeidung von störenden, querlaufenden
Schleifspuren nur in Faserrichtung schleifen.
Heben Sie das Gerät nach der Bearbeitung
vom Werkstück ab und schalten Sie es erst
dann aus.
HINWEIS
► Halten Sie das Gerät während der Arbeit immer
mit beiden Händen fest.
Bedienung
Ein- und ausschalten
Sie können beim Betrieb des Bandschleifers zwi-
schen Moment- und Dauerbetrieb auswählen.
Momentbetrieb einschalten:
♦ Drücken Sie den EIN- / AUS-Schalter
.
Momentbetrieb ausschalten:
♦ Lassen Sie den EIN- / AUS-Schalter
los.
Dauerbetrieb einschalten:
♦ Drücken Sie den EIN- / AUS-Schalter
, halten
Sie ihn gedrückt und drücken Sie die Feststell-
taste .
Dauerbetrieb ausschalten:
♦ Drücken Sie den EIN- / AUS-Schalter
und
lassen Sie ihn los.
Staubbox entleeren
Die Staubbox sollte während des Betriebs alle
10 Minuten entleert werden.
♦ Ziehen Sie die Staubbox
ab (siehe Kapitel
„Staubabsaugung anbringen/entfernen“)
♦ Schütteln Sie die Staubbox
über einen
Abfalleimer, um diese zu entleeren.
♦ Bringen Sie die Staubbox
wieder am Gerät an.

■ 44
│
DE
│
AT
│
CH
PBSD 600 A1
Drehzahl und Schleifband wählen
Mit dem Stellrad Bandgeschwindigkeit können
Sie die Drehzahl auch bei laufendem Gerät
wählen. Die optimale Bandgeschwindigkeit ist ab-
hängig von dem zu bearbeitenden Werkstück bzw.
Material. Ermitteln Sie die jeweils beste Drehzahl
immer selbst in einem praktischen Versuch. In der
nachfolgenden Tabelle finden Sie unverbindliche
Werte, die Ihnen die Ermittlung erleichtern.
Werkstoff /
Arbeitsbereich
Weichholz
Grobschliff (Körnung) 60
Feinschliff (Körnung) 240
Drehzahlvorwahl hoch (5–6)
Werkstoff /
Arbeitsbereich
Hartholz
Grobschliff (Körnung) 60
Feinschliff (Körnung) 180
Drehzahlvorwahl hoch (5–6)
Werkstoff /
Arbeitsbereich
Spanplatten
Grobschliff (Körnung) 60
Feinschliff (Körnung) 150
Drehzahlvorwahl hoch (5–6)
Werkstoff /
Arbeitsbereich
Farbe / Lacke ent-
fernen
Grobschliff (Körnung) 60
Feinschliff (Körnung) ––
Drehzahlvorwahl hoch (5–6)
Werkstoff /
Arbeitsbereich
Lacke anschleifen
Grobschliff (Körnung) 150
Feinschliff (Körnung) 320
Drehzahlvorwahl niedrig (1–2)
Werkstoff /
Arbeitsbereich
Stahl entrosten
Grobschliff (Körnung) 40
Feinschliff (Körnung) 120
Drehzahlvorwahl mittel / hoch (3–4)
Werkstoff /
Arbeitsbereich
Kunststoffe
Grobschliff (Körnung) 120
Feinschliff (Körnung) 240
Drehzahlvorwahl niedrig / mittel (2–3)
Werkstoff /
Arbeitsbereich
Nichteisen-Metalle
(z. B. Alu)
Grobschliff (Körnung) 80
Feinschliff (Körnung) 150
Drehzahlvorwahl mittel / hoch (3–4)
Stationäres Arbeiten
♦ Bringen Sie den Zusatzhandgriff in die
Horizontale Position.
♦ Drehen Sie das Elektrowerkzeug wie in der
Abbildung A gezeigt um und legen Sie es auf
eine stabile Arbeitsplatte.
♦ Setzen Sie zwei Schraubzwingen
in die
dafür vorgesehenen Aussparungen ein und
spannen Sie das Elektrowerkzeug fest.
Tipps und Tricks
■ Niemals mit dem selben Schleifband Holz
und Metall bearbeiten.
■ Verschlissene oder eingerissene Schleifbänder
können das Werkstück beschädigen. Wechseln
Sie die Schleifbänder deshalb rechtzeitig aus.
■ Bewahren Sie Schleifbänder nur hängend auf,
da sie durch Knicke etc. unbrauchbar werden.

DE
│
AT
│
CH
│
45 ■
PBSD 600 A1
Wartung und Reinigung
WARNUNG! VERLETZUNGSGEFAHR!
Schalten Sie vor allen Arbeiten am
Gerät das Gerät aus und ziehen Sie
den Netzstecker.
Der Bandschleifer ist wartungsfrei.
■ Reinigen Sie das Gerät direkt nach Abschluss
der Arbeit.
■ Verwenden Sie zur Reinigung des Gerätes ein
trockenes Tuch und keinesfalls Benzin, Lösungs-
mittel oder Reiniger, die Kunststoff angreifen.
Staubbox
entleeren / reinigen:
♦ Ziehen Sie die Staubbox
vom Gerät ab.
♦ Leeren Sie die Staubbox
vollständig durch
Ausklopfen und stecken Sie die Staubbox
wieder auf das Gerät.
♦ Halten Sie Lüftungsöffnungen immer frei.
♦ Entfernen Sie anhaftenden Schleifstaub mit
einem Pinsel.
Entsorgung
Die Verpackung besteht aus umweltfreund-
lichen Materialien, die Sie über die örtlichen
Recyclingstellen entsorgen können.
Werfen Sie Elektrowerkzeuge nicht
in den Hausmüll!
Gemäß Europäischer Richtlinie 2012/19/EU
müssen verbrauchte Elektrowerkzeuge getrennt
gesammelt und einer umweltgerechten Wiederver-
wertung zugeführt werden.
Möglichkeiten zur Entsorgung des ausgedienten
Gerätes erfahren Sie bei Ihrer Gemeinde- oder
Stadtverwaltung.
Entsorgen Sie die Verpackung
umweltgerecht.
Beachten Sie die Kennzeichnung auf
den verschiedenen Verpackungsmate-
rialien und trennen Sie diese gegeben-
enfalls gesondert. Die Verpackungsma-
terialien sind gekennzeichnet mit
Abkürzungen (a) und Ziffern (b) mit
folgender Bedeutung:
1–7: Kunststoffe,
20–22: Papier und Pappe,
80–98: Verbundstoffe
Möglichkeiten zur Entsorgung des
ausgedienten Produkts erfahren Sie
bei Ihrer Gemeinde- oder Stadtver-
waltung.

■ 46
│
DE
│
AT
│
CH
PBSD 600 A1
Garantie der
Kompernaß Handels GmbH
Sehr geehrte Kundin, sehr geehrter Kunde,
Sie erhalten auf dieses Gerät 3 Jahre Garantie ab
Kaufdatum. Im Falle von Mängeln dieses Produkts
stehen Ihnen gegen den Verkäufer des Produkts
gesetzliche Rechte zu. Diese gesetzlichen Rechte
werden durch unsere im Folgenden dargestellte
Garantie nicht eingeschränkt.
Garantiebedingungen
Die Garantiefrist beginnt mit dem Kaufdatum. Bitte
bewahren Sie den Original-Kassenbon gut auf.
Diese Unterlage wird als Nachweis für den Kauf
benötigt.
Tritt innerhalb von drei Jahren ab dem Kaufdatum
dieses Produkts ein Material- oder Fabrikationsfeh-
ler auf, wird das Produkt von uns – nach unserer
Wahl – für Sie kostenlos repariert oder ersetzt.
Diese Garantieleistung setzt voraus, dass innerhalb
der Drei-Jahres-Frist das defekte Gerät und der
Kaufbeleg (Kassenbon) vorgelegt und schriftlich
kurz beschrieben wird, worin der Mangel besteht
und wann er aufgetreten ist.
Wenn der Defekt von unserer Garantie gedeckt ist,
erhalten Sie das reparierte oder ein neues Produkt
zurück. Mit Reparatur oder Austausch des Produkts
beginnt kein neuer Garantiezeitraum.
Garantiezeit und gesetzliche
Mängelansprüche
Die Garantiezeit wird durch die Gewährleistung
nicht verlängert. Dies gilt auch für ersetzte und
reparierte Teile. Eventuell schon beim Kauf vorhan-
dene Schäden und Mängel müssen sofort nach
dem Auspacken gemeldet werden. Nach Ablauf
der Garantiezeit anfallende Reparaturen sind
kostenpflichtig.
Garantieumfang
Das Gerät wurde nach strengen Qualitätsrichtlinien
sorgfältig produziert und vor Auslieferung gewissen-
haft geprüft.
Die Garantieleistung gilt für Material- oder Fabrika-
tionsfehler. Diese Garantie erstreckt sich nicht auf
Produktteile, die normaler Abnutzung ausgesetzt
sind und daher als Verschleißteile angesehen werden
können oder für Beschädigungen an zerbrechlichen
Teilen, z. B. Schalter, Akkus, Backformen oder Teile
die aus Glas gefertigt sind.
Diese Garantie verfällt, wenn das Produkt beschä-
digt, nicht sachgemäß benutzt oder gewartet wurde.
Für eine sachgemäße Benutzung des Produkts sind
alle in der Bedienungsanleitung aufgeführten Anwei-
sungen genau einzuhalten. Verwendungszwecke
und Handlungen, von denen in der Bedienungsan-
leitung abgeraten oder vor denen gewarnt wird,
sind unbedingt zu vermeiden.
Das Produkt ist nur für den privaten und nicht für den
gewerblichen Gebrauch bestimmt. Bei missbräuch-
licher und unsachgemäßer Behandlung, Gewaltan-
wendung und bei Eingriffen, die nicht von unserer
autorisierten Service-Niederlassung vorgenommen
wurden, erlischt die Garantie.
Abwicklung im Garantiefall
Um eine schnelle Bearbeitung ihres Anliegens
zu gewährleisten, folgen Sie bitte den folgenden
Hinweisen:
■ Bitte halten Sie für alle Anfragen den Kassenbon
und die Artikelnummer (z. B. IAN 12345) als
Nachweis für den Kauf bereit.
■ Die Artikelnummer entnehmen Sie bitte dem
Typenschild, einer Gravur, auf dem Titelblatt
ihrer Anleitung (unten links) oder als Aufkleber
auf der Rück- oder Unterseite.
■ Sollten Funktionsfehler oder sonstige Mängel
auftreten, kontaktieren Sie zunächst die nachfol-
gend benannte Serviceabteilung telefonisch
oder per E-Mail.
■ Ein als defekt erfasstes Produkt können Sie dann
unter Beifügung des Kaufbelegs (Kassenbon)
und der Angabe, worin der Mangel besteht und
wann er aufgetreten ist, für Sie portofrei an die
Ihnen mitgeteilte Service-Anschrift übersenden.

DE
│
AT
│
CH
│
47 ■
PBSD 600 A1
Auf www.lidl-service.com können Sie
diese und viele weitere Handbücher,
Produktvideos und Software herunterladen.
Service
WARNUNG!
■ Lassen Sie Ihre Geräte von der Servicestel-
le oder einer Elektrofachkraft und nur mit
Original-Ersatzteilen reparieren. Damit wird
sichergestellt, dass die Sicherheit des Gerätes
erhalten bleibt.
WARNUNG!
■ Lassen Sie den Austausch des Steckers
oder der Netzleitung immer vom Hersteller
des Gerätes oder seinem Kundendienst
ausführen. Damit wird sichergestellt, dass die
Sicherheit des Gerätes erhalten bleibt.
HINWEIS
► Hinweis: Nicht aufgeführte Ersatzteile (wie z. B.
Kohlebürsten, Schalter, Staubbox) können Sie
über unsere Callcenter bestellen.
Service Deutschland
Tel.: 0800 5435 111 (Kostenfrei aus dem
dt. Festnetz/Mobilfunknetz)
E-Mail: [email protected]
Service Österreich
Tel.: 0820 201 222 (0,15 EUR/Min.)
E-Mail: [email protected]
Service Schweiz
Tel.: 0842 665566 (0,08 CHF/Min.,
Mobilfunk max. 0,40 CHF/Min.)
E-Mail: [email protected]
IAN 315561
Importeur
Bitte beachten Sie, dass die folgende Anschrift
keine Serviceanschrift ist. Kontaktieren Sie zunächst
die benannte Servicestelle.
KOMPERNASS HANDELS GMBH
BURGSTRASSE 21
DE - 44867 BOCHUM
DEUTSCHLAND
www.kompernass.com

■ 48
│
DE
│
AT
│
CH
PBSD 600 A1
Original-Konformitätserklärung
Wir, KOMPERNASS HANDELS GMBH, Dokumentenverantwortlicher: Herr Semi Uguzlu, BURGSTR. 21,
DE - 44867 BOCHUM, Deutschland, erklären hiermit, dass dieses Produkt mit den folgenden Normen,
normativen Dokumenten und EG-Richtlinien übereinstimmt:
Maschinenrichtlinie
(2006 / 42 / EG)
Elektromagnetische Verträglichkeit
(2014 / 30 / EU)
RoHS Richtlinie
(2011 / 65 / EU)*
* Die alleinige Verantwortung für die Ausstellung dieser Konformitätserklärung trägt der Hersteller. Der
oben beschriebene Gegenstand der Erklärung erfüllt die Vorschriften der Richtlinie 2011/65/EU des
Europäischen Parlaments und des Rates vom 8. Juni 2011 zur Beschränkung der Verwendung bestimm-
ter gefährlicher Stoffe in Elektro- und Elektronikgeräten.
Angewandte harmonisierte Normen:
EN 62841-1:2015
EN 62841-2-4:2014
EN 55014-1:2017
EN 55014-2:2015
EN 61000-3-2:2014
EN 61000-3-3:2013
EN 50581:2012
Typbezeichnung der Maschine:
Bandschleifer PBSD 600 A1
Herstellungsjahr: 02 - 2019
Seriennummer: IAN 315561
Bochum, 31.01.2019
Semi Uguzlu
- Qualitätsmanager -
Technische Änderungen im Sinne der Weiterentwicklung sind vorbehalten.

IAN 315561
KOMPERNASS HANDELS GMBH
BURGSTRASSE 21
DE - 44867 BOCHUM
GERMANY
www.kompernass.com
Estado de las informaciones · Versione delle informazioni
Last Information Update · Stand der Informationen:
01 / 2019 · Ident.-No.: PBSD600A1-012019-1
Transcripción de documentos
LIJADORA DE BANDA LEVIGATRICE A NASTRO PBSD 600 A1 LIJADORA DE BANDA LEVIGATRICE A NASTRO Traducción del manual de instrucciones original Traduzione delle istruzioni d’uso originali BELT SANDER BANDSCHLEIFER Translation of the original instructions Originalbetriebsanleitung IAN 315561 Antes de empezar a leer abra la página que contiene las imágenes y, en seguida, familiarícese con todas las funciones del dispositivo. Prima di leggere aprire la pagina con le immagini e prendere confidenza con le diverse funzioni dell'apparecchio. Before reading, unfold the page containing the illustrations and familiarise yourself with all functions of the device. Klappen Sie vor dem Lesen die Seite mit den Abbildungen aus und machen Sie sich anschließend mit allen Funktionen des Gerätes vertraut. ES IT / MT GB / MT DE / AT / CH Traducción del manual de instrucciones original Traduzione delle istruzioni d’uso originali Translation of the original instructions Originalbetriebsanleitung Página 1 Pagina 13 Page 25 Seite 37 A Índice Introducción . . . . . . . . . . . . . . . . . . . . . . . . . . . . . . . . . . . . . . . . . . . . . . . . . . . . . 2 Uso previsto . . . . . . . . . . . . . . . . . . . . . . . . . . . . . . . . . . . . . . . . . . . . . . . . . . . . . . . . . . . . . . . . Componentes ilustrados . . . . . . . . . . . . . . . . . . . . . . . . . . . . . . . . . . . . . . . . . . . . . . . . . . . . . . . Volumen de suministro . . . . . . . . . . . . . . . . . . . . . . . . . . . . . . . . . . . . . . . . . . . . . . . . . . . . . . . . Características técnicas . . . . . . . . . . . . . . . . . . . . . . . . . . . . . . . . . . . . . . . . . . . . . . . . . . . . . . . 2 2 2 2 Indicaciones generales de seguridad para las herramientas eléctricas . . . . . 3 1. Seguridad en el lugar de trabajo . . . . . . . . . . . . . . . . . . . . . . . . . . . . . . . . . . . . . . . . . . . . . 2. Seguridad eléctrica . . . . . . . . . . . . . . . . . . . . . . . . . . . . . . . . . . . . . . . . . . . . . . . . . . . . . . . . 3. Seguridad de las personas . . . . . . . . . . . . . . . . . . . . . . . . . . . . . . . . . . . . . . . . . . . . . . . . . . 4. Uso y manejo de la herramienta eléctrica . . . . . . . . . . . . . . . . . . . . . . . . . . . . . . . . . . . . . . . Indicaciones de seguridad específicas para las lijadoras . . . . . . . . . . . . . . . . . . . . . . . . . . . . . 3 3 4 4 5 Puesta en funcionamiento . . . . . . . . . . . . . . . . . . . . . . . . . . . . . . . . . . . . . . . . . . 5 Tensado/cambio de la banda lijadora . . . . . . . . . . . . . . . . . . . . . . . . . . . . . . . . . . . . . . . . . . . Ajuste del mango adicional . . . . . . . . . . . . . . . . . . . . . . . . . . . . . . . . . . . . . . . . . . . . . . . . . . . . Colocación de la cubierta frontal en una posición abatida. . . . . . . . . . . . . . . . . . . . . . . . . . . . Montaje/desmontaje de la aspiración de polvo . . . . . . . . . . . . . . . . . . . . . . . . . . . . . . . . . . . . Indicaciones de trabajo . . . . . . . . . . . . . . . . . . . . . . . . . . . . . . . . . . . . . . . . . . . . . . . . . . . . . . . 5 6 6 6 7 Manejo . . . . . . . . . . . . . . . . . . . . . . . . . . . . . . . . . . . . . . . . . . . . . . . . . . . . . . . . . 7 Encendido y apagado . . . . . . . . . . . . . . . . . . . . . . . . . . . . . . . . . . . . . . . . . . . . . . . . . . . . . . . . Vaciado del depósito de polvo . . . . . . . . . . . . . . . . . . . . . . . . . . . . . . . . . . . . . . . . . . . . . . . . . Selección de la velocidad y de la banda lijadora . . . . . . . . . . . . . . . . . . . . . . . . . . . . . . . . . . . Trabajo estacionario. . . . . . . . . . . . . . . . . . . . . . . . . . . . . . . . . . . . . . . . . . . . . . . . . . . . . . . . . . Consejos y trucos . . . . . . . . . . . . . . . . . . . . . . . . . . . . . . . . . . . . . . . . . . . . . . . . . . . . . . . . . . . . 7 7 8 9 9 Mantenimiento y limpieza . . . . . . . . . . . . . . . . . . . . . . . . . . . . . . . . . . . . . . . . . . 9 Desecho . . . . . . . . . . . . . . . . . . . . . . . . . . . . . . . . . . . . . . . . . . . . . . . . . . . . . . . . . 9 Garantía de Kompernass Handels GmbH . . . . . . . . . . . . . . . . . . . . . . . . . . . . 10 Asistencia técnica . . . . . . . . . . . . . . . . . . . . . . . . . . . . . . . . . . . . . . . . . . . . . . . . 11 Importador . . . . . . . . . . . . . . . . . . . . . . . . . . . . . . . . . . . . . . . . . . . . . . . . . . . . . 11 Traducción de la Declaración de conformidad original . . . . . . . . . . . . . . . . . . 12 PBSD 600 A1 ES │ 1 ■ LIJADORA DE BANDA PBSD 600 A1 Introducción Sargento Manguito reductor Adaptador para la aspiración Felicidades por la compra de su aparato nuevo. Ha adquirido un producto de alta calidad. Las instrucciones de uso forman parte del producto y contienen indicaciones importantes acerca de la seguridad, del uso y del desecho de este aparato. Antes de usar el producto, familiarícese con todas las indicaciones de manejo y de seguridad. Utilice el producto únicamente como se describe y para los ámbitos de aplicación indicados. Entregue todos los documentos cuando transfiera el producto a terceros. Volumen de suministro Uso previsto Tensión nominal: Según el papel de lija, la lijadora está prevista para el lijado en seco de superficies de madera, plástico, metal y plaste, así como de superficies pintadas y barnizadas. Este aparato solo debe utilizarse para el lijado en seco. Tenga en cuenta que, para el procesamiento de distintos materiales, deben utilizarse papeles de lija diferentes con el granulado que corresponda y debe adaptarse la velocidad al material. El aparato no está indicado para su uso industrial. La utilización de la máquina para otros fines o su transformación se considerarán contrarias al uso previsto y elevarán considerablemente el riesgo de accidentes. El fabricante no se responsabiliza por los daños derivados de una utilización contraria al uso previsto. Componentes ilustrados Interruptor de encendido/apagado Mango adicional (superficie de agarre de goma) Cubierta frontal Palanca tensora para la banda lijadora Rueda de ajuste de la velocidad de la banda Mango (superficie de agarre de goma) Tornillo de ajuste del mango Alojamientos para los sargentos Conexión para el depósito de polvo Botón de bloqueo para el interruptor de encendido/apagado Depósito de polvo Tornillo de ajuste de la banda Banda lijadora ■ 2 │ ES 1 lijadora de banda PBSD 600 A1 1 banda lijadora para madera (granulado: 80) 1 depósito de polvo 1 adaptador para la aspiración y manguito reductor (para la aspiración de polvo externa) 2 sargentos 1 manual de instrucciones de uso Características técnicas 230 V ∼50 Hz (corriente alterna) Consumo nominal de potencia: 600 W Velocidad de la banda al ralentí: 170-250 m/min Velocidad nominal de ralentí: n0 360-560 r. p. m. Banda lijadora: 75 x 457 mm Clase de protección: II/ (aislamiento doble) Valor de emisión sonora: Medición de ruidos según la norma EN 62841. Valores típicos del nivel sonoro con ponderación A de la herramienta eléctrica: Nivel de presión sonora: LpA = Incertidumbre: KpA = 91 dB (A) 3 dB Nivel de potencia acústica: LWA = 102 dB (A) Incertidumbre: KWA = 3 dB ¡Use protección auditiva! Valor total de vibraciones: Valores totales de vibración (suma vectorial de tres líneas) calculados según la norma EN 62841: Lijado con plato de lijado: ah = 4,2 m/s2 Incertidumbre K = 1,5 m/s2 PBSD 600 A1 INDICACIÓN ► El nivel de vibraciones especificado en estas instrucciones de uso se ha calculado según un proceso de medición estandarizado en la norma EN 62841 y puede utilizarse para la comparación de aparatos. El valor de emisión de vibraciones especificado también puede utilizarse para realizar una valoración preliminar de la exposición. El valor de emisión de vibraciones varía en función del uso de la herramienta eléctrica y, en algunos casos, puede superar los valores especificados en estas instrucciones. Por este motivo, la carga de las vibraciones puede estar infravalorada si se utiliza la herramienta eléctrica regularmente de esta manera. ¡ADVERTENCIA! ► Intente que la carga de las vibraciones sea lo más reducida posible. Algunas medidas para reducir el nivel de vibraciones son el uso de guantes al manejar la herramienta y la limitación del tiempo de trabajo. Para ello, deben tenerse en cuenta todas las partes del ciclo de funcionamiento (por ejemplo, los momentos en los que la herramienta eléctrica está desconectada y los momentos en los que está conectada, pero funciona sin carga). Indicaciones generales de seguridad para las herramientas eléctricas ¡ADVERTENCIA! ► Lea todas las indicaciones de seguridad, las instrucciones, las ilustraciones y los datos técnicos suministrados con esta herramienta eléctrica. El incumplimiento de las siguientes instrucciones puede provocar descargas eléctricas, incendios o lesiones graves. Conserve todas las indicaciones de seguridad y las instrucciones para el futuro. El término “herramienta eléctrica” utilizado en las indicaciones de seguridad se refiere a las herramientas eléctricas de accionamiento eléctrico (con cable de red) y a las de accionamiento por batería (sin cable de red). 1. Seguridad en el lugar de trabajo a) Mantenga limpia y bien iluminada la zona de trabajo. El desorden y la falta de iluminación en el lugar de trabajo pueden provocar accidentes. b) No trabaje con la herramienta eléctrica en un entorno potencialmente explosivo en el que haya líquidos, gases o polvos inflamables. Las herramientas eléctricas generan chispas que pueden incendiar el polvo o los vapores. c) Mantenga a los niños y a otras personas alejados durante el manejo de la herramienta eléctrica. Si se distrae, podría perder el control de la herramienta eléctrica. 2. Seguridad eléctrica a) El enchufe de la herramienta eléctrica debe encajar correctamente en la toma eléctrica. No debe modificarse el enchufe de ninguna forma. No utilice ningún enchufe adaptador junto con herramientas eléctricas con conexión a tierra. El uso de enchufes sin manipular conectados a una toma eléctrica adecuada reduce el riesgo de descarga eléctrica. PBSD 600 A1 ES │ 3 ■ b) Evite el contacto físico con cualquier superficie que esté conectada a tierra, como tuberías, sistemas de calefacción, cocinas y neveras. Si su cuerpo hace contacto con la toma de tierra, existe mayor riesgo de descarga eléctrica. c) Mantenga el aparato alejado de la lluvia o de humedades. La penetración de agua en una herramienta eléctrica aumenta el riesgo de descarga eléctrica. d) No utilice el cable de conexión para otros usos, p. ej., para transportar y colgar la herramienta eléctrica o para tirar del enchufe y desconectarlo de la red eléctrica. Mantenga el cable de conexión alejado del calor, del aceite, de los bordes cortantes o de las piezas móviles. Un cable de conexión dañado o enredado aumenta el riesgo de descarga eléctrica. e) Si desea utilizar la herramienta eléctrica al aire libre, utilice exclusivamente los alargadores de cable homologados para su uso en exteriores. El uso de un alargador adecuado para exteriores reduce el riesgo de descarga eléctrica. f) Si no puede evitarse el uso de la herramienta eléctrica en un entorno húmedo, utilice un interruptor diferencial residual. Su uso reduce el riesgo de descarga eléctrica. 3. Seguridad de las personas a) Esté alerta, preste atención a lo que hace y proceda con sensatez a la hora de trabajar con una herramienta eléctrica. No utilice ninguna herramienta eléctrica si se siente cansado o se encuentra bajo la influencia de drogas, alcohol o medicamentos. Un solo momento de distracción mientras utiliza la herramienta eléctrica puede causar lesiones graves. b) Utilice siempre un equipo de protección individual y gafas de protección. El uso de un equipo de protección individual, como mascarilla antipolvo, calzado de seguridad antideslizante, casco o protecciones auditivas según el tipo de herramienta eléctrica en cuestión, reduce el riesgo de lesiones. ■ 4 │ ES c) Evite que el aparato pueda ponerse en marcha accidentalmente. Asegúrese de que la herramienta eléctrica esté apagada antes de conectarla a la red eléctrica o a la batería, asirla o transportarla. Si transporta la herramienta eléctrica con los dedos en el interruptor o conecta la herramienta eléctrica ya encendida a la red eléctrica, puede provocar accidentes. d) Antes de encender la herramienta eléctrica, retire las herramientas de ajuste o las llaves. Las herramientas o llaves que se encuentren dentro del alcance de la pieza giratoria de la herramienta eléctrica pueden producir lesiones. e) Evite mantener una postura corporal forzada. Busque una postura segura y mantenga el equilibrio en todo momento. Así podrá controlar mejor la herramienta eléctrica, especialmente en situaciones inesperadas. f) Utilice ropa adecuada. No lleve ropa ancha ni joyas. Mantenga el pelo y la ropa lejos de las piezas móviles. La ropa holgada, las joyas o el pelo suelto pueden quedar atrapados en las piezas móviles. g) Si se admite el montaje de dispositivos de aspiración y de acumulación de polvo, deben conectarse y utilizarse correctamente. El uso de un dispositivo de aspiración de polvo puede reducir los riesgos causados por el polvo. h) Evite cultivar un sentimiento de falsa seguridad y no se desvíe de lo dispuesto por las normas de seguridad aplicables a las herramientas eléctricas aun cuando esté muy familiarizado con la herramienta eléctrica por haberla utilizado repetidas veces. Un descuido en la manipulación puede causar lesiones graves en una fracción de segundo. 4. Uso y manejo de la herramienta eléctrica a) No sobrecargue la herramienta eléctrica. Utilice la herramienta eléctrica adecuada para el trabajo en cuestión. De esta manera, trabajará mejor y de forma más segura dentro del rango de potencia indicado. PBSD 600 A1 b) No utilice ninguna herramienta eléctrica con el interruptor defectuoso. Una herramienta que no pueda encenderse o apagarse es peligrosa y debe repararse. c) Desconecte el enchufe de la red eléctrica o retire la batería extraíble antes de realizar cualquier ajuste en el aparato, cambiar los accesorios o abandonar la herramienta eléctrica. Estas medidas de seguridad evitan que la herramienta eléctrica se encienda de forma accidental. d) Guarde las herramientas eléctricas que no vaya a utilizar fuera del alcance de los niños. No permita el uso de la herramienta eléctrica a personas que no estén familiarizadas con su manejo o que no hayan leído estas indicaciones. Las herramientas eléctricas son peligrosas cuando están en manos de personas inexpertas. e) Mantenga las herramientas eléctricas y los accesorios en perfecto estado. Compruebe que las piezas móviles funcionen correctamente y no se atasquen, y asegúrese de que ninguna pieza se haya roto ni esté dañada de forma que el funcionamiento del aparato pueda verse afectado. Encargue la reparación de las piezas dañadas antes de utilizar la herramienta eléctrica. Muchos accidentes se deben al mal estado de las herramientas eléctricas. f) Mantenga las herramientas de corte limpias y afiladas, ya que así se atascan menos y son más fáciles de guiar. 5. Asistencia técnica a) Encargue la reparación de su herramienta eléctrica exclusivamente al personal cualificado especializado y solo con recambios originales. De esta forma, se garantiza que la seguridad del aparato no se vea afectada. Indicaciones de seguridad específicas para las lijadoras ■ Sujete el aparato por los mangos aislados, ya que la banda lijadora podría entrar en contacto con el propio cable de red. Si el cable eléctrico se daña, las piezas metálicas del aparato podrían quedar bajo tensión y provocar una descarga eléctrica. ¡ADVERTENCIA! ■ Los polvos desprendidos de algunos materiales, como la pintura con contenido de plomo y algunos tipos de madera y metales, pueden ser perjudiciales para la salud. ■ El contacto con estos polvos o su inhalación entraña un riesgo contra la salud del usuario o de las personas que se encuentren próximas a él. ■ ¡Utilice gafas protectoras y mascarilla de protección contra el polvo! Puesta en funcionamiento Tensado/cambio de la banda lijadora ¡ADVERTENCIA! PELIGRO DE LESIONES ■ Desconecte siempre el enchufe de la red eléctrica antes de realizar cualquier tarea en la lijadora de banda. g) Utilice la herramienta eléctrica, los accesorios, las herramientas intercambiables, etc. según lo dispuesto en estas instrucciones. Tenga en cuenta las condiciones de trabajo y los procedimientos que deban seguirse. El uso de las herramientas eléctricas para aplicaciones distintas a las previstas puede causar situaciones peligrosas. 1. Suelte el mecanismo tensor de la banda lijadora; para ello, accione la palanca tensora hacia fuera. Con esto, puede extraerse la banda lijadora . h) Mantenga los mangos y las superficies de agarre secos, limpios y sin restos de aceite o grasa. Si los mangos o las superficies de agarre están resbaladizos, no podrá manejarse ni controlarse la herramienta eléctrica de forma segura en caso de imprevistos. 2. Coloque una nueva banda lijadora o cámbiela para procesar otro material o cambiar el grosor del granulado. IMPORTANTE: la dirección de las flechas de la parte interior de la banda lijadora y de la carcasa del aparato deben coincidir. PBSD 600 A1 ES │ 5 ■ 3. Vuelva a colocar la palanca tensora posición inicial. en la de forma Ajuste de la banda lijadora manual: Si la banda lijadora no se centra tras el encendido, es posible que tenga que ajustarla manualmente. ♦ Para ello, gire el tornillo de ajuste en el rodillo delantero hasta que la banda lijadora marche de forma centrada. IMPORTANTE: asegúrese de que la banda lijadora no roce la carcasa. Revise regularmente la banda lijadora y, en caso necesario, ajústela con el tornillo de ajuste . Ajuste del mango adicional El mango adicional posiciones. puede ajustarse en varias ♦ Para ajustar el mango adicional tornillo . , afloje el ♦ Ajuste el mango adicional la posición deseada. hasta alcanzar ♦ Vuelva a apretar el tornillo . Colocación de la cubierta frontal en una posición abatida La cubierta frontal puede abatirse hacia arriba para lijar puntos de difícil acceso (consulte la figura). ¡ADVERTENCIA! ► Solo puede abatirse la cubierta frontal si también se abate hacia arriba el mango adicional (consulte el capítulo "Ajuste del mango adicional"). ♦ Abata la cubierta frontal hacia arriba. Montaje/desmontaje de la aspiración de polvo ¡ADVERTENCIA! ¡RIESGO DE EXPLOSIÓN! ■ En caso de presencia de polvo/mezclas de aire explosivas, debe utilizarse un aspirador especial adecuado. ¡EXISTE PELIGRO DE INCENDIO POR LA GENERACIÓN DE CHISPAS! No utilice ningún dispositivo de aspiración de polvo para el lijado de metales (depósito de polvo o aspirador de polvo). ■ No deben procesarse los materiales que contengan asbesto. El asbesto es cancerígeno. ¡ADVERTENCIA! ¡PELIGRO DE INCENDIO! ■ Existe peligro de incendio al trabajar con aparatos eléctricos que dispongan de un depósito de polvo o que puedan conectarse a un aspirador por medio de un dispositivo de aspiración de polvo. En condiciones poco favorables, como, p. ej., si se generan chispas o al lijar piezas metálicas o restos de metal en superficies de madera, el serrín del depósito de polvo (o de la bolsa de la aspiradora) puede llegar a incendiarse. Esta situación puede producirse especialmente si el serrín se mezcla con restos de pintura/barniz o con otros productos químicos y el material que deba lijarse se calienta tras un largo tiempo de trabajo. Por este motivo, debe evitarse el sobrecalentamiento del material y del aparato y vaciarse siempre el depósito de polvo o la bolsa de la aspiradora antes de realizar pausas en el trabajo. ■ Procure que la zona de trabajo esté bien ventilada. ■ Observe las disposiciones nacionales pertinentes para los materiales que desee procesar. ■ 6 │ ES PBSD 600 A1 Procedimiento de lijado: ■ Utilice una mascarilla de protección antipolvo. Montaje del depósito de polvo : ♦ Coloque el depósito de polvo desde arriba sobre la conexión para el depósito de polvo. Desmontaje/extracción del depósito de polvo: ♦ Tire del depósito de polvo extraerlo del aparato. hacia arriba para Conexión del adaptador para la aspiración y del manguito reductor para la aspiración externa: ♦ Coloque el adaptador para la aspiración sobre la conexión . ♦ Inserte el manguito reductor para la aspiración externa en el adaptador para la aspiración . ♦ Conecte el tubo de un aspirador de polvo autorizado (p. ej., un aspirador para talleres) en el manguito reductor para la aspiración externa. Desmontaje del adaptador para la aspiración y del manguito reductor para la aspiración externa: ♦ Tire del tubo del aspirador de polvo. ♦ Extraiga el manguito reductor ración externa. INDICACIÓN ► Durante el trabajo, sujete siempre el aparato con las dos manos de forma firme. Manejo Encendido y apagado Puede seleccionarse entre el modo de funcionamiento temporal y el modo de funcionamiento continuo. Activación del modo de funcionamiento temporal: ♦ Pulse el interruptor de encendido/apagado . Desactivación del modo de funcionamiento temporal: ♦ Suelte el interruptor de encendido/apagado . para la aspi- ♦ Tire del adaptador para la aspiración hacia arriba para extraerlo de la conexión . Indicaciones de trabajo Basta con ejercer una ligera presión: ■ No apriete demasiado. El propio peso de la lijadora de banda es suficiente para obtener un buen resultado. Además, así evitará el desgaste prematuro de la banda lijadora y la superficie de la pieza de trabajo quedará más lisa. Abrasión y superficie: ■ La potencia de abrasión y la calidad de la superficie dependen de la velocidad de la banda y del grosor del granulado de la banda lijadora (consulte también el apartado "Selección de la velocidad y de la banda lijadora"). PBSD 600 A1 ■ Coloque el aparato ya encendido sobre la pieza de trabajo y trabaje con un avance moderado. Realice el proceso de lijado describiendo bandas paralelas y ligeramente superpuestas. Para evitar dejar molestos rastros transversales durante el lijado, lije exclusivamente en la dirección de las fibras. Tras procesar la pieza, levante primero el aparato y apáguelo. Activación del modo de funcionamiento continuo: ♦ Pulse el interruptor de encendido/apagado manténgalo pulsado y presione el botón de bloqueo . , Desactivación del modo de funcionamiento continuo: ♦ Pulse el interruptor de encendido/apagado y vuelva a soltarlo. Vaciado del depósito de polvo El depósito de polvo debe vaciarse cada 10 minutos durante el funcionamiento. ♦ Tire del depósito de polvo para extraerlo del aparato (consulte el capítulo "Montaje/ desmontaje de la aspiración de polvo"). ES │ 7 ■ ♦ Agite el depósito de polvo sobre un contenedor de basura para vaciarlo. Material/tarea Decapado de pintura/barniz ♦ Vuelva a colocar el depósito de polvo el aparato. Lijado grueso (granulado) 60 en Selección de la velocidad y de la banda lijadora Con la rueda de ajuste de la velocidad de la banda , puede seleccionarse la velocidad incluso con el aparato en marcha. La velocidad óptima de la banda depende de la pieza de trabajo o del material que deba procesarse. Calcule siempre por sí mismo la velocidad más adecuada realizando una prueba. En la siguiente lista, encontrará valores orientativos que le facilitarán la selección de la velocidad. Lijado fino (granulado) –– Preselección de la velocidad Alta (5-6) Material/tarea Lijado de barniz Lijado grueso (granulado) 150 Lijado fino (granulado) 320 Preselección de la velocidad Baja (1-2) Material/tarea Eliminación de herrumbre en el acero Lijado fino (granulado) 240 Lijado grueso (granulado) 40 Preselección de la velocidad Alta (5-6) Lijado fino (granulado) 120 Material/tarea Madera dura Lijado grueso (granulado) 60 Material/tarea Madera blanda Lijado grueso (granulado) 60 Lijado fino (granulado) 180 Preselección de la velocidad Alta (5-6) Material/tarea Tableros de aglomerado Lijado grueso (granulado) 60 Lijado fino (granulado) 150 Preselección de la velocidad Alta (5-6) Preselección de la velocidad Media/alta (3-4) Material/tarea Plásticos Lijado grueso (granulado) 120 Lijado fino (granulado) 240 Preselección de la velocidad Baja/media (2-3) Material/tarea Metales no ferrosos (p. ej., aluminio) Lijado grueso (granulado) 80 Lijado fino (granulado) 150 Preselección de la velocidad ■ 8 │ ES Media/alta (3-4) PBSD 600 A1 Trabajo estacionario ♦ Coloque el mango adicional horizontal. Desecho en posición El embalaje consta de materiales ecológicos que pueden desecharse a través de los centros de reciclaje locales. ♦ Dé la vuelta a la herramienta eléctrica de la manera mostrada en la figura A y colóquela sobre una superficie de trabajo estable. ♦ Inserte los dos sargentos en los alojamientos previstos para ello y fije la herramienta eléctrica. Consejos y trucos ■ Nunca procese madera y metal con la misma banda lijadora . ■ Si la banda lijadora está desgastada o mellada, puede dañar la pieza de trabajo. Por este motivo, debe cambiarse la banda lijadora siempre que corresponda. ■ Cuelgue siempre las bandas lijadoras para guardarlas, ya que pueden quedar inutilizables si se doblan. Mantenimiento y limpieza ¡ADVERTENCIA! ¡PELIGRO DE LESIONES! Antes de realizar cualquier tarea en el aparato, apáguelo y desconecte el enchufe de la red eléctrica. La lijadora de banda no necesita mantenimiento. ■ Limpie el aparato directamente después de su uso. ■ Utilice un paño seco para la limpieza del aparato. No use nunca bencina, disolventes ni limpiadores que deterioren el plástico. Vaciado/limpieza del depósito de polvo ♦ Tire del depósito de polvo del aparato. No deseche las herramientas eléctricas con la basura doméstica. Según la Directiva 2012/19/EU, las herramientas eléctricas usadas deben recogerse por separado para someterse a un reciclaje ecológico. Puede informarse acerca de las posibilidades de desecho de los aparatos usados en su administración municipal o ayuntamiento. Deseche el embalaje de forma respetuosa con el medio ambiente. Observe las indicaciones de los distintos materiales de embalaje y, si procede, recíclelos de la manera correspondiente. Los materiales de embalaje cuentan con abreviaciones (a) y cifras (b) que significan lo siguiente: 1–7: plásticos, 20–22: papel y cartón, 80–98: materiales compuestos Puede informarse acerca de las posibilidades de desecho de los aparatos usados en su administración municipal o ayuntamiento. : para extraerlo ♦ Vacíe completamente el depósito de polvo dando ligeros golpecitos y vuelva a colocar el depósito de polvo en el aparato. ♦ Mantenga siempre despejadas las ranuras de ventilación. ♦ Retire el polvo que quede adherido con un pincel. PBSD 600 A1 ES │ 9 ■ Garantía de Kompernass Handels GmbH Estimado cliente: Este aparato cuenta con una garantía de 3 años a partir de la fecha de compra. Si se detectan defectos en el producto, puede ejercer sus derechos legales frente al vendedor. Estos derechos legales no se ven limitados por la garantía descrita a continuación. Condiciones de la garantía El plazo de la garantía comienza con la fecha de compra. Guarde bien el comprobante de caja original, ya que lo necesitará como justificante de compra. Si dentro de un periodo de tres años a partir de la fecha de compra de este producto se detecta un defecto en su material o un error de fabricación, asumiremos la reparación o sustitución gratuita del producto a nuestra elección. La prestación de la garantía requiere la presentación del aparato defectuoso y del comprobante de caja, así como una breve descripción por escrito del defecto detectado y de las circunstancias en las que se haya producido dicho defecto, dentro del plazo de tres años. Si el defecto está cubierto por nuestra garantía, le devolveremos el producto reparado o le suministraremos uno nuevo. La reparación o sustitución del producto no supone el inicio de un nuevo periodo de garantía. Duración de la garantía y reclamaciones legales por vicios La duración de la garantía no se prolonga por hacer uso de ella. Este principio también se aplica a las piezas sustituidas y reparadas. Si después de la compra del aparato, se detecta la existencia de daños o de defectos al desembalarlo, deben notificarse de inmediato. Cualquier reparación que se realice una vez finalizado el plazo de garantía estará sujeta a costes. ■ 10 │ ES Alcance de la garantía El aparato se ha fabricado cuidadosamente según estándares elevados de calidad y se ha examinado en profundidad antes de su entrega. La prestación de la garantía solo rige para defectos en los materiales o errores de fabricación. Esta garantía no cubre las piezas del producto normalmente sometidas al desgaste y que, en consecuencia, puedan considerarse piezas de desgaste ni los daños producidos en los componentes frágiles, p. ej., interruptores, baterías, moldes de horno o piezas de vidrio. Se anulará la garantía si el producto se daña o no se utiliza o mantiene correctamente. Para utilizar correctamente el producto, deben observarse todas las indicaciones especificadas en las instrucciones de uso. Debe evitarse cualquier uso y manejo que esté desaconsejado o frente al que se advierta en las instrucciones de uso. El producto está previsto exclusivamente para su uso privado y no para su uso comercial. En caso de manipulación indebida e incorrecta, uso de la fuerza y apertura del aparato por personas ajenas a nuestros centros de asistencia técnica autorizados, la garantía perderá su validez. Proceso de reclamación conforme a la garantía Para garantizar una tramitación rápida de su reclamación, le rogamos que observe las siguientes indicaciones: ■ Mantenga siempre a mano el comprobante de caja y el número de artículo (p. ej., IAN 12345) como justificante de compra. ■ Podrá ver el número de artículo en la placa de características, grabado en el aparato, en la portada de las instrucciones (parte inferior izquierda) o en un adhesivo en la parte trasera o inferior del aparato. ■ Si se producen errores de funcionamiento u otros defectos, póngase primero en contacto con el departamento de asistencia técnica especificado a continuación por teléfono o por correo electrónico. PBSD 600 A1 ■ Podrá enviar el producto calificado como defectuoso junto con el justificante de compra (comprobante de caja) y la descripción del defecto y de las circunstancias en las que se haya producido de forma gratuita a la dirección de correo proporcionada. En www.lidl-service.com, podrá descargar este manual de usuario y muchos otros más, así como vídeos sobre los productos y software. Asistencia técnica ¡ADVERTENCIA! ■ Encomiende exclusivamente la reparación del aparato al servicio de asistencia técnica o a un electricista especializado y solo con los recambios originales. De esta forma, se garantizará que la seguridad del aparato no se vea afectada. ¡ADVERTENCIA! ■ Encomiende siempre la sustitución del enchufe o del cable de red al fabricante del aparato o a su servicio de atención al cliente. De esta forma, se garantizará que la seguridad del aparato no se vea afectada. Servicio España Tel.: 902 59 99 22 (0,08 EUR/Min. + 0,11 EUR/ llamada (tarifa normal)) (0,05 EUR/Min. + 0,11 EUR/ llamada (tarifa reducida)) E-Mail: [email protected] IAN 315561 Importador Tenga en cuenta que la dirección siguiente no es una dirección de asistencia técnica. Póngase primero en contacto con el centro de asistencia técnica especificado. KOMPERNASS HANDELS GMBH BURGSTRASSE 21 DE - 44867 BOCHUM ALEMANIA www.kompernass.com INDICACIÓN ► Los recambios no especificados (p. ej., escobillas de carbón, interruptores o depósito de polvo) pueden solicitarse a través de nuestro servicio de asistencia técnica. PBSD 600 A1 ES │ 11 ■ Traducción de la Declaración de conformidad original En virtud del presente documento, nosotros, KOMPERNASS HANDELS GMBH, responsable de los documentos: Semi Uguzlu, BURGSTR. 21, DE-44867 BOCHUM Alemania, declaramos que este producto cumple con lo dispuesto por las siguientes normas, documentos normativos y directivas CE: Directiva relativa a las máquinas (2006/42/EC) Compatibilidad electromagnética (2014/30/EU) Directiva sobre las restricciones a la utilización de determinadas sustancias peligrosas en aparatos eléctricos y electrónicos (2011/65/EU)* *La responsabilidad exclusiva de la expedición de esta declaración de conformidad recaerá sobre el fabricante. El objeto descrito de la declaración cumple con las disposiciones de la Directiva 2011/65/EU del Parlamento Europeo y del Consejo del 8 de junio de 2011 sobre las restricciones a la utilización de determinadas sustancias peligrosas en aparatos eléctricos y electrónicos. Normas armonizadas aplicadas: EN 62841-1:2015 EN 62841-2-4:2014 EN 55014-1:2017 EN 55014-2:2015 EN 61000-3-2:2014 EN 61000-3-3:2013 EN 50581:2012 Denominación de la máquina: Lijadora de banda PBSD 600 A1 Año de fabricación: 02-2019 Número de serie: IAN 315561 Bochum, 31/01/2019 Semi Uguzlu - Responsable de calidad Reservado el derecho de realizar modificaciones técnicas en relación con el desarrollo tecnológico. ■ 12 │ ES PBSD 600 A1 Indice Introduzione . . . . . . . . . . . . . . . . . . . . . . . . . . . . . . . . . . . . . . . . . . . . . . . . . . . . 14 Uso conforme . . . . . . . . . . . . . . . . . . . . . . . . . . . . . . . . . . . . . . . . . . . . . . . . . . . . . . . . . . . . . . Componenti illustrati . . . . . . . . . . . . . . . . . . . . . . . . . . . . . . . . . . . . . . . . . . . . . . . . . . . . . . . . . Volume della fornitura . . . . . . . . . . . . . . . . . . . . . . . . . . . . . . . . . . . . . . . . . . . . . . . . . . . . . . . Dati tecnici . . . . . . . . . . . . . . . . . . . . . . . . . . . . . . . . . . . . . . . . . . . . . . . . . . . . . . . . . . . . . . . . 14 14 14 14 Indicazioni generali di sicurezza per elettroutensili . . . . . . . . . . . . . . . . . . . . 15 1. Sicurezza sul posto di lavoro . . . . . . . . . . . . . . . . . . . . . . . . . . . . . . . . . . . . . . . . . . . . . . . . 2. Sicurezza elettrica . . . . . . . . . . . . . . . . . . . . . . . . . . . . . . . . . . . . . . . . . . . . . . . . . . . . . . . . 3. Sicurezza delle persone. . . . . . . . . . . . . . . . . . . . . . . . . . . . . . . . . . . . . . . . . . . . . . . . . . . . 4. Uso e trattamento dell’elettroutensile . . . . . . . . . . . . . . . . . . . . . . . . . . . . . . . . . . . . . . . . . . Indicazioni relative alla sicurezza specifiche per levigatrici . . . . . . . . . . . . . . . . . . . . . . . . . . . 15 15 16 16 17 Messa in funzione . . . . . . . . . . . . . . . . . . . . . . . . . . . . . . . . . . . . . . . . . . . . . . . . 17 Bloccaggio/sostituzione del nastro abrasivo . . . . . . . . . . . . . . . . . . . . . . . . . . . . . . . . . . . . . . Regolazione impugnatura supplementare . . . . . . . . . . . . . . . . . . . . . . . . . . . . . . . . . . . . . . . . Sollevamento della copertura anteriore . . . . . . . . . . . . . . . . . . . . . . . . . . . . . . . . . . . . . . . . . . Applicazione/rimozione dell'aspirazione della polvere . . . . . . . . . . . . . . . . . . . . . . . . . . . . . Istruzioni operative . . . . . . . . . . . . . . . . . . . . . . . . . . . . . . . . . . . . . . . . . . . . . . . . . . . . . . . . . . 17 18 18 18 19 Uso . . . . . . . . . . . . . . . . . . . . . . . . . . . . . . . . . . . . . . . . . . . . . . . . . . . . . . . . . . . . 19 Accensione e spegnimento. . . . . . . . . . . . . . . . . . . . . . . . . . . . . . . . . . . . . . . . . . . . . . . . . . . . Svuotamento del sacco della polvere . . . . . . . . . . . . . . . . . . . . . . . . . . . . . . . . . . . . . . . . . . . Selezione del numero di giri e del nastro abrasivo . . . . . . . . . . . . . . . . . . . . . . . . . . . . . . . . . Lavoro stazionario . . . . . . . . . . . . . . . . . . . . . . . . . . . . . . . . . . . . . . . . . . . . . . . . . . . . . . . . . . Consigli e suggerimenti . . . . . . . . . . . . . . . . . . . . . . . . . . . . . . . . . . . . . . . . . . . . . . . . . . . . . . 19 19 20 21 21 Manutenzione e pulizia . . . . . . . . . . . . . . . . . . . . . . . . . . . . . . . . . . . . . . . . . . . 21 Smaltimento . . . . . . . . . . . . . . . . . . . . . . . . . . . . . . . . . . . . . . . . . . . . . . . . . . . . 21 Garanzia della Kompernass Handels GmbH . . . . . . . . . . . . . . . . . . . . . . . . . . 22 Assistenza . . . . . . . . . . . . . . . . . . . . . . . . . . . . . . . . . . . . . . . . . . . . . . . . . . . . . . 23 Importatore. . . . . . . . . . . . . . . . . . . . . . . . . . . . . . . . . . . . . . . . . . . . . . . . . . . . . 23 Traduzione della dichiarazione di conformità originale . . . . . . . . . . . . . . . . . 24 PBSD 600 A1 IT│MT │ 13 ■ LEVIGATRICE A NASTRO PBSD 600 A1 Introduzione Congratulazioni per l'acquisto del nuovo apparecchio. È stato scelto un prodotto di alta qualità. Il manuale di istruzioni è parte integrante del presente prodotto. Esso contiene importanti indicazioni per la sicurezza, l'uso e lo smaltimento. Prima di utilizzare il prodotto, acquisire dimestichezza con tutte le indicazioni relative ai comandi e alla sicurezza. Utilizzare il prodotto solo come descritto e per i campi d'impiego indicati. In caso di cessione del prodotto a terzi, consegnare anche tutta la relativa documentazione. Riduttore Adattatore di aspirazione Volume della fornitura 1 levigatrice a nastro PBSD 600 A1 1 nastro abrasivo per legno (grana 80) 1 sacco della polvere 1 adattatore per aspirazione e giunto di riduzione (per l'aspirazione della polvere esterna) 2 morse a vite 1 manuale di istruzioni per l'uso Dati tecnici Tensione nominale: Uso conforme La levigatrice a nastro - a seconda della carta abrasiva - è predisposta per la levigatura di superfici asciutte in legno, plastica, metallo e mastice nonché di superfici laccate. L'apparecchio può essere utilizzato solo per levigatura a secco. Assicurarsi che per la lavorazione dei diversi materiali si utilizzino fogli abrasivi di grana adeguata e che anche il numero di giri sia adatto al materiale. L'apparecchio non è destinato all'uso commerciale. Qualunque altro impiego o modifica della macchina è da considerarsi non conforme alla destinazione d'uso prevista e può comportare gravi rischi di infortunio. Il produttore non si assume alcuna responsabilità per i danni derivanti da un uso non conforme. Componenti illustrati Interruttore ON/OFF Impugnatura supplementare (superficie d'impugnatura gommata) Copertura anteriore Leva di serraggio per nastro abrasivo Rotella di regolazione velocità nastro Impugnatura (superficie di presa gommata) Vite per regolazione impugnatura Scomparti per morsa a vite Attacco per sacco della polvere Tasto di blocco per interruttore ON/OFF Sacco della polvere Vite di regolazione per andamento nastro Nastro abrasivo Morsa a vite ■ 14 │ IT│MT 230 V ∼ 50 Hz (corrente alternata) Potenza assorbita nominale: 600 W Velocità nastro in folle: 170–250 m / min Numero di giri nominale in folle: n0 360–560 min-1 Nastro abrasivo: 75 x 457 mm Classe di protezione: II / (isolamento doppio) Valore di emissione acustica: Valore misurato relativo al rumore rilevato ai sensi della norma EN 62841. Valori tipici del livello di rumore dell'elettroutensile classificato A: Livello di pressione acustica: LpA = 91 dB (A) Fattore di incertezza: KpA = Livello di potenza acustica: LWA = 102 dB (A) 3 dB Fattore di incertezza: KWA = 3 dB Indossare protezioni acustiche! Valore complessivo delle vibrazioni: Valori totali di vibrazione (somma dei vettori di tre direzioni) rilevati ai sensi della norma EN 62841: Levigatura con platorello: ah = 4,2 m/s2 Fattore di incertezza K = 1,5 m/s2 PBSD 600 A1 NOTA ► Il livello di vibrazioni indicato nelle presenti istruzioni è stato misurato secondo un procedimento di misurazione conforme alla norma EN 62841 e può essere usato per un confronto tra vari apparecchi. Il coefficiente di emissione delle vibrazioni può anche essere usato per una stima introduttiva dell'esposizione. Il coefficiente di emissione delle vibrazioni cambia in base all'uso dell'elettroutensile e in alcuni casi può essere superiore al valore indicato nelle presenti istruzioni. La sollecitazione da vibrazioni potrebbe risultare sottostimata se l'elettroutensile viene utilizzato regolarmente in tal modo. AVVERTENZA! ► Cercare di ridurre il più possibile la sollecitazione da vibrazioni. Provvedimenti adeguati per la riduzione della sollecitazione da vibrazioni prevedono l'uso di guanti durante l'impiego dell'elettroutensile e la limitazione dei tempi di lavoro. Occorre tenere in considerazione tutte le componenti del ciclo di esercizio (per esempio i tempi nei quali l'elettroutensile è spento e i tempi in cui è acceso ma funziona senza carico). Indicazioni generali di sicurezza per elettroutensili AVVERTENZA! ► Osservare tutte le indicazioni relative alla sicurezza, le istruzioni, le illustrazioni e i dati tecnici di cui è dotato questo elettroutensile. Il mancato rispetto delle seguenti istruzioni può causare scosse elettriche, incendi e/o gravi lesioni. Conservare le indicazioni relative alla sicurezza e le istruzioni per uso futuro. PBSD 600 A1 Il termine “elettroutensile” utilizzato nelle indicazioni relative alla sicurezza si riferisce a elettroutensili collegabili alla rete elettrica (con cavo di rete) o a elettroutensili a batteria (senza cavo di rete). 1. Sicurezza sul posto di lavoro a) Mantenere l’area di lavoro pulita e ben illuminata. Il disordine e la scarsa illuminazione dell’area di lavoro potrebbero dare luogo a infortuni. b) Non lavorare con elettroutensili in ambienti a rischio di esplosione, in presenza di liquidi, gas o polveri infiammabili. Gli elettroutensili generano scintille che possono incendiare la polvere o i vapori. c) Tenere lontani i bambini e altre persone durante l’uso dell’elettroutensile. In caso di distrazione, si potrebbe perdere il controllo dell’elettroutensile. 2. Sicurezza elettrica a) La spina dell’elettroutensile deve essere idonea all’inserimento nella presa. La spina non deve essere assolutamente modificata. Non utilizzare connettori adattatori con elettroutensili collegati a terra. Le spine non modificate e le prese idonee riducono il rischio di scosse elettriche. b) Evitare il contatto corporeo con superfici collegate a terra, come tubi, termosifoni, fornelli e frigoriferi. Quando il corpo è a diretto contatto col suolo, sussiste un maggiore pericolo di scosse elettriche. c) Tenere gli elettroutensili lontano dalla pioggia o dall’umidità. La penetrazione di acqua in un apparecchio elettrico aumenta il rischio di scosse elettriche. d) Non utilizzare il cavo di allacciamento per scopi non conformi, come ad es. per trasportare l’elettroutensile, per appenderlo o per scollegare la spina dalla presa. Tenere il cavo di allacciamento lontano dal calore, dall’olio, da angoli acuminati o da parti in movimento. Cavi di allacciamento danneggiati o aggrovigliati aumentano il rischio di scosse elettriche. IT│MT │ 15 ■ e) Se si lavora all’aperto con un elettroutensile, utilizzare solo prolunghe ammesse anche per uso esterno. L’utilizzo di un cavo di prolunga idoneo all’uso esterno riduce il rischio di scosse elettriche. f) Indossare un abbigliamento idoneo. Non indossare abiti larghi o gioielli. Tenere lontani i capelli e gli indumenti dalle parti in movimento. Gli abiti larghi e sciolti, i gioielli o i capelli lunghi possono impigliarsi nelle parti mobili. f) Se è inevitabile l’uso dell’elettroutensile in un ambiente umido, utilizzare un interruttore differenziale. L’uso di un interruttore differenziale evita il rischio di scosse elettriche. g) Se è possibile montare dispositivi aspirapolvere e aspiratrucioli, occorre collegarli e utilizzarli correttamente. L’uso di un aspiratore per polvere può ridurre i pericoli associati alla polvere. 3. Sicurezza delle persone a) Prestare attenzione controllando le operazioni in corso e procedendo con cura quando si lavora con un elettroutensile. Non utilizzare l’elettroutensile se non si è concentrati o riposati a sufficienza, o se si è sotto l’influsso di droghe, alcol o farmaci. Un solo momento di disattenzione nell’uso dell’elettroutensile può dare luogo a gravi lesioni. b) Indossare dispositivi di protezione individuali e sempre occhiali di protezione. L’uso di un dispositivo di protezione individuale come mascherina antipolvere, scarpe antiscivolo, casco protettivo o paraorecchi acustici, a seconda dell’uso e dell’impiego dell’elettroutensile, riduce il rischio di lesioni. c) Evitare l’accensione involontaria. Accertarsi che l’elettroutensile sia spento prima di collegarlo all’alimentazione e/o alla batteria, sollevarlo o trasportarlo. Se si tiene il dito sull’interruttore mentre si sposta l’elettroutensile o si collega l’elettroutensile alla rete elettrica con l’interruttore su ON, si possono verificare infortuni. d) Rimuovere gli utensili di regolazione o le chiavi per dadi prima di accendere l’elettroutensile. Un utensile o una chiave lasciati in una parte rotante dell’elettroutensile possono provocare lesioni. e) Evitare posture innaturali. Provvedere a una posizione sicura e mantenere sempre l’equilibrio. In tal modo si può controllare meglio l’elettroutensile, soprattutto in situazioni impreviste. ■ 16 │ IT│MT h) Anche se si è acquisita dimestichezza con l’apparecchio usandolo spesso, non sentirsi troppo sicuri e non mancare di rispettare le regole sulla sicurezza nell’uso di elettroutensili. Una piccola disattenzione può dare luogo a gravi lesioni in una frazione di secondo. 4. Uso e trattamento dell’elettroutensile a) Non sovraccaricare l’elettroutensile. Utilizzare l’elettroutensile idoneo al proprio lavoro. Con l’elettroutensile adatto si lavora meglio e con maggiore sicurezza nell’intervallo di potenza indicato. b) Non utilizzare elettroutensili con interruttore guasto. Un elettroutensile che non si riesce più a spegnere o ad accendere è pericoloso e deve essere riparato. c) Staccare la spina dalla presa di corrente e/o rimuovere la batteria, se sfilabile, prima di eseguire impostazioni sull’apparecchio, sostituire gli utensili o riporre l’elettroutensile. Questa misura precauzionale consente di impedire l’avvio involontario dell’elettroutensile. d) Conservare gli elettroutensili non utilizzati fuori della portata dei bambini. Non consentire l’uso dell’elettroutensile a persone inesperte o che non abbiano letto le presenti istruzioni. Gli elettroutensili sono pericolosi se utilizzati da persone inesperte. PBSD 600 A1 e) Trattare gli elettroutensili e gli utensili con cura. Controllare che le parti mobili dell’apparecchio funzionino perfettamente e non si inceppino e che non vi siano elementi rotti o danneggiati al punto da compromettere la funzione dell’elettroutensile. Fare riparare le parti danneggiate prima di utilizzare l’elettroutensile. Molti infortuni derivano da una cattiva manutenzione degli elettroutensili. f) Mantenere gli utensili da taglio ben affilati e puliti. Gli utensili da taglio trattati con cura e con bordi di taglio affilati si inceppano meno spesso e sono più facili da controllare. g) Utilizzare elettroutensili, utensili, ecc. conformi a queste istruzioni. Tenere conto delle condizioni di lavoro e dell’attività da eseguire. L’uso di elettroutensili per applicazioni diverse da quelle previste può dare luogo a situazioni di pericolo. h) Mantenere le impugnature e le superfici di presa asciutte, pulite e prive di olio e grasso. Impugnature e superfici di presa scivolose non consentono un controllo e un utilizzo sicuro dell’elettroutensile in situazioni impreviste. 5. Assistenza a) Fare riparare l’elettroutensile solo da personale qualificato specializzato e solo con l’utilizzo di ricambi originali. In tal modo si garantisce la sicurezza dell’elettroutensile. Indicazioni relative alla sicurezza specifiche per levigatrici ■ Afferrare sempre l'apparecchio dal manico isolato, in quanto il nastro abrasivo potrebbe toccare il proprio cavo di rete. Il danneggiamento di una linea che conduce tensione potrebbe mettere sotto tensione anche le parti dell'apparecchio di metallo e causare così una scossa elettrica. PBSD 600 A1 AVVERTENZA! ■ Polveri di materiali come pittura contenente piombo, alcuni tipi di legno e metallo potrebbero essere nocive alla salute. ■ Il contatto con queste polveri o la loro inalazione può rappresentare un pericolo per la salute dell'utente o delle altre persone presenti nell'ambiente di lavoro. ■ Indossare occhiali protettivi e mascherina antipolvere! Messa in funzione Bloccaggio/sostituzione del nastro abrasivo AVVERTENZA! PERICOLO DI LESIONI ■ Staccare sempre la spina dalla presa prima di eseguire lavori sulla levigatrice a nastro. 1. Svitare il dispositivo di serraggio per il nastro abrasivo ribaltando completamente la leva di serraggio . Il nastro abrasivo può venire rimosso. 2. Adesso inserire un nuovo nastro abrasivo o sostituire il nastro abrasivo inserito per lavorare altro materiale o per cambiare la dimensione della grana. IMPORTANTE: La direzione delle frecce presenti all'interno del nastro abrasivo e sull'involucro dell'apparecchio deve coincidere. 3. Portare nuovamente la leva di serraggio alla posizione di partenza. Regolare manualmente il nastro abrasivo : Se l'andamento del nastro dopo l'accensione non è centrato, lo si deve regolare manualmente all'occorrenza. ♦ A tale scopo ruotare la vite di regolazione presente sul rullo anteriore fino a quando il nastro abrasivo non scorre centrato. IMPORTANTE: Badare assolutamente che il nastro abrasivo non si incastri nell'involucro. Controllare periodicamente l'andamento del nastro e regolarlo, se necessario, con la vite di regolazione . IT│MT │ 17 ■ Regolazione impugnatura supplementare È possibile regolare l'impugnatura supplementare in diverse posizioni. ♦ Per regolare l'impugnatura supplementare svitare la vite . ♦ Portare l'impugnatura supplementare posizione desiderata. ♦ Serrare nuovamente la vite nella . Sollevamento della copertura anteriore È possibile sollevare la copertura anteriore per effettuare interventi di levigatura in punti difficilmente raggiungibili (vedi figura). AVVERTENZA! ► La copertura anteriore può venire sollevata solo se anche l'impugnatura supplementare è stata alzata (vedi capitolo "Regolazione impugnatura supplementare"). ♦ Sollevare la copertura anteriore . Applicazione/rimozione dell'aspirazione della polvere AVVERTENZA! PERICOLO DI ESPLOSIONE! ■ In caso di polvere / miscela d'aria esplosiva si deve utilizzare un apposito aspiratore. PERICOLO D'INCENDIO DOVUTO ALLO SVILUPPO DI SCINTILLE! Quando si levigano metalli non utilizzare un dispositivo per l'aspirazione della polvere (sacco della polvere o aspirapolvere). ■ Non lavorare materiali contenenti amianto. L'amianto è considerato cancerogeno. AVVERTENZA! PERICOLO D'INCENDIO! ■ Quando si lavora con apparecchi elettrici dotati di contenitore di raccolta polvere o collegati all'apparecchio tramite un dispositivo di aspirazione della polvere, sussiste il rischio di incendio! In condizioni sfavorevoli, come ad es. la formazione di scintille, la molatura del metallo o in presenza di resti di metallo nel legno, la polvere di legno presente nel contenitore di raccolta polvere (o nel sacchetto filtro dell'aspirapolvere) può incendiarsi. Ciò può succedere in particolare se la polvere di legno è mescolata a resti di vernice o altre sostanze chimiche e il materiale si è surriscaldato dopo un lungo tempo di lavorazione. Evitare pertanto assolutamente il surriscaldamento del materiale e dell'apparecchio e prima delle pause di lavoro svuotare sempre il sacco della polvere o il sacchetto filtro dell'aspirapolvere. ■ Provvedere a una buona ventilazione del luogo di lavoro. ■ Rispettare le norme vigenti nel paese d'impiego inerenti ai materiali da lavorare. ■ Indossare una mascherina antipolvere. Applicazione del sacco della polvere : ♦ Infilare il sacco della polvere dall'alto sull'attacco per il sacco della polvere. ■ 18 │ IT│MT PBSD 600 A1 Smontaggio/rimozione del contenitore di raccolta polvere: ♦ Sfilare il sacco della polvere verso l'alto. Applicazione dell'adattatore di aspirazione e del giunto di riduzione per aspirazione esterna: ♦ Infilare l'adattatore di aspirazione . sull'attacco ♦ Inserire il giunto di riduzione per aspirazione esterna nell'adattatore di aspirazione . ♦ Infilare il tubo flessibile di un impianto di aspirazione polveri omologato (es. di un aspirapolvere da officina) sul giunto di riduzione per aspirazione esterna. Rimozione dell'adattatore di aspirazione e del giunto di riduzione per aspirazione esterna: ♦ Rimuovere il tubo flessibile del dispositivo aspirapolvere. ♦ Sfilare il giunto di riduzione esterna. per aspirazione ♦ Sfilare l'adattatore di aspirazione tirandolo verso l'alto. Processo di levigatura: ■ Collocare l'apparecchio acceso sul pezzo da lavorare e lavorare avanzando moderatamente. Eseguire il processo di levigatura in parallelo e in sovrapposizione alle piste abrasive. Al fine di evitare fastidiose tracce di levigatura trasversali, levigare procedendo solo nella direzione delle fibre. Sollevare l'apparecchio dopo la lavorazione del pezzo e spegnerlo solo in seguito. NOTA ► Durante la lavorazione, afferrare sempre l'apparecchio saldamente con entrambe le mani. Uso Accensione e spegnimento Nell'utilizzo della levigatrice a nastro si può scegliere tra modalità a impulsi e funzionamento in continuo. Attivazione della modalità a impulsi: ♦ Premere l'interruttore ON/OFF dall'attacco Istruzioni operative È sufficiente esercitare una leggera pressione di levigatura: ■ Lavorare con una pressione di levigatura ridotta. Il peso proprio della levigatrice a nastro è sufficiente per ottenere buoni risultati di levigatura. Inoltre lavorando così si limita il logorio del nastro abrasivo e la superficie del pezzo da lavorare risulta più liscia. Asportazione e superficie: ■ La velocità del nastro e lo spessore della grana del nastro abrasivo definiscono la resa dell'asportazione e la finitura della superficie (vedi anche capitolo "Selezione del numero di giri e del nastro abrasivo"). . Disattivazione della modalità a impulsi: ♦ Rilasciare l'interruttore ON/OFF . Attivazione del funzionamento in continuo: ♦ Premere l'interruttore ON/OFF , tenerlo premuto e premere il tasto di blocco . Disattivazione del funzionamento in continuo: ♦ Premere l'interruttore ON / OFF nuovamente. e rilasciarlo Svuotamento del sacco della polvere Durante il funzionamento si consiglia di scaricare il sacco della polvere ogni 10 minuti. ♦ Sfilare il sacco della polvere (vedi capitolo "Applicazione/rimozione dell'aspirazione della polvere") ♦ Per scaricare il sacco della polvere scuoterlo tenendolo sopra un cestino per rifiuti. ♦ Applicare nuovamente il sacco della polvere sull'apparecchio. PBSD 600 A1 IT│MT │ 19 ■ Selezione del numero di giri e del nastro abrasivo Materiale / zona di lavoro Rimozione di vernici e smalti Con la rotella di regolazione velocità nastro è possibile selezionare il numero di giri anche con l'apparecchio in funzione. La velocità ottimale del nastro dipende dal pezzo ossia dal materiale da lavorare. Calcolare il relativo numero di giri più adatto con una prova pratica. Nella seguente tabella sono indicati valori non vincolanti che facilitano il calcolo. Molatura grossolana (grana) 60 Molatura di precisione (grana) –– Preselezione del numero di giri alto (5–6) Materiale / zona di lavoro Legno morbido Materiale / zona di lavoro Levigatura di smalti Molatura grossolana (grana) 60 Molatura grossolana (grana) 150 Molatura di precisione (grana) 240 Molatura di precisione (grana) 320 Preselezione del numero di giri alto (5–6) Preselezione del numero di giri basso (1–2) Materiale / zona di lavoro Legno duro Materiale / zona di lavoro Trattamento antiruggine per acciaio Molatura grossolana (grana) 60 Molatura grossolana (grana) 40 Molatura di precisione (grana) 180 Molatura di precisione (grana) 120 Preselezione del numero di giri alto (5–6) Preselezione del numero di giri medio / alto (3–4) Materiale / zona di lavoro Pannelli di truciolato Materiale / zona di lavoro Materie plastiche Molatura grossolana (grana) 60 Molatura grossolana (grana) 120 Molatura di precisione (grana) 150 Molatura di precisione (grana) 240 Preselezione del numero di giri alto (5–6) Preselezione del numero di giri bassa / media (2–3) ■ 20 │ IT│MT PBSD 600 A1 Materiale / zona di lavoro Metalli non ferrosi (per es. alluminio) Svuotamento/pulizia del sacco della polvere : Molatura grossolana (grana) 80 ♦ Sfilare il sacco della polvere Molatura di precisione (grana) 150 ♦ Svuotare completamente il sacco della polvere battendovi sopra e poi infilare nuovamente il sacco della polvere sull'apparecchio. Preselezione del numero di giri medio / alto (3–4) ♦ Tenere sempre libere le aperture di aerazione. ♦ Eliminare la polvere più attaccata con un pennello. Lavoro stazionario ♦ Portare l'impugnatura supplementare posizione orizzontale. dall'apparecchio. in ♦ Voltare l'elettroutensile come mostrato nella figura A e collocarlo su un piano di lavoro stabile. ♦ Inserire due morse a vite negli appositi scomparti e bloccare saldamente l'elettroutensile. Consigli e suggerimenti ■ Non lavorare mai legno o metallo con lo stesso nastro abrasivo . ■ Nastri abrasivi logorati o rovinati potrebbero danneggiare il pezzo da lavorare. Sostituire pertanto tempestivamente i nastri abrasivi. ■ Conservare sempre i nastri abrasivi tenendoli appesi, in quanto pieghe ecc. li renderebbero inutilizzabili. Smaltimento L'imballaggio è composto da materiali ecocompatibili che possono essere smaltiti tramite gli appositi centri di raccolta e riciclaggio. Non smaltire gli elettrodomestici assieme ai normali rifiuti domestici! In base alla Direttiva europea 2012/19/EU, gli elettrodomestici usati devono essere raccolti separatamente e conferiti a un centro per il riciclaggio ecologico. Per lo smaltimento dell'apparecchio usato, informarsi presso l'amministrazione comunale o municipale. ■ Pulire l'apparecchio subito dopo il termine del lavoro. Smaltire l‘imballaggio conformemente alle norme di tutela ambientale. Tenere conto dei codici presenti sui vari materiali di imballaggio ed eventualmente separare i materiali effettuando una raccolta differenziata. I materiali di imballaggio presentano codici costituiti da abbreviazioni (a) e numeri (b) con il seguente significato: 1–7: materie plastiche, 20–22: carta e cartone, 80–98: materiali compositi ■ Per la pulizia dell'apparecchio utilizzare un panno asciutto; non impiegare in alcun caso benzina, solventi o detergenti in grado di attaccare la plastica. Per lo smaltimento del prodotto una volta che ha terminato la sua funzione, informarsi presso l’amministrazione comunale. Manutenzione e pulizia ATTENZIONE! PERICOLO DI LESIONI! Prima di qualsiasi lavoro sull'apparecchio, spegnere l'apparecchio e staccare la spina. La levigatrice a nastro non necessita di manutenzione. PBSD 600 A1 IT│MT │ 21 ■ Garanzia della Kompernass Handels GmbH Egregio Cliente, Questo apparecchio ha una garanzia di 3 anni dalla data di acquisto. Qualora questo prodotto presentasse vizi, Le spettano diritti legali nei confronti del venditore del prodotto. La garanzia qui di seguito descritta non costituisce alcun limite a tali diritti legali. Condizioni di garanzia Il periodo di garanzia decorre dalla data dell’acquisto. Si prega di conservare lo scontrino di cassa originale. Tale documento è necessario come prova di acquisto. Qualora entro tre anni a partire dalla data dell’acquisto di questo prodotto si presentasse un vizio del materiale o di fabbricazione, provvederemo, a nostra discrezione, a riparare o a sostituire gratuitamente il prodotto. Questa prestazione di garanzia ha come presupposto che l’apparecchio difettoso e la prova di acquisto (scontrino di cassa) vengano presentati entro il termine di tre anni e che si descriva per iscritto in cosa consiste il vizio e quando si è presentato. Se il vizio rientra nell’ambito della nostra garanzia, il Suo prodotto verrà riparato o sostituito da uno nuovo. Con la riparazione o la sostituzione del prodotto non decorre un nuovo periodo di garanzia. Periodo di garanzia e diritti legali di rivendicazione di vizi Il periodo di garanzia non viene prolungato da interventi in garanzia. Ciò vale anche per le parti sostituite e riparate. Danni e vizi eventualmente già presenti al momento dell’acquisto devono venire segnalati immediatamente dopo che l’apparecchio è stato disimballato. Le riparazioni eseguite dopo la scadenza del periodo di garanzia sono a pagamento. Ambito della garanzia L’apparecchio è stato prodotto con cura secondo severe direttive qualitative e debitamente collaudato prima della consegna. ■ 22 │ IT│MT La garanzia viene prestata in caso di vizi del materiale o di fabbricazione. Questa garanzia non si estende a componenti del prodotto che sono esposti al normale logorio e possono pertanto essere considerati come componenti soggetti a usura o a danni che si verificano su componenti delicati, per es. interruttori, batterie, stampi da forno o parti realizzate in vetro. Questa garanzia decade se il prodotto è stato danneggiato oppure utilizzato o sottoposto a interventi di manutenzione in modo non conforme. Per un utilizzo adeguato del prodotto si devono rigorosamente rispettare tutte le istruzioni esposte nel manuale di istruzioni per l’uso. Si devono assolutamente evitare modalità di utilizzo e azioni che il manuale di istruzioni per l’uso sconsiglia o da cui esso mette in guardia. Il prodotto è destinato esclusivamente all’uso domestico e non a quello commerciale. La garanzia decade in caso di impiego improprio o manomissione, uso della forza e interventi non eseguiti dalla nostra filiale di assistenza autorizzata. Trattamento dei casi di garanzia Per garantire una rapida evasione della Sua richiesta, La preghiamo di seguire le seguenti istruzioni: ■ Tenga a portata di mano per qualsiasi richiesta lo scontrino di cassa e il codice dell’articolo (per es. IAN 12345) come prova di acquisto. ■ Il codice dell’articolo è indicato sulla targhetta di modello, su un’incisione, sul frontespizio del manuale di istruzioni per l’uso (in basso a sinistro) o come adesivo sul lato posteriore o inferiore. ■ Qualora si presentassero malfunzionamenti o altri tipi di vizi, contatti innanzitutto il reparto assistenza clienti qui di seguito indicato telefonicamente o via e-mail. ■ Una volta che il prodotto è stato registrato come difettoso, lo può poi spedire a nostro carico, provvedendo ad allegare la prova di acquisto (scontrino di cassa), una descrizione del vizio e l’indicazione della data in cui si è presentato, all’indirizzo del servizio di assistenza clienti che Le è stato comunicato. PBSD 600 A1 Al sito www.lidl-service.com si possono scaricare questo e molti altri manuali di istruzioni per l’uso, filmati sui prodotti e software. Assistenza AVVERTENZA! ■ Fare riparare gli apparecchi dal centro di assistenza o da un elettricista specializzato e solo con pezzi di ricambio originali. In tal modo si garantisce la sicurezza dell'apparecchio. AVVERTENZA! ■ Fare eseguire sempre la sostituzione della spina o del cavo dal produttore dell'apparecchio o dal relativo centro di assistenza. In tal modo si garantisce la sicurezza dell'apparecchio. NOTA ► I pezzi di ricambio non indicati (come ad es. spazzole di carbone, interruttori, sacco della polvere) possono essere ordinati tramite il nostro call center. Assistenza Italia Tel.: 02 36003201 E-Mail: [email protected] Assistenza Malta Tel.: 80062230 E-Mail: [email protected] IAN 315561 Importatore Badi che il seguente indirizzo non è quello del servizio di assistenza clienti. Contatti innanzitutto il servizio di assistenza clienti indicato. KOMPERNASS HANDELS GMBH BURGSTRASSE 21 DE - 44867 BOCHUM GERMANIA www.kompernass.com PBSD 600 A1 IT│MT │ 23 ■ Traduzione della dichiarazione di conformità originale La KOMPERNASS HANDELS GMBH, responsabile della documentazione: nella persona del Sig. Semi Uguzlu, BURGSTR. 21, DE - 44867 BOCHUM, Germania, dichiara con la presente che questo prodotto è conforme alle seguenti norme, documenti normativi e Direttive CE: Direttiva macchine (2006 / 42 / EC) Compatibilità elettromagnetica (2014 / 30 / EU) Direttiva RoHS (2011 / 65 / EU)* *Il produttore è il responsabile esclusivo del rilascio di questa dichiarazione di conformità. L'oggetto della dichiarazione sopra descritto soddisfa le prescrizioni della Direttiva 2011/65/EU del Parlamento Europeo e del Consiglio Europeo dell'8 giugno 2011 sulla restrizione dell'uso di determinate sostanze pericolose nelle apparecchiature elettriche ed elettroniche. Norme armonizzate utilizzate: EN 62841-1:2015 EN 62841-2-4:2014 EN 55014-1:2017 EN 55014-2:2015 EN 61000-3-2:2014 EN 61000-3-3:2013 EN 50581:2012 Denominazione della macchina: Levigatrice a nastro PBSD 600 A1 Anno di produzione: 02 - 2019 Numero di serie: IAN 315561 Bochum, 31/01/2019 Semi Uguzlu - Direttore qualità Con riserva di modifiche tecniche volte al miglioramento del prodotto. ■ 24 │ IT│MT PBSD 600 A1 Contents Introduction . . . . . . . . . . . . . . . . . . . . . . . . . . . . . . . . . . . . . . . . . . . . . . . . . . . . . 26 Intended use . . . . . . . . . . . . . . . . . . . . . . . . . . . . . . . . . . . . . . . . . . . . . . . . . . . . . . . . . . . . . . . Depicted components. . . . . . . . . . . . . . . . . . . . . . . . . . . . . . . . . . . . . . . . . . . . . . . . . . . . . . . . Package contents . . . . . . . . . . . . . . . . . . . . . . . . . . . . . . . . . . . . . . . . . . . . . . . . . . . . . . . . . . . Technical data . . . . . . . . . . . . . . . . . . . . . . . . . . . . . . . . . . . . . . . . . . . . . . . . . . . . . . . . . . . . . 26 26 26 26 General Power Tool Safety Warnings . . . . . . . . . . . . . . . . . . . . . . . . . . . . . . . 27 1. Work area safety . . . . . . . . . . . . . . . . . . . . . . . . . . . . . . . . . . . . . . . . . . . . . . . . . . . . . . . . . 2. Electrical safety . . . . . . . . . . . . . . . . . . . . . . . . . . . . . . . . . . . . . . . . . . . . . . . . . . . . . . . . . . 3. Personal safety . . . . . . . . . . . . . . . . . . . . . . . . . . . . . . . . . . . . . . . . . . . . . . . . . . . . . . . . . . . 4. Power tool use and care . . . . . . . . . . . . . . . . . . . . . . . . . . . . . . . . . . . . . . . . . . . . . . . . . . . 5. Service . . . . . . . . . . . . . . . . . . . . . . . . . . . . . . . . . . . . . . . . . . . . . . . . . . . . . . . . . . . . . . . . . Appliance-specific safety instructions for grinders . . . . . . . . . . . . . . . . . . . . . . . . . . . . . . . . . . 27 27 28 28 29 29 Operation . . . . . . . . . . . . . . . . . . . . . . . . . . . . . . . . . . . . . . . . . . . . . . . . . . . . . . 29 Tensioning/replacing the abrasive belt . . . . . . . . . . . . . . . . . . . . . . . . . . . . . . . . . . . . . . . . . . Adjusting the additional handle . . . . . . . . . . . . . . . . . . . . . . . . . . . . . . . . . . . . . . . . . . . . . . . . Flipping up the front cover . . . . . . . . . . . . . . . . . . . . . . . . . . . . . . . . . . . . . . . . . . . . . . . . . . . . Attaching/removing a dust extraction unit . . . . . . . . . . . . . . . . . . . . . . . . . . . . . . . . . . . . . . . . Working procedures. . . . . . . . . . . . . . . . . . . . . . . . . . . . . . . . . . . . . . . . . . . . . . . . . . . . . . . . . 29 29 30 30 31 Use . . . . . . . . . . . . . . . . . . . . . . . . . . . . . . . . . . . . . . . . . . . . . . . . . . . . . . . . . . . . 31 Switching on and off . . . . . . . . . . . . . . . . . . . . . . . . . . . . . . . . . . . . . . . . . . . . . . . . . . . . . . . . Emptying the dust collector. . . . . . . . . . . . . . . . . . . . . . . . . . . . . . . . . . . . . . . . . . . . . . . . . . . . Selecting speed and abrasive belt . . . . . . . . . . . . . . . . . . . . . . . . . . . . . . . . . . . . . . . . . . . . . . Stationary work . . . . . . . . . . . . . . . . . . . . . . . . . . . . . . . . . . . . . . . . . . . . . . . . . . . . . . . . . . . . Tips and tricks . . . . . . . . . . . . . . . . . . . . . . . . . . . . . . . . . . . . . . . . . . . . . . . . . . . . . . . . . . . . . . 31 31 32 32 33 Maintenance and cleaning. . . . . . . . . . . . . . . . . . . . . . . . . . . . . . . . . . . . . . . . . 33 Disposal . . . . . . . . . . . . . . . . . . . . . . . . . . . . . . . . . . . . . . . . . . . . . . . . . . . . . . . . 33 Kompernass Handels GmbH warranty . . . . . . . . . . . . . . . . . . . . . . . . . . . . . . 34 Service . . . . . . . . . . . . . . . . . . . . . . . . . . . . . . . . . . . . . . . . . . . . . . . . . . . . . . . . . 35 Importer . . . . . . . . . . . . . . . . . . . . . . . . . . . . . . . . . . . . . . . . . . . . . . . . . . . . . . . 35 Translation of the original Conformity Declaration . . . . . . . . . . . . . . . . . . . . . 36 PBSD 600 A1 GB│MT │ 25 ■ BELT SANDER PBSD 600 A1 Introduction Package contents Congratulations on the purchase of your new appliance. You have chosen a high-quality product. The operating instructions are part of this product. They contain important information about safety, usage and disposal. Before using the product, please familiarise yourself with all operating and safety instructions. Use the product only as described and for the range of applications specified. Please also pass these operating instructions on to any future owner. 1 abrasive belt for wood (grain 80) Intended use 1 belt sander PBSD 600 A1 1 dust collector 1 dust extraction adapter and reducer (for external dust extraction) 2 screw clamps 1 set of operating instructions Technical data Rated voltage: 230 V ∼50 Hz (AC) The belt grinder is designed for the dry surface sanding of wood, plastic, metal and plaster and painted surfaces (depending on the type of sandpaper used). The appliance may only be used for dry sanding. Please note that you need to use appropriate abrasive belts with different grains for working different materials, and that you may need to adapt the speed to suit the material. The appliance is not intended for commercial use. Any other use of or modification to the appliance is deemed to be improper and carries the risk of serious personal injury. The manufacturer accepts no responsibility for damage(s) attributable to misuse. Rated power consumption: 600 W Idling belt speed: 170–250 m/min Sound pressure level: LpA = Depicted components Uncertainty: KpA = ON/OFF switch Additional handle (rubberised grip) Front cover Clamping lever for abrasive belt Belt speed adjusting wheel Handle (rubberised grip) Screw for adjusting the handle Recesses for screw clamps Connection for dust collector Locking button for ON/OFF switch Dust collector Adjustment screw for belt tracking Abrasive belt Screw clamp Reducer Dust extraction adapter ■ 26 │ GB│MT n0 360–560 rpm Rated idling speed: Abrasive belt: 75 x 457 mm Protection class: II / (double insulation) Noise emission value: Noise measurement value determined in accordance with EN 62841. The A-rated noise level of the power tool is typically as follows: 91 dB (A) 3 dB Sound power level: LWA = 102 dB (A) Uncertainty: KWA = 3 dB Wear hearing protection! Total vibration value: Total vibration value (vector total of three directions) determined in accordance with EN 62841: Grinding with the grinding disc:ah = 4.2 m/s2 Uncertainty K = 1.5 m/s2 PBSD 600 A1 NOTE ► The vibration level specified in these instructions has been measured in accordance with the standardised measuring procedure specified in EN 62841 and can be used to make equipment comparisons. The specified vibration emission value can also be used to make an initial exposure estimate. The vibration emission value varies in accordance with the use of the power tool and may be higher than the value specified in these instructions in some cases. Regular use of the power tool in this way may cause the user to underestimate the vibration. WARNING! ► Try to keep the vibration loads as low as possible. Measures to reduce the vibration load are, e.g. wearing gloves and limiting the working time. This applies to all states of operation (e.g. times when the power tool is switched off and times where the power tool is switched on but running without load). General Power Tool Safety Warnings WARNING! ► Read all safety warnings, instructions, illustrations and specifications provided with this power tool. Failure to follow all instructions listed below may result in electric shock, fire and/or serious injury. Save all warnings and instructions for future reference. The term „power tool“ in the warnings refers to your mains-operated (corded) power tool or battery-operated (cordless) power tool. 1. Work area safety a) Keep work area clean and well lit. Cluttered or dark areas invite accidents. b) Do not operate power tools in explosive atmospheres, such as in the presence of flammable liquids, gases or dust. Power tools create sparks which may ignite the dust or fumes. c) Keep children and bystanders away while operating a power tool. Distractions can cause you to lose control. 2. Electrical safety a) Power tool plugs must match the outlet. Never modify the plug in any way. Do not use any adapter plugs with earthed (grounded) power tools. Unmodified plugs and matching outlets will reduce risk of electric shock. b) Avoid body contact with earthed or grounded surfaces, such as pipes, radiators, ranges and refrigerators. There is an increased risk of electric shock if your body is earthed or grounded. c) Do not expose power tools to rain or wet conditions. Water entering a power tool will increase the risk of electric shock. PBSD 600 A1 GB│MT │ 27 ■ d) Do not abuse the cord. Never use the cord for carrying, pulling or unplugging the power tool. Keep cord away from heat, oil, sharp edges or moving parts. Damaged or entangled cords increase the risk of electric shock. g) If devices are provided for the connection of dust extraction and collection facilities, ensure these are connected and properly used. Use of dust collection can reduce dust-related hazards. e) When operating a power tool outdoors, use an extension cord suitable for outdoor use. Use of a cord suitable for outdoor use reduces the risk of electric shock. h) Do not let familiarity gained from frequent use of tools allow you to become complacent and ignore tool safety principles. A careless action can cause severe injury within a fraction of a second. f) If operating a power tool in a damp location is unavoidable, use a residual current device (RCD) protected supply. Use of an RCD reduces the risk of electric shock. 3. Personal safety a) Stay alert, watch what you are doing and use common sense when operating a power tool. Do not use a power tool while you are tired or under the influence of drugs, alcohol or medication. A moment of inattention while operating power tools may result in serious personal injury. b) Use personal protective equipment. Always wear eye protection. Protective equipment such as a dust mask, non-skid safety shoes, hard hat or hearing protection used for appropriate conditions will reduce personal injuries. c) Prevent unintentional starting. Ensure the switch is in the off-position before connecting to power source and/or battery pack, picking up or carrying the tool. Carrying power tools with your finger on the switch or energising power tools that have the switch on invites accidents. d) Remove any adjusting key or wrench before turning the power tool on. A wrench or a key left attached to a rotating part of the power tool may result in personal injury. e) Do not overreach. Keep proper footing and balance at all times. This enables better control of the power tool in unexpected situations. f) Dress properly. Do not wear loose clothing or jewellery. Keep your hair and clothing away from moving parts. Loose clothes, jewellery or long hair can be caught in moving parts. ■ 28 │ GB│MT 4. Power tool use and care a) Do not force the power tool. Use the correct power tool for your application. The correct power tool will do the job better and safer at the rate for which it was designed. b) Do not use the power tool if the switch does not turn it on and off. Any power tool that cannot be controlled with the switch is dangerous and must be repaired. c) Disconnect the plug from the power source and/or remove the battery pack, if detachable, from the power tool before making any adjustments, changing accessories, or storing power tools. Such preventive safety measures reduce the risk of starting the power tool accidentally. d) Store idle power tools out of the reach of children and do not allow persons unfamiliar with the power tool or these instructions to operate the power tool. Power tools are dangerous in the hands of untrained users. e) Maintain power tools and accessories. Check for misalignment or binding of moving parts, breakage of parts and any other condition that may affect the power tool’s operation. If damaged, have the power tool repaired before use. Many accidents are caused by poorly maintained power tools. f) Keep cutting tools sharp and clean. Properly maintained cutting tools with sharp cutting edges are less likely to bind and are easier to control. PBSD 600 A1 g) Use the power tool, accessories and tool bits etc. in accordance with these instructions, taking into account the working conditions and the work to be performed. Use of the power tool for operations different from those intended could result in a hazardous situation. h) Keep handles and grasping surfaces dry, clean and free from oil and grease. Slippery handles and grasping surfaces do not allow for safe handling and control of the tool in unexpected situations. 5. Service a) Have your power tool serviced by a qualified repair person using only identical replacement parts. This will ensure that the safety of the power tool is maintained. Appliance-specific safety instructions for grinders ■ Hold the appliance by the insulated handles as the abrasive belt can come into contact with its own power cable. Damage to a live wire may make exposed metal parts of the power tool live and could give the operator an electric shock. WARNING! ■ Dusts from materials such as leaded paint, some types of wood and metal can be harmful to your health. ■ Contact with or inhalation of these dusts can represent a health hazard for the person operating the appliance and other people in the vicinity. ■ Wear safety goggles and a protective dust mask! Operation Tensioning/replacing the abrasive belt WARNING! RISK OF INJURY ■ Always remove the power plug from the wall socket before carrying out any work on the belt grinder. 1. Loosen the clamping device for the abrasive belt by swivelling the clamping lever all the way out. The abrasive belt can now be removed. 2. Now fit a new abrasive belt or swap the belt to work on a different material or to use a different grain size. IMPORTANT: The direction of the arrows on the inside of the abrasive belt and on the appliance housing must match. back into its initial 3. Push the clamping lever position. If the belt tracking is not centred when you switch on the appliance, you may need to manually adjust it. ♦ To do this, turn the adjusting screw on the front roller until the abrasive belt is running centred. IMPORTANT: It is important to ensure that the abrasive belt does not rub against the housing. Check the belt tracking regularly and adjust it with the adjusting screw if required . Adjusting the additional handle You can position the additional handle different positions. in several ♦ To reposition the additional handle screw . undo the ♦ Move the additional handle position. ♦ Retighten the screw PBSD 600 A1 : Manually adjusting the abrasive belt to the required . GB│MT │ 29 ■ Flipping up the front cover You can flip up the front cover reach areas (see illustration). to grind in hard-to- ■ Ensure that your workplace is adequately ventilated. WARNING! ► The front cover can only be flipped upwards if the additional handle is also positioned upwards (see section "Adjusting the additional handle"). ♦ Flip up the front cover WARNING! RISK OF FIRE! ■ When working with power tools which have a dust collector or can be connected to a vacuum cleaner via a vacuum cleaner adapter, there is a risk of fire! In unfavourable conditions, e.g. when sparks are flying while sanding metal or metal residues in wood, wood dust in the dust collector (or the bag of the vacuum cleaner) can spontaneously ignite. This is a particular risk if the wood dust is mixed with paint residues or other chemicals and the workpiece has become hot after being worked for a long time. Therefore, do not allow the workpiece to overheat and always empty the dust box or the dust bag of the vacuum cleaner before taking a break from work. . Attaching/removing a dust extraction unit WARNING! RISK OF EXPLOSION! ■ If there is an explosive dust/air mixture, you must use a specially designed extraction appliance. RISK OF FIRE DUE TO FLYING SPARKS! Do not use dust extraction systems (dust collector or vacuum cleaner) when grinding metals. ■ Materials containing asbestos must not be processed. Asbestos is a known carcinogen. ■ Observe the regulations applicable in your country regarding the materials to be worked. ■ Wear a dust mask. Fitting the dust collector : ♦ Push the dust collector onto the dust collector connection from above. Dismantling/removing the dust collector: ♦ Pull the dust collector off upwards. Connecting a dust extraction adapter and reducer for an external extraction appliance: ♦ Push the dust extraction adapter connection . onto the ♦ Push the reducer for the dust extraction adapter into the adapter fitting . ♦ Push the hose from a suitable dust extraction appliance (e.g. a workshop vacuum cleaner) onto the reducer for external vacuum extraction. ■ 30 │ GB│MT PBSD 600 A1 Removing the dust extraction adapter and reducer for an external extraction appliance: Use ♦ Pull off the hose of the dust extraction appliance. Switching on and off ♦ Remove the reducer tion. for external dust extrac- ♦ Pull the dust extraction adapter the connection . While operating the belt grinder, you can choose between instantaneous and continuous operation. Switching to instantaneous operation: upwards off Working procedures A light grinding pressure is sufficient: ■ Apply minimal pressure when grinding. The belt grinder's own weight is sufficient for a good grinding result. In addition, working this way helps to reduce the wear on the abrasive belt and the surface of the workpiece will become more smooth. Removal and surface: ■ The material removal rate and surface quality are determined by the belt speed and grain strength of the abrasive belt (see also the section "Selecting speed and abrasive belt"). Grinding: ■ Place the appliance on the workpiece when switched on and work at a moderate feed rate. Guide the grinder in parallel and overlapping sanding motions over the workpiece. To avoid unpleasant transverse grinding marks, always sand in the direction of the grain. After completing the task, lift the appliance from the workpiece and then switch it off. ♦ Press the ON/OFF switch . Switching off instantaneous operation: ♦ Release the ON/OFF switch . Switching to continuous operation: ♦ Press the ON/OFF switch , keep it pressed in and then press the lock button . Switching off continuous operation: ♦ Press the ON/OFF switch it. and then release Emptying the dust collector The dust collector should be emptied after every 10 minutes of operation at least. ♦ Pull the dust collector off (see section "Attaching/removing a dust extraction unit") ♦ Shake the dust collector to empty it. ♦ Fit the dust collector ance. over a rubbish bin back onto the appli- NOTE ► Always hold the appliance firmly with two hands while working. PBSD 600 A1 GB│MT │ 31 ■ Selecting speed and abrasive belt You can use the belt speed adjusting wheel to adjust the speed, even while the appliance is running. The optimum belt speed is dependent on the workpiece or material being processed. We recommend carrying out a practice run to determine the correct speed. In the table below, you will find some recommended values which will help you determine which belt and speed to use for which job. Material/working area Softwood Rough sanding (grain size) 60 Material/working area Rubbing down paintwork/varnish Rough sanding (grain size) 150 Finishing (grain size) 320 Speed preselection low (1–2) Material/working area Removing rust from steel Rough sanding (grain size) 40 Finishing (grain size) 120 Speed preselection medium/high (3–4) Finishing (grain size) 240 Speed preselection high (5–6) Hardwood Material/working area Plastics Material/working area 60 Rough sanding (grain size) 120 Rough sanding (grain size) Finishing (grain size) 240 Finishing (grain size) 180 Speed preselection low/medium (2–3) Speed preselection high (5–6) Material/working area Chipboard Material/working area Non-ferrous metals (e.g. aluminium) Rough sanding (grain size) 60 Rough sanding (grain size) 80 Finishing (grain size) 150 Finishing (grain size) 150 Speed preselection high (5–6) Speed preselection medium/high (3–4) Material/working area Removing paint/ varnish Rough sanding (grain size) 60 Finishing (grain size) –– Speed preselection high (5–6) Stationary work ■ 32 │ GB│MT ♦ Turn the additional handle position. to the horizontal ♦ Turn the power tool as shown in the illustration and place it on a stable worktop. ♦ Fit the two screw clamps in the recesses provided and clamp the power tool tightly. PBSD 600 A1 Tips and tricks Disposal ■ Never use the same abrasive belt wood and metal. to work ■ Worn or cracked abrasive belts can damage the workpiece. Therefore, be sure to replace worn abrasive belts before starting work. ■ Always hang up the abrasive belts to store them, as kinks etc. can make them unusable. Maintenance and cleaning WARNING! RISK OF INJURY! Switch off the appliance and pull out the power plug before starting any work on the appliance. The belt grinder is maintenance-free. ■ Always clean the appliance directly after finishing work. ■ Use a dry cloth to clean the housing. Under no circumstances should you use fuel, detergents, solvents or abrasive cleaners. Emptying/cleaning the dust collector ♦ Pull the dust collector : off the appliance. ♦ Empty the dust collector completely by knocking out the contents and then push the dust collector back onto the appliance. ♦ Ensure ventilation openings are always free. ♦ Remove any adhering grinding dust with a brush. PBSD 600 A1 The packaging is made from environmentally friendly material and can be disposed of at your local recycling plant. Do not dispose of power tools in your normal domestic waste! European Directive 2012/19/EU requires that worn-out power tools be collected separately and recycled in an environmentally compatible manner. Your local community or municipal authorities can provide information on how to dispose of the appliance. Dispose of the packaging in an environmentally friendly manner. Note the labelling on the packaging and separate the packaging material components for disposal if necessary. The packaging material is labelled with abbreviations (a) and numbers (b) with the following meanings: 1–7: Plastics, 20–22: Paper and cardboard, 80–98: Composites Your local community or municipal authorities can provide information on how to dispose of the worn-out product. GB│MT │ 33 ■ Kompernass Handels GmbH warranty Dear Customer, This appliance has a 3-year warranty valid from the date of purchase. If this product has any faults, you, the buyer, have certain statutory rights. Your statutory rights are not restricted in any way by the warranty described below. Warranty conditions The validity period of the warranty starts from the date of purchase. Please keep your original receipt in a safe place. This document will be required as proof of purchase. If any material or production fault occurs within three years of the date of purchase of the product, we will either repair or replace the product for you at our discretion. This warranty service is dependent on you presenting the defective appliance and the proof of purchase (receipt) and a short written description of the fault and its time of occurrence. If the defect is covered by the warranty, your product will either be repaired or replaced by us. The repair or replacement of a product does not signify the beginning of a new warranty period. Scope of the warranty This appliance has been manufactured in accordance with strict quality guidelines and inspected meticulously prior to delivery. The warranty covers material faults or production faults. The warranty does not extend to product parts subject to normal wear and tear or fragile parts such as switches, batteries, baking moulds or parts made of glass. The warranty does not apply if the product has been damaged, improperly used or improperly maintained. The directions in the operating instructions for the product regarding proper use of the product are to be strictly followed. Uses and actions that are discouraged in the operating instructions or which are warned against must be avoided. This product is intended solely for private use and not for commercial purposes. The warranty shall be deemed void in cases of misuse or improper handling, use of force and modifications/repairs which have not been carried out by one of our authorised Service centres. Warranty claim procedure To ensure quick processing of your case, please observe the following instructions: Warranty period and statutory claims for defects ■ Please have the till receipt and the item number (e.g. IAN 12345) available as proof of purchase. The warranty period is not prolonged by repairs effected under the warranty. This also applies to replaced and repaired components. Any damage and defects present at the time of purchase must be reported immediately after unpacking. Repairs carried out after expiry of the warranty period shall be subject to a fee. ■ You will find the item number on the type plate, an engraving on the front page of the instructions (bottom left), or as a sticker on the rear or bottom of the appliance. ■ If functional or other defects occur, please contact the service department listed either by telephone or by e-mail. ■ You can return a defective product to us free of charge to the service address that will be provided to you. Ensure that you enclose the proof of purchase (till receipt) and information about what the defect is and when it occurred. You can download these instructions along with many other manuals, product videos and software on www.lidl-service.com. ■ 34 │ GB│MT PBSD 600 A1 Service WARNING! ■ Have the power tool repaired by the service centre or a qualified electrician and only using genuine replacement parts. This will ensure that the safety of the appliance is maintained. WARNING! ■ Always ensure that the power plug or the mains cable is replaced only by the manufacturer of the appliance or by an approved customer service provider. This will ensure that the safety of the appliance is maintained. NOTE ► Replacement parts not listed (such as carbon brushes, switches, dust collector) can be ordered via our service hotline. Service Great Britain Tel.: 0800 404 7657 E-Mail: [email protected] Service Malta Tel.: 80062230 E-Mail: [email protected] IAN 315561 Importer Please note that the following address is not the service address. Please use the service address provided in the operating instructions. KOMPERNASS HANDELS GMBH BURGSTRASSE 21 DE - 44867 BOCHUM GERMANY www.kompernass.com PBSD 600 A1 GB│MT │ 35 ■ Translation of the original Conformity Declaration We, KOMPERNASS HANDELS GMBH, documents officer: Mr. Semi Uguzlu, BURGSTR. 21, DE-44867 BOCHUM, GERMANY, hereby declare that this product complies with the following standards, normative documents and EC directives: Machinery Directive (2006/42/EC) EMC (Electromagnetic Compatibility) (2014/30/EU) RoHS Directive (2011 / 65 / EU)* *The manufacturer bears the full responsibility for compliance with this conformity declaration. The object of the declaration described above complies with the requirements of the Directive 2011/65/EU of the European Parliament and Council of 8 June 2011 on the limitations of use of certain dangerous substances in electrical and electronic appliances. Applied harmonised standards: EN 62841-1:2015 EN 62841-2-4:2014 EN 55014-1:2017 EN 55014-2:2015 EN 61000-3-2:2014 EN 61000-3-3:2013 EN 50581:2012 Type designation of machine: Belt sander PBSD 600 A1 Year of manufacture: 02 - 2019 Serial number: IAN 315561 Bochum, 31/01/2019 Semi Uguzlu - Quality Manager We reserve the right to make technical changes in the context of further product development. ■ 36 │ GB│MT PBSD 600 A1 Inhaltsverzeichnis Einleitung . . . . . . . . . . . . . . . . . . . . . . . . . . . . . . . . . . . . . . . . . . . . . . . . . . . . . . . 38 Bestimmungsgemäßer Gebrauch . . . . . . . . . . . . . . . . . . . . . . . . . . . . . . . . . . . . . . . . . . . . . . . Abgebildete Komponenten . . . . . . . . . . . . . . . . . . . . . . . . . . . . . . . . . . . . . . . . . . . . . . . . . . . Lieferumfang . . . . . . . . . . . . . . . . . . . . . . . . . . . . . . . . . . . . . . . . . . . . . . . . . . . . . . . . . . . . . . . Technische Daten . . . . . . . . . . . . . . . . . . . . . . . . . . . . . . . . . . . . . . . . . . . . . . . . . . . . . . . . . . . 38 38 38 38 Allgemeine Sicherheitshinweise für Elektrowerkzeuge . . . . . . . . . . . . . . . . . . 39 1. Arbeitsplatzsicherheit . . . . . . . . . . . . . . . . . . . . . . . . . . . . . . . . . . . . . . . . . . . . . . . . . . . . . . 2. Elektrische Sicherheit . . . . . . . . . . . . . . . . . . . . . . . . . . . . . . . . . . . . . . . . . . . . . . . . . . . . . . 3. Sicherheit von Personen . . . . . . . . . . . . . . . . . . . . . . . . . . . . . . . . . . . . . . . . . . . . . . . . . . . . 4. Verwendung und Behandlung des Elektrowerkzeugs . . . . . . . . . . . . . . . . . . . . . . . . . . . . . 5. Service . . . . . . . . . . . . . . . . . . . . . . . . . . . . . . . . . . . . . . . . . . . . . . . . . . . . . . . . . . . . . . . . . Gerätespezifische Sicherheitshinweise für Schleifer . . . . . . . . . . . . . . . . . . . . . . . . . . . . . . . . . . 39 39 40 40 41 41 Inbetriebnahme . . . . . . . . . . . . . . . . . . . . . . . . . . . . . . . . . . . . . . . . . . . . . . . . . 41 Schleifband einspannen /wechseln . . . . . . . . . . . . . . . . . . . . . . . . . . . . . . . . . . . . . . . . . . . . . Zusatzhandgriff einstellen. . . . . . . . . . . . . . . . . . . . . . . . . . . . . . . . . . . . . . . . . . . . . . . . . . . . . Frontabdeckung hochklappen . . . . . . . . . . . . . . . . . . . . . . . . . . . . . . . . . . . . . . . . . . . . . . . . . Staubabsaugung anbringen/entfernen . . . . . . . . . . . . . . . . . . . . . . . . . . . . . . . . . . . . . . . . . . Arbeitshinweise. . . . . . . . . . . . . . . . . . . . . . . . . . . . . . . . . . . . . . . . . . . . . . . . . . . . . . . . . . . . . 41 42 42 42 43 Bedienung . . . . . . . . . . . . . . . . . . . . . . . . . . . . . . . . . . . . . . . . . . . . . . . . . . . . . . 43 Ein- und ausschalten . . . . . . . . . . . . . . . . . . . . . . . . . . . . . . . . . . . . . . . . . . . . . . . . . . . . . . . . . Staubbox entleeren . . . . . . . . . . . . . . . . . . . . . . . . . . . . . . . . . . . . . . . . . . . . . . . . . . . . . . . . . Drehzahl und Schleifband wählen . . . . . . . . . . . . . . . . . . . . . . . . . . . . . . . . . . . . . . . . . . . . . . Stationäres Arbeiten . . . . . . . . . . . . . . . . . . . . . . . . . . . . . . . . . . . . . . . . . . . . . . . . . . . . . . . . . Tipps und Tricks . . . . . . . . . . . . . . . . . . . . . . . . . . . . . . . . . . . . . . . . . . . . . . . . . . . . . . . . . . . . 43 43 44 44 44 Wartung und Reinigung . . . . . . . . . . . . . . . . . . . . . . . . . . . . . . . . . . . . . . . . . . . 45 Entsorgung . . . . . . . . . . . . . . . . . . . . . . . . . . . . . . . . . . . . . . . . . . . . . . . . . . . . . 45 Garantie der Kompernaß Handels GmbH . . . . . . . . . . . . . . . . . . . . . . . . . . . . 46 Service . . . . . . . . . . . . . . . . . . . . . . . . . . . . . . . . . . . . . . . . . . . . . . . . . . . . . . . . . 47 Importeur . . . . . . . . . . . . . . . . . . . . . . . . . . . . . . . . . . . . . . . . . . . . . . . . . . . . . . 47 Original-Konformitätserklärung . . . . . . . . . . . . . . . . . . . . . . . . . . . . . . . . . . . . 48 PBSD 600 A1 DE│AT│CH │ 37 ■ BANDSCHLEIFER PBSD 600 A1 Einleitung Lieferumfang Wir beglückwünschen Sie zum Kauf Ihres neuen Gerätes. Sie haben sich damit für ein hochwertiges Produkt entschieden. Die Bedienungsanleitung ist Teil dieses Produkts. Sie enthält wichtige Hinweise für Sicherheit, Gebrauch und Entsorgung. Machen Sie sich vor der Benutzung des Produkts mit allen Bedienund Sicherheitshinweisen vertraut. Benutzen Sie das Produkt nur wie beschrieben und für die angegebenen Einsatzbereiche. Händigen Sie alle Unterlagen bei Weitergabe des Produkts an Dritte mit aus. 1 Schleifband für Holz (Körnung 80) 1 Bandschleifer PBSD 600 A1 1 Staubbox 1 Absaugadapter und Reduzierstück (zur externen Staubabsaugung) 2 Schraubzwingen 1 Bedienungsanleitung Technische Daten Bemessungsspannung: 230 V ∼ 50 Hz (Wechselstrom) Der Bandschleifer ist - je nach Schleifpapier - für trockenes Flächenschleifen von Holz, Kunststoff, Metall und Spachtelmasse sowie lackierten Oberflächen ausgelegt. Das Gerät darf nur für Trockenschliff verwendet werden. Beachten Sie bitte, dass Sie zur Bearbeitung der verschiedenen Materialien entsprechende Schleifblätter mit unterschiedlicher Körnung einsetzen und die Drehzahl ebenfalls dem Material anpassen. Das Gerät ist nicht für den gewerblichen Einsatz bestimmt. Jede andere Verwendung oder Veränderung der Maschine gilt als nicht bestimmungsgemäß und birgt erhebliche Unfallgefahren. Für aus bestimmungswidriger Verwendung entstandene Schäden übernimmt der Hersteller keine Haftung. Bemessungsaufnahme: 600 W LeerlaufBandgeschwindigkeit: 170–250 m / min Schalldruckpegel: Abgebildete Komponenten LpA = 91 dB (A) Unsicherheit: KpA = 3 dB Schallleistungspegel: LWA = 102 dB (A) Unsicherheit: KWA = 3 dB Bestimmungsgemäßer Gebrauch EIN- / AUS-Schalter Zusatzhandgriff (Gummierte Grifffläche) Frontabdeckung Spannhebel für Schleifband Stellrad Bandgeschwindigkeit Handgriff (Gummierte Grifffläche) Schraube für Handgriffverstellung Aussparungen für Schraubzwinge Anschluss für Staubbox Feststelltaste für EIN- / AUS-Schalter Staubbox Justierschraube für Bandlauf Schleifband Schraubzwinge Reduzierstück Absaugadapter ■ 38 │ DE│AT│CH BemessungsLeerlaufdrehzahl: n0 360–560 min-1 Schleifband: 75 x 457 mm Schutzklasse: II / (Doppelisolierung) Geräuschemissionswert: Messwert für Geräusch ermittelt entsprechend EN 62841. Der A-bewertete Geräuschpegel des Elektrowerkzeugs beträgt typischerweise: Gehörschutz tragen! Schwingungsgesamtwert: Schwingungsgesamtwerte (Vektorsumme dreier Richtungen) ermittelt entsprechend EN 62841: Schleifen mit Schleifteller: ah = 4,2 m/s2 Unsicherheit K = 1,5 m/s2 PBSD 600 A1 HINWEIS ► Der in diesen Anweisungen angegebene Schwingungspegel ist entsprechend einem in EN 62841 genormten Messverfahren gemessen worden und kann für den Gerätevergleich verwendet werden. Der angegebene Schwingungsemissionswert kann auch zu einer einleitenden Einschätzung der Aussetzung verwendet werden. Der Schwingungsemissionswert wird sich entsprechend dem Einsatz des Elektrowerkzeugs verändern und kann in manchen Fällen über dem in diesen Anweisungen angegebenen Wert liegen. Die Schwingungsbelastung könnte unterschätzt werden, wenn das Elektrowerkzeug regelmäßig in solcher Weise verwendet wird. WARNUNG! ► Versuchen Sie, die Belastung durch Vibrationen so gering wie möglich zu halten. Beispielhafte Maßnahmen zur Verringerung der Vibrationsbelastung sind das Tragen von Handschuhen beim Gebrauch des Werkzeugs und die Begrenzung der Arbeitszeit. Dabei sind alle Anteile des Betriebszyklus zu berücksichtigen (Beispielsweise Zeiten, in denen das Elektrowerkzeug abgeschaltet ist, und solche, in denen es zwar eingeschaltet ist, aber ohne Belastung läuft). Allgemeine Sicherheitshinweise für Elektrowerkzeuge WARNUNG! ► Lesen Sie alle Sicherheitshinweise, Anweisungen, Bebilderungen und technischen Daten, mit denen dieses Elektrowerkzeug versehen ist. Versäumnisse bei der Einhaltung der nachfolgenden Anweisungen können elektrischen Schlag, Brand und/oder schwere Verletzungen verursachen. Bewahren Sie alle Sicherheitshinweise und Anweisungen für die Zukunft auf. Der in den Sicherheitshinweisen verwendete Begriff „Elektrowerkzeug“ bezieht sich auf netzbetriebene Elektrowerkzeuge (mit Netzleitung) und auf akkubetriebene Elektrowerkzeuge (ohne Netzleitung). 1. Arbeitsplatzsicherheit a) Halten Sie Ihren Arbeitsbereich sauber und gut beleuchtet. Unordnung und unbeleuchtete Arbeitsbereiche können zu Unfällen führen. b) Arbeiten Sie mit dem Elektrowerkzeug nicht in explosionsgefährdeter Umgebung, in der sich brennbare Flüssigkeiten, Gase oder Stäube befinden. Elektrowerkzeuge erzeugen Funken, die den Staub oder die Dämpfe entzünden können. c) Halten Sie Kinder und andere Personen während der Benutzung des Elektrowerkzeugs fern. Bei Ablenkung können Sie die Kontrolle über das Elektrowerkzeug verlieren. 2. Elektrische Sicherheit a) Der Anschlussstecker des Elektrowerkzeugs muss in die Steckdose passen. Der Stecker darf in keiner Weise verändert werden. Verwenden Sie keine Adapterstecker gemeinsam mit schutzgeerdeten Elektrowerkzeugen. Unveränderte Stecker und passende Steckdosen verringern das Risiko eines elektrischen Schlages. PBSD 600 A1 DE│AT│CH │ 39 ■ b) Vermeiden Sie Körperkontakt mit geerdeten Oberflächen wie von Rohren, Heizungen, Herden und Kühlschränken. Es besteht ein erhöhtes Risiko durch elektrischen Schlag, wenn Ihr Körper geerdet ist. c) Halten Sie Elektrowerkzeuge von Regen oder Nässe fern. Das Eindringen von Wasser in ein Elektrowerkzeug erhöht das Risiko eines elektrischen Schlages. d) Zweckentfremden Sie die Anschlussleitung nicht, um das Elektrowerkzeug zu tragen, aufzuhängen oder um den Stecker aus der Steckdose zu ziehen. Halten Sie die Anschlussleitung fern von Hitze, Öl, scharfen Kanten oder sich bewegenden Teilen. Beschädigte oder verwickelte Anschlussleitungen erhöhen das Risiko eines elektrischen Schlages. e) Wenn Sie mit einem Elektrowerkzeug im Freien arbeiten, verwenden Sie nur Verlängerungsleitungen, die auch für den Außenbereich zugelassen sind. Die Anwendung einer für den Außenbereich geeigneten Verlängerungsleitung verringert das Risiko eines elektrischen Schlages. f) Wenn der Betrieb des Elektrowerkzeugs in feuchter Umgebung nicht vermeidbar ist, verwenden Sie einen Fehlerstromschutzschalter. Der Einsatz eines Fehlerstromschutzschalters vermindert das Risiko eines elektrischen Schlages. 3. Sicherheit von Personen a) Seien Sie aufmerksam, achten Sie darauf, was Sie tun, und gehen Sie mit Vernunft an die Arbeit mit einem Elektrowerkzeug. Benutzen Sie kein Elektrowerkzeug, wenn Sie müde sind oder unter dem Einfluss von Drogen, Alkohol oder Medikamenten stehen. Ein Moment der Unachtsamkeit beim Gebrauch des Elektrowerkzeugs kann zu ernsthaften Verletzungen führen. b) Tragen Sie persönliche Schutzausrüstung und immer eine Schutzbrille. Das Tragen persönlicher Schutzausrüstung, wie Staubmaske, rutschfeste Sicherheitsschuhe, Schutzhelm oder Gehörschutz, je nach Art und Einsatz des Elektrowerkzeugs, verringert das Risiko von Verletzungen. ■ 40 │ DE│AT│CH c) Vermeiden Sie eine unbeabsichtigte Inbetriebnahme. Vergewissern Sie sich, dass das Elektrowerkzeug ausgeschaltet ist, bevor Sie es an die Stromversorgung und / oder den Akku anschließen, es aufnehmen oder tragen. Wenn Sie beim Tragen des Elektrowerkzeugs den Finger am Schalter haben oder das Elektrowerkzeug eingeschaltet an die Stromversorgung anschließen, kann dies zu Unfällen führen. d) Entfernen Sie Einstellwerkzeuge oder Schraubenschlüssel, bevor Sie das Elektrowerkzeug einschalten. Ein Werkzeug oder Schlüssel, der sich in einem drehenden Teil des Elektrowerkzeugs befindet, kann zu Verletzungen führen. e) Vermeiden Sie eine abnormale Körperhaltung. Sorgen Sie für einen sicheren Stand und halten Sie jederzeit das Gleichgewicht. Dadurch können Sie das Elektrowerkzeug in unerwarteten Situationen besser kontrollieren. f) Tragen Sie geeignete Kleidung. Tragen Sie keine weite Kleidung oder Schmuck. Halten Sie Haare und Kleidung fern von sich bewegenden Teilen. Lockere Kleidung, Schmuck oder lange Haare können von sich bewegenden Teilen erfasst werden. g) Wenn Staubabsaug- und -auffangeinrichtungen montiert werden können, sind diese anzuschließen und richtig zu verwenden. Die Verwendung einer Staubabsaugung kann Gefährdungen durch Staub verringern. h) Wiegen Sie sich nicht in falscher Sicherheit und setzen Sie sich nicht über die Sicherheitsregeln für Elektrowerkzeuge hinweg, auch wenn Sie nach vielfachem Gebrauch mit dem Elektrowerkzeug vertraut sind. Achtloses Handeln kann binnen Sekundenbruchteilen zu schweren Verletzungen führen. 4. Verwendung und Behandlung des Elektrowerkzeugs a) Überlasten Sie das Elektrowerkzeug nicht. Verwenden Sie für Ihre Arbeit das dafür bestimmte Elektrowerkzeug. Mit dem passenden Elektrowerkzeug arbeiten Sie besser und sicherer im angegebenen Leistungsbereich. PBSD 600 A1 b) Benutzen Sie kein Elektrowerkzeug, dessen Schalter defekt ist. Ein Elektrowerkzeug, das sich nicht mehr ein- oder ausschalten lässt, ist gefährlich und muss repariert werden. c) Ziehen Sie den Stecker aus der Steckdose und / oder entfernen Sie den abnehmbaren Akku, bevor Sie Geräteeinstellungen vornehmen, Einsatzwerkzeugteile wechseln oder das Elektrowerkzeug weglegen. Diese Vorsichtsmaßnahme verhindert den unbeabsichtigten Start des Elektrowerkzeugs. d) Bewahren Sie unbenutzte Elektrowerkzeuge außerhalb der Reichweite von Kindern auf. Lassen Sie keine Personen das Elektrowerkzeug benutzen, die mit diesem nicht vertraut sind oder diese Anweisungen nicht gelesen haben. Elektrowerkzeuge sind gefährlich, wenn sie von unerfahrenen Personen benutzt werden. e) Pflegen Sie Elektrowerkzeuge und Einsatzwerkzeug mit Sorgfalt. Kontrollieren Sie, ob bewegliche Teile einwandfrei funktionieren und nicht klemmen, ob Teile gebrochen oder so beschädigt sind, dass die Funktion des Elektrowerkzeugs beeinträchtigt ist. Lassen Sie beschädigte Teile vor dem Einsatz des Elektrowerkzeuges reparieren. Viele Unfälle haben ihre Ursache in schlecht gewarteten Elektrowerkzeugen. f) Halten Sie Schneidwerkzeuge scharf und sauber. Sorgfältig gepflegte Schneidwerkzeuge mit scharfen Schneidkanten verklemmen sich weniger und sind leichter zu führen. g) Verwenden Sie Elektrowerkzeug, Einsatzwerkzeug, Einsatzwerkeuge usw. entsprechend diesen Anweisungen. Berücksichtigen Sie dabei die Arbeitsbedingungen und die auszuführende Tätigkeit. Der Gebrauch von Elektrowerkzeugen für andere als die vorgesehenen Anwendungen kann zu gefährlichen Situationen führen. h) Halten Sie Griffe und Griffflächen trocken, sauber und frei von Öl und Fett. Rutschige Griffe und Griffflächen erlauben keine sichere Bedienung und Kontrolle des Elektrowerkzeugs in unvorhergesehenen Situationen. PBSD 600 A1 5. Service a) Lassen Sie Ihr Elektrowerkzeug nur von qualifiziertem Fachpersonal und nur mit OriginalErsatzteilen reparieren. Damit wird sichergestellt, dass die Sicherheit des Elektrowerkzeugs erhalten bleibt. Gerätespezifische Sicherheitshinweise für Schleifer ■ Halten Sie das Elektrowerkzeug an den isolierten Griffflächen, da die Schleiffläche die eigene Anschlussleitung treffen kann. Das Beschädigen einer spannungsführenden Leitung kann metallene Geräteteile unter Spannung setzen und zu einem elektrischen Schlag führen. WARNUNG! ■ Stäube von Materialien wie bleihaltigem Anstrich, einigen Holzarten und Metall können gesundheitsschädlich sein. ■ Die Berühung oder das Einatmen dieser Stäube kann eine Gefährdung für die Bedienperson oder in der Nähe befindliche Personen darstellen. ■ Tragen Sie Schutzbrille und Staubschutzmaske! Inbetriebnahme Schleifband einspannen /wechseln WARNUNG! VERLETZUNGSGEFAHR ■ Ziehen Sie den Netzstecker immer aus der Steckdose, bevor Sie Arbeiten am Bandschleifer durchführen. 1. Lösen Sie die Spannvorrichtung für das Schleifband, indem Sie den Spannhebel ganz herausschwenken. Das Schleifband lässt sich entnehmen. 2. Legen Sie nun ein neues Schleifband auf bzw. wechseln Sie es aus, um anderes Material zu bearbeiten oder die Kornstärke zu wechseln. WICHTIG: Die Pfeilrichtungen auf der Innenseite des Schleifbandes und am Gerätegehäuse müssen übereinstimmen. DE│AT│CH │ 41 ■ 3. Drücken Sie den Spannhebel Ausgangsposition. Schleifband wieder in die manuell justieren: Wird der Bandlauf nach dem Einschalten nicht zentriert, müssen Sie den Bandlauf ggf. manuell nachstellen. ♦ Drehen Sie dazu die Justierschraube an der vorderen Rolle, bis das Schleifband zentriert läuft. WICHTIG: Achten Sie unbedingt darauf, dass sich das Schleifband nicht am Gehäuse einschleift. Prüfen Sie regelmäßig den Bandlauf und regeln Sie ihn, wenn nötig, mit der Justierschraube nach. Zusatzhandgriff einstellen Sie können den Zusatzhandgriff Positionen einstellen. in mehrere ♦ Lösen Sie zum Verstellen des Zusatzhandgriffes die Schraube . ♦ Stellen Sie den Zusatzhandgriff wünschte Position ein. ♦ Ziehen Sie die Schraube in die ge- wieder fest. Frontabdeckung hochklappen Sie können die Frontabdeckung zum Schleifen an schwer erreichbaren Stellen hochklappen (siehe Abbildung). WARNUNG! ► Die Frontabdeckung kann nur hochgeklappt werden, wenn der Zusatzhandgriff ebenfalls nach oben geklappt wurde (siehe Kapitel „Zusatzhandgriff einstellen“). ♦ Klappen Sie die Frontabdeckung nach oben. Staubabsaugung anbringen/ entfernen WARNUNG! EXPLOSIONSGEFAHR! ■ Bei explosivem Staub / Luftgemisch müssen Sie einen dazu speziell geeigneten Absauger verwenden. BRANDGEFAHR DURCH FUNKENFLUG! Verwenden Sie beim Schleifen von Metallen keine Staubabsaugung (Staubbox oder Staubsauger). ■ Asbesthaltiges Material darf nicht bearbeitet werden. Asbest gilt als krebserregend. WARNUNG! BRANDGEFAHR! ■ Beim Arbeiten mit Elektrogeräten, die über eine Staubfangbox verfügen oder durch eine Staubabsaugvorrichtung mit dem Staubsauger verbunden werden können, besteht Brandgefahr! Unter ungünstigen Bedingungen, wie z. B. bei Funkenflug - beim Schleifen von Metall oder Metallresten in Holz - kann sich Holzstaub in der Staubfangbox (oder im Staubbeutel des Staubsaugers) selbst entzünden. Dies kann insbesondere dann geschehen, wenn der Holzstaub mit Lackresten oder anderen chemischen Stoffen vermischt ist und das Schleifgut nach langem Arbeiten heiß ist. Vermeiden Sie deshalb unbedingt eine Überhitzung des Schleifguts und des Gerätes und entleeren Sie vor Arbeitspausen stets die Staubfangbox bzw. den Staubbeutel des Staubsaugers. ■ Sorgen Sie für gute Belüftung des Arbeitsplatzes. ■ Beachten Sie in Ihrem Land gültige Vorschriften für die zu bearbeitenden Materialien. ■ ■ 42 │ DE│AT│CH Tragen Sie eine Staubschutzmaske. PBSD 600 A1 Staubbox Schleifvorgang: anbringen: ♦ Schieben Sie die Staubbox von oben auf den Anschluss für die Staubbox. Staubbox demontieren / abnehmen: ♦ Ziehen Sie die Staubbox nach oben hin ab. Absaugadapter und Reduzierstück zur Fremdabsaugung anschließen: ♦ Schieben Sie den Absaugadapter Anschluss . auf den ♦ Schieben Sie das Reduzierstück zur Fremdabsaugung in den Absaugadapter . ■ Platzieren Sie das Gerät eingeschaltet auf dem Werkstück und arbeiten Sie mit mäßigem Vorschub. Führen Sie den Schleifvorgang parallel und überlappend zu den Schleifbahnen durch. Zur Vermeidung von störenden, querlaufenden Schleifspuren nur in Faserrichtung schleifen. Heben Sie das Gerät nach der Bearbeitung vom Werkstück ab und schalten Sie es erst dann aus. HINWEIS ► Halten Sie das Gerät während der Arbeit immer mit beiden Händen fest. ♦ Schieben Sie den Schlauch einer zulässigen Staubsaugvorrichtung (z. B. eines Werkstattstaubsaugers) auf das Reduzierstück zur Fremdabsaugung. Bedienung Absaugadapter und Reduzierstück zur Fremdabsaugung abnehmen: Sie können beim Betrieb des Bandschleifers zwischen Moment- und Dauerbetrieb auswählen. ♦ Ziehen Sie den Schlauch der Staubsaugvorrichtung ab. Momentbetrieb einschalten: ♦ Ziehen Sie das Reduzierstück saugung ab. ♦ Ziehen Sie den Absaugadapter Anschluss nach oben hin ab. zur Fremdab- Ein- und ausschalten ♦ Drücken Sie den EIN- / AUS-Schalter . Momentbetrieb ausschalten: von dem Arbeitshinweise Geringer Schleifdruck genügt: ■ Arbeiten Sie mit geringem Schleifdruck. Das Eigengewicht des Bandschleifers reicht für gute Schleifleistungen aus. Zusätzlich schonen Sie durch diese Arbeitsweise den Verschleiß des Schleifbandes und die Oberfläche des Werkstückes wird glatter. ♦ Lassen Sie den EIN- / AUS-Schalter los. Dauerbetrieb einschalten: ♦ Drücken Sie den EIN- / AUS-Schalter , halten Sie ihn gedrückt und drücken Sie die Feststelltaste . Dauerbetrieb ausschalten: ♦ Drücken Sie den EIN- / AUS-Schalter lassen Sie ihn los. und Abtrag und Oberfläche: Staubbox entleeren ■ Die Abtragsleistung und die Oberflächengüte werden von der Bandgeschwindigkeit und der Kornstärke des Schleifbandes bestimmt (siehe auch Abschnitt „Drehzahl und Schleifband wählen“). Die Staubbox sollte während des Betriebs alle 10 Minuten entleert werden. ♦ Ziehen Sie die Staubbox ab (siehe Kapitel „Staubabsaugung anbringen/entfernen“) ♦ Schütteln Sie die Staubbox über einen Abfalleimer, um diese zu entleeren. ♦ Bringen Sie die Staubbox PBSD 600 A1 wieder am Gerät an. DE│AT│CH │ 43 ■ Drehzahl und Schleifband wählen Mit dem Stellrad Bandgeschwindigkeit können Sie die Drehzahl auch bei laufendem Gerät wählen. Die optimale Bandgeschwindigkeit ist abhängig von dem zu bearbeitenden Werkstück bzw. Material. Ermitteln Sie die jeweils beste Drehzahl immer selbst in einem praktischen Versuch. In der nachfolgenden Tabelle finden Sie unverbindliche Werte, die Ihnen die Ermittlung erleichtern. Werkstoff / Arbeitsbereich Weichholz Grobschliff (Körnung) 60 Feinschliff (Körnung) 240 Drehzahlvorwahl hoch (5–6) Werkstoff / Arbeitsbereich Hartholz Grobschliff (Körnung) Werkstoff / Arbeitsbereich Stahl entrosten Grobschliff (Körnung) 40 Feinschliff (Körnung) 120 Drehzahlvorwahl mittel / hoch (3–4) Werkstoff / Arbeitsbereich Kunststoffe Grobschliff (Körnung) 120 Feinschliff (Körnung) 240 Drehzahlvorwahl niedrig / mittel (2–3) Werkstoff / Arbeitsbereich Nichteisen-Metalle (z. B. Alu) Grobschliff (Körnung) 80 60 Feinschliff (Körnung) 150 Feinschliff (Körnung) 180 Drehzahlvorwahl mittel / hoch (3–4) Drehzahlvorwahl hoch (5–6) Stationäres Arbeiten Werkstoff / Arbeitsbereich Spanplatten ♦ Bringen Sie den Zusatzhandgriff Horizontale Position. Grobschliff (Körnung) 60 Feinschliff (Körnung) 150 Drehzahlvorwahl hoch (5–6) Werkstoff / Arbeitsbereich Farbe / Lacke entfernen Grobschliff (Körnung) 60 Feinschliff (Körnung) –– Drehzahlvorwahl hoch (5–6) Werkstoff / Arbeitsbereich Lacke anschleifen ■ Verschlissene oder eingerissene Schleifbänder können das Werkstück beschädigen. Wechseln Sie die Schleifbänder deshalb rechtzeitig aus. Grobschliff (Körnung) 150 ■ Bewahren Sie Schleifbänder nur hängend auf, da sie durch Knicke etc. unbrauchbar werden. Feinschliff (Körnung) 320 Drehzahlvorwahl niedrig (1–2) ■ 44 │ DE│AT│CH in die ♦ Drehen Sie das Elektrowerkzeug wie in der Abbildung A gezeigt um und legen Sie es auf eine stabile Arbeitsplatte. ♦ Setzen Sie zwei Schraubzwingen in die dafür vorgesehenen Aussparungen ein und spannen Sie das Elektrowerkzeug fest. Tipps und Tricks ■ Niemals mit dem selben Schleifband und Metall bearbeiten. Holz PBSD 600 A1 Wartung und Reinigung WARNUNG! VERLETZUNGSGEFAHR! Schalten Sie vor allen Arbeiten am Gerät das Gerät aus und ziehen Sie den Netzstecker. Der Bandschleifer ist wartungsfrei. ■ Reinigen Sie das Gerät direkt nach Abschluss der Arbeit. ■ Verwenden Sie zur Reinigung des Gerätes ein trockenes Tuch und keinesfalls Benzin, Lösungsmittel oder Reiniger, die Kunststoff angreifen. Staubbox entleeren / reinigen: ♦ Ziehen Sie die Staubbox vom Gerät ab. ♦ Leeren Sie die Staubbox vollständig durch Ausklopfen und stecken Sie die Staubbox wieder auf das Gerät. Entsorgen Sie die Verpackung umweltgerecht. Beachten Sie die Kennzeichnung auf den verschiedenen Verpackungsmaterialien und trennen Sie diese gegebenenfalls gesondert. Die Verpackungsmaterialien sind gekennzeichnet mit Abkürzungen (a) und Ziffern (b) mit folgender Bedeutung: 1–7: Kunststoffe, 20–22: Papier und Pappe, 80–98: Verbundstoffe Möglichkeiten zur Entsorgung des ausgedienten Produkts erfahren Sie bei Ihrer Gemeinde- oder Stadtverwaltung. ♦ Halten Sie Lüftungsöffnungen immer frei. ♦ Entfernen Sie anhaftenden Schleifstaub mit einem Pinsel. Entsorgung Die Verpackung besteht aus umweltfreundlichen Materialien, die Sie über die örtlichen Recyclingstellen entsorgen können. Werfen Sie Elektrowerkzeuge nicht in den Hausmüll! Gemäß Europäischer Richtlinie 2012/19/EU müssen verbrauchte Elektrowerkzeuge getrennt gesammelt und einer umweltgerechten Wiederverwertung zugeführt werden. Möglichkeiten zur Entsorgung des ausgedienten Gerätes erfahren Sie bei Ihrer Gemeinde- oder Stadtverwaltung. PBSD 600 A1 DE│AT│CH │ 45 ■ Garantie der Kompernaß Handels GmbH Sehr geehrte Kundin, sehr geehrter Kunde, Sie erhalten auf dieses Gerät 3 Jahre Garantie ab Kaufdatum. Im Falle von Mängeln dieses Produkts stehen Ihnen gegen den Verkäufer des Produkts gesetzliche Rechte zu. Diese gesetzlichen Rechte werden durch unsere im Folgenden dargestellte Garantie nicht eingeschränkt. Garantiebedingungen Die Garantiefrist beginnt mit dem Kaufdatum. Bitte bewahren Sie den Original-Kassenbon gut auf. Diese Unterlage wird als Nachweis für den Kauf benötigt. Tritt innerhalb von drei Jahren ab dem Kaufdatum dieses Produkts ein Material- oder Fabrikationsfehler auf, wird das Produkt von uns – nach unserer Wahl – für Sie kostenlos repariert oder ersetzt. Diese Garantieleistung setzt voraus, dass innerhalb der Drei-Jahres-Frist das defekte Gerät und der Kaufbeleg (Kassenbon) vorgelegt und schriftlich kurz beschrieben wird, worin der Mangel besteht und wann er aufgetreten ist. Wenn der Defekt von unserer Garantie gedeckt ist, erhalten Sie das reparierte oder ein neues Produkt zurück. Mit Reparatur oder Austausch des Produkts beginnt kein neuer Garantiezeitraum. Garantiezeit und gesetzliche Mängelansprüche Die Garantiezeit wird durch die Gewährleistung nicht verlängert. Dies gilt auch für ersetzte und reparierte Teile. Eventuell schon beim Kauf vorhandene Schäden und Mängel müssen sofort nach dem Auspacken gemeldet werden. Nach Ablauf der Garantiezeit anfallende Reparaturen sind kostenpflichtig. Garantieumfang Das Gerät wurde nach strengen Qualitätsrichtlinien sorgfältig produziert und vor Auslieferung gewissenhaft geprüft. Die Garantieleistung gilt für Material- oder Fabrikationsfehler. Diese Garantie erstreckt sich nicht auf Produktteile, die normaler Abnutzung ausgesetzt sind und daher als Verschleißteile angesehen werden können oder für Beschädigungen an zerbrechlichen Teilen, z. B. Schalter, Akkus, Backformen oder Teile die aus Glas gefertigt sind. Diese Garantie verfällt, wenn das Produkt beschädigt, nicht sachgemäß benutzt oder gewartet wurde. Für eine sachgemäße Benutzung des Produkts sind alle in der Bedienungsanleitung aufgeführten Anweisungen genau einzuhalten. Verwendungszwecke und Handlungen, von denen in der Bedienungsanleitung abgeraten oder vor denen gewarnt wird, sind unbedingt zu vermeiden. Das Produkt ist nur für den privaten und nicht für den gewerblichen Gebrauch bestimmt. Bei missbräuchlicher und unsachgemäßer Behandlung, Gewaltanwendung und bei Eingriffen, die nicht von unserer autorisierten Service-Niederlassung vorgenommen wurden, erlischt die Garantie. Abwicklung im Garantiefall Um eine schnelle Bearbeitung ihres Anliegens zu gewährleisten, folgen Sie bitte den folgenden Hinweisen: ■ Bitte halten Sie für alle Anfragen den Kassenbon und die Artikelnummer (z. B. IAN 12345) als Nachweis für den Kauf bereit. ■ Die Artikelnummer entnehmen Sie bitte dem Typenschild, einer Gravur, auf dem Titelblatt ihrer Anleitung (unten links) oder als Aufkleber auf der Rück- oder Unterseite. ■ Sollten Funktionsfehler oder sonstige Mängel auftreten, kontaktieren Sie zunächst die nachfolgend benannte Serviceabteilung telefonisch oder per E-Mail. ■ Ein als defekt erfasstes Produkt können Sie dann unter Beifügung des Kaufbelegs (Kassenbon) und der Angabe, worin der Mangel besteht und wann er aufgetreten ist, für Sie portofrei an die Ihnen mitgeteilte Service-Anschrift übersenden. ■ 46 │ DE│AT│CH PBSD 600 A1 Auf www.lidl-service.com können Sie diese und viele weitere Handbücher, Produktvideos und Software herunterladen. Service WARNUNG! ■ Lassen Sie Ihre Geräte von der Servicestelle oder einer Elektrofachkraft und nur mit Original-Ersatzteilen reparieren. Damit wird sichergestellt, dass die Sicherheit des Gerätes erhalten bleibt. Importeur Bitte beachten Sie, dass die folgende Anschrift keine Serviceanschrift ist. Kontaktieren Sie zunächst die benannte Servicestelle. KOMPERNASS HANDELS GMBH BURGSTRASSE 21 DE - 44867 BOCHUM DEUTSCHLAND www.kompernass.com WARNUNG! ■ Lassen Sie den Austausch des Steckers oder der Netzleitung immer vom Hersteller des Gerätes oder seinem Kundendienst ausführen. Damit wird sichergestellt, dass die Sicherheit des Gerätes erhalten bleibt. HINWEIS ► Hinweis: Nicht aufgeführte Ersatzteile (wie z. B. Kohlebürsten, Schalter, Staubbox) können Sie über unsere Callcenter bestellen. Service Deutschland Tel.: 0800 5435 111 (Kostenfrei aus dem dt. Festnetz/Mobilfunknetz) E-Mail: [email protected] Service Österreich Tel.: 0820 201 222 (0,15 EUR/Min.) E-Mail: [email protected] Service Schweiz Tel.: 0842 665566 (0,08 CHF/Min., Mobilfunk max. 0,40 CHF/Min.) E-Mail: [email protected] IAN 315561 PBSD 600 A1 DE│AT│CH │ 47 ■ Original-Konformitätserklärung Wir, KOMPERNASS HANDELS GMBH, Dokumentenverantwortlicher: Herr Semi Uguzlu, BURGSTR. 21, DE - 44867 BOCHUM, Deutschland, erklären hiermit, dass dieses Produkt mit den folgenden Normen, normativen Dokumenten und EG-Richtlinien übereinstimmt: Maschinenrichtlinie (2006 / 42 / EG) Elektromagnetische Verträglichkeit (2014 / 30 / EU) RoHS Richtlinie (2011 / 65 / EU)* *Die alleinige Verantwortung für die Ausstellung dieser Konformitätserklärung trägt der Hersteller. Der oben beschriebene Gegenstand der Erklärung erfüllt die Vorschriften der Richtlinie 2011/65/EU des Europäischen Parlaments und des Rates vom 8. Juni 2011 zur Beschränkung der Verwendung bestimmter gefährlicher Stoffe in Elektro- und Elektronikgeräten. Angewandte harmonisierte Normen: EN 62841-1:2015 EN 62841-2-4:2014 EN 55014-1:2017 EN 55014-2:2015 EN 61000-3-2:2014 EN 61000-3-3:2013 EN 50581:2012 Typbezeichnung der Maschine: Bandschleifer PBSD 600 A1 Herstellungsjahr: 02 - 2019 Seriennummer: IAN 315561 Bochum, 31.01.2019 Semi Uguzlu - Qualitätsmanager Technische Änderungen im Sinne der Weiterentwicklung sind vorbehalten. ■ 48 │ DE│AT│CH PBSD 600 A1 KOMPERNASS HANDELS GMBH BURGSTRASSE 21 DE - 44867 BOCHUM GERMANY www.kompernass.com Estado de las informaciones · Versione delle informazioni Last Information Update · Stand der Informationen: 01 / 2019 · Ident.-No.: PBSD600A1-012019-1 IAN 315561-
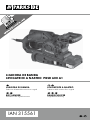 1
1
-
 2
2
-
 3
3
-
 4
4
-
 5
5
-
 6
6
-
 7
7
-
 8
8
-
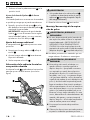 9
9
-
 10
10
-
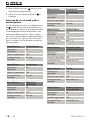 11
11
-
 12
12
-
 13
13
-
 14
14
-
 15
15
-
 16
16
-
 17
17
-
 18
18
-
 19
19
-
 20
20
-
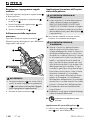 21
21
-
 22
22
-
 23
23
-
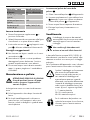 24
24
-
 25
25
-
 26
26
-
 27
27
-
 28
28
-
 29
29
-
 30
30
-
 31
31
-
 32
32
-
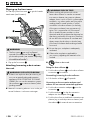 33
33
-
 34
34
-
 35
35
-
 36
36
-
 37
37
-
 38
38
-
 39
39
-
 40
40
-
 41
41
-
 42
42
-
 43
43
-
 44
44
-
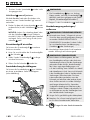 45
45
-
 46
46
-
 47
47
-
 48
48
-
 49
49
-
 50
50
-
 51
51
-
 52
52


Parkside PBSD 600 A1 Original Instructions Manual
- Categoría
- Lijadoras eléctricas
- Tipo
- Original Instructions Manual
en otros idiomas
- italiano: Parkside PBSD 600 A1
- English: Parkside PBSD 600 A1
- Deutsch: Parkside PBSD 600 A1
Artículos relacionados
-
Parkside PBSD 600 A1 Manual de usuario
-
Parkside PTSG 140 A1 Translation Of The Original Instructions
-
Parkside PBS 900 A1 - 5 Operation and Safety Notes
-
Parkside PBS 600 A1 - 5 Operation and Safety Notes
-
-
Parkside PDEXS 150 C2 Translation Of The Original Instructions
-
Parkside PEBS 900 SE - 3 Manual de usuario
-
-
-
Otros documentos
-
Metabo RBE 15-180 Set Instrucciones de operación
-
Hitachi SB 8V2 Handling Instructions Manual
-
Ferm LB501AC Manual de usuario
-
Bosch PBS 75A Manual de usuario
-
GYS Air belt sander 10x330mm Ficha de datos
-
Festool BS 75 E-SET Instrucciones de operación
-
-
Hilti GTB 6X-A22 Instrucciones de operación
-
-
Bosch PBS 7 A El manual del propietario