Genius Car Alarm Alarma Genius G34-Si El manual del propietario
- Categoría
- Alarma de carro
- Tipo
- El manual del propietario

ESPAÑOL
Genius Car Alarm
www.alarmasgenius.com 1
Alarma Serie 3B
4 Botones
G34SI A
(Sensor de impacto interno)
Versión 3
Software 67Plus

ESPAÑOL
Genius Car Alarm
www.alarmasgenius.com2
ALARMA GENIUS – Serie 3B 4 Botones
G34SI A (Sensor de impacto Interno) – Versión 3
Software 67Plus
• Sistema de alarma para vehículos de 12 Voltios
• Modulo controlado por Micro-Procesador
• 2 Controles remotos de 4 botones
• Frecuencia de Transmisión 370 MHz
• Aprendizaje de 4 Controles remotos (Códigos)
• Función de Pánico mediante el Control remoto
• Función Car Finder o Localizador mediante el Control remoto
• Armado y Desarmado Silencioso Mediante el Control remoto
• Armado y Desarmado Silencioso (Programable)
• Identificador de controles programados (I.C.P.) (Programable)
• Salida Negativa Canal 2 (Abre Baúl eléctrico) (Programable)
• Abrir el baúl mediante el Control remoto (Canal 2) sin desarmar la alarma
• Salida Negativa Canal 3 Módulos Opcionales (Programable)
• Salida Positiva para el Destello de Luces con relee interno en el modulo
• Cierre Centralizado Universal
• Armado Automático al cerrar la ultima puerta (Programable)
• Cierre de los Seguros Eléctricos con el Armado Automático (Programable)
• Rearmado Automático con cierre de puertas (Desarmado Accidental)
• Apertura y Cierre de los Seguros eléctricos con la Ignición (Programable)
• Doble Pulso para la Apertura Inteligente de los seguros eléctricos (Programable)
• Sensor de Impacto Interno
• Sensor de Impacto con Pre-aviso Excluible por el Control remoto
• Línea de Pulsadores Originales Positivos o Negativos (Seleccionable)
• Línea de Pulsadores de Baúl y Capo (Negativo)
• Modo Valet (Mediante el botón reset y el Control Remoto)
• Anti-asalto por Apertura de Puerta (Opcional)
• Anti-asalto Especial mediante el swiche de Ignición (Programable)
• Anti-asalto por Control Remoto (Programable)
• Anti-asalto por Presencia (Transmisor Adicional) (Programable)
• Aviso Luminoso al Activarse el Anti-asalto
• Aviso Acústico al Activarse el Anti-asalto (Programable)
• Aviso luminoso de puerta abierta al conducir (Programable)
• Aviso Acústico recordatorio de armar la alarma (Programable)
• Salida Negativa con el armado, para el corta corriente
• Salida Negativa de 30 seg. al armar para Módulos Alza vidrios (Programable)
• Claxon Intermitente (Programable)
• Dome Light (Programable)
• Exclusión de Zonas Defectuosas
• Desarmado manual mediante código PIN de seguridad
• Sirena Electrónica de 120 dba
• LED indicador de Tablero
• Programación de funciones por medio de software y jumper
• Cableado Identificado con colores
• Fusibles de Protección incorporado al Cableado
• Memoria del último estado del sistema

ESPAÑOL
Genius Car Alarm
www.alarmasgenius.com 3
Introducción.
Agradecemos el haber adquirido para su vehículo nuestro sistema de seguridad. Lea
bien el manual de uso del sistema principalmente las funciones del Control remoto, el
swiche valet y el LED indicador del tablero.
El Control Remoto.
Cada Control remoto viene asignado con un código diferente, el sistema de alarma está
programado de fábrica con 2 códigos (2 controles remotos), usted puede programar un
máximo de 4 códigos (4 controles remotos). El control remoto posee 4 botones.
El sistema esta pre-programado con una rutina de trabajo con cada botón del control remoto.
Trabaja con la siguiente Configuración:
Con el swiche de ignición en OFF
Botón 1- Arma – Car Finder
Botón 2 - Desarma
Botón 3 – Pánico
Botón 4 - Canal 2 Abre baúl eléctrico
Botones 3 y 4 simultáneos – Canal 3
Botón 1 y luego el Botón 3 – Exclusión del Sensor de impacto
Botón 1 y luego el Botón 2 – Exclusión del Sensor de impacto y de la línea de pulsadores
Botón 3 y luego el Botón 1 – Arma en Silencioso
Botón 3 y luego el Botón 2 – Desarma en Silencioso
Botón 4 y luego el Botón 3 – Modo Valet
Con el swiche de ignición en ON
Botón 1 - Cierra Seguros Eléctricos
Botón 2 - Abre Seguros Eléctricos
Botón 3 – Pánico
Botón 4 – Canal 2 Abre baúl eléctrico
Botones 1 y 2 Simultáneos – Anti-asalto
Botones 3 y 4 Simultáneos – Canal 3
Botón Reset.
El Botón Reset es utilizado como prevención opcional para el Armado Automático, el Anti-
asalto por ignición, para ingresar al Modo Valet en el caso de hacerle mantenimiento al
vehículo, llevar el vehículo al auto lavado, taller mecánico, parquero en un restaurante, etc. El
botón reset es además usado con la ignición del encendido para desarmar el sistema de alarma
cuando el control remoto se encuentre inoperable (dañado, pilas agotadas o extraviado). El
botón reset es utilizado para programar las funciones del sistema de alarma y para
memorizar nuevos controles remotos.
Botón 1
Botón 2
Botón 3
Botón 4

ESPAÑOL
Genius Car Alarm
www.alarmasgenius.com4
LED indicador del tablero.
Mediante el LED indicador instalado en el tablero, le informa de las 7 diferentes
condiciones que se encuentra el sistema de alarma.
Funciones del Control remoto
• Botón 1 - Arma / Cierra seguros
Con el swiche de ignición en OFF y la alarma Desarmada
Presione y suelte el botón 1 del control remoto para Armar el sistema de alarma.
Con el swiche de ignición en ON
Presione y suelte el Botón 1 del control remoto y Cierran los seguros eléctricos
• Botón 2 - Desarma / Abre Seguros
Con el swiche de ignición en OFF y la alarma Armada
Presione y suelte el botón 2 del control remoto para Desarmar el sistema de alarma y abrirá
los seguros eléctricos, presione y suelte nuevamente el botón 2 del control remoto y enviara
un segundo pulso para abrir los seguros eléctricos.
Con el swiche de ignición en ON
Presione y suelte el botón 2 del control remoto y abre los seguros eléctricos
• Botón 4 - Canal 2
Presione y mantenga presionado el botón 4 del control remoto por 3 segundos, activara el
canal 2, el cual es utilizado para abrir el Baúl eléctrico del vehículo.
• Botones 3 y 4 Simultáneos - Canal 3
Presione los botones 3 y 4 del control remoto simultáneos, activara el canal 3, (Ver
programación canal 3)
• Botones 1 y 2 Simultáneos - Anti asalto
Con la ignición en ON, presione y mantenga presionado los botones 1 y 2 del control remoto
simultáneos por 3 segundos para activar el Anti-asalto por control remoto.

ESPAÑOL
Genius Car Alarm
www.alarmasgenius.com 5
• Botón 3 - Pánico
Con la ignición en ON
Presione y suelte el botón 3 del control remoto, activa la función de Pánico.
Con el sistema de alarma Armado
Presione y suelte el botón 3 del control remoto, activa la función de Pánico.
• Botón 3 y luego el Botón 1 - Armado Silencioso
Con el swiche de ignición en OFF y el sistema de alarma desarmado
Presione y suelte el botón 3 del control remoto, luego presione y suelte el botón 1 del control
remoto, el sistema se armará en modo silencioso, solo se obtendrá el aviso luminoso de
Armado
• Botón 3 y luego el Botón 2 - Desarmado Silencioso
Con el sistema de alarma Armado
Presione y suelte el botón 3 del control remoto, luego presione y suelte el botón 2 del control
remoto, el sistema se Desarmará en modo silencioso, solo se obtendrá el aviso luminoso de
Desarmado.
• Botón 4 y luego el Botón 3 - Modo Valet.
Con el sistema de alarma desarmado y la ignición en OFF.
Presione y suelte el botón 4 del control remoto, luego presione y mantenga presionado el botón 3
del control remoto por 3 segundos, el sistema entra o sale del modo valet.
Códigos de Seguridad en el Control remoto.
Cada sistema posee 2 controles remotos pre-asignados, usted puede asignar hasta 4
Controles remotos. Cada control remoto posee un código único (código invisible) no habrá
otro
Control remoto con el código igual al suyo, de hecho en la fábrica se programan los
microprocesadores de los controles remotos de uno en uno evitando que los códigos se
dupliquen.
Armado del sistema de alarma.
El Armado del sistema de alarma podrá ser obtenida mediare 2 métodos.
• El primero mediante el botón 1 del control remoto, donde es necesario que el swiche de
ignición se encuentre en la posición de OFF y el sistema NO se encuentre en el modo
Valet.

ESPAÑOL
Genius Car Alarm
www.alarmasgenius.com6
• El segundo en mediante el Armado automático, la cual se obtiene al pasar el swiche de
ignición a la posición de ON a OFF y luego abrir y cerrar una puerta. El sistema se
Armará Automático 60 segundos después de haber cerrado la ultima puerta, esta función
es programable. Ver los jumper de programación
•
Armado de sistema de alarma utilizando el Control Remoto
El sistema de alarma siempre podrá ser armado mediante el control remoto con la condición de
que el swiche de ignición se encuentre en la posición de OFF y el sistema no se encuentre
en el modo Valet.
Para armar el sistema de alarma después de salir del vehículo y haber cerrado bien todas las
puertas, simplemente presione y suelte el botón 1 del control remoto 1 vez , las luces
darán 1 destello, la sirena dará 1 sonido y el LED indicador del tablero comenzara a titilar
lentamente confirmando que el sistema se encuentra armado, si los seguros eléctricos
están conectados al sistema de alarma, los seguros eléctricos se cierran, el Corta corriente
será activado evitando que el vehículo pueda ser utilizado, pasado los 10 segundos el sistema
pasa a la modalidad de espera de un intento de hurto
Exclusión de zonas defectuosas.
Al armar el sistema de alarma y alguna zona se encuentre defectuosa, la sirena emitirá 3
sonidos y las luces darán 3 destellos simultáneos, indicándole que una zona se encuentra
defectuosa, cuando esto ocurra la zona defectuosa será excluida automáticamente y el vehículo
quedara protegido con el resto de las zonas, por ejemplo si la baúl se encuentra mal cerrada en
el momento de haber armado el sistema de alarma por el control remoto, la sirena emitirá 3
sonidos y las luces 3 destellos indicándole que hay una zona mal cerrada y excluirá los
sensores de esa zona. La zona defectuosa será nuevamente incorporada a la protección 3
segundos después de haber corregido la falla ósea después de haber cerrado bien el baúl.
Exclusión del Sensor de impacto mediante el control remoto.
Al armar el sistema de alarma, el Sensor de impacto podar ser excluido, presione y suelte el
botón 1 del control remoto para armar el sistema de alarma, dentro de los primeros 3
segundos presione y suelte el botón 3 del control remoto, la sirena confirmara con 1 sonido la
exclusión del Sensor de impacto. Esta función se hace necesaria cuando se deja el vehículo
en una zona transitada por vehículos pesados o cuando se encuentre una persona dentro del
vehículo.
Al desarmar el sistema de alarma el Sensor de impacto vuelve a ser incorporado en el
sistema de protección e incorporándolo en la siguiente armado.
Exclusión del Sensor de impacto y Pulsadores de puertas mediante el control
remoto.
Al armar el sistema de alarma, el Sensor de impacto y la línea de entrada de pulsadores de
puertas podrán ser excluidos, presione y suelte el botón 1 del control remoto para armar el
sistema de alarma, la sirena emite 1 sonido y las luces dan 1 destello, dentro de los primeros
3 segundos presione y suelte el botón 2 del control remoto, la sirena confirmara con 1 sonido

ESPAÑOL
Genius Car Alarm
www.alarmasgenius.com 7
la exclusión del Sensor de impacto y la línea de entrada de pulsadores. Esta función se hace
necesaria cuando se deja el vehículo en una zona transitada por vehículos pesados o cuando
se encuentre una persona dentro del vehículo.
Al desarmar el sistema de alarma el Sensor de impacto y la línea de entrada de pulsadores
vuelven a ser incorporados en el sistema de protección e incorporándolo en la siguiente
armado.
Armado Automática al cerra la ultima puerta (Programable Jumper JP 1)
El sistema de alarma se armara automático después de haber cerrado la última puerta con el
swiche de ignición en la posición de OFF. Una vez que se cierre la ultima puerta, la sirena
emite un sonido, el LED indicador del tablero comenzara a titilar rápidamente indicándole el
inicio del armado del modo Automático, pasados los 60 segundos, después de haber cerrado
la ultima puerta, la sirena emitirá 1 sonido y el LED indicador del tablero comenzara a titilar
lentamente, confirmando el armado completo del sistema de alarma, si los seguros eléctricos
están conectados y programados, los seguros eléctricos se cerraran.
Si durante los primeros 60 segundos antes de armarse el sistema de alarma una puerta es abierta,
el armado automático pasara en modo de espera, al cerrar la puerta la sirena emite 1 sonido y
se reiniciara nuevamente el tiempo de espera de los 60 segundos. El armado automático
quedara excluido con el sistema en modo Vale.
Nota: Para evitar molestias al momento de abandonar el vehículo, cerciorase de retirar la llave
del swiche de encendido, ya que el sistema de alarma al armarse en automático podría cerrar
los seguros eléctricos impidiendo que usted pueda ingresar nuevamente al vehículo.
Sistema de Alarma Armado y Activado.
Cuando el sistema de alarma se encuentra armado el LED indicador del tablero titila
lentamente, si una puerta es abierta, recibir un golpe fuerte o pasado el swiche de ignición a ON,
la sirena comenzara a sonar y las luces a destellar durante 30 segundos, si la puerta permanece
abierta o el swiche de ignición es dejado en la posición de ON, pasados los 30 segundos la
sirena seguirá sonando y las luces detallando si la puerta es cerrada o el swiche de ignición es
pasado a la posición de OFF, después de comenzar a sonar la sirena, la sirena se silenciara a los
30 segundos y las luces dejan de destellar.
Desarmado del sistema de Alarma.
Cuando el sistema de alarma se encuentra en modo armado, presione y suelte el botón 2 del
Control remoto, la sirena emitirá 2 sonidos y las luces 2 destellos indicándole el desarmado
del sistema de alarma, el corta corriente se desactivara, el LED indicador del tablero se
apagara, si los seguros eléctricos están conectados, los seguros se abrirán, presione y suelte
nuevamente el botón 2 del control remoto, el sistema enviara el segundo pulso de apertura
de seguros eléctricos.
Si al desarmar el sistema de alarma, la sirena emitiera 4 sonidos y las luces 4 destellos, esto le
indicara que el vehículo sufrió un intento de hurto, el LED indicador del tablero seguirá
titilando indicándole el motivo del disparo hasta que pase el swiche de ignición a la posición
de ON, por favor revise bien el vehículo. (Ver funciones del LED indicador del tablero)

ESPAÑOL
Genius Car Alarm
www.alarmasgenius.com8
Armado Silencioso.
Con el sistema de alarma desarmado, el swiche de ignición en la posición de OFF y todas las
puertas cerradas, presione y suelte el botón 3 del control remoto, luego presione y suelte el
botón 1 del control remoto para armar el sistema de alarma en modo silencioso, el sistema de
alarma se armara sin que la sirena suene, solo se obtendrá 1 destello de las luces del vehículo.
Al armar en silencioso y el vehículo posee una puerta abierta o mal cerrada, la sirena emitirá
los correspondientes avisos de alerta informándole con 3 sonidos de la sirena.
Desarmado Silencioso.
Con el sistema de alarma en modo armado, presione y suelte el botón 3 del control remoto,
luego presione y suelte el botón 2 del control remoto para desarmar el sistema de alarma en
modo silencioso, el sistema se desarmara sin que la sirena suene. Al desarmar en silencioso y
el vehículo sufrió un intento de hurto, la sirena emitirá los correspondientes avisos de alerta
informándole con 4 sonidos de la sirena. El LED indicador del tablero seguirá titilando
indicándole el motivo del disparo hasta que pase el swiche de ignición a la posición de ON,
por favor revise bien el vehículo. (Ver funciones del LED indicador del tablero)
Silenciado de la sirena o doble desarmado
Cuando el sistema de alarma se encuentra armado el LED indicador del tablero titila
lentamente, si una puerta es abierta, recibir un golpe fuerte o pasado el swiche de ignición a ON,
la sirena comenzara a sonar y las luces a destellar durante 30 segundos, presione y suelte el
botón 1 o el botón 2 del control remoto y la sirena se silencia y las luces del vehículo dejan de
destellar, si la puerta permanece abierta o el swiche de ignición es dejado en la posición de ON,
pasados 5 segundos la sirena comenzara de nuevo a sonar y las luces a destellar. Si la puerta
es cerrada o el swiche de ignición es pasado a la posición de OFF, al presionar y soltar el botón 1 o
el botón 2 del control remoto, la sirena se silencia y las luces dejan de destellar.
Con el sistema de alarma armado y con la sirena sonando y deseamos desarmar el sistema de
alarma, presione y suelte el botón 2 del control remoto, la sirena se silencia y las luces dejan de
destellar, el sistema de alarma sigue armado, inmediatamente que se silencia la sirena, presione y
suelte por segunda vez el botón 2 del control remoto, el sistema de alarma se desarma, la sirena
emitirá 4 sonidos y las luces darán 4 destellos
Re-armado Automático o Desarmado Accidental.
Esta función está programada en la memoria del sistema de alarma como una función
preventiva, caso que se hace necesario cuando usted desarma el sistema de alarma mediante
el control remoto y no ha ingresado al vehículo y pasado el swiche de ignición a la posición de
ON, el LED indicador del tablero comenzara a titilar rápidamente, pasados los 30 segundos el
sistema de alarma se arma nuevamente confirmando con 1 sonido de la sirena y 1 destello de
las luces, los seguros eléctrico se cierran, protegiendo nuevamente el vehículo hasta que
usted lo desarme nuevamente.
Car Finder o Localizador
El Car Finder fue diseñado como una función de localización del vehículo para poder ubicarlo
en aquellos casos cuando no recordamos el lugar donde lo parqueamos en un

ESPAÑOL
Genius Car Alarm
www.alarmasgenius.com 9
estacionamiento, con el sistema de alarma armado, presione y mantenga presionado el
botón 1 del control remoto, inmediatamente la sirena emitirá 10 sonido y las luces darán 10
destellos indicándole la ubicación del vehículo.
Función de Pánico
Presione y mantenga presionado el botón 3 del control remoto, activara la función de pánico,
la sirena comenzara a sonar y las luces del vehículo a encender y apagar. Para desactivar la
función de pánico presione y suelte el botón 1 o el botón 2 del control remoto.
Abre Baúl Eléctrico. (Canal 2- Programable)
En la programación del Sistema de alarma se diseño un canal de transmisión el cual podrá
ser utilizada para abrir la baúl eléctrica del vehículo mediante el control remoto, presione y
mantenga presionado el botón 4 del control remoto por 3 segundos, inmediatamente el baúl
se abrirá, si el sistema de alarma se encuentra armado, no será necesario desarmar el
sistema de alarma y luego abrir el baúl, simplemente presione y mantenga presionado el botón
4 del control remoto por 3 segundos, el sistema de alarma hará un bypass de los sensores y
abrirá el baúl, así a usted se le evitara la molestia de que la sirena comience a sonar al abrir el
baúl por medio del control remoto. Al cerrar el baúl los sensores serán reincorporados
al sistema de protección.
Apertura y Cierre de los seguros eléctricos con la Ignición.
Esta función está programada en la memoria como una función preventiva y de confort.
Con el sistema de alarma desarmado y con todas las puertas cerradas, al pasar el
swiche de ignición a ON, los seguros eléctricos de las puertas se cierran de forma
automática, si una puerta permanece abierta al momento de pasar la ignición a ON, los
seguros eléctricos NO se cierra, previniendo cualquier daño al cierre de puertas.
(Función programable – Función 4)
Al pasar el swiche de ignición a la posición de ON a OFF, los seguros eléctricos de las
puertas se abren inmediatamente. (Función programable – Función 5)
Con el swiche de ignición en ON, al presionar y soltar el botón 1 del control remoto, los
seguros eléctricos de las puertas se cierran, al presionar y soltar el botón 2 del control
remoto, los seguros eléctricos de las puertas se abren.
Anti-asalto por Puertas.
Con el swiche de ignición en la posición de ON, usted abre y cierra la puerta del conductor,
las luces darán 2 destellos indicándole la activación del Anti asalto, si el aviso acústico está
programado la sirena confirmara con 1 sonido. Para que el Anti-asalto por puerta funcione se
debe conectar el cable del Anti-asalto por puerta a un pulsador negativo en la puerta del chofer.
Anti-asalto por Control Remoto. (Programable Función 3)
Esta función es utilizada para inmovilizar el vehículo en caso de emergencia
presionando y manteniendo presionado los botones 1 y 2 simultáneos del control remoto por
3 segundos mientras el motor del vehículo este en marcha, las luces del vehículo darán 2
destellos, indicando la activación del Anti asalto, si el aviso acústico está programado la

ESPAÑOL
Genius Car Alarm
www.alarmasgenius.com10
sirena dará 1 sonido.
Esta función es programable (ver tabla de programación de funciones)
Anti-asalto Por Ignición (Programable Jumper JP4)
Esta función esta en el software del la memoria para activar el Anti-asalto
automáticamente cada vez que se coloque el swiche de ignición de la posición de OFF a la
posición de ON sin necesidad de abrir una puerta o presionar el control remoto. Al pasar el
swiche de ignición a la posición de ON, las luces del vehículo darán 2 destellos, si el aviso
acústico está programado, la sirena emitirá 1 sonido.
Esta función es programable (ver jumper de programación de funciones)
Anti-asalto de Presencia
Esta función es utilizada para inmovilizar el vehículo en caso de emergencia,
simplemente alejando el transmisor de presencia aproximadamente 15 mts. del
vehículo, estando el motor en marcha. Si tiene el transmisor de presencia dentro del
vehículo, la alarma reconocerá la señal y el Anti-asalto entrara en modo pasivo.
MODO DE PASIVO:
Función de anti-asalto quedara en modo pasivo, en el momento que
la alarma reciba por primera vez la señal del trasmisor de presencia,
estando el vehículo encendido.
El anti-asalto pasa a modo Activo cuando se aleja el transmisor
de presencia del vehículo, estando el motor en marcha.
Al alejar el transmisor de presencia, comenzara el conteo del ciclo de
los 60 segundos de activación del anti-asalto.
Después de los 60 segundos, los siguientes 15 segundos las luces
darán 2 destellos, el LED indicador comenzara a titilar rápidamente,
indicando la activación del anti-asalto
(Si el aviso acústico está programado, la sirena dará 1 sonido)
Para que el anti-asalto de presencia funcione, se deberá adquirir
el Transmisor de presencia (opcional) y programarlo en la
memoria del sistema de la alarma y habilitar la función numero 14
de la tabla de funciones
NOTA:
Una vez activado el anti-asalto de presencia, solo podrá ser desactivado mediante el
botón reset.
Si usted se le extravía el transmisor de presencia, se le daña o se le agota la batería
del transmisor de presencia, coloque la alarma en Modo Valet, hasta que remplace o
solvente la situación con el transmisor de presencia.
Encendido del Transmisor de Presencia.
Presione el botón del transmisor y manténgalo presionado, el LED del transmisor
emitirá un destello y se apagara, mantenga el botón presionado, al cabo de 3
segundos el LED del transmisor permanecerá encendido por 2 segundos. Suelte el
Transmisor opcional
de Presencia

ESPAÑOL
Genius Car Alarm
www.alarmasgenius.com 11
botón del transmisor. El transmisor enviara una señal al modulo receptor (Unidad
Central) cada 6 segundos. Cuando la batería interna del transmisor se encuentre
agotada, el LED del transmisor comenzara a darle avisos de advertencia
mediante titileos continuos. Usted deberá remplazar la batería del transmisor.
Apagado del Transmisor de Presencia.
Presione el botón del transmisor y manténgalo presionado, el LED del transmisor
emitirá un destello y se apagara, mantenga el botón presionado, al cabo de 3
segundos el LED del transmisor emitirá 5 destellos. Suelte el botón del transmisor. El
transmisor no enviara mas señales
Anti-asalto Activado
Tan pronto el sistema de alarma entre en modo de anti-asalto las luces del vehículo darán 2
destellos, si la función 7 esta activada, la sirena emitirá 1 sonido, a los 16 segundos el LED
indicador comenzara a titilar lentamente, pasados los 30 segundos la sirena comenzara a sonar
intermitente 1 vez cada 2 segundos y el LED indicador del tablero seguirá titilando ,a los 45
segundos la sirena pasara a sonara intermitente 1 vez cada segundo, las luces del vehículo
seguirán destellando y el LED indicador del tablero seguirá titilando, a los 70 segundos se
activara el corte de corriente constante apagando el motor del vehículo, las luces comenzaran
a destellar, comenzara a sonar la sirena corrida y el LED del tablero seguirá titilando.
Deshabilitacion / Desactivación de los Anti-asaltos
Para Deshabilitar el Anti-asalto antes de que comience a sonar la sirena corrida los 6 tonos
o antes de los 70 segundos después de haberse activado el anti-asalto, presione y suelte el
botón reset 1 vez.
Para Desactivar el anti-asalto después de haber comenzado a sonar la sirena corrida los 6 tonos
o pasados los 70 segundos después de haberse activado, mantenga o pase el swiche de
ignición a la posición de ON, presione el botón reset la cantidad de veces como lo indique el
código de seguridad (de fabrica es 1) y espere 3 segundos, tiempo de espera de confirmación
que el código introducido es el correcto.
Para Deshabilitar el Anti-asalto dentro de los primeros 15 segundos de haberse activado, con
la ignición en ON, presione y suelte el botón 1 del control remoto, la sirena confirmara con 1
sonido la deshabilitacion del anti-asalto. (No aplica para el anti-asalto de presencia)
Modo Valet por Botón Reset o por Control Remoto
El Modo Valet fue diseñado para deshabilitar el sistema de alarma cuando sea requerido,
ejemplo cuando usted necesite deja el vehículo en un estacionamiento, hacerle
mantenimiento, etc.
Para obtener el modo vale se hace necesario que el sistema de alarma se encuentre
desarmado, pase el swiche de ignición en la posición de ON, presione por 3 segundos el
botón reset, al activar el modo vale el LED indicador del tablero pasara a encendido
constante y la sirena emitirá 5 sonidos confirmando el ingreso al modo valet.

ESPAÑOL
Genius Car Alarm
www.alarmasgenius.com12
Con el sistema de alarma desarmado y con el swiche de ignición en OFF, presione y suelte el
botón 4 y luego presione el botón 3 por 3 seg. . del control remoto. El LED del tablero se
encenderá fijo, los seguros de las puertas se cierran y la sirena emitirá 5 sonido confirmado el
ingreso al modo valet.
Cuando el sistema de alarma se encuentre en el modo valet serán excluidos los cortes de
corriente (anti-asaltos) y el sistema de alarma sonora, solo se obtendrá las funciones de
apertura y cierre de los seguros eléctricos, la salida del canal 2 (abre baúl eléctrico) y la salida
del canal 3 (módulos alza vidrio, etc.)
Para salir del modo valet, simplemente con el swiche de ignición en ON presione y suelte
1 vez el botón reset, el LED indicador se apagar indicándole la desactivación del modo valet y
la sirena emitirá 2 sonidos confirmando la salida del modo valet.
Con el sistema de alarma desarmado y con el swiche de ignición en OFF, presione y suelte el
botón 4 y luego presione el botón 3 por 3 seg. . del control remoto. El LED del tablero se apagara
y la sirena emitirá 2 sonido confirmando la salida del modo valet.
Desarmado del sistema mediante el botón reset
En el caso de que el control remoto se extravíe, se dañe o se le agote la batería, usted podrá
desarmar el sistema mediante el botón reset.
• Primero. Con el sistema de seguridad armado, abra la puerta del chofer, la sirena
comenzara a sonar.
• Segundo, pase el swiche de ignición a la posición de ON, dentro de los 10 segundos
presione el botón reset la cantidad de veces asignadas en el código de seguridad (de
fabrica es 1) la sirena continuara sonando por 3 segundos y si el código de seguridad es
correcto el sistema se desarma.
LED indicador del tablero
El LED indicador del tablero está diseñado para darle un aviso luminoso del estado en que se
encuentra el sistema de alarma, adicionalmente le advierte si el vehículo tuvo un intento de
hurto, el LED indicador del tablero normalmente debe ser instalado en el tablero donde se
pueda visualizar fácilmente.
El LED le indicara en 7 diferentes manera la condición en que se encuentra el sistema de
alarma.
• LED apagado: El sistema de alarma se encuentra desarmado.
• LED encendido constante. El sistema de alarma se encuentra el Modo Valet.
• LED Titila Lento. El sistema de alarma se encuentra armado.
• LED Titilas rápido. Aviso de Armado automático o Rearmado Automático.
• LED titila 1 destello con pausa. El vehículo sufrió un intento de hurto por Ignición.
• LED Titila 3 destellos con pausa. El vehículo sufrió un intento de hurto por
apertura de las Puertas.
• LED Titila 4 destellos con pausa. El vehículo sufrió un intento de hurto por medio de los
Módulos opcionales o impacto.

ESPAÑOL
Genius Car Alarm
www.alarmasgenius.com 13
Confirmación mediante la sirena y las luces.
Mediante la sirena electrónica y las luces del vehículo el sistema de seguridad le indicara los
distintitos eventos asociados con la protección del vehículo.
• 1 Sonido de la sirena y 1 destello de luz le indicara el armado del sistema de alarma.
• 1 Sonido de sirena después de haber armado el sistema de seguridad y dentro de
primeros 3 segundos le indicara la exclusión del Sensor de impacto.
• 3 Sonidos de la sirena al armar indica que hay una puerta mal cerrada
• 3 sonidos de la sirena al abandonar el vehículo, recordatorio de armar la alarma
• 2 Sonidos de la sirena y 2 destellos de luces, confirman el desarmado del sistema de
seguridad.
• Sirena suena constante y las luces destellan, el vehículo sufre un intento de hurto
• 4 sonidos de la sirena y 4 destellos de luces al desarmar el sistema de seguridad le
indica que el vehículo sufrió un intento de hurto.
• Sonido de la sirena intermitente por 2 segundos, aviso de impacto leve en el vehículo.
Preaviso del Sensor de impacto.
El Sensor de impacto está diseñado para indicarle mediante la sirena si el vehículo sufrió un
impacto leve o fuerte, si el impacto es leve la sirena sonara intermitente por 2 segundos si el
impacto es fuerte las sirena sonara por 30 segundos.
Programación de funciones.
El micro-procesador de la alarma está diseñado para que las funciones del sistema de
seguridad sean programadas directamente a la memoria, usted podrá programar 12 funciones
por software y 4 funciones por jumper.
Método para ingresar a la memoria de las funciones para poder programar.
El sistema de seguridad posee 14 funciones programables por software los cuales usted
puede cambiar.
Siga los siguientes pasos para ingresar a la memoria de programación:
1. Pase el swiche de ignición de la posición de ON a OFF.
2. Dentro de los primeros 7 segundos después de haber pasado el swiche de ignición
3. a OFF, presione y suelte 5 veces el botón reset.
4. La sirena dará 1 sonido indicándole que entro en el modo de programación de funciones,
usted tiene 10 segundos para seleccionar la función que desee programar, si dentro de
los 10 primeros segundos no ingresa ninguna función a programar, el equipo sale del
modo de programación.
5. Dentro de los primeros 10 segundos, presione y suelte el botón reset la cantidad de
veces correspondiente al número de la función que usted desea programar, la sirena le
confirmara con 1 sonido cada vez que usted presione el botón reset, Ejemplo. usted

ESPAÑOL
Genius Car Alarm
www.alarmasgenius.com14
desea programar el cierre de los seguros eléctricos con el armado automático, presione
el botón reset 1 ves, la sirena responderá con 1 sonido.
6. Para activar una función después de haber seleccionado la función presione y suelte el
botón 1 del control remoto, la sirena confirmara con 1 tono la activación de la función,
para desactivar la función presione y suelte el botón 2 del control remoto la sirena
confirmara con 2 sonidos la desactivación de la función seleccionada. Usted tiene 10
segundos para activar o desactivar la función si durante este periodo usted no ingresa
ninguna actividad el sistema sale automáticamente del modo de programación
confirmando 2 sonidos de la sirena.
7. Si usted necesita programar otra función, presione el botón reset la cantidad de
espacios que hay entre la función programada anteriormente y la siguiente función a
programar. Ejemplo. Ya habíamos programado la función 1 y ahora queremos
programar la función 7 (aviso acústico al activar el anti-asalto) presionamos el
botón reset 6 veces. Y si luego queremos programar la función 8 (Aviso acústico
al armar y desarmar), presionamos el botón reset 1 sola vez.
Para salir del modo de programación espere 10 segundos o pase el swiche de ignición
a la posición de ON, la sirena confirmara con 2 sonidos la salida del modo de
programación
Funciones Programables
.
Presionar
Switch
Valet
FUNCIÓN Presionar el
botón 1
Presionar el
botón 2
Presionar el
botón 3
1 Cierre de los Seguros Eléctricos
con el Armado Automático
SI
NO
2 Retardo de Activación de Señal
de Puertas
SIN
RETARDO
Retardo de
30 Segundos
Retardo de 60
Segundos
3 Anti-asalto por Control remoto
SI
NO
4 Cerrar Seguros con Ignición
SI
NO
5 Abrir Seguros con Ignición
SI
NO
6 SALIDAS PARA CANAL 3 Segundo
Pulso de Abrir
Seguros
CANAL 3
Salida
Intermitente
CLAXON (-)
7 Aviso Acústico de la activación
del Anti-asalto
SI
NO

ESPAÑOL
Genius Car Alarm
www.alarmasgenius.com 15
8 Avisos Acústico de ARMADO Y
DESARMADO
SI
NO
9 Recordatorio de Armar La
Alarma. *Solo en Armado
Manual
SI
NO
10 Advertencia de Puerta Abierta
con la ignición en ON
SI
NO
11 2do Canal
Cajuela
Eléctrica
Luz interior
(Domo)
Pulso de 30 seg.
(Modulo alza
vidrio)
12 Anti-asalto por Puerta Al Abrir
la puerta
Al Cerrar
La puerta
13 RESET DE FABRICA
SI
14
Anti-asalto de Presencia
(Transmisor Adicional)
SI
NO
15
Identificador de Controles
Programados (I.C.P.)
SI
NO
Funciones Programables por Jumper
JUMPER MODO VARIANTES
MODO
VARIANTES
J1:
Armado Automático.
ACTIVADO
(ON)
DESACTIVADO
(OFF)
J2:
PULSOS DE APERTURA
DE LOS SEGUROS
1 PULSO DE
0.5 SEGUNDOS
DOBLE PULSO
J3:
POLARIDAD DE LA LINEA
DE PULSADORES DE
PUERTAS (+ / -)
ENTRADA DE
PUERTAS (+)
ENTRADA DE PUERTAS(-)
J4:
ANTI-ASALTO POR
INGNICION
ACTIVADO
(ON)
DESACTIVADO (OFF)
Importante.
Para habilitar o deshabilitar una función, deberá de ser removida la corriente del modulo,
cambiar la posición de los jumper de las funciones a programar y volver a conectar la
corriente del modulo.

ESPAÑOL
Genius Car Alarm
www.alarmasgenius.com16
Doble Pulso de Apertura de seguros eléctricos.
El sistema de alarma ya viene programado de fábrica con la función de apertura de seguros
eléctricos para vehículos con doble pulso, presione y suelte el botón 2 del control remoto
para desarmar el sistema de alarma, el sistema enviara el primer pulso de apertura, presione
y suelte nuevamente el botón 2 del control remoto y enviara el segundo pulso de apertura de
seguros eléctricos.
Si desea que la función de doble pulso sea automático, seleccione la función del
Jumper JP 2 y al desarmar el sistema de alarma, presionando y soltando el botón 2
del control remoto, el sistema de alarma enviara los 2 pulsos de apertura en forma
automática.
Recordatorio de Armar la Alarma.
Cuando el armado automático, J1 este deshabilitado (OFF), al pasar la llave de ignición a la
posición de ON a OFF, se abre y se cierra una puerta, a los 5 segundos la sirena emite 1
primer aviso con 3 sonidos de la sirena recordándole armar la alarma, a los 15 segundos
siguientes, la sirena vuelve a sonar 3 veces recordándole por segunda vez Armar la alarma.
Advertencia de Puerta abierta mientras se conduce.
Con la llave de ignición en la posición de ON, al abrir una puerta, las luces del vehículo
comenzaran a destellar, indicándole a usted la apertura de una puerta y dando aviso de
prevención a otros conductores.
Función Identificador de controles programados. (I.C.P.)
La función I.C.P. es una función preventiva, al desarmar el sistema de alarma y pasar la
llave de ignición a ON, el LED indicador del tablero comenzara a titilar por 10 segundos la
cantidad de veces a la cantidad de controles que se hayan programado en la memoria.
Programación y Funciones del Canal 3
El canal 3 del sistema de alarma es completamente independiente del canal 2 abre baúl
eléctrico, este fue diseñado para ser utilizado presionando simultáneos los botones 3 y 4 del
control remoto, se podrá utilizar para activar módulos opcionales tales como Modulo de
encendido del vehículo, Modulo Alza vidrio eléctrico, Etc.
El canal 3 posee tres (3) tipo de señal (Pulso, Doble Pulso e Intermitente) los cuales se
pueden programar pero solo uno de los 3 puede ser elegido.
A. Doble Pulso: Es utilizado para enviar un pulso segundo de apertura de los seguros
eléctricos y convertir un sistema de apertura convencional a uno de apertura
inteligente.
B. Pulso: Presione por 3 segundos y suelte los botones 3 y 4 simultáneos del control
remoto, y obtendrá un pulso, si mantiene los Botones presionados el pulso será de 1
segundo.
C. Intermitente: Sonara en intermitencia el claxon del vehículo cuando el sistema de
alarma se dispare por intento de hurto y dará 1 sonido al armar el sistema de alarma y
2 sonidos al desarmar el sistema de alarma, funcionara en conjunto con las funciones de

ESPAÑOL
Genius Car Alarm
www.alarmasgenius.com 17
la salida de la sirena (independiente)
Las funciones son seleccionables en la tabla de programación mediante la función 6 de las
funciones programables.
Programación de la función del canal 3:
A. Doble Pulso .: Presione y suelte el botón 1 la sirena confirma con 1 sonidos
B. Pulso ………..: Presione y suelte el botón 2 la sirena confirma con 2 sonidos
C. Intermitente..: Presione y suelte el botón 3 la sirena confirma con 3 sonidos.
Programación de la función del canal 2:
La función del Canal 2, puede ser programada con 3 diferentes funciones pero solo una de
ellas puede ser elegida:
A. Abre Baúl Eléctrico, Al presionar y manteniendo presionado el botón 3 del control
remoto por 3 segundos, envía un pulso negativo de 1 segundo para abrir el baúl
eléctrico.
B. Dome Light, Enciende las luces internas del vehículo al desarmar el sistema de alarma
y encienden intermitente al sonar la sirena ya sea por pánico o por intento de hurto.
C. Alza vidrio Eléctrico. Al armar el sistema de alarma envía un pulso de 30 segundos
el cual puede ser utilizado para activar un modulo opcional de alza vidrio eléctrico.
Programación de la función del Canal 2:
A. Canal 2 ………………Presione y suelte el botón 1 la sirena confirmara con 1 sonido.
B. Dome Light………….. Presione y suelte el botón 2 la sirena confirmara con 2 sonidos
C. Alza vidrio Eléctrico ….Presione y suelte el Botón 3 la sirena confirmara con 3 sonidos
Programación y Memorización de controles remotos.
El sistema de alarma está diseñado para memorizar hasta 4 controles remotos diferentes,
precaución cada vez que usted programe un control remoto, el sistema de alarma borra de la
memoria los controles remotos anteriores, programe todos los controles remotos en el mismo
momento, ya que mediante esta función de borrado usted podrá borrar de la memoria
cualquier control remoto que se le haya extraviado simplemente programado nuevamente el
control remoto o los controles remotos que usted posea.
Para ingresar a la memoria y así poder programar los controles remotos siga los siguientes
pasos:
1. Pase el swiche de ignición a la posición de ON
2. Dentro de los primeros 5 segundos después de haber pasado el swiche de ignición a la
posición de ON, presione y suelte 5 veces el botón reset, la sirena confirmara con un sonido
largo, usted tiene 10 segundos para comenzar a ingresar los controles remotos, si no
ingresa ningún control remoto antes de los 10 segundos o pasa el swiche de ignición a la

ESPAÑOL
Genius Car Alarm
www.alarmasgenius.com18
posición de OFF, el sistema saldrá automáticamente del modo de aprendizaje de
controles remotos y la sirena le confirmara con 2 sonidos y la memoria de los controles
remotos no será borrada.
3. Presione y suelte el Botón 1 del control remoto a programar, la sirena confirmara con 1
sonido la memorización del control remoto, desde ese momento los controles remotos
viejos son borrados.
4. Si desea programar un segundo control remoto repita el paso 3 donde la sirena le
confirmara con 2 sonidos la memorización del segundo control remoto y con 3 sonidos
el tercero con el cuarto cierra la programación.
5. Pase el swiche de ignición a la posición de OFF o espere 10 segundos y el sistema de alarma
cierra y sale del modo de aprendizaje de controles remotos, la sirena confirmara con 2
sonidos.
Si el Anti-asalto por ignición se encuentra activado, desactive el Anti-asalto por el botón
reset y siga los pasos del 2 al 5.
Identificación de los Cables de instalación
Conector de 7 cables
Azul/Blanco Línea de Pulsador Negativo para Anti-asalto por puertas
Verde/Negro Línea de Pulsadores de Puertas (Negativos o Positivos)
Azul/Negro Línea de Pulsadores Negativos para el Baúl y el Copo
Amarillo Alimentación Positiva 12Vts al pasar el Swiche de Ignición a ON
Marrón/Blanco Salida Negativa de 250mA para el relee del Canal 3
Naranja Salida Negativa de 250mA para el Corta Corriente
Gris
Salida Negativa de 250mA. Para el relee del Canal 2
Conector de 10 cables
Negro
Alimentación Negativa (Conecte Directamente al Chasis Carrocería)
Marrón
Salida Positiva para la Sirena Electrónica
Naranja
Bloquea – Cierra (87a)
Blanco
Bloquea – Cierra (30)
Amarillo
Bloquea – Cierra (87)
Naranja/Negro
Desbloquea – Abre (87a)
Blanco/Negro
Desbloquea – Abre (30)
Amarillo/Negro
Desbloquea – Abre (87)
Rosado
Salida Positiva para el destello de Luces

ESPAÑOL
Genius Car Alarm
www.alarmasgenius.com 19

ESPAÑOL
Genius Car Alarm
www.alarmasgenius.com20

ESPAÑOL
Genius Car Alarm
www.alarmasgenius.com 21

ESPAÑOL
Genius Car Alarm
www.alarmasgenius.com22

ESPAÑOL
Genius Car Alarm
www.alarmasgenius.com 23

ESPAÑOL
Genius Car Alarm
www.alarmasgenius.com24
Fecha de Venta: _________________________________ Factura ____________________
BENEFICIARIO
Nombre: __________________________________________ C.I.: ___________________
Marca del Vehículo: ___________________________________ Color: __________________
Modelo: ______________________________________ Placa: ________________________
SELLO Y FIRMA DEL DISTRIBUIDOR QUE INSTALO EL SISTEMA
REVISION TECNICA
1ra. Fecha ____________________________________________________________________
Observaciones: _________________________________________________________________
Sello:________________________________________________________________________
2da Fecha ____________________________________________________________________
Observaciones: _________________________________________________________________
Sello:________________________________________________________________________
3ra Fecha _____________________________________________________________________
Observaciones: _________________________________________________________________
Sello:

ESPAÑOL
Genius Car Alarm
www.alarmasgenius.com 25
LIMITE DE GARANTÍA
Todo sistema de alarma marca GENIUS está garantizado por ( ) año(s) a partir de la fecha de instalación
tomando en cuenta las siguientes condiciones:
1. Esta garantía no cubre desperfectos o mal funcionamientos ocasionados por:
a. Mala instalación
b. Inmersión en agua o líquidos
c. Choques o incendios
d. Intento de modificación o reparación por manos no calificadas
e. Perdida o deterioro de los controles
2. Los gastos de desmontaje, montaje o cualquier otro que se ocasiones, será por cuenta del
reclamante.
3. La ejecución de esta garantía, tendrá mayor agilidad en sus trámites,
si el usuario posee la calcomanía colocada en el vidrio trasero del vehículo.
4. El departamento técnico de la empresa se reserva el derecho de determinar
la validez de la garantía según experticia
ADVERTENCIA:
El antirrobo tiene exclusivamente una función disuasiva contra eventuales robos. En ningún caso puede ser
considerado como un seguro contra el robo. El constructor declina todas las responsabilidades por averías o
anomalías de funcionamiento de la alarma, de los accesorios o del grupo del automóvil, debido a la mala
instalación o la supervisión de las características especificadas
Recomendaciones para guardar, manténgala siempre con usted.
1) Desactivación del Antiasalto
Con la llave de ignición en ON, presione y suelte el botón reset 1 vez y espere 3 segundos, el antiasalto
se desactivara.
2) Desactivación Manual
Con la llave de ignición en ON, presione y suelte el botón reset 1 vez y espere 3 segundos, el sistema de
alarma se desactivara.
3) Ingreso y Salida del Modo Valet
Con la llave de ignición en la posición de ON, presione y mantenga presionando el botón reset por 5
segundos, el LED del tablero permanecerá encendido fijo, para salir del modo valet, con la llave de
ignición en la posición de ON, presione y suelte el botón reset, el LED del tablero se apagara.
Con la llave de ignición en OFF y con la alarma desarmada, presione y suelte 1 vez el botón 2 del
control remoto, inmediatamente presione y mantenga presionado por 3 segundos el botón 3 del control
remoto, la sirena confirmara con varios sonidos el ingreso o la salida del modo valet.
Importante, Plastifique y guarde estas instrucciones y llévelo siempre consigo
Especificaciones Tecnicas
(1) Frecuencia 370 MHz
(2) Voltaje de trabajo De 9.5V a 16V
(3) Consumo en modo Armado 13mA
(4) Consumo en modo Desarmado 11mA
(5) Salida máxima para las luces 15A
(6) Salida máxima para el canal 2, canal 3, Dome ligth Negativo 0.5A
(7) Salida máxima para el cierre de puerta 15A
(8) Combinaciones de códigos fijos del transmisores 1,0480576

ENGLISH
Genius Car Alarm
www.geniuscaralarm.com26
Car Alarm Series 3 B
4 Buttons
G34 Si
(Internal Shock Sensor)
Version 3

ENGLISH
Genius Car Alarm
www.geniuscaralarm.com 27
CAR ALARM GENIUS – Series 3B
4 Buttons – G34 Si
(Internal Shock Sensor)
• Module controlled using Micro-Processor
• 2 Transmitters - 4 buttons with color Blue LED
• 4 Learning Transmitters (Codes)
• Transmission frequency 370 MHz (Anti-Scanner)
• Panic by transmitter
• Car Finder by transmitter
• Transmitter Arm and Disarm Mute
• Programmable Mute Armed and Disarmed
• Negative output Channel 2 (Opens electric trunk)
• Negative output Channel 3 optional modules (Programmable)
• Opening the electric trunk without deactivating the alarm using the transmitter
(channel 2)
• LED indicator on the board
• Programmed controls identifier (P.C.I.) (Programmable)
• 1 Positive output for Light flash with internal relay in the module
• Universal Central Door Lock
• Automatic Armed (Programmable)
• Electric locks on with the Automatic Armed (Programmable)
• Ignition Lock and unlock (Programmable)
• Double push button to unlock door
• Automatic Rearm (accidental disarm)
• Automatic Rearm with Lock
• Shock Sensor bypass by transmitter
• Line door pin switches (Positive or Negative)
• Line hood and trunk pin switches (Negative)
• Electronic siren of 120 dba
• Mode Valet (using emergency button or Transmitters )
• Wires identified by colors
• Protection fuses included in the installation harness
• Transmitter Anti-carjack (Programmable)
• Door Anti-carjack (Optional)
• Ignition Anti-carjack (Programmable)
• Presence Anti-carjack (Additional transmitter) (Programmable)
• Warning Light when anti-carjack activates
• Acoustic warning when anti-carjack activates (Programmable)
• Negative output in armed, for engine cut
• Second engine cut (Programmable)
• Negative output timed for windows-up modules (Programmable)
• Defective zone exclusion
• Flashing output for the horn (Programmable)
• Dome Light (Programmable)
• Function programming through software
• Manual disarmed by safety PIN code (Programmable)
• Memory of last status of the system.

ENGLISH
Genius Car Alarm
www.geniuscaralarm.com28
Introduction
Thank you for purchasing our security system for your vehicle. Read well the user’s
manual of the system specifically the functions of the transmitter, the valet switch and the
LED indicator on the board.
The Transmitter
Each transmitter has a different code, the alarm system is programmed by the factory with
2 codes (2 transmitters), and you can program a maximum of 4 codes (4 transmitters). The
transmitter has 4 buttons, I, II, III, IV.
The system is pre-programmed with a work routine with each button of the transmitter.
It works with the following configuration:
Programming and memory of the transmitters and witnessed transmitters
The alarm system is designed to memorize up to 4 different transmitters, be careful when
programming a transmitter, the alarm system deletes from the memory the previous
transmitters, program all transmitters at the same time, since through this deletion function
you can delete the memory of any transmitter if it is lost by simply programming the
transmitter or transmitters again. The witnessed transmitter should be the last one to be
memorized.
To enter the memory and be able to program the transmitters, follow these steps:
1. Set the ignition switch in ON
2. Within the first 5 seconds after setting the ignition switch in ON, press and let go the
reset button 5 times, the siren will confirm with long sound, you have 10 seconds to
enter the transmitters, if you do not enter any transmitter before the 10 seconds or
set the ignition switch in OFF, the system will automatically exit the transmitter
learning mode and the siren will confirm with 2 sounds and the memory of the
transmitters will not be deleted.
3. Press and let go button I on the transmitter to program, the siren will confirm with 1
sound the memorization of the transmitter, as of that moment the old transmitters
will be deleted.
Button I
Button III
Button IV
Button II

ENGLISH
Genius Car Alarm
www.geniuscaralarm.com 29
4. If you wish to program a second transmitter, repeat step 3 where the siren confirms
with 2 sounds the memorization of the second transmitter and with 3 sounds the
third and with 4 the programming ends.
The system pre-programmed with a routine of work with each button of the Transmitter. It works
with the following configuration:
a. Alarm is armed and the doors
are locked
a. IGNITION IS
OFF
Press button 1 once
b.
Stop temporarily the alarm’s
trigger
b. SIREN
SOUNDING
Press button 1, then button
3 within 2 seconds
Arm the alarm cancelling the
shock sensor.
IGNITION IS OFF
Press button 1, then button
2 within 2 seconds
Arm the alarm
cancelling the
shock sensor and the doors’
signal input
IGNITION IS OFF
Disarm and unlock doors ARMED
Press button 2 once
Stop temporarily the alarm’s
trigger.
SIREN
SOUNDING
Press button 4 for 3 seconds Channel 2 (Open Trunk) IGNITION IS OFF
Press button 1 for 1 second Car Finder. ARMED
Press button 3 for 3 seconds Panic IGNITION IS OFF
Press buttons 1 and 2
together for 3 seconds
Anti-hijacking IGNITION IS ON
Press button 3, then button
1 within 2 seconds.
Silent Arming Mode IGNITION IS OFF
Press button 3, then button
2 within 2 seconds.
Silent Disarming Mode ARMED
Press button 4, then button
3 for 3 seconds.
Valet Mode
IGNITION IS OFF
Press buttons 3 and 4
together for 2 seconds.
Arm Channel 3
IGNITION IS
ON/OFF
Alarm system armed.
The alarm system can be armed in 2 methods.
1. The first, using button I on the transmitter. It is necessary for the ignition switch to
be OFF and for the system not to be on Valet.

ENGLISH
Genius Car Alarm
www.geniuscaralarm.com30
2. The second, using the automatic armed, which is obtained when the ignition switch
goes from ON to OFF and then open and close a door. The system will
automatically arm in 30 seconds after closing the last door, this functions is
programmable (see function programming chart).
Alarm system armed by using the Transmitter.
The alarm system will always be armed by using the transmitter, provided that the ignition
switch is OFF and the system in not in the Valet mode.
To arm the alarm system after leaving the vehicle and closing all the doors, simply press
and let go button I on the transmitter once, the lights will flash once, the siren will sound
once and the LED indicator on the board will start flashing slowly to confirm that the
system in armed. If the electric locks are connected to the alarm system, they will be
locked; the current breaker will be activated avoiding the use of the vehicle, after 3
seconds the system goes to expecting-robbery mode
Exclusion of defective zones.
When the alarm system is armed and if any of the zones is defective, the siren shall sound
3 times and, simultaneously, the lights will flash 3 times, indicating that a zone is defective,
when this occurs, the defective zone will be automatically excluded and the vehicle will be
protected on the rest of the zones. For example, if the trunk is not closed properly alter
arming the alarm system using the transmitter, the siren will sound 3 times and the lights
will flash 3 times indicating a door is not properly closed and it will exclude the sensors of
that zone. The defective zone will be included again in the protection 3 seconds after
correcting the failure, alter properly closing the trunk.
Armed and activated alarm system.
When the alarm system is armed, the LED indicator on the board blinks slowly, if a door is
opened, the siren starts sounding and the lights flashing for 60 seconds, if the door
remains open after the 60 seconds, the siren will keep sounding and the lights flashing for
3 minutes, after the 3 minutes, the alarm system excludes the door sensors protecting the
vehicle through the rest of the sensors, if the door is closed before the first 60 seconds
after the siren start sounding, the same will silent after 60 seconds and the light will stop
flashing.
If when the alarm system disarms the siren sounds 4 times and the lights flashes 4 times,
this indicates the vehicle was victim of a carjack attempt. The LED indicator on the board
will continue to blink until the ignition switch is ON. Please check the vehicle.
Alarm System Disarm
When the alarm system is armed, press and let go button No. II on the transmitter, the
siren will sound twice and the lights will flash twice indicating the alarm system disarmed,
the current breaker will deactivate, the LED indicator on the board will turn off, if the
electric locks are connected, they will open, if button II is pressed again, the system will
send the second pulse to open the electric locks
Silent Arm
First press and let go button III and then press and let go button I on the transmitter to arm
the alarm system silently, the alarm system will arm without the sound of the siren. When
the alarm is silently armed and a door is open or not properly closed, the siren will sound 3
times as an alert warning.
Silent Disarm
First press and let go button III and then press and let go button II on the transmitter to
disarm the alarm system silently, the system will disarm without the sound of the siren.
When silently disarmed and after the vehicle has been victim of a carjack attempt, the
siren will sound 3 times as an alert warning.

ENGLISH
Genius Car Alarm
www.geniuscaralarm.com 31
ARMING WITH ZONES’ CANCELLATION
This system allows us to arm the alarm cancelling the shock sensor as the 1
st
zone and
the shock sensor and doors’ signal as the 2
nd
zone. This is to avoid false alarm when the
shock sensor or the doors’ switch is triggered.
1. Press button 1, then press button 3 within two seconds, the shock sensor is cancelled.
2. Press button 1, then press button 2 within 2 seconds, both the shock sensor and the
door’s signal are cancelled.
DOORS’ SIGNAL ARMING DELAY
This function allows us to arm the alarm even when the dome lights are on, because the
system will not recognize this signal for the programmed time, avoiding notices of open
door when the alarm is armed.
* See Programming Table-
Disarm of the system using the reset button
In case you lose the transmitter, damage it or the battery of the same dies,
you can disarm the system by pressing the reset button.
First, with the security system armed, open the driver’s door and the siren will
start sounding.
Second, turn ON the ignition switch, before the 10 seconds press the reset
button the number of times assigned in the security code (1 as set by the
factory) the siren will continue to sound for 3 seconds and if the security code
is right the system will disarm.
PANIC
With this function, we can make the system to trigger intentionally to prevent or attract the
attention of people, in case of a theft or aggression attempt.
a. With the ignition in OFF,
- PANIC, BUTTON 3 FOR 3 SECONDS
b. The siren and the lights will trigger for 3 seconds.
c. Press button 1 or button 2 to stop PANIC, the system will remain armed.
d. With the ignition in ON. Activate PANIC.
By stopping PANIC, the system will remain armed without the ignition interrupter, but if the
ignition key is turned to OFF position, the IGNITION INTERRUPTER will be activated.
CAR FINDER
With this function we can make the system to send us signals with the siren and lights,
which will serve us to locate the vehicle, whenever we are in the transmission range
between the remote control and the vehicle.
a. When the alarm is armed,
- CAR FINDER, BUTTON 1 FOR 1 SECOND
b. The siren will chirp 10 times and the parking lights will flash 10 times.
c. Press button 1 or button 2 to stop the Car Finder.
DUAL-STAGE SHOCK SENSOR
If the vehicle receives a light impact, the siren will chirp and the lights will flash 5 times
each. If the vehicle receives a strong impact, the siren and the lights will trigger for 30
seconds.
*The sensitivity can be adjusted.

ENGLISH
Genius Car Alarm
www.geniuscaralarm.com32
ANTI-HIJACKING BY IGNITION (Programmable by Jumper)
This function is in the memory’s software to activate automatically the anti-hijacking mode
every time the ignition key is turned form OFF position to ON position. (See Jumpers table)
ANTI-HIJACKING BY TRANSMITTER (Programmable)
This function is used to immobilize the vehicle in case of emergency, pressing the buttons
1 and 2 simultaneously for 3 seconds and the anti-hijacking mode will activated by
transmitter. (See Functions Programming Table)
ANTI-HIJACKING BY DOORS (Programmable)
With the ignition key in ON position, open driver’s door and the anti-hijacking mode by door
will be activated. You must connect the wire of anti-hijacking by door. (See Functions
Programming Table)
WITNESSED ANTI-CARJACK (Additional transmitter necessary)
This function is used to immobilize the vehicle in case of emergency by
simply separating the additional transmitter while the engine of the
vehicle is working, 60 seconds after the signal disappears, the lights will
flash twice, The LED indicator will start blinking indicating
the anti-carjack has been activated, if the acoustic warning is
programmed, the siren will sound twice.
This function is programmable (see function programming chart).
For the witnessed anti-carjack to function, the additional transmitter must
be acquired. It must be programmed in the alarm system memory and
enable function in the function chart.
Turning on the transmitter
Press the button on the transmitter and hold it, the LED indicator on the
transmitter will turn on and off, after 3 seconds the LED on the transmitter will turn on for 2
seconds. Let go the button on the transmitter.
The transmitter will send a signal to the receiving module (Central Unit) every 6 seconds.
When the internal battery of the transmitter is dead, the LED transmitter will warn you by
continuously blinking. You must replace the batteries of the transmitter.
Turning off the transmitter
Press the button on the transmitter and hold it, the red LED on the transmitter will flash
once, after 3 seconds, the LED of the transmitter will flash 5 times. Let go the button of the
transmitter.
ANTI-HIJACKING SEQUENCE
When the system enters in anti-hijacking mode,
a. 0 to 15 seconds,
nothing happens (See Functions Programming Table, function 9).
16 to 30 seconds,
the LED twinkles slowly.
31 to 45 seconds,
the LED will flash rapidly, the siren will chirp once every two
seconds and the lights will flash once every second.
46 to 70 seconds,
the LED will flash rapidly, the siren will chirp once every second
and the lights will flash once every second.
After 70 seconds
, the siren and the lights will trigger, the engine interrupter will be
activated.
b. When the anti-hijacking is triggered, (the ignition remains in ON position). Even if the
ignition key is turned to OFF position, the siren and the lights remain triggered for 3
minutes.
Optional witnessed
transmitter

ENGLISH
Genius Car Alarm
www.geniuscaralarm.com 33
c. If the ignition key is turned to ON position again, the siren and the lights will be
triggered again.
*To exit Anti-hijacking mode: APPLY THE DISARMING EMERGENCY PROCEDURE
AUTOMATIC ARMING
This function provides us with a greater confidence in our alarm, giving us security and
tranquility because of the alarm’s complete protection.
With this function we can assure that the system will arm automatically in case we forget to
do so.
* For more security, it is recommended to arm the system with the remote control.
a. After turning the ignition key to ON position and closing the doors, 30 seconds later the
alarm will be automatically armed.
* See Jumper 1 selection for MANUAL / AUTOMATIC Arming
* See Programming Table for Automatic Arming Programming with doors lock.
AUTOMATIC REARMING
When the alarm is disarmed with the remote control, without turning the ignition key to ON
position and without opening the doors, 30 seconds later the alarm will be re-armed and
the doors will be locked.
CHANNEL 2 (TRUNK)
a. When the alarm is disarmed:
CHANNEL 2, BUTTON 4 FOR 3 SECONDS, the signal is triggered (The trunk will be
opened)
b. When the alarm is armed:
Activating channel 2, first the alarm will be disarmed and then the signal is triggered. (The
trunk will be opened)
* See Programming Table
CHANNEL 3
With this signal we can control a function (connecting an additional- optional module) such
as a window module, or the engine ignition.
Press buttons 3 and 4 together for two seconds to activate the function. (If the buttons are
pressed for more time, the signal is applied; releasing the buttons will stop the signal)
* See Programming Table
SECOND PULSE TO UNLOCK DOORS
If we wish to control the doors lock as AGENCY TYPE, with this function we can do it.
Disarming the alarm pressing the Button 2 once, only the driver’s door will be unlocked. If
we press Button 2 again, within three seconds the others will be unlocked.
*See Programming Table
HORN OUTPUT
Normally, in alarms the sound is produced by a siren (Positive Output), with this new
system, we can simultaneously drive the horn’s sound (Negative Output), or select one of
the two functions.
* See programming Table
VALET MODE
Valet, it is the function that allows us to cancel temporarily our security system, for those
situations in which we do not want to use the alarm system, for example in the car washer,
while in maintenance services, etc.

ENGLISH
Genius Car Alarm
www.geniuscaralarm.com34
1. Valet by Remote Control
a. While the alarm is disarmed, press BUTTON 4 once. Within 3 seconds, press
BUTTON 3 for 2 seconds.
b. The LED will light solid and the siren will chirp 5 times, confirming that the system is
in Valet mode.
c. If the system is in Valet mode: If we press BUTTON 1, the doors will be locked and
the lights will flash once if BUTTON 2 is pressed, the doors will be unlocked and the
lights will flash twice. d. To exit Valet mode, apply the previous mentioned procedure.
*The LED will turn off.
2. Valet by Reset Switch.
a. When the ignition key is in ON position, keep pressing reset switch until the siren
chirp 5 times.
b. The LED will light solid confirming that the system is in Valet mode.
c. To exit Valet mode, apply the previous mentioned procedure.
* The LED will turn off.
DOORS LOCK WITH IGNITION
The overall alarm system offers us a comfortable and secure operation, and this function is
one of them.
a. After the engine ignition is on, the doors will be locked 2 seconds later.
b. Once the engine is turned off, the doors will be unlocked immediately.
DOOR
LOCKS’ CONTROL WITH THE TRANSMITTER WHILE DRIVING
While driving, if we press button 1, the doors will be locked; and if we press button 2, the
doors will be unlocked.
FUNCTIONS’
SELECTION - JUMPERS
Important: All the Jumper’s selections have to be determined before installation.
JUMPER
MODE DEFAULT FABRIC
CONFIGURATION
MODE VARIANTS
J1: AUTOMATIC ARMING /
MANUAL ARMING
AUTOMATIC ARMING
MANUAL ARMING
J2: DOOR LOCKS’ TIME
0.5 SECONDS
DOUBLE PULSE
J3: DOORS’ POLARITY
(+ O -)
DOORS’ INPUT (-)
DOOR’S INPUT (+)
J4: ANTI-HIJACKING BY
IGNITION
ACTIVATED
(ON)
DEACTIVATED
(OFF)
INSTRUCTIONS
* LED’S
CONDITIONS
a. Armed Alarm: The LED will flash slowly (once every second)
b. Automatic Arming and Re-arming: The LED will flash rapidly.
c. Valet Mode: LED will light solid.
*
TRIGGER DIAGNOSIS – LED

ENGLISH
Genius Car Alarm
www.geniuscaralarm.com 35
Disarming the alarm after it was triggered will make the LED to flash, indicating us the
zone that triggered the alarm.
Triggered by Ignition ---------------------------The LED will flash once.
Triggered by Opened Door ---------------------The LED will flash 3 times.
Triggered by Shock Sensor----------------------The LED will flash 4 times.
FUNCTIONS PROGRAMMING
a. Turn the ignition key to ON position.
b. Within 10 seconds, press the valet switch 5 times.
c. The siren will chirp 3 times.
d. Press the valet switch the number of times of the selected function.
* The siren will sound every time the valet switch is pressed.
e. Press the button in the remote control of the selected option.
* If the button 1 is pressed, the siren will chirp once (1); if the button 2 is pressed, it
will chirp twice (2), and three chirps if button 3 is pressed.
f. To exit the programming mode, turn the ignition key to OFF position.
* The siren will sound a (1) long beep.
PROGRAMMING TABLE
Times the
Valet
switch is
pressed
FUNCTION Press button 1
Press
button 2
Press
button 3
1
Lock closure with automatic arm YES NO
2
Door’s Signal Activation Delay
WITHOUT
DELAY
Delay of 30
seconds
Delay of 60
seconds
3
Anti-hijacking by transmitter
YES NO
4
Lock Doors with Ignition YES NO
5
Unlock Doors with Ignition YES NO
6
OUTPUTS FOR CHANNEL 3
Second Pulse to
Unlock Doors
CHANNEL 3
HORN
OUTPUT
(-)
7
Anti-hijacking Warning
*Indicates the beginning of the
sequence
YES NO
8
ARMED and DISARMED Notices YES NO
9
Reminder to arm the alarm.
*Only in Manual Arming
YES
NO
10
Opened Door Warning YES NO
11
Channel 2 Electric Trunk Dome Light
30 second
Electric
window
lifter

ENGLISH
Genius Car Alarm
www.geniuscaralarm.com36
12
Anti-hijacking by Door Close Door Opend Door
13
FABRIC RESET SI
14
Witnessed Anti-carjack
(Additional Transmitter)
OFF ON
15
Programmed controls identifier
(P.C.I.)
ON OFF
* Example to do the Programming:
a. Select the functions to be changed. (It is recommended to write down them to avoid
mistakes)
b. If you are going to work with 2 or 3 functions, follow these steps:
c. Function # 2: Press valet switch twice and then select button 1.
d. Then, if you wish to program, function #4, press twice again the valet switch (to
complete the # 4) then select button 2 of the remote control.
e. And then, if you also want to program function # 8, press four times the valet switch (to
complete the # 8), select the button 2 of the remote control.
IMPORTANT: Going from one function to another, just press the valet switch the
number of times necessary to complete the following function.
DETAILS OF THE PROGRAMMING FUNCTIONS
1. LOCK CLOSURE WITH AUTOMATIC ARM
If we programmed the Automatic Arming function (JUMPER 1), the alarm will arm by itself,
so with this function 1 we can choose to unlock or lock the doors.
2. DOORS’ SIGNAL ARMING DELAY
This function allows us to arm the alarm even when the dome lights are on, because the
system will not recognize this signal for the programmed time, avoiding notices of open
door when the alarm is armed.
3. ANTI-HIJACKING BY TRANSMITTER
This function is used to immobilize the vehicle in case of emergency; pressing the buttons
1 and 2 simultaneously for 3 seconds while the engine is running, the siren will chirp once
and the parking lights will flash once; after 15 seconds, the LED will start to twinkle
indicating the activation of the anti-hijacking mode. This function is programmable (See
Functions Programming Table)
4 and 5 DOORS LOCK WITH IGNITION
This function provides us comfort and security. When the engine is turned on, the doors
will lock TWO seconds later. When the engine is turned off, the doors will unlock
immediately.
6. OUTPUTS FOR CHANNEL 3
Select a function from one of these three options:
1. CHANNEL 3- Output to drive an optional function, such as a windows module.
2. SECOND PULSE TO UNLOCK DOORS
3. HORN OUTPUT- * NEGATIVE OUTPUT *

ENGLISH
Genius Car Alarm
www.geniuscaralarm.com 37
7. ANTI-HIJACKING WARNING: BEGINNING OF THE SEQUENCE
When this function is activated, triggering the anti-hijacking will make the siren chirp once.
8. ARMING OR DISARMING WARNINGS
When arming the alarm, the siren will chirp once; when disarming the alarm, the siren will
chirp three times. Sometimes, the chirps may be annoying, so the system gives us the
option to cancel temporarily these warning sounds.
9. REMINDER TO ARM THE ALARM
When we get off the vehicle and close the last door, 5 seconds later the siren will chirp
three times and 10 seconds later other three chirps will be produced, indicating that we
have not armed the alarm.
* This function will only activate if in MANUAL ARMING MODE
* See Programming Table
10. OPENED DOOR WARNING
While driving, if one of the doors is opened, the lights will flash for 60 seconds. In case the
door keeps open and is closed before the 60 seconds, the lights will turn off.
11. CHANNEL 2
Function’s Selection- Trunk’s release or dome lights:
DOME LIGHTS – Negative Output Signal for 20 seconds. When disarming, if the ignition
key turns to ON, the dome lights turn off.
TRIGGERED, the dome lights are intermittent.
12. ANTI-HIJACKING BY DOOR (Open / Close)
With the ignition key in ON position, open or close the driver’s door, the siren will sound
once and the parking lights will flash once indicating the activation of the anti-hijacking
mode. For the anti-hijacking by door to work, you must connect the anti-hijacking by door
wire to the push-button (-) in the driver’s door.
13. FABRIC DEFAULT RESET
This function allows us to correct the errors, if we mistaken during programming.
14. WITNESSED ANTI-CARJACK (ADDITIONAL TRANSMITTER NECESSARY)
This function is used to immobilize the vehicle in case of emergency by simply separating
the additional transmitter while the engine of the vehicle is working
15. PROGRAMMED CONTROLS IDENTIFIER (P.C.I.)
Every time you set the key in ON, the LED will light immediately for 10 seconds, to indicate
the number of remote controls that were programmed.
1. Intermittency /pause = 1 control programmed
2. Intermittency /pause = 2 controls programmed
3. Intermittency /pause = 3 controls programmed
4. Intermittency /pause = 4 controls programmed

ENGLISH
Genius Car Alarm
www.geniuscaralarm.com38

ENGLISH
Genius Car Alarm
www.geniuscaralarm.com 39

ENGLISH
Genius Car Alarm
www.geniuscaralarm.com40

ENGLISH
Genius Car Alarm
www.geniuscaralarm.com 41

ENGLISH
Genius Car Alarm
www.geniuscaralarm.com42
Purchase Date: ___________________________ Invoice _____________________
BENEFICIARY
Name: __________________________________
C.I.:_________________________
Vehicle’s Trademark: _______________________ Color: ___________________
Model: ____________________________
Vehicle’s Plate: ___________________________
STAMP AND SIGNATURE OF THE DISTRIBUTOR THAT INSTALLED THE SYSTEM
TECHNICAL REVISION
1
ST
Date ___________________________________________________________
Observations____________________________________________________
Stamp: __________________________________________________________
2
nd
Date ____________________________________________________________
Observations ____________________________________________________
Stamp: __________________________________________________________
3
rd
Date_____________________________________________________________
Observations ___________________________________________________
Stamp _________________________________________________________

ENGLISH
Genius Car Alarm
www.geniuscaralarm.com 43
LIMITED WARRANTY
Every GENIUS branded alarm system is guaranteed for ( ) year(s) since the installation
date considering the following conditions:
1. This warranty does not cover damage or malfunctions caused by:
a. Immersion in water or liquids
b. Shocks or fire
c. Attempted modification or repair by unskilled hands
d. Controls’ Loss or Degradation
2. The costs of dismantling, assembling or any other will be borne by the claimant.
3. The implementation of this guarantee will have greater flexibility in its dealings, if the
user has placed the sticker on the rear window of the vehicle.
4. The technical department of the company reserves the right to determine the validity
of the guarantee according to expertise.
WARNING: The Anti-hijacking is exclusively a deterrent against possible theft. In no case
it can be considered as an insurance against theft. The manufacturer disclaims all liability
for damage or abnormal functioning of the alarm, accessories and automotive group, due
to improper installation or monitoring of the characteristics listed.
Recommendations for Storage
Take it with you always
1. Anti-hijacking Disarming
With the ignition key in ON position, press the reset button 1 time, wait 3 seconds and the
anti-hijacking mode will be disarmed.
2. Manual Disarming
Turn the ignition key to ON position, press the reset button 1 time, wait 3 seconds and the
alarm’s system will be disarmed.
3. Enter and Exit Valet Mode
With the ignition key in ON position, press and hold reset button for 5 seconds, the LED will
light solid; to exit Valet mode, with the ignition key in ON position, press and release reset
button, the LED will turn off.
Important: Plastic and store these instructions and take it with you always.
Technical Specification
(1) Frequency 370 MHz
(2) Working Voltage |From 9.5V to
16V
(3) Standby Current for ARM Mode 13mA
(4) Standby Current for DISARM Mode 11mA
(5) Maximum Parking Light Output 15A
(6) Maximum Negative Output for Trunk, Dome Light, 3
rd
Channel Negative 0.5A
(7) Maximum Central Door Lock Output Negative 0.5A
(8) Combination of Fixed code in Transmitter 1,0480576
-
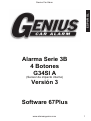 1
1
-
 2
2
-
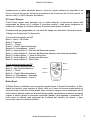 3
3
-
 4
4
-
 5
5
-
 6
6
-
 7
7
-
 8
8
-
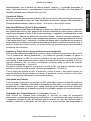 9
9
-
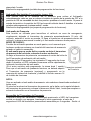 10
10
-
 11
11
-
 12
12
-
 13
13
-
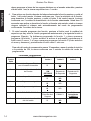 14
14
-
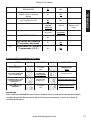 15
15
-
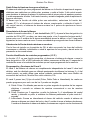 16
16
-
 17
17
-
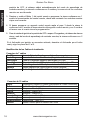 18
18
-
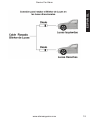 19
19
-
 20
20
-
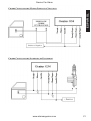 21
21
-
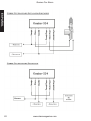 22
22
-
 23
23
-
 24
24
-
 25
25
-
 26
26
-
 27
27
-
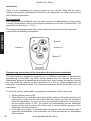 28
28
-
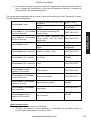 29
29
-
 30
30
-
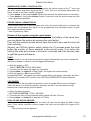 31
31
-
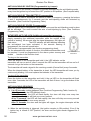 32
32
-
 33
33
-
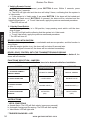 34
34
-
 35
35
-
 36
36
-
 37
37
-
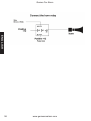 38
38
-
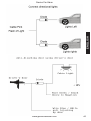 39
39
-
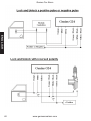 40
40
-
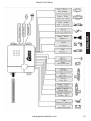 41
41
-
 42
42
-
 43
43


Genius Car Alarm Alarma Genius G34-Si El manual del propietario
- Categoría
- Alarma de carro
- Tipo
- El manual del propietario
En otros idiomas
Documentos relacionados
-
Genius Alarma G5504 OEM TRF Series El manual del propietario
-
 Genius Car Alarm Alarma OEM G5504 Version 2 El manual del propietario
-
 Genius Car Alarm Alarma G350 2Way Digital El manual del propietario
-
 Genius Car Alarm Alarma G3000 Link TRF Series El manual del propietario
-
 Genius Car Alarm Alarma Genius 2B Se 5 Bot El manual del propietario
-
 Genius Car Alarm Alarma Genius 2B Se 2 Bot El manual del propietario
-
Genius Car Alarm Alarma Genius Digital G300a El manual del propietario
-
 Genius Car Alarm Alarma Genius OEM G3000Link El manual del propietario
-
Genius Car Alarm Alarma Genius Digital G300 El manual del propietario
-


Otros documentos
-
Pyle PWD201 Manual de usuario
-
Omega Mercury-SS El manual del propietario
-
Intermatic SP230B Instrucciones de operación
-
-
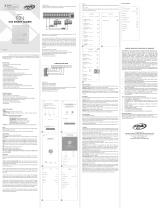 PPA C40 Battery Smart ON El manual del propietario
-
-
-
CompuSTAR 2WG5R - 900SH Manual de usuario
-
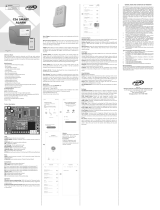 PPA C36 Smart ON Manual de usuario
-
Firstech 1W900FMR – PRO Manual de usuario

