Intermatic SP501B Instrucciones de operación
- Tipo
- Instrucciones de operación

BATTERY INSTALLATION (SEE FIGURES BELOW)
Access the battery compartment on the rear of the unit by removing
the back cover. Press on the upper center part of the cover and slide it
down. Insert four (4) “AA” batteries (not included) following the polar-
ity diagram. When the last battery is inserted, the Status LED will flash
and the LED will flash to indicate the batteries are installed
properly. Replace the battery compartment cover. The Siren will chirp
every 10-15 seconds when the batteries need replacing. AC accessory
SP550B can be used instead of batteries. Output plug must be inserted
into AC power plug, located above in left upper corner of battery
compartment.
BATTERY PRECAUTIONS
Follow these precautions when using batteries in this device:
1. Use only the size and type of batteries specified.
2. Be sure to follow the correct polarity when installing the batteries
as indicated in the battery compartment. Reversed batteries may
cause damage to the device.
3. Do not mix different type of batteries together (e.g. Alkaline and
Carbon-zinc) or old batteries with fresh ones.
4. If the device is not to be used for a long period of time, remove the
batteries to prevent damage or injury from possible battery
leakage.
5. Do not try to recharge batteries not intended to be recharged;
they can overheat and rupture. (Follow battery manufacturer’s
directions.)
6. Will not function properly if batteries are not maintained. Check
performance regularly.
NOTE: Not intended for use in exposed outdoor applications. Will not
operate properly if used in below freezing temperatures (32˚F) or damp
locations.
Remote Siren
Siren Speaker Unit
INSTRUCTIONS
MODEL SP501B
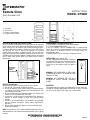
1. Speakers
2. Status LED
3. Battery Compartment
4. Programmable Switch
Slide down
to expose
battery
compartment
PROGRAMMING THE SIREN SPEAKER UNIT
1. Remove battery compartment cover, remove batteries.
2. Locate the programmable switch.
3. Set the “CORRECT SWITCH COMBINATION” on programmable
switch. All 3 switches of the programmable switch must be set at the
same positions as respective switches of the Main Alarm Unit
programmable switch.
4. Replace batteries, replace the battery compartment cover.
INSTALLATION (Siren Speaker Unit)
The unit is designed to be either free standing or
wall mounted. Place the unit in the desired location
within 60’ from the Alarm Unit. To mount the unit
on the wall use the supplied screw (see figure at
right).
WARNING: THE ALARM SIREN IS VERY LOUD;
PLEASE DO NOT ALLOW IT TO SOUND FOR LONG
LENGTHS OF TIME.
WARNING: NOT INTENDED FOR USE AS A
RESIDENTIAL WATER HAZARD ENTRANCE
ALARM.
OPERATION:
The Remote Siren only sounds when triggered by the main alarm unit,
SP210B OR SP230B. Approximately 60 seconds on and 15 seconds
off, the cycle will repeat if main alarm stays in alarm mode.
INTERMATIC INCORPORATED
SPRING GROVE, ILLINOIS 60081-9698
ART 614C
1
2
3
4
AC
Power
Plug

NOTA: No es para aplicaciones exteriores al descubierto. No funcionará
debidamente si se usa a temperaturas inferiores a la congelación (32°F;
0°C) o en lugares húmedos.
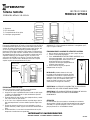
PROGRAMACIÓN DE LA UNIDAD DE ALTAVOZ DE LA SIRENA
1. Quite la tapa del compartimiento de las pilas y saque las pilas.
2. Localice el interruptor programable.
3. Fije la “COMBINACIÓN DE INTERRUPTORES CORRECTA” en el
interruptor programable. Los 3 interruptores del
interruptor programable deben ajustarse en la
misma posición que los interruptores
respectivos del interruptor programable de la
unidad de alarma principal.
4. Vuelva a colocar las pilas y la tapa del
compartimiento de las pilas.
INSTALACIÓN (unidad de altavoz de la sirena)
La unidad está diseñada para funcionar de forma
independiente o montada en la pared. Coloque la
unidad en el lugar deseado, a una distancia máxima
de 60 pies (18 m) de la unidad de alarma. Para
montar la unidad en la pared, use el tornillo
suministrado (vea la figura de la derecha).
ADVERTENCIA: LA SIRENA DE LA ALARMA TIENE UN VOLUMEN MUY
ALTO. NO DEJE QUE SUENE DURANTE MUCHO TIEMPO.
ADVERTENCIA: ESTA ALARMA DE ENTRADA PELIGROSA DE AGUA NO
ESTÁ DISEÑADAS PARA SER USADA EN APLICACIONES
RESIDENCIALES.
OPERACIÓN:
La sirena remota sólo suena cuando es accionada por la unidad de
alarma principal, SP210B o SP230B. Aproximadamente 60 segundos
encendida y 15 segundos apagada, el ciclo se repetirá si la alarma
principal permanece en la modalidad de alarma.
INSTALACIÓN DE LAS PILAS (VEA LAS FIGURAS SIGUIENTES)
El acceso al compartimiento de las pilas se logra por la parte de atrás de
la unidad quitando la tapa trasera. Ejerza presión sobre la parte central
superior de la tapa y deslícela hacia abajo. Inserte cuatro (4) pilas “AA”
(no se incluyen) siguiendo el diagrama de polaridad. Cuando se
introduzca la última pila, destellará el LED de estado. El LED destellará
para indicar que las pilas están bien instaladas. Vuelva a colocar la tapa
del compartimiento de las pilas. La sirena emitirá un pitido cada 10-15
segundos cuando haya que reemplazar las pilas. Se puede usar el
accesorio de CA SP550B en vez de pilas. El enchufe de salida debe
introducirse en el enchufe de CA, ubicado por encima de la esquina
superior izquierda del compartimiento de las pilas.
PRECAUCIOINES CON LAS PILAS
Siga estas precaucones cuando use pilas en este dispositivo:
1. Use sólo pilas del tamaño y tipo especificados.
2. Asegúrese de seguir la polaridad correcta al instalar las pilas según
se indica en el compartimiento. Las pilas cambiadas de posición
pueden dañar el dispositivo.
3. No mezcle diferentes tipos de pilas (por ejemplo alcalinas y carbón-
zinc) o pilas viejas con pilas nuevas.
4. Si no se va a usar el dispositivo durante un período largo, quite las
pilas para impedir daños o lesiones debido a posibles fugas de las
pilas.
5. No trate de recargar las pilas que no sean recargables, ya que se
pueden recalentar y estallar. (Siga las instrucciones del fabricante de
pilas).
6. No funcionará bien si no se efectúa el mantenimiento de las pilas.
Compruebe el rendimiento con regularidad.
Sirena remota
Unidad de altavoz de sirena
INSTRUCCIONES
MODELO SP501B
1. Altavoces
2. LED de estado
3. Compartimiento de las pilas
4. Interruptor programable
Deslice hacia
abajo para
dejar al
descubierto el
compartimiento
de las pilas
INTERMATIC INCORPORATED
SPRING GROVE, ILLINOIS 60081-9698 EE.UU.
ART614C
1
2
3
4
Enchufe
de CA
-
 1
1
-
 2
2


