
R20151220
42950-01

2
DISCONNECT ELECTRIC
POWER SUPPLY
AND LOCK OUT
SERVICE PANEL BEFORE
SERVICING UNIT
WARNING
TO REDUCE THE RISK OF FIRE, ELECTRIC SHOCK, OR INJURY TO PERSONS,
OBSERVE THE FOLLOWING:
1. For general ventilating use only. Do not use to exhaust hazard-
ous or explosive materials and vapors.
2. To avoid motor bearing damage and noisy/unbalanced impellers,
keep drywall spray, construction dust, etc. off power unit.
3. DO NOT install this product in a wall. This product is designed
for installation in ceilings up to a 12/12 pitch (45 degrees).
Ductwork must point upward.
4.
and requirements.
PREVENTATIVE MAINTENANCE
A clean fan provides better service. Disconnect the power supply and
clean the fan as listed below.
liquid, and a soft cloth. DO NOT use abrasive cloths, steel wool pads
or scouring powders.
TO CLEAN FAN ASSEMBLY: Unplug motor cord from receptacle.
To remove motor plate, find the single tab on the motor plate (located
next to the receptacle). Push up rear motor plate tab while pushing
out on the side of the housing or insert a screwdriver into the slot in
the housing (next to tab) and twist screwdriver. Gently vacuum fan,
motor and interior of housing.
METAL AND ELECTRICAL PARTS SHOULD NEVER BE IMMERSED
IN WATER.
MAINTENANCE
The motor is permanently lubricated and never needs oiling. If the
motor bearings are making excessive or unusual
noises, replace the
motor with the exact service motor. You should replace the impeller at
the same time.
CAUTION
WARNING
1. Use this unit only in a manner intended by the manufacturer.
If you have questions, contact the manufacturer.
2. Before servicing or cleaning the unit, switch power off at service
panel and lock the service disconnecting means to prevent
power from being switched on accidentally. When the service
disconnecting means cannot be locked, securely fasten a
prominent warning device, such as a tag, to the service panel.
3. Installation work and electrical wiring must be done by quali-
4.
to prevent backdrafting. Follow the heating equipment manufac-
by the National Fire Prevention Association (NFPA), and the
American Society for Heating, Refrigeration and Air-Conditioning
Engineers (ASHRAE), and the local code authorities.
5. When cutting or drilling into wall(s) or ceiling, do not damage
electrical wiring or other hidden utilities.
6. Ducted fans must always be vented to the outdoors.
7. If this unit is to be installed over a tub or shower, it must be
marked as appropriate for the application and be connected to a
8. Never place a switch where it can be reached from a tub or
shower.
9.
10. This unit must be grounded.
11. Unit must not be installed in a ceiling thermally insulated to a
value greater than R40.
Do Not Install Above
Or Inside This Area
Cooking
Equipment
Floor
45° 45°
COOKING AREA
42950-01 R20151220
turer’s guideline and safety standards, such as those published
GFCI (Ground Fault Circuit Interrupter) - protection branch circuit.
TO CLEAN GRILL: Use a mild detergent, such as dishwashing

R20151220

R20151220

R20151220

R20151220

R20151220
E1
Go to step
on page 17
to attach grill.

R20151220

R20151220

R20151220
E1
Go to step
on page 17
to attach grill.

R20151220

R20151220

R20151220

R20151220
E1
Go to step
on page 17
to attach grill.

R20151220

R20151220

R20151220
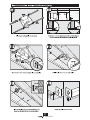
Align posts A, B, C, and D (stamped on the motor housing)
with holes A, B, C, and D (stamped on the grill). Slide the
grill over the posts.

R20151220

R20151220
Troubleshooting

R20151220
1831-A West Oak Parkway, Marietta, GA 30062.

R20151220
42950-02

42950-02
22
DESCONECTE LA
ALIMENTACIÓN ELÉCTRICA
Y CIERRE EL PANEL DE
SERVICIO ANTES DE DAR
MANTENIMIENTO A LA UNIDAD
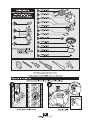
tc.Retire las cubiertas de las puntas de tornillo pre-
cargadas.
ADVERTENCIA
PARA REDUCIR EL RIESGO DE INCENDIO, CHOQUE ELÉCTRICO O LESIONES A
1. Sólo para uso de ventilación general. No use para liberar
materiales y vapores peligrosos o explosivos.
2. Para evitar daños a los rodamientos del motor e impulsores
ruidosos o desbalanceados, mantenga la unidad de potencia
lejos de la aplicación de aerosol para paneles de yeso (drywall),
polvo de la construcción, etc.
3. NO instale este producto en una pared. Este producto está
diseñado para instalarse en techos con una inclinación de
hasta 12/12 (45º). La red de ductos debe dirigirse hacia arriba.
4. Vea más información y los requisitos en la etiqueta de
PRECAUCIÓN
ADVERTENCIA
1. Utilice esta unidad sólo de la manera indicada por el fabrican-
te. Si tiene alguna pregunta, contacte con el fabricante.
2. Antes de dar servicio o limpiar la unidad, desconecte la ali-
mentación en el tablero de servicio y bloquee los elementos
ser conectada accidentalmente. Cuando los elementos de
una forma destacada de advertencia, como una etiqueta, en
el tablero de servicio.
3. Los trabajos de instalación y cableado eléctrico deben ser
los códigos y las normas aplicables, incluyendo el de diseño
contra incendio.
4.
para evacuar los gases por el tubo de la chimenea de equipo
las pautas del fabricante del equipo de calefacción y las
normas de seguridad, como las de la Asociación Nacional
de Protección contra Incendios (NFPA), la Asociación de
Ingenieros Americanos en Calefacción y Aire acondicionado
(ASHRAE), y los códigos locales.
5. Al cortar o taladrar en paredes o techo, no dañe el cableado
eléctrico u otros servicios no visibles.
6. Los ventiladores canalizados siempre deben descargar al
aire libre.
7. Si va a instalar esta unidad en una bañera o ducha, debe
tener una marca que indique que es apropiado para ese uso y
debe conectarse a un circuito derivado protegido por un GFCI
(interruptor automático de falla a tierra).
8. Nunca coloque un interruptor donde pueda ser alcanzado
desde una tina o una ducha.
9. Instale el ventilador por lo menos a 5 pies (1.52 m) por encima
del piso.
10. Esta unidad se debe poner a tierra.
11. La unidad no debe ser instalada en un techo con aislamiento
térmico mayor que R40.
MANTENIMIENTO PREVENTIVO
Un ventilador limpio proporciona mejor servicio. Desconecte la
alimentación y limpie el ventilador como se indica a continuación.
para lavado de platos, y un paño
suave. NO emplee paños abrasivos,
almohadillas de lana de acero ni polvos para fregar.
el cordón del motor de la toma de corriente. Para retirar la placa del
motor, encuentre la pestaña en la placa (ubicada junto a la toma de
corriente). Levante la pestaña posterior de la placa del motor mientras
empuja hacia afuera en el lado del alojamiento o introduzca un des-
tornillador en la ranura del alojamiento (junto a la pestaña) y gire el
destornillador. Suavemente aspire el ventilador, el motor y el interior
del alojamiento.
LAS PARTES METÁLICAS ELÉCTRICAS NUNCA DEBEN
SUMERGIRSE EN AGUA.
MANTENIMIENTO
El motor está lubricado permanentemente y no necesita ser engrasa-
do. Si los rodamientos del motor hacen ruidos excesivos o inusuales,
reemplace el motor con el motor de servicio exacto. Debe reemplazar
el impulsor al mismo tiempo.
ÁREA DE LA COCINA
No instale sobre o
dentro de esta área
Equipo
de cocina
Piso
45° 45°
R20151220
PARA LIMPIAR LA REJILLA : Use un detergente suave, como líquido
PARA LIMPIAR EL CONJUNTO DEL VENTILADOR : Desconecte
PERSONAS, OBSERVE LO SIGUIENTE :

R20151220

R20151220

R20151220

R20151220

R20151220
E1
Vaya al paso
en la página 37 para
fijar la rejilla.

R20151220

R20151220

R20151220
E1
Vaya al paso
en la página 37 para
fijar la rejilla.

R20151220

R20151220

R20151220

R20151220
E1
Vaya al paso
en la página 37 para
fijar la rejilla.

R20151220

R20151220

R20151220

R20151220

R20151220

R20151220
1831-A West Oak Parkway, Marietta, GA 30062
Hunter es una registrada de Hunter Fan Company, y se usa bajo una licencia concedida a Hunter Home Comfort
Impreso en China
-
 1
1
-
 2
2
-
 3
3
-
 4
4
-
 5
5
-
 6
6
-
 7
7
-
 8
8
-
 9
9
-
 10
10
-
 11
11
-
 12
12
-
 13
13
-
 14
14
-
 15
15
-
 16
16
-
 17
17
-
 18
18
-
 19
19
-
 20
20
-
 21
21
-
 22
22
-
 23
23
-
 24
24
-
 25
25
-
 26
26
-
 27
27
-
 28
28
-
 29
29
-
 30
30
-
 31
31
-
 32
32
-
 33
33
-
 34
34
-
 35
35
-
 36
36
-
 37
37
-
 38
38
-
 39
39
-
 40
40


