Alsy 20540-001 Instrucciones de operación
- Tipo
- Instrucciones de operación

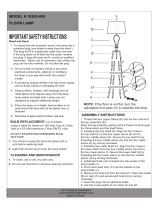
IMPORTANT SAFETY INSTRUCTIONS
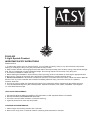
20540-002
3-Light Sputnik Pendant
Read and Save:
1. To reduce the chance of fire or electrical shock: Do not install non-factory wiring or any other electrical components.
Altering or modifying the lamp in any way will render the lamp unsafe.
2. Keep curtains, shades, wall hangings and all other fabrics and objects away from the lamp canopy, lamp shade and light
bulb. Unit is not designed to support additional weight. Do not hang objects from the lamp or any lamp part.
3. This fixture is suitable for indoor use only.
4. Before starting the installation, disconnect the power by turning off the circuit breaker or removing the appropriate fuse
at the fuse box. Turning off the power at the light switch is not sufficient to prevent electrical shock.
5. Electrical Connections: All electrical connections must be in accordance with local codes, ordinances and the National
Electric Code. If you are unfamiliar with methods of installing electrical wiring, secure the services of a qualified,
licensed, electrician.
6. This unit is to be mounted to a metal electrical junction box (outlet box) directly supported by the building structure.
7. Tools and Materials Required: (Not Included) Pliers, flathead screwdriver, wire cutters, step ladder, wire strippers
U.L./CSA listed electrical tape.
LIGHT BULB REPLACEMENT
1. Unit requires three 60 Watt type B bulbs or CFL equivalent or LED equivalent. Bulbs not included.
2. DO NOT EXCEED RECOMMENDED WATTAGE.
3. Turn off the unit and allow the bulb to cool before touching.
4. Light bulb should never touch the lamp shade.
CLEANING AND MAINTENANCE
1. Clean using a mild cleaning solution and a soft cloth.
2. Never use a rough cloth or chemical cleaners containing acids, abrasives or solvents.

For Customer Assistance:
www.evolutionlightingllc.com
Made In China
1
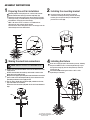
Preparing the unit for installation
3
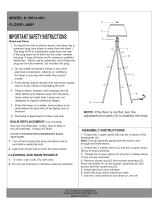
Making the electrical connections
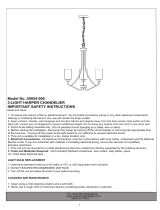
Installing the mounting bracket
Connect the cord with the ribbed surface to the white wire of the
supply circuit.
Connect the half with the markings and smooth surface to the
black wire of the supply circuit.
Wrap the bare copper grounding wire from the xture around the
green screw on the mounting bracket (F), then connect it to the
grounding conductor of the supply circuit.
Use U.L./C.S.A. listed wire connectors (BB) suitable for the size,
type and number of conductors.
Secure the wire connectors (BB) with U.L./C.S.A. listed electrical
tape.
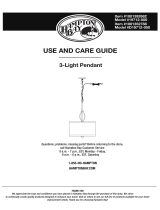
Place the canopy (A) against the mounting surface, allowing
the preassembled screws on mounting bracket (F) to pass
through the canopy (A). Secure with previously removed
canopy nuts (G).
Install three 60 Watt E12 Type B Bulbs or CFL or LED
equivalent (not included).
Make the connections to a 120V AC 60Hz circuit.
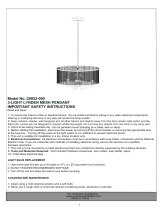
NOTE:
Carefully unpack and lay all parts on a clean, level surface.
Thead all decorative stems (E) onto the lamp body (D).
Determine the desired height of the xture with the provided
stems (B) and (C), assemble them by screwing them together.
Assemble the canopy (A) onto the tube (B)
NOTE : All stems can be use alone or in combination to
determine the look and the height needed.
Feed the xture wires through the stems and canopy once the
desired height has been determined.
Unscrew canopy nuts (G) from the canopy (A)
and detach mounting bracket (F). Attach mounting
bracket (F) to the junction box (not included) with
junction box screws (AA).
2
4
Installing the Fixture
ASSEMBLY INSTRUCTIONS
C
D
A
B
C
C
E(x 57)
F
AA
BB
F
A
G

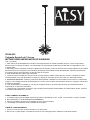
INSTRUCCIONES IMPORTANTES DE SEGURIDAD
20540-002
Colgante Sputnik de 3 Luces
Leer y conservar:
1. Para reducir las posibilidades de incendio o descarga eléctrica: No instale cableado eléctrico u otros componentes
eléctricos que no vengan de fábrica con esta lámpara. Si esta lámpara es alterada o modificada, su seguridad se verá
comprometida.
2. Mantenga cortinas, pantallas, artículos colgantes de las paredes y todo otro artículo textil u objeto alejados de la cubierta
decorativa del techo, la pantalla y la bombilla de la lámpara. Esta unidad no está diseñada para soportar peso adicional.
No cuelgue objetos de la lámpara o de alguna parte de la misma.
3. Esta unidad está apto para lugares humedos.
4. Antes de iniciar la instalación, desconecte la corriente eléctrica desde el interruptor de circuitos o quitando el fusible
correspondiente de la caja de fusibles. No basta con apagar el interruptor de luz para evitar una descarga eléctrica.
5. Conexiones eléctricas: Todas las conexiones eléctricas eben realizarse en conformidad con las normas u ordenanzas
locales y con el Código Nacional de Electricidad. Si no sabe cómo realizar una instalación eléctrica, consiga un electricista
profesional certificado.
6. Esta unidad debe ser montada en una caja de empalme eléctrico de metal (caja eléctrica) que esté directamente
soportada por la estructura del edificio.
7. Herramientas y materiales necesarios: (No incluidas) Llave ajustable, destornillador de cabeza plana, alicate, escalera,
cinta eléctrica aprobada por U.L./CSA.
CÓMO CAMBIAR LA BOMBILLA
1. La unidad requiere tres bombillas Tipo B de 60 vatios o equivalente en CFL o LED. Las bombillas no vienen incluidas.
2. NO EXCEDA EL VATAJE MÁXIMO RECOMENDADO.
3. Apague la unidad y permita que la bombilla se enfríe antes de tocarla.
4. La bombilla nunca debería tocar la pantalla de la lámpara.
LIMPIEZA Y MANTENIMIENTO
1. Limpie con una solución de limpieza suave y un paño suave.
2. Nunca use un paño áspero o limpiadores químicos que contengan ácidos, abrasivos o solventes fuertes.

Para contactar con nuestra oficina de atención al cliente:
www.evolutionlightingllc.com
Fabricado en China
INSTRUCCIONES DE ENSAMBLAJE
1
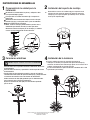
Preparación de la unidad para la
instalación
3
Conexiones eléctricas
Instalación del soporte de montaje
Conecte el hilo con la supercie acanalada al hilo blanco del circuito
de alimentación.
Conecte el hilo con marcas y supercie lisa al hilo negro del circuito
de alimentación.
Enrolle el hilo de cobre pelado de conexión a tierra de la luminaria
alrededor del tornillo verde del soporte de montaje (F) y luego conéctelo
al conductor de conexión a tierra del circuito de alimentación.
Utilice conectores de hilos (BB) aprobados por U.L./CSA adecuados
para el tamaño, tipo y número de conductores.
Ajuste los conectores de hilos (BB) con cinta eléctrica aprobada
por U.L./C.S.A.
Ponga la cubierta (A) contra la supercie de montaje, de
modo que los tornillos pre-ajustados del soporte de montaje (F)
atraviesen la cubierta de la luminaria (A). Ajuste con las tuercas de la
cubierta que destornilló en el primer paso (G).
Instale tres bombillas E12 tipo B de 60 vatios o bombillas CFL o LED
equivalentes (no incluidas).
Haga las conexiones a un circuito de 120V AC 60Hz.
NOTA:
Desembale con cuidado todas las piezas y colóquelas sobre
una supercie limpia y pareja.
Enrosque todas las varillas decorativas (E) al cuerpo de la
lámpara (D).
Determine la altura deseada de la lámpara con los vástagos
incluidos (B) y (C), y enrósquelos entre sí para ensamblarlos.
Monte la cubierta (A) al vástago (B)
NOTA: Todos los vástagos pueden utilizarse ya bien solos o
combinados para obtener el estilo y la altura que desee.
Alimente los hilos de la lámpara por los vástagos y la cubierta
una vez que haya determinado la altura deseada.
Destornille las tuercas de la cubierta (G) para separarlas de la
cubierta (A) y del soporte de montaje (F). Ajuste el soporte de
montaje (F) a la caja de empalme (no incluida) con los tornillos
de la caja de empalme (AA).
2
4
Instalación de la luminaria
C
D
A
B
C
C
E(x 57)
F
AA
BB
F
A
G
-
 1
1
-
 2
2
-
 3
3
-
 4
4


Alsy 20540-001 Instrucciones de operación
- Tipo
- Instrucciones de operación
en otros idiomas
Artículos relacionados


Otros documentos
-
Home Decorators Collection 20533-000 Instrucciones de operación
-
 Catalina Lighting 20852-000 Guía de instalación
-
 Catalina Lighting 20854-000 Guía de instalación
-
-
 Catalina Lighting 19014-001 Manual de usuario
-
-
-
 Hampton Bay 19712-000 Instrucciones de operación
-
M-Audio Sputnik Guía del usuario
-
 Catalina Lighting 19305-000 Manual de usuario


