ProfiCook PC-UM 1207 Instrucciones de operación
- Tipo
- Instrucciones de operación

Bedienungsanleitung / Garantie
Gebruiksaanwijzing • Mode d’emploi • Manual de instrucciones • Istruzioni per l’uso
Instruction Manual • Instrukcja obsługi / Gwarancja • Használati utasítás
Руководство по эксплуатации •
PC-UM1207_IM 21.02.20
Universalmixer PC-UM 1207
Universele mixer • Mixeur universel • Batidora universal
Frullatore universale • Universal Mixer • Mikser uniwersalny
Univerzális mixer • Универсальный миксер •

PC-UM1207_IM 21.02.20
Bedienungsanleitung ....................................................................................Seite 4
Gebruiksaanwijzing ................................................................................... Pagina 11
Mode d’emploi............................................................................................... Page 17
Manual de instrucciones .......................................................................... Página 23
Istruzioni per l’uso .....................................................................................Pagina 29
Instruction Manual ........................................................................................ Page 35
Instrukcja obsługi .......................................................................................Strona 41
Használati utasítás .......................................................................................Oldal 48
Руководство по эксплуатации .................................................................. стр. 54
65 ....................................................................................................................
2

PC-UM1207_IM 21.02.20
3
Übersicht der Bedienelemente
Overzicht van de bedieningselementen • Liste des différents éléments de commande
Indicación de los elementos de manejo • Elementi di comando • Overview of the Components
Przegląd elementów obsługi • A kezelőelemek áttekintése
Обзор деталей прибора •

4
PC-UM1207_IM 21.02.20
Bedienungsanleitung
Vielen Dank, dass Sie sich für unser Produkt entschieden
haben. Wir wünschen Ihnen viel Freude mit dem Gerät.
Symbole in dieser Bedienungsanleitung
Wichtige Hinweise für Ihre Sicherheit sind besonders ge-
kennzeichnet. Beachten Sie diese Hinweise unbedingt, um
Unfälle und Schäden am Gerät zu vermeiden:
WARNUNG:
Warnt vor Gefahren für Ihre Gesundheit und zeigt mög-
liche Verletzungsrisiken auf.
ACHTUNG:
Weist auf mögliche Gefährdungen für das Gerät oder
andere Gegenstände hin.
HINWEIS:
Hebt Tipps und Informationen für Sie hervor.
Inhalt
Übersicht der Bedienelemente .............................................3
Allgemeine Hinweise.............................................................4
Spezielle Sicherheitshinweise für dieses Gerät ...................4
Bestimmungsgemäßer Gebrauch ........................................6
Auspacken des Gerätes .......................................................6
Übersicht der Bedienelemente / Lieferumfang ......................6
Montage ................................................................................6
Anwendungshinweise ........................................................... 6
Drehregler und Taste ............................................................7
Programme ...........................................................................7
Betrieb ................................................................................... 7
Reinigung .............................................................................. 8
Aufbewahrung ....................................................................... 8
Störungsbehebung................................................................9
Technische Daten .................................................................9
Hinweis zur Richtlinienkonformität ........................................9
Garantie ................................................................................9
Entsorgung ..........................................................................10
Allgemeine Hinweise
Lesen Sie vor Inbetriebnahme dieses Gerätes die Bedie-
nungsanleitung sehr sorgfältig durch und bewahren Sie diese
inkl. Garantieschein, Kassenbon und nach Möglichkeit den
Karton mit Innenverpackung gut auf. Falls Sie das Gerät an
Dritte weitergeben, geben Sie auch die Bedienungsanleitung
mit.
• Benutzen Sie das Gerät ausschließlich für den privaten
und den dafür vorgesehenen Zweck. Dieses Gerät ist
nicht für den gewerblichen Gebrauch bestimmt.
• Benutzen Sie das Gerät nicht im Freien. Halten Sie es
vor Hitze, direkter Sonneneinstrahlung, Feuchtigkeit
(auf keinen Fall in Flüssigkeiten tauchen) und scharfen
Kanten fern. Benutzen Sie das Gerät nicht mit feuchten
Händen. Bei feucht oder nass gewordenem Gerät sofort
den Netzstecker ziehen.
• Das Gerät und das Netzkabel müssen regelmäßig auf
Zeichen von Beschädigungen untersucht werden. Wird
eine Beschädigung festgestellt, darf das Gerät nicht
mehr benutzt werden.
• Verwenden Sie nur Original-Zubehör.
• Zur Sicherheit Ihrer Kinder lassen Sie keine Verpackungs-
teile (Plastikbeutel, Karton, Styropor, etc.) erreichbar
liegen.
WARNUNG:
Lassen Sie kleine Kinder nicht mit Folie spielen.
Es besteht Erstickungsgefahr!
Spezielle Sicherheitshinweise für dieses Gerät
WARNUNG:
• Schnittverletzungen! Die Mixmesser sind scharf!
• Betreiben Sie das Gerät nur mit aufgesetztem Deckel.
• Entfernen Sie nicht den Deckel während des Betriebes!
• Greifen Sie während des Betriebs nicht in das Mixgefäß! Sie
könnten sich an den rotierenden Messern verletzen.
• Vor dem Auswechseln von Zubehör oder Zusatzteilen, die im
Betrieb bewegt werden, muss das Gerät ausgeschaltet und
vom Netz getrennt werden.

5
PC-UM1207_IM 21.02.20
WARNUNG:
• Schalten Sie das Gerät erst ein, nachdem Sie kontrolliert haben,
ob das Zubehör fest und sicher sitzt.
• VORSICHT! Es ist sicherzustellen, dass der Mixer ausgeschal-
tet ist, bevor er vom Ständer abgenommen wird.
• Das Gerät ist bei nicht vorhandener Aufsicht und vor dem Zu-
sammenbau, dem Auseinandernehmen oder Reinigen stets
vom Netz zu trennen.
• Reparieren Sie das Gerät nicht selbst, sondern suchen Sie
einen autorisierten Fachmann auf. Wenn die Netzanschlusslei-
tung dieses Gerätes beschädigt wird, muss sie durch den Her-
steller oder seinen Kundendienst oder eine ähnlich qualizierte
Person ersetzt werden, um Gefährdungen zu vermeiden.
• Dieses Gerät darf nicht von Kindern benutzt werden.
• Das Gerät und seine Anschlussleitung sind von Kindern fernzu-
halten.
• Kinder dürfen nicht mit dem Gerät spielen.
• Geräte können von Personen mit reduzierten physischen, sen-
sorischen oder mentalen Fähigkeiten oder Mangel an Erfahrung
und / oder Wissen benutzt werden, wenn sie beaufsichtigt oder
bezüglich des sicheren Gebrauchs des Gerätes unterwiesen wur-
den und die daraus resultierenden Gefahren verstanden haben.
ACHTUNG:
Dieses Gerät ist nicht dazu bestimmt, bei der Reinigung in Was-
ser eingetaucht zu werden. Beachten Sie die Anweisungen, die
wir Ihnen im Kapitel „Reinigung“ dazu geben.
• Benutzen Sie das Gerät nicht, wenn das Mixgefäß leer ist.
• Betreiben Sie das Gerät nicht länger als 2 Minuten. Lassen Sie es
danach ca. 1 Minute abkühlen, bevor Sie es erneut verwenden.

6
PC-UM1207_IM 21.02.20
• Das Gerät nur unter Aufsicht betreiben.
• Manipulieren Sie keine Sicherheitsschalter!
• Während des Betriebs dürfen sich niemals Gegenstände, wie
z. B. Löffel oder Schaber, in dem Mixgefäß benden.
Bestimmungsgemäßer Gebrauch
Dieses Gerät dient zum:
• Mixen von Flüssigkeiten
• Zerkleinern von mittelharten Lebensmitteln
• Zerschlagen von Eis
• Herstellen von Mehlen
Es ist für den Gebrauch im Haushalt und ähnlichen Anwen-
dungsbereichen vorgesehen.
Der Kurzzeitbetrieb ist unbedingt zu beachten.
Es darf nur in der Art und Weise benutzt werden, wie es in
dieser Bedienungsanleitung beschrieben ist. Sie dürfen das
Gerät nicht für gewerbliche Zwecke einsetzen.
Jede andere Verwendung gilt als nicht bestimmungsgemäß
und kann zu Sachschäden oder sogar zu Personenschäden
führen.
Der Hersteller übernimmt keine Haftung für Schäden, die
durch nicht bestimmungsgemäßen Gebrauch entstehen.
Auspacken des Gerätes
1. Nehmen Sie das Gerät aus seiner Verpackung.
2. Entfernen Sie sämtliches Verpackungsmaterial, wie
Folien, Füllmaterial, Kabelhalter und Kartonverpackung.
3. Prüfen Sie den Lieferumfang auf Vollständigkeit.
4. Sollte der Verpackungshinhalt unvollständig oder Be-
schädigungen feststellbar sein, nehmen Sie das Gerät
nicht in Betrieb. Bringen Sie es umgehend zum Händler
zurück.
HINWEIS:
Am Gerät können sich noch Staub oder Produktionsreste
benden. Wir empfehlen Ihnen, das Gerät wie unter
„Reinigung“ beschrieben zu säubern.
Übersicht der Bedienelemente /
Lieferumfang
1 Verschluss der Nachfüllöffnung / Messbecher
2 Deckel Mixgefäß mit Nachfüllöffnung
3 Mixgefäß
4 Messerblock
5 Dichtungsring für den Messerblock
6 Schraubverschluss
7 Basisgerät mit Motor
8 Drehregler und Taste
Ohne Abbildung
Dichtungsring für den Deckel
Montage
Mixgefäß
Stellen Sie das Mixgefäß auf das Motorgehäuse. Beachten
Sie die Symbole am Mixgefäß und am Motorgehäuse.
HINWEIS:
Das Mixgefäß passt in verschieden Stellungen auf das
Motorgehäuse. Aber nur wenn die beiden Dreiecke über-
einanderstehen, ist der Sicherheitsschalter geschlossen.
Deckel
1. Vergewissern Sie sich, dass der Dichtungsring am
Deckel angebracht ist.
2. Setzen Sie den Deckel so am Mixgefäß auf, dass sich
die Lasche des Deckels links neben der Ausgussöffnung
bendet.
3. Drücken Sie den Deckel fest auf das Mixgefäß. Er muss
das Mixgefäß dicht abschließen.
4. Drehen Sie den Deckel im Uhrzeigersinn bis zum An-
schlag. Die Lasche des Deckels sitzt nun genau über
der Ausgussöffnung. Prüfen Sie, dass der Deckel fest
verriegelt ist.
5. Setzen Sie den Verschluss in die Nachfüllöffnung des
Deckels ein. Achten Sie dafür auf die Führungsnasen
am Verschluss. Drehen Sie den Verschluss bis zum An-
schlag im Uhrzeigersinn. Der Verschluss muss einrasten.
HINWEIS:
Der Verschluss der Nachfüllöffnung ist auch als Mess-
becher verwendbar.
Anwendungshinweise
ACHTUNG:
Das Glas kann bei zu hohen Temperaturen springen!
Füllen Sie keine Flüssigkeiten über 60 °C ein.
• Stellen Sie das Gerät auf eine feste und ebene Oberä-
che. Stellen Sie es so auf, dass es nicht kippen kann.
• Schalten Sie das Gerät nur ein, wenn das Mixgefäß mit
dem Deckel geschlossen ist. Die Nachfüllöffnung im
Deckel muss ebenfalls geschlossen sein.
• Überfüllen Sie das Mixgefäß nicht! Sie können maximal
1,75 Liter einfüllen. Beachten Sie die Skala am Gefäß.

7
PC-UM1207_IM 21.02.20
• Schaum braucht viel Volumen. Reduzieren Sie die Füll-
menge bei Flüssigkeiten, die stark schäumen.
• Halten Sie eine Hand auf den Deckel, wenn Sie Eis zer-
kleinern oder bei großen Füllmengen.
• Schneiden Sie das Mixgut vorher in kleine Stücke.
Elektrischer Anschluss
1. Stellen Sie den Drehregler auf Position OFF.
2. Bevor Sie den Netzstecker in die Steckdose stecken,
prüfen Sie, ob die Netzspannung, die Sie benutzen
wollen, mit der des Gerätes übereinstimmt. Die Angaben
dazu nden Sie auf dem Typenschild.
3. Schließen Sie das Gerät nur an eine vorschriftsmäßig
installierte Schutzkontakt-Steckdose an.
Kurzzeitbetrieb
HINWEIS:
Das Gehäuse des Gerätes kann sich im Betrieb er-
wärmen.
• Das Gerät ist für einen Kurzzeitbetrieb von maximal
2 Minuten geeignet. Lassen Sie es vor erneutem Ge-
brauch 1 Minute abkühlen!
• Nach dreimaliger Benutzung des Gerätes ohne Zugabe
von Flüssigkeit, z. B. beim Mahlen von Kaffeebohnen,
Nüssen, Reis o. ä., warten Sie, bis sich das Gehäuse
vollständig abgekühlt hat, bevor Sie das Gerät wieder
verwenden.
Drehregler und Taste
Dieses Bedienelement (8) hat eine Doppelfunktion.
Drehen
• Entgegen dem Uhrzeigersinn: Auswahl der Programme
(1 oder 2 oder 3)
• Im Uhrzeigersinn: Sofortiger Start mit stufenloser Ein-
stellung der Drehzahl (MIN MAX)
• Position OFF = Standby
Drücken
• Start und gegebenenfalls Stopp eines Programmes
• Pulsbetrieb / Turbobetrieb
Programme
Die Programme arbeiten in verschiedenen Intervallen,
kurzen Pausen und kontinuierlichem Lauf.
Programm 1:
• Dieses Programm eignet sich z. B. zum Zerkleinern von
Eiswürfeln.
• Alternativ können Sie den Pulsbetrieb nutzen.
Programm 2:
• Mit diesem Programm können Sie z. B. Smoothies und
Milchshakes herstellen.
• Füllen Sie zuerst frisches Obst und üssige Zutaten (Jo-
ghurt, Milch oder Saft) in das Mixgefäß. Dann fügen Sie
Eis oder Tiefkühlkost hinzu (gefrorenes Obst, Eiswürfel
oder Eiscreme).
Programm 3:
• Pürieren Sie mit diesem Programm z. B. Früchte oder
Gemüse unter Zugabe von Wasser, Milch oder Brühe.
• Die Messer im Mixgefäß sind auch geeignet, um z. B.
Kaffeebohnen, Nüsse, Mandeln, Mais oder Reis zu
Mehl zu verarbeiten. Beachten Sie das Kapitel „Kurz-
zeitbetrieb“.
Pulsbetrieb
• Wenn der Drehregler in der Position OFF steht, können
Sie einen Pulsbetrieb aktivieren, indem Sie auf die Taste
drücken und wieder loslassen.
• Verwenden Sie das Gerät in dieser Betriebsart maximal
2 Minuten. Lassen Sie es vor erneutem Gebrauch
1 Minute abkühlen!
Betrieb
ACHTUNG:
• Nehmen Sie während des Betriebs das Mixgefäß
nicht ab! Unterbrechen Sie den Betrieb mit der Taste
und warten Sie auf den Stillstand der Messer.
• Bevor Sie das Mixgefäß abnehmen, stellen Sie den
Drehregler immer auf Position OFF.
Vorbereitung
1. Stellen Sie sicher, dass der Drehregler auf Position OFF
steht.
2. Setzen Sie das Mixgefäß auf.
3. Geben Sie die Mixzutaten in das Mixgefäß. Beachten
Sie die maximale Füllmenge.
4. Setzen Sie den Deckel auf. Verriegeln Sie den Deckel.
5. Verschließen Sie die Nachfüllöffnung mit dem Ver-
schluss.
Bedienung
Es gibt drei Möglichkeiten, den Betrieb zu beginnen:
• Wählen Sie mit dem Drehregler ein Programm (1 oder
2 oder 3). Drücken Sie die Taste , um den Betrieb
zu starten.
• Wählen Sie eine individuell einstellbare Drehzahl
zwischen MIN und MAX. Das Gerät startet den Betrieb
sofort.
• Betreiben Sie das Gerät im Pulsbetrieb.

8
PC-UM1207_IM 21.02.20
Mixgut nachfüllen
Mixgut oder Gewürze können Sie durch die Nachfüllöffnung
nachfüllen.
1. Stoppen Sie den Betrieb mit dem Drehregler oder der
Taste.
2. Bevor Sie das Gerät wieder einschalten, schließen Sie
die Öffnung wieder.
Betrieb beenden
1. Stellen Sie den Drehregler auf Position OFF.
2. Warten Sie, bis das Messer zum Stillstand gekommen
ist.
3. Ziehen Sie den Netzstecker aus der Steckdose.
4. Entnehmen Sie das Mixgefäß. Drehen Sie es entgegen
dem Uhrzeigersinn ab.
5. Zum Ausgießen nehmen Sie den Deckel ab.
WICHTIGER HINWEIS:
Bewahren Sie Zitrussäfte bzw. säurehaltige Speisen
niemals in Metallgefäßen auf.
Reinigung
WARNUNG:
• Ziehen Sie vor der Reinigung immer den Netzstecker.
• Das Gerät auf keinen Fall zum Reinigen in Wasser tauchen. Es
könnte zu einem elektrischen Schlag oder Brand führen.
• Die Messer am Messerblock sind sehr scharf. Es besteht Ver-
letzungsgefahr!
ACHTUNG:
• Benutzen Sie keine Drahtbürste oder andere scheu-
ernde Gegenstände.
• Benutzen Sie keine scharfen oder scheuernden
Reinigungsmittel.
• Die einzelnen Teile sind nicht für die Reinigung in der
Spülmaschine geeignet.
HINWEIS: Vorreinigung
Füllen Sie das Mixgefäß zur Hälfte mit Wasser und
drehen Sie den Schalter für ca. 10 Sekunden auf „ MIN “.
Schütten Sie die Flüssigkeit anschließend aus.
Zur gründlichen Reinigung nehmen Sie das Mixgefäß ab.
Messerblock aus- und einbauen
1. Drehen Sie das Mixgefäß auf den Kopf.
2. Mit etwas Kraftaufwand drehen Sie den Verschluss ent-
gegen dem Uhrzeigersinn und lösen den Messerblock.
3. Nehmen Sie den Messerblock vorsichtig aus dem
Mixgefäß.
4. Entfernen Sie den Dichtungsring für die Reinigung.
5. Nach dem Trocknen legen Sie den Dichtungsring wieder
auf den Messerblock.
6. Setzen Sie den Messerblock auf das Gewinde am
Boden des Mixgefäßes ein.
7. Drehen Sie den Verschluss vom Messerblock im Uhr-
zeigersinn wieder fest.
8. Stellen Sie sicher, dass der Messerblock fest in seiner
Position sitzt.
ACHTUNG:
Nehmen Sie das Gerät nur in Betrieb, wenn Sie den
Messerblock mit Dichtungsring ordnungsgemäß montiert
haben! Anderenfalls ist das Mixgefäß undicht.
Mixgefäß, Deckel, Messerblock, Schraubverschluss,
Dichtungsringe und Messbecher
Reinigen Sie diese Teile im warmen Spülwasser mit etwas
Handspülmittel. Trocknen Sie alles anschließend, bevor Sie
die Teile wieder montieren.
Gehäuse
Zur äußeren Reinigung des Gerätes benutzen Sie nur ein
mäßig feuchtes Tuch.
Aufbewahrung
• Reinigen Sie das Gerät wie beschrieben. Lassen Sie das
Zubehör vollständig trocknen.
• Wir empfehlen, das Gerät in der Original-Verpackung
aufzubewahren, wenn Sie es über einen längeren Zeit-
raum nicht benutzen möchten.
• Lagern Sie das Gerät immer außerhalb der Reichweite
von Kindern an einem gut belüfteten und trockenen Ort.

9
PC-UM1207_IM 21.02.20
Störungsbehebung
Störung Mögliche Ursache Abhilfe
Das Gerät ist ohne
Funktion.
Das Gerät hat keine Stromversorgung. Überprüfen Sie den Netzanschluss.
Ihr Gerät ist mit einem Sicherheitsschalter
versehen.
Er verhindert das unbeabsichtigte Anlaufen
des Motors.
Kontrollieren Sie den richtigen Sitz des Mixgefäßes.
Der Überhitzungs schutz ist aktiviert. Der
Motor ist zu heiß.
1. Drehen Sie den Schalter sofort auf Position OFF.
Ziehen Sie den Netzstecker aus der Steckdose.
2. Lassen Sie das Gerät für mindestens 15 Minuten
abkühlen, bevor Sie neu starten.
Technische Daten
Modell: ................................................................ PC-UM 1207
Spannungsversorgung: ......................220 - 240 V~, 50 / 60 Hz
Leistungsaufnahme:....................................................1200 W
Schutzklasse: .......................................................................
Füllmenge: ......................................................max. 1,75 Liter
Nettogewicht: .........................................................ca. 4,85 kg
Technische und gestalterische Änderungen im Zuge stetiger
Produktentwicklungen vorbehalten.
Hinweis zur Richtlinienkonformität
Hiermit erklärt der Hersteller, dass sich das Gerät
PC-UM 1207 in Übereinstimmung mit den folgenden
Anforderungen bendet:
• Europäische Niederspannungsrichtlinie 2014 / 35 / EU
• EU-Richtlinie für elektromagnetische Verträglichkeit
2014 / 30 / EU
• Ökodesign Richtlinie 2009 / 125 / EG
• RoHS-Richtlinie 2011 / 65 / EU & (EU) 2015 / 863
Garantie
Garantiebedingungen
1. Gegenüber Verbrauchern gewähren wir bei privater
Nutzung des Geräts eine Garantie von 24 Monaten ab
Kaufdatum.
Ist das Gerät zur gewerblichen Nutzung geeignet, ge-
währen wir beim Kauf durch Unternehmer für das Gerät
eine Garantie von 12 Monaten.
Die Garantiezeit für Verbraucher reduziert sich auf
12 Monate, sofern sie ein zur gewerblichen Nutzung ge-
eignetes Gerät – auch teilweise – gewerblich nutzen.
2. Voraussetzung für unsere Garantieleistungen sind der
Kauf des Geräts in Deutschland bei einem unserer Ver-
tragshändler sowie die Übersendung einer Kopie des
Kaufbelegs und dieses Garantiescheins an uns.
3. Bendet sich das Gerät zum Zeitpunkt des Garantiefalls
im Ausland, muss es auf Kosten des Käufers uns zur
Erbringung der Garantieleistungen zur Verfügung gestellt
werden.
4. Mängel müssen innerhalb von 14 Tagen nach Erkenn-
barkeit uns gegenüber schriftlich angezeigt werden.
Besteht der Garantieanspruch zu Recht, entscheiden wir,
auf welche Art der Schaden / Mangel behoben werden
soll, ob durch Reparatur oder durch Austausch eines
gleichwertigen Geräts.
5. Garantieleistungen werden nicht für Mängel erbracht, die
auf der Nichtbeachtung der Gebrauchsanweisung, un-
sachgemäßer Behandlung oder normaler Abnutzung des
Geräts beruhen. Garantieansprüche sind ferner ausge-
schlossen für leicht zerbrechliche Teile, wie zum Beispiel
Glas oder Kunststoff. Schließlich sind Garantieansprüche
ausgeschlossen, wenn nicht von uns autorisierte Stellen
Arbeiten an dem Gerät vornehmen.
6. Durch Garantieleistungen wird die Garantiezeit nicht
verlängert. Es besteht auch kein Anspruch auf neue
Garantieleistungen. Diese Garantieerklärung ist eine
freiwillige Leistung von uns als Hersteller des Geräts.
Die gesetzlichen Gewährleistungsrechte (Nacherfüllung,
Rücktritt, Schadensersatz und Minderung) werden durch
diese Garantie nicht berührt.
Stand 06 2012
Garantieabwicklung
24 Stunden am Tag, 7 Tage in der Woche
Sollte Ihr Gerät innerhalb der Garantiezeit einen Mangel
aufweisen, steht Ihnen die schnellste und komfortabelste
Möglichkeit der Reklamationsanmeldung über unser SLI -
Internet-Serviceportal zur Verfügung.
www.sli24.de
Bitte melden Sie direkt den Servicevorgang auf unserem
Online Serviceportal www.sli24.de an. Sie erhalten wenige
Sekunden nach Abschluss der Anmeldung ein kostenloses
Versandticket per E-Mail übermittelt. Zusätzlich erhalten Sie
weitere Informationen zur Abwicklung Ihrer Reklamation.
Mit Ihren persönlichen Zugangsdaten, die direkt nach Ihrer
Anmeldung per E-Mail an Sie übermittelt werden, können

10
PC-UM1207_IM 21.02.20
Sie den Status Ihres Vorgangs auf unserem Serviceportal
www.sli24.de online verfolgen.
Sie brauchen das kostenlose Versandticket nur noch auf die
Verpackung Ihres gut verpackten Gerätes zu kleben und
das Paket bei der nächsten Annahmestelle der Deutschen
Post / DHL abzugeben. Der Versand erfolgt für Sie kostenlos
an unser Servicecenter bzw. Servicepartner.
So einfach kann Service sein!
1. Anmelden
2. Einpacken
3. Ab zur Post damit
Fertig, so einfach geht es!
Bitte vergessen Sie nicht, dem Gerät eine Kopie Ihres
Kaufbeleges (Kassenbon, Rechnung, Lieferschein) als Ga-
rantienachweis beizulegen, da wir sonst keine kostenlosen
Garantieleistungen erbringen können.
Unser Serviceportal www.sli24.de bietet Ihnen weitere
Leistungen an:
• Downloadbereich für Bedienungsanleitungen
• Downloadbereich für Firmwareupdates
• FAQ‘s, die Ihnen Problemlösungen anbieten
• Kontaktformular
• Zugang zu unseren Zubehör- und Ersatzteile-Webshops
Auch nach der Garantie sind wir für Sie da! – Kosten-
günstige Reparaturen zum Festpreis!
Bitte nehmen Sie in keinem Fall eine unfreie Einsendung
Ihres Gerätes vor. Unfreie Lieferungen werden von uns
nicht angenommen. Es entstehen Ihnen damit erhebliche
Kosten.
Stand 06 2012
Entsorgung
Bedeutung des Symbols „Mülltonne“
Schonen Sie unsere Umwelt, Elektrogeräte ge-
hören nicht in den Hausmüll.
Nutzen Sie die für die Entsorgung von Elektro-
geräten vorgesehenen Sammelstellen und
geben dort Ihre Elektrogeräte ab, die Sie nicht
mehr benutzen werden.
Sie helfen damit die potenziellen Auswirkungen, durch
falsche Entsorgung, auf die Umwelt und die menschliche
Gesundheit zu vermeiden.
Sie leisten damit Ihren Beitrag zur Wiederverwertung, zum
Recycling und zu anderen Formen der Verwertung von
Elektro- und Elektronik-Altgeräten.
Informationen, wo die Geräte zu entsorgen sind, erhalten
Sie über Ihre Kommunen oder die Gemeindeverwaltungen.

PC-UM1207_IM 21.02.20
11
Gebruiksaanwijzing
Dank u voor het kiezen van ons product. Wij hopen dat u
het gebruik van het apparaat zult genieten.
Symbolen in deze gebruiksaanwijzing
Belangrijke aanwijzingen voor uw veiligheid zijn speciaal
gekenmerkt. Neem deze aanwijzingen strikt in acht om
ongevallen en schade aan het apparaat te vermijden:
WAARSCHUWING:
Waarschuwt voor gevaren voor uw gezondheid en toont
mogelijk letsel risico’s.
LET OP:
Wijst op mogelijke gevaren voor het apparaat of andere
voorwerpen.
OPMERKING:
Kenmerkt tips en informatie voor u.
Inhoud
Overzicht van de bedieningselementen ...............................3
Algemene opmerkingen ......................................................11
Speciale veiligheidsinstructies voor dit apparaat ................ 11
Beoogd gebruik ................................................................... 13
Het apparaat uitpakken .......................................................13
Overzicht van de bedieningselementen /
Omvang van de levering .....................................................13
Montage ..............................................................................13
Opmerkingen voor het gebruik ...........................................13
Draaiknop en toets .............................................................. 14
Programma’s ....................................................................... 14
Gebruik ................................................................................14
Reiniging .............................................................................15
Bewaren .............................................................................. 15
Probleemoplossing .............................................................16
Technische gegevens .........................................................16
Verwijdering .........................................................................16
Algemene opmerkingen
Lees vóór de ingebruikname van dit apparaat de handlei-
ding uiterst zorgvuldig door en bewaar deze goed, samen
met het garantiebewijs, de kassabon en zo mogelijk de
doos met de binnenverpakking. Geef ook de handleiding
mee wanneer u de machine aan derden doorgeeft.
• Gebruik het apparaat uitsluitend privé en uitsluitend
voor de voorgeschreven toepassing. Dit apparaat is niet
geschikt voor commercieel gebruik.
• Gebruik het apparaat niet buiten. Bescherm het tegen
hitte, directe zonnestralen, vocht (in geen geval in
vloeistoffen dompelen) en scherpe randen. Gebruik
het apparaat niet met vochtige handen. Bij vochtig of
nat geworden apparaat onmiddellijk de stroomtoevoer
onderbreken.
• Het apparaat en de netkabel moeten regelmatig op zicht-
bare schade worden gecontroleerd. Wanneer u schade
vaststelt, mag het apparaat niet meer worden gebruikt.
• Gebruik alleen originele reserveonderdelen.
• Laat om veiligheidsredenen geen verpakkingsdelen
(plasticzak, doos, piepschuim, enz.) binnen het bereik
van uw kinderen liggen.
WAARSCHUWING:
Laat kleine kinderen niet met de folie spelen. Er be-
staat gevaar voor verstikking!
Speciale veiligheidsinstructies voor dit apparaat
WAARSCHUWING:
• Risico op snijwonden! De messen van de mixer zijn scherp!
• Gebruik altijd het apparaat met het deksel erop.
• Nooit bij ingeschakeld apparaat het deksel verwijderen!
• Grijp niet in de mixbeker tijdens het gebruik! U kunt zich beze-
ren aan de draaiende messen.
• Vóór de vervanging van accessoires of extra onderdelen die
tijdens het gebruik bewegen, moet het apparaat worden uitge-
schakeld en van het lichtnet worden afgesloten.

PC-UM1207_IM 21.02.20
12
WAARSCHUWING:
• Controleer altijd of de accessoires stevig en veilig vastzitten
voordat u het apparaat inschakelt.
• LET OP! Zorg ervoor dat de blender is uitgeschakeld alvorens
deze van de standaard te verwijderen.
• Altijd de stekker uit het stopcontact verwijderen wanneer het ap-
paraat niet wordt gebruikt en wordt gemonteerd, gedemonteerd
of gereinigd.
• Repareer het apparaat niet zelf. Neem altijd contact op met een
erkende monteur. Als de stroomkabel is beschadigd, moet deze
door de fabrikant, zijn dealer of vergelijkbare, erkende personen
vervangen worden om gevaar te vermijden.
• Dit apparaat mag niet worden gebruikt door kinderen.
• Het apparaat en het netsnoer altijd buiten bereik van kinderen
houden.
• Kinderen mogen niet met het apparaat spelen.
• Apparaten kunnen worden gebruikt door personen met vermin-
derde lichamelijke, zintuigelijke of geestelijke vermogens, of
gebrek aan ervaring en kennis als zij onder toezicht staan of ge-
instrueerd zijn voor het gebruik van het apparaat in een veilige
manier en als zij de gevaren begrijpen.
LET OP:
Dit apparaat dient voor het reinigen niet ondergedompeld te
worden in water. Volg de instructies die zijn opgenomen in het
hoofdstuk “Reiniging”.
• Gebruik het apparaat niet als de mixbeker leeg is.
• Het apparaat niet langer dan 2 minuten inschakelen. Laat het ap-
paraat 1 minuut afkoelen alvorens hem opnieuw te gebruiken.

PC-UM1207_IM 21.02.20
13
• Het apparaat alleen onder toezicht gebruiken.
• Nooit iets aan de veiligheidsschakelaars veranderen!
• Voorwerpen zoals lepels of spatels mogen zich tijdens gebruik
nooit in de mixbeker bevinden.
Beoogd gebruik
Dit apparaat wordt gebruikt voor:
• Mixen van vloeistoffen
• Hakken van harde voedselsoorten
• Vergruizen van ijsblokjes
• Het verwerken tot meel
Het is bedoeld voor gebruik in het huishouden of dergelijke.
Het is absoluut noodzakelijk dat het kortstondig werking
wordt waargenomen.
Het is alleen bedoeld voor gebruik zoals beschreven in
deze handleiding. Het apparaat is niet bedoeld voor com-
mercieel gebruik.
Elk ander gebruik wordt als onbeoogd gebruik beschouwd
en kan tot materiële schade of zelfs persoonlijk letsel leiden.
De fabrikant is niet aansprakelijk voor schade veroorzaakt
door onbeoogd gebruik.
Het apparaat uitpakken
1. Verwijder de verpakking van het apparaat.
2. Verwijder alle verpakkingsmaterialen zoals de plastic lm,
het vulmateriaal, de kabelbinders en de doosverpakking.
3. Controleer of de doos alle onderdelen bevat.
4. Als de verpakkingsinhoud onvolledig is of er schade
wordt geconstateerd, het apparaat niet gebruiken. Breng
het onmiddellijk terug naar de leverancier.
OPMERKING:
Er is mogelijk wat stof of productieresidu op het apparaat
te vinden. Wij raden u aan het apparaat schoon te maken
zoals beschreven onder “Reiniging”.
Overzicht van de bedieningselementen /
Omvang van de levering
1 Navulopeningsdop / maatbeker
2 Mixbekerdeksel met navulopening
3 Mixbeker
4 Messenblok
5 Afdichtring voor het messenblok
6 Schroefdop
7 Basisgedeelte met motor
8 Draaiknop en toets
Niet afgebeeld
Afdichtring voor het deksel
Montage
Mixbeker
Plaats de mixbeker op de motorbehuizing. Houd rekening
met de symbolen op de mixbeker en de motorbehuizing.
OPMERKING:
De mixbeker past in verschillende posities op de motor-
behuizing De veiligheidsschakelaar is alleen gesloten
wanneer de twee driehoeken zich op één lijn bevinden.
Deksel
1. Zorg ervoor dat de afdichtring op het deksel is bevestigd.
2. Plaats het deksel op de mixbeker zodat de klep op het
deksel zich aan de linkerkant van de tuitopening bevindt.
3. Druk het deksel stevig op de mixbeker. Het moet de
mixbeker volledig afsluiten.
4. Draai het deksel met de klok mee totdat het stopt. De
klep bevindt zich nu direct boven de tuitopening. Contro-
leer of het deksel stevig is vastgemaakt.
5. Plaats de dop in de navulopening van het deksel. Let
op de geleiders op de schroefdop. Draai de schroefdop
zo ver mogelijk rechtsom. De dop moet op zijn plaats
vastklikken.
OPMERKING:
De navulopeningsdop kan ook als mixbeker gebruikt
worden.
Opmerkingen voor het gebruik
LET OP:
Het glas kan barsten als de temperatuur te hoog is! Niet
vullen met vloeistoffen boven de 60 °C.
• Plaats het apparaat op een stevige en vlakke ondergrond.
Plaats het apparaat zodanig dat het niet kan kantelen.
• Schakel het apparaat alleen in als de mixbeker af is
gesloten met het deksel. De navulopening in het deksel
moet ook afgesloten zijn.
• Vul de mixbeker niet teveel! U kunt deze vullen tot een
maximum van 1,75 liter. Gebruik de maten op de kan.
• Schuim vereist een grote capaciteit. Verminder de hoe-
veelheid vloeistof die veel schuim produceert.
• Houd een hand op het deksel als u ijs vergruist of als u
een grote hoeveelheid ingrediënten gebruikt.
• Snijd het te mengen voedsel van tevoren in kleine
stukjes.

PC-UM1207_IM 21.02.20
14
Elektrische aansluiting
1. Stel de draaiknop in op de stand OFF.
2. Voordat u de stekker in het stopcontact steekt, controleer
of de te gebruiken netspanning overeenkomt met die
van het apparaat. U vindt de benodigde informatie op het
typeplaatje.
3. Sluit het apparaat alleen op een correct geïnstalleerd en
geaard stopcontact.
Gebruik met korte intervallen
OPMERKING:
De behuizing kan warm worden tijdens de werking.
• Het apparaat is geschikt voor kortstondig gebruik van
max. 2 minuten. Laat het 1 minuut afkoelen voordat u het
opnieuw gebruikt!
• Nadat u het apparaat drie keer hebt gebruikt zonder
het toevoegen van water, bijv. voor het malen van
kofebonen, noten, rijst, etc., wacht totdat de behuizing
volledig is afgekoeld voordat het apparaat opnieuw wordt
gebruikt.
Draaiknop en toets
Dit bedieningselement (8) heeft een dubbele functie.
Draaien
• Tegen de klok in: Keuze uit de verschillende program-
ma’s (1 of 2 of 3)
• Met de klok mee: Start onmiddellijk met een continue aan-
passing van de rotatiesnelheid (MIN MAX)
• OFF stand = Stand-by
Drukken
• Start en, indien nodig, stop een programma
• Pulswerking / Turbowerking
Programma’s
De programma’s werken tegen een verschillende interval,
korte onderbrekingen en continue werking.
Programma 1:
• Dit programma is geschikt voor bijv. het vergruizen van
ijsblokjes.
• U kunt tevens de pulswerking gebruiken.
Programma 2:
• Met dit programma kunt u bijv. smoothies en milkshakes
bereiden.
• Voeg eerst vers fruit en vloeibare ingrediënten (yoghurt,
melk of sap) aan de mixbeker toe. Doe vervolgens ijs
of bevroren levensmiddelen (bevroren fruit, ijsblokjes of
roomijs) erbij.
Programma 3:
• Pureer fruit, groente of een ander levensmiddel terwijl
water, melk of bouillon wordt toegevoegd met gebruik
van dit programma.
• De messen in de mengkan zijn tevens geschikt voor
het verwerken van bijv. kofebonen, noten, amandelen,
maïs of rijst tot meel. Houd rekening met de informatie
vermeld in de sectie “Gebruik met korte intervallen”.
Pulsmodus
• Als de draaiknop zich in de stand OFF bevindt, kunt u de
pulswerking activeren door de toets in te drukken en
vervolgens los te laten.
• Gebruik het apparaat maximaal 2 minuten in deze
bedieningsmodus. Laat het 1 minuut afkoelen voordat u
het opnieuw gebruikt!
Gebruik
LET OP:
• Verwijder de mixbeker niet wanneer het apparaat in
werking is! Stop de werking met behulp van de
toets en wacht totdat de messen tot een volledige
stilstand zijn gekomen.
• Voordat de mixbeker wordt verwijderd, stel de draai-
knop altijd in op de stand OFF.
Voorbereiding
1. Zorg dat de draaiknop op de stand OFF is ingesteld.
2. Plaats de mixbeker.
3. Vul de ingrediënten in de mixbeker. Houd rekening met
de maximale inhoud.
4. Plaats het deksel. Zet het deksel vast.
5. Sluit de navulopening af met de dop.
Werking
U hebt keuze uit drie werkingsopties:
• Kies het gewenste programma (1 of 2 of 3) met behulp
van de draaiknop. Druk op de toets om de werking
te starten.
• Kies een individueel aanpasbare rotatiesnelheid tussen
MIN en MAX. Het apparaat start onmiddellijk met
werken.
• Gebruik het apparaat in de pulswerking.
Mixgoed bijvullen
U kunt mixgoed of kruiden bijvullen via de navulopening.
1. Stop de werking met behulp van de draaiknop of de
toets.
2. Sluit de opening voordat u het apparaat weer inschakelt.

PC-UM1207_IM 21.02.20
15
Het gebruik beëindigen
1. Stel de draaiknop in op de stand OFF.
2. Wacht tot de messen volledig tot stilstand komen.
3. Trek de netstekker uit de contactdoos.
4. Verwijder de mixbeker. Draai deze tegen de klok in.
5. Verwijder het deksel voor het uitgieten.
BELANGRIJKE OPMERKING:
Bewaar citrussappen of zuurhoudende gerechten nooit in
metalen schalen of bekers.
Reiniging
WAARSCHUWING:
• Trek altijd de stekker uit het stopcontact vooraleer u het toestel
schoonmaakt.
• Dompel het apparaat voor de reiniging niet onder water. Dit zou
tot een elektrische schok of brand kunnen leiden.
• De bladen op het messenblok zijn zeer scherp. Er bestaat ge-
vaar voor letsel!
LET OP:
• Gebruik géén draadborstel of andere schurende voor-
werpen.
• Gebruik geen scherpe of schurende reinigingsmiddelen.
• De afzonderlijke onderdelen zijn niet vaatwasmachi-
nebestendig.
OPMERKING: Voorreiniging
Vul de mixbeker tot de helft met water en draai de
schakelaar ong. 10 seconden naar “MIN”. Giet het water
vervolgens weg.
Voor een grondige reiniging verwijdert u de mixbeker van
het apparaat.
Montage en demontage van het messenblok
1. Draai de mixbeker op zijn kop.
2. Draai de schroefdop met wat kracht linksom en verwijder
het messenblok.
3. Verwijder het messenblok voorzichtig uit de mixbeker.
4. Verwijder de afdichtingsring voor reiniging.
5. Na het drogen, plaatst u de afdichtingsring terug op het
messenblok.
6. Plaats het messenblok op het schroefdraad op de bo-
dem van de mixbeker.
7. Draai de schroefdop van het messenblak rechtsom vast.
8. Zorg ervoor dat het messenblok zich stevig in zijn
positive bevindt.
LET OP:
Gebruik het apparaat alleen als u het messenblok op
juiste wijze met de afdichtingsring hebt gemonteerd!
Anders is de mixbeker niet vergrendeld.
Mixbeker, deksel, messenblok, schroefdop,
afdichtringen en mixbeker
Gebruik een beetje afwasmiddel en reinig deze onderdelen
in een warm sopje. Droog daarna alles af voordat u de
onderdelen weer monteert.
Behuizing
Gebruik alleen een matig vochtige doek om de buitenkant
van het apparaat te reinigen.
Bewaren
• Reinig het apparaat volgens de aanwijzingen. Laat de
accessoires volledig drogen.
• Wij raden aan om het apparaat in de oorspronkelijke
verpakking te bewaren wanneer u het voor een langere
tijd niet wilt gebruiken.
• Berg het apparaat altijd buiten bereik van kinderen op en
op een goed geventileerde, droge plek.

PC-UM1207_IM 21.02.20
16
Probleemoplossing
Probleem Mogelijke oorzaak Oplossing
Het apparaat functi-
oneert niet.
Het apparaat is niet op het elektriciteitsnet
aangesloten.
Controleer de netaansluiting.
Uw apparaat is uitgerust met een veilig-
heidsschakelaar.
Deze voorkomt het abusievelijk starten van
de motor.
Controleer of de mixbeker zich stevig op zijn plaats
bevindt.
De beveiliging tegen oververhitting werd
ingeschakeld. De motor is te warm.
1. Draai de schakelaar onmiddellijk in de OFF stand.
Trek de stekker uit het stopcontact.
2. Laat het apparaat tenminste 15 minuten afkoelen
voordat u het opnieuw aanzet.
Technische gegevens
Model:.................................................................PC-UM 1207
Spanningstoevoer: ............................. 220 - 240 V~, 50 - 60 Hz
Opgenomen vermogen: .............................................. 1200 W
Beschermingsklasse: ...........................................................
Volumen: .......................................................... max. 1,75 liter
Nettogewicht: ...................................................... ong. 4,85 kg
Het recht om technische en ontwerpaanpassingen te ma-
ken in de loop van voortdurende productontwikkeling blijft
voorbehouden.
Dit apparaat voldoet aan alle huidige CE-richtlijnen,
zoals de richtlijn elektromagnetische compatibiliteit en de
laagspanningsrichtlijn, en is gefabriceerd volgens de meest
recente veiligheidsvoorschriften.
Verwijdering
Betekenis van het symbool “vuilnisemmer”
Bescherm ons milieu, elektrische apparaten
horen niet in het huisafval.
Maak voor het afvoeren van elektrische
apparaten gebruik van de voorgeschreven
verzamelpunten en geef daar de elektrische
apparaten af die u niet meer gebruikt.
Daardoor helpt u de potentiële effecten te voorkomen
die een verkeerde afvoer op het milieu en de menselijke
gezondheid kunnen hebben.
Op deze wijze levert u uw bijdrage aan het hergebruik, de
recycling en andere verwerkingsvormen voor oude elektro-
nische en elektrische apparaten.
Voor informatie over verzamelpunten voor uw apparaten
kunt u contact opnemen met uw gemeente of gemeentead-
ministratie.

PC-UM1207_IM 21.02.20
17
Mode d’emploi
Merci d’avoir choisi notre produit. Nous espérons que vous
saurez proter votre appareil.
Symboles de ce mode d’emploi
Les informations importantes pour votre sécurité sont
particulièrement indiquées. Veillez à bien respecter ces
indications an d’éviter tout risque d’accident ou d’endom-
magement de l’appareil :
AVERTISSEMENT :
Prévient des risques pour votre santé et des risques
éventuels de blessure.
ATTENTION :
Indique les risques pour l’appareil ou tout autre appareil.
NOTE :
Attire votre attention sur des conseils et informations.
Sommaire
Liste des différents éléments de commande ........................3
Notes générales .................................................................. 17
Conseils de sécurité spéciques à cet appareil .................17
Utilisation conforme ............................................................19
Déballer l’appareil ...............................................................19
Liste des différents éléments de commande /
Contenu de la livraison .......................................................19
Montage ..............................................................................19
Notes d’utilisation ................................................................ 19
Molette et bouton ................................................................20
Programmes .......................................................................20
Utilisation .............................................................................20
Nettoyage ............................................................................ 21
Rangement..........................................................................21
Dépannage..........................................................................22
Données techniques ...........................................................22
Élimination ...........................................................................22
Notes générales
Lisez attentivement ce mode d’emploi avant de mettre l’ap-
pareil en marche pour la première fois. Conservez le mode
d’emploi ainsi que le bon de garantie, votre ticket de caisse
et si possible, le carton avec l’emballage se trouvant à
l’intérieur. Si vous remettez l’appareil à des tiers, veuillez-le
remettre avec son mode d’emploi.
• N’utilisez cet appareil que pour un usage privé et pour
les taches auxquelles il est destiné. Cet appareil n’est
pas prévu pour une utilisation professionnelle.
• Ne l’utilisez pas en plein air. Protégez-le de la chaleur,
des rayons directs du soleil, de l’humidité (ne le plongez
en aucun cas dans l’eau) et des objets tranchants.
N’utilisez pas cet appareil avec des mains humides. S’il
arrive que de l’humidité ou de l’eau atteignent l’appareil,
débranchez aussitôt le câble d’alimentation.
• Il y a lieu d’inspecter l’appareil et le bloc d’alimentation
régulièrement en vue d’éventuels signes d’endom-
magements. Lorsqu’un endommagement est détecté,
l’appareil ne doit plus être utilisé.
• N’utilisez que les accessoires d’origine.
• Par mesure de sécurité vis-à-vis des enfants, ne
laissez pas les emballages (sac en plastique, carton,
polystyrène) à leur portée.
AVERTISSEMENT :
Ne pas laisser les jeunes enfants jouer avec le lm
plastique. Il y a risque d’étouffement !
Conseils de sécurité spéciques à cet appareil
AVERTISSEMENT :
• Risque de coupures ! Les lames du mixeur sont tranchantes !
• Ne jamais utiliser l’appareil sans le couvercle.
• Ne retirez pas le couvercle pendant le fonctionnement !
• Ne mettez pas les mains dans le bol de mixage en fonctionne-
ment ! Vous pourriez être blessé par les lames rotatives.
• Avant de remplacer les accessoires ou d’ajouter des pièces en
mouvement durant le fonctionnement, l’appareil doit être à l’ar-
rêt et débranché de la prise électrique.

PC-UM1207_IM 21.02.20
18
AVERTISSEMENT :
• Avant de remplacer les pièces accessoires, attendez que les
lames se soient immobilisées.
• ATTENTION : N’oubliez pas d’éteindre le mixeur avant de le
retirer du socle.
• Débranchez toujours l’appareil de l’alimentation s’il est laissé
sans surveillance et avant de le monter, démonter ou nettoyer.
• Ne réparez pas vous-même l’appareil. Contactez toujours un
technicien agrée. Si le cordon d’alimentation est endommagé, il
doit être remplacé par le fabricant, son agent de service ou des
personnes ayant qualité semblable an d’éviter un risque.
• Cet appareil ne doit pas être utilisé par les enfants.
• Gardez l’appareil et son cordon hors de la portée des enfants.
• Les enfants ne doivent pas jouer avec l’appareil.
• Les appareils peuvent être utilisés par des personnes dont les
capacités physiques, sensorielles ou mentales sont réduites,
ou des personnes dénuées d’expérience ou de connaissance,
si elles bénécient d’une surveillance ou d’instructions concer-
nant l’utilisation de l’appareil en toute sécurité et qu’elles com-
prennent les risques encourus.
ATTENTION :
Cet appareil ne doit pas être plongé dans l’eau pour le nettoyer.
Suivez les instructions du chapitre « Nettoyage ».
• N’utilisez pas l’appareil si le bol de mixage est vide.
• N’utilisez pas l’appareil pendant plus de 2 minutes. Laissez-le
refroidir environ 1 minute avant de le réutiliser.
• Ne laissez fonctionner l’appareil que sous la surveillance de
quelqu’un.

PC-UM1207_IM 21.02.20
19
• Ne touchez à aucun interrupteur de sécurité !
• Les objets tels que les cuillères ou les racloirs ne doivent jamais
être dans le bol de mixage pendant utilisation.
Utilisation conforme
Cet appareil est utilisé pour :
• Le mélange de liquides
• Hacher des denrées dures
• Écraser des glaçons
• Moudre de la farine
Il est conçu pour une utilisation domestique et pour les
applications similaires.
Il est essentiel de respecter des temps de fonctionnement
courts.
Il doit uniquement être utilisé tel qu’il est décrit dans ce ma-
nuel. Cet appareil n’est pas destiné à un usage industriel.
Tout autre usage est considéré comme inadéquat et peut
causer des dommages matériels ou même des blessures
physiques.
Le fabriquant ne peut être tenu responsable des dommages
causés par une utilisation inadéquate.
Déballer l’appareil
1. Retirez l’appareil de l’emballage.
2. Retirez tous les matériaux d’emballage comme le lm
plastique, le rembourrage, les attache-câbles et la boite.
3. Vériez que toutes les pièces sont bien dans la boite.
4. Si le contenu de l’emballage n’est pas complet ou en
cas de dégâts, n’utilisez pas l’appareil. Rapportez-le
immédiatement au distributeur.
NOTE :
Il se peut de la poussière ou des résidus de fabrication
demeurent dans l’appareil. Nous vous recommandons
de nettoyer l’appareil comme il est décrit dans le chapitre
« Nettoyage ».
Liste des différents éléments de
commande / Contenu de la livraison
1 Bouchon doseur / Bouchon de l’orice de remplissage
2 Couvercle du bol de mixage avec orice de remplissage
3 Bol de mixage
4 Porte-lames
5 Joint en anneau pour le porte-lames
6 Bouchon à vis
7 Socle avec moteur
8 Molette et bouton
Non représenté
Joint en anneau pour le couvercle
Montage
Bol de mixage
Placez le bol de mixage sur le boîtier moteur. Notez la
position des symboles sur le bol de mixage et sur le boîtier
du moteur.
NOTE :
Le bol de mixage peut être installé sur le boîtier moteur
dans différentes positions. L’interrupteur de sécurité est
fermé seulement si les deux triangles sont alignés l’un
sur l’autre.
Couvercle
1. Vériez que le joint en anneau est xé au couvercle.
2. Placez le couvercle sur le récipient mélangeur de ma-
nière que le rabat sur le couvercle soit positionné sur la
gauche du bec versoir.
3. Poussez fermement le couvercle sur le bol de mixage. Il
doit complètement boucher le bol de mixage.
4. Faites tourner le couvercle dans le sens horaire au maxi-
mum. Le rabat est maintenant positionné directement
au-dessus du bec versoir. Vériez que le couvercle est
hermétiquement fermé.
5. Insérez le bouchon dans l’orice de remplissage du
couvercle. Faites attention aux onglets-guides sur le
bouchon à vis. Faites tourner le bouchon à vis dans le
sens horaire au maximum. Le fermoir doit s’enclencher.
NOTE :
Le bouchon de l’orice de remplissage s’utilise également
comme bouchon doseur.
Notes d’utilisation
ATTENTION :
Le verre peut se ssurer si la température est trop éle-
vée ! Ne remplissez pas de liquides au-delà de 60 °C.
• Placez l’appareil sur une surface lisse et plane. Posez-le
de telle sorte qu’il ne puisse pas basculer.
• N’allumez l’appareil que si vous utilisez le bol de mixage
avec couvercle fermé. L’orice de remplissage dans le
couvercle doit également être fermé.
• Ne remplissez pas trop le bol de mixage ! Vous pouvez
le remplir jusqu’à un maximum d’1,75 litre. Utilisez
l’échelle indiquée sur le bol.
• La mousse demande une très grande capacité. Dimi-
nuez la quantité des liquides qui produisent beaucoup
de mousse.

PC-UM1207_IM 21.02.20
20
• Gardez une main sur le couvercle si vous broyez de la
glace ou si vous utilisez une grosse quantité d’ingré-
dients.
• Coupez au préalable les aliments à mélanger en petits
morceaux.
Connexion électrique
1. Réglez la molette sur la position OFF.
2. Avant de brancher la prise dans la che, vériez que
la tension du secteur que vous utilisez correspond à la
tension de l’appareil. Vous trouverez l’information néces-
saire sur la plaque d’identication.
3. Branchez l’appareil à une prise électrique de sécurité
correctement installé.
Mode impulsions
NOTE :
Le boîtier devient chaud pendant utilisation.
• L’appareil est conçu pour une utilisation sur de courtes
périodes de 2 minutes maximum. Laissez-le refroidir
pendant 1 minute avant de continuer à l’utiliser !
• Si vous utilisez l’appareil trois fois de suite sans ajouter
d’eau, par ex. pour moudre du café, mixer des noix, etc.,
attendez que le boîtier refroidisse complètement avant
d’utiliser l’appareil de nouveau.
Molette et bouton
Cet élément de contrôle (8) possède une fonction double.
Faire tourner le bouton
• Dans le sens anti-horaire : Choisir le programme (1 ou
2 ou 3)
• Dans le sens horaire : Activation directe avec réglage
précis de la vitesse de rotation (MIN MAX)
• Position OFF = Veille
Appuyer sur le bouton
• Pour démarrer ou arrêter un programme si nécessaire
• Fonctionnement par pulsion / Turbo
Programmes
Les programmes font fonctionner l’appareil à différents in-
tervalles, en effectuant des pauses ou en le faisant travailler
en continu.
Programme 1 :
• Ce programme est adapté pour concasser des glaçons,
par exemple.
• Alternativement, vous pouvez utiliser la fonction de
pulsion.
Programme 2 :
• Ce programme vous permet de faire des smoothies ou
des milkshakes, par exemple.
• Ajoutez d’abord les fruits et les ingrédients liquides
(yaourt, lait ou jus) dans le bol de mixage. Ajoutez en-
suite la glace ou les aliments congelés (fruits congelés,
glaçons ou glace).
Programme 3 :
• Ce programme est adapté pour faire de la purée de fruits
ou de légumes, avec de l’eau, du lait ou du bouillon.
• Les lames dans le bol de mixage servent également à
moudre, par exemple, des grains de café, des noix, des
amandes, du maïs ou du riz pour les moudre. Respectez
les informations données dans le chapitre « Mode
impulsions ».
Mode impulsions
• Si la molette est sur la position OFF, vous pouvez activer
la fonction de pulsion en appuyant sur le bouton ,
puis en le relâchant.
• Utilisez l’appareil dans ce mode de fonctionnement pen-
dant 2 minutes au maximum. Laissez-le refroidir pendant
1 minute avant de continuer à l’utiliser !
Utilisation
ATTENTION :
• Ne retirez pas le bol de mixage pendant le fonction-
nement ! Mettez l’appareil en pause en appuyant sur
le bouton et attendez que les lames se soient
complètement arrêtées.
• Avant de retirer le bol de mixage, mettez toujours la
molette sur la position OFF.
Préparation
1. Vériez que la molette soit sur la position OFF.
2. Installez le bol de mixage.
3. Versez maintenant les aliments dans le bol de mixage.
Respectez la capacité maximale.
4. Installez le couvercle. Verrouillez le couvercle.
5. Placez le bouchon sur l’orice de remplissage.
Fonctionnement
Vous disposez de 3 options pour démarrer le fonctionne-
ment :
• Choisissez l’un des programmes (1 ou 2 ou 3) à l’aide de
la molette. Appuyez sur le bouton pour démarrer le
fonctionnement.
• Choisissez un réglage de vitesse précis entre MIN et
MAX. L’appareil fonctionne immédiatement.
• Faites fonctionner l’appareil en mode pulsion.

PC-UM1207_IM 21.02.20
21
Pour ajouter des aliments dans l’appareil
Vous pouvez rajouter des articles à mixer ou des épices à
travers l’ouverture dans le couvercle.
1. Interrompez le fonctionnement à l’aide de la molette ou
du bouton.
2. Avant de remettre l’appareil en marche, fermer l’ouver-
ture.
Arrêter l’utilisation
1. Réglez la molette sur la position OFF.
2. Attendez que les lames s’arrêtent totalement.
3. Débranchez le câble de la prise de courant.
4. Enlevez le bol de mixage. Tournez-le dans le sens
inverse des aiguilles d’une montre.
5. Pour verser le contenu, enlevez le couvercle.
NOTE IMPORTANTE :
Ne conservez jamais de jus d’agrumes ou d’aliments
acides dans des récipients métalliques.
Nettoyage
AVERTISSEMENT :
• Avant le nettoyage de l’appareil, retirez toujours la prise au
secteur !
• En aucun cas plonger l’appareil dans de l’eau pour le nettoyer.
Vous risqueriez de provoquer une électrocution ou un incendie.
• Les lames du porte-lames sont très coupantes. Risque de
blessures !
ATTENTION :
• Ne pas utiliser de brosse en l de fer ou autres objets
abrasifs.
• Ne pas utiliser de détergents agressifs ou abrasifs.
• Les pièces individuelles ne vont pas au lave-vaisselle.
NOTE : Prélavage
Remplissez le bol de mixage à moitié d’eau et tournez le
commutateur pour env. 10 secondes sur « MIN ». Videz
ensuite l’appareil.
Pour un nettoyage complet, retirez le bol de mixage de
l’appareil.
Monter et enlever le porte-lames
1. Tournez la partie haute du bol de mixage.
2. Faites tourner le porte-lames dans le sens anti-horaire
en appliquant un peu de force et détachez-le.
3. Enlevez soigneusement le porte-lames du bol de
mixage.
4. Enlevez le joint d’étanchéité pour le nettoyage.
5. Après avoir séché, replacez le joint d’étanchéité sur le
porte-lames.
6. Insérez le porte-lames sur le letage au fond du bol de
mixage.
7. Serrez le bouchon à vis du porte-lames en le vissant
dans le sens horaire.
8. Assurez-vous que le porte-lames est solidement xé.
ATTENTION :
N’utilisez l’appareil que si vous avez correctement xé le
porte-lames avec le joint d’étanchéité ! Sinon, le bol de
mixage ne sera pas scellé.
Bol de mixage, couvercle, porte-lames,
bouchon à vis, joints en anneau et bouchon doseur
Nettoyez ces pièces à l’eau chaude, avec une petite
quantité de produit vaisselle. Puis, séchez tout avant de
remonter les pièces.
Boîtier
Pour le nettoyage extérieur de l’appareil, utiliser un chiffon
légèrement mouillé.
Rangement
• Nettoyez l’appareil comme décrit. Laissez complètement
sécher les accessoires.
• Nous vous conseillons de ranger l’appareil dans son
emballage d’origine, si vous ne souhaitez pas l’utiliser
pendant une longue période.
• Gardez toujours l’appareil hors de la portée des enfants
dans un endroit sec et bien ventilé.

PC-UM1207_IM 21.02.20
22
Dépannage
Problème Cause possible Solution
L’appareil ne fonc-
tionne pas.
L’appareil n’est pas branché à l’alimentation. Vériez le raccordement électrique.
Votre appareil est équipé d’un interrupteur
de sécurité.
Il empêche la mise en marche par inadver-
tance du moteur.
Vériez que le bol de mixage est bien en place.
La protection anti surchauffe s’est déclen-
chée. Le moteur est trop chaud.
1. Tournez immédiatement le bouton sur OFF. Dé-
branchez la che électrique de la prise de courant.
2. Laissez l’appareil refroidir pendant au moins
15 minutes avant de le rallumer.
Données techniques
Modèle : .............................................................PC-UM 1207
Alimentation : .....................................220 - 240 V~, 50 - 60 Hz
Consommation : .......................................................... 1200 W
Classe de protection : ..........................................................
Capacité : ....................................................... max. 1,75 litres
Poids net : ...................................................... environ 4,85 kg
Nous nous réservons le droit d’apporter des modications
techniques ainsi que des modications de conception dans
le cadre du développement continu de nos produits.
Cet appareil est conforme à toutes les directives CE en
vigueur, telles que les directives sur la compatibilité électro-
magnétique et les faibles tensions et a été fabriqué selon
les derniers règlements de sécurité.
Élimination
Signication du symbole « Poubelle »
Protégez votre environnement, ne jetez pas
vos appareils électriques avec les ordures mé-
nagères.
Utilisez, pour l’élimination de vos appareils
électriques, les bornes de collecte prévues à
cet effet où vous pouvez vous débarrasser des
appareils que vous n’utilisez plus.
Vous contribuez ainsi à éviter les impacts potentiels dans
l’environnement et sur la santé de chacun, causés par une
mauvaise élimination de ces déchets.
Vous contribuez aussi au recyclage sous toutes ses formes
des appareils électriques et électroniques usagés.
Vous trouverez toutes les informations sur les bornes
d’élimination des appareils auprès de votre commune ou de
l’administration de votre communauté.

PC-UM1207_IM 21.02.20
23
Manual de instrucciones
Le agradecemos la conanza depositada en este producto
y esperamos que disfrute de su uso.
Símbolos en este manual de instrucciones
Advertencias importantes para su seguridad están seña-
ladas en especial. Siga estas advertencias incondicional-
mente, para evitar accidentes y daños en el aparato:
AVISO:
Advierte ante los peligros para su salud y demuestra
posibles riesgos de herida.
ATENCIÓN:
Indica los posibles riesgos para el aparato u otros objetos.
NOTA:
Pone en relieve consejos e informaciones para usted.
Índice
Indicación de los elementos de manejo ...............................3
Notas generales .................................................................. 23
Consejos de seguridad especiales para este aparato ....... 23
Uso para el que está destinado ..........................................25
Desembalaje del aparato ....................................................25
Indicación de los elementos de manejo /
Contenido en la entrega .....................................................25
Montaje ...............................................................................25
Notas de uso ....................................................................... 25
Mando giratorio y botón ......................................................26
Programas ...........................................................................26
Funcionamiento ..................................................................26
Limpieza .............................................................................. 27
Almacenamiento .................................................................27
Resolución de problemas ...................................................28
Datos técnicos.....................................................................28
Eliminación .......................................................................... 28
Notas generales
Antes de la puesta en servicio de este aparato lea deteni-
damente el manual de instrucciones y guarde éste bien in-
cluido la garantía, el recibo de pago y si es posible también
el cartón de embalaje con el embalaje interior. En caso de
dejar el aparato a terceros, también entregue el manual de
instrucciones.
• Solamente utilice el aparato para el uso privado y para el
n previsto. Este aparato no está destinado para el uso
profesional.
• No lo utilice al aire libre. No lo exponga al calor, a la
entrada directa de rayos de sol, a la humedad (en
ningún caso sumerja el aparato en agua) y a los cantos
agudos. No utilice el aparato con las manos húmedas.
En caso de que el aparato esté húmedo o mojado retire
de momento la clavija de la caja de enchufe.
• El aparato y el cable de alimentación de red se deben
controlar regularmente para garantizar que no estén
dañados. En caso de que se comprobara un daño, no se
podrá seguir utilizando el aparato.
• Solamente utilice accesorios originales.
• Para la seguridad de sus niños no deje material de
embalaje (bolsas de plástico, cartón, poliestireno etc.) a
su alcance.
AVISO:
No deje jugar a los niños con las láminas de plástico.
¡Existe peligro de asxia!
Consejos de seguridad especiales para este aparato
AVISO:
• ¡Riesgo de corte! ¡Las cuchillas de la batidora están aladas!
• Utilice siempre el aparato con la tapa puesta.
• No quite la tapa cuando funciona el aparato.
• No introduzca la mano en la jarra para mezclar durante el fun-
cionamiento. Podría lesionarse con las cuchillas giratorias.
• Antes de sustituir accesorios o piezas adicionales que se mue-
ven durante el funcionamiento del aparato, éste se debe apagar
y se debe desconectar del suministro eléctrico.

PC-UM1207_IM 21.02.20
24
AVISO:
• Compruebe siempre que los accesorios estén bien jados an-
tes de encender el aparato.
• PRECAUCIÓN: Asegúrese de que la batidora está desconec-
tada antes de retirarla de su base.
• Desconecte siempre el aparato de la alimentación si se le deja
sin atención y antes de montarlo, desmontarlo o limpiarlo.
• No repare usted mismo el aparato. Póngase en contacto con
un técnico autorizado. Si el cable de alimentación está dañado,
corresponde al fabricante, a su representante o persona de
cualicación similar su reemplazo para evitar peligros.
• Este aparato no debe ser utilizado por los niños.
• Mantenga el aparato y su cable fuera del alcance de los niños.
• Los niños no deben jugar con el aparato.
• Los aparatos pueden ser utilizados por personas con disca-
pacidad física, psíquica o sensorial o con falta de experiencia
y conocimiento si están bajo supervisión o se les dan instruc-
ciones acerca del uso del aparato de una manera segura y si
entienden los riesgos implicados.
ATENCIÓN:
Este dispositivo no debe sumergirse en agua para limpiarlo. Siga
las instrucciones incluidas en el capítulo “Limpieza”.
• No utilice el aparato si la jarra para mezclar está vacía.
• No utilice el aparato durante más de 2 minutos. Deje que se
enfríe durante aproximadamente 1 minuto antes de volverlo a
utilizar.
• ¡No deje funcionar el aparato sin la presencia de una persona!
• ¡No toque ningún botón de seguridad!

PC-UM1207_IM 21.02.20
25
• Nunca debe haber objetos como cucharas o rascadores dentro
de la jarra para mezclar con la unidad en funcionamiento.
Uso para el que está destinado
Este dispositivo está diseñado para:
• Mezclar líquidos
• Cortar alimentos consistentes
• Picar hielo
• Producción de harinas
Se ha diseñado para el uso doméstico y aplicaciones
similares.
Es imperativo que se tenga en cuenta un funcionamiento
corto.
Solo se debe utilizar tal y como se indica en este manual. El
aparato no se ha diseñado para uso comercial.
Cualquier otro uso se considerará no indicado y podrá oca-
sionar daños materiales o incluso lesiones personales.
El fabricante no será responsable de los daños causados
por este uso indebido.
Desembalaje del aparato
1. Retire el embalaje del aparato.
2. Retire todos los materiales de embalaje, tales como
películas de plástico, bridas y embalaje de la caja.
3. Compruebe que todas las piezas estén en la caja.
4. Si el contenido del embalaje está incompleto u observa
daños, no use el aparato. Devuélvalo de inmediato al
vendedor.
NOTA:
Es posible que queden residuos derivados de la produc-
ción o polvo en el aparato. Le recomendamos que limpie
el aparato tal como se describe en “Limpieza”.
Indicación de los elementos de manejo /
Contenido en la entrega
1 Tapón de la abertura para rellenar / taza de medida
2 Tapa de la jarra para mezclar con abertura para rellenar
3 Jarra para mezclar
4 Bloque de cuchilla
5 Anillo de sellado del bloque de cuchilla
6 Tapón enroscable
7 Base con el motor
8 Mando giratorio y botóne
No mostrado
Anillo de sellado de la tapa
Montaje
Jarra para mezclar
Coloque la jarra para mezclar sobre el chasis del motor.
Observe los símbolos en la jarra de mezcla y el chasis del
motor.
NOTA:
La jarra para mezclar encaja en el chasis del motor
en distintas posiciones. El interruptor de seguridad
solamente está cerrado cuando los dos triángulos están
alineados.
Tapa
1. Asegúrese de que el anillo de sellado esté instalado en
la tapa.
2. Ponga la tapa sobre el recipiente de mezcla de forma
que la aleta de la cubierta esté situada a la izquierda de
la apertura del caño.
3. Pulse la tapa rmemente en la jarra para mezclar. Debe
sellar la jarra para mezclar completamente.
4. Gire la cubierta hacia la derecha hasta que se detenga.
La aleta de la cubierta estará directamente sobre la
apertura del caño. Asegúrese de que la cubierta quede
bien cerrada.
5. Inserte el tapón en la abertura de relleno de la tapa.
Preste atención a las muescas de guía del tapón
enroscable. Gire el tapón enroscable en sentido de las
agujas del reloj al máximo. La pestaña debe encajar en
posición.
NOTA:
El tapón de la abertura para rellenar se puede utilizar
como taza de medida.
Notas de uso
ATENCIÓN:
El cristal puede agrietarse si la temperatura es demasiado
alta. No la llene con líquidos por encima de los 60 °C.
• Coloque el aparato sobre una supercie segura y plana.
Coloque éste de tal manera que no se pueda volcar.
• Conecte el aparato solamente si la jarra para mezclar
está cerrada con la tapa. La abertura para rellenar de la
tapa debe estar también cerrada.
• No llene en exceso la jarra para mezclar. Puede llenar
hasta un máximo de 1,75 litros. Utilice la escala de la
jarra.
• Para crear espuma, será necesaria una capacidad
grande. Reduzca las cantidades de líquido que produz-
can mucha espuma.

PC-UM1207_IM 21.02.20
26
• Sujete con una mano la tapa si está picando hielo o si
hay una gran cantidad de ingredientes.
• Corte el alimento que se va a batir en pequeños trozos
con antelación.
Conexión eléctrica
1. Ponga el mango giratorio en posición OFF.
2. Antes de introducir el enchufe en la toma de corriente,
compruebe que la tensión de la red de suministro que
se va a utilizar coincide con la del aparato. Encontrará la
información necesaria en la placa de identicación.
3. Conecte el aparato solo a un enchufe de seguridad
correctamente instalado.
Uso de intervalo corto
NOTA:
La carcasa puede calentarse durante el funcionamiento.
• El aparato es adecuado para un funcionamiento con-
tinuado breve, un máximo de 2 minutos. ¡Deje que se
enfríe durante 1 minuto antes de utilizarlo otra vez!
• Después de usar el aparato tres veces sin añadir agua,
por ejemplo para moler granos de café, frutos secos,
arroz, etc. espere hasta que se haya enfriado por com-
pleto el chasis antes de volver a usar el aparato.
Mando giratorio y botón
Este elemento operativo (8) tiene una doble función.
Giro
• Hacia la izquierda: Selección de programas (1 o 2 o 3)
• Hacia la derecha: Arranque inmediato con ajuste
continuo de la velocidad de rotación (MIN
MAX)
• Posición OFF = Espera
Pulsar
• Iniciar y, si es necesario, detener un programa
• Funcionamiento de pulso / funcionamiento turbo
Programas
Los programas funcionan con distintos intervalos, pausas
breves y funcionamiento continuo.
Programa 1:
• Este programa es adecuado, por ejemplo, para picar
cubitos de hielo.
• Alternativamente puede usar el funcionamiento de pulso.
Programa 2:
• Con este programa puede, por ejemplo, preparar
batidos.
• Añada primero la fruta fresca y los ingredientes líquidos
(yogur, leche o zumo) a la jarra. Añada a continuación
hielo o alimentos congelados (fruta congelada, cubitos
de hielo o helado).
Programa 3:
• Triture fruta, verdura u otros mientras añade agua, leche
o caldo usando este programa.
• Las hojas de la jarra también son adecuadas para
procesar, por ejemplo, grandos de café, frutos secos,
almendras, maíz o arroz en harina. Tenga en cuenta la
información del capítulo “Uso de intervalo corto”.
Modo pulsación
• Si el mando giratorio está en posición OFF, puede acti-
var el funcionamiento de pulso pulsando el botón y
a continuación soltándolo de nuevo.
• Utilice el aparato en este modo de funcionamiento
durante un máximo de 2 minutos. ¡Deje que se enfríe
durante 1 minuto antes de utilizarlo otra vez!
Funcionamiento
ATENCIÓN:
• ¡No retire la jarra durante el funcionamiento! Pause el
funcionamiento con el botón y espere a que las
hojas se detengan.
• Antes de retirar la jarra, siempre ponga el mando
giratorio en posición OFF.
Preparación
1. Asegúrese de que el mando giratorio esté en posición
OFF.
2. Coloque la jarra para mezclar.
3. Ahora introduzca los ingredientes a batir en la jarra para
mezclar. Tenga en cuenta la capacidad máxima.
4. Ponga la tapa. Cierre la cubierta.
5. Cierre la abertura para rellenar con el tapón.
Uso
Hay 3 opciones para empezar el funcionamiento:
• Seleccione un programa (1 o 2 o 3) con el mando girato-
rio. Pulse el botón para iniciar el funcionamiento.
• Seleccione una velocidad de rotación ajustable indivi-
dualmente entre MIN y MAX. El aparato comenzará a
funcionar de inmediato.
• Haga funcionar el aparato en modo de funcionamiento
de pulso.
Rellenar los alimentos a batir
Ingredientes a batir o especias pueden rellenarse por la
abertura de llenado.
1. Detenga el funcionamiento con el mando giratorio o el
botón.
2. Antes de conectar de nuevo el aparato, cierre la aber-
tura.

PC-UM1207_IM 21.02.20
27
Finalizar el funcionamiento
1. Ponga el mango giratorio en posición OFF.
2. Espere a que la hoja se detenga por completo.
3. Retire la clavija de la caja de enchufe.
4. Retire la jarra para mezclar. Gire hacia la izquierda.
5. Para verter, retire la tapadera.
NOTA IMPORTANTE:
Nunca almacene zumos cítricos o alimentos con ácido en
recipientes de metal.
Limpieza
AVISO:
• ¡Retire siempre el enchufe de la corriente antes de limpiar el
aparato!
• Para la limpieza, en ningún caso sumergir el aparato en agua.
Podría causar un electrochoque o un incendio.
• Las cuchillas del bloque de cuchilla están muy aladas. ¡Existe
el riesgo de lesión!
ATENCIÓN:
• No utilice un cepillo de alambre u objetos abrasivos.
• No utilice detergentes agresivos o abrasivos.
• Las piezas individuales no se pueden lavar en lava-
vajillas.
NOTA: Prelimpieza
Llene la jarra para mezclar hasta la mitad con agua y gire
el interruptor durante unos 10 segundos sobre “MIN”. A
continuación derrame el líquido.
Para la limpieza a fondo retire la jarra para mezclar.
Colocación y desmontaje del bloque de cuchillas
1. Gire la jarra para mezclar en su cabezal.
2. Con un poco de esfuerzo, gire el tapón enroscable en
sentido contrario a las agujas del reloj y suelte el bloque
de cuchilla.
3. Extraiga el bloque de cuchilla con cuidado de la jarra
para mezclar.
4. Desmonte la junta para su limpieza.
5. Después de secar, coloque de nuevo la junta en el
bloque de la cuchilla.
6. Inserte el bloque de la cuchilla sobre la rosca de la parte
inferior de la jarra para mezclar.
7. Apriete el tapón enroscable del bloque de cuchilla girán-
dolo en sentido de las agujas del reloj.
8. Asegúrese de que el bloque de cuchilla está asentado
con seguridad en su posición.
ATENCIÓN:
Ponga en marcha el aparato solamente si ha colocado
correctamente el bloque de cuchillas con la junta. Si no,
la jarra para mezclar no está bien sellada.
Jarra para mezclar, tapa, bloque de cuchilla,
tapón enroscable, arandela de sellado y
taza de medición
Use un poco de lavavajillas y limpie estos componentes
en agua caliente. Luego seque todo antes de montar las
piezas de nuevo.
Carcasa
Para la limpieza exterior del aparato utilice solamente un
paño humedecido de forma moderada.
Almacenamiento
• Limpie el aparato del modo descrito. Deje que los acce-
sorios se sequen del todo.
• Recomendamos que guarde el aparato en su embalaje
original, si no va a usarlo durante un periodo de tiempo
prolongado.
• Guarde el dispositivo lejos del alcance de los niños en
una zona bien ventilada y seca.

PC-UM1207_IM 21.02.20
28
Resolución de problemas
Problema Posible causa Solución
El aparato no
tiene función.
El aparato no está conectado al suministro eléctrico. Supervise la conexión a la red.
Su aparato está equipado con un interruptor de
seguridad.
Este evita la conexión no intencional del motor.
Compruebe que la jarra para mezclar está rme-
mente en su sitio.
Se ha activado la protección contra sobrecalenta-
miento. El motor está demasiado caliente.
1. Gire inmediatamente el interruptor hasta la po-
sición OFF. Desenchufe la unidad de la fuente
de alimentación.
2. Para evitar el sobrecalentamiento, espere al
menos 15 minutos antes de encender de nuevo
la unidad.
Datos técnicos
Modelo: ..............................................................PC-UM 1207
Suministro de tensión: .......................220 - 240 V~, 50 - 60 Hz
Consumo de energía: .................................................1200 W
Clase de protección: ............................................................
Cantidad de llenado: ...................................... máx. 1,75 litros
Peso neto: ........................................................ aprox. 4,85 kg
El derecho de realizar modicaciones técnicas y de diseño
en el curso del desarrollo continuo del producto esta
reservado.
Este dispositivo cumple con todas las directrices CE actua-
les, como la directriz de compatibilidad electromagnética y
de bajo voltaje, y está fabricada según las últimas normas
de seguridad.
Eliminación
Signicado del símbolo “Cubo de basura”
Proteja nuestro medio ambiente, aparatos eléc-
tricos no forman parte de la basura doméstica.
Haga uso de los centros de recogida previstos
para la eliminación de aparatos eléctricos y
entregue allí sus aparatos eléctricos que no
vaya a utilizar más.
Ayudará en evitar las potenciales consecuencias, a causa
de una errónea eliminación de desechos, para el medio
ambiente y la salud humana.
Con ello, contribuirá a la recuperación, al reciclado y a otras
formas de reutilización de los aparatos viejos eléctricos y
electrónicos.
La información cómo se debe eliminar los aparatos, se
obtiene en su ayuntamiento o su administración municipal.

PC-UM1207_IM 21.02.20
29
Istruzioni per l’uso
Grazie per aver scelto il nostro prodotto. Vi auguriamo un
buon utilizzo del dispositivo.
Simboli per questo manuale di istruzioni per l’uso
Le indicazioni importanti per la propria sicurezza sono
indicati appropriatamente. Osservare assolutamente queste
indicazioni, per evitare incidenti e danni all’apparecchio:
AVVISO:
Previene i rischi della propria salute ed indica possibili
rischi di ferite.
ATTENZIONE:
Indica possibili pericoli per l’apparecchio o altri oggetti.
NOTA:
Mette in risalto consigli ed informazioni.
Indice
Elementi di comando ............................................................3
Note generali .......................................................................29
Avvertenze speciali di sicurezza per questo apparecchio
...29
Utilizzo conforme alla destinazione ....................................31
Disimballaggio dell’apparecchio .........................................31
Elementi di comando / Nella fornitura..................................31
Montaggio ...........................................................................31
Note per l’uso ...................................................................... 31
Manopola girevole e tasto ...................................................32
Programmi ...........................................................................32
Funzionamento ...................................................................32
Pulizia .................................................................................. 33
Conservazione .................................................................... 33
Risoluzione di problemi .......................................................34
Dati tecnici ...........................................................................34
Smaltimento ........................................................................34
Note generali
Prima di mettere in funzione questo apparecchio, leggere
molto attentamente le istruzioni per l’uso e conservarle con
cura unitamente al certificato di garanzia, allo scontrino
e, se possibile, alla scatola di cartone con la confezione
interna. Se passate l’apparecchio a terzi, consegnate anche
le istruzioni per l’uso.
• Utilizzare l’apparecchio esclusivamente per scopi privati
e conformemente al tipo di applicazione previsto. Questo
prodotto non è stato concepito ai fini di un impiego in
ambito industriale.
• Non utilizzarlo all’aperto. Proteggerlo dal calore, nonché
dall’esposizione diretta ai raggi solari e dall’umidità (non
immergerlo mai in sostanze liquide) e tenerlo a distanza
da oggetti con spigoli affilati. Non utilizzare l’apparecchio
con le mani umide. Nel caso in cui si bagni o si inumidi-
sca l’apparecchio, staccare immediatamente la spina.
• Controllare regolarmente che l’apparecchio e il cavo
non presentino tracce di danneggiamento. In tal caso
l’apparecchio non deve più essere utilizzato.
• Utilizzare esclusivamente accessori originali.
• Per sicurezza tenere l’imballaggio (sacchetto di plastica,
scatola, polistirolo, ecc.) fuori dalla portata dei bambini.
AVVISO:
Non lasciar giocare i bambini piccoli con la pellicola di
plastica. Pericolo di soffocamento!
Avvertenze speciali di sicurezza per questo apparecchio
AVVISO:
• Pericolo di taglio! Le lame del frullatore sono taglienti!
• Utilizzare sempre l’apparecchio con il coperchio.
• Non togliere il coperchio mentre in funzione!
• Non toccare la caraffa di miscelazione durante il funzionamento!
Potreste essere feriti dalle lame rotanti.
• Prima di sostituire gli accessori o parti aggiuntive che si muo-
vono durante il funzionamento, l’apparecchio deve essere
spento e scollegato dalla corrente.

PC-UM1207_IM 21.02.20
30
AVVISO:
• Controllare sempre che gli accessori siano ben a posto e fermi
prima di accendere l’apparecchio.
• ATTENZIONE: Assicurarsi che il frullatore si spento prima di
rimuoverlo dallo stand.
• Scollegare sempre l’apparecchio dall’alimentazione se esso
viene lasciato senza sorveglianza e prima di montaggio, smon-
taggio e pulizia.
• Non riparare l’apparecchio da soli. Contattare sempre un tecnico
autorizzato. Se il cavo di alimentazione è danneggiato, farlo sosti-
tuire dal produttore, dall’agente addetto all’assistenza oppure da
personale qualificato per evitare situazioni pericolose.
• Non permettere ai bambini di utilizzare questo apparecchio.
• Tenere apparecchio e relativo cavo di alimentazione lontani
dalla portata dei bambini.
• Non consentire ai bambini di giocare con l’apparecchio.
• Gli apparecchi possono essere utilizzati da persone con ridotte
capacità fisiche, sensoriali o mentali e mancanza di esperienza
e conoscenza sotto la supervisione o grazie alle istruzioni
sull’uso dell’apparecchio in modo sicuro e quando essi capi-
scono i pericoli potenziali derivanti dall’utilizzo dell’apparecchio.
ATTENZIONE:
Non immergere l’apparecchio in acqua per pulirlo. Seguire le
istruzioni riportate nel capitolo “Pulizia”.
• Non usare l’apparecchio se la caraffa di miscelazione è vuota.
• Non mettere in funzione l’apparecchio per più di 2 minuti. Lasciarlo
raffreddare per circa 1 minuto prima di utilizzarlo nuovamente.
• Usare l’apparecchio con cautela.

PC-UM1207_IM 21.02.20
31
• Non toccare i tasti di sicurezza!
• Oggetti come cucchiai o raschietti non devono mai essere usati
nella caraffa di miscelazione il funzionamento.
Utilizzo conforme alla destinazione
Questo apparecchio è destinato a:
• Miscelare liquidi
• Per tagliare a pezzetti alimenti duri
• Per rompere ghiaccio
• Produzione di farine
Deve essere utilizzato in ambiente domestico e applicazioni
simili.
È assolutamente necessario attenersi al funzionamento a
breve termine.
Utilizzare l’apparecchio soltanto come descritto nel manuale
istruzioni. L’apparecchio non é destinato all’uso commer-
ciale.
Gli altri usi non sono previsti e possono danneggiare l’appa-
recchio o provocare lesioni personali.
Il produttore non si assume alcuna responsabilità per danni
derivanti da uso improprio dell’apparecchio.
Disimballaggio dell’apparecchio
1. Rimuovere l’imballaggio dal dispositivo.
2. Rimuovere tutto il materiale di imballaggio come pellicola
di plastica, materiale di riempimento, fili per cavi e
imballaggio.
3. Controllare che tutte le parti siano nella confezione.
4. Se il contenuto della confezione risulta incomplete o se si
rilevano guasti, non utilizzare il dispositivo. Consegnarlo
immediatamente al distributore.
NOTA:
Potrebbe esserci polvere e residui di produzione sul di-
spositivo. Si consiglia di pulire il dispositivo come descritto
in “Pulizia”.
Elementi di comando / Nella fornitura
1 Tappo del dosatore / misurino
2 Coperchio della caraffa di miscelazione con apertura
dosatore
3 Caraffa di miscelazione
4 Blocco della lama
5 Anello di tenuta per blocco lama
6 Tappo a vite
7 Sezione base con motore
8 Manopola girevole e tasto
Non visualizzato
Anello di tenuta per coperchio
Montaggio
Caraffa di miscelazione
Mettere la caraffa di miscelazione sull’alloggiamento del
motore. Osservare i simboli sul contenitore di miscelazione
e sull’alloggiamento del motore.
NOTA:
La caraffa di miscelazione si adatta all’alloggiamento del
motore in varie posizioni. L’interruttore di sicurezza viene
chiuso solo quando i due triangoli sono allineati tra loro.
Coperchio
1. Accertarsi che l’anello di tenuta sia fissato al coperchio.
2. Posizionare il coperchio sul contenitore di miscelazione
in modo che la linguetta del coperchio si trovi a sinistra
dell’apertura del beccuccio.
3. Premere il coperchio saldamente sulla caraffa di mi-
scelazione. Deve chiudere completamente la caraffa di
miscelazione.
4. Ruotare il coperchio in senso orario fino a quando non
si blocca. La linguetta del coperchio si trova ora diretta-
mente sopra l’apertura del beccuccio. Verificare che il
coperchio sia ben chiuso.
5. Inserire il tappo nell’apertura del dosatore del coperchio.
Prestare attenzione alle alette di guida sul tappo a vite.
Ruotare il tappo a vite in senso orario fino in fondo. La
chiusura deve scattare in posizione.
NOTA:
Il tappo del dosatore anche essere usato come misurino.
Note per l’uso
ATTENZIONE:
Il vetro si può rompere se la temperatura è troppo alta!
Non riempire con liquidi la cui temperatura è superiore
ai 60 °C.
• Porre l’apparecchio su una superficie piana e stabile.
Disporlo in modo che non possa rovesciarsi.
• Accendere l’apparecchio solo se la caraffa di misce-
lazione è chiusa con il coperchio. Anche il tappo del
dosatore nel coperchio deve essere chiuso.
• Non riempire troppo la caraffa di miscelazione! È pos-
sibile riempirla fino ad un massimo di 1,75 litri. Usare la
scala sulla caraffa.
• Il montare richiede una capacità maggiore. Ridurre le
quantità di liquidi che producono molta schiuma.

PC-UM1207_IM 21.02.20
32
• Tenere una mano sul coperchio se si rompe ghiaccio o
se ci sono molti ingredienti.
• Prima, tagliare il cibo da frullare in piccoli pezzi.
Collegamento elettrico
1. Impostare la manopola girevole in posizione OFF.
2. Prima di inserire la spina nella presa, controllare che la
tensione nominale corrisponda alla tensione dell’appa-
recchio. Le informazioni sono riportate sulla targhetta
dell’apparecchio.
3. Collegare l’apparecchio soltanto a una presa corretta-
mente installata.
Uso a brevi intervalli
NOTA:
L’alloggiamento potrebbe riscaldarsi durante l’utilizzo.
• L’apparecchio è adatto al funzionamento per un breve
periodo di massimo 2 minuti. Lasciarlo raffreddare per
1 minuto prima di riutilizzarlo!
• Dopo aver utilizzato l’apparecchio per tre volte senza
aggiunta di acqua, ad es. per la macinazione di chicchi
di caffè, noci, riso, ecc., attendere che l’alloggiamento si
sia completamente raffreddato prima di utilizzare nuova-
mente l’apparecchio.
Manopola girevole e tasto
Questo elemento di comando (8) ha una doppia funzione.
Rotazione
• In senso antiorario: Scelta dei programmi (1 o 2 o 3)
• In senso orario: Avvio immediato con regolazione conti-
nua della velocità di rotazione (MIN MAX)
• Posizione OFF = Standby
Pressione
• Avvio e, se necessario, arresto di un programma
• Funzionamento ad impulsi / funzionamento a turbina
Programmi
I programmi funzionano a diversi intervalli, brevi pause e a
funzionamento continuo.
Programma 1:
• Questo programma è adatto ad esempio per la frantu-
mazione di cubetti di ghiaccio.
• In alternativa è possibile utilizzare il funzionamento a
impulsi.
Programma 2:
• Con questo programma è possibile ad esempio prepa-
rare frullati e frappè.
• Per prima cosa, aggiungere frutta fresca e ingredienti
liquidi (yogurt, latte o succo di frutta) al contenitore di
miscelazione. Poi aggiungere ghiaccio o cibo congelato
(frutta surgelata, cubetti di ghiaccio o gelato).
Programma 3:
• Purea di frutta o verdura o altro mentre si aggiunge
acqua, latte o brodo utilizzando questo programma.
• Le lame nel contenitore di miscelazione sono adatte
anche per la lavorazione, ad esempio, di chicchi di caffè,
noci, mandorle, mais o riso in farina. Fare attenzione
alle informazioni contenute nel capitolo “Uso a brevi
intervalli”.
Modalità a impulsi
• Se la manopola girevole si trova in posizione OFF, è
possibile attivare il funzionamento a impulsi premendo il
pulsante per poi rilasciarlo nuovamente.
• Usare l’apparecchio in questa modalità di funzionamento
per un massimo di 2 minuti. Lasciarlo raffreddare per
1 minuto prima di riutilizzarlo!
Funzionamento
ATTENZIONE:
• Non rimuovere il contenitore di miscelazione durante
il funzionamento! Sospendere il funzionamento con il
pulsante a attendere finché le lame non si arre-
stano completamente.
• Prima di rimuovere il contenitore di miscelazione,
impostare sempre la manopola girevole in posizione
OFF.
Preparazione
1. Assicurarsi che la manopola girevole si trovi in posizione
OFF.
2. Applicare la caraffa di miscelazione.
3. Versare ora gli alimenti da frullare nella caraffa di misce-
lazione. Rispettare la capacità massima.
4. Mettere il coperchio. Bloccare il coperchio.
5. Chiudere l’apertura del dosatore con il tappo.
Funzionamento
Si hanno a disposizione 3 opzioni per avviare il funziona-
mento:
• Scegliere un programma (1 o 2 o 3) utilizzando la
manopola girevole. Premere il pulsante per avviare
il funzionamento.
• Scegliere una velocità di rotazione regolabile singolar-
mente tra MIN e MAX. L’apparecchio incomincerà a
funzionare immediatamente.
• Utilizzare l’apparecchio in modalità di funzionamento a
impulsi.

PC-UM1207_IM 21.02.20
33
Aggiungere alimenti da frullare
Si possono aggiungere alimenti da frullare o spezie attra-
verso l’apertura di riempimento.
1. Interrompere il funzionamento utilizzando la manopola
girevole o il tasto.
2. Prima di riaccendere l’apparecchio, chiudere l’apertura.
Terminare il funzionamento
1. Impostare la manopola girevole in posizione OFF.
2. Attendere che la lama si arresti completamente.
3. Togliere la spina dalla presa.
4. Togliere la caraffa di miscelazione. Ruotare in senso
antiorario.
5. Per versare togliere il coperchio.
NOTA IMPORTANTE:
Non conservare mai i succhi degli agrumi o alimenti
contenenti acidi in contenitori di metallo.
Pulizia
AVVISO:
• Prima di procedere alla pulizia estrarre sempre la spina dalla
presa di corrente!
• In nessun caso immergere l’apparecchio in acqua per la pulizia.
Ne potrebbe conseguire un corto circuito o incendio.
• Le lame sul blocco lame sono molto affilate. Vi è il rischio di
lesioni!
ATTENZIONE:
• Non usare pagliette o altri oggetti abrasivi.
• Per la pulizia non usare detersivi forti o abrasivi.
• Le singole parti non sono lavabili in lavastoviglie.
NOTA: Pre-pulizia
Riempire la caraffa di miscelazione a metà con acqua
e girare l’interruttore per 10 secondi ca. su “MIN”. Infine
buttare via il liquido.
Per una pulizia a fondo staccare la caraffa di miscelazione.
Montare e smontare il blocco lame
1. Capovolgere la caraffa di miscelazione sulla sua testa.
2. Con un piccolo sforzo ruotare il tappo a vite in senso
antiorario e staccare il blocco lama.
3. Estrarre il blocco lama dalla caraffa di miscelazione con
attenzione.
4. Rimuovere l’anello di tenuta per la pulizia.
5. Una volta asciugato, rimettere l’anello di tenuta in posi-
zione sul blocco lame.
6. Inserire il blocco lame sulla filettatura alla base della
caraffa di miscelazione.
7. Stringere il tappo a vite del blocco lama girandolo in
senso orario.
8. Assicurarsi che il blocco lame sia saldamente fissato in
posizione.
ATTENZIONE:
Usare l’apparecchio solo dopo aver montato il blocco
lame con l’anello di tenuta! Diversamente la caraffa di
miscelazione non sarà sigillata.
Caraffa di miscelazione, misurino, blocco della lama,
tappo a vite, anelli di tenuta e coperchio
Utilizzare un po’ di detersivo per piatti e pulire questi com-
ponenti in acqua calda. Poi asciugare tutto con cura prima
di rimontare le parti.
Custodia
Per la pulizia esterna dell’apparecchio usare solo un panno
un po’ inumidito.
Conservazione
• Pulire l’apparecchio come descritto. Lasciar asciugare
completamente gli accessori.
• Si consiglia di conservare l’apparecchio nella confezione
originale se non viene utilizzato per un lungo periodo.
• Conservare sempre l’apparecchio fuori dalla portata dei
bambini ed in un luogo asciutto e ben ventilato.

PC-UM1207_IM 21.02.20
34
Risoluzione di problemi
Problema Causa possibile Rimedio
L’apparecchio è
senza funzione.
L’apparecchio non è collegato alla corrente. Controllare il collegamento rete.
L’apparecchio è munito di un interruttore di
sicurezza.
Evita una messa in moto casuale del motore.
Verificare che la caraffa di miscelazione sia salda-
mente in posizione.
È scattata la termica. Motore troppo caldo. 1. Girare immediatamente l’interruttore in posizione
OFF. Scollegare la spina di corrente dalla presa
a parete.
2. Lasciar raffreddare il dispositivo per almeno
15 minuti prima di accenderlo di nuovo.
Dati tecnici
Modello: .............................................................. PC-UM 1207
Alimentazione elettrica: ...................... 220 - 240 V~, 50 - 60 Hz
Consumo di energia: ................................................... 1200 W
Classe di protezione: ...........................................................
Capacità: ........................................................... max. 1,75 litri
Peso netto: .............................................................ca. 4,85 kg
Si riserva il diritto di apportare modiche tecniche e di
design nel corso dello sviluppo del prodotto.
Questo dispositivo risponde a tutte le direttive della CE,
come la direttiva sulla compatibilità elettromagnetica e
quella sul basso voltaggio ed è prodotto secondo le più
recenti norme di sicurezza.
Smaltimento
Significato del simbolo “Eliminazione”
Salvaguardare l’ambiente, gli elettrodomestici
non vanno eliminati come riuti domestici.
Per l’eliminazione degli elettrodomestici, fare
uso dei posti di raccolta previsti per questo tipo
e porre quegli elettrodomestici che non sono
più in uso.
Si contribuisce così ad evitare un effetto potenziale sull’am-
biente e sulla salute, dovuto magari ad una eliminazione
sbagliata.
Questo signica un contributo personale alla riutilizzazione,
al riciclaggio e altre forme di utilizzazione di elettrodomestici
ed apparecchi elettronici usati.
Si possono trovare le corrispondenti informazioni sugli ap-
positi luoghi di raccolta, nelle amministrazioni dei comuni.

PC-UM1207_IM 21.02.20
35
Instruction Manual
Thank you for choosing our product. We hope you will enjoy
using the appliance.
Symbols in this Instruction Manual
Important information for your safety is specially marked.
It is essential to comply with these instructions in order to
avoid accidents and prevent damage to the appliance:
WARNING:
This warns you of dangers to your health and indicates
possible injury risks.
CAUTION:
This refers to possible hazards to the appliance or other
objects.
NOTE:
This highlights tips and information.
Contents
Overview of the Components ...............................................3
General Notes ..................................................................... 35
Special Safety Precautions for this Appliance ....................35
Designated Use ..................................................................37
Unpacking the Appliance ....................................................37
Overview of the Components / Scope of Delivery ..............37
Installation ...........................................................................37
Notes for Use ......................................................................37
Rotary Knob and Button .....................................................38
Programmes .......................................................................38
Operation ............................................................................38
Cleaning .............................................................................. 39
Storage ................................................................................39
Troubleshooting ..................................................................39
Technical Data.....................................................................40
Disposal...............................................................................40
General Notes
Read the operating instructions carefully before putting the
appliance into operation and keep the instructions including
the warranty, the receipt and, if possible, the box with the
internal packing. If you give this appliance to other people,
please also pass on the operating instructions.
• The appliance is designed exclusively for private use and
for the envisaged purpose. This appliance is not t for
commercial use.
• Do not use it outdoors. Keep it away from sources of
heat, direct sunlight, humidity (never dip it into any
liquid) and sharp edges. Do not use the appliance with
wet hands. If the appliance is humid or wet, unplug it
immediately.
• The appliance and the mains lead have to be checked
regularly for signs of damage. If damage is found the
appliance must not be used.
• Use only original spare parts.
• In order to ensure your children’s safety, please keep all
packaging (plastic bags, boxes, polystyrene etc.) out of
their reach.
WARNING:
Do not allow small children to play with the plastic foil.
There is a danger of suffocation!
Special Safety Precautions for this Appliance
WARNING:
• Risk of cuts! The mixer blades are sharp!
• Always use the appliance with the lid on.
• Do not remove the lid during operation!
• Do not reach into the mixing jar during operation! You could be
hurt by the rotating knives.
• Before replacement of accessories or additional parts which
move during operation, the appliance must be switched off and
cut off from the mains.

PC-UM1207_IM 21.02.20
36
WARNING:
• Always check that the accessories are seated solidly and se-
curely before switching the appliance on.
• CAUTION: Ensure that the blender is switched off before re-
moving it from the stand.
• Always disconnect the appliance from the supply if it is left unat-
tended and before assembling, disassembling or cleaning.
• Do not repair the appliance by yourself. Always contact an
authorized technician. If the supply cord is damaged, it must be
replaced by the manufacturer, its service agent or similarly quali-
ed persons in order to avoid a hazard.
• This appliance shall not be used by children.
• Keep the appliance and its cord out of reach of children.
• Children shall not play with the appliance.
• Appliances can be used by persons with reduced physical, sen-
sory or mental capabilities or lack of experience and knowledge
if they have been given supervision or instruction concerning
use of the appliance in a safe way and if they understand the
hazards involved.
CAUTION:
This appliance must not be immersed in water for cleaning.
Please follow the instructions provided in chapter “Cleaning”.
• Do not use the appliance if the mixing jar is empty.
• Do not operate the appliance for more than 2 minutes. Allow it to
cool for around 1 minute before using it again.
• The appliance should only be used under supervision.
• Do not manipulate any of the safety switches!

PC-UM1207_IM 21.02.20
37
• Objects like spoons or scrapers never may be in the mixing jar
during operation.
Designated Use
This appliance is used for:
• Mixing of liquids
• Chopping rm foodstuffs
• Crushing ice
• Producing of ours
It is intended for the use in private households and similar
applications.
It is imperative that short-time operation is observed.
It is only to be used as instructed in this user manual. The
appliance is not intended for commercial use.
Any other use shall be considered as not intended use and
can lead to material damage or even personal injury.
The manufacturer shall not be liable for damages caused by
not intended use.
Unpacking the Appliance
1. Remove the packaging of the appliance.
2. Remove all packaging material such as plastic lm, ller
material, cable ties and box packaging.
3. Check that all parts are in the box.
4. If the packaging content should be incomplete or if dam-
ages should be noticeable, do not operate the appliance.
Return it to the distributor immediately.
NOTE:
Dust or production residues may still be found on the
appliance. We recommend that you clean the appliance
as described under “Cleaning”.
Overview of the Components /
Scope of Delivery
1 Rell opening cap / measuring cup
2 Mixing jar lid with rell opening
3 Mixing jar
4 Knife block
5 Sealing ring for the knife block
6 Screw-cap
7 Base section with motor
8 Rotary knob and button
Not Shown
Sealing ring for the lid
Installation
Mixing Jar
Place the mixing jar onto the motor housing. Note the sym-
bols on the mixing jar and the motor housing.
NOTE:
The mixing jar ts onto the motor housing in various
positions. The safety switch is only shut when the two
triangles are aligned with one another.
Lid
1. Make sure that the sealing ring is attached to the lid.
2. Place the lid on the mixing jar so that the ap on the
cover is located to the left of the spout opening.
3. Press the lid rmly onto the mixing jar. It must seal the
mixing jar completely.
4. Turn the cover clockwise until it stops. The cover ap is
now directly over the spout opening. Check to ensure the
cover is shut tight.
5. Insert the cap into the rell opening of the lid. Pay
attention to the guide lugs on the screw-cap. Turn the
screw-cap clockwise as far as it will go. The clasp must
snap into place.
NOTE:
The rell opening cap can also be used as a measuring
cup.
Notes for Use
CAUTION:
The glass may crack if the temperature is too high! Do
not ll with liquids above 60 °C.
• Place the appliance on a rm and at surface. Position it
is such that it cannot tip over.
• Only switch on the appliance if the mixing jar is closed
with the lid. The rell opening in the lid must also be
closed.
• Do not overll the mixing jar! You can ll it to a maximum
of 1.75 litres. Use the scale on the jug.
• Froth requires a large capacity. Reduce quantities of
liquids which produce a lot of froth.
• Keep one hand on the lid if you are crushing ice or if
there is a large quantity of ingredients.
• Cut the food to be mixed into small pieces beforehand.
Electric Connection
1. Set the rotary knob to the OFF position.
2. Before inserting the power plug into the outlet, check
that the mains voltage to be used matches that of the

PC-UM1207_IM 21.02.20
38
appliance. You can nd the required information on the
nameplate
3. Connect the appliance only to a correctly installed safety
socket.
Short-Interval Use
NOTE:
The housing may get hot during operation.
• The appliance is suitable for short-time operation of max.
2 minutes. Let it cool for 1 minute before using it again!
• After using the appliance for three times without adding
water, e.g. for grinding coffee beans, nuts, rice, etc.,
please wait until the housing has completely cooled
down before using the appliance again.
Rotary Knob and Button
This operating element (8) has a dual function.
Turning
• Counter-clockwise: Choice of programmes (1 or 2 or 3)
• Clockwise: Immediate start with continuous adjustment
of the rotation speed (MIN MAX)
• Position OFF = Standby
Pressing
• Start and, if necessary, stop of a programme
• Pulsed operation / Turbo operation
Programmes
The programs work at different intervals, short pauses and
continuous run.
Programme 1:
• This programme is suitable for e. g. crushing ice cubes.
• Alternatively, you can use pulsed operation.
Programme 2:
• With this programme, you can e. g. make smoothies and
milkshakes.
• First, add fresh fruit and liquid ingredients (yogurt, milk
or juice) to the mixing jar. Then add ice or frozen food
(frozen fruit, ice cubes or ice cream).
Programme 3:
• Puree fruit or vegetables or else while adding water, milk
or broth using this programme.
• The blades in the mixing jar are also suitable for process-
ing e. g. coffee beans, nuts, almonds, corn or rice into
our. Be mindful of the information in the chapter entitled
“short-time operation”.
Pulse Mode
• If the rotary knob is in the OFF position, you can activate
pulsed operation by pressing the button and then
releasing it again.
• Use the appliance in this operating mode for a maximum
of 2 minutes. Let it cool for 1 minute before using it
again!
Operation
CAUTION:
• Do not remove the mixing jar during operation! Pause
the operation using the button and wait until the
blades have come to a standstill.
• Before removing the mixing jar, always set the rotary
knob to the OFF position.
Preparation
1. Make sure the rotary knob is in the OFF position.
2. Place the mixing jar in position.
3. Now put the ingredients that are to be mixed into the
mixing jar. Observe the maximum capacity.
4. Put the lid on. Lock the cover.
5. Close the rell opening with the cap.
Operation
You have 3 options for starting the operation:
• Choose a programme (1 or 2 or 3) using the rotary knob.
Press the button to start operating.
• Choose an individually adjustable rotation speed
between MIN and MAX. The appliance will commence
operation immediately.
• Run the appliance in pulsed operation mode.
Adding Further Ingredients to be Mixed
Items to be mixed or spices can be fed in through the lling
aperture.
1. Stop operation using the rotary knob or the button.
2. Before you switch the appliance on again, close the
opening.
Stopping Operation
1. Set the rotary knob to the OFF position.
2. Wait until the blade comes to a complete stop.
3. Remove the mains plug from the socket.
4. Remove the mixing jar. Turn it anticlockwise.
5. Take off the lid before pouring.
IMPORTANT NOTE:
Citrus juices and food containing acids should never be
stored in metal vessels.

PC-UM1207_IM 21.02.20
39
Cleaning
WARNING:
• Always remove the plug before cleaning.
• Under no circumstances should you immerse the appliance in
water for cleaning purposes. Otherwise this might result in an
electric shock or re.
• The blades on the knife block are very sharp. A risk of injury
exists!
CAUTION:
• Do not use a wire brush or any abrasive items.
• Do not use any acidic or abrasive detergents.
• The individual parts are not dishwasher-safe.
NOTE: Preliminary Cleaning
Half ll the mixing jar with water and turn the switch to
“MIN” for approximately 10 seconds. Then pour out the
liquid.
For thorough cleaning, please remove the mixing jar.
Fitting and Detaching the Knife Block
1. Turn the mixing jar on its head.
2. With a little effort turn the screw-cap counterclockwise
and detach the knife block.
3. Take the knife block carefully out of the mixing jar.
4. Remove the seal ring for cleaning.
5. After drying, place the seal ring back onto the knife block.
6. Insert the knife block onto the thread on the bottom of
the mixing jar.
7. Tighten the screw-cap of the knife block by turning it
clockwise.
8. Ensure that the knife block sits securely in position.
CAUTION:
Only operate the appliance if you have properly tted the
knife block with the seal ring! Otherwise the mixing jar will
not be sealed.
Mixing Jar, Lid, Knife Block, Screw-Cap,
Sealing Rings and Measuring Cup
Use a little dishwashing liquid and clean these components
in warm rinsing water. Then dry everything before assem-
bling the parts again.
Housing
Only a moderately moist cloth should be used for cleaning
the outside of the appliance.
Storage
• Clean the appliance as described. Let the accessories
dry completely.
• We recommend that you keep the appliance in the
original packaging, if you do not want to use it for a
longer period.
• Always store the appliance out of reach of children in a
well ventilated, dry place.
Troubleshooting
Problem Possible Cause Solution
The appliance
is not working.
The appliance is not connected to mains power. Check the mains connection.
The appliance is tted with a safety switch.
This prevents the motor from starting up unin-
tentionally.
Check that the mixing jar is rmly in place.
The overheating protection has been activated.
The motor is too hot.
1. Immediately turn the switch to the position OFF.
Disconnect the mains plug from the wall socket.
2. Let the appliance cool down for at least 15 min-
utes before switching it on again.

PC-UM1207_IM 21.02.20
40
Technical Data
Model:.................................................................PC-UM 1207
Power supply:.....................................220 - 240 V~, 50 - 60 Hz
Power consumption: ...................................................1200 W
Protection class: ...................................................................
Filling quantity: .................................................max. 1.75 litre
Net weight: ..................................................... approx. 4.85 kg
The right to make technical and design modications in
the course of continuous product development remains
reserved.
This appliance has been tested according to all relevant
current CE guidelines, such as electromagnetic compatibility
and low voltage directives, and is manufactured according
to the latest safety regulations.
Disposal
Meaning of the “Dustbin” Symbol
Protect our environment: do not dispose of
electrical equipment in the domestic waste.
Please return any electrical equipment that
you will no longer use to the collection points
provided for their disposal.
This helps avoid the potential effects of incorrect disposal
on the environment and human health.
This will contribute to the recycling and other forms of
re-utilisation of electrical and electronic equipment.
Information concerning where the equipment can be dis-
posed of can be obtained from your local authority.

PC-UM1207_IM 21.02.20
41
Instrukcja obsługi
Dziękujemy za wybór naszego produktu. Mamy nadzieję, że
korzystanie z urządzenia sprawi państwu radość.
Symbole użyte w tej instrukcji obsługi
Ważne informacje dotyczące bezpieczeństwa użytkownika
są specjalnie wyróżnione. Koniecznie stosuj się do tych
wskazówek, aby uniknąć wypadków i uszkodzenia urzą-
dzenia:
OSTRZEŻENIE:
Ostrzega przed zagrożeniami dla zdrowia i wskazuje na
potencjalne ryzyka obrażeń.
UWAGA:
Wskazuje na potencjalne zagrożenia dla urządzenia lub
innych przedmiotów.
WSKAZÓWKA:
Wyróżnia porady i informacje ważne dla użytkownika.
Spis treści
Przegląd elementów obsługi .................................................3
Ogólne uwagi ......................................................................41
Specjalne wskazówki bezpieczeństwa dla urządzenia ...... 41
Użytkowanie zgodnie z przeznaczeniem ...........................43
Wypakowanie urządzenia ................................................... 43
Przegląd elementów obsługi / Zakres dostawy ................... 43
Montaż ................................................................................43
Wskazówki dotyczące użytkowania ...................................44
Pokrętło i przycisk ...............................................................44
Programy .............................................................................44
Praca ................................................................................... 45
Czyszczenie ........................................................................ 45
Przechowywanie ................................................................. 46
Usterki i sposoby ich usuwania...........................................46
Dane techniczne .................................................................46
Warunki gwarancji ............................................................... 46
Usuwanie ............................................................................47
Ogólne uwagi
Przed uruchomieniem urządzenia proszę bardzo dokładnie
przeczytać instrukcję obsługi. Proszę zachować ją wraz
z kartą gwarancyjną, paragonem i w miarę możliwości rów-
nież kartonem z opakowaniem wewnętrznym. Przekazując
urządzenie innej osobie, oddaj jej także instrukcję obsługi.
• Proszę wykorzystywać urządzenie jedynie dla prywat-
nego celu, jaki został przewidziany dla urządzenia. Urzą-
dzenie to nie zostało przewidziane do użytku w ramach
działalności gospodarczej.
• Proszę nie korzystać z urządzenia na zewnątrz. Proszę
trzymać urządzenie z daleka od ciepła, bezpośredniego
promieniowania słonecznego, wilgoci (w żadnym
wypadku nie zanurzać w substancjach płynnych) oraz
ostrych krawędzi. Proszę nie obsługiwać urządzenia
wilgotnymi dłońmi. Jeżeli urządzenie jest wilgotne lub
mokre, proszę natychmiast wyciągnąć wtyczkę.
• Należy regularnie sprawdzać, czy urządzenie i kabel
sieciowy nie są uszkodzone. W razie uszkodzenia należy
przestać korzystać z urządzenia.
• Proszę stosować tylko oryginalne akcesoria.
• Dla bezpieczeństwa dzieci proszę nie zostawiać swo-
bodnie dostępnych części opakowania (torby plastikowe,
kartony, styropian itp.).
OSTRZEŻENIE:
Nie pozwalaj dzieciom bawić się folią. Niebezpieczeń-
stwo uduszenia!
Specjalne wskazówki bezpieczeństwa dla urządzenia
OSTRZEŻENIE:
• Ryzyko skaleczenia! Ostrze miksera jest ostre!
• Urządzenie należy zawsze włączać dopiero po założeniu po-
krywy.
• Prosimy nie zdejmować pokrywy w czasie pracy!
• W trakcie pracy urządzenia nie należy wkładać ręki do dzbanka!
Można się zranić obracającymi się nożami.

PC-UM1207_IM 21.02.20
42
OSTRZEŻENIE:
• Przed wymianą akcesoriów lub dodatkowych części, które
poruszają się podczas pracy urządzenia, urządzenie należy
wyłączyć i odłączyć od zasilania.
• Przed włączeniem urządzenia należy zawsze sprawdzić, czy
akcesoria zostały trwale i bezpiecznie zamocowane.
• OSTROŻNIE: Sprawdzić, czy blender jest wyłączony przed
zdjęciem go ze stojaka.
• Zawsze odłączać urządzenie od zasilania, kiedy jest pozosta-
wione bez nadzoru i przed montażem, demontażem lub czysz-
czeniem.
• Nie naprawiać urządzenia samodzielnie. Skontaktować się
z pracownikiem autoryzowanego serwisu. Jeśli przewód zasila-
nia jest uszkodzony, należy go wymienić u producenta, przed-
stawiciela serwisu lub podobnie wykwalikowanej osoby, aby
uniknąć zagrożenia.
• Dzieci nie mogą korzystać z urządzenia.
• Trzymać urządzenie i przewód poza zasięgiem dzieci.
• Dzieci nie mogą bawić się urządzeniem.
• Urządzenia mogą być użytkowane przez osoby z ograniczo-
nymi zdolnościami zycznymi, czuciowymi lub mentalnymi
oraz bez doświadczenia i wiedzy w zakresie użytkowania, jeśli
znajdują się pod nadzorem lub zostały poinstruowane odnośnie
użytkowania urządzenia w bezpieczny sposób i rozumieją zwią-
zane z tym ryzyko.

PC-UM1207_IM 21.02.20
43
UWAGA:
Urządzenia tego nie wolno zanurzać w wodzie podczas czyszcze-
nia. Prosimy korzystać z instrukcji podanych w rozdziale „Czysz-
czenie”.
• Nie używać urządzenia z pustym dzbankiem do mieszania.
• Urządzenia nie należy włączać na dłużej niż 2 minuty. Przed
ponownym włączeniem urządzenie należy odstawić na około
1 minutę w celu ostygnięcia.
• Użytkować urządzenie tylko pod nadzorem.
• Prosimy nie manipulować przy wyłącznikach bezpieczeństwa!
• Gdy urządzenie jest włączone, nie należy nigdy wkładać przed-
miotów, takich jak łyżki czy łopatki, do naczynia miksującego.
Użytkowanie zgodnie z przeznaczeniem
Urządzenie służy do:
• miksowania płynów
• siekania stałych produktów spożywczych
• kruszenia lodu
• mielenie produktów
Urządzenie jest przeznaczone do użytku w prywatnych
gospodarstwach domowych i podobnych miejscach.
Należy bezwzględnie przestrzegać zaleceń dotyczących
krótkotrwałego działania urządzenia.
Urządzenia należy używać wyłącznie zgodnie z niniejszą
instrukcją obsługi. Urządzenie to nie jest przeznaczone do
użytku komercyjnego.
Wszelkie inne sposoby użytkowania nie są zamierzone
i mogą prowadzić do uszkodzenia mienia lub nawet obra-
żeń ciała.
Producent nie ponosi żadnej odpowiedzialności za
uszkodzenia spowodowane użytkowaniem niezgodnym
z przeznaczeniem.
Wypakowanie urządzenia
1. Zdjąć opakowanie z urządzenia.
2. Usunąć cały materiał opakowaniowy, taki jak plastikowe
warstwy, wypełniacze, zaciski do kabli oraz opakowanie
z pudła.
3. Sprawdzić, czy wszystkie części znajdują się pudełku.
4. Jeśli zawartość opakowania jest niepełna lub jest zauwa-
żalnie uszkodzona, nie wolno korzystać z urządzenia.
Natychmiastowo należy zwrócić je do sprzedawcy.
WSKAZÓWKA:
Na urządzeniu wciąż znajduje się kurz oraz pozostałości
po produkcji. Zalecamy czyszczenie urządzenia tak, jak
opisano w rozdziale „Czyszczenie”.
Przegląd elementów obsługi /
Zakres dostawy
1 Nakrywka dolewania / miarka
2 Pokrywa dzbanka z otworem do napełniania
3 Dzbanek miksera
4 Zespół noży
5 Pierścień uszczelniający bloku noży
6 Nasadka z gwintem
7 Podstawa z silnikiem
8 Pokrętło i przycisk
Nie pokazano
Pierścień uszczelniający pokrywy
Montaż
Dzbanek miksera
Dzbanek miksera należy umieścić na obuwie silnika.
Prosimy zwrócić uwagę na oznaczenia na dzbanku do
miksowania oraz na obudowie silnika.

PC-UM1207_IM 21.02.20
44
WSKAZÓWKA:
Dzbanek można ustawić na obudowie silnika w dowolny
sposób. Włącznik bezpieczeństwa zamyka się dopiero
w chwili ustawienia dwóch trójkątów w linii.
Pokrywa
1. Należy dopilnować, by na pokrywie był założony pier-
ścień uszczelniający.
2. Pokrywę należy umieścić na dzbanku do miksowania
w taki sposób, by klapka na osłonie znalazła się po lewej
stronie otworu dziobka.
3. Pokrywę mocno wcisnąć na dzbanek do mieszania.
Ta czynność musi całkowicie uszczelnić dzbanek do
mieszania.
4. Osłonę należy przekręcić w prawo do oporu. Klapka
osłony znajduje się teraz wprost nad otworem dziobka.
Prosimy sprawdzić poprawność założenia osłony.
5. Nakrywkę dolewania wsunąć w otwór dolewania po-
krywy. Należy zwrócić uwagę na występy prowadzące na
nasadce z gwintem. Nasadkę z gwintem należy obrócić
w prawo do oporu. Zatrzask powinien się zablokować.
WSKAZÓWKA:
Nakrywkę dolewania można także wykorzystać jako
miarkę.
Wskazówki dotyczące użytkowania
UWAGA:
Szkło może ulec pęknięciu przy zbyt wysokiej jego tempe-
raturze! Nie wlewać płynów o temperaturze ponad 60 °C.
• Ustaw urządzenie na sztywnym i równym podłożu.
Ustaw je tak, aby nie mogło się wywrócić.
• Urządzenie włączać jedynie przy zamkniętym dzbanku
miksera. Otwór dopełniania w pokrywie także musi być
zamknięty.
• Nie napełniać nadmiernie dzbanka miksera! Można go
napełnić maksymalnie do 1,75 litrów. Korzystać ze skali
na dzbanku.
• Piana wymaga większej pojemności. Należy zmniejszyć
ilość płynów, z których powstaje dużo piany.
• W przypadku kruszenia lodu lub znacznych ilości pro-
duktów należy przytrzymywać pokrywę ręką.
• Żywność przed zmiksowaniem należy wstępnie pociąć
ma małe kawałki.
Połączenie elektryczne
1. Pokrętło należy ustawić pozycji OFF.
2. Przed podłączeniem wtyczki zasilającej do gniazdka
sprawdź, czy napięcie sieci jest zgodne z napięciem
urządzenia. Wymagane informacje można znaleźć na
tabliczce znamionowej.
3. Podłącz urządzenie wyłącznie do prawidłowo zainstalo-
wanego i zabezpieczonego gniazdka elektrycznego.
Krótki czas stosowania
WSKAZÓWKA:
Obudowa może się rozgrzewać w trakcie pracy urzą-
dzenia.
• Urządzenie jest przeznaczone do krótkotrwałej pracy
wynoszącej maksymalnie 2 minuty. Przed ponownym
użyciem należy poczekać na jego ostygnięcie przez
1 minutę!
• Po trzykrotnym użyciu urządzenia bez dodawania wody,
np. w celu zmielenia ziaren kawy, orzechów, ryżu, itp.,
a przed jego ponownym uruchomieniem, należy pocze-
kać do pełnego schłodzenia obudowy.
Pokrętło i przycisk
Pokrętło regulacyjne (8) ma podwójną funkcję.
Obrót
• W lewo: Wybór programów (1 lub 2 lub 3)
• W prawo: Natychmiastowe uruchomienie z płynną regu-
lacją prędkości obrotów (MIN MAX)
• Pozycja OFF = Stan czuwania
Naciśnięcie
• Rozpoczęcie oraz, w razie potrzeby, zakończenie
programu
• Działania pulsacyjne / Działanie turbo
Programy
Programy charakteryzują się różnymi odcinkami czasu
pracy, krótkimi przerwami oraz działaniem ciągłym.
Program 1:
• Program ten jest odpowiedni do, przykładowo, kruszenia
kostek lodu.
• Można również włączyć tryb działania pulsacyjnego.
Program 2:
• Korzystając z tego programu można przygotować, przy-
kładowo, smoothie i koktajle mleczne.
• W pierwszej kolejności w dzbanku należy umieścić
świeże owoce, dodać składniki płynne (jogurt, mleko
lub sok), a następnie lód lub mrożonki (mrożone owoce,
kostki lodu lub lody).
Program 3:
• Korzystając z tego programu można przygotować
przeciery owocowe, warzywne lub inne, dodając wodę,
mleko lub bulion.
• Noże znajdujące się w dzbanku do miksowania
z łatwością poradzą sobie ze zmieleniem ziaren kawy,
orzechów, kukurydzy lub ryżu w mąkę. Prosimy zwrócić
uwagę na informacje zawarte w rozdziale zatytułowanym
„Krótki czas stosowania”.

PC-UM1207_IM 21.02.20
45
Tryb impulsowy
• W sytuacji, gdy pokrętło ustawione jest w pozycji OFF,
działanie pulsacyjne można włączyć naciskając i zwal-
niając przycisk .
• Urządzenie użytkować w tym trybie pracy maksymalnie
przez 2 minuty. Przed ponownym użyciem należy pocze-
kać na jego ostygnięcie przez 1 minutę!
Praca
UWAGA:
• W trakcie pracy urządzenia nie wolno zdejmować
dzbanka do miksowania! Działanie urządzenia można
przerwać naciskając przycisk , a po wyłączeniu
należy poczekać do całkowitego zatrzymania noży.
• Przed zdemontowaniem dzbanka do miksowania
zawsze pokrętło należy ustawić w pozycji OFF.
Przygotowanie
1. Prosimy sprawdzić, czy pokrętło znajduje się w pozycji
OFF.
2. Załóż naczynie miksera.
3. Umieść składniki przeznaczone do zmiksowania w misce
do miksowania. Prosimy pamiętać o maksymalnej
pojemności dzbanka.
4. Załóż pokrywę. Osłonę należy zablokować.
5. Nakrywką zamknąć otwór dolewania.
Działanie
Urządzenie można włączyć na trzy sposoby:
• Za pomocą pokrętła należy wybrać żądany program
(1 lub 2 lub 3). Naciśnięcie przycisku powoduje
uruchomienie programu.
• Z kolei należy dobrać prędkość obrotów w zakresie od
MIN do MAX. Urządzenie uruchomi się niezwłocznie.
• Urządzenie działa w trybie działania pulsacyjnego.
Dodawanie dalszych składników do miksowanie
Przez otwór do dolewania można dodawać miksowany
produkt i przyprawy.
1. Działanie urządzenia można przerwać korzystając z po-
krętła lub przycisku.
2. Zamknij otwór przed ponownym włączeniem urządzenia.
Zakończenie pracy
1. Pokrętło należy ustawić pozycji OFF.
2. Poczekaj, aż ostrza całkowicie się zatrzymają.
3. Wyjąć wtyczkę z gniazdka.
4. Wyjmij miskę do miksowania. Obrócić nim w prawo.
5. W celu wylania zawartości zdejmij pokrywkę.
WAŻNA WSKAZÓWKA:
Soków cytrusowych lub innej żywności zawierającej
kwasy nie wolno przechowywać w metalowych naczy-
niach.
Czyszczenie
OSTRZEŻENIE:
• Zawsze przed rozpoczęciem procesu czyszczenia prosimy wy-
ciągnąć wtyczkę z gniazdka elektrycznego.
• Urządzenia parze nie wolno do czyszczenia zanurzać w wodzie.
Może to doprowadzić do porażenia elektrycznego lub pożaru.
• Ostrza na zespole noży są bardzo ostre. Istnieje ryzyko skale-
czenia!
UWAGA:
• Nie używaj szczotki drucianej ani innych podobnych
przedmiotów.
• Nie używaj ostrych lub ściernych środków czyszczą-
cych.
• Pojedyncze części nie są bezpieczne dla zmywarki
do naczyń.
WSKAZÓWKA: Wstępne czyszczenie
Miskę do miksowania napełnij do połowy wodą i obróć
przełącznik na ok. 10 sekund do pozycji „MIN”. Następnie
wylej płyn.
Do gruntownego czyszczenia zdejmij miskę miksera.

PC-UM1207_IM 21.02.20
46
Montaż i demontaż zespołu noży
1. Obrócić dzbankiem do miksowania na jego głowicy.
2. Używając niewielkiej siły, nasadkę z gwintem należy
przekręcić w lewo, po czym zdjąć blok noży.
3. Ostrożnie wyjąć zespół noży z dzbanka do miksowania.
4. Wyjąć pierścień uszczelniający do umycia.
5. Po wysuszeniu, pierścień uszczelniający na powrót pier-
ścień uszczelniający umieścić na zespole noży.
6. Zespół noży wsunąć na gwint u spodu dzbanka do
miksowania.
7. Z kolei należy dokręcić gwintowaną nasadkę bloku noży
przekręcając ją w prawo.
8. Sprawdzić, czy zespół noży jest nieruchomo osadzony
w swoim położeniu.
UWAGA:
Narzędziem operować tylko przy prawidłowo zamontowa-
nym zespole noży wraz z pierścieniem uszczelniającym!
Inaczej dzbanek miksera nie będzie szczelnie zamknięty.
Dzbanek do miksera, pokrywka, zespół noży, nasadka
z gwintem, pierścienie uszczelniające oraz miarka
Podzespoły należy umyć w ciepłej wodzie z dodatkiem
niewielkiej ilości płynu do mycia naczyń, po czym opłukać
pod bieżącą wodą. Następnie wszystkie wysuszyć je przed
ponownym złożeniem.
Obudowa
Do zewnętrznego czyszczenia urządzenia używaj tylko
lekko zwilżonej szmatki.
Przechowywanie
• Oczyścić urządzenie zgodnie z opisem. Akcesoria należy
pozostawić do całkowitego wyschnięcia.
• Jeśli urządzenie nie będzie używane przez dłuższy
czas, zalecane jest jego przechowywanie w oryginalnym
opakowaniu.
• Urządzenie zawsze przechowywać w miejscu niedostęp-
nym dla dzieci, dobrze przewietrzanym i suchym.
Usterki i sposoby ich usuwania
Problem Możliwa przyczyna Rozwiązanie
Urządzenie nie
funkcjonuje.
Urządzenie nie zostało podłączone do zasilania. Proszę sprawdzić podłączenie do sieci.
Urządzenie zaopatrzone jest w wyłącznik bez-
pieczeństwa.
Uniemożliwia on niezamierzone uruchomienie
silnika.
Sprawdzić, czy dzbanek miksera jest mocno osa-
dzony na swoim miejscu.
Uruchomiona została ochrona przed przegrza-
niem. Silnik jest zbyt gorący.
1. Od razu ustaw przełącznik w pozycji OFF.
Odłącz wtyczkę zasilającą od gniazda elektrycz-
nego.
2. Przed ponownym włączeniem odstaw urządzenie
do ostygnięcia na co najmniej 15 minut.
Dane techniczne
Model:.................................................................PC-UM 1207
Napięcie zasilające: ...........................220 - 240 V~, 50 - 60 Hz
Pobór mocy: ................................................................ 1200 W
Stopień ochrony: ..................................................................
Wielkość napełnienia: .................................... maks. 1,75 litra
Masa netto: ............................................................ok. 4,85 kg
Zastrzegamy sobie prawo wprowadzania zmian technicz-
nych i projektowych w trakcie ciągłego rozwoju produktu.
Urządzenie jest zgodne z aktualnymi dyrektywami CE,
dotyczącymi zgodności elektromagnetycznej czy niskiego
napięcia i produkowane jest zgodnie z najnowszymi przepi-
sami bezpieczeństwa.
Warunki gwarancji
Przyznajemy 24 miesiące gwarancji na produkt licząc od
daty zakupu.
W tym okresie będziemy bezpłatnie usuwać w terminie
14 dni od daty dostarczenia wadliwego sprzętu z kartą
gwarancyjną do miejsca zakupu wszystkie uszkodzenia
powstałe w tym urządzeniu na skutek wady materiałów
lub wadliwego wykonania, naprawiając oraz wymieniając
wadliwe części lub (jeśli uznamy za stosowne) wymieniając
całe urządzenie na nowe.
Sprzęt do naprawy powinien być dostarczony w komplecie
wraz z dowodem zakupu oraz z ważną kartą gwarancyjną
do sprzedawcy w miarę możliwości w oryginalnym opako-
waniu lub innym odpowiednim dla zabezpieczenia przed
uszkodzeniem. W razie braku kompletnego opakowania fa-
brycznego, ryzyko uszkodzenia sprzętu podczas transportu
do i z miejsca zakupu ponosi reklamujący.

PC-UM1207_IM 21.02.20
47
Naprawa gwarancyjna nie dotyczy czynności przewidzia-
nych w instrukcji obsługi, do wykonania których zobowią-
zany jest użytkownik we własnym zakresie i na własny
koszt.
Gwarancja nie obejmuje:
• mechanicznych, termicznych, chemicznych uszkodzeń
sprzętu i wywołanych nimi wad,
• uszkodzeń powstałych w wyniku działania sił zewnętrz-
nych takich jak wyładowania atmosferyczne, zmiana
napięcia zasilania i innych zdarzeń losowych,
• nieprawidłowego ustawienia wartości napięcia elektrycz-
nego, zasilanie z nieodpowiedniego gniazda zasilania,
• sznurów połączeniowych, sieciowych, żarówek, baterii,
akumulatorów,
• uszkodzeń wyrobu powstałych w wyniku niewłaściwego
lub niezgodnego z instrukcją jego użytkowania, przecho-
wywania, konserwacji, samowolnego zrywania plomb
oraz wszelkich przeróbek i zmian konstrukcyjnych doko-
nanych przez użytkownika lub osoby niepowołane,
• roszczeń z tytułu parametrów technicznych wyrobu, o ile
są one zgodne z podanymi przez producenta,
• prawidłowego zużycia i uszkodzeń, które mają nieistotny
wpływ na wartość lub działanie tego urządzenia.
Karta gwarancyjna bez pieczątki sklepu, daty sprzedaży,
nie wypełniona, źle wypełniona, ze śladami poprawek,
nieczytelna wskutek zniszczenia, bez możliwości ustalenia
miejsca sprzedaży oraz dołączonego dowodu zakupu jest
nieważna.
Korzystanie z usług gwarancyjnych nie jest możliwe po
upływie daty ważności gwarancji. Gwarancja na części lub
całe urządzenie, które są wymieniane kończy się, wraz
z końcem gwarancji na to urządzenie.
Wszystkie inne roszczenia, wliczając w to odszkodowania
są wykluczone chyba, że prawo przewiduje inaczej. Rosz-
czenia wykraczające poza tą umowę nie są uwzględniane
przez tą gwarancję.
Gwarancja na sprzedany towar konsumpcyjny nie wyłącza,
nie ogranicza ani nie zawiesza uprawnień kupującego
wynikających z niezgodności towaru z umową.
Gwarancja oraz zawarte w niej warunki obowiązują na
terenie Rzeczpospolitej Polskiej.
Dystrybutor:
CTC Clatronic Sp. z o.o
Ul. Brzeska 1
45-960 Opole
Usuwanie
Znaczenie symbolu „Pojemnik na śmieci”
Proszę oszczędzać nasze środowisko, sprzęt
elektryczny nie należy do śmieci domowych.
Proszę korzystać z punktów zbiorczych,
przewidzianych do zdawania sprzętu elektrycz-
nego, i tam proszę oddawać sprzęt elektryczny,
którego już nie będą Państwo używać.
Tym sposobem pomagają Państwo unikać potencjalnych
następstw niewłaściwego usuwania odpadów, mających
wpływ na środowisko i zdrowie ludzi.
Tą drogą przyczyniają się Państwo do ponownego użycia,
do recyklingu i do innych form wykorzystania starego
sprzętu elektrycznego i elektronicznego.
Informacje, gdzie można zdać sprzęt, otrzymają Państwo
w swoich urzędach komunalnych lub w administracji gminy.

PC-UM1207_IM 21.02.20
48
Használati utasítás
Köszönjük, hogy a termékünket választotta. Reméljük,
elégedetten használja majd a készüléket.
A használati útmutatóban található szimbólumok
Az ön biztonságára vonatkozó utasítások kifejezetten meg
vannak különböztetve. Kérjük, mindenképpen ügyeljen
ezekre annak érdekében, hogy elkerülje a baleseteket és a
készülék károsodását:
FIGYELMEZTETÉS:
Egészségét károsító veszélyforrásokra gyelmeztet és
rámutat a lehetséges sérülési lehetőségekre.
VIGYÁZAT:
Lehetséges veszélyre utal, mely a készülékben vagy más
tárgyakban kárt tehet.
MEGJEGYZÉS:
Tippeket és információkat emel ki.
Tartalom
A kezelőelemek áttekintése ..................................................3
Általános megjegyzések ..................................................... 48
Speciális biztonsági előírások a készülékre vonatkozóan
... 48
Rendeltetésszerű használat ...............................................50
A készülék kicsomagolása ..................................................50
A kezelőelemek áttekintése / A csomag tartalma ................50
Szerelés ..............................................................................50
Megjegyzések használatra .................................................50
Forgatógomb és kapcsoló ..................................................51
Programok ...........................................................................51
Üzemelés ............................................................................51
Tisztítás ...............................................................................52
Tárolás ................................................................................52
Hibaelhárítás ....................................................................... 53
Műszaki adatok ...................................................................53
Selejtezés ............................................................................53
Általános megjegyzések
A készülék használatba vétele előtt gondosan olvassa végig
a használati utasítást, és őrizze meg a garancialevéllel, a
pénztári nyugtával és lehetőleg a csomagolókartonnal, ill. az
abban lévő bélésanyaggal együtt! Amennyiben a készüléket
harmadik személynek adja tovább, a használati útmutatót is
adja a készülékhez.
• Kizárólag személyi célra használja a készüléket, és
csupán arra, amire való! A készülék nem ipari jellegű
használatra készült.
• Ne használja a szabadban! Ne tegye ki erős hőhatásnak,
közvetlen napsugárzásnak és nedvességnek (semmi
esetre se mártsa folyadékba), és óvja az éles szélektől!
Ne használja a készüléket vizes kézzel! Ha a készülék
vizes vagy nedves lett, azonnal húzza ki a konnektorból!
• A készüléket és a hálózati kábelt rendszeresen elle-
nőrizni kell, hogy nincs-e rajta sérülés jele. Ha sérülést
lát rajta, a készüléket nem szabad használni.
• Csak eredeti tartozékokat használjon!
• Gyermekei biztonsága érdekében ne hagyja általuk
elérhető helyen a csomagolóelemeket (műanyag zacskó,
karton, sztiropor stb.)!
FIGYELMEZTETÉS:
Kisgyermekeket ne engedjen a fóliával játszani. Fulla-
dás veszélye állhat fenn!
Speciális biztonsági előírások a készülékre vonatkozóan
FIGYELMEZTETÉS:
• Vágás veszélye! A mixer kései élesek!
• Mindig felhelyezett fedéllel használja a készüléket.
• Működés közben ne távolítsa el a fedelet!
• Működés közben ne nyúljon a keverőtartályba. A forgó kések
sérülést okozhatnak.
• Tartozékok vagy olyan részek, cseréje előtt, amelyek működés
közben forognak, a készüléket ki kell kapcsolni, és le kell vá-
lasztani a hálózatról.

PC-UM1207_IM 21.02.20
49
FIGYELMEZTETÉS:
• A készülék bekapcsolása előtt mindig ellenőrizze, hogy a tarto-
zékok szilárdan és erősen rögzítve vannak.
• VIGYÁZAT: Az állványról való levétele előtt ellenőrizze, hogy
keverő ki van kapcsolva.
• Mindig válassza le a készüléket az elektromos hálózatról, ha
felügyelet nélkül hagyja, valamint összeszerelés, szétszerelés
vagy tisztítás előtt.
• Ne javítsa saját kezűleg a készüléket. Mindig lépjen kapcso-
latba szakképzett szerelővel. Ha a villanyvezeték megsérül, a
gyártónak, a szerviz ügynökségnek vagy más, hasonlóan kép-
zett személynek kell a javítást végeznie, a veszélyek elkerülése
érdekében.
• A készüléket gyerekek nem használhatják.
• Tartsa a készüléket és a kábelét gyerekektől távol.
• A gyerekek nem játszhatnak a készülékkel.
• A készülékeket csökkent zikai, érzékszervi vagy értelmi képes-
ségű személyek, illetve akiknek nincs meg a kellő tapasztalatuk
és tudásuk ehhez, csak akkor használhatják, ha felügyelet alatt
állnak vagy a készülék biztonságos használatára megtanították
őket és megértették a kapcsolódó veszélyeket.
VIGYÁZAT:
Ezt a készüléket ne merítse víz alá tisztításkor. Kérjük, kövesse a
„Tisztítás” fejezetben leírt utasításokat.
• Ne használja a készüléket, ha a keverőedény üres.
• Ne használja a készüléket folyamatosan 2 percnél hosszabb
ideig. Mielőtt ismét használni kezdi, hagyja lehűlni kb. 1 percig.
• A készüléket csak felügyelet mellett használja.

PC-UM1207_IM 21.02.20
50
• Ne manipulálja a biztonsági kapcsolót!
• Tárgyak, pl. a kanalak vagy keverők a használat során nem lehet-
nek a keverőedényben.
Rendeltetésszerű használat
Ez a készülék a következőkre használható:
• Folyadékok keverése
• Kemény élelmiszerek aprítására
• Jég aprítására
• Lisztek előállítása
Háztartásbeli és hasonló felhasználásra készült.
Kötelező a rövid ideig tartó működtetésre vonatkozó szabá-
lyok betartása.
Csak az ebben a használati utasításban leírtak szerint
használható. A készülék nem alkalmas ipari használatra.
Ha a készüléket bármi másra használja, az nem megfelelő
használatnak minősül, mely anyagi károsodáshoz vagy
személyi sérüléshez vezethet.
A gyártó nem vállal felelősséget az ilyen nem megfelelő
használatból adódó károkért.
A készülék kicsomagolása
1. Távolítsa el a csomagolást a készülékről.
2. Távolítsa el az összes csomagolóanyagot, úgymint
a műanyag lmet, töltőanyagot, kábelrögzítőket és a
dobozt.
3. Ellenőrizze, hogy az összes tartozék a dobozban van-e.
4. Ha nincs minden benne a csomagban vagy sérülést
észlel, ne használja a készüléket. Azonnal vigye vissza a
forgalmazóhoz.
MEGJEGYZÉS:
A készülék poros lehet, vagy gyártási maradékok lehetnek
rajta. Javasoljuk, hogy a „Tisztítás” részben leírtak szerint
tisztítsa meg a készüléket.
A kezelőelemek áttekintése /
A csomag tartalma
1 Betöltőnyílás zárókupak / mérőpohár
2 Keverőedény fedél betöltőnyílással
3 Keverőedény
4 Késblokk
5 Vágóegység tömítőgyűrű
6 Csavaros tető
7 Alapzat motorral
8 Forgatógomb és kapcsoló
Nem látszik
Fedél tömítőgyűrű
Szerelés
Keverőedény
Helyezze a mixer kancsót a motorházra. Vegye gyelembe
a motorházon és a kelyhen található szimbólumokat.
MEGJEGYZÉS:
A mixer kancsó több helyzetben is illeszkedik a motor
burkolatára. A biztonsági kapcsoló csak akkor zár, ha a
két háromszög egy vonalban van egymással.
Fedél
1. Győződjön meg róla, hogy a tömítőgyűrű a fedélre van-e
helyezve.
2. Helyezze a fedélt a keverő kehelyre, úgy hogy a fedélen
található fül balra helyezkedjen el a kiöntő nyílástól.
3. Erősen nyomja rá a fedelet a keverőedényre. Teljesen
tömítenie kell a keverőedényt.
4. Fordítsa el a fedelet az óramutató járásával megegyező
irányba, amíg meg nem áll. Így a fedőfül pontosan a
kiöntő nyíláson van. Ellenőrizze, hogy a fedél szorosan
zár.
5. Helyezze be a zárókupakot a fedélben lévő betöltő-
nyílásba. Ügyeljen a csavaros tetőn lévő menetekre.
Fordítsa a csavaros tetőt az óramutató járásával
megegyezően, ameddig lehetséges. A rögzítőfülnek a
helyére kell pattania.
MEGJEGYZÉS:
A betöltőnyílás zárókupakja mérőpohárként is használ-
ható.
Megjegyzések használatra
VIGYÁZAT:
Az üveg túl magas hőmérséklet esetén elpattanhat! Ne
töltsön bele 60 °C-nál forróbb folyadékokat.
• Állítsa a készüléket szilárd és sima felületre! Úgy állítsa
fel, hogy ne billeghessen!
• Csak akkor kapcsolja be a készüléket, ha a keverőedény
le van takarva a fedéllel. A fedélben lévő betöltőnyílásnak
szintén zárva kell lennie.
• Ne töltse túl a keverőedényt! Maximum 1,75 litert tölthet
be. Használja az edényen lévő skálát.
• A habosításhoz nagyobb űrtartalomra van szükség. A
habosodó folyadékok esetében csökkentse a mennyi-
séget.
• Jég aprításakor, illetve nagyobb mennyiségű alapanya-
gok feldolgozásakor tartsa egyik kezét a fedőn.

PC-UM1207_IM 21.02.20
51
• A keverendő élelmiszereket aprítsa fel kis darabokra.
Elektromos csatlakozás
1. Állítsa a forgatógombot OFF pozícióba.
2. Mielőtt bedugná a csatlakozót a konnektorba, elle-
nőrizze, hogy a hálózati feszültség megegyezik-e
a készülék feszültségével. A keresett információt a
névtáblán találja.
3. Csatlakoztassa a készüléket egy megfelelően földelt
csatlakozóba
Rövid idejű használat
MEGJEGYZÉS:
Működés közben a burkolat felforrósodhat.
• A készülék rövid, max. 2 perces üzemeltetéshez alkal-
mazható. Hagyja hűlni 1 percig, mielőtt újra használná!
• Ha háromszor egymás után, víz hozzáadása nélkül
használja a készüléket, pl. kávéőrléshez, dióaprításhoz,
rizshez, stb., várjon amíg a motorház teljesen lehűl,
mielőtt újra használná a készüléket.
Forgatógomb és kapcsoló
Ennek működtetési elemnek (8) két funkciója van.
Fordítás
• Az óramutató járásával ellentétes irányba: Választható
programok (1-es vagy 2-es vagy 3-as)
• Az óramutató járásával megegyező irányba: Azonnali
indítás a forgatási sebesség folyamatos állításával
(MIN MAX)
• OFF pozíció = Készenlét
Nyomás
• Program indítása, és ha szükséges, leállítása
• Pulzáló működtetés / Turbo fokozat
Programok
A programok különböző intervallumokban működnek, rövid
szünetekben és folyamatos működéssel.
1-es program:
• Ez a program alkalmas például jégaprításra.
• Emellett, használhatja a pulzáló programot.
2-es program:
• Ezzel a programmal például gyümölcs- és tejturmixokat
készíthet.
• Először, helyezze a kehelybe a friss gyümölcsöket és a
folyékony hozzávalókat (joghurt, tej vagy gyümülcslé).
Ezt követően adja hozzá a jeget vagy a fagyasztott ter-
méket (fagyasztott gyümölcs, jégkockák vagy jégkrém).
3-as program:
• Gyümölcsök vagy zöldségek vagy bármi más pürésíté-
séhez víz, tej vagy leveslé hozzáadásával.
• Kehelyben található pengék emellett alkalmasak például
kávébab, diófélék, mandula, kukorica feldolgozására
vagy rizs liszt készítésére. Ebben az esetben vegye
gyelembe a „Rövid idejű használa” című fejezetben
foglaltakat.
Impulzus üzemmód
• Ha a forgatógomb OFF pozícióban van, elindíthatja a
pulzáló funkciót a gomb megnyomásával, majd
újbóli elengedésével.
• A készüléket maximum 2 percig használja ebben
az üzemmódban. Hagyja hűlni 1 percig, mielőtt újra
használná!
Üzemelés
VIGYÁZAT:
• Ne távolítsa el a kelyhet működtetés közben! Először
állítsa le a programot a gombbal és várjon, amíg a
pengék nyugalmi helyzetbe kerülnek.
• A kehely eltávolítása előtt mindig állítsa a forgató
gombot OFF pozícióba.
Előkészítés
1. Legyen biztos benne, hogy a forgatógomb OFF pzíció-
ban van.
2. Helyezze fel a turmixedényt.
3. Adja a turmixedénybe a turmixolnivaló hozzávalókat.
Ügyeljen a maximum kapacitásra.
4. Helyezze fel a fedelet. Zárja le a fedelet.
5. A zárókupakkal zárja be a betöltőnyílást.
Működtetés
Három módon kezdheti meg a készülék használatát:
• Válassza ki a programot (1-es vagy 2-es vagy 3-as) a
forgatógombbal. Nyomja meg a gombot a használat
elkezdéséhez.
• Válassza ki a megfelelő forgatási sebességet a MIN és a
MAX érték között. A készülék azonnal el fog indulni.
• Használja a készüléket pulzáló üzemmódban.
Turmixolnivaló hozzávalók utántöltése
Az elkeverendő élelmiszert vagy fűszereket az utántöltő
nyíláson keresztül lehet betölteni.
1. Állítsa le a működést a forgatógomb vagy a kapcsoló
gomb használatával.
2. Mielőtt újra bekapcsolná a készüléket, zárja be a nyílást.

PC-UM1207_IM 21.02.20
52
A használat befejezése
1. Állítsa a forgatógombot OFF pozícióba.
2. Várja meg, amíg a kés teljesen megáll.
3. Húzza ki a dugaszt a konnektorból.
4. Vegye ki a turmixedényt. Forgassa el az óramutató
járásával ellentétes irányba.
5. Kiöntéshez vegye le a fedelet.
FONTOS FIGYELMEZTETÉS:
Citrusgyümölcsök levét, ill. savtartalmú ételeket soha ne
tartson fémedényekben!
Tisztítás
FIGYELMEZTETÉS:
• Tisztítás előtt mindig húzzuk ki a hálózati csatlakozót!
• A készüléket semmiképpen ne merítse vízbe tisztítás közben.
Ez elektromos áramütést vagy tüzet okozhat.
• A késblokk kései nagyon élesek. Sérülésveszélyesek!
VIGYÁZAT:
• Ne használjon drótkefét vagy más súroló hatású
tárgyat.
• Ne használjon agresszív vagy súroló hatású tisztító-
szert.
• Az egyes részek nem helyezhetők mosogatógépbe.
MEGJEGYZÉS: Előtisztítás
Töltse meg a keverőedényt a feléig vízzel és fordítsa el a
kapcsolót kb. 10 másodpercre „MIN”-re. Ezután öntse ki
a folyadékot.
Alapos tisztításhoz vegye le a turmixedényt.
A késblokk fel- és leszerelése
1. Fordítsa a keverőedényt a fejére.
2. Kis erőkifejtéssel fordítsa a csavaros tetőt az óramutató
járásával ellentétesen és válassza le a vágóegységet.
3. Óvatosan vegye ki a késblokkot a keverőedényből.
4. A tisztításhoz távolítsa el a tömítőgyűrűt.
5. Szárítás után helyezze vissza a tömítőgyűrűt a késb-
lokkra.
6. Illessze a késblokkot a keverőedény aljában lévő
menetre.
7. Szorítsa meg a vágóegység csavaros tetejét úgy, hogy
az óramutató járásával egyezően fordítja azt.
8. Ellenőrizze, hogy a késblokk szorosan rögzítve legyen
a helyén.
VIGYÁZAT:
Csak akkor működtesse a készüléket, ha a késblokk
megfelelően fel van szerelve a tömítőgyűrűvel! Ellenkező
esetben a keverőedény nem lesz tömítve.
Keverőedény, fedél, késblokk, csavaros tető,
tömítőgyűrűk és mérőpohár
Használjon kevés mosogatószert és tisztítsa meg ezeket
az alkatrészeket meleg öblítővízben. Az összeszerelés előtt
minden darabot szárítson meg.
Burkolat
A készülék külső tisztításához csak enyhén nedves kendőt
használjon.
Tárolás
• A leírtaknak megfelelően tisztítsa a készüléket. Hagyja,
hogy a tartozékok teljesen megszáradjanak.
• Ha a készüléket hosszabb ideig nem használja, akkor
azt javasoljuk, hogy az eredeti csomagolásában tárolja.
• Mindig a gyerekektől távol tárolja a készüléket, egy jól
szellőztetett, száraz helyiségben.

PC-UM1207_IM 21.02.20
53
Hibaelhárítás
Probléma Lehetséges ok Megoldás
A készülék nem
működik.
A készülék nincs csatlakoztatva a hálózatba. Ellenőrizze a hálózati csatlakozást.
A készülék biztonsági kapcsolóval van ellátva.
Ez megakadályozza a motor véletlen bekap-
csolását.
Győződjön meg arról, hogy a keverőedény megfele-
lően a helyén legyen.
A túlmelegedés elleni védelem aktiválódott. A
motor túl meleg.
1. Azonnal kapcsolja a kapcsolót OFF állásba.
Húzza ki a hálózati dugaszt a fali aljzatból.
2. A készüléket az újbóli bekapcsolás előtt legalább
15 percig hagyja lehűlni.
Műszaki adatok
Modell: ................................................................ PC-UM 1207
Áramellátás: .......................................220 - 240 V~, 50 - 60 Hz
Teljesítményfelvétel: ....................................................1200 W
Védelmi osztály: ...................................................................
Töltési mennyiség: ........................................... max. 1,75 liter
Nettó súly: ..............................................................kb. 4,85 kg
A műszaki és kivitelezési módosítások jogát a folyamatos
termékfejlesztés miatt fenntartjuk.
A készülék megfelel minden érvényes CE irányelvnek,
beleértve az elektromágneses megfelelőségről, és a kisfe-
szültségű berendezésekről szóló irányelveket, és a legújabb
biztonsági szabályozások gyelembe vételével készült.
Selejtezés
A „kuka” piktogram jelentése
Kímélje környezetünket, az elektromos készü-
lékek nem a háztartási szemétbe valók!
Használja az elektromos készülékek ártalmat-
lanítására kijelölt gyűjtőhelyeket, ott adja le
azokat az elektromos készülékeit, amelyeket
többé már nem kíván használni!
Ezzel segítséget nyújt ahhoz, hogy elkerülhetők legyenek
azok a hatások, amelyeket a helytelen „szemétre dobás“
gyakorolhat a környezetre és az emberi egészségre.
Ezzel hozzájárul az újrahasznosításhoz, a recyclinghoz és a
kiöregedett elektromos és elektronikus készülékek értékesí-
tésének egyéb formáihoz.
Az önkormányzatoknál vagy a polgármesteri hivatalokban
tájékoztatást kaphat arról, hogy hova viheti a kiselejtezett
készülékeket.

PC-UM1207_IM 21.02.20
54
Руководство по эксплуатации
Спасибо за выбор нашего продукта. Надеемся, он вам
понравится.
Символы применяемые в данном руководстве
пользователя
Важные рекомендации для обеспечения вашей без-
опасности обозначены по особенному. Обязательно
следуйте этим рекомендациям, чтобы предотвратить
несчастный случай или поломку изделия:
ПРЕДУПРЕЖДЕНИЕ:
Предупреждает об опасности для здоровья и возмож-
ном риске получения травмы.
ВНИМАНИЕ:
Указывает на возможную опасность для изделия и
других окружающих предметов.
ПРИМЕЧАНИЯ:
Дает советы и информацию.
Содержание
Обзор деталей прибора .....................................................3
Общая информация..........................................................54
Особые указания по технике
безопасности для данного устройства ...........................54
Назначение ........................................................................ 56
Распаковка устройства ..................................................... 56
Обзор деталей прибора / Комплект поставки ................. 56
Монтаж ...............................................................................57
Примечания по использования .......................................57
Поворотный переключатель и кнопка ............................57
Программы.........................................................................57
Эксплуатация .....................................................................58
Чистка ................................................................................. 58
Хранение ............................................................................ 59
Устранение неисправностей ............................................59
Технические данные ......................................................... 60
Утилизация ........................................................................60
Общая информация
Перед началом эксплуатации прибора внимательно
прочитайте прилагаемую инструкцию по эксплуатации и
сохраните ее в надежном месте, вместе с гарантийным
талоном, кассовым чеком и, по возможности, картонной
коробкой с упаковочным материалом. Если даете кому-
либо попользоваться прибором, обязательно дайте в
придачу данную инструкцию по эксплуатации.
• Пользуйтесь прибором только частным образом и по
назначению. Прибор не предназначен для коммерче-
ского использования.
• Не пользуйтесь прибором под открытым небом. Пре-
дохраняйте прибор от жары, прямых солнечных лу-
чей, влажности (ни в коем случае не погружайте его
в воду) и ударов об острые углы. Не прикасайтесь к
прибору влажными руками. Если прибор увлажнился
или намок, тут же выньте вилку из розетки.
• Прибор и кабель сетевого питания необходимо
регулярно обследовать на наличие следов повреж-
дения. При обнаружении повреждения пользоваться
прибором запрещается.
• Используйте только оригинальные запчасти.
• Из соображений безопасности для детей не остав-
ляйте лежать упаковку (пластиковые мешки, картон,
пенопласт и т.д.) без присмотра.
ПРЕДУПРЕЖДЕНИЕ:
Не позволяйте детям играть с полиэтиленовой
пленкой. Опасность удушья!
Особые указания по технике безопасности
для данного устройства
ПРЕДУПРЕЖДЕНИЕ:
• Опасность порезов! Лезвия миксера очень острые!
• Всегда используйте прибор с закрытой крышкой.
• Не снимайте крышку во время работы устройства!
• Не помещайте руки в контейнер для смешивания во время
работы! Вращающиеся ножи могут нанести травму.

PC-UM1207_IM 21.02.20
55
ПРЕДУПРЕЖДЕНИЕ:
• Перед заменой принадлежностей или дополнительных
деталей, которые движутся во время работы, необходимо
выключить устройство и отключить его от электросети.
• Всегда проверяйте правильность установки принадлежно-
стей и надежность креплений перед включением устрой-
ства.
• ОСТОРОЖНО: Прежде чем снимать блендер с подставки,
убедитесь, что он выключен.
• Всегда отключайте устройство из сети, когда с ним никто
не работает, а также перед началом разборки, сборки и
чистки.
• Не ремонтируйте устройство самостоятельно. Обязательно
свяжитесь с авторизованным мастером. При повреждении
сетевого шнура, во избежание опасности поражения элек-
трическим током, шнур следует заменить у изготовителя,
сервисного представителя или других квалифицированных
лиц.
• Детям запрещается пользоваться данным устройством.
• Храните устройство и шнур подальше от детей.
• Запрещается детям играть с данным устройством.
• Устройства могут быть использованы людьми с ограничен-
ными физическими и умственными способностями, а также
не имеющие опыта работы, только под присмотром или
после получения инструктажа по безопасной эксплуатации
устройства, если эти люди осознают все риски, связанные с
данным прибором.

PC-UM1207_IM 21.02.20
56
ВНИМАНИЕ:
Во время чистки запрещается погружать прибор в воду.
Просьба соблюдать инструкции, которые приводятся в раз-
деле «Чистка».
• Не используйте устройство, если миксерный бокал ничем не
заполнен.
• Не держите устройство включенным более 2 минут. Дайте
ему остыть в течение, примерно, 1 минуты перед тем, как
использовать его снова.
• Устройство должно работать только под присмотром.
• Не манипулируйте выключателями безопасности!
• Во время работы прибора не допускается нахождение вну-
три емкости ложек и скребков.
Назначение
Это устройство предназначено для следующего:
• Смешивание жидкостей
• Для измельчения твердых пищевых продуктов
• Для колки льда
• Изготовление муки / порошка / пудры
Прибор предназначен для использования в быту и
аналогичных применений.
Необходимо обязательно соблюдать кратковременный
режим работы.
Прибор должен использоваться в соответствии с
инструкциями в этом руководстве. Он не предназначен
для коммерческого применения.
Любое другое применение устройства считается
использованием не по назначению, и может привести к
материальному ущербу или травме.
Производитель не несет ответственности за ущерб,
причиненный использованием устройства не по назна-
чению.
Распаковка устройства
1. Удалите упаковку устройства.
2. Удалите все упаковочные материалы, такие как
полиэтиленовая пленка, материал наполнителя,
кабельные стяжки и коробки.
3. Убедитесь, что в коробке есть все компоненты.
4. Если комплект поставки неполный или заметны
механические повреждения, не включайте прибор.
Сразу же верните весь комплект продавцу.
ПРИМЕЧАНИЯ:
На устройстве все еще могут оставаться мелкие ча-
стицы и пыль, оставшиеся после производственного
процесса. Рекомендуется почистить устройство, как
описано в разделе «Чистка».
Обзор деталей прибора /
Комплект поставки
1 Колпачок отверстия для подачи / мензурка
2 Крышка миксерного бокала с отверстием для подачи
3 Миксерный бокал
4 Ножевая головка
5 Уплотнительное кольцо блока с ножами
6 Завинчивающаяся крышка
7 База с двигателем
8 Поворотный переключатель и кнопка
Не показано
Уплотнительное кольцо крышки

PC-UM1207_IM 21.02.20
57
Монтаж
Миксерный бокал
Установите емкость для смешивания на корпус двига-
теля. Обратите внимание на значки, расположенные на
миксерном бокале и корпусе двигателя.
ПРИМЕЧАНИЯ:
Емкость для смешивания может быть установлена
на корпусе двигателя в различных положениях. Пре-
дохранительный выключатель включен только тогда,
когда два треугольника расположены друг напротив
друга.
Крышка
1. Убедитесь, что уплотнительное кольцо подсоеди-
нено к крышке.
2. Поместите крышку на миксерный бокал так, чтобы
клапан крышки был расположен слева от отверстия
носика.
3. Прижмите крышку к миксерному бокалу, она должна
полностью закрыть бокал.
4. Поверните крышку по часовой стрелке до упора.
Теперь клапан крышки расположен прямо над отвер-
стием носика. Убедитесь, что крышка плотно закрыта.
5. Вставьте колпачок в отверстие для подачи на
крышке. Следите за направляющими выступами на
завинчивающейся крышке. Поверните завинчиваю-
щуюся крышку по часовой стрелке до упора. Колпа-
чок должен со щелчком стать на место.
ПРИМЕЧАНИЯ:
Колпачок отверстия для подачи можно использовать
также в качестве мензурки.
Примечания по использования
ВНИМАНИЕ:
Стекло может треснуть, если температура слишком
высока! Не наполняйте бокал жидкостями, темпера-
тура которых выше 60 °C.
• Установите электроприбор на твердую и ровную
поверхность. Установите его так, чтобы он не мог
опрокинуться.
• Включайте устройство только если миксерный бокал
закрыт крышкой. Отверстие для подачи, находяще-
еся на крышке, также должно быть закрыто.
• Не переполняйте миксерный бокал! Его максималь-
ная вместимость составляет 1,75 литра. Используйте
шкалу на емкости.
• Пена занимает много места. Уменьшите количество
жидкости, производящей много пены.
• Держите одну руку на крышке, если вы колете лед
или если в емкости большое количество ингреди-
ентов.
• Заранее порежьте продукты на небольшие кусочки.
Подключение к электричеству
1. Установите поворотный переключатель в положение
OFF.
2. Перед тем, как вставлять штепсель в розетку, убеди-
тесь, что напряжение сети соответствует специфи-
кации устройства. Требуемую информацию можно
найти на табличке.
3. Подключайте устройство только к правильно уста-
новленной, исправной розетке.
Использование коротких интервалов
ПРИМЕЧАНИЯ:
Корпус устройства может стать горячим во время
работы.
• Устройство предназначено для кратковременной
работы - не более 2 минут. Перед повторным
использованием дайте устройству остыть в течение
1 минуты.
• Использовав прибор три раза без добавления воды,
например, для помола кофейных зерен, орехов, риса
и т. д., подождите, пока корпус полностью не осты-
нет, прежде чем использовать прибор снова.
Поворотный переключатель и кнопка
Данный рабочий элемент (8) имеет двойную функцию.
Поворот
• Против часовой стрелки: выбор программы (1 или
2 или 3)
• По часовой стрелке: немедленный пуск с плавной
регулировкой скорости вращения (MIN
MAX)
• Положение OFF = режим ожидания
Нажатие
• Пуск и при необходимости останов программы
• Работа в импульсном режиме/в режиме «Турбо»
Программы
Программы работают с различными интервалами, с
короткими паузами и в непрерывном режиме.
Программа 1:
• Данная программа подходит, например, для колки
кубиков льда.
• Либо вы можете использовать импульсный режим
работы.
Программа 2
• С помощью данной программы вы можете пригото-
вить, например, смузи и молочные коктейли.
• Сначала добавьте в миксерный бокал свежие
фрукты и жидкие ингредиенты (йогурт, молоко

PC-UM1207_IM 21.02.20
58
или сок). Затем добавьте лед или замороженные
продукты (замороженные фрукты, кубики льда или
мороженое).
Программа 3:
• С помощью данной программы можно приготовить
пюре из фруктов, овощей или других ингредиентов,
одновременно добавив воду, молоко или бульон.
• Лезвия в миксерном бокале также подходят для
переработки, например, кофейных зерен, орехов,
миндаля, кукурузы или риса в муку. Обратите
внимание на информацию в главе «Использование
коротких интервалов».
Импульсный режим
• Если поворотный переключатель находится в поло-
жении OFF, вы можете включить режим импульсной
работы, нажав и отпустив кнопку .
• Используйте работу устройства в этом режиме в
течение, максимум, 2 минут. Перед повторным
использованием дайте устройству остыть в течение
1 минуты.
Эксплуатация
ВНИМАНИЕ:
• Не снимайте миксерный бокал во время работы!
Чтобы прервать работу, нажмите кнопку и
подождите, пока лезвия не остановятся.
• Прежде чем снять миксерный бокал, всегда уста-
новите поворотный переключатель в положение
OFF.
Подготовка к работе
1. Обязательно установите поворотный переключатель
в положение OFF.
2. Вставьте миксерный бокал.
3. Наполните миксерный бокал продуктами. Соблю-
дайте максимальную степень заполнения.
4. Наденьте крышку. Закройте крышку до упора.
5. Закройте колпачком отверстие для подачи.
Работа
Для начала работы можно выбрать 1 из 3 вариантов:
• С помощью поворотного переключателя выберите
необходимую программу (1 или 2 или 3). Чтобы
начать работу, нажмите кнопку .
• Для индивидуальной настройки скорости вращения
выберите положение между MIN и MAX. Прибор
сразу же начнет работать.
• Запустите прибор в импульсном режиме.
Наполнение продуктами
Продукты для измельчения или приправы Вы можете
добавлять через отверстие в крышке.
1. Для остановки прибора используйте поворотный
переключатель или кнопку.
2. Перед тем как включить прибор, закройте отверстие.
Окончание работы
1. Установите поворотный переключатель в положение
OFF.
2. Дождитесь полной остановки лезвий.
3. Выньте сетевую вилку из розетки.
4. Возьмите миксерный бокал. Поверните его против
часовой стрелки.
5. Перед разливом снимите крышку.
ВАЖНОЕ ПРИМЕЧАНИЕ:
Никогда не храните лимонный сок или другие про-
дукты, содержащие кислоты, в металлической посуде.
Чистка
ПРЕДУПРЕЖДЕНИЕ:
• Перед чисткой всегда вынимайте штекер из сети.
• Ни в коем случае не окунайте для чистки прибор в воду. Это
может быть причиной электрического удара или пожара.
• Лезвия ножевой головки очень острые. Есть риск получе-
ния травмы!

PC-UM1207_IM 21.02.20
59
ВНИМАНИЕ:
• Не используйте проволочные щётки или другие
царапающие предметы.
• Не используйте сильные или царапающие чистя-
щие средства.
• Отдельные детали не являются безопасными для
посудомоечной машины.
ПРИМЕЧАНИЯ: Предварительная чистка
Наполните миксерный бокал на половину водой и
поверните выключатель на «MIN» примерно на 10 се-
кунд. В заключении слейте жидкость из бокала.
Для основательной чистки миксерный бокал необхо-
димо снять.
Насадка и снятие ножевой головки
1. Переверните миксерный бокал вверх дном.
2. Приложив небольшое усилие, поверните завинчива-
ющуюся крышку против часовой стрелки и отсоеди-
ните блок с ножами.
3. Осторожно извлеките ножевую головку из миксер-
ного бокала.
4. Снимите уплотнительное кольцо, чтобы помыть его.
5. После того как оно высохнет, установите уплотни-
тельное кольцо обратно на ножевую головку.
6. Вставьте ножевую головку в резьбу на дне миксер-
ного бокала.
7. Затяните завинчивающуюся крышку блока с ножами,
поворачивая ее по часовой стрелке.
8. Убедитесь, что ножевая головка зафиксирована на
своем месте.
ВНИМАНИЕ:
Используйте устройство только если уплотнительное
кольцо должным образом установлено на ножевой
головке! В противном случае миксерный бокал не
будет плотно закрыт.
Миксерный бокал, крышка, ножевая головка,
завинчивающаяся крышка, уплотнительные кольца
и мензурка
Очищайте эти детали в теплой проточной воде с
использованием небольшого количества жидкости для
мытья посуды. После этого высушите их и соберите
устройство снова.
Корпус
Для чистки прибора снаружи пользуйтесь только слегка
влажной тряпкой.
Хранение
• Очистите устройство в соответствии с инструкциями.
Дайте принадлежностям полностью высохнуть.
• Если вы хотите продлить срок службы устройства,
рекомендуется хранить его в оригинальной упаковке.
• Всегда храните устройство в недоступном для детей,
хорошо проветриваемом и сухом месте.
Устранение неисправностей
Проблема Возможная причина Решение
Прибор не функ-
ционирует.
К устройству не подключено электропитание. Проверьте подключение к электросети.
Прибор оснащен предохранительным
выключателем.
Он предотвращает непреднамеренное вклю-
чение мотора.
Убедитесь, что миксерный бокал зафиксирован
на своем месте.
Защита от перегревания была активирована.
Двигатель перегрелся.
1. Незамедлительно установите переключатель
в положение OFF. Отсоедините вилку из
розетки.
2. Дайте прибору остыть в течение 15 минут,
прежде чем использовать его снова.

PC-UM1207_IM 21.02.20
60
Технические данные
Модель: .............................................................PC-UM 1207
Подача напряжения: ........................ 220 - 240 В~, 50 - 60 Гц
Мощность на входе: .................................................1200 Вт
Класс защиты: ....................................................................
Емкость: ...................................................макс. 1,75 литров
Вес нетто: ........................................................прибл. 4,85 кг
Сохранено право на технические и конструкционные
изменения в рамках продолжающейся разработки
продукта.
Данное устройство соответствует всем текущим дирек-
тивам CE, таким как электромагнитная совместимость и
низкое напряжение; оно произведено в соответствии с
новейшими правилами техники безопасности.
Утилизация
Значение символа «корзина»
Защита окружающей среды: не допускается
утилизация электроприборов вместе с бы-
товыми отходами.
Утилизация устаревшей техники и неис-
правных электроприборов производится в
городских приёмных пунктах.
Не допускайте неправильной утилизации отходов. Это
наносит вред окружающей среде и оказывает негатив-
ное воздействие на здоровье людей.
Оказывайте содействие программе утилизации и дру-
гим формам переработки электронной и электрической
техники.
Информацию о пунктах утилизации бытовой техники
можно получить в местных органах власти

PC-UM1207_IM 21.02.20
61
, , ,
. .
.
•. .
•
.
•.
. . .
. .
.
1 . .OFF
.
2 .. 15
. .
PC-UM 1207 ....................................................................................:
60/50 ,~ 240-220 ...............................................:
1200 ............................................................................... :
II .............................................................................................:
1,75 .................................................................:
4,85 ......................................................................... :
.
CE
.
" "
:
.
.
.
.
.

PC-UM1207_IM 21.02.20
62
•
.
." "
• OFF
.
• 1 . 2
.
:
• !
.
•.OFF
1 ..OFF
2 ..
3 . .
.
4 .. .
5 ..
: 3
• . (3 2 1)
.
• .MAX MIN
.
•.
.
1 ..
2 ..
1 ..OFF
2 ..
3 ..
4 . . .
5 ..
:
.
:
•.
• .
.
•! .
:
•.
•.
•.
:
MIN
. . 10
.
1 ..
2 .
.
3 ..
4 ..
5 ..
6 . .
7 ..
8 ..
:
. !

PC-UM1207_IM 21.02.20
63
5
6
7
8
.
.
:
.
.
1 ..
2 .
.
3 . .
.
4 . .
. .
5 . .
.
. .
:
.
:
!
. 60
•. .
• .
.
•. 1,75 !
.
• .
.
•
.
•.
1 ..OFF
2 . ,
.
.
3 ..
:
.
• 1 . 2
.
•
.
. (8)
•(3 2 1) :
• :
(MIN MAX)
• = OFF
•
• /
.
:1
•.
•.
:2
•
.
• )
) . (
.(
:3
•
.

PC-UM1207_IM 21.02.20
64
:
• . .
.
•.
•.
•.
•
.
:
."" .
•.
• 1 . 2
.
•.
•!
•
.
:
•
•
•
•
.
.
.
.
.
.
1 ..
2 .
.
3 ..
4 . .
.
:
.""
/
/ 1
2
3
4

PC-UM1207_IM 21.02.20
65
. .
.
:
:
.
:
.
. :
3 ..............................................................................
65 ..........................................................................................
65 .........................................................
64 ........................................................................................
64 ..............................................................................
64 .................................................... /
63 ......................................................................................................
63 ....................................................................................
63 .........................................................................................
63 .......................................................................................................
62 ....................................................................................................
62 ....................................................................................................
61 ......................................................................................................
61 .......................................................................
61 ............................................................................................
61 .....................................................................................
.
.
.
• .
.
• .
( )
. .
.
•
. .
•.
• )
. (
:
!
:
•! !
•.
• !
•. !
•
.
• .
•. :
•
.

PC-UM1207_IM 21.02.20
Stand 02 / 2020
PC-UM 1207
Internet: www.procook-germany.de
Made in P.R.C.
-
 1
1
-
 2
2
-
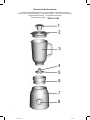 3
3
-
 4
4
-
 5
5
-
 6
6
-
 7
7
-
 8
8
-
 9
9
-
 10
10
-
 11
11
-
 12
12
-
 13
13
-
 14
14
-
 15
15
-
 16
16
-
 17
17
-
 18
18
-
 19
19
-
 20
20
-
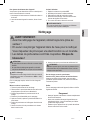 21
21
-
 22
22
-
 23
23
-
 24
24
-
 25
25
-
 26
26
-
 27
27
-
 28
28
-
 29
29
-
 30
30
-
 31
31
-
 32
32
-
 33
33
-
 34
34
-
 35
35
-
 36
36
-
 37
37
-
 38
38
-
 39
39
-
 40
40
-
 41
41
-
 42
42
-
 43
43
-
 44
44
-
 45
45
-
 46
46
-
 47
47
-
 48
48
-
 49
49
-
 50
50
-
 51
51
-
 52
52
-
 53
53
-
 54
54
-
 55
55
-
 56
56
-
 57
57
-
 58
58
-
 59
59
-
 60
60
-
 61
61
-
 62
62
-
 63
63
-
 64
64
-
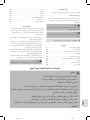 65
65
-
 66
66


ProfiCook PC-UM 1207 Instrucciones de operación
- Tipo
- Instrucciones de operación
en otros idiomas
- français: ProfiCook PC-UM 1207 Mode d'emploi
- italiano: ProfiCook PC-UM 1207 Istruzioni per l'uso
- Deutsch: ProfiCook PC-UM 1207 Bedienungsanleitung
- polski: ProfiCook PC-UM 1207 Instrukcja obsługi