La página se está cargando...

Customer Assistance/Asistencia al Cliente
1-844-553-6667 press 2/presione 2
Use & Care Guide
Manual de Uso y Cuidado
1.5 Pies.Cúbicos, 1000 Vatios
1.5 Cu. Ft., 1000 Watts
Models/Modelos:
111.71513810 - Stainless Steel /
Acero Inoxidable
Sears Brands Management Corporation
Hoffman Estates, IL 60179 U.S.A.
www.kenmore.com
www.sears.com
®
Kenmore Elite

At the end of longer cooking cycles it is normal operation for
the fan to continue running to cool the oven electronic system.
After 5 minutes with no further cooking activity the fan will
automatically shut off. However, you can begin a new
cooking cycle even while the fan is running.
IMPORTANT!
FAN OPERATION NOTICE

EN-1
PRECAUTIONS TO AVOID POSSIBLE
EXPOSURE TO EXCESSIVE MICROWAVE
ENERGY
Specifications
Model: 111.71513810
Rated Voltage: 120V~ 60Hz
Rated Output Power(Microwave): 1000 W
Rated Input Power(Microwave): 1650 W
Grill: 1200 W
Convection: 1450 W
Combination: 1700 W
Oven Capacity: 1.5 cu.ft. / 42 L
Turntable Diameter: Ø 13.4 inch / 340 mm
External Dimensions: 22.9X22.0X14.9 inch (582X559X379 mm)
Net Weight: Approx. 48.9 Lbs (22.2 kg)
(a) Do not attempt to operate this oven with the door open since this can result in harmful
exposure to microwave energy. It is important not to defeat or tamper with the safety
interlocks.
(b) Do not place any object between the oven front face and the door or allow soil or
cleaner residue to accumulate on sealing surfaces.
(c) Do not operate this oven if it is damaged. It is particularly important that the oven
door close properly and that there is no damage to the:
(1) DOOR (bent) or DOOR METAL SCREEN (cracks or breaks)
(2) HINGES AND LATCHES (broken or loosened)
(3) DOOR SEALS AND SEALING SURFACES
(d) The oven should not be adjusted or repaired by anyone except properly qualified
service personnel.
(e) WARNING :
It is hazardous for anyone other than a competent person to carry out
any service or repair operation that involves the removal of a cover which gives
protection against exposure to microwave energy.
(f) WARNING :
Liquids and other foods must not be heated in sealed containers since
they are liable to explode.
(g) WARNING :
Only allow children to use the oven without supervision when adequate
instructions have been given so that the child is able to use the oven in a safe way and
understands the hazards of improper use.
(h) WARNING :
When the appliance is operated in the combination mode, children
should only use the oven under adult supervision due to the temperature generated. (if
provided)
WARNING! The use of this appliance can expose you to chemicals known to
the state of California to cause cancer, birth defects, or other reproductive harm.
For more information go to www.P65Warnings.ca.gov

EN-2
IMPORTANT SAFETY INSTRUCTIONS
WARNING
1. Read all instructions before using the
appliance.
2. Read and follow the specic: "PRECAU-
TIONS TO AVOID POSSIBLE EXPOSURE
TO EXCESSIVE MICROWAVE ENERGY"
found on page 1.
3. As with most cooking appliances, close
supervision is necessary to reduce the risk
of a re in the oven cavity.
4. To reduce the risk of re in the oven
cavity:
i) Do not overcook food. Carefully attend
the appliance when paper, plastic, or
other combustible materials are placed
inside the oven to facilitate cooking.
ii) Remove wire twist-ties and metal
handles from paper or plastic containers/
bags before placing them in the oven.
iii) If materials inside the oven ignite,
keep the oven door closed. Turn the
oven off, and unplug the appliance.
Disconnect the power cord, shut off
power at the fuse or circuit breaker panel.
iv) Do not use the oven cavity for storage
purposes. Do not leave paper products,
cooking utensils, or food in the cavity
when not in use.
v) Never operate an empty microwave
oven. Arcing or sparking in the oven
cavity may occur.
5. This oven must be grounded. Connect
only to properly grounded outlet. See
"GROUNDING INSTRUCTIONS" found on
page 4.
6. Install or locate this oven only in
accordance with the installation
instructions provided.
7. Some products such as whole eggs
and sealed containers-for example,
closed glass jars- are able to explode
and should not be heated in the oven.
8. Use this appliance only for its intended
uses as described in this manual. Do
not use corrosive chemicals or vapors
in this appliance. This oven is
specically designed to heat or cook
or dry food. It is not designed for
industrial or laboratory use.
9. As with any appliance, close
supervision is necessary when used
by children.
10. Do not operate this oven if it has a
damaged cord or plug, if it is not
working properly or if it has been
damaged or dropped.
11. This microwave should be serviced
only by qualifed service personnel.
12. Do not cover or block any openings on
the oven.
13. Do not store or use this appliance
outdoors.
14. Do not use this oven near water, for
example, near a kitchen sink, in a wet
basement, near a swimming pool, or
similar locations.
15. Do not immerse cord or plug in water.
16. Keep cord away from heated surfaces.
17. Do not let cord hang over edge of
table or counter.
18. When cleaning surfaces of door and
oven that come together on closing
the door, use only mild, nonabrasive
soaps or detergents applied with a
sponge or soft cloth.
19.
Do not consume foods immediately after
the oven nishes cooking. Heated foods,
especially pizza, may burn your mouth.
Allow foods to cool to a safe eating
temperature.
20. This appliance is for private household
use only.
To reduce the risk of burns, electric shock, re, injury to persons or
exposure to excessive microwave oven energy when using your
appliance, follow basic safety precautions, including the following:

EN-3
SAVE THESE INSTRUCTIONS
21. Liquids, such as water, coffee, or tea
are able to be overheated beyond
the boiling point without appearing to
be boiling. Visible bubbling or boiling
when the container is
removed from the microwave oven is not
always present. THIS COULD RESULT IN
VERY HOT LIQUIDS SUDDENLY BOILING
OVER WHEN THE CONTAINER IS
DISTURBED OR A SPOON OR OTHER
UTENSIL IS INSERTED INTO THE LIQUID.
i) Do not overheat the liquid.
ii) Stir the liquid both before and
halfway through heating it.
iii) Do not use straight-sided containers
with narrow necks.
iv) After heating, allow the container
to stand in the microwave oven for
a short time before removing the
container.
v) Use extreme care when inserting
a spoon or other utensil into the
container.
22. Oversized foods or oversized metal
utensils should not be inserted in a
thicrowave oven as they may create a
re or risk of electric shock.
23. Do not clean with metal scouring pads.
Pieces can bum off the pad and touch
electrical parts involving a risk of
electric shock.
24. Do not store any materials, other
than manufacturer's recommended
accessories, in this oven when not in use.
25. Do not cover racks or any other part of
the oven with metal foil. This will cause
overtheating of the oven.
26. Do not operate the oven without the
glass tray in place.
Be sure it is properly sitting on the
rotating base.
WARNING - If you see arcing, press pad and correct the problem.
Arcing is the microwave term for sparks in the oven. Arcing is caused by :
a) Metal or foil touching the side of the oven.
b) Foil not molded to food (upturned edges act like antennas).
c) Metal such as twist-ties, poultry pins, or gold rimmed dishes in the microwave.
d) Recycled paper towels containing small metal pieces being used in the microwave.
ARCING

EN-4
1. A short power-supply cord is provided to reduce the risks resulting from becoming entangled in
or tripping over a longer cord.
2. Longer cord sets or extension cords are available and may be used if care is exercised in
their use.
3. If a long cord sets or extension cord is used:
i) The marked electrical rating of the cord set or extension marked electrical rating of
the cord set or extension cord should be at least as great as the electrical rating of the
appliance.
ii) The extension cord must be a grounding-type 3-wire cord.
iii) The longer cord should be arranged so that it will not drape over the countertop or
tabletop where it can be pulled on by children or tripped over unintentionally.
GROUNDING INSTRUCTIONS
DANGER
WARNING
Electric Shock Hazard
Touching some of the internal
components can cause serious
personal injury or death. Do not
disassemble this appliance.
Improper use of the grounding can
result in a risk of electric shock.
Do not plug into an outlet until
appliance is properly installed
and grounded.
Three-pronged
(grounding) plug
This appliance must be grounded. In the event of
an electrical short circuit, grounding reduces the risk
of electric shock by providing an escape wire for the
electric current. To protect against electrical shock,
this appliance is equipped with a cord having a 3-
prong grounding-type plug for insertion into a proper
grounding-type receptacle. DO NOT alter the plug
for use in a 2-prong receptacle. DO NOT use a
3-prong adapter to enable the microwave to be
plugged into a 2-prong receptacle. If the plug will
not t into a receptacle, have the proper receptacle
installed by a qualied electrician.
Consult a qualied electrician or serviceman if the
grounding instructions are not completely understood
or if doubt exists as to whether the appliance is
properly grounded. If it is necessary to use an
extension cord, use only a 3-wire extension cord that
h as a 3-pronged grounding plug, and a 3-slot
receptacle that will accept the plug on the appliance.
The marked rating of the extension cord shall be
equal to or greater than the electrical rating of the
appliance.

EN-5
CAUTION UTENSILS
RADIO FREQUENCY INTERFERENCE
STATEMENT FEDERAL COMMUNICATIONS
COMMISSION (U.S.A ONLY)
Personal injury Hazard
Tightly-closed utensils
could explode. Closed
containers should be opened
and plastic pouches should be
pierced before cooking.
See the instructions on "Materials you can use in
microwave oven or to be avoided in microwave oven."
There may be certain non-metallic utensils that are not
safe to use for microwaving. If in doubt, you can test the
utensil in question following the procedure below.
Utensils Test:
1. Fill a microwave-safe container with 1 cup of cold
water (250ml) along with the utensil in question.
2. Cook on maximum power for 1 minute.
3. Carefully feel the utensil. If the empty utensil is
warm, do not use it for microwave cooking.
4. Do not exceed 1 minute cooking time.
WARNING:
This equipment generates and uses ISM frequency energy and if not installed and used
properly, that is in strict accordance with the manufacturer's instructions, may cause interference
to radio and television reception.
It has been type-tested and found to comply with limits for an ISM equipment pursuant to part
18 of FCC rules, which are designed to provide reasonable protection against such interference
in a residential installation.
However, there is no guarantee that interference will not occur in a particular installation.
If this equipment does cause interference to radio or television reception, which can be
determined by turning the equipment off and on, the user is encouraged to try correct the
interference by one or more of the followings.
• Reorient the receiving antenna of radio or television.
• Relocate the microwave oven with respect to the receiver.
• Move the microwave oven away from the receiver.
• Plug the microwave oven into a different outlet so that microwave oven and receiver are on
different branch circuits.
THE MANUFACTURER is not responsible for any radio or TV interference caused by
UNAUTHORIZED MODIFICATION to this microwave oven. It is the reponsibility of the user to
correct such interfercnce.

EN-6
SAFE AND UNSAFE MATERIALS
Materials you can use in microwave oven
Materials to be avoided in microwave oven
Utensils Remarks
Aluminum foil Shielding only. Small smooth pieces can be used to cover thin parts of
meat or poultry to prevent overcooking. Arcing (sparks in the oven) can
occur if etc. foil is too close to oven walls. The foil should be at least 1 inch
(2.5cm) away from oven walls.
Browning dish Follow manufacturer’s instructions. The bottom of browning dish must be
at least 3/16 inch (5 mm) above the turntable. Incorrect usage may cause
the turntable to break.
Dinnerware Microwave-safe only. Follow manufacturer's instructions. Do not use
cracked or chipped dishes.
Glass jars Always remove lid. Use only to heat food until just warm. Most glass jars
are not heat resistant and may break.
Glassware Heat-resistant oven glassware only. Make sure there is no metallic trim.
Do not use cracked or chipped dishes.
Oven cooking
bags
Follow manufacturer’s instructions. Do not close with metal tie. Make
slits to allow steam to escape.
Paper plates
and cups
Use for short–term cooking/warming only. Do not leave oven unattended
while cooking.
Paper towels Use to cover food for reheating and absorbing fat. Use with supervision
for a short-term cooking only.
Parchment
paper
Use as a cover to prevent splattering or a wrap for steaming.
Plastic Microwave-safe only. Follow the manufacturer’s instructions. Should be
labeled "Microwave Safe". Some plastic containers soften as the food
inside gets hot. "Boiling bags" and tightly closed plastic bags should be
slit, pierced or vented as directed by instructions on package.
Plastic wrap Microwave-safe only. Use to cover food during cooking to retain
moisture. Do not allow plastic wrap to touch food.
Thermometers Microwave-safe only ( meat and candy thermometers).
Wax paper Use as a cover to prevent splattering and retain moisture.
Utensils Remarks
Aluminum tray May cause arcing (sparks in oven). Transfer food into microwave-safe dish.
Food carton with
metal handle
May cause arcing (sparks in oven). Transfer food into microwave-safe dish.
Metal or metal-
trimmed utensils
Metal shields the food from microwave energy. Metal trim may cause
arcing.
Metal twist ties May cause arcing and could cause a re in the oven.
Paper May cause a re in the oven.
Plastic foam Plastic foam may melt or contaminate the liquid inside when exposed
to high temperature.
Wood Wood will dry out when used in the microwave oven and may split
or crack.

EN-7
F
G
A
C
B
E
D
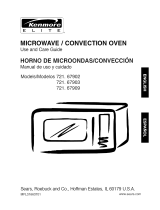
SETTING UP YOUR OVEN
Names of oven Parts and Accessories
Turntable Installation
Remove the oven and all materials from the carton and oven cavity.
Your oven comes with the following accessories:
Glass tray 1
Turntable ring 1
Use & Care Guide 1
Low Rack 1
High Rack 1
A) Control panel
B) Turntable shaft
C) Turntable ring
D) Glass tray
E) Observation window
F) Oven Door
G) Safety interlock system
a. Never place the glass tray upside down. The glass
tray should never be restricted.
b. Both glass tray and turntable ring must always be
used during cooking. The use of the Low and High Rack
is optional based on type of cooking.
CAUTION: If using cooking racks, only place the racks
on the glass turntable. Do not place racks on the oven
oor.
c. All food and containers of food are always to be
placed on the glass tray for cooking.
d. If glass tray or turntable ring cracks or breaks, contact
the following customer assistance number:
1-844-553-6667 press 2
Hub (underside)
Glass tray
Turntable shaft
Turntable ring

EN-8
Countertop Installation
Installation
Remove all packing material and accessories.
Examine the oven for any damage such as
dents or broken door. Do not install if oven is
damaged.
Cabinet:
Remove any protective lm found
on the microwave oven cabinet surface.
Do not remove the off-white Mica cover
that is attached to the oven cavity to
protect the magnetron.
1.
Select a level surface that provide
enough open space for the intake
and/or outlet vents.
(3) Blocking the intake or outlet vent openings
can damage the oven.
(4) Place the oven as far away from
radios and TV as possible.
Operation of microwave oven may
cause interference to your radio or TV
reception.
2.
Plug your oven into a standard household
outlet. Be sure the voltage and the
frequency is the same as the voltage
and the frequency on the rating label.
WARNING:
Do not install oven over a
range cooktop or other heat-producing
appliance. If installed near or over a heat
source, the oven could be damaged and the
warranty would be void.
A minimum clearance of 3.0 inches
(7.5cm) is required between the oven and
any adjacent walls. One side must be open.
(1) Leave a minimum clearance of 12
inches (30cm) above the oven.
(2) Do not remove the legs from the
bottom of the oven.
12 inches (30cm)
OPEN
3.0 inches (7.5cm)
3.0 inches (7.5cm)

EN-9
OPERATION
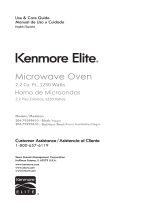
Control Panel and Features
(1) Precision Cooking (Auto Reheat, Auto Cook, Auto Bake, Auto Roast, Popcorn,
Beverage) Auto Menu items allow you to easily program cooking time based on
food quantity.
(2) Defrost : Defrost time calculated by entered weight and category of item.
(3) Micro - Press for Microwave only cooking
(4) Grill - Press for Grill only cooking
(5) Conv - Press for Convection only cooking
(6) Micro + Conv - Press for combined Microwave + Convection cooking
(7) Power Level
(8) Timer / Clock
(9) Number Pads
(10) ONE TOUCH START Pads (1-6)
(11) START / ADD 30 SEC
(12) STOP / Hold 3sec : Before cooking starts, press to clear all previous settings.
During cooking, press once to stop oven; press twice to stop oven and clear all
settings.
Press pad for 3 seconds to lock or unlock display
(13) Display Window
MICRO GRILL PREH lbCONV
DEF CLOCK LOCK
oz
TIMER
(5)
(4)
(6)
(13)
(12)
(3)
(8)
(10)
(9)
(1)
(7)
(1)
(2)
(11)

EN-10
OPERATION
CLOCK SETTING
When the microwave oven is plugged into an outlet, " : 0" will display.
(1) Press
Timer/Clock
once, "12H" will appear in the display.
(2) Press the number pads and enter the current clock time. For example, if the time is now 8:30,
press "8, 3, 0" in order. The numbers will ash in the display.
(3) Press
Timer/Clock
to nish clock setting, ":" will ash and the numbers will appear as a clock
time in the display.
Note: (1) If you make a number entry mistake while in the process of setting clock, press
to start over.
(2) This is a 12 hour clock. If the numbers entered are not within the range between 1:00
to 12:59, the setting will not be accepted until valid numbers are entered.
TIMER
(1) Press
Timer/Clock
twice, " : 0" and TIMER indicator "v" will appear in the display window.
(2) Press the number pads to enter the time amount. The maximum amount of time that can be
enter is 99 minutes 99 seconds.
(3) Press to conrm setting.
(4) When the time amount elapses, the control panel will beep 3 times.
Note: The Timer setting is different from the Clock setting; it is simply a timer.
MICROWAVE COOK
(1) Press Micro, " : 0" and MICRO (Microwave) indicator "v" will appear in the display window.
(2) Press number pads to enter the cooking time; the maximum cooking time is 99 minutes and
99 seconds.
(3) Press Power Level ; PL10 will display. This is the default power level of 100%. Press number
pads 0 through 9 to select a different power level if desired. See the Power Level table
below.
(4) Press to start cooking. Countdown will begin in display window.
Example: To cook the food with 50% microwave power for 15 minutes.
a. Press the Time Cook, " : 0" and M/W (Microwave) indicator "v" will appear in the
display window.
b. Press "1, 5, 0, 0" in order for 15:00 to appear in the display.
c. Press Power Level, then press "5" to select 50% microwave power.
d. Press to start cooking. Countdown will begin in display window.
Note: In the process of setting, if the pad is pressed, the display will return to standby
mode.

EN-11
ARCING
Arcing is the microwave term for sparks in the oven. If you see arcing press the STOP pad. Wait
until oven contents have cooled and correct the problem. See SAFE AND UNSAFE MATERIALS
section of this Use & Care Guide.
FAN OPERATION NOTICE
At the end of Grill / Convection / Combi cooking cycles it is normal operation for the fan to
continue running to cool the oven electronic system. After 5 minutes with no further cooking
activity the fan will automatically shut off. However, you can begin a new cooking cycle even
while the fan is running.
STANDING TIME
"Standing time" means that after the timed cooking period ends, food should be allowed to
stand either inside or outside the oven to completely nish cooking. Outside oven standing time
will allow the oven to be available for other use.
POWER LEVEL
Ten power levels are available.
Power level 0 is also available if you want to program a timed in-oven standing time.
After entering Time Cook digits and prior to starting operation, press
Power Level
and "PL10"
will display. Adjust the power by pressing a number pad as indicated in the table below.
Level 10 9 8 7 6 5 4 3 2 1 0
Power 100% 90% 80% 70% 60% 50% 40% 30% 20% 10% 0%
Display PL10 PL-9 PL-8 PL-7 PL-6 PL-5 PL-4 PL-3 PL-2 PL- 1 PL-0
ONE TOUCH START
(1) Instant cooking at 100% power level and 1 to 6 minutes cooking time can be started by
pressing number pads 1 to 6.
(2) Instant cooking at 100% power level and 30 seconds cooking time can be started by
pressing . Each repeated press will increase cooking time by 30 seconds.
The maximum cooking time is 99 minutes, 99 seconds.
Note: Time can also be added in 30 second increments by pressing during Microwave
Cooking.

EN-12
WEIGHT DEFROST FUNCTION
(1) Press
Weight Defrost
, "dEF1" and DEF. indicator "v" will appear in the display window.
Press the same pad repeatedly, "dEF1", "dEF2", "dEF3" will display in order.
(2) Press number pads to enter the weight to be defrosted.
Input the weight range between 0.2 to 6.0 lbs.
The lb indicator "'v" will ash in the display window.
If the weight input is not between 0.2 to 6.0 lbs, the input will be invalid. The oven will not
operate until valid numbers are entered.
(3) Press to start defrosting and the cooking time remaining will be displayed.
Note: During the Defrost cycle, the oven will beep to remind you to turn over the food. Turn over
food, close door and press to resume defrost cycle.
LED display dEF1 dEF2 dEF3
Food
Meat Poultry
Fish

EN-13
AUTO COOK FUNCTION
(1) Press Auto Cook, "Ac-1" will display.
(2) Press Auto Cook repeatedly to choose the menu. See Auto Cook table below.
(3) Press number pad to enter weight or portions.
(4) Press to start cooking.
NOTICE: Longer AUTO COOK heating periods may produce moisture condensation on the oven
interior. Once interior has cooled after removing food, wipe up moisture with a clean
dry cloth before next oven use
Auto Cook Menu:
Food Display Weight / Portion
Potato Ac-1
8 oz / 16 oz / 24 oz / 32 oz
(1 ea / 2 ea / 3 ea / 4 ea)
Fresh Vegetable Ac-2 4 oz / 8 oz / 12 oz / 16 oz
Frozen Vegetable Ac-3 4 oz / 8 oz / 12 oz / 16 oz
Ground Meat Ac-4 8 oz / 12 oz / 16 oz / 24 oz
Fish/Seafood Ac-5 8 oz / 12 oz / 16 oz / 24 oz
Food Serving Amount and Recommendations
1
Potato
Serving size is 1 to 4 medium sized potatoes, about 8 to 10 oz. (225 to 280
g) each.
Pierce each potato several times with a fork and place around the edge of
the oven tray, at least 1 in.(2.5cm) apart.
2
Fresh
Vegetable
Serving size is 4 to 16oz.
Place moist vegetables in a microwavable container.
Add 2 to 4 tablespoons (30 to 60 ml) water.
Cover with plastic wrap and vent*.
Most vegetables need stirring and 2 to 3 minutes standing time after
cooking.
3
Frozen
Vegetable
Serving size is 4 to 16oz.
Remove from package and place vegetables in a microwavable container.
Add 2 to 4 tablespoons (30 to 60 ml) water.
Cover with plastic wrap and vent*.
Most vegetables need stirring and 2 to 3 minutes standing time after
cooking.
4
Ground
Meat
Serving size is 8 to 24oz. (1/2 to 1.5lbs.)
Crumble meat into a microwave-safe container.
Season and cover with plastic wrap.
Vent cover for well-done meat.
Cover dish for medium cooked meat (such as meat to be used in another dish
and cooked further).
5
Fish/
Seafood
Serving size is 8 to 24oz. (1/2 to 1.5lbs.)
Place the food around the sides of a microwave-safe container. Season and
add 1/4 to 1/2cup (60 to 125 ml) liquid (wine, water, salsa, etc.) if desired.
Cover with plastic wrap and vent*.
*Fold back one corner of the plastic wrap to vent excess steam.
AUTO COOK TABLE

EN-14
AUTO REHEAT FUNCTION
(1) Press Auto Reheat, "rH-1" will display.
(2) Press Auto Reheat repeatedly to choose the menu. See Auto Reheat table below.
(3) Press number pad to enter weight or portions.
(4) Press to start cooking.
Auto Reheat Menu:
Food Display Weight / Portion
Dinner Plate rH-1 10 oz / 12 oz / 16 oz
Soup/Sauce rH-2 1 cup / 2 cups / 3 cups / 4 cups
Casserole rH-3 1 cup / 2 cups / 3 cups / 4 cups
Food Serving Amount and Recommendations
1
Dinner Plate
Serving size is about 10 to 16 oz (280 to 450 g).
Place food to be heated on a dinner plate or similar dish.
Cover with plastic wrap and vent*.
2
Soup/Sauce
Serving size is 1 to 4 cups (250 ml to 1L).
Place food to be heated in a casserole dish.
Cover with plastic wrap and vent*.
3
Casserole
Serving size is 1 to 4 cups (250 ml to 1L).
Place food to be heated in a casserole dish.
Cover with plastic wrap and vent*.
*Fold back one corner of the plastic wrap to vent excess steam.
AUTO REHEAT TABLE

EN-15
AUTO BAKE FUNCTION
(1) Press Auto Bake, "Ab-1" will display.
(2) Press Auto Bake repeatedly to choose the menu. See Auto Bake table below.
(3) Press number pad to enter weight or portions. For Ab-4, press number pad 1 through 3 to
choose weight. For Ab-1, Ab-2, Ab-3, You do not need to press number pad to choose a
weight or portion.
(4) Press to start cooking.
Auto Bake Menu:
Food Display Weight / Portion
Frozen Pizza Ab-1 10~12inch thin crust frozen pizza
Mufns Ab-2 6cup mufn (With preheat function)
Biscuit/Dinner Roll
/Bread Stick
Ab-3 1 pan (With preheat function)
Frozen French Fries Ab-4 8 oz / 12 oz / 16 oz
CAUTION:
If using cooking racks, only place the racks on the glass turntable.
Do not place racks on the oven oor.
Food Serving Amount and Recommendations
1
Frozen Pizza
For best results, a pizza pan is not required. Use a 10~12-inch thin-
crust frozen pizza. If baking a rising-crust pizza, add an additional
10 to 20 minutes' baking time on convection cook at 450°F(230°C).
Place the frozen pizza directly on the high rack.
2
Mufns
Use 1 package of a mufn mix. Place the low rack on the turntable.
After PREHEAT, use 6-cup mufn pan; place pan on rack.
3
Biscuit/Dinner
Roll
/Bread Stick
For best results, bake one pan of biscuits, dinner rolls, or breadsticks
at a time.
After PREHEAT, place the biscuits 1-2 in. (2.5-5 cm) apart on a
greased pizza pan or cookie sheet on the low rack.
Cool on the rack for 10 minutes after cooking.
4
Frozen French
Fries
Use frozen, prepared French fries. Do not overlap or layer potatoes.
For crispier potatoes, use MORE to add additional cooking time.
Spread the french fries on a pizza pan or cookie sheet. Place the
pan on the high rack.
Weight range: 8 to16 oz. (225 to 450 g).
AUTO BAKE TABLE

EN-16
AUTO ROAST FUNCTION
(1) Press Auto Roast, "Ar-1" will display.
(2) Press Auto Roast repeatedly to choose the menu. See Auto Roast table below.
(3) Press number pad to enter weight.
(4) Press to start cooking.
Food Display Weight / Portion
Roast Beef Ar-1 2 lb ~ 4 lb
Roast Chicken Ar-2 2.4 lb ~ 6 lb
Roast Pork Chop Ar-3 1 lb ~ 4 lb
Roast Potato Ar-4 1 lb ~ 2 lb
CAUTION:
If using cooking racks, only place the racks on the glass turntable.
Do not place racks on the oven oor.
Food Serving Amount and Recommendations
1
Roast Beef
Weigh roast and pat dry with paper towels. Place a microwave-
safe/heatproof plate on turntable to catch drippings. Place roast on
low rack.
After cooking, loosely tent roast beef with aluminum foil and let stand
for 5 to 10 minutes.
Weight range: 2 to 4 lbs. (1 to 2 kg)
2
Roast Chicken
Weigh whole chicken. Remove giblets and neck and discard.
Thoroughly wash inside and outside of chicken with cold water. Pat
chicken dry with paper towels. Secure the legs with kitchen twine.
Brush outside of chicken with melted butter or margarine. Place a
microwavesafe/heatproof plate on turntable to catch drippings.
Place chicken breast side up on low rack. After cooking, loosely tent
roast chicken with aluminum foil and let stand for 10minutes.
Weight range: 2.4 to 6lbs. (1 to 3 kg)
3
Roast Pork
Chop
Weigh roast and pat dry with paper towels. Place a microwave-
safe/heatproof plate on turntable to catch drippings. Place roast on
low rack.
After cooking, loosely tent roast with aluminum foil and let stand for
5 to 10minutes.
Weight range: 1 to 4lbs. (450g to 2 kg)
4
Roast Potato
Wash and dry the potatoes thoroughly. Cut potatoes into even sized
pieces and season. Place potatoes in microwave-safe/heatproof
plate. Place on high rack.
Weight range: 1 to 2lbs. (450g to 1 kg)
AUTO ROAST TABLE

EN-17
CONVECTION COOK
In convection cooking a fan in the oven back wall circulates heated air around the food to cook
food quickly and evenly on all sides, also providing browning and crisping to food surfaces.
For best convection performance, preheating is necessary. A preheat time period is built into the
Conv function.
Convection requires the use of the provided elevated racks so that heat circulates on all sides of
the food.
Use the low rack for baking, or for roasting or broiling meats. Fat drains from meat onto the
turntable. Clean turntable before next use.
Use the both the low and high rack for simultaneous baking of two levels of cookies or each
layer of a two-layer cake.
(1) Press Conv, "350F" and CONV indicator "v" will appear in the display window.
(2) Press number pads 0 through 9 to select cooking temperature if desired. Temperature
selections (°F):
0 = 425, 1=100, 2 = 200, 3 = 250, 4 = 275, 5 = 300, 6 = 325, 7 = 350, 8 = 375,
9 = 400. CONV indicator "v", "F" and the corresponding temperature will display.
(3) Press to start preheating. Selected temperature, "F" and "PrEH" are alternately
displayed. CONV indicator "v" will display, and PREH indicator "v" will ash. When the oven
preheats to the selected cooking temperature, PREH indicator "v" stops ashing and the oven
will beep to remind you, and selected temperature, "F" will ash in the display to remind
you to place food in oven and set the cook time. If no cook time is entered within 15 minutes,
the oven will return to display " : 0" or the clock time.
CAUTION: If using cooking racks, only place the racks on the glass turntable. Do not place racks
on the oven oor.
(4) Press number pads to enter the cooking time. The maximum cooking time is 99 minutes, 99
seconds.
(5) Press to start cooking. The remaining cook time will display. CONV indicator "v" will
display and you can check selected temperature by pressing Conv during cooking.
Note: 1) If no preheat is needed, follow step 1 and 2 above and then skip to step 4.
2) If preheating, do not place food into oven until cooking temperature is reached.
3) If Convection Cooking without preheating, place food into oven at the start of cooking.

EN-18
COMBINATION FUNCTION (Microwave + Convection)
(1) Press Micro + Conv, "350F" and MICRO and CONV indicator "v" will appear in the display
window.
(2) Press number pads 0 through 9 to choose cooking temperature. Temperature selections (°F):
0 = 425, 1=100, 2 = 200, 3 = 250, 4 = 275, 5 = 300, 6 = 325, 7 = 350
8 = 375, 9 = 400. MICRO and CONV Indicator "v", "F" and the corresponding temperature
will display.
(3) Press Micro + Conv again. Press number pads to enter the cooking time. The maximum
cooking time is 99 minutes, 99 seconds.
(4) Press to start cooking. The remaining cook time will display. You can check the selected
temperature by pressing MICRO + CONV during cooking.
CAUTION: If using cooking racks, only place the racks on the glass turntable. Do not place racks
on the oven oor.
GRILL FUNCTION (Grill)
When Grill is selected, a burner in the ceiling of the oven turns on to radiate heat onto the food.
When you look into the oven you will see an orange glow through perforations in the top and
upper rear walls. The radiant heat will result in cooked food that is browned and crisped on the
outside surfaces.
Neither microwave energy nor the convection fan operates during Grill operation. The grill
function heats food more slowly than convection cooking.
When using Grill to cook meat, place the meat on the low rack. Fat drains from meat onto the
turntable. Clean turntable before next use.
(1) Press Grill, " : 0" and GRILL indicator "v" will appear in the display window.
(2) Press number pads to enter the cooking time; the maximum cooking time is 99 minutes and
99 seconds.
(3) Press to start cooking.

EN-19
POPCORN
(1) Press
Popcorn
repeatedly until the number you wish appears in the display, "3.2", "3.0" ,
"1.75" will appear in the display in order.
Press Once: Popcorn 3.2 oz
Press Twice: Popcorn 3.0 oz
Press 3 Times: Popcorn 1.75 oz
(2) Press to start cooking. Cook time for size chosen appears in the display. Oven beeps 3
times when cooking is nished.
BEVERAGE
(1) Press Beverage repeatedly until the number you wish appears in the display, "1", "2", "3"
cup will display in order.
(2) Press to start cooking. Cook time for number chosen appears in the display. Oven
beeps 3 times when cooking is nished.
ONE TOUCH COOK
Food Amount Comments
Popcorn
1.75oz.
3.0oz.
3.2oz.
Use only with prepackaged microwave popcorn weighing 1.75,
3.0,3.2 ounces.
Do not use this feature twice in succession on the same food
portion –it may result in severely overcooked or burnt food.
Beverage
(200ml/1cup)
1cup
2cups
3cups
Do not cover.
Drinks heated with the Beverage feature may be very hot.
Remove the container with care.
Do not use this feature twice in succession on the same food
portion –it may result in severely overcooked or burnt food.

EN-20
MULTI-STAGE COOKING
At most 2 stages can be set for cooking.
Note:
ONE TOUCH COOK, ONE TOUCH START and SENSOR COOK
cannot be used in multi-
stage cooking.
Example: 80% Power Level for 5 minutes followed by 60% Power Level for 10 minutes;
a. Press
Time Cook
once, then press "5", "0" and "0" to set rst stage cook time.
b. Press
Power Level
once, then press "8" to choose 80% rst stage cooking power.
c. Press
Time Cook
again, then press "1", "0", "0" and "0" to set second stage cook time.
d. Press
Power Level
again, then press "6" to choose 60% second stage cooking power.
e. Press to immediately start multi-stage cooking.
LOCK FUNCTION
To lock the microwave so that it cannot be operated by children or other unintended users,
press pad for 3 seconds. You will hear a long beep and "Loc" and LOCK indicator "v" will
appear in the display window.
To Unlock, press for 3 seconds, You will hear a long beep and the LOCK indicator "v" will
disappear in the display window.
COOKING END REMINDER FUNCTION
The oven will beep 3 times to alert the user that cooking time has ended. "End" will display.
The time of day will display by opening the door or pressing pad.

EN-21
Maintenance
Troubleshooting
Check your problem by using the chart below and try the solutions for each problem. If the
microwave oven still does not work properly, contact the following number for customer
assistance: 1-800-657-6119.
TROUBLE POSSIBLE CAUSE POSSIBLE REMEDY
Oven will not start
a. Electrical cord for oven is
not plugged in.
b. Door is open.
c. Wrong operation is set.
a. Plug into the outlet.
b. Close the door and try again.
c. Check instructions.
Arcing or sparking
a. Materials to be avoided in
microwave oven were used.
b. The oven is operated when
empty.
c. Spilled food remains in the
cavity.
a. Use microwave-safe cookware
only.
b. Do not operate with oven
empty.
c. Clean cavity with wet towel.
Unevenly cooked
foods
a. Materials to be avoided in
microwave oven were used.
b. Food is not defrosted
completely.
c. Cooking time, power level
is not suitable.
d. Food is not turned or stirred.
a. Use microwave-safe cookware
only.
b. Completely defrost food.
c. Use correct cooking time,
power level.
d. Turn or stir food.
Overcooked foods
Cooking time, power level is not
suitable.
Use correct cooking time, power
level.
Undercooked foods
a. Materials to be avoided in
microwave oven were used.
b. Food is not defrosted
completely.
c. Oven vents are blocked or
restricted.
d. Cooking time, power level is
not suitable.
a. Use microwave-safe cookware
only.
b. Completely defrost food.
c. Check to see that oven venti-
lation ports are not restricted.
d. Use correct cooking time,
power level.
Improper defrosting
a. Materials to be avoided in
microwave oven were used.
b. Cooking time, power level is
not suitable.
c. Food is not turned or stirred.
a. Use microwave-safe cookware
only.
b. Use correct cooking time,
power level.
c. Turn or stir food.
Sensor cooked foods
not properly cooked
a. Cover or lid on food not
vented.
b. Door opened before
sensordetected cooking time
appears in display.
a. Cover or lid over food must
contain vent hole for escaping
steam.
b. Do not open door to stir or turn
food before sensordetected
cooking time appears in
display.

Al nal de los ciclos de cocción más largos, es normal que
el ventilador continúe funcionando para enfriar el sistema
electrónico del horno. Después de 5 minutos sin más actividad
de cocción, el ventilador se apagará automáticamente. Sin
embargo, puedes comenzar una nueva
Ciclo de cocción incluso mientras el ventilador está
funcionando.
¡IMPORTANTE!
AVISO DE FUNCIONAMIENTO DEL VENTILADOR

SP-1
PRECAUCIONES PARA EVITAR POSIBLE
EXPOSICIÓN A EXCESIVA ENERGÍA DE
MICROONDAS
(a) No intente operar este horno con la puerta abierta ya que esto puede causar una
exposición dañina a energía de microondas.
Es importante no quebrar u obstruir los cierres d e seguridad.
(b) No ubicar ningún objeto entre la pared frontal del horno y la puerta ni permitir que
residuos de suciedad o limpiadores se acumulen en los bordes.
(c) No operar el horno si está dañado. Es particularmente importante que la puerta del
horno se cierre correctamente y que no haya daños en:
1. PUERTA (diente)
2. BISAGRAS Y PESTILLOS (quebrado o sueltos)
3. SELLOS DE LAS PUERTAS Y SUPERFICIE SELLANTE
(d)
El horno no deberá ser ajustado ni reparado por nadie excepto por personal de
servicio calicado apropiadamente.
(e) ADVERTENCIA:
Es peligroso para cualquier persona que no sea una persona
competente llevar a cabo cualquier operación de servicio o reparación que implique
la eliminación de una cubierta que proteja contra la exposición a la energía de
microondas.
(f) ADVERTENCIA:
Los líquidos y otros alimentos no deben calentarse en recipientes
sellados, ya que pueden explotar.
(g) ADVERTENCIA:
Solo permita que los niños usen el horno sin supervisión cuando se
hayan dado las instrucciones adecuadas para que el niño pueda usar el horno de
manera segura y entienda los peligros de un uso inadecuado.
(h) ADVERTENCIA:
Cuando el aparato se opera en modo combinado, los niños Solo debe
usar el horno bajo la supervisión de un adulto debido a la temperature generada. (si
se proporciona)
Especificaciones
Modelo: 111.71513810
Alimentación 120V~ 60Hz
Potencia de salida de Microondas 1000 W
Potencia de entrada 1650 W
Parrilla 1200 W
Convección 1450 W
Combinación 1700 W
Capacidad 2.2 cu.ft./60 L
Diámetro de la bandeja Ø 16 inch / 406 mm
Dimensiones extern a s (An. x Prof. x Al.) 22.9X22.0X14.9 inch (582X559X379 mm)
Peso neto Approx. 48.9 Lbs (22.2 kg)
¡ADVERTENCIA! El uso de este electrodoméstico puede exponerlo a
sustancias químicas que el estado de California considera que causan cáncer,
defectos de nacimiento u otros daños reproductivos. Para obtener más
información, vaya a HYPERLINK www.P65Warnings.ca.gov

SP-2
INSTRUCCIONES DE SEGURIDAD
IMPORTANTES
ADVERTENCIA
1. Lea todas las instrucciones antes de
utilizar el electrodoméstico.
2. Lea y preste atención a las “Precauciones
para evitar una posible exposición a la
energía microondas excesiva” tal como se
detalla en la página 1
3. Como con otros electrodomésticos de
cocina, debe prestarse mucha atención
para reducir el riesgo de que se produzca
fuego dentro de la cavidad del horno.
4. Con el n de reducir el riesgo de quese
produzca fuego dentro de la cavidad del
horno:
i) No cocine los alimentos de manera
excesiva. Vigile el horno cuando, para
facilitar la cocción, se prepare alimentos
utilizando materiales de papel o plástico
u otros materiales combustibles.
ii) Retire los cintillos de alambre o asasde
metal de las bolsas o envases de papel
o plástico antes de colocarlos dentro del
horno.
iii) Si cualquier material dentro del
horno se prendiera fuego, mantenga la
puerta cerrada. Apague y desenchufe el
electrodoméstico y desconecte la energía
en la caja o panel de fusibles o de
interruptores principal.
iv) No use la cavidad del horno para
guardar objetos. No deje artículos de
papel, utensilios de cocina o alimentos
dentro del horno cuando no lo esté
usando.
5. Este electrodoméstico debe conectarsea
tierra. Enchúfelo solamente a un
tomacorriente con la debida salida
a tierra. Véase las “Instrucciones de
conexión a tierra” en la página 3.
6. Instale y ubique este horno solamentede
acuerdo con las instrucciones de
instalación de este manual.
7. Algunos productos como huevos enteros
y envases cerrados herméticamente,
por ejemplo frascos de vidrio, podrían
explotar por lo que no deben calentarse
en este horno.
8. Utilice este electrodoméstico sólo paralos
nes que ha sido diseñado tal como
se describe en este manual. No utilice
químicos corrosivos u otras sustancias con
este electrodoméstico. Este horno ha sido
diseñado especícamente para calentar,
cocinar o secar alimentos. No ha sido
diseñado para usos industriales o de
laboratorio.
9. Como con cualquier otro electrodoméstico,
debe prestarse suma atención si va a ser
utilizado por parte de niños.
10. No utilice el electrodoméstico si el cordón
o el enchufe se encuentran dañados, si no
funciona adecuadamente o si ha sufrido
algún tipo de daño o caída.
11. Todo servicio técnico debe ser llevadoa
cabo por parte del personal técnico
calicado.
12. No cubra ni obstruya las aberturas del
horno.
13. No guarde ni utilice este electrodoméstico
al aire libre.
14. No utilice este horno cerca del agua, por
ejemplo cerca de un lavadero de cocina,
en un sótano muy húmedo, cerca de una
piscina u otros lugares similares.
15. No sumerja el cordón ni el enchufe en
agua.
16. Mantenga el cordón lejos de
cualquiersupercie caliente.
17. No permita que el cordón cuelgue del
borde de la mesa o repostero de cocina.
18. Al momento de efectuar la limpieza de
las supercies de la puerta y del horno
que entren en contacto con el cierre
de la puerta, utilice un tipo de jabón o
detergente no abrasivo aplicándolo con
una esponja a un paño suave.
Con el n de reducir el riesgo de que se produ z can
quemaduras, una descarga eléctrica, un incendio, lesiones
o exposiciones a la energía microondas excesiva al momento
de usar este electrodoméstico, siga las siguientes precauciones
de seguridad básicas:

SP-3
GUARDE ESTAS INSTRUCCIONES
INSTRUCCIONES DE CONEXIÓN A TIERRA
19. NO coma los alimentos inmediatamente
después que se terminen de cocinar.
Alimentos calentados, especialmente
pizza pueden quemar su boca. Deje
que los alimentos se enfríen a una
temperatura segura antes de comer.
20. Esta aplicación se dedica solamente
para el uso privadoy doméstico.
21. Los líquidos, tales como el agua, café
o té pueden sobrecalentarsemásallá
del puntode ebullición sin parecer
haber hervido. El burbujeo o hervido
visible de un recipiente al momento de
sacarlo del horno de microondas no
siempre está presente. ESTO PODRÍA
OCASIONAR QUE UN LÍQUIDO
CALIENTE REPENTINAMENTE ROMPA EL
HERVOR AL MOMENTO DE ACCIONAR
ALGÚN MOVIMIENTO O METER
UNA CUCHARA U OTRO UTENSILIO
DENTRO DEL LÍQUIDO.
i) No sobrecaliente los líquidos.
ii) Remueva el líquido antes y a la
mitad del proceso de calentamiento.
iii) No utilice envases o recipientes de
lados verticales con cuellos angostos.
iv) Después de calentar, deje que el
envase o recipiente repose dentro
del horno a microondas durante un
periodo corto antes de retirarlo.
v) Tenga sumo cuidado al momento de
insertar una cuchara o cualquier otro
utensilio dentro del envase o recipiente.
22. Los alimentos de gran tamaño o los
utensilios de metal de gran tamaño
no deben insertarse en un horno de
microondas, ya que pueden provocar
un incendio o riesgo de descarga
eléctrica.
23. No limpiar con estropajos metálicos.
Las piezas se pueden quemar y tocar
las partes eléctricas, lo que implica un
riesgo de descarga eléctrica.
24. No almacene ningún material, aparte
de los accesorios recomendados por
el fabricante, en este horno cuando no
esté en uso.
25. No cubra las parrillas ni ninguna otra
parte del horno con papel metálico.
Esto causará sobrecalentamiento del
horno.
26. No opere el horno sin la bandeja de
vidrio en su lugar. Asegúrese de que
esté correctamente sentado sobre la
base giratoria.
ADVERTENCIA: si ve arcos, presione la tecla y corrija el problema. Arqueado es el
término de microondas para chispas en el horno. El arco es causado por:
a) Metal o papel de aluminio tocando el lado del horno.
b) Lámina no moldeada como alimento (los bordes vueltos hacia arriba actúan como antenas).
c) Metal como las ataduras, los alfileres de las aves de corral o los platos con borde dorado
en el microondas.
d) Toallas de papel reciclado que contienen pequeñas piezas metálicas que se utilizan en el
microondas.
ARCING

SP-4
1. Un cable de abastecimiento corto reduce los riesgos derivados de enredarse o tropezarse con
un cable mas largo.
2. Cordones más largos o cables de más extensión están disponibles y pueden ser ser utilizados
si se ejerce el cuidado en su uso.
3. Si se utiliza un cordón largo o conjuntos de cables de extensión:
i) La clasicación eléctrica del juego de cables o la clasicación eléctrica de las extensiones
de juegos de cables o extensiones de cables deben ser al menos tan grande como la
clasicación eléctrica del aparato.
ii) El cable de extensión debe ser cordón a tierra tipo 3-cable;
iii) El cable más largo debe ser colocado de manera que no cuelgue sobre el mostrador o la
mesa, donde puede ser tirado por niños o tropezarse con el sin intención
INSTRUCCIONES DE CONEXIÓN A TIERRA
PELIGRO
ADVERTENCIA
Peligro de descarga eléctrica
Se podría producir lesiones
serias o hasta la muerte si se
toca algunos de los componentes
internos del horno. No desarme el
electrodoméstico.
Peligro de descarga eléctrica
Un aparato inapropiadamente
conectada a tierra puede causar el
impacto eléctrico.
No enchufe el electrodoméstico
hasta que é ste haya quedado
correctamente instalado
y conectado a tierra.
Enchufe de tres extremidades
(con salidaa tierra)
Este electrodoméstico debe quedar conectado a tierra.
En el caso de un cortocircuito, la conexión a tierra
reduce el riesgo de una descarga eléctrica ofreciendo
un cable de escape para la corriente eléctrica. Con el
n de protegerse del impacto eléctrico, este aparato
está equipado con un cordón que tiene un enchufe de
tres dientes, conectado a tierra, para la inserción en
un adecuado recipiente conectado a tierra. Nl alterar
el enchufe por otro de uso para un recipiente de dos
dientes. NUNCA use un adaptador de tres patas para
poder conectar el microondas a un enchufe de dos
patas. Si el enchufe no acomoda al recipiente, hay que
instalar un recipiente apropiado, lo que se realiza por
un eléctrico callicado.
Consulte con un electricista calicado o un técnico
sobre las instrucciones de conexión a tierra si no las
comprende totalmente o si tuviera alguna duda de
que su electrodoméstico haya quedado correctamente
conectado a tierra. Si fuera necesario utili zar un cable
de extensión, utilice un cable de 3 alambres que cuente
con un enchufe de 3 extremidades y con un receptáculo
de 3 ranuras donde se pueda conectar el enchufe del
electrodoméstico. La resistencia eléctrica del cable
de extensión debe ser igual o mayor a la resistencia
eléctrica del electrodoméstico.

SP-5
PRECAUCIÓN UTENSILIOS
DECLARACIÓN DE INTERFERENCIA DE
RADIOFRECUENCIA COMISIÓN FEDERAL DE
COMUNICACIONES (SOLAMENTE EN LOS
ESTADOS UNIDOS)
Peligro de lesiones personales
Es peligroso para cualquiera
que no esté cualicado realizar
reparaciones o mantenimiento
que supongan retirar la tapa
de mica que protege de la
exposición a las microondas.
Véanse las instrucciones sobre ¨ Materiales que pueden
usarse o deben evitarse en el horno microondas.¨
Algunos utensilios no metálicos pueden no ser seguros
para su uso en un horno microondas. En caso de dudas,
puede probar el utensilio en cuestión aplicando el
procedimiento que se describe a continuación.
Prueba de utensilios:
1. Llene un recipiente apto para horno microondas con
un vaso de agua fría (250ml) e introdúzcalo en el
horno microondas con el utensilio en cuestión.
2. Cocine a la potencia más alta durante 1 minuto.
3. Toque con cuidado el utensilio. Si está caliente, no lo
utilice para cocinar en el horno microondas.
4. No supere 1 minuto de cocción.
Este equipo genera y utiliza energía de frecuencia ISM y, si no se instala y utiliza correctamente,
es decir, es estrictamente de acuerdo con las instrucciones del fabricante y puede causar
interferencias en la recepción de radio y televisión.
Ha sido sometido a pruebas de tipo y se ha encontrado que cumple con los límites para un
equipo ISM conforme a la parte
18 de las reglas de la FCC, que están diseñadas para proporcionar una protección razonable
contra dicha interferencia en una instalación residencial.
Sin embargo, no hay garantía de que no se produzcan interferencias en una instalación en
particular. Si este equipo causa interferencia en la recepción de radio o televisión, lo cual
puede determinarse encendiendo y apagando el equipo, se recomienda al usuario que intente
corregir la interferencia con uno o más de los siguientes.
• Reorientar la antena receptora de radio o televisión.
• Reubicar el horno de microondas con respecto al receptor.
• Aleje el horno de microondas del receptor.
• Enchufe el horno de microondas en una salida diferente para que el horno de microondas y el
receptor estén en diferentes circuitos derivados.
EL FABRICANTE no es responsable de ninguna interferencia de radio o TV causada por
MODIFICACIÓN NO AUTORIZADA a este horno de microondas. Es responsabilidad del usuario
corrija tal interferencia

SP-6
MATERIALES SEGUROS Y SEGUROS
Materiales que se pueden usar en el horno a microondas.
Materiales a ser evitados en el horno a microondas
Utensilios Observaciones
Lámina de aluminio Solamente como protección. Pequeñas piezas lisas pueden ser usadas para cubrir partes delgadas
de carne o pollo para prevenir sobre cocción. Puede ocurrir que se formen arcos si el lm está
muy cerca de las paredes del horno. El lm debe estar por lo menos a 2,5 cm de distancia de las
paredes del horno.
Bandeja doradora Siga las instrucciones del fabricante. El fondo de la bandeja debe estar al menos a 5 mm arriba
del plato giratorio. El uso incorrecto puede resultar en la rotura del plato giratorio.
Elementos para comida Use solamente utensilios seguros para microondas. Siga las instrucciones del fabricante. No use
platos rotos o astillados.
Jarras de vidrio Quíteles siempre la tapa. Use solo para calentar alimentos hasta su punto justo. La mayoría de las
jarras no son resistentes al calor y pueden romperse.
Cristalería Use solamente cristalería resistente al calor del horno. Asegúrese de que no hay adornos metálicos.
No use platos rotos o astillados.
Bolsas para cocinar en
horno
Siga las instrucciones del fabricante. No las cierre con precintos. Asegúrese de que tengan aberturas
para permitir la salida de vapores
Platos y vasos de papel Uselos para cocción / calentamiento de corto tiempo. No deje el horno sin atención mientras cocina
/ calienta.
Servilletasdepapel Uselas para cubrir los alimentos para que retengan y absorban grasa.
Deben usarse con supervisión para cocción de corto tiempo.
Pergaminodepapel Uselo como cubierta para prevenir salpicaduras o como envoltura para cocción al vapor.
Plásticos Solamente aptos para microondas. Siga las instrucciones del fabricante. Deben estar etiquetados
como “Seguros para microondas”. Algunos plásticos contienen aislantes de manera que los alimentos
en su interior logren calentarse. Las “Bolsas para Hervir” y las bolsas plásticas herméticamente
cerradas deben ser abiertas o perforadas y usar como vienen empaquetadas.
Platos y vasos de papel Uselos para cocción / calentamiento de corto tiempo. No deje el horno sin atención mientras cocina
/ calienta.
Servilletasd ep apel Uselas para cubrir los alimentos para que retengan y absorban gra Deben usarse con supervisión
para cocción de corto tiempo.
Pergaminod ep apel Uselo como cubierta para prevenir salpicaduras o como envoltura p cocción al vapor.
Plásticos Solamente aptos para microondas. Siga las instrucciones del fabricante. Deben estar etiquetados
como “Seguros para microondas”. Algunos plásticos contienen aislantes de manera que los alimentos
en su interior logren calentarse. Las “Bolsas para Hervir” y las bolsas plásticas herméticamente
cerradas deben ser abiertas o perforadas y usar como vienen empaquetadas.
Cubiertas plásticas Solamente aptas para microondas. Uselas para cubrir los alimentos durante la cocción para retener
la humedad. No permita que las cubiertas plásticas entren en contacto con los alimentos.
Termómetros Solamente aptos para microondas. (termómetros para carnes y dulces / caramelo).
Papel encerado Uselo como una cubierta para prevenir salpicaduras y retener la humedad
Observaciones Respecto a los utensilios
Bandeja de aluminio Puede causar arcos. Pase los alimentos a un recipiente apto para microondas.
Caja de alimentos con
manija metálica
Puede causar arcos. Pase los alimentos a un recipiente apto para microondas.
Utensilios de metal o con
revestimientos metálicos
Los metales evitan que la energía de microondas vayan a los alimentos. Los adornos de metal
pueden causar arcos.
Precintos o cierres de
metal
Pueden causar arcos y podrían causar fuego dentro del horno.
Bolsas de papel Pueden causar fuego en el horno.
Espumados plásticos Los espumados plásticos pueden derretirse o contaminar el líquido dentro cuando son expuestos a
altas temperaturas
Madera La madera se secará cuando es usada en el horno a microondas y puede rajarse o romperse

SP-7
F
G
A
C
B
E
D
PREPARANDO SU HORNO A MICROONDAS
Nombres de las partes y accesorios
Instalación del plato giratorio
Retire el horno y todos los materiales de su caja y de la cavidad del horno. Su horno viene con
los siguientes accesorios:
Bandeja de vidrio 1
Anillo de plataforma giratoria 1
Manual del usuario 1
Estante bajo 1
Estante alto 1
A) Panel de control
B) Eje para bandeja giratoria
C) Anillo del rodillo giratorio
D) Plato giratoria de vidrio
E) Ventana para observación
F) Puert a del horno
G) Sistema de seguridad de cierre
a. Nunca coloque la bandeja de vidrio con el lado de arriba
hacia abajo. Nunca se debe usar el horno sin esta bandeja.
b. Tanto la bandeja de vidrio como el anillo giratorio deben
usarse siempre durante la cocción. El uso del estante bajo y
alto es opcional según el tipo de cocción.
PRECAUCIÓN: si usa rejillas para cocinar, colóquelas en el
plato giratorio de vidrio. No coloque parrillas en el piso
del hornoTodos los alimentos o los envases que los contienen
siempre deben colocarse sobre la bandeja de vidrio
giratoria.
c. Todos los alimentos y recipientes de alimentos deben
colocarse siempre en la bandeja de vidrio para cocinar.
d. Si la bandeja de vidrio o el aro giratorio se suran o
rompen, conecta con el siguiente número de asistencia para
la clientela:
1-844-553-6667 press 2
Cubo de acople (parte inferior)
Bandeja de
vidrio
Eje del plato
Anillo giratorio

SP-8
Previo a la instalación
Instalación
Retire todo el material de embalaje y los
accesorios.
Examine el horno para descubrir si este
tiene algún daño como ser abolladuras o la
puerta desviada o rota.
Gabinete: Quite todo el film protector que
encuentre en la superficie del gabinete. No
quite la tapa de Mica color marrón claro
adherida dentro de la cavidad del horno,
ya que esta sirve para proteger la válvula
magnetrón.
1. Elija una supercie nivelada
que provea suciente espacio
abierto para la entrada y /o
salida de aire para ventilación.
(3) El bloquear las aberturas de salida /
entrada de aire pueden causar daño al
horno.
(4) Colocar el horno tan lejos como sea
posible de radios y televisores. El
funcionamiento del horno microondas
puede causar interferencias en la
recepción de las emisiones de radio o TV.
2.
Enchufe el horno en un tomacorriente
normal doméstico con puesta a tierra.
Asegúrese de que el voltaje y la
frecuencia se correspondan con el
marcado de la unidad en su etiquetado.
ADVERTENCIA:
No instale el horno sobre una
cocina o fogón u otro artefacto que produzca
calor. Si lo instala cerca o sobre una fuente
de calor, el horno puede dañarse y eso
anulará la garantía.
Una luz mínima de 7.5 cm se requiere entre
el hornoy cualquier pared adyacente. Un
lado debe quedar libre.
(1) Deje una luz mínima de 30 cm encima
del horno.
(2) No quite las patas de la base del horno.
30cm
LIBRE
7.5cm
7.5cm

SP-9
FUNCIONAMIENTO
Panel de control y funciones
(1) Precision Cooking (recalentamiento automático, Auto Cook, Auto Bake, Auto asado,
palomitas de maíz, bebidas) Los elementos del menú automático le permiten cocinar
programa de tiempo basado en la cantidad de alimentos con facilidad.
(2) Descongelamiento: Tiempo de descongelamiento calculado por el peso ingresado y
la categoría del artículo.
(3) Micro - Prensa para cocinar solo en microondas
(4) Grill - Presione para cocinar solo Grill
(5) Conv - Prensa para cocinar solo por convección
(6) Micro + Conv - Prensa para cocción combinada de microondas y convección
(7) Nivel de potencia
(8) Descongelación por peso
(9) temporizador / reloj
(10) tiempo de cocinero
(11) Teclas de cocción rápida (1-6)
(12) PARAR/Presionar 3 seg.: Antes de cocinar, presiónelo para eliminar todos los ajustes
previos. Mientras cocina, presiónelo una vez para detener el horno; presiónelo dos
veces para detener la operación y borrar todos los ajustes. Presione el botón tres
segundos para bloquear o desbloquear la pantalla y panel de control.
(13) Pantalla
MICRO GRILL PREH lbCONV
DEF CLOCK LOCK
oz
TIMER
(5)
(4)
(6)
(13)
(12)
(3)
(8)
(10)
(9)
(1)
(7)
(1)
(2)
(11)

SP-10
OPERACIÓN
AJUSTE DEL RELOJ
Cuando conecte el horno microondas a un enchufe aparecerá ":0" en la pantalla.
(1) Presione Temporizador / Reloj, aparecerá "12H " en la pantalla.
(2) Use el teclado numérico para entrar la hora . Por ejemplo, si son las 8:30, presione "8, 3, 0"
en ese orden. Los números parpadearán en la pantalla.
(3) Presione Temporizador / Reloj para completar el ajuste del reloj. Se mostrará ":" y
aparecerán los números como la hora en la pantalla.
Aviso: (1) Si comete un error de ingreso de números mientras está congurando el reloj,
presione para comenzar nuevamente.
(2) Este es un reloj de 12 horas. Si los números ingresados no están dentro del rango de
1:00 a 12:59, la conguración no será aceptada hasta que se ingresen los números
válidos.
TEMPORIZADOR
(1) Presione Timer / Clock dos veces, ": 0" y el indicador TIMER "v" aparecerá en la ventana de
visualización.
(2) Utilice el teclado numérico para entrar la cantidad de tiempo. La cantidad de tiempo
máxima que puede entrar es 99 minutos y 99 segundos.
(3) Presione el botón para conrmar el ajuste.
(4) Cuando la cantidad de tiempo transcurra, el panel de control emitirá un pitido 3 veces.
Nota: La conguración del temporizador es diferente de la conguración del reloj; es
simplemente un temporizador.
TIEMPO DE COCCIÓN
(1) Presione Time Cook, ": 0" y el indicador M / W (Microondas) "v" aparecerá en la ventana
de visualización.
(2) Utilice el teclado numérico para entrar el tiempo de cocción; el tiempo de cocción máximo
es 99 minutos y 99 segundos.
(3) Presione Nivel De Potencia; aparecerá PL10 en la pantalla. Este es el ajuste prejado
del nivel de potencia 100%. Presione los números del 0 al 9 usando el teclado numérico
si desea seleccionar un nivel de potencia diferente. Vea la tabla de Nivel De Potencia a
continuación.
(4) Presione para comenzar a cocinar.
Ejemplo: Para cocinar alimentos con un nivel de potencia de 50% por 15 minutos.
a. Presione el botón Time Cook, ": 0" y el indicador M / W (Microondas) "v" aparecerá en
la ventana de visualización.
b. Usando el teclado numérico entre "1, 5, 0, 0" en ese orden, aparecerá 15:00 en la
pantalla.
c. Presione Nivel De Potencia, luego presione "5" para seleccionar un nivel de
d. Presione para comenzar a cocinar.
Aviso: En el proceso de conguración, si el se presiona el pad, la pantalla volverá al
modo de espera

SP-11
ARCING
Arqueado es el término de microondas para chispas en el horno. Si ve arcos, presione la Tecla
STOP. Espere hasta que el contenido del horno se haya enfriado y corrija el problema. Consulte
la sección MATERIALES SEGUROS Y NO SEGUROS de esta Guía de uso y cuidado.
AVISO DE FUNCIONAMIENTO DEL VENTILADOR
Al nal de los ciclos de cocción Grill / Convección / Combi, es normal que el ventilador
continúe funcionando para enfriar el sistema electrónico del horno. Después de 5 minutos sin
más actividad de cocción, el ventilador se apagará automáticamente. Sin embargo, puede
comenzar un nuevo ciclo de cocción incluso cuando el ventilador está funcionando.
TIEMPO DE ESPERA
"Tiempo de espera" signica que después del tiempo de cocción, debe dejar que los alimentos
reposen bien sea dentro o fuera del horno para que se terminen de cocinar. El tiempo de
espera fuera del horno permite que el horno esté disponible para otros usos.
NIVEL DE POTENCIA
Hay diez niveles de potencia disponible.
El nivel de potencia 0 también está disponible si desea programar un tiempo de permanencia
en el horno programado.
Después de ingresar los dígitos de Cocción de tiempo y antes de iniciar la operación, presione
Nivel de potencia y se mostrará "PL10". Ajuste la potencia presionando un teclado numérico
como se indica en la tabla a continuación.
Nivel 10 9 8 7 6 5 4 3 2 1 0
Potencia 100% 90% 80% 70% 60% 50% 40% 30% 20% 10% 0%
Aparece en
pantalla
PL10 PL-9 PL-8 PL-7 PL-6 PL-5 PL-4 PL-3 PL-2 PL-1 PL-0
COCCIÓN RAPIDA
(1) Puede iniciar la cocción rápida a un nivel de potencia de 100% con una duración entre 1 y
6 minutos con solo presionar las teclas del 1 al 6 en el teclado.
(2) Puede iniciar la cocción rápida a un nivel de potencia de 100% por 30 segundos cada vez
que presione el botón Cada vez que lo presione se incrementará el tiempo de cocción
en 30 segundos.
El tiempo de cocción máximo es de 99 minutos y 59 segundos.
Aviso: 1) Puede añadir tiempo en incrementos de 30 segundos cada vez que presiona
mientras cocina con el microondas.

SP-12
FUNCIÓN DE DESCONGELAR POR PESO
(1) Presione Descongelar Por Peso, "dEF1" y DEF. el indicador "v" aparecerá en la ventana de
visualización.
Si presiona el botón sucesivamente aparecerán, "DEF1", "DEF2" y "DEF3" en ese orden.
(2) Use el teclado numérico para entrar el peso a descongelar.
El peso debe oscilar entre 0.2 a 6.0 lbs.
El indicador lb "'v" parpadeará en la ventana de visualización.
Si el peso entrado no oscila entre 0.2 a 6.0 lbs, será ignorado. El horno no funcionará hasta
que entre números válidos.
(3) Presione para comenzar a descongelar y aparecerá el tiempo de cocción restanteen
la pantalla.
Aviso: Durante el ciclo de descongelación, el horno emitirá un pitido para recordarle que debe
voltear la comida. Voltee la comida, cierre la puerta y presione para reanudar el
ciclo de descongelación.
Aparece en pantalla DEF1 DEF2 DEF3
Alimento Carnes Aves Pescados

SP-13
FUNCIÓN DE COCCIÓN AUTOMÁTICA
(1) Presione Auto Cook, se mostrará "Ac-1".
(2) Presione Auto Cook repetidamente para elegir el menú. Vea la tabla de cocción automática
a continuación.
(3) Presione el teclado numérico para ingresar peso o porciones.
(4) Presione para comenzar a cocinar.
AVISO: los períodos de calentamiento de COCCIÓN AUTOMÁTICA más prolongados pueden
producir condensación de humedad en el interior del horno. Una vez que el interior se
haya enfriado después de retirar los alimentos, limpie la humedad con un paño limpio y
seco antes del próximo uso del horno.
Menú de cocción automática:
Comida Presentar Peso / Porción
La patata Ac-1 8 oz / 16 oz / 24 oz / 32 oz (1 ea/ 2 ea/ 3 ea/ 4 ea)
Vegetal fresco Ac-2 4 oz / 8 oz / 12 oz / 16 oz
Vegetal congelado Ac-3 4 oz / 8 oz / 12 oz / 16 oz
Carne molida Ac-4 8 oz / 12 oz / 16 oz / 24 oz
Pescado / Mariscos Ac-5 8 oz / 12 oz / 16 oz / 24 oz
La comida Cantidad de servicio y recomendaciones
1
La patata
El tamaño de la porción es de 1 a 4 papas medianas, aproximadamente de 8
a 10 oz. (225 a 280 g) cada uno.
Perfore cada papa varias veces con un tenedor y colóquelas alrededor del
borde de la bandeja del horno, separadas por lo menos 1 pulgada (2.5 cm).
2
Vegetal
fresco
El tamaño de la porción es de 4 a 16 oz.
Coloque los vegetales húmedos en un recipiente apto para microondas.
Agregue 2 a 4 cucharadas (30 a 60 ml) de agua.
Cubrir con plástico y ventilar *.
La mayoría de las verduras necesitan ser removidas y de 2 a 3 minutos de
reposo después de cocinarlas.
3
Vegetal
congelado
El tamaño de la porción es de 4 a 16 oz.
Retire del paquete y coloque las verduras en un recipiente apto para
microondas.
Agregue 2 a 4 cucharadas (30 a 60 ml) de agua.
Cubrir con plástico y ventilar *.
La mayoría de las verduras necesitan ser removidas y de 2 a 3 minutos de
reposo después de cocinarlas.
4
Carne
molida
El tamaño de la porción es de 8 a 24 oz. (1/2 a 1.5lbs.)
Desmenuce la carne en un recipiente apto para microondas.
Sazonar y cubrir con plástico.
Tapa de ventilación para carnes bien hechas.
Cubra el plato para la carne cocida mediana (como la carne que se usará en
otro plato y luego se cocinará)
5
Pescado /
Mariscos
El tamaño de la porción es de 8 a 24 oz. (1/2 a 1.5lbs.)
Coloque la comida alrededor de los lados de un recipiente apto para
microondas. Sazone y agregue 1/4 a 1/2 taza (60 a 125 ml) de líquido (vino,
agua, salsa, etc.) si lo desea.
Cubrir con plástico y ventilar *.
* Doble hacia atrás una esquina de la envoltura de plástico para ventilar el exceso de vapor.
MESA DE COCCIÓN AUTOMÁTICA

SP-14
FUNCION DE RECAMBIO AUTO
(1) Presione el recalentamiento automático, aparecerá "rH-1".
(2) Presione repetidamente el recalentamiento automático para elegir el menú. Consulte la
tabla de recalentamiento automático a continuación.
(3) Presione el teclado numérico para ingresar peso o porciones.
(4) Presione para comenzar a cocinar.
Menú de recalentamiento automático:
La comida Presentar Peso / Porción
Plato de cena rH-1 10 oz / 12 oz / 16 oz
Sopa / Salsa rH-2 1 cup / 2 cups / 3 cups / 4 cups
Cazuela rH-3 1 cup / 2 cups / 3 cups / 4 cups
La comida Cantidad de servicio y recomendaciones
1
Plato de cena
El tamaño de la porción es de aproximadamente 10 a 16 oz (280 a
450 g).
Coloque los alimentos para calentar en un plato o plato similar.
Cubrir con plástico y ventilar *.
2
Sopa / Salsa
El tamaño de la porción es de 1 a 4 tazas (250 ml a 1L).
Coloque los alimentos a calentar en una cazuela.
Cubrir con plástico y ventilar *.
3
Cazuela
El tamaño de la porción es de 1 a 4 tazas (250 ml a 1L).
Coloque los alimentos a calentar en una cazuela.
Cubrir con plástico y ventilar *.
* Doble hacia atrás una esquina de la envoltura de plástico para ventilar el exceso de vapor.
MESA DE REHEAT AUTO

SP-15
FUNCIÓN DE COCCIÓN AUTOMÁTICA
(1) Presione Auto Bake, se mostrará "Ab-1".
(2) Presione repetidamente Auto Bake para elegir el menú. Consulte la tabla de horneado
automático a continuación.
(3) Presione el teclado numérico para ingresar peso o porciones. Para Ab-4, presione los
botones numéricos del 1 al 3 para elegir el peso. Para Ab-1, Ab-2, Ab-3, no necesita
presionar el botón numérico para elegir un peso o una porción.
(4) Presione para comenzar a cocinar.
Menú Auto Bake:
La comida Presentar Peso / Porción
Pizza congelada Ab-1 10 ~ 12 pulgadas de masa delgada pizza congelada
Magdalenas Ab-2 Mufn de 6 tazas (con función de precalentamiento)
Rollo De Galletas /
Cena / Barra De Pan
Ab-3 1 sartén (con función de precalentamiento)
Papas Fritas
Congeladas
Ab-4 8 oz / 12 oz / 16 oz
PRECAUCIÓN:
si usa rejillas para cocinar, colóquelas en el plato giratorio de vidrio.
No coloque parrillas en el piso del horno.
La comida Cantidad de servicio y recomendaciones
1
Pizza
congelada
Para obtener los mejores resultados, no se requiere una bandeja
de pizza. Use una pizza congelada de 10 ~ 12 pulgadas de masa
delgada. Si hornea una pizza de masa ascendente, agregue un
tiempo de horneado adicional de 10 a 20 minutos en la cocina
de convección a 450 ° F (230 ° C). Coloque la pizza congelada
directamente en el estante alto.
2
Magdalenas
Use 1 paquete de una mezcla para mufns. Coloque el estante bajo
en el plato giratorio.
Después de PREHEAT, use un molde para mufns de 6 tazas; coloque
la bandeja en la rejilla.
3
Rollo De
Galletas /
Cena / Barra
De Pan
Para obtener los mejores resultados, hornee una bandeja de
galletas, rollos de comida o palitos de pan a la vez.
Después de PRECALENTAR, coloque las galletas a una distancia de 1
a 5 pulgadas (2.5 a 5 cm) en una bandeja para pizza engrasada o
en una bandeja para hornear galletas en la rejilla baja.
Deje enfriar en la rejilla durante 10 minutos después de cocinar.
4
Papas Fritas
Congeladas
Use papas fritas congeladas y preparadas. No se superponen ni se
superponen las patatas.
Para papas más crujientes, use MÁS para agregar tiempo de cocción
adicional.
Unte las papas fritas en una bandeja para pizza o en una bandeja
para galletas. Coloque la sartén en la rejilla alta.
Rango de peso: 8 a16 oz. (225 a 450 g).
TABLA DE COCCIÓN AUTOMÁTICA

SP-16
FUNCION DE AUTO RASTOS
(1) Presione Auto Roast, se mostrará "Ar-1".
(2) Presione Auto Roast repetidamente para elegir el menú. Consulte la tabla de Auto Roast a
continuación.
(3) Presione el teclado numérico para ingresar el peso.
(4) Presione para comenzar a cocinar.
La comida Presentar Peso / Porción
Carne asada Ar-1 2 lb ~ 4 lb
Pollo asado Ar-2 2.4 lb ~ 6 lb
Chuleta De Cerdo Asada Ar-3 1 lb ~ 4 lb
Patata asada Ar-4 1 lb ~ 2 lb
PRECAUCIÓN:
si usa rejillas para cocinar, colóquelas en el plato giratorio de vidrio.
No coloque parrillas en el piso del horno.
La comida Cantidad de servicio y recomendaciones
1
Carne asada
Pesar el asado y secarlo con toallas de papel. Coloque una placa
apta para microondas / resistente al calor en el plato giratorio para
recoger goteos. Coloque el asado en la parrilla baja.
Después de cocinar, coloque la carne de vacuno asada con papel
aluminio y déjelo reposar de 5 a 10 minutos.
Rango de peso: 2 a 4 libras. (1 a 2 kg)
2
Pollo asado
Pesar el pollo entero. Quitar las menudencias y el cuello y desechar.
Lave bien el pollo por dentro y por fuera con agua fría. Seque el
pollo con toallas de papel. Asegure las piernas con hilo de cocina.
Cepille el exterior del pollo con mantequilla derretida o margarina.
Coloque una placa apta para microondas / calor en el plato
giratorio para atrapar las gotas.
Coloque la pechuga de pollo hacia arriba sobre una rejilla baja.
Después de cocinar, cargue suavemente el pollo asado con papel
aluminio y déjelo reposar durante 10 minutos.
3
Chuleta De
Cerdo Asada
Rango de peso: 2.4 a 6lbs. (1 a 3 kg)
Pesar el asado y secarlo con toallas de papel. Coloque una placa
apta para microondas / resistente al calor en el plato giratorio para
recoger goteos. Coloque el asado en la parrilla baja.
Después de la cocción, cueza el asado con papel aluminio y déjelo
reposar de 5 a 10 minutos.
Rango de peso: 1 a 4 libras. (450g a 2 kg)
4
Patata asada
Lavar y secar bien las patatas. Cortar las papas en trozos de
tamaño uniforme y sazonar. Coloque las papas en un plato apto
para microondas / resistente al calor. Colocar en un estante alto.
Rango de peso: 1 a 2 libras. (450g a 1 kg)
Mesa de autoservicio

SP-17
Cocción por convección
En la cocción por convección, un ventilador en la pared posterior del horno hace circular aire
caliente alrededor de los alimentos para cocinarlos rápida y uniformemente en todos los lados,
lo que también proporciona un dorado y crujientes a las supercies de los alimentos.
Para un mejor rendimiento de convección, es necesario precalentar. Un período de tiempo de
precalentamiento está integrado en la función Conv.
La convección requiere el uso de las rejillas elevadas provistas para que el calor circule por
todos los lados de los alimentos.
Use la parrilla baja para hornear, o para asar o asar carnes. La grasa se escurre de la carne
en el plato giratorio. Limpie el plato giratorio antes del siguiente uso.
Use el estante bajo y el estante alto para hornear simultáneamente dos niveles de cookies o
cada capa de un pastel de dos capas.
(1) Presione Conv, "350F" y el indicador CONV "v" aparecerán en la ventana de visualización.
(2) Presione los botones numéricos del 0 al 9 para seleccionar la temperatura de cocción si lo
desea. Selecciones de temperatura (° F):
0 = 425, 1 = 100, 2 = 200, 3 = 250, 4 = 275, 5 = 300, 6 = 325, 7 = 350, 8 = 375,
9 = 400. Se mostrarán los indicadores CONV "v", "F" y la temperatura correspondiente.
(3) Presione para iniciar el precalentamiento. La temperatura seleccionada, "F" y "PrEH"
se muestran alternativamente. Aparecerá el indicador CONV "v", y el indicador PREH "v"
parpadeará. Cuando el horno se precalienta a la temperatura de cocción seleccionada,
el indicador PREH "v" deja de parpadear y el horno emitirá un pitido para recordarle, y
la temperatura seleccionada, "F" parpadeará en la pantalla para recordarle que coloque
alimentos en el horno y programe la cocción hora. Si no se ingresa el tiempo de cocción
dentro de los 15 minutos, el horno volverá a mostrar ": 0" o la hora del reloj.
PRECAUCIÓN: si usa rejillas para cocinar, colóquelas en el plato giratorio de vidrio. No coloque
parrillas en el piso del horno.
(4) Presione los botones numéricos para ingresar el tiempo de cocción. El tiempo máximo de
cocción es de 99 minutos, 99 segundos.
(5) Presione para comenzar a cocinar. Se mostrará el tiempo de cocción restante.
Aparecerá el indicador CONV "v" y podrá vericar la temperatura seleccionada
presionando el botón Conv durante la cocción.
Nota: 1) Si no se necesita precalentar, siga los pasos 1 y 2 anteriores y luego continúe con el
paso 4.
2) Si precalentamiento, no coloque alimentos en el horno hasta que alcance la
temperatura de cocción.
3) Si Cocción por convección sin precalentamiento, coloque los alimentos en el horno al
comienzo de la cocción.

SP-18
FUNCIÓN DE COMBINACIÓN (Microondas + Convección)
(1) Presione Micro + Conv, "350F" y los indicadores MICRO y CONV "v" aparecerán en la
ventana de visualización.
(2) Presione los botones numéricos del 0 al 9 para elegir la temperatura de cocción. Selecciones
de temperatura (° F):
0 = 425, 1 = 100, 2 = 200, 3 = 250, 4 = 275, 5 = 300, 6 = 325, 7 = 350
8 = 375, 9 = 400. Los indicadores MICRO y CONV "v", "F" y la temperatura
correspondiente se mostrarán.
(3) Presione Micro + Conv de nuevo. Presione los botones numéricos para ingresar el tiempo de
cocción. El tiempo máximo de cocción es de 99 minutos, 99 segundos.
(4) Presione para comenzar a cocinar. Se mostrará el tiempo de cocción restante. Puede
vericar la temperatura seleccionada presionando MICRO + CONV durante la cocción.
PRECAUCIÓN: si usa rejillas para cocinar, colóquelas en el plato giratorio de vidrio. No coloque
parrillas en el piso del horno.
FUNCIÓN DE PARRILLA (Grill)
Cuando se selecciona Parrilla, un quemador en el techo del horno se enciende para irradiar
calor a los alimentos. Cuando mire hacia el horno, verá un brillo anaranjado a través de las
perforaciones en las paredes superior y posterior. El calor radiante dará como resultado que
los alimentos cocidos estén dorados y crocados en las supercies exteriores.
Ni la energía de microondas ni el ventilador de convección funcionan durante el funcionamiento
de la parrilla. La función de parrilla calienta los alimentos más lentamente que la cocción por
convección.
Cuando use la parrilla para cocinar carne, coloque la carne en la parrilla baja. La grasa se
escurre de la carne en el plato giratorio. Limpie el plato giratorio antes del siguiente uso.
(1) Presione Grill, ": 0" y el indicador GRILL "v" aparecerán en la ventana de visualización.
(2) Presione los botones numéricos para ingresar el tiempo de cocción; El tiempo máximo de
cocción es de 99 minutos y 99 segundos.
(3) Presione para comenzar a cocinar.

SP-19
PALOMITAS DE MAÍZ
(1) Presione Popcorn repetidamente hasta que el número que desea aparezca en la pantalla,
"3.2", "3.0", "1.75" aparecerán en la pantalla en orden.
"1.75" aparecerá en la pantalla en orden.
Presione una vez: Popcorn 3.2 oz
Presione dos veces: Popcorn 3.0 oz
Presione 3 veces: Popcorn 1.75 oz
(2) Presione para comenzar a cocinar. El tiempo de cocción para el tamaño elegido
aparece en la pantalla. El horno emite un pitido 3
BEBIDAS
(1) Presione Bebidas varias veces hasta que aparezca el número de tazas deseado en la
pantalla. Las opciones son "1", "2" y "3".
(2) Presione para comenzar a cocinar. El tiempo de cocción para el número elegido
aparece en la pantalla. Horno suena 3 veces cuando termina la cocción.
ONE TOUCH COOK
Comida Cantidad Comentarios
Palomitas de
maiz
1.75oz.
3.0oz.
3.2oz.
Use solo con palomitas de maíz preempaquetadas que pesen
1.75,
3.0.3.2 onzas.
No use esta característica dos veces seguidas en la misma
comida porción, puede resultar en alimentos muy cocidos o
quemados.
Bebidas
(200ml/1cup)
1cup
2cups
3cups
No cubrir.
Las bebidas calentadas con la función Bebidas pueden estar
muy calientes. Retire el contenedor con cuidado.
No use esta característica dos veces seguidas en la misma
comida porción, puede resultar en alimentos muy cocidos o
quemados.

SP-20
COCCIÓN DE MÚLTIPLES ETAPAS
Puede programar un máximo de dos etapas de cocción.
Aviso: Las funciones ONE TOUCH COOK y ONE TOUCH START no se pueden usar en la cocción
de múltiples etapas.
Ejemplo: Cocinar con un nivel de potencia de 80% por cinco minutos, seguido de un nivel de
potencia de 60% por 10 minutos;
a. Presione Tiempo De Cocción, entre "5", "0" y "0" para jar el tiempo de cocción de la
primera etapa.
b. Presione Nivel De Potencia, entre "8" para seleccionar 80% el nivel de potencia de la
primera etapa.
c. Presione Tiempo De Cocción otra vez, entre "1", "0", "0" y "0" para jar el tiempo de
cocción de la segunda etapa.
d. Presione Nivel De Potencia otra vez, entre "6" para seleccionar 60% el nivel de potencia de
la segunda etapa.
e. Presione para comenzar inmediatamente la cocción de múltiples etapas.
FUNCIÓN DE BLOQUEO
Para bloquear el horno microondas para que niños u otros usuarios imprevistos no lo puedan
operar, presione el botón por tres segundos. Escuchará un pitido largo. Si el reloj ha sido
ajustado, aparecerá “Loc” en la pantalla por tres segundos y el horno regresará al modo de
espera. Aparecerá “Loc” en la pantalla por tres segundos cuando presione cualquier tecla.
Para desbloquear, presione por 3 segundos, escuchará un pitido largo y el indicador
LOCK "v" desaparecer en la ventana de visualización.
Función recordatoria del final de la cocción
El horno emitirá tres pitidos para avisar al usuario que la cocción ha terminado. Aparecerá
“End” en la pantalla. La hora aparecerá en la pantalla cuando abra la puerta o al presionar
el Botón .

SP-21
MANTENIMIENTO
localización de defectos
Esta guía de mantenimiento y problemas ha sido desarrollada paraque el usuario pueda
referirse a ella en caso de que algún problema se presente con el aparato. Usted debe revisar
esta guía antes de llamar a servicio técnico y determinar que lo que esta presentado el horno no
sea posible resolverlo por medio de estas instrucciones. 1-844-553-6667 press 2.
PROBLEMA POSIBLE CAUSA POSIBLE SOLUCIÓN
El horno no da inicio a
los procesos
a) El cable no esta conectado.
b) Puerta esta abierta.
c) Operación incorrecta.
a) Conecte el cable.
b) Cierre la puerta.
c) Revise las instrucciones.
Chispeo o contacto
metálico
a) Materiales que no deben
ser usados en el horno están
dentro de el.
b) El horno se opera cuando esta
vacío.
c) Restos de comida en la
cavidad del horno.
a) Utilice solo utensilios de
microondas.
b) No opere vació.
c) Limpie la cavidad
Alimentos cocidos
uniformemente
a) Materiales ajenos están
siendo usados.
b) La comida no esta por
completo descongelada. c) El
tiempo de cocción o poder de
cocción es incorrecto.
d) La comida no se ha volteado
o batido.
a) Utilice solo utensilios para
microondas.
b) Descongele la comida por
completo.
c) Ajuste el tiempo y poder de
cocción correctos.
d) Voltee o bata los alimentos.
Alimentos
sobrecalentadas
Tiempo de cocción o poder
de cocción no esta ajustado
adecuadamente.
Ajuste el tiempo de cocción y
poder de la manera adecuada.
Alimentos crudas no
cocidos
a) Materiales ajenos están
siendo usados.
b) La comida no esta por
completo descongelada.
c) La ventilación no es adecuada.
d) Poder de cocción o tiempo
incorrectos.
a) Utilice solo utensilios para
microondas.
b) Descongele la comida por
completo.
c) Revise que la ventilación sea
la adecuada.
d) Ajuste tiempo y poder
adecuadamente
Descongelación
inapropiado
a) Materiales ajenos están
siendo usados.
b) Poder de cocción o tiempo
incorrectos.
c) La comida no se ha volteado
o batido.
a) Utilice solo utensilios de
microondas.
b) Ajuste tiempo y poder
adecuadamente
c) Voltee o bata los alimentos.

KENMORE LIMITED WARRANTY
FOR ONE YEAR from the date of sale this appliance is warranted against
defects in material or workmanship when it is correctly installed,
operated and maintained according to all supplied instructions.
WITH PROOF OF SALE a defective appliance will be replaced free of
charge. For warranty coverage details to obtain free replacement,
visit the web page: www.kenmore.com/warranty
This warranty does not cover the oven cavity light bulb, which is an
expendable part that can wear out from normal use within the
warranty period.
This warranty is void if this appliance is ever used for other than private
household purposes.
This warranty gives you specific legal rights, and you may also have
other rights which vary from state to state.
Sears Brands Management Corporation, Hoffman Estates, IL 60179
GARANTÍA LIMITADA DE KENMORE
DURANTE UN AÑO a partir de la fecha de venta, este
electrodoméstico, posee garantía contra defectos en los materiales
o en la mano de obra cuando se instale, opere y mantenga
correctamente de acuerdo con todas las instrucciones provistas.
CON EL COMPROBANTE DE VENTA, un electrodoméstico
defectuoso será reemplazado gratuitamente.
Para ver los detalles de cobertura de la garantía a fin de obtener
un reemplazo gratis, visite la página web:
www.kenmore.com/warranty
Esta garantía no cubre la bombilla dentro del horno, que es una
pieza consumible que se puede desgastar con el uso normal dentro
del periodo de garantía.
Esta garantía se anula si este electrodoméstico se usa para
cualquier propósito que no sea el uso doméstico privado.
Esta garantía le otorga derechos legales específicos, y es posible
que tenga también otros derechos, los cuales varían de un estado
a otro.
Sears Brands Management Corporation, Hoffman Estates, IL 60179
®

담당 김지수 님
브랜드 Kenmore 언 어 영어 / 스페인어
F.MODEL Kenmore KOC15 모델 사용자 매뉴얼
B.MODEL 111.71513810 - Stainless Steel / Acero Inoxidable
BUYER
COUNTRY
MEMO 총 24p (140 x 210)
18.07.17-1p (7p _ 일러스트 그림 하 작업 2 cut )
18.07.24-총 23p (1~23p _ ① 신규 작업, ② 일러스트 호환 작업 1 cut)
18.07.26-7p (4p, 5p, 9p, 12p, 17p, 18p, 19p)
18.08.06-4p (1p, 7p, 9p, 16p)
18.08.08-1p (1p)
18.08.09-1p (9p)
18.08.27-3p (9p, 13p, 17p _ 사진 및 일러스트 호환 작업 1 cut)
18.08.29-1p (19p)
18.09.04-2p (2p, 4p) _정성엽 님
18.09.19-(표지, 3p, 7p, 9p, 10p, 15p, 16p, 17p, 18p 페이지 추가, 20p _ ① 수정 작업,
② 일러스트 그림 하 작업 1 cut) _ 이승헌 님
18.11.30-총 3p (3p, 6p, 11p) _ 이승헌 님
18.12.03-총 1p (3p) _ 이승헌 님
18.12.07-총 1p (1p) _ 이승헌 님
18.12.19-총 1p (13p) _ 이승헌 님
19.01.04-총 24p (표지, En: 13p, Sp: 0~21p _ 111.71519810 - Black / Negro 모델명
삭제) _ 이승헌 님
ABOUT THIS MANUAL
(주) 신광씨링
광주광역시 서구 하남대로
502번길 14
NO NEED PRINT
1/47