G3 Ferrari Prisma Univers 25 Manual de usuario
- Categoría
- Microondas
- Tipo
- Manual de usuario
La página se está cargando ...
La página se está cargando ...
La página se está cargando ...
La página se está cargando ...
La página se está cargando ...
La página se está cargando ...
La página se está cargando ...
La página se está cargando ...
La página se está cargando ...
La página se está cargando ...
La página se está cargando ...
La página se está cargando ...
La página se está cargando ...
La página se está cargando ...
La página se está cargando ...
La página se está cargando ...
La página se está cargando ...
La página se está cargando ...
La página se está cargando ...
La página se está cargando ...
La página se está cargando ...
La página se está cargando ...
La página se está cargando ...
La página se está cargando ...
La página se está cargando ...
La página se está cargando ...
La página se está cargando ...
La página se está cargando ...
La página se está cargando ...

WHOLE WHEAT: kneading, rising and baking whole wheat bread, the menu has longer preheating time and the bread
is soft and exible, it is not advised to use the delay function for getting better effect.
QUICK: kneading, rising and baking bread, with a shorter time, generally the bread is smaller with dense texture.
DOUGH: kneading and rising, but without baking, applicable for making bread roll, pizza, biscuit or steaming bread...
CAKE: kneading, rising and baking bread, rise with soda or baking powder, generally the bread is smaller with
dense texture, the menu contains two type of cake: american cake (220 °C) and sponge cake (175 °C).
FISH: suitable for steaming a fish of 0.45 Kg. After the fish washed and scales removed, make a slits on the skin
of fish. Put the fish on a shallow dish of 22-27 cm diameter sprinkle lightly with some ingredient. After
cooking stand for 2 minutes.
RICE: wash rice and soak for 30 minutes. Refer the water volume as follow.
rice 100g 200g 300g cover yes pasta 100g 200g 300g cover no
water 180ml 330ml 480ml water 300ml 600ml 900ml
** Rice -After cooking, stand cover for 5 minutes or until water is absorbed.
** Pasta-During cooking, stir several times, after cooking, stand for 1 or 2 mins.
STEAK: the thinner part is placed near the center of cavity while the thicker part is placed toward outside of dish in
the cavity, you may shield the thin end of steak with foil metal under microwave mode to avoid overcooking.
PIZZA: warm a piece of chilled pizza of 0.15 Kg.
POTATO: cooking the jacket potato, choose medium sized potatoes approx. 200 gr, wash and dry it, total weight is
about 0.45 kg or 0.65 kg. Place potatoes on a large dish and cover the dish with a thin film to prevent water
loss turning the potatos is necessary halfway.
POPCORN: suitable for popping a bag of corn, which is available in the market, weighted 85/100 gr. Prior to
completing, if the popping speed has been decreased to 1 time per 1-2 seconds you should press Stop
button to stop the popping process.
CHICKEN: the thinner part is placed near the center of cavity while the thicker part is placed toward the outside of dish
in the cavity, you may shield the thin end of steak with foil metal under microwave mode to avoid
overcooking.
BEVERAGE: heat a cup of 250 ml and 500 ml liquid. The liquid temperature is about 5-10 °C. use a big mouth cup and
do not seal.
FRESH VEGETABLE: place 0.2-0.8 kg vegetable in a microwave-safe bowl. Add water. Cover with wrap. After cooking
stir and allow to stand. Add amount water according to the vegetable quantity.
** 0.2-0.4 kg: 2 Tablespoon of water; ** 0.5-0.8 kg: 4 Tablespoon of water.
FROZEN VEGETABLE: the same as above.
Note
1. The cook time above bases on the specific food which is at the room temperature of 20-25 °C except specially
noted in cooking beverage. Time may vary for the food in different temperature.
2. When cooking the potatoes and fish it is suggested to cover the food with a layer of plastic thin film to prevent
the loss of water.
3. For cooking specific food, the temperature, weight and shape of food will largely influence the cooking effect. If
any deviation has been found to the factor noted on above menu, you can adjust the cooking time for best result.
4. For making bread, ambient temperature is required at 15-34 °C , too high temperature may make bread sour
while too lower temperature may be difficult to rise, different ambient temperature may result in different size of
bread.
1. Press Stop.
2. Directly turn the control knob to select desired menu.
3. Press Start to confirm.
4. Turn control knob again to set weight
5. Press Start to start cooking. LCD will show the default cooking time.
How to make bread
1. Place ingredients into the bread barrel according to the order mentioned in the recipeusually water or liquid shall
put firstly, then add sugar, salt and flour, always add yeast or baking powder as the last ingredient.
30 47
CONDICIONES DE GARANTIA
G3 FERRARI ESPAÑA S.L. concede para este aparato un periodo de garantía de 24 meses de duración. En
el caso de que el aparato requiera una reparación durante este periodo tenemos a su disposición una red
de servicios técnicos autorizados en el ámbito nacional.
El articulo a reparar debe llegar integro a nuestros centros de asistencia, cualquier manipulación por parte
del comprador, uso inadecuado, caída o por una utilización no doméstica invalidará la garantía. La garantía
cubrirá la reparación totalmente gratuita de los vicios o defectos originarios y de los daños y perjuicios por
ellos ocasionados. Así como, si la reparación no fuese satisfactoria y el aparato no cumpliese las condiciones
óptimas para su uso al cual va a ser destinado, el titular de la garantía tendrá derecho a la sustitución del
mismo por otro de idénticas características o la devolución el importe pagado.
Este aparato tiene derecho a la garantía sin tener que enviar nada.
El usuario debe sólo conservar el presente certicado de garantía para
entregar al centro de asistencia de la red de reparaciones, para
realizar la reparación gratuita en las condiciones descritas arriba.
Para cualquier información sobre los centros de asistencia autorizados, contacte:
DELEGACION COMERCIAL
G3 FERRARI ESPAÑA S.L. C/Reus, 2-4 Bjos - 08022 BARCELONA
TELF: 93/4187439 - FAX: 93/4187453 e-mail: [email protected]
La página se está cargando ...

5. Cake powder
Cake powder is made by grinding soft wheat or low protein wheat, which is specially used for making cakes.
Different our seems to be alike in fact yeast performance or absorbability of various our differs largly for
growing areas, growth reasons, grinding process and storage life You may choose our with different trademark
to test, taste and compare in local market, and select the one which could produce the best result according to
your own experiences and taste.
6. Corn our and oatmeal our
Corn our and oat our are made by grinding corn and oatmeal respectively, they both are the additive
ingredients of making rough bread, which are used for enhancing the avor and texture.
7. Sugar
Sugar is very important ingredient to add sweet taste and color of bread. While it helps to yeast bread as
nourishment. white sugar is largely used.Brown sugar, powder sugar or cotton sugar may be called by special
requirements
8. Yeast
Yeast passes doughy yeasting process, then produces carbon dioxide, making bread expand and inner fabre soft.
however, yeast fastly breeding needs carbohydrate in sugar and our as nourishment.
1 tsp active dry yeast = 3/4 tsp instant yeast
1.5 tsp active dry yeast =1 tsp instant yeast
2 tsp active dry yeast =1.5 tsp instant yeast
Yeast must be stored in refrigerator as it will be killed at high temperature, before use check the date and storage
life of your yeast. Store it back to the refrigerator as soon as possible after each use. Usually the failure of bread
rising is caused by the dead yeast.
The ways described below will check whether your yeast is fresh and active or not:
a. pour 1/2 cup warm water (45-50 °C) into a measuring cup
b. put 1 tsp white sugar into the cup and stir, then sprinkle 2 tsp yeast over the water.
c. place the measuring cup in a warm place for about 10 min. Do not stir the water.
d. the froth will be up to 1 cup. Otherwise the yeast is dead or inactive.
9. Salt
Salt is necessary to improve bread avor and crust color. But salt can also restrain yeast from rising. Never use
too much salt in a recipe. if you don’t want to use salt, omit it. And bread would be larger if without salt.
10. Egg
Eggs can improve bread texture, make the bread more nourish and larger in size, add special egg avor to bread.
when using it must be peeled and stirred evenly.
11. Grease, butter and vegetable oil
Grease can make bread be soft and delay storage life. Butter should be melted or chopped to small particles prior
use, so as to be stir evenly when you take it out from refrigerator.
12. Baking powder
Baking powder mainly is used to rise the UltraFast bread and cake. As it do not need rise time and produce gas
which will form bubble or soften the texture of bread utilizing chemical principle.
13. Soda
The same principle as above. It can also used in combination with baking powder.
14. Water and other liquid
Water is essential ingredient for making bread. Genenally speaking,water temperature between 20 °C and 25 °C is
the most proper. But the water temperature should be within 45-50 °C for achieving rising speed for make Ultra
Fast bread. The water may be replaced by fresh milk or water mixed with 2% milk powder, which may enhance
bread avor and improve crust color. Some recipes may call for juice for the purpose of enhancing bread avor,
eg, apple juice, orange juice, lemon juice and so on.
ingredients weight
One of important step for making a good bread is utilizing proper amount of ingredients. It is strongly suggest to use
measuring cup, measuring spoon to obtain accurate amount,otherwise the bread will be largely inuenced.
1. Weighing liquid ingredients
Water, fresh milk or milk powder solution should be measured with measuring cups.
Observe the level of the measuring cup with your eyes horizontally. When you measure cooking oil or other
ingredients, clean the measuring cup thoroughly without any other ingredients.
32 45
Atención: no utilizar nunca la función microondas o grill hasta que el recipiente para el pan este en el interior del
horno.
Se puede interrumpir en cualquier momento la cocción teniendo apretado Stop durante 3 segundos.
Después que la máquina del pan ha amasado los ingredientes e iniciado la subida no necesita abrir la puerta por que
sino el pan se deshincha!
Aconsejamos utilizar la función máquina para el pan a una temperatura ambiental del horno comprendida entre 15°C
y 34°C.
COCCIÓN RETARDADA
Si preere retardar la cocción, puede programar el horario en el que desea que la cocción se inicie.
Antes de todo debe programar la hora actual come se indica en el párrafo “Regulación de la hora” luego:
1. Apriete Stop.
2. Elija la cocción a microondas, al horno o combinada o el programa para la cocción de pan.
3. Programe el tiempo de cocción girando el mando de control.
N.B: Si selecciona C, C1 o C2 antes de escoger el tiempo de cocción es necesario programar la temperatura de
cocción. Programe también la temperatura con el mando de control y pulse Start. Programar después el tiempo
de cocción.
4. Tenga apretado Clock durante 3 segundos.
5. Programe el tiempo en el cual se desea hacer partir la cocción:
A. gire el mando de control para programar la hora.
B. pulse Clock.
C. gire el mando de control para programar los minutos.
D. pulse Clock para conrmar.
Ahora el timer de retardo está programado. El display continuará mostrando la hora actual. Para ver el horario
programado pulse Clock.
Atención
No es posible la programación en todos los otros programas automáticos, ni en los programas de descongelación y
para cocinar dulces.
El horno no debe nunca dejarse en funcionamiento sin vigilancia.
Si se quiere cortar el alimento del horno antes que el programa se haya completado, se debe cancelar el programa
pulsando Stop. No haga funcionar nunca el horno vacío.
COCCIÓN SECUENCIAL
Es posible programar una cocción personalizada combinando la secuencia preferida los programas:
Microondas, grill y combinado (G, G1, G2), horno ventilado y combinado (C, C1, C2). Se pueden combinar hasta 4
diversas secuencias de cocción repitiendo los puntos 2 y 3.
1. Pulse Stop.
2. Pulse Power para iniciar la cocción a microondas o apriete Grill/Combi Conv.Combi para iniciar la cocción con
uno de los programas C, C1, C2, G, G1, G2.
3. Seleccionar el tiempo de cocción con el mando de control.
4. Pulse Power para proseguir la cocción con la función microondas o apriete Grill/Combi Conv.Combi para iniciar la
cocción con uno de los programas C, C1, C2, G, G1, G2.
5. Seleccionar el tiempo de cocción con el mando de control.
6. Pulse Start para activar la cocción.

2. Measure dry powder
Dry powder should be kept in natural and loose conditions, level the cup mouth gently by blade to ensure
accurate measure.
3. Ingredient sequence
The sequence of placing ingredients should be observed, genenally speaking, the sequence is: liquid ingredients,
eggs, salt and milk powder etc. When Placing the ingredients, the our can’t be wet by liquid completely. The
yeast can only be placed on the dry our. Exclusively, yeast can’t touch with salt After the our has been kneaded
for some time and a beep remind you to put Fruit ingredients into the mixture. If the fruit ingredients are added
too early the avor will be diminished after long time mixing.When you use the delaying function for a long time,
never add the perishable ingredients such as eggs,fruit ingredient.
Trouble shooting guide
P = Problem
C = Cause
S = Solution
P: smoke from ventilation hole when baking
C: some ingredients adhere to the heat element or nearby, for the rst use heat element is spreaded with oil on the
surface
S: operate dry for 10-15 min in order to dispose of the oil on heat element, but be careful not to burn you
P: bread collapses in the middle parts and bottom crust is too thick
C: keep bread warm and leave bread in the bread pan for a long time so that water is losing too much
S: take bread out soon without keeping it warm
P: it is very difcult to take bread out
C: mixer adheres tightly to the shaft in bread pan
S: after taking bread out, put hot water into bread pan and immerge mixer for 10 minutes, then take it out and clean
P: stir ingredients not evenly and bake badly
C: 1. selected procedure is improper
2. after power press stop button and procedure pauses
3. after power open cover several times and bread is dry,no brown crust color
4. stir resistance is too large so that mixer almost can’t rotate and stir adequately
S: 1. select the proper procedure.
2. mix ingredients over again and repeat if dough time is too long
3. don’t open cover at the last rise
4. check mixer hole, then take bread pan out and operate without load, if not normal, contact with the sever
P: display “H:HH” After pressing “start” button
C: the temperature in bread maker is too high to make bread
S: press “stop” button and unplug bread maker, then take bread pan out and open cover until the toaster cools down
P: hear the motor noises but dough isn’t still stirred
C: bread pan is xed improperly or dough is too large to be stirred
S: check whether bread pan is xed properly and dough is made according to recipe and the ingredients is weighed
accurately
P: bread size is so large as to push cover
C: yeast is too much or our is excessive or water is too much or environment temperature is too high
S: check the above factors, reduce properly the amount according to the true reasons
P: bread size is too small or bread no rise
C: no yeast or the amount of yeast is not enough, moreover, yeast may have a poor activity as water temperature is
too high or yeast is mixed together with salt
S: check the amount and performance of yeast
P: dough is so large to overow bread pan
C: the amount of liquids is so much as to make dough soft and yeast is also excessive
S: reduce the amount of liquids and improve dough rigidity
P: bread collapses in the middle parts when baking dough
C: 1. used our is not strong powder and can’t make dough rise
2. yeast rate is too rapid or yeast temperature is too high
3. excessive water makes dough too wet and soft.
3344
FRENCH (Pan francés): este programa se utiliza para cocer pan de poco peso, como el pan francés, con una
corteza bien tostada y muy porosa. Mezcla, levadura, (prolongada), cocción en horno.
WHOLEWHEAT (Integral): este programa se utiliza para cocer pan con un gran porcentaje de harinas pesadas. Esta
regulación tiene una fase de subida más larga para que el cereal pueda absorber el agua e hincharse. No
aconsejamos emplear la selección del tiempo porque los resultados obtenidos serían insucientes. Mezcla,
levadura, cocción de pan integral.
QUICK (Rápido): este programa se utiliza para cocer pan blanco en poco tiempo. El pan cocido de esta manera
generalmente no sube mucho y resulta poco poroso. Mezcla, levadura, cocción en horno rápido.
Para obtener pan blanco en el menor tiempo. El pan preparado con esta programación es normalmente
más pequeño y presenta una consistencia densa. Amasado, fermentación, cocción en horno rápido.
Durante la fase de amasado inicial puede ser necesario ayudar a la máquina removiendo algún residuo de
harina de las paredes del recipiente de cocción con una espátula de plástico.
DOUGHT (Masa): con esta regulación solo se hace la masa, no se cuece pan. Después se saca la masa y se forman
los panecillos, la pizza, etc. Esta regulación permite hacer cualquier tipo de masa. El peso total de
los ingredientes no deberá exceder 1 kg.
CAKE (Tortas): con esta regulación se preparan todos los ingredientes juntos y después se cuecen en el tiempo
seleccionado. Al hacerse una torta, antes de introducir la masa en el molde del aparato es necesario
mezclar dos grupos de ingredientes en escudillas separadas. Mezcla e cocción en horno de dulces.
Es posible seleccionar una temperatura de 175° ó 220° usando el mando de control.
Instrucciones
1. Posicionar los ingredientes en el contenedor del pan.
Habitualmente, el agua o las sustancias líquidas se deben poner primero en el recipiente, luego añadir el azúcar,
la sal y la harina. Por ultimo adjuntar la levadura teniéndolo separado de los ingredientes líquidos y de la sal
(haciendo por ejemplo una pequeña cavidad en la harina y poner la levadura).
2. Poner el contenedor del pan en el horno, hacerlo girar en dirección horaria hasta que se bloquee en la posición
correcta y cierre la puerta.
3. Pulse Stop.
4. Seleccionar un programa girando el mando de control.
5. Pulse Start.
6. En algunos programas es posible programar el peso del pan a 600 grs (1.5 lb) ó 900 grs. (2lb) girando el mando
de control.
7. Si no desea activar inmediatamente la cocción, puede programar el timer de retardo de la activación (vea párrafo
“Cocción Retardada”). Luego pulse Start.
Los alimentos perecederos como el huevo, la leche fresca, la levadura fresca no puede utilizarse con el timer de
retardo de la cocción por que podrían deteriorarse.
8. Si no desea programar la función de retardo de la cocción, pulse directamente Start para dejar inmediatamente la
cocción, el display indicará el tiempo de cocción que falta para nalizarla.
9. Después de la primera fase de amasado un bip advertirá que es posible adjuntar fruta yo nueces.
10. Una vez transcurrido el tiempo de cocción se emitirán 6 bip, abrir la puerta del horno y quite con cautela el
recipiente para el pan del horno utilizando los guantes de horno. Al nal de la cocción el pan permanecerá caliente
automáticamente durante una hora.
11. No quite el pan antes de que se haya enfriado completamente
12. Invierta el recipiente y extraiga el pan. Rellenar el recipiente del pan con agua para evitar que la cuchilla se
bloquee. La cuchilla amasadora puede quedarse en el interior del pan, espere que hasta que el pan no se haya
enfriado y luego quite la cuchilla amasadora con el gancho correspondiente.

1. use bread our or strong power.
2. ingredients is used under room temperature.
3. According to the ability of absorbing water adjust water on recipe.
P: bread weight is very large as organization construct is too dense.
C: 1. too much our or short of water.
2. too many fruit ingredients or too much whole wheat our.
S: 1. reduce our or increase water.
2. reduce the amount of corresponding ingredients and increase yeast.
P: middle parts are hollow after cutting bread.
C: 1. excessive water or no salt.
2. water temperature is too high.
S: 1. reduce properly t water and check salt.
2. check water temperature.
P: bread surface is adhered to dry powder.
C: 1. there is strong glutinosity ingredients in bread such as butter and bananas etc.
2. stir not adequately for short of water.
S: 1. clean up the dough by hand when stirring.
2. check water and mechanical construct of bread maker.
P: crust is too thick and baking color is too dark when making cakes or food with excessive sugar.
C: different recipes or ingredients have great effect on making bread, baking color will become very dark because
of much sugar.
S: if baking color is too dark for the recipe with excessive sugar, press start/stop to power off ahead 5-10 min, take
it out after keeping bread warm for 20 min without opening cover.
Recipes
The following recipes are only for reference, the actual effect maybe inuenced by our, yeastand etc. You could
change it according to your personnel taste and avor (high gluten our is required in all menus below).
Basic bread (Basic)
Weight 1.5 lb - 600 gr 2.0 lb - 900 gr
Water 270 ml 350 ml
Flour 00 380 gr 500 gr
Margarine or butter 5 gr 7 gr
Salt 5 gr 8 gr
Milk powder 15 gr 30 gr
Sugar 15 gr 30 gr
Yeast 8 gr 11 gr
Sweet bread (Sweet)
Weight 1.5 lb - 600 gr 2.0 lb - 900 gr
Milk 220 ml 275 ml
Flour 00 390 gr 500 gr
Margarine or butter 20 gr 25 gr
Salt 5 gr 5 gr
Eggs 1 2
Honey 23 gr 30 gr
Yeast 8 gr 11 gr
34 43
POULTRY (aves): Es posible programar el peso de 0,2 á 3,0 kg
SEAFOOD (frutos de mare): Es posible programar el peso de 0,1 á 0,9 kg
1. Pulse Stop.
2. Pulse Auto Defrost más veces para elegir el programa deseado.
3. Gire el mando de control para seleccionar el peso.
4. Pulse Start.
Observaciones: durante la descongelación se emiten 2 bip para informar que necesita girar el alimento: abra la puerta,
gire los alimentos, cierre la puerta y apriete Start.
Programas para la cocción a microondas de alimentos especicos
1. Pulse Stop
2. Seleccionar un programa usando el mando de control
3. Pulse Start para conrmar
4. Usando el mando de control seleccionar el peso del alimento
5. Pulse Start para activar el programa
FISH (pescado): para cocer un pescado de 450 gr. Después de haber lavado y quitado la piel del pescado, hacer un
corte en el pescado.
RICE (arroz): lavar el arroz y dejar en agua durante 30 min.
STEAK (bistec): poner la parte grasa en el medio del plato y la parte más espesa en el borde.
PIZZA: programa para calentar una pizza de 150 gr.
POTATO (patatas): meter las patatas en un plato largo y cubrir con un lm transparente para evitar perdidas de agua.
Girar las patatas a mitad de cocción.
POPCORN: este programa permite cocer y popcorn para microondas que se encuentran en comercios en las bolsas
de 85/100 gr. Si durante la cocción la distancia entre la explosión de una popcorn y otra supera los 2
segundos signica que los popcorn están listos, apriete Stop para cerrar la cocción.
CHICKEN (pollo): Poner la parte grasa en el medio del plato y la parte más espesa en el borde.
BEVERAGE (bebidas): calentar una taza de 250-500 ml de líquido. La temperatura del líquido debe ser cerca de
5-10 °C.
FRESH VEGETABLE (verdura fresca): poner entre los 200 grs. y los 800 grs. de verduras en un plato apto al horno a
microondas. Adjuntar 2 cucharadas de agua para 200-400 gr de verduras y 4 cucharadas de agua para
500 grs. a los 800 grs. Cubrir con un lm transparente para la cocción.
FROZEN VEGETABLE (verduras congelados): como para las verduras frescas.
Nota
Si notase que el tiempo del menú no cuece de forma óptima puede adaptar el tiempo de cocción según vuestro gusto
para un mejor resultado.
Programas para la cocción del pan
BASIC: Girar el mando de control para seleccionar este programa y el grado de cocción deseado
(LIGHT= ligeramente dorado, MID= mediamente dorado, DARK= dorado).El grado de cocción es
seleccionable sólo en este programa. En los otros programas es automáticamente “mediamente dorado”.
SWEET (Pan dulce): Amasar, fermentación y cocción para obtener un pan dulce.

French bread (French)
Weight 1.5 lb - 600 gr 2.0 lb - 900 gr
Water 200 ml 300 ml
Flour 00 240 gr 360 gr
Flour 0 130 gr 190 gr
Salt 8 gr 12 gr
Oil 12 gr 18 gr
Sugar 5 gr 10 gr
Yeast 8 gr 11 gr
Whole wheatbread (Whole wheatbread)
Weight 1.5 lb - 600 gr 2.0 lb - 900 gr
Water 270 ml 350 ml
Flour of integral wheat 410 gr 540 gr
Honey 5 gr 5 gr
Salt 5 gr 5 gr
Yeast 8 gr 11 gr
Quick bread (Quick)
Weight 1.5 lb - 600 gr 2.0 lb - 900 gr
Water 280 ml 375 ml
Flour 00 390 gr 525 gr
Flour 0 50 gr 75 gr
Salt 5 gr 5 gr
Oil 11 gr 15 gr
Sugar 5 gr 5 gr
Yeast 8 gr 11 gr
Dough for pizza (Dough)
Weight 1.5 lb - 600 gr 2.0 lb - 900 gr
Water 180 ml 265 ml
Flour 00 230 gr 350 gr
Regrinded semolina 155 gr 230 gr
Salt 5 gr 5 gr
Oil 15 gr 17 gr
Sugar 15 gr 17 gr
Yeast 9 gr 12 gr
3542
COCCIÓN CON HORNO VENTILADO/ GRILL/ COMBINADO
Apretando más veces Grill/Combi Conv.Combi se mostrara en el display:C-C1-C2-G-G1-G2
Horno ventilado y combinado horno ventilado + microondas
C: Horno ventilado:la unidad de ventilación está activada durante la cocción. De este modo, el aire caliente circula en
el interior del horno.
C1: Cocción horno ventilado y cocción a microondas alternado.
C2: Como C1 pero con una mayor potencia de microondas.
1. Apriete Stop
2. Apriete Grill/Combi Conv.Combi y elija la modalidad deseada
3. Programar una temperatura con el mando de control:
Para descongelar, utilizar 80 °C o 100 °C
Para cocer, poner el horno sobre 120 °C - 180 °C
Para rustir aves, seleccionar 180 °C - 230 °C
En la modalidad C1 y C2 no superada la temperatura de 180 °C
4. Apriete Start
5. Programe el tiempo de cocción con el mando de control.
6. Apriete Start
Nota
1. El horno no se debe utilizar sin el plato giratorio correctamente colocado que pueda girar.
2. No recubra nunca el plato giratorio ni el grill con papel de aluminio.
Grill y combinado grill + microondas
Para cocer al grill usar la parrilla correspondiente para la cocción. Usar vajilla adaptada y resistente al calor o posicio-
nar directamente sobre la parrilla el alimento a cocer.
G: Solo cocción al grill. Ideal para rustir.
G1: Cocción combinada al grill y microondas. Resistencia y microondas funcionan alternativamente.
G2: Cocción combinada al grill y microondas con un tiempo prolongado de cocción al grill.
1. Pulse Stop.
2. Pulse Grill/Combi Conv.Combi y elija la modalidad deseada.
3. Programar el tiempo de cocción con el mando de control.
4. Pulse Start para activar la cocción.
Atención
Todas las partes del horno comprendidas el plato de cocción están muy calientes. Utilice los guantes de horno para
evitar quemaduras.
DESCONGELACIÓN AUTOMÁTICA
Apretando más veces Auto Defrost se mostrará sobre el display varios programas de descongelación
automática:
MEAT (carne): Es posible programar el peso de 0,1 á 2,0 kg.

Brioche (Cake)
Weight 1.5 lb - 600 gr 2.0 lb - 900 gr
Lukewarm water 70 ml 100 ml
Flour 00 340 gr 500 gr
Butter 120 gr 175 gr
Sugar 55 gr 80 gr
Yeast 10 gr 15 gr
Salt 10 gr 15 gr
Eggs 2 3
DELAY FUNCTION
If you do not want the menu be started immediately, you can preset the cooking menu and time and the preset menu
will be automatically started at your set time. The setting will consist of 2 steps:
1. Setting the current clock;
2. Setting the cooking menu and time.
Example: If you hope that the microwave oven will automatically start cooking with microwave power
1. Set the current time:
1.1 Depress Clock button
1.2 Turn control knob to set hours and hours will be ashed
1.3 Depress Clock again to conrm hours
1.4 Turn control knob to set minutes
1.5 Depress Clock or waiting for 5 seconds, and the numbers will go steady
2. Set the cooking menu and time:
2.1 Select cooking power
2.2 Turn control knob to set cooking time
2.3 Press and hold Clock for 3 seconds to return to current clock
2.4 Set the time you expect to start. Repeat the steps of 1.2, 1.3, 1.4.
Depress clock button to conrm the delayed menu.
Now the program has been activated.
You may check the preseted starting time by depressing Clock button
NOTE: Delay function is not applied to cook specic food in autocook table, defrost and make cakes.
MULTI-STAGE COOKING
To obtain best cooking result ,some recipes call for different cook mode and time. You may program your
personalized menu as follow:
Example :you want cook food with microwave for 3 minutes then grill food for 9 minutes. This is 2 sequence setting.
Sequence 1: microwave for 3 min
1. Press Power
2. Turn the control knob at 3 min
Sequence 2:grill food for 9 min
1. Press Grill/Combi Conv.Combi
2. Turn the control knob at 9 min
3. Press Start to start cooking
36 41
11. Utilice únicamente los utensilios que sean aptos para la cocción par horno microondas.
12. No accionar nunca el horno sin nada en el interior. Poner al menos un vaso de agua.
13. Todos los accesorios no recomendados por el fabricante pueden causar peligro.
SEGURIDAD NIÑOS
Tenga apretado Stop durante 3 seg. hasta que la imagen de una llave no aparezca en el display. Para desbloquear
tenga apretado Stop otros 3 seg. hasta que la llave desaparezca.
RELLAMADA AUTOMATICA
Cuando el tiempo de cocción preseleccionado termina, el display muestra el escrito End y emite 6 bip. Si no aprieta
Stop o si no abre la puerta del horno, el bip continuará durante 3 minutos.
REGULACIÓN DE LA HORA
1. Apriete Clock.
2. Regule la hora con el mando de control.
3. Apriete Clock.
4. Regule los minutos con el mando de control.
5. Apriete Clock para conrmar.
COCCIÓN A MICROONDAS
1. Poner el alimento a calentar en vajilla apropiada. Abra la puerta del horno y coloque el recipiente en el centro del
plato de vidrio. Cierre la puerta.
2. Apriete Power para seleccionar la potencia del microondas.
Cada vez que apriete Power los surcos disminuyen:
5 rayas: máxima potencia, para calentar rápido.
4 rayas: medio-alta potencia, para cocer.
3 rayas: media potencia, para una cocción continuada.
2 rayas: medio-baja potencia, para por ejemplo fundir el queso.
1 raya: baja potencia, para descongelar.
3. Seleccionar el tiempo de cocción girando el mando di control.
4. Apriete Start.
5. Puede cambiar el tiempo de cocción también durante el funcionamiento del horno girando el mando di control.
6. Cuando acaba el tiempo programado el horno se apaga y el escrito ‘END’ aparece en el display.
Se puede ahora extraer el alimento prestando mucha atención de no quemarse.
o bien
1. Apriete Stop.
2. Apriete Start.
3. Cambiar el tiempo de cocción también durante el funcionamiento del horno girando el mando di control.
Nota
1. El tiempo máximo de seleccion es 99 min y 99 seg.
2. No hacer funcionar nunca el horno microondas vacío.
3. Para controlar la cocción puede abrir la puerta del horno. Para continuar la cocción cierre la puerta y apriete Start.
4. Para terminar la cocción antes de tiempo apriete Stop.

When microwave power cooking is nished ,microwave oven will begin grilling operation automatically.
Notes: max 4 sequence can be set per time repeat the steps 1.1, 1.2 if you like to set more.
MICROWAVE COOKING TIPS
1. Arrange food carefully, place thickest areas toward outside of dish.
2. Watch cooking time, cook for the shortest amount of time indicated and add more time as needed.
3. Cover foods before cooking check recipe for suggestions: paper towels, microwave plastic wrap or a lid.
Covers prevent spattering and help foods to cook evenly. (Helps keep oven clean).
4. Shield foods
Use small pieces of aluinium foil to cover thin areas of meats or poultry to avoid overcooking.
5. Stir foods: From outside to center of dish once or twice during cooking, if possible.
6. Turn foods
Foods such as chicken, hamburgers or steaks should be turned over once during cooking.
7. Rearrange foods: Like meatballs halfway through cooking both from top to bottom and from the center of the
dish to the outside.
8. Allow standing time
After cooking ensure adequate standing time.
Remove food from oven and stir if possible.
Cover for standing time which allows the food to nish cooking without overcooking.
9. Check for doneness
Look for signs indicating that cooking temperature has been reached. Doneness signs include:
- Food steams throughout, not just at edge.
- Poultry thigh joints move easily.
- Pork and poultry show no pinkness.
- Fish is opaque and akes easily with a fork.
10. Condensation
A normal part of microwave cooking. The humidity and moisture in food will inuence the amount of moisture in
the oven. Generally, covered foods will not cause as much condensation as uncovered foods. Ensure that the
ventilation openings are not blocked.
11. Browning dish
when using a browning dish or self-heating material, always place a heat-resistant insulator such as a porcelain
plate under it to prevent damage to the turntable, rotating ring due to heat stress. The preheating time specied in
the dishes instructions must not be exceeded.
12. Microwave safe plastic wrap
for cooking food with high fat content, do not bring the wrap in contact with the food as it may melt.
13. Microwave safe plastic cookware
Some microwave safe plastic cookware are not suitable for cooking foods with high fat and sugar content.
CLEANING AND MAINTENANCE
Clean the oven at regular intervals.
Disconnect the power supply cord before cleaning. And if possible leave the door open to inactivate the oven during
cleaning.
Exterior
The outside may be cleaned with mild soap and warm water, wipe clean with a damp cloth. Avoid the use of harsh
abrasive cleaners.
Door
Wipe the door and window on both sides, the door seals and adjacent parts frequently with a damp cloth to remove
any spills or spatters. Do not use abrasive cleaners.
Control panel
Care should be taken in cleaning the control panel. Wipe the panel with a cloth dampened slightly with water only.
Do not scrub or use any sort of chemical cleaners. Avoid the use of excess water.
3740
INSTALACIÓN DEL MICROONDAS
1. La distancia de la parte posterior del horno a la pared debe ser de al menos 10 cm y de la parte lateral del horno a
la pared debe ser de al menos 5 cm; entre el techo y la parte superior del horno deben haber por lo menos 20 cm.
2. No poner ningún objeto sobre el horno.
3. Colocar el horno lejos del televisor, radio o otra antena para evitar interferencias.
GUIA DE LOS UTENSILIOS
Utilizar solo recipientes compatibles y seguros para la cocción en microondas. Normalmente los platos de cerámi-
ca, cristal o plástico resistentes al calor pueden ser aptos a la cocción en microondas. No utilizar nunca platos o
utensilios de metal sea cual sea la función del horno que desee utilizar por que pueden provocar chispas. Se aconseja
no usar vidrio delicado o cristal, plástico no apto para el microondas, bolsas para congelar, papel para cocción
prolongadas y madera.
IMPORTANTES INSTRUCCIONES DE SEGURIDAD
1. El horno puede funcionar solo si la puerta está cerrada correctamente. Hay un bloqueo de seguridad que no debe
dañarse nunca.
2. El recipiente para el pan, la cuchilla de amasar, el vaso medidor y el cuchillo dosicador sirven únicamente para la
cocción del pan, quite el plato giratorio y su soporte antes de instalar en contenedor del pan.
3. No mueva en ningún caso el panel de protección que protege el microondas, es muy peligroso.
4. Para reducir el riesgo de incendio dentro del horno:
a. No cocer excesivamente los alimentos.
b. Quite los lazos del cierre de los sacos de papel o de plástico antes de ponerlos en el horno.
c. No haga freír el aceite o la grasa debido a que la temperatura del aceite resulta muy elevada.
d. Después del uso del horno, secar el panel de protección del microondas con un trapo húmedo y luego
con un trapo seco para eliminar las salpicaduras de alimento o de grasa. La grasa incrustada puede
recalentarse y causar humo o prenderse fuego.
e. Si la materia dentro del horno humea o salpica, dejar la puerta del horno cerrada, apague el horno y
desenchúfelo.
f. Es necesaria una estrecha vigilancia si se usan recipientes monouso de plástico, de papel u otro material
combustible.
5. Para reducir el riesgo de explosión o de ebullición imprevista:
a. No ponga recipientes cerrados estancos en el horno.
b. Después de haber hecho hervir un líquido en el horno dejar el líquido en el horno 20 seg. más para evitar una
salpicadura imprevista retardada del mismo.
c. El huevo con cáscara, la patata, la salchicha y las castañas se deben pelar o agujerear antes de cocerlos.
d. El contenido del biberón y los potitos de comida para recién nacido se deben agitar o sacudir antes del uso,
controlando la temperatura. Existe el riesgo de quemarse.
6. No utilizar el horno si la puerta i el gancho de impermeabilidad están dañados. Llevar el aparato al centro de
asistencia. No pruebe nunca de reparar el horno solo. No tire en ningún caso guarnición interna d la puerta.
7. Después de la cocción, el recipiente está muy caliente. Utilice los guantes de horno para retirar el alimento y
preste atención al vapor que queda prisionero.
8. Después de la cocción cuando abre la tapa, la película transparente o se abren bolsas cerradas preste mucha
atención al vapor que puede salpicar.
9. Preste atención que los utensilios no toquen las paredes del horno durante la cocción.
10. La falta de limpieza del horno puede generar situaciones peligrosas.

Interior walls:
To clean the interior surfaces, wipe with a soft cloth and warm water for hygienic reasons. After use wipe the
waveguide cover in the oven with a soft damp cloth to remove any food splashed. Buildup splashes may overheat and
begin to smoke or catch re. Do not remove the waveguide cover. Do not use a commercial oven cleaner, abrasive or
harsh cleaners and scouring pads on any part of your microwave oven. Never spray oven cleaners directly onto any
part of your oven. Avoid using excess water. After cleaning the oven, ensure any water is removed with a soft cloth.
Turntable/ Rotating ring/Rotating axis
After cooling down, wash with mild soapy water and dry thoroughly.
Tip: when the microwave oven has been used for a long time, there may be some odors exist un oven, following 3
methods can get rid of them:
1. Place several lemon slices in a cup, then heat with high power for 2-3 minutes.
2. Place a cup of red tea in oven, then heat with high power.
3. Put some orange peel into oven, then heat them with high power for 1 minute.
Bread barrel: rub outside and inside with damp cloth, don not use any sharp or abrasive agents for the consideration
of protecting the non-stick coating, the bread pan must be dried completely prior to installing.
Kneading blade: it can be easily removed for cleaning, also wipe the blade carefully with cotton damp cloth, if
kneading blade is difcult to remove from the axle, in this case ll bread barrel with warm water and allow to soak for
approx. 30 min, then remove it.
SERVICING
Warning: it is hazardous for anyone, other than a qualied service technician, to carry out any service for repair
operation which involves removal of any cover which gives protection against exposure to microwave energy.
Caution: MICROWAVE RADIATION
Do not become exposed to radiation from the microwave generator or other parts conducting microwave energy.
During servicing below listed parts are liable to be removed and give access to potentials above
250V to earth.
1. Magnetron 2. High voltage transformer 3. High voltage capacitor 4. High voltage diode 5. High voltage fuse
Below listed condition may cause undue microwave exposure during servicing.
1. Unproper tting of magnetron.
2. Unproper matching of Door interlock, door hinge and door.
3. Unproper tting of switch support.
4. Door, Door seal or enclosure has been damage
ERROR
1. If LCD displays "Err0" during working, it indicates that sensor has been short circuit and you need replace it at the
nearest repaired department.
2. if LCD displays "Err1" during working, it indicates that sensor has been open circuit and you need replace it at the
nearest repaired department.
3. if LCD displays "Err2" during working, it indicates that the preset temperature is higher than that in the cavity.
After-sales service is given by the retailer or by the importer / ditributor of G3 FERRARI products.
38 39
PRECAUCIONES GENERALES PARA EL USO (En conformidad con las indicaciones CE)
1. Leer prestando mucha atención las instrucciones de este manual ya que proporcionan informaciòn importantes
sobre la seguridad de instalación, de utilización y de mantenimiento. De esta manera se podran evitar dicultades
y eventuales accidentes de perjuicio a la seguridad del usuario.
2. Sacado el embalaje, asegurarse de la integridad del aparato, prestando atención en el cable de alimentación.
3. Si el cable de alimentación está dañado, debe ser sustituido por el fabricante o por el servicio de asistencia técnica
o de todos modos por una persona con calicación similar, en modo de prevenir cualquier riesgo.
4. Antes de conectar el aparado, comprobar que el voltaje indicado en la placa de caracteristicas coincida con la tensión
de la red eléctrica. El aparado puede sufrir daños en caso de tensión no correcta.
5. En caso de que la toma de corriente eléctrica y el aparato no resulten compatibles, personal profesionalmente
cualicado podrà substituir la toma por otra idónea y podrà vericar que la sección de los cables de la toma tengan
la potencia absorbida por el secador.
6. En general no se aconseja el uso de adaptadores, tomas de corriente múltiples y/o cables de prolongación, sobre
todo en cuartos de baño o duchas. En el caso que fuese indispensable su utilización, es necesario servirse solo
de adaptadores simples o múltiples y cables de prolongación conformes con las vigentes normas de seguridad,
teniendo cuidado de no superar el lìmite de carga útil del valor de la corriente, marcado sobre el adaptador simple
y los cables de prolongación, y él de potencia maxima marcado sobre el adaptador múltiple.
7 No utilizar el aparado si hubìera algun daño en el cable de alimentación o al enchufe.
8. No utilizar el aparato después de comprobar un funcionamiento irregular. En este caso apagar el aparato. Para
eventuales reparaciones es necesario dirigirse a un centro de asistencia G3 FERRARI autorizado, con la obligación
de utilizar recambios originales. La falta de observancia de todo lo mencionado puede comprometer la seguridad
del aparado.
9. Este aparado se debe destinar exclusivamente para el uso indicado. Cualquier otro tipo de utilización se debe considerar
inadecuada y, por lo tanto, peligrosa. G3 FERRARI no puede considerarse responsable de los daños que puedan
derivarse por usos impropios, erroneos e irracionales.
10. No sumergir por ninguna razón el aparado en agua o en otros liquidos.
11. No utilizar el aparato en presencia de explosivos, substancias particularmente inamables, gas o llamas ardientes.
12. No permitir que niños o incapaces utilizen el aparato sin el cuidado oportuno.
13. No utilizar el aparato con manos o pies mojados.
14. No utilizar por ninguna razon accesorios que no sean previstos por G3 FERRARI y que podrian crear serio peligro.
15. No utilizar el aparato cerca de bañeras , duchas o lavamanos y en los lugares en los que la presencia de agua pueda
representar fuente de peligro.
16. No tirar nunca el cable o el aparato mismo sin desconectar el enchufe de la toma de corriente.
17. No dejar el cable pendiente.
18. No exponer el aparato a agentes atmosfericos como lluvia, viento, nieve, granizo, etc.
19. Desconectar el enchufe cuando no se utilize el aparato o durante su limpieza.
20. En caso de que se decida dejar de utilizar de aparatos de este tipo, dejarlo inactivo cortando el cable de alimentación,
despues de haber desconectado el enchufe de la toma de corriente. Se recomienda ademas dejar inactivas las
piezas que podrian representar fuente de peligro, especialmente para los niños que podrian utilizar el aparato en
sus juegos.
21. Hagan leer estas istrucciones a todos los potenciales utilizadores de este aparato.
22. Conservar estas instrucciones.
Español
Transcripción de documentos
WHOLE WHEAT: kneading, rising and baking whole wheat bread, the menu has longer preheating time and the bread is soft and flexible, it is not advised to use the delay function for getting better effect. QUICK: kneading, rising and baking bread, with a shorter time, generally the bread is smaller with dense texture. Dough: kneading and rising, but without baking, applicable for making bread roll, pizza, biscuit or steaming bread... CAKE: kneading, rising and baking bread, rise with soda or baking powder, generally the bread is smaller with dense texture, the menu contains two type of cake: american cake (220 °C) and sponge cake (175 °C). FISH: suitable for steaming a fish of 0.45 Kg. After the fish washed and scales removed, make a slits on the skin of fish. Put the fish on a shallow dish of 22-27 cm diameter sprinkle lightly with some ingredient. After cooking stand for 2 minutes. RICE: wash rice and soak for 30 minutes. Refer the water volume as follow. rice 100g 200g 300g cover yes pasta 100g 200g 300g cover no water 180ml 330ml 480ml water 300ml 600ml 900ml ** Rice -After cooking, stand cover for 5 minutes or until water is absorbed. ** Pasta-During cooking, stir several times, after cooking, stand for 1 or 2 mins. STEAK: the thinner part is placed near the center of cavity while the thicker part is placed toward outside of dish in the cavity, you may shield the thin end of steak with foil metal under microwave mode to avoid overcooking. PIZZA: warm a piece of chilled pizza of 0.15 Kg. POTATO: cooking the jacket potato, choose medium sized potatoes approx. 200 gr, wash and dry it, total weight is about 0.45 kg or 0.65 kg. Place potatoes on a large dish and cover the dish with a thin film to prevent water loss turning the potatos is necessary halfway. POPCORN: suitable for popping a bag of corn, which is available in the market, weighted 85/100 gr. Prior to completing, if the popping speed has been decreased to 1 time per 1-2 seconds you should press Stop button to stop the popping process. CHICKEN: the thinner part is placed near the center of cavity while the thicker part is placed toward the outside of dish in the cavity, you may shield the thin end of steak with foil metal under microwave mode to avoid overcooking. BEVERAGE: heat a cup of 250 ml and 500 ml liquid. The liquid temperature is about 5-10 °C. use a big mouth cup and do not seal. FRESH VEGETABLE: place 0.2-0.8 kg vegetable in a microwave-safe bowl. Add water. Cover with wrap. After cooking stir and allow to stand. Add amount water according to the vegetable quantity. ** 0.2-0.4 kg: 2 Tablespoon of water; ** 0.5-0.8 kg: 4 Tablespoon of water. FROZEN VEGETABLE: the same as above. CONDICIONES DE GARANTIA G3 FERRARI ESPAÑA S.L. concede para este aparato un periodo de garantía de 24 meses de duración. En el caso de que el aparato requiera una reparación durante este periodo tenemos a su disposición una red de servicios técnicos autorizados en el ámbito nacional. El articulo a reparar debe llegar integro a nuestros centros de asistencia, cualquier manipulación por parte del comprador, uso inadecuado, caída o por una utilización no doméstica invalidará la garantía. La garantía cubrirá la reparación totalmente gratuita de los vicios o defectos originarios y de los daños y perjuicios por ellos ocasionados. Así como, si la reparación no fuese satisfactoria y el aparato no cumpliese las condiciones óptimas para su uso al cual va a ser destinado, el titular de la garantía tendrá derecho a la sustitución del mismo por otro de idénticas características o la devolución el importe pagado. Este aparato tiene derecho a la garantía sin tener que enviar nada. El usuario debe sólo conservar el presente certificado de garantía para entregar al centro de asistencia de la red de reparaciones, para realizar la reparación gratuita en las condiciones descritas arriba. Para cualquier información sobre los centros de asistencia autorizados, contacte: DELEGACION COMERCIAL G3 FERRARI ESPAÑA S.L. C/Reus, 2-4 Bjos - 08022 BARCELONA TELF: 93/4187439 - FAX: 93/4187453 e-mail: [email protected] Note 1. The cook time above bases on the specific food which is at the room temperature of 20-25 °C except specially noted in cooking beverage. Time may vary for the food in different temperature. 2. When cooking the potatoes and fish it is suggested to cover the food with a layer of plastic thin film to prevent the loss of water. 3. For cooking specific food, the temperature, weight and shape of food will largely influence the cooking effect. If any deviation has been found to the factor noted on above menu, you can adjust the cooking time for best result. 4. For making bread, ambient temperature is required at 15-34 °C , too high temperature may make bread sour while too lower temperature may be difficult to rise, different ambient temperature may result in different size of bread. 1. 2. 3. 4. 5. Press Stop. Directly turn the control knob to select desired menu. Press Start to confirm. Turn control knob again to set weight Press Start to start cooking. LCD will show the default cooking time. How to make bread 1. Place ingredients into the bread barrel according to the order mentioned in the recipeusually water or liquid shall put firstly, then add sugar, salt and flour, always add yeast or baking powder as the last ingredient. 30 47 5. Cake powder Cake powder is made by grinding soft wheat or low protein wheat, which is specially used for making cakes. Different flour seems to be alike in fact yeast performance or absorbability of various flour differs largly for growing areas, growth reasons, grinding process and storage life You may choose flour with different trademark to test, taste and compare in local market, and select the one which could produce the best result according to your own experiences and taste. 6. Corn flour and oatmeal flour Corn flour and oat flour are made by grinding corn and oatmeal respectively, they both are the additive ingredients of making rough bread, which are used for enhancing the flavor and texture. 7. Sugar Sugar is very important ingredient to add sweet taste and color of bread. While it helps to yeast bread as nourishment. white sugar is largely used.Brown sugar, powder sugar or cotton sugar may be called by special requirements 8. Yeast Yeast passes doughy yeasting process, then produces carbon dioxide, making bread expand and inner fabre soft. however, yeast fastly breeding needs carbohydrate in sugar and flour as nourishment. 1 tsp active dry yeast = 3/4 tsp instant yeast 1.5 tsp active dry yeast =1 tsp instant yeast 2 tsp active dry yeast =1.5 tsp instant yeast Yeast must be stored in refrigerator as it will be killed at high temperature, before use check the date and storage life of your yeast. Store it back to the refrigerator as soon as possible after each use. Usually the failure of bread rising is caused by the dead yeast. The ways described below will check whether your yeast is fresh and active or not: a. pour 1/2 cup warm water (45-50 °C) into a measuring cup b. put 1 tsp white sugar into the cup and stir, then sprinkle 2 tsp yeast over the water. c. place the measuring cup in a warm place for about 10 min. Do not stir the water. d. the froth will be up to 1 cup. Otherwise the yeast is dead or inactive. 9. Salt Salt is necessary to improve bread flavor and crust color. But salt can also restrain yeast from rising. Never use too much salt in a recipe. if you don’t want to use salt, omit it. And bread would be larger if without salt. 10. Egg Eggs can improve bread texture, make the bread more nourish and larger in size, add special egg flavor to bread. when using it must be peeled and stirred evenly. 11. Grease, butter and vegetable oil Grease can make bread be soft and delay storage life. Butter should be melted or chopped to small particles prior use, so as to be stir evenly when you take it out from refrigerator. 12. Baking powder Baking powder mainly is used to rise the UltraFast bread and cake. As it do not need rise time and produce gas which will form bubble or soften the texture of bread utilizing chemical principle. 13. Soda The same principle as above. It can also used in combination with baking powder. 14. Water and other liquid Water is essential ingredient for making bread. Genenally speaking,water temperature between 20 °C and 25 °C is the most proper. But the water temperature should be within 45-50 °C for achieving rising speed for make Ultra Fast bread. The water may be replaced by fresh milk or water mixed with 2% milk powder, which may enhance bread flavor and improve crust color. Some recipes may call for juice for the purpose of enhancing bread flavor, eg, apple juice, orange juice, lemon juice and so on. ingredients weight One of important step for making a good bread is utilizing proper amount of ingredients. It is strongly suggest to use measuring cup, measuring spoon to obtain accurate amount,otherwise the bread will be largely influenced. 1. Weighing liquid ingredients Water, fresh milk or milk powder solution should be measured with measuring cups. Observe the level of the measuring cup with your eyes horizontally. When you measure cooking oil or other ingredients, clean the measuring cup thoroughly without any other ingredients. 32 Atención: no utilizar nunca la función microondas o grill hasta que el recipiente para el pan este en el interior del horno. Se puede interrumpir en cualquier momento la cocción teniendo apretado Stop durante 3 segundos. Después que la máquina del pan ha amasado los ingredientes e iniciado la subida no necesita abrir la puerta por que sino el pan se deshincha! Aconsejamos utilizar la función máquina para el pan a una temperatura ambiental del horno comprendida entre 15°C y 34°C. COCCIÓN RETARDADA Si prefiere retardar la cocción, puede programar el horario en el que desea que la cocción se inicie. Antes de todo debe programar la hora actual come se indica en el párrafo “Regulación de la hora” luego: 1. Apriete Stop. 2. Elija la cocción a microondas, al horno o combinada o el programa para la cocción de pan. 3. Programe el tiempo de cocción girando el mando de control. N.B: Si selecciona C, C1 o C2 antes de escoger el tiempo de cocción es necesario programar la temperatura de cocción. Programe también la temperatura con el mando de control y pulse Start. Programar después el tiempo de cocción. 4. Tenga apretado Clock durante 3 segundos. 5. Programe el tiempo en el cual se desea hacer partir la cocción: A. gire el mando de control para programar la hora. B. pulse Clock. C. gire el mando de control para programar los minutos. D. pulse Clock para confirmar. Ahora el timer de retardo está programado. El display continuará mostrando la hora actual. Para ver el horario programado pulse Clock. Atención No es posible la programación en todos los otros programas automáticos, ni en los programas de descongelación y para cocinar dulces. El horno no debe nunca dejarse en funcionamiento sin vigilancia. Si se quiere cortar el alimento del horno antes que el programa se haya completado, se debe cancelar el programa pulsando Stop. No haga funcionar nunca el horno vacío. COCCIÓN SECUENCIAL Es posible programar una cocción personalizada combinando la secuencia preferida los programas: Microondas, grill y combinado (G, G1, G2), horno ventilado y combinado (C, C1, C2). Se pueden combinar hasta 4 diversas secuencias de cocción repitiendo los puntos 2 y 3. 1. 2. 3. 4. 5. 6. Pulse Stop. Pulse Power para iniciar la cocción a microondas o apriete Grill/Combi Conv.Combi para iniciar la cocción con uno de los programas C, C1, C2, G, G1, G2. Seleccionar el tiempo de cocción con el mando de control. Pulse Power para proseguir la cocción con la función microondas o apriete Grill/Combi Conv.Combi para iniciar la cocción con uno de los programas C, C1, C2, G, G1, G2. Seleccionar el tiempo de cocción con el mando de control. Pulse Start para activar la cocción. 45 French (Pan francés): este programa se utiliza para cocer pan de poco peso, como el pan francés, con una corteza bien tostada y muy porosa. Mezcla, levadura, (prolongada), cocción en horno. Wholewheat (Integral): este programa se utiliza para cocer pan con un gran porcentaje de harinas pesadas. Esta regulación tiene una fase de subida más larga para que el cereal pueda absorber el agua e hincharse. No aconsejamos emplear la selección del tiempo porque los resultados obtenidos serían insuficientes. Mezcla, levadura, cocción de pan integral. Quick (Rápido): este programa se utiliza para cocer pan blanco en poco tiempo. El pan cocido de esta manera generalmente no sube mucho y resulta poco poroso. Mezcla, levadura, cocción en horno rápido. Para obtener pan blanco en el menor tiempo. El pan preparado con esta programación es normalmente más pequeño y presenta una consistencia densa. Amasado, fermentación, cocción en horno rápido. Durante la fase de amasado inicial puede ser necesario ayudar a la máquina removiendo algún residuo de harina de las paredes del recipiente de cocción con una espátula de plástico. Dought (Masa): con esta regulación solo se hace la masa, no se cuece pan. Después se saca la masa y se forman los panecillos, la pizza, etc. Esta regulación permite hacer cualquier tipo de masa. El peso total de los ingredientes no deberá exceder 1 kg. Cake (Tortas): con esta regulación se preparan todos los ingredientes juntos y después se cuecen en el tiempo seleccionado. Al hacerse una torta, antes de introducir la masa en el molde del aparato es necesario mezclar dos grupos de ingredientes en escudillas separadas. Mezcla e cocción en horno de dulces. Es posible seleccionar una temperatura de 175° ó 220° usando el mando de control. Instrucciones 1. Posicionar los ingredientes en el contenedor del pan. Habitualmente, el agua o las sustancias líquidas se deben poner primero en el recipiente, luego añadir el azúcar, la sal y la harina. Por ultimo adjuntar la levadura teniéndolo separado de los ingredientes líquidos y de la sal (haciendo por ejemplo una pequeña cavidad en la harina y poner la levadura). 2. Poner el contenedor del pan en el horno, hacerlo girar en dirección horaria hasta que se bloquee en la posición correcta y cierre la puerta. 3. Pulse Stop. 4. Seleccionar un programa girando el mando de control. 5. Pulse Start. 6. En algunos programas es posible programar el peso del pan a 600 grs (1.5 lb) ó 900 grs. (2lb) girando el mando de control. 7. Si no desea activar inmediatamente la cocción, puede programar el timer de retardo de la activación (vea párrafo “Cocción Retardada”). Luego pulse Start. Los alimentos perecederos como el huevo, la leche fresca, la levadura fresca no puede utilizarse con el timer de retardo de la cocción por que podrían deteriorarse. 8. Si no desea programar la función de retardo de la cocción, pulse directamente Start para dejar inmediatamente la cocción, el display indicará el tiempo de cocción que falta para finalizarla. 9. Después de la primera fase de amasado un bip advertirá que es posible adjuntar fruta yo nueces. 10. Una vez transcurrido el tiempo de cocción se emitirán 6 bip, abrir la puerta del horno y quite con cautela el recipiente para el pan del horno utilizando los guantes de horno. Al final de la cocción el pan permanecerá caliente automáticamente durante una hora. 11. No quite el pan antes de que se haya enfriado completamente 12. Invierta el recipiente y extraiga el pan. Rellenar el recipiente del pan con agua para evitar que la cuchilla se bloquee. La cuchilla amasadora puede quedarse en el interior del pan, espere que hasta que el pan no se haya enfriado y luego quite la cuchilla amasadora con el gancho correspondiente. 44 2. 3. Measure dry powder Dry powder should be kept in natural and loose conditions, level the cup mouth gently by blade to ensure accurate measure. Ingredient sequence The sequence of placing ingredients should be observed, genenally speaking, the sequence is: liquid ingredients, eggs, salt and milk powder etc. When Placing the ingredients, the flour can’t be wet by liquid completely. The yeast can only be placed on the dry flour. Exclusively, yeast can’t touch with salt After the flour has been kneaded for some time and a beep remind you to put Fruit ingredients into the mixture. If the fruit ingredients are added too early the flavor will be diminished after long time mixing.When you use the delaying function for a long time, never add the perishable ingredients such as eggs,fruit ingredient. Trouble shooting guide P = Problem C = Cause S = Solution P: smoke from ventilation hole when baking C: some ingredients adhere to the heat element or nearby, for the first use heat element is spreaded with oil on the surface S: operate dry for 10-15 min in order to dispose of the oil on heat element, but be careful not to burn you P: bread collapses in the middle parts and bottom crust is too thick C: keep bread warm and leave bread in the bread pan for a long time so that water is losing too much S: take bread out soon without keeping it warm P: it is very difficult to take bread out C: mixer adheres tightly to the shaft in bread pan S: after taking bread out, put hot water into bread pan and immerge mixer for 10 minutes, then take it out and clean P: stir ingredients not evenly and bake badly C: 1. selected procedure is improper 2. after power press stop button and procedure pauses 3. after power open cover several times and bread is dry,no brown crust color 4. stir resistance is too large so that mixer almost can’t rotate and stir adequately S: 1. select the proper procedure. 2. mix ingredients over again and repeat if dough time is too long 3. don’t open cover at the last rise 4. check mixer hole, then take bread pan out and operate without load, if not normal, contact with the sever P: display “H:HH” After pressing “start” button C: the temperature in bread maker is too high to make bread S: press “stop” button and unplug bread maker, then take bread pan out and open cover until the toaster cools down P: hear the motor noises but dough isn’t still stirred C: bread pan is fixed improperly or dough is too large to be stirred S: check whether bread pan is fixed properly and dough is made according to recipe and the ingredients is weighed accurately P: bread size is so large as to push cover C: yeast is too much or flour is excessive or water is too much or environment temperature is too high S: check the above factors, reduce properly the amount according to the true reasons P: bread size is too small or bread no rise C: no yeast or the amount of yeast is not enough, moreover, yeast may have a poor activity as water temperature is too high or yeast is mixed together with salt S: check the amount and performance of yeast P: dough is so large to overflow bread pan C: the amount of liquids is so much as to make dough soft and yeast is also excessive S: reduce the amount of liquids and improve dough rigidity P: bread collapses in the middle parts when baking dough C: 1. used flour is not strong powder and can’t make dough rise 2. yeast rate is too rapid or yeast temperature is too high 3. excessive water makes dough too wet and soft. 33 P: C: S: P: C: S: P: C: S: P: C: S: 1. use bread flour or strong power. 2. ingredients is used under room temperature. 3. According to the ability of absorbing water adjust water on recipe. bread weight is very large as organization construct is too dense. 1. too much flour or short of water. 2. too many fruit ingredients or too much whole wheat flour. 1. reduce flour or increase water. 2. reduce the amount of corresponding ingredients and increase yeast. middle parts are hollow after cutting bread. 1. excessive water or no salt. 2. water temperature is too high. 1. reduce properly t water and check salt. 2. check water temperature. bread surface is adhered to dry powder. 1. there is strong glutinosity ingredients in bread such as butter and bananas etc. 2. stir not adequately for short of water. 1. clean up the dough by hand when stirring. 2. check water and mechanical construct of bread maker. crust is too thick and baking color is too dark when making cakes or food with excessive sugar. different recipes or ingredients have great effect on making bread, baking color will become very dark because of much sugar. if baking color is too dark for the recipe with excessive sugar, press start/stop to power off ahead 5-10 min, take it out after keeping bread warm for 20 min without opening cover. Recipes The following recipes are only for reference, the actual effect maybe influenced by flour, yeastand etc. You could change it according to your personnel taste and flavor (high gluten flour is required in all menus below). Basic bread (Basic) Weight 1.5 lb - 600 gr 2.0 lb - 900 gr Water 270 ml 350 ml Flour 00 380 gr 500 gr Margarine or butter 5 gr 7 gr Salt 5 gr 8 gr Milk powder 15 gr 30 gr Sugar 15 gr 30 gr Yeast 8 gr 11 gr Sweet bread (Sweet) Weight 1.5 lb - 600 gr 2.0 lb - 900 gr Milk 220 ml 275 ml Flour 00 390 gr 500 gr Margarine or butter 20 gr 25 gr Salt 5 gr 5 gr Eggs 1 2 Honey 23 gr 30 gr Yeast 8 gr 11 gr 34 POULTRY (aves): Es posible programar el peso de 0,2 á 3,0 kg SEAFOOD (frutos de mare): Es posible programar el peso de 0,1 á 0,9 kg 1. Pulse Stop. 2. Pulse Auto Defrost más veces para elegir el programa deseado. 3. Gire el mando de control para seleccionar el peso. 4. Pulse Start. Observaciones: durante la descongelación se emiten 2 bip para informar que necesita girar el alimento: abra la puerta, gire los alimentos, cierre la puerta y apriete Start. Programas para la cocción a microondas de alimentos especificos 1. 2. 3. 4. 5. Pulse Stop Seleccionar un programa usando el mando de control Pulse Start para confirmar Usando el mando de control seleccionar el peso del alimento Pulse Start para activar el programa FISH (pescado): para cocer un pescado de 450 gr. Después de haber lavado y quitado la piel del pescado, hacer un corte en el pescado. RICE (arroz): lavar el arroz y dejar en agua durante 30 min. STEAK (bistec): poner la parte grasa en el medio del plato y la parte más espesa en el borde. PIZZA: programa para calentar una pizza de 150 gr. POTATO (patatas): meter las patatas en un plato largo y cubrir con un film transparente para evitar perdidas de agua. Girar las patatas a mitad de cocción. POPCORN: este programa permite cocer y popcorn para microondas que se encuentran en comercios en las bolsas de 85/100 gr. Si durante la cocción la distancia entre la explosión de una popcorn y otra supera los 2 segundos significa que los popcorn están listos, apriete Stop para cerrar la cocción. CHICKEN (pollo): Poner la parte grasa en el medio del plato y la parte más espesa en el borde. BEVERAGE (bebidas): calentar una taza de 250-500 ml de líquido. La temperatura del líquido debe ser cerca de 5-10 °C. FRESH VEGETABLE (verdura fresca): poner entre los 200 grs. y los 800 grs. de verduras en un plato apto al horno a microondas. Adjuntar 2 cucharadas de agua para 200-400 gr de verduras y 4 cucharadas de agua para 500 grs. a los 800 grs. Cubrir con un film transparente para la cocción. FROZEN VEGETABLE (verduras congelados): como para las verduras frescas. Nota Si notase que el tiempo del menú no cuece de forma óptima puede adaptar el tiempo de cocción según vuestro gusto para un mejor resultado. Programas para la cocción del pan BASIC: Girar el mando de control para seleccionar este programa y el grado de cocción deseado (LIGHT= ligeramente dorado, MID= mediamente dorado, DARK= dorado).El grado de cocción es seleccionable sólo en este programa. En los otros programas es automáticamente “mediamente dorado”. Sweet (Pan dulce): Amasar, fermentación y cocción para obtener un pan dulce. 43 COCCIÓN CON HORNO VENTILADO/ GRILL/ COMBINADO Apretando más veces Grill/Combi Conv.Combi se mostrara en el display:C-C1-C2-G-G1-G2 Horno ventilado y combinado horno ventilado + microondas C: Horno ventilado:la unidad de ventilación está activada durante la cocción. De este modo, el aire caliente circula en el interior del horno. C1: Cocción horno ventilado y cocción a microondas alternado. C2: Como C1 pero con una mayor potencia de microondas. 1. 2. 3. 4. 5. 6. Apriete Stop Apriete Grill/Combi Conv.Combi y elija la modalidad deseada Programar una temperatura con el mando de control: Para descongelar, utilizar 80 °C o 100 °C Para cocer, poner el horno sobre 120 °C - 180 °C Para rustir aves, seleccionar 180 °C - 230 °C En la modalidad C1 y C2 no superada la temperatura de 180 °C Apriete Start Programe el tiempo de cocción con el mando de control. Apriete Start Nota 1. El horno no se debe utilizar sin el plato giratorio correctamente colocado que pueda girar. 2. No recubra nunca el plato giratorio ni el grill con papel de aluminio. Grill y combinado grill + microondas French bread (French) Weight 1.5 lb - 600 gr 2.0 lb - 900 gr Water 200 ml 300 ml Flour 00 240 gr 360 gr Flour 0 130 gr 190 gr Salt 8 gr 12 gr Oil 12 gr 18 gr Sugar 5 gr 10 gr Yeast 8 gr 11 gr Weight 1.5 lb - 600 gr 2.0 lb - 900 gr Water 270 ml 350 ml Flour of integral wheat 410 gr 540 gr Honey 5 gr 5 gr Salt 5 gr 5 gr Yeast 8 gr 11 gr Weight 1.5 lb - 600 gr 2.0 lb - 900 gr Water 280 ml 375 ml Flour 00 390 gr 525 gr Whole wheatbread (Whole wheatbread) Quick bread (Quick) Flour 0 50 gr 75 gr Para cocer al grill usar la parrilla correspondiente para la cocción. Usar vajilla adaptada y resistente al calor o posicionar directamente sobre la parrilla el alimento a cocer. Salt 5 gr 5 gr Oil 11 gr 15 gr G: Solo cocción al grill. Ideal para rustir. G1: Cocción combinada al grill y microondas. Resistencia y microondas funcionan alternativamente. G2: Cocción combinada al grill y microondas con un tiempo prolongado de cocción al grill. Sugar 5 gr 5 gr Yeast 8 gr 11 gr Weight 1.5 lb - 600 gr 2.0 lb - 900 gr Water 180 ml 265 ml Flour 00 230 gr 350 gr Atención Todas las partes del horno comprendidas el plato de cocción están muy calientes. Utilice los guantes de horno para evitar quemaduras. Regrinded semolina 155 gr 230 gr Salt 5 gr 5 gr Oil 15 gr 17 gr DESCONGELACIÓN AUTOMÁTICA Sugar 15 gr 17 gr Yeast 9 gr 12 gr 1. 2. 3. 4. Pulse Stop. Pulse Grill/Combi Conv.Combi y elija la modalidad deseada. Programar el tiempo de cocción con el mando de control. Pulse Start para activar la cocción. Apretando más veces Auto Defrost se mostrará sobre el display varios programas de descongelación automática: MEAT (carne): Es posible programar el peso de 0,1 á 2,0 kg. 42 Dough for pizza (Dough) 35 Brioche (Cake) Weight 1.5 lb - 600 gr 2.0 lb - 900 gr Lukewarm water 70 ml 100 ml Flour 00 340 gr 500 gr Butter 120 gr 175 gr Sugar 55 gr 80 gr Yeast 10 gr 15 gr Salt 10 gr 15 gr Eggs 2 3 11. Utilice únicamente los utensilios que sean aptos para la cocción par horno microondas. 12. No accionar nunca el horno sin nada en el interior. Poner al menos un vaso de agua. 13. Todos los accesorios no recomendados por el fabricante pueden causar peligro. SEGURIDAD NIÑOS Tenga apretado Stop durante 3 seg. hasta que la imagen de una llave no aparezca en el display. Para desbloquear tenga apretado Stop otros 3 seg. hasta que la llave desaparezca. RELLAMADA AUTOMATICA Cuando el tiempo de cocción preseleccionado termina, el display muestra el escrito End y emite 6 bip. Si no aprieta Stop o si no abre la puerta del horno, el bip continuará durante 3 minutos. Delay function REGULACIÓN DE LA HORA If you do not want the menu be started immediately, you can preset the cooking menu and time and the preset menu will be automatically started at your set time. The setting will consist of 2 steps: 1. Setting the current clock; 2. Setting the cooking menu and time. 1. 2. 3. 4. 5. Example: If you hope that the microwave oven will automatically start cooking with microwave power 1. Set the current time: 1.1 Depress Clock button 1.2 Turn control knob to set hours and hours will be flashed 1.3 Depress Clock again to confirm hours 1.4 Turn control knob to set minutes 1.5 Depress Clock or waiting for 5 seconds, and the numbers will go steady 2. Set the cooking menu and time: 2.1 Select cooking power 2.2 Turn control knob to set cooking time 2.3 Press and hold Clock for 3 seconds to return to current clock 2.4 Set the time you expect to start. Repeat the steps of 1.2, 1.3, 1.4. Depress clock button to confirm the delayed menu. Now the program has been activated. You may check the preseted starting time by depressing Clock button NOTE: Delay function is not applied to cook specific food in autocook table, defrost and make cakes. Multi-stage cooking To obtain best cooking result ,some recipes call for different cook mode and time. You may program your personalized menu as follow: Example :you want cook food with microwave for 3 minutes then grill food for 9 minutes. This is 2 sequence setting. Sequence 1: microwave for 3 min 1. Press Power 2. Turn the control knob at 3 min Sequence 2:grill food for 9 min 1. Press Grill/Combi Conv.Combi 2. Turn the control knob at 9 min 3. Press Start to start cooking 36 Apriete Clock. Regule la hora con el mando de control. Apriete Clock. Regule los minutos con el mando de control. Apriete Clock para confirmar. COCCIÓN A MICROONDAS 1. 2. 3. 4. 5. 6. Poner el alimento a calentar en vajilla apropiada. Abra la puerta del horno y coloque el recipiente en el centro del plato de vidrio. Cierre la puerta. Apriete Power para seleccionar la potencia del microondas. Cada vez que apriete Power los surcos disminuyen: 5 rayas: máxima potencia, para calentar rápido. 4 rayas: medio-alta potencia, para cocer. 3 rayas: media potencia, para una cocción continuada. 2 rayas: medio-baja potencia, para por ejemplo fundir el queso. 1 raya: baja potencia, para descongelar. Seleccionar el tiempo de cocción girando el mando di control. Apriete Start. Puede cambiar el tiempo de cocción también durante el funcionamiento del horno girando el mando di control. Cuando acaba el tiempo programado el horno se apaga y el escrito ‘END’ aparece en el display. Se puede ahora extraer el alimento prestando mucha atención de no quemarse. o bien 1. Apriete Stop. 2. Apriete Start. 3. Cambiar el tiempo de cocción también durante el funcionamiento del horno girando el mando di control. Nota 1. El tiempo máximo de seleccion es 99 min y 99 seg. 2. No hacer funcionar nunca el horno microondas vacío. 3. Para controlar la cocción puede abrir la puerta del horno. Para continuar la cocción cierre la puerta y apriete Start. 4. Para terminar la cocción antes de tiempo apriete Stop. 41 INSTALACIÓN DEL MICROONDAS 1. 2. 3. La distancia de la parte posterior del horno a la pared debe ser de al menos 10 cm y de la parte lateral del horno a la pared debe ser de al menos 5 cm; entre el techo y la parte superior del horno deben haber por lo menos 20 cm. No poner ningún objeto sobre el horno. Colocar el horno lejos del televisor, radio o otra antena para evitar interferencias. GUIA DE LOS UTENSILIOS Utilizar solo recipientes compatibles y seguros para la cocción en microondas. Normalmente los platos de cerámica, cristal o plástico resistentes al calor pueden ser aptos a la cocción en microondas. No utilizar nunca platos o utensilios de metal sea cual sea la función del horno que desee utilizar por que pueden provocar chispas. Se aconseja no usar vidrio delicado o cristal, plástico no apto para el microondas, bolsas para congelar, papel para cocción prolongadas y madera. IMPORTANTES INSTRUCCIONES DE SEGURIDAD 1. El horno puede funcionar solo si la puerta está cerrada correctamente. Hay un bloqueo de seguridad que no debe dañarse nunca. 2. El recipiente para el pan, la cuchilla de amasar, el vaso medidor y el cuchillo dosificador sirven únicamente para la cocción del pan, quite el plato giratorio y su soporte antes de instalar en contenedor del pan. 3. No mueva en ningún caso el panel de protección que protege el microondas, es muy peligroso. 4. Para reducir el riesgo de incendio dentro del horno: a. No cocer excesivamente los alimentos. b. Quite los lazos del cierre de los sacos de papel o de plástico antes de ponerlos en el horno. c. No haga freír el aceite o la grasa debido a que la temperatura del aceite resulta muy elevada. d. Después del uso del horno, secar el panel de protección del microondas con un trapo húmedo y luego con un trapo seco para eliminar las salpicaduras de alimento o de grasa. La grasa incrustada puede recalentarse y causar humo o prenderse fuego. e. Si la materia dentro del horno humea o salpica, dejar la puerta del horno cerrada, apague el horno y desenchúfelo. f. Es necesaria una estrecha vigilancia si se usan recipientes monouso de plástico, de papel u otro material combustible. 5. Para reducir el riesgo de explosión o de ebullición imprevista: a. No ponga recipientes cerrados estancos en el horno. b. Después de haber hecho hervir un líquido en el horno dejar el líquido en el horno 20 seg. más para evitar una salpicadura imprevista retardada del mismo. c. El huevo con cáscara, la patata, la salchicha y las castañas se deben pelar o agujerear antes de cocerlos. d. El contenido del biberón y los potitos de comida para recién nacido se deben agitar o sacudir antes del uso, controlando la temperatura. Existe el riesgo de quemarse. 6. No utilizar el horno si la puerta i el gancho de impermeabilidad están dañados. Llevar el aparato al centro de asistencia. No pruebe nunca de reparar el horno solo. No tire en ningún caso guarnición interna d la puerta. 7. Después de la cocción, el recipiente está muy caliente. Utilice los guantes de horno para retirar el alimento y preste atención al vapor que queda prisionero. 8. Después de la cocción cuando abre la tapa, la película transparente o se abren bolsas cerradas preste mucha atención al vapor que puede salpicar. 9. Preste atención que los utensilios no toquen las paredes del horno durante la cocción. 10. La falta de limpieza del horno puede generar situaciones peligrosas. 40 When microwave power cooking is finished ,microwave oven will begin grilling operation automatically. Notes: max 4 sequence can be set per time repeat the steps 1.1, 1.2 if you like to set more. Microwave cooking tips 1. Arrange food carefully, place thickest areas toward outside of dish. 2. Watch cooking time, cook for the shortest amount of time indicated and add more time as needed. 3. Cover foods before cooking check recipe for suggestions: paper towels, microwave plastic wrap or a lid. Covers prevent spattering and help foods to cook evenly. (Helps keep oven clean). 4. Shield foods Use small pieces of aluinium foil to cover thin areas of meats or poultry to avoid overcooking. 5. Stir foods: From outside to center of dish once or twice during cooking, if possible. 6. Turn foods Foods such as chicken, hamburgers or steaks should be turned over once during cooking. 7. Rearrange foods: Like meatballs halfway through cooking both from top to bottom and from the center of the dish to the outside. 8. Allow standing time After cooking ensure adequate standing time. Remove food from oven and stir if possible. Cover for standing time which allows the food to finish cooking without overcooking. 9. Check for doneness Look for signs indicating that cooking temperature has been reached. Doneness signs include: - Food steams throughout, not just at edge. - Poultry thigh joints move easily. - Pork and poultry show no pinkness. - Fish is opaque and flakes easily with a fork. 10. Condensation A normal part of microwave cooking. The humidity and moisture in food will influence the amount of moisture in the oven. Generally, covered foods will not cause as much condensation as uncovered foods. Ensure that the ventilation openings are not blocked. 11. Browning dish when using a browning dish or self-heating material, always place a heat-resistant insulator such as a porcelain plate under it to prevent damage to the turntable, rotating ring due to heat stress. The preheating time specified in the dishes instructions must not be exceeded. 12. Microwave safe plastic wrap for cooking food with high fat content, do not bring the wrap in contact with the food as it may melt. 13. Microwave safe plastic cookware Some microwave safe plastic cookware are not suitable for cooking foods with high fat and sugar content. Cleaning and maintenance Clean the oven at regular intervals. Disconnect the power supply cord before cleaning. And if possible leave the door open to inactivate the oven during cleaning. Exterior The outside may be cleaned with mild soap and warm water, wipe clean with a damp cloth. Avoid the use of harsh abrasive cleaners. Door Wipe the door and window on both sides, the door seals and adjacent parts frequently with a damp cloth to remove any spills or spatters. Do not use abrasive cleaners. Control panel Care should be taken in cleaning the control panel. Wipe the panel with a cloth dampened slightly with water only. Do not scrub or use any sort of chemical cleaners. Avoid the use of excess water. 37 Interior walls: To clean the interior surfaces, wipe with a soft cloth and warm water for hygienic reasons. After use wipe the waveguide cover in the oven with a soft damp cloth to remove any food splashed. Buildup splashes may overheat and begin to smoke or catch fire. Do not remove the waveguide cover. Do not use a commercial oven cleaner, abrasive or harsh cleaners and scouring pads on any part of your microwave oven. Never spray oven cleaners directly onto any part of your oven. Avoid using excess water. After cleaning the oven, ensure any water is removed with a soft cloth. Turntable/ Rotating ring/Rotating axis After cooling down, wash with mild soapy water and dry thoroughly. Tip: when the microwave oven has been used for a long time, there may be some odors exist un oven, following 3 methods can get rid of them: 1. Place several lemon slices in a cup, then heat with high power for 2-3 minutes. 2. Place a cup of red tea in oven, then heat with high power. 3. Put some orange peel into oven, then heat them with high power for 1 minute. Bread barrel: rub outside and inside with damp cloth, don not use any sharp or abrasive agents for the consideration of protecting the non-stick coating, the bread pan must be dried completely prior to installing. Kneading blade: it can be easily removed for cleaning, also wipe the blade carefully with cotton damp cloth, if kneading blade is difficult to remove from the axle, in this case fill bread barrel with warm water and allow to soak for approx. 30 min, then remove it. Servicing Warning: it is hazardous for anyone, other than a qualified service technician, to carry out any service for repair operation which involves removal of any cover which gives protection against exposure to microwave energy. Caution: MICROWAVE RADIATION Do not become exposed to radiation from the microwave generator or other parts conducting microwave energy. During servicing below listed parts are liable to be removed and give access to potentials above 250V to earth. 1. Magnetron 2. High voltage transformer 3. High voltage capacitor 4. High voltage diode 5. High voltage fuse Below listed condition may cause undue microwave exposure during servicing. 1. Unproper fitting of magnetron. 2. Unproper matching of Door interlock, door hinge and door. 3. Unproper fitting of switch support. 4. Door, Door seal or enclosure has been damage ERROR 1. 2. 3. If LCD displays "Err0" during working, it indicates that sensor has been short circuit and you need replace it at the nearest repaired department. if LCD displays "Err1" during working, it indicates that sensor has been open circuit and you need replace it at the nearest repaired department. if LCD displays "Err2" during working, it indicates that the preset temperature is higher than that in the cavity. After-sales service is given by the retailer or by the importer / ditributor of G3 FERRARI products. 38 Español PRECAUCIONES GENERALES PARA EL USO (En conformidad con las indicaciones CE) 1. Leer prestando mucha atención las instrucciones de este manual ya que proporcionan informaciòn importantes sobre la seguridad de instalación, de utilización y de mantenimiento. De esta manera se podran evitar dificultades y eventuales accidentes de perjuicio a la seguridad del usuario. 2. Sacado el embalaje, asegurarse de la integridad del aparato, prestando atención en el cable de alimentación. 3. Si el cable de alimentación está dañado, debe ser sustituido por el fabricante o por el servicio de asistencia técnica o de todos modos por una persona con calificación similar, en modo de prevenir cualquier riesgo. 4. Antes de conectar el aparado, comprobar que el voltaje indicado en la placa de caracteristicas coincida con la tensión de la red eléctrica. El aparado puede sufrir daños en caso de tensión no correcta. 5. En caso de que la toma de corriente eléctrica y el aparato no resulten compatibles, personal profesionalmente cualificado podrà substituir la toma por otra idónea y podrà verificar que la sección de los cables de la toma tengan la potencia absorbida por el secador. 6. En general no se aconseja el uso de adaptadores, tomas de corriente múltiples y/o cables de prolongación, sobre todo en cuartos de baño o duchas. En el caso que fuese indispensable su utilización, es necesario servirse solo de adaptadores simples o múltiples y cables de prolongación conformes con las vigentes normas de seguridad, teniendo cuidado de no superar el lìmite de carga útil del valor de la corriente, marcado sobre el adaptador simple y los cables de prolongación, y él de potencia maxima marcado sobre el adaptador múltiple. 7 No utilizar el aparado si hubìera algun daño en el cable de alimentación o al enchufe. 8. No utilizar el aparato después de comprobar un funcionamiento irregular. En este caso apagar el aparato. Para eventuales reparaciones es necesario dirigirse a un centro de asistencia G3 FERRARI autorizado, con la obligación de utilizar recambios originales. La falta de observancia de todo lo mencionado puede comprometer la seguridad del aparado. 9. Este aparado se debe destinar exclusivamente para el uso indicado. Cualquier otro tipo de utilización se debe considerar inadecuada y, por lo tanto, peligrosa. G3 FERRARI no puede considerarse responsable de los daños que puedan derivarse por usos impropios, erroneos e irracionales. 10. No sumergir por ninguna razón el aparado en agua o en otros liquidos. 11. No utilizar el aparato en presencia de explosivos, substancias particularmente inflamables, gas o llamas ardientes. 12. No permitir que niños o incapaces utilizen el aparato sin el cuidado oportuno. 13. No utilizar el aparato con manos o pies mojados. 14. No utilizar por ninguna razon accesorios que no sean previstos por G3 FERRARI y que podrian crear serio peligro. 15. No utilizar el aparato cerca de bañeras , duchas o lavamanos y en los lugares en los que la presencia de agua pueda representar fuente de peligro. 16. No tirar nunca el cable o el aparato mismo sin desconectar el enchufe de la toma de corriente. 17. No dejar el cable pendiente. 18. No exponer el aparato a agentes atmosfericos como lluvia, viento, nieve, granizo, etc. 19. Desconectar el enchufe cuando no se utilize el aparato o durante su limpieza. 20. En caso de que se decida dejar de utilizar de aparatos de este tipo, dejarlo inactivo cortando el cable de alimentación, despues de haber desconectado el enchufe de la toma de corriente. Se recomienda ademas dejar inactivas las piezas que podrian representar fuente de peligro, especialmente para los niños que podrian utilizar el aparato en sus juegos. 21. Hagan leer estas istrucciones a todos los potenciales utilizadores de este aparato. 22. Conservar estas instrucciones. 39-
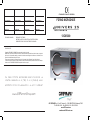 1
1
-
 2
2
-
 3
3
-
 4
4
-
 5
5
-
 6
6
-
 7
7
-
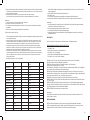 8
8
-
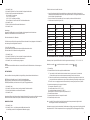 9
9
-
 10
10
-
 11
11
-
 12
12
-
 13
13
-
 14
14
-
 15
15
-
 16
16
-
 17
17
-
 18
18
-
 19
19
-
 20
20
-
 21
21
-
 22
22
-
 23
23
-
 24
24
-
 25
25
-
 26
26
-
 27
27
-
 28
28
-
 29
29
-
 30
30
-
 31
31
-
 32
32
-
 33
33
-
 34
34
-
 35
35
-
 36
36
-
 37
37
-
 38
38


G3 Ferrari Prisma Univers 25 Manual de usuario
- Categoría
- Microondas
- Tipo
- Manual de usuario
En otros idiomas
Documentos relacionados
-
G3 Ferrari Samba Manual de usuario
-
G3 Ferrari Pizza Express Delizia Manual de usuario
-
G3 Ferrari PEARL Manual de usuario
-
-
G3 Ferrari Levante InLine Manual de usuario
-
G3 Ferrari Levante Manual de usuario
-
-
Otros documentos
-
Candy CMW 2070M Manual de usuario
-
Denver OG-2030 Manual de usuario
-
Becken MICROONDAS BMW2327 El manual del propietario
-
Spice SPP044-B Manual de usuario
-
Caple CM209SS Manual de usuario
-
Electrolux EBM 8000EBM8000EBM8000 El manual del propietario
-
-
Optima Cortes Manual de usuario
-
Optima Fruttoso Manual de usuario
-
ARIETE 1581 Pasta Matic Manual de usuario