TEAC LP-R500 El manual del propietario
- Categoría
- Reproductores de CD
- Tipo
- El manual del propietario

ENGLISH
CEC6P10501740
CD recorder with turntable/cassette player
OWNER’S MANUAL
MANUAL DEL USUARIO
Z
LP-R500
ESPAÑOL

2
IMPORTANT SAFETY INSTRUCTIONS
1) Read these instructions.
2) Keep these instructions.
3) Heed all warnings.
4) Follow all instructions.
5) Do not use this apparatus near water.
6) Clean only with dry cloth.
7) Do not block any ventilation openings. Install in accordance with
the manufacturer’s instructions.
8) Do not install near any heat sources such as radiators, heat
registers, stoves, or other apparatus (including amplifiers) that
produce heat.
9) Do not defeat the safety purpose of the polarized or grounding-
type plug. A polarized plug has two blades with one wider than
the other. A grounding type plug has two blades and a third
grounding prong. The wide blade or the third prong are provided
for your safety. If the provided plug does not fit into your outlet,
consult an electrician for replacement of the obsolete outlet.
10) Protect the power cord from being walked on or pinched
particularly at plugs, convenience receptacles, and the point
where they exit from the apparatus.
11) Only use attachments/accessories specified by the manufacturer.
12) Use only with the cart, stand, tripod, bracket,
or table specified by the manufacturer,
or sold with the apparatus. When a cart is
used, use caution when moving the cart/
apparatus combination to avoid injury from
tip-over.
13) Unplug this apparatus during lightning storms or when unused
for long periods of time.
14) Refer all servicing to qualified service personnel. Servicing is
required when the apparatus has been damaged in any way, such
as power-supply cord or plug is damaged, liquid has been spilled
or objects have fallen into the apparatus, the apparatus has been
exposed to rain or moisture, does not operate normally, or has
been dropped.
The lightning flash with arrowhead symbol, within an
equilateral triangle, is intended to alert the user to the
presence of uninsulated “dangerous voltage” within the
product’s enclosure that may be of sufficient magnitude
to constitute a risk of electric shock to persons.
The exclamation point within an equilateral triangle is
intended to alert the user to the presence of important
operating and maintenance (servicing) instructions in the
literature accompanying the appliance.
CAUTION: TO REDUCE THE RISK OF ELECTRIC SHOCK, DO
NOT REMOVE COVER (OR BACK). NO USER-SERVICEABLE
PARTS INSIDE. REFER SERVICING TO QUALIFIED SERVICE
PERSONNEL.

3
ENGLISH
CAUTION
< DO NOT REMOVE THE EXTERNAL CASES OR CABINETS TO EXPOSE
THE ELECTRONICS. NO USER SERVICEABLE PARTS ARE WITHIN.
< IF YOU ARE EXPERIENCING PROBLEMS WITH THIS PRODUCT,
CONTACT TEAC FOR A SERVICE REFERRAL. DO NOT USE THE
PRODUCT UNTIL IT HAS BEEN REPAIRED.
< USE OF CONTROLS OR ADJUSTMENTS OR PERFORMANCE OF
PROCEDURES OTHER THAN THOSE SPECIFIED HEREIN MAY
RESULT IN HAZARDOUS RADIATION EXPOSURE.
WARNING: TO PREVENT FIRE OR SHOCK HAZARD,
DO NOT EXPOSE THIS APPLIANCE TO RAIN OR
MOISTURE.
< Do not expose this apparatus to drips or splashes.
< Do not place any objects filled with liquids, such as vases, on the
apparatus.
< Do not install this apparatus in a confined space such as a book
case or similar unit.
< The apparatus draws nominal non-operating power from the
AC outlet with its POWER or STANDBY/ON switch not in the ON
position.
< The apparatus should be located close enough to the AC outlet
so that you can easily grasp the power cord plug at any time.
< The mains plug is used as the disconnect device, the disconnect
device shall remain readily operable.
< An apparatus with Class ! construction shall be connected to an
AC outlet with a protective grounding connection.
< Batteries (battery pack or batteries installed) shall not be exposed
to excessive heat such as sunshine, fire or the like.
< Excessive sound pressure from earphones and headphones can
cause hearing loss.

4
Contents
Thank you for choosing TEAC. Read this manual carefully to
get the best performance from this unit.
Before using the unit .............................................4
Handling Records ................................................5
How to Replace the Stylus ........................................5
Discs ............................................................6
Turntable Cover ..................................................7
Handling Cassette Tape ..........................................8
Connection ......................................................9
Unit Functions and Remote Control .............................10
Parts of the Turntable ...........................................12
Remote Control Unit ............................................13
Basic Operation .................................................13
Listening to the Radio ...........................................14
Preset Tuning ...................................................15
Listening to a Record ...........................................16
Listening to a CD ................................................18
Programmed Playback ..........................................20
Repeat Playback ................................................21
Shuffle Playback. . . . . . . . . . . . . . . . . . . . . . . . . . . . . . . . . . . . . . . . . . . . . . . . . 22
Time Display ....................................................22
Listening to a Cassette Tape .....................................23
Before Recording ...............................................24
Recording ......................................................25
Finalize .........................................................28
Erase or Unfinalize a CD-RW .....................................29
REC OFF Timer . . . . . . . . . . . . . . . . . . . . . . . . . . . . . . . . . . . . . . . . . . . . . . . . . . 30
Troubleshooting ................................................32
Messages .......................................................33
Specifications ..................................................33
Before using the unit
Read this before attempting any operations.
< Do not place any objects on top of the turntable cover. They may
create noise due to vibrations or fall, especially during playback.
< When the unit is turned on, switching on the TV may cause lines
to appear on the TV screen, depending on the condition of the
electric waves of the TV broadcast. This is not malfunction in the
unit or the TV. In this case, turn off the unit.
< The nominal temperature should be between 5°C and 35°C (41°F
and 95°F). The CD-RW recorder is more sensitive to extremes of
temperature than ordinary CD players.
< Relative humidity should be 30 to 90 degrees non-condensing.
< As the unit may become warm during operation, always leave
sufficient space around the unit for ventilation.
< The voltage supplied to the unit should match the voltage as
printed on the rear panel. If you are in any doubt regarding this
matter, consult an electrician.
< Choose the installation location of your unit carefully. Avoid
placing it in direct sunlight or close to a source of heat. Also avoid
locations subject to vibrations and excessive dust, heat, cold or
moisture.
< Do not place the unit on an amplifier/receiver.
< Do not open the cabinet as this might result in damage to the
circuitry or electrical shock. If a foreign object should get into the
unit, contact your dealer or service company.
< When removing the power plug from the wall outlet, always pull
directly on the plug, never yank on the cord.
< Do not attempt to clean the unit with chemical solvents as this
might damage the finish. Use a clean, dry cloth.
< Keep this manual in a safe place for future reference.
DO NOT MOVE THE UNIT DURING PLAYBACK
During playback, the disc rotates at high speed. Do NOT lift or
move the unit during playback. Doing so may damage the disc
or the unit.
WHEN MOVING THIS UNIT
When changing the unit’s location or packing the unit for
moving, be sure to remove the record or disc. Moving this unit
with the record or disc loaded may result in damage to this unit.
If the unit is to be packed and moved a great distance, it is also
advisable to tighten the turntable with transport locking screw.
See Page 12 for instructions.

5
ENGLISH
Handling Records
Maintenance
< Fingerprints and dust cause noise and sound skip and damage
the record and stylus. Be sure to clean the records with a
commercially available record cleaner.
< When using a record cleaner, follow the grooves and wipe the
surface in a circular motion.
< Keep your records away from dust. Keep them in a cool, dry
place.
< To avoid dust and scratches, keep records in their sleeves and
jackets when not in use.
< Store records upright on their edges. Records stored horizontally
will eventually bend and warp.
< Do not expose records to direct sunlight or high humidity and
temperature. Long exposure to high temperatures will warp the
record.
< Do not store your records in the trunk of your car. The
temperature in a closed trunk can ruin your collection.
< Store records in an area with stable temperature and humidity.
< If the record becomes dirty, gently wipe the surface
in a circular motion, using a soft anti-static cloth.
Commercial record cleaning systems are available from many
retailers or on-line. TEAC does not endorse any specific product
but, depending on the condition of your record collection, it may
be advisable to look into one of these systems. Clean records
protect your stylus from undue wear.
< Do not touch the record’s grooves. Only handle records, by
the edges or the label, with clean hands. Skin oils from even
clean hands can leave a residue on the record surface that will
gradually deteriorate the quality of your record.
label
grooves
edge
How to Replace the Stylus
The stylus should last about 50 hours under normal use.
However, it is recommended that the stylus be replaced as soon as
you notice a change in sound quality.
Prolonged use of a worn-out stylus may damage the record.
Wear and tear on the stylus will be accelerated when playing 78 RPM
records. The higher speed of 78 RPM records wears the stylus more
quickly.
Caution:
< Do not remove or bend the stylus.
< To avoid injury, do not touch the needle.
< Turn off the unit’s power before you replace the stylus.
< Keep out of the reach of children.
< Handle with care, as the stylus is delicate. Use of a bent or
broken stylus may damage the record and cause the turntable to
malfunction.
< Do not expose stylus to extreme heat.
< Contact a qualified repair company if you experience difficulty in
changing the stylus.
Removing old stylus
1. Set a screwdriver at the tip of the stylus and push down to the
direction “A”.
2. Remove the stylus by pulling it forward.
Installing a new stylus
1. Hold the tip of the stylus and insert the other edge by pressing in
the direction “B”.
2. Push up in the direction “C” until it locks at the tip.
B
C
Replacement stylus (sold separately):
STL-103 (includes 3)
SPL-102 (includes 2, for SP records only)
For stylus replacements, contact your dealer or TEAC listed at the
back cover of this Owner’s manual.

6
How to remove the disc How to hold the disc
< If the disc becomes dirty, wipe the surface radially from the center
hole outward towards the outer edge with a soft and dry cloth.
< Never use such chemicals as record sprays, antistatic sprays or
fluid, benzine or thinner to clean the discs. Such chemicals will do
irreparable damage to the disc’s plastic surface.
< Discs should be returned to their cases after use to avoid dust
and scratches that could cause the laser pickup to “skip.”
< Do not expose discs to direct sunlight or high humidity and
temperature for extended periods. Long exposure to high
temperatures will warp the disc.
< Do not play any disc that is warped, deformed or damaged.
Playing such discs may cause irreparable harm to the playing
mechanisms.
< CD-R and CD-RW discs are more sensitive to the effects of heat
and ultraviolet rays than ordinary CDs. It is important that they
are not stored in a location where direct sunlight will fall on
them, and away from sources of heat such as radiators or heat-
generating electrical devices.
< Printable CD-R and CD-RW discs are not recommended, as the
label side might be sticky and damage the unit.
< Do not stick papers or protective sheets on the discs and do not
use any protective coating spray.
< Use a soft oil-based felt-tipped pen to write the information on
the label side. Never use a ball-point or hard-tipped pen, as this
may cause damage to the recorded side.
< Never use a stabilizer. Using commercially available CD stabilizers
with this unit will damage the mechanisms and cause them to
malfunction.
< Do not use CDs with an irregular shape (octagonal, heart shaped,
business card size, etc.). CDs of this sort can damage the unit.
< If you are in any doubt as to the care and handling of a CD-R/
CD-RW disc, read the precautions supplied with the disc, or
contact the disc manufacturer directly.
Please use an audio CD bearing the “DIGITAL AUDIO” mark
or a CD-R or CD-RW discs.
CD
CD-R CD-RW
< Depending on the quality of the disc and/or the condition of the
recording, some CD-R/CD-RW discs may not be playable.
< Copy-protected discs and other discs which do not conform
to the CD standard may not play back correctly in this player.
If you use such discs in this unit, TEAC Corporation and its
subsidiaries cannot be responsible for any consequences or
guarantee the quality of reproduction. If you experience problems
with such non-standard discs, you should contact the producers
of the disc.
< Always place the disc on the disc tray with the label side
uppermost. (Compact discs can be played or recorded only on
one side.)
< To remove a disc from its storage case, press down on the center
of the case and lift the disc out, holding it carefully by the edges.
Discs

7
ENGLISH
About CD-R and CD-RW discs
CD-R discs can be recorded once only. Once they have been used
for recording, they cannot be erased or re-recorded.
However, if space is available on the disc (and the disc has not
been finalized), additional material can be recorded.
By contrast, a CD-RW disc can be used in much the same way as a
CD-R disc, but the last track or tracks recorded can be erased, and
the space on the disc can be re-used for other recordings.
However, you should note that an audio CD created using a CD-
RW disc may not play back satisfactorily on every audio CD player.
CD-R, by contrast, may be played satisfactorily on the majority of
audio CD players.
Finalizing
Although audio data may be written on a CD-R or CD-RW disc, a
standard CD player will not be able to play back the audio until a
final table of contents (TOC) has been written at the start of the
disc.
The process of writing this table of contents is known as
“finalizing”. Once this has been done, no further data can be
written to the disc.
Note that a CD-RW disc that has been finalized can be
“unfinalized”. This allows further tracks to be recorded to the disc,
provided that there is space on the disc.
< Repeat, shuffle and programmed playback do not work with
unfinalized (NO TOC) discs.
Recordable discs
In this manual, we use the term “recordable” disc to describe a
CD-R or CD-RW disc that has not been finalized, and has enough
space to record.
To attach the turntable cover
1. Slide the hinges into the hinge fittings on both sides of the rear of
the turntable.
2. Place the turntable cover hinge fittings over the top portion of
the hinges and slide the cover down into place.
To detach the turntable cover
Hold the cover on both sides and gently pull upward to remove
it from the hinges.
How to open/close the turntable cover
To Open:
Lift the turntable cover halfway until it stops.
< The cover will now stay open.
To Close:
Slowly lower the cover until it touches the turntable base.
Note:
Make sure you grasp the cover by the front edge to avoid
removing hinges.
Be careful not to pinch your fingers when the cover closes.
Turntable Cover

8
Handling Cassette Tape
Instructions for use
< Do not open a cassette or pull out the tape.
< Do not touch the tape.
< Do not leave cassette tapes in a place with a lot of rubbish or
dust.
< Do not use or store cassette tapes in an area with high
temperatures or humidity.
< Keep cassette tapes away from magnets or magnetized items
because they may cause noise or erase recorded contents.
Cassette tapes to avoid
The following cassette tapes may prevent the unit from
performing normal operation or functions. The tape of such
cassette tapes may get caught and causing unexpected
problems.
Cassette tapes with poor form accuracy
Deformed cassettes, ones of which tape does not track properly,
or ones that generate abnormal noise during fast-forwarding or
rewinding.
Long-recording tapes
Tapes for recording 90 minutes or longer sometimes get caught
by the capstan because they are extremely thin and stretch easily.
Avoid using them as much as possible.
Slackening of tapes
Slackened tapes may get caught by the capstan or other parts.
Eliminate slack by using a pencil or alike before use.
Tape types
There are several types of cassette tapes.
Metal
(
Type IV
)
CrO
2
(
Type
II
)
Normal
(
Type
I
)
Automatic tape type detection holes
< When playing a normal tape (type
!
), set the TAPE switch by the
turntable to NORMAL. When playing a chrome tape (type
@
) or
metal tape (type
!%
), set the switch to HIGH.
Cleaning and demagnetizing the cassette
deck
A dirty head causes poor sound quality or sound skip. Dirt on the
tape tracking roller may catch the tape. Clean the head, pinch
roller, and capstan with a cotton applicator dampened with a
commercially available cleaning solution every ten hours of use.
When the head is magnetized, it increases noise and hinders the
unit from transmitting high notes. When these problems occur,
demagnetize the head using a commercially available head
eraser.
Capstan
Record/playback head
Pinch roller
Do not insert a cassette tape until the cleaning solution on the
head dries.

9
ENGLISH
LR
LINE OUT
LR
LINE IN
Connection
C
A
B
D
CAUTION:
< Switch off the power to all equipment before making
connections.
< Read the instructions of each component you intend to use
with this unit.
< Be sure to insert each plug securely. To prevent hum and noise,
avoid bundling the signal interconnection cables together with
the AC power cord.
A
FM antenna
While in FM mode, tune in an FM station and extend the lead to
find the best position for the reception. This antenna may need
to be repositioned if you move your unit to a new location.
B
AM loop antenna
To stand the loop antenna on a surface, fix the claw to the slot
in the antenna base.
Connect the loop antenna’s wires to the AM antenna terminals.
< Make sure to connect the black wire to the GND terminal.
Place the antenna on a shelf or hang it on a window frame, etc.,
in the direction which gives the best reception. Keep all other
wires such as power cords, speaker wires or interconnect wires
as far away as possible from the antenna.
C
AUX IN/OUT jacks
Analog 2-channel audio signal is input or output from these
jacks. Connect these jacks to a CD player, cassette tape deck,
etc. using attached RCA cables.
Make sure to connect:
white plug q white jack (L: left channel)
red plug q red jack (R: right channel)
D
AC Power Cord
Plug this AC power cord into an AC wall socket.
Red
Red
White
White
White
White
Cassette Tape Deck, etc.

10
Unit Functions and Remote Control
A
POWER
Press this button to turn the unit on or off.
B
PHONO/TAPE/AUX, CD, FM/AM
Press the PHONO/TAPE/AUX button and select PHONO/TAPE to
play a record.
Press the PHONO/TAPE/AUX button and select PHONO/TAPE to
play a tape.
Press the PHONO/TAPE/AUX button and select AUX to listen to
the external source connected to the AUX IN jacks.
Press the CD button to play a CD.
Press the FM/AM button to listen to the radio.
C
MANUAL/AUTO REC, PRESET
Use this button to select the mode of track number assignment.
In TUNER mode, use this button to select a preset station.
D
ENTER, MEMORY
Use this button to start finalizing and erasing.
Also use this button to preset stations.
E
FINALIZE/ERASE, FM MODE
Use this button to finalize a CD-R/CD-RW disc.
Use this button to erase or unfinalize a CD-RW disc.
Use this button to select FM MODE.

11
ENGLISH
F
TRACK INCREMENT
During recording, use this button to divide tracks.
G
Display
H
Skip/Search (.m/,/), TUNING ( )
In CD mode, use these buttons to skip tracks.
Hold down these buttons to search for a part of a track.
In FM/AM mode, use these buttons to tune in a station.
I
RECORD
Use this button to enter record pause mode.
J
CD operation buttons
PLAY/PAUSE (y/J)
Use this button to start or pause playback and recording.
STOP (H)
Use this button to stop playback or recording.
K
Speakers (stereo)
L
OPEN/CLOSE (L)
Use this button to open and close the disc tray.
M
Remote Sensor
When operating the remote control unit, point it towards the
REMOTE SENSOR.
N
VOLUME
Turn this knob to adjust the volume.
O
Disc Tray
P
REC LEVEL
In record pause mode, use this knob to adjust the recording level.
Q
PHONES
For private listening, first reduce the volume level to minimum.
Then insert the plug from your headphones into the PHONES
jack, and adjust the volume by turning the VOLUME knob. The
sound from speakers will be cut off while the headphones are
plugged in.
< Do not turn the unit on or off, or insert or pull out the
headphones jack while wearing the headphones.
(Excessive sounds may occur from the headphones.)
< The sound from speakers will be cut off while the headphones
are plugged in.
R
PROGRAM
In CD mode, use this button to program tracks.
S
CLEAR
In CD mode, use this button to clear programmed tracks.
T
REPEAT
In CD mode, use this button to select repeat mode of CD.
U
DISPLAY
In CD mode, use this button to change the display.
V
SHUFFLE
In CD mode, use this button for shuffle playback.
Note:
To simplify explanations, instructions refer to names of buttons
and controls on the front panel, making no mention of the use of
remote control unit.

12
A
turntable
B
screw fixing the turntable for transportation
Before use, completely loosen the screw by turning it clockwise
with a coin or screwdriver.
When you transport the unit, turn the screw counterclockwise to
secure the turntable.
C
cue-lever
Use this lever to lift the tone arm.
D
tone arm holder
Gently push the clamper to the right to release the tone arm.
E
speed selector
Select the speed suitable for the record.
F
tone arm
When you move the tone arm to inside, the turntable will begin
to turn.
Parts of the Turntable
Before use, detach the
stylus guard (white
plastic cover) by pulling it
straight off the front of the
cartridge in the direction of
the arrow.
G
Cassette tape operation button
PLAY (y)
Use this button to play a tape.
F.FWD (,)
Use this button to fast-forward a tape.
REW (m)
Use this button to rewind a tape.
STOP (H)
Use this button to stop playing a tape.
PAUSE (J)
Use this button to suspend playing/recording temporarily.
H
Cassette holder
Set a cassette tape with the exposed tape in front and the side to
play facing up.
I
TAPE switch
When playing a normal tape (type
!
), set the TAPE switch to
NORMAL. When playing a chrome tape (type
@
) or metal tape
(type
!%
), set the switch to HIGH.
J
INPUT switch
When PHONO/TAPE is selected by pressing the corresponding
button, use this switch to switch between “RECORD” and “TAPE“.
When a record or cassette tape is playing, make sure to stop
playing prior to using the switch.
K
45 RPM adaptor
When playing a 45 RPM large hole single record, use the adaptor.
Slide the part of holding the adapter to the side.
Never press the PLAY button (y) and REW button (m) at
the same time.
During use
Side view of the screw for transport
During transport
(when shipped
from the factory)

13
ENGLISH
1
Press the POWER switch to turn the unit on.
2
Select a source by pressing the corresponding button.
< To listen to an external source connected to AUX jacks, select
AUX by pressing the PHONO/TAPE/AUX button once or twice.
When PHONO/TAPE is selected, set the INPUT switch by the
turntable to “RECORD” or “TAPE“.
3
Play the source, and adjust the volume by turning the
VOLUME knob.
Basic Operation
The provided Remote Control Unit allows the unit to be operated
from a distance.
When operating the remote control unit, point it towards the
REMOTE SENSOR on the front panel of the unit.
< Even if the remote control unit is operated within the effective
range, remote control operation may be impossible if there are
any obstacles between the unit and the remote control.
< If the remote control unit is operated near other appliances which
generate infrared rays, or if other remote control devices using
infrared rays are used near the unit, it may operate incorrectly.
Conversely, the other appliances may operate incorrectly.
Battery Installation
1
Remove the battery compartment cover.
2
Insert two “AA” (R6, SUM-3) dry batteries. Make sure that the
batteries are inserted with their positive “+” and negative “_”
poles positioned correctly.
3
Close the cover.
Battery Replacement
If the distance required between the remote control unit and
main unit decreases, the batteries are exhausted. In this case
replace the batteries with new ones.
For more information about collection of batteries, please
contact your local municipality, your waste disposal service or the
point of sale where you purchased the items.
Precautions concerning batteries
< Be sure to insert the batteries with correct positive “+” and
negative “_” polarities.
< Use batteries of the same type. Never use different types of
batteries together.
< Rechargeable and non-rechargeable batteries can be used. Refer
to the precautions on their labels.
< When the remote control unit is not to be used for a long time
(more than a month), remove the batteries from the remote
control unit to prevent them from leaking.
< If the batteries leak, wipe away the liquid inside the battery
compartment and replace the batteries with new ones.
< Do not use any other batteries not specified. Do not mix new
batteries with old ones or use different types of batteries
together.
< Do not heat or disassemble batteries and never throw them in
the fire or water.
< Do not carry or store batteries with other metallic objects. The
battery may short circuit, leak or explode.
< Never recharge a battery.
Remote Control Unit

14
Listening to the Radio
1
Select FM or AM using the FM/AM button.
2
Select the station you want to listen to (auto selection).
Hold down the TUNING button ( or ) until the frequency
display begins to change.
< When a station is tuned in, the tuning process will stop
automatically.
< Press the TUNING button (
or ) to stop the auto selection.
Selecting stations which cannot be tuned
automatically (manual selection)
When the .m or ,/ button is pressed momentarily,
the frequency changes by a fixed step.
Press the .m or ,/ button repeatedly until the
station you want to listen to is found.
FM MODE button
Pressing this button alternates between STEREO mode and
MONO mode.
STEREO
FM stereo broadcasts are received in stereo and the “STEREO”
indicator lights in the display.
< If the sound is distorted and the “STEREO” indicator blinks, the
signal is not strong enough for good stereo reception. In this
case, change to MONO mode.
MONO
To compensate for weak FM stereo reception, select this mode.
Reception will now be forced to monaural, reducing unwanted
noise.
If the reception is poor
AM broadcast
Turn around the AM antenna and/or the unit to find the best
position for AM stations.
FM broadcast
Extend and turn around the FM antenna so that you can receive
the stations clearly.
< If the reception was not improved, an outdoor antenna may be
required.
FM MODE

15
ENGLISH
You can store FM and AM stations into preset channels 1 to 9
respectively.
1
Tune in a station you want to listen to (see steps
1
to
2
of
page 14).
2
Press the MEMORY button.
“FM” and “MHz” or “AM” and “kHz” start blinking.
< You can tune in another station even after the MEMORY button
has been pressed.
3
Select a preset channel to store the station using the
PRESET button.
preset channel
4
Press the MEMORY button.
The station is stored and blinking stops.
To store more stations, repeat steps
1
to
4
.
Preset Tuning
How to select preset stations
1
Press the FM/AM button to select a band.
2
Press the PRESET button repeatedly until the desired
preset station is found.

16
Listening to a Record
< Before use, completely loosen the transportation screw by
turning it clockwise with a coin and remove the stylus guard.
1
Press the PHONO/TAPE/AUX button once or twice to select
PHONO/TAPE.
2
Gently open the dust cover.
< When opening the cover, pay attention to prevent your hand
from getting caught.
3
Set the INPUT switch to PHONO.
4
Put the record on the turntable.
When playing a 45 RPM large hole single record, use the included
adaptor.
5
Select the speed.
6
Gently push the clamper to the right to release the tone
arm.
clamper
7
Raise the cue lever to lift the tone arm off the tone arm
support.
tone arm
cue lever
transportation screwadaptor

17
ENGLISH
8
Move the tone arm gently to the edge of the record (or the
starting point of a track).
The turntable will begin to turn.
9
Gently lower the tone arm by slowly releasing the cue
lever.
You can lower the tone arm manually if the cue lever has not
been raised.
cue lever
tone arm
< Playing records with the dust cover down will prevent dust from
settling on the turntable.
< Do not place anything on top of the turntable cover, especially
while playing a record.
When the playback has been finished, the tone arm automatically
returns to the tone arm holder and the rotation stops.
To stop playback manually, slightly lift the tone arm using the cue
lever and return it to the tone arm holder.
tone arm
cue lever

18
Listening to a CD
4
Press the OPEN/CLOSE button (L) to close the tray.
< Be careful not to pinch your finger.
< It takes a few seconds for the unit to load the disc. No buttons
will work during loading. Wait until the total number of the tracks
and the total play time of the disc are displayed.
1
Press the CD button.
“--” blinks for a few seconds.
When no disc is set, “no dISC” appears on the display.
2
Press the OPEN/CLOSE button (L) to open the tray.
3
Place a disc on the tray with the printed label face up.
< Never place more than one disc on the tray.
< The disc must be placed in the center of the disc tray. If the disc
is not correctly loaded, it may not be possible to open the tray
again once it has closed, so you should ensure the disc is always
centered on the tray.
< Do not force the tray by hand during opening and closing
operations.
disc type indicator
total play time of the disctotal number of the tracks
< The disc type indicator shows the type of disc currently loaded.
CD:
A commercial pre-recorded CD
CD-R:
A finalized CD-R
CD-RW:
A finalized CD-RW
NO TOC CD-R:
A CD-R which has yet to be finalized
NO TOC CD-RW:
A CD-RW which has yet to be finalized
blank:
No disc or unreadable disc
When a non-audio disc is inserted, the unit may start playing
in order to read the data, however there will be no sound.
5
Press the PLAY/PAUSE button (y/J) to start playback.
Disc playback starts from the first track, and y lights on the
display.
< If you load the disc, and then press the PLAY/PAUSE button
(y/J) without having first closed the disc tray, the disc tray
closes and playback starts.

19
ENGLISH
A
To suspend playback temporarily (pause mode)
Press the PLAY/PAUSE button (y/J) during playback.
Playback stops at the current position.
To resume playback, press the PLAY/PAUSE button (y/J)
again.
B
To stop playback
Press the STOP button (H) to stop playback.
C
To skip to the next or a previous track
During playback, repeatedly press the .m or ,/
button until the desired track is found. The selected track will be
played from the beginning.
In the stop mode, press the .m or ,/ button
repeatedly until the track you want to listen to is found, and
press the PLAY/PAUSE button (y/J) to start playback from the
selected track.
< When the .m button is pressed during playback, the
track being played will be played from the beginning. To return
to the beginning of the previous track, press the .m
button twice.
D
Search for a part of a track
During playback, hold down the .m or ,/ button
and release it when the part you want to listen to is found.

20
Programmed Playback
Up to 32 tracks can be programmed in the desired order.
< Insert a disc and select “CD” before beginning programming.
< Shuffle playback does not work during programmed playback.
< Programmed playback works with finalized discs only.
1
Press the PROGRAM button in the stop mode.
“PROGRAM” indicator and “P” blink on the display.
2
Press the . or / button to select a track.
track number
3
Press the PROGRAM button.
The track is programmed, and “P” stops blinking. If you select
another track, “P” starts blinking again.
Repeat steps
2
and
3
to program more tracks.
< To select the same track consecutively, press the PROGRAM
button again.
< You can program up to 32 tracks.
< To cancel the program mode, press the STOP button (H).
< You cannot select the track which does not exist in the disc.
4
When the selection of track numbers has been finished,
press the PLAY/PAUSE button (y/J) to start program
playback.
“PROGRAM” indicator stops blinking.

21
ENGLISH
To check the programmed order
In the stop mode, press the . or / button repeatedly to
show the track numbers that have been stored in memory.
To erase a track, press the CLEAR button when the number is
displayed. After deletion, the next track number will be moved
up.
To add a track to the end of the program
In the stop mode, press the PROGRAM button.
Select a track number by pressing the . or / button, and
then press the PROGRAM button.
The track is added to the end of the program.
To delete the last track from the program
In the stop mode, press the CLEAR button to delete the last
track from the program.
To clear the program
If one of the following buttons is pressed, the programmed
contents will be cleared:
Main unit
OPEN/CLOSE, POWER, FM/AM, PHONO/TAPE/AUX, STOP in the
stop mode
Remote control
FM/AM, PHONO/AUX, STOP in the stop mode
Each time the REPEAT button is pressed, the repeat mode is changed
as follows:
REPEAT ALL (Repeat All the Tracks)
Press the REPEAT button once during playback.
All the tracks of the disc will be played repeatedly.
REPEAT 1 (Repeat one track)
Press the REPEAT button twice during playback.
The track being played will be played repeatedly. If you press the
or button and select another track, the track you selected will be
played repeatedly.
It is also possible to select a track to be repeated in the stop
mode. Press the REPEAT button twice and then select the track
number by pressing the or button. Press the PLAY/PAUSE
button (/) to start playback.
If one of the following buttons is pressed, repeat mode will be
cancelled:
Main unit
OPEN/CLOSE, POWER, FM/AM, PHONO/TAPE/AUX
Remote control
FM/AM, PHONO/AUX
Repeat playback works with finalized discs only.
Repeat Playback

22
Each time the DISPLAY button is pressed, the display changes as
follows:
CD/CD-R/CD-RW playback
Track number and elapsed time of current track
c
Remaining time of current track
c
Total elapsed time of the disc
c
Remaining time of the disc
In record pause mode
Track number and elapsed recording time of next track (0:00)
c
Remaining recordable time of the disc
c
Blank or tuner display
During recording
Track number and elapsed recording time of current track
c
Remaining recordable time of the disc
c
Blank or tuner display
Time DisplayShuffle Playback
The tracks can be played randomly. In the stop mode, press the
SHUFFLE button and the PLAY/PAUSE button.
When the shuffle playback of all the tracks has been finished, the
unit stops and the shuffle playback mode is not cancelled.
< If you press the / button during shuffle playback, next
track will be randomly selected and played. If you press the
. button, the currently played track will be played from the
beginning. A track cannot be replayed during shuffle playback.
< Shuffle playback does not work during programmed playback.
< If one of the following buttons is pressed, playback will stop but
shuffle mode will not be cancelled:
Main unit
OPEN/CLOSE, POWER, FM/AM, PHONO/TAPE/AUX
Remote control
FM/AM, PHONO/TAPE/AUX, SHUFFLE (in the stop mode)
< Shuffle playback works with finalized discs only.

23
ENGLISH
Listening to a Cassette Tape 1
1
Press the PHONO/TAPE/AUX button to select PHONO/
TAPE.
< Each time the PHONO/TAPE/AUX button is pressed, PHONO/
TAPE (record or cassette tape) and AUX (external component) are
selected alternatively.
2
Slowly open the cover.
< When opening the cover, pay attention to prevent your hand
from getting caught.
3
Set the INPUT switch to TAPE.
4
Set a recorded cassette tape in the cassette holder.
Set a cassette tape with the exposed tape in front and the side to
play facing up.
Side to play Tape
5
Set the TAPE switch.
When playing a normal tape (type
!
), set the TAPE switch by the
turntable to NORMAL. When playing a chrome tape (type
@
) or
metal tape (type
!%
), set the switch to HIGH.
6
Press the PLAY button (y).
Playback starts.
When the playback of one side finishes, the playback stops. To play
the other side, turn over the cassette tape.

24
Listening to a Cassette Tape 2
A
To stop playback
Press the STOP button (H) during playback to stop.
B
To suspend playback temporarily
Press the PAUSE button (J) to suspend playback temporarily.
Press the button again to start playback again.
C
Fast-forwarding/rewinding
Press the F.FWD or REW button (,/m) to fast-forward or
rewind a tape respectively.
To stop fast-forwarding or rewinding, press the Stop button (H).
Never press the PLAY button (y) and REW button (m) at
the same time.
When a tape is fast-forwarded or rewound to the end, make
sure to press the STOP button (H) to stop the function.
Before you start recording, make sure that you understand
the following points:
< CD specifications limit the number of tracks to 99 and prevents
recording of tracks shorter than 4 seconds.
< Once you have recorded on a CD-R disc, the data cannot be
erased from it.
< A recorded CD-R can be played back in a regular CD player after
finalizing.
< To add more recordings to a finalized CD-RW, unfinalize it. (See
page 29.)
When all available space on a CD-RW has been recorded, you can
record additional tracks by erasing previously recorded tracks.
Note that you can only erase all tracks or the last track.
Only tracks in between cannot be erased.
< If the STOP button (H) or PLAY/PAUSE button (y/J) is pressed
within four seconds from the beginning of a track, the unit
continues to record no signal and stops when the track’s length
reaches four seconds.
< When the recording is finished, “REC” and “- ENd - - - -” blink for
a few seconds, and the unit then goes into stop mode. Do not
apply shock or vibration to the unit during recording.
< If the disc reaches the end during recording, the unit finalizes the
disc automatically and stops.
< If the disc reaches the end of the 99th track during recording, the
unit finalizes the disc automatically and stops.
< The recording time of a track may differ slightly from the original
one.
< When a partially recorded disc is inserted, recording starts after
the last recorded track.
< The AUTO REC function automatically creates tracks according to
the threshold level that has been set (See page 25.). Therefore it
is possible when using this method that the finished copy could
have more tracks than the original. This would be caused by any
noisy sections or extremely quiet sections within the tracks of
the original source material that causes the threshold level to be
crossed.
Before Recording

25
ENGLISH
Recording 1
Audio from the FM/AM, PHONO, TAPE (cassette tapes) or AUX
sources can be recorded on the CD recorder.
1
Press the PHONO/TAPE/AUX button repeatedly to select
the source to be recorded.
To record a record or cassette tape, select PHONO/TAPE and set
the INPUT switch by the turntable to the desired source.
To record an external source connected to the AUX IN jacks,
select AUX.
2
Load a recordable CD-R or CD-RW disc into the unit.
Press the OPEN/CLOSE button (L), place a disc on the disc tray
with the printed label side up, and then press the OPEN/CLOSE
button (L) to close the disc tray.
Make sure “NO TOC” and “CD-R” (or “CD-RW“) indicators lights on
the display, or the RECORD button in step
4
will not work.
To record a radio broadcast
Select FM or AM using the FM/AM button and select the station
using the .m/,/ button or PRESET button in step
1
.
A station cannot be selected after you press the REC button in
step
4
.
3
Select the mode of track number assignment using the
MANUAL/AUTO REC button.
When the MANUAL/AUTO REC button is pressed once, the
current mode is displayed. Press the MANUAL/AUTO REC button
repeatedly to select any other mode.
< When you record a radio broadcast, press the MANUAL/AUTO
REC button of the remote control unit. (The MANUAL/AUTO REC
button on the main unit will work as the PRESET button in the
tuner mode.)
– – (MANUAL)
Track numbers are not given automatically.
Use the TRACK INCREMENT button to divide tracks.
MANUAL is recommended for recording an analog source such
as a record.
The settings will be reset to “Manual” when the unit is turned off.
–20db, –30db or –40db (AUTO REC)
The unit will automatically insert a track division in the recorded
material when the sound level has dropped below the threshold
for more than 2 seconds, and sound has re-started.
“–20db” takes a louder signal to trigger the track increment.
“–40db” means that a relatively quiet signal will trigger the track
increment. “–40db” is suitable for recording a noiseless source
such as a CD.
When recording from a source with a lot of unwanted noise or
an analog source in auto track setting, more track numbers may
be assigned than actual tracks recorded. In this case, choose
“Manual” setting and press the TRACK INCREMENT button to
assign the track numbers as you wish.

26
Recording 2
< AUTO REC may not work properly with analog sources that
contain low-level noises.
< The AUTO TRACK indicator lights when –20dB, –30dB or –40dB is
selected.
< The default setting is MANUAL (off). When the unit is turned on
or the OPEN/CLOSE button is pressed, the setting is automatically
reset to MANUAL (off).
< The MANUAL/AUTO REC button does not work during recording
or in the record pause mode.
Switching is disabled immediately after a disc is placed. Switch
after “NO TOC” is displayed.
4
Press the RECORD button.
The red indicator on the RECORD button blinks.
The unit enters record pause mode.
During recording, the indicator lights red.
In record pause mode, “REC” indicator blinks and the J indicator
lights on the display.
< No button will work while “bUSY” is displayed. Wait a few seconds
until “bUSY” disappears from the display.
< If the red indicator on the RECORD button does not light, reload a
recordable disc, wait a few seconds until “NO TOC” and “CD-R” (or
“CD-RW“) indicators light on the display, and press the RECORD
button again.
5
Adjusting the recording level.
Play the source to be recorded and adjust the recording level so
that the loudest sound does not exceed the “OVER” indicator on
the peak level meter.
The level can be adjusted from –00 (–∞) dB to 18 dB.
< The default setting is 0 dB. Every time the recording is finished,
the setting is automatically reset to 0 dB.
< Different sources to be recorded (record, cassette tape, CD, etc.)
have different volumes. In order to record at the optimal volume
for different sources, it is necessary to adjust the recording level
for each source.
When you connect to the headphones jack of the radio
cassette recorder or portable player etc.
Set the recording level to “0dB” and adjust the volume of
connected device.
If the recording level is row, adjust the recording level so that the
loudest sound does not exceed the “OVER” indicator on the peak
level meter.
6
Prepare a recording source.
To record from a record
Move the tone arm to the end of a record or a position to record
and slowly put it down.
While the turntable is stopped, the PLAY/PAUSE (y/J) will not
work and you cannot start recording.
To record from a cassette tape
Press the PLAY button (y).
To prevent the beginning part from being cut out, cue the
cassette tape, suspend playback temporarily, start recording as
described in step
7
, and cancel the pause of the tape. (To
suspend playback temporarily when playback is stopped,
press the PAUSE button (J) and then PLAY button (y).)
You can not start recording while the cassette tape is stopped.
Not to record excessive operation sound, press the STOP button
(H) to stop recording as soon as the number on a record or
cassette tape to be recorded finishes.
To record a sound played by a component connected to the
AUX terminal
Play the component connected to the AUX terminal.

27
ENGLISH
7
Press the PLAY/PAUSE button (y/J) to start recording.
8
If AUX is selected in step
1
, play the source to be
recorded.
When the playback of the source finishes, press the STOP button
(H) to stop recording.
When playback of a record finishes and the turntable stops
rotating or playback of a cassette tape finishes, recording
automatically ends.
But to prevent unwanted noise from the tone arm being
recorded, stop the recording manually by using the STOP button.
When recording is stopped, “REC” and “-End---” blink for
several seconds. Do not turn OFF the power or shake the unit
during recording or when “REC” and “-----” are blinking. Such
actions prevent proper recording.
A
To stop recording
Press the STOP button (H) to stop recording.
B
To suspend recording temporarily (pause mode)
Press the PLAY/PAUSE button (y/J). “bUSY” briefly appears on
the display, and the recording is paused.
To restart recording, press the PLAY/PAUSE button (y/J).
< You cannot restart recording while “bUSY” is displayed.
< Remember that every time recording is paused or stopped, a
new track number will always be assigned. It is not possible to
record in two “stages” within one track.
< The unit will not stop or pause even if the PLAY/PAUSE button
is pressed within 4 seconds after recording has started.
This is due to a CD specification which allows you stop or pause
only after 4 seconds of recording.
C
Manual track division
It is possible to divide the recording into tracks while recording.
While recording is taking place, press the TRACK INCREMENT
button. The current track number will be incremented by one.
< The TRACK INCREMENT button works regardless of the
MANUAL/AUTO REC setting.
< You cannot divide the track manually for tracks of less than 4
seconds in CD specifications. Up to 99 tracks can be divided on
one single CD.

28
Finalize
3
Press the FINALIZE button in the stop mode.
“FINAL” appears on the display.
< To cancel the finalizing process, press the STOP button (H).
4
Press the ENTER button to start finalizing.
“NO TOC” and “REC” indicators blink, and the remaining time for
the finalizing operation appears in the display.
When the operation has been finished, the NO TOC indicator
turns off and the display returns to the track/time display.
During finalizing, no button works.
Never turn the power off nor unplug the power cord.
< Although finalized CD-R discs may be played on ordinary CD
players, remember that finalized CD-RW discs may not play on
ordinary CD players.
As has been explained earlier, in order for a disc to become a
standard CD, it must have a Table of Contents (TOC) written to it.
This process is known as finalizing.
Once finalized, CD-R discs are truly final. No more tracks can be
recorded on them. By contrast, CD-RW discs can be “unfinalized“,
and if there is space, further material can be recorded on them.
< You cannot finalize the blank disc.
< When the disc has reached its maximum recordable time, it will
automatically finalize even when recording is still in progress. A
finalized disc cannot be further finalized.
1
Press the CD button to select “CD”.
2
Load an unfinalized (recordable) disc.

29
ENGLISH
Erase or Unfinalize a CD-RW
Erase procedures are possible only on an unfinalized CD-RW disc.
If a CD-RW disc has been finalized, unfinalize it prior to erasure.
Note that it is not possible to perform any erase or unfinalize
procedures on a CD-R disc.
It is possible to erase the last recorded track. It is also possible to
erase a whole disc.
1
Press the CD button to select “CD”.
2
Load a recorded CD-RW.
3
Press the FINALIZE/ERASE button in the stop mode.
Each time the FINALIZE/ERASE button is pressed, the display
changes as follows:
“UnFINAL” (unfinalize) appears when a finalized disc is loaded.
“FINAL” appears when the disc has not been finalized. If you
press the FINALIZE/ERASE button again, “ErASE” and the last track
number will appear.
UnFINAL
Select this to unfinalize the disc.
ErASE XX (the number of the last track recorded on the
disc)
Select this to erase the last track on the disc.
< This will not appear when only one track is recorded on the disc.
ErASE ALL
Select this to erase all the tracks.
< To erase a number in a finalized CD-RW, unfinalize (UnFINAL) first
and then erase the number by the same procedure (ErASE or
ErASE ALL).
< To cancel the erasing or unfinalizing process, press the STOP
button (H).
4
Press the ENTER button to start finalizing.
The remaining time for the operation appears in the display.
When the operation has been finished, the display returns to the
track/time display.
During erasing/unfinalizing, no buttons will work.
Never turn the power off nor unplug the power cord.
< This operation cannot be undone. If you are going to erase a track
or tracks, make sure that they are recordings that you really want
to erase.

30
This unit can record from the radio or other equipment connected
to the unit by setting the end recording time with the REC OFF
timer.
The REC OFF timer function does not work when the unit records
from PHONO or TAPE.
1
Press the PHONO/TAPE/AUX button or the FM/AM button
to select the source to be recorded.
To record an external source connected to the AUX IN jacks,
select AUX.
2
Load a recordable CD-R or CD-RW disc into the unit.
Make sure “NO TOC” and “CD-R” (or “CD-RW)” indicators light on
the display, or the RECORD button will not work.
< Before recording, tune in the radio station, set the track number
assignment, set the recording level and prepare the external
source connected to the AUX IN jacks.
3
Press the RECORD button to set the unit to record pause
mode.
The red indicator on the RECORD button blinks and J appears
on the display.
4
Press the RECORD button again.
“OFF” and the recording time (minutes/seconds) will be
displayed.
recording time
5
Press the .m or ,/ button to set the end
recording time.
Each time the button is pressed, the display will move up (down)
by 5 minutes.
< The time set will be memorized and will be displayed the next
time you will use this function. To change the recording time,
follow the steps
1
to
5
.
< The recording time can be set up to the maximum recordable
time of the disc. When the disc has less than 5 minutes of
recordable time, the recording time will be regulated by the
remaining time.
Example: CD-RW with a recordable time of “74 minutes”
Press the skip buttons (.m/,/) to set the time at
5-minute intervals up to 74 minutes.
6
Press the PLAY/PAUSE button (y/J) to start recording.
When recording starts, recording time starts decreasing.
Recording will stop when the time reaches to “00:00”.
< When recording is finished, the recording timer will be cancelled.
< You can use the PLAY/PAUSE button (y/J) and the TRACK
INCREMENT button during the timer recording.
< Press the STOP button (H) to stop recording.
REC OFF Timer
10:00
…………
70:00
5:00 74:00

31
ENGLISH
Using the audio timer
This unit can start and stop recording together with the
commercially available audio timer.
< Connect the unit’s power cord to the outlet of the audio timer
before setting.
1
Set the unit’s ON/OFF times with the audio timer.
Refer to the instruction manual of audio timer for operations.
2
Turn on the audio timer outlet.
Refer to the instruction manual of audio timer for operations.
3
Set the recording time.
Follow the steps
1
to
5
on page 30.
4
Turn off the audio timer outlet.
Refer to the instruction manual of audio timer for operations.
The unit will turn on and the recording will start when the audio
timer reaches the ON time.
When recording starts, the REC OFF timer and the remaining time
display will start to change.
Recording will stop when reaches to “00:00”.
The unit will turn off when the audio timer’s reaches the OFF
time.
Caution when using the audio timer
< When a CD-R or CD-RW disc is loaded, it will take approximately
30 seconds after the unit turns on to read and start recording.
Set the on time of the audio timer approximately 1-2
minutes before you want to start recording.
< The unit will automatically start finalize when the disc reaches the
end during recording. If the power turns off during recording, the
error will occur and the disc will be no usable. When the audio
timer is used, set the off time of the audio timer 3 to 5 minutes
longer than the recording time of the unit.
Refer to the following example to set the recording time of
the unit and off time of the audio timer.
AM8:00
AM9:04
AM9:00
AM7:59:00
< Audio timer reaches on time
< Unit turns on
After disc reading
< Recording timer starts
< Recording starts
00 Sec. 60 Sec.
Display shows the recording time “65:00”.
Unit’s finishes working: Including time for finalizing, etc.
While the recording time decreases
from “65:00” to “00:00”.
When the display shows
“00:00”
< Recording time finishes
< Recording finishes
AM9:08:00
< Audio timer reaches the off
time
< Unit turns off
If you want to record an FM radio program from “AM8:00” to
“AM9:00”, set the recording time of the unit to “65:00” first, then
set the ON time of audio timer to “AM7:59” and OFF time to
“AM9:08”.
Once the audio timer reaches the on time, the unit will turn
on and the disc will be read. Approximately 30 seconds later,
recording will start. At the same time, the display for the
recording time will start to decrease, and recording will stop
when the display shows “00:00”. The unit will turn off when the
audio timer reaches the off time.

32
Troubleshooting
If you experience any problems with the unit, please take a moment
to look through this chart and see if you can solve the problem
yourself before you call your dealer or a TEAC service center.
General
No power.
e Check the connection to the AC power source. Check and
make sure the AC source is not a switched outlet and if it is, the
switch is turned on. Make sure there is power to the AC outlet
by plugging another item such as a lamp or fan.
No sound.
e Adjust the volume.
The sound is noisy.
e The unit is too close to a TV set or similar appliances.
Relocate the unit further away from them, or turn the other
appliances off.
Remote control does not work.
e Press the POWER switch of the main unit to turn it ON.
e If the batteries are dead, change the batteries.
e Use the remote control unit within the (5m) range and pointed
at the front panel.
e Clear obstacles that are between the remote control unit and
the main unit.
e If a strong light is near the unit, turn it off.
CD Recorder
Will not play.
e Load a disc with the playback side facing down.
e If the disc is dirty, clean the surface of the disc.
e A blank disc has been loaded. Load a prerecorded disc.
e Depending on the disc, etc. it may not be possible to playback
CD-R/CD-RW discs. Try again with another disc.
Sound skips.
e Place the unit on a stable surface to avoid vibration and shock.
e If the disc is dirty, clean the surface of the disc.
e Do not use scratched, damaged or warped discs.
Recording is not possible.
e A playback-only disc or finalized disc has been loaded. Use a
recordable disc.
e The disc does not have a recordable area. Use another disc.
e The recording level is too low. Adjust the recording level.
e The recording does not start if only the RECORD button is
pressed. Always press the PLAY/PAUSE button (y/J) to start
the recording.
Tuner
Cannot listen to any station, or signal is too weak.
e Tune in the station properly.
e If a TV is near the unit, turn it off.
e Rotate the unit or antenna wire for the best reception position.
Turntable
Will not play.
e Loosen the transportation screw, and remove the stylus guard.
(The stylus guard is a plastic cover that protects the stylus
during transportation. Failing to remove this guard will not
allow the needle to contact the groove of the record and no
sound will be heard.)
e Set the Input Selecting switch to “PHONO“.
Sound is noisy or strange.
e If the stylus is worn-out, change the stylus.
e Select the correct playback speed.
Sound skips.
e Place the unit on a stable surface to avoid vibration and shock.
Make sure the unit is level both front to back and side to side.
e Clean the surface of the record.
e Do not use scratched, damaged or warped records.
Cassette tape
The unit does not work even after operation buttons are
pressed.
e Confirm that a cassette tape has been set. If not, set a cassette
tape.
e Insert the cassette tape correctly.
e Set the Input Selecting switch to “TAPE“.
Sound quality is poor.
e Clean the head.
e If the head is magnetized, demagnetize it with a head eraser.
e Set the TAPE switch according to the cassette tape used.
If normal operation cannot be obtained, unplug the power
cord from the outlet and plug it again.
Beware of condensation
When the unit (or a record/disc) is moved from a cold to a warm
place, or used after a sudden temperature change, there is the
danger of condensation; vapor in the air could condense on
the internal mechanism, making correct operation erratic or
impossible. To prevent this, or if this occurs, leave the unit for one
or two hours with the power turned on. The unit will stabilize at
the temperature of its surroundings.
Maintenance
Always keep the turntable clean.
If the surface of the unit gets dirty, wipe with a soft cloth or use
a diluted mild liquid soap. Be sure to remove any excess liquid
completely. Do not use thinner, benzine or alcohol as they may
damage the surface of the unit. Allow the surface of the unit to
dry completely before using.

33
ENGLISH
Specifications Messages
TRACK 0 0:00
A blank CD-R/CD-RW disc is set on the tray.
bUSY
The unit is reading the disc. Wait a few seconds.
CLOSE
Close the disc tray.
ErASE
Erase the last track of the CD-RW disc.
ErASEALL
Erase all the tracks of the CD-RW disc.
FINAL
Finalize the disc.
–40db, –30db or –20db
Settings of the track number assignment mode
NO dISC
No readable disc has been loaded.
OPEN
Open the tray.
- - - -:- -
The unit is reading the disc.
P-**
Program number
UnFINAL
Unfinalize the CD-RW disc.
Error Messages
d FULL, OPFULL
There is no space on the disc, or no more tracks are available.
P-FULL
32 tracks have been programmed. No more tracks can be
programmed.
Err **
An error occurred within the unit.
Press the POWER switch to turn the unit off, wait a minute, and
turn it on again.
Err 03
Something is wrong with the disc.
Turn the unit off and on, and change the disc.
dISC Err
An error disc or irregular-shaped disc has been loaded.
DAO DISC
The unfinalize function cannot be performed with discs recorded
using the "Disc at Once (DAO)" recording system.
(** is variable.)
Amplifier Section
Output power ....................................3.5 W + 3.5 W
Frequency response ............................50 Hz to 20 kHz
Audio input sensitivity/Impedance ............AUX: (0.5 V)/20 kΩ
CD Recorder Section
Media type ...................CD-RW and CD-R for Digital audio
(record and playback)
CD (playback only)
Recording sampling frequency .........................44.1 kHz
Frequency response .................... 20 Hz to 20 kHz (±3 dB)
Signal to noise ratio ................. More than 85 dB (playback)
More than 75 dB (recording)
Cassette tape section
Tracking system ........................4-track, 2-channel stereo
Tape speed ..........................................4.8 cm/sec
Wow&flutter ...............................................0.3%
Frequency characteristic .......................125 to 10,000 Hz
S/N ratio ..................................................45 dB
Tuner Section
Frequency range (FM) ....................87.5 MHz to 108.0 MHz
Frequency range (AM). . . . . . . . . . . . . . . . . . . . . . 522 kHz to 1,629 kHz
Record Player Section
Motor ..........................................DC servo motor
Drive system ..........................................Belt Drive
Speed ..............................33-1/3 rpm, 45 rpm, 78 rpm
Wow and Flutter ...........................less than 0.3% (WDT)
Signal to noise ratio ............................More than 50 dB
Cartridge type .........................Ceramic Stereo Cartridge
Stylus ..................STL-103 (premounted) / SPL-102 (option)
Output level .....................158 - 348 mV (50 mm/S, 1 kHz)
Speaker System Section
Unit .................................................76 mm (3”)
Impedance .............................................4 ohms
GENERAL
Power requirements ................................230V, 50 Hz
Power consumption ...................................... 25 W
Dimensions (W x H x D) .....................470 x 230 x 390 mm
Weight ...................................................11 kg
Operating temperature range .......................5°C to 35°C
Accessories
Owner’s manual x 1
Warranty card x 1
45 RPM adaptor x 1
Remote control unit (RC-1157) x 1
Battery (AA, alkaline or MN) x 2
FM antenna x 1
AM antenna x 1
Hinge x 2
Turntable cover x 1
Quick Start Guide for recording x 1
Stereo RCA pin cable x 1
< Design and specifications are subject to change without notice.
< Weight and dimensions are approximate.
< Illustrations may differ slightly from production models.

34
Indice
Enhorabuena por la adquisición de un TEAC. Lea
detenidamente este manual a fin de obtener el mejor
rendimiento de esta unidad.
Antes de usarse .................................................34
Manejo de discos ...............................................35
Cómo reemplazar la aguja .......................................35
Discos ..........................................................36
Cubierta de la tornamesa ........................................37
Cinta de casete .................................................38
Conexiones .....................................................39
Funciones y Control Remoto ....................................40
Nombres de la tornamesa .......................................42
Control Remoto .................................................43
Operación básica ...............................................43
Para escuchar el radio ...........................................44
Presintonías .....................................................45
Para escuchar un disco .........................................46
Para escuchar un CD ............................................48
Reproducción programada ......................................50
Reproducción Repetida .........................................51
Reproducción aleatoria ..........................................52
Indicación de tiempo ...........................................52
Para escuchar una cinta de casete ...............................53
Antes de grabar .................................................54
Grabación ......................................................55
Finalización .....................................................58
Borrado o Desfinalización de un CD-RW ..........................59
Temporizador REC OFF ..........................................60
Detección de problemas ........................................62
Mensajes .......................................................63
Especificaciones ................................................63
Antes de usarse
Lea esto antes de la operación.
< No coloque ningún objeto sobre la cubierta de la tornamesa.
Podría generar ruido debido a vibraciones o a su caída,
especialmente durante la reproducción.
< Cuando se enciende la unidad, es posible que, al encender la
televisión, aparezcan líneas en la pantalla, dependiendo del
estado de las ondas eléctricas de la retransmisión televisiva. No se
trata de un mal funcionamiento de la unidad o de la televisión. En
este caso, apague la unidad.
< La temperatura nominal debe estar entre 5°C y 35°C (41°F y
95°F). El grabador de CD-RW es más sensible a las temperaturas
extremas que los reproductores comunes de CD (discos
compactos).
< La humedad relativa debe ser de 30 a 90 grados sin
condensación.
< Debido a que la unidad se puede calentar durante la operación,
siempre deje espacio suficiente alrededor de la unidad para su
ventilación.
< El voltaje suministrado a la unidad debe corresponder al voltaje
que se encuentra impreso en el tablero posterior. Si tiene alguna
duda respecto a este asunto, consulte a un electricista.
< Elija la ubicación de instalación de la unidad con cuidado. Evite
colocarla bajo la luz directa del sol o cerca de una fuente de calor.
También evite ubicaciones sujetas a vibraciones y polvo, calor,
frío o humedad excesivos.
< No coloque la unidad sobre un amplificador/ receptor.
< No abra el gabinete sellado, ya que esto puede dar como
resultado un daño a los circuitos o una descarga eléctrica. Si se
introduce un objeto extraño en el aparato, póngase en contacto
con su distribuidor o su agencia de servicio.
< Cuando quite el enchufe de alimentación del tomacorriente de
pared, siempre jale directamente del enchufe, nunca del cable.
< No intente limpiar la unidad con solventes químicos, ya que esto
puede dañar el terminado. Use una tela seca y limpia.
< Conserve el manual en un lugar seguro para futuras consultas.
NO MUEVA LA UNIDAD DURANTE LA REPRODUCCIÓN
Durante la reproducción, el disco gira a gran velocidad. NO
levante ni mueva la unidad durante la reproducción. El hacerlo
podría dañar el disco o la unidad.
CUANDO MUEVA ESTA UNIDAD
Si transporta esta unidad con algún disco cargado, podrían
producirse daños en la unidad. Si la unidad debe empaquetarse
y transportarse a una gran distancia, también se aconseja apretar
la tornamesa con el tornillo de bloqueo para transporte. Véase la
página 42 para las instrucciones.
PRECAUCIÓN
< No permita que ningún líquido se derrame o salpique este
aparato.
< No coloque objetos que contengan líquidos, como jarrones,
encima de este aparato.
< No instale este aparato confinado en un espacio reducido,
como podría ser encastrado en una estantería o lugar similar.
< El aparato absorbe energía nominal no operativa desde la
toma de CA cuando su interruptor POWER o STANDBY/ON no
está en posición ON.
< El aparato debe estar colocado lo suficientemente cerca de
la salida de corriente como para poder acceder al enchufe en
cualquier momento.
< El enchufe principal se utiliza como dispositivo de
desactivación y éste debe estar siempre operativo.
< Conecte siempre los aparatos de clase
!
como este a salidas de
corriente con toma de tierra.
< Las baterías (paquete de baterías o baterías instaladas) no
se deben exponer al calor excesivo tal como sol, fuego o
similares.
< Un exceso de presión de sonido desde los audífonos y
auriculares puede originar pérdida auditiva.

35
ESPAÑOL
Manejo de discos
Mantenimiento
< Las huellas y el polvo pueden producir ruido, saltos de sonido y
daños en el disco y en la aguja. Asegúrese de limpiar los discos
con un limpiador de discos disponible en comercios.
< Al utilizar un limpiador de discos, siga los surcos y seque la
superficie con un movimiento circular.
< Mantenga sus discos lejos del polvo. Guárdelos en un lugar frío y
seco.
< Para evitar el polvo y las ralladuras, mantenga los discos en sus
contenedores y camisas cuando no los esté usando.
< Almacene los discos de manera vertical sostenidos sobre sus
orillas. Los discos almacenados horizontalmente finalmente se
van a doblar y ondular.
< No exponga los discos a la luz directa del sol o a alta humedad y
temperatura. Una exposición larga a altas temperaturas ondulará
el disco.
< No almacene sus discos en la cajuela del coche. La temperatura
de la cajuela cerrada puede arruinar su colección.
< Almacene los discos en un área con temperatura y humedad
estables.
< Si se ensucia el disco, limpie suavemente la superficie en
movimientos circulares, usando una tela antiestática suave.
Muchos sistemas de limpieza de discos están disponibles
comercialmente de varios minoristas o en línea. TEAC no respalda
ningún producto específico de éstos, pero, dependiendo de la
condición de su colección de discos, puede ser recomendable
usar uno de estos sistemas. Los discos limpios protegen su aguja
de un desgaste indebido.
< No toque los surcos. Maneje los discos por las orillas o la etiqueta
solamente, con las manos limpias. Los aceites incluso de las
manos limpias pueden dejar un residuo en la superficie del disco
que gradualmente va a deteriorar la calidad de su disco.
etiqueta
surcos
orilla
Cómo reemplazar la aguja
La aguja debe durar aproximadamente 50 horas bajo uso normal.
Sin embargo, se recomienda reemplazar la aguja tan pronto como
note un cambio en la calidad de sonido.
El uso prolongado de una aguja gastada puede dañar el disco.
El desgaste será intensificado cuando se reproduzcan discos de 78
RPM. La aguja se desgasta más rápido a la velocidad más alta de los
discos de 78 RPM.
Precaución:
< No quite ni doble la aguja.
< Para evitar lesiones, no toque la aguja.
< Apague la alimentación de la unidad para reemplazar la aguja.
< Manténgala fuera del alcance de los niños.
< Manéjela con cuidado, ya que la aguja es delicada. El uso de
una aguja doblada o rota puede dañar el disco y causar un mal
funcionamiento.
< No exponga la aguja a calor extremo.
< Póngase en contacto con una compañía de reparación calificada
en caso de tener dificultades en el cambio de la aguja.
Cómo quitar la aguja usada (gastada)
1. Coloque un destornillador en la punta de la aguja y empuje hacia
abajo en la dirección “A”.
2. Retire la aguja tirando de ella hacia delante.
Instalación de la nueva aguja
1. Sostenga la punta de la aguja e inserte la otra orilla empujándola
en la dirección “B”.
2. Empuje hacia arriba en la dirección “C” hasta que se encaje en la
punta.
B
C
Reemplazo de la aguja (se vende por separado):
STL-103 (incluye 3)
SPL-102 (incluye 2, sólo para discos SP)
Para reemplazar la aguja, póngase en contacto con su distribuidor
o TEAC de la lista que aparece en la contraportada de este Manual
de usuario.

36
Extracción del disco Así se sostiene el disco
< Si se ensucia el disco, pase un paño seco y suave por la superficie,
en sentido radial (desde el agujero central hacia fuera en
dirección al borde externo).
< No utilice nunca productos químicos como los aerosoles para
discos de vinilo, antiestáticos o líquidos, bencina o solventes para
limpiar los discos. Tales sustancias causarán daños irreparables en
la superficie de plástico del disco.
< Los discos deberán devolverse a sus estuches después de usarlos
para evitar la acumulación de polvo y los rayados, que podrían
producir “saltos” en el lector láser.
< No exponga los discos a la luz solar directa ni a niveles elevados
de temperatura o humedad durante períodos prolongados.
La exposición de los discos durante mucho tiempo a altas
temperaturas causará su deformación.
< No reproduzca ningún disco que esté doblado, deformado o
dañado. Reproducir tales discos pueden causar daños irreparables
a los mecanismos de reproducción.
< Los discos CD-R y CD-RW son más sensibles a los efectos del calor
y de los rayos ultravioleta que los CD comunes. No conviene
guardarlos en lugares donde puedan quedar expuestos a la luz
solar directa, y deberán mantenerse alejados de fuentes de calor
como los radiadores o los aparatos eléctricos que desprendan
calor.
< No se recomiendan los discos CD-R y CD-RW imprimibles, ya que
el lado de la etiqueta puede tener restos de adhesivo y dañar la
unidad.
< No adhiera papeles ni láminas de protección a los discos, ni
aplique ningún tipo de aerosol de revestimiento para protección.
< Utilice un rotulador de punta blanda para escribir la información
en el lado de la etiqueta. No emplee nunca bolígrafos ni lápices
de punta dura, ya que podría dañar la cara grabada del disco.
< No utilice nunca estabilizadores. Los estabilizadores de CD
existentes en el mercado producirán daños en los mecanismos y
anomalías en su funcionamiento.
< No utilice discos de diseño irregular (octogonales, forma de
corazón, tamaño de tarjeta de visita, etc.), ya que pueden dañar la
unidad.
< Si tiene alguna duda sobre el cuidado y manipulación de un
disco CD-R/CD-RW, lea las precauciones suministradas con el
disco o póngase directamente en contacto con el fabricante.
Por favor, utilice un disco CD audio, CD-R y CD-RW que
tengan el logotipo “DIGITAL AUDIO”.
CD
CD-R CD-RW
< Según la calidad del disco y/o el estado de la grabación, es
posible que no se puedan reproducir algunos discos CD-R/
CD-RW.
< Los discos protegidos contra copia y otros discos que no
corresponden al estándar de los CDs pueden no ser reproduzidos
correctamente en esta unidad.
Si utiliza tales discos en esta unidad, TEAC Corporation y sus
subsidiarias no asumen ninguna responsabilidad por las posibles
consecuencias ni garantizan la calidad de la reproducción. Si
surge algún problema con estos discos no estándar, deberá
ponerse en contacto con los fabricantes del disco.
< Coloque siempre el disco en la bandeja con la cara de la etiqueta
hacia arriba. (Los discos compactos sólo se reproducen y graban
por una cara).
< Para extraer un disco de su estuche, presione el centro de la caja
y levante con cuidado el disco sosteniéndolo por los bordes.
Discos

37
ESPAÑOL
Acerca de los discos CD-R y CD-RW
Los discos CD-R pueden ser grabados sólo una vez. Una vez que
hayan sido usados para grabar, no se podrán borrar o regrabar los
discos.
Sin embargo, si hay espacio disponible en el disco (y el disco no
haya sido finalizado), se puede grabar material adicional.
Por el contrario, un disco CD-RW se puede utilizar más de la
misma manera como un disco CD-R, pero la última pista o las
pistas grabadas pueden ser borradas, y el espacio que existe en el
disco puede ser reutilizado para otras grabaciones.
Sin embargo, debe saber que un CD de audio creado usándose
un disco CD-RW puede no ser reproducido satisfactoriamente en
todos los reproductores de CD de audio.
Un CD-R, por el contrario, puede ser reproducido
satisfactoriamente en la mayoría de los reproductores de CD de
audio.
Finalización
Aunque los datos de audio pueden ser grabados en un disco
CD-R o CD-RW, un reproductor de CD estándar no podrá
reproducir el audio hasta que una tabla de contenido (TOC) final
se grabe en el inicio del disco.
El proceso de grabación de esta tabla de contenido es reconocido
como “finalización”. Una vez que esto haya sido hecho, no se
puede grabar ningún dato más en el disco.
Observe que un disco CD-RW que se ha finalizado puede ser
“desfinalizado”. Esto le permite grabar más pistas en el disco, con
tal que haya espacio en el disco.
< La reproducción repetida, aleatoria y programada no funciona
con discos desfinalizados (NO TOC).
Discos grabables
En este manual, usamos el término disco “grabable” para describir
un disco CD-R o CD-RW que no haya sido finalizado, y tiene
espacio suficiente para grabar.
Para instalar la cubierta de la tornamesa
1. Deslice los pernos a través del soporte situado a ambos lados de
la parte posterior del tocadiscos.
2. Coloque los accesorios de montaje de las bisagras de la cubierta
de la tornamesa sobre la parte superior de las bisagras y deslice la
cubierta en posición.
Para sacar la cubierta de la tornamesa
Sostenga la cubierta en ambos lados y tírela suavemente hacia
arriba para sacarla de las bisagras.
Cómo abrir/cerrar la cubierta de la tornamesa
Para abrir:
Levante la cubierta de la tornamesa por la mitad, hasta que se
detenga.
< Ahora la cubierta permanecerá abierta.
Para cerrar:
Baje lentamente la cubierta hasta que toque la base de la
tornamesa.
Nota:
Asegúrese de agarrar la cubierta por la parte frontal para evitar
que los pernos se salgan.
Tenga cuidado de no pillarse los dedos cuando cierre la cubierta.
Cubierta de la tornamesa

38
Cinta de casete
Instrucciones de uso
< No abra el casete ni retire la cinta.
< No toque la cinta.
< No deje las cintas de casete en lugares con mucha suciedad o
polvo.
< No utilice ni guarde cintas de casete en lugares con temperatura
o humedad alta.
< Mantenga las cintas de casete alejadas de imanes o de elementos
imantados porque podrían producir ruidos o eliminar contenidos
grabados.
Tipos de cintas de casete que no se
recomiendan
Si utiliza alguna de las siguientes cintas de casete, puede que la
unidad no funcione correctamente. La cinta puede enredarse y
producir problemas inesperados.
Cintas de casete deformadas
Si el casete está deformado, puede que la cinta no gire bien
o que produzca ruidos extraños durante el avance rápido o el
rebobinado.
Cintas de larga duración
Las cintas que graban 90 minutos o más, a veces, se enredan
en el carrete porque son sumamente delgadas se estiran con
facilidad.
Evite utilizarlas siempre que sea posible.
Flojedad en la cinta
Si la cinta está floja, puede enredarse en el carrete o en otras
partes de la unidad.
Elimine la flojedad utilizando un lápiz o algo similar antes de
utilizarla.
Tipos de cinta
Existen varios tipos de cintas de casete.
IV
II
I
< Cuando reproduzca una cinta normal (tipo
!
), sitúe el conmutador
TAPE, que se encuentra en el lateral de la tornamesa, en la
posición NORMAL. Cuando reproduzca una cinta de cromo (tipo
@
) o una cinta de metal (tipo
!%
), sitúe el conmutador en HIGH.
Limpieza y desimantación de la bandeja de
casete
Si el cabezal está sucio, se producen saltos o mala calidad de
sonido. La suciedad en el rodillo de encarrilado puede enredar la
cinta. Cada diez horas de uso, limpie el cabezal, el rodillo de pinza
y el carrete utilizando un bastoncillo de algodón empapado en
líquido limpiador de venta en comercios.
Cuando el cabezal está imantado, aumenta el ruido y dificulta
la transmisión de notas agudas desde la unidad. Cuando se
produzcan estos problemas, desimante el cabezal utilizando un
limpiador para cabezales de venta en comercios.
Carrete
Cabezal de grabación/
reproducción
Rodillo de pinza
No inserte una cinta de casete hasta que se seque el limpiador
del cabezal.

39
ESPAÑOL
LR
LINE OUT
LR
LINE IN
Conexiones
C
A
B
D
PRECAUCIÓN:
< Apague todos los componentes antes de realizar las
conexiones.
< Lea las instrucciones de todos los componentes que vaya a
utilizar con la unidad.
< Asegure firmemente cada uno de los conectores. Para evitar
zumbidos y ruido, no envolva los cables de conexión junto con
los cables de alimentación de CA.
A
Antena FM
Mientras se encuentre en la banda FM, sintonice una estación
de FM y extienda la antena hasta encontrar la mejor posición
para la recepción. Si mueve su unidad a una nueva ubicación,
puede ser necesario volver a ajustar esta antena.
B
Antena de cuadro de AM
Para colocar la antena de cuadro sobre una superficie, fije el
gancho a la ranura de la base de la antena.
Conecte los cables de la antena de cuadro a los terminales de la
antena de AM.
< Asegúrese de conectar el hilo negro al terminal GND.
Coloque la antena en una estantería o cuélguela del marco de
la ventana, etc. orientada para optimizar la recepción. Mantenga
el resto de los cables, como cables de alimentación, cables de
los altavoces o cables de interconexión lo más lejos posible de
la antena.
C
Conectores AUX IN/OUT
La señal analógica de audio de 2 canales entra o sale desde
estos conectores. Puede conectarlos a un reproductor de CD,
una bandeja de cinta de casete, etc. utilizando cables RCA
adjuntos.
Respete las siguientes conexiones:
conector blanco q terminal blanco (L: canal izquierdo)
conector rojo q terminal rojo (R: canal derecho)
D
Cable de alimentación de CA
Enchufe este cable de alimentación de CA en un tomacorriente
de pared CA.
Rojo
Rojo
Blanco
Blanco
Blanco
Blanco
Bandeja de cinta de casete, etc.

40
Funciones y Control Remoto
A
POWER
Presione este botón para encender o apagar la unidad.
B
PHONO/TAPE/AUX, CD, FM/AM
Presione el botón PHONO/TAPE/AUX y seleccione PHONO/TAPE
para reproducir un disco.
Presione el botón PHONO/TAPE/AUX y seleccione PHONO/TAPE
para reproducir una cinta.
Presione el botón PHONO/TAPE/AUX y seleccione AUX para
escuchar la fuente externa conectada en los jacks AUX IN.
Presione el botón CD para reproducir un CD.
Presione el botón FM/AM para escuchar el radio.
C
MANUAL/AUTO REC, PRESET
Utilice este botón para seleccionar el modo de asignación de
números a las pistas.
En el modo TUNER, utilice este botón para seleccionar una
estación preajustada.
D
ENTER, MEMORY
Utilice este botón para iniciar la finalización y borrado.
Utilice también este botón para preajustar las estaciones.
E
FINALIZE/ERASE, FM MODE
Utilice este botón para finalizar un disco CD-R/CD-RW.
Utilice este botón para borrar o desfinalizar un disco CD-RW.
Utilice este botón para seleccionar FM MODE.

41
ESPAÑOL
F
TRACK INCREMENT
Durante la grabación, utilice este botón para dividir las pistas.
G
Pantalla
H
Salto/Búsqueda (.m/,/), TUNING ( )
En el modo CD, utilice estos botones para saltar pistas.
Mantenga presionado estos botones para buscar por una parte
de una pista.
En el modo FM/AM, utilice estos botones para sintonizar una
estación.
I
RECORD
Utilice este botón para iniciar el modo pausa de grabación.
J
Botones de operación del CD
PLAY/PAUSE (y/J)
Utilice este botón para iniciar o pausar la reproducción y
grabación.
STOP (H)
Utilice este botón para detener la reproducción o grabación.
K
Altavoces (estéreo)
L
OPEN/CLOSE (L)
Utilice este botón para abrir cerrar la bandeja de discos.
M
Sensor remoto
Cuando opere la unidad de control remoto, apúntela hacia el
SENSOR REMOTO.
N
VOLUME
Gire esta perilla para ajustar el volumen.
O
Bandeja de disco
P
REC LEVEL
En el modo de pausa de grabación, utilice esta perilla para ajustar
el nivel de grabación.
Q
PHONES
Para escuchar en privado, primero reduzca el nivel del volumen al
mínimo. Luego inserte el enchufe de los audífonos en el conector
PHONES, y ajuste el volumen girando la perilla VOLUME. El
sonido de las bocinas serán aislados mientras los audífonos estén
enchufados.
< No apague ni encienda la unidad, ni introduzca o extraiga el
enchufe de los auriculares mientras los tenga puestos.
(Podrían oírse sonidos excesivos en los auriculares.)
< El sonido de los altavoces se interrumpirá mientras los auriculares
están enchufados.
R
PROGRAM
En el modo CD, utilice este botón para programar pistas.
S
CLEAR
En el modo CD, utilice este botón para borrar las pistas
programadas.
T
REPEAT
En el modo CD, utilice este botón para seleccionar un modo de
repetición de CD.
U
DISPLAY
En el modo CD, utilice este botón para cambiar la pantalla.
V
SHUFFLE
En el modo CD, utilice este botón para una reproducción
aleatoria.
Nota:
Para simplificar las explicaciones e instrucciones contenidas en
este manual, refiérase a los nombres de los botones y controles
sólo en el panel frontal. Los controles asociados en el control
remoto también se operarán similarmente.

42
A
tornamesa
B
fije con tornillos la tornamesa para su transporte
Antes de usarse, afloje completamente el tornillo girándolo hacia
la derecha con una moneda o con un destornillador.
Cuando transporte la unidad, gire el tornillo hacia la izquierda
para fijar la tornamesa.
C
palanca para adelantar
Utilice esta palanca para levantar el brazo de sintonización.
D
base del brazo de sintonización
Empuje suavemente la palanca hacia la derecha para levantar el
brazo de sintonización.
E
selector de velocidad
Seleccione la velocidad adecuada para el disco.
F
brazo de sintonización
Al mover el brazo de sintonización hacia dentro, la tornamesa
comenzará a girar.
Antes de usar la tornamesa,
retire la protección de la
aguja (cubierta de plástico
blanco) jalándola en línea
recta hacia el frente del
cartucho, en la dirección
que marca la flecha.
G
Botón de operación de cinta de casete
PLAY (y)
Utilice este botón para reproducir una cinta.
F.FWD (,)
Utilice este botón para el avance rápido de una cinta.
REW (m)
Utilice este botón para rebobinar una cinta.
STOP (H)
Utilice este botón para detener la reproducción de una cinta.
PAUSE (J)
Utilice este botón para suspender temporalmente la
reproducción/grabación.
H
Sujetador de casete
Coloque la cinta de casete de manera que la cinta esté hacia
delante y la cara de reproducción esté hacia arriba.
I
Conmutador TAPE
Al reproducir una cinta normal (tipo
!
), coloque el conmutador
TAPE en la posición NORMAL. Cuando reproduzca una cinta de
cromo (tipo
@
) o una cinta de metal (tipo
!%
), sitúe el conmutador
en HIGH.
J
Conmutador INPUT
Al seleccionar PHONO/TAPE pulsando el botón correspondiente,
utilice este conmutador para seleccionar entre “RECORD” y
“TAPE”.
Cuando reproduzca una cinta de casete o de grabación,
asegúrese de detener la reproducción antes de utilizar el
conmutador.
K
Adaptador de 45 RPM
Al reproducir un disco sencillo de agujero central grande de 45
RPM, utilice el adaptador.
Deslice la parte de sujeción del adaptador hacia el lado.
Nunca presione el botón PLAY (y) y el botón REW (m) al
mismo tiempo.
Durante el uso
Vista lateral del tornillo de transporte
Durante el
transporte (cuando
sale de la fábrica)
Nombres de la tornamesa

43
ESPAÑOL
1
Presione el interruptor POWER para encender la unidad.
2
Seleccione una fuente presionando el botón
correspondiente.
< Para escuchar una fuente externa conectada en los conectores
AUX, seleccione AUX presionando el botón PHONO/TAPE/AUX
una o dos veces.
Cuando PHONO/TAPE esté seleccionado, ajuste el conmutador
INPUT del lateral de la tornamesa a “RECORD” o “TAPE”.
3
Reproduzca la fuente, y ajuste el volumen girando la
perilla VOLUME.
Operación básica
La unidad de control remoto suministrada le permite controlar el
aparato a distancia.
Cuando opere con el control remoto, diríjalo hacia el SENSOR
REMOTO en el panel frontal del aparato.
< Aunque se utilice la unidad dentro del margen de funcionamiento
efectivo, puede no ser posible operar el control a distancia si hay
obstáculos entre el reproductor y el control remoto.
< Si se utiliza el control remoto cerca de otros aparatos que generen
rayos infrarrojos o si se emplean controles remotos de otros
aparatos que generan rayos infrarrojos cerca del reproductor, es
posible que éste no funcione correctamente.
Del mismo modo, es posible que los otros aparatos tampoco
funcionen correctamente.
Instalación de las pilas
1
Abra la tapa del compartimiento de las pilas.
2
Coloque dos pilas “AA” (R6, SUM-3). Asegúrese de que las pilas
queden ubicadas con sus polos positivo “+” y negativo “_”
correctamente posicionados.
3
Cierre la tapa.
Cambio de pilas
Si nota que ha disminuido la distancia requerida entre el control
remoto y el reproductor, para que el control remoto pueda
funcionar correctamente, esto significa que las pilas están
agotadas. En este caso, reemplácelas por nuevas.
Para más información sobre la recogida de baterías, póngase en
contacto con la autoridad municipal local, el servicio de recogida
de residuos o el punto de venta en el que adquirió el producto.
Precauciones con las pilas
< Asegúrese de insertar las pilas con sus polaridades positiva “+” y
negativa “_” correctas.
< Utilice pilas del mismo tipo. Nunca utilice diferentes tipos de pilas
juntas.
< Pueden utilizarse pilas recargables y no recargables. Consulte las
precauciones en sus rótulos.
< Cuando no vaya a utilizar el control remoto de la unidad durante
un largo periodo (superior a un mes), retire las pilas del mando
para evitar posibles pérdidas.
< Si las pilas pierden líquido, limpie el interior del compartimento y
sustituya las pilas por otras nuevas.
< No utilice cualquier otra pila que no se haya especificado. No
mezcle pilas nuevas con otras viejas ni utilice distintos tipos de
pilas juntas.
< No caliente ni desmonte las pilas y nunca las arroje al agua o al
fuego.
< No transporte ni guarde pilas con otros objetos metálicos.
Podrían producirse cortocircuitos, pérdidas o explosiones.
< Nunca recargue una pila.
Control Remoto

44
Para escuchar el radio
1
Seleccione FM o AM utilizando el botón FM/AM.
2
Seleccione la estación que desee escuchar (selección
automática).
Mantenga presionado el botón TUNING ( o ) hasta que la
visualización de la frecuencia comience a cambiar.
< Cuando se sintoniza una estación, el proceso de sintonización
parará automáticamente.
< Presione el botón TUNING (
o ) para detener la selección
automática.
Selección de estaciones que no pueden
sintonizarse automáticamente (selección
manual)
Cuando se presiona el botón .m o ,/, la frecuencia
cambia en un paso fijo.
Presione el botón .m o ,/ repetidamente hasta
que se encuentre la estación que desea escuchar.
Botón FM MODE
Pulse este botón para conmutar entre los modos STEREO y
MONO.
STEREO
Las emisiones de FM estéreo se reciben en estéreo y el indicador
“STEREO” se ilumina en la pantalla.
< Si el sonido está distorsionado y el indicador “STEREO” parpadea,
la señal no es lo suficientemente fuerte para una buena recepción
estéreo. En tal caso, seleccione el modo MONO.
MONO
Seleccione este modo si la recepción de FM estéreo es débil.
El sonido será monofónico y con menos ruido.
Si la recepción es deficiente
Transmisión de AM
Gire la antena AM y/o la unidad para encontrar la posición de
mejor recepción para las estaciones de AM.
Transmisión de FM
Extienda y ajuste la posición de la antena FM hasta obtener la
mejor recepción de las estaciones.
< Si la recepción no mejora, necesitará una antena exterior.
FM MODE

45
ESPAÑOL
Puede almacenar emisoras de FM y AM en las presintonías 1 a 9.
1
Sintonice una emisora (pasos
1
a
2
en página 44).
2
Pulse el botón MEMORY.
“FM” y “MHz”, o “AM” y “kHz” comienzan a parpadear.
< Puede sintonizar otra estación aún después de presionar el botón
MEMORY.
3
Seleccione un canal de preajuste para almacenar la
estación utilizando el botón PRESET.
canal de preajuste
4
Pulse el botón MEMORY.
La estación se almacena y se detiene el parpadeo.
Para almacenar otras emisoras, repita los pasos
1
a
4
.
Presintonías
Cómo seleccionar presintonías
1
Pulse el botón FM/AM para seleccionar una banda.
2
Pulse el botón PRESET repetidas veces hasta localizar la
presintonía deseada.

46
Para escuchar un disco
< Antes de utilizar la tornamesa, afloje completamente el tornillo de
transporte girándolo hacia la derecha con una moneda y retirar el
protector de la aguja.
1
Presione el botón PHONO/TAPE/AUX una o dos veces para
seleccionar PHONO/TAPE.
2
Abra lentamente la tapa.
< Al abrir la cubierta, tenga cuidado de no pillarse las manos.
3
Ajuste el conmutador INPUT a PHONO.
4
Coloque el disco en la tornamesa.
Cuando se reproduce un disco de 45 RPM, utilice el adaptador
suministrado.
5
Seleccione la velocidad.
6
Empuje suavemente la abrazadera hacia la derecha para
liberar el brazo de sintonización.
abrazadera
7
Levante la palanca para adelantar elevando el brazo de
sintonización y sacarlo del soporte de éste.
brazo de sintonización
palanca para adelantar
tornillo de transporteadaptador

47
ESPAÑOL
8
Mueva el brazo de sintonización suavemente hacia la orilla
del disco (o al punto inicial de una pista).
La tornamesa comenzará a girar.
9
Baje suavemente el brazo de sintonización liberando de
manera lenta la palanca para adelantar.
Usted puede bajar el brazo de sintonización manualmente si no
se ha subido la palanca para adelantar.
palanca de adelantar
brazo de sintonización
< El reproducir discos con la cubierta de protección contra polvo
puesta, evitará que el polvo se asiente en la tornamesa.
< No coloque nada sobre la cubierta de la tornamesa,
especialmente al reproducir un disco.
Cuando la reproducción haya terminado, el brazo de sintonización
vuelve automáticamente hacia la base del brazo de sintonización y
la rotación se detiene.
Para detener la reproducción manualmente, levante ligeramente
el brazo de sintonización utilizando la palanca para adelantar y
regréselo al soporte del brazo de sintonización.
brazo de sintonización
palanca para adelantar

48
Para escuchar un CD
4
Presione el botón OPEN/CLOSE (L) para cerrar la bandeja.
< Tenga cuidado con sus dedos.
< Llevará unos cuantos segundos hasta que la unidad cargue el
disco. Ningún botón funcionará durante la carga. Espere hasta
que se desplieguen el número total de pistas y el tiempo total de
reproducción del disco.
1
Presione el botón CD.
“--” parpadea durante unos segundos.
Si no hay ningún disco colocado, “no dISC” aparece en la pantalla.
2
Presione el botón OPEN/CLOSE (L) para abrir la bandeja.
3
Coloque un disco en la bandeja con la etiqueta impresa
hacia arriba.
< Nunca coloque más de un disco en la bandeja.
< El disco debe ser colocado en el centro de la bandeja de disco. Si
el disco no está correctamente puesto, puede no ser posible abrir
nuevamente la bandeja, una vez que se haya cerrado, de manera
que deberá asegurarse que el disco esté siempre centrado en la
bandeja.
< No fuerce la bandeja con la mano durante las operaciones de
abrir y cerrar.
indicador del tipo de disco
tiempo total de
reproducción del disco
número total de pistas
< El indicador de tipo de disco muestra el tipo de disco actualmente
cargado.
CD:
Un CD comercial pregrabado
CD-R:
Un CD-R finalizado
CD-RW:
Un CD-RW finalizado
NO TOC CD-R:
Un CD-R el cual todavía no haya finalizado
NO TOC CD-RW:
Un CD-RW el cual todavía no haya finalizado
blank (espacio):
No hay disco o el disco es ilegible
Cuando se inserta un disco que no es de audio, la unidad
puede comenzar la reproducción para leer los datos, aunque
no reproducirá ningún sonido.
5
Presione el botón PLAY/PAUSE (y /J ) para iniciar la
reproducción.
Se inicia la reproducción de la primera pista del disco y y se
ilumina en la pantalla.
< Si ha cargado el disco, y luego presiona el botón PLAY/PAUSE
(y/J) sin haber cerrado primero la bandeja de disco, la bandeja
de disco se cierra y se inicia la reproducción.

49
ESPAÑOL
A
Para suspender la reproducción temporalmente (modo de
pausa)
Presione el botón PLAY/PAUSE (y/J) durante la reproducción.
La reproducción se detiene en la posición actual.
Para reanudar la reproducción, presione de nuevo el botón
PLAY/PAUSE (y/J).
B
Para detener la reproducción
Presione el botón STOP (H) para detener la reproducción.
C
Para saltar a la pista anterior o siguiente
Durante la reproducción, presione reiteradas veces el botón
.m o ,/ hasta encontrar la pista deseada. Se
reproducirá la pista seleccionada desde el principio.
En el modo de parada, presione el botón .m o ,/
reiteradas veces hasta encontrar la pista que desea escuchar,
y presione el botón PLAY/PAUSE (y /J ) para iniciar la
reproducción desde la pista seleccionada.
< Cuando se presiona el botón .m durante la reproducción,
la pista que se está reproduciendo se volverá a reproducir
desde el principio. Para regresar al principio de la pista anterior,
presione dos veces el botón .m.
D
Para buscar una parte de una pista
Durante la reproducción, mantenga presionado el botón
.m o ,/ ay libérela cuando haya encontrado la
parte que desea escuchar.

50
Reproducción programada
Se puede programar hasta 32 pistas en el orden deseado.
< Inserte un disco y seleccione “CD” antes de empezar la
programación.
< La reproducción aleatoria no funciona durante la reproducción
programada.
< La reproducción programada funciona con discos finalizados
únicamente.
1
Presione el botón PROGRAM en el modo de parada.
El indicador “PROGRAM” y “P” parpadea en la pantalla.
2
Presione el botón . o / para seleccionar una pista.
número de pista
3
Presione el botón PROGRAM.
El indicador “P” dejan de parpadear. Si selecciona otra pista, “P”
comienza a parpadear otra vez.
Repita los pasos
2
y
3
para programar más pistas.
< Para seleccionar la misma pista de forma consecutiva, vuelva a
pulsar el botón PROGRAM.
< Puede programar hasta 32 pistas.
< Para cancelar el modo de programación, presione el botón
STOP (
H
).
< No puede seleccionar una pista que no existe en el disco.
4
Cuando se completa la selección de los números de pista,
presione el botón PLAY/PAUSE (
G
/
J
) para iniciar la
reproducción del programa.
El indicador “PROGRAM” deja de parpadear.

51
ESPAÑOL
Para verificar el orden programado
En el modo de parada, presione el botón . o /
repetidamente para mostrar los números de pista que se ha
almacenado en la memoria.
Para eliminar una pista, presione el botón CLEAR cuando se
visualice el número. Después de eliminar una pista, el número de
la siguiente pista ascenderá.
Para añadir una pista al final del programa
En el modo de parada, presione el botón PROGRAM.
Seleccione un número de pista presionando el botón . o
/ y luego presione el botón PROGRAM.
Se añadirá la pista al final del programa.
Para eliminar la última pista del programa
En el modo de parada, presione el botón CLEAR para eliminar la
última pista del programa.
Para borrar el programa
Los contenidos programados se eliminarán si se pulsa uno de los
siguientes botones:
Unidad principal
OPEN/CLOSE, POWER, FM/AM, PHONO/TAPE/AUX, STOP en el
modo de parada
Control remoto
FM/AM, PHONO/AUX, STOP en el modo de parada
Cada vez que se presione el botón REPEAT, cambiará el modo como
sigue:
REPEAT ALL (Repetir todas las pistas) REPEAT 1 (Repetir una pista)
(apagado)
REPEAT ALL (Repetir todas las pistas)
Presione una vez el botón REPEAT durante la reproducción.
Todas las pistas del disco serán reproducidas repetidamente.
REPEAT 1 (Repetir una pista)
Presione dos veces el botón REPEAT durante la reproducción.
La pista que está siendo reproducida será reproducida
repetidamente. Si presiona el botón . o / y selecciona
otra pista, la pista seleccionada será reproducida repetidamente.
También es posible seleccionar una pista para ser repetida
en el modo de parada. Presione dos veces el botón REPEAT
y seleccione el número de pista presionando el botón .
o /. Presione el botón PLAY/PAUSE (G/J) para iniciar la
reproducción.
< Si pulsa uno de los siguientes botones, el modo de reproducción
repetida quedará cancelado:
Unidad principal
OPEN/CLOSE, POWER, FM/AM, PHONO/TAPE/AUX
Control remoto
FM/AM, PHONO/AUX
< La reproducción repetida funciona con discos finalizados
únicamente.
Reproducción Repetida

52
Cada vez que se presiona el botón DISPLAY, la indicación cambia
conforme sigue:
Reproducción de CD/CD-R/CD-RW
Número y tiempo transcurrido de la pista actual
c
Tiempo restante de la pista actual
c
Tiempo total transcurrido del disco
c
Tiempo restante del disco
En el modo de pausa de grabación
Número y tiempo de grabación de la próxima pista (0:00)
c
Tiempo restante de grabación del disco
c
Pantalla del afinador o en blanco
Durante la grabación
Nº de la pista de grabación activa y tiempo de grabación
transcurrido de la misma
c
Tiempo restante de grabación del disco
c
Pantalla del afinador o en blanco
Indicación de tiempoReproducción aleatoria
Las pistas pueden ser reproducidas aleatoriamente. En el modo
de parada, presione el botón SHUFFLE y el botón PLAY/PAUSE.
Cuando la reproducción aleatoria de todas las pistas ha finalizado,
la unidad se detiene y el modo de reproducción se cancela.
< Si se presiona el botón / durante la reproducción aleatoria, la
siguiente pista será seleccionada aleatoriamente y reproducida.
Si se presiona el botón ., la pista reproducida actualmente
será reproducida desde el principio. Una pista no puede ser
reproducida de nuevo durante la reproducción aleatoria.
< La reproducción aleatoria no funciona durante la reproducción
programada.
< Si se pulsa uno de los siguientes botones, la reproducción se
detendrá pero no se cancelará el modo aleatorio:
Unidad principal
OPEN/CLOSE, POWER, FM/AM, PHONO/TAPE/AUX
Control remoto
FM/AM, PHONO/TAPE/AUX, SHUFFLE (en el modo de parada)
< La reproducción aleatoria funciona con discos finalizados
únicamente.

53
ESPAÑOL
Para escuchar una cinta de casete 1
1
Presione el botón PHONO/TAPE/AUX para seleccionar
PHONO/TAPE.
< Cada vez que se pulsa el botón PHONO/TAPE/AUX, se
selecciona alternativamente PHONO/TAPE (disco o cinta) y AUX
(componente externo).
2
Abra lentamente la tapa.
< Al abrir la cubierta, tenga cuidado de no pillarse las manos.
3
Ajuste el conmutador INPUT a TAPE.
4
Inserte una cinta de casete grabada en el sujetador de
casete.
Coloque la cinta de casete de manera que la cinta esté hacia delante
y la cara de reproducción esté hacia arriba.
cara de reproducción
cinta
5
Ajuste el conmutador TAPE.
Cuando reproduzca una cinta normal (tipo
!
), sitúe el conmutador
TAPE, que se encuentra en el lateral de la tornamesa, en la posición
NORMAL. Cuando reproduzca una cinta de cromo (tipo
@
) o una
cinta de metal (tipo
!%
), sitúe el conmutador en HIGH.
6
Presione el botón PLAY (y).
Se inicia la reproducción.
Cuando finaliza la reproducción de una cara, la reproducción se
detiene. Para reproducir la otra cara, dé la vuelta al casete.

54
Para escuchar una cinta de casete 2
A
Para detener la reproducción
Presione el botón STOP (H) durante la reproducción para
detenerla.
B
Para suspender la reproducción temporalmente
Presione el botón PAUSE (J) para suspender la reproducción
temporalmente.
Vuelva a pulsar el botón para iniciar otra vez la reproducción.
C
Avance rápido/rebobinado
Presione el botón F.FWD o REW (
,
/m) para avanzar rápido
o para rebobinar la cinta, respectivamente.
Para detener el avance rápido o el rebobinado, presione el
botón Stop (H).
Nunca presione el botón PLAY (y) y el botón REW (m) al
mismo tiempo.
Al avanzar rápido o rebobinar una cinta hasta el final, asegúrese
de presionar el botón STOP (H) para detener esa función.
Antes de iniciar la grabación, asegúrese de entender los
siguientes puntos:
< Las especificaciones del CD limitan el número de pistas a 99
e impide la grabación de pistas de una duración inferior a 4
segundos.
< Una vez que se haya grabado en un disco CD-R, los datos no
pueden ser borrados del mismo.
< Tras finalizar su grabación, un CD-R puede reproducirse en un
reproductor CD normal.
< Para agregar más grabaciones a un CD-RW finalizado, es necesario
desfinalizarlo (véase la página 59).
Cuando se haya grabado todo el espacio disponible en un
CD-RW, es posible grabar pistas adicionales borrando las pistas
grabadas anteriormente. Tenga en cuenta que sólo es posible
borrar todas las pistas o la última pista. No es posible borrar las
pistas situadas en el medio.
< Si se presiona el botón STOP (H) o PLAY/PAUSE (y/J) dentro de
cuatro segundos desde el inicio de una pista, la unidad continúa
grabando sin señal y se detiene cuando la pista alcanza cuatro
segundos.
< Cuando termina la grabación, los indicadores “REC” y “- ENd - - - -”
parpadean durante algunos segundos, y la unidad luego pasa al
modo de parada. No someta a la unidad a golpes o vibraciones
durante la grabación.
< Si el disco llega al final durante la grabación, la unidad finaliza el
disco automáticamente y se detiene.
< Si el disco llega al final de la pista 99 durante la grabación, la
unidad finaliza el disco automáticamente y se detiene.
< El tiempo de grabación de una pista puede diferir ligeramente
del original.
< Cuando se introduce un disco parcialmente grabado, la grabación
se inicia después de la última pista grabada.
< La función AUTO REC (GRABACIÓN AUTOMÁTICA) crea
automáticamente pistas según el valor de límite ajustado (véase
la página 55.). Por lo tanto, con este método es posible que la
copia finalizada tenga más pistas que la original. La causa sería
las secciones de ruido o secciones muy silenciosas dentro de las
pistas del material de la fuente original, lo que hace superar el
valor de límite.
Antes de grabar

55
ESPAÑOL
Grabación 1
Se puede grabar el audio de las fuentes FM/AM, PHONO, TAPE
(cintas de casete) o AUX en el grabador de CD.
1
Presione el botón PHONO/TAPE/AUX repetidamente para
seleccionar la fuente que desea grabar.
Para grabar un disco o casete, seleccione PHONO/TAPE y
configure la fuente deseada en el conmutador INPUT que se
encuentra en el lateral de la tornamesa.
Para grabar una fuente externa conectada a los conectores AUX
IN, seleccione AUX.
2
Cargue un disco CD-R o CD-RW en la unidad.
Presione el botón OPEN/CLOSE (
L
), coloque un disco en la
bandeja de discos con el lado de la etiqueta impresa hacia arriba,
y después presione el botón OPEN/CLOSE (
L
) para cerrar la
bandeja de discos.
Asegúrese que los indicadores “NO TOC” y “CD-R” (o “CD-RW”) se
enciendan en el monitor, de lo contrario, el botón RECORD
(GRABAR) no funcionará en el paso
4
.
Para grabar una retransmisión de radio
Seleccione FM o AM utilizando el botón FM/AM y seleccione la
estación utilizando el botón
.m
/
,/
o el botón
PRESET en el paso
1
.
No se puede seleccionar una estación después de pulsar el botón
REC en el paso
4
.
3
Seleccione el modo de asignación del número de la pista
utilizando el botón MANUAL/AUTO REC.
Cuando se presiona el botón MANUAL/AUTO REC una vez, el
modo actual será exhibido. Presione repetidamente el botón
MANUAL/AUTO REC para seleccionar cualquier otro modo.
Cuando grabe una retransmisión de radio, pulse el botón
MANUAL/AUTO REC del control remoto. (El botón MANUAL/
AUTO REC de la unidad principal funcionará igual que el botón
PRESET en el modo conmutador.)
– – (MANUAL)
No se asignan automáticamente los números de las pistas.
Utilice el botón TRACK INCREMENT para dividir las pistas.
Se recomienda el uso del modo MANUAL para grabar una fuente
analógica, como una grabación.
La configuración volverá al modo “Manual” cuando se apague la
unidad.
–20db, –30db or –40db (AUTO REC)
La unidad insertará automáticamente una división de pista en el
material grabado cuando el nivel de sonido caiga por debajo del
límite durante más de 2 segundos y el sonido se haya reiniciado.
"–20db" requiere una señal más fuerte para activar el incremento
de pista.
"–40db" quiere decir que una señal relativamente débil activará
el incremento de pista. "–40db" resulta adecuada para grabar una
fuente sin ruido, por ejemplo, un CD.
Al grabar desde una fuente con multitud de ruido no deseado
o desde una fuente analógica en el ajuste AUTO TRACK, pueden
asignarse más números de pista que las pistas grabadas reales.
En ese caso, elija el ajuste “Manual” y presione el botón TRACK
INCREMENT para asignar los números de pista como usted
quiera.

56
Grabación 2
< Puede que AUTO REC no funcione bien con fuentes analógicas
que contengan ruidos bajos.
< El indicador AUTO TRACK se enciende cuando se selecciona
–20dB, –30dB ó –40dB.
< El ajuste predefinido de fábrica es MANUAL (desactivado).
Cuando encienda la unidad o cuando pulse el botón OPEN/
CLOSE, el ajuste será reiniciado automáticamente a MANUAL
(desactivado).
< El botón MANUAL/AUTO REC no funciona durante la grabación o
en el modo de pausa de la grabación.
No se puede conmutar inmediatamente después de insertar un
disco. Conmute después de que se visualice "NO TOC".
4
Presione el botón RECORD.
El indicador rojo en el botón RECORD comenzará a parpadear.
La unidad entra en el modo de pausa de grabación.
Durante la grabación, el indicador rojo se ilumina.
En el modo de pausa de grabación, el indicador "REC" parpadea y
el indicador
J
se ilumina en la pantalla.
< Mientras “bUSY” esté exhibido, ningun botón funcionará. Espere
unos segundos hasta que “bUSY” desaparezca del monitor.
< Si el indicador rojo del botón RECORD no se enciende, recoloque
un disco grabable, espere unos segundos hasta que los
indicadores “NO TOC” y “CD-R” (o “CD-RW”) se enciendan en el
monitor, y presione nuevamente el botón RECORD.
5
Ajuste del nivel de grabación.
Reproduzca la fuente a ser grabada y ajuste el nivel de grabación
de manera que el sonido más fuerte no exceda el indicador
“OVER” en el medidor de nivel de pico.
Se puede ajustar el nivel desde –00 (–∞) dB hasta 18 dB.
< El ajuste predefinido de fábrica es 0 dB. Cuando termine la
grabación, el ajuste será reiniciado automáticamente a 0 dB.
< Las diferentes fuentes que se van a grabar (disco, cinta de casete,
CD, etc.) tienen distintos volúmenes. Para grabar al volumen
óptimo para las distintas fuentes, es necesario ajustar el nivel de
grabación para cada fuente.
Conexión al enchufe de auriculares de la grabadora o al
reproductor portátil de radio casete, etc.
Configure el nivel de grabación a "0dB" y ajuste el volumen del
dispositivo conectado.
Si el nivel de grabación es bajo, ajuste el nivel de grabación de
modo que el sonido más fuerte no exceda el indicador "OVER"
del medidor de nivel de pico.
6
Prepare la fuente que va a grabar.
Para grabar el disco
Mueva el brazo de sintonización hasta el extremo del disco
o hasta el lugar desde donde desee grabar y bájelo
cuidadosamente.
Cuando la tornamesa se detiene, el botón PLAY/PAUSE (y/J)
no funciona y no se puede iniciar la grabación.

57
ESPAÑOL
Para grabar la cinta de casete
Presione el botón PLAY (y).
Para que no se corte la primera parte, lleve la cinta hasta el
comienzo del casete, pause la grabación, inicie la grabación tal
como se detalla en el paso
7
y cancele el estado de pausa de la
cinta. (Para pausar la reproducción cuando la
reproducción está detenida, Presione el botón de PAUSE (J) y
después el botón PLAY (y).)
No podrá empezar a grabar mientras esté parada la pletina de
cintas.
Para no grabar demasiado sonido de funcionamiento, presione el
botón STOP (H) para detener la reproducción en cuanto finalice
el número del disco o de la cinta de casete que se va a grabar.
Para grabar sonido procedente de un componente conectado
a la terminal AUX
Reproduzca el componente conectado a la terminal AUX.
7
Presione el botón PLAY/PAUSE (y/J) para empezar la
grabación.
8
Si se selecciona AUX en el paso
1
, reproduzca la fuente a
ser grabada.
Cuando la reproducción de la fuente finalice, pulse el botón STOP
(H) para dejar de grabar.
Cuando la reproducción de un disco finaliza y la tornamesa deja
de girar o la reproducción de una cinta de casete finaliza, la
grabación termina automáticamente.
Para evitar que se grabe sonido no deseado, detenga
manualmente la grabación utilizando el botón STOP.
Cuando la grabación se ha detenido, “REC” y “-End---”
parpadean durante varios segundos. No apague la
alimentación ni agite la unidad durante la grabación o cuando
“REC” y “-----” estén parpadeando. Dichas acciones pueden
evitar que se realice una grabación adecuada.
A
Para detener la grabación
Presione el botón STOP (H) para detener la grabación.
B
Para suspender temporalmente la grabación (modo de
pausa)
Presione el botón PLAY/PAUSE (y/J). “bUSY” aparecerá
brevemente en el monitor y la grabación será pausada.
Para reniiciar la grabación, presione nuevamente el botón PLAY/
PAUSE (y/J).
< No se puede reiniciar la grabación mientras “bUSY” esté
exhibido.
< Recuerde que cada vez que se pausa o detiene la grabación,
siempre será destinado un nuevo número de pista. No se puede
grabar una pista en dos “etapas”.
< La unidad no se detendrá ni pausará, aunque se Presione el
botón PLAY/PAUSE durante los 4 segundos siguientes al inicio
de la grabación.
Esto se debe a una especificación del CD que le permite
detenerla o pausarla sólo después de 4 segundos de grabación.
C
División manual de pistas
Se puede dividir la grabación en pistas durante la grabación.
Presione el botón TRACK INCREMENT durante la grabación. El
número de pista actual será incrementado de una unidad.
< El botón TRACK INCREMENT funciona independientemente del
ajuste MANUAL/AUTO REC.
< No puede dividir la pista manualmente en pistas inferiores a
4 segundos en las especificaciones del CD. Pueden realizarse
hasta 99 divisiones de pistas en un solo CD.

58
Finalización
3
Presione el botón FINALIZE en el modo de parada.
“FINAL” aparece en el monitor.
< Para cancelar el proceso de finalización, presione el botón STOP
(H).
4
Presione el botón ENTER para iniciar la finalización.
Los indicadores “NO TOC” y “REC” parpadean y el tiempo restante
para efectuar la operación de finalización aparece en el monitor.
Cuando termine la operación, el indicador NO TOC se apaga y el
monitor vuelve a la indicación de pista/tiempo.
Durante la operación de finalización, ningún botón funcionará.
No apague la alimentación ni desenchufe el cable de
alimentación.
< Aunque los discos CD-R finalizados puedan ser reproducidos en
reproductores de CD comunes, recuerde que los discos CD-RW
finalizados pueden no ser reproducibles en reproductores de CD
común.
Conforme lo explicado anteriormente, para que un disco sea un CD
estándar, será necesario tener una Tabla de Contenido (TOC) escrita
para eso.
Este proceso es conocido como finalización.
Una vez que estén finalizados, los discos CD-R estarán realmente
finalizados. No se puede grabar más pistas en esos discos. En
cambio, los discos CD-RW pueden ser “desfinalizados”, y si hay
espacio, se puede grabar más material.
< No se puede finalizar un disco en blanco.
< Cuando el disco ha alcanzado el tiempo máximo de grabación, se
finaliza automáticamente aunque la grabación siga en proceso.
Un disco finalizado no puede volver a finalizarse.
1
Presione el botón CD para seleccionar “CD”.
2
Cargue un disco no finalizado (grabable).

59
ESPAÑOL
Borrado o Desfinalización de un CD-RW
Solo se puede ejecutar los procedimientos de borrado en un disco
CD-RW desfinalizado.
Si un disco CD-RW ha sido finalizado, desfinalicelo antes de borrarlo.
Acuerdese de que no es posible ejecutar ningun procedimiento de
borrado o desfinalizacion en un disco CD-R.
Es posible borrar la ultima pista grabada y tambien borrar un disco
entero.
1
Presione el botón CD para seleccionar “CD”.
2
Cargue un CD-RW grabado.
3
Presione el botón FINALIZE/ERASE en el modo de parada.
Cada vez que se presiona el botón FINALIZE/ERASE, la indicación
cambia conforme lo siguiente:
“UnFINAL” (desfinalizado) aparece cuando se carga un disco
finalizado.
Aparece “FINAL” cuando el disco no ha finalizado. Si pulsa de
Nuevo el botón FINALIZE/ERASE, aparecerán “ErASE” y el último
número de pista.
UnFINAL
Seleccione esto para desfinalizar el disco.
ErASE XX (el número de la última pista grabada en el disco)
Seleccione esta indicación para borrar la última pista contenida
en el disco.
< Esta indicación no aparecerá cuando está grabada una sola pista
en el disco.
ErASE ALL
Seleccione esta indicación para borrar todas las pistas.
< Para eliminar un número en un CD-RW finalizado, desfinalícelo
(UnFINAL) primero y después borre el número siguiendo el
mismo procedimiento (ErASE o ErASE ALL).
< Para cancelar el proceso de borrado o de desfinalización, presione
el botón STOP (H).
4
Presione el botón ENTER para iniciar la finalización.
El tiempo restante para ejecutar la operación aparece en el
monitor.
Cuando termine la operación, el monitor vuelve a la indicación
de pista/tiempo.
Durante el borrado/desfinalización, ningún botón funcionará.
Nunca apague la alimentación ni tampoco desenchufe el
cable de alimentación.
< No se puede deshacer esta operación. Si pretende borrar una
pista o más pistas, asegúrese de que sean grabaciones que usted
realmente desea borrar.

60
Esta unidad puede grabar una radio o cualquier otro equipo
conectado a la unidad configurando el final del tiempo de grabación
con el temporizador REC OFF.
La función de temporizador REC OFF no estará disponible cuando la
unidad grabe señales procedentes de las entradas PHONO o TAPE.
1
Presione el botón PHONO/TAPE/AUX o el botón FM/AM
para seleccionar la fuente que desee grabar.
Seleccione AUX para grabar una fuente externa conectada en los
enchufes AUX IN.
2
Cargue un disco CD-R grabable o un CD-RW en la unidad.
Asegúrese de que los indicadores “NO TOC” y “CD-R” (o “CD-RW”)
se iluminen en la pantalla o el botón RECORD no funcionará.
< Antes de grabar, sintonice la cadena de radio, configure la
asignación de número de la pista, configure el nivel de grabación
y prepare la fuente externa conectada a los enchufes AUX IN.
3
Presione el botón RECORD para que la unidad entre en el
modo de pausa de grabación.
El indicador rojo del botón RECORD parpadea y se visualiza J en
la pantalla.
4
Vuelva a presionar el botón RECORD.
Se visualiza “OFF” y el tiempo de grabación (minutos/segundos).
Tiempo de grabación
5
Presione el botón .m o el ,/ botón para
configurar el tiempo de grabación.
Cada vez que se presiona el botón, la pantalla se desplaza hacia
arriba (abajo) 5 minutos.
< El tiempo configurado se memorizará y se visualizará cuando
vuelva a utilizar esta función. Para cambiar el tiempo de
grabación, siga los pasos del
1
al
5
.
< El tiempo de grabación puede configurarse hasta el tiempo
máximo de grabación del disco. Cuando el disco tiene menos de
5 minutos grabados, el tiempo de grabación se regula según el
tiempo restante.
Ejemplo: CD-RW con un tiempo de grabación de “74
minutos”
Presione los botones de salto (.m/,/) para ajustar
el tiempo a intervalos de 5 minutos hasta 74 minutos.
6
Presione el botón PLAY/PAUSE (y/J ) para iniciar la
grabación.
Cuando la grabación comienza, el tiempo de grabación empieza
a disminuir. La grabación se detiene cuando el tiempo llega a
“00:00”.
< Cuando la grabación ha finalizado, el temporizador de grabación
desaparece.
< Puede utilizar el botón PLAY/PAUSE (y/J) y el botón TRACK
INCREMENT mientras está funcionando el temporizador de
grabación.
< Presione el botón STOP (H) para detener la grabación.
Temporizador REC OFF
10:00
…………
70:00
5:00 74:00

61
ESPAÑOL
Uso del temporizador de audio
Esta unidad puede iniciar y detener la grabación con el temporizador
de audio disponible en comercios.
< Conecte el cable de alimentación de la unidad a la toma de
corriente del temporizador de audio antes de configurarlo.
1
Ajuste los tiempos ON/OFF de la unidad con el
temporizador de audio.
Consulte el manual de instrucciones del temporizador de audio
para obtener más información sobre el funcionamiento.
2
Encienda la toma de corriente del temporizador de audio.
Consulte el manual de instrucciones del temporizador de audio
para obtener más información sobre el funcionamiento.
3
Configure el tiempo de grabación.
Siga los pasos del
1
al
5
en la página 60.
4
Apague la toma de corriente del temporizador de audio.
Consulte el manual de instrucciones del temporizador de audio
para obtener más información sobre el funcionamiento.
La unidad se encenderá y la grabación empezará cuando el
temporizador de audio llegue al tiempo ON.
Cuando la grabación empiece, el tiempo de grabación comenzará
a disminuir.
La grabación se detendrá cuando el tiempo de grabación llegue
a “00:00”.
La unidad se encenderá cuando el temporizador de audio llegue
al tiempo OFF.
Precauciones de uso del temporizador de
audio
< Cuando se cargue un disco CD-R o CD-RW, la unidad tardará
aproximadamente 30 segundos en leerlo y comenzar la grabación
después de encenderla.
En el temporizador de audio, ajuste el tiempo del
temporizador de audio aproximadamente 1-2 minutos
antes del momento en que quiera iniciar la grabación.
< La unidad comenzará la finalización automáticamente cuando el
disco llegue al final durante la grabación. Si la unidad se apaga
durante la grabación, se producirá un error y el disco quedará
inutilizable. Cuando utilice el temporizador de audio, ajuste el
tiempo de desactivación del temporizador de audio entre 3 a 5
minutos después del tiempo de grabación de la unidad.
Consulte el siguiente ejemplo para ajustar el tiempo de
grabación de la unidad y el tiempo de desactivación del
temporizador de audio.
AM8:00
AM9:04
AM9:00
AM7:59:00
< El temporizador de audio funciona a tiempo
< La unidad se enciende
Después de leer el disco
<
Comienza el temporizador
de grabación
< Comienza la grabación
00 Seg.
La pantalla muestra el tiempo de grabación “65:00”.
La unidad deja de funcionar: Incluyendo tiempo de finalización, etc.
Cuando el tiempo de grabación
disminuye de “65:00” a “00:00”.
Cuando se visualiza “00:00” en
la pantalla
< Finaliza el tiempo de
grabación
< Finaliza la grabación
AM9:08:00
< El temporizador de audio llega al tiempo de desactivación
< La unidad se apaga
60 Seg.
Si desea grabar un programa de radio FM de “AM8:00” a “AM9:00”,
ajuste el tiempo de grabación de la unidad primero a “65:00”,
después ajuste el tiempo ON del temporizador de audio a
“AM7:59” y el tiempo OFF a “AM9:08”.
Una vez que el temporizador de audio llega al tiempo de
activación, la unidad se enciende y lee el disco. La grabación
comienza aproximadamente 30 segundos después. Al mismo
tiempo, la visualización del tiempo de grabación comenzará a
disminuir y la grabación se detendrá cuando se visualice “00:00”.
La unidad se apagará cuando el temporizador de audio llegue al
tiempo de desactivación.

62
Detección de problemas
Si surge algún problema con la unidad, consulte la siguiente tabla
y pruebe a solucionarlo antes de ponerse en contacto con su
distribuidor o con el servicio técnico de TEAC.
General
Sin alimentación.
e Verifique la conexión a la fuente de alimentación de CA.
Verifique y asegúrese que la fuente de alimentación CA tiene
interruptor y, si lo tiene, que el interruptor esté encendido.
Asegúrese de que haya alimentación en el tomacorriente de CA,
conectando otro artículo como una lámpara o un ventilador.
No hay sonido.
e Ajuste el volumen.
El sonido es ruidoso.
e La unidad está muy cerca a un TV o aparatos similares.
Instale la unidad lejos de ellos o apáguelos.
No funciona el control remoto.
e Presione el interruptor POWER de la unidad para encenderla.
e Si las baterías están agotadas, cambie las baterías.
e Utilice la unidad de control remoto dentro de un rango de (5m)
y apunte hacia el tablero frontal.
e Quite los obstáculos entre la unidad de control remoto y la
unidad principal.
e Si hay una fuente de luz muy fuerte cerca de la unidad,
apáguela..
Grabador de CD
No se puede reproducir.
e Inserte un disco con el lado de reproducción hacia abajo.
e Si el disco está sucio, limpie la superficie del disco.
e Se insertó un disco virgen. Inserte un disco pregrabado.
e Dependiendo del disco, etc. puede no ser posible reproducir
discos CD-R/CD-RW. Intente otra vez con otro disco.
El sonido salta.
e Coloque la unidad sobre una superficie estable para evitar
vibraciones y golpes.
e Si el disco está sucio, limpie la superficie del disco.
e No utilice discos rayados, dañados o deformados.
No se puede grabar.
e Se insertó un disco sólo de reproducción o un disco finalizado.
Utilice un disco grabable.
e El disco no tiene una sección grabable. Utilice otro disco.
e El nivel de grabación está demasiado bajo. Ajuste el nivel de
grabación.
e La grabación no comienza si sólo se presiona el botón RECORD.
Presione siempre el botón PLAY/PAUSE (y/J) para iniciar la
grabación.
Sintonizador
No se puede escuchar ninguna estación o la señal es
demasiado débil.
e Sintonice adecuadamente la estación.
e Si hay un televisor cerca de la unidad, apáguelo.
e Gire la unidad o el cable de la antena FM hasta encontrar la
mejor posición para la recepción.
Tornamesa
No se puede reproducir.
e Afloje el tornillo y desprenda la protección de la aguja.
(La protección de la aguja es una cubierta de plástico gris
ahumado que protege la aguja durante el transporte. Si no se retira
adecuadamente esta protección, la aguja no entrará en contacto
con las ranuras del disco y no se escuchará ningún sonido.)
e Ajuste el conmutador de selección de entrada a "PHONO".
Sonido con ruido o extraño.
e Si la aguja está gastada, cambie la aguja.
e Seleccione la velocidad correcta de reproducción.
El sonido salta.
e
Coloque la unidad sobre una superficie estable para evitar
vibraciones y golpes. Asegúrese de que la unidad esté nivelada tanto
en la parte delantera como en la parte posterior y de lado a lado.
e Limpie la superficie del disco.
e No utilice discos rayados, dañados o deformados.
Cinta de casete
La unidad no funciona aunque se presionen los botones de
funcionamiento.
e Confirme que se ha introducido la cinta de casete. Si no es así,
inserte una cinta de casete.
e Inserte la cinta de casete correctamente.
e Ajuste el conmutador de selección de entrada a “TAPE“.
La calidad de sonido es mala.
e Limpie el cabezal.
eSi el cabezal está imantado, desimántelo con un limpiador para
cabezales.
eAjuste el conmutador TAPE según la cinta de casete que utilice.
Si no se puede restablecer la operación normal, desenchufe el
cable de alimentación del tomacorriente y vuelva a conectarlo.
Tenga cuidado con la condensación
Cuando se mueve la unidad (o un disco) de un lugar frío a
uno cálido, o se la usa después de un cambio repentino de
temperatura, existe el riesgo de que se produzca condensación;
el vapor en el aire podría condensarse en el mecanismo
interno, haciendo que la operación correcta se vuelva irregular
o imposible. Para evitar esto, o si esto ocurre, deje la unidad
durante una o dos horas con la energía encendida. La unidad se
estabilizará a la temperatura ambiente de sus alrededores.
Mantenimiento
Siempre mantenga limpio la tornamesa.
Si la superficie de la unidad se ensucia, límpiela con una tela
suave o utilice jabón líquido suave diluido. Asegúrese de quitar
cualquier exceso por completo. No use disolventes, benzina o
alcohol, ya que estos pueden dañar la superficie de la unidad.
Permita que la superficie de la unidad se seque por completo
antes de usarla.

63
ESPAÑOL
EspecificacionesMensajes
TRACK 0 0:00
Se insertó un disco CD-R/CD-RW en blanco en la bandeja.
bUSY
La unidad está leyendo el disco. Espere unos segundos.
CLOSE
Cierra la bandeja de disco.
ErASE
Borra la última pista del disco CD-RW.
ErASEALL
Borra todas las pistas del disco CD-RW.
FINAL
Finaliza el disco.
–40db, –30db o –20db
Ajustes del modo de asignación de número de pista
NO dISC
Se insertó un disco no legible.
OPEN
Abre la bandeja.
- - - -:- -
La unidad está leyendo el disco.
P-**
Número del programa.
UnFINAL
Desfinaliza el disco CD-RW.
Mensajes de Error
d FULL, OPFULL
No hay espacio en el disco o no hay más pistas disponibles.
P-FULL
32 pistas han sido programadas. No se puede programar más
pistas.
Err **
Ocurrió un error en el mecanismo interno de la unidad.
Presione el interruptor POWER para apagar la unidad, espere un
minuto, y vuelva a encenderla.
Err 03
Hay algún error en el disco.
Apague la unidad una vez y vuelva a encenderla, y cambie el
disco.
dISC Err
Se ha cargado un disco erróneo o un disco deformado.
DAO DISC
El disco que quiere desfinalizar ha sido grabado en el modo de
grabación de disco completo de golpe (DAO) con un ordenador.
La unidad no puede desfinalizar este tipo de discos.
(** es variable.)
Sección del Amplificador
Salida de potencia .................................3,5 W +3,5 W
Respuesta en frecuencia .........................50 Hz a 20 kHz
Sensibilidad de entrada de audio/impedanci . . .AUX: (0,5 V)/20 kΩ
Sección del Grabador de CD
Media type ......................CD-RW y CD-R de audio digital
(para grabación y reproducción)
CD (sólo reproducción)
Frecuencia de muestreo de grabación ..................44,1 kHz
Respuesta en frecuencia ................. 20 Hz a 20 kHz (±3 dB)
Relación señal/ruido ...............más de 85 dB (reproducción)
más de 75 dB (grabación)
Sección de cinta de casete
Sistema de vías ........................4 vías y 2 canales estéreo
Velocidad de reproducción .............................4,8 cm/s
Vibración y ululación .......................................0,3%
Respuesta en frecuencia ........................125 a 10.000 Hz
Relación S/N .............................................45 dB
Sección del Sintonizador
Intervalo de frecuencias (FM) ..............87,5 MHz a 108,0 MHz
Intervalo de frecuencias (AM) ................522 kHz a 1.629 kHz
Sección del Reproductor de Discos
Motor .......................................... servomotor CD
Sistema de impulso ...........................Impulso de banda
Velocidad ...........................33-1/3 rpm, 45 rpm, 78 rpm
Gimoteo y centelleo ......................menos de 0,3% (WDT)
Relación señal/ruido ...........................Superior a 50 dB
Tipo de cartucho ..................Cartucho estéreo de cerámica
Aguja ..................STL-103 (premontado) / SPL-102 (opción)
Nivel de salida ...................158 - 348 mV (50 mm/S, 1 kHz)
Sección del Sistema de Altavoces
Unidad ..............................................76 mm (3")
Impedancia ...........................................4 ohmios
Generalidades
Requerimientos de alimentación ....................230V, 50 Hz
Consumo ................................................. 25 W
Dimensiones (anch. x alt. x prof.) .............470 x 230 x 390 mm
Peso ......................................................11 kg
Rango de temperatura operativa .....................5°C a 35°C
Accesorios
Manual del usuario x 1
Tarjeta de garantía x 1
Adaptador RPM 45 x 1
Unidad de control remoto (RC-1157) x 1
Pila (AA, alcalina o MN) x 2
Antena de FM x 1
Antena de cuadro de AM x 1
Bisagra x 2
Cubierta de tornamesa x 1
Guía rápida de grabación x 1
Cable estéreo toma de RCA x 1
< El diseño y las especificaciones están sujetos a cambio sin previo
aviso.
< El peso y las dimensiones son aproximados.
< Las ilustraciones pueden diferir ligeramente de los modelos
producidos.

Z
This appliance has a serial number located on the rear panel. Please record the
model number and serial number and retain them for your records.
Model number Serial number
0209 MA-1457A
TEAC CORPORATION
1-47 Ochiai, Tama-shi, Tokyo 206-8530, Japan Phone: (042) 356-9156
TEAC AMERICA, INC. 7733 Telegraph Road, Montebello, California 90640 U.S.A. Phone: (323) 726-0303
TEAC CANADA LTD. 5939 Wallace Street, Mississauga, Ontario L4Z 1Z8, Canada Phone: (905) 890-8008
TEAC MEXICO, S.A. de C.V. Río Churubusco 364, Colonia Del Carmen, Delegació Coyoacán, CP 04100, México DF, México Phone: (5255)5010-6000
TEAC UK LIMITED Unit 19 & 20, The Courtyards, Hatters Lane, Watford, Hertfordshire, WD18 8TE, U.K. Phone: (0845) 130-2511
TEAC EUROPE GmbH Bahnstrasse 12, 65205 Wiesbaden-Erbenheim, Germany Phone: 0611-71580
-
 1
1
-
 2
2
-
 3
3
-
 4
4
-
 5
5
-
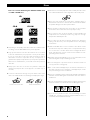 6
6
-
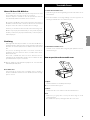 7
7
-
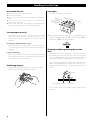 8
8
-
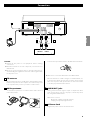 9
9
-
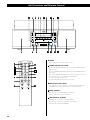 10
10
-
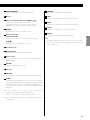 11
11
-
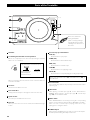 12
12
-
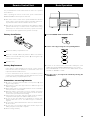 13
13
-
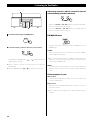 14
14
-
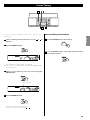 15
15
-
 16
16
-
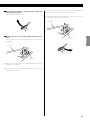 17
17
-
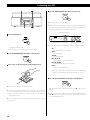 18
18
-
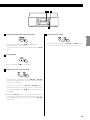 19
19
-
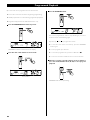 20
20
-
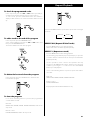 21
21
-
 22
22
-
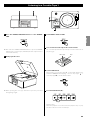 23
23
-
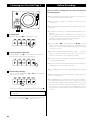 24
24
-
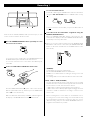 25
25
-
 26
26
-
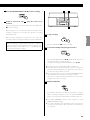 27
27
-
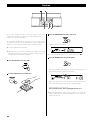 28
28
-
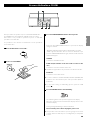 29
29
-
 30
30
-
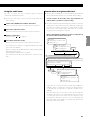 31
31
-
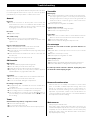 32
32
-
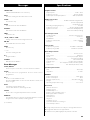 33
33
-
 34
34
-
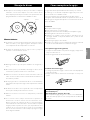 35
35
-
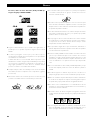 36
36
-
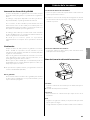 37
37
-
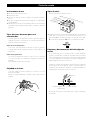 38
38
-
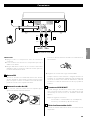 39
39
-
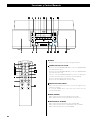 40
40
-
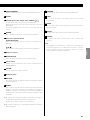 41
41
-
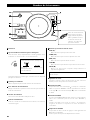 42
42
-
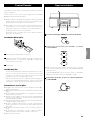 43
43
-
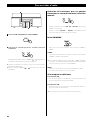 44
44
-
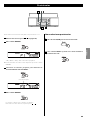 45
45
-
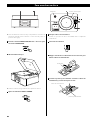 46
46
-
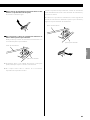 47
47
-
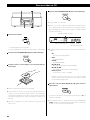 48
48
-
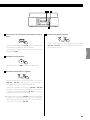 49
49
-
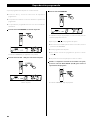 50
50
-
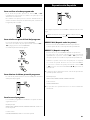 51
51
-
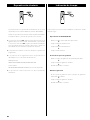 52
52
-
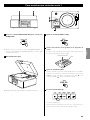 53
53
-
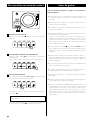 54
54
-
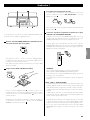 55
55
-
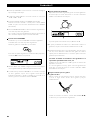 56
56
-
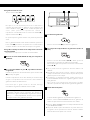 57
57
-
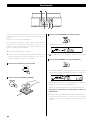 58
58
-
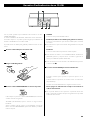 59
59
-
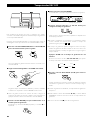 60
60
-
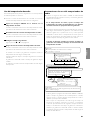 61
61
-
 62
62
-
 63
63
-
 64
64


TEAC LP-R500 El manual del propietario
- Categoría
- Reproductores de CD
- Tipo
- El manual del propietario
en otros idiomas
- English: TEAC LP-R500 Owner's manual
Artículos relacionados
-
TEAC CD-RW890 El manual del propietario
-
TEAC LP-R550USB Manual de usuario
-
TEAC LPR500 Manual de usuario
-
-
-
TEAC CD-RW890MKII El manual del propietario
-
-
-
-
Otros documentos
-
Victor VWRP-3800 Manual de usuario
-
Panasonic SLPH660 Instrucciones de operación
-
Yamaha R-8 El manual del propietario
-
-
iON CD DIRECT El manual del propietario
-
Victor VWRP-5000-GR Manual de usuario
-
Victor VWRP-5000 Manual de usuario
-
Lenco Classic El manual del propietario