
Mini Cassette Recorder
RQ-L36/RQ-L11
Operating Instructions
Instrucciones de funcionamiento
Nhctpykunr go ˙kcgjyataunn
Before connecting, operating or adjusting this product, please read these instructions
completely. Please keep this manual for future reference.
Matsushita Electric Industrial Co., Ltd. prrry
Web Site: http://www.panasonic.co.jp/global/
RQTT0455-G
F0102MA0
Ljr Poccnn
“YctahobjehhsØ gponÎbolntejem b
goprlke g. 2 ct. 5 Ielepajvhofo „akoha
PI “O Îaqnte gpab gotpe°ntejeØ” cpok
cjyÒ°s nÎlejnr pabeh 7 folam c lats
gponÎbolctba gpn ycjobnn, ≠to nÎlejne
ncgojvÎyetcr b ctpofom cootbetctbnn c
hactorqeØ nhctpykuneØ go ˙kcgjy-
ataunn n gpnmehnmsmn texhn≠ecknmn
ctahlaptamn.”
Gpnmep mapknpobkn:
±±1 A ±±±±±±±
Íjemehts kola:
3-nØ cnmboj–fol nÎfotobjehnr
(1±2001 f., 2±2002 f., 3±2003 f., …);
4-sØ cnmboj–mecru nÎfotobjehnr
(A±rhbapv, B±iebpajv, …, L±leka°pv)
PacgojoÒehne mapknpobkn:
Bhytpn °atapeØhofo otceka
CB
1
2
1
2
Two R6/LR6, AA,
UM-3 batteries (not included)
DC IN 3V
FullEmpty
E BATT LEVEL F
A
A
A
Side A
Tab for side A
Tab for side B
Adhesive tape
A
a
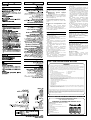
The illustrations show RQ-L36.
Power Source
Insert two R6/LR6, AA, UM-3 (not included)
batteries. (A)
∫ Battery condition indicators (a)
The [BATT LEVEL] indicators light during oper-
ation. As the charge reduces the lamps go out.
When the batteries are weak
The indicator under “E” becomes dim or turns
off.
∫ AC power operation B
Connect only Panasonic AC adaptor RP-AC30
(optional, not available in some countries).
The configuration of the AC adaptor differs
according to the area.
Cautions
≥Align the poles (+ and -) properly when
inserting the batteries.
≥Do not mix old and new batteries or different
types of batteries.
≥Do not recharge ordinary dry cell batteries.
≥Remove the batteries if the unit is not to be
used for a long time.
≥Do not peel off the covering on batteries and
do not use if the covering has been peeled off.
Mishandling of batteries can cause electrolyte
leakage which can damage items the fluid
contacts and may cause a fire.
If electrolyte leaks from the batteries, consult
your dealer.
Wash thoroughly with water if electrolyte comes
in contact with any part of your body.
≥If rechargeable batteries are to be used,
rechargeable batteries manufactured by
Panasonic are recommended.
≥Do not play your headphones or earphones at
a high volume.
≥To avoid product damage, do not expose this
product to rain, water or other liquids.
≥Avoid using or placing this unit near sources of
heat. Do not leave it in an automobile exposed
to direct sunlight for a long period of time with
doors and windows closed.
≥This product may receive radio interference
caused by mobile telephones during use. If
such interference is apparent, please increase
separation between the product and the
mobile telephone.
≥This speaker does not have magnetic shield-
ing. Do not place it near televisions, personal
computers or other devices easily influenced
by magnetism.
Erasure prevention C
Use a screwdriver or similar object to break out
the tab.
To re-record on a protected cassette
Cover the hole with adhesive tape.
Maintenance
If the surfaces are dirty
To clean this unit, wipe with a soft, dry cloth.
≥Never use alcohol, paint thinner or benzine to
clean this unit.
≥Before using chemically treated cloth, read the
instructions that came with the cloth carefully.
For a cleaner crisper sound
Clean the heads regularly to assure good
quality playback. Use a cleaning tape (not
included).
Las ilustraciones muestran el RQ-L36.
Alimentación
IInserte dos pilas tamaño R6/LR6, AA, UM-3
(opcionales). (A)
∫ Indicadores del nivel de las pilas
(a)
Los indicadores [BATT LEVEL] se iluminan
durante el funcionamiento. A medida que la
carga se reduce las lámparas se apagan.
Cuando las pilas están débiles
El indicador debajo de “E” se atenúa o se
apaga.
∫ Funcionamiento con CA B
Conecte solamente el adaptador de CA
Panasonic RP-AC30 (opcional, no disponible
en algunos paises).
La forma del adaptador de CA cambia según la
zona en la que va a ser utilizado.
Precauciones
≥Alinee las polaridades (+ y -) correctamente
cuando inserte la pila.
≥No mezcle pilas viejas y nuevas o tipos
diferentes de pilas.
≥No recargue pilas secas ordinarias.
≥Quite todas las pilas si el aparato no va a ser
utilizado durante mucho tiempo.
≥No pele el revestimiento de las pilas y no las
utilice si no lo tienen.
El mal manejo de las pilas puede causar fugas
en el electrolito, lo que puede dañar objetos que
entran en contacto con él y puede causar un
incendio.
Si hay fuga del electrolito de las pilas, consulte
con su distribuidor.
Lave concienzudamente con agua si el elec-
trolito entra en contacto con cualquier parte de
su cuerpo.
≥Si van a utilizarse baterías recargables, se
recomiendan las fabricadas por Panasonic.
≥No haga funcionar sus auriculares a alto
volumen.
≥Para evitar que se estropee el aparato, no lo
exponga a la lluvia, al agua ni a otros líquidos
≥Evite utilizar o poner este aparato cerca de
fuentes de calor. En especial, no lo deje en e
interior de un automóvil expuesto a la luz
directa del sol durante mucho tiempo estando
sus puertas y ventanas cerradas.
≥Este producto puede tener interferencias
causadas por teléfonos móviles durante su
utilización. Si tales interferencias resultan
evidentes, aumente la separación entre e
producto y el teléfono móvil.
≥Este altavoz no dispone de blindaje magné-
tico. No lo coloque cerca de televisores
ordenadores u otros dispositivos fácilmente
influenciables por el magnetismo.
Prevención contra el borrado C
Utilice un destornillador u objeto similar para
romper la lengüeta.
Para volver a grabar en una cinta de casete
protegida
Tape el agujero con cinta adhesiva.
Mantenimiento
Si las superficies están sucias
Utilice un paño suave y seco para limpiar
este aparato.
≥No utilice nunca alcohol, diluyente de pintura
ni bencina para limpiar este aparato.
≥Antes de utilizar un paño impregnado quími-
camente, lea con atención las instrucciones
suministradas con él.
Para obtener un sonido más claro
Limpie los cabezales con frecuencia para
garantizar una reproducción de calidad. Utilice
cinta limpiacabezales (optional).
(When used in hold mode, at 25 oC, on a flat, stable surface)
Alkaline dry cell batteries; Recording; About 25 hours
Alkaline dry cell batteries; Playback; About 17 hours (RQ-L36)
About 18 hours (RQ-L11)
The play time may be less depending on the operating conditions.
Note:
Specifications are subject to change without notice.
Mass and dimensions are approximate.
Specifications
Track system: 2 track, monaural
Recording system: DC bias, magnet erase
Monitor system: Fix
Frequency range
Playback: 180–7000 Hz
Rec/Playback: 250–6300 Hz
Power output RQ-L36: 450 mW (RMS…max.)
Power output RQ-L11: 420 mW (RMS…max.)
Tape speed RQ-L36: 4.8 cm/s / 1.6 cm/s
Tape speed RQ-L11: 4.8 cm/s
Jacks:
Output; EARPHONE (8 ≠)
Input (RQ-L36 Only); MIC, 0.25 mV (150–600 ≠)
Speaker: 3.6 cm 4 ≠
Power requirement:
Battery; DC 3 V (two R6/LR6, AA, UM-3 batteries)
AC; 3 V with optional AC adaptor RP-AC30
Dimensions (WtHtD): 86.0k112.1k37.2 mm
Mass (without batteries): RQ-L36: 164 g
Mass (without batteries): RQ-L11: 157 g
Play time:
GC
Cn Ar
ENGLISH ESPAÑOL
La página se está cargando...

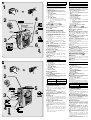
To make recording D
Only normal position tapes can be used.
The sound may not be recorded properly if high
position tapes and metal position tapes are
used with this unit.
1. Open the cover and insert the cassette.
1. a Recording side
2. Set the [PAUSE] selector to OFF position.
3. (RQ-L36 only)
3. Select [MIC LEVEL].
1. Select [HIGH] if you want to record relatively
soft sounds.
4. (RQ-L36 only)
3. Select [REC MODE].
1. 1k: To record sound at a normal speed.
1. 3k: To record sound at three times longer
than the normal speed for long
meetings, etc.
5. (RQ-L36 only)
1. Set the [VAS] selector to [OFF].
6. Press [£].
[PLAY] is also depressed with [£].
Use a tape with tabs in place.
The recording level is automatically adjusted.
∫ To stop recording
Press [STOP].
∫ To temporarily stop recording
Set the [PAUSE] selector to ON position.
To resume recording, set it to OFF position.
∫ To record with VAS (Voice Activa-
ted System) function
(RQ-L36 only)
The sound is recorded automatically, so there is
no tape waste.
To use VAS function, set the [VAS] selector to
[1] or [2] in step 5.
1: If you wish to record lower levels of sound
than usual.
2: If you wish to record only louder sounds.
Note:
After using the VAS function, set the [VAS]
selector to [OFF].
∫ To record through an external
microphone
(RQ-L36 only)
Plug the external microphone (not included) into
the [MIC (PLUG IN POWER)] jack.
≥You can use a condenser microphone without
a built-in power supply.
∫ Follow up recording
Recording can be started during playback by
simply pressing [£].
∫ Monitoring
The sound can be heard with an optional
monaural earphone plugged into the
[EARPHONE] jack.
Note:
≥You can not adjust the volume during
recording.
To playback the tape E
Only normal position tapes can be used.
1. Insert the tape.
1. a Playback side
2. Set the [PAUSE] selector to OFF position.
3. (RQ-L36 only)
3. Select [REC MODE].
3. Select the same mode you used for
recording.
4. Press [PLAY].
5. Adjust the volume.
∫ To stop playback
Press [STOP].
∫ To change play speed (RQ-L36 only)
Turn [TAPE SPEED].
Set b to the center to play at the normal speed.
(Set towards the [FAST] side to play sound
recorded at 3 times normal speed.)
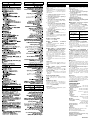
∫ To fast forward and rewind
Press [FF/CUE] or [REW/REV].
The tape will rapidly move in the direction of the
arrow.
≥When the tape reaches the end after fast
forward or rewind, press [STOP] to release
the button.
∫ Cue and review
Sound can be monitored at a high speed for as
long as [FF/CUE] (cue) or [REW/REV] (review)
is held down during playback.
When the button is released, normal playback
will start.
∫ Auto Stop
During playback or recording, when the tape
reaches its end, the automatic stop system will
release the playback and record buttons and
automatically turn off the unit.
∫ Tape counter and reset button
∫
(RQ-L36 only)
The digits return to “000” when the reset button
is pressed. The digits advance with the tape to
provide a reference to quickly find a desired
portion of tape.
Note:
≥When you are resetting the tape counter,
make sure that you push the reset button
firmly and that the counter resets precisely to
“000”.
≥Do not open the cassette compartment cover
during tape operation.
Position of
[REC MODE]
1k
3k
Speed difference
about j30 %–0 %–
about i20 %
0
%–
about
i
30 %
Para grabar D
En este aparato sólo pueden utilizarse cintas
normales.
El sonido tal vez no se grabe correctamente s
se utilizan cintas de alta posición (high position)
o de metal con este aparato.
1. Abra la cubierta e inserte el casete.
1. a Lado de grabación
2. Ponga el selector [PAUSE] en la posición
OFF.
3. (Sólo para RQ-L36)
3. Seleccione [MIC LEVEL].
3. Seleccione [HIGH] si quiere grabar sonidos
relativamente suaves.
4. (Sólo para RQ-L36)
3. Seleccione [REC MODE].
3. 1k: Para grabar sonido a una velocidad
normal.
3. 3k: Para grabar sonido a una velocidad tres
veces más larga que la normal, para
reuniones largas, etc.
5. (Sólo para RQ-L36)
3. Ponga el selector [VAS] en [OFF].
6. Oprima [£].
[PLAY] se pulsa también con [£].
Utilice un casete con las lengüetas puestas.
El nivel de grabación se ajustará automática-
mente.
∫ Para parar la grabación
Pulse [STOP].
∫
Para parar temporalmente la grabación
Ponga el selector [PAUSE] en la posición ON.
Para reanudar la grabación, póngalo en la
posición OFF.
∫ Para grabar con la función VAS
(sistema activado por voz)
∫
(Sólo para RQ-L36)
El sonido se grabará automáticamente, de
forma que no se desperdiciará cinta.
Para usar la función VAS, ponga el selector
[VAS] en [1] o [2] en el paso 5.
1: Si usted desea grabar sonidos de un nive
inferior alnormal.
2: Si usted desea grabar los sonidos más altos
solamente.
Nota:
Después de usar la función VAS, ponga e
selector [VAS] en [OFF].
∫ Para grabar mediante un micrófono
exterior (Sólo para RQ-L36)
Enchufe un micrófono exterior (opcional) en la
toma [MIC (PLUG IN POWER)].
≥Se puede usar un micrófono electrostático sin
fuente de alimentación incorporada.
∫ Continuación de la grabación
La grabación podrá iniciarse durante la repro-
ducción pulsando simplemente [£].
∫ Monitoreo
El sonido puede ser oido con un auricular
monoaural opcional enchufado en la toma
[EARPHONE].
Nota:
≥No se puede ajustar el volumen durante la
grabación.
Para reproducir la cinta E
En este aparato sólo pueden utilizarse cintas
normales.
1. Inserte la cinta.
1. a Lado de reproducción
2. Ponga el selector [PAUSE] en la posición
OFF.
3. (Sólo para RQ-L36)
3. Seleccione [REC MODE].
3. Escoja el mismo modo que usó para grabar.
4. Pulse [PLAY].
5. Ajuste el volumen.
∫ Para parar la reproducción
Pulse [STOP].
∫ Para cambiar la velocidad de repro-
ducción
(Sólo para RQ-L36)
Haga girar [TAPE SPEED].
Ponga b en el centro para reproducir a la
velocidad normal.
(Ajuste hacia el lado [FAST] para reproducir e
sonido grabado al triple de la velocidad normal.)
D
VOLUME
MIC
(PLUG IN POWER)
EAR
PH
ONE
MINI CASSETTE RECORDER
BATT LEVEL
VAS
2
1
O
F
F
F
E
RECORDING
RQ-L36
PAUSE
3X
1X
REC
MODE
REC TIM
E
VO
IC
E AC
TIV
ATE
D
SYS
TE
M
MIC LEVEL
NORM
STOP
HIGH
REC
PLAY
REV
/
REW
FF
/
CUE
∫
STOP
MIC jack
(Plug type: 3.5 mm monaural)
PAUSE
NORM
HIGH
3X
1X
VAS
OFF
2
1
£
Built-in
microphone
1
2
3
4
5
6
TAPE SPEEDAPE SPEED
REC
MODE
a
EARPHONE
(Plug type:
3.5 mm monaural)
(OFF)
(High)
(Normal)
E
1
VOLUME
MIC
(PLUG IN POWER)
EA
R
P
HO
N
E
MINI CASSETTE RECORDER
BATT LEVEL
VAS
2
1
OFF
F
E
RECORDI
NG
RQ-L36
PAUSE
3X
1X
REC
MODE
REC TIME
VOICE ACTIVATED SYSTEM
MIC LEVEL
NORM
STOP
HIGH
REC
PLAY
REV
/
REW
FF
/
CUE
∫
REW/REV
STOP
FF/CUE
6
5
PAUSE
3X
1X
2
3
4
5
000
Tape counter
Reset
button
PLAY
VOLUME
TAPE SPEEDAPE SPEED
5
REC
MODE
a
b
(OFF)
RQ-L36
RQ-L36
RQ-L36
RQ-L36
RQ-L36
RQ-L36
RQ-L36
ENGLISH ESPAÑOL
∫ Para avanzar rápidamente y
rebobinar la cinta
Pulse [FF/CUE] o [REW/REV].
La cinta se moverá rápidamente en la dirección
de la flecha.
≥Cuando la cinta llegue al final después de
avance rápido o del rebobinado, pulse
[STOP] para dejar libre el botón.
∫
Localización progresiva y regresiva
El sonido podrá comprobarse a alta velocidad
mientras se mantenga pulsado [FF/CUE] (loca-
lización progresiva) o [REW/REV] (localización
regresiva) durante la reproducción.
Cuando se deje de pulsar el botón, la reproduc-
ción normal empezará.
∫ Parada automática
Durante la reproducción o la grabación, cuando
la cinta llegue al final, el sistema de parada
automática dejará libres los botones de repro-
ducción y grabación, y el aparato se apagará
automáticamente.
∫
Contador de vueltas de la cinta y
botón de reposición
(Sólo para RQ-L36)
Cuando se pulse el botón de reposición, los
dígitos volverán a “000”. Los dígitos avanzarán
según se mueva la cinta para ofrecer una
referencia rápida y poder así encontrar rápida-
mente una parte deseada de la cinta.
Nota:
≥Cuando reponga el contador de cinta
asegúrese de oprimir firmemente el botón de
reposición y que el contador se reposicione a
exactamente “000”.
≥No abra la tapa del compartimiento del casete
durante la operación de la cinta
Posición de [REC MODE]
1k
3k
Diferencia de velocidad
un j30 %–0 %–
un i20 %
0%–un i30 %
La página se está cargando...
Transcripción de documentos
ENGLISH The illustrations show RQ-L36. Mini Cassette Recorder RQ-L36/RQ-L11 Operating Instructions Instrucciones de funcionamiento Nhctpykunr go ˙kcgjyataunn Before connecting, operating or adjusting this product, please read these instructions completely. Please keep this manual for future reference. GC Power Source Insert two R6/LR6, AA, UM-3 (not included) batteries. (A) ∫ Battery condition indicators (a) The [BATT LEVEL] indicators light during operation. As the charge reduces the lamps go out. When the batteries are weak The indicator under “E” becomes dim or turns off. ∫ AC power operation B Connect only Panasonic AC adaptor RP-AC30 (optional, not available in some countries). The configuration of the AC adaptor differs according to the area. Cautions Matsushita Electric Industrial Co., Ltd. p Web Site: http://www.panasonic.co.jp/global/ r Cn r Ar r y RQTT0455-G F0102MA0 Ljr Poccnn “YctahobjehhsØ gponÎbolntejem b goprlke g. 2 ct. 5 Ielepajvhofo „akoha PI “O Îaqnte gpab gotpe°ntejeØ” cpok cjyÒ°s nÎlejnr pabeh 7 folam c lats gponÎbolctba gpn ycjobnn, ≠to nÎlejne ncgojvÎyetcr b ctpofom cootbetctbnn c hactorqeØ nhctpykuneØ go ˙kcgjyataunn n gpnmehnmsmn texhn≠ecknmn ctahlaptamn.” Gpnmep mapknpobkn: ±±1A±±±±±±± Íjemehts kola: 3-nØ cnmboj–fol nÎfotobjehnr (1±2001 f., 2±2002 f., 3±2003 f., …); 4-sØ cnmboj–mecru nÎfotobjehnr (A±rhbapv, B±iebpajv, …, L±leka°pv) PacgojoÒehne mapknpobkn: Bhytpn °atapeØhofo otceka ≥Align the poles (+ and -) properly when inserting the batteries. ≥Do not mix old and new batteries or different types of batteries. ≥Do not recharge ordinary dry cell batteries. ≥Remove the batteries if the unit is not to be used for a long time. ≥Do not peel off the covering on batteries and do not use if the covering has been peeled off. Mishandling of batteries can cause electrolyte leakage which can damage items the fluid contacts and may cause a fire. If electrolyte leaks from the batteries, consult your dealer. Wash thoroughly with water if electrolyte comes in contact with any part of your body. ≥If rechargeable batteries are to be used, rechargeable batteries manufactured by Panasonic are recommended. ≥Do not play your headphones or earphones at a high volume. ≥To avoid product damage, do not expose this product to rain, water or other liquids. ≥Avoid using or placing this unit near sources of heat. Do not leave it in an automobile exposed to direct sunlight for a long period of time with doors and windows closed. ≥This product may receive radio interference caused by mobile telephones during use. If such interference is apparent, please increase separation between the product and the mobile telephone. ≥This speaker does not have magnetic shielding. Do not place it near televisions, personal computers or other devices easily influenced by magnetism. Erasure prevention C A Use a screwdriver or similar object to break out the tab. To re-record on a protected cassette Cover the hole with adhesive tape. 1 2 Maintenance If the surfaces are dirty Two R6/LR6, AA, UM-3 batteries (not included) a E BATT LEVEL F Empty To clean this unit, wipe with a soft, dry cloth. ≥Never use alcohol, paint thinner or benzine to clean this unit. ≥Before using chemically treated cloth, read the instructions that came with the cloth carefully. For a cleaner crisper sound Clean the heads regularly to assure good quality playback. Use a cleaning tape (not included). Full ESPAÑOL Las ilustraciones muestran el RQ-L36. Alimentación IInserte dos pilas tamaño R6/LR6, AA, UM-3 (opcionales). (A) ∫ Indicadores del nivel de las pilas (a) Los indicadores [BATT LEVEL] se iluminan durante el funcionamiento. A medida que la carga se reduce las lámparas se apagan. Cuando las pilas están débiles El indicador debajo de “E” se atenúa o se apaga. ∫ Funcionamiento con CA B Conecte solamente el adaptador de CA Panasonic RP-AC30 (opcional, no disponible en algunos paises). La forma del adaptador de CA cambia según la zona en la que va a ser utilizado. Precauciones ≥Alinee las polaridades (+ y -) correctamente cuando inserte la pila. ≥No mezcle pilas viejas y nuevas o tipos diferentes de pilas. ≥No recargue pilas secas ordinarias. ≥Quite todas las pilas si el aparato no va a ser utilizado durante mucho tiempo. ≥No pele el revestimiento de las pilas y no las utilice si no lo tienen. El mal manejo de las pilas puede causar fugas en el electrolito, lo que puede dañar objetos que entran en contacto con él y puede causar un incendio. Si hay fuga del electrolito de las pilas, consulte con su distribuidor. Lave concienzudamente con agua si el electrolito entra en contacto con cualquier parte de su cuerpo. ≥Si van a utilizarse baterías recargables, se recomiendan las fabricadas por Panasonic. ≥No haga funcionar sus auriculares a alto volumen. ≥Para evitar que se estropee el aparato, no lo exponga a la lluvia, al agua ni a otros líquidos ≥Evite utilizar o poner este aparato cerca de fuentes de calor. En especial, no lo deje en e interior de un automóvil expuesto a la luz directa del sol durante mucho tiempo estando sus puertas y ventanas cerradas. ≥Este producto puede tener interferencias causadas por teléfonos móviles durante su utilización. Si tales interferencias resultan evidentes, aumente la separación entre e producto y el teléfono móvil. ≥Este altavoz no dispone de blindaje magnético. No lo coloque cerca de televisores ordenadores u otros dispositivos fácilmente influenciables por el magnetismo. Prevención contra el borrado C Utilice un destornillador u objeto similar para romper la lengüeta. Para volver a grabar en una cinta de casete protegida Tape el agujero con cinta adhesiva. Mantenimiento Si las superficies están sucias Utilice un paño suave y seco para limpiar este aparato. ≥No utilice nunca alcohol, diluyente de pintura ni bencina para limpiar este aparato. ≥Antes de utilizar un paño impregnado químicamente, lea con atención las instrucciones suministradas con él. Para obtener un sonido más claro Limpie los cabezales con frecuencia para garantizar una reproducción de calidad. Utilice cinta limpiacabezales (optional). Specifications B C Side A A A Tab for side A Tab for side B DC IN 3V A Adhesive tape Track system: 2 track, monaural Recording system: DC bias, magnet erase Monitor system: Fix Frequency range Playback: 180–7000 Hz Rec/Playback: 250–6300 Hz Power output RQ-L36: 450 mW (RMS…max.) Power output RQ-L11: 420 mW (RMS…max.) Tape speed RQ-L36: 4.8 cm/s / 1.6 cm/s Tape speed RQ-L11: 4.8 cm/s Jacks: Output; EARPHONE (8 ≠) Input (RQ-L36 Only); MIC, 0.25 mV (150–600 ≠) Speaker: 3.6 cm 4 ≠ Power requirement: Battery; DC 3 V (two R6/LR6, AA, UM-3 batteries) AC; 3 V with optional AC adaptor RP-AC30 Dimensions (WtHtD): 86.0k112.1k37.2 mm Mass (without batteries): RQ-L36: 164 g Mass (without batteries): RQ-L11: 157 g Play time: (When used in hold mode, at 25 oC, on a flat, stable surface) Alkaline dry cell batteries; Recording; About 25 hours Alkaline dry cell batteries; Playback; About 17 hours (RQ-L36) About 18 hours (RQ-L11) The play time may be less depending on the operating conditions. Note: Specifications are subject to change without notice. Mass and dimensions are approximate. D ENGLISH 1 a 2 4 RQ-L36 MIC jack (Plug type: 3.5 mm monaural) SE U PA 3X 1X EARPHONE (Plug type: 3.5 mm monaural) REC MODE RQ-L36 (OFF) HONE EARP R) MIC POWE UG IN E LUM (PL Built-in microphone 5 VO NORM MIC 36 HI LEVE GH L RQ-L RDER CO TE RE SSET I CA MIN VAS ING ORD REC STO P 2 RE C ∫STOP 3 1 E US PA L E BATT F OFF LEVE VAS RQ-L36 2 1 OFF 3X (High) 1X REWPLAY FF// REV CUE NORM HIGH MIC LEVEL 6 REC MODE E IM T STEM SY C E VATED R TI E AC VOIC TAAPPE E SP EE FAS D SLOT W £ (Normal) RQ-L36 To make recording D Para grabar D Only normal position tapes can be used. The sound may not be recorded properly if high position tapes and metal position tapes are used with this unit. 1. Open the cover and insert the cassette. 1. a Recording side 2. Set the [PAUSE] selector to OFF position. 3. (RQ-L36 only) 3. Select [MIC LEVEL]. 1. Select [HIGH] if you want to record relatively soft sounds. 4. (RQ-L36 only) 3. Select [REC MODE]. 1. 1k: To record sound at a normal speed. 1. 3k: To record sound at three times longer than the normal speed for long meetings, etc. 5. (RQ-L36 only) 1. Set the [VAS] selector to [OFF]. 6. Press [£]. [PLAY] is also depressed with [£]. Use a tape with tabs in place. The recording level is automatically adjusted. En este aparato sólo pueden utilizarse cintas normales. El sonido tal vez no se grabe correctamente s se utilizan cintas de alta posición (high position) o de metal con este aparato. 1. Abra la cubierta e inserte el casete. 1. a Lado de grabación 2. Ponga el selector [PAUSE] en la posición OFF. 3. (Sólo para RQ-L36) 3. Seleccione [MIC LEVEL]. 3. Seleccione [HIGH] si quiere grabar sonidos relativamente suaves. 4. (Sólo para RQ-L36) 3. Seleccione [REC MODE]. 3. 1k: Para grabar sonido a una velocidad normal. 3. 3k: Para grabar sonido a una velocidad tres veces más larga que la normal, para reuniones largas, etc. 5. (Sólo para RQ-L36) 3. Ponga el selector [VAS] en [OFF]. 6. Oprima [£]. [PLAY] se pulsa también con [£]. Utilice un casete con las lengüetas puestas. El nivel de grabación se ajustará automáticamente. ∫ To stop recording Press [STOP]. ∫ To temporarily stop recording ∫ Para parar la grabación Set the [PAUSE] selector to ON position. To resume recording, set it to OFF position. Pulse [STOP]. ∫ Para parar temporalmente la grabación ∫ To record with VAS (Voice Activated System) function (RQ-L36 only) Ponga el selector [PAUSE] en la posición ON. Para reanudar la grabación, póngalo en la posición OFF. The sound is recorded automatically, so there is no tape waste. To use VAS function, set the [VAS] selector to [1] or [2] in step 5. 1: If you wish to record lower levels of sound than usual. 2: If you wish to record only louder sounds. Note: After using the VAS function, set the [VAS] selector to [OFF]. ∫ To record through an external microphone (RQ-L36 only) Plug the external microphone (not included) into the [MIC (PLUG IN POWER)] jack. ≥You can use a condenser microphone without a built-in power supply. ∫ Follow up recording Recording can be started during playback by simply pressing [£]. ∫ Monitoring The sound can be heard with an optional monaural earphone plugged into the [EARPHONE] jack. Note: ≥You can not adjust the volume during recording. To playback the tape E E Only normal position tapes can be used. 1. Insert the tape. 1. a Playback side 2. Set the [PAUSE] selector to OFF position. 3. (RQ-L36 only) 3. Select [REC MODE]. 3. Select the same mode you used for recording. 4. Press [PLAY]. 5. Adjust the volume. 1 ∫ To stop playback Press [STOP]. ∫ To change play speed (RQ-L36 only) Turn [TAPE SPEED]. Set b to the center to play at the normal speed. (Set towards the [FAST] side to play sound recorded at 3 times normal speed.) a 2 E US PA Position of [REC MODE] Speed difference 1k about j30 %–0 %– about i20 % 0 %–about i30 % 3k ∫ To fast forward and rewind (OFF) RQ-L36 VO Tape counter 000 3 NORM HI MIC LEVE GH L Reset button HONE EARP R) MIC POWE UG IN E LUM (PL 36 ER CORD TE RE SSET I CA MIN G RQ-L O REC STO P RE C E US PA ∫STOP VEL F 65 T LE E REW/REV FF/CUE BAT VAS 2 1 OFF 3X 3X 5 1X 5 RDIN TAP E SPE E FAS D SLOT W REC MODE RQ-L36 4 b TAPE SPEED FAST SLOW RQ-L36 PLAY 1X REWPLAY FF// REV CUE REC MODE E IM T STEM SY C E VATED R TI E AC VOIC VOLUME ESPAÑOL Press [FF/CUE] or [REW/REV]. The tape will rapidly move in the direction of the arrow. ≥When the tape reaches the end after fast forward or rewind, press [STOP] to release the button. ∫ Cue and review Sound can be monitored at a high speed for as long as [FF/CUE] (cue) or [REW/REV] (review) is held down during playback. When the button is released, normal playback will start. ∫ Auto Stop During playback or recording, when the tape reaches its end, the automatic stop system will release the playback and record buttons and automatically turn off the unit. ∫ Tape counter and reset button ∫ (RQ-L36 only) The digits return to “000” when the reset button is pressed. The digits advance with the tape to provide a reference to quickly find a desired portion of tape. Note: ≥When you are resetting the tape counter, make sure that you push the reset button firmly and that the counter resets precisely to “000”. ≥Do not open the cassette compartment cover during tape operation. ∫ Para grabar con la función VAS (sistema activado por voz) ∫ (Sólo para RQ-L36) El sonido se grabará automáticamente, de forma que no se desperdiciará cinta. Para usar la función VAS, ponga el selector [VAS] en [1] o [2] en el paso 5. 1: Si usted desea grabar sonidos de un nive inferior alnormal. 2: Si usted desea grabar los sonidos más altos solamente. Nota: Después de usar la función VAS, ponga e selector [VAS] en [OFF]. ∫ Para grabar mediante un micrófono exterior (Sólo para RQ-L36) Enchufe un micrófono exterior (opcional) en la toma [MIC (PLUG IN POWER)]. ≥Se puede usar un micrófono electrostático sin fuente de alimentación incorporada. ∫ Continuación de la grabación La grabación podrá iniciarse durante la reproducción pulsando simplemente [£]. ∫ Monitoreo El sonido puede ser oido con un auricular monoaural opcional enchufado en la toma [EARPHONE]. Nota: ≥No se puede ajustar el volumen durante la grabación. Para reproducir la cinta E En este aparato sólo pueden utilizarse cintas normales. 1. Inserte la cinta. 1. a Lado de reproducción 2. Ponga el selector [PAUSE] en la posición OFF. 3. (Sólo para RQ-L36) 3. Seleccione [REC MODE]. 3. Escoja el mismo modo que usó para grabar. 4. Pulse [PLAY]. 5. Ajuste el volumen. ∫ Para parar la reproducción Pulse [STOP]. ∫ Para cambiar la velocidad de reproducción (Sólo para RQ-L36) Haga girar [TAPE SPEED]. Ponga b en el centro para reproducir a la velocidad normal. (Ajuste hacia el lado [FAST] para reproducir e sonido grabado al triple de la velocidad normal.) Posición de [REC MODE] Diferencia de velocidad un j30 %–0 %– 1k un i20 % 3k 0 %–un i30 % ∫ Para avanzar rápidamente rebobinar la cinta y Pulse [FF/CUE] o [REW/REV]. La cinta se moverá rápidamente en la dirección de la flecha. ≥Cuando la cinta llegue al final después de avance rápido o del rebobinado, pulse [STOP] para dejar libre el botón. ∫ Localización progresiva y regresiva El sonido podrá comprobarse a alta velocidad mientras se mantenga pulsado [FF/CUE] (localización progresiva) o [REW/REV] (localización regresiva) durante la reproducción. Cuando se deje de pulsar el botón, la reproducción normal empezará. ∫ Parada automática Durante la reproducción o la grabación, cuando la cinta llegue al final, el sistema de parada automática dejará libres los botones de reproducción y grabación, y el aparato se apagará automáticamente. ∫ Contador de vueltas de la cinta y botón de reposición (Sólo para RQ-L36) Cuando se pulse el botón de reposición, los dígitos volverán a “000”. Los dígitos avanzarán según se mueva la cinta para ofrecer una referencia rápida y poder así encontrar rápidamente una parte deseada de la cinta. Nota: ≥Cuando reponga el contador de cinta asegúrese de oprimir firmemente el botón de reposición y que el contador se reposicione a exactamente “000”. ≥No abra la tapa del compartimiento del casete durante la operación de la cinta-
 1
1
-
 2
2
-
 3
3
-
 4
4


Panasonic RQ-L36 Manual de usuario
- Categoría
- Reproductores de casete
- Tipo
- Manual de usuario
en otros idiomas
- English: Panasonic RQ-L36 User manual
Artículos relacionados
-
Panasonic RQ L31 Instrucciones de operación
-
-
-
-
-
-
-
-
-