
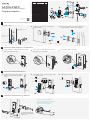
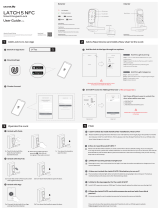
Install latch and strike
Prepare the door. Make sure the latch angle faces the door jamb.
Make sure the triangle is facing upwards
as illustrated.
Install the spring if the door thickness is
over 1.65”(42mm). Plug in the spindle.
Attach the connectors as indicated and secure
the interior assembly.
Route the cable above the bolt and through the
hole stated below.
Install Interior Mounting Plate.
Interior
Spring Spindle
Install batteries and cover.
1
Install exterior keypad assembly
2
Install interior assembly
3
Install interior / exterior lever
4
1a. 1b.
Install the strike on the door frame and ensure the latch
will match the strike.
1c.
2a. 2b. 2c.
3a. 3b. 3c.
1-3/8” - 1-3/4”
(35 mm - 44mm)
(70 mm)
2-3/4”
(60 mm)
2-3/8”
Adjust the latch basket length
Exterior
Drill the hole if needed.
Screw AA
#8 x 3/4" Wood Screws
x 4
Screw BB
#8-32 x 1-3/8" Machine Screws
#4-32 x 15/32" Captive Screw
x 3
Screw C
#8-32 x 5/16" Machine Screws
#8-32 x 15/32" Machine Screws
x 2
Screw D
x 2
Screw E
x 1
Φ2/5” (10mm)
Φ 1” (25.4mm)
J
H
A
D
D
FF
B
G
C
E
I
K
Part Code
A Exterior Assembly 1
Interior Mounting Plate 1
Interior Assembly 1
Handles 2
Cover 1
Spindle 1
1
1
Spring 1
Backup Keys 3
AA Batteries 4
Latch 1
Strike 1
Reset Needle
Screwdriver
Drilling Template
2
Key Fob
1
B
C
D
E
F
G
H
I
J
K
Part Name Quantity
Screw Code
AA #8 x 3/4" Wood Screws 4
EE
CC
#8-32 x 1-3/8" Machine Screws 3
M4x25 Machine Screw (Optional) 1
M4 x 30+6 Stud Screw (Optional) 1
#8-32 x 5/16" Machine Screws 2
#8-32 x 15/32" Machine Screws 2
#4-32 x 15/32" Captive Screw 1
BB
BB +
CC
DD
EE
Screw Name Quantity
DD
BB
BB +
AA
Sloping surface of latch
should face the door frame
Plunger
Strike plate
LATCH 5 NFC
Smart Keypad Lock
Need help?
Installation Guide
V1.3
To get help or learn more
https://support.u-tec.com
Using the hex wrench provided,
screw the set screw anticlockwise
inside the handle base.
Place the handles to the
opposite direction of
the door’s edge.

Instalación del cerrojo y la placa para cerrojo
Prepare la puerta. Asegúrese de que el cerrojo está enfrente al
larguero de puerta.
Asegúrese de que el triángulo queda orientado hacia
arriba como ilustra la imagen.
Instale el resorte si el espesor de puerta
mide más de 1.65”(42mm). Enchufe el
husillo.
Coloque las manijas en la
dirección opuesta al borde
de la puerta.
Coloque los conectores como se indica y sujete
el ensamble interno.
Pase el cable por encima del cerrojo y a través
del agujero que se indica abajo.
Instale la Placa de Montaje Interno.
Interno
Resorte Husillo
Instale pilas y la cubierta
1
Instalación de Ensamble de Teclado Externo
2
Instalación del Ensamble Interno
3
Instalación de Palanca Interno / Externo
4
1a. 1b.
Instale la placa del cerrojo en el marco de puerta y
asegúrese de que el cerrojo encaja en la placa.
1c.
2a. 2b. 2c.
3a. 3b. 3c.
1-3/8” - 1-3/4”
(35 mm - 44mm)
(70 mm)
2-3/4”
(60 mm)
2-3/8”
Ajuste la longitud de la entrada de la cerradura
Externo
Taladre un agujero si hace falta.
Screw AA
Tornillos para Madera #8 x 3/4"
x 4
Screw BB
Tornillos para Metales #8-32 x 1-3/8"
Tornillo Cautivo #4-32 x 15/32"
x 3
Screw C
Tornillos para Metales #8-32 x 5/16"
Tornillos para Metales #8-32 x 15/32"
x 2
Screw D
x 2
Screw E
x 1
Φ2/5” (10mm)
Φ 1” (25.4mm)
J
H
A
D
D
FF
B
G
C
E
I
K
Código del Accesorio
A Ensamble Exterior 1
Placa de Montaje Interno 1
Ensamble Interior 1
Manija 2
Cubierta 1
Husillo 1
1
1
2
Resorte 1
Llave de Backup 3
Pilas AA 4
Cerrojo 1
Placa del Cerrojo 1
Llave para Resetear
Destornillador
Plantilla de Perforación
1
B
C
D
E
F
G
H
I
J
K
Nombre del Accesorio Cantidad
Código del Tornillo
AA Tornillos para Madera #8 x 3/4" 4
EE
CC
Tornillos para Metales #8-32 x 1-3/8" 3
Tornillo para Metales M4x25 (Opcional) 1
Tornillo Prisionero M4 x 30+6 (Opcional) 1
Tornillos para Metales #8-32 x 5/16" 2
Tornillos para Metales #8-32 x 15/32" 2
Tornillo Cautivo #4-32 x 15/32" 1
BB
BB +
CC
DD
EE
Screw Name Cantidad
DD
BB
BB +
AA
La superficie con pendiente
del cerrojo debe enfrenterse
al marco de puerta
Émbolo
Placa del cerrojo
LATCH 5 NFC
Cerradura de Teclado Inteligente
¿Necesita ayuda?
Guía de Instalación
V1.3
Para obtener soporte o saber más
https://support.u-tec.com
Por favor, use la llave hexagonal
proporcionada para sujetar el tornillo
prisionero en sentido antihorario
dentro de la base del mango.
Key Fob
-
 1
1
-
 2
2


U-tec U-tec LATCH 5 NFC Smart Keypad Lock Guía de instalación
- Tipo
- Guía de instalación
- Este manual también es adecuado para
Artículos relacionados

Otros documentos
-
 Ultraloq U-BOLT-PRO-B-UB01 Guía de instalación
-
 Ultraloq Smart Lock U-Bolt Pro Manual de usuario
-
 Ultraloq Ultraloq UL3 BT Manual de usuario
-
Gatehouse HCX7F1B Guía de instalación
-
Kwikset 687BWXCV 11P SMT CP Guía de instalación
-
-
-
Defiant HY76S1BRF4BGS Guía de instalación
-
Brinks 23092-119 Guía de instalación
-
 Ultraloq LATCH 5 NFC Guía del usuario


