La página se está cargando...


Important Notes
- 1 -
This section contains important information to ensure the user’s safety and prevent potential damaged to
property. Please read this section carefully and use the product accordingly.
Don't install the product in the place where the gap between the door and the frame is 3/16’’ (5mm) or more.
Make sure that no unauthorized person has access to the password.
Do not operate the product with wet hands, and keep liquids such as water or drinks away from the product,
or the product may malfunction or be damaged.
Do not use excessive force or sharp objects to turn the handle, as this can damage the product.
Make sure that the door is completely closed when going outside. The manufacturer does not assume the
responsibility for any harm caused by engagement of the lock on an improperly closed door.
Be sure to correctly match the poles (+/-) when installing the batteries. Install the batteries with the correct
poles (+/-).
Do not use water, benzene or alcohol when cleaning the product, as these fluids can cause product
malfunction.
Replace the batteries after the battery replacement alarm sounds.
According to the wireless communication environment, its battery may drain faster.
You must use AA Alkaline Battery and not use Lithium Battery or Rechargeable Battery.
Ultraloq Terms & Policies
Before using all Ultraloq products, please read all applicable terms, rules, policies and
usage provisions found at www.u-tec.com/company/privacy. By using your Ultraloq,
you agree to be bound by the U-tec Privacy Policy.
Need Help?
For technical documents and more information, please visit www.u-tec.com/support
Email: [email protected]

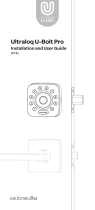
Packing List
- 2 -
ENGLISH
Interior Assembly Exterior Assembly Interior Assembly Mounting Plate Mortise
Ultraloq UL300
Fingerprint and Touchscreen Smart Lock
User Guide (V1.1)
User Guide
Spring
Screw DScrew A Screw C
Reset Needle
Backup Key
A
Spindle
B C
Screw B
B1 B2 B3
AA Alkaline Batteries
(May not be included
for some regions)
Bridge
(Optional)
Drill Template
2”
(50mm)
4”
(100mm)
UL300 Drill Template
V1.3
Fold
Centerline
Centerline
Centerline
Centerline
Centerline
Centerline
DOTTED LINE MUST BE PLACED ON DOOR EDGE
MORTISE DEPTH
Horizontal Center Line
Around 3 feet(1 meter)
above the ground
UpUp
1”
(25mm)
1”
(25mm)
1
”
(25mm)
1
”
(25mm)
Backset
EDGE OF DOOR
Stud Screw/Connection Cable Hole
Spindle/Handle Hole
Extra Spindle Hole
Stud Screw Hole
Centerline
9
/
16”
(15mm)
23
/
8”
(60mm)
91
/
2”
(240mm)
81 3/
16”
(224mm)
87/
16”
(212mm)
13/
8”
(35mm)
57/
16”
(138mm)
9
/
16”
(15mm)
9
/
16”
(14mm)

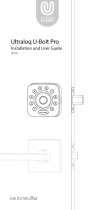
1. Door Dimensions
Installation Guide
- 3 -
Installation Video
Please scan this QR code to watch the easy step by step installation video before attempting to install
Ultraloq UL300. Or you can also view www.u-tec.com/lock/Ul300/guide directly.
If you have a new door,
please drill the holes
according to according to
the Drill Template.
Step 1
Measure to confirm that the door is
between 1-9/16'' to 4'' (40mm to 100mm)
Step 2
Measure to confirm that the
backset is 4’’ (100mm)
Step 3
Measure to confirm the other dimensions.
2”
(50mm)
4”
(100mm)
Fold
Centerline
Centerline
Centerline
Centerline
Centerline
Centerline
DOTTED LINE MUST BE PLACED ON DOOR EDGE
MORTISE DEPTH
Horizontal Center Line
Around 3 feet(1 meter)
above the ground
UpUp
1”
(25mm)
1
”
(25mm)
1
”
(25mm)
1
”
(25mm)
Backset
EDGE OF DOOR
Stud Screw
Connection Cable Hole
Spindle/Handle Hole
Extra Spindle Hole
Stud Screw Hole
Centerline
9
/
16”
(15mm)
9
/
16”
(15mm)
23
/
8”
(60mm)
91
/
2”
(240mm)
13/
8”
(35mm)
81 3/
16”
(224mm)
87/
16”
(212mm)
57/
16”
(138mm)
9
/
16”
(14mm)

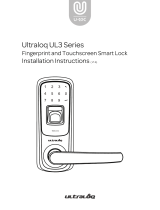
2. Installing Mortise and Strike
- 4 -
2.1 Mortise Overview
Direction Switch: Used to Mortise Handing.
Latch: Used to lock and unlock.
Bolt: Used to lock and unlock for securer.
Spindle Hole: The spindle goes through this hole to drag Latch and Bolt.
Extra Bolt: Used for double locked.
Extra Spindle Hole: The cylinder tailpiece goes through this hole to drag Extra Bolt.
Latch
Bolt
Extra Bolt
Direction Switch
Spindle Hole
Extra Spindle Hole
ENGLISH

- 5 -
2. 2 Mortise Handing
Please make sure the inclined corner is facing the frame. If the Mortise is in the correct handing for the
door, you may skip the next section on Reversing the Mortise Handing.
Step 1. keep the Direction Direction Switch to the top all the way.
2.3 Reversing the Mortise Handing
Step 2. Push and hold the Latch into the Mortise entirely.
Step 3. While the Latch is inside the Mortise, rotate the Latch 180
o
.
Step 4. Release the Latch and it will come out of the Mortise.
Tip: When you release the Latch, please unstuck the small bolt from the side plate of the Mortise.
Step5. Release the Direction Switch to default location.

- 6 -
Keep the Bolt and Extra Bolt retracted (unlocked status), then insert the Mortise and tighten 4 Screws A.
2.5 Installing Strike
Attach the Strike to the jamb using 4 Screws A.
2.4 Installing Mortise
Note:
The Mortise position should be Latch on top and Bolt in the Bottom.
The inclined corner of the Latch must be facing towards the Strike in the door's frame.
Check the door holes dimensions and assure the Mortise fits. If it doesn't, please adjust the holes sizes.
Don't add hand pressure.
ENGLISH


- 8 -
3.2 Installing Exterior Assembly
Step 1.
Insert the spindle into the Exterior Assembly’s hole.
If the thickness of the door is between 1-9/16'' to 2-3/8'' (40mm to 60mm), please use Spindle A (3-1/8'', 80mm).
If the thickness of the door is between 2-3/8'' to 3-1/8'' (60mm to 80mm), please use Spindle B (4'',100mm).
If the thickness of the door is between 3-1/8'' to 4'' (80mm to 100mm), please use Spindle C (4-3/4'', 120mm).
Step 2.
Adjust the arrow pointing to the handle.
Note: This step is very important, otherwise UL300 handle can’t work correctly.
Step 3.
Pass the cable above the Mortise.
Step 4.
Insert two screw into the holes, and pass the Spindle through the Spindle hole of the Mortise.
Attach the Exterior Assembly on the door.
Note:
Before installing the Interior Assembly Mounting Plate, please keep steady the Exterior Assembly.
Be sure not to move it.
ENGLISH

- 9 -
Step 1.
Route the cable through the hole on Interior Assembly Mounting Plate.
Step 2.
Attach the Interior Assembly Mounting Plate on the door and tighten two Screws B.
If the thickness of the door is between 1-9/16'' to 2-3/8'' (40mm to 60mm), please use Screw B1.
If the thickness of the door is between 2-3/8'' to 3-1/8'' (60mm to 80mm), please use Screw B2.
If the thickness of the door is between 3-1/8'' to 4'' (80mm to 100mm), please use Screw B3.
Note:
1. The screw bolts of the Mounting Plate must face the installer.
2. Before tightening the screws completely, tighten one screw up to the middle, then, start with the second one,
this way you will have the right installation. After you have both screws up to the middle you can proceed and
tighten them completely.
Step 1.
Adjust the handle direction of the Exterior Assembly. The operation is the same with the exterior handle.
Step 2.
After confirming the Extra Bolt is retracted, rotate the Extra Bolt Knob to Unlock. The knob and the cylinder
tailpiece should be all vertical.
4. Installing in the interior Mounting Plate
5. Installing Interior Assembly

- 10 -
Step 3.
Insert the Spring into the hole of the interior handle.
Note: This step is important, otherwise the spindle
will not drag the Mortise by turning handle.
Step 5.
Remove the battery box cover.
Step 4.
Insert the connector of the cable to the socket
of the Interior Assembly. Press the connector firmly
until you hear a click.
Step 6.
Pass the Extra Bolt’s cylinder tailpiece
through the Extra Bolt Spindle Hole.
Match the handle’s hole with the Mounting
Plate and the Exterior's Assembly hole.
Attach the Exterior Assembly to the
Interior Assembly Mounting Plate and
tighten Screws C and Screws D.
ENGLISH

Power and Test
- 11 -
Note:
UL300 has a double power design. If you only install 4 AA batteries together, above or below (not in the
middle) it's enough to power UL300. Although, U-tec recommends installing the 8 AA batteries from the
beggining to have a longer battery life.
Lithium batteries may have a longer life, but when they begin to run out of battery, they drain fast. U-tec
doesn't recommend them, as you will not have enough time to change them before the lock becomes
non-functional.
2. Test Lock and Unlock
When UL300 is in factory default mode, a "No User" message will be displayed, any fingerprint, code or key
fob can unlock it. U-tec recommends programing UL300 immediately after the installation. To make sure
the installation is correct, please test the lock. Lock and unlock UL300 a couple of times. During this time
remember to keep the door open to avoid any problem.
Step 1.
Lift up the outside handle, the Bolt will lock.
Step 2.
Turn down the inside handle, the Latch and Bolt will unlock.
Step 3.
Lift up the inside handle, the Bolt will lock, the Latch, will also lock automatically.
Step 4.
Use any Fingerprint, Code or Key Fob to pass verification, then turn down the outside handle, the Latch and
Bolt will unlock.
Step 5.
Rotate the Extra Bolt Knob, the Extra Bolt will lock or unlock.
If the 5 steps above are all successful, you can begin programming UL300. If any step failed, please
re-install UL300 carefully as the guide shows.
1. Power On
Install 8 AA alkaline batteries and then the battery box cover.

1. Product Overview
- 12 -
Please watch our easy step by step User Guide video before attempting to use your Ultraloq UL300 Smart Lock.
1.1 Exterior
User Guide
Message Display Screen
Outside Handle
Backup Key Hole
Micro USB (5V)
Restart Button
Anti-peep Keypad
Fingerprint Reader
Key Fob Reader
User Guide Video
ENGLISH

Anti-peep Keypad
Used to enter the code and unlock from the outside.
Fingerprint Reader
Used to verify your finger and unlock from the outside.
Key Fob Reader
Used to verify your key fob and unlock from the outside.
Message Display Screen
An OLED display with intuitive information will walk you through the whole operation.
Micro USB (5V)
Used to connect a power bank to activate the lock when it runs out of battery.
Restart Button
Used to restart the lock if activation fails.
Backup Key Hole
Used to insert the key to unlock.
Outside Handle
Used to lock or unlock UL300.
0-9 Number Button
Used to input number. Number 2 and Number 8 are also used to upturn page and downturn page.
Back Button
Used to go back to the previous page.
Enter Button
Used to confirm and skip the operation.
- 13 -

- 14 -
1.2 Interior
Bluetooth LED Indicator
When connecting UL300 by App, there will be a steady blue light, otherwise a blue light will blink every second.
Reset Button
Used to reset UL300 to factory default settings.
Inside Handle
Used to lock or unlock UL300.
Extra Bolt Knob
Used to lock or unlock Extra Bolt for double lock.
Battery Cover
Used to cover the batteries and product label.
(A quick guide and Serial Number Lable are printed inside the battery cover. )
Bluetooth LED Indicator Reset Button
Inside Handle
Extra Bolt Knob
Battery Cover
ENGLISH

- 15 -
2.1 Cleaning the Keypad and Finger Reader
Use a microfiber cloth and wipe across the Anti-peep Keypad, Fingerprint Reader and Key Fob Reader.
2.2 Lock Activation
Place a finger on the Fingerprint Reader, touch the Anti-peep keypad with the back of your hand or fingers, or,
present the Fob on the Key Fob Reader.
2.3 Open the door from Outside
Note: Please confirm that the Extra Bolt is unlocked. Otherwise, UL300 will Display a message on the screen
showing “Double Locked”, and only the Admin will be able to unlock it.
2.3.1 Unlock by Code
Step 1.
Place a finger on the Fingerprint Reader or Anti-peep Keypad to activate UL300.
Step 2.
Input the 4-8 digit User Code from a registered user and UL300 will display "Success".
Step 3.
Rotate the handle all the way down to unlock UL300.
2.3.2 Unlock by Fingerprint
Step 1.
Press the finger on the Fingerprint Reader to activate UL300.
Step 2.
Press the finger from a registered user on the middle of the Fingerprint Reader to unlock it. UL300 will
display "Success".
Step 3.
Rotate the handle all the way down to unlock UL300.
2.3.3 Unlock by Key Fob
Step 1.
Present the Key Fob from a registered user on the Key Fob Reader.
Step 2.
Rotate the handle all the way down to unlock UL300.
Note: For more tips about how to use the fingerprint correctly, please check Page 18.
2. Basic Operation

- 16 -
2.3.5 Backup Key
Step 1.
Open the black rubber cover at the bottom of UL300’s Exterior Assembly.
Step 2.
Insert the Backup Key with a vertical position and rotate it to a Horizontal Position to open it.
Step 3.
Rotate the handle all the way down to unlock UL300.
2.4 Open the door from inside
Step 1.
Rotate the Extra Bolt Knob to Unlock (vertical position).
Step 2.
Rotate the handle all the way down to unlock UL300.
2.5 Lock from outside
2.5.1 Lock Latch
UL300 will lock the Latch automatically after 3 seconds after the last unlock.
2.5.2 Lock Bolt
Lift up the Outside Handle to lock the Bolt.
2.3.4 Unlock by Smartphone
Step 1.
Press the Unlock Button in the U-tec App.
Step 2.
Rotate the handle all the way down to unlock UL300.
Note: Don’t forget to remove the Backup Key and close the black rubber cover.
ENGLISH

- 17 -
2.6 Lock from inside
2.6.1 Latch
UL300 will lock the Latch automatically after 3 seconds after the last unlock.
2.6.2 Bolt
Lift the inside handle to lock the Bolt.
2.6.3 Extra Bolt
Rotate the Extra Bolt knob to lock and have a double lock.
2.7 Reset the lock
Note: All data will be erased if you reset UL300 to factory default settings.
Step 1.
Remove the Battery Cover.
Step 2.
Use the Reset Needle and press the Reset Button for 5 seconds until you hear "Success", a message will be
displayed "No user"
Step3.
If UL300 is paired with the U-tec App you must tap "Delete" to remove UL300 from your U-tec account.
2.8 5V Emergency Power
The micro USB port can be used to connect a regular 5V power bank.
Step 1.
Remove the black rubber cover.
Step 2.
Use a regular 5V power bank to power.
Note: 5V Emergency Power is only for temporary power or not being able to charge the lock.

- 18 -
(1)Your finger should cover the Reader completely with some pressure, touching the surrounding metal ring.
(2) Make sure that your finger and the Fingerprint Reader are clean and dry. For the Fingerprint Reader, use a
clean microfiber cloth to wipe off any dirt or debris.
(3) While scanning your finger, you shouldn't tap too quickly or move your finger around.
(4) If you have trouble enrolling one finger, try another.
1:
2:
3:
1 2 3 4 5 6 X X X X X X
1 2 3 4 5 6
X X X X X X
1 2 3 4 5 6
X X X X X X
Example
User Code: 123456
Vague Code Method
2.9 Anti-peep Keypad
2.10 Finger Placement
The lock support up to 16 digit Vague Code. Just enter any 16 digit code, as long as a correct code is included in
what you entered, you will be able to open the door.
ENGLISH

- 19 -
2.11 Use the Key Fob
(1)When using the Key Fob access, please place the Key Fob at the center to cover the reader.
(2)Approach the sensor with medium speed (instead of sudden motion). If it's not working, move the Key Fob
away and re-approach.
2.12 Lock Status
Normal Mode
It’s the default mode, user must pass the fingerprint, code, fob or App access verification to unlock UL300
from outside.
Passage Mode
UL300 will stay unlocked for convenient free passage.
Lockout Mode
UL300 can only be operated manually by Back up Key. All electrical features are turned and only Admin can
disable it.
2.13 Secure Mode
Secure Mode requires two different users’ fingerprint, code or fob to unlock. Fingerprint, code and fob are
free combination. For Example, User 021 fingerpint/code/fob +User 022 fingerprint/code/fob.

- 20 -
Note:
Admin must be created first by Keypad before any other programming.
3.1 Basic Introduction
3.1.1 Factory Default
Factory setting means that any fingerprint, Code or key fob can unlock UL300.
You will hear a voice “Factory default mode, please register Admin”, and the message display shows “No User”.
3.1.2 User ID
User ID is used to distinguish different users. It’s different from Code. UL300 provides User ID 1~200 for admin
and user. You can edit user’s fingerprint, code and fob through User ID.
3.1.3 Admin and User
UL300 supports maximum 20 admins, 160 normal users and 20 temporary users.
Admin
Admin can always unlock via fingerprint, fob, code or App. Admin can add or delete other Admins and Users,
control all lock settings and view logs.
Admin is only adaptive for User ID 001~020.
Normal User
Normal User can always unlock via fingerprint, code and fob or App. User ID is 021~180.
Temporary User
Temporary User has limited access within a specific time range. User ID is 181~200.
3.1.4 Code
For all codes include Admin or User code, it must be 4~8 digit.
3. Lock Programming
ENGLISH

- 21 -
Note:
(1)Add admin first, the Admin User ID is set as default User ID 001.
(2)If you don’t need to add Fingerprint, Code or Key Fob, please press Enter Button to skip this step directly.
(3)If add fingerprint fails, please re-press the fingerprint on the middle on the reader three times. You can
also keep the fingerprint, the reader will collect pictures three times continually.
(4)Must not skip Admin Code step.
No User
Input Code (two times)
Present Key Fob (one
time)
User ID 001
Success
Press Enter Press Finger (three times)
Press Enter
Activate
For all programming flow chart of UL300 User Guide,
means the hint of the Message Display Screen
means the operational action by Keypad
3.2 Programming by U-tec App
3.2.1 Add Admin First
Admin (special for Admin Code) must be created by keypad prior to any other programming.

- 22 -
Step 1.
Scan the above QR code to download the U-tec App, or search “U-tec” in App
Store (iOS) or Google Play (Android).
Step 2.
Open the U-tec App, register a U-tec account and log in U-tec account.
Note:
If you have registered a U-tec Account, please skip this step.
Step 3.
Make sure you completed Admin code register and Admin Code correct.
Step 4.
Turn on the Bluetooth on your smart phone, stay near the lock (within 10 feet /
3 meters) and search the lock in U-tec App.
Step 5.
Click this lock in the device list and input Admin Code which you have created.
Step 6.
U-tec App will pair UL300 automatically. You will get UL300 in the device list.
Step 7.
Start using the App to control UL300.
3.2. 2 Pair UL300 by U-tec App
Note:
(1)If you have multiple locks, please remove all batteries to power off the other unregistered UL300
temporarily. You don’t need to power off the registered UL300 due to U-tec App shows these locks
as Registered.
(2)Admin Code needs to be programmed in the first step, if you haven't set it up, please Program it.
(3)If you forget the Admin Code, we recommend resetting UL300 to factory settings, then follow
the steps for Programming it again.
(4)If you only set up fingerprint or fob in the first step and don’t set up Admin Code, please go to
menu to edit Admin again.
Scan QR code to download the App
ENGLISH

- 23 -
It is recommended to use U-tec App to program your lock. If you don’t have a smart phone or don’t want to
use the App, you can use the programming instructions below.
U-tec App Programming and Keypad Programming are NOT independent, you can use both modes.
3.3.1 Add Normal User
Normal User can always unlock via fingerprint, code, fob or App. User ID is 021~180.
Add User
ID 021
Input Code (two times)
Present Key Fob (one
time)
Add Normal
Press Finger (three times)
Activate Welcome Press Enter Verify
Admin
Fingerprint
Code
Key Fob
Press Enter
Press Enter
Success
3.3.2 Add Temporary User
Temporary User has limited access within specific time range. User ID is 181~200.
Add User
ID 181
Input Code
(two times)
Present Key
Fob
(one time)
To
12-31-2019
Welcome Add Normal
Press Finger
(three times)
Press Enter Verify
Admin
Fingerprint
Code
Key Fob
Press Enter
Press Enter
Success
Press Number 8
then enter
Activate
From
05-20-2019
Input time
then enter
Input time
then enter
00:00-23:59
Input time
then enter
3.3 Keypad Programming by UL300

- 24 -
Admin can always unlock via fingerprint, fob, code or App. Admin can add or delete
Admin and Users, control all lock settings and view logs.
Admin is only adaptive for User ID 001~020.
Add User
ID 002
Input Code (two times)
Present Key Fob (one
time)
Welcome Add Normal
Press Finger (three times)
Press Enter Verify
Admin
Fingerprint
Code
Key Fob
Press Enter
Press Enter
Success
Press Number 8
twice then
enter
Activate
3.3.4 Modify User
You can modify a specific user’s fingerprint, code or fob. You need to remember the User ID,
otherwise you can only reset the lock to factory settings.
Success
Modify User
ID
000
ID
000
Input New
Code
Present
Card
Modify Code
Modify Card
Modify
Sched
To
12-31-2019
Sure to
Modify?
Sure to
Modify?
Welcome
ID
000
Success
Success
Success
Press Enter Verify
Admin
Code
Key Fob
Fingerprint
Activate Add User Press
Number 8
Modify
Finger
Press Enter
Press Number 8
Press Number 8
Press Number 8
Press Enter
ID
000
Input
User ID
Press Enter
Press Enter
Press
Enter
Input
User ID
Input
User ID
Input
User ID
Input
User ID
Press New
Finger
Press Finger
3 times
Input Code
2 times
Present Card
1 time
From
05-20-2019
Input time
then enter
Input time
then enter
00:00-
23:59
Input time
then enter
Sure to
Modify?
Press Enter
Press Enter
Press Enter
3.3.3 Add Admin
ENGLISH

- 25 -
3.3.5 Delete Normal or Temporary User
You can delete a specific normal user or temporary user. You need to remember the User ID,
otherwise you can only reset the lock to factory settings.
Add User
Del Normal
Sure to
Delete?
Welcome Delete User
ID
000
Press Enter Verify
Admin
Fingerprint
Code
Key Fob
Press Number
8 twice
Activate
Press Enter
Del Temp
Press Enter
ID
000
Input
User ID
Sure to
Delete?
Input
User ID
Sure to
Delete?
Press
Number 8
Press Enter
Sure to
Delete?
Press Enter
Press Enter
Success Press Enter
Success Press Enter
Add User
Del Normal
Welcome Delete User
Del All User
Press Enter Verify
Admin
Fingerprint
Code
Key Fob
Press Number
8 twice
Activate
Press Enter
Press Enter
Success Press Enter Sure to
Delete?
Press Number
8 twice
3.3.6 Delete All Users
Admin can delete all normal users, temporary users and other Admins.

- 26 -
3.3.7 Delete Admin
Admin can delete other specific Admins. You need to remember the User ID, otherwise you can
only reset the lock to factory settings.
Add User
Del Normal
Welcome Delete User
Del Admin
Press Enter Verify
Admin
Fingerprint
Code
Key Fob
Press Number
8 twice
Activate
Press Enter
Input User ID
then Enter
Success Press
Enter
Sure to
Delete?
Press Number
8 three times
ID
000
Press
Enter
3.3.8 Language Set
You can change the UL300 language between English and Spanish.
Add User
Language
Spanish
System
Setup
Welcome Press Enter Verify
Admin
Fingerprint
Code
Key Fob
Press Number
8 three times
Activate
Press Enter
Press Enter
Modify
Success
Press Enter
English
Press Number 2/8
ENGLISH

-27 -
3.3.9 Modify Lock's Status
You can switch Normal Mode, Passage Mode and Lockout Mode to meet your specific requirements.
Add User
Language
Passage
Mode
Welcome System
Setup
Lockout
Mode
Press Enter Verify
Admin
Fingerprint
Code
Key Fob
Press Number
8 three times
Activate
Press Enter
Press
Number 8
Passage
Mode
Press Enter
Normal
Mode
Press Number 2/8
Press Number 2/8
Modify
Success Press Enter
3.3.10 Secure Mode
Secure Mode requires two different users’ fingerprint, code or fob.
This feature is not adaptive for App access unlock.
Add User
Language
Welcome System
Setup
Secure
Mode
Sleep
Press Enter Verify
Admin
Fingerprint
Code
Key Fob
Press Number
8 three times
Activate
Press Enter
Press Number 8
twice
Secure
Mode
Press
Enter
Turn on?
Press
Enter
Press
Enter
Press Back
multiple times
Enable:
Disable:
Press
Enter
Add
User
Language
System
Setup
Secure
Mode
Sleep
Welcome Press
Enter
Verify
Admin
Fingerprint
Code
Key Fob
Press Number
8 three times
Activate
Press Enter
Press Number 8
twice
Secure
Mode
Press
Enter
Turn off?
Press
Enter
Press Back
multiple times
Verify Next
User
Fingerprint
Code
Key Fob

- 28 -
ENGLISH
3.3.11 Voice Set
You can adjust the voice level for UL300.
Add User
Language
Volume 1
Volume 3
Welcome System
Setup
Press Enter Verify
Admin
Fingerprint
Code
Key Fob
Press Number
8 three times
Activate
Press Enter
Press Enter
Modify
Success
Press Enter
Mute
Press Number 8
Volume Setup Press Number
8 three times
Volume 2
Press Number 2/8
Press Number 2/8
3.3.12 Date and Time
You can set the date and time of UL300. If you are using the U-tec App, the date and time will
synchronize to the smart phone’s time automatically once you go to Settings Page in the App.
Add User
Language
Date Setup
Add User
Language
Time
Setup
Welcome System
Setup
Modify
Success
Welcome System
Setup
Modify
Success
Press Enter Verify
Admin
Fingerprint
Code
Key Fob
Press Number
8 three times
Activate
Press Enter
Press Number
8 four times
02-20-2019 Press Enter
Input date
then Enter
Press Enter Verify
Admin
Fingerprint
Code
Key Fob
Press Number
8 three times
Activate
Press Enter
Press Number
8 five times
14:38 Press Enter
Input time
then Enter

- 29 -
3.3.13 Reset as Factory Default
Please note all data will be erased if you reset UL300 to factory default.
If you are using U-tec App, please delete UL300 from your U-tec Account after
operating Reset by UL300’s keypad.
Add User
Language
System
Reset
Welcome System
Setup
Reset
Success
Press Enter Verify
Admin
Fingerprint
Code
Key Fob
Press Number
8 three times
Activate
Press Enter
Press Number
8 six times
Confirm
Reset?
Press Enter
Press Enter
No User

- 30 -
ENGLISH
FAQ
1. How to control UL300 remotely?
UL300 is a Bluetooth enabled smart lock. You can pair the optional Ultraloq Bridge WiFi
adaptor with UL300 control it remotely via U-tec App.
2. What if I lost the paired smartphone?
Please go to www.u-tec.com/myutec.html or login U-tec App via another smartphone to
change your U-tec Account password
3. How can I unlock UL300 if the battery runs out?
There will be a low battery alert on the lock and App when battery is low.
Please replace batteries.
Solution 1. Use the backup key to unlock.
Solution 2. Connect a 5V power bank to activate the lock temporarily
4. Does UL300 work with accessories such as bolt from third party?
It is recommended to use the original accessories for best performance and stability.
5. What is the log capacity for UL300?
UL300 supports maximum 1000 logs. The latest log will replace the oldest one once log is full.


Notas Importantes
- 1 -
Esta sección contiene información importante para garantizar la seguridad del usuario y prevenir daños
potenciales a la propiedad. Lea atentamente esta sección y utilice el producto adecuadamente.
No instale el producto en el lugar donde la separación entre la puerta y el marco sea de 3/16" (5 mm) o más.
Asegúrese de que ninguna persona no autorizada tenga acceso a la contraseña.
No opere el producto con las manos mojadas, y mantenga los líquidos como agua o bebidas lejos del
producto, o el producto podría funcionar incorrectamente o dañarse.
No utilice fuerza excesiva ni objetos afilados para girar la manija, ya que esto puede dañar el producto.
Asegúrese de que la puerta esté completamente cerrada cuando salga. El fabricante no asume la
responsabilidad por cualquier daño causado por el acoplamiento de la cerradura en una puerta cerrada
incorrectamente.
Asegúrese de hacer coincidir correctamente los polos (+/-) al instalar las baterías. Instale las baterías con
los polos correctos (+/-).
No utilice agua, benceno o alcohol cuando limpie el producto, ya que estos fluidos pueden causar un mal
funcionamiento del producto.
Reemplace las baterías después de que suene la alarma de reemplazo de baterías.
Según el entorno de comunicación inalámbrica, su batería puede agotarse más rápido.
Debe usar baterías alcalinas AA y no usar una baterías de litio o una batería recargable.
Ultraloq Términos y Condiciones
Antes de usar todos los productos de Ultraloq, lea todos los términos, reglas, políticas y
disposiciones de uso aplicables que se encuentran en
www.u-tec.com/company/privacy. Al utilizar su Ultraloq, usted acepta estar sujeto a la
Política de privacidad de U-tec.
¿Necesita ayuda?
Para obtener documentos técnicos y más información, visite www.u-tec.com/support
Correo electrónico: [email protected]

Lista de Empaque
- 2 -
Ensamble Interior Ensamble Exterior Placa de Montaje del Ensamble Interno Cerradura de Muesca
Guia de Usuario
Resorte
Tornillos DTornillos A Tornillos C
Llave para Resetear
Llave de Repuesto
A
Eje
B C
Tornillos B
B1 B2 B3
AA Baterías Alcalinas
(Podrían no venir incluidas
para algunas regiones)
Bridge
(Opcional)
Plantilla de Perforación
2”
(50mm)
4”
(100mm)
UL300 Drill Template
V1.3
Fold
Centerline
Centerline
Centerline
Centerline
Centerline
Centerline
DOTTED LINE MUST BE PLACED ON DOOR EDGE
MORTISE DEPTH
Horizontal Center Line
Around 3 feet(1 meter)
above the ground
UpUp
1”
(25mm)
1”
(25mm)
1
”
(25mm)
1
”
(25mm)
Backset
EDGE OF DOOR
Stud Screw/Connection Cable Hole
Spindle/Handle Hole
Extra Spindle Hole
Stud Screw Hole
Centerline
9
/
16”
(15mm)
23
/
8”
(60mm)
91
/
2”
(240mm)
81 3/
16”
(224mm)
87/
16”
(212mm)
13/
8”
(35mm)
57/
16”
(138mm)
9
/
16”
(15mm)
9
/
16”
(14mm)
Ultraloq UL300
Cerradura Inteligente con Lector de Huella Dactilar
Guía de Uso (V1.1)
ESPAÑOL

1. Dimensiones de la Puerta
Guía de Instalación
- 3 -
Video de Instalación
Escanee este código QR para ver el video de instalación paso a paso antes de intentar instalar Ultraloq
UL300. O también, puede entrar a www.u-tec.com/lock/Ul300/guide directamente.
Si tiene una puerta nueva,
perfore los orificios de
acuerdo con la Plantilla
de perforación.
Paso 1
Mida para confirmar que la puerta
está entre 1-9 / 16 '' a 4 '' (40mm a 100mm)
Paso 2
Mida para confirmar que el Backset
es de 4 ’(100 mm)
Paso 3
Mida para confirmar las otras dimensiones.
2”
(50mm)
4”
(100mm)
Fold
Centerline
Centerline
Centerline
Centerline
Centerline
Centerline
DOTTED LINE MUST BE PLACED ON DOOR EDGE
MORTISE DEPTH
Horizontal Center Line
Around 3 feet(1 meter)
above the ground
UpUp
1”
(25mm)
1
”
(25mm)
1
”
(25mm)
1
”
(25mm)
Backset
EDGE OF DOOR
Stud Screw
Connection Cable Hole
Spindle/Handle Hole
Extra Spindle Hole
Stud Screw Hole
Centerline
9
/
16”
(15mm)
9
/
16”
(15mm)
23
/
8”
(60mm)
91
/
2”
(240mm)
13/
8”
(35mm)
81 3/
16”
(224mm)
87/
16”
(212mm)
57/
16”
(138mm)
9
/
16”
(14mm)

2. Instalación de la Cerradura y Contrachapa
- 4 -
2.1 Resumen de la Cerradura
Interruptor de dirección: Se utiliza para operar la cerradura.
Cierre de Puerta: Se utiliza para bloquear y desbloquear.
Cerrojo: Se utiliza para bloquear y desbloquear para asegurar.
Orificio del eje: El eje pasa por este agujero para arrastrar el Cierre de Puerta y el Cerrojo.
Cerrojo extra: Se utiliza para doble bloqueo.
Orificio de eje extra: la pieza de cola del cilindro atraviesa este orificio para arrastrar el Cerrojo Extra.
Cierre de Puerta
Cerrojo
Cerrojo Extra
Interruptor de
Dirección
Agujero del Eje
Agujero Extra
del Eje
ESPAÑOL

- 5 -
2. 2 Operacion de Uso de Cerradura
Por favor, asegúrese de que la esquina inclinada esté orientada hacia el marco. Si la Cerradura está del lado
correcto, puede omitir la siguiente sección sobre cómo invertirla
Paso 1. Mantenga el Interruptor de Dirección en la parte superior hasta el final.
2.3 Invirtiendo el Uso de la Cerradura
Paso 2. Presione y mantenga el Cierre de Puerta o Pestillo en la mortaja por completo.
Paso 3. Mientras el Cierra de Puerta o Pestillo está dentro de la Cerradura, gire el pestillo 180 grados.
Paso 4. Suelte el pestillo y saldrá de la cerradura.
Consejo: Cuando suelte el pestillo, suelte el cerrojo pequeño de la placa lateral de la Cerradura.
Paso 5. Suelte el interruptor de dirección a la ubicación predeterminada.

- 6 -
Mantenga el Cerrojo y el Cerrojo Extra retraídos (estado desbloqueado), luego inserte la cerradura y
apriete los 4 tornillos A
2.5 Instalación de Contrachapa
Fije la Contrachapa al marco de la puerta utilizando 4 Tornillos A.
2.4 Instalación de Cerradura
Note:
La posición de la Cerradura debe ser, Cierre de Puerta o Pestillo en la parte superior y Cerrojo
en la parte inferior.
La esquina inclinada del Cierra de Puerta debe estar orientada hacia el marco de la puerta.
Verifique las dimensiones de los orificios de las puertas y asegúrese de que estén bien ajustados. Si no es así,
por favor ajuste los tamaños de los agujeros. No agregue presión con las manos.
ESPAÑOL

- 7 -
3.1 Ajuste la dirección de la manija del Ensamble Exterior
Paso 1.
Afloje el tornillo dentro del agujero. Por favor, no saque el tornillo durante la operación.
Paso 2.
Saque la manija y ajústela en la dirección correcta.
Paso 3.
Apriete el tornillo para fijar la manija.
3. Instalación de Ensable Exterior

- 8 -
3.2 Instalación del Ensamble Exterior
Paso 1.
Inserte el eje en el orificio del Ensamble Exterior.
Si el grosor de la puerta es de 1-9 / 16 '' a 2-3 / 8 '' (40 mm a 60 mm), utilice el eje A (3-1 / 8 '', 80 mm).
Si el grosor de la puerta está entre 2-3 / 8 '' a 3-1 / 8 '' (60 mm a 80 mm), utilice el eje B (4 '', 100 mm).
Si el grosor de la puerta está entre 3-1 / 8 '' a 4 '' (80 mm a 100 mm), utilice el husillo C (4-3 / 4 '', 120 mm).
Paso 2.
Ajuste la flecha que apunta a la manija.
Nota: este paso es muy importante, de lo contrario, la manija del UL300 no podrá funcionar correctamente.
Paso 3.
Pase el cable por encima de la Cerradura.
Paso 4.
Inserte dos tornillos en los orificios y pase el eje a través del orificio del eje de la Cerradura.
Fije el Ensamble Exterior en la puerta.
Note:
Antes de instalar la placa de montaje del Ensamble Interior, mantenga firme el Ensamble Exterior.
Asegúrese de no moverlo.
ESPAÑOL

- 9 -
Paso 1.
Pase el cable a través del orificio en la placa de montaje del Ensamble Interior.
Paso 2.
Fije la placa de montaje del Ensamble Interior en la puerta y apriete los dos tornillos B.
Si el grosor de la puerta es de 1-9 / 16 '' a 2-3 / 8 '' (40 mm a 60 mm), utilice el tornillo B1.
Si el grosor de la puerta está entre 2-3 / 8 '' a 3-1 / 8 '' (60 mm a 80 mm), utilice el tornillo B2.
Si el grosor de la puerta está entre 3-1 / 8 '' a 4 '' (80 mm a 100 mm), utilice el tornillo B3.
Note:
1. Los tornillos de la placa de montaje deben estar orientados hacia el instalador.
2. Antes de apretar los tornillos completamente, apriete un tornillo hasta la mitad, luego comience con el
segundo, de esta manera tendrá la instalación correcta. Después de que ambos tornillos estén hasta la mitad,
puede proceder y apretarlos completamente.
Paso 1.
Ajuste la dirección de la manija del conjunto exterior. La operación es la misma que con la manija exterior.
Paso 2.
Después de confirmar que el Cerrojo Extra está retraído, gírelo para desbloquear. La manija de la puerta y la pieza
de cola del cilindro deben estar todos verticales.
4. Instalación de la placa de Ensamble Interior
5. Instalación del Ensamble Interior

- 10 -
Paso 3.
Inserte el resorte en el agujero de la manija interior.
Note: este paso es importante, de lo contrario, el eje
no arrastrará la Cerradura girando la manija.
Paso 5.
Retire la tapa de la caja de la batería.
Paso 4.
Inserte el conector del cable al puerto del
Ensamble Interior. Presione firmemente el conector
hasta que escuche un clic.
Paso 6.
Pase la pieza de cola del cilindro trasero del
Cerrojo Extra a través del orificio del Cerrojo Extra.
Haga coincidir el orificio de la manija con la placa
de montaje y el orificio del Ensamble Exterior. Fije
el Ensamble Exterior a la placa de montaje del
conjunto interior y apriete los tornillos C y los
tornillos D.
ESPAÑOL

Encendido y Prueba
- 11 -
Note:
UL300 tiene un diseño de doble potencia. Si solo instala 4 baterías AA juntas, arriba o abajo (no en el
medio) es suficiente para alimentar el UL300. Aunque, U-tec recomienda instalar las 8 baterías AA desde el
principio para tener una vida útil más larga.
Las baterías de litio pueden tener una vida útil más larga, pero cuando comienzan a quedarse sin batería,
se agotan rápidamente. U-tec no las recomienda, ya que no tendrá tiempo suficiente para cambiarlas
antes de que el UL300 deje de funcionar.
2. Prueba de bloqueo y desbloqueo
Cuando el UL300 se encuentra en el modo predeterminado de fábrica, se mostrará un mensaje de "No
Usuario", cualquier huella digital, código o llavero puede desbloquearlo. U-tec recomienda programar el
UL300 inmediatamente después de la instalación. Para asegurarse de que la instalación es correcta,
pruebe el UL300. Bloquee y desbloquee el UL300 un par de veces. Durante este tiempo, recuerde
mantener la puerta abierta para evitar cualquier problema.
Paso 1.
Levante la manija exterior, el Cerrojo se bloqueará.
Paso 2.
Gire la manija interior hacia abajo, el Cierre de Puerta o Pestillo y el Cerrojo se desbloquearán.
Paso 3.
Levante la manija interior, el Cerrojo se bloqueará, el Cierre de Puerta o Pestillo también se bloquearán
automáticamente.
Paso 4.
Use cualquier huella digital, código o llavero para pasar la verificación, luego baje la manija exterior, el Cierre
de Puerta o pestillo y el Cerrojo se desbloquearán.
Paso 5.
Gire la perilla del Cerrojo Extra, este se bloqueará o desbloqueará.
Si los 5 pasos anteriores son exitosos, puede comenzar a programar el UL300. Si algún paso falla, por favor
reinstale UL300 con cuidado como muestra la guía.
1. Encendido
Instale 8 baterías alcalinas AA y luego la tapa de la caja de baterías.

1. Descripción del Producto
- 12 -
Mire nuestro video paso a paso de la Guía del usuario antes de intentar usar su Ultraloq UL300.
1.1 Exterior
Guía de Usuario
Pantalla de visualización
de mensajes
Manija Exterior
Agujero de la llave
de respaldo
Micro USB (5V)
Botón de reinicio
Teclado Anti-peep
Lector de huellas dactilares
Lector de llavero/tarjeta
Video de Instalación
ESPAÑOL

Teclado Anti-peep
Se utiliza para introducir el código y desbloquear desde el exterior.
Lector de huellas dactilares
Se utiliza para verificar su dedo y desbloquear desde el exterior.
Lector de llavero/tarjeta
Se utiliza para verificar su llavero y desbloquear desde el exterior.
Pantalla de visualización de mensajes
Una pantalla OLED con información intuitiva lo guiará a través de toda la operación.
Micro USB (5V)
Se utiliza para conectar una pila externa para activar el UL300 cuando se queda sin batería.
Botón de reinicio
Se utiliza para reiniciar el UL300 si falla la activación.
Agujero de la llave de respaldo
Se utiliza para insertar la llave para desbloquear.
Manija exterior
Se utiliza para bloquear o desbloquear el UL300.
Botón de número 0-9
Se utiliza para introducir el número. El número 2 y el número 8 también se utilizan para pasar arriba y abajo.
Botón de retroceso
Se utiliza para volver a la página anterior.
Botón de Enter
Se utiliza para con firmar y omitir la operación.
- 13 -

- 14 -
1.2 Interior
Indicador LED Bluetooth
Al conectar el UL300 con la aplicación, habrá una luz azul fija, de lo contrario, una luz azul parpadeará cada
segundo.
Botón de Reseteo
Se utiliza para restablecer el UL300 a la configuración predeterminada de fábrica.
Manija Interior
Se utiliza para bloquear o desbloquear el UL300.
Perilla de Cerrojo Extra
Se utiliza para bloquear o desbloquear Extra Bolt para doble bloqueo.
Tapa de la batería
Se utiliza para cubrir las baterías y la etiqueta del producto.
(Una guía rápida y la etiqueta de número de serie viene impresa dentro de la tapa de la batería).
Indicador LED bluetooth Botón de Reseteo
Manija Interior
Cerrojo Extra
Tapa de la batería
ESPAÑOL

- 15 -
2.1 Limpieza del teclado y el lector de huella dactilar
Use un paño de microfibra y paselo por el teclado anti-peep, el lector de huellas dactilares y el lector de llavero.
2.2 Activación de Cerradura
Coloque un dedo en el lector de huellas dactilares, toque el teclado Anti-peep con el dorso de la mano o los
dedos, o presente el llavero en el lector de llavero.
2.3 Abrir la puerta desde el exterior
Note: Por favor, confirme que el Cerrojo Extra esté desbloqueado, de lo contrario, el UL300 mostrará un
mensaje en la pantalla que muestra "Doble bloqueo", y solo el administrador podrá desbloquearlo.
2.3.1 Desbloqueo por Código
Paso 1.
Coloque un dedo en el lector de huellas dactilares o en el teclado anti-peep para activar UL300.
Paso 2.
Ingrese el código de usuario de 4-8 dígitos de un usuario registrado y el UL300 mostrará "Exito".
Paso 3.
Gire la manija completamente hacia abajo para desbloquear el UL300.
2.3.2 Desbloqueo por huella digital
Paso 1.
Presione el dedo en el lector de huellas dactilares para activar el UL300.
Paso 2.
Presione el dedo de un usuario registrado en el centro del lector de huellas dactilares para desbloquearlo.
UL300 mostrará "Éxito".
Paso 3.
Gire la manija completamente hacia abajo para desbloquear el UL300.
2.3.3 Desbloqueo por llavero/tarjeta
Paso 1.
Presente el llavero de un usuario registrado en el Lector de Llavero.
Paso 2.
Gire la manija completamente hacia abajo para desbloquear el UL300.
Note: Para obtener más consejos sobre cómo usar la huella digital correctamente, consulte la página 18.
2. Operación básica

- 16 -
2.3.5 Llave de Repuesto
Paso 1.
Abra la cubierta de goma negra en la parte inferior del Ensamble Exterior de UL300.
Paso 2.
Inserte la llave de respaldo en una posición vertical y gírela a una posición horizontal para abrirla.
Paso 3.
Gire la manija completamente hacia abajo para desbloquear UL300.
2.4 Abrir la puerta desde el interior.
Paso 1.
Gire la perilla del Cerrojo Extra para desbloquear (posición vertical).
Paso 2.
Gire la manija completamente hacia abajo para desbloquear el UL300.
2.5 Cierre desde el exterior
2.5.1 Cierre del Pestillo
UL300 bloqueará el pestillo automáticamente después de 3 segundos después del último desbloqueo.
2.5.2 Cerrojo de bloqueo
Levante la manija exterior para bloquear el perno.
2.3.4 Desbloqueo por Celular Inteligente
Paso 1.
Presione el botón Desbloquear en la aplicación U-tec.
Paso 2.
Gire la manija completamente hacia abajo para desbloquear UL300.
Note: No olvide quitar la llave de respaldo y cerrar la cubierta de goma negra.
ESPAÑOL

- 17 -
2.6 Cierre desde el interior
2.6.1 Cierre o Pestillo
UL300 bloqueará el pestillo automáticamente después de 3 segundos después del último desbloqueo.
2.6.2 Cerrojo
Levante la manija interior para bloquear el cerrojo.
2.6.3 Cerrojo extra
Gire la perilla del Cerrojo Extra para bloquear y tener un doble bloqueo.
2.7 Restablecer el UL300
Note: Todos los datos se borrarán si restablece el UL300 a la configuración predeterminada de fábrica.
Paso 1.
Retire la tapa de la batería.
Paso 2.
Use la aguja de reinicio y presione el botón de reinicio durante 5 segundos hasta que escuche "Exito";
aparecerá un mensaje "No Usuario"
Paso 3.
Si el UL300 está emparejado con la aplicación U-tec, debe tocar "Eliminar" para eliminar el UL300 de su cuenta
de U-tec.
2.8 5V de Alimentación de emergencia
El puerto micro USB se puede usar para conectar una pila externa de 5V regular.
Paso 1.
Retire la cubierta de goma negra.
Paso 2.
Utilice un banco de energía regular de 5V para alimentar.
Note: la alimentación de emergencia de 5V es solo para alimentación temporal o no poder cargar la cerradura.

- 18 -
(1) Su dedo debe cubrir el Lector completamente con un poco de presión, tocando el anillo metálico
circundante.
(2) Asegúrese de que su dedo y el lector de huellas dactilares estén limpios y secos. Para el lector de huellas
dactilares, use un paño de microfibra limpio para limpiar la suciedad o los residuos.
(3) Mientras escanea su dedo, no debe tocar demasiado rápido ni mover el dedo.
(4) Si tiene problemas para agregarr un dedo, pruebe con otro.
1:
2:
3:
1 2 3 4 5 6 X X X X X X
1 2 3 4 5 6
X X X X X X
1 2 3 4 5 6
X X X X X X
Ejemplo
Código de usuario: 123456
Metodo Vago
2.9 Teclado Anti-peep
2.10 Colocación de los dedos
UL300 soporta un código vago de hasta 16 dígitos. Simplemente ingrese cualquier código de 16 dígitos,
siempre que se incluya un código correcto en lo que ingresó, podrá abrir la puerta.
ESPAÑOL

- 19 -
2.11 Use el llavero/tarjeta
(1) Cuando utilice el acceso a por medio del Llavero, coloquelo en el centro para cubrir el lector.
(2) Acérquese al sensor con velocidad media (en lugar de movimiento repentino). Si no funciona, aleje el
llavero y vuelva a acercarse.
2.12 Status de la Cerradura
Modo Normal
Es el modo predeterminado, el usuario debe pasar la verificación de acceso a la huella digital, el código, el
control remoto por medio de la aplicación para desbloquear el UL300 desde el exterior.
Modo de pasaje
UL300 permanecerá desbloqueado para un cómodo pasaje libre.
Modo de bloqueo
UL300 solo puede operarse manualmente con la Llave de respaldo. Todas las funciones eléctricas están
activadas y solo el administrador puede desactivarlo.
2.13 Modo seguro
El Modo seguro requiere la huella dactilar, el código o el llavero de dos usuarios diferentes para desbloquear.
Huella digital, código y llavero en combinación libre. Por ejemplo, Usuario 021 huella / código / llavero +
Usuario 022 huella / código / llavero.

- 20 -
Note:
El administrador debe crearse primero con el teclado antes de cualquier otra programación.
3.1 Introducción básica
3.1.1 Predeterminado de fábrica
La configuración de fábrica significa que cualquier huella digital, código o llavero puede desbloquear el UL300.
Escuchará una voz "Modo predeterminado de fábrica, registre Admin", y la pantalla de mensajes muestra "No
hay usuario".
3.1.2 ID de usuario
El ID de usuario se utiliza para distinguir diferentes usuarios. Es diferente del Código. UL300 proporciona un ID
de usuario 1 ~ 200 para administradores y usuarios. Puede editar la huella digital, el código y el mando del usuario
a través del ID de usuario.
3.1.3 Administrador y Usuario
UL300 admite un máximo de 20 administradores, 160 usuarios normales y 20 usuarios temporales.
Administrador
El administrador siempre puede desbloquear mediante huella digital, llavero, código o aplicación. El
administrador puede agregar o eliminar otros administradores y usuarios, controlar todas las configuraciones de
bloqueo y ver los registros.
El administrador solo es adaptable para ID de usuario 001 ~ 020.
Usuario normal
El usuario normal siempre puede desbloquear mediante huella digital, código y llavero o aplicación. El ID de
usuario es 021 ~ 180.
Usuario temporal
El usuario temporal tiene acceso limitado dentro de un rango de tiempo específico. El ID de usuario es 181 ~ 200.
3.1.4 Código
Para todos los códigos, incluido el código de administrador o usuario, debe tener entre 4 y 8 dígitos.
3. Programación de Cerradura
ESPAÑOL

- 21 -
Note:
(1) Agregue un administrador primero, el ID de usuario del administrador se configura como ID de usuario
predeterminada 001.
(2) Si no necesita agregar huella digital, código o llavero, presione el botón Intro para omitir este paso
directamente.
(3) Si falla la adición de huella digital, vuelva a presionar la huella digital en el centro del lector tres veces.
También puede mantener la huella digital, el lector recolectará imágenes tres veces continuamente.
(4) No debe omitir el paso del Código de Administración.
Para todos los diagramas de flujo de programación de la guía del usuario UL300,
significa la pista de la pantalla de visualización de mensajes
Significa la acción operativa mediante teclado.
3.2 Programación por la aplicación de U-tec
3.2.1 Añadir administrador primero
El Admin (especial para el código de administrador) debe crearse mediante el teclado antes de
cualquier otra programación.
No User
Ingrese Código 2 veces
Presente tarjeta 1 vez
User ID 001
Exito
Presione
Enter Presione Dedo 3 veces
Acvar Presione
Enter

- 22 -
Paso 1.
Escanee el código QR para descargar la aplicación U-tec, o busque “U-tec” en App
Store (iOS) o Google Play (Android).
Paso 2.
Abra la aplicación U-tec, registre una cuenta U-tec e inicie sesión en la
cuenta U-tec.
Note:
Si ha registrado una cuenta de U-tec, omita este paso.
Paso 3.
Asegúrese de haber completado el registro del Código de administración y el
Código de administración correcto.
Paso 4.
Encienda el Bluetooth en su teléfono inteligente, permanezca cerca de la cerradura
(a menos de 10 pies / 3 metros) y busque este UL300 en la aplicación U-tec.
Paso 5.
Haga clic en este UL300 en la lista de dispositivos e ingrese el Código de administra-
dor que ha creado.
Paso 6.
La aplicación U-tec emparejará el UL300 automáticamente. Podrá ver el UL300 en
la lista de dispositivos.
Paso 7.
Comience a usar la aplicación para controlar el UL300.
3.2.2 Empareje el UL300 por medio de la U-tec App
Note:
(1) Si tiene varios UL300, retire todas las baterías para apagar los UL300 no registrados temporalmente. No
necesita apagar el UL300 que ya esté registrado debido a que la U-tec App muestra estos UL300 como
Registrados.
(2) El código de administrador debe programarse en el primer paso, si no lo ha configurado, prográmelo.
(3) Si olvida el Código de administración, le recomendamos que restablezca a la configuración de fábrica del
UL300 y luego siga los pasos para Programarlo nuevamente.
(4) Si solo configura la huella digital o el llavero en el primer paso y no configura el código de administrador,
vaya al Menú para editar Admin de nuevo.
Escanee el Código QR para descargar la Aplicación
ESPAÑOL

- 23 -
Se recomienda utilizar la aplicación U-tec para programar su UL300. Si no tiene un teléfono inteligente o no
quiere usar la aplicación, puede usar las instrucciones de programación a continuación.
La programación de la aplicación U-tec y la programación del teclado NO son independientes, puede usar
ambos modos.
3.3.1 Añadir usuario normal
El usuario normal siempre puede desbloquear mediante huella digital, código, llavero o aplicación.
El ID de usuario es 021 ~ 180.
3.3.2 Añadir usuario temporal
El usuario temporal tiene acceso limitado dentro de un rango de tiempo específico.
El ID de usuario es 181 ~ 200.
3.3 Programación del teclado por UL300
Anade User
ID 021
Ingrese Código 2 veces
Presente Tarjeta 1 vez
Verifique
Admin
Anade
Normal
Presione Dedo 3 veces
Exito
Acvar Bienvenido
Huella
Código
Llavero
Presione
Enter
Presione
Enter
Presione
Enter
Anade User
ID 181
Ingrese Código 2
veces
Presente Tarjeta 1
vez
A
12-31-2019
Bienvenido Verifique
Admin
Anade
Normal
Presione Dedo 3
veces
Exito
00:00-23:59
Acvar
De
05-20-2019
Ingrese
Tiempo
despues
enter
Presione
Enter
Huella
Código
Llavero
Presione
Enter
Presione Numero 8
depues Enter
Presione
Enter
Ingrese
Tiempo
despues
enter
Ingrese
Tiempo,
despues
enter

- 24 -
El administrador siempre puede desbloquear mediante huella digital, llavero, código o aplicación.
El administrador puede agregar o eliminar administradores y usuarios, controlar todas las configuraciones
de bloqueo y ver los registros.
El administrador solo es adaptable para el ID de usuario 001 ~ 020.
Anade User
ID 002
Ingrese Código 2 veces
Presente Tarjeta 1 vez
Bienvenido Verifique
Admin
Anade
Normal
Presione Dedo 3 veces
Exito
Presione Numero 8
dos veces
Acvar
depues Enter
Presione
Enter
Huella
Código
Llavero
Presione
Enter
Presione
Enter
3.3.4 Modificar usuario
Puede modificar la huella digital, el código o el llavero de un usuario específico.
Debe recordar el ID de usuario, de lo contrario, solo puede restablecer el UL300 a la configuración de fábrica.
3.3.3 Agregar Administrador
Exito
Modifique
User
ID
000
ID
000
Ingrese
Nuevo
Codigo
Presente
Tarjeta
Modifique
PIN
Modifique
Tarj
Ajuste
Horario
A
12-31-2019
Modificar?
Modificar?
Bienvenido Verifique
Admin
ID
000
ID
000
Presione
Nuevo
Dedo
De
05-20-2019
Modificar?
Exito
Exito
Exito
Acvar Anade User Presione
Numero 8
Modifique
Dedo
Presione
Enter
Presione
Numero 8
Ingrese
User ID
Presione
Dedo 3
veces
Ingrese Codigo
2 veces
Presente
Lavero 1 vez
Ingreso
Tiempo
Despues
enter
Ingrese
Tiempo
Despues
enter
00:00-
23:59
Presione
Enter
Huella
Código
Llavero
Presione
Numero 8
Presione
Numero 8
Presione
Enter
Presione
Enter
Presione
Enter
Presione
Enter
Presione
Enter
Presione
Enter
Presione
Enter
Ingrese
User ID
Ingrese
User ID
Ingrese
User ID
Ingrese
Tiempo
Despues
enter
ESPAÑOL

- 25 -
3.3.5 Eliminar usuario normal o temporal
Puede eliminar un usuario normal específico o un usuario temporal. Debe recordar el ID de usuario,
de lo contrario, solo podrá restablecer el UL300 a la configuración de fábrica.
Anade User
Borre
Normal
Bienvenido Verifique
Admin
Elimine
User
Eliminar
Usuarios
Exito Eliminar?
Presione
Numero 8
dos veces
Acvar
Presione
Enter
Presione
Enter
Presione
Enter
Huella
Código
Llavero
Presione
Enter
Presione
Numero 8
dos veces
3.3.6 Eliminar todos los usuarios
El administrador puede eliminar todos los usuarios normales, usuarios temporales y otros administradores.
Anade User
Borre
Normal
Eliminar?
Bienvenido Verifique
Admin
Elimine
User
ID
000
Eliminar?
ID
000
Eliminar?
Eliminar?
Exito
Exito
Acvar
Presione
Enter
Borre Temp
Presione
Enter
Presione
Enter
Presione
Enter
Presione
Enter
Presione
Enter
Presione
Enter
Presione
Enter
Presione
Numero 8
Ingrese
User ID
Ingrese
User ID
Huella
Código
Llavero
Presione
Numero 8

- 26 -
3.3.7 Eliminar Administrador
El administrador puede eliminar otros administradores específicos. Debe recordar el ID de usuario,
de lo contrario, solo puede restablecer el UL300 a la configuración de fábrica.
Anade User
Borre
Normal
ID
000
Bienvenido Verifique
Admin
Elimine
User
Eliminar
Admin
Eliminar?
Ingreso ID
Usuario,
despues Enter
Exito
Acvar Presione
Enter
Huella
Código
Llavero
Presione
Numero 8
dos veces
Presione
Enter
Presione
Numero 8
dos veces
Presione
Enter
Presione
Enter
3.3.8 Conjunto de idiomas
Puede cambiar el idioma del UL300 entre inglés y español.
Anade
User
Idioma
Espanol
Bienvenido Verifique
Admin
Ajuste
Sistema
Exito
Presione
Numero 8
tres veces
Acvar
English
Presione Numero 2/8
Presione
Enter
Huella
Código
Llavero
Presione
Enter
Presione
Enter
Presione
Enter
ESPAÑOL

-27 -
3.3.9 Modificar el estado de la Cerradura
Puede cambiar el Modo normal, el Modo de paso y el Modo de bloqueo para cumplir con sus
requisitos específicos.
Anade
User
Idioma
Modo
Pasaje
Bienvenido Verifique
Admin
Ajuste
Sistema
Modo
Normal
Modo
Cierre
Exito
Presione
Numero 8
tres veces
Acvar
Presione
Numero 8
Modo Pasaje
Presione Enter
Presione
Enter
Presione
Enter
Huella
Código
Llavero
Presione
Enter
Presione Numero 2/8
Presione Numero 2/8
3.3.10 Modo seguro
El modo seguro requiere dos huellas dactilares, código o llavero de diferentes usuarios.
Esta característica no es adaptable para el desbloqueo de acceso a la aplicación.
Enable:
Disable:
Anade
User
Idioma
Anade
User
Idioma
Bienvenido Verifique
Admin
Ajuste
Sistema
Encender
?
Modo
Seguro
Dormir
Bienvenido Verifique
Admin
Ajuste
Sistema
Apagar?
Modo
Seguro
Dormir
Presione
Numero 8
tres veces
Acvar
Presione
Numero 8
dos veces
Modo
Seguro
Presione Atras
mulples
veces
Presione
Enter
Presione
Enter
Presione
Enter
Huella
Código
Llavero
Presione
Enter
Presione
Numero 8
tres veces
Acvar
Presione
Numero 8
dos veces
Modo
Seguro
Presione Atras
mulples
veces
Presione
Enter
Presione
Enter
Presione
Enter
Huella
Código
Llavero
Presione
Enter

- 28 -
3.3.11 Sonido
Puede ajustar el nivel de voz para el UL300.
Anade
User
Idioma
Silencio
Volumen 1
Volumen 3
Bienvenido Verifique
Admin
Ajuste
Sistema
Exito
Presione
Numero 8
tres veces
Acvar
Presione Numero 8
Ajuste Vol
Presione
Numero 8
tres veces
Volumen 2
Presione Numero 2/8
Presione Numero 2/8
Presione
Enter
Presione
Enter
Presione
Enter
Huella
Código
Llavero
Presione
Enter
3.3.12 Fecha y hora
Puede configurar la fecha y la hora del UL300. Si está utilizando la aplicación U-tec, la fecha y la hora
se sincronizarán automáticamente con la hora del teléfono inteligente una vez que vaya a la página de
configuración en la aplicación.
Anade
User
Idioma
Ajuste
Fecha
Anade
User
Idioma
Ajuste
Hora
Bienvenido Verifique
Admin
Ajuste
Sistema
Exito
Bienvenido Verifique
Admin
Ajuste
Sistema
Exito
Presione
Numero 8
tres veces
Acvar
Presione
Numero 8
cuatro veces
02-20-2019
Ingrese Fecha,
despues Enter
Presione
Numero 8
tres veces
Acvar
Presione
Numero 8
cinco veces
14:38
Ingrese Hora,
despues Enter
Presione
Enter
Presione
Enter
Presione
Enter
Presione
Enter
Huella
Código
Llavero
Huella
Código
Llavero
Presione
Enter
Presione
Enter
ESPAÑOL

- 29 -
3.3.13 Restablecer como predeterminado de fábrica
Tenga en cuenta que todos los datos se borrarán si restablece el UL300 a los valores predeterminados
de fábrica.
Si está utilizando la aplicación U-tec, elimine el UL300 de su cuenta U-tec después de operar
Restablecer con el teclado del UL300.
Anade
User
Idioma
Resetee
Sistema
Bienvenido Verifique
Admin
Ajuste
Sistema
Reseteo
Exitoso
No User
Acvar
Presione
Numero 8
seis veces
Confirmar
Reseteo?
Presione
Enter
Presione
Enter
Presione
Enter
Huella
Código
Llavero
Presione
Numero 8
tres veces
Presione
Enter

- 30 -
FAQ
1. ¿Cómo controlar el UL300 de forma remota?
UL300 es una cerradura inteligente con Bluetooth habilitado. Puede emparejar el Ultraloq Bridge opcional
que le permitirá controlar de forma remota a través de la aplicación U-tec.
2. ¿Qué pasa si pierdo el teléfono inteligente emparejado?
Vaya a www.u-tec.com/myutec.html o inicie sesión en la aplicación U-tec a través de otro teléfono inteligen-
te para cambiar su contraseña de cuenta U-tec
3. ¿Cómo puedo desbloquear el UL300 si se agota la batería?
Habrá una alerta de batería baja en la cerradura y en la aplicación cuando la batería esté baja.
Por favor, reemplace las baterías.
Solución 1. Utilice la llave de repuesto para abrir.
Solución 2. Conecte un banco de energía de 5V para activar el UL300 temporalmente
4. ¿Funciona el UL300 con accesorios tales como Cerrojos de terceros?
Se recomienda usar los accesorios originales para un mejor rendimiento y estabilidad.
5. ¿Cuál es la capacidad de registro para UL300?
UL300 soporta un máximo de 1000 registros. El último registro reemplazará al más antiguo una vez que esté
completo.
ESPAÑOL

/