La página se está cargando ...

Instalación segura - ¿Está seguro que:
✓ Consultó toda la información de cómo armar lo que vino con su
modelo particular?
✓ Verificó que su tobogán es compatible con la altura de la plataforma a la cual
va a sujetarse?
✓ Verificó que se recibieron todas las partes y piezas, y que éstas concuerdan
con la lista departes?
✓ Notó que este tobogán solamente se lo usa en los diseños aprobados de
Timber•Bilt? (No alteró su diseño o añadió/quitó componentes.)
✓ Puede garantizar que todos los herrajes están bien apretados?
✓ Usando una sierra para metales, cortó todas las roscas de los pernos y otras
tuercas y tornillos para quitar los filos agudos usando una lima para metales?
✓ Puso el tobogán en suelo nivelado, a una distancia de no menos de seis pies
(1,8 metros) de cualquier estructura u obstrucción tal como una cerca, garaje,
casa, ramas de árbol cercanas, cuerdas de
lavandería, o alambres eléctricos?
✓ Hizo los sostenes de forma apropiada a las
dimensiones apropiadas?
✓ Ancló y sujetó los sostenes y/o las estacas dentro de la tierra como se
requiere?
✓ Se aseguró que el tobogán no está instalado sobre hormigón, asfalto, tierra
bien comprimida, o cualquier otra superficie dura? (Una caída sobre una
superficie dura podría resultar en lesiones graves a la persona que usa el
equipo.)
✓ Siguió todos los requerimientos de sujetar y hacer superficies que absorban
golpe tal como se aplica al plan del conjunto recibido?
✓ Garantizó no permitir a los niños el uso del equipo hasta que esté instalado
en forma apropiada?
Operación segura - ¿Se aseguró que:
✓ Ha determinado que supervisión de adultos en el lugar, está siempre
presente para chiquillos de cualquier edad?
✓ Enseño a los niños lo que sigue antes de permitirles el uso del equipo?
• No usar el equipo de ningúna otra manera de la que se intenta.
• No treparse al equipo cuando esté mojado.
✓ Ha determinado cómo los niños deben estar
vestidos apropiadamente para jugar (evitar ropa
con algún tipo de cordel y ropa floja que podría enredarse o agarrarse al
equipo.)
Mantenimiento seguro - ¿Ha decidido usted que:
✓ Verificará que todas las tuercas y pernos estén apretados dos veces por mes
durante la temporada de juego tal como se requiere, y los aprieta si se
requiere? (Es particularmente importante que se siga el procedimiento al
comienzo de cada
temporada de juego.)
✓ Verificará visualmente que los herrajes durante la temporada de juego no
muestran evidencia de
deterioración? (Se los debería de reemplazar de acuerdo a las instrucciones
del fabricante.)
Instrucciones para desechar
Cuando se saque al equipo de servicio, éste debe estar desarmado y se lo debe
desechar de tal manera que no existan peligros imprevistos
cuando se lo deseche.
CUIDADO: EL NO SUJETAR LA PARTE DE ABAJO DEL TOBOGÁN A LA ESTACA EN LA
TIERRA PODRÍA RESULTAR EN LESIONES GRAVES A NIÑOS, AL LEVANTARSE EL EXTREMO DE ABAJO DEL TOBOGÁN.
Lista de chequeo para los toboganes Swing•N•Slide™
Cumpliendo con las siguientes declaraciones y advertencias reduce la posibilidad de lesiones graves o fatales.
¡IMPORTANTE! Instrucciones de seguridad adicionales para todo el equipo de recreo Timber•Bilt.
Guarde este hoja de instrucciones en caso de que se necesite poner en contacto con el fabricante.
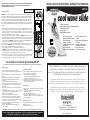
THIS SLIDE MUST NOT BE INSTALLED OVER CONCRETE, GRAVEL, PACKED EARTH, ASPHALT OR
ANY OTHER HARD SURFACE WHICH COULD CAUSE SERIOUS INJURY IN THE EVENT OF A FALL.
Installation Instructions
IMPORTANT: Attach the slide on level ground, not less than six feet (1.828 meters) from any structure or
obstruction such as a fence, garage, house, overhanging branch, laundry line or electrical wire. Protective
surfacing must extend a
minimum of 6 ft. (1.828 m) in all directions from the perimeter of the equipment or
from the outermost edges of any component. A slide extending beyond the platform must have protective
surfacing at least 6 ft. (1.828 m) out from both sides as well as the end. An area of 21" on either side of the
slide should be free of obstructions which a child's arm could contact while sliding.
1. Make sure slide opening is between 23 -1/4'' and 28''. (Fig. 2 represents a typical slide attachment opening).
If not, prepare slide attachment opening by cutting two 2'' x 4'' x 5'' and one 2'' x 4'' to the width of slide
opening shown in (See Fig. 2). Place the 2'' x 4'' x 5'' deck supports so that the top of the 2'' x 4'' deck board
is flush with the top surface of the existing deck boards. (See Fig. 3)
2. Align top of slide square with platform opening. NOTE: Slide should be 90 degrees to deck. Mark hole
locations approximately 1-1/2'' from the front edge of the slide platform (See Fig. 1) Drill three holes through
the deck at the previously marked locations using a 3/8'' drill bit.
NOTE: Each hole must be counterbored on the UNDERSIDE of the deck approximately 5/8'' deep using a 1-
1/8'' spade bit. (See Fig. 1)
3. Attach the top of the slide to the deck using three 2'' carriage bolts, washers and nuts. (See Fig. 1)
CAUTION: If any threads of the bolt extend beyond the nut, remove the excess using a hacksaw. Remove
the sharp edges using a metal file.
4. Prepare a level area of ground where the bottom of the slide will rest.
NOTE: The bottom of the slide should rest 2'' below grade (See Fig. 4). Cut lumber to create a 2'' x 4'' x 18''
stake. Drive the 2'' x 4'' x 18'' stake at the bottom center of the slide. The top of the stake should be flush
below the 2'' grade.(See Fig.4).
5. Using a 1/8'' drill bit, drill a hole through the base of the slide and into the stake. Secure the bottom of the
slide to the stake using the wood screw and washer provided. Level ground around the base making sure the
head of the screw is covered and presents no hazard.
Installation Safety - Have You:
✓ Consulted the assembly instructions supplied with your particular model?
✓ Made sure your slide is compatible with the deck height to which it is to be
attached?
✓ Checked to make sure all parts are received and match the parts list?
✓ Noted this slide is to be used only on Timber•Bilt approved designs? (Do not
alter its design or add/remove components.)
✓ Made sure all hardware is tightened securely?
✓ Using a hacksaw, cut off all protruding threaded ends of bolts and other
fasteners and remove any sharp edges with a metal file as needed?
✓ Placed the slide on level ground, not less than six feet (1.8 meters) from any
structure or obstruction such as a fence, garage, house, overhanging branch,
laundry line or electrical wire?
✓ Built the braces properly and to proper dimensions?
✓ Anchored the braces and/or stakes into the ground as required?
✓ Made sure slide is not installed over concrete, asphalt, packed earth or any
other hard surface? (A fall onto a hard surface can result in serious injury to
the equipment user.)
✓ Followed all anchoring and shock absorbing surfacing requirements in the kit
plan as they apply?
✓ Made sure not to allow children to use equipment until it is properly installed?
Operating Safety - Have You:
✓ Determined that on-site adult supervision is provided for children of all ages?
✓ Taught children the following before allowing them to use the equipment?
• Not to use equipment in a manner other than intended.
• Not to climb on the equipment when it is wet.
✓ Determined children must be dressed appropriately for play? (Avoid clothing
with draw strings and loose fitting clothes which could become entangled or
snagged on equipment.)
Safety Maintenance - Have You Resolved to:
✓ Check all nuts and bolts twice monthly during the usage season for tightness
and tighten as required? (It is particularly important that this procedure be
followed at the beginning of each season.)
✓ Check hardware monthly during usage season for evidence of deterioration?
(Replacement should be made in accordance with manufacturer’s
instructions.)
Disposal Instructions
When the equipment is taken out of service, it must be
disassembled and disposed of in such a way that no
unreasonable hazards will exist at the time the set is
discarded.
CAUTION: FAILURE TO PROPERLY STAKE THIS SLIDE TO THE GROUND COULD RESULT
IN SERIOUS INJURY TO CHILDREN FROM LIFTING THE END OF THE SLIDE.
Safety Checklist for Swing•N•Slide Slides
™
Observing the following statements and warnings reduces the likelihood of serious or fatal injury.
Important!
Additional Safety Instructions for all Swing•N•Slide Playset Equipment. Save this instruction sheet in the event the manufacturer needs to
be contacted.
FIG. 4
1-1/2"
FIG. 1
FIG. 3
FIG. 2
Washer
Washer
Deck Board
2'' x 4'' Deck Board
2'' x 4'' x 5''
Wood Screw
Surfacing
Material
2'' Below Grade
18'' Stake
Carriage Bolt
Nut
5/8" Deep Counterbore
2'' x 4'' Deck Board
2'' x 4'' x 5''
TYPICAL OPENING
Lumber Requirements:
One 2" x 4" x 8' (not included)
NO DEBE INSTALARSE ESTE TOBOGÁN SOBRE HORMIGÓN, GRAVA, TIERRA BIEN EMPACADA,
ASFALTO, U OTRA SUPERFICIE QUE PODRÍA CAUSAR LESIONES GRAVES EN CASO DE UNA CAÍDA.
Instrucciones para la instalación
IMPORTANTE: Conecte el tobogán en un suelo nivelado, no menos de seis pies (1.828 metros) de distancia
de cualquier estructura u obstrucción como una cerca, garaje, casa, rama de árbol que sobresalga, línea para
guindar ropa o cable eléctrico. La superficie de protección se debe extender a un mínimo de 6 pies (1.828 m)
en todas las direcciones del perímetro del equipo o de la orilla más externa de cualquier componente. Un
tobogán que se extienda más allá de la plataforma debe contar con una superficie de protección de al menos 6
pies (1.828 m) en ambos lados y en la punta. Debe haber un área de 21" libre de obstrucciones, en ambos
lados del tobogán, que se pueda poner en contacto con el brazo de un niño cuando se deslice por el mismo.
1. Asegúrese que la abertura es de 23 -1/4'' y 28''. (Fig. 2 representa una abertura típica para conectar un
tobogán). Si no es así, prepare la abertura para el tobogán al cortar dos 2'' x 4'' x 5'' y un 2'' x 4'', como se
muestra en la Fig. 2). Coloque los soportes de la plataforma de 2'' x 4'' x 5'' de tal forma que la parte superior
de la tabla para la plataforma de 2'' x 4'' quede alineada con la superficie superior de las tablas existentes
para la plataforma. (Vea la Fig. 3)
2. Alinee el cuadro de la parte superior del tobogán con la abertura en la plataforma. NOTA: El tobogán debería
estar a 90 grados de la plataforma. Marque el lugar para los orificios aproximadamente a 1-1/2'' de la orilla
frontal de la plataforma del tobogán (Vea la Fig. 1) Taladre tres orificios a través de la plataforma en los
lugares que marcó antes, usando una mecha de 3/8'' del taladro.
NOTA: Cada orificio debe tener un diámetro alargado en el LADO INFERIOR de la plataforma, de
aproximadamente 5/8'' de profundidad, usando una mecha de pala de 1-1/8''. (Vea la Fig. 1)
3. Conecte la parte superior del tobogán a la plataforma usando tres pernos de carruaje de 2'', arandelas y
tuercas. (Vea la Fig. 1)
ADVERTENCIA: Si parte de las roscas del perno se extiende más allá de la tuerca,
remueva el exceso usando un serrucho para metales. Remueva las puntas agudas usando
una lija para metales.
4. Prepare un suelo nivelado donde la parte inferior del tobogán pueda descansar.
NOTA: La parte inferior del tobogán debería descansar 2'' por debajo del nivel del suelo (Vea la Fig. 4). Corte
la madera para crear una estaca de 2'' x 4'' x 18''. Empuje la estaca de 2'' x 4'' x 18'' en el centro inferior del
tobogán. La parte superior de la estaca debería quedar alineada por debajo del nivel
de 2'' del suelo. (Vea la Fig. 4).
5. Usando una mecha de 1/8'' del taladro, perfore un orificio a través de la base del tobogán y la estaca.
Asegure la parte inferior del tobogán a la estaca, usando el tornillo para madera y la arandela provistos.
Nivele el suelo alrededor de la base, asegurándose que la cabeza del tornillo quede cubierta y no represente
un peligro.
FIG. 4
1-1/2"
FIG. 1
FIG. 3
FIG. 2
Arandela
Arandela
Tabla para la plataforma
Tabla de 2'' x 4''
para la plataforma
2'' x 4'' x 5''
Tornillo para madera
Material para la
superficie
2'' por debajo del nivel
Estaca de 18''
Perno de carruaje
Tuerca
Diámetro alargado de 5/8"
de profundidad
Tabla de 2'' x 4'' para la plataforma
2'' x 4'' x 5''
ABERTURA TÍPICA
Tale los Requisitos:
uno 2" X 4" X 8' (no incluyó)
Transcripción de documentos
NO DEBE INSTALARSE ESTE TOBOGÁN SOBRE HORMIGÓN, GRAVA, TIERRA BIEN EMPACADA, ASFALTO, U OTRA SUPERFICIE QUE PODRÍA CAUSAR LESIONES GRAVES EN CASO DE UNA CAÍDA. THIS SLIDE MUST NOT BE INSTALLED OVER CONCRETE, GRAVEL, PACKED EARTH, ASPHALT OR ANY OTHER HARD SURFACE WHICH COULD CAUSE SERIOUS INJURY IN THE EVENT OF A FALL. Lumber Requirements: One 2" x 4" x 8' (not included) Tale los Requisitos: uno 2" X 4" X 8' (no incluyó) FIG. 1 Carriage Bolt Deck Board FIG. 1 Perno de carruaje Tabla para la plataforma Instrucciones para la instalación Installation Instructions 1-1/2" 1-1/2" IMPORTANT: Attach the slide on level ground, not less than six feet (1.828 meters) from any structure or obstruction such as a fence, garage, house, overhanging branch, laundry line or electrical wire. Protective surfacing must extend a minimum of 6 ft. (1.828 m) in all directions from the perimeter of the equipment or from the outermost edges of any component. A slide extending beyond the platform must have protective surfacing at least 6 ft. (1.828 m) out from both sides as well as the end. An area of 21" on either side of the slide should be free of obstructions which a child's arm could contact while sliding. 1. Make sure slide opening is between 23 -1/4'' and 28''. (Fig. 2 represents a typical slide attachment opening). If not, prepare slide attachment opening by cutting two 2'' x 4'' x 5'' and one 2'' x 4'' to the width of slide opening shown in (See Fig. 2). Place the 2'' x 4'' x 5'' deck supports so that the top of the 2'' x 4'' deck board is flush with the top surface of the existing deck boards. (See Fig. 3) 2. Align top of slide square with platform opening. NOTE: Slide should be 90 degrees to deck. Mark hole locations approximately 1-1/2'' from the front edge of the slide platform (See Fig. 1) Drill three holes through the deck at the previously marked locations using a 3/8'' drill bit. NOTE: Each hole must be counterbored on the UNDERSIDE of the deck approximately 5/8'' deep using a 11/8'' spade bit. (See Fig. 1) 3. Attach the top of the slide to the deck using three 2'' carriage bolts, washers and nuts. (See Fig. 1) CAUTION: If any threads of the bolt extend beyond the nut, remove the excess using a hacksaw. Remove the sharp edges using a metal file. 4. Prepare a level area of ground where the bottom of the slide will rest. NOTE: The bottom of the slide should rest 2'' below grade (See Fig. 4). Cut lumber to create a 2'' x 4'' x 18'' stake. Drive the 2'' x 4'' x 18'' stake at the bottom center of the slide. The top of the stake should be flush below the 2'' grade.(See Fig.4). 5. Using a 1/8'' drill bit, drill a hole through the base of the slide and into the stake. Secure the bottom of the slide to the stake using the wood screw and washer provided. Level ground around the base making sure the head of the screw is covered and presents no hazard. Washer 5/8" Deep Counterbore Nut FIG. 2 2'' x 4'' Deck Board 2'' x 4'' x 5'' TYPICAL OPENING x 2'' ck De 4'' ard Bo FIG. 3 2'' x 4'' x 5'' FIG. 4 Wood Screw Washer Surfacing Material 2'' Below Grade 18'' Stake Safety Checklist for Swing•N•Slide Slides™ Observing the following statements and warnings reduces the likelihood of serious or fatal injury. Installation Safety - Have You: ✓ Consulted the assembly instructions supplied with your particular model? ✓ Made sure your slide is compatible with the deck height to which it is to be attached? ✓ Checked to make sure all parts are received and match the parts list? ✓ Noted this slide is to be used only on Timber•Bilt approved designs? (Do not alter its design or add/remove components.) ✓ Made sure all hardware is tightened securely? ✓ Using a hacksaw, cut off all protruding threaded ends of bolts and other fasteners and remove any sharp edges with a metal file as needed? ✓ Placed the slide on level ground, not less than six feet (1.8 meters) from any structure or obstruction such as a fence, garage, house, overhanging branch, laundry line or electrical wire? ✓ Built the braces properly and to proper dimensions? ✓ Anchored the braces and/or stakes into the ground as required? ✓ Made sure slide is not installed over concrete, asphalt, packed earth or any other hard surface? (A fall onto a hard surface can result in serious injury to the equipment user.) ✓ Followed all anchoring and shock absorbing surfacing requirements in the kit plan as they apply? ✓ Made sure not to allow children to use equipment until it is properly installed? Operating Safety - Have You: ✓ Determined that on-site adult supervision is provided for children of all ages? ✓ Taught children the following before allowing them to use the equipment? • Not to use equipment in a manner other than intended. • Not to climb on the equipment when it is wet. ✓ Determined children must be dressed appropriately for play? (Avoid clothing with draw strings and loose fitting clothes which could become entangled or snagged on equipment.) Safety Maintenance - Have You Resolved to: ✓ Check all nuts and bolts twice monthly during the usage season for tightness and tighten as required? (It is particularly important that this procedure be followed at the beginning of each season.) ✓ Check hardware monthly during usage season for evidence of deterioration? (Replacement should be made in accordance with manufacturer’s instructions.) Disposal Instructions When the equipment is taken out of service, it must be disassembled and disposed of in such a way that no unreasonable hazards will exist at the time the set is discarded. IMPORTANTE: Conecte el tobogán en un suelo nivelado, no menos de seis pies (1.828 metros) de distancia de cualquier estructura u obstrucción como una cerca, garaje, casa, rama de árbol que sobresalga, línea para guindar ropa o cable eléctrico. La superficie de protección se debe extender a un mínimo de 6 pies (1.828 m) en todas las direcciones del perímetro del equipo o de la orilla más externa de cualquier componente. Un tobogán que se extienda más allá de la plataforma debe contar con una superficie de protección de al menos 6 pies (1.828 m) en ambos lados y en la punta. Debe haber un área de 21" libre de obstrucciones, en ambos lados del tobogán, que se pueda poner en contacto con el brazo de un niño cuando se deslice por el mismo. 1. Asegúrese que la abertura es de 23 -1/4'' y 28''. (Fig. 2 representa una abertura típica para conectar un tobogán). Si no es así, prepare la abertura para el tobogán al cortar dos 2'' x 4'' x 5'' y un 2'' x 4'', como se muestra en la Fig. 2). Coloque los soportes de la plataforma de 2'' x 4'' x 5'' de tal forma que la parte superior de la tabla para la plataforma de 2'' x 4'' quede alineada con la superficie superior de las tablas existentes para la plataforma. (Vea la Fig. 3) 2. Alinee el cuadro de la parte superior del tobogán con la abertura en la plataforma. NOTA: El tobogán debería estar a 90 grados de la plataforma. Marque el lugar para los orificios aproximadamente a 1-1/2'' de la orilla frontal de la plataforma del tobogán (Vea la Fig. 1) Taladre tres orificios a través de la plataforma en los lugares que marcó antes, usando una mecha de 3/8'' del taladro. NOTA: Cada orificio debe tener un diámetro alargado en el LADO INFERIOR de la plataforma, de aproximadamente 5/8'' de profundidad, usando una mecha de pala de 1-1/8''. (Vea la Fig. 1) 3. Conecte la parte superior del tobogán a la plataforma usando tres pernos de carruaje de 2'', arandelas y tuercas. (Vea la Fig. 1) ADVERTENCIA: Si parte de las roscas del perno se extiende más allá de la tuerca, remueva el exceso usando un serrucho para metales. Remueva las puntas agudas usando una lija para metales. 4. Prepare un suelo nivelado donde la parte inferior del tobogán pueda descansar. NOTA: La parte inferior del tobogán debería descansar 2'' por debajo del nivel del suelo (Vea la Fig. 4). Corte la madera para crear una estaca de 2'' x 4'' x 18''. Empuje la estaca de 2'' x 4'' x 18'' en el centro inferior del tobogán. La parte superior de la estaca debería quedar alineada por debajo del nivel de 2'' del suelo. (Vea la Fig. 4). 5. Usando una mecha de 1/8'' del taladro, perfore un orificio a través de la base del tobogán y la estaca. Asegure la parte inferior del tobogán a la estaca, usando el tornillo para madera y la arandela provistos. Nivele el suelo alrededor de la base, asegurándose que la cabeza del tornillo quede cubierta y no represente un peligro. Arandela Diámetro alargado de 5/8" de profundidad Tuerca Tabla de 2'' x 4'' para la plataforma FIG. 2 2'' x 4'' x 5'' ABERTURA TÍPICA '' x 4ma 2'' for de lata bla p Taara la p FIG. 3 2'' x 4'' x 5'' FIG. 4 Tornillo para madera Arandela Material para la superficie 2'' por debajo del nivel Estaca de 18'' Lista de chequeo para los toboganes Swing•N•Slide™ Cumpliendo con las siguientes declaraciones y advertencias reduce la posibilidad de lesiones graves o fatales. Instalación segura - ¿Está seguro que: ✓ Consultó toda la información de cómo armar lo que vino con su modelo particular? ✓ Verificó que su tobogán es compatible con la altura de la plataforma a la cual va a sujetarse? ✓ Verificó que se recibieron todas las partes y piezas, y que éstas concuerdan con la lista departes? ✓ Notó que este tobogán solamente se lo usa en los diseños aprobados de Timber•Bilt? (No alteró su diseño o añadió/quitó componentes.) ✓ Puede garantizar que todos los herrajes están bien apretados? ✓ Usando una sierra para metales, cortó todas las roscas de los pernos y otras tuercas y tornillos para quitar los filos agudos usando una lima para metales? ✓ Puso el tobogán en suelo nivelado, a una distancia de no menos de seis pies (1,8 metros) de cualquier estructura u obstrucción tal como una cerca, garaje, casa, ramas de árbol cercanas, cuerdas de lavandería, o alambres eléctricos? ✓ Hizo los sostenes de forma apropiada a las dimensiones apropiadas? ✓ Ancló y sujetó los sostenes y/o las estacas dentro de la tierra como se requiere? ✓ Se aseguró que el tobogán no está instalado sobre hormigón, asfalto, tierra bien comprimida, o cualquier otra superficie dura? (Una caída sobre una superficie dura podría resultar en lesiones graves a la persona que usa el equipo.) ✓ Siguió todos los requerimientos de sujetar y hacer superficies que absorban golpe tal como se aplica al plan del conjunto recibido? ✓ Garantizó no permitir a los niños el uso del equipo hasta que esté instalado en forma apropiada? Operación segura - ¿Se aseguró que: ✓ Ha determinado que supervisión de adultos en el lugar, está siempre presente para chiquillos de cualquier edad? ✓ Enseño a los niños lo que sigue antes de permitirles el uso del equipo? • No usar el equipo de ningúna otra manera de la que se intenta. • No treparse al equipo cuando esté mojado. ✓ Ha determinado cómo los niños deben estar vestidos apropiadamente para jugar (evitar ropa con algún tipo de cordel y ropa floja que podría enredarse o agarrarse al equipo.) Mantenimiento seguro - ¿Ha decidido usted que: ✓ Verificará que todas las tuercas y pernos estén apretados dos veces por mes durante la temporada de juego tal como se requiere, y los aprieta si se requiere? (Es particularmente importante que se siga el procedimiento al comienzo de cada temporada de juego.) ✓ Verificará visualmente que los herrajes durante la temporada de juego no muestran evidencia de deterioración? (Se los debería de reemplazar de acuerdo a las instrucciones del fabricante.) Instrucciones para desechar Cuando se saque al equipo de servicio, éste debe estar desarmado y se lo debe desechar de tal manera que no existan peligros imprevistos cuando se lo deseche. Important! Additional Safety Instructions for all Swing•N•Slide Playset Equipment. Save this instruction sheet in the event the manufacturer needs to be contacted. ¡IMPORTANTE! Instrucciones de seguridad adicionales para todo el equipo de recreo Timber•Bilt. Guarde este hoja de instrucciones en caso de que se necesite poner en contacto con el fabricante. CAUTION: FAILURE TO PROPERLY STAKE THIS SLIDE TO THE GROUND COULD RESULT IN SERIOUS INJURY TO CHILDREN FROM LIFTING THE END OF THE SLIDE. CUIDADO: EL NO SUJETAR LA PARTE DE ABAJO DEL TOBOGÁN A LA ESTACA EN LA TIERRA PODRÍA RESULTAR EN LESIONES GRAVES A NIÑOS, AL LEVANTARSE EL EXTREMO DE ABAJO DEL TOBOGÁN.-
 1
1
-
 2
2


Swing-N-Slide Playsets NE 4675-1PK Instrucciones de operación
- Tipo
- Instrucciones de operación
- Este manual también es adecuado para
En otros idiomas
Documentos relacionados
-
Swing-N-Slide Playsets NE 3052 Instrucciones de operación
-
Swing-N-Slide Playsets NE 4678-1HD Instrucciones de operación
-
-
-
-
-
-
-
-
Swing-N-Slide Playsets WS 5007 Instrucciones de operación