Little Journey V4916DSO364 Manual de usuario
- Categoría
- Termómetros corporales digitales
- Tipo
- Manual de usuario
Este manual también es adecuado para

User Manual
Manual
del usuario
EAR AND FOREHEAD
THERMOMETER
TERMÓMETRO DE OÍDO Y FRENTE
English ...... 06
Español ......55

QR codes take you where you want to go
quickly and easily
Whether you require product information, spare parts
or accessories, details on warranties or aftersales ser-
vices, or if you want to watch a product demonstration
video or 360° product view, our QR codes will take you
there in no time at all.
What is a QR code?
A QR code (QR = Quick Response) is a type of matrix that
can be read with a smartphone camera and that con-
tains a link to a website or contact details, for example.
Advantage: You do not need to manually enter a web-
site address or contact details.
How it works
To scan the QR code, all you need is a smartphone with
QR code reader software and an internet connection.
This type of software can be downloaded for free from
your smartphone’s app store.
Try it out now
Just scan the QR code with your
smartphone and find out more
about the ALDI product you have
purchased.
Your ALDI Service Portal
All details mentioned above can
also be found in the ALDI Service
Portal at www.aldi.us.
Depending on your smartphone plan you
maybe charged for the connection.

Dok./Rev.-Nr. 194381_DSO364_20160810
Overview ............................................................... 4
Use .......................................................................... 5
Product contents/device parts ............................ 6
General information ............................................. 7
Reading and storing the user manual ............... 7
Explanation of symbols......................................... 7
Safety ..................................................................... 9
Proper use ...............................................................9
Safety notes .............................................................9
Information on body temperature .....................16
Setup .....................................................................18
Basic functions .................................................... 20
Indicators for body temperature ......................20
Backlight/flashlight function .............................21
Energy-saving mode ............................................21
°Celsius/°Fahrenheit setting.............................22
Setting the date and time ...................................22
Memory mode .......................................................25
Operation .............................................................27
Measuring the body temperature in your ear 27
Measuring forehead temperature ....................29
Measuring object temperature ......................... 31
Cleaning and maintenance ................................ 33
Calibration ........................................................... 35
Troubleshooting ................................................. 36
Electromagnetic immunity ................................38
Changing the battery .........................................46
Technical data .....................................................50
Disposal ............................................................... 53
Disposing of the packaging ...............................53
Disposing of old appliances ...............................53
Contents

A
2
6
1
3
4
5
7
8
9
10
11
12
13
14
15
16
17
18
19
20
21
4

B
C
5
Hypothalamus
Hipotálamo
Eardrum
Tímpano
Infrared sensor
Sensor de infrarrojos
Infrared radiation
Rayos infrarrojos
correct
correcto
incorrect
incorrecto

6
Product contents⁄device parts
1
LCD display
2
Backlight (of the LCD display)
3
SET button
4
Probe tip with infrared sensor
5
Push-on adapter for measuring forehead temperature
6
Button ( ) forehead measurement (with backlight)
7
Button ( ) ear measurement (with backlight)
8
Button ( ) for activating the flashlight
9
MEM button
10
Signal emission opening
11
Battery compartment cover
12
Light (flashlight)
13
Table rest
14
PM indicator
15
Memory indicator ( ) (in memory mode)
16
Battery indicator ( )
17
Indicator ( ) for measuring the temperature of
objects
18
Indicator ( ) for ear measurement
19
Indicator ( ) for forehead measurement
20
Segment indicator for the measured temperature
21
Segment indicator for FE (fever) and CL (clean)
The product contents include two type
AAA batteries.

7
General information
General information
Reading and storing the user
manual
This user manual accompanies this ear
and forehead thermometer DSO 364
(short form “thermometer”). It contains
important information on setup and
handling.
Before using the thermometer, read the user man-
ual carefully. This particularly applies for the safety
instructions. Failure to do so may result in personal
injury or damage to the thermometer.
Store the user manual for future use. Make sure to
include this user manual when passing the ther-
mometer on to third parties.
Explanation of symbols
The following symbols and signal words are used
in this user manual, on the thermometer or on the
packaging.
WARNING!
This signal symbol/word designates a hazard with
moderate risk, which may result in death or severe
injury if not avoided.
NOTICE!
This signal word warns against potential damages
to property.

8
General information
This symbol provides you with use-
ful supplementary information on
assembly or operation.
Use and store in a dry state
Batch name:
V4916DSO364
Serial number: 00001
(sequential number)
2016-08
Production date: 2016-08 (year,
month)
Manufacturer: Handelshaus Ditt-
mann GmbH, Kissinger Straße 68,
D-97727 Fuchsstadt/Germany.
Type BF (body float) protection
against electrical shock. A type
BF application equipment with
greater protection against electric
shock to the body, but not directly
to the heart.

Safety
9
Safety
Proper use
The thermometer is only designed for measuring
the temperature of the human body in the ear or on
the forehead as well as for measuring the tempera-
ture of liquids (e.g. milk or water) or surfaces. The
thermometer is exclusively intended for private use
and is not suitable for commercial application.
The patient may be the intended operator. Only use
the thermometer as described in this user manual.
Any other use is considered improper and may re-
sult in damage to property.
The manufacturer or vendor cannot be held liable
for damages incurred through improper or incorrect
use.
Safety notes
WARNING!
Danger for children and persons
with impaired physical, sensory
or mental abilities!
− This thermometer is not intended to
be used by persons (including chil-
dren) with impaired physical, sensory
or mental abilities or who lack expe-
rience and/or knowledge unless they

Safety
10
are supervised by a person respon-
sible for their safety or have been
instructed by such a person on how to
use the thermometer.
− Store the thermometer so that it is
not accessible for children and young
persons under 18 years of age.
− Supervise children to prevent them
from playing with the thermometer.
− Ensure that the thermometer does
not end up in the hands of children.
Children could ingest small parts or
batteries and choke. Children could
injure themselves when using the
thermometer.
WARNING!
Risk of injury!
Improper handling of the thermometer
may result in injury.
− The thermometer must not be used in
the event of a defect. Do not attempt
to modify, disassemble or repair the
thermometer or to replace parts of it.
− If you experience any irregularities
while using the thermometer, imme-
diately stop using it and consult your
physician.

Safety
11
− Do not engage in any other activity
when performing a measurement.
− If you are not sure how to use the
thermometer, you should consult your
physician before using it.
− Keep this user manual for the entire
service life of the product and include
it if you pass the thermometer on to
third parties. Make sure that the user
manual is also accessible to third
parties. The user manual is part of the
thermometer.
− Avoid improper use and use that does
not correspond to the designated
purpose.
− The thermometer has a class 1 LED
(flashlight function). Do not look direct-
ly into the LED beam for a prolonged
period and do not point the LED beam
in the eyes of other persons or animals.
− This thermometer cannot serve as a
substitute for medical advice or treat-
ment! The measurements taken are
only for reference. If you experience
problems with your health, it is imper-
ative that you consult your physician.
− If possible, measure body tempera-
ture in the same ear as the tempera-

Safety
12
ture in the right or left ear may differ.
− Keep the infrared sensor clean and
dry and avoid damages (see fig. C).
This is the only way to obtain accurate
measurements.
− Do not touch the infrared sensor and
do not blow on it. Dirt on the infrared
sensor could result in inaccurate mea-
surement results.
− Do not attempt to measure your body
temperature in your ear if your ear is
inflamed or infected!
− Do not use the thermometer if it is
damaged. Using a damaged device
could result in injury, pose serious
risks and result in inaccurate mea-
surements.
− Wait a while before measuring tem-
perature if the thermometer was
stored in an area with a large tempera-
ture difference to the place where you
intend to measure temperature. Both
the thermometer and persons whose
body temperature is being measured
should have been in the same environ-
ment for at least 30 minutes.
− Do not measure the temperature in
your ear if you suffer from a disease

Safety
13
affecting your ears or if there is still
water in your ear, e.g. from showering
or swimming.
− Ear wax or a greasy forehead could
result in inaccurate measurements.
You should therefore clean your ear or
forehead before taking your tempera-
ture. Then wait approx. 5 – 10 minutes
before you perform a temperature
measurement.
− Repeat the measurements approx.
every 15 minutes if the readings are
unusually low or if you feel they are
inaccurate. If possible, use a conven-
tional clinical thermometer to take an
oral or rectal temperature reading for
comparison. Ask your physician if in
doubt.
− If ear drops or other medications have
been administered in one ear, you
should measure your body tempera-
ture in the other ear.
− When taking the temperature of per-
sons with hearing aids or ear plugs,
it is recommended to wait approx. 30
minutes after they have been removed
from the ear before taking their tem-
perature.

Safety
14
NOTICE!
Risk of damage!
Improper handling of the thermometer
may result in damage.
− Do not use any accessories from other
devices.
− Do not let the thermometer fall, do
not shake it and do not expose it to
shocks.
− For accurate readings, ensure in
particular that the infrared sensor of
the thermometer is protected against
damage and exposure to wetness and
dirt.
− Do not expose the thermometer to
direct sunlight and excessively high or
low temperatures. Only use and store
the thermometer in a dry environ-
ment that is free of contamination.
− Do not open the thermometer and
do not attempt to repair it yourself in
the event of disturbances or damage.
This will void your warranty claim. The
thermometer may only be repaired by
authorized qualified professionals.
− Do not store the thermometer in areas

Safety
15
where it is exposed to extremely high
or low ambient temperatures (under
-4 °F (-20 °C) or over 131 °F
(55 °C)) or in an extremely dry or moist
environment as this may affect the
accuracy of the measurements.
− Do not use the thermometer in a
damp environment. Keep all liquids
away from the thermometer during
use and do not in any case immerse
the thermometer in liquids.
− Do not use the thermometer if easily
flammable substances and gases or
explosives are nearby.
− During use, the thermometer may in-
terfere with other electric or electrical
equipment. Therefore, do not use it if
other electric devices are nearby.
− Do not use a mobile phone near the
thermometer when measuring tem-
perature. Please note that portable
and mobile HF (high-frequency) com-
munication equipment (e.g. mobile
phones) could interfere with medical
electrical equipment.
− Do not use the thermometer in the
mountains at altitudes of over
9843 feet (3000 meters).

Information on body temperature
16
− Do not use the thermometer at dis-
tances of less than 5 feet (1.5 meters)
to a short-wave or micro-wave device
or high-frequency surgical device.
− Medical electrical devices are subject
to special precautionary measures
with respect to the EMC (electromag-
netic compatibility). Therefore, please
observe the EMC notes concerning
the installation and start-up of the
thermometer.
Information on body
temperature
Body temperature refers to the internal tempera-
ture of the body (core temperature). It fluctuates
over the course of the day and is lowest in the
morning and highest in the late afternoon.
Normal body temperature is not reflected by a fixed
value, but a range of values.
Age Normal body
temperature
in °C
Normal body
temperature
in °F
0 to 2 years 36.4 – 38.0 °C 97.5 – 100.4 °F
3 to 10 years 36.1 – 37.8 °C 97.0 – 100 °F
11 – 65 years 35.9 – 37.6 °C 96.6 – 99.7 °F
over
65 years
35.8 – 37.5 °C 96.4 – 99.5 °F

17
Information on body temperature
The range for normal body temperature differs from
person to person and is affected by numerous fac-
tors: Age, gender, time of day, place and manner in
which the temperature is measured, level of activity,
mood and effect of medication and other factors.
Most people have a lower body temperature when
they sleep; as the day progresses, their body tem-
perature increases.
Infants and small children have a higher body
temperature than adults. As people age, their body
temperature decreases. With children, fluctuations
in body temperature tend to be higher, briefer and
more frequent.
Measuring the temperature at different areas of
the body will return different results: The body
temperature measured rectally is normally approx.
0.5 °F (0.3 °C) higher than in the mouth and the
temperature in the mouth is in turn 0.5 °F (0.3 °C)
higher than the body temperature measured in the
armpit.
To determine body temperature, it is recommended
that you measure your body temperature when
healthy on three to four consecutive days at differ-
ent times of the day. This way, you can determine
the normal body temperature, take note of it and, if
necessary, compare the temperature readings with
the normal readings taken for your body.
Determining your in-ear body temperature
Research has found that the ear is ideal for mea-
suring body temperature as the hypothalamus (the
area of the brain that regulates body temperature)
and the eardrum are supplied with blood by the
same blood vessels. As a result, changes in body

18
Setup
temperature can be determined sooner and more
accurately in the ear than other parts of the body.
It is therefore beneficial if you measure your body
temperature in one of your ears as shown in fig. B
to the extent possible.
Setup
The two batteries have already been inserted in the
thermometer, but are protected by an insulating
strip.
1. Before first use, open the battery compartment
cover
11
on the back of the thermometer.
2. Pull the insulating strip out and close the bat-
tery compartment cover again.
The thermometer will now emit 4 brief signal
tones to indicate that it has switched on and all
indicators will initially appear on the LCD dis-
play
1
for a short period.
The indicator will then switch to standby mode
and display the basic values of time, month

Setup
19
and day of the week as well as current room
temperature in alternation. Additionally, the
display and key lighting of the buttons ( ) ear
measurement and (
) forehead measurement
illuminate for a few seconds.
If the thermometer is switched off, you
can switch it on by pressing any button.
The thermometer will then switch to
standby mode. In this mode, the time,
date and room temperature will continu-
ally alternate on the display.
To correctly position the display in
standby mode and configuration mode,
make sure that the front side with the
buttons is pointing towards the user. In
temperature measuring mode and in
memory mode, it should be positioned
the other way around: In this case, the
display is correctly positioned by holding
the thermometer so that the back side is
pointing towards the user.
If you would like to immediately switch
back to standby mode from configura-
tion or memory mode, you must push
the buttons ( ) ear measurement and
( ) forehead measurement at the same
time. The thermometer will automati-
cally switch to standby mode if there is
no button activity for approx. 1 minute
after performing the temperature mea-
surement or, in configuration or memory
mode, within approx.
30 seconds.

Basic functions
20
If “Lo” or “Hi” appears on the display after
taking a measurement, the temperature
measured has exceeded or underrun
the permissible temperature range.
IMPORTANT INFORMATION on
“Clean warning indicator”:
If, after performing a number of tem-
perature measurements, the green
backlight of the LCD display blinks twice
while emitting 2 audible tones and, this
is not a malfunction, but a warning indi-
cator to “Clean” the device! For this, read
the chapter “ ‘Clean’ warning indicator”.
Basic functions
Indicators for body temperature
The thermometer has a backlight, which immedi-
ately illuminates in different colors after measuring
your body temperature indicating the range of your
body temperature.
Green backlight: The body temperature measured
is below 37.5 °C (99.5 °F).
Red backlight: The body temperature measured is
within the range of an elevated temperature of
37.5 °C (99.5 °F) to 37.9 °C (100.3 °F).
Red backlight red and additionally FE (fever in-
dicator) on the display:
The body temperature measured is within the fever
range between 38.0 °C (100.4 °F) and 42.9 °C (109.3 °F).

Basic functions
21
Backlight⁄flashlight function
Backlight: Every time the SET button
3
or the MEM
button
9
is pushed, the backlight
2
of the LCD
display turns on for approx.10 seconds.
Flashlight: Pushing the button
8
(
) for approx.
2 seconds in standby mode, the flashlight
12
of
the thermometer (1 LED next to the probe tip) will
illuminate for approx. 10 seconds. At the same time,
the blue backlight of the buttons (
) forehead
measurement
6
and (
) ear measurement
7
illuminate for approx. 15 seconds.
If you briefly push the button (
) in standy mode,
the key lighting of the buttons ( ) ear measurement
and ( ) forehead measurement illuminate for ap-
prox. 15 seconds.
If the thermometer is switched off and
you push the button ( ), the backlight
of the LCD display will illuminate for ap-
prox. 10 second and the backlights of the
buttons ( ) forehead measurement and
( ) ear measurement will illuminate for
approx. 15 seconds.
Energy-saving mode
By default, the thermometer is configured to switch
to standby mode approx. 30 – 60 seconds after the
last button activity depending on the respective
mode (time, date and room temperature are shown
in alternation). If you would like the thermometer
to turn off completely after approx. 1 minute, follow
the steps below:

Basic functions
22
1. In standby mode, hold the SET button
3
down for approx. 2 seconds until the 24 hr indi-
cator starts to blink on the display.
2. Then push the SET button 6 more times until
the LCD indicator briefly appears on the LCD
display and until the ON indicator flashes right
afterwards.
3. If you now push the MEM button
9
, the OFF
indicator will start to blink on the display.
4. Then push the SET button to save this setting.
The thermometer will now return to standby
mode and will now automatically switch off ap-
prox. 1 minute after the last button activity.
5. If you would like to set the thermometer back
to continuously standby mode, you can set the
LCD/OFF setting to ON according to the descrip-
tion above.
°Celsius⁄°Fahrenheit setting
1. Push the MEM button
9
to switch to memory
mode.
2. Then hold the SET button
3
down for approx.
2 seconds until the temperature measurement/
indicator switches from °C (degrees Celsius)
to °F (degrees Fahrenheit/1 signal tone) or
vice-versa from °F (degrees Fahrenheit) to °C
(degrees Celsius/2 signal tones).
Setting the date and time
In standby mode and in memory mode, the ther-
mometer displays the room temperature, time and
date in alternation. The two blinking dots between
the hours and minutes indicate the second intervals.

Basic functions
23
1. Push the SET button
3
down for approx.
2 seconds to switch to the configuration mode.
The indicator for the time mode 12 hour (12 hr)
or 24 hour (24 hr) will blink.
2. Push the MEM button
9
to select the desired
time mode. Push the SET button to save the se-
lected time mode. If the 12 hour indicator
(12 hr) is configured, the symbol PM will appear
on the display when displaying the time.
3. The indicator for hours will blink on the display
and with the MEM button, you can perform the
setting from 1 – 12 or 1 – 24 depending on the
previously selected time mode. You can then
save the selected value with the SET button.
4. Now, the indicator for minutes will blink on the
display and with the MEM button, you can set a
value from 00 – 59 and save the selected value
with the SET button.
5. Now, the indicator for the calendar year will
blink on the display and with the MEM button,
you can set a value from 2001 – 2099 and save
the selected value with the SET button.
6. Now, the indicator for the month will blink on
the display and with the MEM button, you can
set a value from 1 – 12 and save the selected val-
ue with the SET button.
7. Now, the indicator for the weekday will blink
on the display and with the MEM button, you
can set a value from 1 – 31 and save the selected
value with the SET button.

24
Basic functions
8. Finally, the LCD indicator appears on the dis-
play for a short time, immediately followed by
a blinking ON. With the MEM button, you can
choose between ON (thermometer stays in
continuously standby mode) and OFF (ther-
mometer automatically switches off approx.
1minute after the last button activity) and save
the selected setting with the SET button. The
thermometer will then switch to standby mode.
If ON was selected, it will remain in standby
mode continuously. If OFF was selected, it will
always switch off automatically after approx.
1 minute of button inactivity.
If you push the MEM button when setting
the values for the date and time, the next
higher value will be set in each case.
Holding the MEM button down will quickly
cycle through the configurable values.
Releasing the MEM button will leave the
setting at the respective value reached.
If you briefly push both buttons ( )
ear measurement and ( ) forehead mea-
surement at the same time in memory or
configuration mode, the thermometer
will switch back to standby mode and
the time, date and room temperature will
be shown in alternation. It will also au-
tomatically switch to standby mode after
approx. 30 seconds of button inactivity.

25
Basic functions
Memory mode
The thermometer saves the last 9 body temperature
measurements in your ear or on your forehead. The
current measurement will appear last in the mem-
ory. If all 9 memory slots are occupied, the oldest
measurement will be deleted from the memory.
1. In standby mode, hold the thermometer so that
the back of the thermometer points towards
you to display the saved measurements and
push the MEM button
9
.
The memory indicator ( )
15
(memory access)
and the number for the last measurement saved
(e.g. 8) will now briefly appear on the display.
Directly afterwards, the temperature measured
with the indicator for ear measurement ( )
18
or forehead measurement (
)
19
will be
displayed,
followed by the time

Basic functions
26
and then the date in continuous alternation.
2. Each time you push the MEM button again,
first the number and then the data saved for
the next memory slot will be shown briefly in
descending order. Once the oldest memory slot
with the number 1 is reached, the indicator will
switch back to standby mode after pushing
the MEM button again and back to the most
recent memory slot (e.g. 8) if the MEM button is
pushed again etc.
If no measurements have been saved,
(-- -°C) with the memory indicator (
)
will appear on the display.
The following symbols may appear on the display
when accessing the measurements in the memory:
Symbol Explanation
Memory indicator for memory mode/
memory access
PM
PM indicator (“post meridiem” = after-
noon in 12-hour mode)
Saved ear temperature measurement

27
Operation
Saved forehead temperature
measurement
If you push the SET button down for
approx. 2 seconds while the saved mea-
surement data is shown, the respective
temperature in the memory will switch/
be converted from °C (degrees Celsius)
to °F (degrees Fahrenheit) or vice-versa.
The switch from °C to °F is confirmed by
1 short audible tone and the switch from
°F to °C is confirmed by 2 short audible
tones.
Operation
Measuring the body
temperature in your ear
1. Before measuring your body temperature
in your ear, remove the push-on adapter for
measuring forehead temperature
5
from the
thermometer.
2. Before performing the measurement, make
sure that the infrared sensor
4
is clean
(see fig. C).
3. Hold the thermometer with your thumb or in-
dex finger on the button (
) ear measure-
ment
7
, but do not push the button (
) yet.

Operation
28
4. Pull your ear back slightly to straighten your
ear canal.
5. Slowly and carefully insert the probe tip with
the infrared sensor
4
in your outer ear canal.
6. Hold the thermometer so that the probe tip is
directly aligned with the eardrum inside your
ear (see fig. B). If possible, always perform the
temperature measurement in the same man-
ner on the same ear.
7. Hold the thermometer steady and then push
the button (
) ear measurement
7
.
A signal tone will indicate that the measure-
ment has started. A signal tone will sound
twice after approx. 2 seconds indicating that
the temperature measurement is complete.
The indicator ( )
18
and the measured ear
temperature will appear on the LCD display
1
.

Operation
29
At the same time, the backlight
2
and the illu-
minated ring will light up indicating the range
of the measured temperature; see chapter “In-
dicators for body temperature”.
8. Carefully remove the probe tip of the thermom-
eter from your outer ear canal and read the
measured temperature on the LCD display. The
indicator (
) indicates that the temperature
in your ear has been measured. It is only pos-
sible to perform a new measurement after the
backlight has gone out (you must wait approx.
6 seconds).
Wait until the measurement has been
saved and no circles are visible on the
display.
Measuring forehead
temperature
1. Fit the push-on adapter for measuring fore-
head temperature
5
on the thermometer so
that it is secure.
2. Before performing the measurement, make
sure that the infrared sensor is clean. Hold the
thermometer with your thumb on the button
(
) forehead measurement
6
, but do not
push the button (
) yet.

Operation
30
3. Hold the thermometer in the middle of your
forehead so that the push-on adapter for mea-
suring your forehead temperature is gently
resting on your forehead.
4. Hold the thermometer steady and then push
the button ( ) forehead measurement.
A signal tone will indicate that the measure-
ment has started. A signal tone will sound twice
after approx. 2 seconds indicating that the
temperature measurement is complete. The
indicator ( )
19
and the measured forehead
temperature will appear on the display
1
.
At the same time, the backlight
2
will light
up indicating the range for the measured
temperature; see chapter “Indicators for body
temperature”.

Operation
31
5. Carefully remove the probe tip
4
of the ther-
mometer from your forehead and read the
measured temperature on the LCD display.
The symbol (
)
19
indicates that your fore-
head temperature has been measured. You can
now immediately start a new measurement.
If you want to immediately switch back to
standby mode, you can briefly push the
MEM button. The thermometer will also au-
tomatically switch back to standby mode
after approx. 1 minute of button inactivity.
Measuring object temperature
1. Please note: This method of performing mea-
surements is not suitable for measuring body
temperature!
2. Before measuring the temperature of an object
(liquid/surface), remove the push-on adapter
for measuring forehead temperature from the
thermometer.
3. Before performing the measurement, make
sure that the infrared sensor is clean.
4. Push the buttons (
) ear measurement
7
and
(
) forehead measurement
6
at the same
time. The indicator (
) for measuring the
temperature of objects
17
accompanied by
the indicator “food”on the display shows that
the object temperature measurement has been
activated.

Operation
32
5. Hold the probe tip with the infrared sensor
4
so that it can measure the temperature of the
liquid or surface within a distance of 0.39" (1cm).
6. Now push the button ( )
7
ear measurement.
A signal tone will indicate that the measure-
ment has started. A signal tone will sound twice
after approx. 2 seconds indicating that the
temperature measurement is complete. The
object temperature measured will appear on
the display.
If you would like to immediately switch
back to standby mode, you can push the
buttons (
) ear measurement and ( )
forehead measurement at the same
time. This will also be done automat-
ically after approx. 1 minute of button
inactivity.

Cleaning and maintenance
33
Cleaning and maintenance
NOTICE!
Risk of short circuit!
Water that has penetrated the housing
may cause a short circuit.
− Never submerge the thermometer in
water.
− Make sure that no water penetrates
the housing.
NOTICE!
Risk of damage!
Improper handling of the thermometer
may result in damage.
− Do not use any aggressive cleaners,
brushes with metal or nylon bristles,
sharp or metallic cleaning utensils
such as knives, hard scrapers and the
like. They could damage the surfaces.
− Never attempt to clean the thermom-
eter with a scouring agent, petrol or a
solvent.
1. For accurate measurements, it is very important
that the infrared sensor
4
of the thermome-
ter is clean and free of scratches.

Cleaning and maintenance
34
2. Each time before performing a measurement
or if the “Clean” warning indicator appears on
the display, check the infrared sensor and, if
necessary, carefully clean it with a cotton swab
soaked with a small amount of medical alcohol
and then immediately with a clean, dry cotton
swab.
3. Use a soft, dry cloth to clean the housing.
4. After cleaning, store the thermometer in a
clean, dry place at room temperature or set it
on the table rest
13
.
5. Never subject the thermometer to extreme
temperatures, moisture, direct sunlight or
vibrations!
“Clean” warning indicator
The thermometer has a special warning indicator
that reminds the user when to clean the infrared
sensor on the probe tip of the thermometer.

Calibration
35
If you have not used the thermometer for a pro-
longed period of time or after approx. 10 mea-
surements, the warning notice will appear by the
segment indicator for CL
21
on the top left of the
LCD display
1
and the green backlight
2
of the
thermometer will blink twice and emit a signal tone
twice to remind the user that the probe tip with the
infrared sensor should be cleaned.
Calibration
The thermometer was calibrated in the factory fol-
lowing manufacture. If the thermometer is used in
accordance with the provisions and notices in the
user manual for private and non-commercial use,
there is no need to calibrate it at regular intervals.
If, however, you doubt the accuracy of the mea-
surements, you should immediately contact your
vendor.
Never attempt to disassemble the thermometer or
make changes as they could result in risks and in
such a case, also void any warranty claim!

Troubleshooting
36
Troubleshooting
Fault Cause Solution
The bat-
teries have
been insert-
ed, but the
LED display
1
is blank.
There may
be debris in
the battery
compartment.
Remove the
debris from
the battery
compartment.
The batteries
are empty or
were inserted
with incorrect
polarity.
Replace the bat-
teries with full
batteries. Make
sure the polarity
is correct!
The battery
contacts are
not aligned
with the
terminals.
Check the bat-
tery contacts.
There is a
fault in the
electronics.
Remove the
batteries and
put them back
in after approx.
3 seconds.
The tempera-
ture measured
is less than
32.0 °C/89.6 °F
or higher than
42.9 °C/109.3
°F.
Observe the no-
tices in the user
manual.
The thermo-
meter is defec-
tive (hardware
error).
Contact the
manufacturer/
vendor.

Troubleshooting
37
Fault Cause Solution
The operating
temperature is
outside of the
valid range.
Observe the
operating
conditions (see
chapter “Techni-
cal data”).
The tem-
perature
measured
is not accu-
rate or you
doubt the
accuracy of
the mea-
surement.
Check whether
the infrared
sensor
4
is
dirty.
Clean the in-
frared sensor
(see chapter
“Cleaning and
maintenance”).
Check whether
the thermom-
eter is properly
used.
Observe the
notices on
operating the
thermometer
and obtain-
ing a correct
measurement.
Check if the
device and
patient have
been in the
same room
for at least 30
minutes before
performing the
measurement.
Make sure that
the device and
patient have
been in the
same room
for at least 30
minutes before
performing the
measurement.
The thermo-
meter is being
used outdoors.
Only use the
thermometer in
indoor areas.
You have held
the thermom-
eter in your
hands for a
prolonged
period.
Place the ther-
mometer e.g.
on a table so
that it can adjust
to the room
temperature.

Electromagnetic immunity
38
Electromagnetic immunity
Table 1 – Instructions and manufacturer data –
electromagnetic emissions – for all EQUIPMENT
and SYSTEMS (see 5.2.2.1).
Instructions and manufacturer data – electro-
magnetic emissions
The (EQUIPMENT or SYSTEM) is designed for use
in the electromagnetic environment described
below. The customer or user of the (EQUIPMENT
or SYSTEM) should ensure that it is indeed used in
such an environment.
Emission
test
Compli-
ance
Electromagnetic envi-
ronment – instructions
HF emis-
sions
CISPR 11
Group 1 The (EQUIPMENT or
SYSTEM) only uses HF
energy for internal
operation. Therefore,
very limited HF emis-
sions may result and it
is highly unlikely that
they will disrupt near-
by electronic equip-
ment in any way.
Guidelines and manufacturer’s declaration –
electromagnetic emissions
The DSO 364 model is intended for operation in
an environment as described below. The custom-
er or the user of the DSO 364 model should en-
sure that it is operated in such an environment.

Electromagnetic immunity
39
Measuring
emitted
interference
Compli-
ance
Electromagnetic
environment
– guidelines
HF emis-
sions in
accordance
with CISPR 11
Group 1
HF emis-
sions in
accordance
with CISPR 11
Class B The DSO 364 model
is intended for use in
all facilities including
residential areas and
for areas that are
directly connected
to a public utility
network that also
supplies buildings
used for residential
purposes.
Harmonic
current
emissions in
accordance
with IEC
61000-3-2
Not
applicable
Emissions
of voltage
fluctuations/
flicker in
accordance
with IEC
61000-3-3
Not
applicable
Guidelines and manufacturer’s declaration –
electromagnetic immunity
The DSO 364 model is intended for operation in
an electromagnetic environment as described
below. The customer or the user of the DSO 364
model should ensure that it is used in such an
environment.

Electromagnetic immunity
40
Immuni-
ty tests
IEC
60601
test
level
Com-
pliance
level
Electromagnet-
ic environment
– guidelines
Electro-
static dis-
charge
(ESD) in
accor-
dance
with IEC
61000-4-2
± 6 kV
contact
dis-
charge
± 8 kV
air dis-
charge
Not ap-
plicable
± 8 kV
air dis-
charge
Floors should
be made of
wood or con-
crete or be
covered with
ceramic tiles.
If the floor is
covered with
synthetic mate-
rial, the relative
humidity must
amount to at
least 30 %.
Fast
transient
electrical
bursts
in accor-
dance
with IEC
61000-
4-4
± 2 kV
for
power
lines
±1 kV
for in-
put and
output
lines
Not ap-
plicable
The quality of
the supply volt-
age should cor-
respond with
a typical store
or hospital
environment.
Surges
in accor-
dance
with IEC
61000-
4-5
± 1 kV
sym-
metrical
voltage
± 2 kV
asym-
metrical
voltage
Not ap-
plicable
The quality of
the supply volt-
age should cor-
respond with
a typical store
or hospital
environment.

Electromagnetic immunity
41
Immuni-
ty tests
IEC
60601
test
level
Com-
pliance
level
Electromagnet-
ic environment
– guidelines
Voltage
drops,
short
inter-
ruptions
and fluc-
tuations
in the
supply
voltage
in accor-
dance
with
IEC
61000-
4-11
< 5 %
U
T
(> 95
% drop
of U
T
)
for ½
period
40 % U
T
(60 %
drop of
the U
T
)
for 5 pe-
riods 70
% U
T
(30
% drop
of U
T
)
for 25
periods
< 5 % U
T
(> 95 %
drop in
U
T
) for
5 s
Not ap-
plicable
The quality of
the supply volt-
age should cor-
respond with a
typical store or
hospital envi-
ronment. If the
user of the DSO
364 model also
requires that
the function
continues after
interruptions
to the power
supply, it is
recommended
that you supply
the DSO 364
model from an
uninterrupted
power supply
or battery.
Magnetic
field with
supply
frequen-
cy (50/60
Hz) in ac-
cordance
with IEC
61000-
4-8
3 A/m 3 A/m Magnetic fields
associated with
the mains fre-
quency should
correspond
to the typical
levels encoun-
tered in a store
or hospital
environment.
NOTICE: U
T
is the mains AC voltage prior to appli-
cation of the test levels.

Electromagnetic immunity
42
Guidelines and manufacturer’s declaration –
electromagnetic immunity
The DSO 364 model is intended for operation
in an electromagnetic environment as de-
scribed below. The customer or the user of the
model should ensure that it is used in such an
environment.
Immu-
nity
tests
IEC
60601
test
level
Com-
pliance
level
Electromagnetic
environment
– guidelines
Portable and
mobile wireless
equipment
should not be
used at distances
to the [device or
system] includ-
ing its lines that
are below the
recommended
safety clearance
that is calculated
based on the
equation that
applies for the
transmission fre-
quency. Recom-
mended safety
clearance:

Electromagnetic immunity
43
Immu-
nity
tests
IEC
60601
test
level
Com-
pliance
level
Electromagnetic
environment
– guidelines
Con-
ducted
HF
distur-
bances
in accor-
dance
with IEC
61000-
4-6
3 Vrms
150
kHz to
80
MHz
3 Vrms d = 1.2 √P
Emit-
ted HF
distur-
bances
in accor-
dance
with IEC
61000-
4-3
3 V/m
80 MHz
to 2.5
GHz
3 V/m d = 1.2 √P
80 MHz to
800 MHz
d = 2.3√P
800 MHz to
2.5 GHz
where P is the
nominal output
of the transmit-
ter in watts (W)
according to the
specifications of
the transmitter
manufacturer
and d is the
recommended
safety clearance
in meters (m).
According to an
on-site survey
a
,
the field strength

Electromagnetic immunity
44
of stationary
radio transmit-
ters is less than
the compliance
level
b
for all
frequencies.
Disturbances are
possible within
the vicinity of
devices with the
following graph-
ic symbols.
NOTICE 1 In the case of 80 MHz and 800 MHz, the
higher value shall apply.
NOTICE 2 These guidelines may not apply in all
situations. The propagation of electromagnetic
waves is affected by absorption and reflection by
buildings, objects and people.
a. The field strength of stationary transmitters
such as base stations for cordless phones and
land mobile radio services, amateur stations, AM
and FM radio and television stations cannot be
precisely predetermined in a theoretical respect.
It is recommended that the location be surveyed
in order to determine the electromagnetic envi-
ronment based on stationary HF transmitters. If
the field strength at the location of the DSO 364
model exceeds the compliance level specified
above, the DSO 364 model must be observed
with respect to normal operation at each appli-
cation location. If the device behaves unusually,
further measures may have to be taken, e.g. re-
orientation or relocation of the DSO 364 model.

Electromagnetic immunity
45
b. Not applicable over a frequency range from
150 kHz to 80 MHz.
Recommended safety clearance between porta-
ble and mobile HF telecommunications devices
and the [DEVICE or SYSTEM].
The DSO 364 model is intended for operation in
an electromagnetic environment where HF dis-
turbances are monitored. The customer or user
of the DSO 364 model can help to avoid electro-
magnetic disturbances by observing the mini-
mum clearance between portable and mobile HF
telecommunication devices (transmitters) and
the DSO 364 model – depending on the output
power of the communication device as discussed
below.
Nominal
output
of the W
transmit-
ter
Safety clearance depending on the
transmission frequency m
150 kHz to
80 MHz
d=1.2 √P
80 MHz to
800 MHz
d=1.2 √P
800 MHz
to
2.5 GHz
d=2.3 √P
0.01 0.12 0.12 0.23
0.1 0.38 0.38 0.73
1 1.2 1.2 2.3
10 3.8 3.8 7. 3
100 12 12 23
For transmitters whose nominal output is not
specified in the above table, the distance can be
determined using the equation in the respective
column where P represents the nominal output
of the transmitter in watts (W) as specified by the
transmitter manufacturer.

Changing the battery
46
NOTICE 1 In order to calculate the recommended
safety clearance between transmitters within a
frequency range of 80 MHz to 2.5 GHz, an addi-
tional factor of 10/3 was used to reduce the prob-
ability that a mobile/portable communication
device accidentally brought into the patient area
causes a disturbance.
NOTICE 2 These guidelines may not apply in all
situations. The propagation of electromagnetic
waves is affected by absorption and reflection by
buildings, objects and people.
Changing the battery
WARNING!
Danger of explosion!
Improper handling of the batteries may
cause an explosion.
− Only replace the batteries with the
same or an equivalent battery type.
− Do not expose the batteries to exces-
sive heat such as from sunshine or fire.
− The enclosed batteries must not be
charged or reactivated with other
means, they must not be dismantled,
disposed of in fire or short circuited.
− Protect batteries against mechanical
damage.

Changing the battery
47
WARNING!
Risk of injury!
Handling batteries improperly may result
in injury.
− Store the batteries so that they are not
accessible for children.
− If swallowed, batteries could pose
a risk of death. Therefore, store the
batteries so that they are not acces-
sible for small children. If a battery is
swallowed, you must seek immediate
medical attention.
− If battery acid has leaked, avoid con-
tact with your skin, eyes and mucous
membranes. In the event of contact
with acid, immediately flush the appli-
cable areas with plenty of clean water
and promptly consult a physician.
NOTICE!
Risk of damage!
Improper handling of the batteries may
result in damage.
− Make sure the polarity is correct when
inserting the batteries.

Changing the battery
48
− Only insert batteries of the same type;
do not use different types of batteries
or old batteries with new batteries.
− Remove the old batteries from the
battery compartment if they are emp-
ty or if you do not intend to use the
thermometer for a prolonged period
of time.
If the battery indicator ( )
16
appears on the LCD
display
1
or the thermometer no longer func-
tions, the batteries should be replaced immediately.
All settings and entries in the memory
will be erased if the batteries are empty
or when changing weak batteries!
Therefore, after inserting new batteries,
the date, time and energy-saving mode
must be reset; see chapter “Setting the
date and time”.
1. Type AAA alkaline batteries are required for
the thermometer. Do not use any rechargeable
batteries!
2. To open the battery compartment cover
11
,
push against the locking clip on the back of the
thermometer and take the cover off.
3. Remove the empty batteries.
4. Then insert two new alkaline batteries (type
AAA). When inserting the batteries, make sure
that the polarity of the batteries is correct (see
marking/stamped information in the battery
compartment).

Changing the battery
49
5. Put the battery compartment cover back in and
push it against the thermometer housing until
it locks back into place.

Technical data
50
Technical data
Model/type: DSO 364
Dimensions
(L × W × H):
Approx. 5.37" x 1.75" x 1.59"
(136.5 × 44.5 × 40.5 mm)
Weight: Approx. 0.12 lb (53.5 g)
(without batteries and
table rest)
Material: Plastics, metals
Power supply: 3.0 V DC, 2× AAA batteries
(V = volts, DC = direct
current)
Measurement
method:
Contactless infrared
measurement
Measurement time: Approx. 2 seconds
Measuring
distance:
Approx. 0.39" (1 cm) (mea-
surement of objects)
Display: LCD display with green
backlight, data shown in
°C (degrees Celsius) or °F
(degrees Fahrenheit), res-
olution: 0.1 °C/°F
Memory function:
(memory)
Storage of the last 9
body temperature
measurements
Energy-saving
function:
The thermometer au-
tomatically deactivates
after approx. 1 min. if
energy-saving mode is
activated.
Laser class: The LED light complies with
protection class I (integrat-
ed flashlight)

Technical data
51
Body temperature:
Measurement
range:
32.0 °C – 42.9 °C
(89.6 °F – 109.3 °F)
Measurement
accuracy:
from 35.5 °C – 42.0 °C
(95.9 °F – 107.6 °F):
+/-0.2 °C (+/-0.4 °F)
other ranges:
+/-0.3 °C (+/-0.5 °F)
Object temperature:
Measurement
range:
20.0 °C – 60.0 °C
(68.0 °F – 140.0 °F)
Measurement
accuracy:
+/-1.0 °C (+/-2.0 °F)
Room temperature:
Measurement
range:
5.0 °C – 59.9 °C
(41.0 °F – 139.8 °F)
Measurement
accuracy:
+/-1.0 °C (+/-2.0 °F)
Operating conditions:
Atmospheric
pressure:
700 hPa – 1060 hPa
Forehead
measurement:
15.0 °C – 40.0 °C
(59.0 °F – 104.0 °F) at 20 %
– 85 % relative humidity
Ear/object
measurement:
10.0 °C – 40.0 °C
(50.0 °F – 104.0 °F) at 20 %
– 85 % relative humidity

Technical data
52
Storage/transport data:
-20°C
55°C
20%
90%
Storage/transport tem-
perature: -20 °C – 55 °C
at 20 % – 90 % relative
humidity
700 hPa
1060 hPa
Atmospheric pressure:
700 hPa – 1060 hPa
Device nameplate:
Manufactured for:
Handelshaus Dittmann GmbH
Kissinger Straße 68
D-97727 Fuchsstadt/
Germany
2016-08
V4916DSO364
Ear-and-Forehead Thermometer DSO 364
3V DC (2xAAA)
Keep dry
item #94078
Made in China

Disposal
53
Disposal
Disposing of the packaging
− Sort the packaging before you dispose of it.
Dispose of paperboard and cardboard with
the recycled paper service and wrappers with
appropriate collection service.
Disposing of old appliances
− Should the thermometer no longer be capable
of being used at some point in time, dispose of
it in accordance with the regulations in force
in your city or state.
− Please ensure your recycling information
applies to local regulations and the EPA recom-
mendations (www.epa.gov).
Batteries may not be disposed of with house-
hold waste!
As the end user you are required by law to bring all
batteries and rechargeable batteries, regardless
whether they contain harmful substances* or not,
to a collection point run by the city, county, or state,
or to a retailer, so that they can be disposed of in an
environmentally friendly manner.
*labeled with: Cd = cadmium, Hg = mercury,
Pb = lead

54

Contenido
55
Contenido
Conjunto ...............................................................4
Uso ........................................................................5
Volumen de suministro/
piezas del dispositivo ........................................56
Códigos QR ..........................................................57
Información general .........................................58
Leer y guardar el manual del usuario ............58
Explicación de símbolos ....................................58
Seguridad .......................................................... 60
Uso debido ...........................................................60
Indicaciones de seguridad ................................ 61
Información sobre la temperatura corporal ...67
Puesta en funcionamiento ................................70
Funciones básicas .............................................. 72
Indicaciones sobre la temperatura
corporal .................................................................72
Retroiluminación/función de linterna ............73
Modo de ahorro energético ...............................73
Ajuste de grados Celsius/Fahrenheit ..............74
Ajuste de la hora y fecha ....................................75
Modo de memoria ...............................................77
Funcionamiento ................................................ 80
Medición de la temperatura corporal
en el oído .............................................................. 80
Medición de la temperatura en la frente ....... 82
Medición de la temperatura en objetos ......... 84
Limpieza y mantenimiento ...............................86
Calibración ........................................................ 88
Resolución de problemas .................................89
Inmunidad electromagnética ...........................92
Cambio de pila ................................................. 102
Datos técnicos ..................................................105
Eliminación .......................................................108
Eliminación del embalaje ................................ 108
Eliminación de equipos en desuso ............... 108

56
Volumen de suministro/piezas del dispositivo
Volumen de suministro⁄
piezas del dispositivo
1
Pantalla LCD
2
Retroiluminación (de pantalla LCD)
3
Botón SET
4
Punta medidora con sensor infrarrojo
5
Caperuza para la medición de la temperatura
en la frente
6
Botón ( ) para la medición de la temperatura
en la frente (con retroiluminación)
7
Botón ( ) para la medición de la temperatura
en el oído (con retroiluminación)
8
Botón ( ) para encender la linterna
9
Botón MEM
10
Apertura de salida de señal
11
Tapa del compartimento de pilas
12
Iluminación (linterna)
13
Soporte para mesa
14
Indicador PM
15
Indicador de memoria ( ) (en modo de
memoria)
16
Indicador de pila ( )
17
Indicador ( ) para medir la temperatura
en objetos
18
Indicador ( ) para medir la temperatura
en el oído
19
Indicador ( ) para medir la temperatura en
la frente
20
Indicador de segmento de temperatura medida
21
Indicador de segmento para FE (fiebre) y CL
(limpieza)
El producto incluye dos pilas de tipo AAA.

Códigos QR
57
Los códigos QR le ayudan a
encontrar la información que
busca fácilmente y rápidamente
Si busca información sobre el producto, recambios
o accesorios, datos sobre garantías o soporte pos-
venta, o si quiere ver un video de demostración del
producto o una vista 360° del producto, los códigos
QR le ayudan a encontrar lo que busca rápidamente.
¿Qué es un código QR?
Un código QR (QR = respuesta rápida) es un tipo de
matriz que se puede leer con la cámara de su
smartphone y que contiene, por ejemplo, un enlace
a una página web o información de contacto.
Ventaja: No es necesario introducir una dirección web
o datos de contacto de forma manual.
Cómo funciona
Para escanear el código QR solo
necesita un smartphone con sof-
tware que pueda leer códigos QR
y una conexión a Internet.
Este tipo de software está dispo-
nible gratis en el app store de su
smartphone.
Pruébelo ahora
Escanee el código QR con su
smartphone para averiguar más
sobre el producto ALDI que ha
comprado.
Su portal de servicio de ALDI
Todos los datos mencionados también se encuentran
en el portal de servicio de ALDI en www.aldi.us.
Según la tarifa contratada, se le puede cobrar por la conexión.

Información general
58
Información general
Leer y guardar el manual del
usuario
Este manual del usuario pertenece al
termómetro de oído y frente DSO 364
(resumido, “termómetro”). Contiene in-
formación importante relacionada con la
puesta en funcionamiento y el uso.
Lea detenidamente el manual del usuario antes de
utilizar el termómetro, en especial el apartado
correspondiente a las indicaciones de seguridad.
La inobservancia de este manual del usuario pue-
de provocar daños en el termómetro.
Guarde el manual del usuario para consultarlo en
el futuro. Si entrega el termómetro a un tercero,
entréguele sin falta este manual del usuario.
Explicación de símbolos
Los siguientes símbolos y términos de advertencia
se emplean en este manual del usuario, en el ter-
mómetro o en el embalaje.
¡ADVERTENCIA!
Este símbolo/término de advertencia designa un
peligro de riesgo moderado que puede provocar la
muerte o lesiones severas si no se evita.

Información general
59
¡AVISO!
Este término de advertencia avisa de posibles
daños materiales.
Este símbolo le proporciona
información adicional útil sobre el
montaje o el funcionamiento.
Utilizar y conservar en seco
Nombre de lote:
V4916DSO364
Número de serie: 00001
(número secuencial)
2016-08
Fecha de fabricación:
2016-08 (año, mes)
Fabricante: Handelshaus
Dittmann GmbH, Kissinger
Straße 68, D-97727 Fuchsstadt
(Alemania).
Tipo BF (body float) de protec-
ción contra descarga eléctrica.
Un equipo de tipo BF con mayor
protección contra descarga
eléctrica para el cuerpo, pero no
directamente para el corazón.

Seguridad
60
Seguridad
Uso debido
El termómetro está diseñado únicamente para me-
dir la temperatura del cuerpo humano en el oído o
en la frente, así como para medir la temperatura de
líquidos (p. ej. leche o agua) o superficies. El termó-
metro está previsto solo para uso privado, y no es
apta para aplicaciones comerciales.
El paciente puede ser el operario previsto. Utilice el
termómetro solo como se describe en este manual
del usuario. Cualquier otra utilización se considera-
rá inapropiada y puede provocar daños materiales.
El fabricante o proveedor no asume ninguna res-
ponsabilidad por los daños derivados de un uso
inapropiado o incorrecto.

Seguridad
61
Indicaciones de seguridad
¡ADVERTENCIA!
¡Peligro para niños y personas
con aptitudes físicas, sensoria-
les o mentales reducidas!
− Este termómetro no está previsto para
que lo usen personas (incluidos niños)
con habilidades físicas, sensoriales
o mentales reducidas o que no tengan
experiencia y/o conocimientos, a
menos que estén supervisadas por
una persona responsable de su segu-
ridad o que hayan recibido instruc-
ciones de tal persona sobre cómo usar
el termómetro.
− Guarde el termómetro de forma que
no esté accesible para niños ni jóvenes
menores de 18 años.
− Supervise a los niños para evitar que
jueguen con el termómetro.
− Asegúrese de que el termómetro no
acabe en manos de los niños. Los niños
podrían ingerir las piezas pequeñas o
las pilas, y asfixiarse. Los niños podrían
lesionarse al usar el termómetro.

Seguridad
62
¡ADVERTENCIA!
¡Riesgo de lesiones!
La manipulación errónea del termómetro
puede provocar lesiones.
− En caso de defecto, no se debe
emplear el termómetro. No intente
modificar el termómetro, desmontarlo,
repararlo ni sustituir sus piezas.
− Si aparecieran anomalías al usar el
termómetro, deje de utilizarlo de inme-
diato y consulte a su médico.
− No haga ninguna otra actividad durante
el proceso de medición.
− Si tiene dudas sobre el uso del termó-
metro, consulte antes a su médico.
− Conserve este manual del usuario du-
rante la vida útil del producto, y entré-
guelo también al ceder el termómetro
a terceros. Asegúrese de que terceras
personas también puedan acceder a
este manual del usuario. El manual del
usuario forma parte del termómetro.
− No haga un uso incorrecto ni ajeno a
su fin.

Seguridad
63
− El termómetro dispone de un LED de
clase 1 (función de linterna). No mire
directamente al rayo de luz del LED
mucho tiempo, ni oriente el rayo de luz
del LED a los ojos de otras personas o
animales.
− ¡Este termómetro no sustituye al
asesoramiento o tratamiento médico!
Las mediciones tomadas sirven solo
de referencia. Si tiene problemas de
salud, acuda al médico.
− Mida la temperatura corporal en el mis-
mo oído siempre que se pueda, puesto
que la temperatura puede variar entre
ambos oídos.
− Mantenga el sensor infrarrojo limpio y
seco, y evite que se dañe (ver la fig. C).
Solo así obtendrá resultados de medi-
ción precisos.
− No toque el sensor infrarrojo ni sople
sobre él. La suciedad en el sensor infra-
rrojo puede dar lugar a resultados de
medición imprecisos.
− ¡No mida la temperatura corporal por
el oído si está inflamado o infectado!
− No utilice el termómetro si está dañado.
El uso de un equipo dañado puede
conllevar lesiones, peligros serios o
mediciones imprecisas.

Seguridad
64
− Si el termómetro ha estado guardado
en un lugar con una temperatura muy
distinta al lugar de la medición, espere
antes de tomar la medición. Tanto
el termómetro como las personas
cuya temperatura se mida, deberían
encontrarse 30 minutos al menos en el
mismo entorno.
− No tome mediciones en el oído si pade-
ce una enfermedad del oído o si aún
queda agua en su interior, p. ej. tras
ducharse o nadar.
− La cera del oído o una frente sebo-
rreica pueden dar lugar a mediciones
imprecisas. Por tanto, limpie el oído o
la frente antes de la medición. A con-
tinuación, espere unos 5–10 minutos
antes de tomar la temperatura.
− Repita las mediciones cada 15 minutos
aprox. si los resultados son anormal-
mente bajos o si no coinciden con
la percepción personal. En tal caso,
también puede realizar una medición
comparativa vía oral o rectal con un
termómetro de fiebre convencional.
En caso de duda, consulte al médico.

Seguridad
65
− Si se administran gotas u otros medica-
mentos en uno de los oídos, la tempe-
ratura se debería medir por el otro.
− Para tomar la temperatura en personas
con audífonos o tapones, se reco-
mienda esperar unos 30 minutos tras
retirarlos para medir la temperatura.
¡AVISO!
¡Riesgo de daños!
La manipulación inadecuada del termó-
metro puede provocar daños.
− No utilice accesorios de otros disposi-
tivos.
− No deje que el termómetro se caiga, no
lo agite ni lo exponga a golpes.
− Para garantizar resultados exactos,
proteja sobre todo el sensor infrarrojo
del termómetro frente a la humedad,
la suciedad y los daños.
− No exponga el termómetro a la luz
solar directa, ni a temperaturas dema-
siado altas o bajas. Emplee y guarde el
termómetro solo en un entorno seco y
libre de suciedad.

Seguridad
66
− No abra el termómetro ni intente repa-
rarlo por su cuenta si se avería o daña.
De lo contrario, la garantía quedará sin
validez. El termómetro solo puede ser
reparado por personal especializado
autorizado.
− No guarde el termómetro en lugares
con temperaturas ambientales dema-
siado altas o bajas (inferiores a -4 °F
(-20 °C) o superiores a 131 °F (55 °C)),
ni en entornos muy secos o húme-
dos, pues podrían darse mediciones
imprecisas.
− No use el termómetro en un entorno
mojado. Durante el uso, mantenga
alejado cualquier líquido y, sobre
todo, nunca sumerja el termómetro en
líquidos.
− No use el termómetro cerca de mate-
riales y gases fácilmente inflamables,
o cerca de explosivos.
− Durante su empleo, el termómetro
puede interferir con otros equipos
eléctricos. Por tanto, no lo utilice cerca
de otros equipos eléctricos.

Información sobre la temperatura corporal
67
− No use celulares cerca del termóme-
tro al medir la temperatura. Tenga en
cuenta que los equipos de comunica-
ción de alta frecuencia (HF) portátiles y
móviles (p. ej., celulares) pueden influir
en los equipos eléctricos médicos.
− No utilice el termómetro en montañas
de más de 9843 pies (3000 metros) de
altura.
− No emplee el termómetro a menos
de 5 pies (1.5 metros) de distancia de
equipos de ondas cortas o microon-
das, ni de equipos quirúrgicos de alta
frecuencia.
− Los equipos eléctricos médicos se rigen
por medidas preventivas especiales
en relación con la CEM (compatibilidad
electromagnética). Por tanto, tenga
presentes las indicaciones sobre CEM
para la instalación y puesta en funcio-
namiento del termómetro.
Información sobre la
temperatura corporal
Por temperatura corporal se entiende la tempe-
ratura interna del cuerpo (temperatura central).
Durante el día va oscilando: es más baja a primera
hora de la mañana y más alta a última hora de la
tarde.

Información sobre la temperatura corporal
68
El valor normal de la temperatura corporal no es un
valor fijo, sino un rango.
Edad Temperatura
corporal
normal en °C
Temperatura
corporal normal
en °F
0–2 años 36.4–38.0 °C 97.5–100.4 °F
3–10 años 36.1–37.8 °C 97.0–100 °F
11–65 años 35.9–37.6 °C 96.6–99.7 °F
más de
65años
35.8–37.5 °C 96.4–99.5 °F
El rango de la temperatura corporal normal es dife-
rente para cada persona, y viene determinado por
muchos factores: edad, sexo, hora, lugar y tipo de
medición de temperatura, nivel de actividad,
estado anímico, influencia de medicamentos, etc.
La mayoría de personas presenta una temperatura
corporal menor al dormir y durante el día aumenta.
Los lactantes y niños pequeños muestran una
temperatura corporal superior a la de los adultos.
Conforme aumenta la edad, disminuye la tempera-
tura corporal. Las oscilaciones térmicas suelen ser
mayores, más rápidas y frecuentes entre los niños.
Las mediciones en diferentes puntos del cuerpo
humano aportan resultados variados: Normalmente
la temperatura corporal medida por vía rectal es
unos 0.5 °F (0.3 °C) superior que en la boca, y esta
es unos 0.5 °F (0.3 °C) superior que en la axila.

Información sobre la temperatura corporal
69
Para averiguar la temperatura corporal, se reco-
mienda tomar la temperatura corporal unos tres o
cuadro días sucesivos, a diferentes horas, con buen
estado de salud. Así puede conocer su temperatura
corporal normal y anotarla para poder comparar
las mediciones de temperatura con los valores nor-
males que detectó en caso necesario.
Medición de la temperatura corporal en el oído
Los resultados de la investigación muestran que
el oído es ideal para medir la temperatura corpo-
ral, puesto que el hipotálamo (el área del cerebro
que regula la temperatura corporal) y el tímpano
reciben sangre de vasos sanguíneos comunes. Los
cambios de la temperatura corporal se pueden
detectar en el oído con mayor rapidez y precisión
que en otros puntos del cuerpo. Por eso resulta
ventajoso tomar la temperatura corporal en el oído
tal como se muestra en la fig. B en la medida de lo
posible.

Puesta en funcionamiento
70
Puesta en funcionamiento
Las dos pilas ya están insertadas en el termómetro,
pero están protegidas por una cinta aislante.
1. Antes del primer uso, abra la tapa del com-
partimento de pilas
11
de la parte trasera del
termómetro.
2. Retire la cinta aislante y cierre de nuevo la tapa
del compartimento de pilas.
El termómetro se enciende ahora con 4breves
tonos y en la pantalla LCD
1
aparecen breve-
mente todos los indicadores.
La indicación pasa entonces al modo de espera
y muestra alternativamente los valores básicos
de hora, mes y día de la semana, y la tempera-
tura ambiente actual. Aparte, la pantalla y la
iluminación de los botones ( ) de medición en
el oído y ( ) medición en la frente se iluminan
unos segundos.

Puesta en funcionamiento
71
Cuando el termómetro está apagado, se
puede encender presionando cualquier
botón. El termómetro pasa entonces al
modo de espera. En este modo, la pan-
talla va cambiando entre la hora, fecha y
temperatura ambiente.
En el modo de espera y el modo de ajus-
te, la indicación de la pantalla es correc-
ta cuando se sostiene el termómetro de
forma que el lado frontal con los botones
está orientado hacia el usuario. En el
modo de medición de temperatura y el
modo memoria, es justo al revés: aquí
la indicación de la pantalla es correcta
cuando se sostiene el termómetro de
forma que el lado trasero está orientado
hacia el usuario.
Si desea cambiar rápido del modo de
ajuste o memoria al de espera, debe
presionar a la vez los botones de medi-
ción en el oído ( ) y medición en la
frente ( ). El termómetro pasa automá-
ticamente al modo de espera si, tras una
medición de temperatura, no se presio-
na ningún botón en aprox. 1minuto, o en
el modo de ajuste o memoria en aprox.
30 segundos.
Tras una medición, si aparece “Lo” o “Hi”
en la pantalla, es que se han superado
los límites inferior o superior del rango
de medición permitido.

Funciones básicas
72
INFORMACIÓN IMPORTANTE sobre el
“aviso de limpieza”:
¡Tras algunas mediciones, si la retroilu-
minación verde de la pantalla LCD co-
mienza a parpadear dos veces al emitir
2tonos, no es que funcione mal, sino
que se trata del aviso de “limpieza”! Para
ello, lea el capítulo “Aviso de limpieza”.
Funciones básicas
Indicaciones sobre la
temperatura corporal
El termómetro dispone de una retroiluminación
que, tras medir la temperatura corporal, indica de
inmediato con diferentes colores en qué rango se
encuentra la temperatura corporal.
Retroiluminación verde: La temperatura corporal
medida está por debajo de 37.5 °C (99.5 °F).
Retroiluminación roja: La temperatura corporal
medida está en el rango de temperatura alta de
37.5°C (99.5 °F) a 37.9 °C (100.3 °F).
Retroiluminación roja y además indicación FE
(fiebre) en la pantalla:
La temperatura corporal medida está en el rango
de fiebre entre 38.0 °C (100.4 °F) y 42.9°C (109.3°F).

Funciones básicas
73
Retroiluminación⁄función de
linterna
Retroiluminación: Cada vez que presiona el botón
SET
3
o MEM
9
, se activa la retroiluminación
2
de la pantalla LCD unos 10segundos.
Linterna: Si mantiene presionado el botón
8
(
)
unos 2 segundos en el modo de espera, la
linterna
12
del termómetro (1 LED junto a la punta
medidora) se enciende unos 10 segundos. Al mis-
mo tiempo, la retroiluminación azul de los
botones (
) de medición en la frente
6
y (
) medi-
ción en el oído
7
se enciende unos 15segundos.
Si presiona brevemente el botón (
) en el modo de
espera, la iluminación de los botones ( ) de medi-
ción en el oído y ( ) medición en la frente se en-
ciende unos 15 segundos.
Si el termómetro está apagado y pre-
siona el botón ( ), la retroiluminación
de la pantalla LCD se encenderá unos
10 segundos y la de los botones ( ) de
medición en la frente y ( ) medición en el
oído se encenderá unos 15 segundos.
Modo de ahorro energético
De forma predeterminada, el termómetro está
configurado para que, según el modo, pase al
modo de espera (se muestran alternativamente la
hora, la fecha y la temperatura ambiente) tras unos
30–60segundos después de presionar un botón.
Si desea que el termómetro se apague del todo tras
1minuto aprox., puede proceder así:

Funciones básicas
74
1. En el modo de espera, mantenga presionado
el botón SET
3
unos 2 segundos hasta que
comience a parpadear la indicación de 24 hr en
la pantalla.
2. Presione entonces el botón SET seis veces hasta
que la pantalla LCD muestre brevemente la indica-
ción LCD y en seguida parpadee la indicación ON.
3. Si presiona el botón MEM
9
, en la pantalla
comienza a parpadear la indicación OFF.
4. Presione entonces el botón SET para guardar
este ajuste. El termómetro regresa al modo de
espera y se apaga ahora tras 1minuto aprox.
después de haber presionado un botón por
última vez.
5. Si desea que el termómetro regrese al modo de
espera permanente, puede fijar el ajuste LCD/
OFF en ON conforme a la descripción anterior.
Ajuste de grados Celsius⁄
Fahrenheit
1. Presione el botón MEM
9
para acceder al
modo memoria.
2. Luego, mantenga presionado el botón SET
3
unos 2 segundos hasta que la indicación/
medición de la temperatura pase de °C (grados
Celsius) a °F (grados Fahrenheit/1 tono) y vicever-
sa, de °F (grados Fahrenheit) a °C (grados
Celsius/2 tonos).

Funciones básicas
75
Ajuste de la hora y fecha
El termómetro va mostrando alternativamente la
temperatura ambiente, la hora y la fecha en el modo
de espera y de memoria. Los dos puntos parpadean-
tes entre la indicación de la hora y los minutos seña-
lan el ritmo de los segundos.
1. Mantenga presionado el botón SET
3
unos
2segundos para acceder al modo de ajuste.
La indicación del modo de 12 horas (12 hr) o
24horas (24 hr) parpadea.
2. Presione el botón MEM
9
para seleccionar el
modo de hora deseado. Presione el botón SET
para guardar el modo de hora seleccionado.
Si configura el modo de 12horas (12 hr), aparece
el símbolo PM con la hora en la pantalla.
3. En la pantalla parpadea ahora la indicación de
las horas. Con el botón MEM puede realizar el
ajuste de 1 a 12 o de 1 a 24 según el modo de hora
escogido antes, y guardar el valor ajustado con
el botón SET.
4. En la pantalla parpadea ahora la indicación de
los minutos. Con el botón MEM puede realizar
el ajuste de 00 a 59, y guardar el valor ajustado
con el botón SET.
5. En la pantalla parpadea ahora la indicación del
año. Con el botón MEM puede realizar el ajuste
de 2001 a 2099, y guardar el valor ajustado con
el botón SET.
6. En la pantalla parpadea ahora la indicación del
mes. Con el botón MEM puede realizar el ajuste
de 1 a 12, y guardar el valor ajustado con el bo-
tón SET.

Funciones básicas
76
7. En la pantalla parpadea ahora la indicación del
día del mes. Con el botón MEM puede realizar el
ajuste de 1 a 31, y guardar el valor ajustado con
el botón SET.
8. Por último, en la pantalla LCD aparece breve-
mente la indicación LCD y enseguida la indica-
ción parpadeante ON. Con el botón MEM, puede
elegir entre ON (el termómetro permanece en el
modo de espera permanente) y OFF (el termó-
metro se apaga automáticamente tras 1 minuto
aprox. después de haber presionado un botón
por última vez) y guardar la configuración es-
cogida con el botón SET. El termómetro pasa
entonces al modo de espera.
Si ha elegido ON, permanece siempre en el
modo de espera. Si ha elegido OFF, se apaga
automáticamente tras 1 minuto aprox. después
de haber presionado un botón por última vez.
Si presiona el botón MEM al ajustar los
valores de fecha y hora, se configura el
siguiente valor más alto. Si mantiene
presionado el botón MEM, los valores
ajustables avanzan rápido. Si suelta el
botón MEM, el ajuste se queda en el valor
alcanzado.
Si presiona a la vez los botones ( ) de
medición en el oído y ( ) de medición en
la frente en el modo de memoria o ajuste,
el termómetro regresa al modo de espe-
ra y va mostrando alternativamente la
hora, fecha y temperatura ambiente.
El paso al modo de espera es automático
si no presiona ningún botón en unos
30segundos.

Funciones básicas
77
Modo de memoria
El termómetro guarda las 9 últimas mediciones de
temperatura corporal en el oído o frente, y en el
último lugar de la memoria muestra la medición
actual. Si las 9 entradas de la memoria están ocu-
padas, se eliminará siempre la medición más anti-
gua de la memoria.
1. Para ver los datos de medición guardados, sos-
tenga el termómetro en el modo de espera de
forma que la parte trasera del termómetro mire
hacia usted y presione el botón MEM
9
.
En la pantalla aparece ahora brevemente el
indicador de memoria ( )
15
(acceso a me-
moria) y el número de la última medición guar-
dada (p. ej., 8).
A continuación, se van mostrando la tempera-
tura medida con el símbolo de medición en el
oído ( )
18
o medición en la frente (
)
19
,

Funciones básicas
78
luego la hora
y entonces la fecha de forma alterna.
2. Cada vez que presione el botón MEM, se irán
mostrando, en orden descendente, primero el
número y en seguida los datos guardados de
la siguiente entrada de la memoria. Cuando se
llegue a la entrada más antigua de la memoria
con el número 1, la indicación regresa de nuevo
al modo de espera tras presionar el botón MEM
y, si lo presiona de nuevo, comienza otra vez por
la entrada más reciente (p. ej., 8), etc.
Si no hay valores de medición guardados,
la pantalla muestra la indicación (-- -°C)
con el indicador de memoria (
).

Funciones básicas
79
Al consultar los valores de medición guardados,
en la pantalla pueden aparecer los siguientes
símbolos:
Símbolo Explicación
Indicador de memoria para modo de
memoria/acceso a memoria
PM
Indicador PM (“post meridiem” =
tarde en el modo de 12 horas)
Medición guardada de la
temperatura en el oído
Medición guardada de la
temperatura en la frente
Si mantiene presionado el botón SET
unos 2 segundos durante la visualización
de los datos de medición guardados, la
correspondiente temperatura guardada
pasa de °C (grados Celsius) a °F (grados
Fahrenheit), y viceversa. La conversión
de °C a °F se indica con 1 tono breve,
y de °F a °C con 2 tonos breves.

Funcionamiento
80
Funcionamiento
Medición de la temperatura
corporal en el oído
1. Antes de medir la temperatura corporal en el
oído, retire del termómetro la caperuza para la
medición de la temperatura en la frente
5
.
2. Antes de la medición, compruebe si el sensor
infrarrojo
4
está limpio (véase la fig. C).
3. Mantenga el termómetro con el pulgar o el índi-
ce sobre el botón (
) de medición en el oído
7
,
pero no presione aún el botón (
).
4. Tire de la oreja un poco hacia atrás para poner
recto el conducto auditivo.
5. Meta la punta medidora con el sensor
infrarrojo
4
lentamente y con cuidado en el
canal auditivo exterior.

Funcionamiento
81
6. Sostenga el termómetro de forma que la punta
medidora apunte directamente al tímpano en el
oído interno (ver la fig. B). Mida la temperatura
de igual manera y en el mismo oído siempre
que sea posible.
7. Mantenga quieto el termómetro y presione en-
tonces el botón (
) de medición en el oído
7
.
Un tono indica que comienza la medición. Tras
unos 2 segundos, un tono doble confirma que
la medición de la tempera tura ha finalizado.
El indicador ( )
18
y la temperatura medida
en el oído se muestran en la pantalla LCD
1
.
Al mismo tiempo se encienden la
retroiluminación
2
y el anillo luminoso, y
orientan sobre el resultado de la medición;
consulte el capítulo “Indicaciones sobre la tem-
peratura corporal”.
8. Retire la punta medidora del termómetro con
cuidado del canal auditivo exterior y vea la tempe-
ratura medida en la pantalla LCD. El símbolo (
)
indica que se ha efectuado una medición de tem-
peratura en el oído. Solamente puede realizar otra
medición una vez apagada la retroiluminación
(debe esperar unos 6 segundos).
Espere a que se guarde la medición, y
en la pantalla no se verá ningún círculo.

Funcionamiento
82
Medición de la temperatura en
la frente
1. Fije la caperuza para la medición de la tempera-
tura en la frente
5
sobre el termómetro.
2. Antes de la medición, compruebe si el sensor
infrarrojo está limpio. Mantenga el termómetro
con el pulgar sobre el botón (
) de medición en
la frente
6
, pero no presione aún el botón (
).
3. Mantenga el termómetro en el centro de la fren-
te de forma que la caperuza para la medición
de la temperatura en la frente se apoye un poco
sobre la frente.

Funcionamiento
83
4. Mantenga quieto el termómetro y presione en-
tonces el botón ( ) de medición en la frente.
Un tono indica que comienza la medición. Tras
unos 2 segundos, un tono doble confirma que la
medición de la temperatura ha finalizado.
El indicador ( )
19
y la temperatura medida
en la frente se muestran en la pantalla
1
.
Al mismo tiempo se enciende la
retroiluminación
2
, y orienta sobre el
resultado de la medición; consulte el capítulo
“Indicaciones sobre la temperatura corporal”.
5. Retire la punta medidora
4
del termómetro
con cuidado de la frente y vea la temperatura
medida en la pantalla LCD.
El símbolo (
)
19
indica que se ha efectuado
una medición de temperatura en la frente. Aho-
ra puede tomar otra medición de inmediato.

Funcionamiento
84
Si desea regresar de inmediato al modo
de espera, puede presionar brevemente
el botón MEM. El termómetro regresará
automáticamente al modo de espera si
no presiona ningún botón en 1 minuto
aprox.
Medición de la temperatura en
objetos
1. Tenga en cuenta: ¡Este método de medición
no está indicado para medir la temperatura
corporal!
2. Antes de medir la temperatura de un objeto
(líquido/superficie), retire del termómetro la
caperuza para la medición de la temperatura
en la frente.
3. Antes de la medición, compruebe si el sensor
infrarrojo está limpio.
4. Presione a la vez los botones (
) de medición en
el oído
7
y (
) de medición en la frente
6
.
El indicador (
) para medir la temperatura de
objetos
17
junto con la indicación “food” en la
pantalla, señalan que la medición de tempera-
tura en objetos está activa.

Funcionamiento
85
5. Mantenga la punta medidora con el sensor
infrarrojo
4
de forma que quede a una distan-
cia de 0.39" (1 cm) del líquido o de la superficie
cuya temperatura se debe medir.
6. Presione ahora el botón ( ) de medición en el
oído
7
. Un tono indica que comienza la me-
dición. Tras unos 2 segundos, un tono doble
confirma que la medición de la temperatura ha
finalizado. La temperatura medida del objeto se
ve en la pantalla.
Si desea cambiar rápido al modo de
espera, puede presionar a la vez los
botones de medición en el oído ( ) y
medición en la frente ( ). El proceso es
automático si no presiona ningún botón
en 1 minuto aprox.

Limpieza y mantenimiento
86
Limpieza y mantenimiento
¡AVISO!
¡Riesgo de cortocircuito!
Si entra agua en la carcasa, se puede pro-
ducir un cortocircuito.
− Nunca sumerja el termómetro en el
agua.
− Asegúrese de que no entre agua en la
carcasa.
¡AVISO!
¡Riesgo de daños!
La manipulación inadecuada del termó-
metro puede provocar daños.
− No utilice limpiadores agresivos, cepi-
llos con cerdas metálicas o de nylon,
ni utensilios de limpieza afilados o
metálicos como cuchillos, espátulas
duras y objetos similares, pues podrían
provocar daños en las superficies.
− Nunca intente limpiar el termómetro
con un producto abrasivo, gasolina
o solvente.

Limpieza y mantenimiento
87
1. Para mediciones exactas, es importante que el
sensor infrarrojo
4
del termómetro esté lim-
pio y sin arañazos.
2. Antes de cada medición o cuando aparece el
aviso “Limpieza” en la pantalla, revise el sensor
infrarrojo y, en caso necesario, límpielo con
cuidado usando un bastoncillo de algodón lige-
ramente empapado en alcohol sanitario y, justo
después, con otro bastoncillo seco y limpio.
3. Para limpiar la carcasa, utilice un paño suave y
seco.
4. Tras la limpieza, guarde el termómetro a tempe-
ratura ambiente en un lugar limpio y seco,
o colóquelo en el soporte para mesa
13
.
5. ¡Nunca exponga el termómetro a tempera-
turas extremas, humedad, luz solar directa ni
sacudidas!

Calibración
88
Aviso de “Limpieza”
El termómetro dispone de un aviso especial que
recuerda al usuario cuándo debe limpiar el sensor
infrarrojo de la punta medidora del termómetro.
Si no ha usado el termómetro durante mucho tiem-
po o tras unas 10 mediciones, aparece el indicador
de segmento CL
21
en la parte superior izquierda
de la pantalla LCD
1
, y parpadea la retroilumina-
ción verde
2
del termómetro 2 veces emitiendo
un tono doble para recordar al usuario que se de-
bería limpiar la punta medidora con el sensor
infrarrojo.
Calibración
El termómetro se calibró en fábrica tras su produc-
ción. Si el termómetro se emplea para uso privado
y no comercial conforme a las disposiciones e
indicaciones del manual del usuario, no se precisa
ninguna calibración periódica. Sin embargo, si
duda sobre la precisión de los valores de medición,
debería contactar de inmediato con su distribuidor.
¡Nunca intente desmontar o modificar el termó-
metro, puesto que puede implicar riesgos y, en tal
caso, la garantía deja de tener validez!

Resolución de problemas
89
Resolución de problemas
Incidencia Causa Solución
Las pilas
están inser-
tadas, pero
la pantalla
LCD
1
no
muestra
nada.
Puede haber
suciedad en el
compartimen-
to de pilas.
Retire la sucie-
dad del com-
partimento de
pilas.
Las pilas están
gastadas o
se han intro-
ducido con
la polaridad
equivocada.
Sustituya las
pilas por otras
nuevas. ¡Con-
trole que la
polaridad sea
correcta!
Los contactos
de las pilas no
están alinea-
dos con los
terminales.
Revise los con-
tactos de la pila.
Hay una in-
cidencia en
el sistema
electrónico.
Retire las pilas
y vuelva a
introducirlas
tras unos
3 segundos.

Resolución de problemas
90
Incidencia Causa Solución
La tempera-
tura medida
es inferior a
32.0°C/ 89.6°F
o superior
a 42.9°C/
109.3°F.
Tenga en cuen-
ta las indicacio-
nes del manual
del usuario.
El termómetro
está averia-
do (fallo del
hardware).
Póngase en
contacto con
el fabricante/
distribuidor.
La tempera-
tura operativa
está fuera del
rango válido.
Respete las
condiciones
operativas
(consulte el
capítulo “Datos
técnicos”).

Resolución de problemas
91
Incidencia Causa Solución
La medición
de la tem-
peratura es
imprecisa o
duda de la
exactitud de
la medición.
Compruebe si
el
sensor infra-
rrojo
4
está
sucio.
Limpie el sen-
sor infrarrojo
(consulte el
capítulo “Lim-
pieza y manteni-
miento”).
Compruebe
si el termó-
metro se usa
debidamente.
Tenga en
cuenta las indi-
caciones sobre
el manejo del
termómetro y
para obtener
un resultado
de medición
correcto.
Compruebe si
el equipo y el
paciente han
estado en el
mismo espa-
cio al menos
30 minutos
antes de la
medición.
Asegúrese de
que el equipo y
el paciente ha-
yan estado en
el mismo espa-
cio al menos
30 minutos
antes de la
medición.
El termóme-
tro se usa en
exteriores.
Utilice el termó-
metro solo en
interiores.
Ha sostenido
el termómetro
mucho tiempo
en la mano.
Deje el termó-
metro, p. ej.,
sobre la mesa,
para que se
adapte a la
temperatura
ambiente.

Inmunidad electromagnética
92
Inmunidad
electromagnética
Tabla 1 – instrucciones y datos del fabricante – emi-
siones electromagnéticas – para todos los EQUIPOS
y SISTEMAS (consulta 5.2.2.1).
Instrucciones y datos del fabricante – emisio-
nes electromagnéticas
El (EQUIPO o SISTEMA) está diseñado para su
uso en el entorno electromagnético descrito a
continuación. El cliente o usuario del (EQUIPO o
SISTEMA) debería garantizar que se utilice en un
entorno de este tipo.
Prue-
ba de
emisiones
Cumpli-
miento
Instrucciones so-
bre el entorno
electromagnético
Emisio-
nes HF
CISPR 11
Grupo 1 El (EQUIPO o SISTEMA)
utiliza energía HF
exclusivamente para
su funcionamiento
interno. Por eso, se
producen muy pocas
emisiones HF que, muy
probablemente, no
causarán ningún tipo
de interferencia cerca
de equipos electróni-
cos cercanos.

Inmunidad electromagnética
93
Pautas y declaración del fabricante – emisio-
nes electromagnéticas
El modelo DSO 364 está diseñado para el funcio-
namiento en un entorno como el indicado abajo.
El cliente o usuario del modelo DSO 364 debe
asegurarse de que se utilice en un entorno de
este tipo.
Mediciones de
interferencias
emitidas
Cumpli-
miento
Pautas sobre
el entorno
electromagnético
Emisiones HF
conforme a
CISPR 11
Grupo 1
Emisiones HF
conforme a
CISPR 11
Clase B El modelo DSO 364
es apropiado para
su uso en todos los
entornos, incluidos
los establecimien-
tos domésticos y
aquellos conecta-
dos directamente
a una red de
alimentación pú-
blica, que también
suministre a edi-
ficios usados con
fines residenciales.
Emisiones de
oscilaciones
armónicas
conforme a
IEC 61000-3-2
No
aplicable
Emisiones de
fluctuaciones
de tensión/
titilaciones
según IEC
61000-3-3
No
aplicable

Inmunidad electromagnética
94
Pautas y declaración del fabricante –
resistencia a interferencias electromagnéticas
El modelo DSO 364 está diseñado para el fun-
cionamiento en el entorno electromagnético
indicado abajo. El cliente o usuario del modelo
DSO 364 debe asegurarse de que se utilice en un
entorno de este tipo.
Compro-
baciones
de la
resistencia
a interfe-
rencias
Nivel de
prueba
IEC
60601
Nivel de
cumpli-
miento
Pautas de
entorno electro-
magnético
Descarga
de electri-
cidad está-
tica (ESD)
según IEC
61000-4-2
± 6 kV
descar-
ga de
contac-
to ± 8
kV des-
carga
de aire
No apli-
cable
± 8 kV
descar-
ga de
aire
Los suelos
deberían ser
de madera o
concreto o estar
alicatados con
cerámica. Si los
suelos están
revestidos de
material sintéti-
co, la humedad
relativa del
aire debe ser
del 30% como
mínimo.
Magni-
tudes
pertur-
badoras
eléctricas
transi-
torias
rápidas/
ráfagas
según IEC
61000-4-4
± 2 kV
para
líneas
de red
± 1 kV
para
líneas
de en-
trada y
salida
No apli-
cable
La calidad del
voltaje de ali-
mentación debe
corresponder a
la típica de un
negocio o entor-
no hospitalario.

Inmunidad electromagnética
95
Compro-
baciones
de la
resistencia
a interfe-
rencias
Nivel de
prueba
IEC
60601
Nivel de
cumpli-
miento
Pautas de
entorno electro-
magnético
Tensiones
transi-
torias
(surges)
según IEC
61000-4-5
± 1 kV
tensión
simé-
trica
± 2 kV
tensión
asimé-
trica
No apli-
cable
La calidad del
voltaje de ali-
mentación debe
corresponder a
la típica de un
negocio o entor-
no hospitalario.
Caídas de
tensión,
interrup-
ciones
cortas y
oscilacio-
nes de la
tensión de
suministro
según IEC
61000-4-11
< 5 % U
T
(> 95 %
caída
de U
T
)
para ½
período
40 % U
T
(60 %
caída
de U
T
)
para 5
perío-
dos 70
% U
T
(30 %
caída
de U
T
)
para 25
perío-
dos < 5
% U
T
(>
95 %
caída
de U
T
)
para 5 s
No apli-
cable
La calidad del
voltaje de ali-
mentación debe
corresponder a
la típica de un
negocio o en-
torno hospitala-
rio. Si el usuario
del modelo DSO
364 sigue usan-
do el equipo
incluso cuando
aparecen in-
terrupciones
del suministro
energético, se
recomienda
alimentar el
modelo DSO
364 con un su-
ministro de co-
rriente libre de
interrupciones o
una batería.

Inmunidad electromagnética
96
Compro-
baciones
de la
resistencia
a interfe-
rencias
Nivel de
prueba
IEC
60601
Nivel de
cumpli-
miento
Pautas de
entorno electro-
magnético
Campo
magnético
con la fre-
cuencia de
suministro
(50/60 Hz)
confor-
me a IEC
61000-4-8
3 A/m 3 A/m Los campos
magnéticos de
la frecuencia de
red deben co-
rresponder a los
valores típicos
que se deben
encontrar en un
negocio o entor-
no hospitalario.
AVISO: U
T
es el voltaje alterno de red antes de la
aplicación del nivel de prueba.
Pautas y declaración del fabricante –
inmunidad electromagnética
El modelo DSO 364 está diseñado para el fun-
cionamiento en el entorno electromagnético
indicado abajo. El cliente o usuario del modelo
debe asegurarse de que se utilice en un entorno
de este tipo.

Inmunidad electromagnética
97
Compro-
baciones
de la re-
sistencia
a interfe-
rencias
Nivel de
prueba
IEC
60601
Nivel de
cumpli-
miento
Pautas de en-
torno electro-
magnético
Los aparatos
de radio
portátiles y
móviles no
se usarán en
una distancia
al [equipo
o sistema],
incluidos los
conductos,
inferior a la
distancia de
seguridad
recomenda-
da, calculada
según la
ecuación
indicada para
la frecuencia
de envío.
Distancia de
seguridad
recomenda-
da:
Magni-
tudes
perturba-
doras HF
guiadas
según IEC
61000-4-6
3 Vrms
150 kHz
a 80
MHz
3 Vrms d = 1.2 √P

Inmunidad electromagnética
98
Compro-
baciones
de la re-
sistencia
a interfe-
rencias
Nivel de
prueba
IEC
60601
Nivel de
cumpli-
miento
Pautas de en-
torno electro-
magnético
Magni-
tudes
perturba-
doras HF
emitidas
según IEC
61000-4-3
3 V/m
80 MHz
a 2.5
GHz
3 V/m d = 1.2 √P 80
MHz a 800
MHz
d = 2.3 √P
800 MHz a
2.5 GHz
Con P como
potencia
nominal de
la emisora
en vatios (W)
conforme a
los datos del
fabricante de
la emisora,
y d como
distancia de
seguridad
recomendada
en metros (m).
Conforme a
un examen
in situ
a
, la
intensidad
del campo de
emisoras de
radio esta-
cionarias es
menor que
el nivel de
conformidad
b
con todas las
frecuencias.

Inmunidad electromagnética
99
Compro-
baciones
de la re-
sistencia
a interfe-
rencias
Nivel de
prueba
IEC
60601
Nivel de
cumpli-
miento
Pautas de en-
torno electro-
magnético
Cerca de
equipos que
lleven el si-
guiente sím-
bolo, puede
haber inter-
ferencias.
NOTA 1 A 80 MHz y 800 MHz, aplica el valor mayor.
NOTA 2 Puede que estas pautas no sean aplica-
bles en todas las situaciones. La propagación de
las ondas electromagnéticas se ve influida por
la absorción y reflexión de inmuebles, objetos y
personas.

Inmunidad electromagnética
100
a. Los campos de intensidad de emisoras esta-
cionarias, como estaciones base de redes móvi-
les y servicios de radio terrestre, estaciones de
radioaficionados, emisoras de televisión y radio
AM y FM, no se pueden predeterminar con exac-
titud en teoría. Para determinar el entorno elec-
tromagnético debido a emisoras estacionarias
HF, se recomienda estudiar el emplazamiento.
Si la intensidad de campo detectada en el lugar
del modelo DSO 364 supera el nivel de confor-
midad indicado arriba, se debe vigilar el funcio-
namiento normal del modelo DSO 364 allí donde
se use. Si se observan características anormales,
puede que sea necesario tomar medidas adicio-
nales, como reorientar o cambiar de lugar del
modelo DSO 364.
b. No aplicable en el rango de frecuencia de
150 kHz a 80 MHz.
Distancias de seguridad recomendadas entre
equipos de comunicación HF portátiles y móviles
y el [EQUIPO o SISTEMA].
El modelo DSO 364 está indicado para su uso
en un entorno electromagnético donde estén
controladas las magnitudes perturbadoras HF.
De esta manera, el cliente o usuario del modelo
DSO 364 puede ayudar a evitar las interferencias
electromagnéticas a través del mantenimiento
de la distancia mínima entre los equipos de co-
municación HF portátiles y móviles (emisoras)
y el modelo DSO 364, tal como se indica abajo
conforme a la potencia de salida del equipo de
comunicación.

Inmunidad electromagnética
101
Potencia
nominal
de la
emisora W
Distancia de seguridad según la
frecuencia de la emisora m
150 kHz
a 80 MHz
d=1.2 √P
80 MHz a
800 MHz
d=1.2 √P
800 MHz
a 2.5 GHz
d=2.3 √P
0.01 0.12 0.12 0.23
0.1 0.38 0.38 0.73
1 1.2 1.2 2.3
10 3.8 3.8 7.3
100 12 12 23
Para las emisoras cuya potencia nominal no se
indique en la tabla superior, se puede determi-
nar la distancia usando la ecuación de la colum-
na pertinente, donde P es la potencia nominal de
la emisora en vatios (W) según la información del
fabricante de la emisora.
NOTA 1 Para calcular la distancia de seguridad
recomendada para emisoras en el rango de
frecuencia de 80 MHz a 2.5 GHz, se usó un factor
adicional de 10/3 para reducir la probabilidad de
que un equipo de comunicación móvil/portátil
ubicado por descuido en la zona de los pacientes
pueda provocar interferencias.
NOTA 2 Puede que estas pautas no sean aplica-
bles en todas las situaciones. La propagación de
las ondas electromagnéticas se ve influida por la
absorción y reflexión de inmuebles, objetos
y personas.

Cambio de pila
102
Cambio de pila
¡ADVERTENCIA!
¡Peligro de explosión!
La manipulación inadecuada de las pilas
puede provocar una explosión.
− Solo cambie las pilas por otras del mis-
mo tipo o equivalente.
− No exponga las pilas a un calor excesivo,
como rayos de sol o fuego.
− Las pilas suministradas no se pueden
cargar ni reactivar con otros medios,
desmontar, tirar al fuego ni cortocir-
cuitar.
− Proteja las pilas contra daños mecánicos.
¡ADVERTENCIA!
¡Riesgo de lesiones!
La manipulación errónea de las pilas pue-
de provocar lesiones.
− Guarde las pilas lejos del alcance de los
niños.

Cambio de pila
103
− Las pilas pueden resultar mortales en
caso de ingesta. Por tanto, guarde las
pilas fuera del alcance de los niños
pequeños. En caso de ingesta de una
pila, se debe buscar ayuda médica de
inmediato.
− Si se derrama el ácido de las pilas, evite
el contacto con piel, ojos y mucosas.
En caso de contacto con el ácido, en-
juague de inmediato las zonas afec-
tadas con abundante agua limpia y
consulte a un médico de inmediato.
¡AVISO!
¡Riesgo de daños!
La manipulación inadecuada de las pilas
puede provocar daños.
− Asegúrese de que la polaridad sea
correcta al meter las pilas.
− Inserte solo pilas del mismo tipo; no
utilice tipos diferentes ni mezcle pilas
usadas con nuevas.
− Saque las pilas viejas del comparti-
mento de pilas si están gastadas o si
no desea usar el termómetro durante
mucho tiempo.

Cambio de pila
104
Si aparece el indicador de pila ( )
16
en la
pantalla LCD
1
o el termómetro no funciona más,
se deberían sustituir las pilas de inmediato.
¡Con las pilas vacías o al cambiar las pilas
débiles, se pierden todos los ajustes y las
entradas de la memoria! Por tanto, tras
insertar pilas nuevas, se deben configu-
rar de nuevo la fecha, hora y el modo de
ahorro energético (consulte el capítulo
“Ajuste de la hora y fecha”).
1. Para el termómetro se necesitan pilas alcalinas
del tipo AAA. ¡No utilice baterías recargables!
2. Para abrir la tapa del compartimento de
pilas
11
, presione el clip de bloqueo de la parte
trasera del termómetro y extraiga la tapa.
3. Retire las pilas usadas.
4. A continuación, introduzca dos pilas alcalinas
nuevas (tipo AAA). Cuando las inserte, tenga en
cuenta la polaridad correcta de las pilas (com-
pruebe la marca/grabado del compartimento
de pilas).
5. Vuelva a montar la tapa del compartimento de
pilas y presiónela contra la carcasa del termó-
metro hasta que encaje bien.

Datos técnicos
105
Datos técnicos
Modelo/tipo: DSO 364
Dimensiones
(largo × ancho
× alto):
aprox. 5.37" × 1.75" × 1.59"
(136.5 × 44.5 × 40.5 mm)
Peso: aprox. 0.12 lb (53.5 g) (sin
pilas ni soporte para mesa)
Material: plásticos, metales
Suministro
eléctrico:
3.0 V CC, 2 pilas AAA
(V = voltio, CC = corriente
continua)
Método de
medición:
medición por infrarrojos sin
contacto
Duración de la
medición:
unos 2 segundos
Distancia de la
medición:
aprox. 0.39" (1 cm)
(medición en objetos)
Pantalla: pantalla LCD con retroilu-
minación verde, indicación
en °C (grados Celsius) o °F
(grados Fahrenheit),
resolución: 0.1 °C/°F
Función de
memoria:
(memory)
almacenamiento de las
9 últimas mediciones de la
temperatura corporal

Datos técnicos
106
Función de ahorro
de energía:
el termómetro se apaga
automáticamente tras
1 min aprox. cuando el
modo de ahorro energético
está activo.
Clase de láser: la lámpara LED correspon-
de al grado de protección I
(linterna integrada)
Temperatura corporal:
Rango de
medición:
32.0 °C–42.9 °C
(89.6 °F–109.3 °F)
Precisión de
medición:
35.5 °C–42.0 °C
(95.9 °F–107.6 °F):
+/-0.2 °C (+/-0.4 °F)
Otros rangos:
+/-0.3 °C (+/-0.5 °F)
Temperatura de objetos:
Rango de
medición:
20.0 °C–60.0 °C
(68.0 °F–140.0 °F)
Precisión de
medición:
+/-1.0 °C (+/-2.0 °F)
Temperatura ambiente:
Rango de
medición:
5.0 °C–59.9 °C
(41.0 °F–139.8 °F)
Precisión de
medición:
+/-1.0 °C (+/-2.0 °F)

Datos técnicos
107
Condiciones operativas:
Presión
atmosférica:
700 hPa–1060 hPa
Medición en
frente:
15.0 °C–40.0 °C
(59.0 °F–104.0 °F)
a 20 %–85 % de humedad
relativa
Medición en oído/
objetos:
10.0 °C–40.0 °C
(50.0 °F–104.0 °F)
a 20 %–85 % de humedad
relativa
Datos de almacenamiento/transporte:
-20°C
55°C
20%
90%
Temperatura de almacena-
miento/transporte:
-20 °C–55 °C a 20 %–90 %
de humedad relativa
700 hPa
1060 hPa
Presión atmosférica:
700 hPa–1060 hPa
Placa de nombre del dispositivo:
Manufactured for:
Handelshaus Dittmann GmbH
Kissinger Straße 68
D-97727 Fuchsstadt/
Germany
2016-08
V4916DSO364
Ear-and-Forehead Thermometer DSO 364
3V DC (2xAAA)
Keep dry
item #94078
Made in China

Eliminación
108
Eliminación
Eliminación del embalaje
− Elimine el embalaje por tipos de material.
Deseche el papel y cartón a través del servicio
de papel reciclado, y los envoltorios a través del
servicio de recogida apropiado.
Eliminación de equipos en
desuso
− Cuando el termómetro no se utiliza más,
elimínelo de acuerdo con las disposiciones
vigentes de su ciudad o estado.
− Asegúrese de que la información sobre reciclaje
corresponda a la normativa local y las recomen-
daciones de la EPA (www.epa.gov).
¡Las pilas no deben ser depositadas en la basura
doméstica!
Como consumidor, usted está obligado legalmente
a llevar todas las pilas y acumuladores (indepen-
dientemente de que contengan sustancias noci-
vas* o no) a un punto de recogida de su ciudad,
condado o estado, o a la tienda, para que puedan
eliminarse de forma respetuosa con el medio
ambiente.
* etiquetado con: Cd = cadmio, Hg = mercurio,
Pb = plomo

USA
DISTRIBUTED BY • DISTRIBUIDO POR:
ALDI INC., BATAVIA, IL 60510
WWW.ALDI.US
AFTER SALES SUPPORT •
SERVICIO POSVENTA
MODEL/NO DEL MODELO:
DSO 364
94078
01/2017
www.greaterconceptsbydesign.com
1-815-342-5850
USA
3
YEARS WARRANTY
AÑOS DE GARANTÍA
-
 1
1
-
 2
2
-
 3
3
-
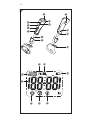 4
4
-
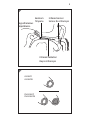 5
5
-
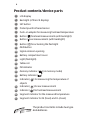 6
6
-
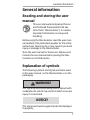 7
7
-
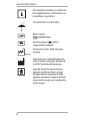 8
8
-
 9
9
-
 10
10
-
 11
11
-
 12
12
-
 13
13
-
 14
14
-
 15
15
-
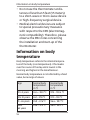 16
16
-
 17
17
-
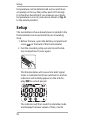 18
18
-
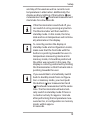 19
19
-
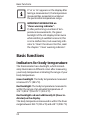 20
20
-
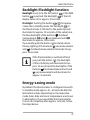 21
21
-
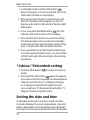 22
22
-
 23
23
-
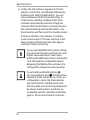 24
24
-
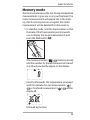 25
25
-
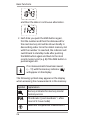 26
26
-
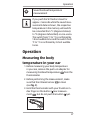 27
27
-
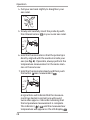 28
28
-
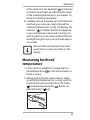 29
29
-
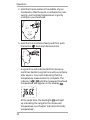 30
30
-
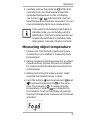 31
31
-
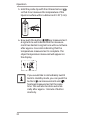 32
32
-
 33
33
-
 34
34
-
 35
35
-
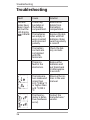 36
36
-
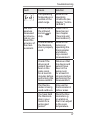 37
37
-
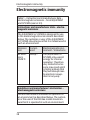 38
38
-
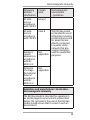 39
39
-
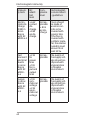 40
40
-
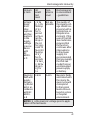 41
41
-
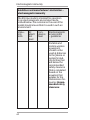 42
42
-
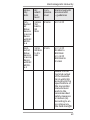 43
43
-
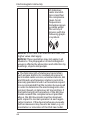 44
44
-
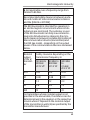 45
45
-
 46
46
-
 47
47
-
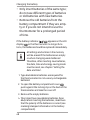 48
48
-
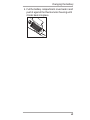 49
49
-
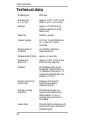 50
50
-
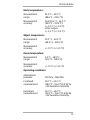 51
51
-
 52
52
-
 53
53
-
 54
54
-
 55
55
-
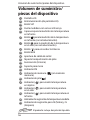 56
56
-
 57
57
-
 58
58
-
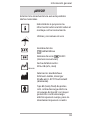 59
59
-
 60
60
-
 61
61
-
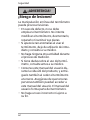 62
62
-
 63
63
-
 64
64
-
 65
65
-
 66
66
-
 67
67
-
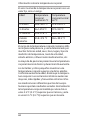 68
68
-
 69
69
-
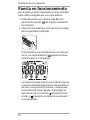 70
70
-
 71
71
-
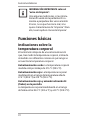 72
72
-
 73
73
-
 74
74
-
 75
75
-
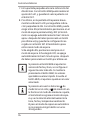 76
76
-
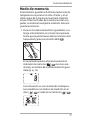 77
77
-
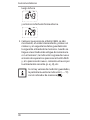 78
78
-
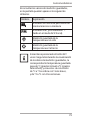 79
79
-
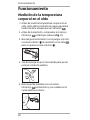 80
80
-
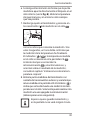 81
81
-
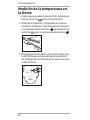 82
82
-
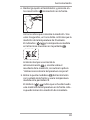 83
83
-
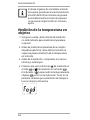 84
84
-
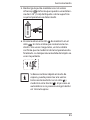 85
85
-
 86
86
-
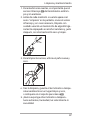 87
87
-
 88
88
-
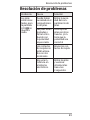 89
89
-
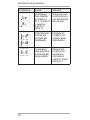 90
90
-
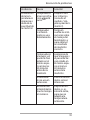 91
91
-
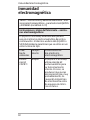 92
92
-
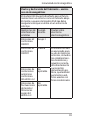 93
93
-
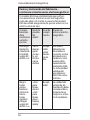 94
94
-
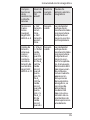 95
95
-
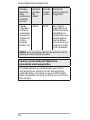 96
96
-
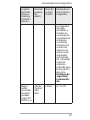 97
97
-
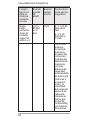 98
98
-
 99
99
-
 100
100
-
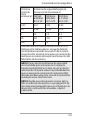 101
101
-
 102
102
-
 103
103
-
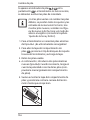 104
104
-
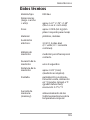 105
105
-
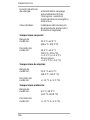 106
106
-
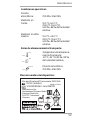 107
107
-
 108
108
-
 109
109


Little Journey V4916DSO364 Manual de usuario
- Categoría
- Termómetros corporales digitales
- Tipo
- Manual de usuario
- Este manual también es adecuado para
en otros idiomas
Otros documentos
-
Silvercrest 326954 El manual del propietario
-
 Miniland thermosense Manual de usuario
-
 Miniland thermotalk plus Manual de usuario
-
 PrimoPassi 87-349 Manual de usuario
-
Medisana TM 750 El manual del propietario
-
Topcom TH-4654 El manual del propietario
-
Terraillon THERMO FAST El manual del propietario
-
Beurer FT 90 El manual del propietario
-
Beurer FT 100+ El manual del propietario
-
HoMedics TI-150 Manual de usuario


