www.homewerksww.com
Questions, problems, missing parts? Before returning to your retailer, call our customer
service department at 1-877-319-3757, 8 a.m. - 5 p.m., CST, Monday - Friday.
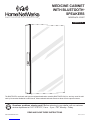
MEDICINE CABINET
WITH BLUETOOTH®
SPEAKERS
MODEL #74-102-BT
Español p. 8
Feb. 25, 2015
Home NetWerks
SIMPLE SOLUTIONS FOR A SMARTER HOME
The BLUETOOTH® word mark and logos are registered trademarks owned by BLUETOOTH SIG, Inc. and any use of the said
mark by Homewerks Worldwide is under license. Other trademark and trade names are those of their respective owners.
READ AND SAVE THESE INSTRUCTIONS

2www.homewerksww.com
TABLE OF CONTENTS
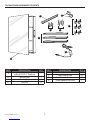
Package and Hardware Contents.......................................................................................................3
Preparation .........................................................................................................................................4
Recommended Tools .......................................................................................................................... 4
BLUETOOTH® Medicine Cabinet Installation Instructions .................................................................4
A. Normal Battery Charging Option ................................................................................................6
B. Hard Wire Battery Charging Option ............................................................................................6
Glass Shelf Installation .......................................................................................................................6
Pairing Your BLUETOOTH® Device to the Speaker ...........................................................................6
BLUETOOTH® Speaker Operation .....................................................................................................7
Care and Maintenance .......................................................................................................................7
Troubleshooting .................................................................................................................................. 7
Warranty .............................................................................................................................................7


4www.homewerksww.com
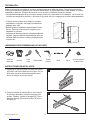
PREPARATION
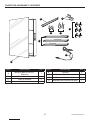
Before beginning assembly of product, make sure all parts are present. Compare parts with package
contents list and hardware contents. If any part is missing or damaged, do not attempt to assemble
the product. Contact customer service for replacement parts.
• It is important to make sure the medicine cabinet body is level and plumb upon installation. Use
a level (not included) to ensure accuracy, or the door may not close and/or secure itself properly.
• If you wish to reverse the hinge side and have it
hinged on the other side, just ip the medicine
cabinet over 180º.
• Speaker battery will hold charge for up to 8
hours of use. Then it will need to be charged
with the power adapter.
• The speaker battery may be delivered partially
charged. Charge battery completely before
using for the rst time to enjoy a full use.
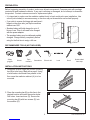
RECOMMENDED TOOLS (NOT INCLUDED)
Safety
goggles Gloves Tape
measure Screwdriver Electric drill Level Pencil Double-sided
foam tape
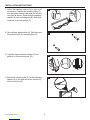
INSTALLATION INSTRUCTIONS
1. Determine at what height the bottom mounting
bar (B) is to be hung. Mark with a pencil. Using
a level make a horizontal line parallel to the
oor were the medicine cabinet (A) is to be
mounted.
1
2. Place the mounting bar (B) on this line in the
desired location and mark the anchor holes.
Drill holes. Insert anchors (D). Secure the
mounting bar (B) with two screws (E) into
the anchors (D).
2

5
www.homewerksww.com
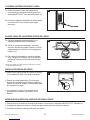
INSTALLATION INSTRUCTIONS
3. Rotate the medicine cabinet (A) for right or left
door swing. Position the mounting clips (C)
into the center channel and slide one left and
one right as shown. Place and hold medicine
cabinet (A) onto mounting bar (B). Mark hole
locations for mounting clips (C).
3
4. Set medicine cabinet aside (A). Drill holes and
insert anchors (D) for mounting clips (C).
4
5. Carefully lower medicine cabinet (A) into
position on the mounting bar (B). 5
6. Secure the mounting clips (C) on the medicine
cabinet (A) to the wall with a two screws (E)
into the anchors (D).
6

6www.homewerksww.com
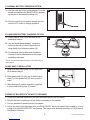
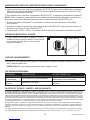
A. NORMAL BATTERY CHARGING OPTION
1a. Join the male end of the power adapter (H) to the
female connection in the BLUETOOTH® speaker
on the side of the medicine cabinet (A).
1a
2a. Plug the cord from the power adapter into the
closest GFCI outlet to charge speakers.
B. HARD WIRE BATTERY CHARGING OPTION
1b. Power adapter cord (H) will be used for this
installation method. 2b
2b. Use the female power adapter* connection
located at the top or bottom (depending on
hinge direction) of medicine cabinet (A).
3b. For recessed outlet or hard wire connection.
Contact a local certied electrician for proper
installation technique.
* Secure cord with double-sided foam tape (not included) if hanging
below cabinet.
GLASS SHELF INSTALLATION
1. Install four shelf locking clips (F) per glass shelf
(G) at desired height. 2
2. Slide glass shelf (G) onto top of shelf locking
clips (F). Push glass shelf (G) down to lock in
place.
3. Glass shelves (G) can be removed by pushing
in on the shelf locking clips (F) feature.
PAIRING OF BLUETOOTH® DEVICE TO SPEAKER
1. To play your personal music les, you need a wireless BLUETOOTH® device.
2. Set your device to a midrange volume before connecting to the speaker.
3. Turn on speakers by pressing button on speaker.
4. Follow the instructions that came with your BLUETOOTH® device to make it discoverable or to set it
to search for other BLUETOOTH® accessories. This may involve entering a passkey or PIN (Personal
Identication Number).

7
www.homewerksww.com
PAIRING OF BLUETOOTH® DEVICE TO SPEAKER (CONTINUED)
5. From the Home screen, choose Settings > BLUETOOTH®, the device searches for Homewerks®
speaker.
NOTE: While your device can maintain multiple pairing records, it can only connect to one accessory
at a time. This prevents your device from sending your data to the wrong BLUETOOTH® accessory.
6. Choose the Homewerks® speaker, and then enter a passkey or PIN (0000) if prompted.
7. When pairing is complete, you can use the BLUETOOTH® speaker to play audio with your device.
8. Optimal volume setting for the BLUETOOTH® speaker is 70% or lower. Settings higher than 70%
may cause sound distortion.
BLUETOOTH® SPEAKER OPERATION
1. Turning the speaker on and off is controlled by
the black button on the speaker. Press the button
once to turn the speaker on and again to turn
the speaker off.
1
CARE AND MAINTENANCE
1. When cleaning your new medicine cabinet, a mild non-abrasive glass cleaner is recommended. Apply
to a soft cloth or paper towel.
CAUTION: Do not spray cleanser directly onto the mirror or frame.
TROUBLESHOOTING
PROBLEM POSSIBLE CAUSE CORRECTIVE ACTION
Device will not pair Another device is already paired Make sure BLUETOOTH® signal is
turned off on other devices.
Speaker is not
working Battery is not charged Charge battery with power adapter
BLUETOOTH® SPEAKER – LIMITED 1-YEAR WARRANTY
If the BLUETOOTH® speaker fails due to a defect in materials or workmanship at any time during the rst year of ownership, the manufacturer
will replace it free of charge, postage-paid at their option. This warranty does not cover products that have been abused, altered, damaged,
misused, cut or worn. This warranty does not cover use in commercial applications. Use only manufacturer-supplied genuine warranty
repair replacement parts to repair the BLUETOOTH® speakers. Use of non-genuine repair parts will void your warranty. The manufacturer
DISCLAIMS all other implied or express warranties including all warranties of merchantability and/or tness for a particular purpose. As
some states do not allow exclusions or limitations on an implied warranty, the above exclusions and limitations may not apply. This warranty
gives you specic legal rights, and you may have other rights that vary from state to state.
This warranty is limited to the replacement of defective parts only. Labor charges and/or damage incurred during installation, repair,
replacement as well as incidental and consequential damages connected with the above are excluded. Any damage to this product
as a result of neglect, misuse, accident, improper installation or use other than the purpose SHALL VOID THIS WARRANTY.
Shipping costs for return product as part of a claim on the warranty must be paid for by the customer. Inquiries regarding warranty
claims can be directed to 1-877-319-3757, 8 a.m. - 5 p.m., CST, Monday - Friday.

8www.homewerksww.com
Preguntas, problemas, piezas faltantes? Antes de volver a la tienda, llame a nuestro
departamento de servicio al cliente al 1-877-319-3757, 08 a.m.-5 p.m., CST, Lunes - Viernes.
CABINA DE MEDICINA
CON BLUETOOTH®
PONENTES
MODELO #74-102-BT
Home NetWerks
SIMPLE SOLUTIONS FOR A SMARTER HOME
Las marcas registradas marca BLUETOOTH® y sus logotipos son marcas registradas propiedad de BLUETOOTH SIG, Inc. y
cualquier uso de dicha marca por Homewerks Worldwide es bajo licencia. Otras marcas y nombres comerciales pertenecen
a sus respectivos propietarios.
LEA Y GUARDE ESTAS INSTRUCCIONES

9
www.homewerksww.com
TABLA DE CONTENIDO
Paquete y Hardware Contenido .........................................................................................................9
Paquete de Hardware y Contenido ..................................................................................................10
Preparación ...................................................................................................................................... 11
Herramientas Recomendadas (No Incluido) .................................................................................... 11
Instrucciones de Instalación BLUETOOTH® Botiquín ...................................................................... 11
A. Normal Batería Opción Carga ..................................................................................................13
B. Batería Cable Rígido Opción Carga ......................................................................................... 13
Instalación Estante de Vidrio ............................................................................................................13
Vinculación del Dispositivo BLUETOOTH® Para el Altavoz ............................................................13
Operación BLUETOOTH® Altavoz ................................................................................................... 14
Cuidado y Mantenimiento ................................................................................................................14
Solución de Problemas ....................................................................................................................14
Garantía ...........................................................................................................................................14


11
www.homewerksww.com
PREPARACIÓN
Antes de comenzar el montaje del producto, asegúrese de tener todas las piezas. Compare las piezas con
la lista del contenido del paquete y su contenido de hardware. Si alguna parte falta o está dañada, no intente
ensamblar el producto. Póngase en contacto con el servicio al cliente de piezas de recambio.
• Es importante asegurarse de que el cuerpo botiquín es el nivel y la plomada en la instalación. uso un nivel (no
incluido) para asegurar la precisión, o la puerta no se puede cerrar y/o asegurar por sí mismo adecuadamente.
• Si desea invertir el lado de la bisagra y la tengan
articulada en el otro lado, sólo tapa el medicamento
gabinete sobre 180º.
• Batería de altavoz celebrará carga de hasta 8 horas
de uso. Entonces tendrá que ser cargado con el
adaptador de corriente.
• La batería del altavoz puede ser entrega parcialmente
cargada. Cargue la batería completamente antes de
utilizando para ello primero el tiempo para disfrutar de
un pleno uso.
HERRAMIENTAS RECOMENDADAS (NO INCLUIDO)
Gafas de
seguridad Guantes Cinta
medir Destornillador Taladro
eléctrico Nivel Lápiz Cinta de espuma
de doble cara
INSTRUCCIONES DE INSTALACIÓN
1. Determinar a qué altura está el montaje de la barra
(B) inferior a la horca. Marque con un lápiz. Con un
nivel hacer una línea horizontal paralela al suelo
fueron el botiquín (A) se va a montar.
1
2. Coloque la barra de montaje (B) en esta línea en
la ubicación deseada y marque los agujeros de
anclaje. Taladros. Inserte los anclajes (D). Fije la
barra de montaje (B) con dos tornillos (E) en los
anclajes (D).
2

12 www.homewerksww.com
INSTRUCCIONES DE INSTALACIÓN
3. Gire el botiquín (A) para la derecha o apertura de
la puerta izquierda. Coloque los clips de montaje
(C) en el canal central y deslice uno izquierdo y
otro derecho, como se muestra. Lugar y mantenga
botiquín (A) sobre la barra de montaje (B).
Ubicación de los oricios Marcar para clips
de montaje (C).
3
4. Establecer botiquín de lado (A). Perforar los
agujeros e inserte los anclajes (D) para los clips
de montaje (C).
4
5. Gabinete Baje cuidadosamente la medicina (A)
en su posición en la barra de montaje (B). 5
6. Asegure los clips de montaje (C) en el botiquín
(A) a la pared con un dos tornillos (E) en los
anclajes (D).
6

13
www.homewerksww.com www.homewerksww.com
A. NORMAL BATERÍA OPCIÓN DE CARGA
1a. Únete al extremo macho del adaptador de
corriente (H) a la conexión de las mujeres en el
altavoz BLUETOOTH® en el lado del botiquín (A).
1a
2a. Conecte el cable del adaptador de alimentación
en la toma GFCI más cercano para cargar
altavoces.
B. HARD CABLE DE LA BATERÍA OPCIÓN DE CARGA
1b. Cable del adaptador de alimentación (H) se
utilizará para este método de instalación. 2b
2b. Utilice la conexión del adaptador* de poder
femenino ubicado en la parte superior o inferior
(dependiendo de la dirección de la bisagra) de
botiquín (A).
3b. Para enchufe empotrado o conexión alambre
duro. Póngase en contacto con un electricista
certicado local para la técnica correcta insta-
lación.
* Cordón de seguridad con cinta de espuma de doble cara (no incluido)
si colgando debajo del gabinete.
INSTALACIÓN REPISA DE VIDRIO
1. Instale cuatro ganchos para las parrillas de bloqueo
(F) por estante de vidrio (G) a la altura deseada. 2
2. Estante de cristal diapositivas (G) en la parte
superior de la plataforma de bloqueo grapas (F).
Estante de vidrio de empuje (G) hacia abajo para
que encaje en su lugar.
3. Los estantes de vidrio (G) se pueden quitar
empujando en el estante clips función (F) de
bloqueo.
MARIDAJE DE BLUETOOTH® DISPOSITIVO PARA ALTAVOZ
1. Para reproducir los archivos de música personales, se necesita un dispositivo BLUETOOTH® inalámbrica.
2. Congurar el dispositivo para un volumen de gama media antes de conectar al altavoz.
3. Encienda los altavoces pulsando el botón de altavoz.

14 www.homewerksww.com
MARIDAJE DE BLUETOOTH® DISPOSITIVO PARA ALTAVOZ (CONTINUADO)
4. Siga las instrucciones que vienen con el dispositivo BLUETOOTH® para que sea visible o para congurarlo
para buscar otros accesorios BLUETOOTH®. Esto puede implicar que entra una clave de acceso o PIN
(Número de Identicación Personal).
5. En la pantalla Inicio, seleccione Conguración> BLUETOOTH®, el dispositivo busca altavoz Homewerks®.
NOTA: Si bien el dispositivo puede mantener varios registros de emparejamiento, sólo puede conectarse a un
accesorio a la vez. Esto evita que el dispositivo envíe sus datos al accesorio BLUETOOTH® mal.
6. Seleccione el altavoz Homewerks®, a continuación, introduzca una clave de acceso o PIN (0000)
si se le solicita.
7. Cuando se completa la vinculación, puede utilizar el altavoz BLUETOOTH® para reproducir audio con el
dispositivo. Ajuste para el altavoz BLUETOOTH®
8. Volumen óptimo es 70% o inferior. Los ajustes más altos del 70% puede causar la distorsión del sonido.
OPERACIÓN BLUETOOTH® ALTAVOZ
1. Al girar el altavoz encendido y apagado se controla
mediante el botón negro en el altavoz. Pulse el botón
una vez para activar el altavoz y otra vez para
desactivar el altavoz.
1
CUIDADO Y MANTENIMIENTO
1. Al limpiar su nuevo gabinete de la medicina, se recomienda un limpiador de cristales no abrasivo. Aplicar a un
paño o toalla de papel suave.
PRECAUCIÓN: No rocíe limpiador directamente sobre el espejo o marco.
SOLUCIÓN DE PROBLEMAS
PROBLEMA POSIBLE CAUSA ACCIÓN CORRECTIVA
El dispositivo no
se emparejará Otro dispositivo ya está emparejado Haga señal BLUETOOTH® seguro está
desactivado en otros dispositivos.
Altavoz no
funciona La batería no se carga Cargue la batería con el adaptador de
corriente
BLUETOOTH® ALTAVOZ - LIMITED 1 AÑO DE GARANTÍA
Si el altavoz BLUETOOTH® falla debido a un defecto en materiales o mano de obra en cualquier momento durante el primer año de
propiedad, el fabricante lo reemplazará gratuitamente, pagado el franqueo en su opción. Esta garantía no cubre los productos que han
sido maltratados, alterados, dañados, mal uso, cortadas o desgastadas. Esta garantía no cubre el uso en aplicaciones comerciales.
Utilice únicamente garantía genuina repuestos reparación suministrados por el fabricante para reparar altavoces BLUETOOTH®. El uso
de piezas de repuesto que no sean originales anulará la garantía. El fabricante niega todas las otras garantías implícitas o expresas,
incluyendo todas las garantías de comerciabilidad y/o idoneidad para un propósito particular. Dado que algunos estados no permiten
exclusiones o limitaciones de una garantía implícita, no pueden aplicarse las exclusiones y limitaciones anteriores. Esta garantía le otorga
derechos legales especícos, y usted puede tener otros derechos que varían de estado a estado.
Esta garantía se limita a la sustitución de sólo piezas defectuosas. Se excluyen los cargos y/o daños Laborales incurridos durante la
instalación, reparación, sustitución, así como daños incidentales y consecuentes relacionados con lo anterior. Cualquier daño en el
producto como consecuencia de la negligencia, mal uso, accidente, instalación incorrecta o uso diferente al propósito anulará esta
garantía.
Los gastos de envío de devolución del producto como parte de una reclamación sobre la garantía deben ser pagados por el cliente.
Las preguntas sobre las reclamaciones de garantía se pueden dirigir al 1-877-319-3757, 08 a.m.-5 p.m., CST, Lunes - Viernes.

FCC statements:
This device complies with part 15 of the FCC rules. Operation is subject to the
following two conditions: (1) this device may not cause harmful interference, and (2)
this device must accept any interference received, including interference that may
cause undesired operation.
NOTE: The manufacturer is not responsible for any radio or TV interference caused
by unauthorized modifications or changes to this equipment. Such modifications or
changes could void the user’s authority to operate the equipment.
NOTE: This equipment has been tested and found to comply with the limits for a
Class B digital device, pursuant to part 15 of the FCC Rules. These limits are designed
to provide reasonable protection against harmful interference in a residential
installation. This equipment generates uses and can radiate radio frequency energy
and, if not installed and used in accordance with the instructions, may cause harmful
interference to radio communications. However, there is no guarantee that
interference will not occur in a particular installation. If this equipment does cause
harmful interference to radio or television reception, which can be determined by
turning the equipment off and on, the user is encouraged to try to correct the
interference by one or more of the following measures:
‐ Reorient or relocate the receiving antenna.
‐ Increase the separation between the equipment and receiver.
‐Connect the equipment into an outlet on a circuit different from that to which the
receiver is connected.
‐Consult the dealer or an experienced radio/TV technician for help.
-
 1
1
-
 2
2
-
 3
3
-
 4
4
-
 5
5
-
 6
6
-
 7
7
-
 8
8
-
 9
9
-
 10
10
-
 11
11
-
 12
12
-
 13
13
-
 14
14
-
 15
15


Home Netwerks 74-102-BT Manual de usuario
- Tipo
- Manual de usuario
- Este manual también es adecuado para
En otros idiomas
- English: Home Netwerks 74-102-BT User manual