
Wireless thermostat/ Drahtloser Thermostat
Termostato inalámbrico/Thermostat sans fil
Vezeték nélküli termosztát/Termostato senza fili
Draadloze thermostaat/ Termostat bezprzewodowy
Termostat fara fir PNI CT60
EN - User manual .................. p. 2
DE - Benutzerhandbuch ....... p. 18
ES - Manual de usuario .......... p. 35
FR - Manuel de l’utilisateur ... p. 52
HU - Használati utasítás ........ p. 69
IT - Manuale dell’utente ......... p. 86
NL - Handleiding .................... p. 103
PL - Instrukcja obsługi ............ p. 120
RO - Manual de utilizare ........ p. 137

2
Introduction
This thermostat starts and stops the central heating
system based on a temperature limit and a preset time
period.
Special warnings
As the product must be connected to a 230V power
supply and to a heating equipment, the installation must
be carried out only by qualified personnel, in order to
avoid irreparable damage to the product or the heating
equipment to which it is connected.
Also, the first configuration of the equipment should be
performed by qualified personnel.

3
Technical specifications
Transmitter power supply 2 x AAA batteries 15.V
Receiver power supply 230VAC, max. 10A
Frequency 868 MHz
Interval of
set temperature +5°C ~ +35°C
Interval of
displayed temperature 0°C ~ +50°C
Display Yes, backlighted
Sensor NTC 3950,
10KOhm@25°C
Accuracy ±0.1°C
Step 0.5°C
Temperature
measurement unit Only Celsius degrees
Water protection class IP30
Housing ABS with fireproof
standard UL94-5

4
Installation instructions
The thermostat can be mounted in 2 ways: on the table
or on the wall with the help of the brackets included in
the package.
Description of keys and icons
Day of the week
ON/OFF
Programming
Back
Eco mode
Programmed
mode
Up/Down
MenuCentral heating ON
Time
Period
Room
temperature

5
Pairing transmitter and receiver
Pairing button
Central heating ON indicator
LED 1
LED 2
Power indicator
Note: the two units come paired from the factory. Make
the pairing procedure only if there are communication
problems.
Long press the pairing button on the receiver unit.
LED 1 flashes frequently.
Turn o the transmitter unit by pressing the key.
Press and hold the MENU key on the transmitter unit
until the pairing code appears on the display (for example
FF FF 0). Immediately press the ▲ key. Another code
will flash on the screen. If the pairing was successful,
the code on the screen will disappear and LED 1 (green)

6
will turn o. Turn on the transmitter unit. If the set
temperature is higher than the room temperature, the
transmitter unit will send an RF signal to the receiver
unit, which, in turn, will send a ON command to the
boiler. In this situation, LED 1 (red) will remain lit.
Set the time and day of the week
Hold down the MENU key for 3 seconds. The minute
indicator will flash. Use the ▲ and ▼ keys to reach the
desired value. Briefly press the MENU key to confirm
and move to the time setting. The time indicator will
flash. Use the ▲ and ▼ keys to reach the desired value.
Briefly press the MENU key to confirm and move to
the day of the week setting (1 to 7). Press the MENU
key to exit.
Operation mode setup
Briefly press the MENU key to set the operation mode:
Scheduled, Manual or Holiday.

7
In Scheduled mode, the PRG icon appears on the right
side of the screen as in the image below:
In Manual mode, only the time, day and temperature
are displayed on the screen:
In Holiday mode (Economic), on the right side of the
screen appears an icon in the form of a suitcase as in the
image below:

8
Scheduled mode
Schedule by day
Briefly press the MENU key to set the Scheduled
operating mode.
Long press the PRG key for 3 seconds to enter the
programming menu.
The time* and temperature* will flash on the screen.
Each time you press the PRG key, the selected value will
be confirmed and you will move on to the next setting.
After setting the time and the temperature for the first
period, it automatically switches to the second period,
then to the third and fourth.
Thus will continue with the setting of the 4 periods for
each day of the week (1 - 7).

9
* Note: The time can be set from 15 to 15 minutes, and
the temperature from half to half a degree. For example,
you can set the time to 07:15 or 07:30 or 07:45 and the
temperature to 22.0°C or 22.5°C or 23.0°C.
Note: Briefly press the PRG key to confirm a setting. Press
the MENU key to exit.
Default settings
Period 1 2
Hour Temp. Hour Temp.
12345
(Mon-Fri) 07:00 22°C 08:30 19°C
6 (Sat) 08:00 22°C 08:30 22°C
7 (Sun) 08:00 22°C 08:30 22°C
Period 3 4
Hour Temp. Hour Temp.
12345
(Mon-Fri) 17:00 22°C 17:00 19°C
6 (Sat) 17:00 22°C 22:00 19°C
7 (Sun) 17:00 22°C 22:00 19°C

10
Note: Press the ▲or ▼key to display the set temperature
on the screen. Wait a few seconds, the screen will return to
room temperature display mode.
Functions
Key lock function
If the Child protection function has been activated
in the advanced settings menu (see page 12), the
thermostat keys will lock as soon as the screen backlight
turns o.
Press the MENU key for 5 seconds to temporarily
unlock the keys.
Open window detection (OWD)
If the function has been activated from the advanced
settings menu (see page 12), the thermostat will turn
o the heating if the room temperature drops suddenly
(default setting 2°C in 15 minutes). This sudden drop in
temperature occurs when a window or door is opened
while the boiler is operating. The OP icon appears on
the screen.
The device will return to its original operating mode after

11
30 minutes. The OP icon disappears from the screen.
By pressing any key, you will exit OWD mode.
Advanced settings
Switch o the thermostat by briefly pressing the key.
Press the MENU and ▲ keys simultaneously for about
6 seconds. 01 0.3°C will appear on the screen.
Use the ▲ and ▼ keys to change the settings and the
MENU key to move to the next setting.
Menu Description Range Default
01 Internal sensor
temperature
calibration
-8°C~8°C 0°C
02 Setting the
maximum
temperature
limit
5°C
~35°C 35°C
03 Set minimum
temperature
limit
5°C
~35°C 5°C

12
05 Anti-freeze
temperature 5°C~15°C 5°C
09 Hysteresis 0.1~6°C 0.3°C
10 Screen display 0: room
temp.
1: set
temp.
0
11 Child
protection 0: keys
unlocked
1: keys
locked
0
12 Open window
detection 1: On
0: O 0
13 The time
interval in
which the
sudden drop in
temperature is
detected
2~30 min. 15 min.

13
14 Degrees lost
in the time
interval set at
menu 13
2°C
3°C
4°C
2°C
15 The time after
which the
device returns
to its original
mode of
operation
10~60
min 30 min.
17 Reset 0: No
1: Yes.
Press
for 5
seconds.
0
Software
version

14
Connection diagram
The connection of the receiver unit to a 230V power
supply and to a heating system must be performed only
by qualified personnel and only after prior consultation
of the technical documentation of the thermostat and
the heating system.
The receiver unit has a relay type control (NO Normal
Open and NC Normal Closed) without potential (non-
energized) which executes the closing of a control
circuit with a maximum current of 10A and a maximum
voltage of 250VAC/DC.
Find examples of connections with certain models of
heating system at the end of the manual.

15
Connections examples
Ariston CLAS EVO SYSTEM
Ferroli DivaCondens 24/28

16
Vaillant Ecotec Pure
Motan Max Optimus

17
Simplified EU declaration of conformity
SC ONLINESHOP SRL declares that PNI
CT60 Wireless Thermostat is in accordance with
RED Directive 2014/53/EU. The full text of the
EU Declaration of Conformity is available at the
following website:
https://www.mypni.eu/products/8001/download/
certifications

Drahtloses Thermostat
PNI CT60
Handbuch

19
Einführung
Dieses Thermostat schaltet die Heizung aufgrund
einer Temperaturgrenze und eines voreingestellten
Zeitraumes ein und aus.
Achtung
Das Produkt muss an eine Versorgungsquelle von
230V und an ein Heizungsgerät angeschlossen werden,
deshalb muss der Einbau durch Fachpersonal erfolgen,
so wird die unabänderliche Beschädigung des Produkten
und des Heizungsgerätes vermieden, diese möglichen
Schäden sind nicht in der Garantie eingeschlossen.
Für die erste Konfigurierung des Gerätes empfehlen wir
Ihnen Fachpersonal zu Rate zu ziehen.

20
Technische Spezifikationen
Versorgung Sender 2 x Batterien AAA
Versorgung Empfänger 230VAC, höchstens 10A
Frequenz 868 MHz
Eingestellter
Temperaturbereich +5°C ~ +35°C
Angezeigter
Temperaturbereich 0°C ~ +50°C
Bildschirm Ja, beleuchtet
Sensor NTC 3950,
10KOhm@25°C
Genauigkeit Messung ±0.1°C
Temperaturschritt 0.5°C
Messeinheit Temperatur Nur Celsiusgrad
Schutzklasse Wasser IP30
Gehäuse ABS mit Standard
Gegenfeuer UL94-5

21
Einbauanweisungen
Die Haupteinheit kann in 2 Weisen eingebaut werden:
auf dem Tisch oder an der Wand mit den mitgelieferten
Gestellen.
Beschreibung Tasten und Piktogramme
Wochentag
ein/aus
Programmierung
Zurück
Modus Ferien
Modus programmiert
Oben/unten
MenüHeizung ein
Uhrzeit
Zeitraum
Raumtemperatur

22
Paarung Sender und Empfänger
Taste Paarung
Anzeige Heizung ein
LED 1
LED 2
Anzeige Versorgung
Hinweis: die 2 Einheiten sind aus der Fabrik gepaart.
Drücken Sie lang die Paarungstaste auf der Einheit
Empfänger.
LED 1 blinkt oft.
Schalten Sie die Einheit Sender aus, indem Sie die Taste
drücken.
Drücken Sie lang die Taste MENU auf der Einheit
Sender, bis auf dem Bildschirm die Paarungskode
angezeigt wird (z.B. FF FF 0) Drücken Sie sofort die
Taste▲. Eine andere Kode blinkt auf dem Bildschirm.
Wenn die Paarung erfolgreich war, erlischt die Kode

23
auf dem Bildschirm, die LED 1 (grün) erlischt. Schalten
Sie die Einheit Sender ein. Wenn die eingestellte
Temperatur höher als die Raumtemperatur ist, sendet
die Einheit Sender ein RF Signal an die Einheit
Empfänger, die weiter einen Einschaltbefehl an die
Heizung sendet. In diesem Fall, bleibt die LED 1 (rot)
eingeschaltet.
Einstellung Stunde und Wochentag
Drücken Sie die Taste Menü für 3 Sekunden. Der
Minutenzeiger blinkt. Verwenden Sie die Tasten
▲ und ▼ um den gewünschten Wert einzustellen.
Drücken Sie kurz die Taste MENU, um zu bestätigen
und um die Stunde einzustellen. Der Stundenzeiger
blinkt. Verwenden Sie die Tasten ▲ und ▼ um den
gewünschten Wert einzustellen. Drücken Sie kurz die
Taste MENU um zu bestätigen und um den Wochentag
einzustellen (von 1 bis 7). Drücken Sie die Taste Menü,
um die Funktion zu verlassen.
Einstellung Betrieb
Drücken Sie kurz die Taste MENÜ um den Betrieb
einzustellen: programmiert, manuell oder Ferien.

24
In Modus programmiert, rechts im Bildschirm erschient
das Piktogramm PRG als im Bild unten:
In Modus Manuell, werden auf dem Bildschirm nur die
Uhr, den Tag und die Temperatur angezeigt:
In Modus Ferien (energiesparend), links im Bildschirm
wird ein Piktogramm in Form eines Koers angezeigt,
so wie im Bild unten:

25
Modus Programmiert
Tagen Programmierung
Drücken Sie kurz die Taste MENU um den Betrieb
Modus einzustellen: programmiert.
Drücken Sie lang die Taste PRG für 3 Sekunden um ins
Einstellungsmenü der Parameter zu kommen.
Auf dem Bildschirm blinken zuerst die Startzeit*und
die Temperatur*. Mit jedem Drücken der Taste PRG
wird der gewählte Wert bestätigt und es wird mit der
nächsten Einstellung fortgesetzt.
Nachdem die Uhr und die Temperatur für den 1.
Zeitraum eingestellt sind, kommt man automatisch zum
2. Zeitraum, dann zum 3. und dann zum 4. Zeitraum.
Es wird mit der Einstellung der 4 Zeiträumen für jeden
Wochen Tag fortgesetzt. (1-7)

26
*Hinweis: die Uhr kann jede Viertelstunde geändert werden,
und die Temperatur jede halbe Stunden. z. B. Sie können die
Uhr bei 07:15 oder 07:30 oder 07:45 und die Temperatur
bei 22.0°C oder 22.5°C oder 23.0°C, einstellen.
Hinweis: drücken Sie kurz die Taste PRG um eine
Implizite Einstellungen
Zeitraum 1 2
Uhr Temp. Uhr Temp.
12345
(Mo.-Fr.) 07:00 22°C 08:30 19°C
6 (Sa.) 08:00 22°C 08:30 22°C
7 (So.) 08:00 22°C 08:30 22°C
Zeitraum 3 4
Uhr Temp. Uhr Temp.
12345
(Mo.-Fr.) 17:00 22°C 17:00 19°C
6 (Sa.) 17:00 22°C 22:00 19°C
7 (So.) 17:00 22°C 22:00 19°C

27
Hinweis: Drücken Sie die Taste ▲ oder ▼ um auf dem
Bildschirm die angezeigte Temperatur einzustellen (SET).
Warten Sie einige Sekunden, der Bildschirm kommt in
Modus Anzeige der Raumtemperatur (ROOM).
Funktionen
Tastensperre
Wenn die Funktion “Kinderschutz” im fortgeschrittenen
Einstellungsmenü aktiviert wurde (siehe Seite 30),
sperren sich die Tasten des Thermostats, wenn das
Hintergrundlicht nicht mehr blinkt.
Drücken Sie die Taste Menü für 5 Sekunden um die
Tasten vorübergehend zu entsperren.
Detektion oenes Fenster (OWD)
Wenn die Funktion aus dem fortgeschrittenen
Einstellungsmenü aktiviert wurde (siehe Seite 30),
schaltet das Thermostat die Heizung aus, wenn die
Temperatur plötzlich sinkt (implizite Einstellung 2°C
in 15 Minuten). Die Temperatur sinkt plötzlich, weil ein
Fenster oder eine Tür oen sind, während die Heizung
eingeschaltet ist. Auf der Anzeige erscheint OP.

28
Das Gerät kommt in ersten Betrieb Modus nach 30
Minuten. OP erlischt vom Bildschirm.
Wenn Sie eine beliebige Taste drücken, verlassen Sie das
Modus OWD.
Fortgeschrittene Einstellungen
Schalten Sie das Thermostat aus, indem Sie drücken.
Drücken Sie gleichzeitig die Tasten MENU und Oben
für zirka 6 Sekunden. Auf dem Bildschirm erscheint 01
0.3°C.
Verwenden Sie die Tasten ▲ und ▼ um die
Einstellungen zu ändern und die Taste Menü um zur
nächsten Einstellung zu gehen.
Menü Beschreibung Intervall Implizit
01 Kalibrierung
Temperatur
interner Sensor
-8°C~8°C 0°C
02 Einstellung
Höchste
Temperatur
grenze
5°C ~35°C 35°C

29
03 Einstellung
Mindest
temperatur
5°C ~35°C 5°C
05 Temperatur
Frostschutz 5°C~15°C 5°C
09 Hysteresis 0.1~6°C 0.3°C
10 Anzeige 0: Raum-
temp.
1: einges-
tellte
Temperatur
0
11 Kinderschutz 0: ents-
perrte
Tasten
1: gesperrte
Tasten
0
12 Detektion
oenes Fenster 1: aktiv
0: inaktiv 0

30
13 Intervall
notwendig
für Detektion
plötzliches
Sinken der
Temperatur
2~30 min. 15 min.
14 Verlorene
Werte im
eingestellten
Zeitintervall
Pkt.13
2°C
3°C
4°C
2°C
15 Intervall in
dem das Gerät
zum normalen
Betrieb
zurückkehrt
10~60 min 30 min.
17 Neue
Einstellung 0: Nein
1: Ja.
Drücken
Sie für 5
Sek.
0
Software
Version

31
Diagramm Anschlüsse Einheit Empfänger
Der Anschluss der Einheit Empfänger an einer
Versorgungsquelle 230V und an einer Heizung erfolgt
nur durch Fachpersonal und nur laut technischen
Spezifikationen für das Thermostat und für die Heizung.
Die Einheit Empfänger hat eine Steuerung Typ Relais
(NO Normal geönet und NC Normal geschlossen)
ohne Potential (ohne Energie/Versorgung), sie schließt
einen Steuerungskreis mit einem höchsten Strom 10A
und einer Höchstspannung von 250VAC/DC. Beispiele
finden Sie am Ende des Handbuches.

32
Beispiele Anschlüsse an die Heizung
Ariston CLAS EVO SYSTEM
Ferroli DivaCondens 24/28

Vaillant Ecotec Pure
Motan Max Optimus

Vereinfachte UE Konformitätserklärung
SC ONLINESHOP SRL erklärt, dass das
drahtlose Thermostat PNI CT60 der Richtlinie
RED 2014/53/UE entspricht. Sie finden den Text
der Erklärung auf der folgenden Seite:
https://www.mypni.eu/products/8001/download/
certifications

Termostato inalámbrico
PNI CT60
Manual de usuario

36
Introducción
Este termostato enciende y detiene el sistema
de calefacción central en función de un límite de
temperatura y un período de tiempo preestablecido.
Advertencias especiales
Dado que el producto debe estar conectado a una
fuente de alimentación de 230V y a un equipo de
calefacción, la instalación debe ser realizada únicamente
por personal calificado, con el fin de evitar daños
irreparables al producto o al equipo de calefacción al
que está conectado.
Además, la primera configuración del equipo debe ser
realizada por personal calificado.

37
Especificaciones técnicas
Fuente de alimentación
del transmisor 2 x Pilas AAA 15.V
Fuente de alimentación
del receptor 230VAC, max. 10A
Frecuencia 868 MHz
Intervalo de temperatura
establecida +5°C ~ +35°C
Intervalo de temperatura
mostrada 0°C ~ +50°C
Pantalla Si, retroiluminado
Sensor NTC 3950,
10KOhm@25°C
Precisión ±0.1°C
Paso 0.5°C
Unidad de medida de
temperatura Solo grados Celsius
Clase de protección
contra el agua IP30

38
Instrucciones de instalación
El termostato se puede montar de 2 formas: en la mesa
o en la pared con la ayuda de los soportes incluidos en
el paquete.
Descripción de teclas e iconos
Día de la semana
ON/OFF
Programación
Atrás
Modo
ecologico
Modo
programado
Arriba/Abajo
MenuCalefacción central encendida
Hora
Periodo
Temperatura
ambiente

39
Emparejamiento de transmisor y receptor
Botón de emparejamiento
Indicador de encendido
de calefacción central
LED 1
LED 2
Indicador de encendido
Nota: las dos unidades vienen emparejadas de fábrica.
Mantenga presionado el botón de emparejamiento en la
unidad receptora.
El LED 1 parpadea con frecuencia.
Apague la unidad transmisora presionando la tecla .
Presione y mantenga presionada la tecla MENU
en la unidad transmisora hasta que el código de
emparejamiento aparezca en la pantalla (por ejemplo,
FF FF 0). Presione inmediatamente la tecla ▲. Otro
código parpadeará en la pantalla. Si el emparejamiento
fue exitoso, el código en la pantalla desaparecerá

40
y el LED 1 (verde) se apagará. Encienda la unidad
transmisora. Si la temperatura establecida es superior a
la temperatura ambiente, la unidad transmisora enviará
una señal de RF a la unidad receptora, que, a su vez,
enviará un comando ON a la caldera. En esta situación,
el LED 1 (rojo) permanecerá encendido.
Establecer la hora y el día de la semana
Mantenga presionada la tecla MENÚ durante 3
segundos. El indicador de minutos parpadeará. Utilice
las teclas ▲ y ▼ para alcanzar el valor deseado. Presione
brevemente la tecla MENÚ para confirmar y pasar al
ajuste de hora. El indicador de tiempo parpadeará.
Utilice las teclas ▲ y ▼ para alcanzar el valor deseado.
Presione brevemente la tecla MENÚ para confirmar y
pasar al ajuste del día de la semana (1 a 7). Presione la
tecla MENÚ para salir.
Configuración del modo de operación
Presione brevemente la tecla MENÚ para configurar el
modo de operación: Programado, Manual o Vacaciones.

41
En el modo Programado, el icono PRG aparece en
el lado derecho de la pantalla como se muestra en la
siguiente imagen:
En el modo Manual, solo se muestran en la pantalla la
hora, el día y la temperatura:
En el modo Vacaciones (Económico), en el lado derecho
de la pantalla aparece un icono en forma de maleta como
en la siguiente imagen:

42
Modo programado
Programación por día
Presione brevemente la tecla MENÚ para configurar el
modo de funcionamiento Programado.
Mantenga presionada la tecla PRG durante 3 segundos
para ingresar al menú de programación.
La hora* y la temperatura* parpadearán en la pantalla.
Cada vez que presione la tecla PRG, se confirmará el
valor seleccionado y pasará a la siguiente configuración.
Después de configurar la hora y la temperatura para el
primer período, cambia automáticamente al segundo
período, luego al tercero y cuarto.
Así continuará con la configuración de los 4 periodos
para cada día de la semana (1 - 7).

43
*Nota: El tiempo se puede configurar de 15 a 15 minutos
y la temperatura de medio a medio grado. Por ejemplo,
puede establecer la hora en 07:15 o 07:30 o 07:45 y la
temperatura en 22,0°C o 22,5°C o 23,0°C.
Nota: Presione brevemente la tecla PRG para confirmar un
ajuste. Presione la tecla MENÚ para salir.
Configuración predeterminadas
Periodo 1 2
Hora Temp. Hora Temp.
12345
(Lun-Vie) 07:00 22°C 08:30 19°C
6 (Sáb) 08:00 22°C 08:30 22°C
7 (Dom) 08:00 22°C 08:30 22°C
Periodo 3 4
Hora Temp. Hora Temp.
12345
(Lun-Vie) 17:00 22°C 17:00 19°C
6 (Sáb) 17:00 22°C 22:00 19°C
7 (Dom) 17:00 22°C 22:00 19°C

44
Nota: Presione la tecla ▲ o ▼ para mostrar la temperatura
establecida en la pantalla. Espere unos segundos, la pantalla
volverá al modo de visualización de temperatura ambiente.
Funciones
Función de bloqueo de teclas
Si se ha activado la función Protección infantil en el
menú de configuración avanzada (consulte la página
48), las teclas del termostato se bloquearán tan pronto
como se apague la luz de fondo de la pantalla.
Presione la tecla MENÚ durante 5 segundos para
desbloquear temporalmente las teclas.
Detección de ventana abierta (OWD)
Si la función se ha activado desde el menú de configuración
avanzada (consulte la página 48), el termostato apagará
la calefacción si la temperatura ambiente desciende
repentinamente (ajuste predeterminado 2°C en 15
minutos). Esta caída repentina de temperatura ocurre
cuando se abre una ventana o puerta mientras la caldera
está en funcionamiento. El icono OP aparece en la
pantalla.

45
El dispositivo volverá a su modo de funcionamiento
original después de 30 minutos. El icono OP desaparece
de la pantalla.
Al presionar cualquier tecla, saldrá del modo OWD.
Ajustes avanzados
Apague el termostato presionando brevemente la tecla
.
Pulse las teclas MENU y ▲ simultáneamente durante
unos 6 segundos. 01 0.3°C aparecerá en la pantalla.
Utilice las teclas ▲ y ▼ para cambiar la configuración y
la tecla MENÚ para pasar a la siguiente configuración.
Menu Description Intervalo Default
01 Calibración de
temperatura del
sensor interno
-8°C~8°C 0°C
02 Establecer el
límite máximo
de temperatura
5°C ~35°C 35°C

46
03 Establecer
límite de
temperatura
mínima
5°C ~35°C 5°C
05 Temperatura
anticongelante 5°C~15°C 5°C
09 Histéresis 0.1~6°C 0.3°C
10 Visualización de
la pantalla 0: temp.
ambiente
1: temp.
establecida
0
11 Protección
infantil 0: llaves
desbloqueadas
0: llaves
bloqueadas
0
12 Detección de
ventana abierta 1: On
0: O 0

47
13 El intervalo
de tiempo
en el que se
detecta la caída
repentina de
temperatura.
2~30 min. 15 min.
14 Grados
perdidos en
el intervalo
de tiempo
establecido en
el menú 13
2°C
3°C
4°C
2°C
15 El tiempo
después del cual
el dispositivo
vuelve a su
modo de
funcionamiento
original.
10~60 min 30 min.
17 Reset 0: No
1: Si. Prensa
durante 5
segundos.
0

48
Versión del
software
Diagrama de conexión
La conexión de la unidad receptora a una fuente de
alimentación de 230 V y a un sistema de calefacción
debe ser realizada solo por personal calificado y solo
después de consultar previamente la documentación
técnica del termostato y el sistema de calefacción.
La unidad receptora tiene un control tipo relé (NA
Normal Abierto y NC Normal Cerrado) sin potencial
(no energizado) que ejecuta el cierre de un circuito de
control con una corriente máxima de 10A y un voltaje
máximo de 250VAC/DC.
Encuentre ejemplos de conexiones con ciertos modelos
de sistema de calefacción al final del manual.

49
Ejemplos de conexiones
Ariston CLAS EVO SYSTEM
Ferroli DivaCondens 24/28

50
Vaillant Ecotec Pure
Motan Max Optimus

51
Declaración de conformidad de la UE simplificada
SC ONLINESHOP SRL declara que el
Termostato Inalámbrico PNI CT60 cumple con
la Directiva RED 2014/53/EU. El texto completo
de la Declaración de conformidad de la UE está
disponible en el siguiente sitio web:
https://www.mypni.eu/products/8001/download/
certifications

Thermostat sans fil
PNI CT60
Manuel de l’utilisateur

53
Introduction
Ce thermostat démarre et arrête le système de chauage
central en fonction d’une limite de température et d’une
période de temps prédéfinie.
Mises en garde spéciales
Le produit devant être connecté à une alimentation
230V et à un équipement de chauage, l’installation
doit être réalisée uniquement par du personnel qualifié,
afin d’éviter des dommages irréparables au produit ou à
l’équipement de chauage auquel il est connecté.
De plus, la première configuration de l’équipement doit
être eectuée par du personnel qualifié.

54
Spécifications techniques
Alimentation de
l'émetteur 2 piles AAA 15.V
Alimentation du
récepteur 230VAC, max. 10A
La fréquence 868 MHz
Intervalle de
température de consigne +5°C ~ +35°C
Intervalle de
température achée 0°C ~ +50°C
Achage Oui, rétro-éclairé
Capteur NTC 3950,
10KOhm@25°C
Précision ±0.1°C
Pas 0.5°C
Unité de mesure de
température Seuls les degrés Celsius
Classe de protection de
l'eau IP30

55
Instructions d’installation
Le termostat peut être monté de 2 manières: sur la
table ou sur le mur à l’aide des supports inclus dans
l’emballage.
Description des touches et des icônes
Jour de la semaine
ON/OFF
Programmation
Arrière
Mode éco
Mode
programmé
Haut / Bas
MenuChauage central ON
Heure
Période
Température
ambiante

56
Appairage de l’émetteur et du récepteur
Bouton d'appairage
Indicateur de
chauage central
LED 1
LED 2
Indicateur d'alimentation
Remarque: les deux unités sont jumelées en usine.
Appuyez longuement sur le bouton d’appairage du
récepteur.
La LED 1 clignote fréquemment.
Éteignez l’émetteur en appuyant sur la touche .
Appuyez sur la touche MENU de l’émetteur et
maintenez-la enfoncée jusqu’à ce que le code
d’appairage apparaisse à l’écran (par exemple FF FF
0). Appuyez immédiatement sur la touche ▲. Un autre
code clignotera à l’écran. Si l’appairage a réussi, le code à
l’écran disparaîtra et la LED 1 (verte) s’éteindra. Allumez

57
l’émetteur. Si la température réglée est supérieure à la
température ambiante, l’émetteur enverra un signal RF
au récepteur, qui, à son tour, enverra une commande
ON à la chaudière. Dans cette situation, la LED 1
(rouge) restera allumée.
Réglez l’heure et le jour de la semaine
Maintenez la touche MENU enfoncée pendant 3
secondes. L’indicateur des minutes clignotera. Utilisez
les touches ▲ et ▼ pour atteindre la valeur souhaitée.
Appuyez brièvement sur la touche MENU pour
confirmer et passer au réglage de l’heure. L’indicateur
de temps clignotera. Utilisez les touches ▲ et ▼ pour
atteindre la valeur souhaitée. Appuyez brièvement sur la
touche MENU pour confirmer et passer au réglage du
jour de la semaine (1 à 7). Appuyez sur la touche MENU
pour quitter.
Configuration du mode de fonctionnement
Appuyez brièvement sur la touche MENU pour régler
le mode de fonctionnement: programmé, manuel ou
vacances.

58
En mode programmé, l’icône PRG apparaît sur le côté
droit de l’écran comme dans l’image ci-dessous:
En mode manuel, seuls l’heure, le jour et la température
sont achés à l’écran:
En mode vacances (économique), sur le côté droit de
l’écran apparaît une icône en forme de valise comme
dans l’image ci-dessous:

59
Mode programmé
Horaire par jour
Appuyez brièvement sur la touche MENU pour régler le
mode de fonctionnement programmé.
Appuyez longuement sur la touche PRG pendant 3
secondes pour accéder au menu de programmation.
L’heure* et la température* clignotent à l’écran. Chaque
fois que vous appuyez sur la touche PRG, la valeur
sélectionnée est confirmée et vous passez au réglage
suivant.
Après avoir réglé l’heure et la température pour la
première période, il passe automatiquement à la
deuxième période, puis à la troisième et à la quatrième.
Ainsi se poursuivra avec le réglage des 4 périodes pour
chaque jour de la semaine (1 - 7).

60
* Remarque: la durée peut être réglée entre 15 et 15 minutes
et la température entre un demi-degré et un demi-degré.
Par exemple, vous pouvez régler l’heure sur 07:15 ou 07:30
ou 07:45 et la température sur 22,0°C ou 22,5°C ou
23,0°C.
Paramètres par défaut
Période 1 2
Heur Temp. Heur Temp.
12345
(Lun-Ven) 07:00 22°C 08:30 19°C
6 (Sam) 08:00 22°C 08:30 22°C
7 (Dim) 08:00 22°C 08:30 22°C
Période 3 4
Heur Temp. Heur Temp.
12345
(Lun-Ven) 17:00 22°C 17:00 19°C
6 (Sam) 17:00 22°C 22:00 19°C
7 (Dim) 17:00 22°C 22:00 19°C

61
Remarque: Appuyez sur la touche ▲ ou ▼ pour acher la
température réglée à l’écran. Attendez quelques secondes,
l’écran reviendra au mode d’achage de la température
ambiante.
Les fonctions
Fonction de verrouillage des touches
Si la fonction de protection enfant a été activée dans le
menu des paramètres avancés (voir page 66), les touches
du thermostat se verrouillent dès que le rétroéclairage
de l’écran s’éteint.
Appuyez sur la touche MENU pendant 5 secondes pour
déverrouiller temporairement les touches.
Détection de fenêtre ouverte (OWD)
Si la fonction a été activée à partir du menu des
réglages avancés (voir page 66), le thermostat
éteindra le chauage si la température ambiante baisse
soudainement (réglage par défaut 2°C en 15 minutes).
Cette baisse soudaine de température se produit
lorsqu’une fenêtre ou une porte est ouverte pendant que
la chaudière fonctionne. L’icône OP apparaît à l’écran.

62
L’appareil reviendra à son mode de fonctionnement
d’origine après 30 minutes. L’icône OP disparaît de
l’écran.
En appuyant sur n’importe quelle touche, vous quitterez
le mode OWD.
Réglages avancés
Éteignez le thermostat en appuyant brièvement sur la
touche .
Appuyez simultanément sur les touches MENU et ▲
pendant environ 6 secondes. 01 0.3°C apparaîtra à
l’écran.
Utilisez les touches ▲ et ▼ pour modifier les paramètres
et la touche MENU pour passer au paramètre suivant.
Menu Description Intervalle Default
01 Étalonnage de la
température du
capteur interne
-8°C~8°C 0°C
02 Réglage de
la limite de
température
maximale
5°C ~35°C 35°C

63
03 Définir la limite
de température
minimale
5°C ~35°C 5°C
05 Température
antigel 5°C~15°C 5°C
09 Hy stérèse 0.1~6°C 0.3°C
10 Écran
d’achage 0: temp.
ambiante
1: temp.
réglé
0
11 Protection
contre l’enfants 0: touche
déverrouillées
1: touche
fermé
0
12 Détection de
fenêtre ouverte 1: On
0: O 0

64
13 L’intervalle de
temps pendant
lequel la baisse
soudaine de
température est
détectée
2~30 min. 15 min.
14 Degrés perdus
dans l’intervalle
de temps défini
au menu 13
2°C
3°C
4°C
2°C
15 Le temps après
lequel l’appareil
revient à son
mode de
fonctionnement
d’origine
10~60 min 30 min.
17 Reset 0: No
1: Oui.
Appuyez sur
pendant 5
secondes
0
Version de
logiciel

65
Diagramme de connexion
Le raccordement du récepteur à une alimentation
230V et à un système de chauage doit être eectué
uniquement par du personnel qualifié et uniquement
après consultation préalable de la documentation
technique du thermostat et du système de chauage.
Le récepteur dispose d’une commande de type relais
(NO Normal Open et NC Normal Closed) sans
potentiel (non alimenté) qui exécute la fermeture d’un
circuit de commande avec un courant maximum de 10A
et une tension maximum de 250VAC/DC.
Trouvez des exemples de connexions avec certains
modèles de système de chauage à la fin du manuel.

66
Exemples de connexions
Ariston CLAS EVO SYSTEM
Ferroli DivaCondens 24/28

67
Vaillant Ecotec Pure
Motan Max Optimus

68
Déclaration de conformité UE simplifiée
SC ONLINESHOP SRL déclare que le thermostat
sans fil PNI CT60 est conforme à la directive RED
2014/53/EU. Le texte intégral de la déclaration
de conformité UE est disponible sur le site Web
suivant:
https://www.mypni.eu/products/8001/download/
certifications

Vezeték nélküli termosztát
PNI CT60
Használati utasítás

70
Bevezetés
Ez a termosztát elindítja és leállítja a központi fűtési
rendszert egy hőmérsékleti határ és egy előre beállított
időtartam alapján.
Különleges figyelmeztetések
Mivel a terméket 230 V-os áramforráshoz és
fűtőberendezéshez kell csatlakoztatni, a telepítést csak
képzett személyzet végezheti, hogy elkerülje a termék
vagy a fűtőberendezés helyrehozhatatlan károsodását.
Ezenkívül a berendezés első konfigurálását képzett
személyzetnek kell elvégeznie.

71
Műszaki adatok
Az adó tápellátása 2 db AAA elem 15.V
Vevő tápellátása 230VAC, max. 10A
Frekvencia 868 MHz
A beállított hőmérséklet
intervalluma +5°C ~ +35°C
A kijelzett hőmérséklet
intervalluma 0°C ~ +50°C
Képernyő Igen, háttérvilágítással
Érzékelő NTC 3950,
10KOhm@25°C
Pontosság ±0.1°C
Lépés 0.5°C
Hőmérsékletmérő
egység Csak Celsius fok
Vízvédelmi osztály IP30
Ház ABS tűzálló UL94-5
szabvány szerint

72
Telepítési útmutató
A termosztátot kétféleképpen lehet felszerelni:
az asztalra vagy a falra a csomagban lévő konzolok
segítségével.
A billentyűk és ikonok leírása
A hét napja
ON/OFF
Programozás
Vissza
Eco mód
Programozott
mód
Fel / le
MenüKözponti fűtés BE
Idő
Időszak
Szobahőmérséklet

73
Az adó és a vevő párosítása
Párosítás gomb
Központi fűtés BE jelzőfény
LED 1
LED 2
Teljesítményjelző
Megjegyzés: a két egység gyárilag párosítva érkezik.
Hosszan nyomja meg a vevőegység párosító gombját.
Az 1. LED gyakran villog.
Kapcsolja ki az adóegységet a gomb megnyomásával
Tartsa nyomva az adóegység MENU gombját, amíg a
párosítási kód meg nem jelenik a kijelzőn (például FF
FF 0). Nyomja meg azonnal a ▲ gombot. Egy másik
kód villog a képernyőn. Ha a párosítás sikeres volt,
a képernyőn lévő kód eltűnik, és az 1-es LED (zöld)
kialszik. Kapcsolja be az adóegységet. Ha a beállított
hőmérséklet magasabb, mint a szobahőmérséklet, akkor

74
az adóegység RF jelet küld a vevőegységnek, amely
viszont bekapcsolási parancsot küld a kazánnak. Ebben a
helyzetben az 1-es LED (piros) továbbra is világít.
Állítsa be az időt és a hét napját
Tartsa lenyomva a MENU gombot 3 másodpercig.
A perc jelző villog. Használja a ▲ és ▼ gombokat a
kívánt érték eléréséhez. Röviden nyomja meg a MENU
gombot a megerősítéshez és az időbeállításhoz lépéshez.
Az időjelző villog. Használja a ▲ és ▼ gombokat a
kívánt érték eléréséhez. Röviden nyomja meg a MENU
gombot a megerősítéshez, és lépjen a hét napjának
beállításához (1–7). A kilépéshez nyomja meg a MENU
gombot.
Üzemmód beállítása
Röviden nyomja meg a MENU gombot a működési mód
beállításához: Ütemezett, Kézi vagy Ünnep.

75
Ütemezett módban a PRG ikon megjelenik a képernyő
jobb oldalán, mint az alábbi képen:
Manuális módban csak az idő, a nap és a hőmérséklet
jelenik meg a képernyőn:
Nyaralás módban (gazdaságos) a képernyő jobb oldalán
egy ikon jelenik meg egy bőrönd formájában, mint az
alábbi képen:

76
Ütemezett mód
Menetrend napról napra
Röviden nyomja meg a MENU gombot az Ütemezett
üzemmód beállításához.
Hosszan nyomja 3 másodpercig a PRG gombot a
programozási menübe való belépéshez.
Az idő* és a hőmérséklet* villogni fog a képernyőn. A
PRG gomb minden egyes megnyomásakor a kiválasztott
érték megerősítést nyer, és a következő beállításra lép.
Az első időszak időtartamának és hőmérsékletének
beállítása után automatikusan átvált a második, majd a
harmadik és a negyedik időszakra.
Így folytatódik a 4 időszak beállítása a hét minden
napjára (1 - 7).

77
* Megjegyzés: Az idő 15-15 perc, a hőmérséklet pedig fél
fok és fél fok között állítható be. Például beállíthatja az
időt 07:15 vagy 07:30 vagy 07:45, a hőmérsékletet pedig
22,0°C vagy 22,5°C vagy 23,0°C értékre.
Alapbeállítások
Időszak 1 2
Óra Hőfok Óra Hőfok
12345
(H-P) 07:00 22°C 08:30 19°C
6 (Szo) 08:00 22°C 08:30 22°C
7 (V ) 08:00 22°C 08:30 22°C
Időszak 3 4
Óra Hőfok Óra Hőfok
12345
(Mon-Fri) 17:00 22°C 17:00 19°C
6 (Sat) 17:00 22°C 22:00 19°C
7 (Sun) 17:00 22°C 22:00 19°C

78
Megjegyzés: Nyomja meg a ▲ vagy ▼ gombot a beállított
hőmérséklet megjelenítéséhez a képernyőn. Várjon néhány
másodpercet, a képernyő visszatér szobahőmérséklet-
megjelenítési módba.
Funkciók
Billentyűzár funkció
Ha a Gyermekvédelem funkció be van kapcsolva
a speciális beállítások menüben (lásd: 84. oldal),
a termosztát gombjai azonnal lezáródnak, amint a
képernyő háttérvilágítása kialszik.
Nyomja meg a MENU gombot 5 másodpercig a
billentyűk ideiglenes feloldásához.
Nyitott ablak észlelése (OWD)
Ha a funkciót a speciális beállítások menüben
aktiválták (lásd: 84. oldal), a termosztát kikapcsolja a
fűtést, ha a helyiség hőmérséklete hirtelen lecsökken
(alapértelmezett beállítás: 2°C 15 perc alatt). Ez a
hirtelen hőmérséklet-csökkenés akkor következik be,
amikor ablakot vagy ajtót nyitnak a kazán működése
közben. A képernyőn megjelenik az OP ikon.

79
A készülék 30 perc múlva visszatér eredeti üzemmódjába.
Az OP ikon eltűnik a képernyőről.
Bármely gomb megnyomásával kilép az OWD módból.
További beállítások
Kapcsolja ki a termosztátot a gomb rövid
megnyomásával.
Nyomja meg egyszerre a MENU és a ▲ gombokat
körülbelül 6 másodpercig. 01 0,3°C jelenik meg a
képernyőn.
A ▲ és ▼ gombokkal módosíthatja a beállításokat, a
MENU gombbal pedig a következő beállításra léphet.
Menü Leírás Intervallum Default
01 Belső érzékelő
hőmérséklet
kalibrálása
-8°C~8°C 0°C
02 A maximális
hőmérsékleti határ
beállítása
5°C ~35°C 35°C

80
03 Állítsa be a
minimális
hőmérsékleti
határt
5°C ~35°C 5°C
05 Fagyálló
hőmérséklet 5°C~15°C 5°C
09 Hiszterézis 0.1~6°C 0.3°C
10 Képernyő
megjelenítése 0: szobahő
mérséklet
1: beállított
hőmérséklet
0
11 Gyermekvédelem 0: kulcsok
feloldva
1: kulcsok
zárva
0
12 Nyitott ablak
észlelése 1: On
0: O 0

81
13 Az az
időintervallum,
amelyben
a hirtelen
hőmérséklet-
csökkenést észlelik
2~30 min. 15 min.
14 A 13. menüben
beállított
időintervallumban
elvesztett fokok
2°C
3°C
4°C
2°C
15 Az az idő, amely
után a készülék
visszatér eredeti
működési
módjához
10~60 min 30 min.
17 Visszaállítás 0: Nem
1: Igen.
Nyomja
meg 5
másodpercig
0
Szoftver verzió

82
Csatlakozási ábra
A vevőegység csatlakoztatását 230 V-os tápegységhez
és fűtési rendszerhez csak képzett személyzet végezheti,
és csak a termosztát és a fűtési rendszer műszaki
dokumentációjának előzetes egyeztetése után.
A vevőegység relé típusú vezérléssel rendelkezik (NO
Normal Open és NC Normal Closed) potenciál nélkül
(feszültség nélkül), amely egy vezérlőáramkör zárását
hajtja végre 10A maximális árammal és 250VAC/DC
maximális feszültséggel.
A kézikönyv végén talál példákat a fűtési rendszer egyes
modelljeivel való összeköttetésekre.

83
Kapcsolódási példák
Ariston CLAS EVO SYSTEM
Ferroli DivaCondens 24/28

84
Vaillant Ecotec Pure
Motan Max Optimus

85
Egyszerűsített EU-megfelelőségi nyilatkozat
Az SC ONLINESHOP SRL kijelenti, hogy
a PNI CT60 vezeték nélküli termosztát
megfelel a 2014/53/EU RED irányelvnek. Az
EU-megfelelőségi nyilatkozat teljes szövege a
következő weboldalon érhető el:
https://www.mypni.eu/products/8001/download/
certifications

Termostato senza fili
PNI CT60
Manuale dell’utente

87
Introduzione
Questo termostato avvia ed arresta il sistema di
riscaldamento basato su un limite di temperatura e su un
periodo di tempo preimpostato.
Avvertenze speciali
Poiché il prodotto deve essere connesso a una rete
elettrica 230V ed a una caldaia di riscaldamento, la
messa in funzione deve essere eseguita solo da personale
tecnico specializzato, per evitare di danneggiare il
prodotto o la caldaia.
Per la configurazione iniziale del termostato, si consiglia
di rivolgersi a personale qualificato con esperienza nel
settore.

88
Specifiche tecniche
Alimentazione unità
trasmettitore 2 x batterie AAA
Alimentazione unità
ricevente 230VAC, max. 10A
Frequenza 868 MHz
Intervallo di temperatura
da impostare +5°C ~ +35°C
Intervallo di temperatura
visualizzata 0°C ~ +50°C
Schermo Si, retroilluminato
Sensore NTC 3950,
10KOhm@25°C
Accuratezza ±0.1°C
Passo 0.5°C
Unità di misura della
temperatura Solo gradi centigradi
Protezione all’acqua IP30
Custodia ABS con standard di
fuoco UL94-5

89
Istruzioni di installazione
L’unità trasmettitore può essere montata in due modi:
sul tavolo o sulla parete con le due stae incluse nella
confezione.
Descrizione tasti ed icone
Giorno della
settimana
Avvio/Arresto
Programmazione
Indietro
Modalità vacanza
Modalità
programata
Su/Giu
MenuCaldaia accesa
Ora
Periodo
Temperatura
ambiente

90
Abbinamento trasmettitore e ricevitore
Tasto abbinamento
Indicatore caldaia accesa
LED 1
LED 2
Indicatore alimentazione
Nota: le due unità sono abbinate dalla fabbrica.
L’abbinamento è consigliato solo se ci sono dei problemmi
di communicazione.
Premere a lungo il tasto di abbinamento dall’unità
ricevente.
Il LED 1 lampeggia.
Arrestare l’unità trasmittente, premendo il tasto .
Premere a lungo il tasto MENU dall’unità trasmettitore,
finchè sullo schermo non appare il codice di
abbinamento (per esempio FF FF 0). Premere subito
il tasto ▲. Un’altro codice lampeggia sullo schermo.

91
Se l’abbinamento è stato finalizzato con successo, il
codice sullo schermo scomparirà, mentre il LED 1
(verde) si spegnerà. Avviare l’unità trasmettitore. Se la
temperatura preimpostata è maggiore della temperatura
ambiente, l’unità trasmettitore invierà un segnale RF
verso l’unità ricevitore, quale, a sua volta, invierà un
commando di avvio alla caldaia. In questa situazione, il
LED 1 (rosso) resterà acceso.
Impostare l’ora e il giorno della settimana
Premere per 3 secondi il tasto MENU. L’indicatore dei
minuti lampeggerà. Usare i tasti ▲ e ▼ per impostare
il valore desiderato. Premere brevemente il tasto
MENU per confermare e per passare all’impostazione
dell’ora. L’indicatore delle ore lampeggerà. Usare i tasti
▲ e ▼ per impostare il valore desiderato. Premere
brevemente il tasto MENU per confermare e per
passare all’impostazione del giorno della settimana (da
1 a 7). Premere il tasto MENU per uscire.
Impostazione della modalità di funzionamento
Premere brevemente il tasto MENU per impostare la
modalità di funzionamento: Programmato, Manuale o

92
Vacanza.
Nella modalità Programmata, nella parte destra dello
schermo si vedrà l’icona PRG come nell’immagine
sotto:
Nella modalità Manuale, sullo schermo si vedrà solo
l’ora, il giorno e la temperatura:
Nella modalità Vacanza (economico), nella parte destra
dello schermo si vedrà un’icona sotto forma di valigia
come nell’immagine sotto:

93
Modalità programmata
Programmazione giornaliera
Premere brevemente il tasto MENU per impostare la
modalità di funzionamento: Programmata.
Premere per 3 secondi il tasto PRG per accedere al
menu delle impostazioni avanzate.
L’ora* e la temperatura* lampeggeranno sullo schermo.
Ogni volta che si preme il tasto PRG il valore scelto verrà
confermato e verrà eseguita la successiva impostazione.
Dopo aver impostato l’ora e la temperatura per il primo
periodo, si passa automaticamente al secondo, quindi al
terzo e al quarto periodo.
Questo continuerà con l’impostazione dei 4 periodi per
ogni giorno della settimana (1 - 7).

94
*Nota: L’ora può essere modificata da un quarto a un quarto
d’ora e la temperatura da mezzo a mezzo grado. Ad esempio,
è possibile impostare l’ora su 07:15 o 07:30 o 07:45 e la
temperatura su 22,0°C o 22,5°C o 23,0°C.
Nota: premere brevemente il tasto PRG per confermare
un’impostazione. Premere il tasto MENU per uscire.
Impostazioni predefinite
Periodo 1 2
Ora Temp. Ora Temp.
12345
(L-V) 07:00 22°C 08:30 19°C
6 (S) 08:00 22°C 08:30 22°C
7 (D) 08:00 22°C 08:30 22°C
Periodo 3 4
Ora Temp. Ora Temp.
12345
(L-V) 17:00 22°C 17:00 19°C
6 (S) 17:00 22°C 22:00 19°C
7 (D) 17:00 22°C 22:00 19°C

95
Nota: premere il tasto ▲ o ▼ per visualizzare la temperatura
impostata (SET) sullo schermo. Attendere qualche secondo,
lo schermo tornerà alla modalità di visualizzazione della
temperatura ambiente (ROOM).
Funzioni
Blocco tasti
Se la Protezione bambini è stata attivata nel menu
delle impostazioni avanzate (vedere pagina 102), i
tasti del termostato si bloccheranno non appena la
retroilluminazione dello schermo si spegne.
Premere il tasto MENU per 5 secondi per sbloccare
temporaneamente i tasti.
Rilevamento finestra aperta (OWD)
Se la funzione è stata attivata dal menù delle
impostazioni avanzate (vedi pag. 102), il termostato
spegnerà il riscaldamento se la temperatura ambiente
scende improvvisamente (impostazione predefinita 2°C
in 15 minuti). Questo improvviso calo di temperatura si
verifica quando una finestra o una porta viene aperta
mentre la caldaia è in funzione. L’icona OP appare sullo

96
schermo.
Il dispositivo tornerà dopo 30 minuti alla modalità
operativa originale. L’icona OP scompare dallo schermo.
Premendo un tasto qualsiasi uscirà dalla modalità OWD.
Impostazioni avanzate
Spegnere il termostato premendo brevemente il tasto
.
Premere contemporaneamente i tasti MENU e ▲ per
circa 6 secondi. Sullo schermo apparirà 01 0.3°C.
Utilizzare i tasti ▲ e ▼ per modificare le impostazioni e
il tasto MENU per passare all’impostazione successiva.
Menu Descrizione Intervallo Impostato
01 Taratura del
sensore interno -8°C~8°C 0°C
02 Impostazione
del limite
massimo di
temperatura
5°C
~35°C 35°C

97
03 Impostazione
del limite
minimo di
temperatura
5°C
~35°C 5°C
05 Temperatura
antigelo 5°C~15°C 5°C
09 Histerezis 0.1~6°C 0.3°C
10 Visione
schermo 0: temp.
ambiente
1: temp.
impostata
0
11 Protezione
bambini 0: Tasti
sbloccati
1: Taste
bloccati
0
12 Rilevamento
finestra aperta 1: attiva
0: innativa 0

98
13 L’intervallo
di tempo
in cui viene
rilevato il calo
improvviso della
temperatura
2~30 min. 15 min.
14 Gradi persi
nell’intervallo
di tempo
impostato al
punto 13
2°C
3°C
4°C
2°C
15 Il tempo
trascorso
prima che il
dispositivo torni
alla modalità di
funzionamento
iniziale
10~60
min 30 min.
17 Ripristina 0: No
1: Si.
Premere
per 5
secondi.
0

99
Versione
software
Schema di collegamento dell’unità ricevente
L’operazione di collegamento del ricevitore ad una rete di
alimentazione 230V e ad una caldaia per riscaldamento
viene eseguita solo da personale qualificato e solo
previa consultazione della documentazione tecnica del
termostato e della caldaia.
L’unità ricevente dispone di un relè di controllo (NO
Normale Aperto e NC Normale Chiuso) senza
potenziale (non eccitato) che esegue la chiusura di un
circuito di controllo con una corrente massima di 10A
e una tensione massima di 250VAC/DC. Alla fine del
manuale trovate esempi di collegamenti con alcuni
modelli di caldaie.

100
Esempi di collegamento con caldaie
Ariston CLAS EVO SYSTEM
Ferroli DivaCondens 24/28

101
Vaillant Ecotec Pure
Motan Max Optimus

102
Dichiarazione di conformità UE semplificata
SC ONLINESHOP SRL dichiara che il Termostato
Wireless PNI CT60 è conforme alla Direttiva RED
2014/53/UE. Il testo completo della Dichiarazione
di conformità UE è disponibile sul seguente sito
Web:
https://www.mypni.eu/products/8001/download/
certifications

Draadloze thermostaat
PNI CT60
Handleiding

104
Invoering
Deze thermostaat start en stopt de CV-installatie
op basis van een temperatuurgrens en een vooraf
ingestelde tijdsperiode.
Speciale waarschuwingen
Aangezien het product moet worden aangesloten op een
230V-voeding en op verwarmingsapparatuur, mag de
installatie alleen worden uitgevoerd door gekwalificeerd
personeel om onherstelbare schade aan het product of
de verwarmingsapparatuur waarop het is aangesloten te
voorkomen.
Ook moet de eerste configuratie van de apparatuur
worden uitgevoerd door gekwalificeerd personeel.

105
Technische specificaties
Zender voeding 2 x AAA batteries 15.V
Ontvanger voeding 230VAC, max. 10A
Frequentie 868 MHz
Interval van ingestelde
temperatuur +5°C ~ +35°C
Interval van weergegeven
temperatuur 0°C ~ +50°C
Scherm Ja, met
achtergrondverlichting
Sensor NTC 3950,
10KOhm@25°C
Nauwkeurigheid ±0.1°C
Stap 0.5°C
Temperatuurmeeteenheid Alleen graden Celsius
Waterbeschermingsklasse IP30
Huisvesting ABS UL94-5

106
Installatie instructies
De thermostaat kan op 2 manieren worden gemonteerd:
op de tafel of aan de muur met behulp van de beugels die
in het pakket zijn meegeleverd.
Beschrijving van toetsen en pictogrammen
Dag van de week
ON/OFF
Programmeren
Terug
Eco-modus
Geprogrammeerde
modus
Op / Neer
MenuCentrale verwarming AAN
Tijd
Periode
Kamertemperatuur

107
Koppelen van zender en ontvanger
Koppelingsknop
Centrale verwarming
AAN-indicator
LED 1
LED 2
Stroomindicator
Opmerking: de twee eenheden worden af fabriek gekoppeld
geleverd. Voer de koppelingsprocedure alleen uit als er
communicatieproblemen zijn.
Druk lang op de koppelingsknop op de ontvangereenheid.
LED 1 knippert regelmatig.
Schakel de zendereenheid uit door op de toets te
drukken .
Houd de MENU-toets op de zendereenheid ingedrukt
tot de koppelingscode op het display verschijnt
(bijvoorbeeld FF FF 0). Druk onmiddellijk op de ▲
-toets. Een andere code knippert op het scherm.

108
Als het koppelen is gelukt, verdwijnt de code op
het scherm en gaat LED 1 (groen) uit. Schakel de
zendereenheid in. Als de ingestelde temperatuur hoger
is dan de kamertemperatuur, stuurt de zenderunit een
RF-signaal naar de ontvangsteenheid, die op zijn beurt
een AAN-commando naar de ketel stuurt. In deze
situatie blijft LED 1 (rood) branden.
Stel de tijd en dag van de week in
Houd de MENU-toets 3 seconden ingedrukt. De
minutenindicator knippert. Gebruik de ▲ en ▼ toetsen
om de gewenste waarde te bereiken. Druk kort op de
MENU-toets om te bevestigen en naar de tijdinstelling
te gaan. De tijdindicator knippert. Gebruik de ▲ en
▼ toetsen om de gewenste waarde te bereiken. Druk
kort op de MENU-toets om te bevestigen en naar de
instelling van de dag van de week (1 t/m 7) te gaan. Druk
op de MENU-toets om af te sluiten.
Instelling bedieningsmodus
Druk kort op de MENU-toets om de werkingsmodus in
te stellen: Gepland, Handmatig of Vakantie.

109
In de geplande modus verschijnt het PRG-pictogram
aan de rechterkant van het scherm, zoals in de
onderstaande aeelding:
In de handmatige modus worden alleen de tijd, dag en
temperatuur op het scherm weergegeven:
In Vakantiemodus (Economisch) verschijnt aan de
rechterkant van het scherm een pictogram in de vorm
van een koer zoals in de onderstaande aeelding:

110
Geplande modus
Plan per dag
Druk kort op de MENU-toets om de geplande
bedrijfsmodus in te stellen.
Houd de PRG-toets 3 seconden lang ingedrukt om het
programmeermenu te openen.
De tijd * en temperatuur * knipperen op het scherm.
Elke keer dat u op de PRG-toets drukt, wordt de
geselecteerde waarde bevestigd en gaat u verder met de
volgende instelling.
Na het instellen van de tijd en de temperatuur voor de
eerste periode, schakelt het automatisch over naar de
tweede periode en vervolgens naar de derde en vierde
periode.
Zo gaat u verder met het instellen van de 4 periodes
voor elke dag van de week (1 - 7).

111
* Opmerking: de tijd kan worden ingesteld van 15 tot 15
minuten en de temperatuur van een halve tot een halve
graad. U kunt bijvoorbeeld de tijd instellen op 07:15 of
07:30 of 07:45 en de temperatuur op 22,0°C of 22,5°C
of 23,0°C.
Standaard instellingen
Periode 1 2
Uur Temp. Uur Temp.
12345
(Ma-Vr) 07:00 22°C 08:30 19°C
6 (Sat) 08:00 22°C 08:30 22°C
7 (Sun) 08:00 22°C 08:30 22°C
Periode 3 4
Uur Temp. Uur Temp.
12345
(Mon-Fri) 17:00 22°C 17:00 19°C
6 (Za) 17:00 22°C 22:00 19°C
7 (Zo) 17:00 22°C 22:00 19°C

112
Opmerking: Druk op de toets ▲ of ▼ om de ingestelde
temperatuur op het scherm weer te geven. Wacht een paar
seconden, het scherm keert terug naar de weergavemodus
bij kamertemperatuur.
Functies
Key lock-functie
Als de kinderbeveiligingsfunctie is geactiveerd in het
menu met geavanceerde instellingen (zie pagina 120),
worden de thermostaattoetsen vergrendeld zodra de
achtergrondverlichting van het scherm uitgaat.
Houd de MENU-toets 5 seconden ingedrukt om de
toetsen tijdelijk te ontgrendelen.
Open raam detectie (OWD)
Als de functie is geactiveerd vanuit het geavanceerde
instellingenmenu (zie pagina 120), zal de thermostaat
de verwarming uitschakelen als de kamertemperatuur
plotseling daalt (standaardinstelling 2°C in 15 minuten).
Deze plotselinge temperatuurdaling treedt op wanneer
een raam of deur wordt geopend terwijl de ketel in
werking is. Het OP-pictogram verschijnt op het scherm.

113
Het apparaat keert na 30 minuten terug naar de
oorspronkelijke bedrijfsmodus. Het OP-pictogram
verdwijnt van het scherm.
Door op een willekeurige toets te drukken, verlaat u de
OWD-modus.
Geavanceerde instellingen
Schakel de thermostaat uit door kort op de -toets
te drukken .
Druk tegelijkertijd ongeveer 6 seconden op de MENU-
en ▲ -toetsen. 01 0,3°C verschijnt op het scherm.
Gebruik de ▲ en ▼ toetsen om de instellingen te
veranderen en de MENU toets om naar de volgende
instelling te gaan.
Menu Omschrijving Interval Default
01 Interne sensor
temperatuur
kalibratie
-8°C~8°C 0°C
02 Instellen van
de maximale
temperatuur grens
5°C ~35°C 35°C

114
03 Instellen van
de minimum
temperatuur grens
5°C ~35°C 5°C
05 Antivries
temperatuur 5°C~15°C 5°C
09 Hysteresis 0.1~6°C 0.3°C
10 Scherm 0: Kamer
temp.
1: ingestelde
temp.
0
11 Kinder
bescherming 0: sleutels
ontgrendeld
1: sleutels
vergrendeld
0
12 Open raam
detectie 1: On
0: O 0

115
13 Het tijdsinterval
waarin de
plotselinge
temperatuur
daling wordt
gedetecteerd
2~30 min. 15 min.
14 Verloren graden
in het tijdsinterval
dat is ingesteld in
menu 13
2°C
3°C
4°C
2°C
15 De tijd waarna
het apparaat
terugkeert naar
de oorspronkelijke
werkingsmodus
10~60 min 30 min.
17 Reset 0: No
1: Ja. druk
op
gedurende 5
seconden.
0
Software versie

116
Verbindingsdiagram
De aansluiting van de ontvangsteenheid op een
230V-voeding en op een verwarmingssysteem
mag alleen worden uitgevoerd door gekwalificeerd
personeel en alleen na voorafgaande raadpleging van
de technische documentatie van de thermostaat en het
verwarmingssysteem.
De ontvangereenheid heeft een relaistype besturing
(NO Normaal Open en NC Normaal Gesloten) zonder
potentiaal (niet bekrachtigd) die het sluiten van een
stuurstroomcircuit uitvoert met een maximale stroom
van 10A en een maximale spanning van 250VAC/DC.
Aan het einde van de handleiding vindt u voorbeelden
van verbindingen met bepaalde modellen
verwarmingssystemen.

117
Aansluitvoorbeelden
Ariston CLAS EVO SYSTEM
Ferroli DivaCondens 24/28

118
Vaillant Ecotec Pure
Motan Max Optimus

119
Vereenvoudigde EU-conformiteitsverklaring
SC ONLINESHOP SRL verklaart dat PNI CT60
draadloze thermostaat in overeenstemming is met
RED-richtlijn 2014/53/EU. De volledige tekst van
de EU-conformiteitsverklaring is beschikbaar op
de volgende website:
https://www.mypni.eu/products/8001/download/
certifications

Termostat bezprzewodowy
PNI CT60
Instrukcja obsługi

121
Wprowadzenie
Ten termostat włącza i wyłącza instalację centralnego
ogrzewania na podstawie ograniczenia temperatury i
zadanego okresu czasu.
Specjalne ostrzeżenia
Ponieważ produkt musi być podłączony do źródła
zasilania 230 V oraz do urządzenia grzewczego, instalacja
może być wykonywana wyłącznie przez wykwalifikowany
personel, aby uniknąć nieodwracalnego uszkodzenia
produktu lub sprzętu grzewczego, do którego jest
podłączony.
Również pierwsza konfiguracja sprzętu powinna być
wykonana przez wykwalifikowany personel.

122
Specyfikacja techniczna
Zasilanie nadajnika 2 baterie AAA 15.V
Zasilanie odbiornika 230VAC, max. 10A
Częstotliwość 868 MHz
Przedział temperatury
zadanej +5°C ~ +35°C
Interwał wyświetlanej
temperatury 0°C ~ +50°C
Ekran Tak, podświetlany
Czujnik NTC 3950,
10KOhm@25°C
Precyzja ±0.1°C
Krok 0.5°C
Jednostka pomiaru
temperatury Tylko stopnie Celsjusza
Klasa ochrony wody IP30
Mieszkaniowy ABS UL94-5

123
Instrukcje Instalacji
Termostat można zamontować na 2 sposoby: na stole
lub na ścianie za pomocą wsporników dołączonych do
opakowania.
Opis klawiszy i ikon
Dzień tygodnia
ON/OFF
Programowanie
Z powrotem
Tryb ekologiczny
Tryb
zaprogramowany
Góra / Dół
MenuCentralne ogrzewanie włączone
Czas
Okres
Temperatura
pokojowa

124
Parowanie nadajnika i odbiornika
Przycisk parowania
Wskaźnik włączenia
centralnego ogrzewania
LED 1
LED 2
Wskaźnik mocy
Uwaga: te dwie jednostki są sparowane fabrycznie.
Procedurę parowania należy wykonywać tylko w przypadku
problemów z komunikacją.
Długo naciśnij przycisk parowania na odbiorniku.
Dioda LED 1 miga często.
Wyłącz nadajnik naciskając klawisz .
Naciśnij i przytrzymaj przycisk MENU na nadajniku, aż
na wyświetlaczu pojawi się kod parowania (na przykład
FF FF 0). Natychmiast naciśnij klawisz ▲. Na ekranie
zacznie migać inny kod. Jeśli parowanie przebiegło
pomyślnie, kod na ekranie zniknie, a dioda LED 1 (zielona)

125
zgaśnie. Włącz nadajnik. Jeśli ustawiona temperatura
jest wyższa niż temperatura w pomieszczeniu, nadajnik
wyśle sygnał RF do odbiornika, który z kolei wyśle
polecenie włączenia do kotła. W tej sytuacji dioda LED 1
(czerwona) pozostanie zapalona.
Ustaw godzinę i dzień tygodnia
Przytrzymaj klawisz MENU przez 3 sekundy. Wskaźnik
minut zacznie migać. Za pomocą klawiszy ▲ i ▼ przejdź
do żądanej wartości. Krótko naciśnij przycisk MENU,
aby potwierdzić i przejść do ustawienia czasu. Wskaźnik
czasu zacznie migać. Użyj klawiszy ▲ i ▼, aby uzyskać
żądaną wartość. Krótko naciśnij przycisk MENU, aby
potwierdzić i przejść do ustawienia dnia tygodnia (od 1
do 7). Naciśnij przycisk MENU, aby wyjść.
Konfiguracja trybu pracy
Krótko naciśnij przycisk MENU, aby ustawić tryb pracy:
Harmonogram, Ręczny lub Urlop.

126
W trybie harmonogramu ikona PRG pojawia się po
prawej stronie ekranu, jak na poniższym obrazku:
W trybie ręcznym na ekranie wyświetlana jest tylko
godzina, dzień i temperatura:
W trybie wakacyjnym (ekonomicznym) po prawej
stronie ekranu pojawia się ikona w postaci walizki jak na
poniższym obrazku:

127
Tryb zaplanowany
Planuj według dnia
Krótko naciśnij przycisk MENU, aby ustawić
zaplanowany tryb pracy.
Naciśnij i przytrzymaj klawisz PRG przez 3 sekundy, aby
wejść do menu programowania.
Czas* i temperatura* będą migać na ekranie. Za każdym
naciśnięciem klawisza PRG wybrana wartość zostanie
potwierdzona i przejdziesz do następnego ustawienia.
Po ustawieniu czasu i temperatury dla pierwszego okresu
automatycznie przełącza się na drugi okres, następnie na
trzeci i czwarty okres.
W ten sposób będzie kontynuowane ustawienie 4
okresów dla każdego dnia tygodnia (1 - 7).

128
* Uwaga: czas można ustawić od 15 do 15 minut, a
temperaturę od połowy do pół stopnia. Na przykład, można
ustawić czas na 07:15 lub 07:30 lub 07:45, a temperaturę
na 22,0°C lub 22,5°C lub 23,0°C.
Uwaga: Krótko naciśnij klawisz PRG, aby potwierdzić
ustawienie. Naciśnij przycisk MENU, aby wyjść.
Ustawienia domyślne
Okres 1 2
Godzina Temp. Godzina Temp.
12345
(Pn-Pt) 07:00 22°C 08:30 19°C
6 (Sob) 08:00 22°C 08:30 22°C
7 (Niedz) 08:00 22°C 08:30 22°C
Okres 3 4
Godzina Temp. Godzina Temp.
12345
(Pn-Pt) 17:00 22°C 17:00 19°C
6 (Sob) 17:00 22°C 22:00 19°C
7 (Niedz) 17:00 22°C 22:00 19°C

129
Uwaga: Naciśnij klawisz ▲ lub ▼, aby wyświetlić
ustawioną temperaturę na ekranie. Poczekaj kilka sekund,
ekran powróci do trybu wyświetlania temperatury w
pomieszczeniu.
Funkcje
Funkcja blokady klawiszy
Jeśli funkcja Ochrona przed dziećmi została aktywowana
w menu ustawień zaawansowanych (patrz strona 138),
klawisze termostatu zostaną zablokowane, gdy tylko
wyłączy się podświetlenie ekranu.
Naciśnij klawisz MENU przez 5 sekund, aby tymczasowo
odblokować klawisze.
Wykrywanie otwartego okna (OWD)
Jeśli funkcja została aktywowana z poziomu menu
ustawień zaawansowanych (patrz strona 138), termostat
wyłączy ogrzewanie, jeśli temperatura w pomieszczeniu
gwałtownie spadnie (ustawienie domyślne 2°C za 15
minut). Ten nagły spadek temperatury występuje w
przypadku otwarcia okna lub drzwi podczas pracy kotła.
Na ekranie pojawi się ikona OP.

130
Urządzenie powróci do pierwotnego trybu pracy po 30
minutach. Ikona OP zniknie z ekranu.
Naciśnięcie dowolnego klawisza spowoduje wyjście z
trybu OWD.
Zaawansowane ustawienia
Wyłączyć termostat przez krótkie naciśnięcie klawisza
.
Naciśnij jednocześnie klawisze MENU i ▲ i przytrzymaj
przez około 6 sekund. 01 0,3°C pojawi się na ekranie.
Użyj klawiszy ▲ i ▼, aby zmienić ustawienia, a klawisza
MENU, aby przejść do następnego ustawienia.
Menu Opis Interwał Default
01 Kalibracja
temperatury
czujnika
wewnętrznego
-8°C~8°C 0°C
02 Ustawianie
maksymalnego
limitu
temperatury
5°C
~35°C 35°C

131
03 Ustaw
minimalną
granicę
temperatury
5°C
~35°C 5°C
05 Temperatura
przeciw-
zamrożeniowa
5°C~15°C 5°C
09 Hysteresis 0.1~6°C 0.3°C
10 Wyświetlacz 0: temp.
pokojowa
1: ustaw et
temp.
0
11 Ochrona
dziecka 0: klucze
odblo-
kowane
1: klucze
zablo-
kowane
0
12 Wykrywanie
otwartego okna 1: On
0: O 0

132
13 Przedział czasu,
w którym
wykrywany jest
nagły spadek
temperatury
2~30 min. 15 min.
14 Stopnie
utracone w
przedziale
czasowym
ustawionym w
menu 13
2°C
3°C
4°C
2°C
15 Czas, po
którym
urządzenie
powraca do
pierwotnego
trybu pracy
10~60
min 30 min.
17 Reset 0: Nie
1: Tak.
Naciśnij
przez 5
sekund.
0

133
Wersja
oprogramo
wania
Schemat podłączenia
Podłączenie odbiornika do zasilania 230V oraz do
instalacji grzewczej może być wykonane wyłącznie przez
wykwalifikowany personel i po uprzednim zapoznaniu
się z dokumentacją techniczną termostatu i instalacji
grzewczej.
Odbiornik posiada sterowanie typu przekaźnikowego
(NO normalnie otwarte i NC normalnie zamknięte) bez
potencjału (bez napięcia), które wykonuje zamknięcie
obwodu sterującego przy maksymalnym prądzie 10 A i
maksymalnym napięciu 250 V AC/DC.
Przykłady połączeń z określonymi modelami instalacji
grzewczych można znaleźć na końcu instrukcji.

134
Przykłady połączeń
Ariston CLAS EVO SYSTEM
Ferroli DivaCondens 24/28

135
Vaillant Ecotec Pure
Motan Max Optimus

136
Uproszczona deklaracja zgodności UE
SC ONLINESHOP SRL oświadcza, że
bezprzewodowy termostat PNI CT60 jest zgodny
z czerwoną dyrektywą 2014/53/UE. Pełny
tekst deklaracji zgodności UE jest dostępny na
następującej stronie internetowej:
https://www.mypni.eu/products/8001/download/
certifications

Termostat fara fir
PNI CT60
Manual de utilizare

138
Introducere
Acest termostat porneste si opreste sistemul de incalzire
pe baza unei limite de temperatura si a unei perioade de
timp presetate.
Atentionari speciale
Deoarece produsul trebuie conectat la o retea de
alimentare cu energie electrica 230V si la un echipament
de incalzire, instalarea trebuie efectuata doar de
personal calificat, pentru a evita defectarea iremediabila
a produsului sau a echipamentului de incalzire la care se
conecteaza, defecte care nu fac obiectul garantiei.
Pentru configurarea initiala a echipamentului, va
recomandam sa apelati la personal calificat si cu
experienta in domeniu.

139
Specificatii tehnice
Alimentare emitator 2 x baterii AAA
Alimentare receptor 230VAC, max. 10A
Frecventa 868 MHz
Interval de
temperatura setata +5°C ~ +35°C
Interval de
temperatura afisata 0°C ~ +50°C
Ecran Da, iluminat
Senzor NTC 3950,
10KOhm@25°C
Precizie masurare ±0.1°C
Pas setare 0.5°C
Unitate de masura
temperatura Doar grade Celsius
Clasa de protectie la apa IP30
Carcasa ABS cu standard
anti-incendiu UL94-5

140
Instructiuni de instalare
Unitatea centrala poate fi montata in 2 moduri: pe masa
sau pe perete cu ajutorul suporturilor incluse in pachet.
Descriere taste si pictograme
Ziua saptamanii
Pornire/Oprire
Programare
Inapoi
Mod vacanta
Mod programat
Sus/Jos
MeniuCentrala pornita
Ora
Perioada
Temperatura
din camera

141
Imperechere emitator si receptor
Buton imperechere
Indicator centrala pornita
LED 1
LED 2
Indicator alimentare
Nota: cele doua unitati vin imperecheate din fabrica. Se
recomanda imperecherea doar daca sunt probleme de
comunicare.
Apasati lung butonul de imperechere de pe unitatea
receptor.
LED-ul 1 clipeste des.
Opriti unitatea emitator, apasand tasta .
Tineti lung apasata tasta MENU de pe unitatea
emitator, pana ce pe ecran apare codul de imperechere
(de exemplu FF FF 0). Apasati imediat tasta ▲. Un
alt cod va clipi pe ecran. Daca imperecherea s-a facut

142
cu succes, codul de pe ecran va disparea, iar LED-ul 1
(verde) se va stinge. Porniti unitatea emitator. Daca
temperatura setata este mai mare decat temperatura
din camera, unitatea emitator va trimite un semnal RF
catre unitatea receptor, care, la randul ei, va trimite o
comanda de pornire catre centrala termica. In aceasta
situatie, LED-ul 1 (rosu) va ramane aprins.
Setare ora si zi din saptamana
Tineti apasata tasta MENU timp de 3 secunde.
Indicatorul minutelor va clipi. Folositi tastele ▲ si ▼
pentru a ajunge la valoarea dorita. Apasati scurt tasta
MENU pentru a confirma si pentru a trece la setarea
orei. Indicatorul orei va clipi. Folositi tastele ▲ si ▼
pentru a ajunge la valoarea dorita. Apasati scurt tasta
MENU pentru a confirma si pentru a trece la setarea
zilei saptamanii (de la 1 la 7). Apasati tasta MENU
pentru a iesi.
Setare mod de functionare
Apasati scurt tasta MENU pentru a seta modul de
functionare: Programat, Manual sau Vacanta.

143
In modul Programat, in partea dreapta a ecranului apare
pictograma PRG ca in imaginea de mai jos:
In modul Manual, pe ecran este afisata doar ora, ziua si
temperatura:
In modul Vacanta (economic), in partea dreapta a
ecranului apare o pictograma sub forma de valiza ca in
imaginea de mai jos:

144
Modul Programat
Programarea pe zile
Apasati scurt tasta MENU pentru a seta modul de
functionare: Programat.
Apasati lung tasta PRG timp de 3 secunde pentru a intra
in meniul de setare a parametrilor.
Pe ecran vor clipi pe rand ora de start* si temperatura*.
La fiecare apasare a tastei PRG va fi confirmata valoarea
aleasa si se va trece la setarea urmatoare.
Dupa ce s-a setat ora si temperatura pentru prima
perioada, se trece automat la perioada a doua, apoi la a
treia si la a patra.
Se va continua astfel cu setarea celor 4 perioade pentru
fiecare zi a saptamanii (1 - 7).

145
*Nota: Ora poate fi schimbata din sfert in sfert de ora, iar
temperatura din jumatate in jumatate de grad. De exemplu,
puteti seta ora 07:15 sau 07:30 sau 07:45 si temperatura
22.0°C sau 22.5°C sau 23.0°C.
Nota: Apasati scurt tasta PRG pentru a confirma o setare.
Apasati tasta MENU pentru a iesi.
Setari implicite
Perioada 1 2
Ora Temp. Ora Temp.
12345
(L-V) 07:00 22°C 08:30 19°C
6 (S) 08:00 22°C 08:30 22°C
7 (D) 08:00 22°C 08:30 22°C
Perioada 3 4
Ora Temp. Ora Temp.
12345
(L-V) 17:00 22°C 17:00 19°C
6 (S) 17:00 22°C 22:00 19°C
7 (D) 17:00 22°C 22:00 19°C

146
Nota: Apasati tasta ▲ sau ▼ pentru a afisa pe ecran
temperatura setata (SET). Asteptati cateva secunde,
ecranul se va intoarce la modul de afisare a temperaturii din
camera (ROOM).
Functii
Blocare taste
Daca functia Protectie copii a fost activata din meniul de
setari avansate (vezi pagina 156), tastele termostatului
se vor bloca imediat ce lumina de fundal a ecranului se
va stinge.
Apasati tasta MENU timp de 5 secunde pentru a
debloca temporar tastele.
Detectie fereastra deschisa (OWD)
Daca functia a fost activata din meniul de setari
avansate (vezi pagina 156), termostatul va opri incalzirea
daca temperatura in camera va scadea brusc (setare
implicita 2°C in 15 minute). Aceasta scadere brusca a
temperaturii se intampla atunci cand este deschis un
geam sau o usa in timp ce centrala functioneaza. Pe
ecran apare pictograma OP.

147
Dispozitivul se va intoarce la modul initial de functionare
dupa 30 minute. Pictograma OP dispare de pe ecran.
Apasand orice tasta, veti iesi din modul OWD.
Setari avansate
Opriti termostatul apasand scurt tasta .
Apasati simultan tastele MENU si Sus timp de
aproximativ 6 secunde. Pe ecran va aparea 01 0.3°C.
Folositi tastele ▲ si ▼ pentru a schimba setarile si tasta
MENU pentru a trece la urmatoarea setare.
Meniu Descriere Interval Implicit
01 Calibrare
temperatura
senzor intern
-8°C~8°C 0°C
02 Setare limita
maxima
temperatura
5°C
~35°C 35°C
03 Setare limita
minima
temperatura
5°C
~35°C 5°C

148
05 Temperatura
antiinghet 5°C~15°C 5°C
09 Histerezis 0.1~6°C 0.3°C
10 Afisare ecran 0: temp.
camerei
1: temp.
setata
0
11 Protectie copii 0: Taste
deblocate
1: taste
blocate
0
12 Detectie
fereastra
deschisa
1: activa
0: inactiva 0
13 Intervalul de
timp in care
se detecteaza
scaderea brusca
a temperaturii
2~30 min. 15 min.

149
14 Grade pierdute
in intervalul de
timp setat la
punctul 13
2°C
3°C
4°C
2°C
15 Intervalul de
timp dupa care
dispozitivul
se intoarce la
modul initial de
functionare
10~60
min 30 min.
17 Resetare 0: Nu
1: Da.
Apasati
tasta
timp de 5
secunde.
0
Versiune
software

150
Diagrama conexiuni unitate receptor
Operatiunea de conectare a unitatii receptor la o sursa
de alimentare 230V si la o centrala termica se executa
doar de personal calificat si doar dupa consultarea in
prealabil a documentatiei tehnice a termostatului si
centralei termice.
Unitatea receptor are o comanda de tip releu (NO
Normal Deschis si NC Normal Inchis) fara potential
(neenergizat) ce executa inchiderea unui circuit de
comanda cu un curent maxim de 10A si o tensiune
maxima de 250VAC/DC. Regasiti exemple de
conectare cu anumite modele de centrale termice la
sfarsitul manualului.

151
Exemple de conectare cu centrale termice
Ariston CLAS EVO SYSTEM
Ferroli DivaCondens 24/28

152
Vaillant Ecotec Pure
Motan Max Optimus

153
Declaratie UE de conformitate simplificata
SC ONLINESHOP SRL declara ca Termostat fara
fir PNI CT60 este in conformitate cu Directiva
RED 2014/53/UE. Textul integral al declaratiei
UE de conformitate este disponibil la urmatoarea
adresa de internet:
https://www.mypni.eu/products/8001/download/
certifications

-
 1
1
-
 2
2
-
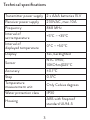 3
3
-
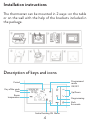 4
4
-
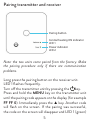 5
5
-
 6
6
-
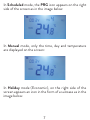 7
7
-
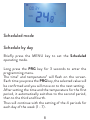 8
8
-
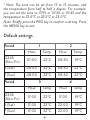 9
9
-
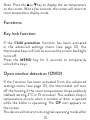 10
10
-
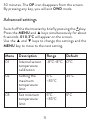 11
11
-
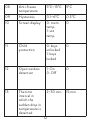 12
12
-
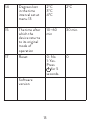 13
13
-
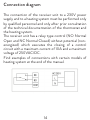 14
14
-
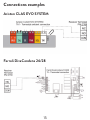 15
15
-
 16
16
-
 17
17
-
 18
18
-
 19
19
-
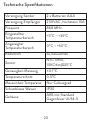 20
20
-
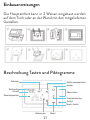 21
21
-
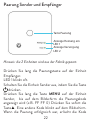 22
22
-
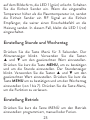 23
23
-
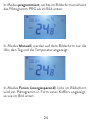 24
24
-
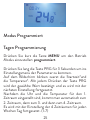 25
25
-
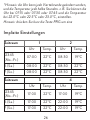 26
26
-
 27
27
-
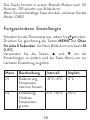 28
28
-
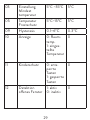 29
29
-
 30
30
-
 31
31
-
 32
32
-
 33
33
-
 34
34
-
 35
35
-
 36
36
-
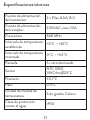 37
37
-
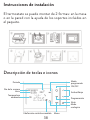 38
38
-
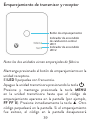 39
39
-
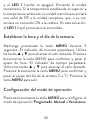 40
40
-
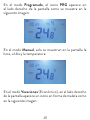 41
41
-
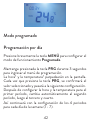 42
42
-
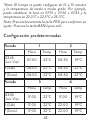 43
43
-
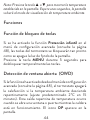 44
44
-
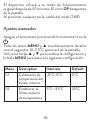 45
45
-
 46
46
-
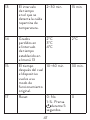 47
47
-
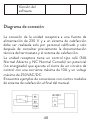 48
48
-
 49
49
-
 50
50
-
 51
51
-
 52
52
-
 53
53
-
 54
54
-
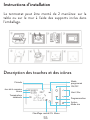 55
55
-
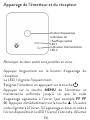 56
56
-
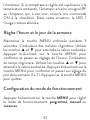 57
57
-
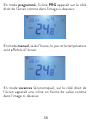 58
58
-
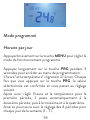 59
59
-
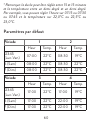 60
60
-
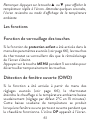 61
61
-
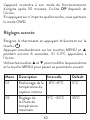 62
62
-
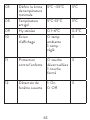 63
63
-
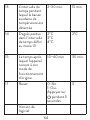 64
64
-
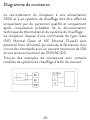 65
65
-
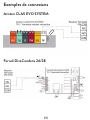 66
66
-
 67
67
-
 68
68
-
 69
69
-
 70
70
-
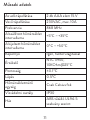 71
71
-
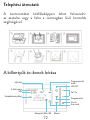 72
72
-
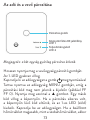 73
73
-
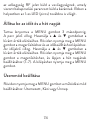 74
74
-
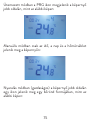 75
75
-
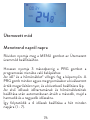 76
76
-
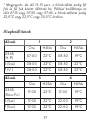 77
77
-
 78
78
-
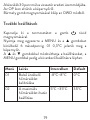 79
79
-
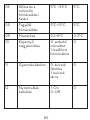 80
80
-
 81
81
-
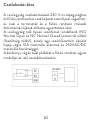 82
82
-
 83
83
-
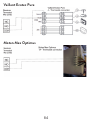 84
84
-
 85
85
-
 86
86
-
 87
87
-
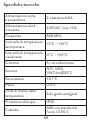 88
88
-
 89
89
-
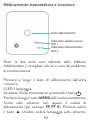 90
90
-
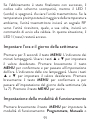 91
91
-
 92
92
-
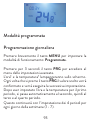 93
93
-
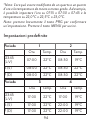 94
94
-
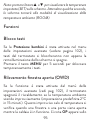 95
95
-
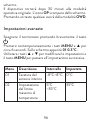 96
96
-
 97
97
-
 98
98
-
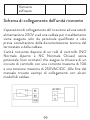 99
99
-
 100
100
-
 101
101
-
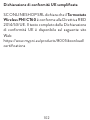 102
102
-
 103
103
-
 104
104
-
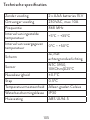 105
105
-
 106
106
-
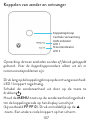 107
107
-
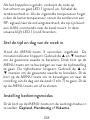 108
108
-
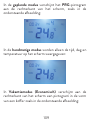 109
109
-
 110
110
-
 111
111
-
 112
112
-
 113
113
-
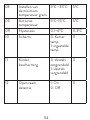 114
114
-
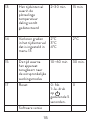 115
115
-
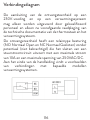 116
116
-
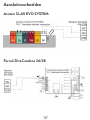 117
117
-
 118
118
-
 119
119
-
 120
120
-
 121
121
-
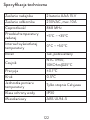 122
122
-
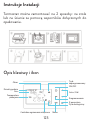 123
123
-
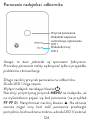 124
124
-
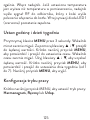 125
125
-
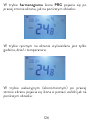 126
126
-
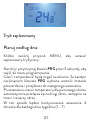 127
127
-
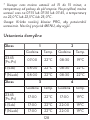 128
128
-
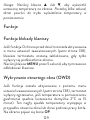 129
129
-
 130
130
-
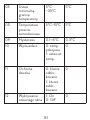 131
131
-
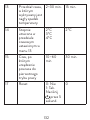 132
132
-
 133
133
-
 134
134
-
 135
135
-
 136
136
-
 137
137
-
 138
138
-
 139
139
-
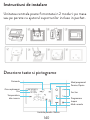 140
140
-
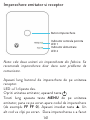 141
141
-
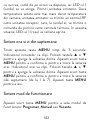 142
142
-
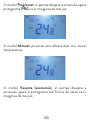 143
143
-
 144
144
-
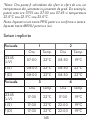 145
145
-
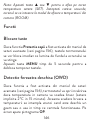 146
146
-
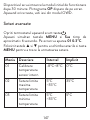 147
147
-
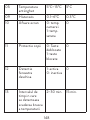 148
148
-
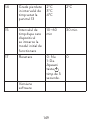 149
149
-
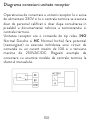 150
150
-
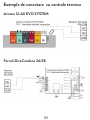 151
151
-
 152
152
-
 153
153
-
 154
154


En otros idiomas
- français: PNI CT60 Manuel utilisateur
- italiano: PNI CT60 Manuale utente
- Deutsch: PNI CT60 Benutzerhandbuch
- polski: PNI CT60 Instrukcja obsługi
Documentos relacionados
Otros documentos
-
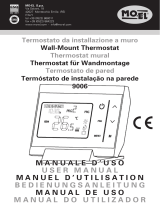 MO-EL CRONOTERMOSTATO 9006ED El manual del propietario
-
Extraflame System expansion motherboard kit El manual del propietario
-
Bticino ELECTRONIC TIMING THERMOSTAT ART. 4477 El manual del propietario
-
Ravelli HR EVO 14 Hydro El manual del propietario
-
HomeMatic hmip-etrv-b-2 Manual de usuario
-
KPS KPS-IH-DIGI1MEMORY El manual del propietario
-
Grant Instruments XUB Digital Ultrasonic Bath Range Manual de usuario
-
Panasonic S80MW1E5 El manual del propietario
-
Aermec CPS Manual de usuario
