KPS KPS-IH-DIGI1MEMORY El manual del propietario
- Tipo
- El manual del propietario

PE - DEIONN045 12/12
DIGITALE ZEITSCHALTUHR
Menüprogrammierung
DE
DIGITAL TIME SWITCH
Menu driven programming
INTERRUPTEUR HORAIRE DIGITAL
Programmation par menu
INTERRUPTOR HORARIO DIGITAL
Programación por menú
INTERRUTTORE ORARIO DIGITALE
Programmazione a menu
EN
FR
ES
IT

DEUTSCH
DE
2
MODELLE:
1234567
06
12 18 24
1234567
06
12 18 24
1234567
06
12 18 24
1234567
06
12 18 24
Digitale 1 oder 2 Kanäle Tages-Wochen-Jahreszeitschaltuhren Eingang/Eingänge für externe Steuerung Steckplatz für externen Speicherschlüssel
Externer Speicherschlüssel
Externer Speicherschlüssel
Digitale 1 oder 2 Kanäle Wochen-Jahreszeitschaltuhren Eingang für Synchronisierung mit DCF77- oder GPS-Antenne Steckplatz für externen Speicherschlüssel
06
12 18 24
()separat erhältlich
(in der Packung enthalten)

0 % 50 %
12:00:00
1234567
0612 18 24
12345
678910
K1
K2
L
N
BUS DCF77/GPS
12345
678910
K1
L
N
BUS DCF77/GPS
12345
678910
K1
K2
L
N
12345
678910
K1
L
N
IE1 IE1IE2
ELEKTRISCHE ANSCHLÜSSE
Beispiel: Benutzen Sie einen
spitzen Gegenstand zum
Drücken der .RESET-Taste
ABB. 2 ABB. 3
DISPLAY
TASTEN
ABB. 4
ABB. 5
ABB. 6
ABB. 1
Nur Wochen-
modelle
Nur 2-Kanal-
Modelle
Nur Modelle
mit GPS- oder
DCF77-Eingang
230V~ 230V~
230V~ 230V~
DE
3
MENu

1 Beschreibung des Geräts 3 Schaltuhrprogramme und
Einstellungen
3-1 Standardprogramm
3-2 Zufallsprogramm
3-3 Zyklusprogramm
3-4 Ferienprogramm
3-6 Löschen
3-7 Manuell
3-8 Optionen
3-8-1 Sprachen
3-8-2 Zeiteinstellung
3-8-3 Externer Eingang
3-8-4 Wartung
3-8-5 Zähler
3-8-6 Beleuchtung
3-8-7 Garantie
4 EMD (externes Speichermedium)
i
i
- Lesen Sie das vorliegende Handbuch vor der Installation oder
Inbetriebnahme des Produkts aufmerksam.
- Dieses Gerät darf ausschließlich von qualifiziertem Fachpersonal
installiert und angeschlossen werden.
Sicherheit Das Gerät ist mit einer fest eingebauten Batterie ausgestattet und darf nicht als
Siedlungsabfall entsorgt, sondern muss getrennt gesammelt werden, um
Umweltschäden zu vermeiden. Gemäß Richtlinie 2006/66/EG und den nationalen
Durchführungsgesetzen für die Entsorgung von Altprodukten wird die
Nichteinhaltung der o.g. Vorgaben gesetzlich sanktioniert.
3-5 Liste PRG (Programme)
Inhaltsverzeichnis
S.4
S.4
S.5
S.5
S.6
S.6
S.6
S.6
S.7
S.7
S.7
S.8
S.9
S.9
S.9
S.9
S.10
S.15
S.10
S.10
S.10
S.10
S.11
S.11
S.11
S.12
S.12
S.12
S.14
S.14
S.15
S.15
S.15
1 Beschreibung desApparates (je nach Modell)
Die digitale Zeitschaltuhr ist eine Uhr für die tägliche oder wöchentliche Programmierung, mit
der Möglichkeit auch zur Eingabe eines Jahreszeitraums, die die automatische Schaltung
verschiedener Lasten (mit einem oder zwei Kanälen) auf Basis einer flexiblen zeitlichen
Programmierung ermöglicht, die ihre Aktivierung vorsehen oder ausschließen kann (ideal für
den Einsatz im Haushalt, in industriellen Gebäuden, Schulen, Büros, öffentlichen Orten usw.),
außerdem ist sie mit einem Eingang/Eingängen für die Fernaktivierung ausgestattet. Für die
Versionen mit Steckplatz für EMD-Schlüssel (Externes Speichergerät) ist es möglich, ein oder
mehrere Programme mit Hilfe eines entsprechenden Speicherschlüssels auf verschiedene
Schaltuhren desselben Modells zu speichern/kopieren oder zu lesen. Die Modelle, die mit
Zeitsignalempfängern verbunden werden können, vom Typ DCF77 oder GPS, ermöglichen
eine Präzisierung für eine stets optimale Uhrzeitsynchronisierung.
1-1 Funktionseigenschaften (je nach Modell)
•
•
•
•
•
•
•-
--
•
•
•
•
•
•
•
•
•
•
•
•
•
•
•
•≤
•
Modelle mit Wochen- und/oder Tages- und Jahres-Programmierung, menügeführt mit
Anzeige der Anleitung auf dem Display mit Hintergrundbeleuchtung
Modelle mit einem oder zwei Relais-Steuerausgängen
Intelligente Relaissteuerung, die die Werte der Last und die Lebensdauer sowohl des Relais
als auch der angeschlossenen Last im Nulldurchgang erhöht
Modelle mit einem oder mehreren externen Eingängen, die dem Ausgang/den Ausgängen
für die manuelle Ferneinstellung zugeordnet sind
Modelle mit externem Speicherschlüssel für das Ausführen und Laden von Programmen
mit der Möglichkeit, nur die Urlaubsprogramme herunterladen/ zu laden
Kalender: Jahr - Monat - Tag Stunden und Minuten
Mehrsprachiges Menü: Italienisch - Englisch - Deutsch - Französisch Spanisch -
Portugiesisch Schwedisch - Holländisch - Russisch - Polnisch Griechisch
Programmarten: Standard-, Zufalls-, zyklische und Urlaubsprogramme
Insgesamt 64 frei einstellbare Programme
Urlaub: Es sind verschiedene Zeiträume im Laufe des Jahres programmierbar
Mindestzeit der Programmierung von 1 Sekunde ON/OFF
Schnelles Löschen von Programmen
Vereinfachtes permanentes oder vorübergehendes manuelles Ein-/Ausschalten
Einstellung Datum/Uhrzeit mit automatischer Umstellung von Sommer- auf Winterzeit und
umgekehrt
Stundenzählerfunktion für die Überwachung der Betriebsstunden der Last
Planung der Wartung der angeschlossenen Lasten
Garantieverwaltung des Produktes
Tastensperre
Display mit weißer Hintergrundbeleuchtung
Steuerung der Hintergrundbeleuchtung des Displays: Dauerlicht ON / Dauerlicht OFF/
Umweltfreundliche Lithiumknopfbatterie (nicht entfernbar) Lebensdauer 6 Jahre
Permanentspeicher zum Speichern von Programmen
Hochpräzises Quarzwerk: ± 0,5 Sek/Tag
Folgende Modelle können mit Zeitsignalempfängern verbunden werden: Typ DCF77 oder GPS.
Anmerkung: Alle Artikel können mit optionalem Zubehör in einer Schalttael montiert werden
4
1-1 Funktionale Eigenschaften
1-2 Technische Eigenschaften
1-3 Display (Abb. 1)
1-4 Funktionstasten
1-5 Funktionen der Tastenkombinationen
1-6 Anschlüsse
1-7 Erstes Einschalten
2 Menüs und Programmierung
2-1 Menüs - Übersicht
2-2 Priorität für Zwangssteuerung
2-3 Anlegen eines neuen Programms
2-4 Prüfen eines Programms
2-5 Ändern eines Programms
2-6 Löschen eines Programms
(schnelles Verfahren)
2-7 Kopieren eines Programms
und Programme
(Ext Input)
DE
zeitgesteuertes Abschalten

1-2 Technische Daten
Betriebsspannung 230 V AC +/- 10%
Frequenz 50-60 Hz
Schutzart
IP20
Ausgangstyp Potenzialfreier Wechslerkontakt;
NO Kontakt = 16(10)A / 250V~ (mit
Strombegrenzung über Widerstand für
Nulldurchgang bei hohem Wert);
NC Kontakt = 16(2)A / 250V~
Betriebstemperatur 0 °C bis +50 °C
Lagertemperatur von -10°C bis +65°C
Aufnahme/Eigenverbrauch 6,5 VA 1 Kanal / 7,8 VA 2 Kanäle
Kabelquerschnitt an Klemmen 1...6mm²
Richtlinie CE-Kennzeichnung LVD/EMC EN60730-2-7
Sprachen
Italienisch, Englisch, Deutsch, Französisch,
Spanisch, Schwedisch, Portugiesisch,
Holländisch, Russisch, Polnisch, Griechisch
Gangreserve bei Stromausfall 6 Jahre ab erstem Einschalten durch
Lithiumbatterie
Nominale Impulsspannung 4kV
Ganggenauigkeit
3000W 3000W 1100W 900W
(125 μF)
7W ÷ 23W
(max. 23 Lampen)
Kanal 1/Kanal 2 OFF/Ausgeschalteter Kanal
Manuelle Zwangssteuerung
des Kanals
ON/Eingeschalteter Kanal
Zufallsprogramme Zyklusprogramme
Symbol Ferien Tastensperre
Anzeige GPS - oder DCF77-
Signalempfang
Durchblättern nach oben
Nr. des ausgewählten
Programms - P01-P64 Durchblättern nach unten
Die Balkenanzeige des Displays stellt darüber hinaus Folgendes dar:
Fortschritt, siehe Abb. 2 auf S.3 (z.B. Löschen siehe Kap.3-6).•
Anzeige der Stunden, siehe Abb.3 auf S.3.•
Auf dem Display werden abwechselnd (einige Sekunden lang) die Zeiteinstellung mit
Datum/Uhrzeit und die eingestellten Programme oder Zwangssteuerungen angezeigt.
i
i
Montage
DIN-Schiene (Schalttafel mit optionalem SET)
Software Klasse A
Schutzklasse Klasse II
Verschmutzungsgrad Normal
Sommerzeit Winterzeit
1-3 Display (siehe Abb. 1 auf S. 3)
+/ 0,5 s/24h bei 25 °C
DE
5
Regelbare Höchstleistung

Öffnet das Hauptmenü (ausgehend vom Einstiegsbildschirm).
•
Schließt den gerade geöffneten Einstellungsbildschirm.•
Blättert eine Liste nach oben durch.•
Erhöht einen nummerischen Wert oder ändert einen Parameter.•
Wenn Sie diese Taste gedrückt halten, wird der Status von Kanal 1•
angezeigt, bis Sie die Taste wieder loslassen (im normalen Betrieb).
Blättert eine Liste nach unten durch.•
Verringert einen nummerischen Wert oder ändert einen Parameter.•
Wenn Sie diese Taste gedrückt halten, wird der Status von Kanal 2•
(bei 2-Kanal-Modellen) angezeigt, bis Sie die Taste wieder loslassen
(Im normalen Betrieb).
Bestätigt die vorgeschlagene Einstellung.•
Setzt das Gerät zurück (Reset); (HINWEIS: Die Programme und•
Funktion Tastenkombination
Sperren / Entsperren der Tasten ( ). 2 s
Temporäre Zwangssteuerung von
Kanal 1 und 2 (siehe Kap. 3-7).
Durch abwechselndes Drücken wird
von TEMP ON auf TEMP OFF geschaltet.
Anmerkung: Das Reset setzt die Einstellungen Zeitschaltuhr auf die Werkseinstellungen
zurück; es wird bei der ersten Programmierung oder beim Auftreten anormaler Anzeigen oder
Funktionsstörungen genutzt. Durch Drücken der Reset-Taste mit einem spitzen Gegenstand
führt die Zeitschaltuhr einen Lamp-Test durch, bei dem alle Displaysegmente eingeschaltet
und anschließend der Bildschirm für die Auswahl der Sprache angezeigt wird. Bei einem
Reset werden aufgehoben oder gehen verloren: Die Tastensperre, die aktuellen Datums- und
Uhrzeiteinstellungen. Letztere müssen neu eingegeben werden, da die Zeitschaltuhr
anderenfalls keine Programme ausführen kann. Beibehalten werden die eingestellten
Programme, die Aktivierung/Deaktivierung des externen Eingangs sowie die Daten für:
Wartung, Stundenzähler, Garantie.
1-4 Funktionstasten
1-5 Funktionen der Tastenkombinationen
Einstellungen „Ext. Input" (externer Eingang) werden nicht gelöscht).
Rückkehr in den AUTO-Modus (sofern
zuvor eine manuelle Zwangssteuerung
eingeschaltet wurde).
Anschluss der 1-Kanal- und 2-Kanal-Modelle
Siehe Plan Abb. 5 auf S.3
•
Anschluss der Modelle mit Eingang für DCF77 oder GPS
Synchro-Modelle (1 Kanal oder 2 Kanäle) mit GPS oder DCF77-Antenne.
Siehe Plan Abb. 6 auf S. 3•
Das Gerät wird ohne werkseitig konfigurierte Einstellungen geliefert.
Drücken Sie mit einem spitzen Gegenstand, um das Gerät zu entsperrenRESET
1.
Stellen Sie die folgenden Daten ein:2.
Sprachen
•(siehe Kap. 3-8-1).
Zeiteinstellung
•(Jahr, Monat, Tag, Zeit, Zeitzone - siehe Kap. 3-8-2).
i
1-6 Anschlüsse (immer die Netzspannung von 230V~ abschalten)
Maximale Entfernung der Kabel für den Anschluss eines Schalters oder einer Taste
1-7 Erstes Einschalten
Bei Stromausfall (z.B. „Blackout") geht der Parameter ZEITEINSTELLUNG nicht
verloren; darüber hinaus:
werden das/die Relais ausschaltet;•
i
wird die Hintergrundbeleuchtung ausschaltet (sofern eingeschaltet);•
wird die Zeiteinstellung mit blinkendem Datum und Uhrzeit 2 Minuten lang angezeigt
•
und anschließend bis zur erneuten Versorgung mit der Netzspannung auf den
Standby-Modus geschaltet (das Display ausgeschaltet), wobei alle gespeicherten Daten
beibehalten werden; alternativ hierzu kann auch eine Taste mehr als 1 Sekunde lang
an den externen Eingang (I.E.) der Zeitschaltuhr: 100 m (Abb. 5 auf S.3).
6
gedrückt werden, um die Zählung für den Standby-Modus wieder aufzunehmen.
MENÜ Ok Reset
MENU
DE Funktion
2 s 2 s
Tastenkombination
2 s 2 s
Permanente manuelle Zwangssteuerung
von Kanal 1 und 2 (siehe Kap. 3-7).
Wenn die Taste 2 Sekunden lang gedrückt
wird, wird PERM angezeigt;
durch abwech selndes Drücken wird von
Beschriebenen Funktionen können nur auf dem Einstiegsbildschirm ausgeführt werden.
+
PERM ON auf PERM OFF geschaltet.

.
Nr. Prg. Frei
Kanal (nur 2-Kanal-Mod.)
Tag (nur Wochenmodelle)
Zeit On/Off
Ende/Jahr
Nr. Prg. Frei
Kanal
(nur 2-Kanal-Mod.)
Tag (nur Wochenmodelle)
Zeit On/Off
Ende/Jahr
Nr. Prg. Frei
Kanal (nur 2-Kanal-Mod.)
Tag (nur Wochenmodelle)
Zeit On/Off
Zeit On/Off
Ende/Jahr
Nr. Prg. Frei
Kanal
(nur 2-Kanal-Mod.)
Zeit Off
Tag/Monat Off
Zeit On
Tag/Monat On
Prüfen
Ändern
Loeschen
Einz Prg
Alle Prg
Ferien
Kanal
(nur 2-Kanal-Mod.)
auto
perm off
perm on
Temp On
temp off
Language
ZEITEINST
EXT INPUT *
WARTUNG
ZAEHLER
Beleucht
Garantie
*Ausgenommen die synchronisierbaren Modelle mit
34
12
5 6 7 8
Drücken Sie die Taste
1. MENU.
Das erste auswählbare Menü wird angezeigt (Standar P).»
Mit den Tasten zeigen Sie die verschiedenen Menüs an.2. .
Bestätigen Sie das gewünschte Menü durch Drücken von .3. OK
.
Priorität zugewiesen, wie
nebenstehend dargestellt ist.
Diese Priorität ist zu berücksichtigen,
wenn verschiedene Programmtypen
für den gleichen Zeitraum programmiert
1900 2000 2200 000 200 400 600 800
1800
STD STD
STD
P01:Standardprogramm
ON 19:00 - OFF 22:00
P02:Standardprogramm
ON 00:00 - OFF 06:00
P03:Zufallsprogramm
ON 20:00 - OFF 00:00
P04:Zyklusprogramm
ON 19:00 - OFF 22:00
P05:Zyklusprogramm
ON 02:00 - OFF 06:00
P06:Zufallsprogramm
ON 04:00 - OFF 06:00
i
i
P01 P02
P03
P04 P05
P06
Alle eingegebenen Programme
von bis sind
gleichzeitig aktiv. Das/Die
Ausgangsrelais sind
entsprechend der festgelegten
Prioritäten aktiviert.
P01 P06
2 Menüs und Programmierung
2-1 Menüs – Übersicht
2-2 Priorität für Zwangssteuerung und Programme
HÖCHSTE PRIORITÄT
Das Gerät verfügt über die von 1 bis 8 angeführten Menüs.
werden.
Zwangssteuerung
Externer Input
(externes Speichermedium)
Ferienprogramm
Zyklus-/
Zufallsprogramm
Standardprogramm
Jedem Programmtyp wird eine
Vorgehensweise für die Auswahl des gewünschten Menüs:
DE
1900 2000 2200 000 200 400 600 800
1800
1900 2000 2200 000 200 400 600 800
1800
1900 2000 2200 000 200 400 600 800
1800
1900 2000 2200 000 200 400 600 80
1800
7
Z u f f a l s p Z y c l u s p
Z u f f a l s p Z y c l u s p
F e r i e n p
F e r i e n p
l i s t e p r g
l i s t e p r g
l o e s c h e n
l o e s c h e n
M a n u e l l
M a n u e l l
O p t i o n e n
M a n u e l l
O p t i o n e n
Manuelle
DCF77 oder GPS
Beispiel:
EMD

Das beschriebene Verfahren gilt für alle Programmtypen. Weitere Einstellungen
werden in den einzelnen Programmen erläutert.
Drücken Sie die Taste .MENU
1.
2.
Bestätigen Sie die Auswahl durch Dr cken vonüOK.3.
Die Anzahl der freien Programme wird 3 Sekunden lang angezeigt.
»
Das erste Programm im Speicher wird angezeigt.»
Drücken Sie die Taste 2 Sekunden lang.4. .
Auf dem Display wird das erste leere Programm angezeigt.
»
Bestätigen Sie durch Drücken von OK.5.
Die Programmnummer wurde damit ausgewählt.»
Nun folgt die Auswahl des Kanals.»
C1 C2
P02
Stellen Sie mit den Tasten den Kanal (bei 2-Kanal-
1.
C1 (Kanal 1) und C2 (Kanal 2) blinken.
»
Bestätigen Sie durch Drücken von .OK2. Der Kanal wurde damit eingestellt.»
Nun folgt die Einstellung des Tages.»
i
P02
P02
P02
Stellen Sie mit den Tasten die Uhrzeit, zu der das1. Programm beginnen soll, im Format einhh/mm
Bestätigen Sie durch Drücken von .OK2. Das Sekundenfeld wird angezeigt.
»
Stellen Sie mit den Tasten die Sekunden ein.
3. .
Bestätigen Sie durch Drücken von .OK4. Die Uhrzeit für den Start des Programms wurde
»
Nun folgt die Einstellung von ZEIT/OFF.
»
P02
P02
Stellen Sie mit den Tasten die Uhrzeit ein, zu der
1.
Wiederholen Sie hierzu die bereits für die Einstellung
Bestätigen Sie durch Drücken von .OK2.
Die Uhrzeit für das Ende des Programms wurde damit
»
Bestätigen Sie das Programmende durch Drücken von .OK
3.
i
i
Einstellen vom Tag (nur für Wochenmodelle)
Auswahl des Tages oder einer Gruppe von Tagen, an dem (denen) das Programm
ausgeführt werden soll. Stellen Sie mit den Tasten den Tag bzw. die Gruppe1. von Tagen ein.
Der ausgewählte Tag bzw. die ausgewählte Gruppe von Tagen
»
wird bzw. werden durch einen blinkenden Pfeil gekennzeichnet.
Bestätigen Sie durch Drücken von .OK2. Nun folgt die Einstellung von ZEIT/ON.
»
(nur für Wochenmodelle)
Nur für Wochenmodelle:Wird eine Gruppe von Tagen (z.B. Samstag und Sonntag) oder
ein Zeitintervall gewählt, dass über Mitternacht hinaus geht (z.B. Uhrzeit ON=23:30,
Uhrzeit OFF=2:00), wird das Programm zweimal ausgeführt, endet bei der zweiten
Ausführung aber am Montag. Darauf weist dann das Blinken des Symbols für den
Montag hin. Das gleiche gilt für die Programme, deren Dauer einen Tag überschreiten.
4. Geben Sie ein neues Programm ein oder verlassen Sie
die Sektion indem Sie mehrmals die -Taste drückenMENÜ
Nur Wochenmodelle: Beachten Sie beim Einstellen der Endzeit (OFF), dass diese zeitlich
nach der Anfangszeit (ON) liegen muss, blättern Sie also vor. Wenn Sie hingegen
rückwärtsblättern, wählen Sie die gesamte Woche aus.
Anmerkung: Wenn der in die Felder Sekunden On und Sekunden OFF eingegebene Wert
gleich null ist, wird das Sekunden-Feld nicht in der Datenübersicht angezeigt.
Außerdem muss ein Programm eine Mindestdauer von 1 Sekunde haben, weshalb die
Endzeit (OFF) nicht mit der Anfangszeit (ON) übereinstimmen kann.
Realisierung eines Programms mit einer Dauer von einigen Tagen
(nur Wochenmodelle) Es ist möglich, die Dauer eines Programme auf mehrere
Tage auszudehnen (z.B. von Montag 12:00 bis Mittwoch
14:00); lassen Sie dazu einfach bei der Einstellung von
„Uhrzeit OFF“ die Stunden über 24 Uhr hinaus laufen. Das
Überschreiten wird angezeigt, indem das Symbol des
Tages, der auf den Programmbeginn folgt, zu blinken
beginnt. Bei jedem Überschreiten von 24 Stunden wird das
Programm um einen Tag erweitert.
2-3 Anlegen eines neuen Programms
Auswahl des Programmtyps (Beispiel: Standar P):
Wählen Sie den gewünschten Kanal (nur bei 2-Kanal-Modellen).
Einstellen von ZEIT/ON
Einstellen von ZEIT/OFF
(nur für Zweikanalmodelle)
8
Auswahl des Programmtyps mit den Tasten .
Modellen) ein.
Durch einmaliges Drücken der Tasten wechseln Sie
zwischen den Minutenfeldern. Um auf das Stundenfeld zu
wechseln, halten Sie die Tasten etwas länger gedrückt.
damit eingestellt.
das Programm enden soll.
von ZEIT/ON beschriebenen Schritte.
eingestellt.
Z u f f a l s p
S t a n d a r p
S t a n d a r p
F r e i
L e e r
S t a n d a r p
K a n a l
P02
1 2 3 4 5 6 7
S t a n d a r p
Tag
e n o e
J a h r p r g
DE
P05
12
14
1 2 3 4 5 6 7

C1
P03
Wählen Sie mit den Tasten den Programmtyp (z.B.1.
Zufalls P) aus dem Menü aus.
.
Bestätigen Sie durch Drücken von .OK2.
Die gespeicherten Programme des gleichen Typs»
werden angezeigt.
Wählen Sie mit den Tasten das zu prüfende
3.
Auf dem Display werden die Einstellungen zyklisch»
2-6 Löschen eines Programms (schnelles Verfahren)
C1
P03
P03
Wählen Sie mit den Tasten den zu löschenden1.
Programmtyp aus dem Menü aus.
.
Beispiel: Zufalls P»
Drücken Sie die Tasten 2 Sekunden lang gleichzeitig.
2.
Auf dem Display wird „LOESCHEN" angezeigt.»
Bestätigen Sie durch Drücken von .OK3.
Auf dem Display wird „LEER" angezeigt.»
Das Programm wurde damit gelöscht.
C1
P03
C1
P04
Wählen Sie mit den Tasten den zu kopierenden1.
Programmtyp (z.B. Zufalls P) aus dem Menü aus.
.
Die Programmnummer blinkt.»
Drücken Sie die Taste circa 3 Sekunden lang.OK2.
Das Programm wird nun in die erste freie Speicher»
position kopiert.
Der erste änderbare Parameter
»
( .: Kanal) blinkt.Z.B
Ändern Sie die Daten, wie in Kapitel 2-33.
Beachten Sie, dass 2 Programme mit den gleichen Daten nicht möglich sind!
i
Einstellen des JAHRESPROGRAMMS
Ermöglicht die Einstellung eines bestimmten Zeitraums, in dem das zuvor eingestellte
Programm ausgeführt werden soll.
Das eingestellte Jahresprogramm gilt für jedes Jahr und wird zyklisch wiederholt.
P02
P02
Stellen Sie mit den Tasten den Anfang und das Ende1.
des Zeitraums im Format ein.TT/MM/--
.
Bestätigen Sie die einzelnen Felder durch Drücken von .OK
2.
Das Jahresprogramm wurde damit eingestellt.»
i
3. Geben Sie ein neues Programm ein oder verlassen Sie
die Sektion, indem Sie mehrmals die -Taste
drücken
MENÜ
Anmerkung: Es ist möglich, P JÄHRLICH über einen Jahreswechsel hinweg
einzustellen, z.B. Monat des Beginns (ON) OKTOBER und Monat des Endes (OFF)
MÄRZ (das Programm wird eine Gesamtdauer von 5 Monaten haben, wobei der
Monat OFF zum folgenden Jahr gehört, und so weiter in zyklischen Abständen.
beschrieben ist.
Anmerkung:
MENÜ
Werden innerhalb von 10 Minuten keine Änderungen vorgenommen
oder drückt man mehrmals , kehrt das Gerät zur Anfangsanzeige zurück und
das neue Programm geht verloren.
2-4 Prüfen eines Programms
2-5 Ändern eines Programms
1. Bestätigen Sie das zu ändernde Programm durch Drücken von .
2. Stellen Sie die neuen Werte wie in Kapitel 2-3 beschrieben ein.
OK
2-7 Kopieren eines Programms
DE
9
Programm aus.
Angezeigt.
Mit der Taste zeigen Sie die Menüs der gewünschten Programme
(Programm P, Zyklus P, ...) an.
MENU
e n o e
J a h r p r g
Z y c l u s p
Z u f f a l s p
Z y c l u s p
Z u f f a l s p
L o e s c h e n
Z u f f a l s p
L e e r
C1
P03

Für die Programmierung siehe Kapitel 2-3.
800 12 00
ON
OFF
Beispiel für die Einstellung aus der Abbildung:
Standardprogramm: ON um 8:00 Uhr, OFF um 12:00 Uhr.
Für die Programmierung siehe Kapitel 2-3.
800 12 00
ON
OFF
Beispiel für die Einstellung aus der Abbildung:
Zufallsprogramm: ON um 8:00 Uhr, OFF um 12:00 Uhr.
i
i
Gestattet das Ein- (ON) und Ausschalten (OFF) einer Last in einem festgelegten
Gestattet das Ein- (ON) und Ausschalten (OFF) einer Last im Zufallsmodus in
einem festgelegten Zeitraum.
Wenn das Zufallsprogramm aktiv ist, wird das Symbol
blinkend auf dem Hauptbildschirm angezeigt.
3-1 Standardprogramm
3-2 Zufallsprogramm
Drücken Sie die Taste , um die verfügbaren Menüs anzuzeigen.MENU
1.
Zeigen Sie mit den Tasten die verschiedenen Menüs an und bestätigen2.
3 Schaltuhrprogramme und Einstellungen 3-3 Zyklusprogramm
Zeit ON und Zeit OFF können auf 1 Sekunde bis 23:59:59 Stunden eingestellt
C1
P01
Für die Programmierung siehe Kapitel 2-3.
Stellen Sie mit den Tasten darüber hinaus ZEIT ON1. und ZEIT OFF ein.
800 12 00
ON
OFF
ZEIT ON
ZEIT OFF
Beispiel für die Einstellung:
Zyklusprogramm: ON um 8:00 Uhr, OFF um 12:00 Uhr.
Verzögerungszeit: ZEIT ON 10 Min. und ZEIT OFF 15 Min.
Mit Hilfe der Urlaubsprogramme können verschiedene Zeiträume im Jahr eingestellt
werden, in denen die den Kanälen 1 und 2 zugeordneten On-/Off-Programme
Wählen Sie Ferien P, wie in Kapitel 2-3 beschrieben ist.1.
Stellen Sie mit den Tasten die ein,Anfangszeit2. zu der das Programm ausgesetzt werden soll (OFF).
Bestätigen Sie durch Drücken von .OK3.
Stellen Sie mit den Tasten das , an demAnfangsdatum
4.
das Programm ausgesetzt werden soll, im Format ein.TT/MM/--
Stellen Sie die Zeit und das Datum für das derEnde5. Programmaussetzung (ON) ein, wie in den Schritten 2
i
i
Wenn das Zufallsprogramm aktiv ist, wird das Symbol
blinkend auf dem Hauptbildschirm angezeigt.
Gestattet das Ein- (ON) und Ausschalten (OFF) einer Last im zyklischen Modus in
einem festgelegten Zeitraum.
Während der eingestellten Urlaubszeit erscheinen auf dem Betriebsbildschirm der
ausgewählte Kanal, die Schrift FERIEN und das Symbol .
Die Ausgänge befinden sich im OFF-Status.
Zum Löschen des Unterbrechungszeitraumes nutzen Sie die entsprechende Funktion
im Menü LÖSCHEN (siehe Abschn. 3.6).
C1 (Kanal 1) und/oder C2 (Kanal 2)
3-4 Ferienprogramm
ausgesetzt werden (Mod. Zweikanalmodelle), z.B. bei Schließung im Sommer oder
o f f 0 2 : 0 0
30/07/--
C1
P06
on 06:00
31/08/--
C1
P06
10
Sie das gewünschte Menü durch Drücken von .OK Werden.
bis 4 beschrieben ist.
Z u f f a l s p
S t a n d a r p
Z u f f a l s p
Z y c l u s p
C1
P01
Z e i t o n
Z e i t o f f
Zeitraum.
über Weihnachten von öffentlichen oder Geschäftsbüros.
Bestätigen Sie die einzelnen Felder durch Drücken von .OK
DE
C1
P03
C1
P02

Ermöglicht es, ein beliebiges gespeichertes Programm anzuzeigen, zu ändern
Blättern Sie mit den Tasten durch das Menü, bis1. .
Bestätigen Sie durch Drücken von .OK
2.
Die Anzahl der freien Programme wird angezeigt.»
Das erste Programm im Speicher wird angezeigt.»
Wählen Sie mit den Tasten das gewünschte
3.
Eine Beschreibung, wie Sie die Daten prüfen, ändern
oder löschen, finden Sie von Kapitel 2-4 bis Kapitel 2-6.
In diesem Menü stehen mehrere Optionen für den Löschvorgang zur Verfügung.
Blättern Sie mit den Tasten durch das Menü, bis1. .
Bestätigen Sie durch Drücken von .OK
2.
Auf die Art des Löschvorgangs haben Sie im Unter-
»
menü Zugriff (siehe nachstehende Tabelle).
Wählen Sie mit den Tasten die gewünschte Art
»
Drücken von .OK
3.
Durch Drücken der Taste können Sie den Löschvorgang abbrechen.MENU
Untermenü Funktion
Einz Prg Löscht das jeweils ausgewählte einzelne Programm.
Alle Prg Löscht alle Programme.
In diesem Fall werden alle gespeicherten Programme gelöscht!
Ferien P Löscht alle Ferienprogramme.
i
i
Ermöglicht die manuelle Zwangssteuerung der Ausgänge unabhängig vom
eingeschalteten Programm. Mögliche Einstellungen:
Display-
Symbol
Kanal-
Status Zwangssteuerungsfunktion
auto C1
C2
Keine Zwangssteuerung, der Kanal wird
Programmgesteuert.
Perm C1 On
C2 On
Permanenter Kanal eingeschaltet.
PERM C1 OFF
C2 OFF
Permanenter Kanal ausgeschaltet.
TEMP C1 On
C2 On
Kanal bis zum nächsten
Programmschritt eingeschaltet.
TEMP C1 OFF
C2 OFF
Kanal bis zum nächsten
Programmschritt ausgeschaltet.
Einschalten einer Zwangssteuerung
Wählen Sie mit den Tasten das Untermenü „MANUELL".
1.
Bestätigen Sie durch Drücken von .OK
2.
Drücken Sie die Tastenkombination (siehe Kap.1-5) zur3.
Auswahl des Kanals (nur bei 2-Kanal-Modellen).
Auf dem Display werden die Informationen über den»
Kanal bzw. die Kanäle angezeigt (siehe obige Tabelle).
Stellen Sie mit den Tasten die Art der Zwangssteue-4. .
Bestätigen Sie die Auswahl durch Drücken von .OK5.
Der Einstiegsbildschirm wird nun angezeigt.»
Auf dem Display wird die Art der Zwangssteuerung des
»
Ausschalten einer Zwangssteuerung (vom Hauptbildschirm aus)
Drücken Sie die Tastenkombination des auszuschaltenden Kanals (siehe Kap. 1-5)1. 2 Sekunden lang.
3-7 Manuell
Für das Ausschalten brauchen Sie im Menü nur den „AUTO"-Modus auszuwählen
(siehe Abschnitt „Einschalten einer Zwangssteuerung").
i
3-5 Liste der Programme (PRG)
3-6 Löschen
oder zu löschen.
DE
11
„LISTE PRG" angezeigt wird.
Programm aus.
Loeschen angezeigt wird.
Löschvorgang aus.
Bestätigen Sie den ausgewählten Löschvorgang durch
Zwangssteue
-rungsmodus
rung ein.
Kanals angezeigt.
F e r i e n p
l i s t e p r g
F R E I
L i s t e p r g
L O E S C H E N
K 1 T E M P
K 1 T E M P
K 2 P E R M
C
C 2C 2
CC
C1
P03

Ermöglicht die Einstellung verschiedener Parameter für die Schaltuhr.
Wählen Sie mit den Tasten „OPTIONEN".1.
Bestätigen Sie durch Drücken von .OK2.
Es folgen die Untermenüs.
»
3-8-1 Sprachen
Ermöglicht die Einstellung der gewünschten Anzeigesprache.
Wählen Sie mit den Tasten das Untermenü1. „LANGUAGE".
Bestätigen Sie durch Drücken von .OK2.
Wählen Sie mit den Tasten die gewünschte Sprache.
3.
Bestätigen Sie durch Drücken von .OK4.
3-8-2 Zeiteinstellung (aktuelle)
Ermöglicht die Einstellung des Datums und der Uhrzeit für das Gerät.
Nach einem Reset muss das Datum neu eingestellt werden.
Wählen Sie mit den Tasten „ZEITEINST".1.
Bestätigen Sie durch Drücken von .OK
2.
Stellen Sie mit den Tasten jeweils JAHR, MONAT,3.
TAG, ZEIT, MINUTEN ein.
Durch einmaliges Drücken der Tasten wechseln Sie
zwischen den Minutenfeldern. Um auf das Stundenfeld zu
Bestätigen Sie durch Drücken von .OK4. Die Zeiteinstellung wurde damit vorgenommen.»
Nun folgt die Einstellung von „SOM / WIN".»
i
i
Zeitumstellung zwischen ( Winter) / ( Sommer)Sommer Winterzeit
Wählen Sie mit den Tasten die Art der Umstellung.1. .
Bestätigen Sie durch Drücken von .OK
2.
Stellen Sie mit den Tasten die Werte (siehe Tabelle) ein.
3. .
Jede Wahl mit bestätigen.OK4.
Mögliche Auswahl auf
dem Display
Umstellung auf Sommerzeit
+1St. ( Sommerzeit)
Umstellung auf Winterzeit
-1St. ( Winterzeit)
Keine Keine Keine
EUROPA Letzter Sonntag im März Letzter Sonntag im Oktober
USA Zweiter Sonntag im März Erster Sonntag im November
Freie ZZ Woche/Tag (Sonntag), frei
Programmierbar
Woche/Tag (Sonntag), frei
Programmierbar
Feste ZZ
Festes, frei programmierba-
res Datum (z.B. 28.02)
Festes, frei programmierbares
Datum (z.B. 29.10)
Time Zone GPS (nur bei GPS- und DCF77-Modellen)
Dies erfolgt nach der Einstellung von ZEITEINST
Wählen Sie mit den Tasten „GPS".
1.
Bestätigen Sie durch Drücken von .OK2.
Wählen Sie die Art der Umstellung (SOM / WIN;
3.
Stellen Sie mit den Tasten die Anzahl Stunden4.
Bestätigen Sie durch Drücken von .OK5.
Die Zeitumstellung wurde damit vorgenommen.»
Der Einstiegsbildschirm wird nun angezeigt.»
i
Die Art der Zeitumstellung von Sommer- auf Winterzeit;
GPS- oder DCF77-Einstellungen (nur für vorbereitete Modelle).
(Werkseinstellung)
Korrektur der Zeitzone (TZONE / UTC) einstellen
bezüglich des Greewich-Meridians:
- hinzufügen, wenn Sie sich östlich von Greenwich befinden
- abziehen, wenn Sie sich westlich von Greenwich befinden
(z.B. Italien, TZONE / UTC + 1).
Modifizierbarer Parameter -12 ÷ +12
3-8 Optionen
EUROPA
Oder die GPS- oder DCF77-Einstellung
(nur für vorbereitete Modelle)
12
wechseln, halten Sie die Tasten etwas länger gedrückt.
(siehe Kap. 3-8-2).
siehe obige Tabelle).
entsprechend der TZONE / UTC ein.
M a n u e l l
O p t i o n e n
Z E I T E I N S T
I t a l i a n o
Z E I T E I N S T
S O M / W I N
Z E I T E I N S T
S o m / w i n
DE

13
“DCF77” mit den Tasten wählen.1.
Bestätigen Sie durch Drücken von .. OK
2.
Time Zone / UTC DCF77 (nur bei GPS- und DCF77-Modellen)
Der Empfänger überträgt, im Gegensatz zum GPS, die Uhrzeit unter
0
Die Stundenanzahl der TZONE / UTC mit den Tasten
3.
Bestätigen Sie durch Drücken von .. OK4.
Die Zeitumstellung wurde eingestellt.»
Zum Hauptbildschirm zurückkehren.
»
einstellen. Modifizierbarer Parameter -3 ÷ +3
Zeitzone (TZONE / UTC) entsprechend der Position zu Frankfurt korrigieren:
- hinzufügen, wenn Sie sich östlich von Frankfurt befinden
- abziehen, wenn Sie sich westlich von Frankfurt befinden
(Z.B. Deutschland, TZONE / UTC +0).
BETRIEBSMODUS MIT GPS-oder DCF 77-EMPF NGER
Wenn an das Produkt ein GPS- oder DCF77-Empfänger für die Uhrzeitsynchro-
nisierung angeschlossen wird, erscheint auf dem Display (nach Abschluss der
Programmierung) das Symbol für den Betrieb mit den folgenden Anzeigen:
Ä
BLINKEND = Warte auf Synchronisierung;
DAUERLICHT = Synchronisierung vorhanden
AUS = Fehlen des Signals oder Empfänger nicht angeschlossen
Unterschied im
Vergleich zur Zone von
Frankfurt
Unterschied im
Vergleich zur Zone von
Greenwich
0 h
+1 h
+1 h+2 h
+2 h
+3 h
-1 h
0 h
-2 h-1 h
keine Synchronisierung (nach 24h Wartezeit)
Tabelle mit Beispielen für die Unterschiede zwischen den Zeitzonen
Nach der Einstellung von DATUM/UHRZEIT (siehe Kap.3-8-2).
i
DE
Berücksichtigung von Sommer-/Winterzeit
Z E I T E I N S T
Z E I T E I N S T

3-8-3 Externer Eingang (Ext Input)
Ermöglicht es, manuelle Zwangssteuerungen des Typs ON und OFF fernbedient
auszuführen (siehe Kap. 3.7); hierzu dienen entsprechende Tasten oder Schalter.
Die Funktion steht für die Modelle nicht zur Verfügung mit GPS- oder DCF77-
Eingang (der Menüpunkt „EXT INPUT" ist im Menü „OPTIONEN" nicht verfügbar).
Wählen Sie mit den Tasten das Untermenü „EXT INPUT".
1. .
Bestätigen Sie durch Drücken von .OK2.
Wählen Sie mit den Tasten die Art der Umschaltung
5. (siehe nachstehende Tabelle).
Bestätigen Sie durch Drücken von .OK6.
Wenn Sie die vorgenommenen Einstellungen ausschalten möchten,
Bestätigen Sie die Auswahl „AUSSCHALT" durch Drücken von .OK
•
Display-
Auswahl
Kanal oderK1
K2 (2-Kanal-
Modelle)
Symbol Funktion Externe
Steuerung
Perm On
off
Schalter
des Kanals auf ON oder OFF.
temp
Temporäre Zwangssteuerung
des Kanals bis zur nachfolgen
den Umschaltung auf ein zuvor
eingestelltes Programm.
i
i
timer on
off
Zeitgesteuerte Zwangssteuerung
eines Kanals (z.B. Steuerung
der Treppenbeleuchtung).
*Die Zeit kann im Format hh:
mm:ss eingestellt werden.
Taste
Taste
Anmerkung: Das Schließen des Kontaktes des externen Eingangs wird
unmittelbar von der Zeitschaltuhr erfasst, während dies für die Öffnung max. 1
Sek. in Anspruch nehmen kann.
Den Kanal mit den Tasten wählen. (2 Kanal Modell).
3.Mit bestätigen.OK4.
3-8-4 Wartung
Gestattet es, für den Kanal C1 und/oder C2 (2 Kanal Modell) einen Zeitraum für den
Betrieb auf ON einzustellen. Nach diesem Zeitraum zeigt die Zeitschaltuhr mit der Schrift
„K1 WART” oder „K2 ”, im Wechsel mit dem aktuellen Datum, einenWART
Wählen Sie mit den Tasten das Untermenü „WARTUNG".
1. .
K1 blinkt.»
Wählen Sie mit den Tasten den gewünschten Kanal
2.
Bestätigen Sie durch Drücken von .OK3.
Stellen Sie mit den Tasten die Stundenzahl ein.4. .
Drücken Sie , um zum nächsten Kanal überzugehenOK5.
Wenn Sie die Werte ändern oder neu einstellen
Annullieren des Wartungshinweises
i
i
Anmerkung: Bei Änderung des Wartungsintervalls gehen eventuelle, bereits
erfolgte Teilzählung verloren.
Nach Ablauf der Zählung erscheinen auf dem Betriebsbildschirm die blinkende Schrift
MANUT und die Anzeige des entsprechenden Kanals.
Nach Durchführung des Wartungseingriffs kann der Hinweis gelöscht werden;
drücken Sie dazu die -Taste und halten Sie sie für circa 2 Sekunden gedrückt,
während der Hinweis zum entsprechenden Kanal angezeigt wird.
OK
Achtung: Beim Löschen der Schrift MANUT wird der Zähler automatisch neu
gestartet und die Zählung beginnt von vorn.
Wenn Sie die WARTUNGS-Funktion nicht nutzen möchten,
stellen Sie den Stundenzähler für den Kanal/die Kanäle auf null.
Diese Information kann für Wartungseingriffe genutzt werden, die nach einem vorgegebenen
Zeitraum am Gerät durchgeführt werden müssen, das an den Ausgang angeschlossen ist.
Die Pfeiltaste gedrückt halten, um die Zehntel-,
Hundertstelwerte etc. schnell zu erhöhen/zu verringern.
Bei kurzem Drücken wird der Wert nur jeweils um eine
Einheit erhöht/verringert.
möchten, wiederholen Sie die Schritte 1 bis 5.
i
C1
(nur bei 2 Kanal Modellen) oder drücken Sie , umMENU
*Die Zeit entsprechend der zuvor beschriebenen Vorgehensweise einstellen,
14
Wiederholen Sie Schritt 1 bis 4.
(bei 2-Kanal-Modellen).
Z E I T E I N S T
W a r t u n g
W a r t u n g
Uhrzeiteingabe On und Off.
erforderlichen Wartungseingriff an.
die Sektion zu verlassen.
Permanente Zwangssteuerung
KK
DE

3-8-6 Beleuchtung
Ermöglicht es, die Zeit für die Beleuchtung des Displays einzustellen.
Wählen Sie mit den Tasten das Untermenü
1.
Bestätigen Sie durch Drücken von .OK2.
Wählen Sie mit den Tasten eine der Optionen:3.
BEL EIN, BEL AUS oder BEL 6 SEK.
3-8-7 Garantie
Ermöglicht es, die seit der Inbetriebnahme der Schaltuhr vergangene Zeit
Wählen Sie mit den Tasten das Untermenü1.
Bestätigen Sie durch Drücken von .OK2.
Auf dem Display wird die Zeit angezeigt, wie oben»
Die Zählung kann nicht auf Null gestellt werden.
i
Beim EMD handelt es sich um eine externe Speicherkarte, auf der 64 Programme
einschließlich der Ferien gespeichert werden können.
Das EMD-Speichermedium ist der Programmierschlüssel.
Stecken Sie das Speichermedium ein.1.
Auf dem Display wird das Speicher-Menü angezeigt.»
Wählen Sie mit den Tasten das gewünschte2.
Untermenü aus (siehe Tabelle).
.
Bestätigen Sie die jeweilige Auswahl durch Drücken von .OK
3.
Untermenü Funktion Hinweise
AUSFUEH Führt die Programme direkt
vom EMD aus. Die Programme werden nur
vom EMD ausgeführt.
Speichert den gesamten Speicher
der Schaltuhr auf dem EMD.
Überschreibt alle bereits auf dem
EMD gespeicherten Programme.
Kopiert den gesamten Inhalt vom
EMD in den Speicher der Schaltuhr.
Überschreibt alle in der Schaltuhr
gespeicherten Programme.
LESEN Liest die Programme vom Zeigt nur die auf dem EMD
gespeicherten Programme an.
Kopiert die Ferienprogramme
von der Schaltuhr auf das EMD.
Überschreibt alle bereits auf
dem EMD gespeicherten
Kopiert die Ferienprogramme
vom EMD auf die Schaltuhr.
Überschreibt alle in der Schaltuhr
gespeicherten Ferienprogramme.
LOESCHEN
Löscht die auf dem EMD gespei
cherten Programme. Löscht den gesamten EMD-
Speicher definitiv.
Drücken Sie die Taste , um das Menü zu schließenMENU1.
Bestätigen Sie die Auswahl „ANNULLIER" durch Drücken von .OK
2.
Der EMD-Speicher wird aus der Schaltuhr ausgeschlossen.
»
Der EMD-Speicher wird nicht mehr erkannt.»
Nehmen Sie das EMD heraus.3.
i
Achtung: Mit Hilfe des Speicherschlüssels können Informationen nur zwischen
Geräten desselben Modells ausgetauscht werden, anderenfalls erscheint auf dem
Display eine Fehlermeldung.
Mit bestätigen, um die Einstellung zu verlassen.OK3.
4 EMD (externes Speichermedium)
Bestätigen Sie durch Drücken von OK4.und die Einstellung verlassen.
3-8-5 Zähler
Wählen Sie mit den Tasten das Untermenü1.
„ZAEHLER".
Bestätigen Sie durch Drücken von .. OK
2.
Wählen Sie mit den Tasten den gewünschten Kanal.
3.
Auf dem Display werden die Betriebsstunden angezeigt.
»
Drücken Sie die Tasten + , um die
Mit bestätigen und die Einstellung verlassen.OK4.
i
Mit Hilfe dieser Funktion zählt die Zeitschaltuhr die Gesamtzeit, in der der Ausgang
aktiv (ON) bleibt. Ihre Aufgabe ist es, die Betriebsdauer des an den Kanal/die
Kanäle / bei Zweikanalmodellen) angeschlossenen Gerätes zu überwachen.
K2
DE
15
Betriebsstunden auf Null zu stellen.
BELEUCHT".
in Tagen anzuzeigen.
„GARANTIE".
beschrieben ist.
SPEIC
LADEN
EMD ab.
Ferienprogramme
W a r t u n g
Z a e h l e r
K 1
Z a e h l e r
B e l e u c h t
B e l e u c h t
B e l e i n
B e l e u c h t
g a r a n t i e
g a r a n t i e
Tag
A u s f h e h
A n n u l l i e r
Der Hersteller behält sich das Recht vor, ohne Vorankündigung alle technischen und baulichen Änderungen am Gerät vorzunehmen, die er für notwendig hält.

ENGLISH
16
MODELS:
EN
1234567
06
12 18 24
1234567
06
12 18 24
1234567
06
12 18 24
1234567
06
12 18 24
1 or 2 channel digital time switches - daily, weekly, monthly/yearly - input/s for external control - slot for an external memory key
external memory key
external memory key
1 or 2 channel digital time switches - weekly, monthly/yearly - input for synchronisation with DCF77 or GPS antenna - slot for an external memory key
06
12 18 24
(included in the package)
()sold separately

0 % 50 %
12:00:00
1234567
12345
678910
C1
C2
L
N
BUS DCF77/GPS
12345
678910
C1
L
N
BUS DCF77/GPS
12345
678910
C1
C2
L
N
12345
678910
C1
L
N
IE1 IE1IE2
ELECTRICAL CONNECTIONS
Example: use a pointed object
to press the button.RESET
FIG. 2 FIG. 3
DISPLAY
KEYS
FIG. 4
FIG. 5
FIG. 6
FIG. 1
0612 18 24
only weekley
models
Only 2 channel
models
only models
with GPS or
DCF77 input
230V~ 230V~
230V~ 230V~
17
EN
MENu

3 Clock programs and
settings
4 External Memory Device
(EMD)
3-1 Standard Program
3-2 Random Program
3-3 Cyclic Program
3-4 Holidays Program
3-5 PGR List (programs)
3-6 Delete
3-7 Manual
3-8 Options
3-8-1 Languages
3-8-2 Date/Time
3-8-3 External input
3-8-4 Maintenance
3-8-5 Hour meter
3-8-6 Back-lighting
3-8-7 Warranty
i
i
- Carefully read this manual before assembling the product and putting it
into operation.
- This equipment must be assembled and connected solely by adequately
skilled personnel.
Safety The equipment contains a non-removable battery and it must not be
disposed of as urban waste but recycled in order to protect the
environment. Failure to comply with the requirements of EU Directive
2006/66, and the national legislations for implementation of this
Directive, for the disposal of products at the end of their service life, is
punishable by law.
Contents
pag.18
pag.18
pag.19
pag.19
pag.20
pag.20
pag.20
pag.20
pag.21
pag.21
pag.21
pag.22
pag.23
pag.23
pag.23
pag.23
pag.24
pag.29
pag.24
pag.24
pag.24
pag.24
pag.25
pag.25
pag.26
pag.26
pag.26
pag.28
pag.28
pag.29
pag.29
pag.29
1 Device description (based on the mode)
the digital time switch is a clock which is programmable daily or weekly, with the
possibility to insert yearly programming, which allows automatic switching of
different loads (single or dual channel) based on time programming which is flexible
enough to provide for or exclude activation (ideal use in residential buildings, industry,
schools, offices, public places, etc.) and is also equipped with input/s for remote
activation. For versions with a slot for an EMD key (External Memory Device), it is
possible to save/copy or read one or more
programs on different time switches of the same model by means of a special memory
key. Models which can be connected with time signal receivers: DCF77 or GPS types
allow optimised precision time synchronisation.
1-1 Functional characteristics (based on the model)
• Models with daily, weekly annual programming, menu driven guided with
indications on backlit display
• Models with one or more relay control outputs
• Intelligent relay command that increases the load values and life time of both the
relay and the connected load “zero crossing”
• Models with external input/s for manual remote forcing output/s
• Models with an external memory key to execute and memorise programs
with possibility of downloading / uploading only holiday programs
• Calendar: year - month - day - hour and minutes
• Multilanguage menu: Italian - English - German - French - Spanish
- Portuguese - Swedish - Dutch - Russian - Polish - Greek
• Type of programs: Standard, Random, Cyclic, Holiday
• 64 settable programs
• Holiday: different periods throughout the year can be set
• Minimum programming ON/OFF time of 1 second
• Quick deleting of programs
• Simplified permanent or temporary manual ON/OFF mode
• Date/hour setting with summer/winter automatic time change
• Hour counting for monitoring the working time of the connected loads
• Maintenance programming of the connected loads
• Managing of the warranty period
• Keyboard blocking
• White backlit display
• Backlit display management: fixed ON / fixed OFF/
• Ecologic Lithium battery (not removable) with 6 years lifetime
• Permanent memory for memorizing programs
• High precision quartz mechanism: ≤ ± 0.5 sec/day
• Models which can be connected to time signal receivers: DCF77 or GPS.
monthly/
Note: back panel mounting is possible on all items with
optional accessories
18
Description of equipment
1-1 Operational features
1-2 Technical features
1-3 Display (Fig. 1)
1-4 Function keys
1-5 Combined key functions
1-6 Connections
1-7 First switch ON
2 Menus and programming
2-1 Menus - overview
2-2 Forcing priority and programs
2-3 Create a new program
2-4 Check a program
2-5 Modify a program
2-6 Delete a program
(Fast method)
2-7 Copy a program
pag.25
EN
temporized switching OFF

1-2 Technical features
Power supply voltage 230 V a.c. +/- 10%
Frequency 50-60 Hz
Protection rating IP20
Output type
Operating temperature From 0 °C to +50 °C
Storage temperature from -10°C to +65°C
Absorption/Self-consumption 6.5 VA single channel / 7.8 VA twin channel
at terminals
1...6mm²
CE standards LVD/EMC EN60730-2-7
Languages available in menu
Italian, English, German, French, Spanish,
Swedish, Portuguese, Dutch, Russian,
Polish, Greek
Backup in case of power
failure 6 years from first switch on, guaranteed
by lithium battery
Nominal pulse voltage 4kV
Time tolerance
3000W 3000W 1100W 900W
(125 μF)
7W ÷ 23W
(max. 23 lamps)
Channel 1/Channel 2 OFF/ Channel deactivated
Manual forcing of channel ON / Channel active
Random programs Cyclic programs
Holidays icon Keyboard lock
GPS or DCF77 signal
reception indication
Scroll up
Program no. Selected
P01-P64
Scroll down
The striped bar on the display also shows:
Progress status, see Fig.2 on page 17 (e.g. cancelling see chapt. 3-6).•
Hour display, see Fig.3 on page 17.•
The display shows alternately (for a few seconds) the date and the time and
the programs or forcings set.
i
i
Installation
DIN- back panel (with optional KIT)
Software Class A
Insulation class Class II
Pollution rating Normal
Standard Time (summer)
Daylight Saving Time (winter)
1-3 Display (see Fig. 1 on page 17)
+/ 0.5 sec/day at 25°C
19
Potential-free relay with changeover contact;
N.O. Contact = 16(10)A / 250V~ (limited
current with Resistance for Zero Crossing of
high value);
N.C. contact = 16(2)A / 250V~
Cross-section of cables
EN
Maximum pilotable power

Enter main menu (from initial screen).•
Exit from any setting•
Scroll list upwards.•
Increase a numerical value or change a parameter.•
Hold down to display status of channel 1 until button is released•
(under normal operation).
Scroll list downwards.•
Decrease a numerical value or change a parameter.•
Hold down to display status of channel 2 (twin channel models)•
until button is released (under normal operation).
Confirm proposed setting.•
Reset equipment•
Function Combined keys
Lock / unlock keys ( ). 2 secs.
Temporary manual forcing of channel 1
and 2 (ref. subsection 3-7).
Alternate pressure to change it from
TEMP ON to TEMP OFF.
Note: Reset resets the time switch and is used at first programming, or should
displays of abnormalities or malfunctions be displayed. Press the Reset button
with a pointed object. After a brief display test, all display segments will be lit and
then screen showing the choice of language will be displayed. The following are
lost upon Reset: keyboard blocking, current date and time settings, these will have
to be re-programmed. The time switch will not function until you re-program it. Set
programs, external input ON/OFF and data relative to maintenance, operating
hours and warranty counts are not lost.
1-4 Function keys
1-5 Combined key functions
(NOTE: The programs and external input settings are not deleted).
Permanent manual forcing of channel 1
and 2 (ref. subsection 3-7).
Press for 2 secs. to access PERM
alternate pressure to change it from
PERM ON to PERM OFF.
Return to AUTO mode (if any manual
forcing has been activated).
It is necessary to be on the initial screen to carry out any of the functions (see table)
Connection of single channel and twin channel models
See diagram Fig. 5 on page 17
•
Connecting models with input for DCF77 or GPS
Single channel or twin channel Synchro models with GPS or DCF77 Antenna.
See diagram Fig. 6 on page 17
•
The equipment is supplied without any settings.
Press with a pointed object to unlock the equipment .RESET
1.
Set following data:2.
Languages
•(Ref. subsection 3-8-1).
Date/Time•(Year, Month, Day, Time, Time Zone - ref. subsection 3-8-2).
i
1-6 Connections (disconnect the 230V~ mains voltage)
Maximum cable distance for switch or button connection to external input (E.I.) of
1-7 First switch ON
If there is a power failure, the Date/Time is memorised, and the digital switch:
disables relay(s),•
i
deactivates back-lighting, if active,• displays flashing date and time for 2 minutes, and then changes to stand-by•
mode (display switched OFF) storing all the programmed data, until the
mains power supply is reconnected or until a button which restarts the
counter for the stand-by mode is pressed for more than 1 sec.
the clock: 100 m (Fig. 5 on page 17).
20
MENu Ok Reset
EN
Function
2 secs. 2 secs.
Combined keys
2 secs. 2 secs.
+

.
FREE PRG NO.
CHANNEL (only twin channel)
DAY (weekly only)
ON/OFF TIME
END/ANNUAL
FREE PRG NO.
ON/OFF TIME
END/ANNUAL
FREE PRG NO.
ON/OFF TIME
TIME ON/OFF
END/ANNUAL
FREE PRG NO.
TIME OFF
DAY/MONTH OFF
TIME ON
DAY/MONTH ON
CHECK
MODIFY
ERASE
SING PROG
ALL PROG
HOLIDAYS
auto
perm off
perm on
Temp On
temp off
LANGUAGE
TIME SET
EXTER *
MAINTENAN
HOURMETER
BACKLIGHT
WARRANTY
* Not including models synchronizable with DCF77 or GPS
34
12
5 6 7 8
Press1. MENU.
The first menu which may be selected appears (P Standard)»
Scroll the various menus using keys .2.
Confirm desired menu with .OK3.
program, as shown alongside.
Take the priorities into consideration
when various types of programs are
programmed for the same period
P01:Standard Program
ON 19:00 - OFF 22:00
P02:Standard Program
ON 00:00 - OFF 06:00
P03:Random Program
ON 20:00 - OFF 00:00
P04:Cyclic Program
ON 19:00 - OFF 22:00
P05:Cyclic Program
ON 02:00 - OFF 06:00
P06:Random Program
ON 04:00 - OFF 06:00
i
i
All programs entered
from to run
simultaneously. The
output relay/s are
activated according to
established priorities
P01 P06
2 Menus and programming
2-1 Menus - overview
2-2 Forcing priority and programs
HIGHEST PRIORITY
The menus listed from 1 to 8 are in the sequence present in the equipment.
of time.
Manual forcing
External input
External Memory Device
(EMD)
Holiday program
Cyclic/Random
program
Standard Program
A priority is assigned to every type of
Procedure to select the desired menu:
21
CHANNEL (only twin channel) CHANNEL (only twin channel)
CHANNEL
(only twin channel)
CHANNEL
(only twin channel)
R a n d o m p C y c l i c p
R a n d o m p C y c l i c p
H o l i d a y p
H o l i d a y p
P r g l i s t
P r g l i s t
E r a s e
E r a s e
O v e r r i d e
O v e r r i d e
O p t i o n s
O v e r r i d e
O p t i o n
S t a n d a r p
DAY (weekly only) DAY (weekly only)
EN
Example:
1900 2000 2200 000 200 400 600 800
1800
STD STD
STD
P01 P02
P03
P04 P05
P06
1900 2000 2200 000 200 400 600 800
1800
1900 2000 2200 000 200 400 600 800
1800
1900 2000 2200 000 200 400 600 800
1800
1900 2000 2200 000 200 400 600 80
1800 0

the individual programs.
Press1. MENU.
Select program type using keys .2.
Press to confirm selection.OK3.
The number of free programs appears for 3 secs.»
The first program in the memory appears.»
Press for 2 secs.4.
The display shows the first empty program.»
Press to confirm.OK5.
The program number is selected.»
Followed by channel setting.»
c1 c2
P02
Set channel (twin channel) using keys .1.
C1/C2 or both flash.»
Press to confirm.OK2.
The program number is selected.»
Followed by channel setting.»
i
Procedure valid for all types of programs Further settings are described in Set program start time using keys in the format1.
hh/mm.
Single pressure of keys moves field by minutes.
Prolonged pressure of keys moves field by hours.
Press to confirm.OK2.
The seconds field appears.»
Set the seconds using keys .3.
Press to confirm.OK4.
The program start time has been set.»
Followed by TIME/OFF setting.»
P02
Set program end time using keys .
1.
Repeat operations as per TIME/ON.
Press to confirm.OK2.
The program end time has been set»
Press to confirm program end time.OK3.
i
i
Set day (only for weekly models)
Select the day or group of days in which the program must be executed.
P02
Set the day or group of days using keys .1.
The flashing arrow indicates the day or group of»
days selected.
Press to confirm.OK2.
Followed by TIME/ON setting.»
1 2 3 4 5 6 7
(only for weekly models)
only for weekly models: if a group of days is selected (eg Saturday and Sunday) and
a time frame that extends past midnight (eg ON = 23:30 hours, time OFF = 2:00), the
program runs two times, but the second run ends on Monday. In this case, the
Monday icon flashes as a warning. This same principle applies to programs lasting
longer than a day.
4. Enter a new program or exit
press the button several timesMENU
Onlyforweeklymodels: set the OFF hour scrolling the time forward with respect to
the ON hour. Scroll back to select the whole week
Note: if you enter zero in the seconds fields for ON and OFF, the seconds field is not
shown in the data summary.
Programs must also have a minimum duration of one second, so the OFF time cannot be
the same as the ON time. (Programs like this are not accepted.)
P05
12
14
1 2 3 4 5 6 7
Creating a program with a duration of several days
(Only weekly mod.) The duration of a program can be extended to several days
(eg, begins Monday at 12:00 and ends Wednesday at
14:00). Just scroll past 24 hours when setting "TIME OFF".
Scrolling past 24 hours is confirmed
when the day after the start of the program blinks. At every
passage from 24 hours, the program will be further
extended to the next day.
2-3 Create a new program
Selection of program type (e.g. with P Standard):
Select channel (only 2 channels models)
Set TIME/ON
Set TIME/OFF
(only for dual channel models)
22
R a n d o m p
S t a n d a r p
S t a n d a r p
F r e e
E m p t y
S t a n d a r p
C h a n n e l
S t a n d a r p
Day
E n d
A n n u a l p
EN
P02
P02
P02
P02

Select the program type from the menu (e.g. RAN1.
DOM P) using keys .
Press to confirm.OK2.
The programs of the same type in the memory»
are displayed.
Select the program to be checked using keys .
3.
The display shows the settings cyclically.»
2-6 Delete a program (fast method)
c1
P0
P03
Select from the menu the program type to be1.
deleted using keys .
e.g. RANDOM P»
Press keys simultaneously for 2 secs.2.
The display shows "ERASE".»
Press OK to confirm.3.
The display shows "EMPTY".»
The program is deleted.
Select from the menu the program type to be copied1.
(e.g. RANDOM P) using keys .
The program number flashes.»
Press for approx. 3 secondsOK2.
The program is copied in the first free position in»
the memory.
The first modifiable data (eg: channel) is displayed
»
flashing.
Modify data as described in subsection 2-3.3.
2 programs with the same data cannot coexist!
i
Set ANNUAL PERIOD
Enables a defined period to be set, in which the program set up previously must
be executed.
The period defined in the annual program is repeated cyclically every year.
P02
Set the start and end of the period in the format1. dd/
mm/-- using keys .
Press to confirm every field.OK2.
The annual period is set.»
i
3. Enter a new program or exit press the
button several times
MENU
Note: P YEARLY can be set over the end of a year, eg Month ON OCTOBER and
Month OFF March (the program will last a total 5 months where the month OFF will
stop in the following year, and so forth cyclically).
Note: if no changes are made within 10 minutes or if is pressed several times,
the device will return to start display and the new duplicated program will be lost.
MENU
2-4 Check a program
2-5 Modify a program
1. Press to confirm program to be modified.
2. Set new values as described in subsection 2-3.
OK
2-7 Copy a program
Access desired program menus (STANDARD P, CYCLIC P...)
by pressing .MENU
23
C y c l i c p
R a n d o m p
E r a s e
R a n d o m p
E m p t y
E n d
A n n u a l p
C y c l i c p
R a n d o m p
EN
P02
C1
P03
P0
P0
C1
P03
C1
P04
C1
P03
3

For programming ref. section 2-3.
800 12 00
ON
OFF
Example of set up from image:
Standard Program ON 8:00 - OFF 12:00.
For programming ref. section 2-3.
800 12 00
ON
OFF
Example of set up from image:
Random Program ON 8:00 - OFF 12:00.
i
i
Allows switching on (ON) and switching off (OFF) of a load in the defined period
Allows switching on (ON) and switching off (OFF) of a load in random mode
within a defined period
When the random program is on, the symbol
will blink on the main display.
3-1 Standard Program
3-2 Random Program
Press to access available menus.MENU
1.
Scroll menus using keys and press to confirm.OK2.
3 Clock programs and settings 3-3 Cyclic Program
The ON time and the OFF time may vary from 1 sec. up to 23:59:59 hours
c1
P01
c1
P01
For programming ref. section 2-3.
In addition, set the time of TIME ON and TIME OFF1.
using keys .
800 12 00
ON
OFF
TIME ON
TIME OFF
Example of set up:
Cyclic Program ON 8:00 - OFF 12:00.
Timing of TIME ON 10 min and TIME OFF 15 min.
The holiday programs let you set different periods throughout the year for the
suspension of programs on/off combined with channel 1 and/or 2 (dual channel
Select HOLIDAY P as described under subsection 2-3.1.
Set the suspension time (OFF) using keys .start2.
Press to confirm.OK3.
Set suspension date using keys in formatstart4.
(press to confirm every field).dd/mm/-- OK
Set the suspension time and date (ON) as perend5.
operations 2 to 4.
i
i
When the random program is on, the symbol
will blink on the main display.
Allows switching on and switching off of a load in cyclic mode (time ON/OFF)
within a defined period
During the set holiday period, the number of the affected channel, a HOLIDAY message
and the symbol will appear on the operating screen.
The outputs (C1 and/or C2) are OFF.
To cancel the suspension period, use the special function in the CANCEL menu (see par. 3.6).
3-4 Holidays Program
mode), eg summer holidays and Christmas in a public or sales office.
24
R a n d o m p
S t a n d a r p
R a n d o m p
C y c l i c p
T i m e o n
T i m e o f f
EN
o f f 0 2 : 0 0
30/07/--
C1
P06
on 06:00
31/08/--
C1
P06
C1
P03
C1
P02

This menu enables any program in the memory to be displayed, modified or
Scroll to "PRG LIST" using keys .1.
Press to confirm.OK2.
The number of free programs appears.»
The first program in the memory is displayed.»
Select the desired program using keys .
3.
Ref. subsections 2-4 to 2-6 for details on checking,
modifying or deleting data.
This menu enables different type of deletions to be made.
Scroll to using keys .ERASE
1.
Press to confirm.OK2.
The type of deletion in the sub-menu is accessed»
(ref. table below).
Select deletion type using keys .
»
Press to confirm deletion.OK3.
Press to cancel deletion.MENU
Sub-menu Function
sing prg Delete single programs selected
ALL prg Delete all programs
All programs in the memory will be deleted!
Holiday p Delete all holiday programs
i
i
This enables the status of the outputs to be forced manually regardless of active
program. Possible settings:
Forcing
Mode Display
Symbol Channel-
Condition Forcing function
auto c1
c2
No forcing on channel; management
from program.
Perm c1 On
c2 On
Permanent channel activated.
PERM c1 OFF
c2 OFF
Permanent channel de-activated.
TEMP c1 On
c2 On
Channel activated until next program
activity.
TEMP c1 OFF
c2 OFF
Channel de-activated until next
program activity.
Activate a forcing
c2 Perm
Select sub-menu "OVERRIDE" using keys .1.
Press to confirm.OK2.
Press combined keys (ref. subsection 1-5) to select3.
channel (only twin channel models).
The display shows information on channel(s)»
(Ref. table above).
Set type of forcing using keys .4.
Press to confirm selection.OK5.
It returns to the main screen.»
The display shows the type of forcing on the channel.»
De-activate a forcing (from the main screen)
Press combined keys of the channel to be de-activated (ref. subsection 1-5) for1. approx. 2 secs.
3-7 Manual
Select "AUTO" mode to deactivate using the menu (ref. subsection "Activate
a forcing").
i
3-5 PRG List (programs)
3-6 Delete
deleted.
25
H o l i d a y p
P r g l i s t
F r e e
P r g l i s t
E r a s e
EN
C
C 2C 2
CC
C1
P03

This enables various clock parameters to be set.
Select "OPTIONS" using keys .1.
Press to confirm.OK2.
The sub-menus follow.»
3-8-1 Languages
This enables the desired interface language to be set.
Select the "LANGUAGE" sub-menu using keys .1. Press to confirm.OK2.
Select the desired language using keys .3.
Press to confirm.OK4.
3-8-2 Date/Time (current)
This enables the date and time of the equipment to be set.
If the equipment is reset the date must be set again.
Select "TIME SET" using keys .1.
Press to confirm.OK
2.
Set YEAR, MONTH, DAY, HOUR, MINUTES,
3.
respectively, using keys .
Single pressure of keys moves field by minutes.
Prolonged pressure of keys moves field by hours
Press to confirm.OK4.
Date and time are set.»
Followed by "SUM/WIN" setting.»
i
i
Winter Summer( ) / ( ) time change
Select switching type using keys .1.
Press to confirm.OK2.
Set values (ref. table) using keys .3.
Confirm each selection pressing .OK4.
Possible selections on
display
Summer switching
+1h ( standard time)
Winter switching
-1h ( daylight savings time)
NoNE None None
EUROPe Last Sunday in March Last Sunday in October
USA Second Sunday in March First Sunday in November
Free tz Week/day (Sun.) freely
programmed
Week/day (Sun.) Freely
programmed
Fixed tz Fixed date freely
programmed (e.g. 28/02)
Fixed date freely
programmed (e.g. 29/10)
Time Zone GPS (only GPS and DCF77 models)
After setting TIME SET (ref. subsection 3-8-2).
Select "GPS" using keys .1.
Press to confirm.OK2.
Select the SUM/WIN mode (ref. previous table).3.
Set number of T ZONE hours using keys .
4.
Press to confirm.OK5.
The time change has been set.»
It returns to the main screen.»
i
the type of Standard Time/Daylight Saving time change;
GPS or DCF77 settings (only for models with this option).
(default setting)
Set the correct time zone (TZONE)
with respect to Greenwich position:
- add if you are east of Greenwich time
- subtract from the Greenwich position if you are west of Greenwich time
(e.g. Italy, T ZONE +1).
Adjustable parameter -12 ÷ +12
3-8 Options
EUROPe
or GPS or DCF77 settings
(only for models with this option).
26
O v e r r i d e
O p t i o n s
T i m e s e t
L a n g u a g e
T i m e s e t
S u M / W I N
T i m e s e t
S u m / w i n
EN

Select “DCF77” with the buttons1. .
Confirm with .OK2.
Time Zone DCF77 (only models with GPS and DCF77 input)
As opposed to the GPS, the receiver transmits the time difference with the
0
Set the T ZONE hour number with the buttons
3. .
Confirm with .OK4.
The time change has been set.»
You will now return to the main screen.»
Adjustable parameter -3 ÷ +3
Set time zone correction (TZONE) with respect to Frankfurt position:
- add if you are east of Frankfurt
- subtract if you are west of Frankfurt
(eg. Italy, TZONE +0).
OPERATION MODE WITH GPS or DCF 77 RECEIVER
If the product is connected to a GPS or DCF 77 receiver for time synchronization,
the operation symbol with the following signals will appear on the display
(once programming has been implemented):
BLINKING = waiting for synchronization,
CONSTANTLY LIT = synchronization present
ABSENT = no signal or receiver disconnected
Difference with respect
to Frankfurt time
Difference with respect
to Greenwich time
0 h
+1 h
+1 h+2 h
+2 h
+3 h
-1 h
0 h
-2 h-1 h
no synchronization (after 24 hours of waiting)
Sample table of time zone differences
After DATE/HOUR setting (see chapt. 3-8-2).
i
27
Summer/Winter correction.
T I M E S E T
T I M E S E T
EN

3-8-3 External input
This enables manual ON and OFF forcing functions to be executed from a remote
position, (ref. section 3.7), by means of buttons or switches.
Function not available for the SYNCHRO models from GPS or DCF77 input
(the "EXT INPUT" item is not available in the "OPTIONS" menu).
Select the "EXT INPUT" sub-menu using keys .
1.
Press to confirm.OK2.
Select switching type (ref. table below) using keys .
5.
Press to confirm.OK6.
In order to deactivate settings made, repeat actions from 1 to 4.
Press to confirm "DEACTIVAT" selection.OK•
Display
Selection
Channel
C1 C2or
(twin channel)
Symbol Function External
control
Perm On
off
Switch
of channel ON o OFF.
temp Temporary forcing of the
channel until the next
switching of a program set
i
i
timer on
off Forcing of a timed channel
(e.g. stairway lighting
Control).
*Time may be set in format
Hh:mm:ss.
Button
Button
Note: closing of the external input contact is detected immediately by the clock,
while opening can take max 1 sec.
Select the channel with the keys . (dual channel mod.).
3.Confirm with .OK4.
3-8-4 Maintenance
Allows setting of an operating period in ON for channel C1 and/or C2 (dual channel
mod.). After this period, the clock signals the need for an operation with the writing
"C1 MAINT" or "C2 ", alternating with the current date.MAINT
Select the "MAINTENAN" sub-menu using keys .
1.
C1 flashes.»
Select channel using keys (twin channel models).2.
Press to confirm.OK
3.
Set number of hours using keys .4.
Press to move on to the next channelOK (dual channel only)5.
In order to modify or rest the values, follow
Cancel maintenance notice
i
i
.
Note:
.
if you modify the maintenance count setting, you will lose any partial count
that may have already accumulated
At the end of the countdown, the MAINTENAN message flashes on the active screen.
You can cancel the message once you have completed the necessary maintenance
by pressing , pressing and holding for about 2 seconds during the active channel
warning.
OK
Attention: when you cancel the MAINTENAN message, the maintenance hour
count restarts automatically.
Set the counter to zero for the channel and/or channels to
disable the MAINTENANCE hour count.
This information can be used to perform maintenance at predetermined intervals of
time on the connected output device.
Keep the arrow key pressed to
rapidly increase/decrease the tens, hundreds, etc.
Repeated pressing moves the unit forward one at a
time.
Instructions from 1 to 5.
i
c1
or press to exit.MENU
*Set the time as per previous procedure, entering On and Off.
28
T i m e s e t
previously.
m a i n t e n a n
M a i n t e n a n
Permanent forcing
EN

3-8-6 Back-lighting
This enables the display backlighting time to be set.
Select the "BACKLIGHT" sub-menu using keys .
1.
Press to confirm.OK2.
Select using keys between: FIXED ON,3.
FIXED OFF or TEMP 6 SEC.
3-8-7 Warranty
This enables the time since the putting into service of the clock to be displayed in days.
Select the "WARRANTY" sub-menu using keys .1.
Press to confirm.OK2.
The display shows the time, as described above.»
Counter may not be zeroed.
i
The EMD is an external memory card, which is able to manage 64 programs,
including the holidays.
The EMD is the programming key.
Insert the EMD.
1.
The display shows the memory management menu.»
Select the desired sub-menu (ref. table) using keys .2.
Press to confirm every selection.OK3.
Sub-menu Function Notes
Execute Execute programs directly
from EMD
The programs are executed
only from EMD
Save all clock memory on EMD
Overwrite all programs already
present on EMD
Load all content from EMD on
clock memory Overwrite all programs present
on clock
Read Read programs from EMD Display only the programs
present on EMD
Load Holiday programs from
clock to EMD Overwrite all Holiday programs
present on EMD
Load Holiday programs from
EMD to clock Overwrite all Holiday programs
present on clock
Erase Delete programs present
on EMD Permanently delete all EMD
Memory
Press to exit.MENU1.
Press to confirm "ABORT" selection.OK2.
The EMD is excluded from the clock.»
The EMD memory is no longer recognised.»
Withdraw the EMD.3.
i
Attention: the memory key can be used to share data, only with same model
devices. Otherwise, the display will show an error message.
Confirm with and exit from settings.OK3.
4 External Memory Device (EMD)
Press to confirmOK
4.
and exit from settings.
3-8-5 Hour meter
Select the "HOURMETER" sub-menu using keys .1.
Press to confirm.OK2.
Select channel using keys .
3.
The display shows the hours of operation.»
Press keys + to zero.
Confirm with and exit from settings.OK4.
i
This function counts the total number of hours for which the output is active
(ON). Its purpose is solely to monitor the working life of the device connected
to the channel and/or channels (dual channel mod.).
c2c2
29
M a i n t e n a n
H o u r m e t e r
H o u r m e t e r
B a c k l i g h t
B a c k l i g h t
F i x e d o n
B a c k l i g h t
W a r r a n t y
W a r r a n t y
Day
Holid
Holid
E x e c u t e
A b o r t
EN
The manufacturer reserves the right to introduce any technical and/or constructive changes deemed necessary, with no prior notice.

FRAN AISÇ
30
MODÈLES :
FR
1234567
06
12 18 24
1234567
06
12 18 24
1234567
06
12 18 24
1234567
06
12 18 24
Interrupteurs horaires digitaux 1 ou 2 canaux - journaliers, hebdomadaires mensuels/annuels - entrée/s pour commande externe - connecteur pour clé de mémoire externe
clé de mémoire externe
clé de mémoire externe
Interrupteurs horaires digitaux 1 ou 2 canaux hebdomadaires mensuels/annuels - entrée pour synchronisation avec antenne DCF77 ou GPS - connecteur pour clé de mémoire externe
06
12 18 24
()achetée séparément
()compris dans le pakage

0 % 50 %
12:00:00
1234567
0612 18 24
12345
678910
S1
S2
L
N
BUS DCF77/GPS
12345
678910
S1
L
N
BUS DCF77/GPS
12345
678910
S1
S2
L
N
12345
678910
S1
L
N
IE1 IE1IE2
RACCORDEMENTS ÉLECTRIQUES
Exemple : utiliser un outil
pointu pour appuyer sur le
bouton de .réinitialisation
FIG. 2 FIG. 3
ÉCRAN
TOUCHES
FIG. 4
FIG. 5
FIG. 6
FIG. 1
seulement
modèles
hebdomadaires
Seulement
modèles
bicanaux
seulement modèles
avec entrée
GPS ou DCF77
230V~ 230V~
230V~ 230V~
31
FR
MENu

1 Description de l’appareil
1-1 Caractéristiques fonctionnelles
1-2 Caractéristiques techniques
1-3 Afficheur (Fig. 1)
1-4 Touches de fonction
1-5 Fonctions d'association de touches
1-6 Connexions
1-7 Première mise sous tension
2 Menus et programmation
2-1 Menus - vue générale
2-2 Priorité forçage et programmes
2-3 Création d'un nouveau programme
2-4 Vérification d'un programme
2-5 Modification d'un programme
2-6 Suppression d'un programme
(méthode rapide)
2-7 Copie d'un programme
3 Programmes horloge et
Réglages
3-1 Programme Standard
3-2 Programme Aléatoire
3-3 Programme Cyclique
3-4 Programme Congés
3-6 Suppression
3-7 Manuel
3-8 Options
3-8-1 Langues
3-8-2 Régul H
3-8-3 Entrée externe
3-8-4 Entretien
3-8-5 Compteur d'heures
3-8-6 Rétroéclairage
3-8-7 Garantie
4 Dispositif Mémoire
Externe (EMD)
i
i
- Avant toute installation et mise en marche du produit, lisez
attentivement cette notice.
- Cet appareil doit être installé et connecté exclusivement par du
personnel qualifié.
Sécurité L'appareil contient une batterie non amovible et ne doit pas être mis au rebut
comme déchet ménager, mais doit être éliminé par tri sélectif pour éviter toute
pollution de l'environnement. Conformément à la Directive 2006/66 et aux lois
nationales de transposition de cette dernière pour l'élimination du produit en
fin de vie utile, l'inobservance de ce qui précède est sanctionné par la loi.
3-5 Liste PRG (programmes)
Sommaire
pag.32
pag.32
pag.33
pag.33
pag.34
pag.34
pag.34
pag.34
pag.35
pag.35
pag.35
pag.36
pag.37
pag.37
pag.37
pag.37
pag.38
pag.43
pag.38
pag.38
pag.38
pag.38
pag.39
pag.39
pag.39
pag.40
pag.40
pag.40
pag.42
pag.42
pag.43
pag.43
pag.43
1 Description de l'appareil (suivant le modèle)
L’interrupteur digital horaire est une horloge de programmation journalière ou
hebdomadaire donnant la possibilité de saisir également une période annuelle qui permet
la commutation automatique de diverses charges (monocanal ou bicanal) en fonction
d'une programmation temporelle si souple qu'elle prévoit ou exclut leur activation
(utilisation idéale dans les logements, les établissements industriels, les écoles, les lieux
publics, etc.), par ailleurs elle est dotée d'une ou de plusieurs entrée/s pour l'activation à
distance. Pour les versions à connecteur pour clé EMD (Dispositif de Mémoire Externe), il
est possible d'enregistrer/copier ou de lire un ou plusieurs programmes sur divers
interrupteurs horaires du même modèle à travers une clé de mémoire prévue à cet effet.
Les modèles connectables à des récepteurs de signal horaire : type DCF77 ou GPS
permettent d'obtenir une précision de la synchronisation horaires toujours optimale.
1-1 Caractéristiques fonctionnelles (suivant le modèle)
• Modèles à programmation journalière, hebdomadaire mensuelle/annuelle guidée par
menu avec lecture des indications sur écran rétro-éclairé
• Modèles à une ou deux sorties de commande relais
• Pilotage intelligent des relais qui augmente les valeurs de charge et la durée aussi
bien du relais que de la charge connectée “zero crossing”
• Modèles à entrée/s externe/s combinées à la/aux sortie/s pour configuration
manuelle à distance
• Modèles avec clé de mémoire externe pour exécution et chargement des programmes
avec possibilité de décharger/charger uniquement les programmes vacances
• Calendrier : année - mois - jour heure et minutes
• Menu multilingue : Italien - Anglais - Allemand - Français - Espagnol
- Portugais - Suédois - Hollandais - Russe - Polonais - Grec
• Types de programmes : Standards, Aléatoires, Cycliques, Vacances
• Total 64 programmes librement configurables
• Vacances : différentes périodes programmables au cours de l'année
• Temps minimum de programmation ON/OFF d'1 seconde
• Effacement rapide des programmes
• Marche/Arrêt manuel permanent ou temporaire simplifié
• Configuration date/heure avec changement heure légale/solaire automatique
• Fonction compteur horaire pour le monitorage des heures de fonctionnement de la charge
• Programmation de l'entretien des charges connectées
• Gestion garantie du produit
• Verrouillage clavier
• Écran rétro-éclairé couleur blanc
• Gestion du rétro-éclairage de l'écran : fixe ON / fixe OFF/
• Pile écologique au LITHIUM (fixe) durée 6 ans
• Mémoire permanente pour l'enregistrement des programmes
• Mécanisme au quartz de haute précision : ≤ ± 0.5 s/jour
• Modèles connectables à des récepteurs de signal horaire : type DCF77 ou GPS.
Remarque : le montage encastré avec des accessoires optionnels est possible
pour tous les articles
32
FR
arrêt temporisé

1-2 Caractéristiques techniques
Tension d'alimentation 230 V c.a. +/- 10%
Fréquence 50-60 Hz
Degré de protection IP20
Type de sortie Relais en contact en échange libre de
potentiel ;
contact N.O. = 16(10)A / 250V~ (en
courant limité par Résistance pour Zero
Crossing (Inflexion) de haute valeur) ;
contact N.F. = 16(2)A / 250V~
Température de fonctionnement
de 0 °C à +50 °C
Température de stockage -10 °C à +65 °C
Absorption /Autoconsommation 6,5 VA mono sortie / 7,8 VA double sortie
Section des câbles aux bornes 1...6mm²
Norme marquée CE LVD/EMC EN60730-2-7
Langues disponibles dans l'appareil
Italien, Anglais, Allemand, Français,
Espagnol, Suédois, Portugais, Hollandais,
Russe, Polonais, Grec.
Réserve de charge en cas
d'absence de secteur 6 ans de la première mise sous tension,
garantie par une pile au lithium
Tension impulsive nominale 4kV
Précision de fonctionnement
3000W 3000W 1100W 900W
(125 μF)
7W ÷ 23W
(max. 23 clign.)
Sortie 1/Sortie 2 OFF/ Sortie désactivée
Forçage manuel de la sortie ON / Sortie activée
Programmes aléatoires Programmes cycliques
Icône Congés Verrouillage clavier
Indication réception signal
GPS ou DCF77
Navigation vers le haut
N° programme sélectionné
(P01 ÷ P64) Navigation vers le bas
La barre réglée de l'afficheur présente en outre :
État d'avancement, voir Fig. 2 page 31 (ex. effacement voir chap. 3-6).•
Affichage des heures, voir Fig. 3 page 31.•
L'afficheur présente en alternance (pour quelques secondes)
la Régul H et les programmes ou les forçages programmés.
i
i
Installation
barre DIN à encastrement (avec KIT en option)
Logiciel classe A
Type d'isolement classe II
Degré de pollution Normal
Heure légale (été) Heure solaire (hiver)
1-3 Afficheur (voir Fig. 1 page. 31)
Puissance max. pilotable
+/ 5 s/j à 25 °C
33
FR

Elle permet d'entrer dans le menu principal (depuis la page-écran initiale)
•
Elle permet de quitter toute programmation.•
Elle permet de faire défiler une liste vers le haut.•
Elle permet d'augmenter une valeur numérique ou de changer un paramètre
•
Si elle est maintenue enfoncée, elle permet l'affichage fixe de l'état de la
•
sortie 1 jusqu'au relâchement de la touche (en fonctionnement normal).
Elle permet de faire défiler une liste vers le bas.•
Elle permet de diminuer une valeur numérique ou de changer un paramètre
•
Si elle est maintenue enfoncée, elle permet l'affichage fixe de l'état•
de la sortie 2 (modèles à double sortie) jusqu'au relâchement de la
touche (en fonctionnement normal).
Elle permet de valider la programmation proposée.
•
Elle permet de réinitialiser l'appareil (REMARQUE : les programmes•
Fonction Association de touches
Verrouiller / déverrouiller les touches(
).
Forçage manuel temporaire sortie 1 et
2 (voir chap. 3-7).
La pression en alternance permet de
commuter entre TEMP ON et TEMP OFF.
Remarque : le Reset réinitialise l'interrupteur horaire et il est utilisé au moment de la
première programmation ou en cas d'affichages anormaux ou de mauvais
fonctionnements. Si l'on appuie sur le bouton de Reset à l'aide d'un objet pointu,
l'interrupteur horaire effectue un test d'allumage, il allume tous les segments de l'écran
puis affiche la page-écran relative au choix de la langue. L'opération de Reset annule : le
verrouillage du clavier, les configurations de date et heure courantes, qui devront être
saisies de nouveau. Autrement l'interrupteur horaire n'exécute pas les programmes. En
revanche, les programmes configurés activation/désactivation entrée externe et les
données relatives à l'entretien, compteur horaire et garantie ne sont pas éliminés.
1-4 Touches de fonction
1-5 Fonctions d'association de touches
et les réglages de l'entrée externe ne sont pas supprimés).
Retour au mode AUTO (en cas d'activa-
tion d'un forçage manuel quelconque).
Pour exécuter une des fonctions décrites il faut se trouver obligatoirement dans la page-écran initiale.
Connexion modèles mono sortie et double sortie
Voir schéma Fig. 5 page 31
•
Raccordement des modèles avec entrée pour DCF77 ou GPS
Modèles Synchro mono sortie ou double sortie avec GPS ou Antenne DCF77.
Voir schéma Fig. 6 page 31
•
L'appareil est livré sans programmation.
Appuyez sur en utilisant un objet pointu pour déverrouillerRESET
1.
Entrez les données suivantes :2.
Langues
•(voir chap. 3-8-1).
Régul h
•
i
1-6 Connexions (toujours couper la tension de réseau 230V~)
Distance maximum des câbles pour le raccordement interrupteur ou bouton à
1-7 Première mise sous tension
En cas d'absence d'énergie électrique (ex. « panne de courant ») le REGUL
H reste en mémoire ; en outre l'interrupteur numérique :
désactive le(s) relais,•
i
désactive le retro-éclairage, s'il est activé,•
affiche la date et l'heure clignotantes pour 2 minutes, puis passe en mode veille
•
(afficheur éteint) en maintenant en mémoire toutes les données programmées
jusqu'au rétablissement de la tension de secteur ou moyennant la pression continue
pour 1 s. d'une touche qui fait redémarrer le comptage pour le mode veille.
l'entrée externe (E.E.) de l'horloge : 100 m (Fig. 5 page 31).
34
(An, Mois, Jour, Heure, Zone heure - voir chap. 3-8-2).
MENÜ Ok Reset
l'appareil
FR
MENU
Fonction
2 s 2 s
Association de touches
2 s 2 s
Forçage manuel permanent sortie 1 et
2 (voir chap. 3-7).
La pression de la touche pendant 2 s
permet d'accéder à PERM
alors que la pression en alternance
permet de commuter entre PERM ON
2 s
+
et PERM OFF.

n. prg libre
SORTIE (double sortie
JOUR (seulement
heure on/off
Fin/annuel
n. prg libre
heure on/off
Fin/annuel
n. prg libre
heure on/off
Temps on/off
Fin/annuel
n. prg libre
heure off
jour/mois off
heure on
jour/mois on
Vérifier
Modifier
Supprimer
unique prg
tous prg
Congés
auto
perm off
perm on
TempS On
TempS off
Langue
REGUL H
ENTREE -EXTERNE *
ENTRETIEN
COMpteur
Rétroéclairage
Garantie
* Sauf modèles synchronisables avec DCF77 ou GPS
34
12
5 6 7 8
Appuyez sur la touche MENU1.
Le premier menu que vous pouvez sélectionner apparaît (P Standard)»
Faites défiler les différents menus à l'aide des touches .2. .
Valider le menu désiré en appuyant sur OK3.
une priorité, comme représenté
ci-contre.
Les priorités doivent être prises en
compte lors de la programmation de
plusieurs types de programme dans
P01:Programme Standard
ON 19:00 - OFF 22:00
P02:Programme Standard
ON 00:00 - OFF 06:00
P03:Programme Aléatoire
ON 20:00 - OFF 00:00
P04:Programme Cyclique
ON 19:00 - OFF 22:00
P05:Programme Cyclique
ON 02:00 - OFF 06:00
P06:Programme Aléatoire
ON 04:00 - OFF 06:00
i
i
Tous les programmes saisis
de à sont actifs
simultanément. Le/s relais
de sortie seront activés
selon les priorités établies.
P01 P06
2 Menus et programmation
2-1 Menus - vue générale
2-2 Priorité forçage et programmes
LA PLUS HAUTE PRIORITÉ
Les menus numérotés 1 à 8 sont représentés selon la séquence présente
la même période.
Forçage manuel
Entrér externe
Mémoire Externe EMD
Programme congés
Programme
Cyclique/Random
Programme Standard
Chaque programme est associé à
Procédure de sélection du menu souhaité :
35
à l'intérieur de l'appareil.
uniquement) SORTIE (double sortie
uniquement) SORTIE (double sortie
uniquement) SORTIE (double sortie
uniquement)
SORTIE (double sortie
uniquement)
P R a n d o m P c y c l i q
P R a n d o m
P c y c l i q
C o n g e s p
C o n g e s p
L i s t e P r g
L i s t e p g r
S u p P r i m e R
s u p r i m e r
M a n u e l
M a n u e l
O p t i o n s
M a n u e l
O p t i o n s
P S t a n d a r
hebdomadaire)
JOUR (seulement
hebdomadaire) JOUR (seulement
hebdomadaire)
FR
Exemple:
1900 2000 2200 000 200 400 600 800
1800
STD STD
STD
P01 P02
P03
P04 P05
P06
1900 2000 2200 000 200 400 600 800
1800
1900 2000 2200 000 200 400 600 800
1800
1900 2000 2200 000 200 400 600 800
1800
1900 2000 2200 000 200 400 600 80
1800 0

Procédure valable pour tous les types de programmes. D'autres réglages sont
décrits dans chaque programme.
Appuyez sur la touche MENU1.
Sélectionnez le type de programme à l’aide des touches .
2.
Validez le choix en appuyant sur .OK3.
Le nombre de programmes libres s'affiche pour 3 s.»
Le premier programme présent dans la mémoire apparaît
»
Appuyez pour 2 s. sur la touche .
4.
Sur l'afficheur apparaît le premier programme vide.»
Validez en appuyant sur .OK5.
Le numéro du programme est sélectionné.»
Programmation de la sortie.»
P02
Programmez la sortie (double sortie) à l'aide des1. .
C1/C2 (Sortie 1/Sortie 2) ou les deux clignotent.»
Validez en appuyant sur .OK2.
La sortie est programmée.»
Suit la programmation du jour.»
i
P02
P02
P02
Programmez l'heure de début programme à l'aide1.
des touches dans le format .hh/mm
Une seule pression des touches déplace le champ
des minutes. Une pression prolongée des touches
Validez en appuyant sur .OK2. Le champ des secondes s'affiche.»
Programmez les secondes à l'aide des touches .3. .
Validez en appuyant sur .OK4. L'heure de début programme est programmée»
Suit la programmation de HEURE/OFF.»
P02
Programmez l'heure de fin programme à l'aide des
1.
Répétez les opérations de HEURE/ON.
Validez en appuyant sur .OK2. L'heure de fin programme est programmée»
Validez la fin de programme en appuyant sur .OK3.
i
i
Programmation du jour (seulement pour modèles hebdomadaires)
Sélection du jour ou d'un groupe de jours dans lesquels le programme doit être exécuté.
P02
Programmez le jour ou le groupe de jours à l'aide1.
des touches .
.
La flèche clignotante indique le jour ou le groupe»
de jours sélectionnés.
Validez en appuyant sur .OK2.
Suit la programmation de HEURE/ON.»
1 2 3 4 5 6 7
(seulement pour modèles hebdomadaires)
Seulement pour modèles hebdomadaires: si l'on choisit un groupe de jours (ex. samedi et
dimanche) et un intervalle de temps qui se prolonge au-delà de minuit (ex. heure
ON=23:30, heure OFF=2:00), le programme est exécuté 2 fois, mais la seconde exécution
se termine lundi. Dans ce cas, l'icône relative au lundi clignote comme avertissement. Le
même principe vaut pour les programmes ayant une durée supérieure à un jour.
4.Saisir un nouveau programme ou quitter en appuyant
plusieurs fois sur la touche .MENU
Seulement modèles hebdomadaires : configurer l'heure de OFF en parcourant
l'horaire en avant par rapport à l'heure de ON. Si l'on parcourt en arrière c'est toute la
semaine qui est sélectionnée
Remarque : si la valeur saisie dans le champ secondes ON et secondes OFF est égale à
zéro, le champ secondes n'est pas affiché dans le récapitulatif des données. Par ailleurs,
un programme doit avoir une durée minimum d'une seconde, par conséquent l'heure de
OFF ne peut pas coïncider avec celle de ON (autrement le programme n'est pas accepté).
Réalisation d'un programme d'une durée de plusieurs jours
(seulement mod. hebdomadaire)
Il est possible d'étendre la durée d'un programme à plusieurs
jours (ex. début lundi à 12h00 et fin mercredi à 14h00) ; il suffit
de parcourir les heures au-delà des 24 heures quand on
configure “Heure OFF”. Le dépassement est signalé par le
clignotement de l'icône du jour qui suit celui du début du
programme. À chaque passage par les 24 heures, le
programme sera ultérieurement prolongé au lendemain.
2-3 Création d'un nouveau programme
Sélection du type de programme (exemple avec P Standard) :
Choix de la sortie (modèles à double sortie uniquement)
Programmation de HEURE/ON
Programmation de HEURE/OFF
(seulement pour modèles bicanaux)
36
Touches .
déplace le champ des heures.
touches .
P R a n d o m
P S t a n d a r
P S t a n d a r
L i b r e
V i d e
P S t a n d a r
S o r t i e
P S t a n d a r
J o u r
F i n
P A n n u e l
P r o g r a m m e
P r o g r a m m e
FR
P02
C1 C2
P02
P05
12
14
1 2 3 4 5 6 7

Sélectionnez dans le menu le type de programme1.
(ex. P Aléatoire) à l'aide des touches .
.
Validez en appuyant sur .OK2.
Les programmes du même type stocké en»
mémoire s'affichent.
Sélectionnez le programme à vérifier à l'aide des touches
3. .
L'afficheur présente les programmations cycliquement.
»
2-6 Suppression d'un programme (méthode rapide)
C1
P03
P0
Sélectionnez dans le menu le type de programme à1.
supprimer à l'aide des touches .
.
Exemple : P random»
Appuyez simultanément sur les touches pour 2 s.2.
Sur l'afficheur apparaît « SUPPRIMER ».»
Validez en appuyant sur .OK3.
Sur l'afficheur apparaît « VIDE ».»
Le programme est supprimé.
Sélectionnez dans le menu le type de programme à1.
copier (ex. P Aléatoire) à l'aide des touches .
.
Le numéro du programme clignote.»
Appuyez pour 3 s. sur la touche .OK2.
Le programme est copié dans la première position»
libre de la mémoire.
La première donnée modifiable (ex: sortie) s'affiche
»
en clignotant.
Modifiez les données comme décrit au chap. 2-3.3.
Deux programmes ayant les mêmes données ne peuvent pas coexister !
i
Programmation PÉRIODE ANNUELLE
Elle vous permet de programmer une période définie, dans laquelle le programme
défini précédemment doit être exécuté.
La période définie dans le programme annuel est répétée cycliquement tous les ans.
P02
Programmez début et fin de la période dans le format1.
Jj/mm/-- à l'aide des touches .
.
Validez chaque champ en appuyant sur .OK2.
La période annuelle est programmée.»
i
3. Saisir un nouveau programme ou quitter en appuyant
plusieurs fois sur la touche MENU
Remarque : il sera possible de configurer le P ANNUEL à cheval de la fin de l'année
ex. Mois ON OCTOBRE et Mois OFF MARS (le programme aura une durée totale de
5 mois et le mois OFF appartiendra à l'année suivante, et ainsi de suite de manière
cyclique).
Remarque : si aucune modification n'est apportée dans les 10 minutes, ou si l'on
appuie plusieurs fois sur , le dispositif retourne à l'affichage initial et perd le
nouveau programme copié.
MENU
2-4 Vérification d'un programme
2-5 Modification d'un programme
1. Validez le programme à modifier en appuyant sur .
2. Programmez les nouvelles valeurs comme décrit au chap. 2-3.
OK
2-7 Copie d'un programme
Pour accéder aux menus des programmes désirés (P standard, P
cyclique...) appuyez sur la touche .MENU
37
F i n
P A n n u e l
P c y c l i q
P r a n d o m
S u p p r i m e r
P r a n d o m
V i d e
P c y c l i q
P r a n d o m
FR
P02
C1
P03
P0
P0
C1
P03
C1
P04
3
C1
P03

Pour la programmation voir chap. 2-3.
800 12 00
ON
OFF
Exemple de programmation de la figure :
Programme Standard ON 08h00 - OFF 12h00
Pour la programmation voir chap. 2-3.
800 12 00
ON
OFF
Exemple de programmation de la figure :
Programme Aléatoire ON 08h00 - OFF 12h00
i
i
Permet la mise en marche (ON) et l'arrêt (OFF) d'une charge pendant une
Permet la mise en marche (ON) et l'arrêt (OFF) d'une charge en mode aléatoire
dans une période déterminée
Quand le programme aléatoire est actif, le symbole
s'affiche sur l'écran principal de manière intermittente.
3-1 Programme Standard
3-2 Programme Aléatoire
Appuyez sur la touche pour accéder aux menus disponibles.MENU
1.
Faites défiler les différents menus à l'aide des touches et validez en2.
3 Programmes horloge et réglages 3-3 Programme cyclique
Le temps ON et le temps OFF peuvent varier entre 1 s. et jusqu'à 23:59:59 heures
C1
P01
C1
P01
Pour la programmation voir chap. 2-3.
En outre, réglez l'heure de TEMPS ON et TEMPS1.
OFF à l'aide des touches .
.
800 12 00
ON
OFF
TEMPS ON
TEMPS OFF
Exemple de programmation :
Programme Cyclique ON 08h00 - OFF 12h00
Temporisation TEMPS ON 10 min et TEMPS OFF 15 min.
Les programmes vacances permettent de configurer différentes périodes au cours de
l'année de suspension des programmes on/off associés au canal 1 et/ou 2 (mod. Bicanal),
Sélectionnez le Congés P comme décrit au chap. 2-3.1.
Programmez l'heure de suspension (OFF) àdébut2.
l'aide des touches .
.
Validez en appuyant sur .OK3.
Programmez la date de suspension à l'aidedébut4.
des touches dans le format .jj/mm
Programmez l'heure et la date de suspensionfin5.
(ON) comme décrit aux points 2 à 4.
i
i
Quand le programme aléatoire est actif, le symbole
s'affiche sur l'écran principal de manière intermittente.
Permet la mise en marche (ON) et l'arrêt (OFF) d'une charge en mode cyclique
(temps ON/OFF) dans une période déterminée
Pendant la période de vacances configurée, le sigle du canal concerné, l'inscription
VACANCES et le symbole s'affichent sur l'écran de travail.
Les sorties C1 (sortie 1) et/ou C2 (sortie 2) sont en état de OFF.
Pour éliminer la période de suspension, utiliser la fonction spéciale dans le menu
EFFACER (voir par. 3.6).
3-4 Programme Congés
par exemple pour la fermeture d'été ou de Noël d'un établissement public ou commercial.
38
Appuyant sur .OK
P r a n d o m
P s t a n d a r
P r a n d o m
P c y c l i q
T e m p s o n
T e m p s o f f
période déterminée
Validez en appuyant sur .OK
FR
o f f 0 2 : 0 0
30/07/--
C1
P06
on 06:00
31/08/--
C1
P06
C1
P03
C1
P02

Ce menu permet de visualiser, modifier ou supprimer tout programme stocké en
Faites défiler jusqu'à « LISTE PRG » à l'aide des
1. .
Validez en appuyant sur .OK2.
Le nombre de programmes libres s'affiche.»
Le premier programme présent dans la mémoire apparaît
»
Sélectionnez le programme désiré à l'aide des touches .
3.
.
Pour les informations sur comment vérifier, modifier
Ou supprimer les données, reportez-vous aux
Ce menu permet plusieurs types de suppression.
Faites défiler jusqu'à à l'aide des touches .Supprimer
1. .
Validez en appuyant sur .OK2.
Vous accédez au type de suppression dans le
»
sous-menu (voir tableau ci-après).
Sélectionnez le type de suppression à l'aide des
»
Validez la suppression en appuyant sur .OK3. .
La touche permet d'annuler la suppression.MENU
Sous-menus
Fonction
unique prg Elle supprime les programmes uniques sélectionnés
Tous prg Elle supprime tous les programmes
Tous les programmes en mémoire seront supprimés !
Congés P Elle supprime tous les programmes congés
i
i
Il permet de forcer manuellement l'état des sorties indépendamment du pro
gramme actif. Programmations possibles :
Mode
Forçage Symbole
sur afficheur
Sortie-
Condition Fonction forçage
auto C1
C2
Aucun forçage sur la sortie, gestion
depuis le programme
Perm C1 On
C2 On
Sortie active en permanence.
PERM C1 OFF
C2 OFF
Sortie désactivée en permanence.
TEMP C1 On
C2 On
Sortie activée jusqu'à une intervention
programme suivante.
TEMP C1 OFF
C2 OFF
Sortie désactivée jusqu'à une
intervention programme suivante.
Activation d'un forçage
S2 Perm
Sélectionnez le sous-menu « MANUEL » à l'aide des1.
Validez en appuyant sur .OK2.
Appuyez sur les touches associées (voir chap.1-5)3.
pour choisir la sortie (modèles double sortie uniquement).
L'afficheur présente les informations sur la sortie»
ou les sorties (voir tableau ci-dessus).
Programmez le type de forçage à l'aide des touches .4. .
Validez le choix en appuyant sur .OK5.
Retour à la page-écran principale.»
L'afficheur présente le type de forçage appliqué»
Désactivation d'un forçage (de l'écran principal)
Appuyez sur les touches associées de la sortie à désactiver (voir chap.1-5)1.
3-7 Manuel
Pour désactiver en utilisant le menu, il vous suffit de sélectionner le mode
« AUTO » (voir paragraphe « Activation d'un forçage »).
i
3-5 Liste PRG (programmes)
3-6 Suppression
mémoire.
39
touches .
chap. 2-4 jusqu'au chap. 2-6.
touches .
touches .
à la sortie.
pour 2 s. Environ.
C o n g e s p
L i s t e p g r
L i b r e
L i s t e p r g
S u p p r i m e r
S 1
S 1
FR
C
C 2C 2
C
C1
P03

Il permet de programmer plusieurs paramètres de l'horloge.
Sélectionnez « OPTIONS » à l'aide des touches .1.
Validez en appuyant sur .OK2.
Voici les sous-menus.»
3-8-1 Langues
Il permet de programmer la langue d'interface désirée.
Sélectionnez le sous-menu « LANGUAGE » à l'aide1.
des touches .
.
Validez en appuyant sur .OK2.
Sélectionnez la langue désirée à l'aide des touches .
3.
Validez en appuyant sur .OK4.
3-8-2 Régul H (courantes)
Il permet de programmer la date et l'heure de l'appareil.
En cas de réinitialisation la date doit être de nouveau programmée.
Sélectionnez le sous-menu « REGUL H » à l'aide
1.
Validez en appuyant sur .OK2.
En outre, réglez AN, MOIS, JOUR, HEURE3.
MINUTES à l'aide des touches .
Une seule pression des touches déplace le champ
des minutes. Une pression prolongée des touches
Validez en appuyant sur .OK4. Date et heure sont programmées.»
Programmation de « ETE/HIVER »»
i
i
Changement ( ) / ( )heure d’hiver heure d’été
Sélectionnez le type de commutation à l'aide des1.
Validez en appuyant sur .OK2.
Programmez les valeurs (voir tableau) à l'aide des touches .
3. .
Pour chaque choix valider en appuyant sur .OK4.
Sélections possibles
sur l'afficheur
Commutation été
+1h ( heure légale)
Commutation hiver
-1h ( heure solaire)
Aucun Aucune Aucune
EUROPe Dernier dimanche du
mois de mars
Dernier dimanche du
mois d'octobre
USA Deuxième dimanche du
mois de mars
Premier dimanche du
mois de novembre
Libre Semaine/jour (dim.)
librement programmés
Semaine/jour (dim.)
librement programmés
Fixe Date fixe librement
programmée (ex. 28/02)
Date fixe librement
programmée (ex. 29/10)
Fuseau horaire GPS (modèles GPS et DCF77 uniquement)
Après le réglage REGUL H (voir chap. 3-8-2).
Sélectionnez « GPS » à l'aide des touches .1. .
Validez en appuyant sur .OK
2.
Sélectionnez le type Eté/Hiver (voir tableau ci-dessus).3.
Programmez le nombre d'heures de T ZONE à l'aide4.
Validez en appuyant sur .OK5.
Le changement d'heure est programmé»
Retour à la page-écran principale.»
i
le type de changement d'heure Légale/Solaire ;
configurations GPS ou DCF77 (seulement pour modèles prévus à cet effet).
(configuration d'usine)
Configurer le fuseau horaire (TZONE)
par rapport à la position de Greenwich :
- ajouter si l'on se trouve à l'est de Greenwich
- soustraire par rapport à la position de Greenwich si l'on se trouve à l'ouest de Greenwich
(ex. Italie, TZONE +1).
Paramètre modifiable -12 ÷ +12
3-8 Options
EUROPe
ou la configuration GPS ou DCF77
(seulement pour modèles prévus à cet effet).
40
déplace le champ des heures.
des touches .
touches .
des touches .
M a n u e l
O p t i o n s
R e g u l h
R e g u l h
e t e / h i v e r
E t e / h i v e r
R e g u l h
FR

Sélectionnez « DCF77 » à l'aide des touches .
1. .
Validez en appuyant sur .OK2.
Fuseau horaire DCF77
(modèles GPS et DCF77 uniquement)
Le récepteur, différemment du GPS transmet l'heure avec la correction heure
0
Programmez le nombre d'heures de T ZONE à l'aide des
3. .
Validez en appuyant sur .OK4.
Le changement d'heure est programmé»
Retour à la page-écran principale.»
Paramètre modifiable -3 ÷ +3
Configurer correction du fuseau horaire (TZONE) par rapport à la position de Francfort:
- ajouter si l'on se trouve à l'est de Francfort
- soustraire si l'on se trouve à l'ouest de Francfort
(Ex. Italia, TZONE +0).
MODE DE FONCTIONNEMENT AVEC RÉCEPTEUR GPS ou DCF 77
Si le produit est raccordé à un récepteur GPS ou DCF 77 pour la synchronisation
de l'horaire, le symbole de fonctionnement s'affiche à l'écran (à la fin des
opérations de programmation) avec les signalisations suivantes :
CLIGNOTANT = en attente de synchronisation ; aucune synchronisation
FIXE = synchronisation présente
ABSENT = absence du signal ou récepteur déconnecté
Différence par rapport
au fuseau de Francfort
Différence par rapport
au fuseau de Greenwich
0 h
+1 h
+1 h+2 h
+2 h
+3 h
-1 h
0 h
-2 h-1 h
(une fois que les 24h d'attente sont dépassées)
Tableau d'exemple de différences du fuseau horaire
Après le réglage REGUL H (voir chap. 3-8-2).
i
41
touches .
R E G U L H
R E G U L H
d'hiver/heure d'été.
FR

42
3-8-3 Entrée externe
Elle permet d'exécuter des fonctions de forçage manuelles de ON et OFF à
distance, (voir chap. 3.7), à l'aide de boutons ou d'interrupteurs.
Fonction non disponible pour les modèles avec entrée GPS ou DCF77
(l'article « EXT INPUT » n'est pas disponible dans le menu « OPTIONS »).
Sélectionnez le sous-menu « EXT INPUT » à l'aide des
1.
Validez en appuyant sur .OK2.
Sélectionnez le type de commutation (voir tableau5. suivant) à l'aide des touches .
Validez en appuyant sur .OK6.
Pour désactiver la programmation effectuée, répétez les actions 1 à 4.
Validez la sélection « DESACTIVER » en appuyant sur .OK
•
Sélection
afficheur
Sortie ouS1
S2 (double
sortie)
Symbole Fonction Commande
externe
Perm On
off
Interrupteur
Forçage permanent de la
temp Forçage temporaire de la
sortie jusqu'à la
commutation suivante d'un
programme précédemment
i
i
timer on
off Forçage d'une sortie
temporisée (ex. Commande
éclairage escaliers)
*Temps réglable en format
hh:mm:ss.
Bouton
Bouton
Remarque : la fermeture du contact de l'entrée externe est immédiatement
relevée par l'horloge, alors que l'ouverture peut mettre au maximum 1 s.
Sélectionner le canal à l'aide des touches
3.
Valider en appuyant sur .OK4.
3-8-4 Entretien
Permet de configurer pour le canal C1 et/ou C2 (mod. bicanal) une période de
fonctionnement sur ON. Une fois cette période écoulée, l'horloge signale la nécessité
D'une intervention par le message “S1 MANUT” ou “S2 MANUT”, alternant avec la date courante.
Sélectionnez le sous-menu « ENTRETIEN » à l'aide
1.
S1 clignote.
»
Sélectionnez la sortie à l'aide des touches
2.
Validez en appuyant sur .OK3.
Programmez le nombre d'heures à l'aide des touches .4. .
Appuyer sur pour passer au canal suivant (seulementOK5.
Pour modifier ou reprogrammer des valeurs, suivez
Suppression du message d'entretien
i
i
Remarque : quand on modifie l'intervalle d'entretien, on perd le comptage partiel
éventuel déjà écoulé.
Une fois que le comptage est s'écoulé, le message clignotant MANUT et l'indication
du canal concerné s'affichent sur l'écran de travail principal.
Lorsque l'intervention d'entretien est terminée, il est possible d'éliminer l'avis en
appuyant sur la touche et la garder enfoncée pendant 2 secondes environ
pendant l'avis qui se réfère au canal concerné.
OK
Attention : quand on efface le message MANUT le compteur horaire est
automatiquement réinitialisé et le comptage redémarre.
Pour ne pas utiliser la fonction ENTRETIEN, configurer le
compteur horaire sur zéro pour le canal ou les canaux.
Cette information peut être utilisée pour effectuer des interventions d'entretien à des
intervalles de temps prédéfinis sur le dispositif connecté à la sor tie.
Garder enfoncée la touche avec la flèche pour
augmenter/diminuer rapidement les dizaines, les
centaines, etc. Appuyer par impulsions simples pour
avancer d'une unité à la fois.
les instructions 1 à 5.
i
C1
bicanal) ou appuyer sur pour quitter.MENU
*Configurer le temps selon la procédure précédente, saisie heure On et Off.
touches .
R E G U L H
des touches .
(modèle double sortie).
E n t r e t i e n
E n t r e t i e n
s
(mod. bicanal).
défini.
sortie sur ON ou OFF.
FR

3-8-6 Rétroéclairage
Il permet de régler le temps de rétroéclairage de l'afficheur.
Sélectionnez le sous-menu « RETRO-ECL » à l'aide
1.
Validez en appuyant sur .OK2.
Sélectionnez FIXE ON, FIXE OFF ou TEMP 6 S à
3.
l'aide des touches .
3-8-7 Garantie
Il permet d'afficher en jours le temps écoulé depuis la mise en service de l'horloge.
Sélectionnez le sous-menu « GARANTIE » à l'aide1.
Validez en appuyant sur .OK2.
Sur l'afficheur apparaît la période, comme décrit»
Le comptage ne peut pas être mis à zéro.
i
Le dispositif EMD est une carte de mémoire externe en mesure de gérer 64
programmes, y compris les congés.
La mémoire EMD est la clé de programmation.
Insérez la mémoire EMD.1.
Sur l'afficheur apparaît le menu de gestion de la mémoire.
»
Sélectionnez le sous-menu désiré (voir tableau) à2.
l'aide des touches .
Validez chaque choix en appuyant sur .OK3.
Sous-menus Fonction Remarques
EXECUTE Exécution des programmes
directement d'EMD Les programmes ne sont
exécutés que par EMD
Sauvegarde de la mémoire
entière de l'horloge sur EMD
Recouvrement de tous les program-
mes déjà présents dans l’EMD
Copie du contenu entier d'EMD
sur la mémoire de l'horloge
Recouvrement de tous les program-
mes présents dans l'horloge
Lire
Lecture des programmes d’EMD
N'affiche que les programmes
présents dans l'EMD
Copie des programmes Congés
de l'horloge à l'EMD
Recouvrement de tous les program-
mes Congés présents dans l’EMD
Copie des programmes Congés
de l'EMD à l'horloge. Recouvrement de tous les pro-
grammes présents dans l’horloge
supprimer Suppression de tous les pro-
grammes présents dans l'EMD. Suppression définitive de la
mémoire EMD entière.
Appuyez sur la touche pour quitter.MENU1.
Validez le choix « ANNULER » en appuyant sur .OK2.
La mémoire EMD est exclue de l'horloge.»
La mémoire EMD n'est plus reconnue.»
Retirez l'EMD.
3.
i
Attention : la clé de mémoire peut être utilisée pour partager les données,
uniquement dans les dispositifs du même modèle, dans le cas contraire l'écran
affichera des messages d'erreur.
Valider en appuyant sur et quitter la configuration.OK
3.
4 Dispositif Mémoire Externe (EMD)
Validez en appuyant sur OK4. et quitter la configuration.
3-8-5 Compteur d'heures
Sélectionnez le sous-menu « COMPTE H » à l'aide1.
des touches .
.
Validez en appuyant sur .OK2.
Sélectionnez la sortie à l'aide des touches .
3.
Sur l'afficheur apparaissent les heures de fonctionnement.
»
Appuyez sur les touches + pour remettre à zéro.
Valider en appuyant sur et quitter la configuration.OK4.
i
À travers cette fonction, l'interrupteur horaire compte le temps total pendant lequel
la sortie reste active (ON). Sa fonction est de surveiller la vie du dispositif connecté
au canal et/ou aux canaux (mod. Bicanal).
S2
43
des touches .
des touches .
ci-dessus.
Sauve
Copi
Conge
Conge
E n t r e t i e n
C o m p t e h
C o m p t e h
R e t r o - e c l
R e t r o - e c l
F i x e o n
R e t r o - e c l
G a r a n t i e
G a r a n t i e
J o u r
E x e c u t e
A n n u l e r
S
FR
Le constructeur se réserva le droit d'apporter toutes les modifications techniques et de fabrication qu'il retiendra nécessaire et sans obligation de préavis

ESPAÑOL
44
MODELOS:
ES
1234567
06
12 18 24
1234567
06
12 18 24
1234567
06
12 18 24
1234567
06
12 18 24
Interruptores horarios digitales de 1 o 2 canales - diarios, semanales, mensuales/anuales - entrada/s para mando externo - ranura para memoria externa
memoria externa
memoria externa
Interruptores horarios digitales de 1 o 2 canales - semanales, mensuales/anuales - entrada para sincronización con antena DCF77 o GPS - ranura para memoria externa
06
12 18 24
()a adquirir separadamente
()incluida en el paquete
IT

0 % 50 %
12:00:00
1234567
18 24
12345
678910
C1
C2
L
N
BUS DCF77/GPS
12345
678910
C1
L
N
BUS DCF77/GPS
12345
678910
C1
C2
L
N
12345
678910
C1
L
N
IE1 IE1IE2
CONEXIONES ELÉCTRICAS
Ejemplo: utilizar un utensilio
acabado en punta para
pulsar el botón de .RESET
FIG. 2 FIG. 3
DISPLAY
BOTONES
FIG. 4
FIG. 5
FIG. 6
FIG. 1
0612
sólo para
modelos
semanales
sólo para modelos
bicanales
sólo para
modelos
con entrada
GPS o DCF77
230V~ 230V~
230V~ 230V~
45
ES
MENu

1 Descripción del aparato
1-1 Características funcionales
1-2 Características técnicas
1-3 Pantalla (Fig. 1)
1-4 Teclas funcionales
1-5 Funciones con combinación
1-6 Conexiones
1-7 Primer encendido
2 Menú y programación
2-1 Menú - panorámica
2-2 Prioridad forzados y programas
2-3 Generar un nuevo programa
2-4 Verificar un programa
2-5 Modificar un programa
2-6 Cancelar un programa
(método rápido)
2-7 Copiar un programa
3 Programas reloj y
Configuraciones
3-1 Programa Standar
3-2 Programa Casual
3-3 Programa Cíclico
3-4 Programa Vacaciones
3-6 Cancelar
3-7 Manual
3-8 Opciones
3-8-1 Idiomas
3-8-2 Data/Hora
3-8-3 Entrada externa
3-8-4 Manutención
3-8-5 Cuenta horas
3-8-6 Retroiluminación
3-8-7 Garantía
4 Dispositivo Memoria
Externa (EMD)
i
i
- Leer atentamente el presente manual antes de montar y de poner en
funcionamiento el producto.
- Este aparato debe ser montado y conectado exclusivamente por
personal adecuadamente cualificado.
Seguridad El aparato contiene una batería, no desmontable, por lo que está sujeto a
recogida diferenciada y no debe eliminarse como un residuo urbano para no
dañar el medio ambiente. Con arreglo a la Directiva 2006/66 y a las leyes
nacionales de transposición para la eliminación del producto al final de su vida
útil, el incumplimiento de la prescripción arriba citada está sancionado por la ley.
3-5 Lista PRG (programas)
Índice
pág.46
pág.46
pág.47
pág.47
pág.48
pág.48
pág.48
pág.48
pág.49
pág.49
pág.49
pág.50
pág.51
pág.51
pág.51
pág.51
pág.52
pág.57
pág.52
pág.52
pág.52
pág.52
pág.53
pág.53
pág.53
pág.54
pág.54
pág.54
pág.56
pág.56
pág.57
pág.57
pág.57
1 Descripción del aparato (según modelo)
Este interruptor digital horario es un reloj de programación diaria o semanal con el que
también es posible introducir un periodo anual, y que permite la conmutación
automática de varias cargas (monocanal o bicanal) según una programación temporal
suficientemente flexible para adaptarse a las necesidades reales de activación y
desactivación (ideal para edificios domésticos, industriales, escuelas, oficinas, lugares
públicos, etc.), además dispone de entrada/s para activación remota. En las versiones
con ranura para EMD (Dispositivo de Memoria Externa) es posible guardar/copiar o leer
uno o varios programas en distintos interruptores horarios del mismo modelo, utilizando
una memoria. Los modelos que pueden ser conectados a receptores de señal horaria
del tipo DCF77 o GPS permiten un nivel de exactitud de sincronización horaria excelente.
1-1 Características de funcionamiento (según modelo)
• Modelos con programación diaria, semanal, mensuales/anuales guiada por menú
y con indicaciones en display retroiluminado
• Modelos con una o dos salidas para accionamiento de relé
• Control inteligente de los relés que aumenta la magnitud de las cargas y la duración
del relé y de la carga “cruce por cero” conectada
• Modelos con entrada/s externas combinadas a la/s salida/s para configuración
manual remota
• Modelos con memoria externa para la ejecución y carga de programas, con
posibilidad de descargar/cargar exclusivamente los programas de vacaciones
• Calendario: año - mes - día - hora y minutos
• Menú multilingüe: Italiano - Inglés - Alemán - Francés - Español - Portugués - Sueco
- Holandés - Ruso - Polaco Griego
• Tipo de programas: Estándar, Aleatorios, Cíclico, Vacaciones
• Total: 64 programas programables
• Vacaciones: pueden programarse varios periodos a lo largo del año
• Tiempo mínimo de programación ON/OFF: 1 segundo
• Borrado rápido de programas
• Encendido/apagado manual permanente o temporal simplificado
• Configuración de fecha/hora con cambio horario invierno/verano automático
• Función cuentahoras para controlar las horas de encendido de la carga
• Programación del mantenimiento de las cargas conectadas
• Gestión de la garantía del producto
• Bloqueo del teclado
• Display retroiluminado color blanco
• Gestión de la retroiluminación del display: fija ON / fija OFF/ apagado temporizado
• Pila ecológica de LITIO (no extraíble) 6 años de duración
• Memoria permanente para el archivo de programas
• Mecanismo de cuarzo de elevada precisión: ≤ ± 0.5 seg./día
• Modelos con posibilidad de conexión a receptores de señal horario: DCF77 o GPS.
Nota: para todos los artículos es posible el montaje tras cuadro
con accesorios opcionales
46
de teclas
ES

1-2 Características técnicas
Tensión de alimentación 230 V c.a. +/- 10%
Frecuencia 50-60 Hz
Grado de protección
IP20
Tipo de salida Relé de contacto en intercambio libre
de potencial;
contacto N.O. = 16(10)A / 250V~ (de
corriente limitada con Resistencia para
Zero Crossing de alto valor);
contacto N.C. = 16(2)A / 250V~
Temperatura de funcionamiento de 0 °C a +50 °C
Temperatura de almacenaje de -10 °C a +65 °C
Absorción/Autoconsumo 6.5 VA monocanal / 7.8 VA bicanal
Sección de los cables a los bornes
1...6mm²
Normativa marca CE LVD/EMC EN60730-2-7
Idiomas disponibles en el aparato
Italiano, Inglés, Alemán, Francés,
Español, Sueco, Portugués, Holandés,
Ruso, Polaco, Griego
Reserva de carga en caso de
interrupción de corriente 6 años a partir del primer encendido,
garantizada por pila al litio
Tensión impulsiva nominal 4kV
Precisión de funcionamiento
3000W 3000W 1100W 900W
(125 μF)
7W ÷ 23W
(máx. 23 lámp.)
Canal 1/Canal 2 OFF/ Canal desactivado
Forzado manual del canal ON / Canal activo
Programas casuales Programas cíclicos
Icono Vacaciones Bloqueo teclado
Indicación recepción señal
GPS o DCF77
Navegación hacia arriba
N° de programa seleccionado
(P01 ÷ P64) Navegación hacia abajo
La barra rayada de la pantalla también muestra lo siguiente:
Estado de avance, véase Fig.2 en pág. 45 (p.ej. para borrado véase cap.3-6).•
Visualización de las horas, véase Fig.3 en pág. 45.•
La pantalla muestra de modo alternado (durante algunos segundos) la Data/
Hora y los programas o forzados configurados.
i
i
Montaje
barra DIN - tras cuadro (con KIT opcional)
Software Clase A
Tipo de aislamiento Clase II
Nivel de contaminación Normal
Horario de verano Horario de invierno
1-3 Pantalla (véase Fig. 1 en pág. 45)
Potencia máxima gestionable
+ 0,5 seg./día a 25 °C
47
ES

Permite entrar en el menú principal (desde la pantalla de inicio).•
Permite salir de cualquier configuración.•
Permite recorrer hacia arriba una lista.
•
Aumenta un valor numérico o cambia un parámetro.•
Si se mantiene presionado permite la visualización fija del estado•
del canal 1 hasta que se suelta la tecla (en funcionamiento normal).
Permite recorrer hacia abajo una lista.•
Disminuye un valor numérico o cambia un parámetro.•
Si se mantiene presionado permite la visualización fija del estado•
del canal 2 (modelos bicanales) hasta que se suelta la tecla (en
funcionamiento normal).
Confirma la configuración propuesta.•
Realiza una restablecimiento (reset) del aparato (NOTA: Los•
Función Combinación de teclas
Bloquear / desbloquear teclas ( ).
Forzado manual temporal canal 1 y 2
(ver cap. 3-7).
Alternando la presión se pasa de
TEMP ON a TEMP OFF.
Nota: el Reset reinicializa el interruptor horario, se utiliza durante la primera programación, o
cuando se visualizaran datos anómalos o ponen de manifiesto problemas de
funcionamiento. Pulsando el botón de Reset con un objeto puntiagudo, el interruptor horario
efectúa el test de luces, encendiéndose todos los segmentos del display y apareciendo a
continuación la pantalla de selección de idioma. Con la operación de Reset se pierden: el
bloqueo del teclado y la configuración de la fecha y la hora actuales, que deberá realizarse
de nuevo. En caso contrario el interruptor horario no ejecutará los programas. Se
mantienen, en cambio, los programas configurados, la activación/desactivación de la
entrada externa y los datos sobre mantenimiento, cuentahoras y garantía.
1-4 Teclas funcionales
1-5 Funciones con combinación de teclas
programas y las configuraciones de entrada externa no se borran).
Conexión de modelos monocanales y bicanales
Véase esquema Fig. 5 en pág.45
•
Conexión de modelos con entrada para DCF77 o GPS
Modelos Synchro monocanales o bicanales con GPS o Antena DCF77.
Véase esquema Fig. 6 en pág. 45
•
El aparato se entrega sin configurar.
Presionar RESET con un objeto acabado en punta para desbloquear
1.
Configurar los siguientes datos:2.
Idiomas (ver cap. 3-8-1).
•
Data/Hora (Año, Mes, Día, Hora, Zona horario - ver cap. 3-8-2).
•
i
1-6 Conexiones
(si la red es de 230V~, desactivar siempre la tensión eléctrica)
Longitud máxima de los cables para la conexión de interruptor o botón
1-7 Primer encendido
En caso de interrupción de la energía eléctrica (como, por ejemplo, un corte de
corriente), la Data/Hora no se borra y el interruptor digital efectúa lo siguiente:
inhabilita el/los relé/s,•
i
desactiva la retroiluminación, si estuviera activa,•
visualiza la fecha y la hora parpadeantes durante 2 minutos para luego pasar al
•
modo stand-by (pantalla apagada), manteniendo en la memoria todos los datos
programados hasta el restablecimiento de la tensión de red, o hasta que se
presione una tecla durante 1 seg. que reanuda el conteo para el modo stand-by.
a la entrada externa (E.E.) del reloj: 100 m (Fig. 5 en pág.45).
48
MENÚ Ok Reset
el aparato (ver Fig.4 ).en pág. 45
ES
MENU
2 seg. 2 seg.
2 seg. 2 seg.
Función Combinación de teclas
Regresa al modo AUTO (si se hubiera
activado un forzado manual cualquiera).
Forzado manual permanente canal 1 y
2 (ver cap. 3-7).
Presionando durante 2 seg. se accede
a PERM;
alternando la presión se pasa de
Para realizar una de las funciones describas hay que estar obligatoriamente en la pantalla de inicio
+
2 seg.
PERM ON a PERM OFF.

.
n. prg libre
Canal (s lo esbicanal )ó
hora on/off
Fin/anual
n. prg libre
DÌA (sólo semanales)
hora on/off
Fin/anual
n. prg libre
hora on/off
Tiempo on/off
fin/anual
n. prg libre
hora off
día/mes off
hora on
día/mes on
Verificar
Modificar
cancelar
único prg
todos prg
vacac
auto
perm off
perm on
Temp On
temp off
Language
DATA/HORA
EXT INPUT*
MANUTENC
CUENTA H
RETROILUM
Garantía
* Excluidos los modelos con posibilidad de
34
12
5 6 7 8
Presionar la tecla MENU.1.
Aparece el primer menú seleccionable (P Standar)»
Recorrer los distintos menús con las teclas .2. .
Confirmar el menú deseado con OK.
3.
da una prioridad, como se indica
al lado.
Cuando se programan diferentes
tipos de programas para el mismo
Periodo de tiempo deben tenerse
P01:Programa Standar
ON 19:00 - OFF 22:00
P02:Programa Standar
ON 00:00 - OFF 06:00
P03:Programa Casual
ON 20:00 - OFF 00:00
P04:Programa Cíclico
ON 19:00 - OFF 22:00
P05:Programa Cíclico
ON 02:00 - OFF 06:00
P06:Programa Casual
ON 04:00 - OFF 06:00
i
i
Todos los programas
introducidos, de a ,
están simultáneamente
activados. El/los relé/s de
salida se activará/n según las
prioridades definidas.
P01 P06
2 Menú y programación
2-1 Menú - panorámica
2-2 Prioridad forzados y programas
MÁXIMA PRIORIDAD
Los menús de 1 a 8 están en la secuencia presente en el aparato.
en cuenta las prioridades.
Forzado manual
Entrada externa
Memoria Externa (EMD)
Programa vacaciones
Programa
Cíclico/Casual
Programa standar
Cada tipo de programa tiene asigna-
Procedimiento para seleccionar el menú:
49
Canal (s lo esbicanal )ó Canal (s lo esbicanal )ó Canal (s lo esbicanal )ó
DÌA (sólo semanales) DÌA (sólo semanales)
Canal (s lo esbicanal )ó
P c a s u a l P c i c l i c o
P c a s u a l
P c i c l i c o
P v a c a c
P v a c a c
L i s t a P r g
L i s t a p g r
C a n c e l a r
C a n c e l a r
M a n u a l
M a n u a l
O p c i o n e s
M a n u a l
O p c i o n e s
P S t a n d a r
Sincronización con DCF77 o GPS
ES
Ejemplo:
1900 2000 2200 000 200 400 600 800
1800
STD STD
STD
P01 P02
P03
P04 P05
P06
1900 2000 2200 000 200 400 600 800
1800
1900 2000 2200 000 200 400 600 800
1800
1900 2000 2200 000 200 400 600 800
1800
1900 2000 2200 000 200 400 600 80
1800 0

Procedimiento válido para todos los tipos de programas. Otras configuracio-
nes se describen en cada programa.
Presionar la tecla MENU1.
2.
Confirmar la selección con .OK3.
Aparece el número de programas libres durante 3 seg.
»
Aparece el primer programa en memoria.»
Presionar durante 2 seg. la tecla .4. .
La pantalla muestra el primer programa vacío.»
Confirmar con .OK5.
El número del programa está seleccionado.»
Ahora debe configurarse el canal.»
c1 c2
P02
Configurar el canal (bicanales) con las teclas .1.
C1/C2 o ambos parpadean.»
Confirmar con .OK2.
El canal está configurado.
»
Ahora debe configurarse el día.»
i
P02
P02
P02
Configurar el horario de inicio del programa con las1.
teclas en el formato .hh/mm
Una breve presión de las teclas modifica el
Una presión prolongada modifica el campo horas.
Confirmar con2. OK.
Aparece el campo de los segundos.»
Configurar los segundos con las teclas .3. .
Confirmar con4. OK.
El horario inicio programa ya está configurado»
Ahora se describe la configuración de HORA/OFF.»
P02
P02
Configurar el horario de fin programa con las teclas
1. .
Repetir las operaciones descritas para HORA/ON.
Confirmar con2. OK.
El horario de fin programa ya está configurado.»
Confirmar el fin programa con .OK3.
i
i
Configurar el día (sólo para los modelos semanales)
Seleccionar el día o el grupo de días en el que el programa debe ejecutarse.
P02
Configurar el día o el grupo de días con las teclas .1.
La flecha parpadeante indica el día o grupo de»
días seleccionado.
Confirmar con2. OK.
Ahora debe programarse la HORA/ON.
»
1 2 3 4 5 6 7
(sólo para los modelos semanales)
sólo para los modelos semanales: si se selecciona un grupo de días (p.ej. sábado y
domingo) y un intervalo de tiempo que sobrepasa las 12 de la noche (p.ej. hora
ON=23:30, hora OFF=2:00), el programa es ejecutado 2 veces, pero la segunda vez
finaliza el lunes. En este caso el icono del lunes parpadea en señal de aviso. Este
mismo principio es aplicado para los programas con duración superior a un día.
4. Introduzca un nuevo programa o bien salga pulsando
varias veces el botón MENÚ
Sólo para los modelos semanales: configure la hora de OFF desplazando el horario
hacia adelante respecto a la hora de ON. Hacia atrás se selecciona la semana entera
Nota: si el valor introducido en el campo segundos ON y segundos OFF es igual a cero, el
campo segundos no aparece en el resumen de datos.
Además, un programa debe durar un segundo como mínimo, por lo tanto la hora de OFF
no puede coincidir con la de ON (en caso contrario el programa no es aceptado).
Realización de un programa con duración de varios días
(sólo para mod. Semanales)
Es posible extender la duración de un programa a varios días
(p.ej. inicio el lunes a las 12:00 horas y fin el miércoles a las
14:00); basta desplazar las horas más allá de las 24 cuando
se configure la “Hora OFF”. Cuando se supera este punto
horario el icono del día siguiente al del inicio de programa se
enciende en forma intermitente. Cada vez que se superen las
24 horas el programa se extenderá al día siguiente.
2-3 Generar un nuevo programa
Seleccionar el tipo de programa (por ejemplo con P Standar):
Seleccionar el canal (sólo modelos bi-canal)
Configurar HORA/ON
Configurar HORA/OFF
(sólo para los modelos bicanal)
50
Seleccionar el tipo de programa con las teclas .
P c a s u a l
P S t a n d a r
P S t a n d a r
L i b r e s
V a c i o
P S t a n d a r
c a n a l
P S t a n d a r
D i a
F i n
P r g a n u a l
campo minutos.
ES
P02
P05
12
14
1 2 3 4 5 6 7

Seleccionar en el menú el tipo de programa (p.ej.1.
P Casual) con las teclas . .
Confirmar con2. OK.
Se visualizan los programas del mismo presentes»
en la memoria.
Seleccionar el programa que se ha de verificar con
3.
La pantalla muestra cíclicamente las configuraciones.»
2-6 Cancelar un programa (método rápido)
c1
Seleccionar en el menú el tipo de programa que se1.
quiere cancelar con las teclas .
.
Por ejemplo: P casual»
Presionar a la vez las teclas durante 2 seg.2.
La pantalla muestra "CANCELAR".»
Confirmar con3. OK.
La pantalla muestra "VACÍO".»
El programa está cancelado.
Seleccionar en el menú el tipo de programa que se1.
quiere copiar (p.ej. P Casual) con las teclas .
.
El número de programa parpadea.»
Presionar durante unos 3 seg. la tecla .OK2.
El programa se copia en la primera posición libre»
de la memoria.
Se visualiza el primer dato modificable (p.ej. canal)
»
parpadeante.
Modificar datos como se describe en el cap. 2-3.3.
¡No pueden coexistir 2 programas con los mismos datos!
i
Configurar PERIODO ANUAL
Permite configurar un periodo definido, en el cual el programa configurado con
anterioridad debe ser ejecutado.
El periodo definido en el programa anual se repite cíclicamente cada año.
P02
Configurar el inicio y fin periodo en el formato1.
con las teclas .
Confirmar cada campo con .OK
2.
El periodo anual ya está configurado.»
i
3. Introduzca el nuevo programa o bien salga pulsando
varias veces el botón MENÚ
Nota: es posible configurar el P. ANUAL sobrepasando el fin de año, p.ej. Mes ON
OCTUBRE y Mes OFF MARZO (el programa durará 5 meses, pues el mes OFF será
el del año siguiente, y así cíclicamente).
Nota: si no se efectúan modificaciones en 10 minutos, o si se pulsa varias veces
, el dispositivo vuelve a la visualización inicial y se pierde el nuevo programa
duplicado.
MENÚ
2-4 Verificar un programa
2-5 Modificar un programa
1. Confirmar el programa que se ha de modificar con
2. Configurar los nuevos valores como se describe en el cap. 2-3.
OK.
2-7 Copiar un programa
Se accede a los menús de los programas deseados (P standar,
P cíclico...) con la tecla .MENU
51
dd/mm/--
las teclas .
F i n
P r g a n u a l
P c i c l i c o
P c a s u a l
C a n c e l a r
P c a s u a l
V a c i o
P c i c l i c o
P c a s u a l
ES
P02
C1
P04
C1
3P0
C1
3P0
3
P0
3
P0
C1
3P0

Para la programación ver el cap. 2-3.
800 12 00
ON
OFF
Ejemplo de configuración de la imagen:
Programa Standar ON hora 8:00, OFF hora 12:00.
Para la programación ver el cap. 2-3.
800 12 00
ON
OFF
Ejemplo de configuración de la imagen:
Programa Casual ON hora 8:00, OFF hora 12:00.
i
i
Permite el encendido (ON) y el apagado (OFF) de una carga en un periodo definido
Permite el encendido (ON) y el apagado (OFF) de una carga de forma aleatoria
para un periodo definido
Cuando el programa aleatorio está activado el símbolo
aparece en la pantalla principal de forma intermitente.
3-1 Programa Standar
3-2 Programa Casual
Presionar la tecla para acceder a los menús disponibles.MENU
1.
Recorrer los menús con las teclas y confirmar con .OK2.
3 Programas reloj y configuraciones 3-3 Programa Cíclico
El tiempo ON y el tiempo OFF pueden variar de 1 seg. a 23:59:59 horas
c1
P01
c1
P01
Para la programación ver el cap. 2-3.
Además, configurar la hora de TIEMPO ON y TIEMP
1.
OFF con las teclas .
800 12 00
ON
OFF
TIEMPO ON
TIEMPO OFF
Ejemplo de configuración:
Programa Cíclico ON hora 8:00, OFF hora 12:00.
Temporización TIEMPO ON 10 min y TIEMP OFF 15 min.
para los que se suspenderán los programas On/Off asociados al canal 1 y/o el 2
(Mod. bicanal), por ejemplo para el cierre de verano y de navidad de una oficina
Seleccionar el P Vacac como se describe en el cap. 2-3.1.
Configurar la hora de de la suspensión (OFF)inicio2.
con las teclas .
.
Confirmar con3. OK.
Configurar la fecha de de la suspensión con lasinicio4.
teclas en formato .dd/mm/--
Configurar la hora y la fecha de de la suspensión (ON)fin
5.
como se describe en los precedentes puntos de 2 a 4.
i
i
Cuando el programa aleatorio está activado el símbolo
aparece en la pantalla principal de forma intermitente.
Permite el encendido y el apagado de una carga en modo cíclico (tiempo ON/OFF)
en un periodo definido
Durante el periodo de vacaciones configurado, en la pantalla aparece la abreviatura del
canal en cuestión, la palabra VACACIONES y el símbolo .
Las salidas (C1 y/o C2) estarán en estado OFF.
Para eliminar el periodo de suspensión utilizar la correspondiente función del menú
BORRAR (véase apdo. 3.6).
3-4 Programa Vacaciones
Abierta al público o un establecimiento comercial.
52
P c a s u a l
P s t a n d a r
P c a s u a l
P c i c l i c o
T i e m p o o n
T i e m p o o f f
Los programas de vacaciones permiten configurar varios periodos a lo largo del año
(Confirmar cada campo con .OK )
ES
C1
P03
o f f 0 2 : 0 0
30/07/--
C1
P06
on 06:00
31/08/--
C1
P06
C1
P02

Este menú permite visualizar, modificar o cancelar cualquier programa presente
Recorrer hasta "LISTA PRG" con las teclas1. .
Confirmar con2. OK.
Aparece el número de programas libres.»
Se visualiza el primer programa presente en la memoria.
»
Seleccionar el programa deseado con las teclas
3. .
Para saber cómo verificar, modificar o cancelar
los datos, ver del cap. 2-4 al cap. 2-6.
Este menú permite diferentes tipos de cancelación.
Recorrer hasta con las teclas .Cancelar
1. .
Confirmar con2. OK.
Se accede al topo de cancelación en el submenú»
(ver la siguiente tabla).
Seleccionar el tipo de cancelación con las teclas
».
Confirmar una cancelación con .OK3.
Con la tecla se anula la cancelación.MENU
Submenú Función
único prg Cancela los programas únicos seleccionados
todos prg Cancela todos los programas
¡Todos los programas presentes en la memoria se cancelarán!
p vacac Cancela todos los programas vacaciones
i
i
Permite forzar manualmente el estado de las salidas, independientemente del
programa activo. Posibles configuraciones:
Modo
forzado Símbolo
Pantalla Canal-
Condición Función forzado
auto c1
c2
Ningún forzado en el canal, gestión
desde el programa.
Perm c1 On
c2 On
Canal permanente activado.
PERM c1 OFF
c2 OFF
Canal permanente desactivado.
TEMP c1 On
c2 On
Canal activado hasta una próxima
intervención programa.
TEMP c1 OFF
c2 OFF
Canal desactivado hasta una próxima
intervención programa.
Activar un forzado
c2 Perm
Seleccionar el submenú "MANUAL" con las teclas1. .
Confirmar con2. OK.
Presionar la combinación de teclas (ver cap.1-5) para3.
seleccionar el canal (sólo modelos bicanales).
La pantalla muestra informaciones sobre el canal»
o canales (ver tabla anterior).
Configurar el tipo de forzado con las teclas .4. .
Confirmar la selección con .OK5.
Se regresa a la pantalla principal.»
La pantalla muestra el tipo de forzado en el canal.»
Desactivar un forzado (en la pantalla principal)
Presionar la combinación de teclas del canal a desactivar (ver cap.1-5) durante
1.
3-7 Manual
Para desactivar a través del menú es suficiente seleccionar el modo "AUTO"
(ver párrafo "Activar un forzado").
i
3-5 Lista PRG (programas)
3-6 Cancelar
en la memoria.
53
unos 2 seg.
P v a c a c
L i s t a p g r
L i b r e s
L i s t a p r g
C a n c e l a r
ES
C
C 2C 2
C
C1
P03

Permite configurar diferentes parámetros del reloj.
Seleccionar con las teclas “OPCIONES".1.
Confirmar con2. OK.
Seguidamente se describen los submenús.»
3-8-1 Idiomas
Permite configurar el idioma deseado para el interfaz.
Seleccionar el submenú "LANGUAGE" con las1.
teclas .
Confirmar con2. OK.
Seleccionar el idioma deseado con las teclas .3. .
Confirmar con4. OK.
3-8-2 Data/Hora (actuales)
Permite configurar la fecha y la hora del aparato.
Si se efectúa un reset hay que volver a programar la fecha.
Seleccionar "DATA/HORA" con las teclas .1. .
Confirmar con2. OK.
Configurar el AÑO, MES, DÍA, HORA, MINUTOS3.
respectivamente con las teclas . .
Una breve presión de las teclas modifica el campo
minutos. Una presión prolongada modifica el
Confirmar con4. OK.
La fecha y la hora ya están programadas.»
Seguidamente se describe la configuración "CAMBIO H".
»
i
i
Cambio hora ( invierno) / ( verano)Solar Legal
Seleccionar el tipo de conmutación con las teclas1. .
Confirmar con2. OK.
Configurar los valores (ver tabla) con las teclas .3. .
Para cada selección confirme con .OK4.
Posibles selecciones en
la pantalla
Conmutación estival
+1h ( horario de verano)
Conmutación invernal
-1h ( horario de invierno)
Ninguno Ninguna Ninguna
EUROPA Último domingo del mes
de marzo
Último domingo del mes
de octubre
USA Segundo domingo del
mes de marzo
Primer domingo del mes
de noviembre
Libre Semana/día (dom.) libre-
mente programados
Semana/día (dom.) libre-
mente programados
Fija Fecha fija libremente
programada (p. ej. 28/02)
Fecha fija libremente
programada (p. ej. 29/10)
Time Zone GPS (sólo modelos GPS o DCF77)
Después de configurar la DATA/HORA (ver cap.3-8-2).
Seleccionar "GPS" con las teclas .1. .
Confirmar con2. OK.
Seleccionar el tipo de Cambio H (ver tabla anterior).3.
Configurar el número de horas de TZONE con las teclas4. .
Confirmar con5. OK.
El cambio de hora ya está configurado.»
Se regresa a la pantalla principal.»
i
el tipo de cambio horario de invierno/verano;
configuraciones GPS o DCF77 (sólo para los modelos que disponen
(configuración de fábrica)
Configurar la corrección del uso horario (TZONE)
tomando como referencia el Meridiano de Greenwich:
- aumentar para lugares al Este de Greenwich
- reducir respecto a la posición de Greenwich para lugares al Oeste de Greenwich
(p.ej. Italia, TZONE +1).
Parámetro modificable de -12 a +12
3-8 Opciones
EUROPA
o bien la configuración GPS o DCF77
(sólo para los modelos que disponen de esta posibilidad).
54
campo horas.
teclas .
M a n u a l
O p c i o n e s
D a t a / h o r a
D a t a / h o r a
C a m b i o h
D a t a / h o r a
de esta posibilidad).
C a m b i o h
ES

Seleccionar "DCF77" con las teclas .1. .
Confirmar con2. OK.
Time Zone DCF77 (sólo modelos GPS y DCF77)
A diferencia del GPS, el receptor transmite la hora con la corrección legal/solar.
0
Configurar el número de horas de TZONE con las teclas
3. .
Confirmar con4. OK.
El cambio de hora ha sido realizado.
»
Se regresa a la pantalla principal.
»
Parámetro modificable de -3 a +3
Configuración de la corrección del huso horario (TZONE) respecto a la posición de Frankfurt:
- aumentar para lugares al Este de Frankfurt
- reducir para lugares al Oeste de Frankfurt
(P.e Italia, TZONE +0).
MODO DE FUNCIONAMIENTO CON RECEPTOR GPS o DCF 77
Si al dispositivo se conecta un receptor GPS o DCF 77 para sincronización
del horario, en el display (una vez finalizadas las operaciones de programación)
aparece el símbolo de funcionamiento, en una de las siguientes variantes:
PARPADEANTE = en espera de sincronización;
FIJO = sincronización realizada
SÍMBOLO AUSENTE = falta de señal o receptor desconectado
Diferencia respecto al
huso de Frankfurt
Diferencia respecto al
huso de Greenwich
0 h
+1 h
+1 h+2 h
+2 h
+3 h
-1 h
0 h
-2 h-1 h
sin sincronización (cuando la espera dura más de 24h)
Tabla de ejemplo de diferencias de huso horario
Después de realizar la configuración FECHA/HORA
i
55
D a t a / h o r a
D a t a / h o r a
(Ver cap.3-8-2).
ES

3-8-3 Entrada externa
Permite efectuar funciones de forzados manuales de ON y OFF desde una
posición remota, (ver cap. 3.7), mediante pulsadores o interruptores.
Función no disponible para los modelos con entrada GPS o DCF77
(la voz "EXT INPUT" no está disponible en el menú "OPCIONES").
Seleccionar el submenú "EXT INPUT" con las teclas .
1.
Confirmar con2. OK.
Seleccionar el tipo de conmutación (ver la siguiente5. tabla) con las teclas .
Confirmar con6. OK.
Para desactivar la configuración efectuada, repetir las operaciones
Confirmar la selección "DESACTIVA" con .OK•
Selección
Pantalla
Canal
C1 C2o
(Bicanal)
Símbolo Función Mando
Externo
Perm On
off
Interruptor
canal en ON o OFF.
temp Forzado temporal del canal
hasta la siguiente
conmutación de un programa
anteriormente configurado.
i
i
timer on
off
Forzado temporizado de
un canal (p.ej. control luz
escaleras).
*Tiempo configurable en
formato hh:mm:ss.
Botón
Botón
Nota: el reloj detecta instantáneamente el cierre de la entrada externa, mientras
que para la apertura puede emplear 1 seg. como máximo.
(mod. bicanal).
3.
Confirme con .OK4.
3-8-4 Manutención
Permite configurar para el canal C1 y/o C2 (mod. bicanal) un periodo de funcionamiento
en ON. Transcurrido este periodo, el reloj avisa que es necesario efectuar el
Mantenimiento, mostrando “C1 MANUT” o “C2 MANUT” en alternancia con la fecha actual.
Seleccionar el submenú "MANUTENC" con las teclas
1. .
C1 parpadea.
»
Seleccionar el canal con las teclas (mod. bicanales).2.
Confirmar con3. OK.
Configurar el número de horas con las teclas .4. .
Pulse para cambiar de canal (sólo para mod. bicanal)OK5.
Para modificar o reconfigurar los valores, seguir
Anular el aviso de manutención
i
i
Nota: cuando se modifica el intervalo de mantenimiento, el periodo ya transcurrido
vuelve a cero.
Una vez alcanzado el límite previsto, en la pantalla principal aparece MANTEN en
intermitente y la abreviatura del correspondiente canal.
Una vez efectuado el mantenimiento se puede eliminar el aviso manteniendo pulsado
el botón unos 2 segundos mientras aparece el aviso correspondiente al canal de
que se trata.
OK
Atención: cuando se elimina el aviso MANTEN el contador vuelve
automáticamente a cero e inicia de nuevo
Si no se desea utilizar la función MANTENIMIENTO ponga a cero
el contador correspondiente al canal y/o los canales.
Esta información puede utilizarse para efectuar el mantenimiento según intervalos de
tiempo predefinidos para el dispositivo conectado a la salida.
Mantenga pulsado el botón flecha para
incrementar/reducir de forma rápida las decenas,
centenas, etc.
Con impulsos únicos se pasa a la unidad siguiente.
las instrucciones del punto 1 al 5.
i
c1
o bien pulse para salir.MENÚ
*Configure el tiempo como en el procedimiento anterior, Introducción de la hora
56
del punto 1 al 4.
D a t a / h o r a
M a n u t e n c
M a n u t e n c
de encendido (On) y hora de apagado (Off).
Seleccione el canal utilizando las teclas
Forzado permanente del
ES

3-8-6 Retroiluminación
Permite configurar el tiempo de retroiluminación de la pantalla.
Seleccionar el submenú "RETROILUM" con las teclas .
1. .
Confirmar con2. OK.
Seleccionar con las teclas entre: FIJO ON, FIJO3.
OFF o TEMP 6 SEG.
3-8-7 Garantía
Permite visualizar en días el tiempo transcurrido desde la puesta en funcionamiento
Seleccionar el submenú "GARANTIA" con las teclas .1. .
Confirmar con2. OK.
La pantalla muestra el tiempo, como se describe»
Este conteo no se puede poner a cero.
i
El dispositivo EMD es una tarjeta de memoria externa que puede gestionar 64
programas incluidas las vacaciones.
La memoria EMD es la llave de programación.
Insertar la memoria EMD.1.
La pantalla muestra el menú de gestión memoria.»
Seleccionar el submenú deseado (ver tabla) con las2.
teclas .
Confirmar cada selección con .OK3.
Submenú Función Notas
EJECUTAR
Ejecuta programas
directamente desde EMD Los programas sólo se
ejecutan desde EMD
Guarda toda la memoria reloj
en EMD Reemplaza todos los progra-
mas ya presentes en EMD
Copia todo el contenido de
EMD en la memoria reloj Reemplaza todos los progra-
mas presentes en el reloj
LEER Lee los programas desde Visualiza sólo los programas
presentes en EMD
Copia los programas Vacacio-
nes del reloj al EMD
Reemplaza todos los programas
Vacaciones presentes en EMD
Copia los programas Vacacio-
nes del EMD al reloj
Reemplaza todos los programas
Vacaciones presentes en el reloj
CANCELAR Cancela los programas
presentes en el EMD
Cancela definitivamente toda la
memoria EMD
Presionar la tecla para salir.MENU1.
Confirmar la selección "ANULAR" con .OK2.
La memoria EMD queda excluida del reloj.»
La memoria EMD no es reconocida.»
Retirar el EMD.3.
i
Atención: el dispositivo de memoria puede utilizarse para compartir datos sólo en
dispositivos del mismo modelo, en caso contrario el display muestra un mensaje
de error.
Confirme con para salir de la configuración.OK3.
4 Dispositivo Memoria Externa (EMD)
Confirmar con4. OK y salga de la configuración.
3-8-5 Cuenta horas
Seleccionar el submenú "CUENTA H" con las1.
teclas .
Confirmar con2. OK.
Seleccionar el canal con las teclas .
3.
La pantalla muestra las horas de funcionamiento.»
Presionar las teclas + para poner a cero.
Confirme con y salga de la configuración.OK4.
i
Con esta función el interruptor horario cuenta el tiempo total durante el que la
salida está activada (ON). Sirve para controlar la vida del dispositivo que está
conectado al canal y/o canales (mod. bicanal).
c2
57
del reloj.
arriba.
Vacac
Vacac
M a n u t e n c
C u e n t a h
C u e n t a h
r e t r o i l u m
r e t r o i l u m
F i j o o n
r e t r o i l u m
G a r a n t i a
D i a
E j e c u t a r
A n u l a r
G a r a n t i a
EMD
ES
El fabricante se reserva el derecho de introducir todas aquellas modificaciones técnicas y constructivas que considere necesarias sin ningún tipo de obligación de avisar previamente

ITALIANO
58
1234567
06
12 18 24
1234567
06
12 18 24
1234567
06
12 18 24
1234567
06
12 18 24
Interruttori orari digitali 1 o 2 canali - giornalieri, settimanali, mensili/annuali - ingresso/i per comando esterno - slot per chiave di memoria esterna
chiave di memoria esterna
chiave di memoria esterna
Interruttori orari digitali 1 o 2 canali - settimanali, mensili/annuali - ingresso per sincronizzazione con antenna DCF77 o GPS - slot per chiave di memoria esterna
06
12 18 24
MODELLI:
(acquistabile separatamente)
(inclusa nella confezione)
IT

0 % 50 %
12:00:00
1234567
0612 18 24
12345
678910
C1
C2
L
N
BUS DCF77/GPS
12345
678910
C1
L
N
BUS DCF77/GPS
12345
678910
C1
C2
L
N
12345
678910
C1
L
N
IE1 IE1IE2
COLLEGAMENTI ELETTRICI
Esempio: utilizzare un
utensile a punta per premere
il pulsante di .RESET
FIG. 2 FIG. 3
DISPLAY
TASTI
FIG. 4
FIG. 5
FIG. 6
FIG. 1
solo modelli
settimanali
solo modelli
bi-canali
solo modelli
con ingresso
GPS o DCF77
230V~ 230V~
230V~ 230V~
59
IT
MENu

1 Descrizione dell’apparecchio
1-1 Caratteristiche funzionali
1-2 Caratteristiche tecniche
1-3 Display (Fig. 1)
1-4 Tasti funzionali
1-5 Funzioni combinazione tasti
1-6 Collegamenti
1-7 Prima accensione
2 Menu e programmazione
2-1 Menu - panoramica
2-2 Priorità forzature e programmi
2-3 Creare un nuovo programma
2-4 Verificare un programma
2-5 Modificare un programma
2-6 Cancellare un programma
(metodo veloce)
2-7 Copiare un programma
3 Programmi orologio e
impostazioni
3-1 Programma Standard
3-2 Programma Casuale
3-3 Programma Ciclico
3-4 Programma Ferie
3-6 Cancella
3-7 Manuale
3-8 Opzioni
3-8-1 Lingue
3-8-2 Data/Ora
3-8-3 Ingresso esterno
3-8-4 Manutenzione
3-8-5 Conta ore
3-8-6 Retroilluminazione
3-8-7 Garanzia
4 Dispositivo Memoria
Esterna (EMD)
i
i
- Leggere attentamente questo manuale prima di montare il prodotto e
metterlo in funzione.
- Questo apparecchio deve essere montato e collegato esclusivamente
da personale adeguatamente qualificato.
Sicurezza L’apparecchio contiene una batteria non rimovibile e non deve essere
smaltito come rifiuto urbano, essendo soggetto a raccolta separata per
evitare danni all’ambiente. Nel rispetto della Direttiva 2006/66 e delle leggi
nazionali di recepimento per lo smaltimento del prodotto a fine vita, il
mancato rispetto di quanto sopra è sanzionato dalla Legge.
3-5 Lista PRG (programmi)
Sommario
pag.60
pag.60
pag.61
pag.61
pag.62
pag.62
pag.62
pag.62
pag.63
pag.63
pag.63
pag.64
pag.65
pag.65
pag.65
pag.65
pag.66
pag.71
pag.66
pag.66
pag.66
pag.66
pag.67
pag.67
pag.67
pag.68
pag.68
pag.68
pag.70
pag.70
pag.71
pag.71
pag.71
1 Descrizione dell’apparecchio (secondo il modello)
l’interruttore digitale orario è un orologio di programmazione giornaliero o settimanale
con possibilità di inserire anche un periodo annuale, che consente la commutazione
automatica di diversi carichi (monocanale o bicanale) in base a una programmazione
temporale sufficientemente flessibile da prevederne o escluderne l’attivazione (ideale
utilizzo in edifici domestici, industriali, scuole, uffici, luoghi pubblici, ecc.), inoltre è
dotato di ingresso/i per l’attivazione da remoto e uno specifico Slot per l’nserimento
della chiave EMD (Dispositivo Memoria Esterna) è possibile salvare/copiare o leggere
uno o più programmi su diversi interruttori orari dello stesso modello tramite apposita
chiave di memoria. I modelli collegabili con ricevitori di segnale orario: tipo DCF77 o
GPS permettono una precisione della sincronizzazione oraria sempre ottimale.
1-1 Caratteristiche funzionali (secondo il modello)
• Modelli a programmazione giornaliera, settimanale, mensili/annuali
guidata da menù con lettura delle indicazioni sul display retroilluminato
• Modelli con una o due uscite di commando relè
• Pilotaggio intelligente dei relè che aumenta i valori di carico e la durata sia del relè,
che del carico collegato “zero crossing”
• Modelli con ingresso/i esterni abbinati alle uscita/e per impostazione manuale remota
• Modelli con chiave di memoria esterna per esecuzione e caricamento dei programmi
con possibilità di scaricare/caricare solo i programmi ferie
• Calendario: anno - mese - giorno - ora e minuti
• Menù multilingue: Italiano - Inglese - Tedesco - Francese - Spagnolo
- Portoghese – Svedese -Olandese - Russo - Polacco - Greco
• Tipi di programmi: Standard, Casuali, Ciclici,
• Totale 64 programmi liberamente impostabili
• Ferie: programmabili differenti periodi nel corso dell’anno
• Tempo minimo di programmazione ON/OFF di 1 secondo
• Cancellazione veloce programmi
• Accensione/spegnimento manuale permanente o temporaneo semplificato
• Impostazione data/ora con cambio ora legale solare automatico
• Funzione contaore per il monitoraggio delle ore di funzionamento del carico
• Programmazione della manutenzione dei carichi collegati
• Gestione garanzia del prodotto
• Blocco tastiera
• Display retroilluminato colore bianco
• Gestione della retroilluminazione del display:
• Pila ecologica al LITIO durata 6 anni
• Memoria permanente per il salvataggio dei programmi
• Meccanismo al quarzo di elevata precisione: ± 0.5 sec/giorno
Ferie
fisso ON / fisso OFF/
(non removibile)
≤
• Modelli collegabili con ricevitori di segnale orario: tipo DCF77 o GPS.
Nota: per tutti gli articoli e possibile l’installazione a retroquadro
con accessori opzionali
Spegnimento temporizzato
60
IT

1-2 Caratteristiche tecniche
Tensione alimentazione 230 V c.a. +/- 10%
Frequenza 50-60 Hz
Grado di protezione IP20
Tipo di uscita Relè a contatto in scambio libero da
potenziale;
contatto N.O. = 16(10)A / 250V~ (a
corrente limitata con Resistenza per
Zero Crossing di elevato valore);
contatto N.C. = 16(2)A / 250V~
Temperatura funzionamento da 0 °C a +50 °C
Temperatura stoccaggio da -10 °C a +65 °C
Assorbimento/Autoconsumo 6.5 VA monocanale / 7.8 VA bicanale
Sezione dei cavi ai morsetti 1...6mm²
Normativa marcata CE LVD/EMC EN60730-2-7
Lingue disponibili nell’apparecchio
Italiano, Inglese, Tedesco, Francese,
Spagnolo, Svedese, Portoghese,
Olandese, Russo, Polacco, Greco
Riserva di carica in caso di
mancanza rete 6 anni dalla prima accensione, garantita
da pila al litio
Tensione impulsiva nominale 4kV
Precisione di funzionamento
3000W 3000W 1100W 900W
(125 μF)
7W ÷ 23W
(max. 23 lamp.)
Canale 1/Canale 2 OFF/ Canale disattivato
Forzatura manuale del
canale
ON / Canale attivo
Programmi casuali Programmi ciclici
Icona Ferie Blocco tastiera
Indicazione ricezione
segnale GPS o DCF77
Navigazione in su
N. programma selezionato
(P01 ÷ P64) Navigazione in giù
La barra rigata del display mostra inoltre:
Stato di avanzamento, vedere Fig. 2 a pag. 59•
Visualizzazione delle ore, vedere Fig. 3 a pag. 59.•
Il display mostra in maniera alternata (per alcuni secondi) la Data/Ora ed i
programmi o forzature impostate.
i
i
Installazione
barra DIN - a retroquadro (con KIT in opzione)
Software classe A
Tipo di isolamento classe II
Grado di inquinamento normale
Ora legale (estiva) Ora solare (invernale)
1-3 Display (vedere Fig. 1 a pag. 59)
+/ 0,5 sec/gg a 25 °C
61
IT
(es. cancellazione vedere cap.3-6).
Potenza massima pilotabile

Permette di entrare nel menu principale (da schermata iniziale).•
Permette di uscire da qualsiasi impostazione.•
Permette di scorrere un elenco in alto.•
Incrementa un valore numerico o cambia un parametro.•
Tenuto premuto permette la visualizzazione fissa dello stato del•
canale 1 fino al rilascio del tasto (in normale funzionamento).
Permette di scorrere un elenco in basso.•
Decrementa un valore numerico o cambia un parametro.•
Tenuto premuto permette la visualizzazione fissa dello stato del•
canale 2 (modelli bicanali) fino al rilascio del tasto (in normale
funzionamento).
Conferma l’impostazione proposta.•
Esegue un reset dell’apparecchio•
Funzione Premere la combinazione tasti
Bloccare / sbloccare tasti ( ).
+
2 sec.
Forzatura manuale canaletemporanea
1 e 2 (vedere anche cap. 3-7).
Alternando la pressione si passa da
TEMP ON a TEMP OFF.
Nota: il Reset reinizializza l’interruttore orario e viene usato all’atto della prima
programmazione, o se dovessero manifestarsi delle visualizzazioni anomale o dei
malfunzionamenti. Premendo il pulsante di Reset con un oggetto a punta, l’interruttore
orario effettua un lamp-test, accendendo tutti i segmenti del display e visualizzando
successivamente la schermata relativa alla scelta della lingua. Con l’operazione di
Reset si perdono: il blocco tastiera, le impostazioni di data e ora attuali, che vanno
inserite nuovamente. In caso contrario l’interruttore orario non esegue i programmi.
Vengono mantenuti i programmi impostati, abilitazione/disattivazione ingresso
esterno e i dati relativi a: manutenzione, conta ore, garanzia.
1-4 Tasti funzionali
1-5 Funzioni combinazione tasti
(NOTA: i programmi e impostazioni ingresso esterno non vengono cancellati)
Funzione
Forzatura manuale canalepermanente
1 e 2 (vedere anche cap. 3-7).
Premendo per 2 sec. si accede a PERM
alternando la pressione (breve) si
passa da PERM ON a PERM OFF.
2 sec. 2 sec.
Torna in modalità AUTO (in caso è
stata attivata una qualsiasi forzatura
manuale).
Per una delle funzioni sotto descritte si deve essere sullaeseguire direttamente schermata principale.
Collegamento modelli monocanali e bicanali
Vedere schema Fig. 5 a pag. 59
•
Collegamento modelli con ingresso per DCF77 o GPS
Modelli sincronizzabili monocanali o bicanali settimanalicon GPS o Antenna DCF77
Vedere schema Fig. 6 a pag. 59
•
L’apparecchio viene fornito privodi impostazioni.
Premere1.
RESET con un oggetto a punta per sbloccare l’apparecchio
Impostare i seguenti dati:2. Lingue
•(vedere cap. 3-8-1).
Data/Ora•(Anno, Mese, Giorno, Ora, Zona orario - vedere cap. 3-8-2).
i
1-6 Collegamenti (disattivare sempre la tensione si rete 230V~)
Distanza massima dei cavi per il collegamento interruttore o pulsante
1-7 Prima accensione
Premere la combinazione tasti
In caso di mancanza dell’energia elettrica (es. “blackout”), la DATA/ORA resta
memorizzata, inoltre l’interruttore digitale:
disabilità il/i relè,•
i
disattiva la retroilluminazione, se attiva,• visualizza data e ora lampeggianti per 2 minuti, per poi passare in modalità• stand-by (display spento) mantenendo in memoria tutti i dati programmati,
sino al ripristino della tensione di rete o tramite la pressione prolungata
per 1 sec. di un tasto che fa ripartire il conteggio per la modalità stand-by.
all’ingresso esterno (I.E.) dell’orologio: 100 m (Fig. 5 a pag. 59).
62
MENU Ok Reset
IT
MENU
2 sec. 2 sec.

.
n. prg libero
canale (solo bicanali)
giorno (solo settimanali)
ora on/off
fine/annuale
n. prg libero
Canale (solo bicanali)
Giorno (solo settimanali)
ora on/off
fine/annuale
n. prg libero
canale (solo bicanali)
Giorno (solo settimanali)
ora on/off
Tempo on/off
fine/annuale
n. prg libero
canale (solo bicanali)
ora off
giorno/mese off
ora on
giorno/mese on
verifica
modifica
cancella
singolo prg
tutti i prg
ferie
canale (solo bicanali)
auto
perm off
perm on
Temp On
temp off
lingua
dATA/ORA
INGRESSO-ESTERNO*
MANUTENZIONE
CONtaore
retroilluminazione
garanzia
* Esclusi i modelli sincronizzabili con DCF77 o GPS
34
12
5 6 7 8
Premere il tasto1. MENU.
Compare il primo menu selezionabile (P Standard)»
Scorrere i vari menu tramite i tasti2. .
Confermare il menu desiderato con3. OK.
assegnata una priorità, come da
rappresentazione a fianco.
Tenere conto delle priorità quando
vengono programmati diversi tipi di
programmi per lo stesso periodo di
P01:Programma Standard
ON 19:00 - OFF 22:00
P02:Programma Standard
ON 00:00 - OFF 06:00
P03:Programma Casuale
ON 20:00 - OFF 00:00
P04:Programma Ciclico
ON 19:00 - OFF 22:00
P05:Programma Ciclico
ON 02:00 - OFF 06:00
P06:Programma Casuale
ON 04:00 - OFF 06:00
i
i
Tutti i programmi inseriti da
a risultano
contemporaneamente attivi.
Il/i relè di uscita saranno
attivati secondo le priorità
stabilite.
P01 P06
2 Menu e programmazione
2-1 Menu - panoramica
2-2 Priorità forzature e programmi
PRIORITÀ MASSIMA
I menu elencati da 1 a 8 sono nella sequenza presente nell’apparecchio:
tempo.
Forzatura manuale
Ingresso esterno
Memoria esterna EMD
Programma “Ferie”
Programma
CiclicoCasuale/
Programma “Standard”
Ad ogni tipo di programma viene
Procedura per selezionare il menu desiderato:
63
IT
Esempio:
1900 2000 2200 000 200 400 600 800
1800
STD STD
STD
P01 P02
P03
P04 P05
P06
1900 2000 2200 000 200 400 600 800
1800
1900 2000 2200 000 200 400 600 800
1800
1900 2000 2200 000 200 400 600 800
1800
1900 2000 2200 000 200 400 600 80
1800 0

Procedura v
descritte nei singoli programmi.
Premere il tasto1. MENU.
Selezionare il tipo di programma tramite i tasti2. .
Confermare la scelta con3. OK.
Compare il numero di programmi liberi per 3 sec.»
Compare primo programma in memoria.»
Premere per 2 sec. il tasto4. .
Il display mostra il primo programma vuoto.»
Confermare con5. OK.
Il numero del programma è selezionato.»
Segue l’impostazione del canale.»
c1 c2
P02
Impostare il canale (bicanali) tramite i tasti1. .
C1/C2 o entrambi lampeggiano.»
Confermare con2. OK.
Il canale è impostato.»
Segue l’impostazione del giorno.»
i
P02
alida per tutti i tipi di programmi. Ulteriori impostazioni vengono
P02
P02
Impostare orario di inizio programma tramite i tasti1.
nel formato .hh/mm
Singola pressione dei tasti sposta il campo minuti.
Pressione prolungata dei tasti sposta il campo ore.
Confermare con2. OK.
Compare il campo dei secondi.»
Impostare i secondi tramite i tasti3. .
Confermare con4. OK.
L’orario inizio programma è stato impostato»
Segue l’impostazione di ORA/OFF.»
P02
P02
Impostare orario di fine programma tramite i tasti
1. .
Ripetere le operazioni come per ORA/ON.
Confermare con2. OK.
L’orario di fine programma è stato impostato.»
Confermare fine programma con3. OK.
i
i
Impostare giorno (solo modelli settimanali)
Selezione del giorno o di un gruppo di giorni in cui il programma deve essere
eseguito.
P02
Impostare il giorno o il gruppo di giorni tramite1.
i tasti .
La freccia lampeggiante indica il giorno o gruppo»
di giorni selezionato.
Confermare con2. OK.
Segue l’impostazione ORA/ON.»
1 2 3 4 5 6 7
(solo per modelli settimanali)
solo per modelli settimanali: se si sceglie un gruppo di giorni (es. sabato e
domenica) e un intervallo di tempo che si estende oltre la mezzanotte (es. ora
ON=23:30, ora OFF=2:00), il programma viene eseguito 2 volte, ma alla seconda
esecuzione termina di lunedì. In questo caso l’icona relativa al lunedì lampeggia come
avviso. Lo stesso principio vale per i programmi con durata superiore a un giorno.
4. Inserire nuovo programma oppure uscire
premendo più volte il tasto MENU
Solo modelli settimanali: impostare l’ora di OFF scorrendo l’orario in avanti rispetto
all’ora di ON. Se si scorre all’indietro si seleziona l’intera settimana
Nota: se il valore immesso nel campo secondi ON e secondi OFF è uguale a zero, il
campo secondi non viene mostrato nel riepilogo dati.
Inoltre, un programma deve avere una durata minima di un secondo, per cui l’ora di OFF
non può coincidere con quella di ON (altrimenti il programma non viene accettato).
Realizzazione di un programma con durata di alcuni giorni
(solo mod. settimanale) È possibile estendere la durata di un programma a più giorni
(es. inizia lunedì alle ore 12:00 e termina mercoledì alle ore
14:00); è sufficiente far scorrere le ore oltre le 24 quando si
imposta “Ora OFF”. L’avvenuto superamento è segnalato
dall’accensione lampeggiante dell’icona del giorno
successivo a quello di inizio programma. A ogni passaggio
dalle ore 24 il programma verrà ulteriormente esteso al
giorno successivo.
2-3 Creare un nuovo programma
Selezione del tipo di programma (esempio con P Standard):
Scegliere il canale (solo modelli bi-canale)
Impostare ORA/ON
Impostare ORA/OFF
(solo per modelli bicanali)
64
IT
P02
P05
12
1 2 3 4 5 6 7

Selezionare dal menu il tipo di programma (es. P1.
Casuale) tramite i tasti .
Confermare con2. OK.
Vengono visualizzati i programmi dello stesso tipo»
in memoria.
Selezionare il programma da verificare tramite i tasti
3. .
Il display mostra ciclicamente le impostazioni.»
2-6 Cancellare un programma (metodo veloce)
c1
Selezionare dal menu il tipo di programma da1.
cancellare tramite i tasti .
Esempio: P casuale»
Premere contemporaneamente i tasti2. per 2 sec.
Il display mostra “CANCELLA”.»
Confermare con3. OK.
Il display mostra “VUOTO”.»
Il programma è cancellato.
Selezionare dal menu il tipo di programma da copiare1.
(es. P Casuale) tramite i tasti .
Il numero del programma lampeggia.»
Premere per ca. 3 sec. il tasto2. OK.
Il programma viene copiato nella prima posizione»
libera della memoria.
Viene visualizzato il primo dato modificabile
»
(es. canale) lampeggiante.
Modificare i dati (a seconda del modello)3.
Non possono coesistere2 programmi con gli stessidati!
i
impostare PERIODO ANNUALE
Permette di impostare un periodo annuale definito, nel quale il programma impostato
precedentemente deve essere eseguito.
Il periodo definito nel programma annuale viene ripetuto ciclicamente ogni anno.
P02
Impostare inizio e fine periodo nel formato1. gg/mm/--
tramite i tasti .
Confermare ogni campo con2. OK.
Il periodo annuale è impostato.»
i
3. Inserire nuovo programma oppure uscire
premendo più volte il tasto MENU
Nota: sarà possibile impostare il P ANNUALE a cavallo di fine anno es. Mese ON
OTTOBRE e Mese OFF MARZO (il programma avrà una durata totale di 5 mesi dove
il mese OFF apparterrà all’anno successivo, e così ciclicamente).
come descritto nel cap. 2-3.
Nota: MENUse non si effettuano modifiche entro 10 minuti, oppure si preme più volte ,
il dispositivo ritorna alla visualizzazione iniziale e perde il nuovo programma duplicato.
2-4 Verificare un programma
2-5 Modificare un programma
1. Confermare il programma da modificare con
2. Impostare i nuovi valori come descritto nel cap. 2-3
.OK
2-7 Copiare un programma
Si accede ai menu dei programmi desiderati (P standard, P ciclico...)
con il tasto .MENU
65
IT
P02
C1
C1
C1
P04
3P0
C1
3P0
3
P0
3
P0
3
P0

Per la programmazione vedere cap. 2-3.
800 12 00
ON
OFF
Esempio impostazione da immagine:
ProgrammaStandardON ora 8:00,OFF ora 12:00.
Per la programmazione vedere cap. 2-3.
800 12 00
ON
OFF
Esempio impostazione da immagine:
Programma Casuale ON ora 8:00, OFF ora 12:00.
i
i
Permette l’accensione (ON) e lo spegnimento (OFF) di un carico in un periodo definito
Permette l’accensione (ON) e lo spegnimento (OFF) di un carico in modo casuale
entro un periodo definito
Quando il programma casuale è attivo il simbolo
è visualizzato nella schermata principale in modo intermittente.
3-1 Programma Standard
3-2 Programma Casuale
Premere il tasto
1. MENU per accedere ai menu disponibili.
Scorrere i menu tramite i tasti2. e confermare con .OK
3 Programmi orologio e impostazioni 3-3 Programma Ciclico
Il tempo ON e il tempo OFF possono variare da 1 sec. fno a 23:59:59 ore
c1
P01
c1
P01
Per la programmazione vedere cap. 2-3.
In aggiunta impostare l’ora di1. TEMPO ON e TEMPO
OFF tramite i tasti .
800 12 00
ON
OFF
TEMPO ON
TEMPO OFF
Esempio impostazione:
Programma Ciclico ON ora 8:00, OFF ora 12:00;
Temporizzazione TEMPO ON 10mine TEMPO OFF 15min.
I programmi ferie permettono di impostare differenti periodi nel corso dell’anno
di sospensione dei programmi on/off abbinati al canale 1 e o 2 (mod. Bicanali), ad
Selezionare il P Ferie come descritto al cap. 2-3.1.
Impostare l’ora d’ sospensione (OFF) tramiteinizio2.
i tasti .
Confermare con3. OK.
Impostare la data di sospensione tramite i tastiinizio4.
in formato , confermando congg/mm/-- OK
Impostare l’ora e la data di sospensione (ON)fine5. come nell’operazione da 2 a 4.
i
i
Quando il programma casuale è attivo il simbolo
è visualizzato nella schermata principale in modo intermittente.
Permette l’accensione e lo spegnimento di un carico in modo ciclico
(tempo ON/OFF) entro un periodo definito
Durante il periodo di ferie impostato, sulla schermata di lavoro compare la sigla del
canale interessato, la scritta FERIE e il simbolo .
Le uscite (C1 e/o C2) sono in stato di OFF.
Per eliminare il periodo di sospensione usare l’apposita funzione nel menu CANCELLA
(vedere par. 3.6).
3-4 Programma Ferie
esempio per chiusura estiva e natalizia di un ufficio pubblico o commerciale.
ogni campo a disposizione.
66
IT
o f f 0 2 : 0 0
30/07/--
C1
P06
on 06:00
31/08/--
C1
P06
3
C1
P0
C1
P02

Questo menu permette di visualizzare, modificare o cancellare qualsiasi
Scorrere fino a “LISTA PRG” tramite i tasti1. .
Confermare con2. OK.
Compare il numero di programmi liberi.»
Viene visualizzato il primo programma in memoria.»
Selezionare il programma desiderato tramite i tasti
3. .
Per sapere come verificare, modificare o cancellare
i dati, vedere dal cap.2-4al cap.2-6.
Questo menupermette diversi tipi di cancellazione.
Scorrere fino a1. Cancella tramite i tasti .
Confermare con2. OK.
Si accede al tipo di cancellazione nel sottomenu»
(vedere tabella seguente).
Selezionare tipo di cancellazione tramite i tasti .
»
Confermare una cancellazione con3. OK.
Con il tasto si annulla la cancellazione.MENU
Sottomenu Funzione
sing prg Cancella singoli programmi selezionati
tutti prg Cancella tutti i programmi
Tutti i programmi in memoria verranno cancellati!
p ferie Cancella tutti i programmi ferie
i
i
Permette di forzare manualmente lo stato delle uscite indipendentemente dal
programma attivo. Impostazioni possibili:
Modo
forzatura Simbolo
display Canale-
Condizione Funzione forzatura
auto c1
c2
Nessuna forzatura sul canale, gestione
da programma.
Perm c1 On
c2 On
Canale permanente attivato.
PERM c1 OFF
c2 OFF
Canale permanente disattivato.
TEMP c1 On
c2 On
Canale attivato fino ad un prossimo
intervento programma.
TEMP c1 OFF
c2 OFF
Canale disattivato fino ad un prossimo
intervento programma.
attivare una forzatura
c2 Perm
Selezionare sottomenu “MANUALE” tramite i tasti1. .
Confermare con2. OK.
Premere combinazione tasti (vedi cap.1-5) per la3.
scelta del canale (solo modelli bi-canali).
Il display mostra informazioni sul canale o canali»
(vedi tabella sopra).
Impostare tipo forzatura tramite i tasti4. .
Confermare la scelta con5. OK.
Il display mostra il tipo di forzatura sul canale.»
Disattivare una forzatura (dalla schermata principale)
Premere combinazione tasti del canale da disattivare (vedi cap.1-5) per1. ca. 2 sec.
3-7 Manuale
Per disattivare tramite il menu è sufficiente impostare la modalità “AUTO”
(come già descritto sopra)
i
3-5 Lista PRG (programmi)
3-6 Cancella
programma in memoria.
67
IT
C
C 2
C
C1
P03
Attivare una forzatura (dalla schermata principale)
Premere combinazione tasti del canale da attivare (vedere modalità al cap.1-5)1.
oppure è possibile dalla , attivare/disattivare una forzaturaschermata principale
Confermare la scelta con OK, si torna alla schermata principale.

Permette di impostare o modificare in qualsiasi momento vari parametri dell’orologio.
Selezionare tramite i tasti1. “OPZIONI”.
Confermare con2. OK.
Seguono i sottomenu.»
3-8-1 Lingue
Permette di impostare la lingua interfaccia desiderata.
Selezionare il sottomenu “LANGUAGE” tramite1.
i tasti .
Confermare con2. OK.
Selezionare la lingua desiderata tramite i tasti3. .
Confermare con4. OK.
3-8-2 Data/Ora (attuali)
Permette di impostare la data e l’ora attuali dell’apparecchio;
In caso di reset la data deve essere nuovamente impostata.
Selezionare “DATA/ORA”1. itramite tasti .
Confermare con2. OK.
Impostare ANNO, MESE, GIORNO, ORA, MINUTI3.
rispettivamente tramite i tasti .
Singola pressione tasti sposta il campo minuti.
Pressione prolungata tasti sposta il campo ore.
Confermare con4. OK.
Data e ora sono impostati.»
Segue l’impostazione “CAMBIO H”.»
i
i
Cambio ora ( invernale) / ( estiva)Solare Legale
Selezionare il tipo di commutazione tramite i tasti1. .
Confermare con2. OK.
Impostare valori (vedi tabella) tramite i tasti3. .
Ad ogni scelta confermare con4.
Possibili selezioni sul
display
Commutazione estiva
+1h ( ora legale)
Commutazione invernale
-1h ( ora solare)
Nessuno Nessuna Nessuna
EUROPA Ultima domenica del
mese di marzo
Ultima domenica del
mese di ottobre
USA Seconda domenica del
mese di marzo
Prima domenica del mese
di novembre
libera Settimana/giorno (dom.)
liberamente programmati
Settimana/giorno (dom.)
liberamente programmati
fissa Data fissa liberamente
programmata (es. 28/02)
Data fissa liberamente
programmata (es. 29/10)
Time Zone GPS (solo modelli con ingresso GPS o DCF77)
Dopo l’impostazione DATA/ORA (vedere cap.3-8-2).
Selezionare “GPS” tramite i tasti1. .
Confermare con2. OK.
Selezionare tipo di Cambio H (vedi tabella precedente)3.
Impostare il numero ore di T ZONE tramite i tasti4. .
Confermare con5. OK.
Il cambio ora è stato impostato.»
Si torna alla schermata principale.»
i
il tipo di cambio ora Legale/Solare;
impostazioni GPS o DCF77 (solo per modelli predisposti).
(impostazione di fabbrica)
OK.
Impostare correzione del fuso orario (TZONE)
:
- aggiungere se ci si trova a est di Greenwich
- sottrarre
rispetto alla posizione di Greenwich
se ci si trova a ovest di Greenwich
(es. Italia, TZONE +1).
Parametro modificabile -12 ÷ +12
3-8 Opzioni
EUROPA
oppure l’impostazione GPS o DCF77
(solo per modelli predisposti).
68
IT
I t a l i a n o

Selezionare “DCF77” tramite i tasti1. .
Confermare con2. OK.
Time Zone DCF77 (solo modelli con ingresso GPS e DCF77)
Il ricevitore a differenza del GPS trasmette l’ora con la correzione legale/solare.
0
Impostare il numero ore di TZONE tramite i tasti
3.
.
Confermare con4. OK.
Il cambio ora è stato impostato.»
Si torna alla schermata principale.»
Parametro modificabile -3 ÷ +3
Impostare correzione del fuso orario (TZONE) rispetto alla posizione di Francoforte:
- aggiungere se ci si trova a est di Francoforte
- sottrarre se ci si trova a ovest di Francoforte
(es. Italia, TZONE +0).
MODO DI FUNZIONAMENTO CON RICEVITORE GPS o DCF 77
Se al prodotto viene collegato un ricevitore GPS o DCF 77 per la sincronizzazione
dell’orario, sul display (terminate le operazioni di programmazione) appare il
simbolo di funzionamento, con le seguenti segnalazioni:
LAMPEGGIANTE = in attesa di sincronizzazione;
FISSO = sincronizzazione presente
ASSENTE = mancanza del segnale o ricevitore scollegato
Differenza rispetto al
fuso di Francoforte
Differenza rispetto al
fuso di Greenwich
0 h
+1 h
+1 h+2 h
+2 h
+3 h
-1 h
0 h
-2 h-1 h
nessuna sincronizzazione (superate le 24h di attesa)
Tabella di esempio differenze di fuso orario
Dopo l’impostazione DATA/ORA (vedi cap.3-8-2).
i
69
IT

3-8-3 Ingresso esterno
Permette di eseguire funzioni di forzature manuali di ON e OFF da remoto, (vedi
ad esempio Cap. 3.7), per mezzo di pulsanti o interruttori (collegati all’orologio).
Funzione non disponibile per i modelli con ingresso GPS o DCF77
(la voce “EXT INPUT” non è disponibile nel menu “OPZIONI”).
Selezionare il sottomenu “EXT INPUT” tramite i tasti
1. .
Confermare con2. OK.
Selezionare tipo di commutazione (vedi tabella5. successiva) tramite i tasti .
Confermare con6. OK.
Per disattivare l’impostazione fatta, ripetere l’azione da 1 a 4.
Confermare selezione “DISATTIVA” con .OK•
Selezione
display
Canale
C1 C2o
(bicanale)
Simbolo Funzione Comando
esterno
Perm On
off
interruttore
canale su ON o OFF.
temp Forzatura temporanea del
canale fino alla successiva
commutazione di un pro-
gramma precedentemente
impostato.
i
i
timer on
off Forzatura di un canale
temporizzata (es. controllo
luce scale).
*Tempo impostabile in
formato hh:mm:ss.
OK per passare al canale successivo (solo bicanale)
pulsante
pulsante
Nota: la chiusura del contatto dell’ingresso esterno, viene rilevato in maniera
immediata dall’orologio, mentre l’apertura può impiegare max 1 sec.
Selezionare il canale tramite i tasti3. (mod. bicanali).
.
Confermare con4. OK.
3-8-4 Manutenzione
Permette di impostare per il canale C1 e/o C2 (mod. bicanale) un periodo di
funzionamento in ON. Trascorso il periodo, l’orologio segnala la necessità di un
intervento con scritta “C1 MANUT” o “C2 MANUT”, alternandosi con la data attuale.
Selezionare il sottomenu “MANUTENZ” tramite i tasti
1. .
C1 lampeggia.»
Selezionare il canale tramite i tasti2. (mod. bicanali).
Confermare con3. OK.
Impostare il numero ore tramite i tasti4. .
Premere
5.
Per modificare o reimpostare i valori, seguire istruzioni
annullare l’avviso di manutenzione
i
i
Nota: quando si modifica l’intervallo di manutenzione si perde l’eventuale conteggio
parziale già trascorso.
Una volta scaduto il conteggio, sulla schermata di lavoro principale appare la scritta
lampeggiante MANUT e l’indicazione del canale interessato.
Eseguito l’intervento di manutenzione, si può eliminare l’avviso premendo il tasto
e mantenerlo premuto per circa 2 secondi durante l’avviso riferito al canale
interessato.
OK
Attenzione: quando si elimina la scritta MANUT il contatore viene riavviato
automaticamente e il conteggio riparte.
Per non utilizzare la funzione MANUTENZIONE impostare il
contatore a zero per il canale e/o canali.
Tale informazione può essere usata per effettuare interventi di manutenzione a
cadenza di tempo prestabilita sul dispositivo connesso all’uscita.
Mantenete premuto il tasto freccia per
incrementare/decrementare in modo veloce le
decine, centinaia ecc.
Singoli impulsi si avanza di una unità alla volta.
da 1 a 5.
i
c1
oppure premere per uscire.MENU
*Impostare il tempo come da procedura precedente, inserimento ora On e Off.
70
Forzatura permanente del
IT

3-8-6 Retroilluminazione
Permette di impostare il tempo di retroilluminazione display.
Selezionare il sottomenu BACKLIGHT tramite i tasti
1. .
Confermare con2. OK.
Selezionare tramite i tasti3. tra: FISSO ON, FISSO
OFF o TEMP 6SEC.
3-8-7 Garanzia
Permette di visualizzare in giorni il tempo trascorso dalla messa in servizio dell’orologio.
Selezionare il sottomenu “GARANZIA” tramite i tasti1. .
Confermare con2. OK.
Il display mostra il tempo, come descritto sopra.»
Conteggio non azzerabile.
i
Il dispositivo EMD è una scheda di memoria esterna, in grado di gestire 64 programmi
compresi i programmi ferie.
La memoria EMD è la chiave di programmazione.
Inserire la memoria EMD.1.
Il display mostra il menu di gestione memoria.»
Selezionare il sottomenu desiderato (vedere tabella sotto)2.
tramite i tasti .
Confermare ogni scelta con3. OK.
Sottomenu Funzione Note
ESEGUE Esegue programmi
direttamente da EMD I programmi vengono eseguiti
solo da EMD
Salva tutta la memoria orologio
su EMD Sovrascrive tutti i programmi
già presenti su EMD
Copia tutto il contenuto da
EMD sulla memoria orologio Sovrascrive tutti i programmi
presenti sull’orologio
LEGGE Legge i programmi da EMD Visualizza solo i programmi
presenti su EMD
Copia i programmi Ferie
dall’orologio all’EMD Sovrascrive tutti i programmi
Ferie presenti su EMD
Copia i programmi Ferie
dall’EMD all’orologio Sovrascrive tutti i programmi
Ferie presenti sull’orologio
CANCELLA Cancella i programmi presenti
sull’EMD Cancella definitivamente tutta
la memoria EMD
Premere il tasto1. MENU per uscire.
Confermare la scelta “ANNULLARE” con2. OK.
La memoria EMD viene esclusa dall’orologio.»
La memoria EMD non viene più riconosciuta.»
Ritirare l’EMD.3.
i
Attenzione: la chiave di memoria può essere utilizzata per condividere i dati, solo nei
dispositivi dello stesso modello, in caso contrario il display mostrerà messaggi di errore.
Confermare con3. OK per uscire dall’impostazione.
4 Dispositivo Memoria Esterna (EMD)
Confermare con4. OK ed uscire dall’impostazione.
3-8-5 Conta ore
Selezionare il sottomenu “CONTA ORE” tramite1.
i tasti .
Confermare con2. OK.
Selezionare il canale (solo mod. bicanali) tramite i tasti .
3.
Il display mostra le ore di funzionamento.»
Premere i tasti + per azzerare.
Confermare con4. OK ed uscire dall’impostazione.
i
Tramite questa funzione l’interruttore orario conteggia il tempo complessivo in
cui l’uscita rimane attiva (ON). La sua funzione è quella di monitorare la vita del
dispositivo connesso al canale e/o canali (mod. bicanali).
c2
71
IT
Il costruttore si riserva la facoltà di introdurre tutte le modifiche tecniche e costruttive che riterrà necessarie senza obblighi di preavviso.
nota: disponibile in opzione un apposito software e adattatore USB per
programmare da PC con maggior facilità la/e chiavette di memoria EMD

SMALTIMENTO DI VECCHI APPARECCHI ELETTRICI ED ELETTRONICI (direttiva europea 2002/96/CE)
Questo simbolo sul prodotto o sul suo imballo indica che questo prodotto non può essere trattato come rifiuto domestico. Al contrario, dovrà essere portato ad un punto di raccolta determinato per il
riciclaggio degli apparecchi elettrici ed elettronici, come ad esempio: - punti vendita, nel caso si acquisti un prodotto nuovo simile a quello da smaltire - punti di raccolta locali (centri di raccolta rifiuti,
centri locali di riciclaggio, ecc...). AssicurandoVi che il prodotto sia smaltito correttamente, aiuterete a prevenire potenziali conseguenze negative per l'ambiente e la salute, che potrebbero essere
causate da un inadeguato smaltimento di questo prodotto .Il riciclaggio dei materiali aiuterà a conservare le risorse naturali. Per informazioni più dettagliate riguardo il riciclaggio di questo prodotto,
contattate per cortesia il Vs. ufficio locale, il Vs. servizio di smaltimento rifiuti domestici o il negozio dove avete acquistato questo prodotto. Attenzione: in alcuni paesi dell’Unione il prodotto non
ricade nel campo di applicazione della legge nazionale di recepimento della direttiva europea 2002/96/CE, e quindi non è in essi vigente alcun obbligo di raccolta differenziata a “fine vita”.
ENTSORGUNG VON GEBRAUCHTEN ELEKTRISCHER UND ELEKTRONISCHER GERÄTEN (EU-Richtlinie 2002/96/EG)
Dieses Symbol auf dem Produkt oder seiner Verpackung weist darauf hin, dass dieses Produkt nicht als normaler Haushaltsabfall zu behandeln ist, sondern an einer Annahmestelle für dal Recycling
von elektrischen oder elektronischen Geräten abgegeben werden muss, wie zum Beispiel: - an den Verkaufsstellen, falls Sie ein ähnliches Neugerät kaufen.- an den örtlichen öffentlichen
Sammelstellen (Wartstoffhof, Recyclingsammelstellen, usw...). Durch Ihren Beitrag zum korrekten Entsorgen dieses Produktes schützen Sie die Umwelt und die Gesundheit Ihren Mitmenschen.
Umwelt werden durch falsches Entsorgen gefährdet. Materialrecycling hilft den Verbrauch von Rohstoffen zu verringern. Weitere Information über das Recycling dieses Produktes
erhalten Sie von Ihrem Gemeinde, den kommunalen Entsorgungsbetrieben oder dem Geschäft, in dem Sie das Produkt gekauft haben.
und Gesundheit
Achtung: in einigen EU-Mitgliedsstaaten fällt das Produkt nicht
unter den Anwendungsbereich des nationalen Gesetzes zur Umsetzung der europäischen Richtlinie 2002/96/EG. Dort besteht keinerlei Verpflichtung zur getrennten Sammlung von Elektro- und
Elektronik-Altgeräten.
TRATAMIENTO DE LOS APARATOS ELÉCTRICOS Y ELECTRÓNICOS EN FINAL DE VIDA (directiva EU 2002/96/CE)
Este símbolo, colocado en el producto o en su embalaje, indica que no debe no debe ser tratado con los desechos domésticos. Debe depositarse en un punto de recogida apropiado para el reciclaje
de los equipos eléctricos y electrónicos: - en los puntos de distribución en caso de compra de un equipo equivalente. - en los puntos de recogida puestos a su disposición localmente (vertedero,
colecta selectiva, etc...).Asegurándose que ese producto se desecha de manera apropriada, ayudará a prevenir las potentiales consecuencias negativas sobre el medio ambiente y la salud humana.
El reciclaje de los materiales ayudará a conservar los recursos naturales. Para cualquier información complementaria al respecto de este producto, puede contactar con su ayuntamiento, el vertedero
de su localidad, o el almacén dónde se compró el producto. Atención: en algunos países de la Unión Europea, el producto no entra en el ámbito de aplicación de la ley nacional que acoge la directiva
europea 2002/96/CE; por lo tanto, en tales países no rige ninguna obligación de recogida diferenciada al terminar la vida útil del producto.
TRAITEMENT DES APPAREILS ÉLECTRIQUES ET ÉLECTRONIQUES EN FIN DE VIE (directive EU 2002/96/CE)
Ce symbole, apposé sur le produit ou sur son emballage, indique que ce produit ne doit pas être traité avec les déchets ménagers.
It doit être remis à un point de collecte approprié pour le recyclage des équipements électriques et électroniques: - dans le points de distribution en cas d’achat d’un équipement équivalent. - dans le
points de collecte mis à votre disposition localement (déchetterie, collecte sélective, etc...). En s’assurant que ce produit est bien mis au rebut de manière appropriée, vous aiderez à prévenir les
conséquences négatives potentielles pour l’environnement et la santé humaine. Le recyclage des matériaux aidera à conserver les ressources naturelles. Pour toute informations supplémentaire au
sujet du recyclage de ce produit, vous pouvez contacter votre municipalité, votre déchetterie ou le magasin où vous avez acheté le produit. Attention: dans certains pays de l’Union, tous les produits
ne relèvent pas du champ d’application de la loi nationale de recyclage relative à la directive europenne 2002/96/CE et ne font pas partie des produits à récupérer en fin de vie.
DISPOSAL OF OLD ELECTRICAL & ELECTRONIC EQUIPMENT (EU directive 2002/96/EC)
This symbol on the product or its packaging to indicates that this product shall not be treated as household waste. Instead, it shall be handed over to the applicable collection point for the recycling of
electrical and electronic equipment, such as for example: - sales points, in case you buy a new and similar produc. - local collection points (waste collection centre, local recycling center, etc...).
By ensuring this product is disposed of correctly, you will help prevent potential negative consequence for the environment and human health, which could otherwise be caused by inappropriate waste
handing of this product. The recycling of materials will help to conserve natural resources. For more detailed information about recycling of this product, please contact your local city office, your
house hold waste disposal service or the shop where you purchased the product. Attention: in some countries of the European Union, the product is not included in the field of application of the
National Law that applies the European Directive 2002/96/EC and therefore these countries have no obligation to carry out a separate collection at the “end of life” of the product.
DE
EN
FR
ES
IT
-
 1
1
-
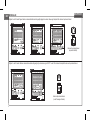 2
2
-
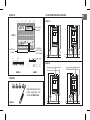 3
3
-
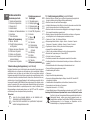 4
4
-
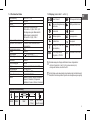 5
5
-
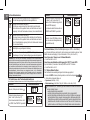 6
6
-
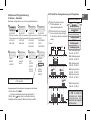 7
7
-
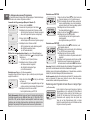 8
8
-
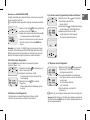 9
9
-
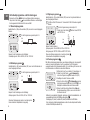 10
10
-
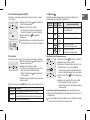 11
11
-
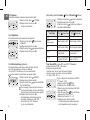 12
12
-
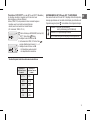 13
13
-
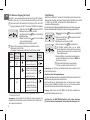 14
14
-
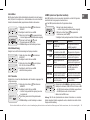 15
15
-
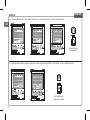 16
16
-
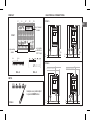 17
17
-
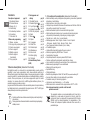 18
18
-
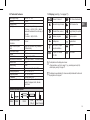 19
19
-
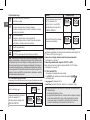 20
20
-
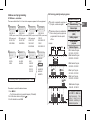 21
21
-
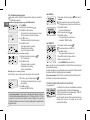 22
22
-
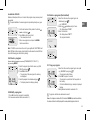 23
23
-
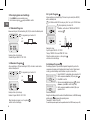 24
24
-
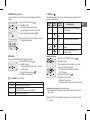 25
25
-
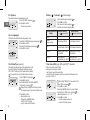 26
26
-
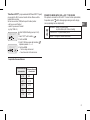 27
27
-
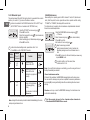 28
28
-
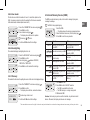 29
29
-
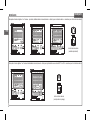 30
30
-
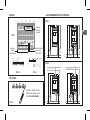 31
31
-
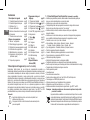 32
32
-
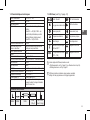 33
33
-
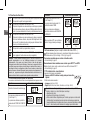 34
34
-
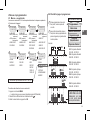 35
35
-
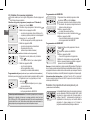 36
36
-
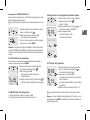 37
37
-
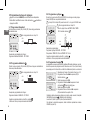 38
38
-
 39
39
-
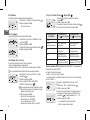 40
40
-
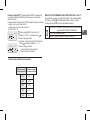 41
41
-
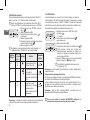 42
42
-
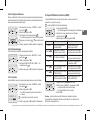 43
43
-
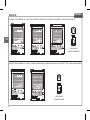 44
44
-
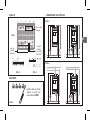 45
45
-
 46
46
-
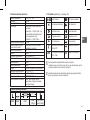 47
47
-
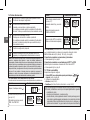 48
48
-
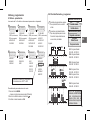 49
49
-
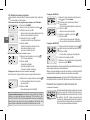 50
50
-
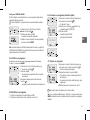 51
51
-
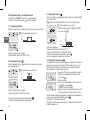 52
52
-
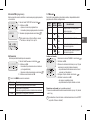 53
53
-
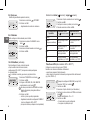 54
54
-
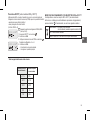 55
55
-
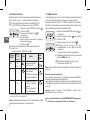 56
56
-
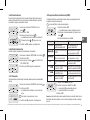 57
57
-
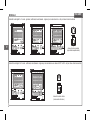 58
58
-
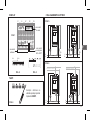 59
59
-
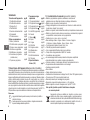 60
60
-
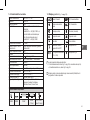 61
61
-
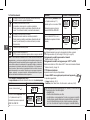 62
62
-
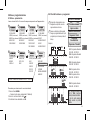 63
63
-
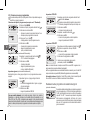 64
64
-
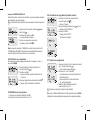 65
65
-
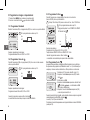 66
66
-
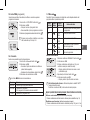 67
67
-
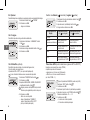 68
68
-
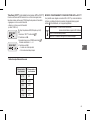 69
69
-
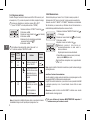 70
70
-
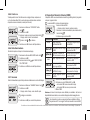 71
71
-
 72
72


KPS KPS-IH-DIGI1MEMORY El manual del propietario
- Tipo
- El manual del propietario
en otros idiomas
Otros documentos
-
ABB D2 Manual de usuario
-
Vemer simply W Manual de usuario
-
-
-
-
-
Ecler ENVIRO MSA2 Manual de usuario
-
Xoro Flat Panel Television HTC1900D Manual de usuario
-
-
Intermatic talentosmartC25 Manual de usuario