ekwb EK-Loop Heat Gun 1500W Guía de instalación
- Tipo
- Guía de instalación

USER GUIDE
EK-Loop
Heat Gun Manual
MANUAL LANGUAGES
EN DE FR IT ES RU CN

TABLE OF CONTENTS
MODELS 3
PACKAGE CONTENT 3
SAFETY WARNINGS 3
INTENDED USE 3
LIST OF MAIN PARTS 4
PUTTING INTO OPERATION 4
SWITCHING ON 4
SETTING THE TEMPERATURE 5
HEAT GUN PLACEMENT 5
GENERAL POWER TOOL SAFETY WARNINGS 7
SAFETY RULES 7
WORK AREA SAFETY 8
PERSONAL SAFETY 9
HEAT GUN USE AND CARE 10
ADDITIONAL SAFETY INSTRUCTIONS FOR HEAT GUN 10
MAINTENANCE AND CLEANING 11
TROUBLESHOOTING 11
TECHNICAL DATA 12
LIMITED WARRANTY CARD 84
LIMITED WARRANTY 84

- 3 -
MODELS
- EK-Loop Heat Gun 2000W - EU Plug
- EK-Loop Heat Gun 2000W - UK Plug
- EK-Loop Heat Gun 1500W - US Plug
PACKAGE CONTENT
Check the heat gun, the power cord and the power plug for transportation damages.
WARNING: Packing materials are not toys! Children must not play with plastic bags!
Danger of suffocation!
• Heat gun (1 piece)
• Instruction manual (1 piece)
When parts are missing or damaged, please contact your dealer.
SAFETY WARNINGS
Read, understand and follow all safety rules and operating instructions in this manual before
using this product.
Accordance to International Standard EN 60335-1
• This heat gun is intended for domestic use only and not for commercial applications.
• This heat gun cannot be used by children or persons with reduced physical, sensory or mental
capabilities or lack of experience and knowledge.
• Children shall not play with the heat gun.
• Cleaning and user maintenance shall not be made by children.
• If the supply cord is damaged, it must be replaced by the manufacturer, its service agent or
similarly qualified persons in order to avoid a hazard.
• A fire may result if the heat gun is not used with care, therefore:
• be careful when using the heat gun in places where there are combustible materials;
• be aware that heat may be conducted to combustible materials that are out of sight;
• do not use in presence of an explosive atmosphere;
• do not apply to the same place for a long time;
• do not leave the heat gun unattended when it is switched on;
• place the heat gun on its stand after use and allow it to cool down before storage.
INTENDED USE
Your heat gun has been specially designed tool for bending acrylic and PETG tubing only.
The heat gun has two settings:
1. Low heat (position 1): for use where the work surface or surrounding must not be allowed
to get too hot.
2. High heat (position 2): for faster heat up time of the work surface where you can also
operate the gun at a greater distance.

- 4 -
PUTTING INTO OPERATION
Observe the mains voltage: The voltage of
the power source must agree with the value
given on the nameplate of the unit. Extension
cords must have a conductor cross section
of 2×1.5mm min.
Before connecting the plug to the mains
voltage you have to check if the switch is in
position “0”. (FIG. 1)
FIG. 1
FIG. 2
LIST OF MAIN PARTS
Position Description
1Heat nozzle
2Heat protection collar
3Air intake openings
4
Main switch
5
Display with temperature rating in
colored increments
6Button for decreasing
temperature
7Button for increasing
temperature
2
5
3
4
1
76
SWITCHING ON
Select the required operating temperature
and air volume with switch position I. (FIG. 2)

- 5 -
Select the required operating temperature
and air volume with switch position II. (FIG. 3)
EU plug (VDE) and UK plug (BS)
Switch position I:
I. Setting 60°C -350°C / 300 l/min -1
Switch position II:
II. Setting 60°C - 600°C / 500 l/min -1
Switching off:
Set the switch to 0. (FIG. 1)
US plug (UL)
Switch position I:
I. Setting 140°F - 572°F / ~11 cfm
Switch position II:
II. Setting 140°F - 932°F / ~18 cfm
Switching off:
Set the switch to 0. (FIG. 1)
FIG. 3
SETTING THE TEMPERATURE
(FIG. 4) The temperature can be increased
and decreased in intervals of 30°C (86°F) via
the control panel when the stage is I, and the
temperature can be increased and decreased
in intervals of 55°C (131°F) via the control panel
when the stage is II. To increase the temperature
press the left-hand button (+); to decrease
the temperature press the right-hand button
(-). Either tap the buttons briefly or press and
hold the buttons until the desired temperature
setting is reached. When doing this, please note
the maximum temperature, which depends on
the on/off switch. The maximum temperature
is only possible in switching to stage 2. If
switching to stage 1 is selected, the maximum
temperature is 350 °C (662°F). The integrated
display shows the temperature rating by
colored increments.
FIG. 4
INCREASE THE
TEMPERATURE
DECREASE THE
TEMPERATURE
INTEGRATED
DISPLAY
HEAT GUN PLACEMENT
Place the heat gun upright on level surface
(table) . Insert a silicone bending rod in a
tube. Silicone rod is used for smoother tube
bends. Hold a tube with inserted silicone
rod approximately 5 cm (2 inches) from
heat gun nozzle. Slowly rotate a tube along
the axis and move it from side to side to
heat the tube evenly. When tube is heated
you can bend it to required shape. If the
tube is heated for a long period, bubbles,
deformation of the pipe diameter, changed
color of the pipe may occur.
MIN. DISTANCE
5 cm (2”)

- 6 -
WARNING (US plug): This heat
gun has a polarized plug (one
blade is wider than the other). To
reduce the risk of electric shock,
this plug is intended to fit in a
polarized outlet only one way. If
the plug does not fit fully in the
outlet, reverse the plug. If it still
does not fit, contact a qualified
electrician. Do not modify the
plug in any way.
Never place a heat gun lying on the side
(FIG.6)
FIG. 6
WARNING: Read this manual
and general safety instructions
carefully before using the
heat gun, for your own safety.
Your heat gun should only be
passed on together with these
instructions. The heat gun should
be connected only to a power
supply of the same voltage as
indicated on the nameplate, and
can only be operated on single-
phase AC supply.
We recommend using EK-Loop Modulus Hard
Tube Bending Tool for easier tube bending:
EK-Loop Modulus Hard Tube Bending
Tool – 12mm,
Product EAN: 3831109816103
https://www.ekwb.com/shop/ek-loop-
modulus-hard-tube-bending-tool-12mm
EK-Loop Modulus Hard Tube Bending
Tool – 14mm,
Product EAN: 3831109816110
https://www.ekwb.com/shop/ek-loop-
modulus-hard-tube-bending-tool-14mm
EK-Loop Modulus Hard Tube Bending
Tool – 16mm,
Product EAN: 3831109816127
https://www.ekwb.com/shop/ek-loop-
modulus-hard-tube-bending-tool-16mm
EAN: 3831109816110
EAN: 3831109816127
EAN: 3831109816103
EAN: 3831109816110
EAN: 3831109816127
EAN: 3831109816103
WARNING
Always place a hot heat gun on a
level surface UPRIGHT (FIG.5)
FIG. 5

- 7 -
GENERAL POWER TOOL SAFETY WARNINGS
SAFETY RULES
WARNING: Non-observance of the safety rules while working with the hot heat gun
can lead to fire, explosion, electric shock or burns. Read the operating instructions
before using the heat gun and always observe the safely rules. Save these instructions
and give them to persons that have not been instructed before they use the heat gun.
WARNING: A damaged casing or an opened unit can lead to a hazardous electric
shock. Do not open the heat gun and do not put a damaged heat gun into operation.
Do not drill into the casing, e.g. to attach a company label. Before any work on the unit,
pull the mains plug.
WARNING: A damaged power cord can lead to a hazardous electric shock. Check the
power cord regularly. Do not operate the unit when the power cord is damaged. Always
have a damaged cord replaced through a specialist. Do not wrap the cord around the
heat gun and protect it from oil, heat and sharp edges. Do not carry the heat gun by the
cord and do not use the cord to pull the plug from the outlet.
WARNING:
Do not work in rain or in a moist or wet environment. This can lead to a
hazardous electric shock. Keep the heat gun dry. Store the heat gun in a dry location
when not in use. Consider the weather conditions. Do not work in wet sanitary facilities.
Avoid body contact with grounded cables or surfaces, such as pipes, radiators, ranges
and refrigerators.
WARNING: Connect the heat gun that is used in the open via a residual current circuit
breaker (RCCB).
WARNING: Danger of explosion! The hot heat gun can explosively ignite combustible
fluids and gases. Do not work in a potentially explosive environment. Check the
surrounding before starting to work. Do not work on fuels or gas containers or in their
vicinity, even when they are empty.
WARNING: Danger of fire! Heat can reach combustible materials that are hidden
behind coverings, in ceilings, floors or cavities, and ignite them. Inspect the work area
before starting to work and in case of doubt, abstain from using the hot heat gun. Do
not point the heat gun at the same spot for extended periods.
WARNING: Danger of fire! An unsupervised operating hot heat gun can set fire to
objects that are close by. The heat gun must be supervised at all limes during operation.
When allowing the switched off heat gun to cool down, always place it down vertical
and standing. Allow the heat gun to cool down completely.
WARNING: Danger of fire! When working plastics varnish or similar materials, gases
develop that are easily inflammable and can lead to explosions. Be prepared for flames
to develop and keep suitable fire-extinguishing means at hand.
WARNING: Danger of intoxication! When working plastics, varnish or similar materials,
gases develop that can be aggressive or toxic. Avoid breathing in vapours, even when
they appear to be harmless. Always provide for good ventilation of the work area or
wear a respirator.

- 8 -
WARNING: Danger of injury! The hot air jet can injure persons or animals. Touching
the hot tube of the heating element or the heat gun nozzle leads to skin burns. Keep
children and other persons away from the heat gunt. Do not touch the tube of the
heating element or the nozzle when they are hot. Do not use the heat gun as a hair
dryer. It develops much more heat than a hair dryer. Do not use the heat gun to heat
up fluids or to dry objects or materials that are destroyed through the influence of
hot air.
WARNING: Unintentional starting or unexpected switching on of the heating
element after actuation of the thermal relay can lead to injuries. Make sure that the
switch is set to OFF when connecting the heat gun to the mains supply. Switch the
heat gun OFF when the thermal relay has actuated.
WARNING: Danger of injury! Using an air flow reflection nozzle that is not suitable
for your heat gun can lead to burns. Use only original accessories for your model that
are listed in these operating instructions.
WARNING: Danger of injury and fire. The hot heat gun is dangerous for children.
Keep the hot heat gun out of the reach of children.
DANGER: Danger of overheating! Incorrect handing can lead to an accumulation
of heat and thus damage to the heat gun. Do not operate the heat gun when it is
placed down horizontally or when pointed downward. The air –intake opening and
the nozzle must not be covered. Use only nozzles that are suitable for your unit.
Read all safety warnings, instructions, illustrations and specifications provided with this heat
gun. Failure to follow all instructions listed below may result in electric shock, fire and/or
serious injury.
WORK AREA SAFETY
1. Keep work area clean and well lit. Cluttered or dark areas invite accidents.
2. Do not operate the heat gun in explosive atmospheres, such as in the presence of flammable
liquids, gases or dust. Heat gun create sparks which may ignite the dust or fumes.
3. Keep children and bystanders away while operating a heat gun. Distractions can cause you
to lose control.
4. A heat gun plugs must match the outlet. Never modify the plug in any way. Do not use
any adapter plugs with earthed (grounded) power tools. Unmodified plugs and matching
outlets will reduce risk of electric shock.
5. Avoid body contact with earthed or grounded surfaces, such as pipes, radiators, ranges
and refrigerators. There is an increased risk of electric shock if your body is earthed or
grounded.
6. Do not expose a heat gun to rain or wet conditions. Water entering a heat gunwill increase
the risk of electric shock.
7. Do not abuse the cord. Never use the cord for carrying, pulling or unplugging the power
tool. Keep cord away from heat, oil, sharp edges or moving parts. Damaged or entangled
cords increase the risk of electric shock.

- 9 -
8. When operating a heat gun outdoors, use an extension cord suitable for outdoor use. Use
of a cord suitable for outdoor use reduces the risk of electric shock.
9. If operating a heat gun in a damp location is unavoidable, use a residual current device
(RCD) protected supply. Use of an RCD reduces the risk of electric shock.
10. Use of a heat gun via an RCD with a rated residual current of 30 mA or less is always
recommended.
11. Heat gun can produce electromagnetic fields (EMF) that are not harmful to the user.
However, users of pacemakers and other similar medical devices should contact the maker
of their device and/or doctor for advice before operating this heat gun.
12. Do not touch the power plug with wet hands.
13. If the cord is damaged, have it replaced by the manufacturer or his agent in order to avoid
a safety hazard.
PERSONAL SAFETY
1. Stay alert, watch what you are doing and use common sense when operating a heat
gun. Do not use a heat gun while you are tired or under the influence of drugs, alcohol
or medication. A moment of inattention while operating a heat gun may result in serious
personal injury.
2. Use personal protective equipment. Always wear eye protection. Protective equipment
such as a dust mask, non-skid safety shoes or hearing protection used for appropriate
conditions will reduce personal injuries.
3. Prevent unintentional starting. Ensure the switch is in the off-position (fig.1) before connecting
to power source , picking up or carrying the heat gun. Carrying a heat gun with your finger on the
switch or energising heat gun that has the switch on invites accidents.
4. Do not overreach. Keep proper footing and balance at all times. This enables better control
of the heat gun in unexpected situations.
5. Dress properly. Do not wear loose clothing or jewellery. Keep your hair and clothing away
from moving parts. Loose clothes, jewellery or long hair can be caught in moving parts.
6. Do not let familiarity gained from frequent use of a heat gun allow you to become
complacent and ignore tool safety principles. A careless action can cause severe injury
within a fraction of a second.
7. In case of accident or breakdown disconnect the heat gun plug from the power source
and contact the the EKWB Customer Support or your local Authorised Service Centre for
advice before operating this heat gun.
8. In case of burns remove hot or burned clothing. If clothing sticks to skin, cut or tear around
it. Hold burned skin under cool (not cold) running water or immerse in cool water until the
pain subsides. Use compresses if running water isn’t available. Cover with sterile, non-
adhesive bandage or clean cloth. Do not apply butter, oil, lotions, or creams (especially if
they contain fragrance).
9. When to see a doctor: when you see signs of infection like increased pain, redness, swelling,
fever, or oozing, the burn blister is larger than 5 cm (2’’) or oozes, redness and pain last
more than a few hours, the pain gets worse, the hands, feet, face, or genitals are burned.

- 10 -
HEAT GUN USE AND CARE
1. Do not force the heat gun. The heat gun will do the job better and safer at the rate for which
it was designed.
2. Do not use the heat gun if the switch does not turn on and off. If the heat gun cannot be
controlled with the switch it is dangerous and must be repaired.
3. Disconnect the plug from the power source from the heat gun before making any
adjustments or storing a heat gun. Such preventive safety measures reduce the risk of
starting the power tool accidentally.
4. Store idle heat gun out of the reach of children and do not allow persons unfamiliar with
the heat gun or these instructions to operate the heat gun. Heat gun is dangerous in the
hands of untrained users.
5. Maintain a heat gun. Check for misalignment or binding of moving parts, breakage of
parts and any other condition that may affect the heat gun’s operation. If damaged,
have the heat gun repaired before use. Many accidents are caused by poorly maintained
power tools.
6. Use the heat gun in accordance with these instructions, taking into account the working
conditions and the work to be performed. Use of the heat gun for operations different
from those intended could result in a hazardous situation.
7. Keep handles and grasping surfaces dry, clean and free from oil and grease. Slippery
handles and grasping surfaces do not allow safe handling and control of the heat
gun in unexpected situations.
8. When using the heat gun, do not wear cloth work gloves which may be entangled.
The entanglement of cloth work gloves in the moving parts may result in personal
injury.
ADDITIONAL SAFETY INSTRUCTIONS FOR HEAT GUN
• Do not place your hand over the air vents or block the vents in any way.
• The nozzle of this heat gun becomes extremely hot during use. Let nozzle cool down
before touching.
• Always switch the heat gun off before putting it down.
• Do not leave the heat gun unattended while it is switched on.
• A fire may arise if the heat gun is not used with care.
• Heat may be conducted to combustible materials that are out of sight. Do not use in a
damp atmosphere, where flammable gases may be present or near combustible materials.
• Place a heat gun on it’s stand and allow to cool fully before storing.Ensure adequate
ventilation as toxic fumes may be produced.
• Do not use as a hairdryer.

- 11 -
• Do not obstruct either the air intake or nozzle outlet, as this may cause excessive heat
build-up resulting in damage to the heat gun.
• Do not direct the hot air blast at other people.
• Do not touch the metal nozzle as it becomes very hot during use and remains hot for up
to 30 minutes after use.
• Do not place the nozzle against anything while using or immediately after use.
• Do not poke anything down the nozzle as it could give you an electric shock. Do not
look down the nozzle while the unit is working because of the high temperature being
produced.
MAINTENANCE AND CLEANING
Attention:
Before performing any work on the heat gun, pull the power plug.
Maintenance:
Your heat gun has been designed to operate over a long period of time with a minimum of
maintenance. Continuous satisfactory operation depends upon proper tool care and regular
cleaning.
Lubrication:
Your heat gun requires no additional lubrication.
Cleaning:
• To prevent overheating of the motor, keep the ventilation slots of the machine clean and free
from dust and dirt.
• Regularly clean the machine housing with a soft cloth, preferably after each use. If the dirt
does not come off use a soft cloth moistened with soapy water.
WARNING: Never use solvents such as petrol, alcohol, ammonia water, etc. These
solvents may damage the plastic parts.
TROUBLESHOOTING
Isolate the power source by either removing the power supply plug from the socket before
carrying out adjustment, servicing or maintenance.

- 12 -
TECHNICAL DATA
Product name
and model
EK-Loop Heat
Gun 2000W –
EU plug
EK-Loop Heat
Gun 2000W –
UK plug
EK-Loop Heat Gun 1500W –
US plug
Power plug type VDE BS UL
Model no. RF15-A2Y RF15B2Y
Voltage 220-240 (V~) 120 V~
Frequency (Hz)
50-60
60
Operational
modes 2
Noise level (dB) 70
Position III III
Rate Power (W) 250 2000 250 1500
Temperature
60-350 (°C) 60600 °C140572 °F 140932 °F
Air flow 300 (l/min) 500 (l/min) 11 (cfm) 18 (cfm)
Display Shows temperature rating by colored increments
Protection class II / Double insulated
Case materials Plastic and rubber
Cable lenght 2000 mm ± 20 mm
Country of origin: China
Warranty
For warranty terms and conditions, please see the enclosed warranty card at the end of the
Instruction manual booklet.
Production date (batch number) can be found on the appliance.
EK® is registrated Trademark of EKWB d.o.o.
© 2022 EKWB d.o.o. All rights reserved
https://www.ekwb.com
Recycling
Products marked with this symbol must not be disposed of with unsorted municipal
waste to avoid environmental and health problems due to hazardous substances.
Always dispose of electrical and electronic products at an appropriate official
recycling/collection point.

- 13 -
EK-Loop
Heißluftpistole Betriebsanleitung

- 14 -
INHALT
MODELLE 15
VERPACKUNGSINHALT 15
SICHERHEITSHINWEISE 15
VERWENDUNGSZWECK 15
LISTE DER BAUTEILE 16
INBETRIEBNAHME 16
EINSCHALTEN 16
EINSTELLUNG DER TEMPERATUR 17
PLATZIERUNG DER HEISSLUFTPISTOLE
17
ALLGEMEINE SICHERHEITSHINWEISE FÜR ELEKTROWERKZEUGE
19
SICHERHEITSREGELN 19
SICHERHEIT AM ARBEITSPLATZ 20
PERSÖNLICHE SICHERHEIT 21
NUTZUNG UND PFLEGE DER HEISSLUFTPISTOLE 22
ZUSÄTZLICHE SICHERHEITSANWEISUNGEN FÜR DIE HEISSLUFTPISTOLE 23
WARTUNG UND REINIGUNG 23
FEHLERBEHEBUNG 24
TECHNISCHE DATEN 24
EINGESCHRÄNKTE GARANTIEKARTE 86
EINGESCHRÄNKTE GARANTIE 86

- 15 -
MODELLE
EK-Loop Heißluftpistole 2000 W – EU-Stecker
EK-Loop Heißluftpistole 2000 W – UK-Stecker
EK-Loop Heißluftpistole 1500 W – US-Stecker
VERPACKUNGSINHALT
Überprüfen Sie die Heißluftpistole, das Netzkabel und den Netzstecker auf Transportschäden.
WARNUNG: Das Verpackungsmaterial ist kein Spielzeug! Kinder dürfen nicht mit
Plastiktüten spielen! Es besteht Erstickungsgefahr!
• Heißluftpistole (1 Stück)
• Betriebsanleitung (1 Stück)
Wenn Teile fehlen oder beschädigt sind, wenden Sie sich bitte an Ihren Händler.
SICHERHEITSHINWEISE
Lesen, verstehen und befolgen Sie alle Sicherheitsregeln und Betriebsanweisungen in dieser
Anleitung, bevor Sie das Produkt benutzen.
Entspricht der internationalen Norm EN 60335-1
• Diese Heißluftpistole ist nur für den Hausgebrauch und nicht für gewerbliche Anwendungen bestimmt.
• Diese Heißluftpistole darf nicht von Kindern oder Personen mit eingeschränkten körperlichen,
sensorischen oder geistigen Fähigkeiten oder mangelnder Erfahrung und Kenntnis benutzt werden.
• Kinder dürfen nicht mit der Heißluftpistole spielen.
• Die Reinigung und Wartung durch den Benutzer darf nicht von Kindern vorgenommen werden.
• Wenn das Netzkabel beschädigt ist, muss es durch den Hersteller, seinen Kundendienst oder
ähnlich qualifizierte Personen ersetzt werden, um eine Gefährdung zu vermeiden.
• Bei unvorsichtiger Verwendung der Heißluftpistole kann ein Brand entstehen:
• Seien Sie vorsichtig, wenn Sie die Heißluftpistole an Orten verwenden, an denen sich
brennbare Materialien befinden;
• beachten Sie, dass die Hitze auf brennbare Materialien, die sich außerhalb der Sichtweite
befinden, übertragen werden kann;
• nicht bei Vorhandensein von explosiven Atmosphären verwenden;
• nicht für eine längere Zeit auf derselben Stelle auftragen;
• lassen Sie die Heißluftpistole nicht unbeaufsichtigt, wenn sie eingeschaltet ist;
• stellen Sie die Heißluftpistole nach dem Gebrauch auf ihren Ständer und lassen Sie sie
abkühlen, bevor Sie sie aufbewahren.
VERWENDUNGSZWECK
Ihre Heißluftpistole wurde speziell für das Biegen von Acryl- und PETG-Rohren entwickelt.
Die Heißluftpistole hat zwei Einstellungen:
1. Geringe Hitze (Position 1): für Anwendungen, bei denen die Arbeitsfläche oder die
Umgebung nicht zu heiß werden darf.
2. Große Hitze (Position 2): für eine schnellere Aufheizzeit der Arbeitsfläche, bei der Sie die
Pistole auch aus größerer Entfernung bedienen können.

- 16 -
INBETRIEBNAHME
Beachten Sie die Netzspannung: Die Spannung der
Stromquelle muss mit dem auf dem Typenschild
des Geräts angegebenen Wert übereinstimmen.
Verlängerungskabel müssen einen Leiterquerschnitt
von mindestens
2×1.5mm
haben.
Bevor Sie den Stecker an die Netzspannung
anschließen, müssen Sie prüfen, dass der Schalter
auf Position „0“ steht. (ABB. 1)
ABB. 1
ABB. 2
LISTE DER BAUTEILE
1Heizdüse
2Hitzeschutzmanschette
3Lufteintrittsöffnungen
4
Hauptschalter
5
Display mit Temperaturanzeige in
farbigen Schritten
6Taste zur Temperatursenkung
7Taste zur Temperaturerhöhung
2
5
3
4
1
76
EINSCHALTEN
Wählen Sie die gewünschte Betriebstemperatur
und Luftmenge mit der Schalterstellung I.
(ABB. 2)

- 17 -
Wählen Sie die gewünschte Betriebstemperatur
und Luftmenge mit der Schalterstellung II. (ABB. 3)
EU-Stecker (VDE) und UK-Stecker (BS)
Schalterstellung I:
I. Einstellung 60 °C–350 °C / 300 l/min-1
Schaltstellung II:
II. Einstellung 60 °C–600 °C / 500 l/min-1
Ausschalten:
Stellen Sie den Schalter auf 0. (ABB. 1)
US-Stecker (UL)
Schalterstellung I:
I. Einstellung 140 °F–572 °F/~11 cfm
Schaltstellung II:
II. Einstellung 140 °F–932 °F/~18 cfm
Ausschalten:
Stellen Sie den Schalter auf 0. (ABB. 1)
ABB. 3
EINSTELLUNG DER TEMPERATUR
(ABB. 4)
Die Temperatur kann in Intervallen von
30 °C (86 °F) über das Bedienfeld erhöht und
gesenkt werden, wenn die Stufe I eingestellt ist.
Die Temperatur kann in Intervallen von 55 °C
(131 °F) über das Bedienfeld erhöht und gesenkt
werden, wenn die Stufe II eingestellt ist. Um die
Temperatur zu erhöhen, drücken Sie die linke
Taste (+); um die Temperatur zu senken, drücken
Sie die rechte Taste (-). Tippen Sie entweder kurz
auf die Tasten oder halten Sie die Tasten gedrückt,
bis die gewünschte Temperatureinstellung
erreicht ist. Beachten Sie dabei die maximale
Temperatur, die vom Ein/Aus-Schalter abhängt.
Die Höchsttemperatur ist nur beim Umschalten
auf Stufe 2 möglich. Wenn auf Stufe 1
umgeschaltet wird, beträgt die Höchsttemperatur
350 °C (662 °F). Das integrierte Display zeigt die
Temperaturstufe in farbigen Schritten an.
ABB. 4
TEMPERATUR
ERHÖHEN
TEMPERATUR
SENKEN
INTEGRIERTE
ANZEIGE
PLATZIERUNG DER HEISSLUFTPISTOLE
Stellen Sie die Heißluftpistole aufrecht auf
eine ebene Fläche (Tisch). Stecken Sie einen
Silikon-Biegestab in ein Rohr. Der Silikonstab
wird für glattere Rohrbiegungen verwendet.
Halten Sie das Rohr mit eingelegtem
Silikonstab etwa 5 cm (2 Zoll) von der
Heißluftpistolendüse entfernt. Drehen Sie
das Rohr langsam entlang der Achse und
bewegen Sie es von einer Seite zur anderen,
um es gleichmäßig zu erhitzen. Wenn das Rohr
erwärmt ist, können Sie es in die gewünschte
Form biegen. Wenn das Rohr für einen
langen Zeitraum erhitzt wird, können Blasen,
Verformung des Rohrdurchmessers und eine
veränderte Farbe des Rohres auftreten.
MIN. ABSTAND
5 cm (2”)

- 18 -
WARNUNG (US-Stecker): Diese Heißluftpistole
hat einen polarisierten Stecker (eine Klinge ist
breiter als die andere). Um das Risiko eines
Stromschlags zu reduzieren, darf dieser
Stecker nur in einer Richtung in eine gepolte
Steckdose eingesteckt werden. Wenn der
Stecker nicht vollständig in die Steckdose
passt, drehen Sie den Stecker um. Falls er
immer noch nicht passt, wenden Sie sich an
einen qualifizierten Elektriker. Den Stecker
auf keinen Fall verändern.
Legen Sie niemals eine Heißluftpistole auf
ihre Seite (ABB. 6)
ABB. 6
WARNUNG: Lesen Sie diese Anleitung
und allgemeine Sicherheitshinweise zu
Ihrer eigenen Sicherheit sorgfältig durch,
bevor Sie die Heißluftpistole verwenden.
Ihre Heißluftpistole sollte nur zusammen
mit diesen Anweisungen weitergegeben
werden. Die Heißluftpistole darf nur an
ein Netzteil der gleichen Spannung
angeschlossen werden, wie auf dem
Typenschild angegeben, und kann
nur mit einphasiger AC-Versorgung
betrieben werden.
Wir empfehlen die Verwendung des EK-Loop-Modul-
Hartrohr-Biegewerkzeugs für eine einfachere Rohrbiegung:
EK-Loop-Modul-Hartrohr-
Biegewerkzeug – 12 mm,
Produkt EAN: 3831109816103
https://www.ekwb.com/shop/ek-loop-
modulus-hard-tube-bending-tool-12mm
EK-Loop-Modul-Hartrohr-
Biegewerkzeug – 14 mm,
Produkt EAN: 3831109816110
https://www.ekwb.com/shop/ek-loop-
modulus-hard-tube-bending-tool-14mm
EK-Loop-Modul-Hartrohr-
Biegewerkzeug – 16 mm,
Produkt EAN: 3831109816127
https://www.ekwb.com/shop/ek-loop-
modulus-hard-tube-bending-tool-16mm
EAN: 3831109816110
EAN: 3831109816127
EAN: 3831109816103
EAN: 3831109816110
EAN: 3831109816127
EAN: 3831109816103
WARNUNG
Legen Sie immer eine Heißluftpistole
AUFRECHT auf eine ebene Fläche (ABB. 5)
ABB. 5

- 19 -
ALLGEMEINE SICHERHEITSHINWEISE FÜR ELEKTROWERKZEUGE
SICHERHEITSREGELN
WARNUNG:
Die Nichtbeachtung der Sicherheitsvorschriften bei der Arbeit mit der
Heißluftpistole kann zu Bränden, Explosionen, Stromschlägen oder Verbrennungen führen.
Lesen Sie die Betriebsanleitung, bevor Sie die Heißluftpistole benutzen, und beachten
Sie stets die Sicherheitsregeln. Bewahren Sie diese Anleitung auf und geben Sie sie an
Personen weiter, die nicht eingewiesen wurden, bevor sie die Heißluftpistole benutzen.
WARNUNG:
Ein beschädigtes Gehäuse oder ein geöffnetes Gerät kann zu einem
gefährlichen Stromschlag führen. Öffnen Sie die Heißluftpistole nicht und nehmen Sie
eine beschädigte Heißluftpistole nicht in Betrieb. Bohren Sie nicht in das Gehäuse, um z.
B. ein Firmenschild anzubringen. Ziehen Sie vor allen Arbeiten am Gerät den Netzstecker.
WARNUNG: Ein beschädigtes Stromkabel kann zu einem gefährlichen Stromschlag
führen. Überprüfen Sie regelmäßig das Stromkabel. Das Gerät nicht verwenden, wenn
das Netzkabel beschädigt ist. Ein beschädigtes Kabel immer durch einen Fachmann
ersetzen lassen. Wickeln Sie das Kabel nicht um die Heißluftpistole und schützen Sie
es vor Öl, Hitze und scharfen Kanten. Tragen Sie die Heißluftpistole nicht am Kabel und
ziehen Sie den Stecker nicht mittels des Kabels aus der Steckdose.
WARNUNG:
Nicht im Regen oder in feuchter oder nasser Umgebung verwenden. Dies
kann zu einem gefährlichen Stromschlag führen. Halten Sie die Heißluftpistole in einem
trocken Zustand. Die Heißluftpistole an einem trockenen Ort aufbewahren, wenn sie
nicht benutzt wird. Betrachten Sie die Wetterbedingungen. Nicht in nassen sanitären
Anlagen verwenden. Vermeiden Sie den Körperkontakt mit geerdeten Kabeln oder
Oberflächen wie Rohren, Kühlkörpern, Herden und Kühlschränken.
WARNUNG: Schließen Sie die Heissluftpistole, wenn Sie sie im Freien verwenden,
über einem (RCCB) Leistungsschalter an.
WARNUNG: Explosionsgefahr! Die Heißluftpistole kann brennbare Flüssigkeiten
und Gase explosionsartig entzünden. Nicht in einer potenziell explosiven Umgebung
verwenden. Vor Beginn der Arbeit die Umgebung prüfen. Arbeiten Sie nicht an
Kraftstoffen oder Gasbehältern oder in ihrer Nähe, auch wenn diese leer sind.
WARNUNG: Brandgefahr! Die Hitze kann brennbare Stoffe, die sich hinter Belägen,
in Decken, Böden oder Hohlräumen verbergen, erreichen und entzünden. Den
Arbeitsbereich vor Beginn der Arbeiten überprüfen und sich im Zweifelsfall die
Heißluftpistole nicht verwenden. Richten Sie die Heißluftpistole nicht über einen
längeren Zeitraum auf dieselbe Stelle.
WARNUNG: Brandgefahr! Eine unbeaufsichtigte Heißluftpistole, die in Betrieb ist,
kann Objekte, die in der Nähe sind, in Brand setzen. Die Heißluftpistole muss während
des Betriebs beaufsichtigt werden. Wenn Sie die abgeschaltete Heißluftpistole
abkühlen lassen, legen Sie sie immer senkrecht und stehend ab. Lassen Sie die
Heißluftpistole vollständig abkühlen.
WARNUNG:
Brandgefahr! Bei der Bearbeitung von Kunststoffen oder ähnlichen
Materialien entwickeln sich Gase, die leicht entflammbar sind und zu Explosionen
führen können. Seien Sie auf Flammen vorbereitet und halten Sie geeignete
Feuerlöschmittel bereit.

- 20 -
WARNUNG:
Vergiftungsgefahr! Bei der Bearbeitung von Kunststoffen, Lacken oder
ähnlichen Materialien entwickeln sich Gase, die aggressiv oder giftig sein können. Vermeiden
Sie das Einatmen von Dämpfen, auch wenn sie harmlos zu sein scheinen. Achten Sie immer
auf eine gute Belüftung des Arbeitsraumes oder tragen Sie eine Atemschutzmaske.
WARNUNG:
Verletzungsgefahr! Die Heißluftpistole kann Personen oder Tiere
verletzen. Berühren der heißen Röhren des Heizelements oder der Heißluftdüse führt zu
Hautverbrennungen. Kinder und andere Personen von der Wärmestrahlung fernhalten.
Berühren Sie die Leitung des Heizelements oder der Düse nicht, wenn sie heiß sind. Verwenden
Sie die Heißluftpistole nicht als Haartrockner. Sie entwickelt viel mehr Hitze als ein Haartrockner.
Verwenden Sie die Heißluftpistole nicht zum Erhitzen von Flüssigkeiten oder zum Trocknen von
Gegenständen oder Materialien, die durch den Einfluss von Heißluft zerstört werden.
WARNUNG:
Unbeabsichtigtes Starten oder unerwartetes Einschalten des Heizelementes
nach Betätigung des Thermorelais kann zu Verletzungen führen. Stellen Sie sicher, dass
der Schalter auf OFF steht, wenn Sie die Heißluftpistole an das Stromnetz anschließen.
Schalten Sie die Heißluftpistole AUS, wenn das Thermorelais ausgelöst wurde.
WARNUNG:
Verletzungsgefahr! Die Verwendung einer Luftstrom-Reflexionsdüse, die
nicht für Ihr Heißluftgebläse geeignet ist, kann zu Verbrennungen führen. Verwenden
Sie für Ihr Modell nur Originalzubehör, das in dieser Gebrauchsanweisung aufgeführt ist.
WARNUNG:
Es besteht Verletzungs- und Brandgefahr. Die Heißluftpistole ist für Kinder
gefährlich. Bewahren Sie die Heißluftpistole außerhalb der Reichweite von Kindern auf.
GEFAHR: Überhitzungsgefahr! Falsche Handhabung kann zu einem Hitzestau
und damit zur Beschädigung der Heißluftpistole führen. Betreiben Sie die
Heißluftpistole nicht, wenn sie waagerecht abgelegt oder nach unten gerichtet ist.
Die Lufteintrittsöffnung und die Düse dürfen nicht abgedeckt werden. Verwenden
Sie nur Düsen, die für Ihr Gerät geeignet sind.
Lesen Sie alle Sicherheitshinweise, Anweisungen, Abbildungen und Spezifikationen, die
dieser Heißluftpistole beiliegen. Die Nichtbeachtung aller unten aufgeführten Anweisungen
kann zu einem elektrischen Schlag, Brand und/oder schweren Verletzungen führen.
SICHERHEIT AM ARBEITSPLATZ
1. Halten Sie den Arbeitsbereich sauber und gut beleuchtet. Unordentliche oder dunkle
Bereiche laden zu Unfällen ein.
2. Betreiben Sie die Heißluftpistole nicht in explosionsgefährdeten Bereichen, wie z. B. in der
Nähe von brennbaren Flüssigkeiten, Gasen oder Staub. Heißluftpistolen erzeugen Funken,
die den Staub oder die Dämpfe entzünden können.
3. Halten Sie Kinder und Unbeteiligte fern, wenn Sie eine Heißluftpistole benutzen.
Ablenkungen können dazu führen, dass Sie die Kontrolle verlieren.
4. Der Stecker einer Heißluftpistole muss in die Steckdose passen. Verändern Sie niemals den Stecker
in irgendeiner Weise. Verwenden Sie keine Adapterstecker mit geerdeten Elektrowerkzeugen.
Unveränderte Stecker und passende Steckdosen verringern das Risiko eines Stromschlags.
5. Vermeiden Sie Körperkontakt mit geerdeten Oberflächen, wie Rohren, Kühlkörpern, Herden und
Kühlschränken. Es besteht ein erhöhtes Risiko eines Stromschlags, wenn Ihr Körper geerdet ist.

- 21 -
6. Setzen Sie die Heißluftpistole nicht Regen oder Nässe aus. Das Eindringen von Wasser in
eine Heißluftpistole erhöht das Risiko eines Stromschlags.
7. Das Kabel nicht anderweitig benutzen. Verwenden Sie das Kabel niemals zum Tragen, Ziehen
oder Ausstecken des Elektrowerkzeugs. Halten Sie das Kabel von Hitze, Öl, scharfen Kanten oder
beweglichen Teilen fern. Beschädigte oder verwickelte Kabel erhöhen das Risiko eines Stromschlags.
8. Wenn Sie eine Heißluftpistole im Freien betreiben, verwenden Sie ein für den Außenbereich
geeignetes Verlängerungskabel. Die Verwendung eines für die Verwendung im Freien
geeigneten Kabels verringert das Risiko eines Stromschlags.
9. Wenn der Betrieb einer Heißluftpistole in einer feuchten Umgebung unvermeidlich
ist, verwenden Sie eine durch einen Fehlerstromschutzeinrichtung (RCD) geschützte
Stromversorgung. Die Verwendung einer RCD verringert das Risiko eines Stromschlags.
10. Die Verwendung einer Heißluftpistole über eine RCD mit einem Nennfehlerstrom von 30
mA oder weniger wird immer empfohlen.
11. Die Heißluftpistole kann elektromagnetische Felder (EMF) erzeugen, jedoch sind sie für
den Benutzer nicht schädlich. Benutzer von Herzschrittmachern und anderen ähnlichen
medizinischen Geräten sollten jedoch den Hersteller ihres Gerätes und/oder ihren Arzt um
Rat fragen, bevor sie diese Heißluftpistole benutzen.
12. Fassen Sie den Netzstecker nicht mit nassen Händen an.
13. Wenn das Kabel beschädigt ist, lassen Sie es vom Hersteller oder seinem Handelsvertreter
austauschen, um ein Sicherheitsrisiko zu vermeiden.
PERSÖNLICHE SICHERHEIT
1. Seien Sie wachsam, passen Sie auf, was Sie tun, und benutzen Sie Ihren gesunden Menschenverstand,
wenn Sie eine Heißluftpistole bedienen. Verwenden Sie eine Heißluftpistole nicht, wenn Sie müde
sind oder unter dem Einfluss von Drogen, Alkohol oder Medikamenten stehen. Ein Moment der
Unachtsamkeit bei der Bedienung einer Heißluftpistole kann zu schweren Verletzungen führen.
2. Verwenden Sie eine persönliche Schutzausrüstung. Tragen Sie immer einen Augenschutz.
Schutzausrüstungen wie Staubmaske, rutschfeste Sicherheitsschuhe oder Gehörschutz, die
unter geeigneten Bedingungen verwendet werden, verringern die Zahl der Personenschäden.
3. Verhindern Sie unbeabsichtigtes Starten. Vergewissern Sie sich, dass der Schalter ausgeschaltet
ist (Abb. 1), bevor Sie die Heißluftpistole an die Stromquelle anschließen, in die Hand nehmen
oder tragen. Das Tragen einer Heißluftpistole mit dem Finger auf dem Schalter oder das
Einschalten einer Heißluftpistole, bei der der Schalter eingeschaltet ist, lädt zu Unfällen ein.
4. Nicht zu weit darüber lehnen. Achten Sie stets auf einen sicheren Stand und das Gleichgewicht.
Dies ermöglicht eine bessere Kontrolle der Heißluftpistole in unerwarteten Situationen.
5. Tragen Sie angemessene Kleidung. Tragen Sie keine weite Kleidung und keinen Schmuck.
Halten Sie Ihre Haare und Kleidung von beweglichen Teilen fern. Lose Kleidung, Schmuck
oder lange Haare können sich in beweglichen Teilen verfangen.
6. Lassen Sie nicht zu, dass die durch häufigen Gebrauch einer Heißluftpistole gewonnene
Vertrautheit Sie dazu verleitet, zu selbstsicher zu werden und die Grundsätze der
Werkzeugsicherheit zu ignorieren. Eine unachtsame Handlung kann im Bruchteil einer
Sekunde zu schweren Verletzungen führen.

- 22 -
7. Im Falle eines Unfalls oder einer Panne Trennen Sie den Stecker der Heißluftpistole von der
Stromquelle und wenden Sie sich an den Kundendienst von EKWB oder an Ihr örtliches
autorisiertes Servicezentrum, bevor Sie die Heißluftpistole in Betrieb nehmen.
8. Im Falle von Verbrennungen entfernen Sie heiße oder verbrannte Kleidung. Wenn Kleidung an
der Haut klebt, schneiden oder reißen Sie sie um die Stelle herum auf. Halten Sie die verbrannte
Haut unter fließendes kühles (nicht kaltes) Wasser oder tauchen Sie sie in kühles Wasser, bis
der Schmerz nachlässt. Verwenden Sie Kompressen, wenn kein fließendes Wasser verfügbar
ist. Mit sterilem, nicht klebendem Verband oder sauberem Tuch abdecken. Tragen Sie keine
Butter, Öle, Lotionen oder Cremes auf (insbesondere, wenn sie Duftstoffe enthalten).
9. Wann Sie einen Arzt aufsuchen sollten: wenn Sie Anzeichen einer Infektion wie verstärkte
Schmerzen, Rötung, Schwellung, Fieber oder Nässen bemerken, wenn die Brandblase
größer als 5 cm (2 Zoll) ist oder nässt, wenn die Rötung und der Schmerz länger als ein paar
Stunden anhalten, wenn die Schmerzen schlimmer werden, wenn die Hände, Füße, das
Gesicht oder die Genitalien verbrannt sind.
NUTZUNG UND PFLEGE DER HEISSLUFTPISTOLE
1. Die Heißluftpistole nicht überbeanspruchen. Die Heißluftpistole erledigt die Arbeit
besser und sicherer mit der Geschwindigkeit, für die sie entwickelt wurde.
2. Verwenden Sie die Heißluftpistole nicht, wenn sich der Schalter nicht ein- und ausschalten
lässt. Wenn sich die Heißluftpistole nicht mit dem Schalter steuern lässt, ist sie gefährlich
und muss repariert werden.
3. Trennen Sie den Stecker der Heißluftpistole von der Stromquelle, bevor Sie
Einstellungen vornehmen oder eine Heißluftpistole aufbewahren. Solche vorbeugenden
Sicherheitsmaßnahmen verringern das Risiko eines unbeabsichtigten Starts des
Elektrowerkzeugs.
4. Bewahren Sie die ungenutzte Heißluftpistole außerhalb der Reichweite von Kindern
auf und erlauben Sie Personen, die mit der Heißluftpistole oder dieser Anleitung nicht
vertraut sind, nicht, die Heißluftpistole zu bedienen. Die Heißluftpistole ist in den Händen
von ungeübten Anwendern gefährlich.
5. Warten der Heissluftpistole. Prüfen Sie, ob bewegliche Teile falsch ausgerichtet sind
oder klemmen, ob Teile gebrochen sind und ob andere Bedingungen vorliegen, die
den Betrieb der Heißluftpistole beeinträchtigen könnten. Wenn die Heißluftpistole
beschädigt ist, lassen Sie sie vor der Verwendung reparieren. Viele Unfälle werden durch
schlecht gewartete Elektrowerkzeuge verursacht.
6. Verwenden Sie die Heißluftpistole gemäß dieser Anleitung und berücksichtigen Sie
dabei die Arbeitsbedingungen und die auszuführenden Arbeiten. Die Verwendung der
Heißluftpistole für andere als die vorgesehenen Arbeiten kann zu einer gefährlichen
Situation führen.
7. Halten Sie Griffe und Griffflächen trocken, sauber und frei von Öl und Fett. Rutschige
Griffe und Griffflächen ermöglichen keine sichere Handhabung und Kontrolle der
Heißluftpistole in unerwarteten Situationen.
8. Tragen Sie bei der Verwendung der Heißluftpistole keine Arbeitshandschuhe aus
Stoff, die sich darin verfangen könnten. Wenn sich Arbeitshandschuhe aus Stoff in den
beweglichen Teilen verfangen, kann es zu Verletzungen kommen.

- 23 -
ZUSÄTZLICHE SICHERHEITSANWEISUNGEN FÜR DIE HEISSLUFTPISTOLE
• Halten Sie Ihre Hand nicht über die Belüftungsöffnungen und blockieren Sie die Öffnungen nicht.
• Die Düse dieser Heißluftpistole wird während des Gebrauchs extrem heiß. Lassen Sie die
Düse abkühlen, bevor Sie sie berühren.
• Schalten Sie die Heißluftpistole immer aus, bevor Sie sie absetzen.
• Lassen Sie die Heißluftpistole nicht unbeaufsichtigt, wenn sie eingeschaltet ist.
• Bei unvorsichtiger Verwendung der Heißluftpistole kann ein Brand entstehen.
• Die Wärme kann auf brennbare Materialien übertragen werden, die sich außerhalb des
Sichtbereichs befinden. Nicht in feuchter Atmosphäre, bei Vorhandensein brennbarer
Gase oder in der Nähe brennbarer Materialien verwenden.
• Legen Sie die Heißluftpistole auf ihren Ständer und lassen Sie sie vor der Lagerung vollständig
abkühlen. Sorgen Sie für ausreichende Belüftung, da giftige Dämpfe entstehen können.
• Nicht als Haartrockner verwenden.
• Verstopfen Sie weder den Lufteintrittsöffnung noch den Düsenauslass, da dies zu einem
übermäßigen Hitzestau und damit zu einer Beschädigung der Heißluftpistole führen kann.
• Richten Sie den Heißluftstrahl nicht auf andere Personen.
• Berühren Sie die Metalldüse nicht, da sie während des Gebrauchs sehr heiß wird und bis
zu 30 Minuten nach dem Gebrauch heiß bleibt.
• Lehnen Sie die Düse während oder unmittelbar nach dem Gebrauch nicht an Gegenstände.
• Stecken Sie keine Gegenstände in die Düse, da Sie einen elektrischen Schlag bekommen könnten.
Schauen Sie nicht in die Düse, während das Gerät in Betrieb ist, da eine hohe Temperatur erzeugt wird.
WARTUNG UND REINIGUNG
Vorsicht: Trennen Sie vor allen Arbeiten an der Heißluftpistole den Netzstecker.
Wartung: Ihre Heißluftpistole wurde so konzipiert, dass sie über einen langen Zeitraum hinweg
mit einem Minimum an Wartung betrieben werden kann. Ein dauerhaft zufriedenstellender
Betrieb hängt von der richtigen Pflege und regelmäßigen Reinigung der Werkzeuge ab.
Schmierung: Ihre Heißluftpistole benötigt keine zusätzliche Schmierung.
Reinigung:
• Um eine Überhitzung des Motors zu vermeiden, halten Sie die Lüftungsschlitze der Maschine
sauber und frei von Staub und Schmutz.
• Reinigen Sie das Gehäuse des Geräts regelmäßig mit einem weichen Tuch, vorzugsweise
nach jedem Gebrauch. Lässt sich der Schmutz nicht entfernen, verwenden Sie ein weiches,
mit Seifenwasser angefeuchtetes Tuch.
WARNUNG:
Verwenden Sie niemals Lösungsmittel wie Benzin, Alkohol,
Ammoniakwasser usw. Diese Lösungsmittel können die Kunststoffteile beschädigen.

- 24 -
FEHLERBEHEBUNG
Trennen Sie die Stromquelle, indem Sie den Netzstecker aus der Steckdose ziehen, bevor Sie
Einstellungen, Wartungsarbeiten oder Instandhaltungsarbeiten durchführen.
TECHNISCHE DATEN
Produktname
und Modell
EK-Loop
Heißluftpistole
2000 W – EU-Stecker
EK-Loop
Heißluftpistole
2000 W – UK-Stecker
EK-Loop Heißluftpistole
1500 W – US-Stecker
Netzsteckertyp VDE BS UL
Modellnr. RF15-A2Y RF15B2Y
Spannung 220-240 (V~) 120 V~
Frequenz (Hz)
50-60
60
Betriebsarten 2
Lärmpegel (dB) 70
Position III III
Nennleistung (W)
250 2000 250 1500
Temperatur
60-350 (°C) 60600 °C140572 °F 140932 °F
Luftstrom 300 (l/min) 500 (l/min) 11 (cfm) 18 (cfm)
Anzeige Zeigt die Temperaturstufe in farbigen Schritten an
Schutzklasse II/Zweifach isoliert
Gehäusematerialien
Kunststoff und Gummi
Kabellänge 2000 mm ± 20 mm
Herkunftsland: China
GARANTIE
Die Garantiebedingungen entnehmen Sie bitte der beiliegenden Garantiekarte am Ende der
Betriebsanleitung.
Das Produktionsdatum (Chargennummer) befindet sich auf dem Gerät.
EK® ist ein eingetragenes Warenzeichen von EKWB d.o.o.
© 2022 EKWB d.o.o. Alle Rechte vorbehalten
https://www.ekwb.com
Recycling
Produkte, die mit diesem Symbol gekennzeichnet sind, dürfen nicht über
den unsortierten Kommunalabfall entsorgt werden, um Umwelt- und
Gesundheitsprobleme durch gefährliche Stoffe zu vermeiden. Entsorgen Sie
elektrische und elektronische Produkte immer bei einer geeigneten offiziellen
Recycling-/Sammelstelle.

- 25 -
Mode d’emploi pour le
décapeur thermique EK-Loop

- 26 -
TABLE DES MATIÈRES
MODÈLES 27
CONTENU DU PAQUET 27
AVERTISSEMENTS DE SÉCURITÉ 27
UTILISATION PRÉVUE 27
LISTE DES PIÈCES PRINCIPALES 28
MISE EN SERVICE 28
MISE EN MARCHE 28
RÉGLAGE DE LA TEMPÉRATURE 29
PLACEMENT DU DÉCAPEUR 29
AVERTISSEMENTS DE SÉCURITÉ GÉNÉRAUX POUR LES OUTILS ÉLECTRIQUES 31
RÈGLES DE SÉCURITÉ 31
SÉCURITÉ DE LA ZONE DE TRAVAIL 32
SÉCURITÉ PERSONNELLE 33
UTILISATION ET ENTRETIEN DU DÉCAPEUR THERMIQUE 34
INSTRUCTIONS DE SÉCURITÉ SUPPLÉMENTAIRES POUR LE DÉCAPEUR 34
ENTRETIEN ET NETTOYAGE 35
DÉPANNAGE 36
DONNÉES TECHNIQUES 36
CARTE DE GARANTIE LIMITÉE 88
GARANTIE LIMITÉE 88

- 27 -
MODÈLES
Décapeur thermique EK-Loop 2 000 W – Prise EU
Décapeur thermique EK-Loop 2 000 W – Prise UK
Décapeur thermique EK-Loop 1 500 W – Prise US
CONTENU DU PAQUET
Assurez-vous que le décapeur thermique, le cordon d’alimentation et la fiche d’alimentation n’ont
pas été endommagés pendant le transport.
AVERTISSEMENT: Les matériaux d’emballage ne sont pas des jouets ! Les enfants
ne doivent pas jouer avec les sacs en plastique ! Risque de suffocation !
• Décapeur thermique (1 pièce)
• Mode d’emploi (1 pièce)
S’il y a des pièces manquantes ou endommagées, veuillez contacter votre revendeur.
AVERTISSEMENTS DE SÉCURITÉ
Lisez, comprenez et respectez toutes les consignes de sécurité et les instructions figurant dans
ce mode d’emploi avant d’utiliser le produit.
Conformément à la norme internationale EN 60335-1
• Ce décapeur thermique est destiné uniquement à un usage domestique et non à des
applications commerciales.
• Ce décapeur thermique ne peut pas être utilisé par des enfants ou des personnes ayant des capacités
physiques, sensorielles ou mentales réduites ou un manque d’expérience et de connaissances.
• Les enfants ne doivent pas jouer avec le décapeur thermique.
• Le nettoyage et la maintenance de l’utilisateur ne doivent pas être effectués par des enfants.
• Si le cordon d’alimentation est endommagé, il doit être remplacé par le fabricant, son agent de
service ou des personnes de qualification similaire, afin d’éviter tout danger.
• Un incendie peut se produire si le décapeur thermique n’est pas utilisé avec précaution, par conséquent :
• vous devez être prudent lorsque vous utilisez le décapeur thermique dans les lieux où il y a
des matériaux combustibles ;
• vous devez prendre en compte que la chaleur peut s’acheminer vers des matériaux
combustibles qui sont hors de vue ;
• vous ne devez pas utiliser le décapeur dans une atmosphère explosive ;
• vous ne devez pas chauffer trop longtemps au même endroit ;
• vous ne devez pas laisser le décapeur thermique sans surveillance lorsqu’il est allumé ;
• vous devez placer le décapeur thermique sur son support après utilisation et le laisser
refroidir avant de le ranger.
UTILISATION PRÉVUE
Votre décapeur thermique a été spécialement conçu pour plier uniquement les tubes acryliques
et PETG. Le décapeur thermique a deux réglages :
1. Chaleur basse (position 1) : pour une utilisation sur une surface de travail ou des environs
ne devant pas devenir trop chauds.
2. Chaleur élevée (position 2) : pour un temps de chauffe plus rapide de la surface de travail
où vous pouvez également utiliser le décapeur à une plus grande distance.

- 28 -
MISE EN SERVICE
Respectez la tension du réseau : La tension de
la source d’alimentation doit correspondre à
la valeur indiquée sur la plaque signalétique
de l’appareil. Les rallonges doivent avoir une
section de conducteur de 2×1,5mm min.
Avant de brancher la fiche au secteur,
assurez-vous que le commutateur est en
position « 0 » (FIG. 1)
FIG. 1
FIG. 2
LISTE DES PIÈCES
PRINCIPALES
1 Buse chauffante
2Collier de protection thermique
3Ouvertures d’entrée d'air
4
Interrupteur principal
5
Affichage avec température par
incréments colorés
6Bouton pour diminuer la
température
7Bouton pour augmenter la
température
2
5
3
4
1
76
MISE EN MARCHE
Sélectionnez la température de
fonctionnement et le volume d’air souhaités
avec le commutateur en position I. (FIG. 2)

- 29 -
Sélectionnez la température de fonctionnement et le volume
d’air souhaités avec le commutateur en position II. (FIG. 3)
Prise UE (VDE) et prise UK (BS)
Position du commutateur I :
I. Réglage 60 °C–350 °C / 300 l/min-1
Position du commutateur II :
II. Réglage 60 °C–600 °C / 500 l/min-1
Arrêt :
Mettez le commutateur sur 0. (FIG. 1)
Prise US (UL)
Position du commutateur I :
I. Réglage 140 °F–572 °F/~11 cfm
Position du commutateur II :
II. Réglage 140 °F–932 °F/~18 cfm
Arrêt :
Mettez le commutateur sur 0. (FIG. 1)
FIG. 3
RÉGLAGE DE LA TEMPÉRATURE
(FIG. 4) Sur le panneau de commande, à
l’étape I, la température peut être augmentée
et diminuée par intervalles de 30 °C (86 °F), à
l’étape II, elle peut être augmentée et diminuée
par intervalles de 55 °C (131 °F). Pour augmenter
la température, appuyez sur le bouton gauche
(+), pour la diminuer, appuyez sur le bouton
droit (-). Appuyez brièvement sur les boutons ou
maintenez-les enfoncés jusqu’à la température
souhaitée. Lors de cette opération, veuillez
noter la température maximale qui dépend de
l’interrupteur marche/arrêt. La température
maximale n’est possible qu’en passant à l’étape
2. À l’étape 1, la température maximale est
de 350 °C (662 °F). L’écran intégré affiche la
température par incréments colorés.
FIG. 4
AUGMENTER LA
TEMPÉRATURE
BAISSER LA
TEMPÉRATURE
AFFICHAGE
INTÉGRÉ
PLACEMENT DU DÉCAPEUR
Placez le décapeur thermique à la verticale
sur une surface plane (table). Insérez une tige
de cintrage en silicone dans le tube. La tige en
silicone est utilisée pour des coudes de tube
plus réguliers. Tenez le tube lorsque la tige en
silicone est insérée à environ 5 cm (2 pouces)
de la buse du décapeur thermique. Faites
pivoter lentement le tube le long de l’axe et
déplacez-le d’un côté à l’autre pour chauffer
uniformément le tube. Lorsque le tube est
chauffé, vous pouvez le plier selon la forme
souhaitée. Si le tube est chauffé pendant une
longue période, des bulles, une déformation
du diamètre du tuyau, un changement de
couleur du tuyau peuvent se produire.
DISTANCE MIN.
5 cm (2”)

- 30 -
AVERTISSEMENT (prise US) : Ce
décapeur thermique a une prise
polarisée (une lame est plus large que
l’autre). Pour réduire le risque de choc
électrique, cette fiche est destinée à
s’insérer dans une prise polarisée dans
un seul sens. Si la fiche ne rentre pas
complètement dans la prise, inversez
la fiche. S’elle ne rentre toujours pas,
contactez un électricien qualifié. Ne
modifiez en aucun cas la fiche.
Ne placez jamais le décapeur thermique
couché sur le côté (FIG.6)
FIG. 6
AVERTISSEMENT : Pour votre propre
sécurité, lisez attentivement ce mode
d’emploi et les consignes de sécurité
générales avant d’utiliser le décapeur
thermique. Votre décapeur thermique
ne doit pas être transmis sans ces
instructions. Le décapeur thermique
doit être connecté uniquement à une
alimentation électrique de la même
tension que celle indiquée sur la plaque
signalétique et ne peut fonctionner que
sur une alimentation CA monophasée.
Nous vous recommandons d’utiliser l’outil de cintrage de tubes
durs EK-Loop Modulus pour un cintrage plus facile des tubes :
Outil de cintrage de tube dur EK-Loop
Modulus – 12 mm,
EAN du produit : 3831109816103
https://www.ekwb.com/shop/ek-loop-
modulus-hard-tube-bending-tool-12mm
Outil de cintrage de tube dur EK-Loop
Modulus – 14 mm,
EAN du produit : 3831109816110
https://www.ekwb.com/shop/ek-loop-
modulus-hard-tube-bending-tool-14mm
Outil de cintrage de tube dur EK-Loop
Modulus – 16 mm,
EAN du produit : 3831109816127
https://www.ekwb.com/shop/ek-loop-
modulus-hard-tube-bending-tool-16mm
EAN: 3831109816110
EAN: 3831109816127
EAN: 3831109816103
EAN: 3831109816110
EAN: 3831109816127
EAN: 3831109816103
AVERTISSEMENT : Placez toujours
le décapeur thermique TOUT DROIT
sur une surface plane (FIG.5)
FIG. 5

- 31 -
AVERTISSEMENTS DE SÉCURITÉ GÉNÉRAUX POUR LES
OUTILS ÉLECTRIQUES
RÈGLES DE SÉCURITÉ
AVERTISSEMENT : Le non-respect des règles de sécurité lors de l’utilisation du décapeur
peut entraîner un incendie, une explosion, un choc électrique ou des brûlures. Lisez le mode
d’emploi avant d’utiliser le décapeur thermique et respectez toujours les règles de sécurité.
Conservez ces instructions et donnez-les aux personnes qui n’en ont pas été informées avant
leur utilisation du décapeur thermique.
AVERTISSEMENT : Un boîtier endommagé ou une unité ouverte peut entraîner un choc
électrique dangereux. N’ouvrez pas le décapeur thermique et ne mettez jamais en service
un décapeur thermique endommagé. Ne percez pas le boîtier, par ex. pour y apposer une
étiquette d’entreprise. Avant toute intervention sur l’appareil, débranchez la fiche secteur.
AVERTISSEMENT : Un cordon d’alimentation endommagé peut entraîner un choc électrique
dangereux. Vérifiez régulièrement le cordon d’alimentation. N’utilisez pas l’appareil lorsque
le cordon d’alimentation est endommagé. Faites toujours remplacer un cordon endommagé
par un spécialiste. N’enroulez pas le cordon autour du décapeur thermique et protégez-le
de l’huile, de la chaleur et des bords tranchants. Ne portez pas le décapeur thermique par le
cordon et n’utilisez pas le cordon pour retirer la fiche de la prise.
AVERTISSEMENT : Ne travaillez pas sous la pluie ou dans un environnement humide ou
mouillé. Cela peut entraîner un choc électrique dangereux. Gardez le décapeur thermique
au sec. Rangez le décapeur thermique dans un endroit sec lorsqu’il n’est pas utilisé. Tenez
compte des conditions météorologiques. Ne travaillez pas dans des installations sanitaires
humides. Évitez tout contact corporel avec des câbles ou des surfaces mis à la terre, tels que
des tuyaux, des radiateurs, des cuisinières et des réfrigérateurs.
AVERTISSEMENT : Connectez le décapeur thermique utilisé à l’air libre à un disjoncteur à
courant résiduel (RCCB).
AVERTISSEMENT : Danger d’explosion ! Le décapeur thermique chaud peut enflammer
de manière explosive des fluides et des gaz combustibles. Ne travaillez pas dans un
environnement potentiellement explosif. Vérifiez l’environnement avant de commencer à
travailler. Ne travaillez pas sur ou à proximité de réservoirs de carburant ou de gaz, même
lorsqu’ils sont vides.
AVERTISSEMENT : Risque d’incendie ! La chaleur peut atteindre les matériaux combustibles
cachés derrière les revêtements, dans les plafonds, les planchers ou les cavités et les
enflammer. Inspectez la zone de travail avant de commencer à travailler et en cas de doute,
abstenez-vous d’utiliser le décapeur thermique. Ne pointez pas le décapeur thermique au
même endroit pendant de trop longues périodes.
AVERTISSEMENT : Risque d’incendie ! Un décapeur fonctionnant sans surveillance peut mettre
le feu à des objets se trouvant à proximité. Le décapeur thermique doit être constamment surveillé
pendant son fonctionnement. Lorsque vous laissez refroidir le décapeur thermique éteint, placez-
le toujours debout à la verticale. Laissez le décapeur thermique complètement refroidir.
AVERTISSEMENT : Risque d’incendie ! Lors du chauffage de vernis plastiques ou de
matériaux similaires, des gaz facilement inflammables se dégagent pouvant provoquer des
explosions. Des flammes peuvent se développer, c’est pourquoi vous devez avoir à portée de
main des moyens d’extinction d’incendie appropriés.

- 32 -
AVERTISSEMENT : Danger d’intoxication ! Lors du chauffage des plastiques, des vernis ou
de matériaux similaires des gaz pouvant être agressifs ou toxiques se développent. Évitez
de respirer toute vapeur, même lorsqu’elle semble inoffensive. Assurez toujours une bonne
aération de la zone de travail ou portez un respirateur.
AVERTISSEMENT : Risque de blessure ! Le jet d’air chaud peut blesser des personnes ou des
animaux. Toucher le tube chaud de l’élément chauffant ou la buse du décapeur thermique
provoque des brûlures de la peau. Tenez les enfants et autres personnes à l’écart du décapeur
thermique. Ne touchez pas le tube de l’élément chauffant ou la buse lorsqu’ils sont chauds.
N’utilisez pas le décapeur thermique comme sèche-cheveux. Il dégage beaucoup plus de
chaleur qu’un sèche-cheveux. N’utilisez pas le décapeur thermique pour chauffer des fluides
ou pour sécher des objets ou des matériaux qui se détruisent par l’influence de l’air chaud.
AVERTISSEMENT : Un démarrage ou une mise en marche involontaire de l’élément
chauffant après l’actionnement du relais thermique peut entraîner des blessures. Assurez-
vous que l’interrupteur est réglé sur OFF lorsque vous connectez le décapeur thermique à
l’alimentation secteur. Éteignez le décapeur thermique lorsque le relais thermique est activé.
AVERTISSEMENT : Risque de blessure ! L’utilisation d’une buse de réflexion du flux d’air
qui n’est pas adaptée à votre décapeur thermique peut entraîner des brûlures. Utilisez
uniquement les accessoires d’origine pour votre modèle répertoriés dans ce mode d’emploi.
AVERTISSEMENT : Risque de blessure et d’incendie. Le décapeur est dangereux pour les
enfants. Gardez le décapeur thermique chaud hors de portée des enfants.
DANGER : Risque de surchauffe ! Une manipulation incorrecte peut entraîner une
accumulation de chaleur et ainsi endommager le décapeur thermique. N’utilisez pas le
décapeur thermique lorsqu’il est placé horizontalement ou lorsqu’il est pointé vers le bas.
L’orifice d’entrée d’air et la buse ne doivent pas être recouverts. N’utilisez que des buses
adaptées à votre appareil.
Lisez tous les avertissements de sécurité, instructions, illustrations et spécifications fournis
avec ce décapeur thermique. Le non-respect de toutes les instructions énumérées ci-
dessous peut entraîner un choc électrique, un incendie et/ou des blessures graves.
SÉCURITÉ DE LA ZONE DE TRAVAIL
1. Gardez la zone de travail propre et bien éclairée. Les zones encombrées ou sombres sont
généralement des lieux propices aux accidents.
2. N’utilisez pas le décapeur thermique dans des atmosphères explosives, comme en
présence de liquides, de gaz ou de poussière inflammables. Le décapeur thermique crée
des étincelles qui peuvent enflammer la poussière ou les fumées.
3. Tenez les enfants et les passants à l’écart lors de l’utilisation d’un décapeur thermique. Les
distractions peuvent vous faire perdre le contrôle.
4. La fiche du décapeur thermique doit correspondre à la prise. Ne modifiez jamais la fiche de
quelque façon que ce soit. N’utilisez pas d’adaptateurs avec des outils électriques mis à la terre.
Des fiches non modifiées et des prises correspondantes réduiront le risque de choc électrique.
5. Évitez tout contact corporel avec des surfaces mises à la terre, telles que des tuyaux, des
radiateurs, des cuisinières et des réfrigérateurs. Il existe un risque accru de choc électrique
si votre corps est mis à la terre.

- 33 -
6. N’exposez pas le décapeur thermique à la pluie ou à des conditions humides. L’eau
pénétrant dans le décapeur thermique augmentera le risque de choc électrique.
7. Ne tirez pas sur le cordon. N’utilisez jamais le cordon pour transporter, tirer ou débrancher l’outil
électrique. Gardez le cordon à l’écart de la chaleur, de l’huile, des bords tranchants ou des pièces
mobiles. Les cordons endommagés ou emmêlés augmentent le risque de choc électrique.
8. Lorsque vous utilisez un décapeur thermique à l’extérieur, utilisez une rallonge adaptée à
une utilisation en extérieur. L’utilisation d’un cordon adapté à une utilisation en extérieur
réduit le risque de choc électrique.
9. Si l’utilisation du décapeur thermique dans un endroit humide est inévitable, utilisez une
alimentation protégée par un dispositif à courant résiduel (RCD). L’utilisation d’un dispositif
à courant résiduel RCD réduit le risque de choc électrique.
10. L’utilisation d’un décapeur thermique via un dispositif à courant résiduel RCD avec un
courant résiduel nominal de 30 mA est toujours recommandée.
11. Le décapeur thermique peut produire des champs électromagnétiques (CEM) qui ne
sont pas nocifs pour l’utilisateur. Cependant, les utilisateurs de stimulateurs cardiaques et
autres dispositifs médicaux similaires doivent contacter le fabricant de leur dispositif et/ou
un médecin pour obtenir des conseils avant d’utiliser ce décapeur thermique.
12. Ne touchez pas la prise d’alimentation avec les mains mouillées.
13. Si le cordon est endommagé, faites-le remplacer par le fabricant ou son agent afin d’éviter
tout danger de sécurité.
SÉCURITÉ PERSONNELLE
1. Restez vigilant, surveillez ce que vous faites et faites preuve de bon sens lorsque vous utilisez
le décapeur thermique. N’utilisez pas de décapeur thermique lorsque vous êtes fatigué ou
sous l’influence de drogues, d’alcool ou de médicaments. Un moment d’inattention lors de
l’utilisation du décapeur thermique peut entraîner des blessures graves.
2. Utilisez un équipement de protection individuelle. Portez toujours des lunettes de
protection. Les équipements de protection tels qu’un masque anti-poussière, des
chaussures de sécurité antidérapantes ou une protection auditive utilisés dans des
conditions appropriées réduisent les blessures corporelles.
3. Empêchez tout démarrage involontaire. Assurez-vous que l’interrupteur est en position
d’arrêt (fig. 1) avant de brancher à la source d’alimentation, de ramasser ou de transporter le
décapeur thermique. Porter un décapeur avec votre doigt sur l’interrupteur ou sous tension
avec l’interrupteur en marche est un comportement pouvant engendrer des accidents.
4. N’exagérez jamais. Gardez une bonne assise et un bon équilibre à tout moment. Cela
permet un meilleur contrôle du décapeur thermique dans des situations inattendues.
5. Habillez-vous correctement. Ne portez pas de vêtements amples ni de bijoux. Gardez vos
cheveux et vos vêtements à l’écart des pièces mobiles. Les vêtements amples, les bijoux
ou les cheveux longs peuvent se prendre dans les pièces mobiles.
6. Ne laissez pas la familiarité acquise par l’utilisation fréquente du décapeur thermique vous
permettre de devenir moins vigilant et d’ignorer les principes de sécurité des outils. Une
action imprudente peut causer des blessures graves en une fraction de seconde.

- 34 -
7. En cas d’accident ou de panne, débranchez la fiche du décapeur thermique de la source
d’alimentation et contactez le service client EKWB ou votre centre de service agréé local
pour obtenir des conseils avant d’utiliser ce décapeur thermique.
8. En cas de brûlures, enlevez les vêtements chauds ou brûlés. Si les vêtements collent à la
peau, coupez ou déchirez autour. Maintenez la peau brûlée sous l’eau courante tiède (pas
froide) ou plongez-la dans de l’eau tiède jusqu’à ce que la douleur disparaisse. Utilisez des
compresses si l’eau courante n’est pas disponible. Couvrez avec un pansement stérile non
adhésif ou un chiffon propre. N’appliquez pas de beurre, d’huile, de lotions ou de crèmes
(surtout s’ils contiennent du parfum).
9.
Consulter un médecin : lorsque vous voyez des signes d’infection comme une augmentation
de la douleur, une rougeur, un gonflement, de la fièvre ou un suintement, la cloque de la brûlure
mesure plus de 5 cm (2’’) ou suinte, la rougeur et la douleur durent plus de quelques heures, la
douleur s’aggrave, les mains, les pieds, le visage ou les organes génitaux sont brûlés.
UTILISATION ET ENTRETIEN DU DÉCAPEUR THERMIQUE
1. Ne forcez pas le décapeur thermique. Le décapeur thermique fonctionnera mieux et de
manière plus sûre si utilisé au taux pour lequel il a été conçu.
2. N’utilisez pas le décapeur thermique si l’interrupteur ne s’allume pas et ne s’éteint pas. Si
le décapeur thermique ne peut pas être contrôlé avec l’interrupteur, cela est dangereux et
doit être réparé.
3. Débranchez la fiche de la source d’alimentation du décapeur thermique avant d’effectuer
des réglages ou de ranger le décapeur thermique. De telles mesures de sécurité préventives
réduisent le risque de démarrage accidentel de l’outil électrique.
4. Rangez le décapeur thermique inactif hors de portée des enfants et ne permettez pas à des
personnes non familiarisées avec le décapeur thermique ou avec ces instructions de l’utiliser.
Le décapeur thermique est un outil dangereux entre les mains d’utilisateurs non formés.
5. Maintenez le décapeur thermique. Assurez-vous qu’il n’y a pas de désalignement ou
de grippage des pièces mobiles, de bris de pièces et de toute autre condition pouvant
affecter le fonctionnement du décapeur thermique. S’il est endommagé, faites réparer
le décapeur thermique avant son utilisation. De nombreux accidents sont causés par des
outils électriques mal maintenus.
6. Utilisez le décapeur thermique conformément à ces instructions en prenant en considération
des conditions de travail et du travail à effectuer. L’utilisation du décapeur thermique pour
des opérations différentes de celles prévues peut entraîner une situation dangereuse.
7. Gardez les poignées et les surfaces de préhension sèches, propres et exemptes d’huile et
de graisse. Les poignées et les surfaces de préhension glissantes ne permettent pas une
manipulation et un contrôle sûrs du décapeur thermique dans des situations inattendues.
8. Lors de l’utilisation du décapeur thermique, ne portez pas de gants de travail en tissu
qui pourraient s’emmêler. L’enchevêtrement de gants de travail en tissu dans les pièces
mobiles peut entraîner des blessures.
INSTRUCTIONS DE SÉCURITÉ SUPPLÉMENTAIRES POUR LE DÉCAPEUR
• Ne placez pas la main sur les ouvertures d’aération et ne les bloquez pas de quelque
manière que ce soit.

- 35 -
• La buse de ce décapeur thermique devient extrêmement chaude pendant l’utilisation.
Laissez la buse refroidir avant de la toucher.
• Éteignez toujours le décapeur thermique avant de le poser.
• Ne laissez pas le décapeur thermique sans surveillance lorsqu’il est allumé.
• Un incendie peut survenir si le décapeur thermique n’est pas utilisé avec précaution.
• La chaleur peut s’acheminer vers des matériaux combustibles qui sont hors de vue.
Ne l’utilisez pas dans une atmosphère humide où des gaz inflammables peuvent être
présents ou à proximité de matériaux combustibles.
• Placez le décapeur thermique sur son support et laissez-le refroidir complètement avant
de le ranger. Assurez une aération adéquate, des vapeurs toxiques pouvant se produire.
• Ne pas utiliser comme sèche-cheveux.
• N’obstruez ni l’entrée d’air ni la sortie de la buse, cela pourrait provoquer une accumulation
de chaleur excessive et endommager le décapeur thermique.
• Ne dirigez pas le jet d’air chaud vers d’autres personnes.
• Ne touchez pas la buse en métal, elle devient très chaude pendant l’utilisation et reste
chaude jusqu’à 30 minutes après utilisation.
• Ne placez pas la buse contre n’importe quel objet pendant l’utilisation ou immédiatement
après l’utilisation.
• N’enfoncez rien dans la buse, cela pourrait vous causer un choc électrique. Ne baissez
pas le regard sur la buse pendant que l’appareil fonctionne en raison de la température
élevée produite.
ENTRETIEN ET NETTOYAGE
Attention : Avant d’effectuer tout travail sur le décapeur thermique, débranchez la fiche
d’alimentation.
Maintenance :
Votre décapeur thermique a été conçu pour fonctionner sur une longue période avec un
minimum de maintenance. Un fonctionnement continu et satisfaisant dépend d’une maintenance
appropriée et d’un nettoyage régulier de l’outil.
Lubrification : Votre décapeur thermique ne nécessite aucune lubrification supplémentaire.
Nettoyage :
• Pour éviter la surchauffe du moteur, maintenez les fentes d’aération de la machine propres et
exemptes de poussière et de saleté.
• Nettoyez régulièrement le boîtier de la machine avec un chiffon doux, de préférence après
chaque utilisation. Si la saleté ne s’enlève pas, utilisez un chiffon doux humidifié avec de l’eau
savonneuse.
AVERTISSEMENT : N’utilisez jamais de solvants tels que l’essence, l’alcool, l’eau
ammoniacale, etc. Ces solvants peuvent endommager les pièces en plastique.

- 36 -
DÉPANNAGE
Isolez la source d’alimentation en retirant la fiche d’alimentation de la prise avant d’effectuer un
réglage, un entretien ou une maintenance.
DONNÉES TECHNIQUES
Nom et modèle
du produit
Décapeur
thermique EK-Loop
2 000 W – Prise UE
Décapeur
thermique EK-Loop
2 000 W – Prise UK
Décapeur thermique EK-Loop
1 500 W – Prise US
Type de prise
d'alimentation VDE BS UL
N° de modèle RF15-A2Y RF15B2Y
Tension 220-240 (V~) 120 V~
Fréquence (Hz)
50-60
60
Modes de
fonctionnement 2
Niveau sonore (dB)
70
Position III III
Puissance (W) 250 2000 250 1500
Température
60-350 (°C) 60600 °C140572 °F 140932 °F
Débit d'air 300 (l/min) 500 (l/min) 11 (cfm) 18 (cfm)
Affichage Affiche la température par incréments colorés
Classe de
protection II/Double isolation
Matériaux du
boîtier Plastique et caoutchouc
Longueur de câble
2 000 mm ±20 mm
Pays d’origine : Chine
Garantie
Pour les conditions de la garantie, veuillez consulter la carte de garantie jointe à la fin du livret
du mode d’emploi.
La date de fabrication (numéro de lot) figure sur l’appareil.
EK® est une marque déposée de EKWB d.o.o.
© 2022 EKWB d.o.o. Tous droits réservés
https://www.ekwb.com
Recyclage
Les produits marqués de ce symbole ne doivent pas être jetés avec les déchets
municipaux non triés afin d’éviter les problèmes d’environnement et de santé
dus aux substances dangereuses. Éliminez toujours les produits électriques et
électroniques dans un point de recyclage/collecte officiel approprié.

- 37 -
Pistola termica
EK-Loop Manuale

- 38 -
SOMMARIO
MODELLI 39
CONTENUTO DELLA CONFEZIONE 39
AVVISI DI SICUREZZA 39
USO PREVISTO 39
ELENCO DEI COMPONENTI PRINCIPALI 40
MESSA IN FUNZIONE 40
ACCENSIONE 40
IMPOSTAZIONE DELLA TEMPERATURA 41
POSIZIONAMENTO DELLA PISTOLA TERMICA 41
AVVISI DI SICUREZZA GENERALI PER GLI UTENSILI ELETTRICI
43
NORME DI SICUREZZA 43
SICUREZZA SUL POSTO DI LAVORO 44
SICUREZZA PERSONALE 45
UTILIZZO E CURA DELLA PISTOLA TERMICA 46
ISTRUZIONI DI SICUREZZA AGGIUNTIVE PER LA PISTOLA TERMICA 46
MANUTENZIONE E PULIZIA 47
RISOLUZIONE DEI PROBLEMI 48
DATI TECNICI 48
SCHEDA DI GARANZIA LIMITATA 90
GARANZIA LIMITATA 90

- 39 -
MODELLI
Pistola termica EK-Loop 2000 W – Spina UE
Pistola termica EK-Loop 2000 W – Spina UK
Pistola termica EK-Loop 1500 W – Spina USA
CONTENUTO DELLA CONFEZIONE
Verificare che la pistola termica, il cavo e la spina di alimentazione non siano stati danneggiati
durante il trasporto.
AVVISO: I materiali di imballaggio non sono giocattoli! I bambini non devono giocare
con i sacchetti di plastica! Pericolo di soffocamento!
• Pistola termica (1 pezzo)
• Manuale d’istruzioni (1 pezzo)
In caso di parti mancanti o danneggiate, contattare il rivenditore.
AVVISI DI SICUREZZA
Leggere, comprendere e seguire tutte le norme di sicurezza e le istruzioni d’uso riportate nel presente
manuale prima di utilizzare il prodotto.
Conformità alla norma EN 60335-1
• Questa pistola termica è destinata esclusivamente a un utilizzo domestico e non ad applicazioni
professionali.
• Questa pistola termica non deve essere utilizzata da bambini o da persone con capacità fisiche,
sensoriali o mentali ridotte e prive dell’esperienza e competenza necessarie.
• I bambini non devono giocare con la pistola termica.
• La pulizia e la manutenzione ordinaria non devono essere eseguite dai bambini.
• Se il cavo di alimentazione è danneggiato, deve essere sostituito dal produttore, dal suo rappresentante
di zona o da personale analogamente qualificato, al fine di evitare eventuali pericoli.
• Pericolo di incendio se la pistola termica non viene utilizzata con attenzione, quindi:
• prestare attenzione quando si usa la pistola termica in luoghi in cui sono presenti materiali
infiammabili;
• tenere presente che il calore può essere condotto a materiali infiammabili che non sono in vista;
• non utilizzare in presenza di atmosfere esplosive;
• non applicare a lungo nello stesso punto;
• non lasciare la pistola termica incustodita mentre è accesa;
• appoggiare la pistola termica sul suo supporto dopo ogni utilizzo e lasciarla raffreddare prima di riporla.
USO PREVISTO
Questa pistola termica è stata esclusivamente progettata per tubi in acrilico e in PETG.
La pistola termica è dotata di due impostazioni:
1. Calore basso (posizione 1): per un utilizzo in cui la superficie di lavoro o l’ambiente
circostante non devono essere troppo caldi.
2. Calore elevato (posizione 2): per un tempo di riscaldamento più rapido della superficie di
lavoro e possibilità di azionare la pistola a una distanza maggiore.

- 40 -
MESSA IN FUNZIONE
Attenersi alla tensione di rete: la tensione della
fonte di alimentazione deve corrispondere
al valore indicato sulla targhetta dell’unità.
Le prolunghe devono avere una sezione del
conduttore di 2×1,5mm min.
Prima di collegare la spina rete è necessario
verificare che l’interruttore sia in posizione
“0”. (FIG. 1)
FIG. 1
FIG. 2
ELENCO DEI COMPONENTI
PRINCIPALI
1Ugello termico
2 Collare di protezione dal calore
3Aperture per l’aspirazione
dell'aria
4
Interruttore principale
5
Display con indicazione della
temperatura con segmenti colorati
6Pulsante per la diminuzione della
temperatura
7Pulsante per l’aumento della
temperatura
2
5
3
4
1
76
ACCENSIONE
Selezionare la temperatura d’esercizio e il
volume d’aria desiderati con l’interruttore in
posizione I (FIG. 2)

- 41 -
Selezionare la temperatura d’esercizio e il volume
d’aria desiderati con l’interruttore in posizione II (FIG. 3)
Spina UE (VDE) e spina UK (BS)
Interruttore in posizione I:
I. Regolazione 60 °C–350 °C / 300 l/min-1
Interruttore in posizione II:
II. Regolazione 60 °C–600 °C / 500 l/min-1
Spegnimento:
Portare l’interruttore su 0 (FIG. 1)
Spina USA (UL)
Interruttore in posizione I:
I. Impostazione 140 °F–572 °F/~11 cfm
Interruttore in posizione II:
II. Impostazione 140 °F–932 °F/~18 cfm
Spegnimento:
Portare l’interruttore su 0 (FIG. 1)
FIG. 3
IMPOSTAZIONE DELLA TEMPERATURA
(FIG. 4) In posizione I, la temperatura può
essere aumentata e diminuita tramite il
pannello di controllo a intervalli di 30 °C (86
°F); in posizione II la temperatura può essere
aumentata e diminuita tramite il pannello
di controllo a intervalli di 55 °C (131 °F). Per
aumentare la temperatura, premere il pulsante
sinistro (+); per diminuire la temperatura,
premere il pulsante destro (-). Premere
brevemente i pulsanti o tenerli premuti fino al
raggiungimento della temperatura desiderata.
Tenere sempre presente la temperatura
massima, che dipenderà dall’interruttore ON/
OFF. La temperatura massima è raggiungibile
solo in posizione II. Se è selezionata la posizione
I, la temperatura massima è di 350 °C (662 °F).
Il display integrato visualizza la temperatura
selezionata con settori di incremento colorati.
FIG. 4
AUMENTARE LA
TEMPERATURA
ABBASSARE LA
TEMPERATURA
DISPLAY
INTEGRATO
POSIZIONAMENTO DELLA PISTOLA
TERMICA
Posizionare la pistola termica in posizione
verticale su una superficie piana (tavolo). Inserire
un’asta di piegatura in silicone in un tubo. L’asta
in silicone viene utilizzata per piegare il tubo in
modo più agevole. Tenere un tubo con l’asta in
silicone inserita a circa 5 cm (2 pollici) dall’ugello
della pistola termica. Ruotare lentamente il
tubo lungo l’asse e muoverlo da un lato all’altro
per riscaldarlo in modo uniforme. Quando il
tubo è riscaldato è possibile piegarlo alla forma
desiderata. Se il tubo viene riscaldato troppo
a lungo, possono verificarsi la formazione di
bolle, la deformazione del diametro del tubo o il
cambiamento di colore del tubo stesso.
DISTANZA MIN.
5 cm (2”)

- 42 -
AVVISO (spina USA): Questa pistola
termica è dotata di una spina polarizzata
(un polo è più largo dell’altro). Per ridurre
il rischio di scariche elettriche, questa
spina è destinata a essere inserita in una
presa polarizzata solo in una direzione.
Se la spina non entra completamente
nella presa, invertire la spina. Se il
problema persiste, contattare un
elettricista qualificato. Non apportare
modifiche di nessun genere alla spina.
Non appoggiare mai di lato la pistola termica
ancora calda (FIG.6)
FIG. 6
AVVISO: Per la vostra sicurezza,
leggere attentamente il presente
manuale e le istruzioni generali di
sicurezza prima di iniziare a utilizzare
la pistola termica. La pistola termica
può essere ceduta ad altri unicamente
accompagnata dalle presenti istruzioni.
La pistola termica deve essere collegata
esclusivamente a una rete della stessa
tensione indicata sulla targhetta, e può
essere utilizzata esclusivamente con
alimentazione CA monofase.
Si raccomanda di utilizzare lo strumento EK-Loop Modulus
Hard Tube Bending Tool per facilitare la piegatura dei tubi:
EK-Loop Modulus Hard Tube Bending
Tool – 12mm,
EAN del prodotto: 3831109816103
https://www.ekwb.com/shop/ek-loop-
modulus-hard-tube-bending-tool-12mm
EK-Loop Modulus Hard Tube Bending
Tool – 14mm,
EAN del prodotto: 3831109816110
https://www.ekwb.com/shop/ek-loop-
modulus-hard-tube-bending-tool-14mm
EK-Loop Modulus Hard Tube Bending
Tool – 16mm,
EAN del prodotto: 3831109816127
https://www.ekwb.com/shop/ek-loop-
modulus-hard-tube-bending-tool-16mm
EAN: 3831109816110
EAN: 3831109816127
EAN: 3831109816103
EAN: 3831109816110
EAN: 3831109816127
EAN: 3831109816103
AVVISO: Posizionare sempre la pistola
termica ancora calda su una superficie
piana e in posizione VERTICALE (FIG.5)
FIG. 5

- 43 -
AVVISI DI SICUREZZA GENERALI PER GLI UTENSILI ELETTRICI
NORME DI SICUREZZA
AVVISO: L’inosservanza delle norme di sicurezza durante il lavoro con la pistola termica
può causare incendi, esplosioni, scariche elettriche o ustioni. Leggere le istruzioni per
l’uso prima di utilizzare la pistola termica e osservare sempre le norme di sicurezza.
Conservare le presenti istruzioni e consegnarle alle persone che non hanno ricevuto
istruzioni prima del loro utilizzo della pistola termica.
AVVISO: Un involucro danneggiato o un’unità aperta può provocare una scarica
elettrica pericolosa. Non aprire la pistola termica e non metterla in funzione se è
danneggiata. Non forare l’involucro, per es. per apporre un’etichetta aziendale. Prima
di qualsiasi intervento sul dispositivo, estrarre la spina di rete.
AVVISO: Un cavo di alimentazione danneggiato può causare una scarica elettrica
pericolosa. Controllare regolarmente il cavo di alimentazione. Non utilizzare l’unità se il
cavo di alimentazione è danneggiato. Far sempre sostituire il cavo danneggiato da un
tecnico qualificato. Non avvolgere il cavo intorno alla pistola termica e tenerlo al riparo
da olio, calore ed eventuali bordi affilati. Non trasportare la pistola termica tenendola
per il cavo e non utilizzare il cavo per estrarre la spina dalla presa.
AVVISO:
Non lavorare sotto la pioggia o in un ambiente umido o bagnato. Questo
potrebbe causare scariche elettriche pericolose. Tenere la pistola termica all’asciutto.
Conservare la pistola termica in un luogo asciutto quando non viene utilizzata. Tenere in
considerazione le condizioni meteorologiche. Non svolgere nessun lavoro in installazioni
sanitarie bagnate. Evitare il contatto del corpo con cavi o superfici con messa a terra,
come tubi, radiatori, fornelli e frigoriferi.
AVVISO: Collegare la pistola termica che viene utilizzata all’aperto tramite un
interruttore differenziale (RCCB).
AVVISO: Pericolo di esplosione! La pistola termica può infiammare in modo esplosivo
fluidi e gas combustibili. Non svolgere nessun lavoro in un ambiente potenzialmente
esplosivo. Controllare l’ambiente circostante prima di iniziare le attività. Non operare
su contenitori di carburante o di gas o nelle loro vicinanze, anche quando sono vuoti.
AVVISO: Pericolo di incendio! Il calore può raggiungere i materiali combustibili
presenti in rivestimenti, soffitti, pavimenti o cavità, e provocarne l’incendio. Ispezionare
l’area di lavoro prima di iniziare le operazioni e, in caso di dubbio, astenersi dall’utilizzare
la pistola termica. Non puntare la pistola termica su uno stesso punto per periodi di
tempo prolungati.
AVVISO: Pericolo di incendio! Il funzionamento non presidiato della pistola termica
incendiare gli oggetti che si trovano nelle sue vicinanze. La pistola termica deve
essere tenuta sotto controllo per tutto il tempo in cui è in funzione. Quando si lascia
raffreddare la pistola termica ormai spenta, posizionarla sempre in posizione verticale
e in modo che sia ben ferma. Lasciare raffreddare completamente la pistola termica.
AVVISO:
Pericolo di incendio! Quando si lavora vernice plastica o materiali simili,
possono svilupparsi gas facilmente infiammabili e che possono causare esplosioni.
È necessario essere preparati al rischio di incendio e tenere a portata di mano mezzi
di estinzione adeguati.

- 44 -
AVVISO: Pericolo di intossicazione! Quando si lavorano plastiche, vernici o materiali
simili, possono svilupparsi gas potenzialmente aggressivi o tossici. Evitare di respirarne
i vapori, anche quando sono apparentemente innocui. Provvedere sempre a una buona
ventilazione dell’area di lavoro o indossare un apposito respiratore.
AVVISO: Pericolo di lesioni! Il getto d’aria calda può causare lesioni a persone o
animali. Toccare il tubo caldo dell’elemento riscaldante o l’ugello della pistola termica
provoca ustioni cutanee. Tenere i bambini e altre persone lontane dalla pistola
termica. Non toccare il tubo dell’elemento riscaldante o l’ugello quando sono caldi.
Non utilizzare la pistola termica come asciugacapelli. Sviluppa molto più calore di un
asciugacapelli. Non utilizzare la pistola termica per riscaldare fluidi o per asciugare
oggetti o materiali che potrebbero essere danneggiati dall’aria calda.
AVVISO: L’avvio involontario o l’accensione imprevista dell’elemento riscaldante
dopo l’attivazione del relè termico può provocare lesioni. Assicurarsi che l’interruttore
sia posizionato su OFF quando si collega la pistola termica alla rete di alimentazione.
Spegnere la pistola termica quando il relè termico è stato attivato.
AVVISO: Pericolo di lesioni! L’utilizzo di un ugello di riflessione del flusso d’aria che
non è adatto alla pistola termica può causare ustioni. Utilizzare esclusivamente
accessori originali per il vostro modello, riportati nelle presenti istruzioni d’uso.
AVVISO: Pericolo di lesioni e incendio. La pistola termica è pericolosa per i bambini.
Tenere la pistola termica calda lontano dalla portata dei bambini.
PERICOLO:
Pericolo di surriscaldamento! Maneggiare la pistola in modo inappropriato
può comportare un accumulo di calore e di conseguenza danneggiare la pistola
termica stessa. Non utilizzare la pistola termica quando è appoggiata orizzontalmente
o quando è rivolta verso il basso. L’apertura per l’aspirazione dell’aria e l’ugello non
devono essere coperti. Utilizzare esclusivamente ugelli adatti alla vostra unità.
Leggere tutte le avvertenze sulla sicurezza, le istruzioni, le illustrazioni e le specifiche fornite
unitamente alla presente pistola termica. La mancata osservanza di tutte le istruzioni riportate
di seguito può essere causa di scariche elettriche, incendi e/o lesioni gravi.
SICUREZZA SUL POSTO DI LAVORO
1. Mantenere pulita e ben illuminata la zona di lavoro. Il disordine o le zone di lavoro non
illuminate possono provocare incidenti.
2. Non utilizzare la pistola termica in ambienti con atmosfera potenzialmente esplosiva, per
es. in presenza di liquidi, gas o polveri infiammabili. La pistola termica genera scintille che
possono infiammare la polvere o i fumi.
3. Tenere lontani i bambini e gli estranei durante l’utilizzo della pistola termica. In caso di
distrazione sussiste il rischio di perdere il controllo dell’utensile.
4. Le spine della pistola termica devono corrispondere alla presa. Non apportare mai modifiche
alla spina. Non utilizzare adattatori con utensili elettrici dotati di messa a terra. L’utilizzo di
spine e di corrispondenti prese elettriche non modificate riduce il rischio di scariche elettriche.
5. Evitare il contatto del corpo con superfici con messa a terra, per es. tubi, radiatori, fornelli e frigoriferi.
Se il corpo è sottoposto a messa a terra, sussiste un rischio maggiore di scariche elettriche.

- 45 -
6. Tenere la pistola elettrica al riparo dalla pioggia o dall’umidità. L’acqua che penetra nella
pistola termica aumenta il rischio di scariche elettriche.
7. Non utilizzare il cavo per scopi diversi da quelli previsti. Non utilizzare il cavo per trasportare
e appendere l’utensile o estrarre la spina dalla presa di corrente. Tenere il cavo al riparo
da fonti di calore, olio, spigoli vivi o parti in movimento. I cavi danneggiati o aggrovigliati
aumentano il rischio di scariche elettriche.
8. Nel caso di utilizzo della pistola termica all’aperto, utilizzare una prolunga adatta all’uso
esterno. L’utilizzo di cavi di prolunga per esterni riduce il rischio di scosse elettriche.
9. Qualora sia indispensabile utilizzare la pistola termica in un luogo umido, utilizzare
un’alimentazione protetta un interruttore differenziale (RCD). L’utilizzo un interruttore
differenziale riduce il rischio di scariche elettriche.
10. Si consiglia sempre di utilizzare la pistola termica tramite un RCD con una corrente residua
nominale di 30 mA o inferiore.
11. La pistola termica può produrre campi elettromagnetici (EMF) che non sono dannosi per
l’utente. Tuttavia, gli utenti con pacemaker e altri dispositivi medici simili dovrebbero contattare il
produttore del dispositivo e/o il medico per una consulenza prima di utilizzare la pistola termica.
12. Non toccare la spina di alimentazione con le mani bagnate.
13. Se il cavo è danneggiato, farlo sostituire dal produttore o dal suo agente per evitare pericoli
per la sicurezza.
SICUREZZA PERSONALE
1. Quando si utilizza la pistola termica è importante concentrarsi sul lavoro e usare buon
senso. Non utilizzare la pistola termica quando si è stanchi o sotto l’effetto di stupefacenti,
alcol e farmaci. Un solo attimo di disattenzione durante l’utilizzo della pistola termica può
provocare gravi lesioni personali.
2. Indossare sempre dispositivi di protezione personale. Indossare sempre occhiali protettivi.
I dispositivi di protezione, per es. maschera antipolvere, calzature di sicurezza antiscivolo
o protezioni acustiche utilizzate nelle condizioni adeguate, ridurranno eventuali lesioni
personali.
3. Evitare l’accensione involontaria dell’utensile. Assicurarsi che l’interruttore sia in posizione OFF
(Fig. 1) prima di collegare la fonte di alimentazione, prendere in mano o trasportare la pistola
termica. Il trasporto della pistola termica con il dito posizionato sull’interruttore o il collegamento
della pistola termica alla rete con l’interruttore su ON aumenta il rischio di incidenti.
4. Non sporgersi troppo. Cercare di tenere una posizione stabile e di mantenere sempre
l’equilibrio. Questo permette un migliore controllo della pistola termica in caso di eventuali
situazioni impreviste.
5. Indossare un abbigliamento adeguato. Non indossare abiti larghi o gioielli. Tenere i capelli
e i vestiti lontani dalle parti in movimento. Abiti larghi, gioielli o capelli lunghi possono
impigliarsi nelle parti in movimento.
6. Non consentire che la familiarità acquisita dall’utilizzo frequente della pistola termica porti a
un atteggiamento rilassato e a ignorare i principi di sicurezza per l’utilizzo dell’utensile. Solo
pochi attimi di disattenzione possono provocare gravi lesioni.

- 46 -
7. In caso di incidente o guasto, scollegare la spina della pistola termica dalla fonte di
alimentazione e contattare l’assistenza clienti EKWB o il centro di assistenza autorizzato di
zona per ricevere una consulenza prima di mettere in funzione la pistola termica.
8. In caso di ustioni rimuovere gli indumenti caldi o bruciati. Se gli indumenti aderiscono alla
cute, tagliarli o strapparli tutt’intorno. Tenere la cute ustionata sotto acqua corrente fresca
(non fredda) o immergerla in acqua fresca fino a quando il dolore si attenua. In mancanza
di acqua corrente, utilizzare degli impacchi. Coprire con una benda sterile non adesiva o un
panno pulito. Non applicare burro, olio, lozioni o creme (in particolare se contenenti profumo).
9. Quando rivolgersi a un medico: in caso di segni visibili di infezione come aumento del
dolore, arrossamento, gonfiore, febbre o trasudamento, la vescica da ustione è più ampia
di 5 cm (2’’) o trasuda, il rossore e il dolore durano più di qualche ora, il dolore peggiora, le
mani, i piedi, il viso o i genitali presentano ustioni.
UTILIZZO E CURA DELLA PISTOLA TERMICA
1. Non forzare la pistola termica. La pistola termica eseguirà un lavoro migliore e più sicuro al
ritmo per il quale è stata progettata.
2. Non utilizzare la pistola termica se l’interruttore non si accende o non si spegne. Se la
pistola termica non può essere controllata mediante l’interruttore, è pericolosa e deve
essere riparata.
3. Scollegare la spina dalla fonte di alimentazione prima di procedere a qualsiasi regolazione o
di riporla. Queste misure preventive riducono il rischio di accensione inavvertita dell’utensile.
4. Conservare la pistola termica inutilizzata lontano dalla portata dei bambini e non permetterne
l’utilizzo a persone che non hanno familiarità con la stessa o con le presenti istruzioni. La
pistola termica è pericolosa nelle mani di utenti non adeguatamente addestrati.
5. Manutenzione della pistola termica. Controllare il disallineamento o l’impuntamento
delle parti mobili, la rottura delle parti e qualsiasi altra condizione che possa influenzare il
funzionamento della pistola termica. Se è danneggiata, far riparare la pistola termica prima
del suo utilizzo. Molti incidenti sono causati da una manutenzione non corretta degli utensili.
6. Utilizzare la pistola termica in conformità alle presenti istruzioni, tenendo conto delle
condizioni di lavoro e del lavoro da eseguire. L’utilizzo della pistola termica per operazioni
diverse da quelle previste potrebbe essere potenzialmente pericoloso.
7. Mantenere le maniglie e le superfici di presa asciutte, pulite e prive di olio e grasso. Le
impugnature e le superfici di presa scivolose non permettono di maneggiare e controllare
la pistola termica in modo sicuro in situazioni impreviste.
8. Quando si utilizza la pistola termica, non indossare guanti da lavoro di stoffa che potrebbero
rimanere impigliati. In caso di guanti da lavoro di stoffa impigliati nelle parti in movimento,
sussiste il rischio di lesioni personali.
ISTRUZIONI DI SICUREZZA AGGIUNTIVE PER LA PISTOLA TERMICA
• Non appoggiare la mano sulle prese d’aria e non bloccare in nessun modo le prese d’aria.
• L’ugello della pistola termica diventa estremamente caldo durante il suo utilizzo. Lasciare
raffreddare l’ugello prima di toccarlo.

- 47 -
• Spegnere sempre la pistola termica prima di deporla.
• Non lasciare la pistola termica incustodita mentre è accesa.
• Se la pistola termica non viene usata con cautela, sussiste il rischio di incendio.
• Il calore può essere condotto a materiali infiammabili che non sono in vista. Non utilizzare
in un’atmosfera umida, in cui possono essere presenti gas infiammabili, o in prossimità di
materiali combustibili.
• Collocare la pistola termica sul suo supporto e lasciarla raffreddare completamente prima
di riporla. Assicurare un’adeguata ventilazione dato che possono venire prodotti fumi
tossici.
• Non utilizzarla come un asciugacapelli.
• Non ostruire l’apertura per l’aspirazione dell’aria o l’uscita dell’ugello; questo potrebbe
causare un eccessivo accumulo di calore con conseguenti danni alla pistola termica
stessa.
• Non dirigere il getto d’aria calda verso altre persone.
• Non toccare l’ugello di metallo: durante l’uso si riscalda molto e rimane caldo fino a 30
minuti dopo il suo utilizzo.
• Non appoggiare l’ugello contro altri oggetti durante e subito dopo il suo utilizzo.
• Non inserire nulla nell’ugello: pericolo di scarica elettrica. Non abbassare lo sguardo verso
l’ugello mentre l’unità è in funzione: la temperatura prodotta è elevata.
MANUTENZIONE E PULIZIA
Attenzione: Prima di eseguire qualsiasi intervento sulla pistola termica, estrarre la spina di
alimentazione.
Manutenzione: La pistola termica è stata progettata per funzionare per un lungo periodo di
tempo, con manutenzione ridotta al minimo. Il funzionamento continuo e ottimale dipende dalla
cura e dalla pulizia regolari dell’utensile.
Lubrificazione: La pistola termica non necessita di ulteriore lubrificazione.
Pulizia:
• Per evitare il surriscaldamento del motore, mantenere le fessure di ventilazione del dispositivo
pulite e libere da polvere e sporco.
• Pulire regolarmente il corpo dell’utensile con un panno morbido, preferibilmente dopo ciascun
utilizzo. Se non si riesce a rimuovere la sporcizia, utilizzare un panno morbido inumidito con
acqua e sapone.
AVVISO: Non utilizzare solventi, per es. benzina, alcool, ammoniaca, ecc. L’utilizzo
di solventi può danneggiare le parti in plastica.

- 48 -
RISOLUZIONE DEI PROBLEMI
Isolare la fonte di alimentazione rimuovendo la spina di alimentazione dalla presa prima di
procedere alla regolazione, alle operazioni di assistenza o alla manutenzione.
DATI TECNICI
Nome del
prodotto e
modello
Pistola termica
EK-Loop 2000W -
spina UE
Pistola termica
EK-Loop 2000W -
spina UK
Pistola termica
EK-Loop 1500W -
spina USA
Tipo di spina di
alimentazione VDE BS UL
Modello n. RF15-A2Y RF15B2Y
Voltaggio 220-240 (V~) 120 V~
Frequenza (Hz)
50-60
60
Modalità di
funzionamento 2
Livello di
rumorosità (dB) 70
Posizione III III
Grado di
potenza (W) 250 2000 250 1500
Temperatura
60-350 (°C) 60600 °C140572 °F 140932 °F
Flusso d'aria 300 (l/min) 500 (l/min) 11 (cfm) 18 (cfm)
Display Mostra il grado di temperatura mediante incrementi colorati
Classe di protezione
II / Doppio isolamento
Materiali correlati
Plastica e gomma
Lunghezza del cavo
2000 mm ± 20 mm
Paese di origine: Cina
Garanzia
Per i termini e le condizioni di garanzia, si prega di consultare la scheda di garanzia allegata
alla fine del libretto di istruzioni.
La data di produzione (numero di lotto) si trova sul dispositivo.
EK® è un marchio registrato di EKWB d.o.o.
© 2022 EKWB d.o.o. Tutti i diritti riservati
https://www.ekwb.com
Riciclaggio
I prodotti contrassegnati con questo simbolo non devono essere smaltiti con i rifiuti
urbani non differenziati per evitare problemi ambientali e sanitari dovuti a sostanze
pericolose. Smaltire sempre i prodotti elettrici ed elettronici in un idoneo punto di
riciclaggio/raccolta ufficiale.

- 49 -
Pistola de calor
EK-Loop Manual

- 50 -
ÍNDICE
MODELOS 51
CONTENIDO DEL PAQUETE 51
ADVERTENCIAS DE SEGURIDAD 51
USO PREVISTO 51
LISTA DE PIEZAS PRINCIPALES 52
PUESTA EN FUNCIONAMIENTO
52
ENCENDIDO 52
AJUSTE DE LA TEMPERATURA 53
COLOCACIÓN DE LA PISTOLA DE CALOR 53
ADVERTENCIAS GENERALES DE SEGURIDAD DE LAS HERRAMIENTAS ELÉCTRICAS 55
REGLAS DE SEGURIDAD 55
SEGURIDAD EN LA ZONA DE TRABAJO 56
LA SEGURIDAD PERSONAL 57
USO Y CUIDADO DE LA PISTOLA DE CALOR 58
INSTRUCCIONES DE SEGURIDAD ADICIONALES PARA LA PISTOLA DE CALOR 58
MANTENIMIENTO Y LIMPIEZA 59
RESOLUCIÓN DE PROBLEMAS 60
DATOS TÉCNICOS 60
TARJETA DE GARANTÍA LIMITADA 92
GARANTÍA LIMITADA 92

- 51 -
MODELOS
Pistola de calor EK-Loop 2000W – Enchufe UE
Pistola de calor EK-Loop 2000W – Enchufe Reino Unido
Pistola de calor EK-Loop 1500W – Enchufe US
CONTENIDO DEL PAQUETE
Compruebe que la pistola de calor, el cable de alimentación y el enchufe no hayan sufrido daños
durante el transporte.
ADVERTENCIA: ¡Los materiales de embalaje no son juguetes! ¡No permita a los
niños jugar con bolsas de plástico! ¡Peligro de asfixia!
• Pistola de calor (1 unidad)
• Manual de instrucciones (1 unidad)
Póngase en contacto con su distribuidor en caso de que falten piezas o estén dañadas.
ADVERTENCIAS DE SEGURIDAD
Lea, comprenda y siga todas las normas de seguridad y las instrucciones de funcionamiento de
este manual antes de utilizar este producto.
Conformidad con la norma internacional EN 60335-1
• Esta pistola de calor sólo está destinada a un uso doméstico y no para aplicaciones en el
ámbito profesional.
• No se permite el uso de esta pistola de calor a niños o personas con capacidades físicas,
sensoriales o mentales reducidas o con falta de experiencia y conocimientos.
• Los niños no deben jugar con la pistola de calor.
• No se permite que los niños realicen la limpieza y el mantenimiento propios del usuario.
• Si el cable de alimentación está dañado, debe ser sustituido por el fabricante, por su servicio
técnico o por cualquier profesional cualificado similar para evitar riesgos.
• Si la pistola de calor no se utiliza con cuidado, puede producirse un incendio:
• tenga cuidado al utilizar la pistola de calor en lugares donde haya materiales inflamables;
• tenga en cuenta que el calor puede transferirse a materiales combustibles que están fuera de la vista
• no utilizar en presencia de una atmósfera explosiva;
• no aplicar en un mismo punto durante mucho tiempo;
• no deje la pistola de calor sin vigilancia mientras se mantenga encendida;
• coloque la pistola de calor en su soporte después de usarla y deje que se enfríe antes de guardarla.
USO PREVISTO
Su pistola de calor ha sido diseñada especialmente para permitir el doblado de tubos acrílicos y
PETG solamente.
La pistola de calor cuenta con dos ajustes:
1. Bajo nivel de calor (posición 1): para utilizar cuando la superficie de trabajo o el entorno no
deben calentarse demasiado.
2. Alto nivel de calor (posición 2): para un calentamiento más rápido de la superficie de trabajo
en la que también puede utilizar la pistola a una distancia mayor.

- 52 -
PUESTA EN FUNCIONAMIENTO
Observe y respete la tensión de la red: La tensión
de la fuente de alimentación debe coincidir con
el valor indicado en la placa de características
del dispositivo. En caso de utilizar cables
alargadores, éstos deben tener como mínimo
una sección de conductor de 2×1.5mm.
Antes de conectar el enchufe a la tensión
de la red, asegúrese de que el interruptor se
encuentra en la posición 0 (FIG. 1)
FIG. 1
FIG. 2
LISTA DE PIEZAS
PRINCIPALES
1 Boquilla de calor
2Collarín de protección contra el
calor
3 Aberturas de entrada de aire
4
Interruptor principal
5
Pantalla con nivel de temperatura en
incrementos de color
6 Botón para bajar la temperatura
7Botón para aumentar la
temperatura
2
5
3
4
1
76
ENCENDIDO
Seleccione la temperatura de funcionamiento
y el flujo de aire necesarios con la posición
del interruptor I (FIG. 2)

- 53 -
Seleccione la temperatura de funcionamiento y el flujo
de aire necesarios con la posición del interruptor I (FIG. 3)
Enchufe UE (VDE) y enchufe Reino Unido (BS)
Posición del interruptor I:
Ajuste I: 60 °C–350 °C / 300 l/min-1
Posición del interruptor II:
Ajuste II: 60 °C–600 °C / 500 l/min-1
Apagado
Sitúe el interruptor en la posición 0 (FIG. 1)
Enchufe de EE.UU. (UL)
Posición del interruptor I:
Ajuste I: 140 °F–572 °F/~11 cfm
Posición del interruptor II:
Ajuste II: 140 °F–932 °F/~18 cfm
Apagado:
Sitúe el interruptor en la posición 0 (FIG. 1)
FIG. 3
AJUSTE DE LA TEMPERATURA
(FIG. 4) La temperatura puede aumentarse y
reducirse en intervalos de 30 °C (86 °F) a través
del panel de control cuando la etapa es I, y la
temperatura puede aumentarse y reducirse en
intervalos de 55 °C (131 °F) a través del panel
de control cuando la etapa es II. Para aumentar
la temperatura, pulse el botón izquierdo (+),
o bien el botón derecho (-) para reducir la
temperatura. Toque brevemente los botones o
manténgalos pulsados hasta alcanzar el ajuste
de temperatura deseado. En este paso, tenga
en cuenta la temperatura máxima, que depende
del interruptor de encendido/apagado. La
temperatura máxima se permite solo al cambiar
a la etapa 2. Al cambiar a la etapa de ajuste 1,
la temperatura máxima es de 350 °C (662 °F).
La pantalla integrada muestra la temperatura
ajustada en incrementos de color.
FIG. 4
SUBIR LA
TEMPERATURA
BAJAR LA
TEMPERATURA
PANTALLA
INTEGRADA
COLOCACIÓN DE LA PISTOLA DE CALOR
Coloque la pistola de calor en posición vertical
sobre una superficie plana (mesa). Introduzca
una varilla de silicona en un tubo. La varilla
de silicona se utiliza para doblar los tubos
de forma más suave. Sujete un tubo con una
varilla de silicona insertada aproximadamente
a 5 cm (2 pulgadas) de la boquilla de la pistola
de calor. Gire lentamente el tubo a lo largo del
eje y muévalo de lado a lado para calentar el
tubo de manera uniforme. Una vez caliente,
se puede doblar a la forma deseada. Si el
tubo se calienta durante demasiado tiempo,
pueden formarse burbujas, que se deforme
el diámetro del tubo y un cambio de color del
mismo.
DISTANCIA
MIN. 5 cm (2”)

- 54 -
ADVERTENCIA (enchufe de EE.UU.):
Esta pistola de calor cuenta con
enchufe polarizado (una clavija es
más ancha que la otra). Para reducir
el riesgo de descarga eléctrica, este
enchufe está pensado para encajar en
una toma de corriente polarizada sólo
en un sentido. En caso de que no entre
el enchufe en la toma de corriente,
dele la vuelta al enchufe. Si sigue sin
encajar, póngase en contacto con un
electricista cualificado. No modifique
el enchufe de ninguna manera.
Nunca coloque o deje una pistola de calor
tumbada de lado (FIG.6)
FIG. 6
ADVERTENCIA:
Por su propia
seguridad, lea atentamente este manual y
las instrucciones generales de seguridad
antes de utilizar la pistola de calor. En
caso de entregar su pistola de calor a
otra persona, entréguele también estas
instrucciones de uso. La pistola de calor
debe conectarse únicamente a una fuente
de alimentación de la misma tensión que
la indicada en la placa de características,
y sólo puede funcionar con alimentación
de corriente alterna monofásica.
Recomendamos utilizar la herramienta de doblado de tubos
duros EK-Loop Modulus para facilitar el doblado de tubos:
Herramienta para doblar tubos duros
EK-Loop Modulus – 12 mm,
artículo EAN: 3831109816103
https://www.ekwb.com/shop/ek-loop-
modulus-hard-tube-bending-tool-12mm
Herramienta para doblar tubos duros
EK-Loop Modulus – 14 mm,
artículo EAN: 3831109816110
https://www.ekwb.com/shop/ek-loop-
modulus-hard-tube-bending-tool-14mm
Herramienta para doblar tubos duros
EK-Loop Modulus – 16 mm,
artículo EAN: 3831109816127
https://www.ekwb.com/shop/ek-loop-
modulus-hard-tube-bending-tool-16mm
EAN: 3831109816110
EAN: 3831109816127
EAN: 3831109816103
EAN: 3831109816110
EAN: 3831109816127
EAN: 3831109816103
ADVERTENCIA: Coloque siempre
la pistola de calor en una superficie
plana y en posición VERTICAL (FIG.5)
FIG. 5

- 55 -
ADVERTENCIAS GENERALES DE SEGURIDAD DE LAS
HERRAMIENTAS ELÉCTRICAS
REGLAS DE SEGURIDAD
ADVERTENCIA:
No observar ni cumplir con las normas de seguridad al utilizar y trabajar
con la pistola de calor, puede ocasionar un incendio, una explosión, una descarga eléctrica
o quemaduras. Lea el manual de instrucciones antes de utilizar la pistola de calor y observe
siempre las normas de seguridad. Guarde estas instrucciones y entréguelas a las personas
que no hayan sido instruidas o formadas en el uso de la pistola de calor antes de utilizarla.
ADVERTENCIA:
Una carcasa dañada o una unidad abierta puede provocar una peligrosa
descarga eléctrica. No abra la pistola de calor y no utilice o ponga en funcionamiento una
pistola de calor dañada. No perfore la carcasa, por ejemplo, para colocar una etiqueta de la
empresa. Antes de realizar cualquier trabajo en el aparato, desconecte el enchufe de la red
eléctrica.
ADVERTENCIA:
Un cable de alimentación dañado puede provocar una peligrosa descarga
eléctrica. Compruebe regularmente el estado del cable de alimentación. No utilice el aparato
si el cable de alimentación presenta algún daño. Encargue siempre la sustitución del cable de
alimentación a personal técnico cualificado. No enrolle el cable alrededor de la pistola de calor
y protéjalo del aceite, el calor y los bordes afilados. No transporte la pistola de calor sujetándola
por el cable, y no tire del cable para desenchufar el enchufe de la toma de corriente.
ADVERTENCIA:
No trabaje bajo la lluvia o en un ambiente húmedo o mojado. Esto puede
provocar una peligrosa descarga eléctrica. Mantenga la pistola de calor seca. Guarde la pistola
de calor en un lugar seco cuando no la utilice. Tenga en cuenta las condiciones meteorológicas.
No trabaje en instalaciones sanitarias húmedas. Evite el contacto del cuerpo con los cables o
superficies conectadas a tierra, como tuberías, radiadores, cocinas y frigoríficos.
ADVERTENCIA: Conecte la pistola de calor que se utiliza en el exterior mediante un
interruptor diferencial (RCCB).
ADVERTENCIA: ¡Peligro de explosión! Una pistola de calor caliente puede provocar
un incendio explosivo de fluidos y gases combustibles. No trabaje en un entorno
potencialmente explosivo. Compruebe el entorno antes de empezar a trabajar. No
trabaje en o cerca de depósitos de combustible o de gas, incluso si están vacíos.
ADVERTENCIA: ¡Peligro de incendio! El calor puede alcanzar a los materiales
combustibles que están tapados por los revestimientos, en techos, suelos o cavidades,
y provocar que se inflamen. Inspeccione la zona de trabajo antes de empezar a trabajar
y, en caso de duda, no utilice la pistola de calor. No mantenga la pistola de calor
apuntando prolongadamente a un mismo punto.
ADVERTENCIA:
¡Peligro de incendio! Una pistola de calor que se utilice sin supervisión
puede prender fuego a los objetos que estén cerca. Por ello, al utilizar la pistola nunca debe
perderse de vista. Al apagar la pistola de calor y quiera dejar que se enfríe, colóquela siempre
en posición vertical y de pie. Deje que la pistola de calor se enfríe completamente.
ADVERTENCIA: ¡Peligro de incendio! Cuando se trabaja con barnices plásticos o
materiales similares, se producen gases que son fácilmente inflamables y pueden
provocar explosiones. Esté preparado para una posible formación de llamas, y tenga a
mano los medios de extinción adecuados.

- 56 -
ADVERTENCIA:
¡Peligro de intoxicación! Cuando se trabaja con barnices plásticos o
materiales similares, se producen gases que pueden ser agresivos o tóxicos. Evite respirar los
vapores, aunque parezcan inofensivos. Asegúrese de mantener siempre una buena ventilación
de la zona de trabajo o utilice un mascarilla protectora o respirador.
ADVERTENCIA:
¡Peligro de lesión! El chorro de aire caliente puede herir a personas o
animales. Tocar el tubo caliente de la resistencia o la boquilla de la pistola de calor provoca
quemaduras en la piel. Mantenga a los niños y a otras personas alejados de la fuente de calor.
No toque el tubo de la resistencia ni la boquilla cuando estén calientes. No utilice la pistola de
calor como un secador de pelo. Una pistola de calor genera mucho más calor que un secador
de pelo. No utilice la pistola de calor para calentar líquidos o para secar objetos o materiales
que pueden estropearse o romperse con el aire caliente.
ADVERTENCIA: Una puesta en funcionamiento o encendido inintencionados
de la resistencia tras el accionamiento del relé térmico puede provocar lesiones.
Asegúrese de que el interruptor esté en la posición OFF cuando conecte la pistola
de calor a la red eléctrica. APAGUE la pistola de calor cuando salte el relé térmico.
ADVERTENCIA:
¡Peligro de lesión! El uso de una boquilla de reflexión de flujo de aire que
no sea adecuada para su pistola de calor puede provocar quemaduras. Utilice únicamente
los accesorios originales para su modelo que figuran en estas instrucciones de uso.
ADVERTENCIA: Peligro de lesiones e incendio. La pistola de calor es peligrosa para
los niños. Mantenga la pistola de calor fuera del alcance de los niños.
PELIGRO:
¡Peligro de sobrecalentamiento! Una manipulación incorrecta puede
provocar una acumulación de calor y, por tanto, dañar la pistola de calor. No utilice la
pistola de calor cuando esté colocada en posición horizontal o cuando apunte hacia
abajo. La abertura de entrada de aire y la boquilla no deben estar tapadas. Utilice sólo
boquillas adecuadas para su dispositivo.
Lea todas las advertencias de seguridad, instrucciones, ilustraciones y especificaciones
suministradas con esta pistola de calor. No observar ni cumplir con las instrucciones indicadas
a continuación puede provocar una descarga eléctrica, un incendio y/o lesiones graves.
SEGURIDAD EN LA ZONA DE TRABAJO
1. Mantener la zona de trabajo limpia y bien iluminada. Las zonas desordenadas u oscuras
son más propensas a que se produzcan accidentes.
2. No utilice la pistola de calor en atmósferas explosivas, tales como cerca de líquidos, gases o
polvo inflamables. La pistola de calor produce chispas que pueden inflamar el polvo o los humos.
3. Mantenga a los niños y a los transeúntes alejados mientras utiliza la pistola de calor. Las
distracciones pueden hacerle perder el control.
4. Los enchufes de la pistola de calor deben coincidir con la toma de corriente. Nunca
modifique el enchufe de ninguna manera. No utilice enchufes adaptadores con
herramientas eléctricas con toma de tierra. Los enchufes no modificados y las tomas de
corriente correspondientes reducirán el riesgo de descarga eléctrica.
5. Evite el contacto del cuerpo con superficies conectadas a tierra, como tuberías, radiadores,
cocinas y frigoríficos. Existe un mayor riesgo de descarga eléctrica si su cuerpo está
conectado a tierra.

- 57 -
6. No exponga la pistola de calor a la lluvia o a la humedad. La entrada de agua en una pistola
de calor aumenta el riesgo de descarga eléctrica.
7. No someta el cable de alimentación a esfuerzos excesivos. Nunca use el cable para
transportar, tirar o desenchufar la herramienta eléctrica. Mantenga el cable alejado del
calor, el aceite, los bordes afilados o las piezas móviles. Los cables dañados o enredados
aumentan el riesgo de descarga eléctrica.
8. Cuando utilice la pistola de calor en el exterior, utilice un cable alargador apto para el uso en
exteriores. La utilización de un cable adecuado para el uso en exteriores reduce el riesgo
de descarga eléctrica.
9. Si no puede evitarse tener que utilizar la pistola de calor en un lugar húmedo, utilice una
fuente de alimentación protegida por un dispositivo de corriente residual (RCD). El uso de
un RCD reduce el riesgo de descarga eléctrica.
10. Siempre se recomienda el uso de una pistola de calor a través de un RCD con una corriente
residual nominal de 30 mA o inferior.
11. La pistola de calor puede generar campos electromagnéticos (CEM) que no son
perjudiciales para el usuario. Sin embargo, los usuarios con marcapasos y otros dispositivos
médicos similares deben ponerse en contacto con el fabricante de su dispositivo y/o con
su médico para que les aconseje antes de utilizar esta pistola de calor.
12. No toque el enchufe con las manos mojadas.
13. Si el cable está dañado, debe ser sustituido por el fabricante o por su servicio técnico para
evitar riesgos.
LA SEGURIDAD PERSONAL
1. Manténgase alerta, preste atención a lo que hace y utilice el sentido común cuando maneje
una pistola de calor. No utilice la pistola de calor cuando esté cansado o bajo los efectos
de drogas, alcohol o medicamentos. Un instante de desatención o un mínimo descuido
durante el uso de la pistola de calor puede provocar graves lesiones personales.
2. Utilice el equipo de protección personal adecuado. Utilice siempre protección para los ojos. Los
equipos de protección, como la máscara antipolvo, el calzado de seguridad antideslizante o la
protección auditiva, utilizados en condiciones adecuadas, reducirán las lesiones personales.
3. Evite que la pistola se encienda inintencionadamente. Asegúrese de que el interruptor se
encuentre en la posición de apagado Off (Fig. 1) antes de enchufar la pistola a la fuente de
alimentación, cogerla o transportarla. Transportar o mover una pistola de calor con el dedo en
el interruptor de arranque o conectar a la red eléctrica la pistola de calor que tiene el interruptor
en la posición de encendido hace que resulte más fácil que se produzca un accidente.
4. No sobrecargue la herramienta. Mantenga el equilibrio y la estabilidad en todo momento.
Esto permite un mejor control de la pistola de calor en situaciones inesperadas.
5. Use una ropa adecuada. No use ropa holgada ni joyas. Mantenga el pelo y la ropa alejados
de las partes móviles. La ropa holgada, las joyas o el pelo largo pueden quedar atrapados
en las piezas móviles.
6. No permita que la familiaridad obtenida con el uso frecuente de una pistola de calor le
permita volverse descuidado e ignorar los principios de seguridad de las herramientas.
Una acción descuidada puede causar lesiones graves en una fracción de segundo.

- 58 -
7. En caso de accidente o avería, desenchufe el enchufe de la pistola de calor de la fuente de alimentación
y póngase en contacto con el servicio de atención al cliente de EKWB o con su centro de servicio
técnico autorizado local para que le asesoren antes de seguir utilizando esta pistola de calor.
8. En caso de quemaduras, quítese la ropa caliente o quemada. Si la ropa se queda adherida a la piel,
corte o rasgue alrededor de la parte adherida. Mantenga la piel quemada bajo el grifo de agua
corriente fresca (no fría) o sumérjala en agua fría hasta que disminuya el dolor. Utilice compresas
si no dispone o no hay agua corriente. Cubra la herida con un vendaje estéril y no adhesivo o con
un paño limpio. No se aplique o se unte mantequilla, aceite, lociones o cremas (especialmente si
contienen fragancia).
9. Acuda al médico si: observa signos de infección como aumento del dolor, enrojecimiento,
hinchazón, fiebre o supuración, la ampolla de la quemadura es mayor de 5 cm (2’’) o rezuma, el
enrojecimiento y el dolor duran más de unas horas, el dolor empeora, las manos, los pies, la cara o
los genitales están quemados.
USO Y CUIDADO DE LA PISTOLA DE CALOR
1. No someta la pistola de calor a un esfuerzo excesivo o sobrecarga. La pistola de calor permitirá
trabajar con mejor resultado y más seguridad a los rangos de temperatura y velocidad para
los que ha sido diseñada.
2. No utilice la pistola de calor si el interruptor no se enciende o apaga. Resulta peligroso si no
puede controlar el funcionamiento de la pistola de calor a través del interruptor.
3. Desenchufe el enchufe de la fuente de alimentación de la pistola de calor antes de realizar
cualquier ajuste o guardar la pistola de calor. Estas medidas de seguridad preventivas
reducen el riesgo de que la herramienta eléctrica pueda encenderse y ponerse en
funcionamiento accidentalmente.
4. Guarde la pistola de calor apagada y desconectada fuera del alcance de los niños y no
permita que personas no familiarizadas con la pistola de calor o con estas instrucciones
la utilicen. La pistola de calor es peligrosa en manos de usuarios no instruidos en su uso.
5. Mantenimiento de la pistola de calor. Compruebe que las piezas móviles no estén
desalineadas o atascadas, que no haya piezas rotas y cualquier otro estado que pueda
afectar al funcionamiento de la pistola de calor. En caso de presentar daños, encargue su
reparación antes de seguir usándola. Muchos accidentes tienen su origen en la falta o mal
mantenimiento de herramientas eléctricas.
6. Utilice la pistola de calor de acuerdo con estas instrucciones, teniendo en cuenta las
condiciones de trabajo y el trabajo a realizar. El uso de la pistola de calor para finalidades
diferentes a las previstas podría dar lugar a una situación peligrosa.
7. Mantenga las empuñaduras y las superficies de agarre secas, limpias y libres de aceite y
grasa. Las empuñaduras y superficies de agarre resbaladizas no permiten un manejo y
control seguros de la pistola de calor en situaciones inesperadas.
8. Cuando utilice la pistola de calor, no lleve puestos guantes de trabajo de tela que puedan enredarse.
El enredo de los guantes de trabajo de tela en las partes móviles puede provocar lesiones personales.
INSTRUCCIONES DE SEGURIDAD ADICIONALES PARA LA PISTOLA DE CALOR
• No coloque la mano sobre las rejillas de ventilación ni las tape o cubra de ninguna manera.

- 59 -
• La boquilla de esta pistola de calor se calienta mucho durante su uso. Deje que la boquilla
se enfríe antes de tocarla.
• Apague siempre la pistola de calor antes de depositarla sobre una superficie.
• No deje la pistola de calor sin vigilancia mientras esté encendida.
• Puede producirse un incendio si no se utiliza la pistola de calor con cuidado.
• Tenga en cuenta que el calor puede transferirse a materiales combustibles que están
fuera de la vista. No utilizar en una atmósfera húmeda, donde pueda haber gases
inflamables o cerca de materiales combustibles.
• Deje colocada la pistola de calor en su soporte y deje que se enfríe completamente
antes de guardarla. Asegúrese de que haya una ventilación adecuada, ya que pueden
producirse humos tóxicos.
• No la utilice a modo de secador de pelo.
• No obstruya la entrada de aire ni la salida de la boquilla, ya que esto puede provocar una
acumulación excesiva de calor que dañe la pistola de calor.
• No dirija el chorro de aire caliente hacia otras personas.
• No toque la boquilla metálica, ya que se calienta mucho durante su uso y permanece
caliente hasta 30 minutos después de su utilización.
• No dirija ni acerque la boquilla contra nada mientras la usa o inmediatamente después
de usarla.
• No introduzca nada por la boquilla, ya que podría recibir una descarga eléctrica. No mire
debajo de la boquilla mientras la unidad está trabajando debido a la alta temperatura que
se produce.
MANTENIMIENTO Y LIMPIEZA
Atención: Antes de realizar cualquier trabajo en la pistola de calor, desenchufe el enchufe de la red.
Mantenimiento: Su pistola de calor ha sido diseñada para funcionar durante un largo periodo de
tiempo con un mantenimiento mínimo. El funcionamiento continuo y satisfactorio depende del
cuidado adecuado de la herramienta y de su limpieza periódica.
Lubricación: Su pistola de calor no necesita lubricación adicional.
Limpieza:
• Para evitar el sobrecalentamiento del motor, mantenga las ranuras de ventilación de la
máquina limpias y libres de polvo y suciedad.
• Limpie regularmente la carcasa de la máquina con un paño suave, preferiblemente después de
cada uso. Si la suciedad no sale, utilice un paño suave ligeramente húmedo con agua jabonosa.
ADVERTENCIA: No utilice nunca disolventes como gasolina, alcohol, agua
amoniacal, etc. Estos disolventes pueden dañar las piezas de plástico.

- 60 -
RESOLUCIÓN DE PROBLEMAS
Aísle la fuente de alimentación sacando el enchufe de la toma de corriente antes de realizar
ajustes, revisiones o mantenimiento.
DATOS TÉCNICOS
Nombre y
modelo del
producto
Pistola de calor
EK-Loop 2000 W –
Enchufe UE
Pistola de calor
EK-Loop 2000 W –
Enchufe Reino Unido
Pistola de calor EK-Loop
1500W – Enchufe US
Tipo de enchufe VDE BS UL
N.º de modelo RF15-A2Y RF15B2Y
Tensión 220-240 (V~) 120 V~
Frecuencia (Hz)
50-60
60
Modos de
funcionamiento 2
Nivel de ruido (dB)
70
Posición III III
Potencia
nominal (W) 250 2000 250 1500
Temperatura
60-350 (°C) 60600 °C140572 °F 140932 °F
Flujo de aire 300 (l/min) 500 (l/min) 11 (cfm) 18 (cfm)
Pantalla Muestra la temperatura ajustada en incrementos de color
Clase de
protección II / Doble aislamiento
Material de la
carcasa plástico y goma
Longitud del cable
2000 mm ±20 mm
País de origen: China
Garantía
Para conocer los términos y condiciones de la garantía, consulte la tarjeta de garantía adjunta
al final del manual de instrucciones.
La fecha de fabricación (número de lote) se encuentra en el aparato.
EK® es una marca registrada de EKWB d.o.o.
© 2022 EKWB d.o.o. Todos los derechos reservados
https://www.ekwb.com
Reciclaje
Los productos marcados con este símbolo no deben desecharse junto con la basura
municipal no clasificada para evitar problemas medioambientales y sanitarios
debidos a su contenido de sustancias peligrosas. Deseche siempre los productos
y aparatos eléctricos y electrónicos en un punto de reciclaje/recogida oficial
adecuado.

- 61 -
Руководство по эксплуатации для
теплового пистолета EK-Loop Heat Gun

- 62 -
СОДЕРЖАНИЕ
СОДЕРЖА НИЕ 63
СОДЕРЖА НИЕ УП АКОВКИ 63
МЕРЫ БЕЗОП АСНО СТИ 63
ИСПОЛЬЗОВАНИЕ ПО НАЗНАЧЕНИЮ 63
СПИСОК ОСНОВНЫХ ЧАСТЕЙ 64
ВВЕДЕНИЕ В ЭКСПЛУАТАЦИЮ
64
ВКЛЮЧЕ НИЕ 64
УСТАНОВКА ТЕМПЕРАТУРЫ
65
РАЗМЕЩЕНИЕ ТЕПЛОВОГО ПИСТОЛЕТА
65
ОБЩИЕ МЕРЫ БЕЗОПАСНОСТИ ДЛЯ ЭЛЕКТРОИНСТРУМЕНТА
67
ПРАВИЛА БЕЗОПАСНОСТИ 67
ТЕХНИКА БЕЗОПАСНОСТИ НА РАБОЧЕМ МЕСТЕ 68
ЛИЧНАЯ БЕЗО ПА СНОСТ Ь 69
ИСПОЛЬЗОВАНИЕ ТЕПЛОВОГО ПИСТОЛЕТА И УХОД ЗА НИМ 70
ДОПОЛНИТЕЛЬНЫЕ ПРАВИЛА ТЕХНИКИ БЕЗОПАСНОСТИ ДЛЯ ТЕПЛОВОГО ПИСТОЛЕТА
70
ТЕХНИЧЕСКОЕ ОБСЛУЖИВАНИЕ И ЧИСТКА 71
ПОИСК И УСТРАНЕНИЕ НЕИСПРАВНОСТЕЙ 72
ТЕ Х НИЧЕСКИЕ ДА ННЫЕ 72
ТАЛОН ОГРАНИЧЕННОЙ ГАРАНТИИ 94
ОГРАНИЧЕННАЯ ГАРАНТИЯ 94

- 63 -
СО ДЕРЖ А НИЕ
Тепловой пистолет EK-Loop Heat Gun 2000 Вт – разъем EU
Тепловой пистолет EK-Loop Heat Gun 2000 Вт – разъем UK
Тепловой пистолет EK-Loop Heat Gun 1500 Вт – разъем US
СО ДЕРЖ А НИЕ УПА КОВКИ
Проверьте тепловой пистолет, шнур питания и разъем электропитания на наличие
повреждений, возникших во время транспортировки.
ПРЕДУПРЕЖДЕНИЕ: Упаковочные материалы не являются игрушками! Детям
запрещено играть с пластиковыми пакетами! Существует риск удушения!
• Тепловой пистолет (1 штука)
• Руководство по эксплуатации (1 штука)
Если какие-то части отсутствуют или повреждены, пожалуйста, обратитесь к вашему торговому посреднику.
МЕРЫ БЕЗОПАСНОСТИ
Перед эксплуатацией данного изделия внимательно прочитайте и соблюдайте все правила
безопасности и эксплуатации, указанные в данном руководстве.
Соответствие Международному Стандарту EN 60335-1
• Данный тепловой пистолет предназначен только для домашнего использования ине предназначен
для коммерческого использования.
• Тепловой пистолет не предназначен для использования детьми или лицами с ограниченными физическими,
сенсорными или интеллектуальными возможностями, а также лицами с недостатком опыта и знаний.
• Детям запрещено играть с тепловым пистолетом.
• Чистка и техническое обслуживание изделия не должны проводиться детьми.
• Если шнур питания поврежден, во избежание опасности он должен быть заменен производителем,
агентом производителя по обслуживанию, либо лицами с похожей квалификацией.
• Возможно возгорание, если тепловой пистолет используется без соблюдения мер предосторожности, поэтому:
• будьте осторожны при обращении с тепловым пистолетом в местах, где много
легковоспламеняющихся материалов;
• не забудьте, что тепло может нагреть легковоспламеняющиеся материалы, которые находятся
вне вашего поля зрения;
• не используйте тепловой пистолет во взрывоопасной атмосфере;
• не применяйте тепловой пистолет на одном и том же месте в течение долгого времени;
• не оставляйте тепловой пистолет без присмотра, когда он включен;
• после использования поместите тепловой пистолет на подставку и оставьте его охладиться
перед тем, как убрать.
ИСПОЛЬЗОВАНИЕ ПО НАЗНАЧЕНИЮ
Ваш тепловой пистолет — это инструмент, специально предназначенный только для сгибания
акриловых трубок и PETG-трубок. Тепловой пистолет имеет два варианта регулировки:
1. Слабый нагрев (позиция 1): для использования в условиях, где рабочая поверхность или
окружающая среда не должны слишком сильно нагреваться.
2. Сильный нагрев (позиция 2): для быстрого нагрева рабочей поверхности, где вы также
можете использовать пистолет на большем расстоянии.

- 64 -
ВВЕДЕНИЕ В ЭКСПЛУАТАЦИЮ
Наблюдайте за сетевым напряжением:
Напряжение источника питания должно
соответствовать значению, которое указано
на фирменной табличке устройства. Размер
минимального поперечного сечения провода
удлинителей должен составлять 2 × 1,5 мм².
Перед подключением разъема к сетевому
напряжению убедитесь, что переключатель
находится в позиции «0» (РИС. 1)
РИС. 1
РИС. 2
СПИС ОК ОСН ОВНЫХ
ЧАСТЕЙ
1Тепловое сопло
2Теплозащитный кожух
3Воздухозаборные отверстия
4
Главный переключатель
5
Дисплей с отображением
номинального значения
температуры с помощью цветного
инкремента
6Кнопка для снижения
температуры
7Кнопка для повышения
температуры
2
5
3
4
1
76
ВК ЛЮЧЕНИЕ
Выберите нужную рабочую температуру и
объем воздуха, установив переключатель в
позицию «I» (
РИС
. 2)

- 65 -
Выберите нужную рабочую температуру и объем воздуха,
установив переключатель в позицию «II» (РИС. 3)
Разъем EU (разъем «Евро») (стандарт VDE) и разъем UK
(разъем британского типа) (стандарт BS)
Переключатель в позиции I:
I. Установленные параметры 60 °C–350 °C / 300 л/мин
-1
Переключатель в позиции II:
II. Установленные параметры 60 °C–600 °C / 500 л/мин
-1
Выключение:
Установите переключатель на 0 (РИС. 1)
Разъем US (разъем американского типа) (стандарт UL)
Переключатель в позиции I:
I. Установленные параметры 140 °F–572 °F/~11
кубических футов в минуту
Переключатель в позиции II:
II. Установленные параметры 140 °F–932 °F/~18
кубических футов в минуту
Выключение:
Установите переключатель на 0 (РИС. 1)
РИС. 3
УСТАНОВКА ТЕМПЕРАТУРЫ
(РИС. 4) Температуру можно повышать и снижать с
интервалами в 30 °C (86 °F) с помощью панели управления
в режиме I, а также с интервалами в 55 °C (131 °F) с
помощью панели управления в режиме II. Чтобы повысить
температуру, нажмите левую кнопку (+); чтобы понизить
температуру, нажмите правую кнопку (-). Вы можете либо
быстро нажимать кнопки, либо нажать и удерживать кнопки,
пока не установится нужная температура. При этом обратите
внимание на максимальную температуру, которая зависит
от переключателя «вкл/выкл». Достичь максимальной
температуры возможно только при переключении
в режим 2. Если выбрано переключение в режим 1,
максимальная температура будет составлять 350 °C (662
°F). Комбинированный дисплей показывает номинальное
значение температуры с помощью цветного инкремента.
РИС. 4
повысить
температуру
понизить
температуру
комбинированный
дисплей
РАЗМЕЩЕНИЕ ТЕПЛОВОГО ПИСТОЛЕТА
Разместите тепловой пистолет вертикально на
ровной поверхности (на столе). Вставьте силиконовый
стержень для сгибания в трубку. Силиконовый стержень
используется для более плавного сгибания трубок.
Держите трубку со вставленным силиконовым стержнем
на расстоянии приблизительно 5 см (2 дюйма) от сопла
теплового пистолета. Чтобы равномерно нагреть трубку,
медленно вращайте ее по оси и двигайте ее из стороны
в сторону. Когда трубка нагреется, вы можете согнуть ее
до нужной формы. Если трубка нагревается в течение
долгого времени, возможно появление пузырьков,
искажение диаметра, изменение цвета трубки.
мин. расстояние
5 см (2”)

- 66 -
ПРЕДУПРЕЖДЕНИЕ (разъем US (разъем
американского типа)): Данный тепловой
пистолет имеет полярную вилку (одно
лезвие шире другого). Для снижения риска
поражения электрическим током данная вилка
предназначена только для одностороннего
подключения к полярной розетке. Если вилка
не полностью входит в розетку, переверните
вилку. Если после этого вы все равно не
можете вставить вилку в розетку, обратитесь
к квалифицированному электрику. Ни в коем
случае не модифицируйте вилку.
Никогда не кладите тепловой пистолет на бок (РИС.6)
РИС. 6
ПРЕДУПРЕЖДЕНИЕ: Перед тем как приступить
к использованию теплового пистолета, для
собственной безопасности внимательно
прочитайте данное руководство по эксплуатации
и общие правила техники безопасности.
Тепловой пистолет следует передавать другому
лицу только вместе с настоящими инструкциями.
Данный тепловой пистолет должен быть
подключен только к источнику питания с таким
же напряжением, как указано на фирменной
табличке, и может работать только от однофазного
источника питания переменного тока.
Для упрощения сгибания трубок мы рекомендуем
использовать инструмент для сгибания жестких
трубок EK-Loop Modulus Hard Tube Bending Tool:
инструмент для сгибания жестких трубок EK-
Loop Modulus Hard Tube Bending Tool – 12 мм,
европейский номер товара (EAN): 3831109816103
https://www.ekwb.com/shop/ek-loop-modulus-
hard-tube-bending-tool-12mm
инструмент для сгибания жестких трубок EK-
Loop Modulus Hard Tube Bending Tool – 14 мм,
европейский номер товара (EAN): 3831109816110
https://www.ekwb.com/shop/ek-loop-modulus-
hard-tube-bending-tool-14mm
инструмент для сгибания жестких трубок EK-
Loop Modulus Hard Tube Bending Tool – 16 мм,
европейский номер товара (EAN): 3831109816127
https://www.ekwb.com/shop/ek-loop-modulus-
hard-tube-bending-tool-16mm
EAN: 3831109816110
EAN: 3831109816127
EAN: 3831109816103
EAN: 3831109816110
EAN: 3831109816127
EAN: 3831109816103
ПРЕДУПРЕЖДЕНИЕ: Нагретый тепловой
пистолет всегда размещайте на ровной
поверхности ВЕРТИКАЛЬНО (РИС.5)
РИС. 5

- 67 -
ОБЩИЕ МЕРЫ БЕЗОПАСНОСТИ ДЛЯ ЭЛЕКТРОИНСТРУМЕНТА
ПРАВИ ЛА БЕЗОП АСНОС ТИ
ПРЕДУПРЕЖДЕНИЕ: Несоблюдение правил безопасности во время работы с горячим тепловым
пистолетом может привести к возгоранию, взрыву, поражению электрическим током или к ожогам.
Перед тем как приступить к использованию теплового пистолета, прочитайте правила эксплуатации
и всегда соблюдайте правила техники безопасности. Сохраните эти инструкции и передайте их лицам,
которые не были проинструктированы перед использованием теплового пистолета.
ПРЕДУПРЕЖДЕНИЕ: Поврежденный корпус или открытый прибор могут привести к опасности
поражения электрическим током. Не открывайте тепловой пистолет и не начинайте работу с ним, если
он поврежден. Не сверлите корпус прибора (например, чтобы прикрепить этикетку компании). Перед тем
как выполнить любые работы на устройстве, вытащите вилку питания.
ПРЕДУПРЕЖДЕНИЕ: Поврежденный шнур питания может привести к поражению электрическим током.
Регулярно проверяйте шнур питания. Не работайте с устройством, если шнур питания поврежден.
Для замены поврежденного шнура всегда обращайтесь к специалисту. Не оборачивайте шнур вокруг
теплового пистолета и защищайте его от масла, высоких температур и острых углов. Не переносите
тепловой пистолет, удерживая его за шнур, и не тяните шнур, чтобы вытащить вилку из розетки.
ПРЕДУПРЕЖДЕНИЕ: Не работайте под дождем или во влажной среде. Это может привести к
поражению электрическим током. Держите тепловой пистолет в сухом виде. Когда тепловой пистолет
не используется, храните его в сухом месте. Учитывайте погодные условия. Не работайте во влажных
санитарных помещениях. Избегайте телесного контакта с заземленными кабелями или поверхностями,
такими как трубы, радиаторы, плиты и холодильные установки.
ПРЕДУПРЕЖДЕНИЕ: Подключите тепловой пистолет, который используется на открытом воздухе, с
помощью автоматического выключателя остаточного тока (RCCB).
ПРЕДУПРЕЖДЕНИЕ: Опасность взрыва! Горячий тепловой пистолет может воспламенить горючие
жидкости и газы. Не работайте в потенциально взрывоопасной среде. Перед тем как приступить к
работе, проверьте окружающую среду. Не применяйте устройство при работе с контейнерами для
топлива или газа или в близости от них, даже когда они пусты.
ПРЕДУПРЕЖДЕНИЕ: Опасность пожара! Тепло может достичь взрывоопасных материалов, скрытых
за покрытиями, в потолках, в полу или в углублениях, и воспламенить их. Перед тем как приступить к
работе, проверьте рабочее пространство и, в случае сомнений, воздержитесь от использования горячего
теплового пистолета. Не направляйте тепловой пистолет на одно и то же место в течение долгого времени.
ПРЕДУПРЕЖДЕНИЕ: Опасность пожара! Работающий горячий тепловой пистолет, оставленный без
присмотра, может привести к возгоранию близко расположенных объектов. Тепловой пистолет должен
постоянно находиться под присмотром во время работы. Чтобы остудить выключенный тепловой
пистолет, всегда размещайте его вертикально в стоячем положении. Дайте тепловому пистолету
полностью остыть.
ПРЕДУПРЕЖДЕНИЕ: Опасность пожара! Во время работы с пластиковыми, лакированными или
подобными материалами образуются легковоспламеняющиеся газы, которые могут привести к взрыву.
Будьте готовы к возникновению пламени и держите под рукой подходящие средства пожаротушения.
ПРЕДУПРЕЖДЕНИЕ: Риск отравления! Во время работы с пластиковыми, лакированными или
подобными материалами образуются газы, которые могут быть агрессивными или токсичными.
Избегайте вдыхания паров, даже если они кажутся безопасными. Всегда заботьтесь о том, чтобы в
рабочем пространстве была хорошая вентиляция, или носите респиратор.

- 68 -
ПРЕДУПРЕЖДЕНИЕ: Риск получения травмы! Горячий воздух может нанести травму людям или
животным. Прикосновение к горячей трубке нагревательного элемента или к соплу теплового
пистолета приводит к ожогу. Берегите тепловой пистолет от детей и посторонних лиц. Не касайтесь
трубки нагревательного элемента или сопла, если они нагреты. Не используйте тепловой пистолет
для сушки волос. Он производит гораздо больше тепла, чем фен для волос. Не используйте тепловой
пистолет для нагрева жидкостей или для сушки объектов или материалов, которые разрушаются под
воздействием горячего воздуха.
ПРЕДУПРЕЖДЕНИЕ: Непреднамеренный пуск или неожиданное включение нагревательного элемента
после запуска теплового реле может привести к травмам. При подключении теплового пистолета к
электросети убедитесь, что переключатель установлен в положение «ВЫКЛ» («OFF»). Когда сработает
тепловое реле, выключите тепловой пистолет.
ПРЕДУПРЕЖДЕНИЕ: Риск получения травмы! Использование сопла, отражающего воздушный поток,
и не подходящего для вашего теплового пистолета, может привести к ожогам. Используйте только
оригинальные аксессуары для модели вашего теплового пистолета, которые перечислены в данном
руководстве по эксплуатации.
ПРЕДУПРЕЖДЕНИЕ: Риск получения травмы и возгорания. Горячий тепловой пистолет опасен для
детей. Храните тепловой пистолет в недоступном для детей месте.
ОПАСНОСТЬ: Опасность перегрева! Неправильное обращение может привести к накоплению тепла и,
следовательно, к повреждению теплового пистолета. Не работайте с тепловым пистолетом, когда он
размещен горизонтально или направлен вниз. Воздухозаборное отверстие и сопло не должны быть
перекрытыми. Используйте только те сопла, которые подходят к вашему устройству.
Прочитайте все правила техники безопасности, инструкции, иллюстрации и описания, прилагаемые к данному
тепловому пистолету. Несоблюдение всех инструкций, перечисленных ниже, может привести к поражению
электрическим током, возгоранию и/или серьезной травме.
ТЕХНИКА БЕЗОПАСНОСТИ НА РАБОЧЕМ МЕСТЕ
1. Следите за тем, чтобы рабочее место было чистым и хорошо освещенным. Загроможденное или
темное рабочее место может стать причиной несчастных случаев.
2. Не работайте с тепловым пистолетом во взрывоопасной атмосфере (например, в присутствии
легковоспламеняющихся жидкостей, газов или пыли). Тепловой пистолет создает искры, которые
могут воспламенить пыль или пары.
3. Во время работы с тепловым пистолетом убедитесь, что рядом нет детей и сторонних
наблюдателей. Отвлечение вашего внимания может привести к тому, что вы потеряете контроль
над работой.
4. Вилки теплового пистолета должны подходить к пистолету. Ни в коем случае не модифицируйте
вилку. Не используйте вилки-переходники с заземленными механическими инструментами.
Неизмененные вилки и подходящие розетки снизят риск поражения током.
5. Избегайте телесного контакта с заземленными поверхностями, такими как трубы, радиаторы,
плиты и холодильные установки. Если ваше тело замкнуто на землю или заземлено, есть риск
поражения электрическим током.
6. Не подвергайте тепловой пистолет воздействию дождя или влаги. Попадание воды в тепловой
пистолет увеличит риск поражения электрическим током.

- 69 -
7. Не нарушайте правила эксплуатации шнура. Никогда не используйте шнур для переноски
электрического инструмента, подтягивания или отключения его от сети. Держите шнур подальше
от тепла, масла, острых углов или движущихся частей. Поврежденные или запутанные шнуры
увеличивают риск поражения электрическим током.
8. При эксплуатации теплового пистолета на улице используйте удлинительный шнур, подходящий
для наружного использования. Использование шнура, подходящего для наружного применения,
снижает риск поражения электрическим током.
9. Если использование теплового пистолета во влажном помещении неизбежно, используйте
источник питания, защищенный устройством дифференциального тока. Использование
устройства дифференциального тока снижает риск поражения электрическим током.
10. Всегда рекомендуется использование теплового пистолета с помощью устройства
дифференциального тока с номинальным остаточным током в 30 мА или меньше.
11. Тепловой пистолет может создавать электромагнитные поля, не опасные для пользователя.
Однако перед работой с тепловым пистолетом пользователи кардиостимуляторов и прочих
подобных медицинских устройств должны проконсультироваться с производителем этих
устройств и/или с врачом.
12. Не трогайте вилку мокрыми руками.
13. Если шнур питания поврежден, во избежание опасности он должен быть заменен производителем
либо агентом производителя по обслуживанию.
ЛИЧНА Я БЕЗОП АСНОС ТЬ
1. При использовании теплового пистолета будьте внимательны, наблюдайте за тем, что вы
делаете, и руководствуйтесь здравым смыслом. Не используйте тепловой пистолет, если вы
устали или находитесь под воздействием транквилизаторов, алкоголя или медикаментов.
Невнимательность при работе с тепловым пистолетом может привести к серьезной травме.
2. Используйте средства индивидуальной защиты. Всегда применяйте средства защиты глаз.
Средства защиты, такие как пылезащитная маска, нескользящие защитные ботинки или
слухозащитные приспособления, используемые в соответствующих условиях, снизят риск
получения травмы.
3. Избегайте непреднамеренного запуска. Перед тем как подключить к сети, взять или перенести
тепловой пистолет, убедитесь, что переключатель находится в положении «ВЫКЛ» («OFF») (рис.
1). Переноска теплового пистолета с удержанием пальца на переключателе или подключение
к сети теплового пистолета, у которого переключатель находится в положении «ON» («ВКЛ»),
может привести к несчастным случаям.
4. Не переусердствуйте. Всегда стойте на устойчивой поверхности и сохраняйте равновесие. Это
помогает лучше контролировать тепловой пистолет в непредвиденных ситуациях.
5. Одевайтесь надлежащим образом. Не носите свободную одежду или украшения. Держите волосы
и одежду подальше от движущихся частей. Свободная одежда, украшения или длинные волосы
могут быть захвачены движущимися частями.
6. Даже если вы близко знакомы с эксплуатацией теплового пистолета из-за частого использования,
не теряйте бдительность и не игнорируйте принципы техники безопасности при работе с
устройством. Неосторожное действие может за доли секунды привести к серьезной травме.

- 70 -
7. В случае аварии или поломки отключите вилку теплового пистолета от источника питания и
обратитесь в Службу поддержки клиентов EKWB либо в ваш местный авторизованный сервисный
центр , чтобы получить консультацию перед работой с тепловым пистолетом.
8. При возникновении ожогов снимите горячую или обгоревшую одежду. Если одежда прилипает
к коже, разрежьте ее или разорвите вокруг места прилипания. Подержите место с обожженной
кожей под прохладной (не холодной) проточной водой или опустите в прохладную воду, пока боль
не утихнет. Если невозможно найти проточную воду, используйте компрессы. Накройте кожу
стерильной, неприлипающей повязкой или чистой тканью. Не используйте масла, лосьоны или
кремы (особенно если они содержат ароматизатор).
9. Показания для обращения к врачу: если вы замечаете признаки инфекции, например,
усилившуюся боль, покраснение, отек, лихорадку или выделения, если волдырь после ожога
стал больше 5 см (2 дюймов) и сочится, если покраснение и боль длятся более нескольких часов,
боль усиливается, ладони, ступни, лицо или гениталии обожжены.
ИСПОЛЬЗОВАНИЕ ТЕПЛОВОГО ПИСТОЛЕТА И УХОД ЗА НИМ
1. Не применяйте силу к тепловому пистолету. Работа теплового пистолета будет качественнее и
безопаснее при той скорости, на которую он расчитан.
2. Не используйте тепловой пистолет, если переключатель не включает или не выключает его.
Если управление тепловым пистолетом с помощью переключателя невозможно, он представляет
опасность и должен быть отремонтирован.
3. Отключите вилку теплового пистолета от источника питания перед проведением любых
регулировок или хранением теплового пистолета. Такие профилактические меры по технике
безопасности снижают риск непреднамеренного запуска электрического инструмента.
4. Храните неработающий тепловой пистолет в недоступном для детей месте и не позволяйте
лицам, не знакомым с тепловым пистолетом или с данной инструкцией, работать с данным
устройством. Тепловой пистолет опасен в руках необученных пользователей.
5. Проводите техническое обслуживание теплового пистолета. Проверяйте нарушение центровки
движущихся частей или их защемление, повреждение деталей и любые другие условия, которые
могут влиять на работу теплового пистолета. В случае поломки отремонтируйте тепловой
пистолет перед использованием. Множество несчастных случаев происходит из-за плохого
технического обслуживания электрического инструмента.
6. Используйте тепловой пистолет в соответствии с данной инструкцией, принимая во внимание
рабочие условия и вид выполняемой работы. Использование теплового пистолета не по
назначению может привести к возникновению опасных ситуаций.
7. Сохраняйте ручки и рукоятки сухими, чистыми и избегайте попадания на них масла и жира.
Скользкие ручки и рукоятки мешают безопасно держать прибор и контролировать тепловой
пистолет в непредвиденных ситуациях.
8. При использовании теплового пистолета не надевайте тканевые рабочие перчатки, т. к. они могут
запутаться. Запутывание тканевых рабочих перчаток в движущихся частях может привести к травме.
ДОПОЛНИТЕЛЬНЫЕ ПРАВИЛА ТЕХНИКИ БЕЗОПАСНОСТИ ДЛЯ
ТЕПЛОВОГО ПИСТОЛЕТА
• Не кладите руки на вентиляционные отверстия и никогда их не закрывайте.

- 71 -
• Сопло теплового пистолета становится очень горячим во время использования. Перед тем, как
коснуться сопла, дайте ему охладиться.
• Всегда выключайте тепловой пистолет перед тем, как убрать его.
• Не оставляйте тепловой пистолет без присмотра, когда он включен.
• Если тепловой пистолет используется неосторожно, это может привести к возгоранию.
• Тепло может нагреть легковоспламеняющиеся материалы, которые находятся вне вашего поля
зрения. Не используйте тепловой пистолет во влажной атмосфере, где могут присутствовать
горючие газы, либо вблизи горючих материалов.
• Поместите тепловой пистолет на подставку и оставьте его охладиться перед тем, как убрать.
Обеспечьте достаточную вентиляцию, поскольку тепловой пистолет может выделять токсичные пары.
• Не используйте тепловой пистолет для сушки волос.
• Не загораживайте воздухозаборные отверстия или выпускное сопло, так как это может привести
к чрезмерному нагреванию и, как следствие, к поломке теплового пистолета.
• Не направляйте струю горячего воздуха на других людей.
• Не трогайте металлическое сопло, так как оно очень сильно нагревается во время использования
теплового пистолета и остается нагретым до 30 минут после использования.
• Не прислоняйте сопло к любым предметам во время или сразу после использования.
• Не вставляйте предметы в металлическое сопло, так как вас может поразить электрическим
током. Не смотрите на сопло во время работы с инструментом, так как из него выделяется очень
высокая температура.
ТЕХНИЧЕСКОЕ ОБСЛУЖИВАНИЕ И ЧИСТКА
Внимание: Перед тем как выполнить любые работы на тепловом пистолете, выньте вилку из
розетки.
Техническое обслуживание: Ваш тепловой пистолет предназначен для работы в течение
долгого времени и требует минимального технического обслуживания. Продолжительная и
качественная работа инструмента зависит от правильного ухода за ним и регулярной чистки.
Смазка: Тепловой пистолет не требует дополнительной смазки.
Чистка:
• Чтобы предотвратить перегрев двигателя, следите за тем, чтобы вентиляционные
отверстия устройства были чистыми и свободными от пыли и грязи.
• Регулярно проводите чистку корпуса устройства с помощью мягкой ткани, желательно
после каждого использования. Если грязь не удаляется, используйте мягкую ткань,
смоченную в мыльной воде.
Предупреждение: Никогда не используйте растворители, например, бензин,
спирт, нашатырный спирт и т. д. Эти растворители могут повредить пластиковые
части инструмента.

- 72 -
ПОИСК И УСТРАНЕНИЕ НЕИСПРАВНОСТЕЙ
Перед проведением технического обслуживания или ремонта изолируйте источник питания,
вынув вилку из розетки.
ТЕ Х НИЧЕСКИЕ Д А ННЫЕ
Название и модель
изделия
Тепловой пистолет
EK-Loop Heat Gun
2000 Вт – разъем EU
(разъем «Евро»)
Тепловой пистолет EK-
Loop Heat Gun 2000 Вт
– разъем UK (разъем
британского типа)
Тепловой пистолет EK-Loop Heat
Gun 1500 Вт – разъем US (разъем
американского типа)
Тип вилки VDE BS UL
Номер модели RF15-A2Y RF15B2Y
Напряжение 220-240 (V~) 120 V~
Частота (Гц) 50-60 60
Режимы работы 2
Уровень шума (дБ) 70
Позиция III III
Номинальная
мощность (Вт) 250 2000 250 1500
Температура 60-350 (°C) 60600 °C140572 °F 140932 °F
Воздушный поток 300 (л/мин) 500 (л/мин) 11 (куб. фут/мин) 18 (куб. фут/мин)
Дисплей Показывает номинальное значение температуры с помощью цветного инкремента
Степень защиты II / с двойной изоляцией
Материалы
корпуса Пластик и резина
Длина кабеля 2000 мм ± 20 мм
Страна происхождения: Китай
Гарантия
Гарантийные условия и сроки приведены в прилагаемом гарантийном талоне в конце
буклета (руководства по эксплуатации).
Дата производства (номер партии) указана на устройстве.
EK® является зарегистрированной торговой маркой EKWB d.o.o.
© 2022 EKWB d.o.o. Все права защищены
https://www.ekwb.com
Утилизация
Товары, отмеченные данным символом, не должны утилизироваться как
отсортированные бытовые отходы, чтобы избежать угроз для здоровья и
окружающей среды из-за вредных веществ. Электрические и электронные товары
всегда утилизируют в соответствующих официальных пунктах сбора/переработки.

- 73 -
EK-Loop
加热枪 手册


- 75 -
型号
EK-Loop 加热枪 2000W – 欧标插头
EK-Loop 加热枪 2000W – 英标插头
EK-Loop 加热枪 1500W – 美标插头
全套包含
请检查加热枪,电源线和电源插头有无运输损坏。
警 告: 包装材料并非玩具!儿童严禁玩耍塑料袋!窒息危险!
• 加热枪(1 件)
• 说明手册(1 件)
当部件缺失或损坏时,请联系您的经销商。
安全警告
在使用本产品前,应阅读、理解并遵守本手册中的所有安全规范和操作说明。
符合国际标准 EN 60335-1
• 本加热枪适用于国内使用,且不得用于商业用途。
• 本加热枪不得由儿童,或身体、感知或心理能力低下,亦或是缺乏经验或知识的人员使用。
• 切勿让儿童玩耍加热枪。
• 不得由儿童进行清洁和用户维护。
• 如果随附线缆损坏,则必须由制造商、其服务机构或类似专业人员进行更换,以避免出现危险。
• 如果并未谨慎使用加热枪,则可能造成起火,因此:
• 在存在易爆材料的场所使用加热枪应格外小心;
• 请小心,热量可能会传递到视线以外的易燃材料处
• 切 勿 在 易 爆 环 境 中 使 用;
• 不要长时间停留在相同位置;
• 在其打开时,切忌无人值守;
• 在使用后请将加热枪放在立架上,让它在存放前冷却下来。
设计用途
您的加热枪为特殊设计工具,仅限用于折弯亚克力和 PETG 管。
该 加 热 枪 具 有两 种 设 置:
1. 低热(位置 1):适用于工作表面或周围不允许过热的场合。
2. 高热(位置 2):适用于工作表面能够更快加热,您可以从更远的距离处操作加热枪。

- 76 -
投入使用
请观察主电压:电源电压必须与装置铭牌上
给出的数值相一致。延长线的横截面至少为
2×1.5mm² 。
在将插头连接至主电压之前,您需要检查开关是
否 处 于“ 0 ”位 置 。( 图 . 1 )
图.1
图.2
主要部件清单
1加热喷嘴
2加热保护圈
3进气口
4
主开关
5
以彩色增量显示温度等级
6降低温度按钮
7升高温度按钮
2
5
3
4
1
76
打开开关
选择开关位置 I 获取所需的操作温度和空气量。
(图 . 2)

- 77 -
选择开关位置 II 获取所需的操作温度和空气量。
(图 . 3)
欧标插头(VDE)和英标插头(BS)
开关位置 I:
I. 设置 60°C–350°C / 300l/最低-1
开关位置 II:
II. 设置 60°C–600°C / 500l/最低-1
开 关 关 闭:
设置开关至 0。(图.1)
美标插头 (UL)
开关位置 I:
I. 设置 140°F–572°F/~11cfm
开关位置 II:
II. 设置 140°F–932°F/~18cfm
开 关 关 闭:
设置开关至 0。(图.1)
图.3
设置温度
(图.4) 在 I 级时,可以通过控制面板在 30℃(86℉
)的范围内增加或减少温度,并且在 II 级时,可以通
过控制面板在 55℃(131℉)的范围内增加或减少温
度。如需增加温度,请按下左侧按钮(+);如需减少
温 度,请 按下右 侧 按 钮(-)。可以 轻 按下按 钮 或 按下 并
按住按钮,直至达到所需温度设置。在操作时,请注
意最大温度,其取决于开/闭开关。只有在切换至 2
级时才能达到最大温度。如果选择了切换至 1 级,则
最高 温 度 为 35 0 ℃(6 6 2℉)。集 成 式 显 示 屏通 过 各
种颜色的增量,显示出了温度等级。
图.4
提高温度
降低温度
一体式显示
加热枪的安放
将加热器朝上放在平面上(桌面)。在管中插入
硅胶软棒。硅胶棒用于润滑软管转弯处。握住插
入硅胶棒的软管,保持距离热枪喷嘴约 5 厘米
(2英寸)。沿着主轴缓慢旋转软管,将其左右移
动,以便均匀加热。当软管被加热后,您就可以将
其弯曲至所需形状。如果软管被长时间加热,则
可能产生气泡、管道直径变形、管道变色等。
最小距离 5cm(2”)

- 78 -
警告(美标插头): 本加热枪配有极
化插头(一侧比另一侧宽)。为了减
少触电风险,其插头只能以一种方式
搭配极化插座。如果插头与插座并不
完全匹配,则请调转插头。如果其仍
然不匹配,则请联系专业电工。切勿
以任 何 方 式 改装 插 头。
切勿将加热枪侧向倒放(图.6)
图.6
警 告: 在 使 用 加 热 枪 前,为了 您 自 身
的安全,请仔细阅读本手册和常规安
全说明。在转交此加热枪时,必须随
附其说明书。加热枪只能连接与铭牌
上注明的相同电压,且只能通过单相
交 流 电 操 作。
我们建议使用 EK-Loop Modulus 硬管折弯工具,
更加容易折弯软管:
EK-Loop Modulus 硬管折弯工具 – 12mm,
产品 EAN:3831109816103
https://www.ekwb.com/shop/ek-loop-
modulus-hard-tube-bending-tool-12mm
EK-Loop Modulus 硬管折弯工具 – 14mm,
产品 EAN:3831109816110
https://www.ekwb.com/shop/ek-loop-
modulus-hard-tube-bending-tool-14mm
EK-Loop Modulus 硬管折弯工具 – 16mm,
产品 EAN:3831109816127
https://www.ekwb.com/shop/ek-loop-
modulus-hard-tube-bending-tool-16mm
EAN: 3831109816110
EAN: 3831109816127
EAN: 3831109816103
EAN: 3831109816110
EAN: 3831109816127
EAN: 3831109816103
警告
请始终将加热枪朝上放在平面上。
(图.5)
图.5

- 79 -
常规电动工具安全警告
安全规范
警 告:在操作加热枪时未遵守安全规范可能会导致起火、爆炸、触电或烧伤。是使用加热枪前
应阅读操作说明,并始终遵守安全规范。应保存好这些说明并在使用加热枪前,交给未经培训
的 员 工。
警 告:损坏的外壳或打开的设备可能会造成触电风险。切勿打开加热枪并且不要将已损坏的加
热枪投入使用。切勿对外壳钻孔,例如,安装公司标签。对装置进行任何作业时,请拔出主插
头。
警 告:损坏的电源线可能会导致触电风险。请定期检查电源线。在电源线已损坏时,切勿操作
装置。务必始终由专业人员更换已损坏的线缆。切勿将电线缠绕在加热枪上,并保护其免于接
触到机油、热量和锋利的边缘。切勿使用电线携带加热枪,也不得使用电线将插头从插座中拉
出。
警 告:切勿在雨中或在潮湿亦或是湿润的环境中作业。这可能会导致触电风险。保持加热枪干
燥。在不使 用 时,请将 加 热 枪 保 存 在 干 燥 的场 所。请 注 意 天 气 状 况。切 勿 在 潮 湿 的 卫 生 设 施 中
使 用。应 避 免 身 体 接触 到 地 线 或 表面,如 管 道、散 热 器、炉 灶 和 冰 箱。
警 告:在露天使用加热枪时应通过残余电流断路器(RCCB)连接。
警 告:爆炸危险!加热枪的爆炸可以引燃易燃液体和气体。切勿在有爆炸可能的环境中使用。
请在开始作业前检查周围环境。切勿对燃油或气体容器或在其周围作业,即使其为空置。
警 告:起火危险!热量可以到达隐藏在覆盖层、天花板、地面或空间中的易燃物,并将其点燃。
请在开始作业前,检查作业区域,在存在疑问时,应放弃使用加热枪。切勿将加热枪长时间指
向 同 一 位 置。
警 告:起火危险!在无人监督的情况下操作加热枪,可以引燃附近的物体。在操作过程中,应始
终注意加热枪。在关闭加热枪进行冷却时,应始终将其以垂直且直立的方式放好。应使加热枪
完全 冷 却。
警 告:起火危险!在对塑料漆面或类似材料作业时,所产生的气体很容易燃烧,并导致爆炸。请
随时做好起火准备,并在手边备好灭火器。
警 告:中毒危险!在对塑料、漆面或类似材料作业时,所产生的气体可能具有刺激性或毒性。应
避免吸入蒸汽,即使其表面上无害。应始终对作业区域进行良好通风,或佩戴面罩。
警 告:受伤危险!热气喷射流可能会伤害人员或动物。触摸加热元件的热管,或加热枪喷嘴
会造成皮肤灼伤。应保持儿童和其他人员远离加热枪。在高热时,切勿触摸加热元件的管道
或是喷嘴。切勿使用加热枪作为吹风机。其所产生的热量远高于吹风机。切勿使用加热枪加
热液体或烘干物体或材料,其会在热空气的影响下受到损毁。
警 告:在热继电器执行后,意外启动或意外打开加热元件将造成受伤。在连接加热枪与主电
源时应确保开关处于关闭位置。在热继电器已启动后,应将加热枪切换为关闭。

- 80 -
警 告:受伤危险!使用与您的加热枪不匹配的气流反射喷嘴可能导致灼伤。必须使用您型号
在操作说明中列明的原厂配件。
警 告:受伤和起火危险。加热枪对于儿童来说很危险。应将加热枪置于儿童无法够到的地
方。
危 险:过热危险!错误的操作可能会导致热量累积并对加热枪造成损坏。在其水平放置或朝
下放置时,切勿使用加热枪。进气口和喷嘴必须妥善盖好。必须使用适合您装置的喷嘴。
阅读所有本加热枪随附的安全警告、说明、示意图和规格书。未能遵守下列的所有说明可能会导致触
电、起 火 及 / 或 严重伤 害。
工作区域安全
1. 应保持工作区域干净整洁。杂乱或黑暗的区域会造成事故。
2. 切勿在易爆环境中操作加热枪,例如存在易燃液体、气体或烟尘的场所。加热枪会产生火花,并从
而引燃烟尘或气雾。
3. 在操作加热枪时应保证远离儿童和旁观者。干扰可能会造成您失去控制。
4. 加热枪插头必须与插座相匹配。严禁以任何形式改装插头。不要将任何适配器插头与接地电动工
具一起使用。未经改造的插头和相应插座能够减少触电风险。
5. 应避免身体接触到地或地表,如管道、散热器、炉灶和冰箱。如果您的身体已接地或接触地面,则
会 增 加 触 电 风险。
6. 切勿将加热枪暴露在雨中或潮湿环境中。有水进入加热枪将导致触电风险增加。
7. 切勿滥用电线。切勿使用电线携带、拖拉或拔出电动工具。应保持电线远离热量、机油、锋利边缘
或移动部件。损坏或缠绕一团的电线会增加触电风险。
8. 在户外时应使用适合户外的电线,以减少触电风险。使用适合户外的电线能够减少触电风险。
9. 如果无法避免在潮湿场所使用加热枪,则应使用剩余电流装置(RCD)来保护电源。使用 RCD 减
少 触电 风 险。
10. 我们始终建议通过额定剩余电流为 30mA 或更少的 RCD 使用加热枪。
11. 加热枪会产生电磁场(EMF),其对用户无害。但是,使用心脏起搏器和其他类似医疗设备的用户,
应在操作此加热枪之前联系其设备制造商,及/或医师寻求建议。
12. 切勿使用潮湿的双手接触电源插座。
13. 如果电线已损坏,应由制造商或其代理商进行更换,以避免出现安全风险。
个人 安 全
1. 在操作加热枪时,应保持警惕,观察您所做的工作,并善用常识。在您疲劳或受到毒品、酒精或药
物影响时,切勿使用加热枪。在操作加热枪时产生疏忽可能会造成严重的人员伤害。
2. 请使用个人防护装备。应始终使用眼部防护设备。在恰当场合下应使用诸如防尘面罩、防滑安全鞋
或听力防护设备等个人防护设备,以减少人员受伤。

- 81 -
3. 防止意外启动。在连接电源、拾取或携带加热枪之前,应确保开关处于关闭-位置(图.1)。用手指抓
住开关取放加热枪或有开关的已通电加热枪,易造成事故。
4. 切勿强行够拿。应始终保持恰当的底脚和平衡。在出现意外状况时能够更好的控制加热枪。
5. 应妥善着装。切勿穿着松散的衣物或佩戴饰物。保持您的头发和衣物远离移动部件。松散的衣物、
饰物或长发可能被移动部件夹住。
6. 切勿因频繁使用熟悉加热枪后,促使您疏忽或忽略工具的安全规范。疏忽的行为可能会在瞬息之
间造成严重受伤。
7. 在出现事故或损坏时,应断开加热枪与电源间的插头,并在操作此加热枪之前联系EKWB 客户支持
部门或您当地的授权服务中心寻求建议。
8. 当出现灼伤时,应移除灼热或燃烧的衣物。如果衣物已经与皮肤粘连,应沿周围切开或撕开。将灼
伤的皮肤用冷(而非冰凉)水冲洗,或浸入冷水中,直至疼痛缓解。如果没有流水,则请压紧。用无
菌、非粘性的绷带或干净布料覆盖。切勿涂抹黄油、油料、乳液或护手霜(尤其是其中包含香精时)
。
9. 何时应当就医:当您发现感染迹象时,比如疼痛增加、发红、肿胀、发烧、或化脓,烧伤水泡大于 5
cm(2”) 或化脓、发红且疼痛超过几小时,疼痛愈加严重,是双手、脚部、脸部或生殖器烧伤。
加热枪的使用和养护
1. 切勿强行使用加热枪。在符合其设计用途时,加热枪的效果更好且更安全。
2. 如果开关无法打开和关闭,则切勿使用加热枪。如果无法通过开关控制加热枪,则其非常危险且必
须 进 行维 修。
3. 在进行任何调整或存储加热枪之前,请断开加热枪的插头与电源。该预防安全措施能够降低意外
启动电动工具的风险。
4. 应将加热枪保存在儿童无法够到的地方,并且不允许不熟悉加热枪或这些说明的人员操作加热
枪。在 非 专 业 人 员 手 中,加 热 枪 很 危 险。
5. 保存加热枪。请检查运动部件是否存在错位或捆绑,部件破损以及任何可能影响加热枪操作的状
况。如有损坏,应在使用前将加热枪修复。有很多事故是因为对电动工具保管不善造成的。
6. 应遵循这些说明使用加热枪,慎重考虑工作环境以及所进行的工作。将加热枪用于设计用途之外
的作业,可能会造成危险状况。
7. 请保持手柄或抓握的表面干燥、清洁且没有机油或润滑油。光滑的手柄或抓握表面无法在意外情
况下安全操作并控制加热枪。
8. 在使用加热枪时,切勿穿戴可能会发生缠绕的布质工作手套。缠绕进移动部件中的布质工作手套可
能会造成人员受伤。
加热枪的额外安全说明
• 切勿将手放在通风口上,或以任何形式挡住通风口。
• 在使用中,加热枪的喷嘴会极热。请在接触前让喷嘴冷却。
• 请在放下加热枪前,务必将其关闭。

- 82 -
• 在加热枪打开时,切勿离开无人值守。
• 如果未能谨慎使用加热枪,则可能造成起火。
• 热量可能会传导至视线以外的易燃材料上。切勿在潮湿环境、可能存在易燃气体或靠近易燃材料
处使 用。
• 在存放前应将加热枪直立放在支架上,使其完全冷却。应确保具备足够的通风,因为其可能产生
有 毒 蒸 汽。
• 切勿将其用作吹风机。
• 切勿阻挡进气口或喷嘴出口,因为这可能会造成热量过度累积,对加热枪造成损坏。
• 切勿直接将热空气对准人吹。
• 因为在使用中金属喷嘴的温度极高,因此在使用后 30 分钟内仍然灼热时,切勿接触金属喷嘴。
• 在使用中或使用后马上将喷嘴依靠任何物品放置。
• 切勿向喷嘴内塞入任何物体,这可能会造成触电。在装置工作时,切勿从下方观察喷嘴,因为其会
产 生 高 温。
维护和清洁
维 护 和 清 洁:
注意:在使用加热枪进行任何作业前,应抽出电源插头。
维 护:
您的加热枪在设计中允许长时间运行,且只需极少维护。只有妥善的养护工具并定期清洁,才能始终获得
满 意 的 运 行 结果。
润 滑:
您的加热枪无需润滑。
清 洁:
• 为了避免电机过热,应保持设备的通风口清洁,且无尘无污渍。
• 应定期用软布清洁机器外壳,最好是每次使用后。如果无法擦掉污渍,请使用肥皂水润湿的软布。
警 告: 切勿使用汽油、酒精、氨水等溶剂。溶剂可能会损坏塑料部件。
故障排除
应在进行调整、保养或维护前,将电源插头从插座中拔出,隔离电源。

- 83 -
技术数据
产品名称和型号 EK-Loop 加热枪
2000W –
欧标插头
EK-Loop 加热枪
2000W –
英标插头
EK-Loop 加热枪
1500W –
美标插头
电源插头类型 VDE BS UL
型号编号 RF15-A2Y RF15-B2Y
电压 220-240 (V~) 120 (V~)
频 率(H z)
50-60
60
运行模式 2
噪音等级(dB) 70
位置 III III
额 定 功率(W) 250 2000 250 1500
温度
60-350 (°C) 60-600 (°C) 140-572 (°F) 140-932 (°F)
空气流量 300 (l/min) 500 (l/min) 11 (cfm) 18 (cfm)
显示屏 通过各种颜色的增量显示温度
防护等级 II/双重绝缘
机箱材料 塑料和橡胶
电缆长度 2000 mm ± 20mm
原 产 国:中 国
保修
如需了解保修条款和条件,请查看说明手册单页末尾随附的保修卡。
在 电 器 上 可 以 找 到 生 产 日 期(批 次 号)。
EK® 是 EKWB d.o.o 的注册商标。
© 2022 EKWB d.o.o.版权所有
https://www.ekwb.com
回收
标有此标志的产品不得与未分类的城市垃圾一起处置,以避免有害物质造成环境和健康问
题。应始终在适当的官方回收/收集点处置电气和电子产品。

- 84 -
LIMITED WARRANTY CARD
Warrantor:
Seller:
Company:
Address:
Postal code:
Place:
Country:
Manufacturer:
EKWB, d. o. o., Poslovna cona Žeje pri
Komendi, Pod lipami 18,
1218 Komenda, Republic of Slovenia
Warrantor’s Seat:
Seller:
Manufacturer: Poslovna cona Žeje pri
Komendi, Republic of Slovenia
Product Type and Model: EK-Loop Heat
Gun, model no.: RF15-X2Y
Serial No.:
Warranty Period: 2 years
Territorial Validity of the Warranty:
Worldwide
Guaranteed Period of Availability of
Service and Spare Parts After the Lapse
of Warranty: 3 years
Notification of Defects and Authorised
Service Centre:
Seller:
Company:
Address:
Postal code:
Place:
Country:
Phone:
Email:
Manufacturer:
EKWB, d. o. o., Poslovna cona Žeje pri
Komendi, Pod lipami 18, 1218 Komenda,
Republic of Slovenia
Phone: +386 59 096 610
E-mail: info@ekwb.com
The warrantor herewith grants a warranty for
the indicated products and warranty period.
The warranty does not affect the rights
under the liability of the seller for defects.
Date:
EKWB, d. o. o.
Matjaž Krč, CEO
LIMITED WARRANTY
The Warrantor warrants faultless operation
of the warranted product during the warranty
period if used for the purpose for which it
was designed, provided it is installed, used
and maintained pursuant to the installation,
operational, maintenance, service instructions,
manufacturer’s recommendations or other
similar documentation.
The warranty period commences to run with
the purchase or delivery, in case the delivery
to the customer’s address was agreed at the
time of purchase.
Warranty claims may be addressed at the
authorised service centre or the seller where
the product was purchased.
The warrantor undertakes to repair or
replace the product at its own cost if the
product does not operate faultlessly during
the warranty period or does not have
the attributes expressly warranted in the
warranty card or advertising materials. In
case repair or replacement is not possible,
the warrantor will reimburse the purchase

- 85 -
price and associated costs or provide
another alternative. The warrantor will bear
the shipping costs for the return of the
defect products as well as for the delivery of
the repaired or replaced product.
Maintenance and care are not subject to
warranty.
Warranty Exclusions
Warranty is excluded for defects that cannot
be attributed to the warrantor or are caused by
reasons out of warrantor’s control, such as e. g.:
a. insignificant deviations from the
specifications;
b. normal wear and tear;
c. unauthorised adaptations or
modifications;
d. defects caused by inappropriate
installation, operation, excessive,
inappropriate, incorrect or negligent
use of the products (e. g. overheating);
e. use of the product for purposes other
than those for which the product was
designed or is intended pursuant to
the operating manual (e. g. drying hair,
starting a fire, etc.);
f. defects caused by combination of
the products with non-EK approved
products, whether technically
compatible or not;
g. defects caused by the use of
inappropriate consumer materials (such
as e. g. fabric, glass);
h. defects caused by maintenance,
repair, relocation or reconfiguration
procedures intended to be performed
by the customer pursuant to the
installation, operation, maintenance,
service manuals or similar
documentation in case of non-
compliance with instructions contained
therein (e. g. improper installation,
insufficient cleaning);
i. defects caused by maintenance, repair,
relocation or reconfiguration procedures
intended to be performed by an
authorised professional in case they are
performed by unauthorised third parties;
j. defects caused by disassembly,
replacement of parts (e. g. exchange
of power plug on supply cord) or
installation of additional parts (e. g.
nozzle) to the product as delivered;
k. defects caused by any other
interference with the product by
unauthorised parties;
l. other defects caused by failure
to comply with instructions or
recommendations of EKWB
contained in installation, operation,
maintenance, service manuals or similar
documentation;
m. software defects that cannot be
reproduced;
n. defects caused by third persons or
Force Majeure (e. g. atmospheric
discharge, surge, exposition to
chemical agents, etc.).
Warrantor’s liability for defects is
excluded for defects that were known
to the customer at the time of purchase
or that could not have remained hidden
to a reasonably prudent customer upon
ordinary inspection.
Warranty is void if the warranty label,
warranty seals or serial number labels are
tampered with or removed.
Any warranty claims are subject to proof
of acquisition and the date of acquisition
(e. g. purchase invoice, delivery note).
The warrantor reserves the right to reject
warranty claims without proof of acquisition.
Detailed warranty conditions and warranty
claim procedure are set forth in General
Terms of Sale of EKWB, d. o. o. available at
https://www.ekwb.com/shop/terms-of-sale
Dispute resolution mechanism under the
aforementioned General Terms of Sale of
EKWB, d. o. o. shall apply.
The warranty is subject to the laws of the
Republic of Slovenia.

- 86 -
EINGESCHRÄNKTE GARANTIEKARTE
Garantiegeber:
Verkäufer:
Unternehmen:
Anschrift:
Postleitzahl:
Ort:
Land:
Hersteller:
EKWB, d.o.o., Poslovna cona Žeje pri
Komendi, Pod lipami 18, 1218 Komenda,
Republik Slowenien
Sitz des Garantiegebers:
Verkäufer:
Hersteller: Poslovna cona Žeje pri Komendi,
Republik Slowenien
Produktart und Modell: EK-Loop
Heißluftpistole, Modell-Nr: RF15-X2Y
Seriennummer:
Garantiedauer: 2 Jahre
Territoriale Gültigkeit der Garantie:
Weltweit
Garantierte Dauer der Verfügbarkeit von
Service und Ersatzteilen nach Ablauf der
Garantie: 3 Jahre
Mängelmeldung und autorisiertes
Servicecenter:
Verkäufer:
Unternehmen:
Anschrift:
Postleitzahl:
Ort:
Land:
Telefon:
Email:
Hersteller:
EKWB, d.o.o., Poslovna cona Žeje pri
Komendi, Pod lipami 18, 1218 Komenda,
Republik Slowenien
Telefon: +386 59 096 610
E-mail: info@ekwb.com
Der Garantiegeber gewährt hiermit eine
Garantie für die angegebenen Produkte und
die Garantiezeit.
Die Garantie berührt nicht die Rechte aus
der Mängelhaftung des Verkäufers.
Datum:
EKWB, d. o. o.
Matjaž Krč, CEO
EINGESCHRÄNKTE GARANTIE
Der Garantiegeber garantiert den einwandfreien
Betrieb des garantierten Produkts während
der Dauer der Garantie, wenn es für den Zweck
verwendet wird, für den es konzipiert wurde,
vorausgesetzt, es wird gemäß den Installations-,
Betriebs-, Wartungs- und Serviceanweisungen,
den Empfehlungen des Herstellers oder anderen
ähnlichen Unterlagen installiert, verwendet und
gewartet.
Die Gewährleistungsfrist beginnt mit dem Kauf oder
der Lieferung, sofern beim Kauf die Lieferung an die
Adresse des Kunden vereinbart wurde.
Garantieansprüche können bei der autorisierten
Kundendienststelle oder dem Verkäufer, bei dem das
Produkt erworben wurde, geltend gemacht werden.
Der Garantiegeber verpflichtet sich, das Produkt
auf eigene Kosten zu reparieren oder zu ersetzen,
wenn das Produkt während der Dauer der Garantie
nicht einwandfrei funktioniert oder nicht die in der
Garantiekarte oder im Werbematerial ausdrücklich
zugesicherten Eigenschaften aufweist. Falls eine
Reparatur oder ein Austausch nicht möglich ist,
erstattet der Garantiegeber den Kaufpreis und die

- 87 -
damit verbundenen Kosten oder stellt eine andere
Alternative zur Verfügung. Der Garantiegeber trägt
die Versandkosten für die Rücksendung der defekten
Produkte sowie für die Lieferung des reparierten
oder ausgetauschten Produkts.
Wartung und Pflege sind nicht Gegenstand der Garantie.
Garantieausschlüsse
Die Garantie ist ausgeschlossen für Mängel, die
nicht vom Garantiegeber zu vertreten sind oder auf
Gründen beruhen, die der Garantiegeber nicht zu
vertreten hat, wie z. B.:
a. unbedeutende Abweichungen von den
Spezifikationen;
b. normale Abnutzung und Verschleiß;
c. nicht genehmigte Anpassungen oder
Änderungen;
d. Mängel, die durch unsachgemäße Installation,
Bedienung, übermäßigen, unsachgemäßen,
falschen oder fahrlässigen Gebrauch der
Produkte (z. B. Überhitzung) verursacht werden;
e. die Verwendung des Produkts zu anderen
Zwecken als denen, für die das Produkt
konzipiert wurde oder gemäß der
Bedienungsanleitung vorgesehen ist (z. B.
Haare trocknen, Feuer machen usw.);
f. Mängel, die durch die Kombination der Produkte
mit nicht von der EK zugelassenen Produkten
verursacht werden, unabhängig davon, ob diese
technisch kompatibel sind oder nicht;
g. Mängel, die durch die Verwendung von
ungeeigneten Verbrauchsmaterialien (wie z. B.
Stoff, Glas) verursacht werden;
h. Mängel, die durch Wartungs-, Reparatur-,
Umstellungs- oder Umkonfigurationsmaßnahmen
verursacht werden, die vom Kunden gemäß
den Installations-, Betriebs-, Wartungs-,
Servicehandbüchern oder ähnlichen Unterlagen
durchzuführen sind, wenn die darin enthaltenen
Anweisungen nicht befolgt werden (z. B.
unsachgemäße Installation, unzureichende
Reinigung);
i. Mängel, die durch Wartungs-, Reparatur-,
Verlegungs- oder Umgestaltungsarbeiten
verursacht werden, die von einem
zugelassenen Fachmann durchgeführt
werden sollen, wenn sie von nicht
zugelassenen Dritten durchgeführt werden;
j. Mängel, die durch Demontage, Auswechseln
von Teilen (z. B. Austausch des Netzsteckers
am Zuleitungskabel) oder Einbau zusätzlicher
Teile (z. B. Düse) zum gelieferten Produkt
entstehen;
k. Mängel, die durch sonstige Eingriffe in das
Produkt durch Unbefugte verursacht wurden;
l. sonstige Mängel, die auf die Nichtbeachtung
von Anweisungen oder Empfehlungen
von EKWB zurückzuführen sind, die in
Installations-, Betriebs-, Wartungs- und
Servicehandbüchern oder ähnlichen
Unterlagen enthalten sind;
m. Softwarefehler, die nicht reproduzierbar sind;
n. Mängel, die durch Dritte oder höhere
Gewalt (z. B. atmosphärische Entladung,
Überschwemmung, Einwirkung chemischer
Stoffe usw.) verursacht werden.
Die Mängelhaftung des Garantiegebers ist
ausgeschlossen für Mängel, die dem Kunden
zum Zeitpunkt des Kaufs bekannt waren oder die
einem verständigen Kunden bei ordnungsgemäßer
Prüfung nicht verborgen bleiben konnten.
Die Garantie erlischt, wenn das Garantieetikett,
die Garantiesiegel oder die Etiketten mit den
Seriennummern manipuliert oder entfernt werden.
Etwaige Garantieansprüche unterliegen dem
Nachweis des Erwerbs und des Erwerbsdatums (z.
B. Kaufrechnung, Lieferschein). Der Garantiegeber
behält sich das Recht vor, Garantieansprüche ohne
Nachweis des Erwerbs abzulehnen.
Die detaillierten Garantiebedingungen und
das Verfahren zur Geltendmachung von
Garantieansprüchen sind in den Allgemeinen
Verkaufsbedingungen von EKWB d.o.o. festgelegt,
die unter https://www.ekwb.com/shop/terms-of-sale
verfügbar sind.
Es gelten die Streitbeilegungsmechanismen
gemäß den vorgenannten Allgemeinen
Verkaufsbedingungen von EKWB, d.o.o.
Die Garantie unterliegt den Gesetzen der Republik
Slowenien.

- 88 -
CARTE DE GARANTIE LIMITÉE
Garant :
Vendeur :
Société :
Adresse :
Code postal :
Lieu :
Pays :
Fabricant :
EKWB, d.o.o., Poslovna cona Žeje pri
Komendi, Pod lipami 18, 1218 Komenda,
République de Slovénie
Siège du garant :
Vendeur :
Fabricant : Poslovna cona Žeje pri Komendi,
République de Slovénie
Type et modèle de produit : Décapeur
thermique EK-Loop, modèle n° : RF15-X2Y
N° de série :
Période de garantie : 2 ans
Validité territoriale de la garantie :
À l’échelle mondiale
Période de disponibilité du service et
des pièces de rechange après expiration
de la garantie : 3 ans
Notification des défauts et centre de
service agréé :
Vendeur :
Société :
Adresse :
Code postal :
Lieu :
Pays :
Téléphone :
Email :
Fabricant :
EKWB, d.o.o., Poslovna cona Žeje pri
Komendi, Pod lipami 18, 1218 Komenda,
République de Slovénie
Téléphone : +386 59 096 610
E-mail : i[email protected]
Le garant accorde par la présente une
garantie pour les produits indiqués et la
période de garantie.
La garantie n’affecte pas les droits au titre de
la responsabilité du vendeur pour les défauts.
Date:
EKWB, d. o. o.
Matjaž Krč, CEO
GARANTIE LIMITÉE
Le garant garantit le fonctionnement sans défaut
du produit garanti pendant la période de garantie
s’il est utilisé aux fins pour lesquelles il a été conçu,
à condition qu’il soit installé, utilisé et maintenu
conformément aux instructions d’installation, de
fonctionnement, de maintenance, de service, aux
recommandations du fabricant ou à toute autre
documentation similaire.
La période de garantie commence à la date d’achat
ou de livraison, si la livraison à l’adresse du client a
été convenue au moment de l’achat.
Les réclamations au titre de la garantie peuvent
être adressées au centre de service autorisé ou au
vendeur où le produit a été acheté.
Le garant s’engage à réparer ou à remplacer le
produit à ses frais, si le produit ne fonctionne pas
parfaitement pendant la période de garantie ou
n’a pas les attributs expressément garantis dans
la carte de garantie ou les supports publicitaires.
Si la réparation ou le remplacement ne sont pas
possibles, le garant remboursera le prix d’achat et
les frais associés ou fournira une autre alternative.
Le garant prendra en charge les frais d’expédition

- 89 -
pour le retour des produits défectueux ainsi que
pour la livraison du produit réparé ou remplacé.
La maintenance et l’entretien ne sont pas couverts
par la garantie.
Exclusions de garantie
La garantie est exclue pour les défauts qui ne
peuvent être attribués au garant ou sont causés par
des raisons indépendantes de la volonté du garant,
telles que :
a. des déviations importantes par rapport aux
spécifications ;
b. une usure normale ;
c. une adaptation ou modification non autorisée ;
d. des défauts causés par une installation, un
fonctionnement inapproprié, une utilisation
excessive, inappropriée, incorrecte ou
négligente des produits (par exemple, une
surchauffe) ;
e. une utilisation du produit à des fins autres que
celles pour lesquelles le produit a été conçu ou
est destiné conformément au mode d’emploi
(par exemple séchage des cheveux, allumage
du feu, etc.) ;
f. des défauts causés par la combinaison de
produits avec des produits non approuvés par
EK, qu’ils soient techniquement compatibles
ou non ;
g. des défauts causés par l’utilisation de
matériaux de consommation inappropriés (tels
que le tissu, le verre) ;
h. des défauts causés par des procédures de
maintenance, de réparation, de déplacement
ou de reconfiguration destinées à être
effectuées par le client conformément
aux manuels d’installation, d’exploitation,
de maintenance, de service ou à une
documentation similaire en cas de non-
respect des instructions y figurant (par
exemple une mauvaise installation, un
nettoyage insuffisant) ;
i. les défauts causés par des procédures de
maintenance, de réparation, de déplacement
ou de reconfiguration destinées à être
effectuées par un professionnel autorisé au
cas où elles seraient effectuées par des tiers
non autorisés ;
j. les défauts causés par le démontage, le
remplacement de pièces (par exemple, le
remplacement de la fiche d’alimentation sur
le cordon d’alimentation) ou l’installation
de pièces supplémentaires (par exemple, la
buse) sur le produit tel que livré ;
k. les défauts causés par toute autre
interférence avec le produit par des parties
non autorisées ;
l. d’autres défauts causés par le non-
respect des instructions ou des
recommandations d’EKWB contenues dans
les manuels d’installation, d’exploitation,
de maintenance, de service ou dans une
documentation similaire ;
m. les défauts logiciels qui ne peuvent pas être
reproduits ;
n. les défauts causés par des tiers ou de
force majeure (par exemple décharge
atmosphérique, surtension, exposition à des
agents chimiques, etc.).
La responsabilité du garant pour les défauts est
exclue pour les défauts qui étaient connus du client
au moment de l’achat ou qui n’auraient pas pu
rester cachés à un client raisonnablement prudent
lors d’une inspection ordinaire.
La garantie est nulle si l’étiquette de garantie, les
cachets de garantie ou les étiquettes de numéro de
série sont falsifiés ou retirés.
Toute réclamation au titre de la garantie est
soumise à une preuve d’acquisition et à la date
d’acquisition (par exemple, facture d’achat, bon de
livraison). Le garant se réserve le droit de rejeter les
demandes de garantie sans preuve d’acquisition.
Les conditions de garantie détaillées et la procédure
de demande de garantie sont énoncées dans les
conditions générales de vente d’EKWB, d.o.o.
disponible sur https://www.ekwb.com/shop/terms-
of-sale
Le mécanisme de résolution des litiges, en vertu
des conditions générales de vente d’EKWB d.o.o.
susmentionnées, doit s’appliquer.
La garantie est soumise aux lois de la République de
Slovénie.

- 90 -
SCHEDA DI GARANZIA LIMITATA
Garante:
Venditore:
Azienda:
Indirizzo:
CAP:
Luogo:
Paese:
Produttore:
EKWB, d.o.o., Poslovna cona Žeje pri
Komendi, Pod lipami 18, 1218 Komenda,
Repubblica di Slovenia
Sede del garante:
Venditore:
Produttore: Poslovna cona Žeje pri
Komendi, Repubblica di Slovenia
Nome del prodotto e modello: Pistola
termica EK-Loop, modello n.: RF15-X2Y
N. di serie:
Periodo di garanzia: 2 anni
Validità territoriale della garanzia: Tutto
il mondo
Periodo garantito di disponibilità
dell’assistenza e delle parti di ricambio
successivamente alla scadenza della
garanzia: 3 anni
Notifica di difetti e centro di assistenza
autorizzato:
Venditore:
Azienda:
Indirizzo:
CAP:
Luogo:
Paese:
Telefono:
Email:
Produttore:
EKWB, d.o.o., Poslovna cona Žeje pri
Komendi, Pod lipami 18, 1218 Komenda,
Repubblica di Slovenia
Telefono.: +386 59 096 610
E-mail: info@ekwb.com
Con la presente il garante accorda un periodo
di garanzia per i prodotti e il periodo indicati.
La garanzia non pregiudica i diritti derivanti
dalla responsabilità del venditore per i difetti.
Data:
EKWB, d. o. o.
Matjaž Krč, AD
GARANZIA LIMITATA
Il garante garantisce il funzionamento
corretto del prodotto garantito durante il
periodo di garanzia se utilizzato per gli scopi
per i quali è stato progettato, a condizione
che venga installato, utilizzato e mantenuto
conformemente alle istruzioni di installazione,
funzionamento, manutenzione e assistenza,
alle raccomandazioni del produttore o ad altra
documentazione analoga.
Il periodo di garanzia decorre dalla data di
acquisto o di consegna, nel caso in cui la
consegna all’indirizzo del cliente sia stata
concordata al momento dell’acquisto.
I reclami in garanzia possono essere indirizzati
al centro di assistenza autorizzato o al venditore
presso il quale il prodotto è stato acquistato.
Il garante si impegna a riparare o sostituire il
prodotto a proprie spese qualora il prodotto
non funzioni in modo corretto durante il periodo
di garanzia o non abbia le caratteristiche
espressamente garantite nella scheda di
garanzia o nei materiali pubblicitari. Nel caso
in cui la riparazione o la sostituzione non sia
possibile, il garante rimborserà il prezzo di

- 91 -
acquisto e i costi correlati o proporrà una
alternativa. Il garante sosterrà le spese di
spedizione per la restituzione dei prodotti
difettosi e per la consegna del prodotto riparato
o sostituito.
La manutenzione e la cura del prodotto non
sono soggette a garanzia.
Esclusioni di garanzia
Sono esclusi dalla garanzia i difetti che non
possono essere attribuiti al garante o che sono
causati da motivi al di fuori del controllo dello
stesso, per es.:
a. scostamenti insignificanti dalle specifiche;
b. normale usura;
c. adattamenti o modifiche non autorizzate;
d. difetti causati da un’installazione
inadeguata, dal funzionamento o
uso eccessivo, inappropriato, errato
o negligente dei prodotti (per es.
surriscaldamento);
e. utilizzo del prodotto per scopi diversi
da quelli per i quali il prodotto è stato
progettato o ai quali è destinato secondo
le istruzioni d’uso (es. asciugare i capelli,
accendere il fuoco, ecc.);
f. difetti causati dalla combinazione dei
prodotti con prodotti non approvati da
EK, siano essi tecnicamente compatibili o
meno;
g. difetti causati dall’utilizzo di materiali di
consumo inadeguati (per es. tessuto,
vetro);
h. difetti causati da procedure di
manutenzione, riparazione, ricollocazione o
riconfigurazione che il cliente deve eseguire
in conformità ai manuali di installazione,
funzionamento, manutenzione, assistenza
o documentazione analoga in caso di
mancato rispetto delle istruzioni ivi
contenute (per es. installazione impropria,
pulizia insufficiente);
i. difetti causati da procedure
di manutenzione, riparazione,
riposizionamento o riconfigurazione che
devono essere eseguite da un tecnico
autorizzato, nel caso in cui siano eseguite
da terzi non autorizzati;
j. difetti causati dallo smontaggio, dalla
sostituzione di parti (per es. sostituzione
della spina di alimentazione sul cavo di
alimentazione) o dall’installazione di parti
aggiuntive (per es. l’ugello) al prodotto
così come consegnato;
k. difetti causati da qualsiasi altra
interferenza con il prodotto da parte di
terzi non autorizzati;
l. altri difetti causati dal mancato rispetto
delle istruzioni o raccomandazioni
di EKWB contenute nei manuali
di installazione, funzionamento,
manutenzione, servizio o
documentazione analoga;
m. difetti software che non possono essere
riprodotti;
n. difetti causati da terzi o da cause di forza
maggiore (per es. scariche atmosferiche,
sovratensioni, esposizione ad agenti
chimici, ecc.).
Il garante declina ogni responsabilità per i
difetti che erano noti al cliente al momento
dell’acquisto o che non avrebbero potuto
rimanere nascosti a un cliente ragionevolmente
prudente successivamente a un’ispezione
ordinaria.
La garanzia è nulla se l’etichetta di garanzia, i
sigilli di garanzia o le etichette del numero di
serie vengono manomessi o rimossi.
Qualsiasi richiesta di garanzia è soggetta alla
prova di acquisto e alla data di acquisto (per
es. fattura di acquisto, bolla di consegna). Il
garante si riserva il diritto di rifiutare i reclami in
garanzia in mancanza di una prova di acquisto.
Le condizioni di garanzia dettagliate e la
procedura di reclamo in garanzia sono stabilite
nelle Condizioni generali di vendita di EKWB,
d.o.o. disponibili su https://www.ekwb.com/
shop/terms-of-sale
Si applicheranno i meccanismi di risoluzione
delle controversie ai sensi delle suddette
Condizioni generali di vendita di EKWB, d.o.o.
La garanzia è soggetta alle leggi della
Repubblica di Slovenia.

- 92 -
TARJETA DE GARANTÍA LIMITADA
Garante:
Vendedor:
Empresa:
Dirección:
Código postal:
Localidad:
País:
Fabricante:
EKWB, d.o.o., Poslovna cona Žeje pri
Komendi, Pod lipami 18, 1218 Komenda,
República de Eslovenia
Dirección del garante:
Vendedor:
Fabricante: Poslovna cona Žeje pri
Komendi, República de Eslovenia
Tipo y modelo del producto: Pistola de
calor EK-Loop, modelo Nº: RF15-X2Y
Número de serie:
Periodo de garantía: 2 años
Validez territorial de la garantía: en todo
el mundo
Período garantizado de disponibilidad
del servicio técnico y de reparación y
piezas de repuesto tras la expiración de
la garantía: 3 años
Notificación de defectos y centro de
servicio técnico autorizado:
Vendedor:
Empresa:
Dirección:
Código postal:
Localidad:
País:
Teléfono
Correo electrónico:
Fabricante:
EKWB, d.o.o., Poslovna cona Žeje pri
Komendi, Pod lipami 18, 1218 Komenda,
República de Eslovenia
Teléfono: +386 59 096 610
E-mail: info@ekwb.com
Por la presente, el garante concede una
garantía para los productos y el período de
garantía indicados.
La garantía no afectará a los derechos de
responsabilidad del vendedor por defectos.
Fecha:
EKWB, d. o. o.
Matjaž Krč, CEO
GARANTÍA LIMITADA
El garante garantiza el funcionamiento sin fallos
del producto garantizado durante el periodo de
vigencia de la garantía, siempre que se utilice
para el fin para el que ha sido diseñado, siempre
que se instale, utilice y mantenga de acuerdo con
las instrucciones de instalación, funcionamiento,
mantenimiento y servicio, las recomendaciones
del fabricante u otra documentación similar.
El período de garantía entra en vigor a partir de
la compra o la entrega, en caso de que la entrega
en el domicilio del cliente se haya acordado en el
momento de la compra.
Las reclamaciones de cobertura por garantía
pueden dirigirse al centro de servicio técnico
autorizado o al vendedor donde se adquirió el
producto.
El garante se compromete a reparar o sustituir
el producto a su cargo si éste no funciona
correctamente durante el periodo de vigencia de
la garantía o no cumple con las características
expresamente garantizadas en la tarjeta de
garantía o en el material publicitario. En caso de
que no sea posible la reparación o la sustitución,
el garante reembolsará el precio de compra

- 93 -
y los costes asociados o proporcionará otra
alternativa. El garante correrá con los gastos de
envío derivados de la devolución de los productos
defectuosos, así como de la entrega del producto
reparado o de sustitución.
El mantenimiento y el cuidado no están sujetos a
la cobertura de garantía.
Exclusiones de la garantía
Se excluyen de la garantía los defectos que no
puedan atribuirse al garante o que se originen por
razones ajenas a su voluntad, como por ejemplo:
a. diferencias insignificantes con respecto a las
especificaciones;
b. el desgaste normal por la utilización;
c. adaptaciones o modificaciones no
autorizadas;
d. los defectos causados por una instalación
inadecuada, el funcionamiento, el uso
excesivo, inapropiado, incorrecto o
negligente de los productos (por ejemplo, el
sobrecalentamiento);
e. el uso del producto para fines distintos
de aquellos para los que ha sido diseñado
o está destinado según el manual de
instrucciones (por ejemplo, secar el pelo,
encender un fuego, etc.);
f. los defectos causados por la combinación
de los productos con productos no
homologados por EK, ya sean técnicamente
compatibles o no;
g. defectos causados por el uso de materiales
de consumo inadecuados (como, por
ejemplo, tela, vidrio);
h. los defectos causados por los trabajos
de mantenimiento, reparación, traslado o
reconfiguración que el cliente deba realizar
en virtud del manuales de instalación,
funcionamiento, mantenimiento, servicio
o documentación similar en caso de
incumplimiento de las instrucciones
contenidas en ellos (por ejemplo, instalación
incorrecta, limpieza insuficiente);
i. los defectos causados por trabajos de
mantenimiento, reparación, traslado o
reconfiguración destinados a ser realizados
por un profesional autorizado, cuando sean
llevados a cabo por terceros no autorizados;
j. los defectos causados por el desmontaje,
la sustitución de piezas (por ejemplo,
el cambio del enchufe en el cable de
alimentación) o la instalación de piezas
adicionales (por ejemplo, la boquilla) al
producto tal como se entrega;
k. los defectos causados por cualquier otra
alteración del producto por parte de
personas no autorizadas;
l. otros defectos causados por el
incumplimiento de las instrucciones o
recomendaciones de EKWB contenidas
en los manuales de instalación,
funcionamiento, mantenimiento, servicio o
documentación similar;
m. defectos de software que no pueden ser
reproducidos;
n. los defectos causados por terceras
personas o por fuerza mayor (por ejemplo,
influencias climáticas, sobretensiones,
exposición a agentes químicos, etc.).
Queda excluida la responsabilidad del garante
por defectos que el cliente conociera en el
momento de la compra o que no hubieran podido
quedar ocultos para un cliente razonablemente
prudente tras una inspección ordinaria.
La garantía queda anulada si se manipulan o
retiran la etiqueta de garantía, los sellos de
garantía o las etiquetas de los números de serie.
Cualquier reclamación de garantía está sujeta
a la aportación de una prueba de adquisición y
de la fecha de adquisición (por ejemplo, factura
de compra, albarán de entrega). El garante se
reserva el derecho de rechazar las reclamaciones
de garantía si no se aporta la correspondiente
comprobación de adquisición.
Las condiciones detalladas de la garantía y el
procedimiento de reclamación de la garantía
se establecen en las Condiciones Generales de
Venta de EKWB, d.o.o. disponibles en https://
www.ekwb.com/shop/terms-of-sale
Mecanismo de resolución de conflictos según las
mencionadas Condiciones Generales de Venta de
EKWB, d.o.o.
La garantía está sujeta a las leyes de la República
de Eslovenia.

- 94 -
ТАЛОН ОГРАНИЧЕННОЙ ГАРАНТИИ
Гарант:
Продавец:
Компания:
Адрес:
Почтовый индекс:
Гор о д :
Страна:
Изготовитель:
EKWB, d.o.o., Poslovna cona Žeje pri Komendi,
Pod lipami 18, 1218 Komenda, Республика
Словения
Головной офис гаранта:
Продавец:
Изготовитель: Poslovna cona Žeje pri
Komendi, Республика Словения
Название и модель изделия:
Тепловой
пистолет EK-Loop Heat Gun, номер модели: RF15-X2Y
Серийный №:
Срок гарантии: 2 года
Территориальное действие гарантии: По
всему миру
Гарантированный срок доступа к сервису
и запасным частям после истечения срока
действия гарантии: 3 года
Уведомление о дефектах и
авторизованный сервисный центр:
Продавец:
Компания:
Адрес:
Почтовый индекс:
Гор о д :
Страна:
Телефон:
Электронная почта:
Изготовитель:
EKWB, d.o.o., Poslovna cona Žeje pri Komendi, Pod
lipami 18, 1218 Komenda, Республика Словения
Телефон: +386 59 096 610
Электронная почта: info@ekwb.com
Настоящим гарант предоставляет гарантию
на указанные изделия и в течение
указанного гарантийного срока.
Гарантия не влияет на права, вытекающие
из ответственности продавца за дефекты.
Дата:
EKWB, d. o. o.
Матьяж Крч (Matjaž Krč), Генеральный директор
ОГРАНИЧЕННАЯ ГАРАНТИЯ
Гарант гарантирует безупречную работу
гарантийного изделия в течение гарантийного
срока в случае, если изделие использовалось
для предназначенной цели, при условии, что
изделие было установлено, использовалось и
обслуживалось в соответствии с инструкцией
по установке, использованию, обслуживанию,
рекомендациями производителя или другой
похожей документацией.
Гарантийный срок начинается с момента покупки
или доставки в случае, если во время покупки была
согласована доставка по адресу покупателя.
Гарантийные претензии можно предъявить в
уполномоченный сервисный центр или продавцу, у
которого было приобретено изделие.
Гарант обязуется отремонтировать или заменить
изделие за свой счет, если оно в течение
гарантийного срока не работает безупречно
или не имеет характерных свойств, точно
гарантированных в гарантийном талоне или
рекламных материалах. В случае, если ремонт
или замена не являются возможными, гарант
возместит цену покупки и сопутствующие расходы
либо обеспечит другую альтернативу. Гарант берет

- 95 -
на себя расходы по возврату дефектного изделия,
а также по доставке отремонтированного или
замененного изделия.
Гарантия не распространяется на техобслуживание
и уход за изделием.
Исключения из гарантии
Исключением из гарантии являются дефекты,
которые нельзя приписать гаранту, или которые
возникли по причинам, не контролируемым
гарантом, например:
a. незначительные отклонения от
спецификаций;
b. естественный износ;
c. несанкционированные адаптации и
изменения;
d. дефекты, причиной которых стала
несоответствующая установка, работа,
излишняя, несоответствующая, неправильная
или небрежная эксплуатация изделия
(например, перегрев);
e. использование изделия для иных целей,
не предусмотренных руководством по
эксплуатации (например, сушка волос,
зажигание огня и т. д.);
f. дефекты, причиной которых является
комбинирование изделия с изделиями,
не одобренными EK, независимо от того,
являются ли они технически совместимыми
или нет;
g. дефекты, причиной которых является
несоответствующие потребительские
материалы (например, ткань, стекло);
h. дефекты, причиной которых является
обслуживание, ремонт, перемещение или
модификация, которые должен выполнять
покупатель, согласно руководству по
установке, эксплуатации, обслуживанию,
сервису или подобной документации в
случае несоответствия с содержащейся в
ней инструкцией (например, неправильная
установка, недостаточная очистка);
i. дефекты, причиной которых является
обслуживание, ремонт, перемещение или
модификация, которые должен выполнять
уполномоченный эксперт, в случае, если
они проводились неуполномоченным
третьим лицом;
j. дефекты, причиной которых является
демонтаж, замена (например, замена
разъема электропитания на шнуре питания)
или установка дополнительных частей
(например, сопла) в изделие в состоянии
доставки;
k. дефекты, причиной которых является
любое другое вмешательство в изделие
неуполномоченными третьими лицами;
l. другие дефекты, причиной которых
является несоблюдение инструкции или
рекомендаций EKWB, содержащихся в
руководствах по установке, эксплуатации,
обслуживанию, сервису и подобной
документации;
m. программные дефекты, которые нельзя
воспроизвести;
n. дефекты, причиной которых являются
третьи лица или форс-мажорные
обстоятельства (например, атмосферный
разряд, перенапряжение, воздействие
химических веществ и т. д.).
Гарант не несет ответственности за дефекты,
которые были известны покупателю во время
покупки, или не могли быть не замеченными
достаточно внимательному покупателю при
обычной проверке.
Гарантия является недействительной, если
гарантийная этикетка, наклейки или этикетки с
серийным номером испорчены или удалены.
При предъявлении гарантийной претензии
необходимо предоставить доказательство о
приобретении и указать дату приобретения
(например, счет-фактура на приобретенное изделие,
накладная). Гарант вправе отклонить гарантийные
претензии без доказательства о приобретении.
Более подробные условия гарантии и порядка
предоставления гарантийных претензий
приведены в Общих условиях продажи EKWB,
d.o.o., доступных по ссылке: https://www.ekwb.com/
shop/terms-of-sale
Применяется механизм урегулирования споров в
соответствии с указанными Общими условиями
продажи EKWB, d.o.o.
Гарантия регулируется законами Республики
Словения.

- 96 -
有限保修卡
保 修人:
销 售 商:
公司:
地址:
邮政编码:
地点:
国家:
制 造 商:
EKWB, d.o.o., Poslovna cona Žeje pri
Komendi, Pod lipami 18, 1218 Komenda, 斯洛
文尼亚共和国
保 修人 场 所:
销售商:
制 造 商: Poslovna cona Žeje pri Komendi, 斯
洛文尼亚共和国
产品类型和型号: EK-Loop 加热枪,型号编
号:R F 1 5 - X 2 Y
序 列 号:
保修期限: 2年
保 修 有 效 地 区 范 围:
全球
保修期满后服务和备件的保证可用期:
3年
缺陷和授权服务中心通知:
销 售 商:
公司:
地址:
邮政编码:
地点:
国家:
电话:
电子邮件:
制 造 商:
EKWB, d.o.o., Poslovna cona Žeje pri
Komendi, Pod lipami 18, 1218 Komenda, 斯洛
文尼亚共和国
电话: +386 59 096 610
电子邮件: info@ekwb.com
保修人谨此给予特定产品保修及保修期限。
保修不会影响销售商应对产品缺陷承担责任的
权利。
日期:
EKWB, d. o. o.
Matjaž Krč, CEO
有限保修
保修人将为产品在保修期内无故障运行提供保修,
但 必 须 根 据 安 装、操 作、维 护、服 务 说 明、制 造 商 建
议或其他类似文件进行安装、使用和维护。
保修期从购买或配送(当购买时同意配送到客户地
址时)之日起生效,
保修索赔可在授权服务中心或购买产品的卖方处
提出。
如果在保修期内,产品无法无故障运行,或是无法
达到保修卡或广告材料中宣称的属性,则保修人将
负责对产品进行维修或更换。当无法维修或更换
时,保修人会承担您购买的价格及相关成本,或是提
供其他备选方案。保修人将承担故障产品退货的运
输成本,以及维修或更换产品的配送费用。
维护和保养不在保修范围内。
保修排除条款
对于不能归因于保修人或由保修人无法控制的原
因造成的损坏,例如:
a. 与 规 格 有 显著 差 异;
b. 正常磨损和损耗;
c. 未经授权的改造或改装;

- 97 -
d. 由 于 安 装 不 当、操 作、过 度、不 当、错 误 或 疏
忽使用本产品所造成的损坏(例如,过热);
e. 用于除产品设计用途或操作手册以外的用途
( 例 如 , 吹 干 头 发 、点 火 等 等 );
f. 因与未经 EK 批准的产品共用所造成的缺
陷,无论其技术上是否兼容;
g. 由 于不 当 使 用 耗 材 造 成 的 缺 陷(例 如,纺 织
品 、 玻 璃 );
h. 由于客户根据设计流程进行维护、维修、迁
址或重新配置流程而造成的损坏 未能遵守
此处随附的说明,即安装、运行、维护、保
养手册或类似文件(例如,不当安装、缺乏
清 洁 );
i. 由于未经授权的第三方进行了本应由授权
人员进行的维护、维修、迁址或重新配置流
程而造成的损坏;
j. 由于对成品产品进行拆卸、更换部件(例
如,更换电源线的插头)或安装额外部件(
例 如,喷 嘴)所 造 成 的 损 坏;
k. 由于其他未授权方对产品干扰而造成的损
坏。
l. 其他因为未能遵守 EKWB 有关安装、操作、
维护、保养手册或类似文件中的说明或建议
而造成的损坏。
m. 无 法 重 现 的 软 件 损 坏;
n. 由 第三 方人 员 或 不 可 抗 力(如,大 气 放 电、浪
涌、接触化学试剂等)所造成的损坏。
对于客户在购买时已知的缺陷,或在正常检查
中,无法在认真检查下进行隐藏的缺陷,保修人
对缺陷不承担责任。
如果保修标签、保修徽记或序列号标签曾被篡改
或 拆 除,则保 修 将 失 效。
任何保修索赔均已提供购置证明和购置日期(例
如,购置发票、配送单)。在缺少购置证明时,保
修人有权拒绝保修索赔。
详细的保修条款和保修索赔流程已在 EKWB
d.o.o. 的常规销售条款中明确规定。可以前往
https://www.ekwb.com/shop/terms-of-sale
查看
出现争议时,应采用上述 EKWB d.o.o. 的常规销
售条款中已明确的争议解决机制。
本保修受斯洛文尼亚共和国法律约束。

- 98 -
EKWB, d.o.o.
Pod lipami 18, SI-1218 Komenda, Slovenija
Declare, under it sole rensponsibility that the product
Product Name and Model:
EK-Loop Heat Gun 2000W – EU Plug ;
EK-Loop Heat Gun 2000W – UK Plug
Regulatory Model Number:
RF15-A2Y
S/N:
YYYYOONNNN
(YYYY - production year; OO - order No.;
NNN – the running S/N)
Conforms to the following Product Specifications and Regulations:
Regulations Product Specifications
Directive for Low Voltage equipment
LVD 2014/35/EU
EN 60335-2-45:2002+A1:2012
EN 60335-2-45:2002+A2:2012
EN 60335-1:2012+AC:2014
EN 60335-1:2012+A11:2014
EN 60335-1:2012+A13:2014
EN 60335-1:2012+A14:2014
EN 60335-1:2012+A1:2014
EN 60335-1:2012+A2:2014
Directive for Electromagnetic compatibility
EMC 2014/30/EU
EN 55014-1:2017/+A11:2020
EN 55014-2:2015
EN IEC 61000-3-2:2019
EN 6100-3-3:2013/+A1:2019
EN 62233:2008
Directive on the restriction of hazardous
substances in electricity equipment RoHS
2011/65/EU and EU 2015/863
Date: Komenda, 06.12.2021 Approved by: Roman Pust
DECLARATION OF CONFORMITY
according to ISO/IEC 17050-1 and EN 17050-1


-
 1
1
-
 2
2
-
 3
3
-
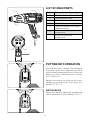 4
4
-
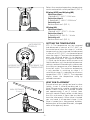 5
5
-
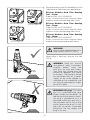 6
6
-
 7
7
-
 8
8
-
 9
9
-
 10
10
-
 11
11
-
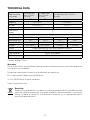 12
12
-
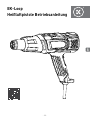 13
13
-
 14
14
-
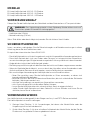 15
15
-
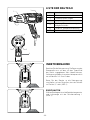 16
16
-
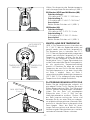 17
17
-
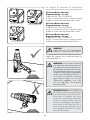 18
18
-
 19
19
-
 20
20
-
 21
21
-
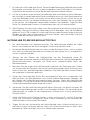 22
22
-
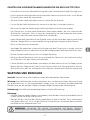 23
23
-
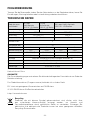 24
24
-
 25
25
-
 26
26
-
 27
27
-
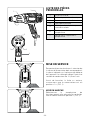 28
28
-
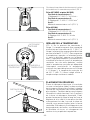 29
29
-
 30
30
-
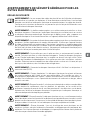 31
31
-
 32
32
-
 33
33
-
 34
34
-
 35
35
-
 36
36
-
 37
37
-
 38
38
-
 39
39
-
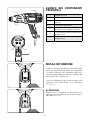 40
40
-
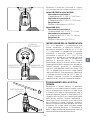 41
41
-
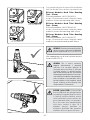 42
42
-
 43
43
-
 44
44
-
 45
45
-
 46
46
-
 47
47
-
 48
48
-
 49
49
-
 50
50
-
 51
51
-
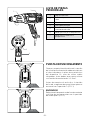 52
52
-
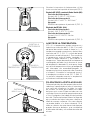 53
53
-
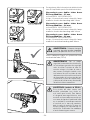 54
54
-
 55
55
-
 56
56
-
 57
57
-
 58
58
-
 59
59
-
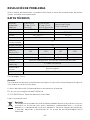 60
60
-
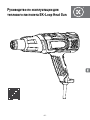 61
61
-
 62
62
-
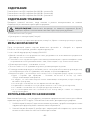 63
63
-
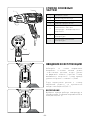 64
64
-
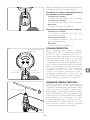 65
65
-
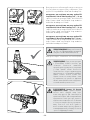 66
66
-
 67
67
-
 68
68
-
 69
69
-
 70
70
-
 71
71
-
 72
72
-
 73
73
-
 74
74
-
 75
75
-
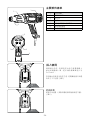 76
76
-
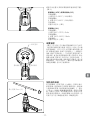 77
77
-
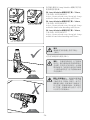 78
78
-
 79
79
-
 80
80
-
 81
81
-
 82
82
-
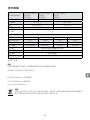 83
83
-
 84
84
-
 85
85
-
 86
86
-
 87
87
-
 88
88
-
 89
89
-
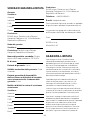 90
90
-
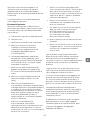 91
91
-
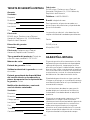 92
92
-
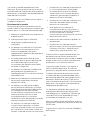 93
93
-
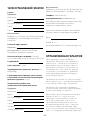 94
94
-
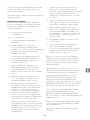 95
95
-
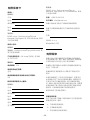 96
96
-
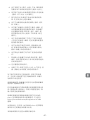 97
97
-
 98
98
-
 99
99
-
 100
100


ekwb EK-Loop Heat Gun 1500W Guía de instalación
- Tipo
- Guía de instalación
en otros idiomas
Artículos relacionados

Otros documentos
-
Worx WX041 Original Instructions Manual
-
Ferm HAM1009 Manual de usuario
-
Silverline 127655 Manual de usuario
-
Black & Decker KX1693 El manual del propietario
-
Ferm HDM1014 El manual del propietario
-
Constructor CHAGD2003-BM Manual de usuario
-
VonHaus 3515181 Instrucciones de operación
-
DeWalt DCE530 Manual de usuario
-
Mannesmann 17220 Manual de usuario
-
Raychem S-40 Guía de instalación