Welch Allyn LumiView Operating Instructions Manual
- Tipo
- Operating Instructions Manual

WelcljAllyrr
LumiView@
Portable Binocular Microscope
Microscope binoculaire portatif
Microscopio binocular
portzitil
Tragbares Binokular-Mikroskop
Operating Instructions
.......................
1
Instructions de fonctionnement
.....
.18
Instruccioness
de
operacicin
............
.35
Gebrauchsanweisung
.......................... .
lstruzioni per il funzionamento
.........50
.63


Thank
you
for purchasing the Welch Allyn
LumNieti
Portable
Binocular Microscope or Flat Surface Magnifier. To ensure
accurate and reliable performance of your new instrument, please
follow the operating and maintenance instructions found
in
this
manual.
U.S.
and
International
Patents
Pending.
IMPORTANT: The material outlined in this manual should be reviewed and understood
prior to operation of the equipment.
Nous vous remercions d’avoir fait I’acquisition du microscope
binoculaire portatif
ou
la
loupe
à
surface plate
LumiVieti
de
Welch Allyn. Suivez les directives contenues
dans
ce manuel pour
assurer le fonctionnement précis et fiable de votre nouvel
instrument pendant de nombreuses années.
Brevets
U.S. et
internationaux
en
instance.
IMPORTANT
:
Avant d’utiliser I’équipement, bien lire les instructions
données
dans
ce
manual.
Agradecemos su compra del Microscopio binocular portátil o
Lupa de superficie plana
LumiVieti
de Welch Allyn. Para asegurar
un rendimiento preciso y confiable de su nuevo instrumento, siga
las instrucciones de operación y mantenimiento que se
encuentran en este manual.
Patentes
de
los
EE.UU.
e
internacionales pendientes.
IMPORTANTE: El material descrito en este manual debe ser revisado y entendido
antes de operar el equipo.
Wir bedanken
uns
für
den
Kauf des tragbaren
LumiVieHP
Binokular-Mikroskops bzw. der Flachlupe von Welch Allyn. Dieses
Geriit wird stets zuverlässig und störungsfrei arbeiten, wenn es
entsprechend
den
Empfehlungen
in
diesem Handbuch verwendet
und gepflegt wird.
U.S.-Patente und
international
Patente
angemeldet.
WICHTIG:
Der
Anwender sollte vor Benutzung des Geräts mit
den
Informationen
in
diesem Handbuch gründlich vertraut sein.
Grazíe per aver acquistato
il
microscopio binoculare portatile
Lumiview@
o la lente di ingrandimento a superficie piatta
della
Welch Allyn. Per garantire che
il
vostro nuovo strumento offra
prestazioni accurate e attendibili, si prega di seguire le istruzioni
per
il
funzionamento e la manutenzione contenute
in
questo
manuale.
Brevetti statunitensi
e
internationali pendenti.
IMPORTANTE:
il
materiale evidenziato
in
questo manuale deve essere esaminato
e compreso prima di far funzionare I’apparecchiatura.
1


Symbols
a
I
CAUTION: Indicates a potentially hazardous
.
situation which, if not avoided, may result in
minor injury or property damage. It also alerts
against unsafe practices.
NOTE:
Provides
supplemental information to the text and
indicates a potentially hazardous situation, which, if not avoided,
may result in property damage. Additionally, it highlights
important information on the use of this equipment.
Standards Compliance
0
0
Double Insulation
Internally Powered
Listed Product Underwriters Laboratories,
Standard UL544
Listed Product Canadian Standards Association,
Standard CAN/CSA C22.2 No. 125
Listed Product ETL Laboratories
Listed Standards
UL544,
CAN/CSA C22.2
No. 125, IEC 601-1, IEC 601-1-2

Contents
CEApproval
................................................................................
Symbols
......................................................................................
Standards Compliance
..............................................................
Instrument Function
..................................................................
Portable Binocular Microscope
............................................
Flat Surface Magnifier
..........................................................
Descriptionof
Controls..
............................................................
Adjustments
................................................................................
Headband Model
..................................................................
Band Adjustments
........................................................
OpticalSectionHorizontal Adjustment
........................
OpticalSectionVerticalAdjustment..
............................
Spectacle Model
..................................................................
Optical Section Vertical Adjustment
..............................
Adjusting for
UserRefractive
Error
......................................
Lens Template
-
SpectacleModel
..............................
Setting the Interpupillaryy
Distance
......................................
Flat Surface Magnifier..........................................................
Connecting to the Power Source
..............................................
Portable
Power
Source
........................................................
DirectPlug-In
Power Source................................................
Accessories
................................................................................
PneumaticSpeculum
Holder................................................
Lamp Replacement
....................................................................
Cleaning
......................................................................................
Maintenance
................................................................................
Specifications..
............................................................................
Approvals
....................................................................................
Product and Accessory Ordering
Information
........................
Instruments
..........................................................................
Power Sources
......................................................................
Accessories
..........................................................................
Power Sources(Portableand
Direct Plug-In)..........................
Portable
................................................................................
Features
........................................................................
Specifications................................................................
Connecting Instrument to Portable Power Source
......
Recharging the
Portable Power Source......................
Accessing
SpareLamp
................................................
BatteryReplacement..
..................................................
DirectPlug-In Transformer..
..................................................
Service and Warranty Information
............................................
Service
..................................................................................
Technical Service Department
..............................................
Warranty
................................................................................
Troubleshooting
Guide..............................................................
4
2
3
3
5
5
5
6
7
7
7
7
7
8
8
8
8
9
9
10
10
10
11
11
11
12
12
12
12
13
13
13
13
14
14
14
14
15
15
15
16
16
17
17
17
17
18

Instrument Function
This device offers binocular (both eyes) viewing, providing a
three-
dimensional stereoscopic view. This stereoscopic view is then
magnified and illuminated to provide excellent tissue rendition.
Portable Binocular Microscope
When the binoculars are engaged, the visual pathways are displaced
medially to allow for binocular vision in narrow cavities. Two diopters
(1.5x) magnification improves vision.
When the binoculars are rotated upwards, the scope becomes a
convenient basic headlight.
Flat Surface Magnifier
l
The three diopter
(2.5x)
flat surface magnifier is available
in either the headband model or the spectacle model. The
magnifier can be flipped up for convenient headlight use.
a
I
CAUTION: DO NOT look directly into the light.
.
This device contains a High Intensity Lamp. It is
not to be used for illumination or examination of
any portion of the eye, Posterior or Anterior.
5

Description of Controls
Front
View
Back View
3
1
1. lnterpupillary distance (IPD) controls
2. Lamp
3. Instrument vertical height adjustment
1
I
5
/*\
4. Binocular flip-up axis 8. Comfort pads
5. Pivot mechanism
9. Cable clips
6. Height adjustment screw
10. Optical assembly
7. Headband circumference
adjustment knob
Fiat Surface Magnifier
12
11
-
11. Magnifier lens
12. Lens holder
13. Vertical adjustment screw
6

Adjustments
Ratchet Style Headband
Instructions
l
Position the main body of the headband on the head so that the
band fits comfortably on the forehead and low on the back of the
head. Use the circumference adjustment knob to adjust the size.
Optics Assembly
l
The optics assembly can be
adjusted to the desired position
by manipulating the links in the
pivot mechanism. The Optics
Assembly should be positioned
as close to the eyes as possible
so that the eyes can gaze directly
through the Optics Assembly.
(Set optics per instructions
provided with your
LumiView.)
l
With the lamp illuminated,
check the adjustment by
confirming that the light beam
is centered in the visual field.
If the light is high or low, refer
to the detailed adjustment
instructions provided with your
LumiView@.
Circumference
adjustment knob
1
Optical Section
7

Spectacle Model
Optical Section Vertical Adjustment
l
Loosen screw that attaches
optical section spectacles.
l
Reposition optical section to
insure proper alignment with
user’s eyes.
Screw
l
Tighten screw to maintain
optical section location.
Adjusting for User Refractive Error
(Spectacle Models Only)
The optimal working distance from the object is 15” (38.1 cm)
-
17” (43.2 cm). If this model is used without corrective lenses and
user is myopic or hyperopic, then the user will need to work
closer or farther from object, depending on refractive error.
To compensate for this, the spectacle models can be fitted with
corrective lenses by an
eyecare
practitioner of your choice. Please
bring the following information to assist your
eyecare
practitioner
in fitting your prescription lenses.
Lens Template
-
Spectacle Model
Front Sizes
Eye
A
B
51 51
43
1
,
A
I
ED
D.B.L
57.4 18

Setting the lnterpupillaty Distance
The lnterpupillary Distance (IPD) Controls move the oculars and are
located on the bottom of the optical section. These oculars move
independently of one another.
l
To set IPD properly, observe an object at approximately
15 inches (38 cm).
l
Close the left eye and adjust the IPD control under the right eye
until the viewed image is centered.
l
Now close the right eye, keeping the left eye open, and adjust the
IPD control for the left eye until that image is centered.
l
Open both eyes and the object should be clear
and centered.
lnterpupillary Distance Controls
Flat Surface Magnifier Model
l
Loosen screw that attaches the lamp section to the adjustment arm.
l
Reposition the lamp section up or down to desired location and
tighten screw.
l
Place instrument on head. Adjust the flat surface magnifier by
moving the lens holder up or down and the magnifier in or out.
Magnifier
Lens holder
Adjustment screw
9

Connecting to the Power Source
NOTE: The instrument power cord must be plugged into either a
Welch
Allyn
Portable Power Source No. 75250 or a Welch
Allyn
Direct
Plug-In Power
Source
No. 75210.
a
I
CAUTION: The lamp housing becomes hot when the
.
lamp is on for more than 5 minutes and can cause
a burn if it contacts the skin. Allow at least 10 min-
utes for cooling between the uses of the illuminator.
Portable Power Source
l
Plug
instrument power cord
into the power cord connector
port on top of the power source.
l
Push in until firmly in place.
l
Gently screw the external
connector sleeve clockwise
to secure (optional).
l
Attach the Portable Power
Source by using the belt clip.
l
The instrument is now ready for use.
Direct Plug-In Power Source
l
Plug Power cord from the
Binocular microscope into the
Direct Plug-In Power cord.
l
Push in until firmly in place.
l
Gently screw the external
connector sleeve clock-wise to secure (optional).
l
Plug direct power source into a nearby receptacle.
l
The instrument is now ready for use.
To instrument
10

Accessories
Pneumatic Speculum Holder
l
A pneumatic speculum holder with a
4x’s magnification lens can be used
to aid in examination of the ear.
Lamp Replacement
A
I
I
CAUTION: Lamps may become very HOT. Be
sure to allow lamps to cool before changing.
l
To change the lamp, flip the binocular assembly into its up position.
Remove the reflector assembly by placing the thumb on the
notch located on the bottom of the reflector housing and pushing
the reflector assembly. (Step 1)
Remove lamp and insert a new Welch
Allyn
lamp No. 08500 into
the back of the reflector. (Step 2)
Replace reflector housing into instrument and push until it snaps
into place.
NOTE: Reflector assembly air vents should be positioned top
and bottom.
Binocular assembly
Reflector
assembly
Step 1
Step 2
11

Cleaning
All glass surfaces, portable binocular microscope lenses, ocular or
eyepiece covers and lamp reflective covers can be cleaned with a
soft cloth moistened with alcohol.
The exterior surfaces of the portable binocular microscope and
power sources can be wiped clean with a soft cloth moistened
with alcohol.
NOTE: Avoid using harsh cleansing fluids or excessively
moistened cloths on any portion of the instrument.
Maintenance
Lamp replacement and cleaning may be performed by the user on
an as needed basis. Additional servicing should be performed by
returning the instrument to an authorized Welch
Allyn
Technical
Service Department or distributor. See “Service and Warranty
Information” section.
Specifications
In
terpupillary
Distance
49 mm to 74 mm
Light Source
3.60v,
Halogen
Headband Adjustment Range
Small, Medium and Large
Weight (No.
20500S)
80
g
Transport and Storage
-20°C to
40
o
C
95% RH maximum
Approvals
UL 544,
CAN/CSA
C22.2 No.125
IEC 601-1, IEC 601-l -2, CE

Product and Accessory Ordering Information
Product No.
Description
Instruments
No.
20500S
Spectacle
LumiView
with Portable Power Source
No. 20510S
Spectacle LumiView with Direct Plug-In
No. 20500H
Headband LumiView with Portable Power Source
No. 20510H
Headband LumiView with Direct Plug Power
No. 205308
No. 20530H
No.
20520S
Spectacle LumiView w/o Power source
Headband LumiView w/o Power source
Spectacle
Flat Surface Magnifier w/ Portable Power Headband
No. 20520H
1
Flat Surface Magnifier w/Portable Power Spectacle
No. 205408
1
Flat Surface Magnifier w/o Power Source
No. 20540H
1
Headband Flat Surface Magnifier
w/o
Power Source
I
Power Sources
No. 75260
No. 75265
No. 74180
Portable Power Source w/ charger
International Portable Power Source w/Charger
(specify country and voltage)
Charger
only for No. 75260
No. 74185
No. 75210
No. 75215
International Charger only for No. 75265
(specify country and voltage)
Direct Plug-In Power Source
International Direct Plug-In Power Source
(specify country and voltage)
Note: The power
source
options listed above operate with all
instrument configurations.
I
1
Accessories
I
No. 08500
Replacement lamp for device (all models)
No. 205007-501
Replacement Reflector Assembly
No. 72250
Replacement battery for portable battery pack
No. 21502
lnsufflation bulb system for LumiView models
No. 21505
Pneumatic Speculum Holder with specula for
LumiView models
No. 22002
Poly Speculum 2mm
No. 22003
Poly Speculum 3mm
No. 22004
Poly Speculum 4mm
No. 22005
Poly Speculum 5mm
No. 22009
Polv
Speculum
9mm
1
No. 05374
I
Hard case
Note:
Only
accessories
and
power
sources
indicated in this manual
are
to
be used with the
Portable
Binocular Microscope and Flat Surface Magnifier.
13

Portable Power Source
(Welch Allyn Model No. 75260)
This power source is designed for use in
both the office and the hospital and is
ideal for carrying to satellite offices. Power
On time is 90 minutes after a full charge of
10 hours.
Power Sources (Portable and Direct Plug-In)
Features:
2
1
1. On/Off Switch
2. Instrument Connector
3. Charging Transformer Port
Specifications:
Battery
Type
Voltage/Capacity
Charger
4.
Charging Indicator
5.
Belt Clip
6.
Spare Lamp Receptacle
Welch Allyn
#72250
(nickel-cadmium)
3.6
VDC/1.8
Ahr
Welch Allyn
#74180
(for international orders, specify country)
14

Connecting Instrument to Portable Power Source:
l
Plug instrument power
Portable Power
Source
cord into the power cord
connector port on top of the
power source.
l
Push in until firmly in place.
l
Gently screw the external
connector sleeve clockwise
to secure (optional).
Recharging the Portable Power Source:
l
Turn portable power source off.
l
Disconnect instrument from
power source.
On/Off
l
Plug charging transformer into
portable power source.
l
Plug charging transformer into
wall socket. LED light indicates
unit is charging.
l
Disconnect charging
transformer from power source
when fully charged, after
10-12 hours.
Accessing Spare Lamp
l
Lift the spare lamp out of
its receptacle and use.
15

Battery Replacement
l
Be sure power is off.
l
Remove both screws from back of power source with Phillips
head screwdriver.
l
Grasp the belt clip, gently pull back and down on the housing.
(Steps 2 and 3)
l
Lift battery out and unplug from unit.
l
Replace with new battery and reverse above steps.
Step 1
Step 3
Step 2
Step 4
NOTE: Power source housing
screws
must be securely tightened
in order to properly ho/d electrical components in place.
Direct Plug-In Transformer
l
Plug Power cord from the binocular otoscope into the Direct
Plug-In Power cord.
l
Push in until firmly in place.
l
Gently screw the external connector sleeve clockwise to
secure (optional).
l
The instrument is now ready for use.
l
Plug direct power source into a nearby receptacle.
e
To instrument
16

Service and Warranty Information
Service
For customers in North America, please return instruments requiring
service to a Welch Allyn Technical Service Department listed below or
to an authorized Welch Allyn distributor.
Technical
Service
Department
Welch Allyn, Inc.
4341 State Street Road
Skaneateles Falls, NY
13153-0200
U.S.A.
Telephone: 800-535-6663 (in U.S.A. only) or (315) 685-4560
Fax: 315-685-4653
For customers outside of North America, return your unit to a
local, authorized Welch Allyn distributor or to your nearest Welch
Allyn service center.
Warranty
Welch Allyn, Inc. warrants the Portable Binocular Microscope and
Flat Surface Magnifier to be free of original defects in material and
workmanship and to perform in accordance with manufacturer’s
specifications for a period of one year from the date of purchase.
If this instrument or any component thereof is found to be defective
or at variance with the manufacturer’s specifications during the
warranty period, Welch Allyn will repair or replace the instrument
or component(s) at no cost to the purchaser.
This warranty only applies to instruments purchased new from Welch
Allyn or its authorized distributors or representatives. The purchaser
must return the instrument directly to Welch Allyn or an authorized
distributor or representative and bear the costs of shipping.
This warranty does not cover breakage or failure due to tampering,
misuse, neglect, accidents, modification or shipping, and is void if
the instrument is not used in accordance with manufacturer’s
recommendations or if repaired or serviced by other than Welch Allyn
or a Welch Allyn authorized representative.
No other express or implied warranty is given.
17

Problem Solution
Illumination spot is too high
Make sure you are 14” to 16”
and is out of field of view.
from patient or object under
inspection. If you are too close,
the illumination spot will be
too high.
Make sure optical section is
aligned with user’s eyes. Sug-
gest looking into the instrument
when on user. The user’s eyes
should be centered vertically on
the center mirrors.
&
A. optical section
too high on user
-/-
B.
optical section
too low on user
d;i%
(
,T,
d
C. optical section
centered
cor-
‘-I
rectly
on user
To correct A and B, simply
loosen screw on back of optical
section and adjust optical
section up or down until image
is centered.
User encounters glare off of
the pneumatic insufflation
system.
Clean the glass section with
alcohol swab or clean cotton
cloth.
Rotate pneumatic assembly
until glare dissipates.
Troubleshooting Guide
18

Problem
Instrument does not
illuminate.
Solution
Replace 08500 lamp.
See
page 11 for instructions.
Battery is expired or discharged.
See page 15 and 16.
Image is distorted or
double image is seen.
Instrument must be set correctly
for interpupillary distance ad-
justment. See page 9 for
instructions.
Depth perception is slightly
altered with 3D optical design.
Continued usage will improve
comfort level.
How
do I utilize bifocals?
Install bifocal lenses so that
only the upper third is for
distance and lower two-thirds is
for reading. Adjust the nose
bridge so that frame sits higher
on nose. Then lower the height
adjustment. This will ensure
that the binocular viewing
system will be positioned in fron
of the reading part of the lenses,
19


Table des matières
Homologation CE..
......................................................................
Symboles ....................................................................................
Conformité aux normes
............................................................
Fonction de l’instrument..
..........................................................
Microscope binoculaire
portatif ..............................................
Loupe
à
surface
plate
............................................................
Description
des commandes
....................................................
Réglages......................................................................................
Modèle
à
serre-tête
................................................................
Réglages
du
serre-tête
......................................................
Réglage horizontal
de la section
optique............................
Réglage vertical
de la section
optique.. ..............................
Modèle
à
lunettes..
..................................................................
Réglage vertical
de la section
optique.. ..............................
Compensation des
erreurs de réfraction
utilisateur................
Réglage de
la
distance
interpupillaire ....................................
Modèle
avec loupe
à surface plate
........................................
Branchement à
la
source d’alimentation ................................
Source
d’alimentation
portative ..............................................
Source
d’alimentation
directe
enfichable..
..............................
Accessoires
................................................................................
Porte-spéculum
pneumatique ................................................
Remplacement de
la
lampe ......................................................
Nettoyage
....................................................................................
Entretien
......................................................................................
Caractéristiques techniques..
....................................................
Homologations..
..........................................................................
Commande des
produits et accessoires
................................
Instruments..
............................................................................
Sources
d’alimentation
..........................................................
Accessoires ............................................................................
Sources d’alimentation (portative et directe enfichable)
......
Portative ..................................................................................
Fonctions
............................................................................
Caractéristiques
techniques.. ..............................................
Branchement de l’instrument
à
la source
d’alimentation
portative....................................................
Recharge de la source d’alimentation portative..
................
Accès à la lampe
de rechange
..........................................
Remplacement
de la
batterie..............................................
Transformateur direct
enfichable
............................................
Service et garantie..
....................................................................
Service
....................................................................................
Technical Service
Depattment ................................................
Garantie
..................................................................................
2
18
18
20
20
20
21
22
22
22
22
22
23
23
23
24
24
25
25
25
26
26
26
27
27
27
27
28
28
28
28
29
29
29
29
30
30
30
31
31
32
32
32
32
21

Fonction de l’instrument
Cet instrument permet la vision binoculaire (des deux yeux) en
assurant une vue stéréoscopique tridimensionnelle. Cette vue
stéréoscopique, grossie et illuminée, donne d’excellentes conditions
d’observation des tissus.
Microscope binoculaire portatif
Lorsque l’oculaire est en place, les voies visuelles se déplacent vers
le centre, permettant la vision binoculaire dans des cavités étroites.
Un grossissement de deux dioptres
(1.5
x) améliore la vision.
Lorsqu’on bascule l’oculaire vers le haut, l’instrument devient une
lampe frontale simple et pratique.
3
Loupe à surface plate
l
La
loupe à surface plate de trois dioptres (2,5 x) est offerte en
modèle à serre-tête ou à lunettes. Elle bascule vers le haut pour
permettre l’emploi de la lampe frontale.
22

Vue avant
Description des commandes
Vue arrière
1.
2.
3.
Commandes de distance interpupillaire
Lampe
Réglage de la hauteur verticale de l’instrument
4. Axe basculant du binoculaire
5. Mécanisme de pivot
6. Vis de réglage de la hauteur
7. Bouton de réglage de
circonférence du serre-tête
10'
9
8. Tampons isolants
9. Serre-câbles
10. Ensemble optique
Loupe à surface plate
12
11
-
11. Lentille grossissante
12. Porte-lentille
13. Vis de réglage vertical
23

Réglages
Serre-tête à
cliquet
Instructions
l
Placer la partie principale du serre-tête sur la tête de manière à
ce que le serre-tête entoure confortablement le front et la partie
inférieure de I’arriére de la tête. L’adapter à la tête à l’aide du
bouton de réglage de la circonférence.
Bouton de réglage
de la circonférence
du serre-tête
1
Ensemble optique
l
Régler l’ensemble optique à la position
désirée en manipulant les maillons
du mécanisme de pivot. Positionner
l’ensemble optique aussi près des
yeux que possible afin de pouvoir
regarder directement à travers.
(Régler les mécanismes optiques en
suivant les instructions fournies avec
le Lumiview.)
I
l
Section optique
l
La lampe étant illuminée, vérifier
son réglage en s’assurant que le
faisceau lumineux est centré sur le
champ visuel. Si l’éclairage est
brillant ou faible, voir les
instructions de réglage détaillées
_
fournies avec le
LumiviewTM.
24

Modèle à lunettes
Réglage vertical de la section optique
,viS
l
Desserrer la vis qui
assujettit les lunettes
à la section optique.
l
Déplacer la section
optique de manière
à
bien l’aligner avec les
yeux.
l
Serrer la vis pour maintenir la section optique en place.
Compensation des erreurs de réfraction utilisateur
(modèle à lunettes uniquement)
La distance frontale optimale entre l’objet et l’utilisateur est de 38 cm
à
43 cm. Si ce modèle est utilisé sans lentilles
correctrices
et si
l’utilisateur est myope ou hypermétrope, il devra travailler plus prés
ou plus loin de l’objet, en fonction de l’erreur de réfraction.
Pour compenser l’erreur de réfraction, l’opticien de l’utilisateur pourra
doter le modèle à lunettes de lentilles correctrices.
25

Réglage de la distance interpupillaire
Les commandes de distance interpupillaire permettent de déplacer
les lentilles
;
elles sont situées au bas de la section optique. Les
lentilles se déplacent indépendamment l’une de l’autre.
l Pour régler correctement la distance interpupillaire, regarder un
objet situé à environ 38 cm.
l Fermer l’oeil gauche et régler la commande située sous l’oeil
droit jusqu’à ce que l’image observée soit centrée.
l Fermer l’oeil droit en gardant l’oeil gauche ouvert et régler la
commande située sous l’oeil gauche jusqu’à ce que l’image soit
centrée.
l Ouvrir les deux yeux
;
l’image devrait être nette et centrée.
1
I
Commandes de distance interpupillaire
Modèle avec loupe à surface plate
l Desserrer la vis qui assujettit la section lampe au bras de réglage.
l Rajuster la position de la lampe vers le haut ou le bas, puis serrer
la vis.
l Placer l’instrument sur la tête. Régler la loupe à surface plate en
déplaçant le porte-lentille vers le haut ou le bas et la loupe vers
l’intérieur ou l’extérieur.
Porte-lentille
I
Loupe
-

Branchement à la source d’alimentation
REMARQUE
:
Le cordon d’alimentation doit être enfiché soit
dans une source d’alimentation portative Welch
Allyn
no
75250,
soit dans une source d’alimentation directe enfichable Welch
Allyn
no
75210.
1
ATTENTION - Le boîtier de la lampe chauffe quand
elle a été allumée pendant plus de 5 minutes et peut
.
brûler au contact de la peau. Laisser la refroidir au
moins 10 minutes entre chaque utilisation.
Source d’alimentation portative
l Enficher le cordon d’alimentation de
l’instrument dans l’orifice de
raccordement du cordon
d’alimentation, situé sur le dessus
de la source d’alimentation.
l
L’enfoncer jusqu’à ce qu’il soit bien calé.
l
Visser délicatement le manchon externe
du connecteur dans le sens des aiguilles
d’une montre pour le serrer (optionnel).
l
Assujettir la source d’alimentation
portative avec la pince de ceinture.
l
Cinstrument est maintenant prêt à
l’emploi.
Source d’alimentation directe
enfichable
l
Raccorder le cordon d’alimentation du microscope binoculaire au
cordon de la source d’alimentation directe enfichable.
l
L’enfoncer jusqu’à ce qu’il soit bien calé.
l
Visser délicatement le manchon externe du connecteur dans le
sens des aiguilles d’une montre pour le serrer (optionnel).
l
Enficher la source d’alimentation directe dans une prise de
courant.
l
Cinstrument est maintenant prêt à l’emploi.
Vers l’instrument
27

Accessoires
Porte-spéculum pneumatique
l
Un porte-spéculum avec lentille
grossissante 4x peut être utilisé
pour permettre l’examen de l’oreille.
Remplacement de la lampe
ATTENTION : La lampe peut devenir BRÛLANTE.
Avant de la changer, s’assurer qu’elle a refroidi.
l
Pour changer la lampe, faire basculer l’oculaire vers le haut,
l
Enlever le réflecteur en plaçant le pouce sur l’encoche située au
bas du boîtier du réflecteur et en appuyant sur le réflecteur.
(Étape 1)
l
Enlever la lampe et insérer une nouvelle lampe Welch
Allyn
no
08500
à
l’arrière de l’ensemble réflecteur. (Étape 2)
l
Remettre le réflecteur dans l’instrument et l’enfoncer jusqu’à
ce qu’il se cale avec un déclic.
REMARQUE : Les grilles d’aération de l’ensemble
reflecteur
doivent
être
situées en haut et en bas.
Oculaire
Réflecteur
\
Étape
1
Étape
2
28

Nettoyage
Nettoyer toutes les surfaces de verre, lentilles du microscope
binoculaire portatif, les oeilletons et la surface
reflechissante
des
lampes avec un chiffon doux humecté d’alcool.
Essuyer les surfaces externes du microscope binoculaire portatif et
des sources d’alimentation avec un chiffon doux humecté d’alcool.
REMARQUE
:
Ne pas employer de liquides nettoyants abrasifs ni
de chiffons très mouillés sur acune partie de
l'instrument.
Entretien
L’utilisateur peut remplacer et nettoyer lui-même la lampe au besoin.
Pour tout autre type d’entretien, réexpédier l’instrument à un centre
de service technique agréé ou à un distributeur Welch
Allyn
Voir la
section
«
Service et garantie
».
Caractéristiques techniques
Distance
intetpupillaire
49 à 74 mm
Source
lumineuse
3,60
V,
halogène
P/age de
reglage
du serre-tête
petite taille, taille moyenne, grande
taille
Poids
(n
o
20500s)
60
g
Transport et rangement
-20
o
C à 40
o
C, HR 95 % maximum
Homologations
UL544,
CAN/CSA
C22.2
N
o
125
IEC 601-1, IEC 601-l-2, CE
29

Commande des produits et accessoires
N
o
75260
N
o
75265
N
o
74160
N
o
74185
N
o
75210
N
o
75215
Sources d’alimentation
Source d’alimentation portative avec chargeur
Source d’alimentation
portative
avec
chargeur.
modele
international (préciser pays et tension)
”
’
Chargeur uniquement pour le
No
75260
Chargeur uniquement, modèle international, pour le
No
75265
(préciser pays et tension)
Source d’alimentation directe enfichable
Source d’alimentation directe enfichable, modèle international
(préciser pays et tension)
Remaque : Les différentes sources d’alimentation indiquées ci-dessus
conviennent à toutes les configurations d’instruments.
N
o
08500
N
o
205007-501
N
o
72250
N
o
21502
N
o
21505
Accessoires
Lampe de rechange (tous modèles)
Réflecteur de rechange
Batterie de rechange pour bloc-batterie portatif
Poire d’insufflation pour
modeles
LumiView
Porte-speculum pneumatique avec spécula pour modèles
LumiView
1
N
o
22002
1
Speculum en
polypropylene
de 2 mm
1
N
o
22003
1
Speculum en polypropylène de 3 mm
I
N
o
22004
I
Soéculum
en
polypropylene
de 4 mm
N
o
22005
N
o
22009
No
05374
Speculum en polypropylène de 5 mm
Spéculum en polypropylène de 9 mm
Mallette rigide
a
!
Remaque : Seuls les accessoires et sources d’alimentation
indiques
dans ce manuel peuvent être utilisés avec le
mocroscope
binoculaire et
la loupe à surface plate.
30

Sources d’alimentation
(portative et directe enfichable)
Source d’alimentation portative
(Modèle Welch Allyn
N”
75260)
Cette source d’alimentation peut être
utilisée au bureau comme à l’hôpital et se
transporte facilement d’un lieu de travail à
un autre. Autonomie : 90 minutes après
pleine charge de 10 heures.
Fonctions :
-6
-5
1.
2.
3.
Interrupteur marche/arrêt 4. Indicateur de charge
Connecteur de l’instrument
5. Pince de ceinture
Orifice de raccordement du
6. Compartiment pour lampe de
transformateur de charge
rechange
Caractétistiques
techniques
:
Type de
batterie
Welch Allyn
no
72250 (nickel-cadmium)
Tensionlcapacité
3,6
v
C.C./l$
A/h
Chargeur
Welch Allyn
no
74160
(commandes internationales
:
préciser le pays)

Branchement de l’instrument à la
source
d’alimentation
portative
:
.
Enficher le cordon d’alimentation
Source d’alimentation
de l’instrument dans l’orifice de
portative
raccordement du cordon
d’alimentation, situé sur le
dessus de la source
d’alimentation.
l renfoncer jusqu’à ce qu’il soit
bien calé.
. Visser délicatement le manchon
externe du connecteur dans le
sens des aiguilles d’une montre pour le serrer (optionnel).
Recharge de la source d’alimentation portative
:
l
Mettre la source
d’alimentation portative hors
tension.
l
Débrancher l’instrument de
la source d’alimentation.
l
Enficher le transformateur de
charge dans la source
d’alimentation portative.
l
Enficher le transformateur de
charge dans la prise murale.
Le voyant DEL indique que
l’appareil se charge.
l
Débrancher le transformateur de charge de la source
d’alimentation une fois qu’elle est complètement chargée, c’est-
à-dire au bout de 1 O-l 2 heures.
Accès à la lampe de rechange
l
Sortir la lampe de rechange de
son compartiment et l’utiliser.
Lampe
ce
rechange

Remplacement de la batterie
l
S’assurer que l’appareil est hors tension.
l
A l’aide d’un tournevis cruciforme, enlever les deux vis de l’arrière
de la source d’alimentation.
l
En le tenant par la pince de ceinture, tirer doucement sur le
boîtier pour l’ouvrir. (Étapes 2 et 3.)
l
Sortir la batterie et la déconnecter.
l
La remplacer par une nouvelle batterie, puis procéder à l’inverse
des étapes précédentes.
Étape 1
Étape 2
_
REMARQUE
:
pour garder les composants électriques bien en
place, il faut s’assurer de bien serrer les vis du boîtier de
l’alimentation électrique.
Transformateur direct enfichable
l
Raccorder le cordon d’alimentation du microscope binoculaire au
cordon d’alimentation direct enfichable.
l
L’enfoncer jusqu’à ce qu’il soit bien calé.
l
Visser délicatement le manchon externe du connecteur dans le
sens des aiguilles d’une montre pour le serrer (optionnel).
l
L’instrument est maintenant prêt à l’emploi.
l
Enficher la source d’alimentation directe dans une prise de courant.
Vers
l'instrument
33

Service et garantie
Service
Clients nord-américains
:
expédier les instruments à faire réparer à
l’un des centres de service technique Welch Allyn indiqués ci-après
ou à un distributeur Welch Allyn agréé.
Technical Service Department
Welch Allyn, Inc.
4341 State Street Road
Skaneateles Falls, NY 13153-0220 U.S.A.
Numéro de téléphone
:
315-685-4560
Numéro de télécopie
:
315-685-4653
Clients d’autres pays
:
expédier l’instrument à un distributeur
local agréé par Welch Allyn ou au centre de service Welch Allyn
le plus proche.
Garantie
Welch Allyn, Inc. garantit que le microscope binoculaire portatif et la
loupe à surface plate sont exempts de tous vices de matériaux et de
fabrication et fonctionneront selon les caractéristiques du fabricant
pendant une période de cinq ans suivant la date d’achat. Si cet
instrument ou l’un quelconque de ses composants est jugé
défectueux ou ne repond pas aux caractéristiques du fabricant
pendant la période de garantie, Welch Allyn le réparera ou le
remplacera gratuitement.
Cette garantie ne couvre que les instruments achetés neufs auprès
de Welch Allyn ou de ses distributeurs ou représentants agréés.
L’acheteur réexpédiera l’instrument directement à Welch Allyn ou à
l’un de ses distributeurs ou représentants agréés, les frais de port
étant à sa charge.
Cette garantie ne couvre pas les bris ou les pannes dus à l’altération,
au mauvais usage, à la négligence, aux accidents,
à
la modification
ou au transport
;
elle sera annulée si l’instrument n’est pas utilisé
conformément aux recommandations du fabricant ou s’il est réparé
ou entretenu par une entreprise autre que Welch Allyn ou un de ses
représentants agréés.
II n’est donné aucune autre garantie, expresse ou implicite.
34

Símbolos
a
1
.
PRECAUCION: Indica una situación
potencialmente peligrosa la cual, si no se evita,
puede ocasionar lesiones menores o daños a la
propiedad. También da la alerta contra prácticas
no seguras.
L
NOTA: Proporciona información suplementaria al texto e indica
situaciones potencialmente peligrosas, las cuales, si no se
evitan, pueden ocasionar daños a la propiedad. Además, resalta
la información importante acerca del uso de este
Cumplimiento de normas
Aislamiento doble
Energizado internamente
Producto listado en Underwriters Laboratories,
norma UL544
Producto listado en Canadian Standards
Association, norma
CAN/CSA
C22.2 No. 125
Productos listados en ETL Laboratories
Normas listadas UL544
CAN/CSA
C22.2 No.
125, IEC 601-1, IEC 601-1-2
35

Contenido
AprobaciónCE
............................................................................
Símbolos......................................................................................
Cumplimientodenormas
..........................................................
Función
del
instrumento
............................................................
Microscopiobinocular
portátil..............................................
Lupa de
superficie
plana
......................................................
Descripciónde
los
controles
....................................................
Ajustes
......................................................................................
Modelo
de
banda frontal
......................................................
Ajustes
de
la
banda......................................................
Ajustehorizontal
dela sección
óptica..
........................
Ajuste vertical
dela secciónóptica
..............................
Modelo
gafas........................................................................
Ajuste vertical
dela secciónóptica
..............................
Ajuste para el
error refractario del
usuario
..........................
Configuraciónde la distancia interpupilaria
........................
Lupade
superficie
plana
......................................................
Conexión
a
la fuente
de energía..............................................
Fuentedeenergía
portátil....................................................
Fuentedeenergía
deenchufe
directo..................................
Accesorios
..................................................................................
Soporte
de
espéculo
neumático..........................................
Recambiode
la
bombilla
..........................................................
Limpieza
......................................................................................
Mantenimiento............................................................................
Especificaciones
........................................................................
Aprobaciones
..............................................................................
Información de pedido de producto y accesorios..
................
Instrumentos........................................................................
Fuentesdeenergía
..............................................................
Accesorios
............................................................................
Fuentes de energía (Portátil y de enchufado directo)
............
Portátil
..................................................................................
Características..
............................................................
Especificaciones
..........................................................
Conexión de instrumento a fuente de energía portátil
Recarga de la fuente de energía portátil..
....................
Acceso a la bombilla de
recambio
..............................
Recambiode
la
baterla
................................................
Transformadorde
enchufe
directo......................................
Servicioy
garantía..
....................................................................
Servicio
................................................................................
Technical
Service
Departmentt
..............................................
Garantía
................................................................................
2
33
33
35
35
35
36
37
37
38
38
38
38
38
38
39
39
40
40
40
41
41
41
42
42
42
42
43
43
43
43
44
44
44
44
45
45
45
46
46
47
47
47
47

Función del instrumento
Este dispositivo ofrece visión binocular (de ambos ojos), propor-
cionando una visión estereoscópica tridimensional. Esta visión
estereoscópica luego se amplifica e ilumina para proporcionar
una excelente presentación del tejido.
Microscopio binocular portátil
Cuando se colocan los binoculares, las vías visuales se desplazan
medialmente para permitir la visión binocular en cavidades angostas.
La amplificación de dos dioptrías (1.5x) mejora la visión.
Cuando los binoculares se giran hacia arriba, el instrumento pasa a
ser una conveniente lámpara frontal básica.
3
Lupa de superficie plana
l
La lupa de superficie plana de tres dioptrías
(2.5x)
está disponible
en el modelo de banda frontal para la cabeza o en el modelo
gafas. La lupa puede girarse hacia arriba para usarse como
conveniente luz de cabeza.
a
1
PRECAUCION: NO
mire directamente la luz.
Este dispositivo contiene una bombilla de alta
.
intensidad. No se puede utilizar para la
iluminación o examen de ninguna parte del ojo,
posterior 0 anterior.
37

Descripción de los controles
vista frontal
Vista
trasera
1. Controles de distancia interpupilar (IPD)
2. Bombilla
3. Ajuste de la altura vertical del instrumento
8
4. Eje binocular que se levanta
5. Mecanismo pivotal
6. Tornillo regulador de altura
7. Perilla reguladora de la banda
frontal
8. Almohadillas para comodidad
9. Sujetadores de cables
10. Sección óptica
Lupa de superficie plana
12
ll
-
11. Lente de lupa
12. Portalente
13. Tornillo de ajuste vertical

Ajustes
Banda frontal estilo trinquete
Instrucciones
l
Colóquese el cuerpo principal de la banda frontal en la cabeza de
tal modo que la banda se ajuste en forma cómoda sobre la
frente y bajo en la parte posterior de la cabeza. Use la perilla
reguladora de circunferencia para ajustar el tamaño.
Perilla de
ajuste de la
Conjunto óptico
l
La sección óptica puede
ajustarse a la posición deseada
manipulando los eslabones del
cerca de los ojos que sea posible
de tal modo que los ojos puedan
mirar directamente a través de la
v,
sección óptica. (Fije la óptica
Sección óptica
según las instrucciones
\
\
Brazo de ajuste
mecanismo pivotal. La sección
óptica debe colocarse lo más
provistas con su
LumiView.)
l
Con la luz iluminada, revise el
ajuste confirmando que el haz
de luz se centre en el campo
visual. Si la luz está alta o baja
-
consulte las instrucciones de
ajuste detalladas provistas
con su LumiView
TM
.
ajuste
39

Modelo gafas
Ajuste vertical de la sección óptica
l
Suelte el tornillo que
, Tornillo
sostiene la sección óptica
de las gafas.
l
Vuelva a colocar la
sección óptica para
asegurar un alineamiento
apropiado con los ojos
del usuario.
l
Apriete el tornillo para mantener la ubicación de la
sección óptica.
Ajuste para el error refractario del usuario
(Modelos de gafas solamente)
La distancia de trabajo óptima del objeto es de 38 cm a 43 cm.
Si este modelo se utiliza sin lentes de corrección y el usuario tiene
miopía o hipermetropía, el usuario deberá trabajar más cerca o más
lejos del objeto, dependiendo del error refractario.
Para compensar por esto, los modelos con gafas se pueden ajustar
con lentes correctivos por su oculista.
40

Configuración de la distancia interpupilar
Los controles de distancia interpupilar (IPD) mueven los oculares y
están ubicados en la parte inferior de la sección óptica. Estos
oculares se mueven independientemente uno de otro.
l Para fijar la IPD correctamente, observe un objeto a
aproximadamente 38 centímetros.
l Cierre el ojo izquierdo y ajuste el control de IPD bajo el ojo
derecho hasta que quede centrada la imagen visualizada.
l Ahora cierre el ojo derecho, manteniendo el ojo izquierdo abierto,
y ajuste el control de IPD para el ojo izquierdo hasta que la
imagen esté centrada.
l Abra ambos ojos y el objeto debería aparecer claro y centrado.
I
I
Controles de distancia interpupilar
Lupa de superficie plana
l Afloje el tornillo que sostiene la sección de la bombilla al brazo
de ajuste.
l Vuelva a colocar la sección de la bombilla hacia abajo o hacia
arriba de la ubicación deseada y apriete el tornillo.
l Coloque el instrumento en la cabeza. Ajuste la lupa de superficie
plana moviendo el soporte de los lentes hacia arriba o hacia
abajo y la lupa hacia adentro y afuera.
Soporte de los lentes
Lupa
Tornillo de ajuste
41

Conexión a la fuente de energía
NOTA: El cable de energía del instrumento debe
ser
enchufado
ya sea en una fuente de
energia
portátil de Welch
Allyn
No.
75250 o
en una fuente de energía de enchufe directo No. 75210.
I
.
ATENCION : El alojamiento de la bombilla se
pone caliente una vez encendida la bombilla más de
5 minutos y puede causar quemaduras al contacto
con la piel. Dejar enfriar al menos 10 minutos
entre cada utilización del iluminador.
Fuente de energía portátil
l
Enchufe el cable de energía del
instrumento en la toma conectora
del cable de energía en la parte
superior de la fuente de energía.
l
Presione hasta que esté firmemente
en su lugar.
l
Atornille suavemente el manguito
del conector externo en el sentido
de las manecillas del reloj para
asegurar (opcional).
l
Coloque la fuente de energía portátil
utilizando el sujetador de cinturón.
l
Ahora el instrumento está listo para su uso.
Fuente de energía de enchufe directo
l
Enchufe el cable de energía del microscopio binocular en el cable
de energía de enchufe directo.
l
Presione hasta que esté firmemente en su lugar.
l
Atornille suavemente el manguito del conector externo en el
sentido de las manecillas del reloj para asegurar (opcional).
l
Enchufe la fuente de energía directa en un tomacorriente
cercano.
l
Ahora el instrumento está listo para su uso.
Al instrumento
42

Accesorios
Soporte de espéculo neumático
l
Se puede utilizar un Soporte de
espéculo neumático con lentes de
aumento de 4x para ayudar en
exámenes del oído.
Recambio de la bombilla
muy CALIENTES. Asegúrese de dejar que la
l
Para cambiar la bombilla, gire el conjunto de los binoculares a su
posición hacia arriba.
l
Retire el ensamble del reflector colocando el dedo pulgar en la
muesca ubicada en la parte inferior de la estructura del reflector,
presionando el ensamble del reflector. (Paso 1).
l
Retire la bombilla e inserte una bombilla nueva Welch
Allyn
No. 08500 en la parte posterior del reflector. (Paso 2).
l
Vuelva a colocar la estructura del reflector y presiónela hasta
que
se inserte a presión.
NOTA: Las ventilaciones de aire del ensamble del reflector deben
estar ubicadas en la parte superior e inferior.
Conjunto de los binoculares
Paso
1
Paso 2
43
bombilla se enfríe antes de recambiarla.
PRECAUCION: Las bombillas se pueden poner

Limpieza
Todas las superficies de vidrio, lentes del microscopio binocular
portátil, cubiertas oculares o de mira y las cubiertas reflectoras de
la bombilla pueden limpiarse con un paño suave humedecido
con alcohol.
A las superficies exteriores del microscopio binocular portátil y de las
fuentes de energía se les puede pasar un paño suave humedecido
con alcohol.
NOTA: Evite utilizar líquidos de limpieza abrasivos o paños
excesivamente humedecidos en cualquier
parte
del instrumento.
Mantenimiento
El recambio de la bombilla y la limpieza puede realizarlos el usuario
según se necesite. El servicio adicional debe ser realizado enviando
el instrumento a un departamento de servicio técnico Welch Allyn o a
un distribuidor autorizado. Vea la sección “Servicio y garantía”.
Especificaciones
Distancia
interpupilar
Fuente de luz
Margen de ajuste de la banda frontal
Peso (No.
20500S)
Transporte y almacenamiento
Aprobaciones
49 mm a 74 mm
3,6OV,
Halógena
pequeño, mediano, grande
80
g
-20°C a
40
o
C,
95% RH máximo
UL 544,
CAN/CSA
C22.2 No. 125
IEC 601-1, IEC 601-1-2, CE
44

Información de pedido de productos y
accesorios
No. de producto Descripción
Instrumentos
N
o
20500S
LumiView de gafas con fuente de energía portátil
N
o
20510S
LumiView de gafas con enchufe directo
N
o
20500H
LumiView de banda frontal con fuente de energía portátil
N
o
2051 OH
LumiView de banda frontal con enchufe directo
N
o
205308
LumiView de gafas sin fuente de energía
N
o
20530H LumiView de banda frontal sin fuente de energía
N
o
205208
Gafas de lupa de superficie plana con banda de energía
I
portatil
I
1
N
o
20520H
1
Lupa
de
superficie
plana
con banda de enerqía
portatil
I
1
N
o
205408
N
o
20540H
N
o
75260
N
o
75265
N
o
74160
N
o
74165
N
o
75210
N
o
75215
I
Lupa
de superficie
plana
sin fuente de
enerqía
I
Banda frontal de lupa de superficie plana sin fuente de energía
Fuentes de energía
Fuente de energía portátil con cargador
Fuente de energía portátil internacional con cargador (especi-
ficar país y voltaje)
Cargador solamente para el No. 75260
Cargador internacional solamente para el No. 75265 (especi-
ficar país y voltaje)
Fuente de energía de enchufe directo
Fuente de energía de enchufe directo internacional (especificar
país y voltaje)
I
,
Nota: Las opciones de fuente de energía listadas más atiba funcionan con
todas las configuraciones de instrumento.
N
o
08500
N
o
205007-501
N
o
72250
N
o
21502
N
o
21505
Accesorios
Bombilla de recambio para el dispositivo (todos los modelos)
Recambio del ensamble del reflector
Batería de recambio para el paquete de batería portátil
Sistema de aislamiento de la bombilla para modelos LumiView
Soporte de espéculo neumático con espéculos para los mode-
los LumiView
N
o
22002
N
o
22003
Espéculo de polipropileno de 2 mm
Espéculo de polipropileno de 3 mm
N
o
22004
N
o
22005
N
o
22009
Espéculo de polipropileno de 4 mm
Espéculo de polipropileno de 5 mm
Especulo
de polipropileno de 9 mm
N
o
05374
Estuche
I
Nota: Sólo los accesorios y fuentes de energía indicados en este
manual se pueden usar con el Mocroscopio binocular portátil y la lupa
de superficie plana.
45

Fuentes de energía
(Portátil y de enchufado directo)
Fuente de energía portátil
(Modelo No. 75260 de
Welch Allyn)
Esta fuente de energía está diseñada para
AYKI
usar en la oficina y en el hospital y es
ideal para llevar a oficinas satélite.
La energía del tiempo Encendido es
90 minutos después de una carga
completa de 10 horas.
Caracteristicas:
2
1
-6
-5
1. Interruptor de encendido/
apagado
2. Conector del instrumento
3. Toma del transformador
de carga
4.
Indicador de carga
5. Sujetador de cinturón
6. Receptáculo de la bombilla
de recambio
Especificaciones
Tipo de batená
Voltaje/capacidad
Cargador
Welch Allyn No. 72250 (níquel-cadmio)
3.6 VCC/1.8 Ahr
Welch Allyn No. 74180 (para pedidos interna-
cionales, especificar país)
46

Conexión de instrumento a fuente de energía portátil:
l
Enchufe el cable de energía
del instrumento en el puerto
Fuente de energía
portátil
conector del cable de energía
en la parte superior de la fuente
de energía.
l
Presione hasta que esté
firmemente en su lugar.
l
Atornille suavemente el
manguito del conector externo
en el sentido de las manecillas
del reloj para asegurar
(opcional).
Recarga de la fuente de
energía portátil:
l
Aoaaue la fuente de
EncendidolApagado
I
energia
portátil.
l
Desconecte el instrumento
desde la fuente de energía.
. Enchufe el transformador
de carga en la fuente de
energía portátil.
U
\
l
Enchufe el transformador
de carga en el tomacorriente
de la pared. El indicador
LED señala que la unidad está cargando.
l
Desconecte el transformador de carga de la fuente de energía
cuando esté completamente
cargado, después de 10 a 12
horas.
Acceso a la bombilla de
recambio
l
Levante la bombilla de
recambio hacia afuera de su
receptáculo y úsela.
47

Recambio de la batería
l
Asegúrese de que la energía esté apagada.
l
Retire ambos tornillos de la parte posterior de la fuente de
energía con un destornillador Phillips.
l
Tome el sujetador de cinturón, suavemente tire hacia afuera y
hacia abajo en la estructura. (Pasos 2 y 3).
l
Levante la batería hacia afuera y desenchúfela de la unidad.
l
Recambie con una batería nueva e invierta los pasos anteriores.
Paso 1
Paso 2
Paso 3
Paso 4
NOTA: Los tomillos de la caja de la fuente de alimentación
deben estar apretados
firmemente
a fin de mantener los
componentes eléctricos debidamente en su sitio.
Transformador de enchufe directo
l
Enchufe el cable de energía del microscopio binocular en el cable
de energía de enchufe directo.
l
Presione hasta que esté firmemente en su lugar.
l
Atornille suavemente el manguito del conector externo en el
sentido de las manecillas del reloj para asegurar (opcional).
l
Ahora el instrumento está listo para su uso.
l
Enchufe la fuente de energía directa en un
tomacorriente.
m
Al instrumento
48

Servicio y garantía
Servicio
Para los clientes en Norteamérica, por favor envíe los instrumentos
que requieran servicio al departamento de servicio de Welch Allyn
listado a continuación o a un distribuidor Welch Allyn autorizado.
Technical Service Department
Welch Allyn, Inc.
4341
State
Street Road
Skaneateles Falls, NY 13153-0220 EE.UU.
Teléfono:
315-685-4560
Fax: 315-685-4653
Para los clientes fuera de Norteamérica, envíe su unidad a un
distribuidor Welch Allyn local, autorizado o a su centro de
servicio Welch Allyn más cercano.
Garantía
Welch Allyn garantiza el Microscopio binocular portátil y la Lupa de
superficie plana como exentos de defectos en materiales y mano de
obra y también para funcionar de acuerdo con las especificaciones
del fabricante por un período de cinco años a partir de la fecha de
compra. Si este instrumento o cualquier componente del mismo se
encuentra defectuoso o difiere de las especificaciones del fabricante
durante el período de garantía, Welch Allyn reemplazará o reparará,
sin costo alguno para el comprador, cualquier el instrumento o
componente(s).
Esta garantía sólo abarca instrumentos comprados nuevos a Welch
Allyn o sus distribuidores o representantes autorizados. El comprador
debe devolver el instrumento directamente a Welch Allyn o a un
distribuidor o representante autorizado y solventar los costos del
envío.
Esta garantía no cubre roturas o fallas debidas a alteraciones,
maltrato, negligencia, accidentes, modificación o envío y queda nula
si el equipo no se utiliza de acuerdo con las recomendaciones del
fabricante o si el instrumento recibe servicio por parte de terceros
que no sean Welch Allyn o uno de sus agente de servicio
autorizados.
No se otorga ninguna otra garantía expresa o implícita.
49

Symbole
VORSICHT: Weist auf eine potentiell gefährliche
oder Sachschäden führen kann. Warnt ebenfalls
vor sicherheitsgefährdendem Vorgehen.
HINWEIS: Enthält zusätzliche Informationen und weist auf eine
potentiell
gefährliche
Situation hin, die zu Sachschäden führen
kann. Betont darüber hinaus wichtige Informationen zur
Verwendung des Gerätes.
Normenentsprechung
0
0
Doppelt isoliert
Interne Stromversorgung
Der Norm UL544 der Underwriters Laboratories
entsprechendes Produkt
Der Norm CAN/CSA C22.2 Nr. 125 der Canadian
Standards
Association
entsprechendes Produkt
Den Anforderungen der ETL Laboratories
entsprechendes Produkt
Den Normen UL544,
CAN/CSA
C22.2 Nr. 125,
IEC 601-1 und IEC
601-1-2
entsprechend
50

Inhaltsverzeichnis
CE-Zulassung..
............................................................................
Symbole
......................................................................................
Normenentsprechung
................................................................
Gerätefunktion
............................................................................
Tragbares Binokular-Otoskop
..............................................
Flachlupe
..............................................................................
Beschreibung der Bedienelemente
..........................................
Einstellungen
..............................................................................
Kopfbandmodell
..................................................................
Kopfbandeinstellung
....................................................
Seitenverstellung des Optikteils
..................................
Höhenverstellung des Optikteils
..................................
Brillenmodell
........................................................................
Höhenverstellung des Optikteils
..................................
Anpassung an den Refraktionsfehler des Anwenders
........
Einstellung der PD
................................................................
Flachlupen-Modell
................................................................
Anschließen
an
die Stromquelle
..............................................
Akkupack
..............................................................................
Netzteil
..................................................................................
Zubehörteile
................................................................................
Pneumatische Spekulumhalterung
......................................
Austausch der Lampe
................................................................
Reinigung
....................................................................................
Wartung
......................................................................................
Technische Daten
......................................................................
Normenentsprechung
................................................................
Bestellinformationen für Geräte und Zubehörteile ................
Geräte
..................................................................................
Stromquellen
........................................................................
Zubehörteile..
........................................................................
Stromquellen
(Akkupack
oder Netzteil).
...................................
Akkupack
..............................................................................
Ausstattung
..................................................................
Technische Daten
........................................................
Anschließen des Geräts an den Akkupack
..................
Aufladen des Akkupacks
..............................................
Zugriff
auf
die
Ersatzlampe
..........................................
Austausch der Batterie
................................................
Einsteck-Netzteil
..................................................................
Service
und
Garantie.. ................................................................
Service
..................................................................................
Technical
Service
Department..
............................................
Garantie
................................................................................
2
48
48
50
50
50
51
52
52
52
52
52
53
53
53
54
54
55
55
55
56
56
56
57
57
57
57
58
58
58
58
59
59
59
59
60
60
60
61
61
62
62
62
62
51

Gerätefunktion
Aufgrund seiner binokularen Konstruktion (für beide Augen)
ermöglicht dieses Gerät eine dreidimensionale, stereoskopische
Betrachtung. Der Betrachter sieht das dreidimensionale Bild dabei
vergrößert und beleuchtet, wobei das Gewebe in natürlichen Farben
wiedergegeben wird.
Tragbares Binokular-Mikroskop
Bei
heruntergeklapptem
Binokularkörper sind die optischen Achsen
so justiert, daß auch kleine Körperhöhlen dreidimensional einge-
sehen werden können. Zwei Dioptrien
(1,5x)
Vergrößerung
ermöglichen ein entspanntes Arbeiten.
Bei hochgeklapptem Binokularkörper wird aus dem Otoskop eine
praktische, einfache Stirnlampe.
t
Flachlupe
l
Die Flachlupe mit ihren 3 Dioptrien
(2,5x)
Vergrößerung ist als
Kopfbandmodell oder Brillenmodell erhältlich. Die Lupe kann
nach oben weggeklappt und die Beleuchtung als praktische
Stirnlampe verwendet werden.
Dieses Gerät enthält eine Lampe hoher
Leuchtstärke. Sie darf nicht zur Ausleuchtung
oder Untersuchung am Auge, weder posterior
noch anterior, verwendet werden.

Beschreibung der Bedienelemente
Vorderansicht
Rückansicht
3
1.
2.
3.
Regler zur Einstellung der PD
Lampe
Höhenverstellung des Geräts
1
/\
4.
5.
6.
7.
10
Fernglas-Hochklappachse
6.
Polster
Kippmechanismus
9.
Kabelklemmen
Höheneinstellschraube
10.
Optik
Einstellknopf für den
Kopfbandumfang
Flacher
Obetflächenvergrößerer
12
11. Vergrößerungslinse
12. Linsenhalter
13. Senkrechte Höheneinstellschraube
53

Einstellungen
Ratschen-Kopfband
Anleitungen:
l
Den Hauptteil des Kopfbandes so auf den Kopf legen, daß er
bequem auf der Stirn und tief im Nacken ruht. Mit dem
Einstellknopf den Umfang auf die richtige Größe einstellen.
Die Optik
l
Die Optik kann durch
Manipulieren der Gelenke im
Kippmechanismus auf die
gewünschte Position eingestellt
werden. Die Optik möglichst
nahe an die Augen rücken,
damit diese gerade
durchschauen können. (Die Optik
gemäß den Anleitungen für das
LumiView
einstellen.)
Einstellknopf
Kopfbandumfang
Einstellarm
I
I
Optikteil
l
Bei eingeschalteter Lampe die
Einstellung prüfen. Der
Lichtstrahl sollte im Sichtfeld
zentriert sein. Befindet sich
das
Licht zu hoch oder zu niedrig,
siehe die detaillierten Anleitungen,
die mit dem
LumiView
TM
mitgeliefert wurden.
’
W
Einstellschraube
54

Brillenmodell
Höhenverstellung des Optikteils
l
Die Befestigungsschraube
des Optikteils an der
Brille lösen.
l
Den Optikteil auf die
Anforderungen der Augen
des Anwenders ausrichten.
l
Zur Feststellung der
Position des Optikteils die Schraube anziehen.
Anpassung an den Refraktionsfehler des Anwenders
(nur für Brillenmodell)
Der optimal Arbeitsabstand zum Untersuchungsobjekt beträgt
38 cm bis 43 cm. Wird dieses Modell bei vorliegender Myopie oder
Hyperopie des Anwenders ohne Korrekturgläser verwendet, ist zur
Kompensation des Brechungsfehlers ein kürzerer oder weiterer
Abstand zum Untersuchungsobjekt erforderlich.
Zur Umgehung dieses Problems kann das Brillenmodell von einem
Optiker mit Korrekturgläsern ausgerüstet werden.
55

Einstellen der PD
Die Regelelemente zur Einstellung der interpupillären Distanz (PD)
befinden sich unten am Optikteil und dienen zum Verschieben der
Okulare. Die Okulare bewegen sich unabhängig voneinander.
l Zur richtigen Einstellung der interpupillären Distanz die Augen auf
ein ca. 38 cm entferntes Objekt richten.
l Das linke Auge schließen, und den PD-Regler unter dem rechten
Auge so einstellen, daß das Objekt zentriert erscheint.
l Das linke Auge öffnen, das rechte Auge schließen, und den
PD-Regler unter dem linken Auge so einstellen, daß das Objekt
zentriert erscheint.
l Beide Augen öffnen. Das Objekt sollte klar und zentriert zu
sehen sein.
I
I
Bedienelemente für interpupilläre Distanz
Flachlupen-Modell
l Die Befestigungsschraube des Lampenteils am Einstellarm lösen.
l Den Lampenteil nach oben oder unten verschieben, und die
Schraube wieder anziehen.
l Das Gerät am Kopf anlegen. Zur Einstellung der Flachlupe die
Linsenhalterung nach oben oder unten und die Lupe nach vorne
oder hinten verschieben.
Linsenhalterung
m&
Lupe
Einstellschraube
56

HINWEIS: Das Netzkabel des Gerätes muß entweder an einen
Akkupack Nr 75252 oder ein Netzteil Nr. 75212
von
Welch
Allyn
angeschlossen werden.
1
.
Akkupack
Anschließen an eine Stromquelle
Vorsicht: Lampengehäuse wird sehr heiß
wenn die Lanpe länger als 5 Minuten brennt -
Verbrennungsgefahr. Lassen Sie die Lampe vor
der nächst Benutzung 10 Minuten abkühlen.
l
Das
Netzkabel des
Geräts am
Netzkabelanschluß oben auf der
Stromquelle anschließen.
l Den Stecker fest eindrücken.
l Zur Sicherung die externe
Steckermanschette vorsichtig im
Uhrzeigersinn drehen (optional).
’
l Den Akkupack mit dem Clip am Gürtel
befestigen.
l Das Gerät ist jetzt betriebsbereit.
Netzteil
l Das Netzkabel des Binokular-Otoskops
mit dem Netzkabel vom Netzteil
verbinden.
l Den Stecker fest eindrücken.
l Zur Sicherung die externe Steckermanschette vorsichtig im
Uhrzeigersinn drehen (optional).
l Das Netzteil an einer passenden Steckdose einstecken.
l Das Gerät ist jetzt betriebsbereit.
Zum Gerät
57
l Den Akkupack mit dem Clip am Gürtel
Zubehörteile
Ohrlupe mit Spekulum und Gummiball
l
Zur Unterstützung der pneumati-
schen Otoskopie steht eine Ohrlupe
mit Spekulum und Gummiball mit
einer 4-fachen Vergrößerung.
Austausch der Lampe

Zubehörteile
Ohrlupe mit Spekulum und Gummiball
l
Zur Unterstützung der pneumati-
schen Otoskopie steht eine Ohrlupe
mit Spekulum und Gummiball mit
einer 4-fachen Vergrößerung.
Austausch der Lampe
1
.
l
Zum Auswechseln der Lampe die Binokulareinheit nach
oben klappen.
l
Zum Entnehmen der Reflektoreinheit den Daumen auf der Kerbe
an der Unterseite des Reflektorgehäuses anlegen und die
Reflektoreinheit wegdrücken (Schritt 1).
l
Die Lampe entnehmen, und eine neue Welch Allyn-Lampe
Nr. 08500 hinten im Reflektor einsetzen (Schritt 2).
l
Das Reflektorgehäuse wieder in das Gerät einlegen und bis zum
Einrasten eindrücken.
HINWEIS: Die Belüftungsschlitze für die Reflektoreinheit sollten
sich oben und unten befinden.
Binokulareinheit
Schritt 1
Schritt 2
58
VORSICHT: Die Lampen können sehr HEISS
werden und müssen vor dem Auswechseln
ausreichend abkühlen.

Reinigung
Alle Glasoberflächen, die Linsen des tragbaren Binokular-Mikroskops,
die Okularabdeckungen und die reflektierenden Abdeckungen der
Lampe können mit einem alkoholbefeuchteten, weichen Tuch
gereinigt werden.
Das tragbare Binokular-Mikroskop und die Stromquellen können außen
mit einem alkoholbefeuchteten, weichen Tuch abgewischt werden.
HINWEIS: Agressive Reinigungsmittel oder zu stark
angefeuchtete
Reinigungstücher dürfen zur Reinigung des
Gerätes nicht verwendet werden.
Wartung
Austausch der Lampe und Reinigung des Gerätes können vom
Benutzer nach Bedarf vorgenommen werden. Für anderweitige
Servicearbeiten sollte das Gerät an einen Welch
Allyn-
Vertragshändler oder ein Service-Center eingeschickt werden.
Der Abschnitt “Service und Garantie” enthält hierzu weitere
Informationen.
Technische Daten
Interpupilläre
Distanz
Lichtquelle
Einstellbereich des Kopfbands
Gewicht (Nr.
20502S)
Transport und Lagerung
49 mm bis 74 mm
3,60
V,
Halogen
klein, mittel, groß
60
g
-20
o
C
bis 40
o
C, maximale rela-
tive Luftfeuchtigkeit 95 %
Normenentsprechung
UL544, CAN/CSA C22.2 Nr. 125
IEC 601-1, IEC 601-1-2, CE
59

Bestellinformationen für Geräte und Zubehörteile
1
Produktnummer
Beschreibung
I
Nr.
205028
Nr. 20510S
Nr.
20500H
Nr. 20510H
Nr. 20530S
Nr. 20530H
Nr. 20522S
Nr. 20522H
Nr. 205429
Nr.
20540H
Geräte
Brillen-LumiView
mit Akkupack
Brillen-LumiView mit Netzteil
Kopfband-LumiView
mit Akkupack
Kopfband-LumiView
mit Netzteil
Brillen-LumiView
ohne Stromquelle
Kopfband-LumiView ohne Stromquelle
Brillen-Flachlupe mit Akkupack
Kopfband-Flachlupe mit Akkupack
Brillen-Flachlupe ohne Stromquelle
Kopfband-Flachlupe ohne Stromquelle
Stromquellen
Nr. 75260
Akkupack mit Ladegerät
Nr. 75262
Akkupack mit Ladegerät, 220V
Nr. 74160
Ladegerät für Nr. 75260
Nr. 74162
Ladegerät für Nr. 75262, 220V
Nr. 75212
Netzteil, 220V
Nr. 75215
Internationales Netzteil (bitte Land und Spannung angeben)
Hinweis: Die oben genannten Stromquellen eignen sich zum Betrieb mit
allen Gerätekonfigurationen.
Hinweis: Das tragbare Binokular-Mikroskop und die Flachlupe dürfen
nur mit den in diesem Handbuch genannten Zubehörteilen und
Stromquellen verwendet werden.
60

Stromquellen (Akkupack oder Netzteil)
Akkupack (Welch Allyn Modell
Nr. 75262)
Diese Stromquelle ist zur Verwendung in
der Praxis und im Krankenhaus vorge-
sehen. Sie eignet sich auch ideal zum
Mitnehmen in die Zweitpraxis. Nach einer
10-stündigen
Aufladung liefert das Gerät
eine Betriebszeit von 90 Minuten.
Ausstattung:
2
1
1.
Ein/Aus-Schalter
2. Geräteanschluß
3. Anschluß für
Ladetransformator
Technische Daten:
Batterietyp
SpannunglKapazität
Ladegerät
-6
4.
Ladeanzeige
5. Gürtelclip
6. Ersatzlampenfach
Welch Allyn Nr. 72250 (Nickel-Cadmium)
3,6
V
Gleichstrom/1,8
Ah
Welch Allyn Nr. 74182
61

Anschließen des Geräts an den Akkupack:
l
Das Netzkabel des Geräts am
Netzkabelanschluß oben an der
Akkupack
Stromquelle anschließen.
l
Den Stecker fest eindrucken.
l
Zur Sicherung die externe
Steckermanschette vorsichtig
im Uhrzeigersinn aufdrehen
(optional).
Aufladen des Akkupacks:
l
Den Akkupack ausschalten.
l
Das Gerät von der
Stromquelle abnehmen.
l
Den Ladetransformator an
den Akkupack anschließen.
l
Den Ladetransformator an
einer Wandsteckdose
anschließen. Die aufleuch-
tende LED zeigt an, daß sich
die Einheit auflädt.
l
Nach Beenden des
Aufladens, im allgemeinen
nach 10-12 Stunden, den
Ladetransformator von der
Stromquelle abnehmen.
Zugriff
auf die Ersatzlampe
Ein/Aus
l
Die Ersatzlampe aus ihrem Fach
entnehmen und einsetzen.
62

Austausch der Batterie
l Sicherstellen, daß das Gerät ausgeschaltet ist.
l Die beiden Schrauben an der Rückseite der Stromquelle mit
einem Kreuzschlitzschraubenzieher lösen.
l Das Gerät am Gürtelclip halten, und am Gehäuse vorsichtig nach
hinten und unten ziehen (Schritte 2 und 3).
l Die Batterie nach oben entnehmen und von der Einheit trennen.
l Die neue Batterie einlegen, und die obigen Schritte in
umgekehrter Reihenfolge durchführen.
Schritt 1
Schritt 2
_
Schritt 3
Schritt 4
HINWEIS: Die Schrauben am Gehäuse der Stromquelle gut
festziehen, um alle elektrischen Bauteile richtig abzusichern.
Netxteil
l Das Netzkabel des Binokular-Otoskop mit dem Netzkabel vom
Netzteil verbinden.
l Den Stecker fest eindrücken.
l Zur Sicherung die externe Steckermanschette vorsichtig im
Uhrzeigersinn drehen (optional).
l Das Gerät ist jetzt betriebsbereit.
l Das Netzteil an einer geeigneten Steckdose einstecken.
m
Zum Gerät
63

Service und Garantie
Service
Kunden in Nordamerika sollten das Gerät für Servicearbeiten an
einen Welch Allyn-Vertragshändler oder an das unten angegebene
Welch Allyn Service Center einsenden.
Technical Service Department
Welch Allyn Inc.
4341 State Street Road
Skaneateles Falls, NY 13153-0220 U.S.A.
Telefon: 315-685-4560
Fax: 315-685-4653
Kunden außerhalb Nordamerikas sollten ein Gerät für
Servicearbeiten an einen Welch Allyn-Vertragshändler oder das
nächstgelegene Welch
Allyn-Servicezentrum einsenden.
Garantie
Welch Allyn Inc. gewährt auf das tragbare Binokular-Mikroskop
und die Flachlupe eine Garantie von fünf Jahren ab Kaufdatum
auf Material- und Herstellfehler sowie auf Einhaltung der
Herstellerspezifikationen. Welch Allyn wird während der Garantiezeit
ein schadhaftes oder von den Herstellerspezifikationen
abweichendes Gerät oder eine Gerätekomponente kostenlos
reparieren
oder ersetzen.
Diese Garantie gilt nur für Geräte, die neu von einem Welch Allyn-
Vertragshändler, einer Vertragsvertretung oder von Welch Allyn direkt
gekauft wurden. Der Käufer muß das Gerät direkt an Welch Allyn
oder einen Vertragshändler oder eine Vertragsvertretung einsenden.
Die Versandkosten gehen zu Lasten des Käufers.
Diese Garantie gilt nicht für Schäden oder Gerätestörungen, die
aufgrund unsachgemäßer Eingriffe, Mißbrauch, Fahrlässigkeit,
Unfällen, Modifizierungen am Gerät oder Lieferzwischenfällen
entstehen. Wird das Gerät abweichend von den Empfehlungen des
Herstellers
eingesetzt oder anderenorts und nicht von Welch Allyn oder
einem Welch Allyn-Vertragshändler repariert oder überholt, so
erlischt diese Garantie.
Es wird keinerlei andere ausdrückliche oder stillschweigende
Garantie gewährt.
Technische Änderungen vorbehalten
64

Simboli
ATTENZIONE: Indica una situazione
potenzialmente pericolosa che, se non evitata,
potrebbe causare lesioni minori o danni alla
proprietà. Questo simbolo awerte inoltre dei
pericoli causati da procedure non di sicurezza.
NOTA: Fornisce informazioni supplementari relative al testo e
indica una situazione potenzialmente pericolosa che, se non
evitata, potrebbe causare danni alla proprietà. Questo simbolo
evidenzia inoltre importanti informazioni relative all’uso di
questo apparecchio.
Conformità agli standard
0
EI
Doppio isolamento
Alimentazione interna
Prodotto approvato dai Underwriters
Laboratories, standard UL644
Prodotto approvato dall’Associazione
canadese degli standard (Canadian Standards
Association), standard
CAN/CSA
C22.2 N.125
Prodotto approvato dai ETL Laboratories
Standard approvati: UL644,
CAN/CSA
C22.2
N.125, IEC 601-1, IEC 601-1-2
65

Contenuti
Approvazione
CE ........................................................................
Simboli
........................................................................................
Conformità
agli standard
..........................................................
Funzione
dello strumento
..........................................................
Microscopio
binoculare
portatile..
..........................................
Lente
di
ingrandimento
a superficie
piatta
............................
Descrizione
dei
controlli
............................................................
Regolazioni..
................................................................................
Modello
a
fascia
frontale..
......................................................
Regolazioni
della fascia
..................................................
Regolazione orizzontale della sezione ottica
..................
Regolazione verticale della sezione ottica
......................
Modello
ad occhiale
..............................................................
Regolazione verticale della sezione ottica
......................
Regolazione
dell’errore di
rifrazione
dell’utente
....................
Predisposizione della distanza interpupillare
........................
Lente di
ingrandimento a superficie piatta..
..........................
Collegamento
all’alimentatore
..................................................
Alimentatore
portatile
............................................................
Alimentatore
ad
innesto
diretto..
............................................
Accessori
....................................................................................
Supporto
dello speculum
pneumatico
..................................
Sostituzione
della lampada
......................................................
Pulizia
..........................................................................................
Manutenzione..
............................................................................
Specifiche..
..................................................................................
Approvazioni..
..............................................................................
Informazioni relative all’ordinazione del prodotto
e
degli
accessori
......................................................................
Strumenti..
..............................................................................
Alimentatori
............................................................................
Accessori..
..............................................................................
Alimentatori
(portatile e
ad innesto diretto)
............................
Portatili
..................................................................................
Caratteristiche..
................................................................
Specifiche
........................................................................
Collegamento dello strumento all’alimentatore portatile . .
Ricarica dell’alimentatore
portatile
..................................
Come accedere
alla lampada di
scorta
..........................
Sostituzione
della batteria..
..............................................
Trasformatore
ad
innesto
diretto..
..........................................
Servizio
e garanzia
....................................................................
Servizio
..................................................................................
Technical
Service
Department
..............................................
Garanzia
................................................................................
66
2
63
63
65
65
65
66
67
67
67
67
67
68
68
68
69
69
70
70
70
71
71
71
72
72
72
72
73
73
73
73
74
74
74
74
75
75
75
76
76
77
77
77
77

Funzione dello strumento
Questo dispositivo permette di ottenere una visione binoculare (con
entrambi gli
occh
i) fornendo una visione stereoscopica tridimensio-
nale. La visione stereoscopica viene quindi ingrandita e illuminata
evidenziando il tessuto in maniera eccellente.
Microscopio binoculare portatile
Quando i binocoli sono innestati, le traiettorie visuali vengono
spostate in posizione mediana per permettere la visione binoculare in
cavità ristrette. L’ingrandimento di due diottrie
(1,5
volte) migliora il
campo visivo.
Quando i binocoli sono ruotati verso l’alto, questo diviene una
comoda lampada frontale di base.
t
Lente di ingrandimento a superficie piatta
.
La lente di ingrandimento a superficie piatta da tre diottrie
(2,5
volte) è disponibile sia per il modello a fascia frontale che per il
modello ad occhiale. La lente di ingrandimento può essere
sollevata per l’uso come lampada frontale.
ATTENZIONE: NON guardare direttamente dentro
la luce. Questo dispositivo contiene una lampada
illuminare o esaminare alcuna porzione dell’occhio
67

Descrizione dei controlli
Vista frontale
vista posteriore
,
1
1. Regolazione della distanza interpupillare (DIP)
2. Lampada
3. Regolazione dell’altezza verticale dello strumento
1
8
10
9
4. Asso di ribaltamento del binocolo
8. Imbottiture di conforto
5. Meccanismo di ribaltamento
9. Fermi del cavetto
6. Vite di regolazione dell’altezza
10. Assemblaggio ottico
7. Manopola di regolazione della
circonferenza della fascia frontale
Lente di ingrandimento a superficie piatta
12
11
-
11. Lente di ingrandimento
12. Supporto della lente
13. Vite di regolazione verticale
68

Regolazioni
Fascia frontale, tipo a
cricchetto
Istruzioni
l
Sistemare sul capo la parte principale della fascia frontale, in
modo tale che la fascia venga a trovarsi in posizione confortevole
sulla fronte e in basso alla nuca. Usare la manopola di regolazione
della circonferenza per regolare le dimensioni della fascia.
Assemblaggio ottico
l
L’assemblaggio ottico può essere
regolato nella posizione desiderata
regolando le connessioni all’interno
del meccanismo per il ribaltamento.
L’assemblaggio ottico deve essere
sistemato il più vicino possibile agli
occhi in modo tale che possano
guardare fissi direttamente all’interno
dell’assemblaggio ottico. (Sistemare
l’assemblaggio ottico come da
Manopola di
regolazione della
regolazione
Sezione ottica
istruzioni allegate al
LumiView).
l
Controllare la regolazione
mentre la lampada è accesa,
verificando che il fascio di luce
sia centrato all’interno del
campo visivo. Se la luce fosse
_
troppo alta o bassa, fare
riferimento alle istruzioni
dettagliate di regolazione
allegate al
LumiView
TM
.
69

Modello ad occhiale
Regolazione verticale della sezione ottica
l
Allentare la vite che
fissa gli occhiali della
sezione ottica.
l
Riposizionare la sezione
ottica in modo da
ottenere un corretto
allineamento con gli occhi
dell’utente.
l
Stringere la vite per mantenere in posizione la sezione ottica.
Regolazione dell’errore di rifrazione dell’utente
(soltanto per i modelli ad occhiale)
La distanza ottimale di funzionamento dall’oggetto è di
38-43
cm. Se
questo modello viene usato senza le lenti correttive, e se l’utente è
miope o presbite,
sara
necessario lavorare mantenendo una distanza
minore o maggiore dall’oggetto, in base all’errore di rifrazione.
Per ovviare a questo problema, i modelli ad occhiale possono essere
prowisti di lenti correttive prescritte dal vostro oculista.
70

Predisposizione della distanza interpupillare
I
controlli della distanza interpupillare (DIP) muovono gli oculari e
sono situati sulla parte inferiore della sezione ottica. Questi oculari si
muovono indipendentemente l’uno dall’altro.
l Per predisporre correttamente la DIP, osservare un oggetto ad
una distanza approssimativa di 38 cm.
l Chiudere l’occhio sinistro e regolare il controllo della DIP sotto
l’occhio destro finché l’immagine osservata viene centrata.
l Chiudere ora l’occhio destro, mantendendo l’occhio sinistro
aperto, e regolare il controllo della DIP per l’occhio sinistro finché
l’immagine viene centrata.
l Aprire entrambi gli occhi. L’oggetto dovrebbe essere chiaro
e centrato.
Controlli della distanza interpupillare
Modello di lente di ingrandimento a superficie piatta
l Allentare la vite che fissa la sezione della lampada al braccio
di regolazione.
l Riposizionare la sezione della lampada, verso l’alto o verso il
basso, fino alla posizione prescelta e stringere la vite.
l Collocare lo strumento sulla testa. Regolare la lente di
ingrandimento a superficie piatta muovendo il sostegno della
lente
verso l’alto o il basso e la lente di ingrandimento verso l’interno
Sostegno della lente
Lente di
ingrandimento
Vite di regolazione
71

Collegamento all’alimentatore
NOTA:
II
cavetto di alimentazione dello strumento deve essere
collegato ad un alimentatore portatile Welch
Allyn
N.75260
o ad
un alimentatore diretto ad innesto Welch Allyn
N.75210.
a
1
.
Se la lampadina rimane accesa per oltre cinque
minuti si surriscalda e può causare scottature se
a contatto con la pelle. Attendere almeno dieci
minuci per il raffreddamento della stessa prima di
utilizzarla nuovamente.
Alimentatore portatile
l
Collegare il cavetto di
alimentazione dello strumento alla
presa di alimentazione posta sulla
parte superiore dell’alimentatore.
l
Spingere verso l’interno finché il
cavetto viene posizionato saldamente.
l
Avvitare delicatamente il manicotto dei
connettore esterno, in senso orario, per
serrarlo (facoltativo).
l
Fissare l’alimentatore portatile usando il
fermaglio a molla per cintura.
l
Lo strumento è ora pronto per l’uso.
Alimentatore ad innesto diretto
l
Collegare il cavetto di alimentazione dall’otoscopio binoculare
nel cavo dell’alimentatore.
l
Spingere verso l’interno finché il cavetto viene posizionato
saldamente.
l
Awitare delicatamente il manicotto del connettore esterno, in
senso orario, per serrarlo (facoltativo).
l
Fissare l’alimentatore diretto direttamente ad una presa.
l
Lo strumento è ora pronto per l’uso.
Allo strumento
72

Accessori
Supporto dello speculum pneumatico
l Un supporto pneumatico dello
speculum, con una lente che
ingrandisce 4 volte, può essere
usato per facilitare l’esame
Sostituzione della lampada
1
.
l Per sostituire la lampada, sollevare il complesso binoculare verso
l’alto.
l Rimuovere il complesso del riflettore posizionando il pollice
sull’incavo situato sul fondo dell’alloggiamento del riflettore e
spingendo il complesso del riflettore (procedimento 1).
l Rimuovere la lampada ed inserire una nuova lampada Welch Allyn
N.08500 nella parte posteriore del riflettore (procedimento 2).
l Ricollocare l’alloggiamento del riflettore nello strumento e
spingerlo finché viene incastrato in posizione corretta.
NOTA: Le aperture di sfogo
dell'aria
del complesso del riflettore
dovrebbero
essere posizionate sulla sommità e sul fondo.
Complesso binoculare
I
Complesso del
riflettore
Procedimento 1
Procedimento 2
73
raffreddino prima di sostituirle.
ATTENZIONE: Le lampade potrebbero essere
molto CALDE. Lasciare che le lampade si

Pulizia
Tutte le superfici di vetro, le lenti del microscopio binoculare portatile,
i coperchi ottici e oculari e i coperchi riflettenti della lampada si
possono pulire con un panno morbido inumidito di alcool.
Sulle superfici esterne del microscopio binoculare portatile e sugli
alimentatori è possibile passare un panno morbido inumidito di
alcool.
NOTA: Evitare di usare fluidi detergenti troppo forti o panni
eccessivamente bagnati su qualsiasi porzione dello strumento.
Manutenzione
La sostituzione della lampada e la pulizia possono essere effettuate
dall’utente quando se ne presenta la necessità. Altri servizi di
manutenzione devono essere effettuati rinviando lo strumento al
Reparto tecnico di servizio autorizzato della Welch Allyn o al
distributore. Consultare la sezione “Servizio e garanzia”.
Specifiche
Distanza
interpupillare
Sorgente di luce
Gamma delle regolazioni
della fascia frontale
Peso
(N.20500S)
Trasporto e
immagazzina-
mento
dai 49 ai 74 mm
3,60
volt, alogena
piccola, media, grande
80
g
dai -20 ai 40 , 95% di umidità
relativa massima
Approvazioni
UL544,
CAN/CSA
C22.2 N.125
IEC 601-1, IEC 601-l -2, CE
74

Informazioni relative all’ordinazione del
prodotto e degli accessori
N 74180
N 74185
(specificare la nazione e la tensione)
Caricatore soltanto per il modello N.75260
Caricatore internazionale soltanto per il modello
(specificare la nazione e la tensione)
N 75210
N 75215
.
.
Alimentatore
Alimentatore internazionale (specificare la nazione e la
tensione)
Nota: Le opzioni di alimentazione sopra elencate funzionano con tutte le
configurazioni dello strumento.
Accessori
N 08500 Lampada di sostituzione per il dispositivo (tutti i modelli)
N 205007-501
Complesso di sostituzione del riflettore
N 72250
Batteria di sostituzione per l’insieme batteria
N 21502
Sistema a bulbo di insufflazione per i modelli
LumiView
N 21505
Supporto per specula pneumatico con specula per i modelli
LumiView
N 22002 Polispecula da 2 mm
N 22003 Polispecula da 3 mm
N 22004 Polispecula da 4 mm
N 22005
Polispecula da 5 mm
N 22009 Polispecula da 9 mm
N 05374 Custodia rigida
Nota: Usare soltanto gli accessoti e gli alimentatori indicati in questo
manuale con il microscopio binoculare portatile e con la lente di
ingrandimento a superficie piatta.

Alimentatori
(portatile e ad innesto diretto)
Alimentatore portatile
(Modello Welch Allyn N.75260)
Questo alimentatore è stato ideato per
l’uso in uffici e ospedali e può essere
trasportato convenientemente negli uffici
satellite. La durata di accensione è di 90
minuti, dopo una ricarica di 10 ore.
Caratteristiche:
2
1
1. Interruttore acceso/spento
4.
2. Connettore dello strumento
5.
3. Presa per la ricarica
6.
del trasformatore
Specifiche:
Tipo di batteria
Tensione/Capacita
Caricatore
Welch Allyn N.72250 (nichel-cadmio)
3,6
volt a tensione continua/
1,8
amperore
Welch Allyn N.74180
(soltanto per ordini internazionali,
specificare la nazione)
1
2
&
1-.-;3
4
\’
3
\
Indicatore di carica
Fermaglio a molla per cintura
Vano porta-lampada
di scorta
76

Collegamento dello strumento all’alimentatore portatile:
l Collegare il cavetto di
Alimentatore
alimentazione dello strumento
portatile
alla presa posta in alto
sull’alimentatore.
l Spingere verso l’interno finché
il cavetto viene posizionato
saldamente.
l Avvitare delicatamente il
manicotto del connettore
esterno
in senso orario per serrarlo
(facoltativo).
Ricarica dell’alimentatore portatile:
alimentazione
dello
strumento
l Spegnere l’alimentatore
portatile.
l Staccare lo strumento
dall’alimentatore.
l Inserire lo spinotto del
trasformatore nell’apposita
presa posizionata
lateralmente
sull’alimentatore.
Acceso/spento
l Collegare il trasformatore ad una presa a muro. La luce a LED
accesa indica che l’unità si sta caricando.
l Quando il trasformatore sarà completamento caricato (dopo
10-12 ore), staccarlo dall’alimentatore.
Come accedere alla lampada
di scorta
. Estrarre la lampada di scorta
dal suo vano ed usarla.
Lampada
di scorta
77

Sostituzione della batteria
l
Accertarsi che l’alimentazione sia disinnestato.
l
Rimuovere entrambe le viti sui retro dell’alimentatore con un
cacciavite a testina Phillips.
l
Afferrare il fermaglio della cinta e tirare delicatamente
l’alloggiamento indietro e verso il basso (procedimenti 2 e 3).
l
Estrarre la batteria e staccarla dall’unità.
l
Sostituire con una nuova batteria e ripetere all’inverso i
procedimenti sopra indicati.
Procedimento 1 Procedimento 2
Procedimento 3
Procedimento 4
NOTA: per mantenere correttamente le parti elettriche al loro
posto, le viti del vano d’alloggiamento della con-ente devono
essere ben strette.
Trasformatore
l
Inserire il cavetto di alimentazione dall’otoscopio binoculare nel
cavo di alimentazione.
l
Spingere verso l’interno finché il cavetto viene posizionato
saldamente.
l
Avvitare delicatamente il manicotto del connettore esterno in
senso orario per serrarlo (facoltativo).
l
Lo strumento è ora pronto per l’uso.
limentatore direttamente ad una presa.
Allo strumento
78

Servizio e garanzia
Servizio
I
clienti del Nord America sono pregati di rinviare gli strumenti, che
necessitano di servizio, al Reparto tecnico di servizio della Welch
Allyn sotto indicato o al distributore autorizzato della Welch Allyn.
Technical
Service
Department
Welch Allyn, Inc.
4341 State Street
Road
Skaneateles
Falls,
NY 13153-0220, U.S.A.
Telefono: 315-685-4560
Fax: 315-685-4653
I clienti al di fuori del Nord America dovranno rinviare l’unità ad
un distributore autorizzato della Welch Allyn locale o al centro di
servizio della Welch Allyn più vicino.
Garanzia
La
Welch Allyn, Inc. garantisce che il microscopio binoculare portatile
e la lente di ingrandimento a superficie piatta sono privi di difetti
d’origine, per quanto riguarda i materiali e la manodopera, e che
sono in grado di funzionare in conformità con le specifiche del
produttore per un periodo di cinque anni dalla data d’acquisto.
Qualora questo strumento, 0 qualsiasi sua componente, si rivelasse
difettoso, o in discordanza con le specifiche del produttore, durante il
periodo di garanzia, la Welch Allyn riparerà o sostituirà lo strumento,
0 la(e) componente(i), gratuitamente.
Questa garanzia si riferisce soltanto agli strumenti nuovi acquistati
presso la Welch Allyn o presso i distributori o rappresentanti
autorizzati. L’acquirente deve rinviare lo strumento direttamente alla
Welch Allyn, o ad un distributore o rappresentante autorizzato, e
sostenere le spese della spedizione.
Questa garanzia non comprende la rottura, o i guasti, dovuti a
manomissione, cattivo uso, trascuratezza, incidenti, modifiche o
spedizione e non
è
valida se lo strumento non viene usato in
conformità con le indicazioni del produttore o se viene riparato, o
sottoposto a servizio, da individui che non facciano parte della Welch
Allyn o che non siano rappresentanti autorizzati della Welch Allyn.
Nessun’altra garanzia manifesta o implicita viene accordata.
79


Welch
Allyn,
Inc.
4341 State Street
Road
Skaneateles Falls, NY 13153-0220
(800) 535-6663 (in U.S.A. only)
or (315) 685-4560
Fax (315) 685-3361
Printed in the U.S.A.
Part No. 205070-2 Rev. A
Transcripción de documentos
WelcljAllyrr LumiView@ Portable Binocular Microscope Microscope binoculaire portatif Microscopio binocular portzitil Tragbares Binokular-Mikroskop Operating Instructions ....................... 1 Instructions de fonctionnement ..... .18 Instrucciones s de operacicin .............35 Gebrauchsanweisung.......................... . .63 lstruzioni per il funzionamento .........50 Thank you for purchasing the Welch Allyn LumNieti Portable Binocular Microscope or Flat Surface Magnifier. To ensure accurate and reliable performance of your new instrument, please follow the operating and maintenance instructions found in this manual. U.S. and International Patents Pending. IMPORTANT: The material outlined in this manual should be reviewed and understood prior to operation of the equipment. Nous vous remercions d’avoir fait I’acquisition du microscope binoculaire portatif ou la loupe à surface plate LumiVieti de Welch Allyn. Suivez les directives contenues dans ce manuel pour assurer le fonctionnement précis et fiable de votre nouvel instrument pendant de nombreuses années. Brevets U.S. et internationaux en instance. IMPORTANT : Avant d’utiliser I’équipement, bien lire les instructions données dans ce manual. Agradecemos su compra del Microscopio binocular portátil o Lupa de superficie plana LumiVieti de Welch Allyn. Para asegurar un rendimiento preciso y confiable de su nuevo instrumento, siga las instrucciones de operación y mantenimiento que se encuentran en este manual. Patentes de los EE.UU. e internacionales pendientes. IMPORTANTE: El material descrito en este manual debe ser revisado y entendido antes de operar el equipo. Wir bedanken uns für den Kauf des tragbaren LumiVieHP Binokular-Mikroskops bzw. der Flachlupe von Welch Allyn. Dieses Geriit wird stets zuverlässig und störungsfrei arbeiten, wenn es entsprechend den Empfehlungen in diesem Handbuch verwendet und gepflegt wird. U.S.-Patente und international Patente angemeldet. WICHTIG: Der Anwender sollte vor Benutzung des Geräts mit den Informationen in diesem Handbuch gründlich vertraut sein. Grazíe per aver acquistato il microscopio binoculare portatile Lumiview@ o la lente di ingrandimento a superficie piatta della Welch Allyn. Per garantire che il vostro nuovo strumento offra prestazioni accurate e attendibili, si prega di seguire le istruzioni per il funzionamento e la manutenzione contenute in questo manuale. Brevetti statunitensi e internationali pendenti. IMPORTANTE: il materiale evidenziato in questo manuale deve essere esaminato e compreso prima di far funzionare I’apparecchiatura. 1 Symbols a I. CAUTION: Indicates a potentially hazardous situation which, if not avoided, may result in minor injury or property damage. It also alerts against unsafe practices. NOTE: Provides supplemental information to the text and indicates a potentially hazardous situation, which, if not avoided, may result in property damage. Additionally, it highlights important information on the use of this equipment. Standards Compliance 0 0 Double Insulation Internally Powered Listed Product Underwriters Laboratories, Standard UL544 Listed Product Canadian Standards Association, Standard CAN/CSA C22.2 No. 125 Listed Product ETL Laboratories Listed Standards UL544, CAN/CSA C22.2 No. 125, IEC 601-1, IEC 601-1-2 Contents CE Approval ................................................................................ Symbols ...................................................................................... Standards Compliance .............................................................. Instrument Function .................................................................. Portable Binocular Microscope ............................................ Flat Surface Magnifier .......................................................... Description of Controls.. ............................................................ Adjustments ................................................................................ Headband Model .................................................................. Band Adjustments ........................................................ Optical Section Horizontal Adjustment ........................ Optical Section Vertical Adjustment.. ............................ Spectacle Model .................................................................. Optical Section Vertical Adjustment .............................. Adjusting for User Refractive Error ...................................... Lens Template - Spectacle Model .............................. Setting the Interpupillary y Distance ...................................... Flat Surface Magnifier .......................................................... Connecting to the Power Source .............................................. Portable Power Source ........................................................ Direct Plug-In Power Source ................................................ Accessories ................................................................................ Pneumatic Speculum Holder.. .............................................. Lamp Replacement .................................................................... Cleaning ...................................................................................... Maintenance ................................................................................ Specifications.. ............................................................................ Approvals .................................................................................... Product and Accessory Ordering Information ........................ Instruments .......................................................................... Power Sources ...................................................................... Accessories .......................................................................... Power Sources (Portable and Direct Plug-In). ......................... Portable ................................................................................ Features ........................................................................ Specifications.. .............................................................. Connecting Instrument to Portable Power Source ...... Recharging the Portable Power Source ...................... Accessing Spare Lamp ................................................ Battery Replacement.. .................................................. Direct Plug-In Transformer.. .................................................. Service and Warranty Information ............................................ Service .................................................................................. Technical Service Department .............................................. Warranty ................................................................................ Troubleshooting Guide .............................................................. 4 2 3 3 5 5 5 6 7 7 7 7 7 8 8 8 8 9 9 10 10 10 11 11 11 12 12 12 12 13 13 13 13 14 14 14 14 15 15 15 16 16 17 17 17 17 18 Instrument Function This device offers binocular (both eyes) viewing, providing a threedimensional stereoscopic view. This stereoscopic view is then magnified and illuminated to provide excellent tissue rendition. Portable Binocular Microscope When the binoculars are engaged, the visual pathways are displaced medially to allow for binocular vision in narrow cavities. Two diopters (1.5x) magnification improves vision. When the binoculars are rotated upwards, the scope becomes a convenient basic headlight. Flat Surface Magnifier l The three diopter (2.5x) flat surface magnifier is available in either the headband model or the spectacle model. The magnifier can be flipped up for convenient headlight use. a .I CAUTION: DO NOT look directly into the light. This device contains a High Intensity Lamp. It is not to be used for illumination or examination of any portion of the eye, Posterior or Anterior. 5 Description of Controls Front View Back View 3 1 1. lnterpupillary distance (IPD) controls 2. Lamp 3. Instrument vertical height adjustment I 4. 5. 6. 7. 1 5 Binocular flip-up axis 8. Comfort pads 9. Cable clips Pivot mechanism Height adjustment screw 10. Optical assembly Headband circumference adjustment knob Fiat Surface Magnifier 12 11 - 11. Magnifier lens 12. Lens holder 13. Vertical adjustment screw 6 /*\ Adjustments Ratchet Style Headband Instructions l Position the main body of the headband on the head so that the band fits comfortably on the forehead and low on the back of the head. Use the circumference adjustment knob to adjust the size. Circumference adjustment knob 1 Optics Assembly l l The optics assembly can be adjusted to the desired position by manipulating the links in the pivot mechanism. The Optics Assembly should be positioned as close to the eyes as possible so that the eyes can gaze directly through the Optics Assembly. (Set optics per instructions provided with your LumiView.) Optical Section With the lamp illuminated, check the adjustment by confirming that the light beam is centered in the visual field. If the light is high or low, refer to the detailed adjustment instructions provided with your LumiView@. 7 Spectacle Model Screw Optical Section Vertical Adjustment l l l Loosen screw that attaches optical section spectacles. Reposition optical section to insure proper alignment with user’s eyes. Tighten screw to maintain optical section location. Adjusting for User Refractive Error (Spectacle Models Only) The optimal working distance from the object is 15” (38.1 cm) 17” (43.2 cm). If this model is used without corrective lenses and user is myopic or hyperopic, then the user will need to work closer or farther from object, depending on refractive error. To compensate for this, the spectacle models can be fitted with corrective lenses by an eyecare practitioner of your choice. Please bring the following information to assist your eyecare practitioner in fitting your prescription lenses. Lens Template - Spectacle Model Front Sizes Eye A B ED D.B.L 51 51 43 57.4 18 1 A , I Setting the lnterpupillaty Distance The lnterpupillary Distance (IPD) Controls move the oculars and are located on the bottom of the optical section. These oculars move independently of one another. l l l l To set IPD properly, observe an object at approximately 15 inches (38 cm). Close the left eye and adjust the IPD control under the right eye until the viewed image is centered. Now close the right eye, keeping the left eye open, and adjust the IPD control for the left eye until that image is centered. Open both eyes and the object should be clear and centered. lnterpupillary Distance Controls Flat Surface Magnifier Model l l l Loosen screw that attaches the lamp section to the adjustment arm. Reposition the lamp section up or down to desired location and tighten screw. Place instrument on head. Adjust the flat surface magnifier by moving the lens holder up or down and the magnifier in or out. Lens holder Magnifier Adjustment screw 9 Connecting to the Power Source NOTE: The instrument power cord must be plugged into either a Welch Allyn Portable Power Source No. 75250 or a Welch Allyn Direct Plug-In Power Source No. 75210. a . I CAUTION: The lamp housing becomes hot when the lamp is on for more than 5 minutes and can cause a burn if it contacts the skin. Allow at least 10 minutes for cooling between the uses of the illuminator. Portable Power Source l l l l l Plug instrument power cord into the power cord connector port on top of the power source. Push in until firmly in place. Gently screw the external connector sleeve clockwise to secure (optional). Attach the Portable Power Source by using the belt clip. The instrument is now ready for use. Direct Plug-In Power Source l l l Plug Power cord from the Binocular microscope into the Direct Plug-In Power cord. Push in until firmly in place. Gently screw the external connector sleeve clock-wise to secure (optional). l Plug direct power source into a nearby receptacle. l The instrument is now ready for use. To instrument 10 Accessories Pneumatic Speculum Holder l A pneumatic speculum holder with a 4x’s magnification lens can be used to aid in examination of the ear. Lamp Replacement A I I CAUTION: Lamps may become very HOT. Be sure to allow lamps to cool before changing. l To change the lamp, flip the binocular assembly into its up position. Remove the reflector assembly by placing the thumb on the notch located on the bottom of the reflector housing and pushing the reflector assembly. (Step 1) Remove lamp and insert a new Welch Allyn lamp No. 08500 into the back of the reflector. (Step 2) Replace reflector housing into instrument and push until it snaps into place. NOTE: Reflector assembly air vents should be positioned top and bottom. Binocular assembly Reflector assembly Step 1 Step 2 11 Cleaning All glass surfaces, portable binocular microscope lenses, ocular or eyepiece covers and lamp reflective covers can be cleaned with a soft cloth moistened with alcohol. The exterior surfaces of the portable binocular microscope and power sources can be wiped clean with a soft cloth moistened with alcohol. NOTE: Avoid using harsh cleansing fluids or excessively moistened cloths on any portion of the instrument. Maintenance Lamp replacement and cleaning may be performed by the user on an as needed basis. Additional servicing should be performed by returning the instrument to an authorized Welch Allyn Technical Service Department or distributor. See “Service and Warranty Information” section. Specifications Interpupillary Distance 49 mm to 74 mm Light Source 3.60v, Halogen Headband Adjustment Range Small, Medium and Large Weight (No. 20500S) 80g -20°C to 40 o C 95% RH maximum Transport and Storage Approvals UL 544, CAN/CSA C22.2 No.125 IEC 601-1, IEC 601-l -2, CE Product and Accessory Ordering Information Product No. No. No. No. No. No. No. No. No. No. No. 20500S 20510S 20500H 20510H 205308 20530H 20520S 20520H 205408 20540H No. 75260 No. 75265 No. 74180 No. 74185 No. 75210 No. 75215 Description 1 1 1 I Instruments Spectacle LumiView with Portable Power Source Spectacle LumiView with Direct Plug-In Headband LumiView with Portable Power Source Headband LumiView with Direct Plug Power Spectacle LumiView w/o Power source Headband LumiView w/o Power source Spectacle Flat Surface Magnifier w/ Portable Power Headband Flat Surface Magnifier w/Portable Power Spectacle Flat Surface Magnifier w/o Power Source Headband Flat Surface Magnifier w/o Power Source Power Sources Portable Power Source w/ charger International Portable Power Source w/Charger (specify country and voltage) Charger only for No. 75260 International Charger only for No. 75265 (specify country and voltage) Direct Plug-In Power Source International Direct Plug-In Power Source (specify country and voltage) Note: The power source options listed above operate with all instrument configurations. I I 1 Accessories Replacement lamp for device (all models) No. 08500 Replacement Reflector Assembly No. 205007-501 No. 72250 Replacement battery for portable battery pack No. 21502 lnsufflation bulb system for LumiView models Pneumatic Speculum Holder with specula for No. 21505 LumiView models No. 22002 Poly Speculum 2mm Poly Speculum 3mm No. 22003 No. 22004 Poly Speculum 4mm Poly Speculum 5mm No. 22005 No. 22009 Polv Speculum 9mm 1 No. 05374 I Hard case Note: Only accessories and power sources indicated in this manual are to be used with the Portable Binocular Microscope and Flat Surface Magnifier. 13 Power Sources (Portable and Direct Plug-In) Portable Power Source (Welch Allyn Model No. 75260) This power source is designed for use in both the office and the hospital and is ideal for carrying to satellite offices. Power On time is 90 minutes after a full charge of 10 hours. Features: 2 1 1. On/Off Switch 2. Instrument Connector 3. Charging Transformer Port 4. Charging Indicator 5. Belt Clip 6. Spare Lamp Receptacle Specifications: Battery Type Welch Allyn #72250 (nickel-cadmium) Voltage/Capacity 3.6 VDC/1.8 Ahr Charger Welch Allyn #74180 (for international orders, specify country) 14 Connecting Instrument to Portable Power Source: Portable Power Source l Plug instrument power cord into the power cord connector port on top of the power source. l l Push in until firmly in place. Gently screw the external connector sleeve clockwise to secure (optional). Recharging the Portable Power Source: l l l l l Turn portable power source off. Disconnect instrument from power source. On/Off Plug charging transformer into portable power source. Plug charging transformer into wall socket. LED light indicates unit is charging. Disconnect charging transformer from power source when fully charged, after 10-12 hours. Accessing Spare Lamp l Lift the spare lamp out of its receptacle and use. 15 Battery Replacement l l l Be sure power is off. Remove both screws from back of power source with Phillips head screwdriver. Grasp the belt clip, gently pull back and down on the housing. (Steps 2 and 3) l Lift battery out and unplug from unit. l Replace with new battery and reverse above steps. Step 1 Step 2 Step 3 Step 4 NOTE: Power source housing screws must be securely tightened in order to properly ho/d electrical components in place. Direct Plug-In Transformer l l l l l Plug Power cord from the binocular otoscope into the Direct Plug-In Power cord. Push in until firmly in place. Gently screw the external connector sleeve clockwise to secure (optional). The instrument is now ready for use. Plug direct power source into a nearby receptacle. e To instrument 16 Service and Warranty Information Service For customers in North America, please return instruments requiring service to a Welch Allyn Technical Service Department listed below or to an authorized Welch Allyn distributor. Technical Service Department Welch Allyn, Inc. 4341 State Street Road Skaneateles Falls, NY 13153-0200 U.S.A. Telephone: 800-535-6663 (in U.S.A. only) or (315) 685-4560 Fax: 315-685-4653 For customers outside of North America, return your unit to a local, authorized Welch Allyn distributor or to your nearest Welch Allyn service center. Warranty Welch Allyn, Inc. warrants the Portable Binocular Microscope and Flat Surface Magnifier to be free of original defects in material and workmanship and to perform in accordance with manufacturer’s specifications for a period of one year from the date of purchase. If this instrument or any component thereof is found to be defective or at variance with the manufacturer’s specifications during the warranty period, Welch Allyn will repair or replace the instrument or component(s) at no cost to the purchaser. This warranty only applies to instruments purchased new from Welch Allyn or its authorized distributors or representatives. The purchaser must return the instrument directly to Welch Allyn or an authorized distributor or representative and bear the costs of shipping. This warranty does not cover breakage or failure due to tampering, misuse, neglect, accidents, modification or shipping, and is void if the instrument is not used in accordance with manufacturer’s recommendations or if repaired or serviced by other than Welch Allyn or a Welch Allyn authorized representative. No other express or implied warranty is given. 17 Troubleshooting Guide Problem Solution Illumination spot is too high and is out of field of view. Make sure you are 14” to 16” from patient or object under inspection. If you are too close, the illumination spot will be too high. Make sure optical section is aligned with user’s eyes. Suggest looking into the instrument when on user. The user’s eyes should be centered vertically on the center mirrors. & A. optical section too high on user -/B. optical section too low on user ( d;i% ,T, d C. optical section centered cor‘-I rectly on user To correct A and B, simply loosen screw on back of optical section and adjust optical section up or down until image is centered. User encounters glare off of the pneumatic insufflation system. Clean the glass section with alcohol swab or clean cotton cloth. Rotate pneumatic assembly until glare dissipates. 18 Problem Solution Instrument does not illuminate. Replace 08500 lamp. See page 11 for instructions. Battery is expired or discharged. See page 15 and 16. Image is distorted or double image is seen. Instrument must be set correctly for interpupillary distance adjustment. See page 9 for instructions. Depth perception is slightly altered with 3D optical design. Continued usage will improve comfort level. How do I utilize bifocals? Install bifocal lenses so that only the upper third is for distance and lower two-thirds is for reading. Adjust the nose bridge so that frame sits higher on nose. Then lower the height adjustment. This will ensure that the binocular viewing system will be positioned in fron of the reading part of the lenses, 19 Table des matières Homologation CE.. ...................................................................... Symboles .................................................................................... Conformité aux normes ............................................................ Fonction de l’instrument.. .......................................................... Microscope binoculaire portatif .............................................. Loupe à surface plate ............................................................ Description des commandes .................................................... Réglages.. .................................................................................... Modèle à serre-tête ................................................................ Réglages du serre-tête ...................................................... Réglage horizontal de la section optique.. .......................... Réglage vertical de la section optique.. .............................. Modèle à lunettes.. .................................................................. Réglage vertical de la section optique.. .............................. Compensation des erreurs de réfraction utilisateur.. .............. Réglage de la distance interpupillaire .................................... Modèle avec loupe à surface plate ........................................ Branchement à la source d’alimentation ................................ Source d’alimentation portative .............................................. Source d’alimentation directe enfichable.. .............................. Accessoires ................................................................................ Porte-spéculum pneumatique ................................................ Remplacement de la lampe ...................................................... Nettoyage .................................................................................... Entretien ...................................................................................... Caractéristiques techniques.. .................................................... Homologations.. .......................................................................... Commande des produits et accessoires ................................ Instruments.. ............................................................................ Sources d’alimentation .......................................................... Accessoires ............................................................................ Sources d’alimentation (portative et directe enfichable) ...... Portative .................................................................................. Fonctions ............................................................................ Caractéristiques techniques.. .............................................. Branchement de l’instrument à la source d’alimentation portative.. .................................................. Recharge de la source d’alimentation portative.. ................ Accès à la lampe de rechange .......................................... Remplacement de la batterie.. ............................................ Transformateur direct enfichable ............................................ Service et garantie.. .................................................................... Service .................................................................................... Technical Service Depattment ................................................ Garantie .................................................................................. 2 18 18 20 20 20 21 22 22 22 22 22 23 23 23 24 24 25 25 25 26 26 26 27 27 27 27 28 28 28 28 29 29 29 29 30 30 30 31 31 32 32 32 32 21 Fonction de l’instrument Cet instrument permet la vision binoculaire (des deux yeux) en assurant une vue stéréoscopique tridimensionnelle. Cette vue stéréoscopique, grossie et illuminée, donne d’excellentes conditions d’observation des tissus. Microscope binoculaire portatif Lorsque l’oculaire est en place, les voies visuelles se déplacent vers le centre, permettant la vision binoculaire dans des cavités étroites. Un grossissement de deux dioptres (1.5 x) améliore la vision. Lorsqu’on bascule l’oculaire vers le haut, l’instrument devient une lampe frontale simple et pratique. 3 Loupe à surface plate l La loupe à surface plate de trois dioptres (2,5 x) est offerte en modèle à serre-tête ou à lunettes. Elle bascule vers le haut pour permettre l’emploi de la lampe frontale. 22 Description des commandes Vue avant 1. 2. 3. Vue arrière Commandes de distance interpupillaire Lampe Réglage de la hauteur verticale de l’instrument 10' 9 8. Tampons isolants 4. Axe basculant du binoculaire 9. Serre-câbles 5. Mécanisme de pivot 10. Ensemble optique 6. Vis de réglage de la hauteur 7. Bouton de réglage de circonférence du serre-tête Loupe à surface plate 12 11 - 11. Lentille grossissante 12. Porte-lentille 13. Vis de réglage vertical 23 Réglages Serre-tête à cliquet Instructions l Placer la partie principale du serre-tête sur la tête de manière à ce que le serre-tête entoure confortablement le front et la partie inférieure de I’arriére de la tête. L’adapter à la tête à l’aide du bouton de réglage de la circonférence. Bouton de réglage de la circonférence du serre-tête 1 Ensemble optique l l 24 Régler l’ensemble optique à la position désirée en manipulant les maillons du mécanisme de pivot. Positionner l’ensemble optique aussi près des yeux que possible afin de pouvoir regarder directement à travers. (Régler les mécanismes optiques en suivant les instructions fournies avec l I le Lumiview.) Section optique La lampe étant illuminée, vérifier son réglage en s’assurant que le faisceau lumineux est centré sur le champ visuel. Si l’éclairage est brillant ou faible, voir les instructions de réglage détaillées _ fournies avec le LumiviewTM. Modèle à lunettes Réglage vertical de la section optique l l l ,viS Desserrer la vis qui assujettit les lunettes à la section optique. Déplacer la section optique de manière à bien l’aligner avec les yeux. Serrer la vis pour maintenir la section optique en place. Compensation des erreurs de réfraction utilisateur (modèle à lunettes uniquement) La distance frontale optimale entre l’objet et l’utilisateur est de 38 cm à 43 cm. Si ce modèle est utilisé sans lentilles correctrices et si l’utilisateur est myope ou hypermétrope, il devra travailler plus prés ou plus loin de l’objet, en fonction de l’erreur de réfraction. Pour compenser l’erreur de réfraction, l’opticien de l’utilisateur pourra doter le modèle à lunettes de lentilles correctrices. 25 Réglage de la distance interpupillaire Les commandes de distance interpupillaire permettent de déplacer les lentilles ; elles sont situées au bas de la section optique. Les lentilles se déplacent indépendamment l’une de l’autre. l l l l Pour régler correctement la distance interpupillaire, regarder un objet situé à environ 38 cm. Fermer l’oeil gauche et régler la commande située sous l’oeil droit jusqu’à ce que l’image observée soit centrée. Fermer l’oeil droit en gardant l’oeil gauche ouvert et régler la commande située sous l’oeil gauche jusqu’à ce que l’image soit centrée. Ouvrir les deux yeux ; l’image devrait être nette et centrée. 1 I Commandes de distance interpupillaire Modèle avec loupe à surface plate l l l Desserrer la vis qui assujettit la section lampe au bras de réglage. Rajuster la position de la lampe vers le haut ou le bas, puis serrer la vis. Placer l’instrument sur la tête. Régler la loupe à surface plate en déplaçant le porte-lentille vers le haut ou le bas et la loupe vers l’intérieur ou l’extérieur. Porte-lentille I Loupe - Branchement à la source d’alimentation REMARQUE : Le cordon d’alimentation doit être enfiché soit dans une source d’alimentation portative Welch Allyn no 75250, soit dans une source d’alimentation directe enfichable Welch Allyn no 75210. 1 . ATTENTION - Le boîtier de la lampe chauffe quand elle a été allumée pendant plus de 5 minutes et peut brûler au contact de la peau. Laisser la refroidir au moins 10 minutes entre chaque utilisation. Source d’alimentation portative l Enficher le cordon d’alimentation de l’instrument dans l’orifice de raccordement du cordon d’alimentation, situé sur le dessus de la source d’alimentation. l l l l L’enfoncer jusqu’à ce qu’il soit bien calé. Visser délicatement le manchon externe du connecteur dans le sens des aiguilles d’une montre pour le serrer (optionnel). Assujettir la source d’alimentation portative avec la pince de ceinture. Cinstrument est maintenant prêt à l’emploi. Source d’alimentation directe enfichable l l l l l Raccorder le cordon d’alimentation du microscope binoculaire au cordon de la source d’alimentation directe enfichable. L’enfoncer jusqu’à ce qu’il soit bien calé. Visser délicatement le manchon externe du connecteur dans le sens des aiguilles d’une montre pour le serrer (optionnel). Enficher la source d’alimentation directe dans une prise de courant. Cinstrument est maintenant prêt à l’emploi. Vers l’instrument 27 Accessoires Porte-spéculum pneumatique l Un porte-spéculum avec lentille grossissante 4x peut être utilisé pour permettre l’examen de l’oreille. Remplacement de la lampe ATTENTION : La lampe peut devenir BRÛLANTE. Avant de la changer, s’assurer qu’elle a refroidi. l l l l Pour changer la lampe, faire basculer l’oculaire vers le haut, Enlever le réflecteur en plaçant le pouce sur l’encoche située au bas du boîtier du réflecteur et en appuyant sur le réflecteur. (Étape 1) Enlever la lampe et insérer une nouvelle lampe Welch Allyn no 08500 à l’arrière de l’ensemble réflecteur. (Étape 2) Remettre le réflecteur dans l’instrument et l’enfoncer jusqu’à ce qu’il se cale avec un déclic. REMARQUE : Les grilles d’aération de l’ensemble reflecteur doivent être situées en haut et en bas. Oculaire Réflecteur \ Étape 1 28 Étape 2 Nettoyage Nettoyer toutes les surfaces de verre, lentilles du microscope binoculaire portatif, les oeilletons et la surface reflechissante des lampes avec un chiffon doux humecté d’alcool. Essuyer les surfaces externes du microscope binoculaire portatif et des sources d’alimentation avec un chiffon doux humecté d’alcool. REMARQUE : Ne pas employer de liquides nettoyants abrasifs ni de chiffons très mouillés sur acune partie de l'instrument. Entretien L’utilisateur peut remplacer et nettoyer lui-même la lampe au besoin. Pour tout autre type d’entretien, réexpédier l’instrument à un centre de service technique agréé ou à un distributeur Welch Allyn Voir la section « Service et garantie ». Caractéristiques techniques Distance intetpupillaire 49 à 74 mm Source lumineuse 3,60 V, halogène P/age de reglage du serre-tête petite taille, taille moyenne, grande taille Poids (no 20500s) 60 g -20o C à 40o C, HR 95 % maximum Transport et rangement Homologations UL544, CAN/CSA C22.2 No 125 IEC 601-1, IEC 601-l-2, CE 29 Commande des produits et accessoires Sources d’alimentation o Source d’alimentation portative avec chargeur o N 75265 Source d’alimentation portative avec chargeur. modele ” ’ international (préciser pays et tension) No 74160 Chargeur uniquement pour le No 75260 N 75260 o N 74185 Chargeur uniquement, modèle international, pour le No 75265 (préciser pays et tension) No 75210 Source d’alimentation directe enfichable o N 75215 Source d’alimentation directe enfichable, modèle international (préciser pays et tension) Remaque : Les différentes sources d’alimentation indiquées ci-dessus conviennent à toutes les configurations d’instruments. Accessoires o Lampe de rechange (tous modèles) o Réflecteur de rechange o Batterie de rechange pour bloc-batterie portatif o Poire d’insufflation pour modeles LumiView o Porte-speculum pneumatique avec spécula pour modèles LumiView N 08500 N 205007-501 N 72250 N 21502 N 21505 1 No 22002 1 Speculum en polypropylene de 2 mm 22003 1 Speculum en polypropylène de 3 mm I No 22004 I Soéculum en polypropylene de 4 mm o 1N o Speculum en polypropylène de 5 mm o N 22009 Spéculum en polypropylène de 9 mm No 05374 Mallette rigide N 22005 a ! 30 Remaque : Seuls les accessoires et sources d’alimentation indiques dans ce manuel peuvent être utilisés avec le mocroscope binoculaire et la loupe à surface plate. Sources d’alimentation (portative et directe enfichable) Source d’alimentation portative (Modèle Welch Allyn N” 75260) Cette source d’alimentation peut être utilisée au bureau comme à l’hôpital et se transporte facilement d’un lieu de travail à un autre. Autonomie : 90 minutes après pleine charge de 10 heures. Fonctions : - 6 - 5 1. Interrupteur marche/arrêt 2. Connecteur de l’instrument 3. Orifice de raccordement du transformateur de charge 4. Indicateur de charge 5. Pince de ceinture 6. Compartiment pour lampe de rechange Caractétistiques techniques : Type de batterie Welch Allyn no 72250 (nickel-cadmium) Tensionlcapacité 3,6 v C.C./l$ A/h Chargeur Welch Allyn no 74160 (commandes internationales : préciser le pays) Branchement de l’instrument à la source d’alimentation portative : . Enficher le cordon d’alimentation de l’instrument dans l’orifice de raccordement du cordon d’alimentation, situé sur le dessus de la source d’alimentation. l Source d’alimentation portative renfoncer jusqu’à ce qu’il soit bien calé. . Visser délicatement le manchon externe du connecteur dans le sens des aiguilles d’une montre pour le serrer (optionnel). Recharge de la source d’alimentation portative : l l l l l Mettre la source d’alimentation portative hors tension. Débrancher l’instrument de la source d’alimentation. Enficher le transformateur de charge dans la source d’alimentation portative. Enficher le transformateur de charge dans la prise murale. Le voyant DEL indique que l’appareil se charge. Débrancher le transformateur de charge de la source d’alimentation une fois qu’elle est complètement chargée, c’està-dire au bout de 1 O-l 2 heures. Accès à la lampe de rechange l Sortir la lampe de rechange de son compartiment et l’utiliser. Lampe ce rechange Remplacement de la batterie l l l l l S’assurer que l’appareil est hors tension. A l’aide d’un tournevis cruciforme, enlever les deux vis de l’arrière de la source d’alimentation. En le tenant par la pince de ceinture, tirer doucement sur le boîtier pour l’ouvrir. (Étapes 2 et 3.) Sortir la batterie et la déconnecter. La remplacer par une nouvelle batterie, puis procéder à l’inverse des étapes précédentes. Étape 1 Étape 2 _ REMARQUE : pour garder les composants électriques bien en place, il faut s’assurer de bien serrer les vis du boîtier de l’alimentation électrique. Transformateur direct enfichable l l l l l Raccorder le cordon d’alimentation du microscope binoculaire au cordon d’alimentation direct enfichable. L’enfoncer jusqu’à ce qu’il soit bien calé. Visser délicatement le manchon externe du connecteur dans le sens des aiguilles d’une montre pour le serrer (optionnel). L’instrument est maintenant prêt à l’emploi. Enficher la source d’alimentation directe dans une prise de courant. Vers l'instrument 33 Service et garantie Service Clients nord-américains : expédier les instruments à faire réparer à l’un des centres de service technique Welch Allyn indiqués ci-après ou à un distributeur Welch Allyn agréé. Technical Service Department Welch Allyn, Inc. 4341 State Street Road Skaneateles Falls, NY 13153-0220 U.S.A. Numéro de téléphone : 315-685-4560 Numéro de télécopie : 315-685-4653 Clients d’autres pays : expédier l’instrument à un distributeur local agréé par Welch Allyn ou au centre de service Welch Allyn le plus proche. Garantie Welch Allyn, Inc. garantit que le microscope binoculaire portatif et la loupe à surface plate sont exempts de tous vices de matériaux et de fabrication et fonctionneront selon les caractéristiques du fabricant pendant une période de cinq ans suivant la date d’achat. Si cet instrument ou l’un quelconque de ses composants est jugé défectueux ou ne repond pas aux caractéristiques du fabricant pendant la période de garantie, Welch Allyn le réparera ou le remplacera gratuitement. Cette garantie ne couvre que les instruments achetés neufs auprès de Welch Allyn ou de ses distributeurs ou représentants agréés. L’acheteur réexpédiera l’instrument directement à Welch Allyn ou à l’un de ses distributeurs ou représentants agréés, les frais de port étant à sa charge. Cette garantie ne couvre pas les bris ou les pannes dus à l’altération, au mauvais usage, à la négligence, aux accidents, à la modification ou au transport ; elle sera annulée si l’instrument n’est pas utilisé conformément aux recommandations du fabricant ou s’il est réparé ou entretenu par une entreprise autre que Welch Allyn ou un de ses représentants agréés. II n’est donné aucune autre garantie, expresse ou implicite. 34 Símbolos a PRECAUCION: Indica una situación potencialmente peligrosa la cual, si no se evita, puede ocasionar lesiones menores o daños a la propiedad. También da la alerta contra prácticas no seguras. 1. L NOTA: Proporciona información suplementaria al texto e indica situaciones potencialmente peligrosas, las cuales, si no se evitan, pueden ocasionar daños a la propiedad. Además, resalta la información importante acerca del uso de este Cumplimiento de normas Aislamiento doble Energizado internamente Producto listado en Underwriters Laboratories, norma UL544 Producto listado en Canadian Standards Association, norma CAN/CSA C22.2 No. 125 Productos listados en ETL Laboratories Normas listadas UL544 CAN/CSA C22.2 No. 125, IEC 601-1, IEC 601-1-2 35 Contenido Aprobación CE ............................................................................ Símbolos.. .................................................................................... Cumplimiento de normas .......................................................... Función del instrumento ............................................................ Microscopio binocular portátil .............................................. Lupa de superficie plana ...................................................... Descripción de los controles .................................................... Ajustes ...................................................................................... Modelo de banda frontal ...................................................... Ajustes de la banda.. .................................................... Ajuste horizontal de la sección óptica.. ........................ Ajuste vertical de la sección óptica .............................. Modelo gafas.. ...................................................................... Ajuste vertical de la sección óptica .............................. Ajuste para el error refractario del usuario .......................... Configuración de la distancia interpupilaria ........................ Lupa de superficie plana ...................................................... Conexión a la fuente de energía .............................................. Fuente de energía portátil .................................................... Fuente de energía de enchufe directo.. ................................ Accesorios .................................................................................. Soporte de espéculo neumático .......................................... Recambio de la bombilla .......................................................... Limpieza ...................................................................................... Mantenimiento ............................................................................ Especificaciones ........................................................................ Aprobaciones .............................................................................. Información de pedido de producto y accesorios.. ................ Instrumentos ........................................................................ Fuentes de energía .............................................................. Accesorios ............................................................................ Fuentes de energía (Portátil y de enchufado directo) ............ Portátil .................................................................................. Características.. ............................................................ Especificaciones .......................................................... Conexión de instrumento a fuente de energía portátil Recarga de la fuente de energía portátil.. .................... Acceso a la bombilla de recambio .............................. Recambio de la baterla ................................................ Transformador de enchufe directo ...................................... Servicio y garantía.. .................................................................... Servicio ................................................................................ t .............................................. Technical Service Department Garantía ................................................................................ 2 33 33 35 35 35 36 37 37 38 38 38 38 38 38 39 39 40 40 40 41 41 41 42 42 42 42 43 43 43 43 44 44 44 44 45 45 45 46 46 47 47 47 47 Función del instrumento Este dispositivo ofrece visión binocular (de ambos ojos), proporcionando una visión estereoscópica tridimensional. Esta visión estereoscópica luego se amplifica e ilumina para proporcionar una excelente presentación del tejido. Microscopio binocular portátil Cuando se colocan los binoculares, las vías visuales se desplazan medialmente para permitir la visión binocular en cavidades angostas. La amplificación de dos dioptrías (1.5x) mejora la visión. Cuando los binoculares se giran hacia arriba, el instrumento pasa a ser una conveniente lámpara frontal básica. 3 Lupa de superficie plana l La lupa de superficie plana de tres dioptrías (2.5x) está disponible en el modelo de banda frontal para la cabeza o en el modelo gafas. La lupa puede girarse hacia arriba para usarse como conveniente luz de cabeza. a .1 PRECAUCION: NO mire directamente la luz. Este dispositivo contiene una bombilla de alta intensidad. No se puede utilizar para la iluminación o examen de ninguna parte del ojo, posterior 0 anterior. 37 Descripción de los controles vista frontal Vista trasera 1. Controles de distancia interpupilar (IPD) 2. Bombilla 3. Ajuste de la altura vertical del instrumento 8 4. Eje binocular que se levanta 8. Almohadillas para comodidad 5. Mecanismo pivotal 9. Sujetadores de cables 6. Tornillo regulador de altura 10. Sección óptica 7. Perilla reguladora de la banda frontal Lupa de superficie plana 12 ll - 11. Lente de lupa 12. Portalente 13. Tornillo de ajuste vertical Ajustes Banda frontal estilo trinquete Instrucciones l Colóquese el cuerpo principal de la banda frontal en la cabeza de tal modo que la banda se ajuste en forma cómoda sobre la frente y bajo en la parte posterior de la cabeza. Use la perilla reguladora de circunferencia para ajustar el tamaño. Perilla de ajuste de la Conjunto óptico l l La sección óptica puede ajustarse a la posición deseada manipulando los eslabones del mecanismo pivotal. La sección óptica debe colocarse lo más cerca de los ojos que sea posible de tal modo que los ojos puedan mirar directamente a través de la sección óptica. (Fije la óptica según las instrucciones provistas con su LumiView.) \ \ Brazo de ajuste v, Sección óptica Con la luz iluminada, revise el ajuste confirmando que el haz de luz se centre en el campo visual. Si la luz está alta o baja consulte las instrucciones de ajuste detalladas provistas ajuste TM con su LumiView . 39 Modelo gafas Ajuste vertical de la sección óptica l l l , Tornillo Suelte el tornillo que sostiene la sección óptica de las gafas. Vuelva a colocar la sección óptica para asegurar un alineamiento apropiado con los ojos del usuario. Apriete el tornillo para mantener la ubicación de la sección óptica. Ajuste para el error refractario del usuario (Modelos de gafas solamente) La distancia de trabajo óptima del objeto es de 38 cm a 43 cm. Si este modelo se utiliza sin lentes de corrección y el usuario tiene miopía o hipermetropía, el usuario deberá trabajar más cerca o más lejos del objeto, dependiendo del error refractario. Para compensar por esto, los modelos con gafas se pueden ajustar con lentes correctivos por su oculista. 40 Configuración de la distancia interpupilar Los controles de distancia interpupilar (IPD) mueven los oculares y están ubicados en la parte inferior de la sección óptica. Estos oculares se mueven independientemente uno de otro. l l l l Para fijar la IPD correctamente, observe un objeto a aproximadamente 38 centímetros. Cierre el ojo izquierdo y ajuste el control de IPD bajo el ojo derecho hasta que quede centrada la imagen visualizada. Ahora cierre el ojo derecho, manteniendo el ojo izquierdo abierto, y ajuste el control de IPD para el ojo izquierdo hasta que la imagen esté centrada. Abra ambos ojos y el objeto debería aparecer claro y centrado. I I Controles de distancia interpupilar Lupa de superficie plana l l l Afloje el tornillo que sostiene la sección de la bombilla al brazo de ajuste. Vuelva a colocar la sección de la bombilla hacia abajo o hacia arriba de la ubicación deseada y apriete el tornillo. Coloque el instrumento en la cabeza. Ajuste la lupa de superficie plana moviendo el soporte de los lentes hacia arriba o hacia abajo y la lupa hacia adentro y afuera. Soporte de los lentes Lupa Tornillo de ajuste 41 Conexión a la fuente de energía NOTA: El cable de energía del instrumento debe ser enchufado ya sea en una fuente de energia portátil de Welch Allyn No. 75250 o en una fuente de energía de enchufe directo No. 75210. I. ATENCION : El alojamiento de la bombilla se pone caliente una vez encendida la bombilla más de 5 minutos y puede causar quemaduras al contacto con la piel. Dejar enfriar al menos 10 minutos entre cada utilización del iluminador. Fuente de energía portátil l l l l l Enchufe el cable de energía del instrumento en la toma conectora del cable de energía en la parte superior de la fuente de energía. Presione hasta que esté firmemente en su lugar. Atornille suavemente el manguito del conector externo en el sentido de las manecillas del reloj para asegurar (opcional). Coloque la fuente de energía portátil utilizando el sujetador de cinturón. Ahora el instrumento está listo para su uso. Fuente de energía de enchufe directo l l l l l Enchufe el cable de energía del microscopio binocular en el cable de energía de enchufe directo. Presione hasta que esté firmemente en su lugar. Atornille suavemente el manguito del conector externo en el sentido de las manecillas del reloj para asegurar (opcional). Enchufe la fuente de energía directa en un tomacorriente cercano. Ahora el instrumento está listo para su uso. Al instrumento 42 Accesorios Soporte de espéculo neumático l Se puede utilizar un Soporte de espéculo neumático con lentes de aumento de 4x para ayudar en exámenes del oído. Recambio de la bombilla PRECAUCION: Las bombillas se pueden poner muy CALIENTES. Asegúrese de dejar que la bombilla se enfríe antes de recambiarla. l l l l Para cambiar la bombilla, gire el conjunto de los binoculares a su posición hacia arriba. Retire el ensamble del reflector colocando el dedo pulgar en la muesca ubicada en la parte inferior de la estructura del reflector, presionando el ensamble del reflector. (Paso 1). Retire la bombilla e inserte una bombilla nueva Welch Allyn No. 08500 en la parte posterior del reflector. (Paso 2). Vuelva a colocar la estructura del reflector y presiónela hasta que se inserte a presión. NOTA: Las ventilaciones de aire del ensamble del reflector deben estar ubicadas en la parte superior e inferior. Conjunto de los binoculares Paso 1 Paso 2 43 Limpieza Todas las superficies de vidrio, lentes del microscopio binocular portátil, cubiertas oculares o de mira y las cubiertas reflectoras de la bombilla pueden limpiarse con un paño suave humedecido con alcohol. A las superficies exteriores del microscopio binocular portátil y de las fuentes de energía se les puede pasar un paño suave humedecido con alcohol. NOTA: Evite utilizar líquidos de limpieza abrasivos o paños excesivamente humedecidos en cualquier parte del instrumento. Mantenimiento El recambio de la bombilla y la limpieza puede realizarlos el usuario según se necesite. El servicio adicional debe ser realizado enviando el instrumento a un departamento de servicio técnico Welch Allyn o a un distribuidor autorizado. Vea la sección “Servicio y garantía”. Especificaciones Distancia interpupilar 49 mm a 74 mm Fuente de luz 3,6OV, Halógena Margen de ajuste de la banda frontal pequeño, mediano, grande Peso (No. 20500S) Transporte y almacenamiento Aprobaciones UL 544, CAN/CSA C22.2 No. 125 IEC 601-1, IEC 601-1-2, CE 44 80 g -20°C a 40o C, 95% RH máximo Información de pedido de productos y accesorios No. de producto Descripción Instrumentos o LumiView de gafas con fuente de energía portátil o LumiView de gafas con enchufe directo o LumiView de banda frontal con fuente de energía portátil o LumiView de banda frontal con enchufe directo N 20500S N 20510S N 20500H N 2051 OH o N LumiView de gafas sin fuente de energía 205308 o N 20530H o N 205208 o 1 N 20520H o 1N 205408 o N 20540H LumiView de banda frontal sin fuente de energía I Gafas de lupa de superficie plana con banda de energía portatil 1 Lupa de superficie plana I I I I con banda de enerqía portatil Lupa de superficie plana sin fuente de enerqía Banda frontal de lupa de superficie plana sin fuente de energía Fuentes de energía o Fuente de energía portátil con cargador o N 75265 Fuente de energía portátil internacional con cargador (especificar país y voltaje) No 74160 Cargador solamente para el No. 75260 N 75260 o N 74165 Cargador internacional solamente para el No. 75265 (especificar país y voltaje) No 75210 Fuente de energía de enchufe directo o N 75215 Fuente de energía de enchufe directo internacional (especificar país y voltaje) , I Nota: Las opciones de fuente de energía listadas más atiba funcionan con todas las configuraciones de instrumento. Accesorios o Bombilla de recambio para el dispositivo (todos los modelos) o Recambio del ensamble del reflector o Batería de recambio para el paquete de batería portátil o Sistema de aislamiento de la bombilla para modelos LumiView o N 21505 Soporte de espéculo neumático con espéculos para los modelos LumiView No 22002 Espéculo de polipropileno de 2 mm N 08500 N 205007-501 N 72250 N 21502 o Espéculo de polipropileno de 3 mm o Espéculo de polipropileno de 4 mm o Espéculo de polipropileno de 5 mm o Especulo de polipropileno de 9 mm o Estuche N 22003 N 22004 N 22005 N 22009 N 05374 I Nota: Sólo los accesorios y fuentes de energía indicados en este manual se pueden usar con el Mocroscopio binocular portátil y la lupa de superficie plana. 45 Fuentes de energía (Portátil y de enchufado directo) Fuente de energía portátil (Modelo No. 75260 de Welch Allyn) Esta fuente de energía está diseñada para usar en la oficina y en el hospital y es ideal para llevar a oficinas satélite. La energía del tiempo Encendido es 90 minutos después de una carga completa de 10 horas. AYKI Caracteristicas: 2 1 - 6 - 5 1. Interruptor de encendido/ apagado 2. Conector del instrumento 3. Toma del transformador de carga 4. Indicador de carga 5. Sujetador de cinturón 6. Receptáculo de la bombilla de recambio Especificaciones Tipo de batená Welch Allyn No. 72250 (níquel-cadmio) Voltaje/capacidad 3.6 VCC/1.8 Ahr Cargador Welch Allyn No. 74180 (para pedidos internacionales, especificar país) 46 Conexión de instrumento a fuente de energía portátil: l l l Enchufe el cable de energía del instrumento en el puerto conector del cable de energía en la parte superior de la fuente de energía. Presione hasta que esté firmemente en su lugar. Atornille suavemente el manguito del conector externo en el sentido de las manecillas del reloj para asegurar (opcional). Recarga de la fuente de energía portátil: l l Aoaaue la fuente de energia portátil. l EncendidolApagado I Desconecte el instrumento desde la fuente de energía. . Enchufe el transformador de carga en la fuente de energía portátil. l Fuente de energía portátil \ U Enchufe el transformador de carga en el tomacorriente de la pared. El indicador LED señala que la unidad está cargando. Desconecte el transformador de carga de la fuente de energía cuando esté completamente cargado, después de 10 a 12 horas. Acceso a la bombilla de recambio l Levante la bombilla de recambio hacia afuera de su receptáculo y úsela. 47 Recambio de la batería l l l l l Asegúrese de que la energía esté apagada. Retire ambos tornillos de la parte posterior de la fuente de energía con un destornillador Phillips. Tome el sujetador de cinturón, suavemente tire hacia afuera y hacia abajo en la estructura. (Pasos 2 y 3). Levante la batería hacia afuera y desenchúfela de la unidad. Recambie con una batería nueva e invierta los pasos anteriores. Paso 1 Paso 2 Paso 3 Paso 4 NOTA: Los tomillos de la caja de la fuente de alimentación deben estar apretados firmemente a fin de mantener los componentes eléctricos debidamente en su sitio. Transformador de enchufe directo l l l l l Enchufe el cable de energía del microscopio binocular en el cable de energía de enchufe directo. Presione hasta que esté firmemente en su lugar. Atornille suavemente el manguito del conector externo en el sentido de las manecillas del reloj para asegurar (opcional). Ahora el instrumento está listo para su uso. Enchufe la fuente de energía directa en un tomacorriente. m Al instrumento 48 Servicio y garantía Servicio Para los clientes en Norteamérica, por favor envíe los instrumentos que requieran servicio al departamento de servicio de Welch Allyn listado a continuación o a un distribuidor Welch Allyn autorizado. Technical Service Department Welch Allyn, Inc. 4341 State Street Road Skaneateles Falls, NY 13153-0220 EE.UU. Teléfono: 315-685-4560 Fax: 315-685-4653 Para los clientes fuera de Norteamérica, envíe su unidad a un distribuidor Welch Allyn local, autorizado o a su centro de servicio Welch Allyn más cercano. Garantía Welch Allyn garantiza el Microscopio binocular portátil y la Lupa de superficie plana como exentos de defectos en materiales y mano de obra y también para funcionar de acuerdo con las especificaciones del fabricante por un período de cinco años a partir de la fecha de compra. Si este instrumento o cualquier componente del mismo se encuentra defectuoso o difiere de las especificaciones del fabricante durante el período de garantía, Welch Allyn reemplazará o reparará, sin costo alguno para el comprador, cualquier el instrumento o componente(s). Esta garantía sólo abarca instrumentos comprados nuevos a Welch Allyn o sus distribuidores o representantes autorizados. El comprador debe devolver el instrumento directamente a Welch Allyn o a un distribuidor o representante autorizado y solventar los costos del envío. Esta garantía no cubre roturas o fallas debidas a alteraciones, maltrato, negligencia, accidentes, modificación o envío y queda nula si el equipo no se utiliza de acuerdo con las recomendaciones del fabricante o si el instrumento recibe servicio por parte de terceros que no sean Welch Allyn o uno de sus agente de servicio autorizados. No se otorga ninguna otra garantía expresa o implícita. 49 Symbole VORSICHT: Weist auf eine potentiell gefährliche oder Sachschäden führen kann. Warnt ebenfalls vor sicherheitsgefährdendem Vorgehen. HINWEIS: Enthält zusätzliche Informationen und weist auf eine potentiell gefährliche Situation hin, die zu Sachschäden führen kann. Betont darüber hinaus wichtige Informationen zur Verwendung des Gerätes. Normenentsprechung 0 0 Doppelt isoliert Interne Stromversorgung Der Norm UL544 der Underwriters Laboratories entsprechendes Produkt Der Norm CAN/CSA C22.2 Nr. 125 der Canadian Standards Association entsprechendes Produkt Den Anforderungen der ETL Laboratories entsprechendes Produkt Den Normen UL544, CAN/CSA C22.2 Nr. 125, IEC 601-1 und IEC 601-1-2 entsprechend 50 Inhaltsverzeichnis CE-Zulassung.............................................................................. Symbole ...................................................................................... Normenentsprechung ................................................................ Gerätefunktion ............................................................................ Tragbares Binokular-Otoskop .............................................. Flachlupe .............................................................................. Beschreibung der Bedienelemente .......................................... Einstellungen .............................................................................. Kopfbandmodell .................................................................. Kopfbandeinstellung .................................................... Seitenverstellung des Optikteils .................................. Höhenverstellung des Optikteils .................................. Brillenmodell ........................................................................ Höhenverstellung des Optikteils .................................. Anpassung an den Refraktionsfehler des Anwenders ........ Einstellung der PD ................................................................ Flachlupen-Modell ................................................................ Anschließen an die Stromquelle .............................................. Akkupack .............................................................................. Netzteil .................................................................................. Zubehörteile ................................................................................ Pneumatische Spekulumhalterung ...................................... Austausch der Lampe ................................................................ Reinigung .................................................................................... Wartung ...................................................................................... Technische Daten ...................................................................... Normenentsprechung ................................................................ Bestellinformationen für Geräte und Zubehörteile ................ Geräte .................................................................................. Stromquellen ........................................................................ Zubehörteile.. ........................................................................ Stromquellen (Akkupack oder Netzteil). ................................... Akkupack .............................................................................. Ausstattung .................................................................. Technische Daten ........................................................ Anschließen des Geräts an den Akkupack .................. Aufladen des Akkupacks .............................................. Zugriff auf die Ersatzlampe .......................................... Austausch der Batterie ................................................ Einsteck-Netzteil .................................................................. Service und Garantie.. ................................................................ Service .................................................................................. Technical Service Department.. ............................................ Garantie ................................................................................ 2 48 48 50 50 50 51 52 52 52 52 52 53 53 53 54 54 55 55 55 56 56 56 57 57 57 57 58 58 58 58 59 59 59 59 60 60 60 61 61 62 62 62 62 51 Gerätefunktion Aufgrund seiner binokularen Konstruktion (für beide Augen) ermöglicht dieses Gerät eine dreidimensionale, stereoskopische Betrachtung. Der Betrachter sieht das dreidimensionale Bild dabei vergrößert und beleuchtet, wobei das Gewebe in natürlichen Farben wiedergegeben wird. Tragbares Binokular-Mikroskop Bei heruntergeklapptem Binokularkörper sind die optischen Achsen so justiert, daß auch kleine Körperhöhlen dreidimensional eingesehen werden können. Zwei Dioptrien (1,5x) Vergrößerung ermöglichen ein entspanntes Arbeiten. Bei hochgeklapptem Binokularkörper wird aus dem Otoskop eine praktische, einfache Stirnlampe. t Flachlupe l Die Flachlupe mit ihren 3 Dioptrien (2,5x) Vergrößerung ist als Kopfbandmodell oder Brillenmodell erhältlich. Die Lupe kann nach oben weggeklappt und die Beleuchtung als praktische Stirnlampe verwendet werden. Dieses Gerät enthält eine Lampe hoher Leuchtstärke. Sie darf nicht zur Ausleuchtung oder Untersuchung am Auge, weder posterior noch anterior, verwendet werden. Beschreibung der Bedienelemente Rückansicht 3 Vorderansicht 1. Regler zur Einstellung der PD 2. Lampe 3. Höhenverstellung des Geräts 1 /\ 10 4. 5. 6. 7. Fernglas-Hochklappachse 6. Polster Kippmechanismus 9. Kabelklemmen Höheneinstellschraube 10. Optik Einstellknopf für den Kopfbandumfang Flacher Obetflächenvergrößerer 12 11. Vergrößerungslinse 12. Linsenhalter 13. Senkrechte Höheneinstellschraube 53 Einstellungen Ratschen-Kopfband Anleitungen: l Den Hauptteil des Kopfbandes so auf den Kopf legen, daß er bequem auf der Stirn und tief im Nacken ruht. Mit dem Einstellknopf den Umfang auf die richtige Größe einstellen. Einstellknopf Kopfbandumfang Die Optik l l 54 Die Optik kann durch Manipulieren der Gelenke im Kippmechanismus auf die gewünschte Position eingestellt werden. Die Optik möglichst nahe an die Augen rücken, damit diese gerade durchschauen können. (Die Optik gemäß den Anleitungen für das LumiView einstellen.) Einstellarm I I Optikteil Bei eingeschalteter Lampe die Einstellung prüfen. Der Lichtstrahl sollte im Sichtfeld zentriert sein. Befindet sich das Licht zu hoch oder zu niedrig, siehe die detaillierten Anleitungen, die mit dem LumiViewTM mitgeliefert wurden. Einstellschraube ’ W Brillenmodell Höhenverstellung des Optikteils l l l Die Befestigungsschraube des Optikteils an der Brille lösen. Den Optikteil auf die Anforderungen der Augen des Anwenders ausrichten. Zur Feststellung der Position des Optikteils die Schraube anziehen. Anpassung an den Refraktionsfehler des Anwenders (nur für Brillenmodell) Der optimal Arbeitsabstand zum Untersuchungsobjekt beträgt 38 cm bis 43 cm. Wird dieses Modell bei vorliegender Myopie oder Hyperopie des Anwenders ohne Korrekturgläser verwendet, ist zur Kompensation des Brechungsfehlers ein kürzerer oder weiterer Abstand zum Untersuchungsobjekt erforderlich. Zur Umgehung dieses Problems kann das Brillenmodell von einem Optiker mit Korrekturgläsern ausgerüstet werden. 55 Einstellen der PD Die Regelelemente zur Einstellung der interpupillären Distanz (PD) befinden sich unten am Optikteil und dienen zum Verschieben der Okulare. Die Okulare bewegen sich unabhängig voneinander. l l l l Zur richtigen Einstellung der interpupillären Distanz die Augen auf ein ca. 38 cm entferntes Objekt richten. Das linke Auge schließen, und den PD-Regler unter dem rechten Auge so einstellen, daß das Objekt zentriert erscheint. Das linke Auge öffnen, das rechte Auge schließen, und den PD-Regler unter dem linken Auge so einstellen, daß das Objekt zentriert erscheint. Beide Augen öffnen. Das Objekt sollte klar und zentriert zu sehen sein. I I Bedienelemente für interpupilläre Distanz Flachlupen-Modell l l l Die Befestigungsschraube des Lampenteils am Einstellarm lösen. Den Lampenteil nach oben oder unten verschieben, und die Schraube wieder anziehen. Das Gerät am Kopf anlegen. Zur Einstellung der Flachlupe die Linsenhalterung nach oben oder unten und die Lupe nach vorne oder hinten verschieben. Linsenhalterung Lupe 56 m& Einstellschraube Anschließen an eine Stromquelle HINWEIS: Das Netzkabel des Gerätes muß entweder an einen Akkupack Nr 75252 oder ein Netzteil Nr. 75212 von Welch Allyn angeschlossen werden. 1. Vorsicht: Lampengehäuse wird sehr heiß wenn die Lanpe länger als 5 Minuten brennt Verbrennungsgefahr. Lassen Sie die Lampe vor der nächst Benutzung 10 Minuten abkühlen. Zubehö Akkupack l Ohrlupe m Das Netzkabel des Geräts am l Netzkabelanschluß oben auf der Stromquelle anschließen. l Den Stecker fest eindrücken. l Zur Sicherung die externe Steckermanschette vorsichtig im Uhrzeigersinn drehen (optional). l l Austau ’ Den Akkupack mit dem Clip am Gürtel befestigen. Das Gerät ist jetzt betriebsbereit. Netzteil l Das Netzkabel des Binokular-Otoskops mit dem Netzkabel vom Netzteil verbinden. l Den Stecker fest eindrücken. l Zur Sicherung die externe Steckermanschette vorsichtig im Uhrzeigersinn drehen (optional). l Das Netzteil an einer passenden Steckdose einstecken. l Das Gerät ist jetzt betriebsbereit. Zur Unte schen O mit Spek einer 4-f Zum Gerät 57 Zubehörteile Ohrlupe mit Spekulum und Gummiball l Zur Unterstützung der pneumatischen Otoskopie steht eine Ohrlupe mit Spekulum und Gummiball mit einer 4-fachen Vergrößerung. Austausch der Lampe .1 l l l l VORSICHT: Die Lampen können sehr HEISS werden und müssen vor dem Auswechseln ausreichend abkühlen. Zum Auswechseln der Lampe die Binokulareinheit nach oben klappen. Zum Entnehmen der Reflektoreinheit den Daumen auf der Kerbe an der Unterseite des Reflektorgehäuses anlegen und die Reflektoreinheit wegdrücken (Schritt 1). Die Lampe entnehmen, und eine neue Welch Allyn-Lampe Nr. 08500 hinten im Reflektor einsetzen (Schritt 2). Das Reflektorgehäuse wieder in das Gerät einlegen und bis zum Einrasten eindrücken. HINWEIS: Die Belüftungsschlitze für die Reflektoreinheit sollten sich oben und unten befinden. Binokulareinheit Schritt 1 58 Schritt 2 Reinigung Alle Glasoberflächen, die Linsen des tragbaren Binokular-Mikroskops, die Okularabdeckungen und die reflektierenden Abdeckungen der Lampe können mit einem alkoholbefeuchteten, weichen Tuch gereinigt werden. Das tragbare Binokular-Mikroskop und die Stromquellen können außen mit einem alkoholbefeuchteten, weichen Tuch abgewischt werden. HINWEIS: Agressive Reinigungsmittel oder zu stark angefeuchtete Reinigungstücher dürfen zur Reinigung des Gerätes nicht verwendet werden. Wartung Austausch der Lampe und Reinigung des Gerätes können vom Benutzer nach Bedarf vorgenommen werden. Für anderweitige Servicearbeiten sollte das Gerät an einen Welch AllynVertragshändler oder ein Service-Center eingeschickt werden. Der Abschnitt “Service und Garantie” enthält hierzu weitere Informationen. Technische Daten Interpupilläre Distanz 49 mm bis 74 mm Lichtquelle 3,60 V, Halogen Einstellbereich des Kopfbands klein, mittel, groß Gewicht (Nr. 20502S) 60 g -20 oC bis 40 oC, maximale relative Luftfeuchtigkeit 95 % Transport und Lagerung Normenentsprechung UL544, CAN/CSA C22.2 Nr. 125 IEC 601-1, IEC 601-1-2, CE 59 Bestellinformationen für Geräte und Zubehörteile 1 Produktnummer Beschreibung Geräte Nr. 205028 Nr. 20510S Nr. 20500H Nr. 20510H Nr. 20530S Nr. 20530H Nr. 20522S Nr. 20522H Nr. 205429 Nr. 20540H Brillen-LumiView mit Akkupack Brillen-LumiView mit Netzteil Kopfband-LumiView mit Akkupack Kopfband-LumiView mit Netzteil Brillen-LumiView ohne Stromquelle Kopfband-LumiView ohne Stromquelle Brillen-Flachlupe mit Akkupack Kopfband-Flachlupe mit Akkupack Brillen-Flachlupe ohne Stromquelle Kopfband-Flachlupe ohne Stromquelle Stromquellen Nr. Nr. Nr. Nr. Nr. Nr. 75260 75262 74160 74162 75212 75215 Akkupack mit Ladegerät Akkupack mit Ladegerät, 220V Ladegerät für Nr. 75260 Ladegerät für Nr. 75262, 220V Netzteil, 220V Internationales Netzteil (bitte Land und Spannung angeben) Hinweis: Die oben genannten Stromquellen eignen sich zum Betrieb mit allen Gerätekonfigurationen. Hinweis: Das tragbare Binokular-Mikroskop und die Flachlupe dürfen nur mit den in diesem Handbuch genannten Zubehörteilen und Stromquellen verwendet werden. 60 I Stromquellen (Akkupack oder Netzteil) Akkupack (Welch Allyn Modell Nr. 75262) Diese Stromquelle ist zur Verwendung in der Praxis und im Krankenhaus vorgesehen. Sie eignet sich auch ideal zum Mitnehmen in die Zweitpraxis. Nach einer 10-stündigen Aufladung liefert das Gerät eine Betriebszeit von 90 Minuten. Ausstattung: 2 1 - 1. Ein/Aus-Schalter 2. Geräteanschluß 3. Anschluß für Ladetransformator 6 4. Ladeanzeige 5. Gürtelclip 6. Ersatzlampenfach Technische Daten: Batterietyp Welch Allyn Nr. 72250 (Nickel-Cadmium) SpannunglKapazität 3,6 V Gleichstrom/1,8 Ah Ladegerät Welch Allyn Nr. 74182 61 Anschließen des Geräts an den Akkupack: l l l Das Netzkabel des Geräts am Netzkabelanschluß oben an der Stromquelle anschließen. Akkupack Den Stecker fest eindrucken. Zur Sicherung die externe Steckermanschette vorsichtig im Uhrzeigersinn aufdrehen (optional). Aufladen des Akkupacks: l l l l l Den Akkupack ausschalten. Das Gerät von der Stromquelle abnehmen. Den Ladetransformator an den Akkupack anschließen. Den Ladetransformator an einer Wandsteckdose anschließen. Die aufleuchtende LED zeigt an, daß sich die Einheit auflädt. Nach Beenden des Aufladens, im allgemeinen nach 10-12 Stunden, den Ladetransformator von der Stromquelle abnehmen. Zugriff auf die Ersatzlampe l 62 Die Ersatzlampe aus ihrem Fach entnehmen und einsetzen. Ein/Aus Austausch der Batterie l Sicherstellen, daß das Gerät ausgeschaltet ist. l Die beiden Schrauben an der Rückseite der Stromquelle mit einem Kreuzschlitzschraubenzieher lösen. l Das Gerät am Gürtelclip halten, und am Gehäuse vorsichtig nach hinten und unten ziehen (Schritte 2 und 3). l Die Batterie nach oben entnehmen und von der Einheit trennen. l Die neue Batterie einlegen, und die obigen Schritte in umgekehrter Reihenfolge durchführen. Schritt 1 Schritt 2 Schritt 3 Schritt 4 _ HINWEIS: Die Schrauben am Gehäuse der Stromquelle gut festziehen, um alle elektrischen Bauteile richtig abzusichern. Netxteil l l l l l Das Netzkabel des Binokular-Otoskop mit dem Netzkabel vom Netzteil verbinden. Den Stecker fest eindrücken. Zur Sicherung die externe Steckermanschette vorsichtig im Uhrzeigersinn drehen (optional). Das Gerät ist jetzt betriebsbereit. Das Netzteil an einer geeigneten Steckdose einstecken. m Zum Gerät 63 Service und Garantie Service Kunden in Nordamerika sollten das Gerät für Servicearbeiten an einen Welch Allyn-Vertragshändler oder an das unten angegebene Welch Allyn Service Center einsenden. Technical Service Department Welch Allyn Inc. 4341 State Street Road Skaneateles Falls, NY 13153-0220 U.S.A. Telefon: 315-685-4560 Fax: 315-685-4653 Kunden außerhalb Nordamerikas sollten ein Gerät für Servicearbeiten an einen Welch Allyn-Vertragshändler oder das nächstgelegene Welch Allyn-Servicezentrum einsenden. Garantie Welch Allyn Inc. gewährt auf das tragbare Binokular-Mikroskop und die Flachlupe eine Garantie von fünf Jahren ab Kaufdatum auf Material- und Herstellfehler sowie auf Einhaltung der Herstellerspezifikationen. Welch Allyn wird während der Garantiezeit ein schadhaftes oder von den Herstellerspezifikationen abweichendes Gerät oder eine Gerätekomponente kostenlos reparieren oder ersetzen. Diese Garantie gilt nur für Geräte, die neu von einem Welch AllynVertragshändler, einer Vertragsvertretung oder von Welch Allyn direkt gekauft wurden. Der Käufer muß das Gerät direkt an Welch Allyn oder einen Vertragshändler oder eine Vertragsvertretung einsenden. Die Versandkosten gehen zu Lasten des Käufers. Diese Garantie gilt nicht für Schäden oder Gerätestörungen, die aufgrund unsachgemäßer Eingriffe, Mißbrauch, Fahrlässigkeit, Unfällen, Modifizierungen am Gerät oder Lieferzwischenfällen entstehen. Wird das Gerät abweichend von den Empfehlungen des Herstellers eingesetzt oder anderenorts und nicht von Welch Allyn oder einem Welch Allyn-Vertragshändler repariert oder überholt, so erlischt diese Garantie. Es wird keinerlei andere ausdrückliche oder stillschweigende Garantie gewährt. Technische Änderungen vorbehalten 64 Simboli ATTENZIONE: Indica una situazione potenzialmente pericolosa che, se non evitata, potrebbe causare lesioni minori o danni alla proprietà. Questo simbolo awerte inoltre dei pericoli causati da procedure non di sicurezza. NOTA: Fornisce informazioni supplementari relative al testo e indica una situazione potenzialmente pericolosa che, se non evitata, potrebbe causare danni alla proprietà. Questo simbolo evidenzia inoltre importanti informazioni relative all’uso di questo apparecchio. Conformità agli standard 0 EI Doppio isolamento Alimentazione interna Prodotto approvato dai Underwriters Laboratories, standard UL644 Prodotto approvato dall’Associazione canadese degli standard (Canadian Standards Association), standard CAN/CSA C22.2 N.125 Prodotto approvato dai ETL Laboratories Standard approvati: UL644, CAN/CSA C22.2 N.125, IEC 601-1, IEC 601-1-2 65 Contenuti Approvazione CE ........................................................................ Simboli ........................................................................................ Conformità agli standard .......................................................... Funzione dello strumento .......................................................... Microscopio binoculare portatile.. .......................................... Lente di ingrandimento a superficie piatta ............................ Descrizione dei controlli ............................................................ Regolazioni.. ................................................................................ Modello a fascia frontale.. ...................................................... Regolazioni della fascia .................................................. Regolazione orizzontale della sezione ottica .................. Regolazione verticale della sezione ottica ...................... Modello ad occhiale .............................................................. Regolazione verticale della sezione ottica ...................... Regolazione dell’errore di rifrazione dell’utente .................... Predisposizione della distanza interpupillare ........................ Lente di ingrandimento a superficie piatta.. .......................... Collegamento all’alimentatore .................................................. Alimentatore portatile ............................................................ Alimentatore ad innesto diretto.. ............................................ Accessori .................................................................................... Supporto dello speculum pneumatico .................................. Sostituzione della lampada ...................................................... Pulizia .......................................................................................... Manutenzione.. ............................................................................ Specifiche.. .................................................................................. Approvazioni.. .............................................................................. Informazioni relative all’ordinazione del prodotto e degli accessori ...................................................................... Strumenti.. .............................................................................. Alimentatori ............................................................................ Accessori.. .............................................................................. Alimentatori (portatile e ad innesto diretto) ............................ Portatili .................................................................................. Caratteristiche.. ................................................................ Specifiche ........................................................................ Collegamento dello strumento all’alimentatore portatile . . Ricarica dell’alimentatore portatile .................................. Come accedere alla lampada di scorta .......................... Sostituzione della batteria.. .............................................. Trasformatore ad innesto diretto.. .......................................... Servizio e garanzia .................................................................... Servizio .................................................................................. Technical Service Department .............................................. Garanzia ................................................................................ 66 2 63 63 65 65 65 66 67 67 67 67 67 68 68 68 69 69 70 70 70 71 71 71 72 72 72 72 73 73 73 73 74 74 74 74 75 75 75 76 76 77 77 77 77 Funzione dello strumento Questo dispositivo permette di ottenere una visione binoculare (con entrambi gli occh i) fornendo una visione stereoscopica tridimensionale. La visione stereoscopica viene quindi ingrandita e illuminata evidenziando il tessuto in maniera eccellente. Microscopio binoculare portatile Quando i binocoli sono innestati, le traiettorie visuali vengono spostate in posizione mediana per permettere la visione binoculare in cavità ristrette. L’ingrandimento di due diottrie (1,5 volte) migliora il campo visivo. Quando i binocoli sono ruotati verso l’alto, questo diviene una comoda lampada frontale di base. t Lente di ingrandimento a superficie piatta . La lente di ingrandimento a superficie piatta da tre diottrie (2,5 volte) è disponibile sia per il modello a fascia frontale che per il modello ad occhiale. La lente di ingrandimento può essere sollevata per l’uso come lampada frontale. ATTENZIONE: NON guardare direttamente dentro la luce. Questo dispositivo contiene una lampada illuminare o esaminare alcuna porzione dell’occhio 67 Descrizione dei controlli Vista frontale vista posteriore , 1 1. Regolazione della distanza interpupillare (DIP) 2. Lampada 3. Regolazione dell’altezza verticale dello strumento 8 1 9 10 4. 5. 6. 7. Asso di ribaltamento del binocolo Meccanismo di ribaltamento Vite di regolazione dell’altezza Manopola di regolazione della circonferenza della fascia frontale 8. Imbottiture di conforto 9. Fermi del cavetto 10. Assemblaggio ottico Lente di ingrandimento a superficie piatta 12 11 - 11. Lente di ingrandimento 12. Supporto della lente 13. Vite di regolazione verticale 68 Regolazioni Fascia frontale, tipo a cricchetto Istruzioni l Sistemare sul capo la parte principale della fascia frontale, in modo tale che la fascia venga a trovarsi in posizione confortevole sulla fronte e in basso alla nuca. Usare la manopola di regolazione della circonferenza per regolare le dimensioni della fascia. Manopola di regolazione della Assemblaggio ottico l l L’assemblaggio ottico può essere regolato nella posizione desiderata regolando le connessioni all’interno del meccanismo per il ribaltamento. L’assemblaggio ottico deve essere sistemato il più vicino possibile agli occhi in modo tale che possano guardare fissi direttamente all’interno dell’assemblaggio ottico. (Sistemare l’assemblaggio ottico come da istruzioni allegate al LumiView). regolazione Sezione ottica Controllare la regolazione mentre la lampada è accesa, verificando che il fascio di luce sia centrato all’interno del campo visivo. Se la luce fosse _ troppo alta o bassa, fare riferimento alle istruzioni dettagliate di regolazione allegate al LumiViewTM. 69 Modello ad occhiale Regolazione verticale della sezione ottica l l l Allentare la vite che fissa gli occhiali della sezione ottica. Riposizionare la sezione ottica in modo da ottenere un corretto allineamento con gli occhi dell’utente. Stringere la vite per mantenere in posizione la sezione ottica. Regolazione dell’errore di rifrazione dell’utente (soltanto per i modelli ad occhiale) La distanza ottimale di funzionamento dall’oggetto è di 38-43 cm. Se questo modello viene usato senza le lenti correttive, e se l’utente è miope o presbite, sara necessario lavorare mantenendo una distanza minore o maggiore dall’oggetto, in base all’errore di rifrazione. Per ovviare a questo problema, i modelli ad occhiale possono essere prowisti di lenti correttive prescritte dal vostro oculista. 70 Predisposizione della distanza interpupillare I controlli della distanza interpupillare (DIP) muovono gli oculari e sono situati sulla parte inferiore della sezione ottica. Questi oculari si muovono indipendentemente l’uno dall’altro. l l l l Per predisporre correttamente la DIP, osservare un oggetto ad una distanza approssimativa di 38 cm. Chiudere l’occhio sinistro e regolare il controllo della DIP sotto l’occhio destro finché l’immagine osservata viene centrata. Chiudere ora l’occhio destro, mantendendo l’occhio sinistro aperto, e regolare il controllo della DIP per l’occhio sinistro finché l’immagine viene centrata. Aprire entrambi gli occhi. L’oggetto dovrebbe essere chiaro e centrato. Controlli della distanza interpupillare Modello di lente di ingrandimento a superficie piatta l l l Allentare la vite che fissa la sezione della lampada al braccio di regolazione. Riposizionare la sezione della lampada, verso l’alto o verso il basso, fino alla posizione prescelta e stringere la vite. Collocare lo strumento sulla testa. Regolare la lente di ingrandimento a superficie piatta muovendo il sostegno della lente verso l’alto o il basso e la lente di ingrandimento verso l’interno Sostegno della lente Lente di ingrandimento Vite di regolazione 71 Collegamento all’alimentatore NOTA: II cavetto di alimentazione dello strumento deve essere collegato ad un alimentatore portatile Welch Allyn N.75260 o ad un alimentatore diretto ad innesto Welch Allyn N.75210. a .1 Se la lampadina rimane accesa per oltre cinque minuti si surriscalda e può causare scottature se a contatto con la pelle. Attendere almeno dieci minuci per il raffreddamento della stessa prima di utilizzarla nuovamente. Alimentatore portatile l l l l l Collegare il cavetto di alimentazione dello strumento alla presa di alimentazione posta sulla parte superiore dell’alimentatore. Spingere verso l’interno finché il cavetto viene posizionato saldamente. Avvitare delicatamente il manicotto dei connettore esterno, in senso orario, per serrarlo (facoltativo). Fissare l’alimentatore portatile usando il fermaglio a molla per cintura. Lo strumento è ora pronto per l’uso. Alimentatore ad innesto diretto l l l Collegare il cavetto di alimentazione dall’otoscopio binoculare nel cavo dell’alimentatore. Spingere verso l’interno finché il cavetto viene posizionato saldamente. Awitare delicatamente il manicotto del connettore esterno, in senso orario, per serrarlo (facoltativo). l Fissare l’alimentatore diretto direttamente ad una presa. l Lo strumento è ora pronto per l’uso. Allo strumento 72 Accessori Supporto dello speculum pneumatico l Un supporto pneumatico dello speculum, con una lente che ingrandisce 4 volte, può essere usato per facilitare l’esame Sostituzione della lampada 1. ATTENZIONE: Le lampade potrebbero essere molto CALDE. Lasciare che le lampade si raffreddino prima di sostituirle. l Per sostituire la lampada, sollevare il complesso binoculare verso l’alto. l Rimuovere il complesso del riflettore posizionando il pollice sull’incavo situato sul fondo dell’alloggiamento del riflettore e spingendo il complesso del riflettore (procedimento 1). l Rimuovere la lampada ed inserire una nuova lampada Welch Allyn N.08500 nella parte posteriore del riflettore (procedimento 2). l Ricollocare l’alloggiamento del riflettore nello strumento e spingerlo finché viene incastrato in posizione corretta. NOTA: Le aperture di sfogo dell'aria del complesso del riflettore dovrebbero essere posizionate sulla sommità e sul fondo. Complesso binoculare I Complesso del riflettore Procedimento 1 Procedimento 2 73 Pulizia Tutte le superfici di vetro, le lenti del microscopio binoculare portatile, i coperchi ottici e oculari e i coperchi riflettenti della lampada si possono pulire con un panno morbido inumidito di alcool. Sulle superfici esterne del microscopio binoculare portatile e sugli alimentatori è possibile passare un panno morbido inumidito di alcool. NOTA: Evitare di usare fluidi detergenti troppo forti o panni eccessivamente bagnati su qualsiasi porzione dello strumento. Manutenzione La sostituzione della lampada e la pulizia possono essere effettuate dall’utente quando se ne presenta la necessità. Altri servizi di manutenzione devono essere effettuati rinviando lo strumento al Reparto tecnico di servizio autorizzato della Welch Allyn o al distributore. Consultare la sezione “Servizio e garanzia”. Specifiche Distanza interpupillare dai 49 ai 74 mm Sorgente di luce 3,60 volt, alogena Gamma delle regolazioni della fascia frontale piccola, media, grande Peso (N.20500S) 80 g dai -20 ai 40 , 95% di umidità relativa massima Trasporto e immagazzinamento Approvazioni UL544, CAN/CSA C22.2 N.125 IEC 601-1, IEC 601-l -2, CE 74 Informazioni relative all’ordinazione del prodotto e degli accessori N 74180 N 74185 N 75210 N 75215 (specificare la nazione e la tensione) Caricatore soltanto per il modello N.75260 Caricatore internazionale soltanto per il modello (specificare la nazione e la tensione) .. Alimentatore Alimentatore internazionale (specificare la nazione e la tensione) Nota: Le opzioni di alimentazione sopra elencate funzionano con tutte le configurazioni dello strumento. Accessori N 08500 N 205007-501 N 72250 N 21502 N 21505 N 22002 N 22003 N 22004 N 22005 N 22009 N 05374 Lampada di sostituzione per il dispositivo (tutti i modelli) Complesso di sostituzione del riflettore Batteria di sostituzione per l’insieme batteria Sistema a bulbo di insufflazione per i modelli LumiView Supporto per specula pneumatico con specula per i modelli LumiView Polispecula da 2 mm Polispecula da 3 mm Polispecula da 4 mm Polispecula da 5 mm Polispecula da 9 mm Custodia rigida Nota: Usare soltanto gli accessoti e gli alimentatori indicati in questo manuale con il microscopio binoculare portatile e con la lente di ingrandimento a superficie piatta. Alimentatori (portatile e ad innesto diretto) Alimentatore portatile (Modello Welch Allyn N.75260) Questo alimentatore è stato ideato per l’uso in uffici e ospedali e può essere trasportato convenientemente negli uffici satellite. La durata di accensione è di 90 minuti, dopo una ricarica di 10 ore. Caratteristiche: 2 1 1 2 & 1-.-;3 \’ 4 3 \ 1. Interruttore acceso/spento 4. Indicatore di carica 2. Connettore dello strumento 5. Fermaglio a molla per cintura 3. Presa per la ricarica del trasformatore 6. Vano porta-lampada di scorta Specifiche: Tipo di batteria Welch Allyn N.72250 (nichel-cadmio) Tensione/Capacita 3,6 volt a tensione continua/ 1,8 amperore Caricatore 76 Welch Allyn N.74180 (soltanto per ordini internazionali, specificare la nazione) Collegamento dello strumento all’alimentatore portatile: l Collegare il cavetto di alimentazione dello strumento alla presa posta in alto sull’alimentatore. l Spingere verso l’interno finché il cavetto viene posizionato saldamente. l Avvitare delicatamente il manicotto del connettore esterno in senso orario per serrarlo (facoltativo). Alimentatore portatile alimentazione dello strumento Ricarica dell’alimentatore portatile: Acceso/spento l Spegnere l’alimentatore portatile. l Staccare lo strumento dall’alimentatore. l Inserire lo spinotto del trasformatore nell’apposita presa posizionata lateralmente sull’alimentatore. l Collegare il trasformatore ad una presa a muro. La luce a LED accesa indica che l’unità si sta caricando. l Quando il trasformatore sarà completamento caricato (dopo 10-12 ore), staccarlo dall’alimentatore. Come accedere alla lampada di scorta . Estrarre la lampada di scorta dal suo vano ed usarla. Lampada di scorta 77 Sostituzione della batteria l l l l l Accertarsi che l’alimentazione sia disinnestato. Rimuovere entrambe le viti sui retro dell’alimentatore con un cacciavite a testina Phillips. Afferrare il fermaglio della cinta e tirare delicatamente l’alloggiamento indietro e verso il basso (procedimenti 2 e 3). Estrarre la batteria e staccarla dall’unità. Sostituire con una nuova batteria e ripetere all’inverso i procedimenti sopra indicati. Procedimento 1 Procedimento 2 Procedimento 3 Procedimento 4 NOTA: per mantenere correttamente le parti elettriche al loro posto, le viti del vano d’alloggiamento della con-ente devono essere ben strette. Trasformatore l l l l Inserire il cavetto di alimentazione dall’otoscopio binoculare nel cavo di alimentazione. Spingere verso l’interno finché il cavetto viene posizionato saldamente. Avvitare delicatamente il manicotto del connettore esterno in senso orario per serrarlo (facoltativo). Lo strumento è ora pronto per l’uso. limentatore direttamente ad una presa. Allo strumento 78 Servizio e garanzia Servizio I clienti del Nord America sono pregati di rinviare gli strumenti, che necessitano di servizio, al Reparto tecnico di servizio della Welch Allyn sotto indicato o al distributore autorizzato della Welch Allyn. Technical Service Department Welch Allyn, Inc. 4341 State Street Road Skaneateles Falls, NY 13153-0220, U.S.A. Telefono: 315-685-4560 Fax: 315-685-4653 I clienti al di fuori del Nord America dovranno rinviare l’unità ad un distributore autorizzato della Welch Allyn locale o al centro di servizio della Welch Allyn più vicino. Garanzia La Welch Allyn, Inc. garantisce che il microscopio binoculare portatile e la lente di ingrandimento a superficie piatta sono privi di difetti d’origine, per quanto riguarda i materiali e la manodopera, e che sono in grado di funzionare in conformità con le specifiche del produttore per un periodo di cinque anni dalla data d’acquisto. Qualora questo strumento, 0 qualsiasi sua componente, si rivelasse difettoso, o in discordanza con le specifiche del produttore, durante il periodo di garanzia, la Welch Allyn riparerà o sostituirà lo strumento, 0 la(e) componente(i), gratuitamente. Questa garanzia si riferisce soltanto agli strumenti nuovi acquistati presso la Welch Allyn o presso i distributori o rappresentanti autorizzati. L’acquirente deve rinviare lo strumento direttamente alla Welch Allyn, o ad un distributore o rappresentante autorizzato, e sostenere le spese della spedizione. Questa garanzia non comprende la rottura, o i guasti, dovuti a manomissione, cattivo uso, trascuratezza, incidenti, modifiche o spedizione e non è valida se lo strumento non viene usato in conformità con le indicazioni del produttore o se viene riparato, o sottoposto a servizio, da individui che non facciano parte della Welch Allyn o che non siano rappresentanti autorizzati della Welch Allyn. Nessun’altra garanzia manifesta o implicita viene accordata. 79 Welch Allyn, Inc. 4341 State Street Road Skaneateles Falls, NY 13153-0220 (800) 535-6663 (in U.S.A. only) or (315) 685-4560 Fax (315) 685-3361 Printed in the U.S.A. Part No. 205070-2 Rev. A-
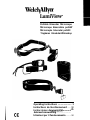 1
1
-
 2
2
-
 3
3
-
 4
4
-
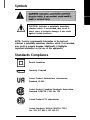 5
5
-
 6
6
-
 7
7
-
 8
8
-
 9
9
-
 10
10
-
 11
11
-
 12
12
-
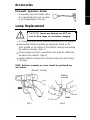 13
13
-
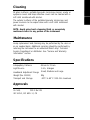 14
14
-
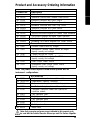 15
15
-
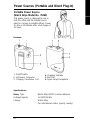 16
16
-
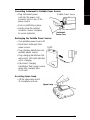 17
17
-
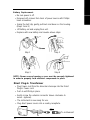 18
18
-
 19
19
-
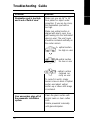 20
20
-
 21
21
-
 22
22
-
 23
23
-
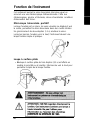 24
24
-
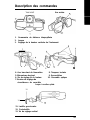 25
25
-
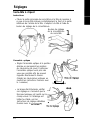 26
26
-
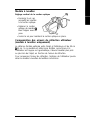 27
27
-
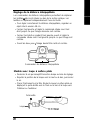 28
28
-
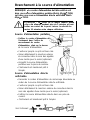 29
29
-
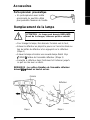 30
30
-
 31
31
-
 32
32
-
 33
33
-
 34
34
-
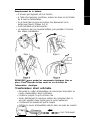 35
35
-
 36
36
-
 37
37
-
 38
38
-
 39
39
-
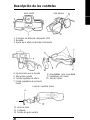 40
40
-
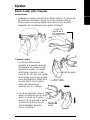 41
41
-
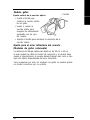 42
42
-
 43
43
-
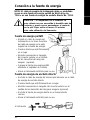 44
44
-
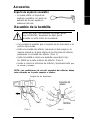 45
45
-
 46
46
-
 47
47
-
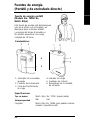 48
48
-
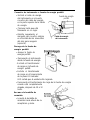 49
49
-
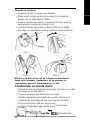 50
50
-
 51
51
-
 52
52
-
 53
53
-
 54
54
-
 55
55
-
 56
56
-
 57
57
-
 58
58
-
 59
59
-
 60
60
-
 61
61
-
 62
62
-
 63
63
-
 64
64
-
 65
65
-
 66
66
-
 67
67
-
 68
68
-
 69
69
-
 70
70
-
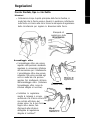 71
71
-
 72
72
-
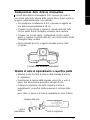 73
73
-
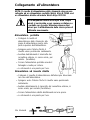 74
74
-
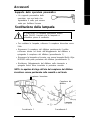 75
75
-
 76
76
-
 77
77
-
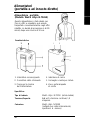 78
78
-
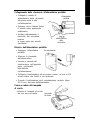 79
79
-
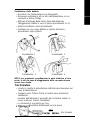 80
80
-
 81
81
-
 82
82
-
 83
83
-
 84
84


Welch Allyn LumiView Operating Instructions Manual
- Tipo
- Operating Instructions Manual
en otros idiomas
- français: Welch Allyn LumiView
- italiano: Welch Allyn LumiView
- English: Welch Allyn LumiView
- Deutsch: Welch Allyn LumiView
Artículos relacionados
-
 Welch Allyn MacroView Directions For Use Manual
-
 Welch Allyn 18200 Manual de usuario
-
 Welch Allyn 88002A Instrucciones de operación
-
Welch Allyn Medical Diagnostic Equipment 48724 Manual de usuario
-
 Welch Allyn PocketScopes Ophthalmoscope Instrucciones de operación
-
 Welch Allyn 71911 Manual de usuario
-
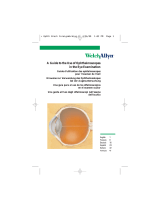 Welch Allyn 11730 A Manual To Use


Otros documentos
-
Hill-Rom 3.5 V Nickel-Cadmium Rechargeable Handles Veterinary Manual de usuario
-
 Hand Held Products HandHeld 3800 Linear Series Guía de inicio rápido
-
-
Carson CP-70 Guía del usuario
-
OttLite 15900C Instrucciones de operación
-
-
-
-
-
Celestron Mini Hheld Illuminated Magnifier Manual de usuario
