Celestron 71221 Manual de usuario
- Categoría
- Monoculares
- Tipo
- Manual de usuario
Este manual también es adecuado para

INSTRUCTION MANUAL
Model #71221
NV-2 NIGHT VISION SCOPE


ENGLISH I 3
Table of Contents
Introduction . . . . . . . . . . . . . . . . . . . . . . . . . . . . . . . . . . . . . . . . . . . . . . . . 4
Notes on Use in Low Light and Complete Darkness . . . . . . . . . . . . . . . . . . . . . . . . 4
What’s in the Box . . . . . . . . . . . . . . . . . . . . . . . . . . . . . . . . . . . . . . . . . . . . . 5
Accessories . . . . . . . . . . . . . . . . . . . . . . . . . . . . . . . . . . . . . . . . . . . . . . . 5
Operating Instructions . . . . . . . . . . . . . . . . . . . . . . . . . . . . . . . . . . . . . . . . . . 6
Battery Installation . . . . . . . . . . . . . . . . . . . . . . . . . . . . . . . . . . . . . . . . . . . . 6
Power On. . . . . . . . . . . . . . . . . . . . . . . . . . . . . . . . . . . . . . . . . . . . . . . . . 6
Power Off . . . . . . . . . . . . . . . . . . . . . . . . . . . . . . . . . . . . . . . . . . . . . . . . 6
Observing . . . . . . . . . . . . . . . . . . . . . . . . . . . . . . . . . . . . . . . . . . . . . . . . 7
Adjusting the Brightness of the Screen . . . . . . . . . . . . . . . . . . . . . . . . . . . . . . . . . 7
Adjusting the Infrared Beam . . . . . . . . . . . . . . . . . . . . . . . . . . . . . . . . . . . . . . . 8
Still Image Recording . . . . . . . . . . . . . . . . . . . . . . . . . . . . . . . . . . . . . . . . . . 8
Playing Back . . . . . . . . . . . . . . . . . . . . . . . . . . . . . . . . . . . . . . . . . . . . . . . 9
Deleting Files. . . . . . . . . . . . . . . . . . . . . . . . . . . . . . . . . . . . . . . . . . . . . . . 10
Video Recording . . . . . . . . . . . . . . . . . . . . . . . . . . . . . . . . . . . . . . . . . . . . . 10
Setting the Time . . . . . . . . . . . . . . . . . . . . . . . . . . . . . . . . . . . . . . . . . . . . . 11
Digital Zoom . . . . . . . . . . . . . . . . . . . . . . . . . . . . . . . . . . . . . . . . . . . . . . . 11
Video Out . . . . . . . . . . . . . . . . . . . . . . . . . . . . . . . . . . . . . . . . . . . . . . . . 12
Connecting to a Computer . . . . . . . . . . . . . . . . . . . . . . . . . . . . . . . . . . . . . . . 12
Power Management . . . . . . . . . . . . . . . . . . . . . . . . . . . . . . . . . . . . . . . . . . . 12
Battery . . . . . . . . . . . . . . . . . . . . . . . . . . . . . . . . . . . . . . . . . . . . . . . . . . 12
Charging the Battery. . . . . . . . . . . . . . . . . . . . . . . . . . . . . . . . . . . . . . . . . . . 12
Technical Specifications . . . . . . . . . . . . . . . . . . . . . . . . . . . . . . . . . . . . . . . . . 13
Maintenance and Safety . . . . . . . . . . . . . . . . . . . . . . . . . . . . . . . . . . . . . . . . . 13
Celestron Two Year Limited Warranty . . . . . . . . . . . . . . . . . . . . . . . . . . . . . . . . . 14

4 I ENGLISH
The Celestron NV-2 Night Vision Scope is designed for use during the day or at night. It offers both standard and night
vision viewing, still image and video recording, and in-device playback. The optical magnification is 4.5x and the digital
zoom is 5.0x.
The Celestron NV-2 Night Vision Scope features a VGA 640x480 color display screen for enhanced image quality during
daylight viewing. At night, the Celestron NV-2 Night Vision Scope can resolve some objects up to 219 yd (200 m) away in
complete darkness.
The Celestron NV-2 Night Vision Scope records all still and video files to its removable memory card. Memory card use
equals ½ hour of video for each gigabyte of memory card size (for example, a 2GB card equals 1 hour of video, while a
32GB card equals 16 hours).
The Celestron NV-2 Night Vision Scope includes a USB 2.0 cable. This cable may be used to charge the unit with a USB plug
(not included), and to transfer recorded files to a computer. An audio and video output cable is also included for connecting to
both PAL and NTSC monitors.
One AW 18650 3.7V 2,200 mAh rechargeable lithium ion battery is included. This provides the Celestron NV-2 Night
Vision Scope with 2-3 hours of battery life.
NOTES ON USE IN LOW LIGHT AND COMPLETE DARKNESS
The night vision performance of the Celestron NV-2 Night Vision Scope will be enhanced in complete darkness when
the infrared beam is activated. This will increase the clarity of the image.
Adjust the focus wheel of the infrared beam to observe subjects at different distances. The Celestron NV-2 Night Vision
Scope uses a low illumination CCD. It can be used in low light (but not completely dark) environments without the
infrared beam being activated.
INTRODUCTION

ENGLISH I 5
WHAT’S IN THE BOX
1 Objective Lens
2 Focus Wheel
3 Battery Compartment
4 Infrared Beam
5 Port Cover
6-7 +/- Button
8 Mode Button
9 Power/Enter Button
10 Eyepiece
11 Tripod Adapter
12 Memory Card Slot
13 Audio/Video Port
14 Charging Indication Light
15 USB Port
ACCESSORIES
• AV Cable
• USB Cable
• AW 18650 3.7V 2,200 mAh Rechargeable
Lithium Ion Battery
• Carrying Case
• Hand Strap
• Lens Cloth

6 I ENGLISH
Remove the battery compartment cover, insert the battery with
the cathode facing inward, then replace the battery compartment
cover tightly and turn on the device. Once the screen is illumi-
nated, the Celestron NV-2 Night Vision Scope is ready to use.
IMPORTANT:
• Only use the correct battery model
• The battery must be fully charged
• The battery must be installed correctly
(cathode facing inward)
POWER ON
• Remove the objective lens cap.
• Press the Power Button (9) one time. Look through eyepiece
(10). Once you see the screen is turned on (like the picture on
the right), the device is working.
What the icons mean:
1. Photo mode
2. Battery life
3. Memory card is installed
4. The number of pictures that can be recorded based on the
memory capacity
BATTERY INSTALLATION
OPERATING INSTRUCTIONS
Battery
Compartment Cover
POWER OFF
Press and hold the Power Button (9) for 3 seconds to turn off the Celestron NV-2 Night Vision Scope.
1 2 3 4

ENGLISH I 7
OBSERVING
• Remove the objective lens cap. Point the objective at the subject and look through the eyepiece (10).
• Adjust the diopter ring on the eyepiece (10) until you can see the screen clearly.
• Adjust the focus wheel (2) until the subject is in focus.
• The brightness of the screen will be automatically adjusted based on the brightness of the environment.
• Press the +/- buttons (6 & 7) to zoom in or out. The zoom range is from 1x to 8x.
• In low light conditions, the infrared beam is not required.
• In complete darkness, using the infrared beam is suggested. Adjust the brightness of the infrared beam to observe the
subject clearly.
IMPORTANT:
Do not block the Celestron NV-2 Night Vision Scope’s infrared beam when using the device in completely dark conditions.
ADJUSTING THE BRIGHTNESS OF THE SCREEN
• Press and hold the Mode Button (8) for 3 seconds to enter
the screen brightness adjustment menu.
• The number indicates the current brightness of the screen
(see the image on the right).
• Press the Mode Button (8) to move the “*” up or down to
select “Bright” to adjust the brightness.
• Press the +/- buttons (6 & 7) to adjust the brightness from
1 (lowest) to 9.9 (brightest).

8 I ENGLISH
ADJUSTING THE INFRARED BEAM
• In the observing (still image/video recording) mode, hold
the Mode Button (8) for 3 seconds to enter the infrared
beam adjustment menu (as shown on the right). The digits
behind the “Lamp” show the current brightness of the
infrared beam.
• Press Mode Button (8) to select the “Lamp” to adjust the
brightness.
• Press the +/- buttons (6 & 7) to adjust the screen bright-
ness from 0 to 9. 9. To close the infrared beam, adjust the
brightness to 0.
• Once the infrared beam is on, “NL” will be indicated on
the upper left corner. The number behind the “NL” is the
current brightness setting of the infrared beam.
IMPORTANT:
The screen brightness adjustment menu and infrared beam
brightness adjusting menu will be automatically exited if
there are no operations made in 5 seconds after activating
the menu.
STILL IMAGE RECORDING
When you turn the device on, it is automatically in observing
(image recording) mode.
What the icons mean:
1. Photo mode
2. Battery life
3. Memory card is installed
4. The number of pictures that can be recorded based on
the memory capacity
Click the Enter Button (9) once to record one image. The
image will be saved automatically on the memory card.
The number displayed on the screen (4) indicates the total
number of images that can be recorded based on the card
memory capacity. This number is determined by the memory
capacity of the card. The actual number of pictures may vary.
1 2 3 4

ENGLISH I 9
PLAYING BACK
• Press the Mode Button (8) to enter playback mode. All
video and images saved on the memory card will be
recognized and automatically played back.
• Press the +/- Button (6 & 7) to select files. Press the Enter
Button (9) to play and pause the playback.
What the icons mean in Photo Playback:
1. Playback mode
2. Battery indicator
3. Memory card is installed
4. Total number of files saved
What the icons mean in Video Playback:
1. Playback mode
2. Battery indicator
3. Date and length of the video
4. Memory card is installed
5. Length of the video
6. Total number of files saved
1 2 3 4 5 6
1 2 3 4

10 I ENGLISH
DELETING FILES
• In playback mode, press and hold the Enter Button (9) to
select the file you want to delete.
• The file information will be displayed on the screen. Press
the +/- Button (6 & 7) to select the file to delete.
• Press the Enter Button (9) again to confirm the deletion.
Press the Mode Button (8) to exit.
• In playback mode, press +/- Button (6 & 7) to select
different recordings.
• Video and images will be automatically recognized and
played back based on the time sequence.
• In video playback mode, press Enter Button (9) to play the
video.
• Press the Enter Button (9) again to pause the video.
• Press the Mode Button (8) to go back to observing (image
recording) mode.
VIDEO RECORDING
In observing (image recording) mode, press the Mode
Button (8) once to enter the video recording mode.
What the icons mean:
1. In video recording mode
2. Battery indicator
3. Date and recording time remaining
4. Recording time remaining
• Press the Enter Button (9) to start recording.
• The video is automatically saved to the memory card.
• Recording time remaining (4) is calculated based on the
memory capacity of card. It may differ from the actual
recording time.
• Press the Enter Button (9) again to pause or exit video
recording.
1 2 3 4

ENGLISH I 11
SETTING THE TIME
• Press and hold the Enter Button (9) to enter the menu, and
press the Mode Button (8) to select “Time Set.”
• Press the +/- Button (6 & 7) to enter time setting mode.
1. Time Format Selection
2. Date Set
3. Time Set
• Press the +/- Button (6 & 7) to switch time format.
• Press the Enter Button (9) to switch the cursor to a different
position.
• Press the +/- Button (6 & 7) to adjust the date and time.
• Press the Enter Button (9) again to exit time setting mode.
DIGITAL ZOOM
Digital zoom can be used in observing (image recording)
and video recording mode.
• Press the + Button (7) once to zoom in by 1x. The maximum
zoom power is 5x above the standard magnification level.
• Press – Button (6) once to zoom out by 1x. The minimum
zoom power is 1x (equal to the standard magnification
level).
• The zoom power is indicated on the screen (5).
1 2 3 4 5
1
2
3

12 I ENGLISH
POWER MANAGEMENT
BATTERY
One AW 18650 3.7V 2,200 mAh rechargeable lithium ion battery is included. To protect your battery, please allow the
battery to charge for 10 hours before using it for the first time.
CHARGING THE BATTERY
A USB cable for connection to an external power source is included. Connect the USB cable to the USB Port (15)
on the Celestron NV-2 Night Vision Scope. Connect the other end of the cable to a USB power port or AC adapter
appropriate to the voltage of the country in which the device is being charged.
VIDEO OUT
To play a video on other monitors, connect the video cable to the Audio/Video Output plug (13) and connect to the monitor.
The video can be played on the monitor. At the same time, it will also play on the device’s screen.
CONNECTING TO A COMPUTER
Connect the Celestron NV-2 Night Vision Scope to a computer using the USB 2.0 cable. After the device is successfully
connected, the computer will automatically recognize the content on the memory card. When using the USB cable to
connect to a computer, the device must have a fully charged battery for optimal performance.

ENGLISH I 13
Optical Specifications
Magnification 4.5×
Objective Lens Diameter 40mm
Field of View 5°× 3.75°
Diopter ±10
Detection Distance in Low Light Condition 2m - ∞
Detection Distance in Complete Dark Condition Up to 219 yd (200 m) on reflective subjects
Power Source Specifications
Operating Voltage 3.7V
Battery Rechargeable lithium ion battery
Other Specifications
Dimension (L × W × H) 161×58×77mm
Weight 0.61 lb/275 g
TECHNICAL SPECIFICATIONS
MAINTENANCE AND SAFETY
• The Celestron NV-2 Night Vision Scope is designed to operate properly between 23°F and 104°F, and at a humidity
level less than 80%.
• The Celestron NV-2 Night Vision Scope should always be stored in its case when it is not in use.
• Store the Celestron NV-2 Night Vision Scope in a cool, dry and clean place.
• The Celestron NV-2 Night Vision Scope is not waterproof or fog proof. Avoid dropping it on the ground or bumping it.
• Charge the device immediately when the LCD screen cannot be turned on. Charge the battery monthly to avoid damage
to the battery.
• Using a can of compressed air, blow away any dust or debris on the lens. To remove dirt or fingerprints, use a very
small amount of isopropyl alcohol and clean with the supplied microfiber cloth.

14 I ENGLISH
CELESTRON TWO YEAR LIMITED WARRANTY
A. Celestron warrants this product to be free from defects in materials and workmanship for two years. Celestron will repair or replace such
product or part thereof which, upon inspection by Celestron, is found to be defective in materials or workmanship. As a condition to the
obligation of Celestron to repair or replace such product, the product must be returned to Celestron together with proof-of-purchase
satisfactory to Celestron.
B. The proper Return Authorization Number must be obtained from Celestron in advance of return. Please submit your request to
Celestron’s online technical support center at https://www.celestron.com/pages/technical-support to receive the number to be
displayed on the outside of your shipping container.
All returns must be accompanied by a written statement setting forth the name, address, and daytime telephone number of the owner, together
with a brief description of any claimed defects. Parts or product for which replacement is made shall become the property of Celestron.
The customer shall be responsible for all costs of transportation and insurance, both to and from the factory of Celestron, and shall be required
to prepay such costs.
Celestron shall use reasonable efforts to repair or replace any product covered by this warranty within thirty days of receipt. In the event repair
or replacement shall require more than thirty days, Celestron shall notify the customer accordingly. Celestron reserves the right to replace any
product which has been discontinued from its product line with a new product of comparable value and function.
This warranty shall be void and of no force of effect in the event a covered product has been modified in design or function, or subjected
to abuse, misuse, mishandling or unauthorized repair. Further, product malfunction or deterioration due to normal wear is not covered
by this warranty.
CELESTRON DISCLAIMS ANY WARRANTIES, EXPRESSED OR IMPLIED, WHETHER OF MERCHANTABILITY OR FITNESS FOR A PARTICULAR USE, EXCEPT AS EXPRESSLY SET FORTH
HEREIN. THE SOLE OBLIGATION OF CELESTRON UNDER THIS LIMITED WARRANTY SHALL BE TO REPAIR OR REPLACE THE COVERED PRODUCT, IN ACCORDANCE WITH THE
TERMS SET FORTH HEREIN. CELESTRON EXPRESSLY DISCLAIMS ANY LOST PROFITS, GENERAL, SPECIAL, INDIRECT OR CONSEQUENTIAL DAMAGES WHICH MAY RESULT FROM
BREACH OF ANY WARRANTY, OR ARISING OUT OF THE USE OR INABILITY TO USE ANY CELESTRON PRODUCT. ANY WARRANTIES WHICH ARE IMPLIED AND WHICH CANNOT
BE DISCLAIMED SHALL BE LIMITED IN DURATION TO A TERM OF TWO YEARS FROM THE DATE OF ORIGINAL RETAIL PURCHASE.
Some states do not allow the exclusion or limitation of incidental or consequential damages or limitation on how long an implied warranty
lasts, so the above limitations and exclusions may not apply to you.
This warranty gives you specific legal rights, and you may also have other rights which vary from state to state. Celestron reserves the right
to modify or discontinue, without prior notice to you, any model or style product. If warranty problems arise or if you need assistance in using
your product, please visit Celestron’s online technical support center at https://www.celestron.com/pages/technical-support.
FCC NOTE: This equipment has been tested and found to comply with the limits for a Class B digital device, pursuant to part 15 of the
FCC Rules. These limits are designed to provide reasonable protection against harmful interference in a residential installation. This equip-
ment generates, uses, and can radiate radio frequency energy and, if not installed and used in accordance with the instructions, may cause
harmful interference to radio communications. However, there is no guarantee that interference will not occur in a particular installation. If
this equipment does cause harmful interference to radio or television reception, which can be determined by turning the equipment off and
on, the user is encouraged to try to correct the interference by one or more of the following measures:
• Reorient or relocate the receiving antenna.
• Increase the separation between the equipment and receiver.
• Connect the equipment into an outlet on a circuit different from that to which the receiver is connected.
• Consult the dealer or an experienced radio/TV technician for help.
Product design and specifications are subject to change without prior notification.
This product is designed and intended for use by those 14 years of age and older.
© 2019 Celestron • All rights reserved
celestron.com/pages/technical-support
Telephone: 1(800) 421-9649
2835 Columbia Street • Torrance, CA 90503 USA
71221
06-19

MODE D'EMPLOI
Modèle #71221
LUNETTE DE VISION NOCTURNE NV-2


FRANÇAIS I 3
Table des matières
Introduction . . . . . . . . . . . . . . . . . . . . . . . . . . . . . . . . . . . . . . . . . . . . . . . . 4
Notes concernant l’utilisation en environnement de faible luminosité ou dans l’obscurité totale . . 4
Contenu de la boîte. . . . . . . . . . . . . . . . . . . . . . . . . . . . . . . . . . . . . . . . . . . . 5
Accessoires . . . . . . . . . . . . . . . . . . . . . . . . . . . . . . . . . . . . . . . . . . . . . . . 5
Instructions d’utilisation . . . . . . . . . . . . . . . . . . . . . . . . . . . . . . . . . . . . . . . . . 6
Installation de la pile . . . . . . . . . . . . . . . . . . . . . . . . . . . . . . . . . . . . . . . . . . . 6
Allumer . . . . . . . . . . . . . . . . . . . . . . . . . . . . . . . . . . . . . . . . . . . . . . . . . . 6
Éteindre. . . . . . . . . . . . . . . . . . . . . . . . . . . . . . . . . . . . . . . . . . . . . . . . . . 6
Observation . . . . . . . . . . . . . . . . . . . . . . . . . . . . . . . . . . . . . . . . . . . . . . . 7
Régler la luminosité de l’écran. . . . . . . . . . . . . . . . . . . . . . . . . . . . . . . . . . . . . . 7
Régler le faisceau infrarouge . . . . . . . . . . . . . . . . . . . . . . . . . . . . . . . . . . . . . . 8
Prendre des photos . . . . . . . . . . . . . . . . . . . . . . . . . . . . . . . . . . . . . . . . . . . 8
Visualiser les images . . . . . . . . . . . . . . . . . . . . . . . . . . . . . . . . . . . . . . . . . . . 9
Supprimer des fichiers. . . . . . . . . . . . . . . . . . . . . . . . . . . . . . . . . . . . . . . . . . 10
Enregistrer des vidéos . . . . . . . . . . . . . . . . . . . . . . . . . . . . . . . . . . . . . . . . . . 10
Régler l’heure . . . . . . . . . . . . . . . . . . . . . . . . . . . . . . . . . . . . . . . . . . . . . . 11
Zoom numérique . . . . . . . . . . . . . . . . . . . . . . . . . . . . . . . . . . . . . . . . . . . . . 11
Sortie vidéo. . . . . . . . . . . . . . . . . . . . . . . . . . . . . . . . . . . . . . . . . . . . . . . . 12
Connexion à un ordinateur. . . . . . . . . . . . . . . . . . . . . . . . . . . . . . . . . . . . . . . . 12
Gestion de l’alimentation . . . . . . . . . . . . . . . . . . . . . . . . . . . . . . . . . . . . . . . . 12
Pile . . . . . . . . . . . . . . . . . . . . . . . . . . . . . . . . . . . . . . . . . . . . . . . . . . . . 12
Charger la pile . . . . . . . . . . . . . . . . . . . . . . . . . . . . . . . . . . . . . . . . . . . . . . 12
Caractéristiques techniques. . . . . . . . . . . . . . . . . . . . . . . . . . . . . . . . . . . . . . . 13
Entretien et sécurité . . . . . . . . . . . . . . . . . . . . . . . . . . . . . . . . . . . . . . . . . . . 13
Garantie limitée Celestron de deux ans . . . . . . . . . . . . . . . . . . . . . . . . . . . . . . . . 14

4 I FRANÇAIS
La lunette de vision nocturne NV-2 est conçue pour être utilisée de jour ou de nuit. Elle permet l’observation standard et
par vision nocturne, la capture de photos ou l’enregistrement vidéo, ainsi que la visualisation du contenu. Le grossissement
optique est de 4,5x et le grossissement numérique est de 5x.
La lunette de vision nocturne NV-2 de Celestron est équipée d’un écran VGA couleur de 640x480 permettant une
visualisation de bonne qualité pendant l’observation diurne. De nuit, la lunette de vision nocturne NV-2 de Celestron
peut transmettre l’image d’objets situés à une distance de 200 m dans l’obscurité totale.
La lunette de vision nocturne NV-2 de Celestron enregistre tous les fichiers photo et vidéo dans la carte mémoire amovible.
La carte mémoire peut contenir l’équivalent d’une demi-heure de vidéo par gigaoctet de capacité (par exemple, une carte
mémoire de 2 Go peut enregistrer 1 heure de vidéo, et une carte mémoire de 32 Go peut enregistrer 16 heures de vidéo).
La lunette de vision nocturne NV-2 de Celestron est livrée avec un câble USB 2.0. Ce câble peut être utilisé pour charger
l’unité avec une fiche USB (non incluse), et pour transférer des fichiers enregistrés vers un ordinateur. Un câble de connexion
audio/vidéo est également inclus pour la connexion à des écrans PAL et NTSC.
Une pile au lithium-ion rechargeable AW 18650 3,7 V 2200 mAh est incluse. Cette dernière donne à la lunette de vision
nocturne NV-2 environ 2 à 3 heures d’autonomie.
NOTES CONCERNANT L’UTILISATION EN ENVIRONNEMENT
DE FAIBLE LUMINOSITÉ OU DANS L’OBSCURITÉ TOTALE
Les performances de vision nocturne de la lunette de vision nocturne NV-2 seront améliorées dans l’obscurité totale lorsque
le faisceau infrarouge est activé. Ce dernier améliore la clarté de l’image.
Réglez la molette de mise au point du faisceau infrarouge pour observer des sujets à différentes distances. La lunette de
vision nocturne NV-2 de Celestron utilise un CCD basse illumination. Il peut être utilisé dans des environnements de faible
luminosité (mais pas dans l’obscurité totale) sans que le faisceau infrarouge soit activé.
INTRODUCTION

FRANÇAIS I 5
CONTENU DE LA BOÎTE
1 Lentille de l’objectif
2 Molette de mise au point
3 Compartiment des piles
4 Faisceau infrarouge
5 Cache des ports
6-7 Bouton +/-
8 Bouton Mode
9 Bouton Entrée/Alimentation
10 Oculaire
11 Adaptateur de trépied
12 Logement pour carte mémoire
13 Port Audio/Vidéo
14 Voyant indicateur de charge
15 Port USB
ACCESSOIRES
• Câble AV
• Câble USB
• Pile au lithium-ion rechargeable
AW 18650 3,7 V 2200 mAh
• Étui de transport
• Dragonne
• Tissu de nettoyage d’objectif

6 I FRANÇAIS
Retirez le cache du compartiment de pile, insérez la pile avec
la cathode orientée vers l’intérieur, puis remettez le cache soi-
gneusement en place et allumez l’appareil. La lunette de vision
nocturne NV-2 de Celestron est prête à l’utilisation lorsque
l’écran s’illumine.
IMPORTANT :
• Utilisez exclusivement le modèle de pile correct
• La pile doit être complètement chargée
• La pile doit être installée correctement
(la cathode orientée vers l’intérieur)
ALLUMER
• Retirez le capuchon de la lentille d’objectif.
• Appuyez sur le bouton d’alimentation (9) une fois. Regardez
dans l’oculaire (10). L’appareil est en fonctionnement lorsque
l’écran s’illumine (comme illustré sur la droite).
Signifi cation de l’icône :
1. Mode photo
2. Autonomie de la pile
3. La carte mémoire est installée
4. Le nombre de photos qui peuvent être enregistrées dépend
de la capacité de la mémoire.
INSTALLATION DE LA BATTERIE
INSTRUCTIONS D’UTILISATION
Cache
du compartiment des piles
ÉTEINDRE
Maintenez le bouton d’alimentation (9) appuyé pendant 3 secondes pour éteindre la lunette de vision nocturne NV-2
de Celestron.
1 2 3 4

FRANÇAIS I 7
OBSERVER
• Retirez le capuchon de la lentille d’objectif. Pointez l’objectif vers le sujet et regardez dans l’oculaire (10).
• Réglez la molette de dioptrie sur l’oculaire (10) jusqu’à ce que vous voyiez l’écran clairement.
• Réglez la molette de mise au point (2) pour obtenir la mise au point sur le sujet.
• La luminosité de l’écran sera adapté automatiquement à la luminosité ambiante.
• Appuyez sur les boutons +/- (6 & 7) pour effectuer un zoom avant ou arrière. Les niveaux de zoom sont compris entre
1x et 8x.
• En conditions de faible luminosité, le faisceau infrarouge n’est pas nécessaire.
• Nous vous suggérons d’utiliser le faisceau infrarouge dans l’obscurité totale. Réglez la luminosité du faisceau infrarouge
pour observer le sujet plus clairement.
IMPORTANT :
Ne bloquez pas le faisceau infrarouge de la lunette de vision nocturne NV-2 de Celestron lorsque vous utilisez l’appareil
dans l’obscurité totale.
RÉGLER LA LUMINOSITÉ DE L’ÉCRAN
• Maintenez le bouton Mode (8) appuyé pendant 3 secondes
pour afficher le menu de réglage de la luminosité.
• Le chiffre indique la luminosité actuelle de l’écran (voir
l’image sur la droite).
• Appuyez sur le bouton Mode (8) pour déplacer le « * » vers
le haut ou vers le bas pour sélectionner « Bright » puis
régler la luminosité.
• Appuyez sur les boutons +/- (6 et 7) pour régler la
luminosité entre 1 (la plus faible luminosité) et 9.9 (la
plus haute luminosité).

8 I FRANÇAIS
RÉGLER LE FAISCEAU INFRAROUGE
• En mode d’observation (capture de photo/de vidéo),
maintenez le bouton Mode (8) appuyé pendant 3 secondes
pour affi cher le menu de réglage du faisceau infrarouge
(comme illustré sur la droite). Le chiffre situé derrière le
terme « Lamp » indique la luminosité actuellement défi nie
pour le faisceau infrarouge.
• Appuyez sur le bouton Mode (8) pour sélectionner « Lamp »
puis régler la luminosité.
• Appuyez sur les boutons +/- (6 et 7) pour régler la lumino-
sité entre 0 et 9. 9. Pour désactiver le faisceau infrarouge,
réglez le niveau de luminosité sur 0.
• « NL » apparaît dans le coin supérieur gauche lorsque le
faisceau infrarouge est allumé. Le chiffre situé derrière le
terme « NL » indique la luminosité actuellement défi nie pour
le faisceau infrarouge.
IMPORTANT :
Le menu de réglage de la luminosité ou le menu de réglage
de la luminosité du faisceau infrarouge sera automatiquement
fermé si aucune opération n’est effectuée 5 secondes après
activation du menu.
PRENDRE DES PHOTOS
Lorsque vous allumez l’appareil, il entre automatiquement en
mode d’observation (enregistrement d’image).
Signifi cation des icônes :
1. Mode photo
2. Indicateur de niveau de la pile
3. Carte mémoire insérée
4. Le nombre de photos qui peuvent être enregistrées
dépend de la capacité de la mémoire
Appuyez sur le bouton Entrée (9) une fois pour enregistrer
une image. L'image est être enregistrée automatiquement
sur la carte mémoire.
Le chiffre affi ché sur l’écran (4) indique le nombre total
d’images pouvant être enregistrées, en fonction de la capacité
mémoire. Le chiffre est déterminé par la capacité mémoire
de la carte. Le nombre réel d’image peut varier.
1 2 3 4

FRANÇAIS I 9
LECTURE
• Appuyez sur le bouton Mode (8) pour activer le mode de
lecture. Toutes les vidéos et les images enregistrées sur
la carte mémoire seront détectées et automatiquement
affichées.
• Appuyez sur les boutons +/- (6 & 7) pour sélectionner
des fichiers. Appuyez sur le bouton Entrée (9) pour lire ou
mettre en pause la lecture.
Signification des icônes en Lecture de photos :
1. Mode lecture
2. Indicateur de niveau de la pile
3. Carte mémoire insérée
4. Nombre total de fichiers enregistrés
Signification des icônes en Lecture de vidéos :
1. Mode lecture
2. Indicateur de niveau de la pile
3. Date de capture de la vidéo et durée de la vidéo
4. Carte mémoire insérée
5. Durée de la vidéo
6. Nombre total de fichiers enregistrés
1 2 3 4 5 6
1 2 3 4

10 I FRANÇAIS
SUPPRIMER DES FICHIERS
• En mode lecture, maintenez le bouton Entrée (9) appuyé
pour sélectionner le fichier que vous souhaitez supprimer.
• Les informations de fichier apparaîtront sur l’écran.
Appuyez sur les boutons +/- (6 et 7) pour sélectionner
le fichier à supprimer.
• Appuyez sur le bouton Entrée (9) de nouveau pour confirmer
la suppression. Appuyez sur le bouton Mode (8) pour quitter.
• En mode lecture, appuyez sur le bouton +/- (6 et 7) pour
sélectionner différents enregistrements.
• Les vidéos et les images seront automatiquement recon-
nues et lues dans l’ordre chronologique.
• En mode de lecture vidéo, appuyez sur le bouton Entrée (9)
pour lire la vidéo.
• Appuyez sur le bouton Entrée (9) de nouveau pour mettre
la vidéo en pause.
• Appuyez sur le bouton Mode (8) pour revenir en mode
d’observation (enregistrement d’image).
ENREGISTRER DES VIDÉOS
En mode observation (enregistrement d’image), appuyez
sur le bouton Mode (8) une fois pour activer le mode
d’enregistrement vidéo.
Signification des icônes :
1. Mode enregistrement vidéo
2. Indicateur de niveau de la pile
3. Date et temps d’enregistrement vidéo disponible restant
4. Temps d’enregistrement vidéo disponible restant
• Appuyez sur le bouton Entrée (9) pour commencer
l’enregistrement.
• La vidéo est automatiquement enregistrée sur la
carte mémoire.
• Le temps d’enregistrement vidéo disponible restant (4) est
calculé en fonction de la capacité mémoire de la carte. Il
peut ne pas correspondre au temps d’enregistrement réel.
• Appuyez sur le bouton Entrée (9) de nouveau pour
mettre en pause l’enregistrement ou l’arrêter.
1 2 3 4

FRANÇAIS I 11
RÉGLER L’HEURE
• Maintenez le bouton Entrée (9) appuyé pour afficher le
menu, et appuyez sur le bouton Mode (8) pour sélectionner
Réglage de l’heure « Time Set ».
• Appuyez sur les boutons +/- (6 et 7) pour activer le mode
de réglage de l’heure.
1. Sélection du format de l’heure
2. Réglage de la date
3. Réglage de l’heure
• Appuyez sur les boutons +/- (6 et 7) pour changer le format
de l’heure.
• Appuyez sur le bouton Entrée (9) pour déplacer le curseur.
• Appuyez sur les boutons +/- (6 et 7) pour régler la date et
l’heure.
• Appuyez sur le bouton Entrée (9) de nouveau pour activer
le mode de réglage de l’heure.
ZOOM NUMÉRIQUE
Le zoom numérique peut être utilisé pendant l’observation
(enregistrement des images) et l’enregistrement vidéo.
• Appuyez sur le bouton + (7) une fois pour augmenter le
zoom de 1x. La puissance de zoom maximum est de 5x
au-dessus du niveau de grossissement par défaut.
• Appuyez sur le bouton - (6) une fois pour réduire le zoom
de 1x. La puissance de zoom minimum est de 1x (niveau de
grossissement par défaut).
• La puissance de grossissement est indiquée sur l’écran (5).
1 2 3 4 5
1
2
3

12 I FRANÇAIS
GESTION DE L’ALIMENTATION
PILE
Une pile au lithium-ion rechargeable AW 18650 3,7 V 2200 mAh est incluse. Pour protéger la batterie, laissez la batterie en
charge pendant 10 heures avant de l’utiliser pour la première fois.
CHARGER LA PILE
Un câble USB est inclus pour la connexion avec une source d’alimentation externe. Branchez le câble USB au port USB
(15) de la lunette de vision nocturne NV-2 de Celestron. Branchez l’autre extrémité du câble au port USB d’un ordinateur ou
à un adaptateur secteur dont la tension acceptée correspond à celle disponible chez vous.
SORTIE VIDÉO
Pour lire une vidéo sur d’autres moniteurs, connectez le câble vidéo à la prise de sortie Audio/Vidéo (13), et au moniteur.
La vidéo peut ensuite être lue sur le moniteur. L’image est également affichée sur l’écran de l’appareil.
CONNEXION À UN ORDINATEUR
Connectez la lunette de vision nocturne NV-2 de Celestron à un ordinateur avec le câble USB 2.0. Lorsque l’appareil est
connecté, l’ordinateur reconnaît automatiquement le contenu de la carte mémoire. Pour garantir le bon fonctionnement,
chargez la batterie de l’appareil au maximum lorsque vous utilisez le câble USB pour effectuer la connexion à un ordinateur.

FRANÇAIS I 13
Caractéristiques optiques
Grossissement 4,5×
Diamètre de la lentille de l’objectif 40 mm
Champ de vision 5°× 3,75°
Dioptrie ±10
Distance de détection en conditions de faible
luminosité
2m - ∞
Distance de détection en conditions d’obscurité totale Jusqu’à 200 m sur les sujets dont la surface est réfléchissante
Caractéristiques de la source d’alimentation
Tension de fonctionnement 3,7 V
Pile Batterie lithium-ion rechargeable
Autres caractéristiques techniques
Dimension (L × l × H) 161×58×77 mm
Poids 275 g / (0,61 lb)
CARACTÉRISTIQUES TECHNIQUES
ENTRETIEN ET SÉCURITÉ
• La lunette de vision nocturne NV-2 de Celestron est prévue pour fonctionner correctement sous des températures
comprises entre -5 °C et 40 °C, et à un taux d’humidité inférieur à 80 %.
• La lunette de vision nocturne NV-2 de Celestron doit toujours être rangée dans son étui lorsqu’elle n’est pas utilisée.
• Rangez la lunette de vision nocturne NV-2 de Celestron dans un lieu frais, sec et propre.
• La lunette de vision nocturne NV-2 de Celestron n’est ni étanche ni résistante au brouillard. Évitez de la faire tomber ou de
lui faire subir des chocs.
• Chargez l’appareil immédiatement si vous remarquez que l’écran ne peut pas être allumé. Chargez la pile tous les mois,
pour éviter de l’endommager.
• Utilisez une bombe d’air comprimé pour souffler la poussière ou les débris qui se sont éventuellement déposés sur
l’objectif. Pour retirer les saletés ou les traces de doigts, imbibez un tissu en microfibre d’une très petite quantité
d’alcool isopropylique pour essuyer l’objectif.

14 I FRANÇAIS
GARANTIE LIMITÉE DE DEUX ANS CELESTRON
A. Celestron garanti que ce produit est libre de défauts de matériaux et de fabrication pour une période de deux ans. Celestron réparera ou
remplacera ce produit ou une partie de celui-ci lorsqu'il a été déterminé, lors d'une inspection par Celestron, que le produit est défectueux
en raison d'un défaut de matériaux ou de fabrication. Comme condition à l'obligation de Celestron de réparer ou remplacer un tel produit, le
produit doit être renvoyé à Celestron avec la preuve d'achat satisfaisante pour Celestron.
B. Un numéro d'autorisation de retour valide doit être obtenu de Celestron avant le renvoi. Soumettez vos questions au centre de support en
ligne de Celestron, à l’adresse https://www.celestron.com/pages/technical-support pour recevoir le numéro que vous devez indiquer sur
l’extérieur de votre coli.
Tous les retours doivent être accompagnés d'un message écrit comportant le nom, l'adresse et le numéro de téléphone joignable en journée du
propriétaire, ainsi qu'une brève description des défaillances déclarées. Les pièces ou le produit ayant été l'objet d'un remplacement deviendront
la propriété de Celestron.
Le client est responsable de tous les coûts de transport et d'assurance, vers et depuis l'usine Celestron, et doit donc prépayer ces frais.
Celestron fera des efforts raisonnables pour réparer ou remplacer tout produit couvert par cette garantie dans les trente jours suivant sa
réception. Dans le cas où une réparation ou un remplacement nécessitera plus de trente jours, Celestron en avisera le client en conséquence.
Celestron se réserve le droit de remplacer tout produit qui a été retiré de sa gamme de produits disponibles avec un nouveau produit ayant
une valeur et des fonctions équivalentes.
Cette garantie sera nulle et sans effet dans le cas où la conception ou la fonction d'un produit couvert a été modifiée, ou lorsque le produit a
été soumis à un usage abusif, à de mauvaises manipulations ou à une réparation non autorisée. En outre, une défaillance ou une détérioration
du produit due à l'usure normale n'est pas couverte par cette garantie.
CELESTRON DÉCLINE TOUTE GARANTIE, EXPRESSE OU IMPLICITE, DE QUALITÉ MARCHANDE OU D'ADAPTATION À UN USAGE PARTICULIER, À MOINS DE DISPOSITIONS EXPRESSES DANS CE
DOCUMENT. LA SEULE OBLIGATION DE CELESTRON EN VERTU DE CETTE GARANTIE LIMITÉE SERA DE RÉPARER OU REMPLACER LE PRODUIT COUVERT, EN CONFORMITÉ AVEC LES DISPOSITIONS
DE CE DOCUMENT. CELESTRON DÉCLINE TOUTE RESPONSABILITÉ POUR TOUTE PERTE DE PROFITS, TOUT DOMMAGE GÉNÉRAL, PARTICULIER OU INDIRECT POUVANT RÉSULTER DE LA VIOLATION
DE TOUTE GARANTIE, OU EN RAISON DE L'UTILISATION DE, OU DE L'INCAPACITÉ À UTILISER, UN PRODUIT CELESTRON. TOUTE GARANTIE IMPLICITE QUI EST ET QUI NE PEUT ÊTRE DÉCLINÉE
SERA LIMITÉE À UNE DURÉE DE DEUX ANS À PARTIR DE LA DATE D'ACHAT INITIALE.
Certains états n'autorisent pas l'exclusion ou la limitation des dommages indirects ou consécutifs ou la limitation de la durée d'une garantie
implicite. Il est donc possible que les limitations et exclusions ci-dessus ne s'appliquent pas à vous.
Cette garantie vous donne des droits légaux spécifiques, et vous pouvez également avoir d'autres droits qui varient d'un état ou d'une province
à l'autre. Celestron se réserve le droit de modifier ou de cesser la production de tout modèle ou style de télescope, et cela sans préavis. Si
vous rencontrez des problèmes avec la garantie, ou si vous avez besoin d’aide pour utiliser le produit, visitez le centre de support technique en
ligne de Celestron à l’adresse https://www.celestron.com/pages/technical-support.
NOTE DE LA FCC : Cet équipement a été testé et déclaré conforme aux limites d'un appareil numérique de classe B, conformément à la
partie 15 des règles de la FCC. Ces limites sont conçues pour fournir une protection raisonnable contre les interférences nuisibles dans
une installation résidentielle. Cet équipement génère, utilise et peut émettre une énergie de fréquence radio et, s’il n’est pas installé et utilisé
conformément aux instructions, peut causer des interférences nuisibles aux communications radio. Mais il n'existe aucune garantie que des
interférences ne seront pas produites dans une installation particulière. Si cet équipement cause des interférences nuisibles à la réception
radio ou télévision, ce qui peut être déterminé en éteignant et en rallumant l'équipement, l'utilisateur est encouragé à essayer de corriger
l'interférence par une ou plusieurs des mesures suivantes :
• Réorientez ou déplacez l'antenne de réception.
• Augmentez la distance entre l'équipement et le récepteur.
• Connectez l'équipement à une prise ou à un circuit différent de celui du récepteur.
• Consultez le revendeur ou un technicien radio / TV expérimenté pour obtenir de l'aide.
L'apparence et les caractéristiques techniques du produit sont sujettes à modification sans préavis.
Ce produit est conçu et prévu pour être utilisé par des personnes âgées de 14 ans et plus.
© 2019 Celestron • Tous droits réservés.
celestron.com/pages/technical-support
Téléphone : 1(800) 421-9649
2835 Columbia Street • Torrance, CA 90503 É.-U.
71221
06-19

BEDIENUNGSANLEITUNG
Modell-Nr. 71221
NV-2 NACHTSICHTGERÄT


DEUTSCH I 3
Inhaltsverzeichnis
Einführung . . . . . . . . . . . . . . . . . . . . . . . . . . . . . . . . . . . . . . . . . . . . . . . . . 4
Hinweise zur Verwendung bei schlechten Lichtverhältnissen und völliger Dunkelheit . . . . 4
Lieferumfang . . . . . . . . . . . . . . . . . . . . . . . . . . . . . . . . . . . . . . . . . . . . . . . 5
Zubehör . . . . . . . . . . . . . . . . . . . . . . . . . . . . . . . . . . . . . . . . . . . . . . . . . 5
Bedienungsanweisungen . . . . . . . . . . . . . . . . . . . . . . . . . . . . . . . . . . . . . . . . 6
Akku einlegen . . . . . . . . . . . . . . . . . . . . . . . . . . . . . . . . . . . . . . . . . . . . . . 6
Einschalten . . . . . . . . . . . . . . . . . . . . . . . . . . . . . . . . . . . . . . . . . . . . . . . 6
Ausschalten . . . . . . . . . . . . . . . . . . . . . . . . . . . . . . . . . . . . . . . . . . . . . . . 6
Beobachten . . . . . . . . . . . . . . . . . . . . . . . . . . . . . . . . . . . . . . . . . . . . . . . 7
Helligkeit des Bildschirms anpassen . . . . . . . . . . . . . . . . . . . . . . . . . . . . . . . . . . 7
Infrarotstrahler anpassen . . . . . . . . . . . . . . . . . . . . . . . . . . . . . . . . . . . . . . . . 8
Standbildaufnahme . . . . . . . . . . . . . . . . . . . . . . . . . . . . . . . . . . . . . . . . . . . 8
Wiedergabe . . . . . . . . . . . . . . . . . . . . . . . . . . . . . . . . . . . . . . . . . . . . . . . 9
Dateien löschen . . . . . . . . . . . . . . . . . . . . . . . . . . . . . . . . . . . . . . . . . . . . . 10
Videoaufnahme . . . . . . . . . . . . . . . . . . . . . . . . . . . . . . . . . . . . . . . . . . . . . 10
Zeit/Datum einstellen . . . . . . . . . . . . . . . . . . . . . . . . . . . . . . . . . . . . . . . . . . 11
Digitalzoom . . . . . . . . . . . . . . . . . . . . . . . . . . . . . . . . . . . . . . . . . . . . . . . 11
Videoausgang . . . . . . . . . . . . . . . . . . . . . . . . . . . . . . . . . . . . . . . . . . . . . . 12
Anschluss an einen Computer . . . . . . . . . . . . . . . . . . . . . . . . . . . . . . . . . . . . . 12
Stromversorgung . . . . . . . . . . . . . . . . . . . . . . . . . . . . . . . . . . . . . . . . . . . . . 12
Akku . . . . . . . . . . . . . . . . . . . . . . . . . . . . . . . . . . . . . . . . . . . . . . . . . . . 12
Akku laden . . . . . . . . . . . . . . . . . . . . . . . . . . . . . . . . . . . . . . . . . . . . . . . . 12
Technische Daten . . . . . . . . . . . . . . . . . . . . . . . . . . . . . . . . . . . . . . . . . . . . . 13
Wartung und Sicherheitshinweise . . . . . . . . . . . . . . . . . . . . . . . . . . . . . . . . . . . 13
Zweijährige eingeschränkte Garantie von Celestron . . . . . . . . . . . . . . . . . . . . . . . . 14

4 I DEUTSCH
Das Celestron NV-2 Nachtsichtgerät wurde für den Einsatz bei Tag und Nacht entwickelt. Es bietet sowohl standardmäßige
Beobachtung als auch Nachtsicht, Standbild- und Videoaufzeichnung sowie gerätinterne Wiedergabe. Die optische
Vergrößerung ist 4,5-fach und der digitale Zoom ist 5,0-fach.
Das Celestron NV-2 Nachtsichtgerät verfügt über ein 640 x 480 VGA-Farbdisplay für eine verbesserte Bildqualität bei
Tageslicht. Nachts kann das Celestron NV-2 Nachtsichtgerät bei völliger Dunkelheit Objekte in einer Entfernung von bis zu
200 m auflösen.
Das Celestron NV-2 Nachtsichtgerät zeichnet alle Standbild- und Videodateien auf seiner auswechselbaren Speicherkarte
auf. Bei Verwendung der Speicherkarte entspricht jede halben Stunde Video einem Gigabyte Speicherkartengröße (z. B.
entspricht eine 2-GB-Karte einer Stunde Video, während eine 32-GB-Karte 16 Stunden entspricht).
Im Lieferumfang des Celestron NV-2 Nachtsichtgeräts ist ein USB 2.0-Kabel enthalten. Mit diesem Kabel können Sie das
Gerät über ein USB-Steckernetzteil (nicht im Lieferumfang enthalten) aufladen und aufgezeichnete Dateien auf einen
Computer übertragen. Ein Audio- und Videoausgangskabel für den Anschluss von PAL- und NTSC-Monitoren ist ebenfalls
enthalten.
Im Lieferumfang ist ein wiederaufladbarer Lithium-Ionen-Akku AW 18650 3,7 V/2.200 mAh enthalten. Dieser ermöglicht dem
Celestron NV-2 eine Betriebsdauer von 2-3 Stunden.
HINWEISE ZUR VERWENDUNG BEI SCHLECHTEN
LICHTVERHÄLTNISSEN UND VÖLLIGER DUNKELHEIT
Die Nachtsichtleistung des Celestron NV-2 verbessert sich bei völliger Dunkelheit, wenn der Infrarotstrahler aktiviert wurde.
Dies erhöht die Bildschärfe.
Stellen Sie das Fokussierrad des Infrarotstrahlers ein, um Motive in unterschiedlichen Entfernungen zu beobachten. Das
Celestron NV-2 Nachtsichtgerät verwendet ein CCD für schwache Beleuchtung. Es kann in Umgebungen mit wenig Licht
(aber nicht vollständig dunkel) verwendet werden, ohne dass der Infrarotstrahl aktiviert werden muss.
EINFÜHRUNG

DEUTSCH I 5
LIEFERUMFANG
1 Objektivlinse
2 Fokussierrad
3 Akkufach
4 Infrarotstrahler
5 Anschlussabdeckung
6-7 Tasten +/-
8 Modus Taste
9 Ein/Aus/Eingabe Taste
10 Okular
11 Stativadapter
12 Speicherkarteneinschub
13 Audio-/Video-Anschluss
14 Ladeanzeige-LED
15 USB-Anschluss
ZUBEHÖR
• AV-Kabel
• USB-Kabel
• AW 18650 3,7 V / 2.200 mAh wiederaufladbarer
Lithium-Ionen-Akku
• Tragetasche
• Handschlaufe
• Objektivreinigungstuch

6 I DEUTSCH
Entfernen Sie den Akkufachdeckel, legen Sie den Akku mit dem
Minuspol nach innen ein, schließen Sie den Akkufachdeckel
wieder und schalten Sie das Gerät ein. Sobald der Bildschirm
aufleuchtet, ist das Celestron NV-2Nachtsichtgerät
einsatzbereit.
WICHTIGER HINWEIS:
• Verwenden Sie nur das vorgeschriebene Akkumodell
• Der Akku muss voll aufgeladen sein
• Der Akku muss ordnungsgemäß eingelegt sein
(Minuspol nach innen gerichtet)
EINSCHALTEN
• Entfernen Sie die Objektivkappe.
• Drücken Sie einmal die Ein/Aus/Eingabe Taste (9). Schauen
Sie durch das Okular (10). Wenn Sie sehen, dass der Bild-
schirm eingeschaltet ist (wie auf dem Bild rechts), funktio-
niert das Gerät.
Bedeutung der Symbole:
1. Fotomodus
2. Akkustand
3. Speicherkarte wurde eingesetzt
4. Die Anzahl der Bilder, die aufgenommen werden können,
hängt von der Speicherkapazität ab
AKKU EINLEGEN
BEDIENUNGSANWEISUNGEN
Akku-
fachdeckel
AUSSCHALTEN
Halten Sie die Ein / Aus Taste (9) für 3 Sekunden gedrückt, um das Celestron NV-2 Nachtsichtgerät auszuschalten.
1 2 3 4

DEUTSCH I 7
BEOBACHTEN
• Entfernen Sie die Objektivkappe. Richten Sie das Objektiv auf das Motiv und schauen Sie durch das Okular (10).
• Stellen Sie den Dioptrienring am Okular (10) so ein, dass Sie den Bildschirm deutlich erkennen können.
• Drehen Sie das Fokussierrad (2), bis das Objekt scharf angezeigt wird.
• Die Helligkeit des Bildschirms wird automatisch an die Umgebungshelligkeit angepasst.
• Drücken Sie die Tasten +/- (6 und 7), um die Ansicht zu vergrößern oder zu verkleinern. Der Zoombereich reicht von 1-fach
bis 8-fach.
• Bei schlechten Lichtverhältnissen ist kein Infrarotstrahler erforderlich.
• Bei völliger Dunkelheit ist die Verwendung des Infrarotstrahlers ratsam. Passen Sie die Helligkeit des Infrarotstrahlers an,
um das Motiv klar zu erkennen.
WICHTIGER HINWEIS:
Blockieren Sie nicht den Infrarotstrahler des Celestron NV-2 Nachtsichtgeräts, wenn Sie das Gerät bei völliger Dunkelheit
verwenden.
HELLIGKEIT DES BILDSCHIRMS ANPASSEN
• Halten Sie die Modus Taste (8) für 3 Sekunden gedrückt,
um das Menü zur Einstellung der Bildschirmhelligkeit
aufzurufen.
• Die Zahl gibt die aktuelle Helligkeit des Bildschirms an
(siehe Bild rechts).
• Drücken Sie die Modus Taste (8), um das Symbol „*“ nach
oben oder unten zu bewegen und wählen Sie „Helligkeit“
(Bright) aus, um die Helligkeit anzupassen.
• Stellen Sie mit den Tasten +/- (6 und 7) die Helligkeit auf 1
(niedrigste) bis 9,9 (höchste) ein.

8 I DEUTSCH
INFRAROTSTRAHLER ANPASSEN
• Halten Sie im Beobachtungsmodus (Standbild- / Videoauf-
nahme) die Modus Taste (8) 3 Sekunden lang gedrückt, um
das Menü zur Einstellung des Infrarotstrahlers aufzurufen
(siehe Abbildung rechts). Die Ziffern hinter „Strahler“
(Lamp) zeigen die aktuelle Helligkeit des Infrarotstrah-
lers an.
• Drücken Sie die Modus Taste (8), um „Strahler“ (Lamp)
zum Einstellen der Helligkeit auszuwählen.
• Drücken Sie die Tasten +/- (6 und 7), um die Strahlhellig-
keit von 0 bis 9.9 einzustellen. Stellen Sie die Helligkeit auf
0, um den Infrarotstrahler abzuschalten.
• Wenn der Infrarotstrahler eingeschaltet ist, wird in der oberen
linken Ecke „NL“ angezeigt. Die Zahl hinter dem „NL“ ist die
aktuelle Helligkeitseinstellung des Infrarotstrahlers.
WICHTIGER HINWEIS:
Das Menü zur Einstellung der Bildschirmhelligkeit und das
Menü zur Einstellung der Infrarotstrahlerhelligkeit werden
automatisch geschlossen, wenn 5 Sekunden nach Aktivie-
rung des Menüs keine Bedienvorgänge ausgeführt werden.
STANDBILDAUFNAHME
Wenn Sie das Gerät einschalten, befi ndet es sich automa-
tisch im Beobachtungsmodus (Bildaufzeichnung).
Bedeutung der Symbole:
1. Fotomodus
2. Akkustand
3. Speicherkarte wurde eingesetzt
4. Die Anzahl der Bilder, die aufgenommen werden können,
hängt von der Speicherkapazität ab
Klicken Sie einmal auf die Eingabe Taste (9), um ein Bild auf-
zunehmen. Das Bild wird automatisch auf der Speicherkarte
gespeichert.
Die auf dem Bildschirm angezeigte Zahl (4) gibt die
maximale Anzahl der Bilder an, die abhängig von der
Speicherkapazität auf der Speicherkarte aufgezeichnet
werden können. Diese Zahl wird durch die Speicherka-
pazität der Karte bestimmt. Die tatsächliche Anzahl der
Bilder kann variieren.
1 2 3 4

DEUTSCH I 9
WIEDERGABE
• Rufen Sie mit der Modus Taste (8) den Wiedergabemodus
auf. Alle auf der Speicherkarte gespeicherten Videos und
Bilder werden erkannt und automatisch wiedergegeben.
• Wählen Sie mit den Tasten +/- (6 und 7) die Dateien aus.
Drücken Sie die Eingabe Taste (9), um die Wiedergabe zu
starten oder vorübergehend anzuhalten.
Was bedeuten die Symbole in Fotowiedergabe:
1. Anzeigemodus
2. Akkustand
3. Speicherkarte wurde eingesetzt
4. Gesamtanzahl der gespeicherten Dateien
Was bedeuten die Symbole in Videowiedergabe:
1. Anzeigemodus
2. Akkustand
3. Datum und länge des Videos
4. Speicherkarte wurde eingesetzt
5. Länge des Videos
6. Gesamtanzahl der gespeicherten Dateien
1 2 3 4 5 6
1 2 3 4

10 I DEUTSCH
DATEIEN LÖSCHEN
• Halten Sie im Wiedergabemodus die Eingabe Taste (9)
gedrückt, um die zu löschende Datei auszuwählen.
• Die Dateiinformationen werden auf dem Bildschirm einge-
blendet. Wählen Sie mit den Tasten +/- (6 und 7) die zu
löschende Datei aus.
• Drücken Sie erneut die Eingabe Taste (9), um den
Löschvorgang der Auswahl zu bestätigen. Drücken Sie
zum Verlassen die Modus Taste (8).
• Drücken Sie im Wiedergabemodus die Tasten +/- (6 und
7), um verschiedene Aufnahmen auszuwählen.
• Videos und Bilder werden automatisch erkannt und anhand
der zeitlichen Reihenfolge wiedergegeben.
• Drücken Sie im Videowiedergabemodus die Eingabe Taste
(9), um das Video abzuspielen.
• Drücken Sie erneut die Eingabe Taste (9), um das Video
vorübergehend anzuhalten.
• Kehren Sie mit der Modus Taste (8) zum Beobachtungsmodus
(Bildaufnahme) zurück.
VIDEOAUFNAHME
Drücken Sie im Beobachtungsmodus (Bildaufnahme) die
Modus Taste (8) einmal, um den Videoaufnahmemodus
aufzurufen.
Bedeutung der Symbole:
1. Im Video-Aufnahmemodus
2. Akkustand
3. Datum und Verbleibende Aufnahmezeit
4. Verbleibende Aufnahmezeit
• Starten Sie mit der Eingabe Taste (9) die Aufnahme.
• Das Video wird automatisch auf der Speicherkarte gesichert.
• Die verbleibende Aufnahmezeit (4) wird basierend auf der
Speicherkapazität der Karte berechnet. Sie kann von der
tatsächlichen Aufnahmezeit abweichen.
• Drücken Sie erneut die Eingabe Taste (9), um die Video-
aufnahme vorübergehend anzuhalten oder zu beenden.
1 2 3 4

DEUTSCH I 11
ZEIT/DATUM EINSTELLEN
• Halten Sie die Eingabe Taste (9) gedrückt, um das Menü
aufzurufen und drücken Sie die Modus Taste (8), um „Zeit-/
Datumseinstellung“ (Time set) auszuwählen.
• Rufen Sie mit den Tasten +/- (6 und 7) den Einstellmodus
für Zeit/Datum auf.
1. Datumsformatauswahl
2. Datumseinstellung
3. Zeiteinstellung
• Drücken Sie die Tasten +/- (6 und 7), um das Datumsformat
zu wechseln.
• Bewegen Sie den Cursor mit der Eingabe Taste (9) zu einer
anderen Position.
• Drücken Sie die Tasten +/- (6 und 7), um Datum und
Uhrzeit einzustellen.
• Drücken Sie erneut die Eingabe Taste (9), um den Einstell-
modus für Zeit/Datum zu verlassen.
DIGITALZOOM
Der Digitalzoom kann im Beobachtungs- (Bildaufnahme)
und Videoaufnahmemodus verwendet werden.
• Drücken Sie die Taste + (7) einmal, um 1 Stufe zu
vergrößern. Die maximale Vergrößerung ist das 5-fache
der Standardvergrößerung.
• Drücken Sie die Taste - (6) einmal, um 1 Stufe zu verkleinern.
Die minimale Vergrößerung ist 1-fach (entspricht der
Standardvergrößerung).
• Die Vergrößerung wird auf dem Bildschirm angezeigt (5).
1 2 3 4 5
1
2
3

12 I DEUTSCH
STROMVERSORGUNG
AKKU
Im Lieferumfang ist ein wiederaufladbarer Lithium-Ionen-Akku AW 18650 3,7 V/2.200 mAh enthalten. Laden Sie den Akku
vor dem ersten Gebrauch zu seinem Schutz 10 Stunden lang auf.
AKKU LADEN
Im Lieferumfang ist ein USB-Kabel zum Anschließen an eine externe Stromversorgung enthalten. Schließen Sie das
USB-Kabel an den USB-Anschluss (15) des Celestron NV-2-Nachtsichtgeräts an. Schließen Sie das andere Ende des
Kabels an einen USB-Stromanschluss oder ein Netzteil an, das der Spannung des Landes entspricht, in dem das Gerät
aufgeladen wird.
VIDEOAUSGANG
Um ein Video auf anderen Monitoren wiederzugeben, schließen Sie das Videokabel an den Audio- / Video-Ausgangsstecker
(13) und an den Monitor an.
Das Video kann auf dem Monitor wiedergegeben werden. Gleichzeitig wird es auch auf dem Bildschirm des Geräts
wiedergegeben.
ANSCHLUSS AN EINEN COMPUTER
Verbinden Sie das Celestron NV-2 Nachtsichtgerät über das USB 2.0-Kabel mit einem Computer. Nachdem das Gerät
erfolgreich angeschlossen wurde, erkennt der Computer den Inhalt auf der Speicherkarte automatisch. Wenn Sie das
USB-Kabel zur Verbindung mit einem Computer verwenden, muss der Akku des Geräts vollständig aufgeladen sein, um eine
optimale Leistung zu erzielen.

DEUTSCH I 13
Optische Spezifikationen
Vergrößerung 4,5-fach
Objektiv-Linsendurchmesser 40 mm
Gesichtsfeld 5° x 3,75°
Dioptrien ±10
Erkennungsentfernung bei schlechten Lichtverhält-
nissen
2 m - ∞
Erkennungsentfernung bei völliger Dunkelheit Bis zu 200 m bei reflektierenden Motiven
Spezifikationen der Stromquelle
Betriebsspannung 3,7 V
Akku Wiederaufladbarer Lithium-Ionen-Akku
Weitere Spezifikationen
Abmessungen (L x B x H) 161 x 58 x 77 mm
Gewicht 275 g
TECHNISCHE DATEN
WARTUNG UND SICHERHEITSHINWEISE
• Das Celestron NV-2 Nachtsichtgerät ist für einen ordnungsgemäßen Betrieb zwischen -5 °C und 40 °C bei einer
Luftfeuchtigkeit von weniger als 80 % ausgelegt.
• Das Celestron NV-2 Nachtsichtgerät muss stets in seiner Tragetasche aufbewahrt werden, wenn es nicht verwendet wird.
• Bewahren Sie das Celestron NV-2 Nachtsichtgerät an einem kühlen, trockenen und sauberen Ort auf.
• Das Celestron NV-2 Nachtsichtgerät ist nicht wasserdicht oder beschlagsicher. Lassen Sie es nicht auf den Boden fallen
und stoßen Sie mit ihm nirgends an.
• Laden Sie das Gerät sofort auf, wenn sich der LCD-Bildschirm nicht einschalten lässt. Laden Sie den Akku monatlich auf,
um Schäden am Akku zu vermeiden.
• Entfernen Sie Staub und Schmutz mit einer Druckluftdose vom Objektiv. Verwenden Sie zum Entfernen von Schmutz
oder Fingerabdrücken eine sehr kleine Menge Isopropylalkohol und reinigen Sie das Objektiv mit dem mitgelieferten
Mikrofasertuch.

14 I DEUTSCH
ZWEIJÄHRIGE EINGESCHRÄNKTE GARANTIE VON CELESTRON
A. Celestron garantiert, dass dieses Produkt zwei Jahre lang frei von Material- und Verarbeitungsfehlern ist. Celestron repariert oder ersetzt
ein solches Produkt oder Teile davon, das nach Überprüfung durch Celestron einen Material- oder Verarbeitungsfehler aufweist. Als
Voraussetzung für die Verpflichtung von Celestron, dieses Produkt zu reparieren oder zu ersetzen, muss das Produkt zusammen mit dem für
Celestron zufriedenstellenden Kaufnachweis an Celestron zurückgeschickt werden.
B. Vor der Rücksendung muss eine ordnungsgemäße Rücksendenummer bei Celestron eingeholt werden. Bitte richten Sie Ihre Anfrage
an das technische Online-Supportcenter von Celestron unter https://www.celestron.com/pages/technical-support um die Nummer zu
erhalten, die sich auf der Außenseite Ihres Verpackungskartons befindet.
Jeder Rücksendung muss eine schriftliche Erklärung mit Namen, Adresse und Telefonnummer des Eigentümers, unter der er erreicht werden
kann, sowie eine kurze Beschreibung aller beanstandeten Defekte beigefügt werden. Teile oder Produkte, für die ein Ersatz geliefert wird, gehen
in den Besitz von Celestron über.
Der Kunde trägt alle Transportkosten und Versicherungen, sowohl von und zu dem Celestron-Werk, und muss diese Kosten im Voraus bezahlen.
Celestron unternimmt angemessene Anstrengungen, um das von dieser Garantie abgedeckte Produkt innerhalb von 30 Tagen nach Erhalt zu
reparieren oder zu ersetzen. Falls für Reparatur oder Austausch mehr als 30 Tage erforderlich sind, muss Celestron den Kunden entsprechend
informieren. Celestron behält sich das Recht vor, alle Produkte, die nicht mehr hergestellt werden, durch ein neues Produkt mit vergleichbarem
Wert und Funktion zu ersetzen.
Diese Garantie ist nichtig und ohne Wirkung für den Fall, dass ein von der Garantie abgedecktes Produkt im Design oder in der Funktion
verändert wurde, oder missbräuchlich, zweckentfremdet, falsch gehandhabt wurde oder eine nicht autorisierte Reparatur durchgeführt wurde.
Des Weiteren wird eine Produktfehlfunktion oder Verschlechterung bedingt durch normalen Verschleiß durch diese Garantie nicht abgedeckt.
CELESTRON LEHNT JEGLICHE GEWÄHRLEISTUNG, OB AUSDRÜCKLICH ODER STILLSCHWEIGEND, OB DER MARKTGÄNGIGKEIT ODER DER EIGNUNG FÜR EINEN BESTIMMTEN ZWECK, AUSSER
DEM HIERIN GENANNTEN, AB. DIE ALLEINIGE VERPFLICHTUNG VON CELESTRON UNTER DIESER EINGESCHRÄNKTEN GARANTIE BESTEHT DARIN, DAS DURCH DIE GARANTIE ABGEDECKTE
PRODUKT IN ÜBEREINSTIMMUNG MIT DEN HIERIN FESTGEHALTENEN BEDINGUNGEN ZU REPARIEREN ODER AUSZUTAUSCHEN. CELESTRON LEHNT AUSDRÜCKLICH JEGLICHE HAFTUNG FÜR
ENTGANGENE PROFITE, ALLGEMEINE, SPEZIELLE, INDIREKTE ODER FOLGESCHÄDEN AB, DIE SICH AUS EINER GARANTIEVERLETZUNG ERGEBEN KÖNNTEN ODER DIE DURCH NUTZUNG BZW.
UNFÄHIGKEIT ZUR NUTZUNG JEGLICHEN CELESTRON-PRODUKTS ERGEBEN. JEGLICHE STILLSCHWEIGENDE ODER NICHT BEANSPRUCHBARE GEWÄHRLEISTUNGEN SIND ZEITLICH AUF ZWEI
JAHRE AB DATUM DES URSPRÜNGLICHEN KAUFS BESCHRÄNKT.
Einige Staaten erlauben keinen Ausschluss oder keine Beschränkung von zufälligen oder Folgeschäden sowie keine zeitliche Begrenzung einer
stillschweigenden Garantie; daher könnten die oben genannten Beschränkungen und Ausschlüsse auf Sie nicht zutreffen.
Diese Garantie gibt Ihnen bestimmte Rechte und darüber hinaus könnten Sie auch weitere Rechte haben, die von Land zu Land variieren.
Celestron behält sich das Recht vor, jegliches Modell und jeglichen Produkttyp zu modifizieren oder aus der Produktlinie auszuschließen, ohne
Ihnen dies vorher anzukündigen. Wenn ein Garantiefall eintritt oder wenn Sie Hilfestellung bei der Verwendung Ihres Produkts benötigen,
besuchen Sie das technische Online-Supportcenter von Celestron unter https://www.celestron.com/pages/technical-support.
FCC-ERKLÄRUNG: Dieses Gerät wurde getestet und entspricht den Grenzwerten für digitale Geräte der Klasse B in Übereinstimmung
mit Artikel 15 der FCC-Bestimmungen. Diese Grenzwerte sollen einen angemessenen Schutz gegen nachteilige Störungen in häuslichen
Installationen bieten. Dieses Gerät erzeugt, verwendet Hochfrequenzenergie und kann diese ausstrahlen und kann, wenn es nicht in
Übereinstimmung mit den Anweisungen installiert und verwendet wird, Störungen im Funkverkehr verursachen. Es kann jedoch nicht
garantiert werden, dass bei einer bestimmten Installation keine Störungen auftreten. Falls dieses Gerät Störungen des Radio- oder
Fernsehempfangs verursacht, was durch ein vorübergehendes Ausschalten des Geräts festgestellt werden kann, wird der Benutzer dazu
angehalten, die Störung durch eine oder mehrere der nachstehenden Maßnahmen zu beheben:
• Die Empfangsantenne verlegen oder neu ausrichten.
• Den Abstand zwischen dem Gerät und dem Empfänger vergrößern.
• Schließen Sie das Gerät an eine Steckdose an, die nicht an den Stromkreis des Empfängers angeschlossen ist.
• Wenden Sie sich an den Händler oder einen erfahrenen Radio-/Fernsehtechniker.
Produktdesign und technische Daten können ohne Vorankündigung geändert werden.
Dieses Produkt wurde für die Verwendung durch Personen von 14 Jahren und darüber entworfen und vorgesehen.
© 2019 Celestron • Alle Rechte vorbehalten
celestron.com/pages/technical-support
Telefonnummer: 1(800) 421-9649
2835 Columbia Street • Torrance, CA 90503 USA.
71221
06-19

MANUALE DI ISTRUZIONI
Modello n. 71221
TELESCOPIO MONOCULARE
PER VISIONE NOTTURNA NV-2


ITALIANO I 3
Indice
Introduzione . . . . . . . . . . . . . . . . . . . . . . . . . . . . . . . . . . . . . . . . . . . . . . . . 4
Note sull'utilizzo con poca luce e in completa oscurità . . . . . . . . . . . . . . . . . . . . . . 4
Contenuto della confezione . . . . . . . . . . . . . . . . . . . . . . . . . . . . . . . . . . . . . . 5
Accessori . . . . . . . . . . . . . . . . . . . . . . . . . . . . . . . . . . . . . . . . . . . . . . . . 5
Istruzioni d'uso . . . . . . . . . . . . . . . . . . . . . . . . . . . . . . . . . . . . . . . . . . . . . . 6
Installazione della batteria . . . . . . . . . . . . . . . . . . . . . . . . . . . . . . . . . . . . . . . . 6
Accensione . . . . . . . . . . . . . . . . . . . . . . . . . . . . . . . . . . . . . . . . . . . . . . . 6
Spegnimento . . . . . . . . . . . . . . . . . . . . . . . . . . . . . . . . . . . . . . . . . . . . . . 6
Osservazione . . . . . . . . . . . . . . . . . . . . . . . . . . . . . . . . . . . . . . . . . . . . . . 7
Regolazione della luminosità dello schermo . . . . . . . . . . . . . . . . . . . . . . . . . . . . . . 7
Regolazione del raggio infrarossi . . . . . . . . . . . . . . . . . . . . . . . . . . . . . . . . . . . . 8
Registrazione immagini . . . . . . . . . . . . . . . . . . . . . . . . . . . . . . . . . . . . . . . . . 8
Riproduzione . . . . . . . . . . . . . . . . . . . . . . . . . . . . . . . . . . . . . . . . . . . . . . . 9
Eliminazione dei file . . . . . . . . . . . . . . . . . . . . . . . . . . . . . . . . . . . . . . . . . . . 10
Registrazione video . . . . . . . . . . . . . . . . . . . . . . . . . . . . . . . . . . . . . . . . . . . 10
Impostazione dell'ora . . . . . . . . . . . . . . . . . . . . . . . . . . . . . . . . . . . . . . . . . . 11
Zoom digitale . . . . . . . . . . . . . . . . . . . . . . . . . . . . . . . . . . . . . . . . . . . . . . 11
Uscita video . . . . . . . . . . . . . . . . . . . . . . . . . . . . . . . . . . . . . . . . . . . . . . . 12
Collegamento a un computer . . . . . . . . . . . . . . . . . . . . . . . . . . . . . . . . . . . . . . 12
Gestione alimentazione . . . . . . . . . . . . . . . . . . . . . . . . . . . . . . . . . . . . . . . . . 12
Batteria . . . . . . . . . . . . . . . . . . . . . . . . . . . . . . . . . . . . . . . . . . . . . . . . . 12
Caricamento della batteria . . . . . . . . . . . . . . . . . . . . . . . . . . . . . . . . . . . . . . . 12
Specifiche tecniche . . . . . . . . . . . . . . . . . . . . . . . . . . . . . . . . . . . . . . . . . . . . 13
Manutenzione e sicurezza . . . . . . . . . . . . . . . . . . . . . . . . . . . . . . . . . . . . . . . 13
Garanzia limitata di due anni Celestron . . . . . . . . . . . . . . . . . . . . . . . . . . . . . . . 14

4 I ITALIANO
Il telescopio monoculare per visione notturna NV-2 Celestron è ideato per essere impiegato sia di giorno sia di notte.
Permette la visione diurna e notturna, consente di scattare foto e registrare video, e offre la riproduzione integrata.
L'ingrandimento ottico è 4.5x e lo zoom digitale è 5.0x.
Il telescopio monoculare per visione notturna NV-2 Celestron presenta uno schermo a colori VGA 640x480 per una
qualità dell'immagine ottimale durante l'osservazione di giorno. Di notte, il telescopio monoculare per visione notturna NV-2
Celestron è in grado di osservare oggetti fino a una distanza massima di 200 m.
Il telescopio monoculare per visione notturna NV-2 Celestron registra tutte le immagini e i video nella scheda di memoria
removibile. La scheda di memoria utilizza un gigabyte di spazio in memoria per ogni ½ ora di video (ad esempio, una scheda
da 2GB può contenere 1 ora di video, mentre una scheda da 32GB ne può contenere 16 ore).
Il telescopio monoculare per visione notturna NV-2 Celestron ha in dotazione un cavo USB 2.0. Questo cavo può essere
utilizzato per ricaricare l'unità con una presa USB (non in dotazione) e per trasferire i file registrati su un computer. È inoltre
in dotazione un cavo di uscita audio e video per il collegamento a monitor PAL e NTSC.
È in dotazione una batteria agli ioni di litio ricaricabile AW 18650 da 3,7 V e 2.200 mAh. Ciò fornisce al telescopio
monoculare per visione notturna NV-2 Celestron una durata della batteria di 2-3 ore.
NOTE SULL'UTILIZZO CON POCA LUCE E INCOMPLETA OSCURITÀ
Le prestazioni in notturna del telescopio monoculare per visione notturna NV-2 Celestron migliorano in completa oscurità
quando è attivato il raggio infrarossi. Ciò migliora la chiarezza dell'immagine.
Regolare la ghiera di messa a fuoco del raggio infrarossi per osservare soggetti a diversa distanza. Il telescopio monoculare
per visione notturna NV-2 Celestron utilizza una bassa illuminazione CCD. Può essere utilizzato in ambienti con poca luce
(ma non oscurità completa) senza attivare il raggio infrarossi.
INTRODUZIONE

ITALIANO I 5
CONTENUTO DELLA CONFEZIONE
1 Lente obiettivo
2 Ghiera di messa a fuoco
3 Vano batterie
4 Raggio infrarossi
5 Sportellino porte
6-7 Pulsante +/-
8 Pulsante Modalità
9 Pulsante Accensione/Avvio
10 Oculare
11 Adattatore treppiede
12 Vano per scheda di memoria
13 Porta audio/video
14 Spia di indicazione ricarica
15 Porta USB
ACCESSORI
• Cavo AV
• Cavo USB
• Batteria agli ioni di litio ricaricabile AW 18650 3,7
V 2.200 mAh
• Sacca di trasporto
• Cinghia
• Panno per lenti

6 I ITALIANO
Rimuovere lo sportellino del vano batterie, inserire la batteria
con il catodo rivolto verso l'interno, quindi riporre e serrare lo
sportellino del vano batterie e accendere il dispositivo. Una
volta illuminato lo schermo, il telescopio monoculare per visione
notturna NV-2 Celestron è pronto all'uso.
IMPORTANTE:
• Utilizzare esclusivamente il modello di batteria corretto
• La batteria deve essere completamente carica
• Installare la batteria correttamente (il catodo rivolto verso
l'interno)
ACCENSIONE
• Rimuovere il tappo dalla lente dell'obiettivo.
• Premere una volta il pulsante Accensione (9). Guardare
attraverso l'oculare (10). Una volta che lo schermo è acceso
(come mostrato a lato), il dispositivo è in funzione.
Signifi cato icone:
1. Modalità Foto
2. Durata della batteria
3. La scheda di memoria è installata.
4. Numero di immagini che possono essere registrate sulla
base della capacità della memoria
INSTALLAZIONE DELLE BATTERIE
ISTRUZIONI D'USO
Sportellino vano batterie
SPEGNIMENTO
Tenere premuto il pulsante Accensione (9) per 3 secondi per spegnere il telescopio monoculare per visione notturna
NV-2 Celestron.
1 2 3 4

ITALIANO I 7
OSSERVAZIONE
• Rimuovere il tappo dalla lente dell'obiettivo. Puntare l'obiettivo verso il soggetto e guardarvi attraverso (10).
• Regolare l'anello di regolazione diottrica sull'obiettivo (10) fino a vedere chiaramente lo schermo.
• Regolare la ghiera di messa a fuoco (2) fino a mettere a fuoco il soggetto.
• La luminosità dello schermo viene regolata automaticamente sulla base della luminosità dell'ambiente circostante.
• Premere i pulsanti +/- (6 & 7) per ingrandire o ridurre l'ingrandimento. L'intervallo di ingrandimento è da 1x a 8x.
• In condizioni di poca luce, non è necessario l'uso del raggio infrarossi.
• In condizioni di completa oscurità, si consiglia l'uso del raggio infrarossi. Regolare la luminosità del raggio infrarossi per
osservare in modo chiaro il soggetto.
IMPORTANTE:
Non bloccare il raggio infrarossi del telescopio monoculare per visione notturna NV-2 Celestron quando si utilizza il
dispositivo in condizioni di completa oscurità.
REGOLAZIONE DELLA LUMINOSITÀ DELLO SCHERMO
• Tenere premuto il pulsante Modalità (8) per 3 secondi per
accedere alla schermata del menu di regolazione della
luminosità.
• Il numero indica il livello di luminosità dello schermo (vedere
l'immagine a destra).
• Premere il pulsante Modalità (8) per spostare “*” verso
l'alto o verso il basso per selezionare “Bright” e regolare
la luminosità.
• Premere i pulsanti +/- (6 & 7) per regolare la luminosità da
1 (più basso) a 9.9 (più luminoso).

8 I ITALIANO
REGOLAZIONE DEL RAGGIO INFRAROSSI
• In modalità di osservazione (registrazione immagini/video),
tenere premuto il pulsante Modalità (8) per 3 secondi per
accedere al menu di regolazione del raggio infrarossi (come
mostrato a destra). Le cifre di fi anco a "Lamp" mostrano
l'attuale livello di luminosità del raggio infrarossi.
• Premere il pulsante Modalità (8) per selezionare “Lamp” e
regolare la luminosità.
• Premere i pulsanti +/- (6 & 7) per regolare la luminosità
dello schermo da 0 a 9. 9. Per interrompere il raggio
infrarossi, regolare la luminosità su 0.
• Una volta attivato il raggio infrarossi, viene indicato “NL”
nell'angolo in alto a sinistra. Il numero di fi anco a "NL"
mostra l'attuale livello di luminosità del raggio infrarossi.
IMPORTANTE:
Il dispositivo esce automaticamente dal menu di regolazione
della luminosità dello schermo e dal menu di regolazione
della luminosità del raggio infrarossi se non vengono
effettuate operazioni per 5 secondi dopo avere attivato
il rispettivo menu.
REGISTRAZIONE IMMAGINI
Quando il dispositivo viene accesso, si trova automaticamente
in modalità osservazione (registrazione immagini).
Signifi cato icone:
1. Modalità Foto
2. Durata della batteria
3. La scheda di memoria è installata
4. Numero di immagini che possono essere registrate sulla
base della capacità della memoria
Fare clic sul pulsante Avvio (9) per registrare un'immagine.
L'immagine viene salvata automaticamente nella scheda
di memoria.
il numero mostrato sullo schermo (4) indica il numero totale
di immagini che possono essere registrate sulla base della
capacità della scheda di memoria. Il numero viene determinato
dalla capacità della scheda di memoria. L'attuale numero di
immagini può variare.
1 2 3 4

ITALIANO I 9
RIPRODUZIONE
• Premere il pulsante Modalità (8) per accedere alla modalità
riproduzione. Tutte le immagini e i video salvati sulla scheda di
memoria verranno riconosciuti e riprodotti automaticamente.
• Premere i pulsanti +/- (6 & 7) per selezionare i file. Premere
il pulsante Avvio (9) per avviare la riproduzione e mettere
in pausa.
Significato icone in Riproduzione foto:
1. Modalità Riproduzione
2. Indicatore batteria
3. La scheda di memoria è installata
4. Numero totale di file salvati
Significato icone in Riproduzione video:
1. Modalità Riproduzione
2. Indicatore batteria
3. Data e durata del video
4. La scheda di memoria è installata
5. Durata del video
6. Numero totale di file salvati
1 2 3 4 5 6
1 2 3 4

10 I ITALIANO
ELIMINAZIONE DEI FILE
• In modalità riproduzione, tenere premuto il pulsante Avvio
(9) per selezionare il file da eliminare.
• Le informazioni relative al file vengono mostrate sullo
schermo. Premere i pulsanti +/- (6 & 7) per selezionare
il file da eliminare.
• Premere nuovamente il pulsante Avvio (9) per confermare
l'eliminazione. Premere il pulsante Modalità (8) per uscire.
• In modalità riproduzione, premere i pulsanti +/- (6 & 7) per
selezionare diverse registrazioni.
• I video e le immagini verranno riconosciuti automaticamente
e riprodotti in ordine di tempo.
• In modalità di riproduzione video, premere il pulsante Avvio
(9) per riprodurre il video.
• Premere nuovamente il pulsante Avvio (9) per mettere in
pausa il video.
• Premere il pulsante Modalità (8) per tornare indietro alla
modalità osservazione (registrazione immagini).
REGISTRAZIONE VIDEO
In modalità osservazione (registrazione immagini), premere
una volta il pulsante Modalità (8) per accedere alla modalità
di registrazione video.
Significato icone:
1. In modalità riproduzione video
2. Indicatore batteria
3. Data e tempo di registrazione rimanente
4. Tempo di registrazione rimanente
• Premere il pulsante Avvio (9) per avviare la registrazione
• Il video viene salvato automaticamente nella scheda di
memoria.
• Il tempo di registrazione rimanente (4) viene calcolato sulla
base della capacità della scheda di memoria. Potrebbe
differire dall'attuale tempo di registrazione.
• Premere nuovamente il pulsante Avvio (9) per mettere in
pausa o uscire dalla registrazione video.
1 2 3 4

ITALIANO I 11
IMPOSTAZIONE DELL’ORA
• Tenere premuto il pulsante Avvio (9) per accedere al menu,
quindi premere il pulsante Modalità (8) per selezionare
“Time Set.”
• Premere i pulsanti +/- (6 & 7) per accedere al menu di
impostazione dell'ora.
1. Selezione formato ora
2. Impostazione data
3. Impostazione ora
• Premere i pulsanti +/- (6 & 7) per modificare il formato
dell'ora.
• Premere il pulsante Avvio (9) per spostare il cursore in
posizione diversa.
• Premere i pulsanti +/- (6 & 7) per regolare la data e l'ora.
• Premere nuovamente il pulsante Avvio (9) per uscire dalla
modalità di impostazione ora.
ZOOM DIGITALE
Lo zoom digitale può essere utilizzato durante la modalità
di osservazione (registrazione immagini) o di registrazione
video.
• Premere una volta il pulsante + (7) per ingrandire di 1x.
Il potere di ingrandimento massimo è di 5x dal livello di
ingrandimento standard.
• Premere una volta il pulsante - (6) per ridurre l'ingrandimento
di 1x. Il potere di ingrandimento minimo è di 1x (pari al livello
di ingrandimento standard).
• Il potere di ingrandimento è indicato sullo schermo (5).
1 2 3 4 5
1
2
3

12 I ITALIANO
GESTIONE ALIMENTAZIONE
BATTERIA
È in dotazione una batteria agli ioni di litio ricaricabile AW 18650 da 3,7 V e 2.200 mAh. Per proteggere la batteria, lasciarla
caricare per almeno 10 ore prima di utilizzarla per la prima volta.
CARICAMENTO DELLA BATTERIA
È in dotazione un cavo USB per il collegamento a una fonte di alimentazione esterna. Collegare il cavo USB alla porta
USB (15) sul telescopio monoculare per visione notturna NV-2 Celestron. Collegare l'altra estremità del cavo a una porta
di alimentazione USB o a un adattatore CA adeguato alla tensione in uso nel Paese in cui viene ricaricato il dispositivo.
USCITA VIDEO
Per riprodurre un video su altri monitor, collegare il cavo video alla presa di uscita audio/video (13) e collegare il monitor.
Il video può ora essere riprodotto sul monitor. Viene riprodotto contemporaneamente sullo schermo del dispositivo.
COLLEGAMENTO A UN COMPUTER
Collegare il telescopio monoculare per visione notturna NV-2 Celestron a un computer mediante il cavo USB 2.0. Una
volta collegato il dispositivo con successo, il computer riconosce automaticamente il contenuto della scheda di memoria.
Quando di utilizza il cavo USB per collegarsi a un computer, il dispositivo deve avere la batteria completamente carica
per garantire un funzionamento ottimale.

ITALIANO I 13
Specifiche ottiche
Ingrandimento 4.5×
Diametro lente dell'obiettivo 40 mm
Campo di visualizzazione 5°× 3,75°
Anello di regolazione diottrica ±10
Distanza rilevamento con poca luce 2m - ∞
Distanza rilevamento in completa oscurità Fino a 200 m su soggetti illuminati
Specifiche alimentazione
Tensione di funzionamento 3,7 V
Batteria Batteria agli ioni di litio ricaricabile
Altre specifiche
Dimensioni (L x P x A) 161×58×77 mm
Peso 0,61 lb. / 275 g
SPECIFICHE TECNICHE
MANUTENZIONE E SICUREZZA
• Il telescopio monoculare per visione notturna NV-2 Celestron è ideato per funzionare correttamente a temperature
comprese fra -5 °C e 40 °C, e a un livello di umidità inferiore all'80%.
• Il telescopio monoculare per visione notturna NV-2 Celestron deve essere conservato nell'apposita sacca quando non è
in uso.
• Conservare il telescopio monoculare per visione notturna NV-2 Celestron in un luogo fresco, asciutto e pulito.
• Il telescopio monoculare per visione notturna NV-2 Celestron non è impermeabile né anti-nebbia. Evitare urti e cadute.
• Ricaricare immediatamente il dispositivo se lo schermo LCD non può essere acceso. Ricaricare ogni mese la batteria per
evitare danni alla stessa.
• Utilizzando una bomboletta ad aria compressa, eliminare eventuale polvere o detriti dalla lente. Per eliminare sporcizia e
impronte, utilizzare una piccolissima quantità di alcol isopropilico e pulire utilizzando il panno in microfibra in dotazione.

14 I ITALIANO
GARANZIA LIMITATA DI DUE ANNI CELESTRON
A. Celestron garantisce che il prodotto sia privo di difetti nei materiali e nella fabbricazione per due anni. Celestron si riserva di riparare o
sostituire prodotti o parti di prodotti che, dopo un'ispezione da parte di Celestron, risultino essere difettosi nei materiali o nella fabbricazione.
Come condizione per l'obbligo di Celestron di riparare o sostituire il prodotto, il prodotto deve essere presentato a Celestron insieme a una
prova d'acquisto valida.
B. Prima dell'invio del prodotto per la restituzione è necessario ottenere da Celestron un codice di autorizzazione alla restituzione. Inviare
la propria richiesta al centro assistenza tecnica online Celestron su celestron.com/pages/technical-support per ricevere il codice da
applicare all'esterno del pacco di invio.
Tutti i resi devono essere accompagnati da una dichiarazione scritta che indichi nome, indirizzo e numero di telefono del proprietario, oltre
a una breve descrizione di ogni difetto riscontrato. Le parti del prodotto per cui si effettua la sostituzione diventano proprietà di Celestron.
I costi di trasporto e assicurazione alla e dalla fabbrica Celestron sono a carico dell’utente, che è tenuto a pagare in anticipo.
Celestron si impegna a riparare o sostituire qualsiasi prodotto coperto da garanzia entro 30 giorni dalla ricezione. Se la riparazione o la
sostituzione dovessero richiedere più di 30 giorni, Celestron si impegna a notificare il cliente di conseguenza. Celestron si riserva il diritto di
sostituire qualsiasi prodotto di cui sia stata interrotta la produzione con un prodotto nuovo di valore e funzione simile.
La presenta garanzia è resa nulla o priva d'effetto nel caso in cui il prodotto venga alterato nel design o nelle funzioni, o sia soggetto ad abusi,
usi impropri o riparazioni non autorizzate. Inoltre, il malfunzionamento o il deterioramento del prodotto causata dalla normale usura non sono
coperti dalla presente garanzia.
CELESTRON NON RICONOSCE ALCUNA GARANZIA, ESPRESSA O IMPLICITA, SIA ESSA DI IDONEITÀ O COMMERCIABILITÀ PER UN PARTICOLARE USO, ECCETTO QUANDO ESPRESSAMENTE
DISPOSTO NEL PRESENTE DOCUMENTO. IL SOLO OBBLIGO DI CELESTRON RELATIVO A QUESTA GARANZIA LIMITATA È QUELLO DI RIPARARE O SOSTITUIRE IL PRODOTTO COPERTO DALLA
GARANZIA SECONDO I TERMINI QUI INDICATI. CELESTRON DECLINA ESPRESSAMENTE QUALSIASI PERDITA DI PROFITTO, DANNI GENERALI, SPECIALI, INDIRETTI O CONSEGUENTI CHE POTREBBERO
RISULTARE DALLA VIOLAZIONE DI QUALSIASI GARANZIA O DERIVANTI DALL'USO O DALL'IMPOSSIBILITÀ DI UTILIZZARE QUALSIASI PRODOTTO CELESTRON. LE GARANZIE IMPLICITE E CHE NON
POSSONO ESSERE DECLINATE SONO LIMITATE NELLA DURATA A UN TERMINE DI DUE ANNI DALLA DATA D'ACQUISTO.
Alcuni Stati non consentono l’esclusione o la limitazione di danni accidentali o consequenziali oppure la limitazione sulla durata di una garanzia
implicita, pertanto le limitazioni e le esclusioni di cui sopra potrebbero non applicarsi all’utente in questione.
La presente garanzia dà all'utente specifici diritti legali, oltre ad altri diritti che possono variare da Stato a Stato. Celestron si riserva il diritto
di modificare o interrompere, senza previa notifica all’utente, eventuali modelli o stili di telescopio. In caso di problemi relativi alla garanzia
o in caso si necessiti assistenza nell'uso del prodotto, visitare il centro assistenza tecnica online Celestron su https://www.celestron.com/
pages/technical-support.
NOTA FCC: La presente apparecchiatura è stata testata ed è risultata conforme ai limiti imposti per i dispositivi digitali di Classe B, ai
sensi della Parte 15 delle norme FCC. Tali limiti sono stati ideati per fornire un’adeguata protezione nei confronti di interferenze dannose
in installazioni residenziali. La presente apparecchiatura genera, utilizza e può irradiare energia in radio frequenza e, se non installata e
utilizzata conformemente alle istruzioni, può causare interferenze dannose alle radiocomunicazioni. Tuttavia, non esiste alcuna garanzia
che l’interferenza non si verifichi in una particolare installazione. Nel caso in cui la presente apparecchiatura causi interferenze dannose
alla ricezione radio o televisiva, il che potrebbe essere determinato dall'accensione e dallo spegnimento dell'apparecchiatura, l'utente è
incoraggiato a tentare di correggere l'interferenza mediante una o più delle misure seguenti:
• Riorientare o riposizionare l’antenna di ricezione.
• Aumentare la distanza tra l’apparecchiatura e il ricevitore.
• Collegare l’apparecchiatura a una presa su un circuito diverso da quello a cui è collegato il ricevitore.
• Consultare il rivenditore o un tecnico specializzato per ricevere assistenza.
Il design del prodotto e le specifiche sono soggetti a modifiche senza previa notifica.
Questo prodotto è progettato per essere utilizzato da persone di età pari o superiore a 14 anni.
© 2019 Celestron • Tutti i diritti riservati.
celestron.com/pages/technical-support
Telefono: 1(800) 421-9649
2835 Columbia Street • Torrance, CA 90503 Stati Uniti
71221
06-19

MANUAL DE INSTRUCCIONES
Modelo #71221
CATALEJO DE VISIÓN NOCTURNA NV-2


ESPAÑOL I 3
Índice
Introducción . . . . . . . . . . . . . . . . . . . . . . . . . . . . . . . . . . . . . . . . . . . . . . . . 4
Notas sobre el uso con baja luminosidad y oscuridad total . . . . . . . . . . . . . . . . . . . . 4
Contenido de la caja . . . . . . . . . . . . . . . . . . . . . . . . . . . . . . . . . . . . . . . . . . . 5
Accesorios . . . . . . . . . . . . . . . . . . . . . . . . . . . . . . . . . . . . . . . . . . . . . . . . 5
Instrucciones de funcionamiento . . . . . . . . . . . . . . . . . . . . . . . . . . . . . . . . . . . 6
Instalación de batería . . . . . . . . . . . . . . . . . . . . . . . . . . . . . . . . . . . . . . . . . . 6
Encendido . . . . . . . . . . . . . . . . . . . . . . . . . . . . . . . . . . . . . . . . . . . . . . . . 6
Apagado . . . . . . . . . . . . . . . . . . . . . . . . . . . . . . . . . . . . . . . . . . . . . . . . . 6
Observación . . . . . . . . . . . . . . . . . . . . . . . . . . . . . . . . . . . . . . . . . . . . . . . 7
Ajuste del brillo de pantalla . . . . . . . . . . . . . . . . . . . . . . . . . . . . . . . . . . . . . . . 7
Ajuste de la luz infrarroja . . . . . . . . . . . . . . . . . . . . . . . . . . . . . . . . . . . . . . . . 8
Grabación de imagen fija . . . . . . . . . . . . . . . . . . . . . . . . . . . . . . . . . . . . . . . . 8
Reproducción . . . . . . . . . . . . . . . . . . . . . . . . . . . . . . . . . . . . . . . . . . . . . . 9
Borrar archivos . . . . . . . . . . . . . . . . . . . . . . . . . . . . . . . . . . . . . . . . . . . . . 10
Grabación video . . . . . . . . . . . . . . . . . . . . . . . . . . . . . . . . . . . . . . . . . . . . . 10
Configurar hora . . . . . . . . . . . . . . . . . . . . . . . . . . . . . . . . . . . . . . . . . . . . . 11
Zoom digital . . . . . . . . . . . . . . . . . . . . . . . . . . . . . . . . . . . . . . . . . . . . . . . 11
Salida de video . . . . . . . . . . . . . . . . . . . . . . . . . . . . . . . . . . . . . . . . . . . . . 12
Conexión a un ordenador . . . . . . . . . . . . . . . . . . . . . . . . . . . . . . . . . . . . . . . . 12
Gestión de energía . . . . . . . . . . . . . . . . . . . . . . . . . . . . . . . . . . . . . . . . . . . . 12
Batería . . . . . . . . . . . . . . . . . . . . . . . . . . . . . . . . . . . . . . . . . . . . . . . . . . 12
Cargar la batería . . . . . . . . . . . . . . . . . . . . . . . . . . . . . . . . . . . . . . . . . . . . . 12
Especificaciones técnicas . . . . . . . . . . . . . . . . . . . . . . . . . . . . . . . . . . . . . . . . 13
Mantenimiento y seguridad . . . . . . . . . . . . . . . . . . . . . . . . . . . . . . . . . . . . . . . 13
Garantía limitada por dos años de Celestron . . . . . . . . . . . . . . . . . . . . . . . . . . . . 14

4 I ESPAÑOL
El catalejo de visión nocturna NV-2 de Celestron ha sido diseñado para uso de día o de noche. Ofrece observación normal
y con visión nocturna, captura de fotografía y video y reproducción en el mismo dispositivo. El aumento óptico es de 4,5x,
y el zoom digital de 5,0x.
El catalejo de visión nocturna NV-2 de Celestron incluye una pantalla a color VGA de 640x480 para una calidad de imagen
mejorada durante la observación diurna. De noche, el catalejo de visión nocturna NV-2 de Celestron puede definir objetos
hasta 200m de distancia en oscuridad total.
El catalejo de visión nocturna NV-2 de Celestron registra todos los archivos de captura y video en su tarjeta de memoria
extraíble. El uso de la tarjeta de memoria equivale a 1/2 hora de video por cada gigabyte de memoria de tarjeta (por ejemplo,
una tarjeta de 2GB equivale a 1 hora de video, mientras que una tarjeta de 32GB equivale a 16 horas).
El catalejo de visión nocturna NV-2 de Celestron incluye un cable USB 2.0. El cable puede usarse para cargar la unidad con
una toma USB (no incluida), y transferir imágenes grabadas a un ordenador. También se incluye un cable de salida audio y
videeo para conectar a monitores tanto PAL como NTSC.
Incluye una batería de litio ión recargable AW 18650 3,7V 2200mAh. Ofrece al catalejo de visión nocturna NV-2 de
Celestron 2-3 horas de duración de batería.
NOTAS SOBRE EL USO CON BAJA LUMINOSIDAD
Y OSCURIDAD TOTAL
El rendimiento de visión nocturna del catalejo de visión nocturna NV-2 de Celestron mejora en oscuridad total cuando se
activa la luz infrarroja. De este modo se aumenta la claridad de la imagen.
Ajuste la rueda de enfoque de la luz infrarroja para observar sujetos a distintas distancias. El catalejo de visión nocturna
NV-2 de Celestron usa un CCD de baja iluminación. Puede usarse en entornos con baja luminosidad (sin oscuridad total)
sin activar la luz infrarroja.
INTRODUCCIÓN

ESPAÑOL I 5
CONTENIDO DE LA CAJA:
1 Lente de objetivo
2 Rueda de enfoque
3 Compartimiento de baterías
4 Luz infrarroja
5 Cubierta del puerto
6-7 Botón +/-
8 Botón de modo
9 Botón Encendido / Intro
10 Ocular
11 Adaptador para trípode
12 Ranura de tarjeta de memoria
13 Puerto audio/video
14 Testigo indicador de carga
15 Puerto USB
ACCESORIOS
• Cable AV
• Cable USB
• Batería recargable AW 18650 3,7V 2200mAh
de litio ión
• Funda de transporte
• Correa para mano
• Gamuza para lente

6 I ESPAÑOL
Retire la cubierta del compartimiento de batería, introduzca
la batería con el cátodo orientado hacia dentro, vuelva a
colocar fi rmemente la cubierta y encienda el dispositivo.
Cuando se ilumine la pantalla el catalejo de visión nocturna
NV-2 de Celestron estará listo para el uso.
IMPORTANTE:
• Use exclusivamente el modelo de batería correcto
• La batería debe estar totalmente cargada
• La batería debe instalarse correctamente
(con el cátodo orientado hacia dentro)
ENCENDIDO
• Saque la tapa de la lente del objetivo.
• Pulse el botón de encendido (9) una vez. Mire por el ocular
(10). Cuando vea que se enciende la pantalla (como en la
imagen de la derecha) el dispositivo estará funcionando.
Signifi cado de los iconos:
1. Modo fotografía
2. Duración de batería
3. Tarjeta de memoria instalada
4. Número de imágenes que pueden grabarse según la
capacidad de memoria
INSTALACIÓN DE BATERÍA
INSTRUCCIONES DE USO
Cubierta
del compartimiento de baterías
APAGADO
Mantenga pulsado el botón de encendido (9) 3 segundos para apagar el catalejo de visión nocturna NV-2 de Celestron.
1 2 3 4

ESPAÑOL I 7
OBSERVACIÓN
• Saque la tapa de la lente del objetivo. Apunte el objetivo al sujeto y mire por el ocular (10).
• Ajuste la arandela de dioptría del ocular (10) hasta que pueda ver claramente la pantalla
• Ajuste la rueda de enfoque (2) hasta que el sujeto esté enfocado.
• El brillo de la pantalla se ajustará automáticamente según la luminosidad del entorno.
• Pulse los botones +/- (6 y 7) para aumentar o reducir. El alcance del zoom es de 1x a 8x.
• En condiciones de baja luminosidad la luz infrarroja no es necesaria.
• En oscuridad total se recomienda usar la luz infrarroja. Ajuste el brillo de la luz infrarroja para observar al sujeto con claridad.
IMPORTANTE:
No obstruya la luz infrarroja del catalejo de visiòn nocturna NV-2 de Celestron cuando use el dispositivo en condiciones de
oscuridad total.
AJUSTE DEL BRILLO DE PANTALLA
• Mantenga pulsado el botón Modo (8) 3 segundos para
acceder al modo de ajuste de brillo de pantalla.
• El número indica el brillo actual de la pantalla (consulte la
imagen de la derecha).
• Pulse el botón Modo (8) para mover «*» arriba o abajo para
seleccionar «Brillo» (Bright) y ajustar el brillo.
• Pulse los botones +/- (6 y 7) para ajustar el brillo de 1 (más
bajo) a 9,9 (más brillante).

8 I ESPAÑOL
AJUSTE DE LA LUZ INFRARROJA
• En modo observación (captura de imágenes/video)
mantenga pulsado el botón Modo (8) 3 segundos para
acceder al menú de ajuste de la luz infrarroja (como se
muestra a la derecha). Los dígitos tras «Luz» (Lamp)
muestran el brillo actual de la luz infrarroja.
• Pulse el botón Modo (8) para seleccionar «Luz» (Lamp)
para seleccionar ajustar el brillo.
• Pulse los botones +/- (6 y 7) para ajustar el brillo de la
pantalla de 0 a 9. 9. Para apagar la luz infrarroja, ajuste el
brillo a 0.
• Cuando la luz infrarroja esté encendida se indicará «NL»
en la esquina superior izquierda. Los dígitos tras «NL»
muestran el brillo actual de la luz infrarroja.
IMPORTANTE:
El menú de ajuste del brillo de la pantalla y el menú de ajuste
del brillo de la luz infrarroja se cierran automáticamente si no
se realizan operaciones en 5 segundos tras activar el menú.
CAPTURA DE IMAGEN FIJA
Cuando encienda el dispositivo estará automáticamente en
modo observación (grabación de imagen).
Signifi cado de los iconos:
1. Modo fotografía
2. Duración de batería
3. Tarjeta de memoria instalada
4. Número de imágenes que pueden grabarse según la
capacidad de memoria
Pulse una vez el botón Intro (9) para capturar una imagen.
La imagen se guardará automáticamente en la tarjeta de
memoria.
El número mostrado en pantalla (4) indica el número total
de imágenes que pueden grabarse según la capacidad
de la tarjeta de memoria. El número lo determina la capaci-
dad de memoria de la tarjeta. El número real de imágenes
puede variar.
1 2 3 4

ESPAÑOL I 9
REPRODUCCIÓN
• Pulse el botón Modo (8) para acceder al modo reproducción.
Las imágenes y el video guardados en la tarjeta de memoria
se reconocerán y se reproducirán automáticamente.
• Pulse el botón +/- (6 y 7) para seleccionar archivos. Pulse
el botón Intro (9) para reproducir y pausar.
Significado de los iconos en Reproducción de fotografías:
1. Modo de reproducción
2. Indicador de batería
3. Tarjeta de memoria instalada
4. Número total de archivos guardados
Significado de los iconos en Reproducción de video:
1. Modo de reproducción
2. Indicador de batería
3. Fecha y duración del video
4. Tarjeta de memoria instalada
5. Duración del video
6. Número total de archivos guardados
1 2 3 4 5 6
1 2 3 4

10 I ESPAÑOL
BORRAR ARCHIVOS
• En modo reproducción, mantenga pulsado el botón Intro
(9) para seleccionar el archivo que desee borrar.
• Se mostrará la información de archivo en pantalla. Pulse
el botón +/- (6 y 7) para seleccionar el archivo que desee
borrar.
• Pulse el botón Intro (9) de nuevo para confirmar el borrado.
Pulse el botón Modo (8) para salir.
• En modo reproducción, pulse el botón +/- (6 y 7) para
seleccionar distintas grabaciones.
• El video y las imágenes se reconocerán automáticamente y
se reproducirán según la secuencia temporal.
• En modo de reproducción video pulse Intro (9) para
reproducir el video.
• Pulse el botón Intro (9) de nuevo para pausar el video.
• Pulse el botón Modo (8) para volver al modo observación
(grabación de imagen).
GRABACIÓN VIDEO
En modo observación (grabación de imagen), pulse el botón
Modo (8) una vez para acceder al modo de grabación video.
Significado de los iconos:
1. En modo de grabación video
2. Indicador de batería
3. Fecha y tiempo de grabación restante
4. Tiempo de grabación restante
• Pulse el botón Intro (9) para iniciar la grabación.
• El video se guardará automáticamente en la tarjeta de
memoria.
• El tiempo de grabación restante (4) se calcula según
la capacidad de memoria de la tarjeta. Puede variar del
tiempo de grabación real.
• Pulse el botón Intro (9) de nuevo para pausar o salir de la
grabación video.
1 2 3 4

ESPAÑOL I 11
AJUSTE DE HORA
• Mantenga pulsado el botón Intro (9) para acceder al menú, y
pulse el botón Modo (8) para seleccionar «Establecer hora»
(Time set).
• Pulse el botón +/- (6 y 7) para acceder al modo de
configuración de hora.
1. Selección de formato de hora
2. Establecer fecha
3. Establecer hora
• Pulse el botón +/- (6 y 7) para cambiar el formato de hora.
• Pulse el botón Intro (9) para cambiar el cursor a una
posición distinta.
• Pulse el botón +/- (6 y 7) para ajustar la fecha y hora.
• Pulse el botón Intro (9) de nuevo para salir del modo de
configuración de hora.
ZOOM DIGITAL
El zoom digital puede usarse para la observación (grabación
de imágenes) y el modo de grabación video.
• Pulse el botón + (7) para aumentar en 1x. La potencia
máxima del zoom es de 5x el nivel de aumento estándar.
• Pulse el botón - (6) para reducir en 1x. La potencia mínima
del zoom es de 1x (igual al nivel de aumento estándar).
• La potencia del zoom se indica en pantalla (5).
1 2 3 4 5
1
2
3

12 I ESPAÑOL
GESTIÓN DE ENERGÍA
BATERÍA
Incluye una batería de litio ión recargable AW 18650 3,7V 2200mAh. Para proteger la batería, déjela cargar 10 horas antes
de usarla por primera vez.
CARGAR LA BATERÍA
Se incluye un cable USB para conectar a una fuente de alimentación externa. Conecte el cable USB al puerto USB (15)
del catalejo de visión nocturna NV-2 de Celestron. Conecte el otro extremo del cable a un puerto de alimentación USB o
adaptador CA adecuado para la tensión del país en el que se cargue el dispositivo.
SALIDA VIDEO
Para reproducir video en otros monitores, conecte el cable video a la toma de salida audio/video (13) y conecte al monitor.
Podrá reproducir el video en el monitor. Simultáneamente también se reproducirá en la pantalla del dispositivo.
CONEXIÓN A UN ORDENADOR
Conecte el catalejo de visión nocturna NV-2 de Celestron a un ordenador con el cable USB 2.0. Cuando se conecte
correctamente el dispositivo, el ordenador reconocerá automáticamente el contenido de la tarjeta de memoria. Cuando
use el cable USB para conectar a un ordenador el dispositivo debe tener una batería totalmente cargada para un
rendimiento óptimo.

ESPAÑOL I 13
Especificaciones ópticas
Aumento 4,5×
Diámetro de lente objetivo 40mm
Campo de visión 5°× 3,75°
Dioptría ±10
Distancia de detección en condiciones de baja
luminosidad
2m - ∞
Distancia de detección en condiciones de oscuridad
total
Hasta 200m con sujetos reflectantes
Especificaciones de alimentación
Voltaje de funcionamiento 3,7V
Batería Batería recargable de litio ión
Otras especificaciones
Dimensiones (L x P x A) 161×58×77mm
Peso 0,61 lb/275 g
ESPECIFICACIONES TÉCNICAS
MANTENIMIENTO Y SEGURIDAD
• El catalejo de visión nocturna NV-2 de Celestron ha sido diseñado para funcionar adecuadamente entre -5°C y 40°C con
un nivel de humedad inferior al 80%.
• El catalejo de visión nocturna NV-2 de Celestron debe guardarse siempre en su funda cuando no se use.
• Guarde el catalejo de visión nocturna NV-2 de Celestron en un entorno fresco, seco y limpio.
• El catalejo de visión nocturna NV-2 de Celestron no es resistente al agua ni a la niebla. Evite dejarlo caer al suelo
y golpearlo.
• Cargue el dispositivo de inmediato cuando no se pueda encender la pantalla LCD. Cargue la batería mensualmente para
evitar que se dañe.
• Usando un bote de aire comprimido, quite el polvo o partículas de la lente. Para eliminar suciedad o huellas dactilares, use
una pequeña cantidad de alcohol isopropílico y límpiela con la gamuza de microfibras incluida.

14 I ESPAÑOL
GARANTÍA LIMITADA POR DOS AÑOS DE CELESTRON
A. Celestron garantiza que su telescopio está libre de defectos de material y mano de obra durante dos años. Celestron reprará o sustituirá
dicho producto o parte del mismo si, al inspeccionarlo Celestron, se determina que es defectuoso por materiales o mano se obra. Como
condición de la obligación de Celestron de reparar o sustituir dicho producto, el producto debe ser devuelto a Celestron junto con una
prueba de compra adecuada para Celestron.
B. Debe obtener un número de autorización de devolución adecuado de Celestron antes de la devolución. Envíe su solicitud al centro de
soporte técnico en línea de Celestron en https://www.celestron.com/pages/technical-support para recibir el número que debe mostrarse
en el exterior de su embalaje de transporte.
Cualquier devolución debe ir acompañada de una declaración por escrito en la que conste el nombre, dirección y número de teléfono de
contacto durante el día del propietario, junto con una breve descripción de cualquier defecto reclamado. Las piezas o productos sustituidos
pasarán a ser propiedad de Celestron.
El cliente será responsable de cualquier coste de transporte y seguros, tanto hacia como desde la fábrica de Celestron, y deberá cubrir
dichos costes.
Celestron realizará todos los esfuerzos razonables para reparar o sustituir cualquier producto cubierto por esta garantía en los treinta días
siguientes a su recepción. En caso de que la reparación o sustitución precise de más de treinta días, Celestron se lo notificará al cliente.
Celestron se reserve el derecho de sustituir cualquier producto que haya sido dejado de fabricar por un nuevo producto de valor y función
comparables.
Esta garantía será nula y sin efecto en caso de que un producto cubierto haya sido modificado en su diseño o función, o sometido a abuso,
mal uso, mala manipulación o reparación no autorizada. Además, las averías o deterioro del producto por desgaste normal no están cubiertos
por esta garantía.
CELESTRON RECHAZA TODA RESPONSABILIDAD POR GARANTÍAS, EXPLÍCITAS O IMPLÍCITAS, SEAN DE ADECUACIÓN COMERCIAL PARA UN USO ESPECÍFICO, SALVO LAS EXPLÍCITAMENTE
AQUÍ DECLARADAS. LA ÚNICA OBLIGACIÓN DE CELESTRON EN ESTA GARANTÍA LIMITADA SERÁ REPARAR O SUSTITUIR EL PRODUCTO CUBIERTO, DE ACUERDO CON LOS TÉRMINOS AQUÍ
ESTABLECIDOS. CELESTRON RECHAZA EXPLÍCITAMENTE CUALQUIER PÉRDIDA DE BENEFICIOS, DAÑOS GENERALES, ESPECIALES, INDIRECTOS O CONSIGUIENTES QUE PUEDAN RESULTAR DE LA
VULNERACIÓN DE CUALQUIER GARANTÍA, O SURJAN DEL USO O INCAPACIDAD PARA USAR CUALQUIER PRODUCTO CELESTRON. CUALQUIER GARANTÍA IMPLÍCITA QUE NO PUEDA REHUSARSE
SERÁ LIMITADA EN SU DURACIÓN A UN TÉRMINO DE DOS AÑOS DESDE LA FECHA DE COMPRA ORIGINAL.
Algunos estados no permiten la exclusión o limitación de datos incidentales o consiguientes, ni permiten limitar el tiempo que dura una garantía
implícita, por lo que las limitaciones indicadas o exclusiones pueden no serle aplicables.
Esta garantía le ofrece derechos legales específicos, y puede tener otros derechos, que varían según el estado. Celestron se reserva el
derecho de modificar o cesar, sin previo aviso, cualquier modelo o estilo de producto. Si surgen problemas de garantía o necesita ayuda para
usar su producto, visite el centro de soporte técnico en línea de Celestron en https://www.celestron.com/pages/technical-support.
NOTA FCC: Este equipo ha sido probado y cumple con los límites de un dispositivo digital de Clase B, según el apartado 15 de las normas
FCC. Estos límites están diseñados para proporcionar una protección razonable contra interferencias dañinas en una instalación doméstica.
Este equipo genera, usa e irradia energía de radiofrecuencia y, si no se instala y utiliza de acuerdo con las instrucciones, puede provocar
interferencias dañinas en comunicaciones por radio. Sin embargo, no existe ninguna garantía de que no se produzcan interferencias en una
instalación concreta. Si este equipo causa interferencias dañinas en la recepción de radio o televisión, lo que puede determinarse apagando
y encendiendo el equipo, se recomienda al usuario intentar corregir las interferencias con una o varias de las medidas siguientes:
• Reorientar o recolocar la antena receptora.
• Aumentar la separación entre el equipo y el receptor.
• Conectar el equipo a una toma de un circuito distinto al que esté conectado el receptor.
• Consultar al vendedor o a un técnico experimentado de radio/TV para obtener ayuda.
El diseño y las especificaciones del producto están sujetos a cambios sin notificación previa.
Este producto ha sido diseñado y está pensado para ser usado por personas de 14 años o más de edad.
© 2019 Celestron • Todos los derechos reservados
celestron.com/pages/technical-support
Teléfono: 1(800) 421-9649
2835 Columbia Street • Torrance, CA 90503 EE.UU.
71221
06-19
-
 1
1
-
 2
2
-
 3
3
-
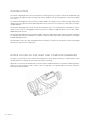 4
4
-
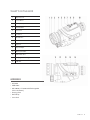 5
5
-
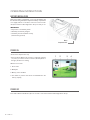 6
6
-
 7
7
-
 8
8
-
 9
9
-
 10
10
-
 11
11
-
 12
12
-
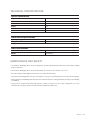 13
13
-
 14
14
-
 15
15
-
 16
16
-
 17
17
-
 18
18
-
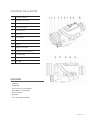 19
19
-
 20
20
-
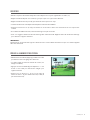 21
21
-
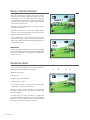 22
22
-
 23
23
-
 24
24
-
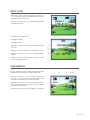 25
25
-
 26
26
-
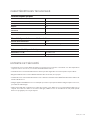 27
27
-
 28
28
-
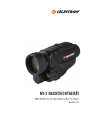 29
29
-
 30
30
-
 31
31
-
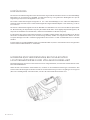 32
32
-
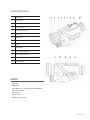 33
33
-
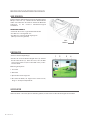 34
34
-
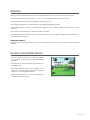 35
35
-
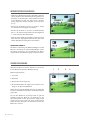 36
36
-
 37
37
-
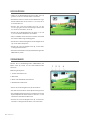 38
38
-
 39
39
-
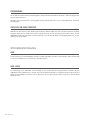 40
40
-
 41
41
-
 42
42
-
 43
43
-
 44
44
-
 45
45
-
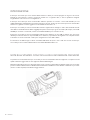 46
46
-
 47
47
-
 48
48
-
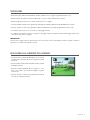 49
49
-
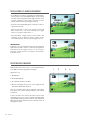 50
50
-
 51
51
-
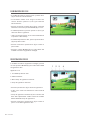 52
52
-
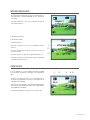 53
53
-
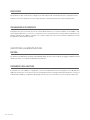 54
54
-
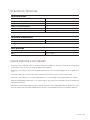 55
55
-
 56
56
-
 57
57
-
 58
58
-
 59
59
-
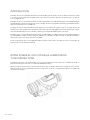 60
60
-
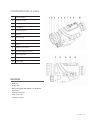 61
61
-
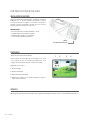 62
62
-
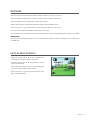 63
63
-
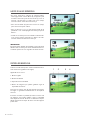 64
64
-
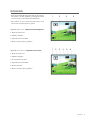 65
65
-
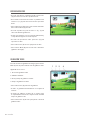 66
66
-
 67
67
-
 68
68
-
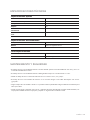 69
69
-
 70
70


Celestron 71221 Manual de usuario
- Categoría
- Monoculares
- Tipo
- Manual de usuario
- Este manual también es adecuado para
en otros idiomas
- français: Celestron 71221 Manuel utilisateur
- italiano: Celestron 71221 Manuale utente
- English: Celestron 71221 User manual
- Deutsch: Celestron 71221 Benutzerhandbuch
Artículos relacionados
-
Celestron 22051 Manual de usuario
-
Celestron AstroMaster 70AZ Manual de usuario
-
Celestron 21063 Instrucciones de operación
-
-
-
Celestron AstroMaster EQ Telescope Series Manual de usuario
-
-
Celestron ASTROMASTER 102AZ Manual de usuario
-
-
Celestron 44312 Manual de usuario

