Celestron 22051 Manual de usuario
- Categoría
- Telescopios
- Tipo
- Manual de usuario
Este manual también es adecuado para

ENGLISH
Instruction Manual
MODELS #22050, 22051, 31150 (60LCM, 80LCM, 114LCM)
TELESCOPES SERIES

2 I ENGLISH

CONTENTS
SOLAR WARNING . . . . . . . . . . . . . . . . . . . . . . . . . . . . . . . . . . . . . . . . . . . . . . . . . . . . . . . . . . . .6
WHAT’S IN THE BOX . . . . . . . . . . . . . . . . . . . . . . . . . . . . . . . . . . . . . . . . . . . . . . . . . . . . . . . . . . 7
ASSEMBLING YOUR TELESCOPE . . . . . . . . . . . . . . . . . . . . . . . . . . . . . . . . . . . . . . . . . . . . . . . . . . 8
The Tripod . . . . . . . . . . . . . . . . . . . . . . . . . . . . . . . . . . . . . . . . . . . . . . . . . . . . . . . . . . . . . . . . . . . 8
The Computerized Mount . . . . . . . . . . . . . . . . . . . . . . . . . . . . . . . . . . . . . . . . . . . . . . . . . . . . . . . . . . . 8
The Telescope Tube . . . . . . . . . . . . . . . . . . . . . . . . . . . . . . . . . . . . . . . . . . . . . . . . . . . . . . . . . . . . . . 9
The Star Diagonal (Refracting Telescopes Only). . . . . . . . . . . . . . . . . . . . . . . . . . . . . . . . . . . . . . . . . . . . . . .9
The Eyepiece . . . . . . . . . . . . . . . . . . . . . . . . . . . . . . . . . . . . . . . . . . . . . . . . . . . . . . . . . . . . . . . . . 10
The StarPointer Finderscope . . . . . . . . . . . . . . . . . . . . . . . . . . . . . . . . . . . . . . . . . . . . . . . . . . . . . . . . . 10
Changing the Finderscope Battery . . . . . . . . . . . . . . . . . . . . . . . . . . . . . . . . . . . . . . . . . . . . . . . . . . . . . . 11
The Hand Control . . . . . . . . . . . . . . . . . . . . . . . . . . . . . . . . . . . . . . . . . . . . . . . . . . . . . . . . . . . . . . . 11
Powering the Telescope. . . . . . . . . . . . . . . . . . . . . . . . . . . . . . . . . . . . . . . . . . . . . . . . . . . . . . . . . . . .11
Moving the Telescope . . . . . . . . . . . . . . . . . . . . . . . . . . . . . . . . . . . . . . . . . . . . . . . . . . . . . . . . . . . . .12
Aligning the Finderscope . . . . . . . . . . . . . . . . . . . . . . . . . . . . . . . . . . . . . . . . . . . . . . . . . . . . . . . . . . . 12
OPERATING THE TELESCOPE. . . . . . . . . . . . . . . . . . . . . . . . . . . . . . . . . . . . . . . . . . . . . . . . . . . . .13
The Hand Control . . . . . . . . . . . . . . . . . . . . . . . . . . . . . . . . . . . . . . . . . . . . . . . . . . . . . . . . . . . . . . . 13
Hand Control Operation. . . . . . . . . . . . . . . . . . . . . . . . . . . . . . . . . . . . . . . . . . . . . . . . . . . . . . . . . . . .14
Alignment Menu. . . . . . . . . . . . . . . . . . . . . . . . . . . . . . . . . . . . . . . . . . . . . . . . . . . . . . . . . . . . . . .14
Sky Align . . . . . . . . . . . . . . . . . . . . . . . . . . . . . . . . . . . . . . . . . . . . . . . . . . . . . . . . . . . . . . . . . . 14
Auto Two-Star Align . . . . . . . . . . . . . . . . . . . . . . . . . . . . . . . . . . . . . . . . . . . . . . . . . . . . . . . . . . . . 16
Two-Star Alignment. . . . . . . . . . . . . . . . . . . . . . . . . . . . . . . . . . . . . . . . . . . . . . . . . . . . . . . . . . . . .16
One-Star Align . . . . . . . . . . . . . . . . . . . . . . . . . . . . . . . . . . . . . . . . . . . . . . . . . . . . . . . . . . . . . . . 17
Solar System Align . . . . . . . . . . . . . . . . . . . . . . . . . . . . . . . . . . . . . . . . . . . . . . . . . . . . . . . . . . . . . 17
Re-Alignment . . . . . . . . . . . . . . . . . . . . . . . . . . . . . . . . . . . . . . . . . . . . . . . . . . . . . . . . . . . . . . . . 18
Object Catalogs . . . . . . . . . . . . . . . . . . . . . . . . . . . . . . . . . . . . . . . . . . . . . . . . . . . . . . . . . . . . . . . .18
Selecting an Object . . . . . . . . . . . . . . . . . . . . . . . . . . . . . . . . . . . . . . . . . . . . . . . . . . . . . . . . . . . . 18
For Planets . . . . . . . . . . . . . . . . . . . . . . . . . . . . . . . . . . . . . . . . . . . . . . . . . . . . . . . . . . . . . . . . . 18
For Stars . . . . . . . . . . . . . . . . . . . . . . . . . . . . . . . . . . . . . . . . . . . . . . . . . . . . . . . . . . . . . . . . . . 18
For Deep-Sky Objects . . . . . . . . . . . . . . . . . . . . . . . . . . . . . . . . . . . . . . . . . . . . . . . . . . . . . . . . . . . 19
Viewing Object Info. . . . . . . . . . . . . . . . . . . . . . . . . . . . . . . . . . . . . . . . . . . . . . . . . . . . . . . . . . . . .19
Sky Tour Mode . . . . . . . . . . . . . . . . . . . . . . . . . . . . . . . . . . . . . . . . . . . . . . . . . . . . . . . . . . . . . . . 19
Direction Buttons . . . . . . . . . . . . . . . . . . . . . . . . . . . . . . . . . . . . . . . . . . . . . . . . . . . . . . . . . . . . . .19
Motor Speed Button . . . . . . . . . . . . . . . . . . . . . . . . . . . . . . . . . . . . . . . . . . . . . . . . . . . . . . . . . . . . 20
MAIN MENU . . . . . . . . . . . . . . . . . . . . . . . . . . . . . . . . . . . . . . . . . . . . . . . . . . . . . . . . . . . . . . . 20
Tracking Menu . . . . . . . . . . . . . . . . . . . . . . . . . . . . . . . . . . . . . . . . . . . . . . . . . . . . . . . . . . . . . . . . . 20
Tracking Mode . . . . . . . . . . . . . . . . . . . . . . . . . . . . . . . . . . . . . . . . . . . . . . . . . . . . . . . . . . . . . . . 20
Tracking Rate . . . . . . . . . . . . . . . . . . . . . . . . . . . . . . . . . . . . . . . . . . . . . . . . . . . . . . . . . . . . . . . . 20
View Time-Site. . . . . . . . . . . . . . . . . . . . . . . . . . . . . . . . . . . . . . . . . . . . . . . . . . . . . . . . . . . . . . . . .21
Hand Control Menu . . . . . . . . . . . . . . . . . . . . . . . . . . . . . . . . . . . . . . . . . . . . . . . . . . . . . . . . . . . . . . 21
Lights Control. . . . . . . . . . . . . . . . . . . . . . . . . . . . . . . . . . . . . . . . . . . . . . . . . . . . . . . . . . . . . . . .21
Scrolling Menu . . . . . . . . . . . . . . . . . . . . . . . . . . . . . . . . . . . . . . . . . . . . . . . . . . . . . . . . . . . . . . . 21
Toggle Bold Font . . . . . . . . . . . . . . . . . . . . . . . . . . . . . . . . . . . . . . . . . . . . . . . . . . . . . . . . . . . . . . 21
Set Contrast . . . . . . . . . . . . . . . . . . . . . . . . . . . . . . . . . . . . . . . . . . . . . . . . . . . . . . . . . . . . . . . . 21
Set Language . . . . . . . . . . . . . . . . . . . . . . . . . . . . . . . . . . . . . . . . . . . . . . . . . . . . . . . . . . . . . . . .21
ENGLISH I 3

Scope Setup Menu . . . . . . . . . . . . . . . . . . . . . . . . . . . . . . . . . . . . . . . . . . . . . . . . . . . . . . . . . . . . . . 21
Setup Time-Site. . . . . . . . . . . . . . . . . . . . . . . . . . . . . . . . . . . . . . . . . . . . . . . . . . . . . . . . . . . . . . .21
Anti-backlash . . . . . . . . . . . . . . . . . . . . . . . . . . . . . . . . . . . . . . . . . . . . . . . . . . . . . . . . . . . . . . . . 21
Slew Limits . . . . . . . . . . . . . . . . . . . . . . . . . . . . . . . . . . . . . . . . . . . . . . . . . . . . . . . . . . . . . . . . . 22
Filter Limits . . . . . . . . . . . . . . . . . . . . . . . . . . . . . . . . . . . . . . . . . . . . . . . . . . . . . . . . . . . . . . . . . 22
Direction Buttons . . . . . . . . . . . . . . . . . . . . . . . . . . . . . . . . . . . . . . . . . . . . . . . . . . . . . . . . . . . . . .22
GoTo Approach . . . . . . . . . . . . . . . . . . . . . . . . . . . . . . . . . . . . . . . . . . . . . . . . . . . . . . . . . . . . . . .22
Cordwrap . . . . . . . . . . . . . . . . . . . . . . . . . . . . . . . . . . . . . . . . . . . . . . . . . . . . . . . . . . . . . . . . . . 22
Utility Menu . . . . . . . . . . . . . . . . . . . . . . . . . . . . . . . . . . . . . . . . . . . . . . . . . . . . . . . . . . . . . . . . . . 22
GPS On/Of . . . . . . . . . . . . . . . . . . . . . . . . . . . . . . . . . . . . . . . . . . . . . . . . . . . . . . . . . . . . . . . . .22
Factory Setting . . . . . . . . . . . . . . . . . . . . . . . . . . . . . . . . . . . . . . . . . . . . . . . . . . . . . . . . . . . . . . . 22
Version . . . . . . . . . . . . . . . . . . . . . . . . . . . . . . . . . . . . . . . . . . . . . . . . . . . . . . . . . . . . . . . . . . . 23
Get Axis Position . . . . . . . . . . . . . . . . . . . . . . . . . . . . . . . . . . . . . . . . . . . . . . . . . . . . . . . . . . . . . . 23
GoTo Axis Position . . . . . . . . . . . . . . . . . . . . . . . . . . . . . . . . . . . . . . . . . . . . . . . . . . . . . . . . . . . . . 23
Hibernate . . . . . . . . . . . . . . . . . . . . . . . . . . . . . . . . . . . . . . . . . . . . . . . . . . . . . . . . . . . . . . . . . . 23
Sun Menu . . . . . . . . . . . . . . . . . . . . . . . . . . . . . . . . . . . . . . . . . . . . . . . . . . . . . . . . . . . . . . . . . .23
Calibrate GoTo . . . . . . . . . . . . . . . . . . . . . . . . . . . . . . . . . . . . . . . . . . . . . . . . . . . . . . . . . . . . . . . 23
Set Mount Position . . . . . . . . . . . . . . . . . . . . . . . . . . . . . . . . . . . . . . . . . . . . . . . . . . . . . . . . . . . . . 23
User Defined Objects . . . . . . . . . . . . . . . . . . . . . . . . . . . . . . . . . . . . . . . . . . . . . . . . . . . . . . . . . . . . . 24
Get RA-DEC. . . . . . . . . . . . . . . . . . . . . . . . . . . . . . . . . . . . . . . . . . . . . . . . . . . . . . . . . . . . . . . . . .24
GoTo RA-DEC. . . . . . . . . . . . . . . . . . . . . . . . . . . . . . . . . . . . . . . . . . . . . . . . . . . . . . . . . . . . . . . . .24
Identify . . . . . . . . . . . . . . . . . . . . . . . . . . . . . . . . . . . . . . . . . . . . . . . . . . . . . . . . . . . . . . . . . . . . . 24
LCM SERIES MENU TREE . . . . . . . . . . . . . . . . . . . . . . . . . . . . . . . . . . . . . . . . . . . . . . . . . . . . . . . 25
YOUR FIRST ASTRONOMICAL OBSERVING SESSION . . . . . . . . . . . . . . . . . . . . . . . . . . . . . . . . . . . . . . 26
The Moon . . . . . . . . . . . . . . . . . . . . . . . . . . . . . . . . . . . . . . . . . . . . . . . . . . . . . . . . . . . . . . . . . . . 26
CELESTIAL OBSERVING TIPS. . . . . . . . . . . . . . . . . . . . . . . . . . . . . . . . . . . . . . . . . . . . . . . . . . . . .26
Magnification. . . . . . . . . . . . . . . . . . . . . . . . . . . . . . . . . . . . . . . . . . . . . . . . . . . . . . . . . . . . . . . . . .26
Field of View . . . . . . . . . . . . . . . . . . . . . . . . . . . . . . . . . . . . . . . . . . . . . . . . . . . . . . . . . . . . . . . . . .26
The Planets . . . . . . . . . . . . . . . . . . . . . . . . . . . . . . . . . . . . . . . . . . . . . . . . . . . . . . . . . . . . . . . . . . 27
Deep-Sky Objects . . . . . . . . . . . . . . . . . . . . . . . . . . . . . . . . . . . . . . . . . . . . . . . . . . . . . . . . . . . . . . .27
Sky Conditions . . . . . . . . . . . . . . . . . . . . . . . . . . . . . . . . . . . . . . . . . . . . . . . . . . . . . . . . . . . . . . . . 27
Selecting an Observing Site . . . . . . . . . . . . . . . . . . . . . . . . . . . . . . . . . . . . . . . . . . . . . . . . . . . . . . . . . 28
Choosing the Best Time to Observe . . . . . . . . . . . . . . . . . . . . . . . . . . . . . . . . . . . . . . . . . . . . . . . . . . . . . 28
Cooling the Telescope. . . . . . . . . . . . . . . . . . . . . . . . . . . . . . . . . . . . . . . . . . . . . . . . . . . . . . . . . . . . .28
Adapting your Eyes . . . . . . . . . . . . . . . . . . . . . . . . . . . . . . . . . . . . . . . . . . . . . . . . . . . . . . . . . . . . . . 28
Astroimaging. . . . . . . . . . . . . . . . . . . . . . . . . . . . . . . . . . . . . . . . . . . . . . . . . . . . . . . . . . . . . . . . . .29
Deep-Sky Observing Equipment . . . . . . . . . . . . . . . . . . . . . . . . . . . . . . . . . . . . . . . . . . . . . . . . . . . . . . . 29
Star Hopping . . . . . . . . . . . . . . . . . . . . . . . . . . . . . . . . . . . . . . . . . . . . . . . . . . . . . . . . . . . . . . . . . 30
CARE AND CLEANING OF THE TELESCOPE . . . . . . . . . . . . . . . . . . . . . . . . . . . . . . . . . . . . . . . . . . . . 30
COLLIMATION OF A NEWTONIAN TELESCOPE. . . . . . . . . . . . . . . . . . . . . . . . . . . . . . . . . . . . . . . . . . .30
Aligning the Secondary Mirror . . . . . . . . . . . . . . . . . . . . . . . . . . . . . . . . . . . . . . . . . . . . . . . . . . . . . . . . 31
Aligning the Primary Mirror . . . . . . . . . . . . . . . . . . . . . . . . . . . . . . . . . . . . . . . . . . . . . . . . . . . . . . . . . . 31
CELESTRON TWO YEAR LIMITED WARANTY . . . . . . . . . . . . . . . . . . . . . . . . . . . . . . . . . . . . . . . . . . . .32
4 I ENGLISH

ENGLISH I 5

• Never look directly at the Sun with the naked eye or with a telescope unless you have the proper solar filter. Permanent and irreversible
eye damage may result.
• Never use your telescope to project an image of the Sun onto any surface. Internal heat build-up can damage the telescope and any
accessories attached to it.
• Never use an eyepiece solar filter or a Herschel wedge. Internal heat build-up inside the telescope can cause these devices to crack or
break, allowing unfiltered sunlight to pass through to the eye.
• Do not leave the telescope unsupervised, either when children are present or adults unfamiliar with the correct operating procedures of
your telescope are present.
SOLAR WARNING
6 I ENGLISH

1. Telescope Tube
2. StarPointer Finderscope
3. Eyepiece
4. Star Diagonal
5. Focus Knob
6. Tripod
7. Accessory Tray
8. Tripod Leg Clamp
9. Altitude Clutch Knob
10. Telescope Mounting Knob
11. Objective Lens
12. Computerized Mount
13. On/Off Switch
14. Hand Control & Hand Control Holder
We recommend saving your telescope box so it can be used to store the telescope when it is not in use. Unpack the box carefully as
some parts are small. Use the parts list below to verify that all parts and accessories are present.
PARTS LIST
WHAT’S IN THE BOX
1. Telescope Tube
2. Telescope Mounting Knob
3. Altitude Clutch Knob
4. Primary Mirror
5. Computerized Mount
6. Tripod
7. Accessory Tray
8. Tripod Leg Clamp
9. StarPointer Finderscope
10. Eyepiece
11. Focus Knob
12. On/Off Switch
13. Hand Control & Hand Control Holder
(80LCM Refractor shown)
(114LCM Newtonian shown)
3
5
6
11
2
4
7
9
10
12
13
14
8
1
3
4
1
13
10
5
6
11
2
9
12
7
8
ENGLISH I 7

ASSEMBLING YOUR TELESCOPE
THE TRIPOD
The LCM tripod comes fully assembled, so setting it up is easy. To
setup the tripod:
1. Remove the tripod from the box.
2. Loosen the clamps on the bottom of each leg by flipping the
lever outward. Extend the inner section of the leg to the desired
length. Tighten the leg clamp by flipping the lever inward to
secure the legs.
3. Stand the tripod upright and pull the tripod legs apart until the
center brace snaps into place.
4. Place the accessory tray on top of the center brace
line up the keyed hole in the center. Rotate the tray until
the tabs at the three points of the tray snap into the
locking clips on each arm of the tripod’s center brace.
5. Attach the hand control holder by positioning the holder with
the square plastic tab facing up and push against the tripod leg
until it snaps in to place.
THE COMPUTERIZED MOUNT
To attach the computerized mount to the tripod:
1. Place the motorized base on top of the tripod making sure that
the three round feet rest on the round flat pads on the inside of
the tripod head.
2. Thread the mounting screw located under the tripod head into
the hole at the bottom of the motorized base and hand tighten
to secure the mount in place.
Now that the base is attached to the tripod, it is a good idea to use
the included bubble level to more accurately level the telescope:
3. Place the bubble level on the top of the motorized base.
4. Adjust the tripod legs until the bubble level shows the base to
be leveled.
8 I ENGLISH

THE TELESCOPE TUBE
THE STAR DIAGONAL (Refracting Telescopes Only)
The erect image diagonal attaches to the back of a refracting
telescope and contains a small prism that reflects light at a 90° angle,
providing a more comfortable viewing position. Most astronomical
telescopes will give a view that is either inverted or reversed left-
to-right. The erect image diagonal corrects the image so that you
will have a 100% correctly oriented image, making your telescope
perfect for daytime terrestrial observing.
To insert the diagonal:
1. Remove the caps from both sides of the diagonal.
2. Loosen the setscrews on the back of the focuser and pull out
the small dust cap.
3. Insert the smaller tube on the diagonal into the back of the
focuser and secure it by tightening the setscrews. You can
adjust the angle of the star diagonal to any desired direction
before tightening the screws.
NOTE: An erect image diagonal is not able to reach focus on a Newtonian
telescope. The image in a Newtonian telescope will always appear upside-down.
To attach the telescope tube to the mount:
1. Losen the altitude clutch by turning the knob counter-clockwise.
Rotate the tube mounting clamp so that the mounting knob is
positioned on the top of the base. Retighten the altitude clutch
knob by turning it clockwise until it is snug. Do not overtighten.
2. Loosen the telescope mounting knob by turning the knob
counter-clockwise.
3. Slide the telescope tube’s dovetail mounting bar into the tube
clamp. Make sure the printing on the telescope tube is right
side up when the tube is attached to the base.
4. Tighten the telescope mounting knob by turning the tube
mounting knob clockwise to secure the tube to the base.
Your telescope is fully assembled and is ready to attach the accessories.
Telescope
Mounting Knob
Altitude
Clutch Knob
ENGLISH I 9

THE EYEPIECE
Your telescope comes with two eyepieces. The 25 mm which will give low magnification with a moderately wide field of view. The
9 mm will give you higher magnification, but a narrower field of view. Additional eyepieces can be purchased to increase or decrease the
magnification to your desired level. When first locating an object, it is best to use the 25 mm eyepiece, then, once the object is centered,
change to the 9 mm eyepiece to “zoom in” on it.
THE STARPOINTER FINDERSCOPE
Your telescope comes with a StarPointer red-dot finderscope
that you will use as a sighting tool when aiming the telescope
at a target.
To install the finderscope:
1. Loosen the two Philips-head screws on the side of the
finderscope and slide the clamp over the dovetail bracket near
the telescope focuser. The large window on the finder should
be facing the front of the telescope.
2. Secure the finderscope in place by tightening the two Philips-
head screws. Do not over tighten these screws, just make the
connection snug.
3. Remove the small plastic tab under the battery cover by pulling
it straight out. This is installed to prevent the battery from
accidentally discharging during transportation.
To install the eyepiece on a 60LCM and 80LCM refracting
telescopes:
1. Loosen the setscrew on the open end of the star diagonal.
2. Insert the silver barrel of the 25 mm eyepiece into the star
diagonal.
3. T ighten the setscrews to secure the eyepiece in pace.
4. To see the sharpest image possible, focus by looking through
the eyepiece and slowly turning the focusing knobs until the
image comes into sharp focus.
To install the eyepiece on a 114LCM Newtonian telescope:
1. Loosen the setscrews on the end of the focuser and remove
the dust cap.
2. Insert the silver barrel of the 25 mm eyepiece directly into the
focuser.
3. Tighten the setscrew to secure the eyepiece in place.
4. To see the sharpest image possible, focus by looking through
the eyepiece and slowly turning the focusing knobs until the
image comes into sharp focus.
Refractor
Newtonian
Power/Brightness
Switch
Up/Down
Adjustment Knob
Left/Right
Adjustment Knob
Battery
Compartment
10 I ENGLISH

CHANGING THE FINDERSCOPE BATTERY
To replace the StarPointer battery, remove the finder from the
scope and turn it over. The battery compartment is located
directly under the large lens assembly. Using a small screwdriver
or your fingernail, gently lift straight up on the cover to remove it.
The battery is held in place by a spring contact. Gently lift this
contact and turn the finder on its side. The battery should slip
right out. Replace the battery with a 3-Volt CR2032 button cell
battery. Slide the new battery under the contact, making sure that
the positive terminal of the battery (the side marked with a “+”) is
pointing upward, toward the spring contact. The battery should
snap in place. Replace the cover by lining up the pins on the cover
with the holes in the finderscope and pressing it down. Be sure to
dispose of the old battery according to your local laws.
THE HAND CONTROL
The LCM hand control has a phone jack type connector at the end
of its cord.
To connect to the scope:
1. Locate the hand control port on the top of the computerized mount.
2. Push the plug at the end of the hand control cord into the port
until it clicks into place.
3. Slide the hand control downward into its holder on the tripod
leg. To remove it, lift straight up.
The LCM can be powered by 8 user supplied AA size alkaline
batteries or an optional 12V AC adapter.
To install batteries into the LCM:
1. Press the tab on the front of the battery compartment and
remove the cover.
2. Gently remove the battery holder from inside the battery
compartment.
3. Place 8-AA batteries (user supplied) inside the battery holder,
taking care to match the battery polarity with the notations on
the battery holder.
4. Return the battery holder back inside the base and replace
the cover.
5. Flip the power switch to the “On” position. The light on the
power button and hand control should come on.
NOTE: When replacing the batteries, be sure to replace all 8 batteries with
fresh ones at the same time. Never mix old and new batteries.
POWERING THE TELESCOPE
Battery
Compartment
12v Outlet
Power Switch
Hand Control
Port
Battery Compartment
Release Tab
Battery Compartment
Release Tab
ENGLISH I 11

MOVING THE TELESCOPE
The LCM computerized mount was designed to be moved using the hand control. With the power on, this can be done by pressing the
four directional buttons on the hand control. You can change the speed of the motors by pressing the MOTOR SPEED button, then
selecting a number from 1 to 9. For initial setup you should keep the rate above Motor Speed 5. When using the hand control to slew the
telescope, the altitude clutch should be tightened.
The scope can be moved by hand in the altitude axis, but only when the altitude clutch has been loosened. Failure to loosen this clutch
and forcing the telescope to move up or down can result in damage to the motor or gears. The mount does not have a clutch in the
azimuth (or right and left direction). It is never safe to move the scope by hand left and right.
ALIGNING THE FINDERSCOPE
The StarPointer finderscope is a reflex sight that uses a red LED to project a red dot onto the round glass window. When you look through
the window, you see the red dot superimposed on your target. The first time you assemble your telescope, you’ll need to align the
finderscope with the main optics of the telescope. Although this step can be done at night, it is significantly easier to do during the day.
Once you have completed the finderscope alignment, you should not have to repeat this step unless the finderscope is bumped or dropped.
To align the StarPointer finderscope:
1. Take the telescope outside during the day. Using your naked eye, find an easily recognizable object, such as a streetlight, car license plate,
or tall tree. The object should be as far away as possible, but at least a quarter mile away.
2. Remove the main dust cover from the telescope and make sure your 25 mm eyepiece is installed.
3. Move the telescope so that it is roughly pointing toward the object you chose in step 1.
4. Look through the telescope’s eyepiece and manually move the telescope until the object you chose lies in the center of the view. If the image
is blurry, gently turn the focus knobs until it comes into sharp focus.
5. Once the object is centered in your 25 mm eyepiece, turn on the finderscope by turning the power/brightness switch knob on the side of
the unit as far as it will go.
6. With your head positioned about a foot behind the finder, look through the round window and locate the red dot. It will probably be close to,
but not on top of, the object you see when you are looking through the 25 mm eyepiece.
7. Without moving the telescope, use the two adjustment knobs on the side and underneath the finderscope. One controls the left-right motion
of the reticle, while the other controls the up-down motion. Adjust both until the red dot appears over the same object you are observing in
the 25 mm eyepiece.
Now choose some other distant targets to practice aiming your telescope. Look through the StarPointer finderscope window and place the red
dot over the target you are trying to view and verify that it appears in the 25 mm eyepiece of the scope.
NOTE: Be sure to turn off the StarPointer finderscope when not in use to conserve battery power.
12 I ENGLISH

OPERATING THE TELESCOPE
THE HAND CONTROL
The LCM’s hand controller is designed to give you instant access to all the functions the telescope has to offer. With automatic slewing to over
4,000 objects, and common sense menu descriptions, even a beginner can master its variety of features in just a few observing sessions. Below
is a brief description of the individual components of the LCM hand controller:
1. LIQUID CRYSTAL DISPLAY (LCD) WINDOW- Has a four-
line, 18-character display screen that has red backlighting for
comfortable viewing of telescope information and scrolling text.
2. ALIGN- Instructs the hand control to begin the process of
aligning your telescope.
3. DIRECTION KEYS- Allows complete control of the mount in
any direction. Use the direction keys to center objects in the
eyepiece or manually slew telescope.
4. CATALOG KEYS- The mount has a key on the hand control to
allow direct access to each of the main catalogs in its 40,000+
object database. Your mount contains the following catalogs in
its database:
• SOLAR SYSTEM- All 7 planets in our Solar System plus the
Moon, Sun and Pluto.
• STAR S- Custom lists of all the brightest stars, double stars,
variable stars and asterisms.
• DEEP SKY- Custom lists of all the best galaxies, nebulae and
clusters as well as the complete Messier and select NGC objects.
5. IDENTIFY- Searches the databases and displays the name and
offset distances to the nearest matching objects.
6. MENU- Displays the many setup and utilities functions, such
as tracking rate and user defined objects and many others.
7. OPTION (CELESTRON LOGO)- Can be used in combination
with other keys to access more advanced features and functions.
8. ENTER- Pressing ENTER allows you to select any of the functions, accept entered parameters and slew the telescope to
displayed objects.
9. BACK- Pressing BACK will take you out of the current menu and display the previous level of the menu path. Press BACK repeatedly
to get back to a main menu or use to erase data entered by mistake.
10. SKY TOUR- Activates the tour mode, which lists all the best objects in the sky and lets you slew the telescope to those objects.
11. SCROLL KEYS- Scrolls up and down within any of the menu lists. A double arrow symbol on the right side of the LCD indicates that
the scroll keys can be used to view additional information.
12. MOTOR SPEED- Slews the telescope faster or slower when the direction buttons are pressed.
13. OBJECT INFO- Displays coordinates and useful information about objects selected from the database.
14. INPUT JACK- Allows you to connect your telescope to a computer, for use with software programs for point-and click slewing capability
and updating firmware via PC.
4
5
6
7
8
9
10
11
11
12
13
14
15
2
4
1 1
3
ENGLISH I 13

HAND CONTROL OPERATION
This section describes the basic hand control procedures needed to operate the LCM.
ALIGNMENT MENU
In order for the LCM to accurately point to objects in the sky, it must first be aligned to known positions (stars) in the sky. With this information,
the telescope can create a model of the sky, which it uses to locate any object with known coordinates. There are many ways to align the LCM
with the sky depending on what information the user is able to provide:
• SkyAlign works by aligning on any three bright stars or planets in the sky.
• Auto Two Star Align will display a list of visible daytime objects (planets and the Moon) available to align the telescope.
• Two Star Align uses the entered time/location information and allows the user to select which two alignment stars the telescope will
automatically slew to.
• One Star Align uses the entered time/location information and allows the user to select one alignment star. Provides a fast alignment,
at the expense of less pointing accuracy.
• Solar System Align will display a list of visible daytime objects (planets and the Moon) available to align the telescope.
NOTE: There are two other methods of alignment shown in the hand control – EQ North and EQ South - but these only apply to alt-azimuth mounts capable of
attaching to an equatorial wedge. The LCM mount does not have this ability.
SKYALIGN
SkyAlign is the easiest way to get your telescope aligned and ready to observe. Even if you do not know a single star in the sky, the LCM will
have you aligned in minutes by asking for basic information like the date, time and location. Then you simply need to aim the telescope to any
three bright celestial objects in the sky. Since SkyAlign requires no knowledge of the night sky, it is not necessary to know the name of the
stars at which you are aiming. You may even select a planet or the Moon. The LCM is then ready to start finding and tracking any of the objects
in its 4,000+ object database. Before the telescope is ready to be aligned, it should be set up in an outside location with all accessories
(eyepiece, diagonal and finderscope) attached and lens cover removed as described in the Assembly section of the manual. To begin SkyAlign:
1. Power on the LCM by flipping the switch located on the side of the base, to the “on” position. Once turned on the hand control display will
say LCM Ready. Press ENTER to choose SkyAlign. Pressing the ALIGN key will bypass the other alignment options and the scrolling text
and automatically begins SkyAlign.
2. Once SkyAlign has been selected, the hand control will display “Enter if OK”, “Undo to edit” and “Saved Site.” The bottom line of the LCD
will display either the current time or the time when you last used the telescope. Since this is your first time using the LCM, press UNDO to
enter current time/site information.
The hand control display will then ask for the following information:
• Location- The hand control will display a list of cities to choose from. Choose the city from the database that is closest to your current
observing site. The city you choose will be remembered in the hand control’s memory so that it will be automatically displayed the next time
an alignment is done. Alternatively, if you know the exact longitude and latitude of your observing site, it can be entered directly into the
hand control and remembered for future use as well. To choose a location city:
1. Use the Up and Down scroll keys to choose between “City Database” and “Custom Site”. “City Database” will allow you to select the
closest city to your observing site from a list of either international or U.S. location. “Custom Site” allows you to enter the exact longitude
and latitude of your observing site. Select “City Database” and press ENTER.
2. The hand control will allow you to choose from either U.S. or international locations. For a listing of U.S. locations by state and then by
city, press ENTER while United States is displayed. For international locations, use the Up or Down scroll key to select International and
press ENTER.
3. Use the Up and Down Scroll buttons to choose your current state (or country if International locations was selected) from the alphabetical
listing and press ENTER.
4. Use the Up and Down Scroll buttons to choose the closest city to your location from the displayed list and press ENTER.
14 I ENGLISH

• Time- Enter the current time for your area. You can enter either the local time (i.e. 8:00), or you can enter military time (i.e. 20:00).
1. Select PM or AM. If military time was entered, the hand control will bypass this step.
2. Choose between Standard time or Daylight Savings time. Use the Up and Down scroll buttons (Keypad #6 or #9) to toggle
between options.
3. Select the time zone that you are observing from. Again, use the Up and Down buttons (Keypad #6 or #9) to scroll through the choices.
For time zone information, refer to the Time Zone map in the appendix of this manual.
• Date- Enter the month, day and year of your observing session. The display will read: mm/dd/yy.
1. If the wrong information has been input into the hand control, the UNDO button will act as a backspace allowing the user to
re-enter information.
2. The next time that your telescope is aligned, the hand control will automatically display the last location (either a city or longitude/latitude)
that was entered. Press ENTER to accept these parameters if they still apply. Pressing the UNDO button will allow you to go back and
select a new city location or longitude/latitude.
3. Use the arrow buttons on the hand control to slew (move) the telescope towards any bright celestial object in the sky. Align the object
with the red dot of the finderscope and press ENTER.
4. If the finderscope has been properly aligned with the telescope tube, the alignment star should now be visible inside the field of view
of the eyepiece. The hand control will ask that you center the bright alignment star in the center of the eyepiece and press the ALIGN
button. This will accept the star as the first alignment position. (There is no need to adjust the slewing rate of the motors after each
alignment step. The LCM automatically selects the best slewing rate for aligning objects in both the finderscope and the eyepiece).
5. For the second alignment object, choose a bright star or planet as far as possible from the first alignment object. Once again use the
arrow button to center the object in the finderscope and press ENTER. Then once centered in the eyepiece press the ALIGN button.
6. Repeat the process for the third alignment star. When the telescope has been aligned to the final stars, the display will read “Match
Confirmed.” Press UNDO to display the names of the three bright objects you aligned to, or press ENTER to accept these three objects
for alignment. You are now ready to find your first object.
TIPS FOR USING SKYALIGN
Remember the following alignment guidelines to make using SkyAlign as simple and accurate as possible.
• Be sure to level the tripod before you begin alignment. The time/site information along with a level tripod will help the telescope
better predict the available bright stars and planets that are above the horizon.
• Remember to select alignment stars that are as far apart in the sky as possible. For best results make sure that the third
alignment star does not lie in a straight line between the first two stars. This may result in a failed alignment.
• Don’t worry about confusing planets for stars when selecting alignment objects. SkyAlign works with the four brightest
planets (Venus, Jupiter, Saturn and Mars) as well as the Moon. In addition to the planets, the hand control has over 80 bright alignment
stars to choose from (down to 2.5 magnitude).
• Rarely SkyAlign may not be able to determine what three alignment objects were centered. This sometime happens when a bright
planet or the Moon passes near one of the brighter stars. In situations like these, it is best to try to avoid aligning to either object
if possible.
• Be sure to center the objects with the same final movements as the direction of the GoTo approach. For example, if the
scope normally finishes a GoTo with the front of the scope moving right and up, you should center all three alignment objects in the
eyepiece using the right and up arrow buttons (the up/down arrows reverse at slew rates of 6 or lower). Approaching the star from
this direction when looking through the eyepiece will eliminate much of the backlash between the gears and assure the most accurate
alignment possible.
ENGLISH I 15

AUTO TWO-STAR ALIGN
As with Sky Align, Auto Two-Star Align requires you to enter all the necessary time/site information as before. Once this information
is entered, the hand control will prompt you to select and point the telescope at one known star in the sky. The LCM now has all the
information it needs to automatically choose a second star that will assure the best possible alignment. Once selected, the telescope will
automatically slew to that second alignment star to complete the alignment. With the LCM set up outside with all accessories attached
and the tripod leveled, follow the steps below to align the telescope:
1. Once the LCM is powered on, Press ENTER to begin alignment.
2. Use the Up and Down scroll keys (Keypad #6 or #9) to select Auto Two-Star Align and press ENTER.
3. The hand control will display the last time and location information that was entered into the hand control. Use the Up and Down buttons to
scroll through the information. Press ENTER to accept the current information or press UNDO to manually edit the information (see SkyAlign
section for detailed instruction on entering time/site information).
4. The display will now prompt you to select a bright star from the displayed list on the hand control. Use Up and Down buttons to scroll to the
desired star and then press ENTER.
5. Use the arrow buttons to slew the telescope to the star you selected. Center the star in the finderscope and press ENTER. Finally, center
the star in the eyepiece and press ALIGN.
6. Based on this information, the LCM will automatically display the most suitable second alignment star that is above the horizon. Press ENTER
to automatically slew the telescope to the displayed star. If for some reason you do not wish to select this star (perhaps it is behind a tree
or building), you can either:
• Press the UNDO button to display the next most suitable star for alignment.
• Use the up and down scroll buttons to manually select any star you wish from the entire list of available stars.
Once finished slewing, the display will ask you to use the arrow buttons to align the selected star with the red dot of the finderscope. Once
centered in the finder, press ENTER. The display will then instruct you to center the star in the field of view of the eyepiece. When the star
is centered, press ALIGN to accept this star as your second alignment star. When the telescope has been aligned to both stars the display
will read “Align Success”, and you are now ready to find your first object.
TWO-STAR ALIGN
With the Two-Star Align method, the LCM requires the user to know the names and positions of two bright stars in order to accurately
align the telescope with the sky and begin finding objects. Here is an overview of the Two-Star Align procedure:
1. Once the LCM is powered on, use the Up and Down scroll keys to select Two-Star Align, and press ENTER.
2. Press ENTER to accept the time/site information displayed on the screen, or press UNDO to enter new information.
3. The SELECT STAR 1 message will appear in the top row of the display. Use the Up and Down scroll keys to select the star you wish to use
for the first alignment star. Press ENTER.
4. The LCM then asks you to center in the eyepiece the alignment star you selected. Use the direction arrow buttons to slew the telescope to
the alignment star and carefully center the star in the finderscope. Press ENTER when centered.
5. Then, center the star in the eyepiece and press ALIGN. In order to accurately center the alignment star in the eyepiece, you may wish to
decrease the slew rate of the motors for fine centering. This is done by pressing the MOTOR SPEED key on the hand controller then
selecting the number that corresponds to the speed you desire. (9 = fastest, 1 = slowest).
6. The LCM will then ask you to select and center a second alignment star and press the ALIGN key. It is best to choose alignment stars that
are a good distance away from one another. Stars that are at least 40º to 60º apart from each other will give you a more accurate alignment
than stars that are close to each other.
Once the second star alignment is completed properly, the display will read “Align Successful”, and you should hear the tracking motors
turn on and begin to track.
16 I ENGLISH

ONE-STAR ALIGN
One-Star Align requires you to input all the same information as you would for the Two-Star Align procedure. However, instead of slewing
to two alignment stars for centering and alignment, the LCM uses only one star to model the sky based on the information given. This
will allow you to roughly slew to the coordinates of bright objects like the Moon and planets and gives the LCM the information needed
to track objects in altazimuth in any part of the sky. One-Star Align is not meant to be used to accurately locate small or faint deep-sky
objects or to track objects accurately for photography. To use One-Star Align:
1. Select One-Star Align from the alignment options.
2. Press ENTER to accept the time/site information displayed on the screen, or press UNDO to enter new information.
3. The SELECT STAR 1 message will appear in the top row of the display. Use the Up and Down scroll keys to select the star you wish to use
for the first alignment star. Press ENTER.
4. The LCM then asks you to center in the eyepiece the alignment star you selected. Use the direction arrow buttons to slew the telescope to
the alignment star and carefully center the star in the finderscope. Press ENTER when centered.
5. Then, center the star in the eyepiece and press ALIGN.
6. Once in position, the LCM will model the sky based on this information and display “Align Successful”.
NOTE: Once a One-Star Alignment has been done, you can use the Re-alignment feature (later in this section) to improve your telescope’s pointing accuracy.
SOLAR SYSTEM ALIGN
Solar System Align is designed to provide excellent tracking and GoTo performance by using solar system objects (Sun, Moon and
planets) to align the telescope with the sky. Solar System Align is a great way to align your telescope for daytime viewing as well as a
quick way to align the telescope for night time observing.
Never look directly at the sun with the naked eye or with a telescope (unless you have the proper solar filter). Permanent
and irreversible eye damage may result.
1. Select Solar System Align from the alignment options.
2. Press ENTER to accept the time/site information displayed on the display, or press UNDO to enter new information.
3. The SELECT OBJECT message will appear in the top row of the display. Use the Up and Down scroll keys to select the daytime object
(planet, Moon or Sun) you wish to align. Press ENTER.
4. The LCM then asks you to center in the eyepiece the alignment object you selected. Use the direction arrow buttons to slew the telescope
to the alignment object and carefully center it in the finderscope. Press ENTER when centered.
5. Then, center the object in the eyepiece and press ALIGN.
Once in position, the LCM will model the sky based on this information and display “Align Successful”.
Selecting the Sun
For safety purposes, the Sun will not be displayed in any of the hand control’s customer object lists unless it is enabled from the Utilities
Menu. To allow the Sun to be displayed on the hand control, do the following:
1. Press the UNDO button until the display reads “LCM Ready.”
2. Press the MENU button and use the Up and Down keys to select the Utilities Menu. Press ENTER.
3. Use the UP and Down keys to select Sun Menu and press ENTER.
4. Press ENTER again to allow the Sun to appear on the hand control display.
The Sun can be removed from the display by using the same procedure as above.
To improve the telescope pointing accuracy, you can use the Re-Align feature as described below.
ENGLISH I 17

RE-ALIGNMENT
The LCM has a re-alignment feature which allows you to replace either of the original alignment stars with a new star or celestial object.
This can be useful in several situations:
• If you are observing over a period of a few hours, you may notice that your original two alignment stars have drifted towards the west
considerably. (Remember that the stars are moving at a rate of 15 degrees of arc every hour). Aligning on a new star that is in the eastern
part of the sky will improve your pointing accuracy, especially on objects in that part of the sky.
• If you have aligned your telescope using the One-star align method, you can use re-align to an additional object in the sky. This will
improve the pointing accuracy of your telescope without having to re-enter additional information.
To replace an existing alignment star with a new alignment star:
1. Select the desired star (or object) from the database and slew to it.
2. Carefully center the object in the eyepiece.
3. Once centered, press the UNDO button until you are at the main menu.
4. With “LCM Ready” displayed, press the ALIGN key on the hand control.
5. The display will then ask you which alignment star you want to replace.
6. Use the UP and Down scroll keys to select the alignment star to be replaced, and press ENTER. It is usually best to replace the star
closest to the new object. This will space out your alignment stars across the sky. If you have used one of the single object alignment
methods then it is always best to replace the object that is “unassigned” with an actual object.
7. Press ALIGN to make the change.
OBJECT CATALOGS
SELECTING AN OBJECT
Now that the telescope is properly aligned, you can choose an object from any of the catalogs in the LCM’s database. The hand control
has a key designated for each of the catalogs in its database.
FOR PLANETS
1. Press the SOLAR SYSTEM button (Keypad #1).
2. Use the up and down SCROLL buttons (Keypad #6 or #9, not the up and down directional buttons) to scroll through the list of solar system
objects until the one you want is displayed on the screen.
3. Press ENTER and the scope will slew to the object.
FOR STARS
1. Press the STAR S button (Keypad #2).
2. Use the up and down SCROLL buttons (Keypad #6 or #9, not the up and down directional buttons) to scroll through the list of categories
that contains the object you want to see and press ENTER. For stars, you have the choice of Named Stars, SAO catalog, Variable Stars,
Asterisms, Constellations, and Double Stars.
3. Use the up and down SCROLL buttons to select the object you want to see and press ENTER. The scope will slew to the object.
4. For the SAO catalog, you are only required to enter the first four digits of the object’s six digit SAO number. Once the first four digits are
entered, the hand control will automatically list all the available SAO objects beginning with those numbers. Use the scroll buttons to
navigate the list of available SAO objects using this prefix and select the desired object by pressing ENTER.
18 I ENGLISH

FOR DEEP-SKY OBJECTS
1. Press the DEEP SKY button (Keypad #3).
2. Use the up and down SCROLL buttons (Keypad #6 or #9, not the up and down directional buttons) to scroll through the list of categories
that contains the object you want to see and press ENTER. You have the choice of Named Objects, NGC catalog, Caldwell catalog, and
Messier catalog.
3. For Named Objects, use the up and down SCROLL buttons to select the object you want to see and press ENTER. The scope will slew to
the object.
4. If you selected the NGC, Caldwell, or Messier catalogs, you will now enter the catalog number using the number keypad and press ENTER
to slew to your target.
NOTE: The hand control will only display objects that are above your horizon. Object that are below the horizon are filtered out of the lists so you do not waste your time
trying to search for objects where the scope would point downward at the ground. You can change this operation and allow pointing below the horizon by changing the
settings in the Slew Limit and Filter Limit menus covered later in the manual.
VIEWING OBJECT INFO
Once the desired object is displayed on the hand control screen, you can also press the OBJECT INFO key. This will give you useful
information about the selected object such as magnitude, constellation, and fascinating facts about many of the brighter and more popular
objects in the database.
Object information can be obtained without having to do a star alignment. After the telescope is powered on, pressing any of the catalog
keys allows you to scroll through object lists or enter catalog numbers and view the information about the object as described above.
SKY TOUR MODE
If you are not sure what objects to look for, the LCM includes a sky tour feature which will display a list of the night’s highlights of the brightest
and most interesting objects above your horizon.
1. Press the SKY TOUR button (Keypad #5) to open the menu.
2. Use the up and down SCROLL buttons to select the object you want to see and press ENTER. The scope will slew to the object.
DIRECTION BUTTONS
The LCM has four direction buttons in the center of the hand control which controls the telescope motion in altitude (up and down) and
azimuth (left and right). The telescope can be controlled at nine different speed rates.
ENGLISH I 19

Pressing the Motor Speed key allows you to instantly change the
speed of the motors from high speed slew rate to precise guiding
rate or anywhere in between. Each rate corresponds to a number
on the hand controller key pad with speed 9 being the fastest and
speed 1 being the slowest.
Speeds 1-4 are good for centering objects in an eyepiece. Speeds
5-6 are good for centering objects in the finderscope. Speeds 7-9
are good for slewing long distances across the sky.
To change the motor speed:
The hand control has a “double button” feature that allows you
to instantly speed up the motors without having to choose a
speed rate. To use this feature, simply press the arrow button that
corresponds to the direction that you want to move the telescope.
While holding that button down, press the opposite directional
button. This will increase the speed to the maximum slew rate.
NOTE: Sidereal rate is the speed at which the Earth rotates and objects
appear to drift across the sky. This is equivalent to 15 arc seconds per second.
MOTOR SPEED BUTTON
MAIN MENU
The LCM contains many user defined setup functions designed to give the user control over the telescope’s many advanced features. All of the
set up and utility features can be accessed by pressing the MENU key (Keypad #7) and scrolling through the options.
TRACKING MENU
Tracking Mode
Once the LCM is aligned, the tracking motors will automatically turn on and begin tracking the sky. However, the tracking can be turned off for
terrestrial use:
• Off- When using the telescope for terrestrial (land) observation the tracking can be turned off so that the telescope never moves.
• Alt-Az- This is the default tracking rate and is used when the telescope has been properly aligned.
NOTE: EQ North & EQ South tracking modes are only used with telescopes that are equatorially mounted. LCM telescopes use Alt-Azimuth mounts and cannot
utilize the two EQ tracking modes.
Tracking Rate
In addition to being able to move the telescope with the hand control buttons, the LCM will continually track a celestial object as it moves across
the night sky. The tracking rate can be changed depending on what type of object is being observed:
• Sidereal- This rate compensates for the rotation of the earth by moving the telescope at the same rate as the rotation of the earth, but
in the opposite direction. When tracking in Alt-Az mode, the telescope must make corrections in both altitude and azimuth.
• Lunar- Used for tracking the Moon when observing the lunar landscape.
• Solar- Used for tracking the Sun when solar observing using a proper solar filter.
MOTOR SPEED RATE
1 0.5x Sidereal
2 1x Sidereal
3 4x Sidereal
4 8x Sidereal
5 16x Sidereal
6 64x Sidereal
7
1°/ Second
8
1.75°/ Second
9
2.75°/ Second
20 I ENGLISH

VIEW TIME-SITE
View Time-Site will display the last saved time and longitude/latitude entered in the hand control.
HAND CONTROL MENU
Lights Control
This menu option lets you adjust the brightness of the lighting on the hand control lights.
• Keypad Level- Adjusts the brightens of the backlight on the keypad buttons.
• Display Level- Adjusts the brightness of the backlight on the LCD panel.
Scrolling Menu
This menu allows you to change the rate of speed that the text scrolls across the hand control display.
• Press the UP (Keypad #6) button to increase the speed of the text.
• Press the DOWN (Keypad #9n) button to decrease the speed of the text.
Toggle Bold Font
This allows you to change the text on the LCD to bold face which can make it easier to read.
Set Contrast
This allows you to choose how dark the text appears on the LCD panel.
Set Language
This allows you to choose the native language of the hand control. Press the number corresponding to the language you desire.
SCOPE SETUP MENU
Setup Time-Site
Allows the user to customize the hand control display by changing time and location parameters (such as time zone and daylight savings).
Anti-backlash
All mechanical gears have a certain amount of backlash or play between the gears. This play is evident by how long it takes for a star to move in
the eyepiece when the hand control arrow buttons are pressed (especially when changing directions). The LCM’s anti-backlash features allows
the user to compensate for backlash by inputting a value which quickly rewinds the motors just enough to eliminate the play between gears.
The amount of compensation needed depends on the slewing rate selected; the slower the slewing rate the longer it will take for the star to
appear to move in the eyepiece. Therefore, the anti-backlash compensation will have to be set higher. You will need to experiment with different
values; a value between 20 and 50 is usually best for most visual observing, whereas a higher value may be necessary for photographic guiding.
Positive backlash compensation is applied when the mount changes its direction of movement from backwards to forwards. Similarly, negative
backlash compensation is applied when the mount changes its direction of movement from forwards to backwards. When tracking is enabled,
the mount will be moving in one or both axes in either the positive or negative direction, so backlash compensation will always be applied when
a direction button is released and the direction moved is opposite to the direction of travel.
To set the anti-backlash value, scroll down to the anti-backlash option and press ENTER. Enter a value from 0-100 for both azimuth and altitude
directions and press ENTER after each one to save these values. The LCM will remember these values and use them each time it is turned on
until they are changed.
ENGLISH I 21

Slew Limits
Sets the limits in altitude that the telescope can slew without displaying a warning message. The slew limits prevent the telescope tube from
slewing to an object below the horizon or slewing to an object that is high enough that the tube might hit one of the tripod legs. However, the
slew limits can be customized depending on your needs. For example, if you would like to slew to an object that is close to the zenith and are
certain that the tube will not hit the tripod legs, you can set the slew limits to 90º in altitude. This will allow the telescope to slew to any object
above the horizon without warning.
Filter Limits
When an alignment is complete, the LCM automatically knows which celestial objects are above the horizon. As a result, when scrolling through
the database lists (or selecting the SKY TOUR function), the LCM hand control will display only those objects that are known to be above the
horizon when you are observing. You can customize the object database by selecting altitude limits that are appropriate for your location and
situation. For example, if you are observing from a mountainous location where the horizon is partially obscured, you can set your minimum
altitude limit to read +20º.This will make sure that the hand control only displays objects that are higher in altitude than 20º.
If you want to explore the entire object database, set the maximum altitude limit to 90º and the minimum limit to –90º. This will display every
object in the database lists regardless of whether it is visible in the sky from your location or not.
Direction Buttons
The direction a star moves in the eyepiece varies depending on the accessories being used. This can create confusion when guiding on a star
using an off-axis guider versus a straight through guide scope. To compensate for this, the direction of the drive control keys can be changed.
To reverse the button logic of the hand control, press the MENU button and select Direction Buttons from the Utilities menu. Use the Up/Down
arrow keys to select either the Azimuth buttons (left and right) or Altitude buttons (up and down) and press ENTER. Pressing ENTER again will
reverse the direction of the hand control buttons from their current state. Direction Buttons will only change the eyepiece rates (rate 1-6) and
will not affect the slew rates (rate 7-9).
GoTo Approach
This lets the user define the direction that the telescope will approach when slewing to an object. This allows the user the ability to minimize the
effects of backlash For example, if your telescope is back heavy from using heavy optical or photographic accessories attached to the back, you
would want to set your altitude approach to the negative direction. This would ensure that the telescope always approaches an object from the
opposite direction as the load pulling on the scope.
To change the GoTo approach direction, simply choose GoTo Approach from the Scope Setup menu, select either Altitude or Azimuth approach,
choose positive or negative and press ENTER.
Cord Wrap
Cordwrap safeguards against the telescope slewing more than 360 degrees in azimuth and wrapping accessory cables around the base of the
telescope. This is useful any time that the telescope is powered using an external power supply. By default, the cord wrap feature is turned off
when the telescope is aligned in altazimuth and turn on when aligned on a wedge.
UTILITY MENU
Scrolling through the MENU options will also provide access to several advanced utility functions.
GPS On/Off
This feature is only available when using your telescope in conjunction with the optional GPS accessory. It allows you to turn off the GPS
module. If you want to use the LCM database to find the coordinates of a celestial object for a future date you would need to turn the GPS
module off in order to manually enter a date and time other than the present.
Factory Setting
Returns the LCM hand control to its original factory setting. Parameters such as backlash compensation values, initial date and time, longitude/
latitude along with slew and filter limits will be reset. However, stored parameters such as PEC and user defined objects will remain saved even
when Factory Settings is selected. The hand control will ask you to press the “0” key before returning to the factory default setting.
22 I ENGLISH

Version
Selecting this option will allow you to see the current version number of the hand control and motor control software. The first set of numbers
indicate the hand control software version. For the motor control, the hand control will display two sets of numbers; the first numbers are for
azimuth and the second set are for altitude.
Get Axis Position
Displays the relative altitude and azimuth for the current position of the telescope.
GoTo Axis Position
Allows you to enter a specific altitude and azimuth position and slew to it.
Hibernate
Hibernate allows the LCM to be completely powered down and still retain its alignment when turned back on. This not only saves power, but is
ideal for those that have their telescopes permanently mounted or leave their telescope in one location for long periods of time. To place your
telescope in Hibernate mode:
1. Select Hibernate from the Utility Menu.
2. Move the telescope to a desire position and press ENTER.
3. Power off the telescope. Remember to never move your telescope manually while in Hibernate mode.
Once the telescope is powered on again, the display will read Wake Up. After pressing ENTER, you have the option of scrolling through the
time/site information to confirm the current setting. Press ENTER to wake up the telescope.
Pressing UNDO at the Wake Up screen allows you to explore many of the features of the hand control without waking the telescope up from
hibernate mode. To wake up the telescope after UNDO has been pressed, select Hibernate from the Utility menu and press ENTER. Do not
use the direction buttons to move the telescope while in hibernate mode.
Sun Menu
For safety purposes the Sun will not be displayed as a database object unless it is first enabled. The enable the Sun, go to the Sun Menu
and press ENTER. The Sun will now be displayed in the Planets catalog and can be used as an alignment object when using the Solar
System Alignment method. To remove the Sun from displaying on the hand control, once again select the Sun Menu from the Utilities Menu
and press ENTER.
Calibrate GoTo
GoTo calibration is a useful tool when attaching heavy visual or photographic accessories to the telescope. GoTo calibration calculates the
amount of distance and time it takes for the mount to complete its final slow GoTo when slewing to an object. Changing the balance of the
telescope can prolong the time it takes to complete the final slew. GoTo Calibration takes into account any slight imbalances and changes the
final GoTo distance to compensate.
Set Mount Position
The Set Mount Position menu can be used to recover an alignment in cases where the telescope or tripod has been manually moved. For
instance, you might use this feature if you needed to adjust the level of the tripod by raising or lowering the tripod legs. After the mount has
been moved, simply slew to a bright star and center it up in the eyepiece, then select “Set Mount Position” from the Utilities menu. Since the
telescope has been moved, the pointing accuracy will be diminished. But now you can slew to a new set of alignment stars and replace any
of the original alignment stars with the new stars. This will help you to avoid having to start the alignment process over from the beginning.
ENGLISH I 23

USER DEFINED OBJECTS
The LCM can store up to 50 different user defined objects in its memory. The objects can be daytime land objects or an interesting celestial
object that you discover that is not included in the regular database. There are several ways to save an object to memory depending on what
type of object it is:
• Save Sky Object- The LCM stores celestial objects to its database by saving its right ascension and declination in the sky. This way
the same object can be found each time the telescope is aligned. Once a desired object is centered in the eyepiece, simply scroll to
the “Save Sky Obj” command and press ENTER. The display will ask you to enter a number between 1-25 to identify the object. Press
ENTER again to save this object to the database. These objects then can be accessed by selecting GoTo Sky Object.
• Save Database (Db) Object- This feature allows you to create your own custom tour of database objects by allowing you to record
the current position of the telescope and save the name of the object by selecting it from any one of the database catalogs.
• Enter RA - DEC- You can also store a specific set of coordinates for an object just by entering the RA and Dec coordinates for that
object. Scroll to the “Enter RA-DEC” command and press ENTER. The display will then ask you to enter first the RA and then the
Declination of the desired object.
• Save Land Object- The LCM can also be used as a spotting scope on terrestrial objects. Fixed land objects can be stored by saving
their altitude and azimuth relative to the location of the telescope at the time of observing. Since these objects are relative to the location
of the telescope, they are only valid for that exact location. To save land objects, once again center the desired object in the eyepiece.
Scroll down to the “Save Land Obj” command and press ENTER. The display will ask you to enter a number between 1-25 to identify the
object. Press ENTER again to save this object to the database. These objects then can be accessed by selecting GoTo Land Object.
To replace the contents of any of the user defined objects, simply save a new object using one of the existing identification numbers; LCM
will replace the previous user defined object with the current one.
GET RA-DEC
Displays the right ascension and declination for the current position of the telescope.
GOTO RA-DEC
Allows you to input a specific RA and declination and slew to it.
IDENTIFY
Identify mode will search any of the LCM database catalogs or lists and display the name and offset distances to the nearest matching
objects. This feature can serve two purposes. First, it can be used to identify an unknown object in the field of view of your eyepiece.
Additionally, Identify Mode can be used to find other celestial objects that are close to the objects you are currently observing. For example,
if your telescope is pointed at the brightest star in the constellation Lyra, choosing Identify and then searching the Named Star catalog will
no doubt return the star Vega as the star you are observing. However, by selecting Identify and searching by the Named Object or Messier
catalogs, the hand control will let you know that the Ring Nebula (M57) is approximately 6° from your current position. Searching the Double
Star catalog will reveal that Epsilon Lyrae is only 1° away from Vega.
To use the Identify feature:
• Press the IDENTIFY button (Keypad #4) and select the Identify option.
• Press the Up/Down scroll keys to select the catalog that you would like to search.
• Press ENTER to begin the search.
NOTE: Some of the databases contain thousands of objects, and can therefore take a minute or two to return the closest object.
24 I ENGLISH

Named Objects
NGC
Caldwell
Messier
LCM Series Menu Tree
Mode
Alt-Az
Off
MENU
(KEYPAD #7)
ALIGN
BUTTON
SOLAR SYSTEM
(KEYPAD #1)
STARS
(KEYPAD #2)
DEEP SKY
(KEYPAD #3)
TRACKING
EQ South
EQ North
RATE
Sidereal
Lunar
Solar
VIEW TIME-SITE
HAND CONTROL
Lights Control
Keypad Level
Display Level
Scrolling Menu
Toggle Bold Font
Set Contrast
Set Language
SkyAlign
Auto Two-Star Align
Two-Star Align
One-Star Align
Solar System Align
EQ North Align
EQ South Align
Moon
Mercury
Venus
Mars
Jupiter
Saturn
Uranus
Neptune
Pluto
Sun
Named Stars
SAO
Variable Stars
Asterisms
Constellations
Double Stars
SCOPE SETUP
Setup Time-Site
Anti-Backlash
Slew Limits
Filter Limits
Direction Buttons
GoTo Approach
Cordwrap
UTILITIES
GPS On/Off
Factory Settings
Version
Get Axis Position
GoTo Axis Position
Hibernate
Sun Menu
Calibrate GoTo
Set Mount Position
USER OBJECTS
GoTo Sky Obj
Save Sky Obj
Save DB Obj
Enter RA & DEC
Save Land Obj
GoTo Land Obj
GET RA-DEC
GOTO RA-DEC
IDENTIFY
ENGLISH I 25

YOUR FIRST ASTRONOMICAL OBSERVING SESSION
THE MOON
Now you are ready to take your telescope out at night and do some real observing!
Let’s start with the Moon. The Moon takes about one month to go through a complete phase cycle, from new Moon to full Moon and back
again. Try observing it at different points during this cycle.
While you can observe the Moon any time it is visible in the sky, the best time to view it is from two days after a new Moon up to a few days
before a full Moon. During this period, you will be able to see the most detail in craters and lunar mountain ranges. Consult a calendar or moon
phase app to find out when the next new Moon will be.
1. With a clear view of the Moon, set up your telescope with the 25 mm eyepiece.
2. Turn on the finderscope and look through it to find the red dot.
3. Move the telescope until you can see the Moon through the finderscope’s window and the red dot is centered on the Moon.
4. Look through the 25 mm eyepiece. Gently turn the focus knobs to adjust the sharpness of the image.
CONGRATULATIONS! YOU HAVE NOW OBSERVED YOUR FIRST CELESTIAL OBJECT!
You can view many other celestial objects, such as planets, star clusters and nebulae using this same basic technique.
CELESTIAL OBSERVING TIPS
This section covers visual observing hints for both solar system and deep-sky objects as well as general observing
conditions which will affect your ability to observe.
MAGNIFICATION
You can change the magnification of your telescope by simply changing eyepieces. Both telescopes and eyepieces have focal lengths
that are measured in millimeters. To calculate the magnification of a given telescope and eyepiece combination, take the focal length of
the telescope and divide it by the focal length of the eyepiece. The resulting number is the magnification factor.
For example, the 80LCM has a focal length of 900 mm. Using the 25 mm eyepiece:
900 mm
=
____________
= 36x
25 mm
Focal Length of Telescope
Magnification =
_________________________
Focal Length of Eyepiece
FIELD OF VIEW
Determining the field of view is important if you want to get an idea of the angular size of the object you are observing. To calculate the
actual field of view, divide the apparent field of the eyepiece (supplied by the eyepiece manufacturer) by the magnification it gives you
in the scope you are using. Using the example in the previous section, we can determine the field of view using the same telescope and
25 mm eyepiece.
45°
=
______
= 1.25 degrees of arc
36
Apparent Field of View of Eyepiece
Actual Field Of View =
________________________________
Magnification
26 I ENGLISH

THE PLANETS
In addition to the Moon, your telescope is capable of observing the 5 brightest planets. Since planets change their positions against the
background stars, you will need to consult sources on the web or use a planetarium app on a smart device to help you locate where these
are. Here are some things to look for:
• Mercury and Venus- Just like the Moon, the two inner planets will go through phases ranging from thin crescents to gibbous.
• Mars- When it is near opposition (the point in its orbit where it is closest to Earth) you should be able to discern the polar cap and
possibly some larger surface features that appear as dark markings on the surface.
• Jupiter- Look for the darker methane cloud bands that circle the planet just above and below the equator. If the Great Red Spot is facing
the Earth, you may be able to catch a glimpse of it. You will also see the four brightest moons of Jupiter – Io, Europa, Ganymede, and
Callisto. These moons are fun to watch because they can move appreciably over just a couple of hours. Occasionally they will travel
behind Jupiter or into its shadow and disappear for periods of time. They can also cross the face of Jupiter and you may even see a
shadow of the moon crossing with it. There are some useful apps for your smart devise that will help you predict when the Great Red
Spot can be seen as well as when any interesting events are going to occur with Jupiter’s moons.
• Saturn- The rings! Saturn is arguably one of the most beautiful objects to look at in a telescope. If seeing conditions are stable enough,
you may even catch the shadow of the rings on the planet and the shadow of the planet on the rings. You should be able to see Titan,
the brightest moon of Saturn.
DEEP-SKY OBJECTS
Deep-sky objects are all of those celestial objects that are outside of our solar system. They include star clusters, planetary nebulae, diffuse
nebulae, double stars and other galaxies outside our own Milky Way. Objects such as nebulae and galaxies can be quite large, but they are
also very faint. In order to get the best view, you will need to make sure you are in the darkest skies possible. The farther you are away from
city lights, the better you will see these objects in the eyepiece. In photographs of nebulae and galaxies, you will see vivid reds and blues.
These colors are not visible when you look through the eyepiece. The colorful images were very long exposure images taken over 15 – 60
minutes or more, where your eye only records data on an instant by instant basis. Digital sensors are much more sensitive to reds and blues
than the human eye is which is most sensitive in the green part of the spectrum. Still, you will be able to see the soft glow of the Andromeda
galaxy and the expanse of the Orion Nebula.
SKY CONDITIONS
Sky conditions can significantly affect the performance of your telescope in three ways.
• Steadiness of the air- On windy days, images of the Moon and planets will appear to wave or jump around in the eyepiece; as if you
are looking at them through moving water. Nights where winds are calm will offer the best higher magnification views of the planets and
the Moon. The best way to judge the stability of the atmosphere is to look at bright stars with the naked eye. If they are “twinkling” or
rapidly changing colors, the air is unstable and you are better off using lower powers and looking for deep sky objects. If the stars are
sharp and not twinkling, the air is stable and should offer great high magnification planetary views.
• Transparency- How clear is the air you are looking through? If there is a high amount of humidity in the air, the faint light from galaxies
and nebulae can be scattered and diffused before reaching your telescope, causing a loss of brightness in your image. Debris in the air
from local forest fires or even distant volcanic eruptions can contribute to large loss of brightness. Sometimes this humidity or debris can
help stabilize the air, making for good planetary and lunar images, but the loss of light would make it difficult to see fainter deep-sky objects.
• Sky Brightness- The amount of ambient light in the atmosphere can also effect deep-sky observing. How dark the sky is can depend on
your local surroundings. In the middle of a city, sky-glow caused by city lights being reflected back to earth from the sky can overpower
the faint light from distant galaxies. Getting away from the bright lights of a major city can make the difference between seeing a faint
deep-sky object and missing it altogether. Planets and the Moon are plenty bright enough on their own so the effect on observing
them is minimal.
ENGLISH I 27

SELECTING AN OBSERVING SITE
If you are going to be observing deep-sky objects, such as galaxies and nebulae, you should consider traveling to a dark sky site that is
reasonably accessible. It should be away from city lights, a relatively unobstructed view of the horizon, and upwind of any major source
of air pollution. Always choose as high an elevation as possible as this can lower the effects of atmospheric instability and can ensure
that you are above any ground fog. While it can be desirable to take your telescope to a dark sky site, it is not always necessary. If
you plan to view the planets, the Moon or even some of the brighter deep-sky objects, you can do this from any location, such as your
own backyard. Try to setup the scope in a location that is out of the direct path of streetlights or house lights to help protect your night
vision. Try to avoid observing anything that lies within 5 to 10 degrees over the roof of a building. Rooftops absorb heat during the
day and radiate this heat out at night. This can cause a layer of turbulent air directly over the building that can degrade your image. It
is best if you set your telescope up directly on a dirt or grassy surface. Setting up on any raised platform such as a wooden deck or a
hard surface like concrete or a sidewalk should be avoided as they transmit vibrations easily that can be transferred to the telescope.
Observing through a window is not recommended because the window glass will distort images considerably. And an open window can
be even worse, because warmer indoor air will escape out the window, causing turbulence which also affects images. Astronomy is an
outdoor activity.
CHOOSING THE BEST TIME TO OBSERVE
Try not to view immediately after sunset. After the sun goes down, the Earth is still cooling, causing air turbulence. As the night goes on, not
only will seeing improve, but air pollution and ground lights will often diminish. Some of the best observing time is often in the early morning
hours before dawn. Objects are best observed as they cross the meridian, the imaginary line that runs from north to south through a point
directly over your head. This is the point at which objects reach their highest points in the sky and your telescope is looking through the least
amount of atmosphere possible. Objects that are rising or setting near the horizon will suffer more atmospheric turbulence since you are
looking through a much longer column of air. It is not always necessary to have cloud-free skies if you are looking at planets or the Moon.
Often broken cloud conditions provide excellent seeing.
COOLING THE TELESCOPE
Telescopes require at least 10 minutes to cool down to outside air temperature. This may take longer if there is a big difference between the
temperature of the telescope and the outside air. This minimizes heat wave distortion inside the telescope tube (tube currents).
ADAPTING YOUR EYES
If you are planning to observe deep sky objects at a dark sky site, it is best if you allow your eyes to fully adapt to the dark by avoiding
exposure to white light sources such as flashlights, car headlights, streetlights, etc. It will take your pupils about 30 minutes to expand to
their maximum diameter and build up the levels of optical pigments to help your eyes see the faint light from a distant target. If you need light
to help setup your telescope in the dark, try using a red LED flashlight at as low a brightness setting as possible and avoid looking straight
at the light source. This will give you the best chance of capturing those faint deep sky objects.
When observing, it is important to observe with both eyes open. This avoids eye fatigue at the eyepiece. If you find this too distracting, cover
the unused eye with your hand or an eye patch. The center of your eye works well in bright daylight, but is the least sensitive part of the eye
when trying to see subtle detail at low light levels. When looking in the eyepiece for a faint target, don’t look directly at it. Instead look toward
the edge of the field of view and the object will appear brighter.
28 I ENGLISH

ASTROIMAGING
One of the first questions most people have about their new telescope is “How can I take images with it?”. Your telescope is capable of
imaging the Moon and planets, but deep-sky objects would require a more advanced telescope and mount with finely geared motorized
tracking. There are a few different methods for using your telescope for imaging:
• Smart Devices or Point-and-Shoot Cameras- This is the easiest and most straight forward method and works well for images of the
Moon and planets. Simply hold your device’s camera up to the eyepiece and take the image. While you can use this with any eyepiece,
it is generally easier to get an image using a lower power (longer focal length) eyepiece. You will need a steady hand to hold the phone
to the eyepiece but you can get good results.
• DSLR- Celestron offers adapters that will allow you to attach a Canon or Nikon DSLR body to the telescope in place of the eyepiece.
You would be effectively using your telescope as a telephoto lens. This will require a T-adapter for the telescope and a T-ring for the
camera body. For more information on the adapters for your specific model of telescope, please go to www.celestron.com.
• CMOS Planetary Imagers- These are specialized cameras that replace the eyepiece in your telescope. It would connect to your laptop
via a USB port. The camera records video of the planet, then the included software breaks up the video file into individual still frames. The
software then combines the individual frames into a single image that contains more detail than was visible in any single frame. This method
will provide you the best possible lunar and planetary images, but does require that you have a laptop at the scope. For more information on
the planetary camera, please go to www.celestron.com.
DEEP-SKY OBSERVING EQUIPMENT
There are some tools that will be indispensable to you for identifying and locating deep-sky objects:
• Red Flashlight- This is an essential tool for deep-sky astronomy for reading finder charts or star atlases. In order to see the faint light
coming from distant objects like nebulae or galaxies, your eyes must be fully dark adapted with your irises open to the fullest extent to
let the most light from your telescope into them. White light from a standard flashlight will causes your eye’s irises to close down and it
can take up to a half-hour for your eyes to return to full dark adaptation. Red lights do not have the same effect. We recommend any red
LED flashlight that has adjustable brightness output, because even red light, if excessively bright can affect your night vision. These are
available through most telescope retailers but can also be found in camping and hardware stores.
• Planisphere- A planisphere is a special circular star map that will show you the rough placement of constellations over your head, so
you can navigate your way across the sky. Unlike charts you can print online, planispheres are good for any time of year, not just the
date or month you printed it for. The planisphere consists of two round disks joined at the center. The bottom disk has a map of the
constellations while the top disk has a window cut into it out showing a portion of the sky map. By turning the inner and outer disks
to match your specific date and time, the map will display only those constellations visible to you at that time. This is handy for finding
rough locations of bright stars and constellations. Planispheres are available through book stores and are available for a number of
geographical latitudes in the Northern or Southern Hemispheres. Be sure to pick one that is designed for your location. To get more
detailed information on where deep-sky objects reside within constellations you will need a Star Atlas.
• Star Atlas- Star atlases are the roadmaps of the sky. Once you have located a constellation with your planisphere, the Star Atlas will
show you a detailed, close-up view of that region of sky showing the stars and deep-sky objects that reside in it. These are available
through many telescope retailers or bookstores.
• Apps and Programs- There are many applications available for a smartphone or tablet that can take the place of the planisphere and
star maps. These will give digital representations of the night sky on your device, allowing you to go from a wide view to a zoomed-in view
with a touch of the screen. These can be downloaded or purchased from your application store, depending on your platform. There are
also some great astronomical sky simulation programs available for your computer that will show you very detailed star maps on screen
and can help you plan an observing session before you get outside with printable star maps customized for your date, location and time.
ENGLISH I 29

STAR HOPPING
The easiest way to find your way around the sky is by a technique called star hopping. The first thing you will need to do is measure the field of
view of your finderscope. Look in the sky and locate a constellation with bright stars. You can use your planisphere or astronomy app to help
identify it. Now find the map in your star atlas that shows this constellation. Center your finderscope on any bright star that you can recognize on
the star map. Hold your head 12 inches behind the reflective window of your StarPointer finderscope and move the telescope so that the bright
star is at the edge of the field if view of the window (it does not matter which direction you pick). Without moving the telescope, look through
the finderscope window and locate another star near the opposite edge of the field of view. Locate this second star on the chart. Measure the
distance between these two stars on the chart using a ruler. This distance is represents one finderscope field of view on your atlas. You can
now use this measurement to locate celestial objects.
CARE AND CLEANING OF THE TELESCOPE
While your telescope requires little maintenance, there are a few things to remember that will ensure your telescope performs at its
best. Occasionally, dust and/or moisture may build up on the objective lens. Special care should be taken when cleaning any instrument
so as not to damage the optics.
If dust has built up on the optics, follow these steps, in order, to clean your scope:
1. Use a camel hair brush to gently remove the larger particles.
2. Use a photographer’s squeeze bulb to blow away any loose debris. You can also use a can of compressed air, such as those sold for
cleaning computer keyboards, but you need to be careful. Avoid using cans that are almost empty and be sure to hold the air can vertically.
Failure to do this can result in the can spitting propellant out onto the optics. Hold the optical surface at an angle to the spray from the can
for approximately two to four seconds.
3. Use an optical cleaning solution of over-the-counter isopropyl alcohol and distilled water in a 50/50 mixture. Apply this solution to a white
unscented tissue, then apply the tissue paper to the optics. Low pressure strokes should go from the center of the lens (or mirror) to the outer
portion in straight lines like spokes on a wheel. Do not rub in circles!
You may experience dew build-up on the optics of your telescope during an observing session. If you want to continue observing, the
dew must be removed, either with a hair dryer (on low setting) or by pointing the telescope at the ground until the dew has evaporated. If
moisture condenses on the inside of the optics, remove the accessories from the telescope. Place the telescope in a dust-free environment
and point it downward until the moisture evaporates.
To minimize the need to clean your telescope, replace all lens covers once you have finished using it. Since the telescope tubes are not
sealed, the covers should be placed over the openings when not in use. This will prevent contaminants from entering the tubes. Internal
adjustments and cleaning should be done only by the Celestron repair department. If your telescope is in need of internal cleaning,
please call the factory for a return authorization number and price quote.
COLLIMATION OF A NEWTONIAN TELESCOPE
While your telescope requires little maintenance, there are a few things to remember that will ensure your telescope performs at
its Collimation is the process of aligning the mirrors of your telescope so that they work in concert with each other to deliver properly
focused light to your eyepiece. By observing out-of-focus star images, you can test whether your telescope’s optics are aligned. Place
a star in the center of the field of view and move the focuser so that the image is slightly out of focus. If the seeing conditions are good,
you will see a central circle of light (the Airy disc) surrounded by a number of diffraction rings. If the rings are symmetrical about the Airy
disc, the telescope’s optics are correctly collimated.
Correctly Aligned Needs Collimation
30 I ENGLISH

Collimation is a painless process and works like this:
Pull off the lens cap which covers the front of the telescope and look
down the optical tube. At the bottom you will see the primary mirror
held in place by three clips 120º apart, and at the top the small oval
secondary mirror held in a support and tilted 45º toward the focuser
outside the tube wall.
The secondary mirror is aligned by adjusting the three smaller screws
surrounding the central bolt. The primary mirror is adjusted by the
three adjusting screws at the back of your scope. The three locking
screws beside them serve to hold the mirror in place after collimation.
Primary Mirror Secondary Mirror
Support for
secondary mirror
Focuser
ALIGNING THE SECONDARY MIRROR
Point the telescope at a lit wall look into the focuser without the eyepiece installed. You may have to twist the focus knob a few turns until
the reflected image of the focuser is out of your view. Keep your eye against the back of and centered in the focus tube. Look for the three
clips holding the primary mirror in place. If you can’t see them, it means that you will have to adjust the three bolts on the top of the secondary
mirror holder, using either an Allen wrench or Phillip’s screwdriver. You will have to alternately loosen one and then compensate for the slack
by tightening the other two. Stop when you see all three mirror clips. Make sure that all three small alignment screws are tightened to secure
the secondary mirror in place.
Primary Mirror Clip
Ignore the reflected
image for now
Primary Mirror Clip
Primary Mirror Clip
Primary Mirror Clip
ALIGNING THE PRIMARY MIRROR
There are 3 large bolts and 3 small screws at the back of your telescope. The large bolts are the adjusting screws and the small screws are the
locking screws. Loosen the large bolts by a few turns. Now run your hand around the front of your telescope keeping your eye to the focuser,
you will see the reflected image of your hand. The idea here being to see which way the primary mirror is defected; you do this by stopping at
the point where the reflected image of the secondary mirror is closest to the primary mirror’s edge.
When you get to that point, stop and keep your hand there while looking at the back end of your telescope- is there an adjusting screw there?
If there is you will want to loosen it (turn the screw to the left) to bring the mirror away from that point. If there isn’t an adjusting screw there,
then go across to the other side and tighten the adjusting screw on the other side. This will gradually bring the mirror into alignment. (It helps
to have a friend to help for primary mirror collimation. Have your partner adjust the adjusting screws according to your directions while you look
in the focuser).
After dark, go out and point your telescope at Polaris, the North Star. With an eyepiece in the focuser, take the image out of focus. You will
see the same image only now, it will be illuminated by starlight. If necessary, repeat the collimating process only keep the star centered while
tweaking the mirror.
Secondary Mirror
Primary Mirror
Stop and keep your
hand here
Both mirrors aligned with
eye looking in focuser
ENGLISH I 31

CELESTRON TWO YEAR LIMITED WARRANTY
A. Celestron warrants your telescope to be free from defects in materials and workmanship for two years. Celestron will repair or replace
such product or part thereof which, upon inspection by Celestron, is found to be defective in materials or workmanship. As a condition to
the obligation of Celestron to repair or replace such product, the product must be returned to Celestron together with proof-of-purchase
satisfactory to Celestron.
B. The Proper Return Authorization Number must be obtained from Celestron in advance of return. Call Celestron at (310) 328-9560 to receive
the number to be displayed on the outside of your shipping container.
All returns must be accompanied by a written statement setting forth the name, address, and daytime telephone number of the owner, together
with a brief description of any claimed defects. Parts or product for which replacement is made shall become the property of Celestron.
The customer shall be responsible for all costs of transportation and insurance, both to and from the factory of Celestron, and shall be required
to prepay such costs.
Celestron shall use reasonable efforts to repair or replace any telescope covered by this warranty within thirty days of receipt. In the event repair
or replacement shall require more than thirty days, Celestron shall notify the customer accordingly. Celestron reserves the right to replace any
product which has been discontinued from its product line with a new product of comparable value and function.
This warranty shall be void and of no force of effect in the event a covered product has been modified in design or function, or subjected
to abuse, misuse, mishandling or unauthorized repair. Further, product malfunction or deterioration due to normal wear is not covered by
this warranty.
CELESTRON DISCLAIMS ANY WARRANTIES, EXPRESS OR IMPLIED, WHETHER OF MERCHANTABILITY OF FITNESS FOR A PARTICULAR USE, EXCEPT AS EXPRESSLY SET FORTH HEREIN. THE
SOLE OBLIGATION OF CELESTRON UNDER THIS LIMITED WARRANTY SHALL BE TO REPAIR OR REPLACE THE COVERED PRODUCT, IN ACCORDANCE WITH THE TERMS SET FORTH HEREIN.
CELESTRON EXPRESSLY DISCLAIMS ANY LOST PROFITS, GENERAL, SPECIAL, INDIRECT OR CONSEQUENTIAL DAMAGES WHICH MAY RESULT FROM BREACH OF ANY WARRANTY, OR ARISING
OUT OF THE USE OR INABILITY TO USE ANY CELESTRON PRODUCT. ANY WARRANTIES WHICH ARE IMPLIED AND WHICH CANNOT BE DISCLAIMED SHALL BE LIMITED IN DURATION TO A
TERM OF TWO YEARS FROM THE DATE OF ORIGINAL RETAIL PURCHASE.
Some states do not allow the exclusion or limitation of incidental or consequential damages or limitation on how long an implied warranty lasts,
so the above limitations and exclusions may not apply to you.
This warranty gives you specific legal rights, and you may also have other rights which vary from state to state.
Celestron reserves the right to modify or discontinue, without prior notice to you, any model or style telescope.
If warranty problems arise, or if you need assistance in using your telescope contact: Celestron - 800.421.9649
NOTE: This warranty is valid to U.S.A. and Canadian customers who have purchased this product from an authorized Celestron dealer in the U.S.A. or Canada. Warranty outside the U.S.A. and Canada
is valid only to customers who purchased from a Celestron’s International Distributor or Authorized Celestron Dealer in the specific country. Please contact them for any warranty service.
FCC NOTE: This device complies with Part 15 of the FCC Rules. Operation is subject to the following two conditions: (1) This device
may not cause harmful interference, and (2) this device must accept any interference received, including interference that may cause
undesired operation.
Product design and specifications are subject to change without prior notification.
This product is designed and intended for use by those 14 years of age and older.
© 2017 Celestron • All rights reserved
www.celestron.com
2835 Columbia Street • Torrance, CA 90503 U.S.A.
Telephone: 800.421.9649
05-17
Printed in China

FRANÇAIS
Mode d’emploi
MODÈLES #22050, 22051, 31150 (60LCM, 80LCM, 114LCM)
SÉRIE DE TÉLESCOPES

2 I FRANÇAIS

SOMMAIRE
AVERTISSEMENT AU SUJET DES RAYONS DU SOLEIL. . . . . . . . . . . . . . . . . . . . . . . . . . . . . . . . . . . . . .6
VOUS TROUVEREZ DANS LA BOÎTE . . . . . . . . . . . . . . . . . . . . . . . . . . . . . . . . . . . . . . . . . . . . . . . . . 7
ASSEMBLAGE DE VOTRE TÉLESCOPE . . . . . . . . . . . . . . . . . . . . . . . . . . . . . . . . . . . . . . . . . . . . . . . 8
Le trépied . . . . . . . . . . . . . . . . . . . . . . . . . . . . . . . . . . . . . . . . . . . . . . . . . . . . . . . . . . . . . . . . . . . 8
La monture électronique. . . . . . . . . . . . . . . . . . . . . . . . . . . . . . . . . . . . . . . . . . . . . . . . . . . . . . . . . . . .8
Le tube de télescope . . . . . . . . . . . . . . . . . . . . . . . . . . . . . . . . . . . . . . . . . . . . . . . . . . . . . . . . . . . . . 9
La diagonale en étoile (télescopes réfracteurs seulement) . . . . . . . . . . . . . . . . . . . . . . . . . . . . . . . . . . . . . . . . . 9
L’oculaire . . . . . . . . . . . . . . . . . . . . . . . . . . . . . . . . . . . . . . . . . . . . . . . . . . . . . . . . . . . . . . . . . . . .10
Le chercheur StarPointer . . . . . . . . . . . . . . . . . . . . . . . . . . . . . . . . . . . . . . . . . . . . . . . . . . . . . . . . . . . 10
Changer la pile du chercheur . . . . . . . . . . . . . . . . . . . . . . . . . . . . . . . . . . . . . . . . . . . . . . . . . . . . . . . . . 11
La commande à main . . . . . . . . . . . . . . . . . . . . . . . . . . . . . . . . . . . . . . . . . . . . . . . . . . . . . . . . . . . . . 11
Allumer le télescope. . . . . . . . . . . . . . . . . . . . . . . . . . . . . . . . . . . . . . . . . . . . . . . . . . . . . . . . . . . . . .11
Orienter le télescope . . . . . . . . . . . . . . . . . . . . . . . . . . . . . . . . . . . . . . . . . . . . . . . . . . . . . . . . . . . . . 12
Aligner le chercheur . . . . . . . . . . . . . . . . . . . . . . . . . . . . . . . . . . . . . . . . . . . . . . . . . . . . . . . . . . . . . . 12
UTILISATION DU TÉLESCOPE . . . . . . . . . . . . . . . . . . . . . . . . . . . . . . . . . . . . . . . . . . . . . . . . . . . . .13
La commande à main . . . . . . . . . . . . . . . . . . . . . . . . . . . . . . . . . . . . . . . . . . . . . . . . . . . . . . . . . . . . . 13
Utilisation de la commande à main . . . . . . . . . . . . . . . . . . . . . . . . . . . . . . . . . . . . . . . . . . . . . . . . . . . . . . 14
Menu d’alignement . . . . . . . . . . . . . . . . . . . . . . . . . . . . . . . . . . . . . . . . . . . . . . . . . . . . . . . . . . . . . 14
Sky Align. . . . . . . . . . . . . . . . . . . . . . . . . . . . . . . . . . . . . . . . . . . . . . . . . . . . . . . . . . . . . . . . . . .14
Alignement Automatique Deux étoiles . . . . . . . . . . . . . . . . . . . . . . . . . . . . . . . . . . . . . . . . . . . . . . . . . . . 16
Alignement Deux étoiles. . . . . . . . . . . . . . . . . . . . . . . . . . . . . . . . . . . . . . . . . . . . . . . . . . . . . . . . . . .16
Alignement Une étoile . . . . . . . . . . . . . . . . . . . . . . . . . . . . . . . . . . . . . . . . . . . . . . . . . . . . . . . . . . . .17
Alignement Système Solaire . . . . . . . . . . . . . . . . . . . . . . . . . . . . . . . . . . . . . . . . . . . . . . . . . . . . . . . . 17
Réalignement . . . . . . . . . . . . . . . . . . . . . . . . . . . . . . . . . . . . . . . . . . . . . . . . . . . . . . . . . . . . . . . . 18
CALATOGUES DES OBJETS . . . . . . . . . . . . . . . . . . . . . . . . . . . . . . . . . . . . . . . . . . . . . . . . . . . . . . 18
Sélectionner un objet . . . . . . . . . . . . . . . . . . . . . . . . . . . . . . . . . . . . . . . . . . . . . . . . . . . . . . . . . . . . 18
Pour les planètes . . . . . . . . . . . . . . . . . . . . . . . . . . . . . . . . . . . . . . . . . . . . . . . . . . . . . . . . . . . . . . 18
Pour les étoiles . . . . . . . . . . . . . . . . . . . . . . . . . . . . . . . . . . . . . . . . . . . . . . . . . . . . . . . . . . . . . . . 18
Pour les objets du ciel profond . . . . . . . . . . . . . . . . . . . . . . . . . . . . . . . . . . . . . . . . . . . . . . . . . . . . . . . 19
Consulter les informations sur un objet. . . . . . . . . . . . . . . . . . . . . . . . . . . . . . . . . . . . . . . . . . . . . . . . . . .19
Mode Sky Tour. . . . . . . . . . . . . . . . . . . . . . . . . . . . . . . . . . . . . . . . . . . . . . . . . . . . . . . . . . . . . . . .19
Boutons de direction . . . . . . . . . . . . . . . . . . . . . . . . . . . . . . . . . . . . . . . . . . . . . . . . . . . . . . . . . . . . 19
Bouton de vitesse du moteur . . . . . . . . . . . . . . . . . . . . . . . . . . . . . . . . . . . . . . . . . . . . . . . . . . . . . . . . 20
MENU PRINCIPAL. . . . . . . . . . . . . . . . . . . . . . . . . . . . . . . . . . . . . . . . . . . . . . . . . . . . . . . . . . . .20
Menu de suivi . . . . . . . . . . . . . . . . . . . . . . . . . . . . . . . . . . . . . . . . . . . . . . . . . . . . . . . . . . . . . . . . . 20
Mode de suivi . . . . . . . . . . . . . . . . . . . . . . . . . . . . . . . . . . . . . . . . . . . . . . . . . . . . . . . . . . . . . . . . 20
Taux de suivi . . . . . . . . . . . . . . . . . . . . . . . . . . . . . . . . . . . . . . . . . . . . . . . . . . . . . . . . . . . . . . . . . 20
Afficher l’heure-le site . . . . . . . . . . . . . . . . . . . . . . . . . . . . . . . . . . . . . . . . . . . . . . . . . . . . . . . . . . . . . 21
Menu de la commande à main . . . . . . . . . . . . . . . . . . . . . . . . . . . . . . . . . . . . . . . . . . . . . . . . . . . . . . . . 21
Contrôle de l’éclairage . . . . . . . . . . . . . . . . . . . . . . . . . . . . . . . . . . . . . . . . . . . . . . . . . . . . . . . . . . . 21
Défilement des menus. . . . . . . . . . . . . . . . . . . . . . . . . . . . . . . . . . . . . . . . . . . . . . . . . . . . . . . . . . . .21
Activer les caractères gras . . . . . . . . . . . . . . . . . . . . . . . . . . . . . . . . . . . . . . . . . . . . . . . . . . . . . . . . . 21
Définir le contraste . . . . . . . . . . . . . . . . . . . . . . . . . . . . . . . . . . . . . . . . . . . . . . . . . . . . . . . . . . . . . 21
Définir le langage . . . . . . . . . . . . . . . . . . . . . . . . . . . . . . . . . . . . . . . . . . . . . . . . . . . . . . . . . . . . . . 21
FRANÇAIS I 3

Menu de configuration du télescope . . . . . . . . . . . . . . . . . . . . . . . . . . . . . . . . . . . . . . . . . . . . . . . . . . . . . 21
Définir l’heure-le site. . . . . . . . . . . . . . . . . . . . . . . . . . . . . . . . . . . . . . . . . . . . . . . . . . . . . . . . . . . . .21
Anti-rebond . . . . . . . . . . . . . . . . . . . . . . . . . . . . . . . . . . . . . . . . . . . . . . . . . . . . . . . . . . . . . . . . . 21
Limites d’orientation . . . . . . . . . . . . . . . . . . . . . . . . . . . . . . . . . . . . . . . . . . . . . . . . . . . . . . . . . . . . .22
Filtres de limites . . . . . . . . . . . . . . . . . . . . . . . . . . . . . . . . . . . . . . . . . . . . . . . . . . . . . . . . . . . . . . . 22
Boutons de direction . . . . . . . . . . . . . . . . . . . . . . . . . . . . . . . . . . . . . . . . . . . . . . . . . . . . . . . . . . . . 22
Approche GoTo . . . . . . . . . . . . . . . . . . . . . . . . . . . . . . . . . . . . . . . . . . . . . . . . . . . . . . . . . . . . . . . 22
Enroulement du câble . . . . . . . . . . . . . . . . . . . . . . . . . . . . . . . . . . . . . . . . . . . . . . . . . . . . . . . . . . . .22
Menus Utilitaires . . . . . . . . . . . . . . . . . . . . . . . . . . . . . . . . . . . . . . . . . . . . . . . . . . . . . . . . . . . . . . . .22
GPS activé/désactivé . . . . . . . . . . . . . . . . . . . . . . . . . . . . . . . . . . . . . . . . . . . . . . . . . . . . . . . . . . . .22
Réglages d’usine . . . . . . . . . . . . . . . . . . . . . . . . . . . . . . . . . . . . . . . . . . . . . . . . . . . . . . . . . . . . . . 22
Version . . . . . . . . . . . . . . . . . . . . . . . . . . . . . . . . . . . . . . . . . . . . . . . . . . . . . . . . . . . . . . . . . . . .23
Obtenir la position d’axe . . . . . . . . . . . . . . . . . . . . . . . . . . . . . . . . . . . . . . . . . . . . . . . . . . . . . . . . . . 23
GoTo position d’axe . . . . . . . . . . . . . . . . . . . . . . . . . . . . . . . . . . . . . . . . . . . . . . . . . . . . . . . . . . . . . 23
Hibernation . . . . . . . . . . . . . . . . . . . . . . . . . . . . . . . . . . . . . . . . . . . . . . . . . . . . . . . . . . . . . . . . . 23
Menu Soleil . . . . . . . . . . . . . . . . . . . . . . . . . . . . . . . . . . . . . . . . . . . . . . . . . . . . . . . . . . . . . . . . . 23
Calibrer GoTo . . . . . . . . . . . . . . . . . . . . . . . . . . . . . . . . . . . . . . . . . . . . . . . . . . . . . . . . . . . . . . . . 23
Définir la position de la monture . . . . . . . . . . . . . . . . . . . . . . . . . . . . . . . . . . . . . . . . . . . . . . . . . . . . . . 23
Objets définis par l’utilisateur . . . . . . . . . . . . . . . . . . . . . . . . . . . . . . . . . . . . . . . . . . . . . . . . . . . . . . . . .24
Obtenir AD-DEC . . . . . . . . . . . . . . . . . . . . . . . . . . . . . . . . . . . . . . . . . . . . . . . . . . . . . . . . . . . . . . . 24
GoTo AD-DEC. . . . . . . . . . . . . . . . . . . . . . . . . . . . . . . . . . . . . . . . . . . . . . . . . . . . . . . . . . . . . . . . .24
Identifier . . . . . . . . . . . . . . . . . . . . . . . . . . . . . . . . . . . . . . . . . . . . . . . . . . . . . . . . . . . . . . . . . . . . 24
ARBORESCENCE DES MENUS DE LA GAMME LCM . . . . . . . . . . . . . . . . . . . . . . . . . . . . . . . . . . . . . . . 25
VOTRE PREMIÈRE SESSION D’OBSERVATION ASTRONOMIQUE . . . . . . . . . . . . . . . . . . . . . . . . . . . . . . . 26
La Lune . . . . . . . . . . . . . . . . . . . . . . . . . . . . . . . . . . . . . . . . . . . . . . . . . . . . . . . . . . . . . . . . . . . . 26
CONSEILS POUR L’OBSERVATION CÉLESTE . . . . . . . . . . . . . . . . . . . . . . . . . . . . . . . . . . . . . . . . . . . .26
Agrandissement . . . . . . . . . . . . . . . . . . . . . . . . . . . . . . . . . . . . . . . . . . . . . . . . . . . . . . . . . . . . . . . . 26
Champ de vision. . . . . . . . . . . . . . . . . . . . . . . . . . . . . . . . . . . . . . . . . . . . . . . . . . . . . . . . . . . . . . . .26
Les planètes . . . . . . . . . . . . . . . . . . . . . . . . . . . . . . . . . . . . . . . . . . . . . . . . . . . . . . . . . . . . . . . . . . 27
Les objets du ciel profond. . . . . . . . . . . . . . . . . . . . . . . . . . . . . . . . . . . . . . . . . . . . . . . . . . . . . . . . . . .27
Conditions atmosphériques . . . . . . . . . . . . . . . . . . . . . . . . . . . . . . . . . . . . . . . . . . . . . . . . . . . . . . . . . .27
Choisir un site d’observation . . . . . . . . . . . . . . . . . . . . . . . . . . . . . . . . . . . . . . . . . . . . . . . . . . . . . . . . . 28
Choisir le meilleur moment pour l’observation . . . . . . . . . . . . . . . . . . . . . . . . . . . . . . . . . . . . . . . . . . . . . . . . 28
Refroidir le télescope . . . . . . . . . . . . . . . . . . . . . . . . . . . . . . . . . . . . . . . . . . . . . . . . . . . . . . . . . . . . . 28
Adapter vos yeux . . . . . . . . . . . . . . . . . . . . . . . . . . . . . . . . . . . . . . . . . . . . . . . . . . . . . . . . . . . . . . . 28
Astrophotographie. . . . . . . . . . . . . . . . . . . . . . . . . . . . . . . . . . . . . . . . . . . . . . . . . . . . . . . . . . . . . . .29
Équipement pour l’observation des objets du ciel profond . . . . . . . . . . . . . . . . . . . . . . . . . . . . . . . . . . . . . . . . . 29
Sauts entre les étoiles. . . . . . . . . . . . . . . . . . . . . . . . . . . . . . . . . . . . . . . . . . . . . . . . . . . . . . . . . . . . .30
MAINTENANCE ET NETTOYAGE DU TÉLESCOPE. . . . . . . . . . . . . . . . . . . . . . . . . . . . . . . . . . . . . . . . . .30
COLLIMATION D’UN TÉLESCOPE NEWTONIEN. . . . . . . . . . . . . . . . . . . . . . . . . . . . . . . . . . . . . . . . . . .30
Aligner le miroir secondaire . . . . . . . . . . . . . . . . . . . . . . . . . . . . . . . . . . . . . . . . . . . . . . . . . . . . . . . . . . 31
Aligner le miroir primaire. . . . . . . . . . . . . . . . . . . . . . . . . . . . . . . . . . . . . . . . . . . . . . . . . . . . . . . . . . . .31
GARANTIE LIMITÉE CELESTRON DE DEUX ANS. . . . . . . . . . . . . . . . . . . . . . . . . . . . . . . . . . . . . . . . . .32
4 I FRANÇAIS

FRANÇAIS I 5

• Ne regardez jamais directement le Soleil à l'œil nu ou avec un télescope, à moins d'utilisez un filtre adapté. Cela pourrait entraîner des
lésions oculaires permanentes et irréversibles.
• N'utilisez jamais votre télescope pour projeter une image du soleil sur une surface quelconque. Une concentration de chaleur dangereuse
peut être générée à l’intérieur et endommager le télescope et les accessoires attachés.
• Ne jamais utilisez un filtre solaire d'oculaire ou une cale de Herschel. La concentration de chaleur au sein du télescope peut entraîner des
dommages à ces accessoires, laissant la lumière du Soleil non filtrée arriver directement à vos yeux.
• Ne laissez pas le télescope sans surveillance, particulièrement en présence d’enfants ou d’adultes qui ne sont pas familiarisés avec
son utilisation.
AVERTISSEMENT AU SUJET DES RAYONS DU SOLEIL
6 I FRANÇAIS

1. Tube de télescope
2. Chercheur StarPointer
3. Oculaire
4. Diagonale en étoile
5. Bouton de focalisation
6. Trépied
7. Plateau pour accessoires
8. Pince d'extension de pied de trépied
9. Bouton de verrou d'altitude
10. Molette de montage du télescope
11. Objectif
12. Monture électronique
13. Bouton Luminosité
14. Commande à main et support
Nous vous recommandons de conserver la boîte de votre télescope afin de pouvoir l'utilisez pour son rangement lorsqu'il n'est pas
utilisé. Déballez le contenu de la boîte avec soin, car certaines pièces sont petites. Utilisez la liste des pièces ci-dessous pour vous
assurer que toutes les pièces et tous les accessoires sont inclus dans la boîte.
LISTE DES COMPOSANTS
VOUS TROUVEREZ DANS LA BOÎTE
1. Tube de télescope
2. Molette de montage du télescope
3. Bouton de verrou d'altitude
4. Miroir primaire
5. Monture électronique
6. Trépied
7. Plateau pour accessoires
8. Pince d'extension de pied de trépied
9. Chercheur StarPointer
10. Oculaire
11. Bouton de focalisation
12. Bouton Luminosité
13. Commande à main et support
(Réfracteur 80LCM illustré)
(Newtonien 114LCM illustré)
3
5
6
11
2
4
7
9
10
12
13
14
8
1
3
4
1
13
10
5
6
11
2
9
12
7
8
FRANÇAIS I 7

ASSEMBLAGE DE VOTRE TÉLESCOPE
LE TRÉPIED
Le trépied du LCM est livré entièrement assemblé, facilitant ainsi
son installation. Pour installer le trépied :
1. Sortez le trépied de la boîte.
2. Desserrez les pinces en bas de chaque pied en ouvrant le
levier. Étendez la section interne du pied à la longueur désirée.
Serrez les pinces en faisant basculer le levier vers l’intérieur.
3. Mettez le trépied en position verticale et écartez ses pieds
jusqu'à ce qu'un déclic confirme que l'entretoise centrale soit
bien en place.
4. Placez le plateau pour accessoires sur l’entretoise, en faisant
correspondre le trou central. Faites pivoter le plateau jusqu’à
ce que les trois languettes s’enclenchent dans les onglets de
chaque pied de part et d’autre de l’entretoise.
5. Pour fixer le support de commande à main, simplement
positionner le support avec la languette carrée de plastique
vers le haut et appuyez contre le pied de trépied jusqu'à ce
qu'il s'enclenche.
LA MONTURE ÉLECTRONIQUE
Pour fixer la monture à votre trépied :
1. Placez la base motorisée sur le dessus du trépied en vous
assurant que les trois pieds ronds reposent sur les tampons
plats ronds à l'intérieur de la tête de trépied.
2. Vissez ensuite la vis de montage située sous la tête du trépied
dans le trou présente au-dessous de la base motorisée. Serrez
à la main pour sécuriser la monture.
Maintenant que la base est fixée au trépied, il est préférable de se
servir du niveau à bulle inclus pour mettre de niveau le télescope
de manière précise :
3. Placez le niveau à bzulles sur le dessus de la base motorisée.
4. Ajusteé les pieds de trépied jusqu'à ce que le niveau à bulle soit
parfaitement à niveau.
8 I FRANÇAIS

LE TUBE DU TÉLESCOPE
LA DIAGONALE EN ÉTOILE (Télescopes réfracteurs seulement)
La diagonale coudée fixée à l'arrière d'une lunette astronomique
contient un petit prisme qui réfléchit la lumière à un angle de
90°, permettant ainsi d'adopter une position plus confortable
pour l'observation. La majorité des télescopes astronomiques
reproduisent une image inversée verticalement ou horizontalement.
La diagonale coudée corrige l’image de manière à ce qu’elle soit
correctement orientée à 100%, ce qui rend votre télescope parfait
pour l’observation terrestre de jour.
Pour insérer la diagonale :
1. Retirez les capuchons des deux extrémités de la diagonale.
2. Desserrez les vis de pression à l'arrière du foyer et retirez le
petit capuchon antipoussière.
3. Insérez le plus petit tube de la diagonale à l'arrière du foyer et
fixez-le en serrant les vis de fixation. Vous pouvez régler l’angle
de la diagonale dans la direction désirée en serrant les vis.
NOTE : Une diagonale coudée ne permet pas la mise au point sur un télescope
de type Newtonien. L'image dans l'oculaire d’un télescope Newtonien s'affichera
toujours à l'envers.
Pour attacher le tube à la monture :
1. Desserrez le verrou d’altitude en faisant tourner la molette dans
le sens anti-horaire. Faites tourner la pince du tube afin que la
molette de monture soit positionnée sur le dessus de la base.
Resserrez la molette de verrou d'altitude en la faisant tourner
dans le sens horaire. Ne pas serrer avec force.
2. Desserrez la molette de montage du télescope en faisant
tourner la molette dans le sens anti-horaire.
3. Faire glisser la barre de monture de la queue d'aronde du
tube de télescope dans la pince du tube. Assurez-vous que
le chercheur pointe dans le sens correct lorsque vous le fixez
à la base.
4. Serrez la molette de montage du télescope en faisant tourner
la molette dans le sens horaire.
Votre télescope est maintenant assemblé et prêt à fixer
les accessoires.
Molette demontage
du télescope
Bouton de verrou
d'altitude
FRANÇAIS I 9

L’OCULAIRE
Votre télescope est livré avec deux oculaires. Un oculaire de 25 mm donnant un faible agrandissement, avec un champ de vision
modérément large. L’oculaire de 9 mm permet un agrandissement plus grand, mais un champ de vision plus serré. D'autres oculaires
peuvent être achetés pour augmenter ou diminuer le grossissement à votre gré. Lorsque vous souhaitez localiser un un objet pour la
première fois, il est recommandé d'utiliser l’oculaire de 25 mm. Une fois que l’objet est centré, échangez-le avec l’oculaire de 9 mm pour
agrandir la vue.
LE CHERCHEUR STARPOINTER
Votre télescope est livré avec un chercheur à point rouge
StarPointer que vous utiliserez comme outil de recherche lorsque
vous pointerez le télescope en direction d'une cible éloignée.
Pour installer le chercheur :
1. Desserrez les deux vis cruciformes présente sur le côté du
chercheur, et faites glisser la pince sur le support de queue
d’aronde situé près du foyer. La grande fenêtre du chercheur
doit être orientée vers l'avant du télescope.
2. Fixez le chercheur en serrant les deux vis cruciformes. Ne
pas serrer trop fort ces vis, mais suffisamment pour que la
connexion soit solide.
3. Retirez la petite languette de plastique située sous le cache de
la pile en tirant dessus. Cette languette est présente pour éviter
que la pile ne se décharge pendant la livraison du produit.
Pour installer un oculaire sur les télescopes réfracteurs 60LCM
et 80LCM :
1. Desserrez les vis de pression situées à l'extrémité ouverte de
la diagonale.
2. Insérez le barillet argenté de l'oculaire 25 mm dans la diagonale.
3. Serrez les vis de pression pour fixer bien en place l'oculaire.
4. Pour obtenir l'image la plus nette qui soit, effectuez la mise au
point en regardant dans l'oculaire et en tournant lentement les
molettes de mise au point jusqu'à ce que vous obteniez une
image nette.
Pour installer l’oculaire sur un télescope Newtonien 114LCM :
1. Desserrez les vis de pression à l'arrière du foyer et retirez le
petit capuchon antipoussière.
2. Insérez le barillet argenté de l'oculaire 25 mm directement dans
le foyer.
3. Serrez les vis de pression pour fixer bien en place l'oculaire.
4. Pour obtenir l'image la plus nette qui soit, effectuez la mise au
point en regardant dans l'oculaire et en tournant lentement les
molettes de mise au point jusqu'à ce que vous obteniez une
image nette.
Réfracteur
Newtonien
Bouton
Marche/Arrêt
Molette de réglage
Haut et Bas
Molette de réglage
Haut et Bas
Compartiment
des piles
10 I FRANÇAIS

CHANGER LA PILE DU CHERCHEUR
Pour remplacer la pile du StarPointer, retirez le chercheur du
télescope, puis retournez-le. Le compartiment des piles se situe
directement sous l’assemblage de la lentille la plus grande. En
vous aidant d’un tournevis ou de votre ongle, soulevez avec soin
le cache pour le retirer. La batterie est maintenue en place par
un contact à ressort. Soulevez doucement le contact et placez le
chercheur sur le côté. La pile doit sortir aisément de son logement.
Remplacez la pile par une pile-bouton 3V de type CR2032. Faites
glisser la nouvelle pile sous le contact, en vous assurant que son
pôle positif (le côté marqué d'un « + ») est bien orienté vers le
haut, vers le contact à ressort. La batterie doit alors s’enclencher.
Remettez le cache en place en faisant correspondre les onglets
avec les trous du chercheur, puis en pressant. Assurez-vous
d’éliminer l’ancienne pile dans le respect de la législation locale.
LA COMMANDE À MAIN
La commande à main LCM possède un connecteur de type fiche
téléphonique à l'extrémité de son cordon.
Pour connecter au télescope:
1. Repérez le port de commande à main situé sur le dessus de la
monture électronique.
2. Enfoncez-y l’extrémité du câble de la commande à main jusqu’à ce
qu’elle s’enclenche.
3. Faites glisser la commande à main vers le bas dans son support.
Pour l’en retirer, soulevez-la directement vers le haut.
Le LCM peut être alimenté par 8 piles alcalines AA (non incluses)
ou par un adaptateur de secteur de CA 12V optionnel.
Pour installer les piles dans le LCM :
1. Appuyez sur la languette sur le devant du compartiment des
piles et retirez le cache.
2. Retirez délicatement le support de la pile de l'intérieur du
compartiment à piles.
3. Placez 8 piles AA (non fournies) à l'intérieur du porte-piles, en
veillant à respecter le sens des polarités tel qu’indiqué sur le
support.
4. Remettez le porte-pile à l'intérieur de la base et replacez le
couvercle.
5. Faites basculer l'interrupteur en position « On ». La lumière sur le
bouton d'alimentation et la commande à main devrait s'allumer.
NOTE : Lorsque vous remplacez les piles, veillez à remplacez chacune des 8 piles
avec des neuves simultanément. Ne pas mélanger des piles neuves et usagées.
ALLUMER LE TÉLESCOPE
Compartiment
des piles
Prise de 12v
Interrupteur
d'alimentation
Port de
Commande à main
Compartiment De la pile
du compartiment des piles
Compartiment De la pile
du compartiment des piles
FRANÇAIS I 11

ORIENTER LE TÉLESCOPE
La monture électronique LCM est conçue pour être orientée avec la commande à main. Lorsqu’elle est alimentée, cela peut être fait
en appuyant sur les quatre boutons de direction de la commande. Vous pouvez modifier la vitesse de mouvement des moteurs
avec le bouton VITESSE DU MOTEUR, puis en sélectionnant un nombre entre 1 et 9. Pour effectuer la configuration initiale, nous
recommandons de sélectionner une vitesse supérieure à 5. Le verrou d’altitude doit être serré lorsque vous utilisez la commande à
main pour orienter le télescope.
Le télescope peut être orienté à la main sur l’axe d’altitude, mais seulement après avoir desserré le verrou d’altitude. Vous risquez
d’endommager le moteur et les engrenages si vous ne desserrez pas le verrou au préalable. La monture n’est pas équipée d’un verrou
pour le mouvement en azimut (de gauche à droite). Il n’est jamais recommandé d’orienter le télescope à la main de gauche à droite.
ALIGNER LE CHERCHEUR
Le chercheur StarPointer est un viseur réflex qui utilise une DEL rouge pour projeter un point rouge sur une fenêtre de verre. Lorsque vous
regardez dans la fenêtre, vous pouvez voir le point rouge superposé à la cible. La première fois que vous assemblez votre télescope, vous
devrez aligner le chercheur avec l'élément optique principal du télescope. Bien que cette étape puisse être effectuée de nuit, il est beaucoup
plus facile de l'effectuer en journée. Une fois que vous avez terminé l'alignement du chercheur, vous ne devriez pas avoir à répéter cette
étape à moins que le chercheur ait été déplacé ou retiré.
Pour aligner le chercheur StarPointer :
1. Installez le télescope à l'extérieur pendant la journée. À l'œil nu, trouvez un objet facilement reconnaissable, comme un lampadaire, une
plaque d'immatriculation de voiture ou un grand arbre. L'objet doit être le plus loin possible, et au moins à 400 m (un quart de mille).
2. Retirez le cache-poussière principal du télescope et assurez-vous que l’oculaire de 25 mm est installé.
3. Positionnez le télescope afin qu'il pointe à peu près vers l'objet que vous avez choisi à l'étape 1.
4. Regardez à travers l'oculaire du télescope et déplacez manuellement le télescope jusqu'à ce que l'objet que vous avez choisi se trouve dans
le centre de vision. Si l'image est floue, tournez tout doucement les molettes de mise au point jusqu'à ce que l'image soit nette.
5. Une fois que l'objet est centré dans votre oculaire 25 mm, allumez le chercheur en tournant jusqu'à la fin de sa course la molette de réglage
d'intensité lumineuse/d'alimentation. Cette molette est située sur le côté de l'appareil.
6. Avec votre tête située à environ 30 cm (1 pied) derrière le chercheur, regardez par la fenêtre ronde et localisez le point rouge. Il sera
probablement près de, mais pas exactement sur l'objet que vous voyez lorsque vous regardez à travers l'oculaire de 25 mm.
7. Sans déplacer le télescope, utilisez les deux molettes de réglage situées sur le côté et en dessous du chercheur. L'une contrôle le
mouvement gauche-droite du réticule, tandis que l'autre contrôle le mouvement haut-bas. Ajustez les deux molettes jusqu'à ce que le point
rouge apparaisse sur l'objet que vous observez dans l'oculaire de 25 mm.
Choisissez maintenant quelques autres cibles lointaines pour vous exercer à pointer votre télescope. Regardez par la fenêtre du chercheur
StarPointer et placez le point rouge sur la cible que vous essayez de visualiser et vérifiez qu'elle est visible dans l'oculaire 25 mm du télescope.
NOTE : N'oubliez pas d'éteindre le chercheur lorsqu'il n'est pas utilisé afin d'économiser les piles.
12 I FRANÇAIS

UTILISATION DU TÉLESCOPE
LA COMMANDE À MAIN
La commande à main du LCM est conçue pour vous donner un accès instantané à toutes les fonctions du télescope. Avec une rotation
automatique vers plus de 4 000 objets et des descriptions faciles à comprendre des menus, même un débutant peut maîtriser la variété des
fonctions offertes en quelques séances d'observation. Vous trouverez ci-dessous une description des composants individuels de la commande
à main LCM.
1. ÉCRAN À CRISTAUX LIQUIDES (LCD)- Quatre lignes de 18
caractères avec rétroéclairage pour une vision tout en confort des
informations du télescope et du défilement de texte.
2. ALIGN- Pour lancer le processus d'alignement de votre télescope.
3. BOUTONS DE DIRECTION- Permet le contrôle complet de
votre télescope dans toute direction. Utilisez les boutons de
direction pour centrer les objets dans l'oculaire ou pour orienter
manuellement votre télescope.
4. BOUTONS DE CATALOGUE- La commande à main possède un
bouton qui permet l'accès direct à chacun des catalogues dans
sa base de données de plus de 40 000 objets. Votre télescope
contient les catalogues suivants dans sa base de données :
• SYSTÈME SOLAIRE- Les 7 planètes de notre système solaire
plus la Lune, le Soleil et Pluton.
• ÉTOILES- Listes personnalisées des étoiles les plus brillantes,
des étoiles binaires, des étoiles variables, des constellations et
des astérismes.
• CIEL PROFOND- Listes personnalisées des meilleures
galaxies, nébuleuses et amas ainsi que la totalité du catalogue
Messier et objets spécifiquement sélectionnés de la liste NGC.
5. IDENTIFIER- Recherche dans la base de données du télescope
et affiche le nom et distances compensées vers les objets
correspondants les plus proches.
6. MENU- Affiche les fonctions de paramétrage et d'utilitaires, tels que taux de suivi et objets définis par l'utilisateur et autres.
7. OPTION (LOGO CELESTRON)- En combinaison avec d'autres touches, permet d'accéder à des fonctionnalités et fonctions avancées.
8. ENTRÉE- Appuyez sur ENTRÉE pour sélectionner n’importe quelle fonction du télescope, pour accepter les paramètres saisis et
orienter le télescope vers les objets affichés.
9. RETOUR- Appuyez sur RETOUR pour quitter le menu courant et afficher le précédent niveau du chemin de menu. Appuyez sur
RETOUR de manière répétée pour revenir au menu principal ou pour effacer des données saisies par erreur.
10. SKY TOUR- Active le mode visite, qui liste les meilleurs objets du ciel et oriente votre télescope vers ces derniers.
11. BOUTONS DE DÉFILEMENT- Pour faire défiler une liste vers le haut ou le bas. Un symbole de flèche double à la droite de l'écran
signifie que les boutons de défilement peuvent être utilisés pour voir des informations supplémentaires.
12. VITESSE DU MOTEUR- Permet de contrôler la vitesse de rotation du moteur lorsque les boutons de direction sont pressés.
13. INFOS OBJET- Affiche les coordonnées et informations pertinentes sur les objets sélectionnés de la base de données.
14. PORT D’ENTRÉE- Permet de connecter votre télescope à un ordinateur, pour utiliser un logiciel offrant des capacités d'orientation par
simple clic et de mise à jour du micrologiciel.
4
5
6
7
8
9
10
11
11
12
13
14
15
2
4
1 1
3
FRANÇAIS I 13

UTILISATION DE LA COMMANDE À MAIN
Cette section décrit les procédures de base de la commande à main utilisée conjointement avec le LCM.
MENU D’ALIGNEMENT
Pour que le LCM pointe avec précision vers des objets dans le ciel, il doit d'abord être aligné sur des positions connues (étoiles) dans le
ciel. Avec cette information, le télescope peut créer un modèle du ciel, qu'il utilise pour localiser n'importe quel objet avec des coordonnées
connues. Il existe un grand nombre de méthodes pour aligner le LCM sur les objets célestes, selon les informations disponibles à l'utilisateur:
• SkyAlign fonctionne en alignant le télescope sur trois étoiles très brillantes ou des planètes du ciel.
• Alignement Deux étoiles auto affiche une liste des objets visibles de jour (les planètes et la Lune) permettant d’aligner le télescope.
• Alignement Deux étoiles utilise les informations horaires/de lieu et permet à l'utilisateur de choisir les deux étoiles vers lesquelles
le télescope s'orientera automatiquement.
• Alignement Une étoile utilise les informations horaires/de lieu et permet à l'utilisateur de choisir une étoile vers laquelle le
télescope s'orientera automatiquement. Permet d’effectuer l’alignement rapidement, au détriment de la précision.
• Alignement Système Solaire affichera une liste des objets visibles en plein jour (planètes et la Lune) disponibles actuellement
afin d'aligner le télescope.
NOTE : La commande à main offre deux méthodes supplémentaires d’alignement – EQ Nord et EQ Sud- mais ces méthodes ne sont applicables qu’aux montures
alt-azimutales capables de recevoir une cale équatoriale. La monture LCM ne permet pas de faire cela.
SKYALIGN
SkyAlign est la méthode la plus facile d'alignement de votre télescope pour commencer l'observation sans attendre. Même si vous ne
connaissez rien aux étoiles, le LCM sera aligné en quelques minutes en demandant quelques informations élémentaires sur la date, l'heure
et votre emplacement. Ensuite vous n'aurez qu'à diriger le télescope sur trois objets célestes brillants de votre choix. Puisque SkyAlign ne
demande aucune connaissance du ciel nocturne, il n'est pas nécessaire de connaître le nom des étoiles que vous choisissez. Vous pouvez
même sélectionner une planète ou la Lune. Le télescope LCM est alors prêt à rechercher et suivre tout objet de la base de données de
plus de 4 000 objets. Avant que le télescope ne soit prêt à être aligné, il devrait être placé à l'extérieur avec tous les accessoires (oculaire,
renvoi et chercheur) fixés et le couvercle d'objectif retiré tel que décrit dans la section Assemblage du manuel. Pour commencer SkyAlign :
1. Mettre le LCM sous tension en basculant l'interrupteur situé sur le côté de la base, à la position «On». Une fois sous tension, la commande à
main affichera le statut «LCM Ready». Appuyez sur ENTRÉE pour sélectionner SkyAlign. Appuyez sur le bouton ALIGNER pour ignorer les
autres options d'alignement et de défilement de texte et pour lancer automatiquement SkyAlign.
2. Dès que SkyAlign est sélectionné, la commande à main affiche «Entrée si OK», «Annuler pour modifier» et «Site Sauvegardé». La ligne
inférieure de l’écran montre soit l'heure réelle ou l'heure de la dernière utilisation du télescope. Puisque c'est votre première utilisation
du LCM, appuyez sur ANNULER pour entrer l'heure actuelle et information de site.
L’écran de la commande à main demandera l'information suivante :
• Emplacement- La commande à main affichera une liste de ville à sélectionner. Sélectionner la ville de la base de données qui est la plus
proche de votre site d'observation courant. La ville sélectionnée sera enregistrée dans la mémoire du contrôle manuel afin qu'elle soit
automatiquement affichée lors d'un prochain alignement. Alternativement, si vous connaissez exactement la longitude et la latitude de votre
site d'observation, vous pouvez l'entrer directement dans la commande à main et l’enregistrer pour utilisation future. Pour choisir une ville :
1. Utilisez les boutons de défilement Haut et Bas pour choisir entre la Base de données des villes et Site personnalisé. La Base de
données des villes vous permettra de sélectionner la ville la plus proche de votre site d'observation à partir d'une liste d'emplacements
aux É.-U. ou ailleurs dans le monde. Site personnalisé vous permet d'entrer exactement la longitude et la latitude de votre site
d'observation. Sélectionnez Base de données des villes et appuyez sur ENTRÉE.
2. La commande à main vous permet de choisir entre emplacement international ou emplacement aux É.-U. Pour une liste des emplacement
aux É.-U. par état et ensuite par ville, appuyez sur ENTRÉE lorsque États-Unis est affiché. Pour les emplacements ailleurs dans le
monde, utilisez le bouton de défilement Haut ou Bas pour sélectionner International et appuyez sur ENTRÉE.
3. Utilisez les boutons de défilement Haut et Bas pour choisir l'état actuel (ou pays si International a été sélectionné) de la liste
alphabétique et appuyez sur ENTRÉE.
4. Utilisez les boutons de défilement Haut et Bas pour choisir la ville la plus proche de votre emplacement de la liste affichée et
appuyez sur ENTRÉE.
14 I FRANÇAIS

• Heure- Entrer l'heure actuelle de votre région. Vous pouvez soit entrer l'heure locale (c.-à-d. 8:00) soit l'heure militaire (c.-à-d. 20:00).
1. Sélectionner PM ou AM. Si l'heure militaire est entrée, la commande à main sautera cette étape.
2. Choisissez Heure normale ou Heure d’été. Utilisez les boutons de défilement Haut et Bas (boutons 6 ou 9) pour basculer entre
les options.
3. Sélectionnez le fuseau horaire de votre site d'observation. Utilisez de nouveau les boutons de défilement Haut et Bas (bouton 6 ou
9) pour défiler entre les choix. Pour des informations sur le fuseau horaire, reportez-vous à la carte des fuseaux horaires à l'annexe
de ce manuel.
• Date- Entrer le mois, jour et année de votre session d'observation. L’écran montrera : mm/dd/yy.
1. Si une mauvaise information est entrée dans la commande à main, le bouton ANNULER agira en tant que retour arrière vous permettant
d'entrer de nouveau l'information.
2. Lors du prochain alignement de télescope, la commande à main affichera automatiquement le dernier emplacement (soit la ville, soit la
longitude/latitude) entrée. Appuyez sur ENTRÉE pour accepter ces paramètres s'ils s'appliquent toujours. En appuyant sur le bouton
ANNULER, vous pourrez retourner et sélectionner un nouvel emplacement de ville ou longitude/latitude.
3. Utilisez les flèches sur la commande à main pour orienter (déplacer) le télescope vers tout objet céleste brillant. Alignez l'objet avec le
point rouge du chercheur et appuyez sur ENTRÉE.
4. Si le chercheur est aligné correctement avec le tube de télescope, l'étoile d'alignement devrait être visible dans le champ de vision
de l'oculaire. La commande à main vous demandera de centrer la brillante étoile d'alignement au centre de l'oculaire et d'appuyez
sur le bouton ALIGN. Cela acceptera l'étoile en tant que première position d'alignement. (Il n'est pas nécessaire d'ajuster la vitesse
d'orientation des moteurs après chaque étape d'alignement. Le LCM sélectionne automatiquement la meilleure vitesse d'orientation pour
l'alignement des objets dans le chercheur et l'oculaire).
5. Pour le deuxième objet d'alignement, choisissez une étoile brillante ou une planète qui se trouve aussi loin que possible du premier objet
d'alignement. Cette fois encore, utilisez les flèches pour centrer l'objet dans le chercheur et appuyez sur ENTRÉE. Une fois centré dans
l'oculaire, appuyez sur le bouton ALIGN.
6. Répéter la procédure pour la troisième étoile d'alignement. Lorsque le télescope est aligné aux étoiles finales, l'écran indiquera
«Correspondance Confirmée». Appuyez sur ANNULER pour afficher les noms des trois objets brillants alignés, ou appuyez sur ENTRÉE
pour accepter ces trois objets comme alignement. Vous êtes maintenant prêt à trouver votre premier objet.
CONSEILS POUR UTILISER SKYALIGN
Gardez les conseils d'alignement suivants à l'esprit pour garantir que SkyAlign soit aussi simple et précis que possible.
• Assurez-vous que le trépied est à niveau avant de commencer le processus d'alignement. L'information de l'heure/site et
le nivellement du trépied aideront le télescope à mieux prédire la disponibilité des étoiles brillantes et planètes qui sont au-dessus de
l'horizon.
• N'oubliez pas de sélectionner des étoiles d'alignement qui sont aussi éloignées les unes des autres que possible dans
le ciel. Pour de meilleurs résultats, s'assurer que la troisième étoile d'alignement ne soit pas en ligne droite entre les les deux premières
étoiles. Dans ce cas, l'alignement pourrait échouer.
• Ne vous souciez pas de confondre les planètes et les étoiles lorsque vous sélectionnez des objets d'alignement.
SkyAlign travaille avec les 4 planètes les plus brillantes (Vénus, Jupiter, Saturne et Mars) ainsi que la Lune. En plus des planètes, la
commande à main comprend plus de 80 étoiles brillantes d'alignement que vous pouvez choisir (jusqu'à 2,5 de magnitude).
• Il se peut que SkyAlign ne soit pas en mesure de déterminer quels trois objets d'alignement sont centrés. Cela peut se produire
lorsqu'une planète brillante ou la Lune passe près d'une des étoiles brillantes. Dans ces situations, il est préférable d'éviter
d'aligner avec ces objets si possible.
• Assurez-vous de centrer ces objets avec les mêmes mouvements finaux que l'approche GoTo. Par exemple, si le télescope
termine un GoTo avec le devant du télescope se déplaçant à droite et en haut, vous devrez centrer les trois objets d'alignement dans
l'oculaire en utilisant les flèches (les flèches haut/bas sont inversées dans les vitesses d'orientation de 6 ou moins). L'approche de
l'étoile de cette manière en regardant dans l'oculaire éliminera la majorité du rebond entre les engrenages et assurera un alignement
le plus précis possible.
FRANÇAIS I 15

ALIGNEMENT AUTOMATIQUE DEUX ÉTOILES
Comme pour SkyAlign, alignement automatique Deux étoiles vous demande d'entrer les informations d'heure/site comme auparavant. Une
fois cette information entrée, la commande à main vous demandera de sélectionner et pointer le télescope vers une étoile connue dans le
ciel. Le LCM a maintenant toute les informations nécessaires pour choisir automatiquement une deuxième étoile qui assurera le meilleur
alignement possible. Une fois sélectionnée, le télescope va automatiquement s'orienter vers cette deuxième étoile d'alignement pour compléter
l'alignement. Installez NexStar à l'extérieur avec tous les accessoires attachés et le trépied mis à niveau, puis suivez les étapes suivantes pour
aligner le télescope. :
1. Une fois le LCM mis sous tension, appuyez sur ENTRÉE pour commencer l'alignement.
2. Utilisez les boutons de défilement Haut et Bas (boutons 6 ou 9) pour sélectionner alignement automatique Deux étoiles et appuyez
sur ENTRÉE.
3. La commande à main affichera les dernières informations sur l'heure et l'emplacement saisies dans la commande à main. Utilisez les boutons
de défilement Haut et Bas pour faire défiler les informations. Appuyez sur ENTRÉE pour accepter l'information actuelle ou appuyez sur
ANNULER pour éditer manuellement l'information (voir la section SkyAlign pour de plus amples informations sur l'entrée d'information
d'heure/site).
4. L’écran vous demandera de sélectionner une étoile brillante à partir de la liste affichée sur la commande à main. Utilisez les flèches Haut et
Bas pour orienter vers l'étoile souhaitée et appuyez sur ENTRÉE.
5. Utilisez les boutons de direction pour orienter le télescope vers l'étoile que vous avez sélectionné. Centrez l'étoile dans le chercheur et
appuyez sur ENTRÉE. Finalement, centrez l'étoile dans l'oculaire et appuyez sur ALIGNER.
6. En se fondant sur ces informations, le LCM affichera automatiquement la deuxième étoile d'alignement la plus adaptée au-dessus de
l'horizon. Appuyez sur ENTRÉE pour orienter automatiquement le télescope vers l'étoile affichée. Si pour une raison quelconque, vous ne
voulez pas sélectionner cette étoile (elle est peut-être derrière un arbre ou immeuble), vous pouvez soit :
• Appuyer sur ANNULER pour afficher l'étoile suivante la plus convenable pour l'alignement.
• Utilisez les boutons de défilement Haut et Bas pour sélectionner manuellement toute étoile que vous désirez parmi la liste
d'étoiles disponibles.
Dès que l'orientation est terminée, l'écran demande d'utiliser les flèches pour aligner l'étoile sélectionnée avec le point rouge du chercheur. Une
fois centrée dans le chercheur, appuyez sur ENTRÉE. L'écran vous demandera alors de centrer l'étoile dans le champ de vision de l'oculaire.
Lorsque l'étoile est centrée, appuyez sur ALIGNER pour accepter cette étoile en tant que deuxième étoile d'alignement. Lorsque le télescope
est aligné sur chaque étoile, l'écran affiche « Alignement réussis ». Vous êtes fin prêt à trouver votre premier objet.
ALIGNEMENT DEUX ÉTOILES
Avec la méthode d'alignement Deux étoiles, le LCM requiert de l'utilisateur de connaître la position de deux étoiles brillantes pour être en
mesure d'aligner précisément le télescope avec le ciel et commencer à trouver des objets. Voici un aperçu de la procédure d'alignement
Deux étoiles :
1. Dès que le LCM est mis sous tension, utilisez les boutons de défilement Haut et Bas pour sélectionner Alignement Deux étoiles et appuyez
sur ENTRÉE.
2. Appuyez sur ENTRÉE pour accepter l'information d'heure/site affichée sur l'écran, ou appuyez sur ANNULER pour entrer de
nouvelles informations.
3. Le message SÉLECT. ÉTOILE 1 apparaitra en haut de l'écran. Utilisez les boutons de défilement Haut et Bas pour sélectionner l'étoile que
vous désirez utiliser comme première étoile d'alignement. Appuyez sur ENTRÉE.
4. Le LCM vous demande alors de centrer dans l'oculaire l'étoile d'alignement sélectionnée. Utilisez les boutons fléchées pour orienter le
télescope vers l'étoile d'alignement et centrez avec soin l'étoile dans le chercheur. Appuyez sur ENTRÉE une fois ceci fait.
5. Puis, centrez l'étoile dans l'oculaire et appuyez sur ALIGNER. Pour faciliter le centrage d'une étoile d'alignement, il peut être pratique de
ralentir la vitesse des moteurs pour les réglages fins. Cela est effectué en appuyant sur le bouton VITESSE DU MOTEUR de la commande
à main et en choisissant le numéro qui correspond à la vitesse souhaitée. (9 = plus rapide, 1 = plus lent).
6. Le LCM vous demandera alors de sélectionner et de centrer une deuxième étoile d'alignement et appuyez sur le bouton ALIGNER. Il est
préférable de choisir les étoiles d'alignement qui sont à bonne distance l'une de l'autre. Des étoiles qui sont éloignées d'au moins de 40° à
60° l'une de l'autre vous donneront un alignement d'étoiles plus précis que des étoiles qui sont plus proches l'une de l'autre.
Dès que le second alignement d'étoiles est complété correctement, l'écran indiquera « Alignement réussi », et vous devriez entendre la mise
en marche et le mouvement des moteurs.
16 I FRANÇAIS

ALIGNEMENT UNE ÉTOILE
L'alignement Une étoile requiert que vous saisissiez les mêmes informations que celles requises par l'Alignement Deux étoiles. Cependant, au
lieu d'orienter vers deux étoiles d'alignement pour le centrage et l'alignement, le LCM n'utilise qu'une étoile pour modéliser le ciel en s'aidant
des informations saisies. Cela vous permettra d'orienter vers les coordonnées d'objets brillants comme la Lune et des planètes et donnera au
LCM l'information nécessaire pour pister les objets dans l'altazimut dans toute partie du ciel. Alignement Une Étoile n'est pas destiné à être
utilisé pour localiser de petits objets ou objets de faible intensité du ciel profond ou pour pister précisément des objets pour être photographiés.
Pour utilisez Alignement Une étoile :
1. Sélectionnez Alignement Une étoile à partir des options d'alignement.
2. Appuyez sur ENTRÉE pour accepter l'information d'heure/site affichée sur l'écran, ou appuyez sur ANNULER pour entrer de
nouvelles informations.
3. Le message SÉLECT. ÉTOILE 1 apparaitra en haut de l'écran. Utilisez les boutons de défilement Haut et Bas pour sélectionner l'étoile que
vous désirez utiliser comme première étoile d'alignement. Appuyez sur ENTRÉE.
4. Le LCM vous demande alors de centrer dans l'oculaire l'étoile d'alignement sélectionnée. Utilisez les boutons fléchées pour orienter le
télescope vers l'étoile d'alignement et centrez avec soin l'étoile dans le chercheur. Appuyez sur ENTRÉE une fois ceci fait.
5. Puis, centrez l'étoile dans l'oculaire et appuyez sur ALIGNER.
6. Une fois en position, le LCM modélisera le ciel basé sur cette information et affichera « Alignement réussi ».
NOTE : Une fois Alignement Une étoile effectué. vous pouvez utilisez la fonction Réalignement (plus loin dans cette section) pour améliorer la précision de
pointage du télescope.
ALIGNEMENT SYSTÈME SOLAIRE
L'Alignement Système Solaire est conçu pour fournir un excellent suivi et les meilleures performances GoTo en s'appuyant sur les objets
du système solaire (Soleil, Lune et les planètes) pour aligner le télescope avec le ciel. L'Alignement Système Solaire est un bon moyen
pour aligner votre télescope pour une observation diurne ainsi qu'un moyen rapide pour aligner le télescope pour l'observation nocturne.
Ne regardez jamais directement vers le soleil à l'œil nu ou avec un télescope (à moins d'utiliser un filtre adapté). Cela
pourrait entraîner des lésions oculaires permanentes et irréversibles.
1. Sélectionnez Alignement Système Solaire à partir des options d'alignement.
2. Appuyez sur ENTRÉE pour accepter l'information d'heure/site affichée sur l'écran, ou appuyez sur ANNULER pour entrer de
nouvelles informations.
3. Le message SÉLECTIONNER OBJET apparaitra en haut de l'écran. Utilisez les boutons de défilement Haut et Bas pour sélectionner les
objets diurnes (planète, Lune ou soleil) que vous souhaitez aligner. Appuyez sur ENTRÉE.
4. Le LCM vous demande alors de centrer dans l'oculaire l'objet d'alignement sélectionné. Utilisez les boutons fléchés pour orienter le télescope
vers l'objet d'alignement et centrez-le avec soin dans le chercheur. Appuyez sur ENTRÉE une fois ceci fait.
5. Ensuite, centrez l'objet dans l'oculaire et appuyez sur ALIGNER.
Une fois en position, le LCM modélisera le ciel basé sur cette information et affichera « Alignement réussi ».
Sélectionner le Soleil
Pour des raisons de sécurité, le Soleil ne sera pas affiché dans aucune liste d'objet de client dans le contrôle à moins que ce ne soit activé à
partir du Menu Utilitaires. Pour permettre au Soleil d'apparaitre dans la commande à main, suivez les étapes suivantes:
1. Appuyez sur ANNULER jusqu'à ce que « LCM prêt » apparaisse.
2. Appuyez sur le bouton MENU et utilisez les flèches Haut et Bas pour sélectionner le Menu Utilitaires. Appuyez sur ENTRÉE.
3. Utilisez les boutons de défilement Haut et Bas pour sélectionner Menu Soleil et appuyez sur ENTRÉE.
4. Appuyez sur ENTRÉE de nouveau pour permettre au soleil d'apparaitre dans l'écran de la commande à main
L'affichage du Soleil peut être désactivé selon le même processus. Pour améliorer la précision de pointage du télescope, vous pouvez
utiliser la fonction Réalignement tel que décrit ci-dessous.
FRANÇAIS I 17

RÉALIGNEMENT
Le LCM possède une fonction de réalignement qui vous permet de remplacer n'importe quelle étoile utilisée dans l'alignement initial par
une autre étoile ou objet céleste. Cela peut se révéler utile dans plusieurs situations :
• Si vous observez depuis quelques heures, vous remarquerez que vos deux étoiles d'alignement originales se sont considérablement
déplacées vers l'ouest. (Rappelez-vous que les étoiles se déplacent à une vitesse de 15° d’arc par heure). Aligner sur une nouvelle étoile
dans la partie est du ciel améliorera la précision de pointage, spécialement sur des objets dans cette partie du ciel.
• Si vous avez aligné votre télescope en utilisant la méthode Alignement Une Étoile, vous pouvez utiliser le réalignement pour
aligner vers un objet supplémentaire dans le ciel. Cela améliorera la précision de pointage de votre télescope sans avoir à entrer
d'information supplémentaire.
Pour remplacer une étoile d'alignement existante avec une nouvelle étoile d'alignement :
1. Sélectionner l'étoile souhaitée (ou l’objet) de la base de données et orienter vers celui-ci.
2. Centrez l'objet avec soin dans l'oculaire.
3. Une fois centré, appuyez sur ANNULER jusqu'au retour au menu principal.
4. Lorsque «LCM prêt » s'affiche, appuyez sur ALIGNER sur la commande à main.
5. L'écran vous demandera alors quelle étoile d'alignement vous désirez remplacer.
6. Utilisez les boutons de défilement Haut et Bas pour sélectionner l'étoile d'alignement à remplacer, et appuyez sur ENTRÉE. Il est
préférable de remplacer l'étoile la plus proche du nouvel objet. Cela espacera vos étoiles d'alignement à travers le ciel. Si vous
avez utilisé une des méthodes d'alignement avec un seul objet alors il est toujours préférable de remplacer un objet « non assigné
» avec un objet réel.
7. Appuyez sur ALIGNER pour effectuer la modification.
CATALOGUE DES OBJETS
SÉLECTIONNER UN OBJET
Maintenant que le télescope est correctement aligné, vous pouvez choisir un objet contenu dans n'importe laquelle des bases de données
du LCM. La commande à main possède un bouton pour chacun des catalogues dans la base de données.
POUR LES PLANÈTES
1. Appuyez sur le bouton SYSTÈME SOLAIRE (bouton 1).
2. Utilisez les boutons de défilement Haut et Bas (boutons 6 ou 9, pas les boutons de direction haut et bas), pour faire défiler la liste des objets
du Système Solaire, jusqu’à ce que celui qui vous intéresse apparaisse sur l’écran.
3. Appuyez sur ENTRÉE et le télescope s’orientera vers l’objet.
POUR LES ÉTOILES
1. Appuyez sur le bouton ÉTOILES (bouton 2).
2. Utilisez les boutons de défilement Haut et Bas (boutons 6 ou 9, pas les boutons de direction haut et bas), pour faire défiler la liste des
catégories contenant celui qui vous intéresse puis appuyez sur ENTRÉE. Pour les étoiles, vous avez le choix entre Étoiles nommées,
Catalogue SAO, Étoiles variables, Astérismes, Constellations et Étoiles doubles.
3. Utilisez les boutons de DÉFILEMENT Haut et Bas pour sélectionner l’objet que vous souhaitez regarder, puis appuyez sur ENTRÉE. Le
télescope s’orientera vers l’objet.
4. Pour le catalogue SAO, vous n'avez qu'à entrer les quatre premiers chiffres du numéro d'objet SAO de six chiffres. Dès que les quatre
chiffres sont entrées, la commande à main listera automatiquement les objets SAO disponibles commençant par ces chiffres. Utilisez les
boutons de défilement pour naviguer dans la liste d’objets SAO utilisant ce préfix, puis sélectionnez l’objet désiré en appuyant sur ENTRÉE.
18 I FRANÇAIS

POUR LES OBJETS DU CIEL PROFOND
1. Appuyez sur le bouton CIEL PROFOND (bouton 3).
2. Utilisez les boutons de défilement Haut et Bas (boutons 6 ou 9, pas les boutons de direction haut et bas), pour faire défiler la liste des
catégories contenant celui qui vous intéresse puis appuyez sur ENTRÉE. Vous avez le choix entre Objets nommés, Catalogue NGC,
Catalogue de Caldwell et Catalogue de Messier.
3. Pour les Objets nommés, utilisez les boutons de DÉFILEMENT Haut et Bas pour sélectionner l’objet que vous souhaitez observer, et
appuyez sur ENTRÉE. Le télescope s’orientera vers l’objet.
4. Si vous avez sélectionné le Catalogue NGC, de Caldwell ou de Messier, saisissez maintenant le numéro de l’objet dans le catalogue avec
le pavé numérique, puis appuyez sur ENTRÉE.
NOTE : La commande à main affichera tous les objets du système solaire qui se trouvent au-dessus de l'horizon. Les objets situés sous l’horizon sont filtrés hors de
la liste, de manière à ne pas vous faire perdre votre temps à essayer de trouver un objet ferait pointer le télescope vers le sol. Vous pouvez modifier ce comportement
et permettre de pointer sous l’horizon en modifiant les paramètres dans les menus de Limite d'orientation et Filtres de limites décrits dans ce mode d’emploi.
CONSULTER LES INFORMATIONS SUR UN OBJET
Une fois que l'objet sélectionné est affiché sur l'écran de la commande à main, vous avez deux options : Cela vous donnera de l'information
utile sur l'objet sélectionné tel que la magnitude, constellation et informations supplémentaires sur plusieurs de ces objets.
Les informations de l'objet peuvent être obtenues sans avoir fait d'alignement d'étoile. Lorsque le télescope est allumé, appuyez sur un
bouton de catalogue pour faire de défiler les listes des objets ou saisir des numéros de catalogue et voir de les information sur l'objet tel
que décrit ci-dessus.
MODE SKY TOUR
Si vous n’êtes pas sûr de quels objets vous devriez observer, le LCM comporte une fonction Sky Tour, qui affiche une liste des objets les
plus brillants et les plus interessants du ciel nocturne, au-dessus de l’horizon.
1. Appuyez sur le bouton SKY TOUR (bouton 5) pour ouvrir le menu.
2. Utilisez les boutons de DÉFILEMENT Haut et Bas pour sélectionner l’objet que vous souhaitez regarder, puis appuyez sur ENTRÉE. Le
télescope s’orientera vers l’objet.
BOUTONS DE DIRECTION
Le LCM possède quatre boutons de direction situés au centre de la commande à main qui contrôle les mouvements du télescope en altitude
(verticalement) et en azimut (horizontalement). La vitesse de mouvement peut être définie selon 9 vitesses.
FRANÇAIS I 19

Le bouton Vitesse du moteur vous permet de modifier immédiatement
la vitesse de mouvement des servomoteurs sur une plage allant de
haute vitesse à des mouvements de précision. Chaque taux de
vitesse est assigné à un numéro sur le pavé numérique, 9 étant la
plus haute vitesse et 1 étant la plus lente.
Les vitesses 1-4 sont pratiques pour centrer des objets dans
l’oculaire. Les vitesses 5-6 sont pratiques pour centrer des objets
dans le chercheur. Les vitesses 7-9 sont pratiques pour couvrir de
longues distances sur le ciel nocturne.
Pour modifier la vitesse du moteur :
La commande à main comporte une fonction « bouton double » qui
permet d'accélérer la vitesse des moteurs sans avoir à spécifier
la vitesse. Pour utiliser cette fonction, appuyez simplement sur
le bouton correspondant à la direction vers laquelle vous voulez
déplacer le télescope. Tout en maintenant ce bouton appuyé,
pressez la direction opposée. Ceci augmentera la vitesse
d’orientation à son maximum.
NOTE : Le taux sidéral est la vitesse à laquelle la terre tourne, ce qui fait que les
objets semblent se déplacer dans le ciel. Ce taux est d’environ 15 degrés d’arc
seconde par seconde.
BOUTON DE VITESSE DU MOTEUR
MENU PRINCIPAL
Le LCM contient plusieurs fonctions de réglage définies par l'utilisateur et conçues pour donner le contrôle des différentes fonctions du
télescope. Toutes les fonctions utilitaires et de réglage peuvent être atteintes en appuyant sur le bouton MENU(Keypad #7) et en faisant
défiler les options.
MENU DE SUIVI
Mode de suivi
Une fois le LCM aligné, les moteurs servant à l'orientation s'allumeront automatiquement et commenceront à suivre le ciel. Cependant, le
suivi peut être désactivé pour usage terrestre :
• Désactivé- Lors de l'utilisation du télescope pour l’observation terrestre (terrain) la suivi peut être désactivé afin que le télescope ne
bouge pas.
• Alt-Az- C’est le taux de suivi par défaut et est utilisé lorsque le télescope est correctement aligné.
NOTE : Les modes de suivi EQ Nord & EQ Sud ne sont utilisés qu’avec les télescopes sur monture équatoriale. Les télescopes LCM utilisent une monture Alt-Azimutale et
ne peuvent donc pas utiliser ces deux modes de suivi EQ.
Taux de suivi
En plus d'être capable de déplacer le télescope avec les boutons de la commande à main, le LCM suivra continuellement un objet céleste
alors qu'il se déplace dans le ciel nocturne. La vitesse de suivi peut être définie selon le type de l'objet concerné :
• Sideral- Cette vitesse compense pour la rotation de la terre en déplaçant le télescope à la même vitesse de rotation de la terre, mais
en direction opposée. Lors du suivi en mode Alt-Az, le télescope doit faire des corrections en altitude et en azimut.
• Lunaire- Utilisé pour suivre la Lune lors d'observation de paysage lunaire.
• Solaire- Utilisé pour suivre le soleil lors d'observation solaire en utilisant un filtre solaire adéquat.
TAUX DE VITESSE DU MOTEUR
1 0,5x sidéral
2 1x sidéral
3 4x sidéral
4 8x sidéral
5 16x sidéral
6 64x sidéral
7
1°/ seconde
8
1.75°/ seconde
9
2.75°/ seconde
20 I FRANÇAIS

AFFICHER L’HEURE-LE SITE
Voir l’Heure-le Site — Utilisé pour afficher la dernière heure sauvegardée et la longitude/latitude saisies dans la commande à main.
MENU DE COMMANDE À MAIN
Contrôle de l’éclairage
Ce menu d’options vous permet d’ajuster la luminosité de l’éclairage sur la commande à main.
• Luminosité des boutons- Ajuste la luminosité du rétro-éclairage des boutons de la commande.
• Luminosité de l’écran- Ajuste la luminosité du rétro-éclairage de l’écran LCD.
Défilement des menus
Ce menu vous permet de modifier la vitesse de défilement du texte dans l'écran de la commande à main.
• Appuyez sur le bouton HAUT (bouton 6) pour augmenter la vitesse de défilement du texte.
• Appuyez sur le bouton BAS (bouton 9) pour réduire la vitesse de défilement du texte.
Activer les caractères gras
Cela permet de modifier l’affichage des caractères sur l’écran pour les rendre plus faciles à lire.
Définir le contraste
Cela permet d’assombrir le texte affiché sur l’écran LCD.
Définir le langage
Cela vous permet de choisir le langage utilisé par la commande à main. Appuyez sur le numéro correspondant au langage désiré.
MENU DE CONFIGURATION DU TÉLESCOPE
Définir l’heure-le site
Permet à l'utilisateur de personnaliser l'affichage de la commande à main en modifiant les paramètres d'heure et d'emplacement (tel que
le fuseau horaire et l’heure d’été).
Anti-rebond
Tous les engrenages mécaniques ont un certain rebond ou jeu entre les engrenages. Ce jeu est évident par le temps que prend l'étoile
à se déplacer dans l'oculaire lorsque les boutons fléchés de la commande à main sont appuyées (spécialement lors de changement de
directions). La fonction anti-rebond du LCM permet à l'utilisateur de compenser le rebond en entrant une valeur qui permet de rapidement
imprimer un mouvement opposé aux moteurs pour éliminer le jeu entre les engrenages. La quantité de compensation requise est fonction du
taux de rotation sélectionné. Plus lent est le mouvement, plus longue sera la latence avant que l'étoile ne semble se déplacer dans l'oculaire.
Par conséquent, la compensation anti-rebond doit être plus élevée. Vous aurez à expérimenter avec différentes valeurs; une valeur entre
20 et 50 est normalement suffisante pour la plupart des observations visuelles, alors qu'une valeur plus élevée peut être nécessaire pour
le guidage photographique. Une compensation positive sera appliquée lorsque la monture change de direction de mouvement d'arrière
en avant. De la même manière une compensation négative sera appliquée lorsque la monture change de direction de mouvement d'avant
en arrière. Lorsque le suivi est activé, la monture se déplacera sur un ou deux axes dans une direction positive ou négative. Donc la
compensation sera toujours appliquée lorsqu'un bouton de direction est relâché et que le mouvement s'inverse par rapport au sens de
déplacement précédent.
Pour régler la valeur anti-rebond, défilez vers le bas jusqu'à l'option anti-rebond et appuyez sur ENTRÉE. Saisissez une valeur entre 0 et 100
pour les directions en azimut et en altitude et appuyez sur ENTRÉE après chacune d'elles pour conserver ces valeurs. Le télescope gardera
en mémoire ces valeurs et les utilisera à chaque mise sous tension ou jusqu'à ce qu'elles soient modifiées.
FRANÇAIS I 21

Limites d'orientation
Régler les limites d'orientation du télescope en altitude sans afficher un message d'avertissement. Ces limites empêchent le tube du télescope
du suivre un objet situé sous l'horizon ou un objet si haut que le tube pourrait entrer en collision avec l'un des pieds du trépied. Mais, ces limites
peuvent être définies selon vos besoins spécifiques. Par exemple, si vous désirez pointer vers un objet proche du zénith et êtes certain que le
tube n'entrera pas en collision avec les pieds, alors vous pouvez définir la limite à 90° en altitude. Cela permettra au télescope de s'orienter vers
tout objet au-dessus l'horizon sans avertissement.
Filtres de limites
Lorsqu'un alignement est terminé, le télescope LCM sait automatiquement quels objets célestes se trouvent au-dessus de l'horizon. En
conséquence, lors du défilement à travers les listes de base de données (ou en sélectionnant la fonction SKY TOUR), la commande à main du
LCM affichera seulement les objets qui se trouvent au-dessus de l'horizon au moment de l'observation. Vous pouvez personnaliser la base de
données d'objets en sélectionnant les limites d'altitude qui sont appropriées à votre emplacement et pour votre situation. Par exemple, si vous
observez depuis une région montagneuse, où l’horizon est partiellement obstrué, vous pouvez définir une limite minimum d’altitude sur +20°.
Cela permet de garantir que seuls les objets situés à une altitude supérieure à 20° seront affichés.
Si vous désirez explorer la base de données d'objets au complet, définissez la limite d'altitude maximum limite à 90° et la limite minimum
à –90°. Cela affichera tous les objets dans les listes des bases de données, qu'ils soient visibles ou non dans le ciel à partir de votre
emplacement.
Boutons de direction
La direction du mouvement d'une étoile dans l'oculaire dépend des accessoires utilisés. Cela peut créer de la confusion lorsque vous
orientez le télescope vers une étoile en utilisant un guideur désaxé au lieu de regarder directement dans le télescope. Pour compenser,
la direction des boutons de contrôle du moteur peut être modifiée. Pour renverser la logique de la commande à main, appuyez sur MENU
et sélectionnez Boutons de direction du menu Utilitaires. Utilisez les boutons fléchés Haut et Bas pour sélectionner les boutons d'Azimut
(gauche et droite) ou encore les boutons d'Altitude (haut et bas) et appuyez sur ENTRÉE. Appuyez à nouveau sur le bouton ENTRÉE pour
renverser la direction des boutons de la commande à main. Les touches de navigation changeront uniquement les vitesses de l'oculaire
(vitesse 1-6) et n'affecteront pas les vitesses de rotation (vitesses 7-9).
Approche GoTo
Permet à l’utilisateur de définir la direction prise par le télescope lors de l'orientation vers un objet. Cela permet de compenser les effets du
rebond. Par exemple, si votre télescope est lourd à l'arrière à cause de lourd optique ou d'accessoires photographiques fixés à l'arrière, vous
devriez fixer l' approche en altitude avec une direction négative. Cela assurera que le télescope approche toujours un objet dans la direction
opposée à la charge tirant sur le télescope.
Pour modifier la direction d'approche GoTo, sélectionnez simplement Approche GoTo du menu Configuration du télescope, puis sélectionnez
soit l'approche Altitude soit l'approche Azimut, choisissez positif ou négatif et appuyez sur Entrée.
Enroulement du câble
Cette fonction est une sécurité empêchant le télescope de pivoter à plus de 360° en azimut et donc d'éviter que les câbles ne s'enroulent
autour de la base du télescope. Ceci est utile lorsque le télescope est branché sur une source d'alimentation externe. Par défaut, la fonction
enrouler le cordon est coupé lorsque le télescope est aligné dans l'altazimut et activé lorsqu'il est aligné sur une cale.
MENU UTILITAIRES
En défilant à travers les options du MENU vous découvrirez plusieurs fonctions utilitaires avancées.
GPS activé/désactivé
Cette fonctionnalité n'est disponible que lors de l’utilisation du télescope avec l'accessoire GPS facultatif. Elle vous permet de désactiver
le module GPS. Si vous désirez utiliser la base de données du LCM pour trouver les coordonnées d'un objet céleste pour une future date,
vous devrez désactiver le module GPS afin d'être en mesure d'entrer manuellement une date et une heure autre que l’actuelle.
Réglages d'usine
Rétablis les paramètres de la commande à main LCM tels-quels lors de sa sortie d’usine. Les paramètres tels que valeurs de compensation
de rebond, date et heure initiales, longitude/latitude ainsi que les limites de filtre et d'orientation seront réinitialisés. Cependant, les
paramètres stockés tels que PEC et objets définis par l'utilisateur resteront intacts même si réglage d'usine est sélectionné. La commande
à main vous demandera d'appuyer sur le bouton « 0 » avant de rétablir les réglages d'usine par défaut.
22 I FRANÇAIS

Version
Cette option vous permet de voir la version actuelle de la commande à main et du logiciel de contrôle du moteur. Le premier ensemble de
numéros indique la version du logiciel de la commande à main. Pour le contrôle de moteur, la commande à main affichera deux ensembles de
numéros ; les premiers numéros sont pour l'azimut et les deuxièmes pour l'altitude.
Obtenir la position d’axe
Affiche l'altitude et l’azimut relatifs pour l'emplacement actuel du télescope.
GoTo position d’axe
Vous permet d'entrer une position spécifique d'altitude et d'azimut et ensuite d’orienter le télescope selon ces valeurs.
Hibernation
Hibernation permet au télescope d'être hors tension et de quand même retenir son alignement lorsqu’il est rallumé. Cela ne fait pas
qu'épargner de l'énergie, mais est idéal pour ceux laissent leur télescope monté tout le temps ou qui laissent leur télescope au même
emplacement pour une période de temps prolongée. Pour mettre votre télescope en hibernation :
1. Sélectionnez Hibernation dans le menu Utilitaires.
2. Déplacer le télescope à l'emplacement souhaité et appuyez sur ENTRÉE.
3. Éteignez le télescope. Rappelez-vous de ne jamais déplacer votre télescope manuellement alors que vous êtes en mode de Mise en
veille prolongée.
Dès que le télescope est de nouveau sous tension, l'écran devrait indiquer Réveil. Après avoir appuyé sur ENTRÉE, vous avez l'option de
défiler à travers l'information d'heure/site pour confirmer le réglage actuel. Appuyez sur ENTRÉE pour réveiller le télescope.
Le fait d'appuyer sur ANNULER sur l'écran Réveil vous permettra d'explorer les différentes fonctionnalités de la commande à main sans avoir
à sortir le télescope de son mode de mise en veille prolongée. Pour réveiller le télescope après avoir appuyé sur ANNULER, sélectionnez
Hibernation du menu Utilitaires et appuyez sur ENTRÉE. N'utilisez pas les boutons de direction pour orienter le télescope pendant le mode
de mise en veille prolongée.
Menu Soleil
Pour des raisons de sécurité, le Soleil ne sera pas affiché en tant qu'objet de base de données à moins qu'il ne soit auparavant activé. Pour
activer le Soleil, ouvrez le menu Soleil et appuyez sur ENTRÉE. Le Soleil sera alors affiché dans le catalogue des Planètes et pourra être
utilisé en tant qu'objet d'alignement lors de l'utilisation de la méthode d'alignement Système Solaire. Pour retirer le Soleil de l'affichage de
la commande à main, sélectionnez de nouveau le menu Soleil du menu Utilitaires et appuyez sur ENTRÉE.
Calibrer GoTo
Calibration GoTo est un outil utile lorsqu'on fixe de lourds accessoires photographiques au télescope. La calibration aller à calcule la
distance et le temps nécessaire à la monture pour compléter son orientation finale GoTo lors de l'orientation vers un objet. La modification
de l'équilibre du télescope peut prolonger le temps d'orientation complet. La fonctionnalité Calibration tient compte de tous les déséquilibres
et modifie la distance GoTo pour compenser.
Définir la position de la monture
Le menu Définir position de la monture peut être utilisé pour récupérer un alignement dans le cas où un télescope ou trépied a été
manuellement déplacé. Par exemple, vous pouvez utilisez cette fonctionnalité si vous avez besoin d'ajuster le niveau du trépied en élevant/
abaissant les pieds de trépied. Après avoir déplacé la monture, orientez simplement le télescope vers une étoile brillante et centrez-la dans
l'oculaire, puis sélectionnez Définir position de la monture du menu Utilitaires. Étant donné que le télescope a été déplacé, la précision
de pointage sera diminuée. Mais maintenant vous pouvez orienter vers un nouvel ensemble d'étoiles d'alignement et remplacer les étoiles
d'alignement originales avec les nouvelles étoiles. Cela vous aidera à éviter de recommencer la procédure d'alignement à partir du début.
FRANÇAIS I 23

OBJETS DÉFINIS PAR L'UTILISATEUR
L'appareil peut mémoriser jusqu'à 50 objets personnalisés différents en mémoire. Les objets peuvent être des objets terrestres de jour ou
un objet céleste intéressant que vous avez découvert et qui n'est pas inclus dans la base de données régulière. Il y a plusieurs manières de
conserver un objet en mémoire dépendant du type d'objet :
• Mémoriser objet céleste- Le LCM stocke les objets célestes dans sa base de données en sauvegardant son ascension droite et
sa déclinaison dans le ciel. De cette manière le même objet peut être localisé chaque fois que le télescope est aligné. Dès que l'objet
souhaité centré dans l'oculaire, défilez simplement vers la commande « Mémoriser objet céleste » et appuyez sur ENTRÉE. L'écran vous
demandera de saisir un nombre entre 1 et 25 pour identifier l'objet. Appuyez de nouveau sur ENTRÉE pour sauvegarder cet objet dans
la base de données. Ces objets peuvent être observés en sélectionnant GoTo objet céleste.
• Mémoriser objet base de données (Bdd)- Cette fonction vous permet de créer votre propre visite guidée d'objets de base de
données en vous permettant d'enregistrer la position courante du télescope et d'enregistrer le nom de l'objet en sélectionnant un des
catalogues de base de données.
• Saisir AD - DEC- Vous pouvez également stocker un ensemble de coordonnées spécifiques d'un objet en entrant l'ascension droite et
la déclinaison pour cet objet. Défilez jusqu'à la commande « Saisir DA-DEC » et appuyez sur ENTRÉE. L'écran vous demandera d'entrer
en premier l'ascension droite et la déclinaison de l'objet souhaité.
• Mémoriser objet terrestre- Le télescope LCM peut également être utilisé comme une lunette d'observation pour les objets terrestres.
Les objets terrestres fixes peuvent être stockés en conservant leur altitude et azimut relativement à l'emplacement du télescope au
moment de l'observation. Étant donné que ces objets dépendent de l'emplacement du télescope, ils ne sont valides que pour cet
emplacement seulement. Pour enregistrer des objets terrestres, centrez l'objet souhaité dans l'oculaire. Défilez vers le bas jusqu'à la
commande « Mémoriser objet terrestre » et appuyez sur ENTRÉE. L'écran vous demandera de saisir un nombre entre 1 et 25 pour
identifier l'objet. Appuyez de nouveau sur ENTRÉE pour sauvegarder cet objet dans la base de données. Ces objets peuvent être
observés en sélectionnant GoTo objet terrestre.
Pour remplacer le contenu de tout objet défini par l'utilisateur, mémorisez simplement un nouvel objet en utilisant un numéro
d'identification existant; le LCM remplacera le précédent objet défini par l'utilisateur par le nouvel objet.
OBTENIR AD-DEC
Affiche l'ascension droite et la déclinaison pour l'emplacement actuel du télescope.
GOTO AD-DEC
Vous permet de saisir une ascension droite et déclinaison particulière et de d'orienter le télescope vers celles-ci.
IDENTIFIER
Le mode Identification recherchera dans les listes ou catalogues de la base de données du LCM et affichera le nom et distances compensées
des objets correspondants le plus proches. Cette fonction peut être utile dans deux cas. Tout d'abord, elle peut permettre d'identifier un
objet non identifié contenu dans le champ de l'oculaire. De plus, le mode Identification peut être utilisé pour trouver d'autres objets célestes
qui sont proches des objets observés. Par exemple, si votre télescope est pointé vers l'étoile la plus brillante de la constellation de Lyra, en
choisissant le mode Identification et ensuite en cherchant dans le catalogue Étoile Nommée, elle sera sans aucun doute identifiée comme
Véga. Cependant, en sélectionnant la fonction Identification et en cherchant dans le catalogue Messier ou Objet nommé, la commande à
main vous indiquera que la Nébuleuse de l'Anneau (M57) se trouve à 6° de votre position présente. En cherchant dans le catalogue Étoile
binaire, vous remarquerez que Epsilon Lyrae se trouve à seulement 1° de Véga.
Pour utiliser la fonction Identification :
• Appuyez sur le bouton IDENTIFIER (bouton 4) et sélectionnez l'option Identifier.
• Utilisez les boutons de défilement Haut et Bas pour sélectionner le catalogue dans lequel vous aimeriez faire la recherche.
• Appuyez sur ENTRÉE pour débuter la recherche.
NOTE : Quelques-unes des bases de données contiennent des milliers d'objets, et cela pourrait prendre une minute ou deux avant que l'objet le plus près soit affiché.
24 I FRANÇAIS

Objets nommés
NGC
Caldwell
Messier
Arborescence des menus de la gamme LCM
Mode
Alt-Az
Désactivé
MENU
(BOUTON 7)
BOUTON
ALIGNER
SYSTÈME SOLAIRE
(BOUTON 1)
ÉTOILES
(BOUTON 2)
CIEL PROFOND
(BOUTON 3)
SUIVI
EQ Sud
EQ Nord
Vitesse de suivi
Sidérale
Lunaire
Solaire
AFFICHER L’HEURE-LE SITE
COMMANDE À MAIN
Éclairage
Éclairage du clavier
Éclairage de l'affichage
Menu de Défilement
Activer les caractères gras
Contraste
Langage d'interface
SkyAlign
Alignement automatique
Deux étoiles
Alignement Deux étoiles
Alignement Une étoile
Solar System Align
(alignement sur système solaire)
Alignement EQ Nord
Alignement EQ Sud
Lune
Mercure
Vénus
Mars
Jupiter
Saturne
Uranus
Neptune
Pluton
Soleil
Étoiles nommées
SAO
Étoiles variables
Astérismes
Constellations
Étoiles doubles
CONFIGURATION DU TÉLESCOPE
Définir l’heure-le site
Anti-rebond
Limites d'orientation
Filtres de limites
Boutons de direction
Approche GoTo
Enroulement de cordon
UTILITAIRES
GPS activé/désactivé
Réglages d'usine
Version
Obtenir position d'axe
Aller à position d'axe
Hibernation
Menu Soleil
Calibration GoTo
Définir position de la monture
OBJETS PERSONNALISÉS
GoTo objets célestes
Mémoriser objet céleste
Mémoriser objet BdD
Saisir AD et DEC
Mémoriser objet terrestre
GoTo objet terrestre
OBTENIR AD ET DEC
GOTO AD ET DEC
IDENTIFIER
FRANÇAIS I 25

VOTRE PREMIÈRE SESSION D'OBSERVATION ASTRONOMIQUE
LA LUNE
Vous êtes maintenant prêt à installer votre télescope à l'extérieur et faire de véritables observations pendant la nuit!
Commençons par la Lune. Les phases de la Lune s'étendent sur un cycle complet d'environ un mois, de la nouvelle Lune à la pleine Lune et
vice versa. Essayez de l'observer à différents moments au cours de ce cycle.
Alors que vous pouvez observer la Lune à n'importe quel moment lorsqu'elle est visible dans le ciel nocturne, le meilleur moment pour la voir
est deux jours après une nouvelle Lune jusqu'à quelques jours avant une pleine Lune. Durant cette période, vous pourrez voir plus de détails
relatifs aux cratères et aux chaînes de montagnes lunaires. Consultez un calendrier pour connaître la prochaine apparition de la nouvelle Lune.
1. Lorsque la Lune se voit clairement, installez votre télescope avec l'oculaire 25 mm.
2. Allumez le chercheur et regardez à travers celui-ci pour trouver le point rouge.
3. Déplacez le télescope de façon à voir la Lune par la fenêtre du chercheur et le point rouge centré sur la Lune.
4. Regardez dans l'oculaire 25 mm. Tournez tout doucement les molettes de mise au point pour régler la netteté de l'image.
FÉLICITATIONS! VOUS AVEZ OBSERVÉ VOTRE PREMIER OBJET CÉLESTE!
Vous pouvez utiliser cette technique de base pour observer d'autres corps célestes, tels que des planètes, des amas d'étoiles ou
des nébuleuses.
CONSEILS POUR L’OBSERVATION CÉLESTE
Cette section offre des conseils sur l'observation des objets du Système Solaire et du ciel profond ainsi que des remarques sur les
conditions d'observation pouvant avoir une influence sur sa qualité.
AGRANDISSEMENT
Vous pouvez changer l’agrandissement de votre télescope en changeant simplement les oculaires. Le télescope et l’oculaire on une
longueur de focale mesurée en millimètres. Pour calculer l’agrandissement d’une combinaison spécifique de télescope et d’oculaire,
prenez la valeur de longueur de focale du télescope, et divisez-la par celle de l’oculaire. La valeur obtenue est le facteur d’agrandissement.
Par exemple, le 80LCM a une longueur de focale de 900 mm. Si vous utilisez l’oculaire de 25 mm :
900 mm
= ____________ = 36x
25 mm
Longueur de focale du télescope
Agrandissement = ______________________________
Longueur de focale de l'oculaire
CHAMP DE VISION
Déterminer le champ de vision est important si vous voulez avoir une idée de la taille angulaire de l'objet observé. Pour calculer le champ
de vision, divisez le champ de vision apparent de l'oculaire (fourni par le fabricant de l'oculaire) par le l’agrandissement. En utilisant
l'exemple de la section précédente, nous pouvons déterminer le champ de vision en utilisant le même oculaire de 25 mm.
45 °
= ______ = 1,25 degrés d’arc
36
Champ de vision apparent de l'oculaire
Champ de vision réel = _________________________________
Agrandissement
26 I FRANÇAIS

LES PLANÈTES
En plus de la Lune, votre télescope est capable d’observer les 5 planètes les plus lumineuses. Les planètes changent de position sur le
fond d’étoiles. Aidez-vous donc des sources disponibles sur Internet, ou utilisez une application d’astronomie sur un appareil intelligent pour
savoir où elles se trouvent. Voici des conseils :
• Mercure et Vénus- Tout comme la lune, les deux planètes intérieures passent par des phases allant de croissants fins à la
phase gibbeuse.
• Mars- Lorsqu’elle se trouve en opposition proche (le point d’orbite où elle est la plus proche de la Terre), vous devriez être capable d’en
discerner les pôles et peut-être les caractéristiques les plus grandes, qui apparaissent comme des tâches sombres sur sa surface.
• Jupiter- Essayez de repérer les bandes de nuages de méthane sombre qui se trouvent juste au-dessus et au-dessous de l’équateur.
Si la Grande tâche rouge fait face à la Terre, vous devriez pouvoir la voir. Vous verrez également les quatre lunes les plus lumineuses
de Jupiter – Io, Europe, Ganymède, et Callisto. Ces lunes sont amusantes à observer car elles se déplacent de manière appréciable
en l’espace de quelques heures. Occasionnellement, elles passeront derrière Jupiter ou se trouveront occultées par son ombre, les
masquant pendant une certaine période de temps. Elles peuvent également passer juste devant Jupiter, et vous pourriez distinguer leur
ombre projetée sur la planète. Il existe des applications utiles pour votre appareil intelligent, qui vous aideront à prédire quand la Grande
tâche rouge est visible, ainsi qu’a prédire les déplacements de ses lunes.
• Saturne- Les anneaux! Saturne est sans conteste l’un des plus beaux objets à observer dans un télescope. Si les conditions
d’observation sont suffisamment stables, vous pourriez même voir l’ombre projetée par les anneaux sur la planète, et vis-versa. Vous
pourriez également voir Titan, la lune la plus brillante de Saturne.
LES OBJETS DU CIEL PROFOND
Les objets du ciel profond sont simplement ceux situés en dehors des limites de notre système solaire. Ces objets sont des amas d'étoiles,
des nébuleuses planétaires, des nébuleuses diffuses, des étoiles doubles et d’autres galaxies situées en dehors de notre Voie Lactée. Les
objets comme les nébuleuses et la galaxies peuvent être très grandes, mais sont également peu lumineuses. Pour en avoir la meilleure vue,
assurez-vous de choisir une nuit la plus sombre possible. Plus loin vous êtes des lumières d’une ville, meilleure sera la vue de ces objets
dans l’oculaire. Dans les photographies des nébuleuses et des galaxies, vous pouvez voir des rouges et des bleus très lumineux. Ces
couleurs ne sont pas visibles dans l’oculaire. Ces images colorées ont été capturées avec des paramètres d’exposition très longs, 15 à 60
minutes ou plus, alors que votre œil capture les couleurs instant par instant. Les capteurs numériques sont bien plus sensibles au couleurs
rouges et bleues que l'œil, qui lui est plus sensible au spectre vert. Vous devriez malgré tout être capable de distinguer la lueur douce de la
galaxie d’Andromède ou de la nébuleuse d’Orion.
CONDITIONS ATMOSPHÉRIQUES
Les conditions atmosphériques affectent les performances de votre télescope de trois manières.
• Stabilité de l’air- Les jours venteux, les images de la Lune et des planètes semblent onduler ou sauter dans l’oculaire, comme si
vous les observiez à travers de l’eau. Les nuits de calme offrent les meilleures conditions d’agrandissement des planètes et de la
Lune. La meilleure manière de juger de la stabilité de l’atmosphère est de simplement observer les étoiles à l'œil nu. Si elles semblent
« clignoter », ou changer rapidement de couleur, alors l’air est peu stable et il est recommandé d’utiliser un faible agrandissement et de
choisir des objets du Ciel profond. Si les étoiles sont nettes et ne clignotent pas, alors l’air est stable et vous pouvez utiliser un grand
agrandissement pour observer les planètes.
• Transparence- L’air au-travers duquel vous observez est-il transparent? Si l’air est chargé d’humidité, la lumière peu intense des
galaxies et des nébuleuses peut être éparpillée et diffusée avant d’atteindre le télescope, rendant l’image plus sombre. Les débris en
suspension créés par un feu de forêt ou même par une irruption volcanique lointaine peut également contribuer lourdement à la perte de
luminosité. Parfois, l’humidité et les débris peuvent aider à stabiliser l’air, permettant de bonnes observations des planètes et de la Lune,
mais au détriment de la luminosité rendant difficile l’observation des objets du Ciel profond.
• Luminosité du ciel- La quantité de lumière ambiante peut également affecter l’observation du Ciel profond. La luminosité du ciel
dépend de votre environnement. Au cœur d'une ville, la brillance du ciel causée par le reflet des lumières de la ville vers la terre peut
contrer la faible luminosité des galaxies lointaines. Éloignez-vous des lumières intenses d’une grande ville vous donner la meilleure
chance d’observer les objets peu brillants du Ciel profond, car elle peut les masquer complètement. Les planètes et la Lune sont
suffisamment lumineuses pour que l’effet de cette brillance soit minime.
FRANÇAIS I 27

CHOISIR UN SITE D'OBSERVATION
Si vous souhaitez observer des objets du Ciel profond, comme des galaxies et des nébuleuses, nous recommandons de vous déplacer sur
un site où le ciel sera plus sombre, si un tell lieu est relativement aisé à atteindre. Ce lieu doit se trouver loin des lumières de la ville, doit
être relativement libre d’obstacles sur l’horizon et de pollution lumineuses. Choisissez toujours un site aussi élevé que possible, car cela
peut contribuer à réduire l’instabilité atmosphérique et peut vous situer au-dessus d’un brouillard éventuel. Bien qu’il soit conseillé d’installer
votre télescope sur un site sombre, cela n’est pas toujours nécessaire. Si vous souhaitez observer les planètes, la Lune ou certains objets
du Ciel profond, vous pouvez le faire depuis n’importe quel lieu, même votre jardin. Essayez d’installer le télescope de manière à ce qu’aucun
lampadaire ou lumière de la maison ne se trouve en ligne de vue directe pour préserver votre vision. Essayez d'éviter d’observer un objet
se trouvant à 5 - 10 degrés du toit d’une maison. Les toits absorbent la chaleur pendant la journée et la relâchent la duit. Cela peut créer
une zone de perturbations juste au-dessus du bâtiment, susceptible de dégrader la qualité de l’image. Il est mieux d’installer le télescope
directement sur la terre ou sur une surface herbeuse. Il déconseillé de l’installer sur une plateforme surélevée comme une terrasse de bois
ou une surface dure comme du ciment ou un trottoir, car ces surfaces transmettent aisément les vibrations qui peuvent se propager dans
votre télescope.
Il n’est pas recommandé d’observer par une fenêtre, car le verre peut déformer les images de manière considérable. Une fenêtre ouverte
est encore pire, car l’air plus chaud de l’intérieur va s’échapper, causant des turbulences qui vont affecter les images. L’astronomie est une
activité de plein air.
CHOISIR LE MEILLEUR MOMENT POUR L’OBSERVATION
Évitez de commencer l’observation immédiatement après le couché du Soleil. La terre commence alors à refroidir, causant des turbulences
aériennes. Au fil de la nuit, non seulement la qualité de l’observation augmentera, mais la pollution de l’air et lumineuse baissera également.
L’un des meilleurs moments pour observer se situe dans les dernières heures de la nuit, juste avant le levé du Soleil. Il est mieux d'observer
les objets lorsqu’ils croisent le méridien, la ligne imaginaire qui passe du nord au sud, sur un point situé directement au-dessus de votre
tête. C’est le point où les objets sont à leur point culminant dans le ciel, et votre télescope les observe au-travers de la plus petite quantité
d’atmosphère possible. Les objets montants ou descendants près de l’horizon souffriront plus des turbulences atmosphériques, car vous
regardez au-travers d’une plus épaisse couche d’air. Il n’est pas obligatoire de choisir une nuit sans aucun nuage si vous observez les
planètes ou la LUNE. Souvent, les éclaircies nuageuses offrent d’excellentes conditions d’observation.
REFROIDIR LE TÉLESCOPE
Le télescope requiert au moins 10 minutes pour refroidir à la température extérieure. Cela peut prendre plus longtemps si la différence
entre la température du télescope et de l’air est grande. Cela minimise les distorsions dues à l’air chaud dans le tube du télescope
(courants de tube).
ADAPTER VOS YEUX
Si vous souhaitez observer les objets du Ciel profond sur un site de ciel sombre, il est recommandé d’attendre que vos yeux s’habituent
complètement à l’obscurité en évitant les sources de lumière blanche, comme des lampes torches, des phares de voiture, des lampadaires,
etc. Votre pupille requiert environ 30 minutes pour se dilater au maximum et pour atteindre la plus grande concentration possible de
pigments optiques qui vous aident à capter les sources de lumière les plus faibles. Si vous souhaitez observer les objets du Ciel profond sur
un site de ciel sombre, il est recommandé d’attendre que vos yeux s’habituent complètement à l’obscurité en évitant les sources de lumière
blanche, comme des lampes torches, des phares de voiture, des lampadaires, etc. Votre pupille requiert environ 30 minutes pour se dilater
au maximum et pour atteindre la plus grande concentration possible de pigments optiques qui vous aident à capter les sources de lumière
les plus faibles. Pour vous aider à être prêt plus rapidement, essayez d’utiliser une lampe torche à DEL rouge à faible luminosité et évitez de
regarder directement dedans. Cela vous donnera les meilleures chances d’observer ces objets du Ciel profond.
Lorsque vous observez, il est important de garder les deux yeux ouverts. Cela permet de minimiser la fatigue oculaire de l'œil situé en face
de l’oculaire. Si vous trouvez cela difficile, couvrez l'œil non utilisé pour l’observation de la main ou avec un cache-œil. Le centre de votre
œil fonctionne bien sous la lumière forte du jour, mais est la zone la moins sensible pour capter les détails les plus subtiles sous une faible
luminosité. Lorsque vous observez une cible peu lumineuse dans l’oculaire, ne regardez pas directement dans sa direction. Regardez plutôt
vers les bords du champ de vision, et l’objet semblera plus lumineux.
28 I FRANÇAIS

ASTROPHOTOGRAPHIE
L’une des premières questions que les utilisateurs se posent à propos de leur nouveau télescope est « Comment l’utiliser pour prendre
des photos? ». Votre télescope est capable de capturer des images de la Lune et des planètes, mais un télescope et une monture aux
engrenages plus fins sont requis pour effectuer le suivi des objets du Ciel profond. Vous disposez de différentes méthodes pour capturer
des images avec votre télescope :
• Appareils intelligentes et appareils photos classiques- Ce matériel constitue la méthode la plus simple à mettre en œuvre pour
capturer des images de la Lune et des planètes. Placez simplement l’appareil photo de votre appareil devant l’oculaire et prenez une
photo. Bien que cela soit possible avec n’importe quel oculaire, cela est plus facile avec un oculaire de plus faible puissance (avec
une longueur de focale plus longue). Veillez à ne pas trembler lorsque vous tenez le téléphone devant l’oculaire pour obtenir de bons
résultats.
• DSLR- Celestron met à votre disposition des adaptateurs qui vous permettent d’attacher un appareil photo DSLR Canon ou Nikon
DSLR au télescope, à la place de l’oculaire. Cela fera en pratique de votre télescope un objectif longue portée. Cela nécessite
l’utilisation d’un adaptateur en T pour le télescope et d’un anneau-T pour l’appareil photo. Pour en savoir plus sur les adaptateurs
disponibles pour votre modèle de télescope en particulier, rendez-vous sur www.celestron.com.
• Imageurs planétaires CMOS- Ce sont des appareils photos spécialisés qui remplacent l’oculaire de votre télescope. Ils se connectent
à un ordinateur portable via le port USB. L’appareil photo enregistre une vidéo de la planète, puis le logiciel associé la divise en images
uniques. Le logiciel combine ensuite les images individuelles en un fichier image unique qui contient plus de détails que visibles
dans une image seule. Cette méthode vous permettra d’obtenir les meilleures images possibles de la Lune et des planètes, mais
nécessitent la présence d’un ordinateur portable à proximité du télescope. Pour en savoir plus sur les appareils photos planétaires,
rendez-vous sur www.celestron.com.
ÉQUIPEMENT POUR L’OBSERVATION DES OBJETS DU CIEL PROFOND
Il existe des outils indispensables à l’identification et à la localisation des objets du Ciel profond :
• Lampe torche rouge- Ceci est un outil essentiel pour l’astronomie du Ciel profond, pour lire les chartes et les atlas célestes. Pour
pouvoir voir la lumière peu intense venue des objets distants tels que les nébuleuses ou les galaxies, vos yeux doivent être complètement
adaptés à l’obscurité, avec les iris ouvertes au maximum. La lumière blanche émise par une lampe torche classique cause la rétraction
des iris, et cela peut prendre jusqu’à 30 minutes pour que votre vision nocturne soit de nouveau au maximum de ses capacité. La lumière
rouge n’a pas le même effet. Nous vous recommandons d’utiliser n’importe quelle lampe torche à DEL rouge dont la luminosité est
réglable, car même la lumière rouge, si intense, peut impacter votre vision nocturne. Ce type de lampe torche est disponible dans
la majorité des revendeurs de télescopes, mais vous les trouverez également dans les magasins de matériel de camping et dans
les quincailleries.
• Planisphère- Une planisphère est une carte des étoiles circulaire spéciale qui vous montre de manière grossière l’emplacement des
constellations au-dessus de votre tête, pour que vous puissiez vous retrouver dans le ciel. À la différence des chartes que vous pouvez
imprimer depuis internet, les planisphères fonctionnent à tout moment de l’année, pas seulement à la date ou le mois pour lequel elle
a été imprimée. La planisphère consiste en deux disques circulaires joints en leur centre. Le disque du bas comporte une carte des
constellations, alors que le disque du dessus comporte une fenêtre montrant une portion de la carte. En faisant pivoter les disques
internes et externes pour faire correspondre l’heure et la date actuelle, la carte ne montrera que les constellations visibles au moment
T. Cela est pratique pour déterminer grossièrement l’emplacement des étoiles brillantes et des constellations. Les planisphères sont
trouvables dans les magasins de livres et disponibles pour un grand nombre de latitudes géographiques des hémisphères nord et sud.
Veillez à en choisir une adaptée à votre lieu d'observation. Pour obtenir de plus amples informations sur l’emplacement des objets du
Ciel profond au sein des constellations, vous devrez vous munir d'un Atlas céleste.
• Atlas céleste- Les atlas célestes constituent des cartes routières du ciel. Une fois que vous avez localisé une constellation avec votre
planisphère, l’atlas céleste vous montrera une vue détaillée et agrandie de cette région du ciel, montrant les étoiles et les objets du Ciel
profond qui s’y situent. Ces atlas sont disponibles chez les revendeurs de télescopes et dans les librairies.
• Applications et programmes- Il existe un grand nombre d’applications disponibles pour les téléphones et les tablettes, qui peuvent
remplacer les planisphères et les cartes des étoiles. Ces applications donnent une représentation numérique du ciel nocturne sur
votre appareil, vous permettant d’agrandir ou de réduire rapidement la région affichée. Ces dernières peuvent être téléchargées ou
achetées depuis la boutique d’applications de votre plateforme. Il existe également des programmes excellents pour la simulation du ciel
disponibles sur votre ordinateur qui montrent des cartes des étoiles très détaillées sur l’écran et peuvent ainsi vous aider à planifier une
session d’observation avant de vous rendre sur votre site d’observation avec des cartes imprimées spécialement pour l’heure, la date
et l’emplacement.
FRANÇAIS I 29

SAUTS ENTRE LES ÉTOILES
La meilleure manière de vous retrouver dans le ciel est en utilisant une technique appelée star hopping. La première chose à faire avant
de commencer est de mesurer le champ de vision de votre chercheur. Observez le ciel et localisez une constellation contenant des étoiles
brillantes. Vous pouvez utiliser votre planisphère ou une application d’astronomie pour vous aider à en identifier une. Trouvez maintenant la
carte dans votre atlas des étoiles qui montre cette constellation. Centrez votre chercheur sur n’importe quelle étoile brillante reconnaissable sur
la carte des étoiles. Positionnez votre tête à 30 centimètres (12 pouces) du chercheur StarPointer et déplacez le télescope de manière à ce
que l’étoile en question se trouve en bordure du champ de vision de la fenêtre (la direction n’a pas d’importance). Sans déplacer le télescope,
regardez dans le chercheur et localisez une autre étoile présente à la bordure opposée du champ de vision. Localisez cette seconde étoile sur
la charte. Mesurez la distance entre ces deux étoiles avec une règle graduée. Cette distance représente le champ de vision de votre chercheur
sur votre atlas. Vous pouvez maintenant utiliser cette mesure pour localiser les objets du ciel.
MAINTENANCE ET NETTOYAGE DU TÉLESCOPE
Bien que votre télescope nécessite peu d'entretien, voici quelques conseils à ne pas oublier pour vous assurer d'obtenir les meilleures
performances possibles de votre télescope. Occasionnellement, de la poussière et/ou de la moisissure pourrait se déposer ou
apparaître sur les lentilles de votre télescope. Nettoyez l'instrument avec un soin particulier pour ne pas abimer l'objectif.
Si de la poussière s’est déposée sur les optiques, suivez ces étapes pour les nettoyer :
1. Utilisez une un pinceau en poil de chameau pour retirer les particules les plus importantes.
2. Utilisez une poire de photographe pour souffler les débris. Vous pouvez également utiliser une bombe d’air comprimé, comme celles utilisées
pour nettoyer les claviers d’ordinateur, mais avec précautions. Évitez d’utiliser les bombes presque vides et veillez à tenir la bombe à la
verticale. Si vous utilisez une bombe presque vide, ou que vous la tenez à l’horizontale, elle peut cracher du gaz liquide sur les optiques.
Positionnez la surface optique selon un angle prononcé et faites souffler l’air pendant environ 2 à 4 secondes.
3. Utilisez une solution de nettoyage d’optiques composées de 50% d’alcool ispropyle et de 50% d’eau distillée. Imbibez d'abord un mouchoir
avec de la solution, puis appliquez le mouchoir sur l'objectif. Tout en exerçant une faible pression, effectuez des mouvements en ligne droite,
en partant du centre de la lentille (ou du miroir) vers l'extérieur. N'effectuez pas de mouvements circulaires!
Occasionnellement lors d'une séance d'observation, vous pouvez remarquer une accumulation de rosée sur l'objectif de votre
télescope. Si vous voulez continuer à observer, la rosée doit être enlevée, soit avec un sèche-cheveux (à faible chaleur) ou en
faisant pointer le télescope vers le sol jusqu'à ce que la rosée se soit évaporée. Si de l'humidité se condense à l'intérieur de l'optique,
retirez les accessoires du télescope. Placez le télescope dans un environnement sans poussière pointez-le vers le bas jusqu’à ce que
la rosée se soit évaporée.
Pour minimiser la fréquence de nettoyage de votre télescope, remettez les capuchons de lentille en place après utilisation. Puisque
les tubes ne sont pas scellés, les capuchons doivent être remis sur les ouvertures lorsque le télescope n'est pas utilisé. Cela empêchera
les éléments étrangers de pénétrer dans le tube optique. Les réglages internes et le nettoyage ne doivent être effectués que par le
service de réparation de Celestron. Si votre télescope a besoin d'un nettoyage interne, appelez l'usine pour obtenir un numéro
d'autorisation de retour et un devis.
COLLIMATION D’UN TÉLESCOPE NEWTONIEN
Bien que votre télescope nécessite peu d'entretien, il existe quelques points à garder à l’esprit pour garantir que sa collimation est
toujours correcte, en s’assurant que les miroirs qu’il contient fonctionnent bien de concert pour délivrer une lumière correctement
concentrée dans votre oculaire. En observant des images d’étoiles qui ne sont pas au point, vous pouvez tester si les optiques sont
correctement alignés. Positionnez une étoile au centre du champ de vision et déplacez le foyer de manière à ce que l’image soit
légèrement floue. Si les conditions d’observation sont bonnes, vous verrez un cercle lumineux central (le disque aérien), entouré
de plusieurs anneaux de diffraction. Si les anneaux sont symétriquement positionnés autour du disque aérien, alors les optiques du
disque sont correctement en collimation.
Aligné correctement Nécessite une collimation
30 I FRANÇAIS

La collimation est un processus aisé qui s’effectue comme suit :
Retirez le capuchon de lentille qui couvre l’avant du télescope et
regardez dans le tube optique. Vous verrez en bas de ce dernier
le miroir primaire, tenu en place par trois clips positionnés à 120°
les uns des autres, et en haut, le petit miroir secondaire ovale
tenu par un support et orienté à 45° en direction du foyer situé
sur le bord extérieur de la paroi du tube.
Le miroir secondaire s’aligne en ajustant les trois plus petites vis
entourant l’écrou central. Le miroir primaire se règle en ajustant les
trois vis situées à l’arrière du télescope. Les trois vis de verrouillage
servent à maintenir le miroir en place après la collimation.
Miroir primaire
Miroir secondaire
Support pour le
miroir secondaire
Foyer
ALIGNER LE MIROIR SECONDAIRE
Pointez le télescope vers un mur éclairé et regardez dans le foyer sans oculaire installé. Il peut être nécessaire d’imprimer quelques tours à la
molette de mise au point jusqu’à ce que l’image réfléchie dans le foyer soit hors de votre champ de vision. Maintenez votre œil en position
derrière et au centre du tube du foyer. Repérez les trois clips maintenant le miroir primaire en place. Si vous ne pouvez pas les voir, cela
veut dire que vous devrez ajuster les trois boulons situés sur le dessus du support du miroir primaire, en utilisant soit une clé Allen ou un
tournevis cruciforme. Vous devrez les serrer et les desserrer tour à tour pour maintenir la tension. Arrêtez le réglage lorsque vous voyez les
trois clips du miroir. Assurez-vous que les trois petites vis d’alignement soient bien serrées pour maintenir le miroir secondaire en place.
Clip du miroir primaire
Ignorez l’image réfléchie
pour le moment.
Clip du miroir primaire
Clip du miroir primaire
Clip du miroir primaire
ALIGNER LE MIROIR PRIMAIRE
Vous trouverez 3 grands boulons et 3 petites vis à l’arrière du télescope. Les grands boulons sont les vis de réglage et les petites vis les vis de
verrouillage. Desserrez les boulons de quelques tours. Déplacez maintenant votre main par le devant de votre télescope, en tenant votre œil
sur le foyer. Vous verrez l’image réfléchie de votre main. Le but de cette étape est de repérer dans quel sens le miroir primaire est penché. Vous
faites cela en vous arrêtant au point où l’image reflétée du miroir secondaire est la plus proche de la bordure du miroir primaire.
Lorsque vous atteignez ce point, arrêtez-vous et maintenez votre main en place tout en regardant vers l’arrière de votre télescope - voyez-vous
une vis de réglage? Si vous voyez cette vis, desserrez-la de quelques tours (faites-la tourner vers la gauche) pour éloigner le miroir de ce point.
Si vous ne voyez pas de vis, alors serrez la vis de réglage présente à l’opposé. Cela alignera graduellement le miroir. (Il est plus facile de vous
faire aider d’un ami pour vous aider a effectuer la collimation du miroir primaire. Demandez à votre partenaire d’ajuster les vis de réglage selon
vos instructions pendant que vous regardez dans le foyer).
À la nuit tombée, sortez avec le télescope, et pointez-le vers l’étoile Polaire, l’étoile du Nord. Installez un oculaire dans le foyer et rendez l’image
floue. Vous verrez la même image, mais illuminée par la lumière des étoiles. Si nécessaire, répétez le processus de collimation en gardant l’étoile
centrée pendant que vous réglez le miroir.
Miroir secondaire
Miroir primaire
Arrêtez ici et gardez la
main en position
Chaque miroir aligné avec
l'œil en face du foyer
FRANÇAIS I 31

GARANTIE LIMITÉE CELESTRON DE DEUX ANS
A. Celestron garantit que votre monture de télescope sera exempte de tout défaut de matériaux ou de fabrication pour une période de deux (2)
ans. Celestron réparera ou remplacera ce produit ou une partie de celui-ci lorsqu'il a été déterminé, lors d'une inspection par Celestron, que
le produit est défectueux en raison d'un défaut de matériaux ou de fabrication. Comme condition à l'obligation de Celestron de réparer ou
remplacer un tel produit, le produit doit être retourné à Celestron avec la preuve d'achat satisfaisante pour Celestron.
B. Un numéro d'autorisation de retour valide doit être obtenu de Celestron avant le renvoi. Appelez Celestron au (310) 328-9560 pour
recevoir le numéro à afficher à l'extérieur de votre colis d'expédition.
Tous les retours doivent être accompagnés d'une déclaration écrite indiquant le nom, l'adresse et le numéro de téléphone de jour du
propriétaire, ainsi qu'une brève description des prétendus défauts. Les pièces ou le produit ayant été l'objet d'un remplacement deviendront
la propriété de Celestron.
Le client sera responsable de tous les frais de transport et d'assurance, à la fois vers et depuis l'usine de Celestron, et devra payer à
l'avance ces coûts.
Celestron fera des efforts raisonnables pour réparer ou remplacer tout télescope couvert par cette garantie dans les trente jours suivant sa
réception. Dans le cas où une réparation ou un remplacement nécessitera plus de trente jours, Celestron en avisera le client en conséquence.
Celestron se réserve le droit de remplacer tout produit qui a été retiré de sa gamme de produits disponibles avec un nouveau produit ayant
une valeur et des fonctions équivalentes.
Cette garantie sera nulle et sans effet dans le cas où la conception ou la fonction d'un produit couvert a été modifiée, ou lorsque le
produit a été soumis à un usage abusif, à de mauvaises manipulations ou à une réparation non autorisée. En outre, une défaillance ou une
détérioration du produit due à l'usure normale n'est pas couverte par cette garantie.
CELESTRON DÉCLINE TOUTE GARANTIE, EXPRESSE OU IMPLICITE, DE QUALITÉ MARCHANDE OU D'ADAPTATION À UN USAGE PARTICULIER, À MOINS DE DISPOSITIONS EXPRESSES DANS CE
DOCUMENT. LA SEULE OBLIGATION DE CELESTRON EN VERTU DE CETTE GARANTIE LIMITÉE SERA DE RÉPARER OU REMPLACER LE PRODUIT COUVERT, EN CONFORMITÉ AVEC LES DISPOSITIONS DE
CE DOCUMENT. CELESTRON DÉCLINE TOUTE RESPONSABILITÉ POUR TOUTE PERTE DE PROFITS, TOUT DOMMAGE GÉNÉRAL, PARTICULIER OU INDIRECT POUVANT RÉSULTER DE LA VIOLATION DE TOUTE
GARANTIE, OU EN RAISON DE L'UTILISATION DE, OU DE L'INCAPACITÉ À UTILISER, UN PRODUIT CELESTRON. TOUTE GARANTIE IMPLICITE QUI EST ET QUI NE PEUT ÊTRE DÉCLINÉE SERA LIMITÉE À
UNE DURÉE DE DEUX ANS À PARTIR DE LA DATE D'ACHAT INITIALE.
Certains états ou certaines provinces ne permettent pas l'exclusion ou la limitation des dommages accessoires ou indirects ou une limitation
sur la durée d'une garantie implicite, alors dans ces cas les limitations et exclusions susmentionnées pourraient ne pas s'appliquer à vous.
Cette garantie vous donne des droits légaux spécifiques, et vous pouvez également avoir d'autres droits qui varient d'un état ou d'une
province à l'autre.
Celestron se réserve le droit de modifier ou de cesser la production de tout modèle ou style de télescope, et cela sans préavis.
Si vous rencontrez des problèmes liés à la garantie, ou si vous avez besoin d'assistance pour utiliser votre télescope, contactez :
Celestron - 800.421.9649
NOTE : Cette garantie est valable pour les clients américains et canadiens qui ont acheté ce produit auprès d'un revendeur autorisé Celestron aux États-Unis ou au Canada. La garantie en dehors
des É.-U. et du Canada n'est valable que pour les clients ayant acheté le produit d'un distributeur international de Celestron ou d'un distributeur agréé dans le pays en question. Veuillez
communiquer avec eux pour toute réparation sous garantie.
REMARQUE RELATIVE À LA FCC: Ce dispositif est conforme à la partie 15 de la réglementation de la FCC. Son utilisation est sujette
aux deux conditions suivantes: (1) Ce dispositif ne doit pas causer d’interférence nuisible, et (2) ce dispositif doit accepter toute interférence
reçue, y compris les interférences qui peuvent engendrer un fonctionnement non désiré.
L'apparence et les caractéristiques du produit peuvent être modifiées sans préavis.
Ce produit a été conçu à l'intention des utilisateurs de 14 ans et plus.
© 2017 Celestron • Tous droits réservés.
www.celestron.com
2835 Columbia Street • Torrance, CA 90503 É.-U.
Téléphone: (800) 421-9649
05-17
Imprimé en Chine

DEUTSCH
Bedienungsanleitung
MODELLE #22050, 22051, 31150 (60LCM, 80LCM, 114LCM)
TELESKOP SERIES

2 I DEUTSCH

INHALTSVERZEICHNIS
WARNHINWEIS BEI SONNENBEOBACHTUNG . . . . . . . . . . . . . . . . . . . . . . . . . . . . . . . . . 6
WAS IST IN DEM PAKET? . . . . . . . . . . . . . . . . . . . . . . . . . . . . . . . . . . . . . . . . . . . . . . . . . . . . . . . 7
ZUSAMMENBAU DES TELESKOPS . . . . . . . . . . . . . . . . . . . . . . . . . . . . . . . . . . . . . . . . . . . . . . . . . 8
Das Stativ . . . . . . . . . . . . . . . . . . . . . . . . . . . . . . . . . . . . . . . . . . . . . . . . . . . . . . . . . . . . . . . . . . . 8
Die computergestützte Montierung . . . . . . . . . . . . . . . . . . . . . . . . . . . . . . . . . . . . . . . . . . . . . . . . . . . . . .8
Der Teleskoptubus. . . . . . . . . . . . . . . . . . . . . . . . . . . . . . . . . . . . . . . . . . . . . . . . . . . . . . . . . . . . . . .9
Der Zenitspiegel (Nur Refraktor Teleskop) . . . . . . . . . . . . . . . . . . . . . . . . . . . . . . . . . . . . . . . . . . . . . . . . . . 9
Das Okular. . . . . . . . . . . . . . . . . . . . . . . . . . . . . . . . . . . . . . . . . . . . . . . . . . . . . . . . . . . . . . . . . . .10
StarPointer-Sucherfernrohr . . . . . . . . . . . . . . . . . . . . . . . . . . . . . . . . . . . . . . . . . . . . . . . . . . . . . . . . . . 10
Akku vom Sucherfernrohr wechseln . . . . . . . . . . . . . . . . . . . . . . . . . . . . . . . . . . . . . . . . . . . . . . . . . . . . . 11
Die Handsteuerung . . . . . . . . . . . . . . . . . . . . . . . . . . . . . . . . . . . . . . . . . . . . . . . . . . . . . . . . . . . . . . 11
Das Teleskop einschalten . . . . . . . . . . . . . . . . . . . . . . . . . . . . . . . . . . . . . . . . . . . . . . . . . . . . . . . . . . . 11
Das Teleskop schwenken . . . . . . . . . . . . . . . . . . . . . . . . . . . . . . . . . . . . . . . . . . . . . . . . . . . . . . . . . . . 12
Das Sucherfernrohr ausrichten . . . . . . . . . . . . . . . . . . . . . . . . . . . . . . . . . . . . . . . . . . . . . . . . . . . . . . . . 12
DAS TELESKOP BEDIENEN . . . . . . . . . . . . . . . . . . . . . . . . . . . . . . . . . . . . . . . . . . . . . . . . . . . . . . 13
Handsteuerung . . . . . . . . . . . . . . . . . . . . . . . . . . . . . . . . . . . . . . . . . . . . . . . . . . . . . . . . . . . . . . . . 13
Bedienung der Handsteuerung . . . . . . . . . . . . . . . . . . . . . . . . . . . . . . . . . . . . . . . . . . . . . . . . . . . . . . . .14
Ausrichtung
Menü . . . . . . . . . . . . . . . . . . . . . . . . . . . . . . . . . . . . . . . . . . . . . . . . . . . . . . . . . . . . . 14
SkyAlign. . . . . . . . . . . . . . . . . . . . . . . . . . . . . . . . . . . . . . . . . . . . . . . . . . . . . . . . . . . . . . . . . . .14
Automatische Zwei-Stern-Ausrichtung. . . . . . . . . . . . . . . . . . . . . . . . . . . . . . . . . . . . . . . . . . . . . . . . . . .16
Zwei-Stern-Ausrichtung . . . . . . . . . . . . . . . . . . . . . . . . . . . . . . . . . . . . . . . . . . . . . . . . . . . . . . . . . . 16
Ein-Stern-Ausrichtung . . . . . . . . . . . . . . . . . . . . . . . . . . . . . . . . . . . . . . . . . . . . . . . . . . . . . . . . . . . 17
Sonnensystem-Ausrichtung . . . . . . . . . . . . . . . . . . . . . . . . . . . . . . . . . . . . . . . . . . . . . . . . . . . . . . . . 17
Neuausrichtung (Re-Alignment) . . . . . . . . . . . . . . . . . . . . . . . . . . . . . . . . . . . . . . . . . . . . . . . . . . . . . . 18
OBJEKTKATALOGE . . . . . . . . . . . . . . . . . . . . . . . . . . . . . . . . . . . . . . . . . . . . . . . . . . . . . . . . . . . 18
Auswahl eines Objekts . . . . . . . . . . . . . . . . . . . . . . . . . . . . . . . . . . . . . . . . . . . . . . . . . . . . . . . . . . .18
Für Planeten. . . . . . . . . . . . . . . . . . . . . . . . . . . . . . . . . . . . . . . . . . . . . . . . . . . . . . . . . . . . . . . . .18
Für Sterne. . . . . . . . . . . . . . . . . . . . . . . . . . . . . . . . . . . . . . . . . . . . . . . . . . . . . . . . . . . . . . . . . .18
Für Deep-Sky Objekte . . . . . . . . . . . . . . . . . . . . . . . . . . . . . . . . . . . . . . . . . . . . . . . . . . . . . . . . . . . 19
Objektinformationen anzeigen . . . . . . . . . . . . . . . . . . . . . . . . . . . . . . . . . . . . . . . . . . . . . . . . . . . . . . . 19
Sky Tour-Modus. . . . . . . . . . . . . . . . . . . . . . . . . . . . . . . . . . . . . . . . . . . . . . . . . . . . . . . . . . . . . . .19
Richtungstasten. . . . . . . . . . . . . . . . . . . . . . . . . . . . . . . . . . . . . . . . . . . . . . . . . . . . . . . . . . . . . . .19
Motorgeschwindigkeit-Taste . . . . . . . . . . . . . . . . . . . . . . . . . . . . . . . . . . . . . . . . . . . . . . . . . . . . . . . . 20
HAUPTMENÜ. . . . . . . . . . . . . . . . . . . . . . . . . . . . . . . . . . . . . . . . . . . . . . . . . . . . . . . . . . . . . . .20
Nachführ-menü . . . . . . . . . . . . . . . . . . . . . . . . . . . . . . . . . . . . . . . . . . . . . . . . . . . . . . . . . . . . . . . . 20
Nachführmodus . . . . . . . . . . . . . . . . . . . . . . . . . . . . . . . . . . . . . . . . . . . . . . . . . . . . . . . . . . . . . . .20
Nachführrate . . . . . . . . . . . . . . . . . . . . . . . . . . . . . . . . . . . . . . . . . . . . . . . . . . . . . . . . . . . . . . . . 20
Ort und Zeit Anzeige . . . . . . . . . . . . . . . . . . . . . . . . . . . . . . . . . . . . . . . . . . . . . . . . . . . . . . . . . . . . . 21
Handsteuerungmenü . . . . . . . . . . . . . . . . . . . . . . . . . . . . . . . . . . . . . . . . . . . . . . . . . . . . . . . . . . . . . 21
Lichtsteuerung. . . . . . . . . . . . . . . . . . . . . . . . . . . . . . . . . . . . . . . . . . . . . . . . . . . . . . . . . . . . . . . .21
Scrolling-Menü . . . . . . . . . . . . . . . . . . . . . . . . . . . . . . . . . . . . . . . . . . . . . . . . . . . . . . . . . . . . . . . 21
Auf Fettschrift umschalten. . . . . . . . . . . . . . . . . . . . . . . . . . . . . . . . . . . . . . . . . . . . . . . . . . . . . . . . . .21
Kontrast einstellen. . . . . . . . . . . . . . . . . . . . . . . . . . . . . . . . . . . . . . . . . . . . . . . . . . . . . . . . . . . . . .21
Sprache einstellen. . . . . . . . . . . . . . . . . . . . . . . . . . . . . . . . . . . . . . . . . . . . . . . . . . . . . . . . . . . . . .21
DEUTSCH I 3

Teleskopsetupmenü . . . . . . . . . . . . . . . . . . . . . . . . . . . . . . . . . . . . . . . . . . . . . . . . . . . . . . . . . . . . . . 21
Ort und Zeiteinstellung . . . . . . . . . . . . . . . . . . . . . . . . . . . . . . . . . . . . . . . . . . . . . . . . . . . . . . . . . . .21
Getriebespielkompensation (Anti-Backlash). . . . . . . . . . . . . . . . . . . . . . . . . . . . . . . . . . . . . . . . . . . . . . . .21
Schwenkgrenzen (Slew Limits). . . . . . . . . . . . . . . . . . . . . . . . . . . . . . . . . . . . . . . . . . . . . . . . . . . . . . .22
Filtergrenzen . . . . . . . . . . . . . . . . . . . . . . . . . . . . . . . . . . . . . . . . . . . . . . . . . . . . . . . . . . . . . . . . 22
Richtungstasten. . . . . . . . . . . . . . . . . . . . . . . . . . . . . . . . . . . . . . . . . . . . . . . . . . . . . . . . . . . . . . .22
Gehe zu Annäherung . . . . . . . . . . . . . . . . . . . . . . . . . . . . . . . . . . . . . . . . . . . . . . . . . . . . . . . . . . . .22
Kabelschutz . . . . . . . . . . . . . . . . . . . . . . . . . . . . . . . . . . . . . . . . . . . . . . . . . . . . . . . . . . . . . . . . .22
Utility Menü . . . . . . . . . . . . . . . . . . . . . . . . . . . . . . . . . . . . . . . . . . . . . . . . . . . . . . . . . . . . . . . . . . 22
GPS An/Aus . . . . . . . . . . . . . . . . . . . . . . . . . . . . . . . . . . . . . . . . . . . . . . . . . . . . . . . . . . . . . . . . 22
Zurücksetzen . . . . . . . . . . . . . . . . . . . . . . . . . . . . . . . . . . . . . . . . . . . . . . . . . . . . . . . . . . . . . . . . 22
Version . . . . . . . . . . . . . . . . . . . . . . . . . . . . . . . . . . . . . . . . . . . . . . . . . . . . . . . . . . . . . . . . . . . 23
Achsenposition anzeigen . . . . . . . . . . . . . . . . . . . . . . . . . . . . . . . . . . . . . . . . . . . . . . . . . . . . . . . . . .23
GoTo (Gehe zu) Achsenposition . . . . . . . . . . . . . . . . . . . . . . . . . . . . . . . . . . . . . . . . . . . . . . . . . . . . . .23
Ruhemodus . . . . . . . . . . . . . . . . . . . . . . . . . . . . . . . . . . . . . . . . . . . . . . . . . . . . . . . . . . . . . . . . .23
Sonnenmenü . . . . . . . . . . . . . . . . . . . . . . . . . . . . . . . . . . . . . . . . . . . . . . . . . . . . . . . . . . . . . . . .23
Calibrate GoTo (Gehe zu Kalibrieren) . . . . . . . . . . . . . . . . . . . . . . . . . . . . . . . . . . . . . . . . . . . . . . . . . . . 23
Einstellen der Montierungsposition . . . . . . . . . . . . . . . . . . . . . . . . . . . . . . . . . . . . . . . . . . . . . . . . . . . . 23
Benutzerdefinierte Objekte . . . . . . . . . . . . . . . . . . . . . . . . . . . . . . . . . . . . . . . . . . . . . . . . . . . . . . . . . . 24
GET RA-DEC (RA-DEK ANZEIGEN) . . . . . . . . . . . . . . . . . . . . . . . . . . . . . . . . . . . . . . . . . . . . . . . . . . . . 24
GoTo RA-DEC (GEHE ZU RA-DEK) . . . . . . . . . . . . . . . . . . . . . . . . . . . . . . . . . . . . . . . . . . . . . . . . . . . . 24
Identifizieren . . . . . . . . . . . . . . . . . . . . . . . . . . . . . . . . . . . . . . . . . . . . . . . . . . . . . . . . . . . . . . . . . . 24
LCM MODELLE MENÜBAUM . . . . . . . . . . . . . . . . . . . . . . . . . . . . . . . . . . . . . . . . . . . . . . . . . . . . . 25
IHRE ERSTE ASTRONOMISCHE BEOBACHTUNG . . . . . . . . . . . . . . . . . . . . . . . . . . . . . . . . . . . . . . . . . 26
Der Mond . . . . . . . . . . . . . . . . . . . . . . . . . . . . . . . . . . . . . . . . . . . . . . . . . . . . . . . . . . . . . . . . . . . 26
TIPPS FÜR HIMMELSBEOBACHTUNG . . . . . . . . . . . . . . . . . . . . . . . . . . . . . . . . . . . . . . . . . . . . . . . 26
Vergrößerung . . . . . . . . . . . . . . . . . . . . . . . . . . . . . . . . . . . . . . . . . . . . . . . . . . . . . . . . . . . . . . . . . 26
Gesichtsfeld . . . . . . . . . . . . . . . . . . . . . . . . . . . . . . . . . . . . . . . . . . . . . . . . . . . . . . . . . . . . . . . . . . 26
Die Planeten . . . . . . . . . . . . . . . . . . . . . . . . . . . . . . . . . . . . . . . . . . . . . . . . . . . . . . . . . . . . . . . . . .27
Deep-Sky-Objekte . . . . . . . . . . . . . . . . . . . . . . . . . . . . . . . . . . . . . . . . . . . . . . . . . . . . . . . . . . . . . . .27
Witterungsbedingungen . . . . . . . . . . . . . . . . . . . . . . . . . . . . . . . . . . . . . . . . . . . . . . . . . . . . . . . . . . . 27
Einen Beobachtungsplatz aussuchen. . . . . . . . . . . . . . . . . . . . . . . . . . . . . . . . . . . . . . . . . . . . . . . . . . . . .28
Die beste Zeit zum Beobachten wählen . . . . . . . . . . . . . . . . . . . . . . . . . . . . . . . . . . . . . . . . . . . . . . . . . . . 28
Auskühlen des Teleskops . . . . . . . . . . . . . . . . . . . . . . . . . . . . . . . . . . . . . . . . . . . . . . . . . . . . . . . . . . . 28
Augen anpassen. . . . . . . . . . . . . . . . . . . . . . . . . . . . . . . . . . . . . . . . . . . . . . . . . . . . . . . . . . . . . . . .28
Astrobild . . . . . . . . . . . . . . . . . . . . . . . . . . . . . . . . . . . . . . . . . . . . . . . . . . . . . . . . . . . . . . . . . . . . 29
Ausrüstung für Deep-Sky Beobachtung . . . . . . . . . . . . . . . . . . . . . . . . . . . . . . . . . . . . . . . . . . . . . . . . . . . 29
Starhopping . . . . . . . . . . . . . . . . . . . . . . . . . . . . . . . . . . . . . . . . . . . . . . . . . . . . . . . . . . . . . . . . . . 30
PFLEGE UND REINIGUNG DES TELESKOPS . . . . . . . . . . . . . . . . . . . . . . . . . . . . . . . . . . . . . . . . . . . .30
KOLLIMATION EINES NEWTON TELESKOPS . . . . . . . . . . . . . . . . . . . . . . . . . . . . . . . . . . . . . . . . . . . .30
Ausrichtung des Fangspiegels . . . . . . . . . . . . . . . . . . . . . . . . . . . . . . . . . . . . . . . . . . . . . . . . . . . . . . . . 31
Ausrichtung des Hauptspiegels. . . . . . . . . . . . . . . . . . . . . . . . . . . . . . . . . . . . . . . . . . . . . . . . . . . . . . . .31
ZWEIJÄHRIGE EINGESCHRÄNKTE GARANTIE VON CELESTRON. . . . . . . . . . . . . . . . . . . . . . . . . . . . . . . .32
4 I DEUTSCH

DEUTSCH I 5

• Niemals mit bloßem Auge oder mit einem Teleskop direkt in die Sonne schauen (außer bei Verwendung eines vorschriftsmäßigen
Sonnenfilters). Es könnte zu permanenten und irreversiblen Augenschäden führen.
• Das Teleskop keinesfalls zur Projektion eines Sonnenbildes auf eine Oberfläche verwenden. Durch die interne Wärmebildung können
das Teleskop und etwaiges daran angeschlossenes Zubehör beschädigt werden.
• Niemals einen Okularsonnenfilter oder einen Herschelkeil verwenden. Die interne Wärmeakkumulation im Teleskop kann zu Rissen
oder Brüchen dieser Instrumente führen. Dadurch könnte ungefiltertes Sonnenlicht ins Auge gelangen.
• Das Teleskop niemals unbeaufsichtigt lassen, wenn Kinder oder Erwachsene, die möglicherweise nicht mit den richtigen Betriebsverfahren
Ihres Teleskops vertraut sind, gegenwärtig sind.
WARNHINWEIS BEI SONNENBEOBACHTUNG
6 I DEUTSCH

1. Teleskoptubus
2. StarPointer Sucherfernrohr
3. Okular
4. Zenitspiegel
5. Fokussierknopf
6. Stativ
7. Zubehörablage
8. Klemme für Stativbeinverlängerung
9. Höhenverriegelungsknopf
10. Teleskop-Befestigungsknopf
11. Objektivlinse
12. Computergestützte Montierung
13. An-/Ausschalter
14. Handsteuerung und Halter für die Handsteuerung
Wir empfehlen Ihnen, die Verpackung Ihres Teleskops aufzubewahren, um das Teleskop bei Nichtverwendung darin zu verstauen. Packen
Sie es sorgfältig aus, da einige kleine Teile darunter sind. Überprüfen Sie anhand der untenstehenden Teileliste die Vollständigkeit aller
Teile und Zubehörteile.
TEILELISTE
WAS IST IN DEM PAKET?
1. Teleskoptubus
2. Teleskop-Befestigungsknopf
3. Höhenkupplungsknopf
4. Hauptspiegel
5. Computergestützte Montierung
6. Stativ
7. Zubehörablage
8. Klemme für Stativbeinverlängerung
9. StarPointer Sucherfernrohr
10. Okular
11. Fokussierknopf
12. An-/Ausschalter
13. Handsteuerung und Halter für die Handsteuerung
(80LCM Refraktor abgebildet)
(114LCM Newton abgebildet)
3
5
6
11
2
4
7
9
10
12
13
14
8
1
3
4
1
13
10
5
6
11
2
9
12
7
8
DEUTSCH I 7

ZUSAMMENBAU DES TELESKOPS
DAS STATIV
Das LCM-Stativ wird komplett zusammengebaut geliefert, sodass
es schnell aufgestellt ist. Das Stativ aufbauen:
1. Nehmen Sie das Stativ aus der Verpackung.
2. Lösen Sie die Arretierhebel an jedem Bein, indem Sie den
Hebel nach außen drehen. Ziehen Sie das Innenteil jedes Beins
bis zur gewünschten Länge aus. Ziehen Sie die Arretierhebel
fest, indem Sie die Hebel nach innen drehen, um alle Beine
festzustellen.
3. Stellen Sie das Stativ aufrecht und ziehen Sie die Stativbeine
auseinander, bis die Mittelstrebe einrastet.
4. Setzen Sie die Zubehörablage auf das Loch in der Mittelstrebe
ausgerichtet auf das Schlüsselloch in der Mitte. Drehen Sie die
Ablage bis die drei Kerben richtig sitzen und die Ablagesicherungen
an den drei Armen der Mittelstrebe des Stativs einrasten.
5. Befestigen Sie den Handsteuerungshalter, indem Sie den Halter
mit der quadratischen Plastiklasche nach oben positionieren
und gegen das Stativbein drücken, bis er einrastet.
DIE COMPUTERGESTÜTZTE MONTIERUNG
Die computergesteuerte Montierung am Stativ anbringen:
1. Setzen Sie die motorisierte Montierung auf das Stativ,
vergewissern Sie sich, dass die drei runden Füße auf den
runden flachen Pads auf der Innenseite des Stativkopfs
aufliegen.
2. Führen Sie die Befestigungsschraube unter dem Stativkopf in
das Loch an der Unterseite der motorisierten Montierung und
ziehen Sie mit der Hand fest, um den Montierung zu sichern.
Jetzt, da die Basis am Stativ befestigt ist, ist es eine gute Idee,
die mitgelieferte Wasserwaage zu verwenden, um das Teleskop
besser auszubalancieren:
3. Legen Sie die Wasserwaage auf die Oberseite der
motorisierten Sockels.
4. Verstellen Sie die Stativbeine so bis die Libelle in der
Wasserwaage ausgerichtet ist.
8 I DEUTSCH

DER TELESKOPTUBUS
DER ZENITSPIEGEL (Nur Refraktor Teleskop)
Der aufrechte Zenitspiegel auf der Rückseite des
Refraktorteleskops reflektiert das Licht über einen kleines Prisma
in einem Winkel von 90 ° und ermöglicht so eine bequemere
Betrachtungsposition. Bei den meisten Teleskopen ist die Ansicht
entweder auf dem Kopf stehend oder von links nach rechts
seitenverkehrt. Der aufrechte Zenitspiegel korrigiert das Bild so,
dass Sie ein zu 100 % korrekt ausgerichtetes Bild haben, so ist
Ihr Teleskop perfekt für das terrestrische Beobachten am Tage.
Den Zenitspiegel anbringen:
1. Nehmen Sie beide Kappen vom Zenitspiegel ab.
2. Lösen Sie die Feststellschrauben auf der Rückseite des
Okularadapters und ziehen die kleine Staubabdeckung ab.
3. Setzen Sie den kleineren Tubus des Zenitspiegels in die
Rückseite des Okularadapters ein und sichern diesen
durch Festziehen der Feststellschrauben. Der Winkel des
Zenitspiegels lässt sich beliebig einstellen, bevor Sie die
Schrauben festziehen.
HINWEIS: Der aufrechte Zenitspiegel kann auf einem Newton Teleskop nicht
fokussieren. Das Bild in einem Newtonschen Teleskop wird immer auf dem Kopf stehen.
Anbringen des Teleskoptubus an der Montierung:
1. Lösen Sie den Höhenkupplungsknopf, indem Sie ihn gegen
den Uhrzeigersinn drehen. Drehen Sie die Tubusklemme
so, dass der Teleskop-Befestigungsknopf auf der
Oberseite der Montageplattfom positioniert ist. Ziehen Sie
den Höhenkupplungsknopf wieder an, indem Sie ihn im
Uhrzeigersinn drehen, bis er fest sitzt. Nicht überdrehen.
2. Lösen Sie den Teleskop-Befestigungsknopf, indem Sie ihn
gegen den Uhrzeigersinn drehen.
3. Schieben Sie die Schwalbenschwanz-Montagestange in die
Rohrschelle. Vergewissern Sie sich, dass der Druck auf dem
Teleskoptubus rechts oben ist, wenn der Tubus an der Basis
befestigt ist.
4. Ziehen Sie den Teleskop-Befestigungsknopf wieder fest,
indem Sie ihn im Uhrzeigersinn drehen, bis der Tubus fest auf
der Montageplattform sitzt.
Ihr Teleskop ist komplett montiert und ist bereit, das Zubehör
anzubringen.
Teleskop
Befestigungsknopf
Höhen
verriegelungsknopf
DEUTSCH I 9

DAS OKULAR
Ihr Teleskop wird mit zwei Okularen geliefert. Das 25 mm wird eine geringe Vergrößerung mit einem mäßig weiten Sichtfeld vermitteln.
Das 9 mm gibt Ihnen eine bessere Vergrößerung, aber ein schmaleres Gesichtsfeld. Zusätzliche Okulare können gekauft werden, um
die Vergrößerung nach Ihrer Vorliebe erhöht oder verringert. Wenn Sie das erste Mal ein Objekt lokalisieren, ist das 25-mm-Okular das
Beste, dann, wenn das Objekt zentriert ist, wechseln Sie auf das 9-mm-Okular, um es zu vergrößern.
STARPOINTER-SUCHERFERNROHR
Ihr Teleskop kommt mit einem StarPointer Leuchtpunktsucher,
das Sie als Zeigehilfsmittel verwenden werden, wenn Sie auf dem
Teleskop ein Objekt anvisieren.
Sucherfernrohr installieren:
1. Lösen Sie die beiden Kreuzschlitzschrauben auf der Seite
des Sucherfernrohrs und schieben die Klemme über die
Schwalbenschwanzhalterung in der Nähe des Okularauszugs.
Richten Sie den Sucher so aus, dass das große Fenster auf die
Vorderseite des Teleskops gerichtet ist.
2. Sichern Sie das Sucherfernrohr, indem Sie die
beiden-Kreuzschlitzschrauben anziehen. Diese Schrauben
nicht überdrehen, nur dass sie gerade so fest sind, dass sie
kein Spiel haben.
3. Entfernen Sie die kleine Kunststofflasche unter dem
Batteriefachdeckel, indem Sie sie gerade herausziehen.
Diese wurde angebracht, damit sich die Batterie während des
Transports nicht versehentlich entlädt.
Installation von Okularen in 60LCM und 80LCM Refraktor
Teleskopen:
1. Lösen Sie die Stellschraube am offenen Ende des Zenitspiegels.
2. Setzen Sie das verchromte Ende des 25-mm-Okulars in den
Zenitspiegel.
3. Ziehen Sie die Stellschrauben fest, um das Okular zu befestigen.
4. Um das schärfste Bild zu sehen, fokussieren Sie, indem Sie
durch das Okular schauen und langsam die Fokussierknöpfe
drehen, bis das Bild in schärfsten ist.
Installation von Okularen in 114LCM Newton Teleskopen:
1. Lösen Sie die Feststellschrauben am Ende des Okularauszugs
und ziehen die kleine Staubabdeckung ab.
2. Setzen Sie das verchromte Ende des 25-mm-Okulars direkt in
den Okularauszug.
3. Ziehen Sie die Feststellschraube, um das Okular zu fixieren,
wieder fest.
4. Um das schärfste Bild zu sehen, fokussieren Sie, indem Sie
durch das Okular schauen und langsam die Fokussierknöpfe
drehen, bis das Bild in schärfsten ist.
Refraktor
Newton
Ein/Aus/Helligkeitssteuerung
Schalter
Aufwärts/Abwärts
Einstellknopf
Links/Rechts
Einstellknopf
Akku
Fach
10 I DEUTSCH

AKKU VOM SUCHERFERNROHR WECHSELN
Um den StarPointer Akku zu ersetzen, entfernen Sie den
Sucher vom Teleskop und drehen ihn um. Das Batteriefach
befindet sich direkt unter dem großen Objektiv. Mit einem
kleinen Schraubenzieher oder mit Ihrem Fingernagel heben
Sie den Akkufachdeckel leicht an und entfernen ihn. Der Akku
wird durch einen Federkontakt festgehalten. Heben Sie diesen
Kontakt vorsichtig an und drehen den Sucher auf die Seite. Der
Stecker sollte direkt herausrutschen. Ersetzen Sie den Akku
mit einer 3-Volt CR2032 Knopfzelle. Schieben Sie die neue
Batterie unter den Kontakt und achten Sie darauf, dass der
Pluspol der Batterie (der mit einem "+" Symbol gekennzeichnet
ist) nach oben in Richtung Federkontakt zeigt. Der Akku
sollte einrasten. Bringen Sie den Akkufachdeckel wieder an,
in dem Sie die Zapfen an dem Deckel über die Löcher im
Sucherfernrohr setzten und herunterdrücken. Beachten Sie,
dass die alte Batterie gemäß den lokalen Gesetzen entsorgt wird.
DIE HANDSTEUERUNG
Die LCM Handsteuerung hat am Kabelende eine Steckverbindung
wie eine Telefonbuchse.
Zum Anschluss mit dem Teleskop:
1. Suchen Sie den Handsteuerungsanschluss auf der Oberseite
der computergestützten Montierung.
2. Stecken Sie den Stecker am Kabelende der Handsteuerung in
den Anschluss bis er einrastet.
3. Setzen Sie den Handsteuerung weiter unten in seinen Halter am
Stativbein. Um sie herauszunehmen, nach oben herausziehen.
Das LCM kann mit 8 mitgelieferten AA-Alkalibatterien oder einem
optionalen 12 Volt Netzteil betrieben werden.
Einlegen der Batterien in das LCM:
1. Drücken Sie auf die Lasche an der Vorderseite des Akkufachs
und entfernen Sie die Abdeckung.
2. Nehmen Sie vorsichtig den Akkuhalter aus dem Batteriefach.
3. Legen Sie 8 AA-Batterien (im Lieferumfang enthalten) in den
Batteriehalter ein, passen Sie auf, dass die Batteriepolarität
mit den Bezeichnungen am Batteriehalter übereinstimmen.
4. Setzen Sie den Akkuhalter wieder in das Akkufach zurück und
schließen es mit der Abdeckung.
5. Stellen Sie den Netzschalter auf „On“ (Ein). Daraufhin sollte
die LED des Netzschalters und der Handsteuerung aufleuchten.
HINWEIS: Wenn Sie die Batterien austauschen, achten Sie darauf, alle 8 Batterien
gleichzeitig mit neuen Batterien zu ersetzen Nie alte Batterien mit neuen
Batterien mischen.
DAS TELESKOP EINSCHALTEN
Akku
Fach
12-V-Ausgang
Netzschalter
Handsteuerung Port
Akkufach
Entriegelungslasche
Akkufach
Entriegelungslasche
DEUTSCH I 11

DAS TELESKOP SCHWENKEN
Die LCM computergestützte Montierung wurde so konzipiert, dass sie mit der Handbedienung bewegt werden kann. Beim eingeschalteten
Teleskop kann dies durch Drücken der Richtungstasten auf der Handsteuerung erfolgen. Sie können die Motorgeschwindigkeit
durch Drücken der MOTOR SPEED-Taste ändern und dann eine Zahl von 1 bis 9 auswählen. Für die Erstinstallation sollten Sie
die Motorgeschwindigkeit 5 beibehalten. Wenn Sie die Handsteuerung verwenden, um das Teleskop zu schwenken, sollte die
Höhenkupplung angezogen werden.
Das Teleskop kann von Hand in der Höhenachse bewegt werden, aber nur, wenn die Höhenkupplung gelöst ist. Wenn Sie diese
Kupplung nicht lösen und das Teleskop nach oben oder unten gezwungen wird, kann dies zu Motor- oder Zahnradschäden führen. Die
Montierung hat keine Kupplung im Azimut (oder rechts und links). Es ist niemals sicher, das Teleskop von Hand nach links und rechts
zu bewegen.
DAS SUCHERFERNROHR AUSRICHTEN
Der StarPointer ist ein Reflexvisier, das mithilfe eines roten LED einen roten Punkt auf das runde Glasfenster projiziert. Wenn Sie durch
das Fenster schauen, sehen Sie den roten Punkt, der von Ihrem Ziel überlagert ist. Nach dem ersten Aufbau Ihres Teleskops müssen Sie
das Sucherfernrohr an der Hauptoptik Ihres Teleskops ausrichten. Obwohl dies auch bei Nacht vorgenommen werden kann, ist es bei Tag
bedeutend einfacher. Sobald Sie die Ausrichtung des Suchers abgeschlossen haben, müssen Sie diesen Schritt nicht wiederholen, es sei
denn, der Sucher wird gestoßen oder fallen gelassen.
Das StarPointer-Sucherfernrohr ausrichten:
1. Nehmen Sie das Teleskop tagsüber nach draußen. Suchen Sie mit dem bloßen Auge ein leicht erkennbares Objekt, wie eine
Straßenlaterne, ein Autokennzeichen oder einen hohen Baum. Das Objekt sollte 400 Meter oder weiter entfernt sein.
2. Nehmen Sie die Hauptabdeckung vom Teleskop ab und vergewissern sich, dass das 25-mm-Okular installiert ist.
3. Richten Sie Ihr Teleskop grob auf das in Schritt 1 ausgewählte Ziel aus.
4. Schauen Sie durch das Okular und bewegen das Teleskop manuell, bis das Objekt, das Sie gewählt haben, zentriert liegt. Wenn das Bild
unscharf ist, drehen Sie vorsichtig die Fokusknöpfe, bis das Bild scharf gestellt ist.
5. Sobald das Objekt in Ihrem 25-mm-Okular zentriert ist, schalten Sie das Sucherfernrohr ein, indem Sie den Power/Helligkeitsknopf seitlich
bis zum Anschlag drehen.
6. Stellen Sie sich etwa 30 cm hinter den Sucherfernrohr auf, schauen durch das runde Fenster und suchen den roten Punkt. Es
wird wahrscheinlich in der Nähe sein, aber nicht oberhalb des Objektes, das Sie sehen, wenn Sie durch das 25-mm-Okular schauen.
7. Verwenden Sie, ohne das Teleskop zu bewegen, die beiden Einstellknöpfe an der Seite und unter dem Sucher. Einer steuert die
Links-Rechts-Bewegung vom Fadenkreuz, während der andere die Aufwärtsbewegung kontrolliert. stellen Sie beide so ein, bis der
rote Punkt über demselben Objekt erscheint, das Sie im 25-mm-Okular beobachten.
Visieren Sie nun einige andere entfernte Zielobjekte an, um das Ausrichten Ihres Teleskops zu üben. Schauen Sie mit beiden Augen
durch den StarPointer und bringen den roten Punkt über das Zielobjekt, das Sie sich ansehen möchten und prüfen, ob es am Teleskop
im 25-mm-Okular erscheint.
HINWEIS: Achten Sie darauf, dass Sie das StarPointer-Sucherfernrohr ausschalten, wenn Sie es nicht verwenden, um den Akku zu schonen.
12 I DEUTSCH

DAS TELESKOP BEDIENEN
HANDSTEUERUNG
Die LCM Handsteuerung ist so konzipiert, um Ihnen sofortigen Zugriff auf alle Funktionen des Teleskop zu geben. Mit der automatischen
Schwenkung auf über 4000 Objekte und den leicht verständlichen Menübeschreibungen, kann selbst ein Anfänger die Funktionsvielfalt
in nur ein paar Beobachtungssessions meistern. Nachstehend finden Sie eine kurze Beschreibung der einzelnen Komponenten der
LCM-Handsteuerung:
1. LCD (FLÜSSIGKRISTALLANZEIGE)-FENSTER:
Verfügt über ein vierzeiliges 18-Zeichen-Display mit roter
Hintergrundbeleuchtung zur bequemen Betrachtung von
Teleskopinformationen und Lauftext.
2. ALIGN-(AUSRICHTUNG): Weist die Handsteuerung an, mit
dem Prozess der Ausrichtung des Teleskops zu beginnen.
3. RICHTUNGSTASTEN: Ermöglichen die vollständige
Kontrolle der Montierung in jede Richtung. Verwenden Sie die
Richtungstasten zur Zentrierung von Objekten im Okular oder
um das Teleskop manuell zu schwenken.
4. KATALOGTASTEN: Auf der Handsteuerung ist eine Taste,
die direkten Zugang zu den Katalogen in der 40000+ Objekte
umfassenden Datenbank ermöglicht. Die Datenbank Ihres
Teleskops enthält folgende Kataloge:
• SONNENSYSTEM: Alle 7 Planeten unseres Sonnensystems
und der Mond, Sonne und Pluto.
• STERNE: Eine zusammengestellte Liste der hellsten Sterne,
Doppelsterne, Variable Sterne und Asterismen.
• DEEP SKY: Eine zusammengestellte Liste der schönsten
Galaxien, Nebel und Cluster, sowie die kompletten Messier-
und NGC-Objekte.
5. IDENTIFY (IDENTIFIZIEREN):
Sucht die Datenbanken und
zeigt den Namen und die Versatzdistanzen zu den nächsten
passenden Objekten an.
6. MENÜ: Zeigt die vielen Setup- und Utilities-Funktionen an, z. B. Nachführrate und benutzerdefinierte Objekte und viele andere.
7. OPTION (CELESTRON LOGO): Kann in Kombination mit anderen Tasten verwendet werden, um auf erweiterte Funktionen und
Funktionen zuzugreifen.
8. ENTER (EINGABETASTE): Drücken von ENTER ermöglicht Ihnen die Auswahl der LCM-Funktionen, die Annahme von
eingegebenen Parametern und Schwenken des Teleskops auf die angezeigten Objekte.
9. BACK: Durch Drücken von BACK (Zurück) verlassen Sie das aktuelle Menü und es wird der vorherige Menüpfad angezeigt. Durch
wiederholtes Drücken von BACK gelangen Sie wieder zum Hauptmenü oder löschen versehentlich eingegebene Daten.
10. SKY TOUR: Aktiviert den Tour-Modus, der alle besten Objekte am Himmel auflistet und das Teleskop auf diese Objekte schwenkt.
11. SCROLLTASTEN: Diese Tasten dienen zum Auf- und Abscrollen in den Menülisten. Ein Doppelpfeilsymbol auf der rechten Seite
des LCD zeigt an, dass die Scrolltasten verwendet werden können, um zusätzliche Informationen anzuzeigen.
12. MOTOR SPEED (MOTORGESCHWINDIGKEIT): Ändert die Geschwindigkeit der Motoren, wenn die Richtungstasten
gedrückt werden.
13. OBJEKT INFO: Zeigt Koordinaten und nützliche Informationen über Objekte, die aus der Datenbank ausgewählt wurden, an.
14. INPUT JACK (EINGANGSBUCHSE): Ermöglicht Ihnen, Ihr Teleskop an einen Computer für die Verwendung mit
Softwareprogrammen für Punkt- und Klickschwenkbarkeit und Aktualisierung der Firmware über PC, anzuschließen.
4
5
6
7
8
9
10
11
11
12
13
14
15
2
4
1 1
3
DEUTSCH I 13

BEDIENUNG DER HANDSTEUERUNG
Dieser Abschnitt beschreibt die grundlegenden Handsteuerungsfunktionen, die zum Betrieb des LCM-Teleskops erforderlich sind.
AUSRICHTUNG MENÜ
Damit das LCM-Teleskop präzise auf Objekte im Himmel zeigen kann, muss es zuerst auf bekannte Positionen (Sterne) im Himmel
ausgerichtet werden. Mit diesen Daten kann das Teleskop ein Modell des Himmels erstellen, das dann zur Lokalisierung von Objekten mit
bekannten Koordinaten verwendet wird. Es gibt viele Möglichkeiten, um das LCM-Teleskop mit dem Himmel auszurichten, je nach den
Informationen, die vom Benutzer bereitgestellt werden können:
• SkyAlign (Himmelsausrichtung) funktioniert durch die Ausrichtung auf drei beliebige helle Sterne oder Planeten am Himmel.
• Auto Two Star Align (Automatische Zwei-Stern-Ausrichtung) zeigt eine Liste der sichtbaren Planeten und den Mond), die zur
Verfügung stehen, um das Teleskop auszurichten.
• Two Star Align (Zwei-Stern-Ausrichtung) verwendet die eingegebenen Zeit-/Ortsinformationen und lässt den Benutzer auswählen,
auf welche zwei Ausrichtungssterne das Teleskop automatisch schwenkt.
• One Star Align (Ein-Stern-Ausrichtung) verwendet die eingegebenen Zeit-/Ortsinformationen und lässt den Benutzer den
Ausrichtungsstern wählen. Es ist das schnellste Ausrichtverfahren, jedoch auf Kosten von weniger präziser Ausrichtung.
• Solar System Align (Sonnensystemausrichtung) zeigt eine Liste der sichtbaren (Planeten und den Mond), die zur Verfügung stehen,
um das Teleskop auszurichten.
HINWEIS: Es gibt zwei weitere Ausrichtungsmethoden, die in der Handsteuerung - EQ Nord und EQ Süd - gezeigt werden, aber diese gelten nur für eine Alt
Azimut-Montierung, bei der das Teleskop an einem äquatorialen Keil befestigt wird. Die LCM Montierung verfügt nicht über diese Fähigkeit,.
SKYALIGN
SkyAlign ist die einfachste Methode, um das Teleskop auszurichten und für Beobachtungen einsatzbereit zu machen. Selbst wenn Sie keinen
einzigen Stern im Himmel kennen, ist das LCM-Teleskop in Minutenschnelle durch Angabe von grundlegenden Informationen wie Datum, Uhrzeit
und Ort ausgerichtet Dann müssen Sie nur noch mit dem Teleskop drei beliebige helle Himmelsobjekte anvisieren. Da Sky Align keine Kenntnis
des Nachthimmels voraussetzt, brauchen Sie die Namen der Sterne, die Sie anvisieren, nicht zu kennen. Sie können sogar einen Planeten
oder den Mond auswählen. Das LCM-Teleskop ist dann bereit, beliebige Objekte in der 4000+ Objekte umfassenden Datenbank aufzufinden
und zu verfolgen. Bevor das Teleskop ausgerichtet werden kann, sollte es an einem Standort im Freien mit allen aufgesetzten Zubehörteilen
(Okular, Zenitspiegel und Sucherfernrohr) aufgestellt werden und den Objektivdeckel abnehmen, wie es im Abschnitt „Zusammenbau“ der
Bedienungsanleitung beschrieben ist. Mit SkyAlign anfangen:
1. Schalten Sie das LCM-Teleskop ein, indem Sie den Schalter an der Seite der Montageplattform auf die Position „On“ (Ein) stellen. Nach dem
Einschalten erscheint auf der Handsteuerung: LCM bereit (LCM Ready) Drücken Sie Eingabetaste (ENTER), um Sky Align zu wählen. Durch
Drücken der ALIGN-Taste werden die anderen Ausrichtungsoptionen und der Scrolling-Text umgangen und SkyAlign fängt automatisch an.
2. Nach der Auswahl von Sky Align wird auf der Handsteuerung „Wenn OK: Enter“ (Enter if OK), „Editieren: UNDO“ (Undo to edit) und
„Gespeicherter Ort“ (Saved Site) angezeigt. Unten in der LCD-Anzeige erscheint entweder die aktuelle Uhrzeit oder die Uhrzeit der
letzten Teleskopnutzung. Da Sie das LCM jetzt zum ersten Mal verwenden, drücken Sie UNDO (Zurück), um die aktuellen Zeit-/
Ortsinformationen einzugeben.
Die Anzeige der Handsteuerung fordert nun die folgenden Informationen an:
• Location- (Ort) Die Handsteuerung zeigt eine Liste von Städten zur Auswahl an. Wählen Sie die Stadt aus der Datenbank aus, die
Ihrer aktuellen Beobachtungsposition am nächsten ist. Die von Ihnen ausgewählte Stadt wird in der Handsteuerung gespeichert, sodass
diese bei der nächsten Ausrichtung automatisch angezeigt wird. Wenn Sie andererseits die exakten Längen- und Breitenangaben Ihrer
Beobachtungsposition kennen, können diese direkt in die Handsteuerung eingegeben und auch für die Zukunft gespeichert werden.
Eine Stadt auswählen:
1. Verwenden Sie die Oben- und Unten-Scrolltasten, um eine Auswahl zwischen Städtedatenbank (City Database) und Benutzerdefinierter
Ort (Custom Site) zu treffen. “City Database” ermöglicht Ihnen die Auswahl der Ihrem Beobachtungsort nächstgelegenen Stadt aus
einer Liste von internationalen oder US-amerikanischen Orten. “Custom Site” ermöglicht Ihnen die Eingabe der genauen geografischen
Länge und Breite Ihres Beobachtungsorts. Wählen Sie Städtedatenbank und drücken auf ENTER.
2. Die Handsteuerung ermöglicht Ihnen die Auswahl aus US-amerikanischen oder internationalen Orten. Für eine Auflistung
US-amerikanischer Standorte nach Staat und anschließend nach Stadt, auf ENTER drücken, während Vereinigte Staaten
angezeigt wird. Für internationale Standorte die Aufwärts- oder Abwärts-Scrolltasten verwenden, um International auszuwählen
und anschließend auf ENTER drücken.
3. Verwenden Sie die Oben- und Unten-Scrolltasten, um Ihren aktuellen Bundesstaat (oder Land, falls „International“ gewählt wurde)
aus der alphabetischen Liste auszuwählen, und drücken dann auf ENTER.
4. Verwenden Sie die Oben- und Unten-Scrolltasten, um die Ihrem Standort nächstgelegene Stadt aus der angezeigten Liste
auszuwählen, und drücken dann auf ENTER.
14 I DEUTSCH

• Time (Zeit)- Geben Sie die aktuelle Uhrzeit für Ihren Bereich ein. Sie können entweder die lokale Uhrzeit (d. h. 8:00) oder die Zeit
im 24-Stunden-Format eingeben (d. h. 20:00).
1. Wählen Sie PM oder AM. Wenn die militärische Uhrzeit eingegeben wurde, überspringt die Handsteuerung diesen Schritt.
2. Wählen Sie zwischen Standardzeit oder Sommerzeit. Verwenden Sie die Pfeiltasten nach oben und unten (Tastenfeld 6 oder 9),
um zwischen den Tasten zu wechseln.
3. Wählen Sie die Zeitzone aus, von der aus Sie Beobachtungen durchführen. Verwenden Sie erneut die Pfeiltasten nach oben und
unten (Tastenfeld 6 oder 9), um durch die Auswahl zu blättern Nähere Informationen zur Zeitzone enthält die Zeitzonenkarte im
Anhang dieses Handbuchs.
• Datum- Geben Sie Monat, Tag und Jahr Ihrer Beobachtungssitzung ein. Die Anzeige auf dem Display lautet: MM/TT/JJ.
1. Wenn falsche Informationen in die Handsteuerung eingegeben wurden, wird die UNDO-Taste als Rücktaste fungieren, sodass der
Benutzer erneut Informationen eingeben kann.
2. Wenn Ihr Teleskop das nächste Mal ausgerichtet wird, zeigt die Handsteuerung automatisch den letzten Standort an (entweder
eine Stadt oder Längengrad/Breitengrad) Auf ENTER drücken, um diese Parameter zu übernehmen, wenn Sie weiterhin zutreffen.
Durch Drücken der UNDO-Taste können Sie zurückgehen und einen neuen Stadtstandort oder Längengrad/Breitengrad auswählen.
3. Verwenden Sie die Pfeiltasten auf der Handsteuerung, um das Teleskop zu einem beliebigen hellen Himmelsobjekt am Himmel zu
schwenken (bewegen). Richten Sie das Objekt mithilfe des roten Punkts des Sucherfernrohrs aus und drücken Sie auf ENTER.
4. Wenn das Sucherfernrohr richtig mit dem Teleskoptubus ausgerichtet wurde, sollte der Ausrichtungsstern jetzt im Sichtfeld des
Okulars zu sehen sein. Die Handsteuerung fordert Sie auf, den hellen Ausrichtungsstern in der Mitte des Okulars zu zentrieren und
die ALIGN-Taste zu drücken. Damit wird der Stern als erste Ausrichtungsposition angenommen. (Die Schwenkrate des Motors
braucht nicht nach jedem Ausrichtungsschritt eingestellt zu werden. Das LCM-Teleskop wählt automatisch die beste Schwenkrate
zur Ausrichtung von Objekten im Sucherfernrohr und Okular aus.)
5. Für das zweite Ausrichunggsobjekt wählen Sie jetzt einen hellen Stern oder Planeten, der möglichst weit vom ersten Ausrichtungsobjekt
entfernt ist. Zentrieren Sie das Objekt wieder mithilfe der Pfeiltasten im Sucherfernrohr und drücken auf ENTER. Auf die ALIGN-Taste
drücken, nachdem das Objekt im Okular zentriert wurde.
6. Wiederholen Sie den Prozess für den dritten Ausrichtungsstern. Wenn das Teleskop auf die letzten Sterne ausgerichtet ist, lautet das
Display "Match Bestätigt". Drücken Sie UNDO, um die Namen der drei hellen Objekte anzuzeigen, auf die die Ausrichtung stattfand,
oder drücken Sie ENTER, um diese drei Objekte zur Ausrichtung zu akzeptieren. Jetzt sind Sie bereit, Ihr erstes Objekt zu finden.
TIPPS ZUR VERWENDUNG VON SKYALIGN
Beachten Sie die folgenden Ausrichtungsrichtlinien, um SkyAlign so einfach und genau wie möglich zu machen.
• Achten Sie darauf, dass das Stativ vor Beginn der Ausrichtung ausbalanciert ist. Zusammen mit einem ausbalancierten
Stativ helfen die Uhrzeit-/Ortsinformationen, die verfügbaren hellen Sterne und Planeten über dem Horizont besser vorherzusagen.
• Denken Sie daran, Sterne zum Ausrichten auszuwählen, die so weit wie möglich im Himmel voneinander entfernt sind.
Sie erzielen die besten Ergebnisse, wenn Sie sicherstellen, dass der dritte Alignment-Stern nicht auf der geraden Linie zwischen den
ersten beiden Sternen liegt. Das könnte zu einer Fehlausrichtung führen.
• Machen Sie sich keine Gedanken darüber, dass Sie bei der Auswahl von Ausrichtungsobjekten Planeten und Sterne
verwechseln könnten. SkyAlign funktioniert mit den vier hellsten Planeten (Venus, Jupiter, Saturn und Mars) sowie dem Mond. Außer
Planeten bietet die Handsteuerung über 80 helle Alignment-Sterne zur Auswahl an (Magnitude bis zu 2,5).
• SkyAlign kann nur in seltenen Fällen nicht feststellen, welche drei Alignment-Objekte zentriert wurden. Das passiert manchmal, wenn
ein heller Planet oder der Mond in der Nähe von einem der helleren Sterne vorbeizieht. In solchen Situationen ist es am
besten, das Alignment mit einem dieser Objekte nach Möglichkeit zu vermeiden.
• Achten Sie darauf, dass Sie die Objekte mit den gleichen abschließenden Bewegungen wie die Richtung des GoTo-
Ansatzes (GoTo Approach) zentrieren. Wenn zum Beispiel das Teleskop normalerweise ein GoTo abschließt, während das Vorderteil
des Teleskops nach rechts und oben bewegt wird, sollten Sie alle drei Alignment-Objekte im Okular mithilfe der Rechts- und Oben-
Pfeiltasten zentrieren (die Up/Down-Pfeiltasten werden bei Schwenkraten von 6 oder darunter umgekehrt). Die Annäherung an den
Stern aus dieser Richtung bei Betrachtung durch das Okular eliminiert einen großen Teil des Getriebespiels und stellt ein Alignment
größter Präzision sicher.
DEUTSCH I 15

AUTOMATISCHE ZWEI-STERN-AUSRICHTUNG
Genau wie beim Sky Align-Verfahren müssen auch bei der Automatischen Zwei-Stern-Ausrichtung (Auto Two-Star Align) alle notwendigen
Zeit-/Ortsinformationen eingegeben werden. Nach Eingabe dieser Informationen fordert die Handsteuerung Sie auf, einen bekannten Stern im
Himmel auszuwählen und mit dem Teleskop anzuvisieren. Das LCM hat jetzt alle Informationen, die es benötigt, um automatisch einen zweiten
Stern auszuwählen, der die bestmögliche Ausrichtung sicherstellen wird. Nach der Auswahl schwenkt das Teleskop automatisch auf diesen
zweiten Ausrichtungsstern, um die Ausrichtung abzuschließen. Befolgen Sie die nachstehenden Schritte zur Teleskop-Ausrichtung, während
das LCD-Teleskop draußen aufgestellt ist, alle Zubehörteile angebracht sind und das Stativ ausbalanciert ist.
1. Sobald das LCM eingeschaltet ist, drücken Sie ENTER, um mit der Ausrichtung zu beginnen.
2. Verwenden Sie die Aufwärts-/Abwärts-Scrolltasten (Tastenfeld 6 oder 9), um Auto Two-Star Align auszuwählen, und drücken dann
auf ENTER.
3. Die Handsteuerung zeigt die letzten Zeit- und Ortsinformationen, die in die Handsteuerung eingegeben wurden, an. Sie können mithilfe
der Aufwärts- und Abwärtstasten durch die Angaben blättern. Drücken Sie ENTER, um die aktuellen Informationen anzunehmen, oder
drücken Sie Rückgängig (UNDO), um die Informationen manuell zu bearbeiten (siehe Abschnitt „Sky Align“ für detaillierte Anweisungen
zur Eingabe von Zeit-/Ortsinformationen).
4. Das Display fordert Sie jetzt zur Auswahl eines hellen Sterns aus der auf der Handsteuerung angezeigten Liste auf. Verwenden Sie die
nach Aufwärts-/Abwärts-Tasten, um zum gewünschten Stern zu scrollen und drücken dann auf ENTER.
5. Verwenden Sie die Pfeiltasten, um das Teleskop zum ausgewählten Stern zu schwenken. Zentrieren Sie den Stern im Sucherfernrohr
und drücken Sie auf ENTER. Zentrieren Sie den Stern im Okular und drücken auf ENTER.
6. Auf der Grundlage dieser Informationen zeigt das LCM automatisch den am besten geeigneten zweiten Ausrichtungsstern an, der sich
über dem Horizont befindet. Drücken Sie auf ENTER, um das Teleskop automatisch zum angezeigten Objekt zu schwenken. Wenn Sie
aus irgendeinem Grund diesen Stern nicht auswählen möchten (beispielsweise weil er sich hinter einem Baum oder Gebäude befindet),
haben Sie die folgenden Möglichkeiten:
• UNDO drücken, um den am nächstbesten geeigneten Stern zum Ausrichten auszuwählen.
• Die Aufwärts-/Abwärts-Scrolltasten verwenden, um einen beliebigen gewünschten Stern aus der gesamten Liste der verfügbaren
Sterne manuell auszuwählen.
Nach Abschluss des Schwenkvorgangs werden Sie auf dem Display aufgefordert, die Pfeiltasten zu verwenden, um den ausgewählten
Stern mit dem roten Punkt des Sucherfernrohrs auszurichten Wenn dieser im Sucher zentriert ist, können Sie auf ENTER drücken. Nun
hilft Ihnen die Anzeige dabei, den Stern im Sichtfeld des Okulars zu zentrieren. Wenn der Stern zentriert ist, auf ALIGN (Ausrichten)
drücken, um diesen Stern als zweiten Ausrichtungsstern zu übernehmen. Wenn das Teleskop auf beide Sterne ausgerichtet wurde, zeigt
das Display Ausrichtung erfolgreich (Align Success) an, und Sie können jetzt Ihr erstes Objekt beobachten.
ZWEI-STERN-AUSRICHTUNG
Bei der Zwei-Stern-Ausrichtung (Two-Star-Alignment-Methode) muss der Benutzer die Positionen von zwei hellen Sternen kennen, um das
LCM präzise mit dem Himmel auszurichten und um dann Objekte zu suchen. Hier ist ein Überblick über das Zwei-Stern-Ausrichten:
1. Sobald das LCM eingeschaltet ist, wählen Sie mit den Aufwärts-/Abwärts-Richtungstasten die Option Zwei-Stern-Ausrichtung aus und
drücken auf ENTER.
2. Drücken Sie ENTER, um die auf dem Display angezeigten Zeit-/Ortsinformationen anzunehmen, oder drücken Sie UNDO, um neue
Informationen einzugeben.
3. Die Meldung SELECT STAR 1 (1. STERN WÄHLEN) erscheint in der oberen Zeile des Displays . Mithilfe der Aufwärts- und Abwärts-
Scrolltasten den ersten Stern für die Ausrichtung auswählen. Drücken Sie auf ENTER.
4. Das LCM fordert Sie auf, den ausgewählten Ausrichtungsstern im Okular zu fokussieren. Benutzen Sie die Richtungspfeiltasten, um das
Teleskop auf den Ausrichtungsstern zu schwenken und diesen vorsichtig im Sucherfernrohr zu zentrieren. Wenn er zentriert ist, drücken
Sie ENTER.
5. Dann wenn der Stern im Okular fokussiert ist, auf ALIGN drücken. Für ein präzises Zentrieren des Ausrichtungssterns im Okular können
Sie die Schwenkrate des Motors für ein feineres Zentrieren verringern. Das erfolgt durch Drücken der Taste MOTOR SPEED auf der
Handsteuerung, gefolgt von der Auswahl der Zahl, die der gewünschten Geschwindigkeit entspricht. (9 = schnellste, 1 = langsamste).
6. Das LCM fordert Sie dann auf, einen zweiten Ausrichtungsstern auszuwählen, zu zentrieren und die ALIGN-Taste zu drücken. Es ist am
Besten, weit voneinander entfernte Ausrichtungssterne auszuwählen. Sterne mit einem Abstand von 40 ° bis 60 ° gewährleisten eine
präzisere Ausrichtung als näher beieinander liegende Sterne.
Nach der abgeschlossenem Ausrichtung des zweiten Sterns wird auf dem Display „Ausrichtung erfolgreich“ (Align Successful) angezeigt
und Sie sollten nun hören, wie sich die Nachführmotoren einschalten und die Nachführung beginnt.
16 I DEUTSCH

EIN-STERN-AUSRICHTUNG
Die Ein-Stern-Ausrichtung fordert Sie zur Eingabe derselben Daten auf, die auch für die Zwei-Stern-Ausrichtung nötig wären. Aber anstatt
zur Zentrierung und zur Ausrichtung auf zwei Ausrichtungssterne zu schwenken, verwendet LCM nur einen Stern zur Modellierung des
Himmels auf Grundlage der angegebenen Informationen. Das ermöglicht Ihnen, in etwa auf die Koordinaten von hellen Objekten, wie z. B.
Mond und Planeten, zuzuschwenken, und gibt LCM die erforderlichen Informationen, Objekte im Altazimut-Modus in jedem Teil des Himmels
zu verfolgen. One-Star Align ist nicht dazu gedacht, zur präzisen Auffindung von kleinen oder schwachen Deep-Sky-Objekten oder zur
präzisen Nachführung von Objekten für Fotozwecke verwendet zu werden. Die Ein-Stern-Ausrichtung verwenden:
1. Wählen Sie One-Star Align aus den Ausrichtungsoptionen aus.
2. Drücken Sie ENTER, um die auf dem Display angezeigten Zeit-/Ortsinformationen anzunehmen, oder drücken Sie UNDO, um neue
Informationen einzugeben.
3. Die Meldung SELECT STAR 1 (1. STERN WÄHLEN) erscheint in der oberen Zeile des Displays. Mithilfe der Aufwärts- und Abwärts-
Scrolltasten den ersten Stern für die Ausrichtung auswählen. Drücken Sie auf ENTER.
4. Das LCM fordert Sie auf, den ausgewählten Ausrichtungsstern im Okular zu fokussieren. Benutzen Sie die Richtungspfeiltasten, um
das Teleskop auf den Ausrichtungsstern zu schwenken und diesen vorsichtig im Sucherfernrohr zu zentrieren. Wenn er zentriert ist,
drücken Sie ENTER.
5. Dann wenn der Stern im Okular fokussiert ist, auf ALIGN drücken.
6. Nach erfolgter Positionierung modelliert das LCM den Himmel auf Grundlage dieser Informationen und zeigt auf dem Display „Alignment
erfolgreich“ (Align Successful) an.
HINWEIS: Nach erfolgtem Ein-Stern-Ausrichtung können Sie die Re-Alignment-Funktion (weiter unten in diesem Abschnitt) verwenden, um die Zeigepräzision des
Teleskops zu verbessern.
SONNENSYSTEM-AUSRICHTUNG
Die Sonnensystemausrichtung (Solar System Align) ist für eine hervorragenden Nachführung und GoTo-Leistung ausgelegt. Es werden
Sonnensystemobjekte (Sonne, Mond und Planeten) zur Ausrichtung des Teleskops mit dem Himmel verwendet. Solar System Align eignet
sich gut, um das Teleskop für Beobachtungen am Tage auszurichten und es ist auch ein schnelles Verfahren zum Ausrichten des Teleskops
für nächtliche Beobachtungen.
Schauen Sie weder mit bloßem Auge noch durch ein Teleskop direkt in die Sonne (es sei denn, Sie verfügen über
einen geeigneten Sonnenfilter). Permanente und irreversible Augenschäden können daraus resultieren.
1. Wählen Sie Solar System Align aus den Ausrichtungsoptionen aus.
2. Drücken Sie ENTER, um die auf dem Display angezeigten Zeit-/Ortsinformationen anzunehmen, oder drücken Sie UNDO, um neue
Informationen einzugeben.
3. Die Meldung „OBJEKT WÄHLEN“ (SELECT OBJECT) erscheint in der oberen Zeile des Displays. Wählen Sie mithilfe der Aufwärts- und
Abwärts-Scrolltasten das Tages-Objekt (Planet, Mond oder Sonne), an dem Sie ausrichten möchten. Drücken Sie auf ENTER.
4. Nun fordert das LCM Sie auf, das ausgewählte Ausrichtungsobjekt im Okular zu zentrieren. Benutzen Sie die Richtungspfeiltasten, um
das Teleskop auf das Ausrichtungsobjekt zu schwenken und diesen vorsichtig im Sucherfernrohr zu zentrieren. Wenn er zentriert ist,
drücken Sie ENTER.
5. Zentrieren Sie das Objekt schließlich im Okular und drücken auf ALIGN.
Nach erfolgter Positionierung modelliert das LCM-Teleskop den Himmel auf der Grundlage dieser Informationen und zeigt „Alignment
erfolgreich“ (Align Successful) an.
Die Auswahl der Sonne
Aus Sicherheitsgründen wird die Sonne nicht in den benutzerdefinierten Objektlisten der Handsteuerung angezeigt, außer wenn sie
im „Utilities“ Menu aktiviert wird. Um die Anzeige der Sonne auf der Handsteuerung zu ermöglichen, gehen Sie folgendermaßen vor:
1. Drücken Sie die UNDO-Taste, bis „LCM bereit“ (LCM Ready) auf der Anzeige erscheint.
2. Drücken Sie die MENU-Taste und wählen Sie mit den Aufwärts-/Abwärts-Tasten die Option Utilities Menü. Drücken Sie auf ENTER.
3. Verwenden Sie die Aufwärts-/Abwärts-Tasten, um das Sun Menu auszuwählen und drücken ENTER.
4. Drücken Sie erneut auf ENTER, um zu erlauben, dass die Sonne im Display der Handsteuerung erscheint.
Die Anzeige der Sonne kann mit dem gleichen Verfahren, wie oben beschrieben, verhindert werden. Um die Zeigegenauigkeit des Teleskops
zu erhöhen, können Sie, wie oben beschrieben, die Funktion Erneut Ausrichten verwenden.
DEUTSCH I 17

NEUAUSRICHTUNG (RE-ALIGNMENT)
Das LCM hat eine Re-Alignment-Funktion (Neuausrichtung), die Ihnen ermöglicht, einen der beiden ursprünglichen Ausrichtungssterne
durch einen neuen Stern oder ein neues Himmelsobjekt zu ersetzen. Dies kann unter mehreren Umständen nützlich sein:
• Wenn Sie über einen Zeitraum von einigen Stunden Beobachtungen durchführen, stellen Sie möglicherweise fest, dass Ihre
ursprünglichen beiden Alignment-Sterne beträchtlich in westlicher Richtung abgedriftet sind. (Denken Sie daran, dass die Sterne
sich mit einer Geschwindigkeit von 15 Grad pro Stunde bewegen. Eine Ausrichtung anhand eines neuen Sterns in einem östlichen
Himmelsteil wird Ihre Zeigegenauigkeit erhöhen, insbesondere für Objekte in diesem Himmelssektor.
• Wenn Sie Ihr Teleskop mit der One-Star-Align-Methode ausgerichtet haben, können Sie die Neuausrichtungs -Funktion verwenden,
um ein Alignment mit einem zusätzlichen Objekt im Himmel durchzuführen. Dadurch wird die Zeigegenauigkeit Ihres Teleskops
erhöht, ohne dass zusätzliche Daten eingegeben werden müssen.
Einen bestehenden Ausrichtungsstern durch einen neuen Ausrichtungsstern ersetzen:
1. Wählen Sie den gewünschten Stern (oder das gewünschte Objekt) aus der Datenbank und schwenken Sie darauf zu.
2. Zentrieren Sie das Objekt vorsichtig im Okular.
3. Sobald es zentriert ist, drücken Sie die UNDO-Taste, bis Sie sich im Hauptmenü befinden.
4. Wenn LCM bereit (LCM Ready) angezeigt wird, auf die ALIGN-Taste auf der Handsteuerung drücken.
5. Sie werden dann auf dem Display gefragt, welchen Stern Sie ersetzen möchten.
6. Verwenden Sie die Aufwärts-/Abwärts-Tasten, um die zu ersetzenden Ausrichtungssterne auszuwählen und drücken dann auf
ENTER. Es ist normalerweise am besten, den am dichtesten beim neuen Objekt gelegenen Stern zu ersetzen. Dadurch werden
Ausrichtungssterne im Himmel ausgeschlossen. Wenn Sie eine der Ein-Objekt-Ausrichtungsverfahren verwendet haben, ist es
immer am besten, das „nicht zugewiesene“ Objekt durch ein tatsächliches Objekt zu ersetzen.
7. Drücken Sie auf ALIGN, um Änderungen vorzunehmen.
OBJEKTKATALOGE
AUSWAHL EINES OBJEKTS
Nun da das Teleskop richtig ausgerichtet ist, können Sie ein Objekt aus einem beliebigen Katalog in der LCM-Datenbank auswählen.
Die Handsteuerung hat für jeden der Kataloge in der Datenbank eine zugewiesene Taste.
FÜR PLANETEN
1. Drücken Sie die SOLAR SYSTEM -Taste (Tastenfeld Nr.1).
2. Verwenden Sie die Aufwärts-/Abwärts-Scrolltasten (Tastenfeld Nr.6 oder Nr.9, nicht die Aufwärts-/Abwärts-Richtungstasten), um
durch die Liste des Sonnensystems zu blättern.
3. Drücken Sie ENTER und das Teleskop wird auf das Objekt geschwenkt.
FÜR STERNE
1. Drücken Sie die STARS -Taste (Tastenfeld Nr.2).
2. Verwenden Sie die Aufwärts-/Abwärts-Scrolltasten (Tastenfeld Nr. 6 oder Nr. 9, nicht die Aufwärts-/Abwärts-Richtungstasten), um
durch die Liste der Kategorien zu blättern, die das Objekt enthält, das Sie sehen möchten, und drücken Sie ENTER. Für die Sterne haben
Sie die Wahl unter den Sternen mit Eigennamen, SAO Katalog, veränderliche Sterne, Asterismen, Konstellationen und Doppelsterne.
3. Verwenden Sie die Aufwärts-/Abwärts SCROLL Tasten, um das gewünschte Objekt auszuwählen und drücken auf ENTER. Das
Teleskop wird zu dem Objekt geschwenkt.
4. Beim SAO-Katalog müssen Sie für einen SAO-Stern nur die ersten vier Ziffern der sechsstelligen SAO-Nummer des Objekts eingeben.
Sobald die ersten vier Ziffern eingegeben sind, listet die Handsteuerung automatisch alle verfügbaren SAO-Objekte auf, die mit diesen
Zahlen beginnen. Verwenden Sie die Navigationstasten, um die Liste der verfügbaren SAO-Objekte mit diesem Präfix zu navigieren
und wählen Sie das gewünschte Objekt mit ENTER.
18 I DEUTSCH

FÜR DEEP-SKY OBJEKTE
1. Drücken Sie die DEEP SKY -Taste (Tastenfeld Nr. 3).
2. Verwenden Sie die Aufwärts-/Abwärts-Scrolltasten (Tastenfeld Nr.6 oder Nr.9, nicht die Aufwärts-/Abwärts-Richtungstasten), um
durch die Liste der Kategorien zu blättern, die das Objekt enthält, das Sie sehen möchten, und drücken Sie ENTER. Sie haben die
Wahl unter Objekten mit Eigennamen, NGC Katalog, Caldwell Katalog und Messier Katalog.
3. Für Objekte mit Eigennamen, verwenden Sie die Aufwärts-/Abwärts SCROLL Tasten, um das gewünschte Objekt auszuwählen und
drücken auf ENTER. Das Teleskop wird zu dem Objekt geschwenkt.
4. Wenn Sie die NGC-, Caldwell- oder Messier-Kataloge ausgewählt haben, geben Sie nun die Katalognummer im Tastenfeld ein und
drücken Sie ENTER, um zu Ihrem Ziel zu schwenken.
HINWEIS: Die Handsteuerung zeigt nur Objekte an, die sich über Ihrem Horizont befinden. Objekte, die unterhalb des Horizonts liegen, werden aus den Listen
gefiltert, sodass Sie Ihre Zeit nicht verschwenden, um nach Objekten zu suchen, wo das Teleskop nach unten zeigen würde. Sie können diesen Vorgang ändern und
den Horizont unterschreiten, indem Sie die Einstellungen in den Slew Limit- und Filterlimit-Menüs ändern, die später in der Bedienungsanleitung behandelt werden.
OBJEKTINFORMATIONEN ANZEIGEN
Sobald das gewünschte Objekt auf dem Handsteuerungsdisplay angezeigt wird, können Sie die Taste OBJECT INFO drücken. Dies gibt
Ihnen nützliche Informationen über das ausgewählte Objekt wie Größe, Konstellation und faszinierende Fakten über viele der helleren
und populäreren Objekte in der Datenbank.
Objektinformationen können Sie ohne eine Sternausrichtung erhalten. Nachdem das Teleskop eingeschaltet ist, können Sie durch
Drücken einer beliebigen Katalogtaste durch die Objektlisten blättern oder Katalognummern eingeben und die Informationen über
das Objekt wie oben beschrieben öffnen.
SKY TOUR-MODUS
Wenn Sie nicht sicher sind, welche Objekte Sie suchen sollen, enthält das LCM eine Himmelstour-Funktion, die eine Liste der Highlights
der Nacht, die hellsten und interessantesten Objekte über dem Horizont zeigt.
1. Drücken Sie die SKY TOUR-Taste (Tastenfeld Nr.5), um das Menü zu öffnen.
2. Verwenden Sie die Aufwärts-/Abwärts SCROLL Tasten, um das gewünschte Objekt auszuwählen und drücken auf ENTER. Das
Teleskop wird zu dem Objekt geschwenkt.
RICHTUNGSTASTEN
Das LCM-Teleskop hat vier Richtungstasten in der Mitte der Handsteuerung auf, die die Höhen- (auf und ab) und Azimut- (links und
rechts) Bewegung des Teleskops steuern. Das Teleskop kann mit neun verschiedenen Geschwindigkeitsraten gesteuert werden.
DEUTSCH I 19

Wenn Sie die Motor Speed (Motorgeschwindigkeit)-Taste drücken,
können Sie die Geschwindigkeitsrate der Motoren sofort von einer
Hochgeschwindigkeits-Schwenkrate auf eine Rate für präzise
Nachführung oder einer Rate dazwischen ändern. Jede Rate
entspricht einer Zahl auf der Tastatur der Handsteuerung. Die Zahl
9 ist die schnellste Rate und 1 die langsamste Geschwindigkeit.
Die Geschwindigkeiten 1-4 sind gut für das Zentrieren von Objekten
in einem Okular. die Geschwindigkeiten 5-6 sind gut für das
Zentrieren von Objekten im Sucherfernrohr. Die Geschwindigkeiten
7-9 sind gut, um lange Strecken über den Himmel zu schwenken.
Änderung der Motorgeschwindigkeitsrate:
Die Handsteuerung verfügt über eine „Doppeltasten“-Funktion,
mit der Sie eine sofortige Beschleunigung der Motoren erreichen
können, ohne dass eine Drehzahl gewählt werden muss. Zur
Verwendung dieser Funktion drücken Sie einfach die Pfeiltaste, die
der Richtung entspricht, in die Sie das Teleskop bewegen möchten.
Halten Sie diese Taste gedrückt und drücken Sie die Taste für die
entgegengesetzte Richtung. Damit wird die Geschwindigkeit auf die
maximale Schwenkrate erhöht.
HINWEIS: Die siderische Geschwindigkeit ist die Geschwindigkeit, mit der die
Erde rotiert und dadurch scheinen die Objekte über den Himmel zu driften. Dies
entspricht 15 Bogensekunden pro Sekunde.
MOTORGESCHWINDIGKEIT-TASTE
HAUPTMENÜ
Das LCM enthält viele benutzerdefinierte Setup-Funktionen, die dem Benutzer die Kontrolle über die vielen erweiterten Teleskopfunktionen
ermöglicht. Alle Einstellungs- und Utility-Funktionen können durch Drücken der MENU-Taste (Tastenfeld Nr.7) und Scrollen durch die
Optionen aufgerufen werden.
NACHFÜHR-MENÜ
Nachführmodus
Sobald das LCM ausgerichtet ist, schalten sich die Tracking-Motoren automatisch ein und beginnen mit dem Tracking des Himmels.
Allerdings kann das Tracking für den terrestrischen Einsatzausgeschaltet werden:
• Aus- Wenn Sie das Teleskops für terrestrische (Land) Beobachtung nutzen, kann das Nachführen deaktiviert werden, sodass sich
das Teleskop nicht bewegt.
• Alt-Az- Dies ist die Standard-Nachführrate und wird verwendet, wenn das Teleskop richtig ausgerichtet wurde.
HINWEIS: Nachführmodi: EQ Nord und EQ Süd werden nur mit Teleskopen mit parallaktischer Montierung verwendet. LCM-Teleskope setzen Alt-Azimut
Montierungen ein und können die zwei EQ Nachführmodi nicht nutzen.
Nachführrate
Zusätzlich zum Bewegen des Teleskops mit den Tasten der Handsteuerung wird das LCM ständig ein Himmelsobjekt verfolgen während
es sich über den Nachthimmel bewegt. Die Nachführgeschwindigkeit kann je nach dem Typ des beobachteten Objekts geändert werden:
• Siderisch- Diese Stufe kompensiert die Erdrotation, indem das Teleskop mit der gleichen Geschwindigkeit wie die Erdrotation,
jedoch in entgegengesetzter Richtung bewegt wird. Bei der Nachführung im Alt-Az-Modus muss das Teleskop in der Höhe und im
Azimut Korrekturen vornehmen.
• Lunar- Zum Nachführen bei der Beobachtung des Mondes und der Mondlandschaft.
• Solar- Dient mit entsprechendem Filter zum Nachführung bei Beobachtungen der Sonne.
MOTORGESCHWINDIGKEIT RATE
1 0.5x siderisch
2 1x siderisch
3 4x siderisch
4 8x siderisch
5 16x siderisch
6 64x siderisch
7
1 °/Sekunde
8
1.75°/Sekunde
9
2.75 °/Sekunde
20 I DEUTSCH

ORT UND ZEIT ANZEIGE
Ort und Zeit Anzeige zeigt die zuletzt gespeicherte Zeit und Längen-/Breitengrad in der Handsteuerung an.
HANDSTEUERUNGMENÜ
Lichtsteuerung:
Mit dieser Menüoption können Sie die Helligkeit der Beleuchtung an der Handsteuerung einstellen.
• Keypad Level- Stellt die Helligkeit der Hintergrundbeleuchtung auf dem Tastenfeld ein.
• Display Level-
Stellt die Helligkeit der Hintergrundbeleuchtung auf dem LCD-Display ein.
Scrolling-Menü
In diesem Menü können Sie die Geschwindigkeit ändern, mit der der Text im Display der Handbedienung durchblättert.
• Drücken Sie UP (Tastenfeld Nr.6) -Taste, um die Textgeschwindigkeit zu erhöhen.
• Drücken Sie DOWN --Taste (Tastenfeld Nr.9) -Taste, um die Textgeschwindigkeit zu verringern.
Auf Fettschrift umschalten
Dies ermöglicht Ihnen, den Text auf dem LCD in Fettschrift zu ändern, was leichter zu lesen ist.
Kontrast einstellen
Hier können Sie wählen, wie dunkel der Text auf dem LCD-Display erscheint soll.
Sprache einstellen
Damit können Sie Ihre Muttersprache auf der Handbedienung wählen. Drücken Sie die Zahl, die der gewünschten Sprache entspricht.
TELESKOPSETUPMENÜ
Ort und Zeiteinstellung
Ermöglicht dem Benutzer die benutzerspezifische Anpassung der Handsteuerung durch Änderung der Zeit- und Ortsparameter (z.B.
Zeitzone und Sommerzeit/Zeitumstellung)
Getriebespielkompensation (Anti-Backlash)
Alle mechanischen Getriebe weisen einen gewissen Nachlauf oder ein Spiel zwischen den Gängen auf. Dieses Spiel zeigt sich, wie
lange es dauert, bis ein Stern sich im Okular bewegt, wenn die Handbedienung Pfeiltasten gedrückt werden (besonders beim Wechseln
der Richtungen). Die Getriebespielfunktion des LCM ermöglicht es dem Benutzer, das Spiel auszugleichen, indem ein Wert eingegeben
wird, der die Motoren schnell genug zurückspult, um das Spiel zwischen den Gängen zu eliminieren. Das Ausmaß des erforderlichen
Ausgleichs hängt von der ausgewählten Schwenkrate ab. Je langsamer die Schwenkrate, desto länger dauert es, bis der Stern sich
im Okular zu bewegen scheint. Daher muss der Getriebespiel-Ausgleich höher eingestellt werden. Sie müssen mit verschiedenen
Werten experimentieren. Ein Wert zwischen 20 und 50 ist für die meisten Beobachtungen normalerweise optimal, während ein höherer
Wert für die Nachführung zum Fotografieren notwendig sein kann. Eine positive Getriebespielkompensation wird angewandt, wenn die
Montierung die Bewegungsrichtung von rückwärts auf vorwärts ändert. Eine negative Getriebespielkompensation wird angewandt, wenn
die Montierung die Bewegungsrichtung von vorwärts zu rückwärts ändert. Bei Aktivierung der Nachführung bewegt sich die Montierung
auf einer oder beiden Achsen entweder in die positive oder negative Richtung, sodass die Getriebespielkompensation immer angewandt
wird, wenn eine Richtungstaste losgelassen wird und die Bewegungsrichtung entgegengesetzt zur Laufrichtung ist.
Zur Einstellung des Getriebespiel-Werts scrollen Sie zur Getriebespiel-Option und drücken ENTER. Geben Sie einen Wert von 0-100 für
die Azimut- und Höhen-Richtungen ein und drücken Sie jeweils ENTER, um jeden dieser Werte zu speichern. Das LCM speichert diese
Werte und verwendet sie jedes mal, wenn das Teleskop eingeschaltet wird, bis sie geändert werden.
DEUTSCH I 21

Schwenkgrenzen (Slew Limits)
Stellt die Höhengrenzen für Schwenkvorgänge des Teleskops ein, ohne eine Warnmeldung anzuzeigen. Die Schwenkgrenzen verhindern,
dass der Teleskoptubus zu einem Objekt unter dem Horizont schwenkt oder zu einem Objekt schwenkt, das so hoch ist, dass der Tubus
an eines der Stativbeine stoßen könnte. Die Schwenkgrenzen können jedoch je nach Ihren Anforderungen angepasst werden. Wenn Sie
z. B. zu einem Objekt schwenken wollen, das sich in der Nähe des Zenits befindet, und wenn Sie sich sicher sind, dass der Tubus nicht an
die Stativbeine anstößt, können Sie die Schwenkgrenzen auf max. 90° Höhe einstellen. Dadurch kann das Teleskop ohne Warnmeldung
zu jedem Objekt über dem Horizont schwenken.
Filtergrenzen
Wenn eine Ausrichtung abgeschlossen ist, erkennt das LCM automatisch, welche Himmelsobjekte sich über dem Horizont befinden. Als
Ergebnis wird beim Durchblättern der Datenbanklisten (oder Auswahl der SKY TOUR Funktion) die LCM-Handsteuerung nur die Objekte
anzeigen, von denen bekannt ist, dass sie beim Beobachten über dem Horizont sind. Sie können die Objektdatenbank anpassen, indem
Sie Höhengrenzwerte eingeben, die sich für Ihren Standort und Ihre Situation eignen. Wenn z.B. Ihr Beobachtungsstandort bergig ist
und der Horizont teilweise verdeckt ist, können Sie Ihre Mindest-Höhengrenze auf +20 º einstellen. Auf diese Weise sichern Sie sich ab,
dass die Handsteuerung nur Objekte mit einer Höhe von über 20 º anzeigt.
Wenn Sie die gesamte Objektdatenbank erkunden möchten, setzen Sie die maximale Höhengrenze auf 90 ° und die minimale Grenze
auf -90 °. Dadurch wird jedes Objekt angezeigt, das in der Datenbank aufgelistet ist, unabhängig davon, ob es von Ihrem Standort aus
am Himmel zu sehen ist oder nicht.
Richtungstasten
Die Richtung, in der sich ein Stern im Okular bewegt, ist je nach dem verwendeten Zubehör unterschiedlich. Das kann zu Verwirrung
führen, wenn mit einem Off-Axis-Guider im Vergleich zu einem direkten Guide-Scope geführt wird. Dies kann kompensiert werden, indem
die Richtung der Antriebssteuerungstasten geändert wird. Um die Tastenlogik der Richtungstasten umzukehren, drücken Sie die MENÜ-
Taste und wählen die Richtungstasten aus dem Utility-Menü. Verwenden Sie die Up/Down-Pfeiltasten, um entweder die Azimuttasten
(links und rechts) oder die Höhentasten (auf und ab) auszuwählen, und drücken Sie ENTER. Drücken Sie erneut auf ENTER, um die
Richtung der Handsteuerungstasten jeweils umzukehren. Die Richtungstasten ändern nur die Okularraten (Rate 1-6) und haben keine
Auswirkung auf die Schwenkraten (Rate 7-9).
Gehe zu Annäherung
Hiermit kann der Benutzer die Richtung festlegen, in die sich das Teleskop beim Schwenken zu einem Objekt annähert. Dieser Ansatz gibt
dem Benutzer die Fähigkeit, die Auswirkungen von Getriebespiel auf ein Mindestmaß zu beschränken. Zum Beispiel, wenn Ihr Teleskop
hecklastig ist, weil an der Rückseite schweres optisches oder Fotozubehör aufgesetzt ist, empfiehlt es sich, die Höhenannäherung auf
die negative Richtung einzustellen. Dies stellt sicher, dass sich das Teleskop immer einem Objekt aus der entgegengesetzten Richtung
nähert, wenn die Last an dem Teleskop zieht.
Wählen Sie zur Richtungsänderung der GoTo-Annäherung einfach eine GoTo-Annäherung aus dem Teleskopsetupmenü aus, wählen Sie
entweder eine Höhen- oder Azimut-Annäherung aus, wählen Sie positiv oder negativ und drücken Sie auf Enter.
Kabelschutz
Der Kabelschutz schützt vor Teleskopschwenkungen von mehr als 360 º azimutal und Umwicklung der Zubehörkabel um das Unterteil des
Teleskops. Diese Funktion ist nützlich, wenn das Teleskop mit einer externen Stromversorgung betrieben wird. Die Kabelschutzfunktion
ist standardmäßig ausgeschaltet, wenn das Teleskop in Altazimut ausgerichtet wird und wird eingeschaltet, wenn auf einem Keil
ausgerichtet wird.
UTILITY MENÜ
Durch Scrollen durch die MENU-Optionen (Menü) erhalten Sie auch Zugang zu einer Reihe von erweiterten Utility-Funktionen, wie z.B.
Getriebespiel-Ausgleich und Schwenkgrenzen.
GPS An/Aus
Diese Funktion ist nur dann verfügbar, wenn Sie Ihr Teleskop in Verbindung mit dem optionalen GPS-Zubehör verwenden. Hiermit kann
das GPS-Modul ausgeschaltet werden. Wenn Sie die LCM-Datenbank verwenden möchten, um die Koordinaten eines Himmelsobjekts
für ein zukünftiges Datum zu finden, müssten Sie das GPS-Modul ausschalten, um ein anderes Datum und eine andere Uhrzeit als die
gegenwärtig eingestellten manuell einzugeben.
Zurücksetzen
Setzt die LCM-Handsteuerung auf die ursprüngliche Werkseinstellungen zurück. Werte wie die Getriebespielkompensation, anfängliche
Daten zu Datum und Uhrzeit, Längen-/Breitengrade sowie Schwenk- und Filtergrenzen werden rückgesetzt. Gespeicherte Parameter wie
z. B. PEC und benutzerdefinierte Objekte bleiben jedoch gespeichert, selbst wenn Zurücksetzen ausgewählt wurde. Die Handsteuerung
fordert Sie zum Drücken der „0“-Taste auf, bevor die Werkseinstellungen aktivierbar werden.
22 I DEUTSCH

Version
Bei Auswahl dieser Option sehen Sie die aktuelle Versionsnummer der Handsteuerung und Motorsteuerungssoftware. Der erste
Nummernsatz zeigt die Softwareversion der Handsteuerung an. Für die Motorsteuerung zeigt die Handsteuerung zwei Nummernsätze
an: die ersten Nummern geben den Azimut und die zweiten die Höhe an.
Achsenposition anzeigen
Zeigt die relative Höhe und Azimut für die aktuelle Position des Teleskops an.
GoTo (Gehe zu) Achsenposition
Ermöglicht die Eingabe einer bestimmten Höhen- und Azimutposition und Schwenken zu dieser Position.
Ruhemodus
Hibernate (Ruhemodus) ermöglicht die komplette Abschaltung des LCM-Teleskops unter Beibehaltung des Alignments beim
Wiedereinschalten. Dies spart nicht nur Strom, sondern ist auch ideal für Beobachter geeignet, die ihr Teleskop permanent installiert
haben oder es für lange Zeiträume an einem Standort aufgestellt lassen. Aktivieren des Teleskop-Ruhemodus:
1. Wählen Sie Hibernate aus dem Utility Menu.
2. Bringen Sie das Teleskop in die gewünschte Position und drücken auf ENTER.
3. Das Teleskop ausschalten. Achten Sie darauf, das Teleskop im Ruhemodus niemals zu bewegen.
Sobald das Teleskop erneut eingeschaltet wird, zeigt der Bildschirm Aufwachen an. Nachdem Sie ENTER gedrückt haben, haben Sie
die Option, durch die Zeit-/Ortsinformationen zu scrollen, um die aktuelle Einstellung zu bestätigen. Drücken Sie auf ENTER, um das
Teleskop aufzuwecken.
Wenn Sie auf dem Aufwach-Bildschirm auf ZURÜCK drücken, können Sie viele Funktionen der Handsteuerung einsehen, ohne das
Teleskop aus dem Ruhemodus aufzuwecken. Um das Teleskop, nachdem Sie auf ZURÜCK gedrückt haben, aufzuwecken, wählen Sie im
Utility-Menü Ruheposition aus und drücken auf ENTER. Die Richtungstasten dürfen, während sich das Teleskop im Ruhemodus befindet,
nicht zum Bewegen verwendet werden.
Sonnenmenü
Aus Sicherheitsgründen wird die Sonne nur dann als Datenbankobjekt angezeigt, wenn sie zuerst aktiviert wurde. Um die Sonne zu
aktivieren, gehen Sie zum Sonnenmenü und drücke auf ENTER. Die Sonne wird nun im Planetenkatalog angezeigt und kann als
Ausrichtungsobjekt für die Sonnensystem-Ausrichtung verwendet werden. Wählen Sie zum Entfernen der Sonne aus der Anzeige der
Handsteuerung erneut das Sonnenmenü im Utility-Menü aus und drücken Sie auf ENTER.
Calibrate GoTo (Gehe zu Kalibrieren)
Gehe zu Kalibrieren ist ein nützliches Tool, wenn schwere optische oder fotografische Zubehörkomponenten am Teleskop angebracht
werden. GoTo-Kalibrierung berechnet die Entfernung und Zeit, die erforderlich sind, damit die Montierung ihr endgültiges langsames
„Gehe zu“ beim Schwenken auf ein Objekt abschließen kann. Eine Änderung an der Teleskopbalance kann die Zeit verlängern, die für
den letzten Schwenk benötigt wird. Die GoTo-Kalibrierung berücksichtigt kleinste Ungleichgewichte und Änderungen der letzten GoTo-
Distanz und kompensiert diese.
Einstellen der Montierungsposition
Das Menü zum Einstellen der Montierungsposition kann zur Wiederherstellung einer Ausrichtung in Fällen, wo das Teleskop oder
Stativ manuell bewegt wurde, verwendet werden. Zum Beispiel könnten Sie diese Funktion verwenden, wenn die Stativebene
durch Heben oder Senken der Stativbeine angepasst werden muss. Nach der Bewegung der Montierung schwenken Sie einfach
zu einem hellen Stern und zentrieren diesen im Okular, dann wählen Sie “Set Mount Position” im Utilities Menü. Da das Teleskop
bewegt wurde, ist die Zeigegenauigkeit herabgesetzt. Sie können jedoch zu neuen Ausrichtungssternen schwenken und jeden der
ursprünglichen Ausrichtungssterne durch diese neuen Sterne ersetzen. Dadurch muss der Ausrichtungsvorgang nicht wieder von
Neuem vorgenommen werden.
DEUTSCH I 23

BENUTZERDEFINIERTE OBJEKTE
Das LCM kann bis zu 50 verschiedene benutzerdefinierte Objekte speichern. Bei diesen Objekten kann es sich um von Ihnen entdeckte
terrestrische Tagesobjekte oder interessante Himmelsobjekte handeln, die nicht in der regulären Datenbank vorhanden sind. Es gibt
verschiedene Wege, ein Objekt in Abhängigkeit der Art des Objekts zu speichern:
• Save Sky Object (Speichere Himmelsobjekt)- Das LCM-Teleskop speichert Himmelsobjekte in seiner Datenbank, indem die
Rektaszension und Deklination der Himmelskugel gespeichert werden. Auf diese Weise kann dasselbe Objekt jedes Mal gefunden
werden, wenn das Teleskop ausgerichtet wird. Sobald ein gewünschtes Objekt im Okular zentriert wurde, scrollen Sie einfach zum
Befehl „Himmelsobj. speichern“ und drücken auf ENTER. Die Anzeige fordert Sie zur Eingabe einer Nummer zwischen 1 und 25 auf, um
das Objekt zu identifizieren. Drücken Sie erneut auf ENTER, um dieses Objekt in die Datenbank zu speichern. Diese Objekte können
dann durch Auswahl von „Gehe zu Himmelsobjekt“ GoTo Sky Object abgerufen werden.
• Save Database (Db) Object-(Objekt in Datenbank speichern)
Mit dieser Funktion können Sie Ihre eigene benutzerdefinierte
Tour von Datenbankobjekten erstellen, da Sie die aktuelle Position des Teleskops aufzeichnen und den Namen des Objekts speichern
können, indem Sie ihn aus einem der Datenbankkataloge auswählen.
• Enter RA - DEC (RA -DEK eingeben)- Sie können auch einen bestimmten Satz von Koordinaten für ein Objekt speichern, indem Sie
einfach die RA- und DEK-Koordinaten eingeben Scrollen Sie zum Befehl „RA-DEK eingeben“ und drücken Sie auf ENTER. Auf dem
Display werden Sie aufgefordert, zuerst die RA und dann die DEK des gewünschten Objekts einzugeben.
• Save Land Object-(Speichere terrestrisches Objekt)
Das LCM kann auch als Spektiv für terrestrische Objekte verwendet werden.
Feststehende terrestrische Objekte können gespeichert werden, indem relativ zum Standort des Teleskops zum Betrachtungszeitpunkt
Höhe und Azimut gespeichert werden. Da sich diese Objekte relativ zum Standort des Teleskops befinden, sind deren Daten nur für
exakt diesen Standort gültig. Terrestrische Objekte werden gespeichert, indem das gewünschte Objekt erneut im Okular zentriert
wird. Scrollen Sie zum Befehl „Terrestrisches Obj. speichern“ und drücken Sie auf ENTER. Das Display fordert Sie zur Eingabe einer
Nummer zwischen 1 und 25 auf, um das Objekt zu identifizieren. Drücken Sie erneut auf ENTER, um dieses Objekt in die Datenbank zu
speichern. Diese Objekte können dann durch Auswahl von GoTo Land Object aufgerufen werden.
Um den Inhalt eines der benutzerdefinierten Objekte zu ersetzen, speichern Sie einfach ein neues Objekt mit einer der vorhandenen
Identifikationsnummern. LCM ersetzt dann das vorherige benutzerdefinierte Objekt durch das aktuelle.
GET RA-DEC (RA-DEK ANZEIGEN)
Zeigt die Rektaszension und Deklination für die aktuelle Position des Teleskops an.
GOTO RA-DEC (GEHE ZU RA-DEK)
Ermöglicht Ihnen die Eingabe einer bestimmten Rektaszension und Deklination und Schwenken zu dieser Position.
IDENTIFIZIEREN
Der Identifizierungsmodus sucht alle LCM-Datenbank-Kataloge oder -Listen ab und zeigt den Namen und die Versatzdistanzen zu
den nächstgelegenen passenden Objekten an. Diese Funktion kann zwei Zwecke erfüllen: Erstens kann sie zur Identifikation eines
unbekannten Objekts im Sichtfeld Ihres Okulars verwendet werden. Außerdem kann der Identifizierungsmodus zur Lokalisierung
anderer Himmelsobjekte, die dicht an den gegenwärtig von Ihnen beobachteten Objekten liegen, verwendet werden. Wenn Ihr
Teleskop z. B. auf den hellsten Stern im Sternbild Lyra gerichtet ist, können Sie die Identifizierung wählen. Daraufhin wird der Katalog
der benannten Sterne zweifelsohne den Stern Vega als den von Ihnen beobachtete Stern angeben. Allerdings, bei Auswahl von
Identifizieren und der Suche nach benannten Objekten oder Messier-Katalogen, teilt Ihnen die Handsteuerung mit, dass der Ringnebel
(M57) ca. 6 ° von Ihrer aktuellen Position entfernt ist. Eine Durchsuchung des Doppelsternkatalogs ergibt, dass sich Epsilon Lyrae nur
1° von Vega entfernt befindet.
Die Identifizierungsfunktion verwenden:
• Drücken Sie die IDENTIFY-Taste (Tastenfeld Nr.4) und wählen die Option Identify (Identifizieren).
• Die Aufwärts-/Abwärts-Scrolltasten verwenden, um den Katalog, in dem gesucht werden soll, auszuwählen.
• Drücken Sie auf ENTER, um mit der Suche zu beginnen.
HINWEIS: Einige Datenbanken enthalten Tausende von Objekten und es kann daher ein oder zwei Minuten dauern, um zum nächsten Objekt zurückzukehren.
24 I DEUTSCH

Objekte mit Eigennamen
NGC
Caldwell
Messier
LCM Modelle Menübaum
Modus
Alt-Az
Aus
MENÜ
(TASTENFELD NR. 7)
AURICHTUNGS
-TASTE
SONNEN`SYSTEM
(TASTENFELD NR. 1)
STERNE
(TASTENFELD NR. 2)
DEEP SKY
(TASTENFELD NR. 3)
NACHFÜHRUNG
EQ Süd
EQ Nord
RATE
Siderisch
Lunar
Solar
UEIT UND ORT ANZEIGE
HANDSTEUERUNG
Beleuchtungskontrolle
Tastaturstufe
Anzeigeebene
Scroll-Menü
Fettdruck ändern
Kontrast einstellen
Sprache einstellen
SkyAlign
Automatische Zweisternausrichtung
Zweisternausrichtung
Einsternausrichtung
Sonnensystemausrichtung
EQ Nord Ausrichtung
EQ Süd Ausrichtung
Mond
Merkur
Venus
Mars
Jupiter
Saturn
Uranus
Neptun
Pluto
Sonne
Sterne mit Eigennamen
SAO
Variable Sterne
Asterismen
Konstellationen
Doppelsterne
TELESKOP EINSTELLEN
Ort und Zeiteinstellung
Getriebespiel
Slew Limits (Schwenkgrenzen)
Filtergrenzen
Richtungstasten
Gehe zu Annäherung
Kabelschutz
UTILITIES
GPS An/Aus
Zurücksetzen
Version
Achsenposition erhalten
GoTo (Gehe zu) Achsenposition
Ruhemodus
Sonnenmenü
Calibrate GoTo (Gehe zu Kalibrieren)
Einstellen der Montierungsposition
NUTZEROBJEKTE
Gehe zu Himmelsobjekt
Speichere Himmelsobjekt
Objekt in Datenbank speichern
RA und DEK eingeben
Speichere terrestrisches Objekt
Gehe zu terrestrischem Objekt
RA-DEK ANZEIGEN
GEHE ZU RA-DEK
IDENTIFIZIEREN
DEUTSCH I 25

IHRE ERSTE ASTRONOMISCHE BEOBACHTUNG
DER MOND
Jetzt können Sie Ihr Teleskop bei Nacht nach draußen nehmen und ans Beobachten gehen!
Fangen wir mit dem Mond an. Der Mond braucht etwa einen Monat, um durch seinen kompletten Phasenzyklus zu gehen, vom Neumond
zum Vollmond und wieder zurück. Versuchen Sie, ihn zu verschiedenen Stadien dieses Zyklus zu beobachten.
Der Mond kann jederzeit beobachtet werden, wenn er am Himmel zu sehen ist, die beste Zeit, um ihn zu sehen, ist ab zwei Tagen nach
Neumond bis zu einige Tage vor Vollmond. Innerhalb dieses Zeitfensters zeigen sich Krater und Mondgebirge am detailreichsten. Sehen
Sie in einem Kalender oder Mondphasen-App nach, um herauszufinden, wann der nächste Neumond ist.
1. Bauen Sie Ihr Teleskop mit dem 25-mm-Okular auf, sobald Sie eine freie Sicht auf den Mond haben.
2. Schalten Sie das Sucherfernrohr ein und schauen Sie hindurch, um die roten Punkte auszumachen.
3. Schwenken Sie Ihr Teleskop, bis Sie den Mond durch das Sucherfernrohr-Fenster sehen können und sich der rote Punkt mittig auf
dem Mond befindet.
4. Schauen Sie durch das 25-mm-Okular. Die Fokusknöpfe vorsichtig drehen, um die Bildschärfe anzupassen.
HERZLICHEN GLÜCKWUNSCH! SIE HABEN GERADE IHR ERSTES HIMMELSOBJEKT BEOBACHTET!
Mit dieser Grundtechnik können Sie viele andere Himmelsobjekte wie Planeten, Sternhaufen und Nebel beobachten.
TIPPS FÜR HIMMELSBEOBACHTUNG
Dieser Abschnitt behandelt visuelle Beobachtungshinweise sowohl für das Sonnensystem als auch für die Deep-Sky-Objekte sowie
allgemeine Bedingungen,die Ihre Beobachtungsfähigkeit beeinflussen.
VERGRÖßERUNG
Sie können die Vergrößerung Ihres Teleskops ändern, indem Sie einfach die Okulare wechseln. Sowohl Teleskope als auch Okulare
haben Brennweiten, die in Millimeter gemessen werden. Um die Vergrößerung einer Teleskop- und Okularkombination zu berechnen,
nehmen Sie die Brennweite des Teleskops und teilen sie durch die Brennweite des Okulars. Das Ergebnis ist der Vergrößerungsfaktor.
Zum Beispiel hat die 80LCM eine Brennweite von 900 mm, mit dem 25 mm Okular:
900 mm
=
____________
= 36x
25 mm
Brennweite des Teleskops
Vergrößerung =
_________________________
Brennweite des Okulars
GESICHTSFELD
Die Bestimmung des Gesichtsfelds ist wichtig, wenn Sie sich eine Vorstellung von der Winkelgröße des beobachteten Objekts machen
wollen. Zur Berechnung des tatsächlichen Gesichtsfelds, dividieren Sie das Scheinbare Gesichtsfeld des Okulars (vom Hersteller des
Okulars angegeben) durch die Vergrößerung, die von der Teleskopbrennweite, des Teleskops, das Sie nutzen, abhängig ist. Anhand
des Beispiels im vorherigen Abschnitt können wir das Sichtfeld mit dem gleichen 25-mm-Okular bestimmen.
45 °
=
______
= 1.25 °
36
Scheinbares Gesichtsfeld des Okulars
Tatsächliche Gesichtsfeld =
_________________________________
Vergrößerung
26 I DEUTSCH

DIE PLANETEN
Zusätzlich zum Mond können Sie mit Ihrem Teleskop die 5 hellsten Planeten beobachten. Da Planeten ihre Positionen gegen die
Hintergrundsterne ändern, müssen Sie Quellen im Internet konsultieren oder eine Planetariumapp auf einem Smartphone verwenden,
das Ihnen hilft, herauszufinden, wo sie sich befinden. Hier sind einige Planeten aufgezählt, die Sie finden können:
• Merkur und Venus- Diese beiden inneren Planeten durchlaufen mondähnliche Phasen, von dünnen Sicheln bis hin zum
Dreiviertelmond.
• Mars- Wenn er in der Nähe von Opposition ist (der Punkt in seiner Umlaufbahn, wo er der Erde am nächsten ist) sollten Sie
in der Lage sein, die Polar- kappen und zu erkennen und möglicherweise einige größere Oberflächenmerkmale, die als dunkle
Markierungen auf der Oberfläche erscheinen.
• Jupiter - Suchen Sie nach den dunkleren Methan-Wolkenbändern, die den Planeten ober- und unterhalb des Äquators umkreisen.
Wenn der große rote Fleck der Erde gegenübersteht, können Sie eventuell einen Blick darauf werfen. Sie können auch die vier
hellsten Monde des Jupiter - Io, Europa, Ganymed und Callisto sehen. Es macht Spaß diese Monde zu beobachten, weil sie
sich nur innerhalb von Stunden merklich bewegen können. Gelegentlich reisen sie hinter Jupiter oder in seinen Schatten und
verschwinden dann wieder eine Zeit lang. Sie überqueren den Jupiter und Sie könnten vielleicht den Schatten der Monde beim
Überqueren sehen. Es gibt einige nützliche Apps für Smartphones, die Ihnen bei der Voraussage helfen, wann der Große Rote
Fleck gesehen werden kann, sowie wenn irgendwelche interessanten Ereignisse, die mit Jupiters Monden auftreten.
• Saturn- Die Ringe! Der Saturn ist wohl eines der schönsten Objekte, das mit einem Teleskop beobachtet werden kann. Wenn die
Bedingungen stabil genug sind, können Sie sogar den Schatten der Ringe auf dem Planeten und den Schatten des Planeten auf
den Ringen erkennen. Es sollte möglich sein, den Titan zu sehen, der hellste, größte Mond des Saturn.
DEEP-SKY-OBJEKTE
Deep-Sky-Objekte (extrasolare Objekte) sind all die Objekte außerhalb der Grenzen unseres Sonnensystems. Dazu gehören
Sternhaufen, Planetennebel, diffuse Nebel, Doppelsterne und andere Galaxien außerhalb unserer eigenen Milchstraße. Objekte
wie Nebel und Galaxien können ziemlich groß sein, aber sie sind nur als schwache Objekte zu erkennen. Um die beste Sicht zu
bekommen, müssen Sie sicherstellen, dass Sie in den dunkelsten Himmel wie möglich blicken. Je weiter weg Sie von den Lichtern
der Stadt sind, desto besser werden Sie diese Objekte im Okular sehen. In den Fotografien von Nebeln und Galaxien können Sie
lebhafte Rot- und Blautöne sehen. Mit dem Okular sind diese Farben nicht sichtbar. Die farbigen Bilder sind mit Langzeitbelichtung
von über 15-60 Minuten aufgenommen, da das Auge nur Daten des Augenblicks erfasst. Digitale Sensoren sind viel empfindlicher im
Rot und Blau Bereich, während das menschliche Auge im grünen Teil des Spektrums am empfindlichsten ist. Trotzdem können Sie
den sanften Glanz der Andromeda-Galaxie und die Ausdehnung des Orionnebels sehen.
WITTERUNGSBEDINGUNGEN
Witterungsbedingungen können die Leistungsfähigkeit Ihres Teleskops auf dreierlei Weise erheblich beeinträchtigen.
• Beständige Atmosphäre- An windigen Tagen werden Bilder des Mondes und der Planeten im Okular flattern oder hopsen,
als ob Sie sie durch bewegtes Wasser betrachten. In windstillen Nächten die besten Vergrößerungsansichten der Planeten und
des Mondes zu sehen. Die beste Möglichkeit, die Stabilität der Atmosphäre zu beurteilen, ist, helle Sterne mit bloßem Auge zu
betrachten. Wenn sie "blinken" oder die Farben sich schnell ändern, ist die Luft instabil und Sie sind mit niedrigeren Energien
besser dran und suchen nach tiefer liegenden Himmelobjekten. Wenn die Sterne scharf sind und nicht funkeln, ist die Luft stabil
und sollte großartige Planetenansichten mit höher Vergrößerung bieten.
• Transparenz- Wie klar ist die Luft durch die Sie schauen? Wenn die Luft einen hohe Feuchtigkeitsgehalt hat, kann das schwache
Licht der Galaxien und Nebeln verstreut und diffus sein, bevor es Ihr Teleskop erreicht, was zu einem Helligkeitsverlust in Ihrem
Bild führt. Verunreinigungen in der Luft von lokalen Waldbränden oder sogar weit entfernten Vulkanausbrüchen könne zu einem
großen Verlust von Helligkeit beitragen. Manchmal können diese Feuchtigkeit oder Verunreinigungen helfen, die Luft zu
stabilisieren, sodass es gute Planeten-und Mondbilder gibt, aber der Verlust von Licht macht es schwierig, schwächere
Deep-Sky-Objekte zu sehen.
• Helligkeit des Himmels- Das Umgebungslicht in der Atmosphäre kann sich auch auf die Deep-Sky-Beobachtung auswirken.
Die Dunkelheit des Himmels kann von Ihrem lokalen Umfeld abhängen. In der Mitte einer Stadt kann das Himmelsglühen, das
durch die Stadtlichter verursacht wird und vom Himmel zur Erde reflektiert wird, das schwache Licht von den entfernten Galaxien
überstrahlen. Weit weg von den hellen Lichtern einer großen Stadt kann den Unterschied machen, zwischen dem Sehen eines
schwachen Deep-Sky-Objekt oder gar nichts sehen. Die Planeten und der Mond sind selbst hell genug. deshalb hat es auf deren
Beobachtung minimale Auswirkungen.
DEUTSCH I 27

EINEN BEOBACHTUNGSPLATZ AUSSUCHEN
Wenn Sie Deep-Sky-Objekte beobachten möchten wie Galaxien und planetarische Nebel, sollten Sie in Betracht ziehen, sie von
einem Standort mit dunklem Himmel zu beobachten. Dies sollte weit weg von den Lichtern der Stadt, mit relativ ungehindertem
Blick auf den Horizont und nicht in Windrichtung von jeglichen Luftverschmutzungsquellen. Gehen Sie immer große Höhen, so
hoch wie möglich, da dies die Auswirkungen atmosphärischen Instabilität senken kann und Sie können sichergehen, dass
Sie über jedem Bodennebel sind. Es ist wohl wünschenswert das Teleobjektiv zu einer Stelle mit dunklem Himmel zu nehmen,
doch das ist nicht immer notwendig. Wenn Sie planen Planeten, den Mond oder sogar einige der helleren Deep-Sky-Objekte zu
beobachten, können Sie dies von jedem Standort wie Ihren eigenen Hinterhof tun. Versuchen Sie sich an einem Ort einzurichten,
der abseits der Straßenlaternen oder Hausbeleuchtungen sind, um Ihre gute Sicht bei Nacht zu sichern. Vermeiden Sie etwas
zu beobachten, das innerhalb von 5 bis 10 Grad über dem Dach eines Gebäudes liegt. Dächer absorbieren während des Tages
Wärme und strahlen diese Wärme in der Nacht ab. Dies könnte dazu führen, dass eine Schicht turbulenter Luft direkt über dem
Gebäude Ihr Bild verschlechtern kann. Es ist am besten, wenn Sie Ihr Teleskop direkt auf Erdboden oder grasbewachsener
Fläche aufstellen. Eine erhöhte Plattform wie ein Holzdeck oder eine harte Oberfläche wie Beton oder Bürgersteig sollte
vermieden werden, da sie Vibrationen leicht übertragen, die wiederum auf das Teleskop übertragen werden können.
Die Beobachtung durch ein Fenster ist nicht empfehlenswert, da die Fensterscheibe die Bilder erheblich verzerren wird. Und ein
offenes Fenster kann noch schlimmer sein, denn wärmere Innenluft wird aus dem Fenster entweichen und verursacht Turbulenzen,
die auch die Bilder beeinflussen. Astronomie ist eine Outdoor-Aktivität.
DIE BESTE ZEIT ZUM BEOBACHTEN WÄHLEN
Es ist nicht ideal direkt nach Sonnenuntergang den Himmel beobachten. Nachdem die Sonne untergegangen ist, ist die Erde
noch am Abkühlen und verursacht Turbulenzen in der Luft. So wie die Nacht vergeht, wird nicht nur die Sicht besser, auch die
Luftverschmutzung und Bodenlichter werden abnehmen. Die beste Beobachtungszeit ist oft in den frühen Morgenstunden vor der
Morgendämmerung. Objekte werden am besten beobachtet, wenn sie den Meridian kreuzen, die imaginäre Linie, die von Norden
nach Süden durch einen Punkt direkt über Ihrem Kopf verläuft. Dies ist der Punkt. an dem die Objekte ihre maximale Höhe im Zenit
erreichen und Sie, wenn Sie durch Ihr Teleskop schauen am wenigsten Atmosphäre haben. Objekte, die in der Nähe des Horizonts
steigen oder sinken, sind mehr atmosphärische Turbulenzen ausgesetzt, da Sie durch eine viel längere Luftsäule schauen. Es ist
nicht immer notwendig, wolkenfreien Himmel zu haben, wenn man auf Planeten oder den Mond schaut. Oft bieten aufgebrochene
Wolkenverhältnisse ausgezeichnetes Sicht.
AUSKÜHLEN DES TELESKOPS
Teleskope brauchen mindestens 10 Minuten, um auf die Außenlufttemperatur abzukühlen. Dies kann länger dauern, wenn ein
großer Unterschied zwischen der Temperatur des Teleskops und der Außenluft gibt. Dies minimiert die Hitzewellenverzerrung im
Teleskoptubus (Röhrenströme).
AUGEN ANPASSEN
Wenn Sie planen, tiefe Deep Sky-Objekte an einem dunklen Himmel zu beobachten, ist es am besten, wenn Sie Ihren Augen
erlauben, sich vollständig an die Dunkelheit anzupassen, indem Sie die Beleuchtung mit weißen Lichtquellen wie Taschenlampen,
Autoscheinwerfern, Straßenlaternen usw. vermeiden. Ihre Pupillen brauchen ungefähr 30 Minuten, um sich zu ihrem maximalen
Durchmesser zu erweitern und um die optischen Pigmente aufzubauen, um das schwache Licht von einem entfernten Ziel sehen zu
können. Wenn Sie Licht brauchen, um Ihr Teleskop in der Dunkelheit aufzubauen, versuchen Sie es mit einer roten LED-Taschenlampe
bei so niedriger Helligkeit wie möglich und vermeiden Sie direkt in die Lichtquelle zu schauen. So haben Sie die größte Chance diese
schwach leuchtenden Deep-Sky-Objekte zu erfassen.
Beim Beobachten ist es wichtig, dass Sie beide Augen geöffnet haben. Dies vermeidet Augenermüdung am Okular. Wenn Sie finden,
dass dies zu sehr ablenkt, bedecken Sie Ihr unbenutztes Auge mit der Hand oder mit einer Augenklappe. Die Pupillen arbeiten
gut bei hellem Tageslicht, aber ist der am wenigsten empfindliche Teil des Auges, wenn man versucht feine Details bei schlechten
Lichtverhältnissen zu sehen. Wenn Sie durch das Okular ein schwach leuchtendes Objekt sehen möchten, dann schauen Sie nicht
direkt darauf. Stattdessen Schauen Sie auf den Rand des Gesichtsfeldes und das Objekt wird heller erscheinen.
28 I DEUTSCH

ASTROBILD
Eine der ersten Fragen, die die meisten Menschen über ihr neues Teleskop stellen, ist: "Wie kann ich Bilder aufnehmen?" Mit Ihrem
Teleskop können Sie Aufnahmen von Mond und Planeten machen, aber für Aufnahmen von Deep-Sky-Objekten benötigen Sie ein
fortschrittlicheres Teleskop und eine Montierung mit fein verzahnter motorischer Nachführung. Es gibt verschiedene Möglichkeiten,
Ihr Teleskop für die Bildgebung zu verwenden:
• Smartphones oder Kompaktkameras- Dies ist die einfachste und geradlinigste Methode und funktioniert gut für Aufnahmen
von Mond und Planeten. Halten Sie einfach Ihre Kamera an das Okular und machen eine Aufnahme. Dazu können Sie jedes Okular
verwenden, im allgemeinen ist es jedoch einfacher mit einem Okular mit einer längeren Brennweite eine Aufnahme zu machen. Sie
benötigen eine ruhige Hand, um das Telefon an das Okular zu halten, Sie können jedoch gute Resultate erhalten.
• DSLR- Celestron bietet Adapter, mit denen Sie am Teleskop an Stelle des Okulars eine Canon oder Nikon DSLR befestigen
können. In dem Fall würden Sie Ihr Teleskop als Teleobjektiv verwenden. Dazu benötigen Sie einen T-Adapter für das Teleskop
und einen T-Ring für das Kameragehäuse. Weitere Informationen über die Adapter für Ihr spezifisches Teleskopmodell finden Sie
unter www.celestron.com.
• CMOS Planetenaufnahmen- Dies sind spezialisierte Kameras, die das Okular in Ihrem Teleskop ersetzen. Sie könnten es mit
dem Laptop über den USB-Anschluss verbinden. Die Kamera zeichnet Videos des Planeten auf, dann bricht die mitgelieferte
Software die Videodatei in einzelne Einzelbilder auf. Die Software kombiniert dann die einzelnen Frames zu einem einzigen
Bild, das mehr Details enthält, als in jedem einzelnen Frame sichtbar war. Diese Methode kreiert Ihnen bestmögliche
Mond- und Planetenbilder, aber erfordert, dass Sie ein Laptop haben. Weitere Information über die Planetenkamera finden
Sie unter www.celestron.com.
AUSRÜSTUNG FÜR DEEP-SKY BEOBACHTUNG
Es gibt einige Werkzeuge, die unentbehrlich für die Identifizierung und Lokalisierung von Deep-Sky-Objekten sind.
• Rote Taschenlampe- Dies ist ein wichtiges Werkzeug für die Deep-Sky-Astronomie für das Lesen von Sternkarten oder
Sternatlanten. Um das schwache Licht, das von fernen Objekten wie Nebel oder Galaxien kommt, zu sehen, müssen Ihre Augen
vollkommen dunkel sein, wobei Ihre Iris so weit geöffnet sind, dass sie am Lichtempfindlichsten sind. Beim weißen Licht einer
normalen Taschenlampe schließen sich die Pupillen und es braucht wieder eine halbe Stunde, bis die Augen wieder die volle
Lichtempfindlichkeit erreicht haben. Rote Lichter haben nicht die gleiche Wirkung. Wir empfehlen eine rote LED-Taschenlampe,
die einstellbare Helligkeit hat, denn auch übermäßig helle rotes Licht kann Ihre Nachtsicht beeinträchtigen. Sie finden diese beim
Teleskop Einzelhändler, aber auch bei Camping- und Baumärkten.
• Planisphäre- Eine Planisphäre ist eine spezielle kreisförmige Sternkarte, die Ihnen die grobe Platzierung der Konstellationen
über dem Kopf zeigt, sodass Sie über den Himmel navigieren können. Im Gegensatz zu Diagrammen, die im Internet herunterladen
und drucken können, sind Planisphären gut für jede Zeit des Jahres, nicht nur für das Datum oder den Monat, in dem es gedruckt
wurde. Die Planisphäre, eine drehbare Sternkarte, besteht aus zwei runden Scheiben, die in der Mitte verbunden. Die untere
Scheibe ist eine Karte mit Konstellationen, während die obere Scheibe ein ausgeschnittenes Fenster hat, das einen Teil der
Sternkarte zeigt. Drehen Sie die obere und untere Scheibe, bis Sie Ihr bestimmtes Datum und Uhrzeit haben, die Karte wird nur die
Konstellationen anzeigen, die zu dieser Zeit sichtbar sind. Dies ist praktisch, um die hellen Sterne und Konstellationen zu finden.
Planisphären sind in Buchhandlungen erhältlich und stehen für eine Reihe von geografischen Breiten in den nördlichen oder
südlichen Hemisphären zur Verfügung. Überzeugen Sie sich, dass Sie eine heraussuchen, die für Ihren Standort geeignet ist. Um
darüber detailliertere Informationen zu erhalten, wo sich Deep-Sky-Objekte innerhalb von Konstellationen befinden, benötigen Sie
einen Sternatlas.
• Sternatlas- Sternatlanten sind die Straßenkarten des Himmels. Sobald Sie eine Konstellation mit Ihrer Planisphäre gefunden
haben, zeigt Ihnen der Sternatlas eine detaillierte, genaue Ansicht dieser Region des Himmels mit den Sternen und Deep-Sky-Objekten,
die sich dort befinden. Diese sind bei Teleskop-Einzelhändlern oder Buchhandlungen erhältlich.
• Apps und Programme- Es gibt viele Anwendungen für Smartphones oder Tablets, die Sie anstelle der Planisphäre und Sternkarten
nehmen können. Diese geben digitale Darstellungen des Nachthimmels auf Ihrem Gerät wieder, sodass Sie einen Blick auf eine
vergrößerte Ansicht mit einem Tippen auf den Bildschirm sehen. Sie können diese von Ihrem App-Anbieter herunterladen oder kaufen,
abhängig von der Plattform. Es gibt auch für Ihren Computer einige großartige astronomische Himmelssimulationsprogramme, die
Ihnen sehr ausführliche Sternkarten auf dem Monitor zeigen und Ihnen dabei helfen kann, eine Beobachtungssitzung zu planen, bevor
Sie nach draußen gehen, mit besonders angefertigten Sternkarten für Ihr Datum, Position und Uhrzeit.
DEUTSCH I 29

STARHOPPING
Die einfachste Weise, Himmelsobjekte aufzufinden, ist eine Technik, die Sternhüpfen genannt wird. Das erste, was Sie tun müssen,
ist das Gesichtsfeld Ihres Sucherfernrohrs zu messen. Schauen Sie in den Himmel und suchen eine Konstellation mit hellen Sternen.
Sie können Ihre Planisphäre oder Astronomieapp verwenden, um sie zu identifizieren. Dann suchen Sie die Karte dieser Konstellation
in Ihrem Sternatlas. Zentrieren Sie Ihr Sucher auf den hellen Stern, den Sie auf der Sternkarte erkennen können. Halten Sie den Kopf
12 Zoll hinter das reflektierende Fenster Ihres StarPointer-Sucherfernrohrs und verschieben Sie das Teleskop, sodass der helle Stern
am Rand des Feldes ist, wenn Sie auf dieses Fenster schauen (es spielt keine Rolle, welche Richtung Sie auswählen). Schauen Sie
durch das Sucherfernrohrfenster, ohne das Teleskop zu bewegen und suchen einen anderen Stern im Bereich des gegenüberliegenden
Randes des Gesichtsfeldes. Lokalisieren Sie den zweiten Stern auf der Karte. Messen Sie mit einem Lineal den Abstand zwischen diesen
beiden Sternen auf der Karte. Dieser Abstand auf Ihrem Atlas repräsentiert ein Gesichtsfeld des Sucherfernrohrs. Sie können jetzt diese
Messung dazu verwenden, um himmlische Objekte zu lokalisieren.
PFLEGE UND REINIGUNG DES TELESKOPS
Ihr Teleskop erfordert wenig Pflege, aber einige Punkte sollten Sie dennoch beachten, um sicherzugehen, dass Ihr Teleskop optimale
Leistung bringt. Gelegentlich kann sich Staub und/oder Feuchtigkeit auf dem Objektiv ansammeln. Wie bei jedem anderen Instrument ist
die Reinigung mit besonderer Vorsicht durchzuführen, damit die Optik nicht beschädigt wird.
Wenn sich Staub auf der Optik aufgebaut hat, gehen Sie folgendermaßen vor, um Ihr Sucherfernrohr zu reinigen:
1. Verwenden Sie eine Kamelhaarbürste, um die gröberen Partikel vorsichtig zu entfernen.
2. Nehmen Sie einen Saugball für Fotografen, um lose Partikel wegzublasen. Sie können auch ein Druckluftspray nehmen, wie sie zur
Reinigung von Computertastaturen verwendet wird, aber Sie müssen dabei vorsichtig sein. Vermeiden Sie Dosen, die fast leer sind
und achten Sie darauf, dass Sie das Druckluftspray vertikal halten. Andernfalls könnte Treibmittel auf die Optik sprühen. Halten Sie die
optische Fläche ca. 2 bis 4 Sekunden schräg zum Druckluftspray.
3. Verwenden Sie eine frei erhältliche optische Reinigungslösung Isopropylalkohol und destilliertes Wasser in einer 50/50 Mischung.
Geben Sie diese Lösung auf ein Papiertaschentuch ohne Duft, dann reinigen Sie damit die Optik. Mit geringem Druck von der
Mitte der Linse (oder Spiegel) nach außen, immer in geraden Linien in einem Zug, wie Speichen in einem Rad. NICHT mit einer
Kreisbewegung reiben!
Während einer Beobachtungsperiode könnte sich Tau auf der Optik Ihres Teleskops bilden. Wenn Sie weiter beobachten möchten, muss
der Tau entfernt werden, entweder mit einem Fön (bei niedriger Einstellung) oder indem das Teleskop auf den Boden gerichtet wird, bis
der Tau verdunstet ist. Wenn im Innern der Optik Feuchtigkeit kondensiert, nehmen Sie die Zubehörteile vom Teleskop ab. Bringen Sie
das Teleskop in eine staubfreie Umgebung und richten Sie es auf den Boden, bis die Feuchtigkeit verdunstet ist.
Setzen Sie nach Gebrauch alle Objektivabdeckungen wieder auf, um den Reinigungsbedarf Ihres Teleskops möglichst niedrig zu halten.
Da die Teleskoptuben nicht abgedichtet sind, sollten alle Abdeckungen bei Nichtgebrauch auf die Öffnungen aufgesetzt werden. Auf
diese Weise wird verhindert, dass Verunreinigungen in den optischen Tubus eindringen. Interne Einstellungen und Reinigungen dürfen
nur durch die Reparaturabteilung von Celestron ausgeführt werden. Wenn Ihr Teleskop eine interne Reinigung benötigt, wenden Sie sich
telefonisch an das Werk, um sich eine Rücksendegenehmigungsnummer und ein Preisangebot geben zu lassen.
KOLLIMATION EINES NEWTON TELESKOPS
Während Ihr Teleskop wenig Wartung erfordert, gibt es einiges, was dennoch zu beachten ist, das sicherstellt, dass Ihr Teleskopdie
Kollimation durchführt, es ist ein Prozess zur Ausrichtung der Spiegel Ihres Teleskops, sodass sie in Übereinstimmung miteinander ar-
beiten, um richtig fokussiertes Licht auf Ihr Okular zu liefern. Beim Beobachten von unscharfen Sternbildern können Sie testen, ob Ihre
Teleskopoptik ausgerichtet ist. Nehmen Sie einen Stern in die Mitte des Gesichtsfeldes und bewegen den Okularauszug, sodass das
Bild leicht aus dem Fokus ist. Wenn die Beobachtungsbedingungen gut sind, sehen Sie einen zentralen Lichtkreis (die Airy Scheibe),
die durch eine Reihe von Beugungsringen umgeben ist. Liegen die Beugungsringe symmetrisch um die Airy Scheibe, ist die Teleskop
Optik korrekt kollimiert.
Richtig ausgerichtet Muss kollimiert werden
30 I DEUTSCH

Kollimation ist ein schmerzloser Prozess und funktioniert wie folgt:
Ziehen Sie den Objektivdeckel ab, der die Vorderseite des
Teleskops bedeckt und schauen Sie in den optischen Tubus.
An der Unterseite sehen Sie den Hauptspiegel, der durch drei
Klemmen 120 º auseinandergehalten wird, und an der Obersei-
te der kleine ovale Fangspiegel in seiner Halterung und um 45 º
in Richtung das Okularauszugs außerhalb der Tubuswand.
Der Fangspiegel wird durch Einstellen der drei kleineren
Schrauben, die die zentrale Stellschraube umgeben, ausgerichtet.
Der Hauptspiegel wird durch die drei Einstellschrauben an der
Rückseite Ihres Teleskops eingestellt. Die drei Fixierschrauben
daneben dienen dazu, den Spiegel nach der Kollimation an Ort
und Stelle zu halten.
Hauptspiegel Fangspiegel
Unterstützung
für Fangspiegel
Okularauszug
AUSRICHTUNG DES FANGSPIEGELS
Richten Sie Ihre Teleskop ohne Okular gegen eine beleuchtete Wand. Möglicherweise müssen Sie den Fokusdrehknopf etwas drehen,
bis das reflektierte Bild des Okularauszugs aus Ihrer Sicht heraus ist. Halten Sie Ihr Auge an die Rückseite und auf die Fokusröhre
zentriert. Achten Sie auf die drei Klemmen die den Hauptspiegel halten. Wenn Sie sie nicht sehen können, bedeutet dies, dass Sie die
drei Schrauben auf der Oberseite des sekundären Spiegelhalters eventuell mit einem Inbusschlüssel oder Kreuzschlitzschraubendreher
nachziehen müssen. Sie müssen abwechselnd eine lösen und dann den Durchhang durch Anziehen der beiden anderen kompensieren.
Hören Sie auf, wenn Sie alle drei Spiegelclips sehen. Vergewissern Sie sich, dass alle drei kleinen Ausrichtungsschrauben angezogen
sind, um den sekundären Spiegel zu befestigen.
Hauptspiegelklemme
Ignorieren Sie das reflektierte
Bild im Augenblick
Hauptspiegelklemme
Hauptspiegelklemme
Hauptspiegelklemme
Fangspiegel
Hauptspiegel
Stoppen und Ihre Hand hier
liegen lassen
Wenn Sie in den Okularauszug
blicken, sind beide Spiegel
ausgerichtet.
AUSRICHTUNG DES HAUPTSPIEGELS
Es gibt 3 große Schrauben und 3 kleine Schrauben an der Rückseite Ihres Teleskops. Die großen Schrauben sind die Einstellschrauben
und die kleinen Schrauben sind die Fixierschrauben. Lösen Sie mit ein paar Umdrehungen die Einstellschrauben. Während Sie in den
Okularauszug blicken, bewegen Sie Ihre Hand vor dem Telekop, Sie können dabei die reflektierte Bild Ihrer Hand sehen. Die Idee dabei
ist zu sehen, inwiefern der Hauptspiegel defekt ist, Sie tun dies, indem Sie an dem Punkt anhalten, an dem das reflektierte Bild des
Fangspiegels am nächsten am Rand des Hauptspiegels liegt.
Wenn Sie an diesen Punkt kommen, hören Sie auf und lassen Sie Ihre Hand dort liegen. Sehen Sie am hinteren Ende Ihres Teleskops eine
Einstellschraube? Wenn ja, da möchten Sie sie sich er lösen (dann drehen Sie die Schraube nach links), um den Spiegel von diesem Punkt
weg zu drehen. Wenn sich dort keine Einstellschraube befindet, gehen Sie zur anderen Seite und ziehen dort die Einstellschraube an. Dies
wird den Spiegel allmählich ausrichten. (Es ist hilfreich, einen Freund zu haben, der bei der Hauptspiegelkollimation beisteht. Lassen Sie
Ihren Partner die Einstellschrauben entsprechend Ihren Richtungsanweisungen einstellen, während Sie in den Okularauszug schauen).
Am Abend richten Sie dann Ihr Teleskop auf den Polarstern (Polaris). Mit einem Okular im Okularauszug stellen Sie den Stern unscharf
ein. Sie sehen dieses Bild nur jetzt, es wird vom Sternenlicht beleuchtet sein. Falls nötig, wiederholen Sie den Kollimationsvorgang, Sie
müssen nur den Stern im Okular zentrieren, während Sie den Spiegel einstellen.
DEUTSCH I 31

ZWEIJÄHRIGE EINGESCHRÄNKTE GARANTIE VON CELESTRON
A. Celestron garantiert, dass Ihr Teleskop für zwei Jahre frei von Material- und Verarbeitungsfehlern ist. Celestron wird ein solches Produkt
oder Teile davon, wenn nach Inspektion durch Celestron ein Defekt an Material oder Verarbeitung gefunden wurde, reparieren oder
austauschen. Die Verpflichtung von Celestron, ein solches Produkt zu reparieren oder auszutauschen, unterliegt der Bedingungen,
dass das Produkt zusammen mit einem für Celestron zufriedenstellenden Kaufbeleg an Celestron zurückgesendet wird.
B. Die korrekte Rücksende-Autorisationsnummer muss zuvor von Celestron angefordert werden. Rufen Sie Celestron unter (310) 328-9560
an, um die Nummer, die auf der Außenseite Ihres Versandcontainers aufgebracht ist, zu erhalten.
Alle Rücksendungen müssen eine schriftliche Erklärung enthalten, aus der der Name, die Adresse und die Telefonnummer des Eigentümers,
zu der er tagsüber erreichbar ist, zusammen mit einer kurzen Beschreibung aller beanstandeten Defekte, hervorgeht. Ausgetauschte Teile
oder Produkte werden Eigentum von Celestron.
Der Kunde ist für alle Kosten für Versand und Versicherung zu und vom Celestron-Werk verantwortlich und muss diese Kosten im
Voraus begleichen.
Celestron muss vernünftige Maßnahmen ergreifen, um jedes Teleskop unter dieser Garantie innerhalb von 30 Tagen nach Erhalt zu
reparieren oder auszutauschen. Für den Fall, dass Reparatur oder Austausch mehr als dreißig Tage in Anspruch nimmt, muss Celestron
den Kunden entsprechen in Kenntnis setzen. Celestron behält sich das Recht vor, ein Produkt, das aus der Produktlinie ausgeschieden
ist, durch ein neues oder in Wert und Funktion vergleichbares Produkt zu ersetzen.
Diese Garantie erlischt und wird außer Kraft gesetzt, für den Fall, dass ein Produkt unter der Garantie in Design oder Funktion
modifiziert wurde oder Missbrauch, unsachgemäße Handhabung oder unautorisierter Reparatur unterzogen wurde. Des Weiteren sind
Produktfehlfunktionen oder Wertminderung aufgrund von normalem Verschleiß von dieser Garantie nicht abgedeckt.
CELESTRON LEHNT JEGLICHE GEWÄHRLEISTUNG, OB AUSDRÜCKLICH ODER STILLSCHWEIGEND, OB DER MARKTGÄNGIGKEIT ODER DER EIGNUNG FÜR EINEN BESTIMMTEN ZWECK, AUSSER
DEM HIERIN GENANNTEN, AB. DIE ALLEINIGE VERPFLICHTUNG VON CELESTRON UNTER DIESER EINGESCHRÄNKTEN GARANTIE BESTEHT DARIN, DAS DURCH DIE GARANTIE ABGEDECKTE
PRODUKT IN ÜBEREINSTIMMUNG MIT DEN HIERIN FESTGEHALTENEN BEDINGUNGEN ZU REPARIEREN ODER AUSZUTAUSCHEN. CELESTRON LEHNT AUSDRÜCKLICH JEGLICHE HAFTUNG FÜR
ENTGANGENE PROFITE, ALLGEMEINE, SPEZIELLE, INDIREKTE ODER FOLGESCHÄDEN AB, DIE SICH AUS EINER GARANTIEVERLETZUNG ERGEBEN KÖNNTEN ODER DIE DURCH NUTZUNG BZW.
UNFÄHIGKEIT ZUR NUTZUNG JEGLICHEN CELESTRON-PRODUKTS ERGEBEN. JEGLICHE STILLSCHWEIGENDE ODER NICHT BEANSPRUCHBARE GEWÄHRLEISTUNGEN IST ZEITLICH AUF ZWEI
JAHRE AB DATUM DES URSPRÜNGLICHEN KAUFS BESCHRÄNKT.
Einige Staaten erlauben keinen Ausschluss oder keine Beschränkung von zufälligen oder Folgeschäden sowie keine zeitliche Begrenzung
einer stillschweigenden Garantie; daher könnten die oben genannten Beschränkungen und Ausschlüsse auf Sie nicht zutreffen.
Diese Garantie gibt Ihnen bestimmte Rechte und darüber hinaus könnten Sie auch weitere Rechte haben, die von Land zu Land variieren.
Celestron behält sich das Recht vor, jegliches Modell und jeglichen Teleskoptyp zu modifizieren oder aus der Produktlinie auszuschließen,
ohne Ihnen dies vorher anzukündigen.
Wenn ein Garantiefall eintritt oder wenn Sie Hilfestellung bei der Verwendung Ihres Teleskops benötigen, wenden Sie sich bitte an:
Celestron - 800.421.9649
HINWEIS: Diese Garantie gilt für Kunden aus U.S.A. und Kanada, die dieses Produkt von einem autorisierten Celestron-Händler in den USA oder Kanada gekauft haben. Eine Garantie
außerhalb der USA und Kanada gilt nur für Kunden, die bei einem internationalen Celestron-Vertrieb oder einem autorisierten Celestron-Händler im jeweiligen Land eingekauft
haben. Bitte wenden Sie sich für jeden Garantieservice an diese Ansprechpartner.
FCC-ERKLÄRUNG: Dieses Gerät entspricht Artikel 15 der FCC-Bestimmungen. Für den Betrieb gelten folgende Bedingungen:
(1) Dieses Gerät darf keine störenden Interferenzen verursachen, und (2) dieses Gerät muss jegliche empfangene Interferenz tolerieren,
einschließlich solcher, die zu einem unerwünschten Betrieb führen.
Das Produktdesign und technische Daten können ohne Vorankündigung geändert werden.
Dieses Produkt wurde für die Verwendung durch Personen von 14 Jahren und darüber
entworfen und vorgesehen.
© 2017 Celestron • Alle Rechte vorbehalten.
www.celestron.com
2835 Columbia Street • Torrance, CA 90503 U.S.A.
Telefon: 800.421.9649
05-17
In China gedruckt

ESPAÑOL
Manual de Instrucciones
MODELOS #22050, 22051, 31150 (60LCM, 80LCM, 114LCM)
SERIE DE TELESCOPIO

2 I ESPAÑOL

ÍNDICE
AVISO SOLAR . . . . . . . . . . . . . . . . . . . . . . . . . . . . . . . . . . . . . . . . . . . . . . . . 6
CONTENIDO DE LA CAJA. . . . . . . . . . . . . . . . . . . . . . . . . . . . . . . . . . . . . . . . . . . . . . . . . . . . . . . .7
MONTAJE DEL TELESCOPIO. . . . . . . . . . . . . . . . . . . . . . . . . . . . . . . . . . . . . . . . . . . . . . . . . . . . . .8
Trípode . . . . . . . . . . . . . . . . . . . . . . . . . . . . . . . . . . . . . . . . . . . . . . . . . . . . . . . . . . . . . . . . . . . . .8
Soporte informatizado . . . . . . . . . . . . . . . . . . . . . . . . . . . . . . . . . . . . . . . . . . . . . . . . . . . . . . . . . . . . .8
Tubo del telescopio . . . . . . . . . . . . . . . . . . . . . . . . . . . . . . . . . . . . . . . . . . . . . . . . . . . . . . . . . . . . . . 9
Diagonal estelar (solo telescopios refractores). . . . . . . . . . . . . . . . . . . . . . . . . . . . . . . . . . . . . . . . . . . . . . . .9
Ocular . . . . . . . . . . . . . . . . . . . . . . . . . . . . . . . . . . . . . . . . . . . . . . . . . . . . . . . . . . . . . . . . . . . . . 10
Localizador StarPointer . . . . . . . . . . . . . . . . . . . . . . . . . . . . . . . . . . . . . . . . . . . . . . . . . . . . . . . . . . . . 10
Cambiar la batería del localizador. . . . . . . . . . . . . . . . . . . . . . . . . . . . . . . . . . . . . . . . . . . . . . . . . . . . . . .11
Mando manual . . . . . . . . . . . . . . . . . . . . . . . . . . . . . . . . . . . . . . . . . . . . . . . . . . . . . . . . . . . . . . . . .11
Alimentación del telescopio . . . . . . . . . . . . . . . . . . . . . . . . . . . . . . . . . . . . . . . . . . . . . . . . . . . . . . . . . .11
Mover el telescopio . . . . . . . . . . . . . . . . . . . . . . . . . . . . . . . . . . . . . . . . . . . . . . . . . . . . . . . . . . . . . . 12
Alinear el localizador. . . . . . . . . . . . . . . . . . . . . . . . . . . . . . . . . . . . . . . . . . . . . . . . . . . . . . . . . . . . . .12
USO DEL TELESCOPIO. . . . . . . . . . . . . . . . . . . . . . . . . . . . . . . . . . . . . . . . . . . . . . . . . . . . . . . . .13
Mando manual . . . . . . . . . . . . . . . . . . . . . . . . . . . . . . . . . . . . . . . . . . . . . . . . . . . . . . . . . . . . . . . . .13
Uso del mando manual . . . . . . . . . . . . . . . . . . . . . . . . . . . . . . . . . . . . . . . . . . . . . . . . . . . . . . . . . . . . 14
Menú de alineación . . . . . . . . . . . . . . . . . . . . . . . . . . . . . . . . . . . . . . . . . . . . . . . . . . . . . . . . . . . . .14
SkyAlign. . . . . . . . . . . . . . . . . . . . . . . . . . . . . . . . . . . . . . . . . . . . . . . . . . . . . . . . . . . . . . . . . . .14
Alineación automática con dos estrellas. . . . . . . . . . . . . . . . . . . . . . . . . . . . . . . . . . . . . . . . . . . . . . . . . .16
Alineación con dos estrellas . . . . . . . . . . . . . . . . . . . . . . . . . . . . . . . . . . . . . . . . . . . . . . . . . . . . . . . . 16
Alineación con una estrella . . . . . . . . . . . . . . . . . . . . . . . . . . . . . . . . . . . . . . . . . . . . . . . . . . . . . . . . .17
Alineación de sistema solar . . . . . . . . . . . . . . . . . . . . . . . . . . . . . . . . . . . . . . . . . . . . . . . . . . . . . . . . 17
Realineación . . . . . . . . . . . . . . . . . . . . . . . . . . . . . . . . . . . . . . . . . . . . . . . . . . . . . . . . . . . . . . . . 18
Catálogos de objetos . . . . . . . . . . . . . . . . . . . . . . . . . . . . . . . . . . . . . . . . . . . . . . . . . . . . . . . . . . . . . 18
Seleccionar un objeto . . . . . . . . . . . . . . . . . . . . . . . . . . . . . . . . . . . . . . . . . . . . . . . . . . . . . . . . . . . 18
Planetas . . . . . . . . . . . . . . . . . . . . . . . . . . . . . . . . . . . . . . . . . . . . . . . . . . . . . . . . . . . . . . . . . . .18
Estrellas . . . . . . . . . . . . . . . . . . . . . . . . . . . . . . . . . . . . . . . . . . . . . . . . . . . . . . . . . . . . . . . . . . .18
Objetos del espacio profundo . . . . . . . . . . . . . . . . . . . . . . . . . . . . . . . . . . . . . . . . . . . . . . . . . . . . . . . 19
Ver información del objeto . . . . . . . . . . . . . . . . . . . . . . . . . . . . . . . . . . . . . . . . . . . . . . . . . . . . . . . . . 19
Modo Sky Tour . . . . . . . . . . . . . . . . . . . . . . . . . . . . . . . . . . . . . . . . . . . . . . . . . . . . . . . . . . . . . . . 19
Botones de dirección. . . . . . . . . . . . . . . . . . . . . . . . . . . . . . . . . . . . . . . . . . . . . . . . . . . . . . . . . . . .19
Botón de velocidad del motor . . . . . . . . . . . . . . . . . . . . . . . . . . . . . . . . . . . . . . . . . . . . . . . . . . . . . . . 20
MENÚ PRINCIPAL . . . . . . . . . . . . . . . . . . . . . . . . . . . . . . . . . . . . . . . . . . . . . . . . . . . . . . . . . . . .20
Menú de seguimiento . . . . . . . . . . . . . . . . . . . . . . . . . . . . . . . . . . . . . . . . . . . . . . . . . . . . . . . . . . . . . 20
Modo seguimiento . . . . . . . . . . . . . . . . . . . . . . . . . . . . . . . . . . . . . . . . . . . . . . . . . . . . . . . . . . . . . 20
Velocidad de seguimiento . . . . . . . . . . . . . . . . . . . . . . . . . . . . . . . . . . . . . . . . . . . . . . . . . . . . . . . . . 20
Ver hora-lugar . . . . . . . . . . . . . . . . . . . . . . . . . . . . . . . . . . . . . . . . . . . . . . . . . . . . . . . . . . . . . . . . . 21
Menú del mando manual . . . . . . . . . . . . . . . . . . . . . . . . . . . . . . . . . . . . . . . . . . . . . . . . . . . . . . . . . . . 21
Control de luces . . . . . . . . . . . . . . . . . . . . . . . . . . . . . . . . . . . . . . . . . . . . . . . . . . . . . . . . . . . . . . 21
Navegar menú . . . . . . . . . . . . . . . . . . . . . . . . . . . . . . . . . . . . . . . . . . . . . . . . . . . . . . . . . . . . . . . 21
Activar negrita. . . . . . . . . . . . . . . . . . . . . . . . . . . . . . . . . . . . . . . . . . . . . . . . . . . . . . . . . . . . . . . .21
Establecer contraste . . . . . . . . . . . . . . . . . . . . . . . . . . . . . . . . . . . . . . . . . . . . . . . . . . . . . . . . . . . . 21
Establecer idioma. . . . . . . . . . . . . . . . . . . . . . . . . . . . . . . . . . . . . . . . . . . . . . . . . . . . . . . . . . . . . .21
ESPAÑOL I 3

Menú de configuración del telescopio . . . . . . . . . . . . . . . . . . . . . . . . . . . . . . . . . . . . . . . . . . . . . . . . . . . . 21
Configurar hora-lugar . . . . . . . . . . . . . . . . . . . . . . . . . . . . . . . . . . . . . . . . . . . . . . . . . . . . . . . . . . . .21
Anti latigazo . . . . . . . . . . . . . . . . . . . . . . . . . . . . . . . . . . . . . . . . . . . . . . . . . . . . . . . . . . . . . . . . .21
Límites de desplazamiento . . . . . . . . . . . . . . . . . . . . . . . . . . . . . . . . . . . . . . . . . . . . . . . . . . . . . . . . . 22
Límites de filtro . . . . . . . . . . . . . . . . . . . . . . . . . . . . . . . . . . . . . . . . . . . . . . . . . . . . . . . . . . . . . . . 22
Botones de dirección. . . . . . . . . . . . . . . . . . . . . . . . . . . . . . . . . . . . . . . . . . . . . . . . . . . . . . . . . . . .22
Aproximación IrA . . . . . . . . . . . . . . . . . . . . . . . . . . . . . . . . . . . . . . . . . . . . . . . . . . . . . . . . . . . . . . 22
Enrollado de cable . . . . . . . . . . . . . . . . . . . . . . . . . . . . . . . . . . . . . . . . . . . . . . . . . . . . . . . . . . . . . 22
Menú de utilidades . . . . . . . . . . . . . . . . . . . . . . . . . . . . . . . . . . . . . . . . . . . . . . . . . . . . . . . . . . . . . . 22
Activar/desactivar GPS . . . . . . . . . . . . . . . . . . . . . . . . . . . . . . . . . . . . . . . . . . . . . . . . . . . . . . . . . . 22
Configuración de fábrica . . . . . . . . . . . . . . . . . . . . . . . . . . . . . . . . . . . . . . . . . . . . . . . . . . . . . . . . . . 22
Versión . . . . . . . . . . . . . . . . . . . . . . . . . . . . . . . . . . . . . . . . . . . . . . . . . . . . . . . . . . . . . . . . . . . 23
Obtener posición de eje . . . . . . . . . . . . . . . . . . . . . . . . . . . . . . . . . . . . . . . . . . . . . . . . . . . . . . . . . . 23
Posición de eje IrA . . . . . . . . . . . . . . . . . . . . . . . . . . . . . . . . . . . . . . . . . . . . . . . . . . . . . . . . . . . . . 23
Hibernar . . . . . . . . . . . . . . . . . . . . . . . . . . . . . . . . . . . . . . . . . . . . . . . . . . . . . . . . . . . . . . . . . . .23
Menú solar . . . . . . . . . . . . . . . . . . . . . . . . . . . . . . . . . . . . . . . . . . . . . . . . . . . . . . . . . . . . . . . . . 23
Calibrar IrA . . . . . . . . . . . . . . . . . . . . . . . . . . . . . . . . . . . . . . . . . . . . . . . . . . . . . . . . . . . . . . . . . 23
Establecer posición de soporte . . . . . . . . . . . . . . . . . . . . . . . . . . . . . . . . . . . . . . . . . . . . . . . . . . . . . . 23
Objetos definidos por el usuario . . . . . . . . . . . . . . . . . . . . . . . . . . . . . . . . . . . . . . . . . . . . . . . . . . . . . . . 24
Obtener RA-DEC . . . . . . . . . . . . . . . . . . . . . . . . . . . . . . . . . . . . . . . . . . . . . . . . . . . . . . . . . . . . . . . 24
IrA RA-DEC . . . . . . . . . . . . . . . . . . . . . . . . . . . . . . . . . . . . . . . . . . . . . . . . . . . . . . . . . . . . . . . . . . 24
Identificar . . . . . . . . . . . . . . . . . . . . . . . . . . . . . . . . . . . . . . . . . . . . . . . . . . . . . . . . . . . . . . . . . . . 24
ÁRBOL DE MENÚ DE LA GAMA LCM. . . . . . . . . . . . . . . . . . . . . . . . . . . . . . . . . . . . . . . . . . . . . . . . .25
PRIMERA SESIÓN DE OBSERVACIÓN ASTRONÓMICA . . . . . . . . . . . . . . . . . . . . . . . . . . . . . . . . . . . . . 26
La Luna. . . . . . . . . . . . . . . . . . . . . . . . . . . . . . . . . . . . . . . . . . . . . . . . . . . . . . . . . . . . . . . . . . . . .26
RECOMENDACIONES DE OBSERVACIÓN CELESTE . . . . . . . . . . . . . . . . . . . . . . . . . . . . . . . . . . . . . . . 26
Aumento . . . . . . . . . . . . . . . . . . . . . . . . . . . . . . . . . . . . . . . . . . . . . . . . . . . . . . . . . . . . . . . . . . . . 26
Campo de visión. . . . . . . . . . . . . . . . . . . . . . . . . . . . . . . . . . . . . . . . . . . . . . . . . . . . . . . . . . . . . . . .26
Los planetas . . . . . . . . . . . . . . . . . . . . . . . . . . . . . . . . . . . . . . . . . . . . . . . . . . . . . . . . . . . . . . . . . .27
Objetos del espacio profundo . . . . . . . . . . . . . . . . . . . . . . . . . . . . . . . . . . . . . . . . . . . . . . . . . . . . . . . . 27
Condiciones del firmamento . . . . . . . . . . . . . . . . . . . . . . . . . . . . . . . . . . . . . . . . . . . . . . . . . . . . . . . . . 27
Selección de un lugar de observación . . . . . . . . . . . . . . . . . . . . . . . . . . . . . . . . . . . . . . . . . . . . . . . . . . . . 28
Elección del mejor momento para observar . . . . . . . . . . . . . . . . . . . . . . . . . . . . . . . . . . . . . . . . . . . . . . . . . 28
Enfriar el telescopio . . . . . . . . . . . . . . . . . . . . . . . . . . . . . . . . . . . . . . . . . . . . . . . . . . . . . . . . . . . . . . 28
Adaptación de los ojos . . . . . . . . . . . . . . . . . . . . . . . . . . . . . . . . . . . . . . . . . . . . . . . . . . . . . . . . . . . . 28
Astrofotografía . . . . . . . . . . . . . . . . . . . . . . . . . . . . . . . . . . . . . . . . . . . . . . . . . . . . . . . . . . . . . . . . .29
Equipo de observación del espacio profundo . . . . . . . . . . . . . . . . . . . . . . . . . . . . . . . . . . . . . . . . . . . . . . . . 29
Salto estelar . . . . . . . . . . . . . . . . . . . . . . . . . . . . . . . . . . . . . . . . . . . . . . . . . . . . . . . . . . . . . . . . . . 30
CUIDADOS Y LIMPIEZA DEL TELESCOPIO . . . . . . . . . . . . . . . . . . . . . . . . . . . . . . . . . . . . . . . . . . . . .30
COLIMADO DE UN TELESCOPIO NEWTONIANO . . . . . . . . . . . . . . . . . . . . . . . . . . . . . . . . . . . . . . . . . .30
Alineación del espejo secundario. . . . . . . . . . . . . . . . . . . . . . . . . . . . . . . . . . . . . . . . . . . . . . . . . . . . . . .31
Alineación del espejo primario . . . . . . . . . . . . . . . . . . . . . . . . . . . . . . . . . . . . . . . . . . . . . . . . . . . . . . . . 31
GARANTÍA LIMITADA POR DOS AÑOS DE CELESTRON . . . . . . . . . . . . . . . . . . . . . . . . . . . . . . . . . . . . . 32
4 I ESPAÑOL

ESPAÑOL I 5

• No mire nunca directamente al sol con los ojos descubiertos o un telescopio a menos que tenga un filtro solar adecuado. Puede producir
daños oculares permanentes e irreversibles.
• No use nunca su telescopio para proyectar una imagen del Sol sobre ninguna superficie. La acumulación interna de calor puede dañar el
telescopio y cualquier accesorio que tenga instalado.
• No use nunca un filtro solar de ocular ni una cuña Herschel. La acumulación interna de calor en el telescopio puede hacer que los
dispositivos se agrieten o rompan, permitiendo pasar la luz solar sin filtrar hasta el ojo.
• No deje el telescopio sin supervisión, especialmente cuando estén presentes niños o adultos no familiarizados con los procedimientos
operativos correctos del telescopio.
AVISO SOLAR
6 I ESPAÑOL

1. Tubo de telescopio
2. Localizador StarPointer
3. Ocular
4. Diagonal estelar
5. Mando de enfoque
6. Trípode
7. Bandeja de accesorios
8. Abrazadera de pata del trípode
9. Mando de bloqueo de altitud
10. Mando de montaje del telescopio
11. Lente de objetivo
12. Soporte informatizado
13. Interruptor de encendido/apagado
14. Mando manual y soporte del mando manual
Recomendamos guardar la caja de su telescopio para poder usarla para guardarlo cuando no lo use. Desembale cuidadosamente la caja,
algunas piezas son pequeñas. Use la lista de piezas siguiente para comprobar que dispone de todas las piezas y accesorios.
LISTA DE PIEZAS
CONTENIDO DE LA CAJA
1. Tubo de telescopio
2. Mando de montaje del telescopio
3. Mando de bloqueo de altitud
4. Espejo primario
5. Soporte informatizado
6. Trípode
7. Bandeja de accesorios
8. Abrazadera de pata del trípode
9. Localizador StarPointer
10. Ocular
11. Mando de enfoque
12. Interruptor de encendido/apagado
13. Mando manual y soporte del mando manual
(Mostrado el Refractor 80LCM)
(Mostrado el Newtoniano 114LCM)
3
5
6
11
2
4
7
9
10
12
13
14
8
1
3
4
1
13
10
5
6
11
2
9
12
7
8
ESPAÑOL I 7

MONTAJE DEL TELESCOPIO
TRÍPODE
El trípode LCM se entrega totalmente montado, por lo que la
instalación es sencilla. Para instalar el trípode:
1. Saque el trípode de la caja.
2. Afloje las fijaciones de la parte inferior de cada pata girando
la palanca hacia fuera. Extienda la sección interna de la pata
hasta la longitud deseada. Apriete la fijación de la pata girando
la palanca hacia dentro para asegurar las patas.
3. Ponga el trípode de pie y separe las patas del trípode hasta
que la abrazadera central encaje en posición.
4. Coloque la bandeja de accesorios sobre la línea de la
abrazadera central por el agujero del centro. Gire la bandeja
hasta que las pestañas de sus tres puntos encajen en los
soportes de cada brazo de la abrazadera central del trípode.
5. Fije el soporte del mando manual colocando el soporte con la
pestaña cuadrada de plástico orientada hacia arriba y presione
contra la pata del trípode hasta que encaje en posición.
SOPORTE INFORMATIZADO
Para instalar el soporte informatizado en el trípode:
1. Coloque la base motorizada sobre el trípode, asegurándose de
que las tres patas redondas se apoyen sobre las almohadillas
redondas planas del interior del cabezal del trípode.
2. Pase el tornillo de montaje situado bajo el cabezal del trípode
por el agujero en la parte inferior de la base motorizada y
apriételo a mano para asegurar el soporte en posición.
Ahora que la base está fijada al trípode, es buena idea usar el nivel
de burbuja incluido para nivelar con mayor precisión el telescopio:
3. Coloque el nivel de burbuja en la parte superior de la base
motorizada.
4. Ajuste las patas del trípode hasta que el nivel de burbuja
muestre que la base está nivelada.
8 I ESPAÑOL

TUBO DEL TELESCOPIO
DIAGONAL ESTELAR (Solo Telescopios Refractores)
La diagonal de imagen recta se instala en la parte posterior de un
telescopio refractor y contiene un pequeño prisma que refleja la
luz en un ángulo de 90º, ofreciendo una posición de observación
más cómoda. La mayoría de telescopios astronómicos ofrecen
una vista invertida o volteada de izquierda a derecha. La diagonal
de imagen recta corrige la imagen de forma que tenga una
imagen orientada correctamente al 100%, asegurándose de que
el telescopio sea perfecto para la observación terrestre diurna.
Para introducir la diagonal:
1. Saque las tapas de ambos extremos de la diagonal.
2. Afloje los tornillos de la parte posterior del enfoque y saque la
pequeña tapa para el polvo.
3. Introduzca el tubo más pequeño de la diagonal en la parte
posterior del enfoque y asegúrelo apretando los tornillos.
Puede ajustar el ángulo de la diagonal estelar en cualquier
dirección deseada antes de apretar los tornillos.
NOTA: Una diagonal de imagen recta no puede enfocar en un telescopio Newtoniano.
La imagen siempre se verá boca abajo en el ocular de un telescopio Newtoniano.
Para fijar el tubo del telescopio al soporte:
1. Afloje el bloqueo de altitud girando el mando en sentido
contrario a las agujas del reloj. Gire la fijación del soporte
del tubo de forma que el mando de montaje esté colocado
en la parte superior de la base. Vuelva a apretar el mando de
bloqueo de altitud girándolo en sentido de las agujas del reloj
hasta que quede ajustado. No lo apriete en exceso.
2. Afloje el mando de montaje del telescopio girándolo en sentido
contrario a las agujas del reloj.
3. Deslice el soporte machihembrado de la barra de montaje del
tubo del telescopio en la fijación del tubo. Asegúrese de que la
impresión en el tubo del telescopio quede con el lado correcto
hacia arriba cuando se fije a la base.
4. Apriete el mando de montaje del telescopio girándolo en
sentido de las agujas del reloj para asegurar el tubo en la base.
Su telescopio está totalmente montado y listo para instalar
los accesorios.
Mando de
montaje del telescopio
Mando de
bloqueo de altitud
ESPAÑOL I 9

OCULAR
Su telescopio incluye dos oculares. El de 25 mm ofrece un aumento bajo con un campo de visión moderadamente amplio. El de 9 mm
le ofrece un mayor aumento pero un campo de visión más estrecho. Puede obtener oculares adicionales para aumentar o reducir el
aumento al nivel deseado. Cuando localice por primera vez un objeto, es preferible usar el ocular de 25 mm, y cuando el objeto esté
centrado, cambiar al de 9 mm para aumentarlo.
LOCALIZADOR STARPOINTER
Su telescopio incluye un localizador de punto rojo StarPointer
que se utiliza como herramienta de mira al apuntar el telescopio
a un objetivo.
Para instalar el localizador:
1. Afloje los dos tornillos de cabezal Philips en el lateral
del localizador y deslice la abrazadera sobre el soporte
machihembrado cerca del enfoque del telescopio. La apertura
grande del localizador debe estar orientada a la parte anterior
del telescopio.
2. Asegure el localizador en posición en posición apretando los
dos tornillos de cabezal Phillips. No apriete estos tornillos en
exceso, solamente ajuste la conexión.
3. Saque la pequeña pestaña de plástico bajo la tapa de la batería
tirando de ella hacia arriba. Se ha instalado para evitar que se
descargue la batería accidentalmente durante el transporte.
Para instalar el ocular en telescopios refractores 60LCM
y 80LCM:
1. Afloje los tornillos del extremo abierto de la diagonal estelar.
2. Introduzca el cañón plateado del ocular de 25 mm en la
diagonal estelar.
3. A priete los tornillos para asegurar el ocular en posición.
4. Para ver la imagen lo más definida posible, enfoque mirando
por el ocular y girando lentamente los mandos de enfoque
hasta mostrar la imagen lo más definida posible.
Para instalar el ocular en un telescopio Newtoniano 114LCM:
1. Afloje los tornillos del extremo del enfoque y saque la tapa para
el polvo.
2. Introduzca el cañón cromado del ocular de 25 mm directamente
en el enfoque.
3. Apriete los tornillos para asegurar el ocular en posición.
4. Para ver la imagen lo más definida posible, enfoque mirando
por el ocular y girando lentamente los mandos de enfoque
hasta mostrar la imagen lo más definida posible.
Refractor
Newtoniano
Encendido/brillo
Interruptor
Arriba/Abajo
Mando de ajuste
Izquierda/Derecha
Mando de ajuste
Batería
Compartimiento
10 I ESPAÑOL

CAMBIAR LA BATERÍA DEL LOCALIZADOR
Para cambiar la batería del StarPointer, retire el localizador del
telescopio y gírelo. El compartimiento de batería se encuentra
directamente bajo la estructura de lente grande. Usando un
pequeño destornillador o la uña, levante la tapa directamente
hacia arriba para sacarla. La batería se aguanta en posición
con un contacto de muelle. Levante con suavidad el contacto y
gire el localizador de lado. La batería debería salir directamente.
Cambie la batería por una batería de botón de 3 voltios CR2032.
Deslice la nueva batería bajo el contacto, asegurándose de que
el terminal positivo de la batería (el lado marcado con "+") esté
orientado hacia arriba, hacia el contacto de muelle. La batería
debería encajar en posición. Cambie la tapa alineando las puntas
de ésta con los agujeros en el localizador y presionándola hacia
abajo. Asegúrese de desechar la batería usada de acuerdo con la
normativa local.
MANDO MANUAL
El mando manual LCM tiene un conector de toma telefónica al final
del cable.
Para conectar con el telescopio:
1. Localice el mando manual en el puerto de la parte superior del
soporte informatizado.
2. Presione la toma del extremo del cable del mando manual en el
puerto hasta que encaje en posición.
3. Deslice el mando manual hacia abajo en el soporte en la pata del
trípode. Para retirarlo, levántelo hacia arriba.
El LCM puede alimentarse con 8 baterías alcalinas de tamaño
AA proporcionadas por el usuario o un adaptador CA opcional
de 12V.
Para instalar baterías en el LCM:
1. Presione la pestaña de la parte anterior del compartimiento de
baterías y retire la tapa.
2. Retire con suavidad el soporte de baterías del interior del
compartimiento.
3. Coloque 8 baterías AA (proporcionadas por el usuario) en
el soporte de baterías, asegurándose de hacer coincidir la
polaridad de las baterías con las indicaciones del soporte.
4. Vuelva a colocar el soporte de baterías en la base y vuelva a
colocar la tapa.
5. Ponga el interruptor de encendido en posición “Encendido”.
Debería encenderse el testigo del botón de encendido.
NOTA: Cuando cambie las baterías, asegúrese de cambiar las 8 baterías por otras
nuevas a la vez. No mezcle baterías usadas con nuevas.
ALIMENTACIÓN DEL TELESCOPIO
Batería
Compartimiento
Salida de 12V
Interruptor
de encendido
Mando manual
Puerto
Compartimiento de baterías
Pestaña de liberación
Compartimiento de baterías
Pestaña de liberación
ESPAÑOL I 11

MOVER EL TELESCOPIO
El soporte informatizado LCM ha sido diseñado para moverse con el mando manual. Cuando esté encendido, puede hacerlo pulsando
los cuatro botones direccionales en el mando manual. Puede cambiar la velocidad de los motores pulsando el botón VELOCIDAD
MOTOR, y seleccionar un número entre 1 y 9. Para la configuración inicial debería mantener la velocidad superior a velocidad motor 5.
Cuando use el mando manual para desplazar el telescopio, el mando de altitud debe aflojarse.
El telescopio puede moverse manualmente en el eje de altitud, pero solamente si se ha aflojado la fijación de altitud. No aflojar esta
fijación y forzar el movimiento arriba o abajo del telescopio puede provocar daños en el motor o los engranajes. El soporte no tiene
una fijación en azimut (o dirección derecha e izquierda). Nunca es seguro mover el telescopio manualmente a izquierda y derecha.
ALINEAR EL LOCALIZADOR
El localizador StarPointer es una mira réflex que usa un LED rojo para proyectar un punto rojo en la ventana de cristal redonda. Cuando mire
por la ventana, verá que el punto rojo está sobreimpuesto en el objeto. La primera vez que monte el telescopio, deberá alinear el localizador con
la óptica principal del telescopio. Aunque puede realizar este paso de noche, es notablemente más sencillo de día. Cuando haya finalizado la
alineación del localizador, no deberá repetir este paso a menos que se golpee o caiga el localizador.
Para alinear el localizador StarPointer:
1. Saque su telescopio al exterior durante el día. Con el ojo desnudo, localice un objeto fácilmente reconocible, como una farola, una matrícula
de coche o un árbol alto. El objeto debe estar lo más lejos posible, al menos a 400 m.
2. Saque la cubierta contra el polvo principal del telescopio y asegúrese de que el ocular de 25 mm esté instalado.
3. Mueva el telescopio de forma que apunte aproximadamente al objeto elegido en el paso 1.
4. Mire por el ocular del telescopio y muévalo manualmente hasta que el objeto elegido quede en el centro del campo de visión. Si la imagen
es borrosa, gire suavemente los mandos de enfoque hasta que quede bien enfocada.
5. Cuando el objeto esté centrado en el ocular de 25 mm, encienda el localizador girando el mando de encendido/brillo en el lateral de la unidad
hasta el final de su recorrido.
6. Con la cabeza aproximadamente a 30 cm del localizador, mire por la ventana redonda y localice el punto rojo. Probablemente esté cerca,
pero no encima del objeto que esté mirando por el ocular de 25 mm.
7. Sin mover el telescopio, use los dos mandos de ajuste del lateral y bajo el localizador. Uno controla el movimiento a izquierda-derecha de
la retícula, mientras el otro controla el movimiento arriba-abajo. Ajuste ambos hasta que el punto rojo aparezca sobre el mismo objeto que
esté observando con el ocular de 25 mm.
Ahora elija otro objetivo distante para practicar el apuntado con el telescopio. Mire por la ventana del localizador StarPointer y ponga el punto
rojo sobre el objeto que esté intentando ver, compruebe que aparece en el ocular de 25 mm del telescopio.
NOTA: Asegúrese de apagar el localizador StarPointer cuando no lo use para conservar batería.
12 I ESPAÑOL

USO DEL TELESCOPIO
MANDO MANUAL
El controlador manual LCM ha sido diseñado para ofrecerle un acceso inmediato a todas las funciones que puede ofrecer el telescopio. Con un
desplazamiento automático a más de 4.000 objetos y descripciones del menú claras, hasta un principiante puede dominar sus muchas
funciones con unas pocas sesiones de observación. A continuación se ofrece una breve descripción de los componentes individuales
del mando manual LCM:
1. VENTANA DE PANTALLA DE CRISTAL LÍQUIDO (LCD)-
Dispone de una pantalla de cuatro líneas y 18 caracteres con
iluminación roja para un visionado cómodo de la información
del telescopio y el texto mostrado.
2. ALINEAR- Instruye al mando manual comenzar el procedimiento
de alineación del telescopio.
3. TECLAS DE DIRECCIÓN- Permite un control completo del
soporte en cualquier dirección. Use las teclas de dirección
para centrar objetos en el ocular o desplazar manualmente el
telescopio.
4. TECLAS DE CATÁLOGO- El soporte tiene una tecla en
el mando manual para permitir el acceso directo a cada uno
de los catálogos principales de su base de datos de más de
40000 objetos. Su soporte contiene los catálogos siguientes
en su base de datos:
• SISTEMA SOLAR- Los 7 planetas de nuestro sistema solar y
la Luna, el Sol y Plutón.
• ESTRELLAS- Listas personalizadas de las estrellas más
brillantes, estrellas dobles, estrellas variables y asterismos.
• ESPACIO PROFUNDO- Listas personalizadas de las mejores
galaxias, nebulosas y clústeres, así como el Messier completo
y una selección de objetos NGC.
5. IDENTIFICAR-
Busca en las bases de datos y muestra el
nombre y distancias de desvío a los objetos coincidentes
más cercanos.
6. MENÚ- Muestra las muchas funciones de configuración y utilidades, como la velocidad de seguimiento, objetos definidos por el
usuario y otros.
7. OPCIONES (LOGOTIPO CELESTRON)- Puede usarse con otras teclas para acceder a funciones y características más avanzadas.
8. INTRO- Pulsar INTRO le permite seleccionar cualquiera de las funciones, aceptar los parámetros introducidos y desplazar el
telescopio a objetos mostrados.
9. ATRÁS- Pulsando ATRÁS saldrá del menú actual y mostrará el nivel anterior de la ruta del menú. Pulsar ATRÁS repetidamente
volverá a un menú principal o puede usarse para borrar datos introducidos por error.
10. SKY TOUR- Activa el modo ruta, que muestra los mejores objetos del firmamento y le permite desplazar el telescopio a
dichos objetos.
11. TECLAS DE DESPLAZAMIENTO- Se utilizan para desplazarse arriba y abajo en cualquiera de las listas del menú. Un
símbolo de doble flecha en el lado derecho de la pantalla LCD indica que las teclas de desplazamiento pueden usarse para
ver información adicional.
12. VELOCIDAD DEL MOTOR- Desplaza el telescopio más rápida o lentamente cuando se pulsan los botones de dirección.
13. INFORMACIÓN DE OBJETO- Muestra coordenadas e información útil sobre objetos seleccionados de la base de datos.
14. TOMA DE ENTRADA- Le permite conectar el telescopio a un ordenador, para usarse con programas informáticos para
capacidades de apuntar y pulsar para desplazamiento y actualizar el firmware con PC.
4
5
6
7
8
9
10
11
11
12
13
14
15
2
4
1 1
3
ESPAÑOL I 13

USO DEL MANDO MANUAL
Esta sección describe los procedimientos básicos del mando manual para usar el LCM.
MENÚ DE ALINEACIÓN
Para que el LCM apunte con precisión objetos del firmamento, debe alinearse primero con posiciones conocidas (estrellas) del
firmamento. Con esta información, el telescopio puede crear un modelo del firmamento, que usa para ubicar cualquier objeto con
coordenadas conocidas. Hay muchas formas de alinear el LCM con el firmamento según la información que pueda proporcionar el usuario:
• SkyAlign funciona alineando tres estrellas brillantes o planetas cualquiera en el firmamento.
• Alineación automática de dos estrellas mostrará una lista de objetos diurnos visibles (planetas y la Luna) disponibles para
alinear el telescopio.
• Alineación de dos estrellas usa la información de hora/ubicación introducida y permite al usuario seleccionar dos estrellas de
alineación a las que se desplazará automáticamente el telescopio.
• Alineación de una estrella usa la información de hora/ubicación introducida y permite al usuario seleccionar una estrella de
alineación. Ofrece una alineación rápida con la contrapartida de una menor precisión en el apuntado.
• Alineación de sistema solar mostrará una lista de objetos diurnos visibles (planetas y la Luna) disponibles para alinear el telescopio.
NOTA: Existen otros dos métodos de alineación mostrados en el mando manual – EQ Norte y EQ Sur - pero solamente son aplicables a soportes altazimut que
puedan instalarse en una cuña ecuatorial. El soporte LCM no puede hacerlo.
SKYALIGN
SkyAlign es la forma más sencilla de alinear y tener listo para la observación su telescopio. Aunque no conozca ninguna estrella del
firmamento, el LCM estará alineado en minutos solicitando información elemental como la fecha, hora y ubicación. Luego, solamente tiene
que apuntar el telescopio a tres objetos celestes brillantes del firmamento. Como SkyAlign no precisa de conocimientos del firmamento,
no es necesario conocer el nombre de las estrellas a las que está apuntando. Incluso puede seleccionar un planeta o la Luna. El LCM
estará listo para comenzar a localizar y seguir cualquiera de los objetos de su base de datos con más de 4000 objetos. Antes de que el
telescopio esté listo para alinearse, debe colocarse en una ubicación de exterior con todos los accesorios (ocular, diagonal y localizador)
fijados y la tapa de la lente retirada como se describe en la sección de montaje del manual. Para iniciar el SkyAlign:
1. Encienda el LCM con el interruptor situado en el lateral de la base en posición “encendido”. Cuando esté encendido, la pantalla del
mando manual mostrará LCM preparado, Pulse INTRO para elegir SkyAlign. Pulsar la tecla ALINEAR anulará las demás opciones de
alineación y el texto mostrado y comenzará SkyAlign automáticamente.
2. Cuando se haya seleccionado SkyAlign, el control manual mostrará “Intro si correcto”, “DESHACER para editar” y “Sitio guardado”.
La línea inferior del LCD mostrará la hora actual o la hora en que se usó por última vez el telescopio. Como es la primera vez que usa
el LCM, pulse DESHACER para introducir la información de hora/lugar actual.
El mando manual solicitará la información siguiente:
• Ubicación- El mando manual mostrará una lista de ciudades para elegir. Elija la ciudad de la base de datos más cercana al lugar de
observación actual. La ciudad elegida se recordará en la memoria del mando manual de forma que se muestre automáticamente la
siguiente vez que se realice una alineación. Alternativamente, si conoce la longitud y latitud exacta de su lugar de observación, puede
introducirlas directamente en el mando manual y recordarlas para usarlas en el futuro. Para elegir una ciudad:
1. Use las teclas de desplazamiento arriba y abajo para elegir entre «Base de datos de ciudades» y «Lugar personalizado». «Base
de datos de ciudades» le permitirá elegir la ciudad más cercana al lugar de observación en una lista de ubicaciones de todo el
mundo y de EE.UU.. «Lugar personalizado» le permite introducir la longitud y latitud exactas del lugar de observación. Seleccione
«Base de datos de ciudades» y pulse INTRO.
2. El mando manual le permitirá elegir entre ubicaciones de EE.UU. o internacionales. Para una lista de ubicaciones de EE.UU.
por estado y ciudad, pulse ENTER cuando se muestre Estados Unidos. Para ubicaciones internacionales, use la tecla de
desplazamiento arriba o abajo para elegir Internacional y pulse ENTER.
3. Use los botones de desplazamiento arriba y abajo para elegir su estado actual (o país si ha elegido ubicaciones internacionales)
de la lista alfabética y pulse INTRO.
4. Use los botones de desplazamiento arriba y abajo para elegir la ciudad más cercana a su ubicación de la lista mostrada y pulse INTRO.
14 I ESPAÑOL

• Hora- Introduzca la hora actual para su zona. Puede introducir la hora local (p.ej., 8:00) o introducir la hora en formato horario militar
(p.ej. 20:00).
1. Seleccione PM o AM. Si ha introducido formato horario militar, el mando manual se saltará este paso.
2. Elija entre hora habitual u horario de verano. Use los botones de desplazamiento arriba y abajo (#6 o #9 del teclado) para cambiar
entre las opciones.
3. Seleccione la zona horaria desde la que esté observando. De nuevo, use los botones arriba y abajo (#6 y #9 del teclado) para moverse
por las opciones. Para obtener información sobre la zona horaria, consulte el mapa de zonas horarias en el apéndice de este manual.
• Fecha- Introduzca el mes, día y año de la sesión de observación. La información se mostrará: mm/dd/aa.
1. Si se ha introducido la información incorrecta en el mando manual, el botón DESHACER actúa como tecla de retroceso, permitiendo
al usuario volver a introducir información.
2. La próxima vez que se alinee su telescopio, el mando manual mostrará automáticamente la última ubicación (una ciudad o longitud/
latitud) introducida. Pulse INTRO para aceptar estos parámetros si aún son aplicables. Pulsar el botón DESHACER le permitirá volver
y seleccionar una nueva ciudad o longitud/latitud.
3. Use los botones de flecha del mando manual para desplazar (mover) el telescopio a cualquier objeto brillante en el firmamento. Alinee
el objeto con el punto rojo del localizador y pulse ENTER.
4. Si el localizador se ha alineado correctamente con el tubo del telescopio, la estrella de alineamiento debería ser visible en el campo
de visión del ocular. El mando manual solicitará que centre la estrella de alineamiento brillante en el centro del ocular y pulse el botón
ALINEAR. Hacerlo aceptará la estrella como primera posición de alineamiento. (No es necesario ajustar la velocidad de desplazamiento
de los motores tras cada paso de alineamiento. El LCM selecciona automáticamente la mejor velocidad de desplazamiento para alinear
objetos tanto en el localizador como en el ocular).
5. Para el segundo objeto de alineación, elija una estrella o planeta brillante lo más lejano posible del primer objeto de alineación.
Use de nuevo los botones de flecha para centrar el objeto en el localizador y pulse INTRO. Una vez centrado en el ocular, pulse
el botón ALINEAR.
6. Repita el proceso para la tercera estrella de alineamiento. Cuando se haya alineado el telescopio con las estrellas finales, la pantalla
mostrará “Coincidencia confirmada”. Pulse DESHACER para mostrar los nombres de los tres objetos brillantes con los que ha alineado,
o pulse INTRO para aceptar estos tres objetos para la alineación. Ahora puede localizar su primer objeto.
RECOMENDACIONES PARA USAR SKYALIGN
Recuerde las siguientes instrucciones de alineación para usar SkyAlign de la forma más sencilla y precisa posible.
• Asegúrese de nivelar el trípode antes de iniciar la alineación. La información de hora/ubicación junto con un trípode ayudará al
telescopio a predecir mejor las estrellas brillantes disponibles y los planetas sobre el horizonte.
• Recuerde seleccionar estrellas de alineación lo más separadas en el firmamento que sea posible. Para obtener los mejores
resultados, asegúrese de que la tercera estrella de alineación no quede en línea recta entre las dos primeras estrellas. Podría provocar
un error de alineación.
• No se preocupe por confundir planetas con estrellas al seleccionar objetos de alineación. SkyAlign funciona con los cuatro
planetas más brillantes (Venus, Júpiter, Saturno y Marte) así como la Luna. Además de los planetas, el mando manual tiene más de 80
estrellas brillantes de alineación para elegir (hasta magnitud 2,5).
• Raramente, SkyAlign no podrá determinar los tres objetos de alineación centrados. Sucede a veces cuando un planeta brillante
o la Luna pasa cerca de una de las estrellas brillantes. En estas situaciones es preferible evitar alinear con dichos objetos si es
posible.
• Asegúrese de centrar los objetos con los mismos movimientos finales que la dirección del acercamiento Ir a. Por ejemplo,
si el telescopio finaliza habitualmente un IrA con la parte anterior del telescopio moviéndose a derecha y arriba, debería centrar los
tres objetos de alineación en el ocular usando los botones derecha y arriba (las flechas arriba/abajo se invierten a velocidades de
desplazamiento 6 o inferior). Aproximarse a la estrella desde esta dirección al mirar por el ocular eliminará la mayor parte del retroceso
entre engranajes y garantizará la alineación más precisa posible.
ESPAÑOL I 15

ALINEACIÓN AUTOMÁTICA CON DOS ESTRELLAS
Al igual que SkyAlign, la alineación automática con dos estrellas precisa que introduzca toda la información de hora/lugar necesaria como
anteriormente. Cuando haya introducido esta información, el mando manual le solicitará que seleccione y apunte el telescopio a una
estrella conocida del firmamento. El LCM tendrá ahora toda la información que precisa para elegir automáticamente una segunda estrella
que garantizará el mejor alineamiento posible. Una vez seleccionada, el telescopio se desplazará automáticamente a la segunda estrella de
alineación y completará la alineación. Con el LCM colocado en un exterior con todos los accesorios colocados y el trípode nivelado, siga los
pasos siguientes para alinear el telescopio:
1. Cuando el LCM esté encendido, pulse INTRO para iniciar la alineación.
2. Use las teclas de desplazamiento arriba y abajo (#6 o #9 del teclado) para seleccionar alineaicón automática de dos estrellas y
pulse INTRO.
3. El mando manual mostrará la última información de hora y lugar introducida en el mando. Use los botones arriba y abajo para moverse por la
información. Pulse INTRO para aceptar la información actual o pulse DESHACER para editarla manualmente (consulte la sección SkyAlign
para instrucciones detalladas sobre la introducción de información de hora/lugar).
4. La pantalla le solicitará que elija una estrella brillante de la lista mostrada en el mando manual. Use las teclas arriba y abajo para desplazarse
a la estrella deseada y pulse INTRO.
5. Use los botones de flecha para desplazar el telescopio a la estrella seleccionada. Centre la estrella en el localizador y pulse ENTER. Para
terminar, centre la estrella en el ocular y pulse ALINEAR.
6. Según esta información, el LCM mostrará automáticamente la segunda estrella de alineación más adecuada que se encuentre sobre el
horizonte. Pulse INTRO para desplazar automáticamente el telescopio a la estrella mostrada. Si por algún motivo no desea seleccionar esta
estrella (quizá porque está tras un árbol o edificio), puede:
• Pulse el botón DESHACER para mostrar la siguiente estrella más adecuada para la alineación
• Use los botones de desplazamiento arriba y abajo para seleccionar manualmente cualquier estrella que desee de la lista de
estrellas disponibles.
Cuando termine de desplazarse, la pantalla le solicitará usar los botones de flecha para alinear la estrella seleccionada con el punto rojo del
localizador. Cuando esté centrada en el localizador, pulse ENTER. La pantalla le solicitará centrar la estrella en el campo de visión del
ocular. Cuando la estrella esté centrada, pulse ALINEAR para aceptar la estrella como segunda estrella de alineación. Cuando el telescopio
se haya alineado con ambas estrellas, la pantalla mostrará «Alineación correcta» y estará listo para encontrar su primer objeto.
ALINEACIÓN CON DOS ESTRELLAS
Con al método de alineación de dos estrellas, el LCM requiere que el usuario conozca los nombres y las posiciones de dos estrellas brillantes
para alinear con precisión el telescopio con el firmamento y comenzar a localizar objetos. Aquí dispone de un resumen del procedimiento
de alineación con dos estrellas:
1. Cuando el LCM esté encendido, use las teclas de desplazamiento arriba y abajo para elegir la alineación de dos estrellas y pulse INTRO.
2. Pulse INTRO para aceptar la información de hora/lugar mostrada en pantalla o pulse DESHACER oara introducir nueva información.
3. Se mostrará el mensaje SELECCIONAR ESTRELLA 1 en la fila superior de la pantalla. Use las teclas de desplazamiento arriba y abajo para
seleccionar la estrella que quiera usar como primera estrella de alineación. Pulse INTRO.
4. El LCM le solicitará que centre la estrella de alineación seleccionada en el ocular. Use las teclas de dirección para desplazar el telescopio a
la estrella de alineación y céntrela cuidadosamente en el localizador. Pulse ENTER cuando esté centrado.
5. A continuación, centre la estrella en el ocular y pulse ALINEAR. Para centrar con precisión la estrella de alineación en el ocular, puede
querer reducir la velocidad de desplazamiento de los motores para un centrado preciso. Esto se hace pulsando la tecla VELOCIDAD
MOTOR en el mando manual y seleccionando el número que se corresponda con la velocidad deseada. (9 = más rápido, 1 = más lento).
6. El LCM le solicitará que seleccione y centre una segunda estrella de alineación y pulse la tecla ALINEAR. Es preferible elegir
estrellas de alineación a una distancia considerable entre si. Las estrellas separadas por al menos 40º y 60º entre si le ofrecerán una
alineación más precisa que estrellas cercanas.
Cuando termine la alineación con la segunda estrella correctamente, la pantalla mostrará «Alineación correcta», y debería escuchar como se
encienden los motores de seguimiento e inician el seguimiento.
16 I ESPAÑOL

ALINEACIÓN CON UNA ESTRELLA
La alineación de una estrella precisa que introduzca la misma información que introduciría para el proceso de alineación de dos estrellas. Sin
embargo, en lugar de desplazarse a dos estrellas de alineación para centrado y alineación, el LCM usa solamente una estrella para modelar el
firmamento según la información introducida. Con ello podrá desplazarse de una forma general a las coordenadas de objetos brillantes, como
la Luna y otros planetas, y le ofrece al LCM la información necesaria para seguir objetos en altazimut en cualquier parte del firmamento. La
alineación de una estrella no está diseñada para localizar con precisión objetos del espacio profundo pequeños o tenues ni seguir objetos con
precisión para fotografiarlos. Para usar la alineación con una estrella:
1. Seleccione Alineación de una estrella en las opciones de alineación.
2. Pulse INTRO para aceptar la información de hora/lugar mostrada en pantalla o pulse DESHACER oara introducir nueva información.
3. Se mostrará el mensaje SELECCIONAR ESTRELLA 1 en la fila superior de la pantalla. Use las teclas de desplazamiento arriba y abajo para
seleccionar la estrella que quiera usar como primera estrella de alineación. Pulse INTRO.
4. El LCM le solicitará que centre la estrella de alineación seleccionada en el ocular. Use las teclas de dirección para desplazar el
telescopio a la estrella de alineación y céntrela cuidadosamente en el localizador. Pulse ENTER cuando esté centrado.
5. A continuación, centre la estrella en el ocular y pulse ALINEAR.
6. Una vez esté en posición, el LCM modelará el firmamento según esta información y mostrará «Alineación correcta».
NOTA: Cuando se haya realizado una alineación de una estrella, puede usar la función de realineación (más adelante en esta sección) para mejorar la precisión de
apuntado de su telescopio.
ALINEACIÓN DE SISTEMA SOLAR
La alineación de sistema solar está diseñada para ofrecer un seguimiento y rendimiento de IrA excelentes usando objetos del sistema solar
(Sol, Luna y planetas) para alinear el telescopio con el firmamento. La alineación de sistema solar es una forma excelente para alinear el
telescopio para observación diurna y es una forma rápida de alinear el telescopio para observación nocturna.
No mire nunca directamente al sol con los ojos descubiertos o un telescopio (a menos que tenga un filtro solar
adecuado). Puede producir daños oculares permanentes e irreversibles.
1. Seleccione Alineamiento de sistema solar en las opciones de alineación.
2. Pulse INTRO para aceptar la información de hora/lugar mostrada en pantalla o pulse DESHACER oara introducir nueva información.
3. Se mostrará el mensaje SELECCIONAR OBJETO en la fila superior de la pantalla. Use las teclas de desplazamiento arriba y abajo
para seleccionar el objeto diurno (planeta, Luna o Sol) con el que desee alinear. Pulse INTRO.
4. El LCM le solicitará que centre la estrella de alineación seleccionada en el ocular. Use las teclas de dirección para desplazar el telescopio
al objeto de alineación y céntrelo cuidadosamente en el localizador. Pulse ENTER cuando esté centrado.
5. A continuación, centre el objeto en el ocular y pulse ALINEAR.
Una vez esté en posición, el LCM modelará el firmamento según esta información y mostrará «Alineación correcta».
Selección del Sol
Por motivos de seguridad, no se muestra el Sol en ninguna de las listas de objetos personalizados del mando manual a menos que se
habilite desde el menú Utilidades. Para permitir mostrar el Sol en el mando manual, realice lo siguiente:
1. Pulse el botón DESHACER hasta que la pantalla muestre «LCM preparado».
2. Pulse el botón MENÚ y use las teclas arriba y abajo para seleccionar el menú Utilidades. Pulse INTRO.
3. Use las teclas ARRIBA y ABAJO para seleccionar el menú Sol y pulse INTRO.
4. Pulse INTRO de nuevo para permitir que el Sol aparezca en la pantalla del mando manual.
El Sol puede eliminarse de la pantalla usando el procedimiento anterior.
Para mejorar la precisión de apuntado del telescopio, puede usar la función Realinear como se describe más adelante.
ESPAÑOL I 17

REALINEACIÓN
El LCM tiene una función de realineación que le permite sustituir cualquiera de las estrellas de alineación originales por una estrella u
objeto celeste nuevo. Puede ser útil en varias situaciones:
• Si observa durante unas horas, puede notar que las dos estrellas de alineación originales se han desplazado notablemente al oeste.
(Recuerde que las estrellas se mueven a una velocidad de 15 grados de arco por hora). La alineación de una nueva estrella que
esté en la zona este del firmamento mejorará la precisión del apuntado, especialmente en objetos en esa zona del firmamento.
• Si ha alineado su telescopio usando el método de alineación de una estrella, puede usar realinear para añadir un objeto adicional del
firmamento. Así mejorará la precisión del telescopio sin tener que volver a introducir información adicional.
Para sustituir una estrella de alineación existente por otra nueva:
1. Seleccione la estrella (u objeto) deseada de la base de datos y desplácese hasta ella.
2. Centre cuidadosamente el objeto en el ocular.
3. Cuando esté centrado, pulse DESHACER hasta que esté en el menú principal.
4. Cuando se muestre «LCM preparado», pulse la tecla ALINEAR en el mando manual.
5. La pantalla le solicitará la estrella de alineación que desea remplazar.
6. Use las teclas de desplazamiento ARRIBA y ABAJO para seleccionar la estrella de alineación que vaya a sustituir y pulse
INTRO. Es preferible sustituir la estrella más cercana al nuevo objeto. Separará las estrellas de alineación en el firmamento.
Si ha usado uno de los métodos de alineación con un objeto es preferible sustituir el objeto “no asignado” por un objeto real.
7. Pulse ALINEAR para realizar el cambio.
CATÁLOGO DE OBJETOS
SELECCIONAR UN OBJETO
Ahora que el telescopio está correctamente alineado, puede elegir un objeto de cualquiera de los catálogos de la base de datos del
LCM. El mando manual tiene una tecla designada para cada catálogo de objetos en su base de datos.
PLANETAS
1. Pulse el botón SISTEMA SOLAR (#1 en el teclado).
2. Use los botones de DESPLAZAMIENTO arriba y abajo (#6 o #9 en el teclado, no los botones arriba y abajo de dirección) para
moverse por la lista de objetos del sistema solar hasta que el que quiera se muestre en pantalla.
3. Pulse INTRO y el telescopio se desplazará al objeto.
ESTRELLAS
1. Pulse el botón ESTRELLAS (#2 en el teclado).
2. Use los botones de DESPLAZAMIENTO arriba y abajo (#6 o #9 en el teclado, no los botones arriba y abajo de dirección) para
moverse por la lista de categorías que contenga el objeto que desee ver y pulse INTRO. Para estrellas puede elegir Estrellas con
nombre, Catálogo SAO, Estrellas variables, Asterismos, Constelaciones y Estrellas dobles.
3. Use las teclas de desplazamiento ARRIBA y ABAJO para seleccionar la estrella de alineación que vaya a sustituir y pulse INTRO. El
telescopio se desplazará al objeto.
4. Para el catálogo SAO solamente necesita introducir los primeros cuatro dígitos del número de seis dígitos del objeto SAO. Cuando
se hayan introducido los primeros cuatro dígitos, el mando manual listará automáticamente todos los objetos SAO disponibles que
comiencen con dichos números. Use los botones de desplazamiento para moverse por la lista de objetos SAO disponibles usando
este prefijo y seleccione el objeto deseado pulsando INTRO.
18 I ESPAÑOL

OBJETOS DEL ESPACIO PROFUNDO
1. Pulse el botón ESPACIO PROFUNDO (#3 en el teclado).
2. Use los botones de DESPLAZAMIENTO arriba y abajo (#6 o #9 en el teclado, no los botones arriba y abajo de dirección) para
moverse por la lista de categorías que contenga el objeto que desee ver y pulse INTRO. Puede elegir entre Objetos con nombre,
Catálogo NGC, Catálogo Caldwell y Catálogo Messier.
3. Para objetos con nombre, use las teclas de desplazamiento arriba y abajo para seleccionar el objjeto que desee ver y pulse INTRO.
El telescopio se desplazará al objeto.
4. Si ha seleccionado los catálogos NGC, Caldwell o Messier, introduzca el número de catálogo usando el teclado numérico y pulse
INTRO para desplazarse al objetivo.
NOTA: El mando manual solamente mostrará objetos que se encuentren sobre el horizonte: Los objetos que se encuentren bajo el horizonte no se muestran en
las listas para no perder tiempo intentando buscar objetos en los que el telescopio apunte al suelo. Puede cambiar esta operación y permitir apuntar bajo el
horizonte cambiando la configuración en los menús de Límite de desplazamiento y Límite de filtro, tratados más adelante en el manual.
VER INFORMACIÓN DEL OBJETO
Cuando se muestre el objeto deseado en la pantalla del mando manual también puede pulsar la tecla INFORMACIÓN DE OBJETO.
Le ofrecerá información útil sobre el objeto seleccionado, como magnitud, constelación y fascinantes datos sobre sobre los objetos
más brillantes y populares de la base de datos.
Puede obtener información de un objeto sin tener que realizar una alineación estelar. Cuando el telescopio esté encendido, pulsar
cualquiera de las teclas del catálogo le permitirá desplazarse por listas de objetos o introducir números de catálogo y ver la
información sobre el objeto del modo descrito anteriormente.
MODO SKY TOUR
Si no está seguro de los objetos que desea ver, el LCM incluye una función de ruta celeste que mostrará una lista de objetos
destacados de esa noche, los objetos más brillantes e interesantes sobre el horizonte.
1. Pulse el botón SKY TOUR (#5 en el teclado) para abrir el menú.
2. Use los botones de DESPLAZAMIENTO arriba y abajo para seleccionar el objeto que desee ver y pulse NTRO. El telescopio se
desplazará al objeto.
BOTONES DE DIRECCIÓN
El LCM tiene cuatro botones de dirección en el centro del mando manual que controla el movimiento del telescopio en altitud (arriba
y abajo) y azimut (izquierda y derecha). El telescopio puede controlarse a nueve velocidades distintas.
ESPAÑOL I 19

Pulsar la tecla de velocidad del motor le permite cambiar
inmediatamente la velocidad de los motores de una velocidad
de desplazamiento elevada a una velocidad de guiado precisa, o
cualquier punto intermedio. Cada velocidad se corresponde con un
número en el teclado del mando manual, siendo la velocidad 9 la más
rápida y la velocidad 1 la más lenta.
Las velocidades 1-4 son adecuadas para centrar objetos en el
ocular. Las velocidades 5-6 son adecuadas para centrar objetos
en el localizador. Las velocidades 7-9 son adecuadas para
desplazarse grandes distancias por el firmamento.
Para cambiar la velocidad del motor:
El mando manual tiene una función de "doble botón" que le
permite acelerar inmediatamente los motores sin tener que elegir
una velocidad. Para usar esta función, pulse el botón de flecha
que se corresponda con la dirección en la que quiera mover el
telescopio. Manteniendo pulsado el botón, pulse el botón de
la dirección opuesta. Aumentará la velocidad a la velocidad de
desplazamiento máxima.
NOTA: La velocidad sideral es la velocidad a la que rota la Tierra y parecen
desplazarse los objetos por el firmamento. Equivale a 15 arco segundos por segundo.
BOTÓN DE VELOCIDAD DEL MOTOR
MENÚ PRINCIPAL
El LCM contiene muchas funciones de configuración definidas por el usuario, diseñadas para dar al usuario control de las muchas
funciones avanzadas del telescopio. Puede acceder a todas las funciones de configuración y utilidades pulsando la tecla MENÚ (#7
del teclado) y desplazándose por las opciones.
MENÚ DE SEGUIMIENTO
Modo seguimiento
Cuando el LCM esté alineado, los motores de seguimiento se activarán automáticamente y comenzarán a seguir el firmamento. Sin embargo,
el seguimiento puede desactivarse para uso terrestre.
• Apagado- Cuando se use el telescopio para observación terrestre (en tierra) puede apagarse el seguimiento de forma que el telescopio
no se mueva.
• Alt-Az- Es la velocidad de seguimiento por defecto y se usa cuando se ha alineado correctamente el telescopio.
NOTA: Los modos de seguimiento EQ Norte y EQ Sur solamente son necesarios para telescopios con soporte ecuatorial. Los telescopios LCM usan soportes Altazimut
y no pueden usar los dos modos de seguimiento EQ.
Velocidad de seguimiento
Además de poder mover el telescopio con los botones del control manual, el LCM seguirá continuamente un objeto celeste a medida que
se mueva por el firmamento. La velocidad de seguimiento puede cambiar según el tipo de objeto observado:
• Sideral- Esta velocidad compensa la rotación de la Tierra moviendo el telescopio a la misma velocidad que la rotación, pero en
dirección opuesta. Cuando se realice seguimiento en modo Alt-Az, el telescopio debe realizar correcciones en altitud y azimut.
• Lunar- Utilizado para seguir la Luna cuando observe el paisaje lunar.
• Solar- Usado para seguir el Sol al realizar observación solar con un filtro solar adecuado.
VELOCIDAD DEL
MOTOR
VELOCIDAD
1 0,5 x sideral
2 1 x sideral
3 4 x sideral
4 8 x sideral
5 16 x sideral
6 64 x sideral
7
1°/ segundo
8
1,75°/ segundo
9
2,75°/ segundo
20 I ESPAÑOL

VER HORA-LUGAR
Ver hora-lugar muestra la última hora y longitud/latitud introducida en el mando manual.
MENÚ DEL MANDO MANUAL
Control de luces:
Esta opción del menú permite ajustar el brillo de la ilumiinación de las luces del mando manual.
• Nivel de teclado- Ajusta el brillo de la iluminación de los botones del teclado.
• Nivel de pantalla-
Ajusta el brillo de la iluminación del panel LCD.
Navegar menú
Este menú le permite cambiar la velocidad a la que se desplaza el texto en la pantalla del mando manual.
• Pulse el botón ARRIBA (#6 en el teclado) para aumentar la velocidad del texto.
• Pulse el botón ABAJO (#9n en el teclado) para reducir la velocidad del texto.
Activar negrita
Permite cambiar el texto del LCD a negrita, para que sea más fácil de leer.
Establecer contraste
Permite elegir la oscuridad del texto en el panel LCD.
Establecer idioma
Permite elegir el idioma del mando manual. Pulse el número correspondiente al idioma deseado.
MENÚ DE CONFIGURACIÓN DEL TELESCOPIO
Configurar hora-lugar
Permite al usuario personalizar la pantalla del mando manual cambiando los parámetros de hora y ubicación (como la zona horaria y el
horario de verano).
Anti latigazo
Todos los engranajes mecánicos tienen cierta cantidad de retroceso o juego entre los engranajes. Este juego es evidente en el tiempo
que tarda una estrella en moverse en el ocular cuando se pulsan los botones de flecha del mando manual (especialmente al cambiar
direcciones). La función anti retroceso del LCM permite al usuario compensar el retroceso introduciendo un valor que retroceda
rápidamente los motores lo justo para eliminar el juego entre engranajes. La cantidad de compensación necesaria depende de la
velocidad de desplazamiento seleccionada; cuanto más lenta sea la velocidad de desplazamiento más tiempo tardará la estrella en
parecer moverse en el ocular. Por lo tanto, la compensación anti retroceso deberá ser mayor. Deberá experimentar con distintos valores;
un valor entre 20 y 50 es normalmente preferible para la mayoría de observaciones visuales, mientras que un valor superior puede ser
necesario para una guía para fotografía. La compensación de retroceso positiva se aplica cuando el soporte cambia de dirección de
movimiento de atrás adelante. De forma similar, la compensación de retroceso negativa se aplica cuando el soporte cambia de dirección
de movimiento de adelante atrás. Cuando esté habilitado el seguimiento, el soporte se moverá en uno o ambos ejes en dirección positiva
o negativa, de forma que la compensación del retroceso siempre se aplicará cuando se suelte un botón de dirección y la dirección de
movimiento sea opuesta a la de desplazamiento.
Para establecer el valor anti retroceso, desplácese a la opción anti retroceso y pulse ENTER. Introduzca un valor de 0-100 en direcciones
de azimut y altitud y pulse ENTER tras cada una para guardar estos valores. El LCM recordará estos valores y los usará cada vez que se
active hasta que se modifiquen.
ESPAÑOL I 21

Límites de desplazamiento
Establece los límites de altitud a los que se puede desplazar el telescopio sin mostrar un mensaje de advertencia. Los límites de desplazamiento
evitan que el tubo del telescopio se desplace a un objeto por debajo del horizonte o se desplace a un objeto lo suficientemente alto como
para que el tubo pueda golpear una de las patas del trípode. Sin embargo, los límites de desplazamiento pueden personalizarse según sus
necesidades. Por ejemplo, si quiere desplazarse a un objeto cerca del cenit y está seguro de que el tubo no golpeará las patas del trípode,
puede establecer los límites de desplazamiento en 90º de altitud. Esto permitirá al telescopio desplazarse a cualquier objeto sobre el horizonte
sin advertencias.
Límites de filtro
Cuando se complete una alineación, el LCM sabrá automáticamente los objetos celestes que están sobre el horizonte. Como resultado, al
desplazarse por las listas de la base de datos (o seleccionar la función SKY TOUR), el LCM mostrará solamente los objetos que se sepa que
están sobre el horizonte cuando esté observando. Puede personalizar la base de datos de objetos seleccionando límites de altitud adecuados
para su ubicación y situación. Por ejemplo, si está observando desde una ubicación montañosa en la que el horizonte está parcialmente oculto,
puede establecer su límite de altitud en +20º. De este modo se asegurará de que el mando manual muestre solamente objetos que estén a
más de 20º de altitud.
Si quiere explorar toda la base de datos de objetos, establezca el límite máximo de altitud en 90º y el límite mínimo en -90º. Hacerlo mostrará
todos los objetos en las listas de la base de datos sin importar si es visible en el firmamento desde su ubicación o no.
Botones de dirección
La dirección en la que se mueve una estrella en el ocular varía según los accesorios utilizados. Esto puede llevar a confusión cuando se guía
a una estrella usando una guía externa al eje con respecto al visor de guía directo. Para compensarlo, la dirección de las teclas de control
del motor puede cambiarse. Para invertir la lógica del botón del mando manual, pulse el botón MENÚ y seleccione los botones de dirección
desde el menú Utilidades. Use las teclas de flecha Arriba/Abajo para seleccionar los botones de azimut (izquierda y derecha) o los botones
de altitud (arriba y abajo) y pulse INTRO. Pulsar ENTER de nuevo invertirá la dirección de los botones del mando manual respecto a su
estado actual. Los botones de dirección solamente cambiarán las velocidades de ocular (velocidad 1-6) y no afectarán a las velocidades
de desplazamiento (velocidades 7-9).
Aproximación IrA
Permite al usuario definir la dirección en la que se acercará el telescopio cuando se desplace a un objeto. Permite al usuario minimizar los
oefectos del retroceso. Por ejemplo, si el telescopio es pesado en la zona posterior por el uso de accesorios ópticos o fotográficos pesados
instalados en la parte posterior, deseará poner el acercamiento en altitud en dirección negativa. Esto garantizará que el telescopio siempre
se aproxime a un objeto desde la dirección opuesta a la carga que tira de él.
Para cambiar la dirección de ir a aproximación, elija Ir a aproximación desde el menú Configuración del telescopio, seleccione la aproximación
de altitud o azimut, elija positiva o negativa y pulse INTRO.
Enrollado de cable
El enrollado de cable protege al telescopio de desplazarse más de 360 grados en azimut y enrollar los cables de los accesorios en la base
del telescopio. Es útil en cualquier momento en el que el telescopio se alimente con una alimentación externa. Por defecto, la función de
enrollado de cable está desactivada cuando el telescopio esté alineado en altazimut y se activa cuando se alinea en una cuña.
MENÚ DE UTILIDADES
Desplazarse por las opciones del MENÚ le proporcionará acceso a diversas funciones de utilidades avanzadas.
Activar/desactivar GPS
Esta función solamente está disponible cuando use el telescopio junto con el accesorio opcional de GPS. Le permite apagar el modulo
GPS. Si quiere usar la base de datos LCM para encontrar las coordenadas de un objeto celeste para una fecha futura, apague el módulo
GPS e introduzca manualmente una fecha y hora distinta a la actual.
Configuración de fábrica
Devuelve el LCM a su configuración original de fábrica. Los parámetros como valores de compensación de retroceso, fecha y hora inicial,
longitud/latitud junto con los límites de desplazamiento y filtro se reiniciarán. Sin embargo, los parámetros guardados como PEC y los
objetos definidos por el usuario seguirán guardados aunque se seleccione Configuración de fábrica. El mando manual le solicitará pulsar
la tecla “0” antes de volver a la configuración por defecto de fábrica.
22 I ESPAÑOL

Versión
Seleccionar esta opción le permitirá ver el número de versión del software del mando manual y el control del motor. El primer grupo de números
indica la versión de software del mando manual. Para el control del motor, el mando manual mostrará dos grupos de números; los primeros
números son para el azimut y los segundos para la altitud.
Obtener posición de eje
Muestra la altitud y azimut relativas para la posición actual del telescopio.
Posición de eje IrA
Le permite introducir una posición de altitud y azimut concreta y desplazarse a ella.
Hibernar
Hibernar permite al LCM apagarse por completo y seguir alineado al volver a encenderse. Así no solamente ahorra energía, sino que es
ideal para tener el telescopio montado permanentemente o dejar el telescopio en una ubicación durante periodos largos de tiempo. Para
colocar su telescopio en modo Hibernación:
1. Seleccione Hibernar en el Menú de Utilidades.
2. Mueva el telescopio a la posición deseada y pulse INTRO.
3. Apague el telescopio. Recuerde no mover nunca el telescopio manualmente cuando esté en modo Hibernación.
Cuando el telescopio se encienda de nuevo la pantalla mostrará Activar. Tras pulsar INTRO tiene la opción de desplazarse por la información
de hora/lugar para confirmar la configuración actual. Pulse ENTER para activar el telescopio.
Pulsar DESHACER en la pantalla de activación le permite explorar muchas de las funciones del mando manual sin activar el telescopio del
modo hibernación. Para activar el telescopio tras pulsar DESHACER, seleccione Hibernar en el menú de utilidades y pulse ENTER. No use
los botones de dirección para mover el telescopio cuando esté en modo hibernación.
Menú solar
Por motivos de seguridad el Sol no se mostrará como objeto de la base de datos a menos que esté previamente habilitado. Para activar el
Sol, acceda al menú solar y pulse INTRO. El Sol se mostrará en el catálogo de planetas y puede usarse como objeto de alineación cuando
use el método de alineación de sistema solar. Para quitar el Sol de las indicaciones del mando manual, seleccione de nuevo el menú solar
del menú Utilidades y pulse ENTER.
Calibrar IrA
La calibración IrA es una herramienta útil cuando coloque accesorios visuales o fotográficos al telescopio. La calibración IrA calcula la
cantidad de distancia y tiempo que tarda el soporte en completar su último IrA lento cuando se desplaza a un objeto. Cambiar el equilibrio
del telescopio puede aumentar el tiempo que tarda en completar el desplazamiento final. La Calibración ir a tiene en cuenta cualquier leve
desequilibrio y cambia la distancia Ir a final para compensar.
Establecer posición de soporte
El menú Establecer posición de soporte puede usarse para recuperar una alineación en casos en los que el telescopio o el trípode se hayan
movido manualmente. Por ejemplo, puede usar esta función si necesita ajustar el nivel del trípode elevando o bajando las patas. Cuando
se haya movido el soporte, desplácese a una estrella brillante y céntrela en el ocular, y seleccione «Establecer posición de soporte» en el
menú de utilidades. Como se ha movido el telescopio, la precisión de apuntado se reducirá. Ahora puede desplazarse a un nuevo grupo
de estrellas de alineación y sustituir cualquiera de las estrellas originales por las nuevas. Le ayudará a evitar tener que iniciar el proceso de
alineación desde el principio.
ESPAÑOL I 23

OBJETOS DEFINIDOS POR EL USUARIO
El LCM puede guardar hasta 50 objetos definidos por el usuario distintos en memoria. Los objetos pueden ser objetos terrestres diurnos
o un objeto celeste interesante que descubra y no esté incluido en la base de datos habitual. Existen distintas formas de guardar un objeto
en memoria según el tipo de objeto que sea:
• Guardar objeto celeste- El LCM guarda objetos celestes en su base de datos guardando su ascensión y declinación en el firmamento.
De este modo se puede encontrar el mismo objeto cada vez si el telescopio está alineado. Cuando se centre el objeto deseado en
el ocular, desplácese al comando “Guardar obj.cel.” y pulse ENTER. La pantalla le solicitará que introduzca un número entre 1-25
para identificar el objeto. Pulse ENTER de nuevo para guardar el objeto en la base de datos. Se puede acceder a estos objetos
seleccionando IrA objeto celeste.
• Guardar objeto en base de datos (Db)-
Esta función le permite crear su ruta personalizada de objetos de la base de datos
permitiéndole registrar la posición actual del telescopio y guardar el nombre del objeto seleccionándolo de cualquiera de los catálogos
de la base de datos.
• Introducir RA - DEC- YTambién puede guardar un grupo concreto de coordenadas para un objeto introduciendo las coordenadas de
R.A. y DEC del objeto. Desplácese al comando "Introducir RA-DEC" y pulse ENTER. La pantalla le solicitará introducir primero el R.A.
y a continuación la declinación del objeto deseado.
• Guardar objeto terrestre-
El LCM también puede usarse como telescopio para objetos terrestres. Los objetos terrestres fijos pueden
guardarse mediante su altitud y azimut relativos a la ubicación del telescopio en el momento de la observación. Como estos objetos
son relativos a la ubicación del telescopio, solamente tienen validez para esa ubicación exacta. Para guardar objetos celestes, centre
de nuevo el objeto deseado en el ocular. Desplácese al comando “Guardar objeto terrestre” y pulse INTRO. La pantalla le solicitará
que introduzca un número entre 1-25 para identificar el objeto. Pulse ENTER de nuevo para guardar el objeto en la base de datos. Se
puede acceder a estos objetos seleccionando IrA objeto terrestre.
Para sustituir el contenido de cualquiera de los objetos definidos por el usuario, guarde un nuevo objeto usando uno de los números
identificadores existentes; el LCM sustituirá el objeto definido por el usuario anterior con el actual.
OBTENER RA-DEC
Muestra la ascensión y declive correctos para la posición actual del telescopio.
IRA RA-DEC
Le permite introducir un R.A. y declinación concretos y desplazarse a él.
IDENTIFICAR
El modo identificación buscará los catálogos o listas de la base de datos del LCM y mostrará el nombre y distancias de desvío a los objetos
coincidentes más cercanos. Esta función puede servir para dos fines. En primer lugar, puede usarse para identificar un objeto desconocido
en el campo de visión del ocular. Además, el modo identificar puede usarse para localizar otros objetos celestes cercanos a los objetos
que esté observando. Por ejemplo, si su telescopio apunta a la estrella más brillante de la constelación de Lira, elegir Identificar y buscar
en el catálogo de estrellas con nombres devolverá sin duda la estrella Vega como la estrella que está viendo. Sin embargo, seleccionando
Identificar y buscando en los catálogos Objetos con nombre o Messier, el mando manual le hará saber que la Nebulosa del Anillo (M57)
está a aproximadamente 6º de su posición actual. Buscar en el catálogo Estrellas dobles mostrará que Epsilon Lyrae solamente está a 1º
de distancia de Vega.
Para usar la función Identificar:
• Pulse el botón IDENTIFICAR (#4 en el teclado) y selección la opción de identificación.
• Pulse las teclas de desplazamiento Arriba/Abajo para seleccionar el catálogo en el que quiera buscar.
• Pulse INTRO para iniciar la búsqueda.
NOTA: Algunas de las bases de datos contienen miles de objetos, y por lo tanto puede tardar uno o dos minutos en devolver el objeto más cercano.
24 I ESPAÑOL

Objetos con nombre
NGC
Caldwell
Messier
Árbol de menú de la gama LCM
Modo
Alt-Az
Apagado
MENÚ
(#7 EN EL TECLADO)
ALINEAR
BOTÓN
SISTEMA SOLAR
(#1 EN EL TECLADO)
ESTRELLAS
(#2 EN EL TECLADO)
ESPACIO PROFUNDO
(#3 EN EL TECLADO)
SEGUIMIENTO
EQ Sur
EQ Norte
VELOCIDAD
Sideral
Lunar
Solar
VER HORA-LUGAR
HANDSTEUERUNG
Control de luz:
Nivel de teclado
Nivel de indicación
Scroll-Menü
Activar negrita
Establecer contraste
Establecer idioma
SkyAlign
Alineación automática con dos estrellas
Alineación con dos estrellas
Alineación de una estrella
Alineación de sistema solar
Alineación EQ Norte
Alineación EQ Sur
Luna
Mercurio
Venus
Marte
Júpiter
Saturno
Urano
Neptuno
Plutón
Sol
Estrellas con nombre
SAO
Estrellas variables
Asterismos
Constelaciones
Estrellas dobles
CONFIGURACIÓN DEL TELESCOPIO
Configurar hora-lugar
Compensación de retroceso
Límites de desplazamiento
Límites de filtro
Botones de dirección
Acercamiento IrA
Enrollado de cable
UTILIDADES
GPS Act/Des
Configuración de fábrica
Versión
Obtener posición de eje
Posición de eje IrA
Hibernar
Menú del Sol
Calibrar IrA
Establecer posición del soporte
OBJETOS DEL USUARIO
IrA objetos celestes
Guardar objeto celeste
Guardar objeto DB
Introducir RA y DEC
Guardar objeto terrestre
IrA objeto terrestre
OBTENER RA-DEC
IRA RA-DEC
IDENTIFICAR
ESPAÑOL I 25

PRIMERA SESIÓN DE OBSERVACIÓN ASTRONÓMICA
LA LUNA
Ahora está a punto para sacar su telescopio de noche y realizar observaciones reales.
Comencemos con la Luna. La Luna tarda aproximadamente un mes en pasar por un ciclo de fases completo, desde la Luna nueva hasta la Luna
llena y de vuelta. Pruebe a observarla en distintos momentos de este ciclo.
Aunque puede observar la Luna en cualquier momento en el que esté visible en el firmamento, el mejor momento para verla es a partir de dos
días tras una Luna nueva hasta unos días antes de la Luna llena. Durante este periodo podrá ver el máximo detalle de los cráteres y riscos
lunares. Consulte un calendario o app de fase lunar para saber cuándo será la siguiente Luna nueva.
1. Con una vista clara de la Luna, instale el telescopio con el ocular de 25 mm.
2. Encienda el localizador y mire por él para localizar el punto rojo.
3. Mueva el telescopio hasta que pueda ver la Luna por la ventana del localizador y el punto rojo esté centrado en la Luna.
4. Mire por el ocular de 25 mm. Gire suavemente los mandos de enfoque para ajustar la definición de la imagen.
FELICIDADES. HA OBSERVADO SU PRIMER OBJETO CELESTE.
Puede observar muchos otros objetos celestes, como planetas, clústeres estelares y nebulosas usando esta misma técnica elemental.
RECOMENDACIONES DE OBSERVACIÓN CELESTE
Esta sección cubre recomendaciones de observación visual para objetos del sistema solar y del espacio profundo, así como condiciones
de observación general que afectarán a su capacidad de observación.
AUMENTO
Puede cambiar el aumento del telescopio cambiando el ocular. Tanto los telescopios como los oculares tienen longitud focal medida en
milímetros. Para calcular el aumento de una combinación de telescopio y ocular, tome la longitud focal del telescopio y divídala por la
longitud focal del ocular. El número resultante será el factor de aumento.
Por ejemplo, el 80LCM tiene una longitud focal de 900 mm. Usando el ocular de 25 mm:
900 mm
=
____________
= 36x
25 mm
Longitud focal del telescopio
Aumento =
_________________________
Longitud focal del ocular
CAMPO DE VISIÓN
Determinar el campo de visión es importante si quiere tener una idea del tamaño angular del objeto que está observando. Para calcular
el campo de visión real, divida el campo aparente del ocular (proporcionado por el fabricante del ocular) por los aumentos que ofrece
en el telescopio que esté usando. Usando el ejemplo de la sección anterior, podemos determinar el campo de visión usando el mismo
telescopio y el ocular de 25 mm.
45°
=
______
= 1.25 grados de arco
36
Campo de visión aparente del ocular
Campo de visión real =
________________________________
Aumento
26 I ESPAÑOL

LOS PLANETAS
Además de la Luna, su telescopio puede observar los 5 planetas más brillantes. Como los planetas cambian de posición respecto a
las estrellas del fondo, necesitará consultar con fuentes de información en la red o usar una app de planetario en un dispositivo para
ayudarle a localizar su posición. Aquí tiene algunos objetos que puede observar:
• Mercurio y Venus- Como la Luna, los dos planetas interiores pasan por fases, desde delgadas crecientes a fases menguantes.
• Marte- Cuando esté cerca de la oposición (el punto está en su órbita más cercana a la Tierra) debería poder discernir el casco polar
y posiblemente algunas características de la superficie más grandes que aparecen como marcas oscuras en la superficie.
• Júpiter- Busque las bandas de nubes de metano más oscuras que rodean el planeta encima y debajo del ecuador. Si la Gran
Mancha Roja está orientada a la Tierra, puede que pueda verla. También verá las cuatro lunas más brillantes de Júpiter - Io,
Europa, Ganímedes y Calisto. Estas lunas son magníficas para observación porque puede verse su movimiento en solamente
un par de horas. Ocasionalmente se desplazan detrás de Júpiter o entran en su sombra y desaparecen durante cierto tiempo.
También pueden cruzar la cara de Júpiter y puede que incluso vea una sombra de la luna cruzándola. Existen diversas apps
útiles para dispositivos que le ayudarán a predecir si se puede ver la Gran Mancha Roja, así como si se van a producir eventos
interesantes con las lunas de Júpiter.
• Saturno- ¡Los anillos! Saturno es posiblemente uno de los objetos más hermosos que se pueden observar en un telescopio. Si las
condiciones de visualizaciónson los suficientemente estables, puede captar la sombra de los anillos en el planeta y la sombra del
planeta en los anillos. Debería poder ver Titán, la luna más brillante de Saturno.
OBJETOS DEL ESPACIO PROFUNDO
Los objetos del espacio profundo son todos los objetos celestes fuera de nuestro sistema solar. Incluyen grupos estelares, nebulosas
planetarias, nebulosas difusas, estrellas binarias y otras galaxias fuera de la Vía Láctea. Los objetos como nebulosas y galaxias
pueden ser bastante grandes, pero también son muy tenues. Para obtener la mejor vista posible, deberá asegurarse de que el
firmamento sea lo más oscuro posible. Cuanto más lejos esté de las luces de ciudades, mejor verá estos objetos en el ocular. En
fotografías de nebulosas y galaxias verá vívidos rojos y azules. Estos colores no son visibles cuando mira por el ocular. Las imágenes
coloreadas son imágenes de exposición extremadamente larga tomadas a lo largo de 15 - 60 minutos o más, donde el ojo solamente
registra datos basándose en cada instante. Los sensores digitales son mucho más sensibles a los rojos y azules que el ojo humano,
que es más sensible a la sección verde del espectro. Igualmente, podrá ver el suave brillo de la galaxia de Andrómeda y la expansión
de la Nebulosa de Orión.
CONDICIONES DEL FIRMAMENTO
Las condiciones del cielo pueden afectar notablemente al telescopio de tres formas.
• Placidez del aire- En días con viento, las imágenes de la Luna y los planetas pueden parecer oscilar o saltar por el ocular, como si
los estuviera viendo a través de agua en movimiento. Las noches con viento calmo ofrecen las mejores vistas con aumento elevado
de los planetas y la Luna. La mejor forma de valorar la estabilidad de la atmósfera es mirar a estrellas brillantes con el ojo desnudo.
Si "parpadean" o cambian de color rápidamente, el aire es inestable y será preferible usar aumentos más bajos y mirar objetos del
espacio profundo. Si las estrellas están definidas y no parpadean, el aire es estable y debería ofrecer magníficas vistas planetarias
con alto aumento.
• Transparencia- ¿Qué claridad tiene el aire por el que está mirando? Si existe una gran cantidad de humedad en el aire, la luz
tenue de galaxias y nebulosas puede esparcerse y difuminarse antes de llegar al telescopio, causando una pérdida de brillo de la
imagen. Los restos en el aire por incendios forestales cercanos, o incluso erupciones volcánicas lejanas, pueden contribuir a una
gran pérdida de brillo. A veces esta elevada humedad o restos pueden ayudar a estabilizar el aire, permitiendo buenas imágenes
planetarias y lunares, pero la pérdida de luz dificulta la observación de objetos del espacio profundo más tenues.
• Brillo celeste- La cantidad de luz ambiente en la atmósfera también puede afectar a la observación del espacio profundo. La
oscuridad del cielo puede depender de su entorno local. En una ciudad, el brillo celeste causado por la iluminación de la ciudad
reflejada a la tierra desde el cielo puede superar a la tenue luz de galaxias distantes. Alejarse de las luces brillantes de una ciudad
grande puede marcar la diferencia entre ver un objeto del espacio profundo y perdérselo por completo. Los planetas y la Luna tienen
el brillo suficiente por sí mismos para que el efecto al observarlos sea mínimo.
ESPAÑOL I 27

SELECCIÓN DE UN LUGAR DE OBSERVACIÓN
Si va a observar objetos del espacio profundo, como galaxias y nebulosas, debería tener en cuenta ir a un lugar con el cielo oscuro que
esté razonablemente accesible. Debería estar alejado de las luces de ciudades, con un campo de visión relativamente sin obstrucciones,
y a contraviento de cualquier fuente importante de contaminación del aire. Elija siempre la elevación más alta posible, dado que puede así
reducir el efecto de la inestabilidad atmosférica y puede garantizar que se encuentre por encima de la niebla. Aunque puede ser deseable
llevar el telescopio a un lugar con el cielo oscuro, no siempre es necesario. Si quiere observar planetas, la Luna o incluso alguno de los
objetos más brillantes del espacio profundo, puede hacerlo desde cualquier lugar, como su patio trasero. Intente montar el telescopio
en un lugar fuera de la incidencia directa de farolas o luces domésticas para ayudar a proteger su visión nocturna. Intente evitar observar
objetos que estén de 5 a 10 grados sobre el tejado de un edificio. Los techos absorben calor durante el día y lo irradian de noche.
Pueden provocar una capa de turbulencias de aire directamente sobre el edificio que puede degradar la imagen. Es preferible instalar
el telescopio directamente sobre una superficie de tierra o hierba. Deberían evitarse plataformas elevadas como tarimas de madera
o superficies rígidas como hormigón o una acera, dado que transmiten vibraciones fácilmente, que pueden transferirse al telescopio.
Observar a través de una ventana no se recomienda, dado que el cristal distorsionará las imágenes considerablemente. Una ventana
abierta puede ser aún peor, dado que el aire cálido del interior saldrá por la ventana, causando turbulencias que también afectarán a la
imagen. La astronomía es una actividad de exteriores.
ELECCIÓN DEL MEJOR MOMENTO PARA OBSERVAR
Intente no observar inmediatamente tras la puesta de sol. Cuando el sol se pone, la Tierra aún se está enfriando, causando turbulencias
en el aire. A medida que transcurre la noche, no solamente mejora la visión, sino que se reduce la contaminación del aire y las luces
terrestres. Algunos de los mejores momentos de observación son de madrugada, antes del amanecer. Los objetos se pueden observar
mejor cuando cruzan el meridiano, la línea imaginaria que pasa de norte a sur por un punto directamente sobre su cabeza. Es el punto en
el que los objetos llegan a su punto más alto en el firmamento, y el telescopio tiene la menor cantidad de atmósfera posible. Los objetos
que estén saliendo o poniéndose cerca del horizonte sufrirán más turbulencias atmosféricas dado que estará mirando por una columna
de aire más alta. No siempre es necesario tener cielos sin nubes si mira planetas o la Luna. A menudo las condiciones de nublado
parcial ofrecen una observación excelente.
ENFRIAR EL TELESCOPIO
Los telescopios necesitan 10 minutos como mínimo para enfriarse a la temperatura del aire exterior. Puede tardar más si existe una gran
diferencia entre la temperatura del telescopio y el aire exterior. De este modo se minimiza la distorsión por calor dentro del telescopio
(corrientes del tubo).
ADAPTACIÓN DE LOS OJOS
Si desea observar objetos del espacio profundo con un lugar con cielo oscuro, es preferible que deje que sus ojos se adapten por
completo a la oscuridad evitando exponerse a fuentes de luz blanca como linternas, faros de coche, farolas, etc. Sus pupilas tardarán
aproximadamente 30 minutos para expandirse a su máximo diámetro y acumular los niveles de pigmentos ópticos para ayudar a sus ojos
a ver la luz tenue de un objeto distante. Si necesita luz para ayudarle a instalar el telescopio en la oscuridad, intente usar una linterna
LED roja en la posición de brillo más baja posible y evite mirar directamente a la fuente de luz. Así tendrá la mejor posibilidad de capturar
dichos objetos tenues del espacio profundo.
Al observar, es importante hacerlo con ambos ojos abiertos. Así evita la fatiga del ojo por el ocular. Si le distrae, cubra el ojo que no use
con la mano o un parche. El centro del ojo funciona bien a la luz del día, pero es la zona menos sensible del ojo al intentar ver detalles
sutiles con niveles de luz bajos. Cuando mire por el ocular un objeto tenue, no lo mire directamente. En su lugar, mire hacia el borde del
campo de visión y el objeto se verá más brillante.
28 I ESPAÑOL

ASTROFOTOGRAFÍA
Una de las preguntas que la mayoría tienen sobre su nuevo telescopio es "¿Cömo puedo capturar imágenes con él?" Su telescopio
puede fotografiar la Luna y los planetas, pero los objetos del espacio profundo precisan de un telescopio más avanzado y de un soporte
con seguimiento motorizado preciso. Existen distintos métodos para usar su telescopio para fotografiar:
• Dispositivos inteligentes o cámaras directas- Es el método más sencillo y directo y funciona bien para fotografiar la Luna y
los planetas. Aguante la cámara del dispositivo contra el ocular y capture la imagen. Aunque puede usarlo con cualquier ocular,
normalmente es más sencillo obtener una imagen usando un ocular de potencia menor (mayor longitud focal). Necesita un pulso
firme para aguantar el teléfono contra el ocular, pero puede obtener buenos resultados.
• DSLR- Celestron ofrece adaptadores que le permitirán instalar un chasis DLSR Canon o Nikon al telescopio en lugar del ocular.
Estará usando de hecho el telescopio como lente. Necesitará un adaptador en T para el telescopio y una arandela T para la cámara.
Para obtener más información sobre los adaptadores para su modelo concreto de telescopio, visite www.celestron.com.
• Cámaras planetarias CMOS- Son cámaras especializadas que sustituyen al ocular de su telescopio. Se conectan al portátil
por puerto USB. La cámara registra video del planeta, y el software incluido parte el video en fotogramas individuales. El software
combina luego los fotogramas individuales en una sola imagen que contiene más detalles que el que fuera visible en cualquiera de
los fotogramas. Este método le ofrece las mejores imágenes planetarias y lunares posibles, pero precisa que tenga un portátil en el
telescopio. Para obtener más información sobre la cámara planetaria, visite www.celestron.com.
EQUIPO DE OBSERVACIÓN DEL ESPACIO PROFUNDO
Aquí encontrará algunas herramientas que serán indispensables para identificar y localizar objetos del espacio profundo:
• Linterna roja- Es una herramienta esencial para la astronomía del espacio profundo para leer tablas de localización o atlas estelares.
Para ver la luz tenue procedente de objetos distantes como nebulosas o galaxias, los ojos deben estar totalmente adaptados con
los iris abiertos al máximo para dejar pasar la mayor cantidad de luz posible del telescopio por ellos. La luz blanca de una linterna
normal hace que los iris se cierren y puede tardar hasta media hora en volver a adaptar los ojos a la oscuridad. La luz roja no tiene el
mismo efecto. Recomendamos cualquier linterna LED roja que tenga una emisión de brillo ajustable, dado que incluso la luz roja, si
es muy brillante, puede afectar a su visión nocturna. Están disponibles en la mayoría de comercios de telescopios, y también puede
encontrarlas en tiendas de camping y ferreterías.
• Planisferio - Un planisferio es un mapa estelar circular especial que le mostrará la ubicación aproximada de constelaciones sobre
su cabeza, para poder moverse por el firmamento. A diferencia de los mapas que puede imprimir por Internet, los planisferios sirven
para cualquier momento del año, no solamente la fecha o mes para el que los imprimió. El planisferio consiste en dos discos redondos
unidos por el centro. El disco inferior tiene un mapa de las constelaciones, mientras que el superior tiene una ventana recortada en
él, mostrando una porción del mapa celeste. Girando los discos interior y exterior para que coincidan con su fecha y hora concretos,
el mapa mostrará solamente las constelaciones visibles en ese momento. Es práctico para localizar ubicaciones aproximadas de
estrellas brillantes y constelaciones. Los planisferios están disponibles en librerías y para distintas latitudes geográficas en los
hemisferios norte o sur. Asegúrese de elegir uno adecuado para su ubicación. Para obtener información más detallada sobre la
ubicación de objetos del espacio profundo en constelaciones necesitará un atlas estelar.
• Atlas estelar- Los atlas estelares son los mapas del firmamento. Cuando haya encontrado una constelación con el planisferio, el
atlas estelar le mostrará una vista detallada y cercana de la región del firmamento, mostrando las estrellas y objetos del espacio
profundo que se encuentran en ella. Están disponibles en muchos comercios de telescopios y librerías.
• Apps y programas- Existen muchas aplicaciones disponibles para teléfonos o tabletas que sustituyen el planisferio y los mapas
estelares. Le ofrecen representaciones digitales del firmamento nocturno en el dispositivo, permitiendo pasar de una vista amplia
a una aumentada con solo tocar la pantalla. Pueden descargarse o adquirirse en la tienda de aplicaciones, según su plataforma.
También existen excelentes programas de simulación astronómica disponibles para su ordenador, que le mostrarán mapas estelares
muy detallados en pantalla y pueden ayudar a planificar una sesión de observación antes de salir al exterior con mapas estelares
imprimibles personalizados para su fecha, ubicación y hora.
ESPAÑOL I 29

SALTO ESTELAR
La forma más sencilla de orientarse en el firmamento es una técnica llamada salto estelar. Lo primero que tiene que hacer es medir el campo
de visión del localizador. Mire al cielo y localice una constelación con estrellas brillantes. Puede usar su planisferio o app de astronomía para
ayudarle a identificarla. Encuentre el mapa en el atlas estelar que muestre esta constelación. Centre el localizador en cualquier estrella brillante
que pueda reconocer en el mapa. Ponga la cabeza a 12 pulgadas (30 cm) de la ventana reflectante del localizador StarPointer y mueva el
telescopio de forma que la estrella brillante esté en el borde del campo de visión de la ventana (no importa la dirección que elija). Sin mover el
telescopio, mire por la ventana del localizador y localice otra estrella cerca del borde opuesto del campo de visión. Localice la segunda estrella
en el mapa. Mida la distancia entre estas dos estrellas en el mapa con una regla. Esta distancia representa un campo de visión del localizador
en su atlas. Ahora puede usar esta medida para localizar objetos celestes.
CUIDADOS Y LIMPIEZA DEL TELESCOPIO
Aunque su telescopio necesita poco mantenimiento, existen algunos aspectos a recordar que garantizarán que el telescopio funcione lo
mejor posible. Ocasionalmente puede acumularse polvo y/o humedad en la lente del objetivo. Tenga especial cuidado al limpiar cualquier
instrumento para evitar dañar la óptica.
Si se ha acumulado polvo en la óptica, siga estos pasos para limpiar el telescopio:
1. Use un pincel de pelo de camello para quitar suavemente las partículas más grandes.
2. Use una perilla de fotografía para eliminar restos sueltos. También puede usar un bote de aire comprimido, como los que pueden adquirirse
para limpiar teclados de ordenador, pero tenga cuidado. No use botes casi vacíos y asegúrese de aguantar el bote vertical. No hacerlo
puede provocar que el bote expulse propelente sobre la óptica. Aguante la superficie de la óptica en ángulo respecto al chorro de aire del
bote durante aproximadamente dos a cuatro segundos.
3. Use una solución de limpieza óptica de alcohol isopropílico y agua destilada en una mezcla 50/50. Aplique la solución en un papel tisú
blanco sin perfumar y aplique el tisú a la óptica. Las pasadas, con poca presión, deben ir del centro de la lente (o espejo) a la sección exterior
en líneas rectas, como radios de una rueda. NO frote en círculos.
Puede experimentar acumulación de humedad en la óptica del telescopio durante una sesión de observación. Si quiere seguir observando,
debe eliminar la humedad, sea con un secador (en posición baja) o apuntando el telescopio al suelo hasta que se evapore la humedad. Si
se condensa humedad en el interior de la óptica, retire los accesorios del telescopio. Ponga el telescopio en un lugar sin polvo y apúntelo
hacia abajo hasta que se evapore la humedad.
Para minimizar la necesidad de limpiar su telescopio, coloque todas las tapas de las lentes cuando haya terminado de usarlo. Como los
tubos del telescopio no son estancos, las tapas deben colocarse sobre las aperturas cuando no lo use. Evitará que entren contaminantes
en el tubo óptico. Los ajustes y limpieza internos solamente deben ser realizados por el departamento de reparaciones de Celestron.
Si su telescopio precisa de limpieza interna, llame a la fábrica para obtener un número de autorización de devolución y un presupuesto.
COLIMADO DE UN TELESCOPIO NEWTONIANO
Aunque su telescopio precisa de poco mantenimiento, debe recordar algunos aspectos que garantizarán que el telescopio funcione lo
mejor posible. El colimado es el proceso de alineación de los espejos del telescopio de forma que funcionen correctamente para ofrecer
luz adecuadamente enfocada en el ocular. Observando imágenes estelares desenfocadas puede comprobar si la óptica de su telescopio
está alineada. Ponga una estrella en el centro del campo de visión y mueva el enfoque de forma que la imagen quede ligeramente enfocada.
Si las condiciones de observación son buenas, verá un círculo de luz central (el disco aéreo) envuelto por varios aros de difracción. Si
las arandelas son simétricas alrededor del disco aéreo, la óptica del telescopio está correctamente colimada.
Correctamente alineado Necesita colimado
30 I ESPAÑOL

El colimado es un proceso sencillo y funciona de este modo:
Saque la tapa de la lente que cubre la parte anterior del telescopio
y mire por el tubo óptico. En la parte inferior verá el espejo primario,
sostenido con tres clips separados en 120º, y en la parte superior
un pequeño espejo secundario aguantado por un soporte e inclinado
45º respecto al enfoque fuera de las paredes del tubo.
El espejo secundario está alineado ajustando los tres tornillos más
pequeños que rodean el perno central. El espejo primario se ajusta
con los tres tornillos de ajuste de la parte posterior de su telescopio.
Los tres tornillos de fijación a su lado sirven para aguantar el espejo
en posición tras el colimado.
Espejo primario Espejo secundario
Soporte del
espejo secundario
Enfoque
ALINEACIÓN DEL ESPEJO SECUNDARIO
Apunte el telescopio a una pared iluminada y mire en el enfoque sin instalar el ocular. Puede tener que girar el mando de enfoque unas vueltas
hasta que la imagen reflejada del enfoque salga de vista. Tenga el ojo contra la parte posterior de y centrado en el tubo de enfoque. Busque
los tres clips que aguantan el espejo primario en posición. Si no puede verlos indica que tiene que ajustar los tres pernos de la parte superior
del soporte del espejo secundario, con una llave allen o destornillador Philips. Tendrá que aflojar alternativamente uno y compensar apretando
los otros dos. Deténgase cuando vea los tres clips del espejo. Asegúrese de que los tres tornillos de alineación estén fijados para asegurar el
espejo secundario en posición.
Clip de espejo primario
Ignorar la imagen
reflejada por ahora
Clip de espejo primario
Clip de espejo primario
Clip de espejo primario
ALINEACIÓN DEL ESPEJO PRIMARIO
Tiene 3 pernos grandes y 3 tornillos pequeños en la parte posterior del telescopio. Los pernos grandes son los tornillos de ajuste y los tornillos
pequeños son los tornillos de bloqueo. Afloje los pernos grandes unas vueltas. Pase la mano por delante del telescopio manteniendo el ojo en
el enfoque, verá la imagen de su mano reflejada. La idea es ver la orientación del espejo primario, lo que hace deteniéndose en el punto en el
que la imagen reflejada del espejo secundario esté más cercana al borde del espejo primario.
Cuando llegue a este punto, deténgase de deje la mano en posición mirando al extremo posterior del telescopio, ¿ve un tornillo de ajuste? Si
está, querrá aflojarlo (gire el tornillo a la izquierda) para alejar el espejo de ese punto. Si no encuentra un tornillo de ajuste, pase al otro lado y
apriete el tornillo de ajuste del otro lado. De este modo pondrá el espejo gradualmente en alineación. (Es recomendable que un amigo le ayude
en el colimado del espejo primario. Haga que su amigo ajuste los tornillos según sus instrucciones mientras mira en el enfoque).
Cuando sea de noche salga y apunte el telescopio a la estrella polar, la estrella del norte. Con un ocular en el enfoque, desenfoque la imagen.
Verá la misma imagen, solamente que estará iluminada por la luz de las estrellas. En caso necesario, repita el proceso de colimado y mantenga
la estrella centrada mientras manipula el espejo.
Espejo secundario
Espejo primario
Detenga y mantenga
la mano aquí
Ambos espejos alineados con el ojo
mirando en el enfoque
ESPAÑOL I 31

GARANTÍA LIMITADA POR DOS AÑOS DE CELESTRON
A. Celestron garantiza que su telescopio está libre de defectos de material y mano de obra durante dos años. Celestron reparará o sustituirá
el producto o parte del mismo si, al ser inspeccionado por Celestron, demuestra tener defectos de materiales o mano de obra. Como
condición de la obligación de Celestron de reparar o sustituir dicho producto, el producto debe ser devuelto a Celestron junto con una
prueba de compra adecuada para Celestron.
B. Debe obtener un número de autorización de devolución adecuado de Celestron antes de la devolución. Llame a Celestron al
(310) 328-9560 para recibir el número que se mostrará en el exterior del recipiente de transporte.
Cualquier devolución debe ir acompañada de una declaración por escrito en la que conste el nombre, dirección y número de teléfono de
contacto durante el día del propietario, junto con una breve descripción de cualquier defecto reclamado. Las piezas o productos sustituidos
pasarán a ser propiedad de Celestron.
El cliente será responsable de cualquier coste de transporte y seguros, tanto hacia como desde la fábrica de Celestron, y deberá cubrir
dichos costes.
Celestron realizará todos los esfuerzos razonables para reparar o sustituir cualquier telescopio cubierto por esta garantía en los treinta días
siguientes a su recepción. En caso de que la reparación o sustitución precise de más de treinta días, Celestron se lo notificará al cliente.
Celestron se reserve el derecho de sustituir cualquier producto que haya sido dejado de fabricar por un nuevo producto de valor y
función comparables.
Esta garantía será nula y sin efecto en caso de que un producto cubierto haya sido modificado en su diseño o función, o sometido a
abuso, mal uso, mala manipulación o reparación no autorizada. Además, las averías o deterioro del producto por desgaste normal no
están cubiertos por esta garantía.
CELESTRON RECHAZA TODA RESPONSABILIDAD POR GARANTÍAS, EXPLÍCITAS O IMPLÍCITAS, SEAN DE ADECUACIÓN COMERCIAL PARA UN USO ESPECÍFICO, SALVO LAS EXPLÍCITAMENTE
AQUÍ DECLARADAS. LA ÚNICA OBLIGACIÓN DE CELESTRON EN ESTA GARANTÍA LIMITADA SERÁ REPARAR O SUSTITUIR EL PRODUCTO CUBIERTO, DE ACUERDO CON LOS TÉRMINOS AQUÍ
ESTABLECIDOS. CELESTRON RECHAZA EXPLÍCITAMENTE CUALQUIER PÉRDIDA DE BENEFICIOS, DAÑOS GENERALES, ESPECIALES, INDIRECTOS O CONSIGUIENTES QUE PUEDAN RESULTAR
DE LA VULNERACIÓN DE CUALQUIER GARANTÍA, O SURJAN DEL USO O INCAPACIDAD PARA USAR CUALQUIER PRODUCTO CELESTRON. CUALQUIER GARANTÍA IMPLÍCITA QUE NO PUEDA
REHUSARSE SERÁ LIMITADA EN SU DURACIÓN A UN TÉRMINO DE DOS AÑOS DESDE LA FECHA DE COMPRA ORIGINAL.
Algunos estados no permiten la exclusión o limitación de datos incidentales o consiguientes, ni permiten limitar el tiempo que dura una
garantía implícita, por lo que las limitaciones indicadas o exclusiones pueden no serle aplicables.
Esta garantía le ofrece derechos legales específicos, y puede tener otros derechos, que varían según el estado.
Celestron se reserva el derecho de modificar o cesar, sin previo aviso, cualquier modelo o estilo de telescopio.
Si surgen problemas de garantía, o necesita asistencia al usar su telescopio, contacte con: Celestron - 800.421.9649
NOTA: Esta garantía tiene validez para clientes de EE.UU. y Canadá que hayan adquirido este producto en un vendedor autorizado de Celestron en EE.UU. y Canadá. La garantía fuera de
EE.UU. y Canadá solamente tiene validez para clientes que hayan comprado en un distribuidor internacional de Celestron o un vendedor de Celestron autorizado en el país específico.
Contacte con ellos para obtener servicio de garantía.
NOTA FCC: Este dispositivo cumple con el apartado 15 de las normas FCC. Su uso está sujeto a las dos condiciones siguientes:
(1) Este dispositivo no puede causar interferencias dañinas, y (2) este dispositivo debe aceptar cualquier interferencia, incluyendo
interferencias que puedan causar un funcionamiento no deseado del dispositivo.
El diseño y las especificaciones del producto están sujetos a cambios sin notificación previa.
Este producto ha sido diseñado y está pensado para ser usado por personas de 14 años o más de edad.
© 2017 Celestron • Todos los derechos reservados
www.celestron.com
2835 Columbia Street • Torrance, CA 90503 EE.UU.
Teléfono: 800.421.9649
05-17
Impreso en China

ITALIANO
Manuale di istruzioni
MODELLI #22050, 22051, 31150 (60LCM, 80LCM, 114LCM)
SERIE DI TELESCOPIO

2 I ITALIANO

INDICE
AVVERTIMENTO SOLARE . . . . . . . . . . . . . . . . . . . . . . . . . . . . . . . . . . . . . . . . . . .6
CONTENUTO DELLA CONFEZIONE. . . . . . . . . . . . . . . . . . . . . . . . . . . . . . . . . . . . . . . . . . . . . . . . . .7
MONTAGGIO DEL TELESCOPIO. . . . . . . . . . . . . . . . . . . . . . . . . . . . . . . . . . . . . . . . . . . . . . . . . . . .8
Treppiede . . . . . . . . . . . . . . . . . . . . . . . . . . . . . . . . . . . . . . . . . . . . . . . . . . . . . . . . . . . . . . . . . . . 8
Montatura computerizzata. . . . . . . . . . . . . . . . . . . . . . . . . . . . . . . . . . . . . . . . . . . . . . . . . . . . . . . . . . .8
Tubo del telescopio . . . . . . . . . . . . . . . . . . . . . . . . . . . . . . . . . . . . . . . . . . . . . . . . . . . . . . . . . . . . . . 9
Diagonale stellare (solo telescopi rifrattori). . . . . . . . . . . . . . . . . . . . . . . . . . . . . . . . . . . . . . . . . . . . . . . . . .9
Oculare . . . . . . . . . . . . . . . . . . . . . . . . . . . . . . . . . . . . . . . . . . . . . . . . . . . . . . . . . . . . . . . . . . . . 10
Cercatore StarPointer . . . . . . . . . . . . . . . . . . . . . . . . . . . . . . . . . . . . . . . . . . . . . . . . . . . . . . . . . . . . .10
Sostituzione della batteria del cercatore . . . . . . . . . . . . . . . . . . . . . . . . . . . . . . . . . . . . . . . . . . . . . . . . . . . 11
Comando manuale . . . . . . . . . . . . . . . . . . . . . . . . . . . . . . . . . . . . . . . . . . . . . . . . . . . . . . . . . . . . . . 11
Accensione del telescopio . . . . . . . . . . . . . . . . . . . . . . . . . . . . . . . . . . . . . . . . . . . . . . . . . . . . . . . . . . 11
Spostamento del telescopio . . . . . . . . . . . . . . . . . . . . . . . . . . . . . . . . . . . . . . . . . . . . . . . . . . . . . . . . . 12
Allineamento del cercatore . . . . . . . . . . . . . . . . . . . . . . . . . . . . . . . . . . . . . . . . . . . . . . . . . . . . . . . . . . 12
FUNZIONAMENTO DEL TELESCOPIO . . . . . . . . . . . . . . . . . . . . . . . . . . . . . . . . . . . . . . . . . . . . . . . . 13
Comando manuale . . . . . . . . . . . . . . . . . . . . . . . . . . . . . . . . . . . . . . . . . . . . . . . . . . . . . . . . . . . . . . 13
Funzionamento del comando manuale . . . . . . . . . . . . . . . . . . . . . . . . . . . . . . . . . . . . . . . . . . . . . . . . . . . . 14
Alignment Menu (Menu allineamento) . . . . . . . . . . . . . . . . . . . . . . . . . . . . . . . . . . . . . . . . . . . . . . . . . . . 14
Sky Align . . . . . . . . . . . . . . . . . . . . . . . . . . . . . . . . . . . . . . . . . . . . . . . . . . . . . . . . . . . . . . . . . . 14
Auto Two-Star Align (Allineamento automatico di due stelle) . . . . . . . . . . . . . . . . . . . . . . . . . . . . . . . . . . . . . . .16
Two-Star Alignment (Allineamento di due stelle) . . . . . . . . . . . . . . . . . . . . . . . . . . . . . . . . . . . . . . . . . . . . . 16
One-Star Align (Allineamento di una stella) . . . . . . . . . . . . . . . . . . . . . . . . . . . . . . . . . . . . . . . . . . . . . . . . 17
Solar System Align (Allineamento con il sistema solare) . . . . . . . . . . . . . . . . . . . . . . . . . . . . . . . . . . . . . . . . . 17
Ri-allineamento . . . . . . . . . . . . . . . . . . . . . . . . . . . . . . . . . . . . . . . . . . . . . . . . . . . . . . . . . . . . . . . 18
Catalogo degli oggetti. . . . . . . . . . . . . . . . . . . . . . . . . . . . . . . . . . . . . . . . . . . . . . . . . . . . . . . . . . . . .18
Selezione di un oggetto . . . . . . . . . . . . . . . . . . . . . . . . . . . . . . . . . . . . . . . . . . . . . . . . . . . . . . . . . . 18
Pianeti . . . . . . . . . . . . . . . . . . . . . . . . . . . . . . . . . . . . . . . . . . . . . . . . . . . . . . . . . . . . . . . . . . . .18
Stelle . . . . . . . . . . . . . . . . . . . . . . . . . . . . . . . . . . . . . . . . . . . . . . . . . . . . . . . . . . . . . . . . . . . . 18
Oggetti del profondo cielo . . . . . . . . . . . . . . . . . . . . . . . . . . . . . . . . . . . . . . . . . . . . . . . . . . . . . . . . . 19
Visualizzazione info oggetto . . . . . . . . . . . . . . . . . . . . . . . . . . . . . . . . . . . . . . . . . . . . . . . . . . . . . . . . 19
Modalità Sky Tour . . . . . . . . . . . . . . . . . . . . . . . . . . . . . . . . . . . . . . . . . . . . . . . . . . . . . . . . . . . . . .19
Pulsanti direzionali . . . . . . . . . . . . . . . . . . . . . . . . . . . . . . . . . . . . . . . . . . . . . . . . . . . . . . . . . . . . . 19
Tasto Motor Speed (Velocità motore) . . . . . . . . . . . . . . . . . . . . . . . . . . . . . . . . . . . . . . . . . . . . . . . . . . . 20
MENU PRINCIPALE . . . . . . . . . . . . . . . . . . . . . . . . . . . . . . . . . . . . . . . . . . . . . . . . . . . . . . . . . . .20
Menu Tracciatura . . . . . . . . . . . . . . . . . . . . . . . . . . . . . . . . . . . . . . . . . . . . . . . . . . . . . . . . . . . . . . . 20
Modalità di tracciatura . . . . . . . . . . . . . . . . . . . . . . . . . . . . . . . . . . . . . . . . . . . . . . . . . . . . . . . . . . . 20
Velocità di tracciatura . . . . . . . . . . . . . . . . . . . . . . . . . . . . . . . . . . . . . . . . . . . . . . . . . . . . . . . . . . . 20
View Time-Site (Visualizza ora-luogo) . . . . . . . . . . . . . . . . . . . . . . . . . . . . . . . . . . . . . . . . . . . . . . . . . . . . .21
Menu comando manuale . . . . . . . . . . . . . . . . . . . . . . . . . . . . . . . . . . . . . . . . . . . . . . . . . . . . . . . . . . . 21
Lights Control (Controllo luci) . . . . . . . . . . . . . . . . . . . . . . . . . . . . . . . . . . . . . . . . . . . . . . . . . . . . . . . 21
Scrolling Menu (Menu Scorrimento) . . . . . . . . . . . . . . . . . . . . . . . . . . . . . . . . . . . . . . . . . . . . . . . . . . . .21
Toggle Bold Font (Attiva/disattiva grassetto) . . . . . . . . . . . . . . . . . . . . . . . . . . . . . . . . . . . . . . . . . . . . . . . 21
Set Contrast (Imposta contrasto) . . . . . . . . . . . . . . . . . . . . . . . . . . . . . . . . . . . . . . . . . . . . . . . . . . . . . 21
Set Language (Imposta lingua). . . . . . . . . . . . . . . . . . . . . . . . . . . . . . . . . . . . . . . . . . . . . . . . . . . . . . .21
ITALIANO I 3

Scope Setup Menu (Menu di configurazione telescopio) . . . . . . . . . . . . . . . . . . . . . . . . . . . . . . . . . . . . . . . . . . 21
Setup Time-Site (Configurazione ora-luogo). . . . . . . . . . . . . . . . . . . . . . . . . . . . . . . . . . . . . . . . . . . . . . . .21
Anti-backlash (Compensazione contraccolpi) . . . . . . . . . . . . . . . . . . . . . . . . . . . . . . . . . . . . . . . . . . . . . . .21
Slew Limits (Limiti di rotazione) . . . . . . . . . . . . . . . . . . . . . . . . . . . . . . . . . . . . . . . . . . . . . . . . . . . . . . 22
Filter Limits (Limiti filtro) . . . . . . . . . . . . . . . . . . . . . . . . . . . . . . . . . . . . . . . . . . . . . . . . . . . . . . . . . . 22
Pulsanti direzionali . . . . . . . . . . . . . . . . . . . . . . . . . . . . . . . . . . . . . . . . . . . . . . . . . . . . . . . . . . . . . 22
GoTo Approach (Approccio VaiA) . . . . . . . . . . . . . . . . . . . . . . . . . . . . . . . . . . . . . . . . . . . . . . . . . . . . . 22
Cordwrap (Avvolgimento del cavo) . . . . . . . . . . . . . . . . . . . . . . . . . . . . . . . . . . . . . . . . . . . . . . . . . . . . 22
Utility Menu (Menu Utilità) . . . . . . . . . . . . . . . . . . . . . . . . . . . . . . . . . . . . . . . . . . . . . . . . . . . . . . . . . . .22
GPS On/Of (Accensione/spegnimento GPS) . . . . . . . . . . . . . . . . . . . . . . . . . . . . . . . . . . . . . . . . . . . . . . 22
Factory Setting (Impostazioni di fabbrica) . . . . . . . . . . . . . . . . . . . . . . . . . . . . . . . . . . . . . . . . . . . . . . . . . 22
Version (Versione). . . . . . . . . . . . . . . . . . . . . . . . . . . . . . . . . . . . . . . . . . . . . . . . . . . . . . . . . . . . . .23
Get Axis Position (Ottieni posizione asse). . . . . . . . . . . . . . . . . . . . . . . . . . . . . . . . . . . . . . . . . . . . . . . . .23
GoTo Axis Position (VaiA posizione asse) . . . . . . . . . . . . . . . . . . . . . . . . . . . . . . . . . . . . . . . . . . . . . . . . . 23
Hibernate (Ibernazione) . . . . . . . . . . . . . . . . . . . . . . . . . . . . . . . . . . . . . . . . . . . . . . . . . . . . . . . . . . 23
Sun Menu (Menu Sole) . . . . . . . . . . . . . . . . . . . . . . . . . . . . . . . . . . . . . . . . . . . . . . . . . . . . . . . . . . .23
Calibrate GoTo (Calibra VaiA) . . . . . . . . . . . . . . . . . . . . . . . . . . . . . . . . . . . . . . . . . . . . . . . . . . . . . . . 23
Set Mount Position (Imposta posizione montatura) . . . . . . . . . . . . . . . . . . . . . . . . . . . . . . . . . . . . . . . . . . . . 23
Oggetti definiti dall'utente. . . . . . . . . . . . . . . . . . . . . . . . . . . . . . . . . . . . . . . . . . . . . . . . . . . . . . . . . . .24
Get RA-DEC (Ottieni RA-DEC). . . . . . . . . . . . . . . . . . . . . . . . . . . . . . . . . . . . . . . . . . . . . . . . . . . . . . . .24
GoTo RA-DEC (VaiA RA-DEC) . . . . . . . . . . . . . . . . . . . . . . . . . . . . . . . . . . . . . . . . . . . . . . . . . . . . . . . . 24
Identify (Identifica) . . . . . . . . . . . . . . . . . . . . . . . . . . . . . . . . . . . . . . . . . . . . . . . . . . . . . . . . . . . . . . .24
ALBERO DEL MENU SERIE LCM . . . . . . . . . . . . . . . . . . . . . . . . . . . . . . . . . . . . . . . . . . . . . . . . . . . 25
PRIMA SESSIONE DI OSSERVAZIONE ASTRONOMICA . . . . . . . . . . . . . . . . . . . . . . . . . . . . . . . . . . . . . 26
La Luna. . . . . . . . . . . . . . . . . . . . . . . . . . . . . . . . . . . . . . . . . . . . . . . . . . . . . . . . . . . . . . . . . . . . .26
SUGGERIMENTI SULL’OSSERVAZIONE CELESTE. . . . . . . . . . . . . . . . . . . . . . . . . . . . . . . . . . . . . . . . .26
Ingrandimento . . . . . . . . . . . . . . . . . . . . . . . . . . . . . . . . . . . . . . . . . . . . . . . . . . . . . . . . . . . . . . . . . 26
Campo visivo . . . . . . . . . . . . . . . . . . . . . . . . . . . . . . . . . . . . . . . . . . . . . . . . . . . . . . . . . . . . . . . . . 26
I pianeti. . . . . . . . . . . . . . . . . . . . . . . . . . . . . . . . . . . . . . . . . . . . . . . . . . . . . . . . . . . . . . . . . . . . .27
Oggetti del profondo cielo . . . . . . . . . . . . . . . . . . . . . . . . . . . . . . . . . . . . . . . . . . . . . . . . . . . . . . . . . . 27
Condizioni del cielo . . . . . . . . . . . . . . . . . . . . . . . . . . . . . . . . . . . . . . . . . . . . . . . . . . . . . . . . . . . . . . 27
Selezione del sito di osservazione . . . . . . . . . . . . . . . . . . . . . . . . . . . . . . . . . . . . . . . . . . . . . . . . . . . . . . 28
Scelta del momento ideale per l'osservazione . . . . . . . . . . . . . . . . . . . . . . . . . . . . . . . . . . . . . . . . . . . . . . . . 28
Raffreddamento del telescopio . . . . . . . . . . . . . . . . . . . . . . . . . . . . . . . . . . . . . . . . . . . . . . . . . . . . . . . . 28
Adattamento degli occhi . . . . . . . . . . . . . . . . . . . . . . . . . . . . . . . . . . . . . . . . . . . . . . . . . . . . . . . . . . . 28
Astrofotografia . . . . . . . . . . . . . . . . . . . . . . . . . . . . . . . . . . . . . . . . . . . . . . . . . . . . . . . . . . . . . . . . .29
Strumenti per l'osservazione del profondo cielo . . . . . . . . . . . . . . . . . . . . . . . . . . . . . . . . . . . . . . . . . . . . . . . 29
Star Hopping . . . . . . . . . . . . . . . . . . . . . . . . . . . . . . . . . . . . . . . . . . . . . . . . . . . . . . . . . . . . . . . . . 30
CURA E PULIZIA DEL TELESCOPIO . . . . . . . . . . . . . . . . . . . . . . . . . . . . . . . . . . . . . . . . . . . . . . . . . 30
COLLIMAZIONE DI UN TELESCOPIO NEWTONIANO . . . . . . . . . . . . . . . . . . . . . . . . . . . . . . . . . . . . . . . 30
Allineamento dello specchio secondario . . . . . . . . . . . . . . . . . . . . . . . . . . . . . . . . . . . . . . . . . . . . . . . . . . . 31
Allineamento dello specchio primario. . . . . . . . . . . . . . . . . . . . . . . . . . . . . . . . . . . . . . . . . . . . . . . . . . . . .31
GARANZIA LIMITATA DI DUE ANNI CELESTRON . . . . . . . . . . . . . . . . . . . . . . . . . . . . . . . . . . . . . . . . . .32
4 I ITALIANO

ITALIANO I 5

• Mai guardare direttamente il Sole a occhio nudo o con un telescopio, a meno che non si disponga di un filtro solare adeguato. Ciò
potrebbe causare danni irreversibili agli occhi.
• Mai utilizzare il telescopio per proiettare un'immagine del Sole su una qualsiasi superficie. L'accumulo interno di calore può danneggiare
il telescopio e i relativi accessori ad esso fissati.
• Mai utilizzare un filtro solare per oculare o un prisma di Herschel. L'accumulo di calore all'interno del telescopio può causare l'incrinatura
o la rottura di tali dispositivi, lasciando che la luce solare non filtrata passi attraverso l'occhio.
• Mai lasciare il telescopio incustodito, sia in presenza di bambini sia di adulti che potrebbero non avere familiarità con le corrette procedure
di funzionamento del telescopio.
AVVERTIMENTO SOLARE
6 I ITALIANO

1. Tubo del telescopio
2. Cercatore StarPointer
3. Oculare
4. Diagonale stellare
5. Manopola di messa a fuoco
6. Treppiede
7. Vano accessori
8. Morsetto delle gambe del treppiede
9. Manopola di blocco dell'altezza
10. Manopola di montaggio del telescopio
11. Obiettivo
12. Montatura computerizzata
13. Interruttore On/Off
14. Comando manuale e relativo supporto
Si consiglia di conservare la confezione del telescopio per riporre il telescopio quando non è in uso. Disimballare con attenzione la
confezione poiché alcuni componenti sono di piccole dimensioni. Utilizzare l'elenco dei componenti fornito di seguito per verificare che
siano presenti tutti i componenti e gli accessori.
ELENCO COMPONENTI
CONTENUTO DELLA CONFEZIONE
1. Tubo del telescopio
2. Manopola di montaggio del telescopio
3. Manopola di blocco dell'altezza
4. Specchio primario
5. Montatura computerizzata
6. Treppiede
7. Vano accessori
8. Morsetto delle gambe del treppiede
9. Cercatore StarPointer
10. Oculare
11. Manopola di messa a fuoco
12. Interruttore On/Off
13. Comando manuale e relativo supporto
(In figura Rifrattore 80LCM)
(In figura, telescopio Newtoniano 114LCM)
3
5
6
11
2
4
7
9
10
12
13
14
8
1
3
4
1
13
10
5
6
11
2
9
12
7
8
ITALIANO I 7

MONTAGGIO DEL TELESCOPIO
TREPPIEDE
Il treppiede LCM è fornito completamente assemblato, pertanto
il montaggio è semplice. Per impostare il treppiede procedere
come segue:
1. Estrarre il treppiede dalla confezione.
2. Allentare i morsetti alla base di ciascuna gamba spostando la
leva verso l'esterno. Estendere la sezione interna della gamba
fino alla lunghezza desiderata. Serrare i morsetti delle gambe
spostando la leva verso l'interno in modo da fissare le gambe.
3. Mettere il treppiede in posizione verticale e tirare le gambe
dello stesso verso l’esterno fino a quando il supporto centrale
non scatta in posizione.
4. Posizionare il vano accessori sopra il supporto in linea con
il foro al centro. Ruotare il vano accessori fino a quando le
linguette ai tre punti del vano stesso scattano in posizione
su ciascun braccio del supporto centrale del treppiede.
5. Fissare il comando manuale posizionando il supporto con la
la linguetta di plastica quadrata rivolta verso l'alto e spingerlo
contro la gamba del treppiede fino a quando non scatta in
posizione.
MONTATURA COMPUTERIZZATA
Per fissare la montatura computerizzata al treppiede procedere
come segue:
1. Sistemare la base motorizzata in cima al treppiede
assicurandosi che i tre piedini rotondi poggino sui cuscinetti
piatti rotondi all'interno della testa del treppiede.
2. Avvitare la vite di montaggio posta sotto la testa del treppiede
sul foro situato sul fondo della testa motorizzata e serrare a
mano per fissare la montatura in posizione.
Ora che la base è stata fissata al treppiede, si consiglia di utilizzare
la livella a bolla in dotazione per livellare il telescopio in maniera
più precisa:
3. Sistemare la livella a bolla in cima alla base motorizzata.
4. Regolare le gambe del treppiede fino al quando la livella a bolla
mostra la base a livello.
8 I ITALIANO

TUBO DEL TELESCOPIO
DIAGONALE STELLARE (solo telescopi rifrattori)
La diagonale per raddrizzare le immagini si fissa sul retro del
telescopio e contiene un piccolo prisma che riflette la luce a un
angolo di 90°, consentendo una posizione di osservazione più
comoda. La maggior parte dei telescopi astronomici offriranno
una vista che è rovesciata oppure invertita da sinistra a destra.
La diagonale per raddrizzare le immagini corregge l'immagine
stessa in modo da avere un'immagine correttamente orientata al
100%, rendendo il telescopio ideale per l'osservazione terrestre
durante il giorno.
Per inserire la diagonale procedere come segue:
1. Rimuovere i coperchi da entrambi i lati della diagonale.
2. Allentare le viti sul retro del focheggiatore ed estrarre il piccolo
coperchio antipolvere.
3. Inserire il tubo più piccolo della diagonale sul retro del
focheggiatore e fissarlo serrando le viti. È possibile regolare
l'angolo della diagonale stellare in qualsiasi direzione
desiderata prima di stringere le viti.
NOTA: La diagonale per raddrizzare le immagini non raggiungerà la messa
a fuoco sul telescopio newtoniano. L'immagine apparirà sempre capovolta nei
telescopi Newtoniani.
Per fissare il tubo del telescopio alla montatura procedere
come segue:
1. Allentare il blocco dell'altezza ruotando la manopola in senso
antiorario. Ruotare la manopola di montaggio del tubo in modo
che sia posizionata in cima alla base. Serrare nuovamente la
manopola di blocco dell'altezza ruotandola in senso orario.
Non serrare eccessivamente.
2. Allentare la manopola di montaggio del telescopio ruotandola
in senso antiorario.
3. Far scorrere la sbarra di montaggio a coda di rondine del tubo
del telescopio sul morsetto del tubo. Assicurarsi che la scritta
sul tubo del telescopio sia correttamente in verticale quando il
tubo è fissato alla base.
4. Serrare la manopola di montaggio del telescopio ruotandola in
senso orario in modo da fissare il tubo alla base.
Il telescopio è ora completamente montato ed è pronto per
collegarvi gli accessori.
Manopola di
montaggio telescopio
Manopola di
blocco altezza
ITALIANO I 9

OCULARE
Il telescopio è dotato di due oculari. L'oculare da 25 mm fornisce un basso ingrandimento con un campo visivo moderatamente ampio.
L'oculare da 9 mm fornisce un maggiore ingrandimento, ma un campo visivo più ristretto. È possibile acquistare altri oculari per aumentare
o diminuire l'ingrandimento al livello desiderato. Durante la prima localizzazione di un oggetto, è preferibile utilizzare l'oculare da 25 mm,
quindi, una volta che l'oggetto è centrato, cambiare l'oculare con quello da 9 mm per "zoomare" su di esso.
CERCATORE STARPOINTER
Il telescopio è dotato di un cercatore StarPointer a puntino rosso
che viene utilizzato come strumento di visione quando si punta il
telescopio verso un oggetto prestabilito.
Per installare il cercatore procedere come segue:
1. Allentare le due viti con testa a croce sul lato del cercatore e far
scorrere il morsetto sopra la staffa a coda di rondine vicino al
focheggiatore del telescopio. L'ampia finestrella del cercatore
dovrebbe essere rivolta verso la parte anteriore del telescopio.
2. Fissare il cercatore in posizione serrando le due viti con
testa a croce. Non serrare eccessivamente le viti, stringere in
modo saldo.
3. Rimuovere la piccola linguetta di plastica sotto il coperchio
della batteria tirandola verso l'esterno. Ciò impedisce che
la batteria si scarichi accidentalmente durante il trasporto.
Per installare l'oculare sui telescopi rifrattori 60LCM e 80LCM
procedere come segue:
1. Allentare le viti sull'estremità aperta del diagonale stellare.
2. Inserire il barilotto color argento dell’oculare da 25 mm nella
diagonale stellare.
3. Serrare le viti per fissare l'oculare in posizione.
4. Per vedere l'immagine in maniera più nitida possibile, mettere
a fuoco guardando attraverso l'oculare e ruotando lentamente
le manopole di messa a fuoco fino a quando l'immagine non è
completamente nitida.
Per installare l’oculare sul telescopio Newtoniano 114LCM
procedere come segue:
1. Allentare la vite sul retro del focheggiatore ed rimuovere il
coperchio antipolvere.
2. Inserire il barilotto color argento dell’oculare da 25 mm
direttamente nel focheggiatore.
3. Serrare la vite per fissare l'oculare in posizione.
4. Per vedere l'immagine in maniera più nitida possibile, mettere
a fuoco guardando attraverso l'oculare e ruotando lentamente
le manopole di messa a fuoco fino a quando l'immagine non è
completamente nitida.
Rifrattore
Newtoniano
Interruttore
alimentazione/luminosità
Manopola di
regolazione su/giù
Manopola di regolazione
su/giù
Vano
batteria
10 I ITALIANO

SOSTITUZIONE DELLA BATTERIA DEL CERCATORE
Per sostituire la batteria StarPointer, rimuovere il cercatore
dall'alloggiamento e capovolgerlo. Il vano batterie si trova proprio
sotto il gruppo delle lenti grandi. Utilizzando un piccolo cacciavite
o l'unghia, sollevare delicatamente verso l'alto il coperchio per
rimuoverlo. La batteria è tenuta in posizione da un contatto a molla.
Sollevare questo contatto delicatamente e girare lateralmente il
cercatore. La batteria dovrebbe scivolare fuori. Sostituire la batteria
con una batteria a bottone interna tipo CR2032 da 3 Volt. Inserire
la nuova batteria sotto il contatto, facendo in modo che il polo
positivo della batteria (lato contrassegnato con un “+”) sia rivolto
verso l'alto, verso il contatto a molla. La batteria deve scattare in
posizione. Sistemare nuovamente il coperchio allineando i perni
sul coperchio con i fori nel cercatore e spingendo verso il basso.
Assicurarsi di smaltire la batteria vecchia secondo le leggi locali.
COMANDO MANUALE
Il comando manuale LCM dispone di un connettore tipo jack del
telefono all'estremità del cavo.
Per collegarlo al telescopio procedere come segue:
1. Localizzare la porta del comando manuale in cima alla
montatura computerizzata.
2. Spingere la spina all'estremità del cavo del comando manuale
nella porta fino a quando non scatta in posizione.
3. Far scorrere verso il basso il comando manuale sul supporto posto
sulla gamba del treppiede. Per rimuoverlo, sollevarlo verso l'alto.
Il telescopio LCM può essere alimentato da 8 batterie alcaline
di tipo AA fornite dall'utente oppure da un adattatore CA
opzionale da 12 v.
Per installare le batterie nel telescopio procedere come segue:
1. Premere la linguetta sulla parte anteriore del vano batteria e
rimuovere il coperchio.
2. Rimuovere delicatamente il supporto della batteria dall'interno
del vano batteria.
3. Posizionare le 8 batterie AA (fornite dall'utente) all'interno del
supporto batteria, facendo attenzione a far corrispondere la
polarità delle batterie ai segni sul supporto batteria.
4. Riporre il supporto batteria all'interno della base e posizionare
nuovamente il coperchio.
5. Far scorrere l'interruttore di accensione sulla posizione "On".
La spia del pulsante di alimentazione e il comando manuale
si illuminano.
NOTA: Quando si sostituiscono le batterie, assicurarsi di sostituire tutte le 8
batterie con batterie nuove. Non mischiare batterie nuove e batterie obsolete.
ACCENSIONE DEL TELESCOPIO
Vano
batteria
Uscita 12 v
Interruttore di
alimentazione
Porta
comando manuale
Linguetta di rilascio
vano batteria
Linguetta di rilascio
vano batteria
ITALIANO I 11

SPOSTAMENTO DEL TELESCOPIO
La montatura computerizzata LCM è stata ideata per essere spostata tramite il comando manuale. Dopo l'accensione, è possibile fare
ciò premendo i quattro tasti direzionali sul comando manuale. È possibile modificare la velocità dei motori premendo il pulsante MOTOR
SPEED (VELOCITÀ MOTORE), quindi selezionando un numero da 1 a 9. Per l'impostazione iniziale tenere la velocità al di sopra della
Velocità motore 5. Quando si impiega il comando manuale per ruotare il telescopio, il blocco dell'altezza deve essere serrato.
È possibile spostare il telescopio a mano lungo l'asse dell'altezza, ma solo una volta allentato il blocco dell'altezza. Nel caso in cui il
blocco non venga allentato e si forzi il telescopio verso il basso o verso l'alto potrebbero verificarsi danni al motore o agli ingranaggi.
La montatura non è dotata di un blocco per l'azimut (cioè in direzione sinistra-destra). Non è sicuro spostare il telescopio a mano verso
sinistra o destra.
ALLINEAMENTO DEL CERCATORE
Il cercatore StarPointer è un mirino reflex che utilizza un LED rosso per proiettare un puntino rosso sulla finestrella di vetro rotonda. Quando si
guarda attraverso la finestra, si vede il puntino rosso sovrapposto all'obiettivo. La prima volta che si monta il telescopio è necessario allineare
il cercatore le ottiche principali del telescopio. Sebbene questa operazione possa essere effettuata di notte, è decisamente più facile da
eseguire di giorno. Una volta completato l'allineamento del cercatore, non è necessario ripetere questo passaggio salvo che il cercatore
riceva un colpo o cada.
Per allineare il cercatore StarPointer procedere come segue:
1. Portare fuori il telescopio durante il giorno. A occhio nudo, individuare un oggetto facilmente riconoscibile, come ad esempio un semaforo, la
targa di un'auto o un albero di grandi dimensioni. L'oggetto deve trovarsi il più lontano possibile, ma almeno a 400 metri.
2. Rimuovere dal telescopio il tappo principale e assicurarsi che sia installato l'oculare da 25 mm.
3. Spostare il telescopio in modo che punti all'incirca verso l'oggetto scelto al punto 1.
4. Osservare attraverso il telescopio mediante l'oculare e muovere manualmente il telescopio fino a quando l'oggetto scelto non si trova al
centro del campo visivo. Se l'immagine è sfocata, ruotare le manopole di messa a fuoco fino a raggiungere una buona messa a fuoco.
5. Una volta centrato l'oggetto nell'oculare da 25 mm, accendere il cercatore ruotando la manopola di accensione/luminosità sul lato
dell'unità fino a finecorsa.
6. Con la testa a circa 30 cm (1 piede) dal cercatore, guardare attraverso la finestrella rotonda e trovare il puntino rosso. Sarà probabilmente
vicino, non al di sopra dell'oggetto quando si guarda attraverso l'oculare da 25 mm.
7. Senza muovere il telescopio, ruotare le due manopole di regolazione sul lato e sotto il cercatore. Una controlla il movimento sinistra-destra
del reticoloe, mentre l'altra controlla il movimento su-giù. Regolare entrambe fino a quando il punto rosso non si trova esattamente sopra
l'oggetto osservato mediante l'oculare da 25 mm.
Quindi individuare altri oggetti distanti per praticare il puntamento del telescopio. Osservare attraverso la finestrella del cercatore StarPointer
e collocare il punto rosso sull'oggetto che si desidera osservare verificando che si trovi nell'oculare da 25 mm del telescopio.
NOTA: Per risparmiare batteria, assicurarsi di spegnere il cercatore StarPointer quando non in uso.
12 I ITALIANO

FUNZIONAMENTO DEL TELESCOPIO
COMANDO MANUALE
Il comando manuale del telescopio LCM è progettato per dare all'utente un accesso istantaneo a tutte le funzioni offerte dal telescopio.
Con una rotazione automatica verso più di 4.000 oggetti e descrizioni del menu semplici, persino un principiante può padroneggiare
la varietà di funzioni in solo poche sessioni di osservazione. Qui di seguito, una breve descrizione dei singoli componenti del comando
manuale del telescopio LCM.
1. SCHERMO LCD (CRISTALLI LIQUIDI)-
Presenta uno
schermo di visualizzazione a quattro righe da 18 caratteri con
retroilluminazione rossa per una comoda visualizzazione delle
informazioni del telescopio e per scorrere il testo.
2. ALIGN- Fornisce istruzioni al comando manuale per iniziare il
processo di allineamento del telescopio.
3. TASTI DIREZIONALI- Consentono pieno controllo della
montatura in qualsiasi direzione. Utilizzare i tasti direzionali per
centrare gli oggetti nell’oculare o per ruotare manualmente il
telescopio.
4. TASTI DEI CATALOGHI- La montatura dispone di un tasto sul
comando manuale che consente l’accesso diretto a ciascuno
dei cataloghi principali nel suo database contenente più di
40.000 oggetti. La montatura contiene nel proprio database i
seguenti cataloghi:
• SISTEMA SOLARE- Tutti i 7 pianeti presenti nel Sistema solare
più la Luna, il Sole e Plutone.
• STELLE- Elenchi personalizzati di tutte le stelle più luminose,
le stelle doppie, le stelle variabili, le costellazioni e gli asterismi.
• PROFONDO CIELO- Elenchi personalizzati di tutte le migliori
galassie, nebulose e ammassi stellari nonché gli oggetti
Messier e NGC selezionati completi.
5. IDENTIFY-
Consente di cercare nel database e visualizza
il nome e la distanza degli oggetti corrispondenti più vicini.
6. MENU- Visualizza le varie funzioni di configurazione e di utilità, quali la velocità di tracciatura, gli oggetti definiti dall’utente e
molto altro.
7. OPZIONI (LOGO CELESTRON)- Può essere utilizzato in combinazione con gli altri tasti per accedere a caratteristiche e
funzionalità più avanzate.
8. ENTER- Il tasto ENTER (INVIO) consente di selezionare qualsiasi funzione, di accettare i parametri immessi e di ruotare il telescopio
verso gli oggetti visualizzati.
9. BACK- Il tasto BACK (INDIETRO) farà uscire l’utente dal menu corrente e visualizzerà il livello precedente del percorso del
menu. Premere BACK (INDIETRO) ripetutamente per andare al menu principale oppure per cancellare i dati inseriti per sbaglio.
10. SKY TOUR- Attiva la modalità tour che elenca tutti i migliori corpi celesti e consente di spostare il telescopio verso di essi.
11. TASTI DI SCORRIMENTO- Utilizzati per scorrere verso l'alto e verso il basso all'interno di qualsiasi elenco del menu. Un simbolo
raffigurante una doppia freccia sul lato destro dello schermo LCD indica che i tasti di scorrimento possono essere utilizzati per
visualizzare informazioni aggiuntive.
12. MOTOR SPEED- Ruota il telescopio più velocemente o più lentamente quando sono premuti i tasti direzionali.
13. OBJECT INFO- Mostra coordinate e informazioni utili provenienti dal database sugli oggetti.
14. JACK INGRESSO- Consente di collegare il telescopio a un computer per utilizzarlo con software per la capacità di rotazione
point-and-click e per aggiornare il firmware tramite PC.
4
5
6
7
8
9
10
11
11
12
13
14
15
2
4
1 1
3
ITALIANO I 13

FUNZIONAMENTO DEL COMANDO MANUALE
In questa sezione sono descritte le procedure di base del comando manuale necessarie per l'utilizzo del telescopio LCM.
ALIGNMENT MENU (MENU ALLINEAMENTO)
Affinché il telescopio LCM possa puntare precisamente gli oggetti nel cielo, esso deve prima allinearsi con posizioni note (stelle) nel cielo. Con
questa informazione, il telescopio può creare un modello del cielo, che utilizzerà per individuare qualsiasi oggetto con coordinate note. Esistono
molti modi per allineare il proprio telescopio LCM con il cielo, a seconda delle informazioni che l’utente è in grado di fornire:
• SkyAlign funziona allineando tre stelle luminose o pianeti qualsiasi nel cielo.
• L'allineamento automatico a due stelle visualizza un elenco degli oggetti diurni visibili (pianeti e la Luna) disponibili per allineare
il telescopio.
• L'allineamento a due stelle utilizza le informazioni di ora/posizione inserite e consente all’utente di selezionare due stelle di
allineamento verso le quali il telescopio ruoterà automaticamente.
• L'allineamento a una stella utilizza le informazioni di ora/posizione inserite e consente all’utente di selezionare una stella di
allineamento. Fornisce un allineamento più rapido, ma meno precisione nel puntare verso gli oggetti.
• L'allineamento con il Sistema Solare visualizza un elenco degli oggetti diurni visibili (pianeti e la Luna) disponibili per allineare
il telescopio.
NOTA: Esistono altri due metodi di allineamento mostrati dal comando manuale, EQ North (EQ Nord) ed EQ South (EQ Sud), ma questi si applicano solo alle
montature altazimutali che possono essere fissate a un prisma equatoriale. La montatura del telescopio LCM non è dotata di questa funzionalità.
SKYALIGN
SkyAlign è il modo più semplice per allineare il telescopio e iniziare da subito le osservazioni. Anche senza conoscere una sola stella in cielo,
il telescopio LCM consente l'allineamento in pochi minuti richiedendo informazioni basiche come la data, l'ora e la posizione. Basta quindi
semplicemente puntare il telescopio su tre qualsiasi oggetti celesti luminosi nel cielo. Poiché SkyAlign non richiede alcuna conoscenza del
cielo di notte, non è necessario conoscere il nome delle stelle verso cui si sta puntando. È possibile addirittura utilizzare un pianeta o la Luna. Il
telescopio LCM è quindi pronto per iniziare a cercare e tracciare un qualsiasi oggetto tra i 4.000 presenti nel database. Prima che il telescopio
sia pronto per essere allineato, deve essere montato in un luogo all'aperto con tutti gli accessori (oculare, diagonale e cercatore), rimuovendo
il tappo della lente come descritto nella sezione Montaggio del manuale. Per avviare SkyAlign procedere come segue.
1. Accendere il telescopio LCM scorrendo l'interruttore verso il lato della base, in posizione "on". Una volta acceso, sul display del comando
manuale compare la dicitura "LCM Ready" (LCM pronto). Premere ENTER (INVIO) per selezionare SkyAlign. Premendo il tasto ALIGN
(ALLINEA) si saltano le altre opzioni di allineamento e il testo a scorrimento, avviando in automatico SkyAlign.
2. Una volta selezionato SkyAlign, sul comando manuale vengono visualizzate le diciture "Enter if OK" (Accedi se OK), "Undo to edit" (Annulla
per modificare) e "Saved Site" (Punto di osservazione salvato). Nella parte inferiore dello schermo LCD vengono visualizzate l'ora corrente o
l'ora dell'ultimo utilizzo del telescopio. Se si sta utilizzando il telescopio LCM per la prima volta, premere UNDO (ANNULLA) per immettere
informazioni su ora/luogo correnti.
Sul display del comando manuale vengono poi richieste le seguenti informazioni:
• Location (Posizione)- Il comando manuale visualizzerà un elenco di città tra cui scegliere. Scegliere dal database la città più vicina al sito
di osservazione corrente. La città scelta sarà salvata nella memoria del comando manuale in modo che sia visualizzata automaticamente
la volta successiva che si eseguirà l’allineamento. In alternativa, se si conoscono la latitudine e la longitudine esatte del proprio sito di
osservazione, esse possono essere inserite direttamente nel comando manuale ed essere salvate allo stesso modo per l'uso futuro. Per
scegliere una città:
1. Utilizzare i tasti di scorrimento Su e Giù per scegliere tra "City Database" (Database città) e "Custom Site" (Punto di osservazione
personalizzato). L'opzione "City Database" (Database città) consente di selezionare la città più vicina al punto di osservazione da un
elenco di città internazionali o statunitensi. L'opzione "Custom Site" (Punto di osservazione personalizzato) consente di digitare latitudine
e longitudine del punto di osservazione. Selezionare "City Database" (Database città) e premere ENTER (INVIO).
2. Il comando manuale consentirà di scegliere tra località statunitensi e internazionali. Per un elenco delle località statunitensi per stato
e quindi per città, premere ENTER (INVIO) mentre è visualizzata la dicitura Stati Uniti. Per le località internazionali, utilizzare i tasti di
scorrimento Su e Giù per selezionare "International" (Internazionale) e premere ENTER (INVIO).
3. Utilizzare i tasti di scorrimento Su e Giù per scegliere lo stato corrente (o il Paese in caso sia stata selezionata una località
Internazionale) dall’elenco in ordine alfabetico e premere ENTER (INVIO).
4. Utilizzare i tasti di scorrimento Su e Giù per scegliere la città più vicina alla propria posizione dall’elenco visualizzato e premere
ENTER (INVIO).
14 I ITALIANO

• Time (Ora)- Inserire l'ora corrente della propria zona. È possibile inserire l’ora locale (ad es., 08:00), oppure è possibile inserire l’ora
militare (ad es., 20:00).
1. Selezionare PM o AM. In caso sia stata inserita l’ora militare, il comando manuale salterà questo passaggio.
2. Scegliere tra Standard time (Ora solare) e Daylight Savings time (Ora legale). Utilizzare i tasti di scorrimento Su e Giù (6 o 9 sulla
tastiera) per passare da un'opzione all'altra.
3. Selezionare il proprio fuso orario. Nuovamente, utilizzare i tasti Su e Giù (6 o 9 sulla tastiera) per scorrere tra le scelte. Per informazioni
sui fusi orari, consultare la mappa dei fusi orari in appendice al manuale.
• Date (Data) - Inserire il mese, il giorno e l’anno della sessione di osservazione. Il display mostra: mm/gg/aa.
1. Se sono state inserite informazioni non corrette tramite il comando manuale, il pulsante UNDO (ANNULLA) funge da tasto indietro
consentendo all'utente di inserire nuovamente le informazioni.
2. A ogni successivo allineamento del telescopio, il comando manuale visualizza in automatico l'ultima posizione (città o longitudine/
latitudine) inserita. Premere ENTER (INVIO) per confermare i parametri se ancora validi. Premendo il pulsante UNDO (ANNULLA) è
possibile tornare indietro e selezionare una nuova città o una nuova longitudine/latitudine.
3. Utilizzare i tasti direzionali sul comando manuale per ruotare (muovere) il telescopio verso un oggetto celeste luminoso nel cielo. Allineare
l'oggetto con il punto rosso del cercatore e premere ENTER (INVIO).
4. Se il cercatore è stato correttamente allineato con il tubo del telescopio, la stella di allineamento dovrebbe ora essere visibile all'interno
del campo visivo dell'oculare. Il comando manuale richiede di centrare la stella luminosa di allineamento al centro dell'oculare e di
premere il pulsante ALIGN (ALLINEA). Ciò accetterà la stella come prima posizione di allineamento. (Non è necessario regolare la
velocità di spostamento dei motori dopo ogni passaggio della procedura di allineamento. Il telescopio LCM seleziona automaticamente
la migliore velocità di spostamento allineando gli oggetti sia nel cercatore sia nell'oculare.)
5. Come secondo oggetto di allineamento, selezionare una stella o un pianeta luminosi il più possibile lontani dal primo oggetto di
allineamento. Utilizzare nuovamente i tasti direzionali per centrare l'oggetto nel cercatore, quindi premere ENTER (INVIO). Quindi, una
volta centrato nell'oculare, premere il pulsante ALIGN (ALLINEA).
6. Ripetere la procedura per la terza stella di allineamento. Una volta allineato il telescopio alla terza stella, sul display viene visualizzata la
dicitura "Match Confirmed" (Abbinamento confermato). Premere UNDO (ANNULLA) per mostrare i nomi degli oggetti luminosi allineati,
oppure premere ENTER (INVIO) per accettare i tre oggetti per l'allineamento. Il telescopio è pronto per cercare il primo corpo celeste.
SUGGERIMENTI PER L'USO DI SKYALIGN
Ricordare di seguire le linee guida per l'allineamento per rendere l'utilizzo di SkyAlign il più semplice e preciso possibile.
• Assicurarsi di livellare il treppiede prima di iniziare l'allineamento. Le informazioni su ora/luogo, insieme a un treppiede a livello,
consentono al telescopio di prevedere in modo migliore le stelle luminose e i pianeti disponibili che si trovano al di sopra dell'orizzonte.
• Ricordare di selezionare per l'allineamento stelle che siano più distanti possibile l'una dall'altra nel cielo. Per risultati
ottimali assicurarsi che la terza stella di allineamento non si trovi sulla linea retta che unisce le prime due stelle. Ciò potrebbe causare
un allineamento non corretto.
• Non c'è da preoccuparsi di confondere i pianeti per stelle al momento della selezione degli oggetti di allineamento.
SkyAlign funziona con i quattro pianeti più luminosi (Venere, Giove, Saturno e Marte) e con la Luna. Oltre ai pianeti, il comando manuale
possiede oltre 80 stelle luminose di allineamento tra cui scegliere (fino a un ingrandimento di 2,5).
• In rari casi SkyAlign potrebbe non essere in grado di determinare quali oggetti di allineamento sono stati centrati. Ciò avviene a volte
quando un pianeta luminoso o la Luna passano vicino a una delle stelle più luminose. In simili situazioni, è preferibile evitare
l'allineamento verso tali oggetti, se possibile.
• Assicurarsi di centrare gli oggetti con lo stesso movimento finale della direzione dell'approccio VaiA. Per esempio, se il
telescopio finisce normalmente un VaiA con la parte anteriore del telescopio che si sposta a destra e verso l'alto, centrare i tre oggetti
di allineamento nell'oculare utilizzando i pulsanti freccia destra e su (le frecce su/giù invertono la direzione a una velocità pari a 6 o
inferiore). Avvicinarsi alla stella da questa direzione mentre si osserva attraverso l'oculare elimina gran parte dei contraccolpi tra gli
ingranaggi e assicura un allineamento quanto più accurato possibile.
ITALIANO I 15

AUTO TWO-STAR ALIGN (ALLINEAMENTO AUTOMATICO DI DUE STELLE)
Similmente a SkyAlign, l'allineamento automatico di due stelle richiede che l'utente immetta le necessarie informazioni su ora/luogo come fatto
in precedenza. Una volta inserite tali informazioni, il comando manuale richiede di selezionare e puntare il telescopio su una stella nota
nel cielo. Il telescopio LCM possiede ora tutte le informazioni necessarie per selezionare in automatico una seconda stella e assicurare
un allineamento ottimale. Una volta selezionata, il telescopio ruota in automatico verso la seconda stella di allineamento per completare
l'allineamento. Con il telescopio LCM collocato all'esterno, gli accessori montati e il treppiede livellato, seguire i passaggi indicati a
continuazione per completare l'allineamento.
1. Una volta acceso il telescopio LCM, premere ENTER (INVIO) per avviare l'allineamento.
2. Utilizzare i tasti di scorrimento Su e Giù (tasto 6 o 9) per selezionare Auto Two-Star Align (Allineamento automatico di due stelle) e premere
ENTER (INVIO).
3. ll comando manuale visualizza ora e posizione dell'ultimo utilizzo. Utilizzare i tasti Su e Giù per scorrere le informazioni. Premere ENTER
(INVIO) per accettare le informazioni correnti o premere UNDO (ANNULLA) per immettere manualmente le informazioni (vedere la sezione
SkyAlign per istruzioni dettagliate su come inserire informazioni su ora/luogo).
4. Sul display viene richiesto di selezionare una stella luminosa dall'elenco visualizzato sul comando manuale. Utilizzare i tasti Su e Giù per
selezionare la stella desiderata, quindi premere ENTER (INVIO).
5. Utilizzare i tasti direzionali per ruotare il telescopio sulla stella desiderata. Centrare la stella nel cercatore e premere ENTER (INVIO). Quindi,
centrare la stella nell'oculare e premere ALIGN (ALLINEA).
6. In base alle informazioni, il telescopio LCM visualizza in automatico la seconda stella di allineamento più adatta sopra l'orizzonte. Premere
ENTER (INVIO) per ruotare il telescopio in automatico sulla stella visualizzata. Se, per qualche ragione, non si desidera utilizzare la stella
selezionata dal comando manuale (magari si trova dietro un albero o un edificio) è possibile:
• Premere il tasto UNDO (ANNULLA) per visualizzare la successiva stella di allineamento più adatta.
• Utilizzare i tasti di scorrimento Su e Giù per selezionare manualmente una qualsiasi stella dall'elenco delle stelle disponibili.
Al termine, lo schermo richiede di utilizzare i tasti direzionali per allineare la stella selezionata con il punto rosso del cercatore. Una volta centrata
la stella nel mirino, premere ENTER (INVIO). Sul display vengono poi visualizzate le istruzioni per centrare la stella nel campo visivo dell'oculare.
Quando la stella è centrata, premere ALIGN (ALLINEA) per confermare la stella come seconda stella di allineamento. Una volta allineato il
telescopio a due stelle, sul display viene visualizzata la dicitura "Align Success" (Allineamento riuscito) ed è possibile iniziare la ricerca del
primo oggetto.
TWO-STAR ALIGN (ALLINEAMENTO DI DUE STELLE)
Mediante il metodo di allineamento a due stelle, il telescopio LCM necessita che l'utente conosca i nomi e le posizioni di due stelle luminose
per allineare in modo preciso il telescopio al cielo e iniziare a trovare altri corpi celesti. Di seguito viene descritta la procedura per l'allineamento
di due stelle.
1. Una volta acceso il telescopio LCM, utilizzare i tasti di scorrimento Su e Giù per selezionare "Two-Star Align" (Allineamento di due stelle) e
premere ENTER (INVIO).
2. Premere ENTER (INVIO) per confermare le informazioni su ora/luogo visualizzate sul display o premere UNDO (ANNULLA) per immettere
nuove informazioni.
3. Il messaggio SELECT STAR 1 (SELEZIONA STELLA 1) viene visualizzato nella parte superiore del display. Utilizzare i tasti di scorrimento
Su e Giù per selezionare la stella che si desidera utilizzare come prima stella di allineamento. Premere ENTER.
4. Il telescopio LCM richiede di centrare nell'oculare la stella di allineamento selezionata. Utilizzare i tasti direzionali per ruotare il telescopio sulla
stella di allineamento, quindi centrare con attenzione la stella nel cercatore. Al termine, premere ENTER (INVIO).
5. Quindi, centrare la stella nell'oculare e premere ALIGN (ALLINEA). Per centrare la stella di allineamento con precisione nell'oculare,
diminuire la velocità di rotazione del motore. Fare ciò premendo il tasto MOTOR SPEED (VELOCITÀ MOTORE) sul comando manuale,
seguito dal numero che corrisponde alla velocità desiderata. (9 = più veloce, 1 = più lento).
6. Il comando manuale richiede poi di selezionare e centrare una seconda stella di allineamento, quindi di premere il tasto ALIGN (ALLINEA).
L'opzione migliore è selezionare stelle di allineamento che si trovino a una certa distanza l'una dall'altra. Stelle che si trovano a una distanza
tra 40º e 60º l'una dall'altra consentono un allineamento più preciso rispetto a stelle più vicine tra loro.
Una volta terminato l'allineamento della seconda stella sul display viene visualizza la dicitura "Align Successful" (Allineamento riuscito) e i motori
di tracciatura si avviano.
16 I ITALIANO

ONE-STAR ALIGN (ALLINEAMENTO DI UNA STELLA)
L'allineamento di una stella richiede di inserire le stesse informazioni necessarie per la procedura di Allineamento a due stelle. Tuttavia, invece
di ruotare verso due stelle di allineamento per la procedura di centratura e allineamento, il telescopio LCM usa una sola stella per creare un
modello del cielo sulla base delle informazioni fornite. Ciò consentirà all’utente di ruotare grossolanamente verso le coordinate di oggetti
luminosi quali la Luna e i pianeti e fornisce al telescopio LCM le informazioni necessarie per tracciare gli oggetti in qualsiasi parte del cielo in
base all'azimut. L'allineamento di una stella non è destinato a essere usato per individuare con precisione oggetti del profondo cielo piccoli
o deboli o per tracciare precisamente gli oggetti per l’acquisizione di immagini astrali. Per utilizzare la procedura di allineamento di una stella
procedere come segue.
1. Selezionare One-Star Align (Allineamento di una stella) dalle opzioni di allineamento.
2. Premere ENTER (INVIO) per confermare le informazioni su ora/luogo visualizzate sul display o premere UNDO (ANNULLA) per immettere
nuove informazioni.
3. Il messaggio SELECT STAR 1 (SELEZIONA STELLA 1) viene visualizzato nella parte superiore del display. Utilizzare i tasti di scorrimento
Su e Giù per selezionare la stella che si desidera utilizzare come prima stella di allineamento. Premere ENTER.
4. Il telescopio LCM richiede di centrare nell'oculare la stella di allineamento selezionata. Utilizzare i tasti direzionali per ruotare il telescopio sulla
stella di allineamento, quindi centrare la stella nel mirino con attenzione. Al termine, premere ENTER (INVIO).
5. Quindi, centrare la stella nell'oculare e premere ALIGN (ALLINEA).
6. Una volta in posizione, il telescopio LCM modella il cielo sulla base di queste informazioni e visualizza il messaggio "Align Successful"
(Allineamento riuscito).
NOTA: Una volta eseguito l’allineamento di una stella, è possibile utilizzare la funzionalità di Ri-allineamento (vedere sotto) per migliorare la precisione di
puntamento del telescopio.
SOLAR SYSTEM ALIGN(ALLINEAMENTO CON IL SISTEMA SOLARE)
L'allineamento con il sistema solare è progettato per fornire una buona tracciabilità e prestazioni GoTo (VaiA) utilizzando gli oggetti presenti
nel sistema solare (Sole, Luna e pianeti) per allineare il telescopio al cielo. L'allineamento con il sistema solare è un ottimo modo per allineare il
telescopio per l'osservazione diurna e un rapido modo per allineare il telescopio per le osservazioni notturne.
Mai guardare direttamente il Sole a occhio nudo o con un telescopio (a meno che non si disponga di un filtro solare
adeguato). Ciò potrebbe causare danni irreversibili agli occhi.
1. Selezionare Solar System Align (Allineamento con il sistema solare) dalle opzioni di allineamento.
2. Premere ENTER (INVIO) per confermare le informazioni su ora/luogo visualizzate sul display o premere UNDO (ANNULLA) per immettere
nuove informazioni.
3. Il messaggio SELECT OBJECT (SELEZIONA OGGETTO) viene visualizzato nella parte superiore del display. Utilizzare i tasti di scorrimento
Su e Giù per selezionare l'oggetto diurno (pianeta, Luna o Sole) che si intende allineare. Premere ENTER (INVIO).
4. Il telescopio LCM richiede di centrare nell'oculare l'oggetto di allineamento selezionato. Utilizzare i tasti direzionali per ruotare il telescopio
sull'oggetto di allineamento, quindi centrare con attenzione l'oggetto nel cercatore. Al termine, premere ENTER (INVIO).
5. Quindi, centrare l'oggetto nell'oculare e premere ALIGN (ALLINEA).
Una volta in posizione, il telescopio LCM modella il cielo sulla base di queste informazioni e visualizza il messaggio "Align Successful"
(Allineamento riuscito).
Scelta del Sole
Per ragioni di sicurezza, il Sole non sarà visualizzato in alcun elenco di oggetti del comando manuale a meno che esso non sia stato abilitato da
Utilities Menu (Menu Utilità). Per far sì che il Sole sia visualizzato sul comando manuale, procedere come segue:
1. Premere il tasto UNDO (ANNULLA) fino a quanto sullo schermo comparirà il messaggio "LCM Ready" (LCM pronto).
2. Premere il tasto MENU e utilizzare i tasti Su e Giù per selezionare Utilities Menu (Menu Utilità). Premere ENTER (INVIO).
3. Utilizzare i tasti Su e Giù per selezionare Sun Menu (Menu Sole) e premere ENTER (INVIO).
4. Premere di nuovo ENTER (INVIO) per consentire all'opzione Sun (Sole) di comparire sul display del comando manuale.
Il Sole può essere rimosso dalla visualizzazione utilizzando la stessa procedura di cui sopra. Per migliorare la precisione di puntamento del
telescopio, è possibile utilizzare la funzionalità Ri-allinea secondo quanto descritto qui di seguito.
ITALIANO I 17

RI-ALLINEAMENTO
Il telescopio LCM dispone di una funzionalità di ri-allineamento che consente di sostituire una qualsiasi delle stelle di allineamento originarie con
una nuova stella od oggetto celeste. Ciò può essere utile in varie situazioni:
• Se si esegue un'osservazione in un periodo di qualche ora, è possibile notare che le due stelle di allineamento originarie si sono
allontanate in modo considerevole verso ovest. (Ricordare che le stelle si spostano a una velocità di 15° all’ora). L’allineamento su una
nuova stella che si trova sulla parte orientale del cielo migliorerà la precisione di puntamento, specialmente per gli oggetti che si trovano
in quella parte del cielo.
• Se si è allineato il telescopio utilizzando il metodo di Allineamento di una stella, è possibile utilizzare la funzione di Ri-allineamento per
allinearsi su un altro oggetto del cielo. Ciò migliorerà la precisione di puntamento del telescopio senza dover inserire nuovamente
informazioni aggiuntive.
Per sostituire una stella di allineamento esistente con una nuova stella di allineamento procedere come segue.
1. Selezionare la stella desiderata (o l’oggetto) dal database e far ruotare verso di essa il telescopio.
2. Centrare con attenzione l'oggetto nell'oculare.
3. Al termine, premere il tasto UNDO (ANNULLA) per tornare al menu principale.
4. Quando sul display viene visualizzata la dicitura "LCM Ready" (LCM pronto), premere il tasto ALIGN (ALLINEA) sul comando manuale.
5. Sul display viene chiesto quale stella di allineamento si desidera sostituire.
6. Utilizzare i tasti di scorrimento Su e Giù per selezionare la stella di allineamento da sostituire, quindi premere ENTER (INVIO). Solitamente
è meglio sostituire la stella più vicina al nuovo oggetto. Questo distanzierà le stelle di allineamento nel cielo. Se è stato utilizzato uno
dei metodi di allineamento con oggetto singolo, è sempre meglio sostituire l'oggetto "non assegnato" con un oggetto vero e proprio.
7. Premere ALIGN (ALLINEA) per effettuare la modifica.
CATALOGO DEGLI OGGETTI
SELEZIONE DI UN OGGETTO
Ora che il telescopio è allineato correttamente, è possibile scegliere un oggetto da uno qualsiasi dei cataloghi presenti nel database LCM.
Il comando manuale presenta un tasto dedicato per ciascun catalogo presente nel database.
PIANETI
1. Premere il pulsante SOLAR SYSTEM (SISTEMA SOLARE) (tasto 1).
2. Utilizzare i pulsanti di scorrimento Su e Giù (tasto 6 o 9, non i tasti direzionali Su e Giù) per scorrere l'elenco degli oggetti del sistema
solare fino a quando quello desiderato non compare sullo schermo.
3. Premere ENTER (INVIO) per spostare il telescopio verso l'oggetto.
STELLE
1. Premere il pulsante STARS (STELLE) (tasto 2).
2. Utilizzare i pulsanti di scorrimento Su e Giù (tasto 6 o 9, non i tasti direzionali Su e Giù) per scorrere l'elenco delle categorie che contiene
l'oggetto desiderato, quindi premere ENTER (INVIO). Per quanto riguarda le stelle, sono disponibili le seguenti categorie: Named Stars
(Stelle identificate), SAO catalog (catalogo SAO), Variable Stars (Stelle variabili), Asterisms (Asterismi), Constellations (Costellazioni) e
Double Stars (Stelle doppie).
3. Utilizzare i pulsanti di scorrimento Su e Giù per selezionare l'oggetto che si desidera visualizzare e premere ENTER (INVIO). Il telescopio si
sposta verso l'oggetto.
4. Per quanto riguarda SAO catalog (Catalogo SAO), è necessario immettere solo le prime quattro cifre del codice SAO a sei cifre dell'oggetto.
Una volta immesse le prime quattro cifre, il comando manuale elencherà automaticamente tutti gli oggetti SAO disponibili che iniziano
per quei numeri. Utilizzare i pulsanti di scorrimento per navigare nell'elenco degli oggetti SAO disponibili usando questo prefisso e
selezionare l'oggetto desiderato premendo ENTER (INVIO).
18 I ITALIANO

OGGETTI DEL PROFONDO CIELO
1. Premere il pulsante DEEP SKY (PROFONDO CIELO) (tasto 3).
2. Utilizzare i pulsanti di scorrimento Su e Giù (tasto 6 o 9, non i tasti direzionali Su e Giù) per scorrere l'elenco delle categorie che contiene
l'oggetto desiderato, quindi premere ENTER (INVIO). Sono disponibili le seguenti categorie: Named Objects (Oggetti identificati), NGC
catalog (Catalogo NGC), Caldwell catalog (Catalogo Caldwell) e Messier catalog (Catalogo Messier).
3. Per quanto riguarda Named Objects Oggetti identificati), utilizzare i pulsanti di scorrimento Su e Giù per selezionare l'oggetto che si desidera
visualizzare e premere ENTER (INVIO). Il telescopio si sposta verso l'oggetto.
4. Se vengono selezionati i cataloghi NGC, Caldwell o Messier, è necessario inserire il numero del catalogo utilizzando il tastierino e premere
ENTER (INVIO) per spostarsi verso l'oggetto desiderato.
NOTA: Il comando manuale mostra esclusivamente oggetti che si trovano al di sopra dell'orizzonte. Gli oggetti che si trovano al di sotto dell'orizzonte vengono esclusi
dagli elenchi per evitare di perdere tempo nel cercare oggetti per cui il telescopio dovrà essere puntato in basso verso terra. È possibile modificare questa funzione e
consentire di puntare al di sotto dell'orizzonte modificando le impostazioni nel menu "Slew Limit" (Limite rotazione) e "Filter Limit" (Limite filtro) che sono trattati
più avanti nel presente manuale.
VISUALIZZAZIONE INFO OGGETTO
Una volta che l'oggetto desiderato sarà visualizzato sullo schermo del comando manuale, è anche possibile premere il tasto OBJECT
INFO (INFO OGGETTO). Ciò fornirà informazioni utili in merito all’oggetto selezionato, quali grandezza e costellazione nonché
informazioni interessanti in merito agli oggetti più luminosi e popolari presenti nel database.
È possibile ottenere informazioni sull'oggetto senza dovere effettuare un allineamento della stella. Una volta acceso il telescopio,
premendo un qualsiasi tasto relativo ai cataloghi è possibile scorrere gli elenchi degli oggetti o accedere ai numeri di catalogo nonché
visualizzare informazioni relative all'oggetto come descritto sopra.
MODALITÀ SKY TOUR
Se non si è certi di quali oggetti cercare, il telescopio LCM presenta una funzione Sky Tour che mostra un elenco degli oggetti più
luminosi e interessanti che si trovano al di sopra dell'orizzonte.
1. Premere il pulsante SKY TOUR (tasto 5) per accedere al menu.
2. Utilizzare i pulsanti di scorrimento Su e Giù per selezionare l'oggetto che si desidera visualizzare e premere ENTER (INVIO). Il telescopio si
sposta verso l'oggetto.
PULSANTI DIREZIONALI
Il telescopio LCM dispone di quattro tasti direzionali posti al centro del comando manuale, i quali controllano il movimento del telescopio
in altezza (su e giù) e in azimut (sinistra e destra). Il telescopio può essere controllato a nove diverse velocità.
ITALIANO I 19

Premere il tasto MOTOR SPEED (VELOCITÀ MOTORE) consente
di modificare istantaneamente la velocità dei motori da alta velocità di
rotazione a velocità di guida precisa o in qualsiasi punto intermedio.
Ciascuna velocità corrisponde a un numero sul tastierino del
comando manuale: la velocità 9 rappresenta la più veloce mentre la
velocità 1 rappresenta la più lenta.
Le velocità 1-4 sono ideali per centrare gli oggetti nell'oculare. Le
velocità 5-6 sono ideali per centrare gli oggetti nel cercatore. Le
velocità 7-9 sono ideali per grandi spostamenti nel cielo.
Per modificare la velocità del motore procedere come segue:
Il comando manuale dispone di una funzionalità a "doppio tasto"
che consente di aumentare istantaneamente la velocità dei motori
senza dover scegliere una velocità specifica. Per utilizzare questa
funzionalità, premere semplicemente il tasto freccia che corrisponde
alla direzione verso cui si intende spostare il telescopio. Mentre si
preme tale tasto, premere il tasto direzionale opposto. Ciò aumenterà
la velocità alla massima velocità di rotazione.
NOTA: La velocità siderale è la velocità a cui ruota la Terra e a cui sembrano
muoversi gli oggetti nel cielo. Ciò equivale a 15 archi di secondo al secondo.
TASTO MOTOR SPEED (VELOCITÀ MOTORE)
MENU PRINCIPALE
Il telescopio LCM contiene molte funzioni di configurazione definite dall’utente ideate per dare all’utente il controllo sulle molte funzio-
nalità avanzate del telescopio. È possibile accedere a tutte le impostazioni e le funzionalità di utilità premendo il tasto MENU (tasto 7) e
scorrendo le opzioni sottostanti.
MENU TRACCIATURA
Tracking Mode (Modalità di tracciatura)
Una volta che il telescopio LCM è allineato, i motori di tracciatura si avviano in automatico e iniziano a tracciare il cielo. È comunque possibile
disattivare la tracciatura per l'osservazione terrestre:
• Off- Quando si utilizza il telescopio per osservazioni terrestri, la tracciatura può essere disattivata. In questo modo il telescopio
non si muove.
• Alt-Az- Corrisponde alla velocità di tracciatura predefinita e si utilizza dopo aver allineato correttamente il telescopio.
NOTA: Le modalità di tracciatura EQ North (EQ nord) e EQ South (EQ sud) sono necessarie solo per telescopi con montaggio equatoriale. I telescopi LCM utilizzano
montature altazimutali e non possono usare due modalità di tracciatura EQ.
Tracking Rate (Velocità di tracciatura)
Oltre ad essere in grado di spostare il telescopio con i tasti del comando manuale, il telescopio LCM traccia continuamente un oggetto
celeste durante il suo spostamento nel cielo notturno. La velocità di tracciatura può essere modificata a seconda del tipo di oggetto in
corso di osservazione:
• Sidereal (Siderale)- Questa velocità compensa la rotazione della Terra muovendo il telescopio alla stessa velocità della Terra, ma in
direzione opposta. Durante la tracciatura in modalità Alt-Az il telescopio deve correggere sia altitudine sia azimut.
• Lunar (Lunare)- Utilizzata per la tracciatura della Luna durante l'osservazione del paesaggio lunare.
• Solar (Solare)- Utilizzata per la tracciatura del Sole durante l'osservazione del Sole mediante apposito filtro solare.
VELOCITÀ MOTORE VELOCITÀ
1 Siderale 0,5x
2 Siderale 1x
3 Siderale 4x
4 Siderale 8x
5 Siderale 16x
6 Siderale 64x
7
1°/ secondo
8
1,75°/ secondo
9
2,75°/ secondo
20 I ITALIANO

VIEW TIME-SITE (VISUALIZZA ORA-LUOGO)
View Time-Site (Visualizza ora e luogo) consente di visualizzare i dati relativi a ora e longitudine/latitudine immessi nel comando manuale
durante l'ultimo utilizzo.
MENU COMANDO MANUALE
Lights Control (Controllo luci)
Questa opzione di menu consente di regolare la luminosità dell'illuminazione del comando manuale.
• Keypad Level (Livello tastierino)- Regola la luminosità della retroilluminazione dei pulsanti del tastierino.
• Display Level (Livello schermo)-
Regola la luminosità della retroilluminazione dello schermo LCD.
Scrolling Menu (Menu Scorrimento)
Da questo menu è possibile modificare la velocità di scorrimento del testo sul display del comando manuale.
• Premere il pulsante SU (tasto 6) per aumentare la velocità del testo.
• Premere il pulsante GIÙ (tasto 9) per diminuire la velocità del testo.
Toggle Bold Font (Attiva/disattiva grassetto)
Ciò consente di modificare il testo sullo schermo LCD in grassetto per una più facile lettura.
Set Contrast (Imposta contrasto)
Ciò consente di scegliere quanto appare scuro il testo sullo schermo LCD.
Set Language (Imposta lingua)
Ciò consente di scegliere la lingua da mostrare sul comando manuale. Premere il numero che corrisponde alla lingua desiderata.
SCOPE SETUP MENU (MENU DI CONFIGURAZIONE TELESCOPIO)
Setup Time-Site (Configurazione ora-luogo)
Consente all’utente di personalizzare lo schermo del comando manuale modificando i parametri di ora e luogo (quali fuso orario e ora legale).
Anti-backlash (Compensazione contraccolpi)
Tutti gli ingranaggi meccanici hanno una certa quantità di contraccolpi o movimenti tra gli ingranaggi stessi. Tali movimenti si manifestano
nel tempo necessario a una stella per spostarsi nell'oculare una volta premuti i tasti direzionali sul comando manuale (specialmente
durante i cambiamenti di direzione). La funzionalità di compensazione contraccolpi del telescopio LCM consente all'utente di compensare
i contraccolpi inserendo un valore che sposta velocemente i motori di quel poco che basta per eliminare i movimenti tra gli ingranaggi.
La quantità di compensazione necessaria dipende dalla velocità di rotazione selezionata; più bassa è la velocità di rotazione più tempo
ci impiegherà la stella a spostarsi nell'oculare. Di conseguenza, la compensazione dovrà essere impostata a un valore maggiore. Sarà
necessario sperimentare valori diversi; un valore tra 20 e 50 è normalmente la soluzione ottimale per la maggior parte delle osservazioni
visive, mentre un valore più elevato potrebbe essere necessario per la guida fotografica. La compensazione contraccolpi positiva è applicata
quando il telescopio modifica la sua direzione di movimento da indietro ad avanti. Similmente, la compensazione contraccolpi negativa è
applicata quando il telescopio modifica la sua direzione di movimento da avanti a indietro. Una volta abilitata la tracciatura, la montatura si
sposta lungo uno o entrambi gli assi in direzione positiva o negativa, quindi la compensazione contraccolpi è sempre applicata quando si
rilascia un tasto direzionale e la direzione di spostamento è opposta alla direzione di viaggio.
Per impostare il valore di compensazione contraccolpi, scorrere all'opzione di compensazione contraccolpi e premere il tasto ENTER
(INVIO). Immettere un valore da 0 a 100 sia per l'azimut sia per l'altezza e premere ENTER (INVIO) dopo l'impostazione di ciascun valore
per confermare. Il telescopio LCM ricorda tali valori e li utilizza ogni volta che viene acceso fino alla loro modifica.
ITALIANO I 21

Slew Limits (Limiti di rotazione)
Questa funzione consente di impostare i limiti entro cui il telescopio può ruotare in altezza senza che venga visualizzato un messaggio di errore.
I limiti di rotazione evitano che il tubo del telescopio ruoti verso un oggetto sotto l'orizzonte o verso un oggetto abbastanza in alto da creare il
rischio che il tubo colpisca una delle gambe del treppiede. Tuttavia, i limiti di rotazione possono essere personalizzati a seconda delle esigenze.
Ad esempio, se si desidera ruotare verso un oggetto vicino allo zenit e si è sicuri che il tubo non colpirà le gambe del treppiede, è possibile
impostare il limite di rotazione massimo in altezza su 90°. Ciò consente al telescopio di ruotare su oggetti sopra l'orizzonte senza pericolo.
Filter Limits (Limiti filtro)
Ad allineamento completato, il telescopio LCM sa quali oggetti celesti si trovano sopra l'orizzonte. Quindi, quando si scorrono gli elenchi nel
database (o si seleziona la funzione SKY TOUR), il comando manuale del telescopio LCM visualizza solo oggetti che si trovano sopra l'orizzonte
al momento dell'osservazione. È possibile personalizzare il database selezionando i limiti di altezza adeguati alla propria posizione e situazione.
Ad esempio, se si osserva da una zona montagnosa in cui l'orizzonte è parzialmente coperto, è possibile impostare il limite di altezza minimo a
+20º. Ciò consentirà che il comando manuale mostri solo oggetti che si trovano a un'altezza superiore a 20º.
Se si desidera esplorare l'intero database, impostare il limite di altezza massimo su 90º e il limite minimo su –90º. In questo modo
verranno visualizzati tutti gli oggetti presenti negli elenchi del database, a prescindere dalla loro visibilità o meno nel cielo in relazione
alla proprio posizione.
Pulsanti direzionali
La direzione in cui una stella si sposta nell'oculare varia a seconda degli accessori utilizzati. Ciò può creare confusione quando si segue
una stella utilizzando una guida fuori asse vs una guida in linea retta. Per compensare questo problema, la direzione dei tasti del controllo
di guida può essere modificata. Per invertire la logica dei pulsanti del comando manuale, premere il tasto MENU e selezionare Direction
Buttons (Tasti direzionali) dal menu Utilities (Utilità). Utilizzare i tasti Su/Giù per selezionare sia i tasti dell'azimut (sinistra e destra) sia i tasti
dell'altezza (Su e Giù), quindi premere ENTER (INVIO). Premendo di nuovo ENTER (INVIO) si inverte la direzione dei tasti del comando
manuale. La funzione inverte solamente i tasti relativi alle velocità dell'oculare (velocità 1-6) e non influenza i tasti relativi alla velocità di
rotazione (velocità 7-9).
GoTo Approach (Approccio VaiA)
Consente all’utente di definire la direzione verso cui si dirigerà il telescopio quando ruota verso un oggetto. Ciò consente all'utente di ridurre
al minimo gli effetti dei contraccolpi. Ad esempio, se il retro del telescopio è pesante a causa delle ottiche o di accessori fotografici fissati su
di esso, è preferibile impostare l'approccio dell'altezza in direzione negativa. Ciò assicura che il telescopio approcci l'oggetto sempre dalla
direzione opposta rispetto al carico che tira sul telescopio.
Per cambiare la direzione dell'approccio VaiA, selezionare GoTo Approach (Approccio VaiA) dal menu Scope Setup (Configurazione
telescopio), selezionare l'approccio Altitude (Altezza) o l'approccio Azimuth (Azimut), selezionare Positive (Positivo) o Negative (Negativo),
quindi premere ENTER (INVIO).
Cord Wrap (Avvolgimento del cavo)
L'avvolgimento del cavo protegge il telescopio dal ruotare più di 360° in azimut provocando quindi il rischio di avvolgimento dei cavi
attorno alla base del telescopio. Ciò è utile ogni volta che il telescopio è messo in funzione utilizzando una fonte di alimentazione esterna.
Per impostazione predefinita, questa funzione è disattiva quando il telescopio è allineato in modalità altazimutale ed è attiva quando è
allineato su un prisma.
UTILITY MENU (MENU UTILITÀ)
Scorrendo le opzioni di menu è anche possibile accedere ad utilità avanzate.
GPS On/Off (Accensione/spegnimento GPS)
Questa opzione è disponibile solo quando si utilizza il telescopio in combinazione con l'accessorio GPS opzionale. La funzione consente di
disattivare il modulo GPS. Se si desidera utilizzare il database del telescopio LCM per trovare le coordinate di un oggetto celeste per una
data futura, disattivare il modulo GPS e immettere manualmente una data e un'ora diverse da quelle attuali.
Factory Setting (Impostazioni di fabbrica)
Ripristina il comando manuale LCM alle impostazioni predefinite di fabbrica. Parametri come compensazione contraccolpi, data e ora iniziali,
longitudine e latitudine, limiti di rotazione e limiti filtro vengono ripristinati. Tuttavia, i parametri salvati quali gli oggetti PEC e quelli definiti
dall’utente, rimarranno salvati anche una volta selezionate le impostazioni di fabbrica. Il comando manuale chiederà di premere il tasto “0”
prima di tornare alle impostazioni predefinite di fabbrica.
22 I ITALIANO

Version (Versione)
Selezionando questa opzione è possibile visualizzare la versione corrente del software del comando manuale e del controllo motore. La prima
serie di numeri indica la versione del software del comando manuale. Per il controllo motore, il comando manuale visualizzerà due serie di
numeri: la prima serie di numeri è per l'azimut mentre la seconda è per l'altezza.
Get Axis Position (Ottieni posizione asse)
Consente di visualizzare altezza e azimut relativi della posizione corrente del telescopio.
GoTo Axis Position (VaiA posizione asse)
Consente all’utente di inserire una posizione specifica relativa all’altezza e all’azimut e di far ruotare il telescopio verso di essa.
Hibernate (Ibernazione)
L'ibernazione consente di spegnere completamente il telescopio LCM e di mantenerne l’allineamento al momento della riaccensione.
Questo non solo risparmia energia, ma è ideale per coloro che tengono il proprio telescopio montato permanentemente o lo lasciano in una
posizione per lunghi periodi di tempo. Per mettere il telescopio in modalità ibernazione procedere come segue.
1. Selezionare Hibernate (Ibernazione) da Utilities Menu (menu Utilità).
2. Spostare il telescopio in una posizione desiderata e premere ENTER (INVIO).
3. Spegnere il telescopio. Ricordarsi di non spostare mai il telescopio manualmente mentre è in modalità Ibernazione.
Una volta riacceso il telescopio, lo schermo visualizzerà la dicitura Sveglia. Dopo aver premuto ENTER (INVIO), l’utente ha la possibilità di
scorrere lungo le informazioni di ora/posizione per confermare l'impostazione corrente. Premere ENTER (INVIO) per attivare il telescopio.
Premendo UNDO (ANNULLA) al momento della visualizzazione della schermata di riattivazione è possibile esplorare altre funzioni
del comando manuale senza riattivare il telescopio dalla modalità di ibernazione. Per riattivare il telescopio dopo aver premuto UNDO
(ANNULLA), selezionare Hibernate (Ibernazione) dal menu Utilities (Utilità), quindi premere ENTER (INVIO). Non utilizzare i tasti direzionali
per spostare il telescopio mentre è in modalità ibernazione.
Sun Menu (Menu Sole)
Per ragioni di sicurezza, il Sole non sarà visualizzato tra gli oggetti presenti nel database a meno che non sia prima abilitato. Per
abilitare il Sole, andare a Sun Menu (Menu Sole) e premere ENTER (INVIO). Il Sole sarà quindi visualizzato nel catalogo dei Pianeti
e può essere utilizzato come oggetto di allineamento quando si utilizza il metodo di allineamento per il Sistema Solare. Per rimuovere
il Sole dagli oggetti visualizzati sul comando manuale, selezionare ancora una volta Sun Menu (Menu Sole) da Utilities Menu (Menu
Utilità) e premere ENTER (INVIO).
Calibrate GoTo (Calibra VaiA)
La Calibrazione VaiA è uno strumento utile al momento del collegamento di pesanti accessori visivi o fotografici al telescopio. La Calibrazione
VaiA calcola la distanza e il tempo impiegato dalla montatura per completare la sua rotazione VaiA finale quando ruota verso un oggetto.
Modificando il bilanciamento del telescopio è possibile prolungare il tempo impiegato per completare la rotazione finale. Questa funzione
prende in considerazione ogni minimo sbilanciamento e modifica la distanza finale VaiA da compensare.
Set Mount Position (Imposta posizione montatura)
Il menu Imposta posizione montatura può essere impiegato per recuperare un allineamento in casi in cui il telescopio o il treppiede vengono
spostati manualmente. Ad esempio, è possibile utilizzare questa funzione se si ha bisogno di regolare il livello del treppiede allungando
o accorciando le gambe. Dopo che la montatura è stato mossa, è sufficiente ruotare il telescopio su una stella luminosa e centrarla
nell'oculare, quindi selezionare Set Mount Position (Imposta posizione montatura) dal menu Utilities (Utilità). Poiché il telescopio è stato
mosso, la precisione di puntamento sarà minore. Ad ogni modo, è possibile ruotare su una nuova serie di stelle di allineamento e sostituire
le stelle di allineamento originarie con nuove stelle. Ciò aiuterà ad evitare l'esecuzione di un nuovo processo di allineamento dall'inizio.
ITALIANO I 23

OGGETTI DEFINITI DALL'UTENTE
Il telescopio LCM può salvare fino a 50 diversi oggetti definiti dall’utente nella sua memoria. Gli oggetti possono essere oggetti terrestri
diurni oppure interessanti oggetti celesti non inclusi nel database. Esistono vari modi per salvare un oggetto nella memoria a seconda della
tipologia di oggetto:
• Save Sky Object (Salva oggetto del cielo)- Il telescopio LCM memorizza oggetti celesti nel suo database salvandone ascensione
retta e declinazione nel cielo. In questo modo è possibile trovare gli stessi oggetti ogni volta che il telescopio è allineato. Una volta
centrato l’oggetto desiderato nell’oculare, scorrere semplicemente al comando "Save Sky Obj" (Salva oggetto del cielo) e premere
ENTER (INVIO). Sul display viene visualizzata la richiesta di immissione di un numero compreso tra 1 e 25 per identificare l'oggetto.
Premere di nuovo ENTER (INVIO) per salvare l'oggetto nel database. Sarà poi possibile accedere a questi oggetti selezionando
GoTo Sky Object. (VaiA oggetto del cielo).
• Save Database (Db) Object (Salva oggetto da database)-
Questa funzione consente di creare un tour personalizzato di
oggetti contenuti nel database registrando la posizione corrente del telescopio e salvando il nome dell'oggetto selezionato da un
qualsiasi catalogo.
• Enter RA - DEC (Inserisci RA - DEC)- È possibile anche salvare un set specifico di coordinate per un oggetto semplicemente
immettendo ascensione diretta e declinazione di tale oggetto. Scorrere al comando "Enter RA-DEC" (Inserisci RA-DEC) e
premere ENTER (INVIO). Lo schermo chiederà quindi all’utente di inserire prima l'ascensione diretta, quindi la declinazione
dell’oggetto desiderato.
• Save Land Object (Salva oggetto terrestre) -
Il telescopio LCM può altresì essere utilizzato come cannocchiale per oggetti terrestri.
Gli oggetti terrestri fissi possono essere memorizzati salvando altezza e azimut in relazione alla posizione del telescopio al momento
dell'osservazione. Poiché sono in relazione con la posizione del telescopio, questi oggetti sono validi solo per una precisa posizione.
Per salvare gli oggetti terrestri, centrare nuovamente gli oggetti desiderati nell'oculare. Scorrere al comando "Save Land Obj" (Salva
oggetto terrestre) e premere ENTER (INVIO). Sul display viene visualizzata la richiesta di immissione di un numero compreso tra 1 e 25
per identificare l'oggetto. Premere di nuovo ENTER (INVIO) per salvare l'oggetto nel database. Sarà poi possibile accedere a questi
oggetti selezionando GoTo Land Object. (VaiA oggetto terrestre).
Per sostituire le informazioni di un oggetto definito dall'utente basta salvare un nuovo oggetto utilizzando una delle identificazioni
numeriche già in uso; il telescopio LCM sostituirà gli oggetti definiti dall’utente precedenti con quello attuale.
GET RA-DEC (OTTIENI RA - DEC)
Consente di visualizzare ascensione retta e declinazione della posizione corrente del telescopio.
GOTO RA-DEC (VAIA RA-DEC)
Consente di immettere ascensione retta e declinazione specifici e ruotare il telescopio in tale posizione.
IDENTIFY (IDENTIFICA)
Questa modalità cercherà all'interno dei cataloghi o degli elenchi del database dell telescopio LCM e visualizzerà il nome e le distanze
offset degli oggetti corrispondenti più vicini. Questa funzione può essere utilizzata per due scopi. In primo luogo, può essere utilizzata per
identificare un oggetto sconosciuto nel campo visivo dell'oculare. Inoltre, la modalità Identifica può essere utilizzata per trovare altri oggetti
celesti che sono vicini agli oggetti attualmente in corso di osservazione. Per esempio, se il telescopio è puntato verso la stella più luminosa
nella costellazione di Lira, scegliere il tasto Identify e quindi cercare nel catalogo delle Stelle aventi un nome ritornerà senza dubbio alla stella
Vega come stella di osservazione. Selezionando Identify (Identifica) e cercando nel catalogo Named Object (Oggetti identificati) oppure nel
catalogo Messier, il comando manuale indicherà che Nebulosa Anello (M57) si trova a circa 6° dalla propria posizione corrente. Cercando
nel catalogo Double Star (Stelle doppie) si scoprirà che Epsilon Lyrae si trova a solo 1° da Vega.
Per utilizzare la funzionalità Identify (Identifica):
• Premere il pulsante IDENTIFY (IDENTIFICA) (tasto 4) e selezionare l'opzione Identify (Identifica).
• Premere i tasti di scorrimento Su e Giù per selezionare il catalogo che si desidera ricercare.
• Premere ENTER (INVIO) per avviare la ricerca.
NOTA: Alcuni dei database contengono migliaia i oggetti, quindi possono essere necessari uno o due minuti per visualizzare il risultato della ricerca.
24 I ITALIANO

Oggetti identificati
NGC
Caldwell
Messier
Albero del menu serie LCM
Modalità
Alt-Az
Off
MENU
(TASTO 7)
PULSANTE
ALLINEA
SISTEMA SOLARE
(TASTO 1)
STELLE
(TASTO 2)
PROFONDO CIELO
(TASTO 3)
TRACCIATURA
EQ Sud
EQ Nord
Velocità
Siderale
Lunare
Solare
VISUALIZZA ORA/POSIZIONE
COMANDO MANUALE
Controllo luci
Livello tastierino
Livello schermo
Menu Scorrimento
Attiva/disattiva grassetto
Imposta contrasto
Imposta lingua
SkyAlign
Allineamento automatico di due stelle
Allineamento di due stelle
Allineamento di una stella
Allineamento per il sistema solare
Allinea EQ Nord
Allinea EQ Sud
Luna
Mercurio
Venere
Marte
Giove
Saturno
UranO
Nettuno
Plutone
Sole
Stelle identificate
SAO
Stelle variabili
Asterismi
Costellazioni
Stelle doppie
CONFIGURAZIONE TELESCOPIO
Configurazione ora-posizione
Anti-contraccolpo
Limiti di rotazione
Limiti filtro
Pulsanti direzionali
Approccio VaiA
Avvolgimento del cavo
UTILITÀ
Accensione/spegnimento GPS
Impostazioni di fabbrica
Versione
Ottieni posizione asse
VaiA posizione asse
Ibernazione
Menu Sole
Calibra VaiA
Imposta posizione montatura
OGGETTI UTENTE
VaiA oggetto del cielo
Salva oggetto del cielo
Salva oggetto database
Inserisci R.A. e Dec
Salva oggetto terrestre
VaiA oggetto terrestre
OTTIENI RA-DEC
VAIA RA-DEC
IDENTIFICA
ITALIANO I 25

PRIMA SESSIONE DI OSSERVAZIONE ASTRONOMICA
LA LUNA
Ora il telescopio è pronto per delle vere osservazioni notturne!
Iniziamo con la Luna. La Luna impiega circa un mese per completare un intero ciclo da Luna nuova a Luna piena. Provare ad osservarla
nelle diverse fasi.
La Luna è osservabile ogni qualvolta è visibile nel cielo notturno, tuttavia il periodo migliore per osservarla è a partire dal terzo giorno di Luna
nuova e fino a qualche giorno prima della Luna piena. Durante questo periodo sono visibili numerosi dettagli come i crateri e le montagne
lunari. Consultare un calendario o un app sulle fasi lunari per sapere la data della prossima Luna nuova.
1. Quando si ha una buona visione della Luna, impostare il telescopio con l'oculare da 25 mm.
2. Accendere il cercatore e osservare attraverso per trovare il punto rosso.
3. Muovere il telescopio fino a quando viene visualizzata la Luna attraverso la finestrella del cercatore e il puntino rosso è centrato sulla Luna.
4. Guardare attraverso l'oculare da 25 mm. Ruotare delicatamente le manopole di messa a fuoco per regolare la nitidezza dell'immagine.
CONGRATULAZIONI! HAI APPENA OSSERVATO IL TUO PRIMO CORPO CELESTE!
Utilizzando la stessa tecnica di base, è possibile osservare molti altri corpi celesti, come pianeti, ammassi stellari e nebulose.
SUGGERIMENTI SULL’OSSERVAZIONE CELESTE
Questa sezione copre suggerimenti per l'osservazione visiva sia del sistema solare sia di corpi del profondo cielo nonché condizioni di
osservazione generale che influenzeranno la capacità di osservazione.
INGRANDIMENTO
È possibile modificare l'ingrandimento del telescopio semplicemente cambiando gli oculari. Entrambi i telescopi e gli oculari hanno
lunghezze focali misurate in millimetri. Per calcolare l'ingrandimento di una data combinazione telescopio e oculare, prendere la lunghezza
focale del telescopio e dividerlo per la lunghezza focale dell'oculare. Il risultato ottenuto rappresenta il fattore di ingrandimento.
Per esempio, il telescopio 80LCM ha una lunghezza focale di 900 mm. Utilizzando l'oculare da 25 mm:
900 mm
=
____________
= 36x
25 mm
Lunghezza focale del telescopio
Ingrandimento =
___________________________
Lunghezza focale dell'oculare
CAMPO VISIVO
La determinazione del campo visivo è importante se si intende avere un'idea della dimensione angolare dell'oggetto che si sta osservando.
Per calcolare il campo visivo corrente, dividere il campo apparente dell'oculare (fornito dal produttore dell'oculare) per l'ingrandimento
fornito dal telescopio in uso. Utilizzando l'esempio fornito alla sezione precedente, è possibile determinare il campo visivo utilizzando lo
stesso telescopio e l’oculare da 25 mm.
45°
=
______
= 1.25 gradi d’arco
36
Campo visivo apparente dell’oculare
Campo visivo corrente =
________________________________
Ingrandimento
26 I ITALIANO

I PIANETI
Oltre alla Luna, il telescopio è in grado di osservare i 5 pianeti più luminosi. Poiché i pianeti cambiano la loro posizione rispetto alle stelle
sullo sfondo, occorre consultare risorse online o utilizzare un app astronomica su un dispositivo smart per localizzarne la posizione. Qui
di seguito alcune cose da cercare.
• Mercurio e Venere- Similmente alla Luna, i due pianeti più interni attraversano varie fasi, da quella crescente a quella calante.
• Marte- Quando è quasi in opposizione (il punto della sua orbita in cui è più vicino alla Terra) è possibile distinguere la calotta polare
e eventualmente alcune caratteristiche della superficie che appaiono come segni scuri.
• Giove- Cercare le fasce più scure di nubi di metano che circondano il pianeta appena sopra e sotto l'equatore. Se la grande macchia
rossa è rivolta verso la terra, potrebbe essere possibile intravederla. Sarà possibile vedere anche i quattro satelliti più luminosi di
Giove - Io, Europa, Ganimede e Callisto. È interessante osservare questi satelliti perché possono spostarsi sensibilmente anche solo
in un paio di ore. Talvolta, essi si sposteranno dietro Giove o nella sua ombra e scompariranno per qualche tempo. Essi possono
anche attraversare la faccia di Giove ed è possibile vedere anche l'ombra del satellite mentre lo attraversa. Esistono alcune utili app
per dispositivi smart che consentono di prevedere quando sarà visibile la grande macchia rossa e quando si verificano gli eventi più
interessanti legati ai satelliti di Giove.
• Saturno- Gli Anelli! Saturno è senza dubbio uno degli oggetti celesti più belli da osservare col telescopio. Se le condizioni per
l'osservazione sono abbastanza stabili, potrebbe inoltre essere possibile osservare l'ombra degli anelli sul pianeta e l'ombra del
pianeta sugli anelli. Si dovrebbe essere in grado di vedere Titano, il satellite più luminoso di Saturno.
OGGETTI DEL PROFONDO CIELO
I corpi del profondo cielo sono semplicemente quei corpi celesti al di fuori dei confini del sistema solare. Includono ammassi di stelle,
nebulose planetarie, nebulose diffuse, stelle doppie e altre galassie al di fuori della Via Lattea. Oggetti quali le nebulose e le galassie
possono essere molto grandi, ma anche debolmente luminose. Al fine di ottenere una migliore visualizzazione, è necessario assicurarsi
di essere al buio più completo. Tanto più si è lontani dalle luci della città, meglio si vedranno gli oggetti nell'oculare. Nelle fotografie di
nebulose e galassie, vedrete rossi e blu vivaci. Questi colori non sono visibili quando si guarda attraverso l'oculare. Le immagini colorate
sono il frutto di una lunga esposizione di immagini scattate per oltre 15 - 60 minuti o più, dove l'occhio registra solo una parte dei dati
visti. I sensori digitali sono molto più sensibili ai rossi e blu di quanto sia l'occhio umano nella parte verde dello spettro. Tuttavia, sarà
possibile osservare la luce soffusa della galassia di Andromeda e la distesa della Nebulosa di Orione.
CONDIZIONI DEL CIELO
Le condizioni del cielo possono influenzare in modo significativo le prestazioni del telescopio in tre modi.
• Stabilità dell'aria- In giornate ventose, le immagini della Luna e dei pianeti possono apparire mosse o a salti nell'oculare; come
se li si osservasse attraverso dell'acqua mossa. Le notti con venti tranquilli permetteranno di vedere i pianeti e la Luna con il
massimo ingrandimento. Il modo migliore per giudicare la stabilità dell'atmosfera è di guardare le stelle luminose ad occhio nudo.
Se sono "scintillanti" o cambiano rapidamente colori, l'aria è instabile ed è consigliabile utilizzare potenze inferiori e cercare oggetti
del profondo cielo. Se le stelle sono taglienti e non scintillanti, l'aria è stabile e dovrebbe offrire grandi viste planetarie ad elevato
ingrandimento.
• Trasparenza- Quanto pulita è l'aria che si sta osservando? Se è presente un elevato grado di umidità nell'aria, la debole luce di
galassie e nebulose può disperdersi prima di raggiungere il telescopio, provocando una perdita di luminosità nell'immagine. La
presenza di detriti nell'aria provenienti da incendi boschivi locali o anche da eruzioni vulcaniche distanti possono contribuire ad
una grande perdita di luminosità. A volte questa umidità o detriti possono contribuire a stabilizzare l'aria, scattando buone immagini
planetarie e lunari, ma la perdita di luce renderebbe difficile vedere gli oggetti del profondo cielo più deboli.
• Luminosità del cielo- La quantità di luce ambientale nell'atmosfera può anche compromettere l'osservazione del profondo cielo. Il
grado di oscurità del cielo può dipendere dall'ambiente circostante. Nel mezzo di una città, la luminescenza del cielo dovuta alle luci
della città che si riflettono verso la Terra dal cielo può sopraffare la luce fioca proveniente dalle galassie lontane. Allontanarsi dalle
luci di una grande città può fare la differenza tra vedere un debole oggetto del profondo cielo e non vederlo affatto. I pianeti e la Luna
sono abbastanza luminosi pertanto l'effetto sull'osservazione è minimo.
ITALIANO I 27

SELEZIONE DEL SITO DI OSSERVAZIONE
Se avete intenzione di osservare oggetti non stellari, quali galassie e nebulose, ci si dovrebbe dirigere verso un sito buio, che sia
ragionevolmente accessibile. Bisogna stare lontano dalle luci cittadine, avere una vista relativamente aperta dell'orizzonte e controvento
di qualsiasi delle principali fonti di inquinamento atmosferico. Scegliere sempre un punto più in alto possibile, per ridurre gli effetti
dell'instabilità atmosferica e per garantire di trovarsi sopra il livello di nebbia. Benché possa essere desiderabile impiantare il telescopio
presso un sito con cielo buio, non è sempre necessario. Se si prevede di visualizzare i pianeti, la Luna o anche alcuni degli oggetti non
stellari più luminosi, è possibile farlo da qualsiasi luogo, anche dal proprio cortile. Cercare di impostare la posizione al di fuori del percorso
diretto di lampioni o luci di casa per aiutare a proteggere la visione notturna. Cercare di evitare di osservare tutto ciò che si trova all'interno
di 5-10 gradi sopra il tetto di un edificio. I tetti cittadini assorbono calore durante il giorno e irradiano il calore fuori di notte. Ciò può causare
uno strato di aria turbolenta direttamente sopra l'edificio in grado di degradare l'immagine. È meglio configurare il telescopio direttamente
su una superficie erbosa o sterrata. Impostare su qualsiasi piattaforma rialzata quale una superficie in legno, mentre quelle dure, come il
cemento, o il marciapiede dovrebbero essere evitate perché trasmettono facilmente vibrazioni che possono essere trasferite al telescopio.
Non si raccomanda di osservare dalla finestra perché le immagini risulterebbero distorte a causa del vetro. Una finestra aperta può
essere ancora peggio perché l'aria calda dell'interno, fuoriuscendo dalla finestra, può causare turbolenza con possibili effetti sulle
immagini. L'astronomia è un'attività all'aperto.
SCELTA DEL MOMENTO IDEALE PER L’OSSERVAZIONE
Cercare di non osservare subito dopo il tramonto. Dopo il tramonto, la Terra è ancora in raffreddamento, causando turbolenze d'aria.
Con l'avanzare della notte, non solo migliora la visuale, ma l'inquinamento atmosferico e le luci spesso svaniscono. Alcuni dei momenti
migliori per osservare si hanno spesso nelle prime ore del mattino, poco prima dell'alba. Gli oggetti sono meglio osservati all'incrocio
con il meridiano, la linea immaginaria che corre da nord a sud attraverso un punto direttamente sopra la propria testa. Questo è il punto in
cui gli oggetti raggiungono i punti più alti nel cielo ed il telescopio osserva attraverso la minor quantità di atmosfera possibile. Gli oggetti
che sorgono o tramontano vicino all'orizzonte subiranno una maggiore turbolenza atmosferica dal momento che si osserva attraverso una
colonna d'aria molto più lunga. Non è sempre necessario avere un cielo sgombro di nuvole se si osservano i pianeti o la Luna. Spesso
condizioni di cielo coperto forniscono una visione eccellente.
RAFFREDDAMENTO DEL TELESCOPIO
I telescopi richiedono almeno 10 minuti per raffreddarsi alla temperatura dell'aria esterna. Ciò potrebbe richiedere più tempo se esiste
una grande differenza tra la temperatura del telescopio e l'aria esterna. Ciò riduce al minimo la distorsione dell'onda di calore all'interno
del tubo del telescopio (correnti del tubo).
ADATTAMENTO DEGLI OCCHI
Se si desidera osservare corpi del profondo cielo in un luogo buio, è preferibile lasciare che gli occhi si adattino all'oscurità evitando
l'esposizione a fonti di luce bianca come torce, fari di auto, lampioni, ecc. Occorrono circa 30 minuti perché le pupille si dilatino al
massimo e sviluppino i pigmenti ottici utili per osservare una luce debole che proviene da un oggetto distante. Se si necessita dell'aiuto
di luce per configurare il telescopio al buio, provare a utilizzare una torcia a LED rossa il meno luminosa possibile ed evitare di guardare
direttamente la sorgente di luce. Ciò concederà le migliori possibilità di acquisizione degli oggetti non stellari deboli.
Durante l'osservazione, è importante farlo con entrambi gli occhi aperti. Questo evita l'affaticamento dell'occhio all'oculare. Se si trova
la cosa troppo antipatica, coprire l'occhio non utilizzato con la mano o mettere una benda sull'occhio. Il centro dell'occhio funziona bene
alla luce del sole, ma è la parte meno sensibile dell'occhio quando si cerca di vedere dettaglio più sottile a bassi livelli di luce. Quando
nell'oculare si cerca un obiettivo debole, non guardarlo direttamente. Guardare, invece, verso il bordo del campo visivo e l'oggetto
apparirà più luminoso.
28 I ITALIANO

ASTROFOTOGRAFIA
Una delle prime domande che la maggior parte delle persone si pone sul proprio nuovo telescopio è la seguente: "Come si scattano le
fotografie?". Il telescopio è in grado di osservare la Luna e i pianeti, ma oggetti del profondo cielo richiedono un telescopio più avanzato
e una montatura con rilevamento motorizzato finemente orientato. Esistono diversi metodi per utilizzare il telescopio per l'astrofotografia.
• Dispositivi intelligenti o fotocamere compatte- Questo è il metodo più semplice e lineare e funziona bene per le immagini della
Kuna e dei pianeti. Basta tenere la fotocamera del dispositivo vicino all'oculare e scattare l'immagine. Mentre è possibile l'utilizzo
con qualsiasi oculare, è generalmente più facile per ottenere un'immagine usare un oculare a bassa potenza (lunghezza focale). E'
necessario avere la mano ferma per tenere il telefono vicino all'oculare, ma è possibile ottenere buoni risultati.
• DSLR- Celestron offre adattatori per consentire di collegare una Reflex Canon o Nikon al telescopio al posto dell'oculare. Sarà
possibile effettivamente utilizzare il telescopio come teleobiettivo. Ciò richiederà un adattatore a T per il telescopio e un anello a T
per il corpo della fotocamera. Per ulteriori informazioni sugli adattatori per il modello specifico del telescopio, si prega di visitare il
sito www.celestron.com.
• Sensore CMOS per alta risoluzione planetaria- Si tratta di telecamere specializzate che sostituiscono l'oculare del telescopio.
Si può collegare al portatile tramite porta USB. La fotocamera registra video del pianeta, quindi il software incluso divide il file video
in singoli fotogrammi. Il software unisce quindi i singoli fotogrammi in una singola immagine che contiene maggiori dettagli di quanto
fosse visibile in ogni singolo fotogramma. Questo metodo fornirà le migliori immagini possibili lunari e planetarie, ma è necessario
avere un portatile adatto. Per ulteriori informazioni sulla fotocamera planetaria, si prega di visitare il sito www.celestron.com.
STRUMENTI PER L’OSSERVAZIONE DEL PROFONDO CIELO
Ci sono alcuni strumenti indispensabili per identificare e localizzare gli oggetti del profondo cielo:
• Torcia elettrica a luce rossa- Si tratta di uno strumento essenziale nell'astronomia non stellare per la lettura dei grafici dei cercatori
o gli atlanti astronomici. Per vedere la debole luce proveniente da oggetti distanti come nebulose o galassie, gli occhi devono
essere completamente adattati al buio, con l'iride aperta al massimo per farvi penetrare più luce dal telescopio. La luce bianca
delle torce standard causerà la chiusura dell'iride e potrebbe volerci fino a mezz'ora perché gli occhi si riadattino completamente
all'oscurità. Le luci rosse non hanno lo stesso effetto. Si consiglia qualsiasi torcia elettrica LED a luce rossa con regolazione dei
livelli di luminosità, perché anche la luce rossa, se eccessivamente forte, può influenzare la visione notturna. E' possibile trovarle
presso i rivenditori di telescopi, ma anche nei negozi per articoli da campeggio e nelle ferramenta.
• Planisfero- Il planisfero è una mappa stellare circolare speciale che mostrerà la posizione approssimativa delle costellazioni sopra la
propria testa, così per orientarsi nel cielo. A differenza dei grafici che si possono stampare online, i planisferi sono ottimi in qualsiasi
periodo dell'anno, non solo nella data o mese stampato. Esso è costituito da due dischi circolari uniti al centro. Il disco inferiore
contiene una mappa delle costellazioni mentre il disco superiore contiene una finestra ritagliata su di esso che mostra una porzione
di mappa del cielo. Ruotando i dischi interni ed esterni e abbinandoli alla propria specifica data e ora, la mappa mostrerà solo quelle
costellazioni visibili in quel dato momento. Ciò è utile per trovare posizioni isolate di costellazioni e stelle luminose. I planisferi sono
disponibili nei negozi di libri e sono disponibili in diverse latitudini nell'emisfero nord oppure in quello sud. Assicurarsi di scegliere
quale meglio si adatta alla propria posizione geografica. Per ottenere informazioni più dettagliate su dove sono situati gli oggetti non
stellari all'interno delle costellazioni è necessario avere un atlante astronomico.
• Atlante stellare- Gli atlanti stellari sono mappe del cielo. Dopo aver individuata una costellazione sul planisfero, l'atlante stellare
mostrerà una visione dettagliata, ravvicinata di quella regione del cielo mostrando le stelle e gli oggetti non stellari in essa presenti.
Essi si trovano presso i diversi rivenditori di telescopi o nelle librerie.
• App e Programmi- Ci sono diverse applicazioni disponibili per smartphone o tablet in grado di sostituirsi al planisfero e alle mappe
stellari. Esse offriranno rappresentazioni digitali del cielo notturno sul proprio dispositivo, permettendo di passare dal rilevamento
ampio alla visualizzazione ingrandita semplicemente toccando lo schermo. Esse possono essere scaricate o acquistate dall'app store,
in funzione della piattaforma in uso. Ci sono anche alcuni ottimi programmi per la simulazione del cielo astronomico disponibili per
computer in grado di mostrare sullo schermo mappe stellari altamente dettagliate e di aiutare a pianificare una sessione osservativa
prima di uscir fuori con mappe stellari stampabili personalizzate per data, posizione e ora.
ITALIANO I 29

STAR HOPPING
Il modo più semplice per orientarsi nel cielo è dato da una tecnica chiamata Star Hopping. La prima cosa da fare è quella di misurare il campo
visivo del cercatore. Guardare il cielo e individuare una costellazione con stelle luminose. È possibile utilizzare l'app planisfero o astronomia per
facilitarne l'individuazione. Ora è possibile cercare la mappa nell'atlante astronomico indicante questa costellazione. Centrare il cercatore su
qualsiasi stella luminosa che è possibile riconoscere sulla mappa stellare. Tenere la testa 30 cm (12 pollici) dietro i vetri riflettenti del cercatore
StarPointer e spostare il telescopio in modo che la stella luminosa sia sul bordo del campo visivo della finestra (non importa quale direzione
si sceglie). Senza muovere il telescopio, guardare attraverso la finestra del cercatore e individuare un'altra stella vicino al bordo opposto del
campo visivo. Individuare la seconda stella sul grafico. Misurare la distanza tra queste due stelle sul grafico utilizzando il righello. Questa
distanza rappresenta un campo visivo del cercatore sull'atlante. È ora possibile utilizzare questa misura per individuare gli oggetti celesti.
CURA E PULIZIA DEL TELESCOPIO
Sebbene il telescopio necessiti di poca manutenzione, vi sono alcune cose da ricordare che garantiranno prestazioni ottime del telescopio.
A volte, polvere e/o umidità possono accumularsi sulle lenti dell’obiettivo. Deve essere prestata particolare attenzione durante la pulizia di
qualsiasi strumento in modo da non danneggiarne l'ottica.
Se si è accumulata polvere sulle ottiche, seguire i seguenti passaggi, nell'ordine, per pulire il telescopio:
1. Utilizzare un pennello di pelo di cammello per rimuovere delicatamente le particelle più grandi.
2. Utilizzare un soffietto fotografico per soffiare via eventuali detriti. È anche possibile utilizzare una bomboletta di aria compressa, come quelle
vendute per la pulizia di tastiere di computer, ma bisogna fare molta attenzione. Evitare l'uso di bombolette quasi vuote e assicurarsi di tenerle
in posizione verticale. Il mancato rispetto di tale disposizione può causare che del propellente vanga spruzzato dalla bomboletta sull'ottica.
Tenere la superficie ottica formando un angolo con lo spruzzo per circa due-quattro secondi.
3. Utilizzare una soluzione per la pulizia delle superfici ottiche composta da alcool isopropilico da banco e acqua distillata in una miscela 50/50.
Applicare la soluzione su un fazzoletto di carta bianco inodore, quindi applicare il fazzoletto alle ottiche. Eseguire movimenti delicati dal
centro della lente (o specchio) verso l'esterno in linea retta come i raggi della ruota. Non strofinare in modo circolare!
Potrebbe verificarsi la formazione di condensa sulle ottiche del telescopio durante una sessione di osservazione. Se si desidera continuare
l'osservazione, rimuovere la condensa con un asciugacapelli (bassa intensità) o puntando il telescopio verso il basso fino a quando la
condensa è evaporata. Se la condensa si forma all'interno delle ottiche, rimuovere gli accessori dal telescopio. Sistemare il telescopio in
un ambiente privo di polvere e rivolgerlo verso il basso fino a quando l'umidità non sarà evaporata.
Per minimizzare la necessità di pulire il telescopio, riposizionare tutti tappi delle lenti una volta terminato l'utilizzo del telescopio. Poiché i
tubi del telescopio non sono a tenuta, sistemare i tappi sulle aperture quando non in uso. Ciò eviterà l'ingresso di contaminanti nel tubo.
Le regolazioni e la pulizia interne devono essere effettuate dalla divisione di assistenza Celestron. Se il telescopio necessità di pulizia
interna, contattare la fabbrica per un numero di autorizzazione al reso e un preventivo.
COLLIMAZIONE DI UN TELESCOPIO NEWTONIANO
Sebbene il telescopio richiede poca manutenzione, ci sono alcune cose da ricordare per garantire prestazioni ottimali. La collimazione
rappresenta il processo di allineamento degli specchi del telescopio in modo che operino a vicenda di concerto per fornire la giusta
condizione di luminosità all'oculare per la messa a fuoco. Osservando le immagini stellari fuori fuoco, è possibile verificare l'allineamento
dell'ottica del telescopio. Posizionare una stella al centro del campo visivo e spostare il focheggiatore, in modo che l'immagine risulti
leggermente fuori fuoco. Se le condizioni di visibilità sono buone, si vedrà un cerchio centrale di luce (il disco di Airy) circondato da
una serie di anelli di diffrazione. Se gli anelli sono simmetrici al disco di Airy, l'ottica del telescopio risulta correttamente collimata.
Correttamente allineato E’ necessario collimare
30 I ITALIANO

La collimazione è un processo indolore e funziona come segue:
Tirare fuori il copriobiettivo che copre la parte anteriore del telescopio
e guardare nel tubo ottico. Sul fondo si vedrà lo specchio primario
sostenuto da tre linguette ad oltre 120º e, nella parte superiore,
il piccolo specchio ovale secondario sostenuto e inclinato di 45°
verso il focheggiatore al di fuori della parete del tubo.
Lo specchio secondario si allinea regolando le tre viti più piccole
che circondano il bullone centrale. Lo specchio primario è regolabile
tramite le tre viti di regolazione sul retro del cannocchiale. Le tre viti
di bloccaggio accanto ad esse servono per tenere lo specchio in
posizione dopo la collimazione.
Specchio primario Specchio secondario
Supporto
dello specchio
secondario
Focheggiatore
ALLINEAMENTO DELLO SPECCHIO SECONDARIO
Puntare il telescopio verso una parete illuminata nel focheggiatore senza l'oculare installato. Potrebbe essere necessario ruotare la manopola
di messa a fuoco per alcuni giri fino a quando l'immagine riflessa del focheggiatore non si vedrà più. Mantenere l'occhio contro la parte
posteriore centrato nel tubo di messa a fuoco. Cercare le tre linguette che tengono lo specchio primario in posizione. Se non si vedono, vuol
dire che bisogna regolare le tre viti sulla parte superiore del supporto dello specchio secondario, possibilmente con una chiave a brugola o
cacciavite a croce. Si dovrà allentare alternativamente solo una, e quindi compensare l'allentamento serrando le altre due. Fermarsi quando
si vedono tutte e tre le linguette dello specchio. Assicurarsi che tutte e tre le piccole viti di allineamento siano serrate per fissare lo specchio
secondario in posizione.
Linguetta specchio primario
Ignorare l’immagine
riflessa per adesso
Linguetta specchio primario
Linguetta specchio primario
Linguetta specchio primario
ALLINEAMENTO DELLO SPECCHIO PRIMARIO
Ci sono 3 bulloni grandi e 3 piccole viti sul retro del telescopio. I bulloni grandi costituiscono le viti di regolazione e le piccole viti sono le quelle
di bloccaggio. Allentare di qualche giro i bulloni grandi. Ora mettere la mano intorno alla parte anteriore del telescopio tenendo d'occhio il
focheggiatore, si vedrà così l'immagine riflessa della mano. Si tratta qui di vedere in quale misura lo specchio primario è difettoso, fermandosi
al punto in cui l'immagine riflessa dello specchio secondario è più vicina al bordo degli specchi primari.
Quando si arriva a quel punto, arrestare e tenere la mano in posizione mentre, guardando il retro del telescopio, verificare se è presente la
vite di regolazione. Se è presente, è necessario allentarla (girare la vite verso sinistra) per portare lo specchio lontano da quel punto. Se
non è presente, quindi spostarsi sul lato opposto e serrare la vite di regolazione di tale lato. Ciò allineerà gradualmente lo specchio. (Può
aiutare avere qualcuno vicino per collimare lo specchio primario. Fargli regolare le viti di regolazione, secondo quanto necessario mentre si
guarda il focheggiatore).
Uscire dopo il tramonto e puntare il telescopio verso la stella polare, la stella del Nord. Con l'oculare nel focheggiatore, scattare l'immagine fuori
fuoco. Solo adesso si vedrà la stessa immagine, poiché sarà illuminata dalla luce stellare. Se necessario, ripetere il processo di collimazione
mantenendo solo al centro la stella mentre si modificano gli specchi.
Specchio secondario
Specchio primario
Fermarsi e tenere la
mano qui
Entrambi gli specchi allineati con
l'occhio che guarda attraverso il
focheggiatore
ITALIANO I 31

GARANZIA LIMITATA DI DUE ANNI CELESTRON
A. Celestron garantisce che il telescopio è privo di difetti nei materiali e nella fabbricazione per due anni. Celestron riparerà o sostituirà tale
prodotto o parte dello stesso che, dopo una verifica da parte di Celestron, risulti essere difettoso nei materiali o nella fabbricazione. Come
condizione dell’obbligo di Celestron di riparare o sostituire detto prodotto, il prodotto deve essere restituito a Celestron assieme a una prova
d’acquisto che sia soddisfacente per Celestron.
B. Prima dell'invio del prodotto per la restituzione è necessario ottenere da Celestron un codice di autorizzazione alla restituzione. Chiamare
Celestron al numero (310) 328-9560 per ricevere il numero da mostrare all’esterno della confezione di spedizione.
Tutte le restituzioni devono essere accompagnate da una dichiarazione scritta indicante il nome, l’indirizzo e un numero di telefono del
proprietario, assieme a una breve descrizione del difetto reclamato. Le parti del prodotto per cui si effettua la sostituzione diventano
proprietà di Celestron.
Il cliente è responsabile di tutti i costi di trasporto e assicurazione, da e verso la fabbrica di Celestron, che devono essere pagati in anticipo.
Celestron si impegna a riparare o sostituire ogni telescopio coperto da garanzia entro 30 giorni dalla ricezione. In caso la riparazione o la
sostituzione richieda più di trenta giorni, Celestron notificherà il cliente di conseguenza. Celestron si riserva il diritto di sostituire qualsiasi
prodotto di cui sia stata interrotta la produzione con un prodotto nuovo di valore e funzione simile.
La presente garanzia sarà annullata e non sarà più in vigore o efficace nel caso in cui un prodotto coperto da garanzia sia stato modificato
nel design o nelle funzioni, o si sospetti l’abuso, l’uso improprio, cattiva gestione o riparazioni non autorizzate. Inoltre, il malfunzionamento o il
deterioramento del prodotto dovuti alla normale usura del prodotto non sono coperti dalla garanzia.
CELESTRON DECLINA QUALSIASI GARANZIA, ESPRESSA O IMPLICITA, SIA DI COMMERCIABILITÀ SIA DI ADEGUATEZZA PER UN DETERMINATO SCOPO, ECCETTO NEI CASI ESPRESSAMENTE QUI
INDICATI. IL SOLO OBBLIGO DI CELESTRON RELATIVO A QUESTA GARANZIA LIMITATA È QUELLO DI RIPARARE O SOSTITUIRE IL PRODOTTO COPERTO DALLA GARANZIA SECONDO I TERMINI
QUI INDICATI. CELESTRON DECLINA QUALSIASI GARANZIA PER PERDITE DI PROFITTI O DANNI GENERALI, SPECIALI, INDIRETTI O CONSEGUENTI DERIVATI DALLA VIOLAZIONE DELLA GARANZIA,
O DALL'USO O L'INCAPACITÀ DI UTILIZZO DI QUALSIVOGLIA PRODOTTO CELESTRON. LE GARANZIE IMPLICITE E CHE NON POSSONO ESSERE DECLINATE SONO LIMITATE NELLA DURATA A UN
TERMINE DI DUE ANNI DALLA DATA D'ACQUISTO.
Alcuni Stati non consentono l'esclusione o la limitazione di danni accidentali o conseguenti, o limitazioni sulla durata di una garanzia implicita,
per cui le limitazioni ed esclusioni sopra indicate potrebbero non essere applicabili.
La presente garanzia dà all'utente specifici diritti legali, oltre ad altri diritti che possono variare da Stato a Stato.
Celestron si riserva il diritto di modificare o sospendere la produzione, senza previa notifica, di qualsivoglia modello o stile di telescopio.
Nel caso in cui sorgano problemi di garanzia, o se si necessita di assistenza per l'uso del telescopio, contattare: Celestron - 800.421.9649
NOTA: La presente garanzia è valida per i clienti di Stati Uniti e Canada che hanno acquistato il proprio prodotto da un rivenditore Celestron autorizzato negli Stati Uniti o in Canada. La garanzia al
di fuori di Stati Uniti e Canada è valida esclusivamente per i clienti che hanno effettuato l’acquisto da un distributore internazionale Celestron o da un rivenditore autorizzato Celestron nello
specifico Paese. Contattare tali rivenditori per qualsiasi tipo di assistenza relativamente alla garanzia.
NOTA FCC: Il presente dispositivo è conforme alla Parte 15 delle Norme FCC. Il funzionamento è soggetto alle seguenti due condizioni:
(1) Il presente dispositivo non deve causare interferenze dannose, e (2) il presente dispositivo deve accettare qualsiasi interferenza ricevuta,
comprese interferenze che potrebbero causare un funzionamento indesiderato.
Il design del prodotto e le specifiche sono soggetti a modifiche senza previa notifica.
Questo prodotto è progettato per essere utilizzato da persone di età pari o superiore ai 14 anni.
© 2017 Celestron • Tutti i diritti riservati.
www.celestron.com
2835 Columbia Street • Torrance, CA 90503 U.S.A.
Telefono: 800.421.9649
05-17
Stampato in Cina
-
 1
1
-
 2
2
-
 3
3
-
 4
4
-
 5
5
-
 6
6
-
 7
7
-
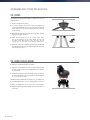 8
8
-
 9
9
-
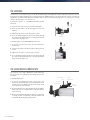 10
10
-
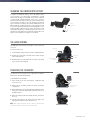 11
11
-
 12
12
-
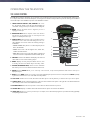 13
13
-
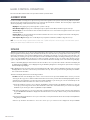 14
14
-
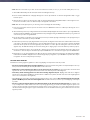 15
15
-
 16
16
-
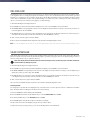 17
17
-
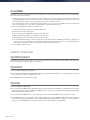 18
18
-
 19
19
-
 20
20
-
 21
21
-
 22
22
-
 23
23
-
 24
24
-
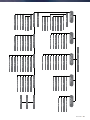 25
25
-
 26
26
-
 27
27
-
 28
28
-
 29
29
-
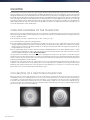 30
30
-
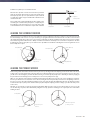 31
31
-
 32
32
-
 33
33
-
 34
34
-
 35
35
-
 36
36
-
 37
37
-
 38
38
-
 39
39
-
 40
40
-
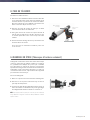 41
41
-
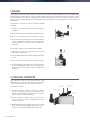 42
42
-
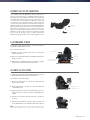 43
43
-
 44
44
-
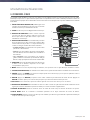 45
45
-
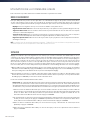 46
46
-
 47
47
-
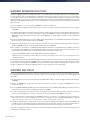 48
48
-
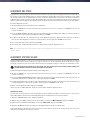 49
49
-
 50
50
-
 51
51
-
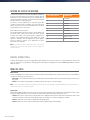 52
52
-
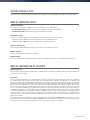 53
53
-
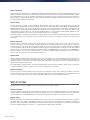 54
54
-
 55
55
-
 56
56
-
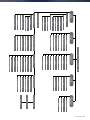 57
57
-
 58
58
-
 59
59
-
 60
60
-
 61
61
-
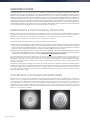 62
62
-
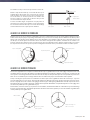 63
63
-
 64
64
-
 65
65
-
 66
66
-
 67
67
-
 68
68
-
 69
69
-
 70
70
-
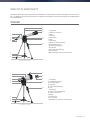 71
71
-
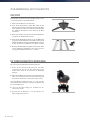 72
72
-
 73
73
-
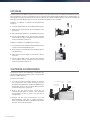 74
74
-
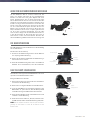 75
75
-
 76
76
-
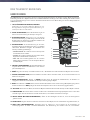 77
77
-
 78
78
-
 79
79
-
 80
80
-
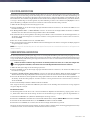 81
81
-
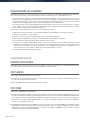 82
82
-
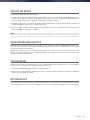 83
83
-
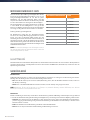 84
84
-
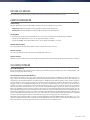 85
85
-
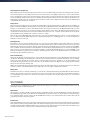 86
86
-
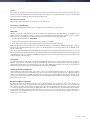 87
87
-
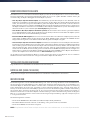 88
88
-
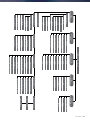 89
89
-
 90
90
-
 91
91
-
 92
92
-
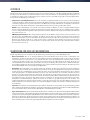 93
93
-
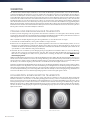 94
94
-
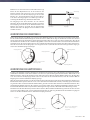 95
95
-
 96
96
-
 97
97
-
 98
98
-
 99
99
-
 100
100
-
 101
101
-
 102
102
-
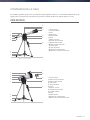 103
103
-
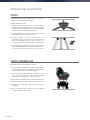 104
104
-
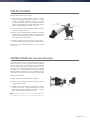 105
105
-
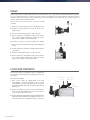 106
106
-
 107
107
-
 108
108
-
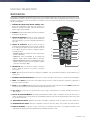 109
109
-
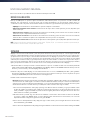 110
110
-
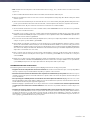 111
111
-
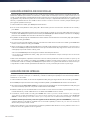 112
112
-
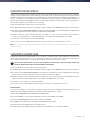 113
113
-
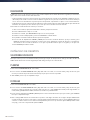 114
114
-
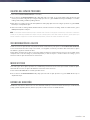 115
115
-
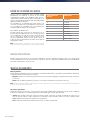 116
116
-
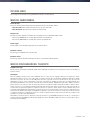 117
117
-
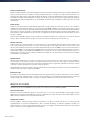 118
118
-
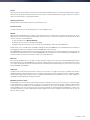 119
119
-
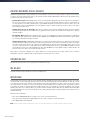 120
120
-
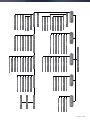 121
121
-
 122
122
-
 123
123
-
 124
124
-
 125
125
-
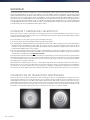 126
126
-
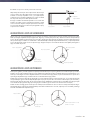 127
127
-
 128
128
-
 129
129
-
 130
130
-
 131
131
-
 132
132
-
 133
133
-
 134
134
-
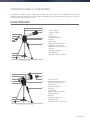 135
135
-
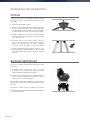 136
136
-
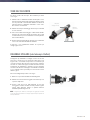 137
137
-
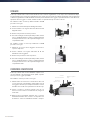 138
138
-
 139
139
-
 140
140
-
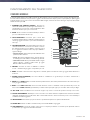 141
141
-
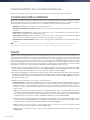 142
142
-
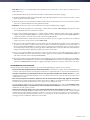 143
143
-
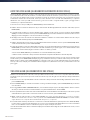 144
144
-
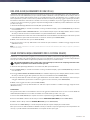 145
145
-
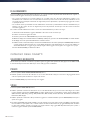 146
146
-
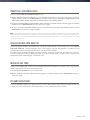 147
147
-
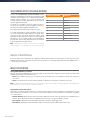 148
148
-
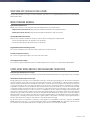 149
149
-
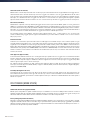 150
150
-
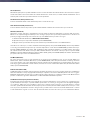 151
151
-
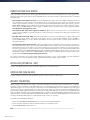 152
152
-
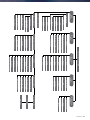 153
153
-
 154
154
-
 155
155
-
 156
156
-
 157
157
-
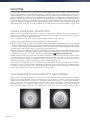 158
158
-
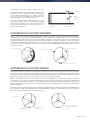 159
159
-
 160
160


Celestron 22051 Manual de usuario
- Categoría
- Telescopios
- Tipo
- Manual de usuario
- Este manual también es adecuado para
En otros idiomas
- français: Celestron 22051 Manuel utilisateur
- italiano: Celestron 22051 Manuale utente
- English: Celestron 22051 User manual
- Deutsch: Celestron 22051 Benutzerhandbuch
Documentos relacionados
-
Celestron Astromaster 102AZ Refractor Telescope Manual de usuario
-
Celestron COSMOS FirstScope Manual de usuario
-
Celestron SkyProdigy Series Manual de usuario
-
-
-
Celestron Travel Scope 70 Manual de usuario
-
-
Celestron 11068 Manual de usuario
-
-
Celestron AstroMaster EQ Telescope Series Manual de usuario
Otros documentos
-
Sharper Image Backpack Telescope El manual del propietario
-
Bushnell 789961 Manual de usuario
-
-
-
-
Bushnell 78-8830 Manual de usuario
-
Bushnell 78-8840 Manual de usuario
-
-
Tasco 46-114375 El manual del propietario
-
Bushnell North Star Goto 78-8831, 78-8846 Manual de usuario