Hayward Phantom 6000 El manual del propietario
- Categoría
- Accesorios para piscinas elevadas
- Tipo
- El manual del propietario


Important Safety Instructions
1
Use Only Genuine Hayward Replacement Parts.
Wa r n i n g
Read this entire Owner’s Guide before assembling and
installing the Phantom cl e a n e r. Failure to follow safety
warnings and Owner’s Guide instructions can result in
severe injury, death or property damage.
For additional free copies of the Owner’s Guide you
can download them from w w w . h a y w a r d n e t . c o m
or call (800) 227-1477.
Warning - Risk of Electrical Shock
The Hayward Phantom Automatic Pool Cleaner is designed to
connect to a threaded 1-1/2 inch female pipe fitting on a
dedicated return line that is powered by a 3/4 H.P. Booster
Pump. You should have a licensed electrician install the
cleaner’s booster bump. The Booster Pump must be
installed in accordance with the National Electrical Code
and all local code requirements. Failure to do so can
result in serious injury or death.
Warning - Risk of Injury
Failure to follow the safety warnings below may result in
severe injury, death or property damage.
• A l w ays disconnect and remove the cleaner and pressure
hose before entering the pool.
• Disconnect the Safety Rope that seperates the pool’s shallow
end from the pool’s deep end, b e fore running the Phantom.
A l w ays reconnect the Safety Rope before entering the pool.
• A l w ays handle with care. Do not let children or pets play with
the cleaner; it is not a toy.
• A l w ays turn the Booster Pump O F F b e f ore handling
the cleaner.
• Do not operate outside the pool. The Phantom Cleaner
and hoses contain high-pressure water jets that may
cause injury.
• Disconnect pressure hose from the universal wall fitting
b e f ore removing the cleaner from the pool.
• N e v e r point any of the cleaner’s high-pressure jets, p r e s s u r e
h o s e , pressure gauge or sweep hose at any person or pet.
Important Information
Caution - Risk of Equipment Damage
• A l w ays turn the Filtration Pump on b e f o r e turning the
booster pump on. Running the booster pump dry will
d a m a ge the booster pump and is not covered by the
H a yward warranty.
• A l w ays disconnect and remove the Phantom cleaner and
hoses from the pool before cleaning or backwashing the
pool filter.
• After cleaning or backwashing the pool filter, allow the
f i l t r a tion system to run for a minimum of five minutes or until
all debris has been flushed from plumbing lines befo r e
reconnecting the Phantom cleaner.
• New plumbing lines must be flushed out before connecting
the Phantom cleaner.
• The Phantom cleaner should not be used to remove plaster
dust or construction debris from new or renovated pools.
• The Phantom cleaner should not be used to remove
excessive sand (dense debris) following wind or sandstorms.
• A l w ays disconnect and remove the Phantom cleaner and
hoses before chemically shocking the pool.
• O n ly operate the Phantom cleaner for the period of time
n e c e s s a ry t o clean the pool. Excessive use is unnecessary
and will cause cleaner parts to premat u r e ly wear.
• R e g u l a r l y inspect the cleaner and hoses; do not use if
d a m a ged or if any rough edges are visible on the cleaner;
this can cause damage to the pool.
• Lift the Phantom cleaner by its wing (Part A , p a ge 4), never
by the hose or bag .
D i s cl a i m e r
• Pool plaster is affected by ag e , w a ter chemistry, e t c .
• Pool plaster can deteriorate over time.
• The integrity of “ g o o d ” pool plaster is such that a pool
vacuum cleaner – automatic or manual – cannot remove
the plaster.
• The integrity of “ g o o d ” pool plaster is such that the plaster
will cause wear on the cleaner, the cleaner will not wear out
“ g o o d ” pool plaster.
• V i nyl pool liners are affected by ag e , s u n l i g h t , and wat e r
c h e m i s t ry.
• V i nyl pool liners can become brittle and weak.
• V i nyl pool liners can be affected by the installation and the
p o o l ’s surroundings.
• P atterns on vinyl pool liners vary in quality.
• When installing the Phantom cleaner, you assume
responsibility for the condition of the pool’s surroundings
and chemistry.

Use Only Genuine Hayward Replacement Parts.
Contents
Introduction
3
Use Only Genuine Hayward Replacement Parts.
2
Important Safety Instructions . . . . . . . . . . . . . . . . . . . . . . . . . . . . . . . . . . . . . . . . . . . .1
Disclaimer . . . . . . . . . . . . . . . . . . . . . . . . . . . . . . . . . . . . . . . . . . . . . . . . . . . . . . . . . . .1
Introduction . . . . . . . . . . . . . . . . . . . . . . . . . . . . . . . . . . . . . . . . . . . . . . . . . . . . . . . . . .3
For Your Records . . . . . . . . . . . . . . . . . . . . . . . . . . . . . . . . . . . . . . . . . . . . . . . . . . . . . .3
Principle Parts . . . . . . . . . . . . . . . . . . . . . . . . . . . . . . . . . . . . . . . . . . . . . . . . . . . . . . . .4
Preparing the Pool . . . . . . . . . . . . . . . . . . . . . . . . . . . . . . . . . . . . . . . . . . . . . . . . . . . . .5
Dedicated Return Line . . . . . . . . . . . . . . . . . . . . . . . . . . . . . . . . . . . . . . . . . . . . . . . . .5
Tools Needed for Installation . . . . . . . . . . . . . . . . . . . . . . . . . . . . . . . . . . . . . . . . . . . . .5
Connecting Phantom Cleaner to Pool . . . . . . . . . . . . . . . . . . . . . . . . . . . . . . . . . . . . . .6
Installing the Universal Wall Fitting . . . . . . . . . . . . . . . . . . . . . . . . . . . . . . . . . . . . . . . . .6
Assembling and Sizing the Rigid Pressure Hose . . . . . . . . . . . . . . . . . . . . . . . . . . . . .7
Connecting the Rigid Pressure Hose . . . . . . . . . . . . . . . . . . . . . . . . . . . . . . . . . . . . . .8
Disconnecting a Hose Pipe . . . . . . . . . . . . . . . . . . . . . . . . . . . . . . . . . . . . . . . . . . . . . .8
Connecting Hose to Wall . . . . . . . . . . . . . . . . . . . . . . . . . . . . . . . . . . . . . . . . . . . . . . . .8
Operating the Phantom Cleaner . . . . . . . . . . . . . . . . . . . . . . . . . . . . . . . . . . . . . . . . . .9
Setting Pressure . . . . . . . . . . . . . . . . . . . . . . . . . . . . . . . . . . . . . . . . . . . . . . . . . . . . .9
Large Capacity Debris Bag . . . . . . . . . . . . . . . . . . . . . . . . . . . . . . . . . . . . . . . . . . . . .10
Attaching Debris Bag . . . . . . . . . . . . . . . . . . . . . . . . . . . . . . . . . . . . . . . . . . . . . . . . .10
Removing Debris Bag . . . . . . . . . . . . . . . . . . . . . . . . . . . . . . . . . . . . . . . . . . . . . . . . .10
Emptying Debris Bag . . . . . . . . . . . . . . . . . . . . . . . . . . . . . . . . . . . . . . . . . . . . . . . . .10
Sand (Dense Debris) . . . . . . . . . . . . . . . . . . . . . . . . . . . . . . . . . . . . . . . . . . . . . . . . . .10
Correctly Operating Phantom Cleaner . . . . . . . . . . . . . . . . . . . . . . . . . . . . . . . . . . . .11
Movement . . . . . . . . . . . . . . . . . . . . . . . . . . . . . . . . . . . . . . . . . . . . . . . . . . . . . . . . .11
Spin-Out . . . . . . . . . . . . . . . . . . . . . . . . . . . . . . . . . . . . . . . . . . . . . . . . . . . . . . . . . .11
Sweep Hose . . . . . . . . . . . . . . . . . . . . . . . . . . . . . . . . . . . . . . . . . . . . . . . . . . . . . . .11
Cleaning . . . . . . . . . . . . . . . . . . . . . . . . . . . . . . . . . . . . . . . . . . . . . . . . . . . . . . . . . .11
Fine Debris . . . . . . . . . . . . . . . . . . . . . . . . . . . . . . . . . . . . . . . . . . . . . . . . . . . . . . . .11
Sand (Dense Debris) . . . . . . . . . . . . . . . . . . . . . . . . . . . . . . . . . . . . . . . . . . . . . . . . . .11
Pressure Hose . . . . . . . . . . . . . . . . . . . . . . . . . . . . . . . . . . . . . . . . . . . . . . . . . . . . . .11
Phantom Cleaner Adjustments . . . . . . . . . . . . . . . . . . . . . . . . . . . . . . . . . . . . . . . . . .12
Changing Spin-Out Frequency . . . . . . . . . . . . . . . . . . . . . . . . . . . . . . . . . . . . . . . . . .12
Changing Spin-Out Cam . . . . . . . . . . . . . . . . . . . . . . . . . . . . . . . . . . . . . . . . . . . . . . .12
Adjusting Spin-Out Duration . . . . . . . . . . . . . . . . . . . . . . . . . . . . . . . . . . . . . . . . . . . .12
Changing Top and Bottom Operation . . . . . . . . . . . . . . . . . . . . . . . . . . . . . . . . . . . . . .13
Adjusting Sweep Hose Power . . . . . . . . . . . . . . . . . . . . . . . . . . . . . . . . . . . . . . . . . . .13
Maintenance . . . . . . . . . . . . . . . . . . . . . . . . . . . . . . . . . . . . . . . . . . . . . . . . . . . . . . . .14
Removing Phantom Cleaner from Pool . . . . . . . . . . . . . . . . . . . . . . . . . . . . . . . . . . . . .14
Emptying Debris Bag . . . . . . . . . . . . . . . . . . . . . . . . . . . . . . . . . . . . . . . . . . . . . . . . .14
Cleaning the In-Line Filter . . . . . . . . . . . . . . . . . . . . . . . . . . . . . . . . . . . . . . . . . . . . . .14
Sweep Hose . . . . . . . . . . . . . . . . . . . . . . . . . . . . . . . . . . . . . . . . . . . . . . . . . . . . . . .15
Storing the Phantom Cleaner . . . . . . . . . . . . . . . . . . . . . . . . . . . . . . . . . . . . . . . . . . .15
Winterizing . . . . . . . . . . . . . . . . . . . . . . . . . . . . . . . . . . . . . . . . . . . . . . . . . . . . . . . .15
Periodic Freezing Conditions . . . . . . . . . . . . . . . . . . . . . . . . . . . . . . . . . . . . . . . . . . . .15
Troubleshooting . . . . . . . . . . . . . . . . . . . . . . . . . . . . . . . . . . . . . . . . . . . . . . . . . . . . . .16
Booster Pump . . . . . . . . . . . . . . . . . . . . . . . . . . . . . . . . . . . . . . . . . . . . . . . . . . . . . . .17
Phantom Parts Diagram and Replacement Parts List . . . . . . . . . . . . . . . . . . . . . . . .18
Limited Warranty . . . . . . . . . . . . . . . . . . . . . . . . . . . . . . . . . . . . . . . . . . . . . . . . . . . . .19
C o n gr at u l ations on your purchase of the Hayward Phantom
A u t o m atic Pool Cleaner. The Hayward Phantom is the only To t a l
Pool Cleaner. The Phantom is designed to not only to clean your
p o o l ’s bottom and sides, but also to skim the wat e r ’s surface as
well – all automat i c a l l y !
This revolutionary design offers the following features:
• Faster Cleaning
-Wider Vacuum Nozzle
-Powerful Sweep Hose
• Large Debris Pick-up
-Large Suction Inlet
-Three High Pressure Water Jets
• Less Frequent Bag Cleaning
-Large Capacity Bag
-Easy to remove, clean and replace debris bag
• Complete Pool Cov e r a g e
- P atented AquaDrive™ water jet propulsion
-Randomized Cleaning & Spin-out
-Sweeps debris off steps while skimming
• Cleans the Pool Bottom, Sides a n d Skims
the Wa t e r ’ s Surfa c e
- A u t o m a tic Ascent and Descent
-Switch for Bottom & Side Cleaning Only or Surface
Skimming Only
• Less Wear on Pool Surfa c e
-P atented AquaDrive water jet propulsion: no powered
wheels wearing pool surfaces
• Easy Installation
A limited warranty program protects your Hayward Phantom
cleaner. To take full advantage of this limited warranty, please
read, complete and return the Limited Wa r r a n t y
Registration Card within 14 days of purchase date.
Your warranty card is included in this Owner’s Guide.
I m p o r t a n t
This Owner’s Guide is for Phantom owners who want to install
their A u t o m ati c Pool Cleaner. H o w e v e r, we recommend that an
Authorized Hayward Dealer install the cleaner.
The Hayward 5060 Booster Pump purchased separat e ly or as
part of the Phantom A u t o m atic Pool Cleaner package off e r s
optimum cleaner perfo r m a n c e . Use of other booster pumps will
provide acceptable performance if they deliver at least 35 Pounds
per Square Inch (PSI) at 12 Gallons Per Minute (GPM) at the
d e d i c a ted line pool wall fitting. For electrical and plumbing
i n s t a l l a tion procedures for the Hayward Booster Pump, refer to the
O w n e r ’s Guide that comes with the Hayward 5060 Booster Pump.
Purchase Date
Serial Number
(located on back of cleaner)
Number of Rigid Pipe Assemblies Used
Pressure Gauge Reading
For Your Records

Use Only Genuine Hayward Replacement Parts.
Contents
Introduction
3
Use Only Genuine Hayward Replacement Parts.
2
Important Safety Instructions . . . . . . . . . . . . . . . . . . . . . . . . . . . . . . . . . . . . . . . . . . . .1
Disclaimer . . . . . . . . . . . . . . . . . . . . . . . . . . . . . . . . . . . . . . . . . . . . . . . . . . . . . . . . . . .1
Introduction . . . . . . . . . . . . . . . . . . . . . . . . . . . . . . . . . . . . . . . . . . . . . . . . . . . . . . . . . .3
For Your Records . . . . . . . . . . . . . . . . . . . . . . . . . . . . . . . . . . . . . . . . . . . . . . . . . . . . . .3
Principle Parts . . . . . . . . . . . . . . . . . . . . . . . . . . . . . . . . . . . . . . . . . . . . . . . . . . . . . . . .4
Preparing the Pool . . . . . . . . . . . . . . . . . . . . . . . . . . . . . . . . . . . . . . . . . . . . . . . . . . . . .5
Dedicated Return Line . . . . . . . . . . . . . . . . . . . . . . . . . . . . . . . . . . . . . . . . . . . . . . . . .5
Tools Needed for Installation . . . . . . . . . . . . . . . . . . . . . . . . . . . . . . . . . . . . . . . . . . . . .5
Connecting Phantom Cleaner to Pool . . . . . . . . . . . . . . . . . . . . . . . . . . . . . . . . . . . . . .6
Installing the Universal Wall Fitting . . . . . . . . . . . . . . . . . . . . . . . . . . . . . . . . . . . . . . . . .6
Assembling and Sizing the Rigid Pressure Hose . . . . . . . . . . . . . . . . . . . . . . . . . . . . .7
Connecting the Rigid Pressure Hose . . . . . . . . . . . . . . . . . . . . . . . . . . . . . . . . . . . . . .8
Disconnecting a Hose Pipe . . . . . . . . . . . . . . . . . . . . . . . . . . . . . . . . . . . . . . . . . . . . . .8
Connecting Hose to Wall . . . . . . . . . . . . . . . . . . . . . . . . . . . . . . . . . . . . . . . . . . . . . . . .8
Operating the Phantom Cleaner . . . . . . . . . . . . . . . . . . . . . . . . . . . . . . . . . . . . . . . . . .9
Setting Pressure . . . . . . . . . . . . . . . . . . . . . . . . . . . . . . . . . . . . . . . . . . . . . . . . . . . . .9
Large Capacity Debris Bag . . . . . . . . . . . . . . . . . . . . . . . . . . . . . . . . . . . . . . . . . . . . .10
Attaching Debris Bag . . . . . . . . . . . . . . . . . . . . . . . . . . . . . . . . . . . . . . . . . . . . . . . . .10
Removing Debris Bag . . . . . . . . . . . . . . . . . . . . . . . . . . . . . . . . . . . . . . . . . . . . . . . . .10
Emptying Debris Bag . . . . . . . . . . . . . . . . . . . . . . . . . . . . . . . . . . . . . . . . . . . . . . . . .10
Sand (Dense Debris) . . . . . . . . . . . . . . . . . . . . . . . . . . . . . . . . . . . . . . . . . . . . . . . . . .10
Correctly Operating Phantom Cleaner . . . . . . . . . . . . . . . . . . . . . . . . . . . . . . . . . . . .11
Movement . . . . . . . . . . . . . . . . . . . . . . . . . . . . . . . . . . . . . . . . . . . . . . . . . . . . . . . . .11
Spin-Out . . . . . . . . . . . . . . . . . . . . . . . . . . . . . . . . . . . . . . . . . . . . . . . . . . . . . . . . . .11
Sweep Hose . . . . . . . . . . . . . . . . . . . . . . . . . . . . . . . . . . . . . . . . . . . . . . . . . . . . . . .11
Cleaning . . . . . . . . . . . . . . . . . . . . . . . . . . . . . . . . . . . . . . . . . . . . . . . . . . . . . . . . . .11
Fine Debris . . . . . . . . . . . . . . . . . . . . . . . . . . . . . . . . . . . . . . . . . . . . . . . . . . . . . . . .11
Sand (Dense Debris) . . . . . . . . . . . . . . . . . . . . . . . . . . . . . . . . . . . . . . . . . . . . . . . . . .11
Pressure Hose . . . . . . . . . . . . . . . . . . . . . . . . . . . . . . . . . . . . . . . . . . . . . . . . . . . . . .11
Phantom Cleaner Adjustments . . . . . . . . . . . . . . . . . . . . . . . . . . . . . . . . . . . . . . . . . .12
Changing Spin-Out Frequency . . . . . . . . . . . . . . . . . . . . . . . . . . . . . . . . . . . . . . . . . .12
Changing Spin-Out Cam . . . . . . . . . . . . . . . . . . . . . . . . . . . . . . . . . . . . . . . . . . . . . . .12
Adjusting Spin-Out Duration . . . . . . . . . . . . . . . . . . . . . . . . . . . . . . . . . . . . . . . . . . . .12
Changing Top and Bottom Operation . . . . . . . . . . . . . . . . . . . . . . . . . . . . . . . . . . . . . .13
Adjusting Sweep Hose Power . . . . . . . . . . . . . . . . . . . . . . . . . . . . . . . . . . . . . . . . . . .13
Maintenance . . . . . . . . . . . . . . . . . . . . . . . . . . . . . . . . . . . . . . . . . . . . . . . . . . . . . . . .14
Removing Phantom Cleaner from Pool . . . . . . . . . . . . . . . . . . . . . . . . . . . . . . . . . . . . .14
Emptying Debris Bag . . . . . . . . . . . . . . . . . . . . . . . . . . . . . . . . . . . . . . . . . . . . . . . . .14
Cleaning the In-Line Filter . . . . . . . . . . . . . . . . . . . . . . . . . . . . . . . . . . . . . . . . . . . . . .14
Sweep Hose . . . . . . . . . . . . . . . . . . . . . . . . . . . . . . . . . . . . . . . . . . . . . . . . . . . . . . .15
Storing the Phantom Cleaner . . . . . . . . . . . . . . . . . . . . . . . . . . . . . . . . . . . . . . . . . . .15
Winterizing . . . . . . . . . . . . . . . . . . . . . . . . . . . . . . . . . . . . . . . . . . . . . . . . . . . . . . . .15
Periodic Freezing Conditions . . . . . . . . . . . . . . . . . . . . . . . . . . . . . . . . . . . . . . . . . . . .15
Troubleshooting . . . . . . . . . . . . . . . . . . . . . . . . . . . . . . . . . . . . . . . . . . . . . . . . . . . . . .16
Booster Pump . . . . . . . . . . . . . . . . . . . . . . . . . . . . . . . . . . . . . . . . . . . . . . . . . . . . . . .17
Phantom Parts Diagram and Replacement Parts List . . . . . . . . . . . . . . . . . . . . . . . .18
Limited Warranty . . . . . . . . . . . . . . . . . . . . . . . . . . . . . . . . . . . . . . . . . . . . . . . . . . . . .19
C o n gr at u l ations on your purchase of the Hayward Phantom
A u t o m atic Pool Cleaner. The Hayward Phantom is the only To t a l
Pool Cleaner. The Phantom is designed to not only to clean your
p o o l ’s bottom and sides, but also to skim the wat e r ’s surface as
well – all automat i c a l l y !
This revolutionary design offers the following features:
• Faster Cleaning
-Wider Vacuum Nozzle
-Powerful Sweep Hose
• Large Debris Pick-up
-Large Suction Inlet
-Three High Pressure Water Jets
• Less Frequent Bag Cleaning
-Large Capacity Bag
-Easy to remove, clean and replace debris bag
• Complete Pool Cov e r a g e
- P atented AquaDrive™ water jet propulsion
-Randomized Cleaning & Spin-out
-Sweeps debris off steps while skimming
• Cleans the Pool Bottom, Sides a n d Skims
the Wa t e r ’ s Surfa c e
- A u t o m a tic Ascent and Descent
-Switch for Bottom & Side Cleaning Only or Surface
Skimming Only
• Less Wear on Pool Surfa c e
-P atented AquaDrive water jet propulsion:no powered
wheels wearing pool surfaces
• Easy Installation
A limited warranty program protects your Hayward Phantom
cleaner. To take full advantage of this limited warranty, please
read, complete and return the Limited Wa r r a n t y
Registration Card within 14 days of purchase date.
Your warranty card is included in this Owner’s Guide.
I m p o r t a n t
This Owner’s Guide is for Phantom owners who want to install
their A u t o m ati c Pool Cleaner. H o w e v e r, we recommend that an
Authorized Hayward Dealer install the cleaner.
The Hayward 5060 Booster Pump purchased separat e ly or as
part of the Phantom A u t o m atic Pool Cleaner package off e r s
optimum cleaner perfo r m a n c e . Use of other booster pumps will
provide acceptable performance if they deliver at least 35 Pounds
per Square Inch (PSI) at 12 Gallons Per Minute (GPM) at the
d e d i c a ted line pool wall fitting. For electrical and plumbing
i n s t a l l a tion procedures for the Hayward Booster Pump, refer to the
O w n e r ’s Guide that comes with the Hayward 5060 Booster Pump.
Purchase Date
Serial Number
(located on back of cleaner)
Number of Rigid Pipe Assemblies Used
Pressure Gauge Reading
For Your Records

Principle Parts
Preparing the Pool
4 5
Use Only Genuine Hayward Replacement Parts.
Caution - Risk of Equipment Damage
Hose may be stored folded pipe-to-pipe. Only first 3-foot hose
section and sweep hose must be stored straight, not coiled.
A. Wing
B. Large Capacity Debris Bag with Float Closure
C. Cleaner Connector
D. Sweep Hose Connector
E. Sweep Hose Adjustment Knob
F. Cam Cap
G. Rigid Pressure Hose
H. Hose Float
I. Hose Pipe Coupling
J. Hose Swivel
K. Adjustable Wall Quick Connect
L. Sweep Hose
M. Wear Roller
N. Rigid Hose Pipe
O. Universal Wall Fitting
P. Top / Auto / Bottom Switch
Q. In-Line Filter
R. Hose Swivel Assembly
S. Hose Cleaner End Assembly
T. Hose Wall End Assembly
U. Setup Pressure Gauge
The Phantom cleaner should not be used to clean the
pool for spring start-up until the following steps
have been taken:
1 . Clear the pool of any objects that might interfere with the
c l e a n e r ’s operat i o n .
2 . Check to see that the water is at the recommended level.
3 . Check the water chemistry.The water should be properly
balanced (ph level) and the pool free from algae.
N o t e : Algae can adversely affect the operation and
p e r f ormance of the cleaner.
4 . Clean or backwash the filtration system without the
Phantom cleaner in the pool.
Caution - Risk of Equipment Damage.
A l w ays disconnect the Phantom Cleaner and hoses form the
Universal Wall Fitting and remove from pool before backwashing
or cleaning the filtration system. Failure to do so can damage the
Booster Pump and Cleaner.
5 . Clean the filtration system pump’s strainer basket
N o t e : After installing the Phantom cleaner, clean the
f i l t r a tion system at regular intervals according to individual
pool conditions.
New Pool Construction
1 . Brush newly constructed pool surface and manually
vacuum new surface debris before installing the
Phantom.
Sand (dense debris)
Always empty the Phantom bag when sand
(or heavy debris) effects the cl e a n e r ’s stability
Pools with excessive amounts of sand should be manually
vacuumed before installing the Phantom.
Dedicated Booster Pump Return Line
The cleaner is designed to connect to a 1-1/2 inch dedicat e d
return line that is at least 6 inches below the normal water level
with 1-1/2 inch female threads. If the dedicated return line has
3/4 inch female threads, you will need to purchase a 1-1/2 inch
NPTF x 3/4 inch NPTM adap t e r.
Tools Needed for Installation
• F l a t blade screwdriver for adjusting the Regulator on the
Wall Quick Connect.
• R i g id Pressure Hose Measuring Tape
(included in Bag #1).
Wall Quick Connect
R e a rview Product
Front view Product
C
L
D
E
M
G
O
K
B
F
A
P
Rigid Pressure Hose Parts (G)
I
H
U
J
N
R
T
K
Q
C
L
M
S

7
Use Only Genuine Hayward Replacement Parts.Use Only Genuine Hayward Replacement Parts.
Connecting the Phantom Cleaner To Pool
6
Installing Universal Wall Fitting
Builders: Install the Dedicated Return Line at the
midpoint of the pool’s long wall.
S p e c i f i c a t i o n : D e d i c a ted Return Line in Pool Wa l l .
D e p t h : At least 6 inches below water level.
S i z e : 1-1/2 inch NPT Female T h r e a d e d .
1 . Flush plumbing lines before proceeding.
2 . Turn Booster Pump and Main Filtration Pump O F F.
3 . Remove plug or existing Universal Wall Fitting from
p r e v i o u s l y installed pool cleaner (if any ) .
4 . Remove the Universal Wall Fitting (part O) and Te f l o n
®
t ape
from Bag #1.
5 . When installing or re-installing the Universal Wall Fitting
use Te fl o n
®
t a pe on its plastic threads. L e ave two starting
threads on the end of the Universal Wall Fitting un-tap e d .
6 . Screw the Universal Wall Fitting into the Dedicated
Return Line.
I m p o r t a n t : Turn the Universal Wall Fitting 1 full turn to the
right to engage starting threads. Be sure both parts are
started properly (not cross threaded) then resume tightening
– hand tighten only.The Universal Wall Fitting may not screw
all the way into the Dedicated Return Line.
Do not over tighten.
Te f l o n
®
is a registered trademark of E.I. du Pont de Nemours
and Company.
Assembling and Sizing the Rigid Pressure Hose
Assembling and Sizing the Rigid Pressure Hose
1 . Open the plastic bag labeled #1 that contains 10 Rigid Hose
Pipes (Part N) and 5 Hose Pipe Couplings (Part I) .
2 . L u b r i c ate the 5 Hose Pipe Couplings by dunking them in
s o apy wat e r.
3 . Align the Barbs on the Hose Pipe Coupling with the Tabs on
the Rigid Hose Pipes and snap together. Be sure the black
o-ring does not slip out of the groove on the Hose Pipe
Coupling (if the o-ring is visible through the latch opening
when pipes are snapped together the o-ring has slipped out
of the groove and will leak)
4 . Make 5 S e t s of Pipe Assemblies by connecting 1 Rigi d
Hose Pipe onto each end of the Hose Pipe Couplings.
5 . L o c ate the “Measuring Tap e ” (packed in Bag #1), secure the
end of the tape marked “ W all Connector End”on the pool
coping immediat e ly above the Universal Wall Fitting.
6 . Unroll the Measuring Tap e , walk around the pool to the
farthest point along the pool wall from the Universal Wa l l
F i t t i n g .
At the farthest point from the Universal Wall Fitting hold
the Measuring Tape at the pool edge/coping and read the
number of Pipe Assemblies specified on the tap e .
Universal Wall Fitting
Rigid Hose Pipe Assembly
Dedicated Return Line
Universal Wall Fitting (O)
Measuring Ta p e
Connecting Hose Pipes
I
N
a . N o t e : If the measuring tape specifies more than 5 Pipe
A s s e m b l i e s , you need to purchase the additional Pipe
sections (P/N AX6000HE) from your Authorized Hay w a r d
D e a l e r.
b . If the measuring tape specifies fewer than 5 Pipe
A s s e m b l i e s , set the remaining Pipe Assemblies aside you
won’t need them.
R e c t a n g u l a r-Shaped Po o l
Kidney-Shaped Po o l
Angle-Shaped Po o l
Universal Wall Fitting
(Dedicated Line)
Universal Wall Fitting
(Dedicated Line)
Farthest Point
Farthest Point
Universal Wall Fitting
(Dedicated Line)
Farthest Point
I N
1 Pipe
Assembly

7
Use Only Genuine Hayward Replacement Parts.Use Only Genuine Hayward Replacement Parts.
Connecting the Phantom Cleaner To Pool
6
Installing Universal Wall Fitting
Builders: Install the Dedicated Return Line at the
midpoint of the pool’s long wall.
S p e c i f i c a t i o n : D e d i c a ted Return Line in Pool Wa l l .
D e p t h : At least 6 inches below water level.
S i z e : 1-1/2 inch NPT Female T h r e a d e d .
1 . Flush plumbing lines before proceeding.
2 . Turn Booster Pump and Main Filtration Pump O F F.
3 . Remove plug or existing Universal Wall Fitting from
p r e v i o u s l y installed pool cleaner (if any ) .
4 . Remove the Universal Wall Fitting (part O) and Te f l o n
®
t ape
from Bag #1.
5 . When installing or re-installing the Universal Wall Fitting
use Te fl o n
®
t a pe on its plastic threads.L e ave two starting
threads on the end of the Universal Wall Fitting un-tap e d .
6 . Screw the Universal Wall Fitting into the Dedicated
Return Line.
I m p o r t a n t : Turn the Universal Wall Fitting 1 full turn to the
right to engage starting threads. Be sure both parts are
started properly (not cross threaded) then resume tightening
– hand tighten only.The Universal Wall Fitting may not screw
all the way into the Dedicated Return Line.
Do not over tighten.
Te f l o n
®
is a registered trademark of E.I. du Pont de Nemours
and Company.
Assembling and Sizing the Rigid Pressure Hose
Assembling and Sizing the Rigid Pressure Hose
1 . Open the plastic bag labeled #1 that contains 10 Rigid Hose
Pipes (Part N) and 5 Hose Pipe Couplings (Part I) .
2 . L u b r i c ate the 5 Hose Pipe Couplings by dunking them in
s o apy wat e r.
3 . Align the Barbs on the Hose Pipe Coupling with the Tabs on
the Rigid Hose Pipes and snap together. Be sure the black
o-ring does not slip out of the groove on the Hose Pipe
Coupling (if the o-ring is visible through the latch opening
when pipes are snapped together the o-ring has slipped out
of the groove and will leak)
4 . Make 5 S e t s of Pipe Assemblies by connecting 1 Rigi d
Hose Pipe onto each end of the Hose Pipe Couplings.
5 . L o c ate the “Measuring Tap e ” (packed in Bag #1), secure the
end of the tape marked “ W all Connector End”on the pool
coping immediat e ly above the Universal Wall Fitting.
6 . Unroll the Measuring Tap e , walk around the pool to the
farthest point along the pool wall from the Universal Wa l l
F i t t i n g .
At the farthest point from the Universal Wall Fitting hold
the Measuring Tape at the pool edge/coping and read the
number of Pipe Assemblies specified on the tap e .
Universal Wall Fitting
Rigid Hose Pipe Assembly
Dedicated Return Line
Universal Wall Fitting (O)
Measuring Ta p e
Connecting Hose Pipes
I
N
a . N o t e : If the measuring tape specifies more than 5 Pipe
A s s e m b l i e s , you need to purchase the additional Pipe
sections (P/N AX6000HE) from your Authorized Hay w a r d
D e a l e r.
b . If the measuring tape specifies fewer than 5 Pipe
A s s e m b l i e s , set the remaining Pipe Assemblies aside you
won’t need them.
R e c t a n g u l a r-Shaped Po o l
Kidney-Shaped Po o l
Angle-Shaped Po o l
Universal Wall Fitting
(Dedicated Line)
Universal Wall Fitting
(Dedicated Line)
Farthest Point
Farthest Point
Universal Wall Fitting
(Dedicated Line)
Farthest Point
I N
1 Pipe
Assembly

9
Use Only Genuine Hayward Replacement Parts.
Warning - Risk of Injury
The Filtration and Booster Pumps must be O F F when connecting
or disconnecting cleaner hose.
Caution - Risk of Equipment Damage
The filter pump must alw ays be run to clear air from the system
b e f ore turning the Booster Pump O N . Never run the Booster
Pump without the main filter pump O N.Running the Booster
Pump dry will damage the Booster Pump and void the warranty.
Operating the Phantom Cleaner
1 . Be sure all filtration system valves are open and supply i n g
w a ter to the Booster Pump.
2 . Be sure valves to and from the Booster Pump and dedicat e d
return line are fully opened.
3 . The Phantom Cleaner and its Booster Pump can only
o p e r a te when the pool’s filter pump is operat i n g .
Caution - Risk of Equipment Damage
Failure to open valves fully and/or failure to have the filtrat i o n
system operating will damage the Booster Pump.This damag e
voids the Booster Pump’s warranty.
Setting Pressure
I m p o r t a n t : The cleaner will not operate properly if the pressure
is not properly set. Too little pressure will prevent proper
movement and cleaning.Too much pressure will cause poor
cleaning and premature wear of Cleaner parts.
Warning - Risk of Injury
Be careful to hold the Cleaner Connector (Part C) with the Setup
Pressure Gauge (Part U) attached under water and not to be
s p r a yed by the hole in the Setup Pressure Gauge or by the
Sweep Hose. N e v e r point a jet or hose at people or pets.
Clip the Setup Pressure Gauge to the hose near the Wall Quick
C o n n e c t .
1 . Turn the filtration system pump O N then the Booster Pump
O N . Read the pressure on the Setup Pressure Gauge
connected to the Cleaner Connector. Use a fl at blade
screwdriver to adjust the Wall Quick Connect Knob until the
pressure reads 25 PSI (
+
/- 5 PSI).
N o t e : The Wall Quick Connect can be adjusted from “ 0 ”
( f u l l y closed) to “ 5 ” ( f u l l y open). Do N OT force the
adjustment knob beyond “ 0 ” or “ 5 ” .
2 . If the Wall Connector is on Position “ 5 ” ( f u l l y open) and the
pressure is still below 20 PSI, check for clogged Filter, P u m p
Strainer Basket, Main Drain, Skimmer Basket, e t c . , t o
determine why there is insufficient water pressure at the
d e d i c ated line. If more pressure is still required have an
Authorized Hayward Pool Dealer or Service person check
the Booster Pump, F i l t r ation System and Plumbing to
determine if they are functioning correctly.
3 . Turn the Booster Pump and Filtration Pump O F F.
4 . R e m ove the Setup Pressure Gauge from the Cleaner
C o n n e c t o r. Store the Setup Pressure Gauge with the
O w n e r ’s Guide in a safe place.
5 . Attach the Cleaner Connector to Cleaner. The Sweep Hose
should be directly below the Pressure Hose.
6 . Place the cleaner in the pool, turn the Filtration system O N ,
then turn the Booster Pump O N.
Connecting Pressure Hose to Cleaner
Adjusting Pressure at Wall Connector
Setup Pressure Gauge & Wall Connect
K
C
U
C
7 . L u b r i c ate the swivel on the 3 ft.Hose Wall End A s s e m b ly (Part T )
in soapy water then snap into one of the Pipe A s s e m b l i e s .
8 . L u b r i c ate the swivel on the Hose Cleaner End A s s e m b ly (Part S)
in soapy water then snap into a different Pipe A s s e m b ly.
9 . Open Bag #2 and lubricate both ends of the Hose Swivel
Assemblies (Part R) in soapy wat e r. Connect the Pipe
Assemblies by snapping the Hose Swivel Assemblies into each
of the Pipe A s s e m b l i e s .
Connecting Hose to Wall Fitting
1 . With the Booster Pump and Filtration system turned O F F,
look down from the pool deck and hold the Wall Quick
Connect so the hose is to the left and the adjustment knob
is to the right. Insert the Wall Quick Connect into the
Universal Wall Fitting and turn it to the left (counter
clockwise) to lock.The hose should be on the bottom below
the adjustment knob.
2 . Pull the Wall Quick Connect outward to check that the Wa l l
Quick Connect is locked into the Universal Wall Fitting.
3 . To d i s c o n n e c t the hose, first turn the Booster Pump and
F i l t r ation pump O F F then push the Wall Quick Connect
toward the wall, turn it to the right (clockwise) and pull the
Wall Quick Connect out of the Universal Wall Fitting.
Disconnecting a Hose Pipe
If it is necessary to shorten, lengthen or replace a component
of the Rigid Pressure Hose, the Snap Fits can be undone by
twisting the connected Hose Pipes as shown.
8
Use Only Genuine Hayward Replacement Parts.
Disconnecting Hose Pipes
Wall Quick Connect
Connecting The Rigid Pressure Hose to Pool Operating the Phantom Cleaner
Wall Connector Assembly
Hose Cleaner End Assembly
T QN
Hose Swivel Assembly
RN
Rigid Pressure Hose Assembly
S

9
Use Only Genuine Hayward Replacement Parts.
Warning - Risk of Injury
The Filtration and Booster Pumps must be O F F when connecting
or disconnecting cleaner hose.
Caution - Risk of Equipment Damage
The filter pump must alw ays be run to clear air from the system
b e f ore turning the Booster Pump O N . Never run the Booster
Pump without the main filter pump O N.Running the Booster
Pump dry will damage the Booster Pump and void the warranty.
Operating the Phantom Cleaner
1 . Be sure all filtration system valves are open and supply i n g
w a ter to the Booster Pump.
2 . Be sure valves to and from the Booster Pump and dedicat e d
return line are fully opened.
3 . The Phantom Cleaner and its Booster Pump can only
o p e r a te when the pool’s filter pump is operat i n g .
Caution - Risk of Equipment Damage
Failure to open valves fully and/or failure to have the filtrat i o n
system operating will damage the Booster Pump.This damag e
voids the Booster Pump’s warranty.
Setting Pressure
I m p o r t a n t : The cleaner will not operate properly if the pressure
is not properly set. Too little pressure will prevent proper
movement and cleaning.Too much pressure will cause poor
cleaning and premature wear of Cleaner parts.
Warning - Risk of Injury
Be careful to hold the Cleaner Connector (Part C) with the Setup
Pressure Gauge (Part U) attached under water and not to be
s p r a yed by the hole in the Setup Pressure Gauge or by the
Sweep Hose. N e v e r point a jet or hose at people or pets.
Clip the Setup Pressure Gauge to the hose near the Wall Quick
C o n n e c t .
1 . Turn the filtration system pump O N then the Booster Pump
O N . Read the pressure on the Setup Pressure Gauge
connected to the Cleaner Connector. Use a fl at blade
screwdriver to adjust the Wall Quick Connect Knob until the
pressure reads 25 PSI (
+
/- 5 PSI).
N o t e : The Wall Quick Connect can be adjusted from “ 0 ”
( f u l l y closed) to “ 5 ” ( f u l l y open). Do N OT force the
adjustment knob beyond “ 0 ” or “ 5 ” .
2 . If the Wall Connector is on Position “ 5 ” ( f u l l y open) and the
pressure is still below 20 PSI, check for clogged Filter, P u m p
Strainer Basket, Main Drain, Skimmer Basket, e t c . , t o
determine why there is insufficient water pressure at the
d e d i c ated line. If more pressure is still required have an
Authorized Hayward Pool Dealer or Service person check
the Booster Pump, F i l t r ation System and Plumbing to
determine if they are functioning correctly.
3 . Turn the Booster Pump and Filtration Pump O F F.
4 . R e m ove the Setup Pressure Gauge from the Cleaner
C o n n e c t o r. Store the Setup Pressure Gauge with the
O w n e r ’s Guide in a safe place.
5 . Attach the Cleaner Connector to Cleaner.The Sweep Hose
should be directly below the Pressure Hose.
6 . Place the cleaner in the pool, turn the Filtration system O N ,
then turn the Booster Pump O N.
Connecting Pressure Hose to Cleaner
Adjusting Pressure at Wall Connector
Setup Pressure Gauge & Wall Connect
K
C
U
C
7 . L u b r i c ate the swivel on the 3 ft.Hose Wall End A s s e m b ly (Part T )
in soapy water then snap into one of the Pipe A s s e m b l i e s .
8 . L u b r i c ate the swivel on the Hose Cleaner End A s s e m b ly (Part S)
in soapy water then snap into a different Pipe A s s e m b ly.
9 . Open Bag #2 and lubricate both ends of the Hose Swivel
Assemblies (Part R) in soapy wat e r. Connect the Pipe
Assemblies by snapping the Hose Swivel Assemblies into each
of the Pipe A s s e m b l i e s .
Connecting Hose to Wall Fitting
1 . With the Booster Pump and Filtration system turned O F F,
look down from the pool deck and hold the Wall Quick
Connect so the hose is to the left and the adjustment knob
is to the right. Insert the Wall Quick Connect into the
Universal Wall Fitting and turn it to the left (counter
clockwise) to lock.The hose should be on the bottom below
the adjustment knob.
2 . Pull the Wall Quick Connect outward to check that the Wa l l
Quick Connect is locked into the Universal Wall Fitting.
3 . To d i s c o n n e c t the hose, first turn the Booster Pump and
F i l t r ation pump O F F then push the Wall Quick Connect
toward the wall, turn it to the right (clockwise) and pull the
Wall Quick Connect out of the Universal Wall Fitting.
Disconnecting a Hose Pipe
If it is necessary to shorten, lengthen or replace a component
of the Rigid Pressure Hose, the Snap Fits can be undone by
twisting the connected Hose Pipes as shown.
8
Use Only Genuine Hayward Replacement Parts.
Disconnecting Hose Pipes
Wall Quick Connect
Connecting The Rigid Pressure Hose to Pool Operating the Phantom Cleaner
Wall Connector Assembly
Hose Cleaner End Assembly
T QN
Hose Swivel Assembly
RN
Rigid Pressure Hose Assembly
S

1 0
Use Only Genuine Hayward Replacement Parts.
R e m ovi ng Debris Bag (Detail)
Attaching Debris Bag
1 . Place the frame of the Debris Bag against the back
of the Cleaner as shown.
2 . Press down on the top corners of the frame.
3 . Press down on the top-center of the frame to lock
the Debris Bag in place.
R e m oving Debris Bag
1 . Pull the top of the Debris Bag frame back (1) and then up (2).
Note: If you allow the bag to dry, the debris will be easier to remove.
Emptying Debris Bag
1 . Hold Bag over trash can or wherever debris is to be placed.
2 . Slide Float Closure off of bag .
3 . Hold open edges apart and shake debris from bag .
4 . Slide Float Closure onto bag .
Sand (dense debris)
If too much sand or heavy debris is collected in the Debris Bag ,
the bag will “ d r o o p ” over the hose while on the bottom and may
not be able to ascend to the surface properly. If you observe the
b ag drooping over the hose turn the booster pump off and empty
the Debris Bag .
N o t e : Pools with excessive amounts of sand should be manually
vacuumed before installing the Phantom.
Attaching Debris Bag
Emptying Debris Bag
B
Float Closure
1 1
Use Only Genuine Hayward Replacement Parts.
Correctly Operating CleanerLarge Capacity Debris Bag
M ov e m e n t
When the Phantom cleaner is operating properly it will randomly
t r a vel around the bottom, sides and surface of the pool in “ A U T O ”
m o d e . The cleaner will clean the bottom and walls 2/3 of its
cycle and skim the surface 1/3 of the cycle. In “ T O P ” or “ B O T ”
(Bottom) mode, the cleaner will stay in the Skimming or Bottom
& Wall mode (respectively) until the switch is changed to a
d i f ferent mode.
S p i n - O u t
The cleaner will periodically stop and rotate clockwise in order
to provide better pool coverage and to escape from corners and
other obstacles. If the cleaner is momentarily stopped in a corner
or at an obstacle, it will Spin-Out to free itself and continue
moving randomly about the pool.The Spin-Out Cam determines
the frequency of the Spin-Outs. The cleaner comes equipped with
3 Spin-Out Cams; every 75, 50 (factory installed) or 30 seconds
(75 second and 30 second Cams are in the A c c e s s o ry bag ) . To
change Spin-Out Frequency see “ C h a n g ing Spin-Out Cam”.
Sweep Hose
The Sweep Hose should move in a slow, u n d u l ating (snake-like)
m o t i o n . It moves debris out of tight corners so the cleaner can
vacuum the debris at a more accessible spot in the pool.
The Sweep Hose also stirs fine debris into suspension fo r
removal by the pool’s filtration system. The Sweep Hose Rollers
are wear parts. When the rollers wear-down to the outer gr o o v e
( W ear Line) replace the Wear Rollers (P/N AX5006A) a bag of
extra Wear Rollers is included.If a hole forms in the Sweep Hose,
it must be replaced with a genuine Hayward Phantom Sweep
Hose (P/N A X 5 0 0 0 R S H A ) .
C l e a n i n g
When the cleaner is on the bottom or walls debris is vacuumed
from below the cleaner and passed through the vacuum tube
into the Debris Bag . When the cleaner is skimming the surface
w a ter jets push the debris into the Debris Bag where it is held
until the user empties the Bag . The cleaner may not pick-up all
debris on the first pass, but your pool should be clean in 3-hours
or less (depending on pool size, s h ape and the amount of debris
in the pool).
Observe the Phantom’s operation at regular intervals and empty
the bag as necessary. O n l y operate the Phantom for the time
n e c e s s a r y to clean the pool. Excessive use is unnecessary and
will cause premature cleaner wear.
Fine Debris
The Large Capacity Debris Bag , as with other pressure-side
c l e a n e r s , does not hold very fine sand or other powder- l i k e
d e b r i s . Powder will be blown through the bag and into
suspension so it can be filtered by the pool’s filtration system.
Sand (Dense Debris)
If too much sand or heavy debris is collected in the Debris Bag ,
the bag will “ d r o o p ” over the hose while on the bottom and may
not be able to ascend to the surface. If you observe the bag
drooping over the hose turn the booster pump off and empty
the Debris Bag .
Pools with excessive amounts of sand should be manually
vacuumed before installing the Phantom.
The Phantom is designed to operate with 1/2-cup of sand and
the remainder of its bag filled with leav e s , a c o r n s , gr a s s e s , e t c .
Pressure Hose
This hose has been designed to minimize the forming of loops
and knotting. Most of the pressure hose should remain below the
surface of the water the majority of the time. If the hose forms a
loop the cleaner will eventually work it out. In the rare event the
hose becomes knotted or tangled, it will limit the range of
the cleaner. To get optimal coverag e , remove knots or bad
tangles if fo u n d .
Sweep Hose
Wear Roller
Wear Line
(outer groove)
Wear Rollers (M)
Spin-Out Cams
75-Second 50-Second 30-Second
Sun Logo

1 0
Use Only Genuine Hayward Replacement Parts.
R e m ovi ng Debris Bag (Detail)
Attaching Debris Bag
1 . Place the frame of the Debris Bag against the back
of the Cleaner as shown.
2 . Press down on the top corners of the frame.
3 . Press down on the top-center of the frame to lock
the Debris Bag in place.
R e m oving Debris Bag
1 . Pull the top of the Debris Bag frame back (1) and then up (2).
Note: If you allow the bag to dry, the debris will be easier to remove.
Emptying Debris Bag
1 . Hold Bag over trash can or wherever debris is to be placed.
2 . Slide Float Closure off of bag .
3 . Hold open edges apart and shake debris from bag .
4 . Slide Float Closure onto bag .
Sand (dense debris)
If too much sand or heavy debris is collected in the Debris Bag ,
the bag will “ d r o o p ” over the hose while on the bottom and may
not be able to ascend to the surface properly. If you observe the
b ag drooping over the hose turn the booster pump off and empty
the Debris Bag .
N o t e : Pools with excessive amounts of sand should be manually
vacuumed before installing the Phantom.
Attaching Debris Bag
Emptying Debris Bag
B
Float Closure
1 1
Use Only Genuine Hayward Replacement Parts.
Correctly Operating CleanerLarge Capacity Debris Bag
M ov e m e n t
When the Phantom cleaner is operating properly it will randomly
t r a vel around the bottom, sides and surface of the pool in “ A U T O ”
m o d e . The cleaner will clean the bottom and walls 2/3 of its
cycle and skim the surface 1/3 of the cycle. In “ T O P ” or “ B O T ”
(Bottom) mode, the cleaner will stay in the Skimming or Bottom
& Wall mode (respectively) until the switch is changed to a
d i f ferent mode.
S p i n - O u t
The cleaner will periodically stop and rotate clockwise in order
to provide better pool coverage and to escape from corners and
other obstacles. If the cleaner is momentarily stopped in a corner
or at an obstacle, it will Spin-Out to free itself and continue
moving randomly about the pool.The Spin-Out Cam determines
the frequency of the Spin-Outs.The cleaner comes equipped with
3 Spin-Out Cams; every 75, 50 (factory installed) or 30 seconds
(75 second and 30 second Cams are in the A c c e s s o ry bag ) . To
change Spin-Out Frequency see “ C h a n g ing Spin-Out Cam”.
Sweep Hose
The Sweep Hose should move in a slow, u n d u l ating (snake-like)
m o t i o n . It moves debris out of tight corners so the cleaner can
vacuum the debris at a more accessible spot in the pool.
The Sweep Hose also stirs fine debris into suspension fo r
removal by the pool’s filtration system. The Sweep Hose Rollers
are wear parts. When the rollers wear-down to the outer gr o o v e
( W ear Line) replace the Wear Rollers (P/N AX5006A) a bag of
extra Wear Rollers is included. If a hole forms in the Sweep Hose,
it must be replaced with a genuine Hayward Phantom Sweep
Hose (P/N A X 5 0 0 0 R S H A ) .
C l e a n i n g
When the cleaner is on the bottom or walls debris is vacuumed
from below the cleaner and passed through the vacuum tube
into the Debris Bag . When the cleaner is skimming the surface
w a ter jets push the debris into the Debris Bag where it is held
until the user empties the Bag . The cleaner may not pick-up all
debris on the first pass, but your pool should be clean in 3-hours
or less (depending on pool size, s h ape and the amount of debris
in the pool).
Observe the Phantom’s operation at regular intervals and empty
the bag as necessary. O n l y operate the Phantom for the time
n e c e s s a r y to clean the pool. Excessive use is unnecessary and
will cause premature cleaner wear.
Fine Debris
The Large Capacity Debris Bag , as with other pressure-side
c l e a n e r s , does not hold very fine sand or other powder- l i k e
d e b r i s . Powder will be blown through the bag and into
suspension so it can be filtered by the pool’s filtration system.
Sand (Dense Debris)
If too much sand or heavy debris is collected in the Debris Bag ,
the bag will “ d r o o p ” over the hose while on the bottom and may
not be able to ascend to the surface. If you observe the bag
drooping over the hose turn the booster pump off and empty
the Debris Bag .
Pools with excessive amounts of sand should be manually
vacuumed before installing the Phantom.
The Phantom is designed to operate with 1/2-cup of sand and
the remainder of its bag filled with leav e s , a c o r n s , gr a s s e s , e t c .
Pressure Hose
This hose has been designed to minimize the forming of loops
and knotting. Most of the pressure hose should remain below the
surface of the water the majority of the time. If the hose forms a
loop the cleaner will eventually work it out. In the rare event the
hose becomes knotted or tangled, it will limit the range of
the cleaner. To get optimal coverag e , remove knots or bad
tangles if fo u n d .
Sweep Hose
Wear Roller
Wear Line
(outer groove)
Wear Rollers (M)
Spin-Out Cams
75-Second 50-Second 30-Second
Sun Logo

Changing Top and Bottom Operation
The Top/Bottom Switch (Part P, p a ge 4) is set to “AU T O”at the
f a c t o r y. The Phantom Cleaner will vacuum the pool bottom and
sides 2/3 of its cycle and skim the surface 1/3 of its cycle
a u t o m at i c a l ly.
The cleaner can be easily adjusted to concentrate on the areas
of the pool with the most debris.
• To ONLY clean the bottom and sides of the pool,
m ove the switch to the right “ B O T ” .
• To ONLY skim the pool surfa c e , m ove the switch
to the left “ T O P ” .
1 3
Use Only Genuine Hayward Replacement Parts.
1 2
Use Only Genuine Hayward Replacement Parts.
Adjusting Sweep Hose Po w e r
• In most pools it will not be necessary to adjust the
Sweep Hose power.
• O b s e rve the Phantom cleaner operating in the pool.
The Sweep Hose should move in a slow, u n d u l ating
(snake-like) motion.
• Sweep Hose Not Mov i n g : If the Sweep Hose does not
move side-to-side and just drags behind the cleaner, c h e c k
the Sweep Hose for holes. Check for debris behind the
adjustment knob or in the jet-end of the Sweep Hose.
• Sweep Hose Moves Slowly Or Not At All: Turn the
adjustment knob counter- c l o c k w i s e to increase Sweep
Hose power.
• Sweep Hose Frequently Sprays Out Of The Po o l :
Turn the adjustment knob cl o c k w i s e to reduce Sweep
Hose power.
N o t e : Do N O T turn the Sweep Hose completely off .
This can cause the hose to tangle or knot.
Phantom Cleaner Adjustments
Warning – Risk of Injury
Turn the Booster Pump and Filtration Pump OFF before
making adjustments to the cl e a n e r. Always make
adjustments outside of the pool. Failure to do so may
cause injury.
Changing Spin-Out Frequency
• In most pools it will not be necessary to change the Spin-Out
f r e q u e n c y.
• The cleaner comes with a 3-prong Spin-Out cam installed,
which makes the Phantom cleaner Spin-Out once every
5 0 - s e c o n d s . This is ap p r o p r i a te for most pools.
• Pools that are small or have many sharp corners or other
obstacles may benefit from more frequent Spin-Outs. F o r
such pools, open the Cam Cap and replace the 3-prong cam
with the 5-prong 30 second cam.
• Pools that are very large and/or have very few obstacles may
benefit from less frequent Spin-Outs. For such pools, o p e n
the Cam Cap and replace the 3-prong cam with the 2-prong
75-second cam.
• The goal is to maximize cleaning time and minimize the
amount of time spinning out.
• If the cleaner is spending too much time at an obstacle
waiting for a Spin-Out, use a cam with more prongs for more
frequent Spin-Outs.
• If the cleaner rarely needs to Spin-Out near an obstacle then
a cam with fewer prongs and less frequent Spin-Outs will
increase effective cleaning time.
• If the cleaner has a tendency to stay in the deep end (not
cleaning the shallow end suff i c i e n t ly ) , in pools with a
p a r t i c u l a r ly steep or long slopes between the deep and
shallow ends,we recommend using a cam with fewer
p r o n g s , it will promote longer straight runs.
Changing Spin-Out Cam
1 . Turn the Cam Cap counter clockwise to open.
2 . Remove the Spin-Out Cam.
3 . Place the desired Cam in place over the stem.
4 . Place unused Cams in A c c e s s o ry Bag and store in a safe
place with the Owner’s Guide.
5 . Close the Cam Cap .
Adjusting Spin-Out Duration
Each Cam has a “ S u m m e r ” side and a “ W i n t e r ” side (see Sun &
S n o w flake logos on each Cam). The Summer side is usually
p r e f e r r e d . If the pool water is cold (below 60 degrees F), t h e
Pressure Hose becomes stiffer and may prevent the Cleaner
from Spinning-Out enough to escape from obstacles.T h e
“ W i n t e r ” Cam side will provide longer Spin-Outs so the Cleaner
o p e r a tes better in cold wat e r.
1 . Turn the Cam Cap to open
2 . Remove the Cam, turn it over and replace the Cam so the
desired (Sun or Snowflake) side is face-up.
• If the cleaner is making more than three attempts to escap e
from an obstacle, use the “ W i n t e r ” s i d e .
• If the cleaner regularly spins-out more than three-quarters
of a turn, use the “ S u m m e r ” s i d e .
Cam Cap on Deck
Top/Auto/Bot Switch
Cam Cap Open
Adjusting Sweep Hose Po w e r
Spin-Out Cams
75-Second 50-Second 30-Second
Cam Cap (F)
Cam Cap (F)
Sun Logo
Spin-Out Cam

Cleaning the In-Line Filter
1 . The In-Line filter (Part Q) is located by the Wall Quick
Connect (Part K).
2 . To remove the screen inside the In-Line Filter, unscrew
the cap of the In-Line Filter and remove the screen.
3 . Remove the debris from the screen and rinse. I m p o r t a n t : I f
the screen frequently becomes plugg e d , the filtrat i o n
system is not performing properly or there is another
plumbing problem.
4 . Place the open end of the screen into the outlet end of the
In-Line Filter and screw the cap back on. I m p o r t a n t : M a k e
sure the O-Ring is in place and properly seat e d .
Caution - Risk of Equipment Damage
Never operate the cleaner without the screen in place.
Operating the cleaner without the screen will damage the
cleaner’s internal mechanism.
1 5
Use Only Genuine Hayward Replacement Parts.
1 4
Use Only Genuine Hayward Replacement Parts.
Sweep Hose
• Sweep Hose Wear Rollers will experience wear when
o p e r ating in a plastered or concrete pool.
• When the Wear Rollers wear-down to the outer groove
( W ear Line) replace the Wear Rollers (P/N A X 5 0 0 6 A ) .
• Check the Sweep Hose for holes
(Replace if necessary with P/N: A X 5 0 0 0 R S H A ) .
Some parts will wear with normal use. To ensure the high quality
p e r fo r m a n c e , insist on Genuine Hayward replacement parts
(using non-Hayward replacement parts will Void the
Phantom Cleaner’s Wa r r a n t y ) . The following parts are user
r e p l a c e abl e and subject to normal wear and tear.
1 . Sweep Hose: If a hole forms in the Sweep Hose, it should
be replaced. Unscrew the metal mender nut from the hose
and pull the Sweep Hose (Sweep Hose Replacement Part
N u m b e r : AX5000RSHA) off the Cleaner Connector. Attach a
new Sweep Hose to the Cleaner Connector.
2 . Large Capacity Debris Bag with Float: The Debris Bag
should be replaced if it is torn (Replacement Part Number:
A X 6 0 0 0 B A ) .
3 . S w i v e l s : If a swivel ceases to turn easily or leaks while
the cleaner is running, it should be replaced.
Storing the Phantom Cleaner
1 . Turn the Booster Pump OFF and set the timer so the
Booster Pump will not turn on while the Phantom cleaner is
out of the pool (N e v e r o p e r a te the Booster Pump without
the cleaner connected).
2 . Disconnect Wall Quick Connect from the Universal Wa l l
F i t t i n g . The Universal Wall Fitting may be left in place.
3 . The cleaner is constructed of the finest materials av a i l ab l e ,
however we recommend that when the Phantom cleaner is
removed from the pool, it should be stored fl at on its wheels
in a shaded area to protect the unit form excessive exposure
to sunlight.
4 . Store the Sweep Hose and the Hose Cleaner End A s s e m b ly
(Part S) straight and fl at , not coiled.The Rigid Hose Pipe
Sections may be folded on one another, so that the short
hoses in-between are bent. If possible, store the hoses in
the shade.
Winterizing the Cleaner
When closing your pool for the winter completely drain the wat e r
from the Phantom Cleaner (by slowing rotating it in all directions)
and Hoses. Store the Phantom Cleaner indoors to prevent
freezing of the inner mechanisms.
Periodic Freezing Conditions
If you are in an area subject to periodic freezing conditions, b u t
pool equipment is kept in operat i o n , it is very important that the
f i l t r a tion system and Phantom cleaner be in operation during
times when hard freezing occurs (normally between 3 AM and
7 A M ) . Running the Phantom cleaner at this time will ensure
against damaging the Cleaner and may prevent freezing the
pool wat e r.
Maintenance Storing the Phantom Cleaner
R e m o ving the Phantom Cleaner From the Po o l
Warning – Risk of Injury
The Booster Pump and Filtration Pump must be O F F w h e n
connecting or disconnecting cleaner or hose.
1 . Turn the Booster Pump and Filtration Pump OFF. I f
you will not be replacing the cleaner before the next Booster
Pump timer cycle, turn the Booster Pump Timer O F F. N e v e r
run the Booster Pump without the cleaner connected.
Failure to do so can cause serious injury.
Caution - Risk of Equipment Damage
N e v e r run the Booster Pump without the Cleaner connected.
Doing so will damage the pump’s motor and void the Booster
P u m p ’s warranty.
2 . From the pool deck looking down push the Wall Quick
Connect into the Universal Wall Fitting and turn it to the right
( c l o c k w i s e ) .
3 . Pull the Wall Quick Connect out of the Universal Wall Fitting.
4 . G r ab the cleaner by the wing, and remove from the pool.
5 . Disconnect the Cleaner Connector from the Phantom
C l e a n e r.
6 . L a y the Cleaner End of the Pressure Hose and the Sweep
Hose fl at and straight.
Important: A lw ays store the Cleaner End of the Pressure Hose
and the Sweep Hose straight, not coiled.The cleaner may not
o p e r a te properly with these hoses bent.
Emptying the Debris Bag
• Empty the Debris Bag regularly. Do not continue to operat e
the Phantom when the bag is full.
1 . Hold Bag over trashcan or wherever debris is to be placed.
2 . Slide Float Closure off of bag .
3 . Hold open edges apart and shake debris from bag .
4 . Slide Float Closure onto bag .
• Sand (dense debris): Always empty the Phantom
Debris Bag when there is too much sand (or heavy
d e b r i s ) . If the Cleaner cannot climb to the surface in TOP
or AUTO mode OR the Bag “ d r o o p s ” over the hose turn the
Booster Pump OFF and empty the Debris Bag.
• When the bag is full of leaves or other debris, the debris may
t r ap air in the bag while skimming the surface. If the trap p e d
air prevents the cleaner from descending to the pool bottom,
empty the Debris Bag .
DO NOT operate the Phantom if it runs on its side or
u p s i d e - d o w n .
In-Line Filter
Wear Roller
Wear Line
(outer groove)
In-Line Filter
Screen

Cleaning the In-Line Filter
1 . The In-Line filter (Part Q) is located by the Wall Quick
Connect (Part K).
2 . To remove the screen inside the In-Line Filter, unscrew
the cap of the In-Line Filter and remove the screen.
3 . Remove the debris from the screen and rinse. I m p o r t a n t : I f
the screen frequently becomes plugg e d , the filtrat i o n
system is not performing properly or there is another
plumbing problem.
4 . Place the open end of the screen into the outlet end of the
In-Line Filter and screw the cap back on. I m p o r t a n t : M a k e
sure the O-Ring is in place and properly seat e d .
Caution - Risk of Equipment Damage
Never operate the cleaner without the screen in place.
Operating the cleaner without the screen will damage the
cleaner’s internal mechanism.
1 5
Use Only Genuine Hayward Replacement Parts.
1 4
Use Only Genuine Hayward Replacement Parts.
Sweep Hose
• Sweep Hose Wear Rollers will experience wear when
o p e r ating in a plastered or concrete pool.
• When the Wear Rollers wear-down to the outer groove
( W ear Line) replace the Wear Rollers (P/N A X 5 0 0 6 A ) .
• Check the Sweep Hose for holes
(Replace if necessary with P/N:A X 5 0 0 0 R S H A ) .
Some parts will wear with normal use. To ensure the high quality
p e r fo r m a n c e , insist on Genuine Hayward replacement parts
(using non-Hayward replacement parts will Void the
Phantom Cleaner’s Wa r r a n t y ) . The following parts are user
r e p l a c e abl e and subject to normal wear and tear.
1 . Sweep Hose: If a hole forms in the Sweep Hose, it should
be replaced. Unscrew the metal mender nut from the hose
and pull the Sweep Hose (Sweep Hose Replacement Part
N u m b e r : AX5000RSHA) off the Cleaner Connector. Attach a
new Sweep Hose to the Cleaner Connector.
2 . Large Capacity Debris Bag with Float: The Debris Bag
should be replaced if it is torn (Replacement Part Number:
A X 6 0 0 0 B A ) .
3 . S w i v e l s : If a swivel ceases to turn easily or leaks while
the cleaner is running, it should be replaced.
Storing the Phantom Cleaner
1 . Turn the Booster Pump OFF and set the timer so the
Booster Pump will not turn on while the Phantom cleaner is
out of the pool (N e v e r o p e r a te the Booster Pump without
the cleaner connected).
2 . Disconnect Wall Quick Connect from the Universal Wa l l
F i t t i n g . The Universal Wall Fitting may be left in place.
3 . The cleaner is constructed of the finest materials av a i l a b l e ,
however we recommend that when the Phantom cleaner is
removed from the pool, it should be stored fl at on its wheels
in a shaded area to protect the unit form excessive exposure
to sunlight.
4 . Store the Sweep Hose and the Hose Cleaner End A s s e m b ly
(Part S) straight and fl at , not coiled.The Rigid Hose Pipe
Sections may be folded on one another, so that the short
hoses in-between are bent. If possible, store the hoses in
the shade.
Winterizing the Cleaner
When closing your pool for the winter completely drain the wat e r
from the Phantom Cleaner (by slowing rotating it in all directions)
and Hoses. Store the Phantom Cleaner indoors to prevent
freezing of the inner mechanisms.
Periodic Freezing Conditions
If you are in an area subject to periodic freezing conditions, b u t
pool equipment is kept in operat i o n , it is very important that the
f i l t r a tion system and Phantom cleaner be in operation during
times when hard freezing occurs (normally between 3 AM and
7 A M ) . Running the Phantom cleaner at this time will ensure
against damaging the Cleaner and may prevent freezing the
pool wat e r.
Maintenance Storing the Phantom Cleaner
R e m o ving the Phantom Cleaner From the Po o l
Warning – Risk of Injury
The Booster Pump and Filtration Pump must be O F F w h e n
connecting or disconnecting cleaner or hose.
1 . Turn the Booster Pump and Filtration Pump OFF. I f
you will not be replacing the cleaner before the next Booster
Pump timer cycle, turn the Booster Pump Timer O F F. N e v e r
run the Booster Pump without the cleaner connected.
Failure to do so can cause serious injury.
Caution - Risk of Equipment Damage
N e v e r run the Booster Pump without the Cleaner connected.
Doing so will damage the pump’s motor and void the Booster
P u m p ’s warranty.
2 . From the pool deck looking down push the Wall Quick
Connect into the Universal Wall Fitting and turn it to the right
( c l o c k w i s e ) .
3 . Pull the Wall Quick Connect out of the Universal Wall Fitting.
4 . G r ab the cleaner by the wing, and remove from the pool.
5 . Disconnect the Cleaner Connector from the Phantom
C l e a n e r.
6 . L a y the Cleaner End of the Pressure Hose and the Sweep
Hose fl at and straight.
Important: A lw ays store the Cleaner End of the Pressure Hose
and the Sweep Hose straight, not coiled.The cleaner may not
o p e r a te properly with these hoses bent.
Emptying the Debris Bag
• Empty the Debris Bag regularly. Do not continue to operat e
the Phantom when the bag is full.
1 . Hold Bag over trashcan or wherever debris is to be placed.
2 . Slide Float Closure off of bag .
3 . Hold open edges apart and shake debris from bag .
4 . Slide Float Closure onto bag .
• Sand (dense debris): Always empty the Phantom
Debris Bag when there is too much sand (or heavy
d e b r i s ) . If the Cleaner cannot climb to the surface in TOP
or AUTO mode OR the Bag “ d r o o p s ” over the hose turn the
Booster Pump OFF and empty the Debris Bag.
• When the bag is full of leaves or other debris, the debris may
t r ap air in the bag while skimming the surface. If the trap p e d
air prevents the cleaner from descending to the pool bottom,
empty the Debris Bag .
DO NOT operate the Phantom if it runs on its side or
u p s i d e - d o w n .
In-Line Filter
Wear Roller
Wear Line
(outer groove)
In-Line Filter
Screen

1 7
Use Only Genuine Hayward Replacement Parts.
1 6
Use Only Genuine Hayward Replacement Parts.
Booster Pump
Booster Pump Typical Installation
From Pool
To Pool
Filtration Pump Pool Filter Heater To Spa
Plumbing
Options
Chlorinator
Solar System
Booster Pump
(sold separately)
Phantom
R e f . N o . Part No. D e s c r i p t i o n
1 A X 5 0 6 0 M Motor (3/4 HP 60 cycles)
2 a A X 5 0 6 0 B Seal Plate (Prior to 2004)
2 b A X 5 0 6 0 B 2 Seal Plate (2004 and bey o n d )
3 S P X 1 2 5 0 X Z 2 C Spring Seal with Seat
4 A X 5 0 6 0 C Impeller A s s e m b ly
5 a A X 5 0 6 0 G A F l a t Gasket, Booster Pump (Prior to 2004)
5 b A X 5 0 6 0 J R i bbon Gasket, Booster Pump (2004 and bey o n d )
6 A X 5 0 6 0 A Volute 3/4” N P T- F
7 S P X 1 7 0 0 F G Pipe Plug with Gasket
8 A X 5 0 6 0 Z 2 A 1 N u t , Bolt and Washer Kit (6-pack)
9 A X 5 0 6 0 R S A 1 Motor Bolt with Washer Kit (4-pack)
1 0 A X 5 0 6 0 P Stem Bumper
1 1 A X 5 0 6 0 D B a s e
1 2 A X 5 0 6 0 H K I T Booster Pump Hose Kit
1 3 A X 5 0 6 0 K Metal Flange (Prior to 2004) Not Shown
O p t i o n a l 5 0 6 0 V K I T Vertical Installation Kit
Troubleshooting
For Technical Assistance Call:
1-800-227-1477

1 9
Use Only Genuine Hayward Replacement Parts.
I m p o r t a n t !
Retain Your Bill of Sale For Proof of Warranty Eligibility
To the Original Retail Consumer / Purchaser (the “ P U R C H A S E R ” )
of the Hayward Phantom A u t o m atic Pool Cleaner (the
“ C L E A N E R ” ) .
H a yward Pool Products, I n c . ( “ H AY W ARD”) warrants the parts fo r
One (1) year form the date of original purchase (excluding the
b a g and sweep hose which are normal replacement parts).
The Hayward Booster Pump is ex c luded in this warranty
and carries its own separate warranty.
SHOULD THE CLEANER FAIL TO BE IN GOOD WORKING ORDER
IN ACCORDANCE WITH THE ABOVE SCHEDULE, H AY W ARD W I L L
AT ITS OPTION REPAIR OR REPLACE THE CLEANER OR A N Y
DEFECTIVE PA R TS AT NO ADDITIONAL CHARGE EXCEPT
AS SET FORTH BELOW. R E PAIR PA R TS AND REPLACEMENT
PRODUCTS WILL BE FURNISHED ON AN EXCHANGE BASIS A N D
WILL BE NEW OR FUNCTIONALLY EQUIVA L E N T. ALL PA R T S
REMOVED AS A RESULT OF REPLACEMENT SHALL BECOME
THE PROPERTY OF HAY W A R D . LIABILITY OF HAY W ARD AND T H E
SOLE REMEDY OF THE PURCHASER WHETHER IN CONTRACT
UNDER ANY WA R R A N T Y, IN T O R T (INCLUDING NEGLIGENCE), I N
STRICT LIABILITY OR OTHERWISE, SHALL BE LIMITED TO T H E
R E PAIR OR REPLACEMENT OF DEFECTIVE PA R TS ONLY A N D
SHALL IN NO EVENT EXCEED THE RETURN OF THE AMOUNT OF
THE PURCHASE PRICE PAID BY THE PURCHASER.
THIS LIMITED WARRANTY IS SUBJECT TO THE
FOLLOWING TERMS AND CONDITIONS:
1 . This Limited Warranty shall not ap p ly to damage caused by
failure to perform normal maintenance on the CLEANER
( e . g . monitoring pressure/flow and replacing a worn bag
and sweep hose).
2 . This Limited Warranty shall be void if the CLEANER is
modified in any respect, i n c l u d i n g , but not limited to the use
of any parts other than Genuine Hayward Parts.
3 . This Limited Warranty shall not ap p ly to any injury, l o s s ,
d a m a g e , defect or malfunction of the CLEANER or failure of
the CLEANER to function resulting form any failure to
o p e r a te or maintain the CLEANER in accordance with the
directions contained in the Owner’s Guide provided by
H AY WARD or any injury, l o s s , d a m a g e , d e f e c t , m a l f u n c t i o n
or failure to function resulting from any misuse,
u n r e a s o n a b l e u s e , t a m p e r i n g , ab u s e , a c c i d e n t , act of God,
a l t e r ations in the CLEANER by anyone other than HAY WA R D
including but not limited to such damages or injuries to
parts resulting from running pump dry (e.g. interruption in or
i n a d e q u ate supply of water to the Booster Pump, o r
obstruction in lines, or otherwise); or damag e , d e f e c t s , o r
malfunctions resulting from defects in, failure or malfunction
o f , or negligence, ab u s e , or misuse with respect to
equipment other than the CLEANER.
4 . This Limited Warranty shall not ap p ly to the malfunction of,
d a m a ge to, m aterials failure in, or changes in the
appearance of the CLEANER resulting from exposure to
sunlight or chemicals or chemical reactions to substances
with which any part of the CLEANER may come in contact or
parts if worn, do not affect performance of the CLEANER.
5 . This Limited Warranty does not apply to cleaners used for
commercial purposes.
6 . The CLEANER is designed to function in a properly
d e s i g n e d , constructed and maintained pool.The Limited
Warranty does not ap p ly in the circumstances where the
p o o l ’s design, construction or maintenance is defective,
substandard or inap p r o p r i ate for the CLEANER’S operat i o n .
7 . D e t e r i o r at i o n , d i s c o l o r ation or brittleness of pool plaster and
v i nyl liners can be caused over time separat e ly by, or in
c o m b i n a tion with, algae and an imbalance in pool wat e r
c h e m i s t ry, improper installat i o n , and other factors.
Limited Warranty
Phantom Parts Diagram Limited Warranty
1 8
Use Only Genuine Hayward Replacement Parts.
R e f . N o . Part No. D e s c r i p t i o n
1 A X 6 0 0 0 TA Deck (with Wing & Cam Cap )
2 A X 6 0 0 1 F Cam Cap
3 AX5003M Cams (3-pack)
4 A X 6 0 0 0 G A Gearbox (with Cams, Hoses & Ti e s )
5 A X 5 0 1 0 D 4 Screws (5-pack)
6 A X 6 0 0 9 B F Front Wheel (with Retainer & Bearing)
7 A X 5 0 0 0 D Rollers (7-pack with Bearing)
8 A X 6 0 0 0 M A M a n i fold A s s e m b l y (with Hoses & Ti e s )
9 A X 5 0 0 0 B Vac Tu b e
1 0 A X 5 0 0 0 A 2 Bottom Housing
1 1 A X 5 0 0 9 E Rear A x l e
1 2 A X 6 0 0 9 B Rear Wheels (with Bearings, Nuts & Hubcap s )
1 3 A X 6 0 0 0 H A R i gid Pressure Hose (complete)
1 4 A X 6 0 0 0 H C A Pressure Hose Cleaner End A s s e m b ly
(Without Sweep Hose)
1 5 A X 6 0 0 0 H W A 2 Pressure Hose and Top of In-Line Filter A s s e m b l y
1 6 A X 6 0 0 0 H FA Hose Swivel A s s e m b ly
1 7 A X 6 0 0 0 H E R i gid Hose Pipe Section (2 Rigid Pipes & 1 Coupling)
1 8 A X 6 0 0 0 H W A 1 Wall Quick Connect,H o s e , Bottom In-Line Filter
A s s e m b ly
1 9 A X 6 0 0 9 S In-Line Filter Screen
2 0 A X 6 0 0 0 P TA Set-up Pressure Gauge
2 1 A X 5 0 0 0 R S H A Sweep Hose (with Rollers & Mender Nut)
2 2 A X 6 0 0 0 B A Large Capacity Debris Bag (with Float )
2 3 A X 5 0 0 4 L 1 Universal Wall Fitting
2 4 A X 5 0 0 6 A Wear Rollers (10-pack)
2 5 A X 5 5 0 0 E F F l o ats (Left & Right)
2 6 A X 6 0 0 0 S W A Top / Auto / Bot Switch
2 7 A X 6 0 0 0 T N K A Nose Jet Ta n k
2 8 A X 6 0 0 8 M Front Spin-Out Jet (with hose & tie)
2 9 A X 5 0 1 0 G 1 0 Wall Quick Connect O-Ring
3 0 A X 5 0 1 0 G 1 8 C l e a n e r-Connector O-Ring
3 1 A X 5 0 1 0 G 1 9 In-Line Filter O-Ring
3 2 AX5010G5 Pipe Connector O-Ring (6-pack)
Phantom Cleaner Hoses (13)
1
2
3
7
8
9
4
27
5
26
12
10
25
20
21
24
22
6
Phantom Cleaner Exploded Vi e w
11
28
1 5
1 7
1 4
3 1
1 9
1 6
1 8
2 3
2 9
30

1 9
Use Only Genuine Hayward Replacement Parts.
I m p o r t a n t !
Retain Your Bill of Sale For Proof of Warranty Eligibility
To the Original Retail Consumer / Purchaser (the “ P U R C H A S E R ” )
of the Hayward Phantom A u t o m atic Pool Cleaner (the
“ C L E A N E R ” ) .
H a yward Pool Products, I n c . ( “ H AY W ARD”) warrants the parts fo r
One (1) year form the date of original purchase (excluding the
b a g and sweep hose which are normal replacement parts).
The Hayward Booster Pump is ex c luded in this warranty
and carries its own separate warranty.
SHOULD THE CLEANER FAIL TO BE IN GOOD WORKING ORDER
IN ACCORDANCE WITH THE ABOVE SCHEDULE, H AY W ARD W I L L
AT ITS OPTION REPAIR OR REPLACE THE CLEANER OR A N Y
DEFECTIVE PA R TS AT NO ADDITIONAL CHARGE EXCEPT
AS SET FORTH BELOW. R E PAIR PA R TS AND REPLACEMENT
PRODUCTS WILL BE FURNISHED ON AN EXCHANGE BASIS A N D
WILL BE NEW OR FUNCTIONALLY EQUIVA L E N T.ALL PA R T S
REMOVED AS A RESULT OF REPLACEMENT SHALL BECOME
THE PROPERTY OF HAY W A R D . LIABILITY OF HAY W ARD AND T H E
SOLE REMEDY OF THE PURCHASER WHETHER IN CONTRACT
UNDER ANY WA R R A N T Y, IN T O R T (INCLUDING NEGLIGENCE), I N
STRICT LIABILITY OR OTHERWISE, SHALL BE LIMITED TO T H E
R E PAIR OR REPLACEMENT OF DEFECTIVE PA RTS ONLY A N D
SHALL IN NO EVENT EXCEED THE RETURN OF THE AMOUNT OF
THE PURCHASE PRICE PAID BY THE PURCHASER.
THIS LIMITED WARRANTY IS SUBJECT TO THE
FOLLOWING TERMS AND CONDITIONS:
1 . This Limited Warranty shall not ap p ly to damage caused by
failure to perform normal maintenance on the CLEANER
( e . g . monitoring pressure/flow and replacing a worn bag
and sweep hose).
2 . This Limited Warranty shall be void if the CLEANER is
modified in any respect, i n c l u d i n g , but not limited to the use
of any parts other than Genuine Hayward Parts.
3 . This Limited Warranty shall not ap p ly to any injury, l o s s ,
d a m a g e , defect or malfunction of the CLEANER or failure of
the CLEANER to function resulting form any failure to
o p e r a te or maintain the CLEANER in accordance with the
directions contained in the Owner’s Guide provided by
H AY WARD or any injury, l o s s , d a m a g e , d e f e c t , m a l f u n c t i o n
or failure to function resulting from any misuse,
u n r e a s o n a b l e u s e , t a m p e r i n g , ab u s e , a c c i d e n t , act of God,
a l t e r ations in the CLEANER by anyone other than HAY W A R D
including but not limited to such damages or injuries to
parts resulting from running pump dry (e.g. interruption in or
i n a d e q u ate supply of water to the Booster Pump, o r
obstruction in lines, or otherwise); or damag e , d e f e c t s , o r
malfunctions resulting from defects in, failure or malfunction
o f , or negligence, ab u s e , or misuse with respect to
equipment other than the CLEANER.
4 . This Limited Warranty shall not ap p ly to the malfunction of,
d a m a ge to, m aterials failure in, or changes in the
appearance of the CLEANER resulting from exposure to
sunlight or chemicals or chemical reactions to substances
with which any part of the CLEANER may come in contact or
parts if worn, do not affect performance of the CLEANER.
5 . This Limited Warranty does not apply to cleaners used for
commercial purposes.
6 . The CLEANER is designed to function in a properly
d e s i g n e d , constructed and maintained pool.The Limited
Warranty does not ap p ly in the circumstances where the
p o o l ’s design, construction or maintenance is defective,
substandard or inap p r o p r i ate for the CLEANER’S operat i o n .
7 . D e t e r i o r at i o n , d i s c o l o r ation or brittleness of pool plaster and
v i nyl liners can be caused over time separat e ly by, or in
c o m b i n a tion with, algae and an imbalance in pool wat e r
c h e m i s t ry, improper installat i o n , and other factors.
Limited Warranty
Phantom Parts Diagram Limited Warranty
1 8
Use Only Genuine Hayward Replacement Parts.
R e f . N o . Part No. D e s c r i p t i o n
1 A X 6 0 0 0 TA Deck (with Wing & Cam Cap )
2 A X 6 0 0 1 F Cam Cap
3 AX5003M Cams (3-pack)
4 A X 6 0 0 0 G A Gearbox (with Cams, Hoses & Ti e s )
5 A X 5 0 1 0 D 4 Screws (5-pack)
6 A X 6 0 0 9 B F Front Wheel (with Retainer & Bearing)
7 A X 5 0 0 0 D Rollers (7-pack with Bearing)
8 A X 6 0 0 0 M A M a n i fold A s s e m b l y (with Hoses & Ti e s )
9 A X 5 0 0 0 B Vac Tu b e
1 0 A X 5 0 0 0 A 2 Bottom Housing
1 1 A X 5 0 0 9 E Rear A x l e
1 2 A X 6 0 0 9 B Rear Wheels (with Bearings, Nuts & Hubcap s )
1 3 A X 6 0 0 0 H A R i gid Pressure Hose (complete)
1 4 A X 6 0 0 0 H C A Pressure Hose Cleaner End A s s e m b l y
(Without Sweep Hose)
1 5 A X 6 0 0 0 H W A 2 Pressure Hose and Top of In-Line Filter A s s e m b l y
1 6 A X 6 0 0 0 H FA Hose Swivel A s s e m b ly
1 7 A X 6 0 0 0 H E R i gid Hose Pipe Section (2 Rigid Pipes & 1 Coupling)
1 8 A X 6 0 0 0 H W A 1 Wall Quick Connect, H o s e , Bottom In-Line Filter
A s s e m b ly
1 9 A X 6 0 0 9 S In-Line Filter Screen
2 0 A X 6 0 0 0 P TA Set-up Pressure Gauge
2 1 A X 5 0 0 0 R S H A Sweep Hose (with Rollers & Mender Nut)
2 2 A X 6 0 0 0 B A Large Capacity Debris Bag (with Float )
2 3 A X 5 0 0 4 L 1 Universal Wall Fitting
2 4 A X 5 0 0 6 A Wear Rollers (10-pack)
2 5 A X 5 5 0 0 E F F l o ats (Left & Right)
2 6 A X 6 0 0 0 S W A Top / Auto / Bot Switch
2 7 A X 6 0 0 0 T N K A Nose Jet Ta n k
2 8 A X 6 0 0 8 M Front Spin-Out Jet (with hose & tie)
2 9 A X 5 0 1 0 G 1 0 Wall Quick Connect O-Ring
3 0 A X 5 0 1 0 G 1 8 C l e a n e r -Connector O-Ring
3 1 A X 5 0 1 0 G 1 9 In-Line Filter O-Ring
3 2 AX5010G5 Pipe Connector O-Ring (6-pack)
Phantom Cleaner Hoses (13)
1
2
3
7
8
9
4
27
5
26
12
10
25
20
21
24
22
6
Phantom Cleaner Exploded Vi e w
11
28
1 5
1 7
1 4
3 1
1 9
1 6
1 8
2 3
2 9
30

2 0
Use Only Genuine Hayward Replacement Parts.
Limited Warranty
Limited Wa r r a n t y
H AY WARD hereby disclaims any and all claims, and PURCHASER
releases HAY W ARD from any and all claims for damages to any
pool plaster or vinyl liner in PURCHASER’S pool by reason of the
use and/or operation of the CLEANER
8 . This Limited Warranty is valid and enfo r c e able only on
CLEANERS assembled, m a n u f a c t u r e d , or purchased and
installed in the United States of America and Canada.
9 . This Limited Warranty shall ap p ly to PURCHASER as origi n a l
purchaser of the CLEANER from an authorized HAY W A R D
dealer and shall not ap p ly to any subsequent purchaser,
assignee or other recipient of the CLEANER from the
P U R C H A S E R .
1 0 . This Limited Warranty does not apply unless the
a c c o m p a nyi ng Registration Card is signed,
completed and returned within fourteen (14) days
from the date of purchase. H ayward reserves the right to
dispose of any Regi s t r ation Card once it is received.
PURCHASER must retain written proof of purchase.
1 1 . The foregoing Limited Warranty gives the PURCHASER
specific legal rights, which may vary from state to stat e , a n d
a c c o r d i n g ly, some of the listed conditions, and exclusions
m a y not ap p ly to PURCHASERS living in certain stat e s .
1 2 . Neither party will be liable to the other for any failure or
d e l a y in performance due in whole or in part to any cause
b e yond such party’s reasonable control, including due to the
e l e m e n t s , acts of God, acts of the other party, acts of civil or
m i l i t a ry authority, w a r, r i o t s , or concerted labor action.
1 3 . The PURCHASER has no right to sell, transfer or assign
interest it has in this agreement without the prior written
consent of HAY W A R D . H AY W ARD may, without notice,
assign its interest in this agreement or any payment or other
sum due hereunder without notice to or prior consent of the
P U R C H A S E R . If Hayward makes any such assignment, t h e
assignee will have all of HAY W A R D ’s rights, o b l i g at i o n s ,
p o w e r s , privileges and remedies. M o d i f i c a tion of this
A g reement may only be made in writing signed by an
authorized agent of HAY W A R D .
Should a defect in workmanship and /or materials in the
CLEANER become evident during the term of the Limited
Wa r r a n t y, PURCHASER must ship the item freight prepaid to any
authorized Factory Service Center as soon as possible after the
d i s c o v e r y of the defect, together with a copy of the Bill of Sale
including date of purchase and serial number of the item claimed
to be defective, the name and address of the PURCHASER and a
brief description of the problems/defects encountered.
Call (800) 227-1477 for the name and address of the nearest
F a c t o ry Service Center (outside the continental U.S. call
(909) 594-1600).
H AY WARD will at its option, repair or replace the defective
CLEANER parts covered by this Limited Warranty at its own cost
and expense and return the same to the PURCHASER freight
p r e p a i d . H AY W ARD is not responsible for any cost and expense
of handling, p a c k i n g , shipping or transporting the CLEANER or
a n y parts to or from the Factory Service Center, unless expressly
provided to the contrary by state law. No dealer, distributor or
other similar person has any authority to make any warranties or
r e p r e s e n t a tions concerning HAY WARD beyond the express terms
contained herein. H AY WARD assumes no responsibility for any
warranties beyond the express terms contained in this Limited
Wa r r a n t y.This Limited Warranty is in lieu of any other warranties
expressed or implied, and is valid and enfo r c e abl e only in the
United States of America and Canada. The PURCHASER must
provide written proof of the original date of purchase of the
CLEANER in form reasonab l y acceptable to HAY W A R D .
The exclusive forum for any dispute between the PURCHASER
and HAY W ARD will be binding arbitrat i o n , conducted in Union
C o u n t y, New Jersey under the rules of the American A r b i t r at i o n
A s s o c i a t i o n , and the prevailing party will be entitled to an aw a r d
of at t o r n e y ’s fees and costs.
THE FOREGOING WARRANTY AND REMEDIES ARE EXCLUSIVE
AND ARE MADE EXPRESSLY IN LIEU OF ALL OTHER
WA R R A N T I E S , EXPRESSED OR IMPLIED,WHETHER IN FACT OR
BY OPERATION OF LAW, S TAT U T O R Y OR OTHERWISE,
INCLUDING WARRANTIES OF MERCHANTABILITY AND FITNESS
FOR USE OR A PA R TICULAR PURPOSE. H AY WARD NEITHER
ASSUMES NOR AUTHORIZES ANY OTHER PERSON TO A S S U M E
FOR IT ANY OTHER LIABILITY IN CONNECTION WITH THE SALE,
I N S TA L L ATION OR USE OF THE CLEANER AND HAY W A R D
MAKES NO WARRANTY W H A TSOEVER FOR EQUIPMENT NOT
SUPPLIED BY HAY W A R D . THE FOREGOING WARRANTY DOES
NOT COVER DAMAGE TO THE CLEANER RESULTING FROM
A C C I D E N T, M I S U S E , A B U S E , OR NON-HAY W A R D
M O D I F I C ATIONS OF THE CLEANER. H AY W ARD SHALL NOT BE
LIABLE FOR DAMAGES DUE TO DELAYS IN DELIVERY OR USE. I N
NO EVENT WILL HAY WARD BE LIABLE TO THE PURCHASER FOR
ANY DAMAGES INCLUDING, BUT NOT LIMITED T O , ANY DIRECT,
S P E C I A L , I N C I D E N TAL OR CONSEQUENTIAL DAMAGES A R I S I N G
OUT OF OR RELATING TO THE SALE, I N S TA L L AT I O N , OR USE OF
OR INABILITY TO USE THE CLEANER, PURCHASER’S SWIMMING
POOL OR FOR ANY OTHER CLAIM BY ANY OTHER PA R T Y.

2 0
Use Only Genuine Hayward Replacement Parts.
Limited Warranty
Limited Wa r r a n t y
H AY WARD hereby disclaims any and all claims, and PURCHASER
releases HAY W ARD from any and all claims for damages to any
pool plaster or vinyl liner in PURCHASER’S pool by reason of the
use and/or operation of the CLEANER
8 . This Limited Warranty is valid and enfo r c e able only on
CLEANERS assembled, m a n u f a c t u r e d , or purchased and
installed in the United States of America and Canada.
9 . This Limited Warranty shall ap p ly to PURCHASER as origi n a l
purchaser of the CLEANER from an authorized HAY W A R D
dealer and shall not ap p ly to any subsequent purchaser,
assignee or other recipient of the CLEANER from the
P U R C H A S E R .
1 0 . This Limited Warranty does not apply unless the
a c c o m p a nyi ng Registration Card is signed,
completed and returned within fourteen (14) days
from the date of purchase. H ayward reserves the right to
dispose of any Regi s t r ation Card once it is received.
PURCHASER must retain written proof of purchase.
1 1 . The foregoing Limited Warranty gives the PURCHASER
specific legal rights, which may vary from state to stat e , a n d
a c c o r d i n g ly, some of the listed conditions, and exclusions
m a y not ap p ly to PURCHASERS living in certain stat e s .
1 2 . Neither party will be liable to the other for any failure or
d e l a y in performance due in whole or in part to any cause
b e yond such party’s reasonable control, including due to the
e l e m e n t s , acts of God, acts of the other party, acts of civil or
m i l i t a ry authority, w a r, r i o t s , or concerted labor action.
1 3 . The PURCHASER has no right to sell, transfer or assign
interest it has in this agreement without the prior written
consent of HAY W A R D . H AY W ARD may, without notice,
assign its interest in this agreement or any payment or other
sum due hereunder without notice to or prior consent of the
P U R C H A S E R . If Hayward makes any such assignment, t h e
assignee will have all of HAY W A R D ’s rights, o b l i g at i o n s ,
p o w e r s , privileges and remedies. M o d i f i c a tion of this
A g reement may only be made in writing signed by an
authorized agent of HAY W A R D .
Should a defect in workmanship and /or materials in the
CLEANER become evident during the term of the Limited
Wa r r a n t y, PURCHASER must ship the item freight prepaid to any
authorized Factory Service Center as soon as possible after the
d i s c o v e r y of the defect, together with a copy of the Bill of Sale
including date of purchase and serial number of the item claimed
to be defective, the name and address of the PURCHASER and a
brief description of the problems/defects encountered.
Call (800) 227-1477 for the name and address of the nearest
F a c t o ry Service Center (outside the continental U.S. call
(909) 594-1600).
H AY WARD will at its option, repair or replace the defective
CLEANER parts covered by this Limited Warranty at its own cost
and expense and return the same to the PURCHASER freight
p r e p a i d . H AY W ARD is not responsible for any cost and expense
of handling, p a c k i n g , shipping or transporting the CLEANER or
a n y parts to or from the Factory Service Center, unless expressly
provided to the contrary by state law. No dealer, distributor or
other similar person has any authority to make any warranties or
r e p r e s e n t a tions concerning HAY WARD beyond the express terms
contained herein. H AY WARD assumes no responsibility for any
warranties beyond the express terms contained in this Limited
Wa r r a n t y.This Limited Warranty is in lieu of any other warranties
expressed or implied, and is valid and enfo r c e abl e only in the
United States of America and Canada. The PURCHASER must
provide written proof of the original date of purchase of the
CLEANER in form reasonab l y acceptable to HAY W A R D .
The exclusive forum for any dispute between the PURCHASER
and HAY W ARD will be binding arbitrat i o n , conducted in Union
C o u n t y, New Jersey under the rules of the American A r b i t r at i o n
A s s o c i a t i o n , and the prevailing party will be entitled to an aw a r d
of at t o r n e y ’s fees and costs.
THE FOREGOING WARRANTY AND REMEDIES ARE EXCLUSIVE
AND ARE MADE EXPRESSLY IN LIEU OF ALL OTHER
WA R R A N T I E S , EXPRESSED OR IMPLIED,WHETHER IN FACT OR
BY OPERATION OF LAW, S TAT U T O R Y OR OTHERWISE,
INCLUDING WARRANTIES OF MERCHANTABILITY AND FITNESS
FOR USE OR A PA R TICULAR PURPOSE. H AY WARD NEITHER
ASSUMES NOR AUTHORIZES ANY OTHER PERSON TO A S S U M E
FOR IT ANY OTHER LIABILITY IN CONNECTION WITH THE SALE,
I N S TA L L ATION OR USE OF THE CLEANER AND HAY W A R D
MAKES NO WARRANTY W H A TSOEVER FOR EQUIPMENT NOT
SUPPLIED BY HAY W A R D . THE FOREGOING WARRANTY DOES
NOT COVER DAMAGE TO THE CLEANER RESULTING FROM
A C C I D E N T, M I S U S E , A B U S E , OR NON-HAY W A R D
M O D I F I C ATIONS OF THE CLEANER. H AY W ARD SHALL NOT BE
LIABLE FOR DAMAGES DUE TO DELAYS IN DELIVERY OR USE. I N
NO EVENT WILL HAY WARD BE LIABLE TO THE PURCHASER FOR
ANY DAMAGES INCLUDING, BUT NOT LIMITED T O , ANY DIRECT,
S P E C I A L , I N C I D E N TAL OR CONSEQUENTIAL DAMAGES A R I S I N G
OUT OF OR RELATING TO THE SALE,I N S TA L L AT I O N , OR USE OF
OR INABILITY TO USE THE CLEANER, PURCHASER’S SWIMMING
POOL OR FOR ANY OTHER CLAIM BY ANY OTHER PA R T Y.

Utilice solamente repuestos genuinos Hay w a r d .
2 2
Utilice solamente repuestos genuinos Hay w a r d .
2 3
Instrucciones importantes de seguridad
A d v e r t e n c i a
Lea toda la Guía del usuario antes de armar e instalar
la limpiadora Phantom. Si no se respetan las adver-
tencias sobre seguridad y las instrucciones en la Guía
del usuario se pueden ocasionar lesiones graves,
muerte o daño al producto.
Puede obtener copias sin cargo de la Guía del usuario en
w w w .haywardnet.com o llamando al (800) 227-1477.
Advertencia – Riesgo de Shock Eléctrico
La limpiadora automática de piscinas Hayward Phantom está
diseñada para ser conectada a un adaptador de tubería con
ranura hembra de 1-1/2 pulgada en una línea especial de
retorno impulsada por una bomba cebadora de 3/4 H.P. U n
electricista autorizado debe realizar la instalación de la bomba
cebadora de la limpiadora. La Bomba Cebadora debe ser
instalada de acuerdo con todos los requisitos del Código
Nacional de Electricidad y del código local. Su incumpli-
miento puede causar lesiones graves o muerte.
Advertencia – Riesgo de lesiones
El incumplimiento de las siguientes advertencias sobre
seguridad puede causar lesiones graves, muerte o daño
a la propiedad.
• Siempre desconecte y retire la manguera limpiadora y la de presión
antes de entrar a la piscina.
• Quite la soga de seguridad que separa el extremo menos profundo
de la pileta del más profundo antes de hacer funcionar la limpiadora
P h a n t o m . Siempre vuelva a conectar la soga de seguridad antes de
entrar a la piscina.
• Siempre trátela con cuidado. No permita que los niños o las mascotas
jueguen con la limpiadora, no se trata de un juguete.
• Siempre A PA G U E la bomba cebadora antes de usar la limpiadora.
• No la haga funcionar fuera de la piscina. La limpiadora Phantom y
las mangueras contienen chorros de agua a alta presión que
pueden causar lesiones.
• Desconecte la manguera de presión del adaptador universal a la
pared antes de retirar la limpiadora de la piscina.
•
Nunca dirija los chorros de alta presión, la manguera de
p r e s i ó n , el manómetro o la manguera de barrido de la
limpiadora hacia una persona o una mascota.
Información importante
Precaución – Riesgo de daño del equipo
• Siempre encienda la bomba de filtrado a n t e s de encender la bomba
c e b a d o r a . Si se hace funcionar la bomba cebadora en seco esta se
dañará y se perderá la cobertura de la garantía Hay w a r d .
• Siempre desconecte y retire de la piscina la limpiadora Phantom y
las mangueras antes de realizar la limpieza o retrolavado del filtro de
la piscina.
• Después de la limpieza y retrolavado del filtro de la piscina, deje el
sistema de filtro encendido por lo menos durante cinco minutos o
hasta que haya salido toda la basura de las líneas de tuberías antes
de volver a conectar la limpiadora Phantom.
• Se deben limpiar las líneas de tuberías nuevas antes de conectar la
limpiadora Phantom.
• No se debe utilizar la limpiadora Phantom para eliminar el polvo
del yeso o la basura resultante de la construcción o renovación
de la piscina.
• No se debe utilizar la limpiadora Phantom para eliminar gr a n d e s
cantidades de arena (basura densa) después de vientos o tormentas
de arena.
• Siempre desconecte y retire la limpiadora Phantom y las mangueras
antes de agregar productos químicos a la piscina.
• Sólo haga funcionar la limpiadora Phantom durante el período de
tiempo necesario para limpiar la piscina. El uso excesivo es innecesario
y producirá el desgaste prematuro de las piezas de la limpiadora.
• Controle regularmente la limpiadora y las mangueras, no la utilice si
presenta daños o bordes burdos visibles, esto puede causar daños a
la piscina.
• Levante la limpiadora Phantom por el ala (pieza A , p á gina 4), n u n c a
por la manguera o la bolsa.
Descargo de responsabilidades
• Los años y los productos químicos para el agua al igual que otros
factores afectan el yeso de la piscina.
• El yeso de la piscina se puede deteriorar con el transcurso del
t i e m p o .
• La integridad de un “ b u e n ” yeso para piscinas es tal que una
aspiradora de piscinas – automática o manual – no puede sacarlo.
• La integridad de un “ b u e n ” yeso para piscinas es tal que el yeso
producirá desgaste en la limpiadora pero no a la inversa.
• Los años, el sol, y la composición química del agua afectan el
revestimiento de vinilo de las piscinas.
• El vinilo se puede volver quebradizo y frági l .
• La instalación y el entorno de la piscina pueden afectar el
revestimiento de vinilo de la piscina.
• La calidad de la estructura del revestimiento de vinilo para piscinas
v a r í a .
• Al instalar la limpiadora Phantom, usted se hace responsable del
estado del entorno de la pileta y de sus productos químicos.
Contenido
Instrucciones importantes de seguridad . . . . . . . . . . . . . . . . . . . . . . . . . . . . . . . . . .22
Descargo de responsabilidades . . . . . . . . . . . . . . . . . . . . . . . . . . . . . . . . . . . . . . . . .22
Introducción . . . . . . . . . . . . . . . . . . . . . . . . . . . . . . . . . . . . . . . . . . . . . . . . . . . . . . . .24
Para su registro . . . . . . . . . . . . . . . . . . . . . . . . . . . . . . . . . . . . . . . . . . . . . . . . . . . . . .24
Piezas principales . . . . . . . . . . . . . . . . . . . . . . . . . . . . . . . . . . . . . . . . . . . . . . . . . . . .25
Preparación de la Piscina . . . . . . . . . . . . . . . . . . . . . . . . . . . . . . . . . . . . . . . . . . . . . .26
Línea de retorno especial . . . . . . . . . . . . . . . . . . . . . . . . . . . . . . . . . . . . . . . . . . . . . .26
Herramientas necesarias para la instalación . . . . . . . . . . . . . . . . . . . . . . . . . . . . . . . .26
Conexión de la limpiadora Phantom a la piscina . . . . . . . . . . . . . . . . . . . . . . . . . . . .27
Instalación del adaptador universal para pared . . . . . . . . . . . . . . . . . . . . . . . . . . . . . . .27
Armado y medición de la manguera rígida de presión . . . . . . . . . . . . . . . . . . . . . . .28
Conexión de la manguera rígida de presión . . . . . . . . . . . . . . . . . . . . . . . . . . . . . . .29
Desconexión de una manguera . . . . . . . . . . . . . . . . . . . . . . . . . . . . . . . . . . . . . . . . . .29
Conexión de la manguera a la pared . . . . . . . . . . . . . . . . . . . . . . . . . . . . . . . . . . . . . .29
Uso de la limpiadora Phantom . . . . . . . . . . . . . . . . . . . . . . . . . . . . . . . . . . . . . . . . . .30
Ajuste de la presión . . . . . . . . . . . . . . . . . . . . . . . . . . . . . . . . . . . . . . . . . . . . . . . . . .30
Bolsa de basura de gran capacidad . . . . . . . . . . . . . . . . . . . . . . . . . . . . . . . . . . . . . .31
Sujeción de la bolsa de basura . . . . . . . . . . . . . . . . . . . . . . . . . . . . . . . . . . . . . . . . . .31
Retiro de la bolsa de basura . . . . . . . . . . . . . . . . . . . . . . . . . . . . . . . . . . . . . . . . . . . .31
Vaciado de la bolsa de basura . . . . . . . . . . . . . . . . . . . . . . . . . . . . . . . . . . . . . . . . . . .31
Arena (basura densa) . . . . . . . . . . . . . . . . . . . . . . . . . . . . . . . . . . . . . . . . . . . . . . . . .31
Uso correcto de la limpiadora Phantom . . . . . . . . . . . . . . . . . . . . . . . . . . . . . . . . . . .32
Movimiento . . . . . . . . . . . . . . . . . . . . . . . . . . . . . . . . . . . . . . . . . . . . . . . . . . . . . . . .32
Giro . . . . . . . . . . . . . . . . . . . . . . . . . . . . . . . . . . . . . . . . . . . . . . . . . . . . . . . . . . . . . .32
Manguera de barrido . . . . . . . . . . . . . . . . . . . . . . . . . . . . . . . . . . . . . . . . . . . . . . . . .32
Limpieza . . . . . . . . . . . . . . . . . . . . . . . . . . . . . . . . . . . . . . . . . . . . . . . . . . . . . . . . . .32
Basura fina . . . . . . . . . . . . . . . . . . . . . . . . . . . . . . . . . . . . . . . . . . . . . . . . . . . . . . . .32
Arena (basura densa) . . . . . . . . . . . . . . . . . . . . . . . . . . . . . . . . . . . . . . . . . . . . . . . . .32
Manguera de presión . . . . . . . . . . . . . . . . . . . . . . . . . . . . . . . . . . . . . . . . . . . . . . . . .32
Ajustes de la limpiadora Phantom . . . . . . . . . . . . . . . . . . . . . . . . . . . . . . . . . . . . . . .33
Cambio de la frecuencia de giro . . . . . . . . . . . . . . . . . . . . . . . . . . . . . . . . . . . . . . . . .33
Cambio de la leva de giro . . . . . . . . . . . . . . . . . . . . . . . . . . . . . . . . . . . . . . . . . . . . . .33
Ajuste de la duración de giro . . . . . . . . . . . . . . . . . . . . . . . . . . . . . . . . . . . . . . . . . . . .33
Cambio de la función superficie y fondo . . . . . . . . . . . . . . . . . . . . . . . . . . . . . . . . . . .34
Ajuste de la potencia de la manguera de barrido . . . . . . . . . . . . . . . . . . . . . . . . . . . . .34
Mantenimiento . . . . . . . . . . . . . . . . . . . . . . . . . . . . . . . . . . . . . . . . . . . . . . . . . . . . . .35
Retiro de la limpiadora Phantom de la pileta . . . . . . . . . . . . . . . . . . . . . . . . . . . . . . . .35
Vaciado de la bolsa de basura . . . . . . . . . . . . . . . . . . . . . . . . . . . . . . . . . . . . . . . . . . .35
Limpieza del filtro en línea . . . . . . . . . . . . . . . . . . . . . . . . . . . . . . . . . . . . . . . . . . . . .35
Manguera de barrido . . . . . . . . . . . . . . . . . . . . . . . . . . . . . . . . . . . . . . . . . . . . . . . . .36
Conservación de la limpiadora Phantom . . . . . . . . . . . . . . . . . . . . . . . . . . . . . . . . . .36
Acondicionamiento para el invierno . . . . . . . . . . . . . . . . . . . . . . . . . . . . . . . . . . . . . . .36
Condiciones periódicas de temperaturas bajo cero . . . . . . . . . . . . . . . . . . . . . . . . . . . .36
Solución de problemas . . . . . . . . . . . . . . . . . . . . . . . . . . . . . . . . . . . . . . . . . . . . . . . .37
Bomba cebadora . . . . . . . . . . . . . . . . . . . . . . . . . . . . . . . . . . . . . . . . . . . . . . . . . . . . .38
Diagrama de las piezas y nómina de los repuestos de la limpiadora Phantom . . . .39
Garantía limitada . . . . . . . . . . . . . . . . . . . . . . . . . . . . . . . . . . . . . . . . . . . . . . . . . . . . .40

Utilice solamente repuestos genuinos Hay w a r d .
2 5
Utilice solamente repuestos genuinos Hay w a r d .
2 4
Introducción
Felicitaciones por comprar la Limpiadora Automática de Piscinas
H a yward Phantom. La Hayward Phantom es la única verdadera
limpiadora de piscinas. La limpiadora Phantom está diseñada
no sólo para limpiar el fondo y los laterales de su piscina, s i n o
también para limpiar la superficie – y todo de manera automática.
Este revolucionario diseño presenta las siguientes
c a r a c t e r í s t i c a s :
• Limpieza más rápida
-Boquilla aspiradora más gr a n d e
-Potente manguera de barrido
• Mayor recolección de basura
- M ayor boca de aspiración
- Tres chorros de agua a alta presión
• Limpieza menos frecuente de la bolsa
-Bolsa de gran cap a c i d a d
-Bolsa de basura fácil de retirar, limpiar y reemplazar
• Cobertura completa de la piscina
-Propulsión de agua a chorro A q u a D r i v e ™
-Limpieza y giro no selectivo
-Barre la basura de los escalones al limpiar la superficie
• Limpia el fondo y los laterales de su piscina y retira la
basura de la superficie
-Ascenso y descenso automático
-Elección de limpieza sólo del fondo y de los laterales o sólo de la
superficie
• Menor desgaste de la superficie de la piscina
-Propulsión de agua a chorro AquaDrive sin ruedas impulsadas que
desgasten la superficie de la piscina
• Instalación fácil
Un programa de garantía limitada protege su limpiadora
Hayward Phantom. Para disfrutar plenamente de su garantía
limitada, por favor lea, complete y remita la Tarjeta de
Registro de Garantía Limitada dentro de los 14 días
de la fecha de compra.
Su tarjeta de garantía se encuentra dentro de la Guía del
usuario.
I m p o r t a n t e
Esta Guía del usuario es para los dueños que quieran instalar su
Limpiadora Automática de Piscinas Phantom. Sin embargo, s e
recomienda que un Representante Autorizado de Hay w a r d
realice la instalación de la limpiadora.
La Bomba Cebadora Hayward 5060 adquirida por separado o
como parte de la Limpiadora Automática de Piscinas Phantom
brinda un rendimiento de limpieza óptimo. Puede obtener un
rendimiento aceptable si utiliza una bomba cebadora con un
suministro mínimo de 35 libras por pulgada cuadrada (PSI) a
12 galones por minuto (GPM) en el adaptador de la línea
especial de la pared de la piscina. Remítase a la Guía del
usuario que viene con la Bomba Cebadora Hayward 5060
para obtener información sobre los procedimientos para la
instalación eléctrica y de tuberías.
Fecha de compra
Número de serie
(en la parte posterior de la limpiadora)
Número de mangueras rígidas armadas en uso
Lectura del manómetro
Para su registro
Piezas principales
2 5
Precaución – Riesgo de daño del equipo
La manguera se puede guardar plegada por tubería. Sólo se
debe guardar derecho, sin enrollarse, el primer tramo de 3 pies
de largo de la manguera y la manguera de barrido.
A. Ala
B. Bolsa para basura de gran capacidad con cierre
desplazable
C. Conector a la limpiadora
D. Conector de la manguera de barrido
E. Botón de ajuste de la manguera de barrido
F. Tapa de levas
G. Manguera rígida para presión
H. Flotador de manguera
I. Conexión de mangueras
J. Placa giratoria de la manguera
K. Acople rápido a pared ajustable
L. Manguera de barrido
M. Rodillo protector
N. Manguera
O. Adaptador universal para pared
P. Interruptor Top/Auto/Bottom (superficie/automático/fondo)
Q. Filtro en línea
R. Montaje de la placa giratoria de la manguera
S. Montaje del extremo limpiador de la manguera
T. Montaje del extremo de la manguera a la pared
U. Manómetro
Acople rápido a la pared
Vista posterior del producto
Vista frontal del producto
C
L
D
E
M
G
O
K
B
F
A
P
Piezas de la manguera rígida de presión (G)
I
H
U
J
N
R
T
K
Q
C
L
M
S

Utilice solamente repuestos genuinos Hay w a r d .
2 5
Utilice solamente repuestos genuinos Hay w a r d .
2 4
Introducción
Felicitaciones por comprar la Limpiadora Automática de Piscinas
H a yward Phantom. La Hayward Phantom es la única verdadera
limpiadora de piscinas. La limpiadora Phantom está diseñada
no sólo para limpiar el fondo y los laterales de su piscina, s i n o
también para limpiar la superficie – y todo de manera automática.
Este revolucionario diseño presenta las siguientes
c a r a c t e r í s t i c a s :
• Limpieza más rápida
-Boquilla aspiradora más gr a n d e
-Potente manguera de barrido
• Mayor recolección de basura
- M ayor boca de aspiración
- Tres chorros de agua a alta presión
• Limpieza menos frecuente de la bolsa
-Bolsa de gran cap a c i d a d
-Bolsa de basura fácil de retirar, limpiar y reemplazar
• Cobertura completa de la piscina
-Propulsión de agua a chorro A q u a D r i v e ™
-Limpieza y giro no selectivo
-Barre la basura de los escalones al limpiar la superficie
• Limpia el fondo y los laterales de su piscina y retira la
basura de la superficie
-Ascenso y descenso automático
-Elección de limpieza sólo del fondo y de los laterales o sólo de la
superficie
• Menor desgaste de la superficie de la piscina
-Propulsión de agua a chorro AquaDrive sin ruedas impulsadas que
desgasten la superficie de la piscina
• Instalación fácil
Un programa de garantía limitada protege su limpiadora
Hayward Phantom. Para disfrutar plenamente de su garantía
limitada, por favor lea, complete y remita la Tarjeta de
Registro de Garantía Limitada dentro de los 14 días
de la fecha de compra.
Su tarjeta de garantía se encuentra dentro de la Guía del
usuario.
I m p o r t a n t e
Esta Guía del usuario es para los dueños que quieran instalar su
Limpiadora Automática de Piscinas Phantom. Sin embargo, s e
recomienda que un Representante Autorizado de Hay w a r d
realice la instalación de la limpiadora.
La Bomba Cebadora Hayward 5060 adquirida por separado o
como parte de la Limpiadora Automática de Piscinas Phantom
brinda un rendimiento de limpieza óptimo. Puede obtener un
rendimiento aceptable si utiliza una bomba cebadora con un
suministro mínimo de 35 libras por pulgada cuadrada (PSI) a
12 galones por minuto (GPM) en el adaptador de la línea
especial de la pared de la piscina. Remítase a la Guía del
usuario que viene con la Bomba Cebadora Hayward 5060
para obtener información sobre los procedimientos para la
instalación eléctrica y de tuberías.
Fecha de compra
Número de serie
(en la parte posterior de la limpiadora)
Número de mangueras rígidas armadas en uso
Lectura del manómetro
Para su registro
Piezas principales
2 5
Precaución – Riesgo de daño del equipo
La manguera se puede guardar plegada por tubería. Sólo se
debe guardar derecho, sin enrollarse, el primer tramo de 3 pies
de largo de la manguera y la manguera de barrido.
A. Ala
B. Bolsa para basura de gran capacidad con cierre
desplazable
C. Conector a la limpiadora
D. Conector de la manguera de barrido
E. Botón de ajuste de la manguera de barrido
F. Tapa de levas
G. Manguera rígida para presión
H. Flotador de manguera
I. Conexión de mangueras
J. Placa giratoria de la manguera
K. Acople rápido a pared ajustable
L. Manguera de barrido
M. Rodillo protector
N. Manguera
O. Adaptador universal para pared
P. Interruptor Top/Auto/Bottom (superficie/automático/fondo)
Q. Filtro en línea
R. Montaje de la placa giratoria de la manguera
S. Montaje del extremo limpiador de la manguera
T. Montaje del extremo de la manguera a la pared
U. Manómetro
Acople rápido a la pared
Vista posterior del producto
Vista frontal del producto
C
L
D
E
M
G
O
K
B
F
A
P
Piezas de la manguera rígida de presión (G)
I
H
U
J
N
R
T
K
Q
C
L
M
S

Utilice solamente repuestos genuinos Hay w a r d .
2 7
Utilice solamente repuestos genuinos Hay w a r d .
2 6
Preparación de la Piscina
No se debe utilizar la limpiadora Phantom para limpiar la
piscina para la puesta en marcha en primavera hasta que
se hayan realizado los siguientes pasos:
1 . Sacar de la piscina cualquier objeto que pudiera interferir
con el funcionamiento de la limpiadora.
2 . Verificar que el nivel del agua sea el recomendado.
3 . Verificar la composición química del ag u a . El agua debe
tener un equilibrio correcto (nivel de ph) y la piscina no debe
tener algas.
N o t a : Las algas pueden afectar adversamente el
funcionamiento y rendimiento de la limpiadora.
4 . Realice la limpieza o retrolavado del sistema de filtro sin la
limpiadora Phantom en la piscina.
Precaución – Riesgo de daño del equipo
Siempre desconecte la limpiadora Phantom y las mangueras del
a d a ptador universal a la pared y retírelas de la piscina antes del
r e t r o l ava do o limpieza del sistema de filtro. Si no lo hace así,
puede dañar la bomba cebadora y la limpiadora.
5 . Limpie la canasta de la bomba del sistema de filtro.
N o t a : Después de instalar la limpiadora Phantom, limpie el
sistema de filtro regularmente según el estado de cada
p i s c i n a .
Construcción de una piscina nueva
1 . Cepille la superficie de la piscina recién construida y
aspire manualmente la basura nueva de la superficie
antes de instalar la Phantom.
Arena (basura densa)
Siempre vacíe la bolsa Phantom si la arena (o basura
pesada) afecta la estabilidad de la limpiadora
Las piscinas con demasiada arena deben ser aspiradas antes de
que se instale la Phantom.
Línea de retorno especial de la bomba cebadora
La limpiadora está diseñada para ser conectada a una línea
especial de retorno de 1-1/2 pulgada ubicada a un mínimo de
6 pulgadas por debajo del nivel normal del agua con una rosca
hembra de 1-1/2 pulgada. Si la línea especial de retorno tiene
una rosca hembra de 3/4 de pulgada, será necesario que
compre un adaptador NPT hembra 1-1/2" x NPT macho 3/4".
Herramientas necesarias para la instalación
• Destornillador de hoja plana para ajustar el regulador en el acople
rápido a pared.
• Cinta de medir para las mangueras rígidas de presión (incluida en la
bolsa 1).
Conexión de la limpiadora Phantom a la piscina
Instalación del Adaptador universal para pared
Constructores: Instale la línea especial de retorno en el punto
medio de la pared larga de la piscina.
Especificación: Línea especial de retorno en la pared de la
piscina.
Profundidad: Un mínimo de 6 pulgadas por debajo del nivel
del agua.
Ta m a ñ o : Rosca NPT hembra 1-1/2"
1 . Purgue las líneas de tuberías antes de continuar.
2 . A P A G U E la bomba cebadora y la bomba principal del filtro.
3 . Retire el adaptador universal a pared existente de la instala-
ción de una limpiadora de piscina anterior (si hubiera).
4 . Retire el adaptador universal a pared y la cinta de Te fl o n
®
d e
la bolsa 1.
5 . Al instalar o reinstalar el adaptador universal a pared ( p i e z a
O ) , utilice la cinta de Te f l o n
®
en la rosca de plástico. Deje las
dos primeras roscas del extremo del adaptador universal a
pared sin cinta.
6 . Enrosque el adaptador universal a pared en la línea especial
de retorno.
I m p o r t a n t e : Dé al adaptador universal para pared 1 gi r o
completo para acoplar las roscas iniciales. Asegúrese que
ambas partes estén correctamente enroscadas (sin roscas
cruzadas) y luego reanude el ajuste - sólo ajuste manual.
El adaptador universal de pared puede no enroscarse del
todo en la línea especial de retorno.
No ajuste de más.
Te fl o n
®
es una marca registrada de E.I. du Pont de Nemours and
C o m p a ny
Adaptador universal de pared
Línea especial de retorno
Adaptador universal
de pared (O)

Utilice solamente repuestos genuinos Hay w a r d .
2 7
Utilice solamente repuestos genuinos Hay w a r d .
2 6
Preparación de la Piscina
No se debe utilizar la limpiadora Phantom para limpiar la
piscina para la puesta en marcha en primavera hasta que
se hayan realizado los siguientes pasos:
1 . Sacar de la piscina cualquier objeto que pudiera interferir
con el funcionamiento de la limpiadora.
2 . Verificar que el nivel del agua sea el recomendado.
3 . Verificar la composición química del ag u a . El agua debe
tener un equilibrio correcto (nivel de ph) y la piscina no debe
tener algas.
N o t a : Las algas pueden afectar adversamente el
funcionamiento y rendimiento de la limpiadora.
4 . Realice la limpieza o retrolavado del sistema de filtro sin la
limpiadora Phantom en la piscina.
Precaución – Riesgo de daño del equipo
Siempre desconecte la limpiadora Phantom y las mangueras del
a d a ptador universal a la pared y retírelas de la piscina antes del
r e t r o l ava do o limpieza del sistema de filtro. Si no lo hace así,
puede dañar la bomba cebadora y la limpiadora.
5 . Limpie la canasta de la bomba del sistema de filtro.
N o t a : Después de instalar la limpiadora Phantom, limpie el
sistema de filtro regularmente según el estado de cada
p i s c i n a .
Construcción de una piscina nueva
1 . Cepille la superficie de la piscina recién construida y
aspire manualmente la basura nueva de la superficie
antes de instalar la Phantom.
Arena (basura densa)
Siempre vacíe la bolsa Phantom si la arena (o basura
pesada) afecta la estabilidad de la limpiadora
Las piscinas con demasiada arena deben ser aspiradas antes de
que se instale la Phantom.
Línea de retorno especial de la bomba cebadora
La limpiadora está diseñada para ser conectada a una línea
especial de retorno de 1-1/2 pulgada ubicada a un mínimo de
6 pulgadas por debajo del nivel normal del agua con una rosca
hembra de 1-1/2 pulgada. Si la línea especial de retorno tiene
una rosca hembra de 3/4 de pulgada, será necesario que
compre un adaptador NPT hembra 1-1/2" x NPT macho 3/4".
Herramientas necesarias para la instalación
• Destornillador de hoja plana para ajustar el regulador en el acople
rápido a pared.
• Cinta de medir para las mangueras rígidas de presión (incluida en la
bolsa 1).
Conexión de la limpiadora Phantom a la piscina
Instalación del Adaptador universal para pared
Constructores: Instale la línea especial de retorno en el punto
medio de la pared larga de la piscina.
Especificación: Línea especial de retorno en la pared de la
piscina.
Profundidad: Un mínimo de 6 pulgadas por debajo del nivel
del agua.
Ta m a ñ o : Rosca NPT hembra 1-1/2"
1 . Purgue las líneas de tuberías antes de continuar.
2 . A P A G U E la bomba cebadora y la bomba principal del filtro.
3 . Retire el adaptador universal a pared existente de la instala-
ción de una limpiadora de piscina anterior (si hubiera).
4 . Retire el adaptador universal a pared y la cinta de Te fl o n
®
d e
la bolsa 1.
5 . Al instalar o reinstalar el adaptador universal a pared ( p i e z a
O ) , utilice la cinta de Te f l o n
®
en la rosca de plástico.Deje las
dos primeras roscas del extremo del adaptador universal a
pared sin cinta.
6 . Enrosque el adaptador universal a pared en la línea especial
de retorno.
I m p o r t a n t e : Dé al adaptador universal para pared 1 gi r o
completo para acoplar las roscas iniciales. Asegúrese que
ambas partes estén correctamente enroscadas (sin roscas
cruzadas) y luego reanude el ajuste - sólo ajuste manual.
El adaptador universal de pared puede no enroscarse del
todo en la línea especial de retorno.
No ajuste de más.
Te fl o n
®
es una marca registrada de E.I. du Pont de Nemours and
C o m p a ny
Adaptador universal de pared
Línea especial de retorno
Adaptador universal
de pared (O)

Utilice solamente repuestos genuinos Hay w a r d .
2 9
Utilice solamente repuestos genuinos Hay w a r d .
2 8 2 9
Utilice solamente repuestos genuinos Hay w a r d .Utilice solamente repuestos genuinos Hay w a r d .
2 8
Armado y medición de la manguera rígida de presión
Armado y medición de la manguera rígida
de presión
1 . Abra la bolsa plástica marcada #1 que contiene 10 mangue-
ras rígidas (pieza N) y 5 conexiones para mangueras (pieza I) .
2 . Lubrique las 5 conexiones de manguera sumergiéndolas en
agua jab o n o s a .
3 . Aliñe la conexión de manguera y la manguera rígida y acó-
p l e l a s . Asegúrese de que el anillo tórico negro no se salga
de la ranura en la conexión de la manguera (si se ve el
anillo a través del orificio de cierre al acoplar las mangue-
r a s , el anillo se ha salido de la ranura y goteará).
4 . Conecte 1 manguera rígida a cada extremo de las conexio-
nes de manguera y arme 5 j u e g o s de mangueras.
5 . Busque la “Cinta de medir” (en la bolsa 1), asegure el
extremo de la cinta que dice “extremo del acople a la
p a r e d ” en la albardilla de la piscina justo arriba del
a d a ptador universal para pared.
6 . Desenrolle la cinta de medir, camine alrededor de la piscina
hasta el punto más distante por la pared de la piscina desde
el adaptador universal para pared.
En el punto más alejado del adaptador universal para pared
sostenga la cinta de medir en el borde o albardilla de la
piscina y lea el número de tramos de mangueras
especificadas en la cinta.
Armado de mangueras rígidas
Cinta de medir
C o n e xión de mangueras
I
N
a . N o t a : Si la cinta de medir especifica más de 5 tramos de
m a n g u e r a , será necesario que compre tramos adicionales
(Número de pieza AX6000HE) en su Representante
autorizado de Hay w a r d .
b . Si la cinta de medir especifica menos de 5 mangueras
a r m a d a s , aparte las otras.
Piscina rectangular
Piscina arriñonada
Piscina en forma de ángulo
Adaptador universal
para pared (línea
especial)
Adaptador universal
para pared (línea
especial)
Punto más distante
Punto más distante
Adaptador universal
para pared (línea
especial)
Punto más distante
I N
1 Armado de
las mangueras
7 . Lubrique la placa gi r atoria en el montaje a la pared del extremo
de la manguera de 3 pies (pieza T) en agua jabonosa y luego
introdúzcala en una de las mangueras armadas.
8 . Lubrique la placa gi r atoria en el montaje del extremo limpiador
de la manguera (pieza S) en agua jabonosa y acóplela a otra
manguera armada.
9 . Abra la bolsa 2 y lubrique ambos extremos del montaje de
la placa gi r atoria de la manguera (pieza R) en agua jab o n o s a .
Conecte las mangueras armadas introduciendo los montajes
de las placas gi r atorias en cada una de las mangueras.
C o n e xión de la manguera al adaptador para
p a r e d
1 . Con la bomba cebadora y el sistema de filtrado
A PA G A D O S , desde la terraza de la piscina mire hacia ab a j o
y sostenga el acople rápido a la pared de manera que la
manguera quede a la izquierda y el botón de ajuste a la
d e r e c h a . Introduzca el acople rápido a la pared dentro del
a d aptador universal para pared y gírelo a la izquierda (en
dirección contraria a las agujas del reloj) para bloquearlo. L a
manguera debe quedar debajo del botón de ajuste.
2 . Tire el acople rápido a la pared hacia afuera para verificar
que haya quedado bloqueado dentro del adap t a d o r
universal para pared.
3 . Para d e s c o n e c t a r la manguera, primero A PA G U E l a
bomba cebadora y la del filtro, luego presione el acople
rápido a pared hacia la pared, gírelo hacia la derecha (en el
sentido de las agujas del reloj) y tire el acople hacia fuera
del adap t a d o r.
D e s c o n e xión de una manguera
Si necesita acortar, alargar o reemplazar un elemento de la
manguera rígida de presión, se pueden liberar los encajes a
presión si se rotan las mangueras de la manera indicada.
D e s c o n exión de las mangueras
Acople rápido a la pared
Conexión de la manguera rígida de presión a la piscina
Montaje del acople a la pared
Montaje del extremo limpiador de la manguera
T QN
Montaje de la placa giratoria de manguera
RN
Montaje de la manguera rígida de presión
S

Utilice solamente repuestos genuinos Hay w a r d .
3 1
Utilice solamente repuestos genuinos Hay w a r d .
3 0
Advertencia – Riesgo de lesiones
Las bombas de filtrado y de cebado deben estar A PA G A D A S a l
conectar o desconectar la manguera limpiadora.
Precaución – Riesgo de daño del equipo
Siempre se debe hacer funcionar la bomba del filtro para eliminar
el aire del sistema antes de E N C E N D E R la bomba cebadora.
Nunca haga funcionar la bomba cebadora sin que la bomba del
filtro principal esté E N C E N D I D A. Si se hace funcionar la bomba
cebadora en seco se la dañara y la garantía quedará invalidada.
Uso de la limpiadora Phantom
1 . Asegúrese de que todas las válvulas del sistema de filtrado
estén abiertas y suministren agua a la bomba cebadora.
2. Asegúrese de que las válvulas de entrada y salida de la
bomba cebadora y la línea especial de retorno estén
completamente abiertas.
3 . La limpiadora Phantom y su bomba cebadora sólo pueden
funcionar cuando la bomba del filtro de la piscina está en
f u n c i o n a m i e n t o .
Precaución – Riesgo de daño del equipo
Si no se abren las válvulas completamente y/o no se pone en
funcionamiento el sistema de filtrado, la bomba cebadora se
d a ñ a r á . Este daño invalida la garantía de la bomba cebadora.
Ajuste de la presión
I m p o r t a n t e : La limpiadora no funcionará bien si no se ajusta la
presión correctamente. Un ajuste de muy poca presión no
permitirá el movimiento y la limpieza correctos. Un ajuste con
demasiada presión provocará una limpieza insatisfactoria y un
desgaste prematuro de las piezas de la limpiadora.
Advertencia – Riesgo de lesiones
Asegúrese de mantener bajo agua al conector limpiador (pieza C)
con el manómetro (pieza U) adherido y de que no se produzca
aspersión por el agujero del manómetro o por la manguera de
b a r r i d o . N u n c a dirija un chorro o una manguera hacia personas
o mascotas.
Sujete el manómetro a la manguera cerca del acople rápido a pared.
1. ENCIENDA la bomba del sistema de filtro y luego la
bomba cebadora. Lea la presión en el manómetro sujeto
al conector limpiador. Utilice un destornillador de hoja
plana para ajustar la perilla del acople rápido a pared
hasta lograr una PSI 25 (+/- 5 PSI).
N o t a : El acople rápido a pared se puede ajustar desde “ 0 ”
(completamente cerrado) hasta “ 5 ” (completamente cerrado).
N O fuerce el botón de ajuste más allá de “ 0 ” o “ 5 ” .
2 . Si el acople a la pared está en la posición “ 5 ” ( c o m p l e t a-
mente abierto) y la presión continúa por debajo de 20 PSI,
verifique si la canasta de la bomba del filtro, el sumidero o
la canasta del skimmer están obstruidos para saber por qué
no hay suficiente presión en el agua en la línea especial.
Si aún se necesita más presión,h a ga que una persona del
s e rvi ce oficial de Hayward o del representante autorizado
controle y determine el funcionamiento correcto de la
bomba cebadora, del sistema de filtro y de las tuberías.
3 . A PA G U E la bomba cebadora y la bomba de filtrado.
4 . Retire el manómetro del conector limpiador. Guarde el
manómetro con la Guía del usuario en un lugar seguro.
5 . Acople el conector limpiador a la limpiadora La manguera
de barrido debe estar directamente por debajo de la man-
guera de presión.
6 . Coloque la limpiadora en la piscina, E N C I E N D A el sistema
de filtro y luego E N C I E N D A la bomba cebadora.
C o n e xión de la manguera de presión a la limpiadora
Ajuste de la presión en el acople a pared
Manómetro y Acople a pared
K
C
C
U
Uso de la limpiadora Phantom
Retiro de la bolsa
de basura (detalles)
Sujeción de la bolsa de basura
1 . Coloque el marco de la bolsa de basura contra la parte
posterior de la limpiadora como se indica.
2 . Presione las esquinas superiores del marco.
3 . Presione el centro superior del marco para bloquear la bolsa
de basura.
Retiro de la bolsa de basura
1 . Tire de la parte superior del marco de la bolsa de basura hacia
atrás (1) y luego hacia arriba (2).
Nota: Si permite que la bolsa se seque, será más fácil retirar la
b a s u r a .
Vaciado de la bolsa de basura
1 . Sostenga la bolsa por encima del tacho de basura o donde sea
que vaya a colocar la basura.
2 . Deslice y desprenda de la bolsa el cierre desplazab l e .
3 . Mantenga los bordes separados y sacuda la basura de la
b o l s a .
4 . Deslice el cierre desplazable a la bolsa.
Arena (basura densa)
Si se acumula mucha arena o restos pesados en la bolsa, é s t a
“ c o l g a r á ” sobre la manguera mientras esté en el fondo y es posible
que no pueda subir correctamente a la superficie. Si observa que la
bolsa está colgando sobre la manguera ap a gue la bomba cebadora
y vacíe la bolsa.
N o t a : Las piscinas con demasiada arena deben ser aspiradas
antes de que se instale la Phantom.
Sujeción de la bolsa de basura
Vaciado de la bolsa
de basura
B
Cierre
desplazable
Bolsa de basura de gran capacidad

Utilice solamente repuestos genuinos Hay w a r d .
3 1
Utilice solamente repuestos genuinos Hay w a r d .
3 0
Advertencia – Riesgo de lesiones
Las bombas de filtrado y de cebado deben estar A PA G A D A S a l
conectar o desconectar la manguera limpiadora.
Precaución – Riesgo de daño del equipo
Siempre se debe hacer funcionar la bomba del filtro para eliminar
el aire del sistema antes de E N C E N D E R la bomba cebadora.
Nunca haga funcionar la bomba cebadora sin que la bomba del
filtro principal esté E N C E N D I D A. Si se hace funcionar la bomba
cebadora en seco se la dañara y la garantía quedará invalidada.
Uso de la limpiadora Phantom
1 . Asegúrese de que todas las válvulas del sistema de filtrado
estén abiertas y suministren agua a la bomba cebadora.
2. Asegúrese de que las válvulas de entrada y salida de la
bomba cebadora y la línea especial de retorno estén
completamente abiertas.
3 . La limpiadora Phantom y su bomba cebadora sólo pueden
funcionar cuando la bomba del filtro de la piscina está en
f u n c i o n a m i e n t o .
Precaución – Riesgo de daño del equipo
Si no se abren las válvulas completamente y/o no se pone en
funcionamiento el sistema de filtrado, la bomba cebadora se
d a ñ a r á . Este daño invalida la garantía de la bomba cebadora.
Ajuste de la presión
I m p o r t a n t e : La limpiadora no funcionará bien si no se ajusta la
presión correctamente. Un ajuste de muy poca presión no
permitirá el movimiento y la limpieza correctos. Un ajuste con
demasiada presión provocará una limpieza insatisfactoria y un
desgaste prematuro de las piezas de la limpiadora.
Advertencia – Riesgo de lesiones
Asegúrese de mantener bajo agua al conector limpiador (pieza C)
con el manómetro (pieza U) adherido y de que no se produzca
aspersión por el agujero del manómetro o por la manguera de
b a r r i d o . N u n c a dirija un chorro o una manguera hacia personas
o mascotas.
Sujete el manómetro a la manguera cerca del acople rápido a pared.
1. ENCIENDA la bomba del sistema de filtro y luego la
bomba cebadora. Lea la presión en el manómetro sujeto
al conector limpiador. Utilice un destornillador de hoja
plana para ajustar la perilla del acople rápido a pared
hasta lograr una PSI 25 (+/- 5 PSI).
N o t a : El acople rápido a pared se puede ajustar desde “ 0 ”
(completamente cerrado) hasta “ 5 ” (completamente cerrado).
N O fuerce el botón de ajuste más allá de “ 0 ” o “ 5 ” .
2 . Si el acople a la pared está en la posición “ 5 ” ( c o m p l e t a-
mente abierto) y la presión continúa por debajo de 20 PSI,
verifique si la canasta de la bomba del filtro, el sumidero o
la canasta del skimmer están obstruidos para saber por qué
no hay suficiente presión en el agua en la línea especial.
Si aún se necesita más presión, h a ga que una persona del
s e rvi ce oficial de Hayward o del representante autorizado
controle y determine el funcionamiento correcto de la
bomba cebadora, del sistema de filtro y de las tuberías.
3 . A PA G U E la bomba cebadora y la bomba de filtrado.
4 . Retire el manómetro del conector limpiador. Guarde el
manómetro con la Guía del usuario en un lugar seguro.
5 . Acople el conector limpiador a la limpiadora La manguera
de barrido debe estar directamente por debajo de la man-
guera de presión.
6 . Coloque la limpiadora en la piscina, E N C I E N DA el sistema
de filtro y luego E N C I E N D A la bomba cebadora.
C o n e xión de la manguera de presión a la limpiadora
Ajuste de la presión en el acople a pared
Manómetro y Acople a pared
K
C
C
U
Uso de la limpiadora Phantom
Retiro de la bolsa
de basura (detalles)
Sujeción de la bolsa de basura
1 . Coloque el marco de la bolsa de basura contra la parte
posterior de la limpiadora como se indica.
2 . Presione las esquinas superiores del marco.
3 . Presione el centro superior del marco para bloquear la bolsa
de basura.
Retiro de la bolsa de basura
1 . Tire de la parte superior del marco de la bolsa de basura hacia
atrás (1) y luego hacia arriba (2).
Nota: Si permite que la bolsa se seque, será más fácil retirar la
b a s u r a .
Vaciado de la bolsa de basura
1 . Sostenga la bolsa por encima del tacho de basura o donde sea
que vaya a colocar la basura.
2 . Deslice y desprenda de la bolsa el cierre desplazab l e .
3 . Mantenga los bordes separados y sacuda la basura de la
b o l s a .
4 . Deslice el cierre desplazable a la bolsa.
Arena (basura densa)
Si se acumula mucha arena o restos pesados en la bolsa, é s t a
“ c o l g a r á ” sobre la manguera mientras esté en el fondo y es posible
que no pueda subir correctamente a la superficie. Si observa que la
bolsa está colgando sobre la manguera ap a gue la bomba cebadora
y vacíe la bolsa.
N o t a : Las piscinas con demasiada arena deben ser aspiradas
antes de que se instale la Phantom.
Sujeción de la bolsa de basura
Vaciado de la bolsa
de basura
B
Cierre
desplazable
Bolsa de basura de gran capacidad

Utilice solamente repuestos genuinos Hay w a r d .
3 3
Utilice solamente repuestos genuinos Hay w a r d .
3 2
Uso correcto de la limpiadora
M ov i m i e n t o
Si está funcionando correctamente y el interruptor se encuentra en
la función “ A U T O ” la limpiadora Phantom se deslizará libremente
por el fo n d o , los laterales y la superficie de la piscina. La limpiadora
realizará una limpieza del fondo y de las paredes en 2/3 de su ciclo
y de la superficie en 1/3 de su ciclo.En la función “ T O P ” o “ B O T ” , l a
limpiadora permanecerá en la función Superficie o Fondo y Paredes
(respectivamente) hasta que se cambie la función en el interruptor.
G i r o
La limpiadora se detendrá y rotará periódicamente en el sentido
de las agujas del reloj para brindar una mejor cobertura de la
piscina y escapar de las esquinas o de otros obstáculos. Si la
limpiadora se detiene momentáneamente en una esquina o en
un obstáculo, girará para liberarse y continuar moviéndose libre-
mente por la piscina. La leva de giro determina la frecuencia de
los gi r o s . La limpiadora está equipada con 3 levas de giro; cada
7 5 , 50 (instalada de fábrica) o 30 segundos (las de 75 y 30
segundos están en la bolsa de accesorios). Para cambiar la
frecuencia de los giros ver “Cambio de la leva de gi r o ” .
Manguera de barrido
La manguera de barrido se debe mover con un movimiento lento,
ondulante (como el de una serpiente). Corre la basura en las
esquinas estrechas para que la limpiadora pueda aspirarla en un
lugar más accesible de la piscina.La manguera de barrido también
levanta la basura fina y la deja suspendida para que el sistema de
filtro la lleve. Los rodillos de la manguera de barrido son
piezas protectoras. Cuando su desgaste llegue a la ranura
externa (línea de desgaste) reemplácelos (N. pieza A X 5 0 0 6 A ) , h a y
una bolsa con rodillos protectores. Si se produce un agujero en la
manguera de barrido,es necesario reemplazarla por una manguera
de barrido genuina Hayward Phantom (N. pieza A X 5 0 0 0 R S H A ) .
L i m p i e z a
Cuando la limpiadora se encuentra en el fondo o en las paredes, l a
basura se aspira por debajo de la limpiadora y pasa a través del
caño de aspiración a la bolsa de la basura.Cuando la limpiadora
está limpiando la superficie (skimmer) los chorros de agua empujan
la basura a la bolsa donde queda hasta que el usuario la vacíe. E s
posible que la limpiadora no recoja toda la basura en la primera
p a s a d a , pero su piscina estará limpia en un máximo de 3 horas
(según el tamaño y la forma de la piscina y la cantidad de basura).
O b s e rve el funcionamiento de la Phantom regularmente y
vacíe la bolsa si es necesario. Sólo haga funcionar la limpia-
dora Phantom durante el período de tiempo necesario para
limpiar la piscina. El uso excesivo es innecesario y producirá el
desgaste prematuro de las piezas de la limpiadora.
Basura fina
La bolsa de basura de gran cap a c i d a d , al igual que otras limpiadoras
con pared de carga, no retendrá la arena muy fina ni otra basura
semejante al polvo. El polvo saldrá de la bolsa y quedará suspendido
y podrá ser filtrado por el sistema de filtro de la piscina.
Arena (basura densa)
Si se acumula mucha arena o restos pesados en la bolsa, é s t a
“ c o l g a r á ” sobre la manguera mientras esté en el fondo y es
posible que no pueda subir a la superficie. Si observa que la bolsa
está colgando sobre la manguera ap a gue la bomba cebadora y
vacíe la bolsa.
Las piscinas con demasiada arena deben ser aspiradas
manualmente antes de que se instale la Phantom.
La limpiadora Phantom está diseñada para funcionar con 1/2 taza
de arena y el resto de la bolsa con hojas, b e l l o t a s , p a s t o , e t c .
Manguera de presión
Esta manguera ha sido diseñada para minimizar la formación de
lazadas y nudos. La mayor parte de la manguera de presión debe
quedar por debajo de la superficie del agua durante casi todo el
t i e m p o . Si se forma una lazada en la manguera, la limpiadora
eventualmente la destrab a r á . En el eventual y extraño caso de
que la manguera se anude o se enrede, la limpiadora se encon-
trará limitada en su alcance. Para obtener una cobertura óptima,
si existen nudos o enredos deshágalos.
Manguera de barrido
Rodillo protector
Línea de desgaste
(ranura exterior)
Rodillo protector (M)
Levas de giro
de 75 segundos de 50 segundos de 30 segundos
Logotipo sol
Ajustes para la limpiadora Phantom
Advertencia – Riesgo de lesiones
Apague la bomba cebadora y la bomba de filtrado antes
de realizar ajustes a la limpiadora. Realice los ajustes
siempre fuera de la piscina. Si no lo hace puede causar
l e s i o n e s .
Cambio de la frecuencia de giro
• En la mayoría de las piscinas no será necesario cambiar la
frecuencia de gi r o .
• La limpiadora viene con una leva de giro de 3 puntas que hace que
la limpiadora Phantom gire una vez cada 50 segundos. Esto es
apropiado para la mayoría de las piscinas.
• Las piscinas que son pequeñas o tienen esquinas pronunciadas u
otros obstáculos se pueden beneficiar con giros más frecuentes.
Para dichas piscinas, abra la tapa con leva y reemplace la leva de
3 puntas por la leva de 30 segundos de 5 puntas.
• Las piscinas que son muy grandes y/o tienen muy pocos obstáculos
se pueden beneficiar con giros menos frecuentes. Para dichas
p i s c i n a s , abra la tapa con leva y reemplace la leva de 3 puntas por
la leva de 75 segundos de 2 puntas.
• El objetivo es maximizar el tiempo de limpieza y minimizar la
cantidad de tiempo de gi r o .
• Si la limpiadora tarda mucho tiempo en un obstáculo a la espera de
un gi r o , utilice una leva con más puntas para giros más frecuentes.
• Si la limpiadora casi nunca necesita girar cerca de un obstáculo,
entonces una leva con menos puntas y giros menos frecuentes
aumentará el tiempo de limpieza efectivo.
• Si la limpiadora tiende a permanecer en el extremo profundo (sin
limpiar suficientemente el extremo menos profundo), en piscinas
con pendientes pronunciadas o largas entre los extremos profundo y
menos profundo, se recomienda utilizar una leva con pocas puntas,
eso facilitará pasadas derechas más largas.
Cambio de la leva de giro
1 . Para ab r i r, gire la tapa de levas en el sentido contrario a las
agujas del reloj.
2 . Retire la leva de gi r o .
3 . Coloque la leva deseada en su lugar sobre el vástag o .
4 . Coloque las levas sin usar en la bolsa de accesorios y
guárdela en un lugar seguro con la guía del usuario.
5 . Cierre la tapa de levas.
Ajuste de la duración de giro
Cada leva tiene un lado “ V e r a n o ” y uno “ I n v i e r n o ” (vea los logotipos
de sol y copo de nieve en cada leva). Generalmente se prefiere el
lado Ve r a n o . Si el agua de la piscina está fría (por debajo de los
6 0 º F ) , la manguera de presión se pone rígida y puede evitar que la
limpiadora gire lo suficiente para escapar de los obstáculos. El lado
de la leva “ I n v i e r n o ” proporcionará giros más prolongados para que
la limpiadora funcione mejor en agua fría.
1 . Para ab r i r, gire la tapa de levas.
2 . Retire la leva, gírela y reemplace la leva de tal modo que el
lado deseado (sol o copo de nieve) quede hacia arriba.
• Si la limpiadora hace más de tres intentos para escapar de
un obstáculo, utilice el lado “ I n v i e r n o ” (copo de nieve).
• Si la limpiadora gira regularmente más de los tres cuartos
de la vuelta, utilice el lado “ V e r a n o ” ( s o l ) .
Tapa de leva s
en cubierta
Tapa de levas abierta
Levas de giro
de 75 segundos de 50 segundos de 30 segundos
Tapa de levas
(F)
Tapa de levas
(F)
Logotipo sol
Leva de giro

Utilice solamente repuestos genuinos Hay w a r d .
3 3
Utilice solamente repuestos genuinos Hay w a r d .
3 2
Uso correcto de la limpiadora
M ov i m i e n t o
Si está funcionando correctamente y el interruptor se encuentra en
la función “ A U T O ” la limpiadora Phantom se deslizará libremente
por el fo n d o , los laterales y la superficie de la piscina. La limpiadora
realizará una limpieza del fondo y de las paredes en 2/3 de su ciclo
y de la superficie en 1/3 de su ciclo. En la función “ T O P ” o “ B O T ” , l a
limpiadora permanecerá en la función Superficie o Fondo y Paredes
(respectivamente) hasta que se cambie la función en el interruptor.
G i r o
La limpiadora se detendrá y rotará periódicamente en el sentido
de las agujas del reloj para brindar una mejor cobertura de la
piscina y escapar de las esquinas o de otros obstáculos. Si la
limpiadora se detiene momentáneamente en una esquina o en
un obstáculo, girará para liberarse y continuar moviéndose libre-
mente por la piscina. La leva de giro determina la frecuencia de
los gi r o s . La limpiadora está equipada con 3 levas de giro; cada
7 5 , 50 (instalada de fábrica) o 30 segundos (las de 75 y 30
segundos están en la bolsa de accesorios). Para cambiar la
frecuencia de los giros ver “Cambio de la leva de gi r o ” .
Manguera de barrido
La manguera de barrido se debe mover con un movimiento lento,
ondulante (como el de una serpiente).Corre la basura en las
esquinas estrechas para que la limpiadora pueda aspirarla en un
lugar más accesible de la piscina.La manguera de barrido también
levanta la basura fina y la deja suspendida para que el sistema de
filtro la lleve. Los rodillos de la manguera de barrido son
piezas protectoras. Cuando su desgaste llegue a la ranura
externa (línea de desgaste) reemplácelos (N. pieza A X 5 0 0 6 A ) , h a y
una bolsa con rodillos protectores. Si se produce un agujero en la
manguera de barrido,es necesario reemplazarla por una manguera
de barrido genuina Hayward Phantom (N. pieza A X 5 0 0 0 R S H A ) .
L i m p i e z a
Cuando la limpiadora se encuentra en el fondo o en las paredes,l a
basura se aspira por debajo de la limpiadora y pasa a través del
caño de aspiración a la bolsa de la basura.Cuando la limpiadora
está limpiando la superficie (skimmer) los chorros de agua empujan
la basura a la bolsa donde queda hasta que el usuario la vacíe. E s
posible que la limpiadora no recoja toda la basura en la primera
p a s a d a , pero su piscina estará limpia en un máximo de 3 horas
(según el tamaño y la forma de la piscina y la cantidad de basura).
O b s e rve el funcionamiento de la Phantom regularmente y
vacíe la bolsa si es necesario. Sólo haga funcionar la limpia-
dora Phantom durante el período de tiempo necesario para
limpiar la piscina. El uso excesivo es innecesario y producirá el
desgaste prematuro de las piezas de la limpiadora.
Basura fina
La bolsa de basura de gran cap a c i d a d , al igual que otras limpiadoras
con pared de carga, no retendrá la arena muy fina ni otra basura
semejante al polvo. El polvo saldrá de la bolsa y quedará suspendido
y podrá ser filtrado por el sistema de filtro de la piscina.
Arena (basura densa)
Si se acumula mucha arena o restos pesados en la bolsa, é s t a
“ c o l g a r á ” sobre la manguera mientras esté en el fondo y es
posible que no pueda subir a la superficie. Si observa que la bolsa
está colgando sobre la manguera ap a gue la bomba cebadora y
vacíe la bolsa.
Las piscinas con demasiada arena deben ser aspiradas
manualmente antes de que se instale la Phantom.
La limpiadora Phantom está diseñada para funcionar con 1/2 taza
de arena y el resto de la bolsa con hojas, b e l l o t a s , p a s t o , e t c .
Manguera de presión
Esta manguera ha sido diseñada para minimizar la formación de
lazadas y nudos. La mayor parte de la manguera de presión debe
quedar por debajo de la superficie del agua durante casi todo el
t i e m p o . Si se forma una lazada en la manguera, la limpiadora
eventualmente la destrab a r á . En el eventual y extraño caso de
que la manguera se anude o se enrede, la limpiadora se encon-
trará limitada en su alcance. Para obtener una cobertura óptima,
si existen nudos o enredos deshágalos.
Manguera de barrido
Rodillo protector
Línea de desgaste
(ranura exterior)
Rodillo protector (M)
Levas de giro
de 75 segundos de 50 segundos de 30 segundos
Logotipo sol
Ajustes para la limpiadora Phantom
Advertencia – Riesgo de lesiones
Apague la bomba cebadora y la bomba de filtrado antes
de realizar ajustes a la limpiadora. Realice los ajustes
siempre fuera de la piscina. Si no lo hace puede causar
l e s i o n e s .
Cambio de la frecuencia de giro
• En la mayoría de las piscinas no será necesario cambiar la
frecuencia de gi r o .
• La limpiadora viene con una leva de giro de 3 puntas que hace que
la limpiadora Phantom gire una vez cada 50 segundos. Esto es
apropiado para la mayoría de las piscinas.
• Las piscinas que son pequeñas o tienen esquinas pronunciadas u
otros obstáculos se pueden beneficiar con giros más frecuentes.
Para dichas piscinas, abra la tapa con leva y reemplace la leva de
3 puntas por la leva de 30 segundos de 5 puntas.
• Las piscinas que son muy grandes y/o tienen muy pocos obstáculos
se pueden beneficiar con giros menos frecuentes. Para dichas
p i s c i n a s , abra la tapa con leva y reemplace la leva de 3 puntas por
la leva de 75 segundos de 2 puntas.
• El objetivo es maximizar el tiempo de limpieza y minimizar la
cantidad de tiempo de gi r o .
• Si la limpiadora tarda mucho tiempo en un obstáculo a la espera de
un gi r o , utilice una leva con más puntas para giros más frecuentes.
• Si la limpiadora casi nunca necesita girar cerca de un obstáculo,
entonces una leva con menos puntas y giros menos frecuentes
aumentará el tiempo de limpieza efectivo.
• Si la limpiadora tiende a permanecer en el extremo profundo (sin
limpiar suficientemente el extremo menos profundo), en piscinas
con pendientes pronunciadas o largas entre los extremos profundo y
menos profundo, se recomienda utilizar una leva con pocas puntas,
eso facilitará pasadas derechas más largas.
Cambio de la leva de giro
1 . Para ab r i r, gire la tapa de levas en el sentido contrario a las
agujas del reloj.
2 . Retire la leva de gi r o .
3 . Coloque la leva deseada en su lugar sobre el vástag o .
4 . Coloque las levas sin usar en la bolsa de accesorios y
guárdela en un lugar seguro con la guía del usuario.
5 . Cierre la tapa de levas.
Ajuste de la duración de giro
Cada leva tiene un lado “ V e r a n o ” y uno “ I n v i e r n o ” (vea los logotipos
de sol y copo de nieve en cada leva). Generalmente se prefiere el
lado Ve r a n o . Si el agua de la piscina está fría (por debajo de los
6 0 º F ) , la manguera de presión se pone rígida y puede evitar que la
limpiadora gire lo suficiente para escapar de los obstáculos. El lado
de la leva “ I n v i e r n o ” proporcionará giros más prolongados para que
la limpiadora funcione mejor en agua fría.
1 . Para ab r i r, gire la tapa de levas.
2 . Retire la leva, gírela y reemplace la leva de tal modo que el
lado deseado (sol o copo de nieve) quede hacia arriba.
• Si la limpiadora hace más de tres intentos para escapar de
un obstáculo, utilice el lado “ I n v i e r n o ” (copo de nieve).
• Si la limpiadora gira regularmente más de los tres cuartos
de la vuelta, utilice el lado “ V e r a n o ” ( s o l ) .
Tapa de leva s
en cubierta
Tapa de levas abierta
Levas de giro
de 75 segundos de 50 segundos de 30 segundos
Tapa de levas
(F)
Tapa de levas
(F)
Logotipo sol
Leva de giro

Utilice solamente repuestos genuinos Hay w a r d .
3 5
Utilice solamente repuestos genuinos Hay w a r d .
3 4
Cambio de la función superficie y fondo
El interruptor superficie/fondo (parte P, p á gina 4) viene instalado
de fábrica en “ AU T O ” . La limpiadora Phantom aspirará el fo n d o
de la piscina y los laterales 2/3 del ciclo y pasará por encima de
la superficie 1/3 de su ciclo automáticamente.
La limpiadora se puede ajustar fácilmente para hacer que se
concentre en aquellas zonas de la piscina donde haya más basura.
• Para limpiar SOLAMENTE el fondo y los laterales de la
p i s c i n a , m u e v a el interruptor hacia la derecha a “ B O T ” .
• Para limpiar la superficie de la piscina SOLAMENTE,
m u e v a el interruptor hacia la izquierda a “ T O P ” .
Ajuste de la potencia de la manguera de barrido
• En la mayoría de las piscinas no será necesario ajustar la potencia
de la manguera de barrido.
• O b s e r ve el funcionamiento de la limpiadora Phantom en la piscina.
La manguera de barrido se debe mover con un movimiento lento,
ondulante (como el de una serpiente).
• La manguera de barrido no se mueve: Si la manguera de
barrido no se mueve de lado a lado y sólo se arrastra detrás de la
l i m p i a d o r a , controle que no tenga ag u j e r o s . Controle que no hay a
basura detrás del botón de ajuste o en el extremo de salida de la
manguera de barrido.
• La manguera de barrido se mueve lentamente o dejó de
m overse: Gire el botón de ajuste en el sentido contrario a
las agujas del reloj para incrementar la potencia de la manguera
de barrido.
• La manguera de barrido con frecuencia tira agua fuera de
la piscina:
Gire el botón de ajuste en el sentido de las agujas del reloj
para reducir la potencia de la manguera de barrido.
N o t a : N O ap ague completamente la manguera de barrido.
Esto puede hacer que la manguera se enrede o anude.
Interruptor TOP/AUTO/BOT
Ajuste de la potencia de la manguera de barrido
Ajustes para la limpiadora Phantom
Limpieza del filtro en línea
1 . El filtro en línea (pieza Q) se encuentra al lado del acople
rápido a pared (pieza K).
2 . Para retirar el filtro dentro del filtro en línea, desenrosque la
t apa del filtro en línea y retírelo.
3 . Retire la basura del filtro y enjuáguelo. I m p o r t a n t e : Si el
filtro se tapa con frecuencia, el sistema de filtrado no está
funcionando correctamente o existe algún otro problema en
la tubería.
4 . Coloque el extremo abierto del filtro en el extremo de salida
del filtro en línea y vuelva a enroscar la tapa I m p o r t a n t e :
Asegúrese de que el anillo tórico esté bien en su lugar.
Precaución – Riesgo de daño del equipo
Nunca haga funcionar la limpiadora si el filtro no está en
su lugar. Si se pone la limpiadora en funcionamiento sin que el
filtro esté en su lugar se dañará el mecanismo interno de la
l i m p i a d o r a .
Mantenimiento
Retiro de la limpiadora Phantom de la pileta
Advertencia – Riesgo de lesiones
Las bombas de filtrado y de cebado deben estar A PA G A D A S a l
conectar o desconectar la limpiadora o la manguera.
1 . A PAGUE las bombas cebadora y de filtrado. Si usted no
va a volver a poner la limpiadora antes del próximo ciclo del
regulador de tiempo, A PA G U E la bomba cebadora. N u n c a
pase la bomba cebadora sin que esté conectada a la limpia-
d o r a . Si no lo hace así, puede causar lesiones graves.
Precaución – Riesgo de daño del equipo
N u n c a pase la bomba cebadora sin que esté conectada a la
l i m p i a d o r a . Si lo hace dañará el motor de la bomba e invalidará
la garantía de la bomba cebadora.
2 . Desde la terraza de la piscina, presione el acople rápido a la
pared dentro del adaptador universal para pared y gírelo
hacia la derecha (en el sentido de las agujas del reloj).
3 . Tire y retire el acople rápido a pared del adaptador universal
para pared.
4 . Tome la limpiadora por el ala y retírela de la piscina.
5 . Desconecte el conector limpiador de la limpiadora Phantom.
6 . Deje los extremos limpiadores de la manguera de presión y
de barrido sin basura y derechos.
Importante: Siempre guarde el extremo limpiador de la
manguera de presión y la manguera de barrido derechos, n o
e n r o l l a d o s . La limpiadora puede no funcionar correctamente si
estas mangueras están dobladas.
Vaciado de la bolsa de basura
• Vacíe la bolsa de basura regularmente. Detenga el funcionamiento
de la Phantom si la bolsa está llena.
1 . Sostenga la bolsa por encima del tacho de basura o donde sea
que vaya a colocar la basura.
2 . Deslice y desprenda de la bolsa el cierre desplazab l e .
3 . Mantenga los bordes separados y sacuda la basura de la bolsa.
4 . Deslice el cierre desplazable a la bolsa.
• Arena (basura densa): Siempre vacíe la bolsa de basura
Phantom cuando haya demasiada arena (o basura pesada).
Si la limpiadora no puede trepar a la superficie en el modo TOP o
AUTO O la bolsa “ c u e l g a ” sobre la manguera apague la bomba
cebadora y vacíe la bolsa de basura.
• Cuando la bolsa está llena de hojas u otros desechos, la basura
puede retener aire en la bolsa mientras se limpia la superficie. Si la
retención de aire no deja que la limpiadora descienda al fondo de la
p i s c i n a , vacíe la bolsa de basura.
No haga funcionar la Phantom si realiza las pasadas sobre un
costado o invertida.
Filtro en línea
Filtro en línea
Filtro

Utilice solamente repuestos genuinos Hay w a r d .
3 5
Utilice solamente repuestos genuinos Hay w a r d .
3 4
Cambio de la función superficie y fondo
El interruptor superficie/fondo (parte P, p á gina 4) viene instalado
de fábrica en “ AU T O ” . La limpiadora Phantom aspirará el fo n d o
de la piscina y los laterales 2/3 del ciclo y pasará por encima de
la superficie 1/3 de su ciclo automáticamente.
La limpiadora se puede ajustar fácilmente para hacer que se
concentre en aquellas zonas de la piscina donde haya más basura.
• Para limpiar SOLAMENTE el fondo y los laterales de la
p i s c i n a , m u e v a el interruptor hacia la derecha a “ B O T ” .
• Para limpiar la superficie de la piscina SOLAMENTE,
m u e v a el interruptor hacia la izquierda a “ T O P ” .
Ajuste de la potencia de la manguera de barrido
• En la mayoría de las piscinas no será necesario ajustar la potencia
de la manguera de barrido.
• O b s e r ve el funcionamiento de la limpiadora Phantom en la piscina.
La manguera de barrido se debe mover con un movimiento lento,
ondulante (como el de una serpiente).
• La manguera de barrido no se mueve: Si la manguera de
barrido no se mueve de lado a lado y sólo se arrastra detrás de la
l i m p i a d o r a , controle que no tenga ag u j e r o s . Controle que no hay a
basura detrás del botón de ajuste o en el extremo de salida de la
manguera de barrido.
• La manguera de barrido se mueve lentamente o dejó de
m overse: Gire el botón de ajuste en el sentido contrario a
las agujas del reloj para incrementar la potencia de la manguera
de barrido.
• La manguera de barrido con frecuencia tira agua fuera de
la piscina:
Gire el botón de ajuste en el sentido de las agujas del reloj
para reducir la potencia de la manguera de barrido.
N o t a : N O ap ague completamente la manguera de barrido.
Esto puede hacer que la manguera se enrede o anude.
Interruptor TOP/AUTO/BOT
Ajuste de la potencia de la manguera de barrido
Ajustes para la limpiadora Phantom
Limpieza del filtro en línea
1 . El filtro en línea (pieza Q) se encuentra al lado del acople
rápido a pared (pieza K).
2 . Para retirar el filtro dentro del filtro en línea, desenrosque la
t apa del filtro en línea y retírelo.
3 . Retire la basura del filtro y enjuáguelo. I m p o r t a n t e : Si el
filtro se tapa con frecuencia, el sistema de filtrado no está
funcionando correctamente o existe algún otro problema en
la tubería.
4 . Coloque el extremo abierto del filtro en el extremo de salida
del filtro en línea y vuelva a enroscar la tapa I m p o r t a n t e :
Asegúrese de que el anillo tórico esté bien en su lugar.
Precaución – Riesgo de daño del equipo
Nunca haga funcionar la limpiadora si el filtro no está en
su lugar. Si se pone la limpiadora en funcionamiento sin que el
filtro esté en su lugar se dañará el mecanismo interno de la
l i m p i a d o r a .
Mantenimiento
Retiro de la limpiadora Phantom de la pileta
Advertencia – Riesgo de lesiones
Las bombas de filtrado y de cebado deben estar A PA G A D A S a l
conectar o desconectar la limpiadora o la manguera.
1 . A PAGUE las bombas cebadora y de filtrado. Si usted no
va a volver a poner la limpiadora antes del próximo ciclo del
regulador de tiempo, A PA G U E la bomba cebadora. N u n c a
pase la bomba cebadora sin que esté conectada a la limpia-
d o r a . Si no lo hace así, puede causar lesiones graves.
Precaución – Riesgo de daño del equipo
N u n c a pase la bomba cebadora sin que esté conectada a la
l i m p i a d o r a . Si lo hace dañará el motor de la bomba e invalidará
la garantía de la bomba cebadora.
2 . Desde la terraza de la piscina, presione el acople rápido a la
pared dentro del adaptador universal para pared y gírelo
hacia la derecha (en el sentido de las agujas del reloj).
3 . Tire y retire el acople rápido a pared del adaptador universal
para pared.
4 . Tome la limpiadora por el ala y retírela de la piscina.
5 . Desconecte el conector limpiador de la limpiadora Phantom.
6 . Deje los extremos limpiadores de la manguera de presión y
de barrido sin basura y derechos.
Importante: Siempre guarde el extremo limpiador de la
manguera de presión y la manguera de barrido derechos, n o
e n r o l l a d o s . La limpiadora puede no funcionar correctamente si
estas mangueras están dobladas.
Vaciado de la bolsa de basura
• Vacíe la bolsa de basura regularmente. Detenga el funcionamiento
de la Phantom si la bolsa está llena.
1 . Sostenga la bolsa por encima del tacho de basura o donde sea
que vaya a colocar la basura.
2 . Deslice y desprenda de la bolsa el cierre desplazab l e .
3 . Mantenga los bordes separados y sacuda la basura de la bolsa.
4 . Deslice el cierre desplazable a la bolsa.
• Arena (basura densa): Siempre vacíe la bolsa de basura
Phantom cuando haya demasiada arena (o basura pesada).
Si la limpiadora no puede trepar a la superficie en el modo TOP o
AUTO O la bolsa “ c u e l g a ” sobre la manguera apague la bomba
cebadora y vacíe la bolsa de basura.
• Cuando la bolsa está llena de hojas u otros desechos, la basura
puede retener aire en la bolsa mientras se limpia la superficie.Si la
retención de aire no deja que la limpiadora descienda al fondo de la
p i s c i n a , vacíe la bolsa de basura.
No haga funcionar la Phantom si realiza las pasadas sobre un
costado o invertida.
Filtro en línea
Filtro en línea
Filtro

Utilice solamente repuestos genuinos Hay w a r d .
3 7
Utilice solamente repuestos genuinos Hay w a r d .
3 6
Manguera de barrido
• Las roldanas de protección de la manguera de barrido sufrirán
desgaste si se usa la limpiadora en una piscina con revestimiento
de yeso o de hormigón.
• Cuando las roldanas de protección presentan desgaste hasta la ranura
externa (línea de desgaste) reemplácelas (N.de pieza A X 5 0 0 6 A ) .
• Controle que la manguera de barrido no tenga ag u j e r o s
(reemplácela si es necesario con N. de pieza:A X 5 0 0 0 R S H A ) .
Algunas piezas sufriran desgaste con el uso regular. P a r a
asegurar un rendimiento de alta calidad, exija r e p u e s t o s
genuinos Hayward (el uso de repuestos que no sean
Hayward legítimos invalidará la garantía de la limpiadora
P h a n t o m ) . Las siguientes piezas están sujetas al desgaste
normal y serán repuestas por el usuario.
1 . Manguera de barrido: Si la manguera de barrido presenta
un ag u j e r o , se la debe reemplazar. Desenrosque el dispositivo
de sujeción metálico de la manguera y tire de la manguera de
barrido (Número de repuesto del conector de la limpiadora:
AX5000RSHA) para que se desprenda del conector limpiador.
Acople una manguera de barrido nueva al conector limpiador.
2 . Bolsa para basura de gran capacidad con cierre
desplazable: Se debe reemplazar la bolsa de basura si se
encuentra rota (Número de repuesto:A X 6 0 0 0 B A ) .
3 . Placas giratorias: Si al pasar la limpiadora una placa
gi r atoria deja de rotar o pierde, se la debe reemplazar.
C o n s e rvación de la limpiadora Phantom
1 . A P AGUE la bomba cebadora y ajuste el regulador de
tiempo para que la bomba cebadora no se encienda
mientras la limpiadora Phantom está afuera de la pileta
(N u n c a h aga funcionar la bomba cebadora si la limpiadora
no está conectada).
2 . Desconecte el acople rápido a pared del adap t a d o r
universal para pared. Se puede dejar el adaptador universal
de pared en su lugar.
3 . Se han utilizado los mejores materiales disponibles para el
armado de la limpiadora, sin embargo, se recomienda que
cuando se la retira de la piscina se la conserve sobre sus
ruedas en un lugar llano y a la sombra para protegerla de
una exposición excesiva al sol.
4 . C o n s e rve la manguera de barrido y el montaje del extremo
limpiador de la manguera (pieza S) derecho y sin basura, s i n
e n r o l l a r s e . Los tramos de manguera rígida pueden plegarse
uno sobre el otro para que entonces las mangueras cortas
intercaladas se doblen.Si es posible, c o n s e r ve las mangue-
ras a la sombra.
Acondicionamiento de la limpiadora para el
i n v i e r n o
Al cerrar su piscina durante el invierno saque toda el agua de la
limpiadora Phantom (mediante una rotación lenta en todas las
direcciones) y de las mangueras. C o n s e rve la limpiadora Phantom
adentro para evitar la congelación de los mecanismos internos.
Condiciones periódicas de temperaturas bajo cero
Si se encuentra en una zona sujeta a condiciones periódicas de
t e m p e r aturas bajo cero, y el equipo de la piscina se mantiene en
f u n c i o n a m i e n t o , es importante que el sistema de filtro y la
limpiadora Phantom estén en funcionamiento durante los
momentos del día en que se sufren las temperaturas bajo cero
más bajas (por lo general entre las 3AM y las 7AM). Al pasar la
limpiadora Phantom en este momento, evitará que se dañe la
limpiadora y que se congele el agua de la piscina.
Conservación de la limpiadora Phantom
Rodillo protector
Línea de desgaste
(ranura exterior)
Solución de problemas
Para recibir ayuda técnica llame:
1-800-227-1477

Utilice solamente repuestos genuinos Hay w a r d .
3 7
Utilice solamente repuestos genuinos Hay w a r d .
3 6
Manguera de barrido
• Las roldanas de protección de la manguera de barrido sufrirán
desgaste si se usa la limpiadora en una piscina con revestimiento
de yeso o de hormigón.
• Cuando las roldanas de protección presentan desgaste hasta la ranura
externa (línea de desgaste) reemplácelas (N.de pieza A X 5 0 0 6 A ) .
• Controle que la manguera de barrido no tenga ag u j e r o s
(reemplácela si es necesario con N. de pieza:A X 5 0 0 0 R S H A ) .
Algunas piezas sufriran desgaste con el uso regular. P a r a
asegurar un rendimiento de alta calidad, exija r e p u e s t o s
genuinos Hayward (el uso de repuestos que no sean
Hayward legítimos invalidará la garantía de la limpiadora
P h a n t o m ) . Las siguientes piezas están sujetas al desgaste
normal y serán repuestas por el usuario.
1 . Manguera de barrido: Si la manguera de barrido presenta
un ag u j e r o , se la debe reemplazar. Desenrosque el dispositivo
de sujeción metálico de la manguera y tire de la manguera de
barrido (Número de repuesto del conector de la limpiadora:
AX5000RSHA) para que se desprenda del conector limpiador.
Acople una manguera de barrido nueva al conector limpiador.
2 . Bolsa para basura de gran capacidad con cierre
desplazable: Se debe reemplazar la bolsa de basura si se
encuentra rota (Número de repuesto:A X 6 0 0 0 B A ) .
3 . Placas giratorias: Si al pasar la limpiadora una placa
gi r atoria deja de rotar o pierde, se la debe reemplazar.
C o n s e rvación de la limpiadora Phantom
1 . A PAGUE la bomba cebadora y ajuste el regulador de
tiempo para que la bomba cebadora no se encienda
mientras la limpiadora Phantom está afuera de la pileta
(N u n c a h aga funcionar la bomba cebadora si la limpiadora
no está conectada).
2 . Desconecte el acople rápido a pared del adap t a d o r
universal para pared. Se puede dejar el adaptador universal
de pared en su lugar.
3 . Se han utilizado los mejores materiales disponibles para el
armado de la limpiadora, sin embargo, se recomienda que
cuando se la retira de la piscina se la conserve sobre sus
ruedas en un lugar llano y a la sombra para protegerla de
una exposición excesiva al sol.
4 . C o n s e rve la manguera de barrido y el montaje del extremo
limpiador de la manguera (pieza S) derecho y sin basura, s i n
e n r o l l a r s e . Los tramos de manguera rígida pueden plegarse
uno sobre el otro para que entonces las mangueras cortas
intercaladas se doblen.Si es posible, c o n s e r ve las mangue-
ras a la sombra.
Acondicionamiento de la limpiadora para el
i n v i e r n o
Al cerrar su piscina durante el invierno saque toda el agua de la
limpiadora Phantom (mediante una rotación lenta en todas las
direcciones) y de las mangueras. C o n s e rve la limpiadora Phantom
adentro para evitar la congelación de los mecanismos internos.
Condiciones periódicas de temperaturas bajo cero
Si se encuentra en una zona sujeta a condiciones periódicas de
t e m p e r aturas bajo cero, y el equipo de la piscina se mantiene en
f u n c i o n a m i e n t o , es importante que el sistema de filtro y la
limpiadora Phantom estén en funcionamiento durante los
momentos del día en que se sufren las temperaturas bajo cero
más bajas (por lo general entre las 3AM y las 7AM).Al pasar la
limpiadora Phantom en este momento, evitará que se dañe la
limpiadora y que se congele el agua de la piscina.
Conservación de la limpiadora Phantom
Rodillo protector
Línea de desgaste
(ranura exterior)
Solución de problemas
Para recibir ayuda técnica llame:
1-800-227-1477

Utilice solamente repuestos genuinos Hay w a r d .
3 8
Bomba cebadora
Instalación típica de la bomba cebadora
Desde la
piscina
a la Piscina
Bomba cebadora Filtro de la piscina Intercambiador de calor al SPA
Opciones
de tubería
Clorinador
Sistema solar
Bomba cebadora
(de venta por separado)
Phantom
N . r i f . N . pieza D e s c r i p c i ó n
1 A X 5 0 6 0 M Motor (3/4 HP 60 ciclos)
2 a A X 5 0 6 0 B Placa de cierre (antes de 2004)
2 b A X 5 0 6 0 B 2 Placa de cierre (a partir de 2004)
3 S P X 1 2 5 0 X Z 2 C Cierre con muelle y asiento
4 A X 5 0 6 0 C Montaje del propulsor
5 a A X 5 0 6 0 G A Junta plana, Bomba cebadora (antes de 2004)
5 b A X 5 0 6 0 J Junta listones, Bomba cebadora (a partir de 2004)
6 A X 5 0 6 0 A Espiral 3/4" NPT- F
7 S P X 1 7 0 0 F G Tapón de tubería con junta
8 A X 5 0 6 0 Z 2 A 1 Kit de tuercas, pernos y arandelas (paquetes de 6)
9 A X 5 0 6 0 R S A 1 Perno para motor con un kit de arandelas (paquete de 4)
1 0 A X 5 0 6 0 P Protección para vástag o
1 1 A X 5 0 6 0 D B a s e
1 2 A X 5 0 6 0 H K I T Kit de mangueras para bomba cebadora
1 3 A X 5 0 6 0 K Brida metálica (antes de 2004) No se muestra
O p c i o n a l 5 0 6 0 V K I T Kit de instalación vertical
Diagrama de las piezas de la limpiadora Phantom
3 9
Utilice solamente repuestos genuinos Hay w a r d .
N . r i f . N . p i e z a D e s c r i p c i ó n
1 A X 6 0 0 0 TA Cubierta (con ala y tapa de levas)
2 A X 6 0 0 1 F Tapa de levas
3 AX5003M Levas (paquete de 3)
4 A X 6 0 0 0 G A Caja de engranajes (con levas, m a n g u e r a s , e n l a c e s )
5 A X 5 0 1 0 D 4 Tornillos (paquete de 5)
6 A X 6 0 0 9 B F Rueda delantera (con tope y cojinete)
7 A X 5 0 0 0 D Rodillos (paquete de 7 con cojinete)
8 A X 6 0 0 0 M A Montaje del colector (con mangueras y enlaces)
9 A X 5 0 0 0 B Tubo aspirador
1 0 A X 5 0 0 0 A 2 Carter inferior
1 1 A X 5 0 0 9 E Eje trasero
1 2 A X 6 0 0 9 B Ruedas traseras (con cojinetes, tuercas y tap a c u b o s )
1 3 A X 6 0 0 0 H A Manguera rígida de presión (completa)
1 4 A X 6 0 0 0 H C A Montaje del extremo de la manguera de presión
(sin manguera de barrido)
1 5 A X 6 0 0 0 H WA 2 Montaje de la manguera de presión y de la parte superior
del filtro en línea
1 6 A X 6 0 0 0 H FA Montaje de la placa gi r ato ria de manguera
1 7 A X 6 0 0 0 H E Sección de manguera rígida (dos mangueras rígidas
y una conexión)
1 8 A X 6 0 0 0 H WA 1 Montaje del acople rápido a pared, la manguera y el filtro
en línea inferior
1 9 A X 6 0 0 9 S Filtro (dispositivo) en el filtro en línea
2 0 A X 6 0 0 0 P TA M a n ó m e t r o
2 1 A X 5 0 0 0 R S H A Manguera de barrido (con rodillos y dispositivo de sujeción)
2 2 A X 6 0 0 0 B A Bolsa para basura de gran capacidad (con cierre
d e s p l a z ab l e )
2 3 A X 5 0 0 4 L 1 A d aptador universal de pared
2 4 A X 5 0 0 6 A Rodillos protectores (paquete de 10)
2 5 A X 5 5 0 0 E F Flotadores (izquierdo y derecho)
2 6 A X 6 0 0 0 S W A Interruptor Superficie/Automático/Fondo
2 7 A X 6 0 0 0 T N K A Depósito de chorro frontal
2 8 A X 6 0 0 8 M I nyector frontal de giro (con manguera y enlace)
2 9 A X 5 0 1 0 G 1 0 O-Ring para conector rápido a pared
3 0 A X 5 0 1 0 G 1 8 O-Ring para conector de limpiadora
3 1 A X 5 0 1 0 G 1 9 O-Ring para filtro en línea
3 2 A X 5 0 1 0 G 5 O-Ring de conector de tubería (paquete de 6)
Mangueras de la limpiadora Phantom (13)
1
2
3
7
8
9
4
27
5
26
12
10
25
20
21
24
22
6
Vista detallada de la Limpiadora Phantom
11
28
1 5
1 7
1 4
3 1
3 2
1 6
1 8
2 3
2 9
30
1 9

Utilice solamente repuestos genuinos Hay w a r d .
3 8
Bomba cebadora
Instalación típica de la bomba cebadora
Desde la
piscina
a la Piscina
Bomba cebadora Filtro de la piscina Intercambiador de calor al SPA
Opciones
de tubería
Clorinador
Sistema solar
Bomba cebadora
(de venta por separado)
Phantom
N . r i f . N . pieza D e s c r i p c i ó n
1 A X 5 0 6 0 M Motor (3/4 HP 60 ciclos)
2 a A X 5 0 6 0 B Placa de cierre (antes de 2004)
2 b A X 5 0 6 0 B 2 Placa de cierre (a partir de 2004)
3 S P X 1 2 5 0 X Z 2 C Cierre con muelle y asiento
4 A X 5 0 6 0 C Montaje del propulsor
5 a A X 5 0 6 0 G A Junta plana, Bomba cebadora (antes de 2004)
5 b A X 5 0 6 0 J Junta listones, Bomba cebadora (a partir de 2004)
6 A X 5 0 6 0 A Espiral 3/4" NPT- F
7 S P X 1 7 0 0 F G Tapón de tubería con junta
8 A X 5 0 6 0 Z 2 A 1 Kit de tuercas, pernos y arandelas (paquetes de 6)
9 A X 5 0 6 0 R S A 1 Perno para motor con un kit de arandelas (paquete de 4)
1 0 A X 5 0 6 0 P Protección para vástag o
1 1 A X 5 0 6 0 D B a s e
1 2 A X 5 0 6 0 H K I T Kit de mangueras para bomba cebadora
1 3 A X 5 0 6 0 K Brida metálica (antes de 2004) No se muestra
O p c i o n a l 5 0 6 0 V K I T Kit de instalación vertical
Diagrama de las piezas de la limpiadora Phantom
3 9
Utilice solamente repuestos genuinos Hay w a r d .
N . r i f . N . p i e z a D e s c r i p c i ó n
1 A X 6 0 0 0 TA Cubierta (con ala y tapa de levas)
2 A X 6 0 0 1 F Tapa de levas
3 AX5003M Levas (paquete de 3)
4 A X 6 0 0 0 G A Caja de engranajes (con levas, m a n g u e r a s , e n l a c e s )
5 A X 5 0 1 0 D 4 Tornillos (paquete de 5)
6 A X 6 0 0 9 B F Rueda delantera (con tope y cojinete)
7 A X 5 0 0 0 D Rodillos (paquete de 7 con cojinete)
8 A X 6 0 0 0 M A Montaje del colector (con mangueras y enlaces)
9 A X 5 0 0 0 B Tubo aspirador
1 0 A X 5 0 0 0 A 2 Carter inferior
1 1 A X 5 0 0 9 E Eje trasero
1 2 A X 6 0 0 9 B Ruedas traseras (con cojinetes, tuercas y tap a c u b o s )
1 3 A X 6 0 0 0 H A Manguera rígida de presión (completa)
1 4 A X 6 0 0 0 H C A Montaje del extremo de la manguera de presión
(sin manguera de barrido)
1 5 A X 6 0 0 0 H W A 2 Montaje de la manguera de presión y de la parte superior
del filtro en línea
1 6 A X 6 0 0 0 H FA Montaje de la placa gi r atoria de manguera
1 7 A X 6 0 0 0 H E Sección de manguera rígida (dos mangueras rígidas
y una conexión)
1 8 A X 6 0 0 0 H W A 1 Montaje del acople rápido a pared, la manguera y el filtro
en línea inferior
1 9 A X 6 0 0 9 S Filtro (dispositivo) en el filtro en línea
2 0 A X 6 0 0 0 P TA M a n ó m e t r o
2 1 A X 5 0 0 0 R S H A Manguera de barrido (con rodillos y dispositivo de sujeción)
2 2 A X 6 0 0 0 B A Bolsa para basura de gran capacidad (con cierre
d e s p l a z ab l e )
2 3 A X 5 0 0 4 L 1 A d aptador universal de pared
2 4 A X 5 0 0 6 A Rodillos protectores (paquete de 10)
2 5 A X 5 5 0 0 E F Flotadores (izquierdo y derecho)
2 6 A X 6 0 0 0 S W A Interruptor Superficie/Automático/Fondo
2 7 A X 6 0 0 0 T N K A Depósito de chorro frontal
2 8 A X 6 0 0 8 M I nyector frontal de giro (con manguera y enlace)
2 9 A X 5 0 1 0 G 1 0 O-Ring para conector rápido a pared
3 0 A X 5 0 1 0 G 1 8 O-Ring para conector de limpiadora
3 1 A X 5 0 1 0 G 1 9 O-Ring para filtro en línea
3 2 A X 5 0 1 0 G 5 O-Ring de conector de tubería (paquete de 6)
Mangueras de la limpiadora Phantom (13)
1
2
3
7
8
9
4
27
5
26
12
10
25
20
21
24
22
6
Vista detallada de la Limpiadora Phantom
11
28
1 5
1 7
1 4
3 1
3 2
1 6
1 8
2 3
2 9
30
1 9

Utilice solamente repuestos genuinos Hay w a r d .
4 1
Utilice solamente repuestos genuinos Hay w a r d .
4 0
¡ I m p o r t a n t e !
C o n s e rve la factura de venta como comprobante de su
elegibilidad para la garantía.
Al Consumidor minorista/Comprador original (el “ C O M P R A D O R ” )
de la Limpiadora automática de piscinas Hayward Phantom (la
“ L I M P I A D O R A” ) .
H a yward Pool Products, I n c . ( “ H AY W ARD”) garantiza las piezas
por Un (1) año a partir de la fecha de compra original (excluyendo
la bolsa y la manguera de barrido que son repuestos normales).
Se ex c luye de esta garantía a la Bomba Cebadora
Hayward ya que tiene su propia garantía por separado.
SI LA LIMPIADORA DEJARA DE FUNCIONAR CORRECTA M E N T E
DENTRO DEL PLAZO ARRIBA MENCIONADO, H AY W ARD A SU
DISCRECIÓN REPARARÁ O SUSTITUIRÁ LA LIMPIADORA O CUAL-
QUIER PIEZA DEFECTUOSA SIN CARGOS ADICIONALES CON
EXCEPCIÓN DE LO ESTABLECIDO MÁS A D E L A N T E . SE ENTRE-
GARÁN LOS REPUESTOS O PRODUCTOS SUSTITUIDOS SOBRE
UNA BASE DE INTERCAMBIO Y SERÁN NUEVOS O FUNCIONAL-
MENTE EQUIVA L E N T E S . TODAS LAS PIEZAS RETIRADAS COMO
R E S U LTADO DE SU SUSTITUCIÓN PASARÁN A SER PROPIEDAD
DE HAY W A R D . LA RESPONSABILIDAD DE HAY W ARD Y EL ÚNICO
RECURSO DEL COMPRADOR YA SEA EN CONTRATO BAJO CUAL-
QUIER GARANTÍA, POR PERJUICIO (INCLUSIVE NEGLIGENCIA),
POR RESPONSABILIDAD POR HECHOS AJENOS O DE OTRO
M O D O , E S TARÁ LIMITADA SOLAMENTE A LA REPARACIÓN O
SUSTITUCIÓN DE LAS PIEZAS DEFECTUOSAS Y BAJO NINGUNA
C I R C U N S TANCIA LA DEVOLUCIÓN EXCEDERÁ EL PRECIO DE
COMPRA PAGADO POR EL COMPRADOR.
LA PRESENTE GARANTÍA LIMITA D A ESTÁ SUJETA A LOS
SIGUIENTES TÉRMINOS Y CONDICIONES:
1 . Esta Garantía Limitada no se aplicará a daños causados por la
no realización del mantenimiento normal de la LIMPIADORA
(por ej. el control de la presión o del flujo y el reemplazo de una
bolsa o de una manguera de barrido gastada.)
2 . Esta Garantía Limitada quedará invalidada si la LIMPIADORA
sufre alguna modificación, i n c l u i d o , aunque no limitado, a l
uso de piezas que no sean piezas auténticas Hay w a r d .
3 . Esta Garantía Limitada no se hace responsable por cualquier
l e s i ó n , p é r d i d a , d a ñ o , d e f e c t o , o funcionamiento impropio de
la LIMPIADORA o falta de funcionamiento de la LIMPIADORA
que resulten del uso o mantenimiento incorrecto de la LIM-
PIADORA de acuerdo a las indicaciones establecidas en la
Guía del usuario proporcionada por Hay w a r d , o por cualquier
l e s i ó n , p é r d i d a , d a ñ o , d e f e c t o , o funcionamiento impropio de
la LIMPIADORA o falta de funcionamiento de la LIMPIADORA
que resulten del uso incorrecto, uso no razonab l e, a l t e r a c i ó n ,
ab u s o , actos fo r t u i t o s , alteraciones a la LIMPIADORA realiza-
das por personas ajenas a HAY W ARD incluyendo pero no
limitadas a daños y o lesiones a piezas que resulten del fun-
cionamiento de la bomba en seco (por ej. la interrupción o el
suministro de agua inadecuado a la Bomba Cebadora, o la
obstrucción de las líneas) o daños, d e f e c t o s , o funciona-
miento impropio que resulten de defectos, f a l l a s , f u n c i o n a -
miento impropio o negligencia, ab u s o , o uso incorrecto, n o
de la LIMPIADORA, sino del equipo.
4 . La presente Garantía Limitada no será ap l i c abl e en el caso
de funcionamiento impropio, d a ñ o , falla en los materiales o
cambios en el aspecto de la LIMPIADORA que resulten de
la exposición al sol o a productos químicos o de reacciones
a sustancias con las que alguna pieza de la LIMPIADORA
pueda entrar en contacto o de piezas que aunque hay a n
sufrido desgaste no afecten el funcionamiento de la
L I M P I A D O R A .
5 . Esta Garantía Limitada no es aplicable a limpiadoras
utilizadas con propósitos comerciales.
6 . La LIMPIADORA está diseñada para funcionar en una
piscina de diseño, construcción y mantenimiento correctos.
Esta Garantía Limitada no tiene validez en el caso de que el
d i s e ñ o , la construcción o el mantenimiento de la piscina
sean defectuosos, de mala calidad o inapropiados para el
funcionamiento de la LIMPIADORA.
7 . El deterioro, la decoloración o la fragilidad del yeso y del
revestimiento de vinilo de la piscina se pueden producir con
el transcurso del tiempo de forma separada o en combina-
ción con las algas y el desequilibrio en la composición quí-
mica del ag u a , la instalación inap r o p i a d a , y otros factores.
Garantía limitada
Garantía limitada
Garantía limitada
H AY W ARD por la presente niega cualquier responsabilidad por
r e c l a m o s , y el COMPRADOR libera a HAY W ARD de todo reclamo
por daños al yeso o al revestimiento de vinilo de la piscina en la
piscina del COMPRADOR a causa del uso y/o funcionamiento de
la LIMPIADORA
8 . La presente Garantía Limitada es válida y ap l i c a b l e
solamente a LIMPIADORAS montadas, f abricadas o
adquiridas e instaladas en los Estados Unidos de Norte
América y Canadá.
9 . La presente Garantía Limitada se aplicará al COMPRADOR
o r i g inal de la LIMPIADORA adquirida a un representante
autorizado de HAY WARD y no se aplicará a ningún otro
comprador posterior, cesionario u otro destinatario de la
LIMPIADORA del COMPRADOR.
1 0 . La presente Garantía Limitada no se aplicará a
menos que la Tarjeta de Registro esté firmada,
completada y remitida dentro de los catorce (14)
días de la fecha de compra. H ayward se reserva el
derecho de disponer de cualquier Tarjeta de Registro una
vez recibida. El COMPRADOR debe conservar un compro-
bante escrito de la compra.
1 1 . La precedente Garantía Limitada concede al COMPRADOR
derechos legales específicos, que pueden variar entre
e s t a d o s , y por lo tanto, algunas de las exclusiones y
condiciones enumeradas pueden no ser ap l i c abl es a
COMPRADORES que viven en ciertos estados.
12. Ninguna de las partes será responsable ante el otro por el
incumplimiento o demora en el desempeño debido total-
mente o en parte a cualquier causa más allá del control
razonable de las partes, incluidos los elementos y actos
fortuitos, los actos de la otra parte, los actos de autoridad
civil o militar, guerra, disturbios, o actos concertados de
los trabajadores.
1 3 . El COMPRADOR no puede vender, transferir o ceder los
derechos emergentes de este acuerdo sin el consentimiento
previo escrito de HAY W A R D . H AY W ARD puede ceder los
derechos emergentes del presente contrato o cualquier pag o
u otra suma debida por el presente sin aviso o consenti-
miento previo del COMPRADOR.Si Hayward realiza alguna
de estas cesiones, el cesionario tendrá todos los derechos,
o b l i g a c i o n e s , p o d e r e s , p r i v i l e gios y recursos de HAY W A R D .
La modificación de este contrato sólo se puede realizar por
escrito y con la firma de un agente autorizado de HAY W A R D .
En el caso de que la LIMPIADORA mostrara defectos de
f abricación o en los materiales durante el término de la Garantía
L i m i t a d a , el COMPRADOR deberá enviar el producto con el fl e t e
p a go a cualquier Centro de Servicios de Fábrica lo antes posible
después de descubrir el defecto, junto con una copia de la
Factura de Venta que incluya la fecha de compra y el número de
serie del producto que se reclama como defectuoso, el nombre y
el domicilio del COMPRADOR y una breve descripción de los
problemas/defectos encontrados.
Llame al (800) 227-1477 para averiguar el nombre y domicilio
del Centro de Servicios de Fábrica más cercano (fuera de los
EE.UU continental llame al (909) 594-1600).
H AY WARD se hará cargo a su discreción de la reparación o sus-
titución de las piezas defectuosas de la LIMPIADORA cubiertas por
esta Garantía Limitada, y al devolverlas al COMPRADOR se hará
cargo de los gastos de envío. H AY W ARD no se hace responsable de
los gastos de embalaje, envío o transporte de la LIMPIADORA o de
alguna de sus piezas hacia o desde el Centro de Servicios de
F á b r i c a , a menos que esté expresamente provisto por la ley estat a l .
Ningún representante, distribuidor o persona similar está autorizada
a realizar garantías o manifestaciones concernientes a HAY W A R D
que excedan los términos expresos del presente contrat o .
H AY WARD no asume ninguna responsabilidad por garantías que
sobrepasen los términos expresos de la presente Garantía Limitada.
Esta Garantía Limitada reemplaza toda otra garantía expresa o
i m p l í c i t a , y es válida y ap l i c a ble solamente en los Estados Unidos de
Norteamérica y en Canadá. El COMPRADOR debe propor cionar a
H AY WARD un comprobante escrito razonablemente aceptable de la
fecha original de compra de la LIMPIADORA.
El único foro para tratar cualquier disputa entre el COMPRADOR y
H AY W ARD será el arbitraje obligat o r i o , conducido en Union County,
Nueva Jersey bajo las normas de la Asociación Americana de
A r b i t r a j e , y la parte vencedora tendrá derecho a la adjudicación
de los honorarios y costas del ab o g a d o .
LAS MENCIONADAS GARANTÍAS Y RECURSOS SON EXCLUYENTES
Y SUSTITUYEN A TODAS LAS DEMÁS GARANTÍAS, EXPRESAS O
I M P L Í C I TA S , YA SEA DE HECHO O POR APLICACIÓN DE LA LEY,
E S TAT U TARIAS U OTRAS, INCLUYENDO LAS GARANTÍAS DE
COMERCIALIDAD Y DE ADECUACIÓN PARA UN PROPÓSITO
D E T E R M I N A D O . H AY W ARD NO ASUME NI AUTORIZA A NINGUNA
OTRA PERSONA A ASUMIR EN SU REPRESENTACIÓN NINGUNA
OTRA RESPONSABILIDAD RELACIONADA CON LA V E N TA , I N S TA-
L A C I Ó N , O USO DE SU LIMPIADORA Y NO SE HACE RESPONSABLE
DE EQUIPOS O DE LO QUE FUERE RELACIONADO A EQUIPOS NO
PROPORCIONADOS POR HAY W A R D . LA GARANTÍA PRECEDENTE
NO CUBRE DAÑOS A LA LIMPIADORA RESULTANTES DE A C C I -
D E N T E , USO IMPROPIO,A B U S O , O MODIFICACIONES REALIZADAS
A LA LIMPIADORA POR PERSONAS AJENAS A HAY W A R D .
H AY WARD NO SERÁ RESPONSIBLE DE LOS DAÑOS POR DEMO-
RAS EN LA ENTRGA O USO. BAJO NINGUNA CIRCUNSTA N C I A
H AY WARD SERÁ RESPONSABLE ANTE EL COMPRADOR POR
DAÑOS Y PERJUICIOS INCLUIDO, PERO NO LIMITA D O , A DAÑOS
D I R E C T O S , E S P E C I A L E S , A C C I D E N T ALES O INDIRECTOS QUE
SURJAN O ESTÉN RELACIONADOS CON LA V E N TA , I N S T A L A C I Ó N
O USO,O INCAPACIDAD DE USAR LA LIMPIADORA, LA PISCINA
DEL COMPRADOR O POR CUALQUIER OTRO RECLAMO DE CUAL-
QUIER OTRA PA R T E .

Utilice solamente repuestos genuinos Hay w a r d .
4 1
Utilice solamente repuestos genuinos Hay w a r d .
4 0
¡ I m p o r t a n t e !
C o n s e rve la factura de venta como comprobante de su
elegibilidad para la garantía.
Al Consumidor minorista/Comprador original (el “ C O M P R A D O R ” )
de la Limpiadora automática de piscinas Hayward Phantom (la
“ L I M P I A D O R A” ) .
H a yward Pool Products, I n c . ( “ H AY W ARD”) garantiza las piezas
por Un (1) año a partir de la fecha de compra original (excluyendo
la bolsa y la manguera de barrido que son repuestos normales).
Se ex c luye de esta garantía a la Bomba Cebadora
Hayward ya que tiene su propia garantía por separado.
SI LA LIMPIADORA DEJARA DE FUNCIONAR CORRECTA M E N T E
DENTRO DEL PLAZO ARRIBA MENCIONADO, H AY W ARD A SU
DISCRECIÓN REPARARÁ O SUSTITUIRÁ LA LIMPIADORA O CUAL-
QUIER PIEZA DEFECTUOSA SIN CARGOS ADICIONALES CON
EXCEPCIÓN DE LO ESTABLECIDO MÁS A D E L A N T E . SE ENTRE-
GARÁN LOS REPUESTOS O PRODUCTOS SUSTITUIDOS SOBRE
UNA BASE DE INTERCAMBIO Y SERÁN NUEVOS O FUNCIONAL-
MENTE EQUIVA L E N T E S . TODAS LAS PIEZAS RETIRADAS COMO
R E S U LTADO DE SU SUSTITUCIÓN PASARÁN A SER PROPIEDAD
DE HAY W A R D . LA RESPONSABILIDAD DE HAY W ARD Y EL ÚNICO
RECURSO DEL COMPRADOR YA SEA EN CONTRATO BAJO CUAL-
QUIER GARANTÍA, POR PERJUICIO (INCLUSIVE NEGLIGENCIA),
POR RESPONSABILIDAD POR HECHOS AJENOS O DE OTRO
M O D O , E S TARÁ LIMITADA SOLAMENTE A LA REPARACIÓN O
SUSTITUCIÓN DE LAS PIEZAS DEFECTUOSAS Y BAJO NINGUNA
C I R C U N S TANCIA LA DEVOLUCIÓN EXCEDERÁ EL PRECIO DE
COMPRA PAGADO POR EL COMPRADOR.
LA PRESENTE GARANTÍA LIMITA D A ESTÁ SUJETA A LOS
SIGUIENTES TÉRMINOS Y CONDICIONES:
1 . Esta Garantía Limitada no se aplicará a daños causados por la
no realización del mantenimiento normal de la LIMPIADORA
(por ej. el control de la presión o del flujo y el reemplazo de una
bolsa o de una manguera de barrido gastada.)
2 . Esta Garantía Limitada quedará invalidada si la LIMPIADORA
sufre alguna modificación, i n c l u i d o , aunque no limitado, a l
uso de piezas que no sean piezas auténticas Hay w a r d .
3 . Esta Garantía Limitada no se hace responsable por cualquier
l e s i ó n , p é r d i d a , d a ñ o , d e f e c t o , o funcionamiento impropio de
la LIMPIADORA o falta de funcionamiento de la LIMPIADORA
que resulten del uso o mantenimiento incorrecto de la LIM-
PIADORA de acuerdo a las indicaciones establecidas en la
Guía del usuario proporcionada por Hay w a r d , o por cualquier
l e s i ó n , p é r d i d a , d a ñ o , d e f e c t o , o funcionamiento impropio de
la LIMPIADORA o falta de funcionamiento de la LIMPIADORA
que resulten del uso incorrecto, uso no razonab l e , a l t e r a c i ó n ,
ab u s o , actos fo r t u i t o s , alteraciones a la LIMPIADORA realiza-
das por personas ajenas a HAY W ARD incluyendo pero no
limitadas a daños y o lesiones a piezas que resulten del fun-
cionamiento de la bomba en seco (por ej. la interrupción o el
suministro de agua inadecuado a la Bomba Cebadora, o la
obstrucción de las líneas) o daños, d e f e c t o s , o funciona-
miento impropio que resulten de defectos, f a l l a s , f u n c i o n a -
miento impropio o negligencia, ab u s o , o uso incorrecto, n o
de la LIMPIADORA, sino del equipo.
4 . La presente Garantía Limitada no será ap l i c abl e en el caso
de funcionamiento impropio, d a ñ o , falla en los materiales o
cambios en el aspecto de la LIMPIADORA que resulten de
la exposición al sol o a productos químicos o de reacciones
a sustancias con las que alguna pieza de la LIMPIADORA
pueda entrar en contacto o de piezas que aunque hay a n
sufrido desgaste no afecten el funcionamiento de la
L I M P I A D O R A .
5 . Esta Garantía Limitada no es aplicable a limpiadoras
utilizadas con propósitos comerciales.
6 . La LIMPIADORA está diseñada para funcionar en una
piscina de diseño, construcción y mantenimiento correctos.
Esta Garantía Limitada no tiene validez en el caso de que el
d i s e ñ o , la construcción o el mantenimiento de la piscina
sean defectuosos, de mala calidad o inapropiados para el
funcionamiento de la LIMPIADORA.
7 . El deterioro, la decoloración o la fragilidad del yeso y del
revestimiento de vinilo de la piscina se pueden producir con
el transcurso del tiempo de forma separada o en combina-
ción con las algas y el desequilibrio en la composición quí-
mica del ag u a , la instalación inap r o p i a d a , y otros factores.
Garantía limitada
Garantía limitada
Garantía limitada
H AY W ARD por la presente niega cualquier responsabilidad por
r e c l a m o s , y el COMPRADOR libera a HAY W ARD de todo reclamo
por daños al yeso o al revestimiento de vinilo de la piscina en la
piscina del COMPRADOR a causa del uso y/o funcionamiento de
la LIMPIADORA
8 . La presente Garantía Limitada es válida y ap l i c ab l e
solamente a LIMPIADORAS montadas, f abricadas o
adquiridas e instaladas en los Estados Unidos de Norte
América y Canadá.
9 . La presente Garantía Limitada se aplicará al COMPRADOR
o r i g inal de la LIMPIADORA adquirida a un representante
autorizado de HAY WARD y no se aplicará a ningún otro
comprador posterior, cesionario u otro destinatario de la
LIMPIADORA del COMPRADOR.
1 0 . La presente Garantía Limitada no se aplicará a
menos que la Tarjeta de Registro esté firmada,
completada y remitida dentro de los catorce (14)
días de la fecha de compra. H ayward se reserva el
derecho de disponer de cualquier Tarjeta de Registro una
vez recibida. El COMPRADOR debe conservar un compro-
bante escrito de la compra.
1 1 . La precedente Garantía Limitada concede al COMPRADOR
derechos legales específicos, que pueden variar entre
e s t a d o s , y por lo tanto, algunas de las exclusiones y
condiciones enumeradas pueden no ser ap l i c abl es a
COMPRADORES que viven en ciertos estados.
12. Ninguna de las partes será responsable ante el otro por el
incumplimiento o demora en el desempeño debido total-
mente o en parte a cualquier causa más allá del control
razonable de las partes, incluidos los elementos y actos
fortuitos, los actos de la otra parte, los actos de autoridad
civil o militar, guerra, disturbios, o actos concertados de
los trabajadores.
1 3 . El COMPRADOR no puede vender, transferir o ceder los
derechos emergentes de este acuerdo sin el consentimiento
previo escrito de HAY W A R D . H AY W ARD puede ceder los
derechos emergentes del presente contrato o cualquier pag o
u otra suma debida por el presente sin aviso o consenti-
miento previo del COMPRADOR.Si Hayward realiza alguna
de estas cesiones, el cesionario tendrá todos los derechos,
o b l i g a c i o n e s , p o d e r e s , p r i v i l e gios y recursos de HAY W A R D .
La modificación de este contrato sólo se puede realizar por
escrito y con la firma de un agente autorizado de HAY W A R D .
En el caso de que la LIMPIADORA mostrara defectos de
f abricación o en los materiales durante el término de la Garantía
L i m i t a d a , el COMPRADOR deberá enviar el producto con el fl e t e
p a go a cualquier Centro de Servicios de Fábrica lo antes posible
después de descubrir el defecto, junto con una copia de la
Factura de Venta que incluya la fecha de compra y el número de
serie del producto que se reclama como defectuoso, el nombre y
el domicilio del COMPRADOR y una breve descripción de los
problemas/defectos encontrados.
Llame al (800) 227-1477 para averiguar el nombre y domicilio
del Centro de Servicios de Fábrica más cercano (fuera de los
EE.UU continental llame al (909) 594-1600).
H AY WARD se hará cargo a su discreción de la reparación o sus-
titución de las piezas defectuosas de la LIMPIADORA cubiertas por
esta Garantía Limitada, y al devolverlas al COMPRADOR se hará
cargo de los gastos de envío.H AY W ARD no se hace responsable de
los gastos de embalaje, envío o transporte de la LIMPIADORA o de
alguna de sus piezas hacia o desde el Centro de Servicios de
F á b r i c a , a menos que esté expresamente provisto por la ley estat a l .
Ningún representante, distribuidor o persona similar está autorizada
a realizar garantías o manifestaciones concernientes a HAY W A R D
que excedan los términos expresos del presente contrat o .
H AY WARD no asume ninguna responsabilidad por garantías que
sobrepasen los términos expresos de la presente Garantía Limitada.
Esta Garantía Limitada reemplaza toda otra garantía expresa o
i m p l í c i t a , y es válida y ap l i c a ble solamente en los Estados Unidos de
Norteamérica y en Canadá. El COMPRADOR debe propor cionar a
H AY WARD un comprobante escrito razonablemente aceptable de la
fecha original de compra de la LIMPIADORA.
El único foro para tratar cualquier disputa entre el COMPRADOR y
H AY W ARD será el arbitraje obligat o r i o , conducido en Union County,
Nueva Jersey bajo las normas de la Asociación Americana de
A r b i t r a j e , y la parte vencedora tendrá derecho a la adjudicación
de los honorarios y costas del ab o g a d o .
LAS MENCIONADAS GARANTÍAS Y RECURSOS SON EXCLUYENTES
Y SUSTITUYEN A TODAS LAS DEMÁS GARANTÍAS, EXPRESAS O
I M P L Í C I TA S , YA SEA DE HECHO O POR APLICACIÓN DE LA LEY,
E S TAT U TARIAS U OTRAS, INCLUYENDO LAS GARANTÍAS DE
COMERCIALIDAD Y DE ADECUACIÓN PARA UN PROPÓSITO
D E T E R M I N A D O . H AY W ARD NO ASUME NI AUTORIZA A NINGUNA
OTRA PERSONA A ASUMIR EN SU REPRESENTACIÓN NINGUNA
OTRA RESPONSABILIDAD RELACIONADA CON LA V E N TA , I N S TA-
L A C I Ó N , O USO DE SU LIMPIADORA Y NO SE HACE RESPONSABLE
DE EQUIPOS O DE LO QUE FUERE RELACIONADO A EQUIPOS NO
PROPORCIONADOS POR HAY W A R D . LA GARANTÍA PRECEDENTE
NO CUBRE DAÑOS A LA LIMPIADORA RESULTANTES DE A C C I -
D E N T E , USO IMPROPIO,A B U S O , O MODIFICACIONES REALIZADAS
A LA LIMPIADORA POR PERSONAS AJENAS A HAY W A R D .
H AY WARD NO SERÁ RESPONSIBLE DE LOS DAÑOS POR DEMO-
RAS EN LA ENTRGA O USO. BAJO NINGUNA CIRCUNSTA N C I A
H AY WARD SERÁ RESPONSABLE ANTE EL COMPRADOR POR
DAÑOS Y PERJUICIOS INCLUIDO,PERO NO LIMITA D O , A DAÑOS
D I R E C T O S , E S P E C I A L E S , A C C I D E N T ALES O INDIRECTOS QUE
SURJAN O ESTÉN RELACIONADOS CON LA V E N TA , I N S TA L A C I Ó N
O USO,O INCAPACIDAD DE USAR LA LIMPIADORA,LA PISCINA
DEL COMPRADOR O POR CUALQUIER OTRO RECLAMO DE CUAL-
QUIER OTRA PA R T E .

-
 1
1
-
 2
2
-
 3
3
-
 4
4
-
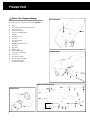 5
5
-
 6
6
-
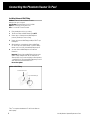 7
7
-
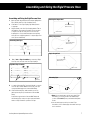 8
8
-
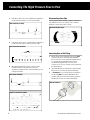 9
9
-
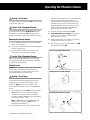 10
10
-
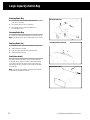 11
11
-
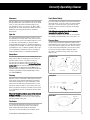 12
12
-
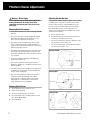 13
13
-
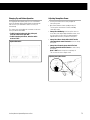 14
14
-
 15
15
-
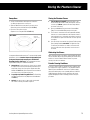 16
16
-
 17
17
-
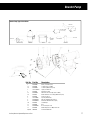 18
18
-
 19
19
-
 20
20
-
 21
21
-
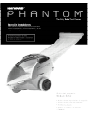 22
22
-
 23
23
-
 24
24
-
 25
25
-
 26
26
-
 27
27
-
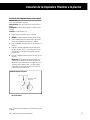 28
28
-
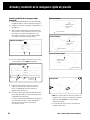 29
29
-
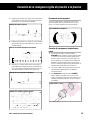 30
30
-
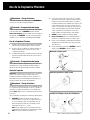 31
31
-
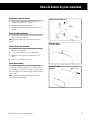 32
32
-
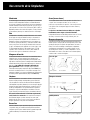 33
33
-
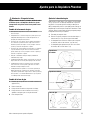 34
34
-
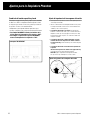 35
35
-
 36
36
-
 37
37
-
 38
38
-
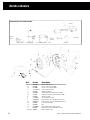 39
39
-
 40
40
-
 41
41
-
 42
42
-
 43
43


Hayward Phantom 6000 El manual del propietario
- Categoría
- Accesorios para piscinas elevadas
- Tipo
- El manual del propietario
en otros idiomas
- English: Hayward Phantom 6000 Owner's manual
Artículos relacionados
Otros documentos
-
Polaris TR28P El manual del propietario
-
Polaris Vac-Sweep 380 El manual del propietario
-
Pentair LL505G Guía del usuario
-
-
-
Polaris TR36P El manual del propietario
-
-
-
-
 Polaris Pools Zodiac Pool Systems - Vacuum Cleaner 180 Manual de usuario
