Sylvania 6842THG Manual de usuario
- Categoría
- Televisores LCD
- Tipo
- Manual de usuario
Este manual también es adecuado para

TO RECEIVE DIGITAL/ANALOG SIGNAL,
YOU MUST CONNECT ANTENNA.
42 inch Digital / Analog
PLASMA DISPLAY TV
Owner’s Manual
6842THG
IF YOU NEED ADDITIONAL ASSISTANCE WITH SET-UP OR OPERATING AFTER
READING OWNER’S MANUAL, PLEASE CALL TOLL FREE 1-800-605-8453,OR
VISIT OUR WEB SITE AT
http://www.SylvaniaConsumerElectronics.com
ENTER
POWER SLEEP
INPUT
SELECT
AUDIO
STILL
SETUP
BACK
SCREEN
MODE
INFO
CH RETURN
MUTE
VOL. CH
1 2 3
4 5 6
7 8 9
-
0
HIGH-DEFINITION TELEVISION
By changing the screen display mode from time
to time, you can reduce burn-in on screen.
(Refer to “CHANGING THE SCREEN DISPLAY
MODE” on page 21.)

2
EN
CAUTION:
TO REDUCE THE RISK OF ELEC-
TRIC SHOCK, DO NOT REMOVE COVER (OR BACK).
NO USER SERVICEABLE PARTS INSIDE. REFER
SERVICING TO QUALIFIED SERVICE PERSONNEL.
CAUTION
RISK OF ELECTRIC SHOCK
DO NOT OPEN
THIS SYMBOL INDICATES THAT DANGER-
OUS VOLTAGE CONSTITUTING A RISK OF
ELECTRIC SHOCK IS PRESENT WITHIN
THIS UNIT.
THIS SYMBOL INDICATES THAT THERE
ARE IMPORTANT OPERATING AND MAIN-
TENANCE INSTRUCTIONS IN THE LITERA-
TURE ACCOMPANYING THE APPLIANCE.
The important note is located on the rear of the cabinet.
WARNING:
TO REDUCE THE RISK OF FIRE OR ELECTRIC SHOCK, DO NOT EXPOSE THIS APPLI-
ANCE TO RAIN OR MOISTURE.
1. Read these instructions.
2. Keep these instructions.
3. Heed all warnings.
4. Follow all instructions.
5. Do not use this apparatus near water.
6. Clean only with dry cloth.
7. Do not block any ventilation openings. Install in
accordance with the manufacturer's instructions.
8. Do not install near any heat sources such as
radiators, heat registers, stoves, or other appa-
ratus (including amplifiers) that produce heat.
9. Do not defeat the safety purpose of the polar-
ized or grounding-type plug. A polarized plug
has two blades with one wider than the other. A
grounding-type plug has two blades and a third
grounding prong. The wide blade or the third
prong are provided for your safety. If the provid-
ed plug does not fit into your outlet, consult an
electrician for replacement of the obsolete out-
let.
10. Protect the power cord from being walked on or
pinched particularly at plugs, convenience
receptacles, and the point where they exit from
the apparatus.
11. Only use attachments/accessories specified by
the manufacturer.
12. Use only with the cart, stand,
tripod, bracket, or table speci-
fied by the manufacturer, or
sold with the apparatus. When
a cart is used, use caution
when moving the cart/appara-
tus combination to avoid injury
from tip-over.
13. Unplug this apparatus during lightning storms or
when unused for long periods of time.
14. Refer all servicing to qualified service person-
nel. Servicing is required when the apparatus
has been damaged in any way, such as power-
supply cord or plug is damaged, liquid has been
spilled or objects have fallen into the apparatus,
the apparatus has been exposed to rain or
moisture, does not operate normally, or has
been dropped.
15. Apparatus shall not be exposed to dripping or
splashing and no objects filled with liquids, such
as vases, shall be placed on the apparatus.
To reduce the risk of fire or electric shock, do
not expose this appliance to rain or moisture.
PORTABLE CART WARNING
S3126A
IMPORTANT SAFETY INSTRUCTIONS

3
EN
IMPORTANT SAFETY INSTRUCTIONS / PRECAUTIONS
PRECAUTIONS
• Place your TV in a room with adequate ventilation.
• Keep your TV set away from sources of direct heat, such as heat registers or direct sunlight.
• Do not place your TV on soft surfaces, such as rugs or blankets.
• Leave enough room for air to circulate around the bottom, top and back of the set.
The serial number of this product may be found on the back of the TV. No others have the same serial num-
ber as yours. You should record the number and other vital information here and retain this book as a perma-
nent record of your purchase to aid identification in case of theft.
Note to CATV system installer:
This reminder is provided to call the CATV system installer's attention to Article 820-40 of the NEC that
provides guidelines for proper grounding and, in particular, specifies that the cable ground should be
connected to the grounding system of the building as close to the point of cable entry as practical.
CAUTION:TO PREVENT ELECTRIC SHOCK, MATCH WIDE BLADE OF PLUG TO WIDE SLOT, FULLY INSERT.
ATTENTION: POUR ÉVITER LES CHOC ÉLECTRIQUES, INTRODUIRE LA LAME LA PLUS LARGE
DE LA FICHE DANS LA BORNE CORRESPONDANTE DE LA PRISE ET POUSSER JUSQU’AU FOND.
FCC WARNING: This equipment may generate or use radio frequency energy. Changes or modifications
to this equipment may cause harmful interference unless the modifications are expressly approved in the
owner’s manual. The user could lose the authority to operate this equipment if an unauthorized change or
modification is made.
Model No.
Serial No.
Dealer Purchase from
Date of Purchase
Dealer Phone No.
Dealer Address
A NOTE ABOUT RECYCLING:
This product’s packaging materials are recyclable and can be reused. Please dispose of any materials in
accordance with your local recycling regulations.
Batteries should never be thrown away or incinerated but disposed of in accordance with your local regula-
tions concerning chemical wastes.
When moving this TV
Due to the weight of this TV, two people should be
used when moving it. Both people should make sure
to grasp the top of the TV with one hand and the
base of the TV with the other hand, as in the follow-
ing illustration.
Optional Accessories
To mount the TV on a wall, the following accessory
is needed:
VISIONMOUNT™ Flat Panel TV Wall Mount from
SANUS SYSTEMS, for large flat panel televisions
(32" to 60"). Refer to page 31 for mounting the TV.
NOTE:
The wall mounts are not supplied with the TV.
#
CAUTION
• This TV is for use only with the Sanus Systems
Model VMPL. Wall Mount.
Use with other wall mounts may result in insta-
bility, causing possible injury.
•
When mounting the TV with the Sanus Systems
wall mount, make sure to mount it on the wood
studs inside the wall, as failure to do so may
result in instability, causing possible injury.
• Refer to the instruction manual included with
the wall mount for details when securing the TV
to the wall.

4
EN
FEATURES
SUPPLIED ACCESSORIES
• Owner’s Manual
(1EMN21782)
• Simple Set Up Guide
(1EMN21783)
• Power Cable
(WBC0192LW001)
• If you need to replace these accessories, please refer to the PART NO, with the illustrations and call our
help line mentioned on the front page.
• Depending on your antenna system, you may need different types of Combiners (Mixer) or Separator
(Splitter). Contact your local electronics store for these items.
•
DTV/TV/CATV
This TV lets you easily switch TV(NTSC) and DTV(ATSC) with the remote control. This feature enables you to simply
view from conventional analog TV to Standard Definition TV, High Definition TV. You can also connect this TV to CATV
if you have a CATV box.
• Program Information Display (DTV)
You can display the title, contents and other information of the current DTV program on the screen.
•
Autoscan
This TV can automatically scan and memorize the channels receivable in your residential area. This feature elimi-
nates the need of a difficult setting procedure.
• V-CHIP
This feature lets you set the viewing limitations to prevent your children from watching inappropriate programs.
• Closed Caption Decoder
This TV contains the built-in Closed Caption Decoder that displays text across the screen. It allows you to read
the dialogue of a TV program or other information in the Closed Caption-supported programs.
• MTS/SAP Tuner
This feature allows you to select with the remote control your desired audio language.
•
Auto Shut Off Function
If there is no signal input from the antenna terminal and no operation for 15 minutes, the unit will turn itself
off automatically.
•
On-Screen Function Display (English / Spanish / French)
This feature lets you select the language displayed in the setup screen from English, Spanish or French.
• Stereo Sound Function
• Full-Function Remote Control
• PLL Frequency Synthesized Tuning
• HDMI Input
This TV accepts 480i / 480p / 720p / 1080i video signals and 32kHz / 44.1kHz / 48kHz audio signals.
• Component VIDEO Input
This TV accepts 480i / 480p / 720p / 1080i video signals.
• S-VIDEO Input
• AV Input
• Analog Audio Output
• Digital Audio Output (Coaxial)
• Resume
This feature will automatically memorize settings if a power failure occurs.
• Remote control unit
(NF000UD)
• Batteries
(“AA” x 2)

5
EN
CONTENTS
C
ONTENTS
IMPORTANT SAFETY INSTRUCTIONS . . . . . . . . . . . . . . . . . . . . . . . . . . . . . . . . . . . . . . . . . . . . . . . . . . . . 2
PRECAUTIONS . . . . . . . . . . . . . . . . . . . . . . . . . . . . . . . . . . . . . . . . . . . . . . . . . . . . . . . . . . . . . . . . . . . . . . 3
SUPPLIED ACCESSORIES . . . . . . . . . . . . . . . . . . . . . . . . . . . . . . . . . . . . . . . . . . . . . . . . . . . . . . . . . . . . . 4
FEATURES . . . . . . . . . . . . . . . . . . . . . . . . . . . . . . . . . . . . . . . . . . . . . . . . . . . . . . . . . . . . . . . . . . . . . . . . . 4
FUNCTIONS . . . . . . . . . . . . . . . . . . . . . . . . . . . . . . . . . . . . . . . . . . . . . . . . . . . . . . . . . . . . . . . 6
REMOTE CONTROL, FRONT AND REAR PANEL FUNCTION . . . . . . . . . . . . . . . . . . . . . . . . . . . . . . . . . . . 6
INSTALLING THE BATTERIES . . . . . . . . . . . . . . . . . . . . . . . . . . . . . . . . . . . . . . . . . . . . . . . . . . . . . . . . . . . 7
BATTERY PRECAUTIONS . . . . . . . . . . . . . . . . . . . . . . . . . . . . . . . . . . . . . . . . . . . . . . . . . . . . . . . . . . 7
REMOTE CONTROL RANGE . . . . . . . . . . . . . . . . . . . . . . . . . . . . . . . . . . . . . . . . . . . . . . . . . . . . . . . . . . . . 7
PREPARATION FOR USE . . . . . . . . . . . . . . . . . . . . . . . . . . . . . . . . . . . . . . . . . . . . . . . . . . . 8
CONNECTION . . . . . . . . . . . . . . . . . . . . . . . . . . . . . . . . . . . . . . . . . . . . . . . . . . . . . . . . . . . . . . . . . . . . . . . 8
ANTENNA CABLE CONNECTION . . . . . . . . . . . . . . . . . . . . . . . . . . . . . . . . . . . . . . . . . . . . . . . . . . . 8
CONNECTION TO CABLE/SATELLITE BOX . . . . . . . . . . . . . . . . . . . . . . . . . . . . . . . . . . . . . . . . . . . . 8
EXTERNAL CONNECTION . . . . . . . . . . . . . . . . . . . . . . . . . . . . . . . . . . . . . . . . . . . . . . . . . . . . . . . . . . . . . 9
HDMI CONNECTION . . . . . . . . . . . . . . . . . . . . . . . . . . . . . . . . . . . . . . . . . . . . . . . . . . . . . . . . . . . . . 9
COMPONENT CONNECTION . . . . . . . . . . . . . . . . . . . . . . . . . . . . . . . . . . . . . . . . . . . . . . . . . . . . . 10
S-VIDEO CONNECTION . . . . . . . . . . . . . . . . . . . . . . . . . . . . . . . . . . . . . . . . . . . . . . . . . . . . . . . . . . .10
ANALOG AUDIO/VIDEO CONNECTION . . . . . . . . . . . . . . . . . . . . . . . . . . . . . . . . . . . . . . . . . . . . . . .11
DIGITAL AUDIO OUTPUT CONNECTION . . . . . . . . . . . . . . . . . . . . . . . . . . . . . . . . . . . . . . . . . . . . . 11
AUDIO OUTPUT CONNECTION . . . . . . . . . . . . . . . . . . . . . . . . . . . . . . . . . . . . . . . . . . . . . . . . . . . . 12
CONNECTING THE POWER CABLE . . . . . . . . . . . . . . . . . . . . . . . . . . . . . . . . . . . . . . . . . . . . . . . . . . . . . .12
INITIAL SETTINGS . . . . . . . . . . . . . . . . . . . . . . . . . . . . . . . . . . . . . . . . . . . . . . . . . . . . . . . . . 13
INITIAL SETTINGS . . . . . . . . . . . . . . . . . . . . . . . . . . . . . . . . . . . . . . . . . . . . . . . . . . . . . . . . . . . . . . . . . . . 13
CHANNEL SETTINGS . . . . . . . . . . . . . . . . . . . . . . . . . . . . . . . . . . . . . . . . . . . . . . . . . . . . . . 14
AUTOSCAN . . . . . . . . . . . . . . . . . . . . . . . . . . . . . . . . . . . . . . . . . . . . . . . . . . . . . . . . . . . . . . . . . . . . . . . . 14
CHANNEL LIST . . . . . . . . . . . . . . . . . . . . . . . . . . . . . . . . . . . . . . . . . . . . . . . . . . . . . . . . . . . . . . . . . . . . . 15
MANUAL REGISTER . . . . . . . . . . . . . . . . . . . . . . . . . . . . . . . . . . . . . . . . . . . . . . . . . . . . . . . . . . . . . . . . . 15
ANTENNA CONFIRMATION . . . . . . . . . . . . . . . . . . . . . . . . . . . . . . . . . . . . . . . . . . . . . . . . . . . . . . . . . . . . 16
LANGUAGE SELECTION . . . . . . . . . . . . . . . . . . . . . . . . . . . . . . . . . . . . . . . . . . . . . . . . . . . . . . . . . . . . . . 17
SETTING THE PANEL PROTECTION . . . . . . . . . . . . . . . . . . . . . . . . . . . . . . . . . . . . . . . . . . . . . . . . . . . . . 17
WATCHING TV . . . . . . . . . . . . . . . . . . . . . . . . . . . . . . . . . . . . . . . . . . . . . . . . . . . . . . . . . . . . 18
CHANNEL SELECTION . . . . . . . . . . . . . . . . . . . . . . . . . . . . . . . . . . . . . . . . . . . . . . . . . . . . . . . . . . . . . . . 18
VOLUME ADJUSTMENT . . . . . . . . . . . . . . . . . . . . . . . . . . . . . . . . . . . . . . . . . . . . . . . . . . . . . . . . . . . . . . 18
STILL MODE . . . . . . . . . . . . . . . . . . . . . . . . . . . . . . . . . . . . . . . . . . . . . . . . . . . . . . . . . . . . . . . . . . . . . . . 19
SWITCHING AUDIO . . . . . . . . . . . . . . . . . . . . . . . . . . . . . . . . . . . . . . . . . . . . . . . . . . . . . . . . . . . . . . . . . . 19
SWITCHING EXTERNAL INPUT . . . . . . . . . . . . . . . . . . . . . . . . . . . . . . . . . . . . . . . . . . . . . . . . . . . . . . . . . 20
CHANGING THE SCREEN DISPLAY MODE . . . . . . . . . . . . . . . . . . . . . . . . . . . . . . . . . . . . . . . . . . . . . . . .21
SCREEN INFORMATION . . . . . . . . . . . . . . . . . . . . . . . . . . . . . . . . . . . . . . . . . . . . . . . . . . . . . . . . . . . . . . 22
SLEEP TIMER . . . . . . . . . . . . . . . . . . . . . . . . . . . . . . . . . . . . . . . . . . . . . . . . . . . . . . . . . . . . . . . . . . . . . . 23
OPTIONAL SETTINGS . . . . . . . . . . . . . . . . . . . . . . . . . . . . . . . . . . . . . . . . . . . . . . . . . . . . . . 23
SETUP SCREEN . . . . . . . . . . . . . . . . . . . . . . . . . . . . . . . . . . . . . . . . . . . . . . . . . . . . . . . . . . . . . . . . . . . . 23
PICTURE ADJUSTMENT . . . . . . . . . . . . . . . . . . . . . . . . . . . . . . . . . . . . . . . . . . . . . . . . . . . . . . . . . . . . . . 24
CLOSED CAPTION . . . . . . . . . . . . . . . . . . . . . . . . . . . . . . . . . . . . . . . . . . . . . . . . . . . . . . . . . . . . . . . . . . . 25
DTV CLOSED CAPTION . . . . . . . . . . . . . . . . . . . . . . . . . . . . . . . . . . . . . . . . . . . . . . . . . . . . . . . . . . . . . . . 26
CLOSED CAPTION STYLE . . . . . . . . . . . . . . . . . . . . . . . . . . . . . . . . . . . . . . . . . . . . . . . . . . . . . . . . . . . . . 26
V-CHIP . . . . . . . . . . . . . . . . . . . . . . . . . . . . . . . . . . . . . . . . . . . . . . . . . . . . . . . . . . . . . . . . . . . . . . . . . . . . 28
HDMI AUDIO . . . . . . . . . . . . . . . . . . . . . . . . . . . . . . . . . . . . . . . . . . . . . . . . . . . . . . . . . . . . . . . . . . . . . . . 30
ATTACHING A WALL MOUNT BRACKET (SOLD SEPARATELY) . . . . . . . . . . . . . . . . . . . . . .31
MISCELLANEOUS . . . . . . . . . . . . . . . . . . . . . . . . . . . . . . . . . . . . . . . . . . . . . . . . . . . . . . . . . 32
TROUBLESHOOTING GUIDE . . . . . . . . . . . . . . . . . . . . . . . . . . . . . . . . . . . . . . . . . . . . . . . . . . . . . . . . . . . 32
GLOSSARY . . . . . . . . . . . . . . . . . . . . . . . . . . . . . . . . . . . . . . . . . . . . . . . . . . . . . . . . . . . . . . . . . . . . . . . . 35
MAINTENANCE . . . . . . . . . . . . . . . . . . . . . . . . . . . . . . . . . . . . . . . . . . . . . . . . . . . . . . . . . . . . . . . . . . . . . 35
SPECIFICATIONS . . . . . . . . . . . . . . . . . . . . . . . . . . . . . . . . . . . . . . . . . . . . . . . . . . . . . . . . . . 36
WARRANTY . . . . . . . . . . . . . . . . . . . . . . . . . . . . . . . . . . . . . . . . . . . . . . . . . . . . . BACK COVER
The following is the description for the symbols used in this manual.
: Settings only for the analog mode
: Settings only for the digital mode
• If there is no symbol under the function heading, those are common settings for the analog
mode and digital mode.
DTV
TV
SYMBOLS USED IN THIS MANUAL

6
EN
F
UNCTIONS
REMOTE CONTROL, FRONT AND REAR PANEL FUNCTION
ENTER
POWER SLEEP
INPUT
SELECT
AUDIO
STILL
SETUP
BACK
SCREEN
MODE
INFO
CH RETURN
MUTE
VOL. CH
1 2 3
4 5 6
7 8 9
-
0
VOLUME CHANNEL
INPUT SELECT /
ENTER
STANDBYSETUP
ON
POWER
VOLUME CHANNEL
INPUT SELECT /
ENTER
STANDBYSETUP
ON
POWER
POWER button (p13)
To turn TV on/off.
Channel number buttons (p18)
To select channels.
SETUP button (p15)
To display on-screen menu.
s
/
B
/
K
/
L
buttons (p13)
To move left / right / up / down through
the items.
ENTER button (p13)
To decide the command of setting when
the menu is displayed.
BACK button (p22)
To go back to the previous operation in menu.
VOL.
XX
/
YY
buttons (p18)
To adjust volume.
MUTE button (p18)
To mute sound.
SLEEP button (p23)
To turn the power off automatically at
preset time.
INPUT SELECT button (p20)
To select TV or external input mode (to
access DVD, VCR, etc.).
AUDIO button (p19)
• Analog mode (TV)
To select audio mode.
• Digital mode (DTV)
To select audio language.
STILL button (p19)
Pauses the image shown on the screen.
SCREEN MODE button (p21)
Selects aspect ratios available for the
screen.
INFO button
• Analog mode (TV) (p22)
To display channel No., signal type
and TV setting.
• Digital mode (DTV) (p22)
To display channel information, signal
type and TV setting.
• External mode (p20)
To display external mode, signal type
and TV setting.
CH
KK
/
LL
buttons (p18/p20)
To select channels and external input
mode.
CH RETURN button (p18)
To return to previously viewed channel.
SETUP button (p15)
To display on-screen menu.
VOLUME
XX
/
YY
buttons (p18)
To adjust volume and move
right(
XX
)/left(
YY
) through the
menu items.
CHANNEL
KK
/
LL
buttons (p18)
To select channels and move
up/down through the menu items.
INPUT SELECT/ENTER
button (p20/p13)
• To select TV or external input
mode (to access DVD, VCR,
etc.).
• To decide the command of
setting when the menu is dis-
played.
POWER button
To turn TV on/off.
Infrared Sensor Window
To receive the infrared rays
transmitted from the remote
control.
NOTE:
With buttons [VOL. X/Y] or [MUTE], you can only adjust the volume of the main unit. You cannot adjust the volume of the external
devices with these buttons.
ON indicator
Lights up when the power is ON.
STANDBY indicator
Lights up when the power is in
the standby mode. Disappears
when the power is ON.
About Interference to Infrared Devices
Please note in advance that using other infrared devices
(such as infrared cordless headphones) near the plasma
display may cause infrared interference to occur.
About Pixel Defects
A plasma display is created by using a collection of miniature
pixels. It is possible to display more than 99.99% of valid pix-
els, however a small fraction of pixels over the life of the
product may not illuminate or may constantly be illuminated.
This is not to be considered a defect in the plasma panel.
Preventing Image Burn on the plasma display
Fixed images displayed on the plasma display for an
extended period of several hours may cause uneven pixel
aging causing damage to the plasma display. You should
try to avoid displaying fixed images for extended periods
on the plasma display.
Images of high luminance displayed on the plasma display
for more than 60 seconds may cause lingering images to
remain on the screen. These images will automatically disap-
pear, but may take time depending on the luminance of the
images and how long they were displayed on the screen.

7
EN
INSTALLING THE BATTERIES
Install two AA batteries (supplied) matching the polarity indicated inside battery compartment of the remote
control.
[BATTERY PRECAUTIONS]
• Be sure to follow the correct polarity as indicated in the battery compartment.
Reversed batteries may cause damage to the device.
•
Do not mix different types of batteries together (e.g. Alkaline and Carbon-Zinc) or old batteries with fresh ones.
• If the device is not to be used for a long period of time, remove the batteries to prevent damage or injury
from possible battery leakage.
• Do not try to recharge batteries not intended to be recharged; they can overheat and rupture.
FUNCTIONS
ANT. IN
AUDIO OUT AUDIO
HDMI
COMPONENT2
Y
Pb
Pr
L
R
AUDIO
Y
Pb
Pr
L
R
AUDIO
L
R
AUDIO
VIDEO1
AC IN
S-VIDEO1
COMPONENT1
HDMI IN
L
R
L
R
DIGITAL
AUDIO OUT
(COAXIAL)
Rear of this TV
from underneath
by side
from underneath
ANT. IN
AUDIO OUT AUDIO
HDMI
COMPONENT2
Y
Pb
Pr
L
R
AUDIO
Y
Pb
Pr
L
R
AUDIO
L
R
AUDIO
VIDEO1
S-VIDEO1
L
R
AUDIO
VIDEO2
S-VIDEO2
COMPONENT1
HDMI IN
L
R
L
R
DIGITAL
AUDIO OUT
(COAXIAL)
ANT. IN jack
Connect your antenna or cable
box here.
DIGITAL AUDIO OUT
(COAXIAL) jack
Connect an optional coaxial
digital audio cable here through
the coaxial digital audio in jack
of a decoder or audio receiver.
AUDIO OUT jacks
Connect the supplied audio
cable here through the audio
in jacks of audio equipment.
HDMI IN jacks
Connect HDMI cable and
audio cable coming from the
HDMI and audio out jack of
external devices.
COMPONENT IN jacks
Connect component cable
and audio cable coming from
the component and audio out
jack of external devices.
VIDEO2 IN jacks
Connect video
cable or S-video
cable and audio
cable coming from
the video or
S-video and audio
out jack of exter-
nal devices.
VIDEO1 IN
jacks
Connect video
cable or
S-video cable
and audio
cable coming
from the video
or S-video
and audio out
jack of exter-
nal devices.
REMOTE CONTROL RANGE
Operate the remote control within a 30 degree angle on both sides of the infrared sensor on the main unit.
You can operate the remote control from a distance of several yards away from the main unit.
NOTE:
Other devices which use infrared beams, sun-
light, fluorescent lights, etc., may affect the
range and effectiveness of the remote control.
Make sure the TV is positioned in a place which
minimizes interference from them.
Within 30 degreesWithin 30 degrees
Approximately
7.6 yds (7 m)
Approximately 5.5 yds (5 m)Approximately 5.5 yds (5 m)

P
REPARATION FOR USE
8
EN
CONNECTION
This section describes how to connect this TV to reception and other sources.
[ANTENNA CABLE CONNECTION]
1) When connecting TV to antenna
Connect the RF cable or antenna cable on your home outlet to the ANT. IN jack of this TV.
2) When connecting
TV to RF/Incoming cable (without box)
Connect the RF cable or incoming cable on your home outlet to the ANT. IN jack of this TV.
*Once connections are completed, turn on the TV and begin initial setup.
Channel scanning is necessary for the TV to memorize all available channels in your area if using
antenna or RF/Incoming cable. (Refer to “INITIAL SETTINGS” on page 13.)
[CONNECTION TO CABLE/SATELLITE BOX]
1) Connect the antenna cable on your home outlet to the input jack of the CABLE/SATELLITE box.
2) Use the corresponding cable to connect the ANT. IN jack of this TV and the output jack of the
CABLE/SATELLITE box.
*
Required cables in 2) and connecting methods differ depending on the CABLE/SATELLITE box. For more informa-
tion, please contact the cable/satellite provider.
ANT. IN
Cable TV
signal
RF Cable
CABLE Box
or SATELLITE Box
or
Satellite
antenna
Rear of this TV
Cables not included
NOTES:
• For your safety and to avoid damages to the unit, unplug the antenna cable from the ANT. IN jack before moving the unit.
•
If you use an antenna in order to receive analog TV, the same antenna generally will work for DTV reception.
Outdoor or attic antennas will be more effective than set-top versions.
• To easily switch between antenna and cable wires, you can purchase “Antenna Selector” commercially available.
•
If you connect cable system directly, contact the CATV installer.
ANT. IN
or
Aerial
antenna
RF Cable
Rear of this TV
Incoming Cable
Cable TV
signal
Cables not included
NOTE:
Be sure that antenna or cable is connected properly before plugging the power cord.
MAKE SURE YOU HAVE AN ANTENNA.
As DTV is only available over the air, you need an antenna to receive digital signal.

9
EN
PREPARATION FOR USE
EXTERNAL CONNECTION
[HDMI CONNECTION]
1) This is the best method to connect this TV to video devices with the HDMI output jack, such as DVD play-
er with HDMI output jack, etc.
It can minimize the deterioration of image quality.
Use the HDMI cable (commercially available) for connection.
2) When your video devices has the DVI output jack, use the HDMI conversion cable from DVI output jack
(commercially available) for connection as illustrated below.
“HDMI, the HDMI logo and High-Definition Multimedia Interface are trademarks or registered
trademarks of HDMI Licensing LLC.”
NOTES:
This TV accepts 480i / 480p / 720p / 1080i video signals.
Audio signals are converted to an analog signal from the digital if you make a connection above.
DVI does not show image if the 480i does not accept EIA/CEA-861/861B.
ANT. IN
AUDIO OUT AUDIO
HDMI IN
L
R
L
R
DIGITAL
AUDIO OUT
(COAXIAL)
HDMI
DVI OUT
AUDIO OUT
RL
To DVI output jack
To audio
output jacks
To AUDIO INPUT
jacks
Rear of this TV
To HDMI INPUT jack
Cable Box or Satellite Box
with the DVI output jack
Cables not included
NOTES:
This TV accepts 480i / 480p / 720p / 1080i video signals, and 32kHz / 44.1kHz / 48kHz audio signals.
This TV accepts only 2 channel audio signal (LPCM).
You need to select “PCM” for the digital audio output of the device you connect or the HDMI audio setting. Audio sometimes makes no
sound if you select “Bitstream”, etc..
This TV only accept signals corresponding EIA861.
ANT. IN
AUDIO OUT AUDIO
HDMI IN
L
R
L
R
DIGITAL
AUDIO OUT
(COAXIAL)
HDMI
HDMI OUT
To HDMI output jack
To HDMI INPUT jack
Rear of this TV
DVD Player with the HDMI output jack
Cables not included

10
EN
[COMPONENT CONNECTION]
1) This is a better method to connect this TV to video devices with the Component output jack, such as DVD
player, etc.
Use the Component cable (commercially available) for connection.
If you connect component output jack to COMPONENT1 input jack, connect an audio cable to AUDIO L/R
jacks of COMPONENT1.
If you connect component output jack to COMPONENT2 input jack, connect an audio cable to AUDIO L/R
jacks of COMPONENT2.
[S-VIDEO CONNECTION]
1) This is a good method to connect this TV to the video devices with the S-video output jack. You can expect
better picture quality than the normal video cable connection.
Use the S-video cable (commercially available) for connection.
If you connect S-video output jack to S-VIDEO1 input jack, connect an audio cable to AUDIO L/R jacks of
VIDEO1.
If you connect S-video output jack to S-VIDEO2 input jack, connect an audio cable to AUDIO L/R jacks of
VIDEO2.
NOTE:
If you connect to the S-VIDEO jack and the VIDEO jack at the same time, S-video connection will have priority.
COMPONENT2
Y
Pb
Pr
L
R
AUDIO
Y
Pb
Pr
L
R
AUDIO
L
R
AUDIO
VIDEO1
S-VIDEO1
COMPONENT1
L
R
AUDIO
VIDEO2
S-VIDEO2
AUDIO
OUT
VIDEO
OUT
S-VIDEO
OUT
DVD/VCR with
the S-video output jack
To S-video
output jack
To S-VIDEO1 INPUT jack
To S-VIDEO2
INPUT jack
To AUDIO INPUT jacks
To AUDIO INPUT jacks
To audio
output jacks
Rear of this TV
Side of this TV
Cables not included
NOTE:
This TV accepts 480i / 480p / 720p / 1080i video signals.
COMPONENT2
Y
Pb
Pr
L
R
AUDIO
Y
Pb
Pr
L
R
AUDIO
L
R
AUDIO
VIDEO1
S-VIDEO1
COMPONENT1
DVD Player with the component video
output jacks
To component video
output jacks
To audio
output jacks
To AUDIO INPUT
jacks
To COMPONENT1
INPUT jacks
Rear of this TV
Cables not included

11
EN
PREPARATION FOR USE
[ANALOG AUDIO/VIDEO CONNECTION]
1) This is the general method to connect this TV to video devices with the video and audio output jacks, such
as VCR, Camcorder, Video Game, etc..
When the audio jack of video devices is monaural, connect this TV to the Audio L jack.
If you connect video output jack to VIDEO1 input jack, connect an audio cable to AUDIO L/R jacks of VIDEO1.
If you connect video output jack to VIDEO2 input jack, connect an audio cable to AUDIO L/R jacks of VIDEO2.
[DIGITAL AUDIO OUTPUT CONNECTION]
1) If you connect this TV to the digital-supported audio device, you can enjoy multi-channel audio like 5.1ch
digital broadcasting sound.
Use the Digital Audio Coaxial cable (commercially available) for connection.
Manufactured under license from Dolby Laboratories. “Dolby” and the double-D symbol are
trademarks of Dolby Laboratories.
ANT. IN
AUDIO OUT AUDIO
HDMI IN
L
R
L
R
DIGITAL
AUDIO OUT
(COAXIAL)
HDMI
COAXIAL
Rear of this TV
MD deck, DAT deck etc.
Dolby Digital decoder
To coaxial digital
audio input jack
To DIGITAL AUDIO
OUTPUT jack
COMPONENT2
Y
Pb
Pr
L
R
AUDIO
Y
Pb
Pr
L
R
AUDIO
L
R
AUDIO
VIDEO1
S-VIDEO1
COMPONENT1
L
R
AUDIO
VIDEO2
S-VIDEO2
AUDIO
OUT
VIDEO
OUT
Camcorder
To video
output
jack
To audio output jacks
To AUDIO INPUT jacks
To VIDEO1 INPUT jack
Rear of this TV
Video Game
VCR
Cables not included
Side of this TV
To VIDEO2
INPUT jack
To AUDIO INPUT jacks

12
EN
ANT. IN
AUDIO OUT AUDIO
HDMI
COMPONENT2
Y
Pb
Pr
L
R
AUDIO
Y
Pb
Pr
L
R
AUDIO
L
R
AUDIO
VIDEO1
AC IN
S-VIDEO1
COMPONENT1
HDMI IN
L
R
L
R
DIGITAL
AUDIO OUT
(COAXIAL)
1
2
AC IN
1
Connect the power cable to this TV first.
2
Connect the power cable to an AC outlet.
#
CAUTION
• Do not connect the power cable to a power
supply outside the indicated voltage of this TV
(AC 120V). Connecting the power cable to a
power supply outside of this range may result in
fire or electrical shocks.
• Always use the power cable included with this
TV. Do not use any other cable.
For safety, make sure to always connect the
power cable to a three pronged AC outlet.
CONNECTING THE POWER CABLE
Connect the power cable to this TV after connecting the input terminals.
[AUDIO OUTPUT CONNECTION]
1) If you connect this TV to an external audio device, you can enjoy much more of the broadcasting pro-
grams with the feeling of being at a live program.
Use the Audio cable (commercially available) for connection.
ANT. IN
AUDIO OUT AUDIO
HDMI IN
L
R
L
R
DIGITAL
AUDIO OUT
(COAXIAL)
HDMI
AUDIO
IN
Rear of this TV
Stereo system
To AUDIO OUTPUT jacksTo audio input jacks
Cables not included

13
EN
INITIAL SETTINGS
This section describes the initial settings when you
first turn on the power after purchase. The initial
setting items are shown below.
• LANGUAGE SELECTION
You can select the menu language displayed on
the screen among English, Spanish and French.
• AUTOSCAN (TV/DTV)
(Select “Air” when using antenna)
The channels broadcasted in TV and DTV are
automatically scanned and memorized. Only the
receivable channels in the area where this TV is
used will be memorized.
• AUTOSCAN (CATV)
(Select “Cable” when using RF/Incoming cable)
The channels broadcasted in CATV are automati-
cally scanned and memorized.
1 After making all the necessary connections, turn
on this TV.
2 Press [POWER]. Initial Setup menu will appear.
• This operation may take a few moments.
• If Initial Setup menu does not appear press
and hold
[ENTER] for 3 seconds, initial setup
will appear then proceed to step 3. If you have
already turned on this TV before, refer to
“LANGUAGE SELECTION” on page 17 to
select a language for the on-screen displays.
3 Select your language using [
K
/
L
], press
[ENTER].
When you first turn on the power, the following
screen is displayed.
The Antenna Confirmation will be displayed in
the selected language after you press
[ENTER].
Initial Setup
Initial Setup
Select the language used for setup.
Elija idioma de preparación.
Sélectionner langue écran config.
Select Enter Exit
SETUP
English
Español
Français
ENTER
ENTER
POWER SLEEP
AUDIO
STILL
SETUP
BACK
SCREEN
MODE
INFO
1 2 3
4 5 6
7 8 9
-
0
INPUT
SELECT
ENTER
POWER
4
Select destination of ANT IN jack using [
K
/
L
],
press
[ENTER].
5 Autoscan will start automatically.
• When scanning is completed, the smallest
memorized channel will be displayed.
NOTES:
• If you do not operate this TV for more than 45 seconds
while initial setup, the message boxes start to move to the
lower left-hand corner of the screen. This is for saving you
screen from burn-in. Press any key except [POWER] to can-
cel it.
• The initial Autoscan function can be executed for either “Air”
or “Cable” only once. When you change the connection
(Air/Cable), set the “Autoscan” again. (Refer to page 14.)
•
If you connect cable system directly, contact the CATV
installer.
• When the scanning is not completed, Helpful Hint will be
displayed every time you turn on the power. If you have
previously registered channels when this screen appears
you can select a channel with number buttons.
• Support hotline is provided on the front page of this
manual.
Initial Setup
Initial Setup
Now the system is scanning for channels,please wait.
Exit
SETUP
5%
Analog channels 1ch
Digital channels 0ch
Initial Setup
Initial Setup
Air
Cable
Select Enter Exit
SETUP
Back
BACK
ENTER
Make sure the antenna is connected to "ANT. IN" jack.
Select the destination of "ANT. IN" jack.
Air
Cable
Or
ANT IN
I
NITIAL SETTINGS
No channel is registered.
Press and hold "ENTER" key for 3 seconds.
Contact support hotline provided on manual or back of unit.
Sin canal registrado.
Mantenga oprimida la tecla "ENTER" durante 3 segundos.
Llame teléfono de apoyo en manual o atrás de TV.
Pas de chaîne consign.
Maintenir la touche "ENTER" pressée 3 secondes.
Contacter numero d'urgence dans manuel ou arrière appareil.
2-0
Hint: Before starting initial setup you must connect antenna.
PREPARATION FOR USE / INITIAL SETTINGS

14
EN
3 For TV channels, using [
K
/
L
], select “Air”.
For CATV channels, select “Cable”.
• Press
[ENTER].
Scanning and memorizing the channels auto-
matically starts.
• When the scanning and memorizing are com-
pleted, the smallest memorized channel in the
broadcasting will be displayed.
NOTES:
• If you do not operate this TV for more than 45 seconds
while initial setup, the message boxes start to move to the
lower left-hand corner of the screen. This is for saving your
screen from burn-in. Press any key except [POWER] to can-
cel it.
•
If you connect cable system directly, contact the CATV
installer.
• If you press [POWER] or [SETUP] during Autoscan, this
setting will be canceled.
• If there is no reception connected or poor signal is detected,
a Hint will appear on screen once scanning stops.
Now the system is scanning for channels, please wait.
Exit
SETUP
72%
Analog channels 10ch
Digital channels 6ch
Autoscan
Autoscan
Autoscan will rescan all channels.
This may take a while to complete.
Select the destination of "ANT. IN" jack.
Back
Air
Cable
Cable
1hour
Air
Cable
Or
ANT IN
AUTOSCAN
If you switch wires (e.g. between antenna and
CATV) or if you move the TV to a different area
after the initial setting, you need to perform
Autoscan again. This function lets you easily select
the receivable channels with
[CH
K
/
L
] and the TV
memorizes them even if you switch wires.
1 Display the setup screen.
• Press
[SETUP].
The following setup screen is displayed.
2
Select “CHANNEL” and press [ENTER] to con-
firm.
• Using
[
K
/
L
], select “Autoscan”.
• Press
[ENTER].
Channel
Channel
Autoscan
Channel List
Manual Register
Antenna
NOTE:
• Make sure if the TV is connected to antenna or cable.
ENTER
STILL
SETUP
BACK
SCREEN
MODE
INFO
CH RETURN
MUTE
VOL. CH
-
0
ENTER
SETUP
C
HANNEL SETTINGS

15
EN
CHANNEL SETTINGS
CHANNEL LIST
The Channel List function lets you skip the unnec-
essary channels from the Channel registration list.
1 Display the setup screen.
• Press
[SETUP].
The following setup screen is displayed.
2
Select “CHANNEL” and press [ENTER] to con-
firm.
• Using
[
K
/
L
], select “Channel List”.
• Press
[ENTER].
3
Select the channel you want to skip.
• Using
[
K
/
L
], select the channel.
• Press
[ENTER], and the highlight on the
selected channel disappears, then the channel
is set as skip. With
[CH
K
/
L
], you cannot
select the channel set as skip.
• If you want to receive the skipped channel,
select your desired channel and press
[ENTER].
• If you skip a major channel, you skip the minor
channels too.
4
To exit the setup, press [SETUP].
NOTE:
• The channel with “DTV” indicated on the display is ATSC,
otherwise the channel is NTSC.
Channel List
Channel List
DTV 8
DTV 8
DTV 6
DTV 6
9
9
DTV 48
DTV 48
58
58
27
DTV 67
Ch Select Watch/Skip Back
BACK
ENTER
Highlight channels for
Ch Up/Down key selection.
Channel
Channel
Autoscan
Channel List
Manual Register
Antenna
ENTER
STILL
SETUP
BACK
SCREEN
MODE
INFO
-
0
ENTER
SETUP
MANUAL REGISTER
You can register remainder of channels that were
not scanned by the Autoscan function due to the
bad reception status at the initial setting.
1 Display the setup screen.
• Press
[SETUP].
The following setup screen is displayed.
2 Select “CHANNEL” and press [ENTER] to con-
firm.
• Using
[
K
/
L
], select “Manual Register”.
• Press
[ENTER].
3 Select the channel you want to add.
• Using
Channel number buttons, select your
desired channel.
• Select “Register” with
[ENTER].
4
To exit the setup, press [SETUP].
NOTES:
• If the setup is completed successfully, “Registered to the
channel list.” is shown on the screen.
• If “Video1” is being used set up will not be completed suc-
cessfully. “Unavailable” will be shown on screen.
Manual Register
Manual Register
For Analog channels,
select a channel to register
using number keys.
For Digital channels,
you must perform Autoscan function.
Register
Ch Change
11
Back
BACK
Channel
Channel
Autoscan
Channel List
Manual Register
Antenna
ENTER
AUDIO
STILL
SETUP
BACK
SCREEN
MODE
INFO
1 2 3
4 5 6
7 8 9
-
0
ENTER
SETUP
1 2 3
4 6
7 8 9
-
0
5

16
EN
ANTENNA CONFIRMATION
You can verify the signal strength of each channel
to get a clearer picture.
1 Display the setup screen.
• Press
[SETUP].
The following setup screen is displayed.
2
Select “CHANNEL” and press [ENTER] to con-
firm.
• Using
[
K
/
L
], select “Antenna”.
• Press
[ENTER].
• Using
Channel number buttons or [CH
K
/
L
],
select the channel you want to confirm the
antenna situation.
Antenna
Antenna
Back
Ch Change
11
CH
Now 70 Peak 80
Channel
Channel
Autoscan
Channel List
Manual Register
Antenna
ENTER
POWER SLEEP
AUDIO
STILL
SETUP
BACK
SCREEN
MODE
INFO
CH RETURN
MUTE
VOL. CH
1 2 3
4 5 6
7 8 9
-
0
INPUT
SELECT
ENTER
SETUP
CH
1 2 3
4 5 6
7 8 9
-
0
• If the channel is set to external input, you can-
not confirm the antenna situation.
4
To exit the setup, press [SETUP].
Antenna
Antenna
Back
Ch Change
Video1
CH
Indicator is available
for antenna signal only.

17
EN
CHANNEL SETTINGS
LANGUAGE SELECTION
You can choose your on screen language from one
of the following English, Spanish or French.
1 Display the setup screen.
• Press
[SETUP].
The following setup screen is displayed.
2
Select “LANGUAGE” and press [ENTER] to con-
firm.
• Using
[
K
/
L
], select “English”, “Español” or
“Français”.
• Press
[ENTER].
3
To exit the setup, press [SETUP].
Language
Language
Select the language for setup display.
Elija idioma de preparación.
Sélectionner langue écran config.
Español
Français
English
ENTER
STILL
SETUP
BACK
SCREEN
MODE
INFO
CH RETURN
MUTE
VOL. CH
-
0
ENTER
SETUP
SETTING THE PANEL PROTECTION
Panel protection prevents the display from being
etched by an unchanging image. You can specify a
setting for it.
1 Display the setup screen.
• Press
[SETUP].
The following setup screen is displayed.
2
Select “DETAIL” and press [ENTER] to confirm.
• Using
[
K
/
L
], select “Panel Protection” and
press
[ENTER] to confirm.
3 Switch the Panel Protection mode.
• Using
[
K
/
L
], select “Strong”, “Weak” or “Off”
and press
[ENTER] to confirm.
NOTE:
•"Weak" moves 1 pixel every 5 minutes and "Strong"
moves 1 pixel every minute. This prevents images
burning into the screen.
4
To exit the setup, press [SETUP].
Panel Protection
Panel Protection
This function is useful for
burn-in reduction of the display
panel by shifting the picture
element.
Select the level for effect.
Strong
Weak
Off
Detail
Detail
Closed Caption
V–chip
HDMI Audio
Panel Protection
Auto
Off
ENTER
STILL
SETUP
BACK
SCREEN
MODE
INFO
CH RETURN
MUTE
VOL. CH
-
0
ENTER
SETUP
BACK

18
EN
CHANNEL SELECTION
You can select the channel by using either [CH
K
/
L
]
or Channel number buttons. How to select the
channel in each way is shown below.
1
Using [CH
K
/
L
], or Channel number buttons
and pressing
[ENTER].
• Using
[CH
K
/
L
], change the channel.
•
When you select a channel, press the channel
number you want to view with
Channel number
buttons. The selected channel will be displayed.
• When selecting analog channel 12
• When selecting digital channel 12-1
Be sure to press
[–] before entering the
minor-channel number.
•
If the channel broadcasts NTSC and ATSC both
and you don't press
[–], then you will receive the
NTSC channel only. The moment you press
[–],
the smallest memorized digital channel will be
displayed.
• When you press [CH RETURN], the previously
selected channel will be selected.
• Same operation is available with
[CHANNEL
K
/
L
] on the front panel of the main unit.
About minor-channel broadcasting:
There may be different programs being broad-
cast on minor-channels through a single chan-
nel from ATSC.You can watch each minor-
channel program being broadcast by selecting
one of the minor-channels.
NOTE:
In the DTV broadcasting, one channel sometimes broadcasts
multiple programs depending on the air time. In this case, the
main channel is called major channel and the minor-channel
is called minor channel.
1 1
2
-
ENTER
1 2
ENTER
ENTER
POWER SLEEP
AUDIO
STILL
SETUP
BACK
SCREEN
MODE
INFO
CH RETURN
MUTE
VOL. CH
1 2 3
4 5 6
7 8 9
-
0
INPUT
SELECT
ENTER
CH RETURN
MUTE
CH
1 2 3
4 5 6
7 8 9
-
0
VOLUME ADJUSTMENT
This section describes how to adjust the volume
when viewing TV. The Mute function, which is use-
ful when you have a visitor or a phone call, will be
also described.
1 Using [VOL.
X
/
Y
] or [MUTE]
[VOL.
X
/
Y
]
•
You can adjust the audio volume with [VOL.
X
/
Y
].
• The volume bar is displayed at the bottom of
the screen when adjusting the volume.
• Same operation is available with
[VOLUME
X
/
Y
] on the front panel of the main unit.
• The volume bar display will automatically dis-
appear in a few seconds.
[MUTE]
• Press [MUTE] on the remote control to mute
the sound.
• To release the Mute status, press
[MUTE]
again or press [VOL.
X
/
Y
].
• “Mute” is displayed on the screen for a few sec-
onds.
Mute
Volume 20
BACK
INFO
CH RETURN
MUTE
VOL. CH
MUTE
VOL.
NOTE:
“No signal” will appear on the screen after the minor-
channel broadcast is over.
You will need to change the channel to continue
watching another TV program.
: changes automatically
: change manually by pressing [CH / ]
on your remote control.
CH4-1
18:00
18:30
19:00
19:30
20:00
CH4-2
CH4-1
CH4-1
CH4-3
No signal No signal
CH4-3
ATSC
CH4
NTSC
No signal
CH4-2CH4-1
No signal
W
ATCHING TV

19
EN
WATCHING TV
STILL MODE
You can freeze the image shown on the screen.
1
Pausing image.
• Press
[STILL], the image shown on the screen
is paused.
• The audio is not paused and keeps on reading
out.
• If the digital signal is gone or protected, the
image will remain paused and the audio will be
muted.
• The Still function will be released after 5
minutes.
2 Canceling Still function
• The Still function will be canceled by pressing
any button while Still function is working.
SWITCHING AUDIO
This section describes how to switch the audio in
the analog mode and how to switch the audio lan-
guage in the digital mode.
1
Switch the audio.
• Every time you press
[AUDIO], the audio will
be switched as below.
When the broadcasting has all audio...
SAP / STEREO SAP / STEREO
SAP / MONO
TV
AUDIO
STILL
SETUP
SCREEN
MODE
7 8 9
-
0
AUDIO
NOTE:
Press any key except [POWER] to cancel still mode.
Still
AUDIO
STILL
SETUP
SCREEN
MODE
1 2 3
4 5 6
7 8 9
-
0
STILL
When the broadcasting has SAP and stereo
audio...
When the broadcasting has SAP and monaural
audio...
When the broadcasting is having only monaural
audio...
(cannot be switched.)
STEREO : Outputs stereo-audio
SAP : Outputs second audio program
MONO : Outputs mono-audio
1 Switch the audio language.
• When you press
[AUDIO], the currently selected
language and the number of received languages
will be displayed on the screen.
• Every time you press [AUDIO], the language
will be switched.
• Languages you can switch differ depending
on the receiving broadcast.
• The information display will automatically dis-
appear in one minute.
NOTE:
The [AUDIO] feature does not affect external source sound.
English 1/3 Spanish 2/3
Other 3/3
"Other" is indicated
when the language is not English,
Spanish or French.
*For international stations audio
language will still be displayed as
English.
6-1
English 1/3
DTV
6
SAP / STEREO
MONO
SAP / MONO SAP / MONO
SAP / STEREO SAP / STEREO

20
EN
SWITCHING EXTERNAL INPUT
When you connect external devices including a
video cassette recorder and home audio system,
you can easily switch the input mode with the
remote control.
1
Switch the input mode.
• When you press
[INPUT SELECT] or [CH
K
/
L
] on the remote control, the input mode will
be switched as below.
• To use the VIDEO1 or S-VIDEO1 INPUT jack on
the TV, select “Video1”.
• To use the VIDEO2 or S-VIDEO2 INPUT jack on
the TV, select “Video2”.
• To use the COMPONENT1 INPUT jacks on the
TV, select “Component1”.
• To use the COMPONENT2 INPUT jacks on the
TV, select “Component2”.
• To use the HDMI INPUT jack on the TV,
select “HDMI”.
TV/DTV channel
Video1
Video2
Component1
Component2
HDMI
ENTER
POWER SLEEP
AUDIO
STILL
SETUP
BACK
SCREEN
MODE
INFO
CH RETURN
MUTE
VOL. CH
1 2 3
4 5 6
7 8 9
-
0
INPUT
SELECT
INPUT
SELECT
INFO
CH
• When you press [INFO], the current external
input mode, the type of resolutions for video
signal, TV aspect ratio CC and TV rating will be
displayed at the top-right of the screen.
1) When using VIDEO1 or S-VIDEO1 INPUT jack
2) When using VIDEO2 or S-VIDEO2 INPUT jack
3) When using COMPONENT1 INPUT jacks
4) When using COMPONENT2 INPUT jacks
5) When using HDMI INPUT jack
• The information display will automatically dis-
appear in one minute.
HDMI
1080i
1080i
HD
HD
NONE
16:9
16:9
Component2
1080i
1080i
HD
HD
NONE
Component1
1080i
1080i
HD
HD
NONE
Video2
480i
480i
SD
SD
CC
CC
TV-PG DLSV
Video1
480i
480i
SD
SD
CC
CC
TV-PG DLSV

21
WATCHING TV
EN
CHANGING THE SCREEN DISPLAY MODE
Each 4 types of display mode can be selected in the
screen mode in both 4:3 and 16:9 TV aspect ratio.
You can select your favorite screen mode and enjoy
the program.
1 Switch the Screen mode.
• Every time you press
[SCREEN MODE], the TV
aspect ratio will be switched alternately.
2
To press [SCREEN MODE] repeatedly until the
normal screen displays.
NOTES:
• You may not switch the display mode depending on the pro-
gram.
• By changing the screen display mode from time to time, you
can reduce burn-in on screen
ENTER
AUDIO
STILL
SETUP
BACK
SCREEN
MODE
INFO
7 8 9
-
0
SCREEN
MODE
Sidebar
(normal)
Wide Cinema
Full
[Sidebar]
Sidebar will display a 4:3 picture at its standard
4:3 size. Sidebars will be displayed on the right
and left edges of the screen.
[Full]
Full will display a 4:3 picture at a 16:9 size,
with horizontal elongation necessary to fill the
screen.
[Cinema]
Cinema will display a 4:3 picture at a 16:9 size,
with less horizontal elongation necessary to fill
the screen because a little bit of the top and
bottom edge of the screen will be cut off.
[Wide]
Wide will display the center of the picture as orig-
inal size and the either side of the picture will be
elongation. The size of the picture will depends
on the original signal.
[Full]
A picture will be displayed at 16:9 size as it is.
[Zoom]
Zoom will display a 16:9 picture without chang-
ing its horizontal to vertical ratio, at its maxi-
mum size.
[Cinema]
Cinema will display a 16:9 picture with vertical
elongation.
[Expand]
Expand will display a 16:9 picture with horizon-
tal elongation.
When the broadcast is sending 4:3 video
signal...
When the broadcast is sending 16:9 video
signal...
ZoomFull
(normal)
Expand Cinema

22
EN
SCREEN INFORMATION
You can display the currently selected channel
number or other information such as the audio
mode on the screen for checking.
In the analog mode, the currently selected channel
number and the audio mode are displayed.
1
Display the channel number and the audio
mode.
• Press
[INFO] on the remote control.
The currently selected channel number, the
audio mode, the type of resolutions for video
signal, TV aspect ratio, CC and TV rating are
displayed at the top-right of the screen.
• To clear the display, press
[BACK] or [INFO]
again.
6
SAP / STEREO
TV-PG DLSV
480i
480i
4:3
4:3
SD
SD
CC
CC
TV
ENTER
AUDIO
STILL
SETUP
BACK
SCREEN
MODE
INFO
CH RETURN
MUTE
VOL. CH
7 8 9
-
0
INFO
BACK
In the digital mode, the detailed information for the
currently selected channel such as the Program
guide is displayed.
1 Display the detailed information for the channel.
• Press
[INFO] on the remote control.
The currently selected program details are dis-
played on the screen.
• The following information is displayed.
(1) Program title
(2) Broadcast station
(3) Program guide (max. 4 lines displayed)
(4) Channel number
(5) Audio language (“Other” is displayed when
the audio language cannot be acquired, or
the acquired languages are other than
English, Spanish or French.)
(6) Effective scanning lines and scan mode
(7) Program definition
(8) Program aspect rating
(9) Program rating
(10) CC (Not available if the CC set to “Off”)
• The following screen is displayed when con-
necting to external devices:
e.g.) When using VIDEO1 INPUT jack for con-
nection
Video1
TV-PG DLSV
480i
480i
SD
SD
CC
CC
NOTES:
• When the program guide is displayed in more than 5 lines,
use
[
K
/
L
] and scroll for reading.
• “No description provided” is displayed when the program
guide is not provided.
6-1
English 1/2
TV-PG DLSV
1080i
1080i
16:9
16:9
HD
HD
CC
CC
Buffy Vampire Slayer
Buffy Vampire Slayer
HDTV
HDTV
A quarter-century ago, which may now qualify as the
good old days of newspapering,run-of-paper sales
accounted for 80 percent of the industry's advertising
revenues. Department stores and supermarket were
(1) (2) (4)
(9)
(10)
(5)
(6), (7), (8)
(3)
DTV

23
EN
WATCHING TV / OPTIONAL SETTINGS
O
PTIONAL SETTINGS
SETUP SCREEN
This section describes the overview of the setup
screen displayed when you press
[SETUP].
For more details, see the reference page for each
item.
The setup screen consists of the function setting
items below.
•
To exit settings.
•
You can adjust the picture quality (Picture Mode,
Brightness, Contrast, Color, Tint, Sharpness and
Color Temp.).
(Refer to “PICTURE ADJUSTMENT” on page 24.)
•
You can automatically scan the
receivable channels and watch or
skip the channel as necessary.
(Refer to “AUTOSCAN” on page 14.)
•
You can change the display format for Closed
Caption as well as varied font styles, which dis-
plays the dialogue of a TV program or other infor-
mation across the screen. (Refer to “CLOSED
CAPTION” on page 25.)
Also, can set the viewing limitations such as
V-Chip of an MPAA rating and the TV rating.
(Refer to “V-CHIP” on page 28.)
HDMI Audio if the TV is connected to digital exter-
nal device such as DVD player. (Refer to “HDMI
AUDIO” on page 30.)
•
You can change the language (English, Spanish,
French) displayed in the setup screen.
(Refer to “LANGUAGE SELECTION” on page 17.)
NOTES:
• To move to the normal screen, press [SETUP].
• If you do not operate this TV for more than 45 seconds
while setup, the message boxes start to move to the lower
left-hand corner of the screen. This is for saving you screen
from burn-in. Press any key except [POWER] to cancel it.
SLEEP TIMER
The Sleep Timer function will automatically turn off
the power of the unit at a preset time.
1
Use Sleep Timer.
• Press
[SLEEP] on the remote control.
• The setting display for Sleep Timer is shown on
the screen.
2
Set the timer.
• You can select 10, 20, 30, 40, 50, 60, 70, 80
and 90 minutes by pressing
[SLEEP].
(You cannot set the timer per one minute. )
• You can set the timer up to 90 minutes.
• After setting, you can check the remained time
per 1 minute by pressing [SLEEP].
• To cancel the sleep timer, press
[SLEEP]
repeatedly until “Sleep Off” is displayed.
• The Sleep Timer setting display will automati-
cally disappear in a few seconds.
NOTE:
• When you disconnect the unit from the AC outlet or when a
power failure occurs, the sleep timer setting will be can-
celled.
Sleep
Off
Sleep
Off
ENTER
POWER SLEEP
AUDIO
STILL
SETUP
SCREEN
MODE
1 2 3
4 5 6
7 8 9
-
0
INPUT
SELECT
SLEEP

24
EN
PICTURE ADJUSTMENT
You can enjoy your favorite picture mode selecting
from five picture default settings that will adjust col-
ors to enhance your viewing experience. Also, the
brightness, contrast, color, tint, sharpness color
temperature, and energy saving settings can be
changed.
1 Display the setup screen.
• Press
[SETUP].
The following setup screen is displayed.
2
Select “PICTURE”, and press [ENTER] to con-
firm.
• Using
[
K
/
L
], select the your desired item and
press
[ENTER] to confirm.
3
Adjust the picture quality.
• Using
[
K
/
L
], select the picture quality item you
want to adjust.
Picture Mode
Using [
K
/
L
], adjust Picture Mode from the
selection, then press
[ENTER]. (Standard,
Dynamic, Movie and News)
Brightness
Using [
s
/
B
], adjust until the darkest parts of
the picture are as bright as you prefer.
s
:To decrease brightness
B
:To increase brightness
Adjust
Brightness 30
Move
Enter
ENTER
Picture
Picture
Standard
Dynamic
Movie
News
Picture Mode
Brightness
Contrast
Color
Tint
Sharpness
Reset Setting
Color Temp.
Picture
Picture
Picture Mode
Brightness
Contrast
Color
Tint
Sharpness
Reset Setting
Color Temp.
Dynamic
30
Neutral
60
36
0
0
0
ENTER
SETUP
BACK
SCREEN
MODE
INFO
ENTER
SETUP
Contrast
Using [
s
/
B
], adjust to increase or decrease
contrast.
s
:To decrease contrast
B
:To increase contrast
Color
Using [
s
/
B
], adjust to be brilliant or pale color.
s
:To pale
B
:To brilliant
Tint
Using [
s
/
B
], adjust to obtain natural skin
tones.
s
:To red
B
:To green
Sharpness
Using [
s
/
B
], adjust the detail of the picture.
s
:To soft
B
:To clear
Reset Setting
Using [
K
/
L
], select “Reset”.
You can reset setting of the Picture Mode you
select.
Color Temp.
Using [
K
/
L
], adjust Color Temperature from the
selection, then press
[ENTER].(Cool, Neutral
and Warm)
• The adjustment bar for picture quality item is
displayed on the screen.
4 To exit the setup, press [SETUP].
NOTE:
• To move to the normal screen, press [SETUP].
Picture
Picture
Cool
Neutral
Warm
Picture Mode
Brightness
Contrast
Color
Tint
Sharpness
Reset Setting
Color Temp.
Reset Setting
Reset Setting
This function resets settings of
"Dynamic" Picture Mode
to factory defaults.
Cancel
Reset
Adjust Move
Enter
ENTER
Sharpness 0
Adjust Move
Enter
ENTER
Tint R2
Adjust
Color 36
Move
Enter
ENTER
Adjust Move
Enter
ENTER
Contrast 60

25
EN
OPTIONAL SETTINGS
CLOSED CAPTION
You can view specially labeled (cc) TV programs,
movies, news and prerecorded tapes, etc. with
either a dialogue caption or text display added to
the program.
You can also change the font size and the font style
by selecting by selecting options in the
“Conventional CC”.
1 Display the setup screen.
• Press
[SETUP].
The following setup screen is displayed.
2
Select “DETAIL” and press [ENTER] to confirm.
• Using
[
K
/
L
], select “Closed Caption” and press
[ENTER] to confirm.
3 Select “Conventional CC” and press [ENTER] to
confirm.
Closed Caption
Closed Caption
Off
Off
Conventional CC
DTV CC
CC Style
Detail
Detail
Closed Caption
V–chip
HDMI Audio
Panel Protection
Auto
Off
ENTER
STILL
SETUP
BACK
SCREEN
MODE
INFO
CH RETURN
MUTE
VOL. CH
-
0
ENTER
SETUP
4
Switch the Closed Caption mode.
• Using
[
K
/
L
], select the desired closed caption,
then press
[ENTER].
[Caption Mode]
CC1 and Text1:
are the primary caption and text services.
The captioning or text is displayed in the same
language as the program’s dialog.
(up to 4 lines of script on the screen, where it
does not obstruct relevant parts of the picture)
CC3 and Text3:
serve as the preferred data channels.
The captioning or text is often a secondary lan-
guage translation, simplified English or displayed
at a slower rate.
CC2, CC4, Text2 and Text4:
are rarely available and broadcasters use them
only in special conditions, such as when CC1
and CC3 are not available or Text1 and Text3 are
not available.
• There are three display modes according to
programs:
Paint-on mode: Displays input characters on the
screen immediately.
Pop-on mode : Once characters are stored in
memory, they are displayed all
at once.
Roll-up mode : Displays the characters continu-
ously by scrolling (max. 4 lines).
5 To exit the setup, press [SETUP].
NOTES:
• If the closed caption is not broadcasted, nothing is dis-
played.
• The closed caption is not displayed when you use HDMI
connection.
• When your TV receives a special effects playback signal
(i.e., Search, Slow and Still) from a VCR’s video output
channel (CH3 or CH4), the TV may not display the correct
caption or text.
• Captions and texts may not match the TV voice exactly.
• Interference may cause the closed caption system not to
function properly.
• The caption or text characters will not be displayed while the
menu display or functions display is shown.
• If a black box appears on the screen, this means that the
TV is set to Text mode. To clear screen, select closed cap-
tion “CC1”, “CC2” , “CC3”, “CC4”or “Off”.
Closed Caption
Closed Caption
DTV CC
CC Style
Conventional CC Off
CC1
CC2
CC3
CC4
Text1
Text2
Text3
Text4

26
EN
DTV CLOSED CAPTION
1 Display the setup screen.
• Press
[SETUP].
The following setup screen is displayed.
2
Select “DETAIL” and press [ENTER] to confirm.
• Using
[
K
/
L
], select “Closed Caption” and press
[ENTER] to confirm.
3
Select “DTV CC” and press [ENTER] to confirm.
4 Switch the DTV Closed Caption mode.
• Using [
K
/
L
], select the desired DTV Closed
Caption, then press
[ENTER].
5 To exit the setup, press [SETUP].
NOTE:
DTV CC:
Apart from closed captions, DTV has its own closed captions
called DTV CC. Use this menu to change the settings for
DTV CC.
Off: Select if you do not want DTV CC. This is the default.
Service 1 to Service 6: Select one of these before chang-
ing any other item in the Closed Caption menu. Choose
Service 1 under normal circumstances.
Closed Caption
Closed Caption
Conventional CC
CC Style
DTV CC
Off
Service1
Service2
Service3
Service4
Service5
Service6
Closed Caption
Closed Caption
Off
Off
Conventional CC
DTV CC
CC Style
Detail
Detail
Closed Caption
V–chip
HDMI Audio
Panel Protection
Auto
Off
DTV
CLOSED CAPTION STYLE
1 Display the setup screen.
• Press
[SETUP].
The following setup screen is displayed.
2
Select “DETAIL” and press [ENTER] to confirm.
• Using
[
K
/
L
], select “Closed Caption” and press
[ENTER] to confirm.
3
Select “CC Style” and press [ENTER] to confirm.
4 Switch the Closed Caption Style.
• Using
[
K
/
L
], select the desired Closed Caption
Style.
5 Use “User Setting”.
• The “User Setting” function lets you change CC
style.
• Using
[
K
/
L
], select “User Setting”.
CC Style
CC Style
On
Off
Font Style
Font Size
Font Color
Font Opacity
Back Color
Back Opacity
Edge Color
Edge Type
User Setting
CC Style
CC Style
Off
Font0
Middle
White
Solid
Black
Black
None
Solid
User Setting
Font Style
Font Size
Font Color
Font Opacity
Back Color
Back Opacity
Edge Color
Edge Type
Closed Caption
Closed Caption
Conventional CC
DTV CC
CC Style
Off
Off
Detail
Detail
Closed Caption
V–chip
HDMI Audio
Panel Protection
Auto
Off

27
EN
OPTIONAL SETTINGS
6
Set each item.
• When “User Setting” is set to “On”, you can set
the following items.
• CC style set by “User Setting” will be displayed.
• Using
[
K
/
L
], select the item you want to set.
• You can switch the setting for each item with
[
K
/
L
].
• The setting description for each item is shown
below.
[Font Style]
Font style of the displayed caption can be
switched as below.
[Font Size]
Font size of the displayed caption can be
switched as below.
[Font Color]
Font color of the displayed caption can be
switched as below.
CC Style
CC Style
White
Black
Red
Green
Blue
Yellow
Magenta
Cyan
Closed Caption
User Setting
Font Style
Font Size
Font Opacity
Back Color
Back Opacity
Edge Color
Edge Type
Font Color
CC Style
CC Style
Small
Large
Middle
Closed Caption
User Setting
Font Style
Font Color
Font Opacity
Back Color
Back Opacity
Edge Color
Edge Type
Font Size
CC Style
CC Style
Closed Caption
User Setting
Font Size
Font Color
Font Opacity
Back Color
Back Opacity
Edge Color
Edge Type
Font Style
ABCDEFGHIJKL
ABCDEFGHIJKL
Picture display
Back
(Back Color and Back Opacity)
Font
(Font Style, Font Size, Font Color and Font Opacity)
Edge
(Edge Color and Edge Type)
[Font Opacity]
Font opacity of the displayed caption can be
switched as below.
[Back Color]
Background color of the displayed caption can
be switched as below.
[Back Opacity]
Background opacity of the displayed caption can
be switched as below.
[Edge Color]
Edge color of the displayed caption can be
switched as below.
[Edge Type]
Edge type of the displayed caption can be
switched as below.
• Press
[ENTER] and set “User Setting” to “ON”.
7
To exit the setup, press [SETUP].
CC Style
CC Style
Raised
Depressed
Uniform
L.Shadow
R.Shadow
None
Closed Caption
User Setting
Font Style
Font Color
Font Opacity
Back Color
Edge Color
Font Size
Back Opacity
Edge Type
CC Style
CC Style
White
Black
Red
Green
Blue
Yellow
Magenta
Cyan
Closed Caption
User Setting
Font Style
Font Size
Font Opacity
Back Color
Back Opacity
Edge Type
Font Color
Edge Color
CC Style
CC Style
Flash
Translucent
Transparent
Solid
Closed Caption
User Setting
Font Style
Font Color
Font Opacity
Back Color
Edge Color
Edge Type
Font Size
Back Opacity
CC Style
CC Style
White
Red
Green
Blue
Yellow
Magenta
Cyan
Closed Caption
Black
User Setting
Font Style
Font Size
Font Opacity
Back Opacity
Edge Color
Edge Type
Font Color
Back Color
CC Style
CC Style
Flash
Translucent
Transparent
Solid
Closed Caption
User Setting
Font Style
Font Size
Font Color
Back Color
Back Opacity
Edge Color
Edge Type
Font Opacity

28
EN
V-CHIP
You can set the viewing limitations to prevent your
children from watching inappropriate programs
including disagreeable expression and description.
The viewing limitations set for the program can be
released by entering the password.
1 Display the setup screen.
• Press
[SETUP].
The following setup screen is displayed.
2
Select “DETAIL” and press [ENTER] to confirm.
• Using
[
K
/
L
], select “V-chip”.
• Press
[ENTER].
The password entry screen is displayed.
V-Chip
V-Chip
PIN Code
Back
BACK
Enter password.
Detail
Detail
Closed Caption
V–chip
HDMI Audio
Panel Protection
Auto
Off
ENTER
POWER SLEEP
AUDIO
STILL
SETUP
BACK
SCREEN
MODE
INFO
1 2 3
4 5 6
7 8 9
-
0
INPUT
SELECT
ENTER
SETUP
1 2 3
4 5 6
7 8 9
0
3
Enter the password.
• Use
Channel number buttons and enter the
4-digit number.
• When you have not set up your password,
enter 0000.
• When the password is correct, the following “V-
chip” screen is displayed.
See the following description for setting each
item.
4
Display the “MPAA Rating” screen.
• Using
[
K
/
L
], select “MPAA Rating”.
• Press
[ENTER].
V-Chip
V-Chip
Select View/Block Back
BACK
ENTER
X
NC-17
R
PG-13
PG
G
NR
V-Chip
V-Chip
MPAA Rating
TV Rating
New Password
A
MPAA Rating
V-Chip
V-Chip
MPAA Rating
TV Rating
New Password
A
MPAA Rating
B
TV Rating
C
New Password
V-Chip
V-Chip
PIN Code
Back
BACK
Enter password.

29
EN
OPTIONAL SETTINGS
5 Set “MPAA Rating”.
• Using the
[
K
/
L
], select the rating.
• Press
[ENTER] and set to “View” or “Block”.
6 To exit the setup, press [SETUP].
4 Display the “TV Rating” screen.
• Using
[
K
/
L
], select “TV Rating”.
• Press
[ENTER].
V-Chip
V-Chip
Select View/Block Back
BACK
ENTER
TV-MA
TV-14
TV-PG
TV-G
TV-Y7
TV-Y
FV
V S L D
V-Chip
V-Chip
MPAA Rating
TV Rating
New Password
B
TV Rating
<Selection>
<Rating Category Explanations>
X : Mature audience only
NC-17 : No one under 17 admitted
R : Restricted; under 17 requires
accompanying parent or adult
guardian
PG-13 :
Unsuitable for children under 13
PG : Parental Guidance suggested
G : General Audience
NR : No Rating
V-Chip
V-Chip
Select View/Block Back
BACK
ENTER
X
NC-17
R
PG-13
PG
G
NR
5 Set “TV Rating”.
• Using
[
K
/
L
], select the rating.
• Press
[ENTER] and set to “View” or “Block” for
the rating without sub categories.
• For the rating with sub categories, they are dis-
played by pressing
[ENTER] twice.
Press
[
K
/
L
/
s
/
B
] and select the rating. Then
press
[ENTER] and set to “View” or “Block”.
6 To exit the setup, press [SETUP].
NOTES:
for MPAA Rating and TV Rating
• When you select a rating and set it to “Block”, the higher
ratings will be blocked automatically. The lower ratings will
be available for viewing.
• When you select a rating and set it to “View”, the lower rat-
ings will be available for viewing automatically. The higher
ratings will be blocked.
<Selection>
<Rating SubCategory Explanations>
FV : Fantasy Violence
V : Violence
S : Sexual Situation
L : Coarse Language
D : Suggestive Dialog
<Selection>
<Rating Category Explanations>
TV-MA : Mature audience only
TV-14 :
Unsuitable for children under 14
TV-PG : Parental Guidance suggested
TV-G : General Audience
TV-Y7 : Appropriate for children seven
and older
TV-Y : Appropriate for all children
V-Chip
V-Chip
Select View/Block Back
BACK
ENTER
TV-MA
TV-14
TV-PG
TV-G
TV-Y7
TV-Y
FV
V S L D
V-Chip
V-Chip
Select View/Block Back
BACK
ENTER
TV-MA
TV-14
TV-PG
TV-G
TV-Y7
TV-Y
FV
V S L D

30
EN
4 Display the “New Password” screen.
• Using
[
K
/
L
], select “New Password”.
• Press
[ENTER].
5 Change the Password.
• Use
Channel number buttons on the remote
control and enter the NEW 4-digit Password.
• Enter Password again in “Confirm Password”
box.
6
To exit the setup, press [SETUP].
NOTES:
• Make sure to enter the exact same new password in the
“Confirm Password” space as one in the space. If they are
different, the space is cleared for reentering.
• Your password will be erased and return to the default
(0000) when a power failure occurs or this TV has been
unplugged for more than 10 seconds. If you forget the pass-
word, unplug the power cord for more than 10 seconds to
restore the password to 0000.
V-Chip
V-Chip
PIN Code
Back
BACK
Confirm password.
Enter password.
V-Chip
V-Chip
MPAA Rating
TV Rating
New Password
C
New Password
HDMI AUDIO
Set the method of sound input for HDMI jack.
1
Display the setup screen.
• Press
[SETUP].
The following setup screen is displayed.
2 Select “DETAIL” and press [ENTER] to confirm.
• Using
[
K
/
L
], select “HDMI Audio” and press
[ENTER] to confirm.
3
Switch the HDMI Audio.
• Using
[
K
/
L
], select the desired HDMI Audio,
then press
[ENTER].
• Select “Auto” if you connected to both digital
device with HDMI jack and analog device for
audio sources. Digital audio input signal has
prior in this setting.
• Select “Digital” if you connected to digital
device with HDMI jack for digital audio input
signal.
• Select “Analog” if you connected to analog
device with analog jacks for analog audio input
signal.
4 To exit the setup, press [SETUP].
Detail
Detail
Closed Caption
V–chip
HDMI Audio
Panel Protection
Auto
Digital
Analog
Detail
Detail
Closed Caption
V–chip
HDMI Audio
Panel Protection
Auto
Off
ENTER
STILL
SETUP
BACK
SCREEN
MODE
INFO
-
0
ENTER
SETUP

31
EN
OPTIONAL SETTINGS / ATTACHING A WALL MOUNT BRACKET (SOLD SEPARATELY)
1 Turn the TV over and place it screen-first onto a
table which has a soft cloth draped over it.
Place the TV in a way so that the stands hang
over the edge of the table.
2
Remove the stands from the TV.
Unscrew the M5 screws indicated by , and
remove the left and right stands.
3
Attach the left and right TV rails to the TV using
the M8 screws included with the wall mount kit.
indicates the position of the screw holes on
the TV.
4 Attach the TV to the wall.
* If you want to attach the stand of this TV again,
insert the stand slowly as illustrated below and
drive screws in the 4 threaded holes ( ).
1
2
1
A
TTACHING A WALL MOUNT BRACKET
(SOLD SEPARATELY)
The following is a description of the method for attaching a wall mount to the TV.
When performing this operation, refer to the instruction manual included with the wall mount kit.
ANT. IN
AUDIO OUT AUDIO
HDMI
COMPONENT2
Y
Pb
Pr
L
R
AUDIO
Y
Pb
Pr
L
R
AUDIO
L
R
AUDIO
VIDEO1
AC IN
S-VIDEO1
COMPONENT1
HDMI IN
L
R
L
R
DIGITAL
AUDIO OUT
(COAXIAL)
2
Stand
Rear of this TV
1
1
#
CAUTION
•Any damage caused by incorrectly attempting to mount the TV is not covered under the terms of the
manufacturer’s warranty.
• This TV is for use only with the Sanus Systems Model VMPL. Wall Mount. Use with other wall mounts
may result in instability causing possible injury.
NOTE:
• The screws and stands you have removed are neces-
sary for reattachment at a later date. Make sure to
keep them in a safe place.
NOTE:
• Only use the screw holes indicated by for mount-
ing the TV.
•For instructions on how to attach the TV rails, refer to
the instruction manual included with the mount wall
kit.
2
NOTES:
•
Make sure to use a table which can support the
weight of the TV and is larger than the TV.
• Make sure the table is in a stable location.
NOTE:
• Refer to the instruction manual included with the
mount wall when securing the TV to the wall.
1

32
EN
TROUBLESHOOTING GUIDE
Before calling for service, check the following chart again.
Symptom Remedy
No power
No picture or sound
No color
Sound OK, Picture Poor
Picture Distorted
Weak Picture
Lines or Streaks in Picture
Picture blurred
Ghosts in picture
Bars on screen
• Be sure the Power cord is connected to outlet.
• If a power failure occurs, unplug the power cord for 30 minutes
to allow the unit to reset itself.
• Check if the power is on.
• Check the outlet connection.
• Check the antenna or cable connection to the main unit.
• When the outside antenna is used, check the wire condition and
connection.
• Try to view other channels. It may be the problem on the broad-
casting station.
• Turn off the power and wait for about 1 minute, then turn it on
again.
• Check the antenna or cable connection to the main unit.
• When the outside antenna is used, check the wire condition and
connection.
• Try to view other channels. It may be the problem on the broad-
casting station.
• Adjust the Color in the setup screen.
• Check the antenna or cable connection to the main unit.
• When the outside antenna is used, check the wire condition and
connection.
• Electric waves may be interfered due to the electric appliances,
etc. nearby.
• Adjust Contrast and Brightness in the setup screen.
• Try to view other channels. It may be the problem on the broad-
casting station.
• When the outside antenna is used, check the wire condition and
connection.
• Try to view other channels. It may be the problem on the broad-
casting station.
• Check the antenna or cable connection to the main unit.
• When the outside antenna is used, check the wire condition and
connection.
• Adjust Contrast and Brightness in the setup screen.
• Try to view other channels. It may be the problem on the broad-
casting station.
• When the outside antenna is used, check the wire condition and
connection.
• Electric waves may be interfered due to the electric appliances,
etc. nearby.
• Try to view other channels. It may be the problem on the broad-
casting station.
• When the outside antenna is used, check the wire condition and
connection.
• Try to view other channels. It may be the problem on the broad-
casting station.
• Check the antenna or cable connection to the main unit.
• When the outside antenna is used, check the wire condition and
connection.
• Electric waves may be interfered due to the electric appliances,
etc. nearby.
• Try to view other channels. It may be the problem on the broad-
casting station.
• When the outside antenna is used, check the wire condition and
connection.
• Electric waves may be interfered due to the electric appliances,
etc. nearby.
M
ISCELLANEOUS

33
EN
MISCELLANEOUS
Symptom Remedy
Picture rolls vertically
Different color marks on screen
Poor reception on some channels
Picture OK, sound poor
Burn-in on screen
No reception of digital signals
The entered channel number changes
automatically
Remote control doesn’t work
Problems on Closed Caption
Misspelled captions are displayed.
Captions are not entirely displayed, or
captions are delayed behind the dia-
logue.
Captions are displayed as a white
box.
No caption is displayed in the Closed
Caption-supported program.
No caption is displayed when playing
the videotape containing captions.
Black box is displayed in the screen.
• When the outside antenna is used, check the wire condition and
connection.
• Electric waves may be interfered due to the electric appliances,
etc. nearby.
• Try to view other channels. It may be the problem on the broad-
casting station.
• Move the TV apart from electric appliances nearby. Turn off the
power and wait for about 30 minutes, then turn it on again.
• Try to view other channels. It may be the problem on the broad-
casting station.
• Check the antenna or cable connection to the main unit.
• When the outside antenna is used, check the wire condition and
connection.
• Electric waves may be interfered due to the electric appliances,
etc. nearby.
• Try to view other channels. It may be the problem on the broad-
casting station.
• Electric waves may be interfered due to the electric appliances,
etc. nearby.
• Try to view other channels. It may be the problem on the broad-
casting station.
• Do not display the continuous image such as video games,
computer graphics, stock market quotations, and other fixed pat-
terns. This may cause the burn-in of the display.
If the problem occurs, display a motion picture such as broad-
casting to reduce the problem.
This continuous on-screen displays can cause permanent dam-
age to the screen. Such burn-in caused by misuse are NOT
COVERED by your warranty.
•
Make sure that Autoscan in the setup screen has been complet-
ed. It will be required when you setup TV for the first time or when
TV is moved to a location where other channels are broadcast.
• The selected channel does not exist at that time. There are not
always minor-channels being broadcast.
•
When Autoscan is interrupted and not completed, some channels will
not be received. Make sure to complete Autoscan in the setup screen.
•
Many digital channels have alternate channel numbers. TV changes the
numbers automatically to the ones signifying the broadcasting stations.
These are the numbers used for analog broadcasts.
• Check the antenna or cable connection to the main unit.
• Check the battery life of the remote control.
• Check if there is an obstacle between the sensor and the
remote control.
• Test the signal output. If OK, then possible remote sensor trou-
ble. (Refer to “IR SIGNAL CHECK” on page 35.)
• Closed captioning production companies may broadcast pro-
grams without correcting the misspelling in a live broadcast.
•
Captions that are delayed a few seconds behind the actual dialogue
are common for live broadcasts. Most captioning production compa-
nies can display a dialogue to a maximum of 220 words per minute. If
a dialogue exceeds that rate, selective editing is used to insure that
the captions remain up-to-date with the current TV screen dialogue.
• When electric waves are interfered due to buildings, weather
conditions etc., incomplete captions may be displayed.
• Broadcasting station may shorten the program to insert the
advertisement. The closed caption decoder cannot read the
information of the shortened program.
• The videotape may be illegally copied, or the caption signal may
fail to be read while coping.
• “Text” mode is selected for caption. Select “CC1”, “CC2” “CC3”,
“CC4” or “Off”.

34
EN
•IGNITION NOISE:
Black spots or horizontal streaks may appear, picture may flutter or drift.
Usually caused by interference from automobile ignition systems, neon
lamps, electrical drills and other electrical appliances.
•GHOSTS:
Ghosts are caused by the television signal following two paths. One is the
direct path and the other is reflected from tall buildings, hills or some
other objects. Changing the direction or position of the antenna may
improve reception. Ghosting may also be caused by defects in the
antenna system such as unshielded leads or connecting several sets to
the same antenna without using multiple antenna couplers.
Ghosting occurring when the TV is connected to a cable TV system may
indicate a bad cable wire or loose connection. Confirm that the cable wire
is properly connected.
•SNOW:
If your receiver is located in the fringe area of a television station where
the signal is weak, your picture may be marred by the appearance of
small dots. When the signal is extremely weak, it may be necessary to
install a special antenna to improve the picture.
Snowing occurring when the TV is connected to a cable TV system may
indicate a bad cable wire or loose connection. Confirm that the cable wire
is properly connected.
•The plasma display panel is lighting the phosphors by the discharge of
internal radiation. Depending on the screen contents, in rare cases this
may cause vertical stripes to appear because of failure to light. Please
note that this is not a malfunction.
Vertical stripes appear,
depending on the screen
contents.
•RADIO FREQUENCY INTERFERENCE:
The interference produces moving ripples or diagonal streaks, and in
some cases, causes loss of contrast in the picture.
•PREVENTION OF AN OBSTACLE TO RADIO RECEIVERS:
This TV has been designed pursuant to the FCC class B Rules. This is to
prevent a problem to Radio receivers. lf this monitor causes a problem to
Radio receivers, then take the following steps:
-Keep the monitor away from Radio.
-Adjust Radio antennas in order for the TV not to receive
interference.
-The antenna cable of Radio should be kept away from the TV.
-Use a coaxial cable for antenna.
You can check if this monitor influences Radio receivers by turning off all
other equipment other than the TV.
If you find a problem receiving Radio when using the TV, check the
instructions mentioned above.

35
EN
MISCELLANEOUS
ATSC
Acronym that stands for Advanced
Television Systems Committee and
the name of the digital broadcasting
standards.
Aspect ratio
The width of a TV screen relative
to its height. Conventional TVs are
4:3 (in other words, the screen is
almost square); widescreen
models are 16:9 (the screen is
almost twice as wide as it is high).
Component video
This is a video signal format that
conveys each of three principal
colors of light (red, blue and
green) through different signal
lines. This allows the viewers to
experience picture colors as
original as it is. There are several
signal formats, including Y / Pb /
Pr and Y / Cb / Cr.
Dolby Digital
The system developed by Dolby
Laboratories to compress digital
sound. It offers you sound of
stereo (2ch) or multi-channel
audio (up to 5.1ch).
HDMI (High-Definition
Multimedia Interface)
Interface that supports all
uncompressed, digital audio/video
formats including set-top box,
DVD player or digital television,
over a single cable.
High Definition TV (HDTV)
Ultimate digital format that
produces high resolution and high
picture quality.
LPCM
(Linear Pulse Code Modulation)
LPCM is a format that can have
up to 8 channels of audio. It is
mainly used in music production.
The format samples and captures
analog signals and transforms
them into digital signals without
compressing the sound data.
NTSC
Acronym that stands for National
Television Systems Committee
and the name of the current
analog broadcasting standards.
Password
A stored 4-digit number that you
must provide in order to make
settings for V-CHIP.
SAP
(Secondary Audio Program)
Second-audio channel delivered
separately from main-audio
channel. This audio channel is
used as an alternate in bilingual
broadcasting.
Standard Definition TV (SDTV)
Standard digital format that is
similar to the NTSC picture
quality.
S-Video
It delivers independently each
signal of color(C) and luminance
(Y) to TV as video signals, so that
higher-quality picture will be
gained.
CABINET CLEANING
• Always unplug the TV from the AC outlet before
cleaning.
Clean the case of the TV with a soft cloth which
has been wet and wrung dry.
• If the screen is dirty or dusty, wipe it clean with a
soft cloth.
NOTE:
Never use a solvent, alcohol or any other abrasive liquid
to clean the TV.
Always make sure the area around vents on the TV is
clear and clean. Failure to do this may result in fire or
cause the TV to fail prematurely.
SERVICING
Should your unit become inoperative, do not try to
correct the problem by yourself. There are no user
serviceable parts inside. Turn off, unplug the power
cord and please call our help line mentioned on the
front page, to locate an Authorized Service Center.
IR SIGNAL CHECK
If the remote control doesn’t work properly, You can
test if the remote control sends out the infrared sig-
nal with an AM radio or a digital camera (including
built-in camera of cellular phone). It will help to
define the cause of malfunction.
•
With an AM radio:
Tune an AM radio to a band with
no broadcasting. Press a button
on remote control toward the
radio. Sound will be fluttering
when you press any key and the
radio receives the signal. This
means the remote control unit is
working.
•
With a digital camera (including built-
in camera of cellular phone):
Direct a digital camera to remote con-
trol, press and hold a button on remote
control. If infrared light appears
through digital camera, the remote
control unit is working.
MAINTENANCE
GLOSSARY

36
EN
S
PECIFICATIONS
GENERAL SPECIFICATIONS
Television system: ATSC
NTSC-M
TV Standard
Closed Caption
System:
§15.119/FCC (Analog CC)
§15.122/FCC (Digital CC)
Channel coverage (ATSC/NTSC)
VHF:
2 ~ 13
UHF: 14 ~ 69
CATV: 2 ~ 13, A ~ W,
W+1 ~ W+94,
A-5 ~ A-1, 5A
Tuning System: Channel frequency
synthesized tuning system
Channel access: Direct access keyboard,
Programmable scan,
and Up/down
Terminals
Antenna input:
VHF/UHF/CATV
75 ohm unbalanced
(F-type)
S-Video input: Mini DIN 4-pin jack x 2
Video input: RCA jack x 2
Audio input: RCA jack (L/R) x 4
Component Video/Audio input:
One pin jack (Y) / 1Vpp x 2
Two pin jacks (Pb/Pr) / 700mVpp x 4
RCA jack (L/R) x 4
HDMI / Audio input:
HDMI jack
RCA jack (L/R) x 2
Coaxial digital audio output:
One pin jack, 500mVpp
Analog Audio output:
RCA jack (L/R) x 2
Stereo Sound System Speaker
ELECTRICAL SPECIFICATIONS
Sound output: 5W, 8 ohm x 4
OTHER SPECIFICATIONS
Remote control: Digital encoded
infrared light system
Operating
temperature:
5°C to 40°C
(41°F to 104°F)
Power requirements: AC120V, 60Hz
Power consumption
(Maximum):
400W
Plasma panel: 42" XGA panel
Dimensions: H:30-11/16" (780mm)
W: 41-1/2" (1054mm)
D:13" (330mm)
Weight: 95.9 lbs. (43.5kg)
• Designs and specifications are subject to change without notice and without our legal obligation.
• If there is a discrepancy between languages, the default language will be English.

37
EN
SPECIFICATIONS / MEMO
M
EMO

1EMN21782 Printed in Malaysia
L0700UA
★★★★★
SYLVANIA
LIMITED WARRANTY
FUNAI CORP. will repair this product, free of charge in the USA in the event of defect in materials or workmanship as follows:
DURATION:
PARTS: FUNAI CORP. will provide parts to replace defective parts without charge for one (1) year from the
date of original retail purchase. Three (3) years for Plasma Panel. Certain parts and Plasma image
burn-in are not covered under this warranty.
LABOR: FUNAI CORP. will provide the labor without charge for a period of ninety (90) days from the date of
original retail purchase.
LIMITS AND EXCLUSIONS:
THIS WARRANTY IS EXTENDED ONLY TO THE ORIGINAL RETAIL PURCHASER. A PURCHASE RECEIPT OR
OTHER PROOF OF ORIGINAL RETAIL PURCHASE WILL BE REQUIRED TOGETHER WITH THE PRODUCT TO
OBTAIN SERVICE UNDER THIS WARRANTY.
This warranty shall not be extended to any other person or transferee.
This warranty is void and of no effect if any serial numbers on the product are altered, replaced, defaced, missing or if
service was attempted by an unauthorized service center. This limited warranty does not apply to any product not pur-
chased and used in the United States.
This warranty only covers failures due to defects in material or workmanship which occurs during normal use. It does not
cover damage which occurs in shipment, failures which are caused by repairs, alterations or product not supplied by
FUNAI CORP., or damage which results from accident, misuse, abuse, mishandling, misapplication, alteration, faulty
installation, improper maintenance, commercial use such as hotel, rental or office use of this product or damage which
results from fire, flood, lightning or other acts of God.
THIS WARRANTY DOES NOT COVER PACKING MATERIALS, ANY ACCESSORIES (EXCEPT REMOTE CONTROL),
ANY COSMETIC PARTS, COMPLETE ASSEMBLY PARTS, DEMO OR FLOOR MODELS.
FUNAI CORP. AND ITS REPRESENTATIVES OR AGENTS SHALL IN NO EVENT BE LIABLE FOR ANY GENERAL,
INDIRECT OR CONSEQUENTIAL DAMAGES ARISING OUT OF OR OCCASIONED BY THE USE OF OR THE
INABILITY TO USE THIS PRODUCT. THIS WARRANTY IS MADE IN LIEU OF ALL OTHER WARRANTIES, EXPRESS
OR IMPLIED, AND OF ALL OTHER LIABILITIES ON THE PART OF FUNAI, ALL OTHER WARRANTIES INCLUDING
THE WARRANTY OF MERCHANTABILITY AND FITNESS FOR A PARTICULAR PURPOSE, ARE HEREBY DIS-
CLAIMED BY FUNAI AND ITS REPRESENTATIVES IN THE UNITED STATES.
ALL WARRANTY INSPECTIONS AND REPAIRS MUST BE PERFORMED BY AN AUTHORIZED SERVICE CENTER.
THIS WARRANTY IS ONLY VALID WHEN THE UNIT IS CARRIED-IN TO AN AUTHORIZED SERVICE CENTER.
THE PRODUCT MUST BE ACCOMPANIED BY A COPY OF THE ORIGINAL RETAIL PURCHASE RECEIPT. IF NO
PROOF OF PURCHASE IS ATTACHED, THE WARRANTY WILL NOT BE HONORED AND REPAIRS COSTS WILL BE
CHARGED.
IMPORTANT:
THIS LIMITED WARRANTY GIVES YOU SPECIFIC LEGAL RIGHTS.YOU MAY HAVE OTHER RIGHTS THAT VARY
FROM STATE TO STATE. IF, AT ANY TIME DURING THE WARRANTY PERIOD, YOU ARE UNABLE TO OBTAIN SATIS-
FACTION WITH THE REPAIR OF THIS PRODUCT, PLEASE CONTACT FUNAI CORP.
ATTENTION:
FUNAI CORP. RESERVES THE RIGHT TO MODIFY ANY DESIGN OF THIS PRODUCT WITH-
OUT PRIOR NOTICE.
WARRANTY STATEMENT REGARDING NON AUTHORIZED REPAIRS:
To obtain warranty service, you must take the product, or deliver the product freight prepaid, in either its original packaging or
packaging affording an equal degree of protection, to any AUTHORIZED SERVICE CENTER. FUNAI CORP. will not reimburse
you for any service done by unauthorized service providers without prior written approval.
To locate your nearest AUTHORIZED SERVICE CENTER or for general service inquiries, please
contact us at :
FUNAI CORPORATION
Customer Service
Tel :1-800-605-8453
http://www.SylvaniaConsumerElectronics.com
19900 Van Ness Avenue, Torrance, CA 90501

PARA RECIBIR SEÑAL DIGITAL ANALÓGICA
DEBE CONECTAR LA ANTENA.
Televisión con pantalla de plasma
digital/analógica de 42 pulgadas
Manual del Usuariol
6842THG
SI NECESITA AYUDA ADICIONAL CON LA INSTALACIÓN O CON EL FUNCIONAMIENTO
DESPUÉS DE LEER EL MANUAL DEL USUARIO, LLAME AL TELÉFONO GRATUITO
1-800-605-
8453 O VISITE NUESTRO SÍTIO WEB EN http://www.SylvaniaConsumerElectronics.com
ENTER
POWER SLEEP
INPUT
SELECT
AUDIO
STILL
SETUP
BACK
SCREEN
MODE
INFO
CH RETURN
MUTE
VOL. CH
1 2 3
4 5 6
7 8 9
-
0
HIGH-DEFINITION TELEVISION
Si cambia el modo de visualización de pantalla de vez en
cuando, puede reducir el efecto de imagen remanente
en pantalla (consulte “CAMBIO DEL MODO DE
VISUALIZACIÓN DE PANTALLA” en página 21).

2
ES
ESTE SÍMBOLO INDICA QUE DENTRO DE
ESTA UNIDAD SE ENCUENTRA PRESENTE
VOLTAJE PELIGROSO QUE CONSTITUYE UN
RIESGO DE CHOQUE ELÉCTRICO.
ESTE SÍMBOLO INDICA QUE EXISTEN
IMPORTANTES INSTRUCCIONES DE
OPERACIÓN Y MANTENIMIENTO EN LA
LITERATURA QUE ACOMPAÑA ESTE
APARATO.
La nota importante está situada en la parte trasera del gabinete.
ADVERTENCIA:
PARA REDUCIR EL RIESGO DE INCENDIO O CHOQUE ELÉCTRICO, NO EXPONGA ESTE
EQUIPO A LA LLUVIA O HUMEDAD.
1. Lea estas instrucciones.
2. Guarde estas instrucciones.
3. Preste atención a todas las advertencias.
4. Siga todas las instrucciones.
5. No utilice este aparato cerca del agua.
6. Límpielo sólo con un trapo seco.
7. No bloquee ninguna abertura de ventilación.
Instálelo de acuerdo con las instrucciones del
fabricante.
8. No lo instale cerca de ninguna fuente de calor
como radiadores, rejillas de calefacción, estufas
ni ningún otro aparato (incluyendo amplifi-
cadores) que produzca calor.
9. Por motivos de seguridad, utilice un enchufe de
conexión a tierra o polarizado. El enchufe polar-
izado tiene dos hojas, una de las cuales es más
ancha que la otra. El enchufe de conexión a
tierra tiene dos hojas y una tercera clavija de
conexión a tierra. La hoja ancha o la tercera
clavija están provistas para su seguridad. Si el
enchufe incluido no encaja en su tomacorriente,
consulte a un electricista para que reemplace el
tomacorriente obsoleto.
10. Proteja el cable de alimentación para que no lo
pisen ni lo aplasten, especialmente en la parte
de los enchufes, en los receptáculos y en el
punto desde donde sale del aparato.
11. Utilice sólo los acoples/accesorios especifica-
dos por el fabricante.
12. Utilícelo sólo con el carro, el
soporte, el trípode o la mesa
especificados por el fabricante
o vendidos con el aparato.
Cuando se utiliza un carro, la
combinación carro/aparato
debe ser movida con cuidado
para evitar lesiones causadas
por una caída.
13. Desenchufe este aparato durante tormentas
eléctricas o cuando no se lo utilice durante
períodos de tiempo prolongados.
14. Deje toda la reparación al personal de servicio
calificado. Es necesaria la reparación cuando el
aparato se dañó de alguna manera, por ejemp-
lo, si el cable de alimentación de energía o el
enchufe está dañado, si se derramó líquido o si
se cayeron objetos en el aparato, o si el aparato
fue expuesto a la lluvia o humedad, o si no fun-
ciona normalmente o si se cayó.
15. No se debe exponer al aparato a goteos ni a
salpicaduras y no se debe colocar sobre el
mismo ningún objeto que contenga líquido,
como floreros.
Para reducir el riesgo de incendios o descargas
eléctricas, no exponga este aparato a la lluvia ni
a la humedad.
ADVERTENCIA SOBRE
LA CARRETILLA PORTÁTIL
S3126A
INSTRUCCIONES DE SEGURIDAD IMPORTANTES
PRECAUCIÓN:
PARA REDUCIR EL RIESGO DE
CHOQUE ELÉCTRICO, NO RETIRE LA CUBIERTA (O PARTE
POSTERIOR). NO EXISTEN PARTES REPARABLES POR EL
USUARIO EN EL INTERIOR. LAS REPARACIONES DEBEN
REALIZARSE POR PERSONAL DE SERVICIO CALIFICADO.
CAUTION
RISK OF ELECTRIC SHOCK
DO NOT OPEN

3
ES
INSTRUCCIONES DE SEGURIDAD IMPORTANTES / PRECAUCIONES
PRECAUCIONES
• Coloque el TV en una habitación suficientemente ventilada.
• Manténgalo alejado de fuentes de calor, como aparatos de calefacción, o de la acción directa del sol.
• No coloque el TV sobre superficies blandas, como alfombrillas o mantas.
• Deje suficiente espacio para que circule el aire alrededor del equipo.
Podrá encontrar el número de serie correspondiente en la parte trasera de la unidad. Ninguna otra unidad
tiene el mismo número de serie que la suya. Deberá registrar aquí el número y otra información importante, y
conservar este libro como registro permanente de su compra para ayudarle a identificar la unidad en caso de
robo. Los números de serie no se conservan en el archivo.
Nota para el instalador del sistema CATV:
Este recordatorio se proporciona para que el instalador del sistema CATV preste atención al Artículo
820-40 del NEC el cual proporciona pautas para una correcta conexión a tierra y, en particular, especifi-
ca que la conexión a tierra del cable debe estar conectada al sistema de tierra del edificio, tan cerca al
punto de entrada del cable como sea práctico.
PRECAUCIÓN:PARA EVITAR CHOQUES ELÉCTRICOS, CONECTE LA LÁMINA ANCHA DEL
ENCHUFE EN LA RANURA ANCHA DE LA TOMA DE CORRIENTE, INSERTE POR COMPLETO.
ADVERTENCIA DE LA FCC: Este equipo puede generar o utilizar energía de radiofrecuencia. Los
cambios o modificaciones del equipo pueden causar serias interferencias si dichos cambios o
modificaciones no han sido expresamente aprobados en el manual del usuario. El usuario podrá perder la
autoridad para operar este equipo si efectúa una modificación o cambio no autorizado.
Modelo núm.
Núm. de serie
Tienda donde se compró
Fecha de compra
Teléfono de la tienda
Dirección de la tienda
NOTA SOBRE RECICLADO:
Los materiales de embalaje de este producto son reciclables y se pueden volver a utilizar. Disponga de
estos materiales siguiendo los reglamentos de reciclaje de su localidad.
Las pilas no deben tirarse o incinerarse, sino descartarse de acuerdo con las normativas locales con-
cernientes a desechos químicos.
Al mover este TV
Debido al peso de este TV, hacen falta dos
personas para moverlo. Ambas personas deben
agarrar la parte superior con una mano y la base
de la TV con la otra mano, como en la siguiente
ilustración.
Accesorios opcionales
Para montar el TV en una pared, se necesita el
siguiente accesorio:
Soporte para el montaje en pared de TV de pantalla
plana VISIONMOUNT™ de SANUS SYSTEMS,
para televisores de pantalla extraplana (de 32 a 60
pulgadas). Consulte en la página 31 para el
montaje del TV.
NOTA:
Los soportes de montaje en pared no se suministran
con el TV.
#
PRECAUCIÓN
•
Este TV sólo se puede utilizar con el soporte de
pared VMPL. del modelo de Sanus Systems. Si se
utiliza con otros soportes para el montaje en
pared, es posible que se produzca inestabilidad,
lo que puede causar lesiones.
• Al instalar la TV con el soporte de pared Sanus
Systems, asegúrese de instalarlo en las
columnas de madera dentro de la pared, de lo
contrario, puede volverse inestable y causar
posibles lesiones.
• Cuando esté fijando la TV en la pared, consulte
el manual de instrucciones incluido con el
soporte de pared por obtener más detalles.

4
ES
CARACTERÍSTICAS
ACCESORIOS SUMINISTRADOS
• Si necesita cambiar estos accesorios, consulte el NO. de PIEZA encima de la figura y llame a nuestra línea
de asistencia mencionado en la página delantera.
• Dependiendo del sistema de su antena, es posible que necesite diferentes tipos de combinadores (mezclado-
ra) o separadores (divisor). Comuníquese con la tienda local de electrónica para adquirir estos artículos.
•
DTV/TV/CATV
Este TV le permite cambiar fácilmente entre TV(NTSC) y DTV(ATSC) con el mando a distancia. Con esta
función se puede ver la televisión analógica convencional como televisión de definición estándar o de alta
definición. También se puede conectar a la CATV, si dispone de caja de CATV.
•
Pantalla de información de programas (DTV)
Se puede mostrar en la pantalla el título, los contenidos y otra información acerca del programa DTV que
se está viendo.
•
Autoscan (Exploración automática)
Este TV puede buscar y memorizar automáticamente los canales que se reciban. Con esta función se elim-
ina la necesidad de llevar a cabo complicados procedimientos de ajuste.
•
V-CHIP
Esta función le permite establecer una serie de limitaciones de cara a evitar que los niños puedan ver
determinados programas.
•
Descodificador de subtítulos
Este TV dispone de descodificador de subtítulos incorporado que muestra el texto en la pantalla. Le per-
mite leer los diálogos de un programa de TV o cualquier otra información en los programas que disponen
de esta función de subtítulos.
•
Sintonizador MTS/SAP
Mediante esta función puede seleccionar el idioma deseado con el mando a distancia.
•
Función de apagado automático
Si no hay entrada de señal del terminal de antena ni se hace funcionar durante 15 minutos, el TV se apa-
gará automáticamente.
•
Idioma de pantalla (Inglés/Español/Francés)
Esta función le permite seleccionar el idioma que se visualiza en la pantalla de instalación entre Inglés,
Españo o Francés.
•
Función de sonido estéreo
• Mando a distancia con todas las funciones
• Sintonización sintetizada de frecuencia PLL
• Entrada HDMI
Este TV acepta señales de vídeo de 480i / 480p / 720p / 1080i, y señales de audio de 32 kHz / 44,1 kHz / 48 kHz.
• Toma de entrada VIDEO componente
Este TV acepta señales de vídeo de 480i / 480p / 720p / 1080i.
•
Entrada S-VIDEO
• Entrada audiovisual
• Salida de audio analógica
• Salida de audio digital (coaxial)
• Reanudar
Esta función activará automáticamente los ajustes memorizados si se ha producido un corte de suministro
eléctrico.
•
Manual del Usuario
(1EMN21782)
• Guía de Instalación
Rápida
(1EMN21783)
• Cable de alimentación
(WBC0192LW001)
•
Unidad de control remoto
(NF000UD)
• Pilas
(“AA” x 2)

5
ES
INDICE
I
NDICE
INSTRUCCIONES DE SEGURIDAD IMPORTANTES . . . . . . . . . . . . . . . . . . . . . . . . . . . . . . . . . . . . . . . . . . .2
PRECAUCIONES . . . . . . . . . . . . . . . . . . . . . . . . . . . . . . . . . . . . . . . . . . . . . . . . . . . . . . . . . . . . . . . . . . . . . .3
ACCESORIOS SUMINISTRADOS . . . . . . . . . . . . . . . . . . . . . . . . . . . . . . . . . . . . . . . . . . . . . . . . . . . . . . . . . .4
CARACTERÍSTICAS . . . . . . . . . . . . . . . . . . . . . . . . . . . . . . . . . . . . . . . . . . . . . . . . . . . . . . . . . . . . . . . . . . . .4
FUNCIONES . . . . . . . . . . . . . . . . . . . . . . . . . . . . . . . . . . . . . . . . . . . . . . . . . . . . . . . . . . . . . . .6
FUNCIONES DEL MANDO A DISTANCIA Y DEL PANEL FRONTAL Y TRASERO . . . . . . . . . . . . . . . . . . . . . .6
INSTALACIÓN DE LAS PILAS . . . . . . . . . . . . . . . . . . . . . . . . . . . . . . . . . . . . . . . . . . . . . . . . . . . . . . . . . . . .7
PRECAUCIONES RELACIONADAS CON LAS PILAS . . . . . . . . . . . . . . . . . . . . . . . . . . . . . . . . . . . . . . . .7
ALCANCE DE ACCIÓN DEL MANDO A DISTANCIA . . . . . . . . . . . . . . . . . . . . . . . . . . . . . . . . . . . . . . . . . . . 7
PREPARACIÓN PARA EL USO . . . . . . . . . . . . . . . . . . . . . . . . . . . . . . . . . . . . . . . . . . . . . . . . .8
CONEXIÓN . . . . . . . . . . . . . . . . . . . . . . . . . . . . . . . . . . . . . . . . . . . . . . . . . . . . . . . . . . . . . . . . . . . . . . . . . . .8
CONEXIÓN DE CABLE DE ANTENA . . . . . . . . . . . . . . . . . . . . . . . . . . . . . . . . . . . . . . . . . . . . . . . . . . .8
CONEXIÓN CON CAJA DE CONVERTIDOR/CAJA DE SATÉLITE . . . . . . . . . . . . . . . . . . . . . . . . . . . . .8
CONEXIÓN EXTERNA . . . . . . . . . . . . . . . . . . . . . . . . . . . . . . . . . . . . . . . . . . . . . . . . . . . . . . . . . . . . . . . . . .9
CONEXIÓN HDMI . . . . . . . . . . . . . . . . . . . . . . . . . . . . . . . . . . . . . . . . . . . . . . . . . . . . . . . . . . . . . . . . .9
CONEXIÓN DE COMPONENTE . . . . . . . . . . . . . . . . . . . . . . . . . . . . . . . . . . . . . . . . . . . . . . . . . . . . .10
CONEXIÓN DE S-VIDEO . . . . . . . . . . . . . . . . . . . . . . . . . . . . . . . . . . . . . . . . . . . . . . . . . . . . . . . . . . .10
CONEXIÓN AUDIO/VIDEO ANALÓGICA . . . . . . . . . . . . . . . . . . . . . . . . . . . . . . . . . . . . . . . . . . . . . . .11
CONEXIÓN DE SALIDA DE AUDIO DIGITAL . . . . . . . . . . . . . . . . . . . . . . . . . . . . . . . . . . . . . . . . . . . .11
CONEXIÓN DE SALIDA DE AUDIO . . . . . . . . . . . . . . . . . . . . . . . . . . . . . . . . . . . . . . . . . . . . . . . . . . .12
CONEXIÓN DEL CABLE DE ALIMENTACIÓN . . . . . . . . . . . . . . . . . . . . . . . . . . . . . . . . . . . . . . . . . . . . . . . .12
PREAJUSTES INICIAL . . . . . . . . . . . . . . . . . . . . . . . . . . . . . . . . . . . . . . . . . . . . . . . . . . . . . .13
PREAJUSTES INICIAL . . . . . . . . . . . . . . . . . . . . . . . . . . . . . . . . . . . . . . . . . . . . . . . . . . . . . . . . . . . . . . . . .13
AJSUTE DE LOS CANALES . . . . . . . . . . . . . . . . . . . . . . . . . . . . . . . . . . . . . . . . . . . . . . . . . .14
AUTOSCAN . . . . . . . . . . . . . . . . . . . . . . . . . . . . . . . . . . . . . . . . . . . . . . . . . . . . . . . . . . . . . . . . . . . . . . . . .14
LISTA DE CANALES . . . . . . . . . . . . . . . . . . . . . . . . . . . . . . . . . . . . . . . . . . . . . . . . . . . . . . . . . . . . . . . . . . .15
REGISTRO MANUAL . . . . . . . . . . . . . . . . . . . . . . . . . . . . . . . . . . . . . . . . . . . . . . . . . . . . . . . . . . . . . . . . . .15
CONFIRMACIÓN DE ANTENA . . . . . . . . . . . . . . . . . . . . . . . . . . . . . . . . . . . . . . . . . . . . . . . . . . . . . . . . . . .16
SELECCIÓN DE IDIOMA . . . . . . . . . . . . . . . . . . . . . . . . . . . . . . . . . . . . . . . . . . . . . . . . . . . . . . . . . . . . . . .17
AJUSTE DE LA PROTECCIÓN DEL PANEL . . . . . . . . . . . . . . . . . . . . . . . . . . . . . . . . . . . . . . . . . . . . . . . .17
PARA MIRAR TV . . . . . . . . . . . . . . . . . . . . . . . . . . . . . . . . . . . . . . . . . . . . . . . . . . . . . . . . . . .18
SELECCIÓN DE CANAL . . . . . . . . . . . . . . . . . . . . . . . . . . . . . . . . . . . . . . . . . . . . . . . . . . . . . . . . . . . . . . . .18
AJUSTE DEL VOLUMEN . . . . . . . . . . . . . . . . . . . . . . . . . . . . . . . . . . . . . . . . . . . . . . . . . . . . . . . . . . . . . . .18
MODO DE IMAGEN FIJA . . . . . . . . . . . . . . . . . . . . . . . . . . . . . . . . . . . . . . . . . . . . . . . . . . . . . . . . . . . . . . .19
CAMBIO DEL MODO DE AUDIO . . . . . . . . . . . . . . . . . . . . . . . . . . . . . . . . . . . . . . . . . . . . . . . . . . . . . . . . . .19
SELECCIÓN DE LA ENTRADA EXTERNA . . . . . . . . . . . . . . . . . . . . . . . . . . . . . . . . . . . . . . . . . . . . . . . . . .20
CAMBIO DEL MODO DE VISUALIZACIÓN DE PANTALLA . . . . . . . . . . . . . . . . . . . . . . . . . . . . . . . . . . . . . .21
INFORMACIÓN DE PANTALLA . . . . . . . . . . . . . . . . . . . . . . . . . . . . . . . . . . . . . . . . . . . . . . . . . . . . . . . . . . .22
TEMPORIZADOR DE APAGADO AUTOMÁTICO . . . . . . . . . . . . . . . . . . . . . . . . . . . . . . . . . . . . . . . . . . . . . .23
AJUSTES OPCIONALES . . . . . . . . . . . . . . . . . . . . . . . . . . . . . . . . . . . . . . . . . . . . . . . . . . . . .23
PANTALLA DE INSTALACIÓN . . . . . . . . . . . . . . . . . . . . . . . . . . . . . . . . . . . . . . . . . . . . . . . . . . . . . . . . . . . .23
AJUSTE DE LA IMAGEN . . . . . . . . . . . . . . . . . . . . . . . . . . . . . . . . . . . . . . . . . . . . . . . . . . . . . . . . . . . . . . .24
SUBTÍTULOS . . . . . . . . . . . . . . . . . . . . . . . . . . . . . . . . . . . . . . . . . . . . . . . . . . . . . . . . . . . . . . . . . . . . . . . .25
SUBTÍTULOS DE DTV . . . . . . . . . . . . . . . . . . . . . . . . . . . . . . . . . . . . . . . . . . . . . . . . . . . . . . . . . . . . . . . . .26
ESTILO DE SUBTÍTULO CERRADO . . . . . . . . . . . . . . . . . . . . . . . . . . . . . . . . . . . . . . . . . . . . . . . . . . . . . . .26
V-CHIP . . . . . . . . . . . . . . . . . . . . . . . . . . . . . . . . . . . . . . . . . . . . . . . . . . . . . . . . . . . . . . . . . . . . . . . . . . . . .28
AUDIO HDMI . . . . . . . . . . . . . . . . . . . . . . . . . . . . . . . . . . . . . . . . . . . . . . . . . . . . . . . . . . . . . . . . . . . . . . . . .30
INSTALACIÓN DE UN SOPORTE PARA LA MONTAJE EN PARED (SE VENDE POR SEPARADO)
. .31
VARIOS . . . . . . . . . . . . . . . . . . . . . . . . . . . . . . . . . . . . . . . . . . . . . . . . . . . . . . . . . . . . . . . . . .32
GUÍA DE LOCALIZACIÓN DE PROBLEMAS . . . . . . . . . . . . . . . . . . . . . . . . . . . . . . . . . . . . . . . . . . . . . . . . .32
GLOSARIO . . . . . . . . . . . . . . . . . . . . . . . . . . . . . . . . . . . . . . . . . . . . . . . . . . . . . . . . . . . . . . . . . . . . . . . . . .35
MANTENIMIENTO . . . . . . . . . . . . . . . . . . . . . . . . . . . . . . . . . . . . . . . . . . . . . . . . . . . . . . . . . . . . . . . . . . . .35
ESPECIFICACIONES . . . . . . . . . . . . . . . . . . . . . . . . . . . . . . . . . . . . . . . . . . . . . . . . . . . . . . . .36
GARANTIA LIMITADA . . . . . . . . . . . . . . . . . . . . . . . . . . . . . . . . . . . . . . . . . . . . . .Tapa Trasera
A continuación se describen los símbolos utilizados en este manual.
: Ajustes solo para el modo analógico
: Ajustes solo para el modo digital
• Si no aparece ningún símbolo debajo del título de la función, se trata de ajustes normales
para los modos analógico y digital.
DTV
TV
SÍMBOLOS EMPLEADOS EN ESTE MANUAL

6
ES
F
UNCIONES
FUNCIONES DEL MANDO A DISTANCIA Y DEL PANEL FRONTAL Y TRASERO
ENTER
POWER SLEEP
INPUT
SELECT
AUDIO
STILL
SETUP
BACK
SCREEN
MODE
INFO
CH RETURN
MUTE
VOL. CH
1 2 3
4 5 6
7 8 9
-
0
VOLUME CHANNEL
INPUT SELECT /
ENTER
STANDBYSETUP
ON
POWER
VOLUME CHANNEL
INPUT SELECT /
ENTER
STANDBYSETUP
ON
POWER
Botón POWER
(pág. 13)
Para encender y apagar el TV.
Botones de Número de canal
(pág. 18)
Para seleccionar canales.
Botón SETUP (pág. 15)
Para mostrar el menú en pantalla.
Botones
s
/
B
/
K
/
L
(pág. 13)
Para desplazarse por los elementos a
izquierda/derecha/arriba/abajo.
Botón ENTER (pág. 13)
Para decidir el comando de ajuste
cuando aparezca el menú.
Botón BACK (pág. 22)
Para volver a la operación anterior en el menú.
Botón VOL.
XX
/
YY
(pág. 18)
Para ajustar el volumen.
Botón MUTE (pág. 18)
Suprime la salida de sonido.
Botón SLEEP (pág. 23)
Para apagar automáticamente el apara-
to a la hora prefijada.
Botón INPUT SELECT (pág. 20)
Para seleccionar el modo de TV o de entrada
externa (acceso a DVD, VCR, etc.).
Botón AUDIO (pág. 19)
• Modo analógico (TV)
Para seleccionar el modo audio.
• Modo digital (DTV)
Para seleccionar el idioma de audio.
Botón STILL (pág. 19)
Pone en pausa la imagen mostrada en la pantalla.
Botón SCREEN MODE (pág. 21)
Selecciona las relaciones de aspecto
disponibles para la pantalla.
Botón INFO
• Modo analógico (TV) (pág. 22)
Para mostrar el número de canal, tipo de
señal y ajuste de TV.
• Modo digital (DTV) (pág. 22)
Para mostrar la información de canal,
tipo de señal y ajuste de TV.
•Modo externo (pág. 20)
Para mostrar modo externo, tipo de
señal y ajuste de TV.
Botones CH
KK
/
LL
(pág. 18/pág. 20)
Para seleccionar los canales y el modo
de entrada externo.
Botón CH RETURN (pág. 18)
Para volver al canal que se estaba viendo antes.
Botón SETUP (pág. 15)
Para ver el menú en pantalla.
Botones VOLUME
XX
/
YY
(pág. 18)
Para ajustar el volumen y desplazarse
a derecha(
XX
)/ izquierda(
YY
) por los
elementos del menú.
Botones CHANNEL
KK
/
LL
(pág. 18)
Para seleccionar canales y
desplazarse arriba/abajo por los
elementos del menú.
Botón INPUT SELECT /
ENTER
(pág. 20/pág. 13)
• Para seleccionar el modo de
TV o de entrada externa
(acceso a DVD, VCR, etc.).
•
Para decidir el comando de
ajuste cuando aparezca el menú.
Botón POWER
Para encender y apagar el TV.
Ventana del sensor de infrarojos
Para recibir los rayos infrarrojos trasmi-
tidos desde el mando a distancia.
NOTA:
Con los botones [VOL. X/Y] o [MUTE], solamente puede ajustar el volumen de la unidad principal. No puede ajustar el volumen de los
dispositivos externos con estos botones.
Indicador ON
Se enciende cuando el aparato
se enciende (ON).
Indicador STANDBY
Se enciende cuando el aparato
está en modo de espera.
Desaparece cuando el aparato
se enciende (ON).
Acerca de las interferencias con dispositivos de infrarrojos
Tenga en cuenta que el uso de otros dispositivos de infrar-
rojos (tales como auriculares inalámbricos de infrarrojos)
cerca de la pantalla de plasma puede provocar interferen-
cias de infrarrojos.
Acerca de los defectos de píxeles
Una pantalla de plasma se crea mediante una colección de
píxeles en miniatura. Es posible mostrar más de un 99,99%
de píxeles válidos, no obstante, una pequeña fracción de píx-
eles a lo largo de la vida útil del producto puede no ilumi-
narse o puede estar constantemente iluminada. Esto no debe
considerarse un defecto en el panel de plasma.
Evitar la imagen remanente en la pantalla de plasma
Las imágenes fijas visualizadas en la pantalla de plasma
durante un periodo prolongado de varias horas pueden
provocar un envejecimiento irregular de píxeles, provocan-
do daños en la pantalla de plasma. Debe tratar de evitar la
visualización de imágenes fijas durante periodos prolonga-
dos en la pantalla de plasma. Las imágenes de alta lumi-
nancia visualizadas en la pantalla de plasma durante más
de 60 segundos pueden hacer que las imágenes persis-
tentes permanezcan en la pantalla. Estas imágenes desa-
parecerán automáticamente, pero pueden tardar en hacerlo
según la luminancia de las imágenes y el tiempo de visual-
ización en pantalla.

7
ES
INSTALACIÓN DE LAS PILAS
Coloque las dos pilas AA (incluidas) suministradas haciendo coincidir la polaridad indicada dentro del
compartimento del mando a distancia.
[PRECAUCIONES RELACIONADAS CON LAS PILAS]
•
Asegúrese de respetar la polaridad correcta como se indica en el compartimiento de las pilas. Si invierte las
pilas puede causar daño al dispositivo.
•
No combine tipos diferentes de pilas. (por ej., Alcalinas y Carbón-Zinc) o pilas usadas con pilas nuevas.
•
Sí el dispositivo no se usará por un periodo largo, se deben retirar las pilas para evitar daños o lesiones
causadas por el posible derrame del ácido en su interior.
•
No intente recargar pilas que no están diseñadas para ese fin, ya que pueden sobrecalentarse y agrietarse.
ANT. IN
AUDIO OUT AUDIO
HDMI
COMPONENT2
Y
Pb
Pr
L
R
AUDIO
Y
Pb
Pr
L
R
AUDIO
L
R
AUDIO
VIDEO1
AC IN
S-VIDEO1
COMPONENT1
HDMI IN
L
R
L
R
DIGITAL
AUDIO OUT
(COAXIAL)
Parte trasera del TV
desde abajo
desde abajo
ANT. IN
AUDIO OUT AUDIO
HDMI
COMPONENT2
Y
Pb
Pr
L
R
AUDIO
Y
Pb
Pr
L
R
AUDIO
L
R
AUDIO
VIDEO1
S-VIDEO1
L
R
AUDIO
VIDEO2
S-VIDEO2
COMPONENT1
HDMI IN
L
R
L
R
DIGITAL
AUDIO OUT
(COAXIAL)
Por lado
Toma ANT. IN
Conecte aquí su antena o caja
de convertidor aquí.
Toma DIGITAL AUDIO OUT
(COAXIAL)
Conecte aquí un cable coaxial
audio digital opcional a través
de la toma de entrada coaxial
audio digital de un descodifi-
cador o receptor de audio.
Tomas AUDIO OUT
Conecte aquí el cable de audio
suministrado a través de las
tomas de entrada de audio de
un equipo de audio.
Tomas HDMI IN
Conecte el cable HDMI y el
cable de audio procedentes de
la toma de salida de HDMI y
audio de dispositivos externos.
Tomas COMPONENT IN
Conecte el cable S-Video y el
cable de audio procedente de
la toma S-Video y audio de
dispositivos externos.
Tomas
VIDEO1 IN
Conecte el cable
de vídeo o el
cable de S-video
y el cable de
audio proce-
dentes de la
toma de salida
de vídeo o
S-video y audio
de un dispositivo
externo.
FUNCIONES
Tomas VIDEO2 IN
Conecte el cable de
vídeo o el cable de S-
video y el cable de
audio procedentes de
la toma de salida de
vídeo o S-video y
audio de un dispositi-
vo externo.
ALCANCE DE ACCIÓN DEL MANDO A DISTANCIA
Utilice el mando a distancia en un ángulo de 30 grados a ambos lados del sensor de infrarrojos de la unidad
principal. Puede utilizar el mando a distancia desde una distancia de varios metros de la unidad principal.
NOTA:
Otros dispositivos que utilicen rayos infrarrojos,
luz solar, luces fluorescentes, etc., pueden afec-
tar al alcance de acción y a la operatividad del
mando a distancia.
Asegúrese de que la TV está colocada en un
lugar donde las interferencias sean mínimas.
Dentro de 30 gradosDentro de 30 grados
Aproximadamente
7,6 yardas (7m)
Aproximadamente
5,5 yardas (5m)
Aproximadamente
5,5 yardas (5m)

8
ES
P
REPARACIÓN PARA EL USO
CONEXIÓN
En esta sección se describe cómo hay que conectar este TV a fuentes receptoras y otras.
[CONEXIÓN DE CABLE DE ANTENA]
1) Cuando se conecta el TV a la antena
Conecte el cable RF o cable de la antena de televisión de su casa a la toma ANT.IN del TV.
2) Cuando se conecta el
TV al cable RF/entrante (sin caja)
Conecte el cable RF o cable de la antena de televisión de su casa a la toma ANT.IN del TV.
*
Una vez hechas las conexiones, encienda el TV y empiece con los ajustes iniciales.
La exploración de canales es necesaria para que el TV memorice todos los canales disponibles en su
zona si utiliza un cable de antena o un cable RF/entrante. (Consulte el "PREAJUSTES INICIAL" en la
página 13.)
[CONEXIÓN CON CAJA DE CONVERTIDOR/CAJA DE SATÉLITE]
1)
Conecte el cable de la antena de la toma de su casa al conector de entrada de la caja de CABLE/SATÉLITE.
2) Utilice el cable correspondiente para conectar la toma ANT. IN del TV y la clavija de salida a la caja de
CABLE/SATÉLITE.
*Los cables necesarios en 2) y los métodos de conexión varían según la caja de CABLE/SATÉLITE.
Para más información, póngase en contacto con el proveedor de cable/satélite.
ANT. IN
Cable RF
Caja de CABLE o
caja de SATÉLITE
o
Señal del
TV cable
Antena de
satélite
Parte trasera del TV
No se incluyen los cables
NOTAS:
•
Para su seguridad y con objeto de evitar posibles daños en la unidad, desenchufe el cable de antena de la toma ANT.IN antes de moverla.
• Si utiliza una antena para recibir TV analógica, la misma antena permitirá recibir la DTV.
Las antenas exteriores o en el techo serán más efectivas que la versiones encima del aparato de TV.
• Para cambiar fácilmente entre los cables de antena y de cable puede comprar un "Selector de Antena" de venta en los comercios.
•
Si desea conectar el sistema de cable directamente, póngase en contacto con el el instalador del sistema CATV.
ANT. IN
o
Antena
aérea
Cable RF
Parte trasera del TV
Cable de entrada
Señal del
TV cable
No se incluyen los cables
NOTA:
Asegúrese de que la antena o el cable están correctamente conectados antes de enchufar el cable de la corriente.
ASEGÚRESE DE TENER UNA ANTENA.
Como el DTV sólo existe en ondas aéreas, necesita una antena para recibir señal digital.

9
ES
PREPARACIÓN PARA EL USO
CONEXIÓN EXTERNA
[CONEXIÓN HDMI]
1) Éste es el mejor método para conectar este TV a dispositivos de vídeo con la toma de salida HDMI, tales
como un reproductor de DVD con toma de salida HDMI, etc.
Puede minimizar el deterioro de la calidad
de imagen.
Utilice el cable HDMI (disponible en el mercado) para la conexión.
2) Cuando su dispositivo de vídeo tenga la toma de salida DVI, utilice el cable de conversión HDMI
(disponible en el mercado) para su conexión, como se muestra en el gráfico.
“HDMI el logotipo HDMI y High-Definition Multimedia Interface (Interface de Multimedios de Alta
Definición) son marcas comerciales o marcas registradas de HDMI Licensing LLC.”
NOTAS:
Este TV acepta señales de vídeo de 480i / 480p / 720p / 1080i.
Las señales de audio se convierten de señal digital a señal analógica si se establece una conexión como se indica anteriormente.
DVI no muestra imagen si la señal 480i no acepta EIA/CEA-861/861B.
ANT. IN
AUDIO OUT AUDIO
HDMI IN
L
R
L
R
DIGITAL
AUDIO OUT
(COAXIAL)
HDMI
DVI OUT
A toma de salida DVI
A tomas de
salida de audio
Al conectores
AUDIO INPUT
Parte trasera del TV
Al conectore HDMI INPUT
Caja de convertidor o caja de
satélite con la toma de salida DVI
No se incluyen los cable
NOTAS:
Este TV acepta señales de vídeo de 480i / 480p / 720p / 1080i, y señales de audio de 32 kHz / 44,1 kHz / 48 kHz.
Este TV acepta solamente señal de audio de dos canales (LPCM).
Necesita seleccionar "PCM" para la salida de audio digital del dispositivo que conecte o para el ajuste de audio HDMI. El audio a
veces no emite sonidos si selecciona "Bitstream", etc.
Este TV solamente acepta señales correspondientes a EIA861.
ANT. IN
AUDIO OUT AUDIO
HDMI IN
L
R
L
R
DIGITAL
AUDIO OUT
(COAXIAL)
HDMI
A toma de salida HDMI
Al conector HDMI INPUT
Parte trasera del TV
Reproductor de DVD con la toma de
salida HDMI
HDMI OUT
No se incluyen los cable

10
ES
[CONEXIÓN DE COMPONENTE]
1) Éste es un mejor método para conectar este TV a dispositivos de vídeo con la toma de salida de compo-
nente, tales como un reproductor de DVD, etc.
Para la conexión utilice el cable del componente (comercialmente disponible).
Si conecta la toma de salida componente a la toma de entrada COMPONENT1, conecte un cable de audio a
las tomas AUDIO L/R (izquierda/derecha) de COMPONENT1.
Si conecta la toma de salida componente a la toma de entrada COMPONENT2, conecte un cable de audio a
las tomas AUDIO L/R (izquierda/derecha) de COMPONENT2.
[CONEXIÓN DE S-VIDEO]
1) Éste es un buen método para conectar este TV a los dispositivos de vídeo con la toma de salida S-Video.
Cabe esperar una calidad de imagen mejor que con la conexión de cable de vídeo normal.
Para realizar la conexión, utilice el cable S-video (comercialmente disponible).
Si conecta la toma de salida S-Video a la toma de entrada S-VIDEO1, conecte un cable de audio a las
tomas AUDIO L/R (izquierda/derecha) de VIDEO1.
Si conecta la toma de salida S-Video a la toma de entrada S-VIDEO2, conecte un cable de audio a las
tomas AUDIO L/R (izquierda/derecha) de VIDEO2.
NOTA:
Si se conecta al mismo tiempo al conector S-VIDEO y al conector VIDEO será la conexión del S-video la que tenga prioridad.
COMPONENT2
Y
Pb
Pr
L
R
AUDIO
Y
Pb
Pr
L
R
AUDIO
L
R
AUDIO
VIDEO1
S-VIDEO1
COMPONENT1
L
R
AUDIO
VIDEO2
S-VIDEO2
AUDIO
OUT
VIDEO
OUT
S-VIDEO
OUT
Parte trasera del TV
Al conector S-VIDEO1 INPUT
Al conector AUDIO INPUT
A toma de
salida de
S-Video
DVD/VCR con la toma de salida
S-Video
A tomas de salida
de audio
No se incluyen los cables
Al conector
S-VIDEO2 INPUT
Al conector AUDIO INPUT
Por lado
NOTA:
Este TV acepta señales de vídeo de 480i / 480p / 720p / 1080i.
COMPONENT2
Y
Pb
Pr
L
R
AUDIO
Y
Pb
Pr
L
R
AUDIO
L
R
AUDIO
VIDEO1
S-VIDEO1
COMPONENT1
A tomas de
salida de
audio
A tomas de salida de vídeo
componente
Parte trasera del TV
Al conectores
AUDIO INPUT
Al conectores
COMPONENT1 INPUT
Reproductor de DVD con las tomas de
salida de vídeo componente
No se incluyen los cables

11
ES
[CONEXIÓN AUDIO/VIDEO ANALÓGICA]
1) Este es el método general para conectar el TV a aparatos de vídeo, como por ejemplo una videograbadora,
mediante las tomas de salida de audio y vídeo.
Cuando el conector audio de los equipos de vídeo sea monoaural, conecte el TV a la clavija Audio L.
Si conecta la toma de salida video a la toma de entrada VIDEO1, conecte un cable de audio a las tomas
AUDIO L/R (izquierda/derecha) de VIDEO1.
Si conecta la toma de salida video a la toma de entrada VIDEO2, conecte un cable de audio a las tomas
AUDIO L/R (izquierda/derecha) de VIDEO2.
[CONEXIÓN DE SALIDA DE AUDIO DIGITAL]
1) Si conecta este TV a el dispositivo de audio digital, podrá disfrutar de sonido de audio multicanal, por
ejemplo sonido de emisiones digitales de 5.1ch.
Utilice el cable coaxial de audio digital (disponible en el mercado) para la conexión.
Fabricado bajo licencia de Dolby Laboratories. “Dolby” y el símbolo de la doble D son marcas
comerciales de Dolby Laboratories.
ANT. IN
AUDIO OUT AUDIO
HDMI IN
L
R
L
R
DIGITAL
AUDIO OUT
(COAXIAL)
HDMI
Parte trasera del TV
A toma de entrada
digital coaxial de audio
Al conector DIGITAL
AUDIO OUTPUT
MD deck, DAT deck, etc.
Descodificador Dolby Digital
COAXIAL
COMPONENT2
Y
Pb
Pr
L
R
AUDIO
Y
Pb
Pr
L
R
AUDIO
L
R
AUDIO
VIDEO1
S-VIDEO1
COMPONENT1
L
R
AUDIO
VIDEO2
S-VIDEO2
AUDIO
OUT
VIDEO
OUT
Parte trasera del TV
Al conectores AUDIO INPUT
A toma de
salida de vídeo
VCR
Videocámara
Videojuegos
A tomas
de salida de audio
Al conectores VIDEO1 INPUT
No se incluyen los cables
Al conector
VIDEO2 INPUT
Al conector AUDIO INPUT
Por lado
PREPARACIÓN PARA EL USO

12
ES
[CONEXIÓN DE SALIDA DE AUDIO]
1) Si conecta este TV a el dispositivo de audio externos, podrá disfrutar mucho más de los programas de
radiotelevisión con la sensación de estar presenciando un programa en directo.
Utilice el cable de audio (disponible en el mercado) para la conexión.
ANT. IN
AUDIO OUT AUDIO
HDMI IN
L
R
L
R
DIGITAL
AUDIO OUT
(COAXIAL)
HDMI
AUDIO
IN
Stereo system
A tomas de salida de audio
Al conectores AUDIO OUTPUT
No se incluyen los cables
Parte trasera del TV
ANT. IN
AUDIO OUT AUDIO
HDMI
COMPONENT2
Y
Pb
Pr
L
R
AUDIO
Y
Pb
Pr
L
R
AUDIO
L
R
AUDIO
VIDEO1
AC IN
S-VIDEO1
COMPONENT1
HDMI IN
L
R
L
R
DIGITAL
AUDIO OUT
(COAXIAL)
1
2
AC IN
1 Conecte primero el cable de alimentación a la
TV.
2
Conecte el cable de alimentación a una toma de
corriente de CA.
#
PRECAUCIÓN
• No conecte el cable de alimentación a una
fuente de alimentación no coincidente con la
tensión indicada para la TV (120 V CA). La
conexión del cable de alimentación a una
fuente de alimentación no coincidente puede
provocar fuego o descargas eléctricas.
• Utilice siempre el cable de alimentación inclui-
do con la TV. No utilice ningún otro cable. Por
seguridad, asegúrese de conectar siempre el
cable de alimentación a una toma de corriente
de CA de tres contactos.
CONEXIÓN DEL CABLE DE ALIMENTACIÓN
Conecte el cable de alimentación a la TV después de conectar los terminales de entrada.

13
ES
P
REAJUSTES INICIAL
PREAJUSTES INICIAL
En esta sección se describen los ajustes iniciales cuando
se enciende por primera vez el equipo tras su compra.
Más abajo se muestran los elementos de dichos ajustes.
• SELECCIÓN DE IDIOMA
Puede seleccionar el idioma del menú que aparece
en la pantalla entre Inglés, Español y Francés.
• Autoscan (Exploración automática) (TV/DTV)
(Seleccione “Aire” cuando utilice antena.)
Los canales emitidos en TV y DTV se buscan y
memorizan automáticamente. Solo quedarán
memorizados los canales que se puedan recibir
en la zona en donde se use el TV.
• Autoscan (Exploración automática) (CATV)
(Seleccione “Cable” cuando utilice un cable básico.)
Los canales emitidos en CATV se buscan y mem-
orizan automáticamente.
1
Una vez hechas todas las conexiones nece-
sarias, encienda este TV.
2
Presione [POWER]. Aparecerá el menú de ajuste inicial.
• Esta operación puede tardar unos momentos
en empezar.
•
Si el menú de Ajuste Inicial no aparece, mantenga
presionado
[ENTER] durante tres segundos, para que
aparezca el ajuste inicial y luego pase al paso 3. Si ha
encendido el TV de antemano, consulte "SELECCIÓN
DE IDIOMA” en la página 17 para seleccionar un
idioma para las indicaciones en pantalla.
3 Seleccione su idioma mediante [
K
/
L
], y pre-
sione
[ENTER].
Cuando encienda por primera vez el equipo, se
mostrará la siguiente pantalla.
Aparecerá en pantalla la confirmación de antena en el
idioma seleccionado después de presionar
[ENTER].
Initial Setup
Initial Setup
Select the language used for setup.
Elija idioma de preparación.
Sélectionner langue écran config.
Select Enter Exit
SETUP
English
Español
Français
ENTER
ENTER
POWER SLEEP
AUDIO
STILL
SETUP
BACK
SCREEN
MODE
INFO
1 2 3
4 5 6
7 8 9
-
0
INPUT
SELECT
ENTER
POWER
4
Seleccione el destino de la toma ANT. IN
mediante
[
K
/
L
], y presione [ENTER].
5 Autoscan se iniciará automáticamente.
• Cuando se haya terminado la exploración, se
mostrará el canal memorizado más pequeño.
NOTAS:
• Si no utiliza este TV durante más de 45 segundos durante
el ajuste inicial, los cuadros de mensaje empiezan a
desplazarse hacia la esquina inferior izquierda de la pan-
talla. Esto sucede para evitar las imágenes remanentes en
pantalla. Presione cualquier tecla excepto [POWER] para
cancelarlos.
• La función de Autoscan inicial puede ejecutarse para “Aire”
o para “Cable” solamente una vez. Cuando cambie la
conexión (Aire/Cable), ajuste de nuevo "Autoscan".
(Consulte la página 14.)
•
Si desea conectar el sistema de cable directamente,
póngase en contacto con el el instalador del sistema
CATV.
• Cuando no termine la exploración, Sugerencias Útiles se
visualizará cada vez que usted conecte la alimentación.
Si ha registrado canales previamente cuando aparece
esta pantalla, usted podrá seleccionar un canal con los
botones de números.
• El número de teléfono del centro de servicio está indica-
do en la portada de este manual.
Preparación Inicial
Preparación Inicial
Sistema escanea canales, espere.
Exit
SETUP
5%
Canales analógicos 1ca
Canales digitales 0ca
Preparación Inicial
Preparación Inicial
Aire
Cable
Seleccionar Entre Salir
SETUP
Atrás
BACK
ENTER
Confirme que antena está conectada a toma "ANT. IN".
Elija el destino de la toma "ANT. IN".
Aire
Cable
O
ANT IN
No channel is registered.
Press and hold "ENTER" key for 3 seconds.
Contact support hotline provided on manual or back of unit.
Sin canal registrado.
Mantenga oprimida la tecla "ENTER" durante 3 segundos.
Llame teléfono de apoyo en manual o atrás de TV.
Pas de chaîne consign.
Maintenir la touche "ENTER" pressée 3 secondes.
Contacter numero d'urgence dans manuel ou arrière appareil.
2-0
Sugerencia: Antes de iniciar el ajuste inicial, debe conectar la antena.
PREPARACIÓN PARA EL USO / PREAJUSTES INICIAL

14
ES
3
Para canales de TV, mediante [
K
/
L
], seleccione
"Aire". Para canales CATV, seleccione "Cable".
• Presione
[ENTER].
Se iniciará automáticamente la búsqueda y
memorización de los canales.
• Cuando finalice este proceso, se mostrará el
canal más pequeño memorizado de la emisión.
NOTAS:
• Si no utiliza este TV durante más de 45 segundos durante
el ajuste inicial, los cuadros de mensaje empiezan a
desplazarse hacia la esquina inferior izquierda de la pan-
talla. Esto sucede para evitar las imágenes remanentes en
pantalla. Presione cualquier tecla excepto [POWER] para
cancelarlos.
•
Si desea conectar el sistema de cable directamente,
póngase en contacto con el el instalador del sistema
CATV.
• Si presiona [POWER] o [SETUP] durante Autoscan, se
cancelará este ajuste.
• Si no hay recepción conectada o si se detecta una señal
deficiente, aparecerá una Sugerencia en pantalla al finalizar
la exploración.
Sistema escanea canales, espere.
Salir
SETUP
72%
Canales analógicos 10ca
Canales digitales 6ca
Autoscan
Autoscan
Autoscan volverá a explorar todos
los canales.
Puede llevar un poco de tiempo en
completarse.
Elija el destino de la toma "ANT. IN".
Atrás
Aire
Cable
Cable
1hora
Aire
Cable
O
ANT IN
AUTOSCAN
Si cambia de cables (por ej., de cable de antena al
cable CATV) o si mueve el TV a un área diferente
después de completar el ajuste inicial, deberá
realizar de nuevo Autoscan (exploración automáti-
ca). Esta función permite seleccionar fácilmente los
canales sintonizables con
[CH
K
/
L
] y el TV los
memoriza incluso si conmuta cables.
1
Visualización de la pantalla de instalación.
• Presione
[SETUP].
Se visualizará la siguiente pantalla de instalación.
2 Selección de "CANAL" y presione [ENTER] para
confirmar su selección.
• Con [
K
/
L
], seleccione "Autoscan".
• Presione
[ENTER].
Canal
Canal
Autoscan
Lista Canales
Registro Manual
Antena
NOTA:
• Asegúrese que el TV está conectado a la antena o cable.
ENTER
STILL
SETUP
BACK
SCREEN
MODE
INFO
CH RETURN
MUTE
VOL. CH
-
0
ENTER
SETUP
A
JSUTE DE LOS CANALES

15
ES
AJSUTE DE LOS CANALES
LISTA DE CANALES
La función de lista de canales le permite omitir los
canales innecesarios de la lista de registro de
canales.
1 Visualización de la pantalla de instalación.
• Presione
[SETUP].
Se visualizará la siguiente pantalla de instalación.
2 Selección de "CANAL" y presione [ENTER] para
confirmar su selección.
• Con
[
K
/
L
], seleccione "Lista Canales".
• Presione
[ENTER].
3
Seleccione el canal que desea añadir.
• Con
[
K
/
L
], seleccione el canal.
• Presione
[ENTER], y el resalte del canal selec-
cionado desaparece. Luego, este canal será
omitido. Mediante
[CH
K
/
L
], no puede ajustar
el canal para que sea omitido.
• Si quiere recuperar el canal omitido, seleccione
su canal deseado y presione
[ENTER].
• Si omite un canal importante, también omitirá
los canales inferiores.
4 Para salir del instalación, presione [SETUP].
NOTA:
• El canal con “DTV” indicado en la pantalla es ATSC, de lo
contrario el canal es NTSC.
Lista Canales
Lista Canales
DTV 8
DTV 8
DTV 6
DTV 6
9
9
DTV 48
DTV 48
DTV 58
DTV 58
DTV 27
67
Selección Ca
Ver/Saltar Atrás
BACK
ENTER
Subraye canales para selección
Ch Up/Down.
Canal
Canal
Autoscan
Lista Canales
Registro Manual
Antena
ENTER
STILL
SETUP
BACK
SCREEN
MODE
INFO
-
0
ENTER
SETUP
REGISTRO MANUAL
Puede registrar la ausencia de canales que no
fueron explorados por la función Autoscan debido a
su estado de recepción deficiente en el ajuste inicial.
1 Visualización de la pantalla de instalación.
• Presione
[SETUP].
Se visualizará la siguiente pantalla de instalación.
2
Selección de "CANAL" y presione [ENTER] para
confirmar su selección.
• Con
[
K
/
L
], seleccione "Registro Manual".
• Presione
[ENTER].
3
Seleccione el canal que desea añadir.
• Mediante los botones de
Número de canal,
seleccione el canal deseado.
• Seleccione "Registra" con
[ENTER].
4 Para salir del instalación, presione [SETUP].
NOTAS:
• Si la configuración se realiza con éxito, aparecerá en pan-
talla “Registro en lista canales”.
• Si la configuración no se realiza con éxito, como en caso de
utilizarse “Video-1”, aparece en la pantalla “No disponible”.
Registro Manual
Registro Manual
Para los canales analógicos,
seleccione un canal a registrar con
la tecla unmérica.
Para los canales digitales, debe
realizar la función Autoscan.
Registra
11
BACK
Cambia Ca Atrás
Canal
Canal
Autoscan
Lista Canales
Registro Manual
Antena
ENTER
AUDIO
STILL
SETUP
BACK
SCREEN
MODE
INFO
1 2 3
4 5 6
7 8 9
-
0
ENTER
SETUP
1 2 3
4 6
7 8 9
-
0
5

16
ES
CONFIRMACIÓN DE ANTENA
Puede verificar la intensidad de señal de cada
canal para obtener una imagen más clara.
1 Visualización de la pantalla de instalación.
• Presione
[SETUP].
Se visualizará la siguiente pantalla de instalación.
2 Selección de "CANAL" y presione [ENTER] para
confirmar su selección.
• Con [
K
/
L
], seleccione "Antena".
• Presione
[ENTER].
• Mediante los botones de
Número de canal o
[CH
K
/
L
], seleccione el canal en el que desea
confirmar la situación de la antena.
Antena
Antena
Atrás
Cambia Ca
11
CH
Ahora 70 Pico 80
Canal
Canal
Autoscan
Lista Canales
Registro Manual
Antena
ENTER
POWER SLEEP
AUDIO
STILL
SETUP
BACK
SCREEN
MODE
INFO
CH RETURN
MUTE
VOL. CH
1 2 3
4 5 6
7 8 9
-
0
INPUT
SELECT
ENTER
SETUP
CH
1 2 3
4 5 6
7 8 9
-
0
• Si el canal es puesto a la entrada externa,
usted no puede confirmar la situación de
antena.
4
Para salir del instalación, presione [SETUP].
Antena
Antena
Atrás
Cambia Ca
Video1
CH
Indicador disponible sólo para
señal antena.

17
ES
AJSUTE DE LOS CANALES
SELECCIÓN DE IDIOMA
Puede elegir su idioma de pantalla entre los sigu-
ientes Inglés, Español o Francés.
1 Visualización de la pantalla de instalación.
• Presione
[SETUP].
Se mostrará la siguiente pantalla de instalación.
2
Selección de "IDIOMA" y presione [ENTER]
para confirmar su selección.
• Con
[
K
/
L
], seleccione “English”, “Español” o
“Français”.
• Presione
[ENTER].
3
Para salir del instalación, presione [SETUP].
Idioma
Idioma
Select the language for setup.display.
Elija idioma de preparación.
Sélectionner langue écran config.
English
Español
Français
ENTER
STILL
SETUP
BACK
SCREEN
MODE
INFO
CH RETURN
MUTE
VOL. CH
-
0
ENTER
SETUP
AJUSTE DE LA PROTECCIÓN DEL PANEL
La protección del panel impide que la pantalla
resulte afectada por una imagen permanente.
Puede especificar un ajuste para ello.
1 Visualización de la pantalla de instalación.
• Presione
[SETUP].
Se mostrará la siguiente pantalla de instalación.
2
Selección de "DETALLE" y presione [ENTER]
para confirmar su selección.
• Mediante
[
K
/
L
], seleccione "Protección Panel" y
presione
[ENTER] para confirmar su selección.
3
Cambie al modo de Protección Panel
• Mediante
[
K
/
L
], seleccione "Fuerte", "Débil" o
"Off" y presione
[ENTER] para confirmar su
selección.
NOTA:
• "Débil" se mueve 1 píxel cada 5 minutos y "Fuerte"
se mueve 1 píxel cada minuto. Esto impide que las
imágenes queden remanentes en la pantalla.
4
Para salir del instalación, presione [SETUP].
Protección Panel
Protección Panel
Función útil para reducción
envejecimiento panel
visualización mediante desplaz
elemento imagen.
Selección nivel para efecto
Fuerte
Débil
Off
Detalle
Detalle
Subtítulo Cerrado
V–chip
Audio HDMI
Protección Panel
Automático
Off
ENTER
STILL
SETUP
BACK
SCREEN
MODE
INFO
CH RETURN
MUTE
VOL. CH
-
0
ENTER
SETUP
BACK

18
ES
P
ARA MIRAR TV
SELECCIÓN DE CANAL
Puede seleccionar el canal usando bien [CH K/L] o
los botones de
Número de canal.A continuación se
muestran los dos modos de hacerlo.
1 Utilice [CH
K
/
L
] o los botones de Número de
canal
y presione [ENTER].
• Cambie el canal usando
[CH
K
/
L
].
•
Cuando seleccione un canal, presione el número de
canal que desea ver con los botones de
Número
de canal
. Se mostrará el canal seleccionado.
• Cuando seleccione el canal analógico 12
• Cuando seleccione el canal digital 12-1
Asegúrese de presionar
[–] antes de introducir
el número de subcanal.
• Si el canal emite indistintamente NTSC y ATSC
y usted no presiona [–], recibirá solamente el
canal NTSC. En el momento en que presione
[–], se mostrará el canal digital memorizado
más pequeño.
• Cuando presione
[CH RETURN], se seleccionará
el canal anteriormente seleccionado.
• La misma operación puede realizarse con
[CHANNEL
K
/
L
] en el panel frontal de la
unidad principal.
NOTA:
En la radiodifusión DTV, a veces un canal emite múltiples
programas dependiendo de la hora de emisión. En este caso,
el canal principal se conoce como canal mayor y el subcanal
como canal menor.
1 1
2
-
ENTER
1 2
ENTER
ENTER
POWER SLEEP
AUDIO
STILL
SETUP
BACK
SCREEN
MODE
INFO
CH RETURN
MUTE
VOL. CH
1 2 3
4 5 6
7 8 9
-
0
INPUT
SELECT
CH RETURN
CH
1 2 3
4 5 6
7 8 9
-
0
ENTER
Sobre la emisión de subcanales:
Puede haber diferentes programas emitidos en
subcanales a través de un único canal proce-
dente de ATSC. Puede ver cada programa de
subcanal emitido seleccionando uno de los
subcanales.
AJUSTE DEL VOLUMEN
En esta sección se describe el modo de ajustar el volu-
men cuando se está viendo la TV. También se describe
la función Mudo, la cual resulta muy útil cuando se tiene
una visita o se recibe una llamada de teléfono.
1
Uso [VOL.
X
/
Y
] o [MUTE]
[VOL.
X
/
Y
]
• Se puede ajustar el volumen de sonido con
[VOL.
X
/
Y
].
• Al ajustar el volumen, se mostrará la barra de
progreso en la parte inferior de la pantalla.
• En el panel frontal del TV podrá realizar la
misma operación con
[VOLUME
X
/
Y
].
• La barra de volumen desaparecerá automática-
mente dentro de unos segundos.
[MUTE]
• Presione [MUTE] del mando a distancia para
quitar el sonido.
•
Para desactivar el estado de silenciamiento,
presione
[MUTE] de nuevo o presione [VOL. X/Y].
• "Mudo" aparece en la pantalla durante unos
segundos.
Mudo
Volumen 20
CH RETURN
MUTE
VOL. CH
MUTE
VOL.
NOTA:
Aparecerá “Sin señal” en la pantalla una vez terminada la
emisión de subcanal.
Necesitará cambiar el canal para seguir viendo otro progra-
ma de televisión.
: cambia automáticamente
: cambia manualmente presionando [CH / ]
en su mando a distancia.
CH4-1
18:00
18:30
19:00
19:30
20:00
CH4-2
CH4-1
CH4-1
CH4-3
Sin señal Sin señal
CH4-3
ATSC
CH4
NTSC
Sin señal
CH4-2CH4-1
Sin señal

19
ES
PARA MIRAR TV
Cuando la emisión contiene SAP y audio estéreo...
Cuando la emisión contiene SAP y audio monoaural...
Cuando la emisión contiene solamente audio monoaural...
(no puede cambiarse.)
ESTÉREO
: Emite audio estéreo.
SAP :
Emite durante un segundo un programa de audio.
MONO : Emite audio monoaural.
1
Cambio del idioma de audio.
• Si se presiona
[AUDIO], se mostrarán en la
pantalla el idioma actualmente seleccionado y
el número de idiomas recibidos.
• Cada vez que presione
[AUDIO], se cambiará
el idioma.
• Los idiomas que se pueden seleccionar difieren
dependiendo de la emisión que se reciba.
• La pantalla de información desaparecerá automática-
mente en un minuto.
NOTA:
La función [AUDIO] no afecta al sonido de fuente externa.
Inglés 1/3 Español 2/3
Otro 3/3
Se indica "Otro" cuando el
idioma no sea Inglés, Español o
Francés.
*En emisoras internacionales, el
idioma de audio seguirá
mostrándose en Inglés.
6-1
Inglés 1/3
DTV
6
SAP / ESTÉREO
MONO
SAP / MONO SAP / MONO
SAP / ESTÉREO SAP / ESTÉREO
MODO DE IMAGEN FIJA
Puede congelar la imagen mostrada en la pantalla.
1 Para poner en pausa la imagen.
• Presione
[STILL], y la imagen mostrada en la
pantalla se pone en pausa.
• El sonido no se interrumpe y sigue su lectura.
• Después de que la señal digital desaparezca o
quede protegida, la imagen sigue en pausa y
el sonido sigue silenciado.
• La función de imagen fija se desactivará
después de 5 minutos.
2
Para cancelar la función de imagen fija
• La función de imagen fija se cancelará al pre-
sionar cualquier botón durante el fun-
cionamiento de esta función.
CAMBIO DEL MODO DE AUDIO
En esta sección se describe el modo de cambiar el
sistema de audio en el modo analógico y como
seleccionar el idioma de audio en el modo digital.
1
Cambio de audio.
• Cada vez que presione
[AUDIO], éste cam-
biará como se indica a continuación.
Cuando la emisión es de todo audio...
SAP / ESTÉREO SAP / ESTÉREO
SAP / MONO
TV
AUDIO
STILL
SETUP
SCREEN
MODE
7 8 9
-
0
AUDIO
NOTA:
Presione cualquier tecla excepto [POWER] para cancelarlos.
Imagen Fija
AUDIO
STILL
SETUP
SCREEN
MODE
1 2 3
4 5 6
7 8 9
-
0
STILL

20
ES
SELECCIÓN DE LA ENTRADA EXTERNA
Si se conectan equipos externos, incluyendo
grabadores de vídeo y sistemas de cine en casa,
se podrá seleccionar fácilmente el modo de entra-
da con el mando a distancia.
1 Selección del modo de entrada.
• Si se presiona
[INPUT SELECT] o [CH
K
/
L
]
del mando a distancia, se cambiará el modo de
entrada como se muestra a continuación.
• Para utilizar la toma VIDEO1 o S-VIDEO1
INPUT del TV, seleccione “Video1”.
• Para utilizar la toma VIDEO2 o S-VIDEO2
INPUT del TV, seleccione “Video2”.
• Para utilizar las tomas COMPONENT1 INPUT
del TV, seleccione “Component1”.
• Para utilizar las tomas COMPONENT2 INPUT
del TV, seleccione “Component2”.
• Para utilizar la toma HDMI INPUT del TV,
seleccione “HDMI”.
Canal de TV/DTV
Video1
Video2
Component1
Component2
HDMI
ENTER
POWER SLEEP
AUDIO
STILL
SETUP
BACK
SCREEN
MODE
INFO
CH RETURN
MUTE
VOL. CH
1 2 3
4 5 6
7 8 9
-
0
INPUT
SELECT
INPUT
SELECT
INFO
CH
• Cuando presione [INFO], el modo de entrada
externa actual, los tipos de resoluciones para
la señal de vídeo, la relación de aspecto del
televisor, el subtítulo cerrado y la calificación
de los programas de TV se visualizarán en la
parte superior derecha de la pantalla.
1)
Si usa el conector VIDEO-1 o S-VIDEO-1 INPUT
2)
Si usa el conector VIDEO-2 o S-VIDEO-2 INPUT
3) Si usa el conector COMPONENT 1 INPUT
4) Si usa el conector COMPONENT2 INPUT
5) Si usa el conector HDMI INPUT
• La pantalla de información desaparecerá
automáticamente en un minuto.
HDMI
480i
480i
4:3
4:3
SD
SD
NINGUNO
Component2
1080i
1080i
HD
HD
NINGUNO
Component1
1080i
1080i
HD
HD
NINGUNO
Video2
480i
480i
SD
SD
CC
CC
TV-PG DLSV
Video1
480i
480i
SD
SD
CC
CC
TV-PG DLSV

21
ES
PARA MIRAR TV
CAMBIO DEL MODO DE VISUALIZACIÓN DE PANTALLA
Cada uno de los 4 tipos de modo de visualización
se puede seleccionar en el modo de pantalla, con
las relaciones de aspecto del televisor 4:3 y 16:9.
Puede seleccionar su modo de pantalla favorito y
disfrutar de los programas.
ENTER
AUDIO
STILL
SETUP
BACK
SCREEN
MODE
INFO
7 8 9
-
0
SCREEN
MODE
1
Cambie el modo de pantalla.
• Cada vez que presione
[SCREEN MODE], la
relación de aspecto del televisor cambiará de
forma alterna.
2 Cada vez que presione [SCREEN MODE]
repetidamente hasta que aparezca la pantalla
normal.
NOTA:
• Dependiendo del programa, podría no ser necesario tener
que cambiar el modo de visualización.
• Si cambia el modo de visualización de pantalla de vez en
cuando, puede reducir el efecto de imagen remanente en
pantalla.
[Sidebar]
Sidebar (barra lateral) mostrará una imagen 4:3
en su tamaño normal 4:3. Aparecerán barras lat-
erales en los bordes derecho e izquierdo de la
pantalla.
[Total]
Total mostrará una imagen de 4:3 a un tamaño
de 16:9, con alargamiento horizontal necesario
para llenar la pantalla.
[Cine]
Cine mostrará una imagen de 4:3 con un
tamaño de 16:9, con menos alargamiento hori-
zontal necesario para llenar la pantalla porque
se recortará una pequeña zona en los bordes
superior e inferior de la pantalla.
[Ancha]
Ancha mostrará el centro de la imagen como
tamaño original y ambos lados de la imagen
(izquierda/derecha) se ampliarán. El tamaño de
la imagen dependerá de la señal original.
[Full]
Se mostrará una imagen con su aspecto real a
un tamaño de 16:9.
[Zoom]
"Zoom" mostrará una imagen en 16:9 sin cam-
biar su relación horizontal/vertical, en su
tamaño máximo.
[Cine]
"Cinema" mostrará una imagen en 16:9 con
alargamiento vertical.
[Amplía]
"Expand" mostrará una imagen en 16:9 con
alargamiento horizontal.
Sidebar
(normal)
Ancha Cine
Total
ZoomTotal
(normal)
Amplía Cine
Cuando la relación de aspecto del TV está ajustada
en 4:3...
Cuando la relación de aspecto del TV está ajus-
tada en 16:9...

22
ES
INFORMACIÓN DE PANTALLA
Con esta función se puede visualizar en la pantalla
el número de canal seleccionado u otra información
como el modo de audio para su comprobación.
En el modo analógico, se muestra el número de
canal seleccionado y el modo de audio.
1
Visualización del número de canal y el modo de audio.
• Presione [INFO] en el mando a distancia.
En la parte superior derecha de la pantalla, se
visualizarán el número de canal actualmente
seleccionado, el modo de audio, el tipo de res-
oluciones para la señal de vídeo, la relación de
aspecto de TV, subtítulos y clase de TV.
• Para borrar la pantalla, presione nuevamente
[BACK] o [INFO].
6
SAP / ESTÉREO
TV-PG DLSV
480i
480i
4:3
4:3
SD
SD
CC
CC
TV
ENTER
AUDIO
STILL
SETUP
BACK
SCREEN
MODE
INFO
CH RETURN
MUTE
VOL. CH
7 8 9
-
0
INFO
BACK
En el modo digital, se mostrará la información
detallada para el canal actualmente seleccionado,
como la guía de programación.
1
Visualización de la información detallada para el canal.
• Presione [INFO] en el mando a distancia.
Se muestran en pantalla los detalles de los
datos del programa actualmente seleccionado.
• Se muestra la siguiente información.
(1) Título del programa
(2) Emisora
(3) Guía de programa (máx. 4 líneas
mostradas)
(4) Número de canal
(5) Idioma de audio (se muestra "Otro" cuando
no puede obtenerse el idioma de audio o si
los idiomas obtenidos no son Inglés,
Español o Francés.)
(6) Líneas de exploración efectiva y modo de
exploración
(7) Definición de programa
(8) Relación de aspecto del programa
(9) Clase de programa
(10) S.C. (No disponible si los subtítulos están
ajustados en “Off”)
• Cuando se conecten equipos externos se
mostrarán las siguientes pantalla:
por ej.: Cuando utilice la toma VIDEO1 INPUT
para la conexión
Video1
TV-PG DLSV
480i
480i
SD
SD
CC
CC
NOTAS:
• Cuando la guía de programación ocupe más de 5 líneas,
utilice
[
K
/
L
] para desplazarse por el texto.
• Aparecerá el mensaje "No se proporciona descripción"
cuando no haya guía de programación.
6-1
Inglés 1/2
TV-PG DLSV
1080i
1080i
16:9
16:9
HD
HD
CC
CC
Buffy Vampire Slayer
Buffy Vampire Slayer
Hace un cuarto de siglo, en una época que ahora puede considerarse
como los viejos tiempos de la prensa, los anuncios en medios
impresos suponeeían el 80 % de los ingresos por publicidad de la
industria. Los grandes almacenes y los supermercados eran
HDTV
HDTV
(1) (2) (4)
(9)
(10)
(5)
(6), (7), (8)
(3)
DTV

23
ES
PARA MIRAR TV / AJUSTES OPCIONALES
A
JUSTES OPCIONALES
TEMPORIZADOR DE APAGADO AUTOMÁTICO
La función Temporizador de Apagado Automático
apagará automáticamente la corriente de la unidad
a una hora determinada.
1
Uso del Temporizador de Apagado Automático.
• Presione
[SLEEP] del mando a distancia.
• Se mostrará la pantalla para el ajuste del
Temporizador de Apagado Automático.
2
Ajuste del temporizador.
• Puede seleccionar 10, 20, 30, 40, 50, 60, 70,
80 y 90 minutos presionando
[SLEEP]. (No
puede ajustar el temporizador por un minuto.)
• El temporizador se puede ajustar hasta 90
minutos.
• Después de ajustarlo, podrá verificar el tiempo
restante en 1 minuto presionando
[SLEEP].
• Para cancelar el temporizador de apagado
automático, presione repetidamente
[SLEEP]
hasta que aparezca "Reposar Off”.
• La pantalla del temporizador de apagado
automático desaparecerá automáticamente tras
unos pocos segundos.
NOTA:
• Si desconecta la unidad del tomacorriente o si se produce
un fallo en la corriente, se cancelará el ajuste del tempo-
rizador de apagado automático.
Reposar
Off
Reposar
Off
ENTER
POWER SLEEP
AUDIO
STILL
SETUP
SCREEN
MODE
1 2 3
4 5 6
7 8 9
-
0
INPUT
SELECT
SLEEP
PANTALLA DE INSTALACIÓN
Esta sección describe el resumen de la pantalla de
instalación que se muestra al presionar
[SETUP].
Para más detalles, vea la página de referencia de
cada elemento.
La pantalla de instalación está formada por los ele-
mentos que se muestran a continuación.
•
Para salir de los ajustes.
•
Para ajustar la calidad de imagen (Modo de
Imagen, Claridad, Contraste, Color, Matiz, Nitidez
y Tempe. de Color).
(Vea el apartado “AJUSTE DE LA IMAGEN” en la
página 24.)
•
Para buscar automáticamente los canales que se
pueden recibir, y ver o saltar los que se necesiten.
(Vea el apartado “AUTOSCAN” en la página 14.)
•
Puede cambiar el formato de pantalla para los
subtítulos, así como utilizar variados estilos de
fuentes, que muestran el diálogo de un programa
de televisión u otra información en la pantalla.
(Consulte “SUBTÍTULOS” en página 25.)
También pueden ajustarse las limitaciones de
visión, tales como V-Chip de clase de MPAA y la
clase de TV. (Consulte “V-CHIP” en página 28.)
Audio HDMI si el TV está conectado a un disposi-
tivo digital externo, por ejemplo un reproductor de
DVD. (Consulte “AUDIO HDMI” en página 30.)
•
Para cambiar el idioma (INGLÉS, ESPAÑOL,
FRANCÉS) que se muestra en la pantalla de insta-
lación.(Vea el apartado "SELECCIÓN DE
IDIOMA" en la página 17.)
NOTAS:
• Para ir a la pantalla normal, presione [SETUP].
• Si no utiliza este TV durante más de 45 segundos durante
el ajuste, los cuadros de mensaje empiezan a desplazarse
hacia la esquina inferior izquierda de la pantalla. Esto
sucede para evitar las imágenes remanentes en pantalla.
Presione cualquier tecla excepto [POWER] para
cancelarlos.

24
ES
AJUSTE DE LA IMAGEN
Puede disfrutar de su modo de imagen preferido
seleccionando entre las cinco configuraciones
predeterminadas de imagen que ajustarán los
colores para mejorar su experiencia de visión.
Además, pueden variarse los ajustes de brillo,
contraste, color, matiz, nitidez, temperatura de color
y ahorro eléctrico.
1 Visualización de la pantalla de instalación.
• Presione
[SETUP].
Se visualizará la siguiente pantalla de
instalación.
2
Selección de "IMAGEN" y presione [ENTER]
para confirmar su selección.
• Mediante
[
K
/
L
], seleccione el elemento
deseado y presione
[ENTER] para confirmar.
3
Ajuste de la calidad de imagen.
• Mediante
[
K
/
L
], seleccione el elemento de
calidad de imagen que desee ajustar.
Modo de Imagen
Mediante [
K
/
L
], ajuste Modo de imagen de la
selección, y presione
[ENTER]. (Normal,
Dinámico, Cine y Noticia)
Claridad
Mediante
[
s
/
B
]
, ajuste hasta que las partes más
obseuras de la imagen tengan el brillo preferido.
s
:Para disminuir la claridad
B
:Para aumentar la claridad
Ajuste
Claridad 30
Mover
Entre
ENTER
Imagen
Imagen
Tempe. de Color
Modo de Imagen
Claridad
Contraste
Color
Matiz
Nitidez
Restablecer Ajustes
Normal
Dinámico
Cine
Noticia
Imagen
Imagen
Modo de Imagen
Claridad
Contraste
Color
Matiz
Nitidez
Restablecer Ajustes
Tempe. de Color
Dinámico
30
Neutral
60
36
0
0
ENTER
SETUP
BACK
SCREEN
MODE
INFO
ENTER
SETUP
Contraste
Mediante [
s
/
B
], ajuste para aumentar o
reducir el contraste.
s
:Para disminuir el contraste
B
:Para aumentar el contraste
Color
Mediante [
s
/
B
], ajuste el color a brillante o
pálido.
s
: Más pálido
B
: Más brillante
Matiz
Mediante [
s
/
B
], ajuste para obtener tonos de
piel naturales.
s
: Más rijo
B
: Más verde
Nitidez
Mediante [
s
/
B
], ajuste para ver más detalles
en la imagen.
s
: Más suave
B
:Más claror
Restablecer Ajustes
Mediante [
K
/
L
], seleccione “Restablecer”.
Puede reajustar el ajuste del modo de imagen
seleccionado.
Temp. de Color
Mediante [
K
/
L
], ajuste Tempe. de Color
(Temperatura de color) de la selección, y
presione
[ENTER].(Frío, Neutral y Caliente)
• La barra de ajuste para el elemento de calidad
de imagen se muestra en la pantalla.
4
Para salir de la configuración, presione [SET UP].
NOTA:
• Para pasar a pantalla normal, presione [SETUP].
Imagen
Imagen
Frío
Neutral
Caliente
Modo de Imagen
Claridad
Contraste
Color
Matiz
Nitidez
Restablecer Ajustes
Tempe. de Color
Restablecer Ajustes
Restablecer Ajustes
Esta función restablece
ajuste predeterminado de
"dinámico" en modo Imagen.
Cancelar
Restablecer
Ajuste Mover
Entre
ENTER
Nitidez 0
Ajuste Mover
Entre
ENTER
Matiz R2
Ajuste
Color 36
Mover
Entre
ENTER
Ajuste Mover
Entre
ENTER
Contraste 60

25
ES
AJUSTES OPCIONALES
SUBTÍTULOS
Podrá ver películas, noticias, programas de TV, etc.
especialmente identificados (cc) ya sea con subtí-
tulos del diálogo o con visualización de texto agre-
gados al programa.
También puede cambiar el tamaño y el estilo de la
fuente seleccionando opciones en “S.C.
Convencional”.
1 Visualización de la pantalla de instalación.
• Presione
[SETUP].
Se visualizará la siguiente pantalla de insta-
lación.
2 Seleccione "DETALLE" y presione [ENTER]
para confirmar su selección.
• Mediante [
K
/
L
], seleccione "Subtítulo Cerrado"
y presione
[ENTER] para confirmar su selec-
ción.
3
Seleccione "S.C. Convencional" y presione
[ENTER] para confirmar su selección.
Subtítulo Cerrado
Subtítulo Cerrado
S.C. Convencional
S.C. DTV
Estilo S.C.
Off
Off
Detalle
Detalle
Subtítulo Cerrado
V–chip
Audio HDMI
Protección Panel
Automático
Off
ENTER
STILL
SETUP
BACK
SCREEN
MODE
INFO
CH RETURN
MUTE
VOL. CH
-
0
ENTER
SETUP
4
Cambie el modo de Subtítulo Cerrado.
• Mediante [
K
/
L
], seleccione el subtítulo cerrado
deseado, y presione
[ENTER].
[MODO DE TÍTULO]
S.C.1 y Texto1:
Son los servicios primarios de subtítulos y texto.
Los subtítulos o el texto se muestran en el
mismo idioma que el diálogo del programa.
(hasta cuatro líneas de escritura sobre pantalla,
sin obstruir zonas relevantes de la imagen.)
S.C.3 y Texto3:
Sirven como canales de datos preferidos.
Los subtítulos o el texto son a menudo una tra-
ducción de un idioma secundario, inglés simplifi-
cado o mostrado a una velocidad más lenta.
S.C.2, S.C.4, Texto2 y Texto4:
Están raramente disponibles y las emisoras los
utilizan solamente en condiciones especiales,
por ejemplo cuando S.C.1 y S.C.3 no están
disponibles o cuando Texto1 y Texto3 no están
disponibles.
• Hay tres modos de visualización de acuerdo
con los programas:
Modo Paint-on: Muestra inmediatamente los
caracteres de entrada en la
pantalla.
Modo Pop-on : Una vez que se han guardado
los caracteres en la memoria,
se muestran todos a la vez.
Modo Roll-up : Muestra los caracteres avanzan-
do de forma continua (máx. 4
líneas).
5 Para salir del instalaci´on, presione [SETUP].
NOTAS:
• Si la emisión que se está recibiendo no tiene subtítulos, no
se verá nada.
• El subtítulo no se visualiza cuando se utiliza la conexión
HDMI.
•
Cuando el TV recibe una señal de reproducción con efectos
especiales (es decir, búsqueda, cámara lenta e imagen con-
gelada) del canal de salida de vídeo del VCR (CA3 o CA4),
el TV podría dejar de mostrar el título o texto correcto.
• Los títulos y textos pueden no coincidir de forma exacta con
las voces.
• Las interferencias pueden provocar que el sistema de subtí-
tulos no funcione correctamente.
• Los caracteres de los títulos o los textos no se mostrarán
mientras que se estén viendo las pantallas de menú o de
funciones.
•
Si aparece un cuadro negro en la pantalla quiere decir que el
TV está ajustado para el modo Texto. Para borrar la pantalla
seleccione subtítulo "S.C.1", "S.C.2", "S.C.3", "S.C.4" o "Off".
Subtítulo Cerrado
Subtítulo Cerrado
S.C. DTV
Estilo S.C.
S.C. Convencional Off
S.C.1
S.C.2
S.C.3
S.C.4
Texto1
Texto2
Texto3
Texto4

26
ES
ESTILO DE SUBTÍTULO CERRADO
1 Visualización de la pantalla de instalación.
• Presione
[SETUP].
Se visualizará la siguiente pantalla de instalación.
2 Seleccione "DETALLE" y presione [ENTER]
para confirmar su selección.
• Mediante
[
K
/
L
], seleccione "Subtítulo Cerrado" y
presione
[ENTER] para confirmar su selección.
3
Seleccione "Estilo S.C." y presione [ENTER]
para confirmar su selección.
4 Cambie al estilo de Subtítulo Cerrado.
• Mediante
[
K
/
L
], seleccione el estilo de subtítu-
lo cerrado deseado.
5
Utilice "Config. Usuarid".
• La función "Config. Usuarid" le permite cambiar el
Estilo S.C..
• Mediante
[
K
/
L
], seleccione "Config. Usuarid".
Estilo S.C.
Estilo S.C.
On
Off
Estilo Fuente
Tamaño Fuente
Color Fuente
Opaco Fuente
Color Fondo
Opaco Atrás
Color Borde
Tipo Borde
Config. Usuarid
Estilo S.C.
Estilo S.C.
Off
Fuente0
Mediano
Blanco
Rellena
Negro
Negro
Ninguno
Rellena
Config. Usuarid
Estilo Fuente
Tamaño Fuente
Color Fuente
Opaco Fuente
Color Fondo
Opaco Atrás
Color Borde
Tipo Borde
Subtítulo Cerrado
Subtítulo Cerrado
S.C. Convencional
S.C. DTV
Estilo S.C.
Off
Off
Detalle
Detalle
Subtítulo Cerrado
V–chip
Audio HDMI
Protección Panel
Automático
Off
SUBTÍTULOS DE DTV
1 Visualización de la pantalla de instalación.
• Presione
[SETUP].
Se visualizará la siguiente pantalla de instalación.
2 Seleccione "DETALLE" y presione [ENTER]
para confirmar su selección.
• Mediante
[
K
/
L
], seleccione "Subtítulo Cerrado"
y presione
[ENTER] para confirmar su selección.
3
Seleccione "S.C. DTV" y presione [ENTER] para
confirmar su selección.
4 Cambie al modo de Subtítulo Cerrado DTV.
• Mediante
[
K
/
L
], seleccione el subtítulo cerrado
DTV deseado, y presione
[ENTER].
5
Para salir del menu,presione [SETUP].
NOTA:
S.C. DTV:
Aparte de los subtítulos cerrados, DTV tiene sus propios sub-
títulos cerrados, denominados S.C. DTV. Utilice este menú
para cambiar la configuración de S.C. DTV.
Off: Selecciónelo si no desea S.C. DTV. Éste es el ajuste
predeterminado.
Servicio 1 a Servicio 6: Seleccione uno de ellos antes de
cambiar cualquier otro elemento del menú de subtítulos cer-
rados. Seleccione Servicio 1 en circunstancias normales.
Subtítulo Cerrado
Subtítulo Cerrado
S.C. Convencional
Estilo S.C.
S.C. DTV
Off
Servicio1
Servicio2
Servicio3
Servicio4
Servicio5
Servicio6
Subtítulo Cerrado
Subtítulo Cerrado
Off
Off
S.C. Convencional
S.C. DTV
Estilo S.C.
Detalle
Detalle
Subtítulo Cerrado
V–chip
Audio HDMI
Protección Panel
Automático
Off
DTV

27
ES
AJUSTES OPCIONALES
6 Ajuste cada elemento.
• Cuando "Config. Usuarid" esté ajustado en
"On", puede ajustar los elementos siguientes.
• Aparece el estilo S.C. ajustado en “Config.
Usuarid”.
• Con
[
K
/
L
], seleccione el elemento que desee
ajustar.
• Puede cambiar la configuración de cada uno
de los elementos con
[
K
/
L
].
• A continuación se muestra la descripción de
los ajustes de estos elementos.
[Estilo Fuente]
Se puede cambiar el estilo de fuente del título
mostrado de la siguiente forma.
[Tamaño Fuente]
El tamaño del texto del título mostrado se puede
cambiar del siguiente modo.
[Color Fuente]
Se puede cambiar el color del texto del título
mostrado de la siguiente forma.
Estilo S.C.
Estilo S.C.
Blanco
Negro
Rojo
Verde
Azul
Amarllo
Magenta
Cyan
Subtítulo Cerrado
Config. Usuarid
Estilo Fuente
Tamaño Fuente
Opaco Fuente
Color Fondo
Opaco Atrás
Color Borde
Tipo Borde
Color Fuente
Estilo S.C.
Estilo S.C.
Pequeño
Grande
Mediano
Subtítulo Cerrado
Config. Usuarid
Estilo Fuente
Color Fuente
Opaco Fuente
Color Fondo
Opaco Atrás
Color Borde
Tipo Borde
Tamaño Fuente
Estilo S.C.
Estilo S.C.
Subtítulo Cerrado
Config. Usuarid
Tamaño Fuente
Color Fuente
Opaco Fuente
Color Fondo
Opaco Atrás
Color Borde
Tipo Borde
Estilo Fuente
ABCDEFGHIJKL
ABCDEFGHIJKL
Imagen
Atrás
(Color Fondo y Opaco Atrás)
Fuente
(Estilo Fuente, Tamaño Fuente, Color Fuente
y Opaco Fuente)
Borde
(Color Borde y Tipo Borde)
[Opaco Fuente]
Se puede cambiar la opacidad del texto del título
mostrado de la siguiente forma.
[Color Fondo]
Se puede cambiar el color de fondo del título
mostrado de la siguiente forma.
[Opaco Atrás]
Se puede cambiar la opacidad del fondo del títu-
lo mostrado de la siguiente forma.
[Color Borde]
El color de borde del subtítulo mostrado puede
cambiarse como se indica a continuación.
[Tipo Borde]
Se puede cambiar el borde de los caracteres del
título mostrado de la siguiente forma.
• Presione
[ENTER] y ajuste "Config. Usuarid" en
"On".
7 Para salir del instalactión, presione [SETUP].
Estilo S.C.
Estilo S.C.
Elevado
Hundido
Uniforme
Sombra Izq.
Sombra Der.
Ninguno
Subtítulo Cerrado
Config. Usuarid
Estilo Fuente
Color Fuente
Opaco Fuente
Color Fondo
Color Borde
Tamaño Fuente
Opaco Atrás
Tipo Borde
Estilo S.C.
Estilo S.C.
Blanco
Negro
Rojo
Verde
Azul
Amarllo
Magenta
Cyan
Subtítulo Cerrado
Config. Usuarid
Estilo Fuente
Tamaño Fuente
Opaco Fuente
Color Fondo
Opaco Atrás
Tipo Borde
Color Fuente
Color Borde
Estilo S.C.
Estilo S.C.
Destello
Translucida
Transparente
Rellena
Subtítulo Cerrado
Config. Usuarid
Estilo Fuente
Tamano Fuente
Color Fuenter
Opaco Fuente
Color Fondo
Color Borde
Tipo Borde
Opaco Atrás
Estilo S.C.
Estilo S.C.
Blanco
Rojo
Verde
Azul
Amarllo
Magenta
Cyan
Subtítulo Cerrado
Negro
Config. Usuarid
Estilo Fuente
Tamaío Fuente
Opaco Fuente
Opaco Atrás
Color Borde
Tipo Borde
Color Fuente
Color Fondo
Estilo S.C.
Estilo S.C.
Destello
Translucida
Transparente
Rellena
Subtítulo Cerrado
Config. Usuarid
Estilo Fuente
Tamaño Fuente
Color Fuenter
Color Fondo
Opaco Atrás
Color Borde
Tipo Borde
Opaco Fuente

28
ES
V-CHIP
Permite que los padres eviten que sus niños vean
programas de televisión que contienen material
inapropiado, incluyendo expresiones y descrip-
ciones desagradables. Se pueden cancelar las lim-
itaciones de programas establecidas introduciendo
la contraseña.
1 Visualización de la pantalla de instalación.
• Presione
[SETUP].
Se visualizará la siguiente pantalla de instalación.
2 Seleccione "DETALLE" y presione [ENTER]
para confirmar su selección.
• Con
[
K
/
L
], seleccione "V-chip".
• Presione
[ENTER].
Se muestra la pantalla de introducción de con-
traseña.
V-Chip
V-Chip
Código Id.
Atrás
BACK
Introduzca contraseña.
Detalle
Detalle
Subtítulo Cerrado
V–chip
Audio HDMI
Protección Panel
Automático
Off
ENTER
POWER SLEEP
AUDIO
STILL
SETUP
BACK
SCREEN
MODE
INFO
1 2 3
4 5 6
7 8 9
-
0
INPUT
SELECT
ENTER
SETUP
1 2 3
4 5 6
7 8 9
0
3 Introduzca la contraseña.
• Con los botones de
Número de canal intro-
duzca el número de 4 dígitos.
• Cuando no haya configurado su contraseña,
introduzca 0000.
• Cuando la contraseña sea correcta, se mues-
tra la siguiente pantalla “V-chip”.
Para realizar el ajuste de cada uno de los ele-
mentos vea la siguiente descripción.
4 Visualización de la pantalla "Clase de MPAA".
• Con
[
K
/
L
], seleccione "Clase de MPAA".
• Presione
[ENTER].
V-Chip
V-Chip
Seleccionar Mirar / Bloque
Atrás
BACK
ENTER
X
NC-17
R
PG-13
PG
G
NR
V-Chip
V-Chip
Clase de MPAA
Clase de TV
Contraseña Nueva
A
Clase de MPAA
V-Chip
V-Chip
Clase de MPAA
Clase de TV
Contraseña Nueva
A
Clase de MPAA
B
Clase de TV
C
Contraseña Nueva
V-Chip
V-Chip
Código Id.
Atrás
BACK
Introduzca contraseña.

29
ES
AJUSTES OPCIONALES
5 Ajuste de "Clase de MPAA".
• Con
[
K
/
L
], seleccione la clase.
• Presione
[ENTER] y ajuste "Mirar" o "Bloq.".
6
Para salir del instalación, presione [SETUP].
4
Visualización de la pantalla "Clase de TV".
• Con
[
K
/
L
], seleccione "Clase de TV".
• Presione
[ENTER].
V-Chip
V-Chip
Seleccionar Mirar / Bloque
Atrás
BACK
ENTER
TV-MA
TV-14
TV-PG
TV-G
TV-Y7
TV-Y
FV
V S L D
V-Chip
V-Chip
Clase de MPAA
Clase de TV
Contraseña Nueva
B
Clase de TV
<Selección> <Explicación de la categoría>
X : Sólo para adultos
NC-17 : Prohibido para menores de 17
años
R : Restringido; los menores de
17 años necesitan de la pres-
encia de los padres o algún
adulto
PG-13 : No adecuado para niños de
menos de 13 años
PG : Se recomienda la presencia
de los padres
G : Público general
NR: No clase
V-Chip
V-Chip
Seleccionar Mirar / Bloque
Atrás
BACK
ENTER
X
NC-17
R
PG-13
PG
G
NR
5 Ajuste de "Clase de TV".
• Con
[
K
/
L
], seleccione la clase.
• Presione
[ENTER] y ajuste "Mirar" o "Bloq."
para la clase sin subcategorías.
• En la clase con subcategorías, se muestran
presionando dos veces
[ENTER]. Presione
[
K
/
L
/
s
/
B
] y seleccione la clase. Después
presione
[ENTER] y ajuste "Mirar" o "Bloq.".
6 Para salir del instalación, presione [SETUP].
NOTAS:
para la CLASE DE TV y CLASE DE MPAA
• Cuando seleccione una clase y la ponga en "Bloq.", se blo-
quearán automáticamente las clases que estén por encima.
Las que queden por debajo estarán disponibles para poder
verlas.
•
Cuando seleccione una clase y la ponga en "Mirar", el resto
de clases estarán automáticamente disponibles para ver. Las
calificaciones más altas se bloquearán.
<Selección>
<Explicaciones de la clasifi-
cación de la subcategoría>
FV : Fantasía violencia
V : Violencia
S : Escenas de carácter sexual
L : Lenguaje vulgar
D : Diálogos provocativos
<Selección> <Explicación de la categoría>
TV-MA: Sólo para adultos
TV-14 : No apto para niños de menos
de 14 años
TV-PG : Se sugiere Guía de Padres
TV-G : Auditorio general
TV-Y7 : Apto para niños mayores de 7
años
TV-Y : Apto para todos los niños
V-Chip
V-Chip
Seleccionar Mirar / Bloque
Atrás
BACK
ENTER
TV-MA
TV-14
TV-PG
TV-G
TV-Y7
TV-Y
FV
V S L D
V-Chip
V-Chip
Seleccionar Mirar / Bloque
Atrás
BACK
ENTER
TV-MA
TV-14
TV-PG
TV-G
TV-Y7
TV-Y
FV
V S L D

30
ES
4 Visualización de la pantalla "Contraseña Nueva".
• Con
[
K
/
L
], seleccione "Contraseña Nueva".
• Presione
[ENTER].
5 Cambie la contraseña.
• Use los botones de
Número de canal del
mando a distancia e introduzca la NUEVA con-
traseña de 4 dígitos.
• Introduzca de nuevo la contraseña en la casilla
"Confirme contraseña".
6 Para salir del menú, presione [SETUP].
NOTAS:
• Asegúrese de introducir exactamente la misma contraseña
nueva en el espacio "Confirme contraseña". Si son difer-
entes, el espacio se queda en blanco para volver a intro-
ducirla.
• Su contraseña se borrará y volverá a la predeterminada
(0000) cuando se produzca un fallo eléctrico o cuando
apague el aparato mediante un interruptor de pared. Si olvi-
da la contraseña, desenchufe el cable de corriente durante
10 segundos para restaurar la contraseña en 0000.
V-Chip
V-Chip
Código Id.
Atrás
BACK
Confirme contraseña.
Introduzca contraseña.
V-Chip
V-Chip
Clase de MPAA
Clase de TV
Contraseña Nueva
C
Contraseña Nueva
AUDIO HDMI
Ajuste el método de entrada de sonido para la
toma HDMI.
1 Active la pantalla de configuración.
• Presione
[SETUP].
Se muestra la siguiente pantalla de configu-
ración.
2
Seleccione "DETALLE" y presione [ENTER]
para confirmar su selección.
• Mediante
[
K
/
L
], seleccione "Audio HDMI" y
presione
[ENTER] para confirmar su selección.
3
Cambie a Audio HDMI.
• Mediante
[
K
/
L
], sseleccione Audio HDMI
deseado, y presione
[ENTER].
• Seleccione "Automático" si ha conectado a
ambos, a un dispositivo digital con toma HDMI,
y a un dispositivo analógico para fuentes de
audio. En este ajuste, las señales de entrada
de audio digital tiene prioridad.
• Seleccione "Digital" si ha conectado a un dis-
positivo digital con toma HDMI para señales de
entrada de audio digital.
• Seleccione "Analógico" si ha conectado a un
dispositivo analógico con tomas analógicas
para señales de entrada de audio analógico.
4
Para salir del instalación, presione [SETUP].
Detalle
Detalle
Subtítulo Cerrado
Automático
Digital
Analógico
V–chip
Audio HDMI
Protección Panel
Detalle
Detalle
Subtítulo Cerrado
V–chip
Audio HDMI
Protección Panel
Automático
Off
ENTER
SETUP
BACK
SCREEN
MODE
INFO
ENTER
SETUP

31
ES
AJUSTES OPCIONALES / INSTALACIÓN DE UN SOPORTE PARA LA MONTAJE EN PARED (SE VENDE POR SEPARADO)
I
NSTALACIÓN DE UN SOPORTE PARA LA MONTAJE EN PARED (SE VENDE POR SEPARADO)
A continuación se ofrece una descripción del método para instalar un soporte para la montaje en pared a este TV.
Al realizar esta operación, consulte el manual de instrucciones incluido con el juego de montaje en pared.
ANT. IN
AUDIO OUT AUDIO
HDMI
COMPONENT2
Y
Pb
Pr
L
R
AUDIO
Y
Pb
Pr
L
R
AUDIO
L
R
AUDIO
VIDEO1
AC IN
S-VIDEO1
COMPONENT1
HDMI IN
L
R
L
R
DIGITAL
AUDIO OUT
(COAXIAL)
Parte trasera del TV
2
Estand
1
1
1 Dé la vuelta al TV y colóquelo sobre su pantalla,
encima de una mesa protegida con una tela
suave extendida.
Coloque el TV de manera que sus bases de
soporte sobresalgan del borde de la mesa.
2 Retire las bases de soporte del TV.
Desenrosque los tornillos M5 indicados por y
retire las bases de soporte.
3
Instale los rieles izquierdo y derecho del TV
mediante los tornillos M8 mm incluidos con el
juego de montaje en pared.
indica la posición de los agujeros de tornillo
en este TV.
4
Instale el TV en la pared.
* Si desea volver a instalar el soporte de este TV,
inserte el soporte lentamente, como se indica en
la ilustración, e introduzca los tornillos en los cua-
tro orificios de rosca ( ).
1
NOTA:
• Consulte el manual de instrucciones incluido con el juego
de montaje en pared para sujetar este TV a la pared.
2
NOTA:
• Los tornillos y las bases de soporte que ha retirado
son necesarios para volver a instalarlos posterior-
mente. Asegúrese de guardarlos en un lugar seguro.
1
NOTAS:
• Asegúrese de utilizar una mesa que pueda soportar
el peso de este TV y que sea más grande que el TV.
• Asegúrese de que la mesa se encuentra en una
ubicación estable.
NOTAS:
• Utilice solamente los orificios para los tornillos indi-
cados con para montar este TV.
• Consulte las instrucciones sobre cómo instalar los
rieles del TV en el manual de instrucciones incluido
con el juego de montaje en pared.
2
1
#
PRECAUCIÓN
• Cualquier daño causado por un intento incorrecto de instalar este TV no está protegido por la garantía
del fabricante.
• Este TV sólo se puede utilizar con el soporte de pared VMPL. del modelo de Sanus Systems. Si se
utiliza con otros soportes para el montaje en pared, es posible que se produzca inestabilidad, lo que
puede causar lesiones.

32
ES
GUÍA DE LOCALIZACIÓN DE PROBLEMAS
Antes de llamar al servicio técnico, compruebe una vez más el siguiente cuadro.
Síntoma Solución
No hay corriente
No hay imagen o sonido
No hay color
El sonido es correcto, la imagen es
deficiente
Imagen distorsionada
Imagen débil
Líneas o rayas en la imagen
Imagen borrosa
Imágenes fantasma
Barras en la pantalla
• Asegúrese de que el cable de alimentación está enchufado en el tomacorriente.
• Si se produce un fallo de corriente, desenchufe el cable de alimentación durante
30 minutos para permitir que la unidad se reinicie por sí misma.
• Compruebe que está encendida la corriente.
• Compruebe la conexión del tomacorriente.
• Compruebe la antena o el cable de conexión de la unidad principal.
• Si está usando una antena exterior, compruebe el estado del cable así como el
de la conexión.
• Trate de ver otros canales. Puede que sea un problema de la emisora que está
sintonizando.
• Apague la corriente, espere aproximadamente 1 minuto y enciéndala de nuevo.
• Compruebe la antena o la conexión del cable que va a la unidad principal.
• Si está usando una antena exterior, compruebe el estado del cable así como el
de la conexión.
• Trate de ver otros canales. Puede que sea un problema de la emisora que está
sintonizando.
• Ajuste el Color en la pantalla instalación.
• Compruebe la antena o la conexión del cable que va a la unidad principal.
• Si está usando una antena exterior, compruebe el estado del cable así como el
de la conexión.
• Las ondas eléctricas pueden verse interferidas debido a la excesiva proximidad
de algún electrodoméstico.
• Ajuste el Contraste y la Claridad en la pantalla instalación.
• Trate de ver otros canales. Puede que sea un problema de la emisora que está
sintonizando.
• Si está usando una antena exterior, compruebe el estado del cable así como el
de la conexión.
• Trate de ver otros canales. Puede que sea un problema de la emisora que está
sintonizando.
• Compruebe la antena o la conexión del cable que va a la unidad principal.
• Si está usando una antena exterior, compruebe el estado del cable así como el
de la conexión.
• Ajuste el Contraste y la Claridad en la pantalla instalación.
• Trate de ver otros canales. Puede que sea un problema de la emisora que está
sintonizando.
• Si está usando una antena exterior, compruebe el estado del cable así como el
de la conexión.
• Las ondas eléctricas pueden verse interferidas debido a la excesiva proximidad
de algún electrodoméstico.
• Trate de ver otros canales. Puede que sea un problema de la emisora que está
sintonizando.
• Si está usando una antena exterior, compruebe el estado del cable así como el
de la conexión.
• Trate de ver otros canales. Puede que sea un problema de la emisora que está
sintonizando.
• Compruebe la antena o la conexión del cable que va a la unidad principal.
• Si está usando una antena exterior, compruebe el estado del cable así como el
de la conexión.
• Las ondas eléctricas pueden verse interferidas debido a la excesiva proximidad
de algún electrodoméstico.
• Trate de ver otros canales. Puede que sea un problema de la emisora que está
sintonizando.
• Si está usando una antena exterior, compruebe el estado del cable así como el
de la conexión.
• Las ondas eléctricas pueden verse interferidas debido a la excesiva proximidad
de algún electrodoméstico.
V
ARIOS

33
ES
VARIOS
La imagen se desplaza vertical-
mente
Marcas de otro color en la pantalla
Recepción defectuosa de algunos
canales
La imagen es correcta, el sonido
es deficiente
Imagen remanente en pantalla
No se reciben señales digitales
El número de canal introducido
cambia automáticamente
El mando a distancia no funciona
Problemas con los Subtítulos
Se ven subtítulos con errores
ortográficos.
No se ven los subtítulos por com-
pleto, o aparecen retrasados con
respecto al diálogo.
Los subtítulos aparecen como un
recuadro blanco. No se ven los
subtítulos en los programas que sí
los tienen.
No se ven subtítulos al poner una
cinta de vídeo que los tiene.
Se ve un recuadro negro en la
pantalla.
• Si está usando una antena exterior, compruebe el estado del cable así como el
de la conexión.
• Las ondas eléctricas pueden verse interferidas debido a la excesiva proximidad
de algún electrodoméstico.
• Trate de ver otros canales. Puede que sea un problema de la emisora que está
sintonizando.
• Aleje el TV de cualquier electrodoméstico que pueda haber cercano. Apague la
corriente, espere unos 30 minutos y vuelva a encenderla.
• Trate de ver otros canales. Puede que sea un problema de la emisora que está
sintonizando.
• Compruebe la antena o la conexión del cable que va a la unidad principal.
• Si está usando una antena exterior, compruebe el estado del cable así como el
de la conexión.
• Las ondas eléctricas pueden verse interferidas debido a la excesiva proximidad
de algún electrodoméstico.
• Trate de ver otros canales. Puede que sea un problema de la emisora que está
sintonizando.
• Las ondas eléctricas pueden verse interferidas debido a la excesiva proximidad
de algún electrodoméstico.
• Trate de ver otros canales. Puede que sea un problema de la emisora que está
sintonizando.
• No visualice imágenes continuas, como juegos de vídeo, gráficos de ordenador,
cotizaciones de bolsa y otros patrones fijos. Esto puede crear imágenes rema-
nentes en la pantalla. Si se produce este problema, visualice una imagen en
movimiento, por ejemplo un programa de televisión, para reducir el problema.
Esta visualización continua en pantalla puede ocasionar un daño permanente
en la pantalla. Ese daño de imagen remanente causada por un uso incorrecto
NO ESTÁ CUBIERTO por la garantía.
• Asegúrese de que se ha completado la autoexploración (Autoscan) en el menú
de configuración. Será necesario cuando configure el TV por primera vez o
cuando el TV sea trasladado a un lugar donde se emitan otros canales.
• El canal seleccionado no existe en ese momento. No siempre hay subcanales
emitidos.
• Cuando Autoscan se interrumpe y no se finaliza, algunos canales no se
recibirán. Asegúrese de finalizar Autoscan en el menú de configuración.
• Muchos canales digitales tienen números de canal alternativos. El TV cambia
dichos números automáticamente a los emitidos por las emisoras.
Estos son los números utilizados para emisiones analógicas.
• Compruebe la antena o la conexión del cable que va a la unidad principal.
• Compruebe el estado de las pilas.
• Compruebe que no haya obstáculos entre el sensor y el mando a distancia.
• Haga una prueba de salida de señal. Si está bien, puede haber un fallo del sen-
sor a distancia. (Consulte el "VERIFICACIÓN DE LA SEÑAL DE INFRARRO-
JOS" en la página 35.)
• En las emisiones en directo, las empresas encargadas de realizar los subtítulos
pueden emitir programas sin una corrección ortográfica previa.
• En las emisiones en directo es normal que los subtítulos vayan retrasados unos
segundos con respecto a los diálogos reales. La mayoría de empresas que se
dedican a la producción de subtítulos pueden mostrar los diálogos a un máximo
de 220 palabras por minuto. Si el diálogo excede esta velocidad, se utiliza una
edición selectiva para asegurar que los subtítulos permanecen actualizados con
respecto al diálogo que se está viendo en cada momento.
• Cuando las ondas eléctricas se ven interferidas debido a edificios, condiciones
meteorológicas, etc., se podrían ver los subtítulos de una forma incompleta.
•
La estación emisora puede acortar los programas para insertar anuncios. El descod-
ificador de subtítulos no puede leer la información de los programas acortados.
• La cinta de vídeo puede ser una copia ilegal o la señal de los subtítulos podría
haber fallado durante el proceso de copiado.
• Está seleccionado el modo “Texto” para los subtítulos. Seleccione “S.C.1”,
“S.C.2”, “S.C.3”, “S.C.4” o “Off”.
Síntoma Solución

34
ES
•RUIDO DE IGNICIÓN:
Pueden aparecer puntos negros o rayas horizontales, la imagen puede
fluctuar o desplazarse.
Generalmente causado por interferencia de sistemas de encendido de
automóviles, lámparas de neón, taladros eléctricos y otros aparatos
eléctricos.
•IMÁGENES FANTASMAS:
Las imágenes "fantasmas" se crean porque la señal de televisión sigue
dos trayectorias.
Una es la trayectoria directa y la otra se refleja desde edificios altos,
montañas u otros objetos.
El cambio de orientación o posición de la antena puede mejorar la
recepción.
Las imágenes fantasmas pueden ser causadas también por defectos en el
sistema de antena, por ejemplo cables no blindados o la conexión de diversos
aparatos a la misma antena sin usar acopladores para antenas múltiples.
La aparición de imágenes fantasmas cuando la TV está conectada a un
sistema de TV por cable puede indicar un cable deficiente o una conexión
floja.
Confirme que el cable está correctamente conectado.
•NIEVE:
Si su receptor está situado en la zona marginal de una emisora de
televisión donde la señal sea débil, su imagen puede resultar afectada por
la aparición de pequeños puntos.
Cuando la señal es extremadamente débil, puede ser necesario instalar
una antena especial para mejorar la imagen.
El efecto de "nieve" cuando la TV está conectada a un sistema de TV por cable
puede indicar un cable deficiente o una conexión floja.
Confirme que el cable está correctamente conectado.
•El panel de visualización de plasma enciende los fósforos mediante la
descarga de radiación interna.
Según el contenido de la pantalla, en casos infrecuentes esto puede
hacer que aparezcan barras verticales por no poder encenderse.
Tenga en cuenta que esto no es un fallo de funcionamiento.
Aparecen barras
verticales, según el
contenido de la pantalla.
•INTERFERENCIA DE FRECUENCIA DE RADIO:
La interferencia produce ondas o rayas diagonales, y en algunos casos
provoca pérdida de contraste en la imagen.
•PREVENCIÓN DE UN OBSTÁCULO PARA RECEPTORES DE RADIO:
Este TV ha sido diseñado en conformidad con as normas FCC clase B.
El objetivo es evitar problemas en los receptores de radio.
Si este monitor causa un problema en receptores de radio, adopte las
medidas siguientes:
- Aleje el monitor de la radio.
-
Ajuste las antenas de radio para que el TV no reciba interferencias.
- El cable de la antena de la radio debe mantenerse lejos del TV.
- Utilice un cable coaxial para la antena.
Puede comprobar si este monitor tiene influencia sobre receptores de
radio apagando todos los equipos excepto el TV.
Si tiene un problema de recepción de radio cuando utilice el TV,
compruebe las instrucciones anteriores.

35
ES
VARIOS
Ancho buzón
El ancho buzón se refiere al
formato que muestra una imagen
alargada en la pantalla de
televisión con una proporción
estándar 4:3 y con espacios en
negro por su parte superior e
inferior. Se usa para mantener la
proporción de la fuente original,
como puede ser una película de
cine (16:9 o más ancho).
ATSC
Acrónimo de Advanced Television
Systems Commitee y nombre del
estándar de radiodifusión digital.
Contraseña
Un número almacenado de cuatro
dígitos que usted debe
proporcionar para realizar ajustes
para V-CHIP.
Dolby Digital
El sistema desarrollado por Dolby
Laboratories para comprimir el
sonido digital. Le ofrece un sonido
de audio estéreo (2 canales) o de
audio multicanal (hasta 5,1
canales).
HDMI (Interfaz multimedia de
alta definición)
IInterfaz que permite todos los formatos
de audio/vídeo digital no comprimidos,
incluidos un descodificador, un
reproductor DVD o una televisión
digital, sobre un único cable.
LPCM (Modulación por
codificación de pulsos lineales)
LPCM es un formato que puede
tener hasta ocho canales de
audio. Se utiliza principalmente en
la producción de música. El
formato muestrea y captura
señales analógicas y las
transforma en señales digitales
sin comprimir los datos de sonido.
NTSC
Acrónimo de National Television
Systems Commitee y nombre del
estándar de radiodifusión
analógico actual empleado.
Salida S-Video
Proporciona independientemente
la señal de color (C) y la de
luminancia (Y) al TV como señales
de vídeo, con lo que se obtiene
una mayor calidad de imagen.
SAP
(Segundo un program de audio)
Canal de audio secundario que se
ofrece aparte del canal de audio
principal. Este canal se usa como
alternativa en las emisiones bilingües.
TV de alta definición
(HDTV o High Definition TV)
Último formato digital que produce
una alta resolución y calidad de
imagen.
TV de definición estándar
(SDTV o Standard Definition TV)
Formato digital estándar cuya cal-
idad es similar a la imagen NTSC.
Vídeo componente
Se trata de un formato de señal
de vídeo que transmite cada uno
de los tres colores principales de
luz (rojo, azul y verde) a través de
diferentes líneas de señal. Esto
permite a los espectadores
experimentar colores de imagen
muy similares a los originales.
Existen diversos formatos de
señal, incluidos Y / Pb / Pr e Y /
Cb / Cr.
LIMPIEZA DE LA CAJA
• Desconecte siempre la TV de la toma de corriente
CA antes de la limpieza.
Limpie la carcasa de la TV con un paño suave previa-
mente humedecido y bien escurrido.
• Si la pantalla está sucia o polvorienta, límpiela con
un paño suave.
NOTA:
No utilice nunca disolvente, alcohol ni ningún otro líquido
abrasivo para limpiar la TV.
Asegúrese siempre de que la zona cercana a los con-
ductos de ventilación de la TV está despejada y limpia.
De lo contrario, podría producirse un incendio o la TV
podría fallar prematuramente.
REPARACIONES
Si su TV se estropea, no intente repararlo usted
mismo. Dentro del equipo no hay piezas que puedan
arreglar los usuarios. Apáguelo, desconéctelo de la
corriente y llame al número de teléfono que aparece
en la portada para localizar al Centro de Servicio
Autorizado.
VERIFICACIÓN DE LA SEÑAL DE INFRARROJOS
Si el mando a distancia tiene problemas, pruebe si
el mando a distancia envía la señal de infrarrojos a
la radio AM o una cámara digital (incluyendo la
cámara integrada en un teléfono celular). Ayudará a
determinar la causa del mal funcionamiento.
•
Con una radio AM:
Sintonice una radio AM a una banda
sin emisoras. Presione un botón en el
mando a distancia hacia la radio. El
sonido se escuchará con intermiten-
cia cuando presione una tecla y la
radio reciba la señal. Esto significa
que la unidad del mando a distancia
está funcionando.
• Con una cámara digital
(incluyendo la cámara integrada en un
teléfono celular):
Apunte una cámara digital hacia el
mando a distancia y mantenga pre-
sionado un botón en el mando a dis-
tancia. Si aparece una luz de infrarro-
jos en la cámara digital, el mando a
distancia está funcionando.
MANTENIMIENTO
GLOSARIO

E
SPECIFICACIONES
36
ES
• El diseño y las especificaciones están sujetos a cambios sin previo aviso y sin obligación legal.
• Si hay una diferencia entre idiomas, el idioma básico será el Inglés.
ESPECIFICACIONES GENERALES
Sistema de televisión: ATSC
NTSC-M
TV estándar
Sistema de
Subtítulos narrativos:
§15.119/FCC (CC analógica)
§15.119/FCC
(CC digital)
Gama de canales (ATSC/NTSC)
VHF:
2 ~ 13
UHF: 14 ~ 69
CATV: 2 ~ 13, A ~ W,
W+1 ~ W+94,
A-5 ~ A-1, 5A
Sistema de sintonización:
Sistema de sintonización
sintetizada de frecuencia de
canales
Acceso de canal: Teclado de acceso directo,
programable para barrido
arriba/abajo
Terminales
Entrada de antena:
VHF/UHF/CATV
75 ohmios desequilibrado
(tipo F)
Entrada S-Video:
Toma de 4 patillas Mini DIN x 2
Entrada de vídeo: Toma de RCA x 2
Entrada de audio: Toma de RCA (L/R) x 4
Entrada de vídeo/audio componente:
Una toma de patilla (Y) / 1Vpp x 2
Dos tomas de patilla (Pb/Pr) / 700mVpp x 4
Toma de RCA (L/R) x 4
Entrada de HDMI/audio:
Toma de HDMI
Toma de RCA (L/R) x 2
Salida digital coaxial de audio:
Toma de una patilla, 500 mVpp
Salida de audio analógica:
Toma de RCA (L/R) x 2
Altavoz de sistema de sonido estereofónico
ESPECIFICACIONES ELÉCTRICAS
Salida de sonido: 5W, 8 ohmios x 4
OTRAS ESPECIFICACIONES
Mando a distancia: Sistema de infrarrojos con
codificación digital
Temperatura de
funcionamiento:
5°C a 40°C
(41°F a 104°F)
Requisitos eléctricos: CA de 120V, 60Hz
Consumo eléctrico
(máximo):
400W
Pantalla de Plasma: Panel XGA de 42 pulgadas
Dimensiones: Al :
30-11/16 pulg.
(780mm)
An : 41-1/2
pulg.
(1054mm)
Prof
:13pulg. (330mm)
Peso: 95,9 lbs. (43,5kg)

37
ES
ESPECIFICACIONES / MEMO
M
EMO

L0700UA
SYLVANIA
GARANTIA LIMITADA
FUNAI CORP. reparará este producto libre de cargos en los EE.UU. de América, en caso de defectos en los
materiales u obra de mano, de la siguiente manera:
DURACION:
Partes: FUNAI CORP. proveerá las partes necesarias para reemplazar las piezas defectuosas sin ningún
cargo durante un (1) año a partir de la fecha de la compra original al minorista. Tres (3) años para el
panel de plasma. La garantía no cubre algunas piezas y la persistencia de imágenes en la pantalla
de plasma.
Mano de obra
: FUNAI CORP. proveerá la mano de obra necesaria sin cargos por un período de noventa (90) días a
partir de la fecha de compra original al minorista.
LIMITES Y EXCLUSIONES:
ESTA GARANTÍA ES EXTENSIVA SOLAMENTE AL COMPRADOR ORIGINAL DEL MINORISTA. UN RECIBO DE
COMPRA U OTRA PRUEBA DE LA COMPRA ORIGINAL SERÁ REQUERIDA JUNTO CON EL PRODUCTO PARA
OBTENER SERVICIO CUBIERTO POR ESTA GARANTÍA.
Esta garantía no será extendida a ninguna otra persona o cesionario.
Esta garantía queda anulada y no tendrá efecto si cualquier número serial del producto es alterado, reemplazado,
mutilado o faltante, o si un centro de servicio no autorizado intenta realizar reparaciones. Esta garantía limitada no
es aplicable a cualquier producto que no haya sido comprado y usado en los Estados Unidos de América.
Esta garantía solamente cubre fallas debido a defectos en los materiales o mano de obra que hayan ocurrido durante el
uso normal del producto. Por lo tanto no cubre daños ocurridos durante su transporte, o fallas causadas por su
reparación, alteración o productos no provistos por FUNAI CORPORATION, o daños que resulten de accidentes, mal
uso, abuso, maltrato, uso indebido, alteración, instalación defectuosa, mantenimiento incorrecto, uso comercial como en
hoteles, renta u oficinas, o daños como consecuencia de incendio, inundación, rayos u otros casos de fuerza mayor.
ESTA GARANTIA NO CUBRE LOS MATERIALES DE EMPAQUE, NINGUN ACCESORIO (EXCEPTO EL
CONTROL REMOTO), NINGUNA PARTE COSMETICA, PARTES COMPLETAS DE MONTAJE, DEMOSTRACION
O MODELOS DE EXHIBICION.
FUNAI CORP. Y SUS REPRESENTANTES O AGENTES NO SERAN SOMETIDOS BAJO NINGUN CONCEPTO A
NINGUNA RESPONSABILIDAD POR DAÑOS GENERALES, INDIRECTOS O COMO CONSECUENCIA,
ORIGINADOS U OCASIONADOS POR EL USO O LA INCAPACIDAD DE USAR ESTE PRODUCTO. ESTA
GARANTIA ES EMITIDA EN LUGAR DE CUALQUIER OTRA GARANTIA, EXPRESA O IMPLICITA, Y DE
CUALQUIER OTRA RESPONSABILIDAD DE PARTE DE FUNAI. CUALQUIER OTRA GARANTIA INCLUYENDO
LA GARANTIA DE COMERCIALIZACION, Y APTITUD PARA UN OBJETIVO EN PARTICULAR, QUEDA POR LA
PRESENTE RECHAZADA POR FUNAI Y SUS REPRESENTANTES EN LOS ESTADOS UNIDOS DE AMERICA.
CUALQUIER INSPECCION Y REPARACION BAJO GARANTIA DEBERA SER REALIZADA POR EL CENTRO DE
SERVICIO AUTORIZADO. ESTA GARANTIA ES VALIDA CUANDO EL APARATO ES LLEVADO A UN CENTRO DE
SERVICIO AUTORIZADO.
EL PRODUCTO DEBERA LLEGAR ACOMPAÑADO POR UNA COPIA DEL RECIBO ORIGINAL DE COMPRA. SI
NO SE AGREGA NINGUN COMPROBANTE DE LA COMPRA, LA GARANTIA NO TENDRA VALIDEZ Y LOS
GASTOS DE REPARACION SERAN CARGADOS AL CLIENTE.
IMPORTANTE:
ESTA GARANTIA LIMITADA LE OTORGA A USTED DERECHOS LEGALES ESPECIALES. POSIBLEMENTE
USTED TENGA OTROS DERECHOS QUE VARIAN DE ACUERDO AL ESTADO EN QUE VIVE. SI, EN
CUALQUIER MOMENTO DURANTE EL PERIODO DE GARANTIA USTED SE VE IMPEDIDO DE SENTIRSE
SATISFECHO CON LA REPARACION DE ESTE PRODUCTO, POR FAVOR CONTACTE A FUNAI CORP.
ATENCION:
FUNAI CORP. SE RESERVA EL DERECHO A MODIFICAR CUALQUIER PARTE DEL
DISEÑO DE ESTE PRODUCTO SIN PREVIO AVISO.
DECLARACIÓN DE GARANTÍA CON RESPECTO A REPARACIONES NO AUTORIZADAS:
Para obtener servicio de garantía, debe usted hacer entrega del producto directamente o con portes pagados, ya
sea en su embalaje original o en un embalaje que proporcione el mismo grado de protección, a cualquier CENTRO
DE SERVICIO AUTORIZADO. FUNAI CORP. no efectuará reembolso por ningún servicio realizado por proveedores
de servicio no autorizados sin autorización previa por escrito.
Para localizar su CENTRO DE SERVICIO AUTORIZADO más cercano o para preguntas
generales de servicio, por favor ponte en contacto con nosotros a :
FUNAI CORPORATION
Servicio al Cliente
Tel :1-800-605-8453
http://www.SylvaniaConsumerElectronics.com
19900 Van Ness Avenue, Torrance, CA 90501

El cable de alimentación
viene incluido.
Power cord is included.
Aerial antenna
Antena aérea
Cable TV signal
Señal del TV cable
L
R
AUDIO
VIDEO2
S-VIDEO2
ANT. IN
AUDIO OUT AUDIO
HDMI
HDMI IN
L
R
L
R
DIGITAL
AUDIO OUT
(COAXIAL)
COMPONENT2
Y
Pb
Pr
L
R
AUDIO
Y
Pb
Pr
L
R
AUDIO
L
R
AUDIO
VIDEO1
S-VIDEO1
COMPONENT1
2CAMCORDER
VIDEOCÀMARA
3
AMPLIFIER/RECEIVER
AMPLIFICADOR/RECEPTOR
1ANTENNA
ANTENA
DVD PLAYER
REPRODUCTOR DE DVD
VCR
VIDEOGRABADOR
CABLE/SAT
TV POR CABLE/SATÉLITE
5
4DVD PLAYER
REPRODUCTOR DE DVD
OR
O
OR
O
OR
O
Lateral trasero del televisor de pantalla de plasma
Plasma Display TV rear side
1
ANTENNA
ANTENA
ANT. IN
AUDIO OUT AUDIO
HDMI
HDMI IN
L
R
L
R
DIGITAL
AUDIO OUT
(COAXIAL)
OR
O
Plasma Display TV
Aerial antenna
Antena aérea
Cable TV signal
Señal del TV cable
2
CAMCORDER
VIDEOCÀMARA
L
R
AUDIO
VIDEO2
S-VIDEO2
VIDEO S–VIDEOLR
Plasma Display TV
OR
O
Some cables here are not included with the plasma display TV.
SIMPLE SET UP GUIDE
GUÍA DE INSTALACIÓN RÁPIDA
Algunos de los cables mostrados no se incluyen con el televisor de pantalla de plasma.

3
AMPLIFIER/RECEIVER
AMPLIFICADOR/RECEPTOR
ANT. IN
AUDIO OUT AUDIO
HDMI
HDMI IN
L
R
L
R
DIGITAL
AUDIO OUT
(COAXIAL)
Plasma Display TV
AUDIO IN
R
L
AUX
TVVIDEO
DIGITAL
AUDIO OUT
(COAXIAL)
5
REPRODUCTOR DE DVD
CABLE/SAT
TV POR CABLE/SATÉLITE
DVD PLAYER
VCR
VIDEOGRABADOR
L
R
AUDIO
VIDEO1
S-VIDEO1
VIDEO
VIDEO AUDIO
S–VIDEO LR
OR
O
Plasma Display TV
OR
O
OR
O
OR
O
OR
O
4
DVD PLAYER
REPRODUCTOR DE DVD
COMPONENT2COMPONENT2 COMPONENT1COMPONENT1COMPONENT2 COMPONENT1
Plasma Display TV
Y
Pb
Pr
L
R
AUDIO
Y
Pb
Pr
L
R
AUDIO
AUDIO
COMPONENT
VIDEO
LR
Y Cb Cr
1. Owner’s Manual
Manual del Usuariol
2. http://www.SylvaniaConsumerElectronics.com
3. 1-800-605-8453
FOR MORE INFORMATION
PARA MÁS INFORMACIÓN
1EMN21783
L0700UA ★★★★★
Printed in Malaysia
-
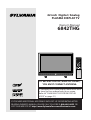 1
1
-
 2
2
-
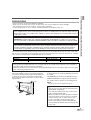 3
3
-
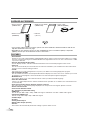 4
4
-
 5
5
-
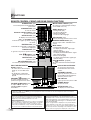 6
6
-
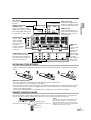 7
7
-
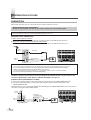 8
8
-
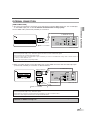 9
9
-
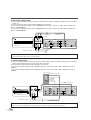 10
10
-
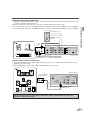 11
11
-
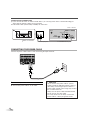 12
12
-
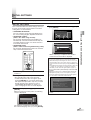 13
13
-
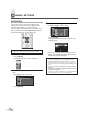 14
14
-
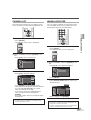 15
15
-
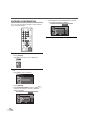 16
16
-
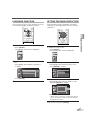 17
17
-
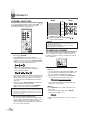 18
18
-
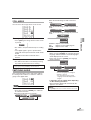 19
19
-
 20
20
-
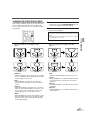 21
21
-
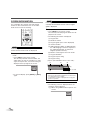 22
22
-
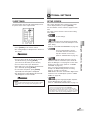 23
23
-
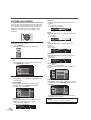 24
24
-
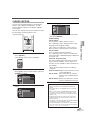 25
25
-
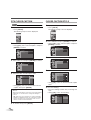 26
26
-
 27
27
-
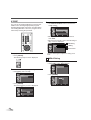 28
28
-
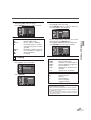 29
29
-
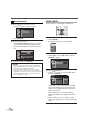 30
30
-
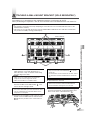 31
31
-
 32
32
-
 33
33
-
 34
34
-
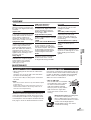 35
35
-
 36
36
-
 37
37
-
 38
38
-
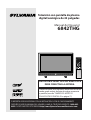 39
39
-
 40
40
-
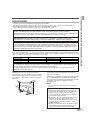 41
41
-
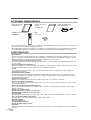 42
42
-
 43
43
-
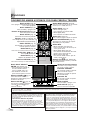 44
44
-
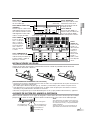 45
45
-
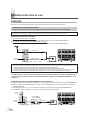 46
46
-
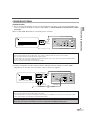 47
47
-
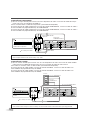 48
48
-
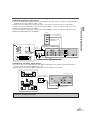 49
49
-
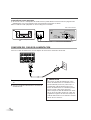 50
50
-
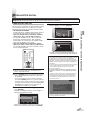 51
51
-
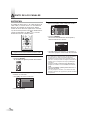 52
52
-
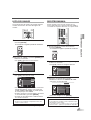 53
53
-
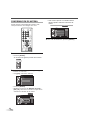 54
54
-
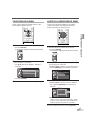 55
55
-
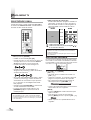 56
56
-
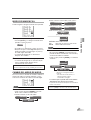 57
57
-
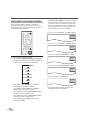 58
58
-
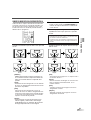 59
59
-
 60
60
-
 61
61
-
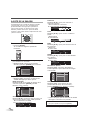 62
62
-
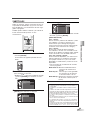 63
63
-
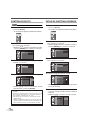 64
64
-
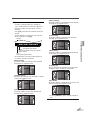 65
65
-
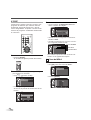 66
66
-
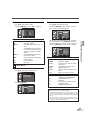 67
67
-
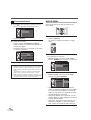 68
68
-
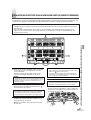 69
69
-
 70
70
-
 71
71
-
 72
72
-
 73
73
-
 74
74
-
 75
75
-
 76
76
-
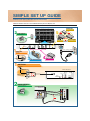 77
77
-
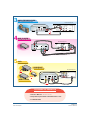 78
78


Sylvania 6842THG Manual de usuario
- Categoría
- Televisores LCD
- Tipo
- Manual de usuario
- Este manual también es adecuado para
en otros idiomas
- English: Sylvania 6842THG User manual
Artículos relacionados
-
Sylvania 6626LCT A Manual de usuario
-
-
Emerson 6632LCT El manual del propietario
-
-
-
-
-
-
-