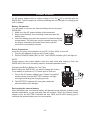
Jensen SMPS-900 Manual de usuario
- Categoría
- Accesorios de guitarra
- Tipo
- Manual de usuario

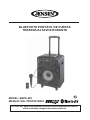
PORTABLE BLUETOOTH
TAILGATE / TROLLEY SPEAKER
MODEL: SMPS-900
USER MANUAL
PLEASE READ THIS USER MANUAL COMPLETELY BEFORE OPERATING
THIS UNIT AND RETAIN THIS BOOKLET FOR FUTURE REFERENCE.

E-1
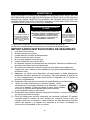
WARNING
TO PREVENT FIRE OR SHOCK HAZARD, DO NOT USE THIS PLUG
WITH AN EXTENSION CORD, RECEPTACLE OR OTHER OUTLET UNLESS
THE BLADES CAN BE
FULLY INSERTED TO PREVENT BLADE EXPOSURE.
TO PREVENT FIRE OR SHOCK
HAZARD, DO NOT EXPOSE THIS APPLIANCE
TO RAIN OR MOISTURE.
The Caution Marking is located at the back enclosure of the apparatus.
The Rating plate is located at the back enclosure of the apparatus
IMPORTANT SAFETY INSTRUCTIONS
1. Read these instructions.
2. Keep these instructions.
3. Heed all warnings.
4. Follow all instructions.
5. Do not use this apparatus near water.
6. Clean only with dry cloth.
7. Do not block any ventilation openings. Install in accordance with the
manufacturer’s instructions.
8. Do not install near any heat sources such as radiators, heat registers, stoves,
or other apparatus (including amplifiers) that product heat.
9. AC adaptor is used as disconnect device and it should remain readily
operable during intended use. In order to disconnect the apparatus from the
mains completely, the AC adaptor should be disconnected form the mains
socket outlet completely.
10. Only use attachments/accessories specified by the manufacturer.
11. Use only with a cart, stand, tripod, bracket, or table
recommended by the manufacturer, or sold with the product.
When a cart is used, use caution when moving the
cart/apparatus combination to avoid injury from tip-over.
12. Unplug this apparatus during lightning storms or when unused
for a long periods of time.
The exclamation point
within the triangle is a
warning sign alerting you
of important instructions
accompanying the product.
The lightning flash and
arrow head within the
triangle is a warning sign
alerting you of “dangerous
voltage” inside the product.
CAUTION: TO REDUCE THE RISK OF
ELECTRIC SHOCK DO NOT
REMOVE COVER (ON BACK), NO
USER SERVICEABLE PARTS INSIDE.
REFER SERVICING TO QUALIFIED
SERVICE PERSONNEL.
CAUTION
RISK OF ELECTRIC SHOCK
DO NOT OPEN

E-2
13. Refer all servicing to qualified service personnel. Servicing is required when the
apparatus has been damaged in any way, such as power-supply cord or plug is
damaged, liquid has been spilled or objects have fallen into the apparatus, the
apparatus has been exposed to rain or moisture, does not operate normally, or
has been dropped.
14. This appliance shall not be exposed to dripping or splashing water and that no
object filled with liquids such as vases shall be placed on the apparatus.
15. Do not overload wall outlet. Use only power source as indicated.
16. Use replacement part as specified by the manufacturer.
17. Upon completion of any service or repairs to this product, ask the service
technician to perform safety checks.
18. Power Sources - This product should be operated only from the type of power
source indicated on the marking label. If you are not sure of the type of power
supply to your home, consult your product dealer or local power company. For
products intended to operate from battery power, or other sources, refer to the
operating instruction.
19. Object and Liquid Entry - Never push objects of any kind into this product
through openings as they may touch dangerous voltage points or short-out
parts that could result in a fire or electric shock. Never spill liquid of any kind on
the product.
20. Damage Requiring Service - Unplug this product from the wall outlet and refer
servicing to qualified service personnel under the following conditions:
a) When the power-supply cord or plug is damaged,
b) If liquid has been spilled, or objects have fallen into the product,
c) If the product has been exposed to rain or water,
d) If the product does not operate normally by following the operating
instructions. Adjust only those controls that are covered by the operating
instructions as an improper adjustment of other controls may result in
damage and will often require extensive work by a qualified technician to
restore the product to its normal operation.
e) If the product has been dropped or damaged in any way, and
f) When the product exhibits a distinct change in performance - this indicates
a need for service.
21. Battery shall not be exposed to excessive heat such as sunshine, fire or the like.
22. Excessive sound pressure from earphones and headphone can cause hearing
loss
23. Minimum distances of 10 cm around the apparatus for sufficient ventilation.
24. The ventilation should not be impeded by covering the ventilation openings
with items, such as newspapers, table-cloths, curtains, etc.
25. No naked flame sources, such as lighted candles, should be placed on the
apparatus.
26. The use of apparatus in moderate climates.
27. Attention should be drawn to the environmental aspects of battery disposal
SAVE THESE INSTRUCTIONS

E-3
COMPLIANCE WITH FCC REGULATIONS
FCC ID SSMMEF267B
This device complies with Part 15 of the FCC Rules. Operation is subject to the
following two conditions:
(1) this device may not cause harmful interference, and
(2) this device must accept any interference received, including interference
that may cause undesired operation.
NOTE : This equipment has been tested and found to comply with the limits for a
Class B digital device, pursuant to Part 15 of the FCC Rules. These limits are
designed to provide reasonable protection against harmful interference in a
residential installation. This equipment generates, uses and can radiate radio
frequency energy and, if not installed and used in accordance with the instructions,
may cause harmful interference to radio communications. However, there is no
guarantee that interference will not occur in a particular installation. If this
equipment does cause harmful interference to radio or television reception, which
can be determined by turning the equipment off and on, the user is encouraged to
try to correct the interference by one or more of the following measures:
- Reorient or relocate the receiving antenna.
- Increase the separation between the equipment and receiver.
- Connect the equipment into an outlet on a circuit different from that to which the
receiver is connected.
- Consult the dealer or an experienced radio/TV technician for help.
CAUTION: Changes or modifications not expressly approved by the party
responsible for compliance could void the user’s authority to
operate the equipment.

E-4
DEAR JENSEN CUSTOMER
Selecting fine audio equipment such as the unit you've just purchased is only the
start of your musical enjoyment. Now it's time to consider how you can maximize
the fun and excitement your equipment offers. This manufacturer and the
Electronic Industries Association's Consumer Electronics Group want you to get
the most out of your equipment by playing it at a safe level. One that lets the sound
come through loud and clear without annoying blaring or distortion and, most
importantly, without affecting your sensitive hearing.
Sound can be deceiving. Over time your hearing "comfort level" adapts to higher
volumes of sound. So what sounds "normal" can actually be loud and harmful to
your hearing. Guard against this by setting your equipment at a safe level BEFORE
your hearing adapts.
To establish a safe level:
• Start your volume control at a low setting.
• Slowly increase the sound until you can hear it comfortably and clearly, and
without distortion.
Once you have established a comfortable sound level:
Set the dial and leave it there.
Taking a minute to do this now will help to prevent hearing damage or loss in the
future. After all, we want you listening for a lifetime.
We Want You Listening For a Lifetime
Used wisely, your new sound equipment will
provide a lifetime of fun and enjoyment. Since
hearing damage from loud noise is often
undetectable until it is too late, this manufacturer
and the Electronic Industries Association's
Consumer Electronics Group recommend you
avoid prolonged exposure to excessive noise.
Customer's Record:
The serial number of this product is found on its bottom. You should note the serial
number of this unit in the space provided as a permanent record of your purchase
to aid in identification in the event of theft of loss.
Model Number: SMPS-900 Serial Number :

E-5
POWER SOURCE
AC Outlet
AC Adapter's Plug
Battery
An AC power adaptor with an output voltage of 15V DC 2A is included with the
SMPS-900. The AC adaptor is used for powering the unit, and also for charging the
built-in battery.
Battery Connection
You will need to connect the internal battery before using the
SMPS-900.
1. Make sure the AC power adaptor is disconnected.
2. Remove the Battery door mounting screw and open the
battery door.
3. Insert the battery plug into the connector located inside the
compartment. The plug can only be inserted one way. Find
the proper orientation and push down firmly until the
connector is completely inserted.
Power Connection
Insert the DC plug of the adaptor into the DC IN Jack (#23) on the unit.
1. Plug the AC adaptor plugs into an AC wall outlet.
2. Set the POWER Switch (#21) to ON. The POWER Indicator (#13) will light up.
NOTE:
Please remove the power adaptor from the wall outlet and unplug it from the
SMPS-900 if the unit is not being used for extended periods of time.
Charging the Built-in Battery for First Time
Before using the SMPS-900, you should charge the built-in
Li-ion battery a minimum of 5~6 hours prior to first use.
1. Plug in the AC power adaptor (see “Power Connection”
section above) and the BATTERY indicator will light
solid light red during the charging process.
2. The BATTERY Indicator will turn green when the
internal battery fully charged.
Recharging the internal battery
After prolonged use, the internal battery will become weak and the operation may
become intermittent, or the operating time will shorten. When the internal battery
charge is low, the BATTERY indicator will turn “RED and FLASH” alerting you to
recharge the internal battery as soon as possible.

E-6
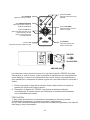
LOCATION OF CONTROLS
1. TREBLE CONTROL
2. BASS CONTROL
3. ECHO CONTROL
4. MIC INPUT
5. GUITAR INPUT
6. AUX IN JACK
7. AUX INDICATOR
8. USB INDICATOR
9. BLUETOOTH INDICATOR
10. SOURCE BUTTON
11. LED LIGHT BUTTON
12. SKIP- BUTTON
13. POWER INDICATOR
14. BATTERY INDICATOR
15. REPEAT INDICATOR
16. PLAY/PAUSE/PAIR BUTTON
17. REPEAT BUTTON
18. SKIP+ BUTTON
19. VOLUME CONTROL
20. MIC/GUITAR VOLUME CONTROL
21. POWER SWITCH
22. USB PORT
23. DC IN JACK
24. HANDLE LOCK BUTTON
25. HANDLE
26. BATTERY COMPARTMENT
27. WHEELS
28. LED LIGHTS
1 7
8
9
10
11
12
2
3
4
5
6
13 19
20
21
22
23
14
15
16
17
18
24
28
25
26
27

E-7
The remote control operates on one CR2025 battery (included).
To activate the remote control, remove the insulation tab inserted in the battery
compartment. When the operation of the remote control becomes intermittent or
unsatisfactory, replace the original battery with a new 3-volt lithium battery.
1. Press down on the compartment cover, slide out the battery holder from the
remote control case.
2. Replace the 3V CR2025 battery. Be sure the battery is installed correctly.
The remote will not work if the battery is installed with the wrong polarity.
CAUTION:
1.Danger of explosion if the battery is replaced incorrectly.
2.Replace only with the same or equivalent type battery.
NOTE: Only use a well-known brand of battery to ensure the longest life and best
performance.
Out
Slide
LITHIUM BA
TTERY
CR 2025
3V
Push here
LITHIUM BA
T
TE
RY
CR 2025
3V
CR2025
PUSH
OPEN
MUTE button
Press to mute the volume.
PLAY/PAUSE button
Press to play or pause a loaded
Bluetooth or USB.
LIGHT control
Press to power LED light on or off.
SKIP+/- buttons
Press to skip between tracks on a
Blutooth or USB playlist.
Press and hold to search through an
individual track.
Function select
Press to select USB/BT/AUX Function.
VOLUME control
Press to adjust the volume up or down.
REPEAT button
Press to repeat the current
track or an entire playlist.

E-8
WARNING
DO NOT INGEST BATTERY, CHEMICAL BURN HAZARD
This product contains a coin/button cell battery. If the coin/button cell battery is
swallowed, it can cause severe internal burns in just 2 hours and can lead to death.
Keep new and used batteries away from children. If the battery compartment does
not close securely, stop using the product and keep it away from children.
If you think batteries might have been swallowed or placed inside any part of the
body, seek immediate medical attention.
BLUETOOTH OPERATION
Pairing to a Device and Playing Audio
1. Press the POWER Switch (#21) to turn the unit ON.
2. Press the SOURCE Button (#10) repeatedly to select Bluetooth mode.
BluetoothThe indicator (#9) will light up.
3. Press and hold the PAIR Button (#16), and the SMPS-900 will enter pairing
Mode. The Bluetooth indicator (#9) will begin flashing.
4. Turn on the Bluetooth function of your device and enable the search or scan
feature to find the SMPS-900. (see your device’s instructions to add or setup a
Bluetooth device). Select "SMPS-900" from the device list when it appears on
your device screen. If required, enter the pass code “0000” to pair (link)
SMPS-900 with your device.
Refer to the user’s manual for your specific device for instructions on pairing
and connecting Bluetooth devices.
5. If you are pairing (linking) your computer to the speaker using Bluetooth, you
may need to set the SMPS-900 as your computer’s default sound device.
6. When successfully paired, the Bluetooth indicator will light steadily and an
audible chime will sound through the speaker.
7. If you want SMPS-900 change to pair with another Bluetooth Enable Device.
Repeat steps 3 to 4.
PLAYING FROM A BLUETOOTH DEVICE
You can wirelessly play music from your Bluetooth device to SMPS-900 after
successfully pairing.
1. Select a song to play on your device and press the PLAY button, or press the
PLAY Button (#16) on the SMPS-900 to play or pause the playback.
2. Slowly adjust both the VOLUME Control (#19) on the SMPS-900 and your
Bluetooth device until you reach a comfortable listening level.
Notes:
• Your Bluetooth enabled device will not play the music through the SMPS-900,
even if connected (linked), if the device does not support the A2DP Bluetooth
profile.
• Remember to turn off the SMPS-900 when you have finished listening.
• Don't forget to switch off the power of your external audio device as well.

E-9
USB PLAYER OPERATION
1. Press the POWER Switch (#21) to turn the unit ON.
2. Press the SOURCE Button (#10) repeatedly to select USB mode. The USB
Indicator (#8) will light up.
3. Plug a USB flash driver into the USB port (#22) on the front of the unit. The USB
device will begin playing automatically.
4. During USB playback, press the PLAY/PAUSE Button (#16) to pause the USB
play and press again to resume.
5. Press the SKIP+ Button (#18) or SKIP- Button (#12) to select next or previous track.
6. Press and hold the SKIP+ Button (#18) or SKIP- Button (#12) to search rapidly
within a track to locate a specific passage.
Note: The SMPS-900 is compatible with, and will play MP3 files that are stored
on a USB flash drive.
AUX OPERATION
You can play other music sources (iPod, MP3 or other digital audio players)
through the speakers of the SMPS-900 by connecting the AUX IN Jack (#6) to your
external player’s audio out jack or headphone jack.
1. Plug one end of an audio cable (not included) into the AUX IN Jack (#6) and the
other end of the cable to the headphone jack of your digital audio player.
2. Press the SOURCE Button (#10) repeatedly to select the AUX mode. The AUX
Indicator (#7) will light up.
3. Start playing the device you plugged into the AUX IN Jack (#6).
4. Slowly adjust both the volume controls of the SMPS-900 and the external device
until you reach a comfortable listening level.
5. Turn off your iPod, MP3 player etc. when finish listening.
6. Switch the POWER switch (#21) to OFF to turn the SMPS-900 off and unplug
the AUX IN Jack (#6).
Notes :
• If you connect the SMPS-900 to the Line-Out Jack of your external device, you
only need to adjust the VOLUME Control (#19) of your SMPS-900. If you
connect to the Headphone Jack of your external device, you may need to
adjust both the volume controls of your external device and the SMPS-900 to
obtain the desirable listening level.
• Remember to turn off the SMPS-900 when you have finished listening. Don't
forget to switch off the power of your external audio device as well.

E-10
BUILT-IN HANDLE
The SMPS-900 has a built-in collapsible handle. To extend the handle, press the
HANDLE LOCK BUTTON (#24) and pull up on the HANDLE (#25). The handle
assembly will lock in position when fully extended.
To lower the handle, press the HANDLE LOCK BUTTON (#24) and push down on
the HANDLE (#25). The handle assembly will collapse and lock in position when it
reaches its lowest point.
TOP MOUNTED LED LIGHTS
The SMPS-900 features a top mounted LED light show. When the power is ON, the
LED LIGHTS (#28) will randomly flash. You can turn the LED LIGHTS ON or OFF
with the LED LIGHT BUTTON (#11).
MICROPHONE AND GUITAR INPUTS
A Microphone is included if you want to use the SMPS-900 as a Public Address
system (PA) or to sing along to the music you are playing.
Plug the Microphone into the MIC INPUT (#4), and adjust the MIC/GUITAR
VOLUME CONTROL (#20) for the best sound with no feedback.
NOTE: If you get feedback with the volume at higher levels, move the microphone
as far away from the speaker as possible.
The SMPS-900 also includes a GUITAR INPUT (#5) for plugging in your guitar
(guitar and cord not included). Adjust the MIC/GUITAR VOLUME CONTROL (#20)
for the best sound with no feedback.

E-11
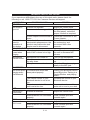
TROUBLE SHOOTING GUIDE
If you experience difficulties in the use of this clock radio, please check the
following or call 1-800-777-5331 for Customer Service and support
PROBLEM POSSIBLE CAUSE REMEDY
GENERAL
No sound in
general.
Volume not adjusted. Adjust the Volume knob.
Source mode in wrong position. Using the Source button (at
the front panel), select the
proper function as required.
Power Adapter disconnected or
loose.
Check the connection or the
Power Adapter.
The unit does
reset to
operation of
any button
Under the influence of
electrostatic phenomenon, the
product may malfunction and
require user to disconnect
Turn off the unit, disconnect
the mains plug, and
reconnect after a few
seconds.
PA / KARAOKE
Feedback is
heard when
singing
Microphone is too close to the
unit or MIC volume is too high.
Move Microphone away from
the unit or decrease MIC
volume.
Microphone
has no sound
Microphone not turned on. Turn on the Microphone.
Microphone volume turned all
the way down.
Turn the Microphone volume
up.
Microphone connection loose. Insert the Microphone plug
totally to the MIC jack.
BLUETOOTH
No sound when
playing audio
via Bluetooth
Your Bluetooth device has
been paired properly.
Pairing your Bluetooth device
according to the “Pairing to a
Device Section. and playing
audio”
The volume control of your
Bluetooth device is set at too
low.
Increase the volume of your
Bluetooth device.
The volume control of the main
unit is set at too low.
Increase the volume of the
main unit to turn to your wish.
USB
No sound in
USB mode
Volume at minimum. Adjust the volume knob.
External device not connected
properly.
Clear contacts pins and
connect again.
AUX
No sound in
AUX mode
Volume at minimum. Adjust the volume knob.
External device not connected
properly.
Clear contacts pins and
connect again.

E-12
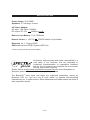
SPECIFICATION
Power Output 30 W RMS*
Speakers 8” Full range, 4 ohms
AC Power Adaptor
AC input : 100-240V~ 50/60Hz
DC output: DC 15V 2000mA
Built-in Li-ion Battery 11.1V, 6000mAh
Remote Control 1 x DC 3V CR2025 button cell (included)
Bluetooth V4.1, Support A2DP
USB maximum size 32GB, Support MP3 Files
* When using the included AC power adaptor
At Spectra, environmental and social responsibility is a
core value of our business. We are dedicated to
continuous implementation of responsible initiatives
with an aim to conserve and maintain the environment
through responsible recycling.
Please visit us at http://www.spectraintl.com/green.htm for more information on
Spectra’s green initiatives or to find a recycler in your area.
The Bluetooth
®
word mark and logos are registered trademarks owned by
Bluetooth SIG, Inc. and any use of such marks by Spectra Merchandising
International, Inc. is under license. Other trademarks and trade names are those of
their respective owners.

E-13
90 DAY LIMITED WARRANTY AND SERVICE
VALID IN THE U.S.A. ONLY
SPECTRA MERCHANDISING INTERNATIONAL, INC. warrants this unit to be free from
defective materials or
factory workmanship for a period of 90 days from the date of
original customer purchase and provided the
product is utilized within the U.S.A. This
warranty is not assignable or transferable. Our obligation under this
warranty is the
repair or replacement of the defective unit or any part thereof, except batteries, when
it is
returned to the SPECTRA Service Department, accompanied by proof of the date of
original consumer purchase, such as a duplicate copy of a sales receipt.
You must pay all shipping charges required to ship the product to SPECTRA for warranty
service. If the product is repaired or replaced under warranty, the return charges will be at
SPECTRA’s expense. There are no other express warranties other than those stated
herein.
This warranty is valid only in accordance with the conditions set forth below:
1. The warranty applies to the SPECTRA product only while:
a. It remains in the possession of the original purchaser and proof of purchase is
demonstrated.
b. It has not been subjected to accident, misuse, abuse, improper service, usage
outside the descriptions and warnings covered within the user manual or non-
SPECTRA approved modifications.
c. Claims are made within the warranty period.
2. This warranty does not cover damage or equipment failure caused by electrical wiring
not in compliance with
electrical codes or SPECTRA user manual specifications,
or failure to provide reasonable care and
necessary maintenance as outlined in the
user manual.
3. Warranty of all SPECTRA products applies to residential use only and is void when
products are used in nonresidential environment or installed outside the United
States.
This warranty gives you specific legal rights, and you may also have other rights which
vary from state to state. TO OBTAIN SERVICE please remove all batteries (if any) and
pack the unit carefully and send it freight prepaid to SPECTRA at the address shown below.
IF THE UNIT IS RETURNED WITHIN THE WARRANTY PERIOD shown above, please
include a proof of purchase (dated cash register receipt) so that we may establish your
eligibility for warranty service and repair of the unit without cost. Also include a note with a
description explaining how the unit is defective. A customer service representative may
need to contact you regarding the status of your repair, so please include your name,
address, phone number and email address to expedite the process.
IF THE UNIT IS OUTSIDE THE WARRANTY PERIOD, please include a check for $85.00
to cover the cost of repair, handling and return postage. All out of warranty returns must be
sent prepaid.
It is recommended that you contact SPECTRA first at 1-800-777-5331 or by email at
[email protected] for updated information on the unit requiring service. In some
cases the model you have may be discontinued, and SPECTRA reserves the right to offer
alternative options for repair or replacement.
SPECTRA MERCHANDISING INTERNATIONAL, INC.
4230 North Normandy Avenue,
Chicago, IL60634, USA. 1-800-777-5331
To register your product, visit the link on the website below to enter your information.
http://www.spectraintl.com/wform.htm
0517 Printed in China

BLUETOOTH PORTÁTIL DE PUERTA
TRASERA/ALTAVOZ RODANTE
MODEL: SMPS-900
MANUAL DEL PROPIETARIO
Por favor lea y observe este Manual de Instrucciones cuidadosamente antes de
utilizar la unidad y reténgalo como futura referencia

S-1
ADVERTENCIA
PARA PREVENIR EL RIESGO DE INCENDIO O DESCARGA ELÉCTRICA, NO USE
ESTE ENCHUFE CON UN CABLE DE EXTENSIÓN, RECEPTÁCULO U OTRA SALIDA A
MENOS QUE PUEDA INSERTAR TOTALMENTE LAS ESPIGAS PARA EVITAR QUE
QUEDEN EXPUESTAS. PARA PREVENIR INCENDIO O DESCARGA ELÉCTRICA NO
EXPONGA ESTE APARATO A LA LLUVIA O HUMEDAD.
La Marca de Precaución se encuentra en la parte trasera del aparato.
La placa de características se encuentra en el recinto de atrás del aparato
IMPORTANTES INSTRUCCIONES DE SEGURIDAD
1. Lea estas instrucciones.
2. Guarde estas instrucciones.
3. Preste atención a todas las Advertencias.
4. Observe todas las instrucciones.
5. No use este aparato cerca del agua.
6. Limpie solamente con un paño seco.
7. No bloquee ninguna de las aberturas de ventilación. Realice la instalación de
acuerdo a las instrucciones del fabricante.
8. No realice la instalación cerca de fuentes de calor tales como radiadores,
registros de calor, estufas u otros artefactos (incluyendo amplificadores) que
produzcan calor.
9. Adaptador se utiliza como dispositivo de desconexión y debe permanecer
fácilmente accesible durante el uso previsto. Para desconectar el aparato de
la red completamente, se debe desconectar el adaptador de CA forman el
enchufe completamente.
10. Solamente utilice accesorios/conexiones especificadas por el fabricante.
11. Utilice el equipo solamente con soportes, trípodes, carros,
abrazaderas o mesa especificados por el fabricante, o vendidos
junto con el aparato. Cuando se utiliza un carro, tenga cuidado
al mover el conjunto carro/aparato para evitar lesiones
provocadas por caídas o inclinación.
12. Desenchufe este aparato durante tormentas eléctricas o cuando no se utilice
por largos períodos de tiempo.
13. Envíe la unidad para servicio solamente con personal calificado. El aparato
necesita servicio cuando ha sido dañado de cualquier forma, como por
ejemplo daños en el enchufe o cable eléctrico, se han derramado líquidos
dentro del aparato o el aparato fue expuesto a la lluvia o humedad, no
El destello de luz y diseño de
flecha con punta dentro de un
triángulo es una señal de
advertencia, alertando sobre
“voltaje peligroso” dentro del
producto
El signo de exclamación
dentro de un triángulo es
una señal de advertencia
alertando de importantes
instrucciones
acompañando este
producto
PRECAUCIÓN
PRECAUCIÓN: PARA REDUCIR EL RIESGO DE
DESCARGA ELÉCTRICA NO REMUEVA LA TAPA O
LA PARTE TRASERA – NO EXISTEN EN EL
INTERIOR PARTES ÚTILES PARA EL USUARIO.
REALICE EL SERVICIO CONPERSONAL DE
MANTENIMIENTO CALIFICADO
RIESGO DE DESCARGA ELÉCTRICO
NO ABRIR
funciona con normalidad, o por una caída.

S-2
14. Este aparato no deberá exponerse a goteos o salpicaduras y nunca deberá
colocarse objetos llenos de líquido como los jarrones sobre el aparato.
15. No sobrecargue la toma de corriente. Utilice sólo la fuente de alimentación como
se indica.
16. Utilizar pieza de recambio especificadas por el fabricante.
17. Al terminar cualquier servicio o reparación de este producto, pida al técnico que
efectúe comprobaciones de seguridad.
18. Fuentes alimentación - este producto deben ser operadas solamente con el tipo
de fuente de alimentación indicado en la etiqueta de marcado. Si no está
seguro del tipo de fuente de alimentación a su hogar, consulte a su distribuidor
o compañía eléctrica local. Para productos destinados a operar desde la
energía de la batería u otras fuentes, consulte el manual de instrucciones.
19. Objetos y líquidos - nunca introduzca objetos de ningún tipo en este producto a
través de aberturas ya que podrían tocar puntos de voltaje peligrosos o
cortocircuitar piezas que podrían provocar un incendio o una descarga eléctrica.
Nunca derrame líquido de ningún tipo sobre el producto.
20. En caso de daños que requieran servicio - hecho de esta unidad del toma
corrientes y derive el mantenimiento a personal calificado de servicio bajo las
siguientes condiciones:
a) Cuando el cable de alimentación eléctrica o el chofer está dañado,
b) Si se ha derramado líquido, u objetos han caído dentro de la unidad,
c) Si el producto ha sido expuesto la lluvia o el agua,
d) Si el producto no funciona normalmente al seguir las instrucciones de
funcionamiento. Ajuste solamente aquellos controles que están explicados
por las instrucciones de funcionamiento, ya que un ajuste inapropiado de
otros controles puede resultar en daños, que a menudo exigirán un
trabajo excesivo por parte del técnico calificado, para restablecer el
producto a su funcionamiento normal.
e) Si el producto sufrió una caída o se dañó en cualquier forma, y
f) Cuando el producto exhibe un cambio notable en el desempeño - esto
indica una necesidad de mantenimiento.
21. No exponer las baterías a calor excesivo como los rayos solares, fuego o
similares.
22. La presión sonora excesiva de los auriculares y los auriculares puede causar
pérdida auditiva.
23. Mínimas distancias de 10 cm alrededor del aparato para una ventilación
suficiente.
24. La ventilación no debe impedirse al cubrir las aberturas de ventilación con
objetos como periódicos, manteles, cortinas, etcetera.
25. No hay fuentes de llama desnuda, como velas encendidas, deben colocarse
sobre el aparato.
26. El uso de aparatos en climas moderados.
27. Debe ser la atención a los aspectos ambientales de la eliminación de la batería.
GUARDE ESTAS INSTRUCCIONES

S-3
CUMPLIMIENTO CON LAS REGULACIONES DE LA COMISION
FEDERAL DE COMUNICACIONES (FCC POR SUS SIGLAS EN INGLÉS)
FCC ID SSMMEF267B
Este dispositivo cumple con la parte 15 de las reglas de la FCC. La operación
cumple con las dos condiciones siguientes:
(1) este dispositivo puede no causar interferencia dañina, y
(2) este dispositivo debe aceptar cualquier interferencia recibida,
incluyendo interferencia que pueda causar la operación indeseada.
NOTA: Este equipo ha sido probado y se ha determinado que satisface los límites
para un dispositivo digital clase B, de acuerdo a lo que dispone la Parte 15 de los
Reglamentos de la FCC, Estos límites tienen el propósito de proporcionar una
protección razonable contra interferencia dañina en una instalación residencial.
Este equipo genera, usa y puede emitir energía de radiofrecuencia, y si no se
instala y se usa de acuerdo con estas instrucciones, puede causar interferencia
dañina a las radiocomunicaciones.
Sin embargo, no hay ninguna garantía de que no vaya a ocurrir interferencia en
ninguna instalación determinada. Si este equipo causa interferencia no deseada
contra la recepción de radio o televisión, lo cual se puede determinar encendiendo
y apagando el aparato, se exhorta al usuario a tratar de corregir el problema de la
interferencia tomando una o más de las siguientes medidas:
- Reoriente o reubique la antena de recepción
- Aumente la distancia entre el equipo y el receptor
- Conecte el equipo a un tomacorriente en un circuito distinto al que usa el
receptor.
- Consulte al concesionario o a un radiotécnico experimentado para que le ayuden.
ADVERTENCIA: Los cambios o modificaciones a esta unidad que no estén
expresamente aprobados por la parte responsable de la conformidad
podrían anular la autoridad del usuario para operar el equipo.

S-4
ESTIMADO CLIENTE DE JENSEN ®
Elegir el fino equipo de audio tal como la unidad que acaba de adquirir es
únicamente el comienzo de su deleite musical. Ahora es el momento de que
considere cómo puede optimizar la diversión y emoción que su equipo le ofrece.
Este fabricante y el Grupo de Aparatos Electrónicos de la Asociación de Industrias
Electrónicas desean que aproveche su equipo al máximo escuchándolo a un nivel
seguro. Éste deberá permitirle que el sonido se escuche fuerte y claro sin que el
sonido sea molesto ni exista distorsión y, lo más importante, sin que afecte su
capacidad sensitiva de audición.
El sonido puede ser engañoso. Con el tiempo el “nivel de comodidad” de su
audición se adapta a volúmenes más altos de sonido. Así que lo que suena
“normal” en realidad podría ser recio y perjudicial para su audición. Protéjase
contra esto ajustando su equipo en un nivel seguro ANTES que su audición se
adapte.
Para establecer un nivel seguro:
Inicie el control de volumen con un ajuste bajo.
Poco a poco incremente el sonido hasta que pueda escucharlo cómoda y
claramente sin que se distorsione.
Una vez que haya establecido un nivel de sonido cómodo:
Ajuste el dial y déjelo ahí.
Tomándose un minuto para realizar esto le ayudará a prevenir que pueda ocurrir
algún
daño o la pérdida de la audición en el futuro. Después de todo, deseamos que siga
escuchando de por vida.
Deseamos que Siga Escuchando de por Vida
Al utilizarlo sensatamente, su nuevo equipo de sonido le
proporcionará toda una vida de diversión y placer.
Debido a que el daño causado por sonidos fuertes
usualmente no puede detectarse hasta que es
demasiado tarde, este fabricante y el Grupo de Aparatos
Electrónicos de la Asociación de la Industria de
Electrónicos le recomiendan que evite la exposición
prolongada al ruido excesivo.
Registro para el Cliente:
El número de serie de este producto está colocado en la unidad. Anote el número
de serie de esta unidad en el espacio proporcionado para mantenerlo como el
registro permanente de su compra para ayudar a su identificación en caso de robo
o pérdida.
Número de Modelo: SMPS-900 Número de Serie:_______________

S-5
FUENTE DE ALIMENTACIÓN DE ENERGÍA
Un adaptador de AC (corriente alterna) con salida de voltaje de 15V DC (corriente
directa) ~ 2A viene incluido con el SMPS-900. El adaptador AC se utiliza para
alimentación de la unidad y también para recargar la batería integrada.
Conexión de la batería
Antes de usar el SMPS-900 debe conectar la batería
interna.
1. Asegúrese de que el adaptador de alimentación AC
esté desconectado.
2. Quite el tornillo de montaje de la puerta de la
bater
ía y abra la puerta de la batería.
3. Inserte la espiga de la batería en el conector
ubicado adentro del compartimiento. Hay una sola
manera de insertar la espiga. Busque el sentido para la conexión correcta y
empuje firmemente hacia abajo hasta que el conector quede totalmente
insertado.
Conexión con la alimentación de energía
Inserte el enchufe DC del adaptador en el conector DC DE ENTRADA
correspondiente al #23 en la unidad.
1. Enchufe las espigas de
l adaptador AC en un tomacorriente AC de pared.
2. Coloque el interruptor de ENCENDIDO/APAGADO (#21) en “ENCENDIDO
(ON), Se iluminará el indicador de ALIMENTACIÓN (#13).
NOTA:
Quite el adaptador de alimentación del tomacorriente de la pared y desenchúfelo
del SMPS-900 si no va a usar la unidad períodos extendidos de tiempo.
Carga de la batería integrada por primera vez
Antes de usar el SMPS-900 por primera vez, deberá
cargar la batería integrada Li-ion por lo menos de 5~6
ho
ras.
1. Enchufe el adaptador de alimentación AC (ver
“Conexión con la alimentación de energía” en la
sección anterior) y el indicador de BATERÍA se
iluminará con una luz fija de color rojo durante el
proceso de carga.
2. El indicador de BATERÍA se tornará verde cuando la
batería interna esté totalmente cargada.
Recargando la batería interna
Después de un uso prolongado, la batería interna se debilitará y la operación
podría resultar intermitente, o el tiempo de fu
ncionamiento puede ser más breve.
Cuando la carga de la batería interna está baja, el indicador de BATERÍA
cambiará a color “ROJO y será INTERMITENTE” alertándole para recargar la
batería interna lo más pronto posible.
Battery
Salida de CA
Adaptador de
corriente CA

S-6
UBICACIÓN DE LOS CONTROLES
1. CONTROL DE ALTOS
2. CONTROL DE BAJOS
3. CONTROL DE ECO
4. ENTRADA DE MICRÓFONO
5. ENTRADA PARA GUITARRA
6. CONECTOR DE ENTRADA
AUX
7. INDICADOR AUX
8. INDICADOR DE USB
9. INDICADOR DE
BLUETOOTH
10. BOTÓN DE ORIGEN
11. BOTÓN DE LUZ LED
12. BOTÓN DE SALTO- PARA
RETROCEDER
13. INDICADOR DE PODER
14. INDICADOR DE BATERÍA
15. INDICADOR DE
REPETICIÓN
16. BOTÓN DE
REPRODUCIR/PAUSA/
EMPAREJAR
17. BOTÓN REPETIR
18. BOTÓN DE SALTO+ PARA
AVANZAR
19. CONTROL DE VOLUMEN
20. CONTROL DE VOLUMEN
MICRÓFONO/GUITARRA
21. INTERRUPTOR DE
ALIMENTACIÓN DE
ENERGÍA
22. PUERTO USB
23. CONECTOR DE ENTRADA
DC
24. BOTÓN DE BLOQUEO DEL
MANGO EXTENSIBLE
25. MANGO EXTENSIBLE
26. COMPARTIMIENTO DE LA
BATERÍA
27. RUEDAS
28. LUCES LED
1 7
8
9
10
11
12
2
3
4
5
6
13 19
20
21
22
23
14
15
16
17
18
24
28
25
26
27

S-7
La unidad de control remoto funciona con una batería de litio CR2025 (Incluida).
Para activar el control remoto, quite la pestaña de aislamiento del compartimiento
de las baterías. Cuando el funcionamiento del control remoto sea intermitente o
poco satisfactorio, reemplace la batería original con una batería de litio nueva de 3
voltios.
1. Pulse hacia abajo la tapa de la cubierta, deslice hacia afuera la caja de la
batería del estuche del control remoto
.
2. Reemplace la batería 3V CR2025. Asegúrese de instalar la batería
correctamente. El control remoto no funcionará si la batería está instalada
con la polaridad equivocada.
PRECAUCIÓN:
1. Hay riesgo de explosión si la batería se reemplaza en forma incorrecta.
2. Sustitúyala únicamente con baterías iguales o equivalentes.
NOTA: Use únicamente baterías de marca reconocida para garantizar una vida útil
más larga y mejor desempeño.
LITHIUM BA
TTE
RY
C
R 2025
3V
LIT
HIUM BATTE
RY
C
R
2025
3V
CR2025
PUSH
OPEN
Botón SILENCIAR
Oprimir para silenciar el volumen.
Seleccionar Función
Oprimir para seleccionar función
USB/AUX.
Control de VOLUMEN
Oprimir para ajustar el volumen
más alto o más bajo.
Botón REPETIR
Oprimir para repetir la pista
Actual o una lista entera
DESLIZAR
HACIA AFUERA
EMPUJAR AQUÍ
Botón REPRODUCIR/PAUSA
Oprimir para reproducir o pausar un
Bluetooth o USB cargado
Botones para SALTO +/-
Oprimir para saltar entre pistas en una
Lista de Bluetooth o de USB.
Oprimir y sostener para buscar
en una pista individual.
Control de LUZ
Oprimir para encender y apagar la luz LED.

S-8
ADVERTENCIA
NO INGERIR LA BATERÍA, PELIGRO DE QUEMADURA QUÍMICA
Este producto contiene una batería de celda tipo moneda/botón. Si la batería de
celda tipo moneda/botón llegara a ser ingerida, causaría quemaduras internas
graves en solo 2 horas y puede causar la muerte. Mantenga las baterías nuevas y
usadas fuera del alcance de los niños. Si el compartimiento de la batería no queda
bien cerrado, deje de utilizar el producto y manténgalo alejado de los niños. Si
sospecha que alguien ingirió la batería o que la colocó dentro de alguna parte del
cuerpo, busque atención médica de inmediato
.
OPERACIÓN DEL BLUETOOTH
Proceso de emparejamiento con un dispositivo y reproducción de audio
1. Pulse el interruptor de ALIMENTACIÓN DE ENERGÍA (#21) para ENCENDER
la unidad.
2. Oprima el botón de ORIGEN (#10) repetidamente para seleccionar MODO de
Bluetooth. Se iluminará el indicador de Bluetooth (#9).
3. Oprima y sostenga el botón de EMPAREJAR (#16) y el SMPS-900 comenzará
el modo de emparejamiento. El indicador de Bluetooth (#9) comenzará a
parpadear.
4. Encienda la función Bluetooth de su dispositivo y habilite el atributo de
búsqueda o escaneo para encontrar el SMPS-900. (Consulte las instrucciones
de su dispositivo para agregar o configurar el dispositivo Bluetooth) Seleccione
"SMPS-900" de la lista de dispositivos cuando ésta aparezca en la pantalla del
mismo. Si es necesario, ingrese el código de acceso “0000” para efectuar el
proceso de emparejamiento de su dispositivo con el SMPS-900.
Consulte el manual del usuario de su dispositivo específico para revisar las
instrucciones y conectar dispositivos Bluetooth.
5. Si el proceso de emparejamiento es entre su computadora y el altavoz
utilizando Bluetooth, podría necesitar configurar el SMPS-900 como su
dispositivo de sonido pre-establecido en la computadora.
6. Cuando haya finalizado el proceso de emparejamiento correctamente, el
indicador de Bluetooth mostrará una luz fija y podrá escuchar una campanilla
por el altavoz.
7. Si quiere que el SMPS-900 cambie de emparejamiento con otro Dispositivo
compatible con Bluetooth. Repita los pasos 3 y 4.
REPRODUCCIÓN DESDE UN DISPOSITIVO BLUETOOTH
Puede escuchar música de manera inalámbrica con su dispositivo Bluetooth hacia
el SMPS-900 después de haber efectuado satisfactoriamente el emparejamiento
con el SMPS/900.
1. Seleccione una melodía en su dispositivo y oprima el botón REPRODUCIR
(PLAY), o bien presione el botón REPRODUCIR (#16) del SMPS-900 para
reproducir o pausar la reproducción.
2. Ajuste lentamente tanto el VOLUMEN (#19) del SMPS-900, como el del
dispositivo con Bluetooth hasta que alcance al nivel de volumen de su
preferencia.

S-9
Notas:
• Su dispositivo con capacidad para Bluetooth no reproducirá música a través del
SMPS-900, aunque el emparejamiento sea satisfactorio, si el dispositivo no
tiene soporte del perfil Bluetooth A2DP.
• Recuerde apagar el SMPS-900 cuando haya terminado de escuchar.
• No olvide apagar la alimentación de energía de su dispositivo externo también
.
OPERACIÓN DEL REPRODUCTOR DE USB
1. Oprima el interruptor de ALIMENTACIÓN DE ENERGÍA (#21) para
ENCENDER la unidad.
2. Oprima el botón de ORIGEN (#10) repetidamente para seleccionar MODO de
USB. Se iluminará el indicador de USB (#8).
3. Conecte una memoria USB al puerto USB (#22) al frente de la unidad. El
dispositivo USB comenzará a funcionar en forma automática.
4. Durante la reproducción del USB, oprima el botón REPRODUCIR/PAUSA (#16)
para pausar la reproducción del USB y oprímalo de nuevo para reanudar la
reproducción.
5. Oprima el botón SALTO+, (Botón #18) o el botón SALTO- (Botón #12) para
seleccionar la pista siguiente o la anterior.
6. Oprima y sostenga el botón SALTO+ (#18) o SALTO- (#12) para efectuar una
búsqueda rápida dentro de una pista para localizar un lugar específico de la
misma.
Nota: El SMPS-900 es compatible y reproducirá archivos MP3 que estén
guardados en una memoria USB.
OPERACIÓN AUX
Puede escuchar música de otras fuentes de origen (iPod, MP3 u otros reproductores
digitales de audio) por medio de los altavoces del SMPS-900 conectando el
conector de ENTRADA AUX (#6) con el conector de salida de audio o con el
conector de audífonos.
1. Enchufe un extremo de cable de audio (no incluido) en el conector DE
ENTRADA AUX (#6) y el otro extremo del cable en el conector de audífonos o de
su reproductor digital de audio.
2. Oprima el botón de ORIGEN (#10) repetidamente para seleccionar el modo
AUX. Se iluminará el indicador AUX (#7).
3. Comience a reproducir en el dispositivo que enchufó en el conector de
ENTRADA AUX (#6).
4. Lentamente ajuste los controles de volumen del SMPS-900 y del dispositivo
externo hasta que llegue a un nivel cómodo para escuchar.
5. Apague su iPod, reproductor de MP3 etc. Cuando termine de escuchar.

S-10
6. Coloque el interruptor de ALIMENTACIÓN DE ENERGÍA (#21) a la posición
APAGADO para apagar el SMPS-900 y desenchufe el conector de ENTRADA
AUX (#6).
Notas:
• Si conecta el SMPS-900 al conector de la línea de Salida de su dispositivo
externo, solamente necesitará ajustar el Control de VOLUMEN (#19) de su
SMPS-900. Si conecta el conector de audífonos de su dispositivo externo,
entonces podría ser necesario que deba ajustar ambos controles de volumen,
de su dispositivo externo y del SMPS-900 para obtener la configuración de
volumen de su preferencia.
• Recuerde apagar el SMPS-900 cuando haya terminado de escuchar. No
olvide apagar la corriente de su dispositivo externo también.
MANGO INTEGRADO
El SMPS-900 tiene un mango extensible integrado. Para extender el mango, oprima
el BOTÓN DE BLOQUEO DEL MANGO (#24) y tire del MANGO (#25) hacia arriba.
El mango se bloqueará en posición cuando esté totalmente extendido.
Para bajar el mango, oprima el BOTÓN DE BLOQUEO DEL MANGO (#24) y empuje
el MANGO (#25) hacia abajo. El mango colapsará y se bloqueará en posición
cuando llegue a su punto más bajo.
LUCES LED MONTADAS EN LA PARTE SUPERIOR
El SMPS-900 trae unas luces montadas en la parte superior para show de luces LED.
Cuando la alimentación está ENCENDIDA, las LUCES LED (#28) se encienden
aleatoriamente. Puede ENCENDER Y APAGAR LAS LUCES LED usando el
BOTÓN DE LAS LUCES LED (#11)
.
ENTRADAS PARA MICRÓFONO Y GUITARRA
Se incluye un micrófono si desea usar el SMPS-900 como sistema de altavoces para
hablar en público (PA) o para cantar con la música que esté escuchando.
Enchufe el micrófono a la ENTRADA DE MICRÓFONO (#4), y ajuste el CONTROL
DE VOLUMEN DE MICRÓFONO/GUITARRA (#20) para obtener el mejor sonido
sin que se escuche interferencia.
NOTA: Si hay interferencia con el volumen a niveles más altos, mueva el
micrófono tan lejos del altavoz como le sea posible.
El SMPS-900 también incluye una ENTRADA PARA GUITARRA (#5) para
enchufar su guitarra (no se incluye ni la guitarra ni el cable). Para obtener el mejor
sonido sin interferencia ajuste el CONTROL DEL VOLUMEN DEL
MICRÓFONO/GUITARRA (#20).

S-11
GUÍA PARA RESOLVER PROBLEMAS
Si experimenta dificultades en el uso de este reproductor, consulte el siguiente
cuadro o llame al 1-800-777-5331 para Servicio y Soporte del Producto.
Dificultad Posible problema Solución
GENERAL
No hay sonido
en general.
No se ha ajustado el volumen. Ajuste la perilla de volumen.
El modo de Origen está en
posición incorrecta.
Utilizando el botón de Origen
(en el panel frontal),
seleccione la función correcta
según la necesite.
El adaptador de Alimentación
de Energía está desconectado
o flojo.
Revise la conexión o el
Adaptador de alimentación.
La unidad
restablece a la
operación de
cualquier
botón.
Bajo la influencia de un
fenómeno electrostático, el
producto puede fallar y es
necesario que el usuario lo
desconecte.
Apague la unidad,
desconecte el enchufe
principal y reconéctelo
después de unos cuantos
segundos.
ALTAVOZ/KARAOKE
Se oye
interferencia
cuando canta.
El micrófono está demasiado
cerca de la unidad o el
volumen del MICRÓFONO está
demasiado alto.
Aleje el micrófono de la
unidad o baje el volumen del
MICRÓFONO.
El micrófono no
tiene sonido.
El micrófono no está
encendido.
Encienda el micrófono.
El volumen del micrófono está
en su nivel más bajo.
Suba el volumen del
micrófono.
La conexión del micrófono está
floja.
Inserte completamente la
espiga al conector del
MICRÓFONO.
BLUETOOTH
No hay sonido
cuando se
reproduce
audio por
medio del
Bluetooth
Su dispositivo Bluetooth no ha
efectuado correctamente el
emparejamiento.
Siga los pasos de
emparejamiento de su
dispositivo Bluetooth según la
sección “Proceso de
emparejamiento con un
Dispositivo Y reproducción de
audio”.
El control de volumen de su
dispositivo Bluetooth está
demasiado bajo.
Aumente el nivel de volumen
en el dispositivo Bluetooth.
El control de volumen de la
unidad principal está
configurado demasiado bajo.
Aumente el volumen de la
unidad principal hasta donde
lo desee.

S-12
USB
No hay sonido
en modo USB.
El volumen se encuentra al
mínimo.
Ajuste el volumen con la
perilla de volumen.
El dispositivo externo no está
conectado adecuadamente.
Revise los pines de contacto
y vuelva a conectar.
AUX
No hay sonido
en modo AUX.
El volumen se encuentra al
mínimo.
Ajuste el volumen con la
perilla de volumen.
El dispositivo externo no está
conectado adecuadamente.
Revise los pines de contacto
y vuelva a conectar.
ESPECIFICACIONES
Salida de energía 30 W RMS*
Altavoces 8” Rango completo, 4 ohms
Adaptador de alimentación AC (corriente alterna)
Entrada AC: 100-240V~ 50/60Hz
Salida DC 15V 2000mA
Batería integrada Li-ion 11.1V, 6000mAh
Control remoto 1 x DC 3V CR2025 batería tipo botón (incluida)
Bluetooth V4.1, Compatible con A2DP
USB tamaño máximo 32GB, Compatible con archivos MP3
* Cuando se usa el adaptador de alimentación de corriente alterna (AC).
En Spectra, la responsabilidad ambiental y social es
un valor fundamental de nuestro negocio. Estamos
dedicados a la implementación continua de
iniciativas responsables con el objetivo de conservar
y mantener el medio ambiente a través del reciclaje responsable.
Visítenos en: http://www.spectraintl.com/green.htm para obtener más información
sobre las iniciativas ecológicas de Spectra o para encontrar un reciclador en su
área.
La marca Bluetooth® del texto y logotipos son marcas registradas propiedad de Bluetooth
SIG, Inc. y cualquier uso de dichas marcas por parte de Spectra Merchandising Intl, Inc.
está bajo licencia. Otras marcas y nombres comerciales son de sus respectivos
propietarios.

S-13
GARANTÍA Y SERVICIOS DE COBERTURA LIMITADA POR 90 DÍAS
VÁLIDA EN LOS ESTADOS UNIDOS SOLAMENTE
SPECTRA MERCHANDISING INTERNATIONAL, INC. garantiza que esta unidad
se encuentra libre de materiales o mano de obra de fábrica defectuosos, por un
período de 90 días, desde la fecha de la compra original por parte del cliente,
siempre que el producto sea utilizado dentro de los Estados Unidos. Esta garantía
no es asignable o transferible. Nuestra obligación de acuerdo a esta garantía es
reparar o reemplazar la unidad con defectos o cualquier parte correspondiente,
con excepción de las baterías, cuando es devuelta al Departamento de Servicios
de SPECTRA, acompañada de la prueba de la fecha original de compra por parte
de cliente, como por ejemplo una copia duplicada del recibo de ventas.
Usted debe pagar todos los costos de envío requeridos para entregar el producto
a SPECTRA para el servicio de garantía. Si el producto es reparado o
reemplazado de acuerdo a garantía, los gastos de retorno serán por cuenta de
SPECTRA. No existen otras garantías expresas diferentes de aquellas declaradas
en el presente documento.
Esta garantía es válida solamente en el cumplimiento de las condiciones que se
establecen a continuación:
1. La garantía se aplica solamente al producto de SPECTRA siempre que:
a. Permanezca en posesión del comprador original y se exhiba la prueba de
compra.
b. Que no ha sido sometido a accidentes, mal uso, abuso, servicio inapropiado,
uso fuera de las descripciones de advertencia cubiertas dentro del manual
del propietario, o modificaciones no aprobada por SPECTRA.
c. Los reclamos deben ser hechos dentro del período de garantía.
2. Esta garantía no cubre daños o fallas del equipamiento causados por
conexiones eléctricas que no cumplen con los códigos eléctricos, con las
especificaciones del manual del propietario de SPECTRA, o la falta de cuidado
razonable y mantenimiento necesario como se describe en el manual del
propietario.
3. La garantía de todos los productos de SPECTRA se aplica solamente al uso
residencial y es anulada cuando los productos son utilizados en un ambiente no
residencial, o instalados fuera de los Estados Unidos.
Esta garantía le da derechos legales específicos, y usted puede tener también
otros derechos que varían de estado a estado. Para OBTENER SERVICIO por
favor remueva todas las baterías (de existir) y embale la unidad con cuidado
enviándola por correo postal asegurado y prepago o UPS a SPECTRA, a la
dirección que se menciona abajo. SI LA UNIDAD ES DEVUELTA DENTRO DEL
PERÍODO DE GARANTÍA EXHIBIDO arriba, por favor incluya una prueba de
compra (recibo de caja registradora con fecha), para que podamos determinar su
elegibilidad para el servicio de garantía y reparación de la unidad sin costo.
También incluya una nota con una descripción explicando en qué forma la unidad
es defectuosa. Un representante de atención al cliente tal vez deba contactarlo en
relación al estado de su reparación, por lo tanto incluya su nombre, dirección,
número de teléfono y dirección de correo electrónico para acelerar el proceso.

S-14
SI LA GARANTÍA SE ENCUENTRA FUERA DEL PERÍODO DE GARANTÍA, por
favor incluya un cheque por $85.00 para cubrir el costo de reparación, manejo y
correo de retorno. Todas las devoluciones cubiertas por la garantía deben ser
enviadas por correo prepago.
Se recomienda que primero entre en contacto con SPECTRA llamando al número
1-800-777-5331 o por correo electrónico enviando un mensaje
a
[email protected] para obtener información actualizada sobre la unidad
que requiere servicio. En algunos casos el modelo puede haber sido
discontinuado y SPECTRA se reserva el derecho de ofrecer opciones alternativas
de reparación o reemplazo.
SPECTRA MERCHANDISING INTERNATIONAL, INC.
4230 North Normandy Avenue,
Chicago, IL 60634, USA.
1-800-777-5331
Para registrar su producto, siga el vínculo a continuación en el sitio web para
ingresar su información.
http://www.spectraintl.com/wform.htmI.
0517 Impreso en Chin
a
-
 1
1
-
 2
2
-
 3
3
-
 4
4
-
 5
5
-
 6
6
-
 7
7
-
 8
8
-
 9
9
-
 10
10
-
 11
11
-
 12
12
-
 13
13
-
 14
14
-
 15
15
-
 16
16
-
 17
17
-
 18
18
-
 19
19
-
 20
20
-
 21
21
-
 22
22
-
 23
23
-
 24
24
-
 25
25
-
 26
26
-
 27
27
-
 28
28
-
 29
29


Jensen SMPS-900 Manual de usuario
- Categoría
- Accesorios de guitarra
- Tipo
- Manual de usuario
en otros idiomas
- English: Jensen SMPS-900 User manual
Artículos relacionados
Otros documentos
-
 Monster Power Rockin' Roller Mini 2 El manual del propietario
-
Axess PFBT7002 Manual de usuario
-
Axess PFBT7001 Manual de usuario
-
Samson Expedition Express El manual del propietario
-
Samson Technologies XP106W Manual de usuario
-
Naxa NDS-1503 El manual del propietario
-
Lenco SB-01 El manual del propietario
-
Lenco Bluetooth Manual de usuario
-
dBTechnologies B·Hype M El manual del propietario
-
