Cómo preparar, parchar y sellar su camino de entrada de asfalto o estacionamiento
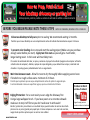
BEFORE YOU BEGIN PLEASE NOTE THESE 4 TIPS
ANTES DE COMENZAR, OBSERVE ESTOS 4 CONSEJOS
Click Here to Watch
our How-To videos!
Haga clic aquí para ver
nuestros videos instructivos!
Allow new blacktop to fully cure prior to sealing. We recommend waiting 12 months.
Permita que el nuevo blacktop se cure completamente antes del sellado. Recomendamos esperar 12 meses.
To prevent color shading do no stop and start the sealing project (Make sure you purchase
enough sealer before you start). Apply two thin coats as you will get a much better,
longer lasting result. A thick coat will most likely track.
Para evitar el sombreado del color, no pare y comience el proyecto de sellado (asegúrese de comprar suficiente
sellador antes de empezar). Además, aplique dos capas delgadas, ya que obtendrá una mejor, resultado más
duradero. Un pelaje grueso probablemente hará un seguimiento.
Wait time between coats: Allow first coat to dry thoroughly before applying second coat.
If shaded or a rough surface wait a minimum of 24 hours
Permita que la primera capa se seque completamente antes de aplicar la segunda capa.
Si está sombreada o tiene una superficie rugosa, espere un mínimo de 24 horas.
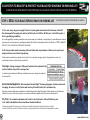
Edging/Protection: For a neat result you can edge the driveway first
Using a large wallpaper brush. If you have pavers or a concrete sidewalk
make sure to tarp it off first so you don’t walk over it with sealer!
Bordes / protección: para obtener un resultado limpio, puede bordear el camino de entrada
primero con un pincel grande para papel tapiz. Si tienes adoquines o una acera de concreto,
asegúrate de quitarlos primero para no caminar con sellador.
3 EASY STEPS AHEAD!
www.latexite.com

3 EASY STEPS TO BEAUTIFY & PROTECT YOUR BLACKTOP DRIVEWAY OR PARKING LOT!
¡3 PASOS FÁCILES PARA BEAUTIFICAR Y PROTEGER SU LUGAR DE CONDUCCIÓN DE BLACKTOP O PARKING!
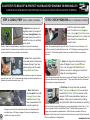
STEP 1: CLEAN / PREP
PASO 1: LIMPIAR / PREPARAR
STEP 2: PATCH PROBLEMS
PASO 2: PROBLEMAS DE PARCHE
a. Edge/trim loose grass and
vegetation away from edges of
driveway. Sweep/broom entire
driveway. Remove loose dirt or
asphalt from any ruts, potholes
or low spots.
b. Scrub all dirt, sap and other
stains with water and Latex·ite
®
Driveway Cleaner. If you have
gas/oil spots prime them with
Latex·ite
®
Oil Spot Primer.
Borde / recorte el césped suelto y la vegetación lejos de los bordes de
entrada. Barrido / escoba entera entrada de coches. Elimine la suciedad o el
asfalto suelto de los surcos, baches o puntos bajos.
Restriegue toda la suciedad, la savia y otras manchas con agua y el limpiador
para caminos Latex · ite®. Si tiene manchas de gas / aceite, prepárelas con el
cebador de manchas de aceite Latex · ite®.
c. Rinse. Wash entire
driveway with Latex·ite
®
Driveway Cleaner: soap
mode then rinse. If you
have a powerwasher this
is will do a great job.
Enjuague. Lavar todo el camino de entrada con el limpiador para
entradas Latex · ite® luego enjuague. Si tienes un lavaplatos esto
también hará un gran trabajo.
a. Fill. For small cracks & joints
up to ½” width use Latex·ite
®
10oz
tube, Latex·ite
®
2X Crack Filler or our
lifetime guarantee Pli· Stix. Scrape out
crack first with a screwdriver and
broom it clean.
b. Trowel. For large cracks, depressions and
areas of ‘allegation’ use Latex·ite
®
Trowel
Patch. Do not apply in lifts thicker than ½”.
Allow to cure prior to sealing over. Feather out
edges for a neat appearance.
Paleta. Para grietas grandes, depresiones y áreas de "alegato" use Trowel Patch. No
aplique en elevaciones más gruesas que ½ ”. Deje curar antes de sellar. Desvanece
los bordes para una apariencia prolija.
Llenar. Para pequeñas grietas y juntas hasta ½ ”de ancho use el tubo Latex · ite®
de 10 oz o nuestro llenador de fisuras Latex · ite® 2X líquido o nuestra garantía de
por vida Pli · Stix. Raspe la grieta primero con un destornillador y escoba para
limpiarla.
c. Fill & Tamp. For large holes and ruts deeper
than 1”, use Latex·ite
®
Super Patch or new water
activated Quick Patch
™
H2O. Use tamper to fully
compact. Traffic ready immediately. Apply in any
weather. Allow to cure 2 weeks prior to sealing
over (Quick Patch H2O can be sealed over next day).
Relleno y Tamp. Para grandes agujeros y surcos más profundos. A partir de 1 ", use
Latex · ite Super Patch o el nuevo Quick Patch ™ H2O activado con agua. Use el
tamper para compactar completamente. Tráfico listo de inmediato. Aplicar en
cualquier clima. Deje curar 2 semanas antes de sellar una vez más (el parche rápido
H20 se puede sellar al día siguiente).
www.latexite.com

3 EASY STEPS TO BEAUTIFY & PROTECT YOUR BLACKTOP DRIVEWAY OR PARKING LOT!
¡3 PASOS FÁCILES PARA BEAUTIFICAR Y PROTEGER SU LUGAR DE CONDUCCIÓN DE BLACKTOP O PARKING!
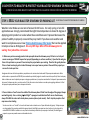
STEP 3: SEAL YOUR BLACKTOP DRIVEWAY OR PARKING LOT
SELECCIONA TU BLACKTOPDRIVEWEWAY O PARKING
Weather note: Make sure no rain in forecast for 24 hours. For early spring or late fall
applications we strongly recommend the night time temperature is above 55 degrees F.
Applying patch products or sealer when these conditions aren’t present decreases the
product’s ability to properly cure and they may track! If you have cool weather and
want to seal please use our new Therma Seal Driveway Filler Sealer that can be applied
in temps as low as 40 degrees F. On very HOT days: Mist off the driveway prior to
sealing. Your job will be a lot easier.
Apply steady down-
pressure and slightly
overlap at each pass!
1. Make sure you have enough product and space pails down the driveway every 10 feet or so. Each pail
covers an average of 350-400 square feet per pail (depending on surface condition). Open the lids and give
them all a quick mix so you won’t have to stop the project when your sealing. Place the lids gently back on.
Place a shovel and empty pail at end of driveway in case you have any extra at the end of the project you
can use for touch-ups later.
Asegúrese de tener suficiente producto y sepárelos en el camino de entrada cada 10 pies aproximadamente. Cada
cubeta cubre un promedio de 350-400 pies cuadrados por balde (según las condiciones de la superficie). Abre las tapas y
dales a todos una mezcla rápida para que no tengas que detener el proyecto cuando selles. Coloque la tapa suavemente
de nuevo. Coloque una pala y un cubo vacío al final del camino de entrada en caso de que tenga algo adicional al final
del proyecto que pueda usar para retoques más tarde
2. Pour a ribbon or ‘bead’ across the width of the driveway about 2 feet from the edge of the garage. Always
work with gravity. Use our Latex·ite
®
Seal Right™ squeegee to walk back and forth across the driveway
always PULLING the sealer with steady down pressure (do not push sealer). Don’t stop the project as that
may cause color shading.
Vierta una cinta o un “cordón” a lo ancho del camino de entrada a unos 2 pies del borde del garaje. Trabaja siempre
con la gravedad. Use nuestra escobilla de goma Latexite Seal Right para caminar de un lado a otro a lo largo de la
calzada SÓLO LLENAR el sellador con una presión hacia abajo constante (no empujar el sellador). No detengas el
proyecto ya que eso puede causar sombreado de color.
www.latexite.com

3 EASY STEPS TO BEAUTIFY & PROTECT YOUR BLACKTOP DRIVEWAY OR PARKING LOT!
¡3 PASOS FÁCILES PARA BEAUTIFICAR Y PROTEGER SU LUGAR DE CONDUCCIÓN DE BLACKTOP O PARKING!
STEP 3: SEAL YOUR BLACKTOPDRIVEWAY OR PARKING LOT
SELECCIONA TU BLACKTOPDRIVEWEWAY O PARKING
3. On a nice, sunny day you can apply first coat in morning and second coat in the afternoon. Block off
the driveway with the empty pails and stay off of it with car traffic for 24-48 hours. Foot traffic ready in 1
hour in good drying conditions.
4. All of our products can be cleaned up (skin and tools) with soap and water. Make sure to recycle your
empty containers or use them for gardening.
En un día agradable y soleado, puede aplicar la primera capa por la mañana y la segunda por la tarde. Bloquee el camino
de acceso con los cubos vacíos y manténgase alejado del tráfico de automóviles durante 24-48 horas. Tráfico peatonal
listo en 1 hora en buenas condiciones de secado.
Todos nuestros productos se pueden limpiar (piel y herramientas) con agua y jabón. ¡Asegúrese de reciclar sus
contenedores vacíos o utilizarlos para jardinería!
Coverage: Average coverage is 400 square feet but will vary based on the
surface condition. See pail for coverage chart.
Recommended Applicator: We recommend the Seal Right™ Driveway Squeegee. Brushes can be used
for edging. Do not use a roller (Unless with our Acrylic Grade Product) as it voids warranty.
www.latexite.com
La cobertura promedio es de 400 pies cuadrados, pero variará según la condición
de la superficie.
Aplicador recomendado: Recomendamos la escobilla de goma Seal Right Driveway. Cepillos puede ser utilizado para
bordes. No use un rodillo (a menos que con nuestro producto de grado acrílico) ya que se vacía garantía.
Dry Time: Do not walk on driveway until surface is dry to the touch. Allow 24-48 hours prior
to car traffic and additional time in humid and shaded conditions.
Tiempo de secado: No camine por el camino de entrada hasta que la superficie esté seca al tacto.
Permitir 24-48 horas antes. Tráfico de vehículos y tiempo adicional en condiciones de humedad y sombra.
-
 1
1
-
 2
2
-
 3
3
-
 4
4


en otros idiomas
- English: Latex-ite 11400 Installation guide
Artículos relacionados
-
Latex-ite 11500 Instrucciones de operación
-
-
-
-
-
-
-
-