AEG Electrolux T37800 Manual de usuario
- Categoría
- Secadoras
- Tipo
- Manual de usuario

LAVATHERM T37800
Secadora con sistema de salida al exterior
Instrucciones de utilización
Exhaust air dryer
Operating instructions
PERFEKT IN FORM UND FUNKTION
125981401.qxp 2006-02-01 11:28 Page 1

2
Estimados clientes,
Le rogamos leer atentamente estas instrucciones de uso y prestar par-
ticular atencióna las normas de seguridad escritas en las primeras
páginas.
Le aconsejamos conservar estas instrucciones para consultas futuras y
darlas al nuevo usuario en caso deventa del aparato.
El triángulo de advertencia y/o las palabras de alerta (!Advertencia!, !Cui-
dado!, !Atención!) poner énfasis en las indicaciones importantes para su
seguridad o para el buen funcionamiento del aparato. Aténgase a ellas sin
falta.
Este símbolo le ayudará y le guiará, paso a paso, en la utilización de este
aparato.
Después de este indicativo recibirá usted información complementaria
sobre el manejo y la aplicación práctica de la máquina.
La hoja de trébol se aplica para destacar consejos e indicaciones útiles
para trabajar con esta máquina de forma ahorrativa y ecológica.
En caso de que se presentara algún problema, no tema porque este libro
le dará las instrucciones necesarias para que Usted lo resuelva por sí
mismo. Refiérase al párrafo "?Algo no funciona?").
Si no bastan las informaciones suministradas, diríjase al Servicio más
cercano (la dirección y el número de teléfono están apuntados en el fol-
leto explicativo adjunto).
Impreso en papel reciclado con bajo impacto medioambiental.
Quien tiene conciencia ecologista, sabe obrar en consecuencia ...
125981401.qxp 2006-02-01 11:28 Page 2

3
Indice
Instrucciones de seguridad. . . . . . . . . . . . . . . . . . . . . . . . . . . . . . . . . . . . . . 4-6
Seguridad en general . . . . . . . . . . . . . . . . . . . . . . . . . . . . . . . . . . . . . . . . . . . . 7
Descarga . . . . . . . . . . . . . . . . . . . . . . . . . . . . . . . . . . . . . . . . . . . . . . . . . . . . . . . 7
Consejos para la protección del medio ambiente. . . . . . . . . . . . . . . . . . . 8-9
Estructura del aparato. . . . . . . . . . . . . . . . . . . . . . . . . . . . . . . . . . . . . . . . . 10-15
Vista anterio. . . . . . . . . . . . . . . . . . . . . . . . . . . . . . . . . . . . . . . . . . . . . . . . . . . . . 10
Vista posterior . . . . . . . . . . . . . . . . . . . . . . . . . . . . . . . . . . . . . . . . . . . . . . . . . . . 10
Panel dos comandos . . . . . . . . . . . . . . . . . . . . . . . . . . . . . . . . . . . . . . . . . . . 11-15
Breves instrucciones de utilización. . . . . . . . . . . . . . . . . . . . . . . . . . . . . . . . . 16
El secado. Secuencia de las operaciones . . . . . . . . . . . . . . . . . . . . . . . . . 17-19
Antes del primer ciclo de secado. . . . . . . . . . . . . . . . . . . . . . . . . . . . . . . . . . . . 17
Separe las prendas según su color . . . . . . . . . . . . . . . . . . . . . . . . . . . . . . . . . . 17
Abrir la puerta de carga . . . . . . . . . . . . . . . . . . . . . . . . . . . . . . . . . . . . . . . . . . . 17
La ropa en la secadora . . . . . . . . . . . . . . . . . . . . . . . . . . . . . . . . . . . . . . . . . . . . 17
Conecte la secadora de ropa; seleccione el tiempo de secado . . . . . . . . . . . 18
Ponga en marcha el aparato . . . . . . . . . . . . . . . . . . . . . . . . . . . . . . . . . . . . . . . 18
Seque o anada ropa . . . . . . . . . . . . . . . . . . . . . . . . . . . . . . . . . . . . . . . . . . . . . . 19
Fin del ciclo de secado . . . . . . . . . . . . . . . . . . . . . . . . . . . . . . . . . . . . . . . . . . . . 19
Desconecte la secadora de ropa . . . . . . . . . . . . . . . . . . . . . . . . . . . . . . . . . . . . 19
Limpie los filtros . . . . . . . . . . . . . . . . . . . . . . . . . . . . . . . . . . . . . . . . . . . . . . . . . 19
Ajuste del nivel de conductividad. . . . . . . . . . . . . . . . . . . . . . . . . . . . . . . . . . 20
Cuadro programas . . . . . . . . . . . . . . . . . . . . . . . . . . . . . . . . . . . . . . . . . . . . . . . 21
Breve resumen de las informaciones sobre los tejidos . . . . . . . . . . . . . . . . 22
Símbolos de cuidado. . . . . . . . . . . . . . . . . . . . . . . . . . . . . . . . . . . . . . . . . . . . . . 22
Mantenimiento . . . . . . . . . . . . . . . . . . . . . . . . . . . . . . . . . . . . . . . . . . . . . . . . . . 23
Limpieza externa . . . . . . . . . . . . . . . . . . . . . . . . . . . . . . . . . . . . . . . . . . . . . . . . . 23
Limpieza de la puerta . . . . . . . . . . . . . . . . . . . . . . . . . . . . . . . . . . . . . . . . . . . . . 23
Limpieza dos filtros . . . . . . . . . . . . . . . . . . . . . . . . . . . . . . . . . . . . . . . . . . . . 23-24
Limpie el tambor . . . . . . . . . . . . . . . . . . . . . . . . . . . . . . . . . . . . . . . . . . . . . . . . . 24
Limpie el panel y los pulsadores . . . . . . . . . . . . . . . . . . . . . . . . . . . . . . . . . . . . 24
Anomalías de fucionamiento? . . . . . . . . . . . . . . . . . . . . . . . . . . . . . . . . . . 25-26
Características técnicas. . . . . . . . . . . . . . . . . . . . . . . . . . . . . . . . . . . . . . . . . . . 27
Conexión eléctrica . . . . . . . . . . . . . . . . . . . . . . . . . . . . . . . . . . . . . . . . . . . . . . . 27
Desembalaje . . . . . . . . . . . . . . . . . . . . . . . . . . . . . . . . . . . . . . . . . . . . . . . . . . . . 28
Accesorios especiales. . . . . . . . . . . . . . . . . . . . . . . . . . . . . . . . . . . . . . . . . . . . . 28
Kit de montaje sobre la lavadora . . . . . . . . . . . . . . . . . . . . . . . . . . . . . . . . . . . 28
Reversibilidad de la puerta. . . . . . . . . . . . . . . . . . . . . . . . . . . . . . . . . . . . . . . . 28
Servicio. . . . . . . . . . . . . . . . . . . . . . . . . . . . . . . . . . . . . . . . . . . . . . . . . . . . . . . . . 29
125981401.qxp 2006-02-01 11:28 Page 3

4
Instrucciones de seguridad
Instrucciones de seguridad
Lo más importante es que Usted conserve cuidadosamente el libro de
instrucciones junto al aparato por si lo necesite en el futuro. En caso de
que Usted venda el aparato o que éste pase a ser deotro propietario, en
caso de que Usted se mude o deje este mismo aparato, asegúrese siem-
pre que el libro de instrucciones acompañe el aparato. Cada nuevo pro-
pietario debe tener la posibilidad de saber como funciona el aparato y
de enterarse de las advertencias útiles.
La seguridad de los aparatos AEG obedecen a los estándares industria-
les y a las exigencias legales respecto a la seguridad de los aparatos. Sin
embargo, como fabricantes que somos, sentimos que nuestra obliga-
ción es suministrar la informaciones de seguridad siguientes. Usted
debe leerlas con mucha atención antes de instalar o utilizar el aparato
Seguridad en general
• Bajo ningún pretexto debe Usted intentar reparar el aparato por sí
mismo. Este tipo de reparaciones realizadas por gente sin experiencia
en este campo puede causar heridas o un mal funcionamiento. Tome
contacto con su Servicio Local o con su depositario AEG. Insista siem-
pre sobre el hecho de que tienen que ser piezas de recambio o de
repuesto auténticas AEG.
• Antes de la puesta en funcionamiento del aparato, compruebe que el
voltaje y que el tipo de corriente indicados en la plataforma informa-
tiva correspondan a los que existen en el sitio donde la secadora se
encuentra instalada. El tipo de fusibles también está indicado en la
plataforma informativa.
• Nunca ponga en marcha el aparato en caso de que el cable eléctrico
esté estropeado o en caso de que el panel de control o el mando tam-
bién estén tan estropeados que hasta los elementos interiores puedan
llegar a estropearse.
• Desenchufe el aparato antes de cualquier operación de limpieza o de
entretenimiento.
• Nunca estire del cable eléctrico para sacar el enchufe de la conexión
eléctrica; Agarre siempre sólo el enchufe.
• No se apoye en la puerta abierta porque puede ser que el aparato se
vuelque.
• Nunca moje el aparato por medio de una manga de riego. !Peligro de
electrocución!
• En caso de que interrumpa Usted el programa de secado para sacar la
ropa: Puede ser que la ropa y el tambor estén muy calientes.
125981401.qxp 2006-02-01 11:28 Page 4

5
• Riesgo de incendio: los tejidos que se han impregnado o empapado
con aceites de cocina constituye un peligro de incendio y no debería
introducirse en la secadora para realizar un proceso de secado.
• Si usted ha lavado su ropa con el producto quitamanchas deberá rea-
lizar un aclarado extra en el programa de lavado antes de introducir
la ropa la secadora
Seguridad para los niños
• Los niños no se dan cuenta de los peligros de los aparatos eléctricos.
Cuando el aparato está funcionando vigile atentamente a los niños
yno los deje jugar con el aparato.
• Las piezas de embalaje (por ej. películas, poliestireno), pueden ser peli-
grosas para los niños. !Peligro de sofocación! Tenga las piezas fuera-
del alcance de los niños.
• Asegúrese de que los ninos o los pequeños animales domésticos no
entren en el tambor de la secadora.
Colocación y conexión
• Siga las instrucciones una a una para colocar y conectar y, si es
necesario, tome en cuenta los consejos de su deshollinador y de las
autoridades locales.
• Compruebe que el aparato no haya sufrido ningún daño durante el
transporte. !Nunca enchufe un aparato estropeado! Si es el caso, tome
contacto con su distribuidor.
• Su secadora de ropa no debe encontrarse en un sitio donde la tempe-
ratura pueda ser inferior a cero o superior a los 35°C.
• Su secadora debe de estar nivelada.
• Su secadora no debe ser colocada en una alfombra gruesa, lo que
podría impedir la libre circulación del aire por la rejilla de aiereación.
• Si el aparato se encuentra cerca de un aparato de calefacción de gas,
de carbón o de electricidad, debe instalar entre su secadora de ropa y
estemismo aparato un panel aislante no inflamable (dimensión:
85x57.5 cm).
• El enchufe de la secadora siempre debe ser accesible.
• No debe introducir el tubo de su secadora de ropa en la campana de
su estufa, en el conducto de su chimenea o en un conducto reserva-
do acualquier aparato de fuel.
• Para lograr una buena ventilación del cuarto donde se encuentra su
secadora de ropa, evite una presión baja.
• Las conexiones permanentes a los principales aparatos eléctricos sólo
pueden ser realizadas por un electricista cualificado
Instrucciones de seguridad
125981401.qxp 2006-02-01 11:28 Page 5

6
Uso conveniente
• Por motivos de seguridad, el aparato no debe sufrir ninguna modifi-
cación.
• El aparato es reservado sólo a un uso doméstico. Si Usted usa la seca-
dora con otro objetivo o la usa de modo no conveniente, el fabrican-
te no asume la responsabilidad de los eventuales daños ocurridos.
• Seque sólo los objetos que hayan sido lavados con agua. Nunca
sequelos objetos que hayan estado en contacto con disolventes infla-
mables (gasolina, alcohol de quemar, detergente de lavado en seco,
etcétera). Estos productos son de naturaleza explosiva y podrían cau-
sar una explosión o un incendio
• No debe secar en su secadora de ropa objetos que contengan goma-
espuma o materias derivadas de la goma espuma. !Peligro de incen-
dio!
Instrucciones de seguridad
125981401.qxp 2006-02-01 11:28 Page 6

7
Seguridad en general/Descarga
Seguridad en general
• Los tejidos almidonados dejan huellas de almidón en el tambor. En
consecuencia, no los seque en su secadora de ropa
• Si la carga de ropa para secar supera la carga máxima indicada, la
misma ropa puede salir arrugada después del secado. Para los tejidos
frágiles, la carga máxima no debería ser superior a 1,5 kg
• Para su información : el 70 por ciento del desgaste de la ropa se debe a su uso
normal, el 20 por ciento a su lavado y el 10 por ciento a su secado en secadora
de ropa. En su secadora, la pelusa se acumula en el filtro. Solo 0,03 g de pelusa
por kilo de ropa se perderá.
Descarga
Eliminar el material de embalaje!
No deje de eliminar debidamente los materiales de embalaje de su secadora de ropa.
Todos ellos son compatibles con el medio ambiente y aptos para su reutilización.
Las piezas de material sintético están identificadas con abreviaturas
internacionales:
• para polietileno, p. ej. películas plásticas de embalaje (>PE<).
• para poliestireno, p. ej. elementos de relleno (libres todos de CFC-clorofluorocarbonos
(>PS<=).
Las partes de cartón están hechas de papel reciclado y deben entregar-
se a los centros de acopio de papel viejo.
Eliminar debidamente las secadoras usadas!
Advertencia! A la hora de eliminar la secadora desenchufe la clavija, corte el cable
de alimentación, elimine la clavija con el trozo sobrante de cable y destruya la cer-
radura de la puerta para que los niños no puedan encerrarse jugando y poner sus
vidas en peligro.
Advertencia! Cuando deje un día su secadora definitivamente fuera de servicio,
llévela por favor al centro de reciclaje más cercano o a su concesionario, que se
hará cargo de ella a cambio de una pequeña retribución. Los materiales útiles son
reciclables conforme a su etiquetado.
Para desarmar los aparatos desechados, basta con usar herramientas corrientes
(destornillador para tornillos de estrella, martillo).
El símbolo en el producto o en su embalaje indica que este producto no se
puede tratar como desperdicios normales del hogar. Este producto se debe entre-
gar al punto de recolección de equipos eléctricos y electrónicos para reciclaje. Al
asegurarse de que este producto se deseche correctamente, usted ayudará a evi-
tar posibles consecuencias negativas para el ambiente y la salud pública, lo cual
podría ocurrir si este producto no se manipula de forma adecuada. Para obtener
información más detallada sobre el reciclaje de este producto, póngase en con-
tacto con la administración de su ciudad, con su servicio de desechos del hogar o
con la tienda donde compró el producto.
125981401.qxp 2006-02-01 11:28 Page 7

8
Consejos para la protección del medio ambiente
Consejos para la protección del medio ambiente
• Durante el lavado, intente no utilizar suavizantes!
Si seca su ropa en secadora de ropa, quedará suave hasta si Usted no
utiliza suavizantesde tejidos.
• Sacuda su ropa!
Sacuda su ropa antes de colocarla en la secadora con el fin de redu-
cirla duración del secado y para evitar que la ropa se arrugue.
• Escurra su ropa correctamente antes de secarla!
En regla general, cuanto más esté escurrida la ropa más económica
resultará la secadora.
En el cuadro siguiente, podrá Usted encontrar indicaciones sobre el
consumo que han sido dadas según la velocidad de centrifugado. Los
datos son dados para 6 kg de ropa para secar.
• Respete Usted las exigencias relativas a la carga!
El aparato resultará más económico si está totalmente cargado, como
lo puede comprobar en el párrafo relativo a los programas.
• Elija el programa de secado conveniente!
Elija el programa de secado adaptado al tipo y a la cantidad de ropa
para que su secadora de ropa resulte más económica. Algunos datos
de consumo:
Centrifugado: Ciclo de secado:
Revolucion es
por minuto
Humedad residual
Tiempo requerid
en minutos
Energía consumina
en
kWh
En
Litros
En
%
1000 3,6 60 97 3,3
1200 3,2 53 80 3,2
1400 3,0 50 75 3,0
1800 2,5 42 65 2,4
125981401.qxp 2006-02-01 11:28 Page 8

9
Consejos para la protección del medio ambiente
1) centrifugado de 1000 revoluciones por minuto
2) centrifugado de 1200 revoluciones por minuto.
• Tejidos sintéticos : la carga sólo puede alcanzar los 3 kg!
• Limpie el filtro de pelusa después de cada ciclo de secado!
Tipo de ropa
Grado de secado
deseado
Carga en kg
Duración en
minutos
Consumo de energía
en kWh
Algodón
1
Secado para depositar 6 97 3,3
Algodón
1
Secado para planchar 6 75 2,6
Tejidos mixtos
2
Secado para depositar 3 52 1,1
125981401.qxp 2006-02-01 11:28 Page 9

Estructura del aparato
Vista anterior
Vista posterior
Salida vapor
lateral
Tuerca redonda
Salida vapor posterior
Rejilla toma de
aire
Cable
électrico
Panel de mandos
Patas regulables
Filtros
Tarjeta
matricula
Puerta abierta
Lampara
tambor
10
Estructura del aparato
125981401.qxp 2006-02-01 11:28 Page 10

Estructura del aparato
Panel dos comandos
1 Mando selector de programas
El mando selector le permite seleccionar un secado electrónico o a tiempo.
Seleccione el tiempo o el programa de secado deseado.
Secado automático (programas electrónicos)
Con estos programas el aparato funciona mediante sensores de
humedad. Lo único que usted tiene que hacer es colocar el mando
selector en el programa requerido según el tipo de ropa y el grado de
secado deseado (véase el cuadro programas).
Secado a tiempo
Usted puede seleccionar un tiempo de secado de 90, 60 minutos para
el algodón y de 30 minutos para los sintéticos para completar el seca-
do, si es necesario.
Para anular un programa en curso gire el mando selector en PARO.
Cuando termina el secado gire el mando selector en PARO antes
de abrir la puerta.
2 Tecla
IINNIICCIIOO//PPAAUUSSAA
.
Pulsar esta tecla para poner en marcha la secadora tras haber selec-
cionado el programa y las opciones. La luz correspondiente cesará de
parpadear. Si se ha seleccionado un inicio diferido, la máquina
empezará la cuenta hacia atrás.
Si se abre la puerta del aparato o la pequeña puerta inferior cuan-
do el programa está en curso, se debe volver a pulsar esta tecla tras
haber cerrado la puerta para reiniciar el programa desde el punto
en que se había interrumpido.
La luz de la tecla INICIO/PAUSA parpadea para recordar que se
debe volver a pulsar la tecla de inicio.
11
125981401.qxp 2006-02-01 11:28 Page 11

12
Estructura del aparato
3 Tecla
IINNIICCIIOO DDIIFFEERRIIDDOO
Esta tecla permite retardar el inicio del programa hasta un máx. de 12
horas.
Se debe seleccionar esta opción tras haber seleccionado el programa
y antes de pulsar INICIO/PAUSA para iniciar el programa.
Cada vez que se pulsa la tecla, el tiempo aumenta en 30 minutos,
hasta que el display visualice un retardo de "2 horas". Luego, se
visualiza el retardo hora a hora.
Los minutos o las horas de retardo que se han seleccionado apare-
cen durante 3 segundos, luego el display visualiza la duración del
programa seleccionado anteriormente.
La cuenta hacia atrás inicia tras haber pulsado la tecla
INICIO/PAUSA.
Para cancelar el tiempo de retardo, se debe pulsar la tecla INICIO/PAUSA
y luego la tecla, INICIO DIFERIDO hasta que el display indique
00’’
h. En este
momento, se debe pulsar la tecla INICIO/PAUSA otra vez.
Tres segundos después de haber cancelado el retardo, en el display
aparece la duración del programa.
Durante el inicio diferido, no se puede cambiar el programa o el tiem-
po de retardo que se ha seleccionado. Para hacerlo se debe apagar la
máquina, situando el selector de programas en PARO. Seleccionar
el nuevo programa, las opciones y el inicio diferido, luego pulsar la
tecla INICIO/PAUSA.
Para cancelar o modificar las opciones que se han seleccionado, es
suficiente situar el aparato en PAUSA. Una vez realizada la
operación deseada, pulsar la tecla INICIO/PAUSA otra vez.
Si se desea añadir ropa durante la cuenta hacia atrás de la máquina,
es suficiente abrir la puerta. Cuando se cierra la puerta, pulsar la tecla
INICIO/PAUSA otra vez para reanudar la cuenta hacia atrás.
4 Tecla
RREEDDUUCCCCIIOONN TTEEMMPP..
Pulsando esta tecla se puede realizar el secado a una temperatura
inferior, para las prendas delicadas.
La luz testigo correspondiente se enciende. Esta opción se puede
utilizar también para el secado a tiempo controlado.
Esta función no se puede utilizar con el PROGRAMA CORTO.
125981401.qxp 2006-02-01 11:29 Page 12

13
5 Tecla
PPRROOGGRRAAMMAA CCOORRTTOO
Pulsando esta tecla se reduce el tiempo de secado en los siguientes
programas para el algodón:
• EXTRA SECO
• SECO
• SECO PARA GUARDAR
La luz correspondiente se enciende. Esta opción no se puede selec-
cionar junto con la función REDUCCION TEMP.
6 Tecla
SSEENNAALL AACCUUSSTTIICCAA
La señal acústica se activa:
• cuando se selecciona el programa
• cuando se pulsan las teclas
• cuando se selecciona una opción incorrecta
• cuando se modifica la posición del selector de programas durante
el programa o cuando se pulsa una tecla de opción durante el ciclo
• al final del programa
• si la máquina no funciona correctamente
• cuando la pequeña puerta inferior está abierta
Pulsando la tecla SENAL ACUSTICA, se encende la señal acústica.
La luz correspondiente se enciende.
7 Tecla
AAPPEERRTTUURRAA PPUUEERRTTAA
Pulsar esta tecla para abrir la puerta. La luz sobre la tecla se enciende.
Es posible abrir la puerta mediante esta tecla solamente si la
secadora está activada (selector de programas situado en un pro-
grama o tiempo de secado).
Si se abre la puerta durante un programa, para reiniciar el programa
se debe pulsar otra vez la tecla INICIO/PAUSA tras haber cer-
rado la puerta.
8
DDIISSPPLLAAYY
En el display aparece la siguiente información:
• duración del programa seleccionado
• inicio diferido
• fin del programa
• selección de opción incorrecta
• código de alarma
Estructura del aparato
125981401.qxp 2006-02-01 11:29 Page 13

Duración del programa seleccionado
Una vez seleccionado el programa, su duración (en horas y minutos) aparece
en el display. Se calcula automáticamente según la carga máxima aceptada
para cada tipo de tejido y el nivel de secado requerido.
Cuando el programa inicia, el tiempo restante aparece cada 5 minutos.
Inicio diferido
Si se ha seleccionado un tiempo de retardo mediante la tecla corres-
pondiente, se visualiza en el display durante 3 segundos; luego, apa-
rece la duración del programa seleccionado anteriormente.
La cuenta hacia atrás se visualiza cada 30 minutos hasta que apa-
rezca "90 minutos", luego hora a hora.
Fin del programa
Un cero intermitente indica el fin del programa y aparece después
de la fase "antiarrugas".
0
3
1.20
14
Estructura del aparato
125981401.qxp 2006-02-01 11:29 Page 14

Selección de opción incorrecta
Si se selecciona una opción que no es compatible con el programa
seleccionado, en el display aparece Err (error).
Este código volverá a aparecer durante la ejecución del programa, si
se pulsa una de las teclas de opción o se gira el selector de progra-
mas.
Código de alarma
En caso de una anomalía de funcionamiento, en el display aparece
un código de alarma (p.ej. E21).
9 Display fases programa
Después de haber arrancado el programa, la luz piloto correspon-
diente a la fase en curso se enciende:
• Luz
SSEECCAADDOO
. Esta luz señala que el aparato está efectuando la
fase de secado.
• Luz
EENNFFRRIIAADDOO..
Esta luz indica que el aparato está en fase de
enfriado. Al final del secado, hay una fase de enfriado de 10 minu-
tos para enfriar la ropa.
• Luz
FFIINN DDEE PPRROOGGRRAAMMAA..
Esta luz se enciende al final de la fase
de enfriado, durante la fase antiarrugas y al final del programa.
• Luz
FFIILLTTRROOSS..
Esta luz se enciende al final del programa para
recordar que se deben limpiar los filtros.
E21
15
Estructura del aparato
125981401.qxp 2006-02-01 11:29 Page 15

Breves instrucciones de utilización
• Escurra la ropa lo más posible.
• Separe las prendas según su color, etcétera…
• Coloque la ropa en la secadora
• Elija el programa de secado/duración
• Si es necesario, apoye en el pulsador:
SSEENNAALL AACCUUSSTTIICCAA
y/o
PPRROOGGRRAAMMAA CCOORRTTOO
y/o
RREEDDUUCCCCIIOONN TTEEMMPP..
(Esta función no se
puede utilizar con el
PPRROOGGRRAAMMAA CCOORRTTOO
) y/o
IINNIICCIIOO DDIIFFEERRIIDDOO
• Apoye el pulsador INICIO/PAUSA aproximadamente 2 segundos
para poner en marcha la secadora de ropa.
Durante el programa, Usted tiene la posibilidad de abrir la puerta del
aparato para sacar parte de la ropa o para añadir otra.
Al final del programa:
• Apague la secadora de ropa.
• Saque la ropa.
• Limpie el filtro de pelusa.
16
Breves instrucciones de utilización
125981401.qxp 2006-02-01 11:29 Page 16

17
El secado.Secuencia de las operaciones
El secado. Secuencia de las operaciones
Antes del primer ciclo de secado
Antes de hacer funcionar el aparato la primera vez, introduzca algu-
nos trapos limpios, húmedos y seleccione un tiempo de secado de 30
minutos. Así estará seguro de que no habrá polvo o suciedad en el
tambor.
Separe las prendas según su color, etcétera…
• Para impedir que las prendas se entremezclen: cierre los cierres de
cremallera botone los botones de las fundas de almohadas y de la
demás fundas; ate todas las cintas, así como los cinturones de los
delantales.
• Los bolsillos deben estar vacíos.
• Quite todos los elementos metálicos (sujetapapeles, etcétera…).
• Dele la vuelta a las prendas hechas de dos capas de tejido (dele la
vuelta a los anoraks con forro de algodón), de este modo se secar
mejor.
• Sacuda la ropa.
Abrir la puerta de carga
• Oprimir la puerta con fuerza
La ropa en la secadora
• Introduzca las prendas en el tambor de una en una, desplegándolas.
Cierre la puerta. Asegúrese de que las prendas no queden atascadas
entre la puerta y el filtro. Coloque la ropa en la secadora
P1108
P1104
125981401.qxp 2006-02-01 11:29 Page 17

Conecte la secadora de ropa, Seleccione el tiempo de secado
•Seleccionar el programa o el tiempo de secado. Las luces SECADO,
ENFRIADO y FIN DE PROGRAMA se encienden. La luz de la
tecla INICIO/PAUSA parpadea y en el display aparece la duración
del programa.
Si se requiere, pulsar la tecla de temperatura baja REDUCCION
TEMP. y/o la tecla : SENAL ACUSTICA o la tecla PROGRAMA CORTO.
Seleccionar el INICIO DIFERIDO, si se requiere. El retardo seleccio-
nado aparece en el display durante 3 segundos, luego se visualiza la
duración del programa seleccionado.
Para cambiar un programa que está ejecutándose, antes de todo se
debe cancelarlo colocando el mando selector en PARO. Seleccione
el nuevo programa y pulse la tecla de arranque INICIO/PAUSA.
Ponga en marcha el aparato
Pulsar la tecla INICIO/PAUSA; la luz correspondiente cesa de par-
padear y se inicia el secado. Solamente la luz "Secado" permanece
encendida. Si se ha seleccionado el inicio diferido, la máquina inicia su
cuenta hacia atrás.
Si se modifica la posición del selector de programas durante el funcio-
namiento de la máquina, la señal acústica se activa, la luz indicadora
de fase programa parpadea y en el display aparece Err.
El tambor gira alternativamente en ambas direcciones durante el secado.
Todos los programas de secado terminan con una fase de enfriado de
10 minutos; la luz ENFRIADO está encendida). Tras esta fase se
puede sacar la ropa.
Las luces FIN DE PROGRAMA y FILTROS están encendidas.
Los pilotos luminosos FIN DE PROGRAMA y FILTROS se encien-
den y suena la señal sonora.
En el display aparece un cero estático.
nexxt02
18
El secado.Secuencia de las operaciones
125981401.qxp 2006-02-01 11:29 Page 18

Saque o añada ropa
Tiene Usted la posibilidad de interrumpir el ciclo de secado en cual-
quier momento para sacar o añadir ropa.
Abra la puerta.
Cuidado! Puede ser que la ropa y el tambor estén calientes.
Saque o añada ropa.
Cierre la puerta y apoye el pulsador INICIO/PAUSA para seguir
con el ciclo de secado.
Fin del ciclo de secado
Si no se saca la ropa al final del ciclo, la secadora ejecuta una fase
antiarrugas (duración máxima: 30 minutos).
Si no se saca la ropa, la secadora se parará automáticamente al final
de la fase antiarrugas. Las luces FIN DE PROGRAMA y FILTROS
permanecen encendidas y la señal acústica se activa cada 10 segun-
dos durante 2 minutos.
La luz de la tecla INICIO/PAUSA se apaga y en el display aparece
un cero intermitente.
Apague la secadora de ropa
Situar el selector de programas en PARO; todas las luces se apa-
gan. El aparato está apagado.
Sacar la ropa.
Si se abre y luego se cierra la puerta antes de situar el selector en
PPAARROO
, todas las luces correspondientes a las fases que compo-
nen el programa ejecutado se encienden y en el display aparece la
duración del programa.
Cuidado! Si el programa de secado debe ser parado antes de que fina-
lice su ciclo, le recomendamos que gire el mando selector en la posi-
ción PARO y luego en la posición “Ventilación” y pulse la tecla de
arranque INICIO/PAUSA.
Espere hasta el final de la fase de enfriamiento antes de sacar la ropa.
De este modo se evitará que la temperatura aumente de manera exce-
siva en el aparato.
Limpie los filtros
Para asegurar la libre circulación del aire durante el ciclo de secado,
los filtros de pelusa deben ser limpiados después de cada ciclo de
secado, antes de sacar la ropa.
19
El secado.Secuencia de las operaciones
125981401.qxp 2006-02-01 11:29 Page 19

20
Ajuste del nivel de conductividad
El agua contiene una cantidad variable de carbonato cálcico y sales
minerales dependiendo de la localización geográfica, variando así los
valores de conductividad.
Cambios importantes en la conductividad del agua comparados con
los prefijados en la fábrica podrían influir ligeramente en la humedad
residual de la colada al final del proceso.
Su secadora le permite regular la sensibilidad del sensor de secado
basado en los valores de conductividad del agua mediante el siguien-
te procedimiento.
Para acceder al modo de selección:
Gire el selector de programas para encender el aparato.
En el modo de selección, pulse simultáneamente los botones 3 y 6
hasta que «
CC00
» final a quando non appaia.
Pulse secuencialmente el botón
IINNIICCIIOO DDIIFFEERRIIDDOO
5 el nivel de con-
ductividad se indica mediante la fase de pilotos luminosos, que se encien-
den siguiendo varias combinaciones, como aparece a continuación:
Normalmente, el aparato viene programado de fábrica al más alto nivel; sin
embargo, algunos modelos pueden configurarse de forma diferente.
Memorizado del nuevo programa:
Pulse los botones 3 y 6 forma simultánea.Pulse los botones hasta que
el piloto que se encuentra sobre los mismos deje de parpadear y suene
la señal sonora.
DISPLAY
Conductividad
Valor aproximado
µS/cm (25°C)
CC00
--
Bajo < 300
CC00 --
Medio 300 - 600
CC00 --
Alto > 600
Ajuste del nivel de conductividad
--
--
--
125981401.qxp 2006-02-01 11:29 Page 20

21
Cuadro programas
Secado automático (programas electrónicos)
(*) Conforme a las normas CEI 1121
• ENFRIADO -esta posición en el mando selector puede ser utilizada para
refrescar la ropa (p.ej. para eliminar un persistente olor de naftalina).
Secado a tiempo
(1) No sobrecargue nunca el tambor (por ejemplo, no introduzca edredones
demasiado grandes).
Los tiempos de secado varían según:
• el tipo de ropa
• el grado de centrifugado antes del secado.
• la cantidad de ropa
Carga
Como es difícil calcular el peso de la ropa, se aconseja de cargar el tambor:
• completamente, pero sin comprimir, de algodón y lino;
• a la mitad, de sintéticos;
• a un tercio, de tejidos muy delicados.
TTiippoo ddee rrooppaa
Tiempo
desecado
CCaarrggaa mmááxxiimmaa
(1)
Posición mando
selector
Algodón, lino 90 min
6 kg 90 MIN
Algodón, lino 60 min
6 kg 60 MIN
Sintéticos 30 min
3 kg 30 MIN
TTiippoo ddee rrooppaa
Grado de secado requerido
CCaarrggaa mmááxxiimmaa
kg
(1)
Programa
Algodón, lino
EXTRA SECO
6
SECO
6
SECO PARA GUARDAR
6 (*)
LIGERAMENTE HUMEDO
6
HUMEDO PARA PLANCHAR
6 (*)
HUMEDO PARA CILINDRO
PLANCHADOR
6
Sintéticos
EXTRA SECO
3
SECO PARA GUARDAR
3 (*)
HUMEDO PARA PLANCHAR
3
Trajes para hombres,
pantalones, trajes para
mujeres, faldas
FACIL PARA PLANCHAR
hasta 1
(5-6 prendas)
Chaquetas pantalón,
vestirse falda.
VENTILACION CON AIRE
FRESCO
de 1 a 4 prendas
Cuadro programas
125981401.qxp 2006-02-01 11:29 Page 21

22
Breve resumen de las informaciones sobre lostejidos
Breve resumen de las informaciones sobre los tejidos
Símbolos de cuidado
Asegúrese que los tejidos son adaptados a las secadoras de ropa. Uno de
los símbolos siguientes debería estar presente en el membrete de sus
prendas:
se puede secar en la secadora
secado normal (alta temperatura)
secado delicado (baja temperatura)
no secar en la secadora
En el caso contrario:
Seque las prendas de algodón de la misma manera que seca los tejidos
mixtos, a una temperatura normal. Cuando tenga que secar prendas de
algodón frágil, apoye el pulsador REDUCCION TEMP.
Es preferible tomar en cuenta los símbolos de cuidado indicados en los
etiquetas de las prendas mientras su compra.
• Lana, edredones
No seque ningún objeto que contenga lana en su secadora de ropa!
Pueden ponerse como fieltro!
Puede secar sus edredones en su secadora de ropa sólo en el caso de
que lo indique uno de los símbolos de cuidado
• Tejidos frágiles y temperaturas elevadas
Seque los tejidos frágiles a temperaturas elevadas (así como los teji-
dosde acrílico y de viscosa) y los objetos que lleven etiqueta con sím-
bolo de cuidado eligiendo un programa de secado para tejidos
sintéticos.
• Prendas de punto
Las prendas de punto tienen tendencia a encoger.
No seque durante demasiado tiempo esas prendas. Aunque las pren-
das de calidad superior menos suelen encoger
• Nuevos tejidos de color
No seque los nuevos tejidos de color con prendas de color usadas. Esto
podría causar el descoloramiento de sus prendas.
125981401.qxp 2006-02-01 11:29 Page 22

Mantenimiento
Limpieza externa
Use solamente agua y jabón y luego seque cuidadosamente.
Importante!: no use alcohol, solventes o productos similares.
Limpieza de la puerta
Limpie periódicamente la parte interna de la puerta para eliminar la
pelusa de las juntas que hay alrededor del filtro.
Una limpieza correcta asegura un secado correcto.
Limpieza dos filtros
La secadora funcionará bien si los filtros estan limpios.
Los filtros recogen toda la “pelusa” que se acumula durante el secado
y de consecuencia deben ser limpiados al final de cada programa,
antes de sacar la ropa, con un paño húmedo. La luz FILTROS está
encendida para recordar esta operación.
El filtro que hay en la parte interna de la puerta debe ser extraido
para su limpieza.
No se alarme por la cantidad de pelusa. Esto no se debe a un desgaste
excesivo de la ropa causado por la secadora. Todas las fibras pierden
pelusa durante el secado; pero mientras en ocasión del secado al aire
libre este fenómeno no se nota, durante el secado en el aparato la
pelusa se recoge en el filtro.
A
U
T
O
R
E
V
E
R
S
E
k
g
5
k
g
2
,5
8
0
0
/
9
0
0
7
0
'
-
9
0
'
3
5
'
-
5
0
'
1
0
0
0
/
1
2
0
0
6
5
'
-
8
5
'
3
0
'
-
4
5
'
8
0
0
/
9
0
0
8
0
'
-
10
0
'
5
5
'
-
7
0
'
1
0
0
0
/
1
2
0
0
7
5
'
-
9
5
'
5
0
'
-
6
5
'
6
5
0
5
0
'
-
6
0
'
3
0
' -
3
5
'
k
g
2
,5
kg
1
P1111
P1110
A
U
T
O
R
E
V
E
R
S
E
k
g
5
k
g
2
,5
8
0
0
/
9
0
0
7
0
'
-
9
0
'
3
5
'
-
5
0
'
1
0
0
0
/
1
2
0
0
6
5
'
-
8
5
'
3
0
' -
4
5
'
8
0
0
/
9
0
0
8
0
'
-
10
0
'
5
5
'
-
7
0
'
1
0
0
0
/
1
2
0
0
7
5
'
-
9
5
'
5
0
' -
6
5
'
6
5
0
5
0
'
-
6
0
'
3
0
'
-
3
5
'
k
g
2
,5
k
g
1
P1109
23
Mantenimiento
125981401.qxp 2006-02-01 11:29 Page 23

Con el paso del tiempo, en los filtros puede aparecer una pátina blancuzca
producida por los residuos de detergente presentes en la ropa.
Límpielos con agua caliente, utilizando un cepillo. Para sacar el filtro de la
puerta, levántelo del modo indicado en la figura. Se puede situar el filtro con
la lengüeta orientada hacia la izquierda o la derecha.
No use el aparato sin filtros!
Limpie el tambor
Advertencia! No limpie el inox del tambor con un detergente abrasi-
vo o conun estropajo metálico.
Limpie la parte interior del tambor así como las aletas del cestocon un
detergente estándar (puede ser con una solución de vinagre).
Limpie el panel y los pulsadores
Advertencia! No utilice productos que sirven para hacer los muebles-
brillantes o detergentes abrasivos.
Limpie el panel y los pulsadores sólo con un trapo húmedo. Utilice
sólo agua caliente.
A
U
T
O
R
E
V
E
R
S
E
k
g
5
k
g
2
,
5
8
0
0
/
9
0
0
7
0
'
-
9
0
'
3
5
'
-
5
0
'
1
0
0
0
/
1
2
0
0
6
5
'
-
8
5
'
3
0
'
-
4
5
'
8
0
0
/
9
0
0
8
0
'
-
1
0
0
'
5
5
'
-
7
0
'
1
0
0
0
/
1
2
0
0
7
5
'
-
9
5
'
5
0
'
-
6
5
'
6
5
0
5
0
'
-
6
0
'
3
0
'
-
3
5
'
k
g
2
,5
kg
1
P1112
24
Mantenimiento
125981401.qxp 2006-02-01 11:29 Page 24

Anomalías de fucionamiento?
En caso de avería, intente remediar el problema usted mismo aplicando
los consejos aquí especificados. En caso de solicitar el auxilio del servi-
cio técnico al producirse algunas de las anomalías aquí señaladas o para
corregir un fallo de manejo, recuerde que tal servicio no será gratuito
ni siquiera durante el período de garantía de la secadora.
Problema Causa probable
Remedio
La secadora no
funciona
La clavija está desenchufada Enchufe la clavija
La tecla de arranque INICIO/PAUSA
no ha sido pulsada.
La tecla de arranque INICIO/PAUSA
pulsada.
No se ha seleccionado ningún pro-
grama
Seleccione un program
La puerta está abierta Cierre la puerta
Están averiados el fusible o el inter-
ruptor por corriente de defecto
en la caja de fusibles (insta-
lación doméstica)
Inspeccione el fusible o el interruptor
por corriente de defecto en la caja de
fusibles. Las averías de la instalación
doméstica las arreglará su electricista.
Se ha seleccionado la opción
INICIO/DIFERIDO.
la opción
INICIO/DIFERIDO convertir.
El secado no es sa-
tisfactorio
Ha seleccionado un programa
inadecuado
Seleccione otro pro-grama (temporiza-
dor) en la próxima sesión de secado
Está atascado el filtro para pelusas Limpie el filtro para pelusas
La ropa no está suficientemente
escurrida
Centrifugue o escurra la ropa sufi-
cientemente antes del secado
La cantidad de ropa es inadecuada
Aténgase a las cantidades especifica-
dasy
Una capa adherente cubre la super-
ficie interior o las aletas del tambor
Limpie la capa que cubre la superficie
interior o las aletas del tambo
25
Anomalías de fucionamiento?
125981401.qxp 2006-02-01 11:29 Page 25

Si estas instrucciones de uso no le ofrecen ninguna indicación para
remediar una avería detectada, comuníquese por favor con el servicio
posventa.
Problema Causa probable
Remedio
El ciclo de secado
dura más de lo usual
La circulación de aire de salida
está obstruida
Enderece la manguera de salida de
aire y/o limpie los conductos por los
que circula
Está atascado el filtro para pelusas Limpie el filtro para pelusas
No se puede cerrar
la puerta de
admisión de ropa
El filtro de pelusa no está en su
sitio y/o no ha encajado la tapa del
filtro
Coloque el filtro de pelusa y/o haga
encajar la tapa del filtro
La secadora suspende
automáticamente el
ciclo de secado: el
display FIN se encien-
de por un momento a
los pocos instantes de
arrancar el programa.
Hay muy poca ropa en el tambor o
la ropa está demasiado seca para el
programa elegido.
Seleccionar un programa temporiza-
dor o un grado más alto de secado
(por ejemplo EXTRA SECO en vez de
SECO PARA GUARDAR)
El ciclo de secado
dura más de lo
habitual. 4,5horas
después de empezar
el ciclo de secado: -
se enciende la indi-
cación FIN - suena
la senal acústica -
se cancela el ciclo de
secado- la indi-
cación de desarrollo
del programa
parpadea
Está oprimida la tecla REDUCCION
TEMP. y la carga del tambor es excesiva
Revisar la selección programada: la
tecla REDUCCION TEMP. es oportuno
sólo para cargas máximas de 3kg
Demasiada ropa en la secadora. Reducir la carga de ropa
La ropa está demasiado húmeda Centrifugar la ropa más intensamente
26
Anomalías de fucionamiento?
125981401.qxp 2006-02-01 11:29 Page 26

Características técnicas
Altura x AnchuraxProfundidad 85x60x57 cm
Profundidad con puerta abierta 107 cm
Altura arreglo 6 mm
Peso neto ca. 32 kg
Capacidad de carga maxima: max. 6 kg
De carga Doméstico
La temperatura ambiente no debe superar +5°C bis +35°C
Este aparato es conforme a las siguientes normas CEE:
- 73/23/CEE del 19/02/73 (norma sobre la baja tensión) y sucesivasmo-
dificaciones;
- 89/336/CEE del 03/05/89 (norma sobre la compatibilidad electroma-
gnética) y sucesivas modificaciones
Conexión eléctrica
El aparato funciona con una tensión de 220- 230 V, monofásica,
50 Hz. Controle que el equipo eléctrico doméstico pueda soportar la
carga máxima requerida (2.6 kW) considerando también los otros even
tuales electrodomésticos en funcionamiento. Conecte el aparato a una
toma de tierra, en conformidad con las normas en vigor.
El productor no se asume la responsabilidad por daños causados
apersonas o cosas debidos al no respeto de las precauciones sobre
la seguridad antes mencionadas
Estas informaciones figuran en la tarjeta matrícula
27
Características técnicas
125981401.qxp 2006-02-01 11:29 Page 27

Desembalaje
Antes de usar el aparato la primera vez extraiga la bosa de
politenocon el relleno de poliestireno. Retire la cinta adhesiva en
del interior en el lado superior del tambor.
Accesorios especiales
A través del servicio posventa de AEG o de su concesionario puede
usted ordenar los siguientes accesorios especiales:
Kit de montaje sobre la lavadora
En las tiendas de los revendedores autorizados hay a disposición un
kit para poder instalar la secadora sobre una lavadora con carga fron-
tal y una profundidad do plano de trabajo entre 48 y 60 cm. Las
instrucciones de instalación se suministran con el kit. Le rogamos las
lea atentamente antes de instalar el aparato.
Reversibilidad de la puerta
Para facilitar la carga o la descarga de la ropa, se puede modificar el
sentido de abertura de la puerta.
Esta operación debe ser efectuada por personal especializado.
Diríjase al centro de asistencia técnica más cercano a su domicilio.
P1107
P1106
28
Desembalaje/Accesorios especiales/Reversibilidad de la puerta
125981401.qxp 2006-02-01 11:30 Page 28

Servicio
En el capítulo "?Algo no funciona?", podrá encontrar una serie de pro-
blemas que no puede Usted solucionar por sí mismo. Lea esta parte
encaso de que se presente un problema.
Si no puede Usted encontrar una solución a su problema, tome contac-
to con su Centro de Servicio que se encuentra muy cerca y, si es
necesario, un especialista muy pronto llegará para ayudarle (las direc-
ciones y los números de teléfono están apuntados en el formulario
adjunto).
En todo caso, prepare bien lo que va a decir antes de llamar para evitar
problemas.
El especialista podrá decidir si es realmente necesario ir a su casa para
ayudarle Apunte el número de serie (Ser. No.) y el número de producto
(Prod. No.)indicados en la plataforma informativa.
Prod. No. . . . . . . . . . . . . . . . . . . . . . .
Ser. No. . . . . . . . . . . . . . . . . . . . . . . . .
Intente ser lo más preciso posible:
• Los síntomas de la avería.
• El momento en que ocurrió la avería.
En qué casos tiene Usted que pagar aun durante el período de garantía?
- cuando hubiera Usted podido solucionar el problema por sí mismoy
con la ayuda del folleto relativo a los problemas (vea la parte"?Algo
no funciona?)
- cuando el especialista tiene que ir a su casa varias veces, debido al
hecho de que no le ha dado Usted todas las informaciones que él
necesitaba, por ejemplo, el especialista tiene que traer varias piezas de
recambio o de repuesto. Puede Usted evitar esas idas y vueltas si pre-
para correctamente y precisa mente para el Centro de Servicio lasin-
formaciones sobre las que indicamos antes.
IPX4
Mod. xxxxxx Type xxxxxxx
Prod.No. xxxxxxxxx xx
xxx-xxxV~xxHz xxxxW xx A
Ser.No.
29
Servicio
125981401.qxp 2006-02-01 11:30 Page 29

30
Dear customer,
Please read these operating instructions carefully and pay particular
attention to the safety notes indicated in the first pages. We recom-
mend that you keep this instruction booklet for future reference and
pass it on to any future owners.
The warning triangle and/or the key words (Warning!, Caution!) emphasi-
ze information that is particularly important for your safety or correct
functioning of the appliance.
This symbol guides you, step by step, in the operation of the appliance.
The information marked with this symbol provides additional instruc-
tions and practical tips on the use of the appliance.
Tips and information about economical and ecological use of the
machine are marked with the clover symbol.
Should any problems arise, this booklet provides instructions on how to
solve them by yourself; see section “Something not working?”.
If this information is not sufficient, please contact our nearest Service
centre (address and telephone numbers are indicated on the enclosed
leaflet).
Printed on recycled paper.
People who think ecologically, act accordingly...
125981401.qxp 2006-02-01 11:30 Page 30

31
Contents
Safety instructions. . . . . . . . . . . . . . . . . . . . . . . . . . . . . . . . . . . . . . . . . . . 32-34
General instructions . . . . . . . . . . . . . . . . . . . . . . . . . . . . . . . . . . . . . . . . . . . . 34
Discarding . . . . . . . . . . . . . . . . . . . . . . . . . . . . . . . . . . . . . . . . . . . . . . . . . . . . . 35
Tips for environmental protection . . . . . . . . . . . . . . . . . . . . . . . . . . . . . 36-37
Structure of the appliance . . . . . . . . . . . . . . . . . . . . . . . . . . . . . . . . . . . . . 38-44
Front view . . . . . . . . . . . . . . . . . . . . . . . . . . . . . . . . . . . . . . . . . . . . . . . . . . . . . . 38
Rear view . . . . . . . . . . . . . . . . . . . . . . . . . . . . . . . . . . . . . . . . . . . . . . . . . . . . . . . 38
Control panel . . . . . . . . . . . . . . . . . . . . . . . . . . . . . . . . . . . . . . . . . . . . . . . . . 39-44
Brief operating instructions . . . . . . . . . . . . . . . . . . . . . . . . . . . . . . . . . . . . . . . 44
Drying. . . . . . . . . . . . . . . . . . . . . . . . . . . . . . . . . . . . . . . . . . . . . . . . . . . . . . . 45-47
Before the first drying cycle . . . . . . . . . . . . . . . . . . . . . . . . . . . . . . . . . . . . . . . 45
Sort out the laundry . . . . . . . . . . . . . . . . . . . . . . . . . . . . . . . . . . . . . . . . . . . . . . 45
Open the door . . . . . . . . . . . . . . . . . . . . . . . . . . . . . . . . . . . . . . . . . . . . . . . . . . . 45
Load the laundry . . . . . . . . . . . . . . . . . . . . . . . . . . . . . . . . . . . . . . . . . . . . . . . . . 45
Switch the machine on, Select the drying programme/time . . . . . . . . . . . . . 46
Start the machine . . . . . . . . . . . . . . . . . . . . . . . . . . . . . . . . . . . . . . . . . . . . . . . . 46
Remove or add laundry . . . . . . . . . . . . . . . . . . . . . . . . . . . . . . . . . . . . . . . . . . . 46
End of drying cycle . . . . . . . . . . . . . . . . . . . . . . . . . . . . . . . . . . . . . . . . . . . . . . . 47
Switch the tumble dryer off . . . . . . . . . . . . . . . . . . . . . . . . . . . . . . . . . . . . . . . 47
Clean the filters. . . . . . . . . . . . . . . . . . . . . . . . . . . . . . . . . . . . . . . . . . . . . . . . . . 47
Adjusting the level of conductivity. . . . . . . . . . . . . . . . . . . . . . . . . . . . . . . . . 48
Programme charts . . . . . . . . . . . . . . . . . . . . . . . . . . . . . . . . . . . . . . . . . . . . . . . 49
Hints & tips on drying . . . . . . . . . . . . . . . . . . . . . . . . . . . . . . . . . . . . . . . . . . . 50
Care symbols . . . . . . . . . . . . . . . . . . . . . . . . . . . . . . . . . . . . . . . . . . . . . . . . . . . . 50
Cleaning and care . . . . . . . . . . . . . . . . . . . . . . . . . . . . . . . . . . . . . . . . . . . . 51-52
External cleaning. . . . . . . . . . . . . . . . . . . . . . . . . . . . . . . . . . . . . . . . . . . . . . . . . 51
Cleaning the door . . . . . . . . . . . . . . . . . . . . . . . . . . . . . . . . . . . . . . . . . . . . . . . . 51
Cleaning the filters . . . . . . . . . . . . . . . . . . . . . . . . . . . . . . . . . . . . . . . . . . . . 51-52
Cleaning the drum . . . . . . . . . . . . . . . . . . . . . . . . . . . . . . . . . . . . . . . . . . . . . . . 52
Cleaning the panel and the controls . . . . . . . . . . . . . . . . . . . . . . . . . . . . . . . . 52
Something not working? . . . . . . . . . . . . . . . . . . . . . . . . . . . . . . . . . . . . . . 53-54
Technical specifications . . . . . . . . . . . . . . . . . . . . . . . . . . . . . . . . . . . . . . . . . . 55
Electrical connection . . . . . . . . . . . . . . . . . . . . . . . . . . . . . . . . . . . . . . . . . . . . . 55
Unpacking . . . . . . . . . . . . . . . . . . . . . . . . . . . . . . . . . . . . . . . . . . . . . . . . . . . . . . 56
Special accessory . . . . . . . . . . . . . . . . . . . . . . . . . . . . . . . . . . . . . . . . . . . . . . . . 56
Kit washing/drying column . . . . . . . . . . . . . . . . . . . . . . . . . . . . . . . . . . . . . . . . 56
Door reversal . . . . . . . . . . . . . . . . . . . . . . . . . . . . . . . . . . . . . . . . . . . . . . . . . . . . 56
Service . . . . . . . . . . . . . . . . . . . . . . . . . . . . . . . . . . . . . . . . . . . . . . . . . . . . . . . . . 57
125981401.qxp 2006-02-01 11:30 Page 31

32
Safety instructions
Safety instructions
It is most important that this instruction book should be retained with
the appliance for future reference. Should the appliance be sold or
transferred to another owner, or should you move house and leave the
appliance, always ensure that the book is supplied with the appliance in
order that the new owner can get to know the functioning of the appli-
ance and the relevant warnings.
The safety of AEG appliances complies with the industry standards and
with legal requirements on the safety of appliances. However, as manu-
facturers, we feel it is our duty to provide the following safety notes.
You MUST read them carefully before installing or using the appliance.
General safety
• Under no circumstances should you attempt to repair the machine
yourself. Repairs carried out by inexperienced persons may cause
injury or serious malfunctioning. Contact your local Service Force
Centre or your AEG dealer. Always insist on genuine AEG spare parts.
• Before starting the appliance check that the rated voltage and the
type of current indicated on the rating plate correspond to those
which exist where the dryer is installed. The type of fuse is also indi-
cated on the rating plate.
• Never start the appliance if the electrical supply cable is damaged or
the control panel or worktop are so damaged that inner components
can be reached.
• Risk of fire: items that have been spotted or soaked with vegetable or
cooking oil constitute a fire hazard and should not be placed in the
tumble dryer
• If you have washed your laundry with stain remover you must execu-
te an extra rinse cycle before loading your tumble dryer.
• Unplug the appliance before carrying out any cleaning or mainten-
ance operations.
• Never pull the power supply cable to remove the plug from the
socket; always take hold of the plug itself.
• Do not lean on the open door, the appliance could turn over.
• Never spray the machine with a jet of water. Danger of electric shock!
• If the drying programme is interrupted in order to remove the laun-
dry: the laundry and the drum could be very hot.
125981401.qxp 2006-02-01 11:30 Page 32

Child safety
• Children are often not aware of how dangerous electrical appliances
can be. When the machine is working, they should be carefully super-
vised and not be allowed to play with the appliance - there is a risk
that they could become trapped inside.
• The packaging components (e.g. plastic film, polystyrene) can be dan-
gerous to children - danger of suffocation! Keep them out of child-
ren’s reach.
• Make sure that children or pets do not climb into the drum.
Positioning and connection
• Follow the separate instructions for positioning and connection.
• Check that the appliance has not been damaged during transport.
Never connect a damaged appliance! If this is the case, contact your
dealer.
• The dryer must not be installed in a room where the temperature can
fall below zero or is higher than + 35°C.
• The dryer must be levelled.
• The dryer must not be positioned on a thick pile carpet as this would
prevent air from circulating freely through the ventilation slots.
• If the appliance is installed near a gas, coal or electric heater, an insu-
lating non-inflammable panel must be inserted between the dryer
and the heater (size: 85x57.5 cm).
• The plug of the dryer must always be accessible.
• The dryer’s exhaust must not be fed into a cooker hood, or a chimney
or flue pipe designed to carry the exhaust from a fuel burning appli-
ance.
• Ensure the room is well ventilated.
• A permanent connection to the mains power supply can only be car-
ried out by a qualified electrician.
33
Safety instructions
125981401.qxp 2006-02-01 11:30 Page 33

Proper use
• For safety reasons, the appliance must not be modified.
• This appliance is designed for domestic use only. If the dryer is used
for any other purposes or is not used correctly, the manufacturer
accepts no responsibility for any possible damage that might occur.
• Dry only items that have been washed with water. Never dry items
that have been in contact with inflammable solvents (petrol, methy-
lated spirits, dry cleaning fluid and the like). These are of a volatile
nature and could cause an explosion or a fire.
• Items containing rubber foam or materials similar to rubber foam
must not be dried in the appliance. Fire danger!
General instructions
• Starched fabrics leave traces of starch in the drum, therefore they
should not be dried in the appliance.
• If the load to be dried exceeds the maximum weight indicated, crea-
sing may occur. For particularly delicate fabrics, the maximum load
should not exceed 1.5 kg.
• For your information: 70 per cent of fabric wear is caused by wearing the gar-
ments, 20 percent by washing and only 10 percent by drying them in a tumble
dryer. In your appliance, fluff accumulates in the filter. Only 0.03g fluff per Kilo
will be lost by your laundry when being machine dried.
34
Safety instructions
125981401.qxp 2006-02-01 11:30 Page 34

Discarding
Packaging materials
Dispose of your tumble dryer’s packaging materials correctly. All materials are
environmentally friendly and can be disposed of without any danger.
The plastic parts can be reused:
• The external plastic cover and the bags inside are made of polyethylene (>PE<).
• The padding is made of CFC free polystyrene foam (>PS<=).
Cartons are made of recycled paper and should be disposed of in paper
collection containers.
Appliance
Warning! When the appliance is disposed of, pull the plug out of the
socket, cut off the electrical supply cable and destroy the plug with the
remaining cable. Disable the door catch in order to prevent children
from becoming trapped inside while playing.
Use an authorised disposal site for your old appliance.
The symbol on the product or on its packaging indicates that this product
may not be treated as household waste. Instead it shall be handed over to the
applicable collection point for the recycling of electrical and electronic equip-
ment. By ensuring this product is disposed of correctly, you will help prevent
potential negative consequences for the environment and human health, which
could otherwise be caused by inappropriate waste handling of this product. For
more detailed information about recycling of this product, please contact your
local city office, your household waste disposal service or the shop where you
purchased the product.
35
Discarding
125981401.qxp 2006-02-01 11:30 Page 35

Tips for environmental protection
• During washing, try not to use fabric softeners!
If the laundry is machine dried, it will remain soft even without using
fabric softeners.
• Shake out your laundry!
Shake out the laundry before putting it into the dryer in order to
reduce the drying time and creasing.
• Spin the laundry properly before drying it!
As a general rule, the more the laundry is spun, the more economi-
cally your dryer works.
In the following table, indications on consumption are provided,
according to the spin speed. The data refers to 6 kg of laundry that
have to be store dried.
• Please observe the full load specifications!
The machine works more economically if it is fully loaded, as indica-
ted in the programme charts.
• Select the correct drying programme!
Select the drying programme suited to the type and quantity of laun-
dry, so that your dryer will work more economically. Some consump-
tion values:
Spinning: Drying cycle:
Revolutions
per minute
Residual dampness
Time required
in minutes
Energy requirement
kWh
in
litres
in
%
1000 3,6 60 97 3,3
1200 3,2 53 80 3,2
1400 3,0 50 75 3,0
1800 2,5 42 65 2,4
36
Tips for environmental protection
125981401.qxp 2006-02-01 11:30 Page 36

1) previously spun at 1000 rpm
2) previously spun at 1200 rpm.
• The “HALF POWER” function: can only be used for loads up to 3 kg!
• Clean the fluff filter after each drying cycle!
Type of laundry
Desired degree
of dryness
Load in kg
Duration in
minutes
Energy consumpti-
on in kWh
Cotton
1
CUPBOARD DRY 6 97 3,3
Cotton
1
IRON DRY 6 75 2,6
Mixed fabrics
2
CUPBOARD DRY 3 52 1,1
37
Tips for environmental protection
125981401.qxp 2006-02-01 11:30 Page 37

Structure of the appliance
Front view
Rear view
Control panel
Adjustable feet
Fluff filters
Rating plate
Door (opening direction
can be changed)
Drum light
38
Structure of the appliance
125981401.qxp 2006-02-01 11:30 Page 38

Control panel
1 Programme/Time Selector Dial
Allows you to select electronically controlled or time controlled drying.
Turn the dial to the required programme or time.
Electronically controlled drying (automatic)
The appliance runs these programmes with the help of probes which
detect the degree of dampness of the laundry.
Simply select the programme according to the type of laundry and
degree of drying required.
Time controlled drying
This can be used to finish off drying if necessary. Select the 90 or 60
minute programme for cottons or the 30 minute programme for syn-
thetics.
To cancel a programme which is running, turn the programme selec-
tor dial to OFF.
At the end of drying, turn the selector dial to OFF to switch the
machine off before removing the laundry.
2 START/PAUSE button
Press this button to start the dryer after having selected the pro-
gramme and the options.
The relevant light will stop flashing. If you have chosen a
delayed start, the machine will begin the countdown.
39
Structure of the appliance
125981401.qxp 2006-02-01 11:30 Page 39

If the door of the appliance or the small door at the bottom is
opened while the programme is running, this button must be
pressed again after closing the door in order to restart the pro-
gramme from the point at which it was interrupted.
This button must also be depressed after a power failure.
In both cases the light of the START/PAUSE button flashes to remind
you that the start button needs to be pressed again.
3 DELAY START.” button
This button allows you to delay the starting of the programme by 12
hours max.
This option must be selected after having selected the programme
and before pressing START/PAUSE to start the programme.
Every time the button is pressed, the time is increased by 30 min-
utes, until the display shows a delay of “2 hours”. After this, the
delay is displayed hour by hour.
The minutes or hours of delay that have been selected are displayed
for 2 seconds, then the display shows the duration of the previously
selected programme.
The countdown begins after you have pressed the
START/PAUSE button.
To cancel the delay time press the START/PAUSE-button and
after press the DELAY START button until the display indicates
00
h. Then press the START/PAUSE button again.
When the delay is cancelled, the display shows
00
h and after the dura-
tion of the programme.
During the delayed start, it is not possible to change the programme
or the delay time that have been selected. To do this, you must first
switch off the machine by setting the programme selector dial to
OFF. Select the new programme, the options and the delayed start,
then press the START/PAUSE button.
During the delayed start, to cancel or change functions that have
been selected, simply set the appliance to PAUSE. Once you perform
the desired operation, press once again the START/PAUSE
button.
If you wish to add more laundry while the machine is performing
the countdown, simply open the door. When you close the door,
press the START/PAUSE button again to cause the countdown to be
resumed.
40
Structure of the appliance
125981401.qxp 2006-02-01 11:30 Page 40

4 HALF POWER button
Pressing this button allows drying to be performed at a lower tem-
perature, for delicate items.
The corresponding pilot light comes on.
This option can also be used for time controlled drying.
This option cannot be selected with “KORT/COURT”.
5 QUICK button
By depressing this button the drying time is reduced in the follo-
wing cotton programmes:
• EXTRA DRY
• CUPBOARD DRY
• STORE DRY
The corresponding pilot light comes on.
This option cannot be selected with HALF POWER function.
6 BUZZER button
A buzzer sounds
• when selecting the programme
• when depressing the buttons
• when an incorrect option selection is made
• when the programme selector dial is turned to another position
during the programme or when you depress an option button
during the cycle
• at the end of the programme and during the anticrease phase
• if the machine is not working correctly
By depressing the button the acoustic signal is switched on.
7 DOOR button
Press this button to open the door. The light above the button will light up.
Opening the door by means of this button is possible only if the
tumble dryer is on (programme selector dial set to a programme
or drying time).
If you open the door during a programme, in order to restart the
programme you must press the “START/PAUSE” button again after
having closed the door.
8 Display
The display shows the following information:
• duration of selected programme
• delayed start
• end of programme
• incorrect option selection
• alarm code
41
Structure of the appliance
125981401.qxp 2006-02-01 11:30 Page 41

Duration of selected programme
After you have selected the programme, its duration (in hours and
minutes) appears on the display. It is calculated automatically on
the basis of the maximum load accepted for each type of fabric and
of the required degree of drying.
When the programme starts, the remaining time is displayed every 5
minutes.
Delayed start
If you have selected a delay time by means of the relevant button,
the display shows it for 2 seconds;then it shows the duration of the
previously selected programme.
The countdown is displayed every 30 minutes until it displays “90
minutes” and then hour by hour.
End of programme
A flashing zero indicates the end of the programme and it is dis-
played after the “anticreasing” phase.
3
1.20
42
Structure of the appliance
125981401.qxp 2006-02-01 11:30 Page 42

Incorrect option selection
If you select an option that is not compatible with the programme
you have selected, the display shows
EErrrr
(error)
This code will reappear during the execution of the programme if
you press one of the option buttons or turn the programme selector.
Alarm code
In the case of a functional problem, the display shows an alarm
code (e.g.
EE2211
).
E21
0
43
Structure of the appliance
125981401.qxp 2006-02-01 11:30 Page 43

9 INDICATOR LIGHTS
These lights indicate the following functions:
• DRYING light.
This light indicates that the appliance is in the drying phase.
• COOLING light.
This light indicates that the appliance is in the cooling phase. At the
end of drying, there is a 10 minute cooling phase to cool the laundry.
• END light.
This light is on at the end of the cooling phase, during the anti-
creasing phase and at the end of the programme.
• FILTER light.
This light illuminates at the end of the programme to remind you
that the filters must be cleaned.
Brief operating instructions
• Spin the laundry as much as possible.
• Sort out the laundry.
• Put the laundry into the tumble dryer.
• Switch the machine on by selecting the drying programme/time.
• If necessary, press the ALARM OFF and/or QUICK and/or
HALF POWER (This option cannot be selected with QUICK func-
tion) and/or DELAY START button.
• Press the START/PAUSE for about 2 seconds to start the dryer.
When the programme is in progress, the door can be opened in order
to remove laundry or to add other items.
At the end of the programme:
• Switch off the tumble dryer.
• Remove the laundry.
• Clean the fluff filters.
44
Structure of the appliance; Brief operating instructions
125981401.qxp 2006-02-01 11:30 Page 44

Drying
Before the first drying cycle
Before using your tumble dryer for the first time, we recommend to
place a few damp cloths inside the appliance and dry for 30 minutes.
There may be dust inside a brand new tumble dryer.
Sort out the laundry
• To prevent bundling of laundry: close zips, button up pillow cases and
duvet covers; tie any strings, such as apron strings.
• Empty pockets.
• Remove any metal parts (paper clips, safety pins, etc. ....).
• Turn garments made of double layer fabrics inside out (e. g. turn
anoraks with cotton lining inside out), so that they will dry better.
• Shake out the laundry.
Open the door
• Open the door by presing on the left side as per picture.
Load the laundry
Warning! When closing the door, do not trap any garments! The
fabrics could get damaged. Please check the laundry does not get
caught between the door and filter.
• Put the prepared and shaken out laundry into the dryer.
P1108
P1104
45
Drying
125981401.qxp 2006-02-01 11:30 Page 45

Switch the machine on - select the drying programme/time
• Select the drying programme or time. The lights DRYING,
COOLING and END come on. The light of the
START/PAUSE button flashes and the display shows the durati-
on of the programme.
If required, press the HALF POWER button and/or the
ALARM OFF button or the QUICK button.
Select the DELAY START if required. The selected delay appears on
the display for 2 seconds, then the duration of the selected programme
is displayed.
Start the machine
Press the START/PAUSE button: the corresponding light stops
flashing and drying starts. Only the DRYING light stays lit. If you have
selected the DELAY START, the machine begins its countdown.
The drum turns alternately in both directions during drying.
All drying programmes end with a 10 minute cooling phase (light
COOLING is on).
The END and FILTER lights illuminate. The display shows a static zero
and the buzzer sounds to indicate the end of the cycle.
You may remove the laundry after this phase.
Remove or add laundry
It is possible to interrupt the drying cycle at any time in order to
remove or add laundry.
Open the door.
Caution! Laundry and drum can be hot.
Remove or add laundry.
Close the door and press START/PAUSE button to continue the
drying cycle.
nexxt02
46
Drying
125981401.qxp 2006-02-01 11:30 Page 46

End of drying cycle
If the laundry is not removed at the end of the cycle, the dryer per-
forms an anti-creasing phase (duration: 30 minutes maximum).
If you do not remove the laundry, the dryer will stop automatically at
the end of the anti-creasing phase.
The FIN and FILTER lights remain lit and the buzzer sounds for
2 minutes.
The light of the START/PAUSE button goes off and a flashing
zero appears on the display.
Switch the tumble dryer off
Turn the programme selector dial to OFF; all the lights go out. The
appliance is switched off.
Remove the laundry.
If you open and then close the door before turning the program-
me selector dial to OFF, all the lights corresponding to the pha-
ses making up the performed programme come on and the display
shows the duration of the programme.
Important!
If the drying programme has to be stopped before it reaches the
end, we recommend that you turn the programme selector dial to
position COOLING and wait until the end of this phase before
removing the laundry. This will avoid a build-up of heat inside the
appliance. To do this first turn the dial to OFF and then to
COOLING and depress START/PAUSE button.
Clean the filters
To ensure free circulation of air during the drying cycle, the fluff fil-
ters must be cleaned after each drying cycle, before removing the
laundry.
47
Drying
125981401.qxp 2006-02-01 11:30 Page 47

Adjusting the level of conductivity
Water contains, a variable quantity of limestone and mineral salts of
which quantities vary according to geographical locations thus vary-
ing its conductivity values.
Relevant variations of the conductivity of the water compared to
those prefixed by the factory could slightly influence the residual
humidity of the laundry at the end of the cycle.
Your dryer allows you to regulate the sensitivity of the drying sensor based on
conductivity values of the water by using the following procedure.
Procedure:
Turn the programme selector dial to switch on the appliance
In selection mode press simultaneously the buttons 3 and 6 until «
CC00
»
appears on the digits.
Adjusting the level of conductivity:
Press the button 5 sequentially: the level of conductivity is indicated
by the lighting of the horizontal hyphens.
Normally, the appliance is factory-set to the highest level; howe-
ver, certain models may be configured differently.
Memorizing the new setting:
Simultaneously press down the buttons 3 and 6 until the previous
drying cycle time appears again on the display and the buzzer sounds.
DISPLAY
Conductivity degree
Approximative value
µS/cm (25°C)
CC00
--
Low < 300
CC00 --
Medium 300 - 600
CC00 --
High > 600
48
Adjusting the level of conductivity
125981401.qxp 2006-02-01 11:30 Page 48

Programme Chart
Automatic drying (electronic programmes)
(*) According to CEI 1121 Standards.
• Dry fresh is designed to clean and freshen garments labelled “dry clean
only” at home, in your tumble dryer, using the special product available on
the market.
Time controlled drying
(1) Never overfill the drum (do not load large quilts, for example).
Programm “COOLING”
This position on the programme selector dial can be used to freshen the laundry (e.g. to
remove a persistent odour of moth-balls).
Load
It is often difficult to estimate the weight of items to be dried. We therefore recommend that
you adopt the following guidelines:
• cotton, linen: drum full but not too tightly packed;
• synthetics: drum no more than half full;
• delicate fabrics: drum no more than one third full.
Type of laundry
Drying time
Max-load
(1)
Programme
selector dial position
COTTON 90 min
6 kg 90 MIN
COTTON 60 min
6 kg 60 MIN
SYNTHETICS 30 min
3 kg 30 MIN
49
Programme Chart
Type of laundry Programme
Max-load
(1)
Programme
COTTON
extra dry
6 kg
store dry
6 kg
cupboard dry
6 kg (*)
slightly damp
6 kg
iron dry
6 kg (*)
machine iron dry
6 kg
SYNTHETICS
extra dry
3 kg
cupboard dry
3 kg (*)
iron dry
3 kg
Jackets, shirts
easy iron
1 kg
Jackets, trousers,
dresses, skirts.
dry fresh
1 - 4 garments
125981401.qxp 2006-02-01 11:31 Page 49

Hints & Tips on Drying
Care symbols
Before placing articles of laundry in your tumble dryer, check the care
labels to ensure they are recommended for tumble drying.
Basically, this fabric can be tumble dried; however the manufacturer does not
specify whether it can be dried with normal or low temperature.
Normal drying (normal temperature)
Gentle drying (low temperature)
Do not tumble dry
If none of these symbols is found:
Dry cottons, as well as mixed fabrics, at normal temperature. Press the
HALF POWER button when delicate cottons have to be dried.
It is advisable to take into consideration the care symbols on garment
labels when buying them.
• Wool, eiderdowns
Do not dry any woollen items in the tumble dryer! They can felt!
Eiderdowns can be tumble dried only if the corresponding care sym-
bol is present.
• Fabrics sensitive to high temperatures
Dry fabrics sensitive to high temperatures (such as acrylic or viscose)
and items bearing the care symbol using a synthetic drying pro-
grammes.
• Tricot garments, knitwear
Tricot garments and knitwear tend to shrink.
Do not overdry these items. High quality products are less likely to
shrink.
• New coloured fabrics
Do not dry new coloured fabrics with light-coloured laundry. This
could lead to discoloration!
50
Hints & Tips on drying
125981401.qxp 2006-02-01 11:31 Page 50

Cleaning and care
Warning! You must disconnect the appliance from the electricity supply,
before you can carry out any cleaning or maintenance work.
External cleaning
Use only soap and water and then dry thoroughly.
Important: do not use methylated spirit, diluents or similar products.
Cleaning the door
Clean periodically the interior part of the door to remove any fluff from
the seals around the filter.
Regular cleaning ensures correct drying.
Cleaning the filters
Your dryer will only function well if the filters are clean.
The filters collect all the fluff which accumulates during drying and
they must therefore be cleaned at the end of each programme, before
removing the laundry, with a damp cloth.
The filter in the inner door must be removed for cleaning.
Do not be alarmed by the amount of fluff. It is not due to excessive
wear caused by the dryer. All fabric looses fluff when drying but it
A
U
T
O
R
E
V
E
R
S
E
kg
5
k
g
2
,5
8
0
0
/
9
0
0
7
0
'
-
9
0
'
3
5
'
-
5
0
'
1
0
0
0
/
1
2
0
0
6
5
'
-
8
5
'
3
0
'
-
4
5
'
8
0
0
/
9
0
0
8
0
' -
1
0
0
'
5
5
'
-
7
0
'
1
0
0
0
/
1
2
0
0
7
5
'
-
9
5
'
5
0
'
-
6
5
'
6
5
0
5
0
'
-
6
0
'
3
0
'
-
3
5
'
k
g
2
,5
k
g
1
P1111
P1110
A
U
T
O
R
E
V
E
R
S
E
kg
5
k
g
2
,
5
8
0
0
/
9
0
0
7
0
'
-
9
0
'
3
5
'
-
5
0
'
1
0
0
0
/
1
2
0
0
6
5
'
-
8
5
'
3
0
'
-
4
5
'
8
0
0
/
9
0
0
8
0
'
-
1
0
0
'
5
5
'
-
7
0
'
1
0
0
0
/
1
2
0
0
7
5
'
-
9
5
'
5
0
'
-
6
5
'
6
5
0
5
0
'
-
6
0
'
3
0
'
-
3
5
'
k
g
2
,
5
k
g
1
P1109
51
Cleaning and care
125981401.qxp 2006-02-01 11:31 Page 51

goes un-noticed in the air. In a tumble dryer it simply collects in the
filter.
If necessary the filters can be cleaned under running water using a brush. In
this case, remove the filter in the door opening as per picture (it can be posi-
tioned with the tongue facing to the left or to the right).
Cleaning the drum
Warning! Do not clean the stainless steel drum with abrasive detergent
or steel wool.
Wipe the inside of the drum and the drum paddles with a standard hou-
sehold detergent (e.g. vinegar solution).
Cleaning the panel and the controls
Warning! Do not use household furniture polish or abrasive detergents.
Wipe the panel and the controls with a damp cloth only. Use only warm
water.
A
U
T
O
R
E
V
E
R
S
E
k
g
5
k
g
2
,5
8
0
0
/
9
0
0
7
0
'
-
9
0
'
3
5
'
-
5
0
'
1
0
0
0
/
1
2
0
0
6
5
'
-
8
5
'
3
0
'
-
4
5
'
8
0
0
/
9
0
0
8
0
'
-
1
0
0
'
5
5
'
-
7
0
'
1
0
0
0
/
1
2
0
0
7
5
'
-
9
5
'
5
0
'
-
6
5
'
6
5
0
5
0
'
-
6
0
'
3
0
'
-
3
5
'
k
g
2
,5
k
g
1
P1112
52
Cleaning and care
125981401.qxp 2006-02-01 11:31 Page 52

Something not working?
If a problem occurs, you can try to solve it yourself following the
instructions below. If you call out an engineer when one of the follo-
wing problems occurs, or to repair a fault due to incorrect use, the call-
out will be charged even if requested within the guarantee period.
Problem Possible cause
Remedy
The drier is not working
properly
Mains plug disconnected Plug in mains plug
The START/PAUSE button has not
been depressed.
press START/PAUSE button
No programme selected Select programme
Loading door open Close loading door
Fuse or residual current circuit
breaker in fuse box (domestic
installation) faulty
Check fuse or residual current circuit
breaker. Faults can be eliminated by
an electrical engineer
The drying results
are not satisfactory
Wrong programme selected
Select another (time) programme for
the next drying cycle
Lint filter blocked Clean lint filter
Wrong filling quantity Observe recommended filling quantity
Laundry not sufficiently dried Pre-dry laundry sufficiently
Deposit on the drum inner surface-
or on the drum ribs
Clean drum inner surface and drum
ribs
53
Something not working?
125981401.qxp 2006-02-01 11:31 Page 53

If these operating instructions do not offer sufficient advice to elimi-
nate a specific fault, please contact our customer service.
Problem Possible cause
Remedy
The drying cycle
exceptionally takes a
long time
Vented air transport disrupted
Straighten N- air venting hose and/or
clean air venting ducts
Lint filter blocked Clean lint filter
The loading door
cannot be closed
Lint filter not installed and/or filter
lid not locked in position
Install lint filter and/or lock filter lid
in position
The drier ends the
drying cycle automa-
tically: END indicator
is illuminated shortly
after programme
start
Too little or too dry laundry loaded
for selected programme
Select time programme or higher
drying level (for instance EXTRA DRY
instead of CUPBOARD)
The drying cycle
exceptionally takes a
long time. 4,5 hours
after starting the
drying cycle: END
indicator is illumi-
nated - drying cycle
is aborted - pro-
gramme run indica-
tor flashes
HALF POWER - button depressed and
filling quantity too large
Check programme selection: only use
HALF POWER -button for laundry
quantities up to 3 kg. Clean lint filter.
Filling quantity too large Reduce filling quantity
Laundry too wet Pre-dry laundry more thorougly
54
Something not working?
125981401.qxp 2006-02-01 11:31 Page 54

Technical specifications
Height x Width x Depth 85x60x57 cm
Depth with the door open 107 cm
Height adjustment 6 mm
Empty weight ca. 32 kg
Load (according to the programme) max. 6 kg
(Different load sizes in some countries are due to different measuring
methods)
Use Domestic
Permissible ambient temperature +5°C to +35°C
This appliance complies with the following EC directives:
- 73/23/EEC of 19/2/1973 “Low voltage directive”
- 89/336/EEC of 3/5/1989 “EMC directive” including modification
directive 92/31/EEC.
Electrical connection
The manufacturer declines any liability should this safety measure not
be observed.
Specifications concerning the power supply are indicated on the
rating plate. The rated voltage and the type of current stated on the
plate must correspond to those which exist where the dryer is instal-
led. Also refer to the rating plate for the type of fuse required.
Before switching on, make sure the electricity supply voltage is the
same as that indicated on the appliance’s rating plate. (See picture on
page 38).
This machine is designed to operate on a 220-230 V, singlephase, 50
Hz supply. Check that your domestic electrical installation can take the
maximum load required (2.6 kW), also taking into account any other
appliances in use.
Warning! THIS APPLIANCE MUST BE EARTHED.
55
Service
125981401.qxp 2006-02-01 11:31 Page 55

Unpacking
Slide out the polythene bag with the polystyrene stuffing before
using the appliance.
Pull off adhesive strips from inside machine on top of drum.
Special accessory
You can obtain the following special accessory through the AEG
customer service organisation or from your dealer:
Kit Washing/drying column
With this kit you can combine your dryer with any LAVAMAT auto-
matic washing machine to a washing and drying column. The appli-
ances are stacked in space-economising manner in this arrangement,
the washing machine at the bottom and the dryer at the top.
It should be possible to stack your new dryer on top of a front loa-
ding washing machine with cover’s depth between 48 and 60 cm.
Read carefully the instructions supplied with the kit.
Door reversal
To make it easier to load or unload the laundry the door can be
reversed.
This operation must be carried out by qualified personnel.
Please contact the nearest Service Force Centre. This is a chargeable
option.
P1107
P1106
56
Unpacking/ Special accessory/Door reversal
125981401.qxp 2006-02-01 11:31 Page 56

Service
In the chapter “Something not working?” some problems that can be
solved by yourself are listed. Read this section in the event of problems.
If you are not able to find a solution, contact the Service centre. It is
close by and, if necessary, an engineer will soon be with you. (Addres-
ses and telephone numbers are given on the enclosed form).
In all cases, set your speech before calling, in order to facilitate
troubleshooting: the engineer will be able to decide whether a service
visit is necessary.
Take note of the serial number (Ser. No.) and the product number (Prod.
No.) indicated on the rating plate.
Prod. No. . . . . . . . . . . . . . . . . . . . . . .
Ser. No. . . . . . . . . . . . . . . . . . . . . . . . .
Try to specify, as precisely as possible:
• The symptoms of the fault.
• When the fault occurs.
When can a service visit be charged during the guarantee period?
- when it should have been possible to solve the problem by yourself,
with the help of the troubleshooting chart (see section “Something
not working?”)
- when the engineer has to come out several times because he has
not been given all the relevant information he needs and so, for
example, has to fetch spare parts. Repeated trips can be avoided if
you prepare your call to the Service centre as described above.
IPX4
Mod. xxxxxx Type xxxxxxx
Prod.No. xxxxxxxxx xx
xxx-xxxV~xxHz xxxxW xx A
Ser.No.
57
Service
125981401.qxp 2006-02-01 11:31 Page 57

AEG Hausgeräte GmbH
Postfach 1036
D-90327 Nürnberg
http://www.aeg.hausgeraete.de
© Copyright by AEG
125981401
125981401.qxp 2006-02-01 11:31 Page 58
-
 1
1
-
 2
2
-
 3
3
-
 4
4
-
 5
5
-
 6
6
-
 7
7
-
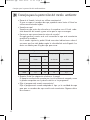 8
8
-
 9
9
-
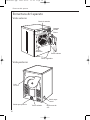 10
10
-
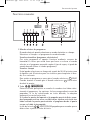 11
11
-
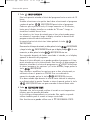 12
12
-
 13
13
-
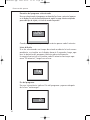 14
14
-
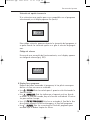 15
15
-
 16
16
-
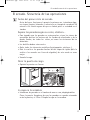 17
17
-
 18
18
-
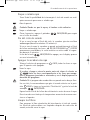 19
19
-
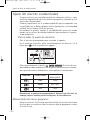 20
20
-
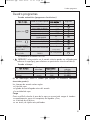 21
21
-
 22
22
-
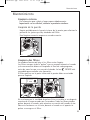 23
23
-
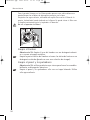 24
24
-
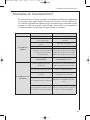 25
25
-
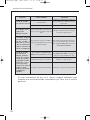 26
26
-
 27
27
-
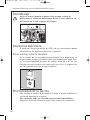 28
28
-
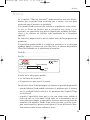 29
29
-
 30
30
-
 31
31
-
 32
32
-
 33
33
-
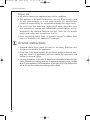 34
34
-
 35
35
-
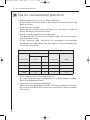 36
36
-
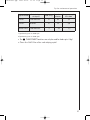 37
37
-
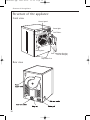 38
38
-
 39
39
-
 40
40
-
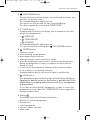 41
41
-
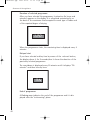 42
42
-
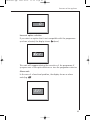 43
43
-
 44
44
-
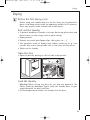 45
45
-
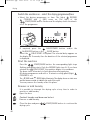 46
46
-
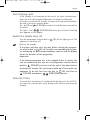 47
47
-
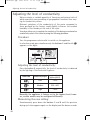 48
48
-
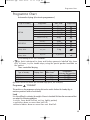 49
49
-
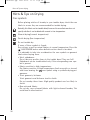 50
50
-
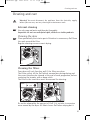 51
51
-
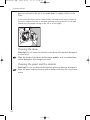 52
52
-
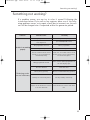 53
53
-
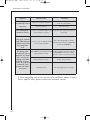 54
54
-
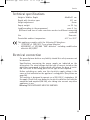 55
55
-
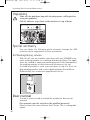 56
56
-
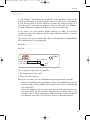 57
57
-
 58
58


AEG Electrolux T37800 Manual de usuario
- Categoría
- Secadoras
- Tipo
- Manual de usuario
en otros idiomas
- English: AEG Electrolux T37800 User manual
Otros documentos
-
Zanussi ZTE255 Manual de usuario
-
Aeg-Electrolux T37840 Manual de usuario
-
-
-
-
Teka TKS1 600 Manual de usuario
-
-
-
Electrolux EDE5310 Manual de usuario
-