Forno FFSEL6012-30 Manual de usuario
- Categoría
- Cocinas
- Tipo
- Manual de usuario

11/2023
Read these instructions carefully before using your appliance, and keep it carefully.
If you follow the instructions, your appliance will provide you with many years of good service.
MODEL NUMBER SERIES
FFSEL6012-30 | FFSEL6012-30BLK | FFSEL6012-30WHT
INSTRUCTION MANUAL
ELECTRIC RANGE
ENGLISH

2
TABLE OF CONTENTS
Customer Care 4
Warning 5
Important Safety 7
Name Of Parts 8
Control Panel 9
Operating Instruction
• Before Use Cooktop..........................................................
• Before Use Oven ............................................................
• Preheating .......................................................................
Oven Modes:
• Bake .........................................................................
• Broil ..........................................................................
Convection Modes:
• Conv. Bake ...............................................................
• Conv. Broil ...............................................................
• Conv. Roast .............................................................
10
11
11
12
13
14
15
15
Range Care
• Cleaning ...........................................................................
• Oven Door Removal .........................................................
• Oven Light Replacement ..................................................
17
18
19
Troubleshooting 20
Warranty 23

3
MODEL NUMBER SERIES
FFSEL6012-30 | FFSEL6012-30BLK | FFSEL6012-30WHT
ELECTRIC RANGE

4
Product Information Servince Information
Model Number:
Use these numbers in any
correspondence or services calls
concerning your product.
If you received a damaged product,
immediately contact Forno.
To save time and money, before
you call for serviced, check the
troubleshooting guide. It listed the
causes of minor operation problems
that you can correct yourself.
Serial Number:
Date of Purchase:
Purchase Address And Phone:
Thank you for purchasing a Frono product. Please read the entire instruction manual before operating your new appliance
practices, features, operation and care recommendations of your appliance.
Both the model and serial number are listed inside the product. For warranty purposes, you will also need the date of
purchase .
Record this information below for future reference.
Customer Care
Services in Canada and Untied States
www.forno.ca.
If you don’t understand something or need more assistance, please visit our website or email: [email protected]
If there is a problem, please contact FORNO customer service. Please note that troubleshooting with a customer service
S/N:FFSEL6012-30/XXXXXXX
Model Number
Serial Number
Model And Serial Number Location

5
WARNING
FOR YOUR SAFETY
WARNING
FOR YOUR SAFETY
Your safety and the safety of others are very important.
We have provided many important safety messages in this manual and on your appliance. Always read and obey all
safety messages.
and others. Al l safety messages will follow the safety alert symbol and either the word “DANGER,”
“WARNING” or “CAUTION.” These words mean:
• You can be killed or seriously injured if you don’t immediately follow instructions.
• You can be killed or seriously injured if you don’t follow instructions.
•
moderate injury.
what can happen if the instructions are not followed.
DANGER
WARNING
CAUTION
WARNING
cancer and birth defects or other reproductive harm. For more information go
to www.P65Warning.ca.gov.

6
WARNING
FOR YOUR SAFETY
• A child or adult can tip the range and be killed.
•
• Slide range back so rear range foot is engaged in the slow of the anti-tip bracket.
• Re-engage the anti-tip bracket if range is moved.
• Do not operate the range without anti-tip bracket installed and engaged.
• Failure to follow these instructions can result in death or serious burns to children and adults.
Making sure the anti-tip bracket is installed:
• Slide range forward.
• Slide range back so rear range foot is under anti-tip bracket.
Anti-Tip
Bracket
Range
Foot

7
to persons, or damage when using the range, follow basic
precautions, including the following:
• WARNING: TO REDUCE THE RISK OF TIPPING OF
THE RANGE, THE RANGE MUST BE SECURED BY
PROPERLY INSTALLED ANTI-TIP DEVICES. TO CHECK IF
THE DEVICES ARE INSTALLED PROPERLY, SLIDE THE
RANGE COMPLETELY FORWARD, LOOK FOR THE ANTI-
TIP BRACKET SECURELY ATTACHED TO THE FLOOR
BEHIND THE RANGE, AND SLIDE RANGE COMPLETELY
BACK UNTIL THE REAR RANGE FOOT IS UNDER ANTI-TIP
BRACKET.
• WARNING: NEVER use this appliance as a space heater
to heat or warm the room. Doing so may result in carbon
• WARNING: NEVER cover any slots, holes, or passages
in the oven bottom or cover an entire rack with materials
• CAUTION: Do not store items of interest to children in
cabinets above a range or on the back guard of a range
–children climbing onto the range to reach items could be
seriously injured.
• DO NOT LEAVE Children Alone –Children should not
be left alone or unattended in areas where the range is in
use. They should never be allowed to sit or stand on any
part of the range.
•
should never be worn while using the range.
• User Servicing – Do not repair or replace any part of the
technician.
• Flammable materials should not be stored in an oven or
near surface units.
• DO NOT USE WATER
• Make sure your pot holders is dry. – Moist or damp pot
holders on hot surfaces may result in burns from steam.
Do not let pot holder touch hot heating elements. Do not
use a towel or other bulky cloth.
• DO NOT TOUCH SURFACE UNITS OR AREAS NEAR
UNITS – Surface units may be hot even though they
are dark in color. Areas near surface units may become
hot enough to cause burns. During and after use, do not
surface units or areas near units until they have had
top and surfaces facing the cook top.
• Never Leave Surface Units Unattended at High Heat
Settings – Boil over causes smoking and greasy spillovers
that may ignite.
•
utensils are suitable for range-top service without
breaking due to sudden temperature changes.
• Utensil Handles Should Be Turned Inward and Not
Important Safety Instructions
to unintentional contact with the utensil, the handle of a
utensil should be positioned so that it is turned inward,
• Clean Cook top with Caution – If a wet sponge or cloth
is used to wipe spills on a hot cooking area, be careful to
fumes if applied to a hot surface.
• CAUTION: When Opening Door, stand on the side of
the range and let the hot air or steam escape before
removing or replacing food.
• Do Not Heat Unopened Food Containers. - Build-up of
pressure may cause the container to burst and result in
injury.
• Keep Oven Vent Ducts free from obstructions.
• Oven Racks Placement – Always place oven racks in the
desired location while the oven is cool. If the rack must be
moved while the oven is hot, do not let the pot holder in
contact with the heated rack.
• DO NOT TOUCH HEATING ELEMENTS OR INTERIOR
SURFACES OF OVEN – Heating elements may be hot
even though they are dark in color. The interior surfaces
of an oven become hot enough to cause burns. During
and after use, do not touch, or let clothing or other
time to cool. Other surfaces of the appliance may become
hot enough to cause burns – among these surfaces are
oven vent openings and surfaces near these openings,
oven doors, and windows of oven doors.
• Proper Installation – The range, when installed, must be
electrically grounded by local codes or, in the absence of
local codes, with the National Electrical Code, ANSI/NFPA
70. In Canada, the range must be electrically grounded by
Canadian Electrical Code. Be sure the range is properly
• Disconnect the electrical supply before servicing the
appliance.
• Injuries may result from the misuse of appliance doors or
drawers such as stepping, leaning, or sitting on the doors
or drawers.
• Maintenance – Keep the range area clear and free from
vapors and liquids.
• For units with ventilating hood
• Clean Ventilating Hoods Frequently – Grease should not
•
on.
READ AND SAVE THESE INSTRUCTIONS
State of California Proposition 65 Warnings: WARNING: This
product contains one or more chemicals known to the State of
California to cause cancer. WARNING: This product contains
one or more chemicals known to the State of California to
cause birth defects or other reproductive harm.

8
1
2
5
3
4
6
8
7
10
11
9
12
14
15
16
13
Names of Parts and Accessories
Numbers Parts
1 Left Rear Burner 1200W
2 Left Front Burner 2200W
3 Control Panel
4Anti-tip Bracket
5Kick Plate
6Right Rear Burner 1200W
7Right Front Burner 2500W
8Hot Surface Indicator Lights
Numbers Parts
9Oven Door Window
10 Oven Vent
11 Broil Element
12 Door Gasket
13 Bottom Element (not visible)
14 Oven Light
15 Model and Serial Number Plate
16 Convection Fan
(For blacksplash Installation)
(For Anti-tip bracket)

9
Control Panel
• Turn the control knob to the desired position. Heat intensity goes from LOW on the right to HIGH on the left.
•
•
•
• The residual heat warning light remains illuminated when the temperature of the ceramic glass surface is hot and will
There are 7 oven settings to select from.
There are 8 temperature settings to select from.
1 Light
2 Bake
3 Convection Bake
4 Broil
1 150 ºF
2 200 ºF
3 250 ºF
4 300 ºF
5 Convection Broil
6 Convection Roast
7 Defrost
5 350 ºF
6 400 ºF
7 450 ºF
8 Broil (500 ºF)
A B C D E F G
Numbers Parts
AFront left burner
BRear left burner
C Rear right burner
D Front right burner
E Oven settings
F Temperature
G Light indicator
Operating Instructions

10
The ceramic cooking area will glow red when a heating element is on. Some parts of the cooktop may not glow red when
overheating. It’s normal for the surface of the ceramic glass to appear to change color when surface cooking areas are
hot. As the glass cools, it will return to its original color.
IMPORTANT: Clean the cooktop after each use to avoid permanent damage from pitting or scratching to the cooktop
surface.
• Make sure the bottoms of pots and pans are clean and dry before using them. Residue and water can leave deposits
when heated.
• Avoid storing jars or cans above the cooktop. Dropping a heavy or hard object onto the cooktop could crack the
cooktop.
• To avoid damage to the cooktop, do not leave a hot lid on the cooktop. As the cooktop cools, air can become trapped
between the lid and the cooktop and ceramic glass could break when the lid is removed.
• For foods containing sugar in any form, clean up all spills as soon as possible. If sugary spills are allowed to cool
down, they can adhere to the cooktop and can cause pitting and permanent marks
•
or bakeware could leave scratches or marks on the cooktop.
• Do not cook popcorn in prepackaged aluminum containers on the cooktop. They could leave aluminum marks that
cannot be removed completely.
• Do not allow objects that could melt, such as plastic or aluminum foil, to touch any part of the entire cooktop.
• Do not use the cooktop as a cutting board.
• Do not cook foods directly on the cooktop.
BEFORE USE
1. Make sure to remove all packing and literature from the cooktop surface and oven cavity.
2. Clean your ceramic glass top. Recommended to use a glass top cleaner.
3.
burners.
4.
burners.
• This procedure will evaporates any protective oils and humidity collected during the manufacturing process, and
enables the electronic control circuits to operate properly.
•
•
surface indicator it will let you be aware if the cooktop is still hot.
2
The “red circle” will indicate which
cooking element is actively hot.
HOT SURFACE INDICATOR LIGHT
On ceramic glass cooktops the Hot Surface Indicator lights are located on the glass cooktop. The Hot Surface Indicator
Operating Instructions (continued)

11
OVEN
This multi-function oven combines the functions of traditional oven modes with the functions of modern, fan-assisted
convection modes in a single oven. Use the Cooking feature control knob, located on the control panel, to select the oven
mode.
Rack Placement in your oven
BEFORE USE
1. Make sure the oven is close.
2. Rotate the cooking feature knob to Bake.
3. Rotate the temperature feature knob to 500°F (260°C).
4. Rotate the timer knob to 30 minutes
NOTE: Allow the oven to operate for 30 minutes with no food in the cavity. Once it did its 30 minutes, open the oven
door to allow the oven to cool. Any odor that may be detected during this initial use is due to the evaporation of
substances used to protect the oven during storage.
5. IMPORTANT:
Do not place anything, including dishes, foil, and oven trays, on the bottom of the oven when it is in operation to avoid
damaging the enamel.
5
2
1
6
Most baked goods (4&3)
Roasting (2&1)
Toasting or Broiling (6&5)
4
3
5
2
1
6
4
3
Multiple Rack (5-2)
COOKING RINGS
The general rule of thumb with cookware, the diameter of the cookware should match the diameter of the elements that
Cookware characteristics
• Aluminum: heats and cools quickly. Frying, braising, roasting. May leave metal markings on glass.
• Cast Iron: on a glass cooktop heats and cools slowly, but retains heat and cooks evenly.
• Copper: tin heats and cools quickly. Best used for gourmet cooking, wine sauces, egg dishes.
• Enamel cookware: response depends on base metal. Not recommended. Imperfections in enamel may scratch
cooktop.
• Glass Ceramic: heats and cools slowly. Not recommended. Heats too slowly. Imperfections in enamel may scratch
cooktop.
• Stainless Steel: heats and cools moderately. Soups, sauces, vegetables, and general cooking.
PREHEATING
1. Turn the cooking functions knob to the desired function you wish to use.
2. Rotate the dial to the temperature you wish to use.
Note: The higher the temperature is, the longer it will take to preheat. The actual oven temperature will go higher than
that cooking will begin at the proper temperature. Do not open the door while the oven is preheating. When the oven had
reached the set temperature, the indicator light on the control panel will turn on. You can then open the door and place
food in the oven.
Operating Instructions (continued)

12
OVEN SETTINGS
1. Bake
• Use one rack when selecting the bake mode.
• On occasion, check the oven to see if your food is done.
for the oven.
•For best results, bake food on a single rack with at least 1” - 1½” (2.5 - 4 cm) space between bakeware and oven walls.
• When using heatproof glass, reduce temperature by 25°F (15°C) from recommended temperature. Use baking sheets
with or without sides or jelly roll pans.
• Dark metal pans or nonstick coatings will cook faster with more browning. Insulated bakeware will slightly lengthen the
cooking time for most foods.
line a baking tray with foil and use this on the bottom shelf.
• Avoid using the opened door as a shelf to place pans.
• See Troubleshooting for tips on solving baking and roasting problems.
Oven (continued)
Baking is cooking with heated air. Both upper and lower elements in the oven are used, but
the fan is used only during preheating. Follow the recipe or convenience food directions for
baking temperature, time, and rack position. Baking time will vary with the temperature of
he temperature can be set
from 170°F (77°C) to 500°F (260°C).
Food Item Rack Position Temp. °F (°C)
(Preheated Oven) Time (Min)
Cupcakes 2 350(175) 19-22
Bunt Cake 1 350(175) 40-45
Angel Food 1 350(175) 35-39
Pie 2 crust, fresh, 9” 2 375-400
(190-205) 45-50
2 375(190) 68-78
Cookies Sugar 2 350-375
(175-190) 8-10
Chocolate Chip cookies 2 350-375
(175-190) 8-13
Brownies 2 350(175) 29-36
2 375(190) 18-22
Yeast rolls 2 375-400
(190-205) 12-15
Biscuits 2 375-400
(190-205) 7-9
2 425 (220) 15-19
2400-450
(205-235) 23-26
2 425 (246) 15-18
Bake chart Oven Function:

13
2. Broil
NOTES: Before broiling, position the rack to your needs
• For best results, use a two-piece broiler pan with a grid (not provided). It is designed to drain juices which helps to
avoid spills and splatters.
• For proper draining, do not cover the grid with foil. The bottom of the pan may be lined with aluminum foil for easier
cleaning.
•
• Pull out the oven rack to stop position before turning or removing food. Use tongs to turn food to avoid the loss of
• After broiling, remove the pan from the oven when removing the food. Drippings will bake on the pan if left in the
• Position food on the grid in the broiler pan, then place it in the center of the oven rack. Close the oven door and set
the control.
Oven (continued) Oven (continued)
and poultry may cook better at lower broiling temperatures. Tips: The oven door remains closed during
broil. When inspecting the food, open the oven door no more than two inches.).
Food And Thickness Rack
Position
Broil Setting.
°F (°C)
Level of
Doneness
SIDE 1
Time (Min)
SIDE 2
Time (Min)
BEEF
Steak (3/4"-1) 5 550 (290)
-Medium Rare
-Medium
-Well Done
- (5 - 7)
- (6 - 8)
- (8 - 10)
- (4 - 6)
- (5 - 7)
- (7 - 0)
Hamburgers (3/4"-1") 4 550 (290) -Medium
-Well Done
- (8 - 11)
- (10-13)
- (6 - 9)
- (8 - 10)
POULTRY
Breast (bone-in) 4 450 (235) Well Done (10 - 12) (8 - 10)
Thigh (very well done) 4 550 (290) Well Done (28 - 30) (13 - 15)
PORK
Pork Chops (1") 5 550 (290) Well Done (7- 9) (5 - 7)
Sausage - fresh 5 550 (290) Well Done (5 - 7) (3 - 5)
Ham Slice (½") 5 550 (290) Well Done (4 - 6) (3 - 5)
SEAFOOD
Fish Filets, 1" Buttered 4 450 (235) Well Done (10 - 14) Do not turn
LAMB
Chops (1") 5 550 (290)
-Medium Rare
-Medium
-Well Done
- (5 - 7)
- (6 - 8)
- (7 - 9)
- (4 - 6)
- (4 - 6)
- (5 - 7)
BREAD
Garlic Bread, 1" slices 4
3550 (290) - (2 - 2:30)
- (4 - 6)

14
Oven (continued)
CONVECTION SETTINGS
During convection cooking, the fan provides hot air circulation throughout the oven. The movement of heated air around
the food can help to speed up cooking by penetrating the cooler outer surfaces. The food cooks more evenly, browning
and crisping outer surfaces while sealing moisture inside. When the oven is set to the Convection function, the bake and
1. Convection Bake:
• Use Convection Bake for single or multiple-rack baking. Reduce standard recipe baking temperature by 25°F (15°C).
• For best results, foods should be cooked uncovered, in low-sided pans to take advantage of the forced air circulation.
• Heatproof glass or ceramic can be used. Reduce the temperature by another 25°F (15°C) when using heatproof glass
dishes for a total reduction of 50°F (30°C).
• Dark metal pans may be used. Note that food may brown faster when using dark metal bakeware.
• The number of racks used is determined by the height of the food to be cooked.
•
Bake mode for these foods.
• When baking four cake layers at the same time, stagger pans so that one pan is not directly above another. For best
results, place cakes on front of upper rack and back of lower rack. Allow 1” - 1½” (2.5 - 4 cm) air space around pans.
1. Turn the cooking functions knob to the convection bake.
2. Rotate the dial to the temperature you wish to use.
3. You can open the door and place food in the oven.
2 at the front
2 at the rear
”
Compared to BAKE setting, Convection Bake adds the use of convection fan(s) to circulate
heated air. So both the temperature and the cooking time may be slightly reduced.
Tips: When convection baking, reduce your recipe baking temperature by 25°F.

15
2. Convection Broil
1. Turn the cooking functions knob to the convection BROIL.
2. Rotate the dial to the temperature you wish to use.
3. The oven will begin preheating. Do not open the door while the oven is preheating. When the oven had reached the
set temperature, the indicator light on the control panel will turn on.
4. You can open the door and place food in the oven.
Guidelines:
•Place rack in the required position needed before turning on the oven.
•Use Convection Broil mode with the oven door closed. •When convection broiling, enter your normal broiling temperature.
•Do not preheat oven.
•Use the 2-piece broil pan.
•Turn meats once halfway through the cooking time. See the Convection Broil chart.
Oven (continued)
3. Convection Roast:
1. Turn the cooking functions knob to the convection roast.
2. Rotate the dial to the temperature you wish to use.
3. You can open the door and place food in the oven.
Convection Broil adds the use of convection fan(s) to circulate heated air. Bring the rack to the
middle of the cavity to provide evening cooking.
Food And Thickness Rack
Position
Broil Setting.
°F (°C)
Level of
Doneness
SIDE 1
Time (Min)
SIDE 2
Time (Min)
BEEF
Steak (1½” or more) 4 450 (235)
-Medium Rare
-Medium
-Well Done
- (9 - 12)
- (11 - 13)
- (18 - 20)
- (8 - 10)
- (10 - 12)
- (16 - 17)
Hamburgers (more than 1") 4 550 (290) -Medium
-Well Done
- (8 - 11)
- (11-13)
- (5 - 7)
- (8 - 10)
POULTRY
Chicken Quarters 4 450 (235) Well Done (16 - 18) (10 - 13)
Chicken Halves 3 450 (235) Well Done (25 - 27) (15 - 18)
Chicken Breasts 4 450 (235) Well Done (13 - 15) (9 - 13)
PORK
Pork Chops (1¼" or more) 4 450 (235) Well Done (12 - 14) (11 - 13)
Sausage - fresh 4 450 (235) Well Done (4 - 6) (3 - 5)
When convection roasting, turn to your normal roasting temperature. The roasting time should
be 15-30% less than in conventional cooking. It is not necessary to preheat the oven for
Convection Roast.

16
Oven (continued)
Food And Thickness Weight
(Lb)
Oven Temp.
°F (°C)
Rack
Position
Time
(Min. Per Lb)
Internal
Temp. °F (°C)
BEEF
Rib Roast - 4 - 6 325 (160) 2 16-20
18-22
-145 (63) Medium Rare
-160 (71) medium
Rib Eye Roast (boneless) - 4 - 6 325 (160) 2 16-20
18-22
-145 (63) Medium Rare
-160 (71) medium
Rump, Eye, Tip, Sirloin (boneless) - 3 - 6 325 (160) 2 16-20
18-22
-145 (63) Medium Rare
-160 (71) medium
Tenderloin Roast - 2 - 3 400 (205) 2 15-20 145 (63) Medium Rare
PORK
Loin Roast (boneless or bone-in) - 5 - 8 350 (205) 2 16-20 160 (71) medium
Shoulder - 3 - 6 400 (205) 2 20-25 160 (71) medium
POULTRY
Chicken whole- 3 - 4 375 (190) 2 18-21 180 (82)
12 - 15
16 - 20
21 - 25
325 (160)
325 (160)
325 (160)
1
1
1
10-14
9-11
6 - 11
-180 (82)
-180 (82)
-180 (82)
Turkey Breast - 3 - 8 325 (160) 1 15-20 170 (77)
Comish Hen - 350 (205) 2 45-75
total 180 (82)
LAMB
Half Leg - 3 - 4 325 (160) 2 22 - 27
28 - 33
-160 (71) medium
-170 (77) well
Whole Leg - 6 - 8 325 (160) 1 22 - 27
28 - 33
-160 (71) medium
-170 (77) well
Guidelines:
• Do not preheat for Convection Roast.
• Roast in a low-sided, uncovered pan.
• When roasting whole chickens or turkey, tuck wings behind back and loosely tie legs with kitchen string.
• Use the 2-piece broil pan for roasting uncovered.
• Double-check the internal temperature of meat or poultry by inserting meat thermometer into another position.
• Large poultry may need to be covered with foil (and pan roasted) during a portion of the roasting time to prevent over-
browning.
•
• After removing the food from the oven, cover loosely with foil for 10 to 15 minutes before carving if necessary to

17
CLEANING
otherwise noted. Do not use abrasive cleaning products.
EXTERIOR PORCELAIN ENAMEL SURFACES
Food spills containing acids, such as vinegar and tomato, should be cleaned as soon as the entire appliance is cool.
Cleaning Method:
Glass cleaner, mild liquid cleaner or nonabrasive scrubbing pad: Gently clean around the model and serial number
plate because scrubbing may remove numbers.
EXTERIOR STAINLESS STEEL
Damage may occur, even with one-time or limited use. Rub in direction of grain to avoid damaging.
Cleaning Methods:
Liquid detergent or all-purpose cleaner: Rinse well with clean water and dry with soft, lint-free cloth.
Stainless Steel Cleaner and Polish
Vinegar for hard water spots
OVEN DOOR EXTERIOR
Cleaning Method:
Glass cleaner and paper towels or nonabrasive plastic scrubbing pad: Apply glass cleaner to soft cloth or sponge,
not directly on panel.
CERAMIC GLASS COOKTOP
IMPORTANT: To avoid damaging the cooktop, do not use steel wool, abrasive powder cleansers, chlorine bleach, rust
remover or ammonia. Ceramic cooktop cleaning materials: cooktop cleaner, cooktop scraper and cooktop cleaning pads
are available at most grocery stores.
1. Remove food/residue with a cooktop scraper. For best results, use the cooktop scraper while the cooktop is still
warm, but not hot to the touch. It is recommended to wear an oven mitt while scraping the warm cooktop.
•
against the glass surface and scrape the residue. It will be necessary to apply pressure in order to remove the
residue.
• Allow the cooktop to cool down completely before proceeding to Step 2.
2.
• Rub cooktop cleaner onto the cooktop surface with a nylon or similar cooktop cleaning pad. Some pressure is
needed to remove stubborn stains.
•
3. Polish with a clean, dry cloth or a clean, dry paper towel.
SMUDGES FROM ALUMINUM BOTTOMED PANS
Cleaning Method:
A cloth dampened in vinegar.
COOKTOP CONTROL KNOBS
• Pull knobs straight out from the control panel to remove.
•
Cleaning Method:
Soap and water or dishwasher:
NOTE: Do not use steel wool, abrasive cleansers or oven cleaner. Do not soak knobs.
Range Care

18
CONTROL PANEL
Cleaning Method:
Glass cleaner and soft cloth or sponge: Apply glass cleaner to soft cloth or sponge, not directly on panel.
NOTE: Do not use abrasive cleaners, steel-wool pads, gritty washcloths or some paper towels. Damage may occur.
OVEN CAVITY
Food spills should be cleaned when oven cools. At high temperatures, foods react with porcelain, so staining, etching,
pitting or faint white spots can result.
Cleaning Method:
Mild detergent and warm water.
NOTE: Do not use oven cleaners.
OVEN RACKS
Cleaning Method:
Steel-wool pad
OVEN DOOR REMOVAL
For normal oven use, there is no need to remove the oven door. However, should it become necessary to remove the
door, follow the instructions in this section.
IMPORTANT:
› When you are planning to clean the oven doors, it is recommended to do this step several hours after the unit has been
› Keep in mind the oven door is heavy, fragile, and the front door has glass. To avoid the glass from breaking, use both
hands and grasp only the sides of the oven door to remove it.
› Be sure that both levers are securely in place before removing the door.
›Do not force doors open or closed.
To remove the oven door:
1. Open the oven door completely.
2. Lift up the hinge latch on each side.
3. Close the oven door as far as it will shut.
4. While grasping both outside edges of the oven door, lift up on the door.
5. Continue to push the top of the door closed while pulling the bottom of the door out of the hinge receivers in the door
frame.
Range Care (continued)
Left hinge Right hinge

19
REPLACING AN OVEN LIGHT
The oven light is a standard 25-watt (G9) appliance bulb.
1. Disconnect the power.
2. Remove the bulb cover by pulling it out of the opening.
3. Remove the burned-out bulb from the socket.
use a tissue when replacing the light bulb.
4. Replace the bulb, and then replace the bulb cover.
5. Reconnect the power.
To place back the oven door:
1. Insert both hanger arms into the hinge receivers in the door frame.
2. Slowly open the oven door, and you will feel the door set into place.
3. Move the hinge latches back into the locked position.
4. Check that the door opens and closes freely. If it does not, repeat the door removal and placing the oven door back.
Range Care (continued)
Left hinge Right hinge
WARNING
Electrical Shock Hazard
•
• The lenses must be in place when using the oven. The lenses serve to protect the light bulb from breaking.
• The lenses are made of glass. Handle carefully to avoid breakage.
• Failure to do so could result in death, electric shock, cuts or burns.

20
Troubleshooting
• BAKING AND ROASTING PROBLEMS
Before contacting Forno customer service, please check the chart below for cases that may apply to you. It can be simple
Baking Issues Causes
Food browns unevenly • Oven not preheated
• Aluminum foil on oven rack or oven bottom
• Baking utensil too large for recipe
• Pans touching each other or oven walls
Food too brown on bottom • Oven not preheated
• Using glass, dull or darkened metal pans
• Incorrect rack position
• Pans touching each other or oven walls
• Oven not preheated
• Using glass, dull or darkened metal pans
• Incorrect rack position
• Pans touching each other or oven walls
Food is baking or roasting too slowly • Oven temperature too high
• Baking time too long
• Oven door opened frequently
Piecrusts do not brown on bottom or crust is soggy • Baking time not long enough
• Using shiny steel pans
• Incorrect rack position
• Oven temperature is too low
• Oven temperature too low
• Incorrect baking time
• Cake tested too soon
• Oven door opened too often
Cakes high in middle with crack on top • Oven temperature too high
• Baking time too long
• Pans touching each other or oven walls
• Incorrect rack position
Piecrust edges too brown • Oven temperature too high
• Edges of crust too thin

21
Troubleshooting (continued)
• COOKTOP
Baking Issues Possible Causes Solutions
Heating elements and controls
do not work.
Fuse is blown or circuit breaker is tripped.
No electricity to the cooktop.
Replace the fuse or reset the
circuit breaker. If the problem
continues, call an electrician. Have
electrician check your power supply.
Heating elements do not heat
properly.
Improper cookware is being used. Select proper cookware. See
“Cookware.”
If the problem continues, call for
service.
even when elements are turned
to their highest settings.
Heating element temperature limiters are
temperature
This is a normal operating condition,
especially during rapid heat-up
operations. The element will cycle
back on automatically after it has
Glass ceramic surface is see
through or appears to be red in
color.
Under direct or bright lighting, you will
sometimes be able to see through the glass
and into the chassis due to its transparent
quality. You may also notice a red tint under
these conditions
These are normal properties of black
ceramic glass panels.

22
Troubleshooting (continued)
• OVEN
Baking Issues Possible Causes Solutions
Oven is not heating No power to the oven Replace the fuse or reset the circuit breaker. If the problem
continues, call an electrician.
Oven control not turned on Make sure the oven temperature
Oven door is not closed
Oven is not cooking
evenly
Not using the correct bake ware or
oven rack position
Refer to cook charts for recommended rack position. Always
reduce recipe temperature by 25 °F (15 °C) when baking
with Convention Bake mode.
Oven display stays
Power interruption
service.
Oven mode and
temperature
controls cannot be
set.
The oven door is open. Close the oven door. The oven mode and temperature
controls cannot be set if the oven door is open.
Cooling fan
continues to run
after oven is turned
The electronic components have
Oven light is not
working properly
Light bulb loose or burned-out. Reinsert or replace the light bulb. Touching the bulb with
Oven light stays on Door is not closing completely Check for obstruction in oven door. Check to see if hinge is
bent or door switch broken.
Cannot remove
lens cover
Soil build-up around the lens cover. Wipe lens cover area with a clean, dry towel prior to
attempting to remove the lens cover.
Clock and timer
are not working
properly
No power to the oven
sure there is proper electrical power to the oven.
Bake and Convection Roast will eliminate any moisture in
the oven.
Porcelain Chips Porcelain interior is bumped by
oven racks
When removing and replacing oven racks, always tilt
racks upward and do not force them to avoid chipping the
porcelain.

23
Warranty
What this limited warranty covers:
The Warranty coverage provided by Forno Appliances in this
Forno dealer/distributor/retailer, purchased and installed in the
United States or Canada, and which has always remained within
the original country of purchase (the United States or Canada).
Warranty coverage is activated on the date of the Product’s
original retail purchase and has a duration of two (2) years.
Warranty coverage is non-transferable. In the event of
replacement of parts or of the entire product, the replacement
Product (or parts) shall assume the remaining original Warranty
activated with the original retail purchase document. This
Forno Appliances will repair or replace any component/part which
fails or proves defective due to materials and/or workmanship
within 2 years of the date of the original retail purchase and
under conditions of ordinary residential, non-commercial use.
Repair or replacement will be free of charge, including labor at
for making the Product reasonably accessible for service. Repair
company during normal working hours.
Important
Retain proof of original purchase to establish warranty period.
Forno’s liability on any claim of any kind, with respect to the
value of the goods or service or part there of which has given rise
to the claim.
30-Day Cosmetic Warranty
The Purchaser must inspect the product at the time of delivery.
Forno warrants that the Product is free from manufacturing
defects in materials and workmanship for a period of thirty (30)
days from date of the original retail purchase of the Product.
This coverage includes:
• Paint blemishes
• Chips
•
Cosmetic warranty does NOT cover:
• Issues resulting from incorrect transport, handling and/
or installation (e.g.: dents, broken, warped or deformed
structures or components, cracked or otherwise damaged
glass components);
• Slight color variations on painted/enameled components;
•
or other analogous factors; > stains/corrosion/discoloration
appliances and demo units.
How to receive service
To receive warranty services, the Purchaser must contact the
Forno Support department in order to determine the problem
and the required service procedures. Troubleshooting with a
customer service representative will be necessary before moving
forward with the service. Model number, serial number and date
of original retail purchase will be requested.
Warranty Exclusions: What Is Not Covered.
• Use of the Product in any non-residential, commercial
application.
• Use of the Product for anything other than its intended
purpose.
• Repair services provided by anyone other than a Forno
• Damages or repair services to correct services provided by
•
codes, electrical codes, gas codes, plumbing codes, building
codes, laws or regulations.
• Defects or damage due to improper storage of the Product.
• Defects, damage or missing parts on products sold out of the
original factory packaging or from displays. > Service calls or
repairs to correct an incorrect installation of the Product and/
or related accessories.
• Replacement of parts/service calls to connect, convert or
otherwise repair the electrical wiring and/or gas line in order
to properly use the product.
• Replacement of parts/service calls to provide instructions
and information on the use of the Product.
• Replacement of parts/service calls to correct issues arising
from the product being used in a manner other than what is
normal and customary for residential use.
• Replacement of parts/service calls due to wear and tear of
components such as seals, knobs, pan supports, shelving,
cutlery baskets, buttons, touch displays, scratched or broken
ceramic-glass tops.
• Replacement of parts/service calls for lack of/improper
maintenance, including but not limited to: build up of
residues, stains, scratches, discoloration, corrosion.
• Defects and damages arising from accidents, alteration,
misuse, abuse or improper installation.
• Defects and damages arising from Product transport,
logistics and handling. Inspection of the product must be
made at time of delivery. Following receipt and inspection,
issues arising from handling, transport and logistics.
•
the control of Forno Appliances, including but not limited
to humidity, power surges, lightning, structural failures
surrounding the appliance and other acts of God.
• Products whose serial number has been altered/damaged/
tampered with. In no case shall Forno be held liable
or responsible for damage to surrounding property,
structures surrounding the Product. Forno is neither
liable nor responsible for the Product if it is located in a
are not reasonably available. Purchaser must bear any
transportation and delivery costs of the Product to the

24
Warranty (Continued)
THERE ARE NO EXPRESS WARRANTIES OTHER THAN THOSE LISTED AND DESCRIBED ABOVE, AND NO WARRANTIES, EITHER EXPRESS OR IMPLIED,
INCLUDING, BUT NOT LIMITED TO, ANY IMPLIED WARRANTIES OF MERCHANTABILITY OR FITNESS FOR A PARTICULAR PURPOSE THAT SHALL APPLY
AFTER THE EXPRESS WARRANTY PERIODS STATED ABOVE, AND NO OTHER EXPRESS WARRANTY OR GUARANTEE GIVEN BY ANY PERSON, FIRM
OR CORPORATION WITH RESPECT TO THIS PRODUCT SHALL BE BINDING ON FORNO. FORNO SHALL NOT BE LIABLE FOR LOSS OF REVENUE OR
PROFITS, FAILURE TO REALIZE SAVINGS OR OTHER BENEFITS, TIME AWAY FROM WORK, MEALS, LOSS OF FOOD OR BEVERAGES, TRAVELING OR
HOTEL EXPENSES, EXPENSES TO RENT OR PURCHASE APPLIANCES, REMODELING/CONSTRUCTION EXPENSES IN EXCESS OF DIRECT DAMAGES
WHICH ARE UNDENIABLY CAUSED EXCLUSIVELY BY FORNO OR ANY OTHER SPECIAL, INCIDENTAL OR CONSEQUENTIAL DAMAGES CAUSED BY THE
USE, MISUSE OR INABILITY TO USE THIS PRODUCT, REGARDLESS OF THE LEGAL THEORY ON WHICH THE CLAIM IS BASED, AND EVEN IF FORNO
HAS BEEN ADVISED OF THE POSSIBILITY OF SUCH DAMAGES. NOR SHALL RECOVERY OF ANY KIND AGAINST FORNO BE GREATER IN AMOUNT
THAN THE PURCHASE PRICE OF THE PRODUCT SOLD BY FORNO AND CAUSING THE ALLEGED DAMAGE. WITHOUT PREJUDICE TO THE FOREGOING,
PURCHASER ASSUMES ALL RISK AND LIABILITY FOR LOSS, DAMAGE OR INJURY TO PURCHASER AND PURCHASER’S PROPERTY AND TO OTHERS
AND THEIR PROPERTY ARISING FROM THE USE, MISUSE, OR INABILITY TO USE THIS PRODUCT SOLD BY FORNO THAT IS NOT A DIRECT RESULT OF
NEGLIGENCE ON THE PART OF FORNO THIS LIMITED WARRANTY SHALL NOT EXTEND TO ANYONE OTHER THAN THE ORIGINAL PURCHASER OF THIS
PRODUCT, IS NON-TRANSFERABLE, AND STATES YOUR EXCLUSIVE REMEDY.

25

11/2023
NUMÉRO DE MODÈLE SÉRIE FFSEL6012-30 | FFSEL6012-30BLK | FFSEL6012-30WHT
MANUEL D'INSTRUCTIONS
CUISINIÈRE ÉLECTRIQUE
FRANÇAIS

27
TABLE DES MATIÈRES
Service clientèle 29
Avertissement 30
32
Nom des pièces 33
Panneau de contrôle 34
Mode d’emploi
• Avant utilisation Table de cuisson.....................................
• Avant d’utiliser le four ......................................................
•
Modes de cuisson:
• Cuisson ...................................................................
• Griller ......................................................................
Modes de convection:
• Cuire au four .............................................................
• Griller ........................................................................
• Conv. Roast .............................................................
35
36
36
37
38
39
40
40
Soins de la gamme
• Nettoyage .........................................................................
•
• Remplacement de la lampe du four ..................................
42
43
44
45
Garantie 48

28
NUMÉRO DE MODÈLE SÉRIE
FFSEL6012-30 | FFSEL6012-30BLK | FFSEL6012-30WHT
CUISINIÈRE ÉLECTRIQUE

29
Informations sur le produit Informations sur les services
correspondance ou appel de service
concernant votre produit.
Pour gagner du temps et de
les causes des problèmes mineurs
corriger vous-même.
votre appareil.
Service clientèle
Services au Canada et aux États-Unis
S/N:FFSEL6012-30/XXXXXXX

30
AVERTISSEMENT
POUR VOTRE SÉCURITÉ
AVERTISSEMENT
POUR VOTRE SÉCURITÉ
• immédiatement
les instructions.
•
les instructions.
•
et ce qui peut arriver si les instructions ne sont pas suivies.
DANGER
AVERTISSEMENT
ATTENTION
AVERTISSEMENT

31
AVERTISSEMENT
POUR VOTRE SÉCURITÉ
Risque de basculement
•
•
•
•
•
• Le non-respect de ces instructions peut entraîner la mort ou des
brûlures graves pour les enfants et les adultes.
au mur.
arrière de la cuisinière se trouve sous le support anti-basculement.
Anti-Tip
Bracket
Range
Foot

32
notamment les suivantes :
• AVERTISSEMENT : POUR RÉDUIRE LE RISQUE DE
BASCULEMENT DE LA CUISINIÈRE, CELLE-CI DOIT ÊTRE
SÉCURISÉE PAR DES DISPOSITIFS ANTI-BASCULEMENT
CORRECTEMENT INSTALLÉS. POUR VÉRIFIER QUE LES
DISPOSITIFS SONT CORRECTEMENT INSTALLÉS, FAITES
VÉRIFIEZ QUE LE SUPPORT ANTI-BASCULEMENT EST BIEN
FIXÉ AU SOL DERRIÈRE LA CUISINIÈRE, ET FAITES GLISSER
QUE LE PIED ARRIÈRE DE LA CUISINIÈRE SE TROUVE SOUS LE
SUPPORT ANTI-BASCULEMENT.
• AVERTISSEMENT :
• AVERTISSEMENT :
ou les passages de la sole du four ou une grille entière avec
• ATTENTION :
ou sur la protection arrière de la cuisinière - les enfants qui
grimpent sur la cuisinière pour atteindre les objets peuvent se
blesser gravement.
• NE LAISSEZ PAS LES ENFANTS SEULS - Les enfants
quelconque du champ de tir.
•
champ de tir.
•
•
• NE PAS UTILISER D'EAU
•
• NE PAS TOUCHER LES UNITÉS DE SURFACE OU LES
ZONES PROCHES DES UNITÉS
cuisson.
•
•
Consignes de sécurité importantes
le dessus de la cuisinière sans se briser en raison de brusques
•
•
vous brûler avec la vapeur. Certains nettoyants peuvent produire
• ATTENTION :
•
•
•
• NE PAS TOUCHER LES ÉLÉMENTS CHAUFFANTS OU
LES SURFACES INTÉRIEURES DU FOUR
des brûlures, notamment les ouvertures de ventilation du four et
four et les fenêtres des portes du four.
•
•
•
•
•
•
•
LIRE ET CONSERVER CES INSTRUCTIONS Avertissements de la

33
1
2
5
3
4
6
8
7
10
11
9
12
14
15
16
13
Noms des pièces et accessoires
1 Brûleur arrière gauche 1200W
2 Brûleur avant gauche 2200W
3 Panneau de contrôle
4Support anti-basculement
5
6Brûleur arrière droit 1200W
7Brûleur avant droit 2500W
8
9Porte du four Fenêtre
10 Évent de four
11
12
13
14 Lumière du four
15
16 Ventilateur de convection
(Pour le support anti-basculement)

34
Panneau de contrôle
•
•
haut.
•
•
•
1 Lumière
2 Cuisson
3 Cuisson par
convection
1 150 ºF
2 200 ºF
3 250 ºF
4 300 ºF
4 Griller
5
6 Rôti par convection
7
5 350 ºF
6 400 ºF
7 450 ºF
8 Gril (500 ºF)
A B C D E F G
ABrûleur avant gauche
BBrûleur arrière gauche
C Brûleur arrière droit
D Brûleur avant droit
E
F
G
Instructions d'utilisation

35
•
•
•
•
et des marques permanentes
•
sur la table de cuisson.
•
•
quelconque partie de la table de cuisson.
•
•
AVANT UTILISATION
1.
2.
3.
les brûleurs avant.
4.
Éteindre les brûleurs arrière.
•
•
•
ANNEAUX DE CUISSON
2
de cuisson qui est activement chaud.
TÉMOIN LUMINEUX DE LA SURFACE CHAUDE
Instructions d'utilisation (suite)

36
FOUR
Ce four multifonction combine les fonctions des modes de cuisson traditionnels et les fonctions des modes de convection
Placement des grilles dans votre four AVANT UTILISATION
1.
2.
3.
4.
5.
5
2
1
6
La plupart des produits de
boulangerie (4&3)
Torréfaction (2&1)
Griller ou griller (6&5)
4
3
5
2
1
6
4
3
Supports multiples (5-2)
•
verre.
•
•
•
peuvent rayer la table de cuisson.
•
•
PRÉCHAUFFAGE
RÉGLAGES DU FOUR
Instructions d'utilisation (suite)

37
1. Cuisson
Four (suite)
Produit alimentaire Position du
rack
Temp. °F (°C)
Temps (Min)
Cupcakes 2 350(175) 19-22
1 350(175) 40-45
La nourriture des anges 1 350(175) 35-39
Tarte 2 croûtes, fraîche,
92 375-400 (190-205) 45-50
2 croûtes, fruits
2 375(190) 68-78
Biscuits Sucre 2 350-375 (175-190) 8-10
chocolat 2 350-375 (175-190) 8-13
Brownies 2 350(175) 29-36
2 375(190) 18-22
2 375-400 (190-205) 12-15
Biscuits 2 375-400 (190-205) 7-9
2 425 (220) 15-19
2 400-450 (205-235) 23-26
2 425 (246) 15-18
Carte de cuisson Fonction four:

38
2. Griller
•
•
•
•
•
•
Four (suite)
Conseils : La porte du four reste fermée pendant la cuisson
au gril. Lorsque vous inspectez les aliments, n'ouvrez pas la porte du four de plus de deux pouces.).
Position du
rack
gril. °F (°C)
Niveau de
La cuisson
CÔTÉ 1
Temps (Min)
CÔTÉ 2
Temps (Min)
BOEUF
Steak (3/4"-1) 5 550 (290)
-Moyennement saignant
-Moyen
-Bien fait
- (5 - 7)
- (6 - 8)
- (8 - 10)
- (4 - 6)
- (5 - 7)
- (7 - 0)
Hamburgers (3/4"-1") 4 550 (290) -Moyen
-Bien fait
- (8 - 11)
- (10-13)
- (6 - 9)
- (8 - 10)
VOLAILLE
Poitrine (avec os) 4 450 (235) Bien fait (10 - 12) (8 - 10)
Cuisse (très bien faite) 4 550 (290) Bien fait (28 - 30) (13 - 15)
PORC
Côtelettes de porc (1") 5 550 (290) Bien fait (7- 9) (5 - 7)
Saucisse - fraîche 5 550 (290) Bien fait (5 - 7) (3 - 5)
Tranche de jambon (½") 5 550 (290) Bien fait (4 - 6) (3 - 5)
FRUITS DE MER
4 450 (235) Bien fait (10 - 14) Ne pas
tourner
AGNEAU
Côtelettes (1") 5 550 (290)
-Moyennement saignant
-Moyen
-Bien fait
- (5 - 7)
- (6 - 8)
- (7 - 9)
- (4 - 6)
- (4 - 6)
- (5 - 7)
PAIN
pouce
4
3550 (290) - (2 - 2:30)
- (4 - 6)

39
Four (suite) Four (suite)
RÉGLAGES DE LA CONVECTION
fonction de convection.
1. Cuisson par convection :
•
cuisson de la recette standard de 25°F (15°C).
•
•
•
•
•
•
1.
2.
3.
"
Conseils : Lors de la cuisson par convection, réduisez la température de cuisson de votre recette de 25°F.

40
2.
1.
2.
3.
4.
5.
Lignes directrices :
Four (suite)
3. Rôti par convection :
1.
2.
3.
Position du
rack
gril. °F (°C)
Niveau de
La cuisson
CÔTÉ 1
Temps (Min)
CÔTÉ 2
Temps (Min)
BOEUF
Steak (1½" ou plus) 4 450 (235)
-Moyennement saignant
-Moyen
-Bien fait
- (9 - 12)
- (11 - 13)
- (18 - 20)
- (8 - 10)
- (10 - 12)
- (16 - 17)
Hamburgers (plus de 1") 4 550 (290) -Moyen
-Bien fait
- (8 - 11)
- (11-13)
- (5 - 7)
- (8 - 10)
VOLAILLE
Quartiers de poulet 4 450 (235) Bien fait (16 - 18) (10 - 13)
3 450 (235) Bien fait (25 - 27) (15 - 18)
Poitrines de poulet 4 450 (235) Bien fait (13 - 15) (9 - 13)
PORC
Côtelettes de porc (1¼" ou
plus) 4 450 (235) Bien fait (12 - 14) (11 - 13)
Saucisse - fraîche 4 450 (235) Bien fait (4 - 6) (3 - 5)

41
Four (suite)
Poids (Lb)
Temp. du
four . °F
(°C)
Position
du rack
Temps
(Min. par
livre)
Interne
Temp. °F (°C)
BOEUF
Rôti de côte - 4 - 6 325 (160) 2 16-20
18-22
-145 (63) Moyennement
saignant
-160 (71) moyen
4 - 6 325 (160) 2 16-20
18-22
-145 (63) Moyennement
saignant
-160 (71) moyen
3 - 6 325 (160) 2 16-20
18-22
-145 (63) Moyennement
saignant
-160 (71) moyen
2 - 3 400 (205) 2 15-20 145 (63) Moyennement
saignant
PORC
avec os) - 5 - 8 350 (205) 2 16-20 160 (71) moyen
Épaule - 3 - 6 400 (205) 2 20-25 160 (71) moyen
VOLAILLE
Poulet entier- 3 - 4 375 (190) 2 18-21 180 (82)
Dinde, non farcie -
12 - 15
16 - 20
21 - 25
325 (160)
325 (160)
325 (160)
1
1
1
10-14
9-11
6 - 11
-180 (82)
-180 (82)
-180 (82)
Poitrine de dinde - 3 - 8 325 (160) 1 15-20 170 (77)
Comish Hen - 350 (205) 2 45-75
total 180 (82)
AGNEAU
Demi-jambe - 3 - 4 325 (160) 2 22 - 27
28 - 33
-160 (71) moyen
-170 (77) bien
6 - 8 325 (160) 1 22 - 27
28 - 33
-160 (71) moyen
-170 (77) bien
Lignes directrices :
•
•
•
•
•
autre position.
•
•
•
6° C).

42
NETTOYAGE
utiliser de produits de nettoyage abrasifs.
SURFACES EXTÉRIEURES EN PORCELAINE ÉMAILLÉE
EXTÉRIEUR EN ACIER INOXYDABLE
EXTÉRIEUR DE LA PORTE DU FOUR
TABLE DE CUISSON EN VITROCÉRAMIQUE
1.
porter un gant de cuisine pour racler la table de cuisson chaude.
•
•
2.
•
tenaces.
•
3.
BOUTONS DE COMMANDE DE LA TABLE DE CUISSON
• Tirer les boutons tout droit du panneau de commande pour les retirer.
•
Soins de la gamme

43
Savon et eau ou lave-vaisselle :
.
PANNEAU DE CONTRÔLE
dommages peuvent survenir.
CAVITÉ DU FOUR
REMARQUE : Ne pas utiliser de nettoyants pour four.
RACKS DE FOUR
RETRAIT DE LA PORTE DU FOUR
charnière dans le cadre de la porte.
Entretien de la gamme (suite)
Charnière gauche Charnière droite

44
Remettre la porte du four en place :
remise en place de la porte du four.
Entretien de la gamme (suite)
Charnière gauche Charnière droite charnière
AVERTISSEMENT
Risque de choc électrique
•
ou les ampoules.
•
casse.
•
•

45
Dépannage
Causes
• Ustensile de cuisson trop grand pour la recette
• Les casseroles se touchent ou touchent les parois du
four
Aliments trop bruns sur le fond
noirci
• Mauvaise position du rack
• Les casseroles se touchent ou touchent les parois du
four
noirci
• Mauvaise position du rack
• Les casseroles se touchent ou touchent les parois du
four
Les aliments cuisent ou rôtissent trop lentement
• Temps de cuisson trop long
• Taille de la casserole trop grande
Les croûtes ne brunissent pas sur le fond ou la
• Utilisation de casseroles en acier brillant
• Mauvaise position du rack
• Temps de cuisson incorrect
• La taille de la poêle est peut-être trop grande
dessus
• Temps de cuisson trop long
• Les casseroles se touchent ou touchent les parois du
four
• Mauvaise position du rack
• Taille de la casserole trop petite

46
Dépannage (suite)
• TABLE DE CUISSON
cuisson Causes possibles Solutions
commandes ne fonctionnent
pas.
le disjoncteur. Si le problème
cuisine"
service après-vente.
de fonctionnement, en particulier
est transparente ou semble
être de couleur rouge.
constater une teinte rouge dans les conditions
suivantes

47
Dépannage (suite)
• FOUR
Questions
cuisson
Causes possibles Solutions
pas
fermeture de la porte du four.
Le four ne cuit pas
Ne pas utiliser le bon produit de
cuisson ou la bonne position de la
grille du four
en mode Convention Bake.
disjoncteurs). Remettre le disjoncteur en marche. Si la
Le mode du four
et les commandes
peuvent pas être
La porte du four est ouverte. Fermer la porte du four. Le mode du four et les commandes
est ouverte.
Le ventilateur de
refroidissement
continue de
fonctionner après
refroidi
ne fonctionne pas
correctement
les doigts peut la faire griller.
Le voyant du four
La porte ne se ferme pas
complètement
Impossible de
retirer la protection
couvercle de la lentille.
minuterie ne
fonctionnent pas
correctement
porcelaine
par les grilles du four

48
Garantie
Ce que couvre cette garantie limitée :
La couverture de la garantie fournie par Forno Appliances dans
original (" Produit ") vendu au consommateur (" Acheteur ") par
Forno pendant les heures normales de travail.
Important
de quelque nature que ce soit, concernant les marchandises et/
garantie cosmétique de 30 jours
Cette couverture comprend :
•
• Chips
•
La garantie cosmétique ne couvre PAS :
•
•
•
Comment recevoir un service
Exclusions de la garantie : Ce qui n'est pas couvert.
•
•
•
•
•
•
produit.
•
une installation incorrecte du produit et/ou des accessoires
• Remplacement de pièces/appels de service pour connecter,
• Remplacement de pièces/appels de service pour fournir des
• Remplacement de pièces/appels de service pour corriger des
autre que celle qui est normale et habituelle pour un usage
• Remplacement de pièces/appels de service en raison de
• Remplacement des pièces/appels de service en cas de
•
incorrecte.
•
•
•
en charge les frais de transport et de livraison du produit

49
Garantie (suite)
IL N'EXISTE AUCUNE GARANTIE EXPRESSE AUTRE QUE CELLES ÉNUMÉRÉES ET DÉCRITES CI-DESSUS, ET AUCUNE GARANTIE, EXPRESSE OU
IMPLICITE, Y COMPRIS, MAIS SANS S'Y LIMITER, TOUTE GARANTIE IMPLICITE DE QUALITÉ MARCHANDE OU D'ADÉQUATION À UN USAGE PARTICULIER
QUI S'APPLIQUERAIT APRÈS LES PÉRIODES DE GARANTIE EXPRESSE INDIQUÉES CI-DESSUS, ET AUCUNE AUTRE GARANTIE EXPRESSE OU
GARANTIE DONNÉE PAR UNE PERSONNE, UNE ENTREPRISE OU UNE SOCIÉTÉ CONCERNANT CE PRODUIT NE SERA CONTRAIGNANTE POUR FORNO.
FORNO N'EST PAS RESPONSABLE DES PERTES DE REVENUS OU DE PROFITS, DE LA NON-RÉALISATION D'ÉCONOMIES OU D'AUTRES AVANTAGES, DE
L'ABSENCE AU TRAVAIL, DES REPAS, DE LA PERTE DE NOURRITURE OU DE BOISSONS, DES FRAIS DE VOYAGE OU D'HÔTEL, DES FRAIS DE LOCATION
OU D'ACHAT D'APPAREILS, DES FRAIS DE RÉNOVATION/CONSTRUCTION DÉPASSANT LES DOMMAGES DIRECTS INDÉNIABLEMENT CAUSÉS
EXCLUSIVEMENT PAR FORNO OU DE TOUT AUTRE DOMMAGE SPÉCIAL, ACCESSOIRE OU CONSÉCUTIF CAUSÉ PAR L'UTILISATION, LA MAUVAISE
UTILISATION OU L'INCAPACITÉ D'UTILISER CE PRODUIT, QUELLE QUE SOIT LA THÉORIE JURIDIQUE SUR LAQUELLE REPOSE LA RÉCLAMATION, ET
MÊME SI FORNO A ÉTÉ INFORMÉE DE LA POSSIBILITÉ DE TELS DOMMAGES. DE MÊME, LE MONTANT DE TOUT RECOUVREMENT À L'ENCONTRE
DE FORNO NE POURRA ÊTRE SUPÉRIEUR AU PRIX D'ACHAT DU PRODUIT VENDU PAR FORNO ET À L'ORIGINE DU DOMMAGE ALLÉGUÉ. SANS
PRÉJUDICE DE CE QUI PRÉCÈDE, L'ACHETEUR ASSUME TOUS LES RISQUES ET TOUTES LES RESPONSABILITÉS EN CAS DE PERTE, DE DOMMAGE
OU DE BLESSURE DE L'ACHETEUR ET DE SES BIENS, AINSI QUE D'AUTRES PERSONNES ET DE LEURS BIENS, RÉSULTANT DE L'UTILISATION, DE LA
MAUVAISE UTILISATION OU DE L'INCAPACITÉ D'UTILISER CE PRODUIT VENDU PAR FORNO ET NE RÉSULTANT PAS DIRECTEMENT D'UNE NÉGLIGENCE
DE LA PART DE FORNO CETTE GARANTIE LIMITÉE NE S'ÉTEND À PERSONNE D'AUTRE QUE L'ACHETEUR D'ORIGINE DE CE PRODUIT, N'EST PAS
TRANSFÉRABLE ET CONSTITUE VOTRE SEUL ET UNIQUE RECOURS.

50

51

11/2023
sigue las instrucciones, su aparato le proporcionará muchos años de buen servicio.
NÚMERO DE MODELO SERIE FFSEL6012-30 | FFSEL6012-30BLK | FFSEL6012-30WHT
MANUAL DE INSTRUCCIONES
COCINA ELÉCTRICA
ESPAGNOL

53
ÍNDICE DE CONTENIDOS
Atención al cliente 55
Advertencia 56
Seguridad importante 58
59
Panel de control 60
Instrucciones de uso
• Antes de usar la placa de cocción....................................
• Antes de usar el horno ....................................................
• Precalentamiento .............................................................
Modos de Horno:
• Hornear ....................................................................
• Asar ..........................................................................
Modos de Convección:
• Conv. Hornear ..........................................................
• Conv. Asar ................................................................
• Conv. Roast ..............................................................
61
61
62
63
64
65
66
66
Servicios de la gama
•
• Desmontaje de la puerta del horno ..................................
•
68
69
70
Solución de problemas 71
Garantía 74

54
NÚMERO DE MODELO SERIE
FFSEL6012-30 | FFSEL6012-30BLK | FFSEL6012-30WHT
COCINA ELÉCTRICA

55
Información sobre el producto Información de servicio
Número de modelo:
Utilice estos números en cualquier
correspondencia o llamada de
servicio relativa a su producto.
Si ha recibido un producto dañado,
póngase inmediatamente en contacto
con Forno.
Para ahorrar tiempo y dinero, antes
la guía de resolución de problemas.
Enumera las causas de pequeños
problemas de funcionamiento que
puedes corregir tú mismo.
Número de serie:
Fecha de compra:
Gracias por adquirir un producto Frono. Lea todo el manual de instrucciones antes de poner en funcionamiento su nuevo
con las prácticas de seguridad, las características, el funcionamiento y las recomendaciones de cuidado de su
fecha de compra.
Anote esta información a continuación para futuras consultas.
Atención al cliente
Servicios en Canadá y Estados Unidos
necesita en www.forno.ca.
Si no entiende algo o necesita más ayuda, visite nuestro sitio web o envíe un correo electrónico a: [email protected]
Si hay algún problema, póngase en contacto con el servicio de atención al cliente de FORNO. Tenga en cuenta que antes
de poder enviar a un proveedor de servicios será necesario solucionar el problema con un representante del servicio de
nosotros.
S/N:FFSEL6012-30/XXXXXXX
Número de modelo
Número de serie

56
ADVERTENCIA
POR SU SEGURIDAD
ADVERTENCIA
POR SU SEGURIDAD
Tu seguridad y la de los demás son muy importantes.
siempre todos los mensajes de seguridad.
Este es el símbolo de alerta de seguridad. Este símbolo le alerta de peligros potenciales que pueden
matarle o herirle a usted y a otras personas. Todos los mensajes de seguridad irán seguidos del
símbolo de alerta de seguridad y de las palabras "PELIGRO", "ADVERTENCIA" o "PRECAUCIÓN"
• Puede morir o resultar gravemente herido si no sigue inmediatamente las
instrucciones.
• Puedes morir o sufrir lesiones graves si no sigues las instrucciones.
• Situación potencialmente peligrosa que, si no se evita, puede provocar
lesiones leves o moderadas.
Todos los mensajes de seguridad le indicarán cuál es el peligro potencial, le indicarán cómo reducir la posibilidad de
PELIGRO
ADVERTENCIA
PRECAUCIÓN
ADVERTENCIA
estado de California como causante de cáncer y defectos de nacimiento u
otros daños reproductivos. Para más información, visite www.P65Warning.
ca.gov.

57
ADVERTENCIA
POR SU SEGURIDAD
Peligro de vuelco
• Un niño o un adulto pueden inclinar el campo de tiro y morir.
• Instale el soporte antivuelco en el suelo o en la pared siguiendo las instrucciones de
instalación.
• Deslice el telescópico hacia atrás de modo que la pata trasera del telescópico quede
encajada en la parte lenta del soporte antivuelco.
•
• No utilice la cocina sin el soporte antivuelco instalado y acoplado.
• El incumplimiento de estas instrucciones puede provocar la muerte o
quemaduras graves a niños y adultos.
Asegurarse de que el soporte antivuelco está instalado:
• Deslice el rango hacia adelante.
• Compruebe que el soporte antivuelco está bien sujeto al suelo y a la
pared.
• Deslice la cocina hacia atrás de modo que la pata trasera quede debajo
del soporte antivuelco.
Anti-Tip
Bracket
Range
Foot

58
ADVERTENCIA: Para reducir el riesgo de incendio, descarga
siga las precauciones básicas, incluyendo las siguientes:
• ADVERTENCIA: PARA REDUCIR EL RIESGO DE VUELCO
DE LA COCINA, ÉSTA DEBE ASEGURARSE MEDIANTE
DISPOSITIVOS ANTIVUELCO INSTALADOS CORRECTAMENTE.
PARA COMPROBAR SI LOS DISPOSITIVOS ESTÁN
INSTALADOS CORRECTAMENTE, DESLICE LA COCINA
COMPLETAMENTE HACIA DELANTE, BUSQUE EL SOPORTE
LA COCINA Y DESLICE LA COCINA COMPLETAMENTE HACIA
ATRÁS HASTA QUE EL PIE TRASERO DE LA COCINA ESTÉ
• ADVERTENCIA: NUNCA utilice este aparato como calefactor
para calentar o entibiar la habitación. De lo contrario, podría
sobrecalentamiento del horno.
• ADVERTENCIA:
del fondo del horno ni cubra una rejilla entera con materiales
pueden atrapar el calor, provocando un riesgo de incendio.
• PRECAUCIÓN:
en armarios situados encima de una cocina o en la protección
trasera de una cocina: los niños que se suban a la cocina para
• NO DEJE SOLOS A LOS NIÑOS -No deje a los niños solos
se les debe permitir sentarse o permanecer de pie en ninguna
parte del campo de tiro.
• Llevar ropa adecuada - Nunca se deben llevar prendas
• Mantenimiento por parte del usuario - No repare ni sustituya
•
• NO UTILICE AGUA en fuegos de grasa - Sofocar el fuego o
•
pueden producirse quemaduras por el vapor. No deje que el
soporte de la olla toque los elementos calefactores calientes.
No utilice una toalla u otro paño voluminoso.
• NO TOQUE LAS UNIDADES DE SUPERFICIE NI LAS
ZONAS CERCANAS A LAS UNIDADES - Las unidades de
orientadas hacia ella.
•
temperaturas - La ebullición produce humo y derrames de
grasa que pueden incendiarse.
• Utensilios de cocina vidriados - Sólo ciertos tipos de utensilios
vidriados son adecuados para el servicio en la encimera
de la cocina sin romperse debido a cambios bruscos de
temperatura.
• Los mangos de los utensilios deben girarse hacia dentro y
Instrucciones de seguridad importantes
Para reducir el riesgo de quemaduras, ignición de materiales
con el utensilio, el mango de un utensilio debe colocarse de
• Limpie la encimera de cocción con Precaución - Si se
quemaduras por vapor. Algunos limpiadores pueden producir
• PRECAUCIÓN: Al abrir la puerta, colóquese en el lateral de la
cocina y deje salir el aire caliente o el vapor antes de retirar o
volver a colocar los alimentos.
• No caliente recipientes de comida sin abrir. - La acumulación
de presión puede hacer estallar el recipiente y provocar
lesiones.
• Mantenga los conductos de ventilación del horno libres de
obstrucciones.
• Colocación de las rejillas del horno - Coloque siempre las
frío. Si es necesario mover la rejilla mientras el horno está
caliente, no deje que el soporte de la olla entre en contacto
con la rejilla caliente.
• NO TOQUE LOS ELEMENTOS CALEFACTORES NI LAS
SUPERFICIES INTERIORES DEL HORNO - Los elementos
calefactores pueden estar calientes aunque sean de color
a estas aberturas, las puertas del horno y las ventanas de las
puertas del horno.
• Instalación adecuada - La cocina, cuando se instala, debe
locales o, en ausencia de códigos locales, según el Código
Asegúrese de que la cocina está correctamente instalada y
•
aparato.
• El uso incorrecto de las puertas o cajones del aparato puede
provocar lesiones, como pisar, apoyarse o sentarse en las
puertas o cajones.
• Mantenimiento - Mantenga el área de la cocina despejada y
libre de materiales combustibles, gasolina y otros vapores y
• Para unidades con campana de ventilación
• Limpie las campanas de ventilación con frecuencia - No debe
•
encienda el ventilador.
LEA Y GUARDE ESTAS INSTRUCCIONES Advertencias de la
Proposición 65 del Estado de California: ADVERTENCIA: Este
producto contiene una o más sustancias químicas conocidas por el
Estado de California como causantes de cáncer. ADVERTENCIA:
Este producto contiene una o más sustancias químicas que, según
el Estado de California, causan defectos de nacimiento u otros
daños reproductivos.

59
1
2
5
3
4
6
8
7
10
11
9
12
14
15
16
13
Nombres de piezas y accesorios
Números
1
1200W
2
2200W
3 Panel de control
4Soporte antivuelco
5Placa de patada
6Quemador trasero derecho
1200W
7Quemador frontal derecho 2500W
Números
8Indicadores luminosos de
9Puerta del horno Ventana
10 Ventilación del horno
11 Elemento de asado
12
13 Elemento inferior (no visible)
14
15 Placa de modelo y número de
serie
16 Ventilador de convección
(Para la instalación del revestimiento negro)
(Para soporte antivuelco)

60
Panel de control
•
•
•
•
•
Hay 7 ajustes de horno para seleccionar.
Hay 8 ajustes de temperatura para elegir.
1
2 Hornear
3 Horneado por
convección
1 150 ºF
2 200 ºF
3 250 ºF
4 300 ºF
4 Ase
5 Asado por convección
6 Asado por convección
7 Descongelar
5 350 ºF
6 400 ºF
7 450 ºF
8 Asar (500 ºF)
A B C D E F G
Números
A
B
C Quemador trasero derecho
D Quemador frontal derecho
E Ajustes del horno
F Temperatura
G Indicador luminoso
Instrucciones de uso

61
se enciende y apaga en ciclos, incluso cuando está ajustada en HI, para evitar que el cristal de la placa se sobrecaliente.
•
pueden dejar depósitos al calentarse.
• Evite guardar tarros o latas encima de la placa de cocción. Dejar caer un objeto pesado o duro sobre la placa de
cocción podría agrietarla.
• Para evitar daños en la placa de cocción, no deje ninguna tapa caliente sobre la misma. Al enfriarse la encimera,
puede quedar aire atrapado entre la tapa y la encimera, y el vidrio cerámico podría romperse al retirar la tapa.
•
marcas permanentes
• No deslice utensilios de cocina o de horno sobre la placa de cocción. Los fondos de aluminio o cobre y los acabados
• No cocine palomitas en recipientes de aluminio preenvasados en la placa de cocción. Podrían dejar marcas de
aluminio que no pueden eliminarse por completo.
• No permita que objetos que puedan fundirse, como plástico o papel de aluminio, toquen ninguna parte de toda la
placa de cocción.
• No utilice la placa de cocción como tabla de cortar.
• No cocine alimentos directamente sobre la placa de cocción.
ANTES DE USAR
1.
2.
3.
menos 30 minutos. Apague los quemadores delanteros.
4. Repita el paso 3 pero colóquelo en los quemadores traseros y encienda el fuego en HI durante al menos 30 minutos.
Apague los quemadores traseros.
• Este procedimiento evapora los aceites protectores y la humedad acumulada durante el proceso de fabricación, y
permite que los circuitos electrónicos de control funcionen correctamente.
• Puede haber un ligero olor durante los primeros usos: es normal y se disipará.
•
ANILLOS DE COCCIÓN
La regla general con los utensilios de cocina es que el diámetro de los utensilios debe coincidir con el diámetro de los
2
elemento de cocción está
activamente caliente.
INDICADOR LUMINOSO DE SUPERFICIE CALIENTE
Instrucciones de uso (continuación)

62
HORNO
Este horno multifunción combina las funciones de los modos de horno tradicionales con las funciones de los modernos
modos de convección asistida por ventilador en un solo horno. Utilice el mando de control de la función de cocción,
situado en el panel de control, para seleccionar el modo de horno.
Colocación de la rejilla en su horno ANTES DE USARLO
1. Asegúrese de que el horno está cerca.
2. Gire el botón de función de cocción a Bake.
3. Gire el mando de la función de temperatura a 260°C (500°F).
4.
proteger el horno durante su almacenamiento.
5. IMPORTANTE: No coloque nada, incluyendo platos, papel de aluminio y bandejas de horno, en la parte inferior del
5
2
1
6
La mayoría de los
productos horneados (4y3)
Asar (2y1)
Tostar o asar (6y5)
4
3
5
2
1
6
4
3
Admite múltiplos (5-2)
Todo lo que sea más de 1", no será efectivo. Características de los utensilios de cocina
• Aluminio: se calienta y se enfría rápidamente. Freír, estofar, asar. Puede dejar marcas metálicas en el cristal.
• Hierro fundido: en una placa de cristal se calienta y se enfría lentamente, pero retiene el calor y cocina
uniformemente.
• Cobre: el estaño se calienta y se enfría rápidamente. Ideal para la cocina gourmet, salsas de vino y platos con huevo.
• Batería de cocina esmaltada: la respuesta depende del metal base. No se recomienda. Las imperfecciones del
esmalte pueden rayar la encimera.
• Vitrocerámica: se calienta y se enfría lentamente. No se recomienda. Calienta demasiado despacio. Las
imperfecciones del esmalte pueden rayar la encimera.
•
PRECALENTAMIENTO
Nota: Cuanto más alta sea la temperatura, más tiempo tardará en precalentarse. La temperatura real del horno será
superior a la temperatura programada para compensar el calor que se pierde al abrir la puerta del horno para colocar los
indicadora del panel de control. A continuación, puede abrir la puerta e introducir los alimentos en el horno.
Instrucciones de uso (continuación)

63
AJUSTES DEL HORNO
1. Hornear
la comida está hecha. • Utilice utensilios de metal para hornear (con o sin acabado antiadherente), vidrio resistente
al calor, vitrocerámica, cerámica u otros utensilios adecuados para el horno. •Para obtener mejores resultados, hornee
los alimentos en una sola rejilla con al menos 2,5 - 4 cm (1" - 1½") de espacio entre la bandeja y las paredes del
recomendada. Utilice bandejas para hornear con o sin bordes o moldes de gelatina. • Las sartenes de metal oscuro o con
recubrimiento antiadherente se cocinarán más rápido y se dorarán más. Los recipientes aislantes alargan ligeramente
el tiempo de cocción de la mayoría de los alimentos. • No utilice papel de aluminio ni bandejas de aluminio desechables
cacerolas. • Consulte Resolución de problemas para obtener consejos sobre cómo solucionar problemas de horneado y
asado.
Horno (continuación)
instrucciones de la receta o del alimento precocinado en cuanto a temperatura de horneado,
tiempo y posición de la rejilla. El tiempo de horneado variará en función de la temperatura de
los ingredientes y del tamaño, forma y acabado del utensilio de horneado. a temperatura
puede ajustarse entre 77°C (170°F) y 260°C (500°F).
Alimentos Posición de la
estantería
Temp. °F (°C)
(Horno precalentado) Tiempo (Min)
Magdalenas 2 350(175) 19-22
Tarta Bunt 1 350(175) 40-45
Comida de ángel 1 350(175) 35-39
92 375-400 (190-205) 45-50
congelada de 9 2 375(190) 68-78
2 350-375 (175-190) 8-10
Galletas con pepitas de
chocolate 2 350-375 (175-190) 8-13
Brownies 2 350(175) 29-36
2 375(190) 18-22
Panecillos de levadura 2 375-400 (190-205) 12-15
Galletas 2 375-400 (190-205) 7-9
Magdalenas 2 425 (220) 15-19
2 400-450 (205-235) 23-26
2 425 (246) 15-18
Tabla de cocción Función Horno:

64
2. Ase
NOTAS: Antes de asar, coloque la rejilla según sus necesidades
•
para drenar los jugos, lo que ayuda a evitar derrames y salpicaduras.
•
•
enrosque.
•
pescado, aves o carne.
•
• Coloque los alimentos sobre la rejilla de la bandeja de asar y, a continuación, colóquelos en el centro de la rejilla del
horno. Cierre la puerta del horno y ajuste el mando.
Horno (continuación)
de forma irregular de la carne, el pescado y las aves pueden cocinarse mejor a temperaturas
de asado más bajas. Consejos: La puerta del horno permanece cerrada durante el asado. Cuando inspeccione
los alimentos, abra la puerta del horno no más de 5 cm.).
Alimentación y grosor Posición de
la estantería
Ajuste del
grill. °F (°C)
Nivel de
Cocción
LADO 1
Tiempo
(Min)
LADO 2
Tiempo
(Min)
CARNE DE VACUNO
Filete (3/4"-1) 5 550 (290)
-Medio raro
-Medio
-Bien hecho
- (5 - 7)
- (6 - 8)
- (8 - 10)
- (4 - 6)
- (5 - 7)
- (7 - 0)
Hamburguesas (3/4"-1") 4 550 (290) -Medio
-Bien hecho
- (8 - 11)
- (10-13)
- (6 - 9)
- (8 - 10)
AVES DE CORRAL
Pechuga (con hueso) 4 450 (235) Bien hecho (10 - 12) (8 - 10)
Muslo (muy bien hecho) 4 550 (290) Bien hecho (28 - 30) (13 - 15)
CARNE DE CERDO
Chuletas de cerdo (1") 5 550 (290) Bien hecho (7- 9) (5 - 7)
Salchichas frescas 5 550 (290) Bien hecho (5 - 7) (3 - 5)
Loncha de jamón (½") 5 550 (290) Bien hecho (4 - 6) (3 - 5)
MARISCO
Filetes de pescado, 1" con
mantequilla 4 450 (235) Bien hecho (10 - 14) No gire
CORDERO
Chuletas (1") 5 550 (290)
-Medio raro
-Medio
-Bien hecho
- (5 - 7)
- (6 - 8)
- (7 - 9)
- (4 - 6)
- (4 - 6)
- (5 - 7)
PAN
Pan de ajo, rebanadas de 1 4
3550 (290) - (2 - 2:30)
- (4 - 6)

65
Horno (continuación) Horno (continuación)
AJUSTES DE CONVECCIÓN
Durante la cocción por convección, el ventilador hace circular el aire caliente por todo el horno. El movimiento del aire
humedad en el interior. Cuando el horno se ajusta a la función de Convección, los elementos de horneado y asado, y el
de convección.
1. Horneado por convección:
•
receta estándar en 25 °F (15 °C).
• Para obtener los mejores resultados, los alimentos deben cocinarse destapados, en cacerolas de poca altura para
•
de cristal resistentes al calor, para una reducción total de 30°C (50°F).
•
recipientes de metal oscuro.
•
• Los productos horneados, en su mayoría, se cocinan muy bien en convección. No intente convertir recetas como
convección. Utilice el modo de horneado normal para estos alimentos.
•
encima de otro. Para obtener mejores resultados, coloque los pasteles en la parte delantera de la rejilla superior y en
la parte trasera de la rejilla inferior. Deje un espacio de aire de 2,5 a 4 cm alrededor de las cacerolas.
1. Gire el mando de las funciones de cocción hasta la posición de horneado por convección.
2.
3. Puede abrir la puerta y colocar los alimentos en el horno.
2 en la parte delantera
2 en la parte trasera
"
En comparación con el ajuste HORNEADO, el Horneado por convección añade el uso
de ventilador(es) de convección para hacer circular el aire caliente. Por lo tanto, tanto la
temperatura como el tiempo de cocción pueden reducirse ligeramente.
Consejos: Cuando hornee por convección, reduzca la temperatura de horneado de su receta en 25°F.

66
2. Asado por convección
3. Gire el mando de las funciones de cocción hasta la posición BROIL convección.
4.
5.
6. Puede abrir la puerta y colocar los alimentos en el horno.
Directrices:
•Coloque la rejilla en la posición necesaria antes de encender el horno.
temperatura normal de asado.
•No precalentar el horno.
•Dar la vuelta a la carne a mitad de cocción. Consulte la tabla de asado por convección.
temperaturas más bajas.
Horno (continuación)
3. Asado por convección:
1. Gire el mando de las funciones de cocción al asado por convección.
2.
3. Puede abrir la puerta y colocar los alimentos en el horno.
Convection Broil añade el uso de ventilador(es) de convección para hacer circular el aire
caliente. Coloque la rejilla en el centro de la cavidad para facilitar la cocción nocturna.
Alimentación y grosor Posición de
la estantería
Ajuste del
grill. °F (°C)
Nivel de
Cocción
LADO 1
Tiempo
(Min)
LADO 2
Tiempo
(Min)
CARNE DE VACUNO
Filete (1½" o más) 4 450 (235)
-Medio raro
-Medio
-Bien hecho
- (9 - 12)
- (11 - 13)
- (18 - 20)
- (8 - 10)
- (10 - 12)
- (16 - 17)
Hamburguesas (más de 1") 4 550 (290) -Medio
-Bien hecho
- (8 - 11)
- (11-13)
- (5 - 7)
- (8 - 10)
AVES DE CORRAL
Cuartos de pollo 4 450 (235) Bien hecho (16 - 18) (10 - 13)
Mitades de pollo 3 450 (235) Bien hecho (25 - 27) (15 - 18)
Pechugas de pollo 4 450 (235) Bien hecho (13 - 15) (9 - 13)
CARNE DE CERDO
Chuletas de cerdo (1¼" o
más) 4 450 (235) Bien hecho (12 - 14) (11 - 13)
Salchichas frescas 4 450 (235) Bien hecho (4 - 6) (3 - 5)
Cuando ase por convección, cambie a la temperatura de asado normal. El tiempo de asado
debe ser un 15-30% inferior al de la cocción convencional. No es necesario precalentar el
horno para el Asado por convección.

67
Horno (continuación)
Alimentación y grosor Peso (Lb)
Temp.
horno . °F
(°C)
Posición
de la
estantería
Tiempo
(Min. Por Lb)
Interno
Temp. °F (°C)
CARNE DE VACUNO
Asado de costilla - 4 - 6 325 (160) 2 16-20
18-22
-145 (63) Medio crudo
-160 (71) medio
Rib Eye asado (deshuesado) - 4 - 6 325 (160) 2 16-20
18-22
-145 (63) Medio crudo
-160 (71) medio
Cuadril, Ojo, Punta, Solomillo
(deshuesado) - 3 - 6 325 (160) 2 16-20
18-22
-145 (63) Medio crudo
-160 (71) medio
Solomillo asado - 2 - 3 400 (205) 2 15-20 145 (63) Medio crudo
CARNE DE CERDO
Lomo asado (deshuesado o con
hueso) - 5 - 8 350 (205) 2 16-20 160 (71) medio
Hombro - 3 - 6 400 (205) 2 20-25 160 (71) medio
AVES DE CORRAL
Pollo entero- 3 - 4 375 (190) 2 18-21 180 (82)
Pavo, no relleno -
12 - 15
16 - 20
21 - 25
325 (160)
325 (160)
325 (160)
1
1
1
10-14
9-11
6 - 11
-180 (82)
-180 (82)
-180 (82)
Pechuga de pavo - 3 - 8 325 (160) 1 15-20 170 (77)
Comish Hen - 350 (205) 2 45-75
total 180 (82)
CORDERO
Media Pierna - 3 - 4 325 (160) 2 22 - 27
28 - 33
-160 (71) medio
Pierna entera - 6 - 8 325 (160) 1 22 - 27
28 - 33
-160 (71) medio
Directrices:
• No precalentar para el Asado por Convección.
•
• Al asar pollos enteros o pavos, colocar las alas detrás de la espalda y atar sin apretar las patas con hilo de cocina.
•
• Compruebe dos veces la temperatura interna de la carne o las aves introduciendo el termómetro para carne en otra
posición.
•
tiempo de asado para evitar que se doren demasiado.
• La temperatura mínima de seguridad para el relleno en aves de corral es de 165ºF (75ºC).
•

68
LIMPIEZA
IMPORTANTE: Antes de limpiar, asegúrese de que todos los mandos están apagados y de que el horno y la placa de
primero jabón, agua y un paño suave o una esponja, a menos que se indique lo contrario. No utilice productos de
SUPERFICIES EXTERIORES DE ESMALTE PORCELÁNICO
Los derrames de alimentos que contengan ácidos, como el vinagre y el tomate, deben limpiarse en cuanto se enfríe todo
el aparato. Estos derrames pueden afectar al acabado.
Limpiacristales, limpiador líquido suave o estropajo no abrasivo: Limpie suavemente alrededor de la placa de
modelo y número de serie, ya que el fregado puede eliminar los números.
ACERO INOXIDABLE EXTERIOR
NOTA: No utilice estropajos llenos de jabón, limpiadores abrasivos, crema abrillantadora para encimeras, estropajos de lana de acero, paños arenosos
o algunas toallas de papel. Pueden producirse daños, incluso con un uso único o limitado. Frotar en dirección del grano para evitar dañarlo.
Detergente líquido o limpiador multiusos: Aclare bien con agua limpia y seque con un paño suave que no suelte
pelusa.
Vinagre para las manchas de agua dura
EXTERIOR DE LA PUERTA DEL HORNO
Limpiacristales y toallitas de papel o estropajo de plástico no abrasivo: Aplique el limpiacristales sobre un paño
suave o una esponja, no directamente sobre el panel.
VITROCERÁMICA
IMPORTANTE: Para evitar dañar la placa de cocción, no utilice estropajos de acero, limpiadores abrasivos en polvo, lejía
comestibles.
1. Retire los restos de comida con una rasqueta. Para obtener los mejores resultados, utilice el rascador de encimera
mientras se raspa la encimera caliente.
•
los residuos. Será necesario aplicar presión para eliminar los residuos.
• Deje que la placa de cocción se enfríe completamente antes de proceder al paso 2.
2.
•
algo de presión para eliminar las manchas difíciles.
• Deje que el limpiador se seque hasta formar una neblina blanca antes de proceder al paso 3.
3. Lustre con un paño limpio y seco o una toalla de papel limpia y seca.
MANCHAS DE SARTENES CON FONDO DE ALUMINIO
Un paño humedecido en vinagre.
MANDOS DE CONTROL DE LA PLACA DE COCCIÓN
•
• Cuando sustituya los mandos, asegúrese de que están girados a la posición de apagado.
Agua y jabón o lavavajillas:
NOTA: No utilice estropajos de acero, limpiadores abrasivos ni limpiadores para hornos. No empapar los pomos.
Cuidado de la gama

69
PANEL DE CONTROL
Limpiacristales y paño suave o esponja: Aplique el limpiacristales sobre un paño suave o una esponja, no
directamente sobre el panel.
NOTA: No utilice limpiadores abrasivos, estropajos de lana de acero, paños arenosos ni toallitas de papel. Pueden producirse daños.
CAVIDAD DEL HORNO
Los derrames de alimentos deben limpiarse cuando el horno se enfríe. A altas temperaturas, los alimentos reaccionan
con la porcelana, por lo que pueden producirse manchas, grabados, picaduras o tenues manchas blancas.
Detergente suave y agua tibia.
NOTA: No utilice limpiadores para hornos.
Almohadilla de lana de acero
Para un uso normal del horno, no es necesario retirar la puerta del horno. No obstante, si fuera necesario desmontar
cristal. Para evitar que el cristal se rompa, utilice ambas manos y agarre sólo los laterales de la puerta del horno para
para abrirlas o cerrarlas.
Para quitar la puerta del horno:
1. Abra completamente la puerta del horno.
2. Levante el pestillo de la bisagra de cada lado.
3. Cierre la puerta del horno hasta el tope.
5. Continúe empujando la parte superior de la puerta para cerrarla mientras tira de la parte inferior de la puerta para
sacarla de los receptores de las bisagras en el marco de la puerta.
Cuidado de la gama (continuación)
Bisagra derecha

70
SUSTITUCIÓN DE LA LUZ DEL HORNO
1. Desconecta la alimentación.
2. Retire la cubierta de la bombilla tirando de ella hacia fuera de la abertura.
3. Retire la bombilla fundida del casquillo. NOTA: Para evitar daños o disminuir la vida útil de la bombilla nueva, no
toque la bombilla con los dedos desnudos. Utilice guantes o un pañuelo de papel para cambiar la bombilla.
4. Sustituya la bombilla y, a continuación, vuelva a colocar la tapa de la bombilla.
5. Vuelva a conectar la alimentación.
Volver a colocar la puerta del horno:
2. Abra lentamente la puerta del horno y sentirá cómo se encaja en su sitio.
3. Vuelva a colocar los pestillos de las bisagras en la posición de bloqueo.
4. Compruebe que la puerta se abre y se cierra libremente. Si no es así, repita la operación de retirar y volver a colocar la
puerta del horno.
Cuidado de la gama (continuación)
Derecha bisagra
ADVERTENCIA
Peligro de descarga eléctrica
• Asegúrese de que el horno y las luces están fríos y de que se ha desconectado la alimentación del horno antes de
sustituir la(s) bombilla(s).
• Las lentes deben estar colocadas cuando se utilice el horno. Las lentes sirven para proteger la bombilla de la
rotura.
• Las lentes son de cristal. Manipular con cuidado para evitar roturas.
•

71
Solución de problemas
• PROBLEMAS DE HORNEADO Y ASADO Antes de ponerse en contacto con el servicio de atención al cliente de
Forno, compruebe en la tabla siguiente los casos que pueden aplicarse a su caso. Puede ser un simple mal uso del
material, las formas y los tamaños de los utensilios de hornear lo que cause malos resultados.
Cuestiones de panadería Causas
Los alimentos se doran de forma desigual • Horno no precalentado
• Papel de aluminio en la rejilla o en el fondo del horno
• Utensilio de repostería demasiado grande para la
receta
• Las ollas se tocan entre sí o con las paredes del
horno
Comida demasiado marrón en el fondo • Horno no precalentado
oscurecido
• Posición incorrecta de la estantería
• Las ollas se tocan entre sí o con las paredes del
horno
• Horno no precalentado
oscurecido
• Posición incorrecta de la estantería
• Las ollas se tocan entre sí o con las paredes del
horno
Los alimentos se cuecen o asan demasiado despacio • Temperatura del horno demasiado alta
• Tiempo de cocción demasiado largo
• Puerta del horno abierta con frecuencia
está blanda
• Posición incorrecta de la estantería
• La temperatura del horno es demasiado baja
Pasteles pálidos, planos y no se pueden hacer por
dentro
• Temperatura del horno demasiado baja
• Tiempo de cocción incorrecto
• Tarta probada demasiado pronto
• Puerta del horno abierta con demasiada frecuencia
Tortas altas en el centro con grieta en la parte
superior
• Temperatura del horno demasiado alta
• Tiempo de cocción demasiado largo
• Las ollas se tocan entre sí o con las paredes del
horno
• Posición incorrecta de la estantería
Bordes de la masa demasiado dorados • Temperatura del horno demasiado alta

72
Solución de problemas (continuación)
• PLACA DE COCCIÓN
Cuestiones de panadería Posibles causas Soluciones
Las resistencias y los mandos
no funcionan.
Se ha fundido el fusible o se ha disparado el
disyuntor.
No hay electricidad en la placa de cocción.
disyuntor. Si el problema persiste,
electricista compruebe el suministro
Las resistencias no calientan
correctamente.
Seleccione los utensilios de cocina
adecuados. Ver "Utensilios de cocina"
Si el problema persiste, llame al
Los elementos calefactores se
apagan incluso cuando están
Los limitadores de temperatura de los
elementos calefactores desconectan
temporalmente los elementos por sobrepasar
Esta es una condición normal de
funcionamiento, especialmente
durante las operaciones de
calentamiento rápido. El elemento se
volverá a encender automáticamente
es transparente o parece de
color rojo.
chasis debido a su calidad transparente.
condiciones
Son propiedades normales de los
paneles de vidrio cerámico negro.

73
Solución de problemas (continuación)
• HORNO
Cuestiones de
panadería Posibles causas Soluciones
El horno no
calienta
No hay corriente en el horno
persiste, llama a un electricista.
El control del horno no está
encendido
Asegúrese de que la temperatura del horno
La puerta del horno no está
cerrada
Cierra la puerta del horno. Las resistencias se apagan al
abrir la puerta y permanecen apagadas hasta que se cierra
la puerta del horno.
El horno no cocina
uniformemente
horno correctas
Consulte las tablas de cocción para conocer la posición
de la receta en 25 °F (15 °C) cuando hornee con el modo
Convention Bake.
La pantalla del
horno permanece
apagada.
Interrupción del suministro
Desconecte la alimentación en la fuente de alimentación
principal (caja de fusibles o disyuntores). Vuelva a conectar
el disyuntor. Si el problema persiste, llame al servicio
Los controles
de modo y
temperatura
del horno no se
pueden ajustar.
La puerta del horno está abierta. Cierra la puerta del horno. Los controles de modo y
temperatura del horno no pueden ajustarse si la puerta del
horno está abierta.
El ventilador de
refrigeración
sigue funcionando
el horno
Los componentes electrónicos aún
El ventilador se apagará automáticamente cuando los
no funciona
correctamente
Bombilla suelta o fundida. Vuelva a insertar o sustituir la bombilla. Tocar la bombilla
con los dedos puede hacer que se queme.
permanece
encendida
La puerta no se cierra
completamente
Compruebe si hay obstrucciones en la puerta del horno.
Compruebe si la bisagra está doblada o si el interruptor de
la puerta está roto.
No se puede quitar
la tapa del objetivo
Acumulación de suciedad
alrededor de la tapa del objetivo.
seca antes de intentar retirar la tapa del objetivo.
El reloj y el
no funcionan
correctamente
No hay corriente en el horno Comprueba el disyuntor o la caja de fusibles de tu casa.
adecuada.
Cuando utilice el modo hornear, precaliente primero el
horno. Convection Bake y Convection Roast eliminarán
cualquier humedad en el horno.
Fichas de
porcelana
El interior de porcelana se golpea
con las rejillas del horno
Al retirar y volver a colocar las rejillas del horno, inclínelas
siempre hacia arriba y no las fuerce para evitar que se astille
la porcelana.

74
Garantía
Qué cubre esta garantía limitada:
La cobertura de la Garantía proporcionada por Forno Appliances
Forno original ("Producto") vendido al consumidor ("Comprador")
comprado e instalado en Estados Unidos o Canadá, y que siempre
ha permanecido dentro del país de compra original (Estados
Unidos o Canadá). La cobertura de la garantía se activa en la
fecha de la compra original al por menor del Producto y tiene una
duración de dos (2) años.
La cobertura de la garantía no es transferible. En caso de
activada con el documento original de compra al por menor.
Forno Appliances reparará o sustituirá cualquier componente o
compra original al por menor y en condiciones de uso residencial
ordinario y no comercial. La reparación o sustitución será gratuita,
incluida la mano de obra a tarifas estándar y los gastos de
envío. El Comprador es responsable de hacer que el Producto
Forno durante el horario normal de trabajo.
Importante
Conserve el comprobante de compra original para establecer el
período de garantía. La responsabilidad de Forno en cualquier
reclamación de cualquier tipo, con respecto a los bienes y/o
servicios prestados, no superará en ningún caso el valor de los
bienes o servicios o parte de los mismos que haya dado lugar a la
reclamación.
garantía cosmética de 30 días
El Comprador debe inspeccionar el producto en el momento de
de fabricación en materiales y mano de obra durante un período
de treinta (30) días a partir de la fecha de la compra original al por
menor del Producto.
Esta cobertura incluye:
• Manchas de pintura
• Fichas
• Defectos macroscópicos de acabado
La garantía cosmética NO cubre:
• Problemas derivados de un transporte, manipulación y/o
instalación incorrectos (por ejemplo: abolladuras, estructuras
o componentes rotos, alabeados o deformados, componentes
de cristal agrietados o dañados de cualquier otra forma);
• Ligeras variaciones de color en los componentes pintados/
esmaltados;
•
ubicación u otros factores análogos; > manchas/corrosión/
Cómo recibir el servicio
Para recibir los servicios de garantía, el Comprador debe
ponerse en contacto con el departamento de Asistencia de Forno
para determinar el problema y los procedimientos de servicio
necesarios. Será necesario que un representante del servicio de
atención al cliente resuelva el problema antes de seguir adelante
con el servicio. Se solicitará el número de modelo, el número de
serie y la fecha de compra original al por menor.
Exclusiones de la garantía: Lo que no está cubierto.
• Uso del Producto en cualquier aplicación comercial no
residencial.
•
• Servicios de reparación prestados por cualquier persona que
• Daños o servicios de reparación para corregir servicios
• Instalación no conforme con los códigos locales/estatales/de
de gas, códigos de fontanería, códigos de construcción, leyes
o reglamentos.
• Defectos o daños debidos a un almacenamiento inadecuado
del Producto.
•
fuera del embalaje original de fábrica o procedentes de
corregir una instalación incorrecta del Producto y/o accesorios
relacionados.
•
conectar, convertir o reparar de otro modo el cableado
correctamente el producto.
•
instrucciones e información sobre el uso del Producto.
•
corregir problemas derivados de un uso del producto distinto
del normal y habitual para uso residencial.
•
desgaste de componentes como juntas, pomos, soportes de
cacerolas, estantes, cestas para cubiertos, botones, pantallas
táctiles, encimeras de vitrocerámica rayadas o rotas.
•
de mantenimiento o mantenimiento inadecuado, incluidos,
decoloración, corrosión.
• Defectos y daños derivados de accidentes, alteraciones, uso
indebido, abuso o instalación incorrecta.
• Defectos y daños derivados del transporte, la logística y la
manipulación del producto. La inspección del producto debe
empresa de transporte cualquier problema derivado de la
manipulación, el transporte y la logística.
•
al control de Forno Appliances, incluidos, entre otros, el
viento, la lluvia, la arena, los incendios, las inundaciones, los
corrimientos de tierra, las temperaturas bajo cero, la humedad
subidas de tensión, los rayos, los fallos estructurales en torno
• Productos cuyo número de serie ha sido alterado/dañado/
manipulado. En ningún caso se considerará a Forno
responsable de los daños causados a la propiedad
circundante, incluidos muebles, armarios, suelos, paneles
y otras estructuras que rodeen al Producto. Forno no se
Comprador deberá correr con los gastos de transporte y

75
Garantía (continuación)
NO EXISTEN GARANTÍAS EXPRESAS DISTINTAS DE LAS ENUMERADAS Y DESCRITAS ANTERIORMENTE, NI GARANTÍAS EXPRESAS O IMPLÍCITAS,
INCLUIDAS, ENTRE OTRAS, LAS GARANTÍAS IMPLÍCITAS DE COMERCIABILIDAD O IDONEIDAD PARA UN FIN DETERMINADO QUE SE APLICARÁN
DESPUÉS DE LOS PERÍODOS DE GARANTÍA EXPRESA INDICADOS ANTERIORMENTE, Y NINGUNA OTRA GARANTÍA EXPRESA O GARANTÍA OFRECIDA
POR CUALQUIER PERSONA, EMPRESA O CORPORACIÓN CON RESPECTO A ESTE PRODUCTO SERÁ VINCULANTE PARA FORNO. FORNO NO SERÁ
RESPONSABLE DE LA PÉRDIDA DE INGRESOS O BENEFICIOS, DE LA IMPOSIBILIDAD DE REALIZAR AHORROS U OTROS BENEFICIOS, DEL TIEMPO DE
AUSENCIA DEL TRABAJO, DE LAS COMIDAS, DE LA PÉRDIDA DE ALIMENTOS O BEBIDAS, DE LOS GASTOS DE VIAJE U HOTEL, DE LOS GASTOS DE
ALQUILER O COMPRA DE ELECTRODOMÉSTICOS, DE LOS GASTOS DE REMODELACIÓN/CONSTRUCCIÓN QUE EXCEDAN DE LOS DAÑOS DIRECTOS
CAUSADOS INNEGABLEMENTE DE FORMA EXCLUSIVA POR FORNO O DE CUALQUIER OTRO DAÑO ESPECIAL, INCIDENTAL O CONSECUENTE
CAUSADO POR EL USO, MAL USO O IMPOSIBILIDAD DE USO DE ESTE PRODUCTO, INDEPENDIENTEMENTE DE LA TEORÍA LEGAL EN LA QUE SE
BASE LA RECLAMACIÓN, E INCLUSO SI FORNO HA SIDO ADVERTIDO DE LA POSIBILIDAD DE DICHOS DAÑOS. NI LA RECUPERACIÓN DE NINGÚN TIPO
CONTRA FORNO PODRÁ SER SUPERIOR AL PRECIO DE COMPRA DEL PRODUCTO VENDIDO POR FORNO Y CAUSANTE DEL DAÑO ALEGADO. SIN
PERJUICIO DE LO ANTERIOR, EL COMPRADOR ASUME TODO RIESGO Y RESPONSABILIDAD POR PÉRDIDAS, DAÑOS O LESIONES AL COMPRADOR Y
A LA PROPIEDAD DEL COMPRADOR Y A OTROS Y A SU PROPIEDAD QUE SURJAN DEL USO, MAL USO O INCAPACIDAD DE USO DE ESTE PRODUCTO
VENDIDO POR FORNO QUE NO SEA RESULTADO DIRECTO DE NEGLIGENCIA POR PARTE DE FORNO ESTA GARANTÍA LIMITADA NO SE EXTENDERÁ A
NADIE MÁS QUE AL COMPRADOR ORIGINAL DE ESTE PRODUCTO, NO ES TRANSFERIBLE Y ESTABLECE SU RECURSO EXCLUSIVO.

Customer Support: Call 1-866-231-8893 or email: [email protected]
-
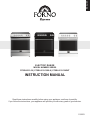 1
1
-
 2
2
-
 3
3
-
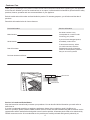 4
4
-
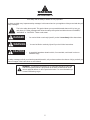 5
5
-
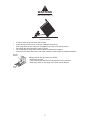 6
6
-
 7
7
-
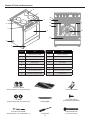 8
8
-
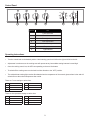 9
9
-
 10
10
-
 11
11
-
 12
12
-
 13
13
-
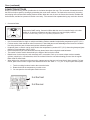 14
14
-
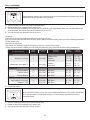 15
15
-
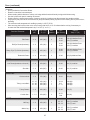 16
16
-
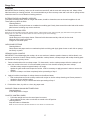 17
17
-
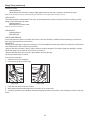 18
18
-
 19
19
-
 20
20
-
 21
21
-
 22
22
-
 23
23
-
 24
24
-
 25
25
-
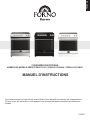 26
26
-
 27
27
-
 28
28
-
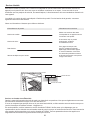 29
29
-
 30
30
-
 31
31
-
 32
32
-
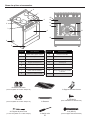 33
33
-
 34
34
-
 35
35
-
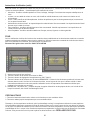 36
36
-
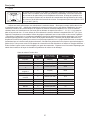 37
37
-
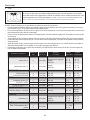 38
38
-
 39
39
-
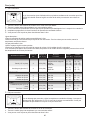 40
40
-
 41
41
-
 42
42
-
 43
43
-
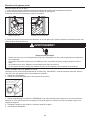 44
44
-
 45
45
-
 46
46
-
 47
47
-
 48
48
-
 49
49
-
 50
50
-
 51
51
-
 52
52
-
 53
53
-
 54
54
-
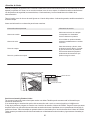 55
55
-
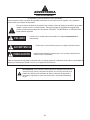 56
56
-
 57
57
-
 58
58
-
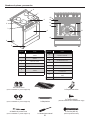 59
59
-
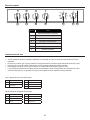 60
60
-
 61
61
-
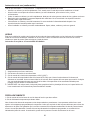 62
62
-
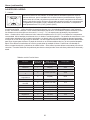 63
63
-
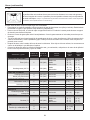 64
64
-
 65
65
-
 66
66
-
 67
67
-
 68
68
-
 69
69
-
 70
70
-
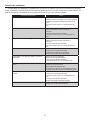 71
71
-
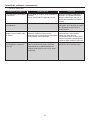 72
72
-
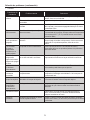 73
73
-
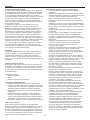 74
74
-
 75
75
-
 76
76


Forno FFSEL6012-30 Manual de usuario
- Categoría
- Cocinas
- Tipo
- Manual de usuario
en otros idiomas
- français: Forno FFSEL6012-30 Manuel utilisateur
- English: Forno FFSEL6012-30 User manual
Otros documentos
-
LG Electronics LDE3037SW El manual del propietario
-
LG LDE3037SW El manual del propietario
-
LG LSES302ST El manual del propietario
-
-
 Kenmore Elite 96043 Guía del usuario
-
 Kenmore Elite 72196043610 El manual del propietario
-
LG Electronics LRE3085ST Guía del usuario
-
-
LG Electronics LRE3083ST Guía del usuario
-
LG LRE3021ST/00 El manual del propietario

