Slime Pro-Series Flat Tire Repair Kit Manual de usuario
- Tipo
- Manual de usuario

ATTENTION! READ ALL INSTRUCTIONS CAREFULLY
FAILURE TO FOLLOW WARNING INSTRUCTIONS CAN RESULT IN FIRE,
PERSONAL INJURY OR PROPERTY DAMAGE.
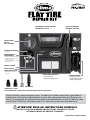
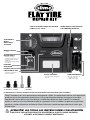
POWER SOURCE
• Plugs into 12 volt,
15 amp power outlet
• 9.84ft. (3m) length
TWIST TO CONNECT
SEALANT/ AIR HOSE
REPLACEABLE SLIME SEALANT
CARTRIDGE # 10179
SELECT MODE
AIR OR
AIR + SEALANT
LED DIGITAL GAUGE
• 0 - 99 PSI
PRESSURE RELEASE
• Deflates tire if it has too
much air
VALVE
DEPRESSOR*
PRESTA
VALVE
BALL INFLATABLES
* VALVE DEPRESSOR IS TO BE USED WITH ACCESSORY ADAPTERS (SEE PAGE 2)
Slime® provides a quick emergency repair. Treated tires should be repaired by a qualified tire
professional at the earliest opportunity to ensure safety and proper cleaning of tire pressure
sensor, if so equipped. We recommend treated tire be repaired within 3 days or 100 miles after
use of Slime Tire Sealant, whichever comes first. Advise tire professional of product use.
PART#50150 | REV011521ART
ADJUSTABLE LED LIGHT
• 350 Lumens for
nighttime emergencies
INFLATE RIGHT™
TECHNOLOGY
• Inflator automatically shuts
off when the set pressure
level is achieved
• Guarantees perfect pressure
with every use
LIGHT SWITCH
POWER SWITCH

CAUTION: HOT • DO NOT HOLD IN HAND WHILE OPERATING • PLACE INFLATOR ON A HARD,
CLEAN SURFACE.
1. DO NOT run vehicle while inflator is operating. You may need to be in “accessory” or
“on” position. Please make sure emergency brake is set and car is in park.
2. Always ensure the valve connector is fully seated to depress the core of the valve stem
for proper inflation.
2. DO NOT use inflator continuously for more than 10 minutes. Allow unit to cool
approximately 25 minutes between uses. Do not leave inflator unattended.
3. ALWAYS use a pressure gauge to check tire pressure. DO NOT overinflate.
4. Soft inflatables (i.e. rafts, balls, etc.) may not have recommended pressure markings.
Be careful not to inflate items beyond their capacity.
5. While operating, never block the inflator input or output.
6. Keep inflator out of reach of children.
7. For use with 12 volt DC power outlets rated 15 amps or higher. Do not use with older
8 amp cigarette lighter receptacles.
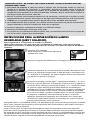
FLAT TIRE REPAIR (AIR + SEALANT) INSTRUCTIONS:
Check your tire warranty prior to installation of this product.
NOTE: Seals punctures up to 1/4 in. (6mm) in tread area for flat tire repair.
Correct tire pressure can be found in your vehicle’s owner’s manual or driver side doorjamb.
Screw air/sealant hose onto tire’s valve stem.
Select AIR + SEALANT.
NOTE: Lay Flat Tire Repair Kit on the ground facing
upward.
Plug inflator into 12 volt accessory power outlet. Do not run vehicle
while inflator is operating. Your vehicle may need to be in accessory or on.
Please make sure emergency brake is set and car is in park.
1
2
3
4
Drive two miles with speeds less than 25 miles per hour to disperse sealant throughout the tire,
allowing it to seek out and seal the puncture. Recheck tire pressure to verify that the puncture has been
sealed.
Slime® provides a quick emergency repair. Treated tires should be repaired by a qualified tire
professional at the earliest opportunity to ensure safety and proper cleaning of tire pressure sensor, if
so equipped. We recommend treated tire be repaired within 3 days or 100 miles after use of Slime Tire
Sealant, whichever comes first. Advise tire professional of product use.
To set the Inflate Right™ Technology, press the + or - buttons to desired
pressure. The gauge will flash three times and return to current tire
pressure. Holding the + or - button will enter into fast-setting mode. Hold
and press the power button for 3 seconds to initiate air/sealant mode.
Once in air/sealant mode, LED screen will flash three times. Press the
power button to start inflation. When the pressure gauge reaches the
pre-set value, the inflator will automatically stop inflation. Once desired
tire pressure is reached, disconnect the air hose and unplug the power
cord. The ON/OFF button can be used to override the pre-set pressure
value if required.

The PRESSURE RELEASE ensures optimum PSI pressure. Push the area to
deflate the tire if it has been overinflated, or if there is too much air prior
to inflation. Check your gauge for the desired PSI level. NOTE: Correct
tire pressure can be found in your vehicle’s owner’s manual or driver side
doorjamb.
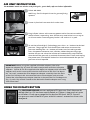
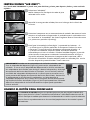
Fig. Y
IMPORTANT! When using the supplied inflatable adapters, the valve
depressor adapter (Fig. X) must be used in conjunction with the inflatable
adapters. Failure to use the supplied valve depressor adapter with inflatable
adapters will result in over-pressurization and failure of the Flat Tire Repair
Kit. To install, remove the valve depressor adapter assembly from the back
of the Flat Tire Repair Kit. Unscrew the Presta valve adapter and set aside.
Thread the valve depressor adapter into the air hose of the Flat Tire Repair Kit
(Fig. Y) until fully seated. Thread on the desired inflatable adapter until snug
and inflate item.
Fig. X
AIR ONLY INSTRUCTIONS:
The AIR ONLY mode can also be used for bicycles, sports balls, rafts and other inflatables.
Screw air/sealant hose onto tire’s valve stem.
Select AIR ONLY.
NOTE: Lay Flat Tire Repair Kit on the ground facing
upward.
Plug inflator into 12 volt accessory power outlet. Do not run vehicle
while inflator is operating. Your vehicle may need to be in accessory or
on. Please make sure emergency brake is set and car is in park.
1
2
3
4
To set the Inflate Right™ Technology, press the + or - buttons to desired
pressure. The gauge will flash three times and return to current tire
pressure. Holding the + or - button will enter into fast-setting mode.
Press the power button to start inflation. When the pressure gauge
reaches the pre-set value, the inflator will automatically stop inflation.
Once desired tire pressure is reached, disconnect the air hose and unplug
the power cord. The ON/OFF button can be used to override the pre-set
pressure value if required.
USING THE DEFLATE BUTTON

WARRANTY INFORMATION: www.slime.com/warranty
QUESTIONS OR COMMENTS: Call 1-888-457-5463 or visit www.slime.com
ITW Global Tire Repair • 125 Venture Drive, Suite 210, San Luis Obispo, CA 93401 USA
Slime® is a trademark of Illinois Tool Works, Inc., registered in the U.S. and other countries.
NOTE: If tire is totally deflated, it is possible that the tire could separate from the rim allowing air to
leak out when trying to inflate. In the event this situation occurs, you will have to jack up the tire prior
to inflation. Dispose of this product at an e-waste recycling collection point or facility. Do not place in
the trash or standard recycling receptacle.
TROUBLESHOOTING:
Inflator fails to operate when plugged in:
1. Check the power plug and push it firmly into the receptacle, twist back and forth..
2. Check receptacle and plug terminals for dirt, or debris. (Use a non-conductive probe, not fingers or
metal).
3. Check vehicle power outlet fuse. It should be 15 amps minimum.
4. Check the fuse. It may have blown: 12V fuse is located in the plug adaptor: unscrew the tip, remove
fuse, and inspect. If necessary, replace fuse with 15A 250V 5mm x 20mm.
5. Check to see if the pre-programmed INFLATE RIGHT digital gauge is set to a lower PSI than your tire
currently is reading (i.e., the digital gauge is set to 15psi but your tire is at 20psi; in this scenario, the
inflator will not turn on) and set the PSI to the correct tire pressure. Refer to Inflate Right™ Technology
operating instructions.
Inflator runs but does not inflate:
1. Be sure the air hose valve connector is fully secured on the tire valve.
2. Check tire for leaks, and check hose for breaks and leaks at fittings and check valve core for damage.
Inflator runs slowly:
1. The inflator may have overheated from excessive use. Shut it off and allow it to cool for 25 minutes.
2. The voltage may be too low. Check the condition of your vehicle’s battery.
Sealant cartridge refills available • PART# 10179
WARNING: HARMFUL OR FATAL IF SWALLOWED. IRRITANT TO SKIN AND EYES. Avoid
ingestion and inhalation. Avoid eye and skin contact. Wash hands after use. Use only as
directed. KEEP OUT OF REACH OF CHILDREN.
FIRST AID: In case of eye contact, rinse eyes for 15 minutes with cool water, lifting eyelids
occasionally. If on skin, wash with soap and water. If inhaled, seek fresh air. If ingested,
DO NOT INDUCE VOMITING; drink plenty of water and contact a physician or hospital.
Contains ethylene glycol and natural latex rubber.
Call ChemTel: +1-800-255-3924 or 1-813-248-0573
Reference product name: PART#50150 or #10179 V1D (Refill)
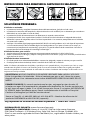
SEALANT CARTRIDGE REMOVAL INSTRUCTIONS:
21 4
Unwrap air/sealant hose. Lift cartridge cover. Pull cartridge out
horizontally.
Rotate cartridge to upright
position.
3

CARTUCHO REEMPLAZABLE DE SELLADOR
SLIME Parte No. 10179
SELECCIONE EL
MODO
AIRE O AIRE Y
SELLADOR
DEPRESOR DE
LA VÁLVULA*
VÁLVULA
PRESTA
PELOTA ARTÍCULOS
INFLABLES
* EL DEPRESOR DE LA VÁLVULA SE DEBE USAR CON LOS ADAPTADORES PARA ACCESORIOS (VEA LA PÁGINA 2)
¡ATENCIÓN! LEA TODAS LAS INSTRUCCIONES CON ATENCIÓN
SI NO SIGUE LAS INSTRUCCIONES DE ADVERTENCIA, PUEDE CAUSAR INCENDIO,
LESIONES A PERSONAS O DAÑOS MATERIALES.
Slime® funciona para una reparación de emergencia rápida. Se recomienda realizar una reparación
profesional con un experto en pinchaduras a la primera oportunidad para asegurar la correcta
limpieza del sensor de aire (en caso de que su vehículo cuente con este sistema). La recomen-
dación es realizar esta actividad dentro de los siguientes 3 días o 160kms (lo que ocurra primero)
posterior a haber utilizado el sellador de Slime. Informe al mecánico reparador de su llanta que
utilizó Slime.
FUENTE DE ENERGÍA
• Detector automático de
energía entre 12V
• 9.84ft. (3m) length
LUZ LED AJUSTABLE
• 350 Lumens para emergencias
de noche
MANGUERA DE AIRE/SELLADOR
CON CONEXIÓN DE ROSCA
MEDIDOR DIGITAL
• 0 - 99 PSI
LIBERACIÓN DE AIRE
• Desinfle el neumático si
excedió en inflado
TECNOLOGÍA
INFLATE RIGHT™
• El inflador se apaga
automáticamente cuando se
alcanza el nivel de presión
establecido
• Garantiza la presión perfecta
con cada uso
INTERRUPTOR DE LA LUZ
BOTON DE
ENCENDIDO

PRECAUCIÓN: CALIENTE • NO SOSTENGA CON LA MANO AL OPERAR • COLOQUE EL INFLADOR SOBRE UNA
SUPERFICIE FIRME Y LIMPIA.
1. NO PONGA EN MARCHA el vehículo cuando el inflador esté funcionando. Puede ser necesario
tenerlo en la posición de “accesorios” o “encendido.” Asegúrese de haber puesto el freno de
emergencia y de tener la palanca de cambios en la posición de estacionado “park.” Asegúrese
siempre de que el conector de la válvula quede bien asentado y baje el centro del vástago de la
válvula para inflar de la manera adecuada.
2. NO USE el inflador continuamente durante más de 10 minutos. Permita que la unidad se enfríe
aproximadamente 25 minutos entre cada uso. No deje solo el inflador mientras esté funcionando.
3. SIEMPRE use un manómetro para medir la presión de la llanta. NO INFLE excesivamente.
4. Los inflables blandos (balsas, pelotas, etc.) pueden no tener marcaciones de presión recomendada.
Tenga cuidado de no inflar los artículos por arriba de su capacidad.
5. Durante la operación, no bloquee la entrada ni la salida del inflador.
6. Mantenga el inflador lejos del alcance de los niños.
7. Para usarse con una alimentación eléctrica de 12 VCD y una corriente nominal de 15 A o mayor. No
use con las tomas antiguas para encendedores.
Maneje dos millas a una velocidad inferior a los 40 kilómetros (25 millas) por hora para esparcir el sellador
por la llanta y permitir que encuentre y selle el pinchazo. Revise nuevamente la presión de la llanta para
verificar que se selló el pinchazo.
Slime® funciona para una reparación de emergencia rápida. Se recomienda realizar una reparación
profesional con un experto en pinchaduras a la primera oportunidad para asegurar la correcta limpieza
del sensor de aire (en caso de que su vehículo cuente con este sistema). La recomendación es realizar esta
actividad dentro de los siguientes 3 días o 160kms (lo que ocurra primero) posterior a haber utilizado el
sellador de Slime. Informe al mecánico reparador de su llanta que utilizó Slime.
INSTRUCCIONES PARA LA REPARACIÓN DE LLANTAS
DESINFLADAS (AIRE Y SELLADOR):
Revise la garantía de su llanta antes de instalar este producto.
NOTA: Sella perforaciones de hasta 6 mm (1/4”) en la banda de rodamiento. La presión de la llanta
adecuada se encuentra en el manual del propietario del vehículo o en el panel de la puerta del lado del
conductor.
Atornille la manguera de sellador/aire en el vástago de la válvula de la llanta.
Seleccione “AIR + SEALANT.”
NOTA: Coloque Flat Tire Repair Kit sobre el piso
volteado hacia arriba.
Conecte el compresor en un tomacorriente de 12Volts. No mueva el auto
mientras el accesorio está operando. Es probable que el swith deba estar
en “accesorio” o “encendido”. Por favor asegúrese tener el freno de mano
y la palanca en posición P (Parking).
1
2
3
4
Configure la tecnología Inflate Right ™ apretando los botones – ó + para
designar la presión preferida. El compresor flasheará 3 veces y regresara a
la presión actual. Mantenga presionado el botón – ó + y entrará en modo
de selección rápida. Retenga presionado el botón de encendido por 3
segundos para iniciar el modo Aire/sellador. Una vez que el indicador led
del modo Aire/sellador flashea 3 veces. Presione el botón de encendido
para iniciar el inflado. Cuando el medidor llegue a la presión seleccionada,
el compresor se detendrá automáticamente. Al llegar a la presión
requerida, desconecte el compresor de la corriente y de la válvula del
neumático. El botón ON/OFF podrá ser utilizado para anular el valor de
presión preestablecido si fuera necesario.

La DESCARGA DE PRESIÓN asegura una presión óptima en pies por pulgada cuadrada (PSI).
Oprima para desinflar la llanta si está demasiado inflada o si tiene demasiado aire antes de
inflarla. Verifique el medidor para obtener el nivel deseado de PSI. NOTA: La presión adecuada
para las llantas se puede encontrar en el manual del propietario o en el marco de la puerta
del conductor.
¡IMPORTANTE! Cuando use los adaptadores de inflación incluidos, se debe
usar el adaptador del depresor (Figura X) junto con los adaptadores de
inflación. Si no se usa el adaptador del depresor de la válvula incluido con
los adaptadores de inflación, esto da lugar a demasiada presión y el Equipo
de reparación de llantas desinfladas no funciona. Para instalarlo, retire el
ensamble del adaptador del depresor de la válvula que se encuentra en la
parte posterior del Equipo de reparación de llantas desinfladas. Destornille
el adaptador de la válvula Presta y colóquelo a un lado. Atornille el
adaptador del depresor de la válvula en la manguera de aire del Equipo de
reparación de llantas desinfladas (Figura Y) hasta que quede bien asentado.
Atornille el adaptador de inflación deseado hasta que quede apretado e
infle el artículo.
INSTRUCCIONES “AIR ONLY”:
En el modo AIRE SOLAMENTE se puede usar para bicicletas, pelotas para deportes, balsas y otros artículos
inflables.
Atornille la manguera de sellador/aire en el vástago de la válvula de
la llanta.
Seleccione “AIR ONLY.”
NOTA: Coloque
Flat Tire Repair Kit
sobre el piso
volteado hacia arriba.
Conecte el compresor en un tomacorriente de 12Volts. No mueva el auto
mientras el accesorio está operando. Es probable que el swith deba estar
en “accesorio” o “encendido”. Por favor asegúrese tener el freno de mano
y la palanca en posición P (Parking).
Fig. X
Fig. Y
1
2
3
4
Configure la tecnología Inflate Right ™ apretando los botones – ó
+ para designar la presión preferida. El compresor flasheará 3 veces
y regresara a la presión actual. Mantenga presionado el botón – ó
+ y entrará en modo de selección rápida. Presione el botón de
encendido para iniciar el inflado. Cuando el medidor llegue a la presión
seleccionada, el compresor se detendrá automáticamente. Al llegar a
la presión requerida, desconecte el compresor de la corriente y de la
válvula del neumático. El botón ON/OFF podrá ser utilizado para anular
el valor de presión preestablecido si fuera necesario.
USANDO EL BOTÓN PARA DESINFLADO

INFORMACIÓN DE GARANTÍA: www.slime.com/warranty
PREGUNTAS O COMENTARIOS: Llamar al 1-888-457-5463 o visitar www.slime.com
ITW Global Tire Repair • 125 Venture Drive, Suite 210, San Luis Obispo, CA 93401 USA
Slime® es una marca registrada de Illinois Tool Works, Inc., registrada en Estados Unidos y en
otros países.
NOTA: Si la llanta está totalmente desinflada, es posible que esté separada del rin y éste permite que el aire se escape
cuando trata de inflarla. Si ocurre esta situación, puede ser necesario levantar la llanta con un gato para inflarla.
Deseche este producto en una instalación de recolección de residuos electrónicos. No lo coloque en la basura o en un
recipiente de reciclaje estándar
SOLUCIÓN DE PROBLEMAS:
El inflador no enciende:
1. Inspeccione el enchufe y empújelo firmemente dentro del tomacorriente, gírelo de un lado a otro.
2. Inspeccione las terminales del receptáculo y del enchufe en busca de suciedad. (Use un elemento que no conduzca
electricidad, no use los dedos ni nada de metal).
3. Inspeccione el fusible del tomacorriente. Este debe tener 15 amperios, como mínimo.
4. Inspeccione el fusible. Este se pudo haber fundido: El fusible de 12V está ubicado en el adaptador del enchufe:
destornille la punta del adaptador, retire el fusible e inspecciónelo. Si es necesario, reemplácelo con un fusible de
15A 250V 5mm x 20mm.
5. Verifique si el medidor digital preprogramado INFLATE RIGHT está configurado en un PSI más bajo de lo que tiene
su llanta actualmente (es decir, el medidor digital está configurado en 15 psi pero su llanta está en 20 psi; en
este escenario, el compresor no se enciende) y ajuste el PSI a la presión correcta de los neumáticos. Consulte las
instrucciones de funcionamiento de la tecnología Inflate Right ™.
El inflador funciona pero no infla:
1. Asegúrese de que el conector del compresor este correctamente conectado a la válvula de la llanta.
2. Revise la llanta en busca de fugas y cheque la manguera en busca de roturas y fugas en el accesorio y también revise
algún daño en la válvula
El inflador funciona lentamente:
1. El inflador puede estar sobrecalentado debido a uso excesivo. Apáguelo y espere 25 minutos para que se enfríe.
2. El voltaje puede ser demasiado bajo. Revise la condición de la batería de su vehículo.
Hay repuestos de cartucho de sellador disponibles • PARTE NO. 10179
ADVERTENCIA: NOCIVO O MORTAL SI SE INGIERE. IRRITANTE PARA LA PIEL Y LOS OJOS.
Evitar la ingestión o la inhalación. Evitar el contacto con ojos o piel. Lávese las manos
después de usar. Usar solamente como indica. MANTENER FUERA DEL ALCANCE DE LOS
NIÑOS.
PRIMEROS AUXILIOS: En caso de contacto con los ojos, enjuague los ojos durante 15
minutos con agua fría, levantando los párpados ocasionalmente. En caso de contacto con
la piel, lavar con agua y jabón. Si se inhala, busque aire fresco. Si se ingiere, NO PROVOCAR
EL VÓMITO, beber abundante agua y llamar inmediatamente el médico o el hospital.
Contiene el etilenglicol y el látex de caucho natural.
Llamar a ChemTel: +1-800-255-3924 o 1-813-248-0573 • Nombre de referencia del
producto: PART#50150 or #10179 V1D (repuesto)
INSTRUCCIONES PARA REMOVER EL CARTUCHO DE SELLADOR:
Desenrolle la manguera
de aire/sellador. Tire del cartucho en
dirección horizontal.
Levante la tapa del cartucho. Gire el cartucho hasta que
quede en posición vertical.
31 2 4
-
 1
1
-
 2
2
-
 3
3
-
 4
4
-
 5
5
-
 6
6
-
 7
7
-
 8
8


Slime Pro-Series Flat Tire Repair Kit Manual de usuario
- Tipo
- Manual de usuario
en otros idiomas
Artículos relacionados


Otros documentos
-
Vonroc CR505DC Manual de usuario
-
Craftsman 919.152360 El manual del propietario
-
-
Campbell Hausfeld CC2300 Guía del usuario
-
Campbell Hausfeld 12V INFLATOR W LIGHT 150 PSI AF010400 Instrucciones de operación
-
-
 Bon-Aire i8000 Guía del usuario
-
-
