
EN
DeVilbiss
®
Vacu-Aide
®
Compact Suction Unit
Instruction Guide
7310 Series
CAUTION–Federal (U.S.A.) law restricts this device to sale
by or on the order of a physician.
Assembled in the USA
Manual de instrucciones
de la unidad de succión
DeVilbiss
®
Vacu-Aide
®
Compact
Serie 7310
PRECAUCION–La legislación federal de los EE. UU.
restringe la venta de este dispositivo a médicos o por
prescripción médica.
Ensamblado en EE. UU.
Guide d’instructions de
l’Unité d’aspiration com-
pacte Vacu-Aide
®
DeVilbiss
®
Série 7310
ATTENTION-En vertu de la loi fédérale américaine, la
vente de cet appareil n’est autorisée que par un médecin
ou sur ordonnance de ce dernier.
Assemblé aux États-Unis
DE
DeVilbiss
®
Vacu-Aide
®
Kompaktes Absauggerät
Bedienungsanleitung
7310 Serie
VORSICHT – Laut US-Bundesgesetz darf dieses Gerät nur
von einem Arzt bzw. auf Anordnung eines Arztes verkauft
werden.
Gefertigt in den USA
Aspiratore compatto
DeVilbiss
®
Vacu-Aide
®
Guida dell’utente
Serie 7310
ATTENZIONE –La legge federale statunitense limita la
vendita di questo dispositivo ai medici o su loro
prescrizione.
Assemblato negli U.S.A.
Instructiehandleiding
DeVilbiss
®
Vacu-Aide
®
Compact afzuigeenheid
Model 7310
ATTENTIE– De federale wetgeving in de Verenigde Staten
schrijft voor dat dit apparaat uitsluitend mag worden
verkocht of voorgeschreven door een arts.
Gemonteerd in de Verenigde Staten
ES
FR
IT
NL
0044

EN - 2 A-7310
1
5
2
3
4
6
7
8
EN English ......................................................................................... EN-3
ES Español......................................................................................... ES-11
FR Français ....................................................................................... FR-20
DE Deutsch ........................................................................................ DE-29
IT Italiano ......................................................................................... IT-38
NL Nederlands ................................................................................... NL-47

EN - 3A-7310
TABLE OF CONTENTS
Figures ..................................................................................................................................................................... EN - 2
IEC Symbols ............................................................................................................................................................ EN - 3
Important Safeguards .............................................................................................................................................. EN - 3
International Travel .................................................................................................................................................. EN - 4
Introduction .............................................................................................................................................................. EN - 4
Important Parts ........................................................................................................................................................ EN - 4
Accessory/Replacement Items ................................................................................................................................ EN - 5
Set-Up ..................................................................................................................................................................... EN - 5
How to Operate Your Suction Unit .......................................................................................................................... EN - 5
Battery Charging .................................................................................................................................................... EN - 6
Battery Replacement ............................................................................................................................................... EN - 6
Cleaning Instructions ............................................................................................................................................... EN - 6
Maintenance ............................................................................................................................................................ EN - 7
Troubleshooting ....................................................................................................................................................... EN - 8
Specifications/Classifications .................................................................................................................................. EN - 8
Warranty .................................................................................................................................................................. EN - 9
DeVilbiss Guidance and Manufacturer’s Declaration .............................................................................................. EN - 9
IEC SYMBOLS
Attention, consult instruction guide Direct current
Consult instructions for use Alternating current
Standby - On/Off Type BF equipment-applied part
Center positive polarity indicator Manufacturer
IP12: Vertically falling water drops shall have no harmful effects when the enclosure is tilted at an angle
up to 15° on either side of the vertical.
This device contains electrical and/or electronic equipment that must be recycled per EU Directive
2012/19/EU- Waste Electrical and Electronic Equipment (WEEE)
IMPORTANT SAFEGUARDS
When using electrical products, especially when children are present, basic safety precautions should always be followed.
Read all instructions before using. Important information is highlighted by these terms:
DANGER–Urgent safety information for hazards that will cause serious injury or death.
WARNING–Important safety information for hazards that might cause serious injury.
CAUTION–Information for preventing damage to the product.
NOTE–Information to which you should pay special attention.
READ ALL INSTRUCTIONS BEFORE USING.
SAVE THESE INSTRUCTIONS
DANGER
To reduce the risk of electrocution:
1. Do not use while bathing.
2. Do not place or store product where it can fall or be pulled into a tub or sink.
3. Do not place in or drop into water or other liquid.
4. Do not reach for a product that has fallen into water. Unplug immediately.
WARNING
To reduce the risk of burns, electrocution, re or injury to persons:
1. Close supervision is necessary when this product is used by, on, or near children or physically incapacitated
individuals.
2. Use this product only for its intended use as described in this guide.

EN - 4 A-7310
3. Never operate this product if:
a. It has a damaged power cord or plug.
b. It is not working properly.
c. It has been dropped or damaged.
d. It has been dropped into water. Return the product to an authorized DeVilbiss service center for examination and
repair.
4. Keep the power cord away from heated surfaces.
5. Never use while drowsy or asleep.
INTERNATIONAL TRAVEL
The suction unit is equipped with an AC to DC Adapter/Charger allowing operation on any AC voltage (100-240 VAC, 47-63
Hz). However the correct power cord must be used to connect to adaptable wall power. Your unit is approved for use on
commercial aircraft; specic standards are listed in the Specications in this guide. Certicate is available upon request; if
needed, contact your provider for a copy of approval letter before travel.
NOTE-Check power cord for adaptability before using.
INTRODUCTION
Your DeVilbiss Suction Unit is a compact medical suctioning device which has been designed for reliable, portable
operation. Following the recommended operating and maintenance procedures outlined in this instruction guide will
maximize the life of this product.
Intended Use Statement
The device is to be used to remove uids from the airway or respiratory support system and infectious materials from
wounds. The device creates a negative pressure (vacuum) that draws uids through disposable tubing that is connected to
a collection container. The uids are trapped in the collection container for proper disposal. It is for use on the order of a
physician only.
Contraindications
The Vacu-Aide Compact Suction Unit should not be used for:
• thoracic drainage
• nasogastric suction
DANGER
The DeVilbiss Vacu-Aide is a vacuum suction device designed for the collection of nonammable uid materials in
medical applications only. Improper use during medical applications can cause injury or death. For all medical
applications:
1. All suctioning should be done in strict accordance with appropriate procedures that have been established by a
licensed medical authority.
2. Some attachments or accessories may not t the tubing supplied. All attachments or accessories should be checked
prior to use to assure proper t.
IMPORTANT PARTS
Inspect the suction unit and all parts before use.
1. Vacuum Regulator Knob (on side)
2. Bacteria Filter (non-sterile)
3. Vacuum Inlet Port (behind lter)
4. Display Panel (top of unit)
5. 725 ml Reusable Container with Lid/Elbow
Assembly
6. DC Power Input (on side)
7. Battery Door
8. Unit Carry Handle/Catheter Holder
9. 6’ (1.8m) Patient Tubing (not shown)
10. AC to DC Adapter/Charger (not shown)
11. 12V DC Power Cord (not shown)
12. High Capacity Rechargeable Battery (not
shown)
13. Carry Case with Shoulder Strap (not shown)
2
4
3
1
5
8
7
6

EN - 5A-7310
ACCESSORY/REPLACEMENT ITEMS
The following items can be purchased separately as accessories or replacement for your suction unit.
Description Part No. Description Part No.
Bacteria Filter (12 pack) 7305D-608 12V DC Power Cord 7304D-619
Battery Door 7310P-602 Line Cord - Hospital Grade USA 099HD-614
AC to DC Adapter/Charger 7305P-613 Line Cord USA 6710D-609
6’ Patient Tubing 6305D-611 Line Cord UK 7305P-630
Carrying Case w/Shoulder Strap 7310P-606 Line Cord EU 7305P-631
725 ml Reusable Container Pkg (Jar, Lid/
Elbow Assembly, Filter)
7310P-603
SET-UP
1. Your unit was shipped with the battery disconnected. Connect battery and charge before rst use. Refer to Battery
Replacement section for instructions.
2. Place clear side of lter labeled IN directly into container’s lid.
3. With lter attached to container, directly insert into the front port. Both the lter and the bottom support secure the
container to the unit (FIG. 1 & 2).
4. The 6’ (1.8m) patient tubing can now be connected to the container lid at the outlet labeled <Patient>.
5. Ensure that all connections are secure before use to prevent leaks.
6. Verify that the unit is at the desired suction level before beginning patient suctioning.
HOW TO OPERATE YOUR SUCTION UNIT
Control Panel Symbols
On/Off
External power: Supplied from AC or DC power cord. Illuminates in GREEN when power is supplied.
Battery charging: Illuminates in YELLOW. The light will go out when the battery is fully charged.
Low battery: illuminates in RED when battery reaches a discharge state.
mmHg
Suction level setting: Scale/strength illuminates in GREEN. This scale shows the level of suction strength
in mmHg.
Power Source Options
AC OPERATION - Plug the 90° power connector of AC to DC adapter/charger into DC power input (FIG 3) and attach the
line cord. Plug the other end of AC adapter into a grounded AC supply.
12V DC OPERATION - Plug the small 90° power connector of DC power cord into DC power input (FIG 3). Plug large end
of cord into 12V DC power receptacle of vehicle.
BATTERY OPERATION - Your unit is equipped with a high capacity rechargeable battery. For initial charge on new unit,
fully charge the battery for a minimum of 5 hours (see Battery Charging). To operate unit from the rechargeable battery,
ensure that no external power sources are plugged into the suction unit.
NOTE– During charging or operating, the power supply may become warm to touch; this is normal.
WARNING
If the unit does not receive external power or the battery has not been charged, the low battery indicator light will
remain on and the performance of the unit will drop rapidly. If Low Battery symbol lights, switch to another power
source to avoid an interrupted suction procedure.
How to adjust the vacuum level
1. Once power source is selected, turn the unit on by pressing the “On” button. The GREEN light, indicating external
power, will remain lit when external power is connected.
2. Occlude (block) the patient end of the tubing, then adjust vacuum level from 50-500 mmHG +/- 10% by turning the

EN - 6 A-7310
vacuum regulator knob clockwise to increase and counter-clockwise to decrease the vacuum (FIG 4). Release and
occlude once more to conrm setting. The desired level of vacuum can be viewed on the LED display.
NOTE–The LEDs have two brightness levels. As the vacuum level is adjusted, the LEDs will illuminate in progression.
When an LED is at half brightness, it indicates that the vacuum level is halfway between the previous fully lit LED and the
half brightness LED. EXAMPLE: If the 150 mmHg LED is fully illuminated and the 200 mmHg LED is at half brightness, the
suction level is 175 mmHg. When the 200 mmHg LED illuminates at full brightness, the unit has reached 200 mmHg.
3. Connect suction tip or catheter as appropriate.
NOTE– If the unit does not maintain vacuum, refer to Troubleshooting.
NOTE–Suctionceasesifliquidlevelreachesoatshut-offvalvelocatedonundersideofcontainerlid.
CAUTION–Further suctioning may cause damage to the vacuum pump and voids warranty. Equipment service is required
ifuidcontentisaspiratedbackintotheunit.
BATTERY CHARGING
The Vacu-Aide Compact series is equipped with a factory-installed high capacity rechargeable battery. Connect battery and
charge before rst use (refer to Battery Replacement).
1. Connect the unit to either an AC or DC power source.
2. The green external power light should illuminate; the yellow charge indicator will remain lit while the battery is
charging.
3. Ensure that the yellow charging light is illuminated when charging begins. As the battery nears a full charge, the
yellow battery charging light may ash for several minutes. This is normal. If your unit does not hold a charge, check
that the yellow light turns on when external power is applied with the power button “Off.” If problems persist, contact
your medical equipment provider.
NOTE–A fully discharged battery will require up to 5 hours (depending on depth of discharge) of charging to reach full
capacity.
If unit is not in use for extended periods, the battery should be recharged a minimum of every 6 months. A fully charged
battery will provide approximately 45-60 minutes of continuous operation at zero vacuum level (free ow).
CAUTION–Completely discharging the battery will shorten the battery life. Do not operate the unit for more than a few
minutes if the low battery indicator light is lit. Recharge the battery as soon as possible.
BATTERY REPLACEMENT
1. Using a coin or straight-blade screwdriver rotate latch to unlocked position (FIG. 5).
2. Remove door by pulling up on latch (FIG. 6).
3. Remove battery from compartment and unplug connector from circuit board (FIG. 7 & 8).
4. Install new battery by reversing the above steps.
5. Fully charge battery before using.
CLEANING INSTRUCTIONS
Collection Container:
NOTE–Elbow is permanently attached to the lid and cannot be removed.
1. Push power button to turn unit off. Wait for vacuum level to drop.
2. Disconnect external power source from input receptacle on unit (if applicable).
3. Remove container from unit by disconnecting the patient tubing and lter.
NOTE–The reusable collection container and lid are single-patient use and should be replaced every 1 to 2 months,
depending on use and cleaning method.
4. Collection containers and lids should be emptied and thoroughly cleaned after each use. Wash in a warm water/
dishwashing detergent solution and rinse with clean, warm tap water. Then soak with a commercial disinfectant or
one part vinegar (>=5% acetic acid concentration) to three parts warm water (131ºF-149ºF/55ºC-65ºC) solution for
60 minutes. Thoroughly rinse with warm tap water and air dry. NOTE: If using a commercial disinfectant, follow
manufacturer’s recommended instructions and dilution ratios carefully.
Suction Unit (single-patient use)
1. With the power “Off,” disconnect the unit from all external power sources.
2. Wipe the outside housing with a clean cloth dampened with commercial disinfectant/detergent (bacterial-germicidal).
CAUTION– Do not submerge suction unit in water; this will result in damage to vacuum pump.

EN - 7A-7310
Tubing (single-patient use)
1. Disconnect the tubing from the unit.
2. Rinse thoroughly by running warm tap water through it.
3. Follow by soaking in a solution of 1 part vinegar (>=5% acetic acid concentration) to 3 parts water
(131ºF-149ºF/55ºC-65ºC) for 60 minutes. Rinse with clean, warm water and air dry.
4. Keep the outer surface of the tubing clean by wiping with a clean, damp cloth.
Carrying Case (single-patient use)
1. Wipe the case using a clean cloth dampened with detergent and/or disinfectant.
NOTE– Disinfection information is based on AARC Clinical Practice Guideline Suctioning of the Patient in the Home.
Suction Unit (multi-patient use)
Device Cleaning and Disinfection When There is a Patient Change
When medical devices have already been used with a patient, contamination with human pathogenic germs should be
assumed (unless there is evidence to the contrary), and the next patient, user or third party should be protected by
appropriate handling and preparation. Therefore, when there is a patient change, people must be protected during the
transport and handling of the device and the device must be fully processed, i.e., cleaned and disinfected, by suitably
trained personnel before reuse to protect the next patient. The complete processing may only be done by the manufacturer
or by a qualied DeVilbiss provider/service technician.
NOTE – When the unit is used as per instructions under normal conditions the interior of the unit is protected from
exposuretopathogensbythein-linelteronthecollectioncontainer,hencenodisinfectionofinternalcomponentsis
necessary.
NOTE–Iftheunitisusedwithoutanin-linelterthentheinterioroftheunithasbeenexposedtopathogensandtheunit
cannot be disinfected.
NOTE–IfthefollowingprocessingoftheunitbyaqualiedDeVilbissprovider/technicianisnotpossible,theunitmustnot
be used by another patient!
DeVilbiss Healthcare recommends that at least the following procedures be carried out by the manufacturer or a qualied
third party between uses by different patients.
1. Dispose of all accessory components that are not suitable for reuse, i.e., collection container, lter, tubing and
carrying case.
2. With the power switch in the “Off” position, disconnect the DeVilbiss Suction Unit from all external power sources.
3. Visually inspect unit for any damage, missing parts, etc.
4. Wipe the housing with a clean cloth and a commercial (bacterial-germicidal) disinfectant that meets the requirements
listed in the NOTE below and is used as per the disinfectant manufacturer’s recommended dilution rates and
instructions.
CAUTION – Do not submerge in water as this will result in damage to the vacuum pump.
NOTE–Donotuseanycleanersordisinfectantsthatcontainammonia,benzeneand/oracetonetocleantheunit.
MAINTENANCE
Changing Filter & Replacing Container
1. Change the bacteria lter every 1 to 2 months OR immediately if overow occurs.
2. Remove the bacteria lter by disconnecting it from the suction unit and lid assembly.
3. Replace it with a new DeVilbiss bacteria lter # 7305D-608 (12 pack).
NOTE–Verifyclearsideofltermarked<In>facescontainer.
NOTE–UseonlythebacterialterprovidedbyDeVilbissHealthcareoroneofitsDistributors.Substitutionmayleadto
contaminationoftheunitand/orpoorperformanceandwillvoidwarranty.
4. Replace Collection Container every 1 to 2 months, depending on use and cleaning method.
NOTE– Use only DeVilbiss 725 ml reusable containers. Substitution may lead to poor performance and will void warranty.

EN - 8 A-7310
TROUBLESHOOTING
NOTE– Before you contact your equipment provider, follow Troubleshooting below:
DANGER
Electric shock hazard. Do not attempt to open or remove cabinet, there are no user-serviceable internal
components. If service is required, return the suction unit to a qualied DeVilbiss provider or authorized service
center. Opening or tampering with the unit will void the warranty.
NOTE– If problem is not resolved, contact your authorized equipment provider.
Problem Action
Unit does not power on. (Green external power
indicator should be illuminated when power is
applied.)
1. Check power sources and connections.
2. Ensure wall outlet is live by plugging in a lamp.
3. Check that battery is fully charged.
Pump runs, but no vacuum. 1. Check that all tubing is connected properly.
2. Check tubing connections for breaks, leaks, or occlusions.
3. Ensure that oat shut-off is not activated due to full container.
4. Check for leaks or cracks in container assembly.
Low vacuum. 1. Use vacuum adjustment knob to increase vacuum level.
2. Check system for leaks.
Battery will not hold a charge. 1. Conrm battery is connected (refer to Set-Up).
2. Verify that charge light turns on.
3. Check electrical connections during charging.
4. Ensure wall outlet is live by plugging in a lamp.
If problem continues, contact your equipment provider.
SPECIFICATIONS/CLASSIFICATIONS
Size...................................................7.25”H x 7.25”W x 6.75”D (18.4cm x 18.4cm x 17.1cm)
Weight ............................................................................ 3.375 lbs. (1.53 kg)
Electrical Requirements ..................................100-240 VAC 50/60 Hz 0.75 A max; 12 VDC, 33 W max
Vacuum Range...................................................................50-500 mmHG +/- 10%
Air Flow @ pump inlet:........................................................... 27 LPM (free flow) typical
(may be less when running from internal battery)
Collection Container Capacity .................................................................725 ml (cc)
Environmental Conditions
Operating Temperature Range.....................................................32°F (0°C) - 104°F (40°C)
Operating Relative Humidity.......................................................................0-95%
Operating Atmospheric Pressure ......................................... 10.2 Psi (70 kPA) - 15.4 Psi (106 kPA)
Storage & Transport Temperature Range ..........................................-40°F (-40°C) - 158°F (70°C)
Storage & Transport Relative Humidity ..............................................................0-95%
Storage & Transport Atmospheric Pressure.................................. 7.3 Psi (50 kPA) - 15.4 Psi (106 kPA)
Warranty
7310 Series ................................. Two-years limited, excluding internal battery and collection container
Internal Battery...............................................................................6 months
Approvals
IEC 601-1; IEC 68; CAN/CSA-C22.2 No. 601.1-M90; UL 2601-1, CE EN 60601-1-2, ISO10079-1:1999
Meets RTCA/DO-160E.....................................................DO-160E - section 21 Category M
(for battery operation only; commercial aircraft, airborne equipment)
Equipment Classifications
With respect to protection from electric shock ......................................Class I and internally powered
Degree of protection against electric shock..............................................Type BF Applied Parts
Degree of protection against ingress of liquids ...................................IP12 and ordinary power supply
Mode of Operation .........................................Intermittent Operation: 30 minutes on, 30 minutes off
Equipment not suitable for use in the presence of a ammable anesthetic mixture with air or with oxygen or nitrous
oxide.
ISO Classification
7310 Series - Electrically powered medical suction equipment for field and transport use according to ISO 10079-1 : 1999
High Flow/High Vacuum

EN - 9A-7310
TWO-YEAR LIMITED WARRANTY
The compressor portion of the DeVilbiss Vacu-Aide Compact Suction Unit 7310 Series (excluding internal rechargeable
battery and collection container) is warranted to be free from defective workmanship and materials for a period of two
years from date of purchase. Internal rechargeable batteries are warranted for 6 months. Any defective part(s) will be
repaired or replaced at DeVilbiss Healthcare’s option if the unit has not been tampered with or used improperly during that
period. Make certain that any malfunction is not due to inadequate cleaning or failure to follow the instructions. If repair is
necessary, contact your DeVilbiss Provider or DeVilbiss for instructions.
NOTE - Be sure to retain a dated proof of purchase document to verify unit is within 2-year warranty period.
NOTE - This warranty does not cover providing a loaner unit, compensating for costs incurred in rental while said unit is
under repair, or costs for labor incurred in repairing or replacing defective part(s).
THERE IS NO OTHER EXPRESS WARRANTY. IMPLIED WARRANTIES, INCLUDING THOSE OF MERCHANTABILITY
AND FITNESS FOR A PARTICULAR PURPOSE, ARE LIMITED TO THE DURATION OF THE EXPRESS LIMITED
WARRANTY AND TO THE EXTENT PERMITTED BY LAW. ANY AND ALL IMPLIED WARRANTIES ARE EXCLUDED.
THIS IS THE EXCLUSIVE REMEDY AND LIABILITY FOR CONSEQUENTIAL AND INCIDENTAL DAMAGES UNDER ANY
AND ALL WARRANTIES ARE EXCLUDED TO THE EXTENT EXCLUSION IS PERMITTED BY LAW. SOME STATES DO
NOT ALLOW LIMITATIONS ON HOW LONG AN IMPLIED WARRANTY LASTS, OR THE LIMITATION OR EXCLUSION
OF CONSEQUENTIAL OR INCIDENTAL DAMAGES, SO THE ABOVE LIMITATION OR EXCLUSION MAY NOT APPLY
TO YOU.
This warranty gives you specic legal rights, and you may also have other rights which vary from state to state.
Manufacturer’s Note
Thank you for choosing a DeVilbiss Vacu-Aide Compact Suction Unit. We want you to be a satised customer. If you have
any questions or comments, please send them to our address on the back cover.
For Service Call Your Authorized DeVilbiss Provider:
Phone ___________________________________________________________________
Purchase Date _____________________________________________________________
Serial # __________________________________________________________________
DEVILBISS GUIDANCE AND MANUFACTURER’S DECLARATION
WARNING
Medical Electrical Equipment needs special precautions regarding EMC and needs to be installed and put into
service according to the Electromagnetic Compatibility [EMC] information provided in the accompanying
documents.
Portable and Mobile RF Communications Equipment can affect Medical Electrical Equipment.
The equipment or system should not be used adjacent to or stacked with other equipment and that if adjacent or
stacked use is necessary, the equipment or system should be observed to verify normal operation in the
conguration in which it will be used.
NOTE– The EMC tables and other guidelines provide information to the customer or user that is essential in determining
the suitability of the Equipment or System for the Electromagnetic Environment of use, and in managing the
Electromagnetic Environment of use to permit the Equipment or System to perform its intended use without disturbing
other Equipment and Systems or non-medical electrical equipment.
Guidance and Manufacturer’s Declaration – Emissions All Equipment and Systems
This device is intended for use in the electromagnetic environment specied below. The customer or user of this device
should assure that it is used in such an environment.
Emissions Test Compliance Electromagnetic Enforcement – Guidance
RF Emissions
CISPR 11
Group 1
This device uses RF energy only for its internal function. Therefore, its RF
emissions are very low and are not likely to cause any interference in
nearby electronic equipment.
RF Emissions
CISPR 11
Class B
Radiated and Conducted
Emissions
This device is suitable for use in all establishments including domestic,
and those directly connected to the public low-voltage power supply
network that supplies buildings used for domestic purposes.
Harmonics
IEC 61000-3-2
Class A
Flicker
IEC 61000-3-3
Complies

EN - 10 A-7310
Immunity Test IEC 60601 Test Level Compliance Level Electromagnetic Environment - Guidance
Electrostatic
Discharge (ESD)
IEC 61000-4-2
±6kV contact
±8kV air
±6kV contact
±8kV air
Floors should be wood, concrete or ceramic
tile. If oors are synthetic, the relative humidity
should be at least 30%.
Electrical Fast
Transient/burst
IEC 61000-4-4
±2kV on AC Mains ±2kV on AC Mains
Mains power quality should be that of a typical
commercial or hospital environment.
Surge
IEC 61000-4-5
±1kV Differential
±2kV Common
±1kV Differential
±2kV Common
Mains power quality should be that of a typical
commercial or hospital environment.
Voltage dips, short
interruptions and
voltage variations
on power supply
input lines
IEC 61000-4-11
>95% Dip for 0.5 Cycle
60% Dip for 5 Cycles
30% Dip for 25 Cycles
>95% Dip for 5 Seconds
>95% Dip for 0.5 Cycle
60% Dip for 5 Cycles
30% Dip for 25 Cycles
>95% Dip for 5 Seconds
Mains power quality should be that of a typical
commercial or hospital environment. If the user
of this device requires continued operation
during power mains interruptions, it is
recommended that the device be powered from
an uninterruptible power supply or battery.
Power Frequency
50/60Hz Magnetic
Field
IEC 61000-4-8
3A/m 3A/m
Power frequency magnetic elds should be
that of a typical location in a typical commercial
or hospital environment.
Conducted RF
IEC 61000-4-6
3 Vrms from
150 kHz to 80 MHz
V1 = 3 Vrms
Portable and mobile RF communications
equipment should be separated from the
device by no less than the recommended
separation distances calculated/listed below:
D=(3.5/V1)√
P
Radiated RF
IEC 61000-4-3
3 V/m
80 MHz to 2.5 GHz
E1 = 3V/m
D=(3.5/E1)√
P
80 to 800 MHz
D=(7/E1)√
P
800 MHz to 2.5 GHz
Where P is the maximum power rating in watts
and D is the recommended separation distance
in meters.
Field strengths from xed transmitters, as
determined by an electromagnetic site survey,
should be less than the compliance levels (V1
and E1).
Interference may occur in the vicinity of
equipment containing a transmitter.
For transmitters rated at a maximum output power not listed above, the recommended separation distance D in meters
(m) can be estimated using the equation applicable to the frequency of the transmitter, where P is the maximum output
power rating of the transmitter in watts (W) according to the transmitter manufacturer.
Note 1: At 80 MHz and 800 MHz, the separation distance for the higher frequency range applies.
Note 2: These guidelines may not apply in all situations. Electromagnetic propagation is affected by absorption and
reection from structures, objects, and people.
Recommended Separation Distances Between Portable and Mobile RF Communications
Equipment and this device. This device and system are NOT Life-Supporting
This device is intended for use in the electromagnetic environment in which radiated disturbances are controlled. The
customer or user of this device can help prevent electromagnetic interference by maintaining a minimum distance
between portable and mobile RF Communications Equipment and the device as recommended below, according to the
maximum output power of the communications equipment.
Maximum Output
Power (Watts)
Recommended Separation Distances for the device (meters)
150 kHz to 80 MHz
D=(1.1667)√
80 to 800MHz
D=(1.1667)√
800 MHz to 2.5 GHz
D=(2.3333)√
0.01 0.11667 0.11667 0.23333
0.1 0.36894 0.36894 0.73785
1 1.1667 1.1667 2.3333
10 3.6894 3.6894 7.3785
100 11.667 11.667 23.333
For transmitters rated at a maximum output power not listed above, the recommended separation distance D in meters
(m) can be estimated using the equation applicable to the frequency of the transmitter, where P is the maximum output
power rating of the transmitter in watts (W) according to the transmitter manufacturer.
Note 1: At 80 MHz and 800 MHz, the separation distance for the higher frequency range applies.
Note 2: These guidelines may not apply in all situations. Electromagnetic propagation is affected by absorption and
reection from structures, objects, and people.
P P P

ES - 11A-7310
ÍNDICE
Figuras ..................................................................................................................................................................... EN - 2
Símbolos IEC .......................................................................................................................................................... ES - 11
Precauciones importantes ....................................................................................................................................... ES - 11
Viajes internacionales.............................................................................................................................................. ES - 12
Introducción ............................................................................................................................................................. ES - 12
Piezas importantes .................................................................................................................................................. ES - 13
Accesorios/Piezas de repuesto ............................................................................................................................... ES - 13
Instalación ............................................................................................................................................................... ES - 13
Cómo utilizar la unidad de succión ......................................................................................................................... ES - 13
Carga de la batería ................................................................................................................................................ ES - 14
Sustitución de la batería .......................................................................................................................................... ES - 14
Instrucciones de limpieza ........................................................................................................................................ ES - 15
Mantenimiento ......................................................................................................................................................... ES - 16
Resolución de problemas ........................................................................................................................................ ES - 16
Especificaciones/Clasificaciones ............................................................................................................................. ES - 17
Garantía ................................................................................................................................................................... ES - 17
Declaración del fabricante y guía de uso de DeVilbiss ........................................................................................... ES - 18
SÍMBOLOS IEC
Atención, consulte el manual de instrucciones Corriente alterna
Consulte las instrucciones de uso Corriente continua
En espera - Encendido / Apagado Utiliza piezas tipo BF
Indicador de polaridad positiva en el centro Fabricante
IP12: las gotas de agua que caigan sobre la carcasa verticalmente o con una inclinación de hasta 15º a
la derecha o a la izquierda respecto a la vertical no afectarán negativamente al equipo.
Este dispositivo contiene componentes eléctricos y/o electrónicos que se deben reciclar conforme a la
directiva de la EU 2012/19/EU relativa a residuos de aparatos eléctricos y electrónicos (RAEE).
PRECAUCIONES IMPORTANTES
Siempre que se utilicen aparatos eléctricos, especialmente en presencia de niños, se deben adoptar las medidas de
seguridad básicas. Lea todas las instrucciones antes de proceder al uso. La información importante se destaca mediante
estos términos:
PELIGRO: Información de seguridad urgente sobre situaciones peligrosas que pueden provocar lesiones
graves o incluso la muerte.
ADVERTENCIA: Información de seguridad importante sobre situaciones peligrosas que pueden provocar
lesiones graves
PRECAUCIÓN: Información para evitar ocasionar daños al producto
NOTA: Información a la que se debe prestar especial atención.
LEA TODAS LAS INSTRUCCIONES ANTES DE PROCEDER AL USO.
GUARDE ESTAS INSTRUCCIONES
PELIGRO
Para reducir el riesgo de electrocución:
1. No utilizar durante el baño.
2. No colocar ni guardar el producto en lugares en los que se pueda caer a una bañera o lavabo.
3. No colocar ni sumergir en agua ni ningún otro líquido.
4. No intentar recoger un producto que se haya caído al agua. Desenchufar inmediatamente.

ES - 12 A-7310
ADVERTENCIA
Para reducir el riesgo de quemaduras, electrocución, incendio o lesiones a las personas:
1. Une surveillance attentive est nécessaire lorsque ce produit est utilisé par, sur ou près d’enfants ou de personnes
handicapées.
2. Este producto sólo se debe utilizar para la función a la que está destinado y de la manera indicada en este manual.
3. No utilizar nunca el producto si:
a. El cable de alimentación o el enchufe están dañados.
b. No funciona correctamente.
c. Se ha caído o dañado.
d. Se ha caído al agua. Devuelva el producto a un centro de servicio autorizado por DeVilbiss para su examen y
reparación.
4. Mantenga el cable de alimentación alejado de supercies calientes.
5. No lo utilice nunca mientras duerme ni cuando tiene sueño.
VIAJES INTERNACIONALES
La unidad de succión está equipada con un adaptador/cargador de CA a CC que permite utilizarlo con cualquier voltaje de
CA (100-240 VCA, 47-63 Hz). No obstante, se debe utilizar un cable de alimentación adecuado para su conexión a un
enchufe. Su unidad ha sido aprobada para uso en aviones comerciales. Los estándares especícos se detallan en la
sección de especicaciones y declaración de este manual. Los certicados están disponibles para quien los solicite; si los
necesita, pida una copia de la carta de aprobación a su proveedor antes de viajar.
NOTA: Antes de proceder a su uso, compruebe si el cable de alimentación es el adecuado.
INTRODUCCION
La Unidad de succión DeVilbiss es un dispositivo médico de succión compacto, portátil y de gran abilidad. Siga los
procedimientos recomendados de mantenimiento y uso de esta guía de instrucciones para maximizar la vida útil de este
producto.
Uso para el que está destinado
El dispositivo se debe usar para eliminar uidos del sistema respiratorio y para eliminar materias infecciosas de heridas. El
dispositivo crea una presión negativa (vacío) que extrae los uidos a través de unos tubos desechables que están
conectados al contenedor de recolección. Los uidos quedan atrapados en el contenedor de recolección para una
eliminación adecuada. Se debe usar sólo bajo orden de un médico.
Contraindicaciones
La unidad de succión DeVilbiss Vacu-Aide Compact no se debe utilizar para:
• drenaje torácico
• succión nasogástrica
PELIGRO
La unidad de succión de DeVilbiss es un aparato de succión de vacío diseñado para recolectar uidos no
inamables en aplicaciones médicas solamente. El uso inapropiado durante las aplicaciones médicas puede
causar lesiones o incluso la muerte. Para todas las aplicaciones médicas:
1. Toda succión debe hacerse en apego estricto a los procedimientos apropiados que han sido establecidos por una
autoridad médica reconocida.
2. Algunos dispositivos o accesorios pueden no ser del tamaño del conducto provisto. Todos los dispositivos o
accesorios deben revisarse antes de usar para asegurar que se ajustan bien.

ES - 13A-7310
PIEZAS IMPORTANTES
Inspeccione la unidad de succión y todas las piezas antes del uso.
1. Botón de regulación de vacío (en el lateral)
2. Filtro antibacteriano (no estéril)
3. Toma de entrada de vacío (detrás del ltro)
4. Panel de visualización (parte superior de la
unidad)
5. Depósito reutilizable de 725 ml con conjunto
codo/tapa
6. Entrada de CC (en el lateral)
7. Tapa del compartimiento de la batería
8. Asa de transporte / soporte para catéter
9. Tubo para el paciente de 1,8 m (6 pies) (no
mostrado)
10. Adaptador/cargador de CA a CC (no mostrado)
11. Cable de alimentación de CC de 12V (no mostrado)
12. Batería recargable de gran capacidad (no mostrada)
13. Bolsa de transporte con correa para el hombro (no mostrada)
ACCESORIOS/PIEZAS DE REPUESTO
Las piezas siguientes de la unidad de succión se pueden adquirir por separado como accesorios o para sustitución.
Descripción Nº de ref. Descripción Nº de ref.
Filtro antibacteriano (paquete de 12) 7305D-608 Cable de alimentación de 12V CC 7304D-619
Tapa del compartimiento de la batería 7310P-602 Cable de corriente - Grado
hospitalario EE. UU.
099HD-614
Adaptador/cargador de CA a CC 7305P-613 Cable de corriente, EE. UU. 6710D-609
Tubo para el paciente de 1,8 m (6 pies) 6305D-611 Cable de corriente, Reino Unido 7305P-630
Maletín de transporte con correa para el hombro 7310P-606 Cable de corriente, UE 7305P-631
Paquete de depósito reutilizable de 725 ml
(Depósito, conjunto codo/tapa, ltro)
7310P-603
INSTALACIÓN
1. La unidad se envía con la batería desconectada. Antes del primer uso, conecte y cargue la batería. Consulte las
instrucciones de la sección Sustitución de la batería.
2. Coloque la parte transparente del ltro con la etiqueta IN directamente en la tapa del depósito.
3. Con el ltro conectado al depósito, insértelo directamente a la toma frontal. Tanto el ltro como el apoyo de la parte
inferior jan el depósito a la unidad (FIG. 1 y 2).
4. Seguidamente, se podrá conectar el tubo de 1,8 m (6 pies) a la salida de la tapa del depósito etiquetada <Patient>.
5. Compruebe que todas las conexiones estén bien aseguradas para evitar fugas.
6. Compruebe que la unidad esté ajustada al nivel de succión deseado antes de comenzar la succión con el paciente.
CÓMO UTILIZAR LA UNIDAD DE SUCCIÓN
Símbolos del panel de control
Encendido / Apagado
Alimentación externa: A través de un cable de alimentación de CA o CC. Al recibir corriente, se enciende
la luz verde.
Carga de la batería: Se enciende una luz AMARILLA. La luz se apagará cuando la batería esté
completamente cargada.
Batería baja: Se encenderá una luz ROJA cuando la batería esté descargada.
mmHg
Ajuste del nivel de succión: La escala/fuerza se ilumina en VERDE. Esta escala muestra el nivel de
succión en mmHg.
2
4
3
1
5
8
7
6

ES - 14 A-7310
Opciones de la fuente de alimentación
FUNCIONAMIENTO CON CA: Enchufe el conector de alimentación de 90° a la entrada de CC del adaptador/cargador de
CA a CC (FIG. 3) y conecte el cable de corriente. Conecte el otro extremo del adaptador de CA a un enchufe de CA con
toma de tierra.
FUNCIONAMIENTO CON 12V DE CC: Enchufe el conector pequeño de 90° de CC a la entrada de CC (FIG. 3). Enchufe
el extremo grande del cable a la toma de CC de 12V del vehículo.
FUNCIONAMIENTO CON BATERÍA: La unidad está equipada con una batería recargable de gran capacidad. En las
unidades nuevas, la batería se debe cargar completamente durante al menos 5 horas (consulte Carga de la batería). Para
utilizar la unidad con la batería recargable, asegúrese de que no se conecten fuentes de alimentación externas a la unidad
de succión.
NOTA: Durante la carga o el funcionamiento, la fuente de alimentación puede estar caliente al tacto; es normal.
ADVERTENCIA
Si la unidad no recibe alimentación externa o la batería no está cargada, el indicador luminoso de batería baja
permanecerá encendido y el rendimiento de la unidad se degradará rápidamente. Si el indicador luminoso de
batería baja se enciende, utilice otra fuente de alimentación para evitar que se interrumpa el proceso de succión.
Cómo ajustar el nivel de vacío
1. Una vez elegida la fuente de alimentación, pulse el botón de encendido para encender la unidad. El indicador
luminoso de alimentación externa VERDE permanecerá encendido mientras la alimentación externa esté conectada.
2. Obstruya (bloquee) el extremo del paciente del tubo y, a continuación, gire el botón de regulación de vacío para
ajustar el nivel entre 50-500 mmHG +/- 10%, en el sentido de las agujas de reloj para aumentar el nivel de vacío y
en el sentido contrario para reducirlo (FIG. 4). Libérelo y bloquéelo una vez más para conrmar el ajuste. El nivel de
vacío deseado se puede observar en los indicadores LED.
NOTA: Los indicadores LED tienen dos niveles de brillo. Al ajustar el nivel de vacío, los LED se encenderán en progresión.
Si un LED brilla con la mitad de intensidad, indica que el nivel de vacío está a la mitad entre éste y el LED anterior que
está iluminado por completo. EJEMPLO: Si el LED de 150 mmHg está iluminado por completo y el de 200 mmHg está a la
mitad, el nivel de succión será de 175 mmHg. Si el LED de 200 mmHg se ilumina por completo, la unidad habrá alcanzado
200 mmHg.
3. Conecte la punta de succión o el catéter, según corresponda.
NOTA: Si la unidad no mantiene el vacío, consulte la sección Resolución de problemas.
NOTA:Lasucciónseinterrumpesielniveldelíquidoalcanzalaválvuladedesconexiónotantesituadaenlaparte
inferior de la tapa del depósito.
PRECAUCIÓN: Sisesiguesuccionando,sepodrádañarlabombadevacíoyseanularálagarantía.Sieluidovuelvea
introducirse en la unidad, será necesario llevar el equipo al servicio técnico.
CARGA DE LA BATERÍA
La serie Vacu-Aide Compact está equipada con una batería recargable de gran capacidad instalada en fábrica. Antes del
primer uso, conecte y cargue la batería (consulte la sección Sustitución de la batería).
1. Conecte la unidad a una fuente de alimentación de CA o CC.
2. El indicador verde de alimentación externa debería encenderse; el indicador de carga amarillo seguirá encendido
mientras la batería se esté cargando.
3. Compruebe que la luz amarilla de carga esté encendida al comenzar la carga. Mientras la batería se aproxima a la
carga completa, la luz amarilla de carga de la batería puede encenderse intermitentemente durante varios minutos.
Es normal. Si la unidad no tiene carga, compruebe que el indicador luminoso amarillo se encienda al aplicar
alimentación externa con el botón de encendido/apagado en la posición de apagado. Si el problema persiste,
contacte con el proveedor del equipo médico.
NOTA: Para que una batería descargada por completo se cargue al máximo de su capacidad, se necesitan hasta 5 horas
(según el grado de descarga).
Si la unidad no se usa durante un largo período de tiempo, la batería se debe recargar al menos cada 6 meses. Una
batería completamente cargada permite un funcionamiento continuo durante aproximadamente 45-60 minutos con un nivel
de vacío de cero (ujo libre).
PRECAUCIÓN: Si la batería se descarga por completo, se reducirá su vida útil. Si el indicador luminoso de batería baja
está encendido, no utilice la unidad durante más de unos minutos. Recargue la batería lo antes posible.
SUSTITUCIÓN DE LA BATERÍA
1. Utilice una moneda o un destornillador de punta plana para girar la pestaña hasta la posición de desbloqueo (FIG. 5).
2. Tire hacia arriba de la pestaña para retirar la tapa (FIG. 6).
3. Extraiga la batería del compartimiento y desenchufe el conector de la placa de circuito (FIG. 7 y 8).
4. Para instalar la batería nueva, repita los pasos anteriores en el orden inverso.
5. Cargue por completo la batería antes del uso.

ES - 15A-7310
INSTRUCCIONES DE LIMPIEZA
Depósito de recolección
NOTA: El codo está permanentemente conectado a la tapa y no se puede retirar.
1. Pulse el botón de encendido/apagado para apagar la unidad. Espere a que descienda el nivel de vacío.
2. Desconecte la fuente de alimentación externa del receptáculo de entrada de la unidad (si procede).
3. Retire el depósito de la unidad, desconectando el tubo del paciente y el ltro.
NOTA: El depósito de recolección reutilizable y la tapa son para su uso por un único paciente, y se deben sustituir cada
1-2 meses, según el uso y el método de limpieza empleado.
4. Los depósitos de recolección y las tapas se deben vaciar y limpiar bien después de cada uso. Lávelos con una
solución de agua caliente jabonosa y aclárelos con agua caliente del grifo. A continuación, sumérjalos en un
desinfectante comercial o en una solución formada por de tres partes agua (55 °C-65 °C) caliente y una parte de
vinagre (concentración de ácido acético >=5%) durante 60 minutos. Enjuáguelos bien con agua caliente del grifo y
déjelos secar al aire. NOTA: Si utiliza un desinfectante comercial, siga cuidadosamente las instrucciones y las
proporciones de dilución recomendadas por el fabricante.
Unidad de succión (para uso de un solo paciente)
1. Apague la unidad y desconéctela de todas las fuentes de alimentación externas.
2. Limpie la carcasa exterior con un paño limpio humedecido en detergente/desinfectante comercial (bactericida-
germicida).
PRECAUCIÓN: No sumerja la unidad de succión en agua; si lo hace, dañará la bomba de vacío.
Tubos (para uso de un solo paciente)
1. Desconecte el conducto de la unidad.
2. Enjuague a fondo haciéndole pasar agua tibia del grifo.
3. A continuación, sumérjalo durante 60 minutos en una solución formada por una parte de vinagre (>=5%
concentración de ácido acético) y tres partes de agua (55 °C - 65 °C). Enjuáguelo con agua limpia y tibia y déjelo
secar al aire.
4. Mantenga la supercie exterior del conducto limpia usando un paño limpio y humedecido.
Estuche Portátil (para uso de un solo paciente)
1. Limpie el estuche portátil con un paño limpio humedecido con detergente y / o desinfectante.
NOTA: La información sobre desinfección está basada en la obra “AARC Clinical Practice Guideline Suctioning of the
Patient in the Home”.
Unidad de Succión (para uso de varios pacientes)
Limpieza y desinfección de la unidad cuando se realiza un cambio de un paciente a otro
Cuando ya se han utilizado dispositivos médicos con un paciente, se debe suponer que existe contaminación con
gérmenes patógenos (a menos que se pruebe lo contrario) y se debe proteger al próximo paciente, usuario o tercero a
través de una manipulación y una preparación adecuadas. Por lo tanto, cuando ocurra un cambio de pacientes se debe
proteger a las personas durante el traslado y la manipulación del dispositivo, y la unidad debe someterse a un proceso
completo de limpieza y desinfección, realizado por personal capacitado, antes de volver a utilizarlo con el n de proteger
al próximo paciente. El proceso completo debe ser realizado exclusivamente por el fabricante, un técnico de
mantenimiento o un proveedor de DeVilbiss capacitado.
NOTA – Si la unidad se utiliza conforme a las instrucciones en condiciones normales, el interior de la unidad está
protegidocontralaexposiciónaagentespatógenosporelltroenlíneadelrecipientederecolección,porlotanto,noes
necesario realizar una desinfección de los componentes internos.
NOTA–Silaunidadseutilizasinunltroenlínea,elinteriordelaunidadquedaexpuestoaagentespatógenosyla
unidad no puede desinfectarse.
NOTA – Si el siguiente proceso para la unidad no puede ser realizado por un técnico o un proveedor de DeVilbiss
calicado,launidadnodebeserutilizadaporotropaciente.
DeVilbiss Healthcare recomienda que al menos el siguiente procedimiento sea realizado por el fabricante o un tercero
calicado entre los usos por diferentes pacientes.
1. Deseche todos los accesorios que no sean aptos para volver a utilizar, en especial el recipiente de recolección, el
ltro, el tubo y el estuche para transporte.
2. Con el interruptor de corriente en la posición “Apagado”, desconecte la unidad de succión de DeVilbiss de todas las
fuentes de alimentación externas.
3. Inspeccione visualmente la unidad en busca de daños, piezas perdidas, etc.

ES - 16 A-7310
4. Limpie la cubierta con un paño limpio y un desinfectante comercial (antibacteriano-germicida) que cumpla con los
requisitos que se enumeran en la NOTA a continuación. Utilice el desinfectante conforme a las instrucciones y los
índices de dilución recomendados por el fabricante.
PRECAUCIÓN – No sumergir en agua, hacer esto dañará la bomba de vacío.
NOTA – No utilizar limpiadores ni desinfectantes que contengan amoníaco, bencina o acetona para limpiar la unidad.
MANTENIMIENTO
Limpieza del filtro y sustitución del depósito
1. Cambie el ltro antibacteriano cada 1 ó 2 meses O inmediatamente si se desborda.
2. Para extraer el ltro antibacteriano, desconéctelo de la unidad de succión y de la pieza de la tapa.
3. Sustitúyalo por un nuevo ltro antibacteriano DeVilbiss nº 7305D-608 (paquete de 12).
NOTA:Compruebequeelladotransparentedelltroconlamarca<In>estécolocadohaciaeldepósito.
NOTA:UtiliceúnicamenteltrosantibacterianosproporcionadosporDeVilbissHealthcareoporunodesusdistribuidores.
Siseutilizanotros,sepuedecontaminarlaunidady/odegradarelrendimiento,yseanularálagarantía.
4. Sustituya el depósito de recolección cada 1 ó 2 meses, en función del uso y del método de limpieza.
NOTA: Use solo recipientes reutilizables DeVilbiss de 725 ml. El uso de otros recipientes puede ocasionar un desempeño
decienteyanularlagarantía.
RESOLUCIÓN DE PROBLEMAS
NOTA: Antes de contactar con el proveedor del equipo, consulte los pasos para la resolución de problemas a
continuación:
PELIGRO
Peligro de de electrocución. No intente abrir ni extraer la caja, no contiene piezas cuya reparación o
mantenimiento pueda efectuar el usuario. Si fuese necesario efectuar alguna reparación, devuelva la unidad a un
proveedor o a un centro de servicio técnico autorizado por DeVilbiss. Si abre o altera la unidad, se anulará la
garantía.
NOTA: Si el problema no se resuelve, contacte con su proveedor de equipos autorizado.
Problema Acción
La unidad no se enciende. (El
indicador luminoso verde de
alimentación externa se debe
encender al aplicar corriente.)
1. Compruebe las conexiones y las fuentes de alimentación.
2. Enchufe una lámpara a la toma de la pared, para comprobar que haya corriente.
3. Compruebe que la batería esté completamente cargada.
La bomba funciona, pero no
hace vacío.
1. Compruebe que todos los tubos estén conectados correctamente.
2. Compruebe que las conexiones de los tubos no estén rotas ni tengan fugas u
obstrucciones.
3. Compruebe que la válvula de desconexión otante no se haya activado por estar
lleno el depósito.
4. Compruebe que no haya fugas ni grietas en las piezas del depósito.
Poco vacío. 1. Utilice le botón de ajuste de vacío para aumentar el nivel de vacío.
2. Compruebe si existen fugas en el sistema.
La batería no conserva la
carga.
1. Compruebe que la batería esté conectada (consulte la sección Instalación).
2. Compruebe que la luz de carga se encienda.
3. Compruebe las conexiones eléctricas durante la carga.
4. Enchufe una lámpara a la toma de la pared, para comprobar que haya corriente.
Si el problema continúa, contacte con el proveedor del equipo.

ES - 17A-7310
ESPECIFICACIONES/CLASIFICACIONES
Dimensiones.........................18,4 cm de alto x 18,4 cm de ancho x 17,1 cm de fondo (7,25” x 7,25” x 6,75”)
Peso ...............................................................................1,53 kg (3,375 lbs)
Requisitos eléctricos ................................... 100-240 VCA 50/60 Hz 0,75 A máx.; 12 VCC, 33 W máx.
Rango de vacío ................................................................de 50-500 mmHG +/- 10%
Flujo de aire en la entrada de la bomba:. ............................................27 LPM (flujo libre) normal
(puede ser menor si se utiliza con la batería interna)
Capacidad del depósito de recolección ..........................................................725 ml (cc)
Condiciones ambientales
Rango de temperatura de funcionamiento..........................................0 °C (32 °F) - 40 °C (104 °F)
Humedad relativa de funcionamiento................................................................0-95%
Presión atmosférica de funcionamiento.................................... 10,2 Psi (70 kPA) - 15,4 Psi (106 kPA)
Rango de temperatura para almacenamiento y transporte ..........................-40 °C (-40 °C) - 70 °C (158 °F)
Humedad relativa para almacenamiento y transporte ...................................................0-95%
Presión atmosférica para almacenamiento y transporte ........................ 7,3 Psi (50 kPA) - 15,4 Psi (106 kPA)
Garantía
7310 . . . . . . . . . . . . . . . . . . . . . . . . .Garantía limitada de 2 años, excluyendo la batería interna y el depósito de recolección
Batería interna ............................................................................... 6 meses
Aprobaciones
IEC 601-1; IEC 68; CAN/CSA-C22.2 No. 601.1-M90; UL 2601-1, CE EN 60601-1-2, ISO10079-1:1999
Cumple la norma RTCA/DO-160E...........................................DO-160E -Sección 21 Categoría M
(sólo para funcionamiento con batería; Equipo apto para uso en vuelo en aviones comerciales)
Clasificaciones del equipo
Relativas a la protección contra descargas eléctricas................................ Clase I y alimentación interna
Grado de protección contra descargas eléctricas ..........................................Utiliza piezas tipo BF
Grado de protección contra la entrada de líquidos ............................IP12 y fuente de alimentación normal
Modo de funcionamiento ...................Funcionamiento intermitente: 30 minutos encendido, 30 minutos apagado
Este equipo no resulta adecuado para ser utilizado en presencia de una mezcla anestésica inflamable con aire, con oxíge-
no o con óxido nitroso.
Clasificación ISO
Serie 7310 - Equipo de succión eléctrico para uso en lugares fijos y medios de transporte, conforme a la norma ISO
10079-1: 1999
Flujo y vacío elevados
GARANTÍA LIMITADA DE DOS AÑOS
La parte del compresor de la unidad de succión DeVilbiss Vacu-Aide Compact Serie 7310 (excluyendo la batería
recargable y el depósito de recolección) está garantizada frente a defectos de fabricación y materiales durante un período
de dos años a partir de la fecha de compra. El período de garantía de las baterías recargables internas es de 6 meses.
Todas las piezas defectuosas se repararán o reemplazarán (a elección de DeVilbiss Healthcare) si la unidad no ha sido
modicada ni se ha utilizado inadecuadamente durante dicho período. Asegúrese de que el funcionamiento incorrecto del
dispositivo no se deba a una limpieza inadecuada ni al incumplimiento de las instrucciones. Si fuese necesario reparar el
dispositivo, contacte con el proveedor de DeVilbiss o con el departamento de atención al cliente de DeVilbiss y solicite
instrucciones.
NOTA:Conserveundocumentodepruebadecompraquepermitavericarqueseencuentradentrodelperíodode
garantía de 2 años.
NOTA: Esta garantía no incluye el préstamo de otra unidad, ni la compensación de los costes en que se incurra por el
alquiler de otra unidad mientras la suya esté en reparación, ni los costes de mano de obra derivados de la reparación o la
sustitución de las piezas defectuosas.
NO EXISTE NINGUNA OTRA GARANTÍA EXPRESA. LAS GARANTÍAS IMPLÍCITAS, INCLUYENDO LAS DE
COMERCIABILIDAD Y ADECUACIÓN A UN FIN CONCRETO, ESTÁN LIMITADAS A LA DURACIÓN DE LA GARANTÍA
LIMITADA EXPRESA Y, EN LA MEDIDA EN QUE LA LEY LO PERMITA, TODAS Y CADA UNA DE LAS GARANTÍAS
IMPLÍCITAS QUEDAN EXCLUIDAS. ÉSTA ES LA ÚNICA GARANTÍA EXISTENTE Y LA ÚNICA RESPONSABILIDAD
QUE SE ASUMIRÁ POR DAÑOS INDIRECTOS O INCIDENTALES. TODAS LAS GARANTÍAS QUEDAN EXCLUIDAS EN
LA MEDIDA EN QUE LA LEY LO PERMITA. ALGUNOS ESTADOS NO PERMITEN LIMITACIONES A LA DURACIÓN DE
LA GARANTÍA IMPLÍCITA, NI LA LIMITACIÓN O EXCLUSIÓN DE DAÑOS INDIRECTOS O INCIDENTALES, POR LO
QUE ES POSIBLE QUE LA LIMITACIÓN O EXCLUSIÓN ANTERIOR NO SEA APLICABLE EN SU CASO.
Esta garantía le otorga derechos legales especícos. Puede disponer también de otros derechos según la legislación
local.

ES - 18 A-7310
Nota del fabricante
Gracias por elegir una unidad de succión DeVilbiss Vacu-Aide Compact. Queremos que usted sea un cliente satisfecho.
Si desea hacer alguna pregunta o comentario, envíenoslo a la dirección indicada en la cubierta posterior.
Para reparaciones, llame a su proveedor autorizado de DeVilbiss:
Teléfono_________________________________________________________
Fecha de compra___________________________________________________
Nº de serie________________________________________________________
DECLARACIÓN DEL FABRICANTE Y GUÍA DE USO DE DEVILBISS
ADVERTENCIA
Este equipo eléctrico médico exige el cumplimiento de unas medidas de precaución especiales de compatibilidad
electromagnética, y se debe instalar y reparar según la información de compatibilidad electromagnética
especicada en los documentos anexos.
Los equipos de comunicación de radiofrecuencia móviles y portátiles pueden afectar a los equipos eléctricos
médicos.
Este equipo o sistema no se debe utilizar junto o sobre otros equipos y, si fuera necesario hacerlo, se deberá
observar para comprobar que funciona con normalidad en la conguración con la que se esté utilizando.
NOTA: Tanto las tablas de compatibilidad electromagnética como el resto de instrucciones proporcionan una información
esencial al cliente o usuario que permitirá determinar la idoneidad del equipo o sistema en el entorno electromagnético
actual y adaptar este entorno electromagnético para permitir al equipo o sistema realizar la función a la que está destinado
sin alterar el funcionamiento de otros equipos y sistemas o de otros equipos eléctricos no médicos.
Declaración del fabricante y guía de uso: emisiones de todos los equipos y sistemas
Este dispositivo se ha diseñado para su uso en los entornos electromagnéticos especicados a continuación. Antes de
utilizar el dispositivo, el cliente o usuario debe comprobar que el entorno sea adecuado.
Prueba de emisiones Cumplimiento Cumplimiento electromagnético - Guía de uso
Emisiones RF
CISPR 11
Grupo 1
Este dispositivo utiliza energía de radiofrecuencia sólo para su
funcionamiento interno. Por tanto, sus emisiones de radiofrecuencia
son muy bajas y no es probable que cause interferencias en los
equipos electrónicos próximos.
Emisiones RF
CISPR 11
Clase B
Emisiones radiadas y
conducidas
Este dispositivo es apto para su uso en todo tipo de emplazamientos,
incluidas viviendas particulares y otros emplazamientos conectados
directamente con la red de suministro eléctrico de bajo voltaje
utilizada con nes domésticos.
Harmónicos
IEC 61000-3-2
Clase A
Parpadeo
IEC 61000-3-3
Cumple
Prueba de inmunidad
Nivel de prueba
IEC 60601
Nivel de
cumplimiento Entorno electromagnético - Guía de uso
Descarga
electroestática
IEC 61000-4-2
±6kV contacto
±8kV aire
±6kV contacto
±8kV aire
El suelo debe ser de madera, cemento o
azulejos. Si el suelo es sintético, la humedad
relativa debe ser de al menos el 30%.
Transitorios eléctricos
rápidos en ráfagas
IEC 61000-4-4
±2kV en CC ±2kV en CC
La calidad de la red eléctrica debe ser la típica
de un entorno hospitalario o comercial.
Sobretensión
IEC 61000-4-5
±1kV diferencial
±2kV común
±1kV diferencial
±2kV común
La calidad de la red eléctrica debe ser la típica
de un entorno hospitalario o comercial.
Caídas de voltaje,
breves interrupciones
y variaciones de
voltaje en líneas de
alimentación eléctrica
IEC 61000-4-11
>95% de caída
durante 0,5 ciclos
60% de caída
durante 5 ciclos
30% de caída
durante 25 ciclos
>95% de caída
durante 5 segundos
>95% de caída
durante 0,5 ciclos
60% de caída
durante 5 ciclos
30% de caída
durante 25 ciclos
>95% de caída
durante 5 segundos
La calidad de la red eléctrica debe ser la
habitual de un entorno hospitalario o
comercial. Si el usuario de este dispositivo
requiere un funcionamiento continuo durante
las interrupciones del suministro eléctrico, se
recomienda conectar el dispositivo a una
batería o una fuente de alimentación continua.

ES - 19A-7310
Prueba de inmunidad
Nivel de prueba
IEC 60601
Nivel de
cumplimiento Entorno electromagnético - Guía de uso
Campo magnético de
50/60 Hz de
frecuencia eléctrica
IEC 61000-4-8
3A/m 3A/m
Los campos magnéticos de frecuencia
eléctrica deben ser los habituales de un
entorno hospitalario o comercial.
RF conducida
IEC 61000-4-6
3 Vrms desde
150 kHz hasta 80 MHz
V1 = 3 Vrms
Los equipos de comunicación de
radiofrecuencia móviles y portátiles deben
mantenerse alejados del dispositivo a una
distancia no inferior a las distancias
recomendadas en la siguiente lista:
D=(3,5/V1)√
P
RF radiada
IEC 61000-4-3
3 V/m
Entre 80 MHz y 2,5 GHz
E1 = 3V/m
D=(3.5/E1)√
P
Entre 80 y 800 MHz
D=(7/E1)√
P
Entre 800 MHz y 2,5 GHz
Donde P es la potencia de salida máxima en
vatios y D la distancia de separación
recomendada en metros.
Las fuerzas de los campos de los
transmisores jos, como se determina en un
estudio de características electromagnéticas,
no debe ser inferior a los niveles de
cumplimiento (V1 y E1).
Se pueden producir interferencias en la
proximidad de equipos que contengan un
transmisor.
Para los transmisores con una potencia de salida máxima no incluidos anteriormente, la distancia de separación
recomendada (D) en metros (m) se puede estimar mediante la ecuación aplicable a la frecuencia del transmisor, donde
P es la potencia de salida máxima del transmisor en vatios (W), según el fabricante del transmisor.
Nota 1: a 80 MHz y 800 MHz, se aplica la distancia de separación para los intervalos de frecuencia más elevados.
Nota 2: es posible que estas pautas no se apliquen en todas las situaciones. La propagación electromagnética se ve
afectada por la absorción y reexión de estructuras, objetos y personas.
Distancias de separación recomendadas entre equipos de comunicación de radio-
frecuencia móviles y portátiles y este dispositivo. Este dispositivo y su sistema
NO están destinados a su uso como aplicaciones de soporte vital.
Este dispositivo está destinado a su uso en entornos electromagnéticos en los que las perturbaciones radiadas estén
controladas. Para evitar las interferencias electromagnéticas, el cliente o el usuario de este dispositivo pueden mantener
una distancia mínima entre equipos de comunicación de radiofrecuencia móviles y portátiles y el dispositivo según las
siguientes recomendaciones, según la potencia de salida máxima del equipo de comunicación.
Potencia de salida
máxima (vatios)
Distancias de separación recomendadas para el dispositivo (metros)
Entre 150 kHz y 80 MHz
D=(1,1667)√
P
Entre 80 y 800 MHz
D=(1,1667)√
P
Entre 800 MHz y 2,5 GHz
D=(2,3333)√
P
0.01 0,11667 0,11667 0,23333
0.1 0,36894 0,36894 0,73785
1 1,1667 1,1667 2,3333
10 3,6894 3,6894 7,3785
100 11,667 11,667 23,333
Para los transmisores con una potencia de salida máxima no incluidos anteriormente, la distancia de separación
recomendada (D) en metros (m) se puede estimar mediante la ecuación aplicable a la frecuencia del transmisor, donde
P es la potencia de salida máxima del transmisor en vatios (W), según el fabricante del transmisor.
Nota 1: a 80 MHz y 800 MHz, se aplica la distancia de separación para los intervalos de frecuencia más elevados.
Nota 2: es posible que estas pautas no se apliquen en todas las situaciones. La propagación electromagnética se ve
afectada por la absorción y reexión de estructuras, objetos y personas.

FR - 20 A-7310
TABLE DES MATIÈRES
Figures......................................................................................................... ............................................................ EN - 2
Symboles CEI .......................................................................................................................................................... FR - 20
Consignes de sécurité importantes ......................................................................................................................... FR - 20
Utilisation de l’appareil à l’étranger................................................ ......................................................................... FR - 21
Introduction .............................................................................................................................................................. FR - 21
Pièces principales ................................................................................................................................................... FR - 22
Accessoires et pièces de rechange ........................................................................................................................ FR - 22
Installation ............................................................................................................................................................... FR - 22
Mode d’emploi de l’unité d’aspiration ...................................................................................................................... FR - 22
Chargement de la batterie ....................................................................................................................................... FR - 23
Remplacement de la batterie .................................................................................................................................. FR - 24
Instructions de nettoyage ........................................................................................................................................ FR - 24
Entretien .................................................................................................................................................................. FR - 25
Guide de dépannage ............................................................................................................................................... FR - 25
Spécifications et classifications ............................................................................................................................... FR - 26
Garantie ................................................................................................................................................................... FR - 26
Recommandations et déclaration du fabricant pour DeVilbiss ............................................................................... FR - 27
SYMBOLES CEI
Attention, reportez-vous au guide
d’instructions
Courant continu
Consultez les instructions d’utilisation Courant alternatif
Veille - Marche/Arrêt Pièce appliquée de type BF
Voyant de polarité positive au centre Fabricant
IP12: Les chutes verticales de gouttes d’eau n’ont aucun effet nuisible pour une inclinaison de l’enceinte
jusqu’à 15° par rapport à la verticale.
Cet appareil contient des équipements électriques et/ou électroniques qui doivent être recyclés d’après la
directive 2012/19/EU relative aux déchets d’équipements électriques et électroniques (DEEE)
CONSIGNES DE SÉCURITÉ
IMPORTANTES
Lors de l’utilisation d’appareils électriques, respectez toujours les consignes de sécurité élémentaires, surtout en présence
d’enfants. Lisez toutes les instructions avant d’utiliser l’appareil. Les informations importantes sont signalées par les
mentions suivantes :
DANGER– Consigne de sécurité très importante sur un danger pouvant entraîner des blessures graves,
voire mortelles.
AVERTISSEMENT – Consigne de sécurité importante sur un danger pouvant entraîner des blessures graves.
ATTENTION – Précautions à prendre pour éviter d’endommager le produit.
REMARQUE – Informations auxquelles il convient de prêter une attention particulière.
LISEZ TOUTES LES INSTRUCTIONS AVANT D’UTILISER L’APPAREIL.
CONSERVEZ CES INSTRUCTIONS.
DANGER
Pour réduire les risques d’électrocution :
1. N’utilisez pas l’appareil en prenant un bain.
2. Ne le placez pas et ne l’entreposez pas dans un endroit où il pourrait tomber ou basculer dans une baignoire ou un
lavabo.

FR - 21A-7310
3. Ne le mettez pas/ne le faites pas tomber dans de l’eau ou tout autre liquide.
4. Ne touchez jamais un appareil qui est tombé dans l’eau. Débranchez-le immédiatement.
AVERTISSEMENT
Pour réduire les risques de brûlure, d’électrocution, d’incendie ou de blessures :
1. Une surveillance attentive est nécessaire lorsque ce produit est utilisé par, sur ou près d’enfants ou de personnes
handicapées.
2. Utilisez toujours ce produit uniquement dans le but pour lequel il a été prévu, tel que décrit dans ce guide.
3. Ne faites jamais fonctionner cet appareil si :
a. Le câble d’alimentation ou la che est endommagé(e).
b. Il ne fonctionne pas de façon adéquate.
c. Le produit est tombé ou celui-ci est endommagé.
d. Il est tombé dans de l’eau. Renvoyez le produit à un distributeur DeVilbiss agréé lorsqu’il doit être contrôlé et
réparé.
4. Éloignez le câble d’alimentation des surfaces chaudes.
5. N’utilisez jamais cet appareil lorsque vous somnolez ou que vous dormez.
UTILISATION DE L’APPAREIL À L’ÉTRANGER
L’unité d’aspiration est équipée d’un adaptateur/chargeur universel CA/CC permettant un fonctionnement sur toute tension
en CA (100-240 V c.a., 47-63 Hz). Il importe cependant d’utiliser le câble d’alimentation approprié pour le brancher dans
une prise murale. L’utilisation de cette unité d’aspiration est autorisée à bord d’avions commerciaux. Consultez les normes
spéciques dans la section Spécications et Déclaration du présent guide. Un certicat d’autorisation d’utilisation peut être
obtenu sur demande. Le cas échéant, contactez votre prestataire de soins pour obtenir une copie du certicat
d’autorisation avant tout voyage à l’étranger.
REMARQUE–Vériezl’adaptationducâbleàlasourced’alimentationavanttouteutilisation.
INTRODUCTION
Votre appareil d’aspiration DeVilbiss est un appareil médical compact d’aspiration qui a été conçu pour un fonctionnement
portable et able. Le respect des procédures d’utilisation et d’entretien mentionnées dans ce guide d’instructions
augmentera la durée de vie de ce produit.
Déclaration d’utilisation prévue :
L’appareil est destiné à aspirer les uides obstruant le système respiratoire et les substances infectieuses des plaies.
L’appareil crée une pression négative (aspiration) qui aspire les uides par un tube jetable relié à un récipient de collecte.
Les uides sont recueillis dans le récipient de collecte pour une élimination adéquate. L’appareil ne peut être utilisé que
sur ordonnance médicale.
Contre-indications
L’unité d’aspiration compacte Vacu-Aide DeVilbiss ne doit en aucun cas être utilisé dans les cas suivants :
• Drainage thoracique
• Aspiration nasogastrique
DANGER
L’unité d’aspiration DeVilbiss est un dispositif d’aspiration conçu pour recueillir des matières liquides
ininammables dans le cadre des applications médicales uniquement. Un usage abusif dans le cadre des
applications médicales risque d’entraîner des blessures corporelles voire la mort. Pour toutes les applications
médicales:
1. Toute aspiration doit être effectuée en stricte conformité avec les procédures appropriées qui ont été établies par
une autorité médicale homologuée.
2. Certains accessoires risquent de ne pas s’adapter sur les tubes fournis. Vérier l’ensemble des accessoires avant
toute utilisation pour vérier leur bonne adaptabilité.

FR - 22 A-7310
PIÈCES PRINCIPALES
Vériez l’état de l’unité d’aspiration et de l’ensemble des pièces avant toute utilisation.
1. Bouton du régulateur de vide (sur le côté)
2. Filtre antibactérien (non stérile)
3. Orice d’admission du vacuomètre (derrière le
ltre)
4. Afchage (sur l’unité)
5. Flacon collecteur réutilisable de 725 ml avec
ensemble couvercle/coude
6. Arrivée secteur CC (sur le côté)
7. Couvercle du compartiment de la batterie
8. Poignée de transport/support de la sonde
d’aspiration
9. Tuyau 6 pieds (1,8m) pour patient (non illustré)
10. Adaptateur/chargeur universel CA/CC (non
illustré)
11. Câble d’alimentation 12 Vcc (non illustré)
12. Batterie rechargeable haute capacité (non illustrée)
13. Sac de transport à bandoulière (non illustré)
ACCESSOIRES ET PIÈCES DE RECHANGE
Les pièces suivantes peuvent être achetées séparément comme accessoires ou comme pièces de rechange pour l’unité
d’aspiration.
Description N° pièce : Description N° pièce :
Filtre antibactérien (12 paquets) 7305D-608 Câble d’alimentation 12 Vcc 7304D-619
Couvercle du compartiment de la batterie 7310P-602 Câble d’alimentation- Qualité
hôpitaux (États-Unis)
099HD-614
Adaptateur/chargeur universel CA/CC 7305P-613 Câble d’alimentation États-Unis 6710D-609
Tuyau de 6 pieds (1,8 m) pour patient 6305D-611 Câble d’alimentation Royaume-Uni 7305P-630
Sac de transport à bandoulière 7310P-606 Câble d’alimentation CE 7305P-631
Ensemble acon collecteur réutilisable de 725 ml
(Flacon collecteur, ensemble couvercle/coude, ltre)
7310P-603
INSTALLATION
1. L’unité est expédiée sans batterie branchée. Branchez la batterie et chargez-la avant la première utilisation de
l’appareil. Reportez-vous à la section Remplacement de la batterie pour obtenir des instructions détaillées.
2. Placez le côté transparent du ltre marqué « IN » dans le couvercle du acon.
3. Une fois le ltre xé au acon collecteur, insérez-le dans l’orice avant de l’unité. La stabilité du acon collecteur sur
l’unité est assurée à la fois par le ltre et le support de xation inférieur (Fig. 1 et 2).
4. Le tuyau de 6 pieds (1,8 m) pour le patient peut alors être inséré dans le couvercle du acon collecteur sur la prise
marquée <Patient>
5. Vériez l’étanchéité de l’ensemble des raccordements avant toute utilisation de l’unité pour éviter les fuites.
6. Vériez que le réglage du niveau d’aspiration est adéquat avant de commencer l’aspiration sur le patient.
MODE D’EMPLOI DE L’UNITÉ D’ASPIRATION
Symboles du panneau de contrôle
Marche/Arrêt
Alimentation externe : fournie à l’unité à partir de la source d’alimentation CA ou du câble d’alimentation
c.c. Le voyant est VERT lorsque l’unité est alimentée.
Chargement de la batterie en cours : Le voyant est JAUNE. Le voyant s’éteint lorsque la batterie est
complètement chargée.
Batterie faible : le voyant est ROUGE lorsque la batterie est déchargée.
mmHg
Réglage du niveau d’aspiration : le voyant d’échelle graduée/puissance est VERT. Cette échelle afche le
niveau de puissance d’aspiration en mmHg.
2
4
3
1
5
8
7
6

FR - 23A-7310
Options de source d’alimentation
FONCTIONNEMENT AVEC ALIMENTATION CA – Branchez le connecteur 90°de l’adaptateur/chargeur universel CA/CC
dans l’entrée d’alimentation CC (g. 3) et raccordez le câble d’alimentation. Branchez l’autre extrémité de l’adaptateur CA
dans une source d’alimentation CA mise à la terre.
FONCTIONNEMENT AVEC ALIMENTATION Vcc – Branchez le petit connecteur 90°du câble d’alimentation CC dans l’entrée
d’alimentation CC (g. 3). Branchez l’extrémité la plus grande du câble d’alimentation dans la prise 12 Vcc du véhicule.
FONCTIONNEMENT DE LA BATTERIE - L’unité est équipée d’une batterie rechargeable haute capacité. Chargez
complètement la batterie d’une nouvelle unité pendant 5 heures au minimum (reportez-vous à la section Chargement de la
batterie). Pour faire fonctionner l’unité à partir de la batterie rechargeable, assurez-vous qu’aucune source d’alimentation
externe n’est branchée sur l’unité d’aspiration.
REMARQUE–Pendant le chargement de la batterie ou le fonctionnement de l’appareil, le bloc d’alimentation peut devenir
chaud.
AVERTISSEMENT
Si l’unité n’est pas alimentée par une source externe ou si la batterie n’est pas chargée, le voyant de batterie
faible reste allumé et le rendement de l’unité d’aspiration diminue rapidement. Si le voyant de batterie faible
s’allume, branchez l’appareil sur une autre source d’alimentation pour éviter toute interruption de la procédure
d’aspiration.
Réglage du niveau de vide
1. Une fois que la source d’alimentation est sélectionnée, appuyez sur le bouton « ON » pour démarrer l’unité
d’aspiration. Le voyant VERT, indiquant une source d’alimentation externe, est allumé tant que l’unité est connectée
à une source d’alimentation externe.
2. Bloquez l’extrémité du tuyau pour patient, puis réglez le niveau de vide de 50-500 mmHG +/- 10% en tournant le
bouton du régulateur de vide dans le sens horaire pour augmenter le niveau de vide et dans le sens antihoraire pour
le diminuer (g 4). Relâchez et occluez une fois de plus pour conrmer le réglage. Le niveau de vide souhaité est
afché au moyen de voyants DEL :
REMARQUE–Les voyants DEL ont deux niveaux de luminosité. Lors du réglage du niveau de vide, les voyants DEL
s’allumentprogressivement.Quandlaluminositéd’unvoyantestmoyenne,celasigniequeleniveaudevideaatteint
une valeur intermédiaire entre celle indiquée par le voyant précédent de luminosité forte et celle indiquée par le voyant de
luminosité faible. EXEMPLE : Si la luminosité du voyant indiquant 150 mmHg est forte et celle du voyant indiquant 200
mmHgestmoyenne,celasigniequelavaleurdel’aspirationestde175mmHg.Lorsquelevoyantquiindique200mmHg
s’illumine pleinement, le niveau de vide a atteint 200 mmHg. (et ainsi de suite avec les autres voyants).
3. Connectez l’extrémité de la sonde d’aspiration de façon appropriée.
REMARQUE–Sil’uniténemaintientpasleniveaudevidesouhaité,reportez-vousàlasectionDépannage.
REMARQUE–L’aspirationcessesileniveaudeliquideatteintlasoupaped’arrêtduotteursituéesouslecouvercledu
aconcollecteur.
ATTENTION–Touteaspirationau-delàdeceniveaupeutendommagerlapompeàvideetannulelagarantie.Ilimportede
réparerl’unitésilecontenuduaconcollecteurestrefouléversl’unité.
CHARGEMENT DE LA BATTERIE
La série d’unité d’aspiration compacte Vacu-Aide est équipée d’une batterie rechargeable haute capacité installée en
usine. Branchez la batterie et chargez-la avant d’utiliser l’unité la première fois (reportez-vous à la section Remplacement
de la batterie).
1. Branchez l’unité sur une source d’alimentation CA ou CC.
2. Le voyant vert d’alimentation externe s’allume. Le voyant de charge jaune est allumé pendant toute la durée du
chargement de la batterie.
3. Vériez que le voyant de charge jaune s’allume lorsque le chargement de la batterie commence. Lorsque la charge
est presque complète, il est normal que le voyant jaune clignote plusieurs minutes. Si l’unité ne tient pas la charge,
assurez-vous que le voyant jaune s’allume lorsque l’unité est branchée sur une source d’alimentation externe, le
bouton de mise en marche étant sur « Off » Si le problème persiste, contactez votre fournisseur d’équipement
médical.
REMARQUE–Lechargementd’unebatteriecomplètementdéchargéepeutprendrejusqu’à5heures(plusunebatterieest
déchargée plus il faut de temps pour la recharger) pour atteindresa capacité maximale.
Si l’unité n’est pas utilisée pendant une longue période, la batterie doit être rechargée au minimum tous les 6 mois. Une
batterie entièrement chargée a une autonomie de 45-60 minutes en fonctionnement continu de l’unité à un niveau de vide
de zéro (écoulement libre)
ATTENTION–Décharger complètement la batterie raccourcit sa durée de vie. Ne faites pas fonctionner l’unité plus de
quelques minutes si le voyant de batterie faible est allumé. Chargez une batterie déchargée dès que possible.

FR - 24 A-7310
REMPLACEMENT DE LA BATTERIE
1. Au moyen d’une pièce de monnaie ou d’une lame de tournevis plate tournez le loquet pour le déverrouiller (g.5)
2. Enlevez la porte en tirant le loquet vers le haut (g.6).
3. Enlevez la batterie du compartiment et débranchez le connecteur de la carte de circuits imprimés (g. 7 et 8).
4. Installez la batterie neuve en suivant les étapes ci-dessus dans l’ordre inverse.
5. Chargez complètement la batterie avant toute utilisation.
INSTRUCTIONS DE NETTOYAGE
Flacon collecteur
REMARQUE–Lecoudeestdénitivementxéaucouvercleetnepeutpasêtreenlevé..
1. Éteignez l’unité au moyen du bouton d’alimentation. Attendez que le niveau de vide baisse.
2. Débranchez la source d’alimentation externe de la prise d’entrée de l’unité (si applicable)
3. Retirez le acon collecteur de l’appareil en déconnectant le tube et le ltre.
REMARQUE–Leaconcollecteurréutilisableetsoncouverclesontconçuspourêtreutilisésparunseulpatientetdoivent
être remplacés tous les 1 ou 2 mois, en fonction de la fréquence d’utilisation et de la méthode de nettoyage.
4. Les acons collecteurs et les couvercles doivent être vidés et nettoyés soigneusement après chaque utilisation.
Lavez les acons et les couvercles dans une solution d’eau chaude et de détergent pour vaisselle, puis rincez-les
dans un premier temps à l’eau claire chaude du robinet. Laissez-les ensuite tremper dans un désinfectant
commercial ou dans une solution à un volume de vinaigre (concentration en acide acétique supérieure ou égale à 5
%) et trois volumes d’eau chaude (entre 55 et 65 °C) pendant une heure. Pour nir, passez-les soigneusement sous
l’eau chaude du robinet et laissez-les sécher à l’air libre. REMARQUE : Si vous utilisez un désinfectant commercial,
suivez scrupuleusement les instructions du fabricant ainsi que les taux de dilution recommandés.
Unité d’aspiration (usage unique)
1. Après l’avoir mise hors tension, débranchez l’unité de toutes sources d’alimentation externe.
2. Essuyez le boîtier avec un chiffon propre humide et un désinfectant/détergent commercial (antibactérien-germicide).
ATTENTION–N’immergezpasl’unitéd’aspirationdansl’eau,celaendommageraitlapompeàvide.
Tube (usage unique)
1. Débranchez le tuyau de l’unité.
2. Rincez soigneusement à l’eau chaude du robinet.
3. Ensuite, laissez tremper dans une solution composée d’un quart de vinaigre (concentration en acide acétique
supérieure ou égale à 5 %) et de trois quarts d’eau chaude (entre 55 et 65 °C) pendant 60 minutes. Rincez à l’eau
claire chaude et laissez sécher à l’air libre.
4. Conserver la surface extérieure de la tubulure propre en essuyant avec un chiffon propre et humide.
Mallette de transport (usage unique)
1. Nettoyer la mallette à l’aide d’un tissu propre imbibé de détergent et / ou de désinfectant.
REMARQUE– Les renseignements concernant la désinfection s’appuient sur les Instructions de pratiques cliniques pour
l’aspirationdepatientsàdomiciledel’AARC.
Unité d’aspiration (utilisation sur plusieurs patients)
Nettoyage et désinfection de l’appareil lorsqu’il y a changement de patient
Lorsqu’un appareil médical a déjà été utilisé avec un patient, il faut partir du principe qu’il y a eu contamination par des
germes pathogènes humains (sauf preuve du contraire). Par conséquent, le prochain patient, utilisateur ou tout autre tiers
doit être dûment protégé par une manipulation et une préparation adéquates. Ainsi, lors d’un changement de patient, les
personnes doivent être protégées au cours du transport et de la manipulation de l’appareil. Avant sa réutilisation par le
patient suivant, l’appareil doit être intégralement traité (c’est-à-dire nettoyé et désinfecté) par un personnel qualié.
L’ensemble du processus ne doit être effectué que par le constructeur, ou l’un des fournisseurs ou techniciens de
maintenance DeVilbiss.
REMARQUE – Lorsque l’unité est utilisée selon les instructions et sous des conditions normales, l’intérieur de l’unité est
protégécontrelesgermespathogènesgrâceaultreenlignesurlerécipientdecollecte;parconséquentiln’estpas
nécessaire de désinfecter les composants internes.
REMARQUE-Sil’unitéestutiliséesansunltreenligne,alorsl’intérieurdel’unitéauraétéexposéauxgermes
pathogènes et l’unité ne pourra pas être désinfectée.
REMARQUE - En cas d’impossibilité pour un fournisseur ou un technicien de maintenance DeVilbiss de suivre la
procédure complète détaillée ci-dessous, l’appareil ne doit pas être utilisé par un autre patient !

FR - 25A-7310
Voici les procédures minimales recommandées par DeVilbiss Healthcare, à faire effectuer par le constructeur ou un tiers
qualié, entre deux patients.
1. Mettez au rebut tous les composants jetables, notamment le récipient de collecte, le ltre, le tuyau et l’étui de
transport.
2. Après avoir placé l’interrupteur en position « Off », déconnectez l’unité d’aspiration DeVilbiss de toutes les sources
externes d’alimentation.
3. Inspectez visuellement tout dommage, pièce manquante, etc., sur l’unité.
4. Essuyez le logement avec un chiffon propre et un désinfectant commercial (bactérien-germicide) qui répond aux
exigences énumérées dans la REMARQUE ci-dessous et qui est utilisé selon les taux de dilution et les instructions
recommandés par le fabricant du désinfectant.
ATTENTION-Nepasimmergerl’unitédansl’eaucarcecirisqueraitd’endommagerlapompeàdépression.
REMARQUE-N’utilisezaucunproduitdenettoyageoudésinfectantcontenantdel’ammoniac,dubenzèneet/oude
l’acétone pour nettoyer l’unité.
ENTRETIEN
Remplacement du filtre et du flacon collecteur
1. Remplacez le ltre antibactérien tous les 1 à 2 mois OU immédiatement si un trop-plein se produit.
2. Retirez le ltre antibactérien en le débranchant de l’ensemble unité d’aspiration et couvercle.
3. Remplacez le ltre usé avec un ltre antibactérien neuf DeVilbisse réf. 7305D-608 (12 paquets)
REMARQUE-Veillezàpositionnerlecôtétransparentdultremarqué<In>ducôtéduaconcollecteur.
REMARQUE–UtilisezuniquementleltreantibactérienfourniparleprestataireDeVilbissHealthcareoul’undeses
distributeurs.Toutesubstitutiondeltrerisqued’entraînerunecontaminationdel’unitéet/ouunediminutiondurendement,
et annule la garantie.
4. Remplacez le acon collecteur tous les 1 à 2 mois, selon la fréquence d’utilisation et la méthode de nettoyage.
REMARQUE–UtilisezuniquementdesaconsréutilisablesDeVilbissde725ml.L’utilisationdeaconsd’unmodèle
différent est susceptible d’entraver le rendement de l’unité et annule la garantie.
DÉPANNAGE
REMARQUE–Avant de contacter votre fournisseur d’équipement médical, reportez-vous au guide de dépannage
ci-dessous :
DANGER
Danger d’électrocution. N’essayez pas d’ouvrir le boîtier ou de le démonter. Il ne contient aucun composant
interne réparable par l’utilisateur. Si une réparation est nécessaire, renvoyez l’unité d’aspiration à un fournisseur
agréé DeVilbiss ou à un centre de service agréé. L’ouverture ou la modication de l’appareil entraîne l’annulation
de la garantie.
REMARQUE – Si un problème persiste, contactez votre fournisseur d’équipement autorisé.
Problème Mesure
L’unité ne se met pas en marche. (le
voyant vert d’alimentation externe doit
s’allumer lorsque l’unité est sous tension)
1. Vériez les sources d’alimentation et les connexions.
2. Vériez que la prise murale est sous tension en branchant une lampe.
3. Assurez-vous que la batterie est complètement chargée.
La pompe fonctionne, mais aucun vide
n’est obtenu.
1. Vériez que le tuyau est correctement branché :
2. Vériez que les raccordements du tuyau ne comportent ni ssures, ni
fuites ni obstructions.
3. Veillez à ce que la soupape d’arrêt du otteur ne soit pas activée en
raison d’un acon plein.
4. Vériez que le acon ne comporte ni fuite ni ssure.
Vide faible 1. Utilisez le bouton de réglage pour augmenter le niveau de vide.
2. Assurez-vous que le système ne présente aucune fuite.
La batterie ne tient pas la charge. 1. Vériez que la batterie est branchée (reportez-vous à la section
Installation)
2. Vériez que le voyant de charge s’allume
3. Vériez toutes les connexions électriques durant le chargement de la
batterie.
4. Vériez que la prise murale est sous tension en branchant une lampe.
Si le problème persiste, contactez votre fournisseur d’équipement médical.

FR - 26 A-7310
CARACTÉRISTIQUES TECHNIQUES/CLASSIFICATIONS
Dimension (HxLxP) .....................................7,25 po x 7,25 po x 6,75 po (18,4cm x 18,4cm x 17,1cm)
Poids ...............................................................................3,375 lb (1,53 kg)
Spécifications électriques...................................100-240 Vca 50/60 Hz 0,75 A max; 12 Vcc, 33 W max
Vide ............................................................................50-500 mmHG +/- 10%
Débit d’air à l’entrée de la pompe ..............................................27 l/mn (écoulement libre) type
(le débit peut être inférieur lors d’un fonctionnement sur batterie interne)
Capacité du flacon collecteur..................................................................725 ml (cc)
Conditions environnementales
Plage de température de fonctionnement ............................................32°F (0°C) - 104°F (40°C)
Humidité relative de fonctionnement ............................................................... 0-95 %
Pression atmosphérique de fonctionnement ................................10,2 Psi (70 kPA) – 15,4 Psi (106 kPA)
Plage de température de stockage et de transport ..............................-40,00°C (-40°C) - 70,00°C (70°C)
Humidité relative de stockage et de transport ........................................................ 0-95 %
Pression atmosphérique de stockage et de transport ..........................7,3 Psi (50 kPA) – 15,4 Psi (106 kPA)
Garantie
7310 . . . . . . . . . . . . . . . . . . . . . . . . .Deux ans de garantie limitée, à l’exception de la batterie interne et du flacon collecteur
Batterie interne.................................................................................6 mois
Homologation
IEC 601-1; IEC 68; CAN/CSA-C22.2 No. 601.1-M90; UL 2601-1, CE EN 60601-1-2, ISO10079-1:1999
Conformes à la norme RTCA/DO-160E.......................................DO-160E - Section 21 Catégorie M
(Pour fonctionnement avec batterie uniquement ; Avion commercial, équipement aérien)
Classes d’équipement
Protection contre le risque de décharge électrique ............................... Classe 1 et sous tension interne
Degré de protection contre les décharges électriques .................................Pièce appliquée de type BF
Degré de protection contre la pénétration de liquides ......................... IP12 et source d’alimentation ordinaire
Mode de fonctionnement ...................... Fonctionnement intermittent 30 minutes de marche/30 minutes d’arrêt
Équipement non utilisable en présence d’un mélange anesthésique inflammable avec de l’air ou avec de l’oxygène ou
avec de l’oxyde d’azote.
Classification ISO
Série 7310 – Équipement électrique médical d’aspiration à usage sur le terrain ou lors du transport conformément à la
norme ISO 10079-1: 1999
Débit élevé/vide élevé
GARANTIE DE DEUX ANS
Le compresseur de l’unité d’aspiration compacte Vacu-Aide DeVilbiss, série 7310 (à l’exclusion de la batterie interne
rechargeable et du acon collecteur) est garanti exempt de vice de matériau et de fabrication pendant une période de
deux ans à compter de la date d’achat. Les batteries rechargeables internes sont garanties 6 mois. Toute pièce
défectueuse sera réparée ou remplacée, à la discrétion de DeVilbiss, à condition que l’appareil n’ait pas été altéré ou
utilisé de façon inappropriée pendant cette période. Vériez que tout mauvais fonctionnement n’est pas simplement dû à
un mauvais nettoyage ou au non-respect des instructions. Si une réparation est nécessaire, contactez votre prestataire
DeVilbiss ou le service à la clientèle de DeVilbiss :
REMARQUE–Veillezàconserverunepreuved’achatdatéequiserviraàvérierquel’unitéestsousgarantiededeuxans.
REMARQUE–Cette garantie ne couvre pas la fourniture d’un appareil de remplacement, la compensation pour le coût de
louage d’un autre appareil pendant que ledit appareil est réparé, ni le coût de main-d’œuvre pour la réparation ou le
remplacement de la (des) pièce(s) défectueuse(s).
IL N’EXISTE AUCUNE AUTRE GARANTIE EXPLICITE. LES GARANTIES IMPLICITES, Y COMPRIS CELLES DE
QUALITÉ MARCHANDE OU D’ADÉQUATION À UN USAGE PARTICULIER, SONT LIMITÉES À LA DURÉE DE LA
GARANTIE LIMITÉE EXPLICITE, ET DANS LA MESURE AUTORISÉE PAR LA LOI. TOUTE GARANTIE IMPLICITE EST
EXCLUE. CETTE GARANTIE CONSTITUE LE SEUL RECOURS DE L’ACHETEUR ET LA SEULE RESPONSABILITÉ
ASSUMÉE PAR LE FABRICANT QUANT À DES DOMMAGES INDIRECTS ET SECONDAIRES. TOUTE AUTRE
GARANTIE EST EXCLUE DANS LES LIMITES D’EXCLUSION AUTORISÉES PAR LA LOI. CERTAINS ÉTATS
INTERDISENT LA LIMITATION DE LA DURÉE DE VALIDITÉ D’UNE GARANTIE IMPLICITE, L’EXCLUSION OU LA
LIMITATION DES DOMMAGES INDIRECTS ET SECONDAIRES ; LA LIMITE ET L’EXCLUSION STIPULÉES CI-DESSUS
PEUVENT DONC NE PAS CONCERNER L’ACHETEUR.
Cette garantie vous confère certains droits légaux spéciques auxquels peuvent s’ajouter d’autres droits selon votre pays.

FR - 27A-7310
Note du fabricant
Nous vous remercions d’avoir choisi l’unité d’aspiration compacte Vacu-Aide DeVilbiss. La satisfaction de nos clients est
notre priorité. Veuillez adresser toute question ou commentaire à l’adresse gurant au verso.
Pour toute réparation communiquez avec le fournisseur DeVilbiss :
Téléphone:______________________________________________________
Date d’achat:____________________________________________________
N° de série:_____________________________________________________
RECOMMANDATIONS ET DÉCLARATION DU FABRICANT POUR DEVILBISS
AVERTISSEMENT
L’équipement médical électrique nécessite des précautions spéciales en ce qui concerne la CEM et doit être
installé et mis en service conformément aux informations sur la compatibilité électromagnétique [CEM] spéciées
dans les documents joints.
L’équipement portatif et mobile de communications HF peut affecter le matériel médical électrique.
L’équipement ou le système de prêts est utilisé à côté ou empilé avec un autre équipement et, si son utilisation
alors qu’il est adjacent ou empilé est nécessaire, l’équipement ou le système doit être observé an de vérier le
fonctionnement normal dans la conguration qui sera utilisée.
REMARQUE–LestableauxdeCEMetautresdirectivesfournissentauclientouàl’utilisateurdesinformationsquisont
essentiellespourdéterminerlapertinencedel’équipementdusystèmequantàuneutilisationdansunenvironnement
électromagnétiqueetdanslagestiondel’environnementélectromagnétiqued’utilisationandepermettreàl’équipementau
système de fonctionner comme prévu sans gêner d’autres équipements et systèmes ou un équipement électrique non médical.
Recommandations et déclaration du fabricant – Émissions pour tous les équipements
et systèmes
Cet appareil est prévu pour être utilisé dans l’environnement électromagnétique ci-dessous. Son acheteur ou utilisateur
doit s’assurer qu’il est utilisé dans un tel environnement.
Test d’émission Conformité Application électromagnétique – Recommandations
Émissions HF
CISPR 11
Groupe 1
Cet appareil n’utilise l’énergie radioélectrique que pour son fonctionnement
interne. Il n’émet donc que peu de radiofréquences et il est peu probable
qu’il interfère avec les appareils électroniques à proximité.
Émissions HF
CISPR 11
Classe B
Émissions rayonnées et
conduites
Cet appareil peut être utilisé dans tous les bâtiments, y compris dans les
bâtiments résidentiels ou ceux directement connectés au réseau
électrique public à basse tension approvisionnant les résidences.
Harmoniques
IEC 61000-3-2
Class A
Scintillation
IEC 61000-3-3
Conforme
Test d'immunité IEC 60601 Test Level
Niveau de
conformité
Environnement électromagnétique -
Recommandations
Décharges
électrostatiques
(ESD)
IEC 61000-4-2
±6kV contact
±8kV air
±6kV contact
±8kV air
Le sol doit être en bois, en ciment ou à carreaux
de céramique. S'il est recouvert d'un matériau
synthétique, l'humidité relative doit être au moins
de 30 %.
Courants
transitoires
rapides/pointes de
tension
IEC 61000-4-4
±2kV sur secteur CA ±2kV sur secteur CA
La qualité du courant du secteur doit être celle
d'un environnement commercial ou hospitalier
typique.
Surtensions
IEC 61000-4-5
±1 kV Différentiel
±2 kV Commun
±1 kV Différentiel
±2 kV Commun
La qualité du courant du secteur doit être celle
d'un environnement commercial ou hospitalier
typique.
Chutes de
tension, courtes
interruptions et
variations de
courant sur les
lignes de courant
d'alimentation
IEC 61000-4-11
>95 % de chute pour
0,5 cycle
60 % de chute pour 5
cycles
30 % de chute pour 25
cycles
>95 % de chute pour
5 secondes
>95 % de chute pour
0,5 cycle
60 % de chute pour
5 cycles
30 % de chute pour
25 cycles
>95 % de chute pour
5 secondes
La qualité du courant du secteur doit être celle
d'un environnement commercial ou hospitalier
typique. Si un fonctionnement continu du dispositif
est requis pendant une interruption de
l’alimentation secteur, il est recommandé d’utiliser
une alimentation permanente (UPS) ou une
batterie.

FR - 28 A-7310
Test d'immunité IEC 60601 Test Level
Niveau de
conformité
Environnement électromagnétique -
Recommandations
Champ
magnétique à la
fréquence du
réseau de 50/60
Hz
IEC 61000-4-8
3A/m 3A/m
Les champs magnétiques de fréquence du
réseau doivent se trouver aux niveaux typiques
d’un environnement commercial ou hospitalier.
HF conduite IEC
61000-4-6
3 Vrms de 150 kHz à 80
MHz
V1 = 3 Vrms
Les équipements de communication HF
portables et mobiles doivent être séparés de
l’appareil par au minimum les distances de
séparation recommandées calculées/indiquées
ci-dessous :
D=(3,5/V1)√
P
HF rayonnée
IEC 61000-4-3
3 V/m
80 MHz à 2,5 GHz
E1 = 3V/m
D=(3,5/E1)√
P
80 MHz à 800 MHz
D=(7/E1)√
P
800 MHz à 2,5 GHz
Où P est la puissance nominale maximale et d
est la distance de séparation recommandée en
mètres.
L’intensité des champs des transmetteurs HF
xes, telle que déterminée par une étude
électromagnétique du site, doit être inférieure
aux niveaux de conformité (V1 et E1).
Des interférences sont possibles à proximité de
l’équipement contenant un transmetteur
Dans le cas de transmetteurs dont le courant de sortie maximum n’est pas listé ci-dessus, le dégagement recommandé,
d, en mètres (m), peut être estimé au moyen de l’équation applicable à la fréquence du transmetteur, dans laquelle P
est le courant de sortie nominal maximum du transmetteur en watts (W), indiqué par son fabricant.
Remarque 1 : à 80 et 800 MHz, la plage des fréquences les plus hautes est celle qui s’applique.
Remarque 2 : ces recommandations peuvent ne pas s’appliquer à toutes les situations. La propagation
électromagnétique dépend de l’absorption et de la réexion par les structures, les objets et les personnes.
Distances recommandées de séparation entre les équipements de communication
HF portables et mobiles et ce dispositif. Cet appareil et ce système NE SONT PAS
conçus pour la réanimation.
Cet appareil est prévu pour être utilisé dans l’environnement électromagnétique où les perturbations rayonnées sont
contrôlées. L’acheteur ou l’utilisateur de cet appareil peut réduire le risque d’interférences radioélectriques en
maintenant une distance minimum entre les équipements de communication à HF mobiles et portatifs et cet appareil,
telle que la distance recommandée ci-dessous, en fonction du courant de sortie maximum de l’équipement de
communication en question.
Sortie électrique
maximum (Watts)
Distances de séparation recommandées pour l’appareil (mètres)
150 kHz à 80 MHz
D=(1,1667)√
P
80 à 800 MHz
D=(1,1667)√
P
800 MHz à 2,5 GHz
D=(2,3333)√
P
0,01 0,11667 0,11667 0,23333
0,1 0,36894 0,36894 0,73785
1 1,1667 1,1667 2,3333
10 3,6894 3,6894 7,3785
100 11,667 11,667 23,333
Dans le cas de transmetteurs dont le courant de sortie maximum n’est pas listé ci-dessus, le dégagement recommandé,
d, en mètres (m), peut être estimé au moyen de l’équation applicable à la fréquence du transmetteur, dans laquelle P
est le courant de sortie nominal maximum du transmetteur en watts (W), indiqué par son fabricant.
Remarque 1 : à 80 et 800 MHz, la plage des fréquences les plus hautes est celle qui s’applique.
Remarque 2 : ces recommandations peuvent ne pas s’appliquer à toutes les situations. La propagation
électromagnétique dépend de l’absorption et de la réexion par les structures, les objets et les personnes.

DE - 29A-7310
INHALTSVERZEICHNIS
Abbildungen......................................................................................................... .................................................... EN - 2
IEC-Symbole................................................................................................ ........................................................... DE - 29
Wichtige Sicherheitsmaßnahmen................................................................. ........................................................... DE - 29
Auslandsreisen................................................................................. ....................................................................... DE - 30
Einführung ............................................................................................................................................................... DE - 30
Wichtige Teile................................................................ .......................................................................................... DE - 31
Zubehör/Ersatzteile...................................................................................... ........................................................... DE - 31
Einrichtung........................................................................................................... .................................................... DE - 31
Betrieb Ihres Absauggeräts.......................................................................... ........................................................... DE - 31
Aufladen der Batterie ............................................................................................................................................... DE - 32
Batterieaustausch.......................................................................................... .......................................................... DE - 33
Reinigungshinweise..................................................................................... ............................................................ DE - 33
Wartung. .................................................................................................................................................................. DE - 34
Fehlersuche ............................................................................................................................................................. DE - 34
Technische Daten/Klassifikationen .......................................................................................................................... DE - 35
Garantie. .................................................................................................................................................................. DE - 35
DeVilbiss-Anleitung und Herstellererklärung .......................................................................................................... DE - 36
IEC-SYMBOLE
Achtung, Bedienungsanleitung lesen Gleichstrom
Gebrauchsanweisung beachten! Wechselstrom
Standby - Ein/Aus Schutzklasse BF
Anzeige für positive Polarität in der Mitte Hersteller
IP12: Vertikal nach unten fallende Wassertropfen dürfen keine negativen Auswirkungen haben, wenn
das Gehäuse nach beiden Seiten um bis zu 15° von der Vertikalen abweichend geneigt wird.
Dieses Gerät enthält elektrische und/oder elektronische Komponenten, die gemäss EU-Richtlinie
2012/19/EU über Elektro- und Elektronik-Altgeräte (WEEE) der Wiederverwertung zugeführt werden
müssen.
WICHTIGE SICHERHEITSMASSNAHMEN
Bei der Verwendung von elektrischen Geräten müssen immer grundsätzliche Sicherheitsvorkehrungen getroffen werden.
Vor der Verwendung die gesamte Bedienungsanleitung lesen. Wichtige Informationen werden folgendermaßen
hervorgehoben:
GEFAHR – Wichtige Sicherheitsinformationen über Gefahren, die schwere Verletzungen oder Tod nach sich
ziehen können.
WARNUNG – Wichtige Sicherheitsinformationen über Gefahren, die schwere Verletzungen zur Folge haben
können.
VORSICHT – Informationen zur Vermeidung von Beschädigungen des Produkts.
HINWEIS – Informationen, auf die Sie besonders achten sollten.
VOR DER VERWENDUNG DIE GESAMTE ANLEITUNG LESEN.
DIESE ANWEISUNGEN AUFBEWAHREN
GEFAHR
So verringern Sie das Risiko eines tödlichen Elektroschocks:
1. Nicht in der Badewanne verwenden.
2. Das Gerät stets so aufstellen oder lagern, dass es nicht in eine Badewanne oder ein Waschbecken fallen bzw.
hineingezogen werden kann.
3. Das Gerät nicht in Wasser oder andere Flüssigkeiten eintauchen oder fallen lassen.
4. Nicht nach dem Gerät greifen, wenn es ins Wasser gefallen ist. Die Stromversorgung zum Gerät sofort unterbrechen
(Stecker ziehen).

DE - 30 A-7310
WARNUNG
Um das Risiko von Verbrennungen, tödlichem Elektroschock, Feuer oder Körperverletzungen zu reduzieren,
beachten Sie bitte folgendes:
1. Die Verwendung des Geräts durch oder in der Nähe von Kindern oder Menschen mit körperlicher Behinderung muss
unter sorgfältiger Aufsicht erfolgen.
2. Das Gerät darf nur zu dem in diesem Leitfaden beschriebenen Zweck verwendet werden.
3. Nehmen Sie das Gerät in folgenden Fällen nicht in Betrieb:
a. Das Netzkabel oder der Stecker sind beschädigt.
b. Das Gerät funktioniert nicht ordnungsgemäß.
c. Das Gerät ist heruntergefallen oder wurde beschädigt.
d. Das Gerät ist ins Wasser gefallen. Schicken Sie das Produkt zur Untersuchung und eventuellen Reparatur an
ein autorisiertes DeVilbiss Service-Center zurück.
4. Stromkabel von heißen Oberächen fernhalten.
5. Niemals bei Müdigkeit oder im Schlaf verwenden.
AUSLANDSREISEN
Das Absauggerät ist mit einem AC-DC-Adapter/Ladegerät ausgerüstet, so dass es bei allen gängigen
Wechselstromspannungen (100-240 Volt AC, 47-63 Hz) verwendet werden kann. Dazu muss jedoch ein passendes
Netzkabel für den Anschluss an die Wandsteckdose verwendet werden. Das Absauggerät ist zur Verwendung in
Verkehrsugzeugen zugelassen; spezische Standards sind im Abschnitt Technische Daten und in der Erklärung in dieser
Bedienungsanleitung angeführt. Die Zulassungsbescheinigung ist auf Anfrage erhältlich; falls erforderlich, können Sie vor
der Reise von Ihrem Händler eine Kopie der Bescheinigung anfordern.
HINWEIS – Überprüfen Sie vor der Verwendung, dass der Stecker des Netzkabels in die Wandsteckdose passt.
EINFÜHRUNG
Das kompakte medizinische DeVilbiss-Absauggerät ist zuverlässig und tragbar. Befolgen Sie die in diesem Handbuch
aufgeführten Betriebs- und Wartungsanweisungen, um eine maximale Lebensdauer des Geräts zu gewährleisten.
Erklärung zum Verwendungszweck
Dieses Gerät ist zur Entfernung von Flüssigkeiten aus den Atemwegen oder dem Atmungsunterstützungssystem und von
Infektionsmaterial aus Wunden bestimmt. Das Gerät erzeugt einen negativen Druck (d. h. ein Vakuum), sodass die
Flüssigkeiten durch einen Einwegschlauch abgesaugt werden, der an einen Sammelbehälter angeschlossen ist. Die
Flüssigkeiten werden zur ordnungsgemäßen Entsorgung im Sammelbehälter aufgefangen. Dieses Gerät darf nur auf
Anordnung eines Arztes verwendet werden.
Kontraindikationen
Die DeVilbiss Vacu-Aide Kompaktes Absauggerät darf nicht angewendet werden:
• Thorax-Drainage
• Nasogastrale Absaugung
GEFAHR
Die DeVilbiss Sekretabsaugpumpe wurde ausschließlich für die nicht permanente Absaugung von Sekreten und
Körperüssigkeiten konzipiert. Brennbare, explosive oder ätzende Flüssigkeiten dürfen nicht abgesaugt werden.
Eine nicht sachgerechte Anwendung kann zu Verletzungen oder zum Tode führen.
1. Die Vacu-Aide QSU darf nur von Personen, welche zuvor in die medizinische Anwendung eingewiesen wurden,
angewendet werden.
2. Vergewissern Sie sich vor Inbetriebnahme, dass alle Zubehörteile vollständig und unbeschädigt sind. Überprüfen Sie
vor Gebrauch die Funktion des Gerätes.

DE - 31A-7310
WICHTIGE TEILE
Inspizieren Sie das Absauggerät und alle Teile vor der Verwendung.
1. Vakuumreglerknopf (an der Seite)
2. Bakterienlter (nicht steril)
3. Vakuumansaugöffnung (hinter dem Filter)
4. Anzeigefeld (auf der Oberseite des Geräts)
5. Wiederverwendbarer 725-ml-Sammelbehälter
mit Baugruppe aus Kappe/Winkel
6. DC(Gleichstrom)-Eingang (an der Seite)
7. Batteriefach
8. Tragegriff/Katheterhalterung
9. 1,8 m langer Patientenschlauch (nicht gezeigt)
10. AC/DC-Adapter/Ladegerät (nicht gezeigt)
11. 12-Volt-DC-Kabel (nicht gezeigt)
12. Wiederauadbare Batterie hoher Kapazität
(nicht gezeigt)
13. Tragetasche mit Schultergurt (nicht gezeigt)
ZUBEHÖR/ERSATZTEILE
Die folgenden Artikel können als Zubehör- oder Ersatzteile für Ihr Absauggerät separat bezogen werden.
Beschreibung Teilenr. Beschreibung Teilenr.
Bakterienlter (12-er Packung) 7305D-608 12-Volt-DC-Kabel 7304D-619
Batteriefach 7310P-602 Netzkabel - „Hospital-Grade“-Qualität USA 099HD-614
AC/DC-Adapter/Ladegerät 7305P-613 Netzkabel USA 6710D-609
1,8 m langer Patientenschlauch 6305D-611 Netzkabel Großbritannien 7305P-630
Tragetasche mit Schultergurt 7310P-606 Netzkabel EU 7305P-631
Wiederverwendbarer 725-ml-Behälter
(Sammelbehälter, Baugruppe aus Kappe/
Winkel, Filter)
7310P-603
EINRICHTUNG
1. Zum Transport Ihres Geräts wurde die Batterie vom Gerät getrennt. Vor der erstmaligen Verwendung müssen Sie die
Batterie anschließen und auaden. Diesbezügliche Anweisungen sind im Abschnitt Batterieaustausch enthalten.
2. Setzen Sie die durchsichtige Seite des Filters mit der Beschriftung IN direkt in den Behälterdeckel ein.
3. Setzen Sie den Behälter mit angebrachtem Filter direkt in die vordere Öffnung ein. Der Behälter wird durch den Filter
und die Bodenauage am Gerät xiert (Abb. 1 & 2).
4. Der 1,8 m lange Patientenschlauch kann jetzt an den Ausgang mit der Beschriftung <Patient> im Behälterdeckel
angeschlossen werden.
5. Achten Sie darauf, dass alle Anschlüsse vor der Verwendung gesichert sind, um Lecks zu verhindern.
6. Überprüfen Sie, dass das Gerät auf die gewünschte Absaugstufe eingestellt ist, bevor Sie es am Patienten
einsetzen.
BETRIEB IHRES ABSAUGGERÄTS
Symbole auf dem Bedienfeld
Ein/Aus
Externe Stromversorgung: Via AC-Netzkabel oder DC-Gleichstromkabel. Leuchtet GRÜN, wenn Strom
zugeführt wird.
Batterie wird aufgeladen: Leuchtet GELB. Das Licht geht aus, wenn die Batterie voll aufgeladen ist.
Entladene Batterie: Leuchtet ROT, wenn die Batterie den Entladezustand erreicht.
mmHg
Einstellung der Absaugstufe: Skala/Stufe leuchtet GRÜN. Diese Skala zeigt den Grad der Absaugstärke in
Einheiten von mmHg an.
2
4
3
1
5
8
7
6

DE - 32 A-7310
Mögliche Stromquellen
AC (Wechselstrom)-Betrieb -Stecken Sie den 90°-Winkelstecker des AC-DC-Adapters/Ladegeräts in den
DC(Gleichstrom)-Eingang (Abb. 3) und schließen Sie das Kabel an. Verbinden Sie das andere Ende des AC-Adapters mit
einer geerdeten Netzsteckdose.
12V-DC (Gleichstrom)-Betrieb –Stecken Sie den kleinen 90°-Winkelstecker des DC-Stromkabels in den
DC-Stromeingang (Abb. 3). Stecken Sie das große Ende des Kabels in die 12V-DC-Steckbuchse des Fahrzeugs.
BATTERIEBETRIEB – Ihr Gerät ist mit einer wiederauadbaren Batterie hoher Kapazität ausgerüstet. Zur erstmaligen
Auadung eines neuen Geräts muss die Batterie wenigstens 5 Stunden lang aufgeladen werden (siehe Abschnitt Auaden
der Batterie). Wenn Sie das Gerät über die wiederauadbare Batterie betreiben möchten, dürfen keine externen
Stromquellen an das Absauggerät angeschlossen sein.
HINWEIS–WährenddesAuadensoderwährenddesBetriebskannsichdasNetzteilerwärmen;dasistnormal.
WARNUNG
Wenn das Gerät nicht an eine externe Stromquelle angeschlossen ist oder die Batterie nicht aufgeladen wurde,
bleibt das Anzeigelicht für die entladene Batterie an und die Leistung des Geräts nimmt rapide ab. Wenn die
Anzeige für die entladene Batterie aueuchtet, sollten Sie eine andere Stromquelle verwenden, um eine
Unterbrechung des Absaugverfahrens zu vermeiden.
Einstellung der vakuumstufe
1. Wenn Sie die Stromquelle gewählt haben, schalten Sie das Gerät durch Drücken der „Ein“-Taste („On“) ein. Das
GRÜNE Licht als Anzeige für die externe Stromversorgung leuchtet und bleibt an, solange die externe
Stromversorgung angeschlossen ist.
2. Verschließen (blockieren) Sie das Patientenende des Schlauchs und stellen Sie das Vakuum dann auf einen Wert
zwischen 50-500 mmHG +/- 10% ein, indem Sie den Vakuumreglerknopf im Uhrzeigersinn drehen, um das Vakuum
zu erhöhen und im Gegenuhrzeigersinn, um das Vakuum zu verringern (Abb. 4). Öffnen und verschließen Sie das
Schlauchende noch einmal, um die Einstellung zu bestätigen. Die gewünschte Vakuumstufe kann auf der LED-
Anzeige abgelesen werden.
HINWEIS–Die LEDs haben zwei Helligkeitsstufen. Während der Einstellung der Vakuumstufe leuchten die LEDs in Folge
auf. Wenn eine LED mit halber Helligkeit erscheint, bedeutet dies, dass die Vakuumstufe halbwegs zwischen der
vorherigen voll erleuchteten LED und der LED mit halber Helligkeit liegt. BEISPIEL: Wenn die 150 mmHg LED voll
erleuchtet ist und die 200 mmHg LED die halbe Helligkeit aufweist, ist die Absaugstärke 175 mmHg. Wenn die 200 mmHg
LED voll erleuchtet ist, hat das Gerät eine Absaugstärke von 200 mmHg erreicht.
3. Schließen Sie die Absaugspitze bzw. den Katheter an.
HINWEIS– Wenn das Gerät das Vakuum nicht hält, konsultieren Sie bitte den Abschnitt Fehlersuche.
HINWEIS–Der Absaugvorgang wird unterbrochen, wenn der Flüssigkeitsspiegel das Schwimmerabsperrventil an der
Unterseite des Behälterdeckels erreicht.
VORSICHT–Weiteres Absaugen kann die Vakuumpumpe beschädigen und die Garantie ungültig machen. Wenn
Flüssigkeit in das Gerät zurückgesaugt wird, wird Geräteservice erforderlich.
AUFLADEN DER BATTERIE
Kompakte Absauggeräte der Serie Vacu-Aide sind mit einer werksseitig installierten wiederauadbaren Batterie hoher
Kapazität ausgerüstet. Vor der erstmaligen Verwendung müssen Sie die Batterie anschließen und auaden (siehe
Abschnitt Batterieaustausch).
1. Schließen Sie das Gerät an eine Wechsel- oder Gleichstromquelle an (AC oder DC).
2. Das grüne Licht für externe Stromversorgung sollte aueuchten; die gelbe Ladeanzeige bleibt erleuchtet, während
die Batterie aufgeladen wird.
3. Achten Sie darauf, dass die gelbe Ladeanzeige leuchtet, wenn der Ladevorgang beginnt. Wenn die Batterie nahezu
voll aufgeladen ist, blinkt die gelbe Batterieladeanzeige u.U. mehrere Minuten lang. Das ist normal. Wenn Ihr Gerät
die Ladung nicht hält, prüfen Sie, dass das gelbe Licht erleuchtet, wenn die externe Stromversorgung eingeschaltet
wird, während der Betriebsschalter auf „Aus“ („Off“) steht. Bei anhaltenden Problemen verständigen Sie bitte Ihren
medizinischen Fachhändler.
HINWEIS–Eine voll entladene Batterie muss (je nach Ausmaß der Entladung) ungefähr 5 Stunden lang aufgeladen
werden, um ihre volle Kapazität zu erreichen.
Wird das Gerät längere Zeit nicht verwendet, sollte die Batterie wenigstens alle 6 Monate aufgeladen werden. Eine voll
aufgeladene Batterie reicht für ungefähr 45-60 Minuten kontinuierlichen Betriebs bei null Vakuum (freie Strömung).
VORSICHT–Durch komplettes Entladen der Batterie verkürzt sich die Batterielebensdauer. Wenn die Anzeige für entladene
Batterie leuchtet, sollten Sie das Gerät nicht länger als ein paar Minuten verwenden. Laden Sie die Batterie sobald wie
möglich auf.

DE - 33A-7310
BATTERIEAUSTAUSCH
1. Öffnen Sie die Verriegelung des Batteriefachs mit Hilfe einer Münze oder eines Flachkopfschraubenziehers durch
Drehen auf die offene Position (Abb. 5).
2. Entfernen Sie die Batterieabdeckung durch Hochziehen an der Verriegelung (Abb. 6).
3. Nehmen Sie die Batterie aus dem Fach heraus und lösen Sie den Stecker von der Platine (Abb. 7 & 8).
4. Installieren Sie die neue Batterie, indem Sie die obigen Schritte in umgekehrter Reihenfolge durchführen.
5. Laden Sie die Batterie vor der Verwendung des Geräts voll auf.
REINIGUNGSHINWEISE
Sammelbehälter
HINWEIS–Der Winkel ist fest mit der Kappe verbunden und kann nicht entfernt werden.
1. Drücken Sie auf den Betriebsschalter, um das Gerät abzuschalten. Warten Sie, bis das Vakuum abgefallen ist.
2. Trennen Sie die externe Stromquelle von der Eingangssteckbuchse am Gerät (falls anwendbar).
3. Entfernen Sie den Behälter durch Lösen des Patientenschlauchs und -lters.
HINWEIS–Der wiederverwendbare Sammelbehälter und der Deckel sind zur Verwendung bei einem einzigen Patienten
bestimmt und sollten in Abhängigkeit von der Nutzung und dem angewandten Reinigungsverfahren alle 1 bis 2 Monate
erneuert werden.
4. Sammelbehälter und Deckel müssen nach jeder Verwendung entleert und gründlich gereinigt werden. Waschen Sie
sie in einer Lösung aus warmem Wasser und Geschirrspülmittel und spülen Sie sie mit sauberem, warmem Wasser.
Weichen Sie sie anschließend 60 Minuten lang mit einem handelsüblichen Desinfektionsmittel oder mit einer Lösung
aus einem Teil Essig (Säurekonzentration ca. 5%) und drei Teilen heißes Wasser (das Wasser sollte mindestens
55°C bis 65°C heiß sein) ein. Spülen Sie sie gründlich mit warmem Leitungswasser und lassen Sie sie an der Luft
trocknen. HINWEIS: Bei Verwendung eines handelsüblichen Desinfektionsmittels sind die empfohlenen Anweisungen
und Verdünnungsverhältnisse des Herstellers sorgfältig einzuhalten.
Absauggerät (nur für die Verwendung bei einem Patienten)
1. Schalten Sie den Betriebsschalter auf „Aus“ („Off“) und trennen Sie alle externen Stromquellen vom Gerät.
2. Wischen Sie die Außenseite des Gehäuses mit einem mit handelsüblichem Desinfektionsmittel oder antibakteriell
und keimtötend wirkendem Detergens befeuchteten sauberen Tuch ab.
VORSICHT– Absauggerät nicht in Wasser eintauchen; dies würde zur Beschädigung der Vakuumpumpe führen.
Schlauch (nur für die Verwendung bei einem Patienten)
1. Entfernen Sie den Schlauch vom Gerät.
2. Spülen Sie ihn sorgfältig unter ießendem warmem Wasser.
3. Anschließend in einer Lösung aus einem Teil Essig (Säurekonzentration ca. 5%) und drei Teilen Wasser (das
Wasser sollte mindestens 55°C bis 65°C heiß sein) 60 Minuten lang einweichen. Spülen Sie ihn mit ießendem
warmem Wasser ab, und lassen Sie ihn an der Luft trocknen.
4. Halten Sie die äußeren Oberächen der Schläuche sauber, indem Sie diese mit einem sauberen feuchten Tuch
abwischen.
Transporttasche (nur für die Verwendung bei einem Patienten)
1. Transporttasche mit einem sauberen, mit Reinigungs- oder Desinfektionsmittel befeuchteten Tuch abwischen.
HINWEIS– Die Angaben zur Desinfektion basieren auf AARC Clinical Practice Guideline Suctioning of the Patient in the
Home.
Absauggerät (Wiedereinsatz)
Reinigung und Desinfektion des Geräts bei Patientenwechsel
Wenn medizinische Geräte bereits bei einem Patienten verwendet wurden, wird von einer Kontamination mit menschlichen
pathogenen Keimen ausgegangen (außer es gibt Beweise für das Gegenteil) und der nächste Patient, Anwender oder
Dritte sollte durch ordnungsgemäße Handhabung und Vorbereitung geschützt werden. Daher müssen Personen bei einem
Patientenwechsel während des Transports und der Handhabung des Geräts geschützt werden und das Gerät muss von
entsprechend geschultem Personal zum Schutz des nächsten Patienten vor der Wiederverwendung vollständig
aufbereitet, d.h. gereinigt und desinziert werden. Die vollständige Aufbereitung darf nur vom Hersteller oder einem
qualizierten DeVilbiss-Händler/Wartungstechniker durchgeführt werden.
HINWEIS – Wenn das Gerät gemäß den Anweisungen unter normalen Bedingungen verwendet wird, ist das Innere des
Geräts durch den Filtereinsatz auf dem Sammelbehälter gegen Krankheitserreger geschützt, sodass keine Desinfektion
der inneren Komponenten notwendig ist.
HINWEIS – Wird das Gerät ohne einen Filtereinsatz verwendet, dann besteht die Gefahr, dass Krankheitserreger im
InnerendesGerätsgelangenunddasGerätnichtdesinziertwerdenkann.
HINWEIS–SolltedienachfolgendeAufbereitungdesGerätsdurcheinenqualiziertenDeVilbiss-Händler/Technikernicht
möglich sein, darf das Gerät von keinem anderen Patienten verwendet werden!

DE - 34 A-7310
DeVilbiss Healthcare empehlt, dass zwischen der Verwendung durch verschiedene Patienten mindestens die folgenden
Maßnahmen vom Hersteller oder einem qualizierten Dritten durchgeführt werden.
1. Die Entsorgung aller Zubehörteile, die zur Wiederverwendung nicht geeignet sind, d.h. Sammelbehälter, Filter,
Schlauch und Tragetasche.
2. Den Betriebsschalter auf „Aus“ („Off“) schalten und alle externen Stromquellen vom DeVilbiss Absauggerät trennen.
3. Eine Sichtprüfung des Gerätes auf etwaige Schäden, fehlende Teile usw. durchführen.
4. Das Gehäuse mit einem sauberen Tuch und einem handelsüblichen (bakterien-keimtötenden) Desinfektionsmittel
abwischen, das die unten im Hinweis aufgeführten Anforderungen erfüllt und in den vom Hersteller des
Desinfektionsmittels empfohlenen Verdünnungsverhältnissen und Anweisungen verwendet wird.
VORSICHT – Nicht in Wasser eintauchen; dies würde zur Beschädigung der Vakuumpumpe führen.
HINWEIS – Verwenden Sie zur Reinigung der Einheit keine Reinigungs- oder Desinfektionsmittel, die Ammoniak, Benzol
und/oderAcetonenthalten.
WARTUNG
Filterwechsel und Austausch des Behälters
1. Wechseln Sie den Bakterienlter alle 1 oder 2 Monate oder bei Überlaufen sofort.
2. Entfernen Sie den Bakterienlter, indem Sie ihn vom Absauggerät und vom Deckel trennen.
3. Ersetzen Sie den Filter durch einen neuen DeVilbiss-Bakterienlter, Teilenr. 7305D-608 (12-er Packung).
HINWEIS–AchtenSiedarauf,dassdiedurchsichtigeSeitedesFiltersmitderBeschriftung<In>zumBehälterhinzeigt.
HINWEIS–BitteverwendenSienurdenvonDeVilbissHealthcareoderseinenVertriebshändlerngeliefertenBakterienlter.
DieVerwendungvonFilternandererHerstellerkannKontaminationdesGerätsund/oderLeistungseinbußenmitsich
bringen und die Garantie ungültig machen.
4. Ersetzen Sie den Sammelbehälter je nach Nutzung und verwendeter Reinigungsmethode alle 1 bis 2 Monate.
HINWEIS–Verwenden Sie bitte nur wiederverwendbare 725 ml-Behälter von DeVilbiss. Die Verwendung von Behältern
anderer Hersteller kann zu Leistungseinbußen führen und die Garantie ungültig machen.
FEHLERSUCHE
HINWEIS–Bevor Sie sich mit Ihrem Gerätehändler in Verbindung setzen, sollten Sie die folgende Fehlersuchtabelle
befolgen:
GEFAHR
Gefahr des elektrischen Schocks. Versuchen Sie nicht, das Gehäuse zu öffnen bzw. zu entfernen; es enthält keine
benutzerwartbaren Teile. Wenn das Gerät gewartet werden muss, senden Sie es an einen qualizierten DeVilbiss
Fachhändler oder ein autorisiertes Service-Center. Öffnen oder Manipulieren des Geräts führt zur Aufhebung der
Garantie.
HINWEIS– Bei anhaltenden Problemen verständigen Sie bitte Ihren autorisierten Fachhändler.
Problem Abhilfemaßnahme
Gerät lässt sich nicht einschalten. (Die
grüne Anzeige für externe
Stromversorgung sollte leuchten, wenn
Strom zugeführt wird.)
1. Überprüfen Sie die Stromquellen und die Anschlüsse.
2. Überprüfen Sie durch Einstöpseln einer Lampe, dass die Steckdose
spannungsführend ist.
3. Überprüfen Sie, dass die Batterie voll aufgeladen ist.
Pumpe läuft, aber es liegt kein Vakuum
vor.
1. Überprüfen Sie, dass der Schlauch korrekt angeschlossen ist.
2. Überprüfen Sie die Schlauchanschlüsse auf Bruchstellen, undichte
Stellen oder Verstopfungen.
3. Achten Sie darauf, dass das Schwimmerabsperrventil nicht wegen einer
vollen Flasche aktiviert wird.
4. Überprüfen Sie die Flasche auf Lecks oder Risse.
Schwaches Vakuum. 1. Erhöhen Sie das Vakuum mit Hilfe des Vakuumreglerknopfs.
2. Überprüfen Sie das System auf undichte Stellen.
Batterie hält die Ladung nicht. 1. Überprüfen Sie, dass die Batterie angeschlossen ist (siehe Abschnitt
Einrichtung).
2. Überprüfen Sie, dass die Ladeanzeige aueuchtet.
3. Überprüfen Sie die elektrischen Anschlüsse während des Auadens.
4. Überprüfen Sie durch Einstöpseln einer Lampe, dass die Steckdose
spannungsführend ist.
Bei anhaltenden Problemen verständigen Sie bitte Ihren Gerätefachhändler.

DE - 35A-7310
TECHNISCHE DATEN/KLASSIFIKATIONEN
Abmessungen.......................................................18,4 cm x 18,4 cm x 17,1 cm (H x B x T)
Gewicht......................................................................................1,53 kg
Elektrische Anforderungen .................................100-240 VAC 50/60 Hz 0,75 A max; 12 VDC, 33 W max
Vakuumbereich....................................................................50-500 mmHG +/- 10%
Luftströmung am Pumpeneingang ..............................typischerweise 27 Liter pro Minute (freie Strömung)
(bei Betrieb über die interne Batterie möglicherweise weniger)
Fassungsvermögen des Sammelbehälters .......................................................725 ml (cc)
Umgebungsbedingungen
Betriebstemperaturbereich ...................................................................0 °C – 40 °C
Betriebsluftfeuchtigkeit .......................................................................... 0-95 %
Atmosphärischer Betriebsdruck ..........................................10,2 Psi (70 kPA) – 15,4 Psi (106 kPA)
Temperaturbereich für Lagerung und Transport.................................................-40 °C – 70 °C
Relative Feuchtigkeit für Lagerung und Transport..................................................... 0-95 %
Atmosphärischer Druck für Lagerung und Transport...........................7,3 Psi (50 kPA) – 15,4 Psi (106 kPA)
Garantie
7310 . . . . . . . . . . . . . . . . . . . .2 Jahre beschränkte Garantie, ausschließlich der internen Batterie und des Sammelbehälters
Interne Batterie...............................................................................6 Monate
Zulassungen
IEC 601-1; IEC 68; CAN/CSA-C22.2 Nr. 601.1-M90; UL 2601-1, CE EN 60601-1-2, ISO10079-1:1999
Erfüllt RTCA/DO-160E . . . . . . . . . . . . . . . . . . . . . . . . . . . . . . . . . . . . . . . . . . . . . . . . . . . DO-160E - Abschnitt 21 Kategorie M
(Nur bei Batteriebetrieb; Verkehrsflugzeuge, Bordgerät)
Geräteklassifikationen
Geräteklassifikation in Bezug auf Schutz vor elektrischem Schock................Klasse I und interne Stromversorgung
Grad des Schutzes vor elektrischem Schock ............................... Anwendungsteile der Schutzklasse BF
Grad des Schutzes gegen Eindringen von Flüssigkeiten .....................IP12 und gewöhnliche Stromversorgung
Betriebsweise ............................................. Zeitweiliger Betrieb: 30 Minuten ein, 30 Minuten aus
Das Gerät darf nicht in der Nähe von entflammbaren Narkosegasmischungen verwendet werden, in denen Luft, Sauerstoff
oder Distickstoffoxid enthalten ist.
ISO-Klassifikation
Serie 7310 – Elektrisch betriebenes medizinisches Absauggerät für ambulante Verwendung und Transport gemäß ISO
10079-1: 1999
Hohe Strömung/Hohes Vakuum
BESCHRÄNKTE GARANTIE FÜR ZWEI JAHRE
Das Kompressorteil des DeVilbiss Vacu-Aide Kompakt-Absauggeräts der Serie 7310 (ausschließlich der internen
wiederauadbaren Batterie und des Sammelbehälters) ist auf Material- und Gerätefehler für zwei Jahre ab Kaufdatum
garantiert. Die internen wiederauadbaren Batterien sind für 6 Monate garantiert. Defekte Teile werden je nach Ermessen
von DeVilbiss Healthcare repariert oder ersetzt, wenn das Gerät während dieser Zeit nicht unsachgemäß verwendet oder
manipuliert wurde. Vergewissern Sie sich, dass eine etwaige Fehlfunktion nicht Folge unsachgemäßer Reinigung oder
Missachtung der Betriebsanweisungen ist. Falls Reparaturen erforderlich sind, wenden Sie sich bitte an Ihren DeVilbiss-
Fachhändler oder an DeVilbiss bezüglich näherer Anweisungen.
HINWEIS–Denken Sie daran, eine datierte Quittung des Kaufvertrags aufzubewahren, um nachzuweisen, dass die
2-jährige Garantie für das Gerät noch nicht abgelaufen ist.
HINWEIS–Diese Garantie umfasst nicht die Bereitstellung einer Leiheinheit, die Kompensation für die Kosten eines
Leihgeräts,währenddieEinheitsichinReparaturbendet,oderentstehendeArbeitskostenfürdieReparaturoderdas
Ersetzen defekter Teile.
ES BESTEHT KEINE ANDERE VERTRAGLICHE GEWÄHRLEISTUNG. GESETZLICHE GEWÄHRLEISTUNG, WIE
GEWÄHRLEISTUNG DER VERMARKTBARKEIT ODER EIGNUNG FÜR EINEN BESTIMMTEN ZWECK, IST NUR FÜR
DEN ZEITRAUM DER VERTRAGLICHEN GEWÄHRLEISTUNG GÜLTIG UND IN DEM GESETZLICH ZULÄSSIGEN
UMFANG, UND JEGLICHE GEWÄHRLEISTUNG STILLSCHWEIGENDER ART IST AUSGESCHLOSSEN. HIERBEI
HANDELT ES SICH UM DIE EINZIG ERTEILTE GEWÄHRLEISTUNG. ES WIRD KEINERLEI GEWÄHRLEISTUNG
HINSICHTLICH FOLGESCHÄDEN ODER DARAUS ENTSTANDENEN ANSPRÜCHEN ÜBERNOMMEN. EINIGE
STAATEN GESTATTEN KEINE BESCHRÄNKUNG DER GESETZLICHEN GEWÄHRLEISTUNG ODER DIE
BESCHRÄNKUNG BZW. DEN AUSSCHLUSS VON BEILÄUFIG ENTSTANDENEN ODER FOLGESCHÄDEN. ES KANN
DAHER SEIN, DASS DIESE BESCHRÄNKUNGEN NICHT AUF SIE ZUTREFFEN.
Diese Garantie gibt Ihnen bestimmte gesetzliche Rechte. Sie können u.U. noch andere Rechte haben, die von Staat zu
Staat unterschiedlich sind.

DE - 36 A-7310
Hinweis des herstellers
Vielen Dank für den Kauf eines DeVilbiss Vacu-Aide Kompakt-Absauggeräts. Wir möchten, dass Sie ein zufriedener Kunde
sind. Falls Sie Fragen oder Anmerkungen haben, senden Sie sie bitte an unsere Anschrift auf der Rückseite dieser
Bedienungsanleitung.
Falls Sie Service benötigen, wenden Sie sich bitte an Ihren autorisierten DeVilbiss-Fachhändler:
Telefon________________________________________________________
Kaufdatum_____________________________________________________
Seriennummer__________________________________________________
DEVILBISS-ANLEITUNG UND HERSTELLERERKLÄRUNG
WARNUNG
Bei medizinischen elektrischen Geräten sind bezüglich der elektromagnetischen Verträglichkeit besondere
Vorsichtsmaßnahmen zu beachten. Sie müssen in Übereinstimmung mit den Informationen zur
elektromagnetischen Verträglichkeit (EMV) in den Begleitdokumenten installiert und in Betrieb genommen werden.
Tragbare und mobile HF-Kommunikationsgeräte können medizinische elektrische Geräte beeinussen.
Das Gerät bzw. System darf nicht neben, unter oder über anderen Geräten betrieben werden. Wenn es jedoch
neben, unter oder über anderen Geräten betrieben werden muss, ist das Gerät bzw. System entsprechend zu
beobachten, um den normalen Betrieb in der beabsichtigten Konguration zu bestätigen.
HINWEIS–Die EMV-Tabellen und anderen Richtlinien liefern dem Kunden oder Benutzer Informationen, die entscheidend
für die Feststellung der Eignung des Geräts oder Systems für die elektromagnetische Nutzungsumgebung sind. Sie bieten
ebenfalls wichtige Informationen für das Management der elektromagnetischen Nutzungsumgebung, um zu gewährleisten,
dass das Gerät oder System seinen beabsichtigten Zweck ohne Beeinträchtigung anderer Geräte oder Systeme oder
nichtmedizinischer elektrischer Geräte erfüllen kann.
Anleitung und Herstellererklärung – Emissionen aller Geräte und Systeme
Dieses Gerät ist für die Verwendung in der unten spezizierten elektromagnetischen Umgebung bestimmt. Der Kunde
oder Benutzer dieses Gerätes hat sicherzustellen, dass es in einer derartigen Umgebung verwendet wird.
Emissionstest Compliance Elektromagnetische Verstärkung – Richtlinie
HF-Emissionen CISPR 11 Gruppe 1
Dieses Gerät verwendet HF-Energie ausschließlich für interne
Funktionen. Daher sind seine HF-Emissionen sehr niedrig und es
ist unwahrscheinlich, dass sie Interferenzen bei benachbarten
elektronischen Geräten verursachen.
HF-Emissionen CISPR 11
Klasse B Gestrahlte
und leitungsgeführte
Emissionen
Dieses Gerät ist geeignet für die Verwendung in allen
Einrichtungen, auch zu Hause, und in allen Einrichtungen, die an
das öffentliche Stromnetz angeschlossen sind, das private
Haushalte versorgt.
Harmonische Emissionen
IEC 61000-3-2
Klasse A
Flicker
IEC 61000-3-3
Entspricht den
Bestimmungen
Prüfung der
Störfestigkeit IEC 60601- Testniveau Compliance-Niveau
Elektromagnetische Umgebung –
Richtlinien
Entladung statischer
Elektrizität
IEC 61000-4-2
±6kV Kontakt
±8kV Luft
±6kV Kontakt
±8kV Luft
Der Untergrund sollte aus Holz, Beton
oder Keramikiesen sein. Ist der Boden
mit synthetischem Material ausgelegt,
muss die relative Luftfeuchtigkeit
mindestens 30 % betragen.
Schnelle transiente
elektrische Störgrößen
(Burst) IEC 61000-4-4
±2kV ofür
Wechsel stromversorg
ungsleitungen
±2kV ofür Wechsel
stromversorg
ungsleitungen
Die Qualität der Stromversorgung muss
der einer normalen Gewerbe- bzw.
Krankenhausumgebung entsprechen.
Stoßspannungen (Surge)
IEC 61000-4-5
±1kV Gegentakt
±2kV Gleichtakt
±1kV Gegentakt
±2kV Gleichtakt
Die Qualität der Stromversorgung muss
der einer normalen Gewerbe- bzw.
Krankenhausumgebung entsprechen.
Spannungseinbrüche,
Kurzzeitunterbrechungen
und Spannungs -
schwankungen der
Stromversorgungs
leitungen
IEC 61000-4-11
> 95 % Einbruch für 0,5
Zyklen
60 % Einbruch für
5 Zyklen
30 % Einbruch für
25 Zyklen
> 95 % Einbruch für 5
Sekunden
> 95 % Einbruch für 0,5
Zyklen
60 % Einbruch für
5 Zyklen
30 % Einbruch für
25 Zyklen
> 95 % Einbruch für 5
Sekunden
Die Qualität der Stromversorgung muss
der einer normalen Gewerbe- bzw.
Krankenhausumgebung entsprechen.
Muss das Gerät auch bei
Unterbrechungen der Stromzufuhr
ununterbrochen in Betrieb bleiben, sollte
es an eine unterbrechungsfreie
Stromversorgung oder Batterie
angeschlossen sein.

DE - 37A-7310
Prüfung der
Störfestigkeit IEC 60601- Testniveau Compliance-Niveau
Elektromagnetische Umgebung –
Richtlinien
Magnetfelder mit
energietechn. Frequenz
50/60 Hz
IEC 61000-4-8
3A/m 3A/m
Magnetfelder mit energietechnischen
Frequenzen sollten sich auf einem für
normale Gewerbe- bzw.
Krankenhausumgebungen typischen
Niveau benden.
Leitungsgeführte HF
IEC 61000-4-6
3 Vrms von
150 kHz bis 80 MHz
V1 = 3 Vrms
Bei der Verwendung von tragbarer und
mobiler HF-Kommunikationsausrüstung
sollte der empfohlene berechnete/unten
aufgeführte Abstand zum Gerät
eingehalten werden.
D=(3,5/V1)√
P
Gestrahlte HF
IEC 61000-4-3
3 V/m
80 MHz bis 2,5 GHz
E1 = 3V/m
D=(3,5/E1)√
P
80 bis 800 MHz
D=(7/E1)√
P
800 MHz bis 2,5 GHz
Wobei P die maximale
Ausgangsnennleistung in Watt (W) und D
der empfohlene Abstand in Metern (m) ist.
Die Feldstärke der festen Sender, die
durch eine elektromagnetische Prüfung
des Aufstellorts ermittelt wird, muss unter
den Compliance-Werten (V1 und E1)
liegen.
Störungen können in der Nähe von
Geräten auftreten, die Sender enthalten.
Für Sender mit einer maximalen Ausgangsnennleistung, die nicht oben aufgeführt ist, kann der empfohlene Abstand d in
Metern (m) mithilfe der entsprechenden Gleichung für die Senderfrequenz bestimmt werden, wobei P die maximale
Ausgangsnennleistung des Senders in Watt (W) gemäß dem Hersteller des Senders darstellt.
Hinweis 1: Bei 80 MHz und 800 MHz trifft der Mindestabstand für den höheren Frequenzbereich zu.
Hinweis 2: Diese Richtlinien können nicht auf alle Situationen angewendet werden. Die Ausbreitung elektromagnetischer
Wellen hängt von der Absorption und Reexion von Strukturen, Objekten und Personen ab.
Empfohlene Abstände zwischen tragbarer und mobiler HF-Kommunikationsausrüstung
und diesem Gerät. Dieses Gerät und System hat KEINE lebenserhaltende Funktion.
Dieses Gerät ist für die Verwendung in einer Umgebung vorgesehen, in der gestrahlte HF-Störungen kontrolliert werden.
Der Kunde bzw. Benutzer des Geräts kann zur Verhinderung von elektromagnetischen Störungen beitragen, indem er
gemäß der Empfehlung unten, die sich nach der maximalen Ausgangsleistung der Kommunikationsausrüstung richtet,
einen minimalen Abstand zwischen der tragbaren und mobilen HF-Ausrüstung und dem Gerät einhält.
Maximale
Ausgangsnennleistung
(Watt)
Empfohlene Abstände für das Gerät (Meter)
150 kHz bis 80 MHz
D=(1,1667)√
P
80 bis 800MHz
D=(1,1667)√
P
800 MHz bis 2,5 GHz
D=(2,3333)√
P
0,01 0,11667 0,11667 0,23333
0,1 0,36894 0,36894 0,73785
1 1,1667 1,1667 2,3333
10 3,6894 3,6894 7,3785
100 11,667 11,667 23,333
Für Sender mit einer maximalen Ausgangsnennleistung, die nicht oben aufgeführt ist, kann der empfohlene Abstand d in
Metern (m) mithilfe der entsprechenden Gleichung für die Senderfrequenz bestimmt werden, wobei P die maximale
Ausgangsnennleistung des Senders in Watt (W) gemäß dem Hersteller des Senders darstellt.
Hinweis 1: Bei 80 MHz und 800 MHz trifft der Mindestabstand für den höheren Frequenzbereich zu.
Hinweis 2: Diese Richtlinien können nicht auf alle Situationen angewendet werden. Die Ausbreitung elektromagnetischer
Wellen hängt von der Absorption und Reexion von Strukturen, Objekten und Personen ab.

IT - 38 A-7310
INDICE
Figure......................................................................................................... ............................................................. EN - 2
Simboli IEC................................................................................................ .............................................................. IT - 38
Avvertenze importanti................................................................................... ........................................................... IT - 38
Uso all’estero......................................................................... .................................................................................. IT - 39
Introduzione ............................................................................................................................................................. IT - 39
Parti fondamentali…………………………................................................................................................................ IT - 40
Accessori/Ricambi………………………………………………………. ...................................................................... IT - 40
Allestimento........................................................................................................... .................................................. IT - 40
Funzionamento dell’aspiratore……………………………………………. .................................................................. IT - 40
Caricamento della batteria ...................................................................................................................................... IT - 41
Sostituzione della batteria.................................................................................... ................................................... IT - 42
Istruzioni per la pulizia.................................................................................... ......................................................... IT - 42
Manutenzione .......................................................................................................................................................... IT - 43
Risoluzione dei problemi ......................................................................................................................................... IT - 43
Specifiche/Classificazioni ........................................................................................................................................ IT - 44
Garanzia .................................................................................................................................................................. IT - 44
DeVilbiss – Guida e dichiarazione del produttore ................................................................................................... IT - 45
SIMBOLI IEC
Attenzione, consultare la guida Corrente continua
Consultare le istruzioni per l’uso Corrente alternata
Standby - Acceso/Spento (On/Off) Parte applicata tipo BF
Indicatore di polo positivo centrale Produttore
IP12: le gocce in caduta verticale non hanno effetti dannosi purché la copertura risulti posizionata entro
un angolo non superiore a 15° rispetto alla verticale.
Il dispositivo contiene attrezzatura elettrica e/o elettronica che deve essere riciclata secondo la Direttiva
della Comunità Europea 2012/19/EU – Riuti di apparecchiature elettriche ed elettroniche (RAEE)
MISURE DI PROTEZIONE IMPORTANTI
Nell’impiego di dispositivi elettrici, specialmente in presenza di bambini, è sempre necessario adottare alcune misure di
sicurezza basilari. Leggere tutte le istruzioni prima dell’uso. Le informazioni importanti sono evidenziate come segue.
PERICOLO – Informazioni di sicurezza essenziali per evitare il rischio di lesioni gravi o di morte.
ATTENZIONE – Informazioni di sicurezza importanti per evitare il rischio di lesioni gravi.
ATTENZIONE – Informazioni per evitare danni al prodotto.
NOTA – Informazioni alle quali occorre prestare particolare attenzione.
LEGGERE TUTTE LE ISTRUZIONI PRIMA DELL’USO.
CONSERVARE QUESTE ISTRUZIONI
PERICOLO
Per evitare il rischio di folgorazione:
1. Non usare il dispositivo in bagno.
2. Non collocare il dispositivo in luoghi da cui potrebbe cadere a terra o dentro un lavandino.
3. Evitare che il dispositivo venga a contatto con acqua o altri liquidi.
4. Non toccare il dispositivo se questo è venuto a contatto con acqua. Scollegarlo immediatamente dalla rete elettrica.

IT - 39A-7310
AVVERTENZA
Per ridurre il rischio di ustioni, folgorazione, incendio o lesioni personali:
1. In caso di utilizzo del dispositivo da parte di individui con disabilità siche o adolescenti è necessaria un’attenta
supervisione.
2. Usare il dispositivo solo per il ne previsto nelle modalità descritte in questa guida.
3. Non utilizzare mai il dispositivo nei seguenti casi:
a. Il cavo o la presa di alimentazione presentano segni di danneggiamento.
b. Il dispositivo non funziona correttamente.
c. Il dispositivo presenta segni di danneggiamento o ha subito una caduta.
d. Il dispositivo è venuto a contatto con l’acqua. In tal caso, rivolgersi a un centro di assistenza DeVilbiss per
l’eventuale riparazione.
4. Tenere il cavo di alimentazione lontano dalle fonti di calore.
5. Non utilizzare il dispositivo in presenza di sintomi di sonnolenza o durante il sonno.
USO ALL’ESTERO
L’aspiratore è provvisto di caricabatterie/adattatore da CA a CC che ne consente l’utilizzo su qualsiasi tensione di
alimentazione CA (100-240 Vca, 47-63 Hz). Tuttavia, è necessario dotarsi del cavo di alimentazione appropriato al tipo di
presa elettrica. L’unità è approvata per l’utilizzo su aeromobili commerciali. Per informazioni sugli standard specici,
consultare la sezione Speciche e Dichiarazione della presente guida. Il certicato è disponibile su richiesta. Se
necessario, contattare il fornitore per una copia della lettera di approvazione prima di mettersi in viaggio.
NOTA–Primadell’utilizzo,vericarel’adeguatezzadelcavodialimentazione.
INTRODUZIONE
L’aspiratore DeVilbiss è un dispositivo medico di aspirazione afdabile e portatile. L’applicazione scrupolosa delle
procedure di utilizzo e manutenzione fornite in questa guida consentirà di prolungare al massimo la durata del dispositivo.
Dichiarazione di utilizzo
Il dispositivo è inteso per la rimozione di uidi dalle vie respiratorie o dal sistema di supporto alla respirazione e di
materiale infettivo dalle ferite. Il dispositivo crea una pressione negativa (aspirazione) che estrae i uidi attraverso un tubo
monouso collegato a un contenitore di raccolta. I uidi vengono intrappolati nel acone di raccolta per essere
opportunamente smaltiti. L’utilizzo deve essere prescritto solo da un medico.
Controindicazioni
L’aspiratore compatto DeVilbiss Vacu-Aide non deve essere utilizzato per:
• drenaggio toracico
• aspirazione nasogastrica
PERICOLO
L’aspiratore DeVilbiss è un dispositivo di aspirazione progettato esclusivamente per la raccolta di uidi non
inammabili nell’ambito di procedure mediche. L’uso improprio del dispositivo durante l’esecuzione di procedure
mediche può causare lesioni o la morte. Per tutte le applicazioni mediche:
1. L’aspirazione deve essere effettuata in stretta conformità alle procedure indicate dal responsabile sanitario
autorizzato.
2. Alcuni collegamenti o accessori possono risultare inadatti ai condotti forniti in dotazione. Tutti i collegamenti ed
accessori devono essere testati prima dell’uso al ne di vericarne l’accoppiamento appropriato.

IT - 40 A-7310
PARTI IMPORTANTI
Ispezionare l’aspiratore e tutte le parti prima dell’uso.
1. Manopola di regolazione depressione
(laterale)
2. Filtro antibatterico (non sterile)
3. Porta di ingresso dell’aspirazione (dietro ltro)
4. Pannello display (parte superiore dell’unità)
5. Recipiente riutilizzabile da 725 ml con gruppo
coperchio/gomito
6. Ingresso tensione CC (laterale)
7. Sportello delle batterie
8. Maniglia di trasporto unità/supporto catetere
9. Tubo pazienta da 6’ (1,8 m) (non illustrato)
10. Caricabatterie/adattatore da CA a CC (non
illustrato)
11. Cavo di alimentazione da 12V CC (non illustrato)
12. Batteria ricaricabile ad alta capacità (non illustrata)
13. Custodia da trasporto con tracolla (non illustrata)
ACCESSORI/RICAMBI
I componenti elencati di seguito possono essere acquistati separatamente come accessori o ricambi per l’aspiratore.
Description Part No. Description Part No.
Filtro antibatterico (12 pz) 7305D-608 Cavo di alimentazione da 12V CC 7304D-619
Sportello delle batterie 7310P-602 Cavo elettrico – Tipo ospedaliero (USA) 099HD-614
Caricabatterie/Adattatore da CA a CC 7305P-613 Cavo elettrico USA 6710D-609
Tubo per paziente da 6’ 6305D-611 Cavo elettrico Regno Unito 7305P-630
Custodia da trasporto con tracolla 7310P-606 Cavo elettrico Unione Europea 7305P-631
Confezione recipiente riutilizzabile da 725 ml
(Recipiente, gruppo coperchio/gomito, ltro)
7310P-603
ALLESTIMENTO
1. L’unità viene fornita con la batteria scollegata. Collegare la batteria e caricarla prima del primo utilizzo. Per
informazioni consultare la sezione Sostituzione della batteria.
2. Posizionare il lato chiaro del ltro con l’etichetta IN direttamente nel coperchio del recipiente.
3. Con il ltro collegato al recipiente, inserire direttamente nella porta anteriore. Sia il ltro che il supporto inferiore
assicurano il recipiente all’unità (FIG. 1 e 2).
4. Il tubo da 6’ (1,8 m) può ora essere collegato al coperchio in corrispondenza della scritta <Patient>.
5. Prima dell’uso vericare che tutti i collegamenti risultino saldi per prevenire eventuali perdite.
6. Prima di iniziare l’operazione di aspirazione sul paziente vericare che l’unità sia regolata sul livello di aspirazione
appropriato.
FUNZIONAMENTO DELL’ASPIRATORE
Simboli del pannello di controllo
On/Off
Alimentazione esterna: fornita da cavo di alimentazione CA o CC. Si accende in VERDE quando è
presente la tensione di alimentazione.
Caricamento della batteria: si accende in GIALLO. Si spegne quando la batteria è carica.
Batteria scarica: si accende in ROSSO quando la batteria è scarica.
mmHg
Impostazione del livello di aspirazione: scala/forza si accende in VERDE. La scala mostra il livello della
forza di aspirazione in mmHg.
2
4
3
1
5
8
7
6

IT - 41A-7310
Opzioni di alimentazione
ALIMENTAZIONE CA – Inserire il connettore di alimentazione a 90° del caricabatterie/adattatore da CA a CC nell’ingresso
di alimentazione CC (FIG 3) e collegare il cavo elettrico. Inserire l’altra estremità dell’adattatore CA in una fonte di
alimentazione CA a massa.
ALIMENTAZIONE 12V CC – Inserire il connettore piccolo di alimentazione a 90° del cavo di alimentazione CC
nell’ingresso di alimentazione CC (FIG 3). Inserire l’estremità grande del cavo nella presa di alimentazione 12V CC
dell’automobile.
ALIMENTAZIONE A BATTERIA – L’unità è provvista di una batteria ricaricabile ad alta capacità. Per caricare inizialmente
la nuova unità, caricare completamente la batteria per almeno 5 ore (vedere la sezione Caricamento della batteria). Per
utilizzare il dispositivo con alimentazione a batteria, vericare che non sia collegato a sorgenti di alimentazione esterne.
NOTA – Durante il caricamento o il funzionamento, la fonte di alimentazione potrebbe risultare calda al tatto. Tale
caratteristica non rappresenta un’anomalia.
AVVERTENZA
Se l’unità non riceve tensione da una sorgente esterna oppure la batteria non è stata caricata, la spia di batteria
scarica rimane accesa e le prestazioni dell’unità si riducono rapidamente. Se si accende il simbolo della batteria
scarica, utilizzare un’altra sorgente di alimentazione per evitare di interrompere la procedura di aspirazione.
Regolazione del livello di aspirazione
1. Dopo aver selezionato la fonte di alimentazione, accendere l’unità premendo il pulsante “On”. La luce VERDE, che
indica l’alimentazione esterna, rimane accesa quando l’alimentazione esterna è collegata.
2. Occludere (bloccare) l’estremità del tubo del paziente, quindi regolare il livello di aspirazione da 50-500 mmHG +/-
10% ruotando la manopola di regolazione dell’aspirazione in senso orario per aumentare il livello di aspirazione, in
senso antiorario per diminuirlo (FIG. 4). Rilasciare e occludere ancora una volta per confermare l’impostazione. Il
livello desiderato di aspirazione può essere visualizzato sul display LED.
NOTA–ILEDhannoduelivellidiluminosità.Quandosiregolaillivellodiaspirazione,iLEDsiaccendonoin
progressione.QuandounLEDèametàluminosità,signicacheillivellodiaspirazioneèametàtrailLEDprecedente
completamente acceso e il LED parzialmente acceso. AD ESEMPIO: se il LED 150 mmHg è completamente acceso e il
LED 200 mmHg è parzialmente acceso, il livello di aspirazione è 175 mmHg. Se il LED 200 mmHg si accende
completamente,l’unitàharaggiunto200mmHg.
3. Collegare la punta di aspirazione o il catetere, come appropriato.
NOTA–Sel’unitànonmantienel’aspirazione,consultarelasezioneRisoluzionedeiproblemi.
NOTA – L’aspirazione termina se il livello del liquido raggiunge la valvola di chiusura a galleggiante situata sul lato
sottostante del coperchio del recipiente.
ATTENZIONE – Un’ulteriore aspirazione potrebbe causare danni alla pompa di aspirazione e invalidare la garanzia. Se si
continuaadaspirarecontenutouidonell’unitàènecessariosottoporrel’apparecchioamanutenzione.
CARICAMENTO DELLA BATTERIA
La serie compatta Vacu-Aide è provvista di serie con una batteria interna ricaricabile ad alta capacità. Collegare la batteria
e caricarla prima del primo utilizzo (fare riferimento alla sezione Sostituzione della batteria).
1. Collegare l’unità a una fonte di alimentazione CA o CC.
2. La spia di alimentazione verde esterna si dovrebbe accendere, mentre la spia di caricamento gialla rimane accesa
mentre la batteria è sotto carica.
3. Accertarsi che la spia di caricamento gialla sia accesa quando inizia la fase di caricamento. Quando il livello di
carica della batteria è prossimo al valore massimo, la spia gialla può lampeggiare per alcuni minuti. Tale
comportamento è da ritenersi normale. Se l’unità non mantiene la carica, vericare che la spia gialla si accenda
quando si trasmette alimentazione esterna tramite il pulsante di alimentazione “Off”. Se il problema persiste,
contattare il fornitore dell’apparecchiatura medica.
NOTA –Unabatteriacompletamentescaricarichiedenoa5oredicarica(asecondadellacapacitàresidua)per
ricaricarsi completamente.
Se l’unità non viene utilizzata per un periodo di tempo prolungato, è necessario ricaricare la batteria almeno ogni 6 mesi.
Una batteria completamente carica garantisce un’autonomia di funzionamento di circa 45-60 minuti con livello di
depressione zero (usso libero).
ATTENZIONE – Se si scarica completa la batteria, si riduce la relativa vita operativa. Quando la spia di batteria scarica è
accesa,utilizzarel’unitàsoloperpochiminuti.Ricaricarelabatterianonappenapossibile.

IT - 42 A-7310
SOSTITUZIONE DELLA BATTERIA
1. Utilizzare una moneta o cacciavite a testa piatta per ruotare il fermo di sblocco nella posizione di sblocco (FIG. 5).
2. Rimuovere lo sportello tirando il fermo di sblocco verso l’alto (FIG. 6).
3. Rimuovere la batteria dal vano e scollegare il connettore dalla scheda (FIG. 7 e 8).
4. Installare una nuova batteria seguendo la procedura inversa.
5. Caricare completamente la batteria prima dell’uso.
ISTRUZIONI PER LA PULIZIA
Recipiente di raccolta
NOTA – Il gomito è collegato in modo permanente al coperchio e non può essere rimosso.
1. Premere il pulsante di alimentazione per spegnere l’unità. Attendere che il livello di depressione scenda.
2. Scollegare l’unità dalla sorgente di alimentazione esterna (se applicabile).
3. Rimuovere il recipiente dall’unità scollegando il ltro e il tubo del paziente.
NOTA – Il recipiente di raccolta riutilizzabile e il coperchio devono essere utilizzati solo per un singolo paziente e devono
essere sostituiti ogni mese oppure ogni due mesi, in base all’utilizzo e al metodo di pulizia.
4. Svuotare e pulire accuratamente il recipiente di raccolta ed il coperchio dopo ogni utilizzo. Lavare il recipiente con
una soluzione di acqua calda e detergente per stoviglie e risciacquarlo con acqua calda pulita. Quindi lavare con un
disinfettante per uso commerciale o con una soluzione costituita da una parte di aceto (>=5% concentrazione acido
acetico) e tre parti di acqua (55 °C-65 °C) calda per 60 minuti. Risciacquare con cura con acqua calda e lasciare
asciugare all’aria. NOTA: se si utilizza un disinfettante per uso commerciale, seguire scrupolosamente le istruzioni e
i valori di diluizione forniti dal produttore.
Aspiratore (utilizzo monopaziente)
1. Con l’alimentazione su “Off”, scollegare l’unità da tutte le fonti di alimentazione esterne.
2. Pulire l’alloggiamento esterno con un panno pulito inumidito con disinfettante commerciale/detergente (battericida-
germicida).
ATTENZIONE – Non immergere l’aspiratore in acqua poiché si potrebbe danneggiare la pompa di aspirazione.
Tubo (utilizzo monopaziente)
1. Scollegare il tubo dall’unità.
2. Risciacquare accuratamente facendo scorrere acqua calda corrente al suo interno.
3. Continuare immergendo in una soluzione di 1 parte di aceto (>=5% concentrazione acido acetico) e 3 parti di acqua
(55 °C-65 °C) per 60 minuti. Risciacquare con acqua calda e pulita e lasciare asciugare all’aria.
4. Pulire la supercie esterna del tubo passandovi un panno pulito inumidito.
Custodia di trasporto (utilizzo monopaziente)
1. Pulire la custodia usando un panno pulito inumidito con detergente e/o disinfettante.
NOTA – Le informazioni relative alla disinfezione sono basate sulle Linee guida dell’AARC per la broncoaspirazione per
pazienti a casa (AARC Clinical Practice Guideline Suctioning of the Patient in the Home).
Aspiratore (utilizzo multi-paziente)
Pulizia e disinfezione del dispositivo in caso di cambio di paziente
Quando i dispositivi medici sono già stati utilizzati con un paziente, si deve presumere (no a prova contraria) una
contaminazione da germi patogeni umani e il paziente, l’utente o altri soggetti terzi seguenti devono essere protetti tramite
misure di manipolazione e preparazione adeguate. Di conseguenza, in caso di cambio di paziente, le persone devono
essere protette durante il trasporto e la manipolazione del dispositivo e quest’ultimo deve essere totalmente trattato, vale a
dire pulito e disinfettato, da personale qualicato prima del riutilizzo per proteggere il paziente successivo. Il trattamento
completo può essere effettuato esclusivamente dal produttore o da un fornitore/tecnico dell’assistenza DeVilbiss
qualicato.
NOTA –Quandol’unitàvieneutilizzatasecondoleistruzioniincondizioninormali,l’internodell’unitàèprotetto
dall’esposizioneagliagentipatogenigraziealltroinlineadelcontenitorediraccolta,quindinonènecessariala
disinfezione dei componenti interni.
NOTA –Sel’unitàèstatautilizzatasenzaunltroinlinea,l’internodell’unitàèstatoespostoagliagentipatogeniel’unità
non può essere disinfettata.
NOTA –Qualoranonfossepossibileeffettuareilseguentetrattamentodell’unitàdapartediunfornitore/tecnicoDeVilbiss,
il dispositivo non deve essere utilizzato da un altro paziente!

IT - 43A-7310
DeVilbiss Healthcare raccomanda che almeno le procedure seguenti siano eseguite dal produttore o da soggetti terzi
qualicati tra un utilizzo e l’altro da parte di pazienti diversi.
1. Smaltire tutti i componenti accessori non idonei per il riutilizzo, ovvero il contenitore di raccolta, il ltro, il tubo e la
custodia da trasporto.
2. Con l’interruttore principale in posizione OFF, scollegare l’aspiratore DeVilbiss dall’eventuale sorgente di
alimentazione esterna.
3. Vericare visivamente che non vi siano danni, elementi mancanti, ecc.
4. Pulire l’unità con un panno pulito inumidito con un disinfettante commerciale (battericida-germicida) che soddis i
requisiti indicati nella NOTA sottostante e utilizzato secondo le istruzioni e i valori di diluizione raccomandati dal
produttore.
ATTENZIONE – Non immergere il dispositivo in acqua poiché potrebbe danneggiarsi la pompa di aspirazione.
NOTA –Nonutilizzaredetergentiodisinfettanticontenentiammoniaca,benzenee/oacetoneperpulirel’unità.
MANUTENZIONE
Sostituzione del filtro e del recipiente
1. Sostituire il ltro antibatterico ogni mese oppure ogni 2 mesi OPPURE immediatamente in caso di fuoriuscita.
2. Rimuovere il ltro antibatterico scollegandolo dal gruppo unità di aspirazione/coperchio.
3. Sostituirlo con un nuovo ltro antibatterico DeVilbiss n. 7305D-608 (confezione da 12).
NOTA –Vericarecheillatochiarodelltrocontrassegnatoconladicitura<In>siarivoltoversoilrecipiente.
NOTA –UtilizzaresoloilltroantibattericofornitodaDeVilbissHealthcareodaunodeisuoidistributori.L’utilizzodi
componentidifferentipotrebbecontaminarel’unitàoridurreleprestazionieinvalidarelagaranzia.
4. Sostituire il recipiente di raccolta ogni mese oppure ogni due mesi, in base all’utilizzo e al metodo di pulizia.
NOTA – Utilizzare solo recipienti riutilizzabili DeVilbiss da 725 ml. L’utilizzo di componenti differenti potrebbe ridurre le
prestazioni e invalidare la garanzia.
RISOLUZIONE DEI PROBLEMI
NOTA – Prima di contattare il fornitore dell’apparecchiatura, consultare la seguente sezione sulla Risoluzione dei problemi:
PERICOLO
Pericolo di scosse elettriche. Non cercare di aprire o rimuovere il modulo poiché nessun componente interno può
essere riparato dall’utente. In caso di assistenza, restituire l’aspiratore a un fornitore DeVilbiss qualicato o a un
centro assistenza autorizzato. L’apertura o la manomissione dell’unità invalida la garanzia.
NOTA – Se il problema persiste, contattare il fornitore dell’apparecchiatura medica.
Problema Soluzione
L’unità non si accende. (La spia verde
di alimentazione esterna deve
accendersi quando l’unità è collegata
a una sorgente di alimentazione.)
1. Vericare la funzionalità della sorgente di alimentazione e i collegamenti.
2. Vericare che la presa di corrente sia attiva collegandovi una lampada.
3. Vericare che la batteria sia completamente carica.
La pompa funziona ma non è
presente aspirazione.
1. Vericare che i tubi siano collegati correttamente.
2. Vericare che i punti di collegamento dei tubi non presentino perdite,
incrinature oppure occlusioni.
3. Vericare che l’interruzione del galleggiante non sia attivata a causa del
riempimento del recipiente.
4. Vericare che il recipiente di raccolta non presenti perdite o incrinature.
Basso livello di aspirazione. 1. Azionare la manopola di regolazione per aumentare il livello di aspirazione.
2. Vericare che l’unità non presenti segni di perdita.
La batteria non mantiene la carica. 1. Vericare che la batteria sia collegata (fare riferimento alla sezione
Allestimento).
2. Vericare che la spia del livello di carica della batteria sia accesa.
3. Vericare i collegamenti elettrici durante la fase di carica.
4. Vericare che la presa di corrente sia attiva collegandovi una lampada.
Se il problema persiste, contattare il fornitore dell’apparecchiatura medica.

IT - 44 A-7310
SPECIFICHE/CLASSIFICAZIONI
Dimensioni ......................................7.25”H x 7.25” W x 6.75”D (18,4 cm A x 18,4 cm L x 17,1 cm P)
Peso .............................................................................3,375 libbre (1,53 kg)
Requisiti elettrici .........................................100-240 VAC 50/60 Hz 0.75 A max; 12 VDC, 33 W max
Livelli di depressione ............................................................da 50-500 mmHG +/- 10%
Flusso aria (ingresso pompa).....................................................27 LPM (flusso libero) tipico
(può essere inferiore con alimentazione a batteria)
Capacità recipiente di raccolta.................................................................725 ml (cc)
Condizioni ambientali
Valori della temperatura d’esercizio. ................................................32°F (0°C) - 104°F (40°C)
Umidità operativa relativa.........................................................................0-95%
Pressione atmosferica d’esercizio ........................................ 10.2 Psi (70 kPA) - 15.4 Psi (106 kPA)
Valori di temperatura di trasporto e stoccaggio ......................................-40°F (-40°C) - 158°F (70°C)
Umidità relativa di trasporto e stoccaggio ............................................................0-95%
Pressione atmosferica di trasporto e stoccaggio .............................. 7.3 Psi (50 kPA) - 15.4 Psi (106 kPA)
Garanzia
Serie 7310 ............................................Due anni, esclusa batteria interna e recipiente di raccolta
Batteria interna.................................................................................6 mesi
Approvazioni
IEC 601-1; IEC 68; CAN/CSA-C22.2 No. 601.1-M90; UL 2601-1, CE EN 60601-1-2, ISO10079-1:1999
Conforme a RTCA/DO-160E ...............................................DO-160E - Sezione 21 Categoria M
(Solo per alimentazione a batteria; Aeromobili commerciali, attrezzature aeree)
Classificazioni del dispositivo
Per la protezione da scosse elettriche.......................................... Classe I e alimentazione interna
Livello di protezione da scosse elettriche ..............................................Parti applicate di tipo BF
Grado di protezione contro ingresso di liquido......................................IP12 e alimentazione ordinaria
Modo di funzionamento ........................... Funzionamento intermittente: 30 minuti acceso, 30 minuti spento
Apparecchiatura non idonea all’uso in presenza di una miscela di anestetico infiammable con l’aria o con ossigeno o ossi-
do nitroso.
Classificazione ISO
Serie 7310 – Dispositivo medico di aspirazione ad alimentazione elettrica per impiego locale e in trasferta conforme alle
norme ISO 10079-1: 1999
Alto flusso/Alta depressione
GARANZIA LIMITATA A DUE ANNI
Il gruppo compressore dell’aspiratore compatto DeVilbiss Vacu-Aide serie 7310 (ad esclusione della batteria interna
ricaricabile e del recipiente di raccolta) è garantito esente da difetti di lavorazione e di materiale per un periodo di due anni
dalla data di acquisto. La batteria interna ricaricabile è garantita per 6 mesi. Qualsiasi parte difettosa sarà riparata o
sostituita a discrezione di DeVilbiss Healthcare se l’unità non è stata manomessa o usata in modo improprio durante tale
periodo. Accertarsi che qualsiasi malfunzionamento non sia dovuto a una pulizia inadeguata o all’inosservanza di istruzioni.
Se è necessaria una riparazione, contattare il rivenditore DeVilbiss o DeVilbiss per istruzioni:
NOTA–Ricordarsidiconservareunacopiadatatadeldocumentodiacquisitoperattestarechel’unitàècopertadalla
garanzia di due anni.
NOTA–Questagaranzianonprevedenélafornituradiunitàsostitutivanél’indennizzopercostisostenutiaseguitodi
eventualenoleggioduranteilperiododiriparazioneopercostidimanodoperasostenutiperlariparazione/sostituzione
delle parti difettose.
NON SI RICONOSCONO ALTRE GARANZIE ESPLICITE. LE GARANZIE IMPLICITE, COMPRESE QUELLE DI
COMMERCIABILITÀ E IDONEITÀ PER UNO SCOPO PARTICOLARE, SONO LIMITATE ALLA DURATA DELLA
GARANZIA ESPLICITA LIMITATA E, NELLA MISURA MASSIMA CONSENTITA DALLA LEGGE, SI ESCLUDE QUALSIASI
ALTRA GARANZIA IMPLICITA. QUESTO È L’UNICO RIMEDIO GIURIDICO A DISPOSIZIONE DELL’ACQUIRENTE. NEI
LIMITI PREVISTI DALLA LEGGE, SI RESPINGE QUALSIASI RESPONSABILITÀ PER EVENTUALI DANNI INDIRETTI E
INCIDENTALI NELL’AMBITO DI QUALSIVOGLIA GARANZIA. ALCUNI PAESI NON CONSENTONO LIMITAZIONI ALLA
DURATA DELLE GARANZIE IMPLICITE, NÉ LIMITAZIONI O ESCLUSIONI DI DANNI CONSEGUENTI O INCIDENTALI;
PERTANTO, LA PREDETTA LIMITAZIONE O ESCLUSIONE POTREBBE NON APPLICARSI AL CASO DI SPECIE.
Questa garanzia conferisce diritti legali specici. L’utente potrebbe godere di altri diritti che variano secondo i paesi.

IT - 45A-7310
Nota del produttore
Grazie per avere scelto l’aspiratore compatto DeVilbiss Vacu-Aide. Desideriamo la soddisfazione dei nostri clienti.
Eventuali domande o commenti possono essere inviati all’indirizzo riportato sulla retro della copertina.
Per contattare il rivenditore autorizzato DeVilbiss:
Telefono_________________________________________________________
Data di acquisto___________________________________________________
Numero di serie___________________________________________________
DEVILBISS – GUIDA E DICHIARAZIONE DEL PRODUTTORE
AVVERTENZA
Le apparecchiature elettromedicali necessitano di attenzioni particolari in merito alla compatibilità
elettromagnetica e devono essere installate e messe in funzione in conformità alle informazioni sulla compatibilità
elettromagnetica fornite dalla documentazione di corredo.
Le apparecchiature di comunicazione a radiofrequenza portatili e mobili possono inuire sul funzionamento degli
strumenti elettromedicali.
Evitare di usare l’apparecchiatura o il sistema in diretta prossimità di altre apparecchiature. Qualora ne fosse
necessario l’uso a anco o direttamente sopra o sotto altri dispositivi, osservarne attentamente il funzionamento
in relazione alla congurazione usata.
NOTA–Lesullacompatibilitàelettromagneticaelealtrelineeguidaoffronoalclienteoall’utenteinformazioniessenzialiper
determinarel’idoneitàdell’apparecchiaturaodelsistemanell’ambienteelettromagneticodiutilizzoepergestiretale
ambiente in modo da permettere all’apparecchiatura o al sistema di funzionare come previsto senza disturbare altri
dispositivi o altre apparecchiature elettriche non destinate all’uso medico.
Guida e dichiarazione del produttore – Emissioni di tutti gli apparecchi e sistemi
Questo dispositivo è stato progettato per l’uso negli ambienti elettromagnetici specicati sotto. Spetta all’acquirente o
all’operatore del dispositivo assicurarsi che lo strumento venga usato in tale ambiente.
Test delle emissioni Conformità Ambiente elettromagnetico – Guida
Emissione di RF
CISPR 11
Gruppo 1
Il dispositivo usa energia a radiofrequenza solamente per le funzioni
interne. Pertanto, le sue emissioni di RF sono molto basse e non
dovrebbero interferire con le apparecchiature elettroniche nei pressi
del sistema.
Emissione di RF
CISPR 11
Classe B
Emissioni irradiate e
condotte
Il dispositivo è adatto per l’uso in tutti gli ambienti, inclusi quelli adibiti
ad uso residenziale e direttamente in connessione con la rete di
alimentazione pubblica a bassa tensione comunemente usata nelle
abitazioni.
Emissione di
armoniche
IEC 61000-3-2
Classe A
Flicker IEC 61000-3-3 Conforme
Test di immunità Livello test IEC 60601 Livello di conformità Ambiente elettromagnetico – Guida
Scariche
elettrostatiche (ESD)
IEC 61000-4-2
±6 kV contatto
±8 kV aria
±6 kV contatto
±8 kV aria
I pavimenti devono essere di legno,
cemento o in piastrelle di ceramica. Se sono
di materiale sintetico, l'umidità relativa deve
essere almeno del 30%.
Transitori veloci/burst
IEC 61000-4-4
±2 kV rete di
alimentazione principale
in CA
±2 kV rete di
alimentazione
principale in CA
La qualità della rete elettrica deve
corrispondere a quella prevista in un tipico
ambiente commerciale od ospedaliero.
Sovratensione
transitoria
IEC 61000-4-5
±1 kV differenziale
±2 kV comune
±1 kV differenziale
±2 kV comune
La qualità della rete elettrica deve
corrispondere a quella prevista in un tipico
ambiente commerciale od ospedaliero.
Cadute di tensione,
brevi interruzioni e
variazioni di tensione
sulle linee di
alimentazione in
ingresso
IEC 61000-4-11
>95% calo per 0,5 cicli
>60% calo per 5 cicli
>30% calo per 25 cicli
>95% calo per 5
secondi
>95% calo per 0,5 cicli
>60% calo per 5 cicli
>30% calo per 25 cicli
>95% calo per 5
secondi
La qualità della rete elettrica deve
corrispondere a quella prevista in un tipico
ambiente commerciale od ospedaliero. Se le
esigenze dell'utente del dispositivo
richiedono che sia assicurato il
funzionamento continuato anche durante le
interruzioni di energia elettrica, si consiglia
di alimentare il sistema con un gruppo di
continuità o una batteria.

IT - 46 A-7310
Test di immunità Livello test IEC 60601 Livello di conformità Ambiente elettromagnetico – Guida
Campi magnetici alla
frequenza di rete
(50/60 Hz)
IEC 61000-4-8
3A/m 3A/m
Il campo magnetico alla frequenza di rete
deve corrispondere a quello di una località
tipica in un tipico ambiente commerciale od
ospedaliero.
RF condotta
IEC 61000-4-6
3 Vrms da
150 kHz a 80 MHz
V1 = 3 Vrms
Le apparecchiature di comunicazione a
radiofrequenza portatili e mobili possono
essere usate a una distanza dal dispositivo
che non sia inferiore alla distanza
consigliata, calcolata e indicata di seguito:
D=(3,5/V1)√
P
RF irradiata
IEC 61000-4-3
3 V/m
da 80 MHz a 2,5 GHz
E1 = 3V/m
D=(3,5/E1)√
P
da 80 MHz a 800 MHz
D=(7/E1)√
P
da 800 MHz a 2,5 GHz
Dove P è la potenza nominale massima in
W e D è la distanza in metri consigliata.
La forza del campo generato dai
trasmettitori ssi, determinata tramite perizia
elettromagnetica del sito, deve essere
inferiore ai livelli di conformità (V1 e E1).
Eventuali interferenze possono vericarsi
nei pressi di apparecchiature contenenti un
trasmettitore.
Per i trasmettitori la cui potenza nominale massima in uscita non sia elencata nella tabella qui sopra, la distanza
consigliata d in metri (m) può essere calcolata in base all’equazione applicabile alla frequenza dell’apparecchio
trasmettitore, dove P è la potenza nominale massima in uscita dal trasmettitore, espressa in W, secondo il produttore del
trasmettitore stesso.
Nota 1. A 80 MHz e 800 MHz, applicare la distanza consigliata per la gamma di frequenza più alta.
Nota 2. Queste direttive potrebbero risultare inapplicabili in alcune situazioni. L’assorbimento e la riessione provocati da
strutture, oggetti e persone inuiscono sulla propagazione elettromagnetica.
Distanze consigliate tra le apparecchiature di comunicazione a radiofrequenza
portatili e mobili e questo dispositivo Questo NON è un sistema di supporto
vitale.
Questo dispositivo è stato progettato per l’uso in ambienti elettromagnetici nei quali le interferenze di RF irradiata sono
contenute. L’acquirente o l’operatore del dispositivo possono aiutare a prevenire le interferenze elettromagnetiche
garantendo la distanza minima consigliata tra il sistema e le eventuali apparecchiature di comunicazione a
radiofrequenza portatili e mobili, in base alla potenza nominale massima in uscita da tali apparecchi.
Potenza massima in
uscita (W)
Distanza consigliata per il dispositivo (m)
da 150 kHz a 80 MHz
D=(1,1667)√
P
da 80 MHz a 800 MHz
D=(1,1667)√
P
da 800 MHz a 2,5 GHz
D=(2,3433)√
P
0,01 0,11667 0,11667 0,23333
0,1 0,36894 0,36894 0,73785
1 1,1667 1,1667 2,3333
10 3,6894 3,6894 7,3785
100 11,667 11,667 23,333
Per i trasmettitori la cui potenza nominale massima in uscita non sia elencata nella tabella qui sopra, la distanza
consigliata d in metri (m) può essere calcolata in base all’equazione applicabile alla frequenza dell’apparecchio
trasmettitore, dove P è la potenza nominale massima in uscita dal trasmettitore, espressa in W, secondo il produttore del
trasmettitore stesso.
Nota 1. A 80 MHz e 800 MHz, applicare la distanza consigliata per la gamma di frequenza più alta.
Nota 2. direttive potrebbero risultare inapplicabili in alcune situazioni. L’assorbimento e la riessione provocati da
strutture, oggetti e persone inuiscono sulla propagazione elettromagnetica.

NL - 47A-7310
INHOUDSOPGAVE
Afbeeldingen......................................................................................................... ................................................... EN - 2
IEC-symbolen................................................................................................ .......................................................... NL - 47
Belangrijke veiligheidsinstructies................................................................................... .......................................... NL - 47
Gebruik in het buitenland ....................................................................... ................................................................ NL - 48
Inleiding .................................................................................................................................................................. NL - 48
Belangrijke onderdelen........................................................... ................................................................................. NL - 49
Accessoires/vervangingsonderdelen..................................................................... .................................................. NL - 49
Instelling................................................................................................. ................................................................. NL - 49
De bediening van uw afzuigeenheid............................................................. .......................................................... NL - 49
De batterij opladen .................................................................................................................................................. NL - 50
De batterij vervangen ............................................................................... .............................................................. NL - 51
Reinigingsinstructies ............................................................................ .................................................................. NL - 51
Onderhoud ............................................................................................................................................................... NL - 52
Problemen oplossen ................................................................................................................................................ NL - 52
Specificaties/classificaties ....................................................................................................................................... NL - 53
Garantie ................................................................................................................................................................... NL - 53
DeVilbiss richtlijnen en fabrikantenverklaring ......................................................................................................... NL - 54
IEC-SYMBOLEN
Waarschuwing. Raadpleeg
instructiehandboekje
Gelijkstroom
Raadpleeg de gebruiksinstructies Wisselstroom
Stand-by - Aan/Uit Type BF-toegepast onderdeel
Positieve polariteitsindicator Producent
IP12: Verticaal vallende druppels hebben geen nadelige invloed als de behuizing 15° naar links of naar
rechts wordt gekanteld.
Het apparaat bevat elektrische en/of elektronische apparatuur die moet worden gerecycled conform
EU-richtlijn 2012/19/EU met betrekking tot elektrisch en elektrotechnisch afval (WEEE)
BELANGRIJKE
VEILIGHEIDSINSTRUCTIES
Wanneer gebruik wordt gemaakt van elektrische producten, vooral in aanwezigheid van kinderen, moeten altijd elementaire
veiligheidsmaatregelen worden genomen. Lees alle instructies goed door voordat u dit product gaat gebruiken. Belangrijke
informatie wordt aangegeven met behulp van de volgende termen:
GEVAAR– Dringende veiligheidsinformatie met betrekking tot gevaren die ernstig letsel of de dood tot
gevolg kunnen hebben.
WAARSCHUWING– Belangrijke veiligheidsinformatie met betrekking tot gevaren die ernstig letsel tot gevolg
kunnen hebben.
VOORZICHTIG – Informatie ter voorkoming van schade aan het product.
OPMERKING – Informatie waarop u bijzonder acht moet slaan.
LEES ALLE INSTRUCTIES DOOR VOORDAT U HET PRODUCT GEBRUIKT.
BEWAAR DEZE INSTRUCTIES
GEVAAR
Doe het volgende om het risico van elektrocutie te beperken:
1. Gebruik het apparaat niet terwijl u in bad zit.
2. Plaats of bewaar het product niet op een plek waar het in een badkuip of gootsteen kan vallen.
3. Leg of dompel het apparaat niet in water of enig andere vloeistof.

NL - 48 A-7310
4. Raak een product dat in water is gevallen niet aan. Verwijder onmiddellijk het netsnoer.
WAARSCHUWING
Doe het volgende om de kans op brandwonden, elektrocutie, brand of persoonlijk letsel te beperken:
1. Nauw toezicht is noodzakelijk wanneer dit product wordt gebruikt door of in aanwezigheid van kinderen of lichamelijk
gehandicapte personen.
2. Gebruik dit product alleen voor het doel waarvoor het is bestemd (zoals beschreven in deze handleiding).
3. Gebruik dit product nooit als:
a. Het netsnoer of de stekker beschadigd is.
b. Het niet correct werkt.
c. Het gevallen of beschadigd is.
d. Het in het water terecht is gekomen. Stuur het product terug naar een geautoriseerd servicecentrum van
DeVilbiss voor onderzoek en reparatie.
4. Zorg ervoor dat het netsnoer niet in aanraking komt met hete oppervlakken.
5. Gebruik het product nooit terwijl u slaapt of als u slaperig bent.
GEBRUIK IN HET BUITENLAND
De afzuigeenheid is uitgerust met een adapter/lader voor overschakeling van wisselstroom op gelijkstroom die het
apparaat in staat stelt te werken bij elk willekeurig voltage (100-240 V wisselspanning, 47-63 Hz). Er moet hierbij echter
wel een netsnoer worden gebruikt dat geschikt is voor verschillende voltages. Uw apparaat is goedgekeurd voor gebruik in
commerciële vliegtuigen, specieke standaarden worden vermeld in de specicaties en conformiteitsverklaring in deze
handleiding. Een certicaat is op aanvraag verkrijgbaar. Neem, zo nodig, vóór vertrek contact op met uw leverancier voor
een exemplaar van de goedkeuringsbrief.
OPMERKING–Controleer vóór gebruik of het netsnoer geschikt is voor verschillende voltages.
INLEIDING
Uw DeVilbiss afzuigeenheid is een compact, draagbaar medisch afzuigapparaat dat is ontworpen met het oog op
betrouwbaarheid. Door de aanbevolen bedienings- en onderhoudsprocedures te volgen die in dit instructiehandboekje
worden beschreven, kunt u de levensduur van dit product maximaliseren.
Verklaring aangaande beoogd gebruik
Dit apparaat moet worden gebruikt voor het verwijderen van vloeistoffen uit de luchtwegen of het
ademhalingsondersteuningssysteem en van besmettelijke materialen uit wonden. Het apparaat wekt een negatieve druk
(vacuüm) op waarmee vloeistoffen worden afgevoerd via een slang voor eenmalig gebruik die is aangesloten op een
opvangpot. De vloeistoffen worden verzameld in de opvangpot voor correcte verwijdering. Het apparaat mag uitsluitend op
voorschrift van een arts worden gebruikt.
Contra-indicaties
De DeVilbiss Vacu-Aide Compact afzuigeenheid mag niet gebruikt worden voor:
• Thoraxdrain
• Nasogastrische zuigkracht
GEVAAR
De DeVilbiss afzuigeenheid is een vacuüm afzuigapparaat dat is ontworpen voor het opzuigen van niet
ontvlambare vloeistoffen in uitsluitend medische toepassingen. Onjuist gebruik tijdens medische toepassingen
kan persoonlijk letsel of de dood tot gevolg hebben. Voor alle medische toepassingen geldt:
1. Alle afzuigactiviteiten dienen strikt te worden uitgevoerd volgens de procedures die zijn opgesteld door een bevoegd
medisch specialist.
2. Sommige hulpstukken of accessoires passen mogelijk niet op de meegeleverde slang. Alle hulpstukken of
accessoires moeten vóór gebruik zorgvuldig worden gecontroleerd om er zeker van te zijn dat deze goed passen.

NL - 49A-7310
BELANGRIJKE ONDERDELEN
Inspecteer de afzuigeenheid en alle onderdelen voor gebruik.
1. Vacuümregelknop (aan zijkant)
2. Bacterielter (niet-steriel)
3. Vacuüminlaatpoort (achter lter)
4. Weergavepaneel (bovenkant van apparaat)
5. Herbruikbare opvanges van 725 ml met
sluiting-/elleboogeenheid
6. Gelijkstroomingang (aan zijkant)
7. Klepje batterijvak
8. Draaghandvat/katheterhouder van apparaat
9. 1,8 m Patiëntslang (niet afgebeeld)
10. Adapter/lader voor overschakeling van
wisselstroom op gelijkstroom (niet afgebeeld)
11. Netsnoer voor 12V gelijkstroom (niet afgebeeld)
12. Krachtige oplaadbare batterij (niet afgebeeld)
13. Draagtas met schouderriem (niet afgebeeld)
ACCESSOIRES/VERVANGINGSONDERDELEN
De volgende items kunnen apart worden aangeschaft als accessoires of vervangingsonderdelen voor uw afzuigeenheid.
Omschrijving Onderdeelnr. Omschrijving Onderdeelnr.
Bacterielter (pak van 12 stuks) 7305D-608 Netsnoer voor 12V gelijkstroom 7304D-619
Klepje batterijvak 7310P-602 Netsnoer goedgekeurd voor
ziekenhuisgebruik in VS
099HD-614
Adapter/lader voor overschakeling van
wisselstroom op gelijkstroom
7305P-613 Netsnoer VS 6710D-609
1,8m lange patiëntslang 6305D-611 Netsnoer Verenigd Koninkrijk 7305P-630
Draagtas met schouderriem 7310P-606 Netsnoer EU 7305P-631
Pakket met 725 ml herbruikbare es
(Opvanges, sluiting-/elleboogeenheid, lter)
7310P-603
INSTELLING
1. Uw eenheid is verzonden met losgekoppelde batterij. Sluit de batterij aan en laad deze op voordat u het apparaat
voor het eerst gaat gebruiken. Raadpleeg de sectie De batterij vervangen voor instructies.
2. Plaats de doorzichtige kant van de lter die de tekst IN bevat rechtstreeks in de sluiting van de es.
3. Sluit de lter aan op de es en plaats het geheel direct in de poort aan de voorzijde. De es is via de lter en de
benedensteun aan het apparaat bevestigd (AFB. 1 en 2).
4. De 1,8m lange patiëntslang kan nu worden aangesloten op de sluiting van de essenhouder op de aansluiting met
de tekst <Patient>.
5. Controleer vóór gebruik of alle verbindingen goed zijn om lekken te voorkomen.
6. Controleer of de juiste afzuigsterkte is ingesteld op het apparaat voordat u begint met afzuigen.
DE BEDIENING VAN UW AFZUIGEENHEID
Symbolen op bedieningspaneel
Aan/Uit
Externe voeding: geleverd via netsnoer voor wisselstroom of netsnoer voor gelijkstroom. GROEN verlicht
als voeding actief is.
Batterij wordt opgeladen: GEEL verlicht. Het lampje gaat uit als de batterij volledig is opgeladen.
Batterij bijna leeg: ROOD verlicht als batterij leeg is.
mmHg
Instelling voor afzuigsterkte: Schaal/sterkte wordt GROEN verlicht. Deze schaal geef de afzuigsterkte in
mmHg aan.
2
4
3
1
5
8
7
6

NL - 50 A-7310
Voedingsopties
WERKING VIA WISSELSTROOM –Steek de 90° adapter/lader voor overschakeling van wisselstroom op gelijkstroom in
de gelijkstroomvoedingsaansluiting (AFB. 3) en sluit het netsnoer aan. Steek het andere uiteinde van de
wisselstroomadapter in een geaard stopcontact.
WERKING VIA 12V GELIJKSTROOM –Steek de kleine 90° voedingsconnector van het netsnoer voor gelijkstroom in de
gelijkstroomingang (AFB. 3). Sluit de grote connector van het netsnoer aan op de 12V gelijkstroomingang van het voertuig.
WERKING OP BATTERIJEN –Uw apparaat is uitgerust met een krachtige, oplaadbare batterij. Laad de batterij voordat u
deze voor het eerst gaat gebruiken in het apparaat minimaal 5 uur op (zie De batterij opladen). Als u de oplaadbare batterij
wilt gebruiken als voeding voor het apparaat, moet u ervoor zorgen dat er geen externe voedingsbronnen zijn aangesloten
op de afzuigeenheid.
OPMERKING– Tijdens het opladen of tijdens het gebruik kan de voedingseenheid warm aanvoelen. Dit is normaal.
WAARSCHUWING
Als het apparaat niet wordt aangesloten op een externe voedingsbron of als de batterij niet opnieuw wordt
opgeladen, blijft het lampje Batterij bijna leeg branden en worden de prestaties van het apparaat snel minder.
Schakel, als het lampje Batterij bijna leeg gaat branden, over op een andere voedingsbron om onderbreking van
de afzuiging te voorkomen.
Het vacuümniveau aanpassen
1. Zet, nadat u de voedingsbron hebt geselecteerd, het apparaat aan door op de knop
Aan” te drukken. Het GROENE lampje, dat aangeeft dat een externe voedingsbron wordt gebruikt, blijft branden als
een externe voedingsbron is aangesloten.
2. Sluit het uiteinde van de slang aan de zijde van de patiënt af en pas vervolgens het vacuümniveau aan van 50-500
mmHG +/- 10% door aan de vacuümregelknop aan de zijkant van het apparaat te draaien (naar rechts om de
vacuüminstelling te verhogen en naar links om de vacuüminstelling te verlagen). Zie AFB. 4. Laat los en sluit
nogmaals af om de instelling te controleren. Het gewenste vacuümniveau kan worden afgelezen op de LED-display.
OPMERKING–De LED’s hebben twee helderheidsniveaus. Bij aanpassing van het vacuümniveau gaan de LED’s één voor
één branden. Als een LED op halve helderheid brandt, geeft dit aan dat het vacuümniveau tussen de vorige volledig
verlichte LED en de half verlichte LED ligt. VOORBEELD: Als de LED voor 150 mmHg volledig brandt en de LED voor 200
mmHg half, bedraagt de afzuigsterkte 175 mmHg. Als de LED voor 200 mmHg volledig brandt, heeft het apparaat een
afzuigsterkte van 200 mmHg bereikt.
3. Sluit zo nodig een afzuigpunt of katheter aan.
OPMERKING– Als het apparaat niet vacuüm blijft, raadpleegt u de sectie Problemen oplossen.
OPMERKING–Het afzuigen wordt gestopt als het vloeistofniveau de vlotterafsluiter bereikt die zich aan de onderkant van
desluitingvandeessenhouderbevindt.
VOORZICHTIG–Verdergaan met afzuigen kan tot schade aan de vacuümpomp leiden en maakt de garantie ongeldig. Er
moet onderhoud op de apparatuur worden uitgevoerd als vloeistof wordt teruggezogen in het apparaat.
DE BATTERIJ OPLADEN
Apparaten van het model Vacu-Aide Compact zijn van fabriekswege uitgerust met een krachtige oplaadbare batterij. Sluit
de batterij aan en laad deze op voordat u het apparaat voor het eerst gaat gebruiken. (Raadpleeg De batterij opladen.)
1. Sluit het apparaat aan op een wissel- of gelijkstroombron.
2. Het groene lampje voor externe voeding zou moeten gaan branden; het gele oplaadlampje blijft branden terwijl de
batterij wordt opgeladen.
3. Controleer of het gele oplaadlampje gaat branden zodra het opladen wordt gestart. Als de batterij bijna vol is,
bestaat de kans dat het gele lampje een aantal minuten lang staat te knipperen. Dat is normaal. Als uw apparaat niet
wordt opgeladen, controleert u of het gele lampje gaat branden zodra een externe voedingsbron wordt gebruikt met
behulp van de voedingsknop “Uit”. Als het probleem zich blijft voordoen, neemt u contact op met de leverancier van
uw apparatuur.
OPMERKING–Een volledig lege batterij heeft tot 5 uur (afhankelijk van hoe leeg de batterij is) nodig voordat deze weer
volledig is opgeladen.
Als het apparaat gedurende langere tijd niet wordt gebruikt, moet de batterij minimaal één keer per zes maanden opnieuw
worden opgeladen. Bij een vacuümniveau van nul (vrije doorstroom) kan uw apparaat ongeveer 45-60 minuten lang
ononderbroken werken op een volledig opgeladen batterij.
VOORZICHTIG–Als de batterij volledig wordt ontladen, leidt dit tot beperking van de levensduur. Werk niet langer dan
enkele minuten met het apparaat als het lampje brandt dat aangeeft dat de batterij bijna leeg is. Laad de batterij zo snel
mogelijk weer op.

NL - 51A-7310
DE BATTERIJ VERVANGEN
1. Draai de vergrendeling in de open stand met behulp van een munt of een platte schroevendraaier (AFB. 5).
2. Verwijder het klepje van het batterijvak door het aan de vergrendeling omhoog te trekken (AFB. 6).
3. Verwijder de batterij uit het vak en koppel de connector los van de printboard (AFB. 7 en 8).
4. Installeer een nieuwe batterij door de bovenstaande stappen in omgekeerde volgorde uit te voeren.
5. Laad de batterij volledig op voordat u deze gaat gebruiken.
REINIGINGSINSTRUCTIES
Opvangfles
OPMERKING–De elleboog is permanent aan de sluiting bevestigd en kan niet worden verwijderd.
1. Druk op de aan/uit-knop om het apparaat uit te zetten. Wacht totdat het vacuümniveau daalt.
2. Koppel de externe voedingsbron los van de gelijkstroomingang op het apparaat (indien van toepassing).
3. Remove canister from unit by disconnecting the patient tubing and lter.
OPMERKING–Deherbruikbareopvangesensluitingzijnbedoeldvoorgebruikbijéénpatiëntenmoetenelke1tot2
maanden worden vervangen, afhankelijk van het gebruik en de reinigingsmethode.
4. Opvangessen en sluitingen moeten na elk gebruik worden leeggemaakt en grondig gereinigd. Was het apparaat af
met een oplossing van warm water en vaatwasmiddel en spoel het schoon met warm water uit de kraan.Laat het
vervolgens 1 uur weken in een in de handel verkrijgbaar desinfecterend middel of een oplossing van één deel azijn
(>=5% azijnzuur concentratie) op drie delen warm water (55 °C-65 °C). Spoel het apparaat grondig schoon met
warm water uit de kraan en laat het aan de lucht drogen. OPMERKING: Volg, bij gebruik van een in de handel
verkrijgbaar desinfecterend middel, nauwkeurig de instructies en verdunningsvoorschriften van de fabrikant.
Afzuigeenheid (voor gebruik door een patiënt)
1. Zet de stroom uit en koppel het apparaat lost van alle externe voedingsbronnen.
2. Veeg de behuizing en de sluiting van de opvanges af met een schone doek en een in de handel verkrijgbaar
desinfecterend middel/reinigingsmiddel (bacterie- of kiemdodend).
VOORZICHTIG– Dompel het apparaat niet onder in water om schade aan de vacuümpomp te voorkomen.
Patiëntslang (voor gebruik door een patiënt)
1. Koppel de slang los van het apparaat.
2. Spoel de slang grondig schoon met warm kraanwater.
3. Hierna weken in een oplossing van 1 deel azijn (>=5% azijnzuur concentratie) op 3 delen water (55 °C-65 °C)
gedurende 60 minuten. Spoel met schoon, warm water en laat het drogen.
4. Houd de buitenkant van de slangen schoon door deze af te vegen met een schone, vochtige doek.
Draagkoffer (voor gebruik door een patiënt)
1. Veeg de koffer af met een schone doek die is bevochtigd met een schoonmaakmiddel en/of desinfecterend middel.
OPMERKING–DeinformatieoverdesinfectieisafkomstigvanAARCKlinischePraktijkrichtlijnen:AfzuigenvandePatiënt
in Thuissituaties.
Afzuigeenheid (gebruik door meerdere patiënten)
Reiniging en desinfectie van de eenheid bij verandering van patiënt
Als medische instrumenten al zijn gebruikt bij een patiënt, dient te worden uitgegaan van verontreiniging met menselijke
pathogene bacteriën (tenzij er bewijs beschikbaar is dat dit niet het geval is) en moet de volgende patiënt, gebruiker of
derde partij worden beschermd door middel van passende verwerking en voorbereiding. Daarom moeten, bij verandering
van patiënt, de mensen worden beschermd tijdens het transport en de verwerking van het instrument en moet het
instrument vóór hergebruik bij de nieuwe patiënt volledig worden verwerkt (gereinigd en gedesinfecteerd) door op de juiste
wijze getrainde medewerkers. De complete verwerking mag uitsluitend worden uitgevoerd door de fabrikant of door een
bevoegde leverancier/servicetechnicus van DeVilbiss.
OPMERKING – Wanneer de eenheid wordt gebruikt volgens de instructies, wordt de binnenzijde van de eenheid in
normaleomstandighedenbeschermdtegenblootstellingaanpathogenendoorhetslanglterophetopvangreservoir,
waardoor desinfectie van de inwendige componenten niet nodig is.
OPMERKING–Alsdeeenheidzonderslanglterwordtgebruikt,zaldebinnenzijdevandeeenheidzijnblootgesteldaan
pathogenen en kan de eenheid niet gedesinfecteerd worden.
OPMERKING–Alsdevolgendeverwerkingvandeeenheiddooreenbevoegdeleverancier/technicusvanDeVilbissniet
mogelijkis,maghetinstrumentnietdooreenanderepatiëntwordengebruikt!
DeVilbiss Healthcare adviseert dat ten minste de volgende procedures worden uitgevoerd door de fabrikant of een
bevoegde derde partij tussen het gebruik van het instrument door verschillende patiënten in.

NL - 52 A-7310
1. Voer alle accessoireonderdelen af die niet geschikt zijn voor hergebruik, d.w.z. opvangreservoir, lter, slangen en
draagkoffer.
2. Zet de aan/uit-schakelaar uit (“Off”) en koppel de DeVilbiss afzuigeenheid los van alle externe voedingsbronnen.
3. Controleer de eenheid visueel op schade, ontbrekende onderdelen, enz.
4. Veeg de behuizing af met een schone doek en een commercieel (bacterie- kiemdodend) desinfectiemiddel dat
voldoet aan de vereisten van de onderstaande OPMERKING en wordt gebruikt volgens de aanbevolen
verdunningsverhoudingen en -instructies van de fabrikant van het desinfectiemiddel.
VOORZICHTIG – Dompel de eenheid niet onder in water om schade aan de vacuümpomp te voorkomen.
OPMERKING – Gebruik voor de reiniging van de eenheid geen schoonmaak- of desinfectiemiddelen met ammoniak,
benzeenen/ofaceton
ONDERHOUD
De filter en de opvangfles vervangen
1. Vervang de bacterielter elke 1 tot 2 maanden OF onmiddellijk nadat overstroming is opgetreden.
2. Verwijder de bacterielter door deze los te koppelen van de afzuigeenheid en de aansluiting op de sluiting van de
verzameles.
3. Vervang deze door een nieuwe bacterielter van DeVilbiss (artikelnr. 7305D-608, pakket met 12 stuks).
OPMERKING–Controleerofdedoorzichtigekantvandeltermethetopschrift<In>inderichtingvandeopvangeswijst.
OPMERKING–GebruikalleendebacterielterdiedoorDeVilbissHealthcareofeenvanhaardistributeurswordtgeleverd.
Vervangingkantotvervuilingvanhetapparaaten/ofslechteprestatiesleidenenmaaktdegarantieongeldig.
4. Vervang de opvanges elke 1 tot 2 maanden, afhankelijk van het gebruik en de reinigingsmethode.
OPMERKING–Gebruik uitsluitend herbruikbare containers van 725 ml van DeVilbiss. Vervanging door containers van een
ander merk kan tot slechte prestaties leiden en laat de garantie vervallen.
PROBLEMEN OPLOSSEN
OPMERKING–Volg, voordat u contact opneemt met de leverancier van uw apparatuur, de aanwijzingen in de
onderstaande sectie Problemen oplossen:
GEVAAR
Er bestaat een risico van elektrische schokken. Probeer niet de behuizing te openen of te verwijderen. Er
bevinden zich binnenin het apparaat geen onderdelen waar de gebruiker service op kan uitvoeren. Als service is
vereist, stuurt u het apparaat terug naar een gekwaliceerde DeVilbiss-leverancier of geautoriseerd
servicecentrum. Wanneer het apparaat wordt geopend of onjuist wordt gebruikt, komt de garantie te vervallen.
OPMERKING– Als het probleem niet is opgelost, neemt u contact op met de leverancier van uw apparatuur.
Probleem Actie
Apparaat wordt niet ingeschakeld.
(Groene externe voedingslampje moet
branden als voedingsbron is
ingeschakeld.)
1. Controleer de voedingsbronnen en aansluitingen.
2. Controleer of het stopcontact werkt door er een lamp op aan te sluiten.
3. Controleer of de batterij volledig is opgeladen.
De pomp draait, maar er ontstaat geen
vacuüm.
1. Controleer of alle slangen correct zijn aangesloten.
2. Controleer de aansluitingen van de slangen op breuken, lekkages of
blokkades.
3. Controleer of de vlotterafsluiter niet is ingeschakeld omdat de es vol is.
4. Controleer de es op lekken of scheuren.
Geringe vacuümwerking. 1. Gebruik de vacuüminstelknop om het vacuümniveau te verhogen.
2. Controleer het systeem op lekken.
De batterij kan niet worden opgeladen. 1. Controleer of de batterij is aangesloten (raadpleeg de sectie Instelling).
2. Controleer of het oplaadlampje brandt.
3. Controleer de elektrische aansluitingen tijdens het opladen.
4. Controleer of het stopcontact werkt door er een lamp op aan te sluiten.
Als het probleem zich blijft voordoen, neemt u contact op met de leverancier
van uw apparatuur.

NL - 53A-7310
SPECIFICATIES/CLASSIFICATIES
Afmetingen .......................................................... 18,4cm (H) x 18,4cm (B) x 17,1cm (D)
Gewicht......................................................................................1.53 kg
Elektrische vereisten .............100-240 V wisselspanning, 50/60 Hz, 0,75 A max; 12 V gelijkspanning, 33 W max
Vacuümbereik.....................................................................50-500 mmHG +/- 10%
Luchtstroom bij pompinlaat: .............................................. Standaard 27 LPM (vrije doorstroom)
(mogelijk minder bij gebruik interne batterij)
Capaciteit opvangfles. .......................................................................725 ml (cc)
Omgevingscondities
Bedrijfstemperatuur ........................................................................0°C tot 40°C
Relatieve luchtvochtigheid in bedrijf.................................................................0-95%
Atmosferische druk in bedrijf ............................................................70 kPA tot 106 kPA
Temperatuurbereik bij opslag/transport........................................................-40°C tot 70°C
Relatieve luchtvochtigheid bij opslag/transport ........................................................0-95%
Atmosferische druk bij opslag/transport....................................................50 kPA tot 106 kPA
Garantie
Model 7310.................................Twee jaar beperkt, met uitzondering van interne batterij en opvangfles
Interne batterij .............................................................................6 maanden
Goedkeuringen
IEC 601-1; IEC 68; CAN/CSA-C22.2 Nr. 601.1-M90; UL 2601-1, CE EN 60601-1-2, ISO10079-1:1999
Voldoet aan RTCA/DO-160E ................................................DO-160E - Sectie 21 Categorie M
(Uitsluitend voor gebruik met batterij; Commercieel vliegtuig, boordapparatuur)
Apparaatclassificaties
Ten aanzien van bescherming tegen elektrische schokken................................Klasse I en intern gevoed
Mate van bescherming tegen elektrische schokken ..............................Type BF – Toegepaste onderdelen
Mate van bescherming tegen binnendringen van vloeistoffen..............................IP12 en normale voeding
Gebruiksmodus ..........................................Intermitterend gebruik: 30 minuten aan, 30 minuten uit
Apparaat niet geschikt voor gebruik bij een ontvlambaar mengsel van anesthesie middelen en lucht, zuurstof of lachgas.
ISO-classificatie
Model 7310 - Elektrisch aangedreven medische afzuigapparatuur voor mobiel gebruik volgens ISO 10079-1: 1999
Hoge doorstroom/Krachtig vacuüm
BEPERKTE GARANTIE VOOR TWEE JAAR
Voor de compressor van de DeVilbiss afzuigeenheid model 7310 (exclusief interne oplaadbare batterij en opvanges) geldt
een garantie van twee jaar op productie- en materiaalfouten, vanaf de datum van aanschaf. Voor de interne oplaadbare
batterij geldt een garantietermijn van 6 maanden. Eventuele defecte onderdelen zullen, naar keuze van DeVilbiss
Healthcare, worden gerepareerd of vervangen mits het apparaat gedurende die periode niet onjuist is gebruikt of is
gerepareerd door onbevoegden. Zorg ervoor dat eventuele storingen niet het gevolg zijn van het feit dat het apparaat
onvoldoende is schoongemaakt of dat de instructies niet zijn uitgevoerd. Als reparatie noodzakelijk is, neemt u contact op
met uw DeVilbiss-leverancier of met DeVilbiss voor nadere instructies.
OPMERKING - Bewaar het bewijs van aankoop zodat kan worden gecontroleerd of de garantietermijn van 2 jaar nog niet
is verstreken.
OPMERKING - Deze garantie voorziet niet in het beschikbaar stellen van een vervangend apparaat, het vergoeden van de
gemaakte kosten bij het huren van een apparaat wanneer dit apparaat wordt gerepareerd of het vergoeden van
arbeidskosten bij het repareren of vervangen van defecte onderdelen.
ER WORDT GEEN ANDERE EXPLICIETE GARANTIE GEBODEN. IMPLICIETE GARANTIES, WAARONDER DE
GARANTIE VAN VERHANDELBAARHEID EN GESCHIKTHEID VOOR EEN BEPAALD DOEL, GELDEN UITSLUITEND
VOOR DE GELDIGHEIDSPERIODE VAN DE EXPLICIETE GARANTIE EN ALLE IMPLICIETE GARANTIES WORDEN,
VOORZOVER TOEGESTAAN DOOR DE WET, UITGESLOTEN. DIT VERTEGENWOORDIGT HET ENIGE
RECHTSMIDDEL EN DE AANSPRAKELIJKHEID VOOR ALLE GEVOLG- EN INDIRECTE SCHADE OP BASIS VAN
ENIGE GARANTIE WORDT UITGESLOTEN, VOORZOVER UITSLUITING HIERVAN WORDT TOEGESTAAN DOOR DE
WET. IN SOMMIGE STATEN IS BEPERKING VAN DE GELDIGHEIDSDUUR VAN EEN IMPLICIETE GARANTIE OF VAN
DE BEPERKING OF UITSLUITING VAN GEVOLG- EN INDIRECTE SCHADE NIET TOEGESTAAN, ZODAT DE
BOVENGENOEMDE BEPERKING OF UITSLUITING MOGELIJK NIET OP U VAN TOEPASSING IS.
Deze garantie biedt u specieke wettelijke rechten. Bovendien bestaat de kans dat u nog andere rechten hebt, die van
land tot land kunnen verschillen.

NL - 54 A-7310
Opmerking van de fabrikant
Hartelijk dank voor het aanschaffen van de DeVilbiss Vacu-Aide Compact afzuigeenheid. Wij willen graag dat u tevreden
bent over onze producten. Als u vragen of opmerkingen hebt, kunt u deze sturen naar het adres op de achterkaft.
Voor service kunt u contact opnemen met uw geautoriseerde DeVilbiss-leverancier:
Telefoon ________________________________________________________
Aankoopdatum ___________________________________________________
Serienummer ____________________________________________________
DEVILBISS RICHTLIJNEN EN FABRIKANTENVERKLARING
WAARSCHUWING
Medische elektrische apparatuur vereist speciale voorzorgsmaatregelen met betrekking tot de elektromagnetische
compatibiliteit (EMC) en moet worden geïnstalleerd en in gebruik worden genomen overeenkomstig de informatie
met betrekking tot elektromagnetische compatibiliteit in de hier verstrekte documenten.
Draagbare en mobiele communicatieapparatuur die werkt met radiogolven kan een negatieve invloed hebben op
medische elektrische apparatuur.
Het apparaat of systeem mag niet worden gebruikt in de buurt van of bovenop andere apparatuur. Als dergelijk
gebruik toch noodzakelijk is, moet de uitrusting of het systeem worden geobserveerd om de normale werking
ervan te controleren in de opstelling waarin deze zal worden gebruikt.
OPMERKING–DeEMC-tabellenenandererichtlijnengevendeklantofgebruikeressentiëleinformatieomtebepalenof
hetapparaat/systeemgeschiktisvoordeelektromagnetischegebruiksomgevingenvoorhetbeheersenvande
elektromagnetischegebruiksomgeving,zodathetapparaat/systeemvoorhetbeoogdedoelkanwordengebruiktzonder
andere apparaten, systemen of niet-medische elektrische apparatuur te storen.
Richtlijnen en fabrikantenverklaring: Emissies, alle apparaten en systemen
Dit apparaat is bedoeld voor gebruik in de hieronder gespeciceerde elektromagnetische omgeving. De klant of
gebruiker van dit apparaat moet zorgen dat het in zo’n omgeving wordt gebruikt.
Emissietest Conformiteit Richtlijnen voor elektromagnetische regelhandhaving
Radiofrequentie-
emissies CISPR 11
Groep 1
Dit apparaat gebruikt RF- (radiofrequente) energie uitsluitend voor
interne functies. De RF-emissie is daarom zeer laag en het is niet
waarschijnlijk dat deze zal interfereren met elektronische apparatuur
die zich in de nabijheid bevindt.
Radiofrequentie-
emissies CISPR 11
Klasse B
Uitgestraalde en
geleide emissies
Dit apparaat is geschikt voor gebruik in alle gebouwen, inclusief
gebouwen bestemd voor bewoning en gebouwen die rechtstreeks
aangesloten zijn op het openbare lichtnet dat voor bewoning gebruikte
gebouwen van elektrische energie voorziet.
Harmonischen
IEC 61000-3-2
Klasse A
Flikkeremissies
IEC 61000-3-3
Voldoet
Immuniteitstest IEC 60601 testniveau Compliant ieniveau
Richtlijnen voor elektromagnetische
omgeving
Elektrostatische
ontlading (ESD)
IEC 61000-4-2
±6kV contact
±8kV lucht
±6kV contact
±8kV lucht
Vloeren dienen van hout, beton of keramische
tegels te zijn. Als de vloeren synthetisch zijn,
dient de relatieve vochtigheid minimaal 30% te
zijn.
Elektrische snelle
transiënte/
burstontlading
IEC 61000-4-4
±2kV op
AC-netspanning
±2kV op AC-
netspanning
De kwaliteit van de netspanning dient de
normale kwaliteit voor een bedrijfs- of
ziekenhuisomgeving te zijn.
Piek
IEC 61000-4-5
±1 kV differentiaal
±2 kV algemeen
±1 kV differentiaal
±2 kV algemeen
De kwaliteit van de netspanning dient de
normale kwaliteit voor een bedrijfs- of
ziekenhuisomgeving te zijn.
Spanningsdalingen,
korte onderbrekingen
en
spanningsverschillen
op
voedingsinputleidingen
IEC 61000-4-11
>95% daling voor 0,5
cyclus
60% daling voor 5 cycli
30% daling voor 25
cycli
>95% daling voor 5
seconden
>95% daling voor
0,5 cyclus
60% daling voor 5
cycli
30% daling voor 25
cycli
>95% daling voor 5
seconden
De kwaliteit van de netspanning dient de
normale kwaliteit voor een bedrijfs- of
ziekenhuisomgeving te zijn. Als de gebruiker
van dit apparaat continu gebruik vereist tijdens
netstroomonderbrekingen, verdient het
aanbeveling het apparaat van stroom te
voorzien met een noodvoeding (UPS,
uninterruptible power supply) of een batterij.

NL - 55A-7310
Immuniteitstest IEC 60601 testniveau Compliant ieniveau
Richtlijnen voor elektromagnetische
omgeving
Netfrequentie 50/60Hz
magnetisch veld
IEC 61000-4-8
3A/m 3A/m
Het magnetische veld van de
vermogensfrequentie dient van een niveau te
zijn dat gebruikelijk is voor een normale locatie
in een normale commerciële of
ziekenhuisomgeving.
Geleide RF
IEC 61000-4-6
3 Vrms van
150 kHz tot 80 MHz
V1 = 3 Vrms
Zorg dat draagbare en mobiele
RF-communicatieapparatuur zich op de
volgende minimale afstanden van het apparaat
bevinden (zie de hieronder berekende,
aanbevolen scheidingsafstanden):
D=(3,5/V1)√
P
Uitgestraalde RF
IEC 61000-4-3
3 V/m
80 MHz tot 2,5 GHz
E1 = 3V/m
D=(3,5/E1)√
P
80 tot 800 MHz
D=(7/E1)√
P
800 MHz tot 2,5 GHz
Waarbij P het maximale vermogen is in watt en
D de aanbevolen scheidingsafstand in meter.
De veldsterkte van vaste zenders, zoals
bepaald in een elektromagnetisch
locatieonderzoek, dient kleiner te zien dat het
compliantieniveau (V1 en E1).
In de nabijheid van apparatuur met een zender
kan interferentie optreden.
Voor zenders met een hierboven niet vermeld nominaal maximaal uitgangsvermogen kan de aanbevolen
scheidingsafstand d in meter (m) worden berekend met gebruik van de vergelijking die van toepassing is op de
frequentie van de zender, waarbij P het volgens de fabrikant van de zender geldende nominale maximale
uitgangsvermogen van de zender is in watt (W)
Opmerking 1: Bij 80 MHz en 800 MHz geldt de scheidingsafstand voor het hogere frequentiebereik.
Opmerking 2: Het kan zijn dat deze richtlijnen niet in alle omstandigheden van toepassing zijn. Overdracht van
elektromagnetische energie wordt beïnvloed door absorptie en reectie van constructies, voorwerpen en
mensen.
Aanbevolen scheidingsafstand tussen draagbare en mobiele
RF-communicatieapparatuur en dit apparaat. Dit apparaat en systeem zijn NIET
levensondersteunend.
Dit apparaat is bedoeld voor gebruik in een elektromagnetische omgeving waarin de uitgestraalde storingen beheersbaar
zijn. De afnemer of gebruiker van dit apparaat kan bijdragen aan de preventie van elektromagnetische interferentie door
een minimumafstand te handhaven tussen draagbare en mobiele RF-communicatieapparatuur en het apparaat, volgens
onderstaande aanbevelingen, met als maatstaf het maximale uitgangsvermogen van de communicatieapparatuur.
Maximaal
uitgangsvermogen
(watt)
Aanbevolen scheidingsafstand voor het apparaat (meter)
150 kHz tot 80 MHz
D=(1,1667)√
P
80 tot 800MHz
D=(1,1667)√
P
800 MHz tot 2,5 GHz
D=(2,3333)√
P
0,01 0,11667 0,11667 0,23333
0,1 0,36894 0,36894 0,73785
1 1,1667 1,1667 2,3333
10 3,6894 3,6894 7,3785
100 11,667 11,667 23,333
Voor zenders met een hierboven niet vermeld nominaal maximaal uitgangsvermogen kan de aanbevolen
scheidingsafstand d in meter (m) worden berekend met gebruik van de vergelijking die van toepassing is op de
frequentie van de zender, waarbij P het volgens de fabrikant van de zender geldende nominale maximale
uitgangsvermogen van de zender is in watt (W)
Opmerking 1: Bij 80 MHz en 800 MHz geldt de scheidingsafstand voor het hogere frequentiebereik.
Opmerking 2: Het kan zijn dat deze richtlijnen niet in alle omstandigheden van toepassing zijn. Overdracht van
elektromagnetische energie wordt beïnvloed door absorptie en reectie van constructies, voorwerpen en
mensen.

DeVilbiss Healthcare LLC • 100 DeVilbiss Drive • Somerset, PA 15501 • USA
800-338-1988 • 814-443-4881 • www.DeVilbissHealthcare.com
© 2016 DeVilbiss Healthcare LLC. 10.16 All Rights Reserved. A-7310 Rev. H
DeVilbiss
®
and Vacu-Aide
®
are registered trademarks of DeVilbiss Healthcare.
EC REP
DeVilbiss Healthcare LLC
100 DeVilbiss Drive
Somerset, PA 15501-2125
USA
800-338-1988 • 814-443-4881
DeVilbiss Healthcare Ltd
Unit 3, Bloomfield Park
Bloomfield Road
Tipton, West Midlands DY4 9AP
UNITED KINGDOM
+44 (0) 121 521 3140
DeVilbiss Healthcare Pty. Limited
15 Carrington Road, Unit 8
Castle Hill NSW 2154
AUSTRALIA
+61-2-9899-3144
DeVilbiss Healthcare SAS
13/17, Rue Joseph Priestley
37100 Tours
FRANCE
+33 (0) 2 47 42 99 42
DeVilbiss Healthcare GmbH
Kamenzer Straße 3
68309 Mannheim
GERMANY
+49 (0) 621-178-98-0
A-7310 REV H
0044
-
 1
1
-
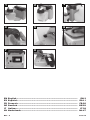 2
2
-
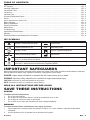 3
3
-
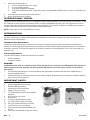 4
4
-
 5
5
-
 6
6
-
 7
7
-
 8
8
-
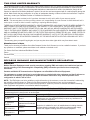 9
9
-
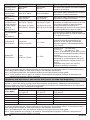 10
10
-
 11
11
-
 12
12
-
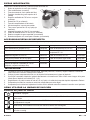 13
13
-
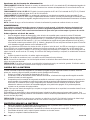 14
14
-
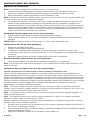 15
15
-
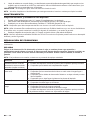 16
16
-
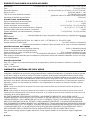 17
17
-
 18
18
-
 19
19
-
 20
20
-
 21
21
-
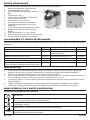 22
22
-
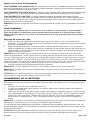 23
23
-
 24
24
-
 25
25
-
 26
26
-
 27
27
-
 28
28
-
 29
29
-
 30
30
-
 31
31
-
 32
32
-
 33
33
-
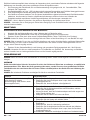 34
34
-
 35
35
-
 36
36
-
 37
37
-
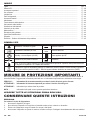 38
38
-
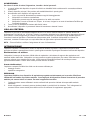 39
39
-
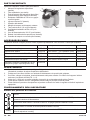 40
40
-
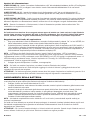 41
41
-
 42
42
-
 43
43
-
 44
44
-
 45
45
-
 46
46
-
 47
47
-
 48
48
-
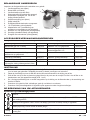 49
49
-
 50
50
-
 51
51
-
 52
52
-
 53
53
-
 54
54
-
 55
55
-
 56
56


Drive Medical Vacu-Aide Compact Suction Unit El manual del propietario
- Tipo
- El manual del propietario
- Este manual también es adecuado para
En otros idiomas
- français: Drive Medical Vacu-Aide Compact Suction Unit Le manuel du propriétaire
- italiano: Drive Medical Vacu-Aide Compact Suction Unit Manuale del proprietario
- Deutsch: Drive Medical Vacu-Aide Compact Suction Unit Bedienungsanleitung
- Nederlands: Drive Medical Vacu-Aide Compact Suction Unit de handleiding
Documentos relacionados
-
Drive Medical Vacu-Aide Suction Unit El manual del propietario
-
-
Drive Medical 7314P-D-EXF El manual del propietario
-
-
-
-
-
-
-
Otros documentos
-
 DeVilbiss H86366 Manual de usuario
-
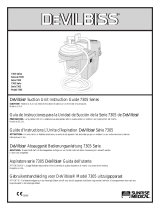 DeVilbiss 7305 Manual de usuario
-
BD ClipVac 5506K Instructions For Use Manual
-
Apex Digital VACPRO Manual de usuario
-
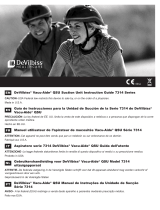 Restwell M84895 Instrucciones de operación
-
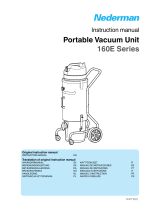 Nederman 160E Series Manual de usuario
-
laerdal suction unit Guía del usuario
-
Moretti LTA475 Manual de usuario
-
Atrium OASIS Instrucciones de operación
-
Medtronic Puritan BennettTM Re/X800 and D/X800 Expiratory Filter/Drain System 800 Series Ventilators Instrucciones de operación


