Avanti IM44U3S Manual de usuario
- Categoría
- Fabricantes de cubitos de hielo
- Tipo
- Manual de usuario
Este manual también es adecuado para

1
INSTRUCTION MANUAL
MANUAL DE INSTRUCCIONES
Model Number:
No. de Modelo:
IM44U3S
BEFORE USE, PLEASE READ AND FOLLOW ALL SAFETY RULES AND OPERATING INSTRUCTIONS.
ANTES DE USAR, LEA Y SIGA TODAS LAS INSTRUCCIONES DE OPERACIÓN.
Avanti has a policy of continuous improvement on its products and reserves the right to change materials and specifications without notice.
La política de Avanti es la de continuar mejorando sus productos y se reserva el derecho de cambiar los materiales y especificaciones sin notificación alguna.
La versión española de este manual comienza en la página 23
Avanti Products LLC
P.O. Box 520604 - Miami, Florida 33152
www.avantiproducts.com

2
TABLE OF CONTENTS
APPLIANCE SAFETY
3
IMPORTANT SAFEGUIDES
4
HELP US HELP YOU
5
PARTS AND FEATURES
6
IMPORTANT SAFETY INSTRUCTIONS
7
INSTALLATION INSTRUCTIONS
7
Installation of Your Icemaker
8 – 9
Electrical Connection
10
Extension Cord
10
Surge Protector
10
Water Supply
11
OPERATING YOUR APPLIANCE
12 – 15
CARE AND MAINTENANCE
15 – 17
Power Failure
18
Vacation Time
18
Moving Your Appliance
18
Energy Saving Tips
18
TROUBLESHOOTING GUIDE
19 – 20
SERVICE FOR YOUR APPLIANCE
21
WIRING DIAGRAM
21
AVANTI PRODUCTS WARRANTY
22
INSTRUCCIONES EN ESPAÑOL
23 – 39
WARRANTY REGISTRATION CARD
40 – 41

3
APPLIANCE SAFETY
Your safety and the safety of others are very important.
We have provided many important safety messages in this manual for your icemaker. Always read
and obey all safety messages.
This is the Safety Alert Symbol. This symbol alerts you to potential hazards that
can kill or injure you and others. All safety messages will follow the Safety Alert
Symbol and either the words” DANGER”, “WARNING” or “CAUTION”.
Danger means that failure to heed this safety
statement may result in severe personal injury
or death.
Warning means that failure to heed this safety
statement may result in extensive product
damage, serious personal injury, or death.
Caution means that failure to heed this safety
statement may result in minor or moderate
personal injury, property or equipment damage.
All safety messages will alert you to know what potential hazard is, tell you how to reduce the chance
of injury, and let you know what can happen if the instructions are not followed.
IMPORTANT SAFETY INSTRUCTIONS
WARNING: To reduce the risk of fire, electric shock or injury when using your icemaker,
follow these basic precautions:
• Plug unit into a grounded 3-prong outlet
• Do not remove the grounding prong.
• Do not use an adapter.
• Do not use and extension cord.
• Disconnect power before cleaning.
• Disconnect power before servicing.
• Replace all panels before operating.
• Use two or more people to move and install the ice maker
SAVE THESE INSTRUCTIONS

4
IMPORTANT SAFEGUIDES
Before the icemaker is used, it must be properly positioned and installed as
described in this manual, so read the manual carefully. To reduce the risk of fire,
electrical shock or injury when using the icemaker, follow basic precaution,
including the following:
• Plug into a grounded 3-prong outlet, do not remove grounding prong, do not use an adapter, and
do not use an extension cord.
• It is recommended that a separate circuit, serving only your icemaker be provided. Use
receptacles that cannot be turned off by a switch or pull chain.
• Never clean icemaker parts with flammable fluids. These fumes can create a fire hazard or
explosion. And do not store or use gasoline or other flammable vapors and liquids in the vicinity
of this or any other icemaker. The fumes can create a fire hazard or explosion.
• Before proceeding with cleaning and maintenance operations, make sure the power line of the
unit is disconnected.
• Do not connect or disconnect the electric plug when your hands are wet.
• Unplug the icemaker or disconnect power before cleaning or servicing. Failure to do so can result
in electrical shock or death.
• Do not attempt to repair or replace any part of your icemaker unless it is specifically
recommended in this manual. All other servicing should be referred to a qualified technician.
FOLLOW WARNING CALL OUTS BELOW ONLY WHEN APPLICABLE TO YOUR MODEL
• Use two or more people to move and install icemaker. Failure to do so can result in back or other
injury.
• To ensure proper ventilation for your icemaker, the front of the unit must be completely
unobstructed. Choose a well-ventilated area with temperatures above 50°F (10
°
C) and below
100°F (38°C). This unit must be installed in an area protected from the element, such as wind,
rain, water spray or drips.
• The icemaker should not be located next to ovens, grills or other sources of high heat.
• The icemaker must be installed with all electrical, water and drain connections in accordance
with state and local codes. A standard electrical supply (115 V AC only, 60 Hz), properly
grounded in accordance with the National Electrical Code and local codes and ordinances is
required.
• Do not kink or pinch the power supply cord of icemaker.
• The fuse (or circuit breaker) size should be 15 amperes.
• It is important for the icemaker to be leveled in order to work properly. You may need to make
several adjustments to level it.
• All installation must be in accordance with local plumbing code requirements.
• Make certain that the pipes are not pinched or kinked or damaged during installations.
• Check for leaks after connection.
• Never allow children to operate, play with or crawl inside the icemaker.
• If you use the drainage container, you MUST set the Drain Select switch to OFF or the water can
overflow from the drainage container
• Although the unit has been tested at the factory, due to long-term transit and storage, the first
batch of cubes must be discarded.
• Do not use solvent-based cleaning agents of abrasives on the interior. These cleaners may
damage or discolor the interior.
• Do not use this apparatus for other than its intended purpose.

5
HELP US HELP YOU...
Read this guide carefully.
It is intended to help you operate and maintain
your new Icemaker properly.
Keep it handy to answer your questions. If you
don't understand something or you need more
assistance, please call:
Avanti Customer Service
800-220-5570
Keep proof of original purchase date (such as
your sales slip) with this guide to establish the
warranty period.
Write down the model and serial numbers.
You'll find them on a plate located on the rear
wall of the Icemaker
Please write these numbers here:
____________________________________
Date of Purchase
____________________________________
Model Number
____________________________________
Serial Number
Use these numbers in any correspondence or
service calls concerning your Icemaker
If you received a damaged Icemaker,
immediately contact the dealer (or builder) that
sold you the Icemaker
Save time and money. Before you call for
service, check the Troubleshooting Guide. It
lists causes of minor operating problems that
you can correct yourself.
If you need service
We're proud of our service and want you to be
pleased. If for some reason you are not happy
with the service you receive, here are some
steps to follow for further assistance.
FIRST, contact the people who serviced your
Icemaker. Explain why you are not pleased. In
most cases, this will solve the problem.
NEXT, if you are still not pleased, write all the
details, including your telephone number, and
send it to:
Customer Service
Avanti Products
10880 NW 30 Street
Miami, FL 33172 USA
CAUTION:
THE ICEMAKER IS NOT DESIGNED
FOR THE STORAGE OF MEDICINE OR
OTHER MEDICAL PRODUCTS.

6
PARTS AND FEATURES
Water distribution tube
Evaporator (ice mold)
Water trough
Float
Ice storage bin
Control panel
Front louver panel
Door
Leveling feet
(Four)
Ice scoop
Water supply hose
Power cord
Water inlet
Drain outlet
Drain hose

7
IMPORTANT SAFETY INSTRUCTIONS
− Read all instructions before using the icemaker.
− DANGER or WARNING: Risk of child entrapment. Child entrapment and suffocation are not problems
of the past. Junked or abandoned icemakers are still dangerous . . . even if they will “just sit in the
garage a few days”.
− Before you throw away your old icemaker: take off the doors. Leave the shelves in place so that
children may not easily climb inside.
− Never allow children to operate, play with, or crawl inside the icemaker.
− Never clean
icemaker parts with flammable fluids. The fumes can create a fire hazard or explosion.
− Do not store or use gasoline or any other flammable vapors and liquids in the vicinity of this or any other
icemaker. The fumes can create a fire hazard or explosion.
INSTALLATION INSTRUCTIONS
Before Using Your Icemaker
• Remove the exterior and interior packing.
• Check to be sure you have all of the following parts:
o 1 Ice Scoop
o 1 Water Supply Hose
o 1 Water Drain Hose
o Instruction Manual
• Before connecting the unit to the power source, let it stand upright for approximately 2 hours.
This will reduce the possibility of a malfunction in the cooling system from handling during
transportation.
• Clean the interior surface with lukewarm water using a soft cloth.
EXCESSIVE WEIGHT HAZARD
USE TWO OR MORE PEOPLE TO MOVE AND INSTALL THE ICEMAKER
FAILURE TO DO SO CAN RESULT IN BACK OR OTHER INJURY
WARNING
To reduce the risk of fire, electrical shock, or
injury when using your icemaker, follow these
basic precautions:
This Unit Is For Indoor Use Only
- SAVE THESE INSTRUCTIONS -

8
Installation of Your Icemaker
• THIS ICEMAKER SHOULD BE PROPERLY INSTALLED BY A QUALIFIED PROFESSIONAL
This icemaker MUST be installed with electrical and water connections in accordance with
all state and local codes.
• Place your icemaker on a floor that is strong enough to support the icemaker when it is fully
loaded. To level your icemaker, adjust the legs at the front of the icemaker.
• Allow a minimum of 1 inch of space between the top and sides of the icemaker and a
minimum of 4 inches at the back, which allows the proper air circulation to cool the
compressor. Ensure the front of the unit is completely unobstructed.
• Locate the icemaker away from direct sunlight and sources of heat (stove, heater, radiator, etc.).
Direct sunlight may affect the acrylic coating and heat sources may increase electrical
consumption. Extreme cold ambient temperatures may also cause the icemaker not to perform
properly.
• Choose a well ventilated area with temperatures above 50ºF (10ºC) and below 100ºF(38ºC).
This unit MUST be installed in an area protected from the elements.
• Avoid locating the icemaker in moist areas. Too much moisture in the air will cause frost to form
quickly on the evaporator requiring more frequent defrosting of the icemaker.
INSTALLATION CLEARANCES:
• The installation of this icemaker requires a cold water supply inlet of ¼” (6.35mm) soft copper tubing
with a shut off valve.
• The icemaker requires a continuous water supply with a minimum pressure of 15 psig and a static
pressure not to exceed 80 psig. The temperature of the water supply into the icemaker should be
between 41ºF (5ºC) and 90ºF (32ºC) for proper operation.
• It is strongly recommended that a water filter be used. A filter, if it is of the proper type, can remove
taste and odors as well as particles. Some water is very hard, and softened water may result in
white, mushy cubes that stick together. De-Ionized water is NOT recommended.
Warning
Operation of the icemaker for extended periods outside of the normal
temperature ranges as described above may affect product performance.
SIDE VIEW
TOP VIEW
Top of unit
Rear of unit
Front of unit
Side Side
4”
1”
1”
1”

9
Leveling the ice maker
It is important for the icemaker to be leveled in order to
work properly. It can be raised or lowered by rotating
the plastic sheaths around each of the four feet on the
bottom of the machine .If you find that the surface is
not level, rotate the feet until the ice maker becomes
level .You may need to make several adjustments to
level it. We recommend using a carpenter’s level to
check the machine.
1. Place a carpenter’s level on top of the product to see if
the ice maker is level from front to back and side to side.
2. Adjust the height of the feet as follows:
Turn the leveling feet to the right to lower that side of the ice maker.
Turn the leveling feet to the left to raise that side of the ice maker.
IMPORTANT: Once you are ready to install it in a cabinet or directly on the floor, you must adjust the
feet to level the ice maker. If the floor is level, just revolve the two front feet to touch the floor.
Reversing the door swing
Tools needed: flathead screwdriver, Phillips screwdriver
IMPORTANT: Before you begin, unplug the ice maker or disconnect power.
To remove door from hinges:
1. Remove top hinge cover by pushing it toward the back of the unit, then lifting it off.
2. Using a Phillips screwdriver, remove the screws, then remove the top hinge mat and top hinge.
Keep the parts together and set them aside.
3. Lift the door off of the bottom hinge and set the door aside.
To replace door on hinges:
1. Using a flathead screwdriver, remove
the plug buttons from the screw holes
opposite the door hinges, top and
bottom. Set aside.
2. Remove the front louver. Set aside.
3. Remove the bottom hinge and place it
on the opposite side at the bottom of the
door.
4. Position the door on the bottom hinge.
5. Align the door on the bottom hinge and
replace the top hinge and top hinge mat.
6. Replace top hinge cover by pressing it
down over the hinge mat and then
pushing it forward.
7. Push the plug buttons into the original
screw holes.
down
up

10
Electrical Connection
This icemaker should be properly grounded for your safety. The power cord of this
icemaker is equipped with a three-prong plug which mates with standard three prong
wall outlets to minimize the possibility of electrical shock.
Do not under any circumstances cut or remove the third ground prong from the power cord supplied.
For personal safety, this icemaker must be properly grounded.
This icemaker requires a standard 115/120 Volt AC ~/60Hz electrical ground outlet with three-prong.
Have the wall outlet and circuit checked by a qualified electrician to make sure the outlet is properly
grounded. When a standard 2-prong wall outlet is encountered, it is your responsibility and obligation
to have it replaced with a properly grounded 3-prong wall outlet.
The cord should be secured behind the icemaker and not left exposed or dangling to prevent
accidental injury.
The icemaker should always be plugged into its own individual electrical outlet which has a voltage
rating that matches the rating label on the icemaker. This provides the best performance and also
prevent overloading house wiring circuits that could cause a fire hazard from overheated. Never
unplug the icemaker by pulling the power cord. Always grip the plug firmly and pull straight out from
the receptacle. Repair or replace immediately all power cords that have become frayed or otherwise
damaged. Do not use a cord that shows cracks or abrasion damage along its length or at either end.
When moving the icemaker, be careful not to damage the power cord.
Extension Cord
Because of potential safety hazards under certain conditions, it is strongly recommended that you do
not use an extension cord with this icemaker. However, if you must use an extension cord it is
absolutely necessary that it be a UL/CUL-Listed, 3-wire grounding type icemaker extension cord
having a grounding type plug and outlet and that the electrical rating of the cord be 115 volts and at
least 10 amperes.
Surge Protector
Most electrical icemakers use a series of electric control boards to operate. These boards are very
susceptible to power surges and could be damaged or destroyed.
If the icemaker is going to be used in an area or if your city / country is prone to power surges /
outages; it is suggested that you use a power surge protector for all electrical devices / icemakers you
use. The surge protector that you select must have a surge block high enough to protect the
icemaker it is connected to. If you have any questions regarding the type and size of surge protector
needed contact a licensed electrician in your area.
Damages due to power surges are not considered a manufacturer covered defect and will void your
product warranty.
WARNING
Improper connection of the equipment-grounding can result in the risk of electrical shock. If the
power cord of the range or icemaker is damaged, have it replaced by an authorized Avanti
Products service center.

11
Water Supply
The water supply should be ready at the point of installation. The water supply pressure should be a
minimum of 15 psig with a static pressure not more than 80 psig. (A wall outlet directly behind the ice
machine will make installation easier.)
IMPORTANT:
1. All installations must be in accordance with local plumbing code requirements. Professional
installation is recommended.
2. Make certain the hoses are not pinched or kinked or damaged during installation.
3. Check for leaks after connection.
Tools required: ½-in. open-end wrench, Phillips screwdriver
Connecting the water line:
1. Turn off main water supply. Turn on the nearest faucet long enough to clear line of water.
2. Find a ½-in. to ¾-in. vertical cold water pipe near the installation location. The distance should be
less than 6 feet. The water supply hose provided with the ice maker is about 6 feet long.
3. A shut-off valve must be installed to the main water supply. If the water pipe has a plain piece of
copper tubing, attach a ¼” O.D. compression union to the tubing and remove the nut.
4. Connect the nut of the water supply hose to the tap, and connect the other end with the water
inlet. Tighten firmly by hand, then one-half turn with wrench.
5. Turn on main water supply and tap. Check for water supply connection leaks. Tighten every
connection (including connection at the water inlet).
IMPORTANT: When you connect the water supply hose and the drain hose, pay
attention to the indications of “Water inlet” and “Drain outlet” on the machine.
Drain
You must connect the drain line before using the ice maker. Follow the steps outlined below.
Connecting the drain line:
NOTE: If there is a drain line near the ice maker, the best choice is to drain water to
the drain line through the drain water hose provided with ice maker.
1. Locate the floor drain near the ice maker. The distance should be less than 4.5 feet since the
length of the long drain water hose provided with the ice maker is about 4.85 feet.
2. Find the drain outlet on the back of ice maker. Connect the drain outlet to the water draining hose,
and insert the other end of the hose into the drain line.
NOTE: Never allow the drain hose to hang or loop higher than the floor of the ice
storage bin.
3. All horizontal runs of drain lines must have a fall of ¼” per foot. An air gap will likely be required
between the ice maker drain tube and the drain/waste receptacle. A standpipe with a trap below it
would be acceptable for the drain/waste receptacle. A floor drain is also acceptable.
4. Pour 1 gallon of water into the ice storage bin to check for leaks in the drainage system. Tighten
any connections that leak.
IMPORTANT: This ice maker is not a freezer. Infrequent drainage
will cause a high rate of melting in the ice storage bin.

12
OPERATING YOUR ICEMAKER
+
_
Description of LEDs and buttons:
1. Bin Full (Red) LED: Bin full indicator light
When this is lit, the ice storage bin is full of ice or there is something blocking the bin-full probe.
The unit will stop working. When ice cubes are removed from the ice storage bin, freeing the bin-
full probe, the red LED will remain flashing for 3 minutes, then the unit will restart and return to
the ice making mode.
2. Ice Making(Green) LED: Ice making indicator light
When this is lit, the unit is working in the ice making mode controlled by a temperature probe on
the evaporator. When the green LED flashes, the unit is working in the ice making mode
controlled by a fixed timer.
3. Ice Harvest (Yellow) LED: Ice harvest indicator light
When this is lit, the unit is working in the ice harvest mode controlled by the ice-full probe.
4. Mode button: Mainly for service. When this is pressed, the ice making mode changes to the ice
harvest mode or vice versa. The mode can be judged from the status of the green and yellow
LEDs.
5. Adjust button: Mainly for service. When it is pressed over 3 seconds, the unit will enter the Ice
Size Adjustment mode. The mode can be judged from the status of the yellow LED.
Ice Size Adjustment Guide:
1. Press and hold the “Adjust” button for at least 3 seconds. The unit will enter the Ice Size
Adjustment mode. The “HARVEST” LED (yellow) will be blinking continuously during the ice size
adjustment. Release the button when the LED blinks continuously to adjust the ice size.
2. While in the Ice Size Adjustment mode, press the “Clean” (-) button or the “Mode” (+) button for
the desired ice size.

13
Smaller ice setting:
By pressing the “Clean” (-) button, you can decrease the size of the ice cubes. The “ICE” LED (green)
will flash as you lower the ice size and will finally be blinking at the setting of smallest ice size.
Larger ice setting:
By pressing the “Mode” (+) button, you can increase the size of the ice cubes. The “BIN FULL” LED
(red) will flash as the larger size is set and will blink when the setting of largest ice size has been
reached.
After 10 seconds without any operation, the unit will return to the previous mode.
NOTE:
• If during the ice size adjustment mode the “BIN FULL”, “ICE” and “HARVEST” LEDS blink all at
once, this indicates that the unit is in the regular (middle) setting of the ice size.
• When the machine is in the cleaning stage or ice full stage, the ice size adjustment mode cannot
be accessed
Operating method
1. Turn on the water tap, let the water trough fill, then press the ON/OFF button on the front panel.
The ice maker will start working automatically.
2. After 3 minutes, the machine will automatically go to the ice-making stage, and the sound of water
flowing will be heard.
3. When the batch of ice has been fully formed, ice will automatically be harvested to the ice storage
bin.
4. When the ice storage bin is full, the sheet of cubes will not fall completely and will hold the bin-full
probe open. The machine stops making ice automatically.
5. The unit will start making ice again after the ice cubes are removed. Then the bin-full probe
swings back to operating position.
Bin full stage
Ice making stage
Ice harvest stage

14
IMPORTANT:
• Although the unit has been tested and cleaned at the factory, due to long-term transit and
storage, the first batch of cubes must be discarded.
• Never turn the water supply tap off when the ice maker is working.
• Never touch the evaporator when unit is running!
• Except to take ice from the unit, keep the door closed to reduce melting and insure proper ice
formation.
How the machine makes ice
Set the ON/OFF button to the ON position.
The machine will automatically go to the ice making stage.
There are two distinct cycles: ice making and harvest.
The freeze cycle happens when water flows to the evaporator surface. The harvest cycle is when the
ice is released and water enters the machine. A complete cycle takes about 20 minutes, but it
depends on temperature and operating conditions.
Freeze: During the freeze cycle the compressor is pumping refrigerant, the fan motor is blowing air,
and the water pump is circulating water. When the batch of ice has been fully formed, the ice maker
stops the freeze cycle and the harvest cycle begins.
Harvest: During the harvest cycle the compressor is still operating, but the water pump has stopped.
The hot gas valve opens, diverting hot refrigerant gas into the evaporator. The hot refrigerant gas
warms the evaporator, causing the cubes to slide as a unit off the evaporator and into the storage bin.
The freeze cycle will restart when all the cubes have been harvested.
How the machine uses the water
The ice maker begins with a fixed charge of water that is contained in the water trough. As the water
flows to the freezing evaporator surface, the portion of water that does not contain mineral impurities
freezes and sticks to the ice cube molds. The water containing impurities falls back into the water
trough. During the ice making process, fresh water enters into the water trough continuously as the
water in the trough freezes continuously in the evaporator.
Normal sounds
Your new ice maker may make sounds that are not familiar to you. Most of the new sounds are
normal. Hard surfaces like the floor and walls can make the sounds louder than they actually are. The
following list describes the sounds that might be new to you and what may be causing them.
• Rattling noises may come from the flow of the refrigerant or the water line. Items stored on top of
the ice maker can also make noises.
• The high efficiency compressor may make a pulsating or high-pitched sound.
• Water running may make a splashing sound.
• You may hear air being forced over the condenser by the condenser fan.
• During the harvest cycle, you may hear the sound of ice cubes falling into the ice storage bin.

15
Preparing the ice maker for long term storage
If the ice maker will not be used for a long time, or is to be moved to another place, it will be
necessary to drain the system of water.
1. Shut off the water supply at the main water source.
2. Disconnect the water supply line from the water inlet.
3. Shut off the electric supply at the main electrical power source.
4. Take out the ice storage bin to remove any remaining ice and water. Dry the bin.
5. Pull off the drainage tube of the water trough to drain off all water.
6. Leave the door open to allow for circulation and to prevent mold and mildew.
7. Leave water supply line and power cord disconnected until ready to reuse.
IMPORTANT:
• Do not touch the power plug when your hands are wet.
• Never unplug the unit by pulling on the cord. Grasp the plug and pull out firmly.
CARE AND MAINTENANCE
Cleaning The Icemaker
Periodic cleaning and proper maintenance will ensure efficiency, top performance, and long life. The
maintenance intervals listed are based on normal conditions. You may want to shorten the intervals if
you have pets, or there are other special considerations.
Important Note:
Never keep anything in the ice storage bin that is not ice: objects like wine and beer
bottles are not only unsanitary, but the labels may slip off and plug up the drain.
If the ice maker is left unused for a long time, before the next use it
must be thoroughly cleaned. Follow carefully any instructions provided
for cleaning or use of sanitizing solutions. Do not leave any solution
inside the ice maker after cleaning.
Before proceeding with cleaning and maintenance operations, make sure the power
line of the unit is disconnected and the water line is shut off.

16
Exterior cleaning
The door and cabinet may be cleaned with a mild detergent and warm water solution such as 1 oz. of
dishwashing liquid mixed with 2 gallons of warm water. Do not use solvent-based or abrasive
cleaners. Use a soft sponge and rinse with clean water. Wipe with a soft clean towel to prevent water
spotting.
If the door panel is stainless steel, it may discolor when exposed to chlorine gas and moisture. Clean
stainless steel with a mild detergent and warm water solution and a damp cloth. Never use an
abrasive cleaning agent.
Interior cleaning
The ice storage bin should be sanitized occasionally. Clean the water trough before the ice maker is
used first time and reused after stopping for an extended period of time. It is usually convenient to
sanitize the trough after the ice making system has been cleaned, and the ice storage bin is empty.
1. Disconnect the power to the unit.
2. Open the door and take out the removable ice storage bin. With a clean cloth, wipe down the
interior of unit and ice bin with a sanitizing solution made of 1 ounce of household bleach or
chlorine and 2 gallons of hot (95ºF – 115ºF) water.
3. Pull off the drain hose of the water trough to drain off all water.
4. Rinse thoroughly with clear water.
5. After draining off all water, put back the drain hose of the water trough
to the original location.
6. Put the ice storage bin inside the unit.
7. Reconnect power to the unit.
The ice scoop should be washed regularly. Wash it just like any other food
container.
Condenser cleaning
A dirty or clogged condenser prevents proper airflow, reduces ice making capacity, and causes higher
than recommended operating temperatures that may lead to component failure. Have the condenser
cleaned at least once every six months.
1. Unplug the ice maker or disconnect power.
2. Gently pull off the lower front louver.
3. Remove dirt and lint from the condenser and the
unit compartment with the brush attachment of a
vacuum cleaner
.
4. Reassemble the lower front louver.
5. Plug in the ice maker or reconnect power.
Right location of the
drain hose
Condenser
Surface

17
Water distribution tube cleaning
When you find the ice cubes are incompletely formed or the output is low, the water distribution tube
may be blocked. Turn off the power button, gently take out the water distribution tube, locate the holes
in the distribution tube and use a pointed object such as a toothpick to dredge the holes. Then put the
water distribution tube back to its original position. If the tube is badly blocked, clean it as follows:
1. Shut off the water supply
2. Disconnect the water hose from the distribution tube.
3. Gently take out the distribution tube.
4. With a brush, clean the tube with a dilute solution of warm water and a mild detergent such as
dishwashing liquid. After removing the dirt and lint from the surface, rinse the tube with clean
water.
5. Replace the distribution tube.
6. Reconnect the water supply.
Ice-making system cleaning (CLEAN BUTTON)
Minerals that are removed from the water during the freezing cycle will eventually form a hard, scaly
deposit in the water system. Cleaning the system regularly helps remove the mineral scale buildup.
How often to clean the system depends upon how hard your water is or how effective your filtration
may be. With hard water of 15 to 20 grains/gal. (4 to 5 grains/ liter), you may need to clean the system
as often as once every 6 months.
1. Make sure that all the ice is off the evaporator. If ice is being formed, wait until the cycle is
completed, then press the machine’s ON/OFF switch on the control panel.
2. Remove all ice from the storage bin.
3. Keep the ice maker connected to the water supply. Pour 8 oz. of Nickel-Safe Ice Maker Cleaner
Solution into the water trough. Then press the ON/OFF switch and the CLEAN button, initiating
the wash cycle. The machine will run in the Automatic Clean Mode.
4. Allow 30 minutes for proper cleaning. After cleaning, press the ON/OFF switch again. Use a drain
hose on the front of the water trough to drain off the waste water to a convenient container.
NOTE: Don’t drain off the waste water to the inside of the cabinet.
5. Repeat steps 3 and 4 (without Ice Maker Cleaning Solution) three times to rinse the ice making
system thoroughly.
6. Prepare a sanitizing solution made of 1 ounce of household bleach and 2 gallons of hot water
(95ºF to 115ºF). Wipe the entire bin inside and outside, covering the entire surface of the walls.
7. Fill a spray bottle with the sanitizing solution and spray all corners and edges, making sure to
cover all surfaces with the solution.
8. Allow the solution to be in contact for at least 3 minutes, then dry.
9. Repeat step 5 to rinse the ice making system one more time.
10. Press the ON/OFF button again. The machine will return to the regular ice making mode. Discard
the first batch of ice.

18
Power Failure
Most power failures are corrected within a few hours and should not affect the temperature of your
icemaker if you minimize the number of times the door is opened. If the power is going to be off for a
longer period of time, you need to take the proper steps to protect your food.
Vacation Time
Short vacations: Leave the unit operating during vacations of less than three weeks.
Long vacations: If the icemaker will not be used for several months, remove all food and unplug the
power cord. Clean and dry the interior thoroughly. To prevent odor and mold growth, leave the door
open slightly: blocking it open if necessary
Moving Your Icemaker
• Remove all the food.
• Securely tape down all loose items inside your unit.
• Turn the leveling screws up to the base to avoid damage.
• Tape the doors shut.
• Be sure the unit stays in the upright position during transportation.
Energy Saving Tips
• The unit should be located in the coolest area of the room, away from heat producing icemakers
or heating ducts, and out of direct sunlight.
• Let hot foods cool to room temperature before placing them in the unit. Overloading the unit
forces the compressor to run longer. Foods that freeze too slowly may lose quality, or spoil.
• Be sure to wrap foods properly, and wipe containers dry before placing them in the unit. This cuts
down on frost build-up inside the freezer.
• Organize and label food to reduce door openings and extended searches. Remove as many
items as needed at one time, and close the door as soon as possible.

19
TROUBLESHOOTING
Before Calling for Service
If the unit appears to be malfunctioning, read through the OPERATION section of this manual first. If
the problem persists, check the Troubleshooting Guide on the following pages. Some of the problems
mentioned in the Guide can be solved easily without a service call.
Problem
Possible Cause
Probable Correction
The machine
doesn’t operate.
The ice maker is unplugged.
Plug the ice maker in.
The fuse is blown.
Replace fuse. If it happens again, call for
service to check for a short circuit in the unit.
The ice maker power button is
set at OFF.
Switch the ice maker power button to ON.
The ice storage bin is full of ice.
Remove some ice cubes. Be sure the ice-full
probe is free of ice.
The water doesn't
feed in after the
machine starts.
The water supply tap is turned
off.
Turn on the water supply tap.
The water supply pipe is not
properly connected.
Reconnect the water supply pipe.
Machine makes ice,
but bin does not fill
up with ice.
The condenser may be dirty.
Clean the condenser.
The air flow to the ice maker
may be obstructed.
Check the installation.
The ambient temperature and
water temperature are high, or
unit is near some heat source.
Check the installation.
Water is leaking out
of the unit.
Some water falls to the floor
when you open the door to
remove ice from storage bin.
Normal condensation on the door or some water
together with ice. Take care when you take out
ice.
Water supply connection is
leaking.
Tighten fitting. See Connecting the water line.
Drain pipe higher than drain
outlet.
Lower drain pipe.
Cubes are partially
formed or are white
on the bottom.
Not enough water in the water
trough.
Check if the water supply pressure is below 15
psig.
Check water supply or filter may be restricted.
Check for a water leak at the water trough.
Noise during
operation
The feet are not leveled and
locked.
Level and lock the feet. See Leveling the Ice
Maker.
Certain sounds are normal.
See Normal Sounds.

20
The ice maker stops
suddenly while
making ice.
The electricity is off.
Reconnect the power supply line.
The room temperature is out of
the stated range.
Cut off the electricity and leave the ice maker
disconnected until the temperature returns to
within the stated range.
The ice storage bin is full of ice. Remove some ice cubes; make sure the ice-full
probe is free of ice.
The body of the ice
maker is electrified
The ground line isn't in the
socket.
Use a socket meeting the grounding
requirements.
Scaling occurs
frequently inside the
machine.
The hardness level of the water
is too high.
Install a water-softening device in front of the
water inlet.
Water leaks from
the ice storage bin
The drainhole below the ice
storage bin is blocked.
Remove the ice storage bin and clean the
drainhole.
The drain hose is kinked or
improperly placed higher than
the floor of the ice storage bin.
Check the drain hose to be sure water can be
drained out unhindered.

21
SERVICE FOR YOUR ICEMAKER
We are proud of our customer service organization and the network of professional service
technicians that provide service on your Avanti Products icemakers. With the purchase of your Avanti
Products icemaker, you can be confident that if you ever need additional information or assistance,
the Avanti Products Customer Service team will be here for you. Just call us toll-free.
Avanti Products Customer Service
Product Information
800-323-5029
Whatever your questions are about our products,
help is available.
Part Orders
800-220-5570
You may order parts and accessories that will be
delivered directly to your home by personal
check, money order, Master Card, or Visa.
In-Home Repair Service
800-220-5570
An Avanti Products authorized service center will
provide expert repair service, scheduled at a time
that is convenient for you. Our trained servicers
know your icemaker inside and out.
WIRING DIAGRAM

22
AVANTI PRODUCTS WARRANTY
Staple your sales receipt here.
Proof of original purchase date is needed to obtain service under warranty.
WHAT IS COVERED
LIMITED ONE-YEAR WARRANTY
Avanti Products warrants that the product is free from defects in materials and/or
workmanship for a period of twelve (12) months from the date of purchase by
the original owner. The foregoing timeline begins to run upon the date of
purchase, and shall not be stalled, tolled, extended, or suspended for any
reason whatsoever unless described in detail in the warranty document. For
one year from the date of purchase by the original owner, Avanti products will, at
its option, repair or replace any part of the product which proves to be defective
in material or workmanship under normal use. Avanti Products will provide you
with a reasonably similar product that is either new or factory refurbished.
During this period Avanti Products will provide all parts and labor necessary to
correct such defects free of charge, so long as the product has been installed
and operated in accordance with the written instructions in this manual. In rental
or commercial use, the warranty period is 90 days. All Avanti appliances of 4.2
cubic feet capacity or less must be brought/sent to the appliance service center
for repair.
SECOND THROUGH
FIFTH YEAR
LIMITED WARRANTY
For the second through the fifth year
from the date of original purchase,
Avanti Products will provide a
replacement compressor free of charge
due to a failure. You are responsible
for the service labor and freight
charges. In rental or commercial use,
the limited compressor warranty is one
year and nine months. Costs involved
to move the product to the service
center and back to the user’s home, as
maybe required, are the user’s
responsibility.
WHAT IS NOT COVERED
The warranty coverage described herein excludes all defects or damage that are not the direct fault of Avanti Products,
including without limitation, one or more of the following:
A failure to comply with any applicable state, local, city, or county electrical, plumbing and/or building codes, regulations, or
laws, including failure to install the product in strict conformity with local fire and building codes and regulations.
Any external, elemental and/or environmental forces and factors, including without limitation, rain, wind, sand, floods, fires,
mud slides, freezing temperatures, excessive moisture or extended exposure to humidity, lightning, power surges, structural
failures surrounding the appliance, and acts of God.
• Content losses of food or other content due to spoilage.
• Incidental or consequential damages
• Parts and labor costs for the following will not be considered as warranty:
− Evaporator doors, door springs, and/or frames.
− Inner door panels, door shelves, door rails, and/or door supports.
− Plastic cabinet liners.
− Punctured evaporator that voids the warranty on the complete sealed system.
• Shipping and handling costs associated with the replacement of the unit.
• Repairs performed by unauthorized servicers.
• Service calls that are related to external problems, such as abuse, misuse, inadequate electrical power, accidents, fire,
floods, or any other acts of God.
• Failure of the product if it is used for other than it intended purpose.
• Surcharges including but not limited to, any after hour, weekend, or holiday service calls, tolls, ferry trip charges, or
mileage expense for service calls to remote areas.
The warranty does not apply outside the Continental USA.
In no event shall Avanti Products have any liability or responsibility whatsoever for damage to surrounding property, including
cabinetry, floors, ceilings, and other structures and/or objects around the product. Also excluded from this warranty are
scratches, nicks, minor dents, and other cosmetic damages on external surfaces and exposed parts; Products on which the
serial numbers have been altered, defaced or removed; service visits for customer education, or visits where there is nothing
wrong with the product; correction of installation problems (you are solely responsible for any structure and setting for the
product, including all electrical, plumbing and/or other connecting facilities, for proper foundation/flooring, and for any
alterations including without limitation cabinetry, walls, floors, shelving etc., as well as the resetting of breakers or fuses.
OUT OF WARRANTY PRODUCT
Avanti Products is under no obligation, at law or otherwise, to provide you with any concessions, including repairs, pro-rates, or
product replacement, once this warranty has expired.

23
TABLA DE CONTENIDO
SEGURIDAD DEL APARATO
24
GUÍAS DE SEGURIDAD IMPORTANTES
25
AYÚDANOS A AYUDARTE
26
PARTES Y CARACTERÍSTICAS
27
INSTRUCCIONES DE SEGURIDAD IMPORTANTES
28
INSTRUCCIONES DE INSTALACIÓN
28
Instalación del aparato
29
Conexión eléctrica
30
Cable de extensión
30
Protector contra variaciones de corriente eléctrica
30
Alimentación de agua
31
FUNCIONAMIENTO DEL APARATO
32 – 33
CUIDADO Y MANTENIMIENTO
34 – 35
Fallo de alimentación
35
Tiempo de vacaciones
35
Para mover su aparato
35
Consejos para ahorrar energía
35
GUÍA DE SOLUCIÓN DE PROBLEMAS
36 – 37
SERVICIO DEL APARATO
38
ESQUEMA DE CABLEADO
38
GARANTÍA "AVANTI PRODUCTS"
39
ENGLISH INSTRUCTIONS
2 – 22
REGISTRO DE GARANTÍA
40 – 41

24
SEGURIDAD DEL APARATO
Su seguridad y la seguridad de los demás son muy importantes.
Hemos incluido muchos mensajes importantes de seguridad en este manual para su aparato. Lea y
obedezca siempre todos los mensajes de seguridad.
Este es el símbolo de alerta de seguridad. Este símbolo le alerta sobre peligros
potenciales que pueden ocasionar la muerte o daños a usted ya los demás.
Todos los mensajes de seguridad irán a continuación del símbolo de
advertencia de seguridad y de la palabra "PELIGRO", "ADVERTENCIA" o
"PRECAUCIÓN".
"PELIGRO" significa que si no se respeta esta
medida de seguridad podría resultar en
lesiones personales graves o la muerte.
"ADVERTENCIA" significa que si no se respeta
esta medida de seguridad podría resultar en
daños extensa producto, lesiones personales
graves o la muerte.
"PRECAUCIÓN" significa que si no se respeta
esta medida de seguridad podría causar
lesiones personales leves o moderadas, daños
materiales o equipos.
Todos los mensajes de seguridad le alertará a saber qué peligro potencial, le dirán cómo reducir las
posibilidades de lesiones, y le hará saber lo que puede suceder si las instrucciones no se siguen.

25
GUÍAS DE SEGURIDAD IMPORTANTES
Antes de usar el aparato, debe tener la posición correcta y se instala como se
describe en este manual, así que lea cuidadosamente el manual. Para reducir
el riesgo de incendio, descarga eléctrica o lesiones personales al usar su
aparato siga estas precauciones básicas, incluyendo las siguientes:
• Conecte a un contacto de 3 clavijas con conexión a tierra, no quite el terminal de conexión a
tierra, no utilice un adaptador, y no use un cable de extensión.
• Se recomienda que se proporcione un circuito separado, que sirve sólo para su aparato. No usar
un tomacorriente que no se puede apagar con un interruptor o cadena de tracción.
• Nunca limpie las partes del aparato con líquidos inflamables. Estos vapores pueden crear un
peligro de incendio o explosión. Y no almacene ni use gasolina u otros vapores y líquidos
inflamables en la proximidad de éste o cualquier otro aparato. Los vapores pueden crear un
peligro de incendio o explosión.
• Antes de proceder a las operaciones de limpieza y mantenimiento, asegúrese de que la línea de
alimentación de la unidad se desconecta.
• No conecte o desconecte el enchufe eléctrico con las manos mojadas.
• Desenchufe el aparato o desconecte la energía antes de la limpieza o el mantenimiento. El no
hacerlo puede dar lugar a descargas eléctricas o muerte.
• No intente reparar o reemplazar cualquier parte de su aparato a menos que se recomiende
específicamente en este manual. Cualquier otro servicio debe ser realizado por un técnico
calificado.
SIGA ADVERTENCIA ESCRITAS AQUÍ SÓLO CUANDO APLICABLE A SU MODELO
• Use dos o más personas para mover e instalar el aparato. El no hacerlo puede resultar en la espalda u otro
tipo de lesiones.
• Para asegurar la adecuada ventilación para su aparato, la parte frontal de la unidad debe estar
completamente despejada. Elija un área bien ventilada con temperaturas superiores (10 ° C) 50 ° F y por
debajo de 100 ° F (38 ° C). Esta unidad se debe instalar en un área protegida del elemento, como el viento,
la lluvia, el goteo de agua.
• El frigorífico no debe colocarse cerca de hornos, parrillas u otras fuentes de calor.
• El aparato debe ser instalado con todas las conexiones eléctricas, de agua y de drenaje de acuerdo con los
códigos estatales y locales. Se requiere un suministro de corriente estándar (115 V CA solamente, de 60
Hz), debidamente conectada a tierra de acuerdo con el Código Eléctrico Nacional y los códigos y
ordenanzas locales.
• No doble ni apriete el cable de alimentación del aparato.
• El fusible (o disyuntor) tamaño debe ser de 15 amperios.
• Es importante que el aparato para ser nivelado para que funcione correctamente. Es posible que tenga que
hacer varios ajustes para nivelarla.
• Toda la instalación debe realizarse de acuerdo con los requerimientos locales de plomería.
• Asegúrese de que los tubos no queden atrapados o doblado o dañado durante la instalación.
• Compruebe si hay fugas después de la conexión.
• Nunca permita que los niños manejen, jueguen o entren dentro del aparato.
• Si utiliza el recipiente de drenaje, debe establecer el drenaje interruptor de selección en la posición OFF o
el agua se desborde del depósito de drenaje
• A pesar de que la unidad ha sido probado en la fábrica, debido al tránsito y almacenamiento a largo plazo,
el primer lote de cubos debe ser desechado.
• No utilice productos de limpieza a base de solventes de abrasivos en el interior. Estos limpiadores pueden
dañar o decolorar el interior.
• No utilice este aparato para propósitos distintos a los previstos.

26
AYÚDANOS A AYUDARTE
Lea detenidamente esta guía.
Se tiene la intención de ayudar a hacer
funcionar y mantener su nueva aparato
correctamente.
Tenga a la mano para responder a sus
preguntas. Si usted no entiende algo o
necesita más ayuda, por favor llame al:
Servicio al cliente de Avanti
800-220-5570
Mantenga comprobante de la fecha original de
compra (como el recibo de venta) con esta
guía para establecer el período de garantía.
Anote el modelo y número de serie.
Los encontrarás en una placa situada en la
pared posterior del aparato.
Por favor, escriba estos números aquí:
____________________________________
Fecha de compra
____________________________________
Número de modelo
____________________________________
número de serie
Utilice estos números en cualquier
correspondencia o llamadas de servicio en
relación con el sistema.
Si usted recibió un dañado aparato,
comuníquese inmediatamente con el
distribuidor (o contratista) que le vendió el
aparato.
Ahorre tiempo y dinero. Antes de acudir al
servicio, verifique la guía de solución de
problemas. En él se enumeran las causas de
los problemas de funcionamiento de menor
importancia que usted mismo puede corregir.
Si usted necesita servicio
Estamos orgullosos de nuestro servicio y
queremos que usted esté satisfecho. Si por
alguna razón usted no está satisfecho con el
servicio que recibe, aquí hay algunos pasos a
seguir para obtener más ayuda.
PRIMERO, póngase en contacto con la gente
que repararon su aparato. Explique por qué
usted no está satisfecho. En la mayoría de los
casos, esto va a resolver el problema.
SIGUIENTE, si todavía no está contento,
escriba todos los detalles, incluyendo su
número de teléfono y envíelos a:
Servicio al Cliente
Avanti Products
10880 NW 30 Street
Miami, FL 33172
EE.UU.
PRECAUCIÓN:
El aparato
no está diseñado para el
almacenamiento de medicinas o de otros
productos médicos.

27
PARTES Y CARACTERISTICAS
Tubo de distribución de agua
Evaporador (Molde de cubo)
Canalón de agua
Flotador
Bandeja de hielo
Panel de contról
Panel frontal
Puerta
Pata niveladora
Cucharón
Manguera de agua
Cable
Entrada de agua
Desagüe
Manguera de desagüe

28
INSTRUCCIONES DE SEGURIDAD IMPORTANTES
− Leer todas las instrucciones antes de usar el aparato.
− PELIGRO o ADVERTENCIA: Riesgo de encierro para niños. Niños atrapados y sofocación no son
problemas del pasado. Aparatos desechados o abandonados siguen siendo peligrosos. . . incluso si van a
"sentarse en el garaje de unos pocos días".
− Antes de deshacerse de su aparato viejo: quite las puertas. Deje los estantes en su lugar para que los
niños no puedan meterse con facilidad.
− Nunca permita que los niños manejen, jueguen o se arrastren dentro del aparato.
− Nunca limpie las piezas del aparato con líquidos inflamables. Los vapores pueden crear un peligro de
incendio o explosión.
− No almacene ni use gasolina u otros vapores y líquidos inflamables en la proximidad de este o cualquier
otro aparato. Los vapores pueden crear un peligro de incendio o explosión.
INSTRUCCIONES DE INSTALACIÓN
Antes de usar el aparato
• Retire la envoltura interna y externa.
• Verifique para asegurarse de que tiene todas las siguientes partes:
o 1 Cucharón
o 2 mangueras (1 para alimentación de agua / 1 para el desagüe)
o Manual de Instrucciones
• Antes de conectar el aparato a la fuente de alimentación, es sugerido dejarlo en posición vertical
durante aproximadamente 2 horas. Esto reducirá la posibilidad de un mal funcionamiento en el
sistema de refrigeración del aparato de la manipulación durante el transporte.
• Limpie la superficie interior con agua tibia usando un paño suave.
PRECAUCIÓN
Para reducir el riesgo de incendio, descarga eléctrica, o
daño cuando use su aparato
, siga las siguientes
precauciones.
Esta unidad es para uso en interiores
- GUARDE ESTAS INSTRUCCIONES -

29
Instalación del aparato
• Este aparata debe ser instalado por un profesional. Este aparato debe estar instalado en
conformidad con todos los regulaciones locales y estatales.
• Coloque la unidad en un piso que sea lo suficientemente fuerte para soportar la unidad cuando
está completamente cargado. Para nivelar la unidad, ajuste las patas niveladoras en la parte
inferior de la unidad.
• Deje un espacio de un mínimo de 4 pulgadas entre la parte posterior y un mínimo de una
pulgada a los lados y panel superior de la unidad, lo que permite la circulación de aire necesaria
para enfriar el compresor y el condensador.
• Coloque la unidad lejos de la luz solar directa y de fuentes de calor (estufa, calentador, radiador,
etc.) La luz solar directa puede afectar a la capa de acrílico y las fuentes de calor puede
aumentar el consumo eléctrico. Temperaturas ambientales extremadamente frías también
pueden causar que la unidad no funcione correctamente.
• Evite colocar la unidad en áreas húmedas.
Dimensiones requeridas para empotrar:
• La instalación de este aparato require una alimentación de agua por tubería de cobre flexible y
válvula de seguridad con una conexión de ¼ de pulgada.
• El aparato require una alimentación de agua continua con una presión de 15 psig y una presión
estática que no excede 80 psig. La temperatura de la alimentación debe estar entre 41ºF (5ºC) y
90ºF (32ºC).
Aviso
Uso del aparato bajo temperaturas fuera de los rangos recomendados puede
afectar el funcionamiento del aparato.
Vista Lateral
Vista Frontal
Panel Superior
Trasero
frente
Lado Lado
4”
1”
1”
1”

30
Conexión eléctrica
Este aparato debe estar correctamente conectado a tierra para su seguridad. El cable eléctrico de
este aparato está equipado con un enchufe de tres patas que se acopla con las tomas de corriente
estándar de tres clavijas para minimizar la posibilidad de choque eléctrico.
Bajo ninguna circunstancia corte o quite la tercera clavija de tierra del cable de alimentación
suministrado. Para su seguridad personal, este aparato debe estar correctamente conectado a tierra.
Este aparato requiere un 115/120 Volt AC ~ / 60Hz enchufe estándar de conexión eléctrica a tierra
con tres clavijas. Haga revisar el tomacorriente y el circuito por un electricista calificado para
asegurarse que el tomacorriente está conectado a tierra correctamente. Cuando se encuentra una
toma de corriente estándar de 2 patas, es su responsabilidad y obligación reemplazarlo por un
tomacorriente de 3 clavijas debidamente conectado a tierra.
El cable debe mantenerse detrás del aparato y no dejó la vista ni colgando para prevenir lesiones
accidentales.
El aparato debe ser conectado siempre en su propio contacto eléctrico individual que tenga un voltaje
que vaya de la placa de características del aparato. Esto proporciona el mejor rendimiento y también
evitar la sobrecarga de los circuitos eléctricos de la casa que podrían causar un riesgo de incendio
por sobrecalentado. Nunca desenchufe el aparato tirando del cable de alimentación. Siempre agarre
firmemente el enchufe y tire derecho hacia afuera del tomacorriente. Repare o reemplace
inmediatamente todos los cables eléctricos que se hayan desgastado o dañado. No utilice un cable
que muestre grietas o raspaduras en toda su longitud o en cualquier extremo. Al mover el aparato,
tenga cuidado de no dañar el cable de alimentación.
Cable de extensión
Debido a peligros potenciales de seguridad bajo ciertas condiciones, se recomienda
encarecidamente que no se utilize un cable de extensión con este aparato. Sin embargo, si debe
utilizar un cable de extensión, es absolutamente necesario que sea un cable de UL / CUL 3 cables de
extensión con puesta a tierra con enchufe con toma de tierra y la salida y que la clasificación eléctrica
del cable sea de 115 voltios y al menos 10 amperios.
Protector contra sobretensiones
La mayoría de los aparatos eléctricos utilizan una serie de tableros de control eléctrico para
funcionar. Estas tarjetas son muy susceptibles a sobretensiones y podrían resultar dañados o
destruídos.
Si el aparato no va a ser utilizado en un área o si su ciudad / país es propenso a subidas de tensión /
interrupciones; se sugiere que utilice un protector contra sobrecargas de energía para todos los
dispositivos / aparatos eléctricos que esté tomando. El estabilizador de tensión que usted seleccione
debe tener un bloqueo suficientemente alto como para proteger el aparato está conectado a. Si usted
tiene alguna pregunta relacionada con el tipo y tamaño de protector contra sobretensiones es
necesario ponerse en contacto con un electricista cualificado en su área.
Los daños debidos a las sobrecargas de energía no se considera un defecto del fabricante cubierto y
anulará la garantía del producto.
PRECAUCIÓN
La conexión incorrecta del conductor a tierra puede resultar en riesgo de descarga eléctrica. Si el
cable de alimentación de la estufa o aparato está dañado, hágalo cambiar por un centro de
servicio de Avanti Products.

31
Alimentación de agua
El aparato require una alimentación de agua continua con una presión de 15 psig y una presión
estática que no excede 80 psig. La temperatura de la alimentación debe estar entre 41ºF (5ºC) y
90ºF (32ºC).
IMPORTANTE:
1. Se recomienda instalación por un profesional. Todas las conexions deben estar en conformidad
con las regulas y regulaciones locales y estatales.
2. Este seguro que las mangueras no están dobladas o comprimidas durante la conexión.
3. Después inspecciona que no hay goteras de las conexiones.
Herramientas necesarias: Llave de boquilla abierta de ½”, destornillador tipo Phillips ( + ).
Como conectar la tubería de alimentación de agua:
1. Apagar la válvula principal del suministro de agua. Abre el grifo para vaciar la tubería de
suministro, cuando la tubería este vacía cierre el grifo.
2. Busca una manguera (½” o ¾”) en posición vertical cerca de la área de instalación. La distancia
del aparato debe ser menos de 6 pies. La manguera que esta incluída con el aparato mide
aproximadamente 6 pies.
3. Requiere una válvula de seguridad conectada al suministro principal de agua.
4. Enrosca un lado de la manguera al grifo y enrosca el otro lado al aparato. Apriete con la mano y
luego con la llave.
5. Abre la válvula y inspeciona por goteras en las conexiones.
Desagüe
Se require conectar la manguera de desagüe al aparato antes de usarlo.
NOTA: Es recomendada usar un drenaje para el desagüe del aparato.
1. Busca un drenaje cerca del aparato, la distancia debe de ser menos de 4.5 pies; la manguera de
desagüe incluída con la unidad mide aproximadamente 4.85 pies.
2. Coloca un lado de la manguera en el drenaje y el otro lado se enrosca al lugar marcado “Drain”.
3. Llena el aparato con un galón de agua e inspecciona por goteras.
IMPORTANTE: Este aparato no es un congelador.

32
FUNCIONAMIENTO DEL APARATO
+
_
Descripción de las luces y botones :
1. Bin Full (Rojo)/(Gaveta llena): Indicador que el aparato está lleno y no continuará haciendo
hielo.
Cuando este alumbrado, significa que la gaveta de almacenaje esté llena. La unidad parará de
hacer hielo hasta que se remueve hielo de la gaveta o se derriten lentamente los cubos.
Cuando el nivel de cubos se baje, la luz roja titilará por aproximadamente 3 minutos y el aparato
regresará al proceso de hacer hielo.
2. Ice Making(Verde)/(Haciendo Hielo): Indicador que el aparato está en el proceso de hacer hielo.
Cuando este encendido el aparato está en proceso de hacer hielo.
3. Ice Harvest (Amarillo)/(Guardando Hielo):
Cuando esté encendido, significa que el aparato esté en el proceso de pasar los cubos de hielo
del evaporador hacia la gaveta de almacenaje.
4. Mode (Modo): Primariamente usado para servicio. Oprime el botón por aproximadamente 3
segundos para cambiar el proceso entre hacer hielo y guardar hielo.
5. Adjust (Ajuste): Primariamente usado para servicio. Oprime el botón por aproximadamente 3
segundos para cambiar el tamaño de los cubos.
Como cambiar el tamaño de los cubos:
1. Oprime el botón por aproximadamente 3 seguntos. El aparato entrará en modo de ajuste. La luz
indicadora amarilla titilará continuo durante la selección del tamaño de los cubos.
2. Mientras que titila la luz amarilla oprime el botón marcado “Clean” ( - ) o “Mode” ( + ) para
seleccionar el tamaño deseado.

33
Cubos de tamaño pequeño:
Oprime el botón marcado “Clean” ( - ) hasta que alumbre la luz verde para seleccionar cubos
pequeños.
Cubos de tamaño grande:
Oprime el botón marcado “Mode” ( + ) hasta que alumbre la luz roja para seleccionar cubos grandes.
Después de 10 segundos el aparato volverá al proceso de hacer hielo automáticamente.
NOTA:
• Si durante el proceso de seleccionar el tamaño de los cubos se alumbran las (3) tres luces a la
vez, esto indica que el tamaño mediano está seleccionado.
• Cuando el aparato esté en el proceso de auto-limpieza, no permite ningun cambio al seleccion
del tamaño de los cubos.
Como hacer hielo:
1. Abre la válvula y deje que el canalón se llene de agua, luego oprime el botón marcado ON/OFF
para encender la unidad. El aparato empezará automáticamente.
2. Después de 3 minutos, el aparato empezará hacer hielo y escuchará el sonido de agua fluyendo.
3. Cuando el hielo está formado completamente, los cubos caerán hacía la gaveta de almacenaje.
4. Cuando la gaveta de almacenaje esté llena, el aparato parará de hacer hielo automáticamente.
5. El aparato volverá hacer hielo cuando se remueve los cubos de la gaveta o se derriten
lentamente.
IMPORTANTE:
• Se recomienda botar los primero cubos producido después de instalación.
• Nunca cierre la válvula mientras que la unidad esté produciendo hielo.
• Nunca tocar el evaporador mientras que la unidad esté produciendo hielo
• Mantener la puerta cerrada para evitar que el hielo se derrita y asegurar función eficiente del
aparato.
Gaveta llena
Hacer hielo
Guardar hielo

34
CUIDADO Y MANETENIMIENTO
Como limpiar el aparato.
Limpieza rutina asegurará eficiencia de función y v
Nota importante:
Nunca almacene artículos en la gaveta de almacenaje, el aparato no es un
congelador. Objetos como botellas de vino o cerveza no son sanitarios y las
etiquetas de las botellas pueden mojarse y caerse causando bloqueo en la
manguera de desagüe.
Limpieza de las partes exteriores
La puerta y el gabinete se pueden limpiar con una solución de un detergente suave y agua tibia (por
ejemplo 1 oz de jabón de lavar platos con 2 galones de agua tibia). No utilice químicos de limpieza
con solventes o abrasivos. Utilice una esponja suave y enjuagüe con agua limpia.
Limpieza del parte interior
Se recomienda que se sanitiza y limpia la gaveta de almacenaje frequentemente. Limpie el canalón
de agua la primera vez que se usa y tambien después de tiempos largos sin uso.
1. Desconecta la unidad de la tomacorriente.
2. Remueva el hielo y limpia el interior de la unidad con una solución de 1 oz de cloro y 2 galones
de agua caliente.
3. Remueva la manguera de desagüe del interior de la unidad.
4. Enjuagüe con agua limpia.
5. Después de drenar la unidad, instale la manguera de desagüe en su
posición original (ver imagen).
6. Conecte la unidad al tomacorriente.
Desconecte la unidad de la tomacorriente y cierre la válvula antes de proceder con la
limpieza y mantenimiento de la unidad.
Posición correcta de
la manguera de
desagüe

35
Condenser cleaning
Un condensador sucio impide la circulación del aire y reduce la capacidad de hacer hielo, y causa
elevación de las temperaturas operativas que puede resultar en daños. Debe de limpiar el
condensador cada seis meses.
1. Desconecte la unidad del tomacorriente.
2. Remueva la parrilla delantera.
3. Limpia el condesador con una aspiradora con broche
4. Instala la parrilla delantera
5. Conecta la unidad al tomacorriente, la unidad volverá a
funcionar automáticamente.
Fallo de alimentación
Usualmente la electricidad regresa en unas pocas horas sin afectar la temperatura de su aparato,
siempre que la puerta no se abra muy frecuentemente. Si le va a faltar electricidad por un período de
tiempo más largo, usted debe tomar los pasos apropiados para proteger sus alimentos.
Tiempo de vacaciones
Vacaciones cortas: Deje la unidad en funcionamiento durante las vacaciones de menos de tres
semanas.
Vacaciones largas: Si el aparato no va a utilizar durante varios meses, retire todos los alimentos y
desenchufe el cable de alimentación. Limpie y seque bien el interior. Para evitar olores y humedad,
deje la puerta levemente abierta: bloquéela de ser necesario
Para mover su aparato
• Retire el hielo. Cierre la válvula de seguridad.
• Desconecte las mangueras de agua y desagüe.
• Asegúrese de colocar cinta adhesiva a todo lo que se puede caer dentro de su aparato.
• Retire las patas para prevenir que se dañen.
• Selle las puertas con cinta adhesiva.
• Asegúrese que el aparato se mantenga parado durante el traslado.
Consejos para ahorrar energía
Su aparato debe estar ubicado en el área más fría de la habitación, alejado de aparatos que
produzcan calor o conductos de aire caliente y lejos de los rayos solares.
Condenser
Surface

36
GUÍA DE SOLUCIÓN DE PROBLEMAS
Puede solucionar muchos problemas comunes de la unidad fácilmente, ahorrando el costo de una
posible llamada de servicio. Pruebe las sugerencias a continuación para ver si puede resolver el
problema antes de llamar al servicio técnico.
Problema
Causa posible
Probable corrección
La máquina no
funciona.
La máquina está desenchufada.
Enchufe la máquina de hielo.
El fusible está fundido.
Reemplace el fusible. Si sucede otra vez,
llame al servicio verificar que un corto
circuito en la unidad.
El botón de encendido del
fabricador de hielo está fijado en
OFF.
El interruptor ice maker en ON.
El recipiente de hielo está lleno
de hielo.
Quite algunos cubitos de hielo.
Asegúrese de que la sonda de lleno de
hielo esté libre de hielo.
El agua no
alimenta en
después de la
máquina.
El grifo de suministro de agua se
apaga.
Abrir el grifo de suministro de agua.
La tubería de suministro de agua
no está conectada correctamente.
Vuelva a conectar la tubería de suministro
de agua.
La máquina hace
hielo, pero bin se
llene con hielo.
El condensador puede estar
sucio.
Limpiar el condensador.
El flujo de aire a la máquina de
hielo puede ser obstruido.
Revise la instalación.
La temperatura ambiente y
temperatura del agua son altos, o
unidad está cerca de alguna
fuente de calor.
Revise la instalación.
Agua gotea fuera
de la unidad.
Agua cae al piso al abrir la puerta
para retirar el hielo del recipiente
de almacenamiento.
Condensación normal en la puerta o agua
con hielo. Tenga cuidado al sacar hielo.
Conexión de suministro de agua
está goteando.
Apriete la conexión. Ver conexión de la
línea de agua.
Superior a la salida de desagüe
de tubo de drenaje.
Tubo de drenaje inferior.
Cubos se terminan
de formar o son de
color blancos en la
parte inferior.
No hay suficiente agua en el
recipiente de agua.
Compruebe si la presión de suministro de
agua es inferior a 15 psig.
Verificar suministro de agua o filtro puede
estar restringido.
Si hay una fuga de agua en el recipiente
de agua.

37
Ruidos durante el
funcionamiento
Los pies no están nivelados y
bloqueados.
Nivelar y trabar las patas. Véase
nivelación de la fábrica de hielo.
Ciertos sonidos son normales.
Ver Sonidos normales.
La fábrica de hielo
se detiene
bruscamente
haciendo hielo.
La electricidad está apagada. Vuelva a conectar la línea de
alimentación.
La temperatura ambiente está
fuera del rango indicado.
Cortar la electricidad y salir de la fábrica
de hielo desconectada hasta que la
temperatura vuelva a dentro de la gama
especificada.
El recipiente de hielo está lleno
de hielo.
Quite algunos cubitos de hielo;
Asegúrese de que la sonda de lleno de
hielo esté libre de hielo.
El cuerpo de la
fábrica de hielo
está vivo
La línea de tierra no está en el
zócalo.
Utilizar un receptáculo que cumple con
los requisitos de puesta a tierra.
Escala se produce
con frecuencia
dentro de la
máquina.
El nivel de dureza del agua es
demasiado alto.
Instalar un dispositivo de ablandamiento
del agua frente a la entrada de agua.
Fugas de agua
desde el recipiente
de hielo
Drainhole debajo el recipiente de
hielo está bloqueada.
Retire el recipiente de hielo y limpie el
drainhole.
La manguera de desagüe está
retorcida o incorrectamente
colocado más alta que el piso del
recipiente de hielo.
Compruebe la manguera de desagüe
para asegurarse de que el agua puede
drenarse hacia fuera sin trabas.

38
SERVICIO DEL APARATO
Estamos orgullosos de nuestra organización de servicio al cliente y la red de técnicos de servicios
profesionales que prestan servicio en sus Avanti Productos aparatos. Con la compra de su Avanti
Products dispositivo, puede estar seguro de que si alguna vez necesita información o asistencia
adicional, el equipo de Servicio al Cliente de Avanti Products estará aquí para usted. Sólo tiene que
llamar al número gratuito.
Servicio al Cliente del Avanti Products
Información sobre el producto
800-323-5029
Lo que sus preguntas son acerca de nuestros
productos, la ayuda está disponible.
Pedidos de piezas
800-220-5570
Usted puede pedir piezas y accesorios que serán
entregados directamente a su casa con un
cheque personal, giro postal, Master Card, o
Visa.
Servicio de reparación en casa
800-220-5570
Un centro de servicio autorizado de Avanti
Products proporcionará el servicio de reparación
de expertos, prevista en un momento que sea
conveniente para usted. Nuestros técnicos se
conocen
nuestros productos de adentro hacia
afuera.
ESQUEMA DE CABLEADO

39
GARANTÍA "AVANTI PRODUCTS"
Grapa aquí su recibo de compra.
Se necesita un comprobante de fecha de compra original para obtener servicio bajo garantía.
QUÉ ESTÁ CUBIERTO - LIMITADA DE UN AÑO GARANTÍA
Avanti Products garantiza que el producto está libre de defectos en materiales y
/ o mano de obra durante un periodo de doce (12) meses desde la fecha de
compra por el propietario original. El tiempo mencionado arriba comienza a
ejecutarse a partir de la fecha de compra y no se interrumpirá, dejará,
extendida, o suspendido por cualquier motivo salvo que se describe en detalle
en el documento de garantía. Durante un año a partir de la fecha de compra por
el propietario original, productos de Avanti, a su elección, reparará o
reemplazará cualquier parte del producto que demuestra ser defectuoso en
material o mano de obra bajo condiciones normales de uso. Avanti Products de
la semana con un producto parecido al original nuevo o restaurado de fábrica.
Durante este período Avanti Products proporcionará todas las piezas y mano de
obra necesarias para corregir tales defectos de forma gratuita, siempre y
cuando el producto ha sido instalado y operado de acuerdo con las
instrucciones escritas en este manual. En uso de alquiler o comercial, el período
de garantía es de 90 días. Todos los electrodomésticos Avanti de 4.2 pies
cúbicos de capacidad o menos deben ser llevados / enviado al centro de
servicio del aparato para su reparación.
SEGUNDO AL QUINTO
AÑO - GARANTÍA
LIMITADA
Para el segundo y hasta el quinto año a
partir de la fecha de compra original,
Avanti Products proporcionará un
compresor de reemplazo de forma
gratuita debido a un fallo. Usted es
responsable de las cargas de trabajo y
de carga de servicio. En uso de alquiler
o comercial, la garantía limitada del
compresor es de un año y nueve meses.
Los costos involucrados para mover el
producto al centro de servicio y de
vuelta a la casa del usuario, ya que tal
vez sea necesario, son responsabilidad
del usuario.
QUE NO ESTA CUBIERTO
La cobertura de la garantía descrita en este documento excluye todos los defectos o daños que no sean responsabilidad
directa de Avanti Products, incluyendo, sin limitación, uno o más de los siguientes:
Un incumplimiento de cualquier estado, la localidad, ciudad o condado de electricidad, plomería y / o códigos de construcción,
reglamentos o leyes, incluyendo la falta de instalar el producto en estricta conformidad con los códigos y reglamentos contra
incendios y construcción.
Cualquier fuerzas externas, elemental y / o medio ambiente y los factores, incluyendo, sin limitación, lluvia, viento, arena,
inundaciones, incendios, deslizamientos de lodo, temperaturas bajas extremas, humedad excesiva o exposición prolongada a
la humedad, rayos, sobrecargas de energía, fallas estructurales alrededor del aparato y los actos de Dios.
• Las pérdidas de contenido de los alimentos o de otros contenidos por averías.
• Daños incidentales o consecuentes
• Las piezas y mano de obra para los siguientes no serán consideradas como garantía:
− Puertas del evaporador, resortes de la puerta, y / o marcos.
− Paneles interiores de las puertas, estantes de la puerta, rieles de las puertas, y / o la puerta apoya.
− Gavetas para vegetales.
− Los bombillos y / o caja de plástico.
− Revestimientos del armazón de plástico.
− Evaporador pinchado que anula la garantía del sistema de sellado completo.
• Los gastos de envío asociados a la sustitución de la unidad.
• Las reparaciones realizadas por administradores no autorizados.
• Las llamadas de servicio que están relacionados con los problemas externos, tales como abuso, mal uso, suministro
eléctrico inadecuado, accidentes, incendios, inundaciones o cualquier otro acto de dios.
• Fallas del producto si es usado para otros propósitos de lo que pretende.
• Costos adicionales que incluyen, pero sin limitarse a, cualquier tras hora, de fin de semana o vacaciones de
servicios de llamadas, peajes, pasajes de transporte o gastos de kilometraje para llamadas de servicio en áreas
remotas.
La garantía no se aplica fuera de EE.UU.
En ningún caso Avanti Products tiene ninguna obligación o responsabilidad alguna por daños a la propiedad circundante,
incluyendo gabinetes, pisos, techos y otras estructuras y / o objetos que rodean al producto. También se excluyen de esta
garantía las rayas, hendiduras, abolladuras menores y otros daños estéticos en superficies externas y partes expuestas;
Productos en los que han sido alterados, adulterado o borrado el número de serie; visitas de servicio para la educación del
cliente, o visitas donde no hay nada malo con el producto; corrección de los problemas de instalación (usted es el único
responsable de cualquier estructura y entorno para el producto, incluyendo todas las instalaciones eléctricas, de fontanería y /
o otras facilidades de conexión, para cimentación / pisos adecuados y para alteraciones incluyendo sin limitación gabinetes,
paredes, pisos, estantes etc., así como el reajuste de interruptores o fusibles.
PRODUCTO FUERA DE GARANTÍA
Avanti Products no tiene la obligación, por ley o de otro modo, para ofrecerle ninguna concesión, incluídos reparaciones,
prorrateos-o reemplazo del producto, una vez que ha expirado la garantía.

40
Registration Information
Thank you for purchasing this fine Avanti product. Please fill out this form and return it to the
following address within 100 days from the date of purchase and receive these important benefits:
Avanti Products, LLC.
P.O.Box 520604 – Miami, Florida 33152
Protect your product:
We will keep the model number and date of purchase of your new Avanti product on file to
help you refer to this information in the event of an insurance claim such as fire or theft.
Promote better products:
We value your input. Your responses will help us develop products designed to best meet
your future needs.
-------------------------------------------------------(detach here)-------------------------------------------------------------
Avanti Registration Card
Name
Model # Serial #
Address
Date Purchased Store / Dealer Name
City State Zip
E-mail Address
Area Code Phone Number
Occupation
Did You Purchase An Additional Warranty
As your Primary Residence, Do You:
Extended
Own Rent
None
Your Age:
Reason for Choosing This Avanti Product:
Please indicate the most important factors
That influenced your decision to purchase
this product:
under 18
18-25
26-30
31-35 36-50 over 50
Marital Status:
Married Single
Price
Product Features
Avanti Reputation
Product Quality
Salesperson Recommendation
Friend / Relative Recommendation
Warranty
Other: ___________________
Is This Product Used In The:
Home Business
How Did You Learn About This Product:
Advertising
In-Store Demo
Personal Demo
Comments:

41
REGISTRO DE GARANTIA
Gracias por comprar este electrodoméstico Avanti. Por favor llene este formulario y envíelo a la
siguiente dirección dentro de los 100 días a partir de la fecha de compra y reciba estos beneficios
importantes:
Avanti Products, LLC.
P.O.Box 520604 – Miami, Florida 33152
Proteger do Producto:
Vamos a mantener el número de modelo y fecha de compra de su nuevo producto Avanti
archivados para que pueda consultar esta información en caso de una reclamación de
seguro como un incendio o robo.
Promover mejores productos:
Valoramos su opinión. Sus respuestas nos ayudarán a desarrollar productos diseñados para
satisfacer mejor sus necesidades futuras.
-------------------------------------------------------(CORTAR AQUI)--------------------------------------------------------
REGISTRO DE CLIENTE
NOMBRE
No. de Modelo No. de Serie
Dirección
Fecha de compra Lugar de compra
Ciudad Estado Codigo
Postal
Correo electrónico
Codigo de area No. de telefono
Ocupación
Compro Ud una garantía adicional?
En su residencia primaria Ud:
Extendida
Es dueno(a) Alquila
No
Su edad:
Cual fue su razon por elegir este producto
Avanti:
Por favor, detalla los factores más
importantes que le influyó a comprar este
producto:
menor de 18 18-25 26-30
31-35 36-50 más de 50
Estado civil:
Casado(a) Soltero(a)
Costo
Características del producto
Reputación de la empresa Avanti
Calidad del producto
Recomendado por el vendedor
Recomendado por un familiar o amistad
Garantía
Otro: ___________________
Cual será el uso de este producto?
En Casa En oficina o área comercial
Como llego Ud a conocer este producto:
Publicidad
Demostraciones dentro de la tienda
Demostración personal
Comentarios:
IM44U3S – 01122016
PRINTED IN CHINA
-
 1
1
-
 2
2
-
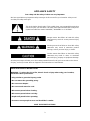 3
3
-
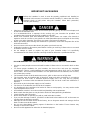 4
4
-
 5
5
-
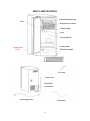 6
6
-
 7
7
-
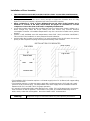 8
8
-
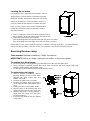 9
9
-
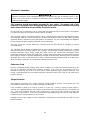 10
10
-
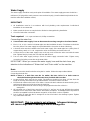 11
11
-
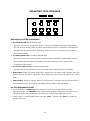 12
12
-
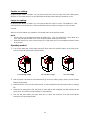 13
13
-
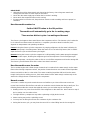 14
14
-
 15
15
-
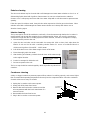 16
16
-
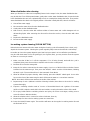 17
17
-
 18
18
-
 19
19
-
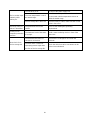 20
20
-
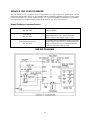 21
21
-
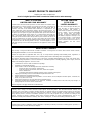 22
22
-
 23
23
-
 24
24
-
 25
25
-
 26
26
-
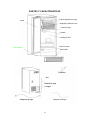 27
27
-
 28
28
-
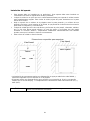 29
29
-
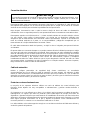 30
30
-
 31
31
-
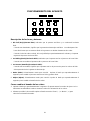 32
32
-
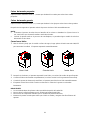 33
33
-
 34
34
-
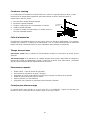 35
35
-
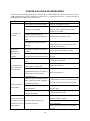 36
36
-
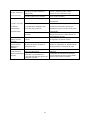 37
37
-
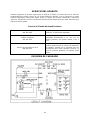 38
38
-
 39
39
-
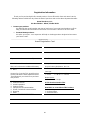 40
40
-
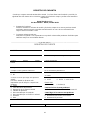 41
41


Avanti IM44U3S Manual de usuario
- Categoría
- Fabricantes de cubitos de hielo
- Tipo
- Manual de usuario
- Este manual también es adecuado para
en otros idiomas
- English: Avanti IM44U3S User manual
Artículos relacionados
Otros documentos
-
Norpole EWCIM65S Guía del usuario
-
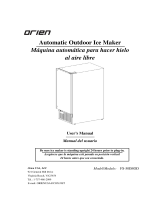 Orien FS50IMOD Manual de usuario
-
Franklin Chef FIM35OD El manual del propietario
-
-
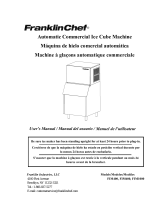 Franklin Industries, L.L.C. FIM1000 Manual de usuario
-
Danby DIM3225BLSST Instrucciones de operación
-
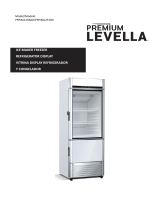 Premium Levella PRFIM1256DX Manual de usuario
-
 Premium Levella PRFIM1256DX Manual de usuario
-
Hoshizaki KM-1300SAH-E Manual de usuario
-
Omcan PT-CN-0390 Refrigerated Prep Tables Manual de usuario


